Edp Install Mvs
262
EDP Installation Guide for MVS Components Informatica Enterprise Data Propagation Version 2.4.05
-
Upload
ramakrishnan2k5 -
Category
Documents
-
view
84 -
download
2
Transcript of Edp Install Mvs

EDP Installation Guide for MVS Components
Informatica Enterprise Data PropagationVersion 2.4.05

Informatica EDP MVS Install GuideVersion 2.4.05September 2008
This software and documentation contain proprietary information of Informatica Corporation and are provided under a license agreement containing restrictions on use and disclosure and are also protected by copyright law. Reverse engineering of the software is prohibited. No part of this document may be reproduced or transmitted in any form, by any means (electronic, photocopying, recording or otherwise) without prior consent of Informatica Corporation. This Software may be protected by U.S. and/or international Patents and other Patents Pending.
Use, duplication, or disclosure of the Software by the U.S. Government is subject to the restrictions set forth in the applicable software license agreement and as provided in DFARS 227.7202-1(a) and 227.7702-3(a) (1995), DFARS 252.227-7013(c)(1)(ii) (OCT 1988), FAR 12.212(a) (1995), FAR 52.227-19, or FAR 52.227-14 (ALT III), as applicable.
The information in this product or documentation is subject to change without notice. If you find any problems in this product or documentation, please report them to us in writing.
Informatica, PowerCenter, PowerCenterRT, PowerCenter Connect, PowerCenter Data Analyzer, PowerExchange, PowerMart, Metadata Manager, Informatica Data Quality, Informatica Data Explorer, Informatica Complex Data Exchange and Informatica On Demand Data Replicator are trademarks or registered trademarks of Informatica Corporation in the United States and in jurisdictions throughout the world. All other company and product names may be trade names or trademarks of their respective owners.
DISCLAIMER: Informatica Corporation provides this documentation “as is” without warranty of any kind, either express or implied, including, but not limited to, the implied warranties of non-infringement, merchantability, or use for a particular purpose. Informatica Corporation does not warrant that this software or documentation is error free. The information provided in this software or documentation may include technical inaccuracies or typographical errors. The information in this software and documentation is subject to change at any time without notice.
Part Number: P-EDPMVS-2405-0002

Preface
iii

Informatica Resources
Informatica Customer PortalAs an Informatica customer, you can access the Informatica Customer Portal site at http://my.informatica.com. The site contains product information, user group information, newsletters, access to the Informatica customer support case management system (ATLAS), the Informatica Knowledge Base, Informatica Documentation Center, and access to the Informatica user community.
Informatica Web SiteYou can access the Informatica corporate web site at http://www.informatica.com. The site contains information about Informatica, its background, upcoming events, and sales offices. You will also find product and partner information. The services area of the site includes important information about technical support, training and education, and implementation services.
Informatica Knowledge BaseAs an Informatica customer, you can access the Informatica Knowledge Base at http://my.informatica.com. Use the Knowledge Base to search for documented solutions to known technical issues about Informatica products. You can also find answers to frequently asked questions, technical white papers, and technical tips.
Informatica Global Customer SupportThere are many ways to access Informatica Global Customer Support. You can contact a Customer Support Center through telephone, email, or the WebSupport Service.
Use the following email addresses to contact Informatica Global Customer Support:
♦ [email protected] for technical inquiries
♦ [email protected] for general customer service requests
WebSupport requires a user name and password. You can request a user name and password at http://my.informatica.com.
iv Preface

Use the following telephone numbers to contact Informatica Global Customer Support:
North America / South America Europe / Middle East / Africa Asia / Australia
Informatica CorporationHeadquarters100 Cardinal WayRedwood City, California 94063United States
Toll Free +1 877 463 2435
Standard RateBrazil: +55 11 3523 7761 Mexico: +52 55 1168 9763 United States: +1 650 385 5800
Informatica Software Ltd.6 Waltham ParkWaltham Road, White WalthamMaidenhead, BerkshireSL6 3TNUnited Kingdom
Toll Free 00 800 4632 4357
Standard RateBelgium: +32 15 281 702France: +33 1 41 38 92 26Germany: +49 1805 702 702Netherlands: +31 306 022 797United Kingdom: +44 1628 511 445
Informatica Business SolutionsPvt. Ltd.Diamond DistrictTower B, 3rd Floor150 Airport RoadBangalore 560 008India
Toll Free Australia: 1 800 151 830Singapore: 001 800 4632 4357
Standard RateIndia: +91 80 4112 5738
Preface v

vi Preface

Contents
About This Book . . . . . . . . . . . . . . . . . . . . . . . . . . . . . . . . . . . . . . . . . . . . . . . . . . . . . . ix
Summary of Changes . . . . . . . . . . . . . . . . . . . . . . . . . . . . . . . . . . . . . . . . . . . . . . . . . xv
Chapter 1 Installation OverviewOverview. . . . . . . . . . . . . . . . . . . . . . . . . . . . . . . . . . . . . . . . . . . . . . . . . . 1-2Installation Task Map . . . . . . . . . . . . . . . . . . . . . . . . . . . . . . . . . . . . . . . . 1-2
Stage I: Prepare for Installation . . . . . . . . . . . . . . . . . . . . . . . . . . . . . 1-3Stage II: Generate the Installation Batch Jobs . . . . . . . . . . . . . . . . . . 1-3Stage III: Install the EDP Components . . . . . . . . . . . . . . . . . . . . . . . 1-4Stage IV: Configure and Start the EDP Components. . . . . . . . . . . . . 1-4
Overview of the Install System. . . . . . . . . . . . . . . . . . . . . . . . . . . . . . . . . 1-4Checkpoints . . . . . . . . . . . . . . . . . . . . . . . . . . . . . . . . . . . . . . . . . . . . 1-5Installation Modes . . . . . . . . . . . . . . . . . . . . . . . . . . . . . . . . . . . . . . . 1-5International Language Support . . . . . . . . . . . . . . . . . . . . . . . . . . . . . 1-6Installation Methods. . . . . . . . . . . . . . . . . . . . . . . . . . . . . . . . . . . . . . 1-6Installation User Profile . . . . . . . . . . . . . . . . . . . . . . . . . . . . . . . . . . . 1-6Installation Default Options . . . . . . . . . . . . . . . . . . . . . . . . . . . . . . . . 1-8Rules for Running Multiple Product Releases in a Single Subsystem1-8Product Naming Conventions. . . . . . . . . . . . . . . . . . . . . . . . . . . . . . . 1-9Conventions for Using the Install System . . . . . . . . . . . . . . . . . . . . . 1-9
Where to Go from This Chapter . . . . . . . . . . . . . . . . . . . . . . . . . . . . . . . . 1-12
Chapter 2 Preparing for InstallationOverview. . . . . . . . . . . . . . . . . . . . . . . . . . . . . . . . . . . . . . . . . . . . . . . . . . 2-2EDP Product Descriptions . . . . . . . . . . . . . . . . . . . . . . . . . . . . . . . . . . . . 2-2
How DataMove and ChangeDataMove Are Similar . . . . . . . . . . . . . 2-2How DataMove and ChangeDataMove Are Different . . . . . . . . . . . . 2-3
Installation Requirements . . . . . . . . . . . . . . . . . . . . . . . . . . . . . . . . . . . . . 2-4Hardware Requirements . . . . . . . . . . . . . . . . . . . . . . . . . . . . . . . . . . . 2-4Software Requirements . . . . . . . . . . . . . . . . . . . . . . . . . . . . . . . . . . . 2-5
Authorization to Run the Installation Batch Jobs . . . . . . . . . . . . . . . . . . . 2-15Authorization of MVS Libraries. . . . . . . . . . . . . . . . . . . . . . . . . . . . . . . . 2-15Security Considerations . . . . . . . . . . . . . . . . . . . . . . . . . . . . . . . . . . . . . . 2-15
Informatica Corporation, Confidential and Proprietary Information
Contents i

Obtaining Product Passwords . . . . . . . . . . . . . . . . . . . . . . . . . . . . . . . 2-15Establishing System Security for the EDP Products . . . . . . . . . . . . . 2-16
Installation Considerations for ChangeDataMove . . . . . . . . . . . . . . . . . . 2-16Compatibility with Other BMC Software Products . . . . . . . . . . . . . . 2-17MVS Configuration for ChangeDataMove. . . . . . . . . . . . . . . . . . . . . 2-17IMS Source . . . . . . . . . . . . . . . . . . . . . . . . . . . . . . . . . . . . . . . . . . . . . 2-19CICS-DBCTL IMS Environment . . . . . . . . . . . . . . . . . . . . . . . . . . . . 2-20CICS/VSAM Source. . . . . . . . . . . . . . . . . . . . . . . . . . . . . . . . . . . . . . 2-20VSAM Batch Source . . . . . . . . . . . . . . . . . . . . . . . . . . . . . . . . . . . . . 2-20DB2 Source and Target . . . . . . . . . . . . . . . . . . . . . . . . . . . . . . . . . . . . 2-21Oracle Target. . . . . . . . . . . . . . . . . . . . . . . . . . . . . . . . . . . . . . . . . . . . 2-22Sybase Target . . . . . . . . . . . . . . . . . . . . . . . . . . . . . . . . . . . . . . . . . . . 2-22
Installation Considerations for DataMove. . . . . . . . . . . . . . . . . . . . . . . . . 2-22MVS Configuration for DataMove . . . . . . . . . . . . . . . . . . . . . . . . . . . 2-23IMS and CICS-IMS DBCTL Environments. . . . . . . . . . . . . . . . . . . . 2-24VSAM Batch. . . . . . . . . . . . . . . . . . . . . . . . . . . . . . . . . . . . . . . . . . . . 2-24DB2. . . . . . . . . . . . . . . . . . . . . . . . . . . . . . . . . . . . . . . . . . . . . . . . . . . 2-24
Multiple EDP Components for ChangeDataMove and DataMove . . . . . . 2-24Multiple Instances of the EDP Agent . . . . . . . . . . . . . . . . . . . . . . . . . 2-25Multiple Instances of the EDP Logger . . . . . . . . . . . . . . . . . . . . . . . . 2-25
Where to Go From this Chapter . . . . . . . . . . . . . . . . . . . . . . . . . . . . . . . . 2-26
Chapter 3 Using the Install System to Generate the Installation Batch JobsOverview . . . . . . . . . . . . . . . . . . . . . . . . . . . . . . . . . . . . . . . . . . . . . . . . . . 3-2
Unloading the Install System . . . . . . . . . . . . . . . . . . . . . . . . . . . . . . . 3-3Starting the Install System . . . . . . . . . . . . . . . . . . . . . . . . . . . . . . . . . 3-5Specifying Install System User Options . . . . . . . . . . . . . . . . . . . . . . . 3-8Generating the Installation Batch Jobs . . . . . . . . . . . . . . . . . . . . . . . . 3-10
Additional Members that the Install System Creates . . . . . . . . . . . . . . . . 3-16Where to Go from This Chapter . . . . . . . . . . . . . . . . . . . . . . . . . . . . . . . . 3-19
Chapter 4 Installing the MVS Components of the EDP ProductsOverview . . . . . . . . . . . . . . . . . . . . . . . . . . . . . . . . . . . . . . . . . . . . . . . . . . 4-2Allocation of Libraries and System Security . . . . . . . . . . . . . . . . . . . . . . 4-2
Allocating and Unloading the Product Libraries . . . . . . . . . . . . . . . . 4-3Controlling Access to EDP Agent Services . . . . . . . . . . . . . . . . . . . . 4-5Controlling Access to EDP Agent Commands . . . . . . . . . . . . . . . . . . 4-6Providing Access to EDP Functions . . . . . . . . . . . . . . . . . . . . . . . . . . 4-7
Batch Job Submission and EDP Agent Activation . . . . . . . . . . . . . . . . . . 4-8Submitting the Installation Batch Jobs . . . . . . . . . . . . . . . . . . . . . . . . 4-9Starting the EDP Agent. . . . . . . . . . . . . . . . . . . . . . . . . . . . . . . . . . . . 4-12
Where to Go from This Chapter . . . . . . . . . . . . . . . . . . . . . . . . . . . . . . . . 4-16
Chapter 5 Configuring the MVS Components of EDPOverview . . . . . . . . . . . . . . . . . . . . . . . . . . . . . . . . . . . . . . . . . . . . . . . . . . 5-2Access to the EDP ISPF Utilities Interface . . . . . . . . . . . . . . . . . . . . . . . . 5-2
Adding EDP Products to an ISPF Menu. . . . . . . . . . . . . . . . . . . . . . . 5-3Starting the EDP Products with a TSO Command . . . . . . . . . . . . . . . 5-4
Informatica Corporation, Confidential and Proprietary Information
ii EDP Installation Guide for MVS Components

Configurations for TCP/IP Connections. . . . . . . . . . . . . . . . . . . . . . . . . . 5-4Configuring TCP/IP for the EDP Console . . . . . . . . . . . . . . . . . . . . . 5-5 Configuring TCP/IP for a Remote Apply Component . . . . . . . . . . . 5-6Interlink TCP/IP Considerations . . . . . . . . . . . . . . . . . . . . . . . . . . . . 5-7
Post-Installation Troubleshooting Measures. . . . . . . . . . . . . . . . . . . . . . . 5-8Applying Post-Installation Zaps and Load Module Replacements . . . . . 5-8Where to Go from This Chapter . . . . . . . . . . . . . . . . . . . . . . . . . . . . . . . . 5-8
Chapter 6 Starting the MVS Components of EDPOverview. . . . . . . . . . . . . . . . . . . . . . . . . . . . . . . . . . . . . . . . . . . . . . . . . . 6-2Starting Selected MVS Components of EDP . . . . . . . . . . . . . . . . . . . . . . 6-2
Starting the EDP Logger . . . . . . . . . . . . . . . . . . . . . . . . . . . . . . . . . . 6-5Starting Pre-Log Merge . . . . . . . . . . . . . . . . . . . . . . . . . . . . . . . . . . . 6-9Starting Post-Log Merge . . . . . . . . . . . . . . . . . . . . . . . . . . . . . . . . . . 6-12Activating the IMS ECCR . . . . . . . . . . . . . . . . . . . . . . . . . . . . . . . . . 6-14Activating the CICS/VSAM ECCR . . . . . . . . . . . . . . . . . . . . . . . . . . 6-25Activating and Loading the VSAM Batch ECCR . . . . . . . . . . . . . . . 6-31Activating the DB2 ECCR . . . . . . . . . . . . . . . . . . . . . . . . . . . . . . . . . 6-32
Where to Go from This Chapter . . . . . . . . . . . . . . . . . . . . . . . . . . . . . . . . 6-32
Appendix A Installation WorksheetsGeneral Installation and User Options . . . . . . . . . . . . . . . . . . . . . . . . . . .A-2Tape Unload Options . . . . . . . . . . . . . . . . . . . . . . . . . . . . . . . . . . . . . . . .A-8Data Set Options . . . . . . . . . . . . . . . . . . . . . . . . . . . . . . . . . . . . . . . . . . . .A-11DB2 and MVS System Options . . . . . . . . . . . . . . . . . . . . . . . . . . . . . . . .A-13Security Options . . . . . . . . . . . . . . . . . . . . . . . . . . . . . . . . . . . . . . . . . . . .A-18DB2 Options for Target and Source . . . . . . . . . . . . . . . . . . . . . . . . . . . . .A-22Default Options (EDMSDIR) . . . . . . . . . . . . . . . . . . . . . . . . . . . . . . . . . .A-26EDP Agent Control Statements (AGENTCTL) . . . . . . . . . . . . . . . . . . . .A-40EDP Logger Parameters (EDMUPARM) . . . . . . . . . . . . . . . . . . . . . . . . .A-44DB2 Options for Target Object/Storage Verification . . . . . . . . . . . . . . . .A-50DB2 Options for Source Object/Storage Verification. . . . . . . . . . . . . . . .A-54Prefix Patterns for the Spill Data Set Names . . . . . . . . . . . . . . . . . . . . . .A-60
Appendix B Support for Western European Code PagesOverview. . . . . . . . . . . . . . . . . . . . . . . . . . . . . . . . . . . . . . . . . . . . . . . . . .B-2
Plans for Additional Enhancements . . . . . . . . . . . . . . . . . . . . . . . . . .B-2Supported Countries. . . . . . . . . . . . . . . . . . . . . . . . . . . . . . . . . . . . . .B-2
Code-Page Identification . . . . . . . . . . . . . . . . . . . . . . . . . . . . . . . . . . . . .B-3Contents of Member ECPAGE in SAMPLIB. . . . . . . . . . . . . . . . . . . . . .B-4
Installing the Zap . . . . . . . . . . . . . . . . . . . . . . . . . . . . . . . . . . . . . . . .B-5
Appendix C Service Aid UtilityOverview. . . . . . . . . . . . . . . . . . . . . . . . . . . . . . . . . . . . . . . . . . . . . . . . . .C-2How to Run the Utility . . . . . . . . . . . . . . . . . . . . . . . . . . . . . . . . . . . . . . .C-2Restrictions . . . . . . . . . . . . . . . . . . . . . . . . . . . . . . . . . . . . . . . . . . . . . . . .C-2Generated Reports. . . . . . . . . . . . . . . . . . . . . . . . . . . . . . . . . . . . . . . . . . .C-3
EDMSDIR Options Report . . . . . . . . . . . . . . . . . . . . . . . . . . . . . . . .C-3
Informatica Corporation, Confidential and Proprietary Information
Contents iii

EDMUPARM Options Report . . . . . . . . . . . . . . . . . . . . . . . . . . . . . C-3EDMLEVEL Maintenance Report . . . . . . . . . . . . . . . . . . . . . . . . . . C-3EDMLEVEL Comparison Report . . . . . . . . . . . . . . . . . . . . . . . . . . C-4
JCL Examples . . . . . . . . . . . . . . . . . . . . . . . . . . . . . . . . . . . . . . . . . . . . . C-5Generating All Reports (#EXSA) . . . . . . . . . . . . . . . . . . . . . . . . . . . C-6Comparing Maintenance Levels (#EXCLEV) . . . . . . . . . . . . . . . . . C-8Generating a Maintenance Information Module (#EXUBLD). . . . . C-9
Glossary
Index
Informatica Corporation, Confidential and Proprietary Information
iv EDP Installation Guide for MVS Components

Figures
Figure 1-1 Task Map for Installing the MVS Components of EDP . . . . . . . . . . . . . 1-2Figure 3-1 Unload Job for the Install System . . . . . . . . . . . . . . . . . . . . . . . . . . . . . . 3-4Figure 3-2 Install System Load Library Specification Panel . . . . . . . . . . . . . . . . . . . 3-6Figure 3-3 Install System Main Menu . . . . . . . . . . . . . . . . . . . . . . . . . . . . . . . . . . . . 3-7Figure 3-4 Generated Installation JCL Jobs . . . . . . . . . . . . . . . . . . . . . . . . . . . . . . . 3-15Figure 4-1 Sample Procedure to Start the EDP Agent . . . . . . . . . . . . . . . . . . . . . . . . 4-13Figure 4-2 Sample Messages When You Start the EDP Agent . . . . . . . . . . . . . . . . . 4-15Figure 6-1 Sample Procedure to Start the EDP Logger (#LOGGER) . . . . . . . . . . . . 6-7Figure 6-2 Sample EDP Messages When You Start the EDP Logger . . . . . . . . . . . . 6-8Figure 6-3 Sample JES Messages When You Start the EDP Logger . . . . . . . . . . . . . 6-8Figure 6-4 Sample Pre-Log Merge Receiver Job (#RECEIVR). . . . . . . . . . . . . . . . . 6-10Figure 6-5 Sample Pre-Log Merge Sender Job (#SENDER) . . . . . . . . . . . . . . . . . . . 6-11Figure 6-6 Sample Post-Log Merge Job (#POSTLOG) . . . . . . . . . . . . . . . . . . . . . . . 6-13Figure 6-7 Sample JCL for Data Set Allocations in Steps 1–5. . . . . . . . . . . . . . . . . 6-18Figure 6-8 Sample Member to Define an External Subsystem . . . . . . . . . . . . . . . . . 6-22Figure 6-9 Sample Programs and Transaction for CICS Version 3 (#CICSV3) . . . . 6-28Figure 6-10 Sample Programs and Transaction for CICS Version 4 (#CICSV4) . . . . 6-28Figure 6-11 Sample Programs and Transaction for CICS/TS Version 1.1 (#CICSV51)6-29Figure 6-12 Sample Programs and Transaction for CICS/TS Versions 1.2 and 1.3
(#CICSV52). . . . . . . . . . . . . . . . . . . . . . . . . . . . . . . . . . . . . . . . . . . . . . 6-29Figure 6-13 Sample JCL for Log Start Report . . . . . . . . . . . . . . . . . . . . . . . . . . . . . . . 6-30Figure C-1 Sample JCL Code to Generate All Reports . . . . . . . . . . . . . . . . . . . . . . .C-6Figure C-2 Sample JCL Code to Generate the EDMLEVEL Comparison Report . .C-8Figure C-3 Sample JCL Code to Generate an EDMLEVEL Maintenance and
Comparison Module . . . . . . . . . . . . . . . . . . . . . . . . . . . . . . . . . . . . . . .C-9
Informatica Corporation, Confidential and Proprietary Information
Figures v

Informatica Corporation, Confidential and Proprietary Information
vi EDP Installation Guide for MVS Components

Tables
Table 2-1 Space Estimates for EDP DB2 Objects . . . . . . . . . . . . . . . . . . . . . . . . . . 2-4Table 2-2 Space Estimates for EDP Data Sets . . . . . . . . . . . . . . . . . . . . . . . . . . . . . 2-5Table 2-3 Supported Oracle Targets . . . . . . . . . . . . . . . . . . . . . . . . . . . . . . . . . . . . . 2-6Table 2-4 Supported DB2/MVS Targets . . . . . . . . . . . . . . . . . . . . . . . . . . . . . . . . . 2-7Table 2-5 Supported DB2 Universal Database for Distributed Systems (Enterprise
Edition) Targets . . . . . . . . . . . . . . . . . . . . . . . . . . . . . . . . . . . . . . . . . . 2-8Table 2-6 Supported DB2 Universal Database for Distributed Systems
(Enterprise-Extended Edition) Targets . . . . . . . . . . . . . . . . . . . . . . . . . 2-8Table 2-7 Supported Microsoft SQL Server Targets . . . . . . . . . . . . . . . . . . . . . . . . 2-9Table 2-8 Supported Sybase Adaptive Server Enterprise Targets . . . . . . . . . . . . . . 2-9Table 2-9 Supported IMS Sources . . . . . . . . . . . . . . . . . . . . . . . . . . . . . . . . . . . . . . 2-10Table 2-10 Supported DB2/MVS Sources . . . . . . . . . . . . . . . . . . . . . . . . . . . . . . . . . 2-10Table 2-11 Supported VSAM Sources . . . . . . . . . . . . . . . . . . . . . . . . . . . . . . . . . . . . 2-11Table 2-12 Supported CICS/ESA Sources . . . . . . . . . . . . . . . . . . . . . . . . . . . . . . . . . 2-12Table 2-13 Supported CICS/TS Sources . . . . . . . . . . . . . . . . . . . . . . . . . . . . . . . . . . 2-12Table 2-14 Operating Systems Supported by the EDP Console . . . . . . . . . . . . . . . . 2-13Table 2-15 Information about Supported Operating Systems and Other Software . . 2-14Table 2-16 ChangeDataMove Components that Require Passwords . . . . . . . . . . . . . 2-16Table 2-17 DataMove Components that Require Passwords . . . . . . . . . . . . . . . . . . . 2-16Table 2-18 Minimum Version Levels of Required BMC Software Products . . . . . . 2-17Table 3-1 Additional Members of the Installation Data Set . . . . . . . . . . . . . . . . . . 3-16Table 4-1 Security Required for the MVS Components of the EDP Products . . . . 4-3Table 4-2 Task List to Submit the Installation JCL Jobs . . . . . . . . . . . . . . . . . . . . . 4-10Table 4-3 JCL Statements for the EDP Agent’s Startup Procedure . . . . . . . . . . . . . 4-13Table 6-1 Startup Procedures by Component . . . . . . . . . . . . . . . . . . . . . . . . . . . . . 6-2Table 6-2 JCL Statements for EDP Logger Startup . . . . . . . . . . . . . . . . . . . . . . . . . 6-6Table 6-3 JCL Statements for the #RECEIVR Procedure . . . . . . . . . . . . . . . . . . . . 6-9Table 6-4 JCL Statements for the #SENDER Procedure . . . . . . . . . . . . . . . . . . . . . 6-10Table 6-5 JCL Statements for the #POSTLOG Procedure . . . . . . . . . . . . . . . . . . . 6-12Table 6-6 Fields Used to Define an IMS External Subsystem . . . . . . . . . . . . . . . . . 6-20Table A-1 General Installation and User Options . . . . . . . . . . . . . . . . . . . . . . . . . . .A-2Table A-2 Tape Unload Options . . . . . . . . . . . . . . . . . . . . . . . . . . . . . . . . . . . . . . . .A-8Table A-3 Data Set Options . . . . . . . . . . . . . . . . . . . . . . . . . . . . . . . . . . . . . . . . . . . .A-11Table A-4 DB2 and MVS System Options . . . . . . . . . . . . . . . . . . . . . . . . . . . . . . . .A-13
Informatica Corporation, Confidential and Proprietary Information
Tables vii

Table A-5 DB2 Authorization Options. . . . . . . . . . . . . . . . . . . . . . . . . . . . . . . . . . . A-18Table A-6 DB2 Options for Target and Source . . . . . . . . . . . . . . . . . . . . . . . . . . . . A-22Table A-7 EDP Default Options (EDMSDIR) . . . . . . . . . . . . . . . . . . . . . . . . . . . . . A-26Table A-8 EDP Agent Control Statements (AGENTCTL) . . . . . . . . . . . . . . . . . . . A-40Table A-9 EDP Logger Parameters (EDMUPARM) . . . . . . . . . . . . . . . . . . . . . . . . A-44Table A-10 DB2 Target Object/Storage Parameters. . . . . . . . . . . . . . . . . . . . . . . . . . A-50Table A-11 DB2 Source Object/Storage Parameters . . . . . . . . . . . . . . . . . . . . . . . . . A-54Table A-12 Symbolic Variables for Specifying Spill Data Set Names . . . . . . . . . . . A-60Table A-13 Variable Concatenation Examples . . . . . . . . . . . . . . . . . . . . . . . . . . . . . A-61Table B-1 Identification Table for Western European Code Pages . . . . . . . . . . . . . B-3Table C-1 Parameters for the Service Aid Utility . . . . . . . . . . . . . . . . . . . . . . . . . . C-5
Informatica Corporation, Confidential and Proprietary Information
viii EDP Installation Guide for MVS Components

xiv
About This Book
The ChangeDataMove and DataMove products are members of the BMC Software Enterprise Data Propagation (EDP) product family. The EDP family includes products that extract, transform, move, and load data across an enterprise, often spanning different platforms.
This book is for system programmers, database administrators (DBAs), and anyone else whose responsibilities include installing, configuring, and activating the MVS components of the EDP products. The EDP Installation Guide for Windows and Unix Components addresses installing and configuring the Windows and Unix components.
To use this book, you should be familiar with your database management system (DBMS). You should also have a working knowledge of the MVS system, which requires familiarity with job control language (JCL) and the Interactive System Productivity Facility (ISPF).
How This Book Is Organized
This book is organized as follows. In addition, a glossary of terms and an index appear at the end of the book.
Chapter/Appendix Description
Chapter 1, “Installation Overview” provides an overview ot the four stages of the installation task map and describes the main features of the Install System
Chapter 2, “Preparing for Installation” describes the software and hardware requirements for installation of the EDP productsThe chapter also includes installation considerations and constraints for DataMove and ChangeDataMove.
Informatica Corporation, Confidential and Proprietary Information
About This Book ix

Related Documentation
Informatica Corporation products offer several types of documentation:
• online books• online Help
In addition to this book and the online Help, you can find useful information in the publications shown in the following table.
Note: The ChangeDataMove and DataMove products share many software components. Information common to both products is available primarily in the EDP Registrations and Transformations User Guide and in the EDP installation guides.
Chapter 3, “Using the Install System to Generate the Installation Batch Jobs”
contains procedures to unload, start, and use the Install System to generate a series of batch jobs that are necessary to install the EDP products
Chapter 4, “Installing the MVS Components of the EDP Products”
includes procedures for running the installation batch jobs, setting system security, and starting the EDP agent
Chapter 5, “Configuring the MVS Components of EDP”
contains information to help you access the EDP ISPF utilities interface and configure the TCP/IP connections
Chapter 6, “Starting the MVS Components of EDP”
provides procedures to start the EDP MVS components that are necessary to support a data propagation
Appendix A, “BMC Software Product Authorization”
describes the security in place for the EDP productsYou must obtain product authorization from BMC Software before you can run the EDP products.
Appendix G, “BMC Software Product Authorization Messages”
explains any error messages that the Product Authorization utility generates
Appendix A, “Installation Worksheets” provides worksheets to help you collect information about your system and environment before you begin the installation processYou will enter information from your completed worksheets into the Install System panels.
Appendix B, “Support for Western European Code Pages”
explains how to apply a zap that allows the ChangeDataMove and DataMove products to use Western European single-byte code pages correctly
Appendix C, “Service Aid Utility” describes a support utility that reports on your implementation of ChangeDataMove or DataMove The reports can assist you or your BMC Software technical support analysts when you install, maintain, or migrate to a new release EDP.
Chapter/Appendix Description
Informatica Corporation, Confidential and Proprietary Information
x EDP Installation Guide for MVS Components

Online Books
The books that accompany this Informatica Corporation product are available in online format. If you are a Windows or Unix user, you can view online books with Acrobat Reader from Adobe Systems. The reader is provided at no cost, as explained in “To Access Online Books.”
To Access Online Books
Online books are formatted as Portable Document Format (PDF) files. You can view them, print them, or copy them to your computer by using Acrobat Reader 5.0 or later.
Category Document Description
installation documents
EDP Installation Guide for MVS Components
contains the installation instructions for EDP MVS components
EDP Installation Guide for Windows and Unix Components
contains the installation instructions for the EDP Windows GUI and the Windows Server and Unix components
core documents EDP Getting Started Guide provides a brief overview of the EDP products, taskmaps and checklists for DataMove and ChangeDataMove propagations, and an introduction to the EDP interfaces
EDP Registrations and Transformations User Guide
contains user information for registering sources and targets; defining transformations; and working with user exits, external integration tables, and other special transformations
DataMove User Guide provides step-by-step instructions for using DataMove
EDP Messages Manual provides explanations and user responses for messages that the EDP products generate
EDP Target API User Guide provides detailed instructions for programming the EDP Target API and using it to propagate data to unsupported targets
supplemental documents
release notes, flashes, technical bulletins
contain the latest updates to EDP products
EDP Master Index contains the combined index entries for all of the installation and core documents in the EDP documentation set except the EDP Messages Manual and the EDP Target API User Guide
EDP Command Reference Summary
provides a brief overview of the commands used with the EDP components
Informatica Corporation, Confidential and Proprietary Information
About This Book xi
In some cases, installation of Acrobat Reader and downloading the online books is an optional part of the product-installation process. For information about downloading the free reader from the Web, go to the Adobe Systems site at http://www.adobe.com.
To download EDP books, go to the Informatica Corporation FTP site at:
ftp://tsftp.informatica.com/updates/EDP/Service_Packs/2.4.05/EDP_Documentation
Login with your customer id and password and download the PDF and PDX files.
To view any online book that Informatica Corporation offers for products other than EDP, visit the support page of the Informatica Corporation Web site at http://my.informatica.com/. Log on and select a product to access the related documentation.
Online Help
The EDP product includes online Help. In the EDP console, you can access Help from the Help menu or in either of the following ways:
• by pressing F1 from any window or dialog box• by clicking the Help button that is provided in most dialog boxes
Conventions
This section provides examples of the conventions used in this book and explains how to read syntax statements.
General Conventions
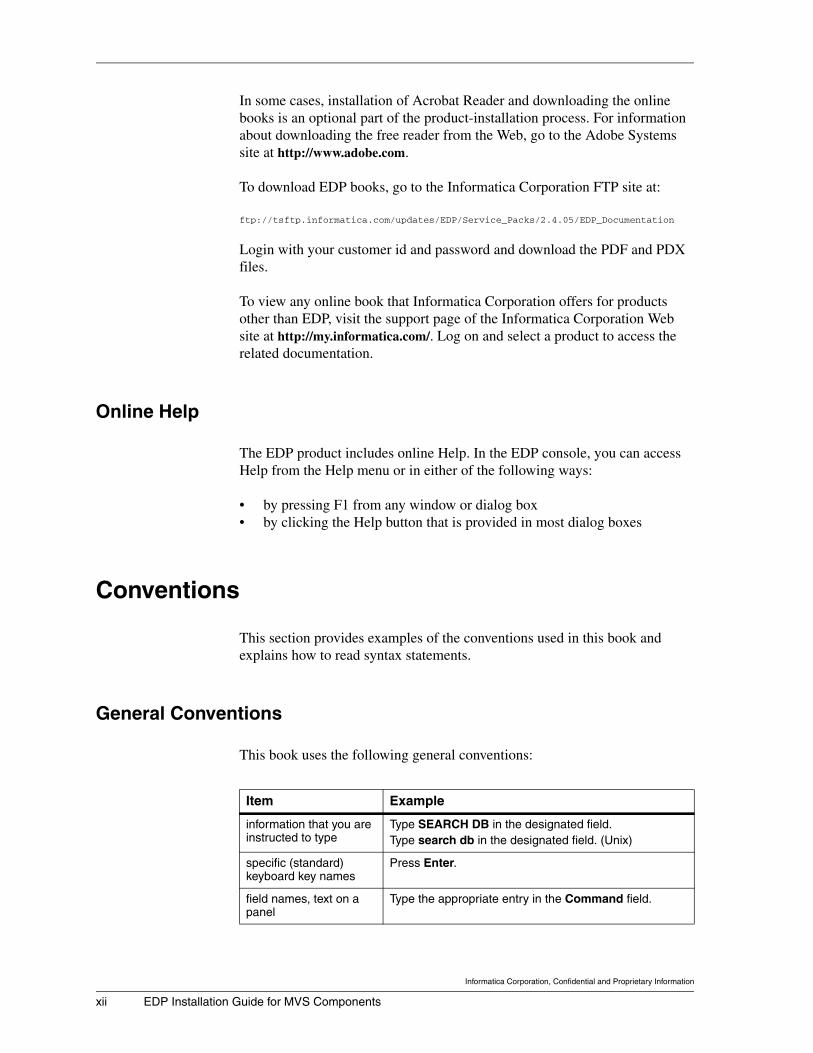
This book uses the following general conventions:
Item Example
information that you are instructed to type
Type SEARCH DB in the designated field.Type search db in the designated field. (Unix)
specific (standard) keyboard key names
Press Enter.
field names, text on a panel
Type the appropriate entry in the Command field.
Informatica Corporation, Confidential and Proprietary Information
xii EDP Installation Guide for MVS Components

This book uses the following types of special text:
Note: Notes contain important information that you should consider.
Warning! Warnings alert you to situations that could cause problems, such as loss of data, if you do not follow instructions carefully.
Syntax Statements
Syntax statements appear in Courier. The following example shows a sample syntax statement:
COMMAND KEYWORD1 [KEYWORD2|KEYWORD3] KEYWORD4={YES|NO}file_name...
The following table explains conventions for syntax statements and provides examples:
directories, file names, Web addresses
The Informatica Corporation home page is at http://www.informatica.com.
nonspecific key names, option names
Use the HELP function key.
KEEPDICTIONARY option
MVS calls, commands, control statements, keywords, parameters, reserved words
Use the SEARCH command to find a particular object.
The product generates the SQL TABLE statement next.
Unix commands, command options, database names
Use the sbacktrack program to create a backup script.
code examples, syntax statements, system messages, screen text
//STEPLIB DD
The table table_name is not available.
emphasized words, new terms, variables
The instructions that you give to the software are called commands.
In this message, the variable file_name represents the file that caused the error.
EDP console menu sequence
Choose File => Open.
Item Example
Informatica Corporation, Confidential and Proprietary Information
About This Book xiii

Item Example
Items in italic type represent variables that you must replace with a name or value. Use an underscore for variables with more than one word.
dtsbackup control_directory
Brackets indicate a group of options. You can choose at least one of the items in the group, but none of them is required. Do not type the brackets when you enter the option. A comma means that you can choose one or more of the listed options. You must use a comma to separate the options if you choose more than one option.
Unix options are indicated with a hyphen.
[table_name, column_name, field]
[-full, -incremental, -level] (Unix)
Braces enclose a list of required items. You must enter at least one of the items. Do not type the braces when you enter the item.
{DBD_name | table_name}
{-a | -c} (Unix)
A vertical bar means that you can choose only one of the listed items. In the example, you would choose either commit or cancel.
{commit | cancel}
{-commit | -cancel} (Unix)
An ellipsis indicates that you can repeat the previous item or items as many times as necessary.
column_name . . .
Informatica Corporation, Confidential and Proprietary Information
xiv EDP Installation Guide for MVS Components

xx
Summary of Changes
This summary describes changes to the functionality of the Enterprise Data Propagation (EDP) products, enhancements to the products, and any major changes to the documentation. The summaries are listed by version and release date.
Version 2.4.00 December 22, 2000
This release fixes known problems in the products. In addition, it includes the following changes and enhancements:
• Both ChangeDataMove and DataMove now support propagating data directly to MS SQL Server tables. Previously, only DataMove could do so. The EDP products no longer use MS SQL Server publications and articles to propagate data.
This change includes the following enhancements:
— MS SQL Server propagations operate in the same way as propagations for other EDP distributed systems targets.
— In addition to tables, DataMove now lets you choose files as data destinations for MS SQL Server propagations.
— Error reporting for DataMove MS SQL Server propagations is enhanced.
• DataMove now offers the option of using the DB2 Universal Database (UDB) load API for faster loading of data into UDB tables.
• DataMove now offers the option of using Oracle direct path loading for faster loading of data into Oracle 8.1.6 tables.
Informatica Corporation, Confidential and Proprietary Information
Summary of Changes xv

• DataMove now offers the option of detecting and using the AutoLoader feature of DB2 UDB Enterprise-Extended Edition (EEE) databases. AutoLoader moves data from files into partitioned tables in a UDB EEE database.
• EDP no longer supports Oracle or Sybase on Hewlett-Packard HP-UX version 10.20. EDP continues to support selected versions of Oracle and Sybase on HP-UX version 11.
• The EDP documentation set now includes the EDP Getting Started Guide and the EDP Command Reference Summary. The EDP Getting Started Guide provides introductory information about using the EDP products. The EDP Command Reference Summary lists commands, their syntax, and their parameters in an easy-to-read format.
Version 2.3.00 July 21, 2000
This release fixes known problems in the products. In addition, it includes the following changes and enhancements:
• The EDP products now support DB2 UDB Enterprise Edition and DB2 UDB Enterprise-Extended Edition as target environments.
• The EDP products now support Oracle targets on the Windows NT and Windows 2000 platforms, as well as on selected Unix platforms.
• The wizards in the EDP Windows interface have been enhanced based on the Microsoft Wizard 97 Specifications.
• The EDP product suite now includes the EDP Target API. This API allows you to propagate data to targets that are not currently supported by the EDP products.
• The documentation set now includes the EDP Target API User Guide.
• The EDP products no longer support Sybase OEMI as a target environment. The EDP products continue to support Sybase Adaptive Server Enterprise as a target environment.
• The EDP products no longer support the PATROL® Knowledge Module™ for Enterprise Data Propagation.
• You can no longer create a data definition language (DDL) or Change Definition Language™ (CDL®) definition of a table from within the EDP Windows interface. You can use any other method you prefer to create tables.
Informatica Corporation, Confidential and Proprietary Information
xvi EDP Installation Guide for MVS Components

• The EDP products no longer provide an ISPF interface for the following tasks:
— registering data resources— defining transformations— defining DataMove propagations
To perform these tasks, use the EDP Windows interface, which has been enhanced. The EDP products continue to provide an ISPF utilities interface for EDP product authorizations and for maintaining EDP repositories.
Version 2.2.00 January 31, 2000
This release fixes known problems in the products. In addition, it includes the following changes and enhancements:
• The EDP products now support native Sybase as a target environment.
• The EDP products now support IMS Fast Path databases as sources.
• The EDP products now support MS SQL Server and native Sybase integration tables (formerly called staging tables). Integration tables enable you to make MVS legacy data available to third-party products that develop and manage data warehouses, data marts, and operational data stores (ODSs). You can use DataMove to initially populate the integration table with the data from your operational source system, and use ChangeDataMove to update the table with changes.
• The EDP products now allow you to access individual fields in keys of ancestor IMS segments. While defining your data transformation, you can use the ancestor-field keys (ANLF) function to map fields from the ancestor segment's key to columns in your target table.
• The ChangeDataMove User Guide and the ChangeDataMove Reference Manual have been combined into one book, the ChangeDataMove User Guide.
• The EDP products can now support many common, single-byte, Western European code pages. For information about EDP and Western European code pages, see the EDP Installation Guide for MVS Components.
Informatica Corporation, Confidential and Proprietary Information
Summary of Changes xvii

Version 2.1.00 March 31, 1999
This release fixes known problems in the products. In addition, it includes the following changes and enhancements:
• The EDP product suite now includes the DataMove product. This product propagates bulk data from IMS, VSAM, and DB2 sources to DB2, Oracle, and Microsoft SQL Server targets.
• The documentation set now includes the DataMove User Guide.
• ChangeDataMove now supports MS SQL Server as a target environment.
• ChangeDataMove offers a sysplex log merge configuration for IMS and VSAM sources.
• The PATROL Knowledge Module for Enterprise Data Propagation now supports ChangeDataMove for all targets except MS SQL Server.
• DataMove and ChangeDataMove now support DB2 and Oracle staging tables.
• ChangeDataMove now supports DB2 data sharing.
• The documentation set now includes the EDP Registrations and Transformations User Guide. This book contains information and procedures on how to register data resources and define transformations for both DataMove and ChangeDataMove.
Version 1.4.01 November 11, 1998
This release fixes known problems in the products. In addition, it includes the following changes and enhancements:
• ChangeDataMove now supports Oracle as a target environment. You can capture changes from DB2, IMS, or VSAM sources and apply those changes to Oracle targets.
• ChangeDataMove now supports capturing changes to non-keyed IMS segments.
• ChangeDataMove now provides a DB2 data set reader utility. This utility allows you to materialize tables from a DB2 source from within ChangeDataMove. Previously, you had to materialize DB2 tables from outside ChangeDataMove.
Informatica Corporation, Confidential and Proprietary Information
xviii EDP Installation Guide for MVS Components

• The exit value (XVAL) function has been added. This function allows you to set the values of target columns by using a post-transformation exit.
Version 1.3.00 June 30, 1998
This is the first release of ChangeDataMove. This product allows you to capture changes from IMS, VSAM, or DB2 sources and apply them to DB2 targets.
Informatica Corporation, Confidential and Proprietary Information
Summary of Changes xix

Informatica Corporation, Confidential and Proprietary Information
xx EDP Installation Guide for MVS Components

12
Chapter 1 Installation Overview
This chapter contains the following topics:
Overview. . . . . . . . . . . . . . . . . . . . . . . . . . . . . . . . . . . . . . . . . . . . . . . . . . 1-2Installation Task Map . . . . . . . . . . . . . . . . . . . . . . . . . . . . . . . . . . . . . . . . 1-2
Stage I: Prepare for Installation . . . . . . . . . . . . . . . . . . . . . . . . . . . . . 1-3Stage II: Generate the Installation Batch Jobs . . . . . . . . . . . . . . . . . . 1-3Stage III: Install the EDP Components . . . . . . . . . . . . . . . . . . . . . . . 1-4Stage IV: Configure and Start the EDP Components. . . . . . . . . . . . . 1-4
Overview of the Install System. . . . . . . . . . . . . . . . . . . . . . . . . . . . . . . . . 1-4Checkpoints . . . . . . . . . . . . . . . . . . . . . . . . . . . . . . . . . . . . . . . . . . . . 1-5Installation Modes . . . . . . . . . . . . . . . . . . . . . . . . . . . . . . . . . . . . . . . 1-5International Language Support . . . . . . . . . . . . . . . . . . . . . . . . . . . . . 1-6Installation Methods. . . . . . . . . . . . . . . . . . . . . . . . . . . . . . . . . . . . . . 1-6Installation User Profile . . . . . . . . . . . . . . . . . . . . . . . . . . . . . . . . . . . 1-6Installation Default Options . . . . . . . . . . . . . . . . . . . . . . . . . . . . . . . . 1-8Rules for Running Multiple Product Releases
in a Single Subsystem . . . . . . . . . . . . . . . . . . . . . . . . . . . . . . . . . . . 1-8Product Naming Conventions. . . . . . . . . . . . . . . . . . . . . . . . . . . . . . . 1-9Conventions for Using the Install System . . . . . . . . . . . . . . . . . . . . . 1-9
Where to Go from This Chapter . . . . . . . . . . . . . . . . . . . . . . . . . . . . . . . . 1-12
Informatica Corporation, Confidential and Proprietary Information
Chapter 1 Installation Overview 1-1

Overview
Overview
Installing the MVS components of the EDP products requires advanced preparation. This chapter introduces the installation task map and explains the Install System.
Installation Task Map
The installation map (Figure 1-1) helps guide you through the four stages of the installation, from preparing for installation to configuring and starting the EDP components. To facilitate the installation process, this book follows the order of the tasks in the installation task map.
Figure 1-1 Task Map for Installing the MVS Components of EDP
Informatica Corporation, Confidential and Proprietary Information
1-2 EDP Installation Guide for MVS Components

Installation Task Map
Stage I: Prepare for Installation
Because the installation of the MVS components requires advanced preparation, take time to become familiar with the flow of tasks in the installation task map. In stage I, you will
• become familiar with the installation process (this chapter)
• review hardware and software requirements and important installation considerations for the ChangeDataMove and DataMove products (Chapter 2)
• use the installation worksheets to collect the information that you will need to complete the installation panels (Appendix C)
Stage II: Generate the Installation Batch Jobs
In stage II, your objective is to unload and start the Install System so that you can choose installation options and generate the JCL batch jobs. (You will use the batch jobs to install the MVS components in the next stage.) To generate the batch jobs, you will rely on the information that you collected by completing the worksheets in Appendix C to complete the Install System panels.
Informatica Corporation, Confidential and Proprietary Information
Chapter 1 Installation Overview 1-3

Overview of the Install System
Stage III: Install the EDP Components
In stage III, you will complete the installation of the MVS components by running the batch jobs that you generated in stage II. Before you can run all of the batch jobs, however, you must also set up the EDP agent by granting it proper authority and starting it.
Stage IV: Configure and Start the EDP Components
After you complete the installation in stage III, complete the tasks in stage IV to ensure that your EDP components are properly configured. The configuration tasks include establishing system security, providing access to EDP functions, configuring TCP/IP connections, and providing for multiple instances of the EDP agent and the EDP logger.
The last set of tasks in stage IV help you to start selected EDP components on the MVS system so that you can continue to set up your ChangeDataMove and DataMove propagations.
Overview of the Install System
The EDP products, as well as many other BMC Software products, use the BMC Software Install System. The Install System is an ISPF application that generates a set of batch jobs in job control language (JCL). You use the installation batch jobs to unload and install products from the distribution tape.
Informatica Corporation, Confidential and Proprietary Information
1-4 EDP Installation Guide for MVS Components

Overview of the Install System
The Install System guides you through the installation process, allowing you to accept or change defaults. You can access Help from each panel by pressing F1.
Checkpoints
The amount of time required to install BMC Software products depends on several factors, including
• the number of products that you install
• the installation path that you choose for each product
• the complexity of each product
By taking checkpoints at predetermined points, the Install System enables you to interrupt the installation at any time.
When you resume the installation process, the Install System displays a list of the checkpoints taken before the interruption. The Install System saves the options that you specified before the interruption. You can return to any checkpoint or begin again, which removes all checkpoints taken in the previous session.
Installation Modes
The Install System offers two installation modes for most BMC Software products:
• Quick installation limits the number of panels shown for most products to a subset of installation panels that are common among various BMC Software mainframe products, and the synonym and default options (DOPTs) panels. These panels use the default values that BMC Software provides. (The Quick option is not available for all products.)
• Custom installation displays all of the option panels for each product in addition to the common installation panels. This option allows the most flexibility in setting up the products that you are installing, from file and database names to file sizes and product-execution parameters.
Note: BMC Software recommends that you use the custom mode to install the EDP products.
Informatica Corporation, Confidential and Proprietary Information
Chapter 1 Installation Overview 1-5

Overview of the Install System
International Language Support
The Install System automatically invokes international language support if the terminal type is 32xxKN. (The ISPF main menu lets you set the terminal type.) For this terminal type, the Install System displays the text in uppercase letters.
Installation Methods
For most BMC Software mainframe products, the installation mehtod that you select is based on whether you are installing a product for the first time or upgrading a product. Normally, you can choose from the following installation methods:
• Full• Maintenance• Subsystem ID (SSID) or multiple SSID
However, for EDP products, you must currently use the Full installation method. Future releases of will allow all installation methods.
You can use the Full installation method to install one or more BMC Software products on a single subsystem. All products allow you to choose a Full installation method. This installation method has the following characteristics:
• creates new product libraries and, if applicable, DB2 objects
• allows an interface with other BMC Software products
• allows data migration from an earlier release (when you specify the Custom installation mode)
• allows you to retain BMC Software security authorization from an earlier release
Installation User Profile
The Install System saves the installation options in a user profile. The member name of the user profile is xxxxPROF, where xxxx is the profile ID. Because the default profile ID is DCI, the default member name is DCIPROF.
Informatica Corporation, Confidential and Proprietary Information
1-6 EDP Installation Guide for MVS Components

Overview of the Install System
The Install System saves the installation profile in the following locations:
• the ISPF profile data set (ISPPROF) associated with your user ID
• the output JCL data set that you specify in the User Options panel to contain the installation batch jobs (HLQ.INSTALL.JCL)
• the HLQ.INSTALL library that you create when you unload the Install System from the tape
Search Order
The Install System searches the following data sets, in the order shown, for the xxxxPROF member:
1. HLQ.INSTALL.JCL 2. HLQ.INSTALL 3. ISPF profile
If the member is in one of the first two data sets, the Install System copies the member to your ISPF profile data set. ISPF can then use this copy to retrieve and store the installation parameters.
If the profile member is not in any of the data sets, the Install System creates a new xxxxPROF member. At the end of the installation session, the Install System copies this member from the ISPF profile data set to the HLQ.INSTALL.JCL and HLQ.INSTALL data sets.
User-Profile Reuse
You can reuse an installation user profile by starting the Install System with an existing HLQ.INSTALL or HLQ.INSTALL.JCL data set. Reusing the profile gives you access to the installation options specified during the previous installation session.
If you reuse a profile from a previous installation session, you must review the installation options carefully. Verify that the values for the options are still valid for the current installation. Change values as needed to reflect the new release. (For example, a database name or plan name might change from one release to the next.)
Warning! If you do not change required parameters for the new installation, you can cause severe errors when you submit the installation JCL. For example, if you do not change a modified DB2 plan name from its previously specified value, you can overwrite a plan that your current installation uses.
Informatica Corporation, Confidential and Proprietary Information
Chapter 1 Installation Overview 1-7

Overview of the Install System
Installation Default Options
After the Install System generates the installation batch jobs, the HLQ.INSTALL.JCL data set contains a member that establishes values for default processing options (DOPTs). The member name has the format $xnnDOPT. The variable xnn is a three-character ID that is based on the installation method you choose for the product. Because EDP requires that you use the the Full installation method, the member name for the default processing options will be $I31DOPT.
The EDP products use an assembled options module. The $xnnDOPT member contains an assembly language program with an options macro call. You can tailor EDP processing by editing the default values in the $xnnDOPT member.
When you submit the $xnnDOPT job, the Install System generates and places the assembled options module in the APF-authorized library that you specified during the installation process.
If you change any of the values in member $xnnDOPT after installation, you must rerun the $xnnDOPT job to make the changes take effect.
Rules for Running Multiple Product Releases in a Single Subsystem
You might need to perform acceptance testing on a new release before upgrading the release to production. For instance, you might be running an earlier version of EDP for DB2 apply, but you would like to experiment with the current version of EDP and to create different objects and options in your new EDP installation. To facilitate this requirement, you can install EDP multiple times within a single DB2 subsystem. To do so, use the Full installation method and follow these rules:
• Use a unique high-level qualifier (HLQ) that is different from the one currently in use. The Install System creates a new set of BMC Software product libraries to support the new release.
• Do not copy the load modules to the APF library that is currently in use.
• Use the Custom installation mode.
• Use a DB2-synonym qualifier for the product that is different from the qualifier that is currently in use.
Informatica Corporation, Confidential and Proprietary Information
1-8 EDP Installation Guide for MVS Components

Overview of the Install System
• Use naming conventions that are different from the ones that are currently in use for plans and collection IDs.
• If you do not want to share the existing DB2 objects with the new release, use DBNAME and CREATOR names that are different from those of other BMC Software objects.
The Install System generates a new ISPF interface to access the newly installed set of products. Continue to use the old ISPF interface to access the older set of products.
Product Naming Conventions
If you are upgrading from an earlier version of EDP, it is possible to use some of the same DB2 objects and the same EDP repositories. For additional information, contact BMC Software Customer Support as indicated on page iii.
Conventions for Using the Install System
This section describes
• the command keys you can use• the conventions for assigning data set names• the use of symbolic variables• common assembly errors for DOPTs
Keys and Commands
To display the active keys when you are running the Install System, type the ISPF command PFSHOW on the command line and press Enter. The following commands are available to help you move through the panels:
• EXIT (F3) saves any changes and returns to the Install System Main Menu.
• CANCEL (F12) saves any changes and returns to the previous panel.
• ENTER accepts the defaults or changes and continues to the next panel.
• HELP (F1) displays Help panels.
Informatica Corporation, Confidential and Proprietary Information
Chapter 1 Installation Overview 1-9

Overview of the Install System
Data Set Names
The Install System uses ISPF conventions when processing data set names. When you specify a data set name, the Install System determines whether the TSO/E PROFILE NOPREFIX option is in use. If it is, the Install System does not add a prefix to the data set name. The maximum length for data set names is 44 characters, including the prefix if one is used.
Symbolic Variables
The Install System frequently uses symbolic variables in data set names, data set prefixes, and job-statement information. A symbolic variable is a variable name with an ampersand (&) prefix. In the Install System, most occurrences of symbolic variables are related to keyword values that you specify in the product options.
While assembling product options, macro processing attempts to resolve all symbolic variables in the listing. Most of the symbolic variables are resolved during Job Control Language (JCL) generation from one of the BMC Software products, not during assembly of the default options (DOPTs) module. To prevent errors during DOPTs-module assembly, the Install System doubles the ampersand for all symbolic variables.
The double-character rule also applies to
• single quotation marks within literal values if the literal is enclosed with delimiting single quotation marks
• a period if it immediately follows a variable name
The following examples illustrate the use of double characters:
Examples of Symbolic Variables
Following are examples of symbolic-variable specifications in the DOPTs listing and in the user options after DOPTS assembly.
Variable Result
&& &
'' '
.. .
Informatica Corporation, Confidential and Proprietary Information
1-10 EDP Installation Guide for MVS Components

Overview of the Install System
Example 1
DOPTs:
&&PREFIX..&&SSID..&&DBNAME..&&TSNAME
User options:
&PREFIX.&SSID.&DBNAME.&TSNAME
Example 2
DOPTs:
//&&USERID.&&JOBCHAR JOB(ACCT),''&&PGMR'',
User options:
//&USERID&JOBCHAR JOB(ACCT),'&PGMR',
Common Assembly Errors for DOPTs
All DOPTs assembly jobs should complete with a successful return code of 0. If you get assembly errors, compare your DOPTs listing with one that the installation process generated. Following are common errors:
• missing comma delimiter after a keyword value
For each keyword value except the last, a comma delimiter is needed. An example follows:
SSID=(DB2P,R) /*wrong*/SSID=(DB2P,R), /*correct*/
• missing continuation character in column 72
For each keyword value except the last, a character such as an asterisk (*) is required in column 72.
• incorrect symbolic-variable substitution
The macro tries to resolve all symbolic variables. You should double the ampersand (&&) on all symbolic variables. An example follows:
JCLDSN=&PREFIX..&SSID..&DBNAME..&TSNAME, /*wrong*/JCLDSN=&&PREFIX..&&SSID..&&DBNAME..&&TSNAME, /*correct*/
Informatica Corporation, Confidential and Proprietary Information
Chapter 1 Installation Overview 1-11
Where to Go from This Chapter
• missing single quotation mark
An example follows:
JC1='//&&USRID.&&JBCHR JOB(ACCT),'&&PGMR', /*wrong*/JC1='//&&USRID.&&JBCHR JOB(ACCT),''&&PGMR'',',/*correct*/
Where to Go from This Chapter
Now that you are familiar with the installation task map and how the Install System works, you are ready to continue with the other tasks in stage I to prepare for installation. The following table lists the next set of tasks and points to the appropriate sections of this book:
Task Where to Go
review the installation requirements
Chapter 2, “Preparing for Installation”
complete the installation worksheets
Appendix A, “Installation Worksheets”
Informatica Corporation, Confidential and Proprietary Information
1-12 EDP Installation Guide for MVS Components

26
Chapter 2 Preparing for Installation
This chapter contains the following topics:
Overview. . . . . . . . . . . . . . . . . . . . . . . . . . . . . . . . . . . . . . . . . . . . . . . . . . 2-2EDP Product Descriptions . . . . . . . . . . . . . . . . . . . . . . . . . . . . . . . . . . . . 2-2
How DataMove and ChangeDataMove Are Similar . . . . . . . . . . . . . 2-2How DataMove and ChangeDataMove Are Different . . . . . . . . . . . . 2-3
Installation Requirements . . . . . . . . . . . . . . . . . . . . . . . . . . . . . . . . . . . . . 2-4Hardware Requirements . . . . . . . . . . . . . . . . . . . . . . . . . . . . . . . . . . . 2-4Software Requirements . . . . . . . . . . . . . . . . . . . . . . . . . . . . . . . . . . . 2-5
Authorization to Run the Installation Batch Jobs . . . . . . . . . . . . . . . . . . . 2-15Authorization of MVS Libraries. . . . . . . . . . . . . . . . . . . . . . . . . . . . . . . . 2-15Security Considerations . . . . . . . . . . . . . . . . . . . . . . . . . . . . . . . . . . . . . . 2-15
Obtaining Product Passwords. . . . . . . . . . . . . . . . . . . . . . . . . . . . . . . 2-15Establishing System Security for the EDP Products . . . . . . . . . . . . . 2-16
Installation Considerations for ChangeDataMove . . . . . . . . . . . . . . . . . . 2-16Compatibility with Other BMC Software Products . . . . . . . . . . . . . . 2-17MVS Configuration for ChangeDataMove . . . . . . . . . . . . . . . . . . . . 2-17IMS Source. . . . . . . . . . . . . . . . . . . . . . . . . . . . . . . . . . . . . . . . . . . . . 2-19CICS-DBCTL IMS Environment. . . . . . . . . . . . . . . . . . . . . . . . . . . . 2-20CICS/VSAM Source . . . . . . . . . . . . . . . . . . . . . . . . . . . . . . . . . . . . . 2-20VSAM Batch Source . . . . . . . . . . . . . . . . . . . . . . . . . . . . . . . . . . . . . 2-20DB2 Source and Target . . . . . . . . . . . . . . . . . . . . . . . . . . . . . . . . . . . 2-21Oracle Target . . . . . . . . . . . . . . . . . . . . . . . . . . . . . . . . . . . . . . . . . . . 2-22Sybase Target . . . . . . . . . . . . . . . . . . . . . . . . . . . . . . . . . . . . . . . . . . . 2-22
Installation Considerations for DataMove . . . . . . . . . . . . . . . . . . . . . . . . 2-22MVS Configuration for DataMove . . . . . . . . . . . . . . . . . . . . . . . . . . 2-23IMS and CICS-IMS DBCTL Environments . . . . . . . . . . . . . . . . . . . 2-24VSAM Batch . . . . . . . . . . . . . . . . . . . . . . . . . . . . . . . . . . . . . . . . . . . 2-24DB2 . . . . . . . . . . . . . . . . . . . . . . . . . . . . . . . . . . . . . . . . . . . . . . . . . . 2-24
Multiple EDP Components for ChangeDataMove and DataMove. . . . . . 2-24Multiple Instances of the EDP Agent. . . . . . . . . . . . . . . . . . . . . . . . . 2-25Multiple Instances of the EDP Logger. . . . . . . . . . . . . . . . . . . . . . . . 2-25
Where to Go From this Chapter . . . . . . . . . . . . . . . . . . . . . . . . . . . . . . . . 2-26
Informatica Corporation, Confidential and Proprietary Information
Chapter 2 Preparing for Installation 2-1

Overview
Overview
This chapter helps you to prepare for installing the EDP products by
• defining the EDP products
• listing hardware and software requirements
• describing authority and security considerations
• explaining operational considerations and constraints for using the ChangeDataMove and DataMove products
EDP Product Descriptions
The EDP product family enables you to extract and transform MVS source data and then load the extracted and transformed data to targets across different platforms in your enterprise. The main products in the EDP family are ChangeDataMove and DataMove.
How DataMove and ChangeDataMove Are Similar
DataMove and ChangeDataMove
• share the same transformation mechanism to
— transform nonrelational data to relational data— convert source data types to the data types that the target database
supports
• can selectively propagate entire source databases or subsets of the source databases
Informatica Corporation, Confidential and Proprietary Information
2-2 EDP Installation Guide for MVS Components

EDP Product Descriptions
Finally, as described in the following table, both DataMove and ChangeDataMove support the same sources and targets:
How DataMove and ChangeDataMove Are Different
While DataMove and ChangeDataMove support the same sources and targets, and both provide for data transformation, each product has a specific function:
• DataMove performs bulk-data propagations.
In a bulk-data propagation, DataMove unloads data from a source database at a predetermined point in time. DataMove then transforms the data according to your selections, and copies the data to a target database. After a bulk-data propagation, the source database may continue receiving updates. These updates will not be reflected in the target database until you execute another bulk-data propagation. At the time of your next propagation, DataMove completely replaces the contents of the target database with the new bulk data.
• ChangeDataMove captures and propagates changed data.
Changed data is data that undergoes continuous or frequent changes that you want to capture and apply to one or more relational target databases on an on-going basis. You can also set up ChangeDataMove to capture and apply changed data in batch mode, that is, at predetermined times rather than continuously. In any case, ChangeDataMove replaces only the data that has changed since the previous propagation.
DataMove can serve as a stand-alone, bulk-data propagation product, or as an initial population mechanism for ChangeDataMove. The DataMove User Guide and ChangeDataMove User Guide provide more information about these products.
Supported Sources Supported Targets
• DB2• IMS full function• IMS Fast Path• VSAM
• DB2 on MVS• DB2 Universal Database (UDB) on distributed
systems• Microsoft SQL Server• Oracle• Sybase
Informatica Corporation, Confidential and Proprietary Information
Chapter 2 Preparing for Installation 2-3

Installation Requirements
Installation Requirements
Before installing the EDP products, decide which installation libraries, installation parameters, and log data sets to use for the data propagation processes. To plan your installation, complete the worksheets in Appendix A, “Installation Worksheets.” The worksheets provide tables of related information categories where you can collect the data that you need to install the EDP products. The installation procedures in Chapter 2 refer you in order to specific worksheets to assist you in completing the corresponding installation panels.
BMC Software recommends that you review your site’s requirements and installation procedures before you begin installing the EDP software. Also, review the information in the following sections for space requirements and software versions that apply to your installation.
Note: You must register the EDP products with your security system (for example, RACF) after allocating the libraries and unloading them from the tape. If necessary, make arrangements with your system administrator to perform this task. For more information about system security, see “Establishing System Security for the EDP Products” on page 2-16.
Hardware Requirements
Table 2-1 lists the space estimates for EDP DB2 apply and environmental change capture routines (ECCRs). For a list of their names and brief descriptions, see “DB2 Options for Source Object/Storage Verification” on page A-54 and “DB2 Options for Target Object/Storage Verification” on page A-50, respectively.
Table 2-1 Space Estimates for EDP DB2 Objects
EDP DB2 Objects (Defaults) Primary Quantity (KBs) Secondary Quantity (KBs)
DB2 apply table space 12200 6100
DB2 apply index space 200 100
DB2 ECCR table space 50240 25104
DB2 ECCR index space 5172 2550
Informatica Corporation, Confidential and Proprietary Information
2-4 EDP Installation Guide for MVS Components

Installation Requirements
The installation JCL allocates various data sets for the EDP product libraries. Table 2-2 lists the allocated data sets. In the data set names, the HLQ prefix represents the high-level qualifier that you choose for the EDP product libraries. The YOUR prefix represents a high-level qualifier that you choose for the working data sets that your EDP products will use. To determine the total space requirements, add the space required for all products that you are installing.
Software Requirements
This section lists supported software systems, discusses compatibility between EDP product versions, and lists the compatible versions of other BMC Software products that share components with the EDP products.
Table 2-2 Space Estimates for EDP Data Sets
EDP Data Sets1(Defaults)RECFM LRECL
Block Size
Estimated TracksDirectory Blocks3380 3390
HLQ.DBRM FB 80 3120 20 18 50
HLQ.EXEC FB 80 3120 15 13 45
HLQ.FIXLOAD U 0 23476 30 30 45
HLQ.FIXZAPS FB 80 3120 15 13 45
HLQ.SAMPLIB FB 80 3120 55 50 45
HLQ.LOAD U 0 23476 2250 2250 220
HLQ.CRG.LOAD U 0 23476 105 91 90
HLQ.PLIB FB 80 3120 150 130 180
HLQ.MLIB FB 80 3120 15 13 45
HLQ.TLIB FB 80 3120 15 13 45
YOUR.USERLIB2 U 0 23476 45 45 45
HLQ.MSGS FB 80 27920 350 300 45
HLQ.EXITLIB2 U 0 23476 30 30 90
HLQ.CNTL FB 80 3120 20 18 50
HLQ.PSU.LOAD U 0 23476 135 120 45
HLQ.SASC65.LOADLIB3 U 0 23476 450 450 45
Totals 3700 3584 1130
1The EDP product libraries are partioned data sets (PDSs).2The Install System creates the YOUR.USERLIB and HLQ.EXITLIB libraries during the installation process. These libraries are not on the tape.
3This data set is optional. For more information, see “DB2 and MVS System Options” on page C-11.
Informatica Corporation, Confidential and Proprietary Information
Chapter 2 Preparing for Installation 2-5

Installation Requirements
Supported Software Systems
Table 2-3 through Table 2-15 list the third-party software and operating systems that the MVS components of the EDP products support.
Table 2-3 Supported Oracle Targets
Oracle Version
Operating System and Version 7.3.4 8.0.5 8.1.6
Hewlett-Packard HP-UX
11 32-bit X X X
11 64-bit X X X
IBM AIX 4.2 X X X
4.3.164-bit sim.
X X X
4.3.2 64-bit
X X X
Sun Solaris 2.6 X X X
7 X X X
8 X
Windows NT Server 4.0SP5
X X X
Windows 2000 Server X
Windows 2000 Advanced Server
X
Note: The EDP products do not support the following Oracle data types: BFILE, MLSLABEL, NCLOB, NCHAR, NVARCHAR2, ROWID, and UROWID. EDP does not support Sun Solaris version 7, 32-bit. EDP no longer supports HP-UX version 10.20.
Informatica Corporation, Confidential and Proprietary Information
2-6 EDP Installation Guide for MVS Components

Installation Requirements
Table 2-4 Supported DB2/MVS Targets
DB2/MVS Version
Operating System and Version 5.1 6.1
IBM MVS with JES2 or JES3
5.1 X
5.2.0 X
5.2.2 X
IBM OS/390 1.1 X
1.2 X
1.3 X X
2.4 X X
2.5 X X
2.6 X X
2.7 X X
2.8 X X
2.9 X X
Note: EDP does not support the following DB2 structures: ASCII tables; referential integrity (RI); and tables that contain graphic characters, DBCS characters, SQL string delimiters, user-defined data types, ROWID data types, or LOB data types.
Informatica Corporation, Confidential and Proprietary Information
Chapter 2 Preparing for Installation 2-7
Installation Requirements
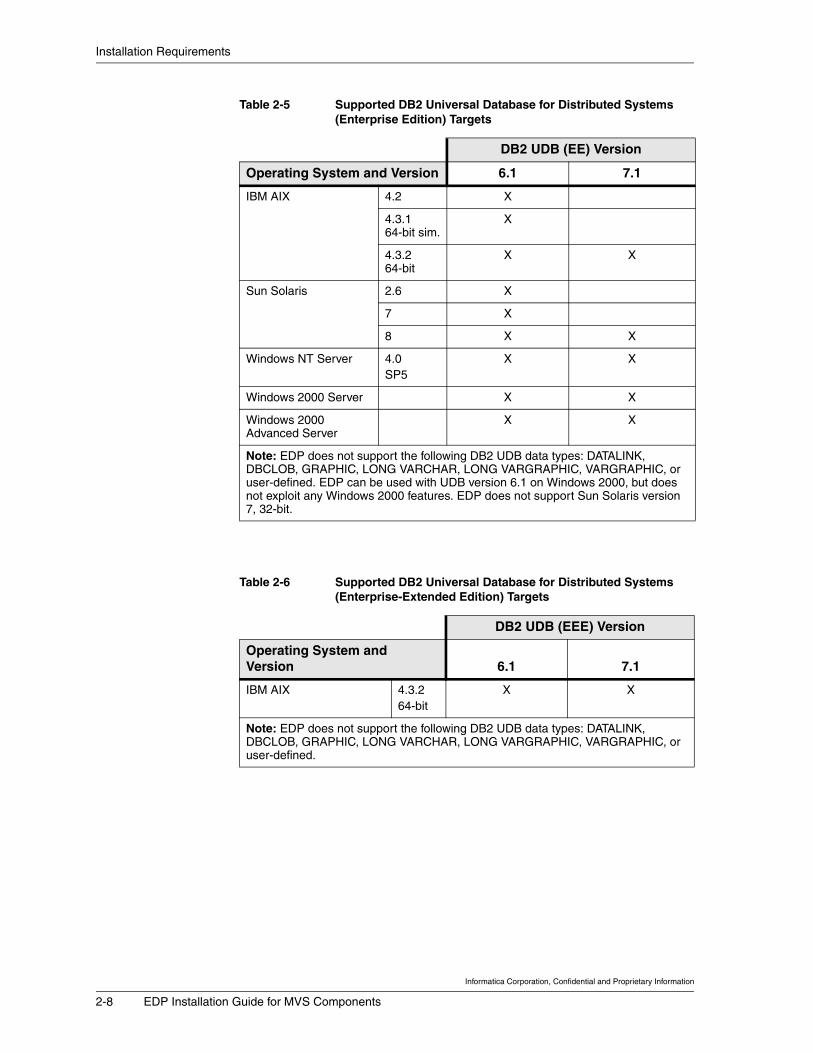
Table 2-5 Supported DB2 Universal Database for Distributed Systems (Enterprise Edition) Targets
DB2 UDB (EE) Version
Operating System and Version 6.1 7.1
IBM AIX 4.2 X
4.3.1 64-bit sim.
X
4.3.2 64-bit
X X
Sun Solaris 2.6 X
7 X
8 X X
Windows NT Server 4.0SP5
X X
Windows 2000 Server X X
Windows 2000 Advanced Server
X X
Note: EDP does not support the following DB2 UDB data types: DATALINK, DBCLOB, GRAPHIC, LONG VARCHAR, LONG VARGRAPHIC, VARGRAPHIC, or user-defined. EDP can be used with UDB version 6.1 on Windows 2000, but does not exploit any Windows 2000 features. EDP does not support Sun Solaris version 7, 32-bit.
Table 2-6 Supported DB2 Universal Database for Distributed Systems (Enterprise-Extended Edition) Targets
DB2 UDB (EEE) Version
Operating System and Version 6.1 7.1
IBM AIX 4.3.264-bit
X X
Note: EDP does not support the following DB2 UDB data types: DATALINK, DBCLOB, GRAPHIC, LONG VARCHAR, LONG VARGRAPHIC, VARGRAPHIC, or user-defined.
Informatica Corporation, Confidential and Proprietary Information
2-8 EDP Installation Guide for MVS Components

Installation Requirements
Table 2-7 Supported Microsoft SQL Server Targets
MS SQL Server Version
Operating System and Version 7.0 SP1 7.0 SP2 2000
Windows NT Server 4.0SP5
X X
Windows 2000 Server X X
Windows 2000 Advanced Server
X X X
Note: EDP does not support the following MS SQL Server data types: TIMESTAMP or UNIQUEIDENTIFIER. MS SQL Server 7.0 requires Internet Explorer 4.01 with Service Pack 1 or later, and Microsoft Data Access Components (MDAC) 2.0 with Service Pack 1. EDP does not support MS SQL Server version 7.5.
Table 2-8 Supported Sybase Adaptive Server Enterprise Targets
Sybase Version
Operating System and Version 11.9.2 12.0 32-bit 12.0 64-bit
Hewlett-Packard HP-UX
11 32-bit X X
11 64-bit X X X
IBM AIX 4.2.1 X
4.3.0 X
4.3.2 64-bit sim.
X
4.3.2 64-bit
X X
4.3.3 64-bit sim.
X X
Sun Solaris 2.6 X X
7 X X X
Note: EDP does not support the following Sybase data types: IDENTITY, SYSNAME, TIMESTAMP, or user-defined. EDP does not support Sun Solaris version 7, 32-bit. EDP no longer supports HP-UX version 10.20.
Informatica Corporation, Confidential and Proprietary Information
Chapter 2 Preparing for Installation 2-9

Installation Requirements
Table 2-9 Supported IMS Sources
IMS Version
Operating System and Version 5.1 6.1
IBM MVS with JES2 or JES3
5.1 X X
5.2.0 X X
5.2.2 X X
IBM OS/390 1.1 X X
1.2 X X
1.3 X X
2.4 X X
2.5 X X
2.6 X X
2.7 X X
2.8 X X
2.9 X X
Table 2-10 Supported DB2/MVS Sources (Part 1 of 2)
DB2/MVS Version
Operating System and Version 5.1 6.1
IBM MVS with JES2 or JES3
5.1 X
5.2.0 X
5.2.2 X X
Informatica Corporation, Confidential and Proprietary Information
2-10 EDP Installation Guide for MVS Components

Installation Requirements
IBM OS/390 1.1 X X
1.2 X X
1.3 X X
2.4 X X
2.5 X X
2.6 X X
2.7 X X
2.8 X X
2.9 X X
Note: EDP does not support the following DB2 structures: ASCII tables; referential integrity (RI); and tables that contain graphic characters, DBCS characters, SQL string delimiters, user-defined data types, ROWID data types, or LOB data types. For all DB2/MVS versions, apply the DB2 PTFs from the informational APARS II09636 and II11809 to your DB2 subsystem. EDP no longer supports DB2/MVS version 4.1.
Table 2-11 Supported VSAM Sources
VSAM
Operating System and Version
IBM MVS with JES2 or JES3
5.1 X
5.2.0 X
5.2.2 X
IBM OS/390 1.1 X
1.2 X
1.3 X
2.4 X
2.5 X
2.6 X
2.7 X
2.8 X
2.9 X
Table 2-10 Supported DB2/MVS Sources (Part 2 of 2)
DB2/MVS Version
Operating System and Version 5.1 6.1
Informatica Corporation, Confidential and Proprietary Information
Chapter 2 Preparing for Installation 2-11

Installation Requirements
Table 2-12 Supported CICS/ESA Sources
CICS/ESA Version
Operating System and Version 3.3 4.1
IBM MVS with JES2 or JES3
5.1 X X
5.2.0 X X
5.2.2 X X
IBM OS/390 1.1 X X
1.2 X X
1.3 X X
2.4 X X
2.5 X X
2.6 X X
2.7 X X
2.8 X
2.9 X
Note: Version 3.3 must have PTF UN50065. Version 4.1 must have PTF UN90903 and a maintenance level of at least 9605.
Table 2-13 Supported CICS/TS Sources (Part 1 of 2)
CICS/TS Version
Operating System and Version 1.1 1.2 1.3
IBM MVS with JES2 or JES3
5.1
5.2.0 X X
5.2.2 X X
IBM OS/390 1.1 X X
1.2 X X
1.3 X X
2.4 X X
2.5 X X X
2.6 X X X
2.7 X X X
2.8 X X X
Informatica Corporation, Confidential and Proprietary Information
2-12 EDP Installation Guide for MVS Components

Installation Requirements
2.9 X X X
Note: EDP does not support the use of the UPDATE operand in the READNEXT or READPREV file control commands when you are accessing a VSAM file in RLS mode.
Table 2-14 Operating Systems Supported by the EDP Console
O/S Information
Windows 95 EDP supports Release C.
Windows 98 EDP supports Windows 98 with the Windows 98 Customer Service Pack.
Windows NT 4.0 Workstation
EDP supports Service Pack 5 or later.
Windows NT 4.0 Server
EDP supports Service Pack 5 or later.
Windows 2000 Professional
EDP supports the original release of Windows 2000 Professional.
Windows 2000 Server
EDP supports the original release of Windows 2000 Server.
Windows 2000 Advanced Server
EDP supports the original release of Windows 2000 Advanced Server.
Table 2-13 Supported CICS/TS Sources (Part 2 of 2)
CICS/TS Version
Operating System and Version 1.1 1.2 1.3
Informatica Corporation, Confidential and Proprietary Information
Chapter 2 Preparing for Installation 2-13

Installation Requirements
Compatibility Between EDP Product Versions
The individual components of the EDP products are compatible only with other components of the same version and release level. For example, you cannot upgrade the EDP Windows GUI and use it with EDP components from an earlier release.
You can run two versions of the EDP products independently. For example, you could run version 2.4 in a test environment and version 2.3 in a production environment. However, all EDP components that communicate with one another must be at the same version and release level.
Table 2-15 Information about Supported Operating Systems and Other Software
O/S or Software Information
DFSMS/MVS EDP supports version 1.1 or later. If you are using version 1.5, you must install the fix contained in IBM APAR OW43440.
Hewlett Packard HP-UX
EDP no longer supports HP-UX version 10.20. EDP supports only HP-UX version 11, 32-bit and 64-bit.
IBM AIX Versions 4.2 and 4.3.1 must have patches xlC.rte and xlC.cpp.
IBM TCP/IP EDP supports version 3.2 or later. EDP also supports version 3.1, but you must contact EDP Technical Support for the necessary parameters and zaps.If you are using TCP/IP version 3.5, 3.6, 3.7, or 3.8 and you have applied APAR PQ33968, you must also apply APAR PQ35713.
Interlink TCP/IP EDP supports version 5.2 or later.
ISPF EDP supports version 4.2 or later.
LE/370 EDP supports version 5.0 or later.
SAS/C EDP supports version 6.5 of the runtime libraries. The EDP distribution tape supplies the correct version of SAS/C.
Microsoft Internet Explorer (IE)
EDP supports IE version 5.0 or later. If you want to use the EDP repository export and import utilities, you must have IE 5.01.
Microsoft Management Console (MMC)
EDP supports version 1.2 of the MMC.
Informatica Corporation, Confidential and Proprietary Information
2-14 EDP Installation Guide for MVS Components

Authorization to Run the Installation Batch Jobs
Authorization to Run the Installation Batch Jobs
For BMC Software products that use DB2, you must have a DB2 authorization of SYSADM to run the batch jobs that the Install System generates. However, you do not need DB2 authorization to run the Install System or to generate the batch jobs.
Authorization of MVS Libraries
The EDP products require that the following MVS libraries be authorized by the authorized program facility (APF):
• HLQ.SASC65.LOADLIB• HLQ.LOAD• HLQ.CRG.LOAD• for the IMS ECCR, all libraries in the DFSESL concatenation (discussed
on page 6-22)
The LOAD libraries are copied from the EDP distribution tape when you run the JCL job $I05UNLD, which the installation process generates. Normally, you authorize these libraries by using the authorized program facility (APF) after running the JCL job.
Security Considerations
The following sections provide an overview of the security requirements for the EDP products.
Obtaining Product Passwords
Before you can run an EDP product, you must obtain a password for certain components of that product. BMC Software provides a temporary or permanent password to you when you license the product. Table 2-16 and Table 2-17 on page 2-16 list the ChangeDataMove and DataMove components that require passwords.
Informatica Corporation, Confidential and Proprietary Information
Chapter 2 Preparing for Installation 2-15

Installation Considerations for ChangeDataMove
For more information about product licensing and password authorization, see Appendix A, “BMC Software Product Authorization.”
Establishing System Security for the EDP Products
Before you can run the EDP agent, you must establish security procedures to provide access to the EDP agent services and commands. You must coordinate the security procedures with the administrator who handles system security at your site.
In addition, you must provide appropriate authority for those users who will manage DB2 Universal Database (UDB), MS SQL Server, Oracle, and Sybase data resources, or who will run propagations that use those resources. For more information about establishing security for the EDP products, see “Allocation of Libraries and System Security” on page 4-2.
Installation Considerations for ChangeDataMove
If you plan to install ChangeDataMove, use the information in this section to determine your plans and requirements for changed-data propagations.
Table 2-16 ChangeDataMove Components that Require Passwords
ChangeDataMove Component Code
DB2 apply component APD
CICS/VSAM ECCR CCC
DB2 ECCR CCD
IMS and DBCTL ECCR CCI
batch VSAM ECCR CCV
Table 2-17 DataMove Components that Require Passwords
DataMove Component Code
DataMove for VSAM source AVI
DataMove for IMS source AVF
DataMove for DB2 source APF
DataMove for DB2 target AVM
Informatica Corporation, Confidential and Proprietary Information
2-16 EDP Installation Guide for MVS Components

Installation Considerations for ChangeDataMove
Compatibility with Other BMC Software Products
If you use IMS as a database source, ChangeDataMove must use certain components from the CONCURRENT REORG and DATABASE INTEGRITY PLUS products from BMC Software. ChangeDataMove uses those components when activating the ECCR for IMS. (The ECCR is a ChangeDataMove component that captures changes based on the processing environment.) For this reason, the EDP installation process allocates and unloads the necessary CONCURRENT REORG and DATABASE INTEGRITY PLUS components from the CRG.LOAD data set on the distribution tape.
However, if CONCURRENT REORG and DATABASE INTEGRITY PLUS are already installed on your system, verify that their version numbers are the same as, or later, than those specified in Table 2-18. If the version numbers are earlier, you must upgrade those products.
MVS Configuration for ChangeDataMove
To optimize MVS configuration for ChangeDataMove, consider increasing
• the numbers of linkage indexes and common data spaces• the number of cross-coupling facility (XCF) groups
Increasing the Number of Linkage Indexes and Common Data Spaces
You may want to increase the values of the NSYSLX and MAXCAD parameters in the IEASYSxx member in SYS1.PARMLIB, based on the following considerations. If you change either parameter, you must run an initial program load (IPL) for the MVS system.
Table 2-18 Minimum Version Levels of Required BMC Software Products
BMC Software Product Minimum Version that EDP Requires
CONCURRENT REORG 1.4.0
DATABASE INTEGRITY PLUS 4.0.00
Informatica Corporation, Confidential and Proprietary Information
Chapter 2 Preparing for Installation 2-17

Installation Considerations for ChangeDataMove
• ChangeDataMove requires two linkage indexes for each instance of the EDP agent. The agent reuses these indexes when you restart it (for example, when you issue the SHUTDOWN and START commands), unless you are performing a cold start. Consider increasing the NSYSLX parameter of the IEASYSxx member in SYS1.PARMLIB.
• ChangeDataMove uses one common data space (SCOPE=COMMON) for each instance of the EDP agent. If you use the SHUTDOWN command with the COMPLETELY option to stop the agent, ChangeDataMove deletes the data space. However, if you do not specify the COMPLETELY option, the data space persists.
When you restart the EDP agent, the agent reuses the data space (unless you are performing a cold start), if it exists. Consider increasing the MAXCAD parameter of the IEASYSxx member in SYS1.PARMLIB to allow for increased usage of common data spaces.
Increasing the Number of XCF Groups
ChangeDataMove uses IBM’s cross-coupling facility (XCF) services to accommodate communication between EDP components. The couple data set should be properly sized to accommodate the additional EDP members and XCF groups. BMC Software recommends that the MVS systems programmer determine the number of existing XCF groups and ensure that additional XCF groups are available. ChangeDataMove uses at least one (and up to four) XCF groups for each EDP logger (a ChangeDataMove component that receives captured data from ECCRs, creates a persistent copy, and records an inventory of the data), that is running.
If your site will use the post-log merge feature (a ChangeDataMove configuration that accommodates sites with multiple MVS images and EDP loggers), BMC Software recommends four XCF groups per EDP logger. Otherwise, one XCF group will suffice.
Global Enqueue Considerations for ChangeDataMove
ChangeDataMove issues only SYSTEMS-level enqueues for serializing across multiple MVS systems. To use ChangeDataMove on multiple MVS systems, you must make use of a global serialization product such as GRS or MIM to propagate these enqueues.
If you are using a cross-system serialization product that requires you to specifically define the enqueues that need to be propagated globally, you will need to know what QNAMEs are issued by ChangeDataMove.
Informatica Corporation, Confidential and Proprietary Information
2-18 EDP Installation Guide for MVS Components

Installation Considerations for ChangeDataMove
• The QNAME of PDX is used when a PDX is accessed with an update intent. The RNAME consists of the PDX dataset name.
• The DB2 ECCR uses a SYSTEMS-level enqueue to prevent multiple instances of the same ECCR running. The QNAME is DB2CAPT and the RNAME is an eight byte field which is the NAME= value from the DB2 ECCR REPL2CTL control file statement CA. The SYSTEMS enqueue exists for the life of the ECCR execution.
This information may need to be included in the options for your cross-system serialization product to ensure these enqueues are properly handled.
IMS Source
This section describes supported IMS environments and restrictions for capturing changes with the IMS environmental change capture routine (ECCR). The ECCR is a ChangeDataMove component that captures based on the processing environment.
Supported Environments
Using the IMS ECCR, ChangeDataMove supports the following IMS batch and online environments:
• DBCTL• MPP• BMP• Batch IMS• Fast Path• DB/DC
Restrictions
You cannot propagate data from IMS Fast Path sequential dependent (SDEP) segments.
The IMS ECCR does not support the following IMS database types:
• hierarchical sequential access method (HSAM) databases• hierarchical indexed sequential access method (HISAM) databases• simple hierarchical sequential access method (SHSAM) databases• generalized sequential access method (GSAM) databases• main storage databases (MSDBs)
Informatica Corporation, Confidential and Proprietary Information
Chapter 2 Preparing for Installation 2-19

Installation Considerations for ChangeDataMove
The IMS ECCR also has the following restrictions:
• The IMS ECCR does not currently support the XRF environment.
• The IMS ECCR does not support non-sysplexed, block-level data sharing of IMS databases.
• You cannot capture changes when PROCOPT=L is specified in your program specification block (PSB).
• You cannot capture changes made to user data in secondary indexes.
CICS-DBCTL IMS Environment
ChangeDataMove has the same support and restrictions for the CICS-DBCTL environment as it does for IMS sources. See “IMS Source” on page 2-19.
CICS/VSAM Source
Currently, the ChangeDataMove CICS/VSAM ECCR supports only recoverable data sets. The supported data sets include CICS-maintained data tables but not user-maintained data tables.
The CICS/VSAM ECCR supports only key-sequenced data sets (KSDSs).
VSAM Batch Source
This section describes the supported VSAM file structures and restrictions for using the VSAM batch ECCR to capture changes.
Supported Structures
Using the VSAM batch ECCR, ChangeDataMove supports the following VSAM file structures:
• key-sequenced data sets (KSDSs)• entry-sequenced data sets (ESDSs)• fixed-length and variable-length relative record data sets (RRDSs)
Informatica Corporation, Confidential and Proprietary Information
2-20 EDP Installation Guide for MVS Components

Installation Considerations for ChangeDataMove
Restrictions
The VSAM batch ECCR does not support the following structures:
• natively updated alternate indexes• records larger than 32,660 bytes• spanned ESDSs• paths defined over ESDSs
The VSAM batch ECCR also has the following restrictions:
• The VSAM batch ECCR does not support
— control interval (CI) mode updates— multiple task control block (TCB) environments— record-level sharing (RLS)
• If you have applications that use request parameter lists (RPLs) that are coded with OPTCD=ASY (specifying asynchronous processing for VSAM files), using the VSAM batch ECCR with those applications causes unpredictable results.
DB2 Source and Target
This section describes supported DB2 database structures and restrictions for using the DB2 ECCR and the DB2 apply component to capture and apply changes. Refer to the EDP Registrations and Transformations User Guide for the DB2 data types that ChangeDataMove supports.
Supported Structures
Using the DB2 ECCR, ChangeDataMove supports all valid DB2 database structures except the following structures:
• ASCII tables
If you attempt to capture changes made to ASCII tables, you will receive unpredictable results.
• table names which contain graphic characters, double-byte character set (DBCS) characters, and structured query language (SQL) string delimiters, and tables which contain user-defined, ROWID, or LOB data types
• referential integrity (RI) for DB2 target only
Informatica Corporation, Confidential and Proprietary Information
Chapter 2 Preparing for Installation 2-21

Installation Considerations for DataMove
The DB2 ECCR also supports DB2 version 3.1 compression.
ChangeDataMove supports changes to tables that use the standard DB2 user exits.
Restrictions
A single DB2 ECCR can run on only one DB2 subsystem.
Performance
With DB2 versions 5.1 and later, EDP increases the performance of DB2 apply by reducing the number of issued PREPARE statements. To do this, the DB2 apply component uses the bind option KEEPDYNAMIC(YES). KEEPDYNAMIC(YES) is generated by default in the bind control statements when ChangeDataMove is installed with DB2 version 5.1 and later. However, you must enable the caching of PREPARE SQL statements as a DB2 installation option. For details, consult your IBM DB2 publications.
Oracle Target
Using the Oracle apply component, ChangeDataMove supports all valid Oracle database structures. Refer to the appendix in the EDP Registrations and Transformations User Guide for the Oracle data types that ChangeDataMove supports.
Sybase Target
Using the Sybase apply component, ChangeDataMove supports all valid Sybase database structures. Refer to the appendix in the EDP Registrations and Transformations User Guide for the Sybase data types that ChangeDataMove supports.
Installation Considerations for DataMove
This section describes installation considerations for DataMove. If you plan to install DataMove, use the information in this section to determine your plans and requirements for bulk-data propagations.
Informatica Corporation, Confidential and Proprietary Information
2-22 EDP Installation Guide for MVS Components

Installation Considerations for DataMove
MVS Configuration for DataMove
To optimize MVS configuration for DataMove, consider increasing the numbers of linkage indexes and common data spaces
Increasing the Number of Linkage Indexes and Common Data Spaces
You may want to increase the values of the NSYSLX and MAXCAD parameters in the IEASYSxx member in SYS1.PARMLIB, based on the following considerations. If you change either parameter, you must run an initial program load (IPL) for the MVS system.
• DataMove requires two linkage indexes for each instance of the EDP agent. The agent reuses these indexes when you restart it (for example, when you issue the SHUTDOWN and START commands), unless this is a cold start. Consider increasing the NSYSLX parameter of the IEASYSxx member in SYS1.PARMLIB.
• DataMove uses one common data space (SCOPE=COMMON) for each instance of the EDP agent. If you use the SHUTDOWN command with the COMPLETELY option to stop the agent, DataMove deletes the data space. However, if you do not specify the COMPLETELY option, the data space persists.
Global Enqueue Considerations for DataMove
DataMove issues only SYSTEMS-level enqueues for serializing across multiple MVS systems. To use DataMove on multiple MVS systems, you must make use of a global serialization product such as GRS or MIM to propagate these enqueues.
If you are using a cross-system serialization product that requires you to specifically define the enqueues that need be propagated globally, you will need to know what QNAME is issued by DataMove.
The QNAME of PDX is used when a PDX is accessed with an update intent. The RNAME consists of the PDX dataset name.
This information may need to be included in the options for your cross-system serialization product to prevent simultaneous updates and repository corruption.
Informatica Corporation, Confidential and Proprietary Information
Chapter 2 Preparing for Installation 2-23

Multiple EDP Components for ChangeDataMove and DataMove
IMS and CICS-IMS DBCTL Environments
DataMove does not support IMS Fast Path sequential dependent (SDEP) segments.
DataMove does not support IMS user data in secondary indexes.
DataMove does not support the following IMS database types:
• hierarchical sequential access method (HSAM) databases• simple hierarchical sequential access method (SHSAM) databases• generalized sequential access method (GSAM) databases• main storage databases (MSDBs)
VSAM Batch
DataMove does not support
• records larger than 32,660 bytes• spanned entry-sequenced data sets (ESDSs)
DB2
DataMove does not support
• ASCII tables.
• table names which contain graphic characters, double-byte character set (DBCS) characters, and structured query language (SQL) string delimiters, and tables which contain user-defined, ROWID, or LOB data types.
Multiple EDP Components for ChangeDataMove and DataMove
Both ChangeDataMove and DataMove allow for the possibility of multiple EDP components. With ChangeDataMove you can have multiple instances of the EDP agent and the EDP agent. DataMove allows you to have multiple instances of the EDP logger. (DataMove does not use the EDP logger.) This section describes some considerations to keep in mind if you plan to use multiple instances of the EDP agent and/or EDP logger.
Informatica Corporation, Confidential and Proprietary Information
2-24 EDP Installation Guide for MVS Components

Multiple EDP Components for ChangeDataMove and DataMove
Multiple Instances of the EDP Agent
Multiple instances of the EDP agent can run simultaneously in a single EDP system. The most common uses for multiple instances of the EDP agent are
• to apply changes on an MVS system other than the one on which you are capturing changes
• to separate test and production environments
• to separate multiple production applications
BMC Software recommends that you create a separate test and production environment, and that you use a different agent for each environment.
The following considerations apply to using multiple instances of the EDP agent:
• You can use only one EDP repository at a time with an EDP agent.
• Multiple instances of the EDP agent can share the same EDP repository.
• VSAM batch ECCR status is for all agents: if you activate the ECCR for one agent, it becomes active for all agents on the same MVS system.
• You can use the same agent ID for different instances of the EDP agent provided they are on different MVS systems.
Multiple Instances of the EDP Logger
Multiple instances of the EDP logger can run simultaneously in a single EDP system. (The DataMove product does not use the EDP logger.) The number that you use depends on your performance needs and data-management processes. Possible reasons for using multiple instances of the EDP logger are as follows:
• a high volume of data
• multiple environments
Although not required, you might want to dedicate a separate EDP logger for each data-resource type (for example, one for IMS and one for VSAM).
• application requirements
Informatica Corporation, Confidential and Proprietary Information
Chapter 2 Preparing for Installation 2-25

Where to Go From this Chapter
For example, you might want to capture changes from different branch offices of an organization on separate instances of the EDP logger.
You can specify a separate logger down to the level of an environment instance. Examples of an environment instance include a single IMS subsystem, a single CICS subsystem, and a single VSAM batch job. You specify the logger that you want to use in the EDMSDIR default options module, or in the job control language (JCL) for the process action controller (PAC).
When you use multiple EDP logger instances on the same MVS image, remember that each logger must have a unique name. However, if the EDP loggers are part of a post-log merge group, those EDP loggers must all have an identical name. Also, note that each logger requires its own EDMSDIR and EDMUPARMS default options. For more details on using multiple logger configurations, refer to the ChangeDataMove User Guide.
Where to Go From this Chapter
Continue with Chapter 3, “Using the Install System to Generate the Installation Batch Jobs.” In Chapter 3, you will enter information in the Install System’s panels. Therefore, be sure to complete the installation worksheets in Appendix A before proceeding.
Informatica Corporation, Confidential and Proprietary Information
2-26 EDP Installation Guide for MVS Components

20
Chapter 3 Using the Install System to Generate the Installation Batch Jobs
This chapter contains the following topics:
Overview. . . . . . . . . . . . . . . . . . . . . . . . . . . . . . . . . . . . . . . . . . . . . . . . . . 3-2Unloading the Install System . . . . . . . . . . . . . . . . . . . . . . . . . . . . . . . 3-3Starting the Install System . . . . . . . . . . . . . . . . . . . . . . . . . . . . . . . . . 3-5Specifying Install System User Options. . . . . . . . . . . . . . . . . . . . . . . 3-8Generating the Installation Batch Jobs. . . . . . . . . . . . . . . . . . . . . . . . 3-10
Additional Members that the Install System Creates . . . . . . . . . . . . . . . . 3-16Where to Go from This Chapter . . . . . . . . . . . . . . . . . . . . . . . . . . . . . . . . 3-19
Informatica Corporation, Confidential and Proprietary Information
Chapter 3 Using the Install System to Generate the Installation Batch Jobs 3-1

Overview
Overview
This chapter explains how to use the Install System to produce a series of batch jobs. In the next chapter, you will use the batch jobs to install the MVS components of the EDP products.
The process of generating the batch jobs should go smoothly if you have
• reviewed the installation task map and the overview of the Install System (Chapter 1, “Installation Overview”)
• reviewed the installation requirements and the authority, security and operational considerations for ChangeDataMove and DataMove (Chapter 2, “Preparing for Installation”)
• completed the worksheets in Appendix A, “Installation Worksheets.”
Informatica Corporation, Confidential and Proprietary Information
3-2 EDP Installation Guide for MVS Components

Unloading the Install System
Unloading the Install System
Summary: Use the following procedure to unload the Install System from the tape. This procedure unloads only those files used during the installation process. It does not unload any product files from the tape.
Before You Begin
Review the release notes, technical bulletins, and flashes that are included with your product. These notices contain additional information about the products on the tape, including information that might have been added after this book was published.
To Unload the Install System
Step 1 Create a batch job similar to that shown in Figure 3-1 on page 3-4, as follows:
1.A Create a job step to unload File 1 into a data set with the low-level qualifier INSTALL (for example, BMC.INSTALL).
File 1 contains executables, ISPF panels, and message panels.
1.B Create a job step to unload File 2 into a load library that you define for use by the Install System (for example, BMC.INSTALL.LOAD).
Refer to Table A-1 on page A-2.
File 2 contains the Install System’s load libraries.
Note: In Figure 3-1, the variable xxxymd represents the distribution tape VOLSER.
Informatica Corporation, Confidential and Proprietary Information
Chapter 3 Using the Install System to Generate the Installation Batch Jobs 3-3

Unloading the Install System
Figure 3-1 Unload Job for the Install System
//DCIINST JOB (ACCOUNT)//*//*//UNLOAD EXEC PGM=IEBCOPY//SYSPRINT DD SYSOUT=*//SYSUT3 DD UNIT=SYSDA,SPACE=(TRK,(1,1))//SYSUT4 DD UNIT=SYSDA,SPACE=(TRK,(1,1))//DCITINST DD DSN=BMC.INSTALL,DISP=OLD,VOL=SER=xxxymd,// UNIT=TAPE,LABEL=(1,SL,EXPDT=98000)//*//DCITLOAD DD DSN=BMC.INSTALL.LOAD,DISP=OLD,VOL=SER=xxxymd,// UNIT=TAPE,LABEL=(2,SL,EXPDT=98000)//*//DCIINST DD DISP=(,CATLG,DELETE),DSN=your.name.INSTALL,// UNIT=SYSDA,SPACE=(CYL,(40,5,700)),// DCB=(RECFM=FB,LRECL=80,BLKSIZE=6160)//*//DCILOAD DD DISP=(,CATLG,DELETE),DSN=your.name.INSTALL.LOAD,// UNIT=SYSDA,SPACE=(CYL,(15,5,45)),// DCB=(RECFM=U,BLKSIZE=23476)//*//SYSIN DD * COPY I=DCITINST,O=DCIINST COPY I=DCITLOAD,O=DCILOAD
Step 2 Run the job.
The job unloads the installation libraries into File 1 and File 2.
Informatica Corporation, Confidential and Proprietary Information
3-4 EDP Installation Guide for MVS Components

Starting the Install System
Starting the Install System
Summary: After you unload the Install System, you must run a CLIST to access the Install System. You can run the CLIST from the ISPF command Shell panel. To display this panel, choose the Command option from the Interactive System Productivity Facility (ISPF) Primary Option menu. You can also run the CLIST from any ISPF command line.
Note: In this procedure, replace the variable HLQ with the high-level qualifier that you assigned to the INSTALL data set when you unloaded the tape.
Before You Begin
Before you start the Install System, you must
• complete the worksheets in Appendix A, “Installation Worksheets”• unload the Install System as instructed on 3-3
This procedure requests a name for the library that will be used for the Install System data sets. You should have collected this information in the installation worksheet in Table A-1 on page A-2.
The Install System uses the ZUSER ISPF variable to create temporary data sets for the installation process and to identify the installer in the comments of the installation JCL. If you prefer to use ZPREFIX instead of ZUSER, you must edit member HLQ.INSTALL (DCIC0000). In member DCIC0000, find the keyword UNCOMMENT and follow the instructions provided.
To Start the Install System
Step 1 In the ISPF Command Shell panel or at any ISPF command line, type the following command:
EX 'HLQ.INSTALL(DCIINSTL)' 'HLQ'
For example, the following command assumes that the high-level qualifier that you used to unload the Install System was BMC.DCI:
EX 'BMC.DCI.INSTALL(DCIINSTL)' 'BMC.DCI'
The Install System displays the Load Library Specification panel (Figure 3-2 on page 3-6).
Informatica Corporation, Confidential and Proprietary Information
Chapter 3 Using the Install System to Generate the Installation Batch Jobs 3-5
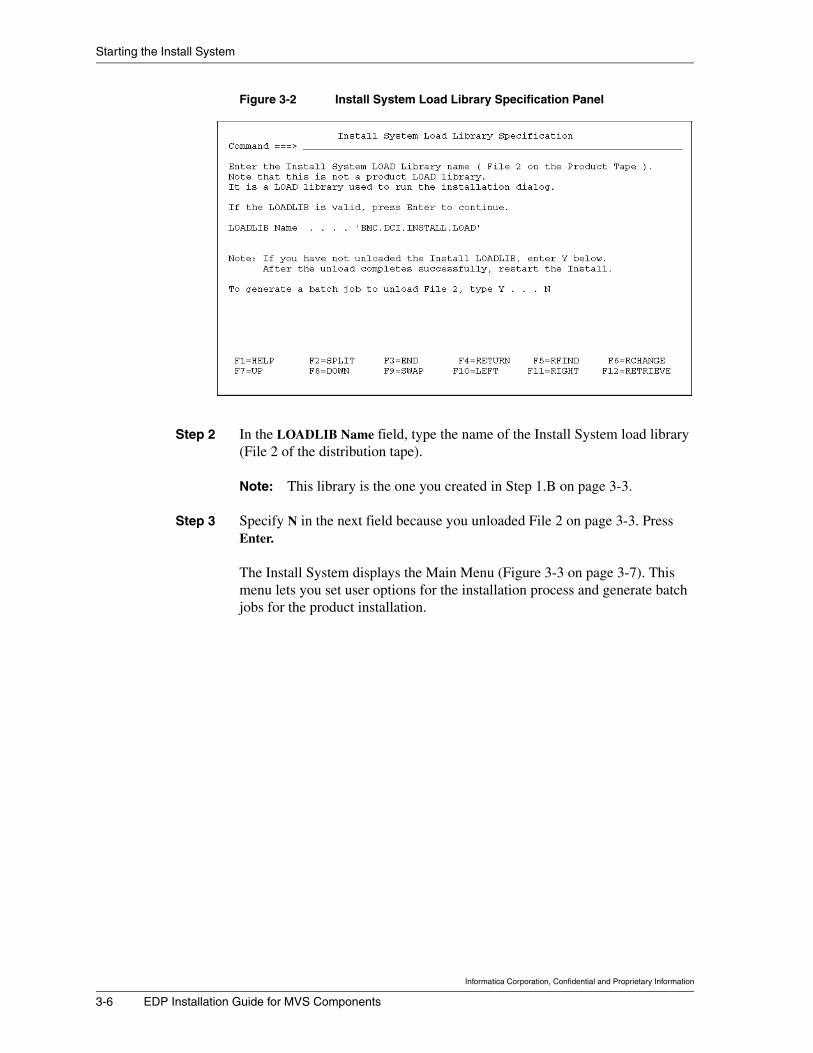
Starting the Install System
Figure 3-2 Install System Load Library Specification Panel
Step 2 In the LOADLIB Name field, type the name of the Install System load library (File 2 of the distribution tape).
Note: This library is the one you created in Step 1.B on page 3-3.
Step 3 Specify N in the next field because you unloaded File 2 on page 3-3. Press Enter.
The Install System displays the Main Menu (Figure 3-3 on page 3-7). This menu lets you set user options for the installation process and generate batch jobs for the product installation.
Informatica Corporation, Confidential and Proprietary Information
3-6 EDP Installation Guide for MVS Components
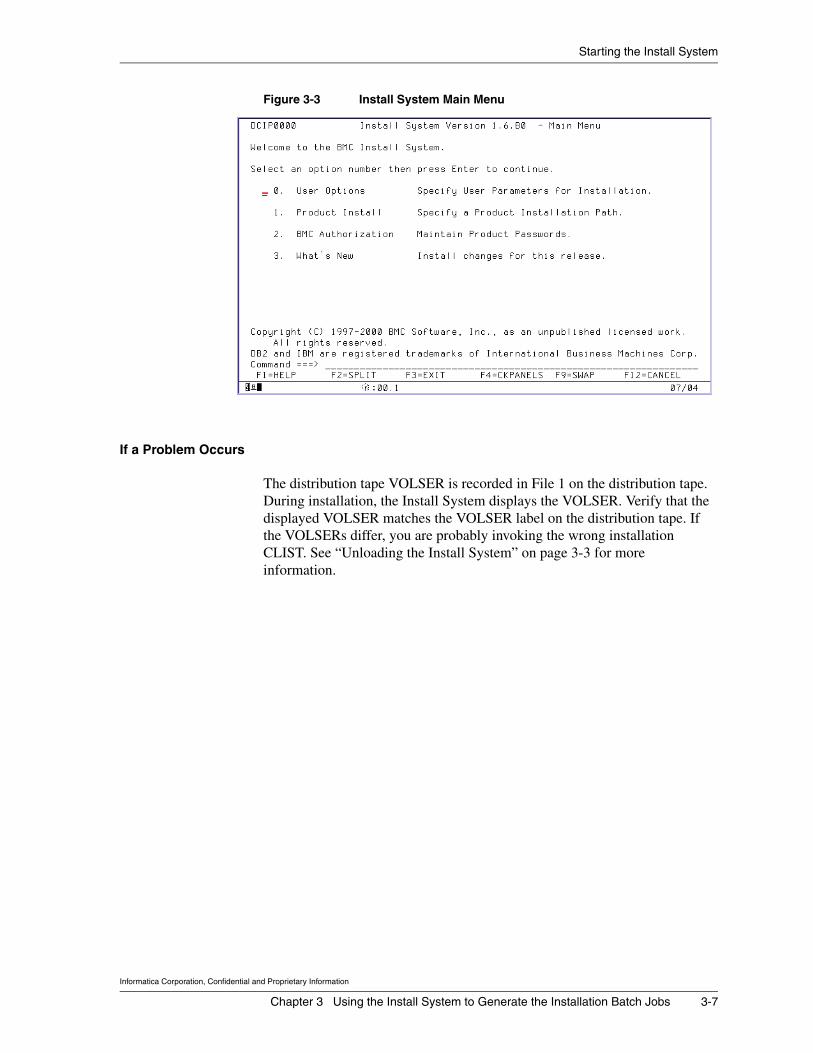
Starting the Install System
Figure 3-3 Install System Main Menu
If a Problem Occurs
The distribution tape VOLSER is recorded in File 1 on the distribution tape. During installation, the Install System displays the VOLSER. Verify that the displayed VOLSER matches the VOLSER label on the distribution tape. If the VOLSERs differ, you are probably invoking the wrong installation CLIST. See “Unloading the Install System” on page 3-3 for more information.
Informatica Corporation, Confidential and Proprietary Information
Chapter 3 Using the Install System to Generate the Installation Batch Jobs 3-7

Specifying Install System User Options
Specifying Install System User Options
Summary: The Install System lets you specify user options for your installation sessions. The options that you specify determine how the Install System runs and where it stores the installation JCL. The options remain in effect until you change them.
Before You Begin
Perform the following tasks:
• Complete the installation worksheets in Appendix C. (This procedure refers to Table A-1 on page A-2.)
• Unload the Install System as instructed in “Unloading the Install System” on page 3-3.
• Start the Install System as instructed in “Starting the Install System” on page 3-5.
Note: To access Help from each panel in the Install System, press F1.
To Specify User Options
Step 1 From the Install System’s Main Menu, type 0 in the selection field to select User Options and press Enter.
The Install System User Options panel is displayed.
Informatica Corporation, Confidential and Proprietary Information
3-8 EDP Installation Guide for MVS Components

Specifying Install System User Options
Step 2 Complete the panel by using the information in Table A-1 on page A-2.
Note: For the installation mode, BMC Software recommends that you choose 2 . Custom.When you complete the panel, press Enter to save your changes and return to the Main Menu.
To generate the necessary JCL to install the EDP products, continue with the next procedure, “Generating the Installation Batch Jobs” on page 3-10.
Informatica Corporation, Confidential and Proprietary Information
Chapter 3 Using the Install System to Generate the Installation Batch Jobs 3-9

Generating the Installation Batch Jobs
Generating the Installation Batch Jobs
Summary: After defining the Install System user options, you are ready to complete the remaining panels to generate the installation batch jobs for the BMC Software products that you choose to install.
Step 1 From the Install System’s Main Menu, type 1 in the selection field and press Enter.
The Install System Product Selection panel is displayed.
Step 2 In the Product Selection panel, type 1 (for a Full installation) in the selection field next to each product that you want to install and press Enter.
Note that the EDP products do not support maintenance installations for this release.
Note: The Product Selection panel lists all of the products available in the installation data set that you created when you unloaded the Install System. If you need to install DB2 components on multiple subsystems, you must run a separate installation for each subsystem.
Informatica Corporation, Confidential and Proprietary Information
3-10 EDP Installation Guide for MVS Components

Generating the Installation Batch Jobs
Step 3 If you did not choose to install any EDP products for DB2, skip this step.
Otherwise, respond to the following screen by selecting the version of DB2 on which the BMC Software products are to be installed:
Note: If you want to install the DB2 components for EDP on multiple subsystems, you must first perform a full installation in a single subsystem. After that, you can perform subsequent installations on other subsystems. The subsystems on which you perform the SSID installation must use the same version of DB2 as the full installation. To install DB2 components on subsystems with different versions of DB2, you must perform a full installation for every existing DB2 version. EDP does not support DB2 versions 3 and 4.
Step 4 When the Install System Product Selection panel is displayed again, verify your selections.
• If you need to change your selections, press F12 to return to previous panel and enter changes.
• If no changes are necessary, press Enter to continue.
For each product that you selected in Step 2, the next series of panels prompt you for the versions of your currently installed EDP products (if any).
Step 5 Press Enter to accept the default values for the EDP products you chose.
Note: Currently, EDP installation does not support upgrades for individual EDP products, so the product version prompts have no effect on the installation.
Informatica Corporation, Confidential and Proprietary Information
Chapter 3 Using the Install System to Generate the Installation Batch Jobs 3-11

Generating the Installation Batch Jobs
Step 6 Complete and verify the installation panels.
6.A Refer to the appropriate installation worksheets, as indicated in the following table, and complete the installation panels.
Note: The following table assumes that you are installing all the EDP products from the distribution tape. However, the Install System displays panels only for the products that you selected in Step 2.
Information Category Corresponding Panels Installation Worksheet
Tape Unload Options • Install System Job Card and High Level Qualifier
• Install System Product Data Set Sizing
• Install System Tape VOLSER Information
Table A-2, “Tape Unload Options,” on page A-8
Data Set Options • Install System Data Set Options
• Install System IBM and DB2 Library Names Specification
Table A-3, “Data Set Options,” on page A-11
DB2 and MVS System Options • Install System APF Authorization and STEPLIB Libraries
• Install System Create New SAS Steplib Option for EDP (This panel appears only if you choose to unload SAS/C into STEPLIB.)
• Install System Steplib to Existing SAS Library (This panel appears only if you choose not to unload SAS/C into STEPLIB.)
• Install System Assembler Specification Panel
• Install System DB2 Parameter Information Panel
Table A-4, “DB2 and MVS System Options,” on page A-13
Informatica Corporation, Confidential and Proprietary Information
3-12 EDP Installation Guide for MVS Components

Generating the Installation Batch Jobs
DB2 Authorization Options • Install System Grant Product Authorization Panel
• Install System Product Authorization
• Install System Retain Product Authorization(This panel appears only if you copy a previous password.)
• Install System Product Trial Authorization(This panel appears only if you use a trial password.)
• Install System Product Trial Authorization(This panel appears if you use a permanent password.)
Table A-5, “DB2 Authorization Options,” on page A-18
DB2 Options for Target and Source
• Install System EDP 'DB2 Target' Options
• Install System EDP 'DB2 Target' Package/Plan Verification (for ChangeDataMove)(This panel lets you change the default DB2 change-apply plan name for EDP and collection ID.)
• Install System EDP 'DB2 Target' Package/Plan Verification (for DataMove)(This panel appears if you choose not to change the DB2 change-apply plan name and collection ID.)
• Install System EDP 'DB2 SOURCE' OPTIONS
• Install System EDP 'DB2 Source' Package/Plan Verification(This panel lets you change the DB2 change-capture plan name, collection ID, and user interface plan name.)
Table A-6, “DB2 Options for Target and Source,” on page A-22
Default Options (EDMSDIR) • Install System EDMSDIR Default Options
Table A-7, “EDP Default Options (EDMSDIR),” on page A-26
EDP Agent Control Statements (AGENTCTL)
• Install System EDP AGENTCTL Default Options
Table A-8, “EDP Agent Control Statements (AGENTCTL),” on page A-40
EDP Logger Parameters (EDMUPARM)
• Install System EDP LOGGER Default Options
Table A-9, “EDP Logger Parameters (EDMUPARM),” on page A-44
Information Category Corresponding Panels Installation Worksheet
Informatica Corporation, Confidential and Proprietary Information
Chapter 3 Using the Install System to Generate the Installation Batch Jobs 3-13

Generating the Installation Batch Jobs
After you complete the installation panels, the Install System displays a series of verification panels.
6.B Use the verification panels to confirm your installation options.
You can make changes during the review. After you confirm your options, the Install System lists the installation jobs that it will generate, based on your installation selections. See Figure 3-4 on page 3-15 for an example.
DB2 Target Object/Storage Verification
• Install System EDP 'DB2 Target' Object/Storage Verification
• Install System EDP 'DB2 Target' Table Space Verification(This panel lets you change the table space attributes of the DB2 target.)
• Install System EDP 'DB2 Target' Table Verification(This panel lets you change the names of the DB2 target tables.)
• Install System EDP 'DB2 Target' Index Space Verification(This panel lets you change the DB2 target index space attributes.)
Table A-10, “DB2 Target Object/Storage Parameters,” on page A-50
DB2 Source Object/Storage Parameters
• Install System EDP 'DB2 Source' Object/Storage Verification
• Install System EDP 'DB2 Source' Table Space Verification (This panel lets you change the DB2 source table space attributes.)
• Install System EDP 'DB2 Source' Table Verification(This panel lets you change the names of the DB2 source tables.)
• Install System EDP 'DB2 Source' Index Space Verification(This panel lets you change the DB2 source index space attributes.)
Table A-11, “DB2 Source Object/Storage Parameters,” on page A-54
Information Category Corresponding Panels Installation Worksheet
Informatica Corporation, Confidential and Proprietary Information
3-14 EDP Installation Guide for MVS Components

Generating the Installation Batch Jobs
Figure 3-4 Generated Installation JCL Jobs
Step 7 Generate the batch jobs to install the products.
7.A Specify 1 to generate installation batch jobs in the data set that you specified in the User Options panel (Step 1 on page 3-10).
7.B Press Enter to start processing the jobs that will generate the installation JCL jobs.
The Install System creates the batch job streams used for product installation. The job streams contain batch jobs and BMC Software worklists. Some products use the worklists to create DB2 objects. The worklist structure uses a BMC Software executable format. It can contain the following types of statements:
• DB2 data definition language (DDL)• data control language (DCL)• data manipulation language (DML)
7.C After all of the required jobs are generated, press Enter.
The Install System lists the generated jobs in the output JCL data set that you specified at the start of the installation, as the following screen shows.
Informatica Corporation, Confidential and Proprietary Information
Chapter 3 Using the Install System to Generate the Installation Batch Jobs 3-15

Additional Members that the Install System Creates
Additional Members that the Install System Creates
Besides the installation JCL jobs listed at the end of the previous procedure, the Install System creates members that the installation JCL references, and members that provide functions for the EDP products. These members are in the JCL library that you specified (HLQ.INSTALL.JCL). Table 3-1 describes each of these members.
Table 3-1 Additional Members of the Installation Data Set (Part 1 of 3)
Member Name Description
AGENTCTL contains the control statement defaults for the EDP agentFor a description of the parameters, see “EDP Agent Control Statements (AGENTCTL)” on page A-40.When you submit the installation JCL $I05UNLD, the Install System creates a new member, AGENTGEN, in YOUR.SAMPLIB. This member contains the control statements that you specified for the EDP agent during installation. Use the AGENTGEN member for any additional configuration tasks that you perform for the EDP agent. Use the AGENTCTL member, also in YOUR.SAMPLIB, to restore the EDP defaults.
APDxxxxB contains the commands to bind the plan for the DB2 apply componentThe job name includes the name of the subsystem (xxxx) where you are installing the apply component.
Informatica Corporation, Confidential and Proprietary Information
3-16 EDP Installation Guide for MVS Components
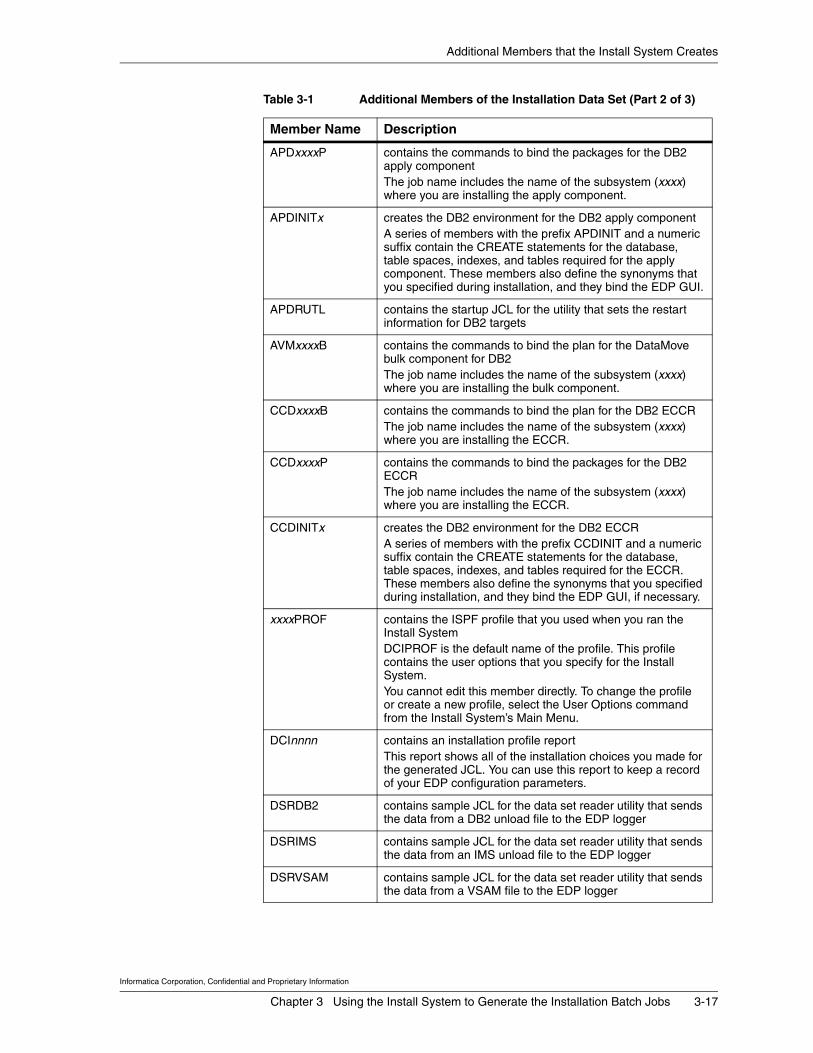
Additional Members that the Install System Creates
APDxxxxP contains the commands to bind the packages for the DB2 apply componentThe job name includes the name of the subsystem (xxxx) where you are installing the apply component.
APDINITx creates the DB2 environment for the DB2 apply componentA series of members with the prefix APDINIT and a numeric suffix contain the CREATE statements for the database, table spaces, indexes, and tables required for the apply component. These members also define the synonyms that you specified during installation, and they bind the EDP GUI.
APDRUTL contains the startup JCL for the utility that sets the restart information for DB2 targets
AVMxxxxB contains the commands to bind the plan for the DataMove bulk component for DB2The job name includes the name of the subsystem (xxxx) where you are installing the bulk component.
CCDxxxxB contains the commands to bind the plan for the DB2 ECCRThe job name includes the name of the subsystem (xxxx) where you are installing the ECCR.
CCDxxxxP contains the commands to bind the packages for the DB2 ECCRThe job name includes the name of the subsystem (xxxx) where you are installing the ECCR.
CCDINITx creates the DB2 environment for the DB2 ECCRA series of members with the prefix CCDINIT and a numeric suffix contain the CREATE statements for the database, table spaces, indexes, and tables required for the ECCR. These members also define the synonyms that you specified during installation, and they bind the EDP GUI, if necessary.
xxxxPROF contains the ISPF profile that you used when you ran the Install SystemDCIPROF is the default name of the profile. This profile contains the user options that you specify for the Install System.You cannot edit this member directly. To change the profile or create a new profile, select the User Options command from the Install System’s Main Menu.
DCInnnn contains an installation profile reportThis report shows all of the installation choices you made for the generated JCL. You can use this report to keep a record of your EDP configuration parameters.
DSRDB2 contains sample JCL for the data set reader utility that sends the data from a DB2 unload file to the EDP logger
DSRIMS contains sample JCL for the data set reader utility that sends the data from an IMS unload file to the EDP logger
DSRVSAM contains sample JCL for the data set reader utility that sends the data from a VSAM file to the EDP logger
Table 3-1 Additional Members of the Installation Data Set (Part 2 of 3)
Member Name Description
Informatica Corporation, Confidential and Proprietary Information
Chapter 3 Using the Install System to Generate the Installation Batch Jobs 3-17

Additional Members that the Install System Creates
ECCRDB2 contains sample JCL to start the DB2 environmental change capture routine (ECCR)
EDMCLIST contains the CLIST for the EDP ISPF utilities interfaceFor more information about the ISPF utilities interface, see “Access to the EDP ISPF Utilities Interface” on page 5-2.
LLLLLLLL contains the startup JCL for the started procedure name of the EDP loggerThe name of the job is the started procedure name that you chose for the logger (LLGNAME) during installation. (See Table A-9 on page A-44.) You must copy this member to your system procedure library. The default name is EDML.
EDMSDIR assembles and links the DOPTS module for your productYou specify the values for these options during installation. For a description of the options, see “Default Options (EDMSDIR)” on page A-26.
EEEEEEEE contains the startup JCL for the started procedure name of the EDP agentThe name of the job is the started procedure name that you chose for the EDP agent (STARTID) during installation. (See Table A-7 on page A-26.) The default name is EDMA.You must copy this member to your system procedure library. You use the procedure to start the EDP agent (as part of completing the installation process.) For more information, see the description of the installation job $I69DLOP on page 4-11.
EEEE0000 Contains the startup JCL for the remote apply component for DB2 and the PAC GUI.The name of the member is the name that you chose for the EDP agent (AGENTID) during installation. (See Table A-7 on page A-26.) The default name is EDMA0000.You must copy this member to your system procedure library.
PACSNDA contains the startup JCL for the remote apply components for all DBMS
PACLOCL contains the startup JCL for the DB2 apply component if the component resides on the host from which ChangeDataMove captures changes
PACSRC contains the startup JCL for the DB2 apply component when the apply component is configured with two different PAC regions
Table 3-1 Additional Members of the Installation Data Set (Part 3 of 3)
Member Name Description
Informatica Corporation, Confidential and Proprietary Information
3-18 EDP Installation Guide for MVS Components

Where to Go from This Chapter
Where to Go from This Chapter
Continue with Chapter 4, “Installing the MVS Components of the EDP Products.” In Chapter 4, you will submit the batch jobs that you generated with the Install System. In addition, you will set system authority for the EDP components and activate the EDP agent.
Informatica Corporation, Confidential and Proprietary Information
Chapter 3 Using the Install System to Generate the Installation Batch Jobs 3-19

Where to Go from This Chapter
Informatica Corporation, Confidential and Proprietary Information
3-20 EDP Installation Guide for MVS Components

16
Chapter 4 Installing the MVS Components of the EDP Products
This chapter contains the following topics:
Overview. . . . . . . . . . . . . . . . . . . . . . . . . . . . . . . . . . . . . . . . . . . . . . . . . . 4-2Allocation of Libraries and System Security . . . . . . . . . . . . . . . . . . . . . . 4-2
Allocating and Unloading the Product Libraries . . . . . . . . . . . . . . . . 4-3Controlling Access to EDP Agent Services . . . . . . . . . . . . . . . . . . . . 4-5Controlling Access to EDP Agent Commands . . . . . . . . . . . . . . . . . 4-6Providing Access to EDP Functions . . . . . . . . . . . . . . . . . . . . . . . . . 4-7
Batch Job Submission and EDP Agent Activation . . . . . . . . . . . . . . . . . . 4-8Submitting the Installation Batch Jobs. . . . . . . . . . . . . . . . . . . . . . . . 4-9Starting the EDP Agent . . . . . . . . . . . . . . . . . . . . . . . . . . . . . . . . . . . 4-12
Where to Go from This Chapter . . . . . . . . . . . . . . . . . . . . . . . . . . . . . . . . 4-16
Informatica Corporation, Confidential and Proprietary Information
Chapter 4 Installing the MVS Components of the EDP Products 4-1

Overview
Overview
This chapter contains the procedures to complete the installation of the MVS components of EDP. If you complied with all of the procedures in the previous chapter, you should have created a series of installation batch jobs, as shown in the following screen of the output JCL data set:
To complete the installation, you will run these batch jobs. Before you can run all of the batch jobs, however, you will also have to set up the EDP agent by granting it proper authority and starting it.
Allocation of Libraries and System Security
The procedures and information in this section allow you to
• allocate and unload the product libraries from tape• set security for the EDP product• provide system acces to EDP functions
Informatica Corporation, Confidential and Proprietary Information
4-2 EDP Installation Guide for MVS Components

Allocating and Unloading the Product Libraries
Allocating and Unloading the Product Libraries
Summary: Use this procedure to allocate and unload the product libraries from the distribution tape.
Before You Begin
Review the following documentation for additional installation requirements:
• the $I00DOC member, which the Install System creates in the output data set where the other installation batch jobs reside
• all release notes, flashes, and technical bulletins that were distributed with the products
To Allocate and Unload the Product Libraries
Step 1 Submit the batch job $I05UNLD.
Step 2 Set security for the EDP components as described in Table 4-1.
Table 4-1 Security Required for the MVS Components of the EDP Products (Part 1 of 2)
Task Type of Security Description
limit user ability to start and stop the MVS components
RACF (or equivalent security facility)
Authorize users to run MVS commands.
DB2 Grant DB2 authority to enable users to run the plan created during installation.Grant DISPLAY, TRACE, and MONITOR2 authority to enable users to start the DB2 ECCR.Note: If the user ID for the DB2 ECCR already has SYSOPR, SYSCTL, or SYSADM authority, you do not need to grant additional authority.
limit access to EDP agent services RACF (or equivalent security facility) and EDP options
Limit access to EDP agent services with a RACF profile in the FACILITY class.See “Controlling Access to EDP Agent Services” on page 4-5.Ensure that the InitAuthCheck parameter in the AGENTCTL file or member is set to YES.
limit access to EDP agent commands
RACF (or equivalent security facility) and EDP options
Limit access to EDP agent command with a RACF profile in the FACILITY classSee “Controlling Access to EDP Agent Commands” on page 4-6.Ensure that the CmdAuthCheck parameter in the AGENTCTL file or member is set to YES.
Informatica Corporation, Confidential and Proprietary Information
Chapter 4 Installing the MVS Components of the EDP Products 4-3

Allocating and Unloading the Product Libraries
Step 3 If the Install System generated the batch job $I20APF, submit the job.
Otherwise, continue with the next step.
Step 4 APF-authorize the MVS libraries:
• HLQ.LOAD• HLQ.CRG.LOAD
limit access to EDP functions, including the ability to update the EDP repository from the EDP console (the Windows graphical user interface for the EDP products)(register source and target data resources, define transformations that include those resources, and edit registrations and transformations)
RACF (or equivalent security facility) and EDP options
Grant access to users who run secondary PAC procedures by specifying YES for the SETUSER option in EDMSDIR.If you specify SETUSER as NO, add the secondary PAC procedure to the RACF-started procedures table, or create a RACF profile in the STARTED class for the procedure.See “Providing Access to EDP Functions” on page 4-7.
DB2 Authorize users to run the plan created during installation, and to update the DB2 target tables.
limit the ability to perform recovery and restart procedures for MVS components
RACF (or equivalent security facility)
Authorize users to run MVS commands.
DB2 Authorize users to run the plan created during installation.
enable OpenEdition, TCP/IP functions to access the started tasks that require it (EDP agent for remote apply and PAC for the EDP console)
RACF (or equivalent security facility)
Define an OpenEdition MVS (OMVS) segment in RACF for the started tasks of the EDP agent and the PAC user IDs.The OMVS segment must contain• a valid user ID (0 for super user authority, but
any valid number will work)• a home directoryRefer to your security system documentation for the procedures to define OMVS segments.
Table 4-1 Security Required for the MVS Components of the EDP Products (Part 2 of 2)
Task Type of Security Description
Informatica Corporation, Confidential and Proprietary Information
4-4 EDP Installation Guide for MVS Components

Controlling Access to EDP Agent Services
Controlling Access to EDP Agent Services
Summary: To restrict access to EDP agent services, perform the following procedure. The HLQ.SAMPLIB contains sample commands for the most common mainframe security products. The member #SECURTY directs you to the specific member for the type of security product for your system.
Step 1 In the HLQ.SAMPLIB library, locate the AGENTGEN member and ensure that the value of the InitAuthCheck parameter is YES (Table A-8 on page A-40).
Note: The variable HLQ is the high-level qualifier that you assigned to the
INSTALL data set when you unloaded the tape.
Step 2 Define the RACF (or equivalent security system) resource profile named BMCEDM.agent_ID.REGISTER in class FACILITY.
Any job requesting EDP agent services must be granted read access to this resource. The agent_ID variable is the agent ID specified in the AGENTGEN member and the default options module EDMSDIR (also called the DOPTs module).
Note: Defining this resource to RACF (or equivalent) with UACC(READ) effectively disables registration security for EDP agent services. All RACROUTE macros that the agent issues will be successful.
You can also disable registration security with the InitAuthCheck configuration parameter. Set its value to NO to disable security checking.
Informatica Corporation, Confidential and Proprietary Information
Chapter 4 Installing the MVS Components of the EDP Products 4-5

Controlling Access to EDP Agent Commands
Controlling Access to EDP Agent Commands
Summary: To restrict access to EDP agent commands, perform the following procedure.
Step 1 In the HLQ.SAMPLIB library, locate the AGENTGEN member and ensure that the value of the CmdAuthCheck parameter is YES (Table A-8 on page A-40).
Note: The variable HLQ is the high-level qualifier that you assigned to the
INSTALL data set when you unloaded the tape.
Step 2 Define the RACF (or equivalent security system) resource profile called BMCEDM.agent_ID.COMMAND.* in class FACILITY.
Any user who needs to use EDP agent commands requires read access to this resource. The agent_ID variable is the agent ID specified in the AGENTGEN member and in the EDMSDIR default options module.
Note: Defining this resource to RACF (or equivalent) with UACC(READ) effectively disables registration security for EDP agent services. All RACROUTE macros that the agent issues will be successful.
You can also disable registration security with the InitAuthCheck configuration parameter. Set its value to NO to disable security checking.
If you prefer, you can define control for individual agent commands by replacing the asterisk (*) with the command name. For example, a resource definition of BMCEDM.AG01.COMMAND.SHUTDOWN protects just the SHUTDOWN command for AgentID AG01. (Refer to the ChangeDataMove User Guide for a list and description of possible EDP agent commands.)
Informatica Corporation, Confidential and Proprietary Information
4-6 EDP Installation Guide for MVS Components

Providing Access to EDP Functions
Providing Access to EDP Functions
Summary: Some of the EDP components must have system authorization to run. You can limit access to these components through RACF or your system’s equivalent.
Before You Begin
This procedure requires that you specify the startup procedure names of secondary PAC procedures for EDP console sessions and any DB2 remote apply components. You define the names of these secondary PAC procedures with the PACPROC option in the EDMSDIR default options module. The names that you specify can be up to eight characters. When EDP starts a secondary PAC, it creates a started task name by incrementing the PACPROC name with a number. The number of significant digits in this number is determined by the MAXGUI option, also in the EDMSDIR default options module.
For example, if your PACPROC name is DB2APPLY and you set MAXGUI to nine, EDP generates started task names of DB2APPL1 through DB2APPL9.
If you set MAXGUI to 50, EDP generates started task names of DB2APP01 through DB2APP50.
If your security system requires that you define every possible started task name, you can use MAXGUI to limit the number of possible started task names.
Note: EDP does not necessarily assign numbers sequentially. It can reuse started task names for procedures that are no longer running.
To Provide Access to EDP Functions
Step 1 Refer to the appropriate worksheets to gather the startup procedure names for the following components:
• EDP logger (see Table A-9 on page A-44)• EDP agent (see Table A-7 on page A-26)• any components running as started tasks rather than batch jobs• secondary PAC procedures for any remote DB2 apply component or the
EDP console (see Table A-7 on page A-33)
Informatica Corporation, Confidential and Proprietary Information
Chapter 4 Installing the MVS Components of the EDP Products 4-7

Batch Job Submission and EDP Agent Activation
Step 2 Use one of the following methods to provide user authorization for each component:
• Add the procedure name to the RACF-started procedures table (ICHRIN03), or its equivalent.
• Create a RACF profile for each procedure name with the class STARTED. This profile can be generic, so that one profile covers all possible EDP started task names.
Note: For the secondary PAC procedures, you can also specify Y for the SETUSER option of the EDMSDIR default options module. If you specify Y for this option, the EDP product uses the user ID and password from the EDP console connection or the PAC job as authorization for processing. For more information about the SETUSER default option, see page A-36.
This step associates a user ID and group ID with the started tasks. The association provides authorized access to any data set that the tasks use, and allows EDP components to pass the authorization-checking process. For more information on the RACF-started procedures table or STARTED class profiles, refer to the documentation for IBM’s RACF or an equivalent product.
Batch Job Submission and EDP Agent Activation
The procedures and information in this section allow you to:
• submit the installation batch jobs • start the EDP agent (which is requirement before you can submit some of
the installation batch jobs)
Informatica Corporation, Confidential and Proprietary Information
4-8 EDP Installation Guide for MVS Components

Submitting the Installation Batch Jobs
Submitting the Installation Batch Jobs
Summary: Use this procedure to submit the installation batch jobs that you generated with the Install System in the previous chapter.
Note: The batch jobs unload the product libraries from the tape and install the MVS components. The Install System overwrites any installation batch jobs that already exist in the specified data set.
To Submit the Installation Batch Jobs
Perform the tasks in Table 4-2 on page 4-10, in the order that they are shown.
Note: The Install System generates only the jobs needed for the products that you are installing. Table 4-2 includes all of the jobs that the Install System would generate if you were installing every EDP product. (You do not need to edit these jobs before running them. The parameters for the members are based on the choices you made in the Install System panels.)
Informatica Corporation, Confidential and Proprietary Information
Chapter 4 Installing the MVS Components of the EDP Products 4-9

Submitting the Installation Batch Jobs
Table 4-2 Task List to Submit the Installation JCL Jobs (Part 1 of 2)
Perform this Task . . . To . . .
1 Submit job $I10VSAM. allocate and create the log restart data sets and active log data sets that the EDP logger will useYou can change the active log size through a field in the Install System EDM LOGGER Default Options panel. See the installation worksheet “EDP Logger Parameters (EDMUPARM)” on page A-44.
2 Submit job $I15PSWD. process the product authorization for your productYou must specify passwords during the installation and submit this job to enable the EDP products to run in your system.
3 Submit job $I20APF. copy the load modules to an APF-authorized libraryThe Install System generates this job only if you specified an APF-authorized library to use for the BMC Software product load modules.
4 Submit job $I31DOPT. create the default options module (EDMSDIR)
5 Submit job $I35BNDI. bind the DB2 plan for the installation jobsThe Install System generates this job only if you selected any of the DB2 products for installation.
6 Submit job $I40INST. run the worklist that creates the DB2 environment for the DB2 ECCR, the DB2 apply, and the DataMove DB2 source and targetFor more information about these components, see the ChangeDataMove User Guide and the DataMove User Guide.This job creates all of the DB2 tables required for the ECCR and the apply component. The job also binds the plans and packages necessary to run the DB2 change-capture and change-apply processes for ChangeDataMove, and the plans necessary for DataMove.The Install System generates this job only if you selected an EDP product for DB2.
7 Submit job $I59COPY. copy configuration files and HLQ.SAMPLIB members from the tapeThe Install System updates these members to include the configuration parameters that you specified during installation.This job does not replace any existing members. You can edit the JCL to allow it to replace existing members, or you can check the HLQ.SAMPLIB library to be sure that the correct versions of the samples and configuration files have been copied to the library.
8 Submit job $I60GRNT. grant the DB2 privileges that you specified during installationThe Install System generates this job only if you selected any EDP products for DB2 and added user IDs to be granted.
Informatica Corporation, Confidential and Proprietary Information
4-10 EDP Installation Guide for MVS Components

Submitting the Installation Batch Jobs
Note: The Install System creates two special jobs, $I98DROP and $I99DLTE. The job $I98DROP removes EDP DB2 objects from your system. The job $I99DLTE deletes the EDP products. Run these jobs only if you want to remove EDP DB2 objects or uninstall the EDP products.
9 Submit job $I69AREP. allocate the data set that contains the EDP repositoryFor more information about the repository data set, see the EDP Registrations and Transformations User Guide.
10 Start the EDP agent. allow the next job, $I69DLOP, to configure the EDP loggerFollow the procedure “Starting the EDP Agent” on page 4-12.
11 Submit job $I69DLOP. configure the EDP loggerRemember that you must start the EDP agent before you run this job.
12 Submit job $I69LDEF. define the active log data sets (created by $I10VSAM) to the EDP logger
13 Submit job $I69LFRM. format the active log data setsAfter completing this job, you can• finish setting system security for all EDP components• add the EDP products to your site’s ISPF menu
system• start other EDP components besides the EDP agentFor more details, see “Where to Go from This Chapter” on page 4-16.
Table 4-2 Task List to Submit the Installation JCL Jobs (Part 2 of 2)
Perform this Task . . . To . . .
Informatica Corporation, Confidential and Proprietary Information
Chapter 4 Installing the MVS Components of the EDP Products 4-11

Starting the EDP Agent
Starting the EDP Agent
Summary: Use this procedure to start the EDP agent before submitting the installation JCL job $I69DLOP to configure the EDP logger. After you edit the EDP agent JCL as outlined in this procedure, add the JCL procedure to your system procedures library.
If you are installing multiple instances of the EDP agent, use this procedure to edit the installation JCL and create a startup procedure for the new EDP agent. For more information about working with the EDP agent, see the ChangeDataMove User Guide or the DataMove User Guide.
Note: Because the agent runs as a started task, normally you do not need to restart it until you perform an IPL or use the EDP agent’s SHUTDOWN command.
Before You Begin
Note the following considerations before starting the EDP agent:
• BMC Software recommends that you start the EDP agent automatically during an IPL, or as soon as possible after the IPL has completed.
• The EDP agent does not consume a large amount of CPU resources, but it acts as a server for other EDP components. BMC Software recommends that you assign the EDP agent a high dispatching priority through the system resources manager (SRM) or the work load manager (WLM).
• You can run multiple EDP agents in a single MVS system. Each agent is identified by the agent ID that you specify in the default options (DOPTs) module, EDMSDIR. You must have a separate options module for each EDP agent. Because the module must be named EDMSDIR, you must create a separate USERLIB for each agent installed on the system.
Informatica Corporation, Confidential and Proprietary Information
4-12 EDP Installation Guide for MVS Components

Starting the EDP Agent
To Start the EDP Agent
Step 1 Make a working copy of the startup procedure for the EDP agent:
• During installation, the Install System generates a startup procedure for the EDP agent. The procedure is located in the installation JCL library, and the member name is the started procedure name that you specified in the EDMSDIR default options module for the agent (in the STARTID field). The default started procedure name is EDMA. The AGENTGEN member contains the EDP agent’s startup parameters that you specified during the installation process.
• You can also use the #AGENT member of the HLQ.SAMPLIB library. However, this sample procedure does not contain any of the parameters that you specified during installation. In the HLQ.SAMPLIB library, the AGENTCTL member contains default EDP startup parameters.
Step 2 Edit the working copy as required.
Table 4-3 describes the JCL statements in this procedure. Figure 4-1 on page 4-13 provides an example.
Figure 4-1 Sample Procedure to Start the EDP Agent
Table 4-3 JCL Statements for the EDP Agent’s Startup Procedure
JCL Statement Description
EXEC Specify the EDP agent module, EDMSTART.
STEPLIB or JOBLIB DD
Include the EDP load library (HLQ.LOAD).This statement is required even if you specify the load library in the link list (LNKLST). The EDP agent must be able to load some modules from the STEPLIB or JOBLIB.If, during the installation, you loaded the SAS/C runtime routines into a separate library that is not in the link list, you must add the library to the STEPLIB or JOBLIB concatenation.
EDMPARMS DD
Specify the name of the user library (YOUR.USERLIB) that contains the EDMSDIR default options module associated with the EDP agent to be started.If you do not include an EDMPARMS DD statement, or if the library you specify does not contain the options modules, the EDP product uses the STEPLIB concatenation to obtain the configuration options.
EDMSCTL DD Specify the data set containing the EDP agent’s startup parameters. BMC Software recommends that you also include the FREE=CLOSE statement to read and deallocate the data set.
SYSPRINT DD Specify the output data set for MVS system messages.
Informatica Corporation, Confidential and Proprietary Information
Chapter 4 Installing the MVS Components of the EDP Products 4-13

Starting the EDP Agent
//EDM1 PROC STARTUP=WARM//*-------------------------------------------------------------------*//* CHANGEDATAMOVE - STARTUP PROC FOR EDM AGENT//* TO USE THIS SAMPLE, YOU MUST COPY IT TO A SYSTEM PROCEDURE//* LIBRARY FROM WHICH STARTED TASK PROCEDURES ARE OBTAINED,//* SUCH AS SYS1.PROCLIB.//*-------------------------------------------------------------------*//* REPLACE THE FOLLOWING ITEMS WITH PROPER INSTALLATION VALUES//* 1. JCL DATA SET NAMES//*-------------------------------------------------------------------*//* NOTE: THE CHANGEDATAMOVE INSTALLATION PROCESS BUILDS AN EXECUTABLE//* VERSION OF THIS JCL, ACCORDING TO INSTALLATION SPECIFICATIONS, AND//* PLACES IT INTO THE HLQ.JCL LIBRARY TO BE EXECUTED DURING PRODUCT//* INSTALLATION. THIS EXAMPLE IS PROVIDED PRIMARILY FOR REFERENCE.//*-------------------------------------------------------------------*//EDMAGENT EXEC PGM=EDMSTART,// PARM='STARTUP=&STARTUP'//STEPLIB DD DISP=SHR,DSN=HLQ.LOAD <=== CDM LOADLIB// DD DISP=SHR,DSN=YOUR.SAS/C.LNKLIB <=== SAS/C LIBRARY//EDMPARMS DD DISP=SHR,DSN=YOUR.USERLIB <=== CDM EDMSDIR//EDMSCTL DD DSN=YOUR.SAMPLIB(AGENTCTL), <=== AGENTCTL MEMBER// DISP=SHR,FREE=CLOSE//SYSPRINT DD SYSOUT=*//SYSTERM DD SYSOUT=*//SYSUDUMP DD SYSOUT=*//*//* REFER TO SAMPLIB MEMBER TRACJCL FOR FURTHER//* INFORMATION ON TRACE AND DIAGNOSTIC DD STATEMENTS//* EDMTRACE DD SYSOUT=* (COMMON SERVICES TRACE)//* LSNLOG DD SYSOUT=* (EDP AGENT TCP LISTENER EVENTS)//* LSNTRC DD SYSOUT=* (EDP AGENT TCP LISTENER TRACE)//*-------------------------------------------------------------------*
Step 3 Add the edited procedure to your system procedures library.
Step 4 Run the startup procedure by using the MVS START command.
Figure 4-2 on page 4-15 shows sample messages that result from a successful startup of the EDP agent.
Informatica Corporation, Confidential and Proprietary Information
4-14 EDP Installation Guide for MVS Components

Starting the EDP Agent
Figure 4-2 Sample Messages When You Start the EDP Agent
STC08125 IEF403I EDMA - STARTED - TIME=12.48.34STC08125 BMCEDM172001I EDMSINI0: EDM Agent. Version 2.4.00STC08125 BMCEDM172002I EDMSINI0: ChangeDataMove. Version 2.4.00. Release date: 20001222STC08125 BMCEDM172008I EDMSINI0: EDM Agent Configuration Parameters:STC08125 BMCEDM172010I EDMSINI0: AgentID=EDMASTC08125 BMCEDM172010I EDMSINI0: LogClass=*STC08125 BMCEDM172010I EDMSINI0: LogHold=NOSTC08125 BMCEDM172010I EDMSINI0: LogLimit=10000STC08125 BMCEDM172010I EDMSINI0: LogBuffLimit=2000STC08125 BMCEDM172010I EDMSINI0: TaskLimit=300STC08125 BMCEDM172010I EDMSINI0: CmdPrefix=EDMASTC08125 BMCEDM172010I EDMSINI0: RepositoryDSN=RDAKER2.REPOSITSTC08125 BMCEDM172010I EDMSINI0: InitAuthCheck=NOSTC08125 BMCEDM172010I EDMSINI0: CmdAuthCheck=NOSTC08125 BMCEDM172010I EDMSINI0: CCVActive=YesSTC08125 BMCEDM172010I EDMSINI0: PatrolKM=NOSTC08125 BMCEDM172010I EDMSINI0: PKDataspaceInit=100STC08125 BMCEDM172010I EDMSINI0: PKDataspaceMax=500STC08125 BMCEDM172010I EDMSINI0: SysplexLogDays=0STC08125 BMCEDM172010I EDMSINI0: STARTUP=WARM <==== PARM ON STARTUP CMDSTC08125 BMCEDM172010I EDMSINI0: ServiceModule=EDMSDUMYSTC08125 BMCEDM172010I EDMSINI0: ServiceModule=EDMSGQIOSTC08125 BMCEDM172010I EDMSINI0: ServiceModule=EDMXCIRQSTC08125 BMCEDM172010I EDMSINI0: DelOldPMods=0STC08125 BMCEDM172010I EDMSINI0: EDMAgentTrace=OffSTC08125 BMCEDM172010I EDMSINI0: TRACEOPTIONS=NONE <==== DEFAULTSTC08125 BMCEDM172024I EDMSINI2: New SSCVT built for EDM Agent EDMA. Addr=0085D138STC08125 BMCEDM172024I EDMSINI2: New SAST built for EDM Agent EDMA. Addr=00813EC0STC08125 BMCEDM172064I EDMSINI4: EDM Agent Dataspace created. Name=00059EDM,STOKEN=8000370100000554,Blocks=143STC08125 BMCEDM172069I EDMSEXE0: Subtask ATTACHed. Module=EDMSCCV0,TaskID=CCV,RC=0STC08125 BMCEDM172071I EDMSCCV0: Subtask initialization completed. TaskID=CCVSTC08125 BMCEDM172018I EDMSCCV0: VSAM ECCR installedSTC08125 BMCEDM172069I EDMSEXE0: Subtask ATTACHed. Module=EDMSDIS0,TaskID=DIS,RC=0STC08125 BMCEDM172023I EDMSCCV0: Active= 1, Inactive=13. EDMASTC08125 BMCEDM172071I EDMSDIS0: Subtask initialization completed. TaskID=DISSTC08125 BMCEDM172069I EDMSEXE0: Subtask ATTACHed. Module=EDMSREP0,TaskID=REP,RC=0STC08125 BMCEDM172071I EDMSREP0: Subtask initialization completed. TaskID=REPSTC08125 BMCEDM172069I EDMSEXE0: Subtask ATTACHed. Module=EDMSDSP0,TaskID=DSP,RC=0STC08125 BMCEDM172071I EDMSDSP0: Subtask initialization completed. TaskID=DSPSTC08125 BMCEDM172069I EDMSEXE0: Subtask ATTACHed. Module=EDMSLOG0,TaskID=LOG,RC=0STC08125 BMCEDM172256I EDMSEXE0: EDM Agent EDMA has completed initializationSTC08125 BMCEDM172071I EDMSLOG0: Subtask initialization completed. TaskID=LOGSTC08125 BMCEDM172072I EDMSLOG0: Log file EDMSLOG OPENed. LogClass=*,LogLimit=10000,LogHold=NoSTC08125 BMCEDM172076I EDMSREP0: Repository file CLOSEdSTC08125 BMCEDM172119I EDMSREP0: Repository file OPENed. RepositoryDSN=RDAKER2.REPOSIT
Informatica Corporation, Confidential and Proprietary Information
Chapter 4 Installing the MVS Components of the EDP Products 4-15

Where to Go from This Chapter
Step 5 If you started the EDP agent as task 10 from Table 4-2 (on page 4-11), return to Table 4-2 and continue with task 11.
If you started the EDP agent as part of a system configuration to accommodate multiple EDP agents, you are finished with this procedure.
Where to Go from This Chapter
Continue with Chapter 5, “Configuring the MVS Components of EDP,” to complete tasks for accessing the EDP ISPF utilities interface and for configuring TCP/IP connections.
Informatica Corporation, Confidential and Proprietary Information
4-16 EDP Installation Guide for MVS Components

8
Chapter 5 Configuring the MVS Components of EDP
This chapter contains the following topics:
Overview. . . . . . . . . . . . . . . . . . . . . . . . . . . . . . . . . . . . . . . . . . . . . . . . . . 5-2Access to the EDP ISPF Utilities Interface . . . . . . . . . . . . . . . . . . . . . . . 5-2
Adding EDP Products to an ISPF Menu . . . . . . . . . . . . . . . . . . . . . . 5-3Starting the EDP Products with a TSO Command. . . . . . . . . . . . . . . 5-4
Configurations for TCP/IP Connections. . . . . . . . . . . . . . . . . . . . . . . . . . 5-4Configuring TCP/IP for the EDP Console . . . . . . . . . . . . . . . . . . . . . 5-5Configuring TCP/IP for a Remote Apply Component. . . . . . . . . . . . 5-6Interlink TCP/IP Considerations . . . . . . . . . . . . . . . . . . . . . . . . . . . . 5-7
Post-Installation Troubleshooting Measures. . . . . . . . . . . . . . . . . . . . . . . 5-8Applying Post-Installation Zaps and Load Module Replacements . . . . . 5-8Where to Go from This Chapter . . . . . . . . . . . . . . . . . . . . . . . . . . . . . . . . 5-8
Informatica Corporation, Confidential and Proprietary Information
Chapter 5 Configuring the MVS Components of EDP 5-1

Overview
Overview
The information and tasks in this chapter will help you to
• access the EDP ISPF utilities interface panels
• configure the TCP/IP connections
This chapter also briefly covers the post-installation troubleshooting measures and discusses how to apply post-installation zaps and load module replacements.
Access to the EDP ISPF Utilities Interface
After installing the EDP products, you can access their ISPF utilities interface by adding the EDP CLIST to your ISPF menu system, or by issuing a TSO command.
The EDP ISPF utilities interface is a set of ISPF panels that enables you to work with EDP repositories, view information about the operating environment, and perform product authorizations from within TSO.
For information about starting the EDP console, see the EDP Getting Started Guide, the ChangeDataMove User Guide, and the DataMove User Guide.
To run the change-capture and change-apply processes, you will need to define and use startup procedures for some of the EDP MVS components. For more information about starting the MVS components, see Chapter 6, “Starting the MVS Components of EDP.”
Informatica Corporation, Confidential and Proprietary Information
5-2 EDP Installation Guide for MVS Components

Adding EDP Products to an ISPF Menu
Adding EDP Products to an ISPF Menu
Summary: BMC Software recommends that you add your EDP product or products to your site’s ISPF menu system. To do so, you must add the EDP CLIST to the SYSPROC concatenation of your TSO logon procedure, and then add a command to the appropriate ISPF menu.
Before You Begin
When you installed the EDP products, the Install System created a CLIST member (EDMCLIST) and placed it in the HLQ.SAMPLIB library. You will use the EDMCLIST member during this procedure. HLQ is the high-level qualifier that you defined for the EDP products during the installation process.
To Add the EDP Products to an ISPF Menu
Step 1 Use one of the following methods to include the EDP CLIST in the SYSPROC concatenation of your TSO logon procedure:
• Copy the EDMCLIST member to an existing system CLIST library that is in the SYSPROC concatenation.
• Copy the EDMCLIST member to the EDP HLQ.EXEC library, and add that library to the SYSPROC concatenation.
Step 2 Add a menu item that issues the EDMCLIST command to the appropriate ISPF panel.
2.A Open the ISPF panel definition in edit mode.
2.B In the )PROC section of the panel, locate the statement that assigns a value to &ZSEL, and add the following line to the statement:
EDP,‘CMD(%EDMCLIST)’
2.C Update the )BODY section of the panel to show that the EDP command will start the EDP products.
2.D Save the changes to the panel definition.
Informatica Corporation, Confidential and Proprietary Information
Chapter 5 Configuring the MVS Components of EDP 5-3

Starting the EDP Products with a TSO Command
Starting the EDP Products with a TSO Command
Summary: If you choose not to add the EDP products to an ISPF menu, you can access the EDP interface from a command line.
Before You Begin
When you installed the EDP products, the Install System created a CLIST member (EDMCLIST) and placed it in the HLQ.SAMPLIB library. You will use the EDMCLIST member during this procedure. HLQ is the high-level qualifier that you defined for the EDP products during the installation process.
To Access the EDP Interface from a Command Line
At the TSO command line, enter the following command:
EX 'HLQ.SAMPLIB(EDMCLIST)'
Note: If you copied the CLIST member to the HLQ.EXEC library as described on page 5-3, refer to that library in the command instead of HLQ.SAMPLIB.
Configurations for TCP/IP Connections
Use the procedures in this section to configure TCP/IP for
• the EDP console (page 5-5)• a remote apply component (page 5-6)
Informatica Corporation, Confidential and Proprietary Information
5-4 EDP Installation Guide for MVS Components
Configuring TCP/IP for the EDP Console
Configuring TCP/IP for the EDP Console
Summary: You must configure a TCP/IP connection between the EDP console and the MVS host where the EDP repository resides. Use the procedures in this section to configure the TCP/IP connection for the GUI.
Before You Begin
If you are using the GUI and a remote apply component, use one of the following methods to configure the default options for the components:
• Create a separate EDMSDIR module for the DB2 apply component and the GUI, and configure each module as instructed in these procedures.
• Configure EDMSDIR according to the instructions in this procedure, and create a secondary PAC procedure for the remote apply component. Use the sender PAC procedure to start the apply component with settings that override the default options. For more information about creating secondary PAC procedures, see the ChangeDataMove User Guide.
To Configure TCP/IP for the GUI
Step 1 Ensure that you have configured the following parameters in the EDMSDIR default options module:
• RMTPORT• TCPWTIME (optional)
Your EDP console must have the port number in order to connect to the MVS host. For a complete description of these parameters, see “Default Options (EDMSDIR)” on page A-26. You should also enter the parameter values on the installation worksheets in Appendix A, “Installation Worksheets.”
Step 2 Start or restart the EDP agent on the MVS host.
Starting the agent starts the EDP listener. When you connect to the host through the EDP console, the listener creates (“spawns”) a PAC to establish a TCP/IP connection with the workstation.
Informatica Corporation, Confidential and Proprietary Information
Chapter 5 Configuring the MVS Components of EDP 5-5

Configuring TCP/IP for a Remote Apply Component
Configuring TCP/IP for a Remote Apply Component
Summary: If you decide to install the DB2 apply component on a different MVS system than your source data, or if you are using remote targets that do not run on MVS, you must configure the TCP/IP connection between the apply component and the host where the source tables reside. Also, use this configuration procedure to configure TCP/IP for DataMove.
Before You Begin
To configure TCP/IP for a remote apply component, use one of the following methods:
• Create a separate EDMSDIR module for the DB2 apply component and the GUI, and configure each module as instructed in the following procedures.
• Configure EDMSDIR according to the instructions in “Configuring TCP/IP for the EDP Console” on page 5-5, and create a secondary PAC procedure for the remote apply component. Use the sender PAC procedure to start the apply component with settings that override the default options. For more information about creating secondary PAC procedures, see the ChangeDataMove User Guide.
Step 1 Ensure that you have configured the following parameters in the EDMSDIR default options module:
• RMTHOST• RMTPORT• TCPWTIME (optional)
For a complete description of these parameters, see “Default Options (EDMSDIR)” on page A-26.
Step 2 Ensure that the TCP system can resolve the host name to an IP address.
Informatica Corporation, Confidential and Proprietary Information
5-6 EDP Installation Guide for MVS Components

Configuring TCP/IP for a Remote Apply Component
The host name must be available in the domain name server, or an entry must exist in the TCPIP.ETC.HOSTS configuration data set. Alternatively, the TCPIP.ETC.HOSTS data set can contain an entry for a network name server that refers to the remote host.
Note: The socket applications of the EDP products look for TCP/IP configuration information in a data set called TCPIP.DATA. If your site uses a high-level qualifier other than TCPIP for its data set (as is the case with IBM’s TCP/IP, which uses user_ID as the high-level qualifier), you will have to add a DD statement in your PAC procedures for the remote apply component. The following statement allows the socket applications to find the TCPIP.DATA data set. (See the ChangeDataMove User Guide.)
//SYSTCPD DD DISP=SHR,DSN=hlq.TCPIP.DATA
Step 3 Start or restart the EDP agent on the remote host.
Starting the agent starts the EDP listener. When the product sends data to the remote apply component, the PAC signals the listener to establish a TCP/IP connection for apply processing.
Interlink TCP/IP Considerations
If your site uses Interlink TCP/IP, your configuration will differ from a configuration for IBM TCP/IP.
For compatibility, you must use the version of Interlink TCP/IP and SAS/C that EDP products support. See “Software Requirements” on page 2-5.
You must add the Interlink libraries to the STEPLIB statements for the following components:
• PAC jobs involved in TCP/IP communications• PAC-started tasks involved in TCP/IP communications• all agents involved in TCP/IP communications
You must list the Interlink libraries before the SAS/C libraries in the STEPLIB statements or in the link list.
If you need help configuring Interlink TCP/IP, contact a BMC Software technical support analyst.
Informatica Corporation, Confidential and Proprietary Information
Chapter 5 Configuring the MVS Components of EDP 5-7
Post-Installation Troubleshooting Measures
Post-Installation Troubleshooting Measures
The startup JCL members (in your HLQ.SAMPLIB) for some of the EDP components contain commented TRACE statements. When uncommented, the trace statements produce meaningful messages that might lead to the cause and resolution for various problems.
Warning! Because trace statements can produce a large number of messages and consume considerable system resources, you should uncomment the trace statements only under the direction of a BMC Software technical support analyst.
Applying Post-Installation Zaps and Load Module Replacements
After you have installed the EDP products and prior to using them in either a test or production environment, you should apply any zaps and load module replacements that the HLQ.FIXZAPS library references. The installation procedure creates the HLQ.FIXZAPS library.
Open the member $$$READ and follow the instructions to apply the zaps and load module replacements that are appropriate for your site. In addition, if your site uses Western European code pages, apply the zap discussed in Appendix B, “Support for Western European Code Pages.”
Where to Go from This Chapter
After adding the EDP utilities interface to your ISPF menu system and configuring the TCP/IP connections, continue to Chapter 6, “Starting the MVS Components of EDP.”
Informatica Corporation, Confidential and Proprietary Information
5-8 EDP Installation Guide for MVS Components

32
Chapter 6 Starting the MVS Components of EDP
This chapter contains the following topics:
Overview. . . . . . . . . . . . . . . . . . . . . . . . . . . . . . . . . . . . . . . . . . . . . . . . . . 6-2Starting Selected MVS Components of EDP . . . . . . . . . . . . . . . . . . . . . . 6-2
Starting the EDP Logger . . . . . . . . . . . . . . . . . . . . . . . . . . . . . . . . . . 6-5Starting Pre-Log Merge . . . . . . . . . . . . . . . . . . . . . . . . . . . . . . . . . . . 6-9Starting Post-Log Merge . . . . . . . . . . . . . . . . . . . . . . . . . . . . . . . . . . 6-12Activating the IMS ECCR . . . . . . . . . . . . . . . . . . . . . . . . . . . . . . . . . 6-14Activating the CICS/VSAM ECCR . . . . . . . . . . . . . . . . . . . . . . . . . . 6-25Activating and Loading the VSAM Batch ECCR . . . . . . . . . . . . . . . 6-31Activating the DB2 ECCR . . . . . . . . . . . . . . . . . . . . . . . . . . . . . . . . . 6-32
Where to Go from This Chapter . . . . . . . . . . . . . . . . . . . . . . . . . . . . . . . . 6-32
Informatica Corporation, Confidential and Proprietary Information
Chapter 6 Starting the MVS Components of EDP 6-1

Overview
Overview
Before you can set up your bulk or changed-data propagations for the DataMove and ChangeDataMove products (respectively), you must start certain EDP components as described in this chapter.
Starting Selected MVS Components of EDP
You started some of the EDP MVS components when you ran the installation JCL and associated procedures. However, other components require additional steps before you can start them. Table 6-1 describes the tasks required to start each component.
Table 6-1 Startup Procedures by Component (Part 1 of 3)
Component When to Start Startup Procedure
EDP agent The agent runs as an MVS started task. You must start the agent:• before submitting member $I69DLOP
to configure the EDP logger (as part of the installation process)
• if you intend to use multiple instances of the EDP agentEach EDP agent must have its own startup procedure
You must start the agent after each MVS initial program load (IPL). BMC Software recommends that you start the agent as part of your IPL procedure, or as soon after an IPL as possible.
The installation process creates a startup procedure that uses the started procedure name that you chose for the EDP agent (STARTID) during installation. (See Table A-7 on page A-26.) The default started procedure name is EDMA.In addition, a sample startup procedure (#AGENT) is located in HLQ.SAMPLIB. For more information about using the EDP agent startup procedure, see “Starting the EDP Agent” on page 4-12.
EDP logger1 The logger runs as a long-running started task.
The installation process creates a startup procedure that uses the started procedure name that you chose for the logger (LLGNAME) during installation. (See Table A-9 on page A-44.) The default started procedure name for the logger is EDML.In addition, a sample startup procedure (#LOGGER) is located in HLQ.SAMPLIB. For more information about using the EDP logger startup procedure, see “Starting the EDP Logger” on page 6-5.
1Starting these components applies only to the ChangeDataMove product.
Informatica Corporation, Confidential and Proprietary Information
6-2 EDP Installation Guide for MVS Components
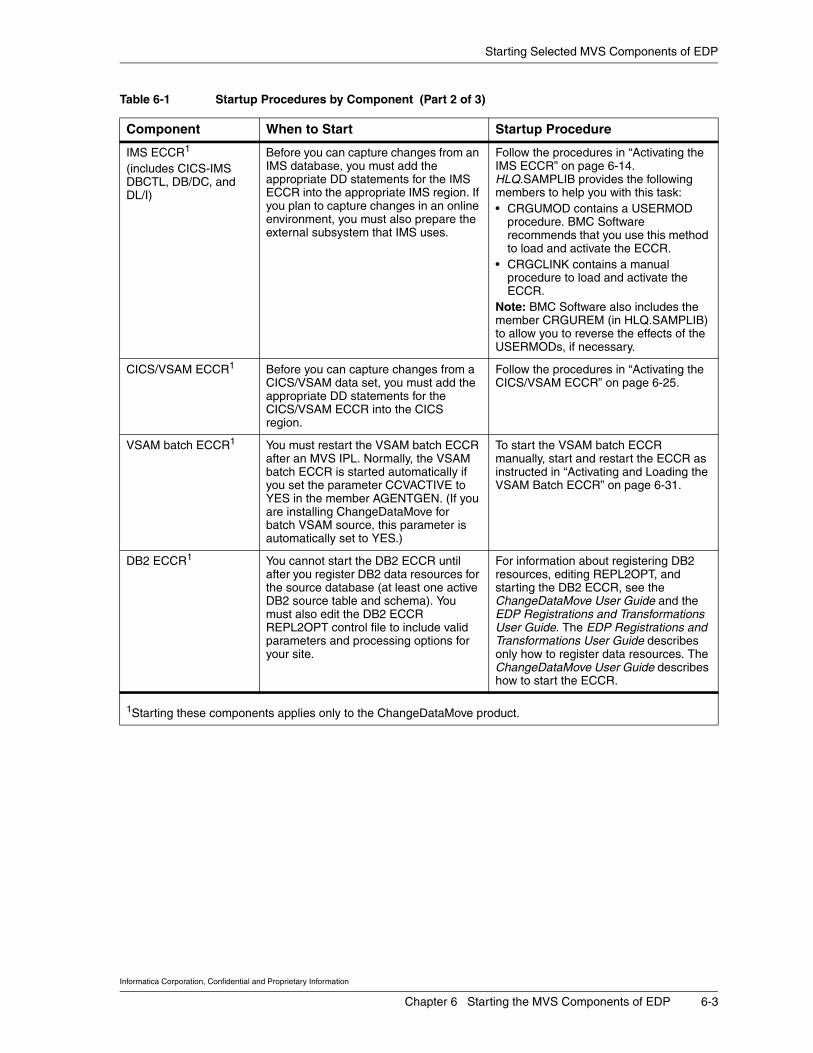
Starting Selected MVS Components of EDP
IMS ECCR1
(includes CICS-IMS DBCTL, DB/DC, and DL/I)
Before you can capture changes from an IMS database, you must add the appropriate DD statements for the IMS ECCR into the appropriate IMS region. If you plan to capture changes in an online environment, you must also prepare the external subsystem that IMS uses.
Follow the procedures in “Activating the IMS ECCR” on page 6-14. HLQ.SAMPLIB provides the following members to help you with this task:• CRGUMOD contains a USERMOD
procedure. BMC Software recommends that you use this method to load and activate the ECCR.
• CRGCLINK contains a manual procedure to load and activate the ECCR.
Note: BMC Software also includes the member CRGUREM (in HLQ.SAMPLIB) to allow you to reverse the effects of the USERMODs, if necessary.
CICS/VSAM ECCR1 Before you can capture changes from a CICS/VSAM data set, you must add the appropriate DD statements for the CICS/VSAM ECCR into the CICS region.
Follow the procedures in “Activating the CICS/VSAM ECCR” on page 6-25.
VSAM batch ECCR1 You must restart the VSAM batch ECCR after an MVS IPL. Normally, the VSAM batch ECCR is started automatically if you set the parameter CCVACTIVE to YES in the member AGENTGEN. (If you are installing ChangeDataMove for batch VSAM source, this parameter is automatically set to YES.)
To start the VSAM batch ECCR manually, start and restart the ECCR as instructed in “Activating and Loading the VSAM Batch ECCR” on page 6-31.
DB2 ECCR1 You cannot start the DB2 ECCR until after you register DB2 data resources for the source database (at least one active DB2 source table and schema). You must also edit the DB2 ECCR REPL2OPT control file to include valid parameters and processing options for your site.
For information about registering DB2 resources, editing REPL2OPT, and starting the DB2 ECCR, see the ChangeDataMove User Guide and the EDP Registrations and Transformations User Guide. The EDP Registrations and Transformations User Guide describes only how to register data resources. The ChangeDataMove User Guide describes how to start the ECCR.
Table 6-1 Startup Procedures by Component (Part 2 of 3)
Component When to Start Startup Procedure
1Starting these components applies only to the ChangeDataMove product.
Informatica Corporation, Confidential and Proprietary Information
Chapter 6 Starting the MVS Components of EDP 6-3

Starting Selected MVS Components of EDP
DB2, MS SQL Server, Oracle, Sybase, and UDB apply components for ChangeDataMove1
You cannot successfully start the apply components until you complete the following tasks:• Register source and target data
resources.• Create and materialize the target
database.• If necessary, define a startup
procedure for the component. (The procedure varies according to your system configuration for apply processing.)
Note: You do not need to materialize the target when you are using integration tables as targets.
For information about completing these tasks and starting the apply components, see the EDP Registrations and Transformations User Guide and the ChangeDataMove User Guide.
DB2, MS SQL Server, Oracle, Sybase, and UDB apply components for DataMove
You cannot successfully start the apply components until you complete the following tasks:• Register source and target data
resources.• Define a DataMove propagation.Note: You do not need to materialize the target when you are using integration tables as targets
For information about completing these tasks and starting the apply components, see the EDP Registrations and Transformations User Guide and the DataMove User Guide.
Table 6-1 Startup Procedures by Component (Part 3 of 3)
Component When to Start Startup Procedure
1Starting these components applies only to the ChangeDataMove product.
Informatica Corporation, Confidential and Proprietary Information
6-4 EDP Installation Guide for MVS Components

Starting the EDP Logger
Starting the EDP Logger
Summary: For each EDP logger subsystem, you must define a startup JCL procedure that specifies a logger, parameter data set, and restart data set names. You can then add the procedure to your system procedures library. For more information about the EDP logger and the log data sets, see the ChangeDataMove User Guide.
Step 1 Make a working copy of an EDP logger startup procedure:
• During installation, the Install System generates a startup procedure for the EDP logger. The procedure is located in the installation JCL library, and the member name is the started procedure name that you chose for the logger (LLGNAME) during installation. (See Table A-9 on page A-44.) The default started procedure name for the logger is EDML.
• You can also use the #LOGGER member of the HLQ.SAMPLIB library. However, this sample procedure does not contain any of the parameters that you specified during installation.
Step 2 Edit the working copy as required.
Table 6-2 on page 6-6 describes the JCL statements in this procedure. Figure 6-1 on page 6-7 provides an example.
BMC Software recommends that you assign the EDP logger a relatively high dispatching priority through SRM or WLM.
Step 3 Add the edited procedure to your system procedures library.
Step 4 Use the MVS START command to run the EDP logger as a started task.
Figure 6-2 on page 6-8 shows sample EDP messages that result from a successful startup of the EDP logger. These messages appear in the EDP message output file, which the system dynamically allocates. Figure 6-3 on page 6-8 shows sample JES messages that result from a successful startup of the EDP logger. The messages BMCEDM17250I and BMCEDM172675I indicate that you have successfully started the EDP logger.
Informatica Corporation, Confidential and Proprietary Information
Chapter 6 Starting the MVS Components of EDP 6-5

Starting the EDP Logger
Table 6-2 JCL Statements for EDP Logger Startup
JCL Statement Description
PROC Set LOGNAME equal to your EDP logger ID.
EXEC Specify the EDMLC000 program.The TIME parameter on the EXEC statement prevents the logger from timing out and ending abnormally. This parameter should be set to 1440 or NOLIMIT.
STEPLIB DD Include the EDP load library. If you added the load library to your system’s LNKLST concatenation, you do not need to add it to the STEPLIB.
EDMPARMS DD Specify the name of the user library (YOUR.USERLIB) that contains the EDMSDIR default options module and the logger options module (EDMUPARM) for the EDP logger that this procedure starts.
SYSPRINT DD Specify the output data set for MVS system messages.
ERDS01 DD Specify the data set name of the primary restart data set. Make sure that this name matches the name you used when you created this data set. For more information about restart data sets, see the ChangeDataMove User Guide.
ERDS02 DD Specify the data set name of the backup restart data set. Make sure that this name matches the name you used when you created this data set. For more information about restart data sets, see the ChangeDataMove User Guide.
Informatica Corporation, Confidential and Proprietary Information
6-6 EDP Installation Guide for MVS Components

Starting the EDP Logger
Figure 6-1 Sample Procedure to Start the EDP Logger (#LOGGER)
//???? PROC LOGNAME='????'//*-------------------------------------------------------------------*//* CHANGEDATAMOVE - EDM LOGGER STARTUP PROCEDURE//* TO USE THIS SAMPLE, YOU MUST COPY IT TO A SYSTEM PROCEDURE//* LIBRARY FROM WHICH STARTED TASK PROCEDURES ARE OBTAINED,//* SUCH AS SYS1.PROCLIB.//*-------------------------------------------------------------------*//* REPLACE THE FOLLOWING ITEMS WITH PROPER INSTALLATION VALUES//* 1. JCL DATA SET NAMES//* 2. REPLACE ???? WITH YOUR LOGGER NAME. USING THE LOGGER NAME AS A//* DATA SET NAME QUALIFIER PROVIDES A STANDARD TO INDICATE WHICH//* DATA SET BELONGS TO WHICH LOGGER.//*//* NOTE: BMC RECOMMENDS SPECIFYING TIME=NOLIMIT ON THE EXEC STATEMENT//* TO PREVENT THE LOGGER STARTED TASK FROM ABENDING DUE TO//* EXCESSIVE WAIT(ABEND 522) OR CPU CONSUMPTION(ABEND 322).//*-------------------------------------------------------------------*//* NOTE: THE CHANGEDATAMOVE INSTALLATION PROCESS BUILDS AN EXECUTABLE//* VERSION OF THIS JCL, ACCORDING TO INSTALLATION SPECIFICATIONS, AND//* PLACES IT INTO THE HLQ.JCL LIBRARY TO BE EXECUTED DURING PRODUCT//* INSTALLATION. THIS EXAMPLE IS PROVIDED PRIMARILY FOR REFERENCE.//*-------------------------------------------------------------------*//LOGGER EXEC PGM=EDMLC000,REGION=0M,TIME=NOLIMIT,PARM=&LOGNAME//STEPLIB DD DISP=SHR,DSN=HLQ.LOAD <=== CDM LOADLIB//EDMPARMS DD DISP=SHR,DSN=YOUR.USERLIB <=== EDMSDIR,EDMUPARM//ERDS01 DD DISP=OLD,DSN=YOUR.????.ERDS01 <=== PRI RESTART DSN//ERDS02 DD DISP=OLD,DSN=YOUR.????.ERDS02 <=== SEC RESTART DSN//SYSPRINT DD SYSOUT=*//SYSUDUMP DD SYSOUT=*//*-------------------------------------------------------------------*//*//* REFER TO SAMPLIB MEMBER TRACJCL FOR FURTHER//* INFORMATION ON TRACE AND DIAGNOSTIC DD STATEMENTS//* EDMTRACE DD SYSOUT=* (COMMON SERVICES TRACE)
Informatica Corporation, Confidential and Proprietary Information
Chapter 6 Starting the MVS Components of EDP 6-7

Starting the EDP Logger
Figure 6-2 Sample EDP Messages When You Start the EDP Logger
8:46:58.22 L O G S T A R T 8:46:58.20 BMCEDM172502I EDM LOGGER 1 EDML initialization in-progress product level V2.4.00 012/31/2000 8:47:05.52 BMCEDM172638I EDM Logger system timestamp for ERDS = 2000.160 14:03:34.298:47:34.48 BMCEDM172639I EDM Logger COPY 1 dsname=RDAKER2.VSAM.EDML.PRILOG.DS01, Startrba=000000000000,Endrba=000000707FFF8:47:34.48 BMCEDM172639I EDM Logger COPY 2 dsname=RDAKER2.VSAM.EDML.SECLOG.DS01, Startrba=000000000000,Endrba=000000707FFF8:47:35.51 BMCEDM172675I EDM Logger extended checkpoint complete Startrba=000000000000, Endrba=000000000168 at 2000.164 08:47:35.508:47:35.53 BMCEDM172811I XCF is in local mode only8:47:35.53 BMCEDM172818I Joined XCF group 'EDML' as member 'EDML'8:47:35.53 BMCEDM172500R EDM LOGGER 1 EDML -READY-8:47:36.03 BMCEDM172512I EDM LOGGER 1 EDML is now accepting data
Figure 6-3 Sample JES Messages When You Start the EDP Logger
STC07141 IEF695I START EDMLLOGR WITH JOBNAME EDMLIS ASSIGNED TO USER ++++++++STC07141 $HASP373 EDML STARTED STC07141 IEF403I EDML - STARTED - TIME=08.46.56STC07141 BMCEDM172502I EDM LOGGER 1 EDML initialization in-progress product level V2.4.00 12/31/2000STC07141 *65 BMCEDM172500R EDM LOGGER 1 EDML -READY-STC07141 BMCEDM172512I EDM LOGGER 1 EDML is now accepting data
Informatica Corporation, Confidential and Proprietary Information
6-8 EDP Installation Guide for MVS Components

Starting Pre-Log Merge
Starting Pre-Log Merge
Summary: Pre-log merge is a configuration of ChangeDataMove in which changes captured from multiple MVS images are logged to a single EDP logger. Use this procedure to start the pre-log merge components of the EDP products. For more information about log merge, see the ChangeDataMove User Guide. (Note that you should not use this procedure for DB2 sources.)
Step 1 Make working copies of the #RECEIVR and #SENDER members from HLQ.SAMPLIB.
Step 2 Edit the working members as required.
Table 6-3 describes the JCL statements in the #RECEIVR procedure. Figure 6-4 on page 6-10 provides an example.
Table 6-3 JCL Statements for the #RECEIVR Procedure
JCL Statement Description
EXEC Specify the EDMLRCV1 program. Set the TIME parameter to 1440 or NOLIMIT. Make sure that PARM is set to XCF.
STEPLIB DD Include the ChangeDataMove load library. If you added the load library to your system’s LNKLST concatenation, you do not need to add it to the STEPLIB.
EDMPARMS DD Specify the name of the user library (YOUR.USERLIB) that contains the EDMSDIR default options module.
SYSPRINT DD Specify the output data set for MVS system messages.
SYSUDUMP DD Specify the dump data set.
Informatica Corporation, Confidential and Proprietary Information
Chapter 6 Starting the MVS Components of EDP 6-9

Starting Pre-Log Merge
Figure 6-4 Sample Pre-Log Merge Receiver Job (#RECEIVR)
// JOB //*-------------------------------------------------------------------*//* CHANGEDATAMOVE - RECEIVE DATA THROUGH XCF FROM OTHER SYSTEMS IN //* THE SYSPLEX. //*-------------------------------------------------------------------*//* THE RECEIVER JOB RECEIVES DATA THROUGH XCF FROM OTHER SYSTEMS //* IN THE SYSPLEX. THE RECEIVER PASSES THE DATA TO THE LOGGER. THIS //* JOB MUST BE ON THE SYSTEM THE LOGGER EXECUTES ON. SENDER JOBS WILL//* TRANSMIT THE DATA FROM OTHER IMAGES IN THE SYSPLEX. //*-------------------------------------------------------------------*//* REPLACE THE FOLLOWING ITEMS WITH PROPER INSTALLATION VALUES //* 1. JCL DATA SET NAMES //*-------------------------------------------------------------------*//MLOG1 EXEC PGM=EDMLRCV1,PARM='XCF' //STEPLIB DD DISP=SHR,DSN=HLQ.LOAD <=== CDM LOADLIB //EDMPARMS DD DISP=SHR,DSN=YOUR.USERLIB <=== EDMSDIR,EDMUPARM //SYSPRINT DD SYSOUT=* //SYSUDUMP DD SYSOUT=* //*-------------------------------------------------------------------*
Step 3 After the logger starts successfully, start the receiver as a batch job or started task.
Step 4 Start the senders on the appropriate MVS images within the sysplex
Table 6-4 describes the JCL statements in the #SENDER procedure. Figure 6-5 on page 6-11 provides an example.
Table 6-4 JCL Statements for the #SENDER Procedure
JCL Statement Description
EXEC Specify the EDMLSND1 program.
STEPLIB DD Include the ChangeDataMove load library. If you added the load library to your system’s LNKLST concatenation, you do not need to add it to the STEPLIB.
EDMPARMS DD Specify the name of the user library (YOUR.USERLIB) that contains the EDMSDIR default options module.
SYSPRINT DD Specify the output data set for MVS system messages.
SYSUDUMP DD Specify the dump data set.
Informatica Corporation, Confidential and Proprietary Information
6-10 EDP Installation Guide for MVS Components

Starting Pre-Log Merge
Figure 6-5 Sample Pre-Log Merge Sender Job (#SENDER)
// JOB //*-------------------------------------------------------------------*//* CHANGEDATAMOVE - TRANSMITS DATA THROUGH XCF TO THE SYSTEM WHERE //* THE LOGGER RESIDES. //*-------------------------------------------------------------------*//* THE SENDER JOB TRANSMITS DATA THROUGH XCF TO THE SYSTEM WHERE //* THE LOGGER RESIDES. CAN BE STARTED ON ANY SYSTEM IN THE SYSPLEX //* WHERE THE LOGGER AND RECEIVER DO NOT EXIST. //*-------------------------------------------------------------------*//* REPLACE THE FOLLOWING ITEMS WITH PROPER INSTALLATION VALUES //* 1. JCL DATA SET NAMES //*-------------------------------------------------------------------*//MLOG1 EXEC PGM=EDMLSND1,PARM='XCF' //STEPLIB DD DISP=SHR,DSN=HLQ.LOAD <=== CDM LOADLIB //EDMPARMS DD DISP=SHR,DSN=YOUR.USERLIB <=== EDMSDIR,EDMUPARM //SYSPRINT DD SYSOUT=* //SYSUDUMP DD SYSOUT=* //*-------------------------------------------------------------------*
Informatica Corporation, Confidential and Proprietary Information
Chapter 6 Starting the MVS Components of EDP 6-11

Starting Post-Log Merge
Starting Post-Log Merge
Summary: Post-log merge is a configuration of ChangeDataMove that accommodates sites with multiple MVS images and multiple EDP loggers. This configuration includes a job that extracts logged data from the EDP loggers and merges the data chronologically for use by the apply process. Use this procedure to start the post-log merge components of the EDP products. For more information about log merge, see the ChangeDataMove User Guide.
Step 1 Make a working copy of the #POSTLOG member from HLQ.SAMPLIB.
Step 2 Edit the working copy as required.
Table 6-5 describes the JCL statements in the #POSTLOG procedure. Figure 6-6 on page 6-13 provides an example.
Step 3 After the logger starts successfully, run the job either as a started task or batch job
Table 6-5 JCL Statements for the #POSTLOG Procedure
JCL Statement Description
EXEC Specify the EDMLCTRD program. Set the TIME parameter to 1440 or NOLIMIT. Make sure that PARM is set to TRACEE. This setting ensures that tracing is not turned on.
STEPLIB DD Include the ChangeDataMove load library. If you added the load library to your system’s LNKLST concatenation, you do not need to add it to the STEPLIB.
EDMPARMS DD Specify the name of the user library (YOUR.USERLIB) that contains the EDMSDIR default options module.
ERDS0x DD The variable x represents 1 through 9, and the DD points to the primary restart data set of each logger being merged.
SYSPRINT DD Specify the output data set for MVS system messages.
SYSUDUMP DD Specify the dump data set.
Informatica Corporation, Confidential and Proprietary Information
6-12 EDP Installation Guide for MVS Components

Starting Post-Log Merge
Figure 6-6 Sample Post-Log Merge Job (#POSTLOG)
// JOB //*-------------------------------------------------------------------* //* CHANGEDATAMOVE - POST LOG MERGER FOR IMS/VSAM IN A SYSPLEX //*-------------------------------------------------------------------* //* WARNING: DO NOT PLACE THE SECONDARY ERDS IN THE JOB OR INCORRECT //* RESULTS WILL OCCUR. //*-------------------------------------------------------------------* //* REPLACE THE FOLLOWING ITEMS WITH PROPER INSTALLATION VALUES //* 1. JCL DATA SET NAMES //* 2. PRIMARY ERDS FROM EACH LOGGER //*-------------------------------------------------------------------* //READER EXEC PGM=EDMLCTRD,PARM='TRACEE' //STEPLIB DD DISP=SHR,DSN=HLQ.LOAD <=== CDM LOADLIB //EDMPARMS DD DISP=SHR,DSN=YOUR.USERLIB <=== EDMSDIR,EDMUPARM //ERDS01 DD DISP=SHR,DSN=YOUR.SYSTEM1.ERDS <=== ERDS OF SYSTEM 1 //ERDS02 DD DISP=SHR,DSN=YOUR.SYSTEM2.ERDS <=== ERDS OF SYSTEM 2 //ERDS03 DD DISP=SHR,DSN=YOUR.SYSTEM3.ERDS <=== ERDS OF SYSTEM 3 //SYSPRINT DD SYSOUT=* //SYSUDUMP DD SYSOUT=* //*-------------------------------------------------------------------*
Informatica Corporation, Confidential and Proprietary Information
Chapter 6 Starting the MVS Components of EDP 6-13

Activating the IMS ECCR
Activating the IMS ECCR
Summary: The IMS ECCR is the ChangeDataMove component that allows you to capture changes made to an IMS database. Before you can capture changes from the IMS source database, you must load the IMS ECCR into the appropriate IMS regions and activate the change-capture process. After the IMS ECCR captures the changes, they are available for propagation to a target database.
Note: This procedure applies equally to the following environments:
• CICS-IMS DBCTL• DB/DC• DL/I
Before You Begin
If your site does not have the BMC Software DATABASE INTEGRITY PLUS product installed, you must link-edit the DBICRYvr module with the DSPCRTR0 module in the IMS execution library (RESLIB). (The variable vr represents the version and release of the IMS system.) The DBICRYvr module provides an interface between IMS database recovery control (DBRC) and the ChangeDataMove repository services.
BMC Software recommends that you use a System Modification Program Extended (SMP/E) user modification (USERMOD) to link-edit DBICRYvr with DSPCRTR0. (BMC Software supplies the sample job CRGUMOD, which contains two USERMODs, in HLQ.SAMPLIB.) This method ensures that SMP/E links the appropriate modules when you apply future IMS maintenance to the DSPCRTR0 module. The USERMODs
• define the new module DBICRYvr and link DSPCRTR0 into it• replace the DSPCRTR0 load module with the DBICRT00 module that
BMC Software supplies
BMC Software also supplies DBICOPY, a job that copies the DATABASE INTEGRITY PLUS execution modules to the IMS RESLIB. ChangeDataMove requires these modules.
Informatica Corporation, Confidential and Proprietary Information
6-14 EDP Installation Guide for MVS Components

Activating the IMS ECCR
BMC Software also provides CRGCLINK, a sample JCL job to link-edit DBICRYvr with DSPCRTR0 manually (described on page 6-15). However, BMC Software recommends that you use CRGUMOD instead, to take advantage of the benefits that SMP/E offers.
Note: To reverse the effects of the USERMODs (if necessary), BMC Software includes the member CRGUREM in HLQ.SAMPLIB. CRGUREM is a sample JCL file that contains SMP/E RESTORE and REJECT commands.
Before you activate the IMS ECCR, review the following additional considerations:
• If you activate the ECCR and open a database or file before you activate the data-resource registrations, you must close (DBR) and reopen (START) the database or file to start capturing changes.
• HLQ refers to the high-level qualifier that you chose for the EDP product libraries during installation.
• YOUR refers to the high-level qualifier you that chose for the user library during installation.
• For additional information about managing this ECCR, see the ChangeDataMove User Guide.
Note: Steps 1–5 of the following procedure require that you allocate certain data sets to specific DDs. Refer to Figure 6-7 on page 6-18 for an example of the necessary JCL statements. The references in parentheses for each DD point to the applicable step number in the procedure.
To Activate the IMS ECCR
Step 1 Depending on whether you have the BMC Software CONCURRENT REORG product installed, proceed as follows:
• If CONCURRENT REORG is installed, verify that the installed version is the same as or later than that required by the EDP products. (See Table 2-18 on page 2-17 for details.) If your installed version is earlier than the recommended version, you must upgrade.
Informatica Corporation, Confidential and Proprietary Information
Chapter 6 Starting the MVS Components of EDP 6-15

Activating the IMS ECCR
• If CONCURRENT REORG is not installed, modify the following procedures and JCL to include the HLQ.CRG.LOAD library:
— IMS control region— DBCTL region— DL/I batch procedures and jobs
When you modify the procedures, the HLQ.CRG.LOAD library must precede the IMS RESLIB in the concatenation. (Refer to Figure 6-7 on page 6-18.)
Step 2 Complete this step if you have DATABASE INTEGRITY PLUS installed:
2.A If DATABASE INTEGRITY PLUS is installed, verify that the installed version is the same as or later than that required by the EDP products. (See Table 2-18 on page 2-17 for details.)
2.B If your installed version is earlier than the recommended version, you must upgrade it. Then, skip to Step 4.
Step 3 Complete this step if you do not have the DATABASE INTEGRITY PLUS product installed:
3.A Edit and run member CRGUMOD in the HLQ.SAMPLIB library.
CRGUMOD contains JCL for an SMP/E-type USERMOD to IMS. Instructions for editing the member are in its header text.
Note: Although BMC Software does not recommend doing so, you can manually link-edit the modules by editing and running member CRGCLINK in the HLQ.SAMPLIB library. Instructions for editing the member are in its header text.
3.B Perform one of the following tasks:
• Modify the DBRC region procedure and JCL to include the HLQ.CRG.LOAD library. The HLQ.CRG.LOAD library must precede the IMS RESLIB in the concatenation.
• Run member DBICOPY in the HLQ.SAMPLIB library. DBICOPY copies the DATABASE INTEGRITY PLUS modules to the IMS RESLIB. ChangeDataMove requires these modules.
Note: See Figure 6-7 on page 6-18 for a sample of the required JCL.
Informatica Corporation, Confidential and Proprietary Information
6-16 EDP Installation Guide for MVS Components

Activating the IMS ECCR
Step 4 Add an EDMPARMS DD statement to the following procedures. Refer to Figure 6-7 on page 6-18.
• IMS control region• DBCTL region• DBRC region• DL/I batch procedures and jobs
The EDMPARMS DD statement references the EDP user library (YOUR.USERLIB) that contains EDMSDIR. An example follows:
//EDMPARMS DD DISP=SHR,DSN=YOUR.USERLIB
Step 5 Perform one of the following tasks, based on the MVS requirements and standard operating procedures at your site:
• Add the HLQ.LOAD library to the STEPLIB concatenation of the following procedures:
— IMS control region— DBCTL region— DBRC region— all DL/I batch jobs
• Include the modules from HLQ.LOAD in a library that is already contained in the STEPLIB concatenation of the following procedures:
— IMS control region— DBCTL region— DBRC region— all DL/I batch jobs
Note: If you have included the modules from the HLQ.LOAD in a library that is already contained in the STEPLIB concatenation of the DL/I batch jobs, you can stop the ECCR from capturing changes for a specific job. To do so, add the following statement to that job:
//EDMNOCAP DD DUMMY
Informatica Corporation, Confidential and Proprietary Information
Chapter 6 Starting the MVS Components of EDP 6-17

Activating the IMS ECCR
• Add the HLQ.LOAD library to the system LNKLST. EDMSDIR must also be available in a library that is in the system LNKLST.
Warning! BMC Software recommends that this EDMSDIR contain the option CCERR=CONT. This is recommended because when EDP software is in the linklist, any access to any IMS database will cause EDP software to get control. If CCERR=ABEND is coded in this EDMSDIR, IMS access will fail if the ChangeDataMove environment is not correct (for example, if the EDP agent is not active). If you still want to have the effect of CCERR=ABEND, you will need to have an EDMPARMS DD in any batch job that updates IMS files to be captured.
Note: If you have added the HLQ.LOAD library to the system LNKLST, you can stop the ECCR from capturing changes from a source connected with a specific job. To stop capturing changes from the source, add the following statement to its related job:
//EDMNOCAP DD DUMMY
Figure 6-7 Sample JCL for Data Set Allocations in Steps 1–5.
IMS CTL REGION //STEPLIB DD DISP=SHR,DSN=HLQ.CRG.LOAD (step 1)// DD DISP=SHR,DSN=HLQ.LOAD (step 5)// DD DISP=SHR,DSN=IMSVS.RESLIB //EDMPARMS DD DISP=SHR,DSN=YOUR.USERLIB (step 4)
DBCTL REGION//STEPLIB DD DISP=SHR,DSN=HLQ.CRG.LOAD (step 1)// DD DISP=SHR,DSN=HLQ.LOAD (step 5)// DD DISP=SHR,DSN=IMSVS.RESLIB //EDMPARMS DD DISP=SHR,DSN=YOUR.USERLIB (step 4)
DBRC REGION//STEPLIB DD DISP=SHR,DSN=HLQ.CRG.LOAD (step 3)// DD DISP=SHR,DSN=HLQ.LOAD (step 5)// DD DISP=SHR,DSN=IMSVS.RESLIB//EDMPARMS DD DISP=SHR,DSN=YOUR.USERLIB (step 4)
DL/1 Batch Jobs//STEPLIB DD DISP=SHR,DSN=HLQ.CRG.LOAD (step 1)// DD DISP=SHR,DSN=HLQ.LOAD (step 5)// DD DISP=SHR,DSN=IMSVS.RESLIB //EDMPARMS DD DISP=SHR,DSN=YOUR.USERLIB (step 4)
Informatica Corporation, Confidential and Proprietary Information
6-18 EDP Installation Guide for MVS Components

Activating the IMS ECCR
Step 6 If you plan to use ChangeDataMove in one of the supported IMS online environments (MPP or BMP, or CICS-IMS DBCTL), prepare the external subsystem.
6.A Add the EXEC parameter, SSM=, to either the DFSPBxxx member (where xxx is your IMS procedure library suffix) or the IMS JCL.
6.B Add a member that defines the external subsystem to the IMS procedure library.
The member name must be the four-character IMS system ID followed by the value of the SSM parameter.
You must not include the EDP subsystem in any SSM member that will be used by DL/I batch procedures and jobs.
If you also specify the SSM parameter in the MPP or BMP regions, be sure to change the members that contain the external subsystem definitions for both the control region and the dependent regions.
Note: If you use the SSM parameter in the IMS control region, all the dependent regions (MPP, and BMP) will have access to all the subsystems that are defined in the member. If you plan to use SSM parameter in both the IMS control region and the dependent region, then you must change both SSM members because the dependent region will have access only to the subsystems that are defined in both members.
6.C Within this member, use the positional fields described in Table 6-6 on page 6-20 to define the external subsystem.
Use commas to separate the parameters that you specify.
Informatica Corporation, Confidential and Proprietary Information
Chapter 6 Starting the MVS Components of EDP 6-19

Activating the IMS ECCR
Table 6-6 Fields Used to Define an IMS External Subsystem (Part 1 of 2)
Parameter Description
SSN a required alphanumeric MVS subsystem name of the external subsystem that will be attachedThis name can be up to 4 characters long and is specified by your installation. The SSN• must be identified to MVS during MVS system generation• must match the EDP agent name (the value of the AgentID
configuration parameter)
LIT a required alphanumeric parameter, up to 4 characters long, that specifies the language interface tokenThe language interface provides routing information to IMS and also contains external subsystem-dependent information for the IMS applications. IMS provides a language interface module named DFSLI000 that uses the token value SYS1. If you do not want to use this supplied language interface module, or want to use more than one (for example, to access test and production subsystems), assemble and link your user-defined language interface, with a token value other than SYS1, into an installation-selected library. For EDP, the language interface token must match the EDP agent name (the value of the AgentID configuration parameter). Consequently, SSN and LIT must have the same value.
ESMT a required alphanumeric parameter, up to 8 characters long, that specifies the name of the external subsystem module tableThis table is defined in the external subsystem and specifies the external subsystem modules IMS must load, and the work areas that IMS must create. It is the responsibility of the external subsystem to create the external subsystem module table and to make the name of that table known to the IMS user who will define these PROCLIB member entries.For ChangeDataMove, this table must be EDMCESMT.
RTT an optional alphanumeric parameter, up to 8 characters long, that specifies the name of the resource translation tableThis table maps an application program name to the name used by the external subsystem for the entity that defines the resources needed by the application (if these names are not the same). The resource translation table need only be used if IMS and the external subsystem use different names for the same resource. It is the responsibility of the external subsystem to create the resource translation table and to make the name of that table known to the IMS user who defines these PROCLIB member entries.ChangeDataMove does not use this field. Because the fields are positional, you must include a comma as a placeholder for this field. (See Figure 6-8 on page 6-22.)
Informatica Corporation, Confidential and Proprietary Information
6-20 EDP Installation Guide for MVS Components

Activating the IMS ECCR
Figure 6-8 on page 6-22 shows an example of the fields used to define the external subsystem for ChangeDataMove.
REO an optional 1-character region error option codeThe option specified here determines the action IMS takes when an application program issues a request for external subsystem services before connection to the external subsystem is complete or if problems are encountered with the external subsystem. IMS does not use these values, but passes them to the external subsystem for its use. The possible values for this command are: • R
The application program receives a return code indicating that the request for external subsystem services has failed. If no other value is specified for the region error option, then R is the default.
• Q IMS abnormally terminates the application program with an abend code of U3051. IMS then places the transaction on a queue to be processed when the connection to the external subsystem is established. After a transaction is on this queue, it can be recovered across warm starts and emergency restarts of IMS.
• A IMS abnormally terminates the application program with an abend code of U3047 and discards the transaction input.
For ChangeDataMove, you must specify this field as A.
CRC an optional 1-character command recognition character that allows external subsystem commands from IMS terminals or automated operator interface (AOI) applications Any EBCDIC value except / is permitted. The character / is reserved for IMS. You can issue external subsystem commands by entering /SSR, followed by the command recognition character specified here, followed by the external subsystem command. When IMS receives a command in this format, it routes that command to the external subsystem for processing. For additional information on the command, see the description of /SSR in the IMS/ESA Operator's Reference. Note: The external subsystem may require IMS user IDs and LTERM names to allow authorization for issuing external subsystem commands. Refer to the external subsystem documentation for information on command authorization requirements.There are four IMS external subsystem commands that you can use if you specify a CRC. The commands are• ABORT• CONTINUE• STAT• STATWTOFor information regarding the use of these commands, refer to Appendix D, “Working with ECCRs” in the ChangeDataMove User Guide.
Table 6-6 Fields Used to Define an IMS External Subsystem (Part 2 of 2)
Parameter Description
Informatica Corporation, Confidential and Proprietary Information
Chapter 6 Starting the MVS Components of EDP 6-21

Activating the IMS ECCR
Figure 6-8 Sample Member to Define an External Subsystem
EDMA,EDMA,EDMCESMT,,A,X
Step 7 For the MPP or BMP environments, populate a DFSESL DD statement in the appropriate IMS region.
The DFSESL DD statement points to the library that contains your external subsystem module. The statement must contain at least the IMS library and the HLQ.LOAD load library. All libraries in the DFSESL concatenation must be APF-authorized.
Note: You do not need to add a DFSESL DD statement for the EDP user library (YOUR.USERLIB).
Use one or more of the following methods to populate a DFSESL DD statement. The methods are listed in order of search, and ChangeDataMove concatenates the values that it finds.
• Include a DFSESL DD statement in the IMS dependent region (in all MPP or BMP JCL that updates a database that is included in the change-capture process).
• Include a DFSESL DD statement in the IMS control region JCL. If a DFSESL DD statement does not already exist in the IMS dependent region or control region, ChangeDataMove allocates one for you.
• If during installation, you defined the ESLLIB parameter for the EDMSDIR default options module, verify that the specified libraries for the parameter are correct.
Note: If you change EDMSDIR, you must reassemble and relink the module. You can edit and run the #ASMDIR sample procedure in HLQ.SAMPLIB to accomplish this task. For the changes to take effect, you must also stop and restart any EDP components that are running.
As an example, assume that you have the following statement in your control region:
//DFSESL DD DSN=IMSVS.R51.RESLIB,DISP=SHR
If you include ESLLIB=(HLQ.LOAD) in your EDMSDIR specifications, ChangeDataMove concatenates this information to produce the following DFSESL DD statement:
Informatica Corporation, Confidential and Proprietary Information
6-22 EDP Installation Guide for MVS Components

Activating the IMS ECCR
//DFSESL DD DSN=IMSVS.R51.RESLIB,DISP=SHR// DD DSN=HLQ.LOAD,DISP=SHR
Step 8 Start your IMS subsystem.
Each time the IMS ECCR starts, ChangeDataMove generates a report with message number BMCEDM172852I. The report lists the default options that are in effect.
If you run the IMS ECCR in an online environment (MPP or BMP), the report also contains allocation options for the DFSESL DD statement.
Step 9 Check the system messages to verify that you activated the IMS ECCR properly.
9.A Look for the following message in the DBRC control region of the JESMSGLG SYSOUT data set:
18.42.26 STC01345 BMC2700I NO VALID DBI PASSWORD FOUND18.42.26 STC01345 BMC44001I DI+ INITIALIZATION COMPLETE18.42.26 STC01345 BMC44008I DI+ LABEL PROCESSING SUSPENDED18.42.27 STC01345 DFS3613I - DRC TCB INITIALIZATION COMPLETE IM95
9.B Look for the following messages in the IMS control region of the JESMSGLG SYSOUT data set:
18.43.03 STC01341 *DFS0800I AWAITING NOTIFICATION FROM SUBSYS EDM1 IM9518.43.07 STC01341 BMC90489W CHANGE RECORDING FACILITY COMPONENT NOT INSTALLED18.43.07 STC01341 BMC90489I CHANGE RECORDING FACILITY INITIALIZATION COMPLETED18.43.07 STC01341 F OLSI95CR,SSNOTIM95IA95EDM1
Informatica Corporation, Confidential and Proprietary Information
Chapter 6 Starting the MVS Components of EDP 6-23

Activating the IMS ECCR
9.C Look for messages similar to the following messages in the IMS control region of the EDMMSG SYSOUT data set:
12/31/2000 E D M M E S S A G E L O G PAGE 1
18:43:06.52 L O G S T A R T18:43:06.45 BMCEDM172852I Options in effect:18:43:06.45 Load Library containing EDMSDIR . . . . . : IMSVS.EDM.USERLIB18:43:06.45 EDMSDIR assembly date/time. . . . . . . . : 20000331 10.1718:43:06.45 Product distribution date . . . . . . . . : 2000123118:43:06.45 Product distribution level. . . . . . . . : 2.4.0018:43:06.45 Agent Id . . . . . . . . . . . . . . . . : EDMA18:43:06.45 Logger Id . . . . . . . . . . . . . . . . : EDML18:43:06.46 SYSOUT class . . . . . . . . . . . . . . : *18:43:06.46 Action if ECCR error encountered . . . . : Continue18:43:06.81 BMCEDM172818I Joined XCF group 'EDML' as member 'IM95'18:43:07.16 BMCEDM172841I EDM ECCR IM95 connected to EDM Logger EDML, Log RBA=X'000000003CCC'18:43:07.88 BMCEDM172852I DFSESL DD allocation options:18:43:07.88 DSNs to allocate to DFSESL DD. . . . . . : IMSVS.RESLIB18:43:07.88 : IMSVS.EDM.LOAD
Informatica Corporation, Confidential and Proprietary Information
6-24 EDP Installation Guide for MVS Components

Activating the CICS/VSAM ECCR
Activating the CICS/VSAM ECCR
Summary: To use the CICS/VSAM ECCR, you must load the ECCR into the appropriate CICS region or regions and activate the CICS/VSAM change-capture process with a CICS transaction or via PLTPI entry.
Before You Begin
Before you activate the CICS/VSAM ECCR, review the following considerations:
• If you specified CCERR=ABEND in the EDP default options and the CICS/VSAM ECCR encounters a serious error or abnormally ends (abends) during initialization, the ECCR immediately terminates the CICS region to prevent loss of data. This process aborts current tasks and backs out in-flight transactions. The ECCR operates as if you had issued the CICS command CEMT PERFORM SHUTDOWN IMMEDIATE. This action ensures data replication integrity. For more information about the CCERR option, see “Default Options (EDMSDIR)” on page A-26.
• If you activate the ECCR and open a file before you activate the data-resource registrations, you must close and reopen the file to start capturing changes.
• In a CICS/MRO environment, you must load the CICS/VSAM ECCR into each CICS region that owns the VSAM files from which you will capture changes.
• HLQ refers to the high-level qualifier that you chose for the EDP product libraries during installation.
Informatica Corporation, Confidential and Proprietary Information
Chapter 6 Starting the MVS Components of EDP 6-25

Activating the CICS/VSAM ECCR
• You must define and open the CSMT queue. (CSMT is a file used for sending messages within CICS. The MVS equivalent is SYSLOG.)
Warning! If you have programs that enable either the XFCREQ or XFCREQC exit, you must initialize those programs after the ECCR initialization program. Otherwise, if these exits were used for expansion or compression, the ECCR would capture compressed records, which would cause the transformation to fail.
In this case, after you initialize the XFCREQ or XFCREQC exits, do not use the TERM or INIT functions of the EDMC transaction to terminate and reinitialize the ECCR. Doing so would reverse the sequence in which the ChangeDataMove-supplied XFCREQ or XFCREQC exits get control, with respect to the exits already in control.
To Activate the CICS/VSAM ECCR
Step 1 Ensure that you are using a supported version of CICS and that any prerequisite CICS maintenance has been applied.
See “Software Requirements” on page 2-5 for information.
Step 2 Modify your CICS JCL.
2.A Add the HLQ.LOAD library to the STEPLIB and DFHRPL DD statements.
Note: If you added the load library to your system’s LNKLST concatenation, you do not need to add it to the STEPLIB statement (but you do need to add it to the DFHRPL DD
statement).
2.B Add an EDMPARMS DD statement to the JCL. The EDMPARMS DD statement references the EDP user library (YOUR.USERLIB). An example follows:
//EDMPARMS DD DISP=SHR,DSN=YOUR.USERLIB
Step 3 Modify the CICS startup procedures.
Informatica Corporation, Confidential and Proprietary Information
6-26 EDP Installation Guide for MVS Components

Activating the CICS/VSAM ECCR
Add the module name EDMKOPER to the second phase of the PLT initialization list (PLTPI), so that the EDP products are initialized during the third stage of CICS initialization.
Alternatively, you can manually activate the CICS/VSAM ECCR by entering the command EDMC INIT.
Note: BMC Software recommends that you add the module name EDMKOPER to the initialization list, rather than manually activating the CICS/VSAM ECCR with EDMC INIT. This is particularly important in a production environment to avoid losing any change captures.
Step 4 Verify that each CICS region that connects to ChangeDataMove uses a unique connection identifier.
You must not change this connection identifier unless you cold-start CICS. The default identifier is the CICS SYSID (specified in the SIT SYSIDNT parameter). To change the connection identifier, specify the following statement in the SIT or SIT override:
INITPARM=(EDMKOPER=option)
Replace option with one of the following options:
Step 5 Locate the #CICSV3, #CICSV4, #CICSV51, or #CICSV52 member in the HLQ.SAMPLIB library, and copy the appropriate member to a working library. Refer to Figure 6-9 on page 6-28 through Figure 6-12 on page 6-29 to determine which sample applies to your level of CICS.
Step 6 Edit the copy as required for your site.
Use DFHCSDUP or RDO to add the ChangeDataMove programs and transaction to the processing program table (PPT) and program control table (PCT). Figure 6-9 through Figure 6-12 (starting on page page 6-28) provide examples.
Option Description
*SYSID uses the CICS SYSID
*JOBNAME uses the job name
*APPLID uses the VTAM ACB name
up to 8 characters uses this group of characters
Informatica Corporation, Confidential and Proprietary Information
Chapter 6 Starting the MVS Components of EDP 6-27

Activating the CICS/VSAM ECCR
Figure 6-9 Sample Programs and Transaction for CICS Version 3 (#CICSV3)
*********************************************************************** * CHANGE THE GROUP(????????) NAME TO CONFORM TO YOUR SHOP STANDARDS * *********************************************************************** DEFINE PROGRAM(EDMKOPER) DATALOCATION(ANY) EXECKEY(CICS) LANGUAGE(ASSEMBLER) GROUP(????????) DEFINE PROGRAM(EDMKCT33) DATALOCATION(BELOW) EXECKEY(CICS) LANGUAGE(ASSEMBLER) GROUP(????????) DEFINE PROGRAM(EDMKIO33) DATALOCATION(ANY) EXECKEY(CICS) LANGUAGE(ASSEMBLER) GROUP(????????) DEFINE PROGRAM(EDMKFE33) DATALOCATION(ANY) EXECKEY(CICS) LANGUAGE(ASSEMBLER) GROUP(????????) DEFINE PROGRAM(EDMKTRUE) DATALOCATION(ANY) EXECKEY(CICS) LANGUAGE(ASSEMBLER) GROUP(????????) DEFINE PROGRAM(EDMCCICS) DATALOCATION(ANY) EXECKEY(CICS) LANGUAGE(ASSEMBLER) GROUP(????????) DEFINE TRANSACTION(EDMC) PROGRAM(EDMKOPER) TASKDATALOC(ANY) TASKDATAKEY(CICS) GROUP(????????)
Figure 6-10 Sample Programs and Transaction for CICS Version 4 (#CICSV4)
*********************************************************************** * CHANGE THE GROUP(????????) NAME TO CONFORM TO YOUR SHOP STANDARDS * *********************************************************************** DEFINE PROGRAM(EDMKOPER) DATALOCATION(ANY) EXECKEY(CICS) LANGUAGE(ASSEMBLER) GROUP(????????) DEFINE PROGRAM(EDMKCT41) DATALOCATION(BELOW) EXECKEY(CICS) LANGUAGE(ASSEMBLER) GROUP(????????) DEFINE PROGRAM(EDMKIO41) DATALOCATION(ANY) EXECKEY(CICS) LANGUAGE(ASSEMBLER) GROUP(????????) DEFINE PROGRAM(EDMKTRUE) DATALOCATION(ANY) EXECKEY(CICS) LANGUAGE(ASSEMBLER) GROUP(????????) DEFINE PROGRAM(EDMCCICS) DATALOCATION(ANY) EXECKEY(CICS) LANGUAGE(ASSEMBLER) GROUP(????????) DEFINE TRANSACTION(EDMC) PROGRAM(EDMKOPER) TASKDATALOC(ANY) TASKDATAKEY(CICS) GROUP(????????)
Informatica Corporation, Confidential and Proprietary Information
6-28 EDP Installation Guide for MVS Components

Activating the CICS/VSAM ECCR
Figure 6-11 Sample Programs and Transaction for CICS/TS Version 1.1 (#CICSV51)
*********************************************************************** * CHANGE THE GROUP(????????) NAME TO CONFORM TO YOUR SHOP STANDARDS * *********************************************************************** DEFINE PROGRAM(EDMKOPER) DATALOCATION(ANY) EXECKEY(CICS) LANGUAGE(ASSEMBLER) GROUP(????????) DEFINE PROGRAM(EDMKCT51) DATALOCATION(BELOW) EXECKEY(CICS) LANGUAGE(ASSEMBLER) GROUP(????????) DEFINE PROGRAM(EDMKIO51) DATALOCATION(ANY) EXECKEY(CICS) LANGUAGE(ASSEMBLER) GROUP(????????) DEFINE PROGRAM(EDMKTRUE) DATALOCATION(ANY) EXECKEY(CICS) LANGUAGE(ASSEMBLER) GROUP(????????) DEFINE PROGRAM(EDMCCICS) DATALOCATION(ANY) EXECKEY(CICS) LANGUAGE(ASSEMBLER) GROUP(????????) DEFINE TRANSACTION(EDMC) PROGRAM(EDMKOPER) TASKDATALOC(ANY) TASKDATAKEY(CICS) GROUP(????????)
Figure 6-12 Sample Programs and Transaction for CICS/TS Versions 1.2 and 1.3 (#CICSV52)
*********************************************************************** * CHANGE THE GROUP(????????) NAME TO CONFORM TO YOUR SHOP STANDARDS * *********************************************************************** DEFINE PROGRAM(EDMKOPER) DATALOCATION(ANY) EXECKEY(CICS) LANGUAGE(ASSEMBLER) GROUP(????????) DEFINE PROGRAM(EDMKCT52) DATALOCATION(BELOW) EXECKEY(CICS) LANGUAGE(ASSEMBLER) GROUP(????????) DEFINE PROGRAM(EDMKIO52) DATALOCATION(ANY) EXECKEY(CICS) LANGUAGE(ASSEMBLER) GROUP(????????) DEFINE PROGRAM(EDMKTRUE) DATALOCATION(ANY) EXECKEY(CICS) LANGUAGE(ASSEMBLER) GROUP(????????) DEFINE PROGRAM(EDMCCICS) DATALOCATION(ANY) EXECKEY(CICS) LANGUAGE(ASSEMBLER) GROUP(????????) DEFINE TRANSACTION(EDMC) PROGRAM(EDMKOPER)TASKDATALOC(ANY) TASKDATAKEY(CICS) GROUP(????????)
Informatica Corporation, Confidential and Proprietary Information
Chapter 6 Starting the MVS Components of EDP 6-29

Activating the CICS/VSAM ECCR
Step 7 Start the CICS region. (If you did not add the module name EDMKOPER to the initialization list, you must manually activate the CICS/VSAM ECCR by using the command EDMC INIT.)
Each time the CICS/VSAM ECCR starts, ChangeDataMove generates a report with message number BMCEDM172852I. The report contains the default options that are in effect, as described in Figure 6-13.
Figure 6-13 Sample JCL for Log Start Report
L O G S T A R T BMCEDM172852I Options in effect: Load Library containing EDMSDIR. . . . . : EDM.QA.APD1.USERLIB EDMSDIR assembly date/time . . . . . . . : 20000526 15.18 Product distribution date. . . . . . . . : 20001231 Product distribution level . . . . . . . : 2.4.00 Agent Id . . . . . . . . . . . . . . . . : EDMA Logger Id. . . . . . . . . . . . . . . . : EDML SYSOUT class . . . . . . . . . . . . . . : * Action if ECCR error encountered . . . . : Continue
Informatica Corporation, Confidential and Proprietary Information
6-30 EDP Installation Guide for MVS Components

Activating and Loading the VSAM Batch ECCR
Activating and Loading the VSAM Batch ECCR
Summary: To use the VSAM batch ECCR, you must activate the ECCR and make it available to batch jobs. You can activate the VSAM batch ECCR either automatically (whenever you start the EDP agent) or manually from the MVS console command line.
To Activate the VSAM Batch ECCR Automatically
To activate the VSAM batch ECCR whenever your EDP agent starts, set the EDP agent configuration parameter CCVACTIVE to YES before you start the EDP agent. For more information about EDP agent configuration, see “Starting the EDP Agent” on page 4-12.
To Activate the VSAM Batch ECCR Manually
Enter the following command to activate the ECCR:
cmd_prefix START VSAMECCR
For cmd_prefix, enter the MVS command prefix for EDP agent commands.
Note: Specifying this command for one EDP agent affects all EDP agents on the same MVS system.
Making the VSAM Batch ECCR Available to Batch Jobs
To make the VSAM batch ECCR available to batch jobs, you can perform either of the following tasks:
• Add the HLQ.LOAD library to the STEPLIB DD statement in every job that updates the VSAM files to be captured.
Note: If the HLQ.LOAD library does not contain EDMSDIR, you must add an EDMPARMS DD statement to these jobs. The EDMPARMS DD statement references the EDP user library (YOUR.USERLIB) that contains EDMSDIR. An example follows:
//EDMPARMS DD DISP=SHR,DSN=YOUR.USERLIB
Informatica Corporation, Confidential and Proprietary Information
Chapter 6 Starting the MVS Components of EDP 6-31

Where to Go from This Chapter
• Add the HLQ.LOAD library to the system LNKLST. EDMSDIR must also be available in a library that is in the system LNKLST.
Warning! BMC Software recommends that this EDMSDIR contain the option CCERR=CONT. This is recommended because when EDP software is in the linklist, any open of any VSAM data set will cause EDP software to get control. If CCERR=ABEND is coded in this EDMSDIR, VSAM opens will fail if the ChangeDataMove environment is not correct (for example, if the EDP agent is not active). If you still want to have the effect of CCERR=ABEND, you will need to have an EDMPARMS DD in any batch job that updates VSAM files to be captured.
Note: If you have added the HLQ.LOAD library to the system LNKLST, you can stop the ECCR from capturing changes from a source connected with a specific job. To stop capturing changes from the source, add the following statement to its related job:
//EDMNOCAP DD DUMMY
Activating the DB2 ECCR
Refer to “Starting the Change-Capture Component for a DB2 Source” in Chapter 6 of the ChangeDataMove User Guide for the procedure to start the DB2 ECCR.
Where to Go from This Chapter
After completing the installation of the EDP products, you may proceed to plan your propagations. Refer to Chapter 2, “Planning the Propagation,” in the EDP Registrations and Transformations User Guide.
Informatica Corporation, Confidential and Proprietary Information
6-32 EDP Installation Guide for MVS Components

62
A
Appendix A Installation Worksheets
Use the worksheets to collect the information you will need to install the EDP products. The installation procedures in Chapter 3, “Using the Install System to Generate the Installation Batch Jobs” refer you to these worksheets to help you complete the ISPF panels. To help you during the actual installation, the worksheets
• follow the same flow as the installation panels • group information into related sets of information categories
Each worksheet shows all or part of the corresponding installation panels with sample responses. Record your own responses in the Option Choice column. In addition, some worksheet entries contain installation notes that further describe events or conditions related to the actual installation. These installation notes differ from other notes in that they only pertain to fields on the installation panels. BMC Software recommends that you review the installation procedures thoroughly before you begin the installation.
Note: The worksheets do not describe every field in the installation panels. Press F1 during installation for complete panel information.
General Installation and User Options . . . . . . . . . . . . . . . . . . . . . . . . . . .A-2Tape Unload Options . . . . . . . . . . . . . . . . . . . . . . . . . . . . . . . . . . . . . . . .A-8Data Set Options . . . . . . . . . . . . . . . . . . . . . . . . . . . . . . . . . . . . . . . . . . . .A-11DB2 and MVS System Options . . . . . . . . . . . . . . . . . . . . . . . . . . . . . . . .A-13Security Options . . . . . . . . . . . . . . . . . . . . . . . . . . . . . . . . . . . . . . . . . . . .A-18DB2 Options for Target and Source . . . . . . . . . . . . . . . . . . . . . . . . . . . . .A-22Default Options (EDMSDIR) . . . . . . . . . . . . . . . . . . . . . . . . . . . . . . . . . .A-26EDP Agent Control Statements (AGENTCTL) . . . . . . . . . . . . . . . . . . . .A-40EDP Logger Parameters (EDMUPARM) . . . . . . . . . . . . . . . . . . . . . . . . .A-44DB2 Options for Target Object/Storage Verification . . . . . . . . . . . . . . . .A-50DB2 Options for Source Object/Storage Verification. . . . . . . . . . . . . . . .A-54Prefix Patterns for the Spill Data Set Names . . . . . . . . . . . . . . . . . . . . . .A-60
Informatica Corporation, Confidential and Proprietary Information
Appendix A Installation Worksheets A-1
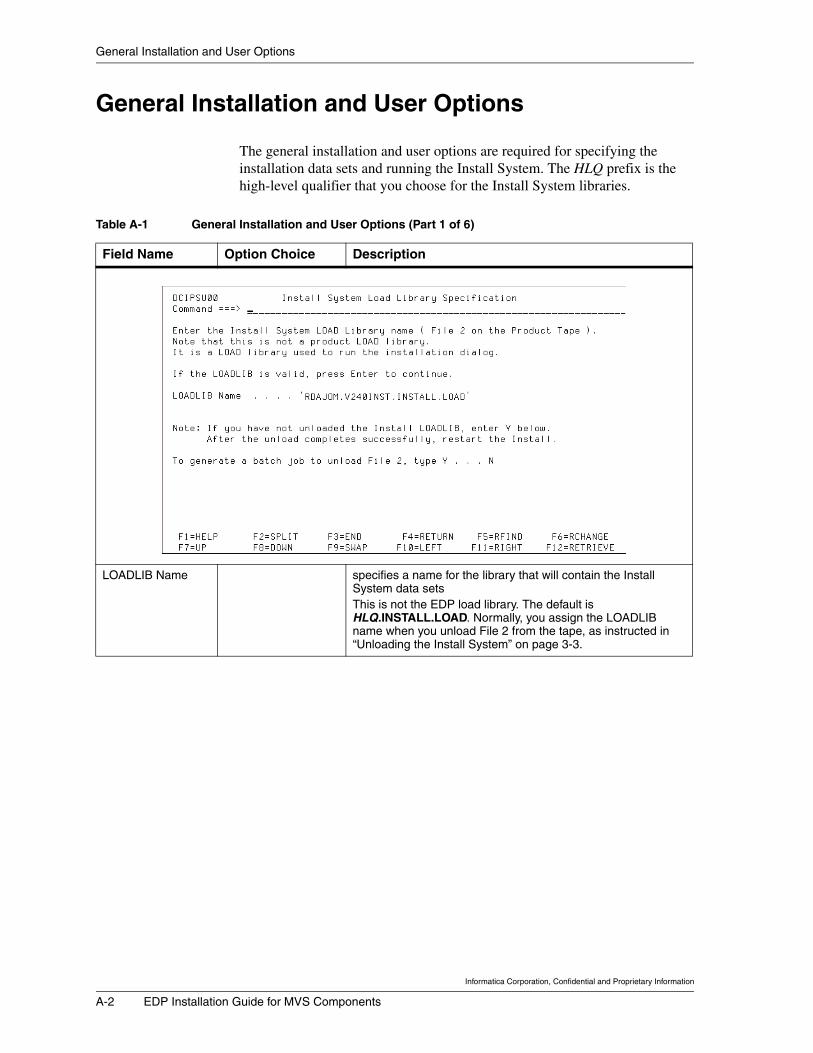
General Installation and User Options
General Installation and User Options
The general installation and user options are required for specifying the installation data sets and running the Install System. The HLQ prefix is the high-level qualifier that you choose for the Install System libraries.
Table A-1 General Installation and User Options (Part 1 of 6)
Field Name Option Choice Description
LOADLIB Name specifies a name for the library that will contain the Install System data setsThis is not the EDP load library. The default is HLQ.INSTALL.LOAD. Normally, you assign the LOADLIB name when you unload File 2 from the tape, as instructed in “Unloading the Install System” on page 3-3.
Informatica Corporation, Confidential and Proprietary Information
A-2 EDP Installation Guide for MVS Components

General Installation and User Options
Installation Mode tells the Install System whether to display a limited number of installation panels or all of the panelsChoose 1 for quick mode or 2 for custom mode:• Quick mode limits the number of installation panels,
prompting you for all applicable options, except for DB2 names for databases, tables, table spaces, and indexes. The quick installation mode uses default settings for DB2 names.
• Custom mode includes all the installation panels, guiding you through the installation process in detail and prompting you for all applicable options.
Installation Note: BMC Software recommends that you always use the Custom mode to install the EDP products.
Output JCL Data Set
indicates where to store the JCL that the Install System generatesThe data set name must be in single quotes. If the data set does not exist, the Install System creates it. The default data set name is HLQ.INSTALL.JCL.If you install EDP components on more than one MVS subsystem, you can specify a different data set name for each subsystem. Doing so prevents the Install System from overwriting the JCL during each installation and allows you to maintain the installation JCL for future maintenance installations.
Output JCL Storage Class
Output JCL Management Class
Output JCL Data Class
provides JCL class information to the Storage Management Subsystem (SMS), including JCL storage class, management class, and data classComplete the applicable fields with the pertinent SMS information. (See your MVS database administrator to obtain the required SMS classes.)
Table A-1 General Installation and User Options (Part 2 of 6)
Field Name Option Choice Description
Informatica Corporation, Confidential and Proprietary Information
Appendix A Installation Worksheets A-3

General Installation and User Options
Output JCL VOLSER
specifies the volume serial ID (VOLSER) used for the output JCL data setIf the data set does not exist, the Install System will allocate it on the volume that you specify. If you leave this field blank, the default is the VOLSER for the HLQ.INSTALL data set.
Install Profile ID indicates your installation profile ID, which consists of up to four characters (the default is DCI)The Install System saves the Install Profile ID as xxxxPROF (where xxxx is the ID) in three places: • in your ISPF profile data set• in the output JCL data set (HLQ.INSTALL.JCL), which
allows a different installer who uses the same JCL output to access the options selected during the previous installation
• in the installation data set (HLQ.INSTALL)
Process Previous Profiles
Y or N tells the Install System whether to use a profile from an earlier installationValid values are Y and N:• Y uses a profile from a previous installation. This option
allows you to browse existing input data sets for an appropriate installation profile and copies the profile to the current installation data set.
• N uses the profile that you supply during the current installation.
Reset Install Profile Y or N specifies whether the Install System will always display a panel that allows you to reset the installation parameters for each installed product to the default values that BMC Software suppliesIf the Install System detects a change in a product release level since the last installation, it displays the Reset panel automatically.When you reset the profile, the Install System• removes previously taken checkpoints• resets the APF library and block size values to blanks• resets the selected products to install to blanks• resets the product interface options to blanks• resets the existing high-level qualifier (HLQ) to the qualifier
that you specified when you started the Install System
Review Variables Y or N specifies whether the Install System should display a series of panels that let you review and change your installation choices before the Install System generates the JCL
Entry Field Delimiter 1 for underscore2 for reverse video3 for no highlighting
specifies how entry fields are displayed on your screen This option applies only to terminals or emulators that have extended highlighting capability.
Installation Note: After you make this selection, the Install System panel is displayed again. Normally, you will choose 1. Product Install to select one or more EDP products at the Install System Product Selection panel, as displayed in the next panel.
Table A-1 General Installation and User Options (Part 3 of 6)
Field Name Option Choice Description
Informatica Corporation, Confidential and Proprietary Information
A-4 EDP Installation Guide for MVS Components

General Installation and User Options
Type 1 in the selection field for each of the EDP products you want to install and press Enter. If you selected any DB2 components, the next panel prompts you for the DB2 version:
Table A-1 General Installation and User Options (Part 4 of 6)
Field Name Option Choice Description
Informatica Corporation, Confidential and Proprietary Information
Appendix A Installation Worksheets A-5

General Installation and User Options
DB2 Version specifies the DB2/MVS version that runs on the source or target subsystemInstallation Note: This panel appears only if you choose to install any DB2 component in the Install System Product Selection panel. (See “Software Requirements” on page 2-5 for a list of the DB2 versions that the EDP products support.)With DB2 versions 5.1 and later, EDP has increased the performance of DB2 apply by reducing the number of issued PREPARE statements. To accomplish this, the BIND option KEEPDYNAMIC (YES) is included in binds issued for a DB2 apply. To further improve the performance of SQL statements, BMC Software recommends that you activate dynamic caching as a DB2 installation option. Consult your IBM DB2 documentation.
Table A-1 General Installation and User Options (Part 5 of 6)
Field Name Option Choice Description
Informatica Corporation, Confidential and Proprietary Information
A-6 EDP Installation Guide for MVS Components

General Installation and User Options
The Install System displays the following panel after you choose the EDP products you want to install. The panel allows you to verify your choices. To make changes to your selections, press F12 to return to the Product Selection panel.
Installation Note: After you press Enter in the above panel, the Install System displays a series of panels prompting you for the currently installed versions of the EDP products. These panels are meant to facilitate upgrading to newer versions of the EDP products. However, because the Install System does not provide an upgrade path for EDP, the Install System will ignore any values you enter in the panels labeled “Install System Previous Release of Product.” The following screen segment shows one such panel:
Table A-1 General Installation and User Options (Part 6 of 6)
Field Name Option Choice Description
Informatica Corporation, Confidential and Proprietary Information
Appendix A Installation Worksheets A-7
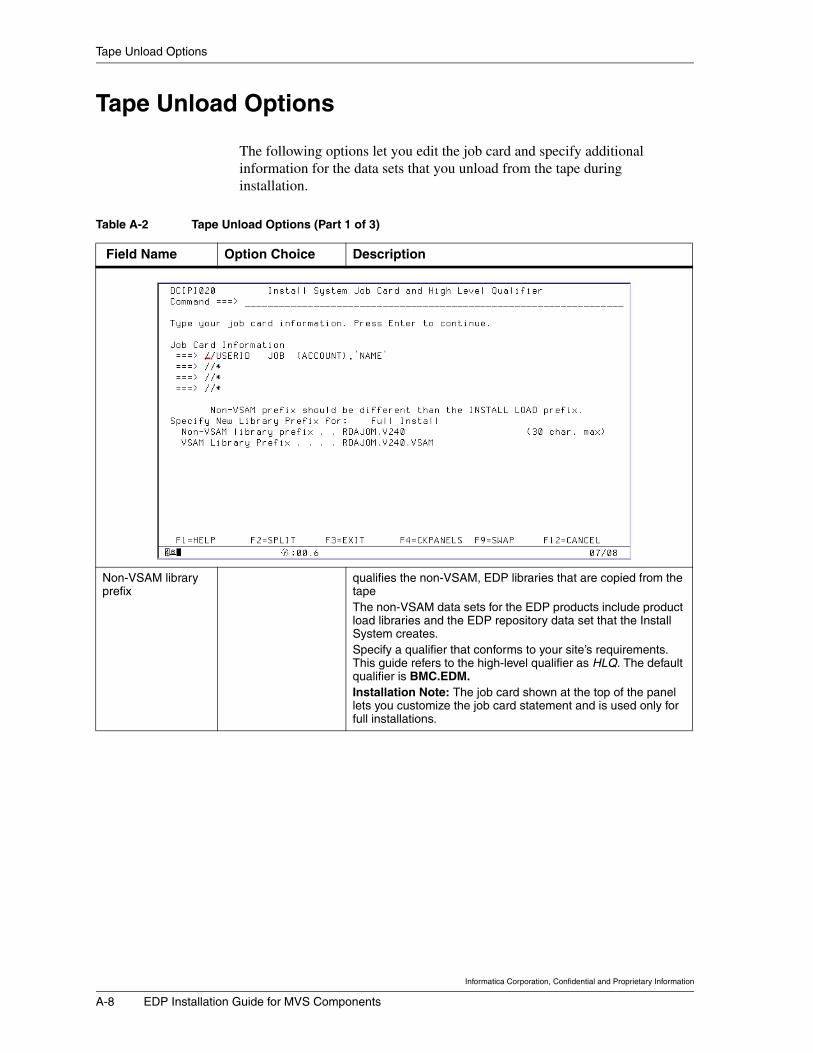
Tape Unload Options
Tape Unload Options
The following options let you edit the job card and specify additional information for the data sets that you unload from the tape during installation.
Table A-2 Tape Unload Options (Part 1 of 3)
Field Name Option Choice Description
Non-VSAM library prefix
qualifies the non-VSAM, EDP libraries that are copied from the tapeThe non-VSAM data sets for the EDP products include product load libraries and the EDP repository data set that the Install System creates.Specify a qualifier that conforms to your site’s requirements. This guide refers to the high-level qualifier as HLQ. The default qualifier is BMC.EDM.Installation Note: The job card shown at the top of the panel lets you customize the job card statement and is used only for full installations.
Informatica Corporation, Confidential and Proprietary Information
A-8 EDP Installation Guide for MVS Components

Tape Unload Options
DASD Type specifies the type of DASD used to contain the product librariesValid values are as follows:1 3380 2 33903 mixed or unknown typeIf you select 3, the field resets to 1 after you press Enter. If you make additional changes, you must type 3 in the DASD Type field again to recalculate the space for mixed or unknown DASD types. The default is 3390.
Space Units specifies the space units that you want to use when the Install System copies the product data sets from the tape to DASDValid values are as follows:1 blocks2 tracks3 cylindersThe default is 2 (TRKS).
Percent Increase increases the amount of allocated space for the product librariesThe percentage that you specify applies to all product libraries on the tape.Valid values are 0 through 999. The default is 0.
Table A-2 Tape Unload Options (Part 2 of 3)
Field Name Option Choice Description
Informatica Corporation, Confidential and Proprietary Information
Appendix A Installation Worksheets A-9

Tape Unload Options
Tape unit name specifies the name of the tape device on which the installation tape is mounted
Tape Management System Installed?
Y or N indicates whether a tape management system is available on your system
VOLSER(product tape)
specifies the VOLSER for the EDP product tapeCopy the VOLSER from the EDP tape label. The Install System uses this field only for verification.
Table A-2 Tape Unload Options (Part 3 of 3)
Field Name Option Choice Description
Informatica Corporation, Confidential and Proprietary Information
A-10 EDP Installation Guide for MVS Components

Data Set Options
Data Set Options
The following options apply to the data sets that you unload from the EDP tape.
Table A-3 Data Set Options (Part 1 of 2)
Field Name Option Choice Description
SMS Managed Y or N specifies whether your MVS system uses SMS for data set managementIf you specify Y, you must also provide values for these fields:• Non-VSAM Storage Class• Non-VSAM Management Class• Non-VSAM Data Class
Non-VSAM Data Set VOLSER
specifies the VOLSER for the EDP data sets
Non-VSAM Storage Class
specifies the SMS Non-VSAM storage class for the EDP data setsThis field is relevant only if you use SMS.
Non-VSAM Management Class
specifies the SMS management class for the EDP data setsThis field is relevant only if you use SMS.
Non-VSAM Data Class
specifies the SMS data class for the EDP data setsThis field is relevant only if you use SMS.
Library unit name specifies the DASD unit name for the non-VSAM data set VOLSER that you specifiedThe default name is SYSALLDA.
Load Library Blocksize
specifies the block size to allocate for the EDP load libraryThe default block size is 23476.
Informatica Corporation, Confidential and Proprietary Information
Appendix A Installation Worksheets A-11

Data Set Options
Temporary unit name
specifies the disk unit name for installation job streamsThis unit includes working data sets such as IEBCOPY SYSUT. The default name is SYSALLDA.Installation Note: After completing the Install System Data Set Options panel, the Install System IBM and DB2 Library Names Specification panel prompts you for data set names for the DB2 load and DB2 exit libraries. If you are installing DB2, these data set names are used to specify library names for STEPLIB generation, batch JCL generation, and APF authorization. See the next two entries for descriptions of those fields.
DB2 Load Library specifies the data set name of the DB2 load libraryThe data set name must be in quotes. The data set name is optional if your MVS link list includes the DB2 load library.Installation Note: This field appears only if you are installing any of the EDP products for DB2.
DB2 Exit Library specifies the data set name of the library that contains the DB2 exit routinesThe data set name must be enclosed in quotes. The data set name is optional if the DB2 exit library is included in your MVS link list.Installation Note: This field appears only if you are installing any of the EDP products for DB2.
Table A-3 Data Set Options (Part 2 of 2)
Field Name Option Choice Description
Informatica Corporation, Confidential and Proprietary Information
A-12 EDP Installation Guide for MVS Components

DB2 and MVS System Options
DB2 and MVS System Options
The following options let you specify information about your DB2 and MVS systems. The Install System uses this information when it generates the installation JCL.
Table A-4 DB2 and MVS System Options (Part 1 of 5)
Field Name Option Choice Description
APF Data Set Name specifies an existing APF-authorized library to use for BMC Software product load modulesFor EDP products, BMC Software recommends that you leave this field blank. Leaving this field blank causes the Install System to use the EDP load libraries as the target libraries for installation. These load libraries must also be APF authorized, but you can authorize them during installation. If you choose to specify a data set, it must already exist and be APF authorized. The Install System uses the specified data set as the target data set for the load modules that are installed from the tape.
APF Data Set Blksize
specifies the block size of an If you specify an APF-authorized libraryThe Install System specifies the block size in the IEBCOPY job that unloads the distribution tape.The Install System load library defaults to the block size specified in the Data Set Options panel. (The default is 23476.) If you specify a different block size for the APF-authorized library, the Install System changes the block size for the load modules.
Other STEPLIB Load Library Names
N/A is not used by the EDP productsInstallation Note: Leave the Other Load Library fields blank.
Informatica Corporation, Confidential and Proprietary Information
Appendix A Installation Worksheets A-13
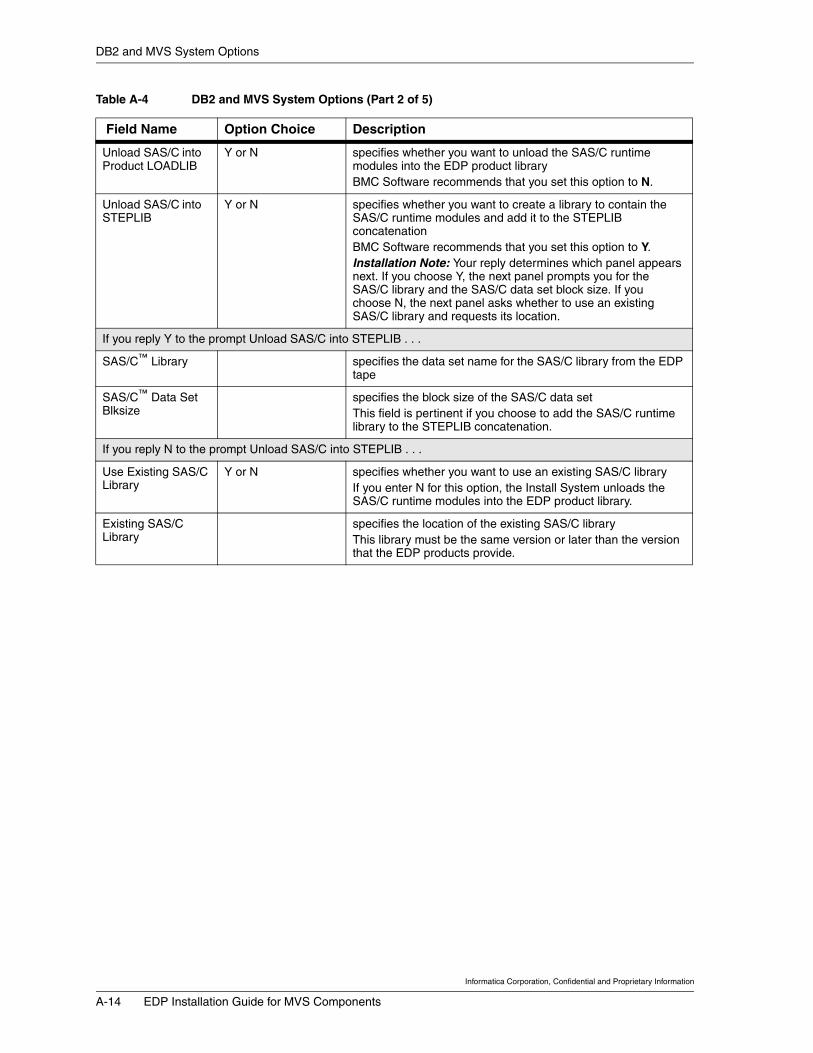
DB2 and MVS System Options
Unload SAS/C into Product LOADLIB
Y or N specifies whether you want to unload the SAS/C runtime modules into the EDP product libraryBMC Software recommends that you set this option to N.
Unload SAS/C into STEPLIB
Y or N specifies whether you want to create a library to contain the SAS/C runtime modules and add it to the STEPLIB concatenationBMC Software recommends that you set this option to Y.Installation Note: Your reply determines which panel appears next. If you choose Y, the next panel prompts you for the SAS/C library and the SAS/C data set block size. If you choose N, the next panel asks whether to use an existing SAS/C library and requests its location.
If you reply Y to the prompt Unload SAS/C into STEPLIB . . .
SAS/C™ Library specifies the data set name for the SAS/C library from the EDP tape
SAS/C™ Data Set Blksize
specifies the block size of the SAS/C data setThis field is pertinent if you choose to add the SAS/C runtime library to the STEPLIB concatenation.
If you reply N to the prompt Unload SAS/C into STEPLIB . . .
Use Existing SAS/C
LibraryY or N specifies whether you want to use an existing SAS/C library
If you enter N for this option, the Install System unloads the SAS/C runtime modules into the EDP product library.
Existing SAS/C
Libraryspecifies the location of the existing SAS/C libraryThis library must be the same version or later than the version that the EDP products provide.
Table A-4 DB2 and MVS System Options (Part 2 of 5)
Field Name Option Choice Description
Informatica Corporation, Confidential and Proprietary Information
A-14 EDP Installation Guide for MVS Components

DB2 and MVS System Options
Installation Note: You should complete both the Logger/Restart data set 1 and data set 2 portions of the screen when both of the following conditions are true:• You are using dual active logger/restart data sets.• You want the allocation information for the second data set to be different from the first data set.You do not have to complete the second Logger/Restart data set portion of the screen when either of the following conditions is true:• You are using neither dual logger nor restart data sets.• You are using dual logger/restart data sets, but you want the logger/restart information for the second data
set to be the same as for the first data set.
Installation Note: If you were to press F12 from the above panel, the Install System would display the Install System Assembler Specification Panel, as shown in the following screen. The EDP products can use only the assembler ASMA90. For this reason, you cannot change the value in the Install System Assembler Specification Panel.
SMS Managed Specify Y if you want EDP to allocate data sets to be managed by the system managed storage (SMS). Otherwise, specify N. The default is Y.If you specify Y, you must also specify storage class names.
Table A-4 DB2 and MVS System Options (Part 3 of 5)
Field Name Option Choice Description
Informatica Corporation, Confidential and Proprietary Information
Appendix A Installation Worksheets A-15

DB2 and MVS System Options
EDP VSAM HLQ specifies the high-level qualifier used for most VSAM data set allocation, including the EDP restart data sets and the active log data setsFor more information about creating restart and log data sets, see the ChangeDataMove User Guide.
VSAM Data Set VOLSER
specifies the DASD volume for all VSAM DEFINE CLUSTER commands issued for the EDP productsYou can review the IDCAMS DEFINE statements to determine whether you should modify the volume placement during installation, job $I10VSAM.
Cylinders specifies the number of data set allocation cylinders for the active EDP log data setsThe default is 15. Review your IDCAMS DEFINE statements to determine whether you need to modify space allocation during installation.
VSAM Storage Class
specifies the SMS VSAM storage class for the EDP data setsThis field is relevant only if you use SMS.
VSAM Management Class
specifies the SMS management class for the EDP data setsThis field is relevant only if you use SMS.
Installation Note: This panel is displayed only if you chose to install any of the EDP products for DB2.
DB2 Subsystem ID specifies the DB2 subsystem ID (SSID) that contains the source or target DB2 database
DB2 Catalog Alias specifies the alias for the DB2 catalog associated with the specified SSIDThe EDP products do not use this option.
Table A-4 DB2 and MVS System Options (Part 4 of 5)
Field Name Option Choice Description
Informatica Corporation, Confidential and Proprietary Information
A-16 EDP Installation Guide for MVS Components
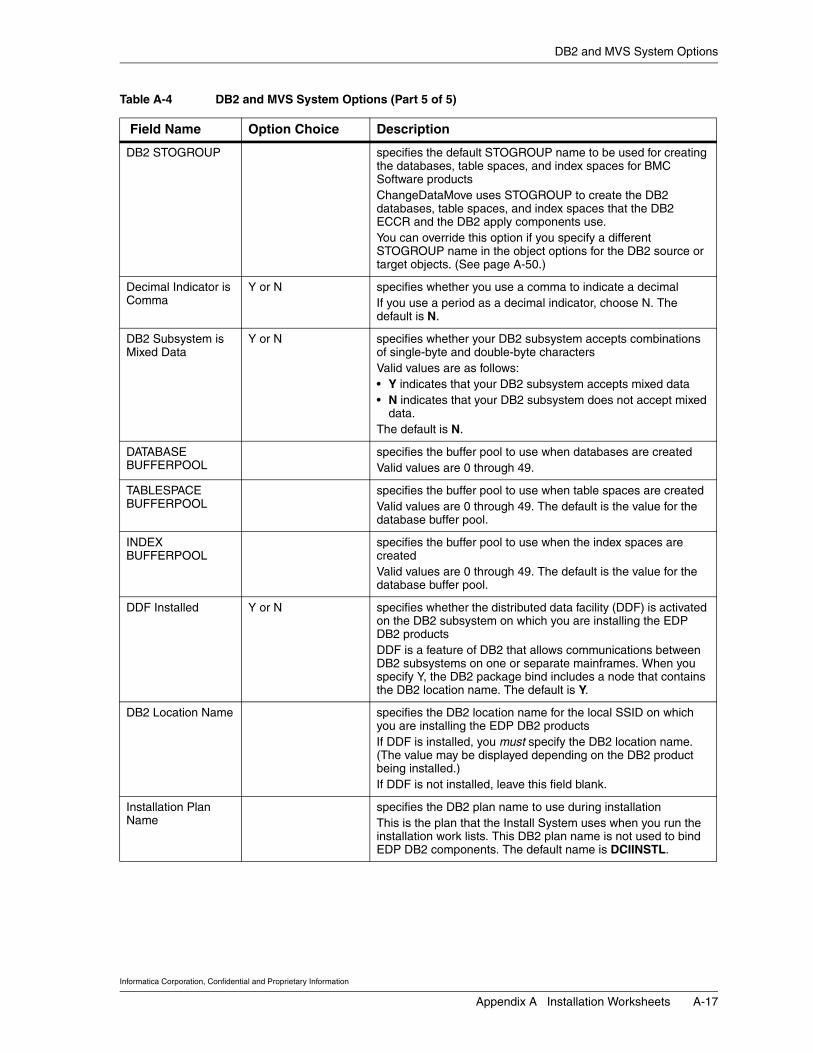
DB2 and MVS System Options
DB2 STOGROUP specifies the default STOGROUP name to be used for creating the databases, table spaces, and index spaces for BMC Software productsChangeDataMove uses STOGROUP to create the DB2 databases, table spaces, and index spaces that the DB2 ECCR and the DB2 apply components use.You can override this option if you specify a different STOGROUP name in the object options for the DB2 source or target objects. (See page A-50.)
Decimal Indicator is Comma
Y or N specifies whether you use a comma to indicate a decimalIf you use a period as a decimal indicator, choose N. The default is N.
DB2 Subsystem is Mixed Data
Y or N specifies whether your DB2 subsystem accepts combinations of single-byte and double-byte charactersValid values are as follows:• Y indicates that your DB2 subsystem accepts mixed data• N indicates that your DB2 subsystem does not accept mixed
data. The default is N.
DATABASE BUFFERPOOL
specifies the buffer pool to use when databases are createdValid values are 0 through 49.
TABLESPACE BUFFERPOOL
specifies the buffer pool to use when table spaces are createdValid values are 0 through 49. The default is the value for the database buffer pool.
INDEX BUFFERPOOL
specifies the buffer pool to use when the index spaces are createdValid values are 0 through 49. The default is the value for the database buffer pool.
DDF Installed Y or N specifies whether the distributed data facility (DDF) is activated on the DB2 subsystem on which you are installing the EDP DB2 productsDDF is a feature of DB2 that allows communications between DB2 subsystems on one or separate mainframes. When you specify Y, the DB2 package bind includes a node that contains the DB2 location name. The default is Y.
DB2 Location Name specifies the DB2 location name for the local SSID on which you are installing the EDP DB2 productsIf DDF is installed, you must specify the DB2 location name. (The value may be displayed depending on the DB2 product being installed.)If DDF is not installed, leave this field blank.
Installation Plan Name
specifies the DB2 plan name to use during installationThis is the plan that the Install System uses when you run the installation work lists. This DB2 plan name is not used to bind EDP DB2 components. The default name is DCIINSTL.
Table A-4 DB2 and MVS System Options (Part 5 of 5)
Field Name Option Choice Description
Informatica Corporation, Confidential and Proprietary Information
Appendix A Installation Worksheets A-17

Security Options
Security Options
The worksheet in this section addresses the DB2 authorization options that you specify during installation. (See “Obtaining Product Passwords” on page 2-15 for the lists of ChangeDataMove and DataMove components that require passwords.)
Note: If you install the DB2 ECCR or apply component, you must specify at least one authorization ID that has the authority to create the DB2 objects required for the EDP products. You can also specify additional authorization IDs to limit access to the EDP products.
Table A-5 DB2 Authorization Options (Part 1 of 4)
Field Name Option Choice Description
Primary AUTHID specifies the 7-character primary authorization ID to use during the installationIf you need to use a 8-character ID, use the secondary AUTHID instead.The Install System gains DB2 authorization by using this ID to create DB2 objects. The ID is also used as the default plan owner for the plans that your installed BMC Software products use.You can specify either the primary AUTHID or the secondary AUTHID. Specifying the primary AUTHID causes the Install System to generate an -AUTH statement that simulates a TSO USERID for the AUTHID that you specify.The AUTHID can be a maximum of 7 characters.The AUTHID you specify must have SYSADM authority.
Informatica Corporation, Confidential and Proprietary Information
A-18 EDP Installation Guide for MVS Components

Security Options
Secondary AUTHID specifies the 8-character secondary authorization ID to use during the installationThe Install System gains DB2 authorization by using this ID to create DB2 objects. The ID is also used as the default plan owner for the plans that your installed BMC Software products use.You can specify either the primary AUTHID or the secondary AUTHID. Specifying the secondary AUTHID causes the Install System to generate a -SETS SET CURRENT SQL ID statement to set authorization to the secondary AUTHID.The AUTHID you specify must have SYSADM authority.
Additional AUTHIDs creates an optional parameter that lets you specify up to three authorization IDs with execution authority for the DB2 plans associated with the BMC Software products that you are installingThe AUTHIDs that you specify will be the initial users of the products.If you specify PUBLIC, all DB2 users can run the DB2 plans for the installed BMC Software products.
Installation Notes: After you select the authorization method for each product you are installing, other panels will prompt you for additional information, as follows:
• If you select 1 - COPY PREVIOUS PASSWORDS, you are prompted for the location of the products’ authorization module or modules, if they are in more than one location. (You can copy current password modules if you previously installed the EDP products, and if the passwords for that installation are valid for the new installation.)
• If you select 2 - TRIAL PASSWORDS, you are prompted for temporary passwords.• If you select 3 - PERMANENT PASSWORDS, you are prompted for permanent passwords, which depend
(partly) on your installation decisions.• If you press enter at this screen, no passwords are generated or copied.
Table A-5 DB2 Authorization Options (Part 2 of 4)
Field Name Option Choice Description
Informatica Corporation, Confidential and Proprietary Information
Appendix A Installation Worksheets A-19
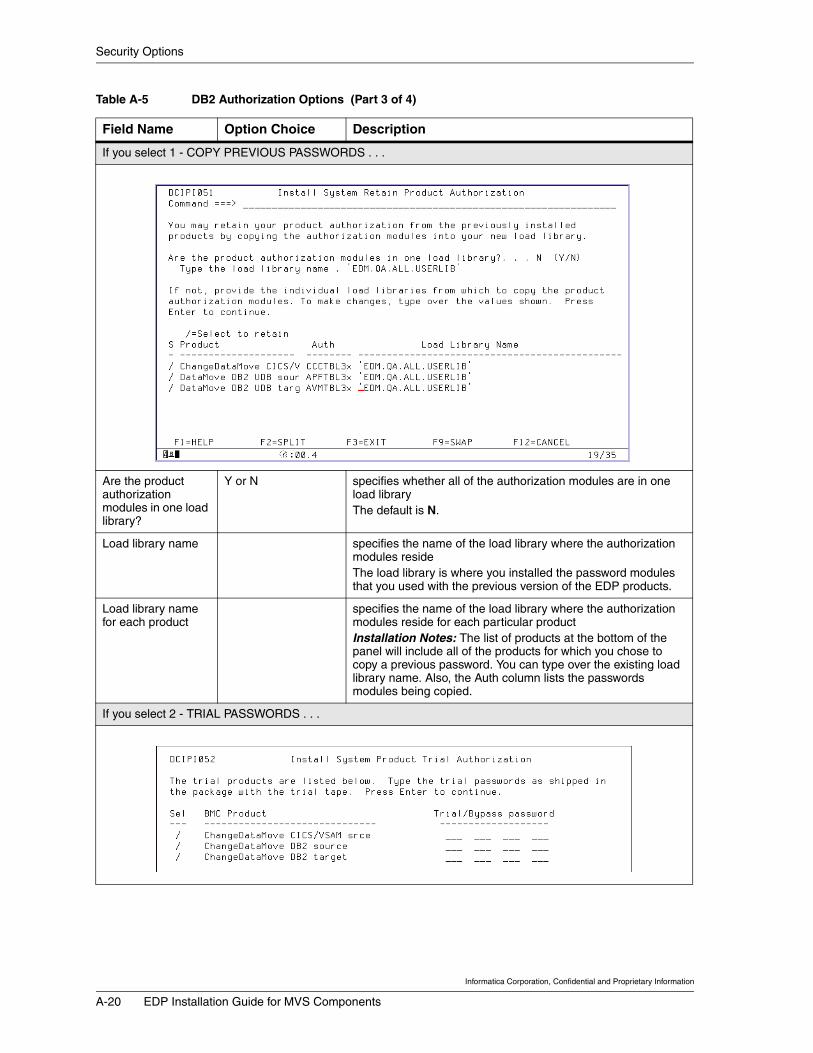
Security Options
If you select 1 - COPY PREVIOUS PASSWORDS . . .
Are the product authorization modules in one load library?
Y or N specifies whether all of the authorization modules are in one load libraryThe default is N.
Load library name specifies the name of the load library where the authorization modules resideThe load library is where you installed the password modules that you used with the previous version of the EDP products.
Load library name for each product
specifies the name of the load library where the authorization modules reside for each particular productInstallation Notes: The list of products at the bottom of the panel will include all of the products for which you chose to copy a previous password. You can type over the existing load library name. Also, the Auth column lists the passwords modules being copied.
If you select 2 - TRIAL PASSWORDS . . .
Table A-5 DB2 Authorization Options (Part 3 of 4)
Field Name Option Choice Description
Informatica Corporation, Confidential and Proprietary Information
A-20 EDP Installation Guide for MVS Components

Security Options
Trial/Bypass password
specifies the temporary passwords for the EDP productsThe product package includes temporary passwords. If you did not receive temporary passwords or you need more information about obtaining passwords, see “How to Apply Passwords” on page A-4.Installation Note: Your list of products will correspond to the products for which you chose to use trial passwords.
If you chose 3 - PERMANENT PASSWORDS . . .
Single CPUID for all products selected?
Y or N specifies whether all of the selected products will be installed on a single CPUID-TYPE
CPUID-TYPE specifies the CPUID-TYPE under which all selected products will be installedInstallation Note: The CPUID-TYPE that you provide is transferred to the product selection area at the bottom of the panel. You can overwrite the CPUID-TYPE for any selected product. To enter the permanent password information, complete Table A-3 on page A-9.
Table A-5 DB2 Authorization Options (Part 4 of 4)
Field Name Option Choice Description
Informatica Corporation, Confidential and Proprietary Information
Appendix A Installation Worksheets A-21

DB2 Options for Target and Source
DB2 Options for Target and Source
If you choose to install the DB2 ECCR or DB2 target component, the following options apply to the DB2 subsystems that those components use. If you are not installing either component, you do not need to complete these worksheets.
Table A-6 DB2 Options for Target and Source (Part 1 of 4)
Field Name Option Choice Description
Qualifier of Product Synonyms
specifies the synonym qualifier name for DB2 target optionsNormally, this name identifies the owner of the product synonyms. The synonym qualifier should be unique to BMC Software products that are installed in the subsystem that contains the DB2 apply component.Installation Note: BMC Software recommends that, in subsequent installations, you change the qualifier of product synonym for every additional subsystem ID (SSID) installation.
Qualifier Status (for DB2 target options)
1 New or 2 Used/Reuse
specifies whether the synonym qualifier for DB2 target options is new Select 1 if the synonym qualifier is new. Select 2 if other BMC Software products (in the subsystem that contains the DB2 apply component) use the same synonym qualifier.The default is 1.
Select to Change Default Option Values
/ or leave field blank specifies whether you want to change the name of the EDP DB2 change apply plan and the EDP DB2 apply collection IDType / to change the names. Otherwise, leave the field blank.
Informatica Corporation, Confidential and Proprietary Information
A-22 EDP Installation Guide for MVS Components
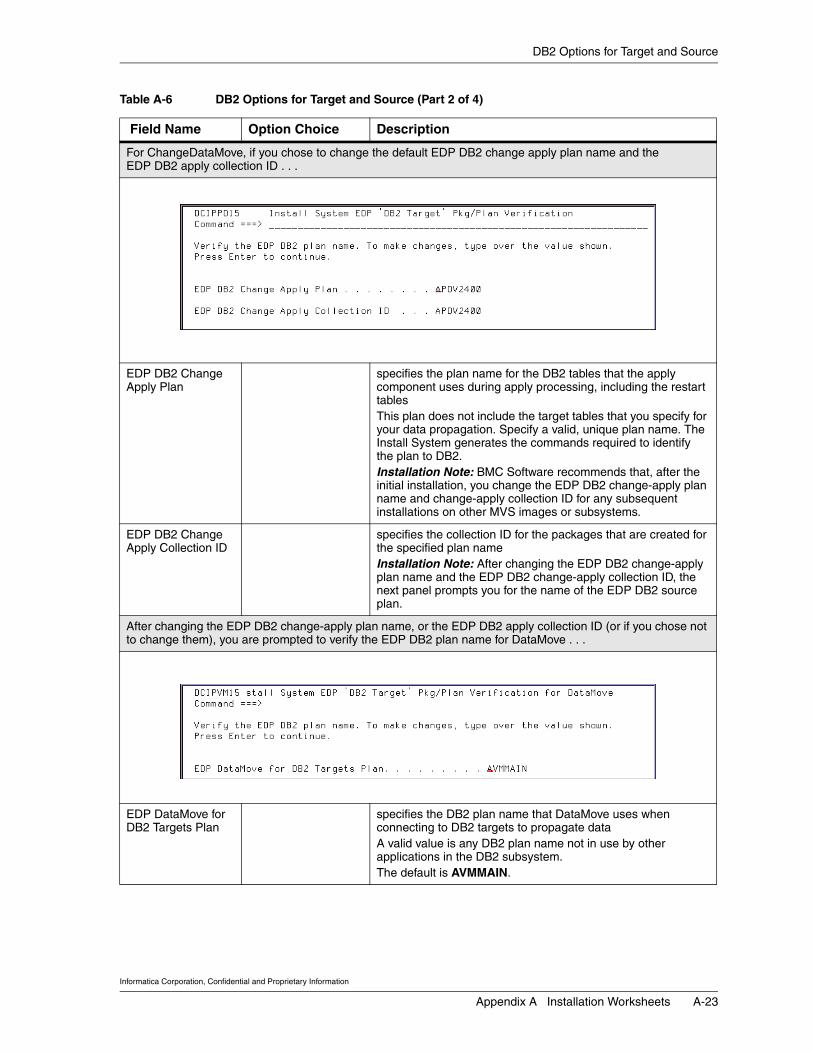
DB2 Options for Target and Source
For ChangeDataMove, if you chose to change the default EDP DB2 change apply plan name and the EDP DB2 apply collection ID . . .
EDP DB2 Change Apply Plan
specifies the plan name for the DB2 tables that the apply component uses during apply processing, including the restart tablesThis plan does not include the target tables that you specify for your data propagation. Specify a valid, unique plan name. The Install System generates the commands required to identify the plan to DB2.Installation Note: BMC Software recommends that, after the initial installation, you change the EDP DB2 change-apply plan name and change-apply collection ID for any subsequent installations on other MVS images or subsystems.
EDP DB2 Change Apply Collection ID
specifies the collection ID for the packages that are created for the specified plan nameInstallation Note: After changing the EDP DB2 change-apply plan name and the EDP DB2 change-apply collection ID, the next panel prompts you for the name of the EDP DB2 source plan.
After changing the EDP DB2 change-apply plan name, or the EDP DB2 apply collection ID (or if you chose not to change them), you are prompted to verify the EDP DB2 plan name for DataMove . . .
EDP DataMove for DB2 Targets Plan
specifies the DB2 plan name that DataMove uses when connecting to DB2 targets to propagate dataA valid value is any DB2 plan name not in use by other applications in the DB2 subsystem. The default is AVMMAIN.
Table A-6 DB2 Options for Target and Source (Part 2 of 4)
Field Name Option Choice Description
Informatica Corporation, Confidential and Proprietary Information
Appendix A Installation Worksheets A-23

DB2 Options for Target and Source
Qualifier of Product Synonyms
specifies the synonym qualifier name for DB2 source optionsNormally, this name identifies the owner of the product synonyms. The synonym qualifier should be unique to BMC Software products that are installed in the subsystem that contains the DB2 ECCR.
Qualifier Status (for DB2 source options)
1 or 2 specifies whether the synonym qualifier for DB2 source options is new Select 1 if the synonym qualifier is new. Select 2 if other BMC Software products (in the subsystem that contains the DB2 ECCR component) use the same synonym qualifier.The default is 1.
Change Default Option Values
/ or leave field blank specifies whether you want to change the name for the EDP DB2 change-capture plan, the EDP DB2 change-collection ID, and the name for the DB2 user interface plan name.
If you chose to change the name of the EDP DB2 change-capture plan, the EDP DB2 change-apply collection ID, and the name of the DB2 User interface plan . . .
EDP DB2 Change Capture Plan
specifies the plan name for the DB2 tables that the ECCR uses during change capture, including the restart tablesThis plan does not include the source tables that you specify for your data propagation. Specify a valid, unique plan name. The Install System generates the commands that are required to identify the plan to DB2.
Table A-6 DB2 Options for Target and Source (Part 3 of 4)
Field Name Option Choice Description
Informatica Corporation, Confidential and Proprietary Information
A-24 EDP Installation Guide for MVS Components

DB2 Options for Target and Source
EDP DB2 Change Capture Collection ID
specifies the collection ID used for the packages that are created for the specified plan name
EDP DB2 User Interface Plan Name
specifies the plan name that binds the GUI interfaceThe plan name serves to find information for the DB2 tables that the EDP products use as sources or targets. Depending on the EDP DB2 components that you install, this option appears on the DB2 Target Options panel or the DB2 Source Options panel. A valid value is any DB2 plan name that is not in use by other applications in the DB2 subsystem. The default is EDMIMAIN.
Table A-6 DB2 Options for Target and Source (Part 4 of 4)
Field Name Option Choice Description
Informatica Corporation, Confidential and Proprietary Information
Appendix A Installation Worksheets A-25

Default Options (EDMSDIR)
Default Options (EDMSDIR)
The EDMSDIR default options (DOPTs) module contains configuration parameters that apply to the common functions of the EDP products. You can edit these configuration parameters for your site’s requirements. You specify these parameters in the Default Options installation panels.
Table A-7 EDP Default Options (EDMSDIR) (Part 1 of 14)
Field Name Option Choice Description
Default EDP Agent ID (AGENTID)
specifies the default EDP agentIf you are applying changes to a remote DB2 system, this is the name of the EDP agent that is on the same system as the associated EDP logger. Valid values are as follows:• four characters, beginning with a letter, #, @, or $• a value that does not conflict with an existing MVS
subsystemThe default value is EDMA.Notes: • The value for AGENTID and the value for LOGGER (see
page A-31) cannot be the same. • You can override the value for AGENTID with a value in the
AgentID field in the AGENTCTL module. See the entry for EDP Agent Name (AgentID) on page A-40.
Informatica Corporation, Confidential and Proprietary Information
A-26 EDP Installation Guide for MVS Components

Default Options (EDMSDIR)
Default EDP Started Task ID (STARTID)
specifies the name of the started procedure for the EDP agentIf your site requires a specific naming convention for started tasks, use the STARTID field to provide a name that conforms to your site’s requirements. The started task procedure name can be the same as or different from the AGENTID. The default value is EDMA.The started procedure name for the EDP agent must not:• end with 0000.• be the same as the started procedure name for the logger.• be the same as the name of the PACPROC (see page A-33).
ECCR Error Action(CCERR)
specifies the action to take when an ECCR is unable to capture changes for a data resource• CONT stops the EDP products but lets the job continue. Any
changes to the data resource will not be captured.• ABEND abnormally ends the job; the transaction does not
update the resource.The default is CONT.If a /STOP subsys is issued from IMS and CCERR=CONT, work continues but the data to be captured is not logged. If CCERR=ABEND, the BMP or MMP terminates abnormally, but the control region continues to function.Note: With a value of ABEND, if the CICS/VSAM ECCR encounters a serious error or abnormally ends during initialization, the ECCR immediately terminates the CICS region to prevent loss of data. If the logger fails or is shut down, and you have applied the fix for CICS APAR PQ37954, the ECCR terminates the CICS region to prevent loss of data. If you have not applied the fix, the ECCR passes the current updates to the CICS as if there is no error, but the transaction abends in CICS with a code of ASP7. No updates occur, and no data is lost.If the IMS ECCR abnormally ends during initialization, the ECCR terminates the IMS online region. This termination ensures data propagation integrity.
Include Century in Dates (CENTURY)
Y or N specifies whether to use four or only two digits when the EDP products display the dateThe default is Y, for yes, to include the century (as in 2000).
Fill CHAR for Conversion Errors (CHARDEF)
handles errors from the EDP data transformerWhen both of the following conditions occur, the data transformer propagates this single-character value through the output column:• The input value causes a conversion error during conversion
to a character data type. • The value of the default option CHARERA (the next option)
is D. For example, if you specify CHARDEF=A, and a character conversion error occurs when you attempt to convert to a five-byte output column, the data transformer places the value AAAAA in the output column. The default is blank. Any character is valid.
Table A-7 EDP Default Options (EDMSDIR) (Part 2 of 14)
Field Name Option Choice Description
Informatica Corporation, Confidential and Proprietary Information
Appendix A Installation Worksheets A-27

Default Options (EDMSDIR)
Character Error Correction (CHARERA)
handles errors from the EDP data transformerThis option tells the EDP data transformer how to respond when a conversion error occurs during conversion to a character data type.The data transformer does not consider truncation to be an error if the source is a character data type. The valid options are as follows:• D propagates the default value specified in option
CHARDEF into the column in which the error occurred.• N places null values into the column in which the error
occurred.• T terminates the data transformer.The default is D.
Log CHAR Errors to EDMMSG (CHARERL)
Y or N handles errors from the EDP data transformerThis option specifies whether to log conversion errors that occur during conversion to a character data type.The data transformer does not consider truncation to be an error if the source is a character data type. The default is Y.
Maximum number of Chardef (CHARVCNT)
0 through 32767 handles errors from the EDP data transformerThis option specifies the maximum number of default characters specified in CHARDEF that the EDP transformer will propagate to an output column with a varying-length character data type.Both of the following must be true:• The input value causes a conversion error during conversion
to a varying-length character data type.• The value of the default option CHARERA is D. Note: If you are migrating from earlier versions of EDP to EDP 2.4, you must reassemble EDMSDIR. If you do not reassemble EDMSDIR, the default for CHARVCNT will be 0 and no default characters will be propagated to the output column. Reassembling the EDMSDIR for EDP 2.4 ensures that the default value of 32767 is used.
Table A-7 EDP Default Options (EDMSDIR) (Part 3 of 14)
Field Name Option Choice Description
Informatica Corporation, Confidential and Proprietary Information
A-28 EDP Installation Guide for MVS Components

Default Options (EDMSDIR)
Number of Errors Permitted (CONVERR)
handles errors from the EDP data transformerThis option specifies the total number of conversion errors that this module will tolerate. When the number of conversion errors reaches this limit, data transformer stops processing. Valid values are –1 through 2147483647.• –1 allows unlimited conversion errors.• 0 allows no conversion errors.The default is –1.
Date Format and Separator (DATE)
specifies the date format that the EDP products will display (for example, in messages)The first value indicates the order of the date elements. The second value is the date separator.• YMD (YY/MM/DD)• MDY (MM/DD/YY)• DMY (DD/MM/YY)The separator can be any character.The defaults are MDY and the slash character (/).
Table A-7 EDP Default Options (EDMSDIR) (Part 4 of 14)
Field Name Option Choice Description
Informatica Corporation, Confidential and Proprietary Information
Appendix A Installation Worksheets A-29

Default Options (EDMSDIR)
Default Date for Conversion Errors (DATEDEF)
defines how the EDP products use the date under specific conditionsThis option serves two functions:1) This option handles errors from the EDP data transformer. It specifies the date to place in the output date or timestamp column when both of the following conditions occur:• The input value causes a conversion error during conversion
to a date or timestamp data type.• The value of the default option DTERA is D.2) This option specifies the date to be used in conversions from a time data type to a data type that requires both time and date. In this type of conversion, the DATEDEF value determines the date part of the output value, and the source time value determines the output time value. You must use a date format that is valid for all target data types, or you will encounter errors when the data is applied.Valid dates range from 0000-01-01 to 9999-12-31. The default is 1900-01-01.
TNR Date Error Action (DTERA)
handles errors from the EDP data transformerThis option specifies the data transformer action during conversion errors to a date or time data typeValid values are as follows:• D propagates the default value specified in options
DATEDEF or TIMEDEF into the column in which the error occurred.
• N places null values into the column in which the error occurred.
• T terminates the data transformer.The default is D.
Log DATE Errors to EDMMSG (DTERL)
Y or N handles errors from the EDP data transformerThis option specifies whether to log conversion errors that occur during conversion to a date or time data type. The EDP data transformer sends the messages to EDMMSG• Y logs date-and-time conversion errors.• N does not log date-and-time conversion errors.The default is Y.
Logger group option (LOGRGRP)
Y, N, or S specifies whether your product is configured for log merge, as well as the type of log merge configuration used. For more information about the log merge feature, see the ChangeDataMove User Guide. • Y specifies the post-log merge configuration.• N specifies that the log merge feature is not used.• S specifies the pre-log merge configuration.The default value is N.
Table A-7 EDP Default Options (EDMSDIR) (Part 5 of 14)
Field Name Option Choice Description
Informatica Corporation, Confidential and Proprietary Information
A-30 EDP Installation Guide for MVS Components

Default Options (EDMSDIR)
EDP Logger ID (LOGGER)
specifies the name of the default EDP loggerYou can specify only one instance of the EDP logger with this parameter. Consequently, you must do one of the following tasks if you use multiple EDP loggers:• Have a separate EDMSDIR for each instance of the EDP
logger. Because you cannot rename EDMSDIR, you must allocate a separate user library (YOUR.USERLIB) for each copy of EDMSDIR.
• Override the default EDP logger value in EDMSDIR by specifying an EDP logger in the apply component’s startup procedure.
A valid value meets the following requirements:• four characters, beginning with a letter, #, @, or $• does not conflict with an existing MVS subsystemThe default value is EDML.Notes: • The value for LOGGER and the value for AGENTID cannot
be the same. • You can override the value for LOGGER with a value in the
LOGGER_NAME field for the EDP logger parameters. See the entry for Logger Name (LOGGER_NAME) on page A-44.
Table A-7 EDP Default Options (EDMSDIR) (Part 6 of 14)
Field Name Option Choice Description
Informatica Corporation, Confidential and Proprietary Information
Appendix A Installation Worksheets A-31

Default Options (EDMSDIR)
No Transformation Profile Action (NOTRANS)
handles errors from the EDP data transformerThis option specifies the action that the EDP data transformer takes when an input record has no associated transformation.• S skips the record and continues processing.• F warns you on the first occurrence of the record type and
continues processing.• W warns you on all occurrences of the record type and
continues processing.• A aborts processing.The default value is F.
Numeric Conversion Errors Default (NUMDEF)
handles errors from the EDP data transformerThis option specifies the value that the EDP data transformer places in the output column when both of the following conditions occur:• The input value causes a conversion error during conversion
to a numeric data type.• The value of the default option NUMERA is D.For example, if you specify NUMDEF=99 and a numeric conversion occurs when you attempt to convert to an integer output column, data transformer places the value x'63' in that column.Valid values are –2147483648 through 2147483647.The default is 0.
Numeric Error Actoin (NUMERA)
handles errors from the EDP data transformerThis option specifies the action that the EDP data transformer takes when a conversion error occurs during conversion to a numeric data type.• D propagates the default value specified in option NUMDEF
into the column in which the error occurred.• N places null values into the column in which the error
occurred.• T terminates the data transformer.The default is D.
Log Numeric Errors to EDMMSG (NUMERL)
handles errors from the DP data transformerThis option specifies whether to log conversion errors that occur during conversion to a numeric data type. The EDP data transformer sends the messages to EDMMSGThe default is Y.
Table A-7 EDP Default Options (EDMSDIR) (Part 7 of 14)
Field Name Option Choice Description
Informatica Corporation, Confidential and Proprietary Information
A-32 EDP Installation Guide for MVS Components

Default Options (EDMSDIR)
PAC Started Procedure Name (PACPROC)
specifies the name of the secondary PAC startup procedure to use for one of the following options: • when you are using the DB2 apply component and your
target table resides on a remote MVS system• when your source and DB2 target reside on the same MVS
system, but you want to define a second PAC region to run the DB2 apply component
• when using the EDP consoleFor DB2 apply, the primary PAC (which you run to start the apply process) uses this information to start the secondary apply PAC.For the EDP console, the EDP products start the secondary PAC when a user requests a connection to the host. The EDP products start a separate PAC for each interface user.The valid value is any valid procedure name.EDP assigns a number to the PAC procedure name each time it starts a new secondary PAC region (for example, for each GUI user). EDP overwrites the trailing characters of the procedure name. EDP does not necessarily assign numbers sequentially. It can reuse the numbers of procedures that are no longer running. Therefore, BMC Software suggests that you use a name with four digits at the end, such as EDMA0000.The default value is EDMA0000.Note: The name for the startup procedure for the PAC must not be the same as the started procedure names for the EDP agent or the EDP logger.
Table A-7 EDP Default Options (EDMSDIR) (Part 8 of 14)
Field Name Option Choice Description
Informatica Corporation, Confidential and Proprietary Information
Appendix A Installation Worksheets A-33

Default Options (EDMSDIR)
PAC Wait Before Terminate Task (PACTIMR)
sets the length of time, in seconds, that the PAC waits to terminate a task after that task has been notified to terminateThis notification may be made by operator request or by abnormal termination of another task. Valid values range from 0 through 999; 0 disables the ability of PAC to terminate tasks. (PAC waits for all tasks to terminate by themselves.) The default value is 30. BMC Software does not recommend using a value of 0. If you set this option to 0, the EDP PAC job may be active indefinitely.
EDP Repository DD Name (REPDDN)
specifies the default DD name for the EDP repository DD statement in the PAC startup procedureValid values include any valid MVS DD name. The default is EDMREP.
Century Rollover Date (ROLLDAT)
specifies the century rollover dateThe value that you specify indicates the point after which the value in a two-digit year field refers to the 20th century (1900-1999). For example, if you specify ROLLDAT=10, dates of 01/01/00 through 12/31/10 refer to the years 2000 through 2010. Dates 01/ 01/11 through 12/31/99 refer to the years 1911 through 1999.Valid values range from –1 through 99; –1 indicates that all 2-digit years refer to the 20th century (1900-1999).The default is –1.
Default SYSOUT Class (SYSOUT)
specifies the default SYSOUT class to be used by any dynamically allocated SYSOUT data setsValid values are any valid SYSOUT class. The default is *, which indicates the JCL MSSG class value for the job or started task is used.
Time Format and Separator (TIME)
specifies the time format that the EDP products will display (for example, in messages):• 24 indicates a 24-hour format, as in military time.• 12 indicates a 12-hour format.The first value indicates the hour format. The second value is the time separator. The separator can be any character. The default is (24,:).
Default Time for Conversion Errors (TIMEDEF)
specifies the time that the data transformer places in the output-time column when both of the following conditions occur:• The input value causes a time data-type conversion error.• The value of the default option DTERA is D.Valid values are any valid time. The default is 00:00:00.
Table A-7 EDP Default Options (EDMSDIR) (Part 9 of 14)
Field Name Option Choice Description
Informatica Corporation, Confidential and Proprietary Information
A-34 EDP Installation Guide for MVS Components

Default Options (EDMSDIR)
Remote Host Name for TCP/IP (RMTHOST)
specifies the remote host name or IP address for the TCP/IP connectionValid values include any character string up to 32 bytes long. The default is TCP. You can also type a TCP/IP address that is up to 15 bytes long.Installation Note: You can override the RMTHOST value by specifying the remote host in your PAC region.
Remote Port for TCP/IP (RMTPORT)
specifies the TCP/IP port number for the EDP listenerThis information is used to start the EDP listener and to establish a TCP/IP connection with a remote system.Use this option for the following configurations:• When using the EDP GUI (in which case the interface must
access the EDP repository information from an MVS system, which is remote to the system running the GUI)
• When applying to a remote MVS systemNote: In addition, RMTPORT is treated as a default port number for the target system when the change or bulk propagation process starts via a PAC job in the source MVS system. However, RMTPORT can be overridden via PAC JCL or through a TCPPARMS control card.Valid values range from 0 through 65535; 0 tells the associated remote EDP agent not to set up a TCP/IP connection. Ensure that the value you specify is not a reserved in-house port. The default is 0.
TCP/IP Connect Timeout (TCPWTIME)
specifies a period of time, in seconds, that the EDP products will try to establish a TCP/IP connection before timing outValid values range from 0 through 9999. A value of 0 indicates that EDP products will not attempt a retry. The default is 30 seconds.
Table A-7 EDP Default Options (EDMSDIR) (Part 10 of 14)
Field Name Option Choice Description
Informatica Corporation, Confidential and Proprietary Information
Appendix A Installation Worksheets A-35

Default Options (EDMSDIR)
TCP/IP Keep Alive Heartbeat Mins(TCPHBEAT)
specifies an interval, in minutes, between the “heartbeats” that the EDP sender sends to the receiver through the TCP/IP link The heartbeat allows you to verify that the communications link between the host and target systems exists, even in the absence of data transmissions.Valid values range from 0 through 9999. A value of 0 disables the heartbeat function.The default interval for the TCP heartbeat is 5 minutes. You can also set the value of the TCP heartbeat interval in the PAC startup procedure for the source MVS system. Doing so overrides this default option. See the ChangeDataMove User Guide for more information about the PAC startup procedure.
Set Userid for Spawned Tasks (SETUSER)
Y or N specifies how EDP chooses the user ID associated with the secondary PAC procedure (set by the PACPROC option)This option applies to DB2 target processing for both ChangeDataMove for DB2 and DataMove for DB2. This option also applies to GUI processing.Y tells EDP to use the user IDs that you specify for the secondary PAC while using DataMove and ChangeDataMove to run:• the EDP GUI• the target portion of the DataMove propagation• the apply portion of the ChangeDataMove propagationN tells the EDP products that you want to use the default user ID specified to RACF (or an equivalent MVS security package) when you establish security for the secondary PAC procedure.For RACF, you can establish security for the secondary PAC procedure by using one of the following methods: add an entry to the started procedures table (ICHRIN03) for the procedure, or add a RACF profile for the procedure in the STARTED class.The default is Y.To run the ChangeDataMove change-apply process, the user ID that is associated with the secondary PAC procedure must have DB2 EXECUTE authority on the ChangeDataMove apply plan. Also, the ID must have SQL INSERT, UPDATE, and DELETE authority on all affected target tables. To run the target portion of the DataMove propagation, the user ID that is associated with the secondary PAC procedure must have DB2 EXECUTE authority on the DataMove apply plan. Also, the ID must have SQL INSERT and DELETE authority on all affected target tables.To run the GUI, the user ID that is associated with the secondary PAC procedure must have DB2 EXECUTE authority for the EDP DB2 user interface plan.If your installation is set up to allow started procedures to run without a user ID, you must grant the proper DB2 authorities (as described above) to PUBLIC for the GUI, ChangeDataMove, and DataMove plans, and the tables to which you are propagating data.If you specify N and provide a password through one of the methods described above, the EDP products still attempt to validate the user ID and password sent to them. The process fails if the user ID and password cannot be validated.
Table A-7 EDP Default Options (EDMSDIR) (Part 11 of 14)
Field Name Option Choice Description
Informatica Corporation, Confidential and Proprietary Information
A-36 EDP Installation Guide for MVS Components
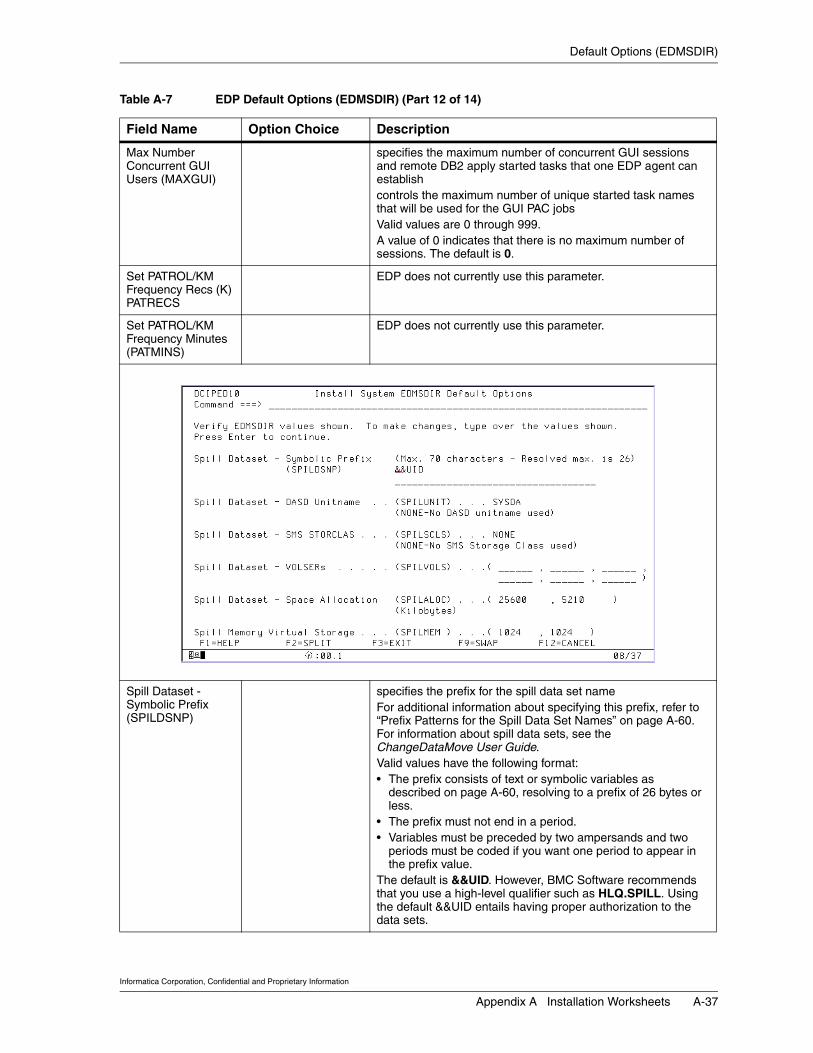
Default Options (EDMSDIR)
Max Number Concurrent GUI Users (MAXGUI)
specifies the maximum number of concurrent GUI sessions and remote DB2 apply started tasks that one EDP agent can establishcontrols the maximum number of unique started task names that will be used for the GUI PAC jobsValid values are 0 through 999.A value of 0 indicates that there is no maximum number of sessions. The default is 0.
Set PATROL/KM Frequency Recs (K) PATRECS
EDP does not currently use this parameter.
Set PATROL/KM Frequency Minutes (PATMINS)
EDP does not currently use this parameter.
Spill Dataset - Symbolic Prefix (SPILDSNP)
specifies the prefix for the spill data set nameFor additional information about specifying this prefix, refer to “Prefix Patterns for the Spill Data Set Names” on page A-60. For information about spill data sets, see the ChangeDataMove User Guide.Valid values have the following format:• The prefix consists of text or symbolic variables as
described on page A-60, resolving to a prefix of 26 bytes or less.
• The prefix must not end in a period.• Variables must be preceded by two ampersands and two
periods must be coded if you want one period to appear in the prefix value.
The default is &&UID. However, BMC Software recommends that you use a high-level qualifier such as HLQ.SPILL. Using the default &&UID entails having proper authorization to the data sets.
Table A-7 EDP Default Options (EDMSDIR) (Part 12 of 14)
Field Name Option Choice Description
Informatica Corporation, Confidential and Proprietary Information
Appendix A Installation Worksheets A-37

Default Options (EDMSDIR)
Spill Dataset - DASD Unitname(SPILUNIT)
specifies the DASD unit to which ChangeDataMove can allocate spill data setsFor information about spill data sets, see the ChangeDataMove User Guide.Valid values are any valid DASD unit name (up to 8 characters), or NONE. The default is SYSDA.
Spill Dataset - SMS STORCLAS(SPILSCLS)
specifies the SMS storage class to use to allocate spill data setsNote: BMC Software recommends that you configure your spill data sets to be SMS managed, and that you use the SPILSCLS option to control the allocation of your spill data sets.For information about spill data sets, see the ChangeDataMove User Guide. Valid values are any valid SMS storage class name (up to 8 characters), or NONE. The default is NONE.
Spill Dataset - VOLSERs(SPILVOLS)
specifies the volumes to use for the spill data setsYou can specify up to six volumes. This parameter is optional if you specify an SMS storage class (SPILSCLS). For information about spill data sets, see the ChangeDataMove User Guide.Valid values are any valid volume serial (VOLSER) IDs. The default is no volumes specified.
Spill Dataset - Space Allocation(SPILALOC)
specifies, in kilobytes, the primary and secondary space allocation for the spill data setsThe first number is the amount to be used for the primary spill data set. The second number is the amount to be used for the secondary spill data set.For information about spill data sets, see the ChangeDataMove User Guide.Valid values are any positive integer from 1 through 231. The default is (25600,5210).
Spill Memory Virtual Storage(SPILMEM)
specifies how much virtual memory storage is allocated, in kilobytes, above the 16 MB line, before using spill data setsThe first number is the amount to be used for the data component of the spill data set. The second number is the amount to be used for the index component of the spill data set. For information about spill data sets, see the ChangeDataMove User Guide.Valid values are any positive integer from 1 through 231. The default is (10240,1024).
Table A-7 EDP Default Options (EDMSDIR) (Part 13 of 14)
Field Name Option Choice Description
Informatica Corporation, Confidential and Proprietary Information
A-38 EDP Installation Guide for MVS Components

Default Options (EDMSDIR)
Data Set Names to concatenate to existing DFSESL DD statement(ESLLIB)
specifies the data sets to concatenate to existing DFSESL DD statements in your IMS dependent region or IMS control regionThis option is required for IMS ECCR online environments. If a DFSESL DD statement does not already exist in your dependent region or control region, the EDP products allocate one for you. (For more information about the DFSESL DD statement, see IBM’s IMS installation procedures.)Valid values include the appropriate data set or sets, placed within parentheses. If you specify multiple data sets with this parameter, separate them with commas. You can specify up to five data sets.
Table A-7 EDP Default Options (EDMSDIR) (Part 14 of 14)
Field Name Option Choice Description
Informatica Corporation, Confidential and Proprietary Information
Appendix A Installation Worksheets A-39

EDP Agent Control Statements (AGENTCTL)
EDP Agent Control Statements (AGENTCTL)
The AGENTCTL module contains parameters that apply to EDP agent functions. After you set the default options and complete the installation, you can perform additional EDP agent configuration tasks by using a member called AGENTGEN, which is stored in HLQ.SAMPLIB. AGENTGEN contains the default options that you set during the installation. When you submit the JCL job $I05UNLD, which the Install System produces, the job generates the member AGENTGEN.
Table A-8 EDP Agent Control Statements (AGENTCTL) (Part 1 of 4)
Field Name Option Choice Description
EDP Agent ID(AgentID)
specifies the name of the EDP agentYou can use the same AgentID for different EDP agents provided they are on different MVS systems.The default is EDMA or the value that you supplied for EDP Agent ID (AGENTID) entry in the default options module EDMSDIR, as described on page A-26.Valid values are as follows:• four characters, beginning with a letter, #, @, or
$• a value that does not conflict with an existing
MVS subsystemNote: The value that you specify in this field will override the value that you specified in the EDP Agent ID (AGENTID) entry in the default options module EDMSDIR on page A-26.
Informatica Corporation, Confidential and Proprietary Information
A-40 EDP Installation Guide for MVS Components

EDP Agent Control Statements (AGENTCTL)
EDMSLOG SYSOUT Class(LogClass)
specifies the EDMSLOG SYSOUT classThe value that you specify must be a valid SYSOUT class.
EDMSLOG SYSOUT Allocated HOLD(LogHold)
specifies whether the EDMSLOG SYSOUT data is allocated with HOLD=YESThe default is No.
EDMSLOG Line Limit (LogLimit)
specifies the EDMSLOG line limitWhen the EDP agent determines that the limit has been reached, it allocates a new log.See the ChangeDataMove User Guide for additional information about the EDP agent message log.Valid values are 5000 through 100000. The default is 10000.
EDMSLOG storage for messages(LogBuffLimit)
specifies the amount of data space storage to allocate as an integration area for EDMSLOG messagesThis limit is specified in terms of the number of messages, allowing 216 bytes per message.The message log is stored in a data space and uses no common storage. See the ChangeDataMove User Guide for additional information about the EDP agent message log.Valid values are numeric from 1000 through 10000. The default is 2000.
Max Concurrent TCBs (TaskLimit)
specifies the amount of data space storage to allocate as an integration area for concurrent MVS tasksThis limit is specified in terms of the maximum number of concurrent tasks control blocks (TCBs) that can request services from the EDP agent, allowing 128 bytes per control block.Valid values are numeric from 150 through 1500. The default value is 300.
EDP Agent Command Prefix(CmdPrefix)
specifies the MVS command prefix to use for all EDP agent commandsValid values are one to eight characters long, beginning with a letter or a symbol. Valid symbols are as follows:¢ . < ( + | & ! $ * ) – / % _ > ? : # @ ' = “ )The prefix must not conflict with existing MVS or EDP agent commands. The default prefix is the value of the AgentID parameter.
Check Authorization During Init(InitAuthCheck)
Yes or No specifies whether to check authorization (by issuing a RACROUTE authorization macro) when a request is made to initialize an EDP agent serviceThe default is No.
Table A-8 EDP Agent Control Statements (AGENTCTL) (Part 2 of 4)
Field Name Option Choice Description
Informatica Corporation, Confidential and Proprietary Information
Appendix A Installation Worksheets A-41

EDP Agent Control Statements (AGENTCTL)
Check Auth for Commands(CmdAuthCheck)
Yes or No specifies whether to check authorization (by issuing a RACROUTE authorization macro) when an EDP agent command is issuedThe default is No.
Specify dataset name for EDP Repository(RepositoryDSN)
specifies the data set name of the EDP repository associated with this EDP agentThis value must be a valid data set name that specifies a cataloged extended partitioned data set (PDX).
PATROLKM EDP does not currently use this parameter.
PKDataspaceInit EDP does not currently use this parameter.
PKDataspaceMax EDP does not currently use this parameter.
Table A-8 EDP Agent Control Statements (AGENTCTL) (Part 3 of 4)
Field Name Option Choice Description
Informatica Corporation, Confidential and Proprietary Information
A-42 EDP Installation Guide for MVS Components

EDP Agent Control Statements (AGENTCTL)
Agent startup(STARTUP)
Warm or Cold specifies whether the EDP agent (when restarted) will use an existing subsystem control block (SSCVT), if one exists (warm) or create a new SSCVT and start as if for the first time (cold)The default is warm.• Warm indicates that the agent will use an
existing dataspace if one exists. If a dataspace does not exist, the agent will create a new one.
• Cold indicates that the agent will create a new dataspace and start as if for the first time. Use this value only if the agent does not start using the Warm value. Using Cold every time you start the agent can lead to exhaustion of the non-system linkage indexes, or the scope=common dataspaces, or both. (The non-system linkage indexes are in the NSYSLX parameter in the MVS IEASYSxx PARMLIB member. The scope=common dataspaces are in the MAXCAD parameter in the MVS IEASYSxx PARMLIB member.)
Note: You can override the startup parameter through the EDP agent START command as described in the ChangeDataMove User Guide.
Sysplex Log Days(SysplexLogDays)
EDP does not currently use this parameter.
CCVACTIVE YES or NO indicates whether the VSAM batch ECCR becomes active during EDP agent startupThe CCVACTIVE does not appear on the AGENTCTL Default Options panel. You use the member AGENTGEN to modify the CCVACTIVE option. If you have selected to install ChangeDataMove for batch VSAM source, this parameter is set to Yes.
Table A-8 EDP Agent Control Statements (AGENTCTL) (Part 4 of 4)
Field Name Option Choice Description
Informatica Corporation, Confidential and Proprietary Information
Appendix A Installation Worksheets A-43
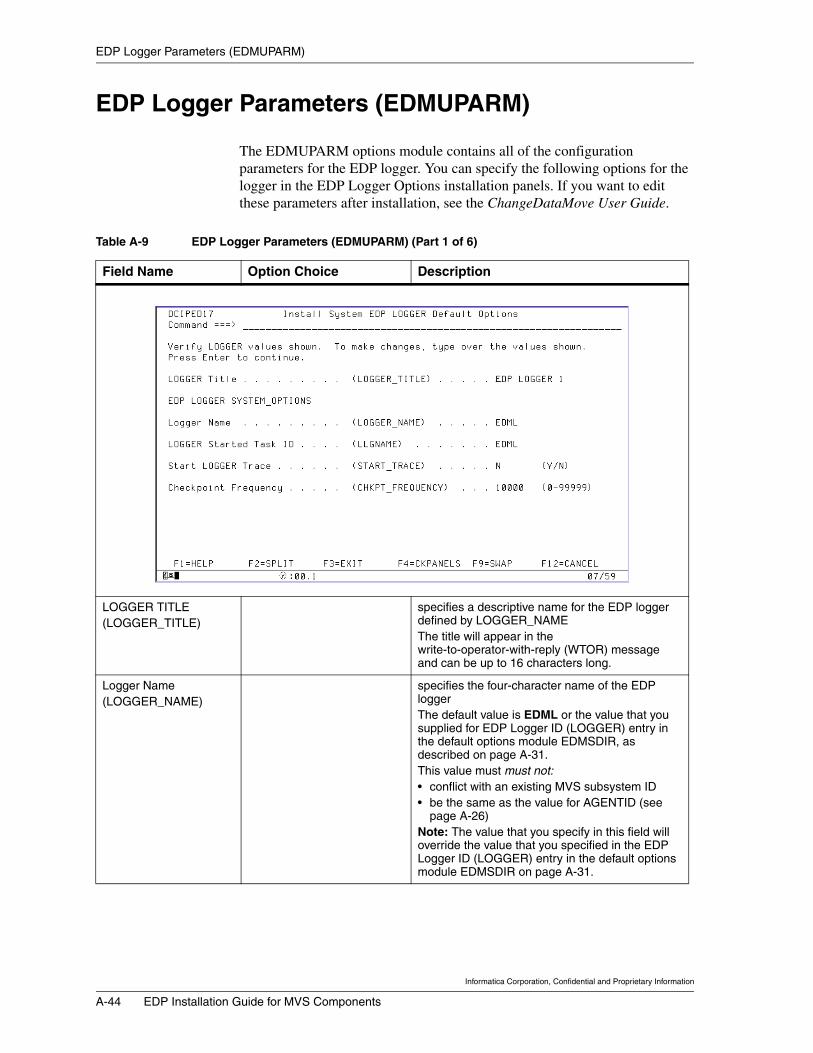
EDP Logger Parameters (EDMUPARM)
EDP Logger Parameters (EDMUPARM)
The EDMUPARM options module contains all of the configuration parameters for the EDP logger. You can specify the following options for the logger in the EDP Logger Options installation panels. If you want to edit these parameters after installation, see the ChangeDataMove User Guide.
Table A-9 EDP Logger Parameters (EDMUPARM) (Part 1 of 6)
Field Name Option Choice Description
LOGGER TITLE(LOGGER_TITLE)
specifies a descriptive name for the EDP logger defined by LOGGER_NAMEThe title will appear in the write-to-operator-with-reply (WTOR) message and can be up to 16 characters long.
Logger Name(LOGGER_NAME)
specifies the four-character name of the EDP loggerThe default value is EDML or the value that you supplied for EDP Logger ID (LOGGER) entry in the default options module EDMSDIR, as described on page A-31.This value must must not:• conflict with an existing MVS subsystem ID• be the same as the value for AGENTID (see
page A-26)Note: The value that you specify in this field will override the value that you specified in the EDP Logger ID (LOGGER) entry in the default options module EDMSDIR on page A-31.
Informatica Corporation, Confidential and Proprietary Information
A-44 EDP Installation Guide for MVS Components

EDP Logger Parameters (EDMUPARM)
Logger Started Task ID(LLGNAME)
specifies the name of the started task for the EDP loggerIf your site requires a specific naming convention for started tasks, use the LLGNAME field to provide a name that conforms to your site’s requirements. The started task ID for the EDP logger can be the same or different from the LOGGER_NAME. The started procedure name for the logger must not:• be the same as the started procedure name for
the EDP agent• be the same as the name of the PACPROC
(see page A-33)
Start LOGGER Trace(START_TRACE)
Y or N specifies whether to collect processing information from the logger (the default is N)This information is useful to diagnose problems, and to determine where to restart the logger.
Checkpoint Frequency(CHKPT_FREQUENCY)
specifies the number of log records to process before taking a checkpointChoose a value that is appropriate for your site. The value must be greater than 0. The default is 10000.
Table A-9 EDP Logger Parameters (EDMUPARM) (Part 2 of 6)
Field Name Option Choice Description
Informatica Corporation, Confidential and Proprietary Information
Appendix A Installation Worksheets A-45

EDP Logger Parameters (EDMUPARM)
Archive Log dataset prefixes(PREFIX_COPY1)
specifies the prefix for the first archive log data set nameThe value must be a prefix up to 17 alphanumeric characters long. The default is BMCEDM1. However, BMC Software recommends that you use a high-level qualifier value, instead. An HLQ works best with SMS-managed data sets and with the parameters for the archive storage class (ARCHIVE_STCL) and the archive message class (ARCHIVE_MGCL).
Archive Log dataset prefixes(PREFIX_COPY2)
specifies the prefix for the second archive log data set nameThe value must be a prefix up to 17 alphanumeric characters long. If you use this keyword, the value cannot be blank even if you specified ARCHIVE_LOG_MODE=SINGLE. The default is BMCEDM2. However, BMC Software recommends that you use a high-level qualifier value instead. An HLQ works best with SMS-managed data sets and with the parameters for the archive storage class (ARCHIVE_STCL) and the archive message class (ARCHIVE_MGCL).
Archive Retention Period(ARCHIVE_RTPD)
specifies the number of days that the system will retain an old archive log data set when a new archive log data set is createdValid values are 0 through 9999. If you specify a value of 0, the EDP logger writes over the archive log data set when creating a new archive. The default is 9999.
Archive Unit(ARCHIVE_UNIT)
specifies the device type or unit name of the device used to store archive log data setsThe value must be a device type or unit name up to 8 alphanumeric characters long. The first character must be alphabetical.BMC Software recommends that you write the archive log data sets to DASD. The default is SYSDA.Installation Note: This parameter and ARC_UNIT_CNT are mutually exclusive with the parameters ARCHIVE_STCL and ARCHIVE_MGCL.
Archive Unit Count(ARC_UNIT_CNT)
specifies the number of DASD units to use for archivingUse this parameter as you would use the count option of the MVS UNIT parameter.The default is 1 unit.Installation Note: This parameter and ARCHIVE_UNIT are mutually exclusive with the parameters ARCHIVE_STCL and ARCHIVE_MGCL.
Table A-9 EDP Logger Parameters (EDMUPARM) (Part 3 of 6)
Field Name Option Choice Description
Informatica Corporation, Confidential and Proprietary Information
A-46 EDP Installation Guide for MVS Components

EDP Logger Parameters (EDMUPARM)
Archive SMS Storage Class(ARCHIVE_STCL)
specifies the SMS archive storage classYou should use this parameter if you are using SMS parameters and have specified a high-level qualifier for the parameters PREFIX_COPY1 and PREFIX_COPY2.Installation Note: This parameter and ARCHIVE_MGCL are mutually exclusive with the ARCHIVE_UNIT and ARC_UNIT_CNT parameters.
Archive SMS Management Class(ARCHIVE_MGCL)
specifies the SMS archive management classThis parameter is optional. You may use it if you are using SMS parameters and have specified a high-level qualifier for the parameters PREFIX_COPY1 and PREFIX_COPY2. Omitting the management class parameter has the same effect as omitting the parameter in a batch data-set allocation. See your SMS support team for guidance on whether to use this parameter.Installation Note: This parameter and ARCHIVE_STCL are mutually exclusive with the ARCHIVE_UNIT and ARC_UNIT_CNT parameters.
Alloc Units for Pri/Sec qnty(SPACE_ALLOC)
specifies the unit type for primary and secondary space allocations for archive logsValid values are as follows:• BLK allocates space in blocks.• CYL allocates space in cylinders.• TRK allocates space in tracks.The default is CYL.
Table A-9 EDP Logger Parameters (EDMUPARM) (Part 4 of 6)
Field Name Option Choice Description
Informatica Corporation, Confidential and Proprietary Information
Appendix A Installation Worksheets A-47

EDP Logger Parameters (EDMUPARM)
Primary space allocation(PRIM_SPACE)
specifies the primary space allocation for DASD data sets in the unit type that you specify in the SPACE_ALLOC parameterThe default logs provided with the EDP products have a size of 1500 records. (A record is 4096 bytes.) This size requires the archive log data sets to have a size of 300 blocks. See the ChangeDataMove User Guide for information about log data sets.
Secondary space allocation(SEC_SPACE)
specifies the secondary space allocation for DASD data sets in the unit type that you specify in the SPACE_ALLOC parameter for archive logsSee the ChangeDataMove User Guide for information about log data sets.The value for this parameter must be greater than 0. The default is 540 blocks.
Archive Log dataset blocksize(ARCHIVE_BLKSIZE)
specifies the block size of the archive log data setThe block size must be compatible with the device type that you specify in the ARCHIVE_UNIT parameter. The value must be a multiple of 4096 and must be in the range 4096 through 28672. The default is 20480.
Input Buffer Size(LOG_INBUFF)
specifies the size, in 4 K blocks, of the input buffer for reading the active and archive logsThe value must be a decimal number from 1 through 60. The default is 28.
Table A-9 EDP Logger Parameters (EDMUPARM) (Part 5 of 6)
Field Name Option Choice Description
Informatica Corporation, Confidential and Proprietary Information
A-48 EDP Installation Guide for MVS Components

EDP Logger Parameters (EDMUPARM)
Output Buffer Size(LOG_OUTBUFF)
specifies the size, in 4 K blocks, of the output buffer that the EDP logger uses for writing the active and archive log data setsThe value must be a number from 1 through 50. The default is 5.
Logger in Single/Dual Mode(ACTIVE_LOG_MODE)
Single or Dual specifies whether the EDP logger writes to one or two active log data sets at a timeThe default is DUAL. BMC Software strongly recommends that you use dual logging.
Archive in Single/Dual Mode(ARCHIVE_LOG_MODE)
Single or Dual specifies whether the EDP logger writes to one or two archive log data sets at a timeThe EDP logger generates archive logs when the active log is off-loaded.The default is DUAL. BMC Software strongly recommends that you use dual logging.
ERDS in Single/Dula Mode(ERDS_LOG_MODE)
Single or Dual specifies whether the EDP logger writes to one or two EDP restart data sets at a timeThe default is DUAL. BMC Software strongly recommends that you use dual logging.
Logger Group Suffix(SUFFIX)
0-9 uniquely identifies each logger in a logger groupThe value is required and must be a unique integer from 0 through 9 for any logger defined in the post-log merge group. The default is 0. For non-post-log merge, you are required to specify a value of 0.
Table A-9 EDP Logger Parameters (EDMUPARM) (Part 6 of 6)
Field Name Option Choice Description
Informatica Corporation, Confidential and Proprietary Information
Appendix A Installation Worksheets A-49

DB2 Options for Target Object/Storage Verification
DB2 Options for Target Object/Storage Verification
The following options apply to DB2 target utility objects and storage choices for DB2 target table spaces, DB2 target table names, and DB2 target index spaces.
Table A-10 DB2 Target Object/Storage Parameters (Part 1 of 4)
Field Name Option Choices Descriptions
STOGROUP specifies the type of allocation for the definition of tables, table spaces, and index spaces for the DB2 apply componentYou can choose an existing STOGROUP or VCAT name, but not both. If you do not specify a STOGROUP or VCAT name, the Install System defaults to the STOGROUP name specified in the DB2 Parameter Information panel. (See page A-17.)Installation Notes: If you specify a STOGROUP, after completing the rest of the panel, you can choose to verify or change the default object names and sizes. See the corresponding panel in this table for information to complete the definitions of table spaces, tables, and index spaces. To verify or change any or all of these definitions, type / next to the definition option. To keep the default definitions, leave the field blank.
Informatica Corporation, Confidential and Proprietary Information
A-50 EDP Installation Guide for MVS Components

DB2 Options for Target Object/Storage Verification
VCAT Name specifies the type of allocation for the definition of tables, table spaces, and index spaces for the DB2 apply componentYou can choose an existing VCAT name or STOGROUP, but not both. If you choose a VCAT name, you must also specify a VCAT volume.If you specify an existing VCAT name, the Install System will generate and execute the IDCAMS commands necessary to create the objects.If you do not specify a VCAT name or STOGROUP, the Install System defaults to the STOGROUP name specified in the DB2 Parameter Information panel. (See page A-17.) Installation Notes: If you specify a VCAT name, after completing the rest of the panel, you can choose to verify or change the default object names and sizes. See the corresponding screen panel in this table for information to complete the definitions of table spaces, tables, and index spaces. To verify or change any or all of these definitions, type / next to the definition option. To keep the default definitions, leave the field blank.
VCAT Volume specifies the catalog where the VSAM objects will resideIf you chose a VCAT name for allocation definition, you must also specify a VOLSER for the catalog where the VSAM objects will reside.
Database Name for Chg Apply
specifies the name of the DB2 database that will contain the restart and processing tables for the DB2 apply componentIf you are installing the DB2 capture component, the database name specified here must be different from the one specified for the DB2 capture.
CREATOR Name for all objects
specifies the user ID of the creator for the DB2 apply restart and processing tables
Table A-10 DB2 Target Object/Storage Parameters (Part 2 of 4)
Field Name Option Choices Descriptions
Informatica Corporation, Confidential and Proprietary Information
Appendix A Installation Worksheets A-51

DB2 Options for Target Object/Storage Verification
If you chose to verify or change the EDP DB2 target table space attributes . . .
DB2 Table Table Space Name
PRIQTY SECQTY Description
BMCREP_TARGET_REG(DB2 apply target registration)
lets you specify the table space name and its primary and secondary storage quantities (sizes) for each DB2 tableIf you specified a STOGROUP earlier, supply the sizes in kilobytes. If you specified a VCAT name earlier, supply the sizes in tracks.
BMCREP_RESTART_CTL(DB2 apply restart)
R2APST(DB2 apply processing statistics)
BMCREP_NONPROCESS1 (table space for the first nonprocessed record table)
BMCREP_NONPROCESS2 (table space for the second nonprocessed record table)
If you chose to verify or change the EDP DB2 target table names . . .
Table A-10 DB2 Target Object/Storage Parameters (Part 3 of 4)
Field Name Option Choices Descriptions
Informatica Corporation, Confidential and Proprietary Information
A-52 EDP Installation Guide for MVS Components

DB2 Options for Target Object/Storage Verification
DB2 Table Table Name Description
BMCREP_TARGET_REG(DB2 apply target registration)
lets you change table names, by allowing you to type over the table’s current name
BMCREP_RESTART_CTL(DB2 apply restart)
R2APST(DB2 apply processing statistics)
BMCREP_NONPROCESS1(Table space for the first nonprocessed record table)
BMCREP_NONPROCESS2(Table space for the second nonprocessed record table)
If you chose to verify or change the EDP DB2 target table index space attributes . . .
DB2 Index space DB2 Index Space Name
PRIQTY SECQTY Function
XR2AREG(for the DB2 apply registration table)
specifies, for each DB2 table, its index space name, and the primary and secondary quantities (size).If you specified a STOGROUP earlier, supply the sizes in kilobytes. If you specified a VCAT name earlier, supply the sizes in tracks.
XR2ARST(for the DB2 apply restart table)
Table A-10 DB2 Target Object/Storage Parameters (Part 4 of 4)
Field Name Option Choices Descriptions
Informatica Corporation, Confidential and Proprietary Information
Appendix A Installation Worksheets A-53

DB2 Options for Source Object/Storage Verification
DB2 Options for Source Object/Storage Verification
The following options apply to DB2 source utility objects and storage choices for DB2 source table spaces, table names, and index spaces.
Table A-11 DB2 Source Object/Storage Parameters (Part 1 of 6)
Field Name Option Choices Descriptions
STOGROUP specifies the type of allocation for the definition of tables, table spaces, and index spaces for the DB2 ECCR componentYou can choose an existing STOGROUP or VCAT name, but not both. If you do not specify a value, the Install System defaults to the STOGROUP name specified in the DB2 Parameter Information panel. (See page A-17.)Installation Notes: If you specify a STOGROUP, after completing the rest of the panel, you can choose to verify or change the default object names and sizes. See the corresponding panel in this table for information to complete the definitions of table spaces, tables, and index spaces. To verify or change any or all of these definitions, type / next to the definition option. To keep the default definitions, leave the field blank.
Informatica Corporation, Confidential and Proprietary Information
A-54 EDP Installation Guide for MVS Components

DB2 Options for Source Object/Storage Verification
VCAT Name specifies the type of allocation for the definition of tables, table spaces, and index spaces for the DB2 ECCR componentYou can choose an existing VCAT name or STOGROUP, but not both. If you choose a VCAT name, you must also specify a VCAT volume.If you specify an existing VCAT name, the Install System will generate and execute the IDCAMS commands necessary to create the objects.If you do not specify a VCAT name or STOGROUP, the Install System defaults to the STOGROUP name specified in the DB2 Parameter Information panel. (See page A-17.) Installation Note: If you specify a VCAT name, after completing the rest of the panel, you can choose to verify or change the default object names and sizes. See the corresponding panel in this table for information to complete the definitions of table spaces, tables, and index spaces. To verify or change any or all of these definitions, type / next to the definition option. To keep the default definitions, leave the field blank.
Database Name for Change Capture
specifies the name of the DB2 database that will contain the processing tables for the DB2 ECCR
Creator Name for all objects
specifies the user ID of the creator for the DB2 ECCR tables
Table A-11 DB2 Source Object/Storage Parameters (Part 2 of 6)
Field Name Option Choices Descriptions
Informatica Corporation, Confidential and Proprietary Information
Appendix A Installation Worksheets A-55
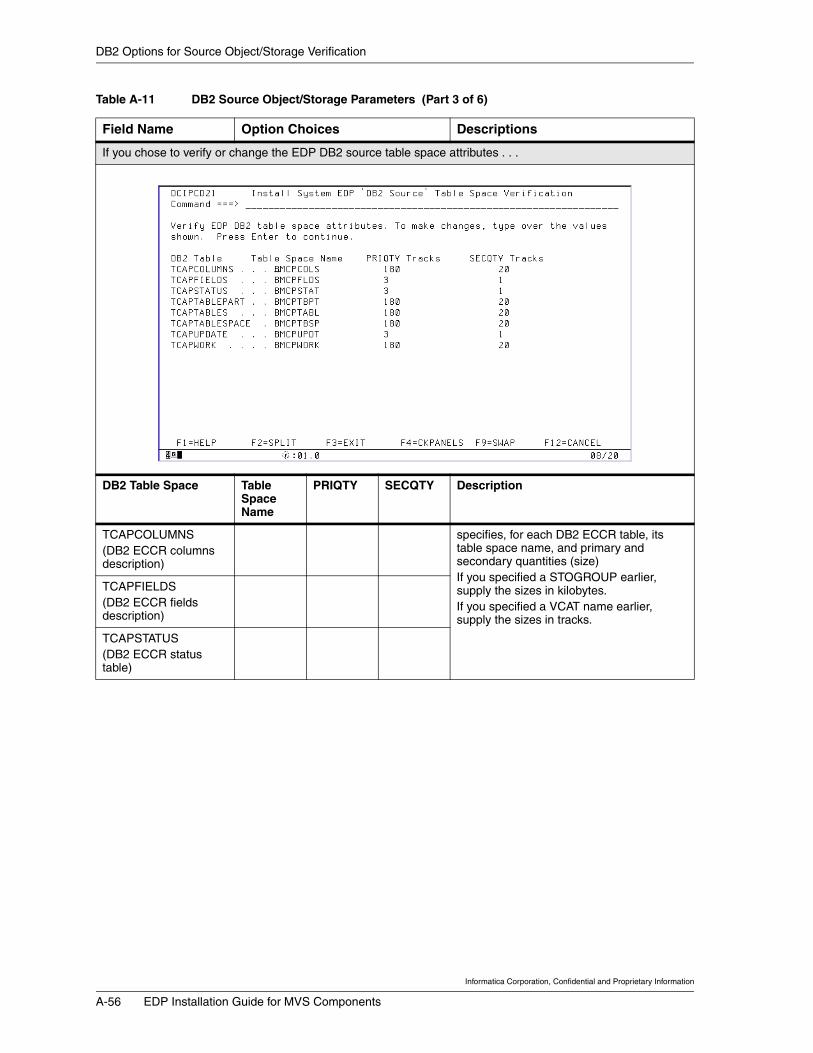
DB2 Options for Source Object/Storage Verification
If you chose to verify or change the EDP DB2 source table space attributes . . .
DB2 Table Space Table Space Name
PRIQTY SECQTY Description
TCAPCOLUMNS(DB2 ECCR columns description)
specifies, for each DB2 ECCR table, its table space name, and primary and secondary quantities (size)If you specified a STOGROUP earlier, supply the sizes in kilobytes. If you specified a VCAT name earlier, supply the sizes in tracks.
TCAPFIELDS(DB2 ECCR fields description)
TCAPSTATUS(DB2 ECCR status table)
Table A-11 DB2 Source Object/Storage Parameters (Part 3 of 6)
Field Name Option Choices Descriptions
Informatica Corporation, Confidential and Proprietary Information
A-56 EDP Installation Guide for MVS Components

DB2 Options for Source Object/Storage Verification
DB2 Table Space Table Space Name
PRIQTY SECQTY Description
TCAPTABLEPART(DB2 ECCR table that helps to process compressed files)
specifies, for each DB2 ECCR table, its table space name, and primary and secondary quantities (size)If you specified a STOGROUP earlier, supply the sizes in kilobytes. If you specified a VCAT name earlier, supply the sizes in tracks.
TCAPTABLES(DB2 ECCR table space that describes the source tables)
TCAPTABLESPACE(DB2 ECCR table space that describes the source table space)
TCAPUPDATE(DB2 ECCR table space that maintains update information about the EDP log)
TCAPWORK(DB2 ECCR work table that records in-flight table definition changes)
If you chose to verify or change the EDP DB2 source table names . . .
Table A-11 DB2 Source Object/Storage Parameters (Part 4 of 6)
Field Name Option Choices Descriptions
Informatica Corporation, Confidential and Proprietary Information
Appendix A Installation Worksheets A-57

DB2 Options for Source Object/Storage Verification
DB2 Source Table Space
Table Name Description
TCAPCOLUMNS(DB2 ECCR columns description)
lets you change a table name by allowing you to type over its current name
TCAPFIELDS(DB2 ECCR fields description)
TCAPSTATUS(DB2 ECCR status table)
TCAPTABLEPART(DB2 ECCR table that helps to process compressed files)
lets you change a table name by allowing you to type over its current name
TCAPTABLES(DB2 ECCR table that describes the source tables)
TCAPTABLESPACE(DB2 ECCR table that describes the source table space)
TCAPUPDATE(DB2 ECCR table that maintains EDP log update information)
TCAPWORK(DB2 ECCR work table that records in-flight table definition changes)
If you chose to verify or change the EDP DB2 source index space attributes . . .
Table A-11 DB2 Source Object/Storage Parameters (Part 5 of 6)
Field Name Option Choices Descriptions
Informatica Corporation, Confidential and Proprietary Information
A-58 EDP Installation Guide for MVS Components

DB2 Options for Source Object/Storage Verification
DB2 Table Index Space Name
PRIQTY SECQTY Functions
TCAPCOLUMNS(Column-description table)
specifies, for each DB2 table, its index space name, and the primary and secondary quantities (size)If you specified a STOGROUP earlier, supply the sizes in kilobytes. If you specified a VCAT name earlier, supply the sizes in tracks.
TCAPFIELDS(Field-description table)
TCAPSTATUS(Status table)
TCAPTABLEPART(Index space for the table that helps process compressed files)
TCAPTABLES(Index space for the work table that maintains describes the source tables)
TCAPTABLESPACE(Index space for the table that describes the source table space)
specifies, for each DB2 table, its index space name, and the primary and secondary quantities (size)If you specified a STOGROUP earlier, supply the sizes in kilobytes. If you specified a VCAT name earlier, supply the sizes in tracks.
TCAPWORK(Index space for the table that records in-flight table definition changes)
Table A-11 DB2 Source Object/Storage Parameters (Part 6 of 6)
Field Name Option Choices Descriptions
Informatica Corporation, Confidential and Proprietary Information
Appendix A Installation Worksheets A-59

Prefix Patterns for the Spill Data Set Names
Prefix Patterns for the Spill Data Set Names
The default option SPILDSNP allows you to specify a pattern for the DSN prefix of the spill data sets. Your EDP product adds other qualifiers to this prefix to form the complete data set name. Your product uses these data sets, if necessary, during apply processing. For this pattern, you may use text, any of the variables in Table A-12, or a combination of the two.
Additional guidelines are as follows:
• The pattern must resolve to a length of 26 bytes or less.
• Variables must be preceded by two ampersands.
• If you want a period to appear in the prefix, type two periods.
• You can specify multiple nodes in your prefix. For example, the following example generates a prefix that combines the user ID and the job name of the PAC job:
SPILDSNP=&&UID..&&JOBNAME
The next example uses specific text (FINANCE) and a symbolic variable (&&UID) to generate a prefix:
SPILDSNP=FINANCE.&&UID
• In some cases, you must include a period in your pattern as a node delimiter, or to indicate the end of a variable name. Table A-13 on page A-61 illustrates concatenation in prefix patterns and clarifies which instances require a period.
Table A-12 Symbolic Variables for Specifying Spill Data Set Names
Symbolic Variable Definition Length of Result
&JOBNAME job name used in the PAC startup job 8 bytes maximum
&USERID or &UID PAC job user ID 8 bytes maximum
&DATE execution date (in the form MMDDYY) 6 bytes
&TIME execution time (in the form HHMMSS) 6 bytes
Informatica Corporation, Confidential and Proprietary Information
A-60 EDP Installation Guide for MVS Components

Prefix Patterns for the Spill Data Set Names
• Trailing blanks are ignored.
• Symbols for numeric values (&DATE and &TIME) must be prefixed by an alphabetic or national character (#, @, or $). In the following examples, the first statement is correct, but the second causes an error:
SPILDSNP=&&UID..RP&&DATE
SPILDSNP=&&UID..&&DATE
Although you can prefix a symbolic variable with an alphabetic character, you cannot append characters. For example, XX&&UID is valid, but &&UIDXX is invalid. (However, &&UID.XX is valid.)
Table A-13 Variable Concatenation Examples
Task Code
Result (Where &UID=ABC and &JOBNAME=PAC)
concatenate the values of two variables—no node delimiter
&&UID&&JOBNAME ABCPAC
make two nodes from the values of two variables
&&UID..&&JOBNAME ABC.PAC
concatenate the value of a variable with text—no node delimiter
&&UID.NEW ABCNEW
concatenate text with the value of a variable—no node delimiter
NEW&&UID NEWABC
make two nodes from the value of a variable followed by text
&&UID..NEW ABC.NEW
make two nodes from text followed by the value of a variable
NEW.&&UID NEW.ABC
Informatica Corporation, Confidential and Proprietary Information
Appendix A Installation Worksheets A-61

Prefix Patterns for the Spill Data Set Names
Informatica Corporation, Confidential and Proprietary Information
A-62 EDP Installation Guide for MVS Components

6
B
Appendix B Support for Western European Code Pages
This appendix contains the following topics:
Overview. . . . . . . . . . . . . . . . . . . . . . . . . . . . . . . . . . . . . . . . . . . . . . . . . .B-2Plans for Additional Enhancements . . . . . . . . . . . . . . . . . . . . . . . . . .B-2Supported Countries. . . . . . . . . . . . . . . . . . . . . . . . . . . . . . . . . . . . . .B-2
Code-Page Identification . . . . . . . . . . . . . . . . . . . . . . . . . . . . . . . . . . . . .B-3Contents of Member ECPAGE in SAMPLIB. . . . . . . . . . . . . . . . . . . . . .B-4
Installing the Zap . . . . . . . . . . . . . . . . . . . . . . . . . . . . . . . . . . . . . . . .B-5
Informatica Corporation, Confidential and Proprietary Information
Appendix B Support for Western European Code Pages B-1

Overview
Overview
This appendix discusses the zap that allows the ChangeDataMove and DataMove products to use Western European single-byte code pages correctly. The ECPAGE in the SAMPLIB library includes this zap. After installing the zap, you will be able to
• select code pages when moving data to MS SQL Server, Oracle, Sybase, or UDB targets
• display object names correctly in the graphical user interface (GUI) for each country supported
• move character data from the appropriate mainframe code page (including German EBCDIC code pages) to the appropriate distributed systems code page for each country supported
Plans for Additional Enhancements
BMC Software plans to add more support for Western European code pages in future releases of the ChangeDataMove and DataMove products, as follows:
• automated configuration types• conversion tables, in the following order:
United Kingdom, Germany, France, Italy, and Switzerland
BMC Software will address Turkish and Arabic code-page support at a later date.
Supported Countries
With the zap installed, ChangeDataMove and DataMove support single-byte code pages for the following countries:
Australia Finland Netherlands Sweden
Austria France New Zealand Switzerland
Belgium Germany Norway United Kingdom
Brazil Iceland Portugal USA
Canada Italy Spain
Denmark Latin America Spanish Latin America
Informatica Corporation, Confidential and Proprietary Information
B-2 EDP Installation Guide for MVS Components

Code-Page Identification
Code-Page Identification
Table B-1 lists the code pages that this enhancement supports. All conversions between the source and the target are bidirectional. That is, conversion will work both from the source to the target and from the target to the source. The distributed systems target coded character set identifier (CCSID) is always the same. The CCSID describes the standard 8-bit ASCII code page (ISO-8859-1), which supports all languages in question.
Table B-1 Identification Table for Western European Code Pages
Source CCSID Target CCSID Source CCSID Description
0025 (hex)00037 (decimal)
0333 (hex)00819 (decimal)
Australia, Brazil, Canada, Netherlands, New Zealand, Portugal, USA
011D (hex)00285 (decimal)
0333 (hex)00819 (decimal)
United Kingdom
0116 (hex)00278 (decimal)
0333 (hex)00819 (decimal)
Finland, Sweden
0111 (hex)00273 (decimal)
0333 (hex)00819 (decimal)
Austria, Germany
0129 (hex)00297 (decimal)
0333 (hex)00819 (decimal)
France
011C (hex)00284 (decimal)
0333 (hex)00819 (decimal)
Spain, Spanish Latin America
0115 (hex)00277 (decimal)
0333 (hex)00819 (decimal)
Denmark, Norway
0118 (hex)00280 (decimal)
0333 (hex)00819 (decimal)
Italy
01F4 (hex)00500 (decimal)
0333 (hex)00819 (decimal)
Belgium, Switzerland, International Latin-1
0367 (hex)00871 (decimal)
0333 (hex)00819 (decimal)
Iceland
Informatica Corporation, Confidential and Proprietary Information
Appendix B Support for Western European Code Pages B-3

Contents of Member ECPAGE in SAMPLIB
Contents of Member ECPAGE in SAMPLIB
The data set bundles the zaps in the following order:
• Code-Page zaps
You can choose from 10 code-page-specific zaps (one for each supported code page). The code-page zaps are supplied in hexadecimal CCSID numeric order (0025, 0111, 0115, 0116, 0118, 011C, 011D, 0129, 01F4, and 0367). These zaps are optional, depending on the system configuration.
Comment characters precede all code-page zaps. To run a code page, you must remove the comment characters from the line for the corresponding zap. The zap can then verify that the EDP default conversion is in place and replace the code-page conversion table with the code page specified in the zap.
• Comma-for-Decimal Inversion zaps
By default, ChangeDataMove and DataMove assume that you use USA-style punctuation for numerals in your source data (for example, 3,000.00 instead of 3.000,00). The zap inverts the default European Code Page (ECP) comma/decimal behavior (using 3.000,00 instead of 3,000.00) during the transformation process. Use the zap only if ECP comma/decimal behavior is appropriate for your site. Scroll to the end of the ECPAGE and choose the following:
COMMA FOR DECIMAL POINT, VERSION 2.4.00
Informatica Corporation, Confidential and Proprietary Information
B-4 EDP Installation Guide for MVS Components

Installing the Zap
Installing the Zap
Summary: This procedure discusses how to install the zap for the European code page.
Follow these steps to install the zap:
Step 1 Make a copy of the member ECPAGE, which is included in the HLQ.SAMPLIB.
Note: Replace the variable HLQ with the high-level qualifier that you assigned to the SAMPLIB library.
Step 2 Open the copy of the ECPAGE member and edit it as follows:
• remove the comment characters from the the code page for the desired CCSID
• remove the comment characters from the comma-for-decimal zaps if you do not want to use the USA-style default for punctuating numerals
Step 3 Install the zap by using the IBM program AMASPZAP.
Note: After installing the zap, and if you are planning to propagate data to Oracle, Sybase, or UDB targets in Unix, be sure to rename the European code page in Unix. Follow the procedure in the EDP Installation Guide for Windows and Unix Components.
Informatica Corporation, Confidential and Proprietary Information
Appendix B Support for Western European Code Pages B-5

Installing the Zap
Informatica Corporation, Confidential and Proprietary Information
B-6 EDP Installation Guide for MVS Components

10
C
Appendix C Service Aid Utility
This appendix contains the following topics:
Overview. . . . . . . . . . . . . . . . . . . . . . . . . . . . . . . . . . . . . . . . . . . . . . . . . .C-2How to Run the Utility . . . . . . . . . . . . . . . . . . . . . . . . . . . . . . . . . . . . . . .C-2Restrictions . . . . . . . . . . . . . . . . . . . . . . . . . . . . . . . . . . . . . . . . . . . . . . . .C-2Generated Reports. . . . . . . . . . . . . . . . . . . . . . . . . . . . . . . . . . . . . . . . . . .C-3
EDMSDIR Options Report . . . . . . . . . . . . . . . . . . . . . . . . . . . . . . . .C-3EDMUPARM Options Report . . . . . . . . . . . . . . . . . . . . . . . . . . . . . .C-3EDMLEVEL Maintenance Report. . . . . . . . . . . . . . . . . . . . . . . . . . .C-3EDMLEVEL Comparison Report . . . . . . . . . . . . . . . . . . . . . . . . . . .C-4
JCL Examples . . . . . . . . . . . . . . . . . . . . . . . . . . . . . . . . . . . . . . . . . . . . . .C-5Generating All Reports (#EXSA) . . . . . . . . . . . . . . . . . . . . . . . . . . .C-6Comparing Maintenance Levels (#EXCLEV) . . . . . . . . . . . . . . . . . .C-8Generating a Maintenance Information Module (#EXUBLD) . . . . .C-9
Informatica Corporation, Confidential and Proprietary Information
Appendix C Service Aid Utility C-1

Overview
Overview
This appendix discusses the Service Aid utility that the EDP products provide. With this utility, you or your technical support analyst can obtain information about your current implementation of the ChangeDataMove or DataMove product. You can use this information to
• ensure that you use the correct installation options when installing later releases of ChangeDataMove and DataMove
• determine which installation options are in use when you report a problem
• determine which product maintenance has been installed (to assist your technical support analyst in diagnosing a problem)
• automate the process of verifying that new maintenance software will not regress currently installed maintenance software
Specifically, the Service Aid utility generates reports about the contents of your EDP load modules. The installation process creates these modules based on the options that you choose during installation and modifies the modules when you install a maintenance release.
Future EDP releases may include additional Service Aid functions.
How to Run the Utility
The stand-alone Service Aid utility does not require the use or presence of any other EDP component (such as the EDP agent or logger). To run the utility to generate specific reports, use the appropriate JCL from the HLQ.SAMPLIB data set (where HLQ is the high-level identifier specified at installation) and parameters shown in Table C-1 on page C-5. “JCL Examples” on page C-5 illustrates how to use the sample JCL.
Restrictions
The Service Aid utility has the following restrictions:
• operates only on the MVS (OS/390) platform• provides information only about the MVS components of
ChangeDataMove and DataMove
Informatica Corporation, Confidential and Proprietary Information
C-2 EDP Installation Guide for MVS Components

Generated Reports
Generated Reports
The generated reports are identified by JCL PARM= parameters that you enter. You can generate the following reports:
• EDMSDIR Options• EDMUPARM Options• EDMLEVEL Maintenance• EDMLEVEL Comparison
Figure C-1 on page C-6 shows an example of JCL code that generates all of the available reports.
EDMSDIR Options Report
This report lists the EDMSDIR options that are currently in effect, based on the load module library that you specify in a EDMPARMS DD statement.
If you omit the EDMPARMS DD statement, the utility bases the report on the EDMSDIR options module that is contained in the normal load-module search order (that is, STEPLIB, LPA, linklist). In this case, the utility also reports where it located the EDMSDIR load module.
EDMUPARM Options Report
This report lists the EDMUPARM (logger) options that are currently in effect, based on the load module library that you specify in a EDMPARMS DD statement.
If you omit the EDMPARMS DD statement, the utility bases the report on the EDMUPARM options module that is contained in the normal load-module search order (that is, STEPLIB, LPA, linklist).
EDMLEVEL Maintenance Report
This report lists the maintenance that is currently installed in ChangeDataMove and DataMove, based on the load module library that you specify in an EDMLEVEL DD statement.
Informatica Corporation, Confidential and Proprietary Information
Appendix C Service Aid Utility C-3

Generated Reports
If you omit the EDMLEVEL DD statement, the utility bases the report on the contents of the EDMLEVEL load module that is contained in the normal load-module search order (STEPLIB, LPA, linklist). The utility also reports where it located the EDMLEVEL load module.
EDMLEVEL Comparison Report
This report compares two EDMLEVEL load modules:
• the EDMLEVEL module contained in the library that the EDMLEVEL DD statement specifies (the “old” EDMLEVEL)
• the EDMLEVEL module found by using the normal load-module search order of STEPLIB, LPA, linklist (the “new” EDMLEVEL)
Note: The expectation is that the new EDMLEVEL load module is in the STEPLIB data sets.
The purpose of this comparison is to determine whether any maintenance is recorded in the old EDMLEVEL load module but not in the new one. When installing a maintenance release, instructions are provided to use this comparison to ensure that the load modules that are being replaced contain (at least) all previously installed updates. The report indicates if there are any discrepancies are not and you will decide after reviewing the report whether to replace the load modules. This safeguard ensures that installing the maintenance does not regress any product maintenance that is already in place.
When generating this report, observe the following guidelines:
• You must provide an EDMLEVEL DD statement, and the designated library must contain an EDMLEVEL load module.
• The release levels of the two EDMLEVEL load modules must be the same.
For an example of the JCL code that generates the EDMLEVEL Comparison report, see Figure C-2 on page C-8.
Informatica Corporation, Confidential and Proprietary Information
C-4 EDP Installation Guide for MVS Components

JCL Examples
JCL Examples
This section provides examples of the sample JCL to illustrate how to generate various reports. The examples are as follows:
• generating all reports (page C-6)• comparing maintenance levels (page C-8)• generating a maintenance information module (page C-9)
The sample JCL is located in HLQ.SAMPLIB. Table C-1 lists the parameters that you or your technical support analyst can add to the JCL code.
Table C-1 Parameters for the Service Aid Utility
Parameter Description
ALL1 generates all reports (the default)The utility uses this default if you add no parameters to the JCL.
SDIR generates the EDMSDIR options report
UPRM generates the EDMUPARM options report
LEVL identifies current maintenance for ChangeDataMove and DataMove
CLEV compares maintenance levels
UBLD1 builds source member EDMUDESC, which provides a short description of applied zaps and load module replacements
1Only BMC Software personnel can use the UBLD parameter. If you attempt to use UBLD or ALL, you receive the message BMCEDM181313I EDMUOPTS: EDMUDESC source module build failed.
Informatica Corporation, Confidential and Proprietary Information
Appendix C Service Aid Utility C-5

JCL Examples
Generating All Reports (#EXSA)
Figure C-1 illustrates using the sample JCL with all of the parameters to generate all reports.
Figure C-1 Sample JCL Code to Generate All Reports
//EDMUOPTS EXEC PGM=EDMUOPTS,PARM='SDIR,UPRM,LEVL,CLEV,UBLD'//*-------------------------------------------------------------------*//* STAND ALONE UTILITY: *//* PROVIDE SERVICE AIDS FOR USE IN INSTALLING, MAINTAINING, AND*//* IN MIGRATING TO NEW RELEASES OF EDP PRODUCTS: *//* CHANGE DATA MOVE AND DATAMOVE. *//* *//* PARMS: *//* ALL - ALL THE REPORTS; EXCEPT UBLD *//* *//* UBLD - ONLY AT BMC (SEE #EXUBLD) *//* BUILD ZAP AND LMOD INFORMATION DESCRIPTION SOURCE *//* MODULE EDMUDESC USING $CNTL *//* IF MEMBER $CNTL IS NOT FOUND IN EDMCNTL DD DATASET *//* AN "EMPTY" EDMUDESC IS BUILD *//* ====> SEE #EXUBLD *//* SEARCH ORDER: *//* EDMCNTL DD *//* *//* *//* SDIR - REPORT OF EDMSDIR OPTIONS THAT ARE CURRENTLY IN *//* EFFECT *//* *//* SEARCH ORDER: *//* EDMPARMS DD *//* STEPLIB; LPA; LINKLIST *//* *//* UPRM - REPORT OF EDMUPARM (LOGGER OPTIONS) CURRENTLY IN *//* EFFECT *//* *//* SEARCH ORDER: *//* EDMPARMS DD *//* STEPLIB; LPA; LINKLIST *//* *//* LEVL - REPORT OF MAINTENANCE THAT IS CURRENTLY INSTALLED IN *//* CDM AND DM PRODUCTS; DESCRIPTIONS OF ZAPS AND LMODS *//* ARE IN LOAD MODULE EDMUDESC. *//* *//* SEARCH ORDER: (EDMLEVEL) *//* EDMLEVEL DD *//* STEPLIB; LPA; LINKLIST *//* SEARCH ORDER: (EDMUDESC) *//* STEPLIB; LPA; LINKLIST *
Informatica Corporation, Confidential and Proprietary Information
C-6 EDP Installation Guide for MVS Components

JCL Examples
//* *//* CLEV - COMPARING MAINTENANCE LEVELS ====> SEE #EXCLEV *//* *//* SEARCH ORDER: *//* EDMLEVEL DD MUST CONTAIN "OLD" EDMLEVEL *//* ---- ------------- *//* STEPLIB; LPA; LINKLIST: *//* MUST CONTAIN "NEW" EDMLEVEL *//* SEARCH ORDER: (EDMUDESC) *//* STEPLIB; LPA; LINKLIST *//*-------------------------------------------------------------------*//STEPLIB DD DISP=SHR,DSN= YOUR LOADLIB LOAD//EDMPARMS DD DISP=SHR,DSN= YOUR EDMPARMS LIB EDMSDIR//* EDMUPARM//EDMLEVEL DD DISP=SHR,DSN= EDMLEVEL//*EDMCNTL DD DISP=OLD,DSN= $CNTL//*//* (SOURCE)EDMUDESC//REPORT DD SYSOUT=* REPORT//SYSOUT DD SYSOUT=*
Informatica Corporation, Confidential and Proprietary Information
Appendix C Service Aid Utility C-7

JCL Examples
Comparing Maintenance Levels (#EXCLEV)
Figure C-2 compares maintenance levels of ChangeDataMove and DataMove as specified by the EDMLEVEL DD statement.
Figure C-2 Sample JCL Code to Generate the EDMLEVEL Comparison Report
//EDMUOPTS EXEC PGM=EDMUOPTS,PARM='CLEV'//*-------------------------------------------------------------------*//* STAND ALONE UTILITY: *//* PROVIDE SERVICE AIDS FOR USE IN INSTALLING, MAINTAINING, AND*//* IN MIGRATING TO NEW RELEASES OF EDP PRODUCTS: *//* CHANGE DATA MOVE AND DATAMOVE. *//* *//* PARMS: *//* CLEV - COMPARING MAINTENANCE LEVELS *//* *//* SEARCH ORDER: *//* EDMLEVEL DD MUST CONTAIN "OLD" EDMLEVEL *//* ---- ------------- *//* STEPLIB; LPA; LINKLIST: *//* MUST CONTAIN "NEW" EDMLEVEL *//* ---- ------------- *//* *//* LOAD MODULE EDMUDESC *//* IS USED TO ADD DESCRIPTIVE INFORMATION (IN REPORT) *//* FOR ALL ZAPS AND LMODS FOUND IN EDMLEVEL *//* EDMUDESC IS BUILT, ASM AND LINKED AT BMC. *//* *//* *//* IF EDMUDESC IS NOT AVAILABLE THE FOLLOWING INFO *//* MESSAGE IS DISPLAYED: PROCESSING CONTINUES *//* BMCEDM1813209I *//* No descriptive ZAP and LMOD info available*//* *//* *//* SEARCH ORDER: *//* STEPLIB; LPA; LINKLIST *//* *//*-------------------------------------------------------------------*//STEPLIB DD DISP=SHR,DSN= maintenance loadlib LOAD//* with "new" EDMLEVEL NEW EDMLEVEL//* EDMUDESC// DD DISP=SHR,DSN= loadlib OLD LOAD//EDMLEVEL DD DISP=SHR,DSN= loadlib with "old" EDMLEVEL OLD EDMLEVEL//REPORT DD SYSOUT=* REPORT//SYSOUT DD SYSOUT=*
Informatica Corporation, Confidential and Proprietary Information
C-8 EDP Installation Guide for MVS Components

JCL Examples
Generating a Maintenance Information Module (#EXUBLD)
Figure C-3 illustrates the UBLD parameter, which is for BMC Software internal use only. BLD generates a load module that provides descriptive information about zaps and load module replacements.
Figure C-3 Sample JCL Code to Generate an EDMLEVEL Maintenance and Comparison Module
//EDMUOPTS EXEC PGM=EDMUOPTS,PARM='UBLD' //*-------------------------------------------------------------------* //* STAND ALONE UTILITY: * //* PROVIDE SERVICE AIDS FOR USE IN INSTALLING, MAINTAINING, AND* //* IN MIGRATING TO NEW RELEASES OF EDP PRODUCTS: * //* CHANGE DATA MOVE AND DATAMOVE. * //* * //* PARM : * //* UBLD - ONLY AT BMC * //* BUILD SOURCE MODULE EDMUDESC; * //* USING MEMBER $CNTL IN DD EDMCNTL * //* WRITE SOURCE MODULE EDMUDESC TO PDS * //* DD EDMCNTL * //* * //* MEMBER $CNTL FOUND IN .ZAPS DATASET * //* .ZAP DATASET: * //* THE .ZAPS DATASET WILL CONTAIN THE ZAPS FOR * //* THE RESPECTIVE RELEASE OF CDM/DM THAT IT ADDRESSES* //* THE ZAP MEMBER IS BASED UPON THE PROBLEM NUMBER * //* (WHETHER PROBLEM TRACKING OR VANTIVE) * //* $CNTL SHORT DESCRIPTION ON: * //* ZAP APPLIED INDICATORS AND OFFSETS FOR CDM/DM * //* STARTING AT OFFSET 256 X'100' TO 639 X'1FF' * //* AND * //* LMOD APPLIED INDICATORS AND OFFSETS * //* STARTING AT OFFSET X'200' THRU X'27F' * //* IN MODULE: EDMLEVEL * //* * //* THIS BUILD, ASM AND LINK IS DONE AT BMC. * //* THE LOAD MODULE EDMUDESC: DISTIBUTED TO CUSTOMER * //* WITH THE CURRENT VERSION. * //* * //* IF $CNTL IS NOT FOUND; THE FOLLOWING INFORMATION *//* MESSAGE IS DISPLAYED; PROCESSING CONTINUES *//* 1813212I EDMULDR $CNTL NOT IN DD EDMCNTL *//* *//* IF SOURCE MODULE EDMUDESC BUILD SUCCESSFUL: *//* THE FOLLOWING INFORMATION MESSAGE IS DISPLAYED: *//* 181315I EDMUOPTS ASM AND LINK SOURCE MOD:EDMUDESC *//* *//* SHIP LOAD MODULE AS PART OF MAINTENANCE / INSTALL *//* *
Informatica Corporation, Confidential and Proprietary Information
Appendix C Service Aid Utility C-9

JCL Examples
//* SEARCH ORDER: *//* EDMCNTL DD *//* *//* *//* WHERE USED: *//* LOAD MODULE EDMUDESC IS USED TO ADD DESCRIPTIVE INFO*//* (IN REPORT) FOR ALL ZAPS AND LMODS FOUND IN EDMLEVEL*//* IE. IF PARM=LEVL AND/OR CLEV. *//* *//* *//* IF EDMUDESC IS NOT AVAILABLE THE FOLLOWING INFO *//* MESSAGE IS DISPLAYED: PROCESSING CONTINUES *//* *//* 1813209I No descriptive ZAP and LMOD info available*//* *//* *//* SEARCH ORDER: *//* EDMLEVEL DD *//* STEPLIB; LPA; LINKLIST *//* *//*-------------------------------------------------------------------*//STEPLIB DD DISP=SHR,DSN= maintenance loadlib LOAD //* //EDMCNTL DD DISP=OLD,DSN= "ZAP" source PDS //* $CNTL <=====//* EDMUDESC<=====//REPORT DD SYSOUT=* REPORT //SYSOUT DD SYSOUT=*
Informatica Corporation, Confidential and Proprietary Information
C-10 EDP Installation Guide for MVS Components

30
Glossary
agent See EDP agent.
ancestor key (ANCKY)A field that consists of the keys of the IMS segments in the hierarchical path above the segment from which you are propagating data. The ancestor key does not include the key of the propagated segment.
ancestor-field key (ANLF)A field within the multifield key of an IMS segment that is an ancestor of the segment from which you are propagating data. Using ancestor-field keys in your data transformations allows you to propagate data from an ancestor’s key fields to separate target columns.
ancestor-level key (ANL)The key field of an IMS segment that is an ancestor of the segment from which you are propagating data. Using ancestor-level keys in your data transformations allows you to propagate the keys of your ancestor segments to separate target columns (instead of propagating a single, concatenated key for all ancestors).
APF See authorized program facility (APF).
area Within an IMS Fast Path data entry database (DEDB), a data set that represents an entire logical data structure. This structure consists of a subset of root segments and their dependent segments. The DEDB randomizing module determines which root segments reside in an area. A single root segment and its dependents cannot span multiple areas.
A DEDB can have up to 240 areas.
article In the MS SQL Server RDBMS, a grouping of data to be replicated as part of a publication. An article can be a table, selected columns or rows in a table, or a stored procedure. One or more articles comprise a publication.
Informatica Corporation, Confidential and Proprietary Information
Glossary 1

EDP versions earlier than 2.4 supported data propagations to target articles. EDP 2.4 supports propagations to target tables only. See also publication.
authorized program facility (APF)An IBM facility that allows you to establish authorization for programs to use certain functions that are otherwise restricted.
basic direct access method (BDAM)An access method that directly retrieves or updates particular blocks of a data set stored on a direct access storage device (DASD).
batch processing In MVS, the processing of data or jobs in such a manner that you cannot further influence processing while it is in progress. For example, in the EDP products, you can use batch processing to verify transformations, define EDP loggers, and so on.
batch message processing (BMP)A mode of program execution within an online IMS environment. BMP is accomplished by a program that has access to online databases and message queues.
BDAM See basic direct access method (BDAM).
BMP See batch message processing (BMP).
bulk-data propagationThe process of unloading bulk data from a source database, transforming the data, and moving it to a target database. You can use this type of propagation to materialize or refresh target tables. DataMove is a BMC Software product that performs bulk-data propagation. Contrast with changed-data propagation.
canonical data typesSee EDP canonical data types.
catalog A set of system tables that contain metadata about the objects in your database. A catalog can include the number and names of tables and the attributes of each column in a table. For all RDBMSs except Oracle, you can use a catalog to register target tables for a data propagation. See also data dictionary.
ChangeDataMove A BMC Software product that lets you selectively capture changes made to data in DB2, IMS, or VSAM sources and apply those changes in near real time to one or more relational databases. Supported target RDBMSs are
• DB2/MVS• DB2 Universal Database (UDB) for distributed systems• MS SQL Server
Informatica Corporation, Confidential and Proprietary Information
2 EDP Installation Guide for MVS Components

• Oracle• Sybase Adaptive Server Enterprise (referred to as Sybase)
Both ChangeDataMove and DataMove belong to the BMC Software Enterprise Data Propagation (EDP) product family.
changed-data propagationThe process of capturing changes made to a source database and applying those changes to a target database. The ChangeDataMove product propagates changed data between different types of databases in near real time or on a scheduled basis. Contrast with bulk-data propagation and data propagation.
check box In a Windows interface, a square box on which you click to select or clear an option. When an X or check mark appears in the box, the option is selected.
CICS See Customer Information Control System (CICS).
CICS transaction codeA CICS code that serves as a prefix when you issue CICS/VSAM ECCR commands. This code is defined during installation of your EDP product. See also Customer Information Control System (CICS).
click In a Windows interface, to press and release the left mouse button.
collapse In a Windows interface, to condense a list that has an expanded, hierarchical tree structure (for example, the list in the left pane of an MMC console window). You can collapse the list by clicking the box to the left of an item or by double-clicking the item.
column In a table, a structure that defines a unit of data that must be in every row. Each column has at least a name and a data type.
command button In a Windows interface, a rectangular button on which you click to initiate an action (for example, the OK and Cancel buttons). An ellipsis after a button’s name indicates that you will need to provide more information before the action can be completed.
command prefix A prefix that you use when specifying EDP agent commands. This prefix is a configuration parameter of the EDP agent and is defined during installation.
console In the Microsoft Management Console (MMC), a group of one or more snap-ins, folders, and controls saved in an .msc file to provide an administrative function. The EDP graphical user interface is a console.
Each console may have its own menus and toolbar, which are distinct from those of the main MMC window. You can adjust a console to suit your needs and then save your configuration settings as part of the .msc file for future use.
Informatica Corporation, Confidential and Proprietary Information
Glossary 3

console tree The hierarchical list of items (or nodes) on the Tree tab in the left pane of a console window. The tree nodes can represent snap-ins (for example, the EDP console) and the objects, tasks, and containers that comprise each snap-in (for example, the EDP repository).
context menu In a Windows interface, a menu that pops up for certain items when you select them. For example, in the EDP products, you can display context menus by right-clicking items listed in
• the console tree• the right pane of an MMC console window• some dialog boxes and wizard pages
The menu contains commands specific to the selected item.
copybook A portion of a COBOL program that describes the data fields in one IMS segment or VSAM record. In the EDP console, you can use a copybook to register your IMS and VSAM schemas.
CPU ID The combination of serial number, model number, and submodel number that uniquely identifies a processor or processor complex.
cross-coupling facility (XCF)An IBM facility. For EDP products, this facility monitors movement of data between EDP components.
Customer Information Control System (CICS)A program from IBM that provides concurrent transaction processing, including database creation and maintenance.
DASD See direct access storage device (DASD).
data dictionary A set of Oracle system tables and views that contain metadata about your data objects and environment. The metadata includes table names, column lengths, column data types, users, user privileges, and links between databases. In the EDP products, you can use data dictionaries to register Oracle target tables and schemas.
Note: MS SQL Server users may refer to these tables and views as the data dictionary or the catalog. For consistency, the EDP products use catalog for MS SQL Server. See also catalog.
data entry database (DEDB)A direct access database that the IMS Fast Path feature uses. The DEDB consists of one or more areas that contain segments and dependent segments. Fast Path uses VSAM’s improved control-interval processing to access the database.
Informatica Corporation, Confidential and Proprietary Information
4 EDP Installation Guide for MVS Components

Data Facility Storage Management Subsystem (DFSMS)The IBM MVS facility that automates and centralizes storage management.
data language 1 (DL/I)A data manipulation language that provides an interface between user applications and IMS.
data management block (DMB)An IMS/VS control block in main storage that describes and controls a physical database. A DMB is constructed from information obtained from the IMS application control block (ACB) library or the database description (DBD) library. IMS uses DMBs during online processing.
data mart A database that contains historical data focusing on a specific business area or department. A data mart typically addresses fewer subject areas than a data warehouse but is not necessarily smaller in size.
data propagation The process of extracting, transforming, moving, and loading data across enterprise systems that use the same or different platforms. The EDP products propagate bulk data (with DataMove) or changed data (with ChangeDataMove) from mainframe systems to relational databases. See also bulk-data propagation and changed-data propagation.
data set group (DSG)In IMS, an operating system data set that contains a subset of a database with one or more unique segment types. A database always consists of at least one data set group.
data set readers See EDP data set readers.
data type An attribute that defines the kind of information that a field or column can hold. Each DBMS allows several character, numeric, and date/time data types. For example, DB2 data types include CHAR, INTEGER, and DATE. When you define a transformation, you must ensure that the source and target data types are compatible. See also EDP canonical data types.
data warehouse A database that contains data representing the business history of an organization. The data warehouse is designed for enterprise decision support. In addition, a data warehouse is typically
• separate from operational systems• structured for querying and analysis• focused on subjects of interest to business analysts • a source of summary data • associated with defined periods of time
Informatica Corporation, Confidential and Proprietary Information
Glossary 5

database description (DBD)The collection of macro parameter statements that define the physical and logical characteristics of an IMS database. The DBD describes characteristics such as
• database organization and access method • segments and fields in a database record • relationships between types of segments
In the EDP products, you can use a DBD to register IMS segments.
database management system (DBMS)A system that organizes and manages data storage and retrieval in databases. See also hierarchical database, relational database, and relational database management system (RDBMS).
database materializationSee materialize.
DataMove A BMC Software product that lets you move data in bulk fashion from DB2, IMS, or VSAM sources to distributed, relational databases. Supported target RDBMSs are
• DB2/MVS • DB2 Universal Database (UDB) for distributed systems• MS SQL Server• Oracle• Sybase Adaptive Server Enterprise (referred to as Sybase)
Both DataMove and ChangeDataMove belong to the BMC Software Enterprise Data Propagation (EDP) product family. You can use DataMove to initially populate the target tables to which you will propagate changed data with ChangeDataMove, or you can use DataMove as a stand-alone product.
data-resource levelsThe categories and subcategories of data resources in a database, as follows:
• For DB2/MVS, the levels are subsystem, table, and schema.
• For IMS, the levels are database, segment, and schema.
• For VSAM, the levels are data set, record, and schema.
• For Oracle, the levels are instance, table, and schema.
Informatica Corporation, Confidential and Proprietary Information
6 EDP Installation Guide for MVS Components

• For MS SQL Server, the levels are server, database, table, and schema.
If you propagated data to MS SQL Server publications with an earlier version of EDP, you might still see registrations for the following levels: server, publication, article, and schema. These registrations are now obsolete.
• For Sybase, the levels are server, database, table, and schema.
• For UDB, the levels are instance, database, table, and schema.
Usually, these levels reflect how data is stored in a database. To fully describe the source or target for a data propagation, you must register data resources at all levels specified for your DBMS type.
data-resource registrationAn EDP entity that describes a source or target data resource that you want to use for data propagations. See also register.
DB2 catalog See catalog.
DB2 Universal Database (UDB)An IBM family of multiple-user, object-relational database products for Unix, OS/2, and Windows operating systems. The EDP products support the following UDB products as targets on selected Unix or Windows operating systems:
• DB2 Universal Database Enterprise Edition (EE)• DB2 Universal Database Enterprise-Extended Edition (EEE)
Note: The UDB family also includes the DB2 UDB for OS/390 product. However, the EDP products and documentation refer to that product as DB2/MVS or DB2 to distinguish it from the UDB products for distributed systems.
See also DB2/MVS, relational database, and relational database management system (RDBMS).
DB2/MVS The name that the EDP products and documentation use for the IBM Data Base 2 (DB2) relational database products for MVS and OS/390 systems. The EDP products support DB2 as a source or target.
Note: EDP uses DB2/MVS or DB2 instead of the IBM product name DB2 UDB for OS/390. Doing so distinguishes this product from the UDB products for distributed systems.
See also DB2 Universal Database (UDB), relational database, and relational database management system (RDBMS).
Informatica Corporation, Confidential and Proprietary Information
Glossary 7

DBCS See double-byte character set (DBCS).
DBD See database description (DBD).
DBMS See database management system (DBMS).
DEDB See data entry database (DEDB).
default options moduleThe EDMSDIR module, which contains default configuration options for your EDP product installation. Depending on the EDP product, this module resides in either the CNTL data set or the APF-authorized library and has a member name of $xnnDOPT.
DFSMS See Data Facility Storage Management Subsystem (DFSMS).
dialog box In a Windows interface, a type of window in which you enter information to carry out a particular command or task. Dialog boxes can contain various types of buttons, options, and boxes for entering information.
direct access storage device (DASD)On an MVS mainframe computer, a storage device that contains data and allows random read and write access.
DL/I See data language 1 (DL/I).
DL/I database A type of database that is created and accessed by using DL/I. This database uses one of the following database organization methods: HSAM, HISAM, SHISAM, HDAM, HIDAM, SHSAM, GSAM, MSDB, or DEDB.
DMB See data management block (DMB).
double-byte character set (DBCS)A character set that uses two bytes to represent one character. Some languages (such as Japanese, Chinese, and Korean) require DBCS support because they contain more symbols than 256 code points can represent. Only products that support DBCS can accommodate typing, displaying, and printing double-byte characters.
double-click In a Windows interface, to press and release the left mouse button twice, in quick succession.
drag In a Windows interface, to point to an object on the screen, press the left mouse button, and hold the button down while moving the mouse. You can use this technique to select a block of text or to move objects on the screen. For example, in the EDP Transformation window, you can map a source field to a target column by dragging the field to the column.
Informatica Corporation, Confidential and Proprietary Information
8 EDP Installation Guide for MVS Components

drop-down list box In a Windows interface, a closed version of a list box. (That is, only one line is visible initially.) To view the drop-down list, click the down-arrow button next to the box.
When open, the list box displays all possible values. If the list box is not large enough to display all values at the same time, a scroll bar appears on the right side. Use the scroll bar to scroll through the list. See also list box.
DSG See data set group (DSG).
dynamic allocation A feature that allows an MVS program to allocate data sets based on the resources currently needed and information from control blocks, rather than from DD statements.
ECM See EDP control module (ECM).
EDMNAME A name that EDP generates and assigns to the following source and target data resources when you register them:
• IMS segments• VSAM records• DB2/MVS, MS SQL Server, Oracle, Sybase, and UDB tables
EDP uses EDMNAMEs to link data-resource registrations with transformation definitions and find the data resources to propagate.
You can change how EDP generates default EDMNAMEs. However, you cannot edit an assigned EDMNAME after you complete a registration.
If you are using ChangeDataMove, you can use domains to create groups of EDMNAMEs. You then specify the domain names instead of the EDMNAMEs for the apply component.
EDMSDIR See default options module.
EDP See Enterprise Data Propagation (EDP).
Informatica Corporation, Confidential and Proprietary Information
Glossary 9

EDP agent An EDP component that provides the following services to other EDP components:
• obtaining and managing global queues• creating address spaces• obtaining data from the EDP repositories
On MVS target systems, the EDP agent handles the same function as the EDP listeners on distributed-system targets.
EDP canonical data typesThe format of propagated data while the EDP data transformer is processing the data. When converting data from the source format (IMS, VSAM, or DB2), EDP first converts it to EDP canonical format and then to the target format (DB2, MS SQL Server, Oracle, Sybase, or UDB).
The EDP data transformer processes post-transformation exits while the data is in the canonical format. Therefore, you must use the EDP canonical data types to describe your data when writing post-transformation exits.
EDP console The Windows graphical user interface for the EDP products. The EDP console is a snap-in to the Microsoft Management Console (MMC). From the EDP console, you
• register source and target data resources• define transformations• activate registrations and transformation definitions• create DataMove propagation profiles• set options for default EDMNAMEs• enter other propagation information
See also snap-in.
EDP control module (ECM)An internal interface that BMC Software uses for communication between certain stand-alone BMC Software utilities and EDP components and processes.
EDP data set readersEDP utilities that read unloaded source data to initially populate or repopulate a target table. The EDP products provide separate data set readers for each type of source DBMS. In certain configurations, DataMove uses a data set reader for bulk-data propagation. In ChangeDataMove, you can use a data set reader to materialize a target for changed-data propagation.
Informatica Corporation, Confidential and Proprietary Information
10 EDP Installation Guide for MVS Components
EDP data transformerAn EDP component that transforms nonrelational data in IMS segments or VSAM records into a relational row-and-column format. The relational format is suitable for propagation to a target table. The data transformer also performs data-type conversions. See also hierarchical database and relational database.
EDP integration tableA special target table to which you can propagate data to make transactional changes available to a third-party product. In addition to your changes, the table includes control information that the third-party product requires to process the changes. To obtain this control information, you use the STGTBL1 post-transformation exit.
You can use integration tables for a variety of purposes. For example, use an integration table with messaging middleware to make changes available to downstream applications and processes for e-business. Alternatively, use an integration table with products for developing and managing data warehouses, data marts, or operational data stores (ODSs).
The EDP products support integration tables for all supported target RDBMSs.
EDP ISPF utilities interfaceThe set of ISPF panels that BMC Software distributes with the EDP products. These panels enable you to work with EDP repositories, view information about the operating environment, and perform product authorizations from within TSO. See also EDP utilities.
EDP listener An EDP component that resides on Unix and Windows target systems:
• On Unix systems, the EDP listener is a daemon that you can configure to start automatically or manually after installing the EDP target components.
• On Windows systems, the EDP listener is a service that is started when you restart your machine after installing the EDP target components.
On both types of systems, the EDP listener runs in the background and comes into play when it receives communications from other EDP components. When the EDP listener starts, a port opens to establish a connection between the source MVS system and the target system.
Note: On MVS target systems, the listener’s tasks are handled by the EDP agent.
Informatica Corporation, Confidential and Proprietary Information
Glossary 11

EDP repository An extended partitioned data set (PDX) on the MVS host. The EDP repository stores information that the EDP products require in order to perform data propagations. This information includes data-resource registrations, transformation definitions, and DataMove propagation profiles.
EDP taskpad A feature of the EDP console that lets you initiate basic EDP tasks directly from options in the right pane of the console window. By default, the taskpad is displayed in the right pane when you start the EDP console. You can begin the following tasks from the taskpad:
• register a new source or target• open an existing transformation definition• create a new transformation definition• create a DataMove propagation profile
EDP utilities A set of utilities that are accessible from the EDP ISPF utilities interface or in MVS batch mode. These utilities allow you to perform the following tasks:
• create and maintain EDP repositories (ISPF interface and MVS batch)• view information about the operating environment (ISPF interface only)• perform product authorizations (ISPF interface only)• create special event markers (MVS batch only)• materialize target tables (MVS batch only)
Electronic Software Distribution (ESD) imageAn image that BMC Software provides when you request electronic distribution of the EDP products. The image compresses the product data sets into one or more sequential data sets. Installing from an ESD image is slightly different than installing from a tape.
Enterprise Data Propagation (EDP)The family of BMC Software products to which ChangeDataMove and DataMove belong. These products extract, transform, move, and load data across an enterprise, from mainframe sources to relational targets.
ESD See Electronic Software Distribution (ESD) image.
expand In a Windows interface, to open a list that has a hierarchical tree structure (for example, the list in the left pane of an MMC console window). You expand the list by clicking the box to the left of an item or by double-clicking the item.
expiration date See password activation deadline, product license expiration date, or temporary expiration date.
Informatica Corporation, Confidential and Proprietary Information
12 EDP Installation Guide for MVS Components

extended partitioned data set (PDX)A BDAM preformatted data set that contains a directory of entries and the data records associated with those entries. This control PDX is unique to BMC Software products. The EDP repository is in PDX format.
extended recovery facility (XRF)A function of IMS that provides an alternate IMS system to monitor the active IMS system for recovery purposes.
Extensible Markup Language (XML)A subset of Standard Generalized Markup Language (SGML) for describing structured data in an open and nonproprietary format. You use XML to describe and manage data, rather than control how data is displayed. You can define an unlimited number of tags to identify types of data items, such as date or city name. The World Wide Web Consortium provides standards and specifications to ensure that XML is uniform and not vendor dependent.
In the EDP products, you can export an EDP repository’s contents to an XML file on your Windows client. You can view the XML file in a Web browser. If necessary, you can edit the XML file in a standard text editor or in an XML editor. When you are ready, you can import the file into a new repository.
See also XML schema.
Fast Path See IMS Fast Path.
Fast Path Reorg/EP™
A BMC Software utility that you can use to reorganize IMS Fast Path databases. In DataMove, you can select Fast Path Reorg/EP as an option for unloading data from a Fast Path database for propagation to a target database.
foreign key In a table, a column or set of columns whose values match one primary key value of a row in the same table or another table. A foreign key does not have to be unique.
generalized sequential access method (GSAM)In IMS, a method of accessing nonhierarchical simple physical sequential data sets.
generated key (GENKY)A type of key that you assign to a target column when both of these conditions are true:
• Your source is an IMS segment or VSAM record that has repeating groups.
Informatica Corporation, Confidential and Proprietary Information
Glossary 13

• You cannot produce a unique key for the target table by assigning only a replication key to the target column.
The generated key causes your EDP product to generate sequential values (beginning with 1) for each target row that contains repeating data. When combined with a replication key, the generated key produces a unique key for your target table. See also repeating group.
grace period The 15-day period during which a product is allowed to run on a nonlicensed processor before it ceases to run. The BMC Software Contracts Administration department can issue a new permanent password to reset the failure mode and the grace period at any time.
GSAM See generalized sequential access method (GSAM).
HDAM See hierarchic direct access method (HDAM).
HIDAM See hierarchic indexed direct access method (HIDAM).
hierarchic direct access method (HDAM)In IMS, an algorithmic addressability method to access records in a hierarchical direct organization.
hierarchic indexed direct access method (HIDAM)In IMS, an index method to access records in a hierarchical direct organization.
hierarchic indexed sequential access method (HISAM)In IMS, an index method to access records in a hierarchical sequential organization.
hierarchic sequential access method (HSAM)In IMS, a method to access records in a hierarchical sequential organization on tape or direct access storage.
hierarchical databaseA database that uses a tree structure instead of a table to present data to the user. (Examples are IMS databases.) In this tree structure, each “child” is owned by only one “parent.” Contrast with relational database.
HISAM See hierarchic indexed sequential access method (HISAM).
HSAM See hierarchic sequential access method (HSAM).
identifier exit A user exit that the EDP data transformer calls for a VSAM data set or IMS segment that has multiple record types. The exit identifies the record types and finds their associated schemas. See also record-identifier exit, redefined segment-identifier exit, and user exit.
Informatica Corporation, Confidential and Proprietary Information
14 EDP Installation Guide for MVS Components
IMS See Information Management System (IMS).
IMS Fast Path An IMS database-access method that enables rapid transaction response times for systems that have large database and transaction volumes.
IMS full-function databaseAn IMS DL/I database that does not use the Fast Path method of database access.
Information Management System (IMS)An IBM database and data-communication system that manages hierarchical databases and networks. See also hierarchical database.
initial program load (IPL)The procedure that causes an operating system to initialize for operations.
integration table See EDP integration table.
Interactive System Productivity Facility (ISPF)See EDP ISPF utilities interface.
IRowSetFastLoad An OLE DB interface by Microsoft that EDP uses to copy bulk data into an MS SQL Server table.
IPL See initial program load (IPL).
IXF See Integrated Exchange Format (IXF).
JCL See job control language (JCL).
job control language (JCL)A computer language that is used to describe job processing requirements to an MVS system.
list box In a Windows interface, a box listing items that you can select for a field. If the box cannot display all items at the same time, a scroll bar appears on the right side. Use the scroll bar to scroll through the list.
listener See EDP listener.
listener port On a host system (MVS, Unix, or Windows), the port that is reserved for TCP/IP communications with EDP components.
LNKLST A member in an MVS system data set that defines libraries that should be accessed during job processing.
main storage database (MSDB)In IMS, a root-segment database that resides in main storage.
Informatica Corporation, Confidential and Proprietary Information
Glossary 15

map To associate source fields or columns with target columns in a transformation definition. Mapping identifies how the source data will populate the target table.
materialize To move a replica of the source data (or a portion of the source data) to the target table in order to synchronize the source and target. This process entails copying the source data, transforming it (if necessary), and loading it into the target table.
You can use any of these methods to materialize a target table:
• Use DataMove in conjunction with a supported unload utility.• Use the data set readers that ChangeDataMove provides.• Manually materialize the table by using your organization's preferred
tools or processes.
The ChangeDataMove and DataMove methods let you use transformation definitions and user exits to modify the source data during materialization. (Other tools and processes may not offer that flexibility.) BMC Software recommends using DataMove. DataMove materialization is usually faster than ChangeDataMove materialization and ensures data compatibility and consistency.
maximize In a Windows interface, to enlarge a window or dialog box so that it fills all space available to it. In EDP, you maximize a window by clicking the Maximize button on the window's title bar or by choosing Maximize from the window's Control menu. You maximize a dialog box by double-clicking its title bar.
menu In a Windows interface, a list of commands that are accessible from the menu bar or a context menu. To choose a command from a menu, click the command name or type the letter underlined in the name. Menu commands that are dimmed are currently not available. Menu commands can include the following symbols and conventions:
• An ellipsis (. . .) after a command name indicates that a dialog box will be displayed for you to enter more information.
• An arrowhead after a command name indicates that a submenu with additional commands will be displayed.
See also context menu.
metadata Data that describes other data. For databases, metadata usually refers to the structural definition of database objects. For example, a DB2 catalog contains metadata about the tables in a DB2 database.
Informatica Corporation, Confidential and Proprietary Information
16 EDP Installation Guide for MVS Components

Microsoft Management Console (MMC)An extensible graphical user interface (GUI) that provides a common framework for administrative tools, such as the EDP products and the MS SQL Server Enterprise Manager. The administrative tools are called consoles and are composed of one or more snap-ins. The MMC runs on Windows systems. See also EDP console and snap-in.
Microsoft SQL ServerSee MS SQL Server.
minimize In a Windows interface, to reduce a window to a button by clicking the Minimize button on the window’s title bar or by choosing Minimize from the window's Control menu. See also maximize.
MMC See Microsoft Management Console (MMC).
model The highest-level designation that can be applied to a single processor complex. For example, an IBM 3090-600 has a model designation of 3090 and a submodel number of 600.
The model may not be the same as the family of processors. For example, an IBM ES/9000-942 is in the ES/9000 family. However, this family is composed of three models of processors, and each model has numerous submodels:
• The 9021 models are the water-cooled members of the family.
• The 9121s are the air-cooled members.
• The 9221s are the small, entry-level models and represent a bridge between the non-370/390 architecture (such as the System/36) and the ES/9000 family.
MS SQL Server A SQL-based, client/server, relational database and RDBMS from Microsoft. MS SQL Server also provides replication services and Data Transformation Services (DTS). See also relational database and relational database management system (RDBMS).
MS SQL Server Query AnalyzerA graphical user interface (GUI) for designing and testing SQL statements, batches, and scripts interactively. You can access this interface from MS SQL Server Enterprise Manager.
MSDB See main storage database (MSDB).
Informatica Corporation, Confidential and Proprietary Information
Glossary 17

multiple virtual storage (MVS)The mainframe operating system under which DB2, IMS, and VSAM run. In EDP documentation, MVS means MVS/XA, MVS/ESA, MVS/370, and OS/390, unless otherwise noted.
MVS See multiple virtual storage (MVS).
near real time Pertaining to the timeliness of data or information that has been delayed by time required for electronic communication and automatic data processing. In near-real-time processing, these delays are considered to be insignificant.
node In the EDP console, an item listed in the left pane of the console window. The left pane shows a tree view of the items that the console is currently managing.
A node can represent a snap-in or an object, task, or container that is part of a snap-in. Loading a snap-in adds nodes to the tree. You can also manually add nodes for items such as folders, links to Web pages, and ActiveX controls. When you select a node, the right pane displays the node’s contents or options.
nonrelational sourceIn EDP, an IMS database or VSAM data set that is the source of data for a data propagation.
normalization The process of restructuring a data model by reducing its relations to their simplest forms. In the EDP products, normalization is an issue when your IMS or VSAM copybook contains repeating groups (OCCURS clauses).
null A special marker for a field that has no explicitly assigned value (similar to “not available” or “to be announced”). A null is not the same as a blank or zero. A null cannot be greater than, less than, or equal to any other value, including another value of null. In schemas for relational tables, you can specify whether a column can contain a null (that is, whether it is “nullable”).
ODS See operational data store (ODS).
operational data store (ODS)A database that contains near-real-time data from multiple operational databases. Unlike data warehouses, ODSs do not contain summary data. An ODS often serves as a staging area for data warehouses.
option button In a Windows interface, a circular button that you use to select one option from a set of mutually exclusive options. Clicking an option button selects that option and clears the previous selection. The selected button is marked by a black dot in its center. Option buttons are sometimes referred to as radio buttons.
Informatica Corporation, Confidential and Proprietary Information
18 EDP Installation Guide for MVS Components

Oracle An RDBMS that provides relational access to data. See also relational database and relational database management system (RDBMS).
OS/390 An IBM product that bundles MVS, TCP/IP, TSO, and VTAM. The first version of OS/390 (version 1.1, or R1) was equivalent to MVS version 5.2.2. In addition to earlier versions of MVS, the EDP products support OS/390 version 1.1 and later.
PAC See process action controller (PAC).
partitioned data set (PDS)An MVS data set in direct access storage that is divided into portions, called members. Each member can contain a program, part of a program, or data. PDS is synonymous with library.
password activation deadlineThe date (either the 15th or the last day of the month) through which a password will be accepted (installed) by the product authorization interface. When this date has passed, BMC Software Contracts Administration must issue another password.
PDS See partitioned data set (PDS).
PDX See extended partitioned data set (PDX).
permanent passwordSee product authorization passwords.
permanent table The portion of a BMC Software product that contains the control information for permanent passwords.
point In a Windows interface, to position the mouse pointer over an object.
post-transformation exitAn optional, user-supplied exit routine that the EDP data transformer invokes after default transformation processing. With a post-transformation exit, you can customize a transformation, as follows:
• modify existing values in output rows
• screen out data for a target table
• supply new values for target columns when column values cannot be obtained by simple source-to-target mappings or assignment of keys
• create multiple output rows from a single output row
Informatica Corporation, Confidential and Proprietary Information
Glossary 19

• cause the data transformer to end abnormally (abend) under specified conditions
• change the update type of the record (for example, from an Insert to an Update)
• populate the special columns in the EDP integration tables, which integrate the EDP products with third-party products
pre-transformation exitAn optional, user-supplied exit routine that the EDP data transformer invokes prior to default transformation processing. With a pre-transformation exit, you can customize a transformation, as follows:
• modify values from an input segment, record, or table
• create multiple output rows from a single input segment or record
• cause the data propagation to end abnormally (abend) under specified conditions
• screen out rows resulting from an OCCURS clause in a nonrelational input record (that is, selected occurrences from the input record)
• screen out data from the input record, segment, or table
• change the update type of the record (for example, from an Insert to an Update)
primary data set groupIn an IMS database, the first data set group defined or the only data set group. This group always contains the root segment type. See also secondary data set group.
primary database See source database.
primary key In an RDBMS such as DB2, one or more columns whose values uniquely identify a row in a table. A primary key cannot contain a null value. No two rows in the table can have the same primary key. A primary key is commonly used for joins with foreign keys in other tables. See also foreign key.
process action controller (PAC)An EDP component that provides a common structure for controlling the execution of the following EDP processes:
• reading changed data from the EDP logger (ChangeDataMove only)
• applying changes with the apply component (ChangeDataMove only)
Informatica Corporation, Confidential and Proprietary Information
20 EDP Installation Guide for MVS Components

• extracting bulk data from the source with unload utilities or with the EDP data set readers
• loading bulk data onto the target (DataMove only)
• transforming data
• coordinating mainframe services for the EDP console
The PAC also provides common messaging and tracing services.
product authorization passwordsPasswords that enable you to use a BMC Software product:
• A temporary password allows you to run a product on any processor for a limited period of time. This password bypasses normal license checks and is used to start and extend product trials.
• A permanent password contains product and processor information. BMC Software provides a permanent password when you purchase a license for a BMC Software product. With a permanent password, you can run the product only on a specific processor.
product authorization tableThe portion of a BMC Software product that contains the control information for the product authorization utility. Two product authorization tables are embedded in each product: a temporary or trial table, and a permanent table.
product license An agreement between your organization and BMC Software that states the extent of your legal right to use a specific product. The license also specifies the system and processor on which you will run the product.
product license expiration dateThe date (expressed as the month and year) through which the product will run under a specific license agreement. This date is used to control leases by limiting the period of time that the product will run on the specified processor.
propagation See data propagation.
publication In the MS SQL Server RDBMS, a group of articles that can be replicated as a unit to one or more Subscriber servers. EDP versions earlier than 2.4 supported data propagations to target publications. EDP 2.4 supports propagations to target databases only. See also article.
RBA See relative byte address (RBA).
RDBMS See relational database management system (RDBMS).
Informatica Corporation, Confidential and Proprietary Information
Glossary 21

record A set of data that the DBMS treats as a unit, or a set of related data items that are grouped for processing.
record-identifier exitA user exit that you create and specify in a VSAM data set registration when the data set has multiple record definitions that you want to use for data propagation. The exit returns an 8-character logical record name. The EDP data transformer uses this name to find the schemas associated with the record definitions.
redefined segment-identifier exitA user exit that you create and specify in an IMS segment registration when you have redefined the segment to accommodate multiple record definitions. The exit returns an 8-character logical segment name for each definition. The EDP data transformer uses these names to find the schemas registered for the redefined segment and the segment redefinitions.
register To define the source or target data resources that you want to participate in data propagation. You save these definitions in the EDP repository. See also data-resource registration.
Informatica Corporation, Confidential and Proprietary Information
22 EDP Installation Guide for MVS Components

relational database A collection of data organized in tables. Each table column represents an attribute, and each row represents a record. All of the EDP target databases are relational.
Other characteristics of relational databases are as follows:
• You can generate new tables from existing tables.
• You can relate a table to one or more other tables in the database. (That is, the table is not owned by a single “parent.”)
• You relate tables by matching values in one table with values in another.
• The standard language is structured query language (SQL).
relational database management system (RDBMS)An application for data storage and retrieval that organizes data into tables. Each table may consist of one or more rows with one or more columns. Each column represents a single item of data. You can relate tables to one another if they share one or more columns in common. In the EDP products, all supported targets are RDBMSs.
relative byte address (RBA)In MVS, the hexadecimal value of the location of the record from the beginning of the storage space allocated for the associated data set.
repeating group In the EDP products, the portion of a COBOL copybook (IMS or VSAM) that contains an OCCURS clause. When the copybook compiler is run, the specified set of fields repeats for the number of times specified in the OCCURS clause.
replicate database See target database.
replication See data propagation.
replication key (REPKY)A unique key field for a specific source IMS segment or VSAM record. This key consists of the following items:
• for IMS, the fully concatenated key (which includes the key field of the propagated segment and ancestor-level keys for that segment)
• for VSAM, the key field of the propagated record
repository See EDP repository.
RESLIB The IMS library data set that contains the authorized load modules for the IMS system.
Informatica Corporation, Confidential and Proprietary Information
Glossary 23

resource registrationSee data-resource registration.
right-click In a Windows interface, to press and release the right mouse button.
schema In the EDP products, a description of the fields or columns of a particular segment, record, or table. This description includes defining characteristics, such as data type, length, and precision. You enter schema information at the lowest data-resource level when you register a source or target. Schema details are required for creating transformation definitions.
scroll In a Windows interface, to move through a list of items by clicking the up-arrow or down-arrow buttons on the scroll bar to the right of the list, or by dragging the scroll box.
SDEP See sequential dependent part (SDEP).
secondary data set groupIn an IMS database, one or more data set groups in addition to the primary data set group. Usually, you define secondary data set groups to improve the use of auxiliary storage. See also primary data set group.
segment In IMS, the unit of access to a database. A segment is the smallest amount of data that one IMS operation can transfer.
segment-identifier exitSee redefined segment-identifier exit.
sequential dependent part (SDEP)The unit of access to a database, and the last part of a DEDB area that is reserved for sequential dependent segments. In an IMS Fast Path DEDB, the SDEP segment is chained off from the root segment and inserted in a last-in, first-out manner into the last part of a DEDB area.
serial number A five-digit number that (along with the model number and submodel number) uniquely identifies a processor or processor complex. The product authorization utility uses the serial number as it appears on legal documentation, such as hardware contracts and your BMC Software product license.
Note: The CPU ID that may appear on software-generated reports or on operating systems’ consoles is not always complete. For example, features such as IBM’s PR/SM can overlay portions of the serial number when the machine itself reports the number.
SHISAM See simple hierarchic indexed sequential access method (SHISAM).
SHSAM See simple hierarchic sequential access method (SHSAM).
Informatica Corporation, Confidential and Proprietary Information
24 EDP Installation Guide for MVS Components

simple hierarchic indexed sequential access method (SHISAM)In IMS, an index method to access records in a hierarchical sequential organization that contains a single segment.
simple hierarchic sequential access method (SHSAM)In IMS, a method to access a hierarchical sequential organization, containing a single segment, on either tape or direct access storage.
SNA See Systems Network Architecture (SNA).
snap-in A program that plugs into and runs from a Microsoft Management Console (MMC). Snap-ins cannot run from outside of a console. When you install an administrative tool with a snap-in, such as the EDP console, the snap-in becomes available to other MMC consoles. For example, you could add the EDP snap-in to the MS SQL Server console.
source database In EDP data propagations, the DB2/MVS database, IMS database, or VSAM data set from which you propagate data. A source database (also called a primary database) typically includes operational data.
SQL See structured query language (SQL).
Start menu The Windows menu that you open by clicking the Start button on the end of the Windows taskbar. From the Start menu, you can start a program, find a computer or file, change system settings, get Windows Help information, or shut down the system.
status bar In a Windows interface, the message bar at the bottom of a window. In the EDP console, when you point at commands in menus, this bar displays brief descriptions of the commands. The bar also displays other information related to the current state of your product.
STEPLIB The MVS library that contains the application programs associated with a job step.
structured query language (SQL)A database query and programming language that IBM developed. This language is commonly used for accessing, querying, updating, and managing relational databases, such as any of the EDP target databases.
submodel The secondary designation used to identify a single processor. For example, an IBM 3090-600 has a model designation of 3090 and a submodel of 600. See also model.
Informatica Corporation, Confidential and Proprietary Information
Glossary 25

Sybase Adaptive Server Enterprise (Sybase)An SQL-based RDBMS from Sybase that provides relational access to data. Both ChangeDataMove and DataMove allow you to propagate data to a Sybase target. See also relational database and relational database management system (RDBMS).
SYNAD exit routine An MVS exit routine that is entered when a physical error occurs on an I/O operation.
synchronization The process of ensuring, at a single point in time, that your target database is an accurate representation of the portions of the source database that you are propagating.
Systems Network Architecture (SNA)A description of the logical structure (as well as the formats, protocols, and operational sequences) for transmitting information through networks and for controlling network configuration.
target database In EDP data propagations, the DB2/MVS, MS SQL Server, Oracle, Sybase, or UDB database to which you propagate data. The target database is usually a copy of the source database or a portion of the source database. The target database is also called the replicate database.
TCP/IP See Transmission Control Protocol/Internet Protocol (TCP/IP).
temporary expiration dateThe date used to limit trials and disaster recovery or testing periods for licensed users. This expiration date refers to the day on which the product will no longer run as a trial or bypass the normal license controls. The temporary expiration date is set by issuing a temporary product authorization password. See also product authorization passwords.
temporary passwordSee product authorization passwords.
temporary table The portion of a BMC Software product that contains the control information for temporary passwords.
text box In a Windows interface, a field into which you type text. When you tab to or click in an empty text box, a blinking I-beam cursor shows where you can start typing. To replace an existing entry, drag over the entry or double-click in the box, and then type the new text.
tier A value that is encoded as part of a permanent password for a particular CPU ID. The tier is used to limit the function or number of features that the product supports under the license for that CPU.
Informatica Corporation, Confidential and Proprietary Information
26 EDP Installation Guide for MVS Components

Time Sharing Option (TSO)An IBM MVS operating system option that provides interactive time sharing from remote terminals.
time-of-day (TOD) A value that specifies both the date and the time.
TOD See time-of-day (TOD).
toolbar In a Windows interface, a row of icon buttons that provides quick access to frequently used commands and options. The MMC provides two toolbars: one for the MMC window, and one for the console window. These toolbars provide standard MMC buttons for working with consoles, windows, the console tree, list views, and Help. EDP buttons are added to the right end of the console window toolbar when you click an item in the EDP console tree.
If you do not know what a specific button does, move the mouse pointer over the button to display a brief description called a tooltip.
transaction code See CICS transaction code.
transformation definitionAn EDP entity that defines how a source schema is associated with a target schema, at the field and column level, for data propagations. The definition contains a mapping of source fields or columns to target columns. It can also contain optional transformation properties, including
• transformation exits• dates of activation and deactivation• names of any associated DataMove propagations• a transformation group identifier• a user-provided description
transformation exitAn optional exit routine, usually written by the user, to override default processing by the EDP data transformer and customize a transformation. The two types of transformation exits are pre-transformation exits and post-transformation exits. You can specify one or both of these exits for a transformation. The data transformer invokes your exit or exits for each DB2 table, IMS segment, or VSAM record that the data transformer receives. See also post-transformation exit and pre-transformation exit.
Transmission Control Protocol/Internet Protocol (TCP/IP)A set of communication protocols that support peer-to-peer connectivity for local-area and wide-area networks. The EDP products use TCP/IP for communications between
• the MVS source and the EDP console• the MVS source and remote target systems (MVS, Unix, or Windows)
Informatica Corporation, Confidential and Proprietary Information
Glossary 27

TSO See Time Sharing Option (TSO).
UDB See DB2 Universal Database (UDB).
Unix The operating system under which Oracle, Sybase, and UDB targets may run. Unix provides multitasking capabilities to multiple users. Because it is written in C, Unix is portable to a variety of machines, although it typically runs on servers.
UNLOAD PLUS® BMC Software utilities for unloading DB2 or IMS data. In DataMove, you have the option of using these utilities to unload data from a source. You can select UNLOAD PLUS for DB2 to unload DB2 data or UNLOAD PLUS for IMS to unload IMS data.
Note: You can also use the Extended Performance (EP) version of the utility to unload IMS data. UNLOAD PLUS/EP for IMS can run under the EDP PAC or as a separate step.
user exit A user-written routine that can be called from a specific point within an application. In the EDP products, users can specify user exits to identify multiple record types or redefined segments, or to customize transformations. See also record-identifier exit, redefined segment-identifier exit, and transformation exit.
user ID A string of characters that uniquely identifies a user to a system.
utilities See EDP utilities.
verify To use the EDP verification utility to validate the contents of a transformation definition and its associated data-resource registrations. The verification utility makes sure that
• the source and target data resources are registered• the source segment, record, or table is activated for data propagation • the transformation definition exists and is activated• the source and target data types are compatible
This utility also checks to see whether a record-identifier exit, redefined segment-identifier exit, or transformation exit is specified for the target.
version code See submodel.
Virtual Storage Access Method (VSAM)An IBM data-access method that allows efficient sequential and direct access to MVS data sets.
Informatica Corporation, Confidential and Proprietary Information
28 EDP Installation Guide for MVS Components

volume On an MVS mainframe computer, a uniquely addressable storage device, such as DASD or a reel of tape. The device is identified by a unique volume serial number (VOLSER).
VSAM See Virtual Storage Access Method (VSAM).
wildcard A symbol that you can use to represent missing characters when you enter information in some fields of the EDP console:
• For IMS and VSAM items, you can use the wildcard * (asterisk) for an ending string of characters.
• For DB2 and Oracle items, you can use the trailing wildcard % (percent sign).
Windows interface See Microsoft Management Console (MMC) and EDP console.
wizard In a Windows interface, one or more “pages” that guide you through the steps of a complex or infrequent task. For example, the EDP console provides a wizard to help you register data resources.
XCF See cross-coupling facility (XCF).
XML See Extensible Markup Language (XML).
XML schema A formal specification for an XML document that indicates the names and attributes of allowable elements and the relationships among those elements. Developers write schemas in XML and can extend the schemas to include additional information, such as data types, inheritance, and presentation rules. With schemas, XML data can be self-describing. That is, the software that reads the XML data can interpret the data structure based on the rules in the schema.
The EDP products use an XML schema to define the allowable characteristics of an XML file to which you export an EDP repository's contents. EDP uses the schema to help validate the file when you import the file into a new repository.
Note: EDP uses the Internet Explorer 5 implementation of the XML schema language. This implementation is based on the following submissions to the World Wide Web Consortium: XML-Data note and Document Content Description (DCD).
See also Extensible Markup Language (XML).
XRF See extended recovery facility (XRF).
Informatica Corporation, Confidential and Proprietary Information
Glossary 29

XVAL function The EDP exit value function that you assign to target columns whose values you need to obtain with a post-transformation exit. Use this function when you cannot obtain a target-column value with a simple source-to-target mapping or with a key assignment. See also post-transformation exit.
Informatica Corporation, Confidential and Proprietary Information
30 EDP Installation Guide for MVS Components

14
Index
Informatica Corporation, Confidential and Proprietary Information
Index 1

Symbols#AGENT startup procedure 13#CICSV2 sample JCL 27#CICSV3 sample JCL 27#CICSV4 sample JCL 27#LOGGER startup procedure 5#POSTLOG sample JCL 12#RECEIVR sample JCL 9#SENDER sample JCL 9$I10VSAM installation JCL 10$I15PSWD installation JCL 10$I20APF installation JCL 10$I31DOPT installation JCL 10$I35BNDI installation JCL 10$I40INST installation JCL 10$I59COPY installation JCL 10$I60GRNT installation JCL 10$I69AREP installation JCL 11$I69DLOP installation JCL 11$I69LDEF installation JCL 11$I69LFRM installation JCL 11&DATE variable 60&JOBNAME variable 60&TIME variable 60&UID variable 60&USERID variable 60
Aabends
CICS/VSAM 25configuration parameter 25, 27
accessingISPF interface, overview 2secure product functions 7
activatingCICS/VSAM ECCR 25IMS ECCR 14VSAM batch ECCR 31
ACTIVE_LOG_MODE parameter 49adding EDP to ISPF 3Additional AUTHIDs option 19#AGENT startup procedure 13agent, EDP. See EDP agentAGENTCTL member 16AGENTGEN member 5, 6
Informatica Corporation, Confidential and Proprietary Information
2 EDP Installation Guide for MVS Components

AGENTID option 26AgentID parameter 25, 5, 6, 40allocating
spill data sets 38alternate indexes, VSAM 21APDINITx member 17APDRUTL member 17APDxxxxB member 16APDxxxxP member 17APF (authorized program facility)
authorization requirements 15Data Set Block Size option 13Data Set Name option 13
apply componentsconfiguring TCP/IP 6
ARC_UNIT_CNT parameter 46ARCHIVE_BLKSIZE parameter 48ARCHIVE_LOG_MODE parameter 49ARCHIVE_MGCL parameter 47ARCHIVE_RTPD parameter 46ARCHIVE_STCL parameter 47ARCHIVE_UNIT parameter 46ASCII tables, not supported 21assigning default user ID 36ASY parameter 21asynchronous processing, VSAM files 21AUTHID option
secondary 19specifying multiple 19
authorizationEDP agent commands 42EDP agent service initialization 41execute installation JCL batch jobs 15for DB2 components 19MVS libraries 15prerequisite to execute installation JCL
batch jobs 15authorized user ID for product functions 7AVMxxxxB member 17
Bbatch IMS environments supported 19BLK parameter 47BMP environment 19, 22buffers
limits of EDP agent message log 41
CCCDINITx member 17CCDxxxxB member 17CCDxxxxP member 17CCERR option 27CEMT PERFORM SHUTDOWN command 25,
27century
data 34in display date 27rollover date 34
character data typesconversion errors 27substitution 27
character substitution 27CHARDEF option 27CHARERA option 28CHARERL option 28CHARVCNT option 28checkpoints
installation 5CHKPT_FREQUENCY parameter 45CI (control interval) 21CICS
DFHRPL DD statement 26loading ECCR into CICS region 25modifying JCL 26starting CICS region 30startup procedure 26
CICS/ESAversions supported 12
CICS/TSversions supported 12
CICS/VSAM ECCR#CICSV2 sample JCL 27#CICSV3 sample JCL 27#CICSV4 sample JCL 27abends 25activating 25initialization 27
CICS-maintained data tables 20#CICSV2 sample JCL 27#CICSV3 sample JCL 27#CICSV4 sample JCL 27CLEV parameter 5CLIST
adding to ISPF 3
Informatica Corporation, Confidential and Proprietary Information
Index 3

Install System 5CmdAuthCheck parameter 42CmdPrefix parameter 41COMMAND (RACF resource) 6command prefix 41commands
authorization checking 42for starting ChangeDataMove 4
common data space, requirement for EDP agent 18, 23
compression dictionary for DB2 logs 22CONCURRENT REORG 17, 15configuration options, default
CCERR option 27CHARDEF option 27CHARERA option 28CHARERL option 28CHARVCNT option 28CONVERR option 29DTERA option 30DTERL option 30EDP agent 26EDP logger 31EDP repository 34ESLLIB option 39LOGGER option 31LOGRGRP option 30MAXGUI option 37NOTRANS option 32NUMDEF option 32NUMERA option 32NUMERL option 32PAC startup procedure 33PACPROC option 33PACTIMR option 34REPDDN option 34RMTHOST option 6, 35RMTPORT option 5, 6, 35ROLLDAT option 34SETUSER option 8, 36SPILALOC option 38SPILDSNP option 37, 60SPILMEM option 38SPILSCLS option 38SPILUNIT option 38SPILVOLS option 38SYSOUT option 34TCPHBEAT 36
TCPWTIME option 5, 6, 35TIME option 34TIMEDEF option 34
configuringTCP/IP, for apply component 6TCP/IP, for GUI connection 5
control interval. See CIconventions
document xiisyntax statements xiiitypographical xii
CONVERR option 29conversion errors
character substitution 27date substitution 30EDMSDIR options 29logging 28, 30, 32number of 29numeric substitution 32specifying action to take 28, 30, 32time substitution 34
CREATOR Name option 55CRGCLINK sample JCL 16CRGUMOD sample JCL 16cross-coupling facility. See XCFCYL option 47Cylinders option 16
DDASD (direct access storage device)
Type option 9unit, specifying for spill data sets 38volume for VSAM DEFINEs option 16
data component of spill data set 38data sets
entry-sequenced (ESDS) 20for DFSESL DD statement 39key-sequenced (KSDS) 20recoverable 20relative record (RRDS) 20repository name 42
data sharing, support for IMS ECCR 20data tables, CICS-maintained 20DATABASE BUFFERPOOL option 17DATABASE INTEGRITY PLUS 17
Informatica Corporation, Confidential and Proprietary Information
4 EDP Installation Guide for MVS Components

Database Name for Change Capture parameter 55
Database Name for Chg Apply option 51databases
GSAM 19, 24HISAM 19HSAM 19, 24SHSAM 19, 24
DataMoveinstallation considerations 22
data-type conversionserror handling 29
&DATE variable 60DATE option 29DATEDEF option 30dates
century display 27data-type conversion errors 30default options for display 27, 29rollover 34substitution 30variable 60
DB2 apply componentauthorization 19authorized user ID 8configuring TCP/IP connection 6defining second PAC region 33environments and structures supported 21remote 5, 6, 33, 35spill data sets 38
DB2 ECCRASCII tables, not supported 21multiple ECCRs 22preparing to start 3
DB2 installation optionsCatalog Alias option 16Change Apply Collection ID option 23Change Apply Plan option 23Change Capture Collection ID option 25Change Capture Plan option 24EDP DB2 Interface Plan Name option 25Exit Library option 12Load Library option 12STOGROUP option 17Subsystem ID option 16Subsystem is Mixed Data option 17Version option 6
DB2 Location Name option 17
DB2 Universal Database (EE)versions supported 8
DB2 Universal Database (EEE)versions supported 8
DB2/MVS sourcesversions supported 10
DB2/MVS targetsversions supported 7
DBCTL, IMS environment 19DBICRT00 replacing DSPCRTR0 14DBICRYvr IMS module 14DCInnnn member 17DDF Installed option 17Decimal Indicator is Comma option 17default configuration options
CHARDEF option 27CHARERA option 28CHARERL option 28CHARVCNT option 28CONVERR option 29DTERA option 30DTERL option 30EDP agent 26EDP logger 31EDP repository 34ESLLIB option 39LOGGER option 31LOGRGRP option 30MAXGUI option 37NOTRANS option 32NUMDEF option 32NUMERA option 32NUMERL option 32PAC startup procedure 33PACPROC option 33PACTIMR option 34REPDDN option 34RMTHOST option 6, 35RMTPORT option 5, 6, 35ROLLDAT option 34SETUSER option 8, 36SPILALOC option 38SPILDSNP option 37, 60SPILMEM option 38SPILSCLS option 38SPILUNIT option 38SPILVOLS option 38SYSOUT option 34
Informatica Corporation, Confidential and Proprietary Information
Index 5

TCPHBEAT option 36TCPWTIME option 5, 6, 35TIME option 34TIMEDEF option 34
default options (DOPTs) 8, 26default options module (EDMSDIR)
configuring TCP/IP options 6EDMSDIR member 18relation to EDP logger 31
defining user options for installation 10DFHRPL DD statement 26DFSESL DD statement 22, 39disabling security for EDP agent 5displaying
date, default options for 27, 29time, default options for 34
distribution, unloading the tape 3document conventions xiidocumentation
electronic online Help xiionline xiirelated x
DOPTs option 8, 26DSN prefix for spill data sets 37, 60DSPCRTR0 IMS module 14DSRDB2 member 17DSRIMS member 17DSRVSAM member 17DTERA option 30DTERL option 30
EECCRDB2 member 18ECCRs (environmental change capture routines)
See also CICS/VSAM ECCR, DB2 ECCR, IMS ECCR, and VSAM batch error
description of 14error handling 27
EDMC INIT command 30EDMCLIST member 18, 3, 4EDMKOPER module name 27EDMLC000 program module 6EDMLEVEL Comparison reports 4EDMLEVEL Maintenance reports 3EDMPARMS DD statement
for EDP logger 6
for IMS ECCR 17for VSAM batch ECCR 31in agent startup procedure 13
EDMSCTL DD statementin EDP agent startup procedure 13
EDMSDIR Options reports 3EDMSLOG message log
buffer limit 41class 41HOLD allocation 41line limit 41
EDMSTART module 13EDMUPARM Options reports 3EDP agent
#AGENT 13accessing commands 6accessing services 5AGENTGEN member 5, 6AGENTID option 26AgentID parameter 6, 40CmdAuthCheck parameter 42CmdPrefix parameter 41default 26disabling security 6including in IPL procedure 12InitAuthCheck parameter 6, 41LogBuffLimit parameter 41LogClass parameter 41message log parameters 28, 32, 41multiple 25, 12name 40remote apply component 6, 35RepositoryDSN parameter 42requirements, common data space 18, 23requirements, linkage indexes 18, 23security 5, 6security commands 6starting 12, 7TaskLimit parameter 41with EDP repository 25
EDP componentsEDP console 37
EDP consoleonline Help xiioverview 37TCP/IP connections 5
EDP data transformererror handling for characters 27
Informatica Corporation, Confidential and Proprietary Information
6 EDP Installation Guide for MVS Components

error handling for dates 30error handling for numerics 32error handling for times 34limit on number of errors 29
EDP distribution tape 3EDP ISPF utilities interface 2EDP logger
#LOGGER sample 5, 7EDMPARMS DD statement 6ERDS01 DD statement 6ERDS02 DD statement 6LOGNAME parameter 6multiple 25name 31relation to EDMSDIR module 31starting 5time out, preventing 6
EDP products, unloading from tape 3EDP repository
default 34specifying for EDP agent 42with EDP agent 25
electronic documentation, online Help xiienqueues 18Entry Field Delimiter option 4entry-sequenced data sets. See ESDSsERDS_LOG_MODE parameter 49ERDS01 DD statement 6ERDS02 DD statement 6error handling
character data types 27date data types 30ECCRs 27limit of conversion errors 29numeric data types 32time data types 30time-stamp data types 30
ESDSs (entry-sequenced data sets) 20ESLLIB option 39establishing authorized user ID 7execution variables
date 60time 60
FFACILITY class 5
file structures, VSAM 20
Gglobal enqueues 18GSAM databases 19, 24GUI (graphical user interface)
authorized user ID 8maximum users 37See also EDP console and EDP GUI
component
Hhardware, requirements 4Help, online 9HISAM databases 19HLQ.FIXZAPS 8HOLD SYSOUT option 41host
configuring TCP/IP 6RMTHOST option 35
HSAM databases 19, 24
I$I10VSAM installation JCL 10$I15PSWD installation JCL 10$I20APF installation JCL 10$I31DOPT installation JCL 10$I35BNDI installation JCL 10$I40INST installation JCL 10$I59COPY installation JCL 10$I60GRNT installation JCL 10$I69AREP installation JCL 11$I69DLOP installation JCL 11$I69LDEF installation JCL 11$I69LFRM installation JCL 11ICHRIN03 table 8ID, user variable 60IEASYSxx member of SYS1.PARMLIB
editing 17, 23MAXCAD parameter 18, 23NSYSLX parameter 18, 23
IMSadding EDMPARMS DD statement 17
Informatica Corporation, Confidential and Proprietary Information
Index 7
DBICRYvr module 14DBRC, providing and interface to the
repository 14DBSCRTR0 module 14DFSESL DD statement 22, 39environments and structures supported 19starting the IMS subsystem 23using USERMOD to provide access to
ChangeDataMove 14, 15versions supported 10
IMS ECCRactivating 14DFSESL DD statement 39in an online environment 19initialization 27preparing external subsystem 19
INDEX BUFFERPOOL option 17index component of spill data set 38indexes, secondary 20INIT command 30InitAuthCheck parameter 5, 6, 41initializing
CICS/VSAM ECCR 27EDP agent service, authorization checking
41IMS ECCR 27
Install Profile ID option 4Install System
CLIST 5common assembly errors 11data set names 10keys and commands 9starting 5symbolic variables 10user options 10
installationcheckpoints 5hardware requirement 4modes 5multiple releases 8requirements 4resuming 5software requirements 5starting over 5user profile 6
installation JCL$I10VSAM member 10$I15PSWD member 10
$I20APF member 10$I31DOPT member 10$I35BNDI member 10$I40INST member 10$I59COPY member 10$I60GRNT member 10$I69AREP member 11$I69DLOP member 11$I69LDEF member 11$I69LFRM member 11
installation methodfull install 6maintenance install 6multiple SSID 6SSID 6
Installation Mode option 3installation options
APF Data Set Block Size option 13APF Data Set Name option 13CREATOR Name option 51, 55DASD Type option 9DASD volume for VSAM DEFINEs option
16DATABASE BUFFERPOOL option 17Database Name for Chg Apply option 51Decimal Indicator is Comma option 17default (DOPTs) option 8, 26Entry Field Delimiter option 4INDEX BUFFERPOOL option 17Install Profile ID option 4Installation Plan Name option 17Library Unit Name option 11Load Library Block Size option 11LOADLIB name option 2Mode option 3Output JCL Data Set option 3Percent Increase option 9Primary AUTHID option 18Process Previous Profiles option 4Qualifier of Product Synonyms option 22,
24Qualifier Status option 22, 24Reset Install Profile option 4Review Variables option 4Space Units option 9STEPLIB Load Library Names option 13STOGROUP option 50, 54TABLESPACE BUFFERPOOL option 17
Informatica Corporation, Confidential and Proprietary Information
8 EDP Installation Guide for MVS Components

Tape Management System option 10Tape unit name option 10Temporary Unit Name option 12Unload SAS/C options 14VCAT Name option 51VCAT Volume option 51zap for Western European code page support
5Installation Plan Name option 17international language support 6IPL (initial program load), including the EDP
agent 12ISPF (Interactive System Productivity Facility).
See EDP ISPF utilities interfaceissuing
EDP agent commands for authorization checking 42
JJCL samples
#AGENT 13#CICSV2 27#CICSV3 27#CICSV4 27#POSTLOG 12#RECEIVR 9#SENDER 9
&JOBNAME variable 60
Kkey-sequenced data set. See KSDSKSDS (key-sequenced data set) 20
LLEVL parameter 5Library Unit Name option 11licenses, requirements 15limitations
on buffer for EDP agent message log 41on lines in EDP agent message log 41on MVS tasks (TCBs) 41
linkage indexes, requirement for EDP agent 18, 23
LLGNAME parameter 45LNKLST
adding CICS/VSAM ECCR 26LOAD libraries, APF authorization 15Load Library Block Size option 11load module replacement 8LOADLIB name option 2log message. See message logsLOG_INBUFF parameter 48LOG_OUTBUFF parameter 49LogBuffLimit parameter 41LogClass parameter 41#LOGGER startup procedure 5LOGGER option 31logger, EDP. See EDP loggerLOGGER, startup procedure 7LOGGER_NAME parameter 44LOGGER_TITLE parameter 44logging conversion errors
for characters 28for dates 30for numerics 32
LogHold parameter 41LogLimit parameter 41LOGNAME option 6LOGRGRP option 30
Mmain storage databases. See MSDBsMAXCAD parameter of IEASYSxx 18, 23MAXGUI option 37message logs
buffer limit 41class 41conversion errors 28, 30, 32HOLD allocation 41line limit 41
migrating from previous release, Full Install 6MPP, IMS environment 19, 22MS SQL Server targets
versions supported 9MSDBs (main storage databases) 19, 24multiple components
EDP agents 25, 12EDP loggers 25MVS systems 25
Informatica Corporation, Confidential and Proprietary Information
Index 9

MVSauthorized libraries 15common data space requirement 18, 23configuration considerations 17, 23configuring TCP/IP 6editing the IEASYSxx member of
SYS1.PARMLIB 17, 23ETC.HOSTS data set 6linkage indexes 18, 23START command 14starting selected components 2TCP/IP, GUI connection 5
MVS taskslimits of TCBs 41
Nname of EDP agent 40Non-VSAM installation options
Data Class 11Data Set VOLSER 11library prefix 8Management Class 11
NOTRANS option 32NSYSLX parameter 18, 23null values in columns 28, 30, 32number of conversion errors
specifying 29NUMDEF option 32NUMERA option 32numeric data types
conversion errors 32numeric substitution 32NUMERL option 32
Oonline documentation xiionline Help xiioperating systems supported, information about
13, 14OPTCD parameter 21Oracle targets
environments and structures supported 22versions supported 6
Output JCL Data Class option 3
Output JCL Data Set option 3Output JCL Management Class option 3Output JCL Storage Class option 3Output JCL VOLSER option 4
PPAC (process action controller)
default EDP repository in startup procedure 33
default startup procedure 34for DB2 apply component 33overriding default options 5, 6secondary procedure, establishing user ID 8starting TCP/IP listener 5, 7task termination wait time 34timer for task termination 34using secondary procedure 5, 6
PACLOCL member 18PACPROC option 33PACSNDA member 18PACSRC member 18PACTIMR option 34passwords
requirements 15paths over ESDSs, support for 21patterns for spill data set DSN prefix 60Percent Increase option 9PERFORM SHUTDOWN command 25, 27planning the installation considerations 4planning worksheets
installation 4port number
remote, for TCP/IP connection 5, 6, 35post-log merge
starting 12prefix
command 41for spill data sets 37, 60
PREFIX_COPY1 parameter 46PREFIX_COPY2 parameter 46pre-log merge
starting 9PRIM_SPACE parameter 48primary allocation
for spill data sets 38Primary AUTHID option 18
Informatica Corporation, Confidential and Proprietary Information
10 EDP Installation Guide for MVS Components

procedures, JCLEDP logger startup procedure 5post-log merge 12pre-log merge sender and receiver 9starting EDP agent 13starting EDP logger 7
Process Previous Profiles option 4PROCOPT parameter 20product authorization
password requirements 15
QQualifier of Product Synonyms option 22, 24Qualifier Status option 22, 24
RRACF
class 5FACILITY class profile 5, 6STARTED class profile 8
RACROUTE authorization macro 41records
VSAM size limits 21recoverable data sets 20referential integrity. See RIREGISTER (RACF resource) 5related documentation xrelative record data sets. See RRDSsremote apply 5, 6, 35remote EDP agents, multiple 5, 6, 35remote host
configuring TCP/IP for apply component 6name 6, 35port for TCP/IP connection 5, 6, 35
REPDDN option 34repository, EDP. See EDP repositoryRepositoryDSN parameter 42Reset Install Profile option 4resource profiles, RACF 5resuming install dialog 5Review Variables option 4RI (referential integrity) 21RMTHOST option 6, 35RMTPORT option 5, 6, 35
ROLLDAT option 34rollover date, century 34RPLs (request parameter lists) 21RRDSs (relative record data sets) 20
SSAS/C
adding to STEPLIB concatenation option 14unloading into LOADLIB option 14
SDIR parameter 5SEC_SPACE parameter 48secondary allocation of spill data sets 38secondary AUTHID option 19secondary indexes 20security
accessing EDP agent commands 5, 6database authorization overview 16EDP agent commands 5EDP agent services 5product passwords 15providing access to product functions 7
security class 5Service Aid utility
CLEV parameter 5discription 2EDMLevel Comparison report 3EDMLevel Maintenance report 3EDMSDIR Options report 3EDMUPARM Options report 3generated reports 3LEVL parameter 5parameters 5restrictions 2SDIR parameter 5stand-alone 2UBLD parameter 5UPRM parameter 5
SETUSER option 8, 36SHSAM databases 19, 24SMS class for spill data sets 38SMS Managed option 11, 15software, requirements 5SPACE_ALLOC parameter 47spanned ESDSs 21SPILALOC option 38SPILDSNP option 37, 60
Informatica Corporation, Confidential and Proprietary Information
Index 11

spill data setsallocating 38configuration options 38DASD unit, specifying 38DSN prefix, specifying 37, 60SMS class, specifying 38volume serial identification 38
SPILMEM option 38SPILSCLS option 38SPILUNIT option 38SPILVOLS option 38stamp, VOLSER on distribution tape 7START subtask command (MVS) 14START_TRACE parameter 45STARTED profile (RACF resource) 8started task table, RACF 8starting
ChangeDataMove from TSO command line 4
CICS region 30CICS/VSAM ECCR 25components, overview 2DB2 ECCR 3EDP agent 12, 13, 7EDP logger 5IMS change capture 14IMS subsystem 23Install System 5post-log merge 12pre-log merge 9TCP/IP listener 5, 7VSAM batch ECCR 31
startup procedureoverview 2
STEPLIB Load Library Names option 13STOGROUP option 50, 54storage
main storage database 24SUFFIX parameter 49support, Western European code page 2Sybase targets
versions supported 9symbolic variables for spill data set prefix 37, 60syntax statement conventions xiiiSYS1.PARMLIB, editing members 17, 23SYSOUT class 34, 41SYSPROC concatenation 3
TTABLESPACE BUFFERPOOL option 17tape
unloading Install System 3Tape Management System option 10Tape unit name option 10task termination with PAC 34TaskLimit parameter 41TCB (task control block)
limit 41TCP/IP (Transmission Control Protocol/Internet
Protocol) connectionconfiguring GUI 5configuring remote apply 6interval between heartbeats 36listener port 5, 7MVS configuration 6remote port conncection 5, 6, 35wait time 5, 6, 35
TCPWTIME option 5, 6, 35Temporary Unit Name option 12&TIME variable 60time data types
conversion errors 34time display
default option for 34TIME option 34time out
prevention 6TCP/IP connection 5, 6, 35
TIME parameter 6time substitution 34time variable 60TIMEDEF option 34transformation definitions
missing 32TRK option 47troubleshooting
installation, MVS 8TSO
command line, starting ChangeDataMove 4Commands Utility panel 5logon procedure, adding CLIST to
SYSPROC concatenation 3typographical conventions xii
Informatica Corporation, Confidential and Proprietary Information
12 EDP Installation Guide for MVS Components

UUBLD parameter 5&UID variable 60unit, DASD, specifying for spill data sets 38Unload SAS/C
into Product LOADLIB option 14into STEPLIB option 14
unloadingthe Install System from tape 3
UPRM parameter 5user ID
default 36variable 60
user options, defining 10user profile
installation 6&USERID variable 60USERMOD, using for IMS ECCR 14, 15
Vvariables for spill data set DSN prefix 37, 60VCAT Name option 51, 55VCAT Volume option 51VCCADHK module 31VOLSER
for spill data sets 38product tape 10verification 7
Volume serial number. See VOLSERVSAM
CICS, initialization 27environments and structures supported 20HLQ installation option 16versions supported 11
VSAM batch ECCRactivating 31asynchronous processing 21EDMPARMS DD statement 31record limits 21
VSAM Management Class option 16VSAM Storage Class option 16
WWestern European code-page
installing zap 5support 2
work area storage (SPILMEM option) 38worksheets, planning
installation 4
XXCF (cross-coupling facility), increasing
number of groups 18XFCREQ exit 26XFCREQC exit 26XRF (extended recovery facility) 20xxxxPROF member 17
Yyear 2000, century rollover date 34
Zzap 8
Informatica Corporation, Confidential and Proprietary Information
Index 13

Informatica Corporation, Confidential and Proprietary Information
14 EDP Installation Guide for MVS Components