EDC Training: Rave Architect Lite - Ivory...
167
EDC Training: Rave Architect Lite Leader Guide 2.0 [30 Mar 11]
Transcript of EDC Training: Rave Architect Lite - Ivory...
EDC Training:
Rave Architect Lite
Leader Guide 2.0 [30 Mar 11]
Confidential and Proprietary
Copyright © 2011 Roche Group. This document is proprietaryand confidential. It remains the property of the Roche Group at alltimes. No part of this document may be used, reproduced, ortransmitted in any form or by any means, electronic ormechanical, including photocopying and recording, for anypurpose without express consent of the Roche Group.
ii Rave Architect Lite
ACKNOWLEDGMENTS
This version of this guide owes its development to Process and Training
Management (PTM).
Note: The information in this guide applies to the PD and gRED
development process only. Processes and use of the Rave may differ in other
organizations within Roche.
Version 2.0
Document Date 30 Mar 11
Amendment History Original (Version 1.0) published 11/10/08
✎
© Roche Group CONTENTS iii
CONTENTS
➡ Acknowledgments ii
➡ Contents iii
➡ Class Preparation ix
➡ INTRODUCTION 1
1 Introduction to this Course 2
About the Rave Architect Module 2
Audiences for this Training 4
What You Will Learn in the Architect Lite Training 4
Training Prerequisites 4
Sample Project Used in this Training 5
2 Key Study Design and Build Concepts 6
Study Build Process 6
Clinical Programmer Responsibilities 6
Study Specifications for Building Studies 6
Relationships Between Study Specifications and Finished Studies in the Rave
EDC Module 7
3 Getting Started with Architect 8
Launching Architect 8
Architect Main Screen 10
Projects, Environments, and Global Library Volumes 11
Projects 11
Environments 12
Rave URLs Used at Roche 13
Global Library Volume 13
Navigating Architect 14
Exploring the Sample Project 15
Viewing a Project 15
Project Components 16
Viewing a Draft 17
Types of Items in a Draft 18
Viewing a Version 19
Studies 20
How These Study Components Are Related 21
iv CONTENTS Rave Architect Lite
Hands-On Exercise 21
4 Exploring Items in a Draft 22
Selecting Items to Explore 22
Viewing Forms 23
Viewing Folders 24
Viewing Dictionaries 26
Viewing Matrices 28
Viewing Edit Checks 30
Viewing Custom Functions 32
Viewing Derivations 33
Viewing Restrictions 36
Hands-On Exercise 38
5 Exploring Fields on a Form 39
About Fields 39
Selecting a Field on a Form 40
Previewing Fields on a Form 41
Viewing Field Properties 42
Viewing Variable Settings for a Field 47
Viewing Field Help Text 48
Viewing Field Edit Checks 48
Viewing Verification and Review Settings for a Field 49
Viewing View Restrictions for a Field 50
Viewing Entry Restrictions for a Field 50
Viewing Edit Checks for a Field 51
Viewing Derivations for a Field 51
Hands-On Exercise 52
Conclusion to Section 1 53
What You Have Learned in This Section 53
Where to Go from Here 53
Break 53
➡ BUILDING STUDIES 55
6 Working with Projects, Environments, and Drafts 56
Working with Projects 56
Creating a Project 56
Editing Project Settings 56
© Roche Group CONTENTS v
Working with Environments 58
Creating an Environment 58
Editing the Environment Setup 59
Working with Drafts 60
Naming Conventions for Drafts 60
Ways to Create and Populate a Draft 61
Creating a Draft 61
Editing Settings for a Draft 64
Hands-On Exercise 65
7 Copying Items from the Global Library Volume 66
About Copying from the Global Library Volume 66
Running the Copy Wizard 66
Arranging eCRFs on the Forms Screen 69
Hands-On Exercise 71
8 Building Forms 73
About Forms (eCRFs) 73
Forms and Mock eCRFs 74
Naming Conventions for Forms 74
Form OIDs and Dataset Conversion 75
Form OIDs Ending in Numbers 75
Form OIDs Ending in a 'C' (Coded Forms) 76
Copying Forms from the Global Library Volume 77
Creating Forms 78
Editing Form Settings 79
Deleting Forms 79
Adding Fields to a Form 79
Fields and Mock eCRFs 80
Naming Conventions for Fields 80
Working with Dictionaries 82
Naming Conventions for Dictionaries and Entries 82
Dictionaries and Mock eCRFs 82
Copying Dictionaries from the Global Library Volume 83
Creating a Dictionary 84
Working with Variables 85
Naming Conventions for Variables 85
vi CONTENTS Rave Architect Lite
Creating a Variable 86
Associating Dictionaries with a Variable 87
Specifying Help Text for Forms and Fields 88
Help Text and Mock eCRFs 88
Hands-On Exercise 88
9 Creating Folders 91
About Folders 91
Folders and the Visit Form Matrix 92
Naming Conventions for Folders 93
Naming Conventions for Folder OIDs 93
Copying Folders from the Global Library Volume 93
Copying Folders from Another Study 94
Hands-On Exercise 95
10 Creating Matrices 96
About Matrices 96
Standard Matrices 96
Matrices and the Visit Form Matrix 97
Copying Matrices from the Global Library Volume 98
Modifying a Matrix 98
Creating a Matrix (Unscheduled Visit) 100
Hands-On Exercise 101
11 Testing Your Progress 103
Publishing a Version from a Draft 103
Naming Conventions for Versions 103
Publishing a Version 104
Pushing a Version to a Study 106
Reviewing Your Results 108
Making Subsequent Changes 109
Hands-On Exercise 110
12 Defining Restrictions 111
About Restrictions 111
Restrictions and User Roles in Rave 111
Restrictions and the View & Entry Restrictions Document 112
Implications of Restricted Forms and Fields 112
© Roche Group CONTENTS vii
Configuring View and Entry Restrictions for a Form 113
Configuring SDV, Manual Reviews, and Default Values 114
Requires Verification 116
Manual Review 116
Default Values 116
Testing Restrictions 117
Hands-On Exercise 118
13 Defining Field Edit Checks 119
About Edit Checks 119
Field Edit Checks and SLACs 120
Configuring Field Edit Checks 120
Hands-On Exercise 122
14 Working with Edit Checks and Custom Functions 123
Working with Edit Checks 123
Roche Naming Conventions for Edit Checks 123
Check Steps and Check Actions 125
Available Check Actions 126
Edit Checks and SLACS 127
Copying Edit Checks from the Global Library Volume 128
Create an Edit Check 128
Testing Edit Checks 133
Using Custom Functions 134
About Custom Functions 134
Types of Custom Functions 134
Sample Custom Function Code in the Custom Function Module 135
Hands-On Exercise 136
15 Finishing Touches 139
Copying to the P2 Project for Your Study 139
Making Changes Late in the Development Cycle 140
Making Revisions Prior to Pushing to Production 140
Making Amendments After Pushing to Production 141
Hands-On Exercise 141
Conclusion to Section 2 142
Training Review 142
Where to Go From Here 142
viii CONTENTS Rave Architect Lite
Course Evaluation Form 142
➡ Glossary 143
➡ Index 151
© Genentech, Inc. LESSON ix
CLASS PREPARATION
Before the First Day of the Class
At least 72 hours before class, contact the EDC Help Desk to:
➡ Ensure that the Arch Lite training environment has been refreshed since the last
training session, or that enough unused student studies are available to use for the
class. Refreshes occur monthly, on the first weekend of every month.
➡ Reserve a training facility with:
➡ Instructor’s computer that is connected to an overhead projector
➡ Internet access from all attendees’ computers
➡ Identify the block of Rave training user account to use for your training location.
➡ Obtain a sufficient number of copies of the following documents:
➡ Arch Lite Instructor’s Guide
➡ Arch Lite Participant Guide
➡ Mock eCRFs / eCRF Help Text / Source Document Verify (SDV)
➡ Obtain electronic copies of the following documents and load them on the
student computers for use during class:
➡ Study Configuration Document (SCD)
➡ Visit Form Matrix, including View & Entry (V&E) Restrictions
➡ Study Logic and Check Specifications (SLACS)
Immediately After the Refresh
➡ Confirm that you can view the Rave login screen by entering the training URL
(https://rochetrn563.mdsol.com) into the browser address window.
➡ Verify that you can log into Rave using the instructor’s user account
(casaal_1). This account gives you Lead CASA permissions to the instructor
demo study (DEMO2010_D) and to each of the site-specific leader studies.
➡ Confirm that you can log into Rave with each of the user accounts that will be
used during the training. After logging in, make sure that each user account has
access to the correct studies and sites. Refer to the Training Accounts for PTIM
spreadsheet that shows which user accounts are linked to which projects in the
training environment. Each training site has 11 studies. The training site is
encoded into the study name (for example, NUT2025_D or WEL2049_D).
Each study has one user account assigned to it (for example, SSF2013_D is
assigned the user account casaal_13). Determines the set of user accounts to
use for the class, and then verify each one.
Delivery Time for the Class
The Rave Architect Lite training typically
requires 1.5 days to deliver in a
classroom setting. Although the material
is split into two main sections, the first
day typically ends after completing the
first two lessons in the second section
(through Lesson 7).
Site-specific Leader Studies
Each site has one leader study, which use
the naming pattern xxx2001_D, where
represents xxx the site abbreviation (such as BAS2001_D) for Basel).
User Accounts for the Class
Login user names, passwords, and
associated studies for the training
environment are defined in the Training
Accounts for PTIM spreadsheet.
x LESSON Rave Architect Lite
On the Day of the Class
On the day of the class, you need the following:
➡ Dry erase agenda poster and pen
➡ Participant name placards
➡ Training Evaluation Forms
For each attendee:
➡ From the instructor’s machine and each learner’s machine:
➡ Confirm that you can view the Rave login screen by entering the training URL
(https://rochetrn563.mdsol.com) into the browser address window.
➡ Confirm that you can log into Rave with each of the user accounts that the
attendee will be using during the training.
➡ Confirm that you can access the survey:
http://www.surveymonkey.com/s/B8Q3X5K
➡ Copy the electronic handouts onto a local drive on each machine.
➡ Assign a unique training user number to each participant. Write the number on
their placard. This number correlates with the user accounts that each attendee
will use to log into Rave and launch the Architect module.
➡ Distribute the printed handouts—Participant Guide and mock eCRFs.
SECTION 1
INTRODUCTIONIn this section of the training, you get introduced to the study building process for Roche-
sponsored EDC clinical trials, Medidata Rave’s Architect module, and the terminology
used to describe the system build process and Architect functionality.
Lessons in this section include:
➡ Introduction to this Course (see page 2)
➡ Key Study Design and Build Concepts (see page 6)
➡ Getting Started with Architect (see page 8)
➡ Exploring Items in a Draft (see page 22)
➡ Exploring Fields on a Form (see page 39)
All participants are required to complete Section 1 of this training. Completion of
Section 2, “Building Studies” on page 55, is required for certain roles (for example, Study
Data Managers, Data Acquisition Specialists, and Data Modeling Specialists), but optional
for others.
2 LESSON 1 Rave Architect Lite
LESSON 1
INTRODUCTION TO THIS COURSE
This lesson introduces the Rave Architect module. It covers the following topics:
➡ About the Rave Architect Module (see page 2)
➡ Audiences for this Training (see page 4)
➡ What You Will Learn in the Architect Lite Training (see page 4)
➡ Training Prerequisites (see page 4)
➡ Sample Project Used in this Training (see page 5)
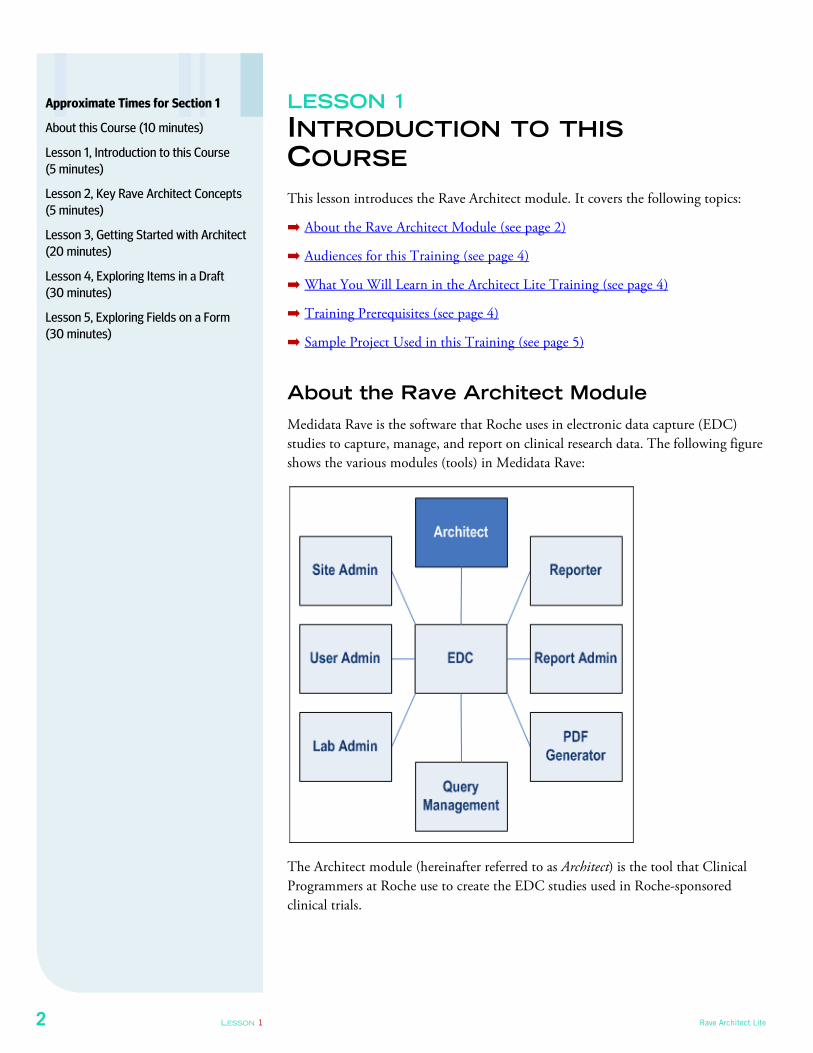
About the Rave Architect Module
Medidata Rave is the software that Roche uses in electronic data capture (EDC)
studies to capture, manage, and report on clinical research data. The following figure
shows the various modules (tools) in Medidata Rave:
The Architect module (hereinafter referred to as Architect) is the tool that Clinical
Programmers at Roche use to create the EDC studies used in Roche-sponsored
clinical trials.
Approximate Times for Section 1
About this Course (10 minutes)
Lesson 1, Introduction to this Course
(5 minutes)
Lesson 2, Key Rave Architect Concepts
(5 minutes)
Lesson 3, Getting Started with Architect
(20 minutes)
Lesson 4, Exploring Items in a Draft
(30 minutes)
Lesson 5, Exploring Fields on a Form
(30 minutes)
© Genentech, Inc. LESSON 1 3
Architect provides Clinical Programmers with a comprehensive, full-featured
development environment in which to:
➡ build electronic case report forms (eCRFs)
➡ design all the elements on an eCRF, including fields, variables, data entry
controls, labels, lists, help text, SAS labels, and so on
➡ write data logic for eCRF data, including data entry checks and edit checks that
can trigger queries, stickies, and other actions
➡ construct visit folders and matrixes
➡ specify role-based access to eCRFs and data using view and entry restrictions
➡ configure eCRFs for Source Document Verification (SDV) and sign-off
➡ write custom code for specialized operations
➡ copy standard elements from the Global Library Volume (Global Volume
Integrated, or GVI)
➡ create and manage separate development, testing, production, and training
environments
➡ iteratively improve a study design by generating drafts, versions, and studies to test
and refine
For each Roche-sponsored clinical trial that uses EDC, Clinical Programmers create
two projects in Architect (one for development and one for production), copy in the
standard elements they need from the Global Library Volume, and then configure
the study according to the requirements of the study specifications associated with
the study protocol. The end result is a Rave study that study participants can access in
the Rave EDC Module.
Note: At Roche, a group of report developers—not Clinical Programmers—
use the Rave Reporter module to build reports. Report development is
outside the scope of this training.
Writing Effective Study Specifications
Clinical programmers (CPs) rely on study
specifications that are well written,
precise, and thorough. By having hands-
on experience with Architect in this
course, you will better understand the
necessity of properly-prepared study
specifications.✎
4 LESSON 1 Rave Architect Lite
Audiences for this Training
This training is designed to meet the learning needs of two main audience groups:
➡ Study Data Managers (SDMs) are the primary audience for this training.
➡ Additional Clinical Data Management personnel—such as Data Acquisition
Specialists (DAS) and Data Modeling Specialists (DMS)—will benefit from
learning about the terminology, processes, and tools used to build EDC studies at
Roche.
What You Will Learn in the Architect Lite
Training
This training consists of two main sections:
➡ Section 1, “Introduction” on page 1, provides a general introduction to the EDC
study build process for Roche-sponsored clinical trials, Architect, and the
terminology used to describe the system build process and Architect functionality.
All participants are required to complete this section.
➡ Section 2, “Building Studies” on page 55, provides in-depth, hands-on experience
with using Architect to build a study. Only certain participants (such as SDMs)
are required to complete this section.
During the course, you will also learn—where relevant—about Roche standards,
naming conventions, Clinical Programmer best practices, design considerations, and
lessons learned. The purpose is to provide information that can be used to produce
better study specifications for Roche-sponsored clinical trials that use EDC.
Training Prerequisites
Before taking this training, participants must have completed the following trainings:
➡ Intro to EDC
➡ EDC Business Process Training (online)
➡ EDC Study Specification course (online)
SDMs Must Complete Section 2
Prior to leading a team in the design of an
EDC system, SDMs will be required to
complete the entire course.
© Genentech, Inc. LESSON 1 5
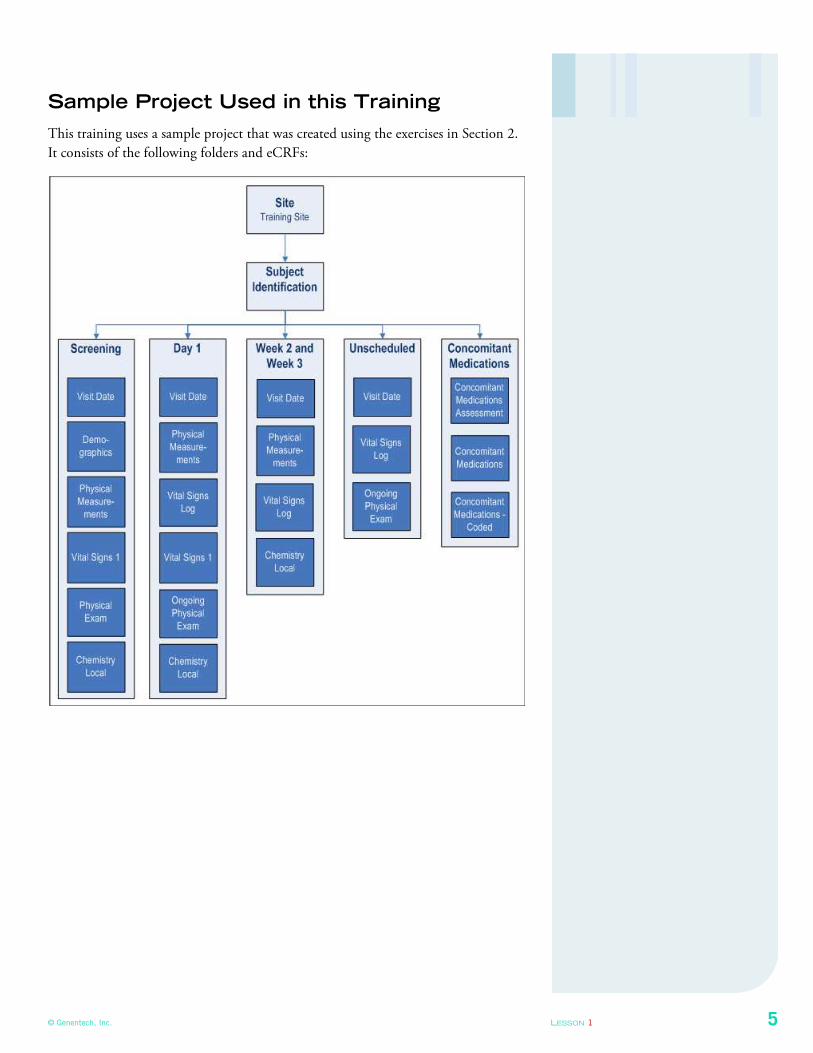
Sample Project Used in this Training
This training uses a sample project that was created using the exercises in Section 2.
It consists of the following folders and eCRFs:
6 LESSON 2 Rave Architect Lite
LESSON 2
KEY STUDY DESIGN AND BUILD CONCEPTS
This lesson briefly describes EDC study design and build concepts for Roche-
sponsored clinical trials. It covers the following topics:
➡ Study Build Process (see page 6)
➡ Clinical Programmer Responsibilities (see page 6)
➡ Study Specifications for Building Studies (see page 6)
➡ Relationships Between Study Specifications and Finished Studies in the Rave
EDC Module (see page 7)
Study Build Process
This section briefly describes the EDC study design for Roche-sponsored clinical
trials. For detailed information about the overall process, refer to the Study Start-Up
RACI and the EDC Business Process Flows, which can be found at:
http://shareweb.bas.roche.com/shareweb/livelink?func=ll&objId=60431418&objAction=browse&fromExpand=TRUE
Clinical Programmer Responsibilities
Clinical Programmer responsibilities include:
➡ Provide technical support for Clinical Data Management in clinical database
development and edit check programming
➡ Serve as a study configuration expert to Clinical Data Management and
implement the study configuration in Rave, including study creating and
customization, data extraction and transformation, and reporting
Study Specifications for Building Studies
Clinical Programmers rely on the following study specifications to guide their efforts:
➡ Mock eCRFs / eCRF Help Text / Source Document Verify (SDV) (printed)
➡ Study Configuration Document (SCD) (electronic)
➡ View & Entry (V&E) Restrictions (electronic)
➡ Study Logic and Check Specifications (SLACS), which include the Visit Form
Matrix (electronic)
These specifications are written in support of the study protocol.
Handouts
At the beginning of this training, you will
receive handouts of these study
specifications.
Leader Note
Have participants open all of the
electronic handouts on their desktops.
© Genentech, Inc. LESSON 2 7
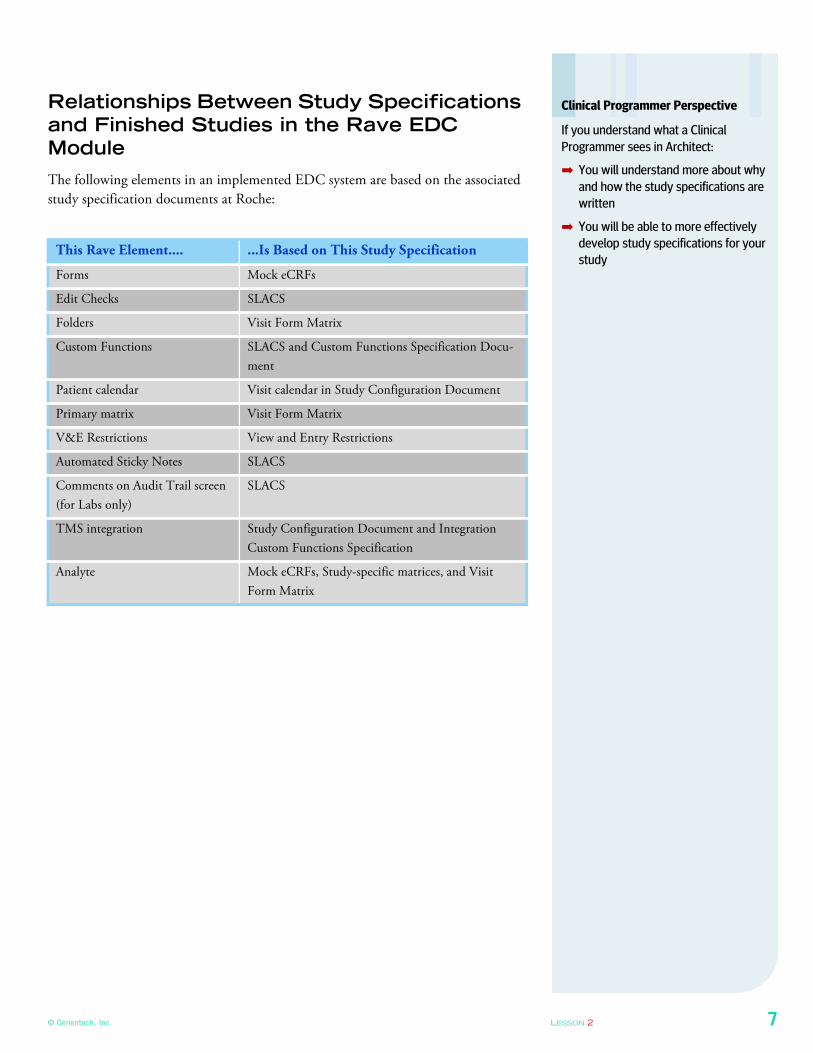
Relationships Between Study Specifications
and Finished Studies in the Rave EDC
Module
The following elements in an implemented EDC system are based on the associated
study specification documents at Roche:
This Rave Element.... ...Is Based on This Study Specification
Forms Mock eCRFs
Edit Checks SLACS
Folders Visit Form Matrix
Custom Functions SLACS and Custom Functions Specification Docu-
ment
Patient calendar Visit calendar in Study Configuration Document
Primary matrix Visit Form Matrix
V&E Restrictions View and Entry Restrictions
Automated Sticky Notes SLACS
Comments on Audit Trail screen
(for Labs only)
SLACS
TMS integration Study Configuration Document and Integration
Custom Functions Specification
Analyte Mock eCRFs, Study-specific matrices, and Visit
Form Matrix
Clinical Programmer Perspective
If you understand what a Clinical
Programmer sees in Architect:
➡ You will understand more about why
and how the study specifications are
written
➡ You will be able to more effectively
develop study specifications for your
study
8 LESSON 3 Rave Architect Lite
LESSON 3
GETTING STARTED WITH ARCHITECT
This lesson shows you how to launch and navigate Architect. It covers the following
topics:
➡ Launching Architect (see page 8)
➡ Architect Main Screen (see page 10)
➡ Projects, Environments, and Global Library Volumes (see page 11)
➡ Navigating Architect (see page 14)
➡ Exploring the Sample Project (see page 15)
➡ Studies (see page 20)
➡ Hands-On Exercise (see page 21)
Launching Architect
To access Architect, you must first log into Rave using your Rave user account.
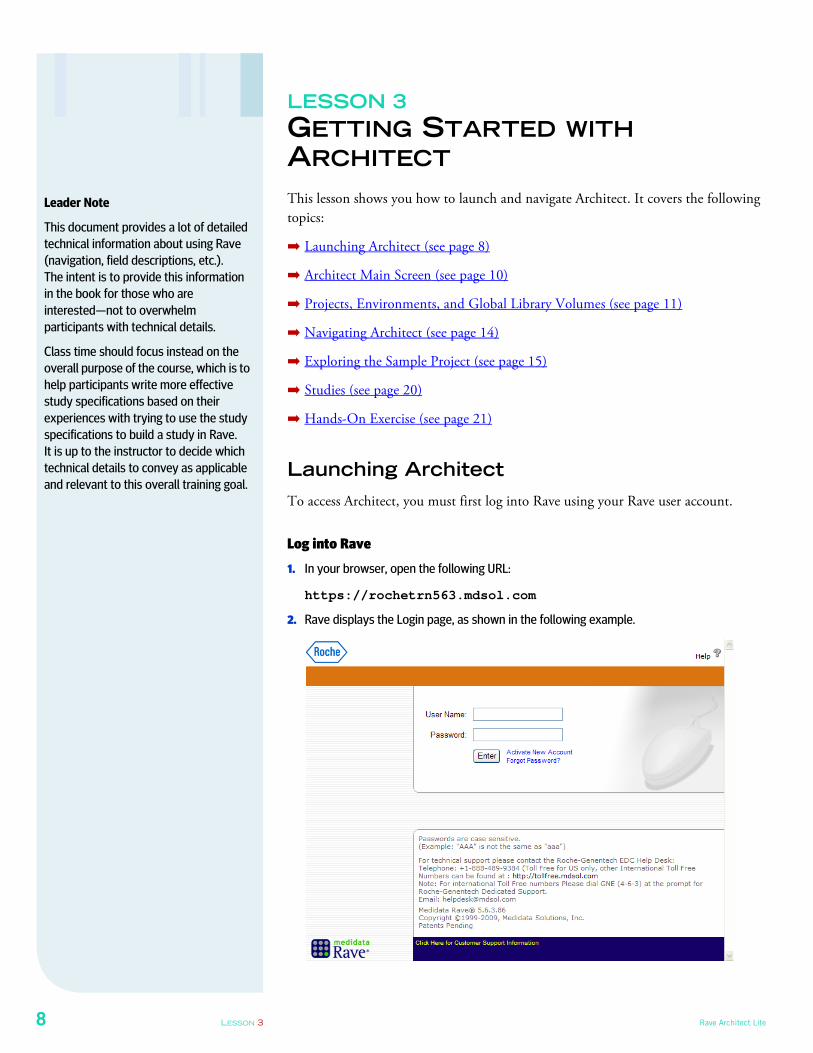
Log into Rave
1. In your browser, open the following URL:
https://rochetrn563.mdsol.com
2. Rave displays the Login page, as shown in the following example.
Leader Note
This document provides a lot of detailed
technical information about using Rave
(navigation, field descriptions, etc.).
The intent is to provide this information
in the book for those who are
interested—not to overwhelm
participants with technical details.
Class time should focus instead on the
overall purpose of the course, which is to
help participants write more effective
study specifications based on their
experiences with trying to use the study
specifications to build a study in Rave.
It is up to the instructor to decide which
technical details to convey as applicable
and relevant to this overall training goal.

© Genentech, Inc. LESSON 3 9
3. Enter the following information exactly as instructed (login is case sensitive):
4. Click Enter to submit your entries.
Rave validates your user name and password and, if valid, displays the Rave opening page.
Launch the Architect Module
1. In the Installed Modules box in the sidebar of the Rave Home page, click Architect.
Rave launches the Architect module.
Note: The modules listed in the sidebar depend on the type of User Group you have been
assigned to. Common User Groups are: User, Developer, and Admin.
Field Description
User Name Login name with sufficient permissions to access Architect.
Assigned by your instructor. Example: casaal_#
Password Login password. Example: password3
Access to Architect
Clinical Programmers are given access to
Rave Architect through their Rave user
accounts. In this training, you log into
Rave with a training account that has
access to the Rave Architect module.
Look for the Architect Module
The Architect Module appears in the
Installed Modules box.Architect Module
Hands-On Demonstration
During the leader’s demonstration, follow
along on your computer and complete
each step.
Click to launch the Architect module
10 LESSON 3 Rave Architect Lite
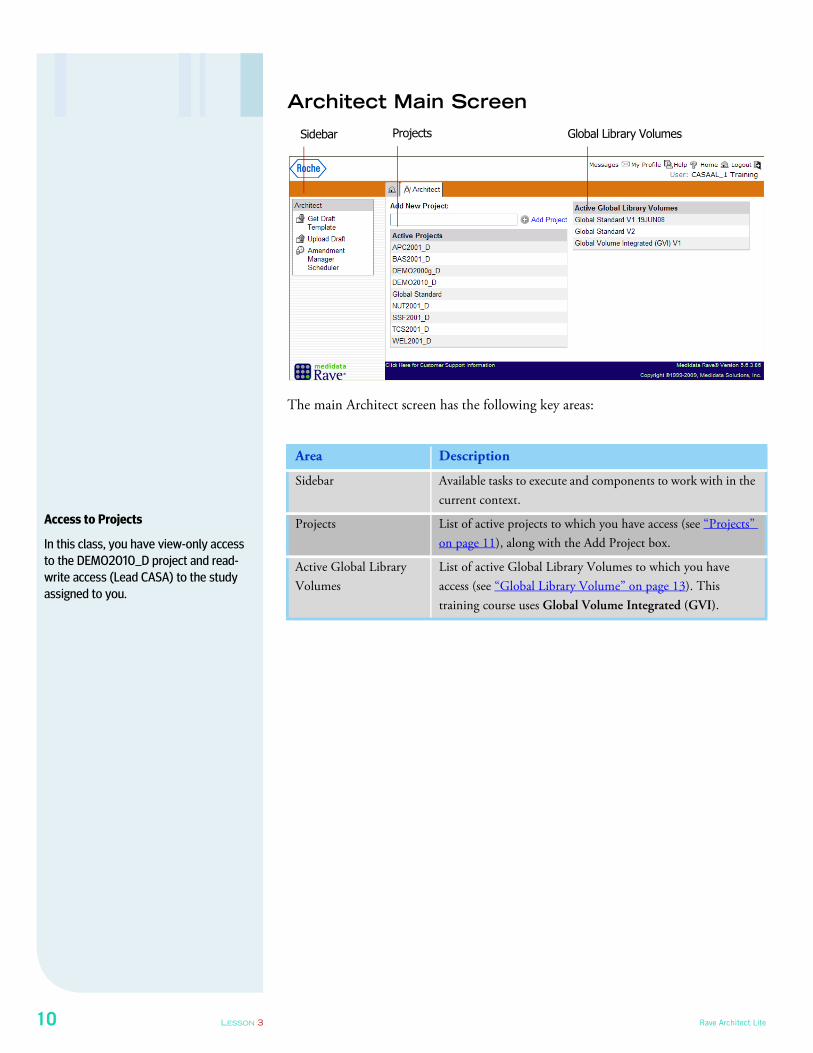
Architect Main Screen
The main Architect screen has the following key areas:
Area Description
Sidebar Available tasks to execute and components to work with in the
current context.
Projects List of active projects to which you have access (see “Projects”
on page 11), along with the Add Project box.
Active Global Library
Volumes
List of active Global Library Volumes to which you have
access (see “Global Library Volume” on page 13). This
training course uses Global Volume Integrated (GVI).
Projects Global Library VolumesSidebar
Access to Projects
In this class, you have view-only access
to the DEMO2010_D project and read-
write access (Lead CASA) to the study
assigned to you.
© Genentech, Inc. LESSON 3 11
Projects, Environments, and Global Library
Volumes
This section describes important concepts for using Architect—projects,
environments, URLs, and the Global Library Volumes.
Projects
In Architect, a project is the equivalent of a study. A project contains the drafts,
environments, subject search configurations, and copy source definitions. When
Clinical Programmers begin constructing a new EDC study for a Roche-sponsored
clinical trial, they begin by creating a new project in Architect.
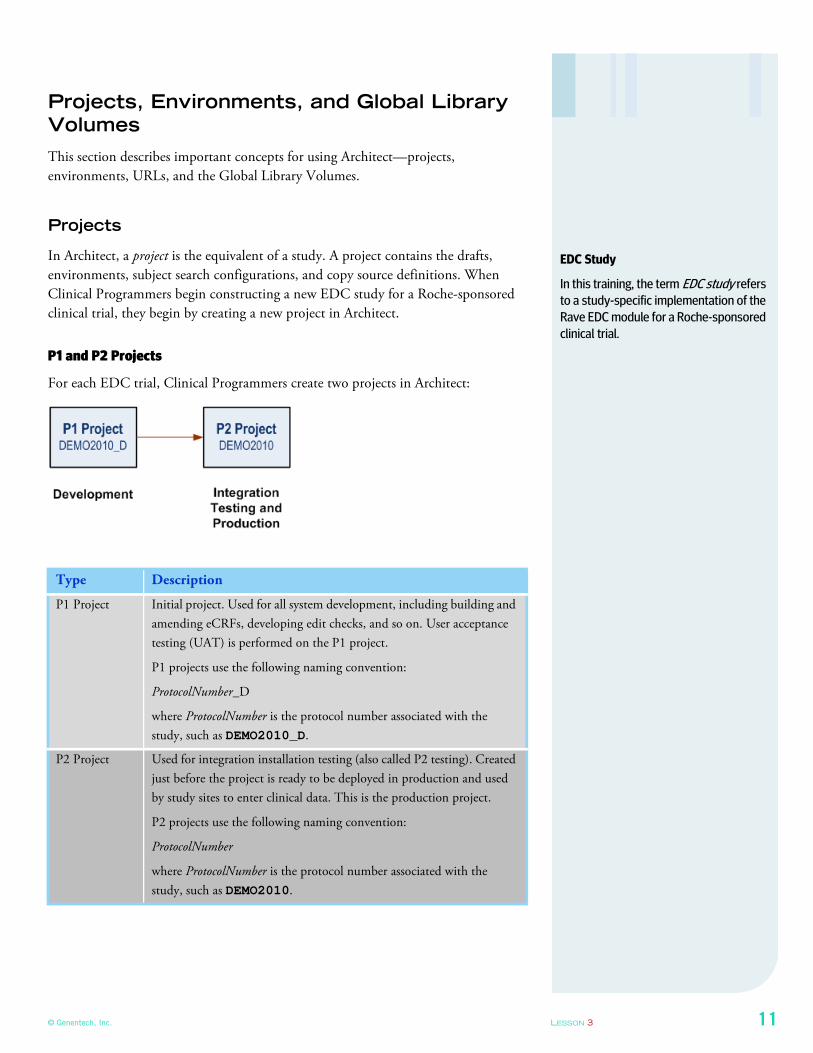
P1 and P2 Projects
For each EDC trial, Clinical Programmers create two projects in Architect:
Type Description
P1 Project Initial project. Used for all system development, including building and
amending eCRFs, developing edit checks, and so on. User acceptance
testing (UAT) is performed on the P1 project.
P1 projects use the following naming convention:
ProtocolNumber_D
where ProtocolNumber is the protocol number associated with the
study, such as DEMO2010_D.
P2 Project Used for integration installation testing (also called P2 testing). Created
just before the project is ready to be deployed in production and used
by study sites to enter clinical data. This is the production project.
P2 projects use the following naming convention:
ProtocolNumber
where ProtocolNumber is the protocol number associated with the
study, such as DEMO2010.
EDC Study
In this training, the term EDC study refers to a study-specific implementation of the
Rave EDC module for a Roche-sponsored
clinical trial.
12 LESSON 3 Rave Architect Lite
Clinical Views
The two projects are needed to satisfy Roche’s requirements for clinical views. In
Rave, clinical views contain replicated copies of production data and are used to
support Roche standard reports, ad hoc reporting (using JReview), and for exporting
(for SAS integration). Both P1 and P2 projects are created on the Roche production
URL.
Environments
In Architect, an environment is a partitioned instance in the database for a particular
purpose. The name of the environment describes the context in which it is used. For
example, Clinical Programmers construct a study using Architect in the DEV
environment, and site users access the study’s EDC module in the PROD
environment. Roche policies determine the environments that can be used for P1 and
P2 projects. Roche uses the following naming conventions for Rave environments:
Environment Description
DEV Development environment in which Clinical Programmers create and
configure EDC studies. Data in this environment is sample data for
development purposes only. Other environments are copied from
DEV. P1 (but not P2) projects are deployed in the DEV environment.
TEST Test environment in which SDMs and their project teams conduct
online eCRF reviews and formal user acceptance testing (UATs) of
EDC studies. Data in this environment is sample data for test purposes
only. P1 and P2 projects are deployed in the TEST environment.
TRAIN Training environment for system users. Data in this environment is
sample data for training purposes only. P1 (but not P2) projects are
deployed in the TRAIN environment.
PROD Production environment in which the Rave EDC study is deployed live
and accessed by system users. Each project has a PROD environment
by default. Data collected in this environment is real clinical data gath-
ered from actual study participants and is submitted to the FDA.
Testing is never conducted in the PROD environment. P2 (but not P1)
projects are deployed in the PROD environment. This default environ-
ment is inactivated in P1.
© Genentech, Inc. LESSON 3 13
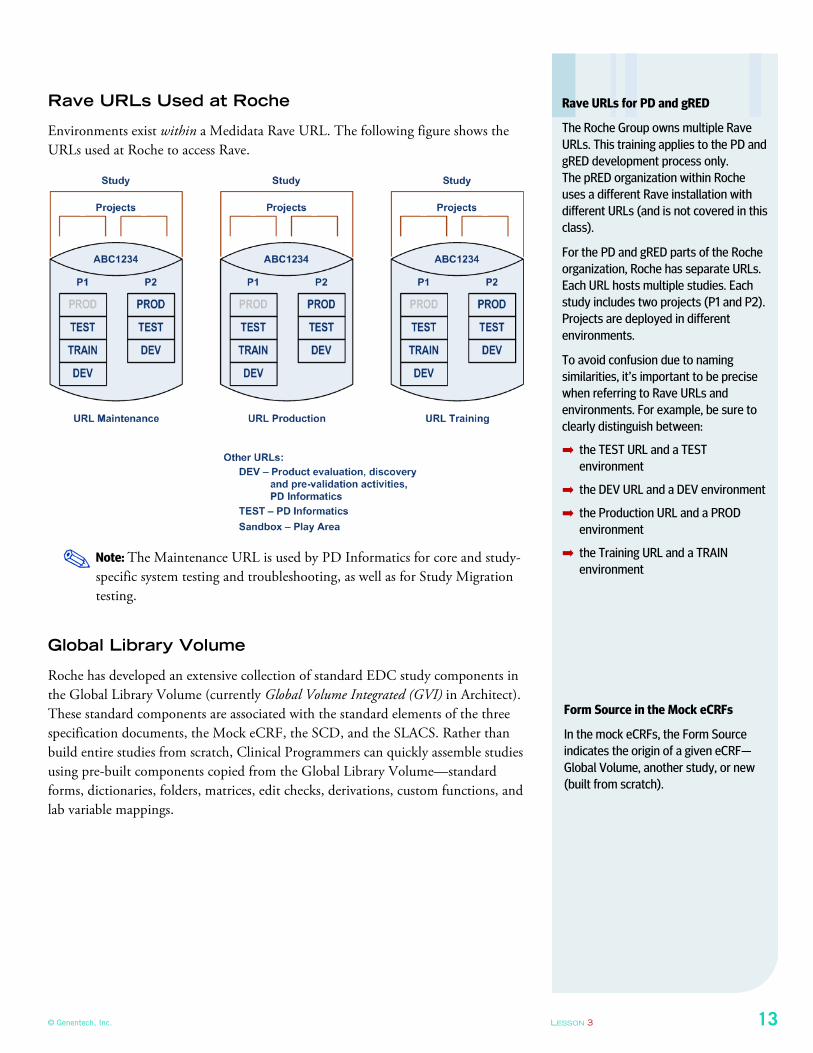
Rave URLs Used at Roche
Environments exist within a Medidata Rave URL. The following figure shows the
URLs used at Roche to access Rave.
Note: The Maintenance URL is used by PD Informatics for core and study-
specific system testing and troubleshooting, as well as for Study Migration
testing.
Global Library Volume
Roche has developed an extensive collection of standard EDC study components in
the Global Library Volume (currently Global Volume Integrated (GVI) in Architect).
These standard components are associated with the standard elements of the three
specification documents, the Mock eCRF, the SCD, and the SLACS. Rather than
build entire studies from scratch, Clinical Programmers can quickly assemble studies
using pre-built components copied from the Global Library Volume—standard
forms, dictionaries, folders, matrices, edit checks, derivations, custom functions, and
lab variable mappings.
Rave URLs for PD and gRED
The Roche Group owns multiple Rave
URLs. This training applies to the PD and
gRED development process only.
The pRED organization within Roche
uses a different Rave installation with
different URLs (and is not covered in this
class).
For the PD and gRED parts of the Roche
organization, Roche has separate URLs.
Each URL hosts multiple studies. Each
study includes two projects (P1 and P2).
Projects are deployed in different
environments.
To avoid confusion due to naming
similarities, it’s important to be precise
when referring to Rave URLs and
environments. For example, be sure to
clearly distinguish between:
➡ the TEST URL and a TEST
environment
➡ the DEV URL and a DEV environment
➡ the Production URL and a PROD
environment
➡ the Training URL and a TRAIN
environment✎
Form Source in the Mock eCRFs
In the mock eCRFs, the Form Source
indicates the origin of a given eCRF—
Global Volume, another study, or new
(built from scratch).
14 LESSON 3 Rave Architect Lite
Navigating Architect
Navigating the Architect module is very much like navigating the Rave EDC
module. Here are a few reminders:
➡ Always use Rave buttons, tabs, and links—not the buttons (Back, Forward, Stop,
Refresh, or Home) or menu commands in your Web browser—to navigate the
Rave interface. If you use any of the browser buttons, Rave will prompt you to re-
enter your password before you can resume using Rave.
➡ If you are logged into Rave but remain idle (no mouse clicks or keystrokes) for a
period of time (45 minutes or more), then Rave will lock you out of the system
and prompt you to re-enter your password or log in before you can resume using
Rave. Rave displays the prompt when you click the mouse or use the keyboard
after a period of inactivity. If you have any unsaved data when a time-out occurs,
then you will lose that data. Therefore, it is important to save data entry changes
as you go.
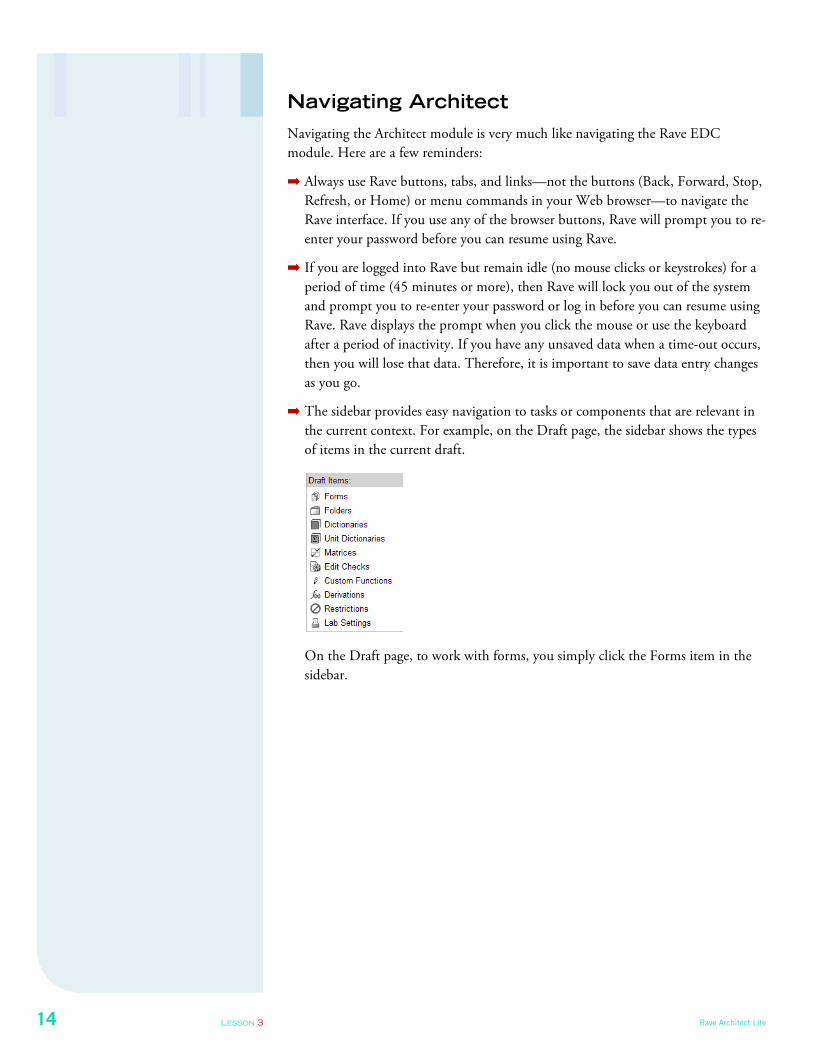
➡ The sidebar provides easy navigation to tasks or components that are relevant in
the current context. For example, on the Draft page, the sidebar shows the types
of items in the current draft.
On the Draft page, to work with forms, you simply click the Forms item in the
sidebar.
© Genentech, Inc. LESSON 3 15
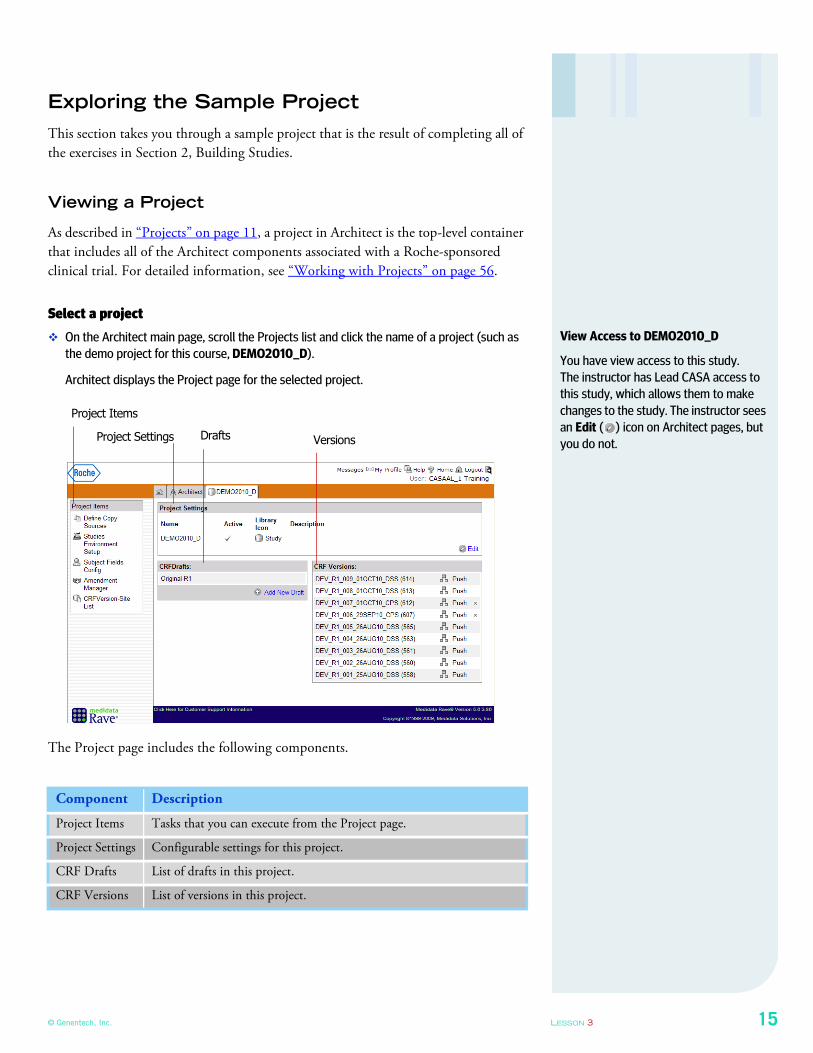
Exploring the Sample Project
This section takes you through a sample project that is the result of completing all of
the exercises in Section 2, Building Studies.
Viewing a Project
As described in “Projects” on page 11, a project in Architect is the top-level container
that includes all of the Architect components associated with a Roche-sponsored
clinical trial. For detailed information, see “Working with Projects” on page 56.
Select a project
� On the Architect main page, scroll the Projects list and click the name of a project (such as
the demo project for this course, DEMO2010_D).
Architect displays the Project page for the selected project.
The Project page includes the following components.
Component Description
Project Items Tasks that you can execute from the Project page.
Project Settings Configurable settings for this project.
CRF Drafts List of drafts in this project.
CRF Versions List of versions in this project.
View Access to DEMO2010_D
You have view access to this study.
The instructor has Lead CASA access to
this study, which allows them to make
changes to the study. The instructor sees
an Edit ( ) icon on Architect pages, but
you do not.Project Settings
Project Items
Drafts Versions
16 LESSON 3 Rave Architect Lite
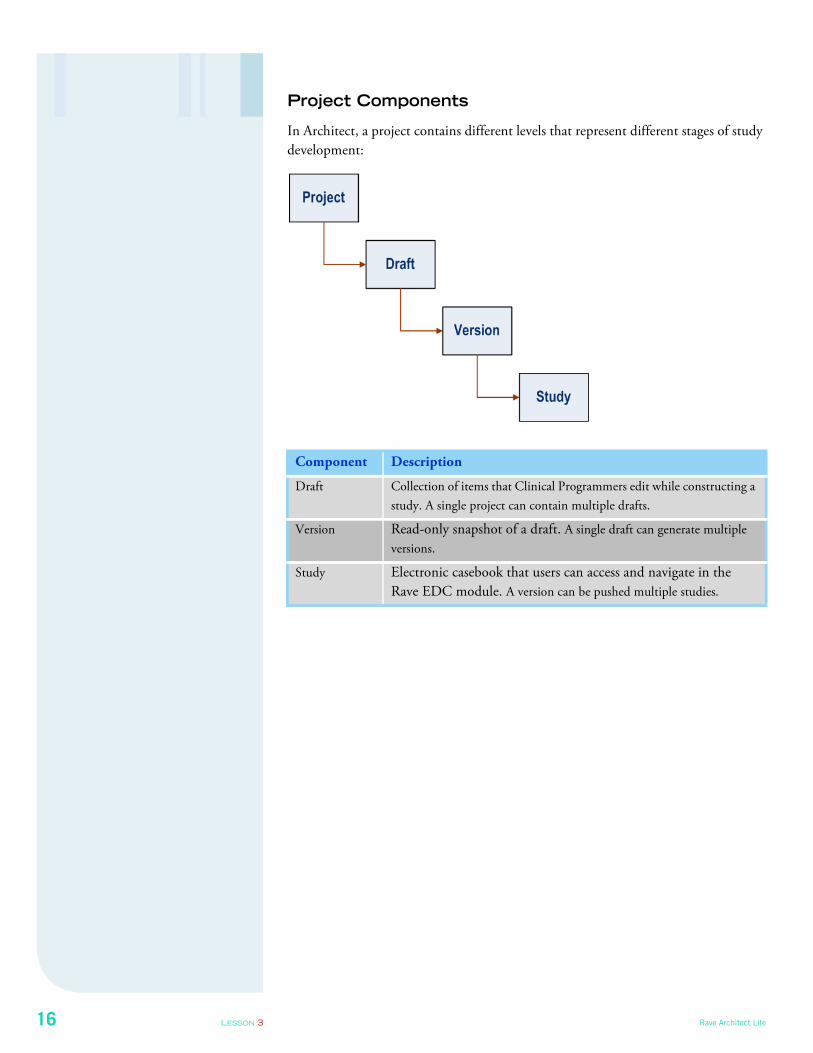
Project Components
In Architect, a project contains different levels that represent different stages of study
development:
Component Description
Draft Collection of items that Clinical Programmers edit while constructing a
study. A single project can contain multiple drafts.
Version Read-only snapshot of a draft. A single draft can generate multiple
versions.
Study Electronic casebook that users can access and navigate in the
Rave EDC module. A version can be pushed multiple studies.
© Genentech, Inc. LESSON 3 17
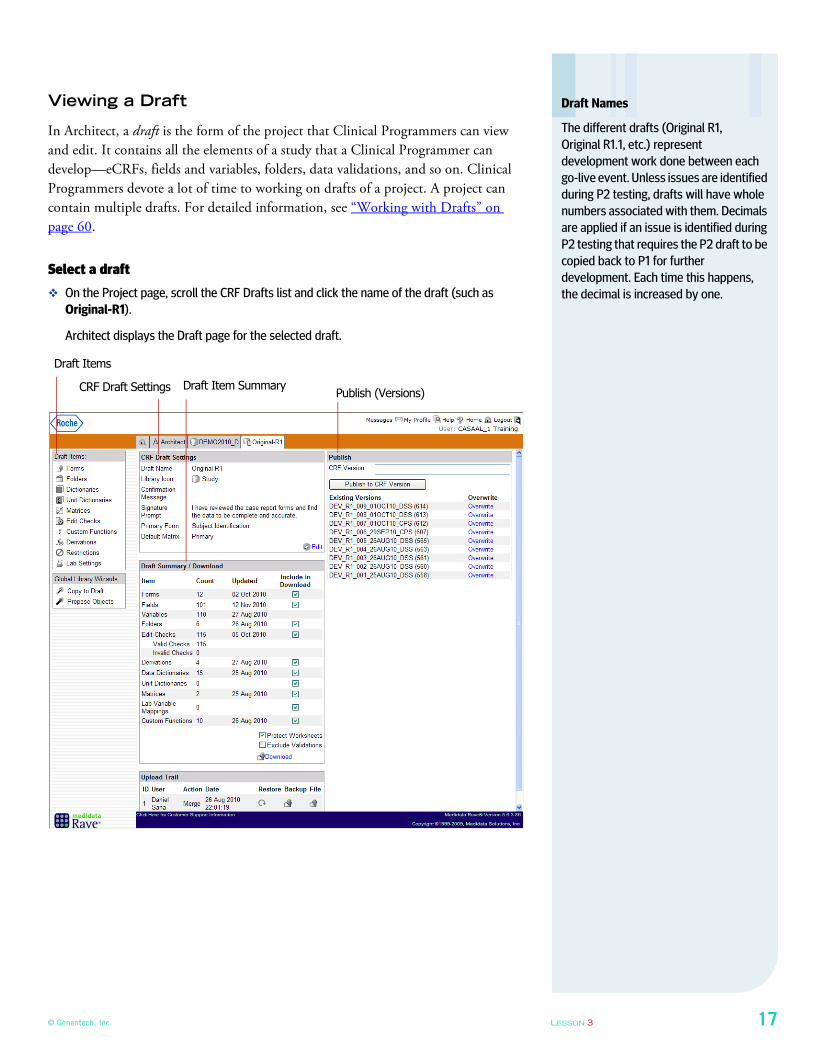
Viewing a Draft
In Architect, a draft is the form of the project that Clinical Programmers can view
and edit. It contains all the elements of a study that a Clinical Programmer can
develop—eCRFs, fields and variables, folders, data validations, and so on. Clinical
Programmers devote a lot of time to working on drafts of a project. A project can
contain multiple drafts. For detailed information, see “Working with Drafts” on
page 60.
Select a draft
� On the Project page, scroll the CRF Drafts list and click the name of the draft (such as
Original-R1).
Architect displays the Draft page for the selected draft.
Draft Names
The different drafts (Original R1,
Original R1.1, etc.) represent
development work done between each
go-live event. Unless issues are identified
during P2 testing, drafts will have whole
numbers associated with them. Decimals
are applied if an issue is identified during
P2 testing that requires the P2 draft to be
copied back to P1 for further
development. Each time this happens,
the decimal is increased by one.
CRF Draft Settings
Draft Items
Draft Item SummaryPublish (Versions)
18 LESSON 3 Rave Architect Lite
The Draft page includes the following components.
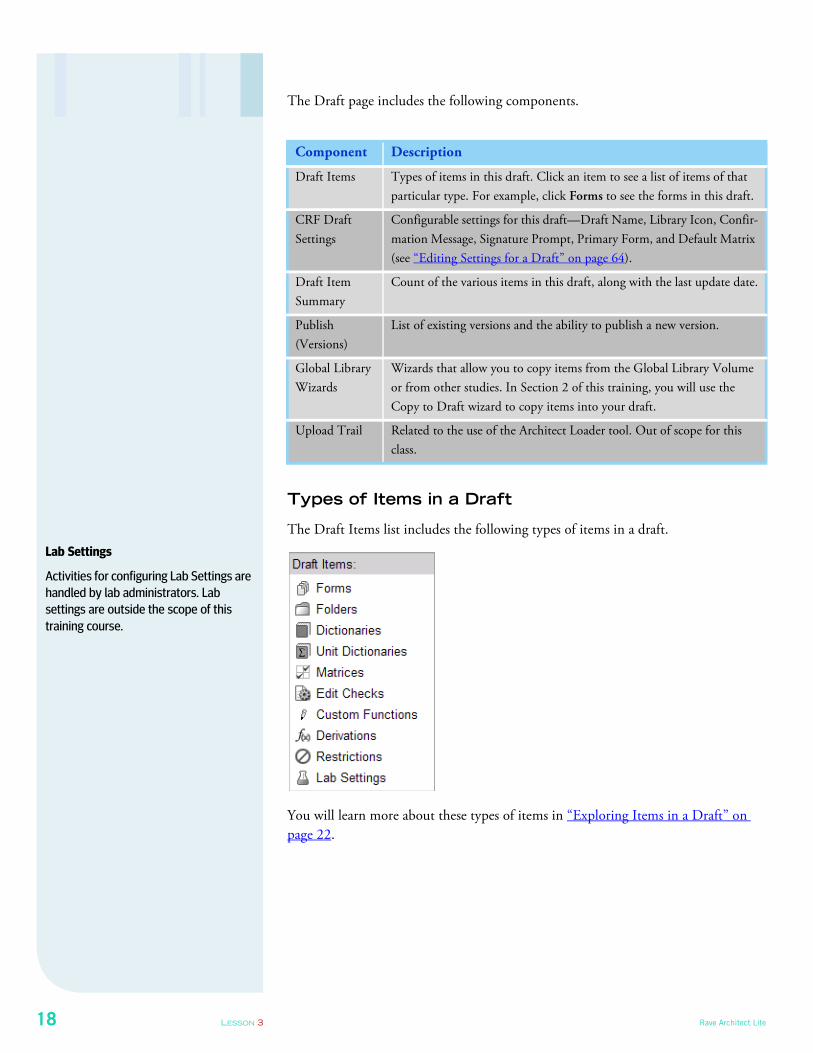
Types of Items in a Draft
The Draft Items list includes the following types of items in a draft.
You will learn more about these types of items in “Exploring Items in a Draft” on
page 22.
Component Description
Draft Items Types of items in this draft. Click an item to see a list of items of that
particular type. For example, click Forms to see the forms in this draft.
CRF Draft
Settings
Configurable settings for this draft—Draft Name, Library Icon, Confir-
mation Message, Signature Prompt, Primary Form, and Default Matrix
(see “Editing Settings for a Draft” on page 64).
Draft Item
Summary
Count of the various items in this draft, along with the last update date.
Publish
(Versions)
List of existing versions and the ability to publish a new version.
Global Library
Wizards
Wizards that allow you to copy items from the Global Library Volume
or from other studies. In Section 2 of this training, you will use the
Copy to Draft wizard to copy items into your draft.
Upload Trail Related to the use of the Architect Loader tool. Out of scope for this
class.
Lab Settings
Activities for configuring Lab Settings are
handled by lab administrators. Lab
settings are outside the scope of this
training course.
© Genentech, Inc. LESSON 3 19
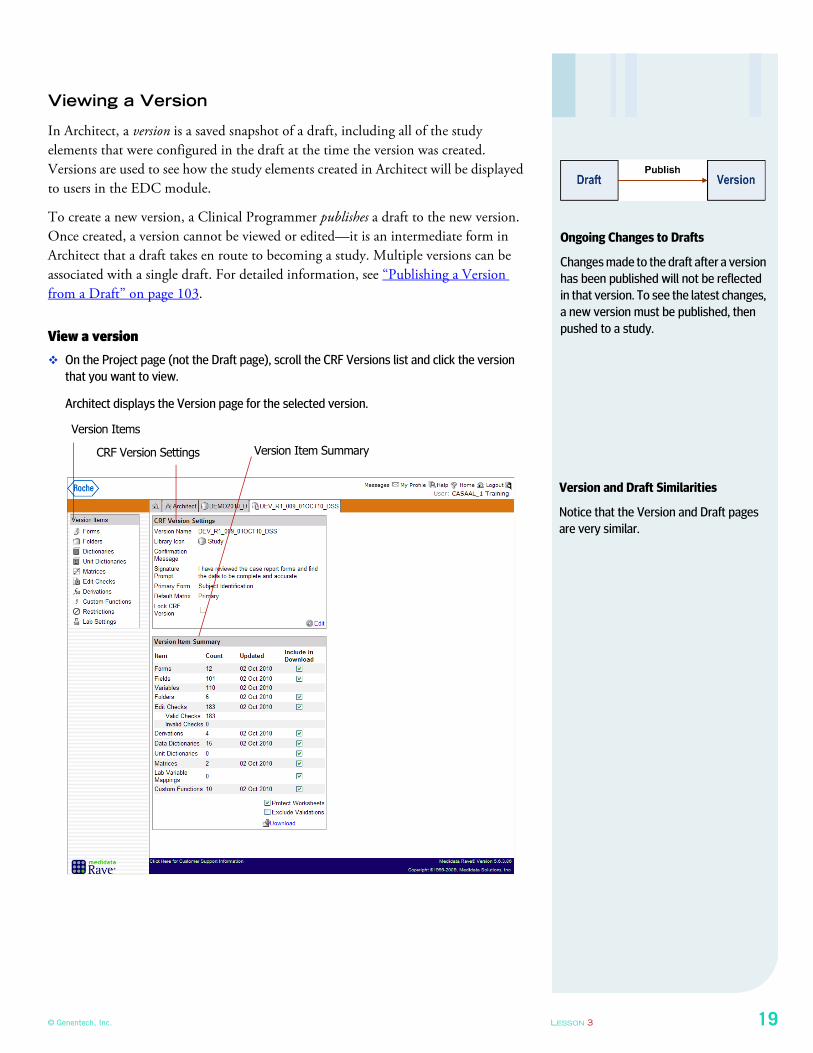
Viewing a Version
In Architect, a version is a saved snapshot of a draft, including all of the study
elements that were configured in the draft at the time the version was created.
Versions are used to see how the study elements created in Architect will be displayed
to users in the EDC module.
To create a new version, a Clinical Programmer publishes a draft to the new version.
Once created, a version cannot be viewed or edited—it is an intermediate form in
Architect that a draft takes en route to becoming a study. Multiple versions can be
associated with a single draft. For detailed information, see “Publishing a Version
from a Draft” on page 103.
View a version
� On the Project page (not the Draft page), scroll the CRF Versions list and click the version
that you want to view.
Architect displays the Version page for the selected version.
Ongoing Changes to Drafts
Changes made to the draft after a version
has been published will not be reflected
in that version. To see the latest changes,
a new version must be published, then
pushed to a study.
Version and Draft Similarities
Notice that the Version and Draft pages
are very similar.
CRF Version Settings
Version Items
Version Item Summary
20 LESSON 3 Rave Architect Lite
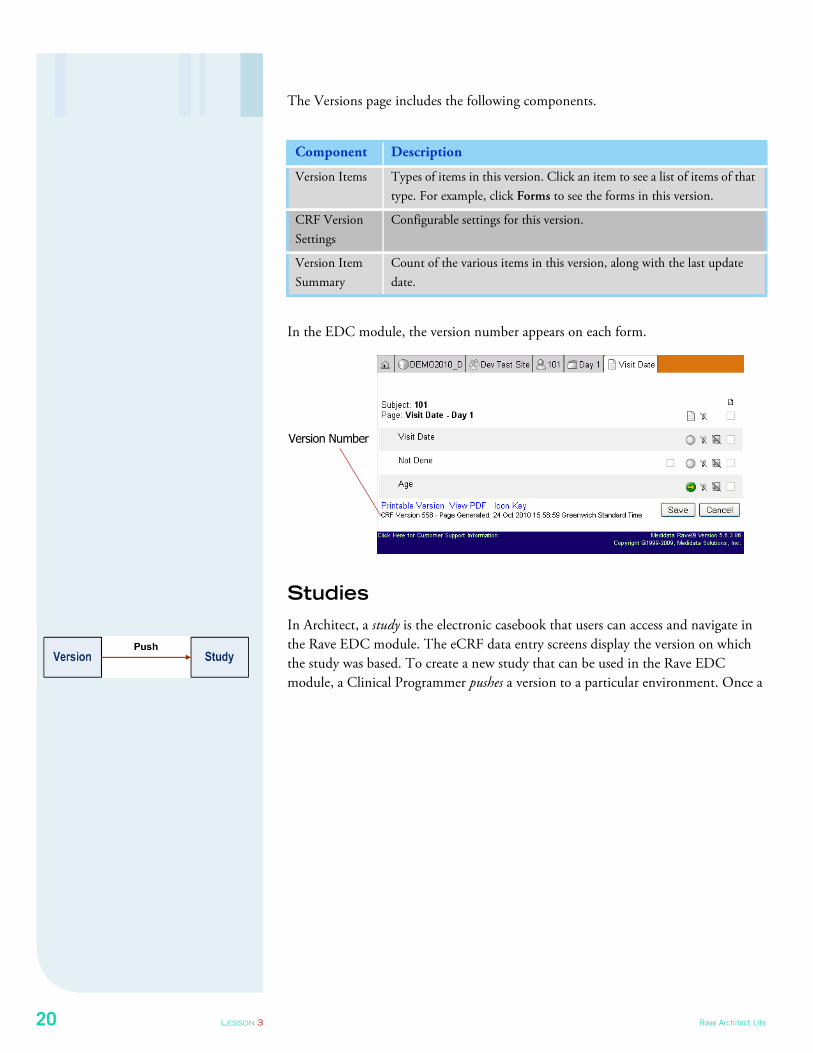
The Versions page includes the following components.
In the EDC module, the version number appears on each form.
Studies
In Architect, a study is the electronic casebook that users can access and navigate in
the Rave EDC module. The eCRF data entry screens display the version on which
the study was based. To create a new study that can be used in the Rave EDC
module, a Clinical Programmer pushes a version to a particular environment. Once a
Component Description
Version Items Types of items in this version. Click an item to see a list of items of that
type. For example, click Forms to see the forms in this version.
CRF Version
Settings
Configurable settings for this version.
Version Item
Summary
Count of the various items in this version, along with the last update
date.
Version Number
© Genentech, Inc. LESSON 3 21
study is available in that environment, authorized users can access the study and enter
data.
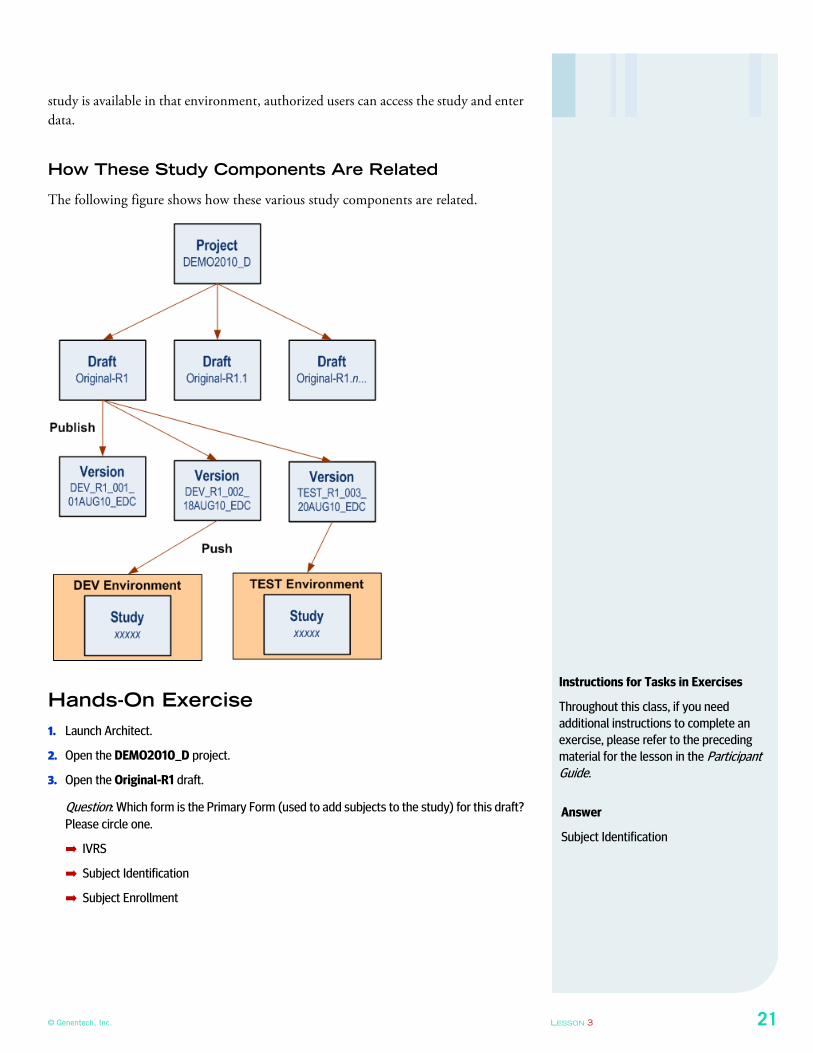
How These Study Components Are Related
The following figure shows how these various study components are related.
Hands-On Exercise
1. Launch Architect.
2. Open the DEMO2010_D project.
3. Open the Original-R1 draft.
Question: Which form is the Primary Form (used to add subjects to the study) for this draft?
Please circle one.
➡ IVRS
➡ Subject Identification
➡ Subject Enrollment
Instructions for Tasks in Exercises
Throughout this class, if you need
additional instructions to complete an
exercise, please refer to the preceding
material for the lesson in the Participant Guide.
Answer
Subject Identification
22 LESSON 4 Rave Architect Lite
LESSON 4
EXPLORING ITEMS IN A DRAFT
This lesson shows you how to explore items in a draft. It covers the following topics:
➡ Selecting Items to Explore (see page 22)
➡ Viewing Forms (see page 23)
➡ Viewing Folders (see page 24)
➡ Viewing Dictionaries (see page 26)
➡ Viewing Matrices (see page 28)
➡ Viewing Edit Checks (see page 30)
➡ Viewing Custom Functions (see page 32)
➡ Viewing Derivations (see page 33)
➡ Viewing Restrictions (see page 36)
➡ Hands-On Exercise (see page 38)
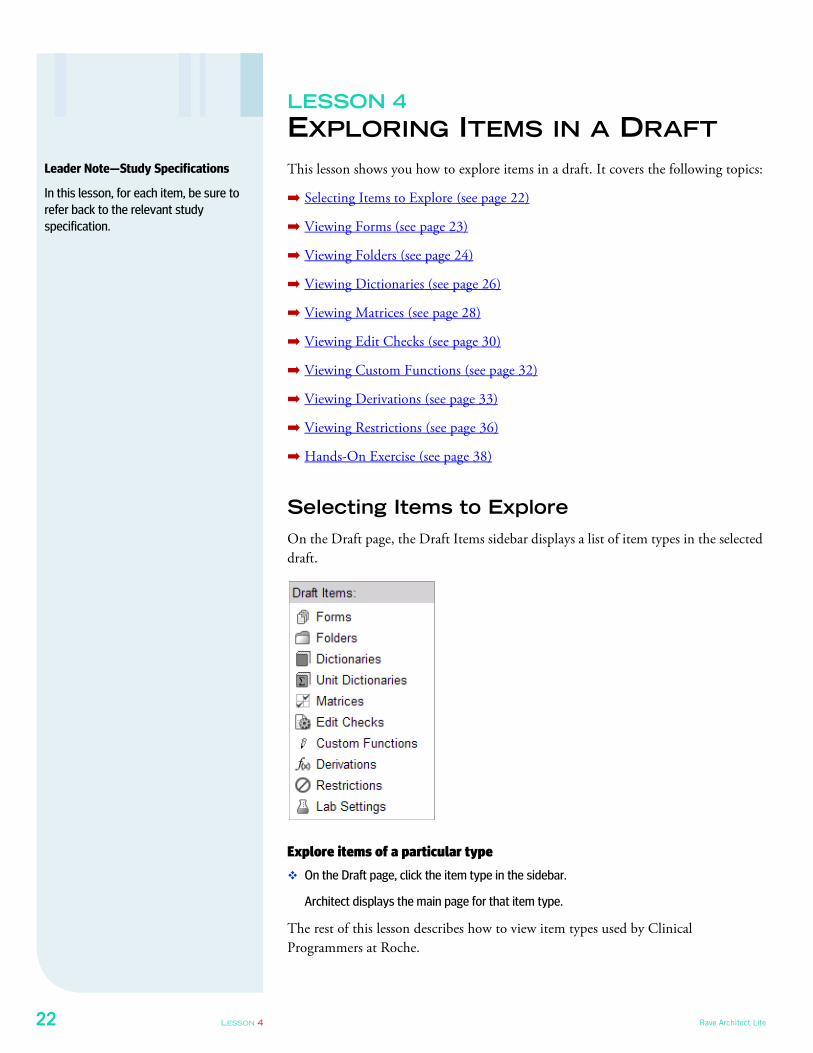
Selecting Items to Explore
On the Draft page, the Draft Items sidebar displays a list of item types in the selected
draft.
Explore items of a particular type
� On the Draft page, click the item type in the sidebar.
Architect displays the main page for that item type.
The rest of this lesson describes how to view item types used by Clinical
Programmers at Roche.
Leader Note—Study Specifications
In this lesson, for each item, be sure to
refer back to the relevant study
specification.
© Genentech, Inc. LESSON 4 23
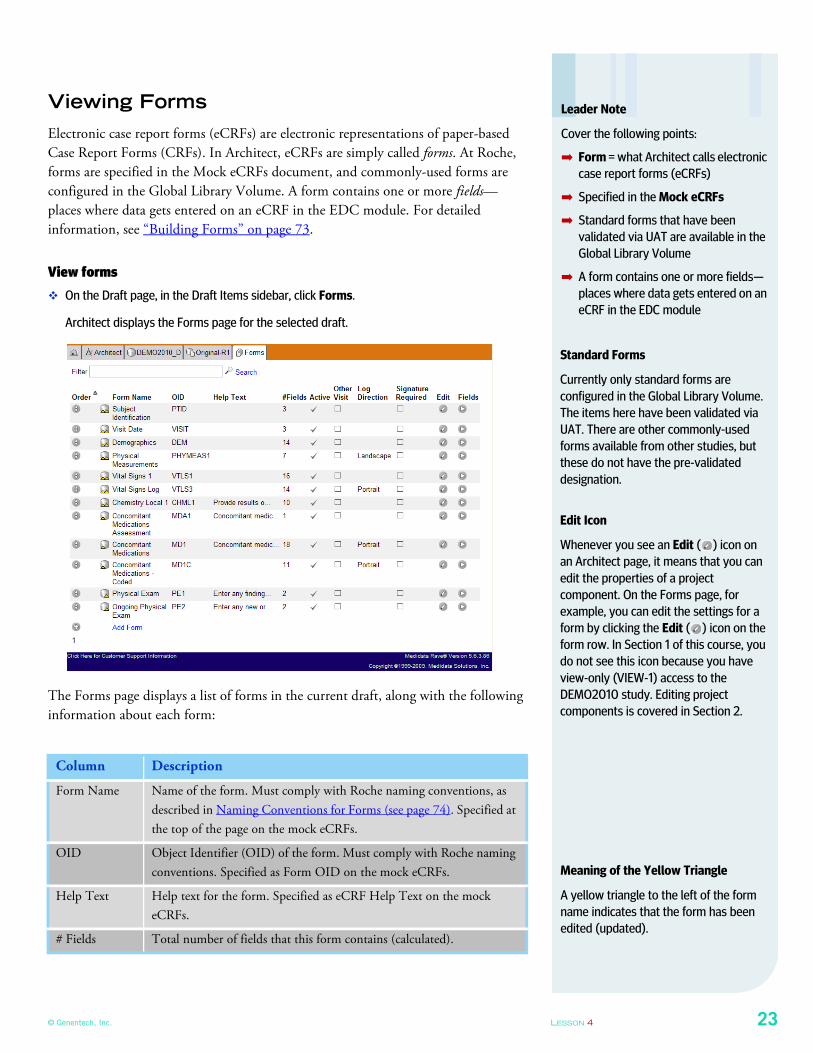
Viewing Forms
Electronic case report forms (eCRFs) are electronic representations of paper-based
Case Report Forms (CRFs). In Architect, eCRFs are simply called forms. At Roche,
forms are specified in the Mock eCRFs document, and commonly-used forms are
configured in the Global Library Volume. A form contains one or more fields—
places where data gets entered on an eCRF in the EDC module. For detailed
information, see “Building Forms” on page 73.
View forms
� On the Draft page, in the Draft Items sidebar, click Forms.
Architect displays the Forms page for the selected draft.
The Forms page displays a list of forms in the current draft, along with the following
information about each form:
Column Description
Form Name Name of the form. Must comply with Roche naming conventions, as
described in Naming Conventions for Forms (see page 74). Specified at
the top of the page on the mock eCRFs.
OID Object Identifier (OID) of the form. Must comply with Roche naming
conventions. Specified as Form OID on the mock eCRFs.
Help Text Help text for the form. Specified as eCRF Help Text on the mock
eCRFs.
# Fields Total number of fields that this form contains (calculated).
Leader Note
Cover the following points:
➡ Form = what Architect calls electronic
case report forms (eCRFs)
➡ Specified in the Mock eCRFs
➡ Standard forms that have been
validated via UAT are available in the
Global Library Volume
➡ A form contains one or more fields—
places where data gets entered on an
eCRF in the EDC module
Standard Forms
Currently only standard forms are
configured in the Global Library Volume.
The items here have been validated via
UAT. There are other commonly-used
forms available from other studies, but
these do not have the pre-validated
designation.
Edit Icon
Whenever you see an Edit ( ) icon on
an Architect page, it means that you can
edit the properties of a project
component. On the Forms page, for
example, you can edit the settings for a
form by clicking the Edit ( ) icon on the
form row. In Section 1 of this course, you
do not see this icon because you have
view-only (VIEW-1) access to the
DEMO2010 study. Editing project
components is covered in Section 2.
Meaning of the Yellow Triangle
A yellow triangle to the left of the form
name indicates that the form has been
edited (updated).
24 LESSON 4 Rave Architect Lite
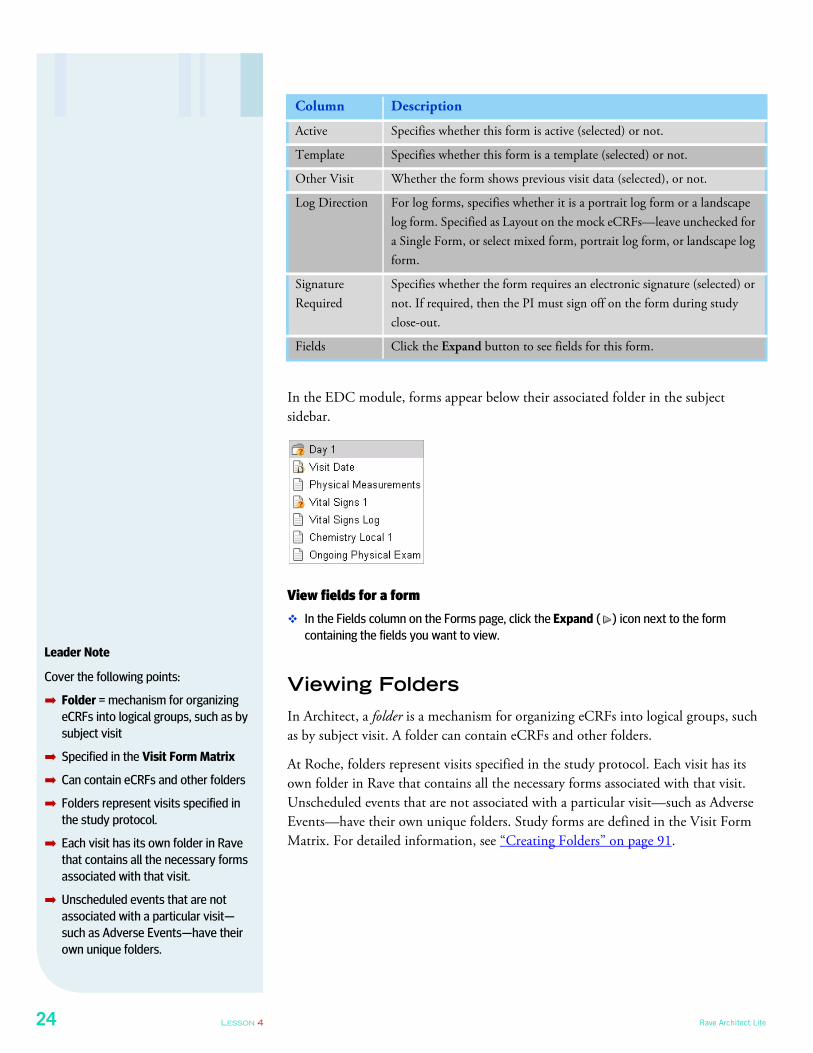
In the EDC module, forms appear below their associated folder in the subject
sidebar.
View fields for a form
� In the Fields column on the Forms page, click the Expand ( ) icon next to the form
containing the fields you want to view.
Viewing Folders
In Architect, a folder is a mechanism for organizing eCRFs into logical groups, such
as by subject visit. A folder can contain eCRFs and other folders.
At Roche, folders represent visits specified in the study protocol. Each visit has its
own folder in Rave that contains all the necessary forms associated with that visit.
Unscheduled events that are not associated with a particular visit—such as Adverse
Events—have their own unique folders. Study forms are defined in the Visit Form
Matrix. For detailed information, see “Creating Folders” on page 91.
Active Specifies whether this form is active (selected) or not.
Template Specifies whether this form is a template (selected) or not.
Other Visit Whether the form shows previous visit data (selected), or not.
Log Direction For log forms, specifies whether it is a portrait log form or a landscape
log form. Specified as Layout on the mock eCRFs—leave unchecked for
a Single Form, or select mixed form, portrait log form, or landscape log
form.
Signature
Required
Specifies whether the form requires an electronic signature (selected) or
not. If required, then the PI must sign off on the form during study
close-out.
Fields Click the Expand button to see fields for this form.
Column Description
Leader Note
Cover the following points:
➡ Folder = mechanism for organizing
eCRFs into logical groups, such as by
subject visit
➡ Specified in the Visit Form Matrix
➡ Can contain eCRFs and other folders
➡ Folders represent visits specified in
the study protocol.
➡ Each visit has its own folder in Rave
that contains all the necessary forms
associated with that visit.
➡ Unscheduled events that are not
associated with a particular visit—
such as Adverse Events—have their
own unique folders.
© Genentech, Inc. LESSON 4 25
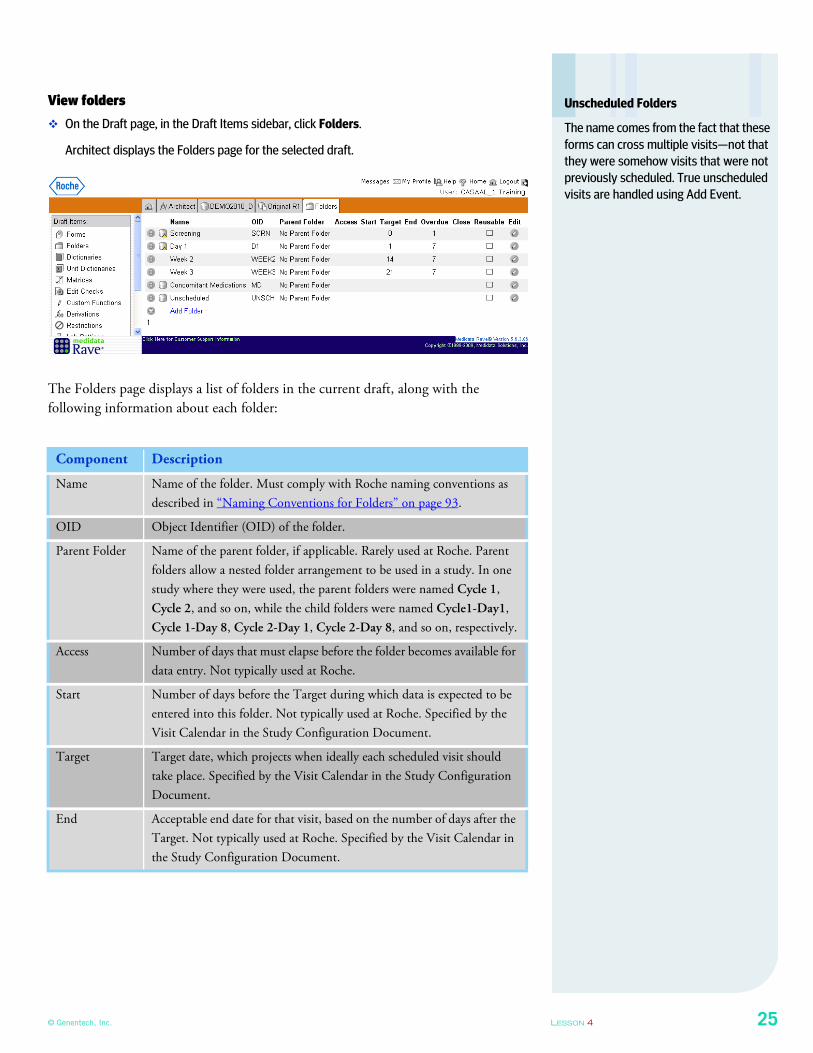
View folders
� On the Draft page, in the Draft Items sidebar, click Folders.
Architect displays the Folders page for the selected draft.
The Folders page displays a list of folders in the current draft, along with the
following information about each folder:
Component Description
Name Name of the folder. Must comply with Roche naming conventions as
described in “Naming Conventions for Folders” on page 93.
OID Object Identifier (OID) of the folder.
Parent Folder Name of the parent folder, if applicable. Rarely used at Roche. Parent
folders allow a nested folder arrangement to be used in a study. In one
study where they were used, the parent folders were named Cycle 1,
Cycle 2, and so on, while the child folders were named Cycle1-Day1,
Cycle 1-Day 8, Cycle 2-Day 1, Cycle 2-Day 8, and so on, respectively.
Access Number of days that must elapse before the folder becomes available for
data entry. Not typically used at Roche.
Start Number of days before the Target during which data is expected to be
entered into this folder. Not typically used at Roche. Specified by the
Visit Calendar in the Study Configuration Document.
Target Target date, which projects when ideally each scheduled visit should
take place. Specified by the Visit Calendar in the Study Configuration
Document.
End Acceptable end date for that visit, based on the number of days after the
Target. Not typically used at Roche. Specified by the Visit Calendar in
the Study Configuration Document.
Unscheduled Folders
The name comes from the fact that these
forms can cross multiple visits—not that
they were somehow visits that were not
previously scheduled. True unscheduled
visits are handled using Add Event.
26 LESSON 4 Rave Architect Lite
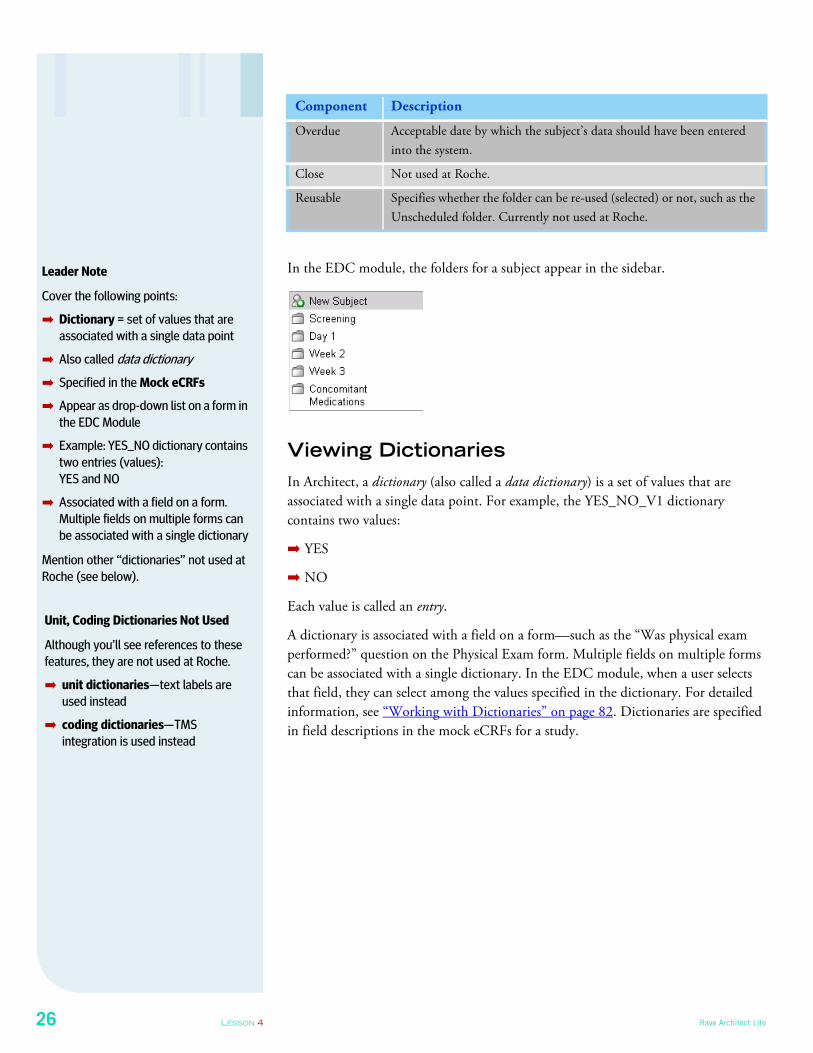
In the EDC module, the folders for a subject appear in the sidebar.
Viewing Dictionaries
In Architect, a dictionary (also called a data dictionary) is a set of values that are
associated with a single data point. For example, the YES_NO_V1 dictionary
contains two values:
➡ YES
➡ NO
Each value is called an entry.
A dictionary is associated with a field on a form—such as the “Was physical exam
performed?” question on the Physical Exam form. Multiple fields on multiple forms
can be associated with a single dictionary. In the EDC module, when a user selects
that field, they can select among the values specified in the dictionary. For detailed
information, see “Working with Dictionaries” on page 82. Dictionaries are specified
in field descriptions in the mock eCRFs for a study.
Overdue Acceptable date by which the subject’s data should have been entered
into the system.
Close Not used at Roche.
Reusable Specifies whether the folder can be re-used (selected) or not, such as the
Unscheduled folder. Currently not used at Roche.
Component Description
Unit, Coding Dictionaries Not Used
Although you’ll see references to these
features, they are not used at Roche.
➡ unit dictionaries—text labels are
used instead
➡ coding dictionaries—TMS
integration is used instead
Leader Note
Cover the following points:
➡ Dictionary = set of values that are
associated with a single data point
➡ Also called data dictionary
➡ Specified in the Mock eCRFs
➡ Appear as drop-down list on a form in
the EDC Module
➡ Example: YES_NO dictionary contains
two entries (values):
YES and NO
➡ Associated with a field on a form.
Multiple fields on multiple forms can
be associated with a single dictionary
Mention other “dictionaries” not used at
Roche (see below).
© Genentech, Inc. LESSON 4 27
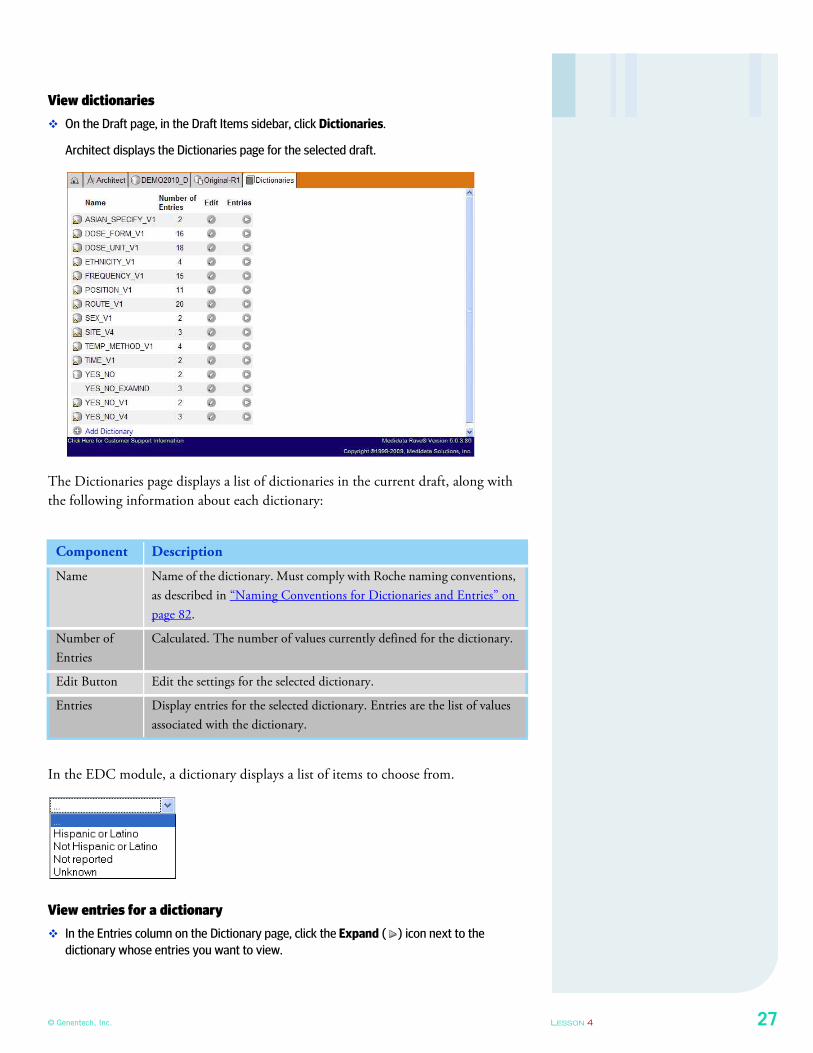
View dictionaries
� On the Draft page, in the Draft Items sidebar, click Dictionaries.
Architect displays the Dictionaries page for the selected draft.
The Dictionaries page displays a list of dictionaries in the current draft, along with
the following information about each dictionary:
In the EDC module, a dictionary displays a list of items to choose from.
View entries for a dictionary
� In the Entries column on the Dictionary page, click the Expand ( ) icon next to the
dictionary whose entries you want to view.
Component Description
Name Name of the dictionary. Must comply with Roche naming conventions,
as described in “Naming Conventions for Dictionaries and Entries” on
page 82.
Number of
Entries
Calculated. The number of values currently defined for the dictionary.
Edit Button Edit the settings for the selected dictionary.
Entries Display entries for the selected dictionary. Entries are the list of values
associated with the dictionary.
28 LESSON 4 Rave Architect Lite
Viewing Matrices
In Architect, a matrix defines which forms belong in which folders in a study.
A matrix implements the specifications in the Visit Form Matrix. For detailed
information, see “Creating Matrices” on page 96.
Every study has a primary matrix, which contains all the folders and forms that are
automatically added when a new subject is entered into Rave. You can also define
additional matrices for specific purposes—such as an unscheduled visit matrix—that
can be added to an existing subject. In the SLACs spreadsheet, these appear on the
Allow Add Matrices tab. It is common for multiple matrices to be in use in studies
with complex multi-arm or multi-treatment design options.
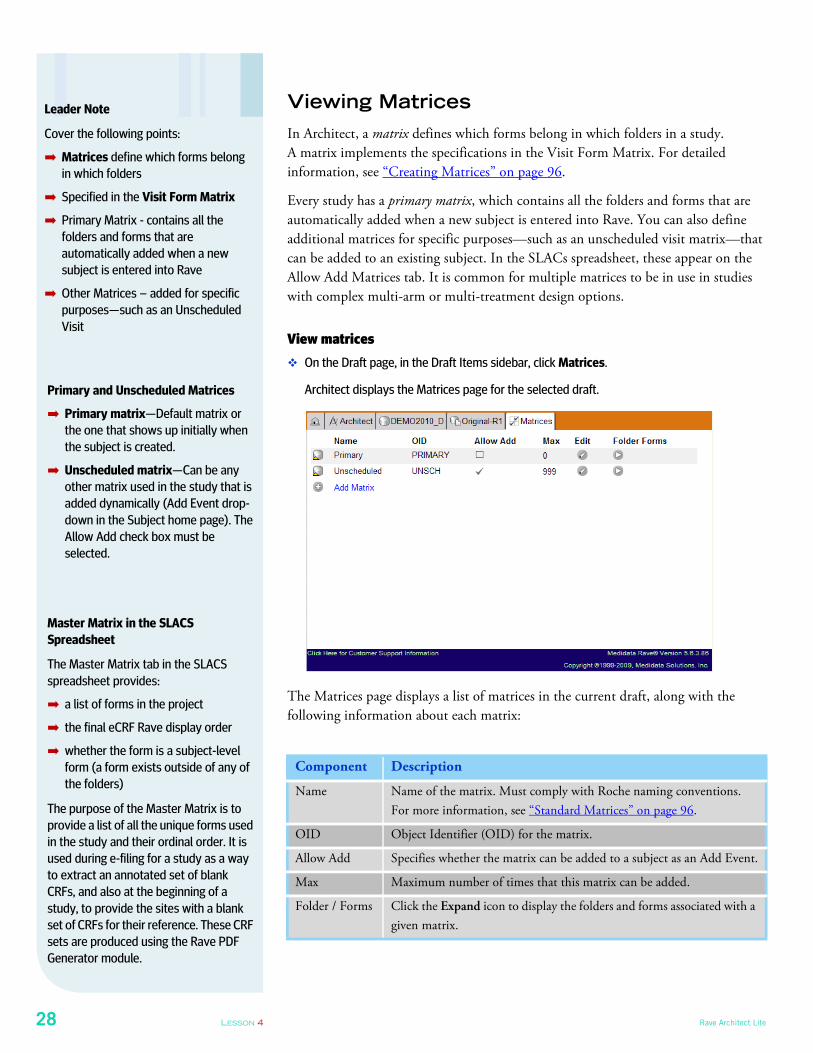
View matrices
� On the Draft page, in the Draft Items sidebar, click Matrices.
Architect displays the Matrices page for the selected draft.
The Matrices page displays a list of matrices in the current draft, along with the
following information about each matrix:
Component Description
Name Name of the matrix. Must comply with Roche naming conventions.
For more information, see “Standard Matrices” on page 96.
OID Object Identifier (OID) for the matrix.
Allow Add Specifies whether the matrix can be added to a subject as an Add Event.
Max Maximum number of times that this matrix can be added.
Folder / Forms Click the Expand icon to display the folders and forms associated with a
given matrix.
Leader Note
Cover the following points:
➡ Matrices define which forms belong
in which folders
➡ Specified in the Visit Form Matrix
➡ Primary Matrix - contains all the
folders and forms that are
automatically added when a new
subject is entered into Rave
➡ Other Matrices – added for specific
purposes—such as an Unscheduled
Visit
Primary and Unscheduled Matrices
➡ Primary matrix—Default matrix or
the one that shows up initially when
the subject is created.
➡ Unscheduled matrix—Can be any
other matrix used in the study that is
added dynamically (Add Event drop-
down in the Subject home page). The
Allow Add check box must be
selected.
Master Matrix in the SLACS
Spreadsheet
The Master Matrix tab in the SLACS
spreadsheet provides:
➡ a list of forms in the project
➡ the final eCRF Rave display order
➡ whether the form is a subject-level
form (a form exists outside of any of
the folders)
The purpose of the Master Matrix is to
provide a list of all the unique forms used
in the study and their ordinal order. It is
used during e-filing for a study as a way
to extract an annotated set of blank
CRFs, and also at the beginning of a
study, to provide the sites with a blank
set of CRFs for their reference. These CRF
sets are produced using the Rave PDF
Generator module.
© Genentech, Inc. LESSON 4 29
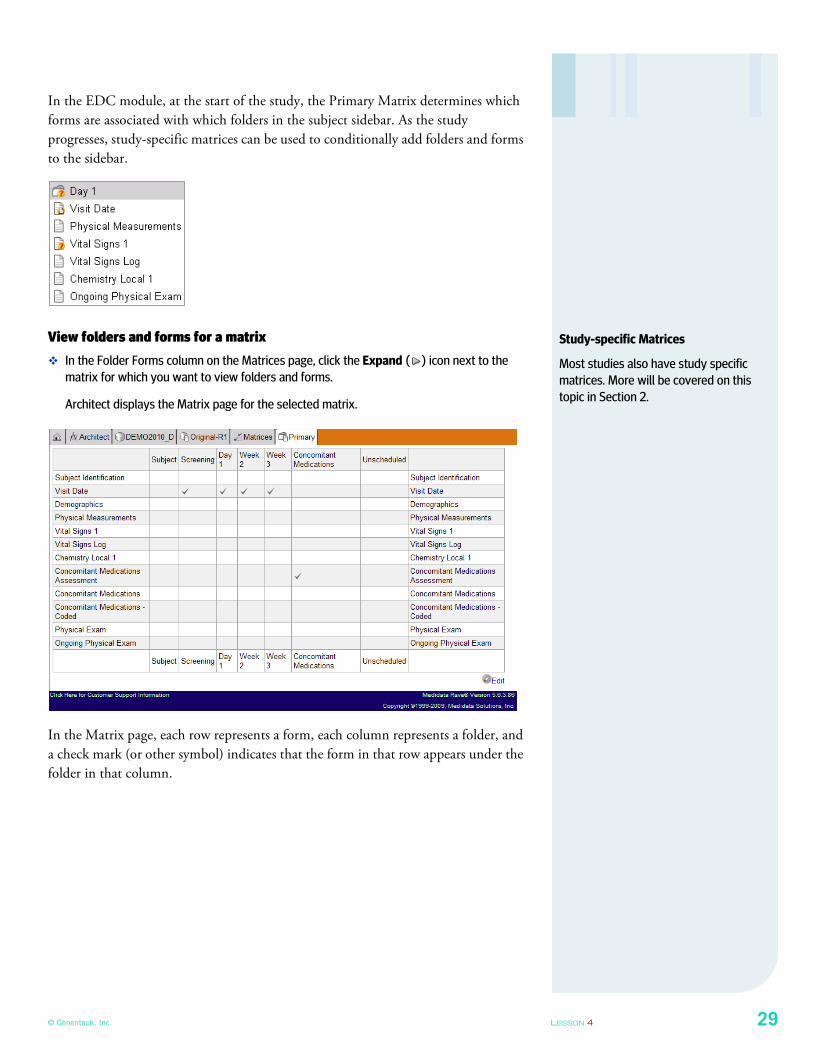
In the EDC module, at the start of the study, the Primary Matrix determines which
forms are associated with which folders in the subject sidebar. As the study
progresses, study-specific matrices can be used to conditionally add folders and forms
to the sidebar.
View folders and forms for a matrix
� In the Folder Forms column on the Matrices page, click the Expand ( ) icon next to the
matrix for which you want to view folders and forms.
Architect displays the Matrix page for the selected matrix.
In the Matrix page, each row represents a form, each column represents a folder, and
a check mark (or other symbol) indicates that the form in that row appears under the
folder in that column.
Study-specific Matrices
Most studies also have study specific
matrices. More will be covered on this
topic in Section 2.

30 LESSON 4 Rave Architect Lite
Viewing Edit Checks
In the EDC Module, edit checks catch data entry errors or aberrant data to help
ensure that the submitted data are valid. Users cannot rely entirely on edit checks to
prevent all data errors, but they do provide a safety net, and—along with visual
confirmation of the data and other precautions—they support an environment in
which data errors are minimized. For detailed information, see “Working with Edit
Checks and Custom Functions” on page 123.
Edit checks are defined in the Study Logic and Check Specifications (SLACS) for a
Roche-sponsored clinical trial.
In Architect, an edit check consists of two parts:
➡ a condition (if statement), and
➡ an associated action (then statement) to take if the condition is true
In an edit check, the condition consists of one or more check steps, and one or more
check actions can be taken if the edit check condition is true. The following example
uses Infix, the natural language notation that Architect uses to summarize the logic of
an edit check:
➡ condition (check step): If PTID in Subject Identification IsNotEmpty then...
➡ action (check action): set the subject name using the data in PTID in Subject
Identification
In the SLACs:
➡ The condition is specified in the Check Description column.
➡ The check action is specified in the Check Action, Action Field, and Response
Box and Manual Close columns.
Leader Note
Cover the following points:
➡ Edit checks catch entry errors or
aberrant data to help ensure that the
submitted data are valid (safety net)
➡ Perform other actions - firing queries,
making forms appear, setting the
calendar, and other operations
➡ Specified in the Study Logic and
Check Specifications (SLACS)
Leader Note
Cover the following points:
➡ Edit Check = Condition + Action
➡ Condition (if statement) =
One or more check steps
➡ Action (then statement) =
One or more check actions to take
if the edit check condition is true
© Genentech, Inc. LESSON 4 31
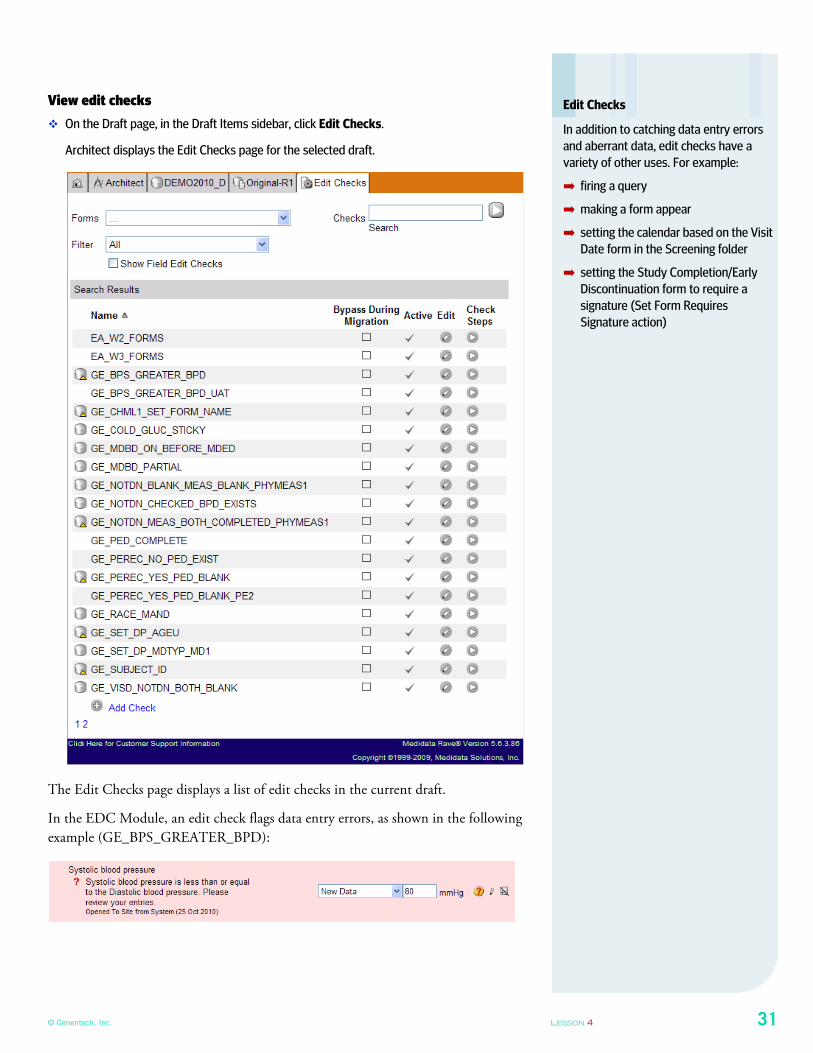
View edit checks
� On the Draft page, in the Draft Items sidebar, click Edit Checks.
Architect displays the Edit Checks page for the selected draft.
The Edit Checks page displays a list of edit checks in the current draft.
In the EDC Module, an edit check flags data entry errors, as shown in the following
example (GE_BPS_GREATER_BPD):
Edit Checks
In addition to catching data entry errors
and aberrant data, edit checks have a
variety of other uses. For example:
➡ firing a query
➡ making a form appear
➡ setting the calendar based on the Visit
Date form in the Screening folder
➡ setting the Study Completion/Early
Discontinuation form to require a
signature (Set Form Requires
Signature action)
32 LESSON 4 Rave Architect Lite
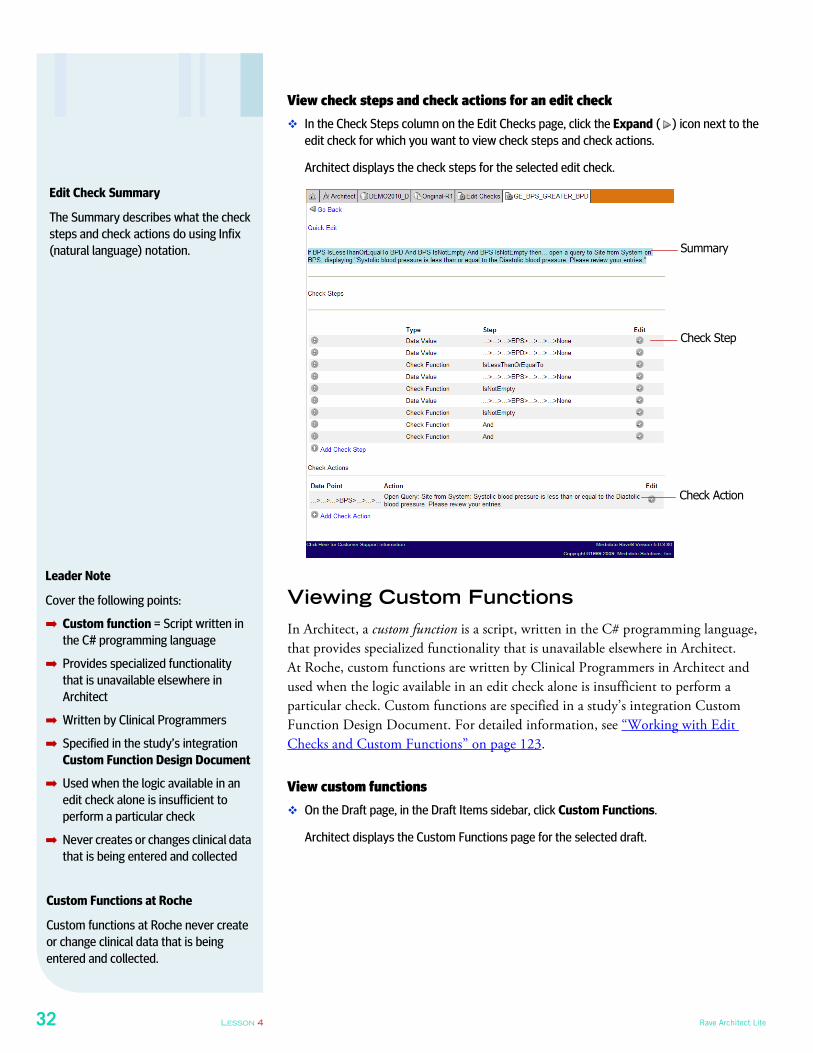
View check steps and check actions for an edit check
� In the Check Steps column on the Edit Checks page, click the Expand ( ) icon next to the
edit check for which you want to view check steps and check actions.
Architect displays the check steps for the selected edit check.
Viewing Custom Functions
In Architect, a custom function is a script, written in the C# programming language,
that provides specialized functionality that is unavailable elsewhere in Architect.
At Roche, custom functions are written by Clinical Programmers in Architect and
used when the logic available in an edit check alone is insufficient to perform a
particular check. Custom functions are specified in a study’s integration Custom
Function Design Document. For detailed information, see “Working with Edit
Checks and Custom Functions” on page 123.
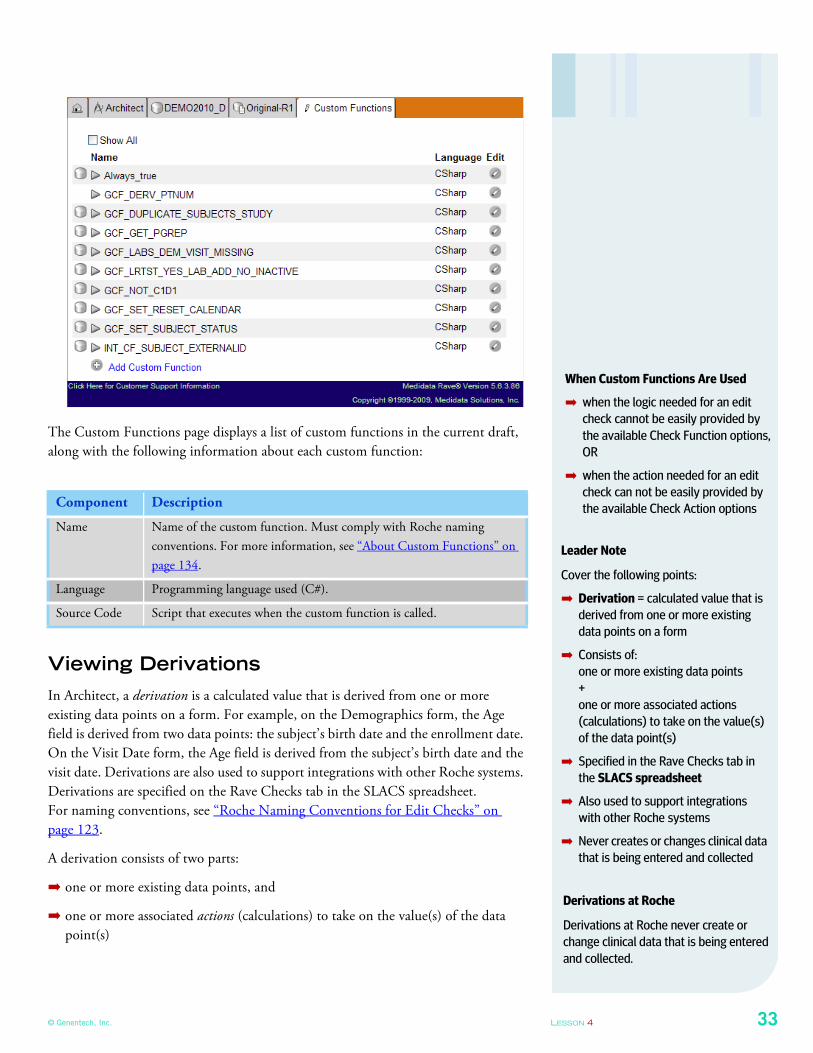
View custom functions
� On the Draft page, in the Draft Items sidebar, click Custom Functions.
Architect displays the Custom Functions page for the selected draft.
Edit Check Summary
The Summary describes what the check
steps and check actions do using Infix
(natural language) notation.
Check Step
Check Action
Summary
Leader Note
Cover the following points:
➡ Custom function = Script written in
the C# programming language
➡ Provides specialized functionality
that is unavailable elsewhere in
Architect
➡ Written by Clinical Programmers
➡ Specified in the study’s integration
Custom Function Design Document
➡ Used when the logic available in an
edit check alone is insufficient to
perform a particular check
➡ Never creates or changes clinical data
that is being entered and collected
Custom Functions at Roche
Custom functions at Roche never create
or change clinical data that is being
entered and collected.
© Genentech, Inc. LESSON 4 33
The Custom Functions page displays a list of custom functions in the current draft,
along with the following information about each custom function:
Viewing Derivations
In Architect, a derivation is a calculated value that is derived from one or more
existing data points on a form. For example, on the Demographics form, the Age
field is derived from two data points: the subject’s birth date and the enrollment date.
On the Visit Date form, the Age field is derived from the subject’s birth date and the
visit date. Derivations are also used to support integrations with other Roche systems.
Derivations are specified on the Rave Checks tab in the SLACS spreadsheet.
For naming conventions, see “Roche Naming Conventions for Edit Checks” on
page 123.
A derivation consists of two parts:
➡ one or more existing data points, and
➡ one or more associated actions (calculations) to take on the value(s) of the data
point(s)
Component Description
Name Name of the custom function. Must comply with Roche naming
conventions. For more information, see “About Custom Functions” on
page 134.
Language Programming language used (C#).
Source Code Script that executes when the custom function is called.
When Custom Functions Are Used
➡ when the logic needed for an edit
check cannot be easily provided by
the available Check Function options,
OR
➡ when the action needed for an edit
check can not be easily provided by
the available Check Action options
Derivations at Roche
Derivations at Roche never create or
change clinical data that is being entered
and collected.
Leader Note
Cover the following points:
➡ Derivation = calculated value that is
derived from one or more existing
data points on a form
➡ Consists of:
one or more existing data points
+
one or more associated actions
(calculations) to take on the value(s)
of the data point(s)
➡ Specified in the Rave Checks tab in
the SLACS spreadsheet
➡ Also used to support integrations
with other Roche systems
➡ Never creates or changes clinical data
that is being entered and collected
34 LESSON 4 Rave Architect Lite
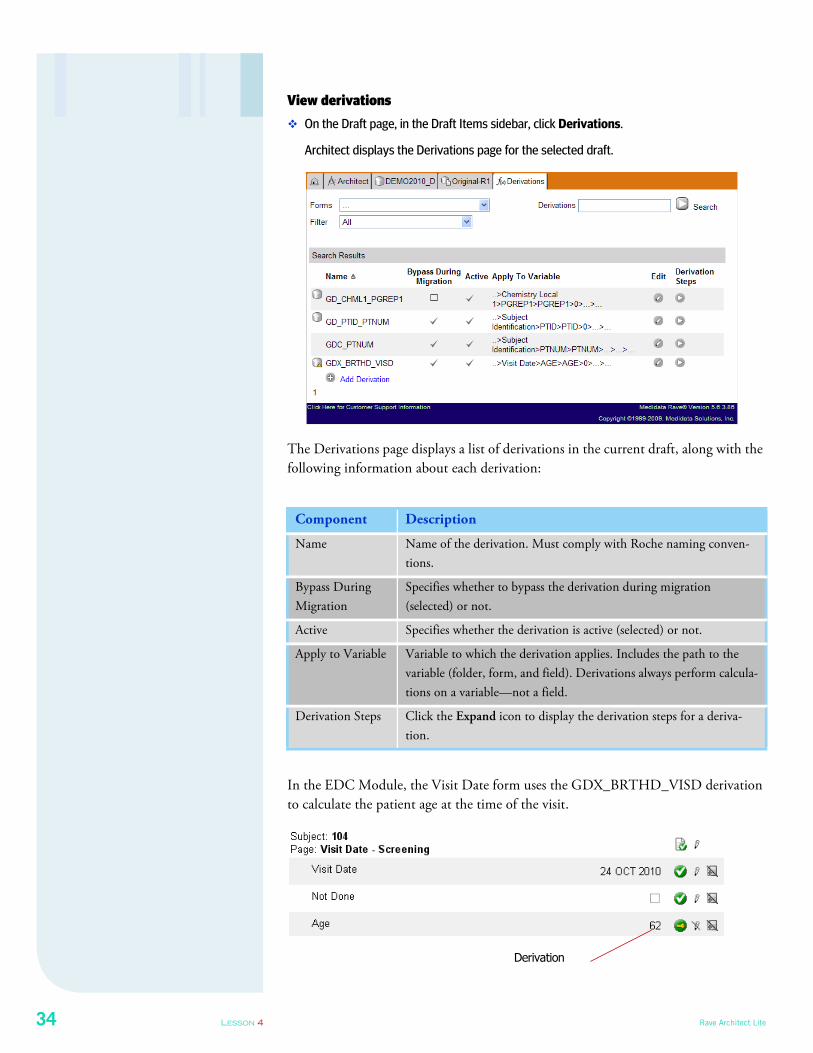
View derivations
� On the Draft page, in the Draft Items sidebar, click Derivations.
Architect displays the Derivations page for the selected draft.
The Derivations page displays a list of derivations in the current draft, along with the
following information about each derivation:
In the EDC Module, the Visit Date form uses the GDX_BRTHD_VISD derivation
to calculate the patient age at the time of the visit.
Component Description
Name Name of the derivation. Must comply with Roche naming conven-
tions.
Bypass During
Migration
Specifies whether to bypass the derivation during migration
(selected) or not.
Active Specifies whether the derivation is active (selected) or not.
Apply to Variable Variable to which the derivation applies. Includes the path to the
variable (folder, form, and field). Derivations always perform calcula-
tions on a variable—not a field.
Derivation Steps Click the Expand icon to display the derivation steps for a deriva-
tion.
Derivation
© Genentech, Inc. LESSON 4 35
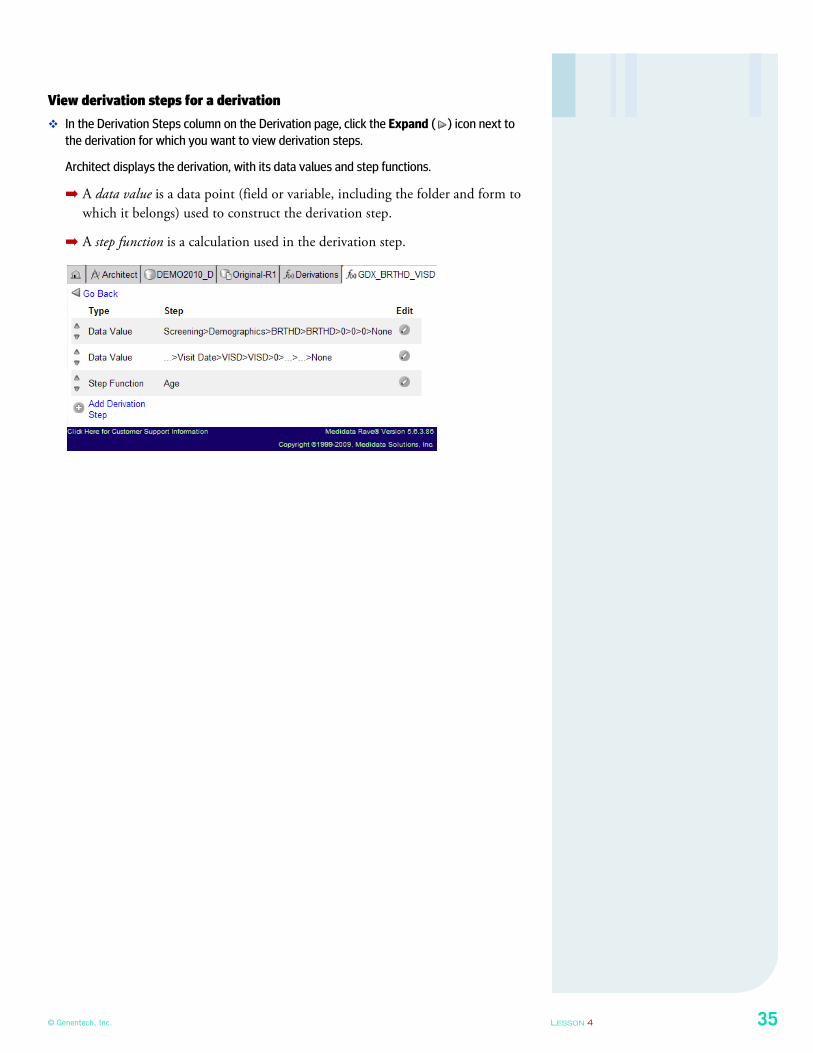
View derivation steps for a derivation
� In the Derivation Steps column on the Derivation page, click the Expand ( ) icon next to
the derivation for which you want to view derivation steps.
Architect displays the derivation, with its data values and step functions.
➡ A data value is a data point (field or variable, including the folder and form to
which it belongs) used to construct the derivation step.
➡ A step function is a calculation used in the derivation step.
36 LESSON 4 Rave Architect Lite
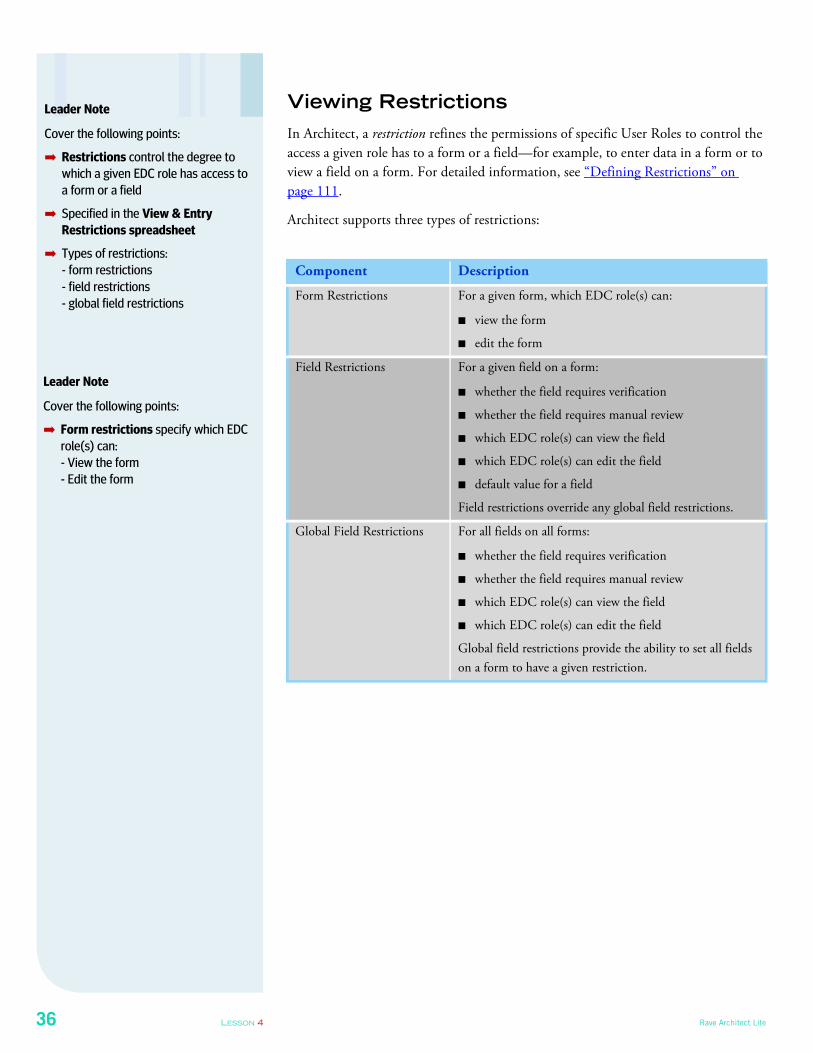
Viewing Restrictions
In Architect, a restriction refines the permissions of specific User Roles to control the
access a given role has to a form or a field—for example, to enter data in a form or to
view a field on a form. For detailed information, see “Defining Restrictions” on
page 111.
Architect supports three types of restrictions:
Component Description
Form Restrictions For a given form, which EDC role(s) can:
■ view the form
■ edit the form
Field Restrictions For a given field on a form:
■ whether the field requires verification
■ whether the field requires manual review
■ which EDC role(s) can view the field
■ which EDC role(s) can edit the field
■ default value for a field
Field restrictions override any global field restrictions.
Global Field Restrictions For all fields on all forms:
■ whether the field requires verification
■ whether the field requires manual review
■ which EDC role(s) can view the field
■ which EDC role(s) can edit the field
Global field restrictions provide the ability to set all fields
on a form to have a given restriction.
Leader Note
Cover the following points:
➡ Restrictions control the degree to
which a given EDC role has access to
a form or a field
➡ Specified in the View & Entry
Restrictions spreadsheet
➡ Types of restrictions:
- form restrictions
- field restrictions
- global field restrictions
Leader Note
Cover the following points:
➡ Form restrictions specify which EDC
role(s) can:
- View the form
- Edit the form
© Genentech, Inc. LESSON 4 37
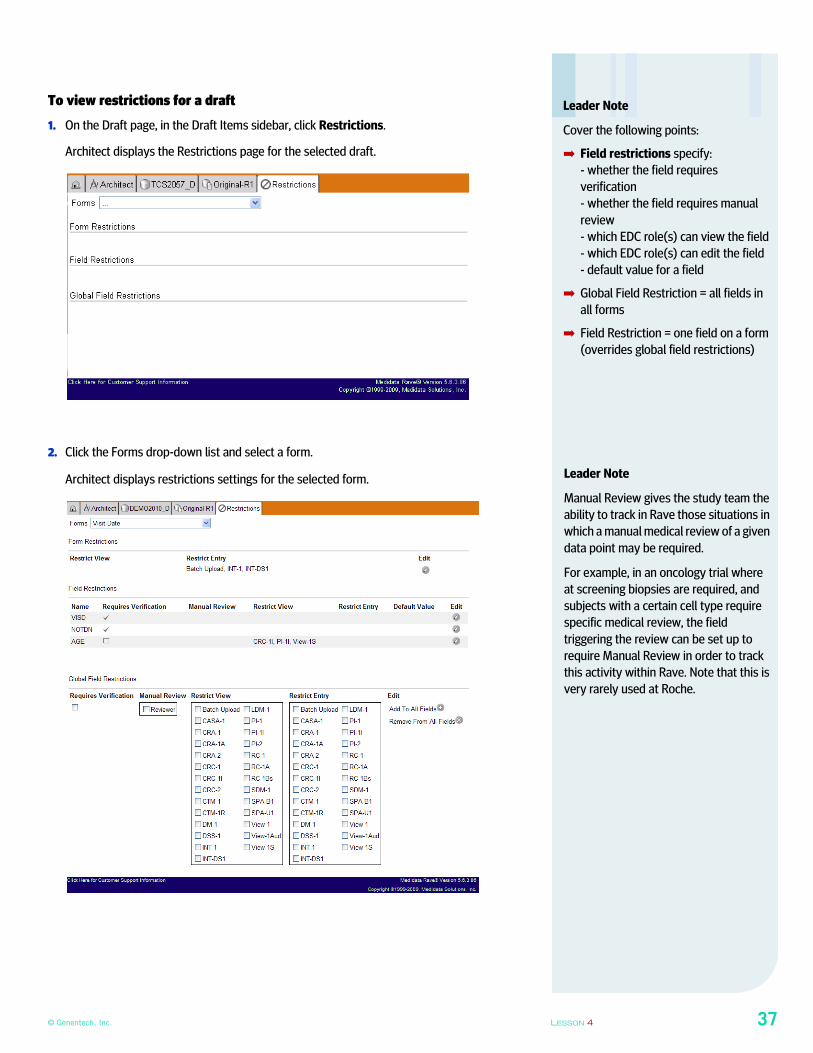
To view restrictions for a draft
1. On the Draft page, in the Draft Items sidebar, click Restrictions.
Architect displays the Restrictions page for the selected draft.
2. Click the Forms drop-down list and select a form.
Architect displays restrictions settings for the selected form.
Leader Note
Cover the following points:
➡ Field restrictions specify:
- whether the field requires
verification
- whether the field requires manual
review
- which EDC role(s) can view the field
- which EDC role(s) can edit the field
- default value for a field
➡ Global Field Restriction = all fields in
all forms
➡ Field Restriction = one field on a form
(overrides global field restrictions)
Leader Note
Manual Review gives the study team the
ability to track in Rave those situations in
which a manual medical review of a given
data point may be required.
For example, in an oncology trial where
at screening biopsies are required, and
subjects with a certain cell type require
specific medical review, the field
triggering the review can be set up to
require Manual Review in order to track
this activity within Rave. Note that this is
very rarely used at Roche.
38 LESSON 4 Rave Architect Lite
Hands-On Exercise
1. Open the Forms page for this draft.
Review the Form OIDs and other form settings.
Question: Which form has the form OID value of PE2? Please circle one.
➡ Physical Exam
➡ Ongoing Physical Exam
➡ Subject Identification
2. Open the Folders page for this draft.
Review the list of available folders.
Question: For which folders have no target values been assigned?
Please circle all that apply.
➡ Screening
➡ Day 1
➡ Week 2
➡ Week 3
➡ Unscheduled
➡ Concomitant Medications
3. Open the Matrices page for this draft.
Review the list of available matrices. Display and review the folder forms associated with
the Primary Matrix.
Question: Which folders have the Visit Date form specified in the Primary Matrix?
Please circle all that apply.
➡ Screening
➡ Day 1
➡ Week 2
➡ Week 3
➡ Unscheduled
➡ Concomitant Medications
Answer
➡ Ongoing Physical Exam
Answer
➡ Unscheduled
➡ Concomitant Medications
Answer
➡ Screening
➡ Day 1
➡ Week 2
➡ Week 3
© Genentech, Inc. LESSON 5 39
LESSON 5
EXPLORING FIELDS ON A FORM
This lesson shows you how to explore items in a draft. It covers the following topics:
➡ About Fields (see page 39)
➡ Selecting a Field on a Form (see page 40)
➡ Previewing Fields on a Form (see page 41)
➡ Viewing Field Properties (see page 42)
➡ Viewing Variable Settings for a Field (see page 47)
➡ Viewing Field Help Text (see page 48)
➡ Viewing Field Edit Checks (see page 48)
➡ Viewing Verification and Review Settings for a Field (see page 49)
➡ Viewing View Restrictions for a Field (see page 50)
➡ Viewing Entry Restrictions for a Field (see page 50)
➡ Viewing Edit Checks for a Field (see page 51)
➡ Viewing Derivations for a Field (see page 51)
➡ Hands-On Exercise (see page 52)
About Fields
As mentioned in “Viewing Forms” on page 23, a field is a place on a form where data
gets entered on an eCRF in the EDC module. A data point is a piece of data that gets
put into a field, such as a date, description, selection from a drop-down list, and so
on. Field properties are specified in the Mock eCRF document. For detailed
information, see “Adding Fields to a Form” on page 79.
As you will soon learn in this lesson, fields are highly configurable in Architect, with
many available options to govern how users interact with the forms and provide data
in the EDC Module.
Leader Note
Cover the following points:
➡ Fields = place on a form where data
gets entered on an eCRF in the EDC
module
➡ Data point - piece of data that gets
put into a field
➡ date, description, selection from a
drop-down list, etc.
➡ Specified in the Mock eCRFs
➡ Field properties are highly
configurable
➡ Govern how users interact with the
forms and provide data in the EDC
Module
40 LESSON 5 Rave Architect Lite
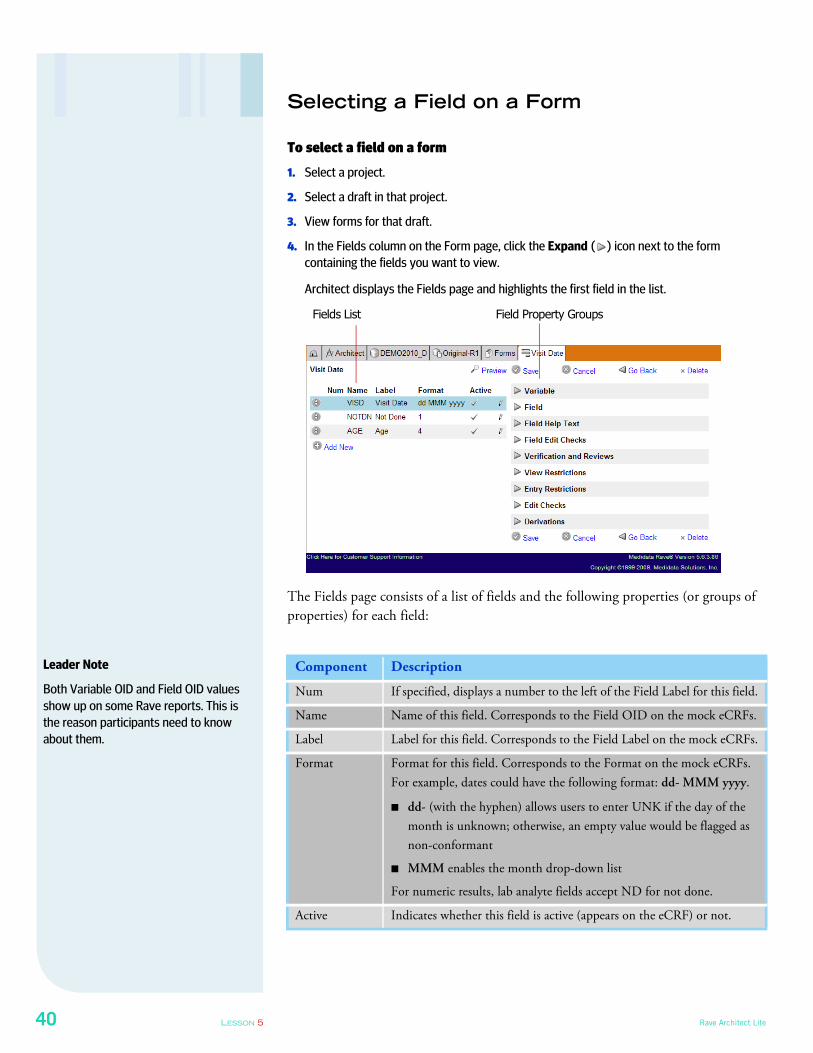
Selecting a Field on a Form
To select a field on a form
1. Select a project.
2. Select a draft in that project.
3. View forms for that draft.
4. In the Fields column on the Form page, click the Expand ( ) icon next to the form
containing the fields you want to view.
Architect displays the Fields page and highlights the first field in the list.
The Fields page consists of a list of fields and the following properties (or groups of
properties) for each field:
Component Description
Num If specified, displays a number to the left of the Field Label for this field.
Name Name of this field. Corresponds to the Field OID on the mock eCRFs.
Label Label for this field. Corresponds to the Field Label on the mock eCRFs.
Format Format for this field. Corresponds to the Format on the mock eCRFs.
For example, dates could have the following format: dd- MMM yyyy.
■ dd- (with the hyphen) allows users to enter UNK if the day of the
month is unknown; otherwise, an empty value would be flagged as
non-conformant
■ MMM enables the month drop-down list
For numeric results, lab analyte fields accept ND for not done.
Active Indicates whether this field is active (appears on the eCRF) or not.
Fields List Field Property Groups
Leader Note
Both Variable OID and Field OID values
show up on some Rave reports. This is
the reason participants need to know
about them.
© Genentech, Inc. LESSON 5 41
For instructions on editing field properties, see “Adding Fields to a Form” on
page 79.
Previewing Fields on a Form
On the fields page, you can preview a form to see how the form, with its current form
and field configuration settings, will appear to users in the EDC Module.
Preview a form
1. Navigate to the Form page for the form that you want to preview.
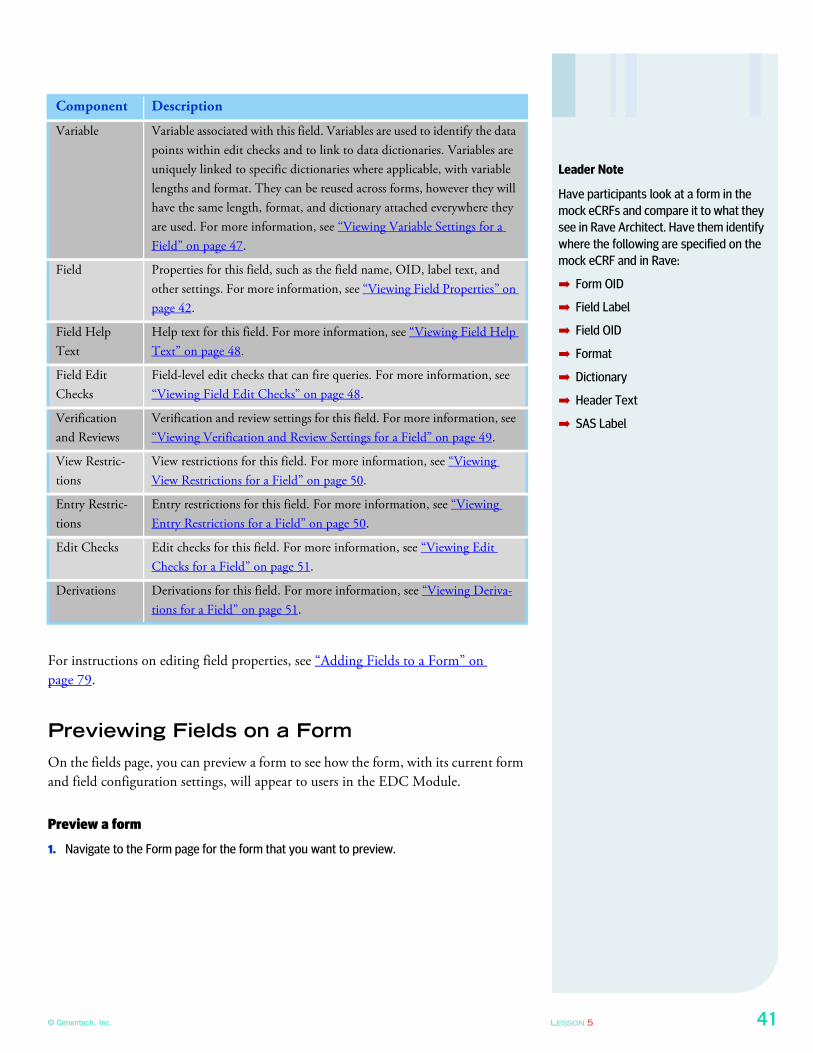
Variable Variable associated with this field. Variables are used to identify the data
points within edit checks and to link to data dictionaries. Variables are
uniquely linked to specific dictionaries where applicable, with variable
lengths and format. They can be reused across forms, however they will
have the same length, format, and dictionary attached everywhere they
are used. For more information, see “Viewing Variable Settings for a
Field” on page 47.
Field Properties for this field, such as the field name, OID, label text, and
other settings. For more information, see “Viewing Field Properties” on
page 42.
Field Help
Text
Help text for this field. For more information, see “Viewing Field Help
Text” on page 48.
Field Edit
Checks
Field-level edit checks that can fire queries. For more information, see
“Viewing Field Edit Checks” on page 48.
Verification
and Reviews
Verification and review settings for this field. For more information, see
“Viewing Verification and Review Settings for a Field” on page 49.
View Restric-
tions
View restrictions for this field. For more information, see “Viewing
View Restrictions for a Field” on page 50.
Entry Restric-
tions
Entry restrictions for this field. For more information, see “Viewing
Entry Restrictions for a Field” on page 50.
Edit Checks Edit checks for this field. For more information, see “Viewing Edit
Checks for a Field” on page 51.
Derivations Derivations for this field. For more information, see “Viewing Deriva-
tions for a Field” on page 51.
Component Description
Leader Note
Have participants look at a form in the
mock eCRFs and compare it to what they
see in Rave Architect. Have them identify
where the following are specified on the
mock eCRF and in Rave:
➡ Form OID
➡ Field Label
➡ Field OID
➡ Format
➡ Dictionary
➡ Header Text
➡ SAS Label
42 LESSON 5 Rave Architect Lite
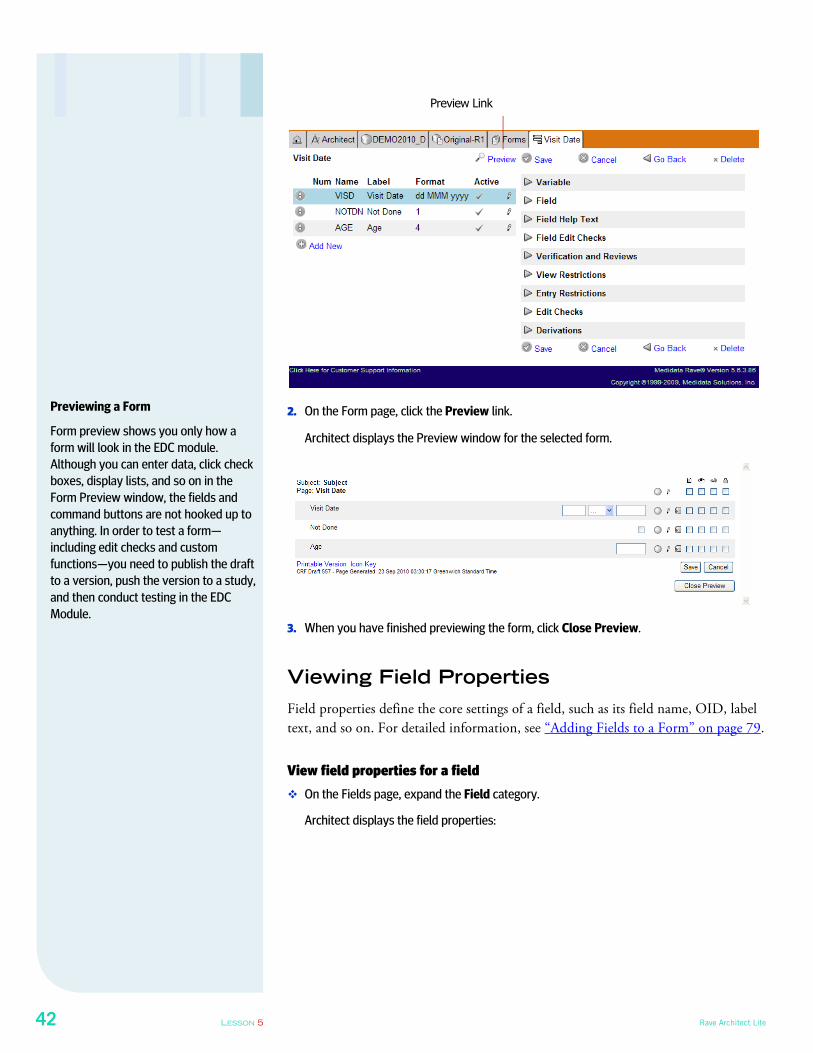
2. On the Form page, click the Preview link.
Architect displays the Preview window for the selected form.
3. When you have finished previewing the form, click Close Preview.
Viewing Field Properties
Field properties define the core settings of a field, such as its field name, OID, label
text, and so on. For detailed information, see “Adding Fields to a Form” on page 79.
View field properties for a field
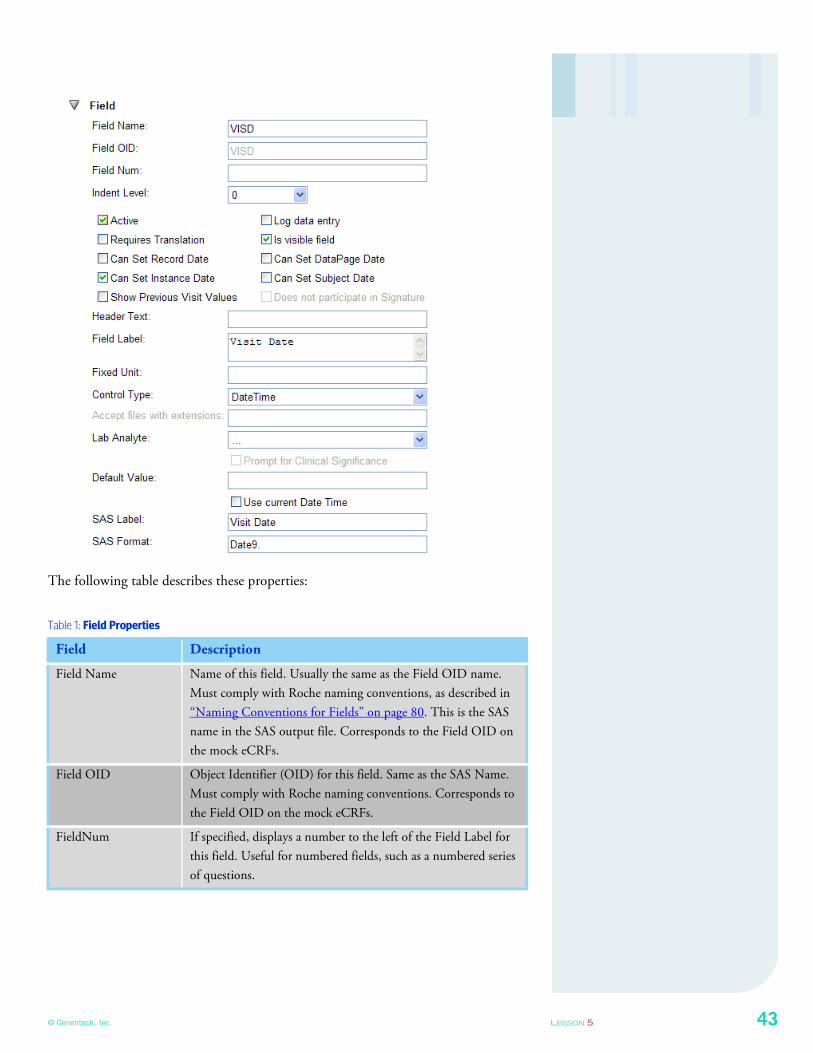
� On the Fields page, expand the Field category.
Architect displays the field properties:
Preview Link
Previewing a Form
Form preview shows you only how a
form will look in the EDC module.
Although you can enter data, click check
boxes, display lists, and so on in the
Form Preview window, the fields and
command buttons are not hooked up to
anything. In order to test a form—
including edit checks and custom
functions—you need to publish the draft
to a version, push the version to a study,
and then conduct testing in the EDC
Module.
© Genentech, Inc. LESSON 5 43
The following table describes these properties:
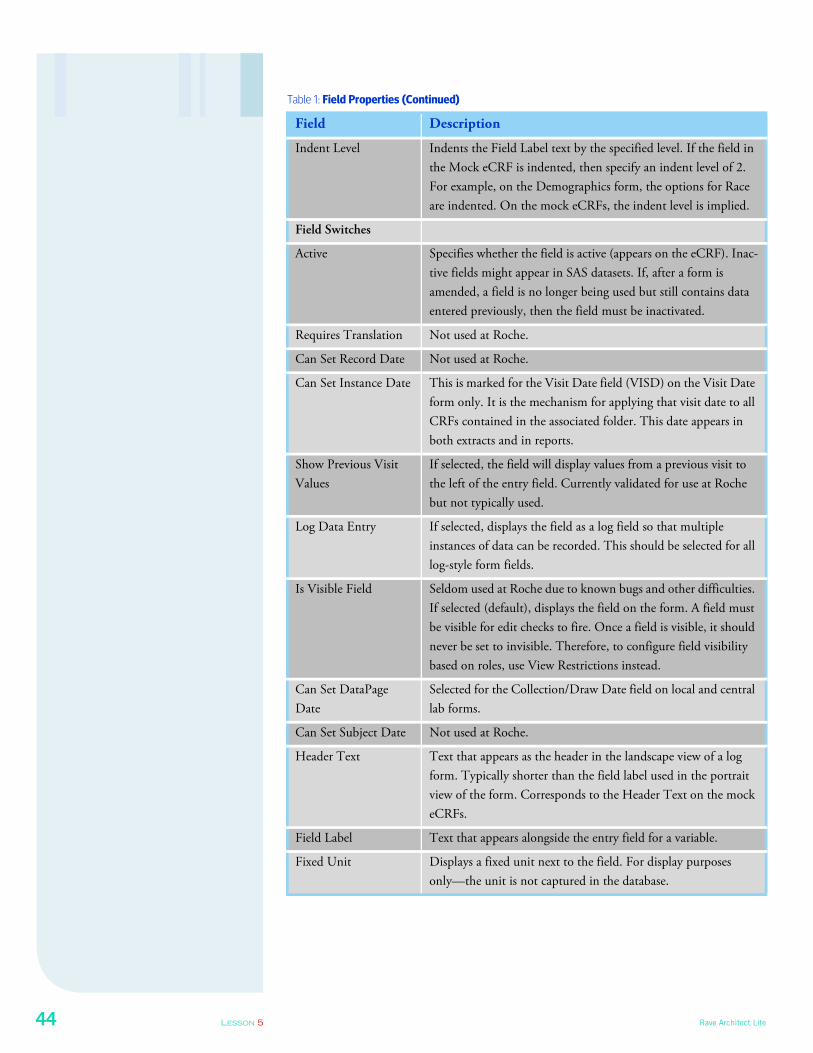
Table 1: Field Properties
Field Description
Field Name Name of this field. Usually the same as the Field OID name.
Must comply with Roche naming conventions, as described in
“Naming Conventions for Fields” on page 80. This is the SAS
name in the SAS output file. Corresponds to the Field OID on
the mock eCRFs.
Field OID Object Identifier (OID) for this field. Same as the SAS Name.
Must comply with Roche naming conventions. Corresponds to
the Field OID on the mock eCRFs.
FieldNum If specified, displays a number to the left of the Field Label for
this field. Useful for numbered fields, such as a numbered series
of questions.
44 LESSON 5 Rave Architect Lite
Indent Level Indents the Field Label text by the specified level. If the field in
the Mock eCRF is indented, then specify an indent level of 2.
For example, on the Demographics form, the options for Race
are indented. On the mock eCRFs, the indent level is implied.
Field Switches
Active Specifies whether the field is active (appears on the eCRF). Inac-
tive fields might appear in SAS datasets. If, after a form is
amended, a field is no longer being used but still contains data
entered previously, then the field must be inactivated.
Requires Translation Not used at Roche.
Can Set Record Date Not used at Roche.
Can Set Instance Date This is marked for the Visit Date field (VISD) on the Visit Date
form only. It is the mechanism for applying that visit date to all
CRFs contained in the associated folder. This date appears in
both extracts and in reports.
Show Previous Visit
Values
If selected, the field will display values from a previous visit to
the left of the entry field. Currently validated for use at Roche
but not typically used.
Log Data Entry If selected, displays the field as a log field so that multiple
instances of data can be recorded. This should be selected for all
log-style form fields.
Is Visible Field Seldom used at Roche due to known bugs and other difficulties.
If selected (default), displays the field on the form. A field must
be visible for edit checks to fire. Once a field is visible, it should
never be set to invisible. Therefore, to configure field visibility
based on roles, use View Restrictions instead.
Can Set DataPage
Date
Selected for the Collection/Draw Date field on local and central
lab forms.
Can Set Subject Date Not used at Roche.
Header Text Text that appears as the header in the landscape view of a log
form. Typically shorter than the field label used in the portrait
view of the form. Corresponds to the Header Text on the mock
eCRFs.
Field Label Text that appears alongside the entry field for a variable.
Fixed Unit Displays a fixed unit next to the field. For display purposes
only—the unit is not captured in the database.
Table 1: Field Properties (Continued)
Field Description
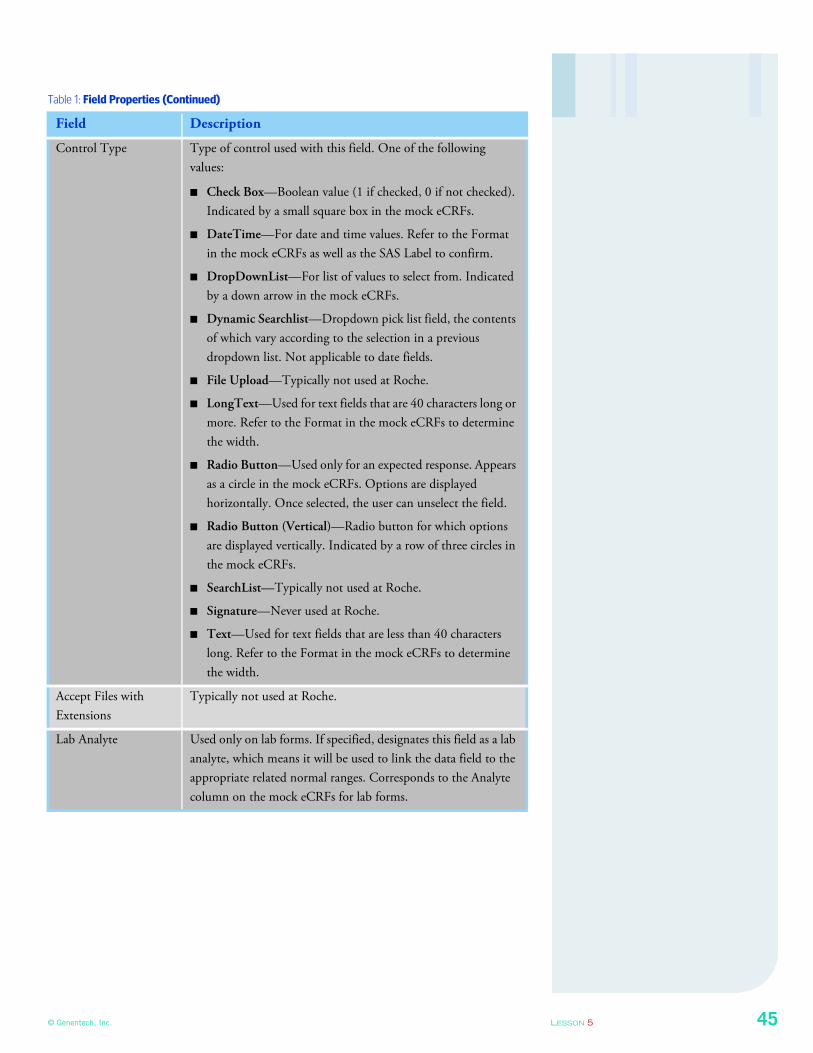
© Genentech, Inc. LESSON 5 45
Control Type Type of control used with this field. One of the following
values:
■ Check Box—Boolean value (1 if checked, 0 if not checked).
Indicated by a small square box in the mock eCRFs.
■ DateTime—For date and time values. Refer to the Format
in the mock eCRFs as well as the SAS Label to confirm.
■ DropDownList—For list of values to select from. Indicated
by a down arrow in the mock eCRFs.
■ Dynamic Searchlist—Dropdown pick list field, the contents
of which vary according to the selection in a previous
dropdown list. Not applicable to date fields.
■ File Upload—Typically not used at Roche.
■ LongText—Used for text fields that are 40 characters long or
more. Refer to the Format in the mock eCRFs to determine
the width.
■ Radio Button—Used only for an expected response. Appears
as a circle in the mock eCRFs. Options are displayed
horizontally. Once selected, the user can unselect the field.
■ Radio Button (Vertical)—Radio button for which options
are displayed vertically. Indicated by a row of three circles in
the mock eCRFs.
■ SearchList—Typically not used at Roche.
■ Signature—Never used at Roche.
■ Text—Used for text fields that are less than 40 characters
long. Refer to the Format in the mock eCRFs to determine
the width.
Accept Files with
Extensions
Typically not used at Roche.
Lab Analyte Used only on lab forms. If specified, designates this field as a lab
analyte, which means it will be used to link the data field to the
appropriate related normal ranges. Corresponds to the Analyte
column on the mock eCRFs for lab forms.
Table 1: Field Properties (Continued)
Field Description
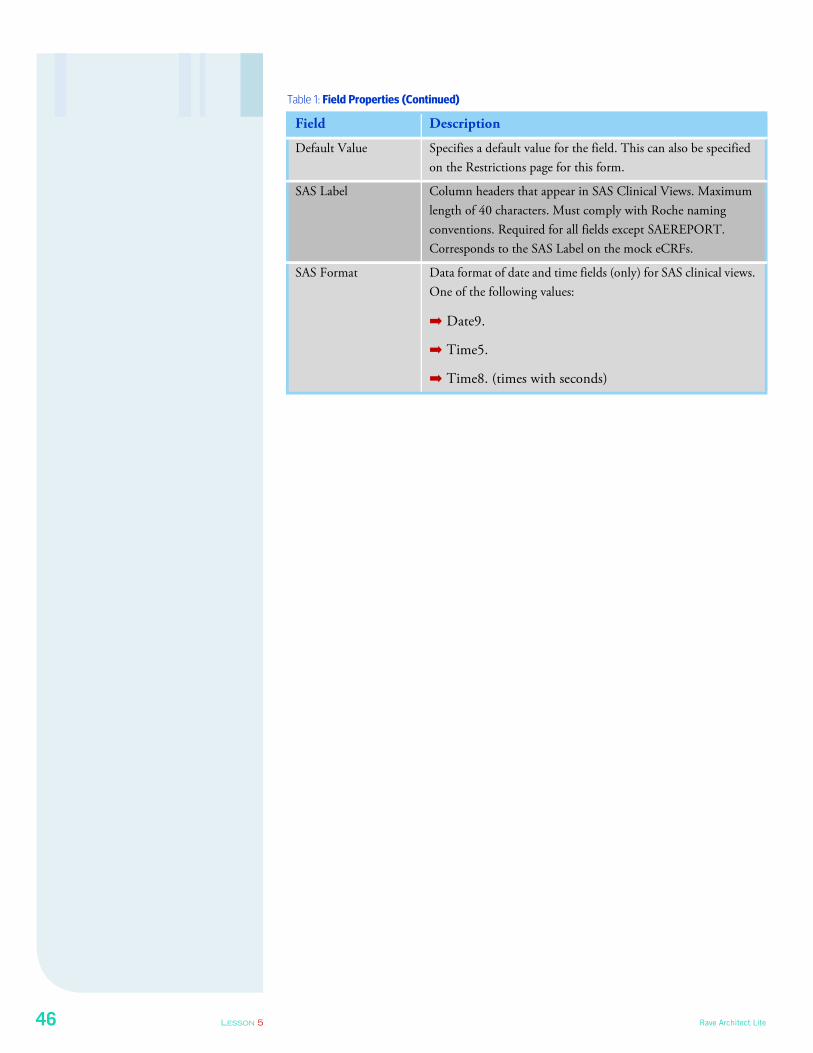
46 LESSON 5 Rave Architect Lite
Default Value Specifies a default value for the field. This can also be specified
on the Restrictions page for this form.
SAS Label Column headers that appear in SAS Clinical Views. Maximum
length of 40 characters. Must comply with Roche naming
conventions. Required for all fields except SAEREPORT.
Corresponds to the SAS Label on the mock eCRFs.
SAS Format Data format of date and time fields (only) for SAS clinical views.
One of the following values:
➡ Date9.
➡ Time5.
➡ Time8. (times with seconds)
Table 1: Field Properties (Continued)
Field Description
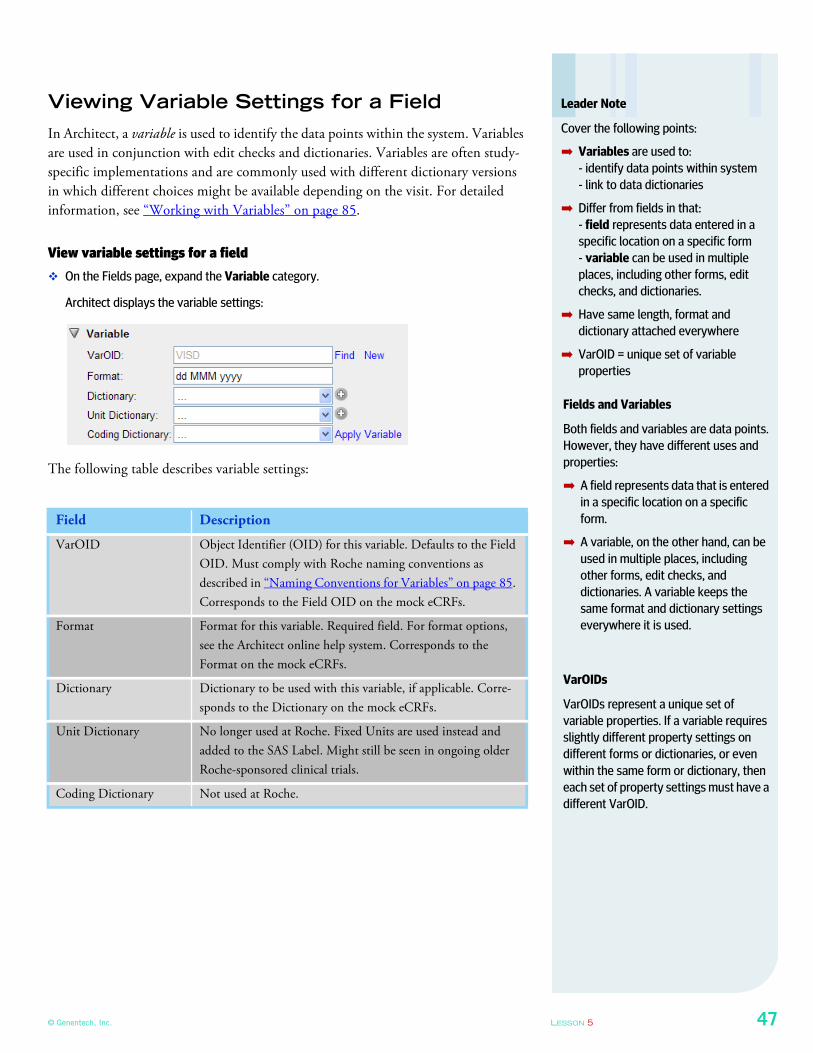
© Genentech, Inc. LESSON 5 47
Viewing Variable Settings for a Field
In Architect, a variable is used to identify the data points within the system. Variables
are used in conjunction with edit checks and dictionaries. Variables are often study-
specific implementations and are commonly used with different dictionary versions
in which different choices might be available depending on the visit. For detailed
information, see “Working with Variables” on page 85.
View variable settings for a field
� On the Fields page, expand the Variable category.
Architect displays the variable settings:
The following table describes variable settings:
Field Description
VarOID Object Identifier (OID) for this variable. Defaults to the Field
OID. Must comply with Roche naming conventions as
described in “Naming Conventions for Variables” on page 85.
Corresponds to the Field OID on the mock eCRFs.
Format Format for this variable. Required field. For format options,
see the Architect online help system. Corresponds to the
Format on the mock eCRFs.
Dictionary Dictionary to be used with this variable, if applicable. Corre-
sponds to the Dictionary on the mock eCRFs.
Unit Dictionary No longer used at Roche. Fixed Units are used instead and
added to the SAS Label. Might still be seen in ongoing older
Roche-sponsored clinical trials.
Coding Dictionary Not used at Roche.
Leader Note
Cover the following points:
➡ Variables are used to:
- identify data points within system
- link to data dictionaries
➡ Differ from fields in that:
- field represents data entered in a
specific location on a specific form
- variable can be used in multiple
places, including other forms, edit
checks, and dictionaries.
➡ Have same length, format and
dictionary attached everywhere
➡ VarOID = unique set of variable
properties
Fields and Variables
Both fields and variables are data points.
However, they have different uses and
properties:
➡ A field represents data that is entered
in a specific location on a specific
form.
➡ A variable, on the other hand, can be
used in multiple places, including
other forms, edit checks, and
dictionaries. A variable keeps the
same format and dictionary settings
everywhere it is used.
VarOIDs
VarOIDs represent a unique set of
variable properties. If a variable requires
slightly different property settings on
different forms or dictionaries, or even
within the same form or dictionary, then
each set of property settings must have a
different VarOID.
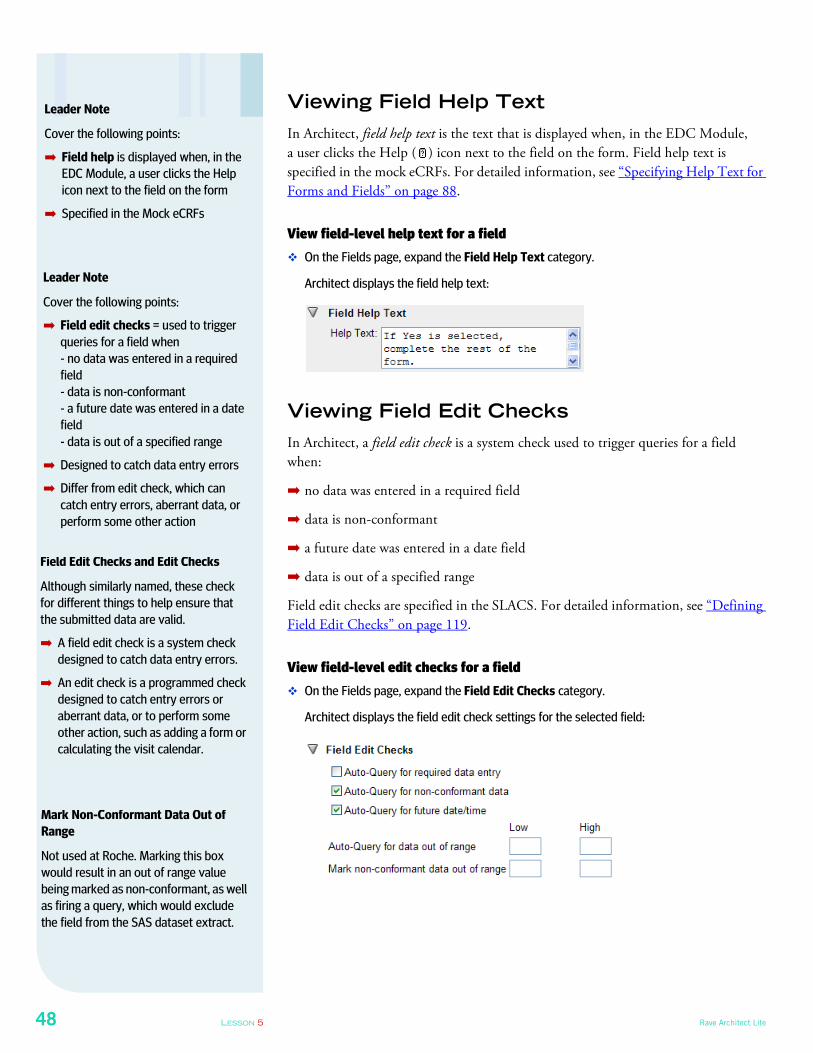
48 LESSON 5 Rave Architect Lite
Viewing Field Help Text
In Architect, field help text is the text that is displayed when, in the EDC Module,
a user clicks the Help ( ) icon next to the field on the form. Field help text is
specified in the mock eCRFs. For detailed information, see “Specifying Help Text for
Forms and Fields” on page 88.
View field-level help text for a field
� On the Fields page, expand the Field Help Text category.
Architect displays the field help text:
Viewing Field Edit Checks
In Architect, a field edit check is a system check used to trigger queries for a field
when:
➡ no data was entered in a required field
➡ data is non-conformant
➡ a future date was entered in a date field
➡ data is out of a specified range
Field edit checks are specified in the SLACS. For detailed information, see “Defining
Field Edit Checks” on page 119.
View field-level edit checks for a field
� On the Fields page, expand the Field Edit Checks category.
Architect displays the field edit check settings for the selected field:
Leader Note
Cover the following points:
➡ Field help is displayed when, in the
EDC Module, a user clicks the Help
icon next to the field on the form
➡ Specified in the Mock eCRFs
Leader Note
Cover the following points:
➡ Field edit checks = used to trigger
queries for a field when
- no data was entered in a required
field
- data is non-conformant
- a future date was entered in a date
field
- data is out of a specified range
➡ Designed to catch data entry errors
➡ Differ from edit check, which can
catch entry errors, aberrant data, or
perform some other action
Mark Non-Conformant Data Out of
Range
Not used at Roche. Marking this box
would result in an out of range value
being marked as non-conformant, as well
as firing a query, which would exclude
the field from the SAS dataset extract.
Field Edit Checks and Edit Checks
Although similarly named, these check
for different things to help ensure that
the submitted data are valid.
➡ A field edit check is a system check
designed to catch data entry errors.
➡ An edit check is a programmed check
designed to catch entry errors or
aberrant data, or to perform some
other action, such as adding a form or
calculating the visit calendar.
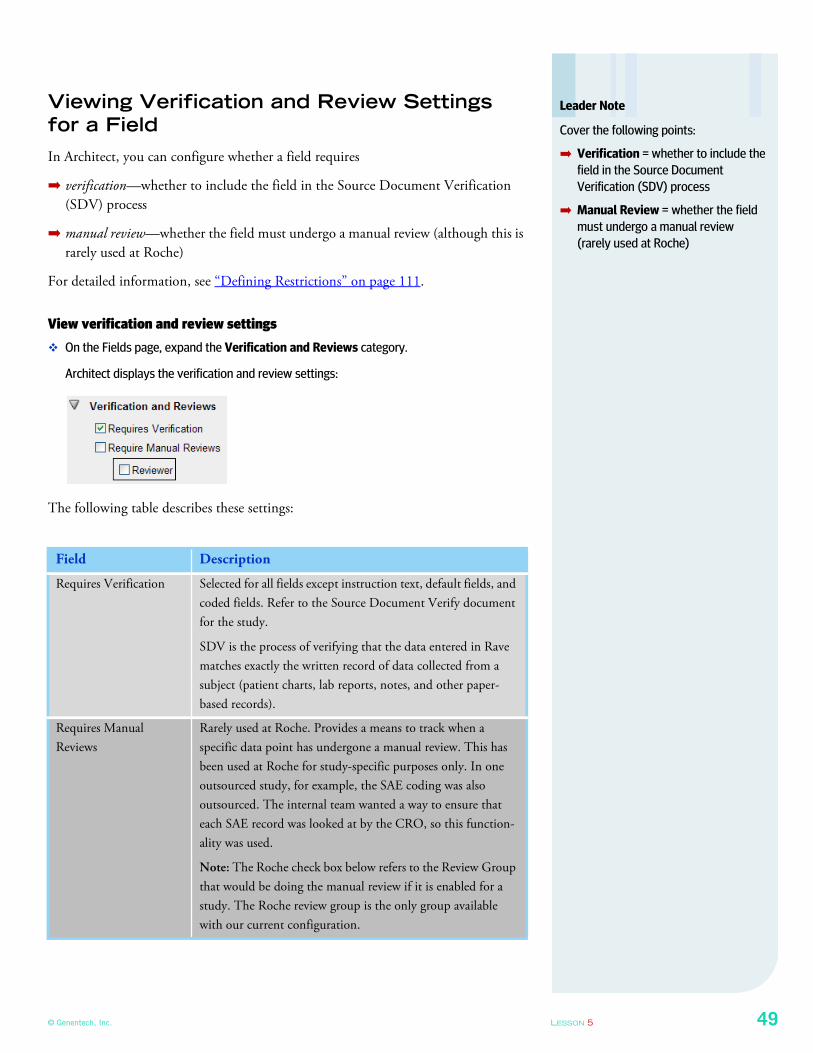
© Genentech, Inc. LESSON 5 49
Viewing Verification and Review Settings
for a Field
In Architect, you can configure whether a field requires
➡ verification—whether to include the field in the Source Document Verification
(SDV) process
➡ manual review—whether the field must undergo a manual review (although this is
rarely used at Roche)
For detailed information, see “Defining Restrictions” on page 111.
View verification and review settings
� On the Fields page, expand the Verification and Reviews category.
Architect displays the verification and review settings:
The following table describes these settings:
Field Description
Requires Verification Selected for all fields except instruction text, default fields, and
coded fields. Refer to the Source Document Verify document
for the study.
SDV is the process of verifying that the data entered in Rave
matches exactly the written record of data collected from a
subject (patient charts, lab reports, notes, and other paper-
based records).
Requires Manual
Reviews
Rarely used at Roche. Provides a means to track when a
specific data point has undergone a manual review. This has
been used at Roche for study-specific purposes only. In one
outsourced study, for example, the SAE coding was also
outsourced. The internal team wanted a way to ensure that
each SAE record was looked at by the CRO, so this function-
ality was used.
Note: The Roche check box below refers to the Review Group
that would be doing the manual review if it is enabled for a
study. The Roche review group is the only group available
with our current configuration.
Leader Note
Cover the following points:
➡ Verification = whether to include the
field in the Source Document
Verification (SDV) process
➡ Manual Review = whether the field
must undergo a manual review
(rarely used at Roche)
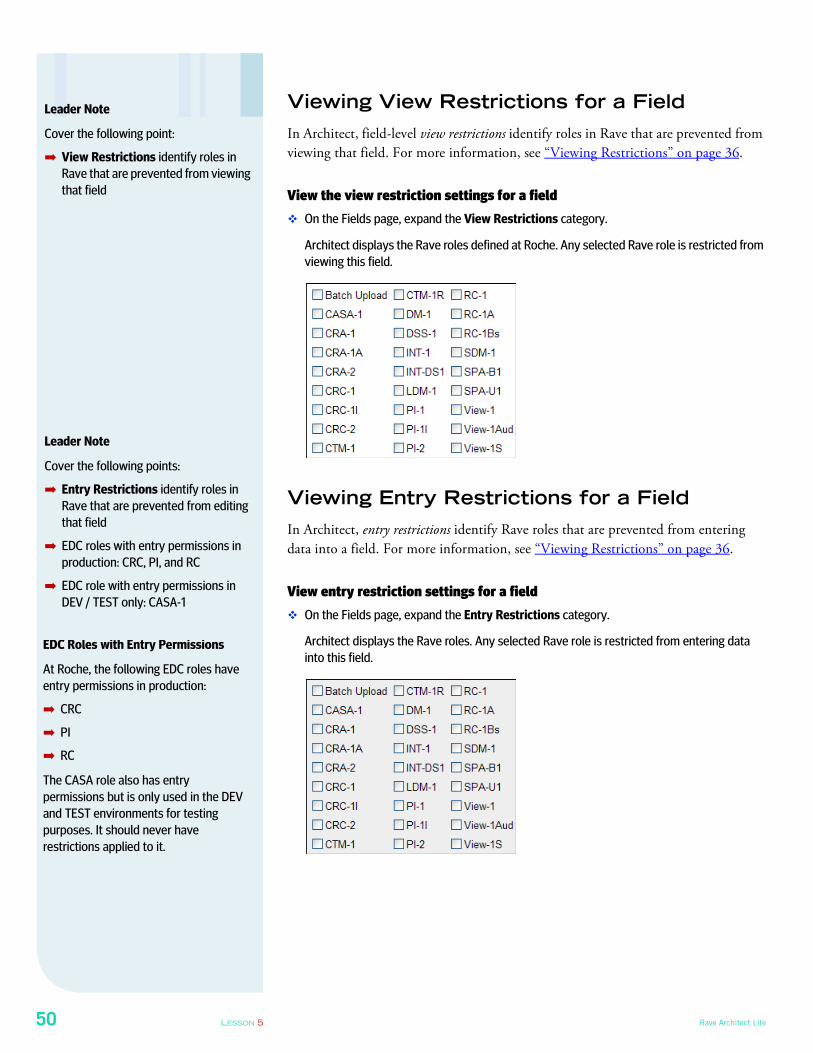
50 LESSON 5 Rave Architect Lite
Viewing View Restrictions for a Field
In Architect, field-level view restrictions identify roles in Rave that are prevented from
viewing that field. For more information, see “Viewing Restrictions” on page 36.
View the view restriction settings for a field
� On the Fields page, expand the View Restrictions category.
Architect displays the Rave roles defined at Roche. Any selected Rave role is restricted from
viewing this field.
Viewing Entry Restrictions for a Field
In Architect, entry restrictions identify Rave roles that are prevented from entering
data into a field. For more information, see “Viewing Restrictions” on page 36.
View entry restriction settings for a field
� On the Fields page, expand the Entry Restrictions category.
Architect displays the Rave roles. Any selected Rave role is restricted from entering data
into this field.
Leader Note
Cover the following point:
➡ View Restrictions identify roles in
Rave that are prevented from viewing
that field
Leader Note
Cover the following points:
➡ Entry Restrictions identify roles in
Rave that are prevented from editing
that field
➡ EDC roles with entry permissions in
production: CRC, PI, and RC
➡ EDC role with entry permissions in
DEV / TEST only: CASA-1
EDC Roles with Entry Permissions
At Roche, the following EDC roles have
entry permissions in production:
➡ CRC
➡ PI
➡ RC
The CASA role also has entry
permissions but is only used in the DEV
and TEST environments for testing
purposes. It should never have
restrictions applied to it.
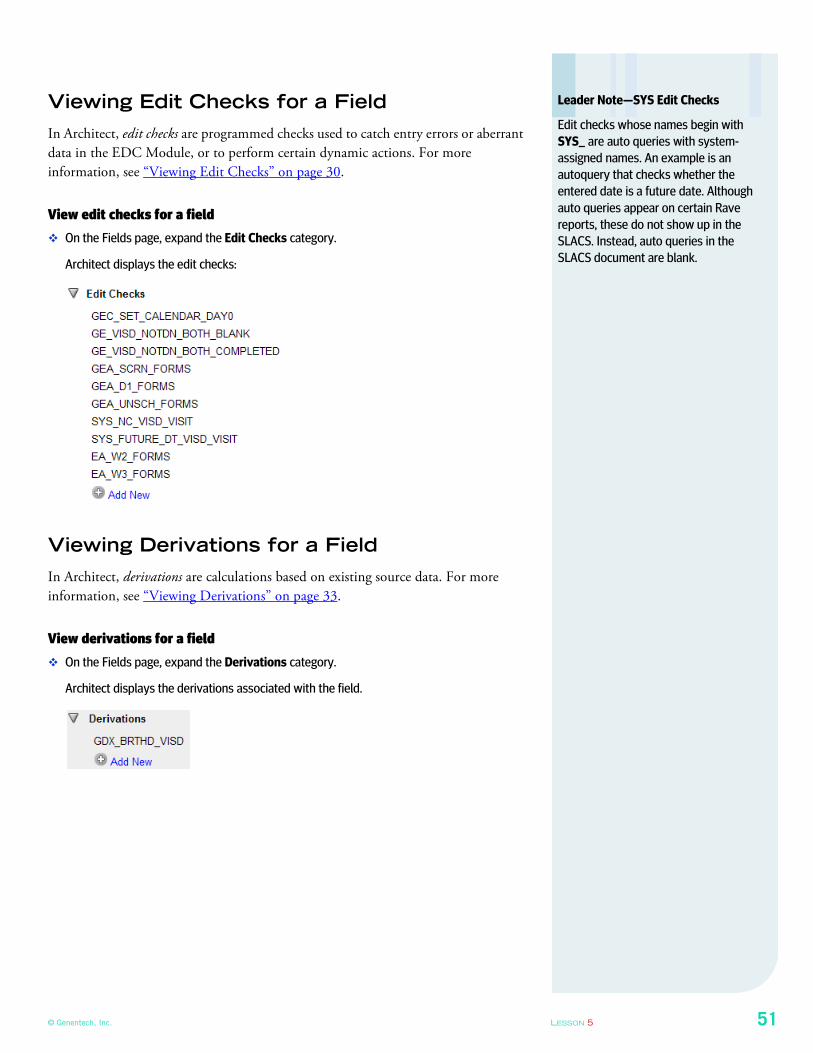
© Genentech, Inc. LESSON 5 51
Viewing Edit Checks for a Field
In Architect, edit checks are programmed checks used to catch entry errors or aberrant
data in the EDC Module, or to perform certain dynamic actions. For more
information, see “Viewing Edit Checks” on page 30.
View edit checks for a field
� On the Fields page, expand the Edit Checks category.
Architect displays the edit checks:
Viewing Derivations for a Field
In Architect, derivations are calculations based on existing source data. For more
information, see “Viewing Derivations” on page 33.
View derivations for a field
� On the Fields page, expand the Derivations category.
Architect displays the derivations associated with the field.
Leader Note—SYS Edit Checks
Edit checks whose names begin with
SYS_ are auto queries with system-
assigned names. An example is an
autoquery that checks whether the
entered date is a future date. Although
auto queries appear on certain Rave
reports, these do not show up in the
SLACS. Instead, auto queries in the
SLACS document are blank.
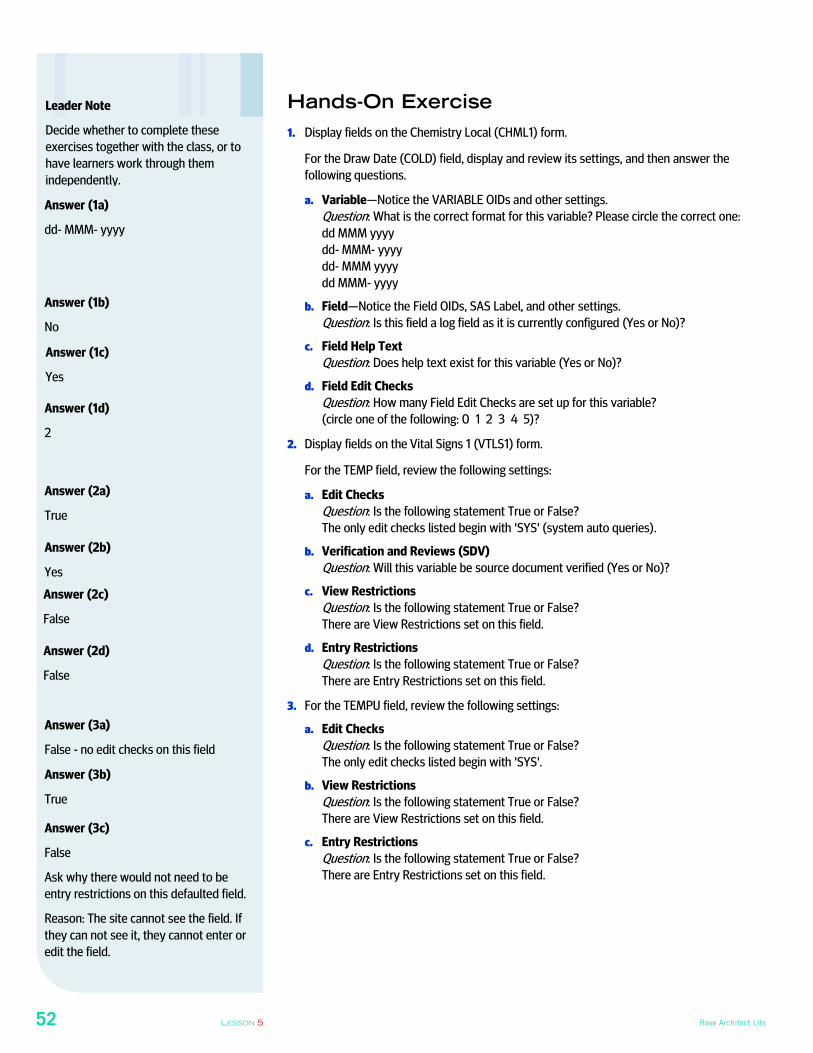
52 LESSON 5 Rave Architect Lite
Hands-On Exercise
1. Display fields on the Chemistry Local (CHML1) form.
For the Draw Date (COLD) field, display and review its settings, and then answer the
following questions.
a. Variable—Notice the VARIABLE OIDs and other settings.
Question: What is the correct format for this variable? Please circle the correct one:
dd MMM yyyy
dd- MMM- yyyy
dd- MMM yyyy
dd MMM- yyyy
b. Field—Notice the Field OIDs, SAS Label, and other settings.
Question: Is this field a log field as it is currently configured (Yes or No)?
c. Field Help Text
Question: Does help text exist for this variable (Yes or No)?
d. Field Edit Checks
Question: How many Field Edit Checks are set up for this variable?
(circle one of the following: 0 1 2 3 4 5)?
2. Display fields on the Vital Signs 1 (VTLS1) form.
For the TEMP field, review the following settings:
a. Edit Checks
Question: Is the following statement True or False?
The only edit checks listed begin with 'SYS' (system auto queries).
b. Verification and Reviews (SDV)
Question: Will this variable be source document verified (Yes or No)?
c. View Restrictions
Question: Is the following statement True or False?
There are View Restrictions set on this field.
d. Entry Restrictions
Question: Is the following statement True or False?
There are Entry Restrictions set on this field.
3. For the TEMPU field, review the following settings:
a. Edit Checks
Question: Is the following statement True or False?
The only edit checks listed begin with 'SYS'.
b. View Restrictions
Question: Is the following statement True or False?
There are View Restrictions set on this field.
c. Entry Restrictions
Question: Is the following statement True or False?
There are Entry Restrictions set on this field.
Leader Note
Decide whether to complete these
exercises together with the class, or to
have learners work through them
independently.
Answer (1a)
dd- MMM- yyyy
Answer (1b)
No
Answer (1c)
Yes
Answer (1d)
2
Answer (2a)
True
Answer (2b)
Yes
Answer (2c)
False
Answer (2d)
False
Answer (3a)
False - no edit checks on this field
Answer (3b)
True
Answer (3c)
False
Ask why there would not need to be
entry restrictions on this defaulted field.
Reason: The site cannot see the field. If
they can not see it, they cannot enter or
edit the field.
© Genentech, Inc. LESSON 5 53
Conclusion to Section 1
Section 1 provided a general introduction to the EDC system build process, the
Architect module, and the terminology used to describe the system build process and
Architect functionality.
What You Have Learned in This Section
In this section, you have learned how to:
➡ Describe the following Architect concepts:
➡ Rave Architect module
➡ Global Library Volume - Global Volume Integrated (GVI)
➡ Study design specifications for Roche EDC studies
➡ Key study components in Architect, including P1 and P2 projects,
environments, drafts, versions, and studies
➡ Key project components, such as forms, folders, dictionaries, matrices, edit
checks, custom functions, derivations, and restrictions
➡ Log into Rave and launch Architect.
➡ Navigate the Architect interface using the sample study.
➡ Find and view projects, environments, drafts, and versions.
➡ Find and view project components, such as forms, folders, dictionaries, matrices,
edit checks, custom functions, derivations, and restrictions.
➡ Find and view field configurations on a form, including field properties, variables,
field help text, field edit checks, verification and review settings, view and entry
restrictions, edit checks, and derivations.
Where to Go from Here
Where you go from here depends on your role in Roche-sponsored clinical trials:
➡ Study Data Managers (SDMs) are required to proceed to Section 2, which
provides in-depth, hands-on experience with using the Architect module to build
a study.
➡ For other Rave roles, you are finished with the training. Please fill out the Course
Evaluation Form for Arch Lite Session 1 at:
http://www.surveymonkey.com/s/B8Q3X5K
Break

54 LESSON 5 Rave Architect Lite
SECTION 2
BUILDING STUDIESIn this section of the training, you use Architect to build and test a study. It provides
hands-on experience to reinforce concepts introduced in Section 1, “Introduction” on
page 1.
Lessons in this section include:
➡ Working with Projects, Environments, and Drafts (see page 56)
➡ Copying Items from the Global Library Volume (see page 66)
➡ Building Forms (see page 73)
➡ Creating Folders (see page 91)
➡ Creating Matrices (see page 96)
➡ Testing Your Progress (see page 103)
➡ Defining Restrictions (see page 111)
➡ Defining Field Edit Checks (see page 119)
➡ Working with Edit Checks and Custom Functions (see page 123)
➡ Finishing Touches (see page 139)
➡ Conclusion to Section 2 (see page 142)
Audience for Section 2
Study Data Managers are required to
complete this section of the training.
Other participants—such as Data
Acquisition Specialists, Clinical
Programmers, and Clinical Coding
Specialists—have the option to complete
this section of the training.
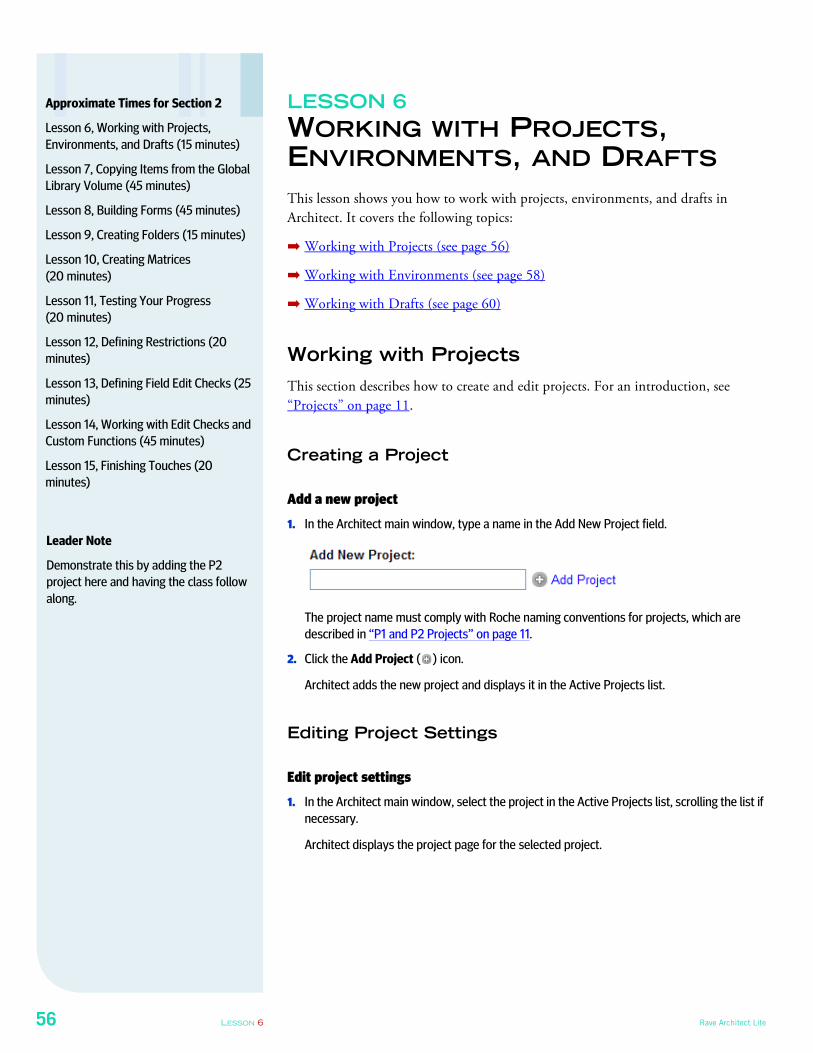
56 LESSON 6 Rave Architect Lite
LESSON 6
WORKING WITH PROJECTS, ENVIRONMENTS, AND DRAFTS
This lesson shows you how to work with projects, environments, and drafts in
Architect. It covers the following topics:
➡ Working with Projects (see page 56)
➡ Working with Environments (see page 58)
➡ Working with Drafts (see page 60)
Working with Projects
This section describes how to create and edit projects. For an introduction, see
“Projects” on page 11.
Creating a Project
Add a new project
1. In the Architect main window, type a name in the Add New Project field.
The project name must comply with Roche naming conventions for projects, which are
described in “P1 and P2 Projects” on page 11.
2. Click the Add Project ( ) icon.
Architect adds the new project and displays it in the Active Projects list.
Editing Project Settings
Edit project settings
1. In the Architect main window, select the project in the Active Projects list, scrolling the list if
necessary.
Architect displays the project page for the selected project.
Approximate Times for Section 2
Lesson 6, Working with Projects,
Environments, and Drafts (15 minutes)
Lesson 7, Copying Items from the Global
Library Volume (45 minutes)
Lesson 8, Building Forms (45 minutes)
Lesson 9, Creating Folders (15 minutes)
Lesson 10, Creating Matrices
(20 minutes)
Lesson 11, Testing Your Progress
(20 minutes)
Lesson 12, Defining Restrictions (20
minutes)
Lesson 13, Defining Field Edit Checks (25
minutes)
Lesson 14, Working with Edit Checks and
Custom Functions (45 minutes)
Lesson 15, Finishing Touches (20
minutes)
Leader Note
Demonstrate this by adding the P2
project here and having the class follow
along.
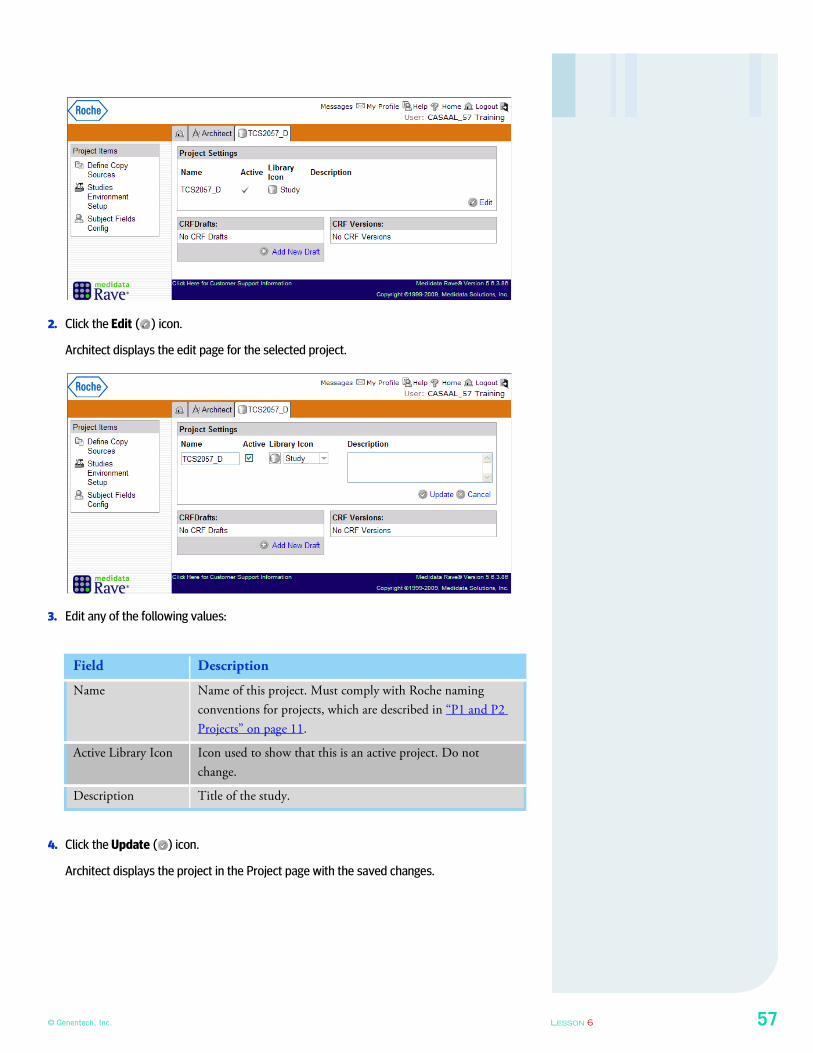
© Genentech, Inc. LESSON 6 57
2. Click the Edit ( ) icon.
Architect displays the edit page for the selected project.
3. Edit any of the following values:
4. Click the Update ( ) icon.
Architect displays the project in the Project page with the saved changes.
Field Description
Name Name of this project. Must comply with Roche naming
conventions for projects, which are described in “P1 and P2
Projects” on page 11.
Active Library Icon Icon used to show that this is an active project. Do not
change.
Description Title of the study.
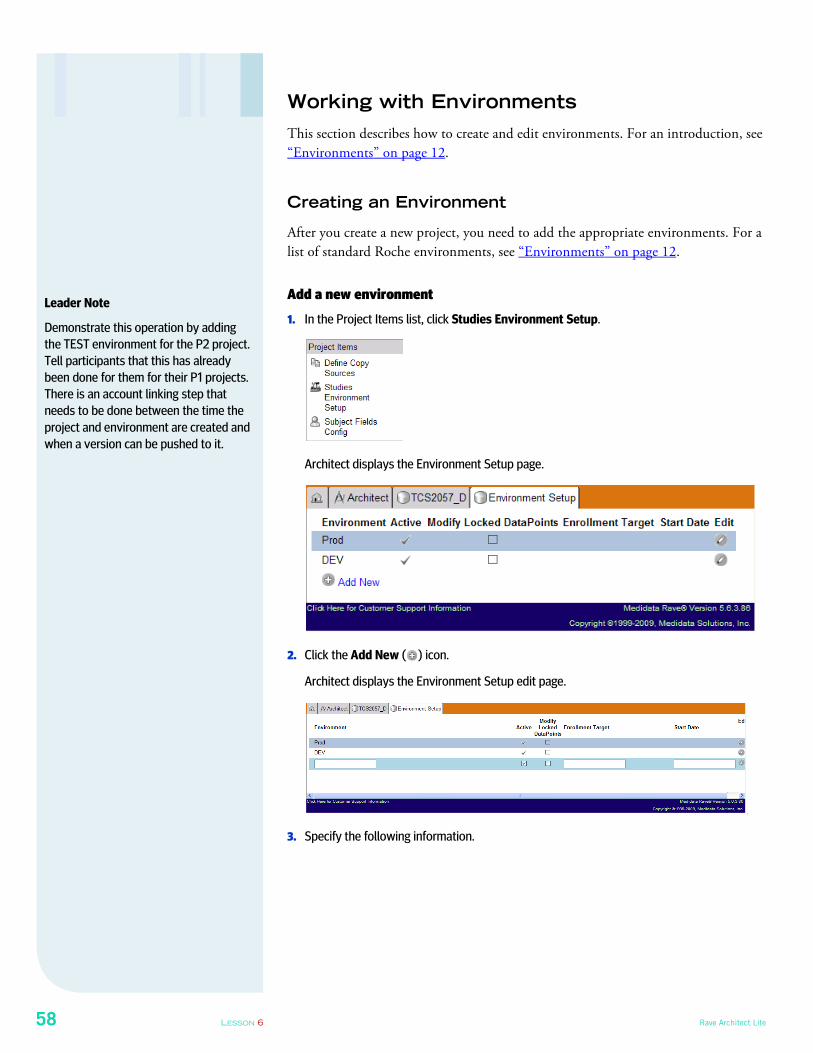
58 LESSON 6 Rave Architect Lite
Working with Environments
This section describes how to create and edit environments. For an introduction, see
“Environments” on page 12.
Creating an Environment
After you create a new project, you need to add the appropriate environments. For a
list of standard Roche environments, see “Environments” on page 12.
Add a new environment
1. In the Project Items list, click Studies Environment Setup.
Architect displays the Environment Setup page.
2. Click the Add New ( ) icon.
Architect displays the Environment Setup edit page.
[
3. Specify the following information.
Leader Note
Demonstrate this operation by adding
the TEST environment for the P2 project.
Tell participants that this has already
been done for them for their P1 projects.
There is an account linking step that
needs to be done between the time the
project and environment are created and
when a version can be pushed to it.
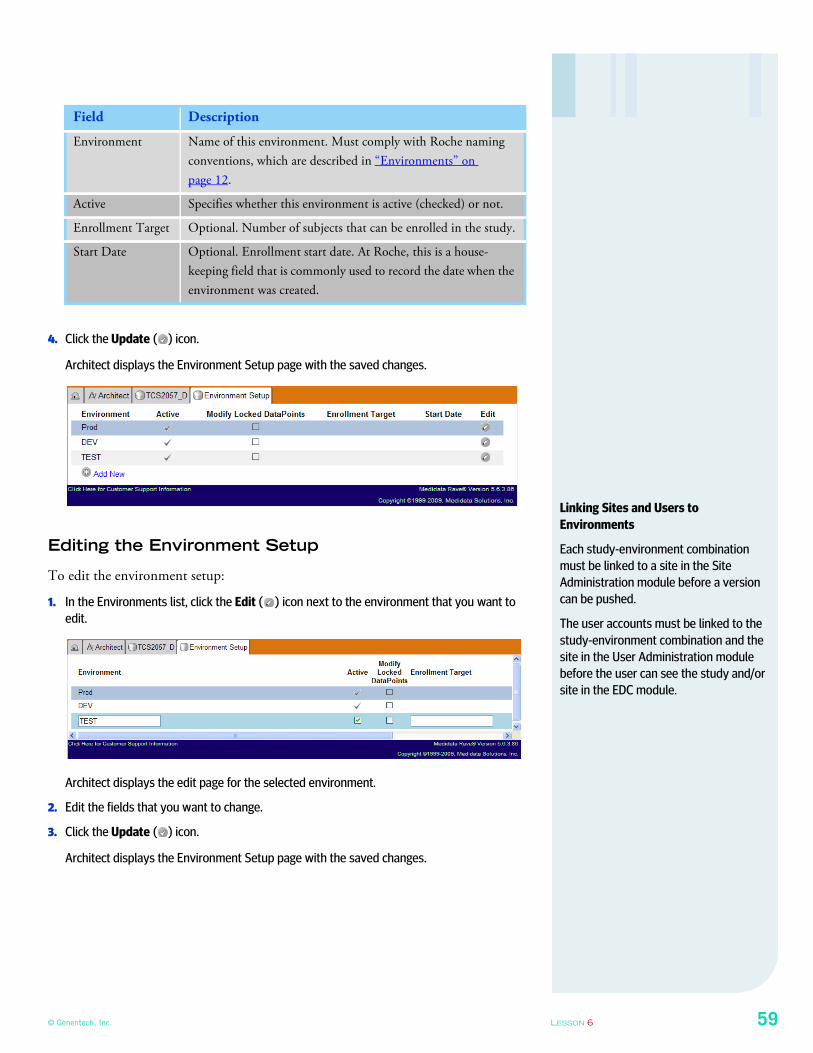
© Genentech, Inc. LESSON 6 59
4. Click the Update ( ) icon.
Architect displays the Environment Setup page with the saved changes.
Editing the Environment Setup
To edit the environment setup:
1. In the Environments list, click the Edit ( ) icon next to the environment that you want to
edit.
Architect displays the edit page for the selected environment.
2. Edit the fields that you want to change.
3. Click the Update ( ) icon.
Architect displays the Environment Setup page with the saved changes.
Field Description
Environment Name of this environment. Must comply with Roche naming
conventions, which are described in “Environments” on
page 12.
Active Specifies whether this environment is active (checked) or not.
Enrollment Target Optional. Number of subjects that can be enrolled in the study.
Start Date Optional. Enrollment start date. At Roche, this is a house-
keeping field that is commonly used to record the date when the
environment was created.
Linking Sites and Users to
Environments
Each study-environment combination
must be linked to a site in the Site
Administration module before a version
can be pushed.
The user accounts must be linked to the
study-environment combination and the
site in the User Administration module
before the user can see the study and/or
site in the EDC module.
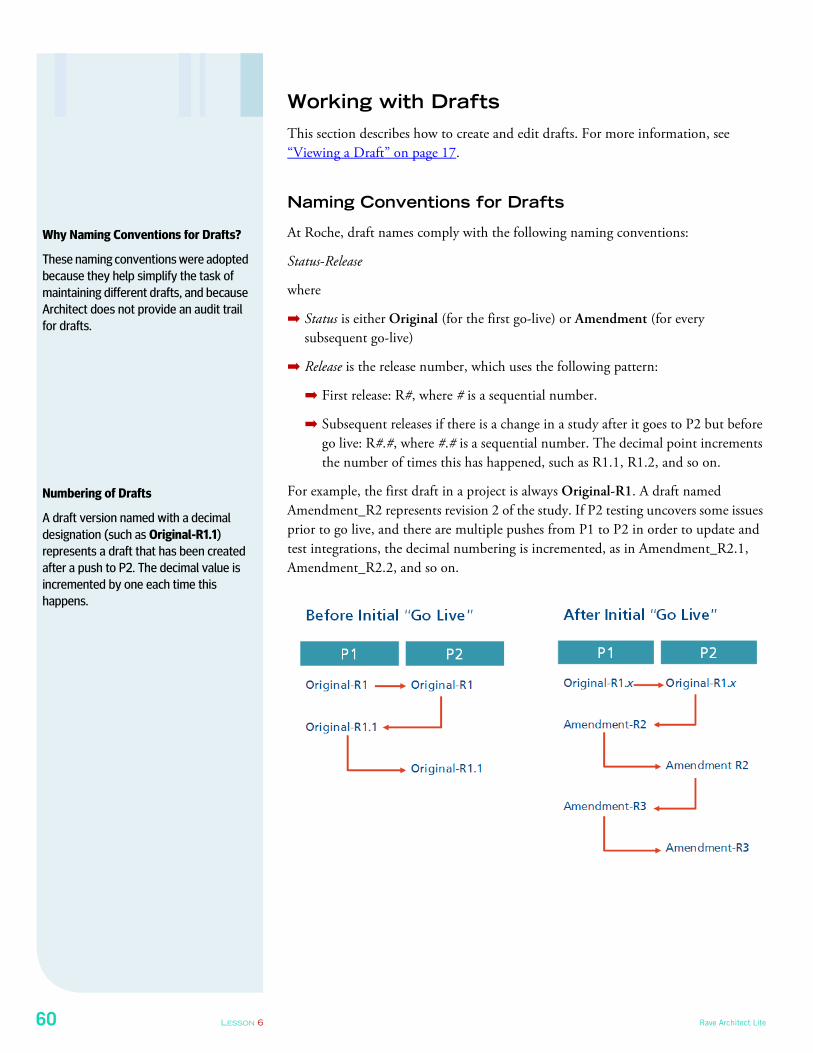
60 LESSON 6 Rave Architect Lite
Working with Drafts
This section describes how to create and edit drafts. For more information, see
“Viewing a Draft” on page 17.
Naming Conventions for Drafts
At Roche, draft names comply with the following naming conventions:
Status-Release
where
➡ Status is either Original (for the first go-live) or Amendment (for every
subsequent go-live)
➡ Release is the release number, which uses the following pattern:
➡ First release: R#, where # is a sequential number.
➡ Subsequent releases if there is a change in a study after it goes to P2 but before
go live: R#.#, where #.# is a sequential number. The decimal point increments
the number of times this has happened, such as R1.1, R1.2, and so on.
For example, the first draft in a project is always Original-R1. A draft named
Amendment_R2 represents revision 2 of the study. If P2 testing uncovers some issues
prior to go live, and there are multiple pushes from P1 to P2 in order to update and
test integrations, the decimal numbering is incremented, as in Amendment_R2.1,
Amendment_R2.2, and so on.
Why Naming Conventions for Drafts?
These naming conventions were adopted
because they help simplify the task of
maintaining different drafts, and because
Architect does not provide an audit trail
for drafts.
Numbering of Drafts
A draft version named with a decimal
designation (such as Original-R1.1)
represents a draft that has been created
after a push to P2. The decimal value is
incremented by one each time this
happens.
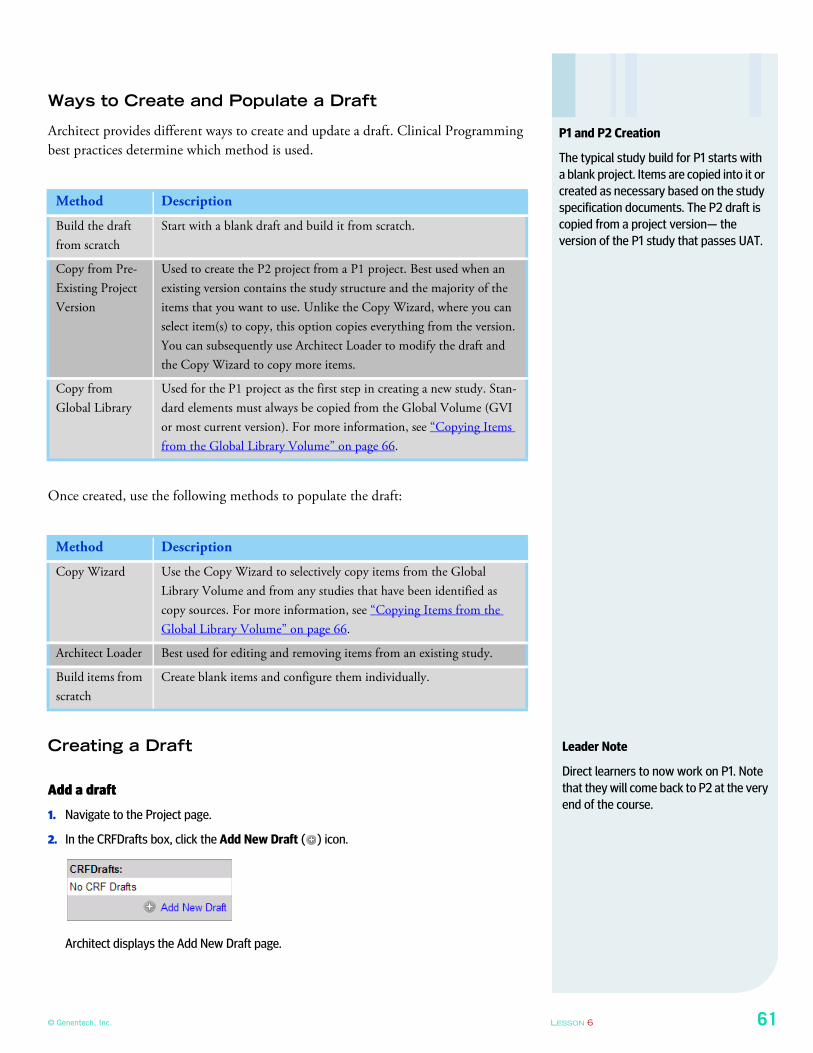
© Genentech, Inc. LESSON 6 61
Ways to Create and Populate a Draft
Architect provides different ways to create and update a draft. Clinical Programming
best practices determine which method is used.
Once created, use the following methods to populate the draft:
Creating a Draft
Add a draft
1. Navigate to the Project page.
2. In the CRFDrafts box, click the Add New Draft ( ) icon.
Architect displays the Add New Draft page.
Method Description
Build the draft
from scratch
Start with a blank draft and build it from scratch.
Copy from Pre-
Existing Project
Version
Used to create the P2 project from a P1 project. Best used when an
existing version contains the study structure and the majority of the
items that you want to use. Unlike the Copy Wizard, where you can
select item(s) to copy, this option copies everything from the version.
You can subsequently use Architect Loader to modify the draft and
the Copy Wizard to copy more items.
Copy from
Global Library
Used for the P1 project as the first step in creating a new study. Stan-
dard elements must always be copied from the Global Volume (GVI
or most current version). For more information, see “Copying Items
from the Global Library Volume” on page 66.
Method Description
Copy Wizard Use the Copy Wizard to selectively copy items from the Global
Library Volume and from any studies that have been identified as
copy sources. For more information, see “Copying Items from the
Global Library Volume” on page 66.
Architect Loader Best used for editing and removing items from an existing study.
Build items from
scratch
Create blank items and configure them individually.
P1 and P2 Creation
The typical study build for P1 starts with
a blank project. Items are copied into it or
created as necessary based on the study
specification documents. The P2 draft is
copied from a project version— the
version of the P1 study that passes UAT.
Leader Note
Direct learners to now work on P1. Note
that they will come back to P2 at the very
end of the course.
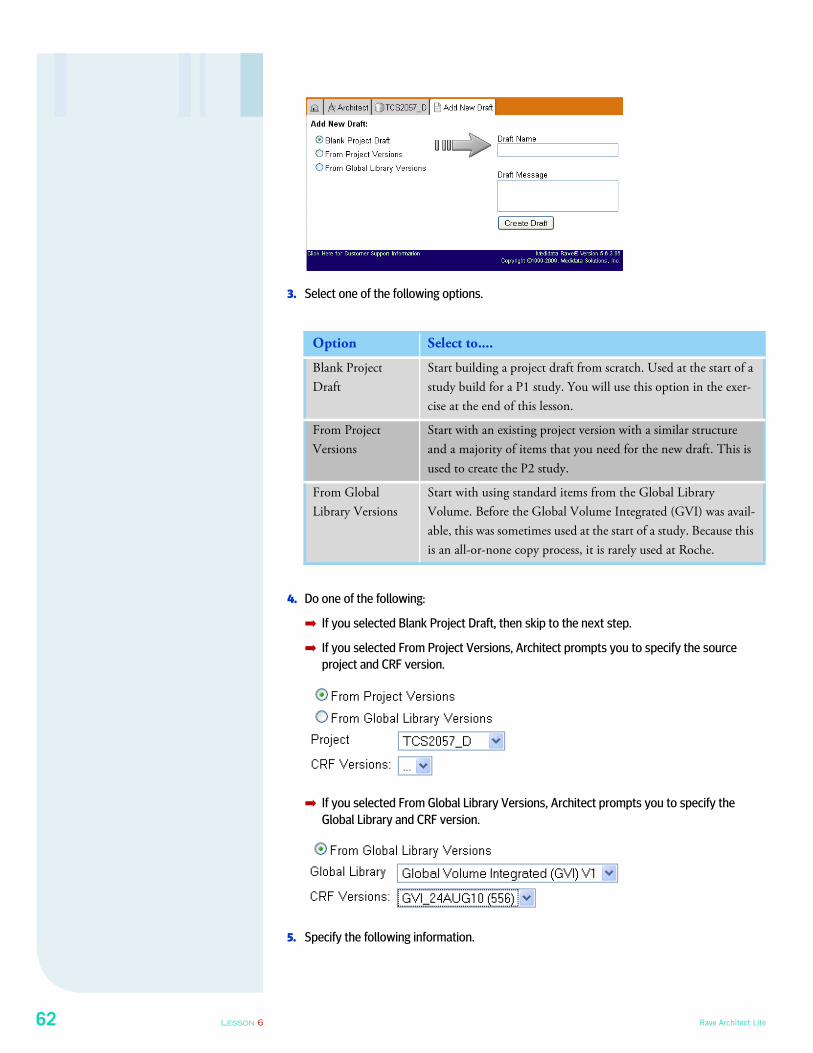
62 LESSON 6 Rave Architect Lite
3. Select one of the following options.
4. Do one of the following:
➡ If you selected Blank Project Draft, then skip to the next step.
➡ If you selected From Project Versions, Architect prompts you to specify the source
project and CRF version.
➡ If you selected From Global Library Versions, Architect prompts you to specify the
Global Library and CRF version.
5. Specify the following information.
Option Select to....
Blank Project
Draft
Start building a project draft from scratch. Used at the start of a
study build for a P1 study. You will use this option in the exer-
cise at the end of this lesson.
From Project
Versions
Start with an existing project version with a similar structure
and a majority of items that you need for the new draft. This is
used to create the P2 study.
From Global
Library Versions
Start with using standard items from the Global Library
Volume. Before the Global Volume Integrated (GVI) was avail-
able, this was sometimes used at the start of a study. Because this
is an all-or-none copy process, it is rarely used at Roche.
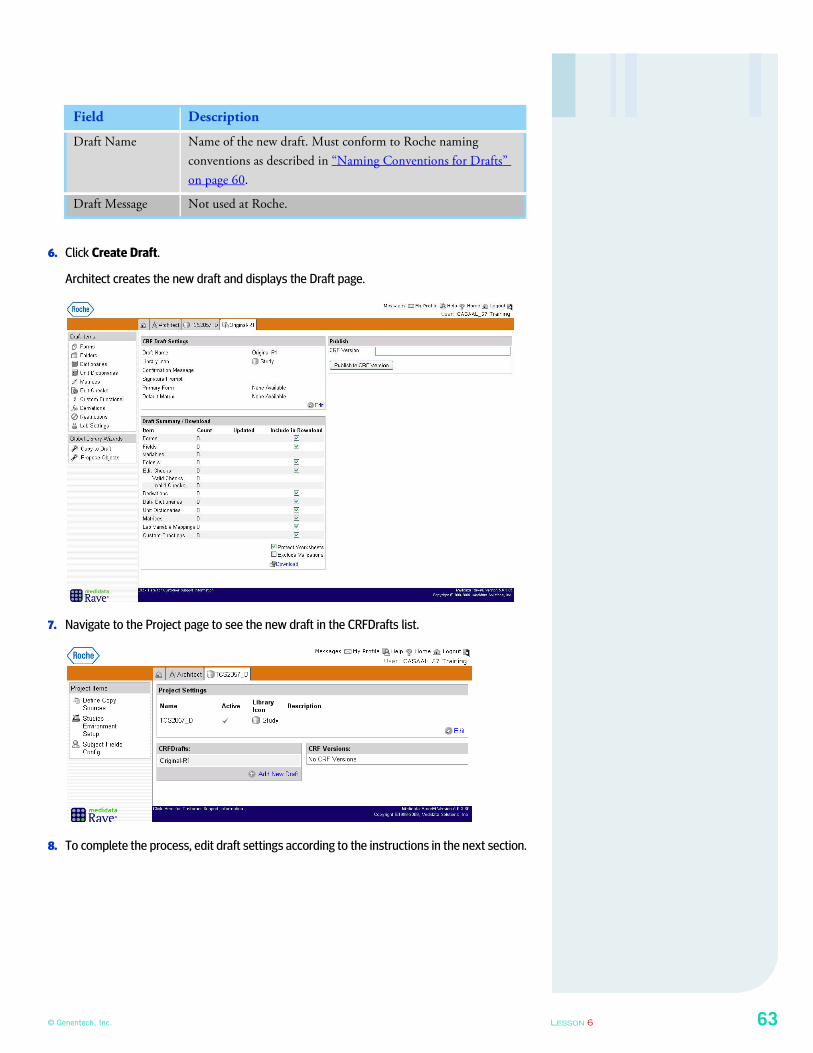
© Genentech, Inc. LESSON 6 63
6. Click Create Draft.
Architect creates the new draft and displays the Draft page.
7. Navigate to the Project page to see the new draft in the CRFDrafts list.
8. To complete the process, edit draft settings according to the instructions in the next section.
Field Description
Draft Name Name of the new draft. Must conform to Roche naming
conventions as described in “Naming Conventions for Drafts”
on page 60.
Draft Message Not used at Roche.

64 LESSON 6 Rave Architect Lite
Editing Settings for a Draft
Edit draft settings
1. On the Project page, click the draft that you want to edit.
2. On the Draft page, in the CRFDraft Settings box, click the Edit ( ) icon.
Architect prompts you to change draft settings.
3. Specify the following settings:
Field Description
Draft Name Name of the draft. Must conform to Roche naming conventions
as described in “Naming Conventions for Drafts” on page 60.
Library Icon Do not change.
Confirmation
Message
Not used at Roche.
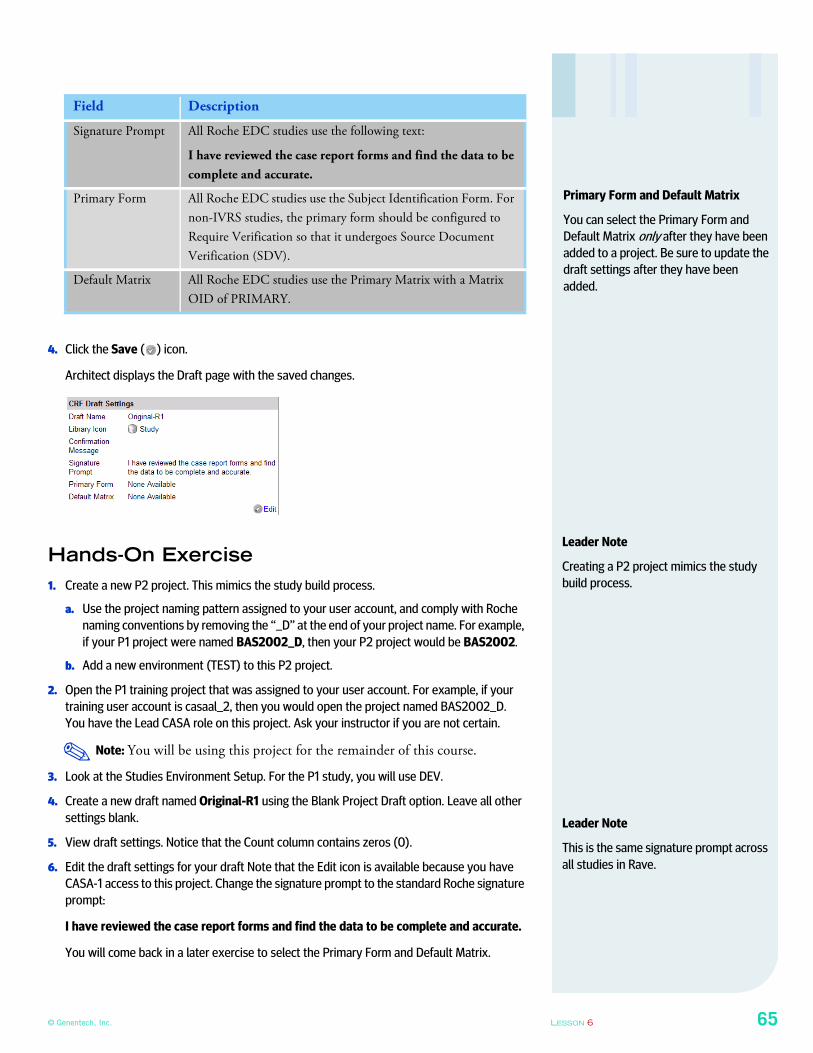
© Genentech, Inc. LESSON 6 65
4. Click the Save ( ) icon.
Architect displays the Draft page with the saved changes.
Hands-On Exercise
1. Create a new P2 project. This mimics the study build process.
a. Use the project naming pattern assigned to your user account, and comply with Roche
naming conventions by removing the “_D” at the end of your project name. For example,
if your P1 project were named BAS2002_D, then your P2 project would be BAS2002.
b. Add a new environment (TEST) to this P2 project.
2. Open the P1 training project that was assigned to your user account. For example, if your
training user account is casaal_2, then you would open the project named BAS2002_D.
You have the Lead CASA role on this project. Ask your instructor if you are not certain.
Note: You will be using this project for the remainder of this course.
3. Look at the Studies Environment Setup. For the P1 study, you will use DEV.
4. Create a new draft named Original-R1 using the Blank Project Draft option. Leave all other
settings blank.
5. View draft settings. Notice that the Count column contains zeros (0).
6. Edit the draft settings for your draft Note that the Edit icon is available because you have
CASA-1 access to this project. Change the signature prompt to the standard Roche signature
prompt:
I have reviewed the case report forms and find the data to be complete and accurate.
You will come back in a later exercise to select the Primary Form and Default Matrix.
Signature Prompt All Roche EDC studies use the following text:
I have reviewed the case report forms and find the data to be
complete and accurate.
Primary Form All Roche EDC studies use the Subject Identification Form. For
non-IVRS studies, the primary form should be configured to
Require Verification so that it undergoes Source Document
Verification (SDV).
Default Matrix All Roche EDC studies use the Primary Matrix with a Matrix
OID of PRIMARY.
Field Description
Primary Form and Default Matrix
You can select the Primary Form and
Default Matrix only after they have been added to a project. Be sure to update the
draft settings after they have been
added.
Leader Note
Creating a P2 project mimics the study
build process.
✎
Leader Note
This is the same signature prompt across
all studies in Rave.
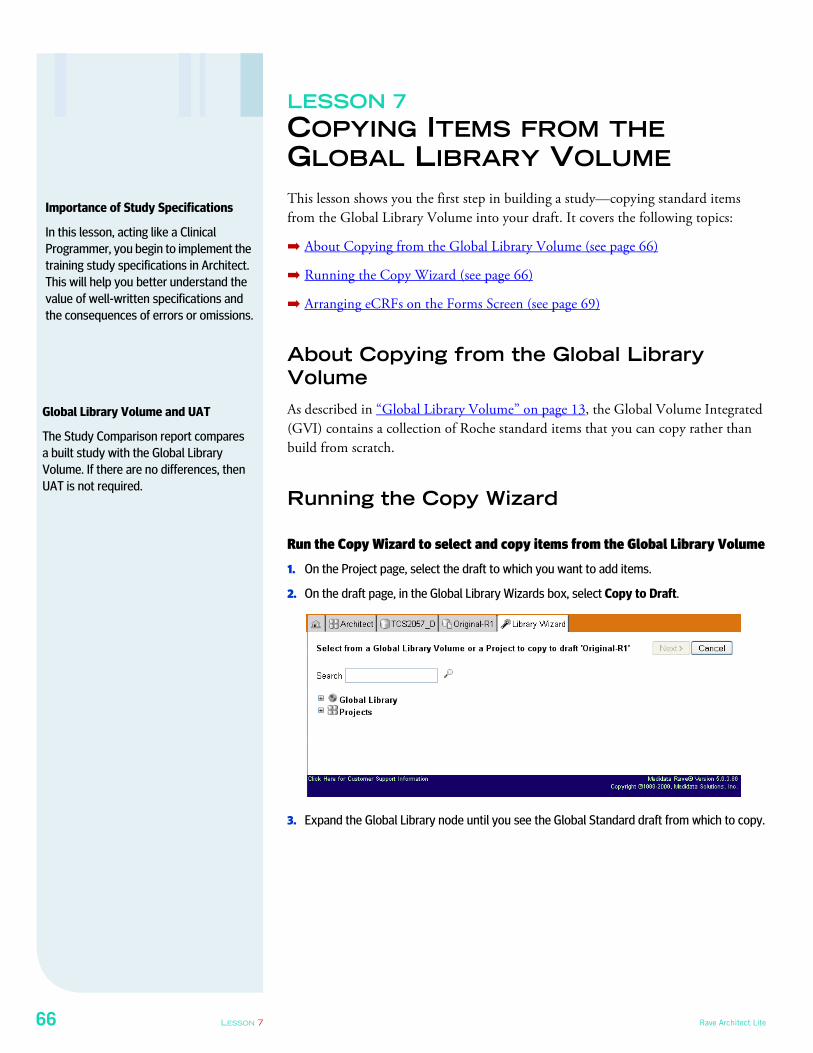
66 LESSON 7 Rave Architect Lite
LESSON 7
COPYING ITEMS FROM THE GLOBAL LIBRARY VOLUME
This lesson shows you the first step in building a study—copying standard items
from the Global Library Volume into your draft. It covers the following topics:
➡ About Copying from the Global Library Volume (see page 66)
➡ Running the Copy Wizard (see page 66)
➡ Arranging eCRFs on the Forms Screen (see page 69)
About Copying from the Global Library
Volume
As described in “Global Library Volume” on page 13, the Global Volume Integrated
(GVI) contains a collection of Roche standard items that you can copy rather than
build from scratch.
Running the Copy Wizard
Run the Copy Wizard to select and copy items from the Global Library Volume
1. On the Project page, select the draft to which you want to add items.
2. On the draft page, in the Global Library Wizards box, select Copy to Draft.
3. Expand the Global Library node until you see the Global Standard draft from which to copy.
Importance of Study Specifications
In this lesson, acting like a Clinical
Programmer, you begin to implement the
training study specifications in Architect.
This will help you better understand the
value of well-written specifications and
the consequences of errors or omissions.
Global Library Volume and UAT
The Study Comparison report compares
a built study with the Global Library
Volume. If there are no differences, then
UAT is not required.
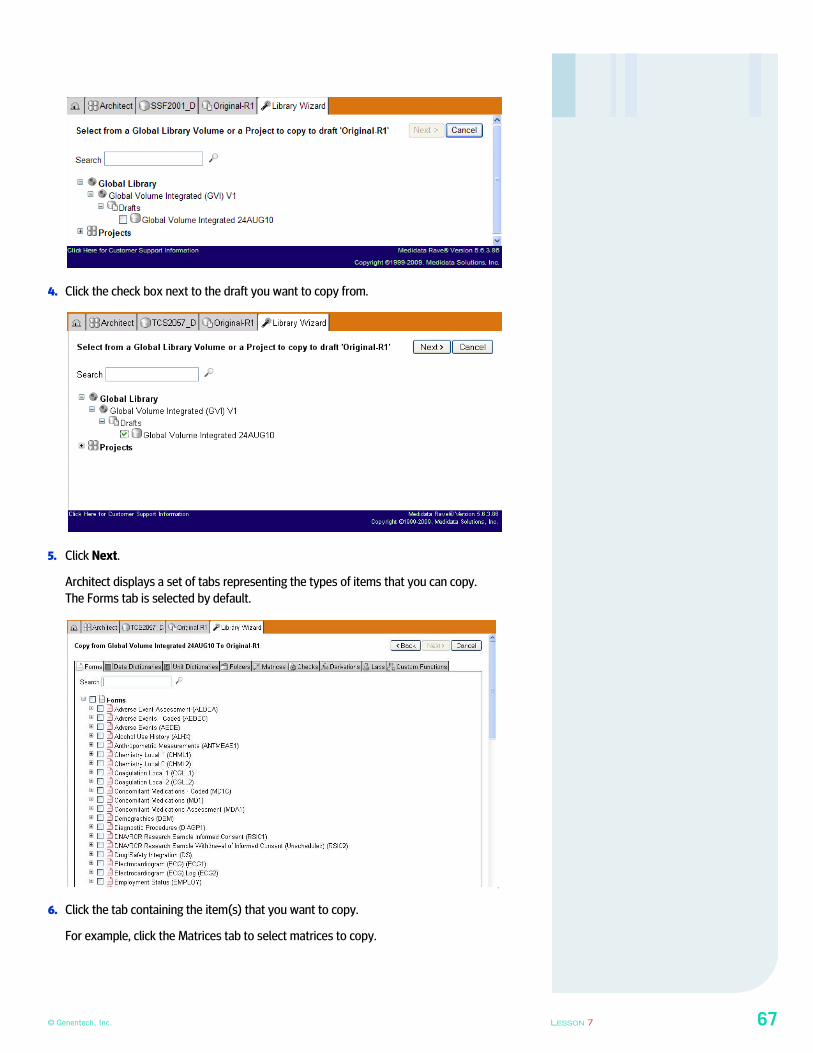
© Genentech, Inc. LESSON 7 67
4. Click the check box next to the draft you want to copy from.
5. Click Next.
Architect displays a set of tabs representing the types of items that you can copy.
The Forms tab is selected by default.
o
6. Click the tab containing the item(s) that you want to copy.
For example, click the Matrices tab to select matrices to copy.
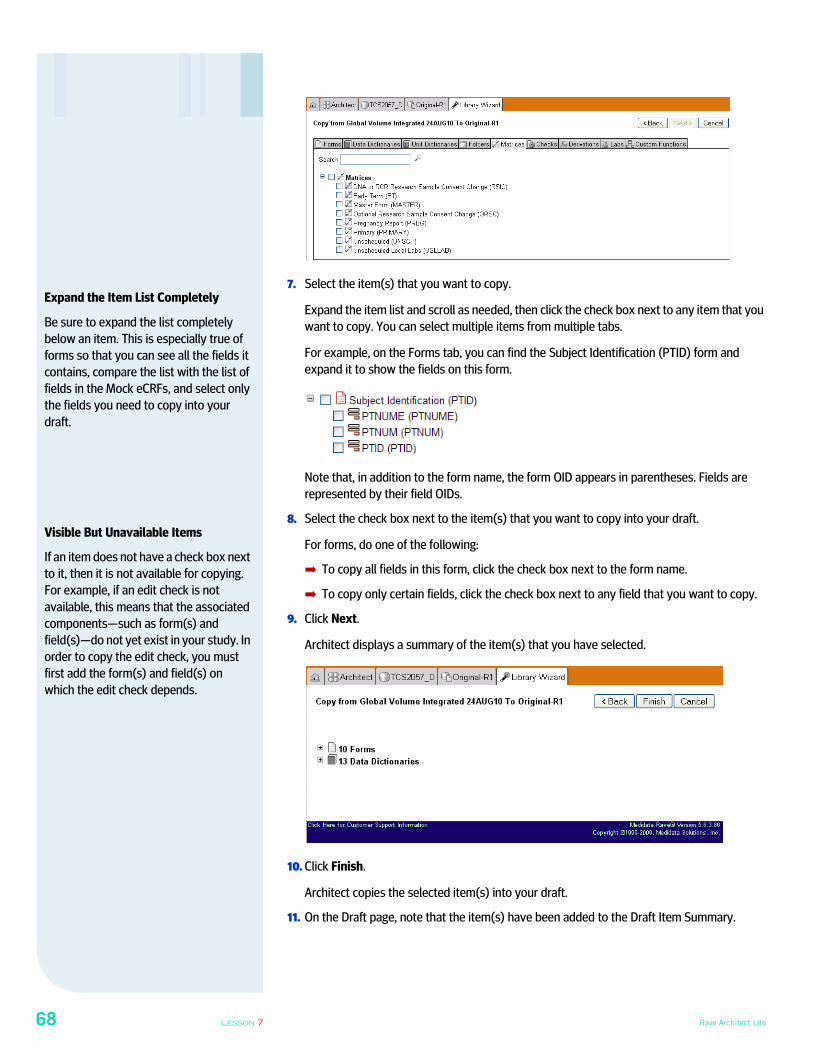
68 LESSON 7 Rave Architect Lite
7. Select the item(s) that you want to copy.
Expand the item list and scroll as needed, then click the check box next to any item that you
want to copy. You can select multiple items from multiple tabs.
For example, on the Forms tab, you can find the Subject Identification (PTID) form and
expand it to show the fields on this form.
Note that, in addition to the form name, the form OID appears in parentheses. Fields are
represented by their field OIDs.
8. Select the check box next to the item(s) that you want to copy into your draft.
For forms, do one of the following:
➡ To copy all fields in this form, click the check box next to the form name.
➡ To copy only certain fields, click the check box next to any field that you want to copy.
9. Click Next.
Architect displays a summary of the item(s) that you have selected.
10. Click Finish.
Architect copies the selected item(s) into your draft.
11. On the Draft page, note that the item(s) have been added to the Draft Item Summary.
Expand the Item List Completely
Be sure to expand the list completely
below an item. This is especially true of
forms so that you can see all the fields it
contains, compare the list with the list of
fields in the Mock eCRFs, and select only
the fields you need to copy into your
draft.
Visible But Unavailable Items
If an item does not have a check box next
to it, then it is not available for copying.
For example, if an edit check is not
available, this means that the associated
components—such as form(s) and
field(s)—do not yet exist in your study. In
order to copy the edit check, you must
first add the form(s) and field(s) on
which the edit check depends.
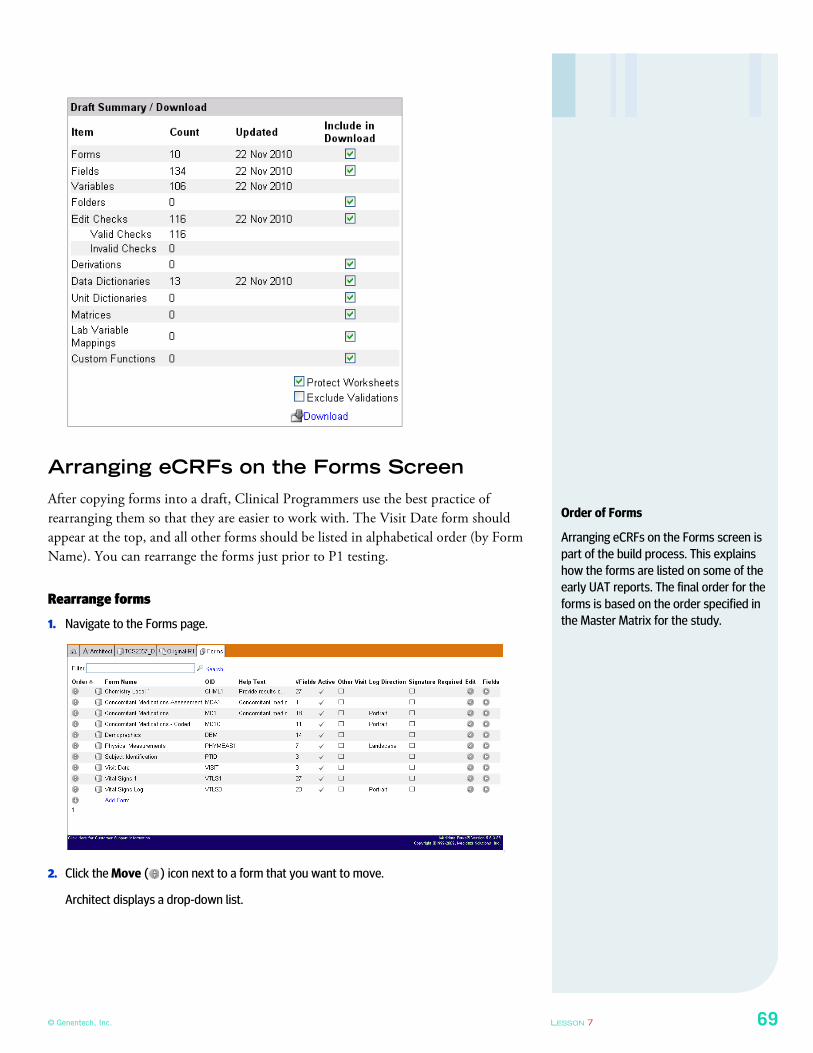
© Genentech, Inc. LESSON 7 69
Arranging eCRFs on the Forms Screen
After copying forms into a draft, Clinical Programmers use the best practice of
rearranging them so that they are easier to work with. The Visit Date form should
appear at the top, and all other forms should be listed in alphabetical order (by Form
Name). You can rearrange the forms just prior to P1 testing.
Rearrange forms
1. Navigate to the Forms page.
[
2. Click the Move ( ) icon next to a form that you want to move.
Architect displays a drop-down list.
Order of Forms
Arranging eCRFs on the Forms screen is
part of the build process. This explains
how the forms are listed on some of the
early UAT reports. The final order for the
forms is based on the order specified in
the Master Matrix for the study.
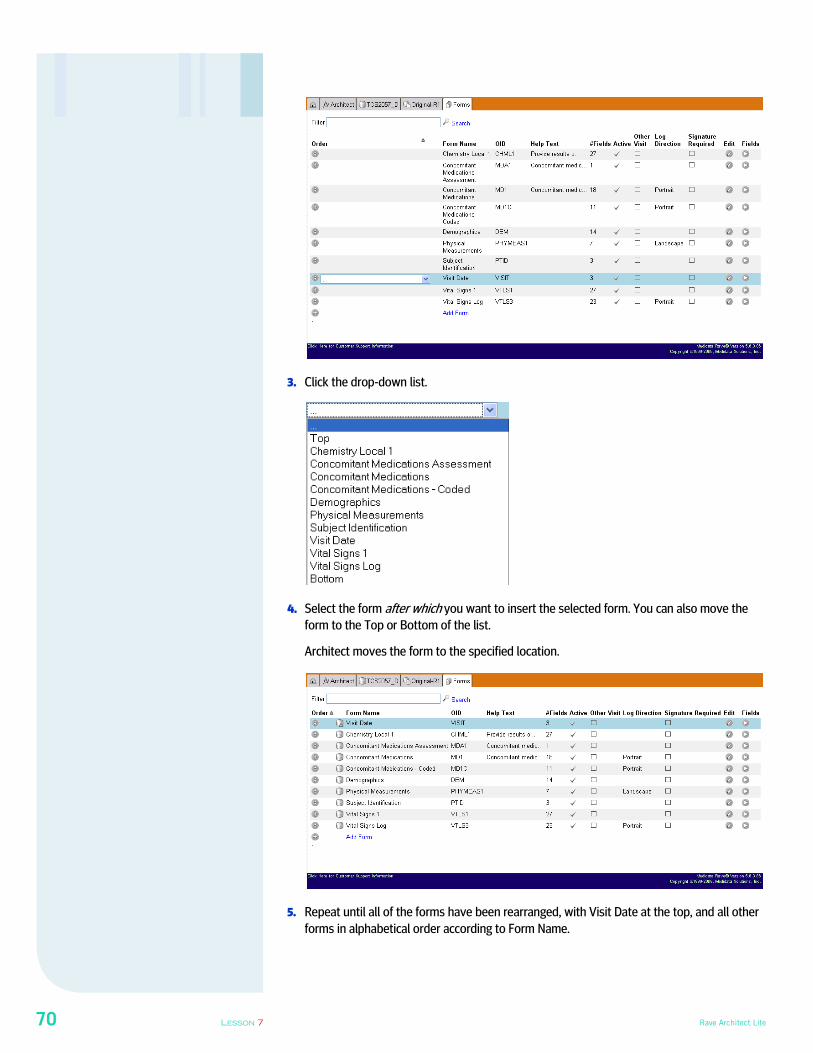
70 LESSON 7 Rave Architect Lite
3. Click the drop-down list.
4. Select the form after which you want to insert the selected form. You can also move the
form to the Top or Bottom of the list.
Architect moves the form to the specified location.
5. Repeat until all of the forms have been rearranged, with Visit Date at the top, and all other
forms in alphabetical order according to Form Name.
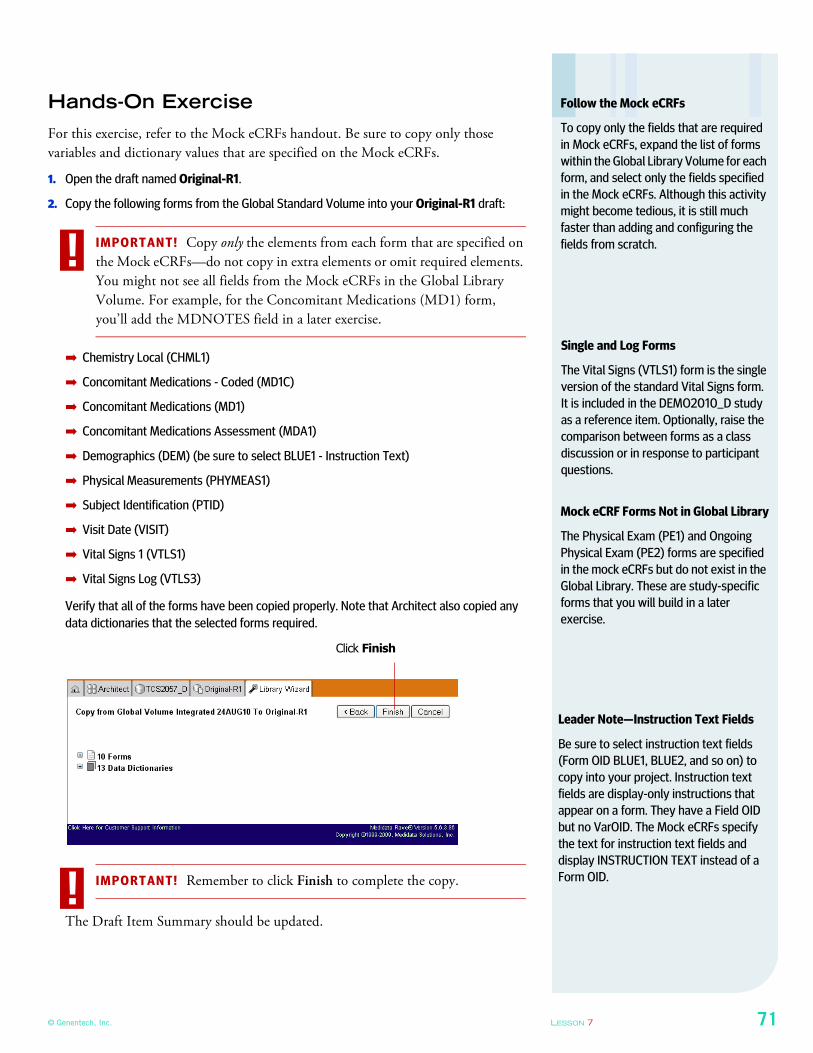
© Genentech, Inc. LESSON 7 71
Hands-On Exercise
For this exercise, refer to the Mock eCRFs handout. Be sure to copy only those
variables and dictionary values that are specified on the Mock eCRFs.
1. Open the draft named Original-R1.
2. Copy the following forms from the Global Standard Volume into your Original-R1 draft:
IMPORTANT! Copy only the elements from each form that are specified on
the Mock eCRFs—do not copy in extra elements or omit required elements.
You might not see all fields from the Mock eCRFs in the Global Library
Volume. For example, for the Concomitant Medications (MD1) form,
you’ll add the MDNOTES field in a later exercise.
➡ Chemistry Local (CHML1)
➡ Concomitant Medications - Coded (MD1C)
➡ Concomitant Medications (MD1)
➡ Concomitant Medications Assessment (MDA1)
➡ Demographics (DEM) (be sure to select BLUE1 - Instruction Text)
➡ Physical Measurements (PHYMEAS1)
➡ Subject Identification (PTID)
➡ Visit Date (VISIT)
➡ Vital Signs 1 (VTLS1)
➡ Vital Signs Log (VTLS3)
Verify that all of the forms have been copied properly. Note that Architect also copied any
data dictionaries that the selected forms required.
IMPORTANT! Remember to click Finish to complete the copy.
The Draft Item Summary should be updated.
Follow the Mock eCRFs
To copy only the fields that are required
in Mock eCRFs, expand the list of forms
within the Global Library Volume for each
form, and select only the fields specified
in the Mock eCRFs. Although this activity
might become tedious, it is still much
faster than adding and configuring the
fields from scratch.!
Single and Log Forms
The Vital Signs (VTLS1) form is the single
version of the standard Vital Signs form.
It is included in the DEMO2010_D study
as a reference item. Optionally, raise the
comparison between forms as a class
discussion or in response to participant
questions.
Mock eCRF Forms Not in Global Library
The Physical Exam (PE1) and Ongoing
Physical Exam (PE2) forms are specified
in the mock eCRFs but do not exist in the
Global Library. These are study-specific
forms that you will build in a later
exercise.
Leader Note—Instruction Text Fields
Be sure to select instruction text fields
(Form OID BLUE1, BLUE2, and so on) to
copy into your project. Instruction text
fields are display-only instructions that
appear on a form. They have a Field OID
but no VarOID. The Mock eCRFs specify
the text for instruction text fields and
display INSTRUCTION TEXT instead of a
Form OID.
Click Finish
!
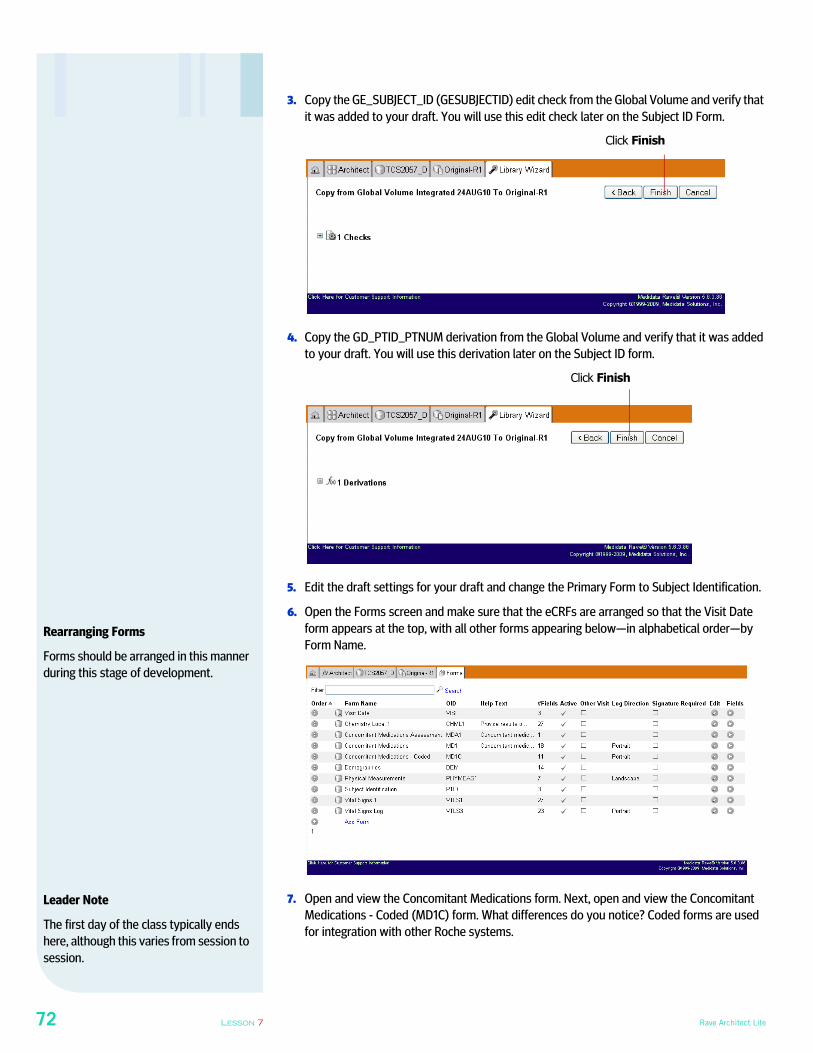
72 LESSON 7 Rave Architect Lite
3. Copy the GE_SUBJECT_ID (GESUBJECTID) edit check from the Global Volume and verify that
it was added to your draft. You will use this edit check later on the Subject ID Form.
4. Copy the GD_PTID_PTNUM derivation from the Global Volume and verify that it was added
to your draft. You will use this derivation later on the Subject ID form.
5. Edit the draft settings for your draft and change the Primary Form to Subject Identification.
6. Open the Forms screen and make sure that the eCRFs are arranged so that the Visit Date
form appears at the top, with all other forms appearing below—in alphabetical order—by
Form Name.
7. Open and view the Concomitant Medications form. Next, open and view the Concomitant
Medications - Coded (MD1C) form. What differences do you notice? Coded forms are used
for integration with other Roche systems.
Click Finish
Click Finish
Rearranging Forms
Forms should be arranged in this manner
during this stage of development.
Leader Note
The first day of the class typically ends
here, although this varies from session to
session.
© Genentech, Inc. LESSON 8 73
LESSON 8
BUILDING FORMS
This lesson shows you how to build forms in Architect. It covers the following topics:
➡ About Forms (eCRFs) (see page 73)
➡ Copying Forms from the Global Library Volume (see page 77)
➡ Creating Forms (see page 78)
➡ Deleting Forms (see page 79)
➡ Adding Fields to a Form (see page 79)
➡ Working with Dictionaries (see page 82)
➡ Working with Variables (see page 85)
➡ Specifying Help Text for Forms and Fields (see page 88)
➡ Hands-On Exercise (see page 88)
About Forms (eCRFs)
As described in Viewing Forms (see page 23), eCRFs are simply called forms in
Architect. At Roche, forms are specified in the Mock eCRFs document, and
commonly-used, pre-validated forms are configured in the Global Library Volume.
A form contains one or more fields—places where data gets entered on an eCRF in
the EDC module.
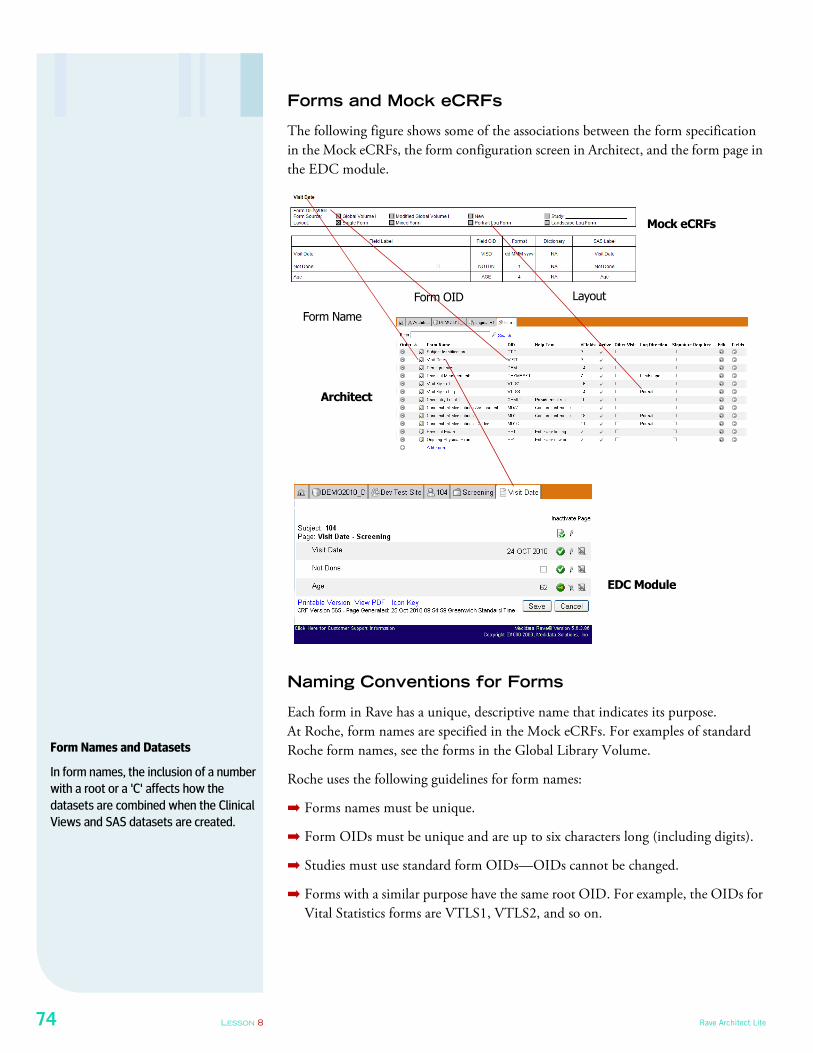
74 LESSON 8 Rave Architect Lite
Forms and Mock eCRFs
The following figure shows some of the associations between the form specification
in the Mock eCRFs, the form configuration screen in Architect, and the form page in
the EDC module.
Naming Conventions for Forms
Each form in Rave has a unique, descriptive name that indicates its purpose.
At Roche, form names are specified in the Mock eCRFs. For examples of standard
Roche form names, see the forms in the Global Library Volume.
Roche uses the following guidelines for form names:
➡ Forms names must be unique.
➡ Form OIDs must be unique and are up to six characters long (including digits).
➡ Studies must use standard form OIDs—OIDs cannot be changed.
➡ Forms with a similar purpose have the same root OID. For example, the OIDs for
Vital Statistics forms are VTLS1, VTLS2, and so on.
Form Name
Form OID Layout
EDC Module
Architect
Mock eCRFs
Form Names and Datasets
In form names, the inclusion of a number
with a root or a 'C' affects how the
datasets are combined when the Clinical
Views and SAS datasets are created.
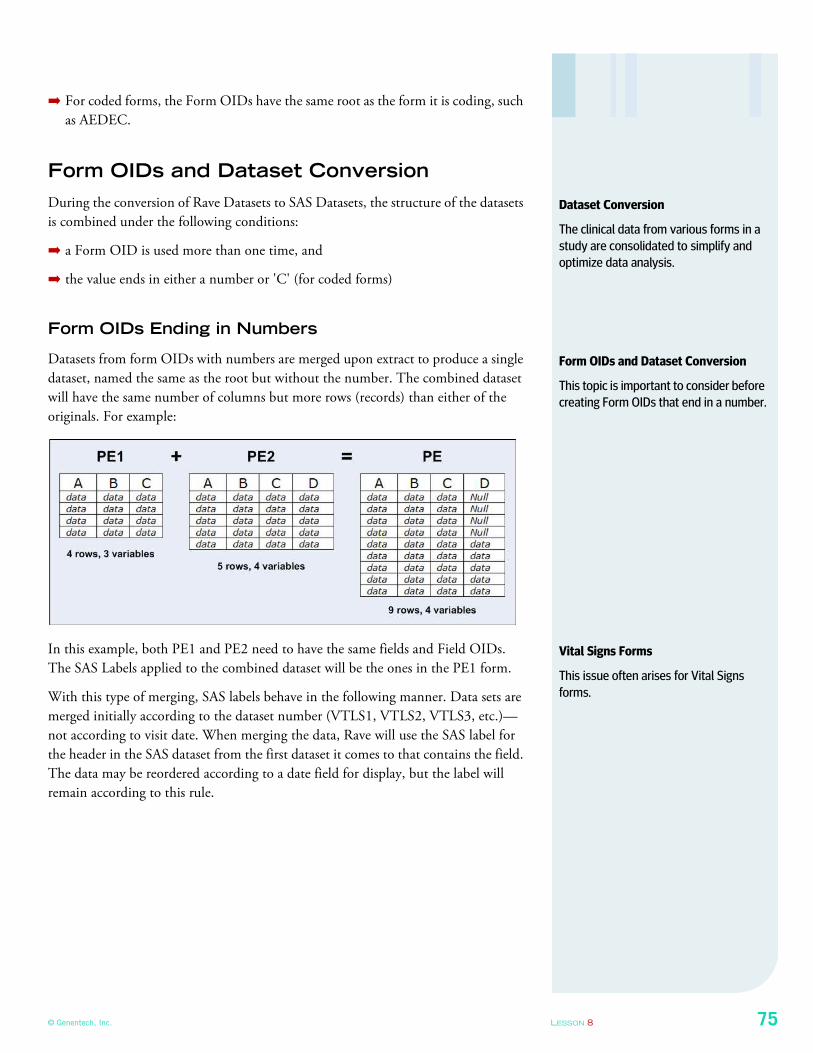
© Genentech, Inc. LESSON 8 75
➡ For coded forms, the Form OIDs have the same root as the form it is coding, such
as AEDEC.
Form OIDs and Dataset Conversion
During the conversion of Rave Datasets to SAS Datasets, the structure of the datasets
is combined under the following conditions:
➡ a Form OID is used more than one time, and
➡ the value ends in either a number or 'C' (for coded forms)
Form OIDs Ending in Numbers
Datasets from form OIDs with numbers are merged upon extract to produce a single
dataset, named the same as the root but without the number. The combined dataset
will have the same number of columns but more rows (records) than either of the
originals. For example:
In this example, both PE1 and PE2 need to have the same fields and Field OIDs.
The SAS Labels applied to the combined dataset will be the ones in the PE1 form.
With this type of merging, SAS labels behave in the following manner. Data sets are
merged initially according to the dataset number (VTLS1, VTLS2, VTLS3, etc.)—
not according to visit date. When merging the data, Rave will use the SAS label for
the header in the SAS dataset from the first dataset it comes to that contains the field.
The data may be reordered according to a date field for display, but the label will
remain according to this rule.
Dataset Conversion
The clinical data from various forms in a
study are consolidated to simplify and
optimize data analysis.
Form OIDs and Dataset Conversion
This topic is important to consider before
creating Form OIDs that end in a number.
Vital Signs Forms
This issue often arises for Vital Signs
forms.

76 LESSON 8 Rave Architect Lite
Form OIDs Ending in a 'C' (Coded Forms)
Datasets from form OIDs with 'C' are joined to the corresponding dataset without
the 'C' to produce a single dataset, named without the 'C'. The combined dataset will
have the same number of rows as each of the originals but more columns. For
example:
This functionality is part of our coding integration with TMS.
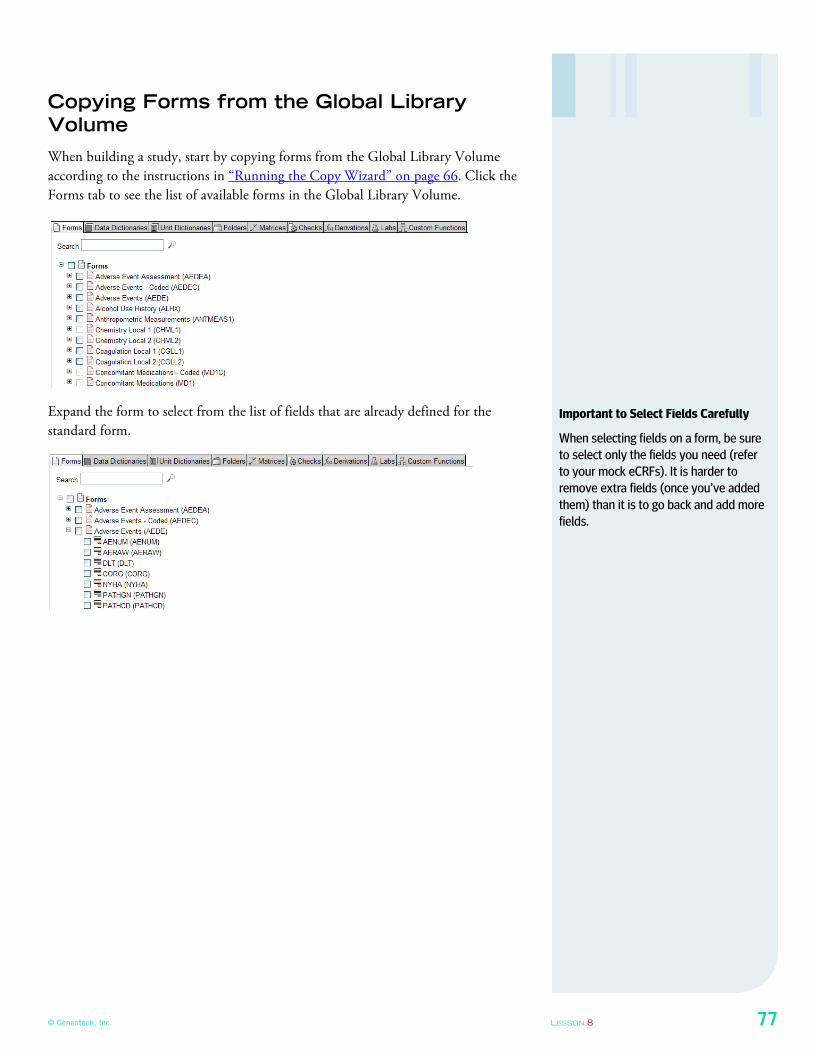
© Genentech, Inc. LESSON 8 77
Copying Forms from the Global Library
Volume
When building a study, start by copying forms from the Global Library Volume
according to the instructions in “Running the Copy Wizard” on page 66. Click the
Forms tab to see the list of available forms in the Global Library Volume.
Expand the form to select from the list of fields that are already defined for the
standard form.Important to Select Fields Carefully
When selecting fields on a form, be sure
to select only the fields you need (refer
to your mock eCRFs). It is harder to
remove extra fields (once you’ve added
them) than it is to go back and add more
fields.
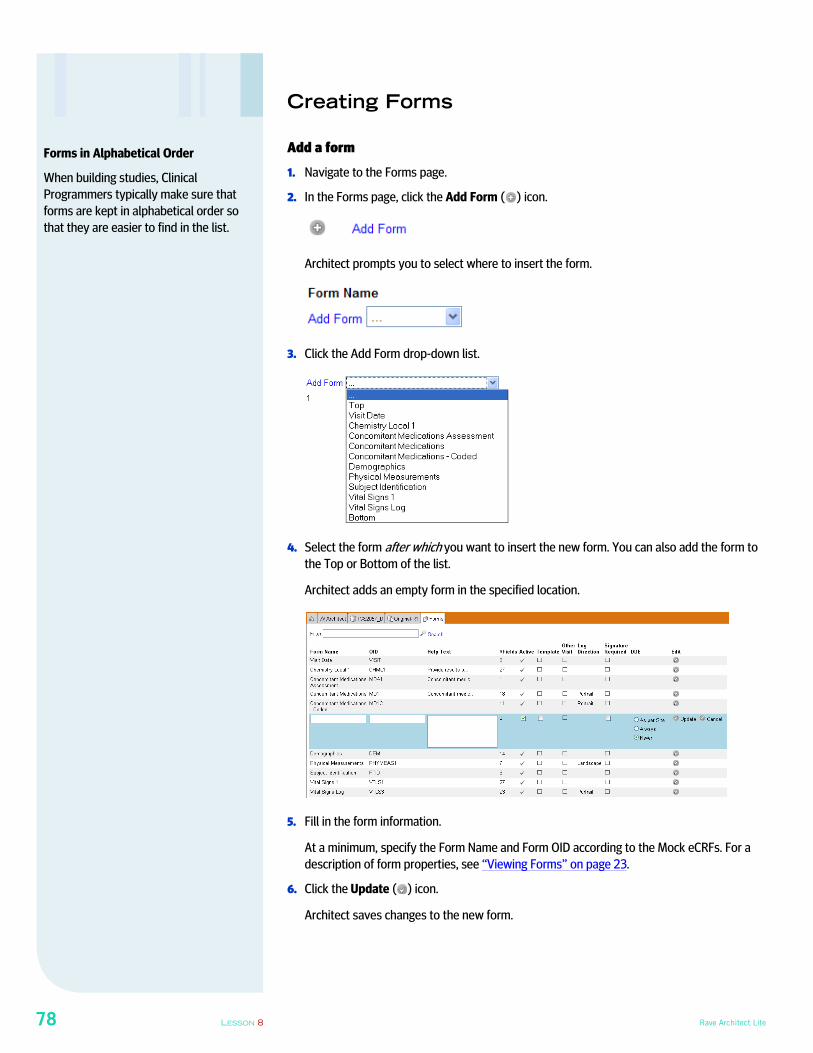
78 LESSON 8 Rave Architect Lite
Creating Forms
Add a form
1. Navigate to the Forms page.
2. In the Forms page, click the Add Form ( ) icon.
Architect prompts you to select where to insert the form.
3. Click the Add Form drop-down list.
4. Select the form after which you want to insert the new form. You can also add the form to
the Top or Bottom of the list.
Architect adds an empty form in the specified location.
5. Fill in the form information.
At a minimum, specify the Form Name and Form OID according to the Mock eCRFs. For a
description of form properties, see “Viewing Forms” on page 23.
6. Click the Update ( ) icon.
Architect saves changes to the new form.
Forms in Alphabetical Order
When building studies, Clinical
Programmers typically make sure that
forms are kept in alphabetical order so
that they are easier to find in the list.

© Genentech, Inc. LESSON 8 79
Editing Form Settings
Edit form settings
1. Navigate to the Forms page.
2. Click the Edit ( ) icon next to the form that you want to edit.
Architect displays the form row with editable fields.
3. Edit the fields that you want to change.
For example, if you wanted to inactivate a form, you would simply clear (uncheck) the
Active check box.
4. Click the Update ( ) icon.
Architect saves changes to the form.
Deleting Forms
At Roche, once a study has gone live, a form can not be deleted—it must be
inactivated instead if it will no longer be used in the study.
Adding Fields to a Form
As mentioned in “About Fields” on page 39, a field is a place on a form where data
gets entered on an eCRF in the EDC module. Fields and field properties are specified
in the Mock eCRF document.
Changing a Form OID Value
If you are trying to change the Form OID
value, you must first create a new form
with the new value, then inactivate the
old form.
Field OIDs and “Ghost OIDs”
If you delete a field and then proceed to
add a new field and use the search filter,
the name of the deleted field appears in
the list. It will show up in the clinical view
tables for the data set where it was
originally defined. This is the reason for
P1 and P2.
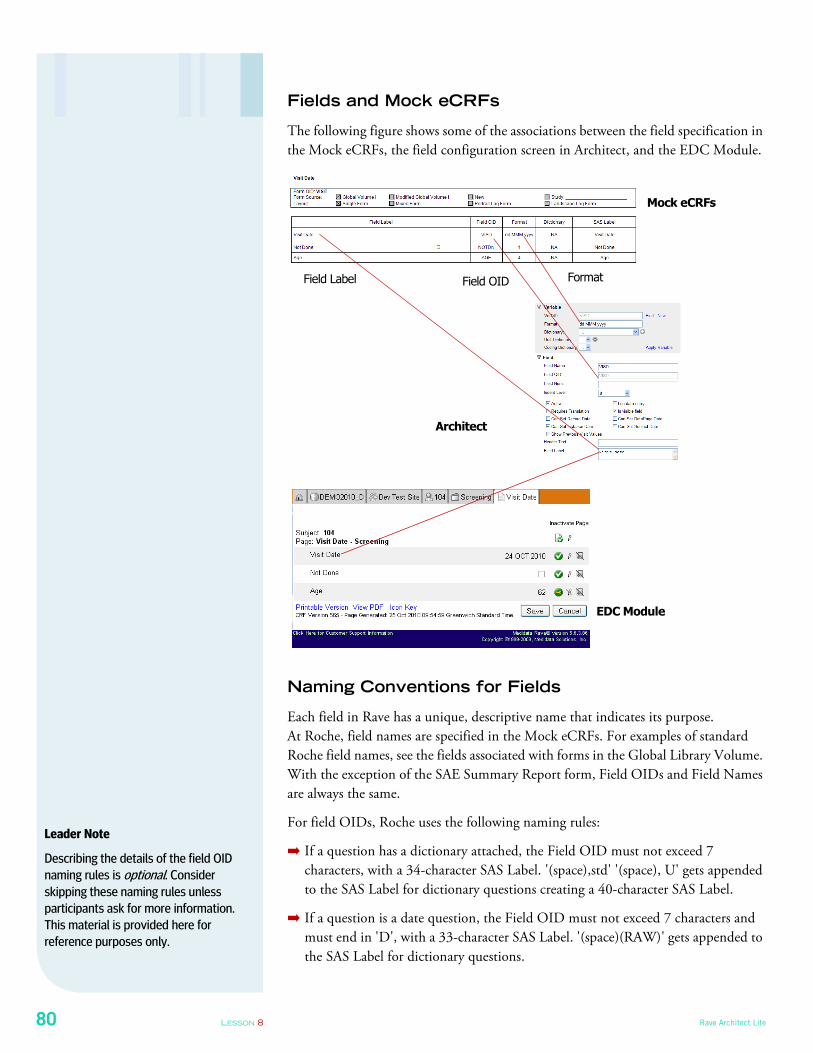
80 LESSON 8 Rave Architect Lite
Fields and Mock eCRFs
The following figure shows some of the associations between the field specification in
the Mock eCRFs, the field configuration screen in Architect, and the EDC Module.
Naming Conventions for Fields
Each field in Rave has a unique, descriptive name that indicates its purpose.
At Roche, field names are specified in the Mock eCRFs. For examples of standard
Roche field names, see the fields associated with forms in the Global Library Volume.
With the exception of the SAE Summary Report form, Field OIDs and Field Names
are always the same.
For field OIDs, Roche uses the following naming rules:
➡ If a question has a dictionary attached, the Field OID must not exceed 7
characters, with a 34-character SAS Label. '(space),std' '(space), U' gets appended
to the SAS Label for dictionary questions creating a 40-character SAS Label.
➡ If a question is a date question, the Field OID must not exceed 7 characters and
must end in 'D', with a 33-character SAS Label. '(space)(RAW)' gets appended to
the SAS Label for dictionary questions.
Field Label Field OID Format
EDC Module
Architect
Mock eCRFs
Leader Note
Describing the details of the field OID
naming rules is optional. Consider skipping these naming rules unless
participants ask for more information.
This material is provided here for
reference purposes only.
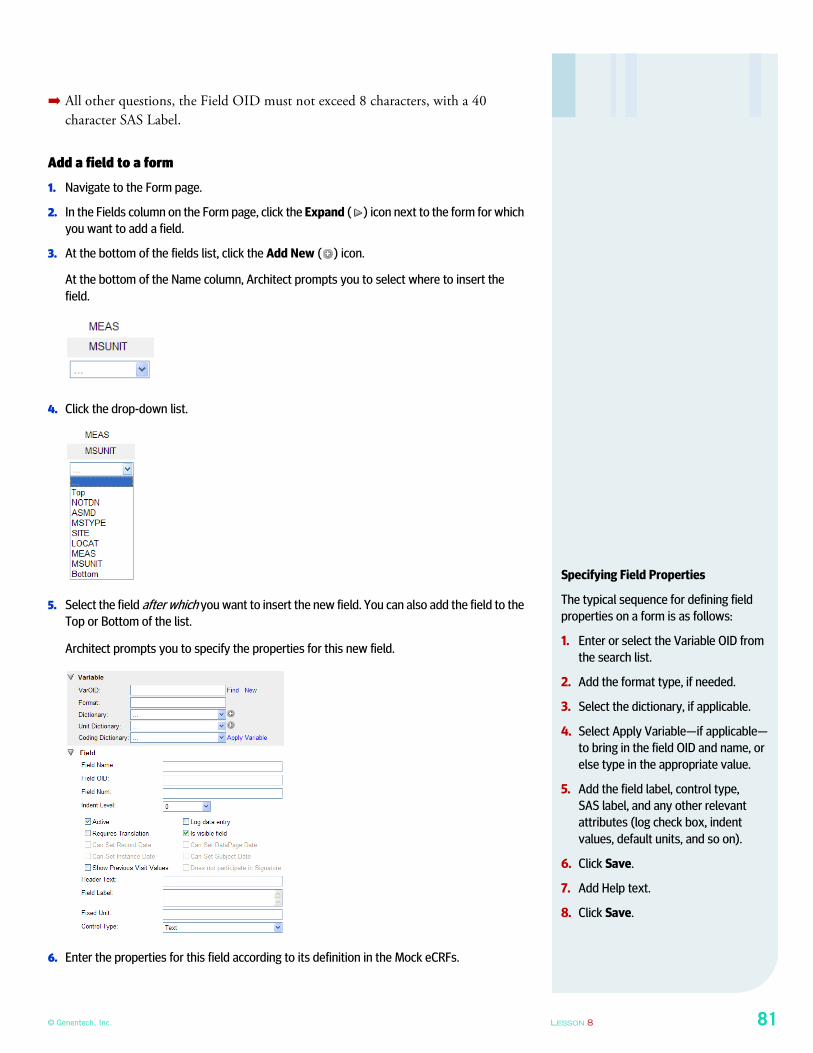
© Genentech, Inc. LESSON 8 81
➡ All other questions, the Field OID must not exceed 8 characters, with a 40
character SAS Label.
Add a field to a form
1. Navigate to the Form page.
2. In the Fields column on the Form page, click the Expand ( ) icon next to the form for which
you want to add a field.
3. At the bottom of the fields list, click the Add New ( ) icon.
At the bottom of the Name column, Architect prompts you to select where to insert the
field.
4. Click the drop-down list.
5. Select the field after which you want to insert the new field. You can also add the field to the Top or Bottom of the list.
Architect prompts you to specify the properties for this new field.
6. Enter the properties for this field according to its definition in the Mock eCRFs.
Specifying Field Properties
The typical sequence for defining field
properties on a form is as follows:
1. Enter or select the Variable OID from
the search list.
2. Add the format type, if needed.
3. Select the dictionary, if applicable.
4. Select Apply Variable—if applicable—
to bring in the field OID and name, or
else type in the appropriate value.
5. Add the field label, control type,
SAS label, and any other relevant
attributes (log check box, indent
values, default units, and so on).
6. Click Save.
7. Add Help text.
8. Click Save.
82 LESSON 8 Rave Architect Lite
For information about field properties, see “Exploring Fields on a Form” on page 39.
7. Click the Save ( ) icon.
Working with Dictionaries
As described in “Viewing Dictionaries” on page 26, a dictionary is a set of values
(entries) that are associated with a single data point. Dictionaries and their entries are
defined in the Mock eCRFs.
Naming Conventions for Dictionaries and Entries
At Roche, data dictionary names consist of:
DescriptiveName_V#
where
➡ DescriptiveName is a brief name that indicates the purpose of the dictionary
➡ _V# is the version number of the dictionary being used
Dictionaries in the Global Volume will always be V0. When a dictionary subset is
used in a study, it will be renumbered (V1, V2, V#, etc.) for each version of the
dictionary that is used.
Dictionary entries use:
➡ User Data Strings: Mixed case and any keyboard characters. The values displayed
on the screen in the EDC module in Rave.
➡ Coded Values: All-uppercase characters and no punctuation. Avoid special
characters of any kind in coded values. Coded Values are what is stored. Coded
values are what will be seen on Data Listing Reports, J-Review queries, or any
other report that accesses the data.
Dictionaries and Mock eCRFs
The following figure shows some of the associations between the dictionary
specification in the Mock eCRFs, the field dictionary screen in Architect, and the
EDC Module.
Leader Notes
➡ Demonstrate how to re-use variables
by clicking New to create a new field,
then licking Find to find a field already
used.
➡ Describe when you need to have a
unique variable OID.
➡ Using the Chemistry Local 1 (CHML1)
form, edit the Glucose (GLUC) field
and show the list of pre-defined
analytes that are available for lab
forms. Explain that analytes are
configured using the Rave Lab
Administration module.
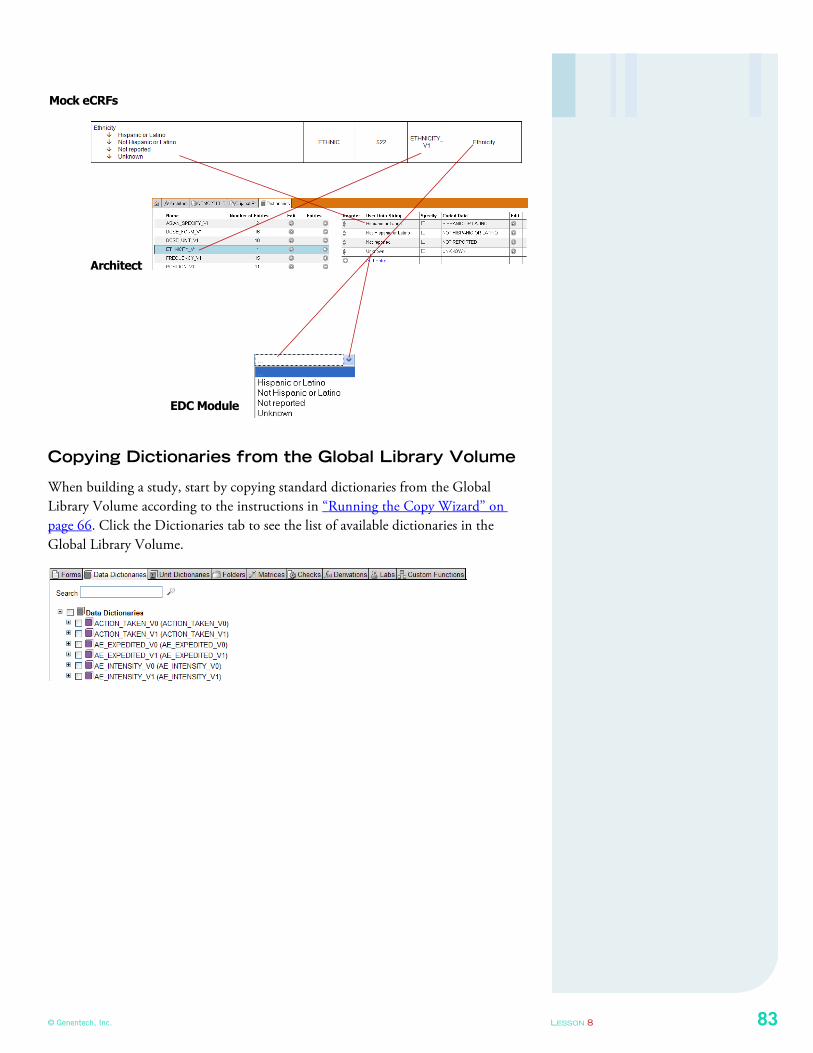
© Genentech, Inc. LESSON 8 83
Copying Dictionaries from the Global Library Volume
When building a study, start by copying standard dictionaries from the Global
Library Volume according to the instructions in “Running the Copy Wizard” on
page 66. Click the Dictionaries tab to see the list of available dictionaries in the
Global Library Volume.
EDC Module
Architect
Mock eCRFs
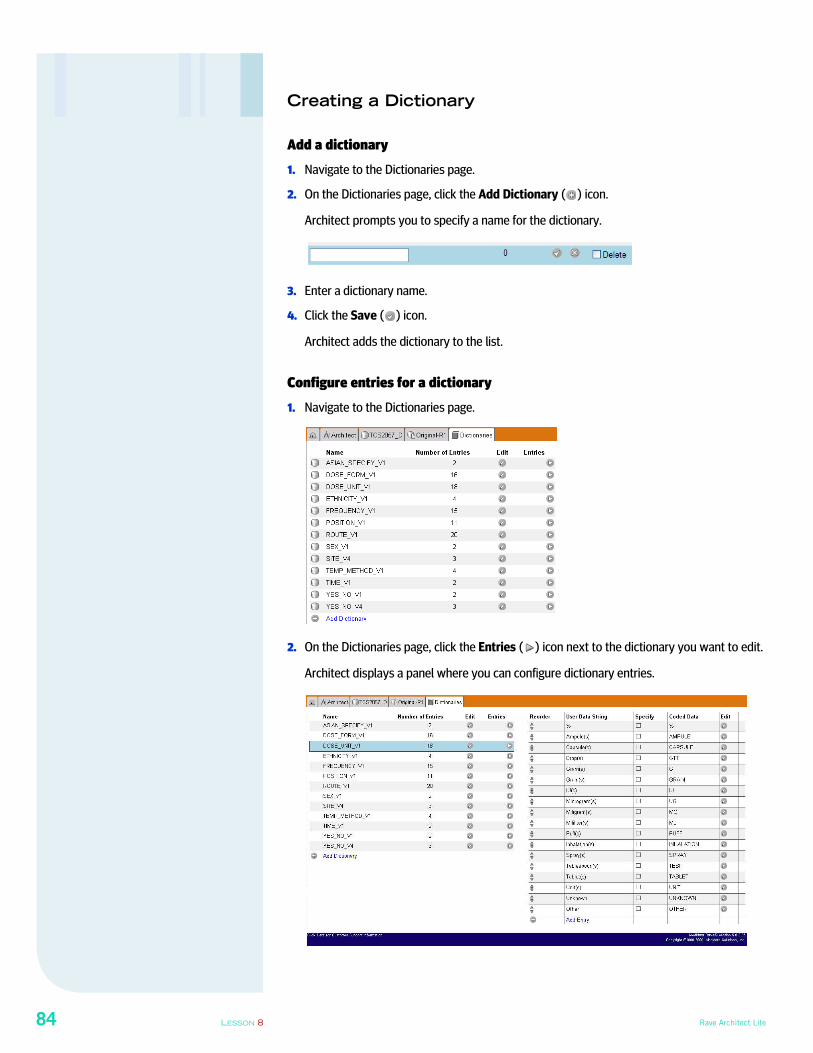
84 LESSON 8 Rave Architect Lite
Creating a Dictionary
Add a dictionary
1. Navigate to the Dictionaries page.
2. On the Dictionaries page, click the Add Dictionary ( ) icon.
Architect prompts you to specify a name for the dictionary.
3. Enter a dictionary name.
4. Click the Save ( ) icon.
Architect adds the dictionary to the list.
Configure entries for a dictionary
1. Navigate to the Dictionaries page.
2. On the Dictionaries page, click the Entries ( ) icon next to the dictionary you want to edit.
Architect displays a panel where you can configure dictionary entries.
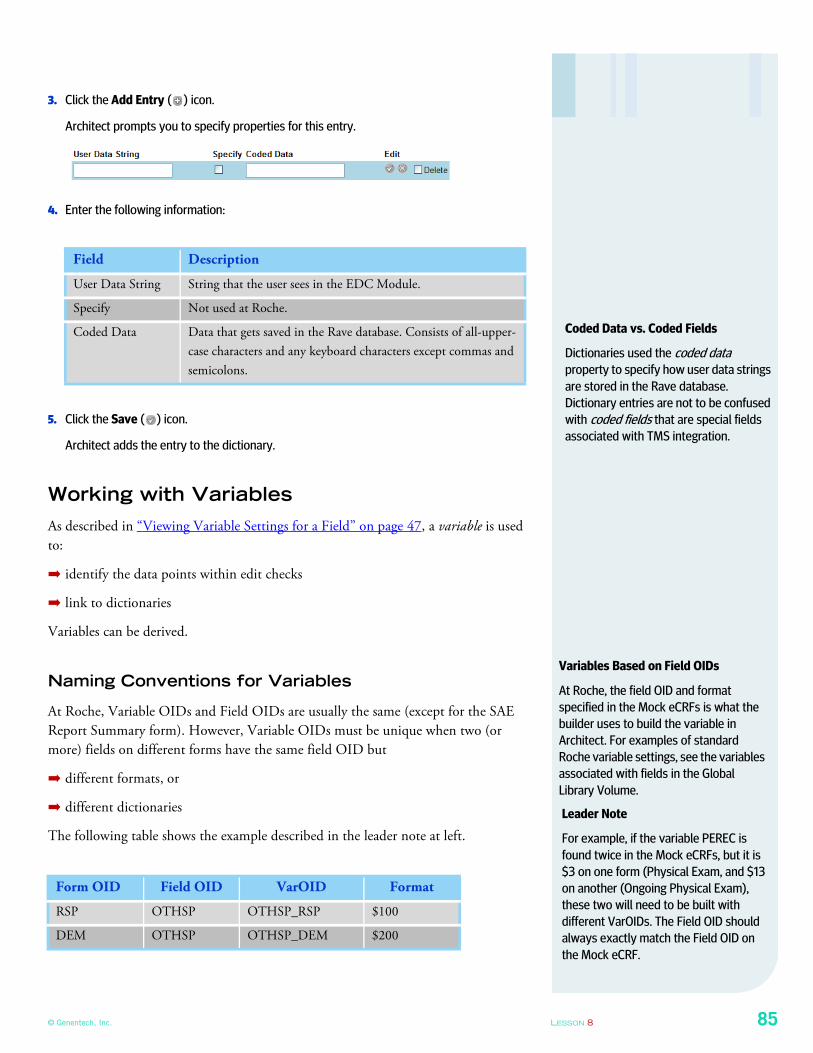
© Genentech, Inc. LESSON 8 85
3. Click the Add Entry ( ) icon.
Architect prompts you to specify properties for this entry.
4. Enter the following information:
5. Click the Save ( ) icon.
Architect adds the entry to the dictionary.
Working with Variables
As described in “Viewing Variable Settings for a Field” on page 47, a variable is used
to:
➡ identify the data points within edit checks
➡ link to dictionaries
Variables can be derived.
Naming Conventions for Variables
At Roche, Variable OIDs and Field OIDs are usually the same (except for the SAE
Report Summary form). However, Variable OIDs must be unique when two (or
more) fields on different forms have the same field OID but
➡ different formats, or
➡ different dictionaries
The following table shows the example described in the leader note at left.
Field Description
User Data String String that the user sees in the EDC Module.
Specify Not used at Roche.
Coded Data Data that gets saved in the Rave database. Consists of all-upper-
case characters and any keyboard characters except commas and
semicolons.
Form OID Field OID VarOID Format
RSP OTHSP OTHSP_RSP $100
DEM OTHSP OTHSP_DEM $200
Coded Data vs. Coded Fields
Dictionaries used the coded data property to specify how user data strings
are stored in the Rave database.
Dictionary entries are not to be confused
with coded fields that are special fields associated with TMS integration.
Variables Based on Field OIDs
At Roche, the field OID and format
specified in the Mock eCRFs is what the
builder uses to build the variable in
Architect. For examples of standard
Roche variable settings, see the variables
associated with fields in the Global
Library Volume.
Leader Note
For example, if the variable PEREC is
found twice in the Mock eCRFs, but it is
$3 on one form (Physical Exam, and $13
on another (Ongoing Physical Exam),
these two will need to be built with
different VarOIDs. The Field OID should
always exactly match the Field OID on
the Mock eCRF.
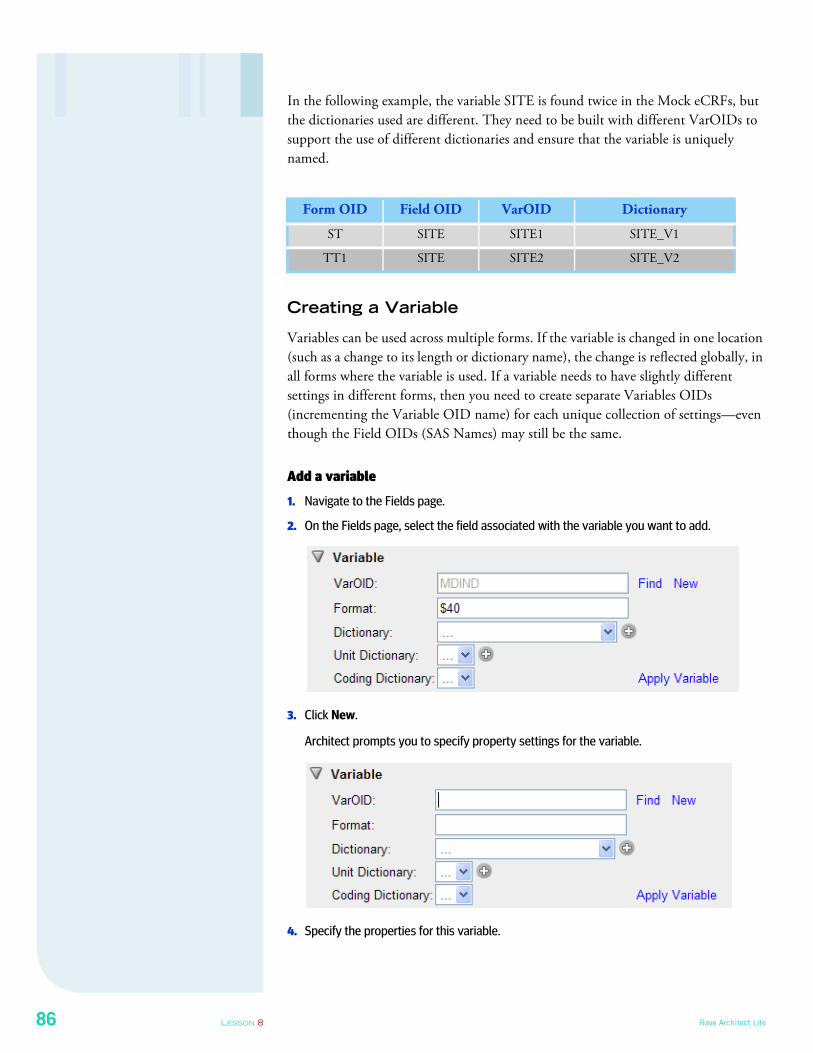
86 LESSON 8 Rave Architect Lite
In the following example, the variable SITE is found twice in the Mock eCRFs, but
the dictionaries used are different. They need to be built with different VarOIDs to
support the use of different dictionaries and ensure that the variable is uniquely
named.
Creating a Variable
Variables can be used across multiple forms. If the variable is changed in one location
(such as a change to its length or dictionary name), the change is reflected globally, in
all forms where the variable is used. If a variable needs to have slightly different
settings in different forms, then you need to create separate Variables OIDs
(incrementing the Variable OID name) for each unique collection of settings—even
though the Field OIDs (SAS Names) may still be the same.
Add a variable
1. Navigate to the Fields page.
2. On the Fields page, select the field associated with the variable you want to add.
3. Click New.
Architect prompts you to specify property settings for the variable.
4. Specify the properties for this variable.
Form OID Field OID VarOID Dictionary
ST SITE SITE1 SITE_V1
TT1 SITE SITE2 SITE_V2
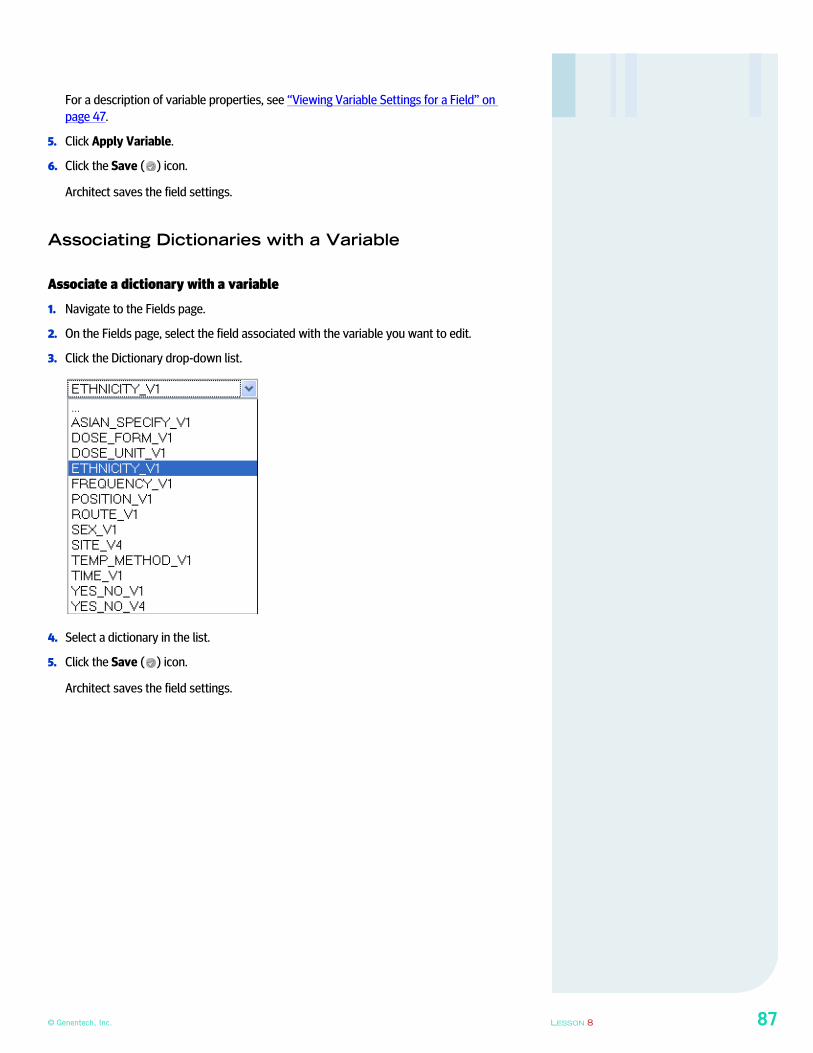
© Genentech, Inc. LESSON 8 87
For a description of variable properties, see “Viewing Variable Settings for a Field” on
page 47.
5. Click Apply Variable.
6. Click the Save ( ) icon.
Architect saves the field settings.
Associating Dictionaries with a Variable
Associate a dictionary with a variable
1. Navigate to the Fields page.
2. On the Fields page, select the field associated with the variable you want to edit.
3. Click the Dictionary drop-down list.
4. Select a dictionary in the list.
5. Click the Save ( ) icon.
Architect saves the field settings.
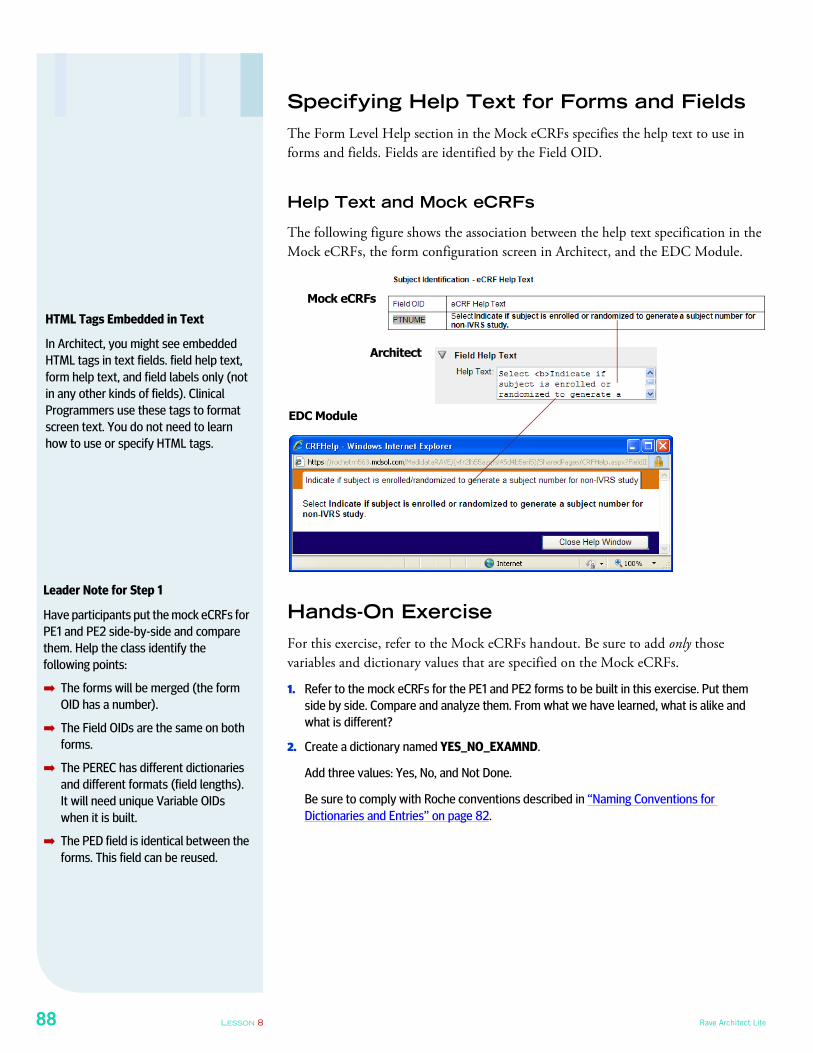
88 LESSON 8 Rave Architect Lite
Specifying Help Text for Forms and Fields
The Form Level Help section in the Mock eCRFs specifies the help text to use in
forms and fields. Fields are identified by the Field OID.
Help Text and Mock eCRFs
The following figure shows the association between the help text specification in the
Mock eCRFs, the form configuration screen in Architect, and the EDC Module.
Hands-On Exercise
For this exercise, refer to the Mock eCRFs handout. Be sure to add only those
variables and dictionary values that are specified on the Mock eCRFs.
1. Refer to the mock eCRFs for the PE1 and PE2 forms to be built in this exercise. Put them
side by side. Compare and analyze them. From what we have learned, what is alike and
what is different?
2. Create a dictionary named YES_NO_EXAMND.
Add three values: Yes, No, and Not Done.
Be sure to comply with Roche conventions described in “Naming Conventions for
Dictionaries and Entries” on page 82.
HTML Tags Embedded in Text
In Architect, you might see embedded
HTML tags in text fields. field help text,
form help text, and field labels only (not
in any other kinds of fields). Clinical
Programmers use these tags to format
screen text. You do not need to learn
how to use or specify HTML tags.
EDC Module
Mock eCRFs
Architect
Leader Note for Step 1
Have participants put the mock eCRFs for
PE1 and PE2 side-by-side and compare
them. Help the class identify the
following points:
➡ The forms will be merged (the form
OID has a number).
➡ The Field OIDs are the same on both
forms.
➡ The PEREC has different dictionaries
and different formats (field lengths).
It will need unique Variable OIDs
when it is built.
➡ The PED field is identical between the
forms. This field can be reused.

© Genentech, Inc. LESSON 8 89
3. Following along with the instructor, build the Physical Exam Form (PE1) from scratch
according to the Mock eCRF handout. Enter the fields in the same sequential order as they
appear on the mock eCRF. Be sure to specify:
➡ Form settings—Form OID and Form Level Help.
➡ Attributes for all fields—Field OID, Field Label, Format, SAS Label, and Field Level Help.
➡ Associate the PEREC variable with the YES_NO_V1 dictionary that was automatically
copied over from the Global Library Volume. For the Control Type, click DropDownList.
➡ For the PED date field, select the DateTime Control Type, and specify the following SAS
format value: ‘Date9.’ Be sure to include the period as part of the value. This will not be
specified in the Mock eCRFs but is part of the build convention at Roche.
➡ Specify an Indent of 2 (this is the convention at Roche for indenting labels).
➡ Save your changes and preview the form. The preview appears in a separate browser
window.
4. Build the Ongoing Physical Exam form (form OID is PE2) using the same form settings and
field OIDs as in the instructor demo.
➡ Change the label of the PEREC field to the specifications on the Mock eCRF.
➡ Create a new variable (variable OID: PEREC2) for the PEREC field.
Note: Use PEREC for the field OID. This is because the dictionary used here differs from
the dictionary used in PE1, and because the field is longer. Any attribute that is different
between a re-used field OID in a study will require a new variable OID to be used.
➡ Be sure to review your build of the PE1 form to ensure that you did not accidentally
change the dictionary associated with the PEREC field on that form.
➡ Associate the PEREC2 variable with the YES_NO_EXAMND dictionary.
➡ For the Control Type, click DropDownList.
➡ For the PED field, add the PED variable by finding and selecting it. Click Find, select the
Physical Exam form, select the PED field, select the PED variable, and click Select. This
date requires the following SAS format (include the period): Date9.
5. Preview the form. The preview appears in a separate browser window.
Example of a Study-specific Form
The Physical Exam (PE1) form is an
example of a study-specific form, which
is why you are building it from scratch.
Renaming the Variable OID
In step 2, you rename a variable OID but
reuse the field name and field OID. This is
because renaming the variable OID will
make the variable unique within the Rave
system. Reusing the Field OID will affect
how the data appears upon extract. This
can be important if the intent is to merge
the data between forms.
Variables and Dictionaries
We use different variable OIDs for fields
that have the same variable name
because the dictionary attached to a
variable is one of its attributes. The same
dictionary must be used in every place
where the variable is used in a study. If
you try to change the dictionary in one
place where the variable is used, it will
change the dictionary every place that
variable is used. This is why different
variables are needed.

90 LESSON 8 Rave Architect Lite
6. Edit the Concomitant Medications (MD1) (Log) Form.
a. Add a Notes (MDNOTES) field according to the specifications on the Mock eCRF
handout.
b. Preview the form.
c. For the MD1 form, change the Log Direction to Landscape, then preview the form. What
is the difference in how it is displayed? Change it back to Portrait to match the mock
eCRFs.
Leader Note
Ask the class: If they add a field to a
standard form, what are the
consequences to their UAT plan?
© Genentech, Inc. LESSON 9 91
LESSON 9
CREATING FOLDERS
This lesson shows you how to create folders using the Folders module in Architect.
It covers the following topics:
➡ About Folders (see page 91)
➡ Copying Folders from the Global Library Volume (see page 93)
➡ Copying Folders from Another Study (see page 94)
About Folders
As described in “Viewing Folders” on page 24, a folder in Rave is a mechanism for
organizing eCRFs into logical groups, such as by subject visit. At Roche, folders
represent visits specified in the study protocol and defined in the Visit Form Matrix.
Each visit has its own folder in Rave that contains all the necessary forms associated
with that visit. Unscheduled events that are not associated with a particular visit—
such as Adverse Events—have their own unique folders. A folder can contain eCRFs
and other folders.
Where are Folders Specified?
Folders are specified in the Primary
Matrix and Allow Add Matrices tabs in
the SLACS spreadsheet. A
comprehensive list is specified in the
Visit Calendar and Add Events section of
the Study Configuration Document.
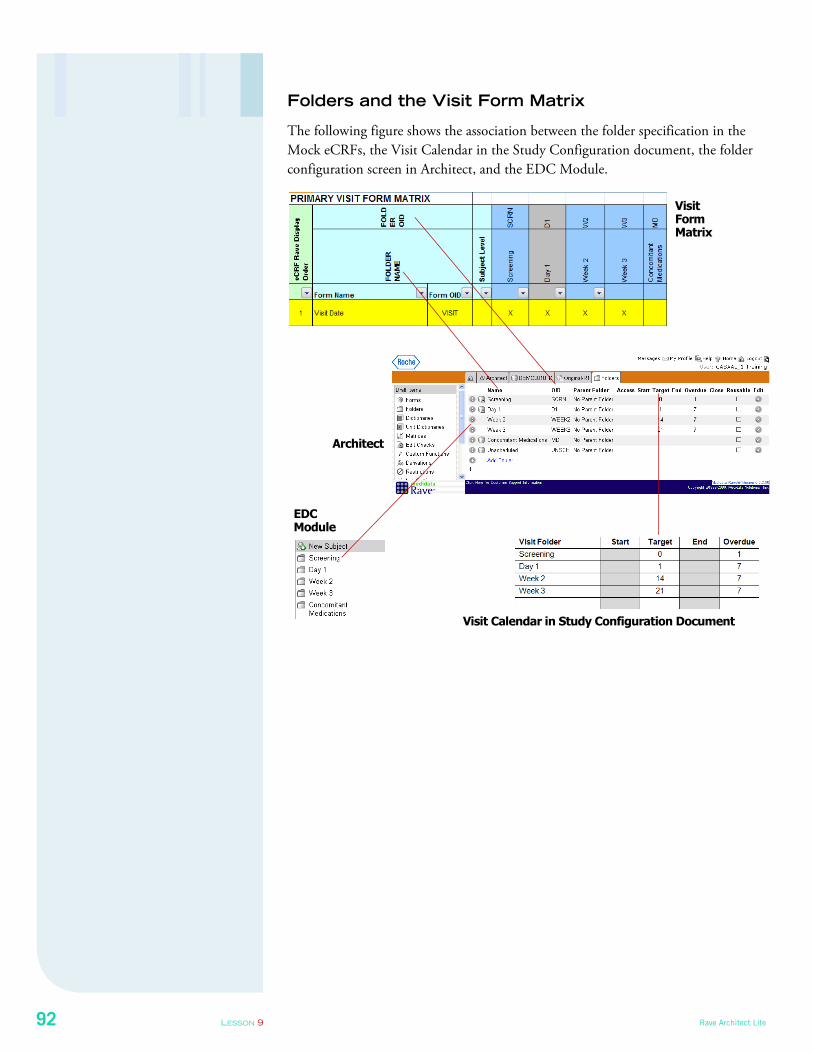
92 LESSON 9 Rave Architect Lite
Folders and the Visit Form Matrix
The following figure shows the association between the folder specification in the
Mock eCRFs, the Visit Calendar in the Study Configuration document, the folder
configuration screen in Architect, and the EDC Module.
EDC Module
Visit Form Matrix
Architect
Visit Calendar in Study Configuration Document
© Genentech, Inc. LESSON 9 93
Naming Conventions for Folders
Each folder in Rave has a unique, descriptive name that indicates its purpose.
At Roche, folder names are specified in the Visit Form Matrix. For examples of
standard Roche folder names, see the folders in the Global Library Volume.
Roche uses the following guidelines for folder names:
➡ Folder names have a maximum length of 50 characters and can have both upper
and lower case characters.
➡ Folder names cannot contain underscores, but may contain spaces or dashes.
No more than one space or one dash is allowed between text characters. No spaces
should be placed around dashes. No other special characters are allowed.
➡ If word abbreviations are required to conform to the 50 character limit, use
abbreviations that are recognizable to others.
➡ Refer to the Table of Standard Abbreviations and a Table of Standard Folder
Names and Folder OIDs in the Biometric Global Process Library. Double-check
the standard to see whether the folder name has already been approved.
Naming Conventions for Folder OIDs
Each folder has a unique folder object ID (OID) that is brief but descriptive.
At Roche, folder OIDs are specified in the Visit Form Matrix. For examples of
standard Roche folder OIDs, see the folders in the Global Library Volume.
Roche uses the following guidelines for folder OIDs:
➡ Folder OIDs have a maximum length of 10 characters and must contain all upper
case text. Folder OIDs cannot contain underscores, spaces, dashes, or any other
special characters. General conventions for new folder OIDs:
➡ Use the first letter of the event name followed by the number of the event.
Example: Week 1 Day 3 would be W1D3.
➡ If the event is a single word it can be abbreviated.
Example: Unscheduled would be UNSCH.
➡ If the event is multiple words, use the first letter of each word.
Example: End of Study would be EOS.
➡ Refer to the Table of Standard Folder Names and Folder OIDs in the Biometric
Global Process Library.
Copying Folders from the Global Library
Volume
When building a study, start by copying standard folders from the Global Library
Volume according to the instructions in “Running the Copy Wizard” on page 66.
Click the Folders tab to see the list of available folders in the Global Library Volume.
Conventions for Folder OIDs
Refer to the reference documents in the
Biometrics Global Library for the most
recent version of the naming conventions
for folder OIDs.
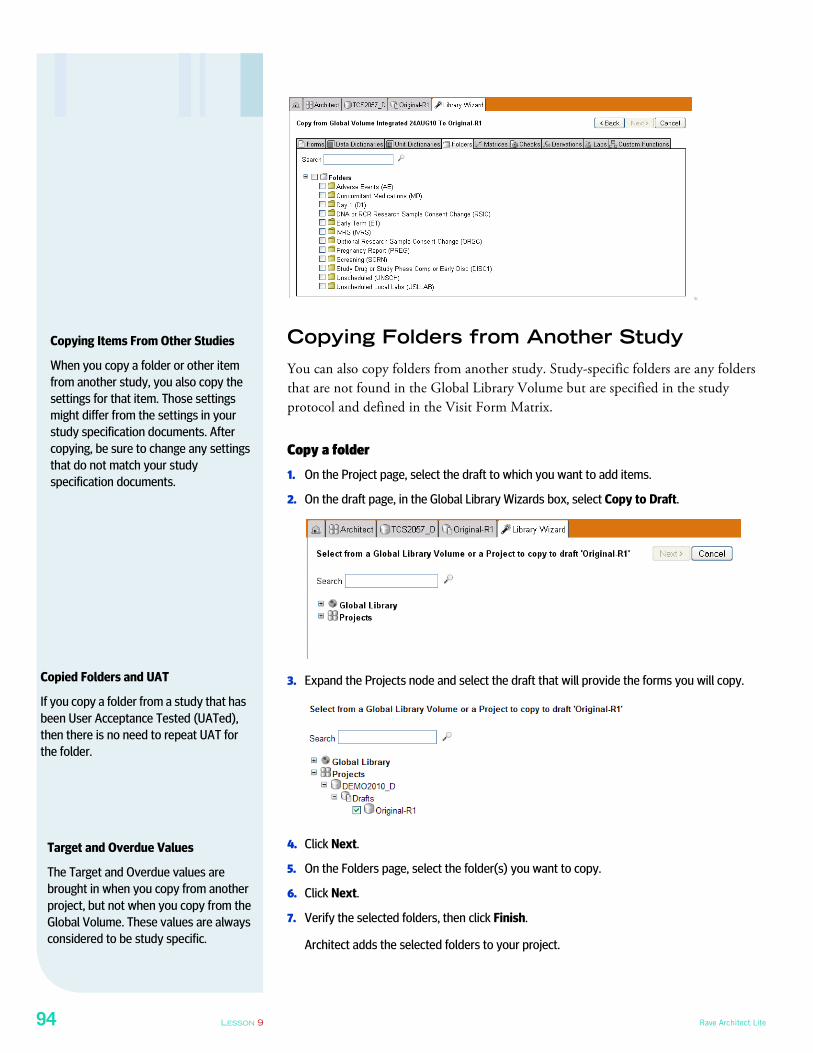
94 LESSON 9 Rave Architect Lite
722
Copying Folders from Another Study
You can also copy folders from another study. Study-specific folders are any folders
that are not found in the Global Library Volume but are specified in the study
protocol and defined in the Visit Form Matrix.
Copy a folder
1. On the Project page, select the draft to which you want to add items.
2. On the draft page, in the Global Library Wizards box, select Copy to Draft.
3. Expand the Projects node and select the draft that will provide the forms you will copy.
4. Click Next.
5. On the Folders page, select the folder(s) you want to copy.
6. Click Next.
7. Verify the selected folders, then click Finish.
Architect adds the selected folders to your project.
Copying Items From Other Studies
When you copy a folder or other item
from another study, you also copy the
settings for that item. Those settings
might differ from the settings in your
study specification documents. After
copying, be sure to change any settings
that do not match your study
specification documents.
Copied Folders and UAT
If you copy a folder from a study that has
been User Acceptance Tested (UATed),
then there is no need to repeat UAT for
the folder.
Target and Overdue Values
The Target and Overdue values are
brought in when you copy from another
project, but not when you copy from the
Global Volume. These values are always
considered to be study specific.
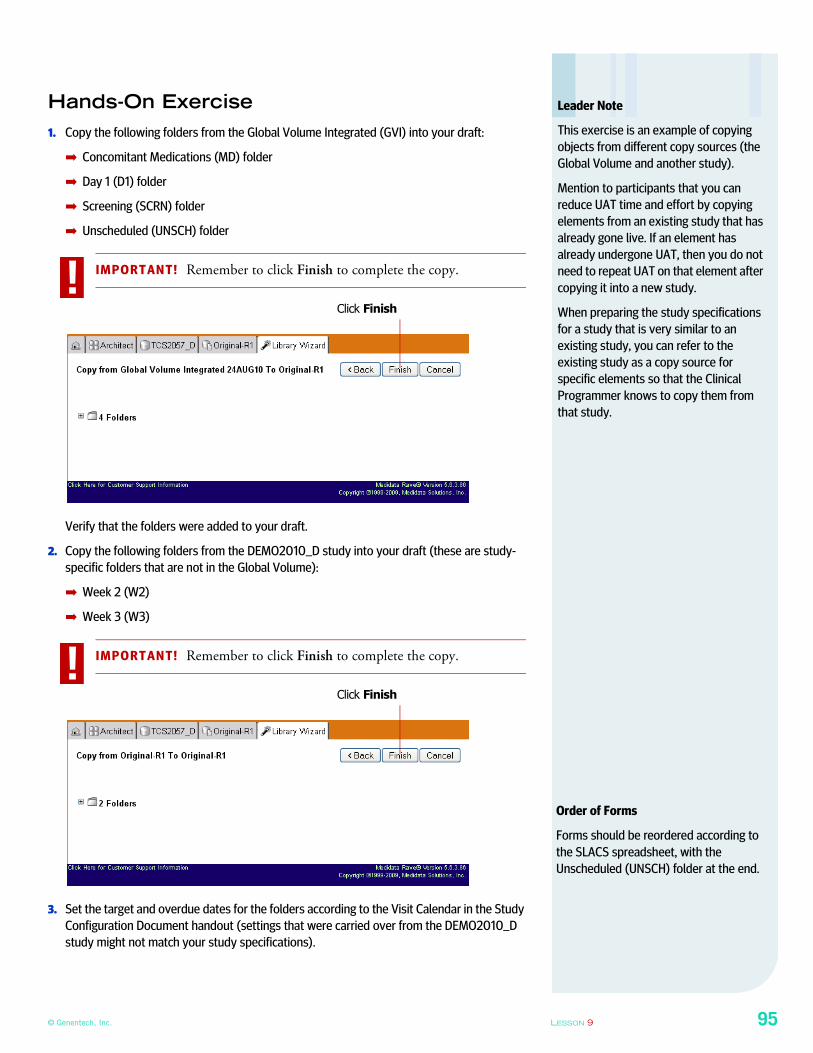
© Genentech, Inc. LESSON 9 95
Hands-On Exercise
1. Copy the following folders from the Global Volume Integrated (GVI) into your draft:
➡ Concomitant Medications (MD) folder
➡ Day 1 (D1) folder
➡ Screening (SCRN) folder
➡ Unscheduled (UNSCH) folder
IMPORTANT! Remember to click Finish to complete the copy.
Verify that the folders were added to your draft.
2. Copy the following folders from the DEMO2010_D study into your draft (these are study-
specific folders that are not in the Global Volume):
➡ Week 2 (W2)
➡ Week 3 (W3)
IMPORTANT! Remember to click Finish to complete the copy.
3. Set the target and overdue dates for the folders according to the Visit Calendar in the Study
Configuration Document handout (settings that were carried over from the DEMO2010_D
study might not match your study specifications).
Leader Note
This exercise is an example of copying
objects from different copy sources (the
Global Volume and another study).
Mention to participants that you can
reduce UAT time and effort by copying
elements from an existing study that has
already gone live. If an element has
already undergone UAT, then you do not
need to repeat UAT on that element after
copying it into a new study.
When preparing the study specifications
for a study that is very similar to an
existing study, you can refer to the
existing study as a copy source for
specific elements so that the Clinical
Programmer knows to copy them from
that study.
!Click Finish
!Click Finish
Order of Forms
Forms should be reordered according to
the SLACS spreadsheet, with the
Unscheduled (UNSCH) folder at the end.
96 LESSON 10 Rave Architect Lite
LESSON 10
CREATING MATRICES
This lesson shows you how to create and configure matrices using the Matrix module
in Architect. It covers the following topics:
➡ Copying Matrices from the Global Library Volume (see page 98)
➡ Creating a Matrix (Unscheduled Visit) (see page 100)
About Matrices
As described in “Viewing Matrices” on page 28, a matrix defines which folders
belong to which forms in a study. At Roche, matrices are built according to the
study’s Visit Form Matrix and documented in the SLACS spreadsheet.
Standard Matrices
Matrices at Roche consist of the following standard types:
Matrix Type Description
Primary Default matrix that is automatically created when a new subject is
added.
Add Event Allows for adding more folders upon request, such as for unscheduled
visits (sites can add visits manually from a drop-down list). The matrix
should be configured to “allow add” and have a minimum of one (if the
folder should be added only once per subject) or a maximum of 99.
Master matrix Used to generate blank eCRFs and PDF files for annotated CRFs. Spec-
ifies the display order and identifies subject-level forms. The GVI
includes a Master Form matrix.
Study-specific
Matrices
Used when you have two different cohorts in a single study. Each
cohort uses a different matrix. Typical situations for using study-specific
matrices include:
■ multi-arm study designs with a matrix for each treatment arm
■ very long studies, such as oncology studies where subject survival is
the end point. Visits can be added in blocks as subjects progress
throughout the study rather than all at once.
Study-specific matrices do not exist in the Global Volume—if specified
in the SLACs spreadsheet for a study, they need to be created by the
Clinical Programmer.
Where are Matrices Specified?
Matrices are specified in a study’s Visit
Form Matrix and documented as tabs in
the SLACs spreadsheet.
Matrices in Every Study
Every EDC study for a Roche-sponsored
clinical trial has the following standard
matrices:
➡ Primary Matrix
➡ Unscheduled
➡ DNA Research Sample Consent
Change
➡ Early Term
➡ Pregnancy Report
➡ Master Matrix
Most studies have additional study-
specific matrices added by the system
through form logic and edit checks.
Leader Note—Master Matrix
For the master matrix, compare system-
generated PDF eCRFs to old hand-written
annotated paper CRFs. The system
generates both blank and annotated
versions for the study records.
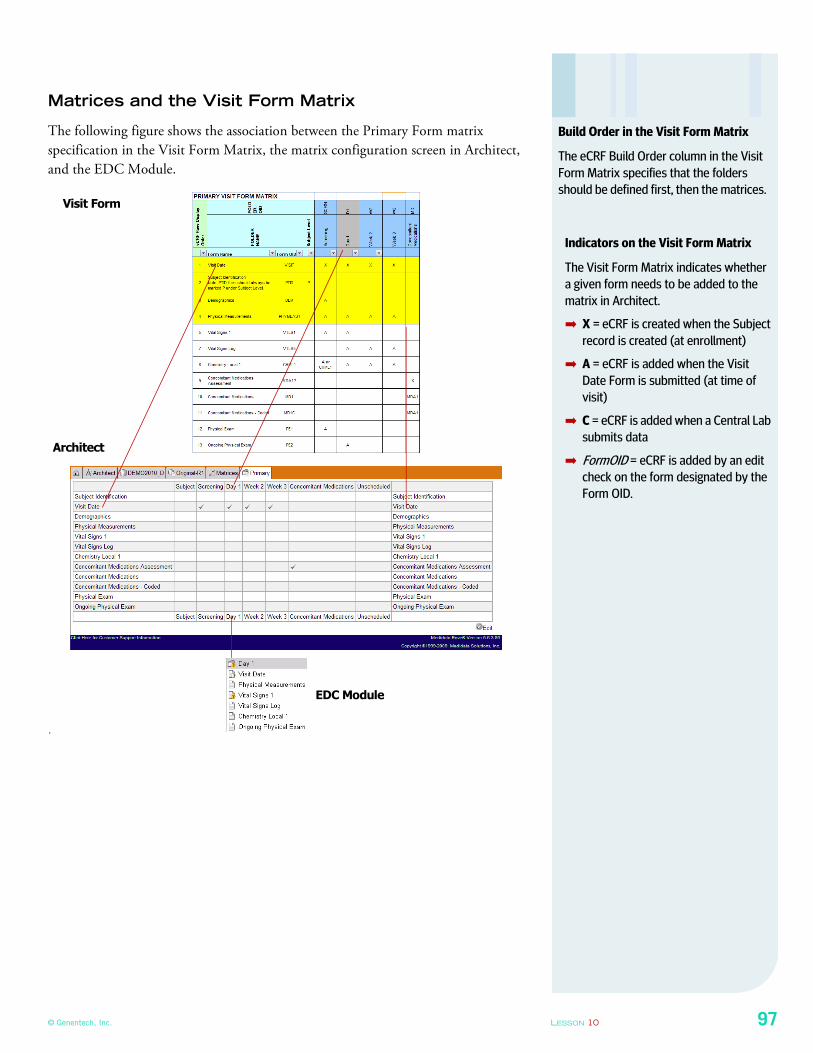
© Genentech, Inc. LESSON 10 97
Matrices and the Visit Form Matrix
The following figure shows the association between the Primary Form matrix
specification in the Visit Form Matrix, the matrix configuration screen in Architect,
and the EDC Module.
.
Build Order in the Visit Form Matrix
The eCRF Build Order column in the Visit
Form Matrix specifies that the folders
should be defined first, then the matrices.
Indicators on the Visit Form Matrix
The Visit Form Matrix indicates whether
a given form needs to be added to the
matrix in Architect.
➡ X = eCRF is created when the Subject
record is created (at enrollment)
➡ A = eCRF is added when the Visit
Date Form is submitted (at time of
visit)
➡ C = eCRF is added when a Central Lab
submits data
➡ FormOID = eCRF is added by an edit check on the form designated by the
Form OID.
EDC Module
Visit Form
Architect
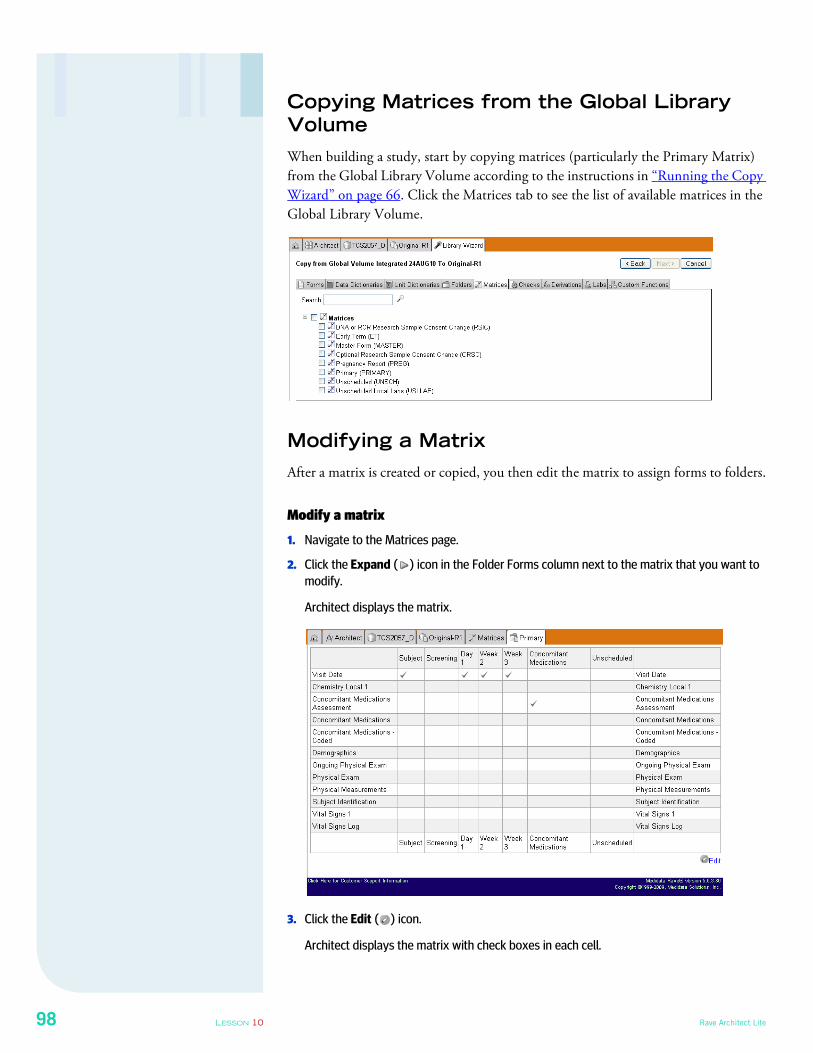
98 LESSON 10 Rave Architect Lite
Copying Matrices from the Global Library
Volume
When building a study, start by copying matrices (particularly the Primary Matrix)
from the Global Library Volume according to the instructions in “Running the Copy
Wizard” on page 66. Click the Matrices tab to see the list of available matrices in the
Global Library Volume.
Modifying a Matrix
After a matrix is created or copied, you then edit the matrix to assign forms to folders.
Modify a matrix
1. Navigate to the Matrices page.
2. Click the Expand ( ) icon in the Folder Forms column next to the matrix that you want to
modify.
Architect displays the matrix.
3. Click the Edit ( ) icon.
Architect displays the matrix with check boxes in each cell.
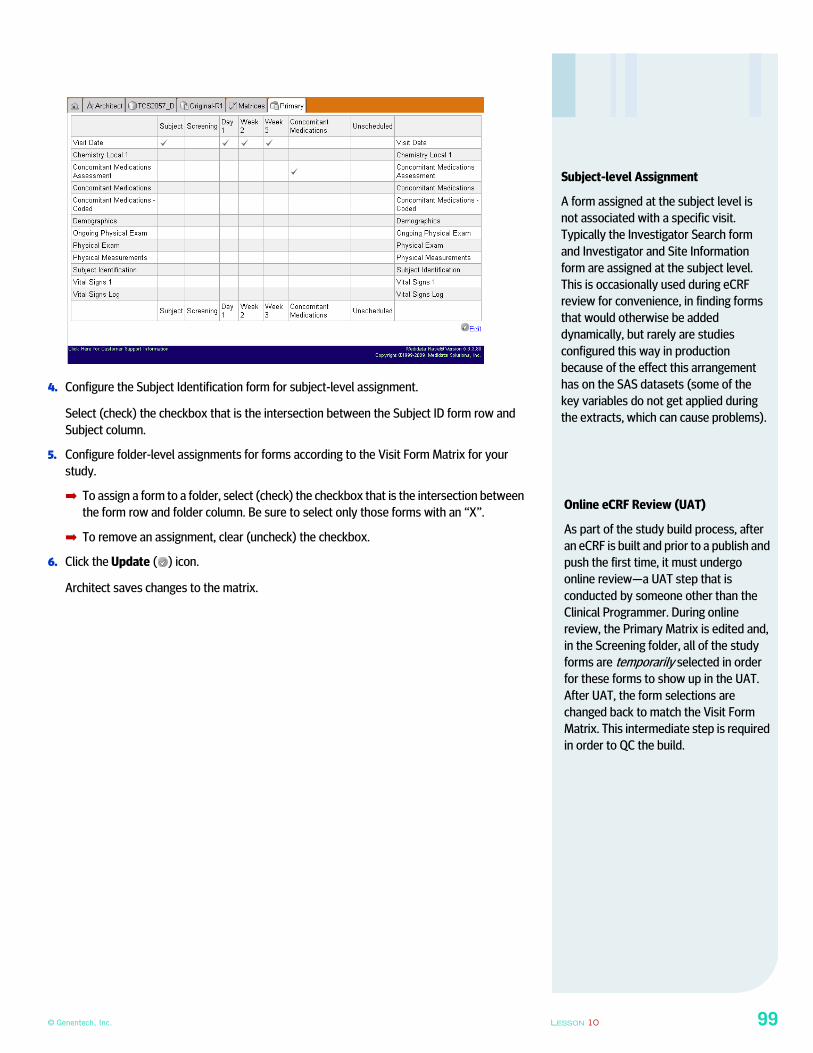
© Genentech, Inc. LESSON 10 99
4. Configure the Subject Identification form for subject-level assignment.
Select (check) the checkbox that is the intersection between the Subject ID form row and
Subject column.
5. Configure folder-level assignments for forms according to the Visit Form Matrix for your
study.
➡ To assign a form to a folder, select (check) the checkbox that is the intersection between
the form row and folder column. Be sure to select only those forms with an “X”.
➡ To remove an assignment, clear (uncheck) the checkbox.
6. Click the Update ( ) icon.
Architect saves changes to the matrix.
Subject-level Assignment
A form assigned at the subject level is
not associated with a specific visit.
Typically the Investigator Search form
and Investigator and Site Information
form are assigned at the subject level.
This is occasionally used during eCRF
review for convenience, in finding forms
that would otherwise be added
dynamically, but rarely are studies
configured this way in production
because of the effect this arrangement
has on the SAS datasets (some of the
key variables do not get applied during
the extracts, which can cause problems).
Online eCRF Review (UAT)
As part of the study build process, after
an eCRF is built and prior to a publish and
push the first time, it must undergo
online review—a UAT step that is
conducted by someone other than the
Clinical Programmer. During online
review, the Primary Matrix is edited and,
in the Screening folder, all of the study
forms are temporarily selected in order for these forms to show up in the UAT.
After UAT, the form selections are
changed back to match the Visit Form
Matrix. This intermediate step is required
in order to QC the build.
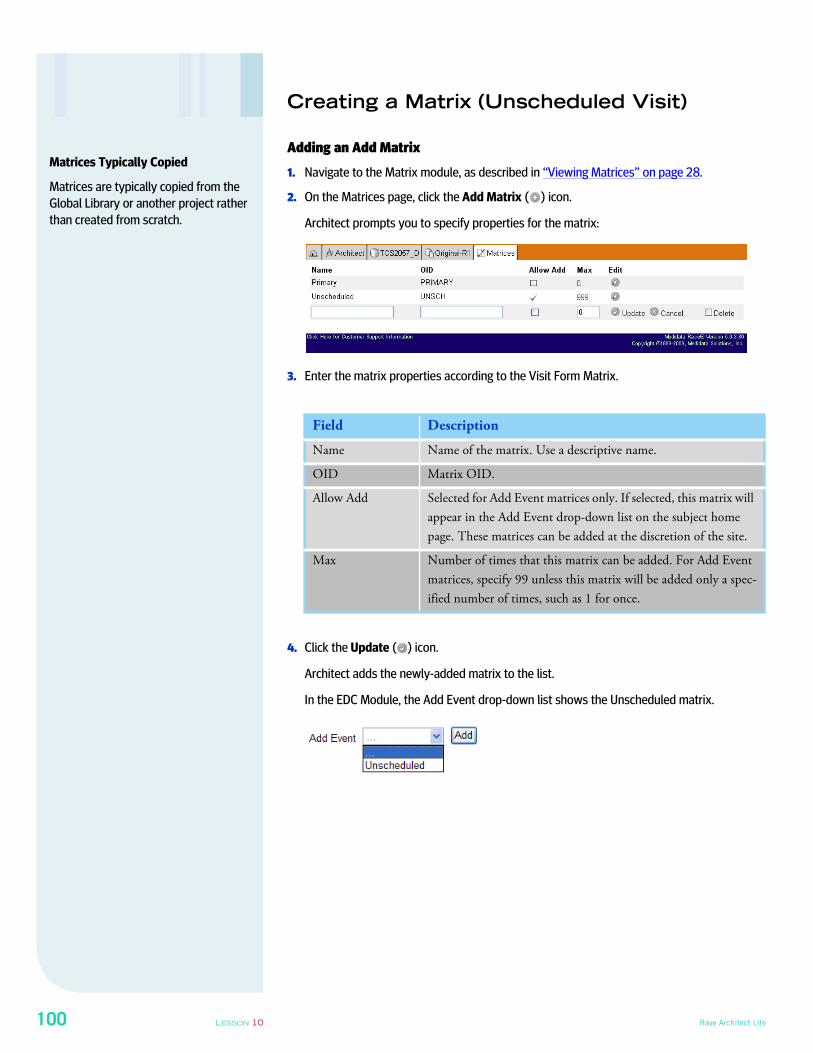
100 LESSON 10 Rave Architect Lite
Creating a Matrix (Unscheduled Visit)
Adding an Add Matrix
1. Navigate to the Matrix module, as described in “Viewing Matrices” on page 28.
2. On the Matrices page, click the Add Matrix ( ) icon.
Architect prompts you to specify properties for the matrix:
3. Enter the matrix properties according to the Visit Form Matrix.
4. Click the Update ( ) icon.
Architect adds the newly-added matrix to the list.
In the EDC Module, the Add Event drop-down list shows the Unscheduled matrix.
Field Description
Name Name of the matrix. Use a descriptive name.
OID Matrix OID.
Allow Add Selected for Add Event matrices only. If selected, this matrix will
appear in the Add Event drop-down list on the subject home
page. These matrices can be added at the discretion of the site.
Max Number of times that this matrix can be added. For Add Event
matrices, specify 99 unless this matrix will be added only a spec-
ified number of times, such as 1 for once.
Matrices Typically Copied
Matrices are typically copied from the
Global Library or another project rather
than created from scratch.
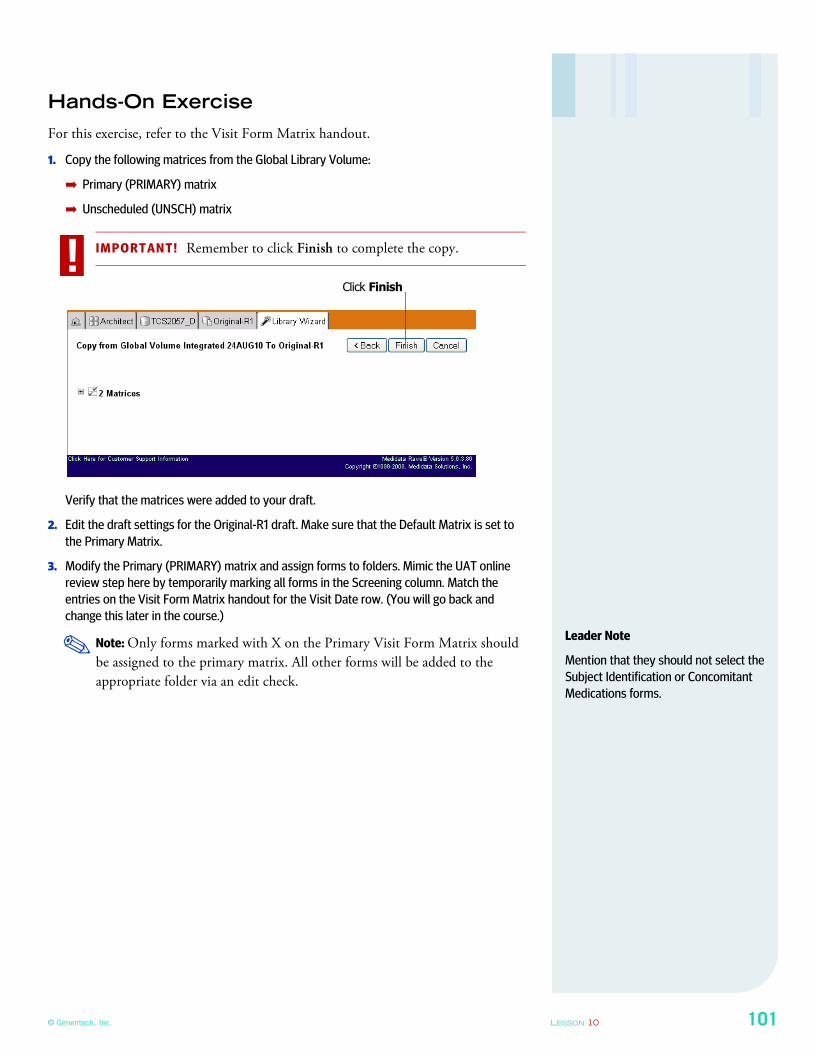
© Genentech, Inc. LESSON 10 101
Hands-On Exercise
For this exercise, refer to the Visit Form Matrix handout.
1. Copy the following matrices from the Global Library Volume:
➡ Primary (PRIMARY) matrix
➡ Unscheduled (UNSCH) matrix
IMPORTANT! Remember to click Finish to complete the copy.
Verify that the matrices were added to your draft.
2. Edit the draft settings for the Original-R1 draft. Make sure that the Default Matrix is set to
the Primary Matrix.
3. Modify the Primary (PRIMARY) matrix and assign forms to folders. Mimic the UAT online
review step here by temporarily marking all forms in the Screening column. Match the
entries on the Visit Form Matrix handout for the Visit Date row. (You will go back and
change this later in the course.)
Note: Only forms marked with X on the Primary Visit Form Matrix should
be assigned to the primary matrix. All other forms will be added to the
appropriate folder via an edit check.
!Click Finish
✎ Leader Note
Mention that they should not select the
Subject Identification or Concomitant
Medications forms.
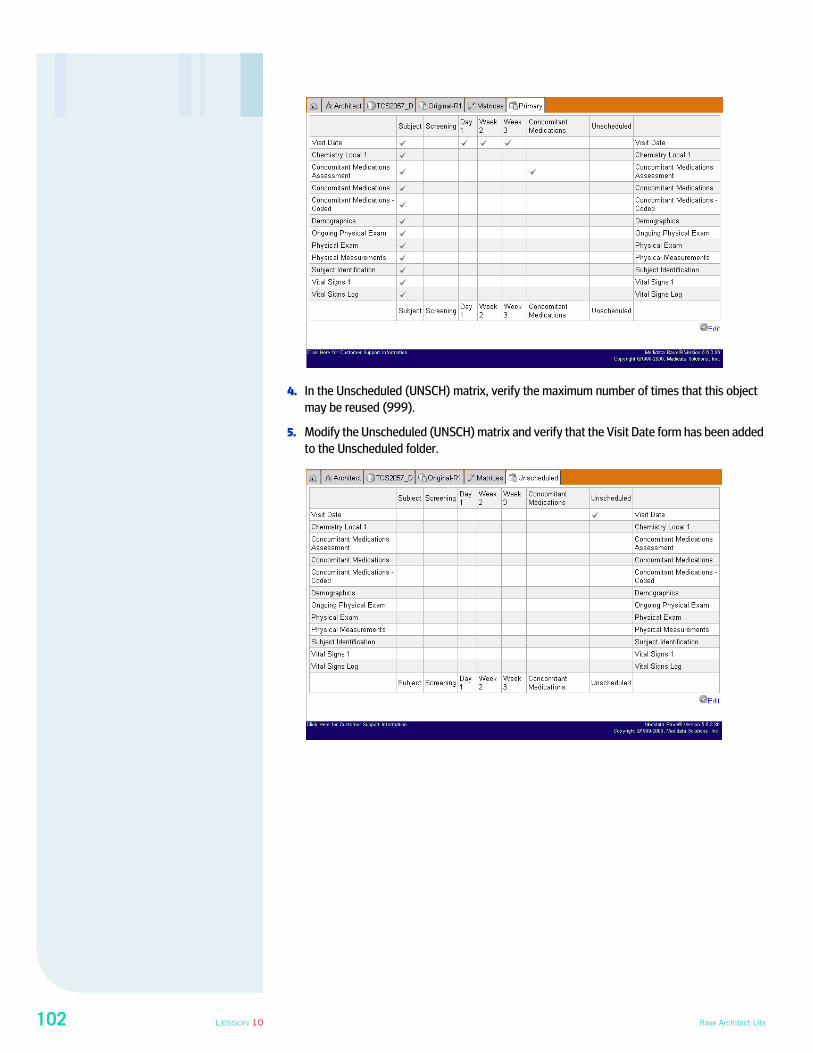
102 LESSON 10 Rave Architect Lite
4. In the Unscheduled (UNSCH) matrix, verify the maximum number of times that this object
may be reused (999).
5. Modify the Unscheduled (UNSCH) matrix and verify that the Visit Date form has been added
to the Unscheduled folder.
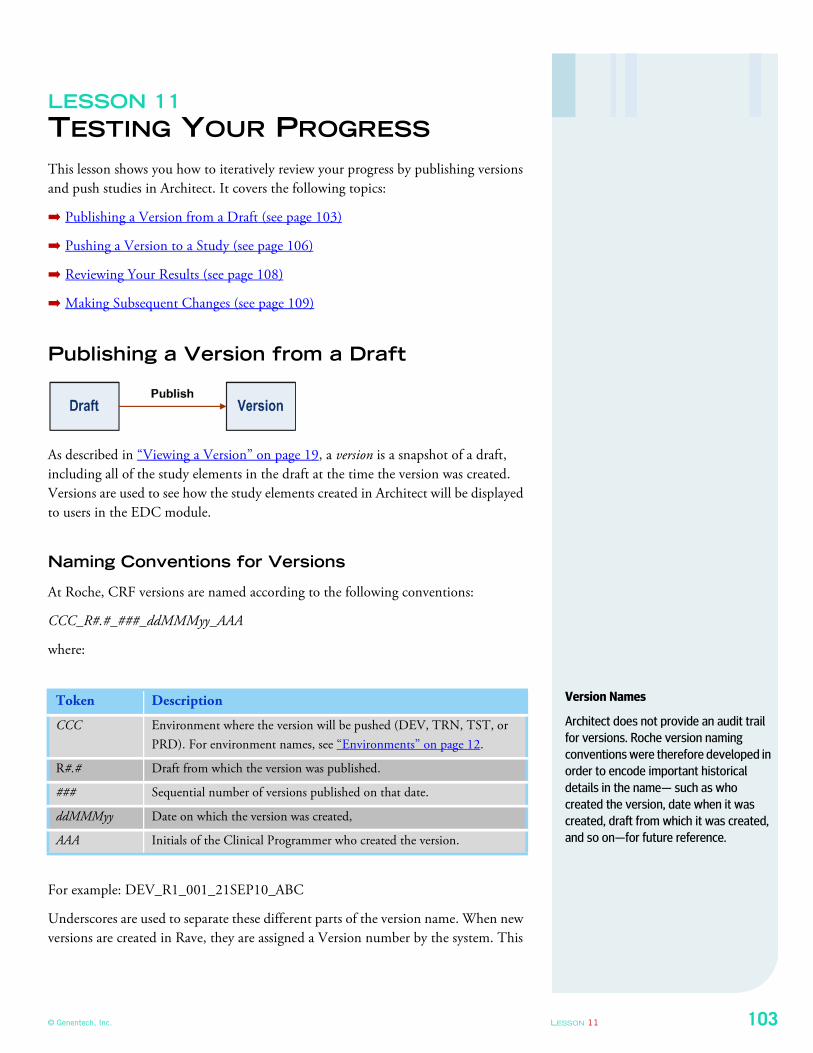
© Genentech, Inc. LESSON 11 103
LESSON 11
TESTING YOUR PROGRESS
This lesson shows you how to iteratively review your progress by publishing versions
and push studies in Architect. It covers the following topics:
➡ Publishing a Version from a Draft (see page 103)
➡ Pushing a Version to a Study (see page 106)
➡ Reviewing Your Results (see page 108)
➡ Making Subsequent Changes (see page 109)
Publishing a Version from a Draft
As described in “Viewing a Version” on page 19, a version is a snapshot of a draft,
including all of the study elements in the draft at the time the version was created.
Versions are used to see how the study elements created in Architect will be displayed
to users in the EDC module.
Naming Conventions for Versions
At Roche, CRF versions are named according to the following conventions:
CCC_R#.#_###_ddMMMyy_AAA
where:
For example: DEV_R1_001_21SEP10_ABC
Underscores are used to separate these different parts of the version name. When new
versions are created in Rave, they are assigned a Version number by the system. This
Token Description
CCC Environment where the version will be pushed (DEV, TRN, TST, or
PRD). For environment names, see “Environments” on page 12.
R#.# Draft from which the version was published.
### Sequential number of versions published on that date.
ddMMMyy Date on which the version was created,
AAA Initials of the Clinical Programmer who created the version.
Version Names
Architect does not provide an audit trail
for versions. Roche version naming
conventions were therefore developed in
order to encode important historical
details in the name— such as who
created the version, date when it was
created, draft from which it was created,
and so on—for future reference.
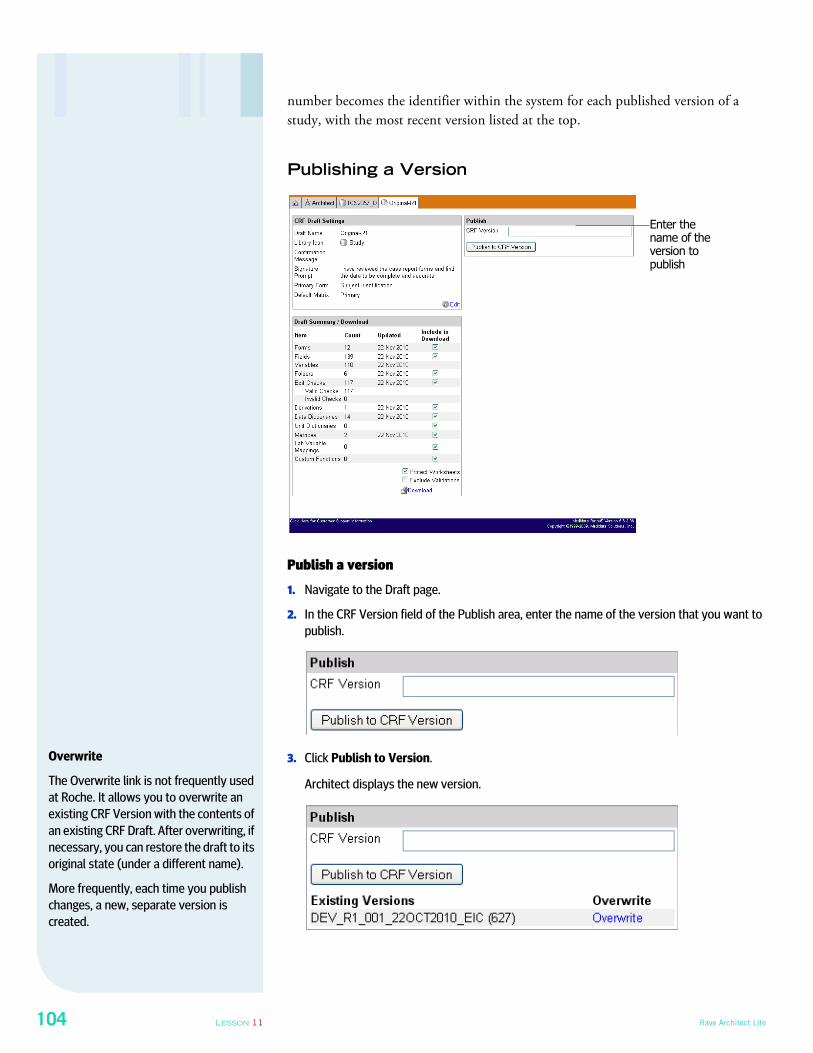
104 LESSON 11 Rave Architect Lite
number becomes the identifier within the system for each published version of a
study, with the most recent version listed at the top.
Publishing a Version
Publish a version
1. Navigate to the Draft page.
2. In the CRF Version field of the Publish area, enter the name of the version that you want to
publish.
3. Click Publish to Version.
Architect displays the new version.
Enter the name of the version to publish
Overwrite
The Overwrite link is not frequently used
at Roche. It allows you to overwrite an
existing CRF Version with the contents of
an existing CRF Draft. After overwriting, if
necessary, you can restore the draft to its
original state (under a different name).
More frequently, each time you publish
changes, a new, separate version is
created.
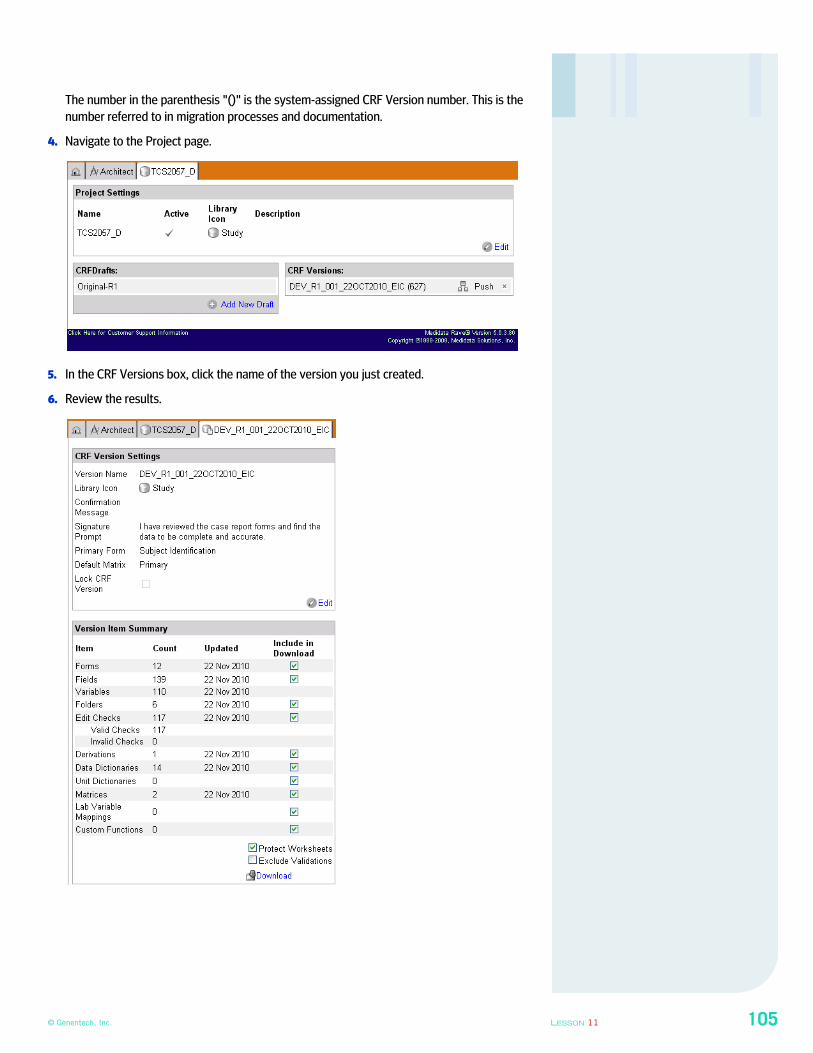
© Genentech, Inc. LESSON 11 105
The number in the parenthesis "()" is the system-assigned CRF Version number. This is the
number referred to in migration processes and documentation.
4. Navigate to the Project page.
5. In the CRF Versions box, click the name of the version you just created.
6. Review the results.
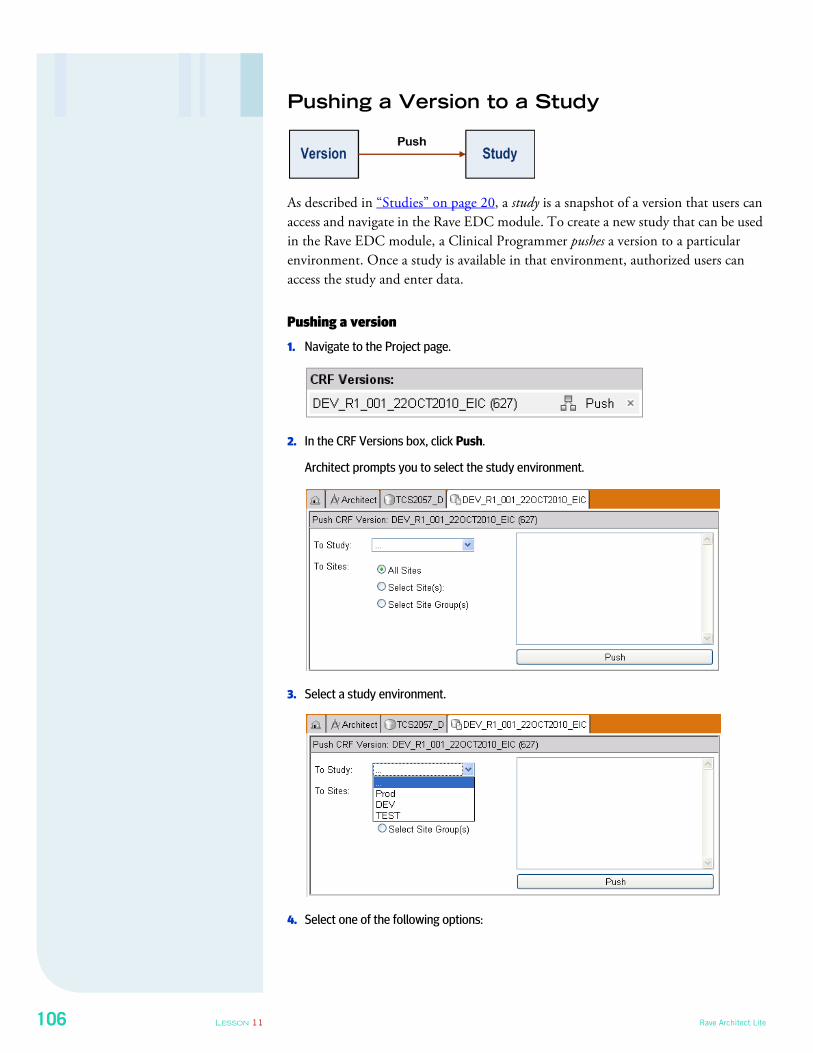
106 LESSON 11 Rave Architect Lite
Pushing a Version to a Study
As described in “Studies” on page 20, a study is a snapshot of a version that users can
access and navigate in the Rave EDC module. To create a new study that can be used
in the Rave EDC module, a Clinical Programmer pushes a version to a particular
environment. Once a study is available in that environment, authorized users can
access the study and enter data.
Pushing a version
1. Navigate to the Project page.
2. In the CRF Versions box, click Push.
Architect prompts you to select the study environment.
3. Select a study environment.
4. Select one of the following options:
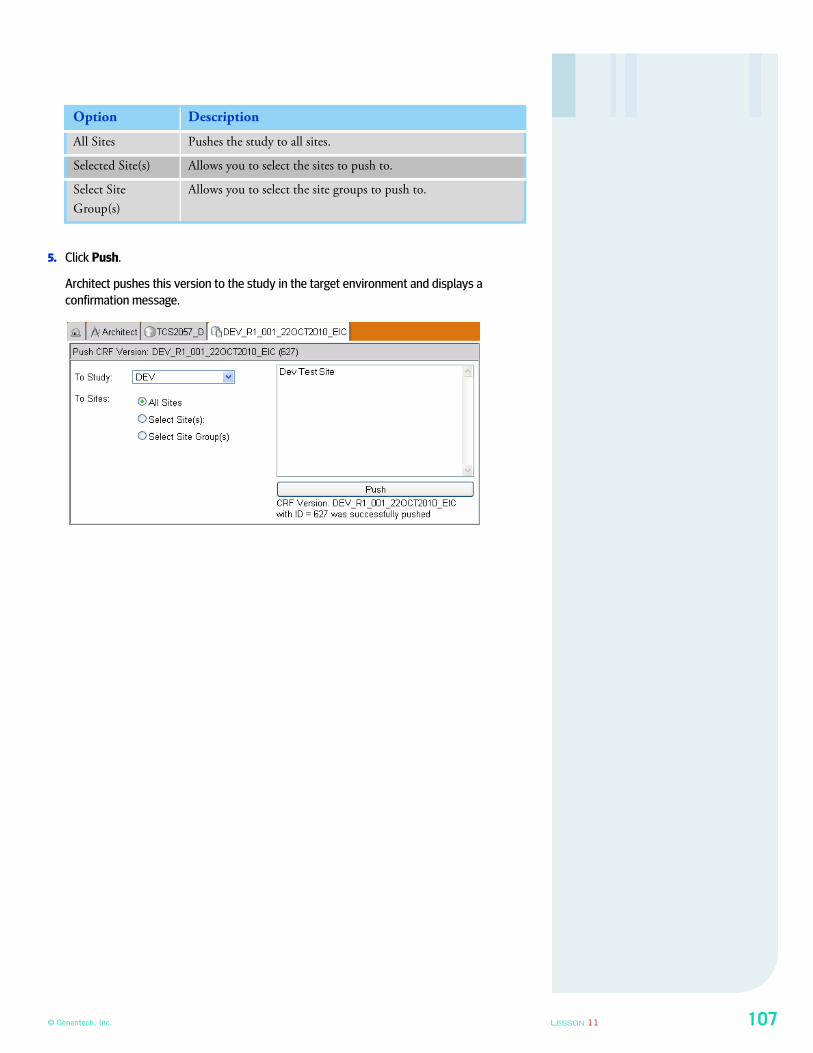
© Genentech, Inc. LESSON 11 107
5. Click Push.
Architect pushes this version to the study in the target environment and displays a
confirmation message.
Option Description
All Sites Pushes the study to all sites.
Selected Site(s) Allows you to select the sites to push to.
Select Site
Group(s)
Allows you to select the site groups to push to.
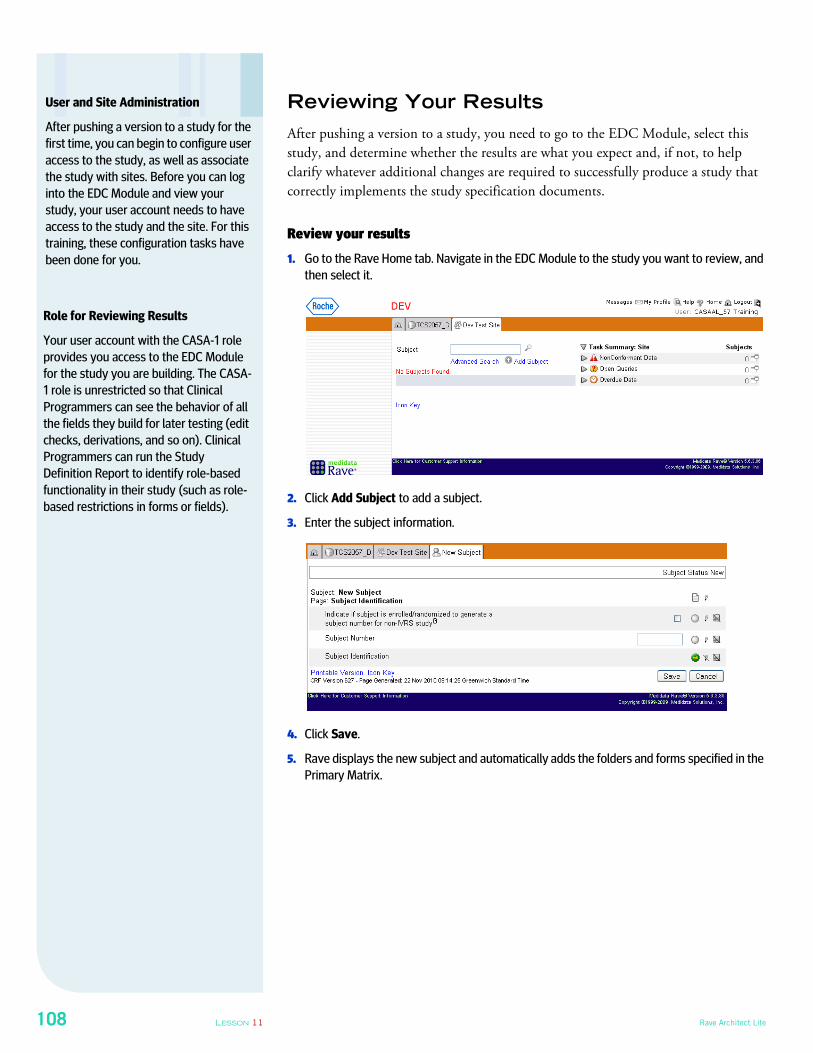
108 LESSON 11 Rave Architect Lite
Reviewing Your Results
After pushing a version to a study, you need to go to the EDC Module, select this
study, and determine whether the results are what you expect and, if not, to help
clarify whatever additional changes are required to successfully produce a study that
correctly implements the study specification documents.
Review your results
1. Go to the Rave Home tab. Navigate in the EDC Module to the study you want to review, and
then select it.
2. Click Add Subject to add a subject.
3. Enter the subject information.
4. Click Save.
5. Rave displays the new subject and automatically adds the folders and forms specified in the
Primary Matrix.
User and Site Administration
After pushing a version to a study for the
first time, you can begin to configure user
access to the study, as well as associate
the study with sites. Before you can log
into the EDC Module and view your
study, your user account needs to have
access to the study and the site. For this
training, these configuration tasks have
been done for you.
Role for Reviewing Results
Your user account with the CASA-1 role
provides you access to the EDC Module
for the study you are building. The CASA-
1 role is unrestricted so that Clinical
Programmers can see the behavior of all
the fields they build for later testing (edit
checks, derivations, and so on). Clinical
Programmers can run the Study
Definition Report to identify role-based
functionality in their study (such as role-
based restrictions in forms or fields).
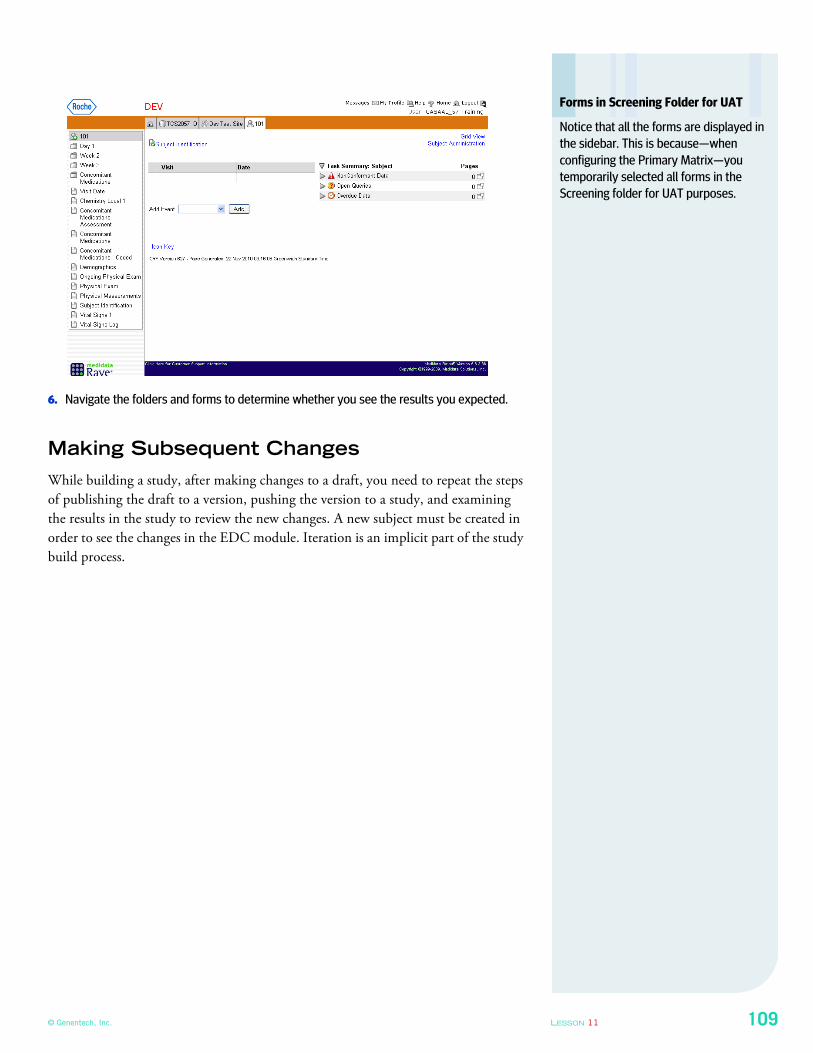
© Genentech, Inc. LESSON 11 109
6. Navigate the folders and forms to determine whether you see the results you expected.
Making Subsequent Changes
While building a study, after making changes to a draft, you need to repeat the steps
of publishing the draft to a version, pushing the version to a study, and examining
the results in the study to review the new changes. A new subject must be created in
order to see the changes in the EDC module. Iteration is an implicit part of the study
build process.
Forms in Screening Folder for UAT
Notice that all the forms are displayed in
the sidebar. This is because—when
configuring the Primary Matrix—you
temporarily selected all forms in the
Screening folder for UAT purposes.

110 LESSON 11 Rave Architect Lite
Hands-On Exercise
1. Publish your draft to the DEV_R1_001_DATE_INI version, where:
➡ DATE_ is the current date in ddMMMyy format (such as 08OCT10).
➡ INI are your initials.
The number in the parenthesis "()" is the system-assigned CRF Version number.
This is the number referred to in migration processes and documentation.
2. Navigate to the Version page and review the results.
3. Push your version to a study whose name matches your assigned project name. For
example, if your project is named APC2041_D, then push your version to the study named
APC2041_D. Select DEV and the Dev Test Site. Be sure to push the most recent version.
4. Review your results in the DEV20nng Study.
➡ Go to the Rave Home page.
➡ Select the study you have been building.
➡ Add a new subject.
➡ Test by going to the Screening folder and specifying a Visit Date. Note that all forms are
listed in this folder—this temporary configuration allows you to easily conduct a UAT on
all forms. Review the forms. For example, go to the Vital Signs Log Form and notice that
the repeated defaults have been added.
5. Verify that the forms configured in the Screening folder match the Mock eCRFs, and fix any
discrepancies.
Leader Note
Have participants follow along for this
activity and encourage them to look at
the forms they built.
Leader Note
Have participants complete one cycle of
this activity, perhaps for a particular
form, or forms as they have time.
Leader Note
Have participants look at the Vital Signs
Log form and note that there are no
defaulted values included. Draw their
attention to where that is specified in the
mock eCRFs. Adding those defaults is
what they will do in the next lesson.
© Genentech, Inc. LESSON 12 111
LESSON 12
DEFINING RESTRICTIONS
This lesson shows you how to define form and field restrictions in Architect. It covers
the following topics:
➡ About Restrictions (see page 111)
➡ Configuring View and Entry Restrictions for a Form (see page 113)
➡ Configuring SDV, Manual Reviews, and Default Values (see page 114)
➡ Default Values (see page 116)
➡ Testing Restrictions (see page 117)
➡ Hands-On Exercise (see page 118)
About Restrictions
As described in “Viewing Restrictions” on page 36, a restriction controls the degree to
which a given EDC role has access to forms or fields—for example, to change data in
a form or to view a field on a form. A role is a set of permissions to perform certain
actions and access particular data. Each user is assigned just one role per study. Roles
determine what a user sees and has access to—Rave modules, eCRFs, reports, and so
on. If you are working on multiple studies, you might be assigned the same role in all
studies, or your role might vary from study to study, depending on your job
function(s) for that study.
Restrictions and User Roles in Rave
Roche has defined a standard set of Rave user roles. Role assignments are made on a
study-by-study basis. For a given study, role assignments are specified in its Study
Configuration Document (SCD). When a user logs in, Rave grants them access to
Rave features and data based on the permissions configured for their associated role.
Where are Restrictions Specified?
Restrictions are specified in a study’s
View & Entry Restrictions document.
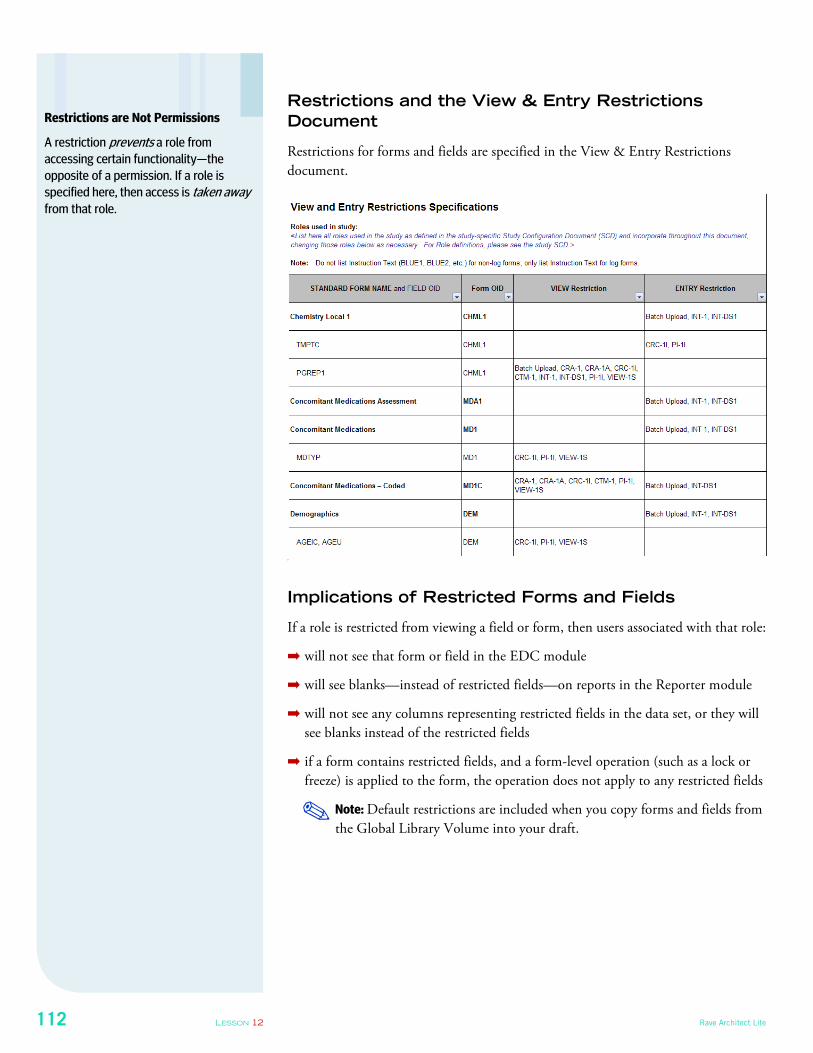
112 LESSON 12 Rave Architect Lite
Restrictions and the View & Entry Restrictions
Document
Restrictions for forms and fields are specified in the View & Entry Restrictions
document.
o
Implications of Restricted Forms and Fields
If a role is restricted from viewing a field or form, then users associated with that role:
➡ will not see that form or field in the EDC module
➡ will see blanks—instead of restricted fields—on reports in the Reporter module
➡ will not see any columns representing restricted fields in the data set, or they will
see blanks instead of the restricted fields
➡ if a form contains restricted fields, and a form-level operation (such as a lock or
freeze) is applied to the form, the operation does not apply to any restricted fields
Note: Default restrictions are included when you copy forms and fields from
the Global Library Volume into your draft.
Restrictions are Not Permissions
A restriction prevents a role from
accessing certain functionality—the
opposite of a permission. If a role is
specified here, then access is taken away from that role.
✎
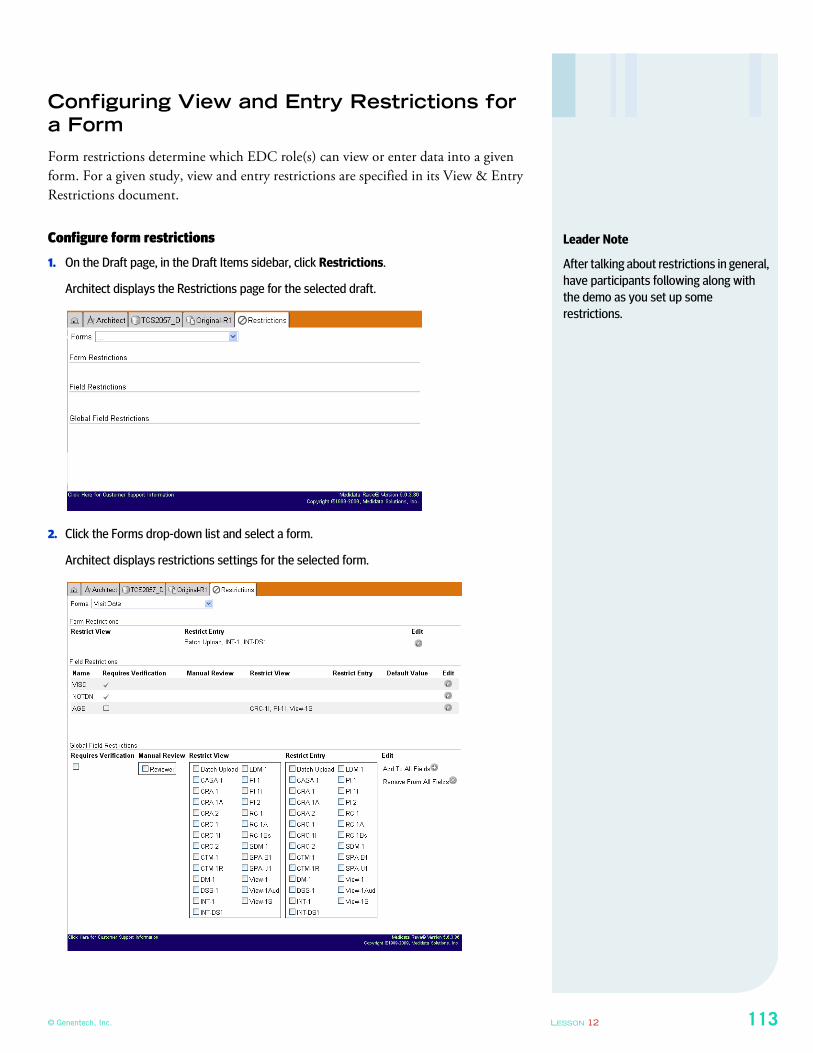
© Genentech, Inc. LESSON 12 113
Configuring View and Entry Restrictions for
a Form
Form restrictions determine which EDC role(s) can view or enter data into a given
form. For a given study, view and entry restrictions are specified in its View & Entry
Restrictions document.
Configure form restrictions
1. On the Draft page, in the Draft Items sidebar, click Restrictions.
Architect displays the Restrictions page for the selected draft.
2. Click the Forms drop-down list and select a form.
Architect displays restrictions settings for the selected form.
Leader Note
After talking about restrictions in general,
have participants following along with
the demo as you set up some
restrictions.
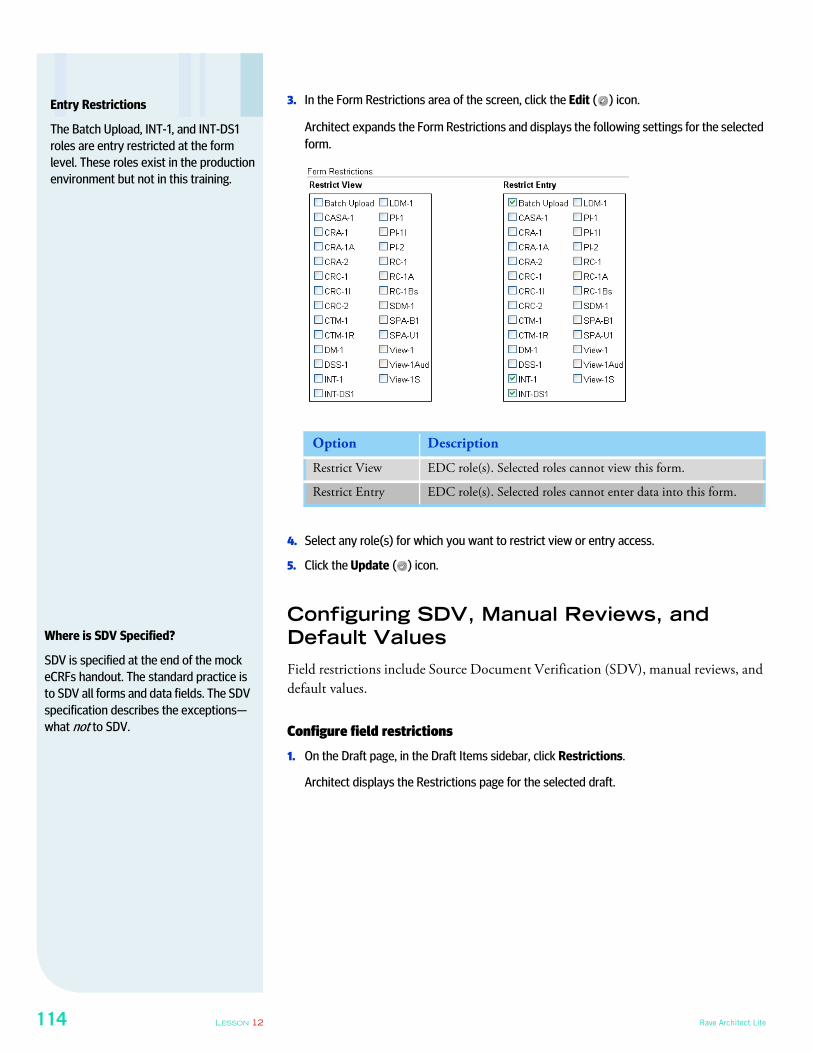
114 LESSON 12 Rave Architect Lite
3. In the Form Restrictions area of the screen, click the Edit ( ) icon.
Architect expands the Form Restrictions and displays the following settings for the selected
form.
4. Select any role(s) for which you want to restrict view or entry access.
5. Click the Update ( ) icon.
Configuring SDV, Manual Reviews, and
Default Values
Field restrictions include Source Document Verification (SDV), manual reviews, and
default values.
Configure field restrictions
1. On the Draft page, in the Draft Items sidebar, click Restrictions.
Architect displays the Restrictions page for the selected draft.
Option Description
Restrict View EDC role(s). Selected roles cannot view this form.
Restrict Entry EDC role(s). Selected roles cannot enter data into this form.
Entry Restrictions
The Batch Upload, INT-1, and INT-DS1
roles are entry restricted at the form
level. These roles exist in the production
environment but not in this training.
Where is SDV Specified?
SDV is specified at the end of the mock
eCRFs handout. The standard practice is
to SDV all forms and data fields. The SDV
specification describes the exceptions—
what not to SDV.
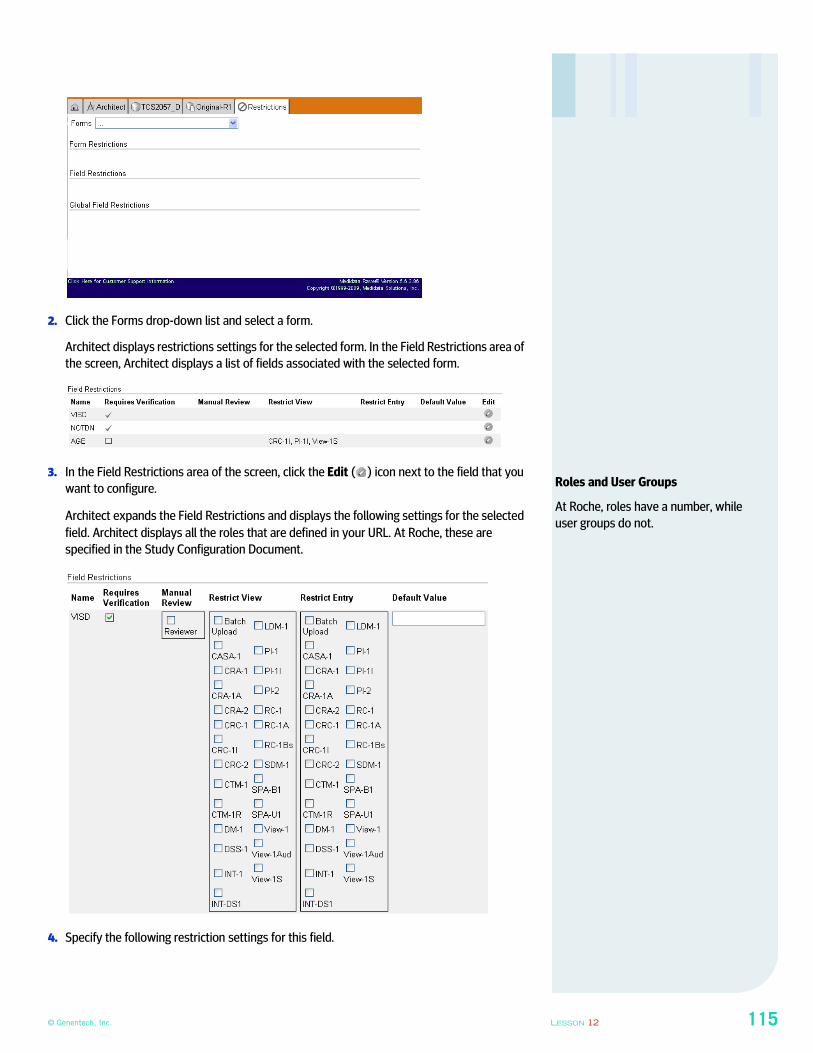
© Genentech, Inc. LESSON 12 115
2. Click the Forms drop-down list and select a form.
Architect displays restrictions settings for the selected form. In the Field Restrictions area of
the screen, Architect displays a list of fields associated with the selected form.
3. In the Field Restrictions area of the screen, click the Edit ( ) icon next to the field that you
want to configure.
Architect expands the Field Restrictions and displays the following settings for the selected
field. Architect displays all the roles that are defined in your URL. At Roche, these are
specified in the Study Configuration Document.
4. Specify the following restriction settings for this field.
Roles and User Groups
At Roche, roles have a number, while
user groups do not.
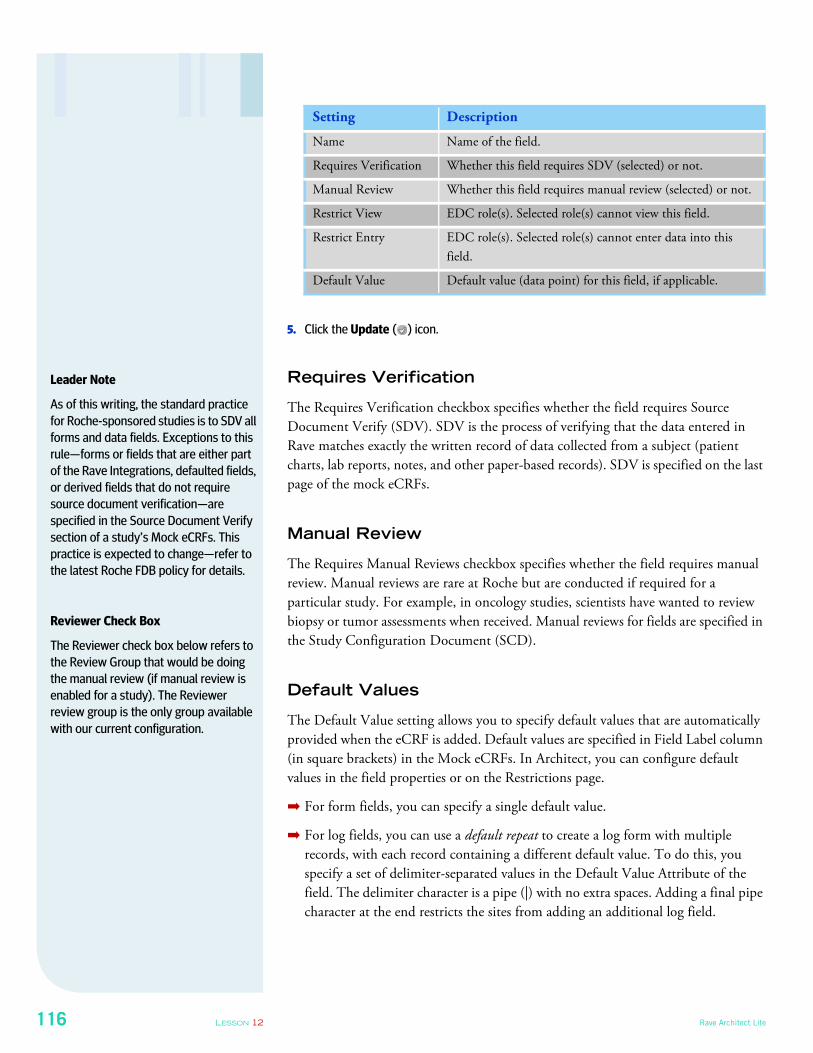
116 LESSON 12 Rave Architect Lite
5. Click the Update ( ) icon.
Requires Verification
The Requires Verification checkbox specifies whether the field requires Source
Document Verify (SDV). SDV is the process of verifying that the data entered in
Rave matches exactly the written record of data collected from a subject (patient
charts, lab reports, notes, and other paper-based records). SDV is specified on the last
page of the mock eCRFs.
Manual Review
The Requires Manual Reviews checkbox specifies whether the field requires manual
review. Manual reviews are rare at Roche but are conducted if required for a
particular study. For example, in oncology studies, scientists have wanted to review
biopsy or tumor assessments when received. Manual reviews for fields are specified in
the Study Configuration Document (SCD).
Default Values
The Default Value setting allows you to specify default values that are automatically
provided when the eCRF is added. Default values are specified in Field Label column
(in square brackets) in the Mock eCRFs. In Architect, you can configure default
values in the field properties or on the Restrictions page.
➡ For form fields, you can specify a single default value.
➡ For log fields, you can use a default repeat to create a log form with multiple
records, with each record containing a different default value. To do this, you
specify a set of delimiter-separated values in the Default Value Attribute of the
field. The delimiter character is a pipe (|) with no extra spaces. Adding a final pipe
character at the end restricts the sites from adding an additional log field.
Setting Description
Name Name of the field.
Requires Verification Whether this field requires SDV (selected) or not.
Manual Review Whether this field requires manual review (selected) or not.
Restrict View EDC role(s). Selected role(s) cannot view this field.
Restrict Entry EDC role(s). Selected role(s) cannot enter data into this
field.
Default Value Default value (data point) for this field, if applicable.
Leader Note
As of this writing, the standard practice
for Roche-sponsored studies is to SDV all
forms and data fields. Exceptions to this
rule—forms or fields that are either part
of the Rave Integrations, defaulted fields,
or derived fields that do not require
source document verification—are
specified in the Source Document Verify
section of a study’s Mock eCRFs. This
practice is expected to change—refer to
the latest Roche FDB policy for details.
Reviewer Check Box
The Reviewer check box below refers to
the Review Group that would be doing
the manual review (if manual review is
enabled for a study). The Reviewer
review group is the only group available
with our current configuration.
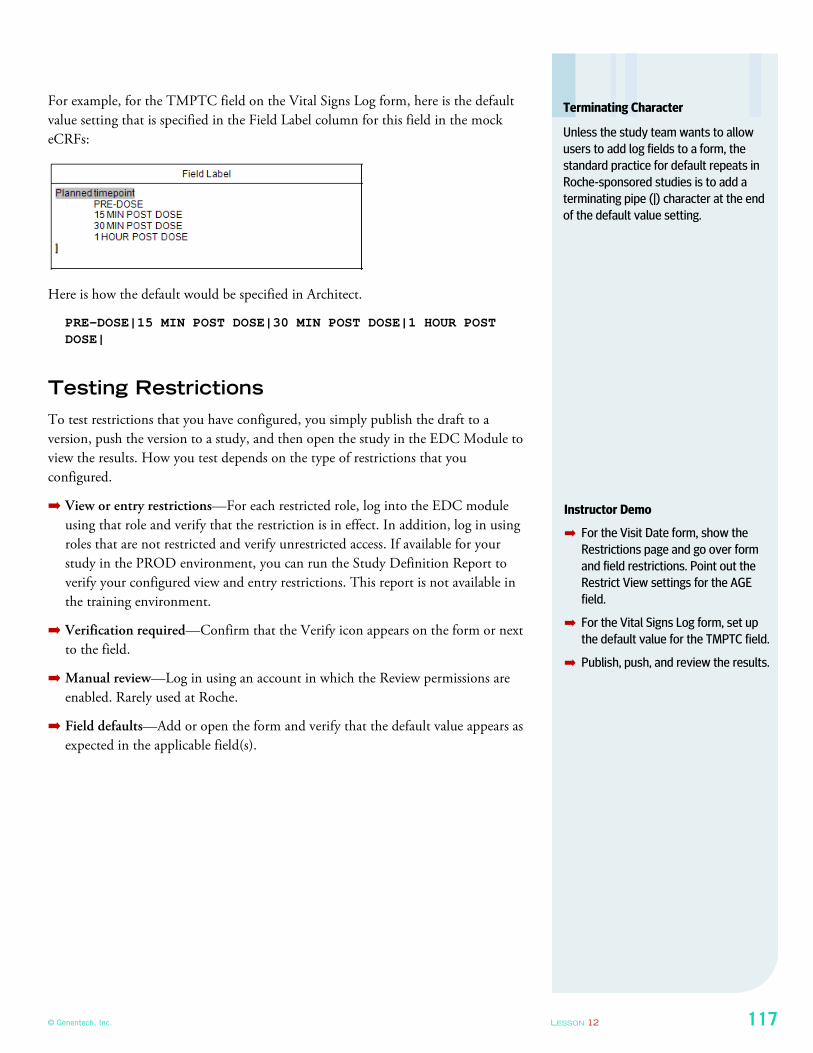
© Genentech, Inc. LESSON 12 117
For example, for the TMPTC field on the Vital Signs Log form, here is the default
value setting that is specified in the Field Label column for this field in the mock
eCRFs:
Here is how the default would be specified in Architect.
PRE-DOSE|15 MIN POST DOSE|30 MIN POST DOSE|1 HOUR POST DOSE|
Testing Restrictions
To test restrictions that you have configured, you simply publish the draft to a
version, push the version to a study, and then open the study in the EDC Module to
view the results. How you test depends on the type of restrictions that you
configured.
➡ View or entry restrictions—For each restricted role, log into the EDC module
using that role and verify that the restriction is in effect. In addition, log in using
roles that are not restricted and verify unrestricted access. If available for your
study in the PROD environment, you can run the Study Definition Report to
verify your configured view and entry restrictions. This report is not available in
the training environment.
➡ Verification required—Confirm that the Verify icon appears on the form or next
to the field.
➡ Manual review—Log in using an account in which the Review permissions are
enabled. Rarely used at Roche.
➡ Field defaults—Add or open the form and verify that the default value appears as
expected in the applicable field(s).
Terminating Character
Unless the study team wants to allow
users to add log fields to a form, the
standard practice for default repeats in
Roche-sponsored studies is to add a
terminating pipe (|) character at the end
of the default value setting.
Instructor Demo
➡ For the Visit Date form, show the
Restrictions page and go over form
and field restrictions. Point out the
Restrict View settings for the AGE
field.
➡ For the Vital Signs Log form, set up
the default value for the TMPTC field.
➡ Publish, push, and review the results.
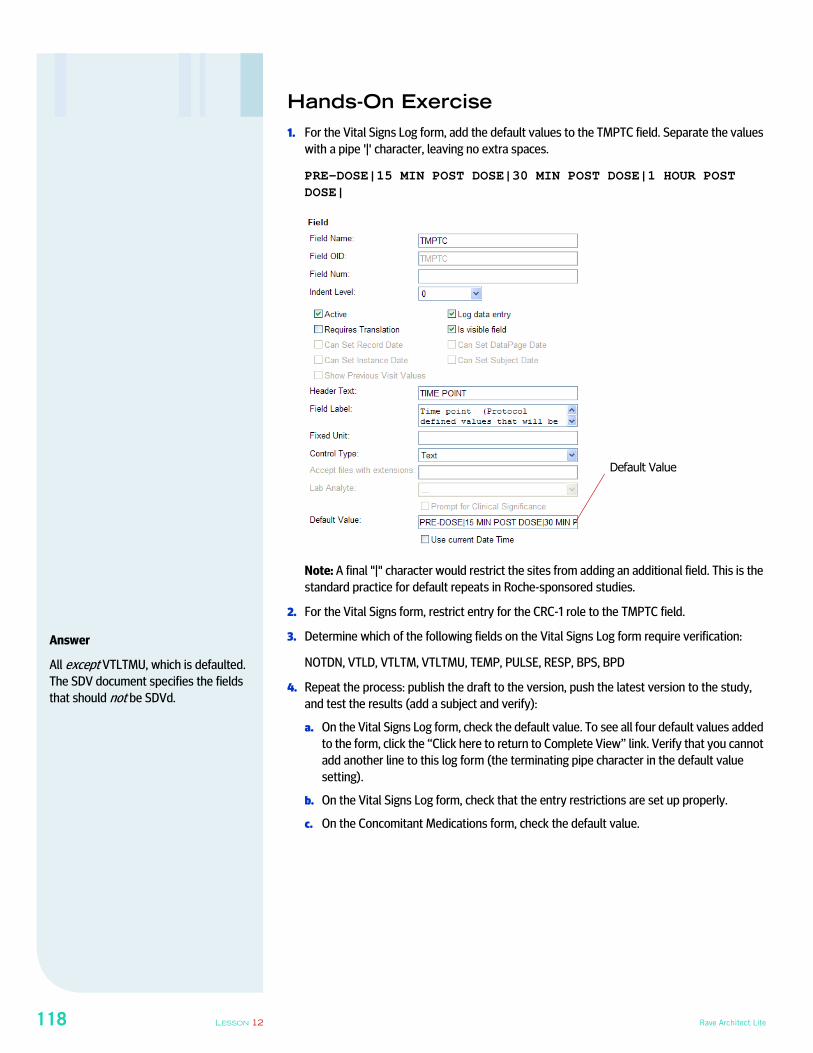
118 LESSON 12 Rave Architect Lite
Hands-On Exercise
1. For the Vital Signs Log form, add the default values to the TMPTC field. Separate the values
with a pipe '|' character, leaving no extra spaces.
PRE-DOSE|15 MIN POST DOSE|30 MIN POST DOSE|1 HOUR POST DOSE|
Note: A final "|" character would restrict the sites from adding an additional field. This is the
standard practice for default repeats in Roche-sponsored studies.
2. For the Vital Signs form, restrict entry for the CRC-1 role to the TMPTC field.
3. Determine which of the following fields on the Vital Signs Log form require verification:
NOTDN, VTLD, VTLTM, VTLTMU, TEMP, PULSE, RESP, BPS, BPD
4. Repeat the process: publish the draft to the version, push the latest version to the study,
and test the results (add a subject and verify):
a. On the Vital Signs Log form, check the default value. To see all four default values added
to the form, click the “Click here to return to Complete View” link. Verify that you cannot
add another line to this log form (the terminating pipe character in the default value
setting).
b. On the Vital Signs Log form, check that the entry restrictions are set up properly.
c. On the Concomitant Medications form, check the default value.
Default Value
Answer
All except VTLTMU, which is defaulted.
The SDV document specifies the fields
that should not be SDVd.
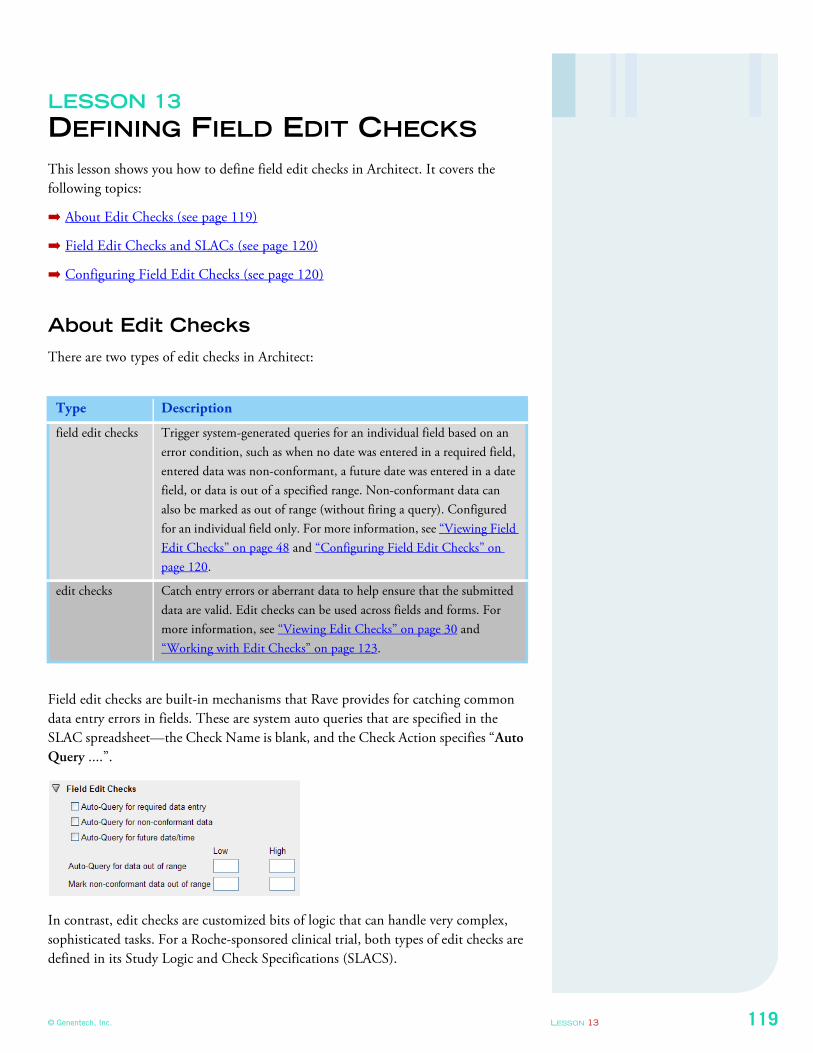
© Genentech, Inc. LESSON 13 119
LESSON 13
DEFINING FIELD EDIT CHECKS
This lesson shows you how to define field edit checks in Architect. It covers the
following topics:
➡ About Edit Checks (see page 119)
➡ Field Edit Checks and SLACs (see page 120)
➡ Configuring Field Edit Checks (see page 120)
About Edit Checks
There are two types of edit checks in Architect:
Field edit checks are built-in mechanisms that Rave provides for catching common
data entry errors in fields. These are system auto queries that are specified in the
SLAC spreadsheet—the Check Name is blank, and the Check Action specifies “Auto
Query ....”.
In contrast, edit checks are customized bits of logic that can handle very complex,
sophisticated tasks. For a Roche-sponsored clinical trial, both types of edit checks are
defined in its Study Logic and Check Specifications (SLACS).
Type Description
field edit checks Trigger system-generated queries for an individual field based on an
error condition, such as when no date was entered in a required field,
entered data was non-conformant, a future date was entered in a date
field, or data is out of a specified range. Non-conformant data can
also be marked as out of range (without firing a query). Configured
for an individual field only. For more information, see “Viewing Field
Edit Checks” on page 48 and “Configuring Field Edit Checks” on
page 120.
edit checks Catch entry errors or aberrant data to help ensure that the submitted
data are valid. Edit checks can be used across fields and forms. For
more information, see “Viewing Edit Checks” on page 30 and
“Working with Edit Checks” on page 123.
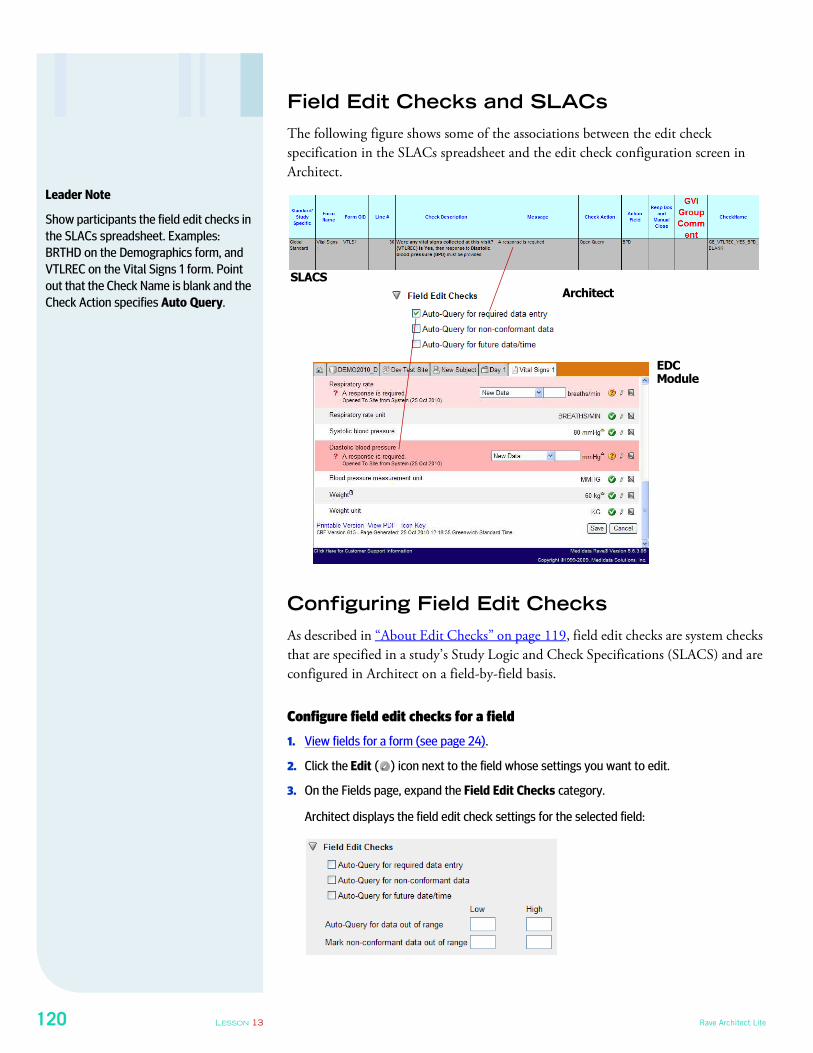
120 LESSON 13 Rave Architect Lite
Field Edit Checks and SLACs
The following figure shows some of the associations between the edit check
specification in the SLACs spreadsheet and the edit check configuration screen in
Architect.
Configuring Field Edit Checks
As described in “About Edit Checks” on page 119, field edit checks are system checks
that are specified in a study’s Study Logic and Check Specifications (SLACS) and are
configured in Architect on a field-by-field basis.
Configure field edit checks for a field
1. View fields for a form (see page 24).
2. Click the Edit ( ) icon next to the field whose settings you want to edit.
3. On the Fields page, expand the Field Edit Checks category.
Architect displays the field edit check settings for the selected field:
EDC Module
Architect
SLACS
Leader Note
Show participants the field edit checks in
the SLACs spreadsheet. Examples:
BRTHD on the Demographics form, and
VTLREC on the Vital Signs 1 form. Point
out that the Check Name is blank and the
Check Action specifies Auto Query.
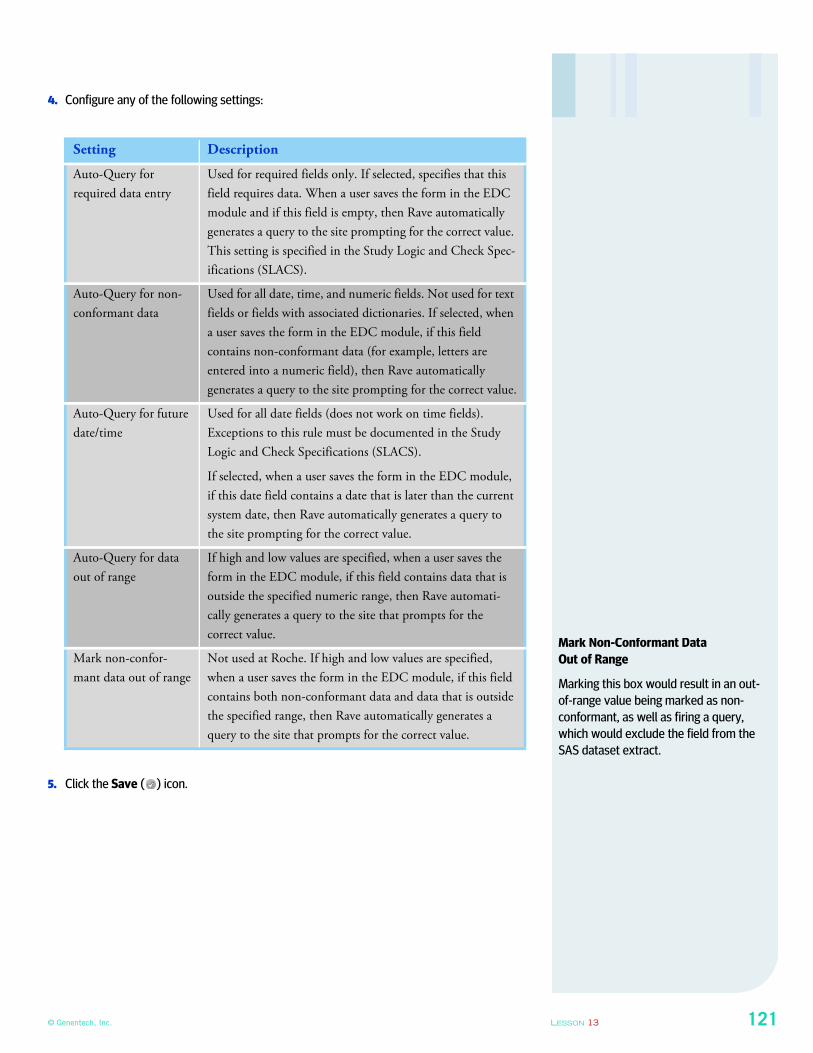
© Genentech, Inc. LESSON 13 121
4. Configure any of the following settings:
5. Click the Save ( ) icon.
Setting Description
Auto-Query for
required data entry
Used for required fields only. If selected, specifies that this
field requires data. When a user saves the form in the EDC
module and if this field is empty, then Rave automatically
generates a query to the site prompting for the correct value.
This setting is specified in the Study Logic and Check Spec-
ifications (SLACS).
Auto-Query for non-
conformant data
Used for all date, time, and numeric fields. Not used for text
fields or fields with associated dictionaries. If selected, when
a user saves the form in the EDC module, if this field
contains non-conformant data (for example, letters are
entered into a numeric field), then Rave automatically
generates a query to the site prompting for the correct value.
Auto-Query for future
date/time
Used for all date fields (does not work on time fields).
Exceptions to this rule must be documented in the Study
Logic and Check Specifications (SLACS).
If selected, when a user saves the form in the EDC module,
if this date field contains a date that is later than the current
system date, then Rave automatically generates a query to
the site prompting for the correct value.
Auto-Query for data
out of range
If high and low values are specified, when a user saves the
form in the EDC module, if this field contains data that is
outside the specified numeric range, then Rave automati-
cally generates a query to the site that prompts for the
correct value.
Mark non-confor-
mant data out of range
Not used at Roche. If high and low values are specified,
when a user saves the form in the EDC module, if this field
contains both non-conformant data and data that is outside
the specified range, then Rave automatically generates a
query to the site that prompts for the correct value.
Mark Non-Conformant Data
Out of Range
Marking this box would result in an out-
of-range value being marked as non-
conformant, as well as firing a query,
which would exclude the field from the
SAS dataset extract.
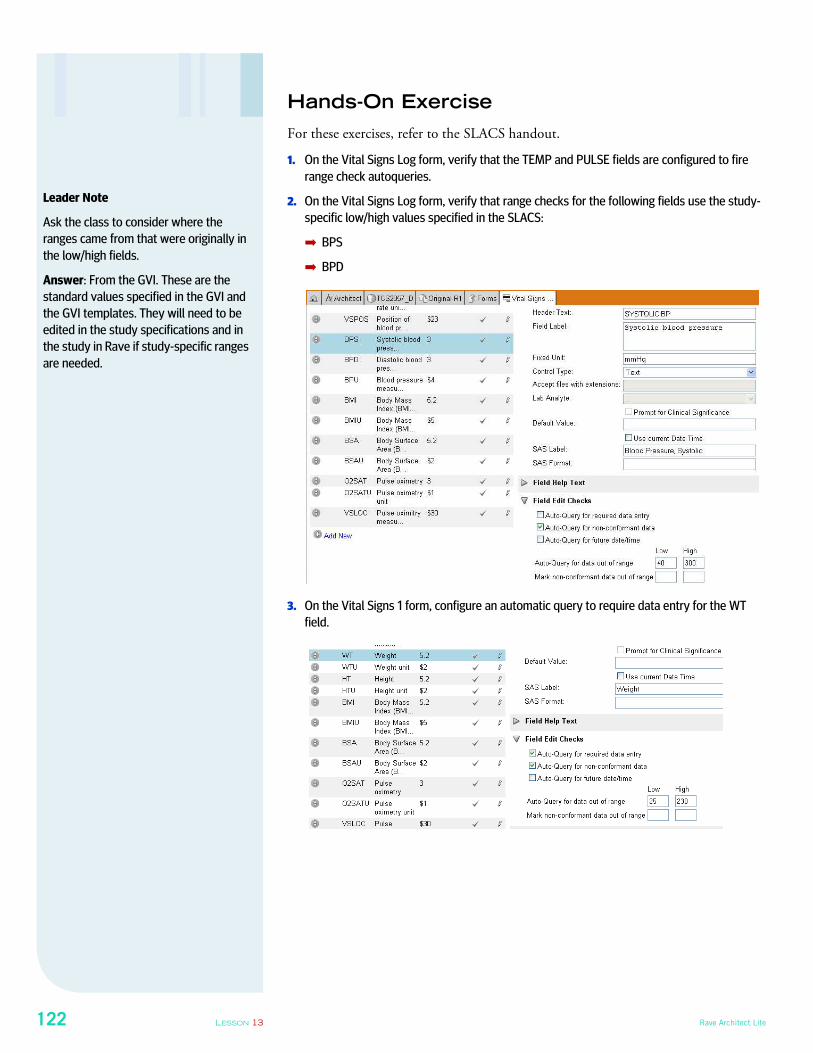
122 LESSON 13 Rave Architect Lite
Hands-On Exercise
For these exercises, refer to the SLACS handout.
1. On the Vital Signs Log form, verify that the TEMP and PULSE fields are configured to fire
range check autoqueries.
2. On the Vital Signs Log form, verify that range checks for the following fields use the study-
specific low/high values specified in the SLACS:
➡ BPS
➡ BPD
3. On the Vital Signs 1 form, configure an automatic query to require data entry for the WT
field.
Leader Note
Ask the class to consider where the
ranges came from that were originally in
the low/high fields.
Answer: From the GVI. These are the
standard values specified in the GVI and
the GVI templates. They will need to be
edited in the study specifications and in
the study in Rave if study-specific ranges
are needed.
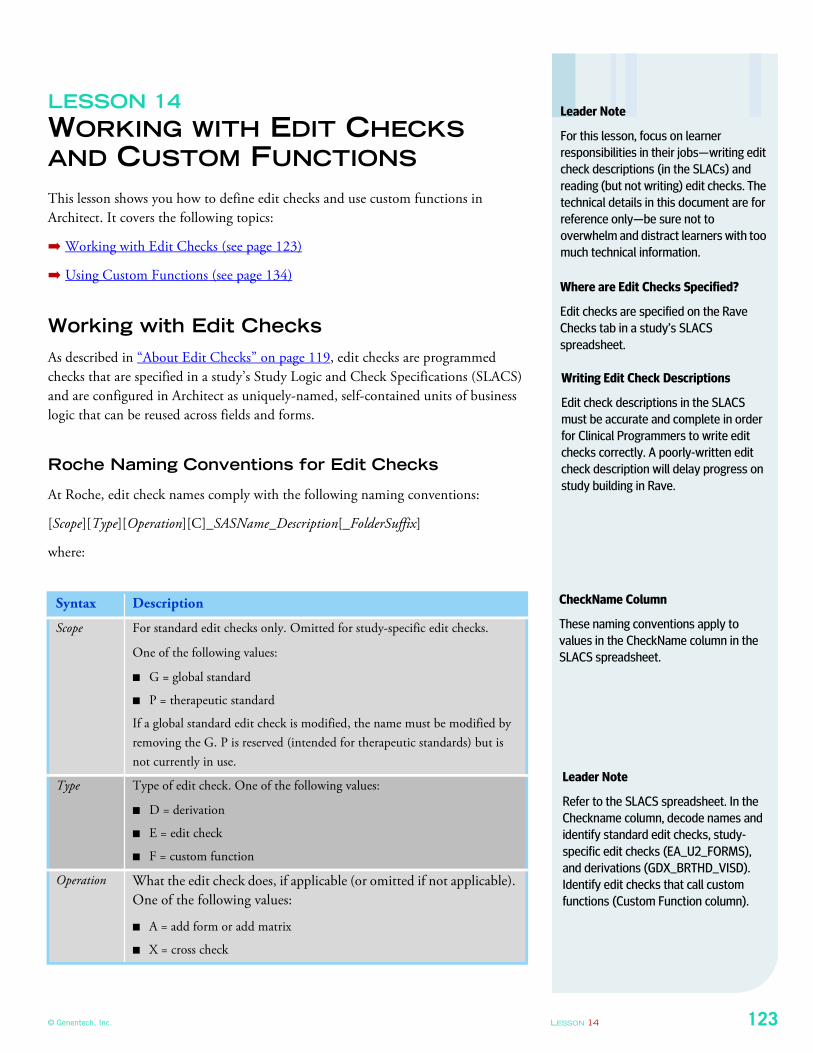
© Genentech, Inc. LESSON 14 123
LESSON 14
WORKING WITH EDIT CHECKS AND CUSTOM FUNCTIONS
This lesson shows you how to define edit checks and use custom functions in
Architect. It covers the following topics:
➡ Working with Edit Checks (see page 123)
➡ Using Custom Functions (see page 134)
Working with Edit Checks
As described in “About Edit Checks” on page 119, edit checks are programmed
checks that are specified in a study’s Study Logic and Check Specifications (SLACS)
and are configured in Architect as uniquely-named, self-contained units of business
logic that can be reused across fields and forms.
Roche Naming Conventions for Edit Checks
At Roche, edit check names comply with the following naming conventions:
[Scope][Type][Operation][C]_SASName_Description[_FolderSuffix]
where:
Syntax Description
Scope For standard edit checks only. Omitted for study-specific edit checks.
One of the following values:
■ G = global standard
■ P = therapeutic standard
If a global standard edit check is modified, the name must be modified by
removing the G. P is reserved (intended for therapeutic standards) but is
not currently in use.
Type Type of edit check. One of the following values:
■ D = derivation
■ E = edit check
■ F = custom function
Operation What the edit check does, if applicable (or omitted if not applicable).
One of the following values:
■ A = add form or add matrix
■ X = cross check
Leader Note
For this lesson, focus on learner
responsibilities in their jobs—writing edit
check descriptions (in the SLACs) and
reading (but not writing) edit checks. The
technical details in this document are for
reference only—be sure not to
overwhelm and distract learners with too
much technical information.
Where are Edit Checks Specified?
Edit checks are specified on the Rave
Checks tab in a study’s SLACS
spreadsheet.
Writing Edit Check Descriptions
Edit check descriptions in the SLACS
must be accurate and complete in order
for Clinical Programmers to write edit
checks correctly. A poorly-written edit
check description will delay progress on
study building in Rave.
CheckName Column
These naming conventions apply to
values in the CheckName column in the
SLACS spreadsheet.
Leader Note
Refer to the SLACS spreadsheet. In the
Checkname column, decode names and
identify standard edit checks, study-
specific edit checks (EA_U2_FORMS),
and derivations (GDX_BRTHD_VISD).
Identify edit checks that call custom
functions (Custom Function column).
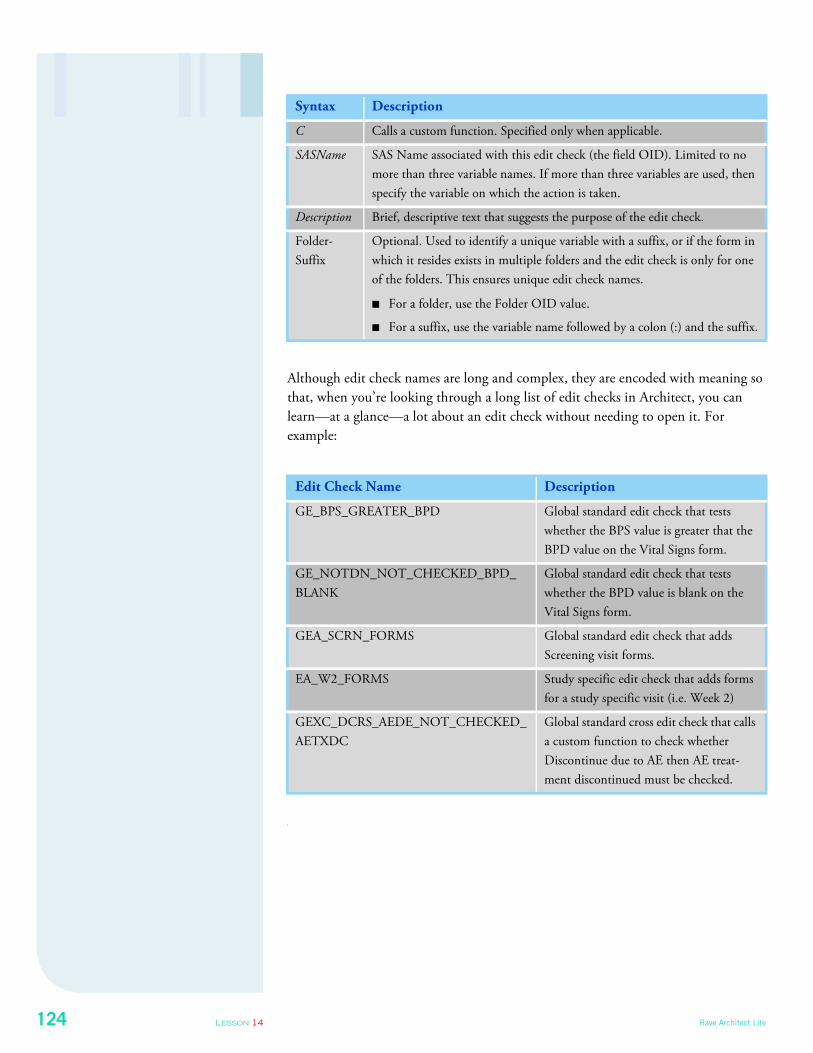
124 LESSON 14 Rave Architect Lite
Although edit check names are long and complex, they are encoded with meaning so
that, when you’re looking through a long list of edit checks in Architect, you can
learn—at a glance—a lot about an edit check without needing to open it. For
example:
s
C Calls a custom function. Specified only when applicable.
SASName SAS Name associated with this edit check (the field OID). Limited to no
more than three variable names. If more than three variables are used, then
specify the variable on which the action is taken.
Description Brief, descriptive text that suggests the purpose of the edit check.
Folder-
Suffix
Optional. Used to identify a unique variable with a suffix, or if the form in
which it resides exists in multiple folders and the edit check is only for one
of the folders. This ensures unique edit check names.
■ For a folder, use the Folder OID value.
■ For a suffix, use the variable name followed by a colon (:) and the suffix.
Edit Check Name Description
GE_BPS_GREATER_BPD Global standard edit check that tests
whether the BPS value is greater that the
BPD value on the Vital Signs form.
GE_NOTDN_NOT_CHECKED_BPD_
BLANK
Global standard edit check that tests
whether the BPD value is blank on the
Vital Signs form.
GEA_SCRN_FORMS Global standard edit check that adds
Screening visit forms.
EA_W2_FORMS Study specific edit check that adds forms
for a study specific visit (i.e. Week 2)
GEXC_DCRS_AEDE_NOT_CHECKED_
AETXDC
Global standard cross edit check that calls
a custom function to check whether
Discontinue due to AE then AE treat-
ment discontinued must be checked.
Syntax Description
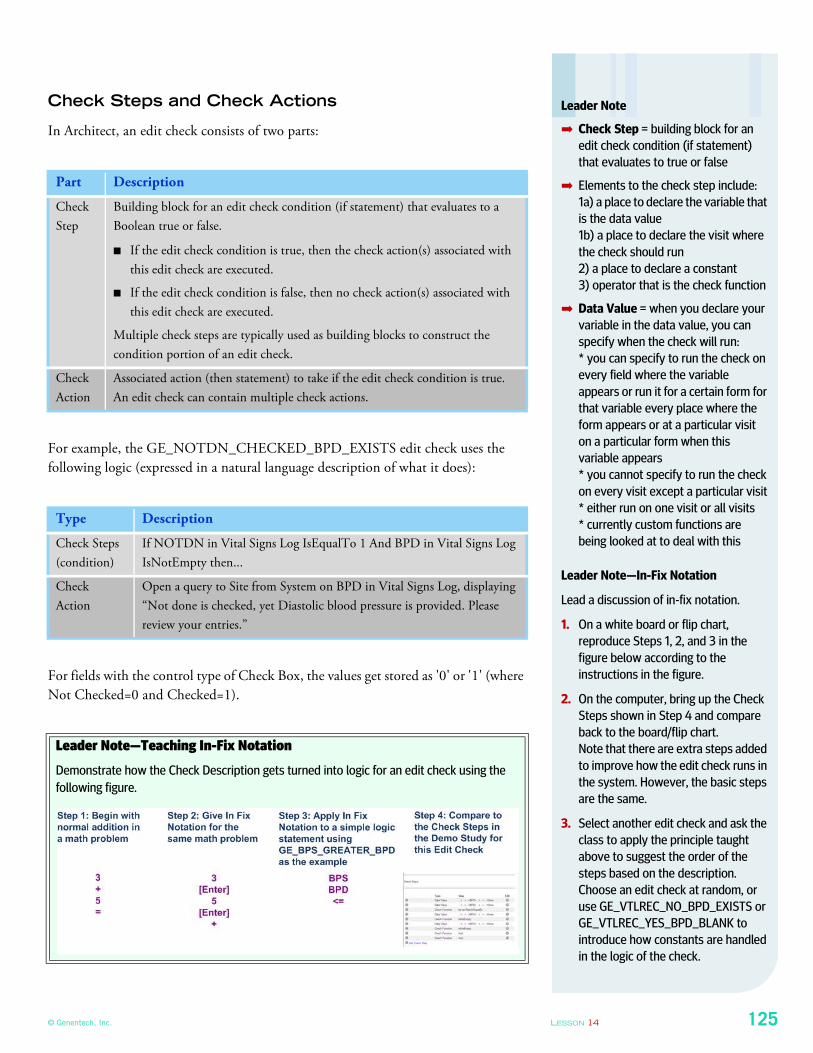
© Genentech, Inc. LESSON 14 125
Check Steps and Check Actions
In Architect, an edit check consists of two parts:
For example, the GE_NOTDN_CHECKED_BPD_EXISTS edit check uses the
following logic (expressed in a natural language description of what it does):
For fields with the control type of Check Box, the values get stored as '0' or '1' (where
Not Checked=0 and Checked=1).
Part Description
Check
Step
Building block for an edit check condition (if statement) that evaluates to a
Boolean true or false.
■ If the edit check condition is true, then the check action(s) associated with
this edit check are executed.
■ If the edit check condition is false, then no check action(s) associated with
this edit check are executed.
Multiple check steps are typically used as building blocks to construct the
condition portion of an edit check.
Check
Action
Associated action (then statement) to take if the edit check condition is true.
An edit check can contain multiple check actions.
Type Description
Check Steps
(condition)
If NOTDN in Vital Signs Log IsEqualTo 1 And BPD in Vital Signs Log
IsNotEmpty then...
Check
Action
Open a query to Site from System on BPD in Vital Signs Log, displaying
“Not done is checked, yet Diastolic blood pressure is provided. Please
review your entries.”
Leader Note—Teaching In-Fix Notation
Demonstrate how the Check Description gets turned into logic for an edit check using the
following figure.
Leader Note
➡ Check Step = building block for an
edit check condition (if statement)
that evaluates to true or false
➡ Elements to the check step include:
1a) a place to declare the variable that
is the data value
1b) a place to declare the visit where
the check should run
2) a place to declare a constant
3) operator that is the check function
➡ Data Value = when you declare your
variable in the data value, you can
specify when the check will run:
* you can specify to run the check on
every field where the variable
appears or run it for a certain form for
that variable every place where the
form appears or at a particular visit
on a particular form when this
variable appears
* you cannot specify to run the check
on every visit except a particular visit
* either run on one visit or all visits
* currently custom functions are
being looked at to deal with this
Leader Note—In-Fix Notation
Lead a discussion of in-fix notation.
1. On a white board or flip chart,
reproduce Steps 1, 2, and 3 in the
figure below according to the
instructions in the figure.
2. On the computer, bring up the Check
Steps shown in Step 4 and compare
back to the board/flip chart.
Note that there are extra steps added
to improve how the edit check runs in
the system. However, the basic steps
are the same.
3. Select another edit check and ask the
class to apply the principle taught
above to suggest the order of the
steps based on the description.
Choose an edit check at random, or
use GE_VTLREC_NO_BPD_EXISTS or
GE_VTLREC_YES_BPD_BLANK to
introduce how constants are handled
in the logic of the check.
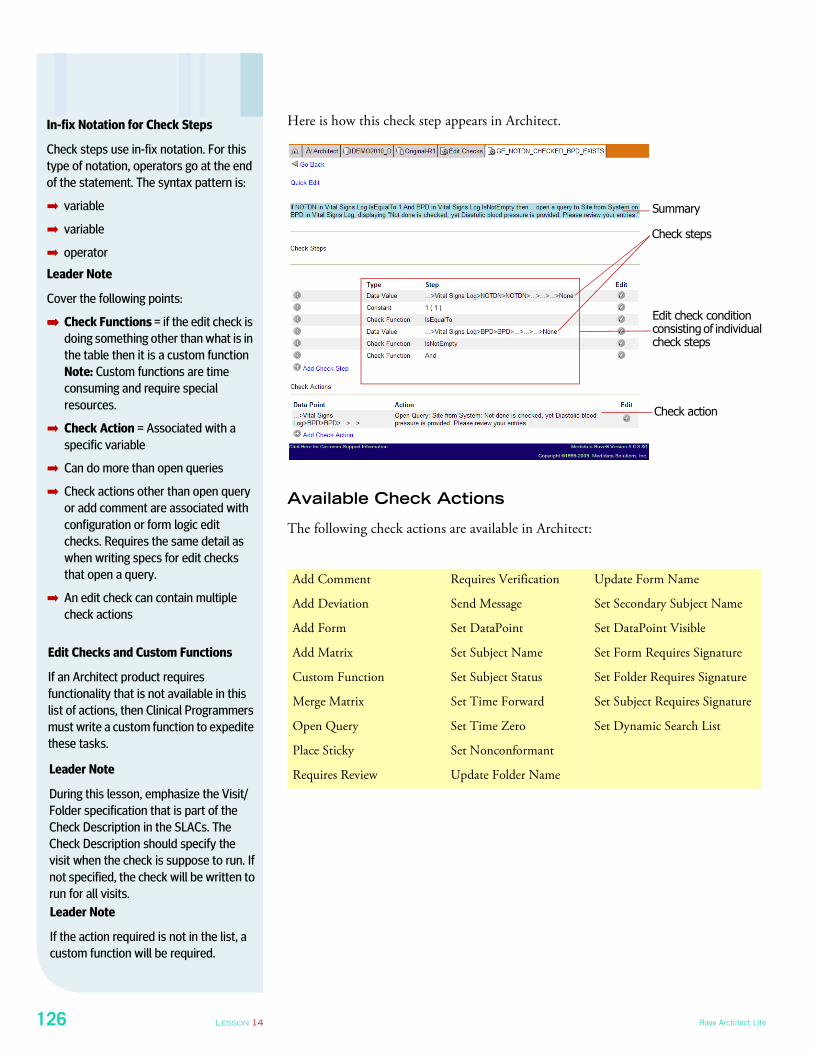
126 LESSON 14 Rave Architect Lite
Here is how this check step appears in Architect.
Available Check Actions
The following check actions are available in Architect:
Add Comment
Add Deviation
Add Form
Add Matrix
Custom Function
Merge Matrix
Open Query
Place Sticky
Requires Review
Requires Verification
Send Message
Set DataPoint
Set Subject Name
Set Subject Status
Set Time Forward
Set Time Zero
Set Nonconformant
Update Folder Name
Update Form Name
Set Secondary Subject Name
Set DataPoint Visible
Set Form Requires Signature
Set Folder Requires Signature
Set Subject Requires Signature
Set Dynamic Search List
In-fix Notation for Check Steps
Check steps use in-fix notation. For this
type of notation, operators go at the end
of the statement. The syntax pattern is:
➡ variable
➡ variable
➡ operator
Summary
Check action
Edit check condition consisting of individual check steps
Check steps
Leader Note
Cover the following points:
➡➡➡➡ Check Functions = if the edit check is
doing something other than what is in
the table then it is a custom function
Note: Custom functions are time
consuming and require special
resources.
➡ Check Action = Associated with a
specific variable
➡ Can do more than open queries
➡ Check actions other than open query
or add comment are associated with
configuration or form logic edit
checks. Requires the same detail as
when writing specs for edit checks
that open a query.
➡ An edit check can contain multiple
check actions
Edit Checks and Custom Functions
If an Architect product requires
functionality that is not available in this
list of actions, then Clinical Programmers
must write a custom function to expedite
these tasks.
Leader Note
During this lesson, emphasize the Visit/
Folder specification that is part of the
Check Description in the SLACs. The
Check Description should specify the
visit when the check is suppose to run. If
not specified, the check will be written to
run for all visits.
Leader Note
If the action required is not in the list, a
custom function will be required.
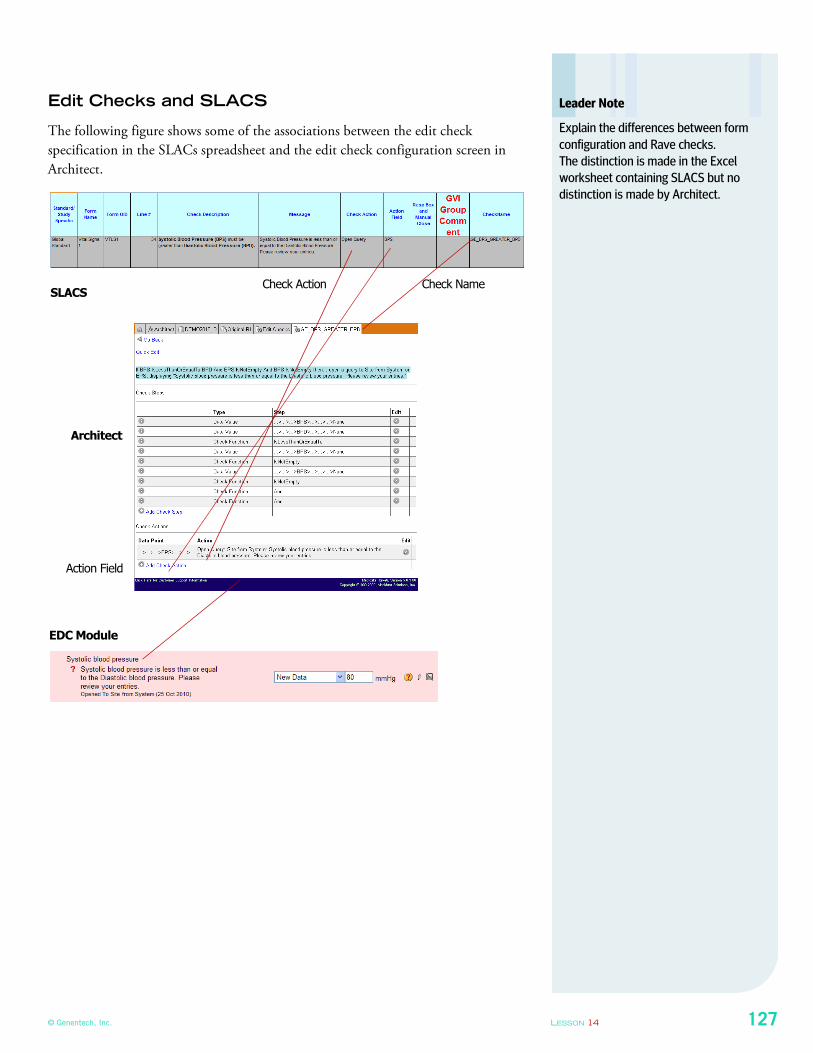
© Genentech, Inc. LESSON 14 127
Edit Checks and SLACS
The following figure shows some of the associations between the edit check
specification in the SLACs spreadsheet and the edit check configuration screen in
Architect.
Leader Note
Explain the differences between form
configuration and Rave checks.
The distinction is made in the Excel
worksheet containing SLACS but no
distinction is made by Architect.
Check NameCheck Action
EDC Module
Architect
SLACS
Action Field
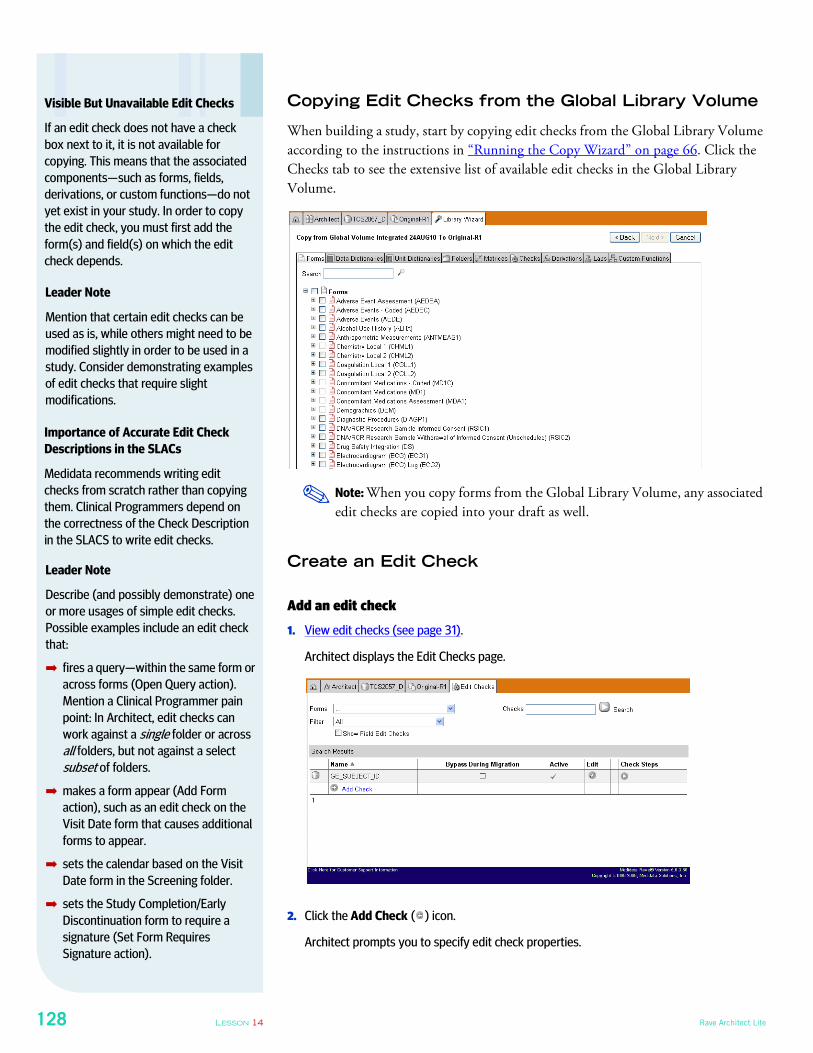
128 LESSON 14 Rave Architect Lite
Copying Edit Checks from the Global Library Volume
When building a study, start by copying edit checks from the Global Library Volume
according to the instructions in “Running the Copy Wizard” on page 66. Click the
Checks tab to see the extensive list of available edit checks in the Global Library
Volume.
Note: When you copy forms from the Global Library Volume, any associated
edit checks are copied into your draft as well.
Create an Edit Check
Add an edit check
1. View edit checks (see page 31).
Architect displays the Edit Checks page.
2. Click the Add Check ( ) icon.
Architect prompts you to specify edit check properties.
Visible But Unavailable Edit Checks
If an edit check does not have a check
box next to it, it is not available for
copying. This means that the associated
components—such as forms, fields,
derivations, or custom functions—do not
yet exist in your study. In order to copy
the edit check, you must first add the
form(s) and field(s) on which the edit
check depends.
✎
Leader Note
Mention that certain edit checks can be
used as is, while others might need to be
modified slightly in order to be used in a
study. Consider demonstrating examples
of edit checks that require slight
modifications.
Leader Note
Describe (and possibly demonstrate) one
or more usages of simple edit checks.
Possible examples include an edit check
that:
➡ fires a query—within the same form or
across forms (Open Query action).
Mention a Clinical Programmer pain
point: In Architect, edit checks can
work against a single folder or across all folders, but not against a select subset of folders.
➡ makes a form appear (Add Form
action), such as an edit check on the
Visit Date form that causes additional
forms to appear.
➡ sets the calendar based on the Visit
Date form in the Screening folder.
➡ sets the Study Completion/Early
Discontinuation form to require a
signature (Set Form Requires
Signature action).
Importance of Accurate Edit Check
Descriptions in the SLACs
Medidata recommends writing edit
checks from scratch rather than copying
them. Clinical Programmers depend on
the correctness of the Check Description
in the SLACS to write edit checks.
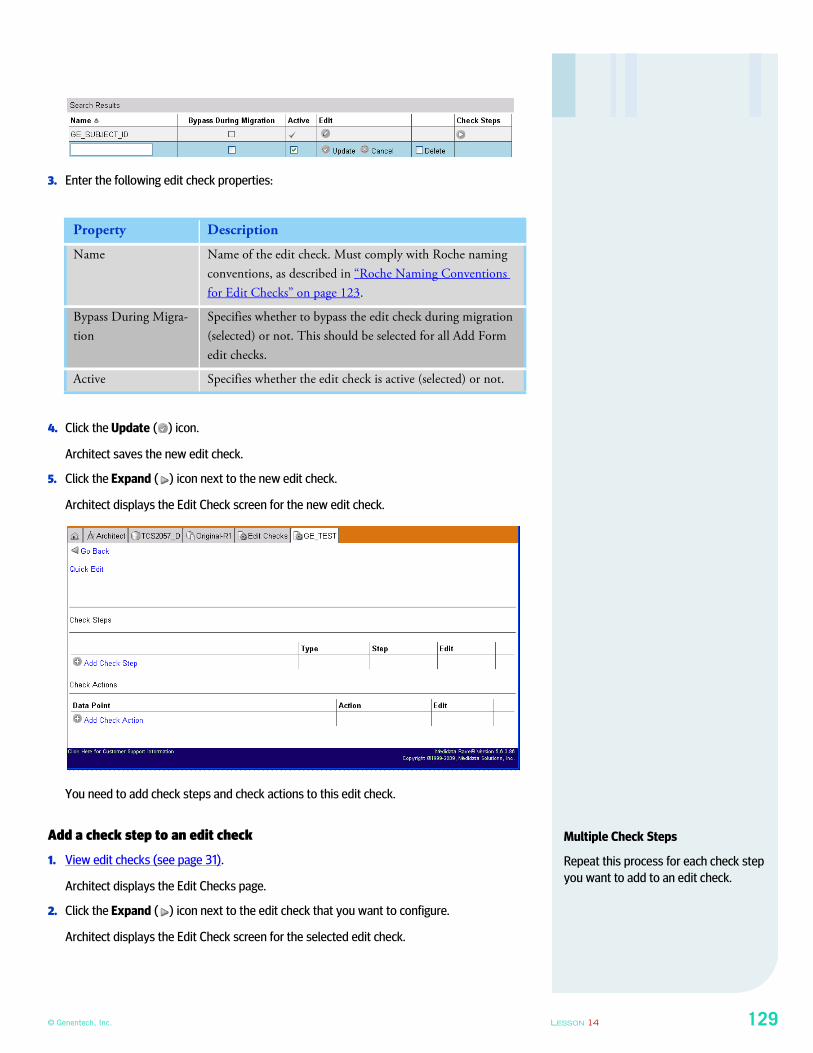
© Genentech, Inc. LESSON 14 129
3. Enter the following edit check properties:
4. Click the Update ( ) icon.
Architect saves the new edit check.
5. Click the Expand ( ) icon next to the new edit check.
Architect displays the Edit Check screen for the new edit check.
You need to add check steps and check actions to this edit check.
Add a check step to an edit check
1. View edit checks (see page 31).
Architect displays the Edit Checks page.
2. Click the Expand ( ) icon next to the edit check that you want to configure.
Architect displays the Edit Check screen for the selected edit check.
Property Description
Name Name of the edit check. Must comply with Roche naming
conventions, as described in “Roche Naming Conventions
for Edit Checks” on page 123.
Bypass During Migra-
tion
Specifies whether to bypass the edit check during migration
(selected) or not. This should be selected for all Add Form
edit checks.
Active Specifies whether the edit check is active (selected) or not.
Multiple Check Steps
Repeat this process for each check step
you want to add to an edit check.
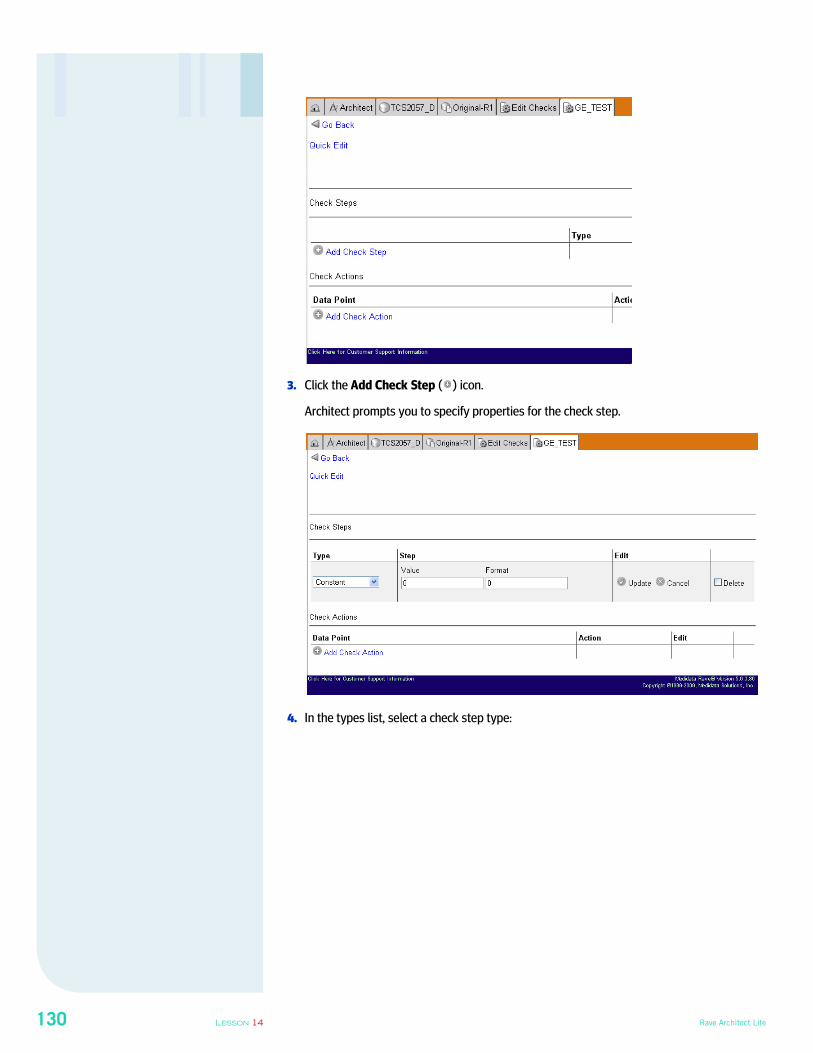
130 LESSON 14 Rave Architect Lite
3. Click the Add Check Step ( ) icon.
Architect prompts you to specify properties for the check step.
4. In the types list, select a check step type:
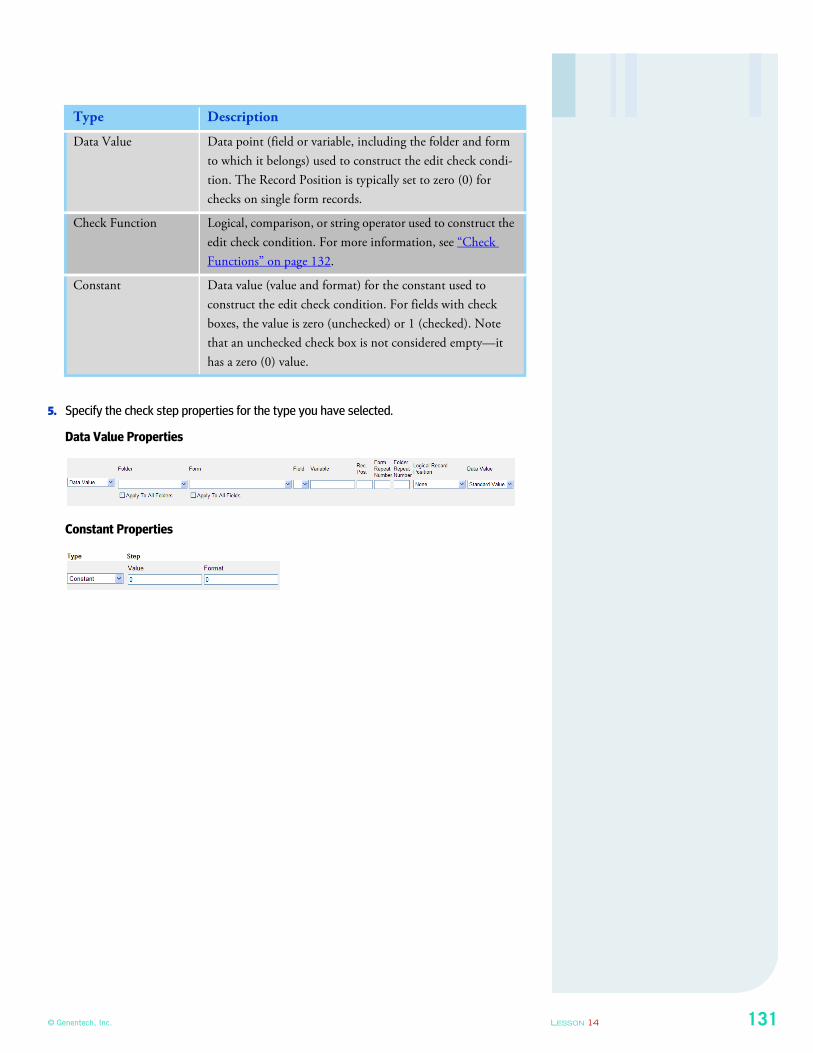
© Genentech, Inc. LESSON 14 131
5. Specify the check step properties for the type you have selected.
Data Value Properties
Constant Properties
Type Description
Data Value Data point (field or variable, including the folder and form
to which it belongs) used to construct the edit check condi-
tion. The Record Position is typically set to zero (0) for
checks on single form records.
Check Function Logical, comparison, or string operator used to construct the
edit check condition. For more information, see “Check
Functions” on page 132.
Constant Data value (value and format) for the constant used to
construct the edit check condition. For fields with check
boxes, the value is zero (unchecked) or 1 (checked). Note
that an unchecked check box is not considered empty—it
has a zero (0) value.
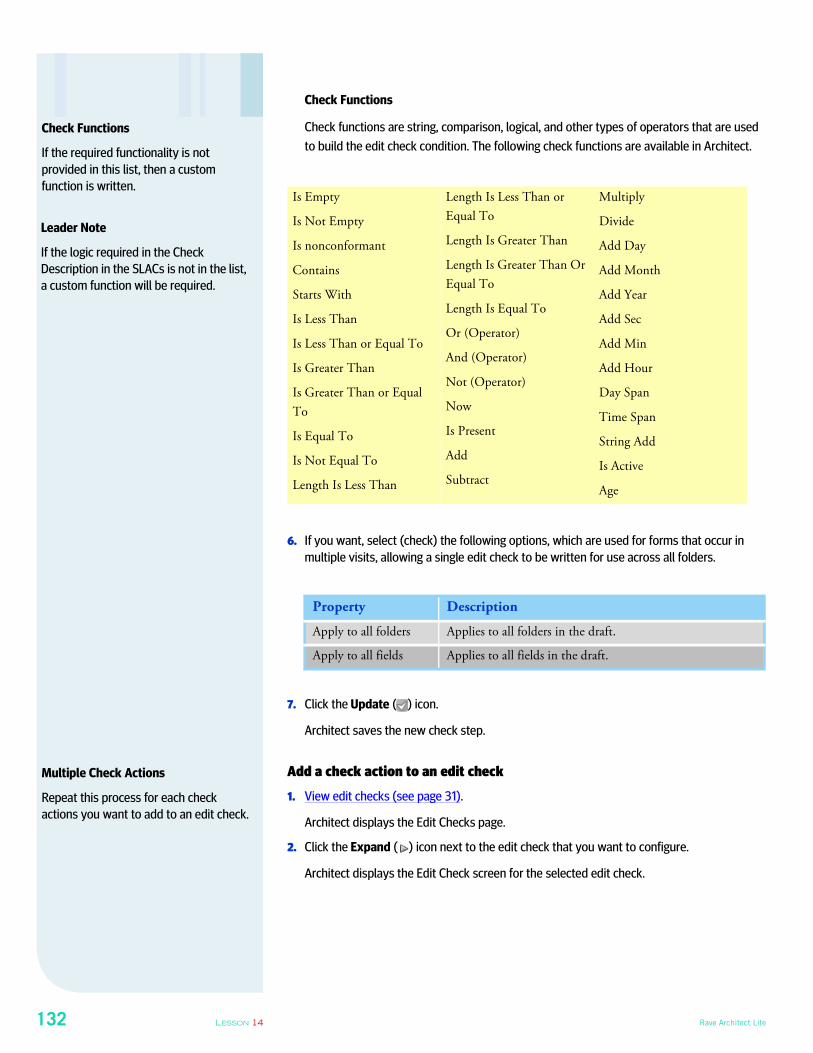
132 LESSON 14 Rave Architect Lite
Check Functions
Check functions are string, comparison, logical, and other types of operators that are used
to build the edit check condition. The following check functions are available in Architect.
6. If you want, select (check) the following options, which are used for forms that occur in
multiple visits, allowing a single edit check to be written for use across all folders.
7. Click the Update ( ) icon.
Architect saves the new check step.
Add a check action to an edit check
1. View edit checks (see page 31).
Architect displays the Edit Checks page.
2. Click the Expand ( ) icon next to the edit check that you want to configure.
Architect displays the Edit Check screen for the selected edit check.
Is Empty
Is Not Empty
Is nonconformant
Contains
Starts With
Is Less Than
Is Less Than or Equal To
Is Greater Than
Is Greater Than or Equal
To
Is Equal To
Is Not Equal To
Length Is Less Than
Length Is Less Than or
Equal To
Length Is Greater Than
Length Is Greater Than Or
Equal To
Length Is Equal To
Or (Operator)
And (Operator)
Not (Operator)
Now
Is Present
Add
Subtract
Multiply
Divide
Add Day
Add Month
Add Year
Add Sec
Add Min
Add Hour
Day Span
Time Span
String Add
Is Active
Age
Property Description
Apply to all folders Applies to all folders in the draft.
Apply to all fields Applies to all fields in the draft.
Check Functions
If the required functionality is not
provided in this list, then a custom
function is written.
Leader Note
If the logic required in the Check
Description in the SLACs is not in the list,
a custom function will be required.
Multiple Check Actions
Repeat this process for each check
actions you want to add to an edit check.
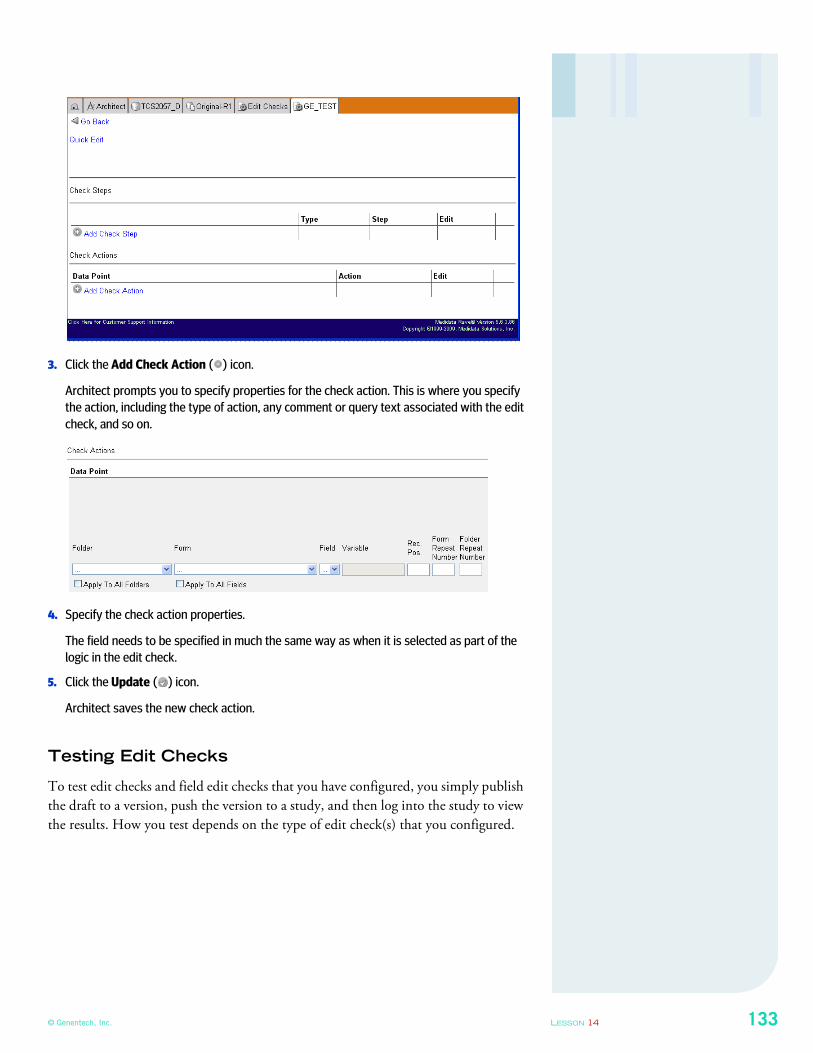
© Genentech, Inc. LESSON 14 133
3. Click the Add Check Action ( ) icon.
Architect prompts you to specify properties for the check action. This is where you specify
the action, including the type of action, any comment or query text associated with the edit
check, and so on.
4. Specify the check action properties.
The field needs to be specified in much the same way as when it is selected as part of the
logic in the edit check.
5. Click the Update ( ) icon.
Architect saves the new check action.
Testing Edit Checks
To test edit checks and field edit checks that you have configured, you simply publish
the draft to a version, push the version to a study, and then log into the study to view
the results. How you test depends on the type of edit check(s) that you configured.
134 LESSON 14 Rave Architect Lite
Using Custom Functions
This section shows you how custom functions are used in Architect.
About Custom Functions
As described in “Viewing Custom Functions” on page 32, a custom function is a
script, written in the C# programming language, that provides specialized data
quality checks that cannot be executed using edit checks or other Architect features.
Custom functions are used to handle other functionality as well, such as the flow of
data collection, creating time points, setting special values on a form, expediting data
integration, and so on.
Types of Custom Functions
At Roche, there are two types of custom functions:
Type Description
standard and study-
specific custom func-
tions
Copied from the Global Library Volume or standard project,
along with the edit checks that fire them. Defined in the
study’s Custom Function Design Document.
integration custom func-
tions
Developed by Informatics and customized as needed to fit
study-specific requirements. Defined in the study’s integration
Custom Function Design Document.
Leader Note
Remind participants that, at Roche,
custom functions never create or change
clinical data that is being entered and
collected.
Where are Custom Functions
Specified?
Custom functions are specified in a
study’s integration Custom Function
Design Document.
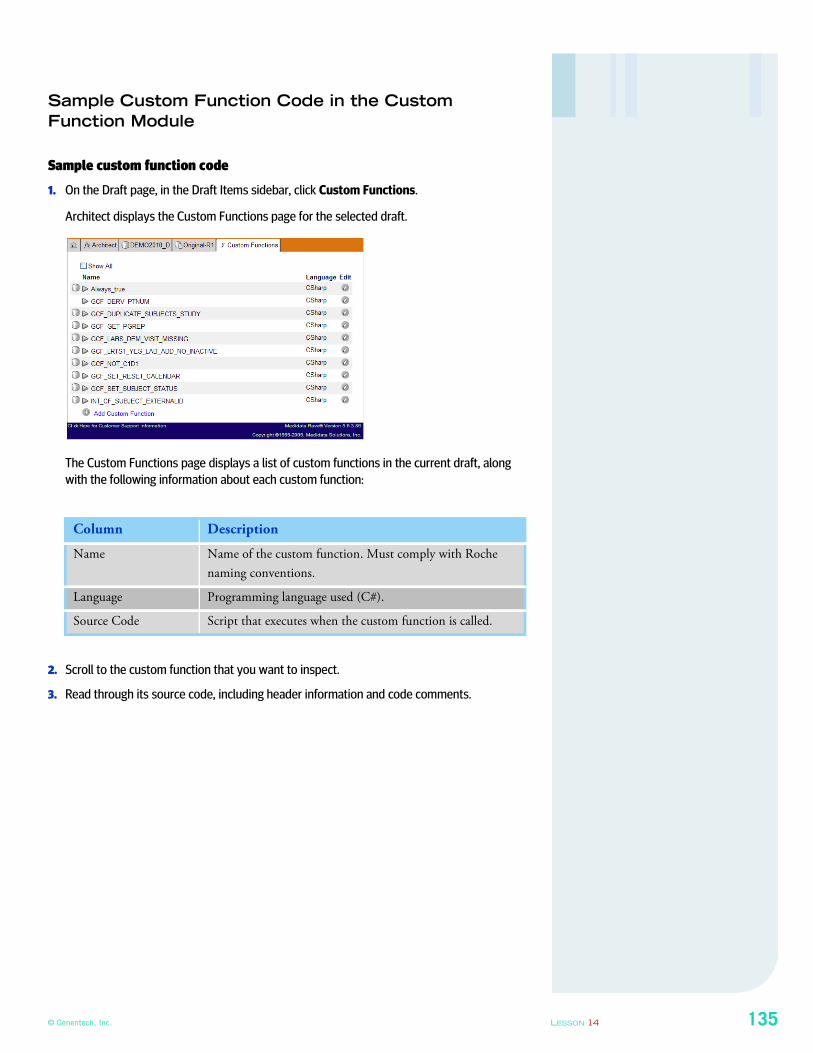
© Genentech, Inc. LESSON 14 135
Sample Custom Function Code in the Custom
Function Module
Sample custom function code
1. On the Draft page, in the Draft Items sidebar, click Custom Functions.
Architect displays the Custom Functions page for the selected draft.
The Custom Functions page displays a list of custom functions in the current draft, along
with the following information about each custom function:
2. Scroll to the custom function that you want to inspect.
3. Read through its source code, including header information and code comments.
Column Description
Name Name of the custom function. Must comply with Roche
naming conventions.
Language Programming language used (C#).
Source Code Script that executes when the custom function is called.
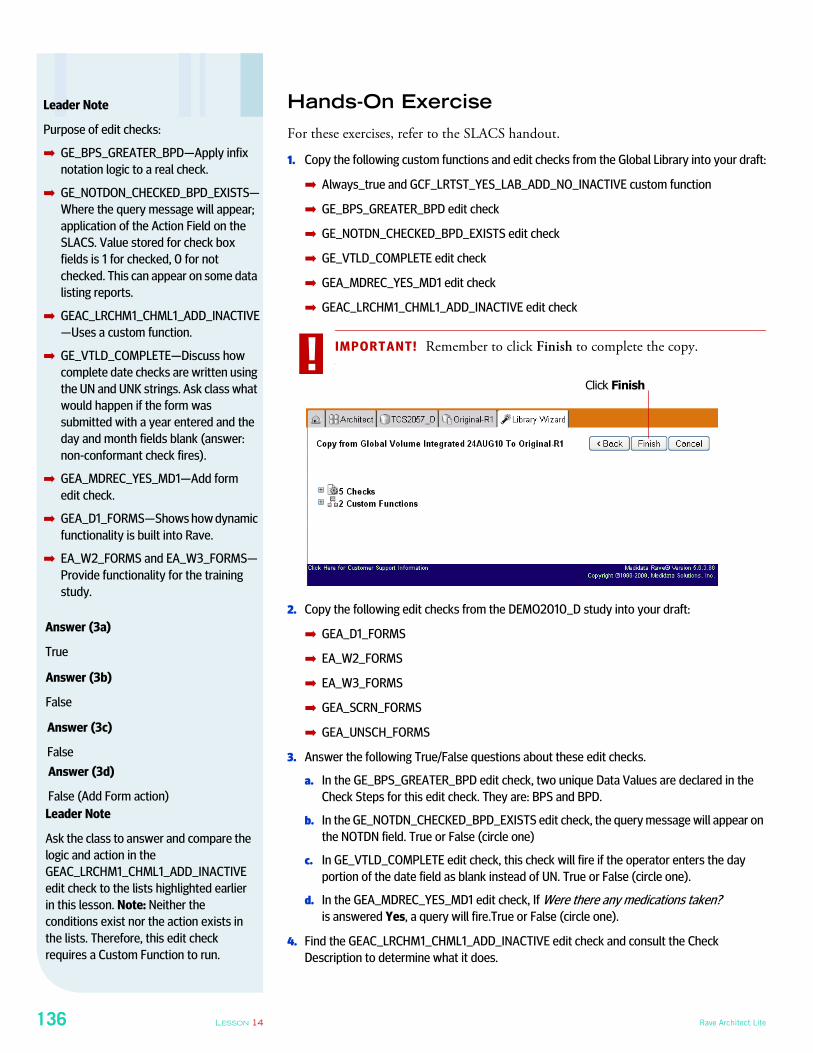
136 LESSON 14 Rave Architect Lite
Hands-On Exercise
For these exercises, refer to the SLACS handout.
1. Copy the following custom functions and edit checks from the Global Library into your draft:
➡ Always_true and GCF_LRTST_YES_LAB_ADD_NO_INACTIVE custom function
➡ GE_BPS_GREATER_BPD edit check
➡ GE_NOTDN_CHECKED_BPD_EXISTS edit check
➡ GE_VTLD_COMPLETE edit check
➡ GEA_MDREC_YES_MD1 edit check
➡ GEAC_LRCHM1_CHML1_ADD_INACTIVE edit check
IMPORTANT! Remember to click Finish to complete the copy.
2. Copy the following edit checks from the DEMO2010_D study into your draft:
➡ GEA_D1_FORMS
➡ EA_W2_FORMS
➡ EA_W3_FORMS
➡ GEA_SCRN_FORMS
➡ GEA_UNSCH_FORMS
3. Answer the following True/False questions about these edit checks.
a. In the GE_BPS_GREATER_BPD edit check, two unique Data Values are declared in the
Check Steps for this edit check. They are: BPS and BPD.
b. In the GE_NOTDN_CHECKED_BPD_EXISTS edit check, the query message will appear on
the NOTDN field. True or False (circle one)
c. In GE_VTLD_COMPLETE edit check, this check will fire if the operator enters the day
portion of the date field as blank instead of UN. True or False (circle one).
d. In the GEA_MDREC_YES_MD1 edit check, IfWere there any medications taken? is answered Yes, a query will fire.True or False (circle one).
4. Find the GEAC_LRCHM1_CHML1_ADD_INACTIVE edit check and consult the Check
Description to determine what it does.
Leader Note
Purpose of edit checks:
➡ GE_BPS_GREATER_BPD—Apply infix
notation logic to a real check.
➡ GE_NOTDON_CHECKED_BPD_EXISTS—
Where the query message will appear;
application of the Action Field on the
SLACS. Value stored for check box
fields is 1 for checked, 0 for not
checked. This can appear on some data
listing reports.
➡ GEAC_LRCHM1_CHML1_ADD_INACTIVE
—Uses a custom function.
➡ GE_VTLD_COMPLETE—Discuss how
complete date checks are written using
the UN and UNK strings. Ask class what
would happen if the form was
submitted with a year entered and the
day and month fields blank (answer:
non-conformant check fires).
➡ GEA_MDREC_YES_MD1—Add form
edit check.
➡ GEA_D1_FORMS—Shows how dynamic
functionality is built into Rave.
➡ EA_W2_FORMS and EA_W3_FORMS—
Provide functionality for the training
study.
!Click Finish
Answer (3a)
True
Answer (3b)
False
Answer (3c)
False
Answer (3d)
False (Add Form action)
Leader Note
Ask the class to answer and compare the
logic and action in the
GEAC_LRCHM1_CHML1_ADD_INACTIVE
edit check to the lists highlighted earlier
in this lesson. Note: Neither the
conditions exist nor the action exists in
the lists. Therefore, this edit check
requires a Custom Function to run.
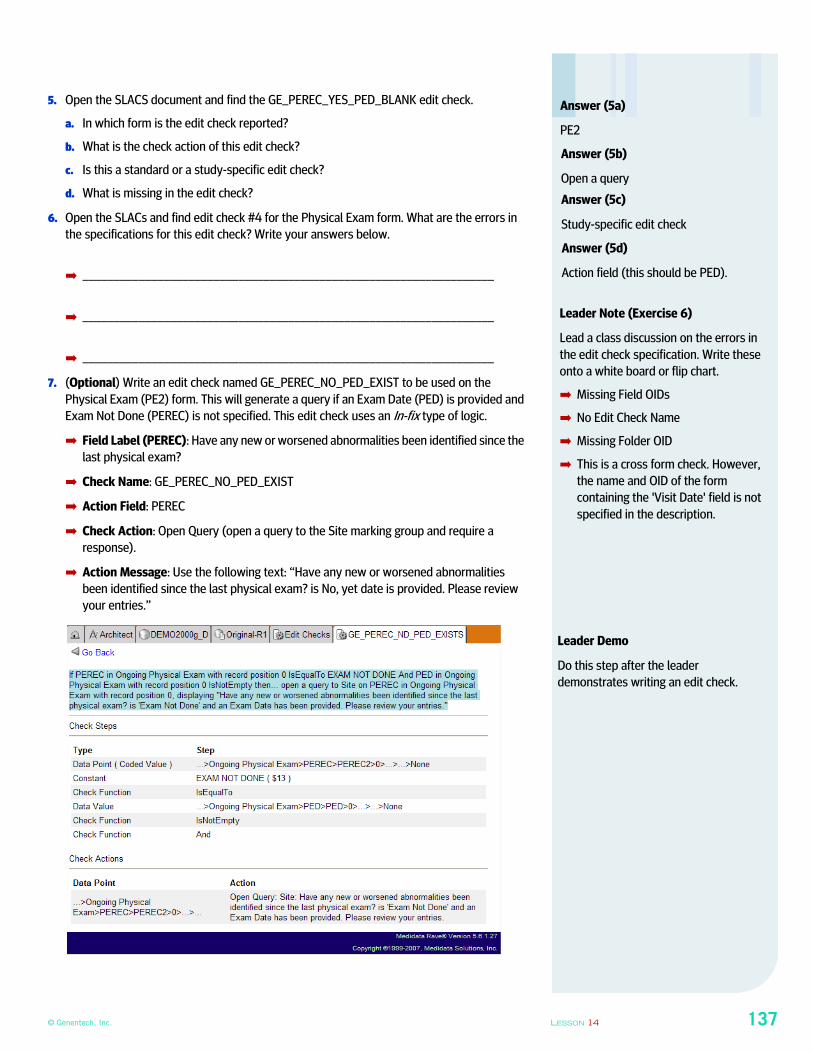
© Genentech, Inc. LESSON 14 137
5. Open the SLACS document and find the GE_PEREC_YES_PED_BLANK edit check.
a. In which form is the edit check reported?
b. What is the check action of this edit check?
c. Is this a standard or a study-specific edit check?
d. What is missing in the edit check?
6. Open the SLACs and find edit check #4 for the Physical Exam form. What are the errors in
the specifications for this edit check? Write your answers below.
➡ __________________________________________________________________
➡ __________________________________________________________________
➡ __________________________________________________________________
7. (Optional) Write an edit check named GE_PEREC_NO_PED_EXIST to be used on the
Physical Exam (PE2) form. This will generate a query if an Exam Date (PED) is provided and
Exam Not Done (PEREC) is not specified. This edit check uses an In-fix type of logic.
➡ Field Label (PEREC): Have any new or worsened abnormalities been identified since the
last physical exam?
➡ Check Name: GE_PEREC_NO_PED_EXIST
➡ Action Field: PEREC
➡ Check Action: Open Query (open a query to the Site marking group and require a
response).
➡ Action Message: Use the following text: “Have any new or worsened abnormalities
been identified since the last physical exam? is No, yet date is provided. Please review
your entries.”
Answer (5a)
PE2
Answer (5b)
Open a query
Answer (5c)
Study-specific edit check
Answer (5d)
Action field (this should be PED).
Leader Note (Exercise 6)
Lead a class discussion on the errors in
the edit check specification. Write these
onto a white board or flip chart.
➡ Missing Field OIDs
➡ No Edit Check Name
➡ Missing Folder OID
➡ This is a cross form check. However,
the name and OID of the form
containing the 'Visit Date' field is not
specified in the description.
Leader Demo
Do this step after the leader
demonstrates writing an edit check.
138 LESSON 14 Rave Architect Lite
8. Important: Change the settings on the Primary Form back to match the SLACS spreadsheet
(from the temporary assignments you set in order to prepare the study for UAT).
9. Publish, push, and review results.
10. Test the edit check you wrote.
11. Examine the changes you made earlier to the defaulted values for the Vital Signs Log form.
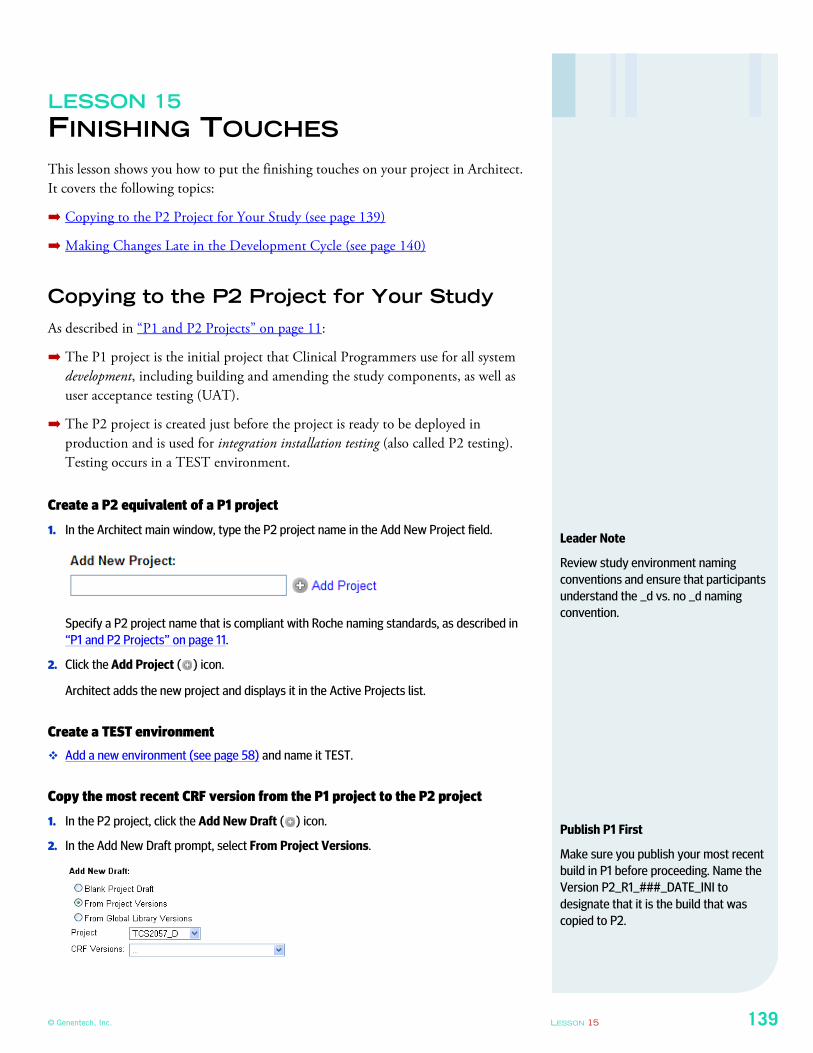
© Genentech, Inc. LESSON 15 139
LESSON 15
FINISHING TOUCHES
This lesson shows you how to put the finishing touches on your project in Architect.
It covers the following topics:
➡ Copying to the P2 Project for Your Study (see page 139)
➡ Making Changes Late in the Development Cycle (see page 140)
Copying to the P2 Project for Your Study
As described in “P1 and P2 Projects” on page 11:
➡ The P1 project is the initial project that Clinical Programmers use for all system
development, including building and amending the study components, as well as
user acceptance testing (UAT).
➡ The P2 project is created just before the project is ready to be deployed in
production and is used for integration installation testing (also called P2 testing).
Testing occurs in a TEST environment.
Create a P2 equivalent of a P1 project
1. In the Architect main window, type the P2 project name in the Add New Project field.
Specify a P2 project name that is compliant with Roche naming standards, as described in
“P1 and P2 Projects” on page 11.
2. Click the Add Project ( ) icon.
Architect adds the new project and displays it in the Active Projects list.
Create a TEST environment
� Add a new environment (see page 58) and name it TEST.
Copy the most recent CRF version from the P1 project to the P2 project
1. In the P2 project, click the Add New Draft ( ) icon.
2. In the Add New Draft prompt, select From Project Versions.
Leader Note
Review study environment naming
conventions and ensure that participants
understand the _d vs. no _d naming
convention.
Publish P1 First
Make sure you publish your most recent
build in P1 before proceeding. Name the
Version P2_R1_###_DATE_INI to
designate that it is the build that was
copied to P2.
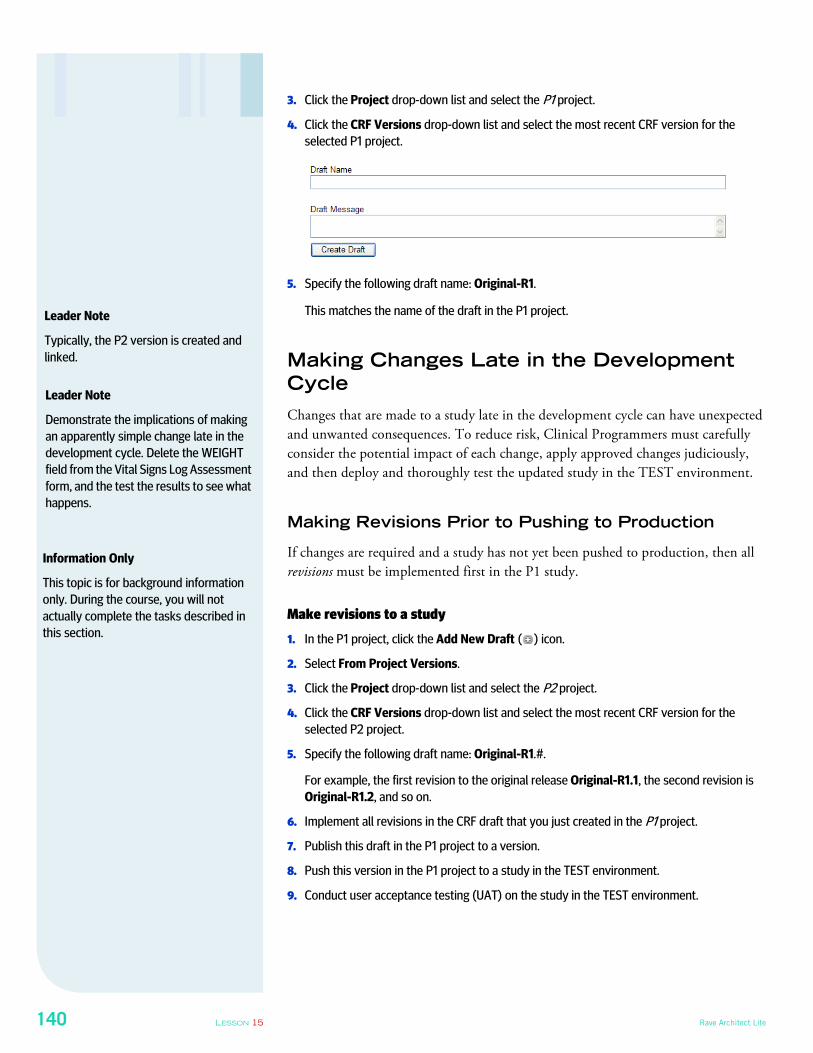
140 LESSON 15 Rave Architect Lite
3. Click the Project drop-down list and select the P1 project.
4. Click the CRF Versions drop-down list and select the most recent CRF version for the
selected P1 project.
5. Specify the following draft name: Original-R1.
This matches the name of the draft in the P1 project.
Making Changes Late in the Development
Cycle
Changes that are made to a study late in the development cycle can have unexpected
and unwanted consequences. To reduce risk, Clinical Programmers must carefully
consider the potential impact of each change, apply approved changes judiciously,
and then deploy and thoroughly test the updated study in the TEST environment.
Making Revisions Prior to Pushing to Production
If changes are required and a study has not yet been pushed to production, then all
revisions must be implemented first in the P1 study.
Make revisions to a study
1. In the P1 project, click the Add New Draft ( ) icon.
2. Select From Project Versions.
3. Click the Project drop-down list and select the P2 project.
4. Click the CRF Versions drop-down list and select the most recent CRF version for the
selected P2 project.
5. Specify the following draft name: Original-R1.#.
For example, the first revision to the original release Original-R1.1, the second revision is
Original-R1.2, and so on.
6. Implement all revisions in the CRF draft that you just created in the P1 project.
7. Publish this draft in the P1 project to a version.
8. Push this version in the P1 project to a study in the TEST environment.
9. Conduct user acceptance testing (UAT) on the study in the TEST environment.
Leader Note
Typically, the P2 version is created and
linked.
Leader Note
Demonstrate the implications of making
an apparently simple change late in the
development cycle. Delete the WEIGHT
field from the Vital Signs Log Assessment
form, and the test the results to see what
happens.
Information Only
This topic is for background information
only. During the course, you will not
actually complete the tasks described in
this section.
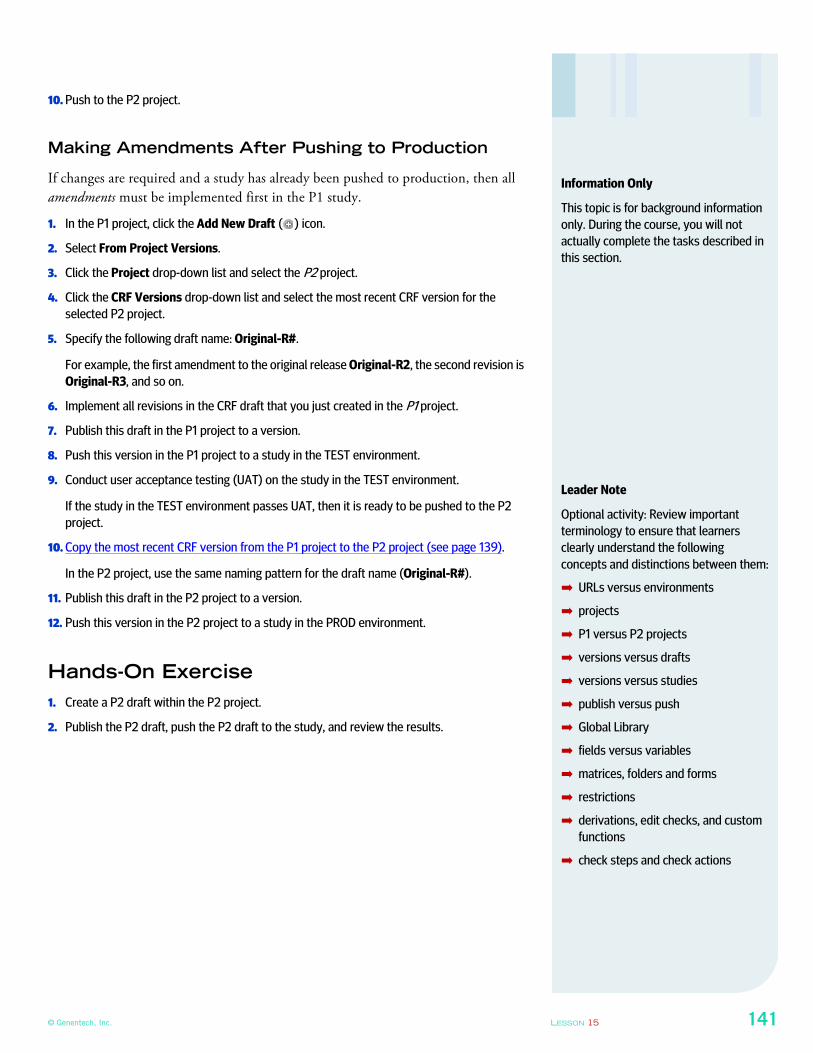
© Genentech, Inc. LESSON 15 141
10. Push to the P2 project.
Making Amendments After Pushing to Production
If changes are required and a study has already been pushed to production, then all
amendments must be implemented first in the P1 study.
1. In the P1 project, click the Add New Draft ( ) icon.
2. Select From Project Versions.
3. Click the Project drop-down list and select the P2 project.
4. Click the CRF Versions drop-down list and select the most recent CRF version for the
selected P2 project.
5. Specify the following draft name: Original-R#.
For example, the first amendment to the original release Original-R2, the second revision is
Original-R3, and so on.
6. Implement all revisions in the CRF draft that you just created in the P1 project.
7. Publish this draft in the P1 project to a version.
8. Push this version in the P1 project to a study in the TEST environment.
9. Conduct user acceptance testing (UAT) on the study in the TEST environment.
If the study in the TEST environment passes UAT, then it is ready to be pushed to the P2
project.
10. Copy the most recent CRF version from the P1 project to the P2 project (see page 139).
In the P2 project, use the same naming pattern for the draft name (Original-R#).
11. Publish this draft in the P2 project to a version.
12. Push this version in the P2 project to a study in the PROD environment.
Hands-On Exercise
1. Create a P2 draft within the P2 project.
2. Publish the P2 draft, push the P2 draft to the study, and review the results.
Information Only
This topic is for background information
only. During the course, you will not
actually complete the tasks described in
this section.
Leader Note
Optional activity: Review important
terminology to ensure that learners
clearly understand the following
concepts and distinctions between them:
➡ URLs versus environments
➡ projects
➡ P1 versus P2 projects
➡ versions versus drafts
➡ versions versus studies
➡ publish versus push
➡ Global Library
➡ fields versus variables
➡ matrices, folders and forms
➡ restrictions
➡ derivations, edit checks, and custom
functions
➡ check steps and check actions
142 LESSON 15 Rave Architect Lite
Conclusion to Section 2
This section provided in-depth, hands-on experience with using the Architect
module to build a study. Study Data Managers (SDMs) must have completed this
section prior to leading a team in the design of an EDC system.
Training Review
In this section, you have learned how to:
➡ Configure projects, environments, and drafts
➡ Copy items from the Global Library Volume
➡ Create and configure forms
➡ Create and configure folders
➡ Create and configure matrices
➡ Create and configure fields on a form, including variables, help text, and other
settings
➡ Create and configure dictionaries and assign dictionaries to variables
➡ Publish a draft to a version
➡ Push a version to a study
➡ Review the results of a study in the EDC module
➡ Configure form and field restrictions
➡ Configure edit checks
➡ Scroll through custom functions
➡ Create a P2 project from a P1 project and make revisions and amendments to the
study
Where to Go From Here
Now that you have completed Section 2, before you leave, be sure to sign the group
training record.
You can now apply what you’ve learned in this course to future study design efforts.
Course Evaluation Form
Please fill out the Course Evaluation Form for Arch Lite Session 2 at:
http://www.surveymonkey.com/s/B8Q3X5K
© Roche Group GLOSSARY 143
GLOSSARY
Architect module
Component of Medidata Rave that enables Clinical Programmers to
create EDC studies that authorized users can access in the Rave
EDC module.
blue line fields
Now referred to as instruction text. See instruction text.
check action
In an edit check, an action to take if the edit check condition is true.
Edit checks can contain multiple check actions. See also edit check,
check step.
check step
Building block for an edit check condition (if statement) that evalu-
ates to a Boolean true or false. If the edit check condition is true,
then the check action(s) associated with this edit check are executed.
Multiple check steps are typically used as building blocks to
construct the condition portion of an edit check. See also edit check,
check action.
custom function
Script, written in the C# programming language, that provides
specialized data quality checks that cannot be executed using edit
checks or other Architect features. Custom functions are used to
handle other functionality as well, such as the flow of data collec-
tion, creating time points, setting special values on a form, expe-
diting data integration, and so on. See also edit check.
data point
Piece of data that gets put into a field, such as a date, description,
selection from a drop-down list, and so on. See also field.
derivation
A calculated value that is derived from one or more existing data
points on a form. A derivation consists of two parts: one or more
existing data points, and one or more associated actions (calcula-
tions) to take on the value(s) of the data point(s). For example, on
the Demographics form, the Age field is derived from two data
points: the subject’s birth date and the enrollment date.
design document
See study specifications.
144 GLOSSARY Rave Architect Lite
dictionary
Set of values that are associated with a single data point. For
example, the YES_NO dictionary contains two values: YES and
NO. Each value is called an entry. In the EDC module, when a user
selects a field associated with a dictionary, they can select among the
values specified in the dictionary. Also called a data dictionary.
draft
Form of a project that Clinical Programmers can view and edit. It
contains all the elements of a study that a Clinical Programmer can
develop—eCRFs, fields and variables, folders, data validations, and
so on. See also project.
eCRF
Electronic case report form. An online version of a printed case
report form (CRF) used in Roche-sponsored clinical trials, such as a
Physical Exam, Subject Eligibility, or Visit Date form. Instead of
manually filling out printed CRFs, Rave users complete eCRFs
online. See also form.
EDC
Electronic Data Capture. Process of collecting and distributing clin-
ical trial data electronically using an EDC application such as Rave.
edit check
In the EDC Module, edit checks catch entry errors or aberrant data
to help ensure that the submitted data are valid, or to perform study
dynamics actions. Edit checks are defined in the Study Logic and
Check Specifications (SLACS) for a study. Edit checks consist of a
condition (If X) and one or more operations to execute (then Y) if
the condition is true. See also check action, check step.
entry restriction
Restriction that identifies Rave role(s) that are prevented from
making changes to a form or field. See also restriction, View & Entry
Restrictions (V&E).
environment
A partitioned instance in the database for a particular purpose.
The name of the environment describes the context in which it is
used. For example, Clinical Programmers construct a study using
Architect in the DEV environment, and site users access the study’s
EDC module in the PROD environment. See also project, study.
© Roche Group GLOSSARY 145
field
A place where a data point gets entered on an eCRF. See also eCRF,
form.
folder
Mechanism for organizing eCRFs into logical groups, such as by
subject visit. Folders represent visits specified in the study protocol.
Each visit has its own folder in Rave that contains all the necessary
forms associated with that visit. A folder can contain eCRFs and
other folders. Folders are defined in the Visit Form Matrix. See also
Visit Form Matrix.
form
An electronic representation of the paper-based Clinical Research
Form (CRF). Also referred to in this training as an electronic CRF
(eCRF). Forms and form elements are specified in the Mock eCRFs
document, and commonly-used forms are configured in the Global
Library Volume. A form contains one or more fields—places where
data gets entered on an eCRF in the EDC module. See also eCRF,
primary form, Mock eCRFs / eCRF Help Text, field.
ghost OID
If you delete a field and then proceed to add a new field and use the
search filter, the name of the deleted field appears in the list. It will
show up in the clinical view tables for the data set where it was orig-
inally defined. This is the reason for P1 and P2—the P2 project gets
rid of them.
Global Library Volume
Collection of standard EDC study components associated with the
standard elements of the three specification documents, the Mock
eCRF, the SCD, and the SLACS. Rather than build entire studies
from scratch, Clinical Programmers can quickly assemble studies
using pre-built components copied from the Global Library
Volume—standard forms, dictionaries, folders, matrices, edit
checks, derivations, custom functions, and lab variable mappings.
See also study specifications.
Help Text
Text that provides instructions for a form or field. Specified in the
eCRF Help Text portion of the Mock eCRFs. See also Mock eCRFs
/ eCRF Help Text.
146 GLOSSARY Rave Architect Lite
instruction text
Instructional text that appears on forms in an EDC module. This
text is specified in the Mock eCRFs document. See also Mock eCRFs
/ eCRF Help Text.
log eCRF
Type of eCRF that is used to add multiple instances of the same
eCRF, such as the Concomitant Medications eCRF or the Adverse
Event eCRF. Log eCRFs are displayed so that each log line is a sepa-
rate, horizontal row. When editing a log eCRF, the landscape mode
displays the editable fields in a row, while the portrait mode displays
editable fields on a page, stacked vertically. See also single eCRF
(non-log eCRF).
matrix
Defines which forms belong in which folders in a study. A matrix
implements the specifications in the Visit Form Matrix. See also
primary matrix, Visit Form Matrix.
Mock eCRFs / eCRF Help Text
Study specification document for eCRFs in a study. Defines the
details of forms and fields to implement in Architect, along with
source document verify (SDV) requirements. See also study specifica-
tions.
OID
Object Identifier (OID) that uniquely identifies a component
(folder OID, form OID, matrix OID, field OID, variable OID, and
so on) in Architect. Must comply with Roche naming conventions.
P1 project
Initial project for a Roche-sponsored clinical trial. Used for all
system development, including building and amending eCRFs,
developing edit checks, and so on. See also P2 project, project.
P2 project
Created just before the project is ready to be deployed in production
and used by study sites to enter clinical data. Used for integration
installation testing (also called P2 testing). See also P1 project,
project.
portrait eCRF
The way that most eCRFs appear. Compare with log eCRF.
© Roche Group GLOSSARY 147
primary form
Required form into which data must be added in order to add a
subject to the system. All Roche EDC studies use the Subject Identi-
fication Form. See also form.
primary matrix
Default matrix that is automatically added when a new subject is
entered into Rave. See also matrix.
project
In Architect, the equivalent of a study. A project contains the drafts,
environments, subject search configurations, and copy source defi-
nitions. See also draft, version, study.
publish
Process of saving a snapshot of a draft to a version at a given point in
time. See also draft, version.
push
Process of creating a study from a version at a given point in time.
See also version, study.
query
An electronic question about a piece of data on an eCRF. Queries
come from two primary sources: system-generated queries are gener-
ated automatically by the Rave software or by a Rave integration,
and manual queries are created explicitly by a user who is authorized
to do so. A query requires an explicit response from the person(s) to
whom it was directed.
restriction
Controls the degree to which a given EDC role has access to a form
for a field—for example, to change data in a form or to view a field
on a form. For example, only certain users can view the Electrocar-
diogram or Hematology Local eCRF. Restrictions are specified in
the View & Entry Restrictions (V&E) document for a study. See
also view restriction, entry restriction, View & Entry Restrictions
(V&E).
role
A set of permissions to perform certain actions and access particular
data within Rave. Roles determine what a user sees and has access
to, including eCRFs, reports, clinical views, and so on. When a user
148 GLOSSARY Rave Architect Lite
logs in, Rave grants them access to Rave features and data based on
the permissions configured for their associated roles. Each user
account is assigned just one role.
SAS format
Data format of date and time fields (only) for SAS clinical views.
One of the following values: Date9., Time5., or Time8. (times with
seconds). See also SAS label, SAS name.
SAS label
Column headers that appear in SAS Clinical Views. See also SAS
format, SAS label
SAS name
Physical name of a field, which is represented as the SAS name in
the SAS output file. Usually the same as the Field OID name. See
also SAS format, SAS label.
sidebar
Area of the Rave user interface that lists tasks you can execute and
components to work with.
single eCRF (non-log eCRF)
The way that most eCRFs appear. Compare with log eCRF.
Source Document Verification (SDV)
Process of verifying that the data entered in Rave matches exactly
the written record of data collected from a subject (patient charts,
lab reports, notes, and other paper-based records).
standard study
See Global Library Volume.
study
Operationally, any systematic trial of investigational or approved
products in human subjects pertaining to the efficacy and/or safety
of the product. Each study is uniquely identified by its Roche-
assigned study number.
In Architect, a study is the electronic casebook users can access and
navigate in the Rave EDC module. To create a new study that can
be used in the Rave EDC module, a Clinical Programmer pushes a
version to a particular environment. Once a study is available in that
environment, authorized users can access the study and enter data.
See also version, push.
© Roche Group GLOSSARY 149
Study Configuration Document (SCD)
Study specification document that defines the Rave configuration
settings to be implemented for a study. See also study specifications.
Study Logic & Check Specifications (SLACS)
Study specification document that defines the edit checks to be
implemented for a study. See also matrix, study specifications.
study specifications
Set of design documents that define the Rave EDC implementation
details of a Roche-sponsored clinical trial. See Study Configuration
Document (SCD), Mock eCRFs / eCRF Help Text, Study Logic &
Check Specifications (SLACS), View & Entry Restrictions (V&E)
user acceptance testing (UAT)
Process of testing an EDC module before rolling it out to produc-
tion.
variable
Named token that is used to identify the data points within the
system. Variables are used in edit checks and dictionaries. They can
be reused across forms, however they will have the same length,
format, and dictionary attached everywhere they are used.
version
Saved snapshot of a draft, including all of the study elements that
were configured in the draft at the time the version was created.
Versions are used to see how the study elements created in Architect
will be displayed to users in the EDC module. See also draft,
publish.
View & Entry Restrictions (V&E)
Study specification document that defines the view and entry
restrictions for forms and fields in a study. See also restriction, view
restriction, entry restriction, study specifications.
view restriction
Restriction that identifies Rave role(s) that are prevented from
viewing a form or field. See also restriction, View & Entry Restrictions
(V&E).
Visit Form Matrix
Study specification document that defines the visits and associated
forms to be implemented for a study. See also matrix, study specifica-
tions.

150 GLOSSARY Rave Architect Lite
© Genentech, Inc. INDEX 151
INDEX
Aamending a study 141
Architect module
about the Architect module 2
launching 9
main screen 10
navigating 14
starting Rave 8
audiences for this training 4
Ccheck actions
about check actions 125
adding 132
available check actions 126
check functions 132
check steps
about check steps 125
adding 129
properties 131
types of 130
class preparation ix
control types 45
Copy Wizard 66
custom functions
about custom functions 32
inspecting code 135
integration custom functions 134
standard custom functions 134
types of 134
viewing 32, 135
Ddatasets conversion 75
default matrix
about the default matrix 65
hands-on exercise 101
Primary Matrix 96
derivations
about derivations 33, 51
viewing 34, 51
DEV environment 12
DEV URL 13
dictionaries
about dictionaries 26
adding 84
copying from the Global Library
Volume 83
EDC Module 27
entries 26, 84
hands-on exercise 88
Mock eCRFs 82
naming conventions 82
variables, associating with 87
viewing 27
viewing entries for 27
drafts
adding 61
default matrix 65
editing 64
exploring items in 22
hands-on exercise 21
items in 18
naming conventions 60
primary form 65
relationship to other components 21
signature prompt 65
viewing 17
ways to create 61
Eedit checks
about edit checks 30, 51, 119
adding 128
adding check actions to 132
adding check steps to 129
check actions 125
check functions 132
check steps 125
constants 131
copying from the Global Library
Volume 128
data values 131
EDC Module 31
hands-on exercise 52
naming conventions 123
152 INDEX Rave Architect Lite
Study Logic and Check Specifications
(SLACS) 127
testing 133
types of 119
viewing 31, 51
entry restrictions
about entry restrictions 50
hands-on exercise 52
viewing 50
environments
about environments 12
adding 58
DEV environment 12
editing 59
naming conventions 12
PROD environment 12
TEST environment 12
TRAIN environment 12
Ffield edit checks
about field edit checks 48, 119
configuring 120
hands-on exercise 52, 122
properties 121
Study Logic and Check Specifications
(SLACS) 120
testing 133
viewing 48
field help text 88
about field help text 48
hands-on exercise 52
viewing 48
fields
about fields 39
adding to a form 79
control types 45
default values 46, 116
derivations 51
edit checks 51
entry restrictions 50
field edit checks 48
field labels 44
field name 43
field properties 42
hands-on exercise 52
header text 44
Mock eCRFs 80
naming conventions 80
OIDs 43
property types 40
review settings 49
SAS format 46
SAS labels 46
selecting on a form 40
variable settings 47
verification settings 49
view restrictions 50
folders
about folders 24, 91
adding 94
copying from the Global Library
Volume 93
EDC Module 26
hands-on exercise 38, 95
naming conventions 93
OIDs 25, 93
viewing 25
Visit Form Matrix 92
form help text 88
forms
about forms 23, 73
adding 78
adding fields to 79
arranging 69
copying from the Global Library
Volume 77
dataset conversion 75
deleting 79
EDC Module 24
editing 79
hands-on exercise 38, 89
Mock eCRFs 74
naming conventions 74
OIDs 23
previewing 41
primary form 65
restrictions 113
viewing 23
Gghost OID 79
© Genentech, Inc. INDEX 153
Global Library Volume
copying from 66
hands-on exercise 71
Global Volume Integrated (GVI)
about the Global Library 13
H
handouts 6
help text
Mock eCRFs 88
specifying 88
M
Maintenance URL 13
manual review 116
matrices
about matrices 28, 96
Add Event matrix 96
adding 100
copying from the Global Library
Volume 98
default matrix 65
EDC Module 29
editing 98
hands-on exercise 38, 101
Master Form matrix 96
OIDs 28, 100
Primary Matrix 96
standard matrices 96
study-specific matrix 96
viewing 28
viewing folders and forms 29
Visit Form Matrix 97
Mock eCRFs
dictionaries 82
fields 80
forms 74
handout 6
help text 88
N
naming conventions
dictionaries 82
drafts 60
edit checks 123
environments 12
fields 80
folder OIDs 93
folders 93
forms 74
P1 projects 11
P2 projects 11
variables 85
versions 103
P
P1 projects
about P1 projects 11
adding 56
copying to P2 139
naming conventions 11
P2 projects
about P2 projects 11
copying to 139
naming conventions 11
preparing the class ix
prerequisites 4
Primary Form
about the primary form 65
hands-on exercise 72
Primary Matrix
editing 98
hands-on exercise 101
PROD environment 12
Production URL 13
projects
about projects 11
adding 56
amending 141
editing 56
hands-on exercise 21
making revisions 140
P1 projects 11
P2 projects 11
relationship to other components 21
viewing 15
publishing versions 104
pushing studies 106
R
Rave
logging in 8
154 INDEX Rave Architect Lite
modules 2
restrictions
about restrictions 36, 111
field restrictions 36
form restrictions 36, 113
global field restrictions 36
hands-on exercise 118
implications 112
security roles 111
testing 117
View & Entry Restrictions 112
viewing 37
reviews
about manual review 49
hands-on exercise 52
viewing 49
S
sample project
about the sample project 5
exploring 15
sandbox 13
SAS
format 46
label 46
SAS datasets 75
security roles 111
signature prompt
about the signature prompt 65
hands-on exercise 65
Source Document Verify (SDV) 116
studies
about studies 20
pushing from a version 106
relationship to other components 21
Study Configuration Document (SCD)
handout 6
visit calendar 92
study design
about study design 6
builder responsibilities 6
specification documents 6
Study Logic and Check Specifications
(SLACS)
edit checks 127
field edit checks 120
handout 6
study specifications
Architect elements, relationships
between 7
Mock eCRFs 6
Study Configuration Document
(SCD) 6
Study Logic and Check Specifications
(SLACS) 6
View & Entry Restrictions 6
T
TEST environment 12
TEST URL 13
TRAIN environment 12
training
audiences 4
handouts 6
prerequisites for 4
sample project 5
sections in this training 4
Training URL 13
U
URLs used at Roche 13
V
variables
about variables 47, 85
adding 86
dictionaries, associating with 87
hands-on exercise 52, 89
naming conventions 85
VarOIDs 47
viewing 47
verification 116
verifications
about verification 49
hands-on exercise 52
viewing 49
versions
about versions 103
EDC Module 20
hands-on exercise 110
naming conventions 103
publishing 104
© Genentech, Inc. INDEX 155
pushing to a study 106
relationship to other components 21
viewing 19
View & Entry Restrictions
handout 6
restrictions 112
view restrictions
about view restrictions 50
hands-on exercise 52
viewing 50
visit calendar 92
Visit Form Matrix
folders 92
handout 6
matrices 97

156 INDEX Rave Architect Lite
Rave Architect Lite [revised 30 Mar 11] © Roche Group