eCourts System Power of Attorney (PA) -...
144
1 eCourts System Power of Attorney (PA)
Transcript of eCourts System Power of Attorney (PA) -...

1
eCourts System
Power of Attorney (PA)

2

3
15th August 2018BEFORE AFTER
ONLINE FILING PROCESSNew Case Code:SKW, SKW(IR)
Example: WA-SKW-1-08/2018
MANUAL FILING PROCESSCase Code:
PA XXXXX / YEAR Example: PA 12345 / 2010

4
Hardware and
Software Requirement

5
In order to use EFS, you will need a computer/laptop with these
specifications:
Computer RAM
4GB (min 2GB)
Computer
Processor
2GHz for laptop
(min 1.68GHz)
or
2.2GHz for desktop
(min 1.86GHz)
Operating
System
Minimum
32-bit
Windows
(version
7, 8 or 10)
Others
Scanner(for upload PDF,
documentation
of exhibit etc)
Printer(for printing
of processed
documents,
if required)

6
Next, you will need to install/subscribe to these
applications/services:
Internet
Service
from
Streamyx, Unifi,
Time, Maxis
Broadband etc
Compatible
Browser
Chrome or
Mozilla Firefox
Document
Applications
Microsoft
Word
&
Adobe Acrobat Reader

7
Procedures for eFiling
System Registration

8
User ID: Lawyers

9
3Open Online Banking Accountsee below for participating banks
4Register Pentadbir Sistem EFS Accounton eKehakiman e-Filing System (EFS) (efs.kehakiman.gov.my)
from eCourt Portal (ecourt.kehakiman.gov.my)1
Obtain e-Filing (EFS) Reference ID
2Apply for Personal Cert Token & Install MPKI Applicationfrom Augmented Technology Sdn Bhd (aug-tech.net)
5Register EFS Lawyer AccountsFor all staff involved in filing of documents
PendaftaranPentadbir Sistem EFS
Personal Banking Account Affin Bank, Alliance Bank, AmBank, Bank Islam, Bank Muamalat, Bank Rakyat, BSN, CIMB Bank, Hong Leong Bank, Kuwait Finance
House, Maybank, OCBC Bank, Public Bank, RHB Bank, Standard Chartered, UOB
Corporate Banking Account Affin Bank, Alliance Bank, AmBank, Bank Muamalat, CIMB Bank, Deutsche Bank, Hong Leong Bank, HSBC, Kuwait Finance House,
Maybank, OCBC Bank, Public Bank, RHB, Standard Chartered, UOB
10
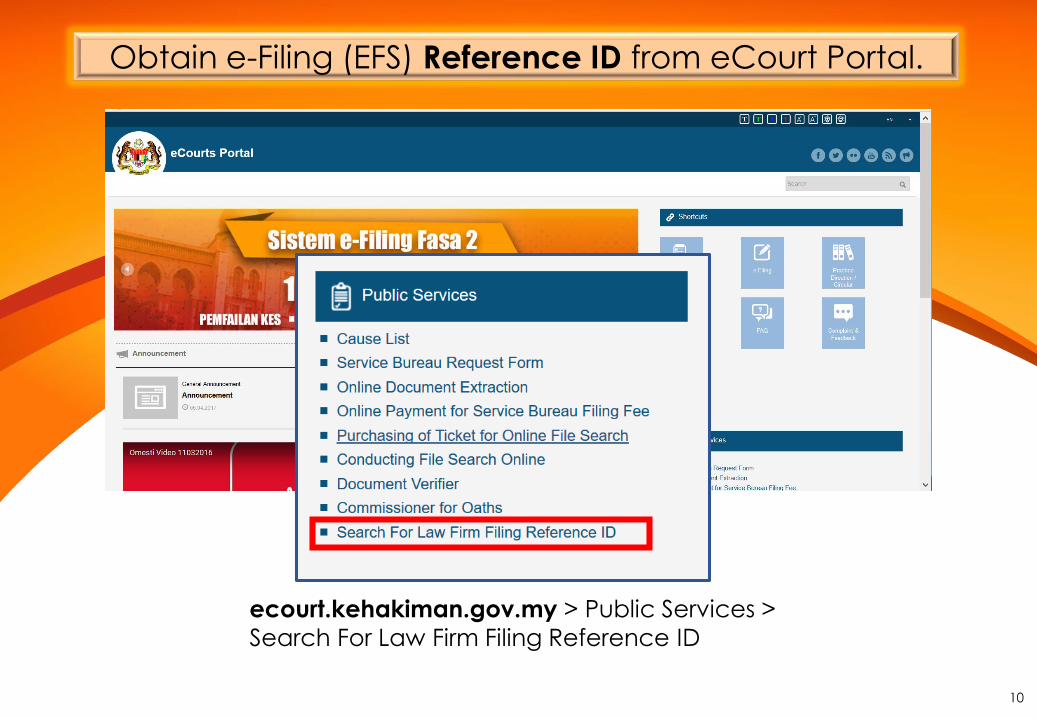
Obtain e-Filing (EFS) Reference ID from eCourt Portal.
ecourt.kehakiman.gov.my > Public Services >
Search For Law Firm Filing Reference ID

11
Register EFS Administrator account from eCourt website.
efs.kehakiman.gov.my > Lawyer Administrator Registration > Fill in the required fields.
eFiling Registration
https://efs.kehakiman.gov.my/EFSWeb/

12
User ID: Others
(GLC/Bank/Company/Individual)

13
Steps for others:
Complete EFS Registration Form
https://ecourt.kehakiman.gov.my
Submit EFS Registration Form
Apply for Personal Cert Token &
Install MPKI once received the EFS
Reference ID from eCourts
https://aug-tech.net/
eFiling Registration

14
Click the link in the email and user will be directed to the “First Time Login” screen. **continue here first time login14
Click Select to browse for the document to be uploaded.17
Click Sign & Add to add the document to the table below.18
An email will be sent with the registered Login ID and Temporary Password
for eFiling System.

15
Token Application

16
Digital Signature Act 1997 [Act 562]
“Any digital signature used as an electronic signature
in any Government activities.”
A type of digital signature.
Uses an encrypted key to imprint an invisible signature of the filer
on the document being filed.
Allows court to confirm that the document filed is authentic and is
from a legitimate source.
1
2
3
Conclusion: Every filer must have a Token to complete filing process.
What is Token?

17
a) Go to https://aug-tech.net/ > Repository > Personal Certificate Application Form V1.9.pdf
b) Fill in Personal Certificate Application Form.
c) Submit the forms to Augmented Tech Sdn. Bhd.
Apply for Personal Certificate Token from Augmented Tech
Sdn. Bhd.

19

20
You need to install MPKI-Agent to enable the eFiling system to read your
Digital Certificate.
Download:
https://aug-tech.net/downloads/ > ecourt-mpki-x86-1.6.1.0.exe
http://dl.omesti.com/ > MPKI 1.6.1.0
Manual:
http://dl.omesti.com/ > How to Install MPKI
Disable Pop-up Blocker:-
Google Chrome - Klik Customize and control Google Chrome menu >
Setting > Advanced > Privacy > Content Settings > Popups > Tick Allowed.
Mozilla Firefox – Klik Tools > Option > Privacy & Security > Permissions >
untick Block Pop-up Windows.
Install the MPKI Agent application on PC / Laptop
21
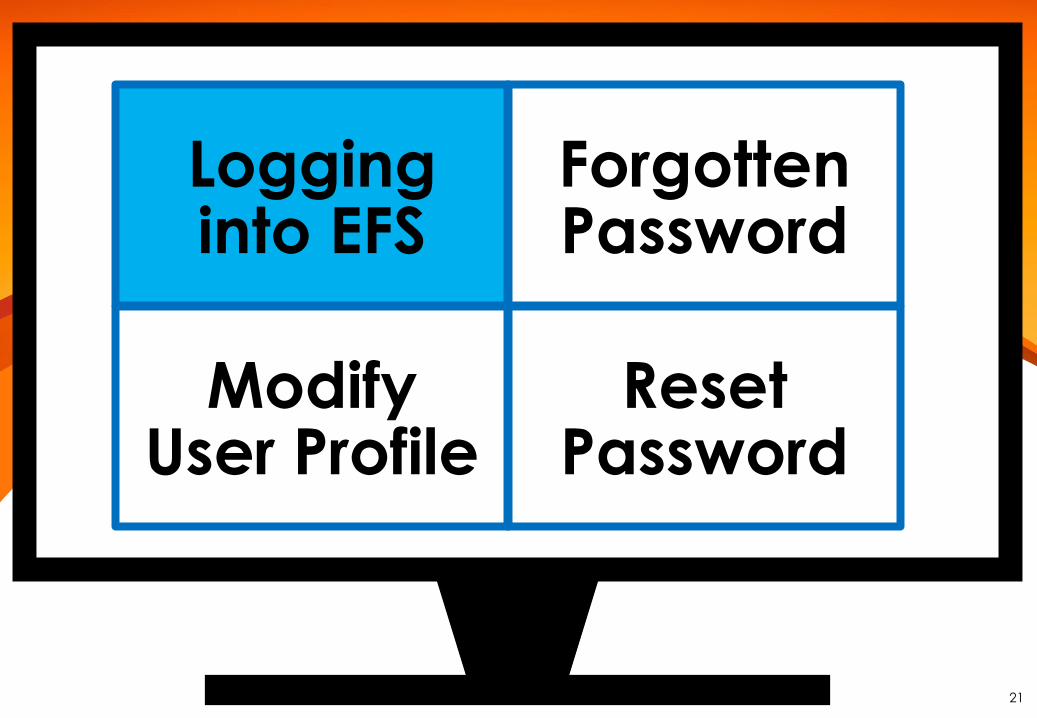
Logging into EFS
Forgotten Password
Modify User Profile
ResetPassword

22
At EFS homepage, click Login.1
Enter Login ID and Password and click Login. 2
Set a Non Defined Fee (RM), if applicable.16
Click Select to browse for the document to be uploaded.17
Click Sign & Add to add the document to the table below.18
2
1

23
When logging in for the first time, user will be redirected to First Time Login page.
Enter the Temporary Password received.3
Enter a New Password, retype the password again in Retype Password.4
Click Change Password.5
Click Sign & Add to add the document to the table below.18
3
4
5
COMPULSORY

24
6
A dialog confirms that password has been updated. Click Close.6
Enter a New Password, retype the password again in Retype Password. 17
Click Change Password.18
Click Select to browse for the document to be uploaded.17
Click Sign & Add to add the document to the table below.18

25
Logging into EFS
Forgotten Password
Modify User Profile
ResetPassword

26
At EFS homepage, click Login.1
Click Forgot password?.2
Set a Non Defined Fee (RM), if applicable.16
Click Select to browse for the document to be uploaded.17
Click Sign & Add to add the document to the table below.18
1
2

27
Enter IC No. and Email.3
Click Reset.4
Set a Non Defined Fee (RM), if applicable.16
Click Select to browse for the document to be uploaded.17
Click Sign & Add to add the document to the table below.18
4
3

28
System will display a message stating that password has been sent to the email address registered.5
Click Yes.6
Set a Non Defined Fee (RM), if applicable.16
Click Select to browse for the document to be uploaded.17
Click Sign & Add to add the document to the table below.18
5

29
6
An email will be sent with the registered login ID and temporary password.6
Click the link in the email and user will be directed to the “First Time Login” screen. **continue here first time login14
Set a Non Defined Fee (RM), if applicable.16
Click Select to browse for the document to be uploaded.17
Click Sign & Add to add the document to the table below.18

30
7
At EFS homepage, click Login.7
Enter Login ID and Password with the temporary password and click Login. 8
Set a Non Defined Fee (RM), if applicable.16
Click Select to browse for the document to be uploaded.17
Click Sign & Add to add the document to the table below.18
8

31
9
Enter the Temporary Password.9
Enter New Password, retype the password again in Retype Password. 10
Click Change Password.11
Click Select to browse for the document to be uploaded.17
Click Sign & Add to add the document to the table below.18
10
11

32
12
A dialog confirms that password has been updated. Click Close.12
Enter a New Password, retype the password again in Retype Password. 17
Click Change Password.18
Click Select to browse for the document to be uploaded.17
Click Sign & Add to add the document to the table below.18

33
Logging into EFS
Forgotten Password
Modify User Profile
ResetPassword

34
1
Click on username.1
Login to EFS.2
Set a Non Defined Fee (RM), if applicable.16
Click Select to browse for the document to be uploaded.17
Click Sign & Add to add the document to the table below.18

35
2
Update the user details as required.2
Click Save when done.3
Set a Non Defined Fee (RM), if applicable.16
Click Select to browse for the document to be uploaded.17
Click Sign & Add to add the document to the table below.18
3

36
4
A dialog confirms that user details have been updated. Click Close.4
Click Search.6
Set a Non Defined Fee (RM), if applicable.16
Click Select to browse for the document to be uploaded.17
Click Sign & Add to add the document to the table below.18

37
Logging into EFS
Forgotten Password
Modify User Profile
ResetPassword

38
1
Click on username.1
Login to EFS.2
Set a Non Defined Fee (RM), if applicable.16
Click Select to browse for the document to be uploaded.17
Click Sign & Add to add the document to the table below.18

39
2
Click Reset Password.2
Click Save when done.5
Set a Non Defined Fee (RM), if applicable.16
Click Select to browse for the document to be uploaded.17
Click Sign & Add to add the document to the table below.18

40
3
Enter the Existing Password.3
Enter New Password, retype the password again in Retype Password. 4
Click Change Password.5
Click Select to browse for the document to be uploaded.17
Click Sign & Add to add the document to the table below.18
4
5

41
6
A dialog confirms that password has been updated. Click Close.6
Click Search.6
Set a Non Defined Fee (RM), if applicable.16
Click Select to browse for the document to be uploaded.17
Click Sign & Add to add the document to the table below.18

42
Please make sure MPKI works before processing the file.

43
Please enter localhost on Mozilla or Google Chrome.
https://localhost:4567

44
Checklist

45
SENARAI SEMAK BAGI PEMFAILAN SURAT KUASA WAKIL

46
SENARAI SEMAK BAGI PEMFAILAN PEMBATALAN SURAT KUASA WAKIL

47
PA Filing Method

48
PA : Registration
(New Filing)

49
https://efs.kehakiman.gov.my

50
Overview – eFiling System (EFS)
Main Page
My Filing
Search
Announcements
Language
Notifications
Start Filing

51
NEW CASE FILING EXISTING CASE FILING
Case Code:
1. SKW - Surat Kuasa Wakil
2. SKW(IR) - Surat Kuasa Wakil (Tidak Boleh Batal)
OVERVIEW

52
1
1 Log in to EFS work page https://efs.kehakiman.gov.my and click on Case Initiation to file a new case. A new window tab will appear.

53
2
Fill in all details in Case Information. 2
*Once the Case Code is selected, an undertaking box will be displayed
After reading the Undertaking, tick on the checkbox and click Proceed.3
*
3

54
Select the correct Description of Action and click Add.4
4
5
Description of Action added will be displayed as above.5
6
6 Click on Add Party to proceed.

55
7 Select Party Type “Donor” from dropdown list.
7

56
8
8 Select Identity Type from dropdown list.

57
9
Fill in the required fields.9

58
10
11
12
Fill in the required fields.10
Click Save when done.12
Click Add Address after fill in the address.11

59
Repeat steps 6 until 12 to insert details of other parties.
Parties added will appear under Party Details section.
13
14
13
14
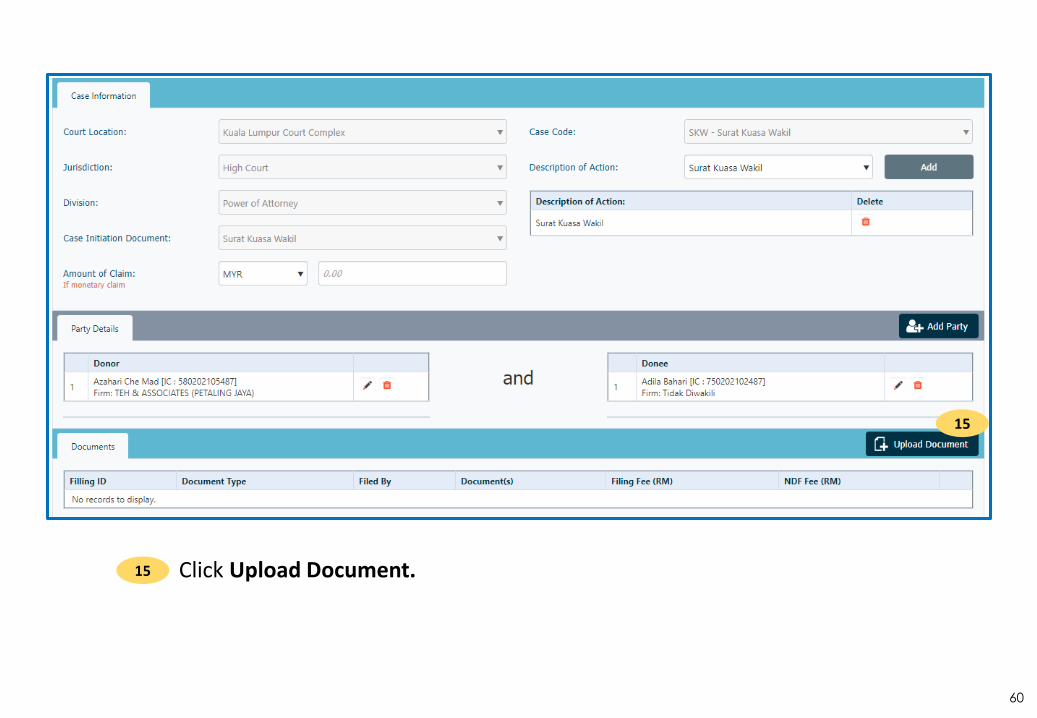
60
15
15 Click Upload Document.

61
16
17 Click Select to browse document (pdf format only).
Select Document Type Surat Kuasa Wakil.
16
17

62
Select document from the folder and upload document.18
Please rename document according to document type!
18

63
19 Click Add to proceed.
19

64
20
21
20 Select Softcert or Token on Digital Signature Type and fill in Password.
21 Click Sign to sign the document.

65
22 Document added will be shown here. Click on dustbin icon to delete this document.
23 Click Add to Listing.
22
23

66
24 To complete the filing process, click Save to Filing Cart.
24

67
26
Click either Personal Account or Corporate Account to make payment.26
25 User is allowed to file other documents (maximum 10 documents) via new Case Initiation or File Existing Case. Click on Dollar sign ($) to make payment.
25

68
27
After reading the disclaimer displayed, click Yes to proceed. If you wish to cancel the transaction click No.
27
28
28 Select Payment Channel and click Proceed. System will be redirected to therespective bank’s FPX page. Login into the bank portal and complete thepayment transaction.

69
28
28 Select Payment Channel and click Proceed. System will be redirected to therespective bank’s FPX page. Login into the bank portal and complete thepayment transaction.

70
After payment transaction completed, the filing will be listed under My Filing.29
29
30
Click on the case information to expand the Filing Details and the registered Case No. will be displayed.
30

71
PA : Revocation
(Existing Filing)
72
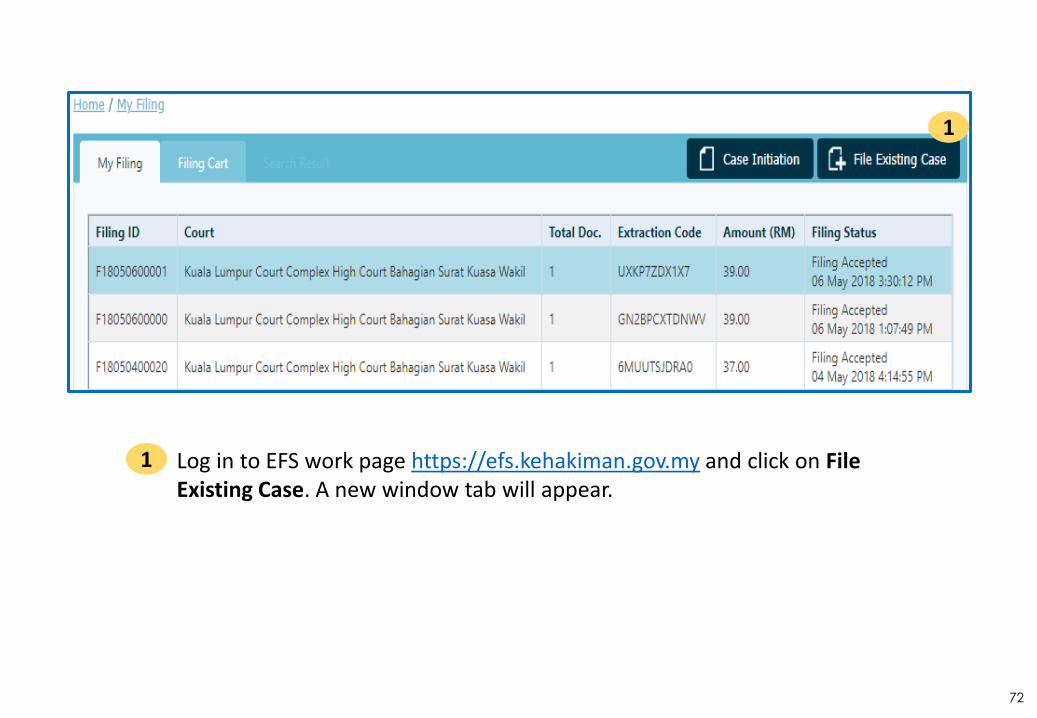
1
Log in to EFS work page https://efs.kehakiman.gov.my and click on File Existing Case. A new window tab will appear.
1

73
Click Search to search the case number entered.3
Enter Case No.2
32

74
Tick on Notis Pembatalan.3
Key in the PA Serial No. of Surat Kuasa Wakil. 4
Click Verify.5
54
3

75
Note that if the PA Serial Number entered is wrong, verification will failed. A pop-up error message will appear stated that the PA Serial Number is Invalid. Kindly try again.
6
6
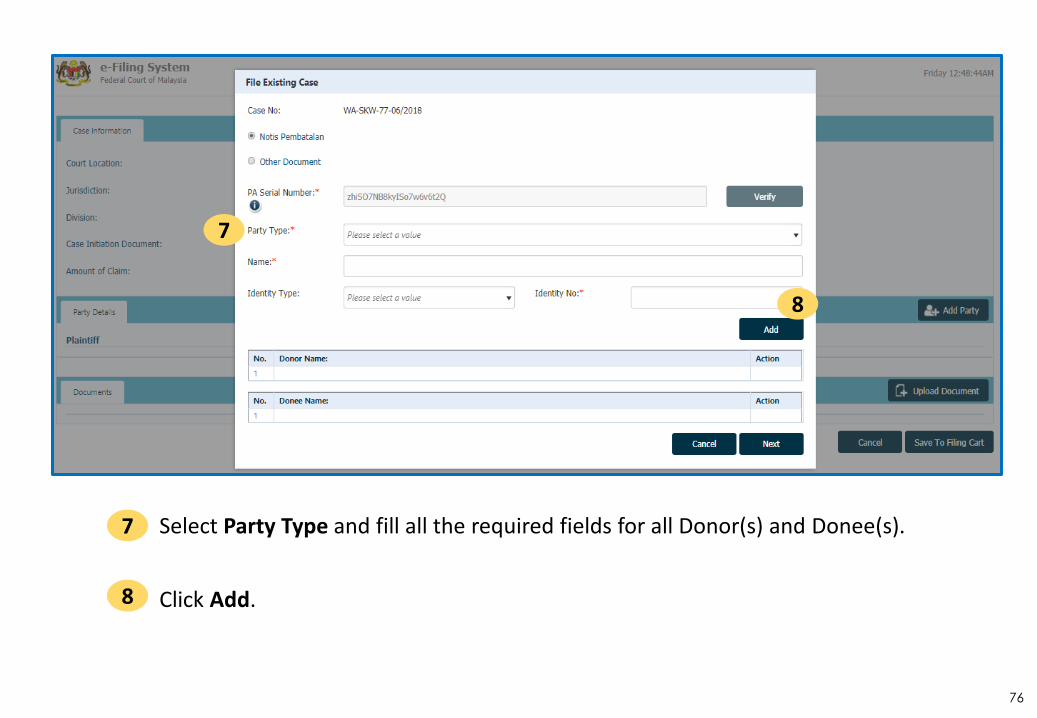
76
Select Party Type and fill all the required fields for all Donor(s) and Donee(s).7
Click Add.8
7
8

77
Note that if the Party Details not match with the previous Filing of PA, verification will failed. A pop-up error message will appear stated that the Party Details is Incorrect. Kindly try again.

78
Click Next.9
9

79
Click Next.11
Select Representative from the dropdown list and tick the checkbox.10
11
10

80
The Case Information page will appear and proceed to Upload Document.12
12

81
Select Document Type Notis Pembatalan.13
Click Select to browse document (pdf format only).14
Click Add to proceed.15
13
14
15
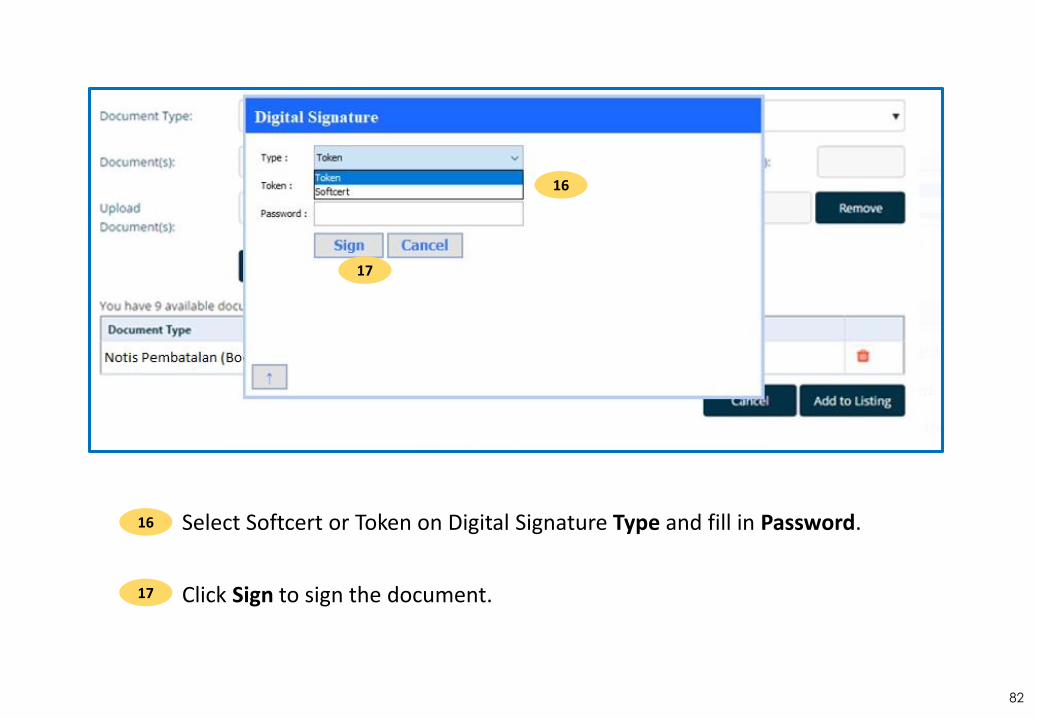
82
Click Sign to sign the document.17
Select Softcert or Token on Digital Signature Type and fill in Password.16
17
16

83
Document added will be shown here. Click on dustbin icon to delete this document.
18
Click Add to Listing.19
19
18
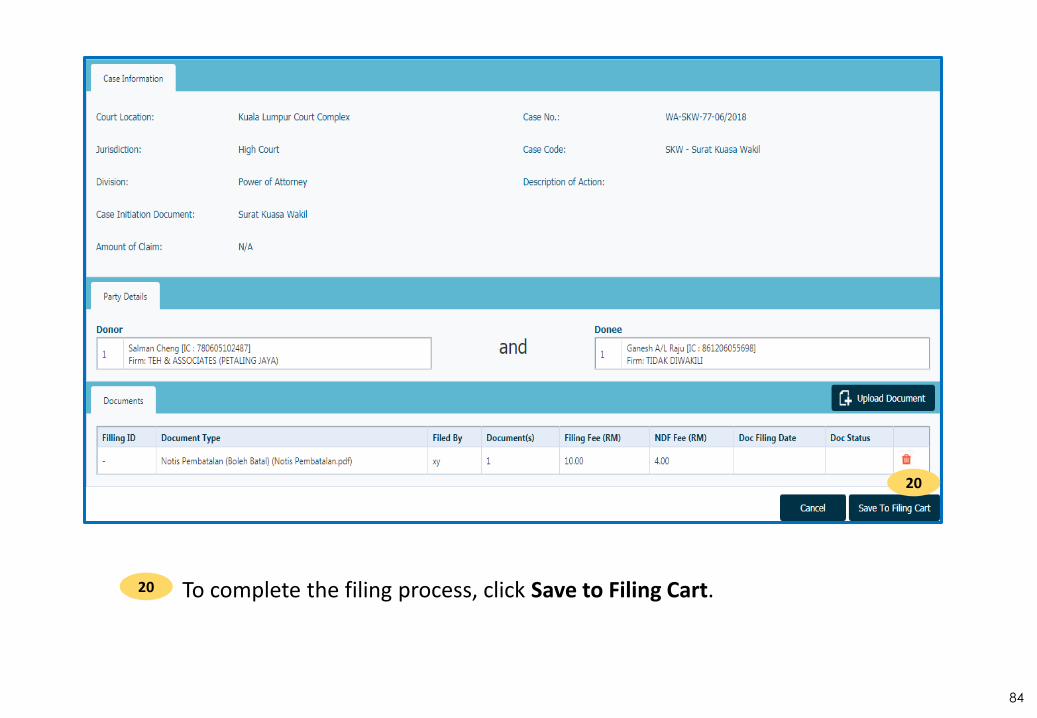
84
20
To complete the filing process, click Save to Filing Cart.20

85
Click on Dollar sign ($) to make payment and complete the transaction. 21
21

86
Document Extraction

87

88
1a
1b
Click on Ready for extraction and extraction inbox will appear.1a
Click on message to view.1b

89
2
3
Message is displayed at below.2
Click on the Name of Document to extract the processed document.3

90
PA Extraction

91
Processed document: Signature and Seal by
Court Registrar
Praecipe of the document
S/N: Serial Number of PA

92
Notis Pembatalan
Extraction

93
Revoked Case Code
Signature and Seal by Court Registrar
Praecipe of the document

94
Revoked PA
Extraction

95
Praecipe of the document
Signature and Seal by Court Registrar (previous filing)
Signature and Seal of revocation document
Revoked Case Code

96
PA : Other Documents
(Existing Filing)

97
1
Log in to EFS work page https://efs.kehakiman.gov.my and click on File Existing Case. A new window tab will appear.
1

98
Click Search to search the case number entered.3
Enter Case No.2
32

99
Tick Other Document and click Next to proceed.4
4

100
Click Next.6
5
6
Select Representative from the dropdown list and tick the checkbox.5

101
7
The Case Information page will be displayed and proceed to Upload Document.7

102
Click Select to browse document (pdf format only).9
Select Document Type.8
Click Add to proceed.10
9
8
10

103
Click Sign to sign the document.12
Select Softcert or Token on Digital Signature Type and fill in Password.11
12
11

104
Document added will be shown here. Click on dustbin icon to delete this document.
13
Click Add to Listing.14
13
14

105
To complete the filing process, click Save to Filing Cart.15
15

106
Click on Dollar sign ($) to make payment and complete the transaction. 16
16

107
Document Filing Process

108
Online File Search

109
SURAT PERMOHONAN FILING (RM2)
COURT OFFICER APPROVED SURAT PERMOHONAN
USER WILL RECEIVED AN EMAIL AND GET DIRECT LINK TO PAY ANOTHER RM10
COMPLETE THE TRANSACTION (RM10)
COURT OFFICER GENERATE TICKET NO.
USER RECEIVED TICKET NO. VIA EMAIL
21
54
3
6
Steps for Online File Search

110
Once received the ticket
number

111
Overview – eFiling System (EFS)
Main Page
Online File Search

112
1
Enter Ticket No.1
Click Verify.2
Set a Non Defined Fee (RM), if applicable.16
Click Select to browse for the document to be uploaded.17
Click Sign & Add to add the document to the table below.18
2

113
Verified Ticket No. will be marked with a green tick.3
Enter Case No..4
Click Search.5
Click Select to browse for the document to be uploaded.17
Click Sign & Add to add the document to the table below.18
3
4 5

114
Click Yes. A new window will appear.6
Click Search.5
Click Select to browse for the document to be uploaded.17
Click Sign & Add to add the document to the table below.18
6

115
Click Document Listing.7
Enter Case No..4
Click Search.5
Click Select to browse for the document to be uploaded.17
Click Sign & Add to add the document to the table below.18
Reminder!
A ticket purchased only valid for 30 minutes.
7

116
Click Document icon to view document.8
Reminder!
A ticket purchased only valid for 30 minutes.
8
117
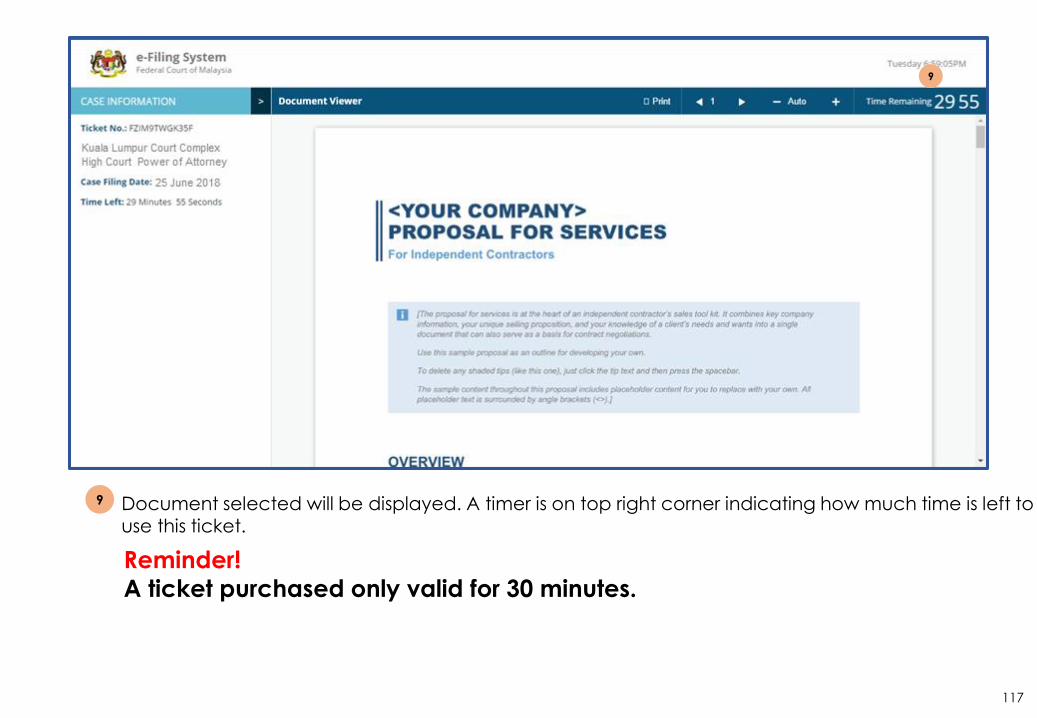
9
Document selected will be displayed. A timer is on top right corner indicating how much time is left to use this ticket.
9
Enter Case No..4
Click Search.5
Click Select to browse for the document to be uploaded.17
Click Sign & Add to add the document to the table below.18
Reminder!
A ticket purchased only valid for 30 minutes.

118
How to conduct file search
from eCourt Portal

119
https://ecourt.kehakiman.gov.my/

120
Enter Ticket No.. (Tickets can be purchased from eCourts Portal)1
Click Verify.2
1 2

121
Enter Case No..5
Click Search.6
Case no. box will appear.4
New windows will pop out.7
4 5 6

122
Click Document Listing.8
Reminder!
A ticket purchased only valid for 30 minutes.
8

123
9
Click Document icon to view document.9
Reminder!
A ticket purchased only valid for 30 minutes.
9

124
Document selected will be displayed. A timer is on top right corner indicating how much time is left to use this ticket.
10
Click Search.5
Click Select to browse for the document to be uploaded.17
Click Sign & Add to add the document to the table below.18
Reminder!
A ticket purchased only valid for 30 minutes.
1010

125
Document Verifier
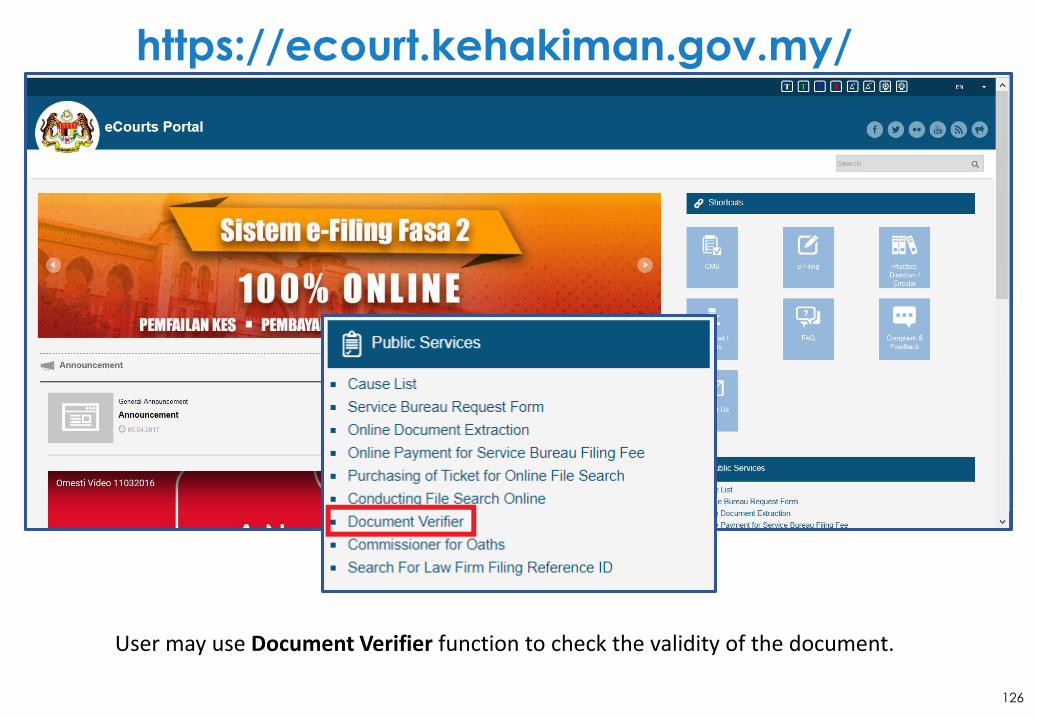
126
https://ecourt.kehakiman.gov.my/
User may use Document Verifier function to check the validity of the document.

127
2
1
Key-in the Document Serial No. (S/N).1
Click Retrieve to view the document.2
3 User can compare the displayed document with the original document.

128
If you face any issues while using EFS,
please perform the following steps:
1) Clear cache (see steps below)
2) Close the browser
3) Open new browser and login to system

129
Clear Cache – Google Chrome(for Mozilla Firefox, please refer to next section)

130
1
Click on the Menu button.1
Click Login. 4
Set a Non Defined Fee (RM), if applicable.16
Click Select to browse for the document to be uploaded.17
Click Sign & Add to add the document to the table below.18

131
2
Click History and a new window will appear.2
Click Login. 4
Set a Non Defined Fee (RM), if applicable.16
Click Select to browse for the document to be uploaded.17
Click Sign & Add to add the document to the table below.18

132
3
Click Clear browsing data, a new window will appear.3
Click Login. 4
Set a Non Defined Fee (RM), if applicable.16
Click Select to browse for the document to be uploaded.17
Click Sign & Add to add the document to the table below.18
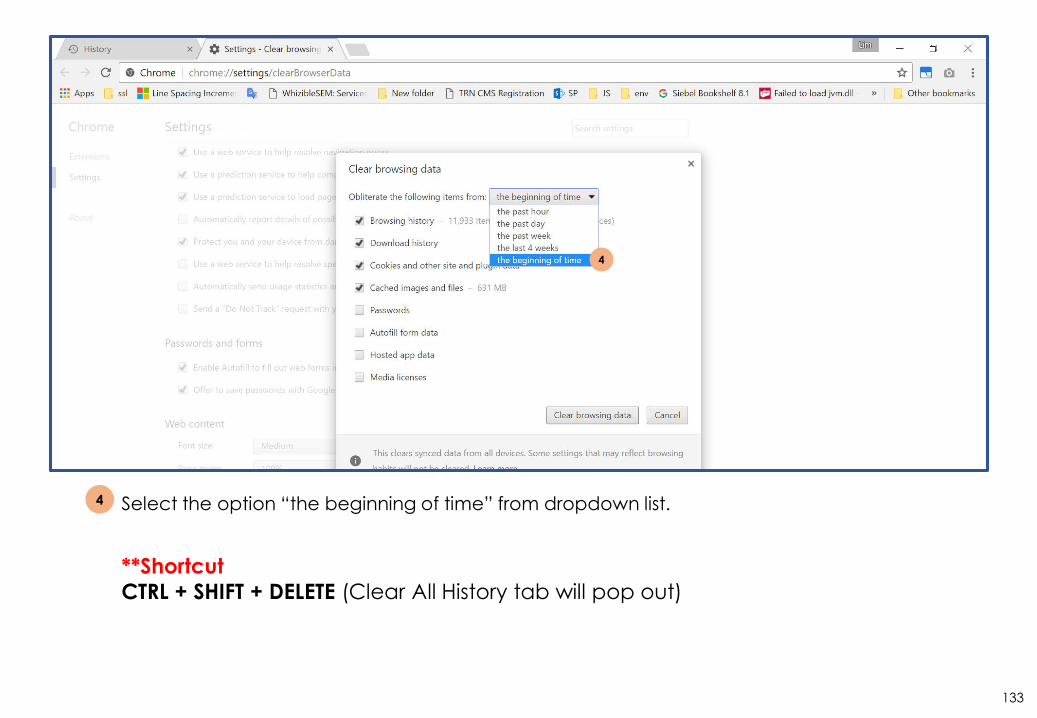
133
4
Select the option “the beginning of time” from dropdown list.
**Shortcut
CTRL + SHIFT + DELETE (Clear All History tab will pop out)
4
Click Sign & Add to add the document to the table below.18

134
5
Click Clear browsing data. After the cache has been cleared, the pop-up will be closed.5
Click Login. 4
Set a Non Defined Fee (RM), if applicable.16
Click Select to browse for the document to be uploaded.17
Click Sign & Add to add the document to the table below.18

135
6
Click X to close window.6
Click Login. 4
Set a Non Defined Fee (RM), if applicable.16
Click Select to browse for the document to be uploaded.17
Click Sign & Add to add the document to the table below.18

136
7
Open a new window and login to EFS.7
Click Login. 4
Set a Non Defined Fee (RM), if applicable.16
Click Select to browse for the document to be uploaded.17
Click Sign & Add to add the document to the table below.18

137
Clear Cache – Mozilla Firefox(for Google Chrome, please refer to previous section)

138
1
Click on the Menu button.1
Click Login. 4
Set a Non Defined Fee (RM), if applicable.16
Click Select to browse for the document to be uploaded.17
Click Sign & Add to add the document to the table below.18

139
2
Click History and a new window will appear.2
Click Login. 4
Set a Non Defined Fee (RM), if applicable.16
Click Select to browse for the document to be uploaded.17
Click Sign & Add to add the document to the table below.18

140
3
Click Clear Recent History, a new window will appear.3
Click Login. 4
Set a Non Defined Fee (RM), if applicable.16
Click Select to browse for the document to be uploaded.17
Click Sign & Add to add the document to the table below.18

141
4
Select the option “Everything” from dropdown list.
**Shortcut
CTRL + SHIFT + DELETE (Clear All History tab will pop out)
4
16
Click Sign & Add to add the document to the table below.18

142
5
Click Clear Now. After the cache has been cleared, the pop-up will be closed.5
Click X to close window.6
Set a Non Defined Fee (RM), if applicable.16
Click Select to browse for the document to be uploaded.17
Click Sign & Add to add the document to the table below.18
6

143
Open a new window and login to EFS.7
Click Login. 4
Set a Non Defined Fee (RM), if applicable.16
Click Select to browse for the document to be uploaded.17
Click Sign & Add to add the document to the table below.18
7

144
Thank you
eCourts Helpdesk
Email : [email protected]
CC Email : [email protected]
Helpdesk No. : 03-27331313