eCourseware Assessments - University of Memphis · individual users. Random sections pull questions...
42
4/22/2020 Brought to you by: umTech & The Center for Teaching & Learning eCourseware Assessments Center for Teaching and Learning (CTL) 100 Administration Bldg., Memphis, TN 38152 Phone: 901.678.8888 Email: [email protected] Center for Teaching and Learning Website
Transcript of eCourseware Assessments - University of Memphis · individual users. Random sections pull questions...

4/22/2020 Brought to you by: umTech & The Center for Teaching & Learning
eCourseware Assessments
Center for Teaching and Learning (CTL) 100 Administration Bldg., Memphis, TN 38152 Phone: 901.678.8888 Email: [email protected] Center for Teaching and Learning Website

Center for Teaching and Learning (CTL) 1 | P a g e
Table of Contents Creating a Dropbox Folder ...................................................................... 4
Setting Dropbox Folder Availability and Due Dates .......................................... 5
Set availability dates for a dropbox folder ................................................. 5
Set due date for a dropbox folder ........................................................... 5
Setting Release Conditions for a Dropbox Folder ............................................ 5
Adding Special Access Permissions to a Dropbox Folder .................................... 6
Leaving Feedback and Grading Dropbox Submissions........................................ 7
View a file submission in the document viewer ........................................... 7
Evaluating and Grading Submissions ........................................................... 8
Evaluate a dropbox submission .............................................................. 8
Bulk Publishing Dropbox Feedback Evaluations .............................................. 8
Reset a Quiz Attempt ............................................................................ 9
Set Special Access for a Quiz ................................................................... 9
Creating Random Sections in Quizzes......................................................... 10
Import a Publisher’s Test Bank ................................................................ 11
Submit a Quiz in Progress ...................................................................... 12
Quiz Restrictions ................................................................................ 13
Special Access Quizzes.......................................................................... 17
Update All Attempts ............................................................................ 21
Configuring a Topic for Assessment ........................................................... 23
Assessing a Topic ................................................................................ 25
Selecting a Grading System .................................................................... 26
Weighted System .............................................................................. 27
Points System .................................................................................. 27
Formula System ............................................................................... 27
Selecting a Grade Scheme ..................................................................... 28
Grade Setup Wizard ............................................................................. 29
Create a Grade Category ....................................................................... 30
To create grade book categories: .......................................................... 30

Center for Teaching and Learning (CTL) 2 | P a g e
Understanding Grade Items .................................................................... 31
Creating a numeric grade item ................................................................ 31
Create a numeric grade item ................................................................ 32
Calculation Options ............................................................................. 34
Grading System ................................................................................ 34
Weighted .................................................................................... 34
Points ........................................................................................ 34
Formula ...................................................................................... 34
Final Grade Released ......................................................................... 35
Calculated Final Grade .................................................................... 35
Adjusted Final Grade ...................................................................... 35
Grade Calculations ............................................................................ 35
Drop ungraded items ....................................................................... 35
Treat ungraded items as 0 ................................................................ 35
Auto Update ................................................................................. 35
Extra Credit and Bonus Points ................................................................. 37
Bonus Points/Items ........................................................................... 39
To make a grade item a Bonus Item: .................................................... 39
Editing grade items after users’ grades have been entered ............................... 40
Service Desk Request ........................................................................... 41
Submitting a Ticket ........................................................................... 41
Call the ITS Service Desk (901.678.8888) any day of the week! ........................ 41
(Excluding Some Holidays) ................................................................... 41
Important Links .................................................................................. 41

Center for Teaching and Learning (CTL) 3 | P a g e
Purpose
This documentation highlights how to make assessments in eCourseware (Daylight).
Audience
This documentation is intended for University Faculty and Staff.

Center for Teaching and Learning (CTL) 4 | P a g e
Dropbox
Creating a Dropbox Folder
1. Click the Assessments dropdown menu in the course navigation bar and select
Dropbox.
2. Click on the New Folder button.
3. Complete the form (create a Grade Item if desired).
4. To check for plagiarism, make sure the Originality Check Option is enabled.
5. Set due date/time on the Restrictions tab.
6. Click Save.

Center for Teaching and Learning (CTL) 5 | P a g e
Setting Dropbox Folder Availability and Due Dates
Set availability dates for a dropbox folder
1. On the Dropbox Folders page, click the folder that want to edit. Click the Edit
Folder button from the context menu of the folder you want to set an availability.
2. Click the Restrictions tab.
3. In the Availability section, set the dropbox folder’s Start Date and End Date.
4. Click Save and Close.
Set due date for a dropbox folder
1. On the Dropbox Folders page, click the folder that want to edit. Click the Edit
Folder button from the context menu of the folder you want to set due date.
2. Click the Restrictions tab.
3. In the Availability section, set the dropbox folder’s Due Date.
4. Click Save and Close.
Setting Release Conditions for a Dropbox Folder
Release conditions allow you to associate a dropbox folder with other items in
Learning Environment. For example, you can require that users meet certain criteria,
such as reading a set of lecture notes in the Content tool, before they can submit
their work to a dropbox folder. Another option is to require a submission to the
dropbox folder a criterion for accessing another item, such as a quiz.
1. On the Dropbox Folders page, click the folder that you want to set conditions for.
Click the Edit Folder button from the context menu of the folder you want to set
restrictions for.
2. Click the Restrictions tab.
3. In the Release Conditions section, click either Attach Existing or Create and
Attach.
4. Select from the drop-down list if All conditions must be met or if Any condition
must be met to access the dropbox folder.

Center for Teaching and Learning (CTL) 6 | P a g e
Adding Special Access Permissions to a Dropbox Folder
Special access permissions allow you to set different availability dates and times for
specific users. For example, you could extend the deadline for users who require
remedial help or who are submitting work beyond the original scope of the dropbox
folder. You can also add special access after a dropbox folder’s end date has passed
for users who have a legitimate excuse for missing the deadline or for users you want
to submit additional material, such as planning notes or a bibliography.
1. On the Dropbox Folders page, click the folder that you want to add special
permissions for. Click on the Edit Folder button from the context menu of the
folder you want to add special access permissions.
2. In the Restrictions tab, select one of the following:
• Allow users with special access to submit files outside the normal
availability dates for this folder.
• Allow only users with special access to see this folder.
3. Click Add Users to Special Access.
4. On the Special Access page, select the Date Availability you want to grant special
access.
5. Use the View By option and Search For field to locate the users you want to grant
special access.
6. Select the check box beside each appropriate user’s name.
7. Click Save.
One you have added special access permissions for users, they are listed in the Special
Access section. You can edit or delete users’ special access by clicking the Edit or
Remove special access icons beside their names.

Center for Teaching and Learning (CTL) 7 | P a g e
Leaving Feedback and Grading Dropbox Submissions
The Evaluate Submission page enables you to evaluate and leave feedback for user
submissions, but you can also download submissions from the Folder submissions page
to work on files offline.
The following file formats are compatible with Dropbox’s document viewer:
• MS Word (DOC, DOCX)
• MS PowerPoint (PPT, PPTX, PPS)
• Adobe Acrobat ((PDF, PDFS)
• Web (HTM, HTML)
• Plain text (TXT)
• Images (BMP, GIF, JPG, JPEG, PNG)
View a file submission in the document viewer
In the submission list on the Evaluate Submission page, click on the student’s
submission from a file submission’s context menu.

Center for Teaching and Learning (CTL) 8 | P a g e
Evaluating and Grading Submissions
Evaluate a dropbox submission
1. If you created a grade item for the dropbox folder, enter a value in the Score
field. Note information about grade items tied to the dropbox folder appears
beside the score value.
2. Provide comments and suggestions in the Feedback field.
3. You can Add a File, Record Audio, or Record Video as feedback. Feedback
given as an annotated file also appears in your list of added files.
4. Click Save Draft to save feedback and continue grading submissions. Click
Publish to release your feedback to user.
Note: As you grade each submission, you can click Next Student in the upper right
until you reach the final submission where you can click Finish to return to the
Folder Submissions page. If you want to publish feedback simultaneously for multiple
users, you can bulk publish from the folder’s Folder Submissions page.
Bulk Publishing Dropbox Feedback Evaluations
1. In the Users tab on the folder Submissions page, select the check box beside the
users you want to send feedback to.
Note: If you select users who have already received published feedback, bulk
publishing will update their feedback.
2. Click Publish feedback for selected users.
Note: you cannot revert bulk publishing, but you can retract feedback for users
individually on the Evaluate Submission page.

Center for Teaching and Learning (CTL) 9 | P a g e
Quizzes
Reset a Quiz Attempt
1. Access Quizzes, by going to the Assessments dropdown menu.
2. Click the down arrow next to the quiz name and choose Grade option.
3. Click Display Options and check Allow Reset (if necessary).
4. Check the box next to the student’s attempt.
5. Click the small trash can icon at the top of the listings.
6. Click Yes.
Set Special Access for a Quiz
1. Go to the Quiz tool and click on the Quiz name.
2. Click on the Restrictions tab and scroll to the bottom
3. Click Add Users to Special Access.
4. Make choices and settings for individuals or groups as needed.
5. Click Save.

Center for Teaching and Learning (CTL) 10 | P a g e
Creating Random Sections in Quizzes
Create random sections in Quizzes to distribute a unique set of questions to
individual users. Random sections pull questions from a designated pool of questions
stored in the Question Library. Specify how many questions users receive from the
random section question pool after you import questions from the Question Library
into the random section folder.
Since you can only access random sections within Quizzes, you must create a quiz
before you can create its random sections. You can import an infinite number of
questions from the Question Library into each random section, but you cannot create
new questions within random section folders.
1. On the Manage Quizzes page, click on the quiz that you to add a random section
to.
2. Click Add/Edit Questions in the Properties tab.
3. Click New, then select Random Section.
4. Enter a Section Name.
5. You can enter a Message.
6. You can enter Private Comments. These comments are for your personal use and
view only.
7. Click Add a File to upload an image. You can enter a description of the image in
the Description field.
8. Set your Display Options:
• Show section name displays the random section name in quizzes that contain
this random section.
• Insert a line break after section name inserts extra space below the random
section name.
• Display message and image
o Select display section message and image once to display these items once
at the beginning of the random section.
o Select repeat section message and image before each question to repeat
both message and image before each question in the random section.
9. You can enter Section Feedback in the text field.
10. Click Save.
11. Click on the random section you just created.
12. Click Import.
13. In the Source Section drop-down list, choose the Collection Root or a specific
section where existing questions reside.

Center for Teaching and Learning (CTL) 11 | P a g e
14. Select the questions you want to import, click Save.
15. Enter the Questions per attempt you want each user to see from the random
section.
16. Enter the points value for each questions in the Points for each field.
Note: All questions within a random section are assigned the same points value.
17. Click Save.
Import a Publisher’s Test Bank
1. First, download the test bank from your publisher’s site. Try the Desire2Learn
(D2L) package first, and if that doesn’t work try the Black board version of the test
bank. It will download as a .zip file. Don’t extract the files. The .zip file is what
you need to upload to D2L.
2. Navigate to your D2L course and click on the Edit Course button.
3. Click on Import/Export/Copy Components.
4. Choose Import Components, then click Browse.
5. Use the file browser to locate your file, click on the file, and then click Open to
select it.
6. Your file name will now be listed next to the browse button. Click Start to start
the import.
Important! If you downloaded more than one quiz in one .zip file you will need to
extract all the text banks from the combined file and upload each individual .zip file.
D2L can only upload one quiz worth of questions at a time.
7. You will see a progress screen that shows you the import is working. When you see
two green arrows click Continue.
8. Fill in the Import Options form.
• Give your quiz a name in the line that says “import file to…” It is essential that
you do not use any characters other than letters or numbers for this quiz
name. If you use punctuation or spaces it might upload correctly but then not
display your quiz. Keep it concise but descriptive.
• Next, choose Do not overwrite the existing file.
• Check the box next to import metadata.
• Under select components to import, choose either Select all components or
Select individual items to import. If you choose Select individual items then
the next scree will allow you to pick the questions to import.
• Then, click Continue.
9. Confirm you choices and click Continue, or click Go Back to make changes.

Center for Teaching and Learning (CTL) 12 | P a g e
10. You will see a progress screen again showing that the process is working. When all
the lines have green check marks next to them, click Continue.
11. You will see a message that tells you the import was successful. From here either
choose Import another package or View Content.
Note: You have not created a quiz yet, you have simply imported the questions.
Submit a Quiz in Progress
Occasionally a student may save their quiz responses, but forget to submit their quiz.
The quiz will have the status of in progress next to the name of the student and may
require an instructor to submit the quiz for the student. The following documentation
will demonstrate this process of submitting a student’s quiz as an instructor.
1. Go into eCourseware, and access “Quizzes”.
2. Find the quiz you want to enter, select the down arrow to the right of the quiz
name, and choose “Grade”.
3. Once you enter the “grade” area for Quizzes, you will be on the screen that will
show “Users who have completed an attempt”. Change this to “Users who have
an attempt in progress”, and hit the search button. Then select the impersonate
button to enter the quiz AS that student. This is located next to (in progress).

Center for Teaching and Learning (CTL) 13 | P a g e
4. You will now be in the quiz AS the student. All you need to do is select “submit
quiz”. You will get two confirmation screens, just select either “yes” or “submit
quiz” for both.
5. You will be brought back out to the grade area of this quiz, and the student will no
longer be on the list of “users with attempts in progress” and change this to “users
who have submitted attempts” and choose the “search” button. The grade should
publish to your grade book if it doesn’t please navigate back to “Enter Grade”
area of the quiz and publish the quiz grade.
Quiz Restrictions
To configure the Quiz Restrictions do the following:
1. Click the Restrictions tab.
2. Set the quiz Status drop down menu to Active when the quiz should be visible to
course participants.
Note: If the quiz will use start and end dates we suggest that you set the quiz as
active immediately. If the quiz is inactive when the quiz is set to start, it will be
invisible to participants and they will not be able to access the quiz.
3. The Due Date sets the day on which the quiz is due. To set the due date, check
the Has Due Date box and set a date and time.
Note: The End Date can be set to a day after the due date.
4. The Start Date sets the earliest date and time that a participant will be able to
begin the quiz. To set a start date check the Has Start Date box and set a date
and time.
5. The End Date sets the latest date and time that a participant will be able to begin
the quiz. To set an End Date check the Has End Date box and set a date and time.
6. Check the Display in Calendar check box to display the quiz start and end dates in
participants’ Events widget and Calendar. By default, quizzes that are beginning or
ending within the next 3 days will appear in participants’ list of events, however,
participants can adjust their display settings to show events between 2 and 14
days out.

Center for Teaching and Learning (CTL) 14 | P a g e
Note: Use Additional Release Conditions to set conditions that a participant must
meet before being able to take the quiz.
Optional Advanced Restrictions: If you would like to have the ability to restrict quiz
access by a password and/or IP address restriction click the blue Expand optional
advanced restrictions link to display the following fields:
7. Password – Optional: To require that participants enter a password before they
can begin the quiz type the desired password in the Password text field.
Passwords must be between 1 and 20 characters in length and may contain letters,
numbers and special characters. Passwords are case sensitive, so participants must
type lower case and capital letters exactly as they are set in this field.
8. IP Restriction (IPV$)-Optional: To require participants to take their quiz in a
specific locations (like an on campus computer lab) enter IP address restrictions in
the IP Restriction (IPv4) field that match the network settings of the approved
computers. When using IP address restrictions, the first box must contain the 3
starting numbers of the IP address range. Each additional field is optional
depending on how specific you want the IP address restrictions to be.

Center for Teaching and Learning (CTL) 15 | P a g e
9. Time Limit: Type a number in the Time Limit field to set the number of minutes a
participant has to complete a quiz once they click the Start Quiz button.
10. Grace Period: Type a number in the Grace Period field to set the number of
minutes a participant has, after the time limit has passes, to submit their quiz
before it is flagged as late. The grace period must be at least 1 minute.
Note: To set a Grace Period, you must first select Enforced Time Limit.
11. After the Grace Period: There are three options to control how late quiz
submissions are handled:
• Allows normal submission: Participants can submit their quiz at any time
within the start and end dates of the exam, regardless of any time limit or
grace period set. The quiz submission will be graded as late, but no points will
be deducted.
• Auto-Submit Attempt: Participants must complete their quiz within the time
limit and grace period set. Once the time limit and grace period have passed
the participant is prompted to submit their attempt. If the participant submits
their quiz it will be graded by D2L, however, if no action is taken by the
participant the quiz will not be submitted and no grade will be given. When
using this option you must check the enforced check box to enforce the late
limit. Doing so will also enable the show clock check box which allows
participants to monitor how much time remains.
• Use Late Limit of___ minutes: Participants must complete their quiz within
the time limit, grace period, and late limit the quiz submission will be flagged
as late and the participant will receive a ) on the quiz attempt. The late limit
may be set between 1-120 minutes in length. When using this option you must
check the enforced check box to enforce the late limit. Doing so will also

Center for Teaching and Learning (CTL) 16 | P a g e
enable the show clock check box, allowing participants see the amount of time
remaining to complete the exam within the time limit.
12. Before configuring Special Access restrictions click the white Save button to save
any date and time restrictions you have entered. This will prevent you from losing
any restrictions you have set when you go the Special Access restrictions page. To
provide specific participants with availability and time limits for the quiz that are
different from the rest of the class click the white Add User to Special Access
button. This is the option that should be used when providing special
accommodations for the students working with the Disability Resources for
Students (DRS) office.
For more information about configuring Special Access, see the Special Access Quizzes
help page.
13. When finished, click the Save button to save and remain within the quiz.
14. Click the Save and Close button to save and exit the quiz.
Center for Teaching and Learning (CTL) 17 | P a g e
Special Access Quizzes
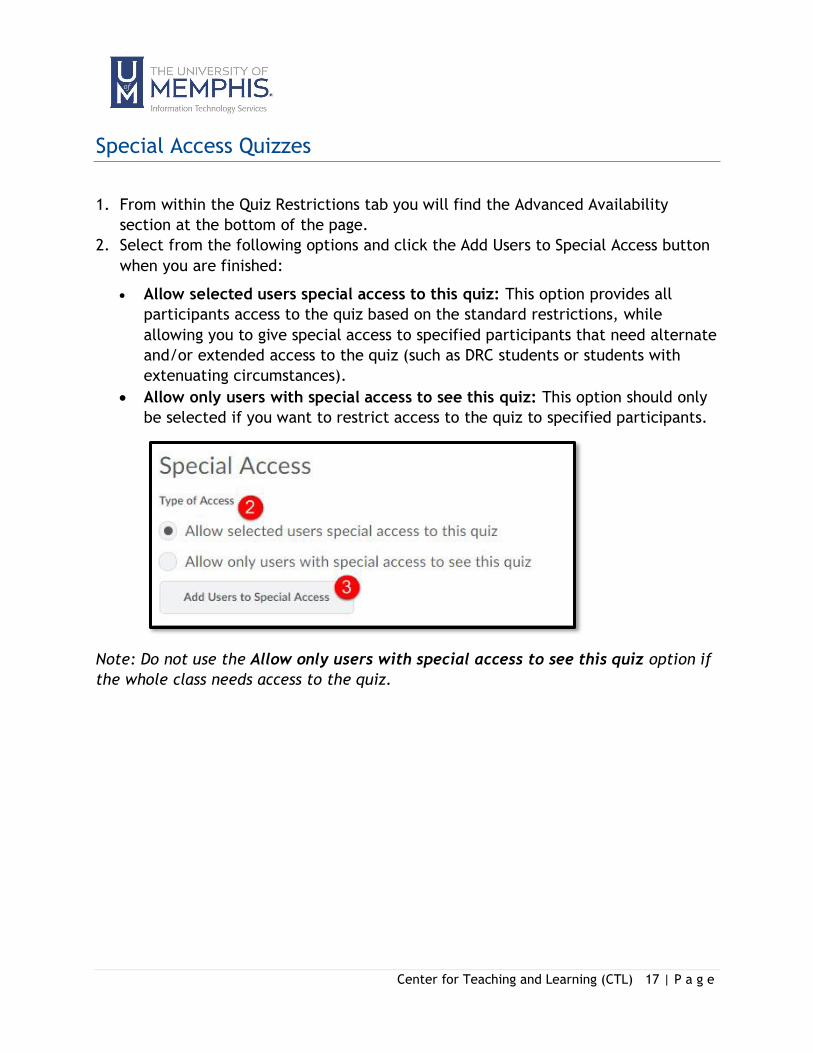
1. From within the Quiz Restrictions tab you will find the Advanced Availability
section at the bottom of the page.
2. Select from the following options and click the Add Users to Special Access button
when you are finished:
• Allow selected users special access to this quiz: This option provides all
participants access to the quiz based on the standard restrictions, while
allowing you to give special access to specified participants that need alternate
and/or extended access to the quiz (such as DRC students or students with
extenuating circumstances).
• Allow only users with special access to see this quiz: This option should only
be selected if you want to restrict access to the quiz to specified participants.
Note: Do not use the Allow only users with special access to see this quiz option if
the whole class needs access to the quiz.

Center for Teaching and Learning (CTL) 18 | P a g e
3. Date Availability: If you would like to assign special Start, End, and/or Due Dates
for selected participants, modify the Start Date, End Date, and /or Due Date fields
to match the dates and times you would like the selected participants to have
access to the quiz.

Center for Teaching and Learning (CTL) 19 | P a g e
4. Timing: This section allows you to configure the time limits for the exam with the
following options:
• Assign alternative time limit: If you are adding special time restrict ions for a
DRS student but are unsure of how much time to allow, contact the DRS at
901.678.2880.
• Assign alternative grace period: If you would like to use a special grace period
for selected participants, check the Assign special grace period checkbox and
type the number of minutes you would like to use in the Grace Period field.
• Assign alternative behavior for exceeding the time limit: If you would like to
provide special rules for how to handle late submissions, check the Assign an
alternative behavior for exceeding the time limit checkbox and select the
option that corresponds with how you want to handle late submissions.

Center for Teaching and Learning (CTL) 20 | P a g e
5. Attempts: This section allows you to set an alternative number attempts allowed
for certain participants.
6. Users: If the D2L course contains a large number of participants you may use the
View By option to sort by Sections or Groups (if your D2L site contains Groups).
You may also search for the individual by first name and/or last name. Once the
participants(s) have been located place a check mark to the left of each
individual’s name that you wish to assign the special access restrictions to.
7. When finished, click the Add Special Access button.

Center for Teaching and Learning (CTL) 21 | P a g e
Update All Attempts
The Update All Attempts options is useful for when you want to award points for a
specific question to either all participants, or all participants who answered the
question a certain way.
To grade all attempts at a quiz question, do the following:
1. Click the down arrow to the right of the quiz that needs to be graded, then select
Grade from the drop down menu.
2. You will arrive on the Users tab of the Grade quiz page. To grade by question click
the Questions tab.

Center for Teaching and Learning (CTL) 22 | P a g e
3. Place a bullet next to the Update all Attempts option.
4. Click on the blue question text of the question you want to grade to open that
question.
5. You will arrive on the Update all Attempts page.

Center for Teaching and Learning (CTL) 23 | P a g e
Discussions
Discussions is a great tool for both online and on-ground classes. Before your students
can post to a discussion you must first create both a Forum and a Topic. Forums act as
categories and Topics act as prompts. Students cannot post to a Forum; they can only
post to a topic within a Forum.
Click on the Communication dropdown menu to reveal the Discussions link.
Configuring a Topic for Assessment
1. On the Discussions List page, click Edit Topic from the context menu of the topic
you want to configure.
2. Click the Assessment tab.
3. If you want to link a topic score to a grade item, select your Grade Item from the
drop-down list, or click New Grade Item to create a grade item for the topic in a
pop-up window.

Center for Teaching and Learning (CTL) 24 | P a g e
4. Specify the number you want to Score Out Of. This is the scale, ranging from zero
to the number you enter, that users are evaluated on. For example, if you enter
15, users are assessed on a scale from zero to fifteen.
5. Click Add Rubric to associate the topic with one or more rubrics. Click the Create
Rubric in New Window link to create a new rubric.
Note: A Rubrics section displays in the collapsible Description area of the topic,
containing links to any rubrics you associate with the topic. Clicking on a rubric link
will open the rubric in a pop-up window, allowing users to preview the expectations
for the topic.
6. If you want to assess individual posts (rather than assigning an overall topic score
directly for each user):
• Select the Allow assessment of individual posts check box.
• Select the Calculation method you want to use to determine users’ overall
topic scores based on post scores.
• By default, the system ignores unassessed posts when calculating the topic
score. However, if you want the calculation to treat unassessed posts as if
those posts receive a score of zero, select the Include unassessed posts in the
calculated score as zero check box.
7. Click Save and Close.

Center for Teaching and Learning (CTL) 25 | P a g e
Assessing a Topic
1. On the Discussions List page, click on the topic you want to assess.
2. Do one of the following:
• To assess Individual Posts:
o Click Assess Topic from the context menu of the topic.
o Click the Topic Score link beneath the name of the user you want to
assess. This will bring up all of their posts for the topic, which you
can then assign individual scores.
Note: You must select the Allow assessment of individual posts check
box in the Assessment tab of the Edit Topic page to assess individual
posts.
• To assess the topic as a whole:
o Click the Assess Topic from the context menu of the topic.
o Click the Topic Score link beneath the name of the user you want to
assess. This will bring up all of their posts for the topic, which you
can then assign an overall Topic Score for.
Note: You must clear the Allow assessment of individual posts. Check
box in the Assessment tab of the Edit Topic page to assess to assess the
topic as a whole.
3. Click Save, then click Close.

Center for Teaching and Learning (CTL) 26 | P a g e
Grades The instructor can determine how to set up the grade book to best reflect their
approach to evaluation, including the grading system and grade scheme that is most
appropriate for the course. Instructors can select how grades display to students, how
they update in the grade book, and how you want to deal with ungraded items.
Prior to using the grade book it is important to determine the Grading System that
will be used.
Selecting a Grading System
The grading system is created to help determines how the grade items in your grade
book calculate and display the users' final grades. There are three options:
• The weighted system - Grade items can count as a percentage of a final grade
worth 100%,
• The points system - Grade items can be worth a certain amount of points that
are totaled for a final grade.
• The formula system - You can define a custom formula for how grade items
contribute to a final grade.

Center for Teaching and Learning (CTL) 27 | P a g e
Weighted System
The weighted system calculates grade items as a percentage of a final grade worth
100%. The grade items are placed in categories. The categories is given a percentage
and when calculated total 100%. The Max Points you assign to individual grade items
can be any value, but their contribution towards the category they belong to and
the final grade is the percentage value (weight) assigned to them.
Points System
The points system is used to calculate points assigned to grade items that contribute
to the final grade. A user’s final grades are calculated, by adding the scores on all
grade items together, and dividing by the sum of the Max Points values. The sum of
the Max Points values for all grade items does notneed to equal 100.
Formula System
The formula system is based on the points system. Grade items are calculated using
the points system, but a formula is used to set conditions around how grade items
contribute to the final grade. For example, you could require that users receive at
least 50% on their midterm and final exam to pass a course.

Center for Teaching and Learning (CTL) 28 | P a g e
Selecting a Grade Scheme
A grade scheme enables can be set up to organize users’ achievements. Based on their
performance on grade items, which are determined by levels of achievement. A grade
scheme can include any number of achievement levels. Each achievement level has its
own range of acceptable grades and a symbol, such as a numeric value, letter, or text
description, to represent it. You can create your own grade schemes or use schemes
set up by your organization.
Grade Scheme Example
Letter: A, B, C, D, E, F
Numeric: 2.0, 2.5, 3.0, 3.5, 4.0
Text: Below Expectations, Meets Expectations, Exceeds Expectations
To access and begin using the eCourseware grade book navigate to the Grades tool on
the course navigation bar.

Center for Teaching and Learning (CTL) 29 | P a g e
Grade Setup Wizard
The set up wizard is located in the Grade tools. If a grade book is not set up or
imported for your course, you will see the Grades Setup Wizard page when you first
navigate to the tool. You can also click Setup Wizard to open it.

Center for Teaching and Learning (CTL) 30 | P a g e
Creating Grade Items
Create a Grade Category
Use grade book categories to organize and group related grade items into sections.
For example, you could have separate categories for Dropbox Submissions, Quizzes,
Case Studies, Participation, Discussions, and so on. When grade items are grouped
together in a category, you can distribute points equally across all grade items and
drop the highest or lowest item in the group.
To create grade book categories:
• On the Manage Grades page, click Category from the New button.
• Enter a Name for the category.
• If you want, enter a Short Name to display in the grade book.
• If you want, enter a Description of the category. Select the Allow users to view
description check box if you want to make the category description available to
users.
• If you are using the weighted system, enter the total Weight or percentage that you
want the category to contribute towards the final grade.
• Set additional options as required and click Save and Close. To create another
category, click Save and New.

Center for Teaching and Learning (CTL) 31 | P a g e
Understanding Grade Items
Grade items in your grade book represent all the work that you want to evaluate users
on in a course. Grade items can exist independently in your grade book, or you can
associate them with course objects such as discussions, quizzes, and dropbox folders.
Each grade item has its own entry in the grade book, which you assign a grade to for
each user. Depending on the grade item type you want to create, grade items can be
graded numerically or based on a grade scheme.
Creating a numeric grade item
Grade users by assigning a value out of a specified total number of points.

Center for Teaching and Learning (CTL) 32 | P a g e
Create a numeric grade item
1. On the Manage Grades page, click Item from the New button.
2. Click Numeric.
3. Enter a Name for the grade item.
4. You can enter a Short Name to display in the grade book.
5. If you want the grade item associated with a category, select a category from the
Category drop-down list or click New Category.
6. Enter a Description of the grade item. If you want to make the description
available to users, select Allow users to view grade item description.
7. Enter the value you want the item graded out of in the Maximum Points field.
Note: If you are using the weighted system, enter the Weight you want the grade
item to contribute to the category. If the item does not belong to a category, the
Weight you enter contributes to the final grade.
8. If you want users’ grades to exceed the total value of the item, select the Can
Exceed check box.
9. Select the Bonus check box if you want the item counted as a bonus item.
Note: Bonus items are not counted towards the maximum points for a category or
final grade. If available, you must select the Can Exceed check box, and the Bonus
check box to allow users' grades to exceed the maximum points specified.
10. If you are using the points system, you can also choose the Exclude from Final
Grade Calculation option. If you are using the weighted system you can
accomplish the same results by setting the weight to 0%.
11. You can select a Grade Scheme to associate with the item.
12. You can click Add Rubric to add a rubric, or click the Create Rubric in New
Window link to create a new rubric.
13. Select Display Options.

Center for Teaching and Learning (CTL) 33 | P a g e
14. Click Save and Close.

Center for Teaching and Learning (CTL) 34 | P a g e
Calculation Options
To change the calculation options for the grade book:
1. Click the Settings link located in the top, right corner of the screen.
2. Click the Calculation Options tab.
Settings you can control on this screen are:
Grading System
The Default Setting is Points.
Weighted
Select this setting to use a weighted grade book calculation. Under a Weighted
system, grade categories are assigned a weight as a percentage of the final grade.
Grade items are assigned a weight as a percentage of their parent grade category, or
of the final grade if they have no parent category.
Points
Select this setting to use a Points grade book calculation. Under a Points system,
grade items are given a worth in points. Categories are then weighted by the sum of
points of their child grade items and the final grade becomes the total number of
points of all grade times.
Formula
Select this setting to use a Formula grade book calculation. Under a Formula system,
grade items are given a worth in points. Then a custom-defined formula determines
how they contribute to the calculated final grade.

Center for Teaching and Learning (CTL) 35 | P a g e
Final Grade Released
Selecting one of the below settings does NOT release a final grade to participants.
You are only selecting which final grade will be released to participants when you
choose to release it. The Default Setting is Adjusted Final Grade.
Calculated Final Grade
Select this setting to have the Calculated Final Grade released to participants.
Adjusted Final Grade
Select this setting to have the Adjusted final Grade released to participants.
Grade Calculations
The Default Setting is Treat ungraded items as 0.
Drop ungraded items
Select this setting to exclude ungraded grade items from the final grade calculation.
Treat ungraded items as 0
Select this setting to automatically assign a value of 0 to all ungraded grade items.
Auto Update
Select this option to keep you Final Calculated Grade updated automatically. The
Default Setting is unselected.
3. When you finished selecting your preferences, click Save.

Center for Teaching and Learning (CTL) 36 | P a g e

Center for Teaching and Learning (CTL) 37 | P a g e
Extra Credit and Bonus Points
Extra credit points are added to an existing assignment. For example, a bonus
question offered on a quiz or exam. To make sure any extra credit points participants
have earned are counted correctly, you’ll need to make sure that the grade item, the
grade category, AND the Final Grade are all allowed to exceed.
To do this:
1. Make sure you are in Manage Grades.
2. Click the name of the grade item or category you would like to edit.
3. For grade items and Final Grades, check the box under Can Exceed.

Center for Teaching and Learning (CTL) 38 | P a g e
4. For grade categories, check the box to the left of Allow category grade to exceed
category weight.
5. After making the change in the grade item, grade category, or Final Grade, be
sure to click one of the Save options at the bottom of the screen to save your
changes:
Save and Close: Saves any changes and returns you to the Manage Grades screen.
Save and New: Saves any changes and allows you to begin creating a new grade
item/category.
Save: Saves any changes and stays on the same screen.

Center for Teaching and Learning (CTL) 39 | P a g e
Bonus Points/Items
Bonus points, or Bonus Items, refer to grade items that can only improve a
participant’s grade. Failure to receive a score on a Bonus Item does not penalize a
participant’s grade.
To make a grade item a Bonus Item:
1. Make sure you are in Manage Grades.
2. Click the name of the grade item you would like to edit.
3. Check the box under Bonus.
4. After making the change in the grade item, grade category, or Final Grade, be
sure to click one of the Save options at the bottom of the screen to save your
changes:
• Save and Close: Saves any changes and returns you to the Manage Grades
screen.
• Save and New: Saves any changes and allows you to begin creating a new grade
item/category.
• Save: Saves any changes and stays on the same screen.
Note: If a Bonus Item belongs to a grade category, you will need to set the grade
category to exceed the maximum number of points possible so that any bonus points
earned can move to the Final Grade calculation.

Center for Teaching and Learning (CTL) 40 | P a g e
Editing grade items after users’ grades have been entered
Editing the Max. Points, Weight, Bonus, or Can Exceed fields for a grade item that
already has grades entered for it can drastically change users’ recorded achievement.
Make sure you consider how grades are affected before you make changes and review
and adjust users’ grades afterwards.
Examples:
• You raise the Max. Points for a grade item from 10 – 20. A user who previously
had 10/10 now has a grade of 10/20.
• You lower the Max. Points for a grade item from 12 to 10 when Can Exceed is
not selected. A user who previously had 11/12 now has 10/10.

Center for Teaching and Learning (CTL) 41 | P a g e
Locating Help Resources
The Center for Teaching and Learning offers support to faculty, staff, and students. Upon completing
the training covered in this course; faculty, staff and students are able to receive additional training
help and resources. Such help can be located as follows:
Service Desk Request
Submitting a Ticket
• Login URL: o Here is a link to our service desk ticketing system o After logging in, choose the link Request Help or Services. o Choose Request Help or Services.
Call the ITS Service Desk (901.678.8888) any day of the week! (Excluding Some Holidays)
• The ITS Service Desk is available from 8:00 a.m. – 11:59 p.m., seven days a week (excluding some holidays). You can contact the Service Desk for assistance with technical login problems or issues. Incoming calls after hours will be handled by voicemail services. If you require assistance after 12:00 a.m., please leave a message or submit a service request.
• Messages will be checked regularly and receive priority response the following business day. You may also email The Center for Teaching and Learning, [email protected] (using this email will automatically generate a help desk ticket).
Important Links • Explore the umTech Website
• Center for Teaching and Learning (CTL) Website
• Search our Training and Documentation