
Ecoreach DOCA0069EN 09/2014 Ecoreach - Tekniske ...studiecd.dk/pdfs/all/DOCA0069EN-00.pdfCompact NSX...
112
DOCA0069EN-00 www.schneider-electric.com Ecoreach DOCA0069EN 09/2014 Ecoreach Online Help Version 1.0 09/2014
Transcript of Ecoreach DOCA0069EN 09/2014 Ecoreach - Tekniske ...studiecd.dk/pdfs/all/DOCA0069EN-00.pdfCompact NSX...

Ecoreach
DOCA0069EN 09/2014
DO
CA
0069
EN
-00
www.schneider-electric.com
Ecoreach Online HelpVersion 1.009/2014

The information provided in this documentation contains general descriptions and/or technical characteristics of the performance of the products contained herein. This documentation is not intended as a substitute for and is not to be used for determining suitability or reliability of these products for specific user applications. It is the duty of any such user or integrator to perform the appropriate and complete risk analysis, evaluation and testing of the products with respect to the relevant specific application or use thereof. Neither Schneider Electric nor any of its affiliates or subsidiaries shall be responsible or liable for misuse of the information contained herein. If you have any suggestions for improvements or amendments or have found errors in this publication, please notify us.
No part of this document may be reproduced in any form or by any means, electronic or mechanical, including photocopying, without express written permission of Schneider Electric.
All pertinent state, regional, and local safety regulations must be observed when installing and using this product. For reasons of safety and to help ensure compliance with documented system data, only the manufacturer should perform repairs to components.
When devices are used for applications with technical safety requirements, the relevant instructions must be followed.
Failure to use Schneider Electric software or approved software with our hardware products may result in injury, harm, or improper operating results.
Failure to observe this information can result in injury or equipment damage.
© 2014 Schneider Electric. All rights reserved.
2 DOCA0069EN 09/2014
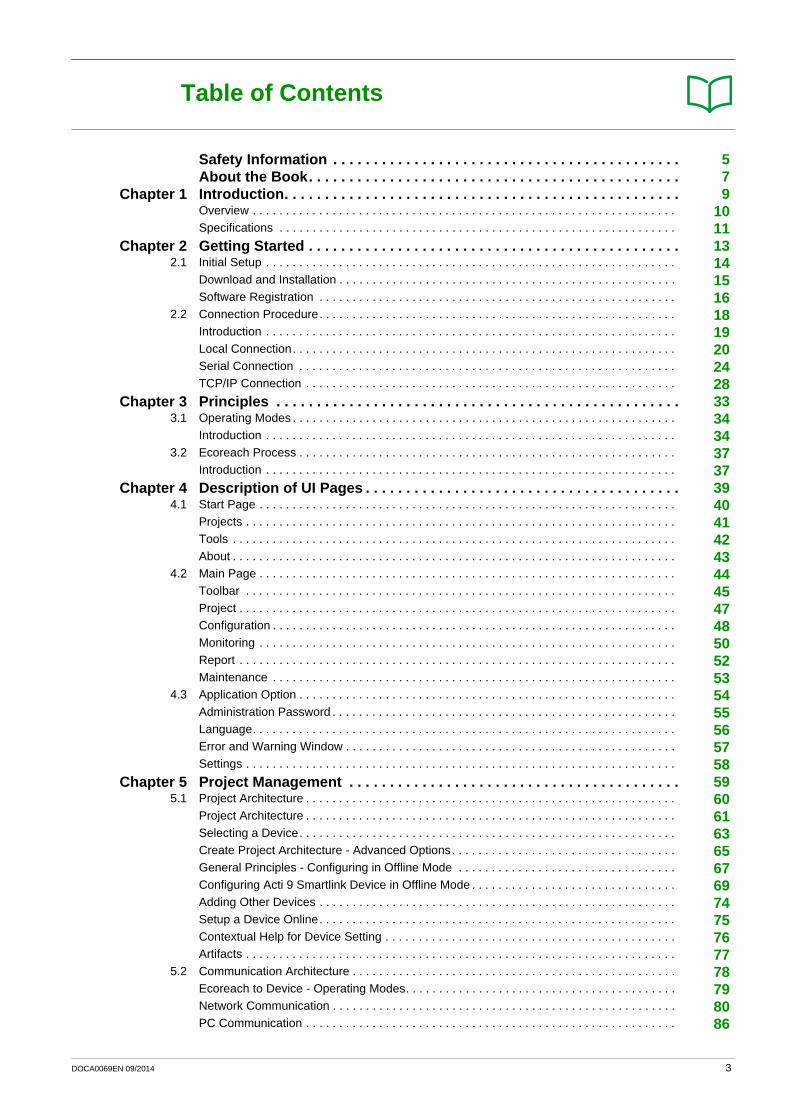
Table of Contents
Safety Information . . . . . . . . . . . . . . . . . . . . . . . . . . . . . . . . . . . . . . . . . . . 5About the Book. . . . . . . . . . . . . . . . . . . . . . . . . . . . . . . . . . . . . . . . . . . . . . 7
Chapter 1 Introduction. . . . . . . . . . . . . . . . . . . . . . . . . . . . . . . . . . . . . . . . . . . . . . . . . 9Overview . . . . . . . . . . . . . . . . . . . . . . . . . . . . . . . . . . . . . . . . . . . . . . . . . . . . . . . . . . . . . . . . 10Specifications . . . . . . . . . . . . . . . . . . . . . . . . . . . . . . . . . . . . . . . . . . . . . . . . . . . . . . . . . . . . 11
Chapter 2 Getting Started . . . . . . . . . . . . . . . . . . . . . . . . . . . . . . . . . . . . . . . . . . . . . . 132.1 Initial Setup . . . . . . . . . . . . . . . . . . . . . . . . . . . . . . . . . . . . . . . . . . . . . . . . . . . . . . . . . . . . . . 14
Download and Installation . . . . . . . . . . . . . . . . . . . . . . . . . . . . . . . . . . . . . . . . . . . . . . . . . . . 15Software Registration . . . . . . . . . . . . . . . . . . . . . . . . . . . . . . . . . . . . . . . . . . . . . . . . . . . . . . 16
2.2 Connection Procedure. . . . . . . . . . . . . . . . . . . . . . . . . . . . . . . . . . . . . . . . . . . . . . . . . . . . . . 18Introduction . . . . . . . . . . . . . . . . . . . . . . . . . . . . . . . . . . . . . . . . . . . . . . . . . . . . . . . . . . . . . . 19Local Connection. . . . . . . . . . . . . . . . . . . . . . . . . . . . . . . . . . . . . . . . . . . . . . . . . . . . . . . . . . 20Serial Connection . . . . . . . . . . . . . . . . . . . . . . . . . . . . . . . . . . . . . . . . . . . . . . . . . . . . . . . . . 24TCP/IP Connection . . . . . . . . . . . . . . . . . . . . . . . . . . . . . . . . . . . . . . . . . . . . . . . . . . . . . . . . 28
Chapter 3 Principles . . . . . . . . . . . . . . . . . . . . . . . . . . . . . . . . . . . . . . . . . . . . . . . . . . 333.1 Operating Modes . . . . . . . . . . . . . . . . . . . . . . . . . . . . . . . . . . . . . . . . . . . . . . . . . . . . . . . . . . 34
Introduction . . . . . . . . . . . . . . . . . . . . . . . . . . . . . . . . . . . . . . . . . . . . . . . . . . . . . . . . . . . . . . 343.2 Ecoreach Process . . . . . . . . . . . . . . . . . . . . . . . . . . . . . . . . . . . . . . . . . . . . . . . . . . . . . . . . . 37
Introduction . . . . . . . . . . . . . . . . . . . . . . . . . . . . . . . . . . . . . . . . . . . . . . . . . . . . . . . . . . . . . . 37Chapter 4 Description of UI Pages . . . . . . . . . . . . . . . . . . . . . . . . . . . . . . . . . . . . . . . 39
4.1 Start Page . . . . . . . . . . . . . . . . . . . . . . . . . . . . . . . . . . . . . . . . . . . . . . . . . . . . . . . . . . . . . . . 40Projects . . . . . . . . . . . . . . . . . . . . . . . . . . . . . . . . . . . . . . . . . . . . . . . . . . . . . . . . . . . . . . . . . 41Tools . . . . . . . . . . . . . . . . . . . . . . . . . . . . . . . . . . . . . . . . . . . . . . . . . . . . . . . . . . . . . . . . . . . 42About . . . . . . . . . . . . . . . . . . . . . . . . . . . . . . . . . . . . . . . . . . . . . . . . . . . . . . . . . . . . . . . . . . . 43
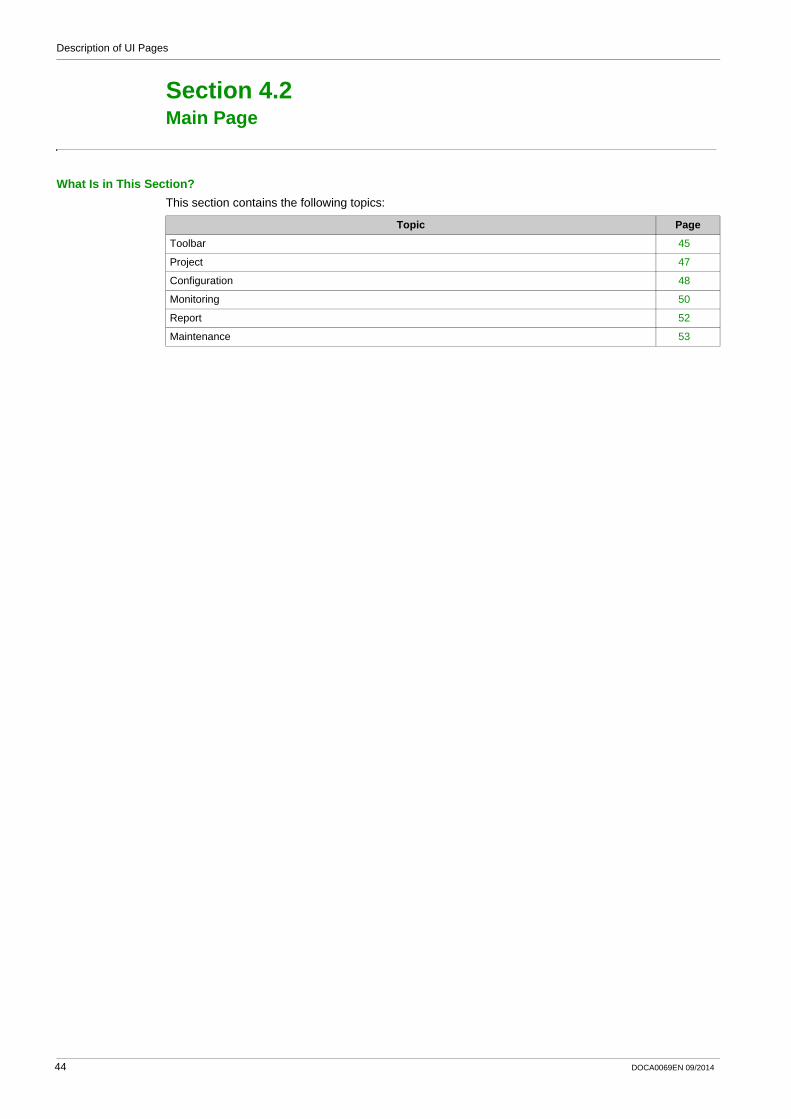
4.2 Main Page . . . . . . . . . . . . . . . . . . . . . . . . . . . . . . . . . . . . . . . . . . . . . . . . . . . . . . . . . . . . . . . 44Toolbar . . . . . . . . . . . . . . . . . . . . . . . . . . . . . . . . . . . . . . . . . . . . . . . . . . . . . . . . . . . . . . . . . 45Project . . . . . . . . . . . . . . . . . . . . . . . . . . . . . . . . . . . . . . . . . . . . . . . . . . . . . . . . . . . . . . . . . . 47Configuration . . . . . . . . . . . . . . . . . . . . . . . . . . . . . . . . . . . . . . . . . . . . . . . . . . . . . . . . . . . . . 48Monitoring . . . . . . . . . . . . . . . . . . . . . . . . . . . . . . . . . . . . . . . . . . . . . . . . . . . . . . . . . . . . . . . 50Report . . . . . . . . . . . . . . . . . . . . . . . . . . . . . . . . . . . . . . . . . . . . . . . . . . . . . . . . . . . . . . . . . . 52Maintenance . . . . . . . . . . . . . . . . . . . . . . . . . . . . . . . . . . . . . . . . . . . . . . . . . . . . . . . . . . . . . 53
4.3 Application Option . . . . . . . . . . . . . . . . . . . . . . . . . . . . . . . . . . . . . . . . . . . . . . . . . . . . . . . . . 54Administration Password . . . . . . . . . . . . . . . . . . . . . . . . . . . . . . . . . . . . . . . . . . . . . . . . . . . . 55Language. . . . . . . . . . . . . . . . . . . . . . . . . . . . . . . . . . . . . . . . . . . . . . . . . . . . . . . . . . . . . . . . 56Error and Warning Window . . . . . . . . . . . . . . . . . . . . . . . . . . . . . . . . . . . . . . . . . . . . . . . . . . 57Settings . . . . . . . . . . . . . . . . . . . . . . . . . . . . . . . . . . . . . . . . . . . . . . . . . . . . . . . . . . . . . . . . . 58
Chapter 5 Project Management . . . . . . . . . . . . . . . . . . . . . . . . . . . . . . . . . . . . . . . . . 595.1 Project Architecture . . . . . . . . . . . . . . . . . . . . . . . . . . . . . . . . . . . . . . . . . . . . . . . . . . . . . . . . 60
Project Architecture . . . . . . . . . . . . . . . . . . . . . . . . . . . . . . . . . . . . . . . . . . . . . . . . . . . . . . . . 61Selecting a Device. . . . . . . . . . . . . . . . . . . . . . . . . . . . . . . . . . . . . . . . . . . . . . . . . . . . . . . . . 63Create Project Architecture - Advanced Options. . . . . . . . . . . . . . . . . . . . . . . . . . . . . . . . . . 65General Principles - Configuring in Offline Mode . . . . . . . . . . . . . . . . . . . . . . . . . . . . . . . . . 67Configuring Acti 9 Smartlink Device in Offline Mode . . . . . . . . . . . . . . . . . . . . . . . . . . . . . . . 69Adding Other Devices . . . . . . . . . . . . . . . . . . . . . . . . . . . . . . . . . . . . . . . . . . . . . . . . . . . . . . 74Setup a Device Online. . . . . . . . . . . . . . . . . . . . . . . . . . . . . . . . . . . . . . . . . . . . . . . . . . . . . . 75Contextual Help for Device Setting . . . . . . . . . . . . . . . . . . . . . . . . . . . . . . . . . . . . . . . . . . . . 76Artifacts . . . . . . . . . . . . . . . . . . . . . . . . . . . . . . . . . . . . . . . . . . . . . . . . . . . . . . . . . . . . . . . . . 77
5.2 Communication Architecture . . . . . . . . . . . . . . . . . . . . . . . . . . . . . . . . . . . . . . . . . . . . . . . . . 78Ecoreach to Device - Operating Modes. . . . . . . . . . . . . . . . . . . . . . . . . . . . . . . . . . . . . . . . . 79Network Communication . . . . . . . . . . . . . . . . . . . . . . . . . . . . . . . . . . . . . . . . . . . . . . . . . . . . 80PC Communication . . . . . . . . . . . . . . . . . . . . . . . . . . . . . . . . . . . . . . . . . . . . . . . . . . . . . . . . 86
DOCA0069EN 09/2014 3

5.3 Monitor and Control . . . . . . . . . . . . . . . . . . . . . . . . . . . . . . . . . . . . . . . . . . . . . . . . . . . . . . . . 90Monitor . . . . . . . . . . . . . . . . . . . . . . . . . . . . . . . . . . . . . . . . . . . . . . . . . . . . . . . . . . . . . . . . . . 91Test . . . . . . . . . . . . . . . . . . . . . . . . . . . . . . . . . . . . . . . . . . . . . . . . . . . . . . . . . . . . . . . . . . . . 92Logs . . . . . . . . . . . . . . . . . . . . . . . . . . . . . . . . . . . . . . . . . . . . . . . . . . . . . . . . . . . . . . . . . . . . 94Control . . . . . . . . . . . . . . . . . . . . . . . . . . . . . . . . . . . . . . . . . . . . . . . . . . . . . . . . . . . . . . . . . . 95
5.4 Report . . . . . . . . . . . . . . . . . . . . . . . . . . . . . . . . . . . . . . . . . . . . . . . . . . . . . . . . . . . . . . . . . . 97Configuration Report . . . . . . . . . . . . . . . . . . . . . . . . . . . . . . . . . . . . . . . . . . . . . . . . . . . . . . . 97
5.5 Firmware Upgrade . . . . . . . . . . . . . . . . . . . . . . . . . . . . . . . . . . . . . . . . . . . . . . . . . . . . . . . . . 99Upgrade Firmware . . . . . . . . . . . . . . . . . . . . . . . . . . . . . . . . . . . . . . . . . . . . . . . . . . . . . . . . . 100Compatibility Check of Device/Firmware and Corrective Actions . . . . . . . . . . . . . . . . . . . . . 103
Index . . . . . . . . . . . . . . . . . . . . . . . . . . . . . . . . . . . . . . . . . . . . . . . . . . . . . . 107
4 DOCA0069EN 09/2014
Safety Information
Important Information
NOTICERead these instructions carefully, and look at the equipment to become familiar with the device before trying to install, operate, or maintain it. The following special messages may appear throughout this documentation or on the equipment to warn of potential hazards or to call attention to information that clarifies or simplifies a procedure.
PLEASE NOTEElectrical equipment should be installed, operated, serviced, and maintained only by qualified personnel. No responsibility is assumed by Schneider Electric for any consequences arising out of the use of this material.
A qualified person is one who has skills and knowledge related to the construction and operation of electrical equipment and its installation, and has received safety training to recognize and avoid the hazards involved.
FCC NoticeThis equipment has been tested and found to comply with the limits for a Class A digital device, pursuant to part 15 of the FCC Rules. These limits are designated to provide reasonable protection against harmful interference when the equipment is operated in a commercial environment. This equipment generates, uses, and can radiate radio frequency energy and, if not installed and used in accordance with the instruction manual, may cause harmful interference to radio communications. Operation of this equipment in a residential area is likely to cause harmful interference in which case the user will be required to correct the interference at this own expense.
DOCA0069EN 09/2014 5

6 DOCA0069EN 09/2014
About the Book
At a Glance
Document ScopeThe purpose of this online help is to provide authorized users, panel builders, installers and maintenance personnel with the technical information needed to operate Ecoreach software. Ecoreach provides a simple setting and operating software application for Compact NSX, Compact NS, Masterpact, PowerPact circuit breakers, and Acti 9 Smartlink through which the user can do the configuration or settings management and project management for these devices locally and in Ecoreach cloud.
Validity NoteThe technical characteristics of the devices described in this document also appear online. To access this information online:
The characteristics that are presented in this manual should be the same as those characteristics that appear online. In line with our policy of constant improvement, we may revise content over time to improve clarity and accuracy. If you see a difference between the manual and online information, use the online information as your reference.
Related Documents
Step Action
1 Go to the Schneider Electric home page www.schneider-electric.com.
2 In the Search box type the reference of a product or the name of a product range.Do not include blank spaces in the model number/product range.To get information on grouping similar modules, use asterisks (*).
3 If you entered a reference, go to the Product Datasheets search results and click on the reference that interests you.If you entered the name of a product range, go to the Product Ranges search results and click on the product range that interests you.
4 If more than one reference appears in the Products search results, click on the reference that interests you.
5 Depending on the size of your screen, you may need to scroll down to see the data sheet.
6 To save or print a data sheet as a .pdf file, click Download XXX product datasheet.
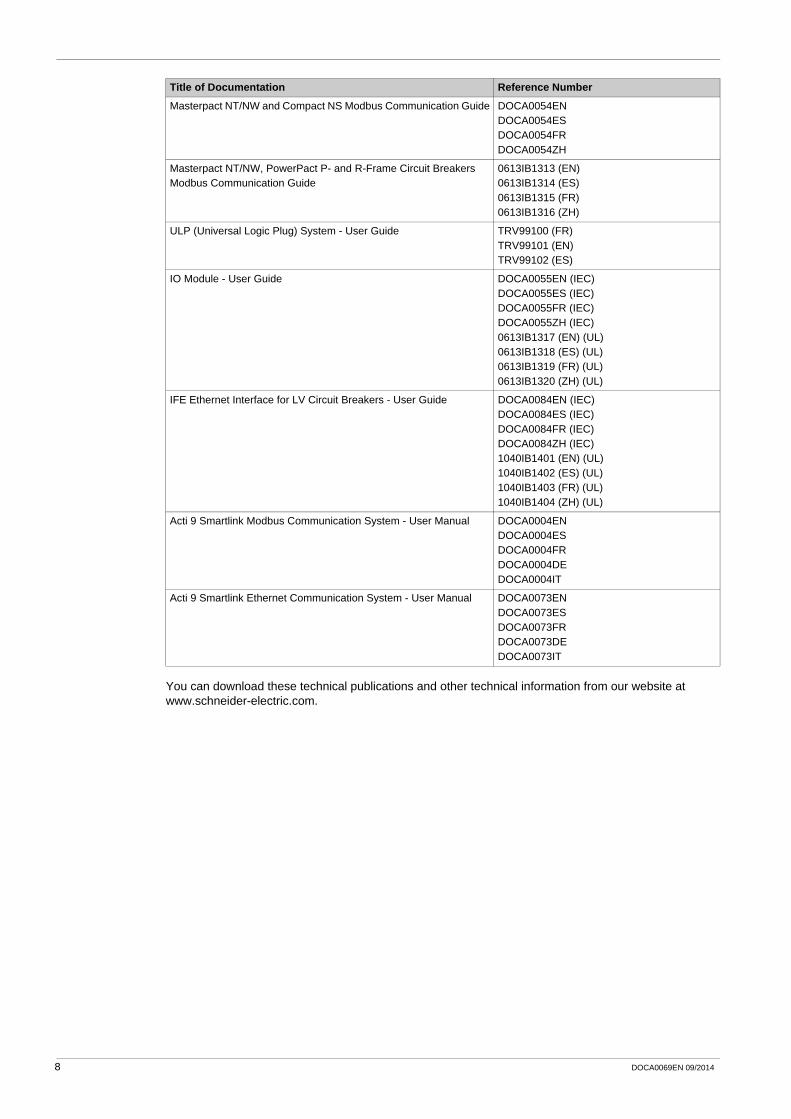
Title of Documentation Reference Number
Compact NSX AC 100-630 A Circuit Breakers - User Guide LV434100 (FR)LV434101 (EN)LV434102 (ES)
Compact NSX Micrologic 5 and 6 Trip Units - User Guide LV434103 (FR)LV434104 (EN)LV434105 (ES)
Compact NSX Modbus Communication Guide LV434106 (FR) LV434107 (EN) LV434108 (ES) DOCA0091ZH
PowerPact H-, J-, and L-Frame Circuit Breakers - User guide 48940-313 (FR, EN, ES)
Micrologic 5/6 Electronic Trip Units - User Guide for PowerPact H-, J, and L Frame Circuit Breakers
48940-312 (FR, EN, ES)
PowerPact H-, J-, and L-Frame Circuit Breakers Modbus Communication Guide
0611IB1302 (EN)0611IB1303 (ES)0611IB1304 (FR)0611IB1305 (ZH)
DOCA0069EN 09/2014 7
You can download these technical publications and other technical information from our website at www.schneider-electric.com.
Masterpact NT/NW and Compact NS Modbus Communication Guide DOCA0054ENDOCA0054ESDOCA0054FRDOCA0054ZH
Masterpact NT/NW, PowerPact P- and R-Frame Circuit Breakers Modbus Communication Guide
0613IB1313 (EN)0613IB1314 (ES)0613IB1315 (FR)0613IB1316 (ZH)
ULP (Universal Logic Plug) System - User Guide TRV99100 (FR)TRV99101 (EN)TRV99102 (ES)
IO Module - User Guide DOCA0055EN (IEC)DOCA0055ES (IEC)DOCA0055FR (IEC)DOCA0055ZH (IEC)0613IB1317 (EN) (UL)0613IB1318 (ES) (UL)0613IB1319 (FR) (UL)0613IB1320 (ZH) (UL)
IFE Ethernet Interface for LV Circuit Breakers - User Guide DOCA0084EN (IEC)DOCA0084ES (IEC)DOCA0084FR (IEC)DOCA0084ZH (IEC)1040IB1401 (EN) (UL)1040IB1402 (ES) (UL)1040IB1403 (FR) (UL)1040IB1404 (ZH) (UL)
Acti 9 Smartlink Modbus Communication System - User Manual DOCA0004ENDOCA0004ESDOCA0004FRDOCA0004DEDOCA0004IT
Acti 9 Smartlink Ethernet Communication System - User Manual DOCA0073ENDOCA0073ESDOCA0073FRDOCA0073DEDOCA0073IT
Title of Documentation Reference Number
8 DOCA0069EN 09/2014

Ecoreach IntroductionDOCA0069EN 09/2014
Introduction
Chapter 1Introduction
What Is in This Chapter?This chapter contains the following topics:
Topic Page
Overview 10
Specifications 11
DOCA0069EN 09/2014 9

Introduction
Overview
DescriptionEcoreach is an Electrical Asset Management software that helps the user to manage a project as part of designing, testing, commissioning, and maintenance phases of the project life cycle. It enables the user to build and commission panels efficiently, and assist in the maintenance and operation phases.
Ecoreach software operates connected to the cloud ensuring a unique project reference for the user. The user can prepare the settings of the devices offline (without connecting to the device), save the project in the cloud as reference, and configure the devices when connected with them. When the cloud connection is unavailable, Ecoreach manages a specific workflow to ensure that the device configuration is unaffected.
Using Ecoreach, the user can manage the project reference and access the reference project from any PC operating Ecoreach. The user can avail value-added features to manage the project. For example, attaching the artifacts to each device or at the project level, organizing devices in switchboards, managing a hierarchical structure of the installation, and so on.
FeaturesEcoreach supersedes the Schneider Electric customer engineering tools such as the Remote Setting Utility (RSU) and Remote Control Utility (RCU) with additional features.
Ecoreach supports the connection of Schneider Electric devices to:Create projects by device discovery and selection of devices from devices catalog.Save the project in Ecoreach Cloud for reference.Upload and download settings to multiple devices in batches.Carry out commands, generate, and print device settings report. Perform a communication wiring test on the entire project or for a specific switchboard and generate and print test report.Manage multiple devices with an electrical and communication hierarchy model.Monitor the protections and IO status.Read information (alarms, measurements, parameters).Manage artifacts (project documents).Download latest device firmware.
Compatible DevicesEcoreach is compatible with the following devices:
CompactTM NSX 100-630 (IEC) circut breaker PowerPactTM H-, J-, and L- frame (UL) circuit breakerCompact NS 630b-3200A (IEC) and PowerPactTM M-, P-, and R-frame (UL) circuit breakerMasterpact NT/NW (IEC and UL) circuit breaker Acti 9 SmartlinkSwitch-disconnectorPower meters (iEM3000, PM9, and PM3000 series)
10 DOCA0069EN 09/2014
Introduction
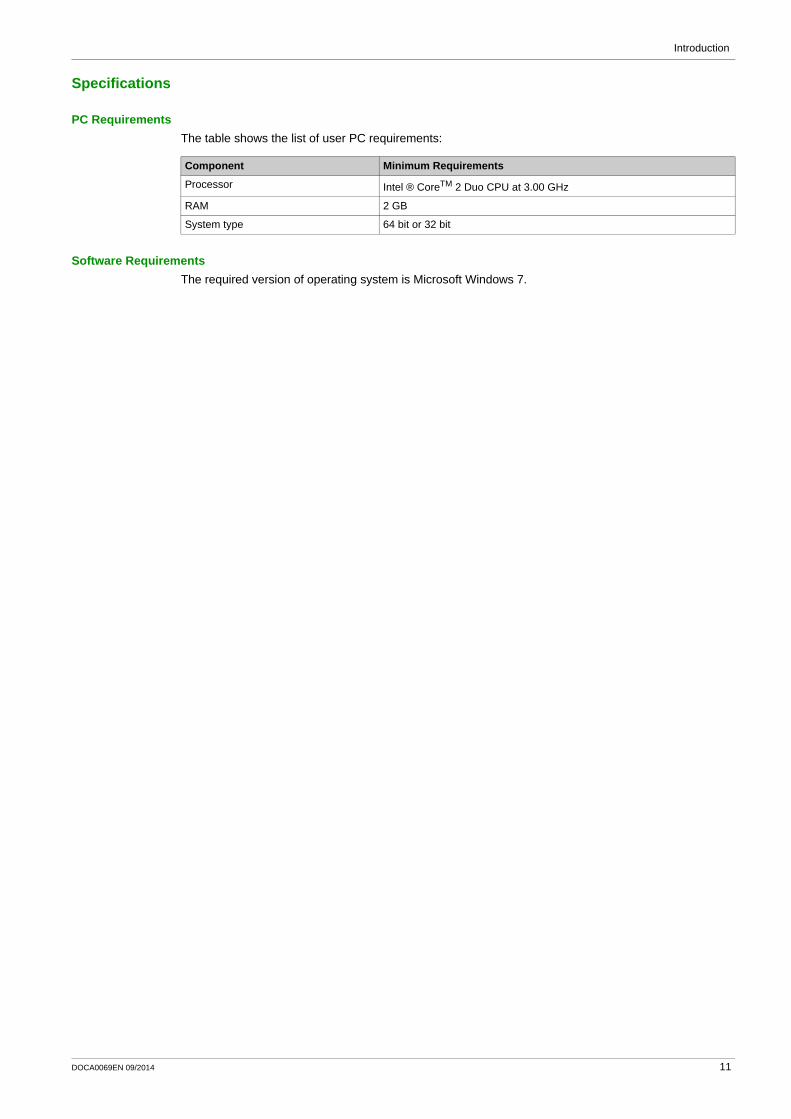
Specifications
PC RequirementsThe table shows the list of user PC requirements:
Software RequirementsThe required version of operating system is Microsoft Windows 7.
Component Minimum Requirements
Processor Intel ® CoreTM 2 Duo CPU at 3.00 GHz
RAM 2 GB
System type 64 bit or 32 bit
DOCA0069EN 09/2014 11

Introduction
12 DOCA0069EN 09/2014

Ecoreach Getting StartedDOCA0069EN 09/2014
Getting Started
Chapter 2Getting Started
What Is in This Chapter?This chapter contains the following sections:
Section Topic Page
2.1 Initial Setup 14
2.2 Connection Procedure 18
DOCA0069EN 09/2014 13

Getting Started
Initial Setup
Section 2.1Initial Setup
What Is in This Section?This section contains the following topics:
Topic Page
Download and Installation 15
Software Registration 16
14 DOCA0069EN 09/2014
Getting Started
Download and Installation
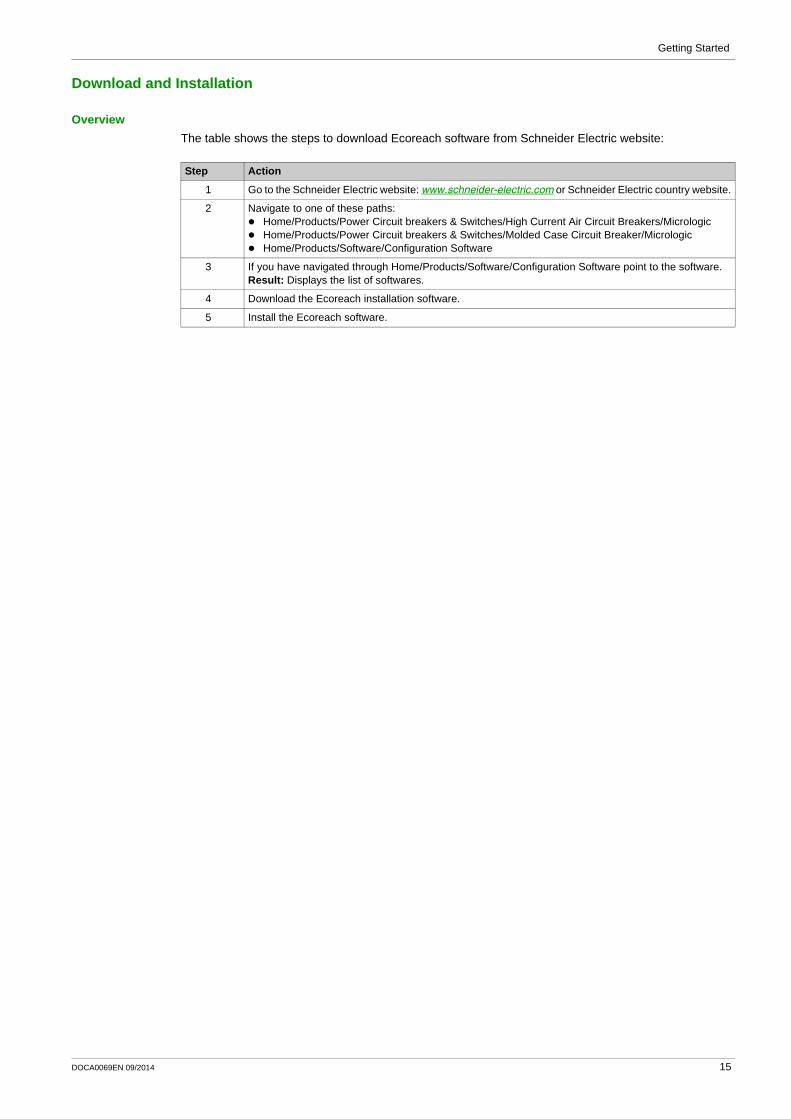
OverviewThe table shows the steps to download Ecoreach software from Schneider Electric website:
Step Action
1 Go to the Schneider Electric website: www.schneider-electric.com or Schneider Electric country website.
2 Navigate to one of these paths:Home/Products/Power Circuit breakers & Switches/High Current Air Circuit Breakers/MicrologicHome/Products/Power Circuit breakers & Switches/Molded Case Circuit Breaker/MicrologicHome/Products/Software/Configuration Software
3 If you have navigated through Home/Products/Software/Configuration Software point to the software.Result: Displays the list of softwares.
4 Download the Ecoreach installation software.
5 Install the Ecoreach software.
DOCA0069EN 09/2014 15

Getting Started
Software Registration
OverviewThe following screen appears when you start the Ecoreach software for first time.
The table shows the steps to register the Ecoreach software:
Results of RegistrationAfter the first time registration, a pop-up window appears for these two cases:
Step Action
1 Enter all the details.
2 Enter a valid email address.
3 Click Register.Result: An email containing password is sent to your email address.
4 Use the password for further login.
Cases Pop-up Window
If you are a new Ecoreach cloud account user
If you are an existing Ecoreach cloud account user
16 DOCA0069EN 09/2014
Getting Started
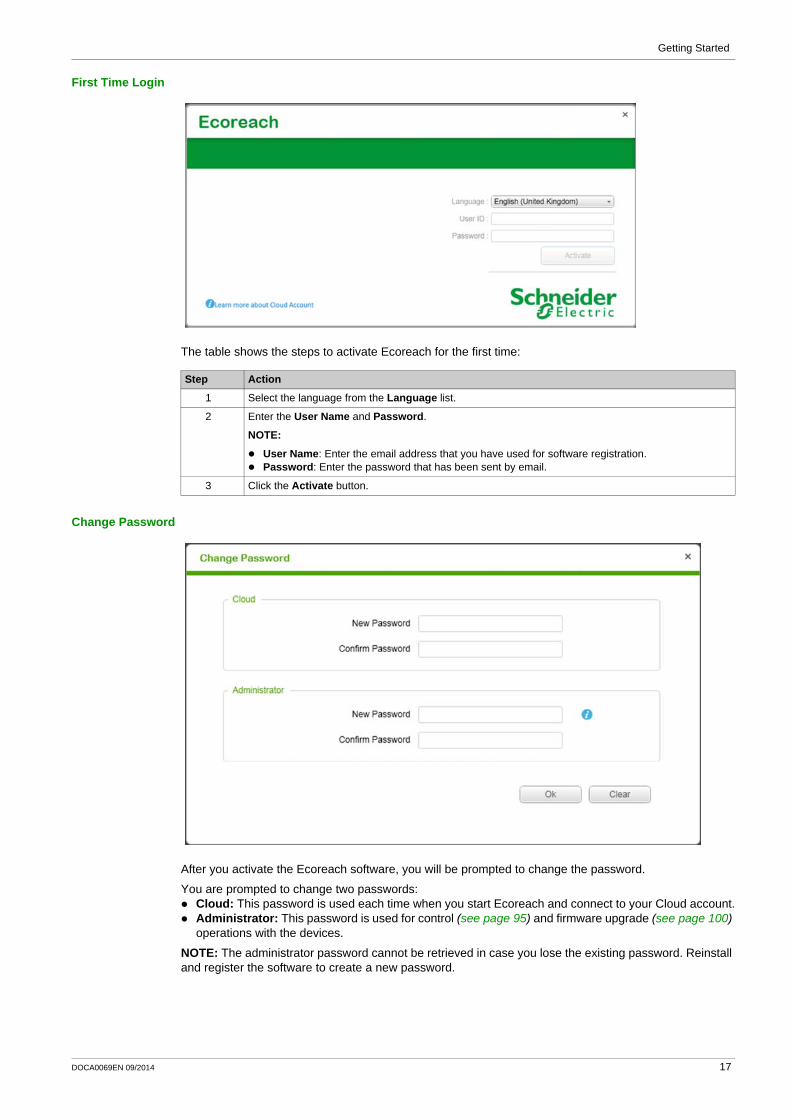
First Time Login
The table shows the steps to activate Ecoreach for the first time:
Change Password
After you activate the Ecoreach software, you will be prompted to change the password.
You are prompted to change two passwords:Cloud: This password is used each time when you start Ecoreach and connect to your Cloud account.Administrator: This password is used for control (see page 95) and firmware upgrade (see page 100) operations with the devices.
NOTE: The administrator password cannot be retrieved in case you lose the existing password. Reinstall and register the software to create a new password.
Step Action
1 Select the language from the Language list.
2 Enter the User Name and Password.
NOTE:
User Name: Enter the email address that you have used for software registration.Password: Enter the password that has been sent by email.
3 Click the Activate button.
DOCA0069EN 09/2014 17
Getting Started
Connection Procedure
Section 2.2Connection Procedure
What Is in This Section?This section contains the following topics:
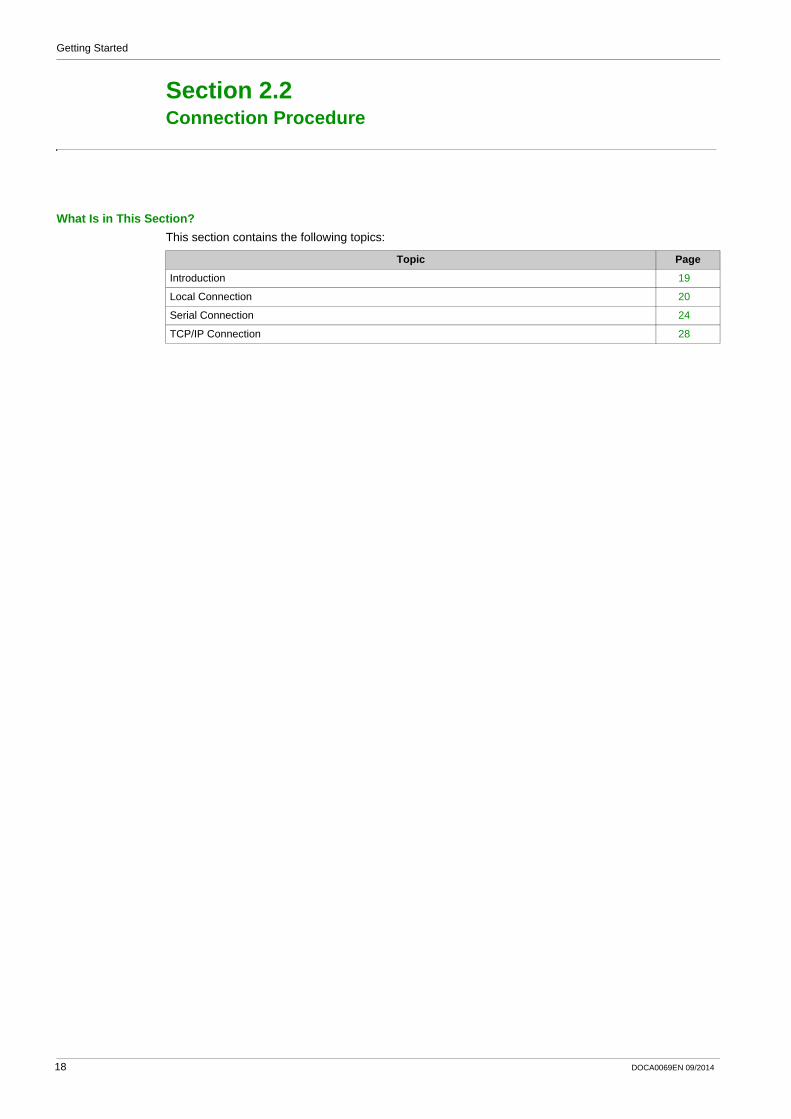
Topic Page
Introduction 19
Local Connection 20
Serial Connection 24
TCP/IP Connection 28
18 DOCA0069EN 09/2014

Getting Started
Introduction
OverviewThe connection procedure is applicable for all the product ranges managed by Ecoreach.
The table lists the possible connections with circuit breakers and Acti 9 Smartlink:
Connection Type Connections
Local Connection
Connection through UTA-Test Plug (see page 20) Compact NSX or PowerPact H-, J-, and L- frame: point-to-point connection through the front test plug of the trip unit
Connection through UTA-ULP cable (see page 21) Compact NSX or PowerPact H-, J-, and L- frame with BSCM ULP and ULP busMasterpact or Compact NS 630b-3200A with BCM ULP and ULP bus
Connection through MagicBox (see page 22) Masterpact or Compact NS 630b-3200A or PowerPact M-, P-, and R- frame: point-to-point connection through the front test plug of the trip unit
Serial Connection
Connection through IFM (see page 24) Compact NSX or PowerPact H-, J-, and L- frame with BSCM module and ULP bus and IFM communication moduleMasterpact or Compact NS 630b-3200A or PowerPact M-, P-, and R- frame with BCM ULP and ULP bus and IFM communication module
Connection through BCM (see page 25) Masterpact or Compact NS 630b-3200A or PowerPact M-, P-, and R- frame with BCM module
Connection through CCM (see page 26) Masterpact or Compact NS 630b-3200A or PowerPact M-, P, and R- frame with BCM and CCM module or with BCMULP and CCM module
Connection through Acti 9 Smartlink device (see page 27)
Acti 9 Smartlink RS485
TCP/IP Connection
Connection to devices network through TCP/IP gateway (see page 28)
Compact NSX or PowerPact H-, J-, and L- frame with IFM communication module, Masterpact or Compact NS 630b-3200A or PowerPact M- , P-, and R- frame with IFM communication module, all connected to the gateway through their IFM module
Connection through IFE (see page 29) Compact NSX or PowerPact H-, J-, and L- frame with BSCM module with ULP bus and IFE communication moduleMasterpact or Compact NS 630b-3200A or PowerPact M-, P-, and R- frame with BCM ULP and ULP bus and IFE communication module
Connection to devices network through Ethernet TCP/IP daisy chain (see page 30)
Compact NSX or PowerPact H-, J-, and L- frame with BSCM module with ULP bus and IFE communication moduleMasterpact or Compact NS 630b-3200A or PowerPact M-, P-, and R- frame with BCM ULP and ULP bus and IFE communication module
Typical network connection (see page 31) Compact NSX or PowerPact H-, J-, and L- frame with IFE communication module, Masterpact or Compact NS 630b-3200A or PowerPact M-, P-, and R- frame with IFE communication module, Acti 9 Smartlink IP, all connected to an Ethernet switch
DOCA0069EN 09/2014 19

Getting Started
Local Connection
Connection through UTA-Test Plug Using a USB CableThis connection is applicable for Compact NSX and PowerPact H-, J-, and L- frame circuit breakers.
The figure shows an example of the Compact NSX circuit breaker:
A PC running EcoreachB UTA maintenance moduleC Micrologic trip unitD ULP cableE Standard USB cord for connection to the PC
Connection through UTA-Test Plug Using a Bluetooth DongleThis connection is applicable for Compact NSX and PowerPact H-, J-, and L- frame circuit breakers.
The figure shows an example of the Compact NSX circuit breaker:
A PC running EcoreachB UTA maintenance moduleC Micrologic trip unitD ULP cableE Power cordF Bluetooth dongle
20 DOCA0069EN 09/2014

Getting Started
Connection to a UTA-ULP Cable This connection is applicable for Compact NSX, Compact NS 630b-3200A, Masterpact, PowerPact M-, P- and R- frame, and PowerPact H-, J-, and L- frame circuit breakers.
The table shows the steps to connect a PC to IMU (Intelligent Modular Unit):
The figure shows an example of UTA connection with the Compact NSX breaker and ULP modules like IFM, FDM:
A PC running EcoreachB USB cableC UTA maintenance moduleD ULP cableE IFM Modbus-SL interface for LV circuit breakerF FDM121 display for LV circuit breakerG Compact NSX circuit breakerH Power cord
Step Action
1 Identify an ULP module, located within the IMU that has the termination plug installed.
NOTE: The ULP modules can be IFM, IFE, FDM121, or IO module.
2 Disconnect the ULP termination and connect the ULP cable from the maintenance module.
3 Use the PC running Ecoreach to configure the device.
4 Disconnect the maintenance module and connect the ULP termination in the RJ45 port.
DOCA0069EN 09/2014 21

Getting Started
The figure shows the UTA connection to IO modules in Masterpact circuit breaker:
A PC running Ecorecah B USB cable C UTA maintenance moduleD IO input/output module for LV circuit breaker E ULP cableF Masterpact NT/NW circuit breakerG BCM ULP
Connection through a MagicBoxThis connection is applicable for Masterpact, Compact NS630b-3200A, and PowerPact M-, P- and R- frame.
The figure shows an example of Masterpact circuit breaker:
A PC running Ecoreach B MagicBoxC Micrologic trip unitD Test connectorE Converter USB to RS232
22 DOCA0069EN 09/2014
Getting Started
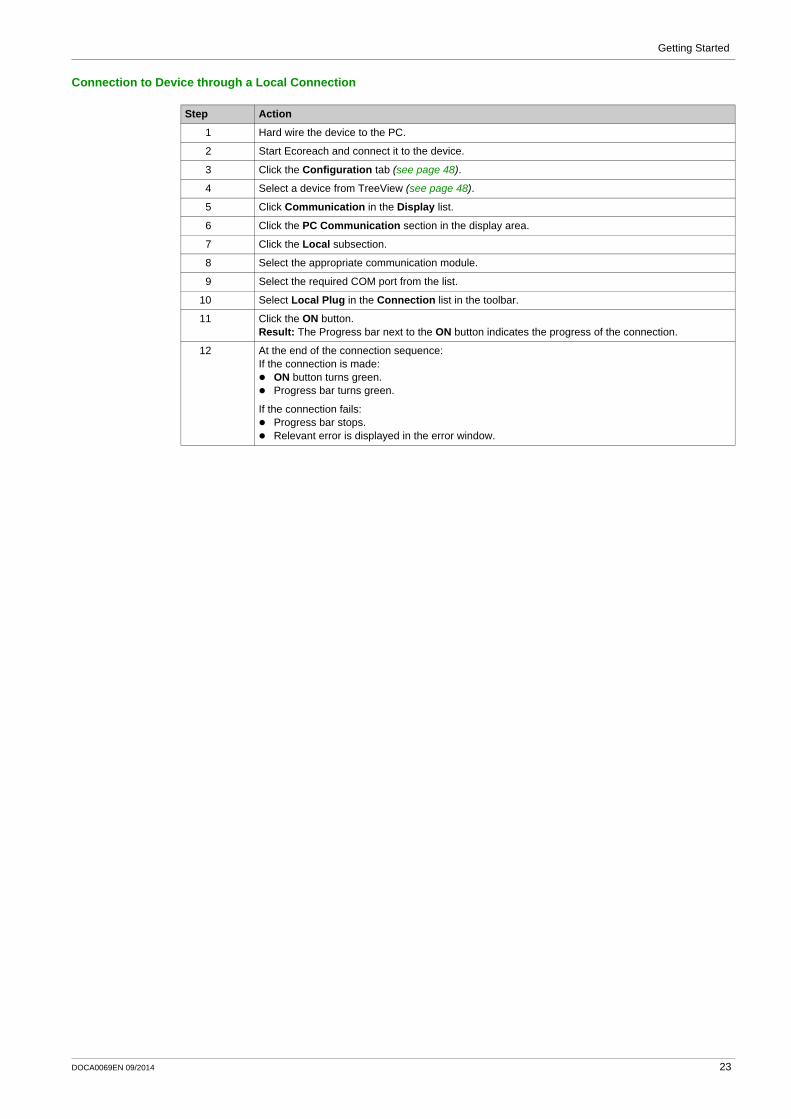
Connection to Device through a Local Connection
Step Action
1 Hard wire the device to the PC.
2 Start Ecoreach and connect it to the device.
3 Click the Configuration tab (see page 48).
4 Select a device from TreeView (see page 48).
5 Click Communication in the Display list.
6 Click the PC Communication section in the display area.
7 Click the Local subsection.
8 Select the appropriate communication module.
9 Select the required COM port from the list.
10 Select Local Plug in the Connection list in the toolbar.
11 Click the ON button.Result: The Progress bar next to the ON button indicates the progress of the connection.
12 At the end of the connection sequence:If the connection is made:
ON button turns green.Progress bar turns green.
If the connection fails:Progress bar stops.Relevant error is displayed in the error window.
DOCA0069EN 09/2014 23
Getting Started
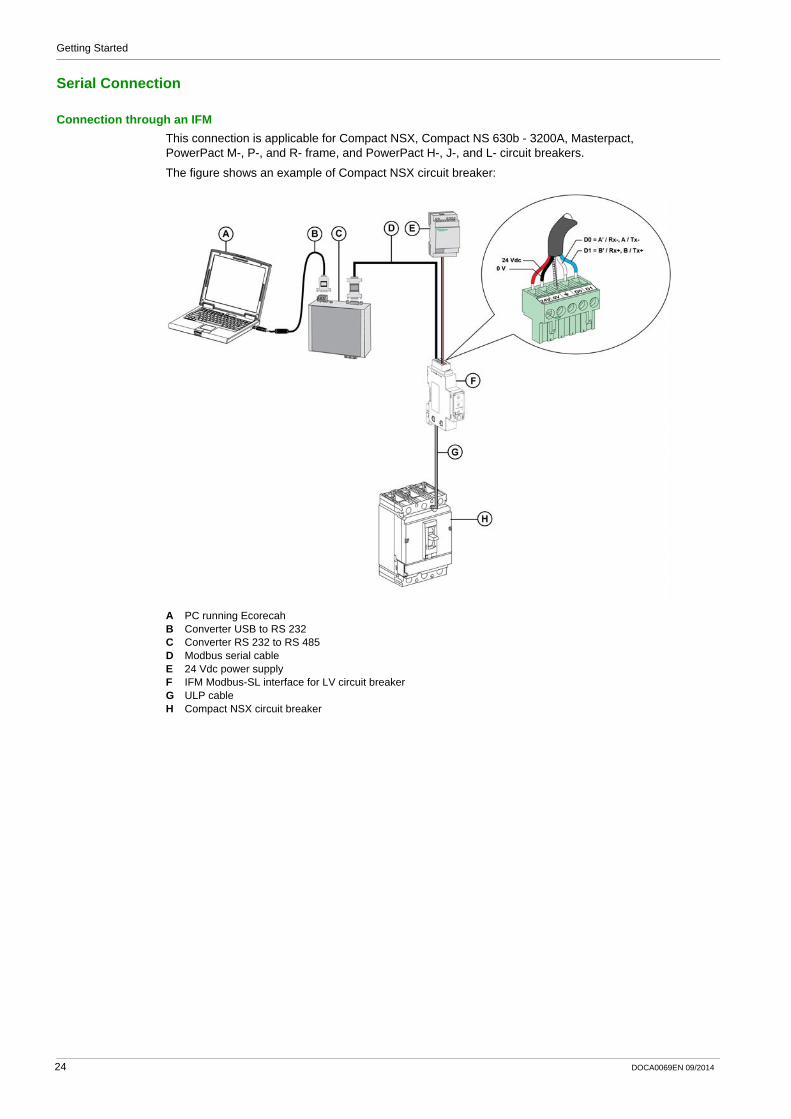
Serial Connection
Connection through an IFMThis connection is applicable for Compact NSX, Compact NS 630b - 3200A, Masterpact, PowerPact M-, P-, and R- frame, and PowerPact H-, J-, and L- circuit breakers.
The figure shows an example of Compact NSX circuit breaker:
A PC running EcorecahB Converter USB to RS 232C Converter RS 232 to RS 485D Modbus serial cableE 24 Vdc power supplyF IFM Modbus-SL interface for LV circuit breakerG ULP cableH Compact NSX circuit breaker
24 DOCA0069EN 09/2014
Getting Started
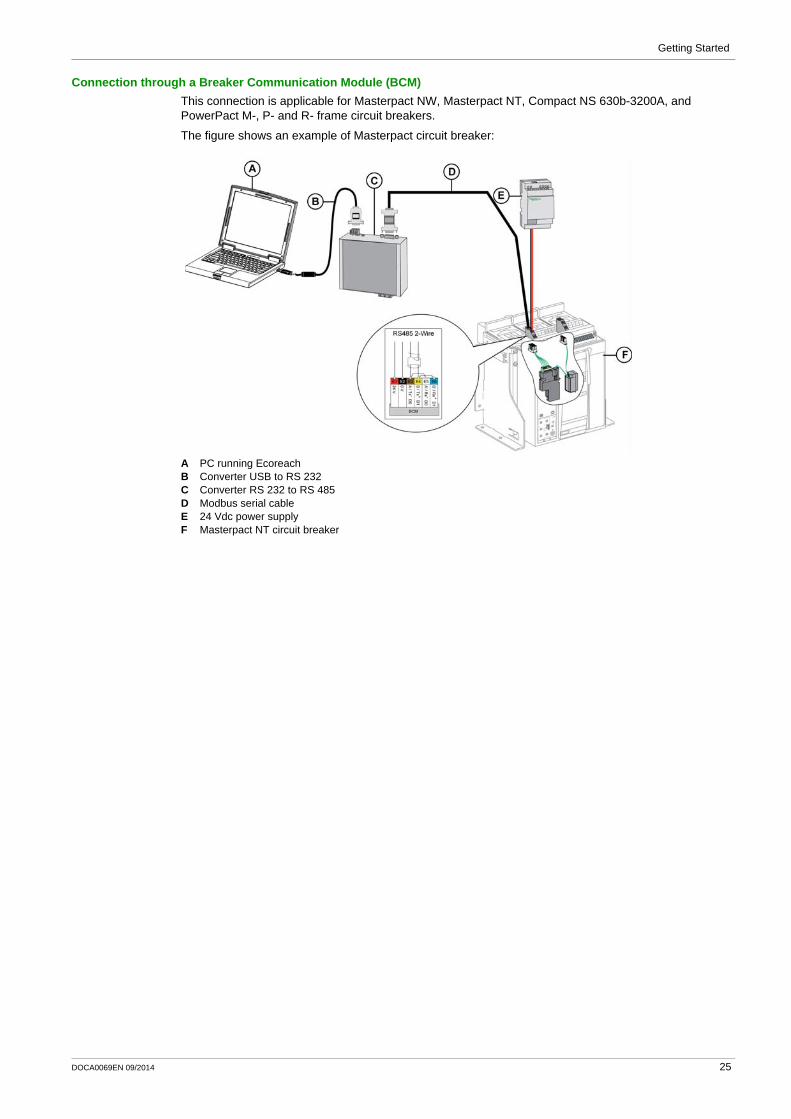
Connection through a Breaker Communication Module (BCM)This connection is applicable for Masterpact NW, Masterpact NT, Compact NS 630b-3200A, and PowerPact M-, P- and R- frame circuit breakers.
The figure shows an example of Masterpact circuit breaker:
A PC running EcoreachB Converter USB to RS 232C Converter RS 232 to RS 485D Modbus serial cableE 24 Vdc power supplyF Masterpact NT circuit breaker
DOCA0069EN 09/2014 25

Getting Started
Connection through a Cradle Communication Module (CCM)This connection is applicable for Masterpact NW, and Compact NS 630b-3200A circuit breakers.
The figure shows an example of Masterpact circuit breaker:
A PC running EcorecahB Converter USB to RS 232C Converter RS 232 to RS 485D Modbus serial cableE 24 Vdc power supplyF Craddle Communication Module (CCM)G Masterpact NT circuit breaker
26 DOCA0069EN 09/2014
Getting Started
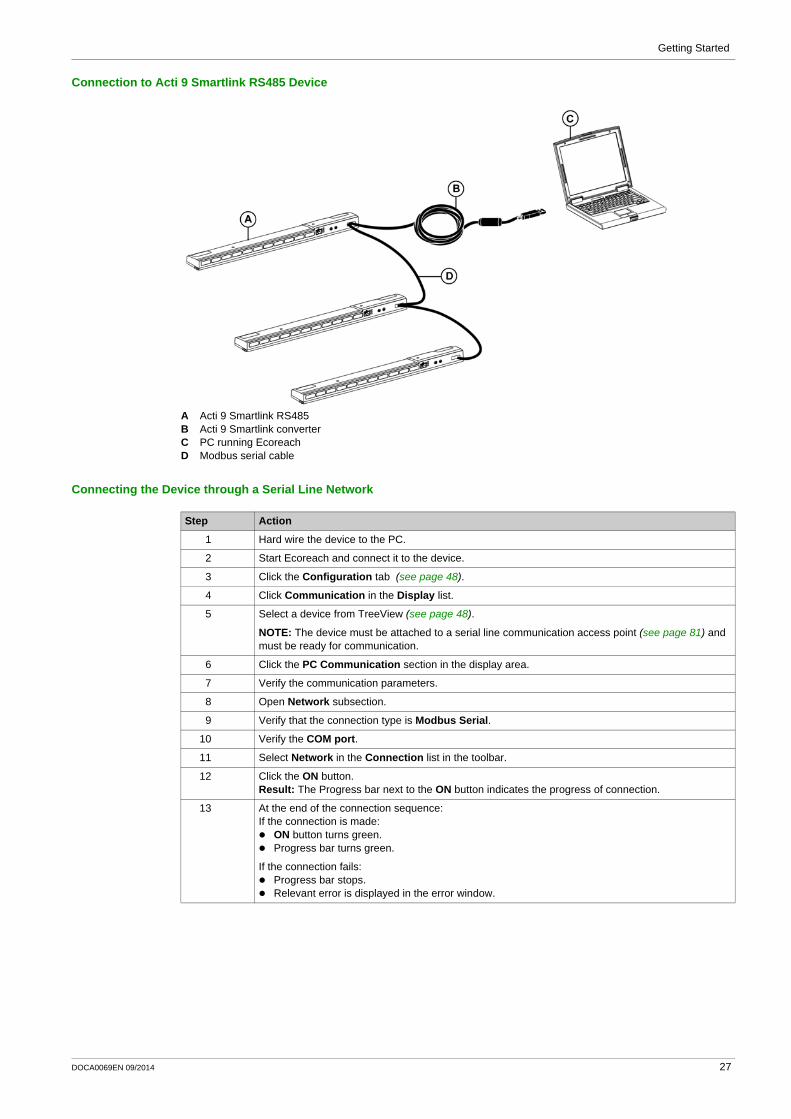
Connection to Acti 9 Smartlink RS485 Device
A Acti 9 Smartlink RS485B Acti 9 Smartlink converterC PC running EcoreachD Modbus serial cable
Connecting the Device through a Serial Line Network
Step Action
1 Hard wire the device to the PC.
2 Start Ecoreach and connect it to the device.
3 Click the Configuration tab (see page 48).
4 Click Communication in the Display list.
5 Select a device from TreeView (see page 48).
NOTE: The device must be attached to a serial line communication access point (see page 81) and must be ready for communication.
6 Click the PC Communication section in the display area.
7 Verify the communication parameters.
8 Open Network subsection.
9 Verify that the connection type is Modbus Serial.
10 Verify the COM port.
11 Select Network in the Connection list in the toolbar.
12 Click the ON button.Result: The Progress bar next to the ON button indicates the progress of connection.
13 At the end of the connection sequence:If the connection is made:
ON button turns green.Progress bar turns green.
If the connection fails:Progress bar stops.Relevant error is displayed in the error window.
DOCA0069EN 09/2014 27
Getting Started
TCP/IP Connection
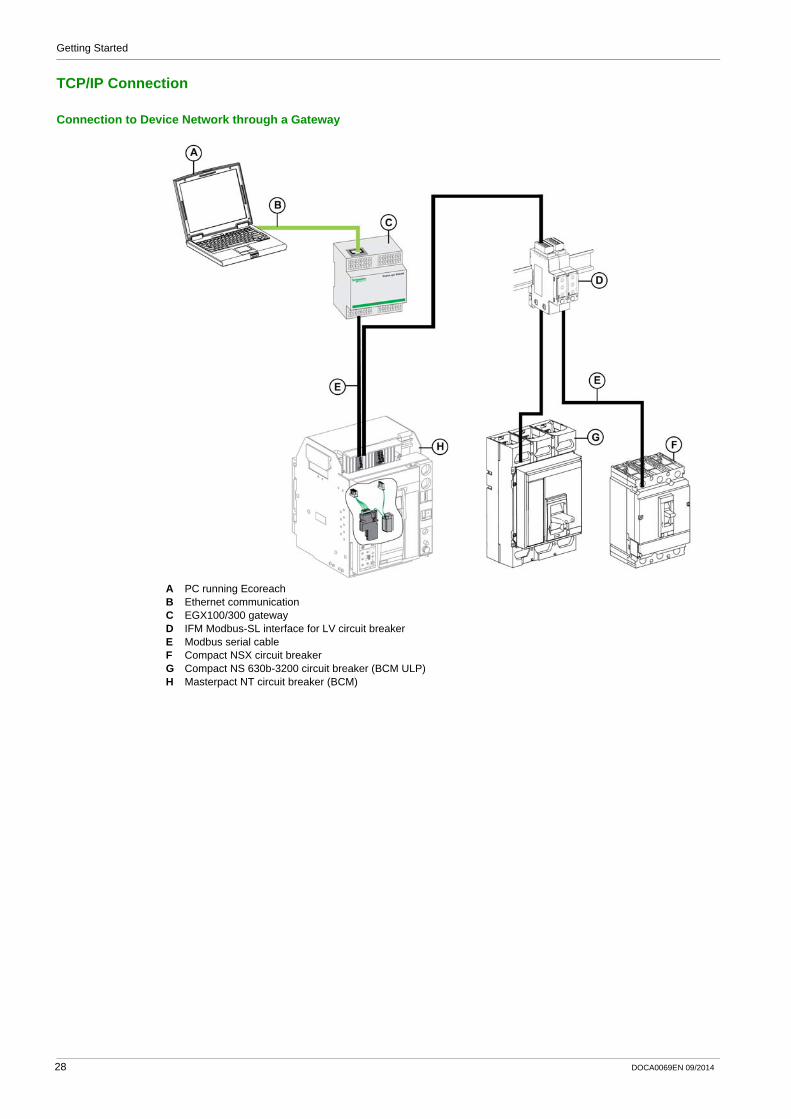
Connection to Device Network through a Gateway
A PC running EcoreachB Ethernet communicationC EGX100/300 gatewayD IFM Modbus-SL interface for LV circuit breakerE Modbus serial cableF Compact NSX circuit breakerG Compact NS 630b-3200 circuit breaker (BCM ULP)H Masterpact NT circuit breaker (BCM)
28 DOCA0069EN 09/2014

Getting Started
Connection to Device through the IFE
A PC running EcoreachB Ethernet communicationC IFE Ethernet interface for LV circuit breakerD ULP cableE Masterpact NT circuit breaker (BCM ULP)
Step Action
1 Connect the device to the PC
2 Start Ecoreach and connect it to the device.
3 Click the Configuration tab (see page 48).
4 Click Communication in the Display list.
5 Select a device from TreeView (see page 48) attached to a Gateway communication access point (see page 82) and ready for communication.
6 Click the PC Communication section in the display area.
7 Verify the communication parameters.
8 Open the Network subsection.
9 Verify that the connection type is TCP/IP Gateway, and verify the Gateway IP address.
10 Select Network in the Connection list.
11 Click the ON button.Result: The progress bar next to the ON button indicates the progress of connection.
12 At the end of the connection sequence:If the connection is made:
ON button turns green.Progress bar turns green.
If the connection fails:Progress bar stops.Relevant error is displayed in the error window.
DOCA0069EN 09/2014 29

Getting Started
Connection to Device Network through a Daisy Chain
A PC running EcoreachB Ethernet communicationC IFE Ethernet interface for LV circuit breakerD ULP cableE Compact NSX circuit breakerF Masterpact NT circuit breaker (BCM ULP)G Masterpact NW circuit breaker (BCM)
30 DOCA0069EN 09/2014

Getting Started
Typical Network Connection An Ethernet switch allows you to connect multiple devices in a single network.
You can connect devices to IFE, EGX gateway, and Acti 9 Smartlink IP devices through an Ethernet switch.
The figure shows an example of multiple devices connected to a single network using an Ethernet switch:
A PC running EcoreachB Ethernet communicationC ConneXium Ethernet switchD EGX100/300 gatewayE IFE Ethernet interface for LV circuit breakerF IFM Modbus-SL interface for LV circuit breakerG Acti 9 Smartlink IPH Acti 9 Smartlink RS485I Modbus serial cableJ ULP cableK Compact NSX circuit breakerL Compact NS 630b-3200 circuit breakerM Masterpact NT circuit breaker (BCM ULP)N Masterpact NW circuit breaker (BCM )O Modbus serial cable
DOCA0069EN 09/2014 31

Getting Started
Connect to Device through TCP/IP Network
Step Action
1 Connect the device to the PC.
2 Start Ecoreach and connect it to the device.
3 Click the Configuration tab (see page 48).
4 Click Communication in the Display list.
5 Select a device from TreeView.
NOTE: The device must be attached to a TCP/IP communication access point (see page 82) and must be ready for communication.
6 Click the PC Communication section in the display area.
7 Verify the communication parameters.
8 Open the Network subsection.
9 Verify that the connection type is TCP/IP.
10 Select Network in the Connection list.
11 Click the ON button.Result: The progress bar next to the ON button indicates the progress of connection.
12 At the end of the connection sequence:If the connection is made:
ON button turns green.Progress bar turns green.
If the connection fails:Progress bar stops.Relevant error is displayed in the error window.
32 DOCA0069EN 09/2014
Ecoreach PrinciplesDOCA0069EN 09/2014
Principles
Chapter 3Principles
What Is in This Chapter?This chapter contains the following sections:
Section Topic Page
3.1 Operating Modes 34
3.2 Ecoreach Process 37
DOCA0069EN 09/2014 33

Principles
Operating Modes
Section 3.1Operating Modes
Introduction
OverviewThe Ecoreach software operates in cloud-connected mode and the projects created are stored in the Ecoreach cloud storage allotted to you. Once the project is created, you are ready to use the complete features of the Ecoreach software. When you save the project, Ecoreach will prompt you to save it in your local PC for the first time and the same project will also be saved in the cloud as reference. Whenever you modify and save, the project gets automatically synchronized with the project reference in cloud. As a result, you can completely prepare a project offline even when you are at the office.
During the commissioning phase, you may sometime have a challenge to access the internet connection at customer sites. If this occurs, you can still continue to use the Ecoreach software with complete features for a grace period of 30 days within which you can synchronize the project to the cloud. The grace period details will be displayed when the mouse pointer rests on the cloud status bar. The grace period starts once you modify and save a cloud project when you are not connected to Ecoreach cloud
The complete features and sub features of Ecoreach software are:Prepare Project Architecture
Create a New Project ArchitectureEdit a Project Architecture
Adding a DeviceAdding Schneider Electric DevicesAdding Other Devices
Create a Project Architecture - Advanced OptionDevice DiscoveryDevice Discovery ReportAdd Discovered Devices into Project
Setup a DeviceSetup a Device OnlineSetup a Device OfflineContextual Help of Device Settings
ArtifactsProject Artifacts
Device Artifacts
Prepare Communication ArchitectureAdding Devices in Communication NetworkModifing Devices in Communication NetworkCommunication Settings ConsistencyConnecting to a DeviceDevice Connection through Different ModesDevice IdentificationTransfer of Settings for a DeviceTransfer of Settings - Multiple DevicesCommunication Test and its ReportExport Project Configuration
Monitoring and ControlLogs and HistoriesConfiguration ReportFirmware Upgrade and Compatibility Matrix Device/Firmware with Corrective Actions
34 DOCA0069EN 09/2014

Principles
The status of cloud connection and the project synchronization are displayed in the toolbar (see page 45):
Sharing Cloud ProjectsOnce you create a cloud project, Ecoreach provides you an option to share the project with a second user by selecting the option, Share this project with other cloud users under the Project properties. Once this option is selected, you can transfer the project to the second user by using any of the file transfer methods like USB storage device, Email, so on. The second user can work on the project shared by you and perform any modifications. When the second user saves the project, it gets saved onto your cloud project even though you are the project owner.
The figure shows an example of this feature usage:
NOTE: This feature shall be used between two users working on a same project from the same company or two users working on the same project from two different companies. Please note that the sharing of projects between users should be done only with mutual agreement. Schneider Electric is not responsible for any consequences due to misuse of this feature.
Status Description
Indicates that an active internet connection is available and the modified project copy in the PC is synchronized with the reference project in Ecoreach cloud.
Indicates that an active internet connection is available but the modified project copy in the PC is not synchronized with the reference project in Ecoreach cloud.
DOCA0069EN 09/2014 35

Principles
Create a Project without Internet ConnectivityUnder normal conditions, you will create a project in Ecoreach with an active cloud connection so that the project gets stored in Ecoreach cloud and will be the reference project. Ecoreach also manages a condition when you need to create a local project when the internet connection is unavailable.
After you create a project in this mode, you can setup the device configuration when connected to the devices.
The following features are also available after the project is registered in Ecoreach cloud and gets synchronized with the reference project in cloud:
Adding devices to the project after identifying the devices through Device Discovery functionSetup of device parameters in project when it is disconnected from Ecoreach ( offline device configuration)Adding artifacts to the projectCommunication test and its reportExporting project configurationMultiple devices configurationCompatibility matrix for device/ firmware with corrective actions
NOTE: In the local project mode, wherever the icon is displayed indicates that the features will be available after the project is registered in Ecoreach Cloud.
Synchronize a Local Project to the Reference Project in Ecoreach CloudAfter the Internet connection with Ecoreach is established, you can update the project in your cloud account:
Step Action
1
Click the icon in the toolbar (see page 45), which prompts for confirmation of the action.
2 Click Yes and save the project.Result: The project gets saved on your local PC and in Ecoreach cloud.
36 DOCA0069EN 09/2014
Principles
Ecoreach Process
Section 3.2Ecoreach Process
Introduction
OverviewYou can create an Ecoreach project to configure and monitor the devices, execute wiring check tests and generate reports. The projects created are saved in cloud and locally in your PC, and when cloud connection is unavailable, the projects are saved only in your PC.
Creating a Project
Step Action
1 Click the Create a new project button.
NOTE: Clicking the New Project button closes the current project. If the current project has been modified since the last save, a dialog box warns you that the latest modifications are lost. Cancel the action or proceed to create a new project.
2 Enter the project details (see page 47) such as customer details, internal references, and related artifacts.
3 Prepare a project architecture (see page 61).
4 Prepare configuration in offline mode (see page 67).
5 Prepare communication architecture (see page 80).
6 Connect to a device (see page 86).
NOTE: Refer to Connection Procedure to check the physical connection.
7 Transfer the device settings (see page 88) (upload or download).
8 Monitor (see page 91) the status of device and its modules.
9 Perform Control (see page 95) operations like open, close, reset of the circuit breakers.
10 Generate and print configuration report (see page 98).
11 Upgrade the firmware (see page 100) of modules and devices.
DOCA0069EN 09/2014 37

Principles
38 DOCA0069EN 09/2014

Ecoreach Description of UI PagesDOCA0069EN 09/2014
Description of UI Pages
Chapter 4Description of UI Pages
What Is in This Chapter?This chapter contains the following sections:
Section Topic Page
4.1 Start Page 40
4.2 Main Page 44
4.3 Application Option 54
DOCA0069EN 09/2014 39

Description of UI Pages
Start Page
Section 4.1Start Page
What Is in This Section?This section contains the following topics:
Topic Page
Projects 41
Tools 42
About 43
40 DOCA0069EN 09/2014

Description of UI Pages
Projects
OverviewThe start page provides access to the Ecoreach main functions.
Legend Tab/Function Description
A Projects Allows you to access the main project creation page.
B Tools (see page 42) Allows you to access advanced project creation by device discovery.
C About Provides information about software, related agreements, and system details.
D Exit Allows you to exit from the software.
E Display area Displays the selected tab function.
F Create a new project (see page 37) Allows you to create a new project.
G Open project Allows you to open an existing project.
H Latest News Provides information about Schneider Electric’s latest news by RSS feeds.
I All the corporate news Allows navigation to the Schneider Electric corporate website.
DOCA0069EN 09/2014 41

Description of UI Pages
Tools
Overview
In the Tools tab, you can add the devices to the project architecture by discovering devices (see page 65) in the network.
42 DOCA0069EN 09/2014
Description of UI Pages
About
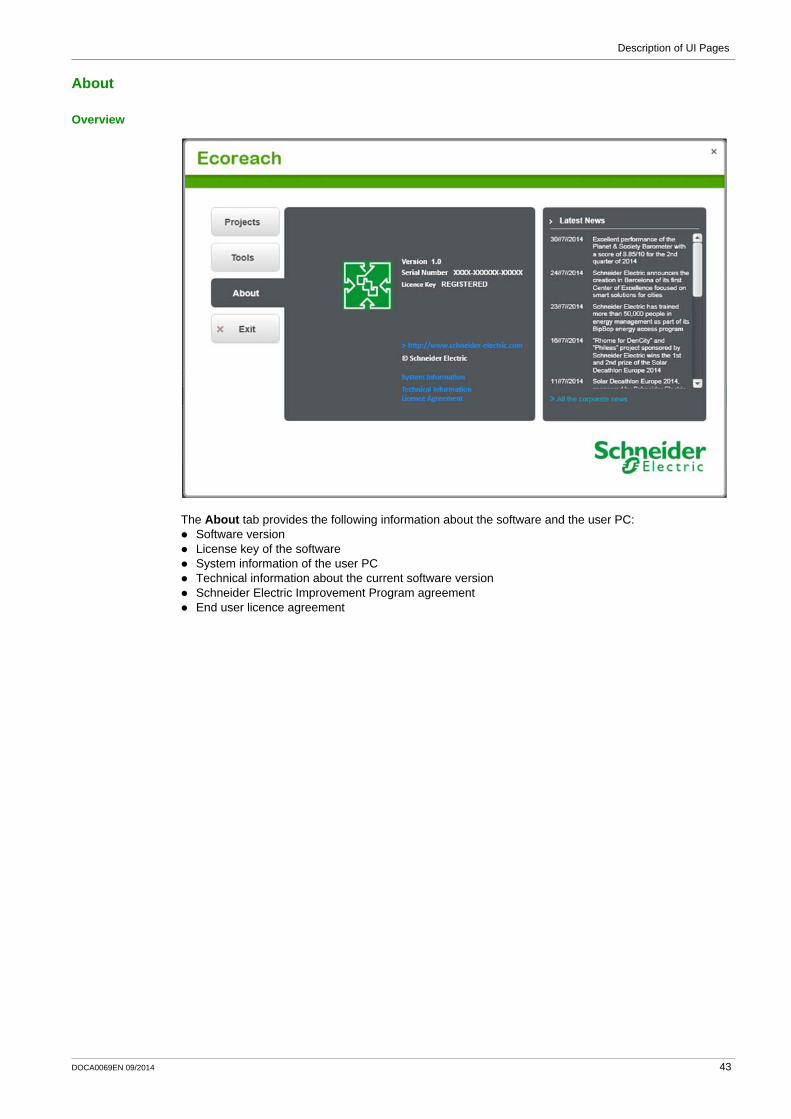
Overview
The About tab provides the following information about the software and the user PC:Software versionLicense key of the softwareSystem information of the user PCTechnical information about the current software versionSchneider Electric Improvement Program agreementEnd user licence agreement
DOCA0069EN 09/2014 43
Description of UI Pages
Main Page
Section 4.2Main Page
What Is in This Section?This section contains the following topics:
Topic Page
Toolbar 45
Project 47
Configuration 48
Monitoring 50
Report 52
Maintenance 53
44 DOCA0069EN 09/2014

Description of UI Pages
Toolbar
Overview
ToolbarThe toolbar allows you to access the Ecoreach general functions.
Legend Zone Description
A Toolbar Displays a set of icons to perform functions.
B Tab zone Includes tabs and a display area with content depending on the tab selected.
Icon Function Description
Start Page Allows you to access the start page.
New Allows you to create a new project.
NOTE: This function is the same as the Create a new project function (see page 37) on the start page, of the Projects tab.
Open Allows you to open an existing project.
NOTE: This function is the same as the Open project function on the start page, of the Projects tab.
Save Allows you to save the project.
Import Allows you to import discovered devices in the network.
NOTE: This function is same as the import function described in the Tools tab (see page 42).
Export (see page 89)
Allows you to export the devices and its configuration details in .CSV format.
Print Allows you to print the selected device configuration in a preview window.
Undo Allows you to cancel or reverse the last function executed.
Redo Allows you to reverse the undo action.
DOCA0069EN 09/2014 45

Description of UI Pages
Tab ZoneThe content of the Tab zone depends on the selected tab.
Project (see page 47)Configuration (see page 48)Monitoring (see page 50)Report (see page 52)Maintenance (see page 53)
Information Icon
You can point to the information icon to know the description of the fields.
Cut Allows you to remove the selection from the active document and places it on clipboard.
Copy Allows you to copy the selected items to the clipboard.
Paste Allows you to place the content of the clipboard at the insertion point.
Settings (see page 58)
Displays the Ecoreach application settings.
Help (see page 76)
Allows you to access the online help.
Cloud login Indicates that the project is a cloud project. (see page 34)
Operating modes (see page 34)
Allows you to select the operating modes: Offline, Local Plug or Network.
OFF/ON button The ON button allows the Ecoreach project to be connected to the device. It turns green when the software is connected to the device.The OFF button allows the Ecoreach project to be disconnected from the device. It turns red when the software is not connected to the device.
Progress bar Indicates the progress of the connection.
Error and Warning window (see page 57)
Indicates the number of detected errors and warnings detected by Ecoreach.
Icon Function Description
46 DOCA0069EN 09/2014
Description of UI Pages
Project
Overview
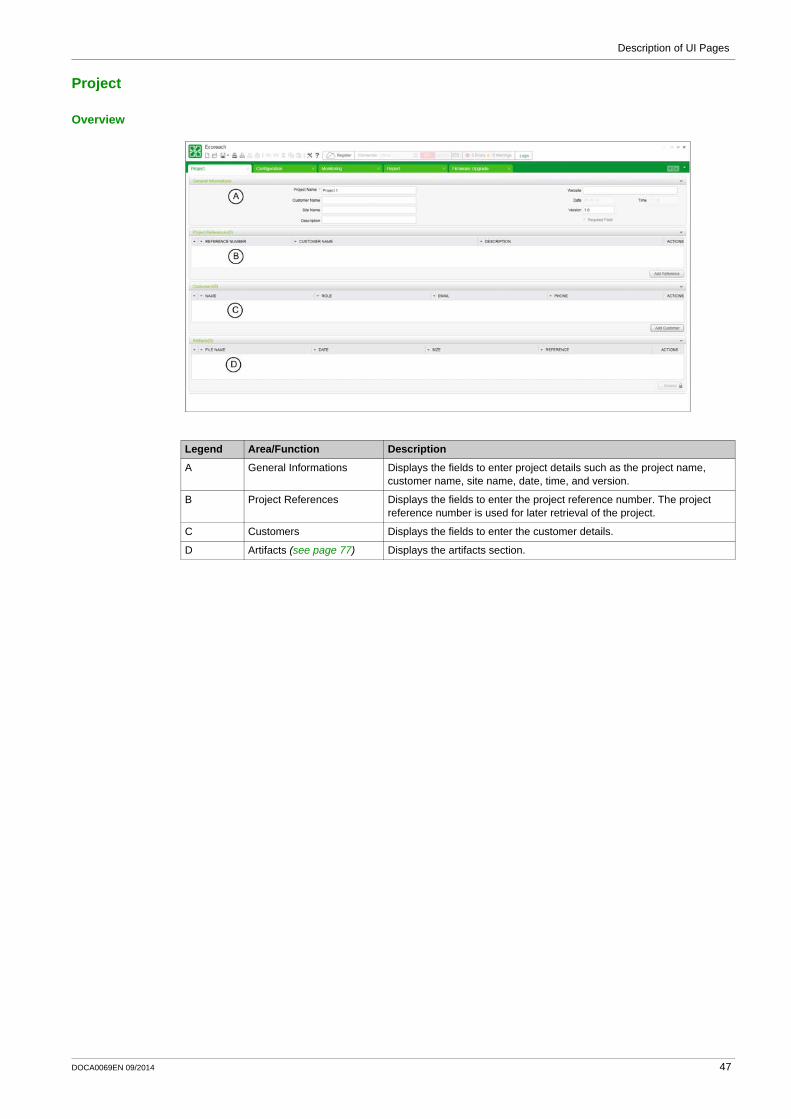
Legend Area/Function Description
A General Informations Displays the fields to enter project details such as the project name, customer name, site name, date, time, and version.
B Project References Displays the fields to enter the project reference number. The project reference number is used for later retrieval of the project.
C Customers Displays the fields to enter the customer details.
D Artifacts (see page 77) Displays the artifacts section.
DOCA0069EN 09/2014 47

Description of UI Pages
Configuration
TreeView
Legend Tab/Function Description
A View selection button Allows you to select the view: TreeView or TableView.
B Display Selects the type of display for the TreeView: General or Communication.
C TreeView Architecture (see page 61)
Displays the working area to manage the project architecture.
D Location button (see page 61)
Allows you to add a location to a project architecture.
E Switchboard button (see page 61)
Allows you to add a switchboard to a project architecture.
F Device button (see page 61)
Allows you to add a device to a project architecture.
G Display area Displays the properties of a selected element.
H Setting Transfer buttons (see page 88)
Allows you to transfer the settings from device to project and project to device.
48 DOCA0069EN 09/2014

Description of UI Pages
TableView
Legend Tab/Function Description
A View selection button Allows you to select view: TreeView or TableView.
B Display area Displays the device characteristics.
C Column selector Selects the columns to be displayed.
D Filter Allows you to apply filter criteria on columns.
E Setting transfer buttons (see page 88)
Allows you to transfer the settings from device to project and project to device.
F Perform Communication Test button (see page 89)
Allows you to generate the communication test report.
DOCA0069EN 09/2014 49
Description of UI Pages
Monitoring
Overview
Monitoring Tab
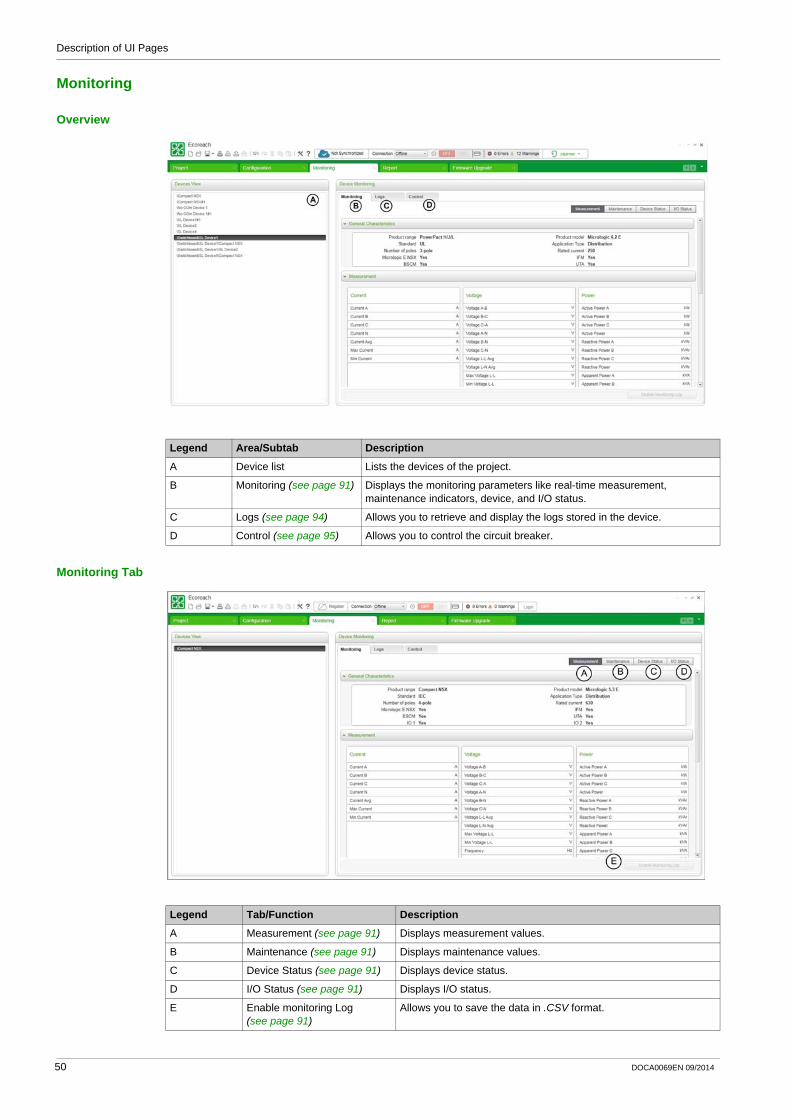
Legend Area/Subtab Description
A Device list Lists the devices of the project.
B Monitoring (see page 91) Displays the monitoring parameters like real-time measurement, maintenance indicators, device, and I/O status.
C Logs (see page 94) Allows you to retrieve and display the logs stored in the device.
D Control (see page 95) Allows you to control the circuit breaker.
Legend Tab/Function Description
A Measurement (see page 91) Displays measurement values.
B Maintenance (see page 91) Displays maintenance values.
C Device Status (see page 91) Displays device status.
D I/O Status (see page 91) Displays I/O status.
E Enable monitoring Log (see page 91)
Allows you to save the data in .CSV format.
50 DOCA0069EN 09/2014
Description of UI Pages
Logs Tab
Control Tab
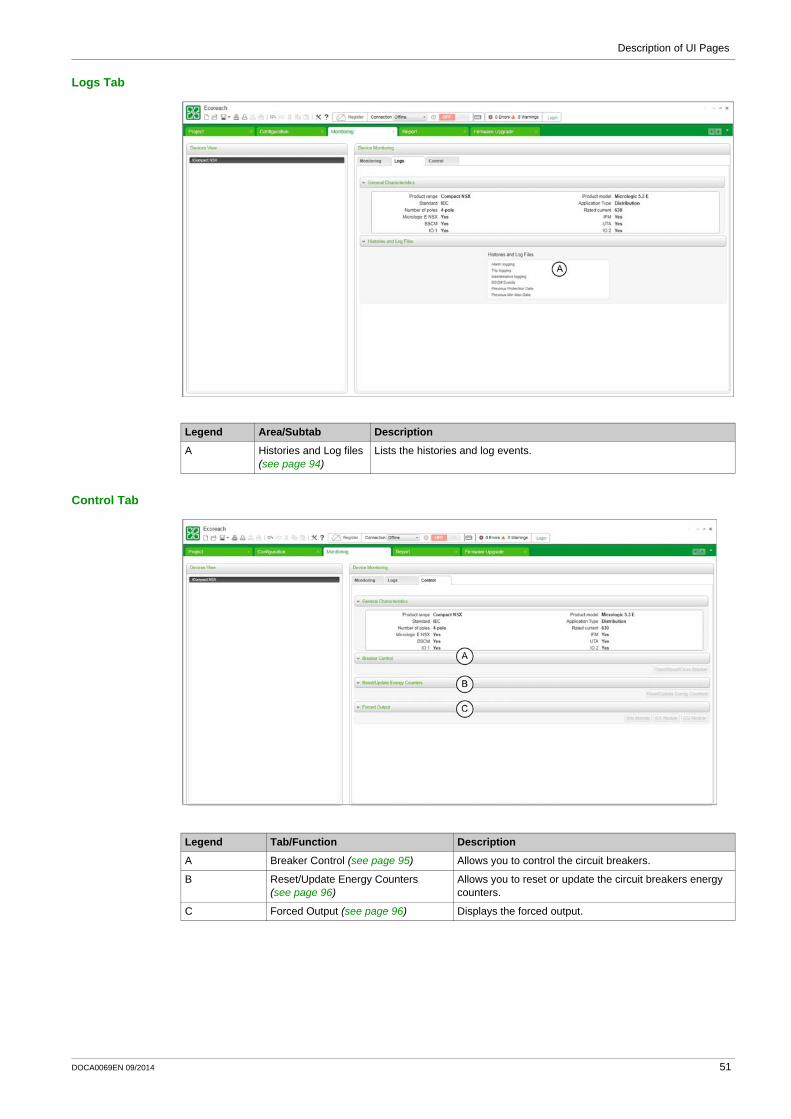
Legend Area/Subtab Description
A Histories and Log files (see page 94)
Lists the histories and log events.
Legend Tab/Function Description
A Breaker Control (see page 95) Allows you to control the circuit breakers.
B Reset/Update Energy Counters (see page 96)
Allows you to reset or update the circuit breakers energy counters.
C Forced Output (see page 96) Displays the forced output.
DOCA0069EN 09/2014 51

Description of UI Pages
Report
Overview
Front Page TabThis tab allows you to enter or modify the user details. The details entered in this tab appears on the front page of the report.
Project TabThis tab allows you to modify the project details. The details entered under this tab appears in the report.
Contents SubtabThis tab provides the selection option for the required format of header, footer, front page, and project details to be included in the report. This tab includes:
Report HeaderReport FooterFront pageAdvanced sections
Each of these sections includes a check box to select the options.
Legends Button/Tab Description
A Generate Report Button Allows you to generate and print a configuration report.
B Front Page Allows you to record the user details.
C Project Allows you to record the project details.
D Contents Provides selection options for specific project details for the report header, footer, front page, and so on.
E Logo button Allows you to replace the current logo with new logo.
52 DOCA0069EN 09/2014
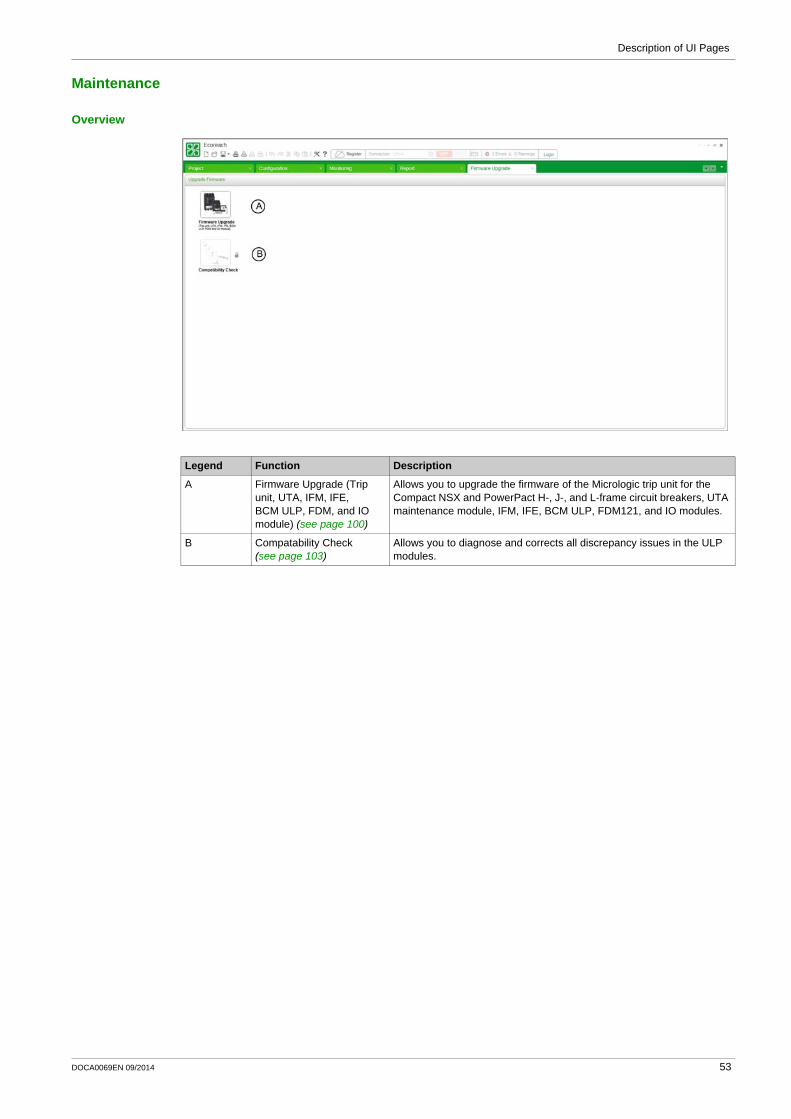
Description of UI Pages
Maintenance
Overview
Legend Function Description
A Firmware Upgrade (Trip unit, UTA, IFM, IFE, BCM ULP, FDM, and IO module) (see page 100)
Allows you to upgrade the firmware of the Micrologic trip unit for the Compact NSX and PowerPact H-, J-, and L-frame circuit breakers, UTA maintenance module, IFM, IFE, BCM ULP, FDM121, and IO modules.
B Compatability Check (see page 103)
Allows you to diagnose and corrects all discrepancy issues in the ULP modules.
DOCA0069EN 09/2014 53

Description of UI Pages
Application Option
Section 4.3Application Option
What Is in This Section?This section contains the following topics:
Topic Page
Administration Password 55
Language 56
Error and Warning Window 57
Settings 58
54 DOCA0069EN 09/2014

Description of UI Pages
Administration Password
OverviewYou can change the administration password by clicking the Settings icon (see page 58) in toolbar (see page 45).
NOTE: The administration password cannot be retrieved if you lose the existing password. Reinstall and register the software to create a new password.
DOCA0069EN 09/2014 55

Description of UI Pages
Language
OverviewYou can select the language by clicking the Settings (see page 58) icon in the toolbar (see page 45).
You can select any of the following languages from the Supported Languages drop-down list:EnglishFrenchGermanSpanishChineseItalianRussian
56 DOCA0069EN 09/2014

Description of UI Pages
Error and Warning Window
DescriptionYou can view the details of the errors and warnings only in the Configuration tab (see page 48) and Monitoring tab (see page 50).
You can view the status of the errors and warnings in toolbar (see page 45).
Error and Warning WindowThe error and warning window displays at the bottom pane of the Configuration tab (see page 48) and Monitoring tab (see page 50) in two cases:
when you click the error and warning status icon in the tool barwhen a new error or warning occurs
The window can be drag and dropped or closed. The error window can be sorted based on criticality, date and time, or by description.
The window displays the following information:
Error Log Display and ManagementThe recently occurred errors and warnings are displayed at the top of the error and warning window.
The window displays a maximum of 512 errors or warnings.
Examples of Errors and WarningsThe examples of errors and warnings are:
Connection has failed.Device communication has failed to read....Device communication has failed to write....
Legend Zone Description
A Error and warning status Indicates the number of errors and warnings which occurred during the project session.
B Error and warning window
Displays the errors and warnings with the time and description.
C Vertical drag icon Allows you to increase or decrease the Error and Warning window.
Criticality Date Time Description
ErrorWarning
Date and time of occurrence Reason for occurrence
DOCA0069EN 09/2014 57

Description of UI Pages
Settings
Overview
The Settings icon is available in the toolbar (see page 45). You can modify the basic tool settings from this page.
ApplicationApplication tab consists of the following settings:
Password Settings: Allows you to modify the password.Language: Allows you to select any of these languages: English, French, German, Spanish, Chinese, Italian, and Russian.Date & Time Format: Allows you to set the date and format time according to local practices.General: Allows you to set the limit of maximum number of subhierarchy levels in the TreeView (see page 48) in the configuration tab.Default Directory: Allows you to set the default directory to save the project and for firmware downloads.
58 DOCA0069EN 09/2014

Ecoreach Project ManagementDOCA0069EN 09/2014
Project Management
Chapter 5Project Management
What Is in This Chapter?This chapter contains the following sections:
Section Topic Page
5.1 Project Architecture 60
5.2 Communication Architecture 78
5.3 Monitor and Control 90
5.4 Report 97
5.5 Firmware Upgrade 99
DOCA0069EN 09/2014 59
Project Management
Project Architecture
Section 5.1Project Architecture
What Is in This Section?This section contains the following topics:
Topic Page
Project Architecture 61
Selecting a Device 63
Create Project Architecture - Advanced Options 65
General Principles - Configuring in Offline Mode 67
Configuring Acti 9 Smartlink Device in Offline Mode 69
Adding Other Devices 74
Setup a Device Online 75
Contextual Help for Device Setting 76
Artifacts 77
60 DOCA0069EN 09/2014

Project Management
Project Architecture
IntroductionA project architecture can be created, modified, or redefined in the TreeView (see page 48). The project elements such as location, switchboard, and device can be added or modified in the project architecture. The project architecture provides a clear representation of the switchboard location, grouping, and feeder identification. The devices that are added to communication access points such as gateways and serial interfaces can be grouped as per the physical connections and can be used as the project reference architecture. The changes made at the site can be tracked using the reference architecture.
Definition of Project ElementsLocation: A location is a place where one or more switchboards are installed. A location can be a site or a building.
Switchboard: A switchboard is an assembly of single or multiple columns, which contains devices and their wiring system.
Device: A device is a single product such as a circuit breaker or power meter which is assembled in a switchboard.
TreeView ToolbarThe TreeView toolbar on the left pane of the Configuration tab (see page 48) displays the desired project elements and allows you to modify the view of the project architecture:
Creating a New Project ArchitectureThe table shows the steps to create a new project architecture:
Pull-down menu/Button Function Description
Display Displays two architectures:General: Enables you to create a project architecture where the location, switchboard, and devices are organized in a logical order.Communication: Enables you to add communication gateways into the project architecture. You can associate the slave devices to the respective gateways.
Expand_All Expands the complete project hierarchy to display all elements.
Collapse_All Collapses the project architecture to display elements in level 1 only.
Step Action
1 Click the Configuration tab (see page 48), and then click General in the Display list.
2 Click the Location button in the left pane.Result:A list appears with the following options:
SiteBuildingFloorElectrical RoomCustom
3 Click the desired option from the list.Result:
Adds the location in the left pane.Display area displays the characteristics of the selected location item in the Characteristics tab.
4 Edit the location characteristics.
5 Click the Switchboard button.Result:
Adds the switchboard under the selected location in the left pane.Display area displays the characteristics of the switchboard.
6 Edit the switchboard characteristics.
DOCA0069EN 09/2014 61

Project Management
Editing a Project Architecture ItemRight-click on the project architecture item in the TreeView (see page 48) to perform the following functions:
RenameDeleteCutCopyPasteCopy SettingsPaste SettingsPrint
The Copy and Paste function allows you to copy and paste an item to create a duplicate instant of it in the project architecture.
The Copy Settings and Paste Settings function allows you to copy and paste only the settings from one item to another item in the project architecture.
When performing the copy and paste setting action, you may get a discrepancy window if the settings of both devices do not match. Parameters that are highlighted in yellow color are dependant parameters which may be copied to the destination devices and parameters that are highlighted in red color are not matching and will not be copied to the destination devices.
7 Click the Device button.Result: Opens the Select Device Characteristics dialog box.
8 Select the required device from the device catalog, and then click Ok.Result:
Adds the device in the left pane.Display area displays the characteristics of the device.
Step Action
NOTICERISK OF PARTIAL OR WRONG CONFIGURATIONCopy the settings of a device and paste the settings only to a similar device type (Example: Masterpact to Masterpact) with same current rating.
Failure to follow these instructions can result in equipment damage.
62 DOCA0069EN 09/2014

Project Management
Selecting a Device
IntroductionYou can select a device from Schneider Electric catalog. You can also add a third-party device (see page 64) into the project.
Adding Schneider Electric Devices
The table shows the steps to add Schneider Electric devices:
Legends Tab/Function Description
A Schneider Devices Allows you to add Schneider Electric devices.
B Other Devices Allows you to add third-party devices.
C Show Allows you to choose devices based on Basic Characteristics or Basic and Advanced Characteristics.
D Information icon Provides information about the selected item in the list.
E Clear Clears the selection.
F Quantity Allows you to enter the required quantity of the selected device.
G Device Name Displays the name of the selected device. It also allows you to modify the device name.
Step Action
1 Click the Device button in the left pane of the Configuration tab (see page 48).Result: Opens the Select Device Characteristics dialog box.
2 Click either Schneider Devices or Other Devices.
3 Click either Basic Characteristics or Basic and Advanced Characteristics in the Show list.
NOTE: The Basic and Advanced Characteristics option enables you to select additional modules or accessories.
4 Select the device from the Device Type window.
5 Select the required options from subsequent lists.
6 Enter the Quantity.
7 Modify the device name if needed.
8 Click Ok.Result: Adds the device in the Project Architecture (see page 61) area.
DOCA0069EN 09/2014 63

Project Management
Adding Other DevicesEcoreach allows you to add and configure the third party devices also.
The table shows the steps to add other devices:
Step Action
1 Click the Device button in the left pane of the Configuration tab (see page 48).Result: Opens the Select Device Characteristics dialog box.
2 Click Other Devices.Result: Displays the fields to enter the device details.
3 Enter the device details.
4 Enter the Quantity.
5 Modify the device name if needed.
6 Click Ok.Result: Adds the device in the Project Architecture (see page 61) area.
64 DOCA0069EN 09/2014

Project Management
Create Project Architecture - Advanced Options
OverviewIn addition to creating a project architecture (see page 61) manually, you can also create a project by device discovery.
Device DiscoveryDevice discovery enables you to discover the devices in the network. It also provides an option to generate and save the report of the devices discovered in the network in a .pdf format.
Device discovery supports the communication network architecture when:Devices are connected to a Modbus TCP/IP networkDevices are connected to a Modbus serial line networkDevices are connected in a network, which includes both Modbus TCP/IP network and Modbus serial line network through gateway devices
Discovering Devices on a Modbus TCP/IP Network
Discovering Devices on a Modbus Serial Network
Step Action
1 Click the Device Discovery icon either in the Tools tab (see page 42) or in the toolbar (see page 45).
2 Click IP in the Communication Type list.Result: Displays the Modbus TCP/IP Scan Configuration.
3 Enter the Start IP Address.
4 Enter either Number of Devices or End IP Address.
5 Click the Discover Devices button.Result: Displays the list of devices discovered in the TCP/IP network.
6 Select the required device.
7 Click the ADD button.Result: Adds the discovered device to the project architecture (see page 61).
Step Action
1 Click the Device Discovery icon either in the Tools tab (see page 42) or in the toolbar (see page 45).
2 Click Serial in the Communication Type list.Result: Displays the Modbus serial Scan Configuration.
3 Select one or more COM Port.
4 Use one of the following methods to select Addresses:Click the specific address in the Addresses list.Hold CTRL to select multiple addresses in the Addresses list.Click the 1...31 button to select the addresses from 1 to 31.Click the 1...247 button to select the addresses from 1 to 247.
5 Select one or more Baud rate listed.
6 Select one or more Parity.
7 Click Discover Devices button.Result: Displays the list of devices discovered in the serial network.
8 Select the required device.
9 Click the ADD button.Result: Adds the discovered device to the project architecture (see page 61).
DOCA0069EN 09/2014 65

Project Management
Discovering Devices on a Combination of IP and Serial Network
Saving Device Discovery ReportThe table shows the steps to save the device discovery (see page 65) result:
Adding Discovered Devices into ProjectThe table shows the steps to add devices from the device discovery (see page 65) result into a project architecture (see page 61).
Step Action
1 Click the Device Discovery icon either in the Tools tab (see page 42) or in the toolbar (see page 45).
2 Click IP from the Communication Type list.Result: Displays the Modbus TCP/IP Scan Configurations.
3 Select the Include deep scanning for serial network check box.Result: Enables the Addresses list
4 Enter the Start IP Address.
5 Enter either Number of Devices or End IP Address.
6 Use one of the following methods to select Addresses:Click the specific address in the Addresses list.Hold CTRL to select multiple addresses in the Addresses list.Click the 1...31 button to select the addresses from 1 to 31.Click the 1...247 button to select the addresses from 1 to 247.
7 Click the Discover Devices button.Result: Displays the list of devices discovered in both IP and serial network.
8 Select the required device.
9 Click the ADD button.Result: Adds the discovered device to the project architecture (see page 61).
Step Action
1 Click the Save Report as PDF button.Result: Opens the Save As dialog box.
2 Choose the location to save the report.
3 Click Ok.Result: Saves the device discovery report in the desired location.
Step Action
1 Select one or more devices from the device discovery result.Result: Displays a progress bar indicating the status of adding devices.
2 Click the Add button.Result: Adds the discovered device in the project architecture (see page 61) and the progress bar disappears.
66 DOCA0069EN 09/2014

Project Management
General Principles - Configuring in Offline Mode
OverviewWhen Ecoreach is not physically connected to a device or to a communication network, it is referred as an offline mode. In this mode, you can configure the project elements like location, switchboard, devices, and communication elements in Tree View under the Configuration tab (see page 48).
Location CharacteristicsFor a selected location in TreeView (see page 48), you can see the configurable parameters under General Characteristics. The General Characteristics allows you to modify the location name and select the location type. It also allows you to enter the description of the location.
Switchboard CharacteristicsFor a selected switchboard in TreeView (see page 48), you can see the configurable parameters under different characteristics group.
The parameters can be modified according to your need.
Device Characteristics Group Description
General Characteristics Allows you to modify the switchboard name, description, and certification.The certifications are:
IECULBi Standards
Physical Characteristics Allows you to set the location dimension and weight. Also allows you to select switchboard topology.The topologies are:
Drawout (Disconnectable)Fixed Position
Connection Type Allows you to select the cable and the busbar.
Electrical Data Allows you to set the switchboard voltage, frequency, nominal current, Icc, and Ipk. Also allows you to select the auxiliary voltage.
Protection Allows you to set IP and IK.
Others Allows you to select the form and cable type.
DOCA0069EN 09/2014 67
Project Management
Device CharacteristicsFor a selected device in TreeView (see page 48), you can see the configurable parameters under different characteristics group.
The parameters can be modified according to your need.
The device characteristics group contains four columns which are as follows:
Setting Characteristics
IconsIcons are displayed in front of the elements in the TreeView.
In front of the element indicates that artifact is attached to that element.
In front of the device indicates that device is connected.
In front of the device indicates the warning message.
Device Characteristics Group Description
General Characteristics Displays the selected device trip unit, ranges, communication modules, and accessories.
Protection Allows you to modify the protection settings supported by a device like instantaneous overcurrent, short time overcurrent protection, long time overcurrent protection, ground fault protection, and neutral protection depending on the selected device.
I/O Configuration Allows you to set the IO configuration and the alarm name for output configuration.
Metering Displays device metering values.
Communication Parameters Allows you to select the baud rate, parity, stop bits, device address, and auto speed sensing or IP settings if the device is of TCP/IP type.
PC Communication(1) Allows you to select the communication type. The communication type options are:
Modbus SerialModbus TCP/IP via Gateway
Communication Displays device communication values.(1) This group is available only when you select Communication from the Display list in TreeView (see page 48).
Device Values Description
Project Values You can configure these parameters according to the application needs. When you add the device for the first time, the Project values will be same as Default values.
Device Values You can view these parameters when Ecoreach is connected with device. The values are updated periodically on the background when connected with the device.
Default Values You can view the default value of a parameter when the device is added into the project.
Range You can view the range applicable for each setting parameter in this column.
Step Action
1 Select the project element from TreeView (see page 48) under the Configuration tab (see page 48).Result: The display area displays the general characteristics details of the selected element in the left pane.
2 Set the parameters under the characteristics group using:Direct entry of the numerical value.Select value using slider control and text field.Edit a string.Select values from the drop-down list.
Result: Displays the icon next to the parameters and at the characteristics group level.
3 Click the Save button.Result: The Modified parameters are saved.
68 DOCA0069EN 09/2014

Project Management
Configuring Acti 9 Smartlink Device in Offline Mode
IntroductionThe Acti 9 Smart Test tab appears only when you select the Acti 9 Smartlink device in the TreeView (see page 48).
The Acti 9 Smart Test tab allows to:Configure devices connected to the channels.Test devices connected to the channels.
The figure shows the Acti 9 Smart Test tab:
Device ToolboxThe Device Toolbox is used to select the devices logically in the Ecoreach.
The device toolbox consists of images of devices that can be connected to the Acti 9 Smartlink devices. A device is selected by a drag action from the Device toolbox to the Smartlink channels.
Energy Meter Tooltip and Analog Device TooltipThe figure shows the Device Toolbox with the Energy Meter tooltip:
The Analog Device is displayed only for Smartlink IP.
Legend Area
A Device Toolbox
B ChannelsSmartlink IP displays seven I/O channels and one analog channel.Smartlink RS485 displays 11 I/O channels.
C Reset configuration button is used to reset channel configuration
DOCA0069EN 09/2014 69
Project Management
The figure shows the Device Toolbox with the Analog Device tooltip:
Adding a Channel
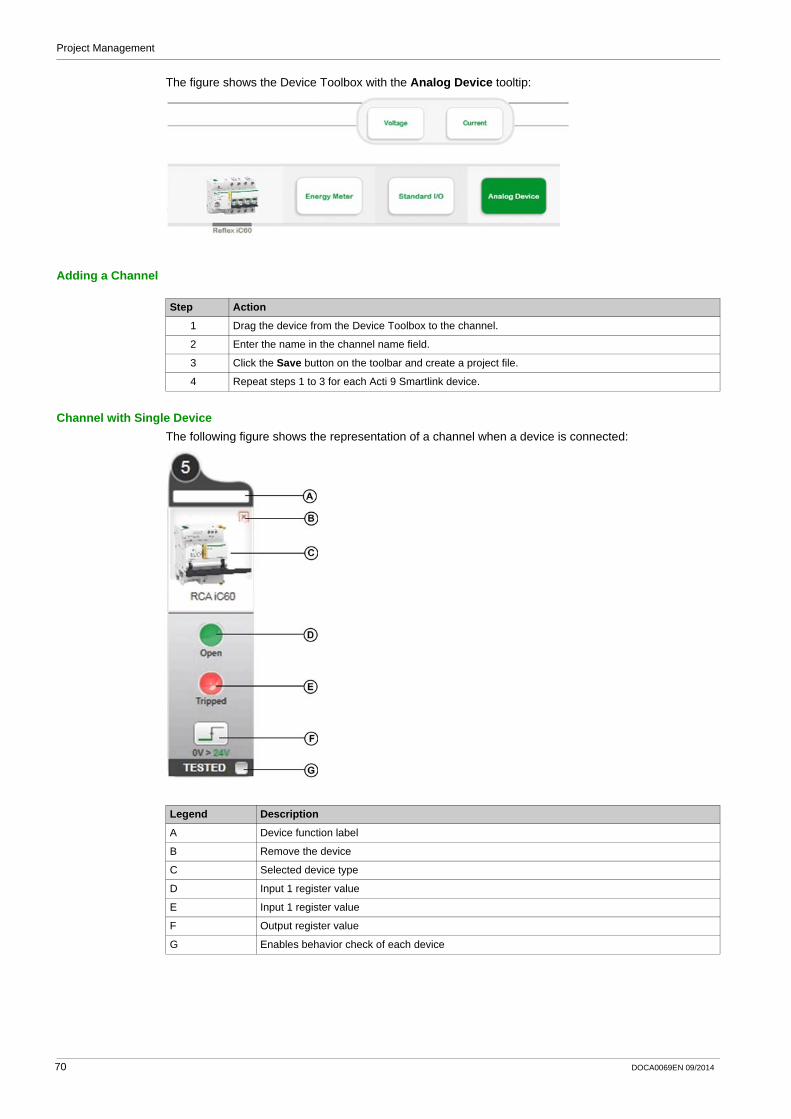
Channel with Single DeviceThe following figure shows the representation of a channel when a device is connected:
Step Action
1 Drag the device from the Device Toolbox to the channel.
2 Enter the name in the channel name field.
3 Click the Save button on the toolbar and create a project file.
4 Repeat steps 1 to 3 for each Acti 9 Smartlink device.
Legend Description
A Device function label
B Remove the device
C Selected device type
D Input 1 register value
E Input 1 register value
F Output register value
G Enables behavior check of each device
70 DOCA0069EN 09/2014

Project Management
The device function label text box is used to set a user-friendly name to the channel (up to 20 characters). If this name is too long to fit in the text box, it appears truncated. However, a mouse point on the name displays the complete name.
Input 1 and Input 2 register values are 0 or 1, regardless of the connected device. Commands (Open/Close) work the same way.
The following table shows the different displays depending on the type of connected device:
Channel with Two CountersTwo counters can be connected on a single channel (one per input). When an energy counter device is dragged, the channel representation changes based on the connectivity of the device.
Register Value
IOF+
SD24
OF+
SD24
RC
A T
i24
Ref
lex
iC60
Ti2
4
iAC
T24
iATL
24
Stan
dard
I/O
Input 1 1 Close Close Close O/C = 1 O/C = 1 O/C = 1 I1 = 1
0 Open Open Open O/C = 0 O/C = 0 O/C = 0 I1 = 0
Input 2 1 Not tripped Not tripped Not tripped auto/off = 1 – – I2 = 1
0 Tripped Tripped Tripped auto/off = 0 – – I2 = 0
Command button – – X X X X X
Pulse weight configuration – – – – – – –
DOCA0069EN 09/2014 71

Project Management
For the energy counter devices, you can read and/or configure the pulse weight and Meter value of an input only if Acti 9 Smartlink is connected.
Legend Description
A Device function label on input 1
B Remove the device
C Connected counter on input 1
D Input delta pulse calculator
E Input 1 meter value
F Input 1 pulse weight
G Device function label on input 2
H Connected counter on input 2
I Input 2 meter value
J Input 2 pulse weight
K Enables behavior check of each device
72 DOCA0069EN 09/2014

Project Management
Pulse Weight
When connected with the device, the option to configure the time between two pulses is active. Click to open the delta pulse calculator.
Configure the Time Between Two PulsesThe table shows the procedure to configure the time between two pulses for a channel:
Parameter Description
Pulse Weight Pulse weight unit is Wh.
Load Power of the devices connected to the circuit that counter measures the energy consumption. Unit is W.
Time between two pulses Calculation of the time between 2 pulses = 3,600 x 1/(number of pulses) with Number of pulses = Load/Pulse weight.
Step Action Comment
1 Enter the pulse weight value for the counter in the Pulse Weight box.
2 Enter the load of the channel in the Load box. The time between pulses is displayed in the pop-up.
3 Click OK. The time between pulses is displayed in the pop-up.Displays the pulse weight value in the channel.
DOCA0069EN 09/2014 73

Project Management
Adding Other Devices
OverviewYou can add third-party devices in TreeView (see page 48) under the Configuration tab (see page 48) as complete customer project.
CharacteristicsFor a selected device in TreeView (see page 48), you can see the configurable parameters under the characteristics group.
The parameters can be modified according to your need.
Setting Characteristics
Characteristics Description
General Characteristics Displays the general information entered by the you like the Device type, Manufacturer details, product range, and so on.
Step Action
1 Select the device from TreeView (see page 48) of the Configuration tab (see page 48).Result: The display area displays the general characteristics details of the selected element in the left pane.
2 Enter the parameters under the characteristics group.
3 Click the Save button.Result: Entered parameters are saved.
74 DOCA0069EN 09/2014

Project Management
Setup a Device Online
OverviewEcoreach operates online with the devices as per the status set by the user (Local Plug or Network). In this mode, Ecoreach is logically connected to one or more devices and you can configure the devices irrespective of the cloud connectivity status.
Setting up a Device in Online
Step Action
1 To connect the device with Ecoreach, configure the device communication parameters (See Device Characteristics (see page 68) ) and the PC Communication (see page 86) details according to the type of communication supported for that device.
2 After configuring the communication parameters and PC communication access points, connect to a device (see page 86) either on Local Plug or Network mode.
3 After connecting to the device, modify the parameters displayed in the Characteristics tab in the right pane of the Configuration tab (see page 48) and transfer them to the device by clicking the Project>>Device button.Result: A popup message with a progress bar indicates the status of the action.
4 You can also click the Device>> Project button to get the device values into Ecoreach.
DOCA0069EN 09/2014 75

Project Management
Contextual Help for Device Setting
Overview
When configuring the devices, you can understand the settings of the device using the icon. You can
click the icon to open the device document pointing to the specific section that describes the settings in detail.
76 DOCA0069EN 09/2014

Project Management
Artifacts
IntroductionThe Artifacts section allows you to attach files related to the project. You can attach any type of files like .pdf, .excel, and screenshot in .jpeg format. Each file displays with file name, date, size, and reference information.
The examples of files that can be added as project artifacts are:Engineering drawingsBuilding mapsWiring diagramAny scanned image
In addition to the project artifacts, you can also add the artifacts for project elements like location, switchboard, device, direct TCP/IP, gateway, and serial interface.
When artifacts are added to devices, it is highlighted with the icon in TreeView under the Configuration tab (see page 48) .
NOTE: You can attach any number of files to the artifacts, but ensure that the file size do not exceed 20 MB.You are not allowed to add executable files (.exe) and script files.
Adding an Artifact File
NOTE: When you add a file with the same name as the existing artifacts, a dialog box appears as Artifacts already exists. To replace the file, delete the existing file and add a new file.
Deleting an Artifact File
Viewing an Artifact File
NOTE: Artifacts added into Ecoreach project can be opened and viewed only when there is a suitable windows application available in the user machine.
Step Action
1 For project artifacts: Click the Browse button in the Artifacts section under the Project tab (see page 47).For project element artifacts: Click the ADD button in the Artifacts section under the Configuration tab (see page 48).
Result: Opens the Open dialog box.
2 Select the file to be added.
3 Click Open to attach the selected file.Result: Opens Adding Artifacts dialog box with the status.
4 Click the Close button.Result: Adds the artifact file in the Artifacts section.
Step Action
1 Select the file to be removed in the Artifacts section of the Project tab (see page 47) or Configuration tab (see page 48).
2 Click the Delete icon.Result: Opens the Do you want to remove selected artifact? dialog box.
3 Click the Yes button.Result: Deletes the selected file.
Step Action
1 Select the file to be viewed in the Artifacts section of the Project tab (see page 47) or Configuration tab (see page 48).
2 Click the Open icon.Result: Opens the selected file.
DOCA0069EN 09/2014 77

Project Management
Communication Architecture
Section 5.2Communication Architecture
What Is in This Section?This section contains the following topics:
Topic Page
Ecoreach to Device - Operating Modes 79
Network Communication 80
PC Communication 86
78 DOCA0069EN 09/2014

Project Management
Ecoreach to Device - Operating Modes
Device Connection Through Different ModesYou can choose the operation mode to work with the devices from the toolbar (see page 45).
Operating Mode Description
Offline In Offline mode, you can create a project, add or remove a device, view the settings, configure the communication settings, and create the communication architecture. And also you can modify full device settings(1), and generate the complete project configuration report.
Local Plug In Local Plug mode, you can connect to the device using the front test port connection available in the device. When connected, you can:
Compare the device settings with the project settings.Transfer settings from device to project and project to device.Monitor the device status, real-time measurements, maintenance data, and IO status (if any).
Network In Network mode, you can connect to the device through a multipoint communication network, either serial line or TCP/IP.In this mode, you can perform all the functions available in the Local Plug mode. Additionally, you can perform the transfer of settings from project to device or device to project in batch-wise operation for multiple devices in TableView (see page 49) under the Configuration tab (see page 48).
(1) This function is available only if the project is stored in the Ecoreach Cloud. When the project is not stored on Cloud, you can only modify the communication settings. All other settings can be modified only when Ecoreach is connected to the device.
DOCA0069EN 09/2014 79
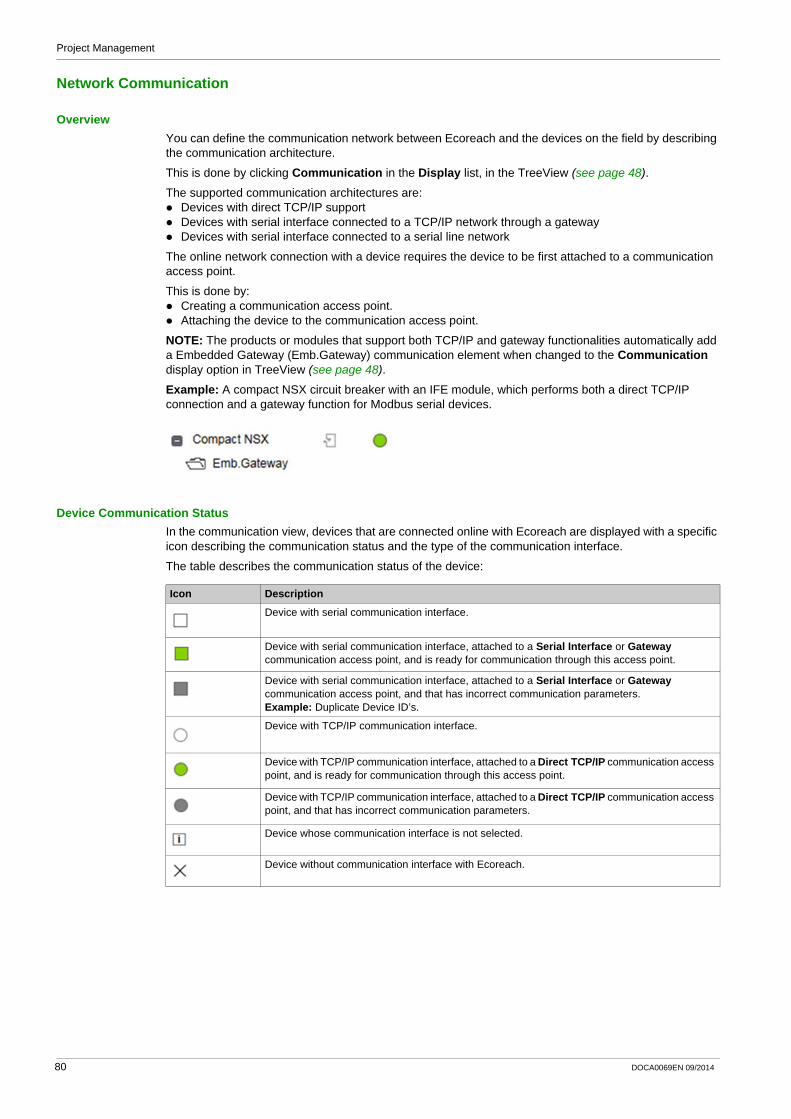
Project Management
Network Communication
OverviewYou can define the communication network between Ecoreach and the devices on the field by describing the communication architecture.
This is done by clicking Communication in the Display list, in the TreeView (see page 48).
The supported communication architectures are:Devices with direct TCP/IP supportDevices with serial interface connected to a TCP/IP network through a gatewayDevices with serial interface connected to a serial line network
The online network connection with a device requires the device to be first attached to a communication access point.
This is done by:Creating a communication access point.Attaching the device to the communication access point.
NOTE: The products or modules that support both TCP/IP and gateway functionalities automatically add a Embedded Gateway (Emb.Gateway) communication element when changed to the Communication display option in TreeView (see page 48).
Example: A compact NSX circuit breaker with an IFE module, which performs both a direct TCP/IP connection and a gateway function for Modbus serial devices.
Device Communication StatusIn the communication view, devices that are connected online with Ecoreach are displayed with a specific icon describing the communication status and the type of the communication interface.
The table describes the communication status of the device:
Icon Description
Device with serial communication interface.
Device with serial communication interface, attached to a Serial Interface or Gateway communication access point, and is ready for communication through this access point.
Device with serial communication interface, attached to a Serial Interface or Gateway communication access point, and that has incorrect communication parameters.Example: Duplicate Device ID’s.
Device with TCP/IP communication interface.
Device with TCP/IP communication interface, attached to a Direct TCP/IP communication access point, and is ready for communication through this access point.
Device with TCP/IP communication interface, attached to a Direct TCP/IP communication access point, and that has incorrect communication parameters.
Device whose communication interface is not selected.
Device without communication interface with Ecoreach.
80 DOCA0069EN 09/2014

Project Management
Communication Access PointA communication access point is described using a communication element.
The three types of communication elements are:
Creating a Communication Access PointYou can create a communication access point by adding the appropriate communication element according to the targeted communication architecture in the communication TreeView (see page 48).
In the Communication TreeView, you can delete, rename, and cut/paste an existing communication element using the contextual menu.
When you select a communication element from the TreeView, its parameters are shown under the following sections in the display area:
GeneralCommunicationAttached device list
The table shows the description of the sections:
Communication Elements
Description
TCP/IP This element is used to describe the access to devices fitted with a TCP/IP communication interface.In this case, Ecoreach uses the IP interface of the PC and the IP address of the remote device to establish the online connection.
Gateway This element is used to describe the access to Modbus serial devices that are connected to a Modbus TCP/IP gateway.In this case, Ecoreach uses the IP interface of the PC, the IP address of the remote gateway, and the individual Modbus address of the device attached to the gateway to establish the online connection.
Serial Interface This element is used to describe the direct access to Modbus serial devices through a serial communication interface.In this case, Ecoreach uses a local serial communication port of the PC and the individual Modbus address of the device attached to this communication port to establish the online connection.
Section Description
General This section allows entering a name, type and description.In addition, for a Gateway, the parameter URL allows entering the http address to the embedded web server of the gateway.
Communication This section allows entering the communication parameters specifically for Gateway and Serial Interface access points.
Attached device list This section lists the devices that are accessible through the communication access point and that are ready for online network communication with Ecoreach.
DOCA0069EN 09/2014 81

Project Management
Gateway Communication Access PointFor a Gateway communication access point, enter the following parameters:
The following figure shows an example of General and Communication sections for a Gateway communication access point:
Serial Interface Communication Access PointFor a Serial Interface communication access point, enter the following parameters:
The following figure shows an example of General and Communication sections for a Serial Interface communication access point:
Parameters Description
TCP/IP Address IPV4 IPV4 address of the gateway.
Serial line parameters:Baud RateParityStop Bits
These parameters are not used to configure the gateway but are used as reference parameters to check the consistency of the SL parameters of all devices attached to the gateway (For details, refer to Communication settings consistency (see page 84)).
Parameters Description
Com port This parameter identifies the local serial communication port used on the PC to establish the connection with the devices for online network communication.
Serial line parameters:Baud RateParityStop Bits
These parameters are used to configure the PC local communication port and are used as reference parameters to check the consistency of the SL parameters of all devices attached to the serial communication port (For details, refer to Communication settings consistency (see page 84)).
82 DOCA0069EN 09/2014

Project Management
TCP/IP Communication Access PointFor a TCP/IP communication access point you have two sections, General and Attached device list. The communication settings are managed through the device communication parameters for all the devices connected to this access point.
All the native TCP/IP devices of a project must be attached to this communication access point to group devices with similar subnet ranges under this element. You may use more than one TCP/IP communication access point depending on the number of devices in a project. When devices with different subnet configurations are grouped, Ecoreach warns you about the Communication settings consistency. (see page 84)
Attached Devices ListThe figure shows an example for the list of attached devices:
Attaching a Device to a Communication Access PointFor online network connection with a device, the device must be attached to a communication access point.
The table shows the steps to attach a device:
In project architecture, you can identify the attached devices of any communication access point:
Step Action
1 From the TreeView (see page 48), select the communication element to which you want to attach the device.
2 Click Attached device list section in the display area.
3 Drag the device from the Communication TreeView to the Attached device list in the display area.
NOTE: This operation is permitted only if the device communication interface type is compatible with device type of the communication access point.
Result: The attached device appears in the Attached device list section with its full path name from the TreeView.
Step Action
1 From the TreeView (see page 48), select the communication element to which you want to attach the device.
2 Click Attached device list section in the display area.
3 Select a device from the Attached device list.Result: The selected device and the corresponding device in the TreeView are highlighted with the same color.
DOCA0069EN 09/2014 83
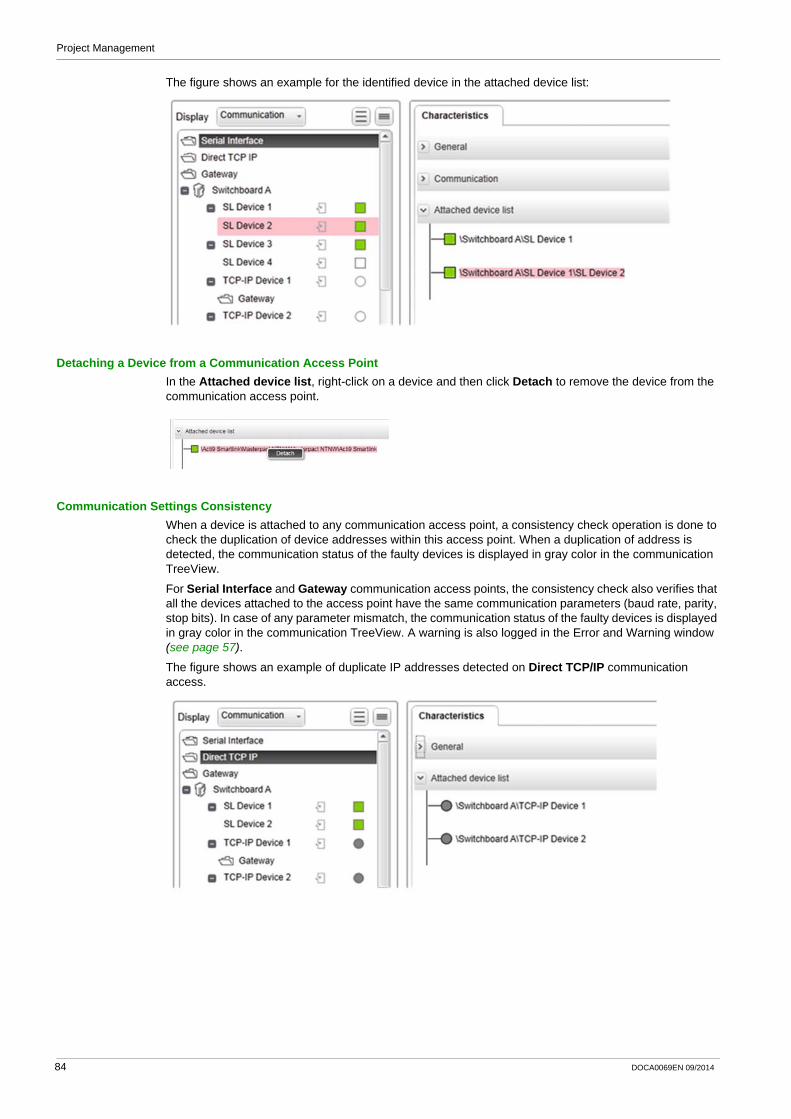
Project Management
The figure shows an example for the identified device in the attached device list:
Detaching a Device from a Communication Access PointIn the Attached device list, right-click on a device and then click Detach to remove the device from the communication access point.
Communication Settings ConsistencyWhen a device is attached to any communication access point, a consistency check operation is done to check the duplication of device addresses within this access point. When a duplication of address is detected, the communication status of the faulty devices is displayed in gray color in the communication TreeView.
For Serial Interface and Gateway communication access points, the consistency check also verifies that all the devices attached to the access point have the same communication parameters (baud rate, parity, stop bits). In case of any parameter mismatch, the communication status of the faulty devices is displayed in gray color in the communication TreeView. A warning is also logged in the Error and Warning window (see page 57).
The figure shows an example of duplicate IP addresses detected on Direct TCP/IP communication access.
84 DOCA0069EN 09/2014

Project Management
The figure shows an example of inconsistencies detected on Serial Interface communication access point.
DOCA0069EN 09/2014 85

Project Management
PC Communication
OverviewWhen a device is selected from the TreeView (see page 48), the PC Communication section in the display area shows the communication interfaces available for the connection with Ecoreach.
The communication interfaces are:LocalNetwork
LocalWhen a device offers a local point-to-point serial interface (front test communication port), this communication interface may be used by the Ecoreach to connect the device and is displayed in the Local subsection.
Depending on the device type, the local connection may require appropriate interface modules or cables.
For example, the Compact NSX device connection can be done using a UTA module. For Masterpact devices, it can be established through a UTA module or a MagicBox module.
The communication parameters are set automatically by Ecoreach according to the type of the device. You must select only the PC communication port that is used to establish the connection. When several local interfaces are possible, you must click Active to select the desired local interface to be active.
NetworkWhen a device is attached to a communication access point (ready for Network communication), the Network subsection gives the summary of the communication settings used to connect with the device.
Connecting to a DeviceThe table shows the steps to establish a connection with a device using the ON/OFF button:
Step Action
1 Click Communication in the Display list, in the TreeView (see page 48).
2 Select a device in the TreeView.
3 Click either Local Plug or Network in the Connection list.
86 DOCA0069EN 09/2014

Project Management
Device IdentificationWhen connecting to a device, you see a discrepancy window. This window appears when the device with its optional modules declared in the project and actual device connected are not the same.
Case 1: When the mandatory device characteristics detail declared in the project and the connected device are different, you cannot continue further with the device connection.
4 Click the ON button to connect the device.
NOTE: Click OFF to disconnect the device from Ecoreach.
Step Action
NOTICERISK OF PARTIAL CONFIGURATION OR MODULE FAILUREWhen discrepancy is detected with one or more devices, perform the Compatibility Check for the device and follow the recommended actions before connecting to the device.
Failure to follow these instructions can result in equipment damage.
DOCA0069EN 09/2014 87

Project Management
Case 2: When some of the optional modules of a device declared in the project architecture and the connected device are different:
In this case, you cannot continue with the device connection.
Transfer of Setting for a Single DeviceYou can transfer the settings between the project and the device as follows:
Transfer of settings from project to device (Download)Transfer of settings from device to project (Upload)
Transfer of Settings for Multiple DevicesYou can transfer the settings to multiple devices from the TableView (see page 49) of the Configuration tab (see page 48). Only the devices that are qualified with communication settings consistency (see page 84) are available for the selection to perform these actions:
Transfer of settings from project to device (Download)Transfer of settings from device to project (Upload)
NOTE: Although in TableView only a few groups of settings are displayed, this action results in updating or transferring of all settings of the selected devices.
NOTICERISK OF PARTIAL CONFIGURATION OR MODULE FAILUREWhen discrepancy is detected with one or more devices, perform the Compatibility Check for the device and follow the recommended actions before connecting to the device.
Failure to follow these instructions can result in equipment damage.
88 DOCA0069EN 09/2014

Project Management
Communication Test and Its ReportsEcoreach allows you to perform the communication test on one or more devices from the TableView (see page 49) of the Configuration tab (see page 48).
You can perform the communication test (Communication wiring check) of the communication network architecture of the complete project devices or few selected devices. A report is produced at the end of the test with both device and its communication settings with the test success or failure status in a .pdf format. You can store the report for future needs as an artifact within the project or externally in user PC.
NOTE: Only the devices that are verified with communication settings consistency (see page 84) can be tested using this feature.
Export Device ConfigurationYou can export the devices and their configuration details displayed in the TableView (see page 49) of the Configuration tab (see page 48) as a .csv file.
This feature is accessible from the Toolbar (see page 45). When you click the icon, you are prompted to save the .csv file, which contains the details of all devices in the project and its settings shown in the TableView (see page 49).
DOCA0069EN 09/2014 89
Project Management
Monitor and Control
Section 5.3Monitor and Control
What Is in This Section?This section contains the following topics:
Topic Page
Monitor 91
Test 92
Logs 94
Control 95
90 DOCA0069EN 09/2014

Project Management
Monitor
IntroductionYou can monitor the real-time values of the selected device from the Monitoring tab (see page 50). Ecoreach displays the main electrical parameters of the selected device in four different tabs. You can use this feature while performing the switchboard commissioning and during maintenance period. Ecoreach cannot be used as real-time SCADA software. The values are displayed in four tabs.
The Monitoring tab displays the following relevant tabs for the selected device in the Device Monitoring area:
MeasurementMaintenanceDevice statusI/O status
MeasurementYou can monitor the real-time measurements of all the connected devices from the Measurement tab (see page 50). It automatically reads and displays the real-time values of the selected device at regular intervals.
You can read the following real-time measurements:Current, voltage, and power values at every one secondPower factor at every 10 secondsHarmonics at every 30 seconds
MaintenanceYou can monitor the maintenance values of the connected device from the Maintenance tab (see page 50). It reads the data from the device at every 10 seconds.
You can read the following maintenance values:Breaker Command CounterGeneral dataLoad ProfileTemperature ProfileContact CounterDevice identification dataProtection trip counterCircuit breaker trip counter
Device StatusYou can view the hardware status of the device from the Device Status tab (see page 50). Depending on the device selected, you see the alarm status, breaker position, trip indicator, time before tripping, circuit breaker status (open or close), spring charge, and/or cradle status.
I/O StatusYou can view the input and output status of the devices from the I/O Status tab (see page 50). You can see the status for all the digital inputs, digital outputs, and analog inputs.
Data Monitoring LogYou can save the pre-configured measurement data that are logged into a .csv file for later analysis and reporting.
Step Action
1 Click the Enable Monitoring Log button in the Monitoring tab (see page 50).Result: Opens the file save window.
2 Choose the path where a file needs to be saved.
3 Enter or modify the file name.
4 Click the Save button.Result: Saves the .csv file.
DOCA0069EN 09/2014 91
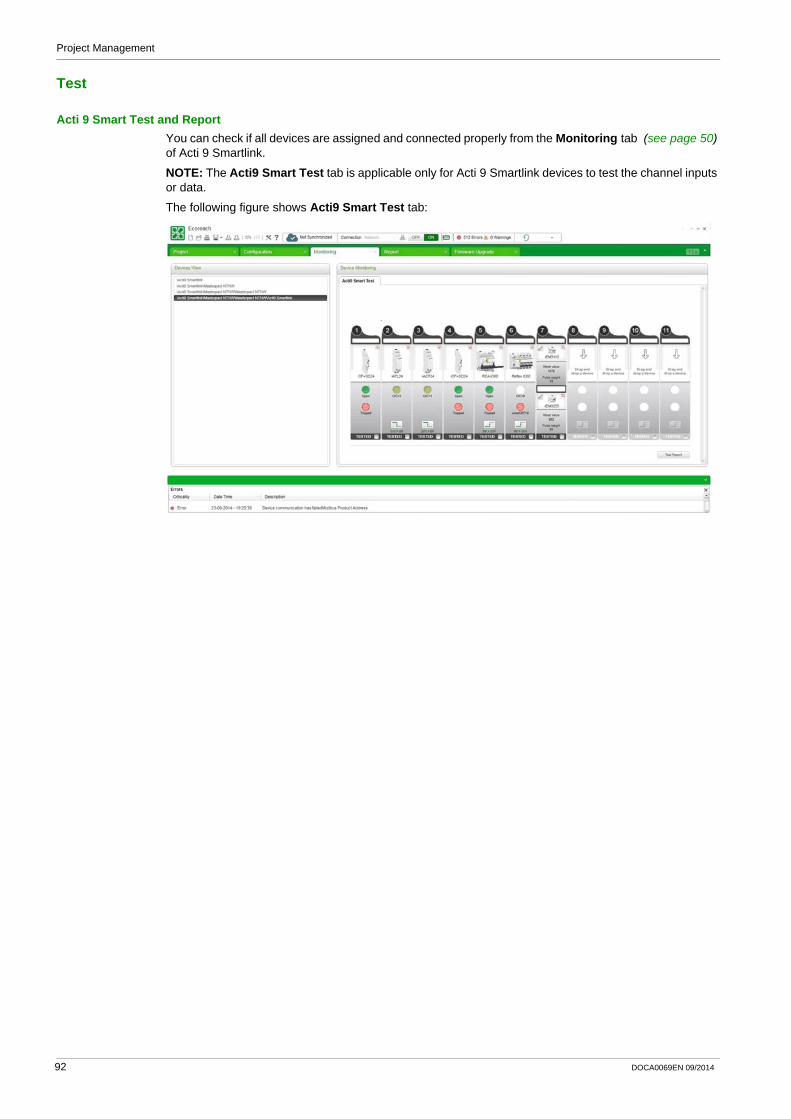
Project Management
Test
Acti 9 Smart Test and ReportYou can check if all devices are assigned and connected properly from the Monitoring tab (see page 50) of Acti 9 Smartlink.
NOTE: The Acti9 Smart Test tab is applicable only for Acti 9 Smartlink devices to test the channel inputs or data.
The following figure shows Acti9 Smart Test tab:
92 DOCA0069EN 09/2014

Project Management
The Acti9 Smart Test tab allows you to generate a report to check the list of tested devices connected to Acti 9 Smartlink device. To generate the report, click Test Report in the Acti9 Smart Test tab.
The following figure shows an example of the Acti 9 Smart Test Report:
The report contains the following information:Network Configuration typeActi 9 Smartlink device typeModbus address of the Acti 9 Smartlink deviceChannel numberChannel nameChannel device typeTest information of each channel (tested or not)Main modbus address of the device
DOCA0069EN 09/2014 93
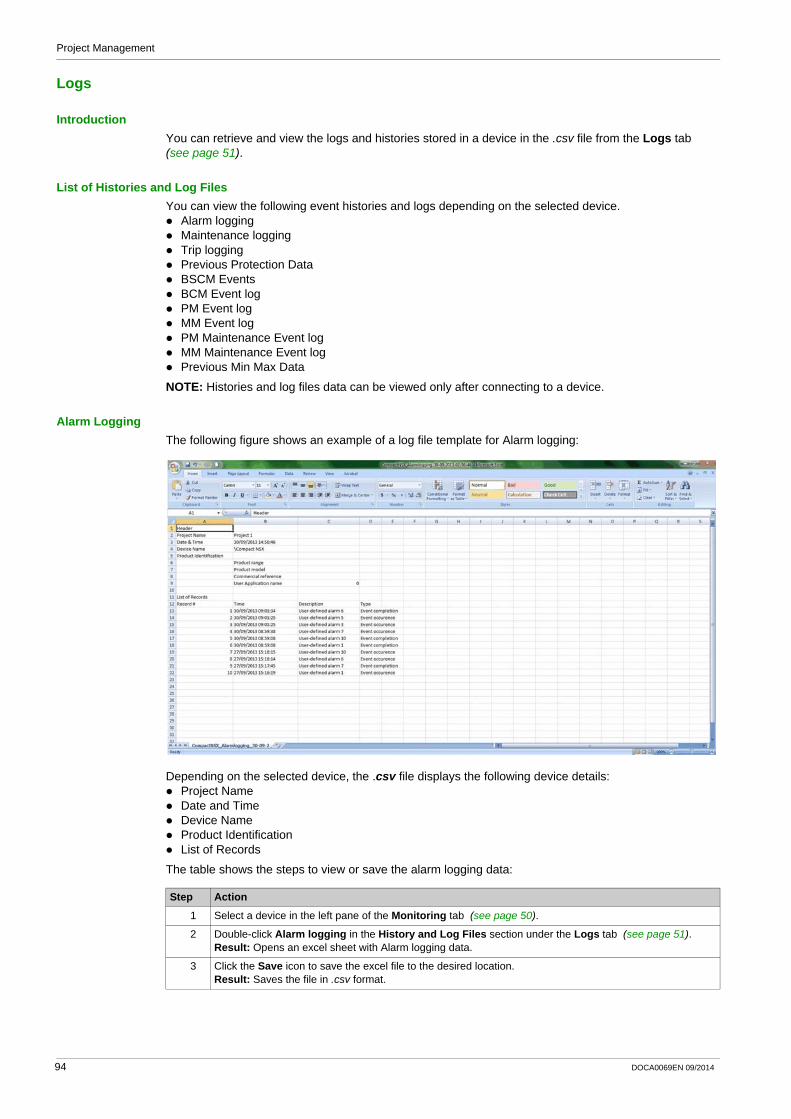
Project Management
Logs
IntroductionYou can retrieve and view the logs and histories stored in a device in the .csv file from the Logs tab (see page 51).
List of Histories and Log FilesYou can view the following event histories and logs depending on the selected device.
Alarm loggingMaintenance loggingTrip loggingPrevious Protection DataBSCM EventsBCM Event logPM Event logMM Event logPM Maintenance Event logMM Maintenance Event logPrevious Min Max Data
NOTE: Histories and log files data can be viewed only after connecting to a device.
Alarm LoggingThe following figure shows an example of a log file template for Alarm logging:
Depending on the selected device, the .csv file displays the following device details:Project NameDate and TimeDevice NameProduct IdentificationList of Records
The table shows the steps to view or save the alarm logging data:
Step Action
1 Select a device in the left pane of the Monitoring tab (see page 50).
2 Double-click Alarm logging in the History and Log Files section under the Logs tab (see page 51).Result: Opens an excel sheet with Alarm logging data.
3 Click the Save icon to save the excel file to the desired location.Result: Saves the file in .csv format.
94 DOCA0069EN 09/2014

Project Management
Control
IntroductionYou can control the circuit breaker added in a project from the Control tab (see page 51). You can open, close, or reset the connected circuit breaker. You can also reset or update the energy counters and check IO modules function.
Ecoreach will prompt you to enter the administrator password (see page 55) and the device password to perform the control operations. Before performing these actions, also refer the corresponding device user manuals
Opening a Circuit Breaker
Closing a Circuit Breaker
DANGERHAZARD OF ELECTRIC SHOCK, EXPLOSION, OR ARC FLASHDo not use the software to Open/Close breakers and electrical circuit, without having a physical feedback mechanism validating the completeness of software action.
Failure to follow these instructions will result in death or serious injury.
Step Action
1 Select a circuit breaker in the left pane of the Monitoring tab (see page 50).
2 Click the Open/Reset/Close Breaker button in the Breaker Control section under the Control tab (see page 51).Result: Opens the Device Name dialog box.
3 Click the Commands tab.Result: Displays the Open, Reset, and Close button.
4 Click the Open button.Result: Opens the Password dialog box.
5 Enter the password.Result:
Open button turns green color.Submit and Cancel buttons are enabled.
6 Click the Submit button.Result: Opens the circuit breaker.
Step Action
1 Select a circuit breaker in the left pane of the Monitoring tab (see page 50).
2 Click the Open/Reset/Close Breaker button in the Breaker Control section under the Control tab (see page 51).Result: Opens the Device Name dialog box.
3 Click the Commands tab.Result: Displays the Open, Reset, and Close button.
4 Click the Close button.Result: Opens the Password dialog box.
5 Enter the password.Result:
Close button turns green color.Submit and Cancel buttons are enabled.
6 Click the Submit button.Result: Closes the circuit breaker.
DOCA0069EN 09/2014 95

Project Management
Resetting a Circuit Breaker
Resetting or Updating Energy CountersYou can reset or update energy counters from the Control tab (see page 51). Depending on the circuit breaker selected, you see the values of the following energy counters:
Reactive energyActive energyApparent energy
Forced Output - IO ModuleYou can check the IO module status by forcing its output to High or Low, based on the device and the optional modules available with the device.
The function supports the following IO modules:SDx output moduleIO#1 moduleIO#2 module
Step Action
1 Select a circuit breaker in the left pane of the Monitoring tab (see page 50).
2 Click the Open/Reset/Close Breaker button in the Breaker Control section under the Control tab (see page 51).Result: Opens the Device Name dialog box.
3 Click the Commands tab.Result: Displays the Open, Reset, and Close button.
4 Click the Reset button.Result: Opens the Password dialog box.
5 Enter the password.Result:
Close button turns green color.Submit and Cancel buttons are enabled.
6 Click the Submit button.Result: Resets the circuit breaker.
Step Action
1 Select a circuit breaker in the left pane of the Monitoring tab (see page 50).
2 Click the Reset/Update Energy Counters button in the Reset/Update Energy Counter section under the Control tab (see page 51).Result: Opens the Energy Counters dialog box.
3 Click the Update Counters button to update the values.Result: Opens the Password dialog box.
4 Enter the password.
5 Click the Proceed button.Result: Resets or updates the energy counters.
NOTICERISK OF EQUIPMENT DAMAGEDo not force outputs of IO modules when the device is commissioned and in real operation. This function must be performed only when you intend to check the IO status functionality during the installation and testing phase.
Failure to follow these instructions can result in equipment damage.
96 DOCA0069EN 09/2014

Project Management
Report
Section 5.4Report
Configuration Report
IntroductionYou can prepare the complete project configuration report with all the devices and its settings. You can also customize the report by modifying the front page content, including the project information and logo customization.
Modifying the Report DetailsYou can enter or modify the user details and project details with the required format from the Reports tab (see page 52).
You can enter or modify the user details from the Front Page tab (see page 52). The details entered in this tab appears on the front page of the report.You can enter or modify the project details from the Project tab (see page 52). The details entered in this tab appear in the report.You can select from the options for the required format of header, footer, front page, and project details to be included in the report from the Contents tab (see page 52). The available options are:
Report HeaderReport Footer Front pageAdvanced sections
You can click the check box to select the options listed.
Adding a LogoYou can add your own logo to be included in the report header from the Front Page tab (see page 52) and Contents tab (see page 52). You will see the Schneider Electric logo, which is a default logo.
The table shows the steps to add a new logo:
Step Action
1 Click the Remove button in the Front Page tab of the Reports tab (see page 52) to remove the current logo.Result: Removes the current logo.
2 Click the Logo button.Result: Opens the file selection window.
3 Select the logo to be added.
4 Click Open.Result: Adds the new logo.
DOCA0069EN 09/2014 97

Project Management
Generating a ReportYou can generate and print a configuration report of the project. The user and project details are automatically filled with the details entered in the Project tab (see page 52). You can fill the empty fields or modify the existing details.
The table shows the steps to generate a report of the project:
NOTE: Report may contain fields marked with ’*’ indication. This indicates that these parameters values are modified in the project but they are not yet saved into the project.
Step Action
1 Enter the details in the Front Page tab under the Reports tab (see page 52).
2 Enter the details in the Project tab under the Report tab.
3 Check the required options in the Contents tab under the Report tab.
4 Click the Generate Report button.Result: Opens the Print window.
5 Select the printer.
6 Click the OK button.Result: Generates the report.
98 DOCA0069EN 09/2014

Project Management
Firmware Upgrade
Section 5.5Firmware Upgrade
What Is in This Section?This section contains the following topics:
Topic Page
Upgrade Firmware 100
Compatibility Check of Device/Firmware and Corrective Actions 103
DOCA0069EN 09/2014 99
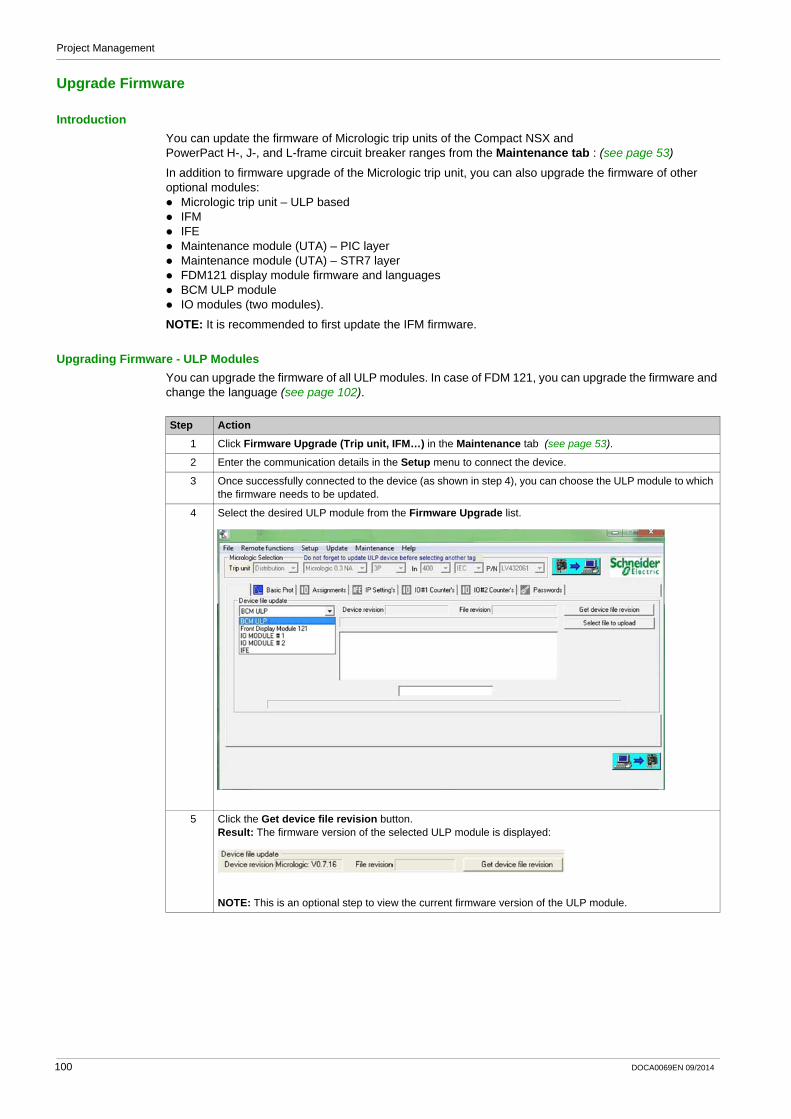
Project Management
Upgrade Firmware
IntroductionYou can update the firmware of Micrologic trip units of the Compact NSX and PowerPact H-, J-, and L-frame circuit breaker ranges from the Maintenance tab : (see page 53)
In addition to firmware upgrade of the Micrologic trip unit, you can also upgrade the firmware of other optional modules:
Micrologic trip unit – ULP basedIFMIFEMaintenance module (UTA) – PIC layerMaintenance module (UTA) – STR7 layerFDM121 display module firmware and languagesBCM ULP moduleIO modules (two modules).
NOTE: It is recommended to first update the IFM firmware.
Upgrading Firmware - ULP ModulesYou can upgrade the firmware of all ULP modules. In case of FDM 121, you can upgrade the firmware and change the language (see page 102).
Step Action
1 Click Firmware Upgrade (Trip unit, IFM…) in the Maintenance tab (see page 53).
2 Enter the communication details in the Setup menu to connect the device.
3 Once successfully connected to the device (as shown in step 4), you can choose the ULP module to which the firmware needs to be updated.
4 Select the desired ULP module from the Firmware Upgrade list.
5 Click the Get device file revision button.Result: The firmware version of the selected ULP module is displayed:
NOTE: This is an optional step to view the current firmware version of the ULP module.
100 DOCA0069EN 09/2014
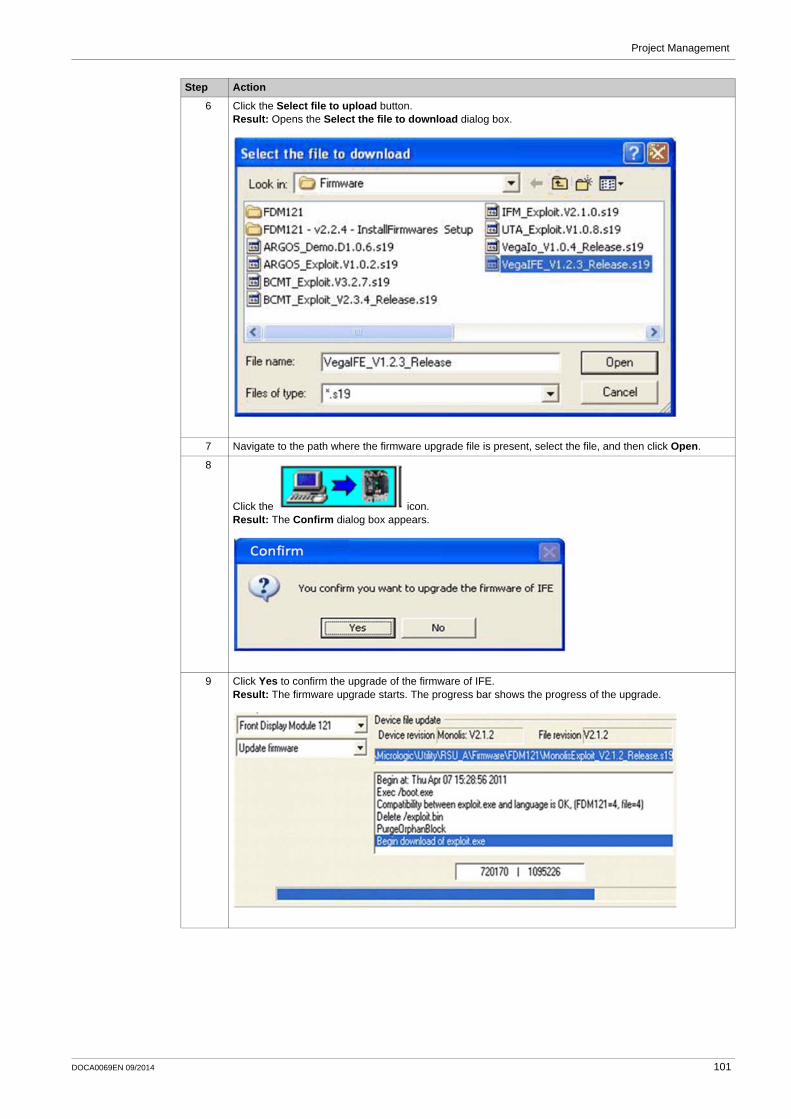
Project Management
6 Click the Select file to upload button.Result: Opens the Select the file to download dialog box.
7 Navigate to the path where the firmware upgrade file is present, select the file, and then click Open.
8
Click the icon.Result: The Confirm dialog box appears.
9 Click Yes to confirm the upgrade of the firmware of IFE.Result: The firmware upgrade starts. The progress bar shows the progress of the upgrade.
Step Action
DOCA0069EN 09/2014 101

Project Management
Upgrading Firmware and Language Files - FDM121You can upgrade the language file along with firmware upgrade.
Step Action
1 Click Front Display Module 121 in the Firmware Upgrade list.
2 You can select:Update firmware to update only firmwareUpdate language to update only language fileUpdate all to update both firmware and language file
3 You have an option to download only the firmware or language file into FDM121. You can also download both language file and the new firmware together using the Update all option.The FDM121 displays the IMU information in 10 languages:
Five fixed default languagesFive optional languages
The five default languages are:ChineseEnglish UKEnglish USFrenchSpanish
4 You can add five optional languages and define their order of appearance in the Language menu of FDM121.
5 You can view the configuration of the language menu:
102 DOCA0069EN 09/2014

Project Management
Compatibility Check of Device/Firmware and Corrective Actions
IntroductionWhen the ULP modules are upgraded for new functionalities, you may need to check the compatibility of the different modules in the IMU system. Compatibility Matrix is the diagnosis function that helps you to diagnose and identify all discrepancy issues in the ULP modules. This matrix also provides the recommended actions and diagnostics messages relevant to the detected discrepancies.
NOTE: You can perform the compatibility check only in online mode through all the communication channels.
Compatibility MatrixYou can view the compatibility matrix by clicking Compatibility Check in the Maintenance tab. The Compatibility Matrix window has:
Four main sectionsRefresh button.
List of ModulesThe list of modules section displays the list of all ULP modules. This is a global list of ULP modules independent of whether they are connected or not. The ULP modules detected in the IMU are identified with one of the following colors listed based on the offer release of the ULP module.
If an ULP module in the list is not detected in the IMU, then the ULP module is identified with gray color. The ULP modules of ULP V1.2 offer release is selected in blue color. If all the devices listed in the section are identified with blue color, then that IMU is free of all discrepancies.
Legend Description
A List of modules
B Operating Mode Diagnostics
C Recommended Action
D Diagnostic Message
DOCA0069EN 09/2014 103

Project Management
The table shows the ULP module firmware version for each device:
Operating Mode Diagnostics and Recommended ActionsThe Operating Mode Diagnostics and Recommended Action section helps you to identify the discrepancy conditions within the ULP modules. The Firmware Upgrade tool reads the operating mode information from the ULP modules to display the Compatibility Matrix window. In the Compatibility Matrix window, each row is dedicated for a ULP module, and each column is dedicated for an operating mode.
The Recommended Action section provides the information on how to recover from a compatibility discrepancy situation. Each discrepancy has a generic pre-defined recommended action.
The x mark indicates the operating mode of a ULP module in the corresponding column with respect to the row.
The table lists the information or recommended actions for different operating modes of the ULP module:
Device List ULP Module Firmware Version
IFM ≤ 1.0.8 = ULP V1.0> 1.0.8 = ULP V1.2
FDM121 ≤ 2.1.2 = ULP V1.0= 2.1.3 = ULP V1.1> 2.1.3 = ULP V1.2
BCM ULP < 4.0.0 = ULP V1.1> 4.0.0 = ULP V1.2
NSX Micrologic Trip Unit ≤ 1.0.2 = ULP V1.0> 1.0.2 = ULP V1.2
Maintenance module = 1.0.8 = ULP V1.0> 1.0.8 = ULP V1.2
BSCM ≤ 2.1.8 = ULP V1.0> 2.1.8 = ULP V1.2
IO module ≥ 2.1.1 = ULP V1.2
IFE ≥ 1.0.8 = ULP V1.2
Module Operating Mode
Description Recommended Action to be performed
Nominal The ULP module is in nominal mode. None
Test The test button is pressed. None
Non-critical firmware discrepancy
There is a non-critical firmware discrepancy between the ULP module and other modules in the IMU.
Upgrade firmware (see page 100) at the next maintenance operation
Non-critical hardware discrepancy
There is a non-critical hardware discrepancy between the UPL module and other modules in the IMU.
Replace module at the next maintenance operation
Hardware degraded The ULP module is in degraded mode. Replace module at the next maintenance operation
Configuration discrepancy
A configuration discrepancy is detected by the ULP module.A Configuration discrepancy occurs when:
The ULP module does not detect the presence of a mandatory component needed for its applicationThe ULP module detects a possible wrong configuration of its application
-
Critical firmware discrepancy
There is a critical firmware discrepancy between the ULP module and other modules in the IMU.
Upgrade firmware (see page 100)
Critical hardware discrepancy
There is a critical hardware discrepancy between the ULP module and other modules in the IMU.
Replace module
Conflict The ULP module is in conflict mode. Remove duplicate module
Stop The ULP module is out of service. Replace module
Power OFF Check power supply
104 DOCA0069EN 09/2014

Project Management
Diagnostic MessageThe diagnostic message section provides the additional information about certain discrepancy modes.
You can see more than one diagnostic message for a discrepancy mode.
NOTE: For IMU 1.2, the diagnostics message lists a configuration discrepancy detected by the IO module.
RefreshAfter performing a recommended action for a specific discrepancy, you can click the Refresh button to update the changes in the Compatibility Matrix.
DOCA0069EN 09/2014 105

Project Management
106 DOCA0069EN 09/2014

Ecoreach IndexDOCA0069EN 09/2014
Index
AAbout Tab
Overview, 43Administration Password
Overview, 55Artifacts
Adding an artifact File, 77Deleting an Artifact File, 77Viewing an Artifact File, 77
CConfiguration Report
Modifying the Report Details, 97Configuring Acti 9 Smartlink Device in Offline Mode
Adding a Channel, 70Channel with Two Counters, 71Device Toolbox, 69Pulse Weight, 73Tooltip, 69
Configuring Other DevicesCharacteristics, 74Setting Characteristics, 74
Connection ProcedureIntroduction, 19
Contecxtual Help for Device SettingsOverview, 76
ControlClosing a Circuit Breaker, 95Forced output -IO Module, 96Opening a Circuit Breaker, 95Resetting a Circuit Breaker, 96Resetting or Updating Energy Counters, 96
Create Project Architecture - Advanced OptionsAdding Discovered Devices into Project, 66Device Discovery, 65Discovering Devices on a Combination of IP and Serial Network, 66Discovering Devices on a Modbus Serial Line Net-work, 65Discovering Devices on a Modbus TCP/IP Net-work, 65Saving Device Discovery Report, 66
DDescription of UI
Overview, 45Toolbar, 45
Download and InstallationOverview, 15
EEcoreach Error Log Management
Description, 57Ecoreach Process
Creating a Project in Online Mode, 37Introduction, 37
DOCA0069EN 09/2014
GGeneral Principles - Configuring in Offline Mode
Device Characteristics, 68Location Characteristics, 67Setting Characteristics, 68Switchboard Characteristics, 67
IIntroduction
Compatible Devices, 10
LLocal Connection
Magic Box, 22UTA-Test Plug, 20UTA-ULP Cable, 21
LogsAlarm Logging, 94List of Histories and Log Fles, 94
MMonitor
Data Monitoring Log, 91Device Status, 91IO Status, 91Maintenance, 91Measurement, 91
MonitoringOverview, 50
NNetwork Communication
Device Communication Status, 80
OOperating Modes
Device Connection through Different Modes, 79Overview
Features, 10
PPC Communication
Communication Test and its Reports, 89Connecting to a Device, 86Device Identification, 87Export Device Configuration, 89Local, 86Network, 86Transfer of settings for a Single Device, 88Transfer of Settings for Multiple Devices, 88
107
Index
Project ArchitectureCreating a New Project Architecture, 61Definition of Project Elements, 61Editing a Project Architecture Item, 62Introduction, 61TreeView Toolbar, 61
SSelecting a Device
Adding a Schneider Electric Devices, 63Adding Other Devices, 64
Serial ConnectionActi 9 Smartlink Device, 27BCM, 25CCM, 26IFM, 24
SettingsCompatibility Matrix Device/Firmware, 103Firmware Upgrade to ULP Modules, 100
Setup a Device OnlineOverview, 75
Software RegistrationChange Password, 17First Time Login, 17Overview, 16Results of Registration, 16
SpecificationsPC Requirements, 11Software Requirements, 11
TTCP/IP Connection
Daisy Chain, 30Gateway Connection, 28IFE, 29Typical Network Connection , 31
TestActi 9 Smart Test and Report, 92
108
DOCA0069EN 09/2014


As standards, specifications and designs change from time to time, please ask for confirmation of the information given in this publication.
DOCA0069EN-00
Schneider Electric Industries SAS35, rue Joseph MonierCS30323F - 92506 Rueil Malmaison Cedex
www.schneider-electric.com 09/2014


![Index [link.springer.com]978-3-0348-9217-9/1.pdfcompact Hermitian symmetric space, 557, 560, 561, 566 compact smooth category, 303-305, 314 compact smooth framed category, 312,313](https://static.fdocuments.us/doc/165x107/5f1060b97e708231d448d019/index-link-978-3-0348-9217-91pdf-compact-hermitian-symmetric-space-557-560.jpg)