![Oracle Identity Manager Connector Guide for Novell eDirectory€¦ · · 2018-02-02[1]Oracle® Identity Manager Connector Guide for Novell eDirectory Release 9.0.4 E10432-14 October](https://static.fdocuments.us/doc/165x107/5aca97737f8b9acb7c8e4fd0/oracle-identity-manager-connector-guide-for-novell-edirectory-2018-02-021oracle.jpg)
eControl 3 - downloads.omni-ts.comdownloads.omni-ts.com/.../eControl-3.5...Guide.pdf · •...
68
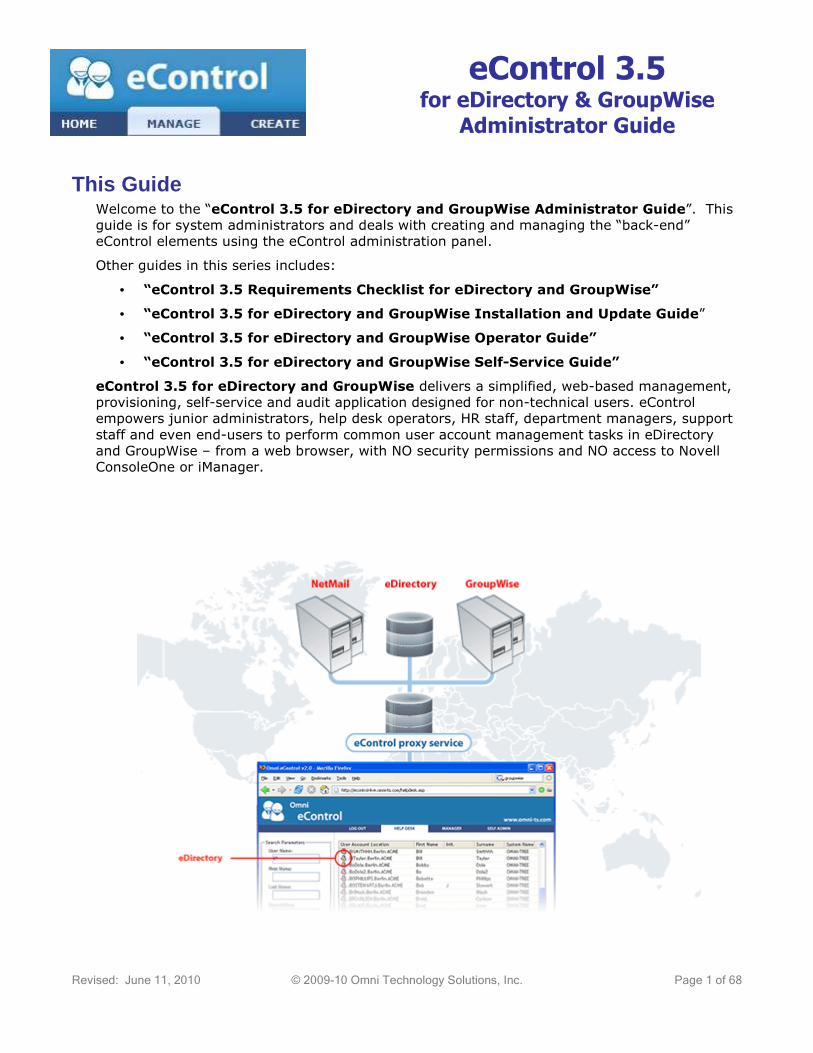
eControl 3.5 for eDirectory & GroupWise Administrator Guide Revised: June 11, 2010 © 2009-10 Omni Technology Solutions, Inc. Page 1 of 68 This Guide Welcome to the “eControl 3.5 for eDirectory and GroupWise Administrator Guide”. This guide is for system administrators and deals with creating and managing the “back-end” eControl elements using the eControl administration panel. Other guides in this series includes: • “eControl 3.5 Requirements Checklist for eDirectory and GroupWise” • “eControl 3.5 for eDirectory and GroupWise Installation and Update Guide” • “eControl 3.5 for eDirectory and GroupWise Operator Guide” • “eControl 3.5 for eDirectory and GroupWise Self-Service Guide” eControl 3.5 for eDirectory and GroupWise delivers a simplified, web-based management, provisioning, self-service and audit application designed for non-technical users. eControl empowers junior administrators, help desk operators, HR staff, department managers, support staff and even end-users to perform common user account management tasks in eDirectory and GroupWise – from a web browser, with NO security permissions and NO access to Novell ConsoleOne or iManager.
Transcript of eControl 3 - downloads.omni-ts.comdownloads.omni-ts.com/.../eControl-3.5...Guide.pdf · •...
eControl 3.5 for eDirectory & GroupWise
Administrator Guide
Revised: June 11, 2010 © 2009-10 Omni Technology Solutions, Inc. Page 1 of 68
This Guide Welcome to the “eControl 3.5 for eDirectory and GroupWise Administrator Guide”. This
guide is for system administrators and deals with creating and managing the “back-end”
eControl elements using the eControl administration panel.
Other guides in this series includes:
• “eControl 3.5 Requirements Checklist for eDirectory and GroupWise”
• “eControl 3.5 for eDirectory and GroupWise Installation and Update Guide”
• “eControl 3.5 for eDirectory and GroupWise Operator Guide”
• “eControl 3.5 for eDirectory and GroupWise Self-Service Guide”
eControl 3.5 for eDirectory and GroupWise delivers a simplified, web-based management,
provisioning, self-service and audit application designed for non-technical users. eControl
empowers junior administrators, help desk operators, HR staff, department managers, support
staff and even end-users to perform common user account management tasks in eDirectory
and GroupWise – from a web browser, with NO security permissions and NO access to Novell
ConsoleOne or iManager.

eControl 3.5 for eDirectory & GroupWise Admin Guide
www.omni-ts.com
Revised: June 11, 2010 © 2009-10 Omni Technology Solutions, Inc. Page 2 of 68
TTTTable of Contentsable of Contentsable of Contentsable of Contents
How eControl Works .............................................................................................. 4
Types if eControl Access ........................................................................................ 5
Login to the eControl Portal .................................................................................. 6
Access the eControl Administration Panel ............................................................. 6
Assign Delegated Administration .......................................................................... 7
Configure the Manage Module ............................................................................... 8
How it Works .............................................................................................................. 8
Calculating Cumulative Authorities ................................................................................. 8
No Administrative or Supervisor Rights Required ............................................................. 9
Planning for eControl Manage ........................................................................................ 9
Planning Concepts for Task Collections ........................................................................... 9
Configure the Super Administrator Task Collection ......................................................... 10
Modify the “All Tasks” Task Collection .......................................................................... 10
Assign the “All Tasks” Collection .................................................................................. 11
Create and Manage Task Collections ............................................................................. 15
Assign Task Collections .............................................................................................. 17
Add Groups ......................................................................................................... 18
Configure Task Collection Assignments ................................................................... 19
Manage Information Forms ......................................................................................... 22
Manage Search Forms ................................................................................................ 24
Manage Custom Tasks ............................................................................................... 25
Configure the Create Module ............................................................................... 26
How it Works ............................................................................................................ 26
Type of Objects that can be Created ............................................................................ 26
No Administrative or Supervisor Rights Required ........................................................... 26
Planning Concepts for eControl Create ......................................................................... 27
Building the Source Objects ........................................................................................ 27
Build the Create Forms ............................................................................................... 28
How to remove an existing field ............................................................................. 30
How to add a new field ......................................................................................... 30
How to change the type of an existing field ............................................................. 31
Modify Details – Common Settings ......................................................................... 32
Modify Details – (Type: Text) ................................................................................ 33
Modify Details – (Type: Autocompletion) ................................................................. 33
Modify Details – (Type: Pick List) ........................................................................... 35
Modify Details – (Type: Multi-select list) ................................................................. 36
Build the Create Profiles ............................................................................................. 36
Add Create Profile Folders ..................................................................................... 37
Build a Simple Create Profile ................................................................................. 38
Edit a Create Profile ............................................................................................. 40
Copy Additional Create Profiles .............................................................................. 41
Build Group and Contact Create Profiles .................................................................. 44
Build Linked Create Profiles ................................................................................... 44

eControl 3.5 for eDirectory & GroupWise Admin Guide
www.omni-ts.com
Revised: June 11, 2010 © 2009-10 Omni Technology Solutions, Inc. Page 3 of 68
Configure the Self Service Module ....................................................................... 48
How it Works ............................................................................................................ 48
No Administrative or Supervisor Rights Required ........................................................... 48
Planning Concepts for eControl Self-Service .................................................................. 48
Enable and Configure Forgot Password.......................................................................... 49
Configure Self-Service Forms ...................................................................................... 50
Create and Configure a Self-Service Assignment ........................................................... 51
Configure the Audit Module ................................................................................. 56
How it Works ............................................................................................................ 56
No Administrative or Supervisor Rights Required ........................................................... 56
Manage Activity Report Settings .................................................................................. 56
Create and Configure an Audit Assignment ................................................................... 57
Modify an Audit Assignment......................................................................................... 58
Enable the Audit Assignments ..................................................................................... 59
Additional eControl Administration Panel Features ............................................. 60
eControl Service Account Only Features ....................................................................... 60
Access Audit Trail Logs ............................................................................................... 60
Access System Logs ................................................................................................... 62
Manage License Information ....................................................................................... 63
Request a License ...................................................................................................... 64
Apply a License ......................................................................................................... 64
Edit the Login Page .................................................................................................... 65
Support for eControl ............................................................................................ 66
Reporting a Technical Issue ........................................................................................ 66
Upgrade and Maintenance Support Agreements ............................................................. 66
Contacting Support .................................................................................................... 67
Online Resources ....................................................................................................... 68

eControl 3.5 for eDirectory & GroupWise Admin Guide
www.omni-ts.com
Revised: June 11, 2010 © 2009-10 Omni Technology Solutions, Inc. Page 4 of 68
How eControl Works
eControl 3.5 provides a web-based directory and email service management system with
special features designed to empower non-IT staff with the ability to manage users without
requiring SUPERVISOR or ADMINISTRATOR rights! With eControl, concerns such as WAN
bandwith, distance, time-zones, training of IT staff, improving helpdesk effectiveness, costs, and security are overcome.
eControl installs as a Windows service that can connect directly to the configured mail and
directory systems via native API, SOAP and/or LDAP calls. This enables support staff to
manage mixed and multiple Active Directory, Exchange, eDirectory and GroupWise systems
from a single web interface. eControl 3.5 now supports 3rd Party Extensions integrating SQL database systems.

eControl 3.5 for eDirectory & GroupWise Admin Guide
www.omni-ts.com
Revised: June 11, 2010 © 2009-10 Omni Technology Solutions, Inc. Page 5 of 68
eControl comprises four feature modules that are enabled through the licensing process and provisioned in the administration panel:
Types of Types of Types of Types of eControl AeControl AeControl AeControl Accessccessccessccess
Access to the eControl web portal is limited to users who have been assigned some type of
access:
� eControl Service Account – accounts that are configured in the Riva eDirectory or
Active Directory connections. These accounts have supervisory rights / permissions to
their corresponding eDirectory tree or Active Directory domain. These accounts have
automatic access to the “Administration” panel.
� eControl Delegated Administrators – eDirectory or Active Directory group members
assigned “Delegated Access” do not need supervisor rights / permissions to their
corresponding eDirectory trees or Active Directory domains. These accounts are
granted access to the “Administration” panel.
� eControl Operators – eDirectory or Active Directory groups that are assigned to a task
collection, create profile or audit view assignment. These accounts can perform
delegated administrative tasks in the “Manage”, “Create”, or “Audit” panels.
� eControl Users - eDirectory or Active Directory groups that are assigned to a user self-
service assignment. These accounts can change their own password, configure ‘Forgot
password’ settings, and personal information.

eControl 3.5 for eDirectory & GroupWise Admin Guide
www.omni-ts.com
Revised: June 11, 2010 © 2009-10 Omni Technology Solutions, Inc. Page 6 of 68
Login toLogin toLogin toLogin to the the the the eControl eControl eControl eControl PortalPortalPortalPortal
To access the eControl web portal login:
� http://localhost using a web browser on the eControl host server
� http://<eControl host server IP address or DNS name> from any desktop web browser
• Username – provide the login name configured to the eDirectory connection configured
during the installation. If there are multiple AD connections, choose the domain where
the eControl management accounts are located.
• Language – This will appear if eControl was installed with multiple language support.
The visible language of the eControl web pages will be localized to the language selected
during the login.
Access the Access the Access the Access the eControl Administration PaneleControl Administration PaneleControl Administration PaneleControl Administration Panel
eControl is administered using an “Administration” panel available only to eControl service
accounts and delegated administrators. Only those accounts will see the Administration link
in the menu tool bar.
eControl 3.5 for eDirectory & GroupWise Admin Guide
www.omni-ts.com
Revised: June 11, 2010 © 2009-10 Omni Technology Solutions, Inc. Page 7 of 68
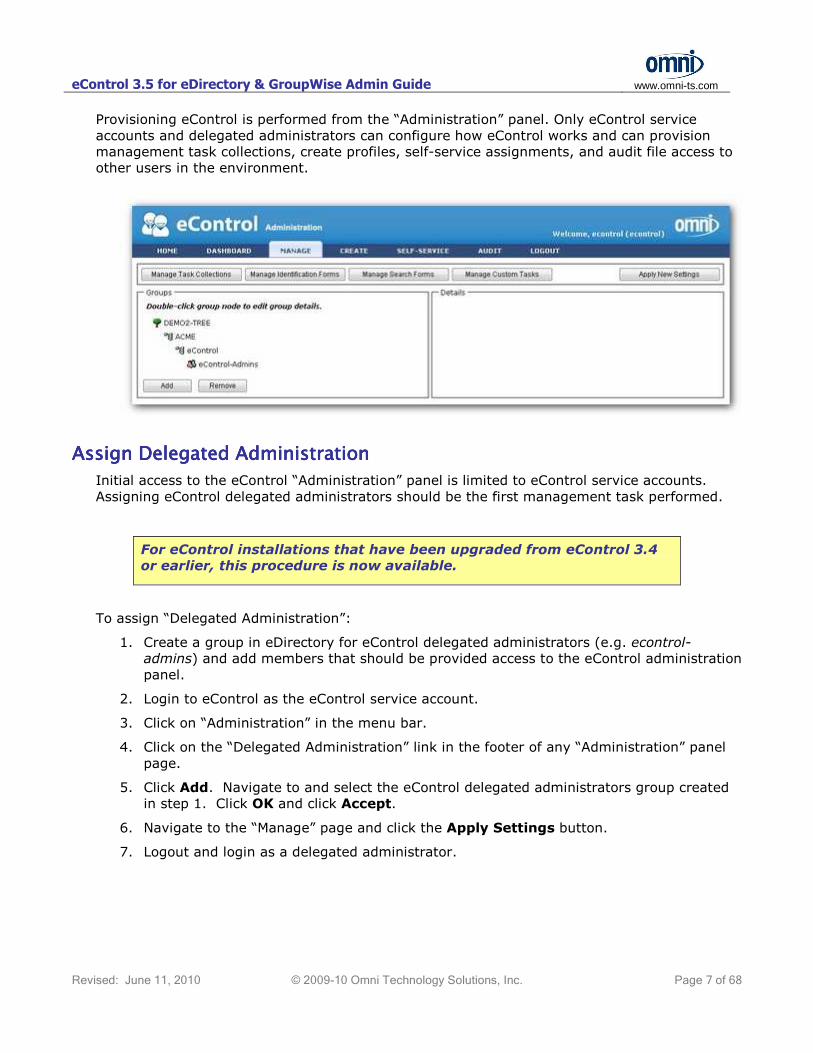
Provisioning eControl is performed from the “Administration” panel. Only eControl service
accounts and delegated administrators can configure how eControl works and can provision
management task collections, create profiles, self-service assignments, and audit file access to
other users in the environment.
Assign Delegated AdministrationAssign Delegated AdministrationAssign Delegated AdministrationAssign Delegated Administration
Initial access to the eControl “Administration” panel is limited to eControl service accounts.
Assigning eControl delegated administrators should be the first management task performed.
For eControl installations that have been upgraded from eControl 3.4
or earlier, this procedure is now available.
To assign “Delegated Administration”:
1. Create a group in eDirectory for eControl delegated administrators (e.g. econtrol-
admins) and add members that should be provided access to the eControl administration
panel.
2. Login to eControl as the eControl service account.
3. Click on “Administration” in the menu bar.
4. Click on the “Delegated Administration” link in the footer of any “Administration” panel
page.
5. Click Add. Navigate to and select the eControl delegated administrators group created
in step 1. Click OK and click Accept.
6. Navigate to the “Manage” page and click the Apply Settings button.
7. Logout and login as a delegated administrator.
eControl 3.5 for eDirectory & GroupWise Admin Guide
www.omni-ts.com
Revised: June 11, 2010 © 2009-10 Omni Technology Solutions, Inc. Page 8 of 68
Configure the Manage ModuleConfigure the Manage ModuleConfigure the Manage ModuleConfigure the Manage Module
The "Manage" module provides web-based Directory object management tasks for eControl
operators.
HHHHow it Worksow it Worksow it Worksow it Works
For the Manage Module:
1. Task collections are created and configured. This defines what tasks can be carried out.
2. Task collections are assigned to Directory groups. This defines who has the authority to
carry out the assigned tasks in a task collection (we refer to this as "Task Authority").
3. Search paths are assigned to each Task Authority and task collection assignment. This
determines where (in which containers and therefore against which users and groups)
the assigned tasks can be carried out (we refer to this as "Search Authority").
Task Collections are based on the types of tasks available for the type of Directory and email
system being managed. eControl 3 currently supports:
• eDirectory 8.5+
• GroupWise 5.5 EP+
Calculating Cumulative AutCalculating Cumulative AutCalculating Cumulative AutCalculating Cumulative Authoritieshoritieshoritieshorities
Important concepts to remember are:
• A user can be a member of multiple groups
• Task collections are assigned to groups
• A task collection can be assigned to more than one group
• A group can be assigned only one task collection but can be configured for multiple
search contexts and exclusions
• Search contexts can be specific to a single container or can allow for sub-containers to
be searched and containers can be excluded from a search context
• Each task collection assignment may be assigned to multiple search contexts in multiple
Directory systems
The cumulative affect is that a single user can be assigned conflicting task sets (e.g. a
restricted set from task collection “A” and a fully-enabled task set from task collection “B”) for
the same group of target users being managed. In that case, eControl calculates:
• Search Authority - the cumulative list of all containers in all managed directories that
can be searched by the operator, and
• Task Authority - the cumulative list of tasks that can be performed by the operator
against the selected user is based on adding together all of the assigned tasks for every
task collection that applies to the selected user. eControl will apply the least restrictive
(most permissive) set of tasks.
If an eControl operator is assigned to a “Task Collection”, the “Manage” tab will be visible when
they login to the eControl portal. Search operations will only work for those search contexts
defined in the task collection that has been assigned to the group the Operator is a member of.
This limits the scope of task ability for each eControl operator to assigned task collections.

eControl 3.5 for eDirectory & GroupWise Admin Guide
www.omni-ts.com
Revised: June 11, 2010 © 2009-10 Omni Technology Solutions, Inc. Page 9 of 68
No Administrative or Supervisor Rights RequiredNo Administrative or Supervisor Rights RequiredNo Administrative or Supervisor Rights RequiredNo Administrative or Supervisor Rights Required
User accounts that will be enabled to use eControl to manage network users and resources
require NO supervisor or administrator rights in the file system, in the Directory or to email
systems being managed. Management tasks are assigned to eDirectory or Active Directory
groups through the eControl Administration panel. Any member of a group that has been
assigned a specified task can carry out that task.
Planning for eControl ManagePlanning for eControl ManagePlanning for eControl ManagePlanning for eControl Manage
To implement eControl ‘Manage’, some time must be taken to create and configure objects in
advance. Some things to consider are:
• What different types of administration do you want to implement:
o Will there be system-wide administrators?
o Will there be container specific administrators?
o What other types of administrators do you want to enable ... for example:
� IT help desk operators who can enable/disable accounts, change
passwords, and modify group membership
� Office Managers who can enable/disable accounts and change passwords
� Regional Administrators who can perform user and group management
across multiple locations
• What types of tasks do you want each type of administration to perform? This will help
to define task collections.
• Where in the Directory will each type of administration be able to perform assigned
tasks? This will help to determine “scope” defined as the “search context” (the parent
and child containers) that can be assigned to each task collection assignment.
Planning ConceptsPlanning ConceptsPlanning ConceptsPlanning Concepts for Task Collections for Task Collections for Task Collections for Task Collections
Careful planning is required to determine where to add, remove or adjust task.
When looking at what task collections to create, it is helpful to use the following strategy:
• STEP 1 – Determine which containers are going to be managed by eControl.
• STEP 2 – Determine the types of task collections that are needed to support the desired
user account and email account management strategy, e.g. all tasks, tasks for office
managers, tasks for user support staff. In this step, you should always have an “All
Tasks” collection and a list of additional task collections that are required. Each task
collection should have the exact set of tasks to be configured in that collection. (e.g. a
set of minimal tasks that a junior level help desk operator can perform). Be detailed with
this step and decide on an appropriate naming strategy for each task collection.
• STEP 3 – Determine which group of “operators” will be assigned to each task collection.
You can choose existing Directory groups or create additional user groups as required.
Decide on an appropriate naming strategy for each “eControl” group.
After the plan has been completed, the next step is to create the new task collections and
assign them to groups to match the user account management strategy.

eControl 3.5 for eDirectory & GroupWise Admin Guide
www.omni-ts.com
Revised: June 11, 2010 © 2009-10 Omni Technology Solutions, Inc. Page 10 of 68
Configure Super Administrator Task CollectionConfigure Super Administrator Task CollectionConfigure Super Administrator Task CollectionConfigure Super Administrator Task Collection
The recommended first task after assigning “Delegated Administration” is to enable system-
wide administrators (e.g. “econtrol-admins” group). This includes:
• Modify the “All Tasks” task collection to select appropriate tasks, and
• Assign the “All Tasks” task collection to the “econtrol-admins” group.
Modify the “All Tasks” Task CollectionModify the “All Tasks” Task CollectionModify the “All Tasks” Task CollectionModify the “All Tasks” Task Collection
The recommended first task after the initial login to the administration panel is to modify the
“All Tasks” task collection to ensure that the desired tasks are enabled:
1. Login into eControl as the eControl service account.
2. Select the Administration tab in the top tool bar. This will take you to the eControl
Administration panel.
3. Select the Manage tab in the top tool bar. This will take you to the administration panel
for the "Manage" module.
4. To modify the task collection to be assigned to the econtrol-admins group, click the
Manage Task Collections button. The “All Tasks” task collection will be selected and
there are no groups listed as having this task collection assigned to them.
Click on “eDirectory” to display the full list of available tasks.
5. Scroll down through the available tasks and select the ones that should be made
available to the eControl system-wide administrators.

eControl 3.5 for eDirectory & GroupWise Admin Guide
www.omni-ts.com
Revised: June 11, 2010 © 2009-10 Omni Technology Solutions, Inc. Page 11 of 68
6. Click the Update button to record the setting changes. Click the OK button to close the
“Success” window and the click the Save button to save the changes and close the
Manage Task Collections window.
Assign the “All Tasks” Task CollectionAssign the “All Tasks” Task CollectionAssign the “All Tasks” Task CollectionAssign the “All Tasks” Task Collection
Once the desired tasks have been selected, the “All Tasks” task collection must be assigned to
the the system-wide administrator group (e.g. “econtrol-admins”):
1. In the “Groups” pane, click the Add button.
2. Ensure that the correct Directory is displayed for the “System Name”. Beside the
“Group or Container:” field, click the browse icon open the Directory browse window.
Navigate and select the system-wide administrators group and click the OK button.
3. In the “Add Group or Container” window, click Accept.

eControl 3.5 for eDirectory & GroupWise Admin Guide
www.omni-ts.com
Revised: June 11, 2010 © 2009-10 Omni Technology Solutions, Inc. Page 12 of 68
4. The selected system-wide administrators group will now appear in the “Groups” pane
and the “Group Information” window will automatically open.
In the "Group Information" window below "Search Contexts" click the Add button to
select the search contexts which also define the “scope” of administration for this
assignment.

eControl 3.5 for eDirectory & GroupWise Admin Guide
www.omni-ts.com
Revised: June 11, 2010 © 2009-10 Omni Technology Solutions, Inc. Page 13 of 68
5. In the “Add Search Context” window, use the drop-down button to select the System
Name and click the browse icon to select the top level container for the search context
(e.g. o=ACME). Click the Ok button to add this search context.
Click the down arrows beside the “Advanced …” field.
• Select Is excluded? to specify that this container is excluded from the search
context (used to create exclusion filters).
• Select Is browsable? To enable viewing this container in a tree-view pane for
object searching.
• Object classes: is used to add a list of object types that can be searched and
displayed.

eControl 3.5 for eDirectory & GroupWise Admin Guide
www.omni-ts.com
Revised: June 11, 2010 © 2009-10 Omni Technology Solutions, Inc. Page 14 of 68
If Add another search context was checked, when the Accept button is clicked, the
container will be added to the search list. At the “Success” window, click OK, and the
“Add Search Context” window will open again to allow the selection of another
container. With the final container to be added, uncheck the Add another search
context option and then click Accept.
6. If a container was missed, repeat steps 4 and 5 to add as many additional search
contexts as required for all the Directory systems that are being managed.
7. Select the “Mail Stores” tab to manage the available email systems.
8. Ensure that the “Enabled” is checked for the email system listed.
9. Click the Save button to save the task collection assignment to the sys-wide
administrators group.
10. Click on the “Group Members” tab to view the users that are members of the group
assigned to the task collection.
eControl 3.5 for eDirectory & GroupWise Admin Guide
www.omni-ts.com
Revised: June 11, 2010 © 2009-10 Omni Technology Solutions, Inc. Page 15 of 68
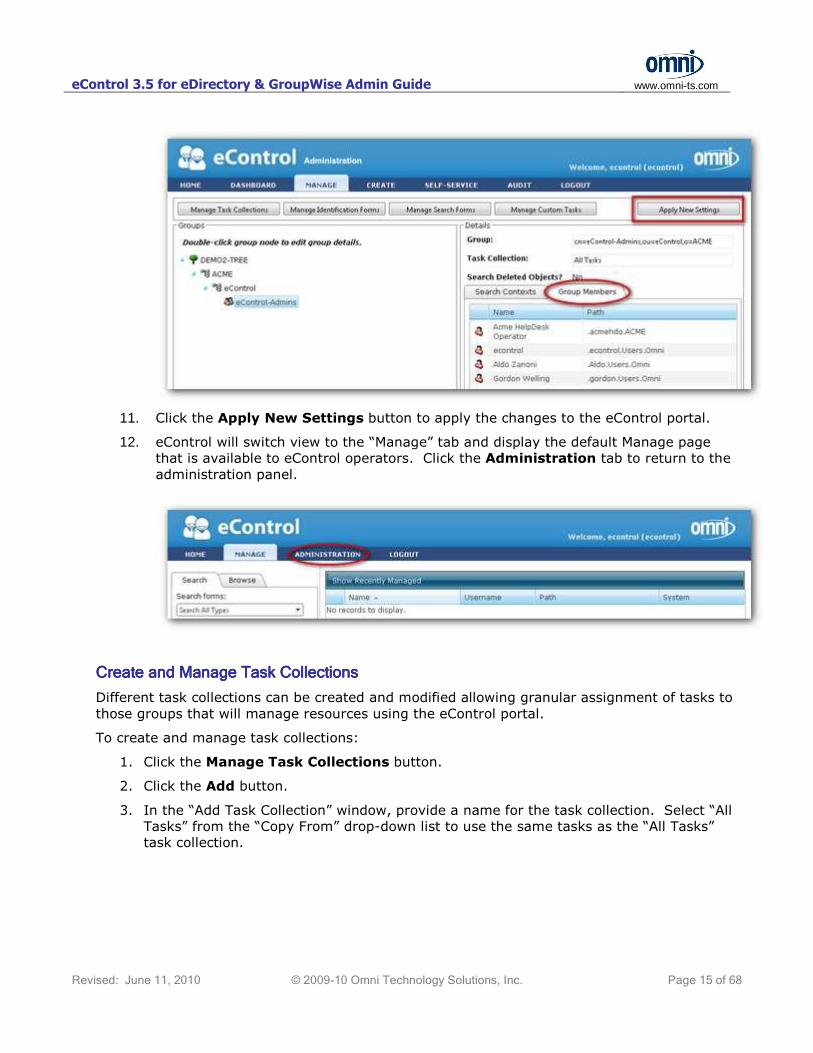
11. Click the Apply New Settings button to apply the changes to the eControl portal.
12. eControl will switch view to the “Manage” tab and display the default Manage page
that is available to eControl operators. Click the Administration tab to return to the
administration panel.
Create and Manage Task CollectionsCreate and Manage Task CollectionsCreate and Manage Task CollectionsCreate and Manage Task Collections
Different task collections can be created and modified allowing granular assignment of tasks to
those groups that will manage resources using the eControl portal.
To create and manage task collections:
1. Click the Manage Task Collections button.
2. Click the Add button.
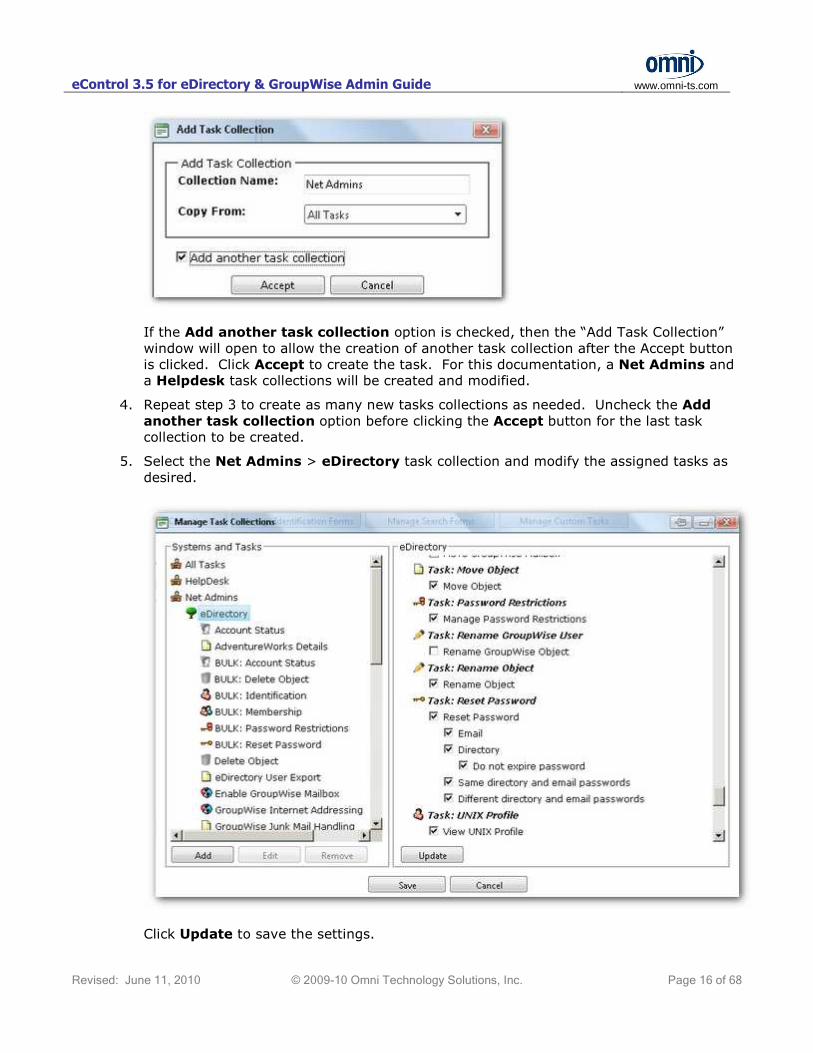
3. In the “Add Task Collection” window, provide a name for the task collection. Select “All
Tasks” from the “Copy From” drop-down list to use the same tasks as the “All Tasks”
task collection.
eControl 3.5 for eDirectory & GroupWise Admin Guide
www.omni-ts.com
Revised: June 11, 2010 © 2009-10 Omni Technology Solutions, Inc. Page 16 of 68
If the Add another task collection option is checked, then the “Add Task Collection”
window will open to allow the creation of another task collection after the Accept button
is clicked. Click Accept to create the task. For this documentation, a Net Admins and
a Helpdesk task collections will be created and modified.
4. Repeat step 3 to create as many new tasks collections as needed. Uncheck the Add
another task collection option before clicking the Accept button for the last task
collection to be created.
5. Select the Net Admins > eDirectory task collection and modify the assigned tasks as
desired.
Click Update to save the settings.

eControl 3.5 for eDirectory & GroupWise Admin Guide
www.omni-ts.com
Revised: June 11, 2010 © 2009-10 Omni Technology Solutions, Inc. Page 17 of 68
6. Select the HelpDesk > eDirectory task collection and modify the assigned tasks as
desired.
Click Update to save the settings.
7. Click Save to save all the new task collections and close the “Manage Task Collection” window.
Assign Task CollectionsAssign Task CollectionsAssign Task CollectionsAssign Task Collections
The “Manage” module depends on the assignment of task collections. Observe the following
considerations when assigning a task collection:
• A task collection can be assigned to multiple groups.
• A group is limited to one task collection assignment.
• Each task collection can be assigned more than one search context. The combination of
all Directory containers in all search contexts assigned to a task collection define the
management “scope” of that task collection. A member of an group assigned to a task
collection is limited to managing those objects that are “in scope” or exist in the path of
the assigned search contexts.
To assign task collections:
1. Add one or more Directory groups to the list.
2. For each group, assign a task collection.
eControl 3.5 for eDirectory & GroupWise Admin Guide
www.omni-ts.com
Revised: June 11, 2010 © 2009-10 Omni Technology Solutions, Inc. Page 18 of 68
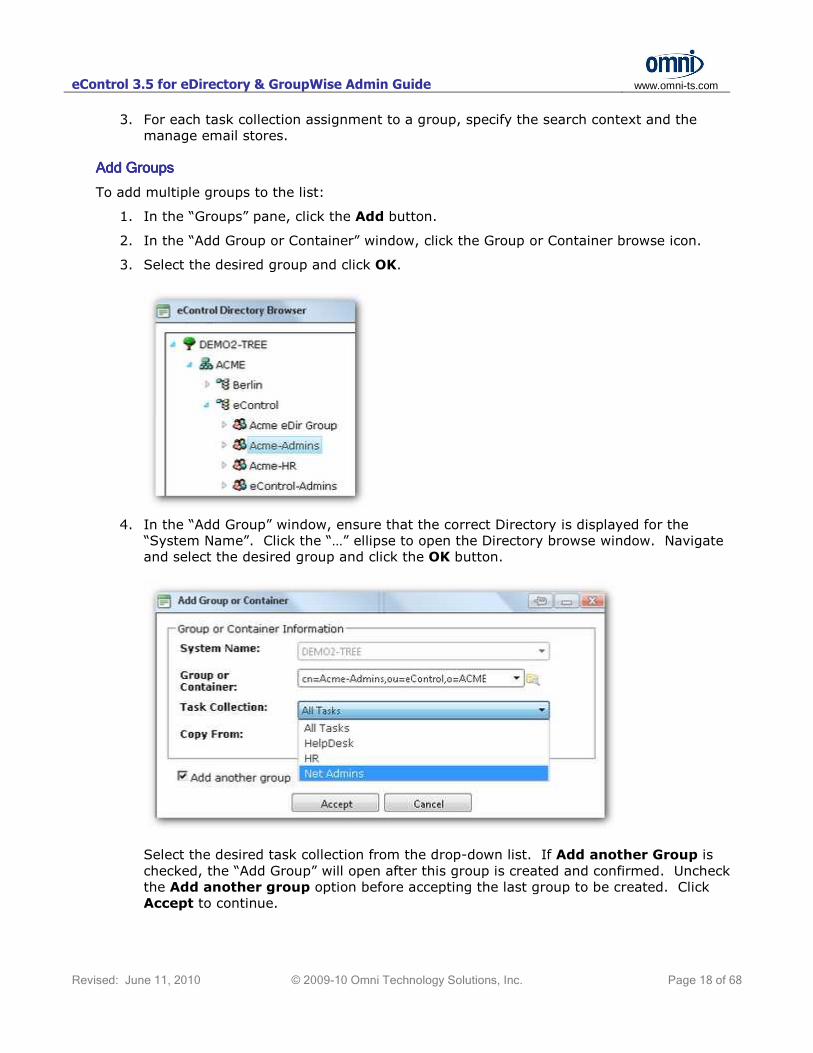
3. For each task collection assignment to a group, specify the search context and the
manage email stores.
Add GroupsAdd GroupsAdd GroupsAdd Groups
To add multiple groups to the list:
1. In the “Groups” pane, click the Add button.
2. In the “Add Group or Container” window, click the Group or Container browse icon.
3. Select the desired group and click OK.
4. In the “Add Group” window, ensure that the correct Directory is displayed for the “System Name”. Click the “…” ellipse to open the Directory browse window. Navigate
and select the desired group and click the OK button.
Select the desired task collection from the drop-down list. If Add another Group is
checked, the “Add Group” will open after this group is created and confirmed. Uncheck
the Add another group option before accepting the last group to be created. Click
Accept to continue.
eControl 3.5 for eDirectory & GroupWise Admin Guide
www.omni-ts.com
Revised: June 11, 2010 © 2009-10 Omni Technology Solutions, Inc. Page 19 of 68
Configure the Task Collection AssignmentsConfigure the Task Collection AssignmentsConfigure the Task Collection AssignmentsConfigure the Task Collection Assignments
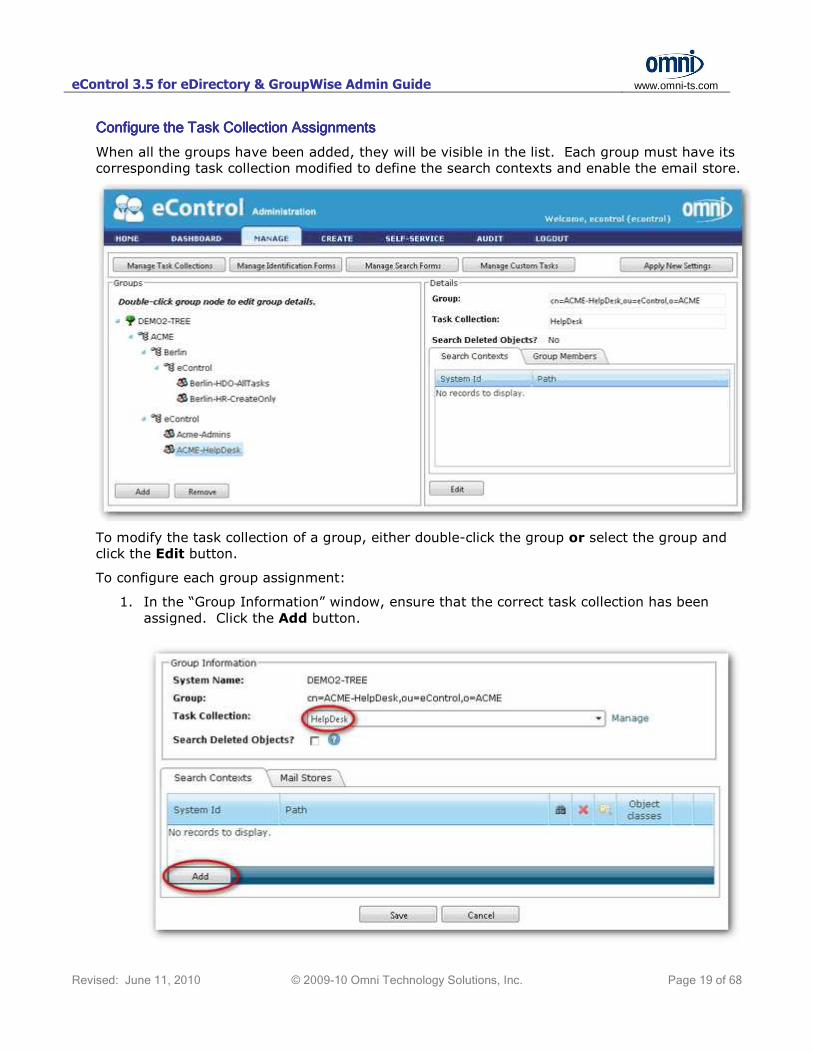
When all the groups have been added, they will be visible in the list. Each group must have its
corresponding task collection modified to define the search contexts and enable the email store.
To modify the task collection of a group, either double-click the group or select the group and
click the Edit button.
To configure each group assignment:
1. In the “Group Information” window, ensure that the correct task collection has been
assigned. Click the Add button.
eControl 3.5 for eDirectory & GroupWise Admin Guide
www.omni-ts.com
Revised: June 11, 2010 © 2009-10 Omni Technology Solutions, Inc. Page 20 of 68
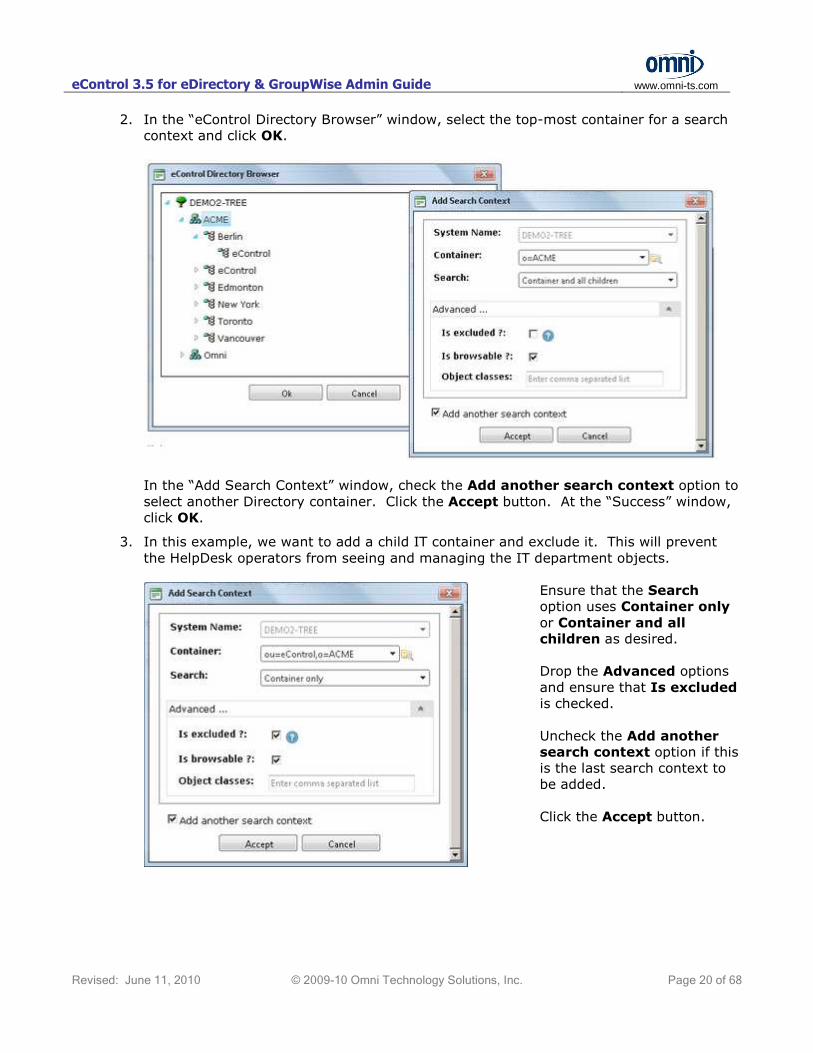
2. In the “eControl Directory Browser” window, select the top-most container for a search
context and click OK.
In the “Add Search Context” window, check the Add another search context option to
select another Directory container. Click the Accept button. At the “Success” window,
click OK.
3. In this example, we want to add a child IT container and exclude it. This will prevent
the HelpDesk operators from seeing and managing the IT department objects.
Ensure that the Search
option uses Container only
or Container and all
children as desired.
Drop the Advanced options
and ensure that Is excluded
is checked.
Uncheck the Add another
search context option if this
is the last search context to
be added.
Click the Accept button.
eControl 3.5 for eDirectory & GroupWise Admin Guide
www.omni-ts.com
Revised: June 11, 2010 © 2009-10 Omni Technology Solutions, Inc. Page 21 of 68
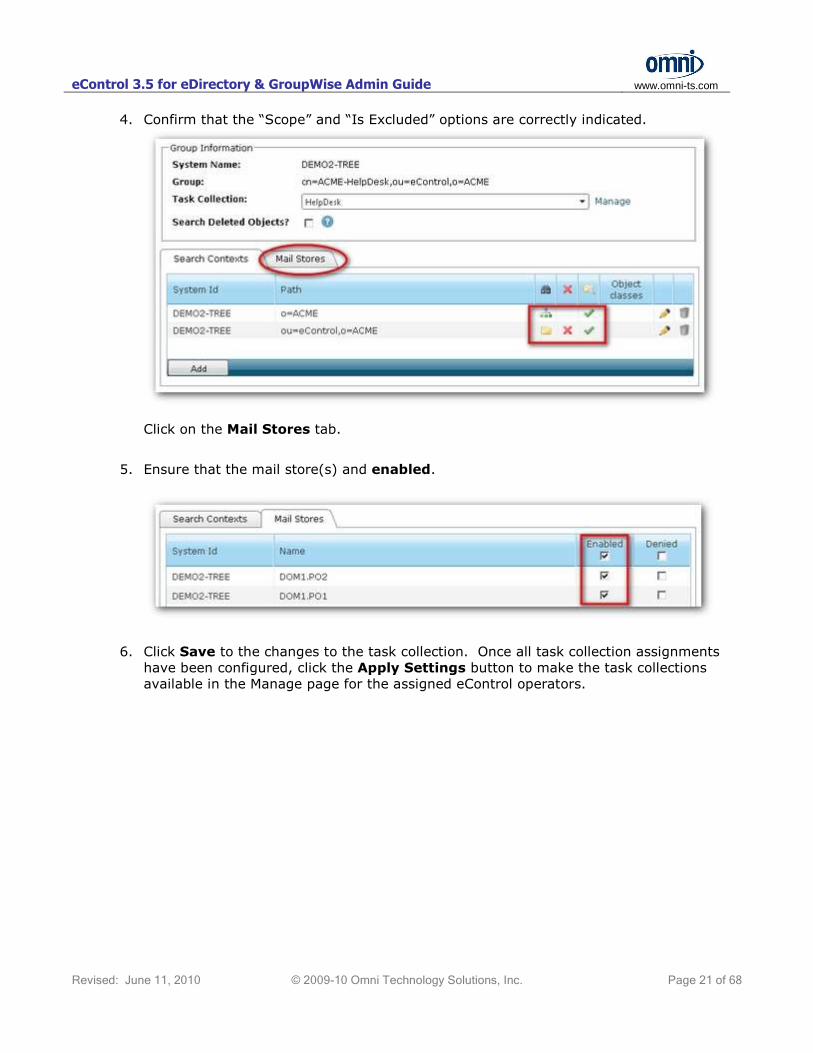
4. Confirm that the “Scope” and “Is Excluded” options are correctly indicated.
Click on the Mail Stores tab.
5. Ensure that the mail store(s) and enabled.
6. Click Save to the changes to the task collection. Once all task collection assignments
have been configured, click the Apply Settings button to make the task collections
available in the Manage page for the assigned eControl operators.
eControl 3.5 for eDirectory & GroupWise Admin Guide
www.omni-ts.com
Revised: June 11, 2010 © 2009-10 Omni Technology Solutions, Inc. Page 22 of 68
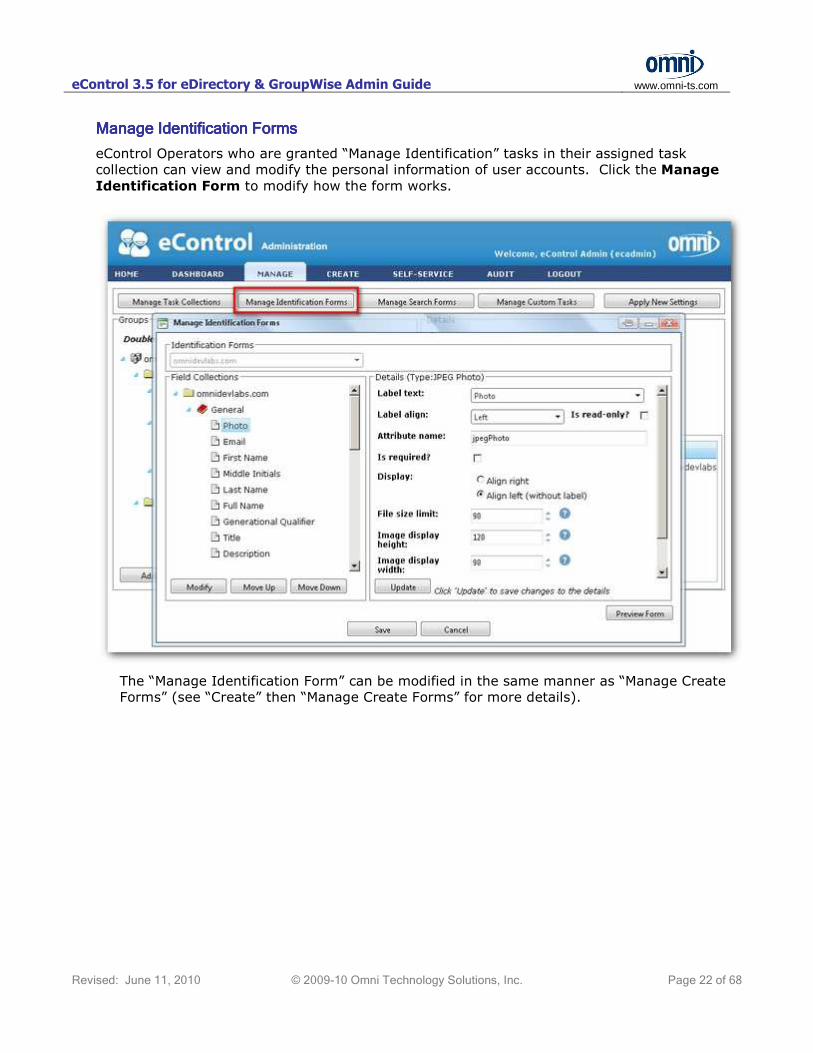
Manage Identification FormsManage Identification FormsManage Identification FormsManage Identification Forms
eControl Operators who are granted “Manage Identification” tasks in their assigned task
collection can view and modify the personal information of user accounts. Click the Manage
Identification Form to modify how the form works.
The “Manage Identification Form” can be modified in the same manner as “Manage Create
Forms” (see “Create” then “Manage Create Forms” for more details).

eControl 3.5 for eDirectory & GroupWise Admin Guide
www.omni-ts.com
Revised: June 11, 2010 © 2009-10 Omni Technology Solutions, Inc. Page 23 of 68
The important differences is that with “Manage Identification Form”, the Headers match the
Tabs in the actual form and the Fields match the Input Fields in the actual form.
eControl 3.5 for eDirectory & GroupWise Admin Guide
www.omni-ts.com
Revised: June 11, 2010 © 2009-10 Omni Technology Solutions, Inc. Page 24 of 68
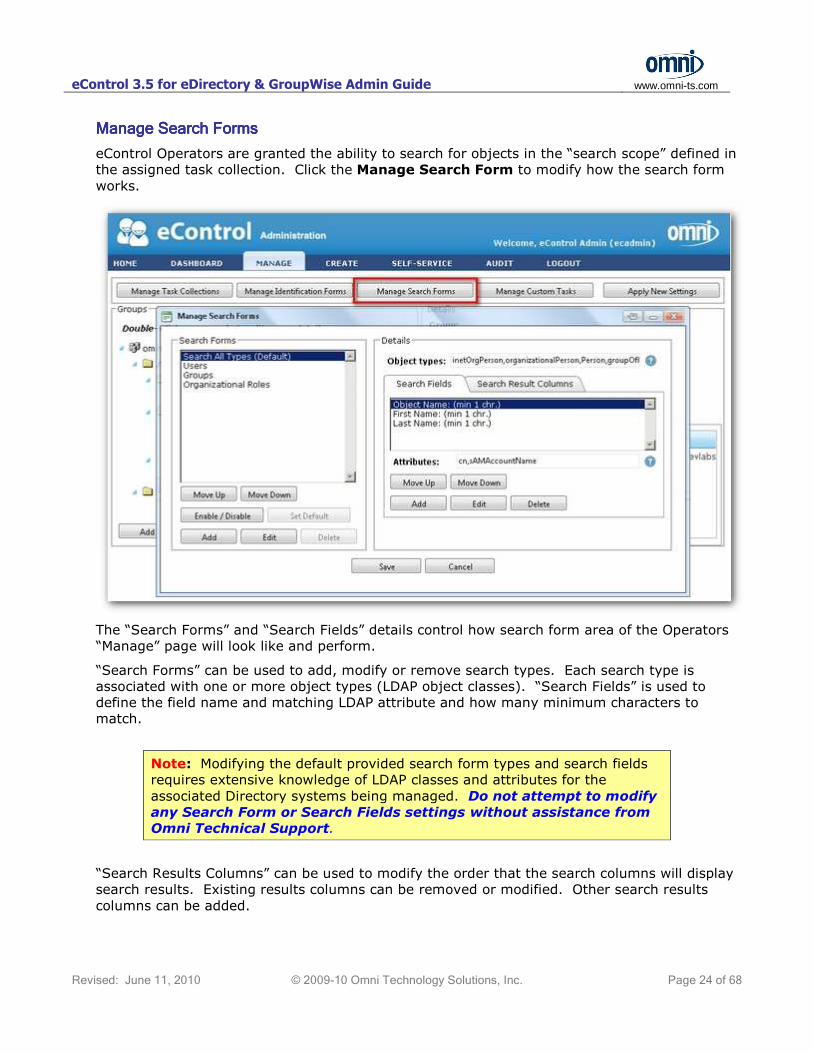
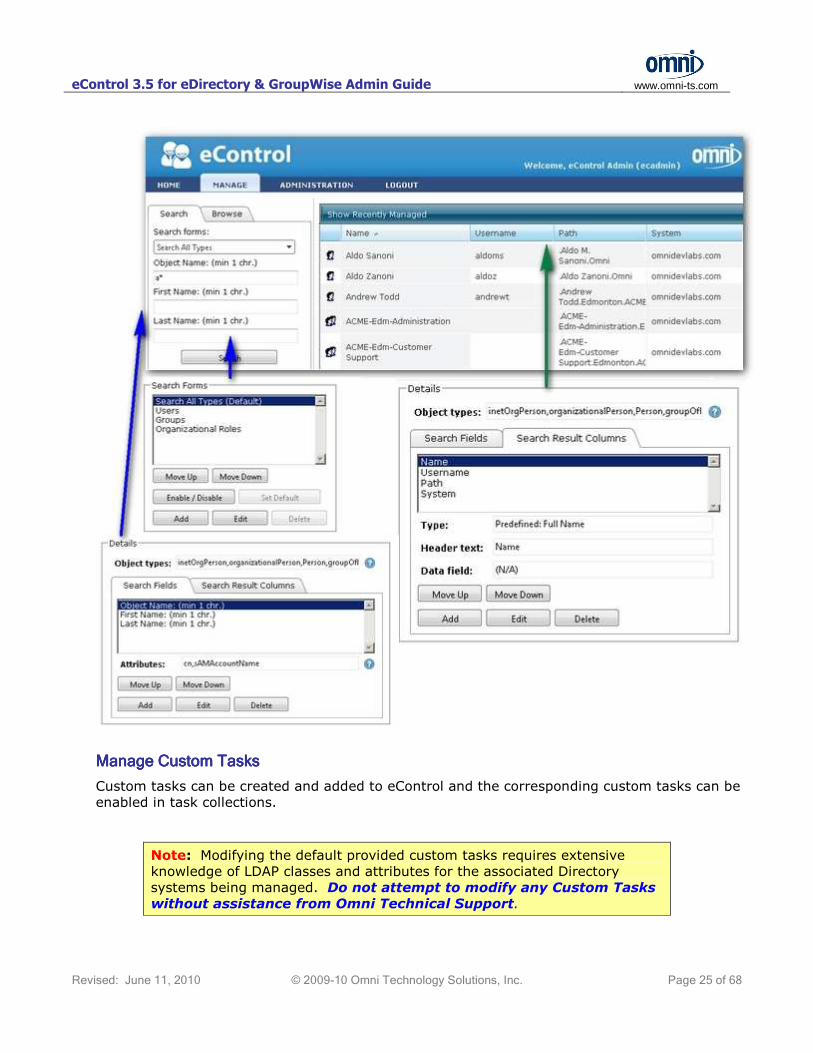
Manage Search FormsManage Search FormsManage Search FormsManage Search Forms
eControl Operators are granted the ability to search for objects in the “search scope” defined in
the assigned task collection. Click the Manage Search Form to modify how the search form
works.
The “Search Forms” and “Search Fields” details control how search form area of the Operators
“Manage” page will look like and perform.
“Search Forms” can be used to add, modify or remove search types. Each search type is
associated with one or more object types (LDAP object classes). “Search Fields” is used to
define the field name and matching LDAP attribute and how many minimum characters to
match.
Note: Modifying the default provided search form types and search fields
requires extensive knowledge of LDAP classes and attributes for the
associated Directory systems being managed. Do not attempt to modify
any Search Form or Search Fields settings without assistance from
Omni Technical Support.
“Search Results Columns” can be used to modify the order that the search columns will display
search results. Existing results columns can be removed or modified. Other search results
columns can be added.
eControl 3.5 for eDirectory & GroupWise Admin Guide
www.omni-ts.com
Revised: June 11, 2010 © 2009-10 Omni Technology Solutions, Inc. Page 25 of 68
Manage Custom TasksManage Custom TasksManage Custom TasksManage Custom Tasks
Custom tasks can be created and added to eControl and the corresponding custom tasks can be
enabled in task collections.
Note: Modifying the default provided custom tasks requires extensive
knowledge of LDAP classes and attributes for the associated Directory
systems being managed. Do not attempt to modify any Custom Tasks
without assistance from Omni Technical Support.
eControl 3.5 for eDirectory & GroupWise Admin Guide
www.omni-ts.com
Revised: June 11, 2010 © 2009-10 Omni Technology Solutions, Inc. Page 26 of 68
Configure the Configure the Configure the Configure the CreateCreateCreateCreate Module Module Module Module
The "Create" module provides web-based enable eControl operators to create objects within the
Directory(s) being managed. Complete granular control is provided through the eControl
Administration panel where the eControl administrator can control what objects are created by
which group of users and in which containers in the Directory.
HHHHow it Worksow it Worksow it Worksow it Works
For the Create Module:
1. Source objects are created in the Directory(s). This provides an object that can be used as a template for creating objects of the same type.
2. “Create forms” are built and configured. Those forms will be used by eControl
operators to create new objects.
3. “Create Profiles” are built which define:
• the create form to use;
• the source object (the template) to use;
• the target location where the new objects will be created;
• whether bulk create will be enabled;
• which eDirectory groups can be assigned to those create objects; and
• which additional groups to make the new objects a member of.
If an eControl operator is assigned to a “Create Profile”, the “Create” tab will be visible when
they login to the eControl portal. Operators will only be able to see and use those “Create
Profiles” that they have been assigned to.
Types of Objects that can be CreatedTypes of Objects that can be CreatedTypes of Objects that can be CreatedTypes of Objects that can be Created
The Create Module supports the individual and bulk creation of:
• eDirectory user objects – whatever common settings are applied to the base object will
be copied to the new user created including GroupWise account settings, home directory
settings, and group memberships
• eDirectory objects where a base object has been created in the Directory that can be
used as a template.
No Administrative or Supervisor Rights RequiredNo Administrative or Supervisor Rights RequiredNo Administrative or Supervisor Rights RequiredNo Administrative or Supervisor Rights Required
Directory groups will be assigned to create new objects and members of those groups require
NO supervisor rights or administrator-level permissions in the file system, in the Directory or to
email systems being managed. Create tasks are performed by the eControl service accounts on
behalf of those users that have been assigned to a create profile.

eControl 3.5 for eDirectory & GroupWise Admin Guide
www.omni-ts.com
Revised: June 11, 2010 © 2009-10 Omni Technology Solutions, Inc. Page 27 of 68
Planning ConceptsPlanning ConceptsPlanning ConceptsPlanning Concepts for for for for eControl CreateeControl CreateeControl CreateeControl Create
Careful planning and preparations will result in the creation of the correctly functioning “create
profiles”. When looking at what create profiles to create, it is helpful to use the following
strategy:
• STEP 1 – Determine the target objects to be created in terms of context (location in the
Directory system) and the configuration of the new objects that will be created. For
user objects consider home directories, GroupWise account, common identification
information (like department, location, mailing address, telephone numbers, etc),
account profile, terminal services configuration, remote access settings, and group
memberships.
• STEP 2 – Create an appropriate source or base object to be used as a template that will
be used to create the new object. Since a Create Profile can specify a create form, a
target location, and group membership (for user objects), create the minimum number
of source objects needed. Focus on creating source objects that specify configurations
that can be common for all as many target objects as possible and specify unique
settings using the combination of a create form and create profile settings.
• STEP 3 – Determine which values the eControl operator must provide in the create form
when creating the new target object. Keep in mind that you may need different create
forms for the same target objects: one for single object creation and one for bulk
import. This step involves identifying the field definitions that will be mapped to the
target Directory system.
• STEP 4 – Determine which Directory group(s) will be assigned to use each create
profile.
Build the Source ObjectsBuild the Source ObjectsBuild the Source ObjectsBuild the Source Objects
Once planning and preparations have been completed, source objects that will be used as
templates for new objects need to be created. Consider the following factors:
• User objects – create source user objects that are common to a context and configure
the object with the common settings (e.g. home folder, terminal settings, common
identification information, common group memberships, etc). For example, if the
Directory has containers based on geographic location, and users are differentiated by
the group memberships (Sales or Marketing or Administration), create a single source
user object for that location. Unique information can be specified in the create form and
unique membership associations can be specified in the create profile. Using this
strategy a single user template object can be created for the “New York” container and
multiple create profiles such as “New York – Sales” and “New York – Administration” can
be created to meet unique requirements.
• Group type objects - there is not a lot of unique information that can be
pre-configured in a source group type object. Typically, a single source object for each
type can be created per eDirectory tree or replica partition.
As a best practice, it is recommended that:
• source objects are located in a ‘Resources’ child container inside the ‘eControl’ container,
and
• the ‘eControl’ container should be outside the scope of management for all task
collection assignments except for the eControl service account.

eControl 3.5 for eDirectory & GroupWise Admin Guide
www.omni-ts.com
Revised: June 11, 2010 © 2009-10 Omni Technology Solutions, Inc. Page 28 of 68
Build the Create FormsBuild the Create FormsBuild the Create FormsBuild the Create Forms
Once source objects have been created, create forms need to be built and configured. eControl
ships with 4 pre-built create forms which should not be modified in any way. Those create
forms are normally used as a source to create new unique create forms. The pre-built create
forms include:
• User (Active Directory) - not used in eDirectory only environments
• Group (Active Directory) - not used in eDirectory only environments
• User (eDirectory)
• Group (eDirectory)
To build a new create form for a user object:
1. In the Administration panel, select the “Create” tab.
2. Click the Manage Create Forms button.
3. In the "Manage Create Forms" window click the Add button in the "Forms" pane.
4. In the "Add Form" window, provide a descriptive name for a new form.
Enter a description for this form (optional). Select the applicable pre-built create form
as a source object from the Copy From: drop-down list and provide a suitable
description. Click the Accept button.
eControl 3.5 for eDirectory & GroupWise Admin Guide
www.omni-ts.com
Revised: June 11, 2010 © 2009-10 Omni Technology Solutions, Inc. Page 29 of 68
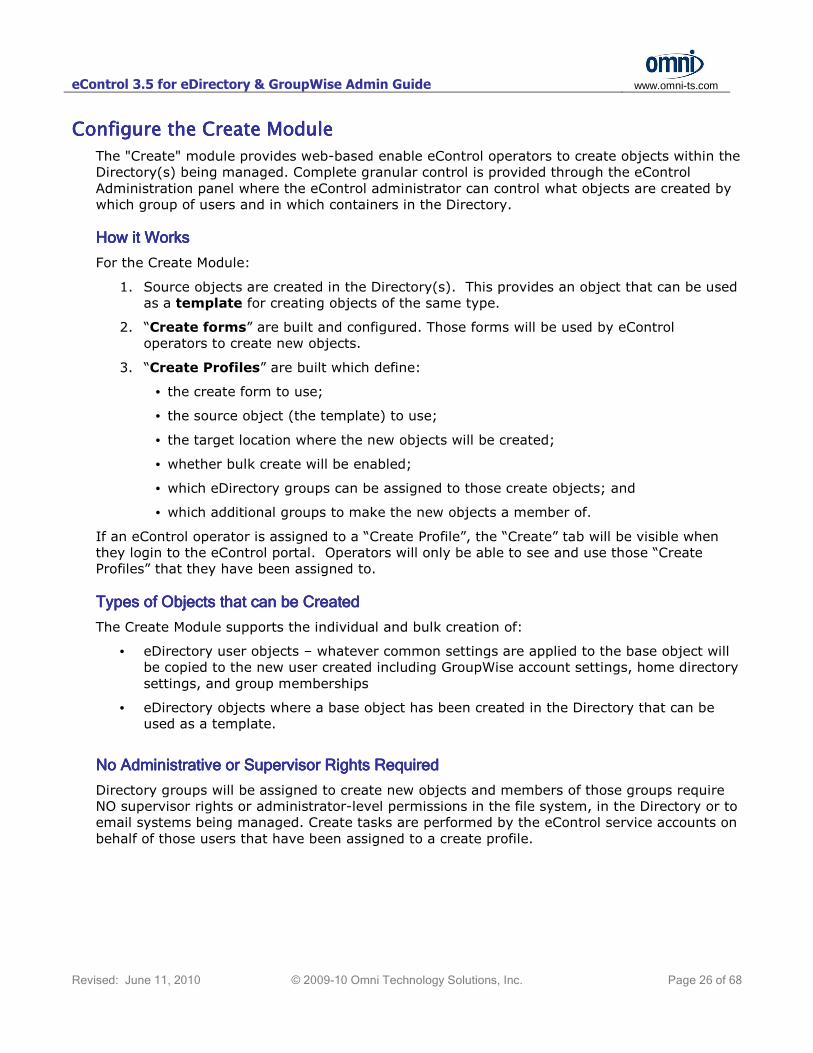
5. In the “Manage Create Forms” window, select the new create form (e.g. ACME eDir
User) from the forms drop-down list. Click the Save button to save the new create
form. You can then manage the create form:
The “Manage Create Form” is made up of three panels:
• The “Forms” panel allows the administrator to select the create form to manage.
In addition, the administrator can add a new create form, and edit or remove the
create form that is displayed in the form drop-down list.
• The “Field Collections” panel displays in a tree-view the fields that will be used
in the create form. Fields are contained in categories.
o An administrator can create a new category, edit the category currently
selected, move the category currently selected up or down (which changes
the order of categories as displayed in the create form), and remove an
existing category (that contains no fields).
o An administrator can create a new field, move a field up or down in the
current category (which changes the order of the fields as displayed in the
create form), change the type of a field, and can remove a field.
• The “Details” panel shows the unique information for each category or field.
This is where changes can be made and updated.
• Below the “Details” panel is a “Preview Form” button that can be used to
display a sample create form using the settings currently saved for that form.
4. Make the necessary modifications to the create form and click Update.
eControl 3.5 for eDirectory & GroupWise Admin Guide
www.omni-ts.com
Revised: June 11, 2010 © 2009-10 Omni Technology Solutions, Inc. Page 30 of 68
5. Use the Preview Form button to open a preview form and test the changes that have
been saved.
6. Click Save to save all changes to the create form and make it available to a create
profile.
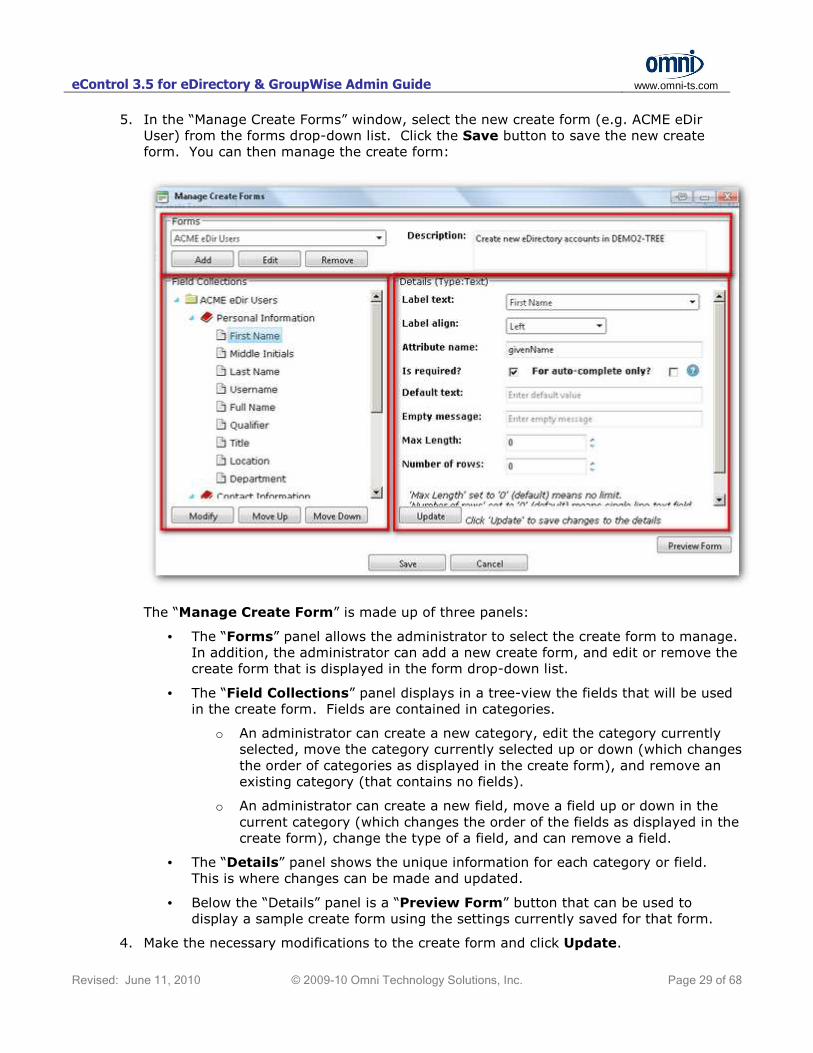
How to remove an existing fieldHow to remove an existing fieldHow to remove an existing fieldHow to remove an existing field
In some cases, existing fields will need to be removed, e.g. if the source user object that will be
assigned to the create profile that uses this create form is configured with an GroupWise
account, then the email field should be removed to prevent problems. Warning – do not
remove an existing field marked as “Required”. Those fields are required by eDirectory and if
removed, the object create process will fail.
To remove an existing field from a create form:
1. Right-click the field to be deleted and select “Remove”
Note - Removal of fields cannot
be undone. Once a field has been
removed the only way to add it
back is to manually recreate it.
2. Verify the removal action.
How to add a new fieldHow to add a new fieldHow to add a new fieldHow to add a new field
To add a new field to an existing create form:
1. Right-click the category which will contain the new field and select “New Field”

eControl 3.5 for eDirectory & GroupWise Admin Guide
www.omni-ts.com
Revised: June 11, 2010 © 2009-10 Omni Technology Solutions, Inc. Page 31 of 68
2. In the “Add Field” window:
• Select the label text from the drop-down list, or type in the desired label text.
• Provide the LDAP Attribute name that eControl will use to link the field to the
applicable eDirectory attribute for the object type. Refer to Novell documentation
for LDAP names for eDirectory attributes.
• Select the desired field type from the drop-down list. The most common are:
o Text used to record text values,
o AutoComplete used when values from other attributes will be used to
automatically fill in the value,
o Pick List used to create a drop-down or radio button pick list, and
o Multi-Select List used to create a multiple-select list box.
• Select the Add another field option to open a new “Add Field” window after the
current new field is added. Uncheck this option when configuring the last new
field to add.
• Click Accept to add the new field to the create form.
How to change the type an existing fieldHow to change the type an existing fieldHow to change the type an existing fieldHow to change the type an existing field
In some cases, the administrator may want to change the type of an existing field. This is
commonly done to change a “Text” type to a different type to better automate the create form,
e.g. change a “Department” field from a “Text” type to a “Pick List” type.
To change the type of an existing field in an existing create form:
1. Right-click the field to be modified and select “Change Type”

eControl 3.5 for eDirectory & GroupWise Admin Guide
www.omni-ts.com
Revised: June 11, 2010 © 2009-10 Omni Technology Solutions, Inc. Page 32 of 68
Note – Changing field type removes the current settings associated with the field. Once
a field type has been changed the only way to revert it back is to change type back and
manually recreate the desired settings.
2. Select the desired type and verify the action.
Modify DetailsModify DetailsModify DetailsModify Details –––– Common Settings Common Settings Common Settings Common Settings
All field types share the follow common settings:
• Label text: is the
label for the field that
will be displayed in
the create forms.
• Label align: the
alignment that will be
applied to the data
inputted into the field.
• Attribute name: is
the LDAP attribute name that is being mapped to the field. Refer to Novell
documentation for LDAP attribute names for eDirectory attributes.
• Is required: this field must contain a value.
• For auto-complete only? – data inputted to this field will not be saved to the
Directory. It will be used for other auto-complete type fields in this form. If this option
is selected, ensure that the “Attribute name:” field is set to NOFIELD.
There are two buttons that apply to all field types:
• Update button
will save the
changes made
in to the
settings for the
field.
• Preview Form
button will open a window and display the form that includes the field being modified.
Changes made to a field being modified will not appear in the “Preview Form” unless the
Update button is clicked before clicking the Preview Form button.

eControl 3.5 for eDirectory & GroupWise Admin Guide
www.omni-ts.com
Revised: June 11, 2010 © 2009-10 Omni Technology Solutions, Inc. Page 33 of 68
Modify Details (Type: Text)Modify Details (Type: Text)Modify Details (Type: Text)Modify Details (Type: Text)
“Field Type: Text” is used to record text values. Settings specific to “Field Type: Text” include:
• Default Text: The
value in this setting
will be displayed and
will be applied to
the field if the
operator does not
modify the value
while running the
create object
wizard. Leave blank
if a default value is
not required.
• Empty Message:
The value of this
setting will be
displayed as a note
but will not be
applied to the field
value if the operator does not modify the value while running the create object wizard.
Use this to provide additional instruction to the operator.
• Max Length: Specify the maximum number of characters for this field’s value
(optional). Leave as ‘0’ to indicate as no limit (default).
• Number of rows: Specify the maximum number of rows available in the create form.
Leave as ‘0’ to indicate no limit (default).
Modify Details (Type: Autocompletion)Modify Details (Type: Autocompletion)Modify Details (Type: Autocompletion)Modify Details (Type: Autocompletion)
“Field Type: Autocompletion” is used to create a value based on a “pattern” by using data from
other fields. Settings specific to “Field Type: Autocompletion” include:
• Display Mode: Specifies
how the value will be
displayed on the create
form.
o “Display in form” -
this field will display
onn the create form
and can be modified
by the operator.
o “Display in Preview” - this field will display on the create form in a read-only
mode.
o “Do not display” – the value is created but is not displayed on the create form.
• Pattern: The value of
this field uses data
drawn from other
fields.

eControl 3.5 for eDirectory & GroupWise Admin Guide
www.omni-ts.com
Revised: June 11, 2010 © 2009-10 Omni Technology Solutions, Inc. Page 34 of 68
Click the elipse to open the “Pattern Builder”.
lak
To use the pattern builder:
o Highlight a field from the “Available form fields” list box and specify the number
of leading characters to use, or check “All” to use all characters. Multiple fields
can be selected, which will result in the resulting characters being concatenated
together to form a new resulting value.
o To add separator text, like a blank space or a hyphen ‘-‘, enter the desired value
and click the Add segment button.
o To remove blank spaces, hyphens or other symbols, enter the desired value and
click the Add segment button for “Remove text”. Use this to remove a null
space at the end of a character string.
o Click UPPERCASE or lowercase buttons to force the result value to be all caps
or all lower case characters.
o “Pattern segments” list box contains all selected patterns. Use the Move Up and
Move Down buttons to place patterns segments in a specific order if required.
o Click Save to save the configured pattern to the field configuration.
Do not forget to click Update to save the changes made to this field and test the
pattern using the Preview Form button.

eControl 3.5 for eDirectory & GroupWise Admin Guide
www.omni-ts.com
Revised: June 11, 2010 © 2009-10 Omni Technology Solutions, Inc. Page 35 of 68
Modify Details (Type: Pick List)Modify Details (Type: Pick List)Modify Details (Type: Pick List)Modify Details (Type: Pick List)
“Field Type: Pick List” is used to create a means for the operator to select a pre-defined value
from a list. The default list type is a drop-down selection. Settings specific to “Field Type:
Pick List” include:
• Allow custom text? If checked, the operator can type in a new optional value into the
text box for the field value (only works with drop-down lists).
• Radio-buttons? If checked, the operator can only select values from a radio button
list. This option disables “Allow custom text?” if checked.
• Values: Create pre-defined values by typing in a “Display text” and “Value” pair and
clicking the Add button which will add the value segment to the “Values” list.
Do not forget to click Update to save the changes made to this field and test the pattern using
the Preview Form button

eControl 3.5 for eDirectory & GroupWise Admin Guide
www.omni-ts.com
Revised: June 11, 2010 © 2009-10 Omni Technology Solutions, Inc. Page 36 of 68
Modify Details (TModify Details (TModify Details (TModify Details (Type: Multiype: Multiype: Multiype: Multi----select list)select list)select list)select list)
“Field Type: Multi-select list” is used to create a means for the operator to select a one or more
pre-defined value(s) from a list displayed in a list box. Settings specific to “Field Type:
Multi-select list” include:
• Values: Create pre-defined values by typing in a “Display text” and “Value” pair and
clicking the Add button which will add the value segment to the “Values” list.
Do not forget to click Update to save the changes made to this field and test the pattern using
the Preview Form button
Build the Create ProfilesBuild the Create ProfilesBuild the Create ProfilesBuild the Create Profiles
Once create forms have been defined, create profiles need to be built and configured. There
are two types of create profiles:
• Simple create profile – specifies a create profile assignment that links a create form to a
single target location in a target system. A simple create profile can create a user object
and corresponding email account, and can include management of corresponding third
party extension.
• Linked create profile – specifies a create profile assignment that links multiple simple
create profiles together in a combined create wizard. Use this to create a user account
in one system and in another system using the same values, e.g. use this to create an
user account in eDirectory and a corresponding GroupWise account, and a corresponding
account in Active Directory (to support file & print & SharePoint for example). Linked
profiles are usually configured to create matching user identities in different Directory
systems that will use the same authentication credentials (username and password).
The recommended process is to:
• Add Profile folders
• Add Create Profiles inside the applicable Profile folder
• Modify the Create Profile

eControl 3.5 for eDirectory & GroupWise Admin Guide
www.omni-ts.com
Revised: June 11, 2010 © 2009-10 Omni Technology Solutions, Inc. Page 37 of 68
Add Create Profile FoldersAdd Create Profile FoldersAdd Create Profile FoldersAdd Create Profile Folders
To build new create profile folders:
1. Under the “Create” tab, right-click the “Profiles” folder and select “New Folder”.
2. In the “New Profile Folder” window provide a name and description for the new folder.
If creating multiple profile folder, check the Add another folder option and click
Accept. Once the last new profile folder has been specified, uncheck the Add another
folder option and click Accept.

eControl 3.5 for eDirectory & GroupWise Admin Guide
www.omni-ts.com
Revised: June 11, 2010 © 2009-10 Omni Technology Solutions, Inc. Page 38 of 68
Build a Simple Create ProfileBuild a Simple Create ProfileBuild a Simple Create ProfileBuild a Simple Create Profile
To build new simple create profile:
1. Right-click the desired Create Profile folder and select “New Profile”.
2. In the “New Profile” window under the “Settings” tab:
• Provide a name for the Create Profile.
• Provide a description (optional).
• From the System drop-down, select the correct Directory system.
• From the Master Form drop-down, select the desired create form.
• Click the ellipse beside the Base Object, navigate the Directory browse window
and select the source object to use as the template for this Create Profile.
• Click the ellipse beside the Creation Container, navigate the Directory browse
window and select the target container where the new objects will be created.
• Check the Inter-system Unique? option if eControl will perform an entity
uniqueness check against all systems that eControl has managed connections to.
• Check the Allow bulk create option if eControl should allow bulk create of
objects using this Create Profile.
eControl 3.5 for eDirectory & GroupWise Admin Guide
www.omni-ts.com
Revised: June 11, 2010 © 2009-10 Omni Technology Solutions, Inc. Page 39 of 68
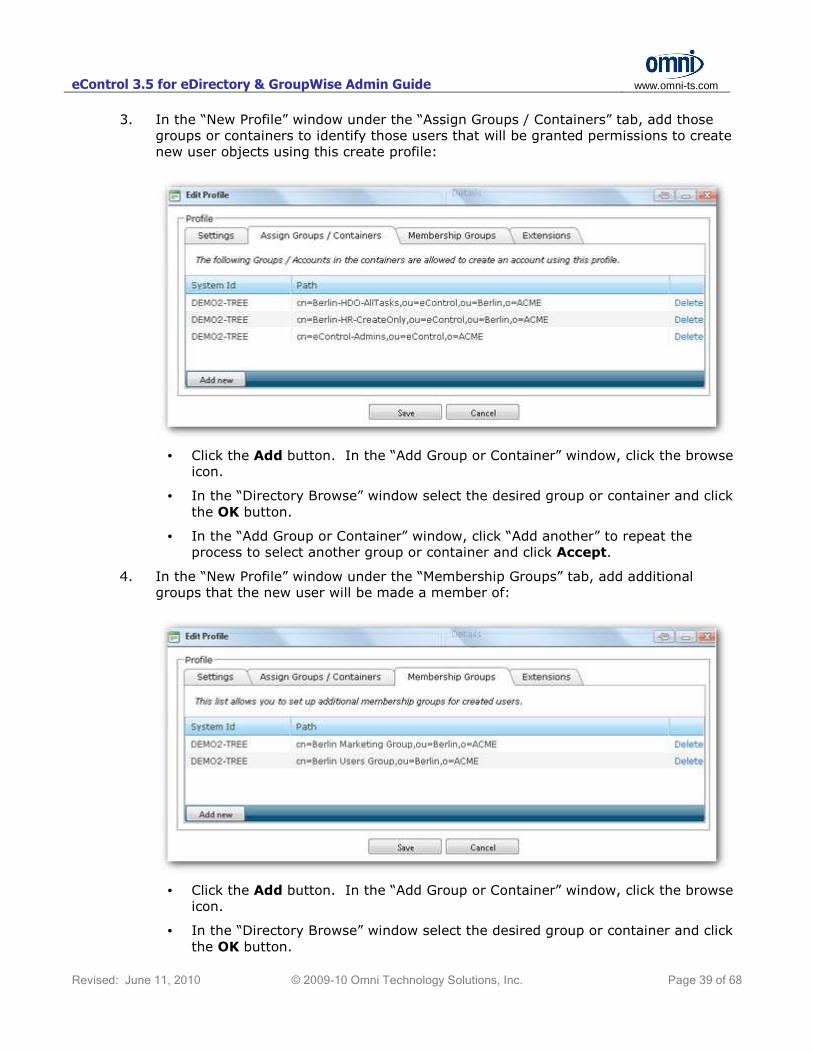
3. In the “New Profile” window under the “Assign Groups / Containers” tab, add those
groups or containers to identify those users that will be granted permissions to create
new user objects using this create profile:
• Click the Add button. In the “Add Group or Container” window, click the browse
icon.
• In the “Directory Browse” window select the desired group or container and click
the OK button.
• In the “Add Group or Container” window, click “Add another” to repeat the
process to select another group or container and click Accept.
4. In the “New Profile” window under the “Membership Groups” tab, add additional
groups that the new user will be made a member of:
• Click the Add button. In the “Add Group or Container” window, click the browse
icon.
• In the “Directory Browse” window select the desired group or container and click
the OK button.

eControl 3.5 for eDirectory & GroupWise Admin Guide
www.omni-ts.com
Revised: June 11, 2010 © 2009-10 Omni Technology Solutions, Inc. Page 40 of 68
• In the “Add Group or Container” window, click “Add another” to repeat the
process to select another group or container and click Accept.
5. In the “New Profile” window, click the Accept button to build this Create Profile.
Edit a Create ProfileEdit a Create ProfileEdit a Create ProfileEdit a Create Profile
There are three ways to start the edit of an existing create profile:
• Double-click the tree node object for the create profile.
• Right-click the tree node object for the create profile and select “Edit Profile”.
• Select the tree node object for the create profile and click the Edit button.
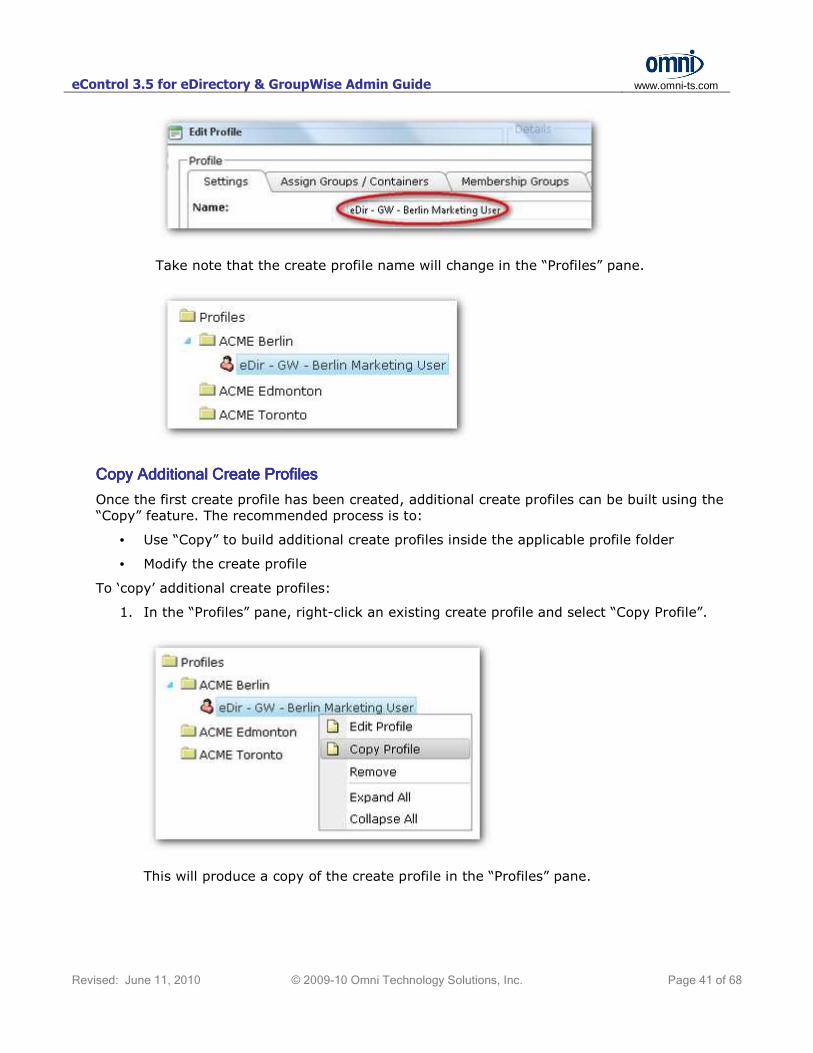
To change the name of an existing profile object:
1. Choose one of the methods to edit the create profile, e.g. In the “Profiles” pane, right-
click an existing create profile and select “Edit Profile”.
2. In the “Edit Profile” window, change the “Name” value and save the change.
eControl 3.5 for eDirectory & GroupWise Admin Guide
www.omni-ts.com
Revised: June 11, 2010 © 2009-10 Omni Technology Solutions, Inc. Page 41 of 68
Take note that the create profile name will change in the “Profiles” pane.
Copy Additional Create ProfilesCopy Additional Create ProfilesCopy Additional Create ProfilesCopy Additional Create Profiles
Once the first create profile has been created, additional create profiles can be built using the
“Copy” feature. The recommended process is to:
• Use “Copy” to build additional create profiles inside the applicable profile folder
• Modify the create profile
To ‘copy’ additional create profiles:
1. In the “Profiles” pane, right-click an existing create profile and select “Copy Profile”.
This will produce a copy of the create profile in the “Profiles” pane.

eControl 3.5 for eDirectory & GroupWise Admin Guide
www.omni-ts.com
Revised: June 11, 2010 © 2009-10 Omni Technology Solutions, Inc. Page 42 of 68
2. In the “Profiles” pane, right-click the new “(copy)” create profile and select “Edit Profile”.
3. In the “Edit Profile” window under the “Settings” tab, modify the name and description
(optional) of the create profile.
4. In the “Edit Profile” window under the “Assign Groups” tab, modify the assigned groups
if necessary:

eControl 3.5 for eDirectory & GroupWise Admin Guide
www.omni-ts.com
Revised: June 11, 2010 © 2009-10 Omni Technology Solutions, Inc. Page 43 of 68
• Click the Delete link beside an existing assigned group to remove it from the list,
and
• Click the Add button to add a new group to the assigned group list.
5. In the “Edit Profile” window under the “Membership Groups” tab, modify the
membership group list:
• Click the Delete link beside an existing assigned group to remove it from the list,
and
• Click the Add button to add a new group to the assigned group list.
6. Click the Save button to save the modified create profile.

eControl 3.5 for eDirectory & GroupWise Admin Guide
www.omni-ts.com
Revised: June 11, 2010 © 2009-10 Omni Technology Solutions, Inc. Page 44 of 68
Build Group and Build Group and Build Group and Build Group and Other Other Other Other Create ProfilesCreate ProfilesCreate ProfilesCreate Profiles
Use the “New Profile” or “Copy” procedures described above to build new create profiles for
group and other object types. There are some additional tips:
• “Copy” cannot be used to build a new create profile in a different create profile folder.
• “Copy” can be used to build a create profile for a group or contact object type using the
user object type. All that needs to be modified to make a create profile unique is the
“Profile Name” and the “Master Form” needs to be changed to use a create form that
matches the target object type.
Build Linked Create ProfilesBuild Linked Create ProfilesBuild Linked Create ProfilesBuild Linked Create Profiles
Linked profiles combines simple create profiles for different Directory systems into a single
create object wizard. In this example, a linked create profile is built using simple create profiles
for eDirectory and Active Directory (and presumes that Active Directory connections have been
added and licensed, and a simple create profile for Active Directory has been built.
To build new linked create profile:
1. Right-click the desired Create Profile folder and select “New Linked Profile”.
2. In the “New Linked Profile” window under the “Settings” tab:

eControl 3.5 for eDirectory & GroupWise Admin Guide
www.omni-ts.com
Revised: June 11, 2010 © 2009-10 Omni Technology Solutions, Inc. Page 45 of 68
• Provide a name for the Linked Profile.
• Provide a description (optional).
• Click the Add new button and add those groups that will be granted permissions
to create users with this Linked Profile.
3. In the “New Linked Profile” window under the “Profiles” tab, highlight each Create
Profile to use in this Linked Profile and click the Add button. This will add the selected
Create Profiles to a order sensitive list.
4. Use the Up and Down arrows to place the Create Profiles in the desired order.
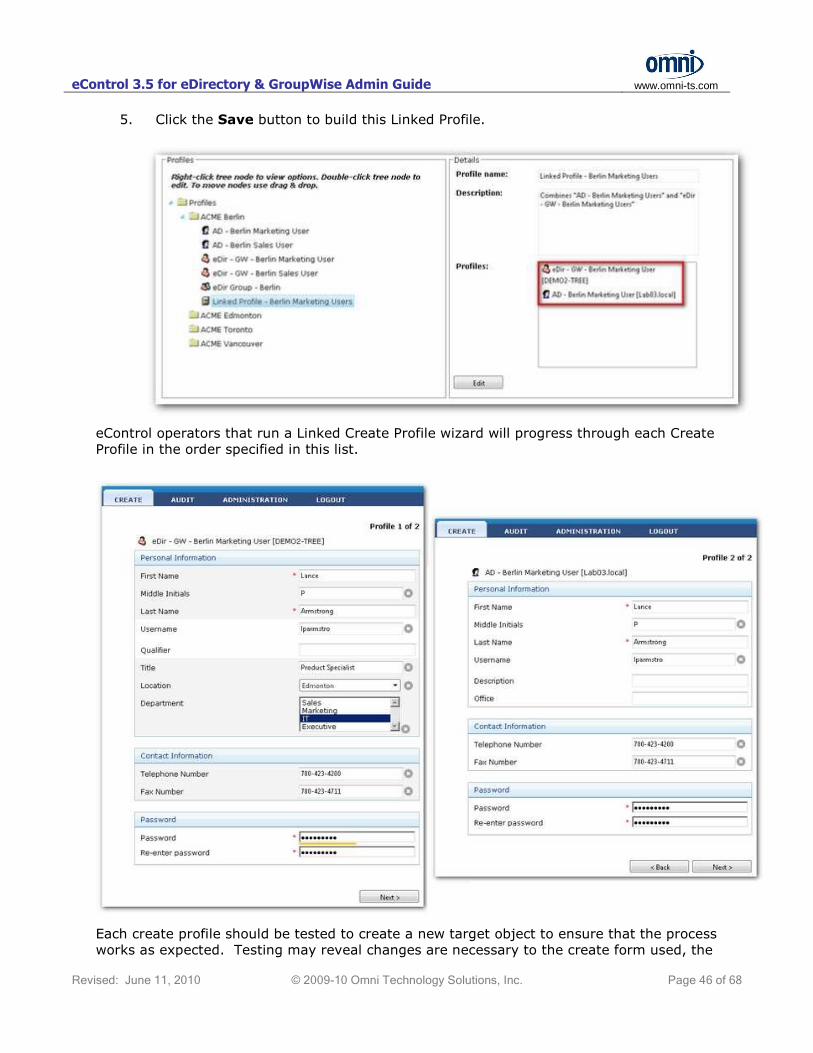
eControl 3.5 for eDirectory & GroupWise Admin Guide
www.omni-ts.com
Revised: June 11, 2010 © 2009-10 Omni Technology Solutions, Inc. Page 46 of 68
5. Click the Save button to build this Linked Profile.
eControl operators that run a Linked Create Profile wizard will progress through each Create
Profile in the order specified in this list.
Each create profile should be tested to create a new target object to ensure that the process
works as expected. Testing may reveal changes are necessary to the create form used, the

eControl 3.5 for eDirectory & GroupWise Admin Guide
www.omni-ts.com
Revised: June 11, 2010 © 2009-10 Omni Technology Solutions, Inc. Page 47 of 68
base (source) object, or the create profile settings. Remember that create profile assignments
do not become available until the Apply New Settings button has been clicked.

eControl 3.5 for eDirectory & GroupWise Admin Guide
www.omni-ts.com
Revised: June 11, 2010 © 2009-10 Omni Technology Solutions, Inc. Page 48 of 68
Configure the Configure the Configure the Configure the Self ServiceSelf ServiceSelf ServiceSelf Service Module Module Module Module
The “Self Service” module allows eControl administrators to configure eDirectory and/or
GroupWise values that can be self-serviced by users. This includes password self-service. Users
can reset and change passwords from within the Self Service module of from a web-browser
using the "Forgot Your Password" challenge/response "secret answers". The User Self Service
options include allowing users to Subscribe/Unsubscribe from GroupWise Distribution Lists. User
Self Service can be configured to allow users to update their own demographic information.
HHHHow it Worksow it Worksow it Worksow it Works
For the Self-Service Module:
1. “Forgot Password Management” is configured to enabled forgot password/reset
features and define the verification questions and mechanism.
2. “Manage Self-Service Form” can be modified. Those forms will be used by users to
modify their personal information.
3. “Self Service Group Assignments” are built which define:
• Reset password configuration;
• Forgot password configuration; and
• Managed lists configuration.
No Administrative or Supervisor Rights No Administrative or Supervisor Rights No Administrative or Supervisor Rights No Administrative or Supervisor Rights RequiredRequiredRequiredRequired
If a group is assigned to a “Self Service Group” assignment, the “Self-Service” tab will be
visible to members of that group when they login to the eControl portal. If “Forgot Password”
is enabled, members of that group will be able to change passwords using without having to
login by using the “Forgot password” link.
Members of groups assigned to a “Self-Service Group” assignment require NO supervisor rights
or administrator-level permissions. Self-service tasks are performed by the eControl service
accounts on behalf of those users that have been assigned to a Self-Service Group assignment.
Planning ConceptsPlanning ConceptsPlanning ConceptsPlanning Concepts for for for for eControl SelfeControl SelfeControl SelfeControl Self----ServiceServiceServiceService
Careful planning and preparations will result in the creation of the correctly functioning “self-
service” assignments. When looking at what self-service group assignments to create, it is
helpful to use the following strategy:
• STEP 1 – Determine a strategy for forgot password, password self-service, self adding
to/removal from groups and distribution groups and modifying personal information.
• STEP 2 – Enable and configure “Forgot Password Management” and “Manage Self-
Service Forms”.
• STEP 3 – Add self-service group assignment(s) and configure the reset password, forgot
password and manage lists features.
eControl 3.5 for eDirectory & GroupWise Admin Guide
www.omni-ts.com
Revised: June 11, 2010 © 2009-10 Omni Technology Solutions, Inc. Page 49 of 68
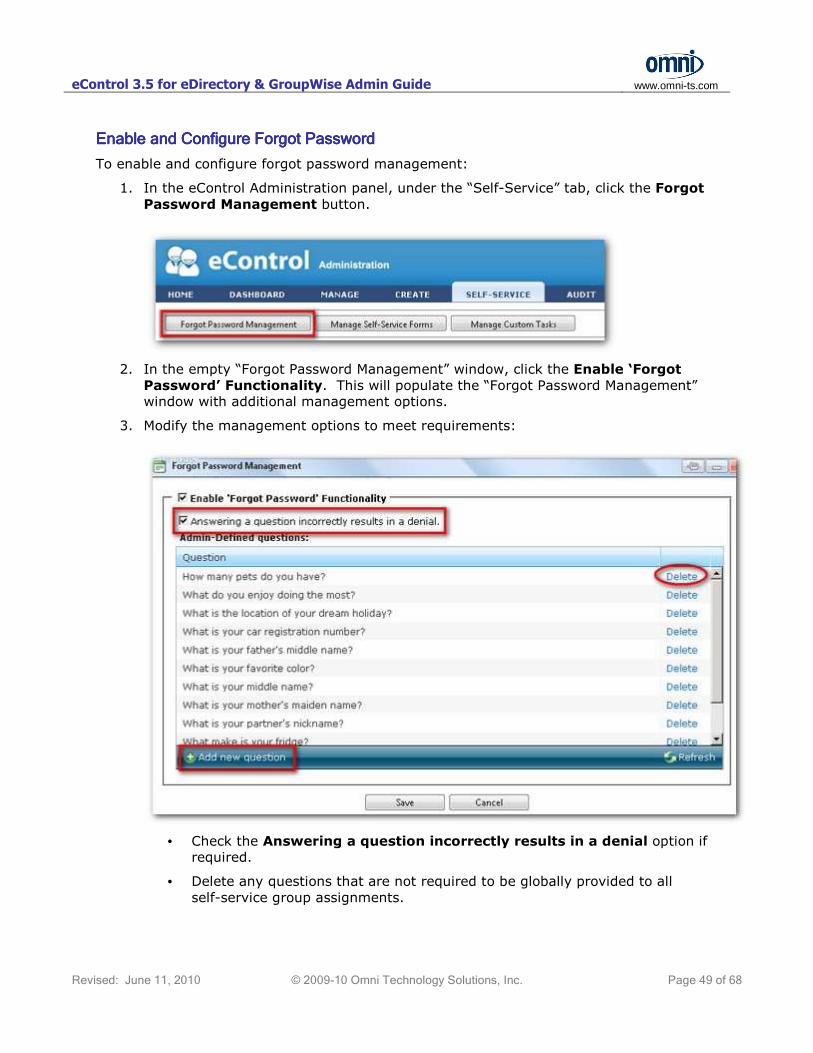
Enable aEnable aEnable aEnable and Configure Forgot Passwordnd Configure Forgot Passwordnd Configure Forgot Passwordnd Configure Forgot Password
To enable and configure forgot password management:
1. In the eControl Administration panel, under the “Self-Service” tab, click the Forgot
Password Management button.
2. In the empty “Forgot Password Management” window, click the Enable ‘Forgot
Password’ Functionality. This will populate the “Forgot Password Management”
window with additional management options.
3. Modify the management options to meet requirements:
• Check the Answering a question incorrectly results in a denial option if
required.
• Delete any questions that are not required to be globally provided to all
self-service group assignments.
eControl 3.5 for eDirectory & GroupWise Admin Guide
www.omni-ts.com
Revised: June 11, 2010 © 2009-10 Omni Technology Solutions, Inc. Page 50 of 68
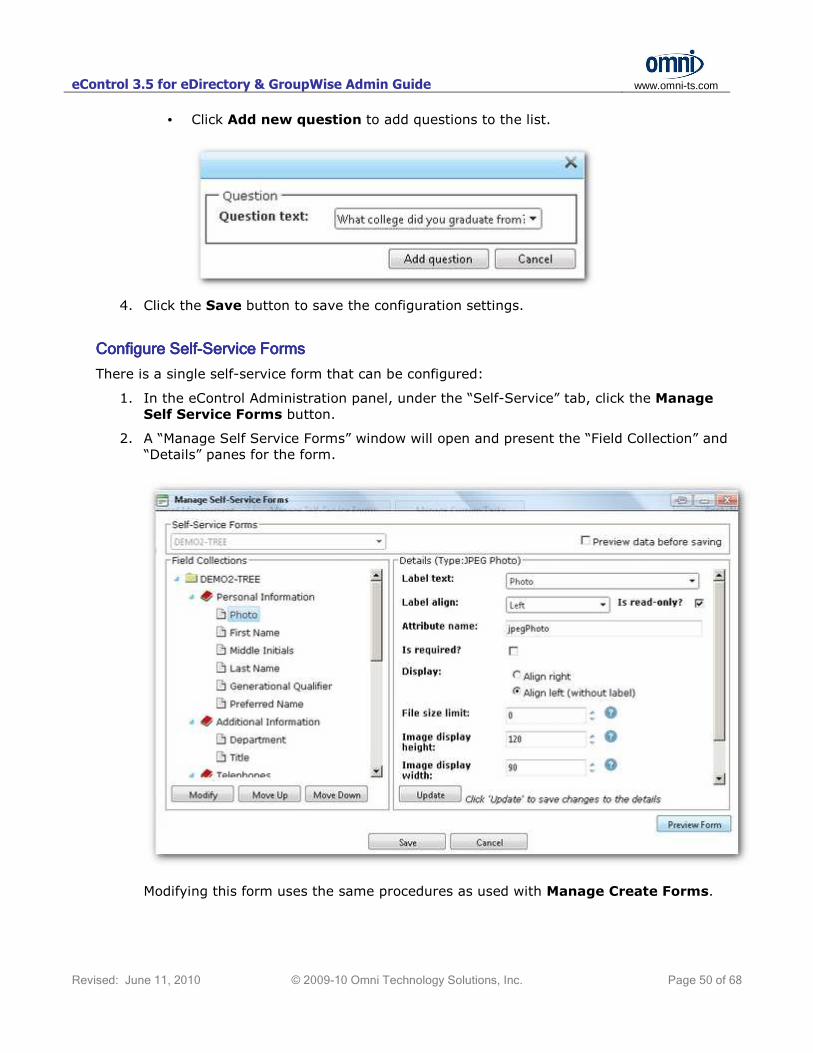
• Click Add new question to add questions to the list.
4. Click the Save button to save the configuration settings.
Configure SelfConfigure SelfConfigure SelfConfigure Self----Service FormsService FormsService FormsService Forms
There is a single self-service form that can be configured:
1. In the eControl Administration panel, under the “Self-Service” tab, click the Manage
Self Service Forms button.
2. A “Manage Self Service Forms” window will open and present the “Field Collection” and
“Details” panes for the form.
Modifying this form uses the same procedures as used with Manage Create Forms.
eControl 3.5 for eDirectory & GroupWise Admin Guide
www.omni-ts.com
Revised: June 11, 2010 © 2009-10 Omni Technology Solutions, Inc. Page 51 of 68
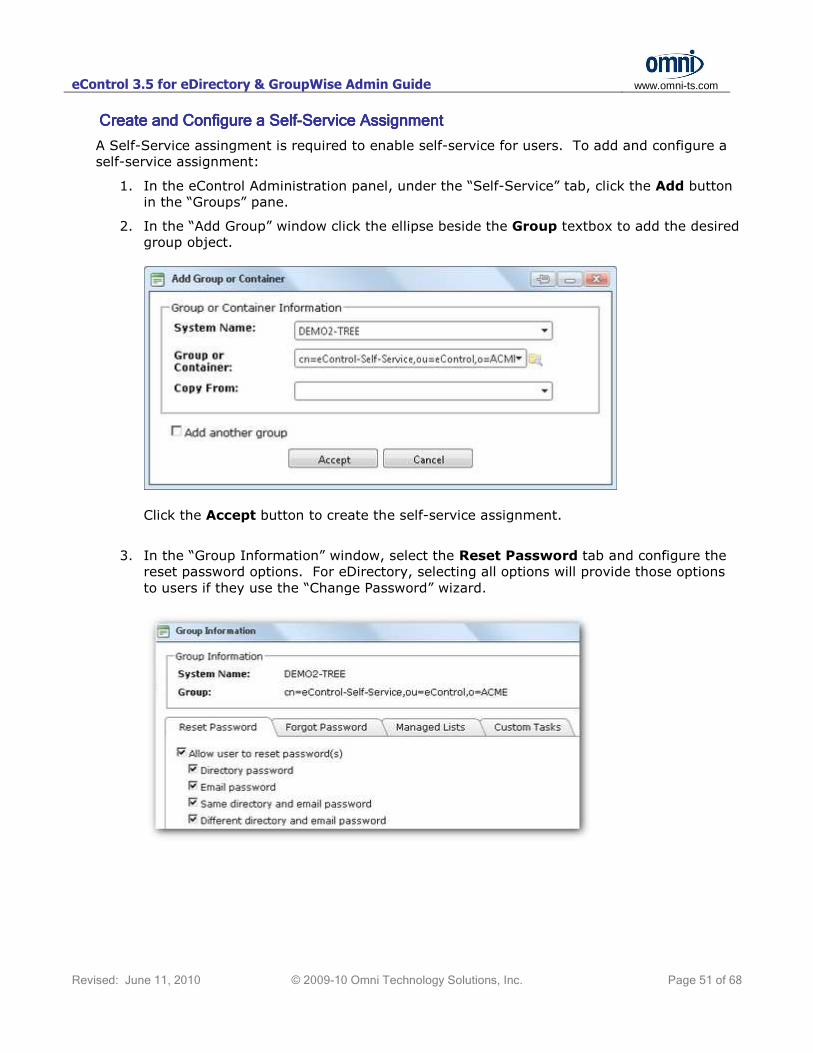
Create and Configure a SelfCreate and Configure a SelfCreate and Configure a SelfCreate and Configure a Self----Service AssignmentService AssignmentService AssignmentService Assignment
A Self-Service assingment is required to enable self-service for users. To add and configure a
self-service assignment:
1. In the eControl Administration panel, under the “Self-Service” tab, click the Add button
in the “Groups” pane.
2. In the “Add Group” window click the ellipse beside the Group textbox to add the desired group object.
Click the Accept button to create the self-service assignment.
3. In the “Group Information” window, select the Reset Password tab and configure the
reset password options. For eDirectory, selecting all options will provide those options
to users if they use the “Change Password” wizard.

eControl 3.5 for eDirectory & GroupWise Admin Guide
www.omni-ts.com
Revised: June 11, 2010 © 2009-10 Omni Technology Solutions, Inc. Page 52 of 68
4. Select the Forgot Password tab and configure those options:
• Select Enable ‘Forgot Password’ to provide the ‘Forgot Password” feature to
members of the group for this self-service assignment. If this iption is not
checked, users will not see any ‘Forgot Password’ links at the eControl Login
screen.
• Select User can define his/how own ‘Forgot Password’ questions and User
can select admin-defined ‘Forgot Password’ questions to enable the user to
customize their ‘Forgot Password’ settings. These options will be made available
in the Self-Service page when the user logs into eControl and selects the “Self-
Service” tab.
• Selecting the specific admin-defined questions that will be made available to the
user.
• Select User must answer a minimum number of questions and specify the
minimum number (optional). Do not check this item if “Answering a question
incorrectly will result in denial” option was checked when Enable ‘Forgot
Password’ Functionality was checked as part of configuring “Forgot Password
Management”.
eControl 3.5 for eDirectory & GroupWise Admin Guide
www.omni-ts.com
Revised: June 11, 2010 © 2009-10 Omni Technology Solutions, Inc. Page 53 of 68
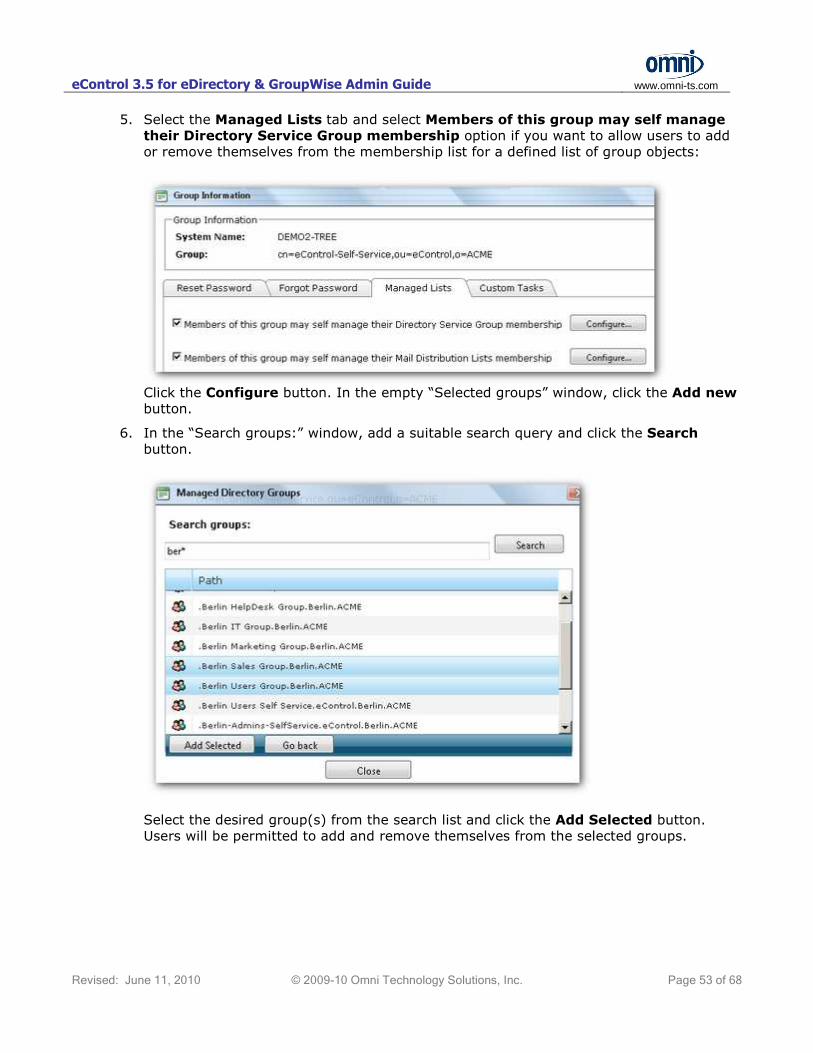
5. Select the Managed Lists tab and select Members of this group may self manage
their Directory Service Group membership option if you want to allow users to add
or remove themselves from the membership list for a defined list of group objects:
Click the Configure button. In the empty “Selected groups” window, click the Add new
button.
6. In the “Search groups:” window, add a suitable search query and click the Search button.
Select the desired group(s) from the search list and click the Add Selected button.
Users will be permitted to add and remove themselves from the selected groups.
eControl 3.5 for eDirectory & GroupWise Admin Guide
www.omni-ts.com
Revised: June 11, 2010 © 2009-10 Omni Technology Solutions, Inc. Page 54 of 68
7. In the “Selected groups:” window, click the Close button to save the selected group(s).
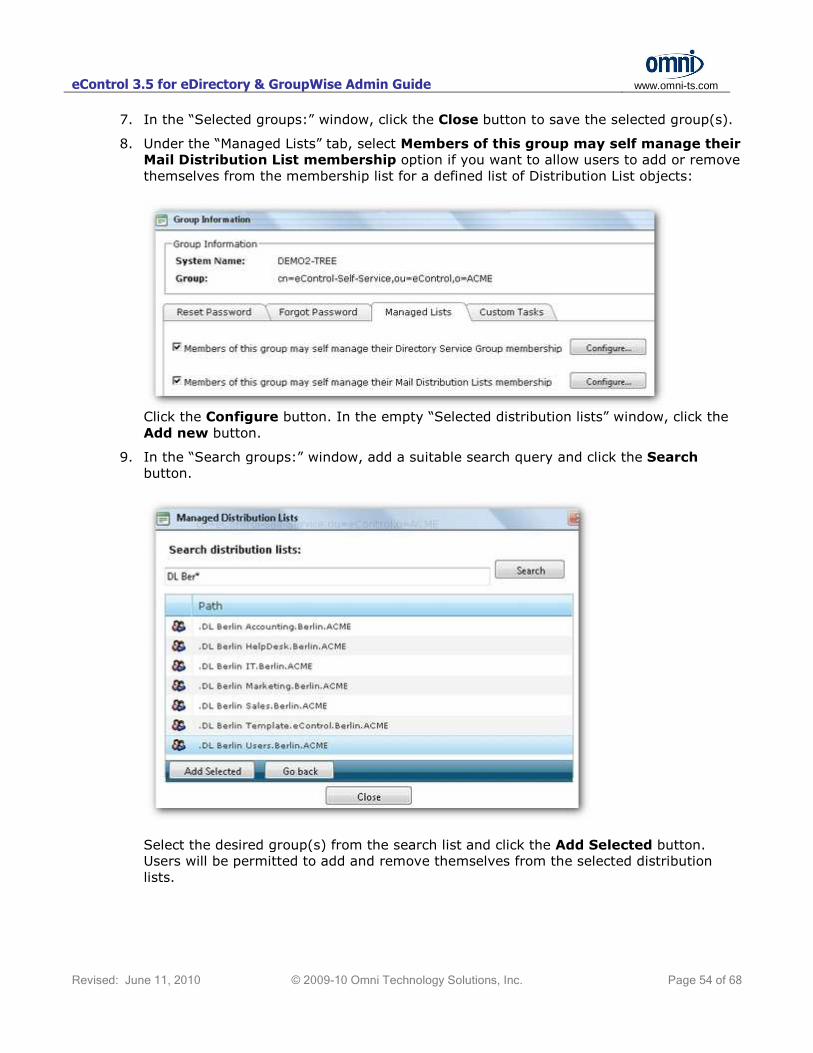
8. Under the “Managed Lists” tab, select Members of this group may self manage their
Mail Distribution List membership option if you want to allow users to add or remove
themselves from the membership list for a defined list of Distribution List objects:
Click the Configure button. In the empty “Selected distribution lists” window, click the
Add new button.
9. In the “Search groups:” window, add a suitable search query and click the Search button.
Select the desired group(s) from the search list and click the Add Selected button.
Users will be permitted to add and remove themselves from the selected distribution
lists.

eControl 3.5 for eDirectory & GroupWise Admin Guide
www.omni-ts.com
Revised: June 11, 2010 © 2009-10 Omni Technology Solutions, Inc. Page 55 of 68
10. In the “Selected distribution lists:” window, click the Close button to save the selected
group(s).
11. Under the “Custom Tasks” tab, available custom tasks can be added to the assignment
which will make those custom task pages available to users when logged into eControl
Self Service.
12. In the “Group Information” window click the Save button.
13. Click the Apply New Settings button to enable the eControl Self Service assignment
in the eControl portal for assigned users.
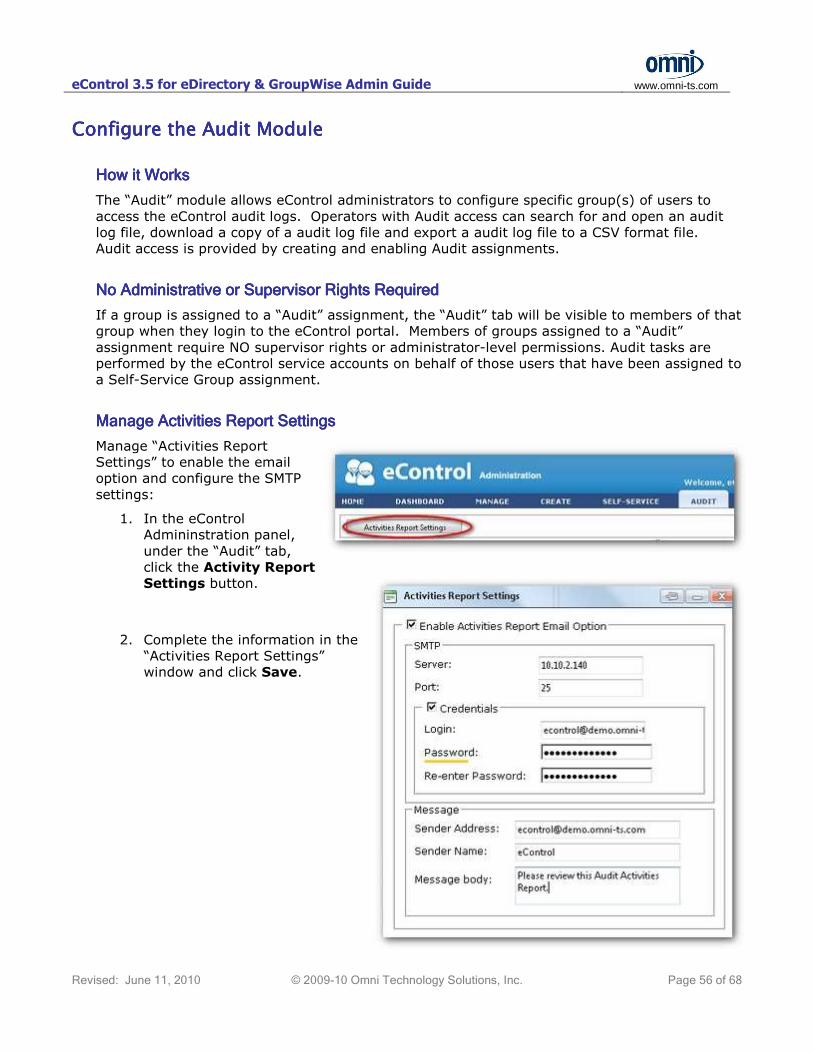
eControl 3.5 for eDirectory & GroupWise Admin Guide
www.omni-ts.com
Revised: June 11, 2010 © 2009-10 Omni Technology Solutions, Inc. Page 56 of 68
Configure the Configure the Configure the Configure the AuditAuditAuditAudit Module Module Module Module
How it WorksHow it WorksHow it WorksHow it Works
The “Audit” module allows eControl administrators to configure specific group(s) of users to
access the eControl audit logs. Operators with Audit access can search for and open an audit
log file, download a copy of a audit log file and export a audit log file to a CSV format file.
Audit access is provided by creating and enabling Audit assignments.
No Administrative or Supervisor Rights RequiredNo Administrative or Supervisor Rights RequiredNo Administrative or Supervisor Rights RequiredNo Administrative or Supervisor Rights Required
If a group is assigned to a “Audit” assignment, the “Audit” tab will be visible to members of that
group when they login to the eControl portal. Members of groups assigned to a “Audit”
assignment require NO supervisor rights or administrator-level permissions. Audit tasks are
performed by the eControl service accounts on behalf of those users that have been assigned to
a Self-Service Group assignment.
Manage Activities Report SettingsManage Activities Report SettingsManage Activities Report SettingsManage Activities Report Settings
Manage “Activities Report
Settings” to enable the email
option and configure the SMTP
settings:
1. In the eControl Admininstration panel,
under the “Audit” tab,
click the Activity Report
Settings button.
2. Complete the information in the
“Activities Report Settings”
window and click Save.
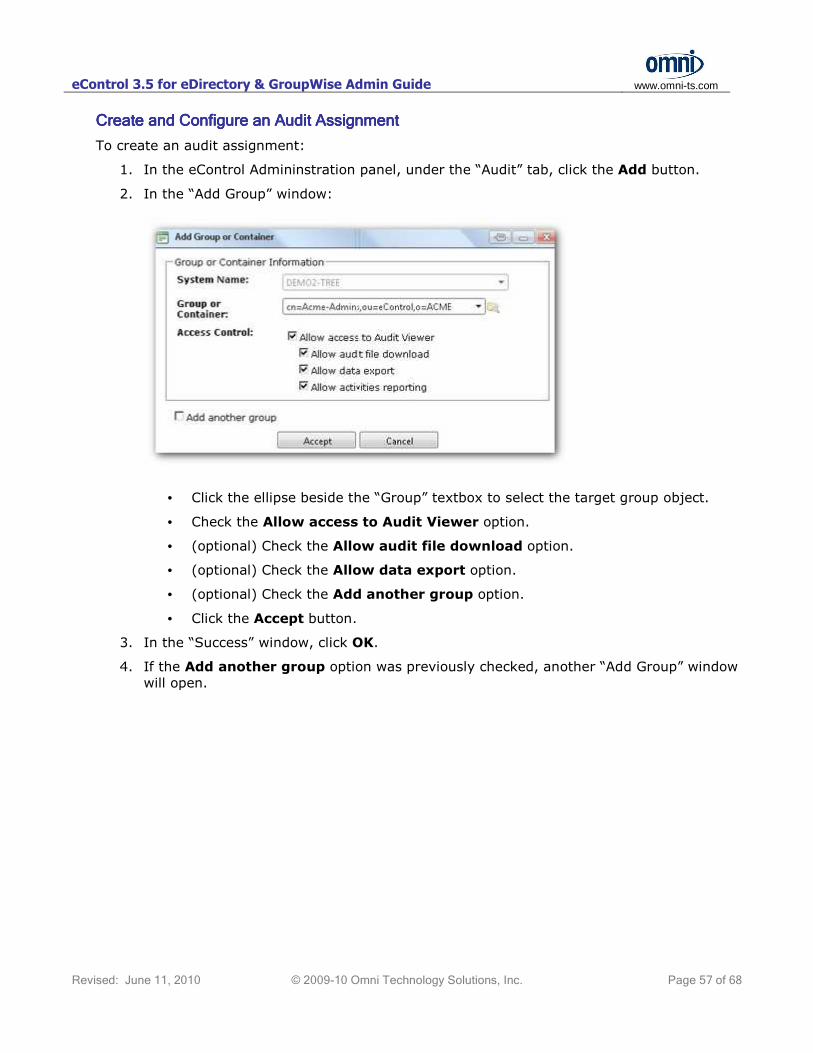
eControl 3.5 for eDirectory & GroupWise Admin Guide
www.omni-ts.com
Revised: June 11, 2010 © 2009-10 Omni Technology Solutions, Inc. Page 57 of 68
Create and Configure an Audit AssignmentCreate and Configure an Audit AssignmentCreate and Configure an Audit AssignmentCreate and Configure an Audit Assignment
To create an audit assignment:
1. In the eControl Admininstration panel, under the “Audit” tab, click the Add button.
2. In the “Add Group” window:
• Click the ellipse beside the “Group” textbox to select the target group object.
• Check the Allow access to Audit Viewer option.
• (optional) Check the Allow audit file download option.
• (optional) Check the Allow data export option.
• (optional) Check the Add another group option.
• Click the Accept button.
3. In the “Success” window, click OK.
4. If the Add another group option was previously checked, another “Add Group” window will open.

eControl 3.5 for eDirectory & GroupWise Admin Guide
www.omni-ts.com
Revised: June 11, 2010 © 2009-10 Omni Technology Solutions, Inc. Page 58 of 68
Configure the desired options and click the Accept button.
Modify an Audit AssignmentModify an Audit AssignmentModify an Audit AssignmentModify an Audit Assignment
To modify an audit assignment:
1. In the “Group” panel, select the desired audit assignment and click the Edit button.
2. In the “Group Information” window, check or uncheck the desired access control options
and click the Save button.
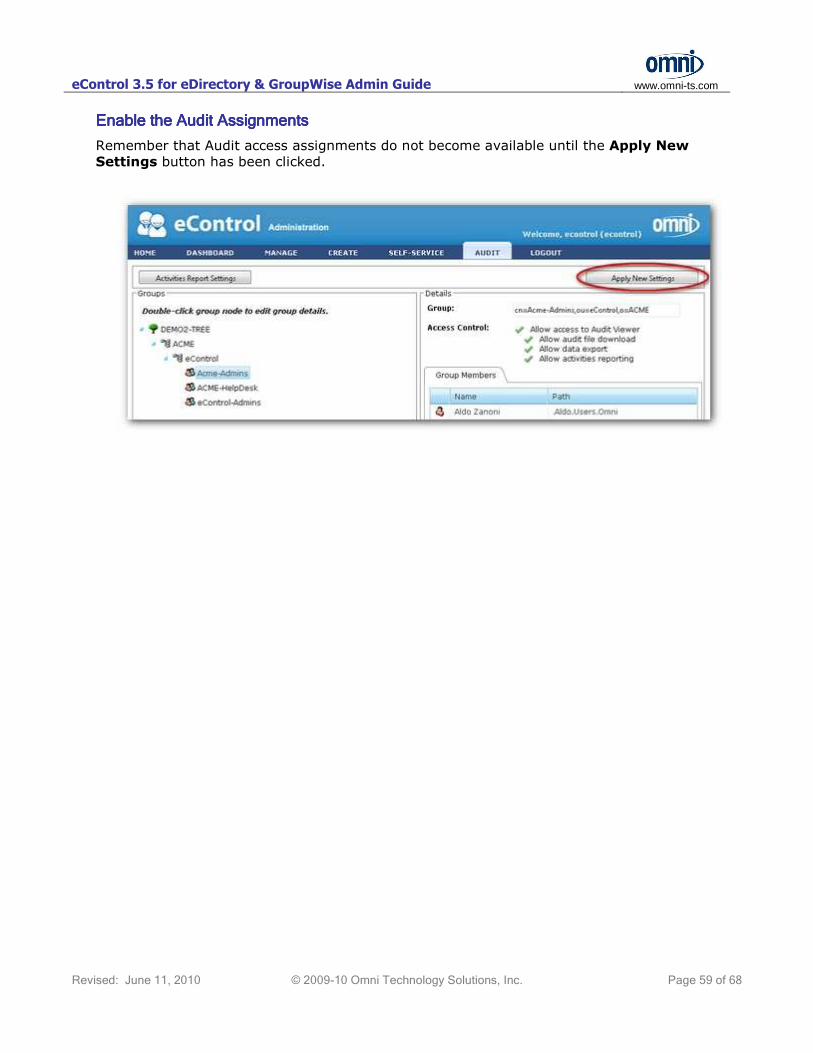
eControl 3.5 for eDirectory & GroupWise Admin Guide
www.omni-ts.com
Revised: June 11, 2010 © 2009-10 Omni Technology Solutions, Inc. Page 59 of 68
Enable the Audit AssignmentsEnable the Audit AssignmentsEnable the Audit AssignmentsEnable the Audit Assignments
Remember that Audit access assignments do not become available until the Apply New
Settings button has been clicked.

eControl 3.5 for eDirectory & GroupWise Admin Guide
www.omni-ts.com
Revised: June 11, 2010 © 2009-10 Omni Technology Solutions, Inc. Page 60 of 68
Additional eControl Administration Panel FeaturesAdditional eControl Administration Panel FeaturesAdditional eControl Administration Panel FeaturesAdditional eControl Administration Panel Features
eControl ServiceControl ServiceControl ServiceControl Service Account Only Featurese Account Only Featurese Account Only Featurese Account Only Features
The eControl service account has sole access to the eControl Administration panel which
includes special access links in the footer of each page.
Access Audit Trail LogsAccess Audit Trail LogsAccess Audit Trail LogsAccess Audit Trail Logs
To access an audit trail log:
1. Click on the View Audit Trail link.
2. From the “Audit log” drop-down list, check the desired year, or month, or week, or
specific date. Click the Apply button and eControl will compile the audit log entries for
the selected date(s) into a single chronological view.
3. Once the log file is visible, the column widths can be adjusted.

eControl 3.5 for eDirectory & GroupWise Admin Guide
www.omni-ts.com
Revised: June 11, 2010 © 2009-10 Omni Technology Solutions, Inc. Page 61 of 68
4. The view of the log can be filtered by selection a filter item from a drop-down list
or by using a text box which will open a drop-down containing a list of filter options.
5. A filtered view of the log can be cleared at the column or by using the Clear Filters
button.
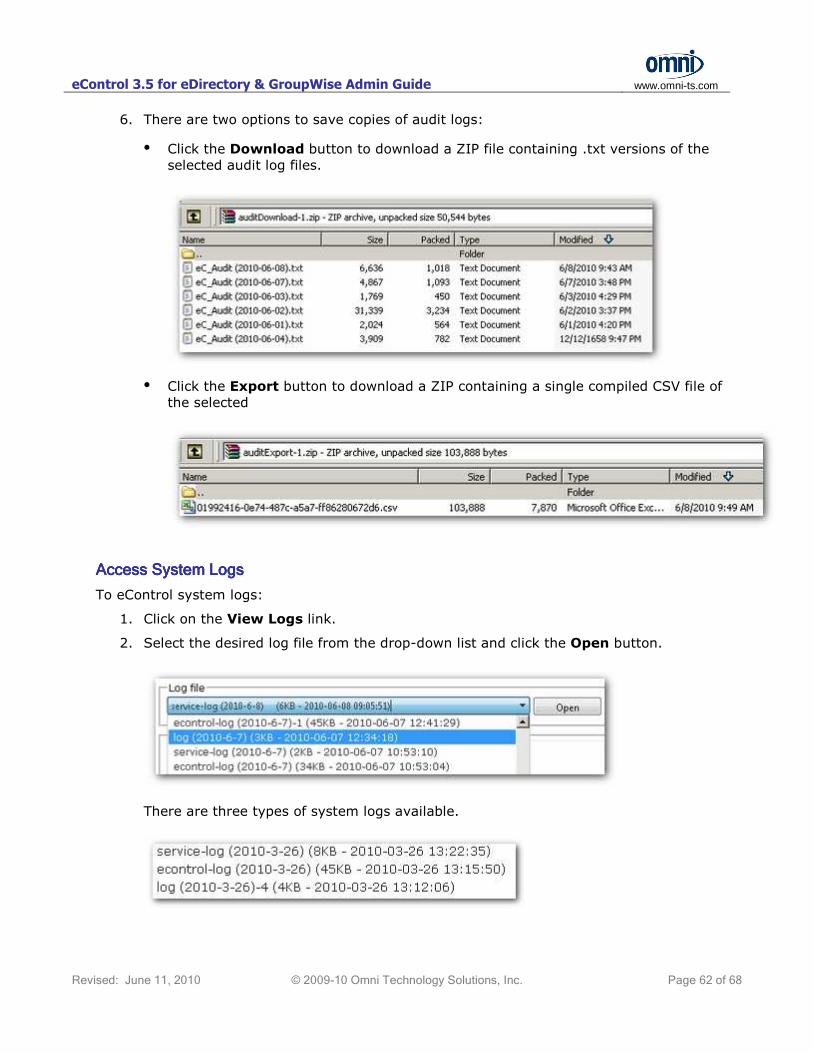
eControl 3.5 for eDirectory & GroupWise Admin Guide
www.omni-ts.com
Revised: June 11, 2010 © 2009-10 Omni Technology Solutions, Inc. Page 62 of 68
6. There are two options to save copies of audit logs:
• Click the Download button to download a ZIP file containing .txt versions of the
selected audit log files.
• Click the Export button to download a ZIP containing a single compiled CSV file of
the selected
Access System LogsAccess System LogsAccess System LogsAccess System Logs
To eControl system logs:
1. Click on the View Logs link.
2. Select the desired log file from the drop-down list and click the Open button.
There are three types of system logs available.

eControl 3.5 for eDirectory & GroupWise Admin Guide
www.omni-ts.com
Revised: June 11, 2010 © 2009-10 Omni Technology Solutions, Inc. Page 63 of 68
3. To download a system log in the original file format, click the Download button.
ManageManageManageManage License Information License Information License Information License Information
Click on the Licenses link in the footer to open the licenses information page.
Licenses need to be requested and uploaded after a connection to an existing system is
modified or a new connection is added (refer to the applicable eControl Installation Guide).

eControl 3.5 for eDirectory & GroupWise Admin Guide
www.omni-ts.com
Revised: June 11, 2010 © 2009-10 Omni Technology Solutions, Inc. Page 64 of 68
Request a LicenseRequest a LicenseRequest a LicenseRequest a License
To request a license:
1. Under the “Request License” tab, complete the form and click Submit.
ApplyApplyApplyApply a License a License a License a License
To upload and apply a
license:
1. Click on the Select button, browse and
select the
replacement or
additional license
file.
Click the Upload
button.
2. Click the Apply Settings button to
apply the license file
just uploaded.

eControl 3.5 for eDirectory & GroupWise Admin Guide
www.omni-ts.com
Revised: June 11, 2010 © 2009-10 Omni Technology Solutions, Inc. Page 65 of 68
EdEdEdEdit the Login pageit the Login pageit the Login pageit the Login page
The eControl Administration panel includes the ability to modify the eControl login page by
adding text and pictures (if needed). Click on the Edit Login Page in the footer and then click
the Edit button.
Add the desired content and then format it. When the editing of the content is complete, click
the Save button. To see the changes, logout of eControl.
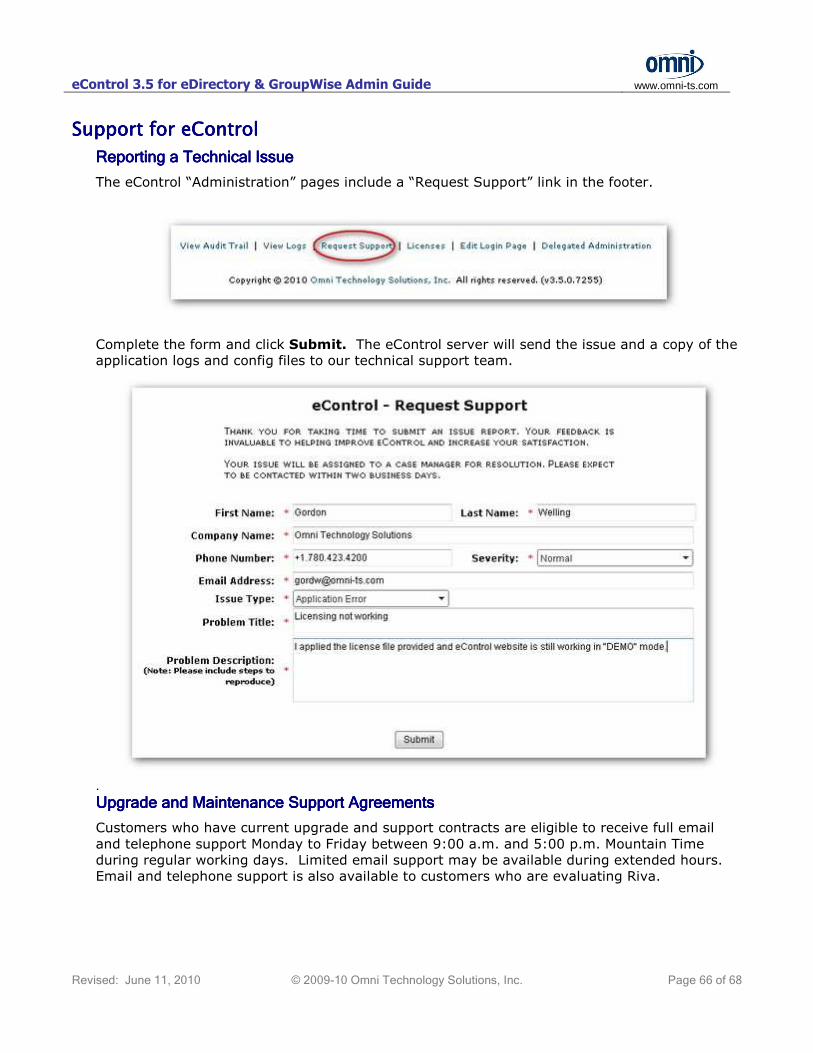
eControl 3.5 for eDirectory & GroupWise Admin Guide
www.omni-ts.com
Revised: June 11, 2010 © 2009-10 Omni Technology Solutions, Inc. Page 66 of 68
Support for Support for Support for Support for eControleControleControleControl
Reporting a Technical IssueReporting a Technical IssueReporting a Technical IssueReporting a Technical Issue
The eControl “Administration” pages include a “Request Support” link in the footer.
Complete the form and click Submit. The eControl server will send the issue and a copy of the
application logs and config files to our technical support team.
.
Upgrade and Upgrade and Upgrade and Upgrade and Maintenance Maintenance Maintenance Maintenance Support Support Support Support AgreementsAgreementsAgreementsAgreements
Customers who have current upgrade and support contracts are eligible to receive full email
and telephone support Monday to Friday between 9:00 a.m. and 5:00 p.m. Mountain Time
during regular working days. Limited email support may be available during extended hours.
Email and telephone support is also available to customers who are evaluating Riva.

eControl 3.5 for eDirectory & GroupWise Admin Guide
www.omni-ts.com
Revised: June 11, 2010 © 2009-10 Omni Technology Solutions, Inc. Page 67 of 68
Contacting SupportContacting SupportContacting SupportContacting Support
You can contact support by phone, email or fax.
Email: [email protected]
Phone: +1-780-423-4200
Fax: +1-780-423-4711
You can also use the "Contact Us" link in the upper right-hand corner of our web site. Please
include as many details as possible when requesting support:
eControl 3.5 for eDirectory & GroupWise Admin Guide
www.omni-ts.com
Revised: June 11, 2010 © 2009-10 Omni Technology Solutions, Inc. Page 68 of 68
Online ResourcesOnline ResourcesOnline ResourcesOnline Resources
Online resources for Riva include:
• Product Documentation: Go to www.omni-ts.com select Support, follow the link for
Documentation and select eControl and EMU Documentation
• eControl Flash Tutorials: will be added to www.omni-ts.com/quicktours
• Support Forum: Go to www.omni-ts.com/Forum and:
o Select the eControl ~ Installation, Management and Support forum.
o “eControl Tips” available at http://www.omni-ts.com/forum/post--2124--page-
1.html is a collection of forum articles to provide troubleshooting and advanced
management steps for eControl.
• Product FAQ: Go to http://www.omni-ts.com/web-management and select Frequently
Asked Questions


