eColor Reach Powercore gen2 - Color · PDF fileeColor Reach Powercore gen2 Product Guide 3...
12
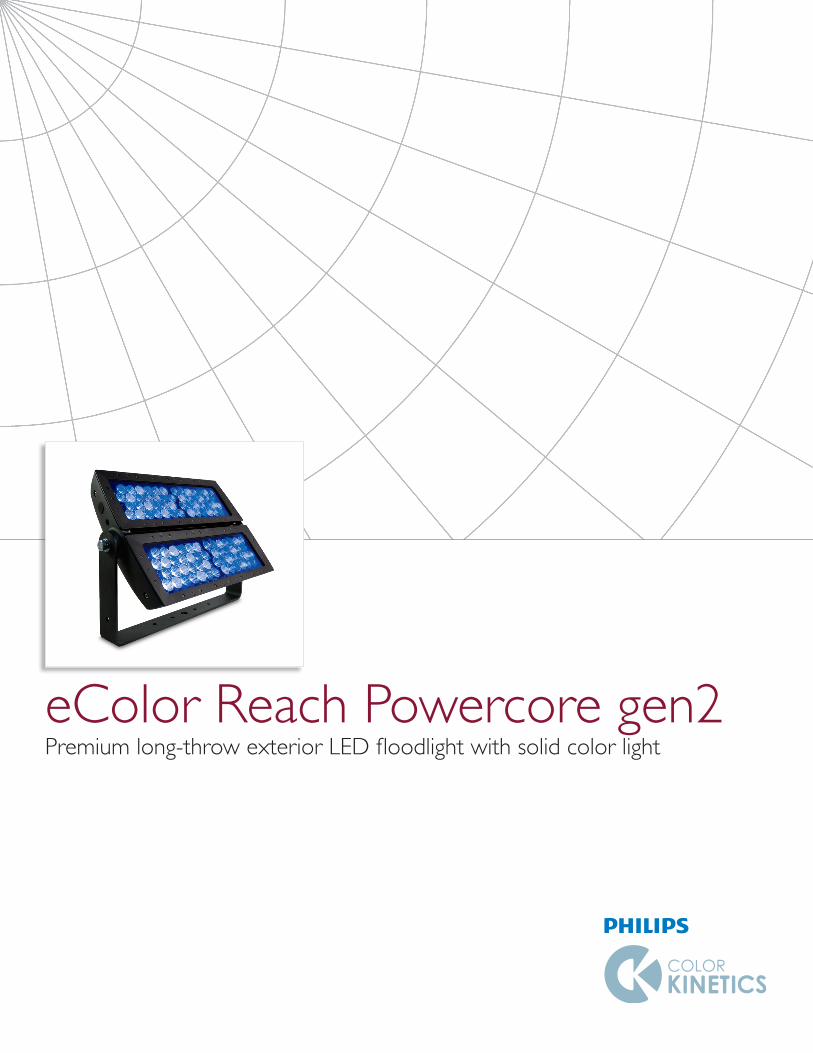
eColor Reach Powercore gen2 Premium long-throw exterior LED floodlight with solid color light
Transcript of eColor Reach Powercore gen2 - Color · PDF fileeColor Reach Powercore gen2 Product Guide 3...
eColor Reach Powercore gen2Premium long-throw exterior LED floodlight with solid color light
eColor Reach Powercore gen2 Product Guide2
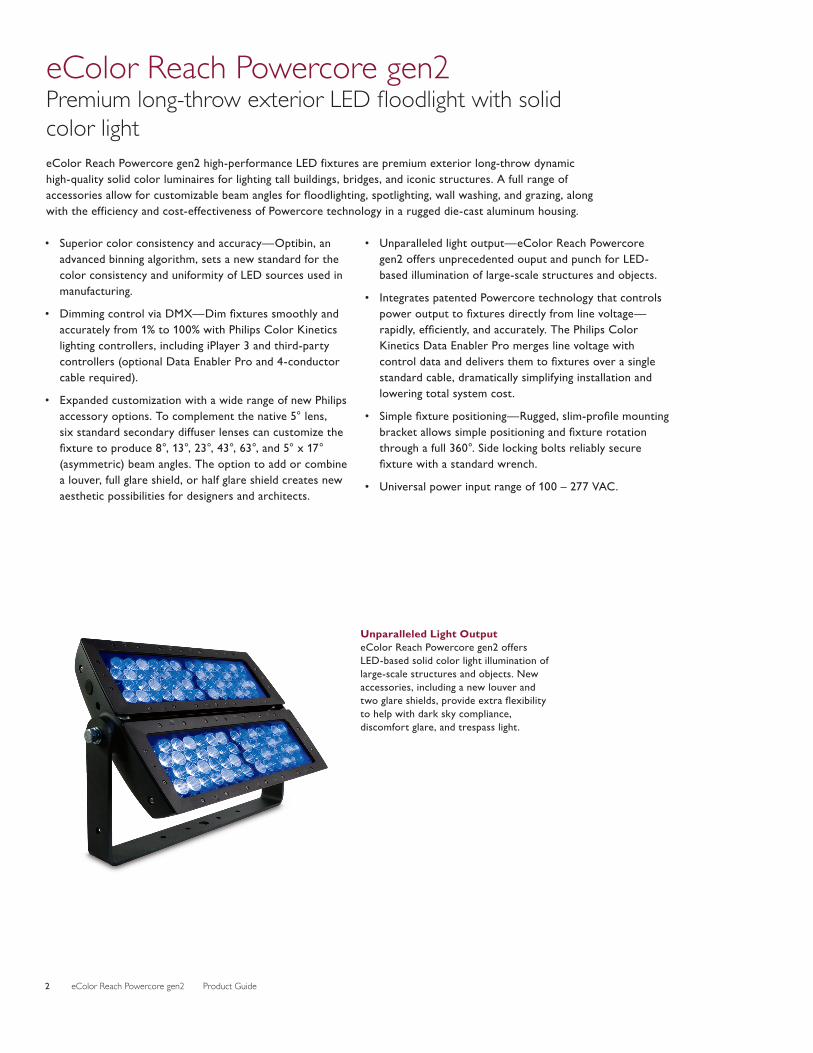
Unparalleled Light Output eColor Reach Powercore gen2 offers LED-based solid color light illumination of large-scale structures and objects. New accessories, including a new louver and two glare shields, provide extra flexibility to help with dark sky compliance, discomfort glare, and trespass light.
• Superior color consistency and accuracy—Optibin, an advanced binning algorithm, sets a new standard for the color consistency and uniformity of LED sources used in manufacturing.
• Dimming control via DMX—Dim fixtures smoothly and accurately from 1% to 100% with Philips Color Kinetics lighting controllers, including iPlayer 3 and third-party controllers (optional Data Enabler Pro and 4-conductor cable required).
• Expanded customization with a wide range of new Philips accessory options. To complement the native 5° lens, six standard secondary diffuser lenses can customize the fixture to produce 8°, 13°, 23°, 43°, 63°, and 5° x 17° (asymmetric) beam angles. The option to add or combine a louver, full glare shield, or half glare shield creates new aesthetic possibilities for designers and architects.
• Unparalleled light output—eColor Reach Powercore gen2 offers unprecedented ouput and punch for LED-based illumination of large-scale structures and objects.
• Integrates patented Powercore technology that controls power output to fixtures directly from line voltage—rapidly, efficiently, and accurately. The Philips Color Kinetics Data Enabler Pro merges line voltage with control data and delivers them to fixtures over a single standard cable, dramatically simplifying installation and lowering total system cost.
• Simple fixture positioning—Rugged, slim-profile mounting bracket allows simple positioning and fixture rotation through a full 360°. Side locking bolts reliably secure fixture with a standard wrench.
• Universal power input range of 100 – 277 VAC.
eColor Reach Powercore gen2 high-performance LED fixtures are premium exterior long-throw dynamic high-quality solid color luminaires for lighting tall buildings, bridges, and iconic structures. A full range of accessories allow for customizable beam angles for floodlighting, spotlighting, wall washing, and grazing, along with the efficiency and cost-effectiveness of Powercore technology in a rugged die-cast aluminum housing.
eColor Reach Powercore gen2Premium long-throw exterior LED floodlight with solid color light

eColor Reach Powercore gen2 Product Guide 3
Specifications, UL/CEDue to continuous improvements and innovations, specifications may change without notice.
E For help estimating the light output and distribution of eColor lighting fixtures, please contact Philips Color Kinetics Applications Engineering Services at [email protected].
Item Specification Details
Output Beam Angle 5° primary optic (no spread lens) 8°/13°/23°/43°/63°/5° x 17° (asymmetric) spread lenses
Electrical
Input Voltage 100 – 277 VAC, auto-switching, 50/60 Hz
Power Consumption 250 W maximum at full output, steady state
Power Factor .989 @ 120 VAC
Control On/Off; digital dimming by 4 connector cable & DE Pro
Physical
Dimensions (Height x Width x Depth)
522 x 733 x 122 mm (20.5 x 28.9 x 4.8 in)
Weight 34 kg (75 lb)
Effective Projected Area (EPA) 0.42 m2
Housing Die-cast aluminium, powder-coated finish
Mechanical Impact IK07
Lens Tempered glass
Fixture Connections Integral male/female waterproof connector
Temperature Ranges-40° – 50° C (-40° – 122° F) Operating -20° – 50° C (-4° – 122° F) Startup-40° – 80° C (-40° – 176° F) Storage
Humidity 0 – 95%, non-condensing
Fixture Run LengthsTo calculate fixture run lengths and total power consumption for your specific installation, download the Configuration Calculator from www.philipscolorkinetics.com/support/install_tool/
Certification and Safety
Certification UL/cUL, FCC Class A, CE, PSE
Environment Dry/Damp/Wet Location, IP66
8º 13º
23º
5º x 17º
43º 63º
5º
692 mm (27.25 in)
305 mm (12 in)
89 mm(3.5 in)
76 m
m(3
in)
38 m
m(1
.5 in
)
345 mm (13.6 in)Ø27 mm(1.05 in)
Ø13 mm(.53 in)
152 mm(6 in)
122 mm(4.8 in)
459
mm
(18
in)
733 mm (28.9 in)
522
mm
(20.
5 in
)
eColor Reach Powercore gen2 Product Guide4
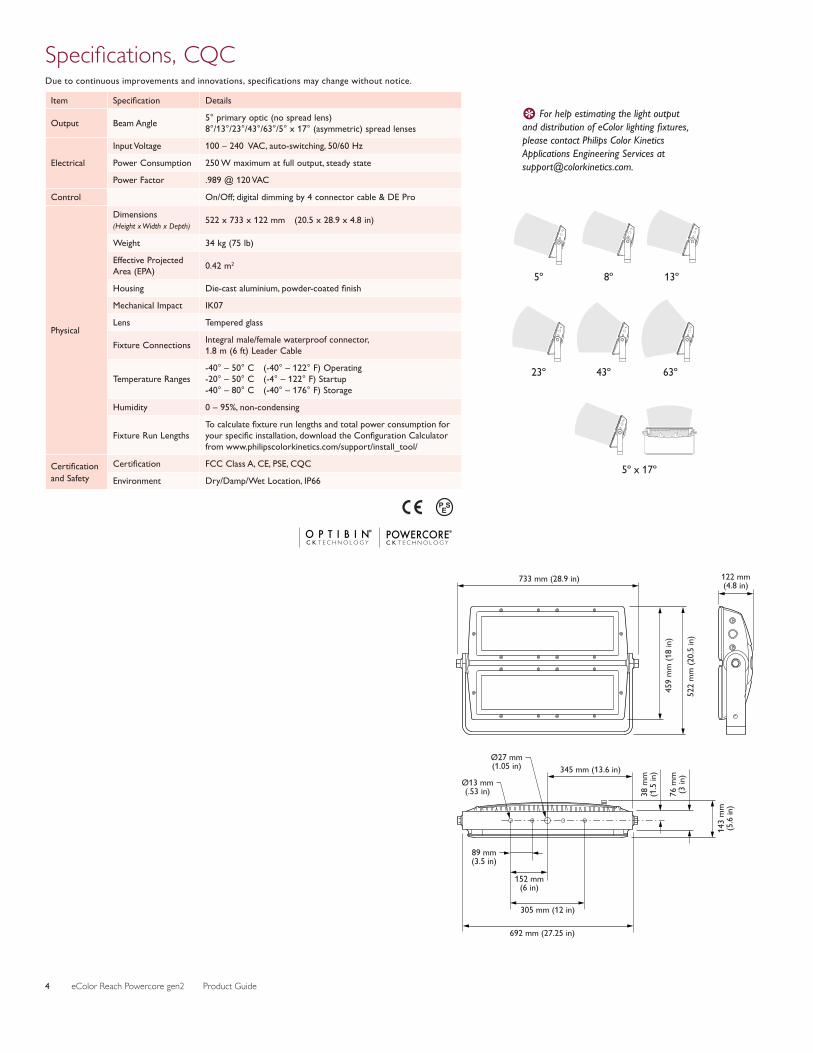
Specifications, CQCDue to continuous improvements and innovations, specifications may change without notice.
E For help estimating the light output and distribution of eColor lighting fixtures, please contact Philips Color Kinetics Applications Engineering Services at [email protected].
Item Specification Details
Output Beam Angle 5° primary optic (no spread lens) 8°/13°/23°/43°/63°/5° x 17° (asymmetric) spread lenses
Electrical
Input Voltage 100 – 240 VAC, auto-switching, 50/60 Hz
Power Consumption 250 W maximum at full output, steady state
Power Factor .989 @ 120 VAC
Control On/Off; digital dimming by 4 connector cable & DE Pro
Physical
Dimensions (Height x Width x Depth)
522 x 733 x 122 mm (20.5 x 28.9 x 4.8 in)
Weight 34 kg (75 lb)
Effective Projected Area (EPA) 0.42 m2
Housing Die-cast aluminium, powder-coated finish
Mechanical Impact IK07
Lens Tempered glass
Fixture Connections Integral male/female waterproof connector, 1.8 m (6 ft) Leader Cable
Temperature Ranges-40° – 50° C (-40° – 122° F) Operating -20° – 50° C (-4° – 122° F) Startup-40° – 80° C (-40° – 176° F) Storage
Humidity 0 – 95%, non-condensing
Fixture Run LengthsTo calculate fixture run lengths and total power consumption for your specific installation, download the Configuration Calculator from www.philipscolorkinetics.com/support/install_tool/
Certification and Safety
Certification FCC Class A, CE, PSE, CQC
Environment Dry/Damp/Wet Location, IP66
8º 13º
23º
5º x 17º
43º 63º
5º
692 mm (27.25 in)
305 mm (12 in)
89 mm(3.5 in)
76 m
m(3
in)
38 m
m(1
.5 in
)345 mm (13.6 in)Ø27 mm(1.05 in)
Ø13 mm(.53 in)
152 mm(6 in)
143
mm
(5.6
in)
122 mm(4.8 in)
459
mm
(18
in)
733 mm (28.9 in)
522
mm
(20.
5 in
)

eColor Reach Powercore gen2 Product Guide 5
Fixtures and Data Enabler ProeColor Reach Powercore gen2 fixtures are part of a complete line-voltage system which includes fixtures and:
• One Leader Cable to connect each eColor Reach Powercore gen2 fixture to a power source.
• 3-conductor copper wire to connect eColor Reach Powercore gen2 fixtures in series or in parallel. Standard 12 AWG (2.05 mm) stranded wire is recommended.
• 4-conductor copper wire to connect eColor Reach Powercore gen2 fixtures in series or in parallel, when digital dimming feature will be used, with a Philips Data Enabler Pro. 4-conductor wire is required for all connections downstream from the Data Enabler Pro.
• Philips Data Enabler Pro, when digital dimming feature will be used.
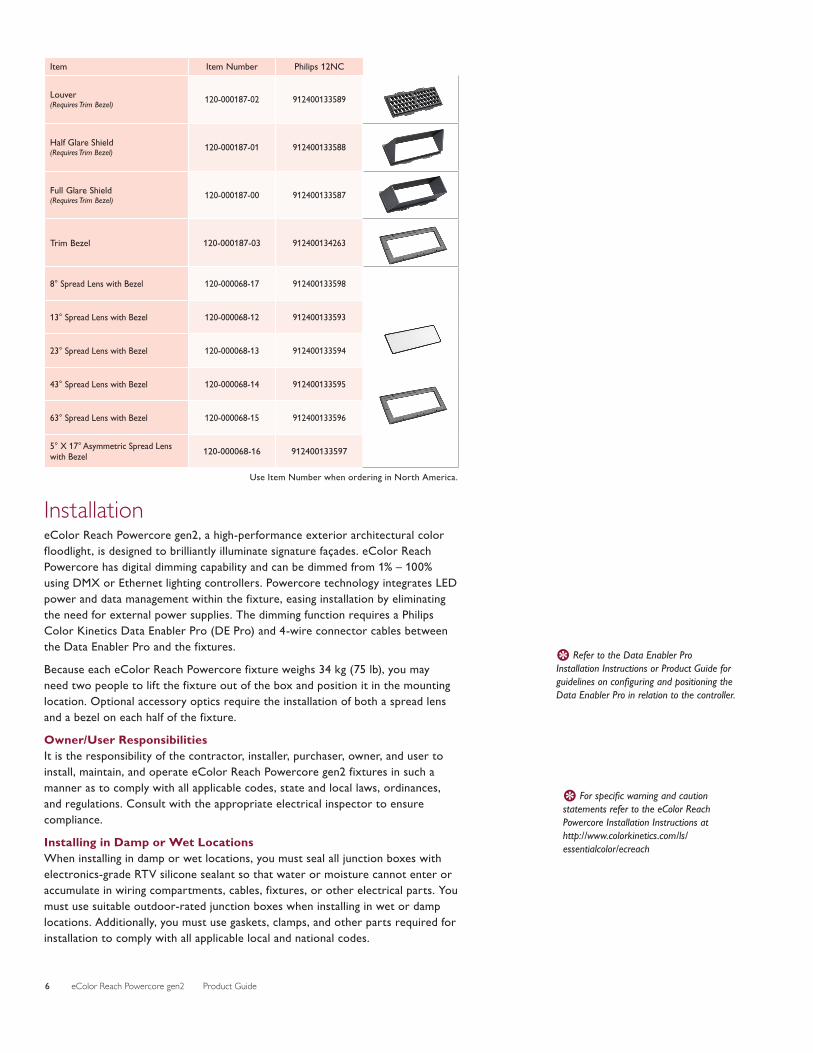
Use Item Number when ordering in North America.
Fixtures
Use Item Number when ordering in North America.
Use Item Number when ordering in North America.
Item Style Item Number* Philips 12NC
Data Enabler Pro3/4 in / 1/2 in NPT (US trade size conduit) 106-000004-00 910503701210
PG21/PG13 (metric size conduit) 106-000004-01 910503701211
Data Enabler
AccessoriesAll of the Philips Color Kinetics accessories are designed to provide customizable options for controlling and dispersing light as well as added protection.
Item Type Item Number Philips 12NC
eColor Reach Powercore gen2 Leader cable(s) sold separately UL/CE
Red 223-000084-08 912400133481
Green 223-000084-09 912400133482
Blue 223-000084-10 912400133483
Amber 223-000084-11 912400133484
eColor Reach Powercore gen2 Includes 1.8 m (6 ft) Leader Cable CQC
Red 223-000079-12 912400133508
Green 223-000079-13 912400133509
Blue 223-000079-14 912400133510
Amber 223-000079-15 912400133511
Item Type Item Number Philips 12NC
3 Conductor Replacement Leader Cable, 100–240 VAC 6 ft (1.8 m) CE/PSE 108-000046-01 910503700622
3 Conductor Replacement Leader Cable, 100–240 VAC: 6 ft (1.8 m) CQC 108-000046-02 910503704175
3 Conductor Replacement Leader Cable, 100–277 VAC
10 ft (3.0 m)UL/cUL 108-000056-03 910503704071
CE/PSE 108-000056-04 910503704072
50 ft (15.2 m)UL/cUL 108-000056-00 910503703138
CE/PSE 108-000056-01 910503704069
4 Conductor Replacement Leader Cable (required to digitally dim unit, w/ DE Pro), 100–240 VAC
6 ft (1.8 m) CE/PSE 108-000043-03 910503700454
4 Conductor Replacement Leader Cable (required to digitally dim unit, w/ DE Pro), 100–277 VAC
10 ft (3.0 m)UL/cUL 108-000055-03 910503704066
CE/PSE 108-000055-04 910503704067
50 ft (15.2 m)UL/cUL 108-000055-00 910503703137
CE/PSE 108-000055-01 910503704064
eColor Reach Powercore gen2 Product Guide6
Item Item Number Philips 12NC
Louver (Requires Trim Bezel) 120-000187-02 912400133589
Half Glare Shield(Requires Trim Bezel) 120-000187-01 912400133588
Full Glare Shield (Requires Trim Bezel) 120-000187-00 912400133587
Trim Bezel 120-000187-03 912400134263
8° Spread Lens with Bezel 120-000068-17 912400133598
13° Spread Lens with Bezel 120-000068-12 912400133593
23° Spread Lens with Bezel 120-000068-13 912400133594
43° Spread Lens with Bezel 120-000068-14 912400133595
63° Spread Lens with Bezel 120-000068-15 912400133596
5° X 17° Asymmetric Spread Lens with Bezel 120-000068-16 912400133597
E For specific warning and caution statements refer to the eColor Reach Powercore Installation Instructions at http://www.colorkinetics.com/ls/essentialcolor/ecreach
E Refer to the Data Enabler Pro Installation Instructions or Product Guide for guidelines on configuring and positioning the Data Enabler Pro in relation to the controller.
InstallationeColor Reach Powercore gen2, a high-performance exterior architectural color floodlight, is designed to brilliantly illuminate signature façades. eColor Reach Powercore has digital dimming capability and can be dimmed from 1% – 100% using DMX or Ethernet lighting controllers. Powercore technology integrates LED power and data management within the fixture, easing installation by eliminating the need for external power supplies. The dimming function requires a Philips Color Kinetics Data Enabler Pro (DE Pro) and 4-wire connector cables between the Data Enabler Pro and the fixtures.
Because each eColor Reach Powercore fixture weighs 34 kg (75 lb), you may need two people to lift the fixture out of the box and position it in the mounting location. Optional accessory optics require the installation of both a spread lens and a bezel on each half of the fixture.
Owner/User Responsibilities It is the responsibility of the contractor, installer, purchaser, owner, and user to install, maintain, and operate eColor Reach Powercore gen2 fixtures in such a manner as to comply with all applicable codes, state and local laws, ordinances, and regulations. Consult with the appropriate electrical inspector to ensure compliance.
Installing in Damp or Wet LocationsWhen installing in damp or wet locations, you must seal all junction boxes with electronics-grade RTV silicone sealant so that water or moisture cannot enter or accumulate in wiring compartments, cables, fixtures, or other electrical parts. You must use suitable outdoor-rated junction boxes when installing in wet or damp locations. Additionally, you must use gaskets, clamps, and other parts required for installation to comply with all applicable local and national codes.
Use Item Number when ordering in North America.
eColor Reach Powercore gen2 Product Guide 7
Prepare for the Installation1. Determine the appropriate location of each Data Enabler Pro in relation to the
fixtures, and of the fixtures in relation to each other. The Data Enabler Pro and first fixture must be separated by no more than the 3 m (10 ft) length of the Leader Cable.
eColor Reach Powercore gen2 fixtures can be installed in series or in parallel (wired to a common junction box). The maximum number of fixtures each circuit can support depends on specific configuration details such as fixture spacing, circuit size, line voltage, and method of connection (in series or in parallel). For more information, and for help calculating the number of fixtures your specific installation can support, download the Configuration Calculator from www.philipscolorkinetics.com/support/install_tool/, or consult Application Engineering Services at [email protected].
2. Ensure that all additional parts and tools are available, including:
• A 28 mm hex or adjustable wrench for adjusting the locking bolts on the fixture bracket.
• One electrical junction box per fixture, rated for your application. (Refer to the junction box manufacturer’s literature for additional items required for mounting or sealing.)
• A sufficient length of 3- or 4-conductor copper wire. We recommend 12 AWG (2.05 mm) stranded wire.
• Conduit as required.
• Electronics-grade room temperature vulcanizing (RTV) silicone sealant.
Start the Installation1. If digital dimming is desired, install all Data Enabler Pro devices, including any
interfaces with controllers. One Leader Cable is required to make connection to the fixture. The Data Enabler Pro sends power and control signals to the fixtures over the Leader Cable.
2. Verify that all additional supporting equipment (switches, controllers) is in place.
3. Ensure that all additional parts (optional mounting tracks, mounting hardware, terminators) and tools are available.
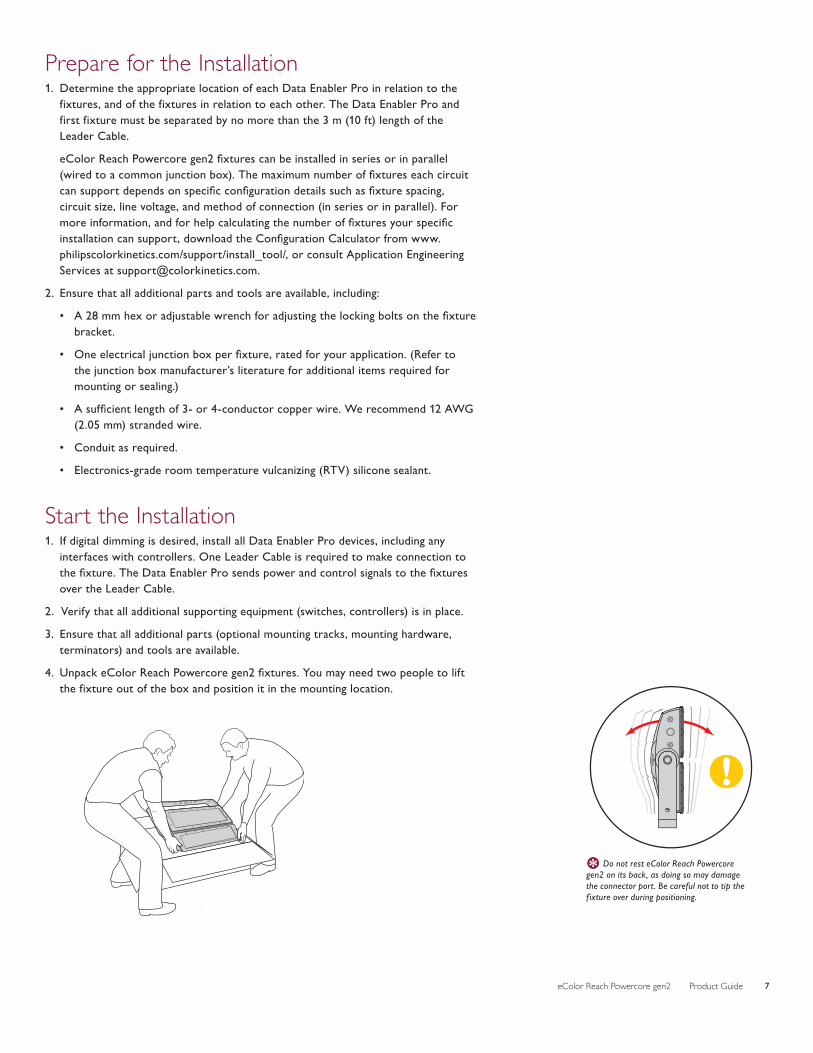
4. Unpack eColor Reach Powercore gen2 fixtures. You may need two people to lift the fixture out of the box and position it in the mounting location.
C
E Do not rest eColor Reach Powercore gen2 on its back, as doing so may damage the connector port. Be careful not to tip the f ixture over during positioning.

eColor Reach Powercore gen2 Product Guide8
Attach Accessory Lenses (Optional)Accessories can be installed to change the beam angle or add extra glare control to the fixture in outdoor environments.
Spread Lens
Half Glare Shield
Full Glare Shield
Trim Bezel
Louver
5º x 17º5º x 17º
E For complete instructions on how to install the accessories, refer to the Accessory Installation Instructions at http://www.colorkinetics.com/ls/essentialcolor/ecreach
E For installations in extreme environments, refer to the Reach Spread Lens Kit Installation Instructions at http://www.colorkinetics.com/ls/essentialcolor/ecreach for details on sealing the spread lens and bezel to prohibit water ingress.
eColor Reach Powercore gen2 Product Guide 9
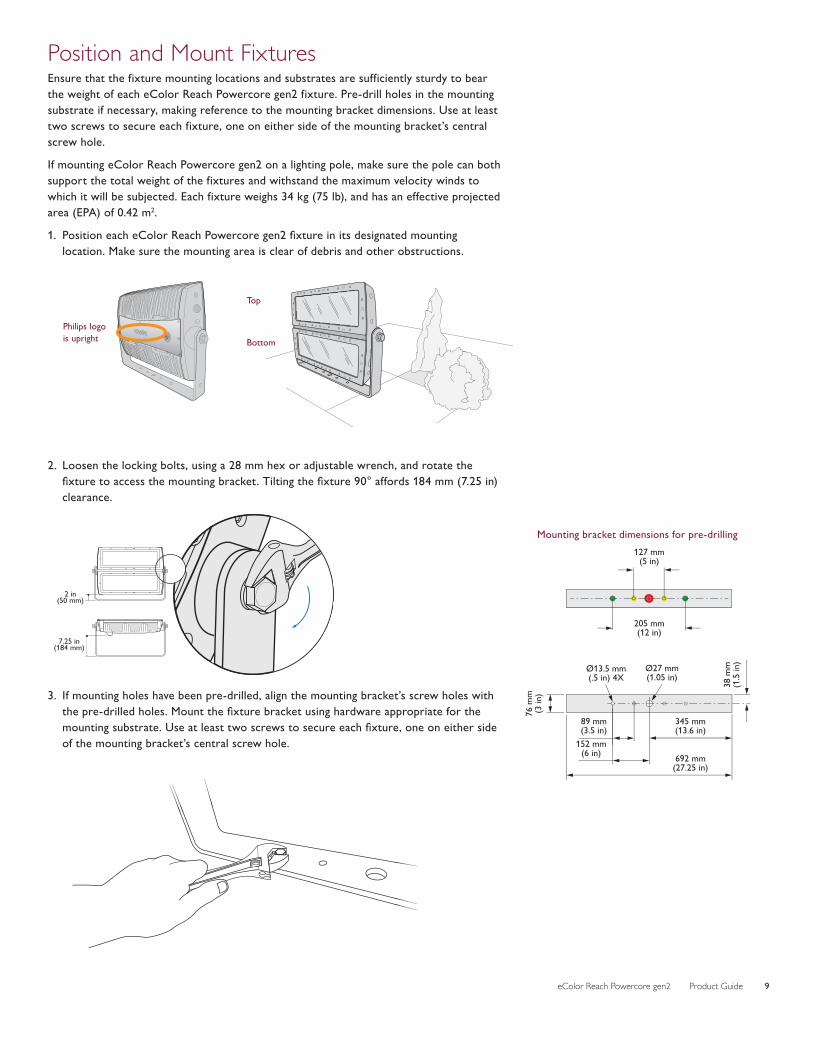
Philips logo is upright
Top
Bottom
Position and Mount FixturesEnsure that the fixture mounting locations and substrates are sufficiently sturdy to bear the weight of each eColor Reach Powercore gen2 fixture. Pre-drill holes in the mounting substrate if necessary, making reference to the mounting bracket dimensions. Use at least two screws to secure each fixture, one on either side of the mounting bracket’s central screw hole.
If mounting eColor Reach Powercore gen2 on a lighting pole, make sure the pole can both support the total weight of the fixtures and withstand the maximum velocity winds to which it will be subjected. Each fixture weighs 34 kg (75 lb), and has an effective projected area (EPA) of 0.42 m2.
1. Position each eColor Reach Powercore gen2 fixture in its designated mounting location. Make sure the mounting area is clear of debris and other obstructions.
2. Loosen the locking bolts, using a 28 mm hex or adjustable wrench, and rotate the fixture to access the mounting bracket. Tilting the fixture 90° affords 184 mm (7.25 in) clearance.
3. If mounting holes have been pre-drilled, align the mounting bracket’s screw holes with the pre-drilled holes. Mount the fixture bracket using hardware appropriate for the mounting substrate. Use at least two screws to secure each fixture, one on either side of the mounting bracket’s central screw hole.
Mounting bracket dimensions for pre-drilling
7.25 in(184 mm)
2 in(50 mm)
Ø13.5 mm(.5 in) 4X
76 m
m(3
in)
152 mm(6 in)
89 mm(3.5 in)
38 m
m(1
.5 in
)
692 mm(27.25 in)
Ø27 mm(1.05 in)
345 mm(13.6 in)
127 mm(5 in)
205 mm(12 in)
eColor Reach Powercore gen2 Product Guide10
Connect Fixtures eColor Reach Powercore gen2 fixtures can be installed in series or in parallel (wired to a common junction box). Ensure that all junction boxes are suitable for the environment and that all wiring between junction boxes complies with local codes.
Make sure the power is OFF before connecting eColor Reach Powercore gen2 fixtures.
1. Install junction boxes. (Refer to the manufacturer’s literature for additional items required for mounting or sealing.)
2. If installing fixtures in a series, pull 3-conductor copper wire between each junction box in the series. If installing fixtures in parallel, pull 3-conductor copper wire from a power source to a common junction box, and from the common junction box to each fixture’s junction box.
If these fixtures are to use digital dimming and control features, there must be a Philips Color Kinetics Data Enabler Pro between the power mains and the first junction box. All cabling between the Data Enabler Pro and the downstream fixtures must be 4-conductor cables.
The maximum cable run from a Data Enabler Pro to any individual eColor Reach Compact Powercore fixture is 53 m (175 ft). When installing in parallel, the total cable length cannot exceed 122 m (400 ft).
3. If necessary, remove the connector cap from the port on the back of the eColor Reach Powercore gen2 housing. Insert the Leader Cable into the port. Turn the Leader Cable’s lock nut to the right until it locks into place.
For installations with CQC-compatible (CE) cabling: Turn the Leader Cable’s lock nut to the right until it locks into place.
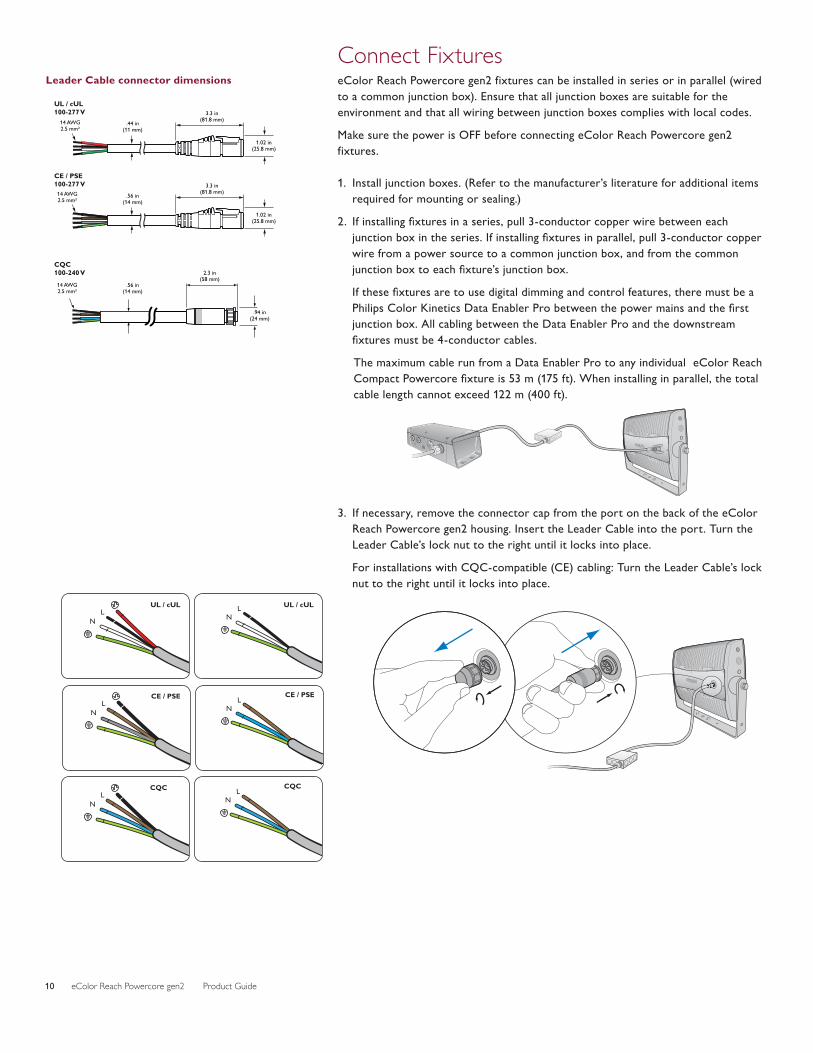
Leader Cable connector dimensions
14 AWG2.5 mm²
UL / cUL100-277 V
.44 in(11 mm)
1.02 in(25.8 mm)
3.3 in(81.8 mm)
14 AWG2.5 mm²
CE / PSE100-277 V
.56 in(14 mm)
1.02 in(25.8 mm)
3.3 in(81.8 mm)
CQC100-240 V
14 AWG2.5 mm²
.56 in(14 mm)
2.3 in(58 mm)
.94 in(24 mm)
UL / cULL
N
UL / cULLN
CE / PSEL
N
CE / PSEL
N
CQCL
N
CQCL
N
eColor Reach Powercore gen2 Product Guide 11
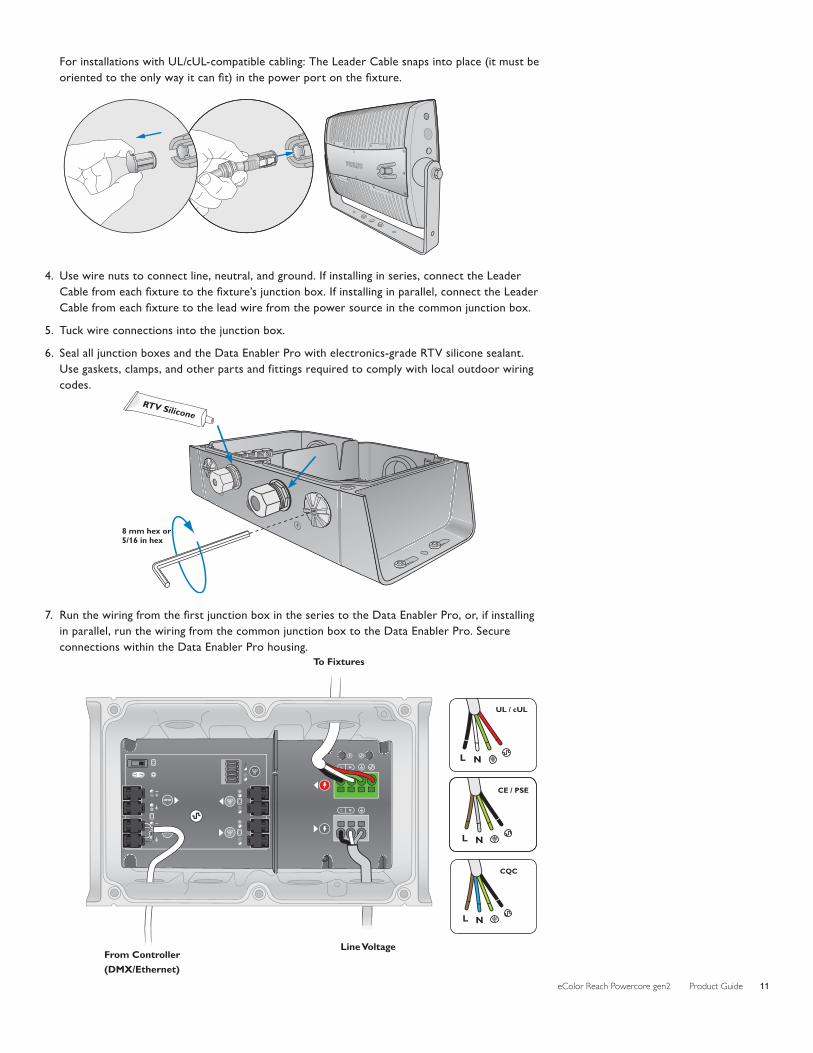
8 mm hex or5/16 in hex
For installations with UL/cUL-compatible cabling: The Leader Cable snaps into place (it must be oriented to the only way it can fit) in the power port on the fixture.
4. Use wire nuts to connect line, neutral, and ground. If installing in series, connect the Leader Cable from each fixture to the fixture’s junction box. If installing in parallel, connect the Leader Cable from each fixture to the lead wire from the power source in the common junction box.
5. Tuck wire connections into the junction box.
6. Seal all junction boxes and the Data Enabler Pro with electronics-grade RTV silicone sealant. Use gaskets, clamps, and other parts and fittings required to comply with local outdoor wiring codes.
7. Run the wiring from the first junction box in the series to the Data Enabler Pro, or, if installing in parallel, run the wiring from the common junction box to the Data Enabler Pro. Secure connections within the Data Enabler Pro housing.
RTV Silicone
RTV Silicone
Line VoltageFrom Controller(DMX/Ethernet)
L N
L N
DMX
DMX
To Fixtures
UL / cUL
UL / cUL
LN
CE / PSE
CE / PSE UL / cULCE / CQC
LN
UL / cUL CE / PSEL
NL
N
L N
L N L N
L N
CE / PSECQC
L N
UL / cUL CE / CQCPSE
L N L N
UL / cUL CE / PSE
L N L N
L N
CE / PSE
L N
CE / CCC
L N
CE / Japan
L N
CE
L N
CE / PSE
L N
CE / PSECCC
L N
CE / PSE
L N
CQC
L N
eColor Reach Powercore gen2 Product Guide12
Connect to PowerYou can connect the first junction box in a series, or a common junction box in a parallel installation, directly to a power source.
1. Run a sufficient length of 3-conductor wire from the first junction box in the series to the power source, or if installing in parallel, run the wiring from the common junction box to the power source.
2. If installing in a wet or damp location, seal all junction boxes with electronics-grade RTV silicone sealant. Use gaskets, clamps, and other parts and fittings required to comply with local outdoor wiring codes.
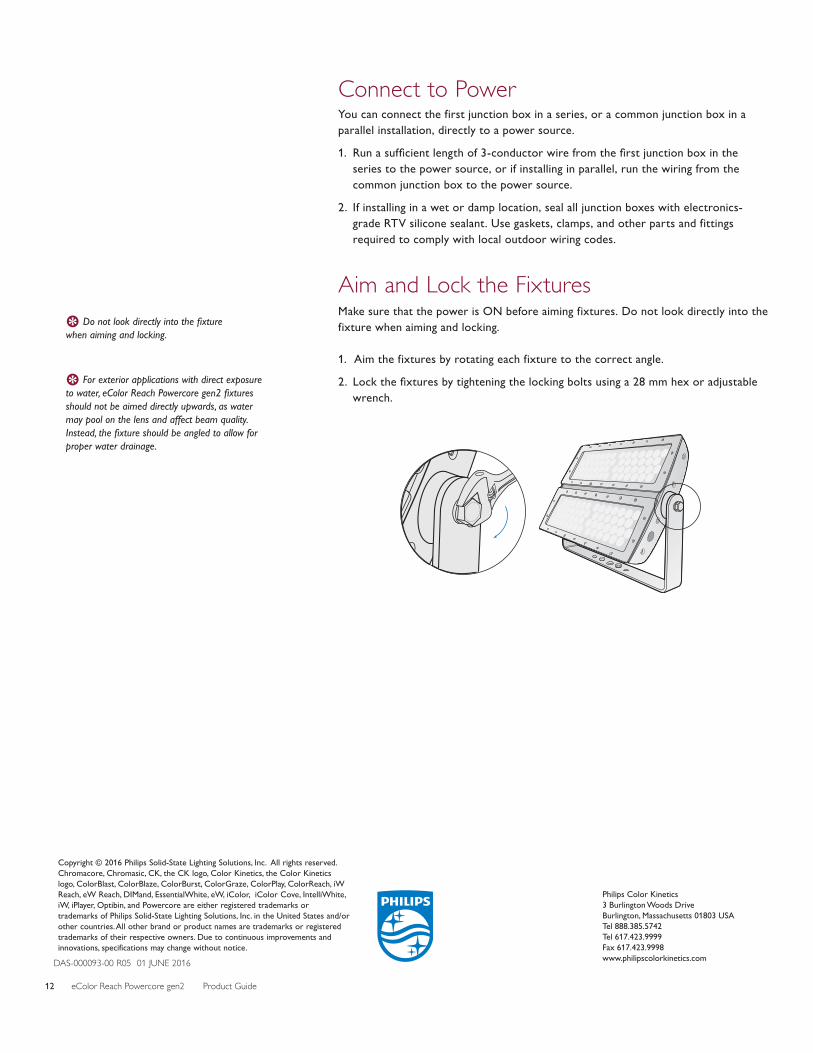
Aim and Lock the FixturesMake sure that the power is ON before aiming fixtures. Do not look directly into the fixture when aiming and locking.
1. Aim the fixtures by rotating each fixture to the correct angle.
2. Lock the fixtures by tightening the locking bolts using a 28 mm hex or adjustable wrench.
E Do not look directly into the fixture when aiming and locking.
E For exterior applications with direct exposure to water, eColor Reach Powercore gen2 fixtures should not be aimed directly upwards, as water may pool on the lens and affect beam quality. Instead, the fixture should be angled to allow for proper water drainage.
DAS-000093-00 R05 01 JUNE 2016
Copyright © 2016 Philips Solid-State Lighting Solutions, Inc. All rights reserved.Chromacore, Chromasic, CK, the CK logo, Color Kinetics, the Color Kinetics logo, ColorBlast, ColorBlaze, ColorBurst, ColorGraze, ColorPlay, ColorReach, iW Reach, eW Reach, DIMand, EssentialWhite, eW, iColor, iColor Cove, IntelliWhite, iW, iPlayer, Optibin, and Powercore are either registered trademarks or trademarks of Philips Solid-State Lighting Solutions, Inc. in the United States and/or other countries. All other brand or product names are trademarks or registered trademarks of their respective owners. Due to continuous improvements and innovations, specifications may change without notice.
Philips Color Kinetics3 Burlington Woods DriveBurlington, Massachusetts 01803 USATel 888.385.5742Tel 617.423.9999Fax 617.423.9998www.philipscolorkinetics.com