
EclipsePartsGuide
19
ECLIPSE SERIES MANUAL & PARTS GUIDE HP-SBS HP-BCS HP-BS HP-CS C M Y CM MY CY CMY K EclipseCover.pdf 9/24/07 1:47:55 AM
-
Upload
trikers666 -
Category
Documents
-
view
110 -
download
1
Transcript of EclipsePartsGuide

ECLIPSE SERIES MANUAL & PARTS GUIDE
HP-SBSHP-BCS HP-BSHP-CS
C
M
Y
CM
MY
CY
CMY
K
EclipseCover.pdf 9/24/07 1:47:55 AM

Congratulations on the purchase of your Iwata Eclipse™ airbrush, a versatile, reliable and high-performance airbrush. We designed this Eclipse for the exacting needs of the artist who requires a multi-purpose, high-paint flow airbrush for spraying fine details and wide backgrounds all with one airbrush, one nozzle and needle size. This technology proves to be the defining feature of the Iwata Eclipse.
Iwata airbrushes are designed for the demanding professional. Modern precision machining and carefully selected materials are used in the manufacturing process to ensure consistent high performance and long life. Each Iwata airbrush is spray-tested before shipment to assure maximum performance and adherence to Iwata’s strict quality standards. To maintain your Eclipse at its peak performance, proper care and attention must be observed.
distinguish these airbrushes as Eclipse!
ONLY FROM IWATA-MEDEA
VERSATILITY,
RELIABILITY & PERFORMANCEC
M
Y
CM
MY
CY
CMY
K
EclipsePage3.pdf 9/24/07 1:57:03 AM

4IWATA ECLIPSE HP-BCS, SBS, CS, BS
This multi-purpose, high-paint-flow, high-detail Eclipse Series airbrush covers a wide range of uses. Commonly used to spray premixed or heavier paints, it is well suited for uses demanding precise control of spray when applying moderate-to-large amounts of paint to a variety of surfaces and to various-sized areas. This Eclipse Series brush has established a new benchmark for excellence in an all-purpose airbrush.
·Bottom-feed airbrush features a 0.5-mm needle and nozzle cap combination
·Sets the industry standard for high-performing, general-purpose, high-paint-flow airbrushes
·Versatile, reliable performance – this airbrush does it all
Iwata Eclipse HP-BCS·Side-feed airbrush features a 0.35mm needle, nozzle, and nozzle cap combination with the option of four cup sizes – the standard 1/8 oz. side cup, a 1/4 oz. side cup, a special 1/2 oz. gravity-feed side cup or a 1 oz. siphon-feed bottle
·Ideal for custom automotive graphics and murals, as well as for fine-arts work that requires custom color mixing and thicker paints
·The Auto-Graphics version of the HP-SBS is similar to the standard HP-SBS, except that it comes with a large 1/2 oz gravity-feed cup and a 1 oz. siphon-feed bottle
Iwata Eclipse HP-SBS
C
M
Y
CM
MY
CY
CMY
K
EclipsePage4.pdf 9/25/07 1:30:28 AM
5
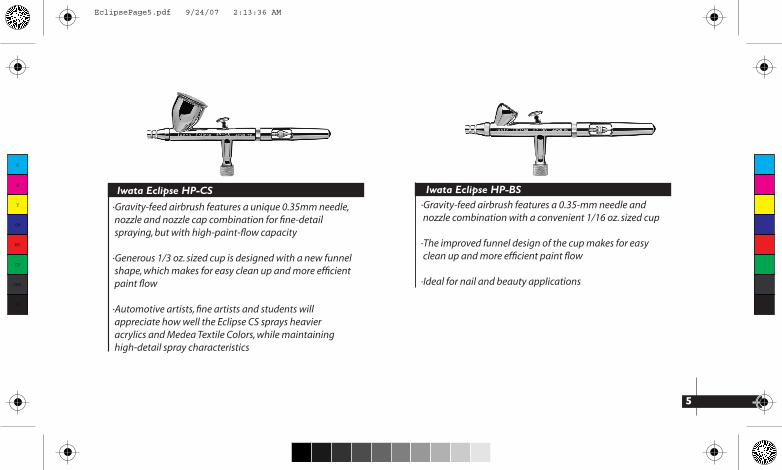
·Gravity-feed airbrush features a unique 0.35mm needle, nozzle and nozzle cap combination for fine-detail spraying, but with high-paint-flow capacity
·Generous 1/3 oz. sized cup is designed with a new funnel shape, which makes for easy clean up and more efficient paint flow
·Automotive artists, fine artists and students will appreciate how well the Eclipse CS sprays heavier acrylics and Medea Textile Colors, while maintaining high-detail spray characteristics
Iwata Eclipse HP-CS·Gravity-feed airbrush features a 0.35-mm needle and nozzle combination with a convenient 1/16 oz. sized cup
·The improved funnel design of the cup makes for easy clean up and more efficient paint flow
·Ideal for nail and beauty applications
Iwata Eclipse HP-BS
C
M
Y
CM
MY
CY
CMY
K
EclipsePage5.pdf 9/24/07 2:13:36 AM

6 GETTING STARTED HP-BCS, SBS, CS, BS
Compressor Choose an appropriate compressor for your Eclipse airbrush. The Iwata Smart Jet Compressor is a good beginner choice and will provide approximately 20-25 psi of air pressure to the Eclipse. The high-powered Iwata Power Jet, Power Jet Lite and Power Jet Pro compressors can provide up to 50 psi to the Eclipse. At 35 psi, the ideal air pressure to utilize all of the airbrush’s unique potential, the Eclipse’s versatility provides high-paint flow for background spray as well as for controllable fine line detail performance. This unmatched versatility is a unique feature of the Iwata Eclipse airbrush series.
(BCS)1. Screw the airhose onto the compressor.2. Screw the airhose onto the airbrush.3. If using a Power Jet, Power Jet Lite or Power Jet Pro compressor, adjust the pressure to between 30 and 45 psi.4. Check for any air leaks in the compressor and airhoses.5. Fill the bottle with Medea Airbrush Cleaner, or the appropriate solvent for your paint.
6. Attach the bottle to the airbrush by pushing the bottle stem into the bottle joint of the airbrush body.7. Point the airbrush away from you.8. Press down on the main lever (#12) to start the flow of air through the airbrush.9. Pull back on the main lever to open the nozzle of the airbrush.10. Spray cleaning solution through the airbrush to rinse out any residual pre-testing pigment.
C
M
Y
CM
MY
CY
CMY
K
EclipsePage6.pdf 9/24/07 6:06:17 PM

7
(BS, CS, SBS)1. Screw the airhose onto the compressor.2. Screw the airhose onto the airbrush.3. If using a Power Jet, Power Jet Lite or Power Jet Pro compressor, adjust the pressure to between 30 and 45 psi.4. Check for any air leaks in the compressor or airhoses.5. Place a few drops of cleaner into the bowl.6. Point the airbrush away from you.7. Press down on the main lever (#12) to start the flow of air through the airbrush.8. Pull back on the main lever to open the nozzle of the airbrush.9. Spray cleaning solution through the airbrush to rinse out any residual pre-testing pigment.
C
M
Y
CM
MY
CY
CMY
K
EclipsePage7.pdf 9/24/07 6:07:35 PM
8
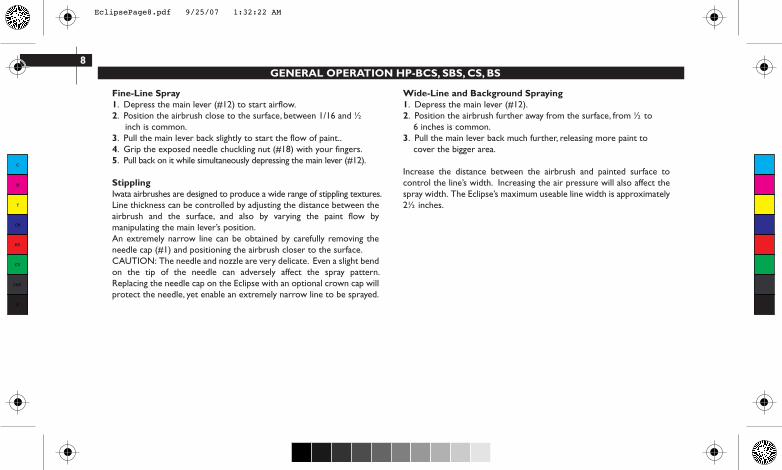
Fine-Line Spray1. Depress the main lever (#12) to start airflow.2. Position the airbrush close to the surface, between 1/16 and ½ inch is common.3. Pull the main lever back slightly to start the flow of paint..4. Grip the exposed needle chuckling nut (#18) with your fingers.5. Pull back on it while simultaneously depressing the main lever (#12).
StipplingIwata airbrushes are designed to produce a wide range of stippling textures.Line thickness can be controlled by adjusting the distance between the airbrush and the surface, and also by varying the paint flow by manipulating the main lever’s position. An extremely narrow line can be obtained by carefully removing the needle cap (#1) and positioning the airbrush closer to the surface.CAUTION: The needle and nozzle are very delicate. Even a slight bend on the tip of the needle can adversely affect the spray pattern. Replacing the needle cap on the Eclipse with an optional crown cap will protect the needle, yet enable an extremely narrow line to be sprayed.
Wide-Line and Background Spraying1. Depress the main lever (#12).2. Position the airbrush further away from the surface, from ½ to 6 inches is common.3. Pull the main lever back much further, releasing more paint to cover the bigger area.
Increase the distance between the airbrush and painted surface to control the line’s width. Increasing the air pressure will also affect the spray width. The Eclipse’s maximum useable line width is approximately 2½ inches.
GENERAL OPERATION HP-BCS, SBS, CS, BS
C
M
Y
CM
MY
CY
CMY
K
EclipsePage8.pdf 9/25/07 1:32:22 AM

9
Cutaway HandleThe cutaway handle (#19) is a special feature on the Eclipse. Its purpose is to free up paint clogs that may have formed at the tip of the airbrush without removing the handle and the needle.
1. Unscrew the needle cap (#1).2. Unscrew the nozzle cap (#2).3. Adjust the air pressure between 5 and 50 psi.
Lower air pressure will give you coarse stipple whereas higher pressure will provide a fine stipple effect. Paint viscosity will also effect the stippling texture.
Air PressureFor the Eclipse, working pressures generally vary between 20 and 60 psi, depending on what type of work is being done and what textures are desired. In general 35 psi or above is prefered to take full advantage of the unique, versatile spray characteristics of the Eclipse. The viscosity of the paint and your desired spray characteristics will also affect your ideal pressure. As a general rule, larger amounts of paint, or thicker paints, will be sprayed with higher pressures.
Paint PreparationFor non-specific airbrush paints, proper preparation, including filtering the paint through a nylon mesh, is recommended for best performance. Paint should be thinned with its proper solvent. It is best to prepare paint relatively thin and make repeated passes across the work to achieve the desired shade. This will also improve the quality of your work and decrease the cleaning time of your airbrush.
Safety Tips• Always spray in a well ventilated area.• Do not spray solvent-based (flammable) paints around open flames.• Use the appropriate respirator to safely filter out the paint vapors particular to the kind of paint you are using.• Wear eye protection to prevent paint contact with eyes. • Never use air pressure that exceeds the airbrush’s limit. (98 psi)
C
M
Y
CM
MY
CY
CMY
K
EclipsePage9.pdf 9/24/07 6:09:58 PM
10 MAINTENANCE
Cleaning the Airbrush between Colors(BCS)1. Remove the paint bottle.2. Attach a bottle containing the appropriate cleaning solution.3. Spray until the solution sprays clear.4. Remove the bottle of cleaning solution.5. Spray air until the airbrush sprays dry.6. Attach a bottle containing the next color.7. Repeat cleaning procedure when finished.
(BS, CS, SBS)1. Dump out the color cup’s excess paint. 2. Rinse the cup with the appropriate cleaning solution.3. Use a paper towel to wipe out any leftover paint.4. Fill the bottom of the cup with cleaner.5. Spray cleaner until the spray is clear.6. Add the next color to the color cup.7. Repeat cleaning procedure when finished.
Before Each SessionSpray water, or the appropriate paint solvent, through the airbrush to make sure the airbrush is working properly.
After Each SessionOr any time the airbrush becomes clogged:1. Increase the air pressure.2. Spray cleaning solution for a short time.3. Clean the needle if necessary.Cleaning the airbrush this way helps clean the paint passage, the nozzle and the needle thoroughly.
C
M
Y
CM
MY
CY
CMY
K
EclipsePage10.pdf 9/25/07 1:33:21 AM

11
Cleaning the Needle 1. Unscrew the handle (#19) from the airbrush body.2. Loosen the needle chucking nut (#18).3. Gently pull the needle (#17) straight out.4. Fold a soft cloth damp with cleaner over the needle.5. Rotate the needle to gently wipe the residual paint off.6. Carefully insert the needle into the airbrush until it seats fully against the nozzle (#4). • CAUTION: The most probable time to damage the needle is when the needle passes through the main lever (#12) and through the needle packing screw (#14b). • If the needle stops abruptly, retract and examine the trigger mechanism for proper assembly and re-insert the needle.7. Tighten the needle chucking nut finger tight. • Pull the main lever back and forth to visually confirm the needle’s ability to move.8. Screw the handle back onto the airbrush body.
PeriodicallyTo ensure smooth main lever action, lubricate the needle (#17) and the main lever mechanism (#12) regularly.1. Unscrew the handle (#19).2. Loosen the needle chucking nut (#18).3. Remove the needle.4. Coat the needle lightly with a high-quality lubricant, like Medea Super Lube.
5. Wipe the needle with a soft, clean cloth, leaving a light coat of lube behind.6. Re-insert the needle gently into the airbrush.7. Tighten the needle chucking nut.8. Screw the handle onto the airbrush body.Drip one drop of lube into the slot directly behind the main lever and as close to the main lever as possible. DO NOT over-lube the needle or the main lever mechanism, since it is possible to transfer excess lube into the nozzle causing severe paint-flow problems.
DO NOT use light machine oil or WD-40 for lubrication. These will cause the needle to stick as it moves through the needle packing o-ring.
CAUTION: If it becomes absolutely necessary to dismantle the airbrush remember that in most situations tools are not needed. DO NOT use pliers. If needed, use the provided wrench to unscrew the head cap (#3).
C
M
Y
CM
MY
CY
CMY
K
EclipsePage11.pdf 9/24/07 6:15:44 PM
12 TROUBLESHOOTING PROCEDURES
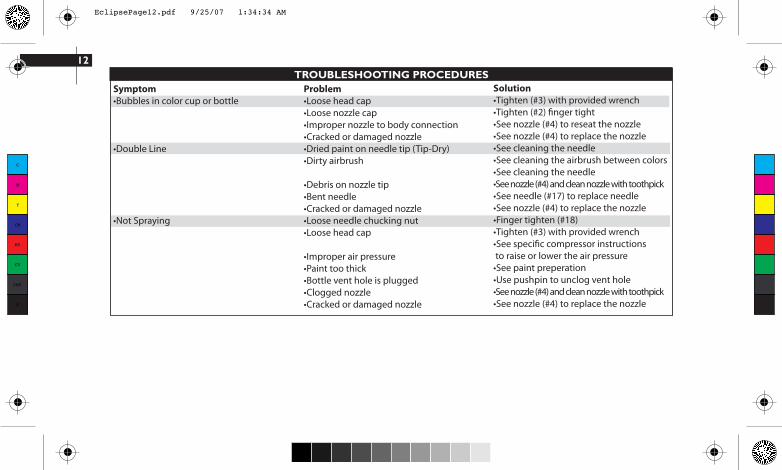
Symptom•Bubbles in color cup or bottle
•Double Line
•Not Spraying
Problem•Loose head cap•Loose nozzle cap•Improper nozzle to body connection•Cracked or damaged nozzle•Dried paint on needle tip (Tip-Dry)•Dirty airbrush
•Debris on nozzle tip•Bent needle•Cracked or damaged nozzle•Loose needle chucking nut•Loose head cap
•Improper air pressure•Paint too thick•Bottle vent hole is plugged•Clogged nozzle•Cracked or damaged nozzle
Solution•Tighten (#3) with provided wrench•Tighten (#2) finger tight•See nozzle (#4) to reseat the nozzle •See nozzle (#4) to replace the nozzle•See cleaning the needle•See cleaning the airbrush between colors•See cleaning the needle•See nozzle (#4) and clean nozzle with toothpick•See needle (#17) to replace needle•See nozzle (#4) to replace the nozzle•Finger tighten (#18)•Tighten (#3) with provided wrench•See specific compressor instructions to raise or lower the air pressure•See paint preperation•Use pushpin to unclog vent hole•See nozzle (#4) and clean nozzle with toothpick•See nozzle (#4) to replace the nozzle
C
M
Y
CM
MY
CY
CMY
K
EclipsePage12.pdf 9/25/07 1:34:34 AM

13
Symptom•Skipping
•Spattering
Problem•Dried paint on needle tip (Tip-Dry)•Pigment too thick•Air pressure too high
•Improper nozzle to body connection•Dirty airbrush
•Cracked or damaged nozzle•Dried paint on needle tip (Tip-Dry)•Pigment build-up in needle cap•Air pressure too low
•Pigment too thick•Dirty airbrush
•Dirty airbrush
•Dried out air valve packing o-ring
Solution•Clean with cotton swab dipped in cleaner•See paint preparation•See specific compressor instructions to lower the air pressure•See nozzle (#4) to reseat the nozzle•See cleaning the airbrush between colors•See cleaning the needle•See nozzle (#4) to replace the nozzle•Clean with cotton swab dipped in cleaner•Unscrew #1 and clean with cotton swab•See specific compressor instructions to raise the air pressure•See paint preparation•See cleaning the airbrush between colors•See cleaning the needle•See cleaning the airbrush between colors•See cleaning the needle•Lube trigger housing
TROUBLESHOOTING PROCEDURES
C
M
Y
CM
MY
CY
CMY
K
EclipsePage13.pdf 9/24/07 6:17:40 PM

14 REPLACEMENT PARTS AND ACCESSORIES
Nozzle (#4)In time, the nozzle may wear or be damaged and may need to be replaced.1. Unscrew the handle (#19).2. Loosen the needle chucking nut (#18).3. Gently pull the needle (#17) part way back. It doesn’t need to be fully pulled out.4. Unscrew the head cap (#3).5. The nozzle should fall out. If it doesn’t, push it gently to the side with your thumb.6. Fit the new nozzle onto the airbrush body.7. Screw the head cap onto the airbrush body. • Hand tighten cap or “lightly” tighten it with the provided wrench. • DO NOT OVERTIGHTEN!8. Push the needle all the way forward until it seats with the new nozzle.9. Tighten the needle chucking nut.10. Screw the handle onto the airbrush body.TIP: Keep a spare nozzle on hand for unforeseen accidents.
Crown Cap (Optional Accessory)A crown cap replaces the needle cap (#1). It physically protects the needle while spraying very fine lines. It also prevents pigment build-up and spattering when spraying large backgrounds.
Pre-Set Handle (Optional Accessory)The pre-set handle replaces the handle (#19). A threaded adjusting screw mounted behind the handle limits the distance the main lever can be pulled back. This provides accurate control of paint volume and is especially useful when doing repetitive, precision work.
C
M
Y
CM
MY
CY
CMY
K
EclipsePage14.pdf 9/25/07 1:35:24 AM

15
1
18
17
Needle (#17)Iwata needles are made of precision ground and hardened stainless-steel that will withstand prolonged usage. They are, however, subject to easy physical damage because of the long tapered, extremely fine tip. If the needle point becomes severely bent, it must be straightened before pulling it back through the nozzle. If not, the bent needle might damage the nozzle as it’s pulled through.
TIP: Keep a spare needle on hand for unforeseen accidents.
Quick Disconnect (Optional Accessory)A quick disconnect joint is screwed onto the airhose and a quick disconnect adapter is screwed onto each airbrush. When using multiple airbrushes, the quick disconnect joint facilitates changing airbrushes on the same airhose quickly.
Several bottle sets and styles are available. From the Crystal Clear bottles and Jars of water based paints to the solvent impervious High Strength translucent bottles and jars, Iwata-Medea offers a wide assortment of bottles for every application.
C
M
Y
CM
MY
CY
CMY
K
EclipsePage15.pdf 9/24/07 6:19:22 PM

16
GENERAL OPERATION HP-BCS, SBS, CS, BS
All Iwata airbrushes are Warranted against all manufacturing defects of material and manufacture or workmanship for a period of FIVE years from date of purchase. This warranty does not cover fluid needles or fluid nozzles since these parts need to be replaced occasionally due to normal wear. Any other part or material that is or becomes defective so as not to be usable within this period will be repaired or replaced. This warranty does not cover damage caused by negligence or airbrushes that have been altered or abused in any way. Call or email Iwata-Medea before returning an airbrush for the appropriate procedure for warranty repairs.
Genuine Iwata
IMAGE NEEDED
Copyright © 2006 Iwata-Medea Inc. All rights reserved. The Iwata-Medea logo, Iwata-Medea®, Iwata Eclipse™, Iwata Revolution™, Iwata Kustom™, Iwata Micron™, Sprint Jet,Smart Jet™, Power Jet Pro™, Power Jet Lite™, Medea Super Lube ™, Pistol Grip Filter™, and all products denoted with ® or ™ are registered trademarks or trademarks ofIwata-Medea Inc. • Iwata® and the Iwata logo are registered trademarks of Anest Iwata Japan • Teflon is a registered trademark of E.I. dupont de Nemours and Company or its affiliates. All other trademarks are of their respective owners. For more information visit www.iwata-medea.com
C
M
Y
CM
MY
CY
CMY
K
EclipsePage16.pdf 9/25/07 1:36:29 AM

17
Attaching directly onto the airbrush,the Iwata-Medea Pistol-Grip Filter is thefinal defense to deliver clean, dry air toyour airbrush. Miniature in size, the super-fine, 5-micron filter element performslike a full-size moisture separator.
The clear filter bowl allows a visualinspection of built-up moisture and isevacuated through a spring-loadedrelease valve – without taking thefilter off the airbrush.
Ergonomically designed, the Pistol-GripFilter provides for many comfortablehours of spraying.
The Iwata Eclipse
Series Airbrush
works well with
the Iwata-Medea
Pistol-Grip Filter.
Pistol-Grip Filter
For clean, dry airflow.
Part # FA450
C
M
Y
CM
MY
CY
CMY
K
EclipsePage17.pdf 9/24/07 6:21:11 PM

18
C
M
Y
CM
MY
CY
CMY
K
EclipsePage18.pdf 9/25/07 1:36:53 AM

19
Needle CapCrown Cap.5mm Nozzle Cap.35mm Nozzle CapHead Cap.5mm Nozzle.35mm NozzlePacking Head O-RingAirbrush BodyPacking Valve PistonO-RingAir Valve Guide BodyAir ValveAir Valve SpringAir Valve SpringAir Valve Guide ScrewMain Lever (Trigger)Teflon Needle Packing SetNeedle Chucking GuideAuxilary LeverNeedle SpringNeedle Spring
# Code # Part Name 1 601 11 105 01 602 11 602 21 603 11 604 11 604 21 605 1
1 580 1
1 608 11 609 11 510 41 035 11 611 11 612 11 725 11 715 1
1 135 11 135 2
1
22344567
89101011121314
1515
BCS BS CS SBS
■ ■ ■ ■
O O O O■ O O OO ■ ■ ■
■ ■ ■ ■
■ O O OO ■ ■ ■
■ ■ ■ ■
■ ■ ■ ■
■ ■ ■ ■
■ ■ ■ ■
O ■ ■ ■
■ O O O■ ■ ■ ■
■ ■ ■ ■
■ ■ ■ ■
■ ■ ■ ■
O ■ ■ ■
■ O O O
16181819
21
22
22a22b23
# Code # Part Name
Spring Guide.5mm Needle.35mm NeedleSingle Cut HandlePre-Set handlePre-Set Cut-Away HandleLid, Eclipse CSLid, 1/4oz Side CupLid, 1/3oz Gravity CupLid, 1/2oz Gravity Cup1/8oz Side Cup1/4oz Side Cup1/3oz Gravity Cup1/2oz Gravity Cup1/8 / 1/4oz Lower LidPacking Lower LidBlanking Screw
1 170 21 617 11 617 21 619 11 155 21 155 61 618 11 095 71 718 11 095 81 070 31 070 41 720 11 070 61 095 61 150 51 045 2
BCS CS SBS BS
■ ■ ■ ■
■ O O O● ■ ■ ■
■ ■ ■ ■
O O O OO O O O✕ ✕ ■ O✕ ✕ ✕ O✕ ✕ O O✕ ✕ ✕ O✕ ✕ ✕ ■
✕ ✕ ✕ O✕ ✕ ✕ O✕ ✕ ✕ ●
✕ ✕ ✕ ■
✕ ✕ ✕ ■
✕ ✕ ✕ ■
■
✕
O
= Standard= No= Optional
C
M
Y
CM
MY
CY
CMY
K
Page18ECl.pdf 7/2/08 12:51:11 PM

W W W . I W A T A - M E D E A . C O M
Iwata-Medea, Inc. • P.O. Box 14397 • Portland, Oregon 97293
tel: 503-253-7308 • fax: 503-253-0721 • [email protected]
C
M
Y
CM
MY
CY
CMY
K
EclipseBackcover.pdf 9/24/07 3:05:43 AM


