
e17735
212
Oracle® Database Installation Guide 12c Release 1 (12.1) for Microsoft Windows E17735-07 July 2013
-
Upload
khanh-tran -
Category
Documents
-
view
27 -
download
0
description
e17735
Transcript of e17735

Oracle® DatabaseInstallation Guide
12c Release 1 (12.1) for Microsoft Windows
E17735-07
July 2013

Oracle Database Installation Guide, 12c Release 1 (12.1) for Microsoft Windows
E17735-07
Copyright © 1996, 2013, Oracle and/or its affiliates. All rights reserved.
Primary Author: Ashmita Bose
Contributing Authors: Janet Stern, Prakash Jashnani, Reema Khosla
Contributor: The Oracle Database 12c documentation is dedicated to Mark Townsend, who was an inspiration to all who worked on this release.
Contributors: Barb Glover, Eric Belden, Sudip Datta, David Friedman, Alex Keh, Peter LaQuerre, Rich Long, Matt McKerley, Sham Rao Pavan, Hanlin Qian, Janelle Simmons, Helen Slattery, Sujatha Tolstoy, Michael Verheij, Madhu Velukur, Sergiusz Wolicki, Sue Mavris, Mohammed Shahnawaz Quadri, Rahul S Joshi, Vishal Saxena, Krishna Itikarlapall, Santanu Datta, Alex Keh
This software and related documentation are provided under a license agreement containing restrictions on use and disclosure and are protected by intellectual property laws. Except as expressly permitted in your license agreement or allowed by law, you may not use, copy, reproduce, translate, broadcast, modify, license, transmit, distribute, exhibit, perform, publish, or display any part, in any form, or by any means. Reverse engineering, disassembly, or decompilation of this software, unless required by law for interoperability, is prohibited.
The information contained herein is subject to change without notice and is not warranted to be error-free. If you find any errors, please report them to us in writing.
If this is software or related documentation that is delivered to the U.S. Government or anyone licensing it on behalf of the U.S. Government, the following notice is applicable:
U.S. GOVERNMENT END USERS: Oracle programs, including any operating system, integrated software, any programs installed on the hardware, and/or documentation, delivered to U.S. Government end users are "commercial computer software" pursuant to the applicable Federal Acquisition Regulation and agency-specific supplemental regulations. As such, use, duplication, disclosure, modification, and adaptation of the programs, including any operating system, integrated software, any programs installed on the hardware, and/or documentation, shall be subject to license terms and license restrictions applicable to the programs. No other rights are granted to the U.S. Government.
This software or hardware is developed for general use in a variety of information management applications. It is not developed or intended for use in any inherently dangerous applications, including applications that may create a risk of personal injury. If you use this software or hardware in dangerous applications, then you shall be responsible to take all appropriate fail-safe, backup, redundancy, and other measures to ensure its safe use. Oracle Corporation and its affiliates disclaim any liability for any damages caused by use of this software or hardware in dangerous applications.
Oracle and Java are registered trademarks of Oracle and/or its affiliates. Other names may be trademarks of their respective owners.
Intel and Intel Xeon are trademarks or registered trademarks of Intel Corporation. All SPARC trademarks are used under license and are trademarks or registered trademarks of SPARC International, Inc. AMD, Opteron, the AMD logo, and the AMD Opteron logo are trademarks or registered trademarks of Advanced Micro Devices. UNIX is a registered trademark of The Open Group.
This software or hardware and documentation may provide access to or information on content, products, and services from third parties. Oracle Corporation and its affiliates are not responsible for and expressly disclaim all warranties of any kind with respect to third-party content, products, and services. Oracle Corporation and its affiliates will not be responsible for any loss, costs, or damages incurred due to your access to or use of third-party content, products, or services.

iii
Contents
Preface ................................................................................................................................................................. xi
Audience....................................................................................................................................................... xiDocumentation Accessibility .................................................................................................................... xiiAccessing Documentation......................................................................................................................... xiiRelated Documentation............................................................................................................................. xiiConventions ............................................................................................................................................... xiii
Changes in This Release for Oracle Database Installation Guide................................ xv
Changes in Oracle Database 12c Release 1 (12.1).................................................................................. xv
1 Overview of Oracle Database Installation
New Oracle Products and Features Installed with This Release .................................................... 1-1Planning Your Installation ..................................................................................................................... 1-1Installation Considerations .................................................................................................................... 1-3
Installation Differences Between Windows and UNIX Systems................................................. 1-3Recommended File System............................................................................................................... 1-4Hardware and Software Certification............................................................................................. 1-4
Third-Party Database Certification for Oracle SQL Developer............................................ 1-4Multiple Oracle Homes Support...................................................................................................... 1-4
Installing Oracle Database on a System with an Existing Oracle Software ....................... 1-5Oracle Grid Infrastructure for a Standalone Server ...................................................................... 1-5Oracle Cluster Synchronization Services........................................................................................ 1-5Oracle Universal Installer Overview............................................................................................... 1-6Oracle Base Directory ........................................................................................................................ 1-6Oracle Home Directory ..................................................................................................................... 1-7
Contents of the Oracle Home Environment............................................................................ 1-7Multiple Oracle Home Components ........................................................................................ 1-8
Oracle Inventory Directory .............................................................................................................. 1-8Installing Oracle Database Vault in an Oracle Data Guard Environment................................. 1-8Oracle Database Vault Default Audit Policy and Initialization Parameters ............................. 1-8Consider Memory Allocation and Automatic Memory Management....................................... 1-8
Oracle Database Installation Methods................................................................................................. 1-9Interactive Installation Types ........................................................................................................... 1-9Automated Installation Methods Using Response Files .............................................................. 1-9
Software Updates Option .................................................................................................................... 1-10
iv
Oracle Database Editions..................................................................................................................... 1-10Database Security Notification Options ........................................................................................... 1-11Database Configuration Options ....................................................................................................... 1-12
Preconfigured Database Types ..................................................................................................... 1-12Installation Choices That Affect Database Creation .................................................................. 1-12Creating a Database After Installation......................................................................................... 1-13
Database Storage Options ................................................................................................................... 1-13File System ...................................................................................................................................... 1-13Oracle Automatic Storage Management...................................................................................... 1-14
Oracle Automatic Storage Management Components....................................................... 1-14Database Management Options ......................................................................................................... 1-15
Management Options for Preconfigured Databases.................................................................. 1-16Management Options for Custom Databases ............................................................................. 1-17Features Provided by Oracle Enterprise Manager Database Express 12c ............................. 1-17
Database Backup and Recovery Options.......................................................................................... 1-18Configuring Recovery .................................................................................................................... 1-18
Upgrade Considerations ...................................................................................................................... 1-18Upgrading Your Operating System Before a Database Upgrade ............................................ 1-18
Upgrading the Operating System.......................................................................................... 1-19Migrating to a New Computer .............................................................................................. 1-19
Upgrading Oracle Automatic Storage Management ................................................................. 1-19Migration Considerations.................................................................................................................... 1-20
2 Oracle Database Preinstallation Tasks
Oracle Database Hardware Requirements .......................................................................................... 2-1Hardware Component Requirements for Windows x64 ............................................................. 2-2Hard Disk Space Requirements ....................................................................................................... 2-2Verifying Hardware Requirements ................................................................................................. 2-3
Oracle Database Software Requirements............................................................................................ 2-4Windows Certification and Web Browser Support ........................................................................... 2-5
Remote Desktop Services .................................................................................................................. 2-5Installation Requirements for Web Browsers ................................................................................ 2-5Default Share Configuration Requirement..................................................................................... 2-6
Reviewing Operating System Security Common Practices ............................................................. 2-6Confirm Host Name Resolution............................................................................................................ 2-6Checking the Network Setup................................................................................................................. 2-6
Installing Oracle Database on Computers with Multiple IP Addresses .................................... 2-6Installing Oracle Database on Computers with Multiple Aliases............................................... 2-7Installing Oracle Database on Nonnetworked Computers.......................................................... 2-7Installing a Loopback Adapter......................................................................................................... 2-8
Checking if a Loopback Adapter is Installed on Your Computer ....................................... 2-9Installing a Loopback Adapter on Windows Server 2008..................................................... 2-9Installing a Loopback Adapter on Windows 7 and Windows Server 2008 R2 ............... 2-10Installing Microsoft KM-TEST Loopback Adapter on Windows 8 and Windows Server 2012 2-11Removing a Loopback Adapter ............................................................................................. 2-11
Individual Component Requirements .............................................................................................. 2-11
v
Configuring Disk Storage for Oracle Data Files and Recovery Files....................................... 2-12Choosing a Storage Option for Oracle Database and Recovery Files .............................. 2-12Configuring Disk Storage ....................................................................................................... 2-12
Creating Directories for Oracle Data Files or Recovery Files ................................................... 2-13Guidelines for Placing Oracle Data Files on a File System ................................................ 2-13Guidelines for Placing Oracle Recovery Files on a File System ........................................ 2-13Creating Required Directories ............................................................................................... 2-14
Oracle Database Security Strong Authentication Requirements ............................................. 2-14Oracle Enterprise Manager Requirements .................................................................................. 2-15Oracle-Managed Files Requirements ........................................................................................... 2-15Oracle Real Application Clusters (Oracle RAC)......................................................................... 2-15Oracle Volume Shadow Copy Service (VSS) Writer .................................................................. 2-15
3 Configuring Users, Groups and Environments for Oracle Database
Creating Required Operating System Groups and Users ................................................................ 3-1About the Oracle Installation User .................................................................................................. 3-1Creating Oracle Home User ............................................................................................................. 3-2Understanding the Oracle Inventory Directory and the Oracle Inventory Group .................. 3-2Operating System Groups Created During Oracle Database Installation................................. 3-2Operating System Groups and Users for Job Role Separation .................................................... 3-5
About Job Role Separation Operating System Privileges Groups and Users .................... 3-5Oracle Software Owner For Each Oracle Software Product................................................. 3-5Standard Oracle Database Groups for Job Role Separation for Oracle Database ............. 3-5Extended Oracle Database Groups for Job Role Separation................................................. 3-6Oracle Automatic Storage Management Groups for Job Role Separation ......................... 3-7
Stopping Existing Oracle Services ........................................................................................................ 3-7Configuring User Accounts .................................................................................................................... 3-8
Configuring Environment Variables for the Software Installation Owner ............................... 3-8Managing User Accounts with User Account Control................................................................. 3-8
4 Oracle Grid Infrastructure for a Standalone Server
Requirements for an Oracle Grid Infrastructure for a Standalone Server Installation ............. 4-2System Requirements ........................................................................................................................ 4-2Memory Requirements...................................................................................................................... 4-2Disk Space Requirements.................................................................................................................. 4-2
Oracle ACFS and Oracle ADVM........................................................................................................... 4-3About Oracle ACFS and Oracle ADVM ......................................................................................... 4-3Oracle ACFS and Oracle ADVM Support on Windows............................................................... 4-3Restrictions and Guidelines for Oracle ACFS................................................................................ 4-4
Oracle Automatic Storage Management Storage Configuration .................................................... 4-4Managing Disk Groups for Older Database Versions .................................................................. 4-4Oracle Automatic Storage Management Installation Considerations........................................ 4-5Preparing Disks for Oracle Automatic Storage Management ..................................................... 4-6
General Steps for Configuring Oracle Automatic Storage Management ........................... 4-6Step 1: Identifying Storage Requirements for Oracle Automatic Storage Management.. 4-6

vi
Step 2: Creating DAS or SAN Disk Partitions for an Oracle Automatic Storage Management Instance 4-9Step 3: Manually Configuring Disks for Oracle Automatic Storage Management ........ 4-11
Manually Configuring Oracle Automatic Storage Management Disk Groups ..................... 4-13Testing the Oracle Automatic Storage Management Installation ............................................ 4-13Upgrading Existing Oracle Automatic Storage Management Instances ................................ 4-14
Installing Oracle Grid Infrastructure for a Standalone Server Using a Software-Only Installation.............................................................................................................................................. 4-14
Installing the Software Binaries .................................................................................................... 4-15Configuring the Software Binaries ............................................................................................... 4-15
Installing and Configuring Oracle Grid Infrastructure for a Standalone Server..................... 4-16Installing Oracle Grid Infrastructure for a Standalone Server with a New Database Installation 4-16Installing Oracle Grid Infrastructure for a Standalone Server for an Existing Database ..... 4-20
Modifying Oracle Grid Infrastructure for a Standalone Server Binaries After Installation.. 4-21
5 Installing Oracle Database
Preinstallation Considerations for Installing Oracle Database ...................................................... 5-1Installation Consideration on Windows......................................................................................... 5-1Performing Multiple Oracle Database Installations...................................................................... 5-2Installing on Systems That Already Have Oracle Components.................................................. 5-2Installing with Minimum Memory Requirements ........................................................................ 5-2
Reviewing Component-Specific Installation Guidelines ................................................................ 5-3Selecting the Database Character Set .............................................................................................. 5-4Using an Oracle Automatic Storage Management Disk Group .................................................. 5-5
Accessing the Installation Software ..................................................................................................... 5-6Installing from a Remote DVD Drive.............................................................................................. 5-6
Step 1: On the Remote Computer, Share the DVD Drive ..................................................... 5-7Step 2: On the Local Computer, Map the DVD Drive ........................................................... 5-7
Installing on Remote Computers Through Remote Access Software ........................................ 5-8Installing on Remote Computers from a Hard Drive............................................................ 5-8Installing on Remote Computers from a Remote DVD Drive.............................................. 5-8
Downloading Oracle Software......................................................................................................... 5-8Downloading the Installation Archive Files from Oracle Technology Network .............. 5-9Downloading the Software from Oracle Software Delivery Cloud .................................... 5-9Extracting the Installation Files.............................................................................................. 5-10
Copying the Oracle Database Software to a Hard Disk ............................................................ 5-10Installing the Oracle Database Software .......................................................................................... 5-10Cloning an Oracle Home ..................................................................................................................... 5-19
6 Oracle Database Postinstallation Tasks
Installing the Latest Patch Set Release................................................................................................. 6-1Validating Invalid PL/SQL Modules ................................................................................................... 6-2Configuring the Secure Sockets Layer ................................................................................................. 6-2Configuring Oracle Components .......................................................................................................... 6-2
Configuring Direct NFS Client......................................................................................................... 6-3About Direct NFS Client Storage.............................................................................................. 6-4

vii
About the Oranfstab File for Direct NFS Client ..................................................................... 6-4Mounting NFS Storage Devices with Direct NFS Client....................................................... 6-4Specifying Network Paths for a NFS Server ........................................................................... 6-4Enabling Direct NFS Client ....................................................................................................... 6-5Performing Basic File Operations Using the ORADNFS Utility.......................................... 6-6Monitoring Direct NFS Client Usage ....................................................................................... 6-7Disabling Direct NFS Client ...................................................................................................... 6-7
Configuring Oracle Messaging Gateway ...................................................................................... 6-7Configuring Oracle Administration Assistant for Windows ...................................................... 6-7Configuring Oracle Label Security .................................................................................................. 6-7Configuring the OraClrAgnt Service for Oracle Database Extensions for .NET ...................... 6-8Configuring Oracle Database Vault ................................................................................................ 6-8Configuring Oracle Net Services ..................................................................................................... 6-8Installing Oracle Text Supplied Knowledge Bases ....................................................................... 6-9Installing the Oracle Text Filtering Component ............................................................................ 6-9Configuring or Reinstalling Oracle XML DB................................................................................. 6-9Configuring PL/SQL External Procedures .................................................................................... 6-9Configuring Shared Server Support............................................................................................. 6-10Setting Credentials for the Job System to Work with Oracle Enterprise Manager ............... 6-10Configuring Oracle Database to Communicate with Oracle Automatic Storage Management .... .............................................................................................................................................................. 6-11Installing Oracle Database Examples ........................................................................................... 6-11Creating the OraMTS Service for Microsoft Transaction Server.............................................. 6-11
Creating a Fast Recovery Area Disk Group ..................................................................................... 6-12About the Fast Recovery Area and the Fast Recovery Area Disk Group ............................... 6-12Creating the Fast Recovery Area Disk Group............................................................................. 6-12
Enabling and Disabling Database Options ..................................................................................... 6-13Changing the Oracle Home User Password ..................................................................................... 6-14Postinstallation Tasks for SQL Developer ....................................................................................... 6-15
7 Getting Started with Oracle Database
Checking the Installed Oracle Database Contents and Directory Location ................................. 7-1Logging In to Oracle Enterprise Manager Database Express 12c ................................................... 7-2Managing Oracle Automatic Storage Management .......................................................................... 7-2
Starting and Stopping Oracle Automatic Storage Management................................................. 7-2Oracle Automatic Storage Management Utilities.......................................................................... 7-2
Starting and Stopping an Oracle Database ......................................................................................... 7-3Starting and Stopping the Database with Oracle Administration Assistant for Windows .... 7-3Starting and Stopping the Database from the Microsoft Windows Services Utility................ 7-3
Accessing Oracle Database with SQL*Plus ........................................................................................ 7-4Accessing Oracle Database with Oracle SQL Developer ................................................................. 7-4Reviewing User Accounts and Passwords........................................................................................... 7-5
Reviewing Administrative Accounts .............................................................................................. 7-5Minimum Requirements for Passwords ......................................................................................... 7-8
Using Enterprise Manager Database Express 12c to Unlock Accounts and Reset Passwords ........................................................................................................................................... 7-9Using SQL*Plus to Unlock and Change Passwords .............................................................. 7-9
viii
Recommendations for Passwords.................................................................................................... 7-9Identifying Databases ......................................................................................................................... 7-10Locating the Server Parameter File .................................................................................................... 7-11Identifying Tablespaces and Data Files............................................................................................ 7-11Locating Redo Log Files ....................................................................................................................... 7-12Locating Control Files .......................................................................................................................... 7-12Understanding Oracle Database Services on Windows ................................................................ 7-13
8 Removing Oracle Database Software
About the Deinstallation Tool ............................................................................................................... 8-1Example of Running the Deinstallation Tool..................................................................................... 8-4Example of Running the Deinstallation Command .......................................................................... 8-5Example of a Deinstallation Response File for an Oracle Database .............................................. 8-5Example of a Deinstallation Response File for Oracle Grid Infrastructure ................................. 8-6
A Installing Java Access Bridge
Overview of Java Access Bridge 2.0.2 .................................................................................................. A-1Setting Up Java Access Bridge 2.0.2 ..................................................................................................... A-1
B Optimal Flexible Architecture
Overview of the Optimal Flexible Architecture Standard .............................................................. B-1Advantages of Multiple Oracle Homes and OFA ........................................................................ B-1
Changes to the Optimal Flexible Architecture for Oracle Database ............................................. B-2Directory Tree Differences by Release ............................................................................................... B-2
Top-Level Oracle Directory ............................................................................................................. B-2Database File Names......................................................................................................................... B-2Database File Name Extensions ...................................................................................................... B-2
Optimal Flexible Architecture Directory Naming Conventions.................................................... B-3ORACLE_BASE Directory .............................................................................................................. B-3ORACLE_HOME Directory............................................................................................................. B-3Automatic Diagnostic Repository (ADR) Directory .................................................................... B-3ADMIN Directory ............................................................................................................................. B-4ORADATA Directory ....................................................................................................................... B-4RECOVERY_AREA Directory......................................................................................................... B-4
Optimal Flexible Architecture and Multiple Oracle Home Configurations ............................... B-4Specifying an ORACLE_HOME Directory.................................................................................... B-5Installing a Default Optimal Flexible Architecture Database: Example 1 ................................ B-5Installing a Nondefault Optimal Flexible Architecture Database: Example 2 ......................... B-5
Comparison Between Optimal Flexible Architecture on Windows and UNIX .......................... B-6Directory Naming ............................................................................................................................. B-7ORACLE_BASE Directory .............................................................................................................. B-7Support for Symbolic Links on Windows ..................................................................................... B-7
Optimal Flexible Architecture Structure File Mapping................................................................... B-8
C Installing and Configuring Oracle Database Using Response Files
How Response Files Work..................................................................................................................... C-1
ix
Reasons for Using Silent Mode or Response File Mode.............................................................. C-2General Procedure for Using Response Files ................................................................................ C-2
Preparing a Response File ..................................................................................................................... C-3Editing a Response File Template .................................................................................................. C-3Saving a Response File ..................................................................................................................... C-4
Running Oracle Universal Installer Using the Response File ....................................................... C-5Running Net Configuration Assistant Using a Response File....................................................... C-6Running Oracle Database Configuration Assistant Using a Response File................................ C-7
Silent Mode of Database Configuration Assistant ....................................................................... C-7Progress Only Mode of Database Configuration Assistant ........................................................ C-8Running Database Configuration Assistant in Response File Mode......................................... C-8
Postinstallation Configuration Using a Response File .................................................................... C-8About the Postinstallation Configuration File .............................................................................. C-9Running Postinstallation Configuration Using a Response File ................................................ C-9
D Configuring Oracle Database Globalization Support
Installing and Using Oracle Components in Different Languages............................................... D-1Configuring Oracle Components to Run in Different Languages ............................................. D-1
Determining the Operating System Locale ........................................................................... D-2Configuring Locale and Character Sets Using the NLS_LANG Environment Variable . D-2NLS_LANG Settings in Console Mode and Batch Mode..................................................... D-3
Installing Translation Resources ..................................................................................................... D-4Running Oracle Universal Installer in Different Languages ......................................................... D-5
E Managing Oracle Database Port Numbers
About Managing Ports ........................................................................................................................... E-1Viewing Port Numbers and Access URLs .......................................................................................... E-1Port Numbers and Protocols of Oracle Components ....................................................................... E-2Changing the Oracle Services for Microsoft Transaction Server Port ......................................... E-3
F Troubleshooting the Oracle Database Installation
Verifying Requirements ........................................................................................................................ F-1Encountering Installation Errors .......................................................................................................... F-2Reviewing the Log of an Installation Session ................................................................................... F-2Silent Mode Response File Error Handling ....................................................................................... F-2Troubleshooting Host Name Changes and CSS ............................................................................... F-3Troubleshooting Configuration Assistants........................................................................................ F-3
Configuration Assistant Failures .................................................................................................... F-3Irrecoverable Errors .......................................................................................................................... F-4
Troubleshooting Inventory Issues ....................................................................................................... F-4Troubleshooting Screen Display Issues ............................................................................................. F-4Cleaning Up After a Failed Installation.............................................................................................. F-4Continuing Installations or Upgrades After Server Restarts.......................................................... F-5

x
G Frequently Asked Questions About Installation
Installing Oracle Database or Oracle Database Client .................................................................... G-1Installing Oracle Database Tools ......................................................................................................... G-3Installing Oracle Database with Oracle Applications ..................................................................... G-7Installing Oracle Database Heterogeneous Connectivity Tools (Gateways) .............................. G-8
Glossary
Index

xi
Preface
This guide explains how to install and configure Oracle Database for Microsoft Windows x64 (64-Bit). This guide also provides information about Optimal Flexible Architecture, cloning an Oracle home, troubleshooting installation issues, and the process to remove the database software.
This preface contains these topics:
■ Audience
■ Documentation Accessibility
■ Accessing Documentation
■ Related Documentation
■ Conventions
AudienceOracle Database Installation Guide for Microsoft Windows is intended for anyone installing Oracle Database on a single computer. Additional installation guides for Oracle Real Application Clusters, Oracle Grid Infrastructure, Oracle Database Examples, and Oracle Enterprise Manager Cloud Control are available on Oracle Technology Network at:
http://www.oracle.com/technetwork/indexes/documentation/index.html
To use this document, you need the following:
■ A supported Microsoft Windows operating system installed and tested on your computer system
■ Administrative privileges on the computer where you are installing the Oracle Database software
■ Familiarity with object-relational database management concepts
See Also: "Oracle Database Software Requirements" for information about supported operating systems
See Also: Oracle Database Quick Installation Guide for Microsoft Windows x64 (64-Bit) to install Oracle Database using the default settings

xii
Documentation AccessibilityFor information about Oracle's commitment to accessibility, visit the Oracle Accessibility Program website at http://www.oracle.com/pls/topic/lookup?ctx=acc&id=docacc.
Access to Oracle SupportOracle customers have access to electronic support through My Oracle Support. For information, visit http://www.oracle.com/pls/topic/lookup?ctx=acc&id=info or visit http://www.oracle.com/pls/topic/lookup?ctx=acc&id=trs if you are hearing impaired.
Accessing DocumentationThe documentation for this release includes platform-specific documentation and generic product documentation.
Platform-Specific DocumentationPlatform-specific documentation includes information about installing and using Oracle products on particular platforms.
The platform-specific documentation for this product is available in both Adobe portable document format (PDF) and HTML format on Oracle Technology Network at:
http://www.oracle.com/technetwork/indexes/documentation/index.html
Product DocumentationProduct documentation includes information about configuring, using, or administering Oracle products on any platform. The product documentation for Oracle Database 12c Release 1 (12.1) is available in both HTML and PDF formats on Oracle Technology Network (OTN) at:
http://www.oracle.com/technetwork/indexes/documentation/index.html
Related DocumentationFor more information, see these Oracle resources:
■ Oracle Database Concepts
■ Oracle Database New Features Guide
■ Oracle Database Licensing Information
■ Oracle Database Readme
■ Oracle Database Release Notes for Microsoft Windows
■ Oracle Universal Installer and OPatch User's Guide for Windows and UNIX
■ Oracle Database Client Installation Guide for Microsoft Windows
■ Oracle Database Examples Installation Guide
■ Oracle Real Application Clusters Installation Guide
■ Oracle Grid Infrastructure Installation Guide
■ Oracle Automatic Storage Management Administrator's Guide
■ Oracle Enterprise Manager Cloud Control Basic Installation Guide

xiii
■ Oracle Database Platform Guide for Microsoft Windows
■ Oracle Database Upgrade Guide
■ Oracle Database 2 Day DBA
For information about Oracle error messages, see Oracle Database Error Messages. Oracle error message documentation is available only in HTML. If you only have access to the Oracle Database 12c Release 1 (12.1) Online Documentation Library, you can browse the error messages by range. Once you find the specific range, use your browser's "find in page" feature to locate the specific message. When connected to the Internet, you can search for a specific error message using the error message search feature of the Oracle online documentation.
Many books in the documentation set use the sample schemas of the seed database, which is installed by default when you install Oracle. For information about how these schemas were created and how you can use them yourself, see Oracle Database Sample Schemas.
To download free release notes, installation documentation, white papers, or other collateral, visit the Oracle Technology Network. You must register online before using Oracle Technology Network; registration is free and can be done at
http://www.oracle.com/technetwork/community/join/overview/index.html
If you already have a user name and password for Oracle Technology Network, then you can go directly to the documentation section of the Oracle Technology Network website at
http://www.oracle.com/technetwork/indexes/documentation/index.html
ConventionsThe following text conventions are used in this document:
Convention Meaning
boldface Boldface type indicates graphical user interface elements associated with an action, or terms defined in text or the glossary.
italic Italic type indicates book titles, emphasis, or placeholder variables for which you supply particular values.
monospace Monospace type indicates commands within a paragraph, URLs, code in examples, text that appears on the screen, or text that you enter.

xiv

xv
Changes in This Release for Oracle Database Installation Guide
This preface contains:
Changes in Oracle Database 12c Release 1 (12.1)
Changes in Oracle Database 12c Release 1 (12.1)The following are changes in Oracle Database Installation Guide for Oracle Database 12c Release 1 (12.1):
■ New Features
■ Deprecated Features
■ Desupported Features
New Features■ Oracle Home User Support for Database
Starting with Oracle Database 12c Release 1 (12.1), Oracle Database supports the use of Oracle Home User, which can be specified at installation time. The Oracle Home User can be a Windows Built-in Account or a standard Windows User Account (not an Administrator account). This account is used for running Windows services for Oracle home. For enhanced security, Oracle recommends that you use a standard Windows User Account (instead of Windows Built-in Account).
See Also: Oracle Database New Features Guide
See Also: ■
■ "Recommended File System" on page 1-4
■ "Configuring Environment Variables for the Software Installation Owner" on page 3-8
■ "Managing User Accounts with User Account Control" on page 3-8
■ "Operating System Groups Created During Oracle Database Installation" on page 3-2
■ "Managing Oracle Home User" section in Oracle Database Platform Guide for Microsoft Windows

xvi
■ Oracle ASM File Access Control on Windows
This feature provides access control to separate the roles on Windows. With Oracle database services running as users rather than Local System, the Oracle ASM access control feature must be enabled to support role separation on Windows. In previous releases, this feature was disabled on Windows because all Oracle services run as Local System.
■ Oracle Flex ASM
Oracle Flex ASM enables an Oracle ASM instance to run on a separate physical server from the database servers. Any number of Oracle ASM servers can be clustered to support much larger number of database clients.
Oracle Database instances can be set up as clients to Oracle Flex ASM where metadata is provided to the database instance by an Oracle Flex ASM instance that may be on a different node than the database instance.
Note that Oracle Flex ASM can apply to a collection of databases, each one a single instance but running in a Flex ASM Cluster.
■ Deinstallation Tool Integrated with Installation Media
Starting with Oracle Database 12c Release 1 (12.1), the deinstallation tool is integrated with the database installation media and is no longer provided on a separate installation media.
■ Simplified Oracle Label Security Installation
Starting with Oracle Database 12c Release 1 (12.1), Oracle Label Security is installed by default as part of the Oracle Database installation. You can no longer select Oracle Label Security as a custom component during an Enterprise Edition database installation.
See Also:
■ "Oracle Automatic Storage Management File Access Control" in Oracle Database Platform Guide for Microsoft Windows
■ "Managing Oracle ASM File Access Control for Disk Groups" in Oracle Automatic Storage Management Administrator's Guide
■ "Operating System Groups Created During Oracle Database Installation" on page 3-2
■ "Preparing Disks for Oracle Automatic Storage Management" on page 4-6
See Also: Oracle Automatic Storage Management Administrator's Guide for more information about Oracle Flex ASM
See Also:
■ "About the Deinstallation Tool" on page 8-1
■ "Change for Standalone Deinstallation Tool" in Oracle Database Upgrade Guide

xvii
■ Simplified Oracle Database Vault Installation
Starting with Oracle Database 12c, Oracle Database Vault is installed by default as part of the Oracle Database installation. However, you can configure, enable, or disable Oracle Database Vault after the Oracle Database installation, either using Oracle DBCA, or by running SQL statements as described in the "Disabling and Enabling Oracle Database Vault" section in Oracle Database Vault Administrator's Guide.
■ Unified Database Audit Configuration
Starting with Oracle Database 12c Release 1 (12.1), you can create named audit policies. An audit policy contains a set of audit options and it is stored in the database as an object. The advantage of creating a named audit policy is that it reduces the number of commands that are required to create a database audit policy, and it simplifies the implementation of an audit configuration for security and compliance with conditional auditing.
This new audit policy framework is included with the database installation.
■ Oracle Enterprise Manager Database Express 12c
Oracle Database 12c introduces Oracle Enterprise Manager Database Express 12c, a web-based management tool built into Oracle Database without any need for special installation or management. Using Oracle Enterprise Manager Database Express, you can perform basic administrative tasks such as user, performance, memory, and space management. You can also view performance and status information about your database.
Note that starting with Oracle Database 12c, Oracle Enterprise Manager Database Control is no longer available. See Oracle Database Upgrade Guide for more information.
■ Support for Separation of Database Administration Duties
Oracle Database 12c provides support for separation of database administration duties for Oracle Database by introducing task-specific and least-privileged administrative privileges that do not require the SYSDBA administrative privilege.
See Also:
■ "Configuring Oracle Label Security" on page 6-7
■ Oracle Label Security Administrator's Guide
See Also: "Registering Oracle Database Vault with an Oracle Database" in Oracle Database Vault Administrator's Guide
See Also: "Auditing Activities with Unified Audit Policies and the AUDIT Statement" in Oracle Database Security Guide
See Also:
■ "Introduction to Oracle Enterprise Manager Database Express" in Oracle Database 2 Day DBA
■ "Features Provided by Oracle Enterprise Manager Database Express 12c" on page 1-17
■ "Getting Started with Oracle Database" on page 7-1

xviii
These new privileges are: SYSBACKUP for backup and recovery, SYSDG for Oracle Data Guard, and SYSKM for encryption key management.
■ Oracle DBCA Support for CDBs and PDBs
Starting with Oracle Database 12c Release 1 (12.1), Oracle Database Configuration Assistant (Oracle DBCA) allows you to create either a non-CDB or a multitenant container database (CDB). You can create the CDB with zero, one, or more user-created pluggable databases (PDBs).
You can also create a CDB with one PDB during database installation.
■ Support for NFS Version in Direct NFS Client
Starting with Oracle Database 12c Release 1 (12.1), you can specify the NFS protocol version to be used by the Direct NFS Client.
■ Configuring the OraClrAgnt Service for Oracle Database Extensions for .NET
Starting with Oracle Database 12c Release 1 (12.1), after installation you use the OraClrCtl.exe utility to create, start, stop, and delete the OraClrAgnt service.
Deprecated FeaturesThe following features are deprecated in this release, and may be desupported in a future release. See Oracle Database Upgrade Guide for a complete list of deprecated features in this release.
See Also:
■ "About Job Role Separation Operating System Privileges Groups and Users" on page 3-5
■ "Extended Oracle Database Groups for Job Role Separation" on page 3-6
■ "Creating Job Role Separation Operating System Privileges Groups and Users" in Oracle Grid Infrastructure Installation Guide
■ "Database Administrator Authentication" in Oracle Database Administrator's Guide
■ "Managing Administrative Privileges" in Oracle Database Advanced Security Administrator's Guide
See Also:
■ The "Specify Database Identifiers" screen in " Oracle Universal Installer Windows" on page 5-13
■ "About Common Users and Local Users", "Managing Common Roles and Local Roles", and "Managing Commonly and Locally Granted Privileges" in Oracle Database Security Guide for information on users, roles, and privileges in a CDB and PDB
■ "Overview of Managing a Multitenant Environment" in Oracle Database Administrator's Guide
See Also: "Enabling Direct NFS Client" on page 6-5.
See Also: "Configuring the OraClrAgnt Service for Oracle Database Extensions for .NET" on page 6-8.

xix
■ Change for Standalone Deinstallation Tool
The deinstallation tool is now integrated with the database installation media.
See "Deinstallation Tool Integrated with Installation Media".
■ Deprecation of -cleanupOBase
The -cleanupOBase flag of the deinstallation tool is deprecated in this release. There is no replacement for this flag.
■ Windows NTS Authentication Using the NTLM Protocol
The NTS authentication adapter no longer supports the use of the NT Lan Manager (NTLM) protocol to authenticate Windows domain users. Thus the NTS adapter cannot be used to authenticate users in old Windows NT domains or domains with old Windows NT domain controllers. However, local connections and Oracle Database services running as a Windows Local User continue to be authenticated using NTLM.
■ Deprecation Announcement for Oracle Restart
Oracle Restart is a feature provided as part of Oracle Grid Infrastructure. Oracle Restart monitors and can restart Oracle Database instances, Oracle Net Listeners, and Oracle ASM instances. Oracle Restart is currently restricted to manage single instance Oracle Databases and Oracle ASM instances only, and is subject to desupport in future releases. Oracle continues to provide Oracle ASM as part of the Oracle Grid Infrastructure installation for standalone and cluster deployments.
Desupported FeaturesThe following features are no longer supported by Oracle. See Oracle Database Upgrade Guide for a complete list of desupported features in this release.
■ Oracle Enterprise Manager Database Control
■ CLEANUP_ORACLE_BASE Property Removed
■ Oracle COM Automation
■ Oracle Objects for OLE
■ Oracle Counters for Windows Performance Monitor
■ Raw Devices

xx

1
Overview of Oracle Database Installation 1-1
1 Overview of Oracle Database Installation
This chapter describes the different installation types of Oracle Database and issues to consider before you install Oracle Database:
■ New Oracle Products and Features Installed with This Release
■ Planning Your Installation
■ Installation Considerations
■ Oracle Database Installation Methods
■ Software Updates Option
■ Oracle Database Editions
■ Database Security Notification Options
■ Database Configuration Options
■ Database Storage Options
■ Database Management Options
■ Database Backup and Recovery Options
■ Upgrade Considerations
■ Migration Considerations
1.1 New Oracle Products and Features Installed with This ReleaseThere are many new features and products installed with this release. See the Changes in This Release for Oracle Database Installation Guide chapter.
1.2 Planning Your InstallationThe Oracle Database installation process consists of six steps:
1. Read the release notes: Read the Oracle Database release notes before you begin the installation. The release notes are available with the platform-specific documentation. The latest version of the release notes is available on Oracle Technology Network at
http://www.oracle.com/technetwork/indexes/documentation/index.html
2. Review the licensing information: Although the installation media in your media pack contain many Oracle components, you are permitted to use only those components for which you have purchased licenses.

Planning Your Installation
1-2 Oracle Database Installation Guide
Oracle Support Services does not provide support for components for which licenses have not been purchased.
3. Plan the installation: This overview chapter describes the Oracle products that you can install and issues that you must consider before starting the installation.
You also may want to see Appendix G, which covers frequently asked questions about installing Oracle Database components, such as how to install Oracle Database if your site uses Oracle applications or if you need multiple Oracle Database client connections.
If you plan to perform multiple installations, see Appendix C for information about silent or response file installations, and cloning the Oracle home.
Oracle Database Client is installed separately. You cannot install Oracle Database Client during an Oracle Database installation.
4. Complete preinstallation tasks: Chapter 2 describes tasks that you must complete before installing Oracle Database. Additionally, see Chapter 4 for Oracle Restart preinstallation tasks.
5. Install the software: Use the following sections to install Oracle Database:
■ Chapter 4 describes how to use Oracle Universal Installer to install Oracle Grid Infrastructure for a standalone server.
■ Chapter 5 describes how to use Oracle Universal Installer to install Oracle Database and how to clone an Oracle home.
■ Appendix C describes how to perform silent or response file installations, which you may want to use to perform multiple installations of Oracle Database.
■ Appendix D describes how to install and use Oracle components in different languages.
■ Appendix F provides troubleshooting advice in case you encounter problems with the installation.
6. Complete postinstallation tasks: Chapter 6 describes postinstallation tasks.
7. Get started using Oracle Database: Use the following sections to get started using Oracle Database:
■ Chapter 7 describes how to check the contents of the installed Oracle Database, how to start the database and various other Oracle tools, and how to locate various files.
■ "Cloning an Oracle Home" on page 5-19 describes how you can clone an existing Oracle Database home.
■ Appendix B on the Optimal Flexible Architecture, which is a set of guidelines that ensure reliable Oracle installations that require little maintenance.
■ Appendix D describes globalization support information.
■ Appendix E explains how to manage Oracle Database port numbers.
8. Remove Oracle Database software: Chapter 8 describes how to remove Oracle Database software.
See Also: Oracle Database Licensing Information

Installation Considerations
Overview of Oracle Database Installation 1-3
1.3 Installation ConsiderationsThis section contains information that you should consider before deciding how to install this product. It contains the following sections:
■ Installation Differences Between Windows and UNIX Systems
■ Recommended File System
■ Hardware and Software Certification
■ Multiple Oracle Homes Support
■ Oracle Grid Infrastructure for a Standalone Server
■ Oracle Cluster Synchronization Services
■ Oracle Universal Installer Overview
■ Oracle Base Directory
■ Oracle Home Directory
■ Oracle Inventory Directory
■ Installing Oracle Database Vault in an Oracle Data Guard Environment
■ Oracle Database Vault Default Audit Policy and Initialization Parameters
■ Consider Memory Allocation and Automatic Memory Management
1.3.1 Installation Differences Between Windows and UNIX SystemsIf you are experienced with installing Oracle components in UNIX environments, note that many manual setup tasks required on UNIX are not required on Windows. The key differences between UNIX and Windows installations are:
■ Startup and shutdown services
With Windows, you log in to a user account with Administrator privileges to install the Oracle Database software. You can also specify an Oracle Home User (standard Windows User Account, not an Administrator account) during installation. On Linux and UNIX systems, you must create and use a software owner user account, and this user must belong to the Oracle Inventory group.
■ Environment variables
With Windows, Oracle Universal Installer sets environment variables such as PATH, ORACLE_BASE, ORACLE_HOME, and ORACLE_SID in the registry. In UNIX systems, you must manually set these environment variables.
If you have multiple Oracle databases in an Oracle home, then only the SID of the last Oracle database is set in the registry. See Oracle Universal Installer and OPatch User's Guide for Windows and UNIX for more information about managing Oracle homes.
■ Operating System Groups
On Windows systems, Oracle Universal Installer creates ORA_DBA, ORA_OPER, ORA_SID_DBA, ORA_SID_OPER, ORA_HOMENAME_DBA, ORA_HOMENAME_OPER and other groups, which are used for operating system authentication for Oracle Database and Oracle ASM instances. On Linux and UNIX systems, you must create these operating system groups manually, and they are used for granting permission to access various Oracle software resources and for operating system authentication. Windows does not use an Oracle Inventory group.

Installation Considerations
1-4 Oracle Database Installation Guide
■ Account for running Oracle Universal Installer
With Windows, you log in to a user account with Administrator privileges to install the Oracle Database software. You can also specify an Oracle Home User (standard Windows User Account, not Administrator account) during installation. On Linux and UNIX systems, you must create and use a software owner user account, and this user must belong to the Oracle Inventory group.
1.3.2 Recommended File SystemOracle strongly recommends that you install the Oracle database home (Oracle database binaries, trace files, and so on) on Oracle ACFS or NTFS; the database files themselves must be placed on Oracle ASM if using Oracle ACFS; otherwise they can be placed on NTFS. Usage of Oracle ACFS and Oracle ASM or NTFS is recommended to ensure security of these files.
1.3.3 Hardware and Software CertificationThe platform-specific hardware and software requirements included in this installation guide were current at the time this guide was published. However, because new platforms and operating system software versions might be certified after this guide is published, review the certification matrix on the My Oracle Support website for the most up-to-date list of certified hardware platforms and operating system versions. This website also provides compatible client and database versions, patches, and workaround information for bugs. The My Oracle Support website is available at
https://support.oracle.com/
You must register online before using My Oracle Support. After logging in, from the menu options, select the Certifications tab. On the Certifications page, use the Certification Search options to search by Product, Release, and Platform. You can also search using the Certification Quick Links options such as Product Delivery, and Lifetime Support.
1.3.3.1 Third-Party Database Certification for Oracle SQL DeveloperYou can use Oracle SQL Developer to view metadata and data of several non-Oracle databases. Refer to "Database Certification for SQL Developer (Oracle and Third-Party)" in Oracle SQL Developer Installation Guide for more information.
1.3.4 Multiple Oracle Homes SupportOracle Database supports multiple Oracle homes. You can install this release or previous releases of the software more than once on the same system, in different Oracle home directories. This allows flexibility in deployment and maintenance of the database software. For example, it enables you to run different versions of the
See Also: "Oracle Database Differences on Windows and UNIX" appendix in Oracle Database Platform Guide for Microsoft Windows
See Also: "Setting File Permissions" in Oracle Database Platform Guide for Microsoft Windows for information about the default permissions when using Oracle Universal Installer and Database Configuration Assistant to install the Oracle Database software
See Also: "Windows Certification and Web Browser Support" on page 2-5

Installation Considerations
Overview of Oracle Database Installation 1-5
database simultaneously on the same system, or it enables you to upgrade specific database instances on a system without affecting other running databases. However, when you have installed multiple Oracle homes on a single system, there is also some added complexity introduced that you must consider allowing these Oracle homes to coexist.
1.3.4.1 Installing Oracle Database on a System with an Existing Oracle SoftwareYou must install this product into a new Oracle home directory. You cannot install products from one release of Oracle Database into an Oracle home directory of a different release. For example, you cannot install Oracle Database 12c software into an existing Oracle9i Oracle home directory.
You can install this release more than once on the same system if each installation is installed in a separate Oracle home directory.
1.3.5 Oracle Grid Infrastructure for a Standalone ServerThe Oracle Grid Infrastructure for a standalone server provides the infrastructure to include your single instance database in an enterprise grid architecture. Oracle Database 12c Release 1 (12.1) combines these infrastructure products into one software installation called the Oracle Grid Infrastructure home. On a single instance database, the Oracle Grid Infrastructure home includes Oracle Restart and Oracle Automatic Storage Management (Oracle ASM) software.
To use Oracle Automatic Storage Management or Oracle Restart, you must first install Oracle Grid Infrastructure for a standalone server before you install and create the database. Otherwise, you must manually register the database with Oracle Restart.
1.3.6 Oracle Cluster Synchronization ServicesWhen you install the Oracle Grid Infrastructure for a standalone server, Oracle Universal Installer configures the single-node version of Oracle Cluster Synchronization Services (CSS).
The CSS service is required to enable synchronization between an Oracle ASM instance and the database instances that rely on it for database file storage. Because the service must be running before an Oracle ASM instance or database instance starts, it is configured to start automatically by Oracle Restart before the Oracle ASM instance is started. It must be running if an Oracle database is using Oracle ASM for database file storage.
For single-instance installations, the CSS is installed-in and runs from the Oracle Grid Infrastructure home which is the same home that runs Oracle ASM.
See Also:
■ "Using Oracle Home User In Case of Multiple Oracle Home Directories" in Oracle Database Platform Guide for Microsoft Windows
■ My Oracle Support Note 460054.1 for more details about multiple Oracle home environment issues
See Also: Chapter 4, "Oracle Grid Infrastructure for a Standalone Server" for more information about installing Oracle Grid Infrastructure for a standalone server
Installation Considerations
1-6 Oracle Database Installation Guide
1.3.7 Oracle Universal Installer OverviewOracle Universal Installer is a Java-based graphical user interface (GUI) tool that enables you to install Oracle software. Oracle Universal Installer provides the following capabilities:
■ Component and suite installations
■ Globalization support
■ Distributed installation support
■ Unattended silent installations using response files
■ Removal of installed components
■ Multiple Oracle homes support
Oracle Universal Installer can run a silent or response file installation of Oracle software using response files. See Appendix C, "Installing and Configuring Oracle Database Using Response Files" for more information.
You must use the Oracle Universal Installer 12c to install components into an Oracle Database 12c Oracle home directory.
Oracle Universal Installer automatically installs the Oracle version of the Java Runtime Environment (JRE). This version is required to run Oracle Universal Installer and several Oracle assistants. Do not modify the JRE, unless doing so with a patch provided by My Oracle Support. Visit the following site to find Oracle patches to download:
https://support.oracle.com/
When Oracle Universal Installer runs, it creates an dbhome_n directory, which keeps track of the components you are installing. Do not modify the contents of this directory. By default, this directory is located at the same directory level as ORACLE_HOME.
1.3.8 Oracle Base DirectoryIf you install Oracle Database 12c on a computer with no other Oracle software installed, Oracle Universal Installer creates an Oracle base directory for you. If Oracle software is installed, then one or more Oracle base directories exist. In the latter case, Oracle Universal Installer offers you a choice of Oracle base directories to install Oracle Database.
The Oracle Home User has complete control over the Oracle Base for a particular home. For reasons of security, different Windows User Accounts used as Oracle Home Users for different Oracle homes are not allowed to share the same Oracle Base. However, to support Oracle Database upgrade, Oracle supports the sharing of Oracle Base between a Windows Built-in Account and a Windows User Account. This means
Note: On cluster systems with Oracle RAC installations, the CSS is configured during the Oracle Clusterware installation. If the system is running Oracle Clusterware, then refer to Oracle Real Application Clusters Installation Guide for information about removing Oracle RAC or Oracle Clusterware.
See Also: "Oracle Automatic Storage Management" on page 1-14

Installation Considerations
Overview of Oracle Database Installation 1-7
that if you choose to reuse an Oracle Base from an earlier release of Oracle Database in Oracle Database 12c, then the Oracle Home User of Oracle Database 12c Oracle home has complete control over the Oracle Base of the earlier release.
In a default Windows installation, the Oracle base directory appears as follows:
DRIVE_LETTER:\app\username
where username is the Oracle Installation User if you choose Windows Built-in Account, else it is the Oracle Home User (standard Windows User Account).
1.3.9 Oracle Home DirectoryThis section covers the following topics:
■ Contents of the Oracle Home Environment
■ Multiple Oracle Home Components
1.3.9.1 Contents of the Oracle Home EnvironmentThe Oracle home directory is located under the Oracle base directory. For example, in a default Windows installation, if you name the Oracle home directory dbhome_1, it appears in the Oracle base directory as follows:
DRIVE_LETTER:\app\username\product\12.1.0\dbhome_1
where username is the installation user if you choose Windows Built-in Account, else it is the Oracle Home User specified.
An Oracle home corresponds to the environment in which Oracle components run. This environment includes the following:
■ Location of installed component files
■ PATH variable pointing to binary files of installed components
■ Registry entries
■ Service names
■ Program groups
Oracle homes also have a name associated with them, which is automatically assigned by the installer.
See Also: "Managing Oracle Home User" in Oracle Database Platform Guide for Microsoft Windows
Caution: After installing Oracle Database 12c or later with a Windows User Account used as the Oracle Home User, do not install older version of databases and share the same Oracle base directory. During the installation of older releases of Oracle Database, ACLs are reset corresponding to older releases. Thus Oracle Database 12c or later services might not be able to access the Oracle base directory and the files in it.
Note: You can choose to create an Oracle base directory, even if other Oracle base directories exist on the system.

Installation Considerations
1-8 Oracle Database Installation Guide
1.3.9.2 Multiple Oracle Home ComponentsYou can install all Oracle components in multiple Oracle homes on the same computer. However, some components can only support one active instance at a time. The current (latest) installation renders the previous one inactive. These components are:
■ Oracle Administration Assistant for Windows
■ Oracle Provider for OLE DB
1.3.10 Oracle Inventory Directory The Oracle Inventory directory is the central inventory location for all Oracle software installed on a server. By default, the location of the Oracle Inventory directory is C:\Program Files\Oracle\Inventory. This directory is created automatically the first time you install Oracle software on a Windows server.
1.3.11 Installing Oracle Database Vault in an Oracle Data Guard EnvironmentStarting with Oracle Database 12c, Oracle Database Vault is installed by default as part of the Oracle Database installation.
If you plan to use Oracle Data Guard with Oracle Database Vault, then see "Integrating Oracle Database Vault with Oracle Data Guard" in Oracle Database Vault Administrator's Guide.
1.3.12 Oracle Database Vault Default Audit Policy and Initialization ParametersOracle Database Vault installs a baseline database auditing policy. This policy covers the access control configuration information stored in Database Vault database tables, information stored in Oracle Catalog (rollback segments, tablespaces, and so on), the use of system privileges, and Oracle Label Security configuration. When you install Oracle Database Vault, the security specific database initialization parameters are initialized with default values.
1.3.13 Consider Memory Allocation and Automatic Memory ManagementDuring a Typical installation, you create your database with Database Configuration Assistant (DBCA), and automatic memory management is enabled. If you choose advanced installation, then you can either specify memory allocation manually, or enable automatic memory management.
With automatic memory management, the Oracle Database instances automatically manage and tune memory for you. With automatic memory management, you choose a memory target, and the instance automatically distributes memory between the system global area (SGA) and the instance program global area (instance PGA). As memory requirements change, the instance dynamically redistributes memory between the SGA and instance PGA.
You can enable automatic memory management either during, or after the database installation. Enabling automatic memory management after installation involves a shutdown and restart of the database.
See Also: Oracle Database Vault Administrator's Guide for more information about the database audit policy
See Also: "Managing Memory" in Oracle Database Administrator's Guide

Oracle Database Installation Methods
Overview of Oracle Database Installation 1-9
1.4 Oracle Database Installation MethodsYou can choose different installation methods to install Oracle Database, which are as follows:
■ Interactive Installation Types
■ Automated Installation Methods Using Response Files
1.4.1 Interactive Installation TypesWhen you use the interactive method to install Oracle Database by selecting the Create and configure a database option, Oracle Universal Installer displays a series of screens that enable you to specify all the required information to install the Oracle Database software and create a database.
Oracle Universal Installer provides you the following options:
■ Desktop Class: Select this option if you are installing on a laptop or desktop class system. This option includes a starter database and allows minimal configuration. This option is designed for those who want to quickly set up a database.
■ Server Class: Select this option if you are installing on a server class system, such as what you would use when deploying Oracle in a production data center. This option allows for more advanced configuration options. Advanced configuration options available using this option include Oracle RAC, Oracle Automatic Storage Management, backup and recovery configuration, integration with Enterprise Manager Cloud Control, and more fine-grained memory tuning, among others.
Furthermore, the Server Class option provides you with the following installation types:
– Typical: Select this installation method to quickly install Oracle Database. This installation type requires minimal user input. It installs the software and optionally creates a general-purpose database using the information that you specify on the screen. It is the default installation type.
– Advanced: Select this installation type to complete any of the following tasks:
– Select a database character set or different product languages
– Create the EXAMPLE tablespace during the installation
– Create a database on a different file system from the software
– Specify different passwords for administrative schemas
– Configure recovery options
– Configure Oracle Configuration Manager
– In the Select Database Edition screen, if you select Enterprise Edition, then Oracle Universal Installer automatically selects the components most customers need for their Oracle Database installation.
1.4.2 Automated Installation Methods Using Response FilesBy creating a response file and specifying this file when you start Oracle Universal Installer, you can automate some or all of the Oracle Database installation. These
See Also: "Reviewing Component-Specific Installation Guidelines" on page 5-3

Software Updates Option
1-10 Oracle Database Installation Guide
automated installation methods are useful if you must perform multiple installations on similarly configured systems.
When you use a response file, you can run Oracle Universal Installer in the following modes, depending on whether you specify all of the required information or not:
■ Silent Mode: Oracle Universal Installer runs in silent mode if you use a response file that specifies all required information, and specify the -silent option when starting Oracle Universal Installer. None of the Oracle Universal Installer screens are displayed.
■ Response File Mode: Oracle Universal Installer runs in response file mode if you do not specify all required information in the response file.
For more information about these modes and about how to complete an installation using response files, see Appendix C.
1.5 Software Updates OptionUse the Software Updates feature to dynamically download and apply the latest updates released by Oracle; such as, interim patch updates, Oracle Universal Installer updates, and the latest patch set updates. This functionality is available starting with Oracle Database 11g Release 2 (11.2.0.2).
You can choose to download the latest updates by providing your My Oracle Support credentials or you can apply previously downloaded updates. You can also download the updates separately using the -downloadUpdates option and later apply them during the Oracle Database installation by providing the location where the updates are present.
1.6 Oracle Database EditionsYou can choose one of the following installation types when installing Oracle Database 12c:
■ Enterprise Edition: Installs licensable Oracle Database options, and database configuration and management tools in addition to all of the products that are installed during a Standard Edition installation. It also installs products most commonly used for data warehousing and transaction processing. This option also permits you to enable or disable individual components from a components list.
■ Standard Edition: This installation type is designed for department or workgroup-level applications and for small and medium-sized enterprises (SMEs). It is engineered to provide core relational database management services and options. It installs an integrated set of management tools, full distribution, replication, web features, and facilities for building business-critical applications.
■ Standard Edition One: This installation type is designed for department, workgroup-level, or web applications. From single instance environments for small business to highly distributed branch environments, Oracle Database Standard Edition One includes all the facilities necessary to build business-critical applications.
■ Personal Edition: Installs the same software as the Enterprise Edition installation type, but supports only a single user development and deployment environment
See Also: "Installing the Oracle Database Software" for more information about the -downloadUpdates option, and dynamically applying software updates during installation
Database Security Notification Options
Overview of Oracle Database Installation 1-11
that requires full compatibility with Enterprise Edition and Standard Edition. Oracle RAC is not installed with Personal Edition.
1.7 Database Security Notification OptionsOracle issues security alerts as needed for vulnerability fixes that are determined to be too critical to wait for distribution in the next Critical Patch Update.
During the database installation, in the Configure Security Updates screen, Oracle Universal Installer prompts you to provide a security contact. Select one of the following options:
■ Provide an email address to receive security information for your installation.
■ Provide a My Oracle Support email address or account name to receive security information for your installation, and to enroll your system for Security Updates. You can receive information about alerts through My Oracle Support.
You can choose not to provide this information, but Oracle strongly recommends that you configure a security notification contact.
The information collected by Security Updates is limited to configuration information. The data collected does not include personally identifiable information (with the exception of a local contact name in case of transmission problems). You may still use all licensed Oracle functionality if you decline to enable Security Updates.
To choose not to receive security notifications, leave all fields in the Configure Security Updates screen blank, and click Next to continue.
If you provide your My Oracle Support credentials, then Security Updates automatically gathers configuration information regarding your installed Oracle products and uploads it to Oracle's support systems. You can access the information it collects through your My Oracle Support account, and review health check recommendations, patch recommendations and other recommendations for your system in addition to security alerts.
See Also:
■ You must install Oracle Database Client separately. You cannot install it during an Oracle Database installation. See Oracle Database Client Installation Guide for Microsoft Windows for installation instructions
■ Oracle Database Licensing Information for more information about the features available with each Oracle Database edition and for information about licensing
Note:
■ The installation process is the same for all the database editions.
■ Ensure that you install only those products for which you have a valid license.
See Also: The Oracle Security Policies page, which is available from the following URL:
http://www.oracle.com/us/support/assurance/fixing-policies/index.html

Database Configuration Options
1-12 Oracle Database Installation Guide
1.8 Database Configuration OptionsYou can create an Oracle database during the installation process. If you choose to create an Oracle database, Oracle Universal Installer uses Oracle Database Configuration Assistant to create it. You can create one of the preconfigured database types, which are designed for a variety of different applications, modify one of the preconfigured database types, or create a customized database to suit your own requirements.
This section describes the following database configuration options:
■ Preconfigured Database Types
■ Installation Choices That Affect Database Creation
■ Creating a Database After Installation
1.8.1 Preconfigured Database TypesOracle provides the following preconfigured database types that you can create or customize during the installation:
■ General Purpose/Transaction Processing
■ Data Warehouse
See the online help provided by either Oracle Universal Installer or Oracle Database Configuration Assistant for a description of these preconfigured database types.
1.8.2 Installation Choices That Affect Database CreationOracle Universal Installer runs Oracle Database Configuration Assistant in one of two modes, depending on the choices that you make during the installation:
■ Silent or response file mode
If you choose the Enterprise Edition, Standard Edition, or Personal Edition as the database edition, then choose to create a preconfigured database type. Oracle Universal Installer prompts you for the minimum amount of information required to create a database of the type you choose. It then runs Oracle Database Configuration Assistant in silent or response file mode to create the database after it installs the software.
■ Interactive mode
Install the database using Oracle Universal Installer and start Oracle Database Configuration Assistant from Oracle home. Oracle Database Configuration Assistant runs in interactive mode. Using the screens in Oracle Database Configuration Assistant, you can either modify one of the preconfigured database types or customize the database.
Note: Oracle recommends that you use this method to create a database if you have not previously created one.
Note: If you choose this method to create a database, click the Help button on any of the Oracle Database Configuration Assistant screens for a description of the information that you must specify on that screen.

Database Storage Options
Overview of Oracle Database Installation 1-13
1.8.3 Creating a Database After InstallationIf you decide not to create a database during the installation, you can use Oracle Database Configuration Assistant to create one after you have installed the software.
1.9 Database Storage OptionsIf you choose to create a database during the installation, you can specify the following storage options for database files:
■ File System
■ Oracle Automatic Storage Management
1.9.1 File System If you choose the file system option, then Oracle Database Configuration Assistant creates the database files in a directory on a file system on your computer. Oracle recommends that the file system you choose be separate from the file systems used by the operating system or the Oracle software. The file system that you choose can be any of the following:
■ A file system on a disk that is physically attached to the system
If you are creating a database on basic disks that are not logical volumes or RAID devices, then follow the Optimal Flexible Architecture (OFA) recommendations and distribute the database files over multiple disks.
■ A file system on a logical volume manager (LVM) or a RAID device
If you are using multiple disks in an LVM or RAID configuration, then Oracle recommends that you use the stripe-and-mirror-everything (SAME) methodology to increase performance and reliability. Using this methodology, you must not specify multiple file system mounting points for database storage.
■ A network file system (NFS) mounted from a certified network attached storage (NAS) device. You also have the option to use the Direct NFS Client feature, which simplifies the administration of NFS configurations and also offers performance improvements.
If the NAS device is certified by Oracle, then you can store the database files on them.
If you choose the Advanced database creation option, then you can also choose to use the Oracle-managed files feature with the new database. If you use this feature, then you must specify only the database object name instead of file names when creating or deleting database files.
See Also: Oracle Database 2 Day DBA for more information about using Oracle Database Configuration Assistant to create a database after installation
Note: Installing files on raw devices is no longer an option during installation. You must use a file system, or use Oracle Automatic Storage Management.
See Also: "Configuring Direct NFS Client" for more information about the Direct NFS Client feature

Database Storage Options
1-14 Oracle Database Installation Guide
1.9.2 Oracle Automatic Storage ManagementOracle Automatic Storage Management is a high-performance storage management solution. For Oracle Database files, it simplifies the management of a dynamic database environment, such as creating and laying out databases and managing disk space.
Oracle Automatic Storage Management can be used with single database installations, multiple database installations, and in Oracle RAC environments. It can be used with databases created in Oracle Database 10g Release 1 (10.1.0.3 or later). However, Oracle Database 12c must use Oracle Automatic Storage Management from Oracle Database 12c or later. Oracle Automatic Storage Management is installed as part of the Oracle Grid Infrastructure installation. If you plan to use Oracle Automatic Storage Management, then you must install Oracle Grid Infrastructure before you install and create the database. If you want to upgrade an existing Oracle Automatic Storage Management installation, then you must upgrade Oracle Automatic Storage Management by running an Oracle Grid Infrastructure upgrade.
Oracle Automatic Storage Management manages the storage of all database files, such as redo logs, control files, and data pump export files. Oracle Automatic Storage Management can manage the Oracle Database executable binary files and any other database file by creating a file system with Oracle Automatic Storage Management Cluster File System. Though Oracle Automatic Storage Management Cluster File System is cluster aware, it works as a file system on a single instance database also.
To use Oracle Automatic Storage Management, you allocate partitioned disks to Oracle with preferences for striping and mirroring. Oracle Automatic Storage Management manages the disk space for you, thus eliminating the need for traditional disk management tools such as logical volume managers (LVM), file systems, and the numerous commands necessary to manage both. The synchronization between Oracle Automatic Storage Management and the database instance is handled by Oracle Cluster Synchronization Services (CSS).
1.9.2.1 Oracle Automatic Storage Management ComponentsOracle Automatic Storage Management uses the following components:
■ Oracle Automatic Storage Management Disk Groups
■ Oracle Automatic Storage Management Instance
Oracle Automatic Storage Management Disk Groups A disk group is a set of disk devices that Oracle Automatic Storage Management manages as a unit. Each disk device can be an individual physical disk, a multiple disk device such as a RAID storage array or a logical volume, or a partition on a physical disk. However, mostly, disk groups consist of one or more individual physical disks. To enable Oracle Automatic Storage Management to balance I/O and storage
See Also: Oracle Database Administrator's Guide for more information about Oracle-managed files
See Also: Chapter 4, "Oracle Grid Infrastructure for a Standalone Server" for more information about installing the Oracle Grid Infrastructure software
See Also: Oracle Automatic Storage Management Administrator's Guide for more information about Oracle Automatic Storage Management Cluster File System

Database Management Options
Overview of Oracle Database Installation 1-15
appropriately within the disk group, ensure that all devices in the disk group have similar, if not identical, storage capacity and performance.
You can set the redundancy and striping attributes of individual file types within a disk group by using Oracle Automatic Storage Management disk group templates. When you create a disk group, Oracle Automatic Storage Management creates a set of default templates for that disk group. Default template settings depend on the disk group type. For example, the default template for control files for a normal redundancy disk group sets three-way mirroring. All other files are configured with two-way mirroring for normal redundancy, or three-way mirroring when configured for high redundancy. For a high redundancy disk group, the default mirroring cannot be changed, which implies that all files are always three-way mirrored in a high redundancy disk group. You can modify the default templates to suit the unique needs of your site. See Oracle Automatic Storage Management Administrator's Guide for more information.
Oracle Automatic Storage Management spreads data evenly across all of the devices in the disk group to optimize performance and utilization. You can add or remove disk devices from a disk group without shutting down the database. When you add or remove disks, Oracle Automatic Storage Management rebalances the data files across the disk group. You can create multiple disk groups to handle specific tasks, such as backup and recovery operations, in addition to routine file storage activities.
When you add a device to a disk group, you can specify a failure group for that device. Failure groups identify disk devices that have common failure characteristics, for example, devices that are attached to the same controller. If the controller fails, then all devices attached to it become unavailable. By default, each device also belongs to its own failure group. By using the failure groups you specify, Oracle Automatic Storage Management can distribute data among the devices in the disk group to help minimize the risk of data loss caused by component failures.
Oracle Automatic Storage Management InstanceThe Oracle Automatic Storage Management instance is a special Oracle instance that manages Oracle Automatic Storage Management disk groups. The Oracle ASM instance and the ASMSNMP account are created and started, if necessary, when you install Oracle Grid Infrastructure. Oracle Enterprise Manager uses this account to monitor Oracle ASM instances to retrieve data from Oracle ASM-related data dictionary views. The ASMSNMP account status is set to OPEN upon creation, and it is granted the SYSDBA privilege.
There is only one Oracle ASM instance per host regardless of the number of database instances running on that host.
1.10 Database Management OptionsTo simplify database administration, Oracle provides a web-based management tool called Oracle Enterprise Manager.
■ Deploy Oracle Enterprise Manager centrally in your environment.
See Also:
■ "Step 3: Manually Configuring Disks for Oracle Automatic Storage Management" on page 4-11
■ "Managing Oracle ASM Users with Oracle Enterprise Manager" in Oracle Automatic Storage Management Administrator's Guide for more information about ASMSNMP user

Database Management Options
1-16 Oracle Database Installation Guide
To deploy Oracle Enterprise Manager centrally, you must install at least one Oracle Management Repository and at least one Oracle Management Service within the environment, then install an Oracle Enterprise Management Agent on every computer. You then can use a single HTML interface to manage and monitor software and hardware targets on all of those systems. Targets can include Oracle databases, application servers, Net listeners, and third-party software. This single interface is called Oracle Enterprise Manager Cloud Control.
■ Oracle Enterprise Manager Database Express locally on the database system
Oracle Enterprise Manager Database Express 12c is a web-based management tool built into Oracle Database without any need for special installation or management.
Oracle Enterprise Manager Database Express can manage only a single database. If you want to administer multiple databases on a system, then you must either configure a separate Oracle Enterprise Manager Database Express for each database, or you must install Oracle Enterprise Manager Cloud Control.
This section contains the following topics:
■ Management Options for Preconfigured Databases
■ Management Options for Custom Databases
■ Features Provided by Oracle Enterprise Manager Database Express 12c
1.10.1 Management Options for Preconfigured DatabasesWhen you create a preconfigured database during the installation, you must select the Oracle Enterprise Manager interface to manage the database. The following options are available:
■ Use Oracle Enterprise Manager Cloud Control for central database management
This option is available only if an Oracle Management Agent is installed on the system. When Oracle Universal Installer (OUI) detects an Oracle Management Agent on the system, you can choose this option and specify the Oracle Management Service to use to manage the database.
Note:
■ Oracle Enterprise Manager Cloud Control is available separately on the Oracle Enterprise Manager Cloud Control installation media, and on the Oracle Technology Network website at:
http://www.oracle.com/technetwork/oem/enterprise-manager/overview/index.html
■ For the latest Oracle Enterprise Manager certification information see the My Oracle Support certification page at:
https://support.oracle.com/
See Also:
■ Oracle Enterprise Manager Cloud Control Basic Installation Guide
■ Oracle Enterprise Manager Oracle Database Plug-in Release Notes

Database Management Options
Overview of Oracle Database Installation 1-17
If an Oracle Management Agent is not installed, then you must use Oracle Enterprise Manager Database Express to manage the database. However, if Oracle Management Agent is installed after Oracle Database, then you can use Oracle Enterprise Manager Cloud Control to manage this database.
■ Use Oracle Enterprise Manager Database Express for local database management
Oracle Enterprise Manager Database Express is built into Oracle Database without any need for special installation or management. Oracle Enterprise Manager Database Express is available and configured by default during the database installation, and is not displayed as an option in Oracle Universal Installer during the database installation.
1.10.2 Management Options for Custom DatabasesInstall the database using Oracle Universal Installer and start Oracle Database Configuration Assistant from Oracle home. Oracle Database Configuration Assistant runs in interactive mode. Using a screen in Oracle Database Configuration Assistant, you can specify the Oracle Enterprise Manager interface to manage the database. Alternatively, you can choose not to configure the database with Enterprise Manager.
Oracle recommends that you configure the database to use Oracle Enterprise Manager during the database installation. However, if you do not do this, then see Oracle Database 2 Day DBA for configuring EM Express, or see Oracle Enterprise Manager Cloud Control Administrator's Guide for information about how to use Oracle Enterprise Manager Cloud Control to discover targets.
1.10.3 Features Provided by Oracle Enterprise Manager Database Express 12c Oracle Enterprise Manager Database Express provides a web-based user interface that enables you to monitor, administer, and maintain an Oracle database.
You can use Oracle Enterprise Manager Database Express to perform basic database administration tasks, such as:
■ Configuration and Administration
– Initialization Parameters
– Memory Management
– Database Feature Usage
– Database Properties
■ Storage
– Tablespaces Management
– Undo Management
– Redo Log Groups
– Archive Logs
– Control Files
■ Security
– Users Management
– Roles Management
– Profiles Management

Database Backup and Recovery Options
1-18 Oracle Database Installation Guide
You can also use Oracle Enterprise Manager Database Express to complete Performance Monitoring and Tuning tasks, such as:
■ Performance Hub
– Real Time SQL Monitoring
– ASH (Active Session History) Analytics
– ADDM (Automatic Database Diagnostic Monitor)
– AWR (Automatic Workload Repository) Browser
– Historical performance monitoring and tuning
■ SQL Tuning Advisor
1.11 Database Backup and Recovery OptionsTo simplify the management of backup and recovery files, you can create a fast recovery area for your database. During the database installation, Oracle Universal Installer provides you with options to configure the fast recovery area location. However, to configure backups, and to implement a backup and recovery strategy, you must use either Recovery Manager (RMAN) or Oracle Enterprise Manager Cloud Control.
1.11.1 Configuring RecoveryYou can provide the location of the fast recovery area during the database installation.
You can use either a file system directory or an Oracle Automatic Storage Management disk group for the fast recovery area. The default disk quota configured for the fast recovery area is 2 GB. For Oracle Automatic Storage Management disk groups, the required disk space depends on the redundancy level of the disk group that you choose. Chapter 2 describes how to choose the location of the fast recovery area and identifies its disk space requirements.
1.12 Upgrade ConsiderationsFor information about upgrading an earlier release of Oracle Database to Oracle Database 12c, see Oracle Database Upgrade Guide. The following sections provide additional platform-specific upgrade information that you must review before upgrading an existing database:
■ Upgrading Your Operating System Before a Database Upgrade
■ Upgrading Oracle Automatic Storage Management
1.12.1 Upgrading Your Operating System Before a Database UpgradeWhen you upgrade to a new release of Oracle Database, the operating system requirements may have changed. If required, upgrade your operating system before
See Also:
■ Oracle Database Backup and Recovery User's Guide for information about Oracle backup and recovery solutions using RMAN or Oracle Enterprise Manager Cloud Control
■ Oracle Database 2 Day DBA for information about configuring customized backups and recovering a backed up database

Upgrade Considerations
Overview of Oracle Database Installation 1-19
upgrading Oracle Database. See Chapter 2, "Oracle Database Preinstallation Tasks" for a list of supported operating systems.
To upgrade the operating system and then perform a database upgrade, perform one of the following procedures:
■ Upgrading the Operating System
■ Migrating to a New Computer
1.12.1.1 Upgrading the Operating SystemUpgrade the operating system. Then, upgrade the database either manually or by using Oracle Database Upgrade Assistant.
1.12.1.2 Migrating to a New ComputerMigrate to a new computer using one of the following methods:
■ To upgrade the database on the new computer:
1. Copy the database files from the computer running the previous operating system to the one running the supported operating system.
2. Re-create the control files on the computer running the supported operating system.
3. Manually upgrade the database using the method described in Oracle Database Upgrade Guide.
■ You can also upgrade the database using the Export/Import utilities method described in Oracle Database Upgrade Guide.
1.12.2 Upgrading Oracle Automatic Storage ManagementIn previous releases, Oracle ASM was installed as part of the Oracle Database installation. With Oracle Database 11g Release 2 (11.2), Oracle ASM is part of an Oracle Grid Infrastructure installation, either for a cluster or for a standalone server.
If you want to upgrade an existing Oracle ASM installation, then you must upgrade Oracle ASM by running an Oracle Grid Infrastructure upgrade. If you do not have Oracle ASM installed and you want to use Oracle ASM as your storage option, then you must complete an Oracle Grid Infrastructure installation before you start your Oracle Database installation.
Note: You cannot use Oracle Database Upgrade Assistant if you use this method. However, this method lets you easily revert to the earlier database.
See Also: The table on "Supported Upgrade Paths for Upgrading Oracle Database" in Oracle Database Upgrade Guide for information about upgrading your current database release
See Also:
■ Oracle Database Upgrade Guide
■ Oracle Automatic Storage Management Administrator's Guide

Migration Considerations
1-20 Oracle Database Installation Guide
1.13 Migration ConsiderationsYou can migrate an existing Oracle Database 11g for 32-bit Windows to Oracle Database 12c for 64-bit Windows. See "Migrating an Oracle Database 11g Release 2 (11.2) or Earlier Database" section in the Oracle Database Platform Guide for Microsoft Windows for migration information.
Oracle Database Upgrade Assistant has an option, Move Database from a Different Release 12.1 Oracle home, which lets you move your database from a Windows Built-in Account secured home to a Windows User Account secured home. See the "Moving a Database from an Existing 12c Oracle Home to a New 12c Oracle Home" section in the Oracle Database Upgrade Guide.
See Also: "Using Oracle Home User During Oracle Database Upgrade" section in Oracle Database Platform Guide for Microsoft Windows for more information

2
Oracle Database Preinstallation Tasks 2-1
2Oracle Database Preinstallation Tasks
This chapter describes the tasks that you must complete before you start Oracle Universal Installer.
This guide contains information required to install Oracle Database 12c. Ensure that you review information related to the platform on which you intend to install Oracle Database 12c.
This chapter includes information about the following topics:
■ Oracle Database Hardware Requirements
■ Oracle Database Software Requirements
■ Windows Certification and Web Browser Support
■ Reviewing Operating System Security Common Practices
■ Confirm Host Name Resolution
■ Checking the Network Setup
■ Individual Component Requirements
2.1 Oracle Database Hardware RequirementsThis section describes hardware component and hard disk space requirements.
■ Hardware Component Requirements for Windows x64
■ Hard Disk Space Requirements
■ Verifying Hardware Requirements
Note:
■ To use Oracle Automatic Storage Management (Oracle ASM) or Oracle Restart, you must first install Oracle Grid Infrastructure for a standalone server before you install and create the database. Otherwise, you must manually register the database with Oracle Restart.
■ To install Oracle Grid Infrastructure for a standalone server, see "Requirements for an Oracle Grid Infrastructure for a Standalone Server Installation" on page 4-2 and to install Oracle Grid Infrastructure for a cluster, see Oracle Grid Infrastructure Installation Guide before you proceed with the database preinstallation tasks.

Oracle Database Hardware Requirements
2-2 Oracle Database Installation Guide
2.1.1 Hardware Component Requirements for Windows x64The following table lists the hardware components that are required for Oracle Database on Windows x64.
2.1.2 Hard Disk Space RequirementsThis section lists system requirements for Windows platforms that use the NT File System (NTFS). Oracle strongly recommends that you install the Oracle database home (Oracle database binaries, trace files, and so on) on Oracle ACFS or NTFS; the database files themselves must be placed on Oracle ASM if using Oracle ACFS; otherwise they can be placed on NTFS. Usage of Oracle ACFS and Oracle ASM or NTFS is recommended to ensure security of these files.
The NTFS system requirements listed in this section are more accurate than the hard disk values reported by the Oracle Universal Installer Summary window. The Summary window does not include accurate values for disk space, the space required to create a database, or the size of compressed files that are expanded on the hard drive.
The hard disk requirements for Oracle Database components include 32 MB to install Java Runtime Environment (JRE) and Oracle Universal Installer on the partition where the operating system is installed. If sufficient space is not detected, installation fails and an error message appears.
Table 2–2 lists the disk space requirements on NTFS for Windows x64. The starter database requires 720 MB of disk space.
The figures in these tables include the starter database.
Table 2–1 Windows x64 Hardware Requirements
Requirement Value
System Architecture Processor: AMD64 and Intel EM64T
Physical memory (RAM) 2 GB minimum
Virtual memory (swap) ■ If physical memory is between 2 GB and 16 GB, then set virtual memory to 1 times the size of the RAM
■ If physical memory is more than 16 GB, then set virtual memory to 16 GB
Disk space ■ Typical Install Type total: 10 GB
■ Advanced Install Types total: 10 GB
See Table 2–2 for details.
Video adapter 256 colors
Screen Resolution 1024 X 768 minimum
See Also:
■ "Configuring Disk Storage for Oracle Data Files and Recovery Files" on page 2-12
■ "Creating Directories for Oracle Data Files or Recovery Files" on page 2-13
■ "Preparing Disks for Oracle Automatic Storage Management" on page 4-6
■ "Installing with Minimum Memory Requirements" on page 5-2

Oracle Database Hardware Requirements
Oracle Database Preinstallation Tasks 2-3
* Refers to the contents of the admin, cfgtoollogs, flash_recovery_area, and oradata directories in the ORACLE_BASE directory.
** This size can be higher depending on the installation options selected, such as languages or additional components. If you choose to install Oracle Database with customized backups enabled, include at least 2 GB extra for data file disk space.
2.1.3 Verifying Hardware RequirementsTo ensure that the system meets these requirements, follow these steps:
1. Determine the physical RAM size.
For example, on a Windows Server 2008 R2 computer, click System and Security in the Windows Control Panel, then click System.
If the size of the physical RAM installed in the system is less than the required size, then you must install more memory before continuing.
2. Determine the size of the configured virtual memory (also known as paging file size).
For example, on a Windows Server 2008 R2 computer, click System and Security, then click System, click Advanced System Settings, click the Advanced tab on System Properties page, and then click Settings in the Performance section. Then select the Advanced tab on Performance Options page.
The virtual memory is listed in the Virtual Memory section.
If necessary, see your operating system documentation for information about how to configure additional virtual memory.
3. Determine the amount of free disk space on the system.
For example, on a Windows Server 2008 R2 computer, right-click My Computer and click Open.
4. Determine the amount of disk space available in the temp directory. This is equivalent to the total amount of free disk space, minus what is required for the Oracle software to be installed.
On Windows x64, if there is less than 125 MB of disk space available in the temp directory, then delete all unnecessary files. If the temp disk space is still less than 125 MB, then set the TEMP or TMP environment variable to point to a different hard drive location.
For example, to change the environment variables on a Windows Server 2008 R2 computer, click System and Security, then click System, click Advanced System
Table 2–2 Windows x64 Disk Space Requirements on NTFS
Installation Type TEMP Space
SYSTEM_DRIVE:\ Program Files\Oracle\Inventory Oracle Home Data Files * Total
Enterprise Edition 500 MB 4.55 MB 6.0 GB 4.19 GB ** 10.19 GB **
Standard Edition 500 MB 4.55 MB 5.5 GB 4.12 GB ** 9.62 GB **
Personal Edition 500 MB 4.55 MB 4.85 GB 4.13 GB ** 8.98 GB **
See Also: "Overview of NTFS File System and Windows Registry Permissions" in Oracle Database Platform Guide for Microsoft Windows
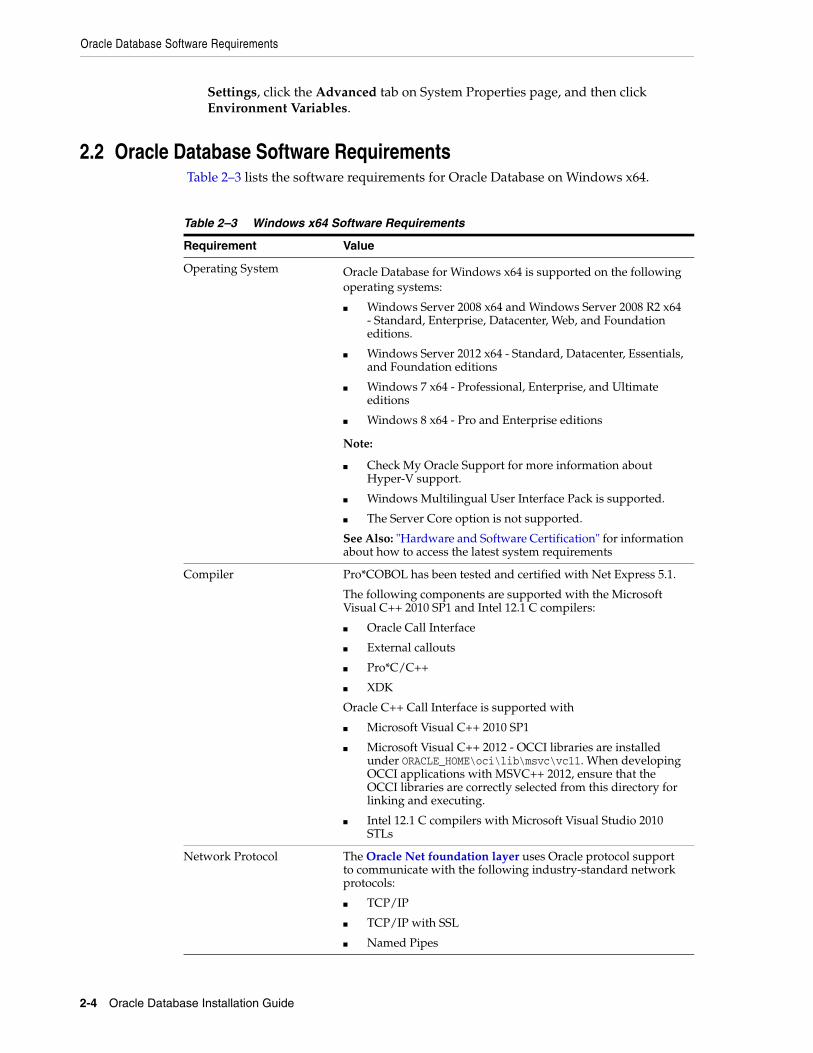
Oracle Database Software Requirements
2-4 Oracle Database Installation Guide
Settings, click the Advanced tab on System Properties page, and then click Environment Variables.
2.2 Oracle Database Software Requirements Table 2–3 lists the software requirements for Oracle Database on Windows x64.
Table 2–3 Windows x64 Software Requirements
Requirement Value
Operating System Oracle Database for Windows x64 is supported on the following operating systems:
■ Windows Server 2008 x64 and Windows Server 2008 R2 x64 - Standard, Enterprise, Datacenter, Web, and Foundation editions.
■ Windows Server 2012 x64 - Standard, Datacenter, Essentials, and Foundation editions
■ Windows 7 x64 - Professional, Enterprise, and Ultimate editions
■ Windows 8 x64 - Pro and Enterprise editions
Note:
■ Check My Oracle Support for more information about Hyper-V support.
■ Windows Multilingual User Interface Pack is supported.
■ The Server Core option is not supported.
See Also: "Hardware and Software Certification" for information about how to access the latest system requirements
Compiler Pro*COBOL has been tested and certified with Net Express 5.1.
The following components are supported with the Microsoft Visual C++ 2010 SP1 and Intel 12.1 C compilers:
■ Oracle Call Interface
■ External callouts
■ Pro*C/C++
■ XDK
Oracle C++ Call Interface is supported with
■ Microsoft Visual C++ 2010 SP1
■ Microsoft Visual C++ 2012 - OCCI libraries are installed under ORACLE_HOME\oci\lib\msvc\vc11. When developing OCCI applications with MSVC++ 2012, ensure that the OCCI libraries are correctly selected from this directory for linking and executing.
■ Intel 12.1 C compilers with Microsoft Visual Studio 2010 STLs
Network Protocol The Oracle Net foundation layer uses Oracle protocol support to communicate with the following industry-standard network protocols:
■ TCP/IP
■ TCP/IP with SSL
■ Named Pipes

Windows Certification and Web Browser Support
Oracle Database Preinstallation Tasks 2-5
2.3 Windows Certification and Web Browser SupportThe following sections provide certification information:
■ Remote Desktop Services
■ Installation Requirements for Web Browsers
■ Default Share Configuration Requirement
2.3.1 Remote Desktop ServicesOracle supports installing, configuring, and running Oracle Database through Remote Desktop Services, formerly known as Terminal Services, on Windows. To install Oracle Database, Oracle recommends that you start all configuration tools from the Terminal Server console session of the server (using mstsc/console).
Platform-specific support information is as follows:
■ Windows client operating systems: The Remote Desktop is only available in Single User Mode.
■ Windows server operating systems: You can have multiple Remote Desktop sessions.
2.3.2 Installation Requirements for Web BrowsersWeb browsers are required to use Oracle Enterprise Manager Database Express and Oracle Enterprise Manager Cloud Control. Web browsers must support Java Script, and the HTML 4.0 and CSS 1.0 standards. For a list of browsers that meet these requirements, see the Oracle Enterprise Manager certification matrix on My Oracle Support:
Oracle Database Client If you plan to connect to Oracle Database 12c Release 1 (12.1) from a release of Oracle Database Client that is 10g Release 2 (10.2) or higher, then the following conditions apply:
■ Oracle Database Client is version 10.2 or higher.
■ If the earlier Oracle Database Client is running on the same computer as Oracle Database 12c Release 1 (12.1), a bequeath connection cannot be used.
Oracle recommends upgrading Oracle Database Client to the latest patchset (10.2.0.5, or 11.2.0.3 or later). You can download the patchset from the Patches and Updates section of My Oracle Support at
https://support.oracle.com
See Also:
■ The Microsoft website for more information about Remote Desktop Services
http://www.microsoft.com/
■ The My Oracle Support website for the latest Terminal Services and Remote Desktop Services information
https://support.oracle.com/
Table 2–3 (Cont.) Windows x64 Software Requirements
Requirement Value

Reviewing Operating System Security Common Practices
2-6 Oracle Database Installation Guide
https://support.oracle.com
2.3.3 Default Share Configuration RequirementThe prerequisite checks during Oracle Database installation require that the system drive on your computer has default share configured on it. Use the net use command to verify, for example:
C:\> net use \\hostname\c$The command completed successfully
Ensure that the current user, the user in the Administrator group, has all the privileges on the default share.
2.4 Reviewing Operating System Security Common PracticesSecure operating systems are an important basis for general system security. Ensure that your operating system deployment is in compliance with common security practices as described in your operating system vendor security guide.
2.5 Confirm Host Name ResolutionTypically, the computer on which you want to install Oracle Database is connected to a network. Ensure that the computer host name is resolvable through a Domain Name System (DNS), a network information service (NIS), or a centrally-maintained TCP/IP host file, such as /etc/hosts. Use the ping command to ensure that your computer host name is resolvable. For example:
ping myhostnamepinging myhostname.example.com [192.0.2.2] with 32 bytes of data:Reply from 192.0.2.2: bytes=32 time=138ms TTL=56
If your computer host name does not resolve, then contact your system administrator.
2.6 Checking the Network SetupTypically, the computer on which you want to install Oracle Database is connected to the network, has local storage to contain the Oracle Database installation, has a display monitor and a media drive.
This section describes how to install Oracle Database on computers that do not meet the typical scenario. It covers the following topics:
■ Installing Oracle Database on Computers with Multiple IP Addresses
■ Installing Oracle Database on Computers with Multiple Aliases
■ Installing Oracle Database on Nonnetworked Computers
■ Installing a Loopback Adapter
2.6.1 Installing Oracle Database on Computers with Multiple IP AddressesYou can install Oracle Database on a computer that has multiple IP addresses, also known as a multihomed computer. Typically, a multihomed computer has multiple
See Also: Oracle Enterprise Manager Cloud Control Basic Installation Guide for information on accessing the Oracle Enterprise Manager certification matrix

Checking the Network Setup
Oracle Database Preinstallation Tasks 2-7
network cards. Each IP address is associated with a host name; additionally, you can set up aliases for the host name. By default, Oracle Universal Installer uses the ORACLE_HOSTNAME environment variable setting to find the host name.
Clients must be able to access the computer using this host name, or using aliases for this host name. To check, ping the host name from the client computers using the short name (host name only) and the full name (host name and domain name). Both must work.
Setting the ORACLE_HOSTNAME Environment VariableTo set the ORACLE_HOSTNAME environment variable:
1. Display System in the Windows Control Panel.
2. In the System Properties dialog box, click Advanced.
3. In the Advanced tab, click Environment Variables.
4. In the Environment Variables dialog box, under System Variables, click New.
5. In the New System Variable dialog box, enter the following information:
■ Variable name: ORACLE_HOSTNAME
■ Variable value: The host name of the computer to use.
6. Click OK, then in the Environment Variables dialog box, click OK.
7. Click OK in the Environment Variables dialog box, then in the System Properties dialog box, click OK.
2.6.2 Installing Oracle Database on Computers with Multiple AliasesA computer with multiple aliases is registered with the naming service under a single IP address but with multiple aliases. The naming service resolves any of those aliases to the same computer. Before installing Oracle Database on such a computer, set the ORACLE_HOSTNAME environment variable to the computer whose host name you want to use.
2.6.3 Installing Oracle Database on Nonnetworked ComputersYou can install Oracle Database on a non-networked computer. If the computer, such as a laptop, is configured for DHCP and you plan to connect the computer to the network after the Oracle Database installation, perform these steps before you install Oracle Database on the non-networked computer.
1. Install a loopback adapter on the computer.
The loopback adapter and local IP address simulate a networked computer. If you connect the computer to the network, Oracle Database still uses the local IP address and host name.
2. Ping the computer from itself, using only the host name and using the fully qualified name, which should be in the DRIVE_LETTER:\system32\drivers\etc\hosts file.
For example, if you installed a loopback adapter on a computer called mycomputer on the mydomain.com domain, check the following:
DRIVE_LETTER:\>ping mycomputer Ping itself using just the
See Also: "Installing a Loopback Adapter" on page 2-8

Checking the Network Setup
2-8 Oracle Database Installation Guide
hostname.Reply from 10.10.10.10 Returns local IP.DRIVE_LETTER:\>ping mycomputer.mydomain.com Ping using a fully qualified name.Reply from 10.10.10.10 Returns local IP.
If the ping command fails, contact your network administrator.
Connecting the Computer to the Network after InstallationIf you connect the computer to a network after installation, the Oracle Database instance on your computer can work with other instances on the network. Remember that you must have installed a loopback adapter on your computer. Your computer can use a static IP or DHCP, depending on the network to which you are connected.
2.6.4 Installing a Loopback AdapterWhen you install a loopback adapter, the loopback adapter assigns a local IP address for your computer. After the loopback adapter is installed, there are at least two network adapters on your computer: your own network adapter and the loopback adapter. To run Oracle Database on Windows, set the loopback adapter as the primary adapter.
You can change the bind order for the adapters without reinstalling the loopback adapter. The bind order of the adapters to the protocol indicates the order in which the adapters are used. When the loopback adapter is used first for the TCP/IP protocol, all programs that access TCP/IP first probe the loopback adapter. The local address is used for tools, such as Oracle Enterprise Manager. Any other applications that use a different Ethernet segment are routed to the network card.
A loopback adapter is required if:
■ You are installing on a non-networked computer and plan to connect the computer to a network after installation.
This section covers the following topics:
■ Checking if a Loopback Adapter is Installed on Your Computer
■ Installing a Loopback Adapter on Windows Server 2008
■ Installing a Loopback Adapter on Windows 7 and Windows Server 2008 R2
■ Installing Microsoft KM-TEST Loopback Adapter on Windows 8 and Windows Server 2012
■ Removing a Loopback Adapter
Note: When you ping a computer from itself, the ping command should return the local IP address (the IP address of the loopback adapter).
See Also: "Installing Oracle Database on Nonnetworked Computers" on page 2-7

Checking the Network Setup
Oracle Database Preinstallation Tasks 2-9
2.6.4.1 Checking if a Loopback Adapter is Installed on Your ComputerTo check if a loopback adapter is installed on your computer, run the ipconfig /all command:
DRIVE_LETTER:\>ipconfig /all
If there is a loopback adapter installed, you would see a section that lists the values for the loopback adapter. For example:
Ethernet adapter Local Area Connection 2:Connection-specific DNS Suffix . :Description . . . . . . . . . . . : Microsoft Loopback AdapterPhysical Address. . . . . . . . . : 02-00-4C-4F-4F-50DHCP Enabled. . . . . . . . . . . : NoIP Address. . . . . . . . . . . . : 10.10.10.10Subnet Mask . . . . . . . . . . . : 255.255.0.0
2.6.4.2 Installing a Loopback Adapter on Windows Server 2008To install a loopback adapter on Windows Server 2008:
1. Open the Windows Control Panel.
2. Double-click Add Hardware to start the Add Hardware wizard.
3. In the Welcome window, click Next.
4. In the The wizard can help you install other hardware window, select Install the hardware that I manually select from a list, and click Next.
5. From the list of hardware types, select the type of hardware you are installing, select Network adapters, and click Next.
6. In the Select Network Adapter window, make the following selections:
■ Manufacturer: Select Microsoft.
■ Network Adapter: Select Microsoft Loopback Adapter.
7. Click Next.
8. In the The wizard is ready to install your hardware window, click Next.
9. In the Completing the Add Hardware Wizard window, click Finish.
10. Click Manage Network Connections. This displays the Network Connections Control Panel item.
11. Right-click the connection that was just created. This is usually named "Local Area Connection 2". Choose Properties.
12. On the General tab, select Internet Protocol (TCP/IP), and click Properties.
13. In the Properties dialog box, click Use the following IP address and do the following:
a. IP Address: Enter a non-routable IP for the loopback adapter. Oracle recommends the following non-routable addresses:
Note: Loopback Adapter installed on the computer should be made the Primary Network Adapter.
Checking the Network Setup
2-10 Oracle Database Installation Guide
– 192.168.x.x (x is any value between 0 and 255)
– 10.10.10.10
b. Subnet mask: Enter 255.255.255.0.
c. Record the values you entered, which you need later in this procedure.
d. Leave all other fields empty.
e. Click OK.
14. Click Close.
15. Close Network Connections.
16. Restart the computer.
17. Add a line to the DRIVE_LETTER:\ WINDOWS\system32\drivers\etc\hosts file with the following format, after the localhost line:
IP_address hostname.domainname hostname
where:
■ IP_address is the non-routable IP address you entered in step 13.
■ hostname is the name of the computer.
■ domainname is the name of the domain.
For example:
10.10.10.10 mycomputer.mydomain.com mycomputer
18. Check the network configuration:
a. Open System in the Control Panel, and verify that Full computer name displays the host name and the domain name, for example, sales.us.example.com.
b. Click Change. In Computer name, you should see the host name, and in Full computer name, you should see the host name and domain name. Using the previous example, the host name would be sales and the domain would be us.example.com.
c. Click More. In Primary DNS suffix of this computer, you should see the domain name, for example, us.example.com.
2.6.4.3 Installing a Loopback Adapter on Windows 7 and Windows Server 2008 R2To install a loopback adapter on Windows 7 and Windows Server 2008 R2:
1. Click Start and enter hdwwiz in the Search box.
2. Click hdwwiz to start the Add Hardware wizard.
3. Go to step 3 of Section 2.6.4.2, "Installing a Loopback Adapter on Windows Server 2008". The remaining steps are the same as given for Windows Server 2008.
Note: Domain name is optional.

Individual Component Requirements
Oracle Database Preinstallation Tasks 2-11
2.6.4.4 Installing Microsoft KM-TEST Loopback Adapter on Windows 8 and Windows Server 2012To install a loopback adapter on Windows 8 and Windows Server 2012:
1. Complete steps 1-5 of Section 2.6.4.2, "Installing a Loopback Adapter on Windows Server 2008".
2. In the Select Network Adapter window, make the following selections:
■ Manufacturer: Select Microsoft.
■ Network Adapter: Select Microsoft KM-TEST Loopback Adapter.
Then continue with the same steps as given for Windows Server 2008.
2.6.4.5 Removing a Loopback AdapterTo remove a loopback adapter:
1. Display System in the Windows Control Panel.
2. In the Hardware tab, click Device Manager. This tab is not available with Windows Server 2008. Click Device Manager instead.
3. In the Device Manager window, expand Network adapters. You should see Microsoft Loopback Adapter.
4. Right-click Microsoft Loopback Adapter and select Uninstall.
In Windows 8 and Windows Server 2012, right-click Microsoft KM-TEST Loopback Adapter and select Uninstall.
5. Click OK.
6. Restart the computer.
7. Remove the line from the DRIVE_LETTER:\WINDOWS\system32\drivers\etc\hosts file, added after the localhost line while installing the loopback adapter on other Windows operating systems.
2.7 Individual Component RequirementsThis section contains these topics:
■ Configuring Disk Storage for Oracle Data Files and Recovery Files
■ Creating Directories for Oracle Data Files or Recovery Files
■ Oracle Database Security Strong Authentication Requirements
■ Oracle Enterprise Manager Requirements
■ Oracle-Managed Files Requirements
■ Oracle Real Application Clusters (Oracle RAC)
■ Oracle Volume Shadow Copy Service (VSS) Writer

Individual Component Requirements
2-12 Oracle Database Installation Guide
2.7.1 Configuring Disk Storage for Oracle Data Files and Recovery FilesThis section describes the storage options for storing Oracle data files and, optionally, Oracle database recovery files. After you choose the storage method to use for each file type, use the following sections to configure the required storage:
■ Choosing a Storage Option for Oracle Database and Recovery Files
■ Configuring Disk Storage
2.7.1.1 Choosing a Storage Option for Oracle Database and Recovery FilesOracle Database files include data files, control files, redo log files, the server parameter file, and the password file. For all installations, you must choose the storage option to use for Oracle Database files. During the database installation, you must choose the storage option to use for recovery files (the fast recovery area). You do not have to use the same storage option for each file type.
The storage option that you choose for recovery files can be the same as or different to the option you choose for the data files. The recovery files must be placed on Oracle ASM if using Oracle ACFS; otherwise they can be placed on NTFS.
2.7.1.2 Configuring Disk StorageFor more information about these options, see the "Database Storage Options" section on page 1-13. For information about how to configure disk storage before you start the installation, see one of the following sections depending on your choice:
■ To use a file system for database or recovery file storage, see the "Creating Directories for Oracle Data Files or Recovery Files" section on page 2-13.
■ To use Oracle Automatic Storage Management for database or recovery file storage, see the "Preparing Disks for Oracle Automatic Storage Management" section on page 4-6.
See Also:
■ Chapter 2, "Oracle Application Express Installation Requirements" and "Recommended Pre-installation Tasks" in Oracle Application Express Installation Guide
■ "Pre-installation Requirements" section in Oracle Configuration Manager Installation and Administration Guide and Oracle Configuration Manager Prerequisites for preinstallation requirements for Oracle Configuration Manager
■ Appendix B, "Country Codes", in Oracle Configuration Manager Installation and Administration Guide for a list of valid country codes that can be used while installing Oracle Configuration Manager.
Note: You do not have to use the same storage option for each file type.
Note: Database files and recovery files are supported on file systems and Oracle ASM.

Individual Component Requirements
Oracle Database Preinstallation Tasks 2-13
2.7.2 Creating Directories for Oracle Data Files or Recovery FilesIf you decide to place the Oracle database or recovery files on a file system, use the following guidelines when deciding where to place them:
■ Guidelines for Placing Oracle Data Files on a File System
■ Guidelines for Placing Oracle Recovery Files on a File System
■ Creating Required Directories
2.7.2.1 Guidelines for Placing Oracle Data Files on a File System■ You can choose either a single file system or multiple file systems to store the data
files:
– If you want to use a single file system, then choose a file system on a physical device that is dedicated to the database.
For best performance and reliability, choose a redundant array of independent disks (RAID) device or a logical volume on multiple physical devices and implement the stripe and mirror everything (SAME) methodology.
– If you want to use multiple file systems, then choose file systems on separate physical devices that are dedicated to the database.
Select this method to distribute physical I/O and create separate control files on different devices for increased reliability. You must choose the Advanced database creation option during the installation to implement this method.
■ If you intend to create a preconfigured database during the installation, then the file system (or file systems) that you choose must have at least 950 MB of free disk space.
For production databases, you must estimate the disk space requirement depending on the use of the database.
■ For optimum performance, the file systems that you choose should be on physical devices that are used only by the database.
■ The default location suggested by Oracle Universal Installer for the database file directory is a subdirectory of the Oracle base directory. However, this default location is not recommended for production databases.
2.7.2.2 Guidelines for Placing Oracle Recovery Files on a File System
If you place the Oracle recovery files on a file system, use the following guidelines when deciding where to place them:
■ To prevent disk failure from making both the data files and the recovery files unavailable, place the recovery files in a file system on a different physical disk from the data files.
Note: You must choose a location for recovery files only if you intend to enable automated backups during the installation.
Note: Alternatively, for both data files and recovery files, use an Oracle Automatic Storage Management disk group.
Individual Component Requirements
2-14 Oracle Database Installation Guide
■ The file system that you choose should have at least 2 GB of free disk space.
The disk space requirement is the default disk quota configured for the fast recovery area (specified by the DB_RECOVERY_FILE_DEST_SIZE initialization parameter).
If you choose the Advanced database configuration option, you can specify a different disk quota value. After you create the database, you can also use Oracle Enterprise Manager Cloud Control or Oracle Enterprise Manager Database Express to specify a different value.
■ The default location suggested by Oracle Universal Installer for the database file directory is a subdirectory of the Oracle base directory. However, this default location is not recommended for production databases.
2.7.2.3 Creating Required Directories
To create directories for the Oracle database or recovery files on separate file systems from the Oracle base directory, follow these steps:
1. Use Windows Explorer to determine the free disk space on the file system.
2. From the display, identify the file systems to use:
If you are using the same file system for multiple types of files, then add the disk space requirements for each type to determine the total disk space requirement.
3. Note the names of the directories for the file systems that you identified.
4. If you also want to use Oracle Automatic Storage Management, see "Preparing Disks for Oracle Automatic Storage Management" on page 4-6 for instructions. Otherwise see the "Stopping Existing Oracle Services" section on page 3-7.
2.7.3 Oracle Database Security Strong Authentication RequirementsEnsure that you meet the hardware and software requirements so that you can use strong authentication (Kerberos, PKI) with Oracle Database.
See Also: Oracle Database Backup and Recovery User's Guide for more information about the fast recovery area
Note: You must complete this procedure only to place the Oracle database or recovery files on a separate file system from the Oracle base directory.
File Type File System Requirements
Data files Choose either:
■ A single file system with at least 950 MB of free disk space.
■ Two or more file systems with at least 950 MB of free disk space in total.
Recovery files Choose a file system with at least 2 GB of free disk space.

Individual Component Requirements
Oracle Database Preinstallation Tasks 2-15
2.7.4 Oracle Enterprise Manager RequirementsAll Oracle Enterprise Manager products must belong to the same release. Older versions of Enterprise Manager are not supported with the new release.
2.7.5 Oracle-Managed Files RequirementsIf you choose the Advanced database creation option, you can use the Oracle-managed files feature with the new database. If you use this feature, you need only specify the database object name instead of file names when creating or deleting database files. Configuration procedures are required to enable Oracle Managed Files.
2.7.6 Oracle Real Application Clusters (Oracle RAC)If you plan to install Oracle RAC or a grid computing environment, then you must first install Oracle Grid Infrastructure for a Cluster.
2.7.7 Oracle Volume Shadow Copy Service (VSS) WriterOracle Volume Shadow Copy Service Writer is supported on Windows Server operating systems.
Note: Oracle Enterprise Manager products are released on the Enterprise Manager Cloud Control installation media. Oracle Enterprise Manager Database Express is built into Oracle Database without any need for special installation or management
See Also: Oracle Enterprise Manager Cloud Control Basic Installation Guide and Oracle Enterprise Manager Cloud Control Advanced Installation and Configuration Guide
See Also: "Using Oracle-Managed Files" in Oracle Database Administrator's Guide
See Also: Oracle Real Application Clusters Installation Guide and Oracle Grid Infrastructure Installation Guide
See Also: "Performing Database Backup and Recovery with VSS" in Oracle Database Platform Guide for Microsoft Windows

Individual Component Requirements
2-16 Oracle Database Installation Guide
3
Configuring Users, Groups and Environments for Oracle Database 3-1
3Configuring Users, Groups and Environments for Oracle Database
This chapter describes the users, groups, and environment settings to complete before you install Oracle Database and Grid Infrastructure for a standalone server.
This chapter contains the following topics:
■ Creating Required Operating System Groups and Users
■ Stopping Existing Oracle Services
■ Configuring User Accounts
3.1 Creating Required Operating System Groups and UsersDepending on if this is the first time Oracle software is being installed on your system and on the products that you are installing, you may have to create several operating system groups and users.
You can choose to create one administrative user and use one group for operating system authentication for all system privileges on the storage and database tiers. For example, you can designate the oracle user to be the Oracle Installation user for all Oracle software and use only the ORA_DBA group for authentication. You can also create custom configuration groups and users based on job role separation that divide access privileges.
Log in as an Administrator user, and use the following instructions to create the Oracle Installation user for Oracle Database.
■ About the Oracle Installation User
■ Creating Oracle Home User
■ Understanding the Oracle Inventory Directory and the Oracle Inventory Group
■ Operating System Groups Created During Oracle Database Installation
■ Operating System Groups and Users for Job Role Separation
3.1.1 About the Oracle Installation UserTo install Oracle Grid Infrastructure for a standalone server or Oracle Database software, you must use either a Windows Local or Windows Domain user that is also a member of the Administrators group. This user is referred to as the Oracle Installation User.
Creating Required Operating System Groups and Users
3-2 Oracle Database Installation Guide
3.1.2 Creating Oracle Home UserDuring Oracle Database installation, you can specify an optional Oracle Home User associated with the Oracle home. The Oracle Home User can be Windows Built-in Account or a standard Windows User Account (not an Administrator account). This account is used for running the Windows services for the Oracle home. Do not log in using this account to perform administrative tasks. Windows User Account can be a Windows Local User, Windows Domain User or Managed Services Account (MSA). If you want to create a new user during installation, then it can only be a Windows Local User. It cannot be a Windows Domain User or an MSA. The new user that is created is denied interactive logon privileges to the Windows computer. However, a Windows administrator can manage this account like any other Windows account. Oracle recommends that you use the standard Windows User Account (instead of Windows Built-in Account) as the Oracle Home User for enhanced security.
Silent installation is enhanced to support password prompt for the Oracle Home User. So, customers and independent software vendors (ISV) can use response files without hard coding the password into the source code.
Oracle recommends using the standard Windows User Account (not an Administrator account) as the Oracle Home User for typical installation, software-only installation, and cloning.
If an existing Windows User Account is used as the Oracle Home User for software-only installation, then a password is not required. Thus, you can perform a silent, software-only installation using Windows User Account.
If using a Windows User Account as the Oracle Home User for cloning individual Oracle Database installations, then a password is not required.
3.1.3 Understanding the Oracle Inventory Directory and the Oracle Inventory GroupThe Oracle Inventory directory is the central inventory location for all Oracle software installed on a server. By default, the location of the Oracle Inventory directory is C:\Program Files\Oracle\Inventory.
When you install Oracle software on the system for the first time, OUI creates the directories for the Oracle central inventory and the Oracle Inventory group, ORA_INSTALL. The ORA_INSTALL group contains all the Oracle Home Users for all Oracle homes on the server.
Whether you are performing the first installation of Oracle software on this server, or are performing an installation of additional Oracle software on the server, you do not need to create the Oracle central inventory or the ORA_INSTALL group; the Oracle Universal Installer creates them automatically. You cannot change the name of the Oracle Inventory group - it is always ORA_INSTALL.
3.1.4 Operating System Groups Created During Oracle Database InstallationDuring installation, the user groups listed in Table 3–1 are created, if they do not already exist. In the following table, the HOMENAME variable refers to the generated HOMENAME for a software installation, which is of the form OraproductmajorVersionHomenumber. For example, OraDB12cHome1.

Creating Required Operating System Groups and Users
Configuring Users, Groups and Environments for Oracle Database 3-3
Table 3–1 User Groups Created During Oracle Database Installation
Operating System Group Name
Related System Privilege Description
ORA_DBA SYSDBA system privileges for all Oracle Database installations on the server
A special OSDBA group for the Windows operating system.
Members of this group are granted SYSDBA system privileges for all Oracle Databases installed on the server.
ORA_OPER SYSOPER system privileges for all Oracle databases installed on the server
A special OSOPER group for the Windows operating system.
Members of this group are granted SYSOPER system privileges all Oracle Databases installed on the server.
ORA_ASMADMIN SYSASM system privileges for Oracle ASM administration
The OSASM group for the Oracle ASM instance.
Using this group and the SYSASM system privileges enables the separation of SYSDBA database administration privileges from Oracle ASM storage administration privileges. Members of the OSASM group are authorized to connect using the SYSASM privilege and have full access to Oracle ASM, including administrative access to all disk groups that are managed by that Oracle ASM instance.
ORA_ASMDBA SYSDBA system privileges on the Oracle ASM instance
The OSDBA group for the Oracle ASM instance.
SYSDBA for ASM system privileges grant access to data stored on Oracle ASM disks. During installation, the Oracle Installation user is added to this group. After you create an Oracle Database, the database service ID of that database is added to this group to uniquely identify data files from that database.
ORA_ASMOPER SYSOPER for ASM system privileges
The OSOPER group for the Oracle ASM instance.
This group is granted SYSOPER system privileges on the Oracle ASM instance, which permits the user to perform operations such as startup, shutdown, mount, dismount, and check disk group. This group has a subset of the privileges of the OSASM group.
ORA_HOMENAME_DBA SYSDBA system privileges for all instances that run from the Oracle home with a name of HOMENAME
An OSDBA group for a specific Oracle home with a name of HOMENAME.
Members of this group can use operating system authentication to gain SYSDBA system privileges for any database that runs from the specific Oracle home. If you specified an Oracle Home User during installation, the user is added to this group during installation.

Creating Required Operating System Groups and Users
3-4 Oracle Database Installation Guide
During the installation of Oracle Database, all groups mentioned in the table are populated for proper operation of Oracle products. You must not remove any group member populated by Oracle. However, if you want to assign specific database privileges to new Windows operating system users, then you can manually add users to these groups after the installation completes.
Oracle creates other groups, such as, ORA_INSTALL, ORA_CLIENT_LISTENERS, ORA_GRID_LISTENERS, ORA_HOMENAME_SVCSIDS during installation and you should not change these groups, memberships, and ACLs associated with various Oracle created groups.
ORA_HOMENAME_OPER SYSOPER system privileges for all instances that run from the Oracle home with a name of HOMENAME
An OSDBA group for the Oracle home with a name of HOMENAME.
Members of this group can use operating system authentication to gain SYSOPER system privileges for any database that runs from the specific Oracle home.
ORA_HOMENAME_SYSBACKUP SYSBACKUP system privileges for all instances that run from the Oracle home with a name of HOMENAME
OSBACKUPDBA group for a specific Oracle home with a name of HOMENAME.
Members of this group have privileges necessary for performing database backup and recovery tasks on all database instances that run from the specified Oracle home directory.
ORA_HOMENAME_SYSDG SYSDG system privileges for all instances that run from the Oracle home with a name of HOMENAME
OSDGDBA group for a specific Oracle home with a name of HOMENAME.
Members of this group have privileges necessary for performing Data Guard administrative tasks on all database instances that run from the specified Oracle home directory.
ORA_HOMENAME_SYSKM SYSKM system privileges for all instances that run from the Oracle home with a name of HOMENAME.
OSKMDBA group for a specific Oracle home with a name of HOMENAME.
Members of this group have privileges necessary for performing encryption key management tasks on all database instances that run from the specified Oracle home directory.
See Also:
■ "Database Administrator Authentication" section in Oracle Database Administrator's Guide for more information about database system privileges
■ "Authentication for Accessing Oracle ASM Instances" section in Oracle Automatic Storage Management Administrator's Guide for more information about Oracle ASM system privileges
Table 3–1 (Cont.) User Groups Created During Oracle Database Installation
Operating System Group Name
Related System Privilege Description

Creating Required Operating System Groups and Users
Configuring Users, Groups and Environments for Oracle Database 3-5
3.1.5 Operating System Groups and Users for Job Role SeparationA job role separation configuration of Oracle Database and Oracle ASM is a configuration with groups and users to provide separate groups for operating system authentication.
This section contains the following topics:
■ About Job Role Separation Operating System Privileges Groups and Users
■ Oracle Software Owner For Each Oracle Software Product
■ Standard Oracle Database Groups for Job Role Separation for Oracle Database
■ Extended Oracle Database Groups for Job Role Separation
■ Oracle Automatic Storage Management Groups for Job Role Separation
3.1.5.1 About Job Role Separation Operating System Privileges Groups and UsersDuring the Oracle Database installation, the OSDBA, OSOPER, OSBACKUPDBA, OSDGDBA and OSKMDBA groups are created and users assigned to these groups. Members of these groups are granted operating system authentication for the set of database system privileges each group authorizes. Oracle recommends that you use different operating system groups for each set of system privileges.
3.1.5.2 Oracle Software Owner For Each Oracle Software ProductYou can create a single user (for example, oracle) to own both Oracle Database, and Oracle Grid Infrastructure for a standalone server installations. However, Oracle recommends that you create one software owner to own each Oracle software installation (typically, oracle, for the database software and grid for the Oracle Restart owner user).
You must create at least one software owner the first time you install Oracle software on the system.
3.1.5.3 Standard Oracle Database Groups for Job Role Separation for Oracle DatabaseThe following is a list of standard Oracle Database groups. These groups provide operating system authentication for database administration system privileges:
■ The OSDBA group (ORA_DBA)
Use this group the first time you install Oracle Database software on the system. This group identifies operating system user accounts that have database administrative privileges (the SYSDBA privilege) for all database instances running on the server.
Note: In Oracle documentation, a user created to own only Oracle Grid Infrastructure software installations is called the grid user. A user created to own either all Oracle installations, or only Oracle database installations, is called the oracle user.
Note: All these groups are automatically created as a part of Oracle Database installation on Windows.

Creating Required Operating System Groups and Users
3-6 Oracle Database Installation Guide
Members of the ORA_DBA group do not have SYSASM privileges on Oracle ASM instances, which are needed for mounting and dismounting disk groups.
■ The OSOPER group for Oracle Database (ORA_OPER)
Use this group if you want a separate group of operating system users to have a limited set of database administrative privileges for starting up and shutting down the database (the SYSOPER privilege).
■ The OSDBA group for a particular Oracle home (ORA_HOMENAME_DBA)
This group is created the first time you install Oracle Database software into a new Oracle home. This group identifies operating system user accounts that have database administrative privileges (the SYSDBA privilege) for the database instances that run from that Oracle home.
■ The OSOPER group for a particular Oracle home (ORA_HOMENAME_OPER)
Use this group if you want a separate group of operating system users to have a limited set of database administrative privileges for starting up and shutting down the database instances that run from a particular Oracle home (the SYSOPER privilege).
3.1.5.4 Extended Oracle Database Groups for Job Role SeparationIn addition to the SYSOPER privilege to start up and shut down the database, you can create new administrative privileges that are more task-specific and less privileged than the ORA_DBA/SYSDBA system privileges to support specific administrative privileges tasks required for everyday database operation. Users granted these system privileges are also authenticated through operating system group membership.
During installation, you are prompted to provide operating system groups whose members are granted access to these system privileges. You can assign the same group to provide authentication for these privileges (for example, ORA_DBA), but Oracle recommends that you provide a unique group to designate each privilege.
The OSDBA subset job role separation privileges and groups consist of the following:
■ The OSBACKUPDBA group for Oracle Database (ORA_HOMENAME_SYSBACKUP)
Use this group if you want a separate group of operating system users to have a limited set of database backup and recovery related administrative privileges (the SYSBACKUP privilege).
■ The OSDGDBA group for Oracle Data Guard (ORA_HOMENAME_SYSDG)
Use this group if you want a separate group of operating system users to have a limited set of privileges to administer and monitor Oracle Data Guard (the SYSDG privilege).
■ The OSKMDBA group for encryption key management (ORA_HOMENAME_SYSKM)
Use this group if you want a separate group of operating system users to have a limited set of privileges for encryption key management such as Oracle Wallet Manager management (the SYSKM privilege).
Note: All these groups, ORA_HOMENAME_SYSBACKUP, ORA_HOMENAME_SYSDG, and ORA_HOMENAME_SYSKM, are applicable only to the database instances running from that particular Oracle home.
Stopping Existing Oracle Services
Configuring Users, Groups and Environments for Oracle Database 3-7
3.1.5.5 Oracle Automatic Storage Management Groups for Job Role SeparationCreate the following operating system groups if you are installing Oracle Grid Infrastructure:
■ The OSDBA group for Oracle ASM (ORA_ASMDBA)
Members of the ASM Database Administrator group (OSDBA for ASM) are granted read and write access to files managed by Oracle ASM. During installation, the Oracle Installation Users and Oracle Database Service IDs are configured as members of this group.
■ The OSASM group for Oracle ASM Administration (ORA_ASMADMIN)
Create this group as a separate group if you want to have separate administration privileges groups for Oracle ASM and Oracle Database administrators. Members of this group are granted the SYSASM system privileges to administer Oracle ASM. In Oracle documentation, the operating system group whose members are granted SYSASM privileges is called the OSASM group.
Members of the OSASM group can use SQL to connect to an Oracle ASM instance as SYSASM using operating system authentication. The SYSASM privileges permit mounting and dismounting of disk groups, and other storage administration tasks. SYSASM privileges provide no access privileges on an Oracle Database instance.
■ The OSOPER group for Oracle ASM (ORA_ASMOPER)
This is an optional group. Create this group if you want a separate group of operating system users to have a limited set of Oracle ASM instance administrative privileges (the SYSOPER for ASM privilege), including starting up and stopping the Oracle ASM instance. By default, members of the OSASM group also have all privileges granted by the SYSOPER for ASM privilege.
To use the Oracle ASM Operator group to create an Oracle ASM administrator with fewer privileges than those granted by the SYSASM system privilege you must assign the user to this group after installation.
3.2 Stopping Existing Oracle Services
Consider the following before you install Oracle Grid Infrastructure for a standalone server or Oracle Database:
See Also:
■ Oracle Database Administrator's Guide for more information about the OSDBA, OSASM, OSOPER, OSBACKUPDBA, OSDGDBA, and OSKMDBA groups, and the SYSDBA, SYSASM, SYSOPER, SYSBACKUP, SYSDG, and SYSKM privileges
■ The "Managing Administrative Privileges" section in Oracle Database Security Guide
Note: If you are installing additional Oracle Database 12c products in an existing Oracle home, then stop all processes, including the listener and database, running in the Oracle home. You cannot install into an existing Oracle home other than 12c. You must complete this task to enable Oracle Universal Installer to relink certain executables and libraries.

Configuring User Accounts
3-8 Oracle Database Installation Guide
■ If you plan to use Oracle Restart, then you must install the Oracle Grid Infrastructure for a standalone server before you install and create the database. When you perform a database installation, the database must use the same listener created during the Oracle Grid Infrastructure for a standalone server installation, thereafter you do not have to perform the steps listed in this section.
The default listener and any additional listeners must run from the Oracle Grid Infrastructure home.
■ If you have an existing Oracle Database 12c running on Oracle ASM, then stop any existing Oracle ASM instances. After you finish installing Oracle Grid Infrastructure for a standalone server, start the Oracle ASM instance again.
If you choose to create a database during the installation, then most installation types configure and start a default Oracle Net listener using TCP/IP port 1521 and the IPC key value EXTPROC. However, if an existing Oracle Net listener process is using the same port or key value, Oracle Universal Installer looks for the next available port (for example, 1522) and configures and starts the new listener on this available port.
3.3 Configuring User AccountsDuring installation, you can specify an Oracle Home User. Before starting the installation, there are a few checks you must perform for the Oracle Installation users, to ensure the installation succeeds.
This section contains the following topics:
■ Configuring Environment Variables for the Software Installation Owner
■ Managing User Accounts with User Account Control
3.3.1 Configuring Environment Variables for the Software Installation OwnerBefore starting the Oracle Database installation, ensure that the TEMP environment variable is set correctly. See "Hard Disk Space Requirements" on page 2-2 for more information.
3.3.2 Managing User Accounts with User Account ControlTo ensure that only trusted applications run on your computer, the Windows operating systems supported for Oracle Database provide User Account Control. If you have enabled this security feature, then, depending on how you have configured it, Oracle Universal Installer prompts you for either your consent or your credentials when installing Oracle Database. Provide either the consent or your Windows Administrator credentials as appropriate.
You must have Administrator privileges to run some Oracle tools, such as Database Configuration Assistant, Net Configuration Assistant, and OPatch, or to run any tool or application that writes to any directory within the Oracle home. If User Account Control is enabled, and you are logged in as the local Administrator, then you can successfully run each of these commands in the usual way. However, if you are logged in as "a member of the Administrator group," then you must explicitly start these tasks with Windows Administrator privileges. All the Oracle shortcuts that require Administrator privileges start as "Administrator" automatically when you click the shortcuts. However, if you run the above tools from a Windows command prompt, you must run them from an Administrator command prompt. OPatch does not have a shortcut and has to be run from an Administrator command prompt.

Configuring User Accounts
Configuring Users, Groups and Environments for Oracle Database 3-9
To start a command prompt window with Windows Administrator privileges:1. On your desktop, create a shortcut for the command prompt window. An icon for
that shortcut appears on the desktop.
2. Right-click the icon for the newly created shortcut, and specify Run as administrator.
When you open this window, the title bar reads Administrator: Command Prompt. Commands run from within this window are run with Administrator privileges.
See Also: "Running Tools with Windows User Account Control" in Oracle Database Platform Guide for Microsoft Windows for more information.

Configuring User Accounts
3-10 Oracle Database Installation Guide
4
Oracle Grid Infrastructure for a Standalone Server 4-1
4Oracle Grid Infrastructure for a Standalone Server
Oracle Grid Infrastructure for a standalone server, also known as Oracle Restart, provides system support for a single-instance Oracle Database. This support includes volume management, file system, and automatic restart capabilities. If you plan to use Oracle Automatic Storage Management (Oracle ASM), then you must install Oracle Restart before installing your database. Oracle Grid Infrastructure for a standalone server includes Oracle Restart and Oracle Automatic Storage Management. Oracle combined the two infrastructure products into a single set of binaries that is installed into an Oracle Restart home. Oracle Restart should be installed before installing Oracle Database.
Oracle Automatic Storage Management is a volume manager and a file system for Oracle database files that supports single-instance Oracle Database and Oracle Real Application Clusters (Oracle RAC) configurations. Oracle Automatic Storage Management also supports a general purpose file system for your application needs, including Oracle Database binaries. Oracle Automatic Storage Management is Oracle's recommended storage management solution that provides an alternative to conventional volume managers, file systems, and raw devices.
Oracle Restart improves the availability of your Oracle database because of the following:
■ When there is a hardware or a software failure, Oracle Restart automatically starts all Oracle components, including the Oracle database instance, Oracle Net Listener, database services, and Oracle ASM.
Note:
■ You can neither install Oracle Restart on an Oracle Grid Infrastructure cluster member node, nor add an Oracle Restart server to an Oracle Grid Infrastructure cluster member node. Oracle Restart supports single-instance databases on one server, while Oracle Grid Infrastructure for a Cluster supports single-instance or Oracle RAC databases on a cluster.
■ If you want to use Oracle ASM or Oracle Restart, then you must install Oracle Grid Infrastructure for a standalone server before you install and create the database. Otherwise, you must manually register the database with Oracle Restart.
■ Oracle Restart is used in single-instance (nonclustered) environments only.

Requirements for an Oracle Grid Infrastructure for a Standalone Server Installation
4-2 Oracle Database Installation Guide
■ Oracle Restart starts components in the proper order when the database host is restarted.
■ Oracle Restart runs periodic checks to monitor the status of Oracle components. If a check operation fails for a component, then the component is shut down and restarted.
This chapter contains the following sections:
■ Requirements for an Oracle Grid Infrastructure for a Standalone Server Installation
■ Oracle ACFS and Oracle ADVM
■ Oracle Automatic Storage Management Storage Configuration
■ Installing Oracle Grid Infrastructure for a Standalone Server Using a Software-Only Installation
■ Installing and Configuring Oracle Grid Infrastructure for a Standalone Server
■ Modifying Oracle Grid Infrastructure for a Standalone Server Binaries After Installation
4.1 Requirements for an Oracle Grid Infrastructure for a Standalone Server Installation
Before you install Oracle Grid Infrastructure for a standalone server, ensure that your system meets the following requirements:
■ System Requirements
■ Memory Requirements
■ Disk Space Requirements
4.1.1 System RequirementsOracle Grid Infrastructure for a standalone server has similar system requirements as Oracle Grid Infrastructure for a cluster, such as requiring 64-bit Windows server operating system.
Components included with Oracle Grid Infrastructure, such as Oracle ASM, have the same system requirements as Oracle Grid Infrastructure.
Note that specific system requirements for Oracle Grid Infrastructure for a standalone server are noted below.
4.1.2 Memory RequirementsAt least 1 GB of RAM (for Oracle Grid Infrastructure for a Standalone Server installations, including installations where you plan to install Oracle Database).
4.1.3 Disk Space RequirementsThe following are the disk space requirements for installing Oracle Grid Infrastructure for a standalone server:
See Also: Oracle Grid Infrastructure Installation Guide for complete Oracle Grid Infrastructure system requirements

Oracle ACFS and Oracle ADVM
Oracle Grid Infrastructure for a Standalone Server 4-3
At least 4.5 GB of disk space
The amount of disk space available in the %TEMP% directory is equivalent to the total amount of free disk space, minus what is required for Oracle Grid Infrastructure for a standalone server to be installed.
If less than 1 GB free disk space is available in the %TEMP% directory, then complete the following steps:
■ Delete unnecessary files from the %TEMP% directory to meet the disk space requirement.
■ Set TEMP environment variable. Go to System Properties, then Environment Variables, "TEMP=C:\Temp\"
If you plan to install Oracle Database, then you must meet additional preinstallation requirements. See Chapter 2, "Oracle Database Preinstallation Tasks."
4.2 Oracle ACFS and Oracle ADVMThis section contains information about Oracle Automatic Storage Management Cluster File System (Oracle ACFS) and Oracle Automatic Storage Management Dynamic Volume Manager (Oracle ADVM). It contains the following topics:
■ About Oracle ACFS and Oracle ADVM
■ Oracle ACFS and Oracle ADVM Support on Windows
■ Restrictions and Guidelines for Oracle ACFS
4.2.1 About Oracle ACFS and Oracle ADVMOracle ACFS extends Oracle ASM technology to support all of your application data in both single instance and cluster configurations. Oracle ADVM provides volume management services and a standard disk device driver interface to clients. Oracle Automatic Storage Management Cluster File System communicates with Oracle ASM through the Oracle Automatic Storage Management Dynamic Volume Manager interface.
4.2.2 Oracle ACFS and Oracle ADVM Support on WindowsStarting with Oracle ASM 11g Release 2 (11.2.0.2), Oracle ACFS and Oracle ADVM are also supported on Windows Server 2008, x64 and Windows Server 2008 R2, x64.
See Also:
■ My Oracle Support Note 1369107.1 for more information about platforms and releases that support Oracle ACFS and Oracle ADVM:
https://support.oracle.com/CSP/main/article?cmd=show&type=NOT&id=1369107.1
■ Patch Set Updates for Oracle Products (My Oracle Support Note 854428.1 for current release and support information:
https://support.oracle.com/CSP/main/article?cmd=show&type=NOT&id=854428.1

Oracle Automatic Storage Management Storage Configuration
4-4 Oracle Database Installation Guide
4.2.3 Restrictions and Guidelines for Oracle ACFSOracle Restart does not support root-based Oracle Clusterware resources. For this reason, the following restrictions apply if you run Oracle ACFS on an Oracle Restart configuration:
■ Oracle Restart does not support Oracle ACFS resources on all platforms.
■ Starting with Oracle Database 12c, Oracle Restart configurations do not support the Oracle ACFS registry.
■ You must manually load Oracle ACFS drivers after a system restart.
■ You must manually mount an Oracle ACFS file system, and unmount it after the Oracle ASM instance has finished running.
■ Creating Oracle datafiles on an Oracle ACFS file system is not supported in Oracle Restart configurations.
To enable Oracle ACFS on Oracle Restart see "Enabling Oracle ACFS on Oracle Restart Configurations" on page 4-21.
Note the following general restrictions and guidelines also about Oracle ACFS:
■ Oracle ACFS can be used as an option only when Oracle ASM is configured.
■ You can place Oracle database binaries and administrative files (for example, trace files) on Oracle ACFS.
■ Oracle ACFS provides a general purpose file system for other files.
4.3 Oracle Automatic Storage Management Storage ConfigurationReview the following sections for information on Oracle Automatic Storage Management (Oracle ASM) storage configuration:
■ Managing Disk Groups for Older Database Versions
■ Oracle Automatic Storage Management Installation Considerations
■ Preparing Disks for Oracle Automatic Storage Management
■ Manually Configuring Oracle Automatic Storage Management Disk Groups
■ Testing the Oracle Automatic Storage Management Installation
■ Upgrading Existing Oracle Automatic Storage Management Instances
4.3.1 Managing Disk Groups for Older Database VersionsUse Oracle ASM Configuration Assistant (Oracle ASMCA) to create and modify disk groups when you install earlier version of Oracle databases on Oracle Grid Infrastructure installations.
Releases before Oracle Database 11g Release 2 used Database Configuration Assistant to perform administrative tasks on Oracle ASM. Starting with 11g Release 2 (11.2),
See Also:
■ Oracle Database Release Notes for Microsoft Windows for latest information about supported platforms and releases
■ "Introducing Oracle ACFS and Oracle ADVM" in Oracle Automatic Storage Management Administrator's Guide

Oracle Automatic Storage Management Storage Configuration
Oracle Grid Infrastructure for a Standalone Server 4-5
Oracle ASM is installed with Oracle Restart. You can no longer use Oracle DBCA to perform administrative tasks on Oracle ASM.
4.3.2 Oracle Automatic Storage Management Installation ConsiderationsIn previous releases, Oracle Automatic Storage Management (Oracle ASM) was installed as part of the Oracle Database installation. Starting with Oracle Database 11g Release 2 (11.2), Oracle Automatic Storage Management is part of an Oracle Grid Infrastructure installation, either for a cluster, or for a standalone server.
If you want to upgrade an existing Oracle Automatic Storage Management installation, then you must upgrade Oracle Automatic Storage Management by running an Oracle Grid Infrastructure upgrade (upgrades of existing Oracle Automatic Storage Management installations). If you do not have Oracle Automatic Storage Management installed and you want to use Oracle Automatic Storage Management as your storage option, then you must complete an Oracle Grid Infrastructure for a standalone server installation before you start your Oracle Database installation.
You must run Oracle Automatic Storage Management Configuration Assistant for installing and configuring Oracle ASM instances, disk groups, volumes, and Oracle Automatic Storage Management Cluster File System (Oracle ACFS). In addition, you can use the ASMCA command-line interface.
Oracle Database 12c introduces Oracle Flex ASM that can apply to a collection of databases, each one a single instance but running in a Flex ASM Cluster.
Apply the following guidelines when you install Oracle Automatic Storage Management:
■ You must complete the steps listed under the "Preparing Disks for Oracle Automatic Storage Management" section to prepare a disk partition to use for the Oracle Automatic Storage Management disk groups.
■ Ensure that at least one disk is configured appropriately in an Oracle ASM disk group before beginning the installation.
■ When you install Oracle Automatic Storage Management, Oracle Automatic Storage Management Configuration Assistant creates a separate server parameter file (SPFILE) and password file for the Oracle Automatic Storage Management instance. As soon as Oracle Automatic Storage Management is installed, ASMSNMP schema and user are created. See Oracle Automatic Storage Management Administrator's Guide for more information.
■ The Oracle Automatic Storage Management instance that manages the existing disk group runs in the Oracle Grid Infrastructure home directory.
See Also: Oracle Automatic Storage Management Administrator's Guide for details about configuring disk group compatibility for databases using Oracle Database 11g or earlier software with Oracle Grid Infrastructure 12c.
See Also:
■ "Managing Oracle Flex ASM" in Oracle Automatic Storage Management Administrator's Guide
■ "Oracle ASM Configuration Assistant" in Oracle Automatic Storage Management Administrator's Guide for information about Oracle ASMCA
Oracle Automatic Storage Management Storage Configuration
4-6 Oracle Database Installation Guide
4.3.3 Preparing Disks for Oracle Automatic Storage ManagementIf you plan to use Oracle Automatic Storage Management to manage database files for your databases, then use the procedures in this section to prepare disk groups before you install an Oracle Automatic Storage Management instance.
This section covers the following topics:
■ General Steps for Configuring Oracle Automatic Storage Management
■ Step 1: Identifying Storage Requirements for Oracle Automatic Storage Management
■ Step 2: Creating DAS or SAN Disk Partitions for an Oracle Automatic Storage Management Instance
■ Step 3: Manually Configuring Disks for Oracle Automatic Storage Management
4.3.3.1 General Steps for Configuring Oracle Automatic Storage ManagementThe following are the general steps to configure Oracle Automatic Storage Management:
1. Identify your site’s storage requirements.
2. If you are creating a new Oracle Automatic Storage Management disk group, create partitions for direct attached storage (DAS) or storage area network (SAN) disks.
3. Use asmtool to stamp the disks before using them for Oracle Automatic Storage Management.
4. Configure the disks for use with Oracle Automatic Storage Management. You must provide the Oracle Automatic Storage Management disk configuration information during the Oracle Grid Infrastructure for a standalone server installation.
4.3.3.2 Step 1: Identifying Storage Requirements for Oracle Automatic Storage ManagementTo identify the storage requirements for using Oracle Automatic Storage Management, you must determine how many devices and the amount of free disk space that you require. To complete this task, follow these steps:
1. Determine whether you want to use Oracle ASM for Oracle Database files, recovery files, or both. Oracle Database files include data files, control files, redo log files, the server parameter file, and the password file.
During the database installation, you have the option to select either a file system or Oracle ASM as the storage mechanism for Oracle Database files. Similarly, you
Note: Oracle does not recommend using identifiers for database object names that must be quoted. While these quoted identifiers may be valid as names in the SQL CREATE statement, such as CREATE DISKGROUP "1data" ..., the names may not be valid when using other tools that manage the database object.
See Also: "Step 3: Manually Configuring Disks for Oracle Automatic Storage Management" for more information about stamping the disks
Oracle Automatic Storage Management Storage Configuration
Oracle Grid Infrastructure for a Standalone Server 4-7
also have the option to select either a file system or Oracle ASM as the storage mechanism for your recovery files.
If you select Oracle ASM as your storage option for Oracle Database files, then depending on your choice in the Specify Recovery Options screen, you have the following options:
■ If you select the Oracle ASM option for your recovery files, then Oracle Universal Installer provides you with only the option to use the same disk group for both Oracle Database files and recovery files.
■ If you decide not to enable recovery during the database installation, then, after the database installation, you can set the DB_RECOVERY_FILE_DEST parameter to enable the fast recovery area.
2. Choose the Oracle Automatic Storage Management redundancy level for each Oracle Automatic Storage Management disk group you create.
The redundancy level that you choose for the Oracle Automatic Storage Management disk group determines how Oracle Automatic Storage Management mirrors files in the disk group and determines the number of disks and amount of disk space that you require. The redundancy levels are as follows:
■ External redundancy
An external redundancy disk group requires a minimum of one disk device. The effective disk space in an external redundancy disk group is the sum of the disk space in all of its devices.
Because Oracle Automatic Storage Management does not mirror data in an external redundancy disk group, Oracle recommends that you use only RAID or similar devices that provide their own data protection mechanisms as disk devices in this type of disk group.
■ Normal redundancy
To optimize performance and reliability in a normal redundancy disk group, Oracle Automatic Storage Management uses two-way mirroring for data files and three-way mirroring for control files, by default. In addition, you can choose the mirroring characteristics for individual files in a disk group. Alternatively, you can use two-way mirroring or no mirroring.
A normal redundancy disk group requires a minimum of two failure groups (or two disk devices) if you are using two-way mirroring. The effective disk space in a normal redundancy disk group is half the sum of the disk space in all of its devices.
Note: You do not have to use the same storage mechanism for both Oracle Database files and recovery files. You can use a file system for one file type and Oracle ASM for the other.
See Also:
■ "Oracle ASM Configuration Assistant Command-Line Interface" section in Oracle Automatic Storage Management Administrator's Guide
■ "Creating a Fast Recovery Area Disk Group" on page 6-12

Oracle Automatic Storage Management Storage Configuration
4-8 Oracle Database Installation Guide
For most installations, Oracle recommends that you use normal redundancy disk groups.
■ High redundancy
In a high redundancy disk group, Oracle Automatic Storage Management uses three-way mirroring to increase performance and provide the highest level of reliability. A high redundancy disk group requires a minimum of three disk devices (or three failure groups). The effective disk space in a high redundancy disk group is one-third the sum of the disk space in all of its devices.
While high redundancy disk groups do provide a high level of data protection, you must consider the higher cost of additional storage devices before deciding to use this redundancy level.
3. Determine the total amount of disk space that you require for the data files and recovery files.
Use the following table to determine the minimum number of disks and the minimum disk space requirements for the installation:
If an Oracle Automatic Storage Management instance is on the system, you can use an existing disk group to meet these storage requirements. If necessary, you can add disks to an existing disk group during the database installation.
4. Optionally identify failure groups for the Oracle Automatic Storage Management disk group devices.
If you intend to use a normal or high redundancy disk group, you can further protect your database against hardware failure by associating a set of disk devices in a custom failure group. By default, each device comprises its own failure group. However, if two disk devices in a normal redundancy disk group are attached to the same SCSI controller, the disk group becomes unavailable if the controller fails. The controller in this example is a single point of failure.
For instance, to avoid failures of this type, you could use two SCSI controllers, each with two disks, and define a failure group for the disks attached to each controller. This configuration would enable the disk group to tolerate the failure of one SCSI controller.
Redundancy Level
Minimum Number of Disks Data Files
Recovery Files
Both File Types
External 1 1.6 GB 2.95 GB 4.55 GB
Normal 2 3.2 GB 5.90 GB 9.10 GB
High 3 4.8 GB 8.85 GB 13.65 GB
Note: You must complete this step only if you intend to use an installation method that runs Oracle Automatic Storage Management Configuration Assistant in interactive mode, for example, if you intend to choose the Advanced database configuration option. Other installation types do not allow you to specify failure groups.
Note: If you define custom failure groups, you must specify a minimum of two failure groups for normal redundancy disk groups and three failure groups for high redundancy disk groups.
Oracle Automatic Storage Management Storage Configuration
Oracle Grid Infrastructure for a Standalone Server 4-9
5. If you are sure that a suitable disk group does not exist on the system, install or identify appropriate disk devices to add to a new disk group. Use the following guidelines when identifying appropriate disk devices:
■ All of the devices in an Oracle Automatic Storage Management disk group should be the same size and have the same performance characteristics.
■ Do not specify multiple partitions on a single physical disk as a disk group device. Oracle Automatic Storage Management expects each disk group device to be on a separate physical disk.
■ Although you can specify a logical volume as a device in an Oracle Automatic Storage Management disk group, Oracle does not recommend their use. Logical volume managers can hide the physical disk architecture, preventing Oracle Automatic Storage Management from optimizing I/O across the physical devices.
4.3.3.3 Step 2: Creating DAS or SAN Disk Partitions for an Oracle Automatic Storage Management InstanceIn order to use a DAS or SAN disk in Oracle Automatic Storage Management, the disk must have a partition table. Oracle recommends creating exactly one partition for each disk containing the entire disk.
This section covers the following topics.
■ Step 1: Enabling Disk Automounting
■ Step 2: Creating the Disk Partitions
Step 1: Enabling Disk AutomountingBefore you can configure partitions or logical drives on Windows, you must enable disk automounting. Enable disk automounting when using:
■ Disk partitions on both single-instance and Oracle RAC installations
■ Cluster file system for Oracle RAC
■ Oracle Clusterware
■ Raw partitions for a single-node database installation
■ Primary or logical partitions for Oracle Automatic Storage Management
To enable automounting:
1. Enter the following commands at a command prompt:
DRIVE_LETTER:\> diskpartDISKPART> automount enableDISKPART> exit
2. Restart your computer.
See Also: "Step 3: Manually Configuring Disks for Oracle Automatic Storage Management" on page 4-11 for information about completing this task
Note: You can use any physical disk for Oracle Automatic Storage Management, if it is partitioned. However, you cannot use NAS or Microsoft dynamic disks.

Oracle Automatic Storage Management Storage Configuration
4-10 Oracle Database Installation Guide
Step 2: Creating the Disk PartitionsTo create disk partitions, use the disk administration tools provided by the operating system or third party vendors. The following administration tools are provided by the operating system:
■ The graphical user interface Disk Management snap-in to manage disks.
To access this tool, type diskmgmt.msc at the command prompt. Alternatively, from the Start menu, select All Programs, then Administrative Tools, then Computer Management. Then select the Disk Management node in the Storage tree.
Create primary partitions and logical drives in extended partitions by selecting the New Simple Volume option. To create a raw device, assign a drive letter and remove the letter after the partition is created. For other Windows, you must not assign the drive letter. You must select Do not format this partition to specify raw partition. Do not use spanned volumes or striped volumes. These options convert the volume to a dynamic disk. Oracle Automatic Storage Management does not support dynamic disks.
For other Windows, create primary partitions by selecting the New Partition option. Create the logical drives by selecting the New Logical Drive option.
■ The command-line tool diskpart.exe, which lets you create primary partitions, extended partitions, and logical drives.
To access this tool, enter diskpart.exe at the command prompt. The syntax for using diskpart.exe for the procedures in this section is as follows:
DRIVE_LETTER:\> diskpartDISKPART> select disk disknDISKPART> create partition primary | extended | logical size=sizenDISKPART>
where:
■ diskpart.exe is the command-line tool for managing disks.
■ diskn is the disk number where the partitions are created.
■ sizen is the size of the partition, for example 500 represents 500 MB.
You can enter the diskpart.exe commands directly at the command line; alternatively, you can enter the commands in a text file, and then run diskpart /s using this file as a script.
You cannot create more than four primary disk partitions per disk. If you need more, you can get around this limitation by creating three primary partitions and then creating the fourth partition as an extended partition with as many logical partitions within as you need.
For example, to create the disk partitions on Disk 5 and assign them each a size:
DISKPART> select disk 5DISKPART> create partition primary size=500DISKPART> ...DISKPART> create partition extendedDISKPART> create partition logical size=800DISKPART> ...DISKPART> create partition logical size=500
See Also: The online help or documentation for the administration tool you are using

Oracle Automatic Storage Management Storage Configuration
Oracle Grid Infrastructure for a Standalone Server 4-11
If you prefer to use logical drives, you can create an extended partition and then assign the logical drives within it. For example:
DISKPART> create partition extendedDISKPART> create partition logical size=500DISKPART> create partition logical size=700
4.3.3.4 Step 3: Manually Configuring Disks for Oracle Automatic Storage ManagementTo use Oracle Automatic Storage Management with direct attached storage (DAS) or storage area network (SAN), the disks must be stamped with a header. If you install Oracle Grid Infrastructure for a standalone server in interactive mode, Oracle Universal Installer configures the disks’ headers during the installation process. However, if you plan to install Oracle Grid Infrastructure for a standalone server in response file mode, you must manually configure the disks before installation by using either asmtoolg (GUI version) or asmtool (command-line version). You can also use these tools to reconfigure the disks later on after installation. The asmtoolg and asmtool utilities only work on partitioned disks—you cannot use Oracle Automatic Storage Management on unpartitioned disks.
The asmtoolg and asmtool tools associate meaningful, persistent names with disks to facilitate using those disks with Oracle Automatic Storage Management. Oracle Automatic Storage Management uses disk strings to more easily operate on groups of disks at once, so the names that asmtoolg or asmtool creates make this easier than using Windows drive letters.
All disk names created by asmtoolg or asmtool begin with the prefix ORCLDISK followed by a user-defined prefix (the default is DATA) and a disk number for identification purposes.
Using the asmtoolg Tool (Graphical User Interface)The asmtoolg tool is a graphical interface for creating device names. Use asmtoolg to add, change, delete, and examine the devices available for use in Oracle Automatic Storage Management.
To add or change disk stamps:
1. In the installation media labeled Oracle Grid Infrastructure 12c Release 1 (12.1), from the media root, go to asmtool directory and double-click asmtoolg.exe.
If Oracle Database is installed, go to ORACLE_HOME\bin and double-click asmtoolg.exe.
If User Account Control is enabled, then create a shortcut for the command prompt window on your desktop. An icon for that shortcut appears on the desktop. Right click the icon for the newly created shortcut, and specify "Run as administrator." When the command window opens, go to ORACLE_HOME\bin, and then type asmtoolg.
2. Select the Add or change label option, then click Next.
The asmtoolg tool shows the devices available on the system. Unrecognized disks are labeled as "Candidate device", stamped Oracle Automatic Storage Management disks as "Stamped ASM disk", and unstamped Oracle Automatic Storage Management disks as "Unstamped ASM disks." The tool also shows disks that are recognized by Windows as a file system (such as NTFS). These are not available for use as disks and cannot be selected. In addition, Microsoft Dynamic disks are not available for use as Oracle Automatic Storage Management disks.

Oracle Automatic Storage Management Storage Configuration
4-12 Oracle Database Installation Guide
If necessary, follow the steps under "Step 2: Creating DAS or SAN Disk Partitions for an Oracle Automatic Storage Management Instance" on page 4-9 to create a disk partition for the Oracle Automatic Storage Management instance.
3. In the Stamp Disks window, select the disks to stamp.
Oracle Automatic Storage Management can generate unique stamps for all of the devices selected for a given prefix. The stamps are generated by concatenating a number with the prefix specified. For example, if the prefix is DATA, then the first Oracle Automatic Storage Management link name is ORCLDISKDATA0.
You can also specify the stamps of individual devices.
4. Optionally, select a disk to edit the individual stamp (Oracle Automatic Storage Management link name).
5. Click Next.
6. Click Finish.
To delete disk stamps:
1. Select the Delete labels option, then click Next.
The delete option is only available if disks exist with stamps. The delete window shows all stamped Oracle Automatic Storage Management disks.
2. In the Delete Stamps window, select the disks to unstamp.
3. Click Next.
4. Click Finish.
Using the asmtool Utility (Command Line)The asmtool utility is a command-line interface for stamping disks. If User Account Control is enabled, then you can create a shortcut for the command prompt window on your desktop. An icon for that shortcut appears on the desktop. Right-click the icon for the newly created shortcut, and specify "Run as administrator." Then start asmtool.
It has the following options:
Option Description
-add Adds or changes stamps. You must specify the hard disk, partition, and new stamp name. If the disk is a raw device or has an existing Oracle Automatic Storage Management stamp, then you must specify the -force option. Also sets Oracle Automatic Storage Management instances to rescan the available disks.
If you must partition a disk, then follow the procedures under "Step 2: Creating DAS or SAN Disk Partitions for an Oracle Automatic Storage Management Instance" on page 4-9.
Example:
asmtool -add [-force]\Device\Harddisk1\Partition1 ORCLDISKASM0\Device\Harddisk2\Partition1 ORCLDISKASM2...
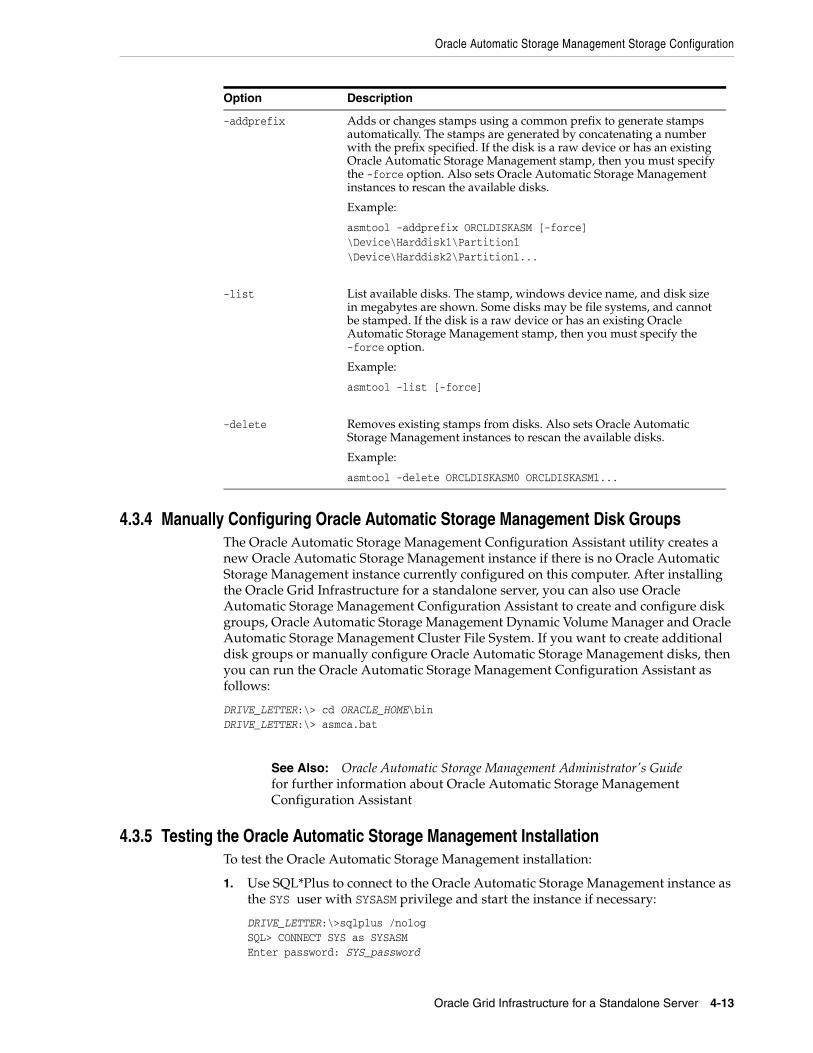
Oracle Automatic Storage Management Storage Configuration
Oracle Grid Infrastructure for a Standalone Server 4-13
4.3.4 Manually Configuring Oracle Automatic Storage Management Disk GroupsThe Oracle Automatic Storage Management Configuration Assistant utility creates a new Oracle Automatic Storage Management instance if there is no Oracle Automatic Storage Management instance currently configured on this computer. After installing the Oracle Grid Infrastructure for a standalone server, you can also use Oracle Automatic Storage Management Configuration Assistant to create and configure disk groups, Oracle Automatic Storage Management Dynamic Volume Manager and Oracle Automatic Storage Management Cluster File System. If you want to create additional disk groups or manually configure Oracle Automatic Storage Management disks, then you can run the Oracle Automatic Storage Management Configuration Assistant as follows:
DRIVE_LETTER:\> cd ORACLE_HOME\binDRIVE_LETTER:\> asmca.bat
4.3.5 Testing the Oracle Automatic Storage Management InstallationTo test the Oracle Automatic Storage Management installation:
1. Use SQL*Plus to connect to the Oracle Automatic Storage Management instance as the SYS user with SYSASM privilege and start the instance if necessary:
DRIVE_LETTER:\>sqlplus /nologSQL> CONNECT SYS as SYSASMEnter password: SYS_password
-addprefix Adds or changes stamps using a common prefix to generate stamps automatically. The stamps are generated by concatenating a number with the prefix specified. If the disk is a raw device or has an existing Oracle Automatic Storage Management stamp, then you must specify the -force option. Also sets Oracle Automatic Storage Management instances to rescan the available disks.
Example:
asmtool -addprefix ORCLDISKASM [-force]\Device\Harddisk1\Partition1\Device\Harddisk2\Partition1...
-list List available disks. The stamp, windows device name, and disk size in megabytes are shown. Some disks may be file systems, and cannot be stamped. If the disk is a raw device or has an existing Oracle Automatic Storage Management stamp, then you must specify the -force option.
Example:
asmtool -list [-force]
-delete Removes existing stamps from disks. Also sets Oracle Automatic Storage Management instances to rescan the available disks.
Example:
asmtool -delete ORCLDISKASM0 ORCLDISKASM1...
See Also: Oracle Automatic Storage Management Administrator's Guide for further information about Oracle Automatic Storage Management Configuration Assistant
Option Description

Installing Oracle Grid Infrastructure for a Standalone Server Using a Software-Only Installation
4-14 Oracle Database Installation Guide
SQL> STARTUP
2. Enter the following command to view the existing disk groups, their redundancy level, and the amount of free disk space in each one:
SQL> SELECT NAME,TYPE,TOTAL_MB,FREE_MB FROM V$ASM_DISKGROUP;
4.3.6 Upgrading Existing Oracle Automatic Storage Management InstancesIf you have an Oracle Automatic Storage Management installation from a previous release installed on your server, or in an existing Oracle Grid Infrastructure for a standalone server installation, you can use Oracle Automatic Storage Management Configuration Assistant to upgrade the existing Oracle Automatic Storage Management instance to 12c Release 1 (12.1), and subsequently configure disk groups, Oracle Automatic Storage Management volumes and Oracle Automatic Storage Management file systems.
During installation, if you chose to use Oracle Automatic Storage Management and Oracle Automatic Storage Management Configuration Assistant detects that there is an earlier Oracle Automatic Storage Management version installed in another Oracle Automatic Storage Management home, then after installing the Oracle Automatic Storage Management 12c Release 1 (12.1) binaries, you can start Oracle Automatic Storage Management Configuration Assistant to upgrade the existing Oracle Automatic Storage Management instance.
4.4 Installing Oracle Grid Infrastructure for a Standalone Server Using a Software-Only Installation
A software-only installation only copies the Oracle Grid Infrastructure for a standalone server binaries to the specified location. Configuring Oracle Grid Infrastructure for a standalone server and Oracle ASM must be done manually after the installation has finished.
When you perform a software-only installation of Oracle Grid Infrastructure software, you must complete a few manual configuration steps to enable Oracle Restart after you install the software.
Performing a software-only installation involves the following steps:
See Also: Oracle Automatic Storage Management Administrator's Guide for a more detailed description of Oracle Automatic Storage Management
Note: You must first shut down all databases and applications using an existing Oracle Automatic Storage Management instance before upgrading it.
Note: Oracle recommends that only advanced users perform the software-only installation, because this installation method provides no validation of the installation and this installation option requires manual postinstallation steps to enable the Oracle Grid Infrastructure for a standalone server software.

Installing Oracle Grid Infrastructure for a Standalone Server Using a Software-Only Installation
Oracle Grid Infrastructure for a Standalone Server 4-15
1. Installing the Software Binaries
2. Configuring the Software Binaries
4.4.1 Installing the Software Binaries1. Log in to Windows using a member of the Administrators group and run the
setup.exe command from the Oracle Database 12c Release 1 (12.1) installation media.
2. Complete a software-only installation of Oracle Grid Infrastructure for a standalone server.
See "Configuring the Software Binaries" on page 4-15 for information about configuring Oracle Grid Infrastructure for a standalone server after performing a software-only installation.
3. Verify that the server meets the installation requirements using the command runcluvfy.bat stage -pre hacfg. Ensure that you have completed all storage and server preinstallation requirements.
4.4.2 Configuring the Software BinariesTo configure and activate a software-only Oracle Grid Infrastructure for a standalone server installation for Oracle Restart, complete the following tasks:
1. Log in as a member of the Administrators group and run the roothas.pl script from the Grid_home, using the following syntax:
Grid_home\perl\bin\perl -IGrid_home\perl\lib -IGrid_home\crs\install Grid_home\crs\install\roothas.pl
For example, if your Grid home is C:\app\oracle\product\12.1.0\grid, then run the following script:
C:\app\oracle\product\12.1.0\grid\perl\bin\perl -I C:\app\oracle\product\12.1.0\grid\perl\lib -IC:\app\oracle\product\12.1.0\grid\crs\installC:\app\oracle\product\12.1.0\grid\crs\install\roothas.pl
2. Change directory to Grid_home\oui\bin, where Grid_home is the path of the Oracle Grid Infrastructure for a standalone server home.
3. Enter the following command:
setup.exe -updateNodeList ORACLE_HOME=Grid_homeCLUSTER_NODES= CRS=TRUE
For example:
C:\app\oracle\product\12.1.0\grid> setup.exe -updateNodeList ORACLE_HOME=C:\app\oracle\product\12.1.0\gridCLUSTER_NODES= CRS=TRUE
4. Use the SRVCTL utility along with Network Configuration Assistant and Oracle Automatic Storage Management Configuration Assistant to add the listener, the Oracle Automatic Storage Management instance, and all Oracle Automatic Storage Management disk groups to the Oracle Restart configuration.

Installing and Configuring Oracle Grid Infrastructure for a Standalone Server
4-16 Oracle Database Installation Guide
4.5 Installing and Configuring Oracle Grid Infrastructure for a Standalone Server
If you install Oracle Restart and then create your database, the database is automatically added to the Oracle Restart configuration, and is then automatically restarted when required. However, if you install Oracle Restart on a host computer on which a database exists, you must manually add the database, the listener, the Oracle Automatic Storage Management (Oracle ASM) instance, and other components to the Oracle Restart configuration.
This section covers the following topics:
■ Installing Oracle Grid Infrastructure for a Standalone Server with a New Database Installation
■ Installing Oracle Grid Infrastructure for a Standalone Server for an Existing Database
4.5.1 Installing Oracle Grid Infrastructure for a Standalone Server with a New Database Installation
Perform the following steps to install the Oracle Grid Infrastructure for a standalone server and then create a database that is managed by Oracle Restart. First install Oracle Grid Infrastructure for a standalone server, which installs Oracle Restart and Oracle Automatic Storage Management, then configure Oracle Automatic Storage Management with at least one disk group, and then install Oracle database that stores database files in Oracle Automatic Storage Management disk groups. Click the help button on the Oracle Universal Installer page for page level assistance.
To install Oracle Grid Infrastructure for a standalone server with a new database installation:
1. Double-click setup.exe to start Oracle Universal Installer.
Downloading Updates Before Installation
Starting with Oracle Database 11g Release 2 (11.2.0.2), if you plan to run the installation in a secured data center, then you can download updates before
See Also:
■ Oracle Database Net Services Administrator's Guide to configure a listener using Oracle Network Configuration Assistant
■ Oracle Automatic Storage Management Administrator's Guide to create and add disk groups, and configure Oracle ASM using Oracle ASMCA
■ Oracle Database Administrator's Guide to create and add an ASM instance using SRVCTL
Note: Oracle Restart can accommodate multiple single-instance databases on a single host computer.
Note: You must install Oracle Grid Infrastructure for a standalone server from the Oracle Grid Infrastructure media.

Installing and Configuring Oracle Grid Infrastructure for a Standalone Server
Oracle Grid Infrastructure for a Standalone Server 4-17
starting the installation by starting Oracle Universal Installer on a system that has Internet access in update download mode. To start Oracle Universal Installer to download updates before installation, enter the following command:
setup.exe -downloadUpdates
Provide the My Oracle Support user name and password, and provide proxy settings if needed. After you download updates, transfer the update file to a directory on the server where you plan to run the installation.
2. Starting with Oracle Database 11g Release 2 (11.2.0.2), you can use the Software Updates feature to dynamically download and apply latest updates. After starting Oracle Universal Installer, in the Download Software Updates screen, select one of the following options and click Next:
■ Use My Oracle Support credentials for download: Select this option to download and apply the latest software updates.
Click Proxy Settings to configure a proxy for Oracle Universal Installer to use to connect to the Internet. Provide the proxy server information for your site, along with a user account that has access to the local area network through which the server is connecting. Starting with Oracle Database 11g Release 2 (11.2.0.3) you can enter the Proxy Realm information. The proxy realm information is case-sensitive. If you do not have a proxy realm, then you do not need to provide an entry for the Proxy Username, Proxy Password, and Proxy Realm fields.
Click Test Connection to ensure that your proxy settings are correctly entered, and the installer can download the updates.
■ Use pre-downloaded software updates: Select this option if you have already downloaded software updates using the Oracle Universal installer command setup.exe -downloadUpdates.
Note: The pre-downloaded option only works if you have used Oracle Universal Installer to download the updates, either during the installation, or before the installation with the -downloadUpdates option. You cannot manually download updates, and then provide the manual download path to the installer.
■ Skip software updates: Select this option if you do not want to apply any updates.
3. The Apply Software Updates screen is displayed if you select to download the software updates or provide the pre-downloaded software updates location.
See Also:
■ Oracle Universal Installer and OPatch User's Guide for Windows and UNIX for more information about response file formats
■ "Software Updates Option" on page 1-10
Note: Start Oracle Universal Installer from the terminal session where you logged in as the Oracle Grid Infrastructure software owner user and set the user’s environment.

Installing and Configuring Oracle Grid Infrastructure for a Standalone Server
4-18 Oracle Database Installation Guide
a. If you selected Use My Oracle Support credentials for download in the previous screen, select Download and apply all updates, and then click Next to apply the updates.
By default, the download location for software updates is placed in the home directory of the Oracle installation owner you are using to run this installation. If you choose to download the software updates in another location, then click Browse and select a different location on your server.
b. If you selected Use pre-downloaded software updates in the previous screen, select Apply all updates, and then click Next to apply the updates downloaded before starting the installation.
4. The Select Installation Option screen appears. Select the Install and Configure Oracle Grid Infrastructure for a Standalone Server option, to install and configure Oracle Restart and Oracle Automatic Storage Management. Click Next.
5. On the Select Product Languages screen, select one or more languages. Move the languages from the Available Languages list to the Selected Languages list. Click Next.
6. Create ASM Disk Group screen lists all the stamped disks matching the default pattern, \\.\ORCLDISK. After you have created the disk partitions, the disks must be stamped with a header before they can be used by Oracle ASM. Click Stamp Disk.
Click Change Discovery Path to select any devices for use by Oracle Automatic Storage Management but are not listed. In the Change Discovery Path window, enter a string to use to search for devices that Oracle Automatic Storage Management uses, such as \\.\ORCLDISK*, and then click OK.
The Disk Group Name default is DATA. You can enter a new name for the disk group, or use the default name.
Check with your system administrator to determine if the disks used by Oracle Automatic Storage Management are mirrored at the storage level. If so, select External for the redundancy. If the disks are not mirrored at the storage level, then select Normal for the redundancy.
Every Oracle ASM disk is divided into allocation units (AU). An allocation unit is the fundamental unit of allocation within a disk group. Starting with Oracle Database 11g Release 2 (11.2.0.3), you can select the AU Size value from 1, 2, 4, 8, 16, 32, or 64 MB, depending on the specific disk group compatibility level. The default value is set to 1 MB.
7. In the Specify ASM Password screen, enter the password required to connect to the Oracle ASM instance. The Oracle Automatic Storage Management instance is managed by a privileged role called SYSASM, which grants full access to Oracle Automatic Storage Management disk groups. Oracle recommends that you create a less privileged user, ASMSNMP, with SYSDBA privileges to monitor the Oracle Automatic Storage Management instance.
Enter password for the SYS and ASMSNMP user accounts. The passwords should be at least eight characters in length and include at least one alphabetic, one numeric, and one of the following special characters: #, _, - (number sign, underscore, or
Note: For normal redundancy, you require twice as much disk space to hold the same amount of data. For example, if your database is 100 GB, then you approximately require 200 GB of storage.

Installing and Configuring Oracle Grid Infrastructure for a Standalone Server
Oracle Grid Infrastructure for a Standalone Server 4-19
dash). Only these three special characters are allowed. You can use no other special characters in passwords.
Optionally, you can use the same password for all accounts. However, Oracle recommends that you specify a different password for each account. You must remember the passwords that you specify.
8. On the Specify Installation Location screen, enter the following details and click Next:
■ Oracle base: Enter the directory location for Oracle base. Do not include spaces in the path name.
■ Software location: This field is populated by default in concurrence with Oracle base location. Do not include spaces in the path name.
9. Perform Prerequisite Checks screen, checks if the minimum system requirements are met to perform the database installation. If all the system requirements are met, then you are directed to the Summary screen. However, in a failed installation, you can review the error.
To get a failed requirements list, click Show Failed. Click Fix & Check Again, if you want the installer to fix the problem and check the system requirements once more. If you click Check Again, then you can run the prerequisite check again to see if the minimum requirements are met to carry on with the database installation.
To get a list of failed requirements, select Show Failed from the list. To get a list of all the prerequirement checks run by the OUI, select Show All. To get a list of the prerequirement checks that are successful, select Show Succeeded.
10. Review contents of the Summary screen, click Install.
Starting with Oracle Database 11g Release 2 (11.2), you can save all the installation steps into a response file by clicking Save Response File. This file can be used for a silent installation.
11. The Install Product screen displays the progress of the Oracle Grid Infrastructure for a standalone server installation.
12. The Finish screen displays the installation status. Click Close to end the installation, then Yes to confirm you want to exit Oracle Universal Installer.
If you encounter any problems, refer to the configuration log for information. The path to the configuration log is displayed on the Configuration Assistants window.
13. Oracle ASMCA is installed as part of the Oracle Grid Infrastructure for a standalone server installation. To create additional disk groups, run the Oracle ASMCA utility. For example, you can create another disk group named RECOVERY to store the fast recovery area.
Note:
■ The Fix & Check Again option generates a script that sets some system parameters to Oracle-recommended values. Oracle recommends that you do not modify the contents of this script.
■ Oracle recommends that you use caution in checking the Ignore All option. If you check this option, then Oracle Universal Installer may not confirm that your system can install Oracle Database successfully.

Installing and Configuring Oracle Grid Infrastructure for a Standalone Server
4-20 Oracle Database Installation Guide
14. Install Oracle Database. Refer to "Installing the Oracle Database Software" on page 5-10 for information about installing Oracle Database.
4.5.2 Installing Oracle Grid Infrastructure for a Standalone Server for an Existing Database
Follow the high-level instructions in this section to install Oracle Grid Infrastructure for a standalone server and configure it for an existing Oracle database. Oracle Restart can only manage existing 12.1 resources and hence you can install Oracle Grid Infrastructure for a standalone server only for an existing 12.1 database. However, Oracle database releases before 12.1 can coexist on the same server without being managed by Oracle Restart.
To install Oracle Restart for an Existing database:
■ On the same host computer as the database, use Oracle Universal Installer to install the Oracle Grid Infrastructure for a standalone server, and select Install and Configure Oracle Grid Infrastructure for a Standalone Server as the installation option.
The Oracle Grid Infrastructure for a standalone server components are installed in a separate Oracle home.
Refer to "Installing Oracle Grid Infrastructure for a Standalone Server with a New Database Installation" on page 4-16 for detailed instructions.
■ Go to the Grid home's bin directory.
Use the srvctl add database command with the -c SINGLE flag to add the database in an Oracle Restart configuration. Also use the srvctl add command to add the listener, the Oracle ASM instance, all Oracle ASM disk groups, and any database services to the Oracle Restart configuration.
Note: To check if the Oracle High Availability Service is installed properly, run crsctl check has command from Grid_home\bin directory. has is a service that is installed with Oracle Restart, which is responsible for starting software services like Oracle Automatic Storage Management.
Note:
■ If a new database is installed after a grid infrastructure installation, then the listener runs from the Oracle Grid Infrastructure for a standalone server home. Because Oracle Automatic Storage Management is installed as part of the Oracle Grid Infrastructure for a standalone server, the default listener is created and runs from the Oracle Grid Infrastructure for a standalone server home. If you perform a database installation, then the database uses the same listener created during the Oracle Grid Infrastructure for a standalone server installation.
■ If you are using Oracle Restart, then the default listener and any additional listeners must run from the Oracle Grid Infrastructure for a standalone server home.

Modifying Oracle Grid Infrastructure for a Standalone Server Binaries After Installation
Oracle Grid Infrastructure for a Standalone Server 4-21
4.6 Modifying Oracle Grid Infrastructure for a Standalone Server Binaries After Installation
After installation, you must first stop the Oracle Restart stack to modify the software installed in your Grid home. For example, to apply a one-off patch or modify any of the DLLs used by Oracle Restart or Oracle ASM, you must follow these steps to stop and restart the Oracle Restart stack.
Prepare the Oracle Grid Infrastructure for a standalone server home for modification using the following procedure:
1. Log in using a member of the Administrators group and go to the directory Grid_home\bin, where Grid_home is the path to the Oracle Grid Infrastructure for a standalone server home.
2. Shut down the Oracle Restart stack using the following command:
DRIVE_LETTER:\Grid_home\bin> crsctl stop has -f
Alternatively, you can use the roothas.pl script to stop Oracle Restart, as shown in the following example:
DRIVE_LETTER:\Grid_home\crs\install> perl roothas.pl -unlock
The roothas.pl script stops Oracle Restart and then verifies that it is stopped.
3. After the Oracle Restart stack is completely shut down, perform the updates to the software installed in the Grid home.
4. Use the following command to restart the Oracle Restart stack:
DRIVE_LETTER:\Grid_home\bin> crsctl start has
Enabling Oracle ACFS on Oracle Restart ConfigurationsTo use Oracle ACFS on Oracle Restart configurations, you must first enable Administrator access for Oracle ACFS using the following command:
DRIVE_LETTER:\cd Grid_home\crs\installDRIVE_LETTER:\Grid_home\perl\bin\perl.exe roothas.pl -lockacfs
See Also: "srvctl add" in Oracle Database Administrator's Guide for more information
Caution: Before relinking executables, you must shut down all executables that run in the Oracle home directory that you are relinking. In addition, shut down applications linked with Oracle shared libraries.

Modifying Oracle Grid Infrastructure for a Standalone Server Binaries After Installation
4-22 Oracle Database Installation Guide

5
Installing Oracle Database 5-1
5 Installing Oracle Database
You can use the media for installing Oracle Database on all supported operating systems. This chapter covers the following topics:
■ Preinstallation Considerations for Installing Oracle Database
■ Reviewing Component-Specific Installation Guidelines
■ Accessing the Installation Software
■ Installing the Oracle Database Software
■ Cloning an Oracle Home
5.1 Preinstallation Considerations for Installing Oracle DatabaseThe Oracle Database software is available on installation media or you can download it from the Oracle Technology Network (OTN) website. In most cases, you use the graphical user interface (GUI) provided by Oracle Universal Installer to install the software. However, you can also use Oracle Universal Installer without the GUI by supplying a response file with silent or response file mode.
Complete the requirements described in Chapter 2, "Oracle Database Preinstallation Tasks" and "Reviewing Component-Specific Installation Guidelines" on page 5-3 before you begin the installation.
Next, consider the following issues:
■ Installation Consideration on Windows
■ Performing Multiple Oracle Database Installations
■ Installing on Systems That Already Have Oracle Components
■ Installing with Minimum Memory Requirements
5.1.1 Installation Consideration on WindowsOn Windows, command prompts should be opened with Administrator privileges.
Note: Windows requires Administrator privileges at the command prompt.
See Also: "Managing User Accounts with User Account Control"

Preinstallation Considerations for Installing Oracle Database
5-2 Oracle Database Installation Guide
5.1.2 Performing Multiple Oracle Database InstallationsIf you must perform multiple installations of Oracle Database, then you may want to use either of the following methods to install Oracle Database:
■ Response files: At each node, you run Oracle Universal Installer from the command line using silent or response file mode and you supply a response file to provide information Oracle Universal Installer needs. The response file is a text file containing the settings you normally enter in the Oracle Universal Installer GUI dialog boxes.
■ Cloning the Oracle home of an existing Oracle Database installation: With this method, you install one instance of Oracle Database, and then clone its Oracle home for each additional installation.
5.1.3 Installing on Systems That Already Have Oracle Components
Follow these steps when other components exist on your computer:
1. Log on as a member of the Administrators group for the computer on which you want to install Oracle components.
If you are installing on a Primary Domain Controller (PDC) or a Backup Domain Controller (BDC), log on as a member of the Domain Administrators group.
2. Delete the ORACLE_HOME environment variable if it exists. See the Microsoft online help for more information about deleting environment variables.
3. Back up any databases you must upgrade. Review "Upgrade Considerations" on page 1-18 for more information.
5.1.4 Installing with Minimum Memory RequirementsInstallations of Oracle Database on computers with RAM and virtual memory lesser than the minimum required have the following limitations:
■ Computers cannot run Oracle Database Upgrade Assistant, Oracle Database Configuration Assistant, or Oracle Net Services Configuration Assistant during an Oracle Universal Installer installation session.
■ Depending on how many applications run on the computer, you must further increase the paging file size or reduce the size of the System Global Area (SGA) if
See Also: Appendix C, "Installing and Configuring Oracle Database Using Response Files"
See Also: "Cloning an Oracle Home" on page 5-19
See Also: "Upgrade Considerations" on page 1-18 before running Oracle Universal Installer
Note: The ORACLE_HOME environment variable is automatically set in the registry. Manually setting this variable prevents installation.
See Also: Chapter, "Preinstallation Checklist" in Oracle Real Application Clusters Installation Guide before running Oracle Universal Installer
Reviewing Component-Specific Installation Guidelines
Installing Oracle Database 5-3
you run out of virtual memory. If temporary files and the paging file are both stored on the same physical drive, the space requirements for one may limit the size of another. If your system has limited free space, first install the Oracle Database software. After the installation is finished, create a database with Oracle Database Configuration Assistant.
You can install only the database software by selecting the Install Database Software only option provided on the Select Installation Option screen.
After installation, run the appropriate configuration assistant for your needs:
■ To create a new database, run Oracle Database Configuration Assistant. From the Start menu, select All Programs, then Oracle - HOMENAME, then Configuration and Migration Tools, then Database Configuration Assistant.
■ To upgrade an existing database, run Oracle Database Upgrade Assistant. From the Start menu, select All Programs, then Oracle - HOMENAME, then Configuration and Migration Tools, then Database Upgrade Assistant.
5.2 Reviewing Component-Specific Installation GuidelinesReview the following guidelines before starting Oracle Universal Installer:
■ Oracle Universal Installer
Do not use Oracle Universal Installer from an earlier Oracle release to install components from this release.
■ Oracle Automatic Storage Management
In previous releases, Oracle Automatic Storage Management (Oracle ASM) was installed as part of the Oracle Database installation. With Oracle Database 11g Release 2 (11.2), Oracle Automatic Storage Management is part of an Oracle Grid Infrastructure installation, either for a cluster, or for a standalone server.
If you want to upgrade an existing Oracle Automatic Storage Management installation, then you must upgrade Oracle Automatic Storage Management by running an Oracle Grid Infrastructure upgrade. If you do not have Oracle Automatic Storage Management installed and you want to use Oracle Automatic Storage Management as your storage option, then you must complete an Oracle Grid Infrastructure for a standalone server installation before you start your Oracle Database installation.
■ Installations on a cluster
If Oracle Clusterware or Oracle RAC is installed on the system, Oracle Universal Installer displays the Grid Installation Options page. You must select Single instance database installation, unless you want to install Oracle RAC. The other options on the page are Oracle Real Application Clusters database installation and Oracle RAC One Node database installation.
Note: Do not install the database on computer systems that barely meet the minimum memory and virtual memory requirements of 1 GB.
See Also: "Oracle Grid Infrastructure for a Standalone Server" for information about Oracle Grid Infrastructure for a standalone server

Reviewing Component-Specific Installation Guidelines
5-4 Oracle Database Installation Guide
5.2.1 Selecting the Database Character SetOracle Database uses the database character set for:
■ Data stored in SQL character datatypes (CHAR, VARCHAR2, CLOB, and LONG).
■ Identifiers such as table names, column names, and PL/SQL variables.
■ Stored SQL and PL/SQL source code, including text literals embedded in this code.
Once a database is created, changing its character set is usually very expensive in terms of time and resources. Such operation may require converting all character data by exporting the whole database and importing it back. Therefore, it is important that you carefully select the database character set at installation time.
Oracle recommends Unicode AL32UTF8 as the database character set. Unicode is the universal character set that supports most of the currently spoken languages of the world. It also supports many historical scripts (alphabets). Unicode is the native encoding of many technologies, including Java, XML, XHTML, ECMAScript, LDAP. Unicode is ideally suited for databases supporting the Internet and the global economy.
As AL32UTF8 is a multibyte character set, database operations on character data may be slightly slower when compared to single-byte database character sets, such as WE8MSWIN1252. Storage space requirements for text in most languages that use characters outside of the ASCII repertoire are higher in AL32UTF8 compared to legacy character sets supporting the language. Note that the increase in storage space concerns only character data and only data that is not in English. The universality and flexibility of Unicode usually outweighs these additional costs.
Legacy character sets should be considered when compatibility, storage requirements, or performance of text processing is critical and the database supports only a single group of languages. The database character set to be selected in such case is the character set of most clients connecting to this database.
The database character set of a multitenant container database (CDB) determines which databases can be plugged in later. Ensure that the character set you choose for the CDB is compatible with the database character sets of the databases to be plugged into this CDB.
The default character set suggested or used by Oracle Universal Installer and Database Configuration Assistant in this release is based on the language configuration of the operating system.
For most languages, the default character set is one of the Microsoft Windows character sets, for example WE8MSWIN1252. It is noteworthy that the same default is used by the database installation process on UNIX-based platforms. This results from the assumption that most clients connecting to the database run under the Microsoft Windows operating system. As the database should be able to store all characters coming from the clients and Microsoft Windows character sets have richer character repertoire than the corresponding ISO 8859 character sets, the Microsoft Windows character sets are usually the better choice. For example, the EE8MSWIN1250 character set supports the Euro currency symbol and various smart quote characters, while the corresponding EE8ISO8859P2 character set does not support them. In any case, Oracle
See Also: Oracle Real Application Clusters Installation Guide
See Also: "Choosing a Database Character Set for a Multitenant Container Database" in Oracle Database Globalization Support Guide

Reviewing Component-Specific Installation Guidelines
Installing Oracle Database 5-5
converts the data between the database character set and the client character sets, which are declared by the NLS_LANG settings.
The list of database character sets that is presented to you for selection by Oracle Universal Installer contains only the recommended character sets. Even though Oracle Database supports many more character sets, they are either deprecated or they are binary subsets of another recommended character set. For example, WE8DEC is a deprecated character set and US7ASCII and WE8ISO8859P1 are both binary subsets of WE8MSWIN1252.
If, for compatibility reasons, you must create a database in one of the non-recommended character sets, choose the Advanced database configuration option. Database Configuration Assistant in the interactive mode gives you the opportunity to select any of the database character sets supported on Windows.
5.2.2 Using an Oracle Automatic Storage Management Disk GroupThis section is optional and describes how to identify disk groups and determine the free disk space that they contain. You can store either database or recovery files in an existing Oracle Automatic Storage Management disk group that you created during the Oracle Grid Infrastructure for a standalone server installation.
To determine whether an existing Oracle Automatic Storage Management disk group exists, or to determine whether there is sufficient disk space in a disk group, use the following procedure:
1. In the Services Control Panel, ensure that the OracleASMService+ASM service has started.
See Also: "Choosing a Character Set" in Oracle Database Globalization Support Guide
Caution: AL32UTF8 is the Oracle Database character set that is appropriate for XMLType data. It is equivalent to the IANA registered standard UTF-8 encoding, which supports all valid XML characters.
Do not confuse Oracle Database database character set UTF8 (no hyphen) with database character set AL32UTF8 or with character encoding UTF-8. Database character set UTF8 has been superseded by AL32UTF8. Do not use UTF8 for XML data. UTF8 supports only Unicode version 3.0 and earlier; it does not support all valid XML characters. AL32UTF8 has no such limitation.
Using database character set UTF8 for XML data could cause an irrecoverable error or affect security negatively. If a character that is not supported by the database character set appears in an input-document element name, a replacement character (usually a question mark) is substituted for it. This terminates parsing and raises an exception.
Note: The Oracle Automatic Storage Management instance that manages the existing disk group runs in a different Oracle home directory.

Accessing the Installation Software
5-6 Oracle Database Installation Guide
2. Open command prompt and temporarily set the ORACLE_SID environment variable to specify the appropriate value for the Oracle Automatic Storage Management instance.
For example, if the Oracle Automatic Storage Management SID, which is named +ASM, is located in the asm directory, you would enter the following setting:
DRIVE_LETTER:\>set ORACLE_SID=+ASM
3. Connect to the Oracle Automatic Storage Management instance as the SYS user with the SYSASM privilege and start the instance if necessary:
DRIVE_LETTER:\>sqlplus /nologSQL> CONNECT SYS as SYSASMEnter password: SYS_password SQL> STARTUP
4. Enter the following command to view the existing disk groups, their redundancy level, and the amount of free disk space in each one:
SQL> SELECT NAME,TYPE,TOTAL_MB,FREE_MB FROM V$ASM_DISKGROUP;
5. From the output, identify a disk group with the appropriate redundancy level and note the free space that it contains.
6. If necessary, install, or identify the additional disk devices required to meet the storage requirements listed in section "Selecting the Database Character Set".
5.3 Accessing the Installation SoftwareThe Oracle Database software is available on installation media or you can download it from the Oracle Technology Network website, or Oracle Software Delivery Cloud website. To install the software from the hard disk, you must either download it and unpack it, or copy it from the installation media, if you have it.
You can access and install Oracle Database by using one of the following methods:
■ Installing from a Remote DVD Drive
■ Installing on Remote Computers Through Remote Access Software
■ Downloading Oracle Software
■ Copying the Oracle Database Software to a Hard Disk
5.3.1 Installing from a Remote DVD DriveIf the computer where you want to install Oracle Database does not have a DVD drive, you can perform the installation from a remote DVD drive. You must complete the following steps:
■ Step 1: On the Remote Computer, Share the DVD Drive
Note: If you are adding devices to an existing disk group, then Oracle recommends that you use devices that have the same size and performance characteristics as the existing devices in that disk group.
See Also: "Upgrading Existing Oracle Automatic Storage Management Instances"

Accessing the Installation Software
Installing Oracle Database 5-7
■ Step 2: On the Local Computer, Map the DVD Drive
5.3.1.1 Step 1: On the Remote Computer, Share the DVD DriveThe remote DVD drive must allow shared access. To set this up, perform these steps on the remote computer that has the DVD drive:
1. Log in to the remote computer as an Administrator user.
2. Start Windows Explorer.
3. Right-click the DVD drive letter and select Sharing (or Sharing and Security).
4. Click the Sharing tab and do the following:
a. Select Share this folder.
b. In Share name, give it a share name such as dvd. You use this name when you map the DVD drive on the local computer in step d of "Step 2: On the Local Computer, Map the DVD Drive".
c. Click Permissions. You need at least read permission for the user who accesses the drive to install Oracle Database.
d. Click OK when you are finished.
5. Insert the Oracle Database installation media into the DVD drive.
5.3.1.2 Step 2: On the Local Computer, Map the DVD DrivePerform these steps on the local computer to map a remote DVD drive and to run Oracle Universal Installer from the mapped drive:
1. Map the remote DVD drive.
a. Start Windows Explorer on the local computer.
b. From the Tools menu, select Map Network Drive to display the Map Network Drive dialog box.
c. Select a drive letter to use for the remote DVD drive.
d. In Folder, enter the location of the remote DVD drive using the following format:
\\remote_hostname\share_name
where:
– remote_hostname is the name of the remote computer with the DVD drive.
– share_name is the share name that you entered in step 4 of the previous procedure. For example:
\\computer2\dvd
e. If you must connect to the remote computer as a different user, click different user name, and enter the user name.
f. Click Finish.
2. Run Oracle Universal Installer from the mapped DVD drive.
3. Go to the "Installing the Oracle Database Software" section on page 5-10.

Accessing the Installation Software
5-8 Oracle Database Installation Guide
5.3.2 Installing on Remote Computers Through Remote Access SoftwareIf you want to install and run Oracle Database on a remote computer (that is, the remote computer has the hard drive and runs Oracle Database components), but you do not have physical access to the computer, you still can perform the installation on the remote computer if it is running remote access software such as VNC or Symantec pcAnywhere. You also need the remote access software running on your local computer.
You can install Oracle Database on the remote computer in one of two ways:
■ If you have copied the contents of the Oracle Database DVD to a hard drive, you can install the software from the hard drive.
■ You can insert the DVD into a drive on your local computer, and install the software from the DVD.
5.3.2.1 Installing on Remote Computers from a Hard DriveIf you have copied the contents of the Oracle Database DVD to a hard drive, you can install the software from the hard drive.
To install the software on a remote computer from a hard drive:
1. Ensure that the remote access software is installed and running on the remote and local computers.
2. Share the hard drive that contains the Oracle Database DVD.
3. On the remote computer, map a drive letter to the shared hard drive. You use the remote access software to do this on the remote computer.
4. Through the remote access software, run Oracle Universal Installer on the remote computer. You access Oracle Universal Installer from the shared hard drive.
5. Go to the "Installing the Oracle Database Software" section on page 5-10.
5.3.2.2 Installing on Remote Computers from a Remote DVD DriveYou can insert the DVD into a drive on your local computer, and install from the DVD.
To install the software on a remote computer from a remote DVD drive:
1. Ensure that the remote access software is installed and running on the remote and local computers.
2. On the local computer, share the DVD drive.
On the remote computer, map a drive letter to the shared DVD drive. You use the remote access software to do this on the remote computer.
These steps are described in the "Installing from a Remote DVD Drive" section on page 5-6.
3. Through the remote access software, run Oracle Universal Installer on the remote computer. You access Oracle Universal Installer from the shared DVD drive.
4. Go to the "Installing the Oracle Database Software" section on page 5-10.
5.3.3 Downloading Oracle SoftwareYou can download the trial version of the installation files from the Oracle Technology Network (OTN) or Oracle Software Delivery Cloud website and extract them on your hard disk. Ensure that you completely review and understand the terms of the license.

Accessing the Installation Software
Installing Oracle Database 5-9
Most downloads include the Development License. This section contains the following topics:
■ Downloading the Installation Archive Files from Oracle Technology Network
■ Downloading the Software from Oracle Software Delivery Cloud
■ Extracting the Installation Files
5.3.3.1 Downloading the Installation Archive Files from Oracle Technology NetworkTo download the installation archive files from Oracle Technology Network:
1. Use any browser to access the software download page from Oracle Technology Network:
http://www.oracle.com/technetwork/indexes/downloads/index.html
2. Navigate to the download page for the product to install.
3. On the download page, identify the required disk space by adding the file sizes for each required file.
The file sizes are listed next to the file names.
4. Select a file system with enough free space to store and expand the archive files.
In most cases, the available disk space must be at least twice the size of all of the archive files.
5. On the file system that you selected in step 4, create a parent directory for each product, for example OraDB12c, to hold the installation directories.
6. Download all of the installation archive files to the directory that you created in step 5.
7. Verify that the files you downloaded are the same size as the corresponding files on Oracle Technology Network. Also verify the checksums are the same as noted on Oracle Technology Network.
8. Extract the files in each directory that you just created.
9. After you have extracted the required installation files, see Section 5.4, "Installing the Oracle Database Software."
5.3.3.2 Downloading the Software from Oracle Software Delivery CloudYou can download the software from Oracle Software Delivery Cloud as Media Packs. A Media Pack is an electronic version of the software that is also available to Oracle customers on CD-ROM or DVD. To download the Media Pack:
1. Use any browser to access the Oracle Software Delivery Cloud website:
http://edelivery.oracle.com/
2. Complete the Export Validation process by entering information (name, company, e-mail address, and country) in the online form.
3. In the Media Pack Search page, specify the Product Pack and Platform to identify the Media Pack you want to download. If you do not know the name of the Product Pack, you can search for it using the License List.
4. Optionally, select the relevant product to download from the Results list.
5. In the search results page, click Readme to download and review the Readme file for download instructions and product information.

Installing the Oracle Database Software
5-10 Oracle Database Installation Guide
6. After you review the Readme, choose the appropriate Media Pack from the search results to download the individual zip files. Follow the Download Notes instructions in this page. Once you download and extract the contents of the required zip files, proceed with the installation of the software.
7. After you download the files, click View Digest to verify that the MD5 or SHA-1 checksum matches with what is listed in the media download page.
5.3.3.3 Extracting the Installation FilesTo extract the installation archive files, perform the following steps:
1. If necessary, change to the directory that contains the downloaded installation archive files.
2. Oracle Database software is available as two zip files. Ensure that you extract both the zip files to the same directory.
When you have extracted all of the required installation files, see "Installing the Oracle Database Software".
5.3.4 Copying the Oracle Database Software to a Hard DiskTo copy the contents of the installation media to a hard disk:
1. Create a directory on your hard drive. For example:
C:\> mkdir \installC:\> mkdir \install\database
2. Copy the contents of the installation media to the directory that you just created.
3. After you have copied all of the required installation files, see the "Installing the Oracle Database Software" section on page 5-10.
5.4 Installing the Oracle Database SoftwareIn most cases, you use the graphical user interface (GUI) provided by Oracle Universal Installer to install Oracle Database. The instructions in this section explain how to run the Oracle Universal Installer GUI to perform most database installations.
Note: Print the page with the list of downloadable files. It contains a list of part numbers and their corresponding descriptions to refer during the installation process.
See Also:
■ My Oracle Support note 549617.1 for information on how to verify the integrity of a software download at:
https://support.oracle.com/CSP/main/article?cmd=show&type=NOT&id=549617.1
■ Frequently Asked Questions section on the Oracle Software Delivery Cloud website for more information about Media Packs

Installing the Oracle Database Software
Installing Oracle Database 5-11
To install the Oracle Database software:
1. Log on as a member of the Administrators group for the computer on which you want to install Oracle components.
If you are installing on a Primary Domain Controller (PDC) or a Backup Domain Controller (BDC), log on as a member of the Domain Administrators group.
2. If you are installing Oracle Database on a computer with multiple Network Interface Cards or multiple aliases, use System in the Control Panel to create the ORACLE_HOSTNAME system environment variable. Set this variable to point to the host name of the computer on which you are installing Oracle Database.
3. Insert Oracle Database installation media and navigate to the database directory. Alternatively, navigate to the directory where you downloaded or copied the installation files.
Use the same installation media to install Oracle Database on all supported Windows operating systems.
4. Double-click setup.exe to start Oracle Universal Installer.
Downloading Updates Before Installation
Starting with Oracle Database 11g Release 2 (11.2.0.2), if you plan to run the installation in a secured data center, then you can download updates before
See Also:
■ If you plan to use Oracle Restart or Oracle Automatic Storage Management, then you must install Oracle Grid Infrastructure for a standalone server before you install and create the database. Otherwise, you must manually register the database with Oracle Restart. For information about installing Oracle Grid Infrastructure, see "Installing and Configuring Oracle Grid Infrastructure for a Standalone Server"
■ You may have to shut down existing Oracle processes before you start the database installation. See "Stopping Existing Oracle Services"
■ Appendix C, "Installing and Configuring Oracle Database Using Response Files" to install Oracle Database using the silent or response file installation method, without the GUI. It also explains how to clone an existing Oracle home. These methods are useful to perform multiple installations of Oracle Database.
See Also:
■ "Setting the ORACLE_HOSTNAME Environment Variable" on page 2-7
■ "Installing Oracle Database on Computers with Multiple IP Addresses" on page 2-6
■ "Installing Oracle Database on Computers with Multiple Aliases" on page 2-7
■ "Deconfigure DNS Registration for Public Network Adapter" in Oracle Grid Infrastructure Installation Guide for Microsoft Windows x64 (64-Bit) for information about mandatory configuration task, if your server has multiple NIC cards
Installing the Oracle Database Software
5-12 Oracle Database Installation Guide
starting the installation by starting Oracle Universal Installer on a system that has Internet access in update download mode. To start Oracle Universal Installer to download updates before installation, enter the following command:
setup.exe -downloadUpdates
Provide the My Oracle Support user name and password, and provide proxy settings if needed on the Provide My Oracle Support credentials screen. Then, enter the Download location and click Download on the Download software updates screen. If updates are available, then they are downloaded in the location provided. The Finish Updates screen shows the successful download of the updates. Click Close.
After you download updates, transfer the update file to a directory on the server where you plan to run the installation.
5. Follow these guidelines to complete the installation:
■ Do not install Oracle Database 12c software into an existing Oracle home.
■ Follow the instructions displayed in the Oracle Universal Installer screens. If you need additional information, click Help.
■ Do not modify the Java Runtime Environment (JRE) except by using a patch provided by Oracle Support Services. Oracle Universal Installer automatically installs the Oracle-supplied version of the JRE. This version is required to run Oracle Universal Installer and several Oracle assistants.
■ If you encounter errors while installing the software, see Appendix F for information about troubleshooting.
■ If you chose an installation type that runs Oracle Database Configuration Assistant in interactive mode, then you must provide detailed information about configuring your database and network.
If you need help when using the Oracle Database Configuration Assistant in interactive mode, click Help on any screen.
6. When the Configuration Assistant tasks are complete, click Finish, click Exit, then click Yes to exit from Oracle Universal Installer.
7. Optionally, delete the OraInstalldate_time directory to remove the temporary files that were created during the installation process. The OraInstalldate_time directory holds about 45 MB of files. This directory is created in the location set by the TEMP environment variable setting.
Restarting your computer also removes the OraInstalldate_time directory.
See Also:
■ Oracle Universal Installer and OPatch User's Guide for Windows and UNIX for more information about response file formats
■ "Software Updates Option" on page 1-10
See Also: "Minimum Requirements for Passwords" on page 7-8 for password guidelines
Note: If you chose a default installation, Oracle Database Configuration Assistant does not run interactively.

Installing the Oracle Database Software
Installing Oracle Database 5-13
8. See Chapter 6, "Oracle Database Postinstallation Tasks" for information about tasks that you must complete after you have installed Oracle Database.
The following table lists the various screens displayed during an Enterprise Edition installation for Oracle Database 12c:
Table 5–1 Oracle Universal Installer Windows
Screen Action
Configure Security Updates
Enter your e-mail address, preferably your My Oracle Support e-mail address or user name in the Email field.
You can select the I wish to receive security updates via My Oracle Support check box to receive security updates.
Enter your My Oracle Support password in the My Oracle Support Password field.
Click Next.
See Also: "Database Security Notification Options" on page 1-11
Download Software Updates
Starting with Oracle Database 11g Release 2 (11.2.0.2), you can use the Software Updates feature to dynamically download and apply latest updates. Select one of the following options, and click Next:
■ Use My Oracle Support credentials for download: Select this option to download and apply the latest software updates.
Click Proxy Settings to configure a proxy for Oracle Universal Installer to use to connect to the Internet. Provide the proxy server information for your site, along with a user account that has access to the local area network through which the server is connecting. Starting with Oracle Database 11g Release 2 (11.2.0.3), you can enter the Proxy Realm information. The proxy realm information is case-sensitive. If you do not have a proxy realm, then you do not need to provide an entry for the Proxy Username, Proxy Password, and Proxy Realm fields.
Click Test Connection to ensure that your proxy settings are correctly entered, and the installer can download the updates.
■ Use pre-downloaded software updates: Select this option if you have already downloaded software updates using the Oracle Universal installer command setup.exe -downloadUpdates.
Specify the path to the location where you have already downloaded the software updates.
Note: The pre-downloaded option only works if you have used Oracle Universal Installer to download the updates, either during the installation, or before the installation with the -downloadUpdates option. You cannot manually download updates, and then provide the manual download path to the installer.
■ Skip software updates: Select this option if you do not want to apply any updates.
See Also: "Software Updates Option" on page 1-10
Apply Software Updates This screen is displayed if you select to download the software updates, or provide the pre-downloaded software updates location.
■ If you selected Use My Oracle Support credentials for download in the previous screen, select Download and apply all updates, and then click Next to apply the updates.
By default, the download location for software updates is placed in the home directory of the Oracle installation owner you are using to run this installation. If you choose to download the software updates in another location, then click Browse and select a different location on your server.
■ If you selected Use pre-downloaded software updates in the previous screen, select Apply all updates, and then click Next to apply the updates downloaded before starting the installation.

Installing the Oracle Database Software
5-14 Oracle Database Installation Guide
Select Installation Option Select one of the following installation options, click Next.
■ Create and configure a database: This option creates a new database along with sample schemas.
■ Install database software only: This option installs only the database binaries. To configure database, you must run Oracle Database Configuration Assistant after the software installation.
■ Upgrade an existing database: This option installs the software binaries in a new Oracle home. At the end of the installation, you can upgrade the existing database.
System Class Select the type of system for installing the database, click Next.
■ Desktop Class: Choose this option if you are installing on a laptop or desktop class system. This option includes a starter database and allows minimal configuration. This option is designed for those who want to quickly set up a database.
■ Server Class: Choose this option if you are installing on a server class system, such as what you would use when deploying Oracle in a production data center. This option allows for more advanced configuration options. Advanced configuration options available using this option include Oracle RAC, Oracle Automatic Storage Management, backup and recovery configuration, integration with Enterprise Manager Cloud Control, and more fine-grained memory tuning, among many others.
Grid Installation Options Select the type of database installation you want to perform, click Next.
■ Single instance database installation: This option installs the database and the listener.
■ Oracle Real Application Clusters database installation: This option installs Oracle Real Application Clusters.
■ Oracle RAC One Node database installation: This option installs Oracle RAC One Node database.
Select Install Type Select one of the following, then click Next:
■ Typical Install: This installation method is selected by default. It lets you quickly install Oracle Database using minimal input. It installs the software and optionally creates a general-purpose database using the information that you specify on this screen.
■ Advanced Install: This installation method enables to perform more complex installations, such as creating individual passwords for different accounts, creating specific types of starter databases (for example, for transaction processing or data warehouse systems), using different language groups, specifying e-mail notifications, and so on.
Select Product Language This option allows you to select the language in which you want to run the product.
Select the product language from the Available Languages list, transfer it to the Selected Languages list. Click Next.
Select Database Edition Select Enterprise Edition, Standard Edition, Standard Edition One, or Personal Edition. Click Next
See Also: "Enabling and Disabling Database Options" on page 6-13 for information about enabling and disabling components that are installed with Oracle Database.
"Configuring Oracle Components" on page 6-2 for information about configuring components that are installed with Oracle Database.
Table 5–1 (Cont.) Oracle Universal Installer Windows
Screen Action

Installing the Oracle Database Software
Installing Oracle Database 5-15
Specify Oracle Home User Starting with Oracle Database 12c, Oracle recommends that you use Windows Built-in Account or specify a standard Windows User Account (not an Administrator account) to install and configure the Oracle home. This account is used for running the Windows services for the Oracle home. Do not log in using this account to perform administrative tasks. Select one of the following, then click Next.
■ Use Existing Windows User
The account can be a Windows Local User, Windows Domain User or Windows Managed Services Account (MSA). You must provide both the user name and password for a Windows Local or Domain User. For Windows MSA, which is a managed domain account, only the user name is required.
■ Create New Windows User
Provide the user name and password for the Windows Local User that you want Oracle Universal Installer to create. Confirm the password. The new user that is created is denied interactive logon privileges to the Windows computer. However, a Windows administrator can manage this account like any other Windows account.
Select Use Windows Built-in Account if you do not want to specify an Oracle Home User during installation. No user name or password is required and the Windows services for the Oracle home run as the LocalSystem or LocalService.
For Database Server installation, Oracle recommends that you use a standard Windows User Account (instead of Windows Built-in Account) as the Oracle Home User for enhanced security.
See Also: "Managing Oracle Home User" in Oracle Database Platform Guide for Microsoft Windows
Specify Installation Location
The Oracle base path appears by default. You can change the path based on your requirement. Specify Oracle base, Software location, and click Next.
The Oracle base directory is a top-level directory for Oracle software installations owned by an Oracle installation owner account. The default Oracle base path is DRIVE_LETTER:\app\user, where user is the user account running the installation. You can change the path based on your requirements.
In the Software Location field, accept the default value or enter the Oracle home directory path in which you want to install Oracle components. The directory path should not contain spaces.
Click Next.
Note: This screen is available only with Advanced Installation.
See Also: "Optimal Flexible Architecture Directory Naming Conventions" for information about directory naming conventions
Select Configuration Type Select one of the following, click Next:
■ General Purpose / Transaction Processing: This is a starter database designed for general usage or transaction-heavy applications.
■ Data Warehousing: A starter database optimized to run Data Warehousing applications.
See the online Help provided by either Oracle Universal Installer or Oracle Database Configuration Assistant for a description of these preconfigured database types.
Table 5–1 (Cont.) Oracle Universal Installer Windows
Screen Action

Installing the Oracle Database Software
5-16 Oracle Database Installation Guide
Specify Database Identifiers
Specify the following information, then click Next:
Database Naming
Specify the Global Database Name using the following syntax:
database_unique_name.db_domain
where:
■ database_unique_name is the name of the database. It can contain a maximum of 30 characters as long as the first eight characters are unique and begin with an alphabetic character. The characters can include alphanumeric, underscore (_), dollar ($), and pound (#), no other special characters are permitted in a database name.
■ db_domain is the computer environment used for the database. It should contain no more than 128 characters (alphanumeric, underscore (_), and pound (#)), inclusive of all periods.
Note: Ensure that the combination of database name (first eight unique characters of database unique name), delimiter, and the database domain name does not exceed 128 characters.
For example:
sales.us.example.com
where:
■ database_unique_name is sales
■ db_domain is us.example.com
When you enter the Global Database Name, Oracle Universal Installer automatically populates the SID prefix with the database name. You can change this name in Advanced installation.
Oracle Universal Installer limits the SID to 12 alphanumeric characters and the SID cannot contain underscore (_), dollar ($), and pound (#).
Select the Create as Container database option to create the database as a multitenant container database (CDB) that can support one pluggable database (PDB). If you want Oracle Universal Installer to create a PDB when it creates the CDB, specify the PDB name in the Pluggable Database Name field.
The PDB name must be unique and must follow the database naming conventions. See "Identifying Databases"
To create additional PDBs and to manage PDBs, use Oracle Database Configuration Assistant.
See Also: "Creating and Managing a Database with DBCA" in Oracle Database 2 Day DBA
Table 5–1 (Cont.) Oracle Universal Installer Windows
Screen Action

Installing the Oracle Database Software
Installing Oracle Database 5-17
Specify Configuration Options
Specify the following configuration details, then click Next.
Memory:
Select the Enable Automatic Memory Management option to allow the database to automatically distribute memory between SGA and PGA. If you do not select this option, then the SGA and PGA must be sized manually.
See Also: "Consider Memory Allocation and Automatic Memory Management" on page 1-8
Character Sets:
This option enables you to store the character data in the database in one of the following methods:
■ Use the default: This option uses the operating system language settings.
■ Use Unicode: This option enables you to store multiple language groups.
■ Choose from the following list of character sets: This option enables the Select Database Character Set drop down list.
See Also:
■ "Selecting the Database Character Set"
■ Oracle Database Globalization Support Guide for information about choosing a character set.
Sample Schemas:
The Create database with sample schemas option is not selected by default. However, you can select the option, to create the starter database with sample schema. If you create the database as a CDB with one PDB, then the sample schema is created as a PDB.
Note: By default, Oracle database is configured to include enhanced security settings.
Specify Database Storage Options
Select one of the following, then click Next.
■ File System: Specify the database file location.
■ Oracle Automatic Storage Management.
See Also: "Using an Oracle Automatic Storage Management Disk Group" on page 5-5
Specify Management Options
This screen gives you the option to manage your database using Oracle Enterprise Manager Cloud Control. Select Register with Enterprise Manager (EM) Cloud Control and specify the following for Oracle Enterprise Manager Cloud Control configuration, and click Next:
■ OMS Host: This is the system name where the Management repository is running.
■ OMS Port: This is the Oracle Enterprise Manager port number to receive requests from the Management service.
■ EM Admin Username: This is the user name to log in to Oracle Enterprise Manager.
■ EM Admin Password: This is the password to log in to Oracle Enterprise Manager.
■ Specify password of ASMSNMP user: This is the password for the ASMSNMP user configured in Oracle ASM, required only if you choose Oracle ASM as your database storage option.
Note: Oracle Enterprise Manager Database Express is always installed and configured by default irrespective of whether you register Oracle Enterprise Manager Cloud Control.
Table 5–1 (Cont.) Oracle Universal Installer Windows
Screen Action

Installing the Oracle Database Software
5-18 Oracle Database Installation Guide
Specify Recovery Options Select Enable Recovery to enable recovery using one of the following options:
■ Select File System to use a file system directory for the fast recovery area, and then specify the fast recovery area path in the Recovery Area location field.
■ Select Oracle Automatic Storage Management to use an Automatic Storage Management disk group for the fast recovery area.
Click Next.
See Also: "Preparing Disks for Oracle Automatic Storage Management" on page 4-6
Select ASM Disk Group This screen is displayed only if you select Oracle Automatic Storage Management as your storage option.
Disk groups are created during the Oracle Grid Infrastructure installation. Disk groups are configured with the SYSASM privilege using asmcmd or SQL create diskgroup commands. An ASM disk group consists of multiple disk partitions.
The table in this screen displays existing disk groups created during the Oracle Grid Infrastructure installation. Select a disk group to use for database file storage.
Specify Schema Passwords Enter and confirm passwords for the privileged database accounts: SYS, SYSTEM, and DBSNMP.
If you chose to create the database as a CDB, then Oracle Universal Installer also asks for the PDBADMIN password.
Click Next.
Note: Optionally, you can use the same password for all accounts. However, Oracle recommends that you specify a different password for each account. You must remember the passwords that you specify.
See Also: "Minimum Requirements for Passwords" on page 7-8 for information about password guidelines
Perform Prerequisite Checks
This option checks if the minimum system requirements to perform the database installation are met.
Click Fix & Check Again, if you want the installer to fix the problem and check the system requirements once more.
If you click Check Again, then you can run the prerequisite check again to see if the minimum requirements are met to carry on with the database installation.
To get a list of failed requirements, select Show Failed from the list. To get a list of all the prerequirement checks run by the OUI, select Show All. To get a list of the prerequirement checks that are successful, select Show Succeeded.
Note: Oracle recommends that you use caution in checking the Ignore All option. If you check this option, then Oracle Universal Installer may not confirm that your system can install Oracle Database successfully.
See Also: "Oracle Database Preinstallation Tasks" for information about the system requirements
Summary Review the information displayed on this screen, and click Install.
Note: You can save all the installation steps into a response file by clicking Save Response File. Later, this file can be used for a silent installation.
Install Product This screen displays the progress of a database installation. It also shows the status information while the product is being installed. Click Next.
This screen then displays the status information for the configuration assistants that configure the software and create a database. When the message is displayed after Database Configuration Assistant process, click OK to continue.
Finish This screen is shown automatically when all the configuration tools are successful.
Table 5–1 (Cont.) Oracle Universal Installer Windows
Screen Action
Cloning an Oracle Home
Installing Oracle Database 5-19
5.5 Cloning an Oracle HomeYou can copy an existing Oracle home and then configure it for a new environment. This process is called cloning. If you are performing multiple Oracle Database installations, you may want to use this method to create each new Oracle home, because copying files from an existing Oracle Database installation takes less time than creating a new version of them. This method is also useful if the Oracle home that you are cloning has patches applied to it. When you clone an Oracle home, the new Oracle home has the patch updates.
To clone an Oracle home:
1. Ensure that the Oracle Database installation whose home you want to clone has been successful.
You can check the success of the installation by reviewing the installActionsdate_time.log file for the installation session, which is normally located in the C:\Program Files\Oracle\Inventory\logs directory.
If you have installed patches, you can check their status by running the following commands at a command prompt:
C:\ORACLE_HOME\OPatch> set ORACLE_HOME=ORACLE_HOME_using_patchC:\ORACLE_HOME\OPatch> opatch lsinventory
2. Stop the Oracle-related services on this computer.
You can stop Oracle services by using one of the following methods:
■ Oracle Administration Assistant for Windows: From the Start menu, select All Programs, then Oracle - HOMENAME, then Configuration and Migration Tools, then Administrative Assistant for Windows, then Oracle Managed Objects, then Computers, and then machine-name. Select Databases, then right-click global database name, select Stop Service.
■ Microsoft Windows Services utility: From the Start menu, select Control Panel, then Administrative Tools, then Services. Right-click any service that begins with Oracle, and then from the menu, select Stop.
3. Create a ZIP file with the Oracle home (but not Oracle base) directory, selecting the Save full path info option.
For example, if the source Oracle installation is in C:\app\username\product\12.1.0\dbhome_1, you zip the dbhome_1 directory, leaving out the admin, flash_recovery_area, and oradata directories that are under 12.1.0. These directories are created in the target installation later on when you create a new database there.
4. Copy the ZIP file to the root directory of the target computer.
5. Extract the ZIP file contents, selecting the Use folder names option.
Note: Oracle Database Administrator's Guide covers cloning Oracle databases in detail, and cloning Oracle homes.
Note: Choose Startup/Shutdown Options to control whether a database instance should be stopped along with the service.
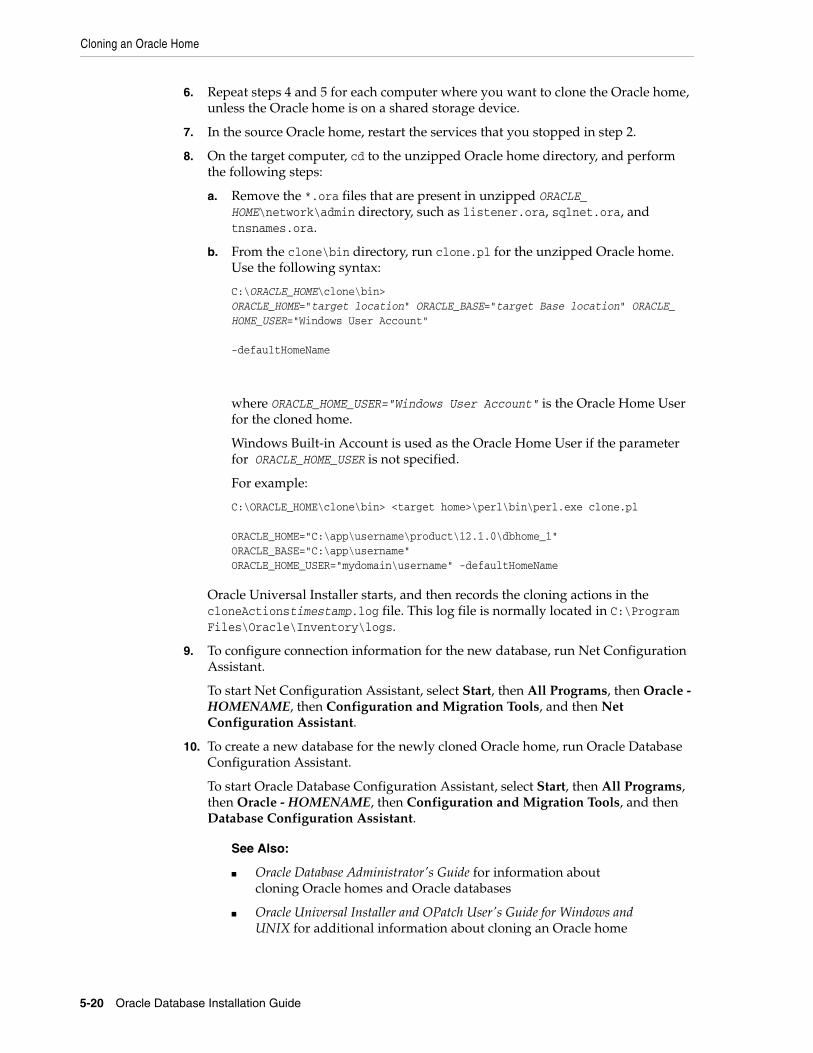
Cloning an Oracle Home
5-20 Oracle Database Installation Guide
6. Repeat steps 4 and 5 for each computer where you want to clone the Oracle home, unless the Oracle home is on a shared storage device.
7. In the source Oracle home, restart the services that you stopped in step 2.
8. On the target computer, cd to the unzipped Oracle home directory, and perform the following steps:
a. Remove the *.ora files that are present in unzipped ORACLE_HOME\network\admin directory, such as listener.ora, sqlnet.ora, and tnsnames.ora.
b. From the clone\bin directory, run clone.pl for the unzipped Oracle home. Use the following syntax:
C:\ORACLE_HOME\clone\bin>ORACLE_HOME="target location" ORACLE_BASE="target Base location" ORACLE_HOME_USER="Windows User Account" -defaultHomeName
where ORACLE_HOME_USER="Windows User Account" is the Oracle Home User for the cloned home.
Windows Built-in Account is used as the Oracle Home User if the parameter for ORACLE_HOME_USER is not specified.
For example:
C:\ORACLE_HOME\clone\bin> <target home>\perl\bin\perl.exe clone.pl ORACLE_HOME="C:\app\username\product\12.1.0\dbhome_1" ORACLE_BASE="C:\app\username"ORACLE_HOME_USER="mydomain\username" -defaultHomeName
Oracle Universal Installer starts, and then records the cloning actions in the cloneActionstimestamp.log file. This log file is normally located in C:\Program Files\Oracle\Inventory\logs.
9. To configure connection information for the new database, run Net Configuration Assistant.
To start Net Configuration Assistant, select Start, then All Programs, then Oracle - HOMENAME, then Configuration and Migration Tools, and then Net Configuration Assistant.
10. To create a new database for the newly cloned Oracle home, run Oracle Database Configuration Assistant.
To start Oracle Database Configuration Assistant, select Start, then All Programs, then Oracle - HOMENAME, then Configuration and Migration Tools, and then Database Configuration Assistant.
See Also:
■ Oracle Database Administrator's Guide for information about cloning Oracle homes and Oracle databases
■ Oracle Universal Installer and OPatch User's Guide for Windows and UNIX for additional information about cloning an Oracle home

Cloning an Oracle Home
Installing Oracle Database 5-21
Use the following steps to configure Oracle Configuration Manager for a cloned Oracle home:
1. Run the following command from ORACLE_HOME\ccr\state:
del *.ll*
2. Run the following command from ORACLE_HOME:
copy ccr\inventory\core.jar ccr\inventory\pending
3. Run these commands from ORACLE_HOME\ccr\bin:
emSnapshotEnvdeployPackages
4. If new credentials are needed, run this command from ORACLE_HOME\ccr\bin.
configCCR
If Oracle Configuration Manager was manually configured using setupCCR, then perform the following in the cloned Oracle home:
1. Delete all the subdirectories of the ORACLE_HOME\ccr\hosts directory to remove the previously configured hosts.
2. Run the following command from ORACLE_HOME\ccr\bin:
configCCR -a
If you have installed Oracle Configuration Manager in the original Oracle home but have not configured it, then run the following command in the cloned Oracle home to configure it:
setupCCR

Cloning an Oracle Home
5-22 Oracle Database Installation Guide

6
Oracle Database Postinstallation Tasks 6-1
6Oracle Database Postinstallation Tasks
This chapter describes the following postinstallation configuration tasks:
■ Installing the Latest Patch Set Release
■ Validating Invalid PL/SQL Modules
■ Configuring the Secure Sockets Layer
■ Configuring Oracle Components
■ Creating a Fast Recovery Area Disk Group
■ Enabling and Disabling Database Options
■ Changing the Oracle Home User Password
■ Postinstallation Tasks for SQL Developer
6.1 Installing the Latest Patch Set ReleaseOracle recommends installing the latest patch set release after successful installation of Oracle Database.
You must register online before using My Oracle Support. After logging in to My Oracle Support, select the Patches and Updates tab from the top of the screen.
To download required patches:
1. Use a web browser to view the My Oracle Support website:
https://support.oracle.com/
2. Log in to My Oracle Support.
3. On the main My Oracle Support page, click Patches and Updates tab.
4. In the Patch Search group, select Product or Family (Advanced).
5. In the Product field, select Oracle Database.
6. In the Release field select the release number. For example, Oracle 12.1.0.1.0.
7. Click Search.
8. Any available patch updates are displayed in the Patch Search page.
Note: If you are not a My Oracle Support registered user, click Register here and follow the registration instructions.

Validating Invalid PL/SQL Modules
6-2 Oracle Database Installation Guide
9. Select the patch number and click ReadMe. The README page is displayed and contains information about the patch set and how to apply the patches to your installation.
10. Return to the Patch Search page, click Download, and save the file on your system.
11. Use the unzip utility provided with Oracle Database 12c to uncompress the Oracle patch updates that you downloaded from My Oracle Support. The unzip utility is located in the ORACLE_BASE\ORACLE_HOME\bin directory.
6.2 Validating Invalid PL/SQL ModulesOracle recommends running the utlrp.sql script after creating or upgrading a database. This script recompiles all PL/SQL modules that may be in an INVALID state, including packages, procedures, types, and so on. This step is optional, but recommended so that the performance cost of recompilation is incurred during the installation rather than in the future.
1. Start SQL*Plus:
DRIVE_LETTER:\> sqlplus /nolog
2. Connect to the database with the SYS account:
SQL> CONNECT SYS AS SYSDBAEnter password: SYS_password
3. Start the database (if necessary):
SQL> STARTUP
4. Run the utlrp.sql script, which by default is located in ORACLE_HOME\rdbms\admin\utlrp.sql. For example:
SQL> @?\rdbms\admin\utlrp.sql
6.3 Configuring the Secure Sockets LayerOracle highly recommends you configure and use a Secure Sockets Layer (SSL) to ensure that passwords and other sensitive data are not transmitted in clear text in HTTP requests.
6.4 Configuring Oracle ComponentsMany Oracle products and options must be configured before you use them for the first time. Before using individual Oracle products or options, refer to the appropriate manual in the product documentation library.
This section contains these topics:
Note: There should be no other data definition language (DDL) statements running on the database while the script is running, and packages STANDARD and DBMS_STANDARD must be valid.
See Also: Oracle Database Security Guide for more information about Secure Socket Layer

Configuring Oracle Components
Oracle Database Postinstallation Tasks 6-3
■ Configuring Direct NFS Client
■ Configuring Oracle Messaging Gateway
■ Configuring Oracle Administration Assistant for Windows
■ Configuring Oracle Label Security
■ Configuring the OraClrAgnt Service for Oracle Database Extensions for .NET
■ Configuring Oracle Database Vault
■ Configuring Oracle Net Services
■ Installing Oracle Text Supplied Knowledge Bases
■ Installing the Oracle Text Filtering Component
■ Configuring or Reinstalling Oracle XML DB
■ Configuring PL/SQL External Procedures
■ Configuring Shared Server Support
■ Setting Credentials for the Job System to Work with Oracle Enterprise Manager
■ Configuring Oracle Database to Communicate with Oracle Automatic Storage Management
■ Installing Oracle Database Examples
■ Creating the OraMTS Service for Microsoft Transaction Server
6.4.1 Configuring Direct NFS ClientDirect NFS Client is an alternative to using kernel-managed NFS. Refer to the following sections to configure Direct NFS Client:
■ About Direct NFS Client Storage
■ About the Oranfstab File for Direct NFS Client
■ Mounting NFS Storage Devices with Direct NFS Client
■ Specifying Network Paths for a NFS Server
■ Enabling Direct NFS Client
■ Performing Basic File Operations Using the ORADNFS Utility
■ Monitoring Direct NFS Client Usage
■ Disabling Direct NFS Client
See Also:
■ "Available Installation Scenarios" in Oracle Application Express Installation Guide
■ "Post-installation Database Configuration" section in Oracle Configuration Manager Installation and Administration Guide for information about postinstallation tasks for Oracle Configuration Manager
Note: You need only perform postinstallation tasks for components that you intend to use.

Configuring Oracle Components
6-4 Oracle Database Installation Guide
6.4.1.1 About Direct NFS Client StorageWith Oracle Database, you can store data files on a supported NFS system. You can configure Oracle Database to access NFS servers directly using an Oracle internal Direct NFS Client. Direct NFS Client supports NFSv3, NFSv4 and NFSv4.1 except Parallel NFS to access the NFS server. If Oracle Database cannot open an NFS server using Direct NFS Client, then an informational message is logged into the Oracle alert and trace files indicating that Direct NFS Client could not be established.
Management of Oracle data files created with Direct NFS Client should be done according to the guidelines specified in Oracle Database Administrator's Guide. The Oracle database files resident on the NFS server that are served by the Direct NFS Client can also be accessed through a third party NFS client. The volume must be mounted through CIFS or kernel NFS to enable regular windows utilities and commands, such as copy, and so on, access the database files in the remote location. Volumes mounted through CIFS cannot be used for database file storage without configuring Direct NFS Client. The atomic write requirements required for database access are not guaranteed by CIFS protocol. Consequently, CIFS can only be used for operating system level commands, such as copy, move, and so on.
Some NFS file servers require NFS clients to connect using reserved ports. If your filer is running with reserved port checking, then you must disable it for Direct NFS Client to operate. To disable reserved port checking, consult your NFS file server documentation.
6.4.1.2 About the Oranfstab File for Direct NFS ClientTo enable the Direct NFS Client, you must add an oranfstab file to ORACLE_HOME\dbs. When oranfstab is placed in this directory, the entries in this file are specific to a single database.
6.4.1.3 Mounting NFS Storage Devices with Direct NFS ClientDirect NFS Client determines mount point settings for NFS storage devices based on the configuration information in oranfstab. Direct NFS Client looks for the mount point entries in ORACLE_HOME\dbs\oranfstab. It uses the first matched entry as the mount point.
6.4.1.4 Specifying Network Paths for a NFS ServerDirect NFS Client can use up to four network paths defined in the oranfstab file for an NFS server. The Direct NFS Client performs load balancing across all specified paths. If a specified path fails, then Direct NFS Client reissues I/O commands over any remaining paths.
Direct NFS Client requires an NFS server supporting NFS read/write buffers of at least 16384 bytes.
Direct NFS Client issues writes at wtmax granularity to the NFS server. Direct NFS Client does not serve an NFS server with a wtmax less than 16384. Oracle recommends that you use the value 32768.
For NFS servers that restrict port range, you can use the insecure option to enable clients other than root to connect to the NFS server. Alternatively, you can disable Direct NFS Client as described in "Disabling Direct NFS Client" on page 6-7.

Configuring Oracle Components
Oracle Database Postinstallation Tasks 6-5
6.4.1.5 Enabling Direct NFS ClientComplete the following procedure to enable Direct NFS Client:
1. Create an oranfstab file with the following attributes for each NFS server to be accessed using Direct NFS Client:
■ server: The NFS server name.
■ path: Up to 4 network paths to the NFS server, specified either by IP address, or by name, as displayed using the ifconfig command on the NFS server.
■ local: Up to 4 network interfaces on the database host, specified by IP address, or by name, as displayed using the ipconfig command on the database host.
■ export: The exported path from the NFS server. Use UNIX-style path.
■ mount: The corresponding local mount point for the exported volume. Use WINDOWS-style path.
■ mnt_timeout: Specifies (in seconds) the time for which Direct NFS Client should wait for a successful mount before timing out. This parameter is optional and the default timeout is 10 minutes. (600)
■ uid: (Optional) The UNIX user ID to be used by Direct NFS Client to access all NFS servers listed in oranfstab. The default value is uid:65534, which corresponds to user:nobody on the NFS server.
■ gid: (Optional) The UNIX group ID to be used by Direct NFS Client to access all NFS servers listed in oranfstab. The default value is gid:65534, which corresponds to group:nogroup on the NFS server.
■ nfs_version: Specifies the NFS protocol version that the Direct NFS Client uses. Possible values are NFSv3, NFSv4 and NFSv4.1. The default version is NFSv3. If you want to specify NFSv4.x, then you must set the nfs_version parameter accordingly in the oranfstab file.
The following is an example of an oranfstab file with two NFS server entries:
server: MyDataServer1local: 192.0.2.0path: 192.0.2.1local: 192.0.100.0path: 192.0.100.1nfs_version: nfsv3export: /vol/oradata1 mount: C:\APP\ORACLE\ORADATA\ORCL
server: MyDataServer2local: LocalInterface1path: NfsPath1local: LocalInterface2
Note: Use NFS servers supported for Oracle Database. See the My Oracle Support website for support information:
https://support.oracle.com
See Also: "Limiting Asynchronous I/O in NFS Server Environments" in Oracle Database Performance Tuning Guide

Configuring Oracle Components
6-6 Oracle Database Installation Guide
path: NfsPath2local: LocalInterface3path: NfsPath3local: LocalInterface4path: NfsPath4export: /vol/oradata2 mount: C:\APP\ORACLE\ORADATA\ORCL2export: /vol/oradata3 mount: C:\APP\ORACLE\ORADATA\ORCL3
As a rule, a mount point specified in oranfstab file represents local path where the database files reside normally, that is, without Direct NFS Client being enabled. For example, if a database that does not use Direct NFS Client would have kept its files in C:\app\oracle\oradata\orcl directory, then C:\app\oracle\oradata\orcl should be specified as a virtual mount point in the corresponding oranfstab file.
2. Oracle Database uses an ODM library, oranfsodm11.dll, to enable Direct NFS Client. To replace the standard ODM library, oraodm11.dll, with the ODM NFS library, oranfsodm11.dll, complete the following steps:
1. Change directory to ORACLE_HOME\bin.
2. Shutdown the Oracle database.
3. Enter the following commands:
DRIVE_LETTER:\> copy oraodm11.dll oraodm11.dll.stubDRIVE_LETTER:\> copy /Y oranfsodm11.dll oraodm11.dll
6.4.1.6 Performing Basic File Operations Using the ORADNFS UtilityORADNFS is a utility which enables the database administrators to perform basic file operations over Direct NFS Client on Microsoft Windows platforms.
ORADNFS is a multi-call binary, a single binary that acts like several utilities. This allows ORADNFS to be smaller since all the built-in commands can leverage DNFS code for many common operations. ORADNFS is run by issuing a command as an argument on the command line.
For example, C:\> ORADNFS help causes ORADNFS to print a list of built-in commands, and C:\> ORADNFS ls C:\ORACLE\ORADATA\ORCL causes ORADNFS to behave as an ls command of C:\ORACLE\ORADATA\ORCL remote directory, where C:\ORACLE\ORADATA is a DNFS virtual mount point specified in the oranfstab configuration file.
Note:
■ Direct NFS Client ignores uid or gid value of 0.
■ The exported path from the NFS server must be accessible for read, write, and execute operations by the user with the uid, gid specified in oranfstab. If neither uid nor gid is listed, then the exported path must be accessible by the user with the uid:65534, gid:65534.

Configuring Oracle Components
Oracle Database Postinstallation Tasks 6-7
6.4.1.7 Monitoring Direct NFS Client UsageUse the following views for Direct NFS Client management:
■ v$dnfs_servers: Shows a table of servers accessed using Direct NFS Client.
■ v$dnfs_files: Shows a table of files currently open using Direct NFS Client.
■ v$dnfs_channels: Shows a table of open network paths (or channels) to servers for which Direct NFS Client is providing files.
■ v$dnfs_stats: Shows a table of performance statistics for Direct NFS Client.
6.4.1.8 Disabling Direct NFS ClientComplete the following steps to disable the Direct NFS Client:
1. Log in as the Oracle Grid Infrastructure software owner.
2. Restore the stub oraodm11.dll file by reversing the process you completed in "Enabling Direct NFS Client".
3. Remove the oranfstab file.
6.4.2 Configuring Oracle Messaging Gateway Oracle Messaging Gateway, an Oracle Database Advanced Queuing feature, requires additional configuration after you install Oracle Database if you plan to use Oracle Database Advanced Queuing.
6.4.3 Configuring Oracle Administration Assistant for WindowsOracle Administration Assistant for Windows requires the Microsoft Management Console and HTML Help 1.2 or later to run. Microsoft Management Console (MMC) version 3.0 is available with Windows Server 2008 and Windows Server 2008 R2. Oracle recommends the latest MMC version available.
6.4.4 Configuring Oracle Label SecurityYou must configure Oracle Label Security in a database to use it. See "Oracle Label Security Using Oracle Internet Directory" in Oracle Label Security Administrator's Guide for more information.
Note:
■ A valid copy of the oranfstab configuration file must be present in ORACLE_HOME\dbs directory for ORADNFS to operate.
■ The user must be a member of the local ORA_DBA group to execute ORADNFS.
See Also: "Loading and Setting Up Oracle Messaging Gateway" in Oracle Database Advanced Queuing User's Guide to configure Oracle Messaging Gateway and for additional instructions about configuring the listener.ora, tnsnames.ora, and mgw.ora files
See Also: Microsoft documentation at
http://www.microsoft.com/

Configuring Oracle Components
6-8 Oracle Database Installation Guide
6.4.5 Configuring the OraClrAgnt Service for Oracle Database Extensions for .NETOracle Database Extensions for .NET depends on a Windows service to operate properly. This service is called the OraClrAgnt service, which can be accessed through the Service Control Panel, as OracleORACLE_HOMEClrAgent, where ORACLE_HOME represents an Oracle home name.
In earlier versions of Oracle Database, the OraClrAgnt service was automatically created by the installer. Starting with Oracle Database 12c Release 1 (12.1), after installation you use the OraClrCtl.exe utility to create, start, stop, and delete the OraClrAgnt service. The OraClrAgnt service is configured by this tool using the Oracle Home User account specified during the Oracle Database installation.
6.4.6 Configuring Oracle Database VaultOracle Database includes Database Vault by default, but you must register it before you can use it. Ensure that you create the Database Vault Owner and, optionally, the Database Vault Account Manager administrative accounts before you can use them.
See the "Registering Oracle Database Vault with an Oracle Database" section in Oracle Database Vault Administrator's Guide to register Oracle Database Vault.
6.4.7 Configuring Oracle Net ServicesIf you have a previous release of Oracle software installed on this system, you can copy information from the Oracle Net tnsnames.ora and listener.ora configuration files from the previous release to the corresponding files for the new release.
Modifying the listener.ora FileIf you are upgrading from a previous release of Oracle Database, Oracle recommends that you use the current release of Oracle Net listener instead of the listener from the previous release.
If you have referenced the previous Oracle home directory names in the static listener information, then these directory names must be modified before the listener.ora file can be used in the 12.1 environment.
To use the listener from the current release, you must copy static service information from the listener.ora file from the previous release to the version of that file used by the new release.
For any database instances earlier than release 8.0.3, add static service information to the listener.ora file. Oracle Database releases later than release 8.0.3 do not require static service information.
Modifying the tnsnames.ora FileUnless you are using a central tnsnames.ora file, copy Oracle Net service names and connect descriptors from the previous release tnsnames.ora file to the version of that file used by the new release.
See Also: Oracle Database Extensions for .NET Developer's Guide for Microsoft Windows for more information about the OraClrCtl.exe tool and for installing and configuring the OraClrAgnt service
Note: The default location for the tnsnames.ora and listener.ora files is the ORACLE_BASE\ORACLE_HOME\network\admin\ directory.

Configuring Oracle Components
Oracle Database Postinstallation Tasks 6-9
If necessary, you can also add connection information for additional database instances to the new file.
6.4.8 Installing Oracle Text Supplied Knowledge BasesAn Oracle Text knowledge base is a hierarchical tree of concepts used for theme indexing, ABOUT queries, and deriving themes for document services. If you plan to use any of these Oracle Text features, you can install two supplied knowledge bases (English and French) from the Oracle Database Examples media.
6.4.9 Installing the Oracle Text Filtering ComponentOracle Text Filtering Technology requires the Visual C++ libraries included in the Visual C++ Redistributable Package provided by Microsoft. You can download the 2005 SP1 Redistributable Package version of the vcredist_x64.exe file from
http://www.microsoft.com/downloads
6.4.10 Configuring or Reinstalling Oracle XML DBOracle XML DB is a component of the Oracle Database installation. However, you must manually configure the FTP and HTTP ports for Oracle XML DB.
Also, see Oracle XML DB Developer's Guide for more information about the following tasks:
■ Reinstalling Oracle XML DB
■ Configuring or customizing the Oracle XML DB tablespace
■ Configuring FTP, HTTP/WebDAV port numbers
6.4.11 Configuring PL/SQL External ProceduresConfiguring PL/SQL depends on the network configuration files used. In nearly all cases, configuration is automatic. However, if you are using pre-8.0.3 tnsnames.ora and listener.ora files with your 12c database, then you must manually configure them.
See Also: Oracle Text Reference for information about creating and extending knowledge bases, such as extending the supplied knowledge bases to accommodate your requirements, or creating your own knowledge bases in languages other than English and French
See Also: Oracle Text Reference for more information about Oracle Text Filtering Technology
See Also: The "Using FTP on the Standard Port Instead of the Oracle XML DB Default Port" and "Using HTTP(S) on a Standard Port Instead of an Oracle XML DB Default Port" sections in Oracle XML DB Developer's Guide for configuring the Oracle XML DB ports
See Also: "Developing Applications for Windows" of Oracle Database Platform Guide for Microsoft Windows
Configuring Oracle Components
6-10 Oracle Database Installation Guide
6.4.12 Configuring Shared Server SupportThe default setup for using Shared Server mode depends on how the software has been installed. If you installed Oracle Database through the Enterprise Edition, Standard Edition, or Personal Edition installation types, then shared support was not configured. If you created your database through Oracle Database Configuration Assistant, then you were offered a choice of shared or dedicated server support.
6.4.13 Setting Credentials for the Job System to Work with Oracle Enterprise ManagerWindows systems require that you set the correct credentials for the Jobs system to work properly in Oracle Enterprise Manager. By default, the Management Agent service is installed as a LocalSystem user. When submitting jobs, such as stopping or starting the database, the operating system user submitting the job must have the Log on as a batch job privilege enabled.
Perform the following steps to establish that privilege for any operating system user who must submit an Oracle Enterprise Manager job.
1. Start the Local Security Policy tool:
■ Windows Server 2008: From the Start menu, select All Programs, Administrative Tools, then Local Security Policy.
2. Under the Security Settings list, expand the list to Local Policies.
3. Under Local Policies, double-click User Rights Assignment.
4. Under Policy, search for the Log on as a batch job policy.
If the Management Agent service is installed as any other user (that is, not LocalSystem), then, in addition to granting the Log on as a batch job privilege, you must grant the "Windows service" user the following three privileges:
■ Act as part of the operating system
■ Adjust memory quotas for a process
■ Replace a process level token
The service under the "Windows service" user runs at the operating system level.
5. With each policy, perform the following steps:
a. Double-click the policy name.
b. In the Properties dialog box, click Add User or Group.
c. In the Select Users or Groups dialog box, enter the name of the user (for example, jsmith, administrator, and so on.)
d. Click Check Names to check that you have entered the name correctly.
e. Click OK.
See Also: "Postinstallation Configuration Tasks on Windows" of Oracle Database Platform Guide for Microsoft Windows
Note: On Windows Server 2008, the name of the dialog box is Select Users, Computers, or Groups.
Configuring Oracle Components
Oracle Database Postinstallation Tasks 6-11
6. Click OK to exit the Properties dialog box, then exit Local Security Settings and Administrative Tools.
7. Restart your computer.
If a user exists locally and at the domain level, Windows gives the local user precedence. To use the domain user, qualify the user name with the domain name. For example, to use the user joe in the ACCOUNTS domain specify the user name as ACCOUNTS\joe.
6.4.14 Configuring Oracle Database to Communicate with Oracle Automatic Storage Management
On Windows, Oracle Database installations that use Oracle Automatic Storage Management must use Windows native authentication. By default, Windows native authentication is enabled. To ensure that it is, check the sqlnet.ora file, by default located in ORACLE_HOME\network\admin, and ensure that it has NTS enabled. For example:
sqlnet.authentication_services=(NTS)
6.4.15 Installing Oracle Database ExamplesIf you plan to use the following products or features, then download and install the products from the Oracle Database Examples media:
■ Oracle Database Examples
■ Oracle JDBC Development Drivers
■ Oracle Text Knowledge Base
6.4.16 Creating the OraMTS Service for Microsoft Transaction ServerOracle Services for Microsoft Transaction Server (OraMTS) permit Oracle databases to be used as resource managers in Microsoft application coordinated transactions. OraMTS acts as a proxy for the Oracle database to the Microsoft Distributed Transaction Coordinator (MSDTC). As a result, OraMTS provides client-side connection pooling and allows client components that leverage Oracle to participate in promotable and distributed transactions. In addition, OraMTS can operate with Oracle databases running on any operating system, given that the services themselves are run on Windows.
On releases before Oracle Database 12c, the OraMTS service was created as part of a software-only installation. Starting with Oracle Database 12c, you must use a configuration tool to create this service.
To create the OraMTS service after performing a software-only installation for Oracle Database, perform the following steps:
1. Open a command window.
2. Change directories to ORACLE_HOME\bin.
See Also: Oracle Database Platform Guide for Microsoft Windows for more information about Windows native authentication
See Also: Oracle Database Examples Installation Guide for detailed information about various Oracle product demonstrations

Creating a Fast Recovery Area Disk Group
6-12 Oracle Database Installation Guide
3. Run the OraMTSCtl utility to create the OraMTS Service:
C:\ORACLE_HOME\bin> oramtsctl.exe -new
6.5 Creating a Fast Recovery Area Disk GroupDuring installation, by default you can create one disk group. If you plan to add an Oracle Database for a standalone server, then you should create the fast recovery area for database files.
6.5.1 About the Fast Recovery Area and the Fast Recovery Area Disk GroupThe fast recovery area is a unified storage location for all Oracle Database files related to recovery. Database administrators can define the DB_RECOVERY_FILE_DEST_SIZE parameter to the path for the fast recovery area to enable on-disk backups, and rapid recovery of data. Enabling rapid backups for recent data can reduce requests to system administrators to retrieve backup tapes for recovery operations.
When you enable fast recovery in the init.ora file, it writes all RMAN backups, archive logs, control file automatic backups, and database copies to the fast recovery area. RMAN automatically manages files in the fast recovery area by deleting obsolete backups and archive files no longer required for recovery.
Oracle recommends that you create a fast recovery area disk group. Oracle Clusterware files and Oracle Database files can be placed on the same disk group, and you can also place fast recovery files in the same disk group. However, Oracle recommends that you create a separate fast recovery disk group to reduce storage device contention.
The fast recovery area is enabled by setting DB_RECOVERY_FILE_DEST_SIZE. The size of the fast recovery area is set with DB_RECOVERY_FILE_DEST_SIZE. As a general rule, the larger the fast recovery area, the more useful it becomes. For ease of use, Oracle recommends that you create a fast recovery area disk group on storage devices that can contain at least three days of recovery information. Ideally, the fast recovery area should be large enough to hold a copy of all of your data files and control files, the online redo logs, and the archived redo log files needed to recover your database using the data file backups kept under your retention policy.
Multiple databases can use the same fast recovery area. For example, assume you have created one fast recovery area disk group on disks with 150 GB of storage, shared by three different databases. You can set the size of the fast recovery for each database depending on the importance of each database. For example, if database1 is your least important database, database2 is of greater importance and database3 is of greatest importance, then you can set different DB_RECOVERY_FILE_DEST_SIZE settings for each database to meet your retention target for each database: 30 GB for database1, 50 GB for database2, and 70 GB for database3.
6.5.2 Creating the Fast Recovery Area Disk GroupTo create a fast recovery file disk group:
1. Navigate to the Grid home bin directory, and start ASM Configuration Assistant (ASMCA). For example:
See Also: Oracle Services for Microsoft Transaction Server Developer's Guide for Microsoft Windows for more information about OraMTS, which allows Oracle databases to be used as resource managers in distributed transactions
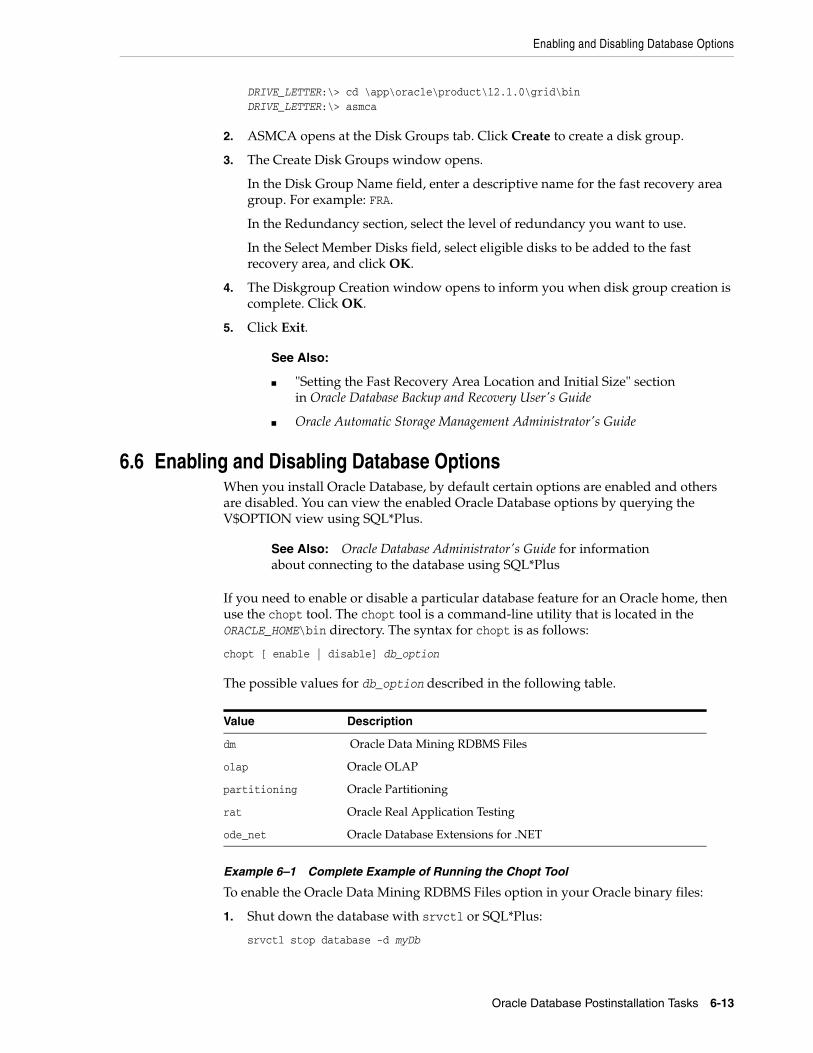
Enabling and Disabling Database Options
Oracle Database Postinstallation Tasks 6-13
DRIVE_LETTER:\> cd \app\oracle\product\12.1.0\grid\binDRIVE_LETTER:\> asmca
2. ASMCA opens at the Disk Groups tab. Click Create to create a disk group.
3. The Create Disk Groups window opens.
In the Disk Group Name field, enter a descriptive name for the fast recovery area group. For example: FRA.
In the Redundancy section, select the level of redundancy you want to use.
In the Select Member Disks field, select eligible disks to be added to the fast recovery area, and click OK.
4. The Diskgroup Creation window opens to inform you when disk group creation is complete. Click OK.
5. Click Exit.
6.6 Enabling and Disabling Database OptionsWhen you install Oracle Database, by default certain options are enabled and others are disabled. You can view the enabled Oracle Database options by querying the V$OPTION view using SQL*Plus.
If you need to enable or disable a particular database feature for an Oracle home, then use the chopt tool. The chopt tool is a command-line utility that is located in the ORACLE_HOME\bin directory. The syntax for chopt is as follows:
chopt [ enable | disable] db_option
The possible values for db_option described in the following table.
Example 6–1 Complete Example of Running the Chopt Tool
To enable the Oracle Data Mining RDBMS Files option in your Oracle binary files:
1. Shut down the database with srvctl or SQL*Plus:
srvctl stop database -d myDb
See Also:
■ "Setting the Fast Recovery Area Location and Initial Size" section in Oracle Database Backup and Recovery User's Guide
■ Oracle Automatic Storage Management Administrator's Guide
See Also: Oracle Database Administrator's Guide for information about connecting to the database using SQL*Plus
Value Description
dm Oracle Data Mining RDBMS Files
olap Oracle OLAP
partitioning Oracle Partitioning
rat Oracle Real Application Testing
ode_net Oracle Database Extensions for .NET

Changing the Oracle Home User Password
6-14 Oracle Database Installation Guide
2. Stop the database service, OracleServiceSID, using the Services program in Control Panel.
3. Run the following commands:
cd %ORACLE_HOME%/binchopt enable dm
4. Start the database service, OracleServiceSID, using the Services program in Control Panel.
5. Start up the database:
srvctl start database -d myDb
6.7 Changing the Oracle Home User PasswordOracle Home User Control is a command-line utility that allows an administrator to update the password for an Oracle Home User. This tool updates the password for Windows services in the Oracle home. The input password must match the password for the Windows User Account used as the Oracle Home User. So, first use Windows operating system tools to change the Windows password and then use this tool to update the Windows services in the Oracle home to use the same password.
Syntax Overview:
The following is the command syntax:
orahomeuserctl list | updpwd [-user username] [-host hostname1, hostname2, . . .] [-log logfilename]
where:
■ orahomeuserctl is used to display the Oracle Home User name associated with the current Oracle home or to update the Oracle Home User password.
■ list displays the Oracle Home User name associated with the current Oracle home.
■ updpwd prompts for the new password and updates the password for the named Oracle Service User. The following are the options for updpwd:
– -user username
This option determines the Oracle Home User name. If this option is not present, then the user name associated with the current Oracle home is used. If the named user, be it the username or user of the current Oracle home, is an MSA or Windows Built-in account, then an error message is displayed and the command is terminated.
– -host hostname1, hostname2,. . .
When this option is present, the utility updates the passwords for all services belonging to the named Oracle Home User on the specified hosts. Otherwise, the Oracle Home User Control utility updates the passwords for all the services belonging to the named Oracle Home User on a specified host with
Note: You must have administrator privileges to run this Oracle Home User Control utility.

Postinstallation Tasks for SQL Developer
Oracle Database Postinstallation Tasks 6-15
single instance installation, or updates the passwords for all services belonging to the named Oracle Home User on all the specified hosts.
When the update completes, the utility displays the number of successful updates and any services that failed to update with the new password.
– -log logfilename
This option adds the password update operation results to a log file for every service name receiving the new password. By default, the log files are located in the ORACLE_HOME\log directory. If logfilename specifies only a file name, then the log is stored in the named file in the default directory. However, if the logfilename contains a path, then that path is used without modification.
6.8 Postinstallation Tasks for SQL DeveloperSee the following sections in Oracle SQL Developer Installation Guide for recommended postinstallation tasks for SQL Developer:
■ Migrating User Settings from a Previous Release
■ Migrating Information from Previous Releases
■ Location of User-Related Information

Postinstallation Tasks for SQL Developer
6-16 Oracle Database Installation Guide

7
Getting Started with Oracle Database 7-1
7Getting Started with Oracle Database
This chapter describes where to go after you have completed an Oracle Database installation, such as how to check the installed contents, start various tools, and identify and locate various files. It covers these topics:
■ Checking the Installed Oracle Database Contents and Directory Location
■ Logging In to Oracle Enterprise Manager Database Express 12c
■ Managing Oracle Automatic Storage Management
■ Starting and Stopping an Oracle Database
■ Accessing Oracle Database with SQL*Plus
■ Accessing Oracle Database with Oracle SQL Developer
■ Reviewing User Accounts and Passwords
■ Identifying Databases
■ Locating the Server Parameter File
■ Identifying Tablespaces and Data Files
■ Locating Redo Log Files
■ Locating Control Files
■ Understanding Oracle Database Services on Windows
7.1 Checking the Installed Oracle Database Contents and Directory Location
Use Oracle Universal Installer to check the contents and directory location of your Oracle Database installation.
Follow these steps:
1. From the Start menu, select All Programs, then Oracle - HOMENAME, then Oracle Installation Products, then Universal Installer.
2. In the Welcome window, click Installed Products to display the Inventory dialog box.
3. To check the installed contents, find the Oracle Database product in the list.
To find additional information about an installed product, click Details.
4. To check the directory location of the installed contents, click the Environment tab.
5. Click Close to exit the Inventory dialog box.

Logging In to Oracle Enterprise Manager Database Express 12c
7-2 Oracle Database Installation Guide
6. Click Cancel to exit Oracle Universal Installer, then click Yes to confirm.
7.2 Logging In to Oracle Enterprise Manager Database Express 12cTo start Oracle Enterprise Manager Database Express, use the EM Express URL provided by Oracle Database Configuration Assistant (Oracle DBCA) during the database installation and creation. For information about logging in to Oracle Enterprise Manager Database Express see "Starting EM Express" in Oracle Database 2 Day DBA and "Accessing the Database Home Page" in Oracle Database 2 Day DBA.
If Oracle DBCA did not provide the EM Express URL during the database installation and creation, or if you need to change the EM Express port later on, then see "Configuring the HTTP Port for EM Express" in Oracle Database 2 Day DBA.
7.3 Managing Oracle Automatic Storage ManagementThis section covers the following topics:
■ Starting and Stopping Oracle Automatic Storage Management
■ Oracle Automatic Storage Management Utilities
7.3.1 Starting and Stopping Oracle Automatic Storage ManagementTo start and stop Oracle Automatic Storage Management, in addition to using SQL*Plus, you can use the srvctl utility.
To start Oracle Automatic Storage Management instance using the srvctl utility, run the following command:
srvctl start asm
To stop Oracle Automatic Storage Management instance using the srvctl utility, run the following command:
srvctl stop asm
7.3.2 Oracle Automatic Storage Management UtilitiesTo manage Oracle Automatic Storage Management, you can use the following tools:
■ asmcmd: This command-line tool lets you manage Oracle Automatic Storage Management disk group files and directories.
■ asmtool: This command-line tool is required to stamp the disks to create or modify disk groups later on after the database installation.
■ Oracle Automatic Storage Management Configuration Assistant: Oracle Automatic Storage Management Configuration Assistant (ASMCA) is an interactive utility that enables you to create an Oracle Automatic Storage Management instance or upgrade existing Oracle Automatic Storage Management instances. It also enables you to create and configure disk groups, Oracle Automatic Storage Management volumes and Oracle Automatic Storage Management File Systems (ASMFS).
See Also: Oracle Automatic Storage Management Administrator's Guide for information about starting and stopping Oracle Automatic Storage Management instances by using SQL*Plus

Starting and Stopping an Oracle Database
Getting Started with Oracle Database 7-3
■ Oracle Enterprise Manager Cloud Control: If you have Oracle Enterprise Manager installed, you can use Cloud Control to manage Oracle ASM functions, such as migrating an existing database to Oracle ASM, checking the status of the Oracle ASM instance, checking the performance of the Oracle ASM disk groups, and creating or dropping Oracle ASM disk groups.
■ Oracle Enterprise Manager Database Express 12c: This utility enables you to perform basic administrative tasks such as user, performance, memory, and space management.
■ SQL*Plus: You can use Oracle Automatic Storage Management-specific commands from this tool. To connect to the Oracle Automatic Storage Management instance, you use the same methods that you use to connect to an Oracle Database instance.
7.4 Starting and Stopping an Oracle DatabaseYou can start and stop an Oracle database by using any of the following methods:
■ Starting and Stopping the Database with Oracle Administration Assistant for Windows
■ Starting and Stopping the Database from the Microsoft Windows Services Utility
7.4.1 Starting and Stopping the Database with Oracle Administration Assistant for Windows
To start or stop the database:
1. From the Start menu, select All Programs, then Oracle - HOMENAME, then Configuration and Migration Tools, and then Administrative Assistant for Windows.
2. In the console window, expand the Oracle Administration Assistant for Windows tree structure.
3. Under Databases, right-click the name of the database, and from the menu, select from the following options:
■ Connect Database
■ Start Service
■ Disconnect Database
■ Stop Service
■ Startup/Shutdown Options
■ Process Information
7.4.2 Starting and Stopping the Database from the Microsoft Windows Services UtilityYou can use SQL or srvctl utility to start or stop the database instance. SRVCTL starts the service automatically.
To use SQL to start the database instance, start the Windows services:
See Also: Oracle Automatic Storage Management Administrator's Guide for more information about managing Oracle Automatic Storage Management

Accessing Oracle Database with SQL*Plus
7-4 Oracle Database Installation Guide
1. From the Start menu, select All Programs, then Administrative Tools, and then Services.
2. In the Services dialog box, locate the name of the database you want to start or stop.
3. Right-click the name of the database, and from the menu, select either Start, Stop, or Pause.
To set its startup properties, right-click Properties, and in the dialog box, select either Automatic, Manual, or Disabled from the Startup type list.
7.5 Accessing Oracle Database with SQL*PlusTo issue SQL and PL/SQL statements to Oracle Database, you can use SQL*Plus. This tool enables you to perform the same database management operations, and query, insert, update, or delete data directly in the database.
To start SQL*Plus, from the Start menu, select All Programs, then Oracle - HOMENAME, then Application Development, and then SQL Plus.
Alternatively, at the command line, you can enter the following command at a Windows command prompt:
C:\> sqlplus /nologSQL> CONNECT user_nameEnter password: password
For example, to log on as SYSTEM using the password password, you enter:
C:\> sqlplus /nologSQL> CONNECT SYSTEMEnter password: password
If you are logging on as SYS, you must connect as SYSDBA:
C:\> sqlplus /nologSQL> CONNECT SYS AS SYSDBAEnter password: password
7.6 Accessing Oracle Database with Oracle SQL DeveloperTo issue SQL and PL/SQL statements to Oracle Database, you can use SQL Developer. All SQL and PL/SQL commands are supported as they are passed directly from the SQL Worksheet to the Oracle Database.
To start SQL Developer:
1. From the Start menu, select All Programs, then Oracle - HOMENAME, then Application Development, and then SQL Developer.
2. If you are asked to enter the full path name for java.exe, click Browse and find java.exe. For example, C:\Program Files\Java\jdk1.6.0_25\bin\java.exe.
See Also:
■ SQL*Plus User's Guide and Reference
■ SQL*Plus Quick Reference
■ Oracle Database Administrator's Guide for more information about accessing Oracle Database using SQL*Plus.
Reviewing User Accounts and Passwords
Getting Started with Oracle Database 7-5
3. Once SQL Developer starts, perform the following steps:
■ Right-click Connections.
■ Select New Connection.
■ In the New/Select Database Connection dialog box, enter a Connection name, username, password, and for the host string, the name of the database to which you want to connect.
■ Click Connect.
Once connected, you can view, create, modify, and delete the database objects using the Connection Navigator or issue any SQL or PL/SQL command using a SQL Worksheet (From the Tools menu, select SQL Worksheet).
SQL*Plus commands have to be interpreted by the SQL Worksheet before being passed to the database. The SQL Worksheet currently supports many SQL*Plus commands. SQL*Plus commands which are not supported by the SQL Worksheet are ignored and are not sent to the Oracle Database.
7.7 Reviewing User Accounts and PasswordsAll databases created by Oracle Database Configuration Assistant include the SYS, SYSTEM, and DBSNMP database accounts. In addition, Oracle provides several other administrative accounts. Before using these other accounts, you must unlock them and reset their passwords. This section covers the following topics:
■ Reviewing Administrative Accounts
■ Minimum Requirements for Passwords
■ Recommendations for Passwords
7.7.1 Reviewing Administrative AccountsTable 7–1 describes the administrative user names.
See Also: "SQL*Plus Statements Supported and Not Supported in SQL Worksheet" in Oracle SQL Developer User's Guide
See Also:
■ "Minimum Requirements for Passwords" on page 7-8 for information about using Oracle Enterprise Manager Database Express to view a complete list of the user accounts defined for your database
■ Oracle Database Administrator's Guide for information about Oracle security procedures and security best practices
Note: Use Oracle Enterprise Manager Database Express 12c to view the complete list of database accounts.

Reviewing User Accounts and Passwords
7-6 Oracle Database Installation Guide
Table 7–1 Administrative Accounts
User Name Description See Also
ANONYMOUS Allows HTTP access to Oracle XML DB. Oracle XML DB Developer's Guide
APEX_040200 The account owns the Oracle Application Express schema and metadata.
Oracle Application Express Application Builder User's Guide
APEX_PUBLIC_USER The minimally privileged account used for Oracle Application Express configuration with Oracle HTTP Server and mod_plsql.
Oracle Application Express Application Builder User's Guide
APPQOSSYS Used for storing or managing all data and metadata required by Oracle Quality of Service Management.
None
AUDSYS The account where the unified audit data trail resides.
Oracle Database Security Guide
BI Owns the Business Intelligence schema included in the Oracle Sample Schemas. It is only available if you loaded the Sample Schemas.
Oracle Database Sample Schemas
CTXSYS The Oracle Text account. Oracle Text Reference
DBSNMP Used by Management Agent of Oracle Enterprise Manager to monitor and manage the database.
Oracle Enterprise Manager Cloud Control Administrator's Guide
DIP Used by Directory Integration Platform (DIP) to synchronize the changes in Oracle Internet Directory with the applications in the database.
None
DVF The account owned by Database Vault that contains public functions to retrieve the Database Vault Factor values.
Oracle Database Vault Administrator's Guide
DVSYS There are two roles assciated with this account. Database Vault owner role manages the Database Vault roles and configurations. The Database Vault Account Manager is used to manage database user accounts.
Note: Part of Oracle Database Vault user interface text is stored in database tables in the DVSYS schema. By default, only the English language is loaded into these tables. You can use the DVSYS.DBMS_MACADM.ADD_NLS_DATA procedure to add other languages to Oracle Database Vault. See the "Adding Languages to Oracle Database Vault" section in the Oracle Database Vault Administrator's Guide
Oracle Database Vault Administrator's Guide
EXFSYS Owns the Expression Filter schema. None
FLOWS_FILES The account owns the Oracle Application Express uploaded files.
Oracle Application Express Application Builder User's Guide
HR Owns the Human Resources schema included in the Oracle Sample Schemas. It is available only if you loaded the Sample Schemas.
Oracle Database Sample Schemas
IX Owns the Information Transport schema included in the Oracle Sample Schemas. This account is available only if you loaded the Sample Schemas.
Oracle Database Sample Schemas
LBACSYS The Oracle Label Security administrator account. Oracle Label Security Administrator's Guide
MDDATA The schema used by Oracle Spatial and Graph for storing geocoder and router data.
Oracle Spatial and Graph Developer's Guide

Reviewing User Accounts and Passwords
Getting Started with Oracle Database 7-7
MDSYS The Oracle Spatial and Graph, and Oracle Multimedia Locator administrator account.
Oracle Spatial and Graph Developer's Guide
OE Owns the Order Entry schema included in the Oracle Sample Schemas. This account is available only if you loaded the Sample Schemas.
Oracle Database Sample Schemas
ORACLE_OCM This account contains the instrumentation for configuration collection used by the Oracle Configuration Manager.
Oracle Configuration Manager Installation and Administration Guide
ORDDATA This account contains the Oracle Multimedia DICOM data model.
Oracle Multimedia DICOM Developer's Guide
ORDPLUGINS The Oracle Multimedia user. Plug-ins supplied by Oracle and third party plug-ins are installed in this schema.
Oracle Multimedia Reference
ORDSYS The Oracle Multimedia administrator account. Oracle Multimedia Reference
OUTLN Centrally manages metadata associated with stored outlines. Supports plan stability, which enables maintenance of the same execution plans for the same SQL statements.
Oracle Database Concepts
PM Owns the Product Media schema included in the Oracle Sample Schemas. This account is created only if you loaded the Sample Schemas.
Oracle Database Sample Schemas
SCOTT An account used by Oracle sample programs and examples.
Oracle Database Administrator's Guide
SH Owns the Sales History schema included in the Oracle Sample Schemas. This account is available only if you loaded the Sample Schemas during an Enterprise Edition installation
Oracle Database Administrator's Guide
SI_INFORMTN_SCHEMA Stores the information views for the SQL/MM Still Image Standard.
Oracle Multimedia Reference
SPATIAL_CSW_ADMIN_USR
The Catalog Services for the Web (CSW) account. It is used by the Oracle Spatial and Graph CSW cache manager to load all record type metadata, and record instances from the database into the main memory for the record types that are cached.
Oracle Spatial and Graph Developer's Guide
SPATIAL_WFS_ADMIN_USR
The Web Feature Service (WFS) account. It is used by the Oracle Spatial and Graph WFS cache manager to load all feature-type metadata, and feature instances from the database into main memory for the feature types that are cached.
Oracle Spatial and Graph Developer's Guide
SYS Used for performing database administration tasks.
Oracle Database Administrator's Guide
SYSBACKUP The account used to perform backup and recovery tasks.
Oracle Database Installation Guide
(this guide)
SYSDG The account used to administer and monitor Oracle Data Guard.
Oracle Database Installation Guide
(this guide)
SYSKM The account used to perform encryption key management.
Oracle Database Installation Guide
(this guide)
Table 7–1 (Cont.) Administrative Accounts
User Name Description See Also

Reviewing User Accounts and Passwords
7-8 Oracle Database Installation Guide
7.7.2 Minimum Requirements for PasswordsPasswords for all Oracle system administration accounts except SYS, SYSTEM, and DBSNMP are revoked after installation. Before you use a locked account, you must unlock it and reset its password. If you created a starter database during the installation, Oracle Database Configuration Assistant displays a screen with your database information and the Password Management button. Use the Password Management button and unlock only the user names you use.
The installation does not continue if the following requirements are not met:
■ Password cannot exceed 30 characters.
■ Password cannot contain invalid characters: ! @ % ^ & * ( ) + = \ | ` ~ [ { ] } ; : ' " , < > ?
■ A user name cannot be a password.
■ An empty password cannot be accepted.
■ The SYS account password cannot be change_on_install. (case-insensitive)
■ The SYSTEM account password cannot be manager. (case-insensitive)
■ The DBSNMP account password cannot be dbsnmp. (case-insensitive)
■ If you choose to use the same password for all the accounts, then that password cannot be change_on_install, manager, or dbsnmp. (case-insensitive)
If you created a starter database during the installation, but you did not unlock the required account, unlock the account using one of the following methods:
■ Using Enterprise Manager Database Express 12c to Unlock Accounts and Reset Passwords
■ Using SQL*Plus to Unlock and Change Passwords
SYSTEM Used for performing database administration tasks.
Oracle Database Administrator's Guide
WMSYS The account used to store the metadata information for Oracle Workspace Manager.
Oracle Database Workspace Manager Developer's Guide
XDB Used for storing Oracle XML DB data and metadata.
Oracle XML DB Developer's Guide
See Also:
■ "Database Administrator Usernames" of Oracle Database Administrator's Guide
■ "Administering External Users and Roles on Windows" of Oracle Database Platform Guide for Microsoft Windows
Note: If you select the option to create the database as a multitenant container database, then you must provide the pluggable database administrator password.
Table 7–1 (Cont.) Administrative Accounts
User Name Description See Also
Reviewing User Accounts and Passwords
Getting Started with Oracle Database 7-9
7.7.2.1 Using Enterprise Manager Database Express 12c to Unlock Accounts and Reset PasswordsTo unlock and reset user account passwords using Oracle Enterprise Manager Database Express 12c see the "Administering Database User Accounts" section in Oracle Database 2 Day DBA.
7.7.2.2 Using SQL*Plus to Unlock and Change PasswordsUse SQL*Plus to unlock accounts and change passwords any time after the installation process.
To change a password after installation:
1. Start SQL*Plus:
C:\> sqlplus /nolog
2. Connect as SYSDBA:
SQL> CONNECT SYS AS SYSDBAEnter password: SYS_password
3. Enter a command similar to the following, where account is the user account to unlock and password is the new password:
SQL> ALTER USER account IDENTIFIED BY password ACCOUNT UNLOCK;
7.7.3 Recommendations for PasswordsWhen prompted for a password, follow these guidelines. Oracle recommends that the password you specify:
■ contains at least one lowercase letter.
■ contains at least one uppercase letter.
■ contains at least one digit.
■ is at least 8 characters in length.
See Also: Oracle Database Administrator's Guide for more information about:
■ Unlocking and changing passwords after installation
■ Oracle security procedures
■ Security best practices
See Also: Click Help in the Oracle Enterprise Manager Database Express 12c window for more information
See Also:
■ Oracle Database Security Guide to learn how to add new users and change passwords
■ Oracle Database SQL Language Reference for the ALTER USER statement syntax used for unlocking user accounts
■ Oracle Database Administrator's Guide for information about the users SYS and SYSTEM

Identifying Databases
7-10 Oracle Database Installation Guide
■ uses the database character set which can include the underscore (_), dollar ($), and pound sign (#) characters.
■ if contains special characters, including beginning the password with a number or symbol, then enclose the password with double-quotation marks.
■ should not be an actual word.
7.8 Identifying Databases The Oracle Database software identifies a database by its global database name. A global database name consists of the database name and database domain. Usually, the database domain is the same as the network domain, but it need not be. The global database name uniquely distinguishes a database from any other database in the same network. You specify the global database name when you create a database during the installation, or when using Oracle Database Configuration Assistant.
The database name input field is used to set the DB_NAME, DB_UNIQUE_NAME, and DB_DOMAIN Oracle initialization parameter values.
For example:
sales_world.example.com
In this example:
■ sales_world is the name of the database. The database name (DB_UNIQUE_NAME) portion is a string of no more than 30 characters that can contain alphanumeric, underscore (_), dollar ($), and pound (#) characters but must begin with an alphabetic character. No other special characters are permitted in a database name.
■ sales_wo is the DB_NAME. The DB_NAME initialization parameter specifies a database identifier of up to eight characters.
■ example.com is the network domain in which the database is located. Together, the database name and the network domain make the global database name unique. The domain portion is a string of no more than 128 characters that can contain alphanumeric, underscore (_), and pound (#) characters. The DB_DOMAIN initialization parameter specifies the domain name.
However, the DB_NAME parameter need not necessarily be the first eight characters of DB_UNIQUE_NAME.
The DB_UNIQUE_NAME parameter and the DB_DOMAIN name parameter combine to create the global database name value assigned to the SERVICE_NAMES parameter in the initialization parameter file.
The System Identifier (SID) identifies a specific database instance. The SID uniquely distinguishes the instance from any other instance on the same computer. Each database instance requires a unique SID and database name.
For example, if the SID and database name for an Oracle database are ORCL, then each database file is located in the ORACLE_BASE\oradata\orcl directory, and the initialization response file is located in the ORACLE_BASE\admin\orcl\pfile directory.
See Also: "DB_UNIQUE_NAME" and "DB_NAME" in Oracle Database Reference
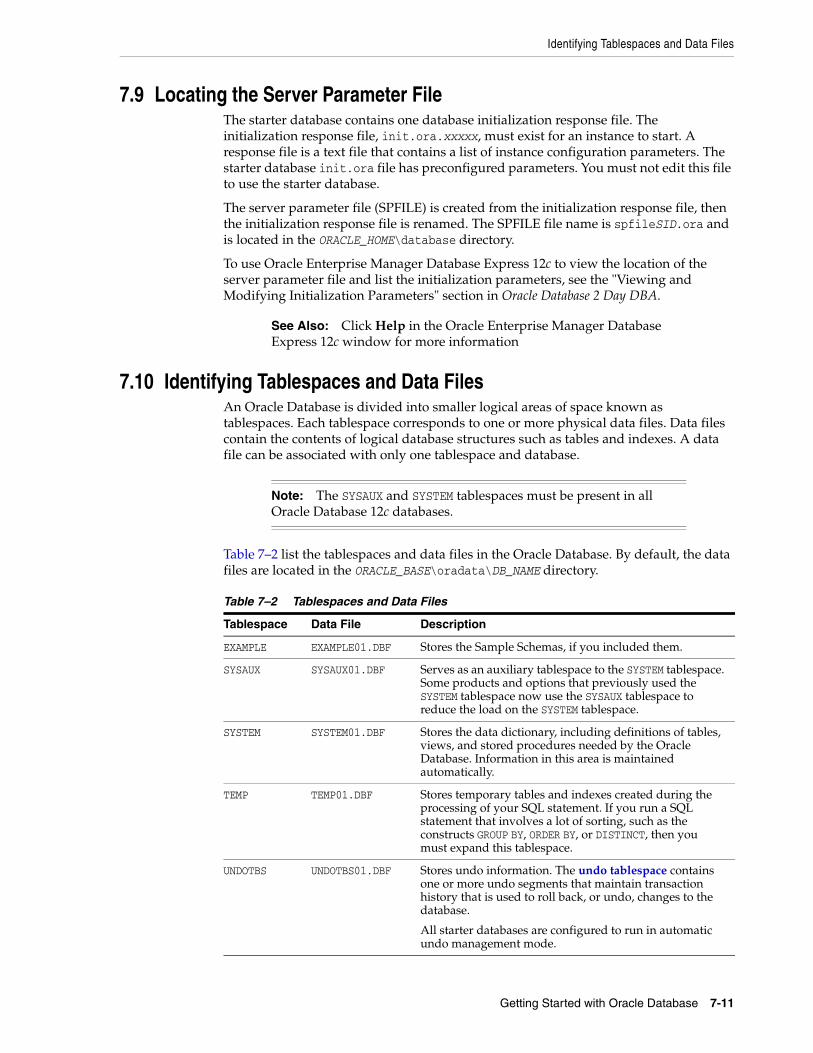
Identifying Tablespaces and Data Files
Getting Started with Oracle Database 7-11
7.9 Locating the Server Parameter FileThe starter database contains one database initialization response file. The initialization response file, init.ora.xxxxx, must exist for an instance to start. A response file is a text file that contains a list of instance configuration parameters. The starter database init.ora file has preconfigured parameters. You must not edit this file to use the starter database.
The server parameter file (SPFILE) is created from the initialization response file, then the initialization response file is renamed. The SPFILE file name is spfileSID.ora and is located in the ORACLE_HOME\database directory.
To use Oracle Enterprise Manager Database Express 12c to view the location of the server parameter file and list the initialization parameters, see the "Viewing and Modifying Initialization Parameters" section in Oracle Database 2 Day DBA.
7.10 Identifying Tablespaces and Data FilesAn Oracle Database is divided into smaller logical areas of space known as tablespaces. Each tablespace corresponds to one or more physical data files. Data files contain the contents of logical database structures such as tables and indexes. A data file can be associated with only one tablespace and database.
Table 7–2 list the tablespaces and data files in the Oracle Database. By default, the data files are located in the ORACLE_BASE\oradata\DB_NAME directory.
See Also: Click Help in the Oracle Enterprise Manager Database Express 12c window for more information
Note: The SYSAUX and SYSTEM tablespaces must be present in all Oracle Database 12c databases.
Table 7–2 Tablespaces and Data Files
Tablespace Data File Description
EXAMPLE EXAMPLE01.DBF Stores the Sample Schemas, if you included them.
SYSAUX SYSAUX01.DBF Serves as an auxiliary tablespace to the SYSTEM tablespace. Some products and options that previously used the SYSTEM tablespace now use the SYSAUX tablespace to reduce the load on the SYSTEM tablespace.
SYSTEM SYSTEM01.DBF Stores the data dictionary, including definitions of tables, views, and stored procedures needed by the Oracle Database. Information in this area is maintained automatically.
TEMP TEMP01.DBF Stores temporary tables and indexes created during the processing of your SQL statement. If you run a SQL statement that involves a lot of sorting, such as the constructs GROUP BY, ORDER BY, or DISTINCT, then you must expand this tablespace.
UNDOTBS UNDOTBS01.DBF Stores undo information. The undo tablespace contains one or more undo segments that maintain transaction history that is used to roll back, or undo, changes to the database.
All starter databases are configured to run in automatic undo management mode.
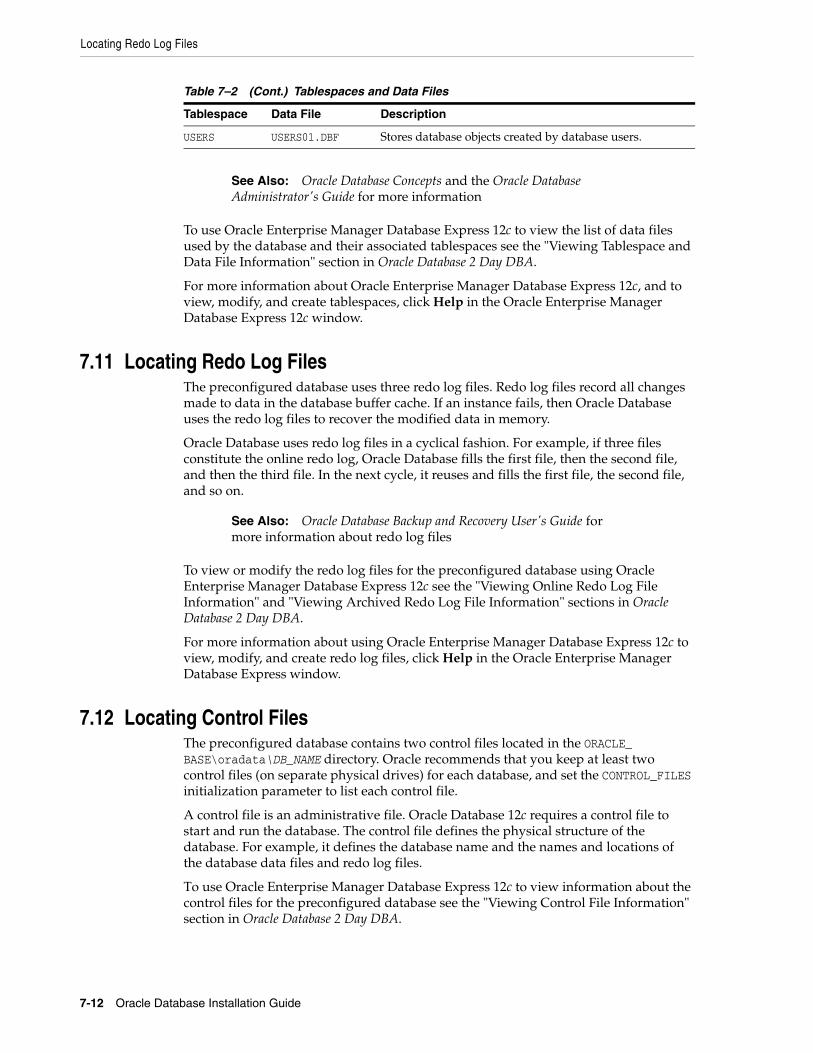
Locating Redo Log Files
7-12 Oracle Database Installation Guide
To use Oracle Enterprise Manager Database Express 12c to view the list of data files used by the database and their associated tablespaces see the "Viewing Tablespace and Data File Information" section in Oracle Database 2 Day DBA.
For more information about Oracle Enterprise Manager Database Express 12c, and to view, modify, and create tablespaces, click Help in the Oracle Enterprise Manager Database Express 12c window.
7.11 Locating Redo Log FilesThe preconfigured database uses three redo log files. Redo log files record all changes made to data in the database buffer cache. If an instance fails, then Oracle Database uses the redo log files to recover the modified data in memory.
Oracle Database uses redo log files in a cyclical fashion. For example, if three files constitute the online redo log, Oracle Database fills the first file, then the second file, and then the third file. In the next cycle, it reuses and fills the first file, the second file, and so on.
To view or modify the redo log files for the preconfigured database using Oracle Enterprise Manager Database Express 12c see the "Viewing Online Redo Log File Information" and "Viewing Archived Redo Log File Information" sections in Oracle Database 2 Day DBA.
For more information about using Oracle Enterprise Manager Database Express 12c to view, modify, and create redo log files, click Help in the Oracle Enterprise Manager Database Express window.
7.12 Locating Control FilesThe preconfigured database contains two control files located in the ORACLE_BASE\oradata\DB_NAME directory. Oracle recommends that you keep at least two control files (on separate physical drives) for each database, and set the CONTROL_FILES initialization parameter to list each control file.
A control file is an administrative file. Oracle Database 12c requires a control file to start and run the database. The control file defines the physical structure of the database. For example, it defines the database name and the names and locations of the database data files and redo log files.
To use Oracle Enterprise Manager Database Express 12c to view information about the control files for the preconfigured database see the "Viewing Control File Information" section in Oracle Database 2 Day DBA.
USERS USERS01.DBF Stores database objects created by database users.
See Also: Oracle Database Concepts and the Oracle Database Administrator's Guide for more information
See Also: Oracle Database Backup and Recovery User's Guide for more information about redo log files
Table 7–2 (Cont.) Tablespaces and Data Files
Tablespace Data File Description

Understanding Oracle Database Services on Windows
Getting Started with Oracle Database 7-13
For more information about using Oracle Enterprise Manager Database Express 12c to perform various tasks related to tablespaces and data files, redo log files, and control files, click Help in the Oracle Enterprise Manager Database Express window.
7.13 Understanding Oracle Database Services on WindowsTwo main Oracle services are automatically started after installation when you create a database:
■ OracleServiceSID (Oracle Database service)
■ OracleHOMENAMETNSListener (Oracle Database listener service)
If you configured Oracle Automatic Storage Management, the OracleOHService and OracleASMService+ASM services are listed as well. However, other services for networking or other individual components may not automatically start.
See Also: Oracle Database Administrator's Guide for more information about setting the CONTROL_FILES initialization parameter value
See Also: Oracle Database Administrator's Guide for more information about setting the CONTROL_FILES initialization parameter value

Understanding Oracle Database Services on Windows
7-14 Oracle Database Installation Guide

8
Removing Oracle Database Software 8-1
8Removing Oracle Database Software
This chapter describes how to completely remove Oracle software and configuration files related to the specified Oracle home. It includes information about removing Oracle software using the deinstallation tool.
The deinstallation tool removes standalone Oracle Database installations, Oracle Clusterware and Oracle Automatic Storage Management (Oracle ASM) from your server, as well as Oracle Real Application Clusters (Oracle RAC) and Oracle Database client installations.
Starting with Oracle Database 11g Release 2 (11.2), Oracle recommends that you use the deinstallation tool to remove the entire Oracle home associated with the Oracle Database, Oracle Clusterware, Oracle ASM, Oracle RAC, or Oracle Database client installation. Oracle does not support the removal of individual products or components.
The following sections describe the tool, and provide information about additional options to use the tool:
■ About the Deinstallation Tool
■ Example of Running the Deinstallation Tool
■ Example of Running the Deinstallation Command
■ Example of a Deinstallation Response File for an Oracle Database
■ Example of a Deinstallation Response File for Oracle Grid Infrastructure
8.1 About the Deinstallation ToolStarting with Oracle Database 12c Release 1 (12.1), the deinstallation tool is integrated with Oracle Universal Installer (OUI). You can perform a deinstallation by running the
See Also: Oracle Grid Infrastructure Installation Guide and Oracle Real Application Clusters Installation Guide for information about removing an Oracle RAC installation.
The "Dropping Disk Groups" section in the Oracle Automatic Storage Management Administrator's Guide for information about removing an Oracle Automatic Storage Management disk group.
Caution: If you have a standalone database on a node in a cluster and you have multiple databases with the same global database name (GDN), then you cannot use the deinstallation tool to remove one database only.

About the Deinstallation Tool
8-2 Oracle Database Installation Guide
setup.exe command with the -deinstall and -home options from the base directory of the Oracle Database, Oracle Database Client, or Oracle Grid Infrastructure installation media.
The deinstallation tool is also available as a separate command (deinstall) in Oracle home directories after installation. It is located in ORACLE_HOME\deinstall.
The deinstallation tool uses the information you provide and the information gathered from the software home to create a response file. Alternatively, you can supply a response file generated previously by the deinstall command using the –checkonly option, or by editing the response file template.
The deinstallation tool stops Oracle software, and removes Oracle software and configuration files on the operating system for a specific Oracle home.
If the software in the Oracle home is not running (for example, after an unsuccessful installation), then the deinstallation tool cannot determine the configuration, and you must provide all the configuration details either interactively or in a response file.
Oracle recommends that you run the deinstallation tool as the Oracle software installation owner. The default method for running the deinstallation tool is from the deinstall directory in the Oracle home as the installation owner:
%ORACLE_HOME%\deinstallDRIVE_LETTER:\> deinstall\deinstall.bat
Caution: When you install Oracle Database, if the central inventory contains no other registered homes besides the home that you are deconfiguring and removing, then the Deinstallation tool removes the following files and directory contents in the Oracle base directory of the Oracle Database installation owner:
■ admin
■ cfgtoollogs
■ checkpoints
■ diag
■ oradata
■ flash_recovery_area
Oracle strongly recommends that you configure your installations using an Optimal Flexible Architecture (OFA) configuration, and that you reserve Oracle base and Oracle home paths for exclusive use of Oracle software. If you have any user data in these locations in the Oracle base that is owned by the user account that owns the Oracle software, then the deinstallation tool deletes this data.
In addition, for Oracle Grid Infrastructure installations:
■ Oracle Automatic Storage Management Cluster File System (Oracle ACFS) must be dismounted and Oracle Automatic Storage Management Dynamic Volume Manager (Oracle ADVM) must be disabled.
■ If Grid Naming Service (GNS) is in use, then the entry for the subdomain needs to be deleted from DNS by your DNS administrator.

About the Deinstallation Tool
Removing Oracle Database Software 8-3
The command uses the following syntax, where variable content is indicated by italics:
deinstall.bat [-silent] [-checkonly][-paramfile complete path of input parameter property file] [-params name1=value name2=value . . .][-o complete path of directory for saving files] [-help] To run the deinstallation tool from the database installation media, use the setup.exe command with the -deinstall option, followed by the -home option to specify the path of the Oracle home you want to remove using the following syntax, where variable content is indicated in italics:
setup.exe -deinstall -home complete path of Oracle home [-silent] [-checkonly][-paramfile complete path of input parameter property file] [-params name1=valuename2=value . . .] [-o complete path of directory for saving files] [-help] Provide information about your servers as prompted or accept the defaults.
In addition, you can run the deinstallation tool from other locations, or with a response file, or select other options to run the tool.
■ -home
Use this flag to indicate the home path of the Oracle home to check or deinstall. To deinstall Oracle software using the deinstall command, located in the Oracle home you plan to deinstall, provide a response file in a location outside the Oracle home, and do not use the -home flag.
If you run the deinstallation tool from the ORACLE_HOME\deinstall path, then the -home flag is not required because the tool identifies the location of the home where it is run. If you run the tool using setup.exe -deinstall from the installation media, then -home is mandatory.
■ -silent
Use this flag to run the deinstallation tool in noninteractive mode. This option requires one of the following:
– A working system that it can access to determine the installation and configuration information. The -silent flag does not work with failed installations.
– A response file that contains the configuration values for the Oracle home that is being deinstalled or deconfigured.
You can generate a response file to use or modify by running the tool with the -checkonly flag. The tool then discovers information from the Oracle home to deinstall and deconfigure. It generates the response file that you can then use with the -silent option.
You can also modify the template file deinstall.rsp.tmpl, located in the ORACLE_HOME\deinstall\response directory.
Note: If User Account Control is enabled, then you must create a desktop shortcut to a DOS command window. Open the command window through the Run as administrator, right-click context menu, and start the deinstallation tool.
For more information about the User Account Control, see "Managing User Accounts with User Account Control".
Example of Running the Deinstallation Tool
8-4 Oracle Database Installation Guide
■ -checkonly
Use this flag to check the status of the Oracle software home configuration. Running the deinstallation tool with the -checkonly flag does not remove the Oracle configuration. The -checkonly flag generates a response file that you can then use with the deinstallation tool and -silent option.
■ -paramfile complete path of input parameter property file
Use this flag to run the deinstallation tool with a response file in a location other than the default. When you use this flag, provide the complete path where the response file is located.
The default location of the response file depends on the location of the deinstallation tool:
– From the installation media or stage location: \response
– After installation from the installed Oracle home: ORACLE_HOME\deinstall\response.
■ -params ["name1=value" "name2=value" "name3=value" . . .]
Use this flag with a response file to override one or more values to change it in a response file you have created.
■ -o complete path of directory for saving response file
Use this flag to provide a path other than the default location where the response file is saved. The default location is \response\deinstall.rsp.tmpl.
The default location of the response file depends on the location of deinstallation tool:
– From the installation media or stage location before installation: \response
– After installation from the installed Oracle home: ORACLE_HOME/deinstall/response.
■ -help
Use the help option (-help ) to obtain additional information about the command optional flags.
8.2 Example of Running the Deinstallation ToolIf you perform a deinstallation by running the setup.exe command with the -deinstall option from the installation media, then help is displayed unless you enter a -home flag and provide a path to the home directory of the Oracle software to remove from your system.
Use the optional flag -paramfile to provide a path to a response file.
In the following example, the setup.exe command is in the path \directory_path, where directory_path is the path to the database directory on the installation media, and C:\app\oracle\product\12.1.0\dbhome_1 is the path to the Oracle home which is removed:
DRIVE_LETTER:\> cd \directory_pathDRIVE_LETTER:\> setup.exe -deinstall -home C:\app\oracle\product\12.1.0\dbhome_1
The following example uses a response file in the software owner location C:\Documents and Settings\oracle\:
DRIVE_LETTER:\> cd \directory_path

Example of a Deinstallation Response File for an Oracle Database
Removing Oracle Database Software 8-5
DRIVE_LETTER:\> setup.exe -deinstall -paramfile C:\Documents and Settings\oracle\my_db_paramfile.tmpl
8.3 Example of Running the Deinstallation CommandIf you perform a deinstallation by using the deinstall command from the ORACLE_HOME\deinstall folder, then the deinstallation starts without prompting you for an ORACLE_HOME.
Use the optional flag -paramfile to provide a path to a response file.
In the following example, the deinstall command is in the path C:\app\oracle\product\12.1.0\dbhome_1\deinstall, and it uses a response file in the software owner location C:\Documents and Settings\oracle\:
DRIVE_LETTER:\> cd \app\oracle\product\12.1.0\dbhome_1\deinstall\DRIVE_LETTER:\> deinstall.bat -paramfile %HOMEPATH%\my_db_paramfile.tmpl
For the grid infrastructure home, use the deinstallation script (deinstall.bat) in the Oracle Grid Infrastructure for a standalone server home, which in this example is C:\app\oracle\product\12.1.0\grid:
DRIVE_LETTER:\> cd \app\oracle\product\12.1.0\grid\deinstall\DRIVE_LETTER:\> deinstall.bat -paramfile %HOMEPATH%\my_grid_paramfile.tmpl
8.4 Example of a Deinstallation Response File for an Oracle DatabaseYou can perform a deinstallation on a standalone Oracle Database with the -paramfile option to use the values you specify in the response file. The following is an example of a response file, in which the Oracle Database binary owner is oracle, the Oracle Database home (Oracle home) is in the path C:\app\oracle\product\12.1.0\dbhome_1, the Oracle base (where other Oracle software is installed) is C:\app\oracle, the Oracle Inventory home is C:\Program Files\Oracle\Inventory, and the local node (the node where you run the deinstallation session from) is myserver:
#Copyright (c) 2005, 2009 Oracle Corporation. All rights reserved.ORACLE_HOME=C:\app\oracle\product\12.1.0\dbhome_1ORACLE_BASE.orcl=C:\app\oracleFLASH_RECOVERY_LOC.orcl=C:\app\oracle\flash_recovery_area\ORCLSTORAGE_TYPE.orcl=FSDB_TYPE.orcl=SI_DBNETCA_LOCAL_LISTENERS=LISTENERLOGDIR=C:\app\oracle\product\12.1.0\dbhome_1\deinstall\logs\NODE_LIST.orcl=myserverObaseCleanupPtrLoc=\tmp\deinstall2012-06-12_09-14-11AM\orabase_cleanup.lstARCHIVE_LOG_DESTINATION_LOC.orcl=ORACLE_BASE=C:\app\oracleDUMP_DESTINATION_LOC.orcl=C:\app\oracle\admin\orclLOCAL_SID.orcl=orclINVENTORY_LOCATION=C:\Program Files\Oracle\InventoryRAW_MAPPING_FILE.orcl=SID_LIST.orcl=orclDB_UNIQUE_NAME_LIST=orclDATAFILE_LOC.orcl=C:\app\oracle\oradata\orcl, C:\app\oracle\fast_recovery_area\orclHOME_TYPE=SIDBCRS_HOME=falseCREATION_MODE.orcl=y

Example of a Deinstallation Response File for Oracle Grid Infrastructure
8-6 Oracle Database Installation Guide
CONFIGFILE_LOC.orcl=ORACLE_BINARY_OK=trueDIAG_DEST.orcl=C:\app\oracle\diag\rdbms\orclLOCAL_NODE=myserverlocal=falseSPFILE_LOC.orcl=C:\app\oracle\product\12.1.0\dbhome_1\dbs\spfileorcl.orainventory_loc=C:\Program Files\Oracle\InventoryMinimumSupportedVersion=11.2.0.1.0silent=falseDBCA_LOG.orcl=C:\app\oracle\cfgtoollogs\dbca\orclORACLE_HOME=C:\app\oracle\product\12.1.0\dbhome_1CCR_CONFIG_STATUS=CCR_DEL_HOMEEMCA_LOG.orcl=C:\app\oracle\cfgtoollogs\emca\orclORACLE_HOME_VERSION_VALID=true
8.5 Example of a Deinstallation Response File for Oracle Grid Infrastructure
You can perform a deinstallation on an Oracle Grid Infrastructure for a standalone server home with the -paramfile option to use the values you specify in the response file.
The following is an example of a response file, in which the Oracle grid infrastructure binary owner is oracle, the Oracle grid infrastructure home is in the path D:\app\oracle, the Oracle base (where other Oracle software is installed) is D:\app\12.1.0\, the central Oracle inventory home (oraInventory) is C:\Program Files\Oracle\Inventory, the local node (the node where you are run the deinstallation session from) is myserver:
# Copyright (c) 2005, 2009 Oracle Corporation. All rights reserved.ORACLE_HOME=C:\app\oracle\product\12.1.0\gridLOCAL_NODE=myserverHOME_TYPE=SIHAASM_REDUNDANCY=EXTERNALORACLE_BASE=C:\app\oracle\ObaseCleanupPtrLoc=C:\Users\oracle\AppData\Local\Temp\deinstall2013-01-28_05-03-31AM\utl\orabase_cleanup.lstSCAN_PORT=0silent=falseASM_UPGRADE=falseORA_CRS_HOME=C:\app\oracle\product\12.1.0\gridMinimumSupportedVersion=11.2.0.1.0GPNPCONFIGDIR=$ORACLE_HOMELOGDIR=C:\Users\username\logs\ORACLE_HOME_VERSION_VALID=trueGPNPGCONFIGDIR=$ORACLE_HOMEORACLE_OWNER=usernameISROLLING=trueCRS_STORAGE_OPTION=0ORACLE_BINARY_OK=trueMGMT_DB=falseNETCA_LISTENERS_REGISTERED_WITH_HAS=LISTENERASM_AU_SIZE=1HUB_SIZE=0ASM_ORACLE_BASE=C:\app\oracleORA_DBA_GROUP=JREDIR=C:\app\oracle\product\12.1.0\grid\jdk\jre\USER_IGNORED_PREREQ=false

Example of a Deinstallation Response File for Oracle Grid Infrastructure
Removing Oracle Database Software 8-7
ASM_DISK_GROUPS="+DATA"ORA_ASM_GROUP=LANGUAGE_ID=AMERICAN_AMERICA.WE8MSWIN1252CSS_LEASEDURATION=400ASM_HOME=C:\app\oracle\product\12.1.0\gridASM_DIAGNOSTIC_DEST=C:\app\oracle\product\OBTZ=America/DenverWindowsRegistryCleanupList=C:\Users\oracle\AppData\Local\Temp\deinstall2013-01-28_05-03-31AM\utl\registry_cleanup.lstREUSEDG=falseSILENT=falselocal=falseINVENTORY_LOCATION=C:\Program Files\Oracle\InventoryGNS_CONF=falseBIG_CLUSTER=falseLISTENER_USERNAME=domainname\oracleASM_DISKS=\\.\ORCLDISKDATA0ORACLE_HOME=C:\app\oracle\product\12.1.0\gridCRS_HOME=trueASM_IN_HOME=trueCRFHOME="C:\app\oracle\product\12.1.0\grid"ASM_DROP_DISKGROUPS=trueOLD_ACTIVE_ORACLE_HOME=ASM_LOCAL_SID=+ASMJLIBDIR=C:\app\oracle\product\12.1.0\grid\jlibVNDR_CLUSTER=falseASM_DISK_GROUP=DATA

Example of a Deinstallation Response File for Oracle Grid Infrastructure
8-8 Oracle Database Installation Guide

A
Installing Java Access Bridge A-1
AInstalling Java Access Bridge
This appendix describes how to install Java Access Bridge 2.0.2. Java Access Bridge 2.0.2 enables use of a screen reader with Oracle components:
■ Overview of Java Access Bridge 2.0.2
■ Setting Up Java Access Bridge 2.0.2
A.1 Overview of Java Access Bridge 2.0.2Java Access Bridge 2.0.2 enables assistive technologies to read Java applications running on the Windows platform. Assistive technologies can read Java-based interfaces, such as Oracle Universal Installer and Oracle Enterprise Manager Database Express.
Java Access Bridge 2.0.2 is supported on Windows Server 2008 x64, Windows Server 2008 R2 x64, Windows 7 x64, and Windows 8 x64 for 64-bit database installations. For a list of supported system configurations, including supported versions of Microsoft Windows and Java SE, see section "Supported System Configuration" available at the following link location:
http://www.oracle.com/technetwork/java/javase/tech/index-jsp-136191.html
During installation, Oracle Universal Installer uses Java Runtime Environment (JRE) 1.6 contained in Oracle Database installation media. The JRE enables the use of Java Access Bridge during installation. See "Setting Up Java Access Bridge 2.0.2" on page A-1 for information about installing and configuring Java Access Bridge after you install Oracle components.
A.2 Setting Up Java Access Bridge 2.0.2This section describes how to install and configure Java Access Bridge 2.0.2 for Windows after installing Oracle components.
To set up Java Access Bridge 2.0.2 on Windows 64-bit operating system, follow these steps:
1. Go to Java Standard Edition (Java SE) Downloads page to download the latest build of JDK 7:
http://www.oracle.com/technetwork/java/javase/downloads/index.html
2. Install JDK 7 after accepting the Oracle license agreement

Setting Up Java Access Bridge 2.0.2
A-2 Oracle Database Installation Guide
3. Press Windows key+U to open Ease of Access Center, and select Use the computer without a display
4. Select the Enable Accessbridge check box. Click Save to save the changes
5. Download Java Access Bridge 2.0.2:
http://www.oracle.com/technetwork/java/javase/downloads/jab-2-0-2-download-354311.html
Download the accessbridge-2_0_2-fcs-bin-b06.zip file after accepting the Oracle license agreement
6. Extract accessbridge-2.0.2 to a directory on your system where you plan to install Java Access Bridge. For example, name the directory as follows:
AB_HOME
7. Open the command prompt and navigate to one of the directory depending on the type of installation (database, client, or companion) you want to perform by typing the DRIVE_LETTER:.
This changes the directory to as follows:
DRIVE_LETTER:\Disk1
8. Run the following command once you are in the Disk1 directory:
setup.exe -jreLoc path-to-jdk7\jre
Oracle Universal Installer starts and JAWS is able to read all prompts and controls on the screen
9. Once you click the Install button, you must open Windows Explorer to see the directory where the database is installed (DRIVE_LETTER:\app\username\product\12.1.0\dbhome_1), until the JDK folder is created. Once the JDK folder is created, you must copy the files listed in Table A–1 from the Java Access Bridge source location to the JDK destination folder. Copying these files will enable accessibility for both Oracle Database Configuration Assistant and Oracle Net Configuration Assistant
Note: You must have administrator privileges to install JDK on Windows
Table A–1 Copy Files to JDK Directory on Windows 64-Bit
Copy To
AB_HOME\JavaAccessBridge-64.dll dbhome_1\jdk\jre\bin
AB_HOME\JAWTAccessBridge-64.dll dbhome_1\jdk\jre\bin
AB_HOME\Accessibility.properties dbhome_1\jdk\jre\lib
AB_HOME\Access-bridge-64.jar dbhome_1\jdk\jre\lib\ext
AB_HOME\jaccess.jar dbhome_1\jdk\jre\lib\ext

B
Optimal Flexible Architecture B-1
BOptimal Flexible Architecture
This appendix describes the Optimal Flexible Architecture standard. This standard is a set of configuration guidelines created to ensure well organized Oracle installations that are easier to maintain. It includes information about the following topics:
■ Overview of the Optimal Flexible Architecture Standard
■ Changes to the Optimal Flexible Architecture for Oracle Database
■ Directory Tree Differences by Release
■ Optimal Flexible Architecture Directory Naming Conventions
■ Optimal Flexible Architecture and Multiple Oracle Home Configurations
■ Comparison Between Optimal Flexible Architecture on Windows and UNIX
■ Optimal Flexible Architecture Structure File Mapping
B.1 Overview of the Optimal Flexible Architecture StandardThe Optimal Flexible Architecture standard helps you to organize database software and configure databases to allow multiple databases, of different versions, owned by different users to coexist. Optimal Flexible Architecture assists in identification of ORACLE_BASE with its Automatic Diagnostic Repository () diagnostic data to properly collect incidents.
All Oracle components on the installation media are compliant with Optimal Flexible Architecture. Oracle Universal Installer places Oracle Database components in directory locations, assigning the default permissions that follow Optimal Flexible Architecture guidelines.
Oracle recommends that you use Optimal Flexible Architecture, specially if the database grows in size, or if you plan to have multiple databases.
B.1.1 Advantages of Multiple Oracle Homes and OFAWhen you install Oracle database, you are installing one of the largest applications that your computer can support. Using multiple Oracle homes and Optimal Flexible Architecture provides many advantages when administering large databases. The following advantages are important:
■ Structured organization of directories and files, and consistent naming for database files simplify database administration.
■ Distribution of I/O across multiple disks prevents performance bottlenecks caused by multiple read or write commands issued simultaneously to a single drive.

Changes to the Optimal Flexible Architecture for Oracle Database
B-2 Oracle Database Installation Guide
■ Distribution of applications across multiple disks safeguards against database failures.
■ Login home directories are not at risk when database administrators add, move, or delete Oracle home directories.
■ Multiple databases, of different versions, owned by different users can coexist concurrently.
■ Software upgrades can be tested in an Oracle home in a separate directory from the Oracle home where your production database is located.
B.2 Changes to the Optimal Flexible Architecture for Oracle DatabaseThe Optimal Flexible Architecture recommended Oracle home path is similar to the following:
c:\app\username\product\12.1.0\dbhome_1
The ORACLE_BASE default does not contain version information but the default ORACLE_HOME does.
B.3 Directory Tree Differences by ReleaseOptimal Flexible Architecture has necessitated changes to the Oracle Database directory tree. This section lists the differences:
■ Top-Level Oracle Directory
■ Database File Names
■ Database File Name Extensions
B.3.1 Top-Level Oracle DirectoryWhen you install Oracle Database Optimal Flexible Architecture-compliant database, there is a top-level Oracle base directory, DRIVE_LETTER:\app\username, where DRIVE_LETTER is the hard drive letter.
The Oracle base directory contains \ORACLE_HOME directories, \oradata directories (for database files), \diag (for diagnostic data), \flash_recovery_area (for recovery operations), and \admin directories (for database administration files).
B.3.2 Database File NamesDatabase files do not have the SID in the database file name. For example, the first control file is named control01.ctl. The SID in the file name is not necessary because all the database files for a particular database are placed in \oradata under a directory called DB_UNIQUE_NAME that is named for that database.
B.3.3 Database File Name ExtensionsIn an Optimal Flexible Architecture-compliant release, database file names have the following extensions:
■ .ctl for control files
■ .log for log files
■ .dbf for data files

Optimal Flexible Architecture Directory Naming Conventions
Optimal Flexible Architecture B-3
B.4 Optimal Flexible Architecture Directory Naming ConventionsOptimal Flexible Architecture uses directory naming conventions that make it easy to identify the precise Oracle home and database name that is associated with a set of files. This section describes the naming conventions used for top-level directories of an Optimal Flexible Architecture-compliant database directory tree:
■ ORACLE_BASE Directory
■ ORACLE_HOME Directory
■ Automatic Diagnostic Repository (ADR) Directory
■ ADMIN Directory
■ ORADATA Directory
■ RECOVERY_AREA Directory
B.4.1 ORACLE_BASE Directory ORACLE_BASE is the root of the Oracle directory tree. If you install an Optimal Flexible Architecture-compliant database using Oracle Universal Installer default settings, then ORACLE_BASE is DRIVE_LETTER:\app\username.
If you are installing Oracle Database for Microsoft Windows on a computer with no other Oracle software installed, then you can change the ORACLE_BASE directory before running Oracle Universal Installer. Most users do not need or want to do this.
Do not change the value of ORACLE_BASE after you run Oracle Universal Installer for the first time. If there is an existing ORACLE_BASE and you change it, then there is a conflict of Oracle base directories. If you create another ORACLE_BASE when the original ORACLE_BASE exists, then certain tools and the database are not able to find previously created files. They look for them in the new ORACLE_BASE instead of the original ORACLE_BASE.
B.4.2 ORACLE_HOME DirectoryThe ORACLE_HOME directory is located under DRIVE_LETTER:\ORACLE_BASE, where DRIVE_LETTER:\is any hard drive, and contains subdirectories for Oracle software executables and network files.
If you install Oracle Database for Windows on a computer with no other Oracle software installed and you use default settings, then the first directory that you create is called \dbhome_1.
B.4.3 Automatic Diagnostic Repository (ADR) DirectoryOracle Database 11g onwards, Automatic Diagnostic Repository directories replace the bdump, cdump, and udump directories for the database. The diagnostic data goes into ORACLE_BASE\diag\rdbms\DB_UNIQUE_NAME\instance_name
Some of these subdirectories are:
\alert\hm\incident\incpkg\ir
See Also: Your operating system documentation for instructions about editing environment variables
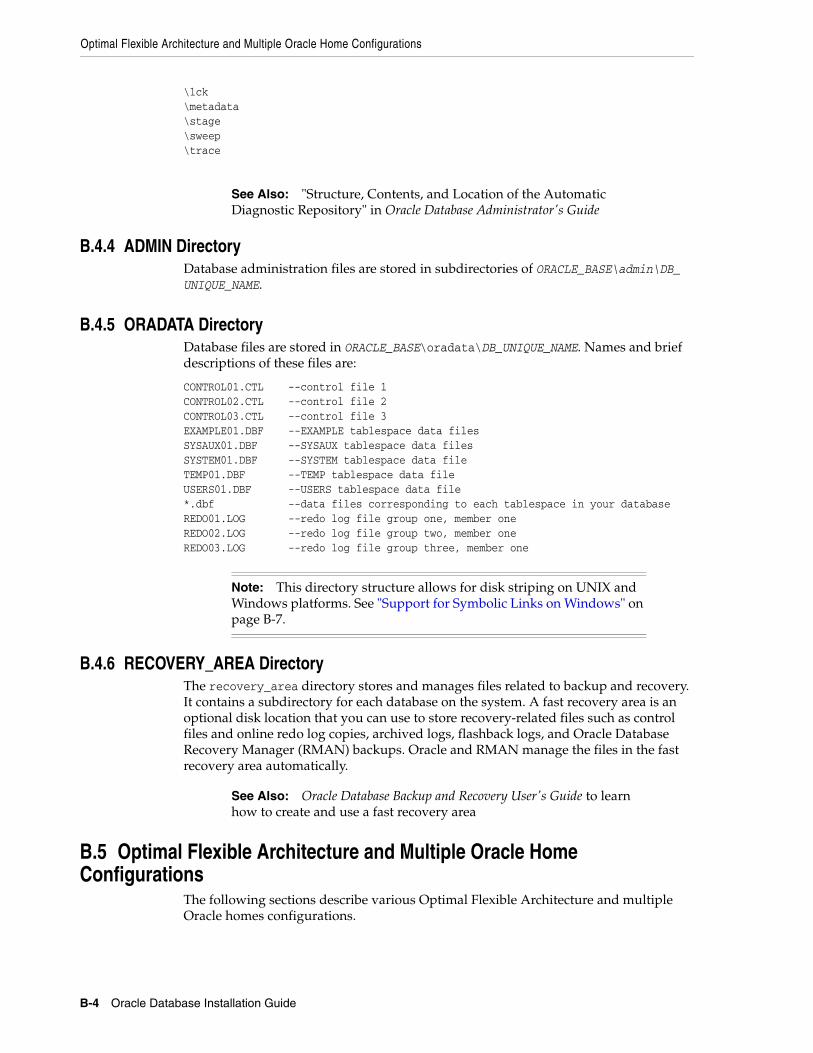
Optimal Flexible Architecture and Multiple Oracle Home Configurations
B-4 Oracle Database Installation Guide
\lck\metadata\stage\sweep\trace
B.4.4 ADMIN DirectoryDatabase administration files are stored in subdirectories of ORACLE_BASE\admin\DB_UNIQUE_NAME.
B.4.5 ORADATA DirectoryDatabase files are stored in ORACLE_BASE\oradata\DB_UNIQUE_NAME. Names and brief descriptions of these files are:
CONTROL01.CTL --control file 1CONTROL02.CTL --control file 2CONTROL03.CTL --control file 3EXAMPLE01.DBF --EXAMPLE tablespace data filesSYSAUX01.DBF --SYSAUX tablespace data filesSYSTEM01.DBF --SYSTEM tablespace data fileTEMP01.DBF --TEMP tablespace data fileUSERS01.DBF --USERS tablespace data file*.dbf --data files corresponding to each tablespace in your databaseREDO01.LOG --redo log file group one, member oneREDO02.LOG --redo log file group two, member oneREDO03.LOG --redo log file group three, member one
B.4.6 RECOVERY_AREA DirectoryThe recovery_area directory stores and manages files related to backup and recovery. It contains a subdirectory for each database on the system. A fast recovery area is an optional disk location that you can use to store recovery-related files such as control files and online redo log copies, archived logs, flashback logs, and Oracle Database Recovery Manager (RMAN) backups. Oracle and RMAN manage the files in the fast recovery area automatically.
B.5 Optimal Flexible Architecture and Multiple Oracle Home Configurations
The following sections describe various Optimal Flexible Architecture and multiple Oracle homes configurations.
See Also: "Structure, Contents, and Location of the Automatic Diagnostic Repository" in Oracle Database Administrator's Guide
Note: This directory structure allows for disk striping on UNIX and Windows platforms. See "Support for Symbolic Links on Windows" on page B-7.
See Also: Oracle Database Backup and Recovery User's Guide to learn how to create and use a fast recovery area

Optimal Flexible Architecture and Multiple Oracle Home Configurations
Optimal Flexible Architecture B-5
B.5.1 Specifying an ORACLE_HOME DirectoryTo install an Optimal Flexible Architecture-compliant database, you must specify an Oracle home directory in the form of:
DRIVE_LETTER:\app\username\product\12.1.0\dbhome_1
where:
■ DRIVE_LETTER:\ is any hard drive. For example, c:\
■ \app\username is the ORACLE_BASE before performing the installation.
■ dbhome_1 is the default directory name.
The following are examples of Optimal Flexible Architecture-compliant Oracle home directories:
■ c:\app\test1\product\12.1.0\dbhome_1
■ d:\app\test2\product\12.1.0\dbhome_1
B.5.2 Installing a Default Optimal Flexible Architecture Database: Example 1This example shows how to create all Oracle homes within one Oracle base directory.
1. Install any Oracle Database that supports Optimal Flexible Architecture (Oracle Database Release 8.1.6 or later) on a computer with no other Oracle software installed and ensure that you accept the default settings for the Oracle home (for example, c:\app\username\product\12.1.0\dbhome_1).
2. Install any Oracle Database in a second Oracle home accepting the default settings.
Table B–1 shows the default Optimal Flexible Architecture database settings.
B.5.3 Installing a Nondefault Optimal Flexible Architecture Database: Example 2In this example, you install each Oracle home into its own directory, but they all share the same Oracle base.
1. Install any Oracle Database that supports Optimal Flexible Architecture (Oracle Database 8.1.6 or later) on a computer with no other Oracle software installed and change the default Oracle Universal Installer settings for the first Oracle home (for example, from c:\oracle\ora81 to X:\xyz\oracle\abc).
2. Install any Oracle Database and change the default Oracle Universal Installer settings for the second Oracle home (for example, from c:\oracle\ora10 to X:\pqr).
Table B–2 shows the nondefault Optimal Flexible Architecture database settings for this example.
Table B–1 Default Optimal Flexible Architecture Database Settings
Setting Value
ORACLE_BASE c:\app\username (same for all Oracle homes)
Oracle home 1 c:\app\username\product\12.1.0\dbhome_1
Oracle home 2 c:\app\username\product\12.1.0\dbhome_2

Comparison Between Optimal Flexible Architecture on Windows and UNIX
B-6 Oracle Database Installation Guide
The resulting directory tree would look similar to this:
X:\pqr --Oracle home 2 \bin \networkX:\xyz \oracle --ORACLE_BASE for both Oracle homes \abc --Oracle home 1 \bin \network \admin \DB_UNIQUE_NAME1 \dpdump \ \DB_UNIQUE_NAME2 \... \oradata \DB_UNIQUE_NAME1 CONTROL01.CTL CONTROL02.CTL CONTROL03.CTL EXAMPLE01.DBF SYSAUX01.DBF SYSTEM01.DBF TEMP01.DBF USERS01.DBF REDO01.LOG REDO02.LOG REDO03.LOG \DB_UNIQUE_NAME2
B.6 Comparison Between Optimal Flexible Architecture on Windows and UNIX
You implement Optimal Flexible Architecture on Windows and UNIX in the same way. However, differences exist regarding the following:
■ Directory Naming
■ ORACLE_BASE Directory
■ Support for Symbolic Links on Windows
Table B–2 Nondefault Optimal Flexible Architecture Database Settings: Example 2
Setting Value
ORACLE_BASE X:\xyz\oracle
(same for both Oracle homes)
Oracle home 1 X:\xyz\oracle\abc
Oracle home 2 X:\pqr
See Also: Your UNIX operating system-specific administrator's reference for information about Optimal Flexible Architecture on UNIX

Comparison Between Optimal Flexible Architecture on Windows and UNIX
Optimal Flexible Architecture B-7
B.6.1 Directory NamingTop-level names of the Optimal Flexible Architecture directory tree differ between Windows and UNIX. However, main subdirectory names and file names are the same on both operating systems.
B.6.2 ORACLE_BASE Directory On Windows, Oracle base is associated with an Oracle home directory. ORACLE_BASE is defined in the registry (for example, in HKEY_LOCAL_MACHINE\SOFTWARE\ORACLE\KEY_HOMENAME).
On UNIX, ORACLE_BASE is associated with a UNIX user’s environment.
B.6.3 Support for Symbolic Links on WindowsThe goal of Optimal Flexible Architecture is to place all Oracle software under one ORACLE_BASE directory and to spread files across different physical drives as your databases increase in size.
On UNIX, although everything seems to be in one directory on the same hard drive, files can be on different hard drives if they are symbolically linked or have that directory as a mount point.
On Windows, you can use volume mount points to mount files on different hard drives to a single directory. You may have oradata directories on multiple drives, with data files in each one, on Windows version which does not support volume mount points.
Oracle recommends that you use one logical drive to store your database administration files and that you place other files, as needed, on other logical drives in an oradata\DB_UNIQUE_NAME directory.
In the following example, there are four logical drives for a database named prod:
■ c:\ contains an Oracle home and database administration files.
■ f:\ contains redo log files. The F:\ drive could also represent two physical drives that have been striped to increase performance.
■ g:\ contains one of the control files and all tablespace files. The G:\ drive could also use a RAID Level-5 configuration to increase reliability.
■ h:\ contains the second control file.
The directory structure would look similar to this:
c:\app\username\product\11.2.0 --First logical drive \dbhome_1 --Oracle home \bin --Subtree for Oracle binaries \network --Subtree for Oracle Net \... \admin --Subtree for database administration files \prod --Subtree for prod database administration files \adump --Audit files \dpdump --Default directory for data pump operations. \pfile --Initialization response file
f:\app\username\product\11.2.0 --Second logical drive (two physical drives, striped) \oradata --Subtree for Oracle Database files \prod --Subtree for prod database files redo01.log --Redo log file group one, member one
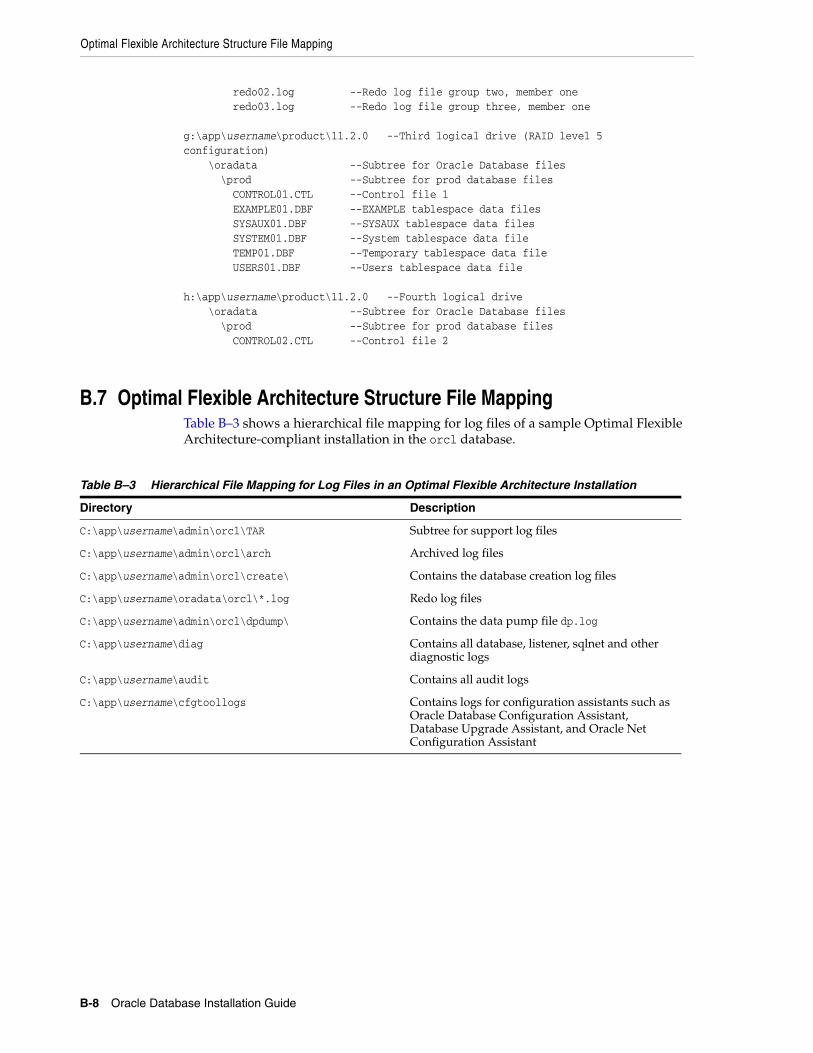
Optimal Flexible Architecture Structure File Mapping
B-8 Oracle Database Installation Guide
redo02.log --Redo log file group two, member one redo03.log --Redo log file group three, member one
g:\app\username\product\11.2.0 --Third logical drive (RAID level 5 configuration) \oradata --Subtree for Oracle Database files \prod --Subtree for prod database files CONTROL01.CTL --Control file 1 EXAMPLE01.DBF --EXAMPLE tablespace data files SYSAUX01.DBF --SYSAUX tablespace data files SYSTEM01.DBF --System tablespace data file TEMP01.DBF --Temporary tablespace data file USERS01.DBF --Users tablespace data file
h:\app\username\product\11.2.0 --Fourth logical drive \oradata --Subtree for Oracle Database files \prod --Subtree for prod database files CONTROL02.CTL --Control file 2
B.7 Optimal Flexible Architecture Structure File MappingTable B–3 shows a hierarchical file mapping for log files of a sample Optimal Flexible Architecture-compliant installation in the orcl database.
Table B–3 Hierarchical File Mapping for Log Files in an Optimal Flexible Architecture Installation
Directory Description
C:\app\username\admin\orcl\TAR Subtree for support log files
C:\app\username\admin\orcl\arch Archived log files
C:\app\username\admin\orcl\create\ Contains the database creation log files
C:\app\username\oradata\orcl\*.log Redo log files
C:\app\username\admin\orcl\dpdump\ Contains the data pump file dp.log
C:\app\username\diag Contains all database, listener, sqlnet and other diagnostic logs
C:\app\username\audit Contains all audit logs
C:\app\username\cfgtoollogs Contains logs for configuration assistants such as Oracle Database Configuration Assistant, Database Upgrade Assistant, and Oracle Net Configuration Assistant

C
Installing and Configuring Oracle Database Using Response Files C-1
CInstalling and Configuring Oracle Database Using Response Files
This appendix describes how to use response files to perform silent or response file installations, configure network connections, and configure or start an Oracle database. It covers the following topics:
■ How Response Files Work
■ Preparing a Response File
■ Running Oracle Universal Installer Using the Response File
■ Running Net Configuration Assistant Using a Response File
■ Running Oracle Database Configuration Assistant Using a Response File
■ Postinstallation Configuration Using a Response File
C.1 How Response Files WorkYou can automate the installation and configuration of Oracle software, either fully or partially, by specifying a response file when you start Oracle Universal Installer. Oracle Universal Installer uses the values in the response file to provide answers to some or all of the Oracle Universal Installer prompts. It includes information about the following topics:
■ Reasons for Using Silent Mode or Response File Mode
■ General Procedure for Using Response Files
Typically, Oracle Universal Installer runs in interactive mode, which means that it prompts you to provide information in graphical user interface (GUI) screens. When you use response files to provide this information, you run Oracle Universal Installer at a command prompt using either of the following modes:
■ Silent mode: Oracle Universal Installer does not display any screens. Instead it displays progress information in the command window where you started it. To use silent mode, you run setup.exe with the -silent parameter and include a response file, which contains responses to the Oracle Universal Installer prompts.
■ Response File mode: During a response file mode installation, Oracle Universal Installer displays all the screens, screens for which you specify information in the response file and also screens for which you did not specify the required information in the response file. The advantage is that you can validate the values in the screens for which you have provided the information in the response file and continue with the installation. To use response file mode, run setup.exe

How Response Files Work
C-2 Oracle Database Installation Guide
without the -silent parameter, but include the response file or any other parameters that apply.
You define the settings for a silent or response file installation by entering values for the variables listed in the response file. For instance, to specify the Oracle home, you would supply the appropriate value for the ORACLE_HOME variable, as in the following example:
ORACLE_HOME="C:\app\product"
Another way of specifying the response file variable settings is to pass them as command-line arguments when you run Oracle Universal Installer. For example:
DRIVE_LETTER:\setup.exe_location> setup -silent "ORACLE_HOME=C:\app\product" ...
This method is particularly useful if you do not want to embed sensitive information, such as passwords, in the response file. For example:
DRIVE_LETTER:\setup.exe_location> setup -silent "s_dlgRBOPassword=password" ...
Ensure that you enclose the variable and its setting in quotes.
Use the -promptForPassword flag if you do not want to embed the password in the response file and also do not want to pass them on command-line argument. For example:
DRIVE_LETTER:\setup.exe_location> setup -silent -promptForPassword "ORACLE_HOME=C:\app\product" ...
This method supports only the Oracle Home User passwords.
C.1.1 Reasons for Using Silent Mode or Response File ModeTable C–1describes several reasons why you might want to run Oracle Universal Installer in silent mode or response file mode.
C.1.2 General Procedure for Using Response FilesYou follow these general steps to install Oracle Database using response files:
See Also: Oracle Universal Installer and OPatch User's Guide for Windows and UNIX for more information about response file formats.
Table C–1 Reasons for Using Silent Mode or Response File Mode
Mode Uses
Silent Use silent mode to:
■ Complete an unattended installation
■ Complete several similar installations on multiple systems without user interaction
Oracle Universal Installer displays progress information in the window that you used to start it, but it does not display the Oracle Universal Installer screens.
Response File Use response file mode to complete similar Oracle software installations on multiple systems, providing default answers to some, but not all, of Oracle Universal Installer prompts.
In response file mode, all the installer screens are displayed, but defaults for the fields in these screens are provided by the response file. You have to provide information for the fields in screens where you have not provided values in the response file.
Preparing a Response File
Installing and Configuring Oracle Database Using Response Files C-3
1. If you plan to use Oracle Automatic Storage Management and configure new disks, then you must perform the following steps:
a. Create partitions for DAS or SAN disks.
b. Manually configure the disks using the asmtoolg or asmtool utility.
2. Customize or create a response file for the installation settings that you need.
You can create the response file by using one of the following methods:
■ Modify one of the sample response files that is provided with the installation.
■ Run Oracle Universal Installer at a command prompt and save the inputs by selecting the Save Response File option.
"Preparing a Response File" on page C-3 explains how to customize or create the response file.
3. Run Oracle Universal Installer from a command prompt, specifying the response file, using either silent or response file mode.
"Running Oracle Universal Installer Using the Response File" on page C-5 explains how to run Oracle Universal Installer with a response file.
C.2 Preparing a Response FileThis section describes the methods that you can use to prepare a response file for use during silent-mode or response file-mode installations:
■ Editing a Response File Template
■ Saving a Response File
C.2.1 Editing a Response File Template This method is most useful for the Enterprise Edition or Standard Edition installation types.
Oracle provides response file templates for each product and installation type, and for each configuration tool. These files are located in the ORACLE_BASE\ORACLE_HOME\assistants directory, and the database\response directory on the Oracle Database installation media.
See Also:
■ "Step 2: Creating DAS or SAN Disk Partitions for an Oracle Automatic Storage Management Instance" on page 4-9
■ "Step 3: Manually Configuring Disks for Oracle Automatic Storage Management" on page 4-11
Note: Windows requires Administrator privileges at the command prompt.
Note: If you copied the software to a hard disk, the response files are located in the stage_area\database\response directory.

Preparing a Response File
C-4 Oracle Database Installation Guide
Table C–2 lists the available sample response files:
To copy and modify a response file:
1. Copy the appropriate response files from the database\response directory on the Oracle Database media to your hard drive.
2. Modify the response files with a text file editor.
Remember that you can specify sensitive information, such as passwords, at the command line rather than within the response file. "How Response Files Work" on page C-1 explains this method.
3. Run the response file by following the instructions in the "Running Oracle Universal Installer Using the Response File" section on page C-5.
C.2.2 Saving a Response FileYou can use the Oracle Universal Installer in interactive mode to save a response file, which you can edit and then use to complete silent mode or response file mode installations.
Starting with Oracle Database 11g Release 2 (11.2), you can save all the installation steps into a response file during installation by clicking Save Response File on the Summary page. You can use the generated response file for a silent installation later.
When you save the response file, you can either complete the installation, or you can exit from Oracle Universal Installer on the Summary page, before it starts to copy the software to the system.
Table C–2 Response Files
Response File Name Description
db_install.rsp Silent installation of Oracle Database 12c
grid_install.rsp Silent installation of Oracle Grid Infrastructure
dbca.rsp Silent installation of Database Configuration Assistant
netca.rsp Silent installation of Oracle Net Configuration Assistant
Caution: When you modify a response file template and save a file for use, the response file may contain plain text passwords. Ownership of the response file should be given to the Oracle software installation owner only. Oracle strongly recommends that database administrators or other administrators delete or secure response files when they are not in use.
See Also: Oracle Universal Installer and OPatch User's Guide for Windows and UNIX for detailed information about creating response files. In an installed Oracle Database, select Start, then All Programs, then Oracle - HOMENAME, then Oracle Installation Products, then Universal Installer Concepts Guide. It appears in HTML format.
Note: Oracle Universal Installer does not save passwords in the response file.

Running Oracle Universal Installer Using the Response File
Installing and Configuring Oracle Database Using Response Files C-5
To save a response file:
1. Ensure that the computer on which you are creating the response file has met the requirements described in Chapter 2.
When you run Oracle Universal Installer to save a response file, it checks the system to verify that it meets the requirements to install the software. For this reason, Oracle recommends that you complete all of the required preinstallation tasks and save the response file while completing an installation.
2. At the command prompt, use the cd command to change to the directory that contains the Oracle Universal Installer setup.exe executable.
On the installation DVD, setup.exe is located in the database directory. Alternatively, navigate to the directory where you downloaded or copied the installation files.
3. Run setup.exe.
4. After Oracle Universal Installer starts, enter the installation settings, to save the response file.
5. When the installer displays the Summary screen, perform the following:
a. Click Save Response File and specify a file name and location for the response file. Then, click Save to save the values to the file.
b. Click Finish to continue with the installation.
Click Cancel if you do not want to continue with the installation. The installation stops, but the saved response file is retained.
6. Before you use the saved response file on another system, edit the file and make any required changes.
Use the instructions in the file as a guide when editing it.
C.3 Running Oracle Universal Installer Using the Response FileAt this stage, you are ready to run Oracle Universal Installer at the command line, specifying the response file you created, to perform the installation. On Windows, you must open the command prompt with Administrator privileges. The Oracle Universal Installer executable, setup.exe, provides several options. For help information about the full set of these options, run setup.exe with the -help option, for example:
DRIVE_LETTER:\setup.exe_location setup -help
A new command window appears, with the "Preparing to launch..." message. In a moment, the help information appears in that window.
To run Oracle Universal Installer and specify a response file:
1. Place the response file on the computer where you want to install Oracle Database.
2. At a command prompt, run Oracle Universal Installer with the appropriate response file. On Windows, you must open the command prompt with Administrator privileges. For example:
Note: Windows requires Administrator privileges at the command prompt.

Running Net Configuration Assistant Using a Response File
C-6 Oracle Database Installation Guide
DRIVE_LETTER:\setup.exe_location setup [-silent] "variable=setting" [-nowelcome] [-noconfig] [-nowait] -responseFile filename
where:
■ filename: Identifies the full path of the response file.
■ setup.exe_location: Indicates the location of setup.exe.
■ -silent: Runs Oracle Universal Installer in silent mode and suppresses the Welcome window.
■ "variable=setting" refers to a variable within the response file that you may prefer to run at the command line rather than set in the response file. Enclose the variable and its setting in quotes.
■ -noconfig: Suppresses running the configuration assistants during installation, performing a software-only installation instead.
■ -nowait: Closes the console window when the silent installation completes.
If you save a response file during a silent installation, then Oracle Universal Installer saves the variable values that were specified in the original source response file into the new response file.
C.4 Running Net Configuration Assistant Using a Response FileWhen you run Net Configuration Assistant with a response file, you run it in silent mode. This lets you configure and start an Oracle Net listener on the system, configure naming methods, and configure Oracle Net service names. To run NetCA in silent mode, use the netca.rsp response file in the ORACLE_BASE\ORACLE_HOME\assistants\netca directory, and the response directory in the database\response directory on the DVD.
On Windows, you must open the command prompt with Administrator privileges.
To create a Net Configuration Assistant response file:
1. Copy the netca.rsp response file template from the response file directory to a directory on your system.
The netca.rsp is located in the database\response directory on the Oracle Database installation media.
2. Open the response file in a text editor.
3. Edit the file, following the instructions in the file.
See Also:
■ "Installing Oracle Products" in Oracle Universal Installer and OPatch User's Guide for Windows and UNIX for more information about installing using response files
■ "Deinstalling Products" in Oracle Universal Installer and OPatch User's Guide for Windows and UNIX for more information about deinstalling using response files
Note: If you copied the software to a hard disk, the response files are located in the stage_area\database\response directory.
Running Oracle Database Configuration Assistant Using a Response File
Installing and Configuring Oracle Database Using Response Files C-7
Net Configuration Assistant fails if you do not correctly configure the netca.rsp response file.
To run Net Configuration Assistant using the response file you just created, run Net Configuration Assistant in silent mode as follows, replacing local_dir with the directory where you placed your version of the netca.rsp response file:
C:\ORACLE_HOME\bin> netca /silent /responsefile local_dir\netca.rsp
For example:
C:\ORACLE_HOME\bin> netca /silent /responsefileC:\oracle_response_files\mynetca.rsp
C.5 Running Oracle Database Configuration Assistant Using a Response File
You can run Oracle Database Configuration Assistant in silent or response file mode to configure and start an Oracle database on your system. To run Oracle Database Configuration Assistant in silent or response file mode, use the dbca.rsp response file in the ORACLE_BASE\ORACLE_HOME\assistants\netca directory, and the response directory in the database\response directory on the DVD.
To run Database Configuration Assistant in response file mode, you must use the -responseFile flag in combination with either the -silent or -progressOnly flag. To run Database Configuration Assistant in response file mode, you must use a graphical display and set the DISPLAY environment variable.
On Windows, you must open the command prompt with Administrator privileges.
This section contains the following topics:
■ Silent Mode of Database Configuration Assistant
■ Progress Only Mode of Database Configuration Assistant
■ Running Database Configuration Assistant in Response File Mode
C.5.1 Silent Mode of Database Configuration AssistantUse the -silent flag in combination with the -responseFile flag to set the mode to silent. In the silent mode, Database Configuration Assistant uses values that you specify, in the response file or as command-line options, to create a database. No window or user interface is displayed in the silent mode.
Note: If you copied the software to a hard disk, the response files are located in the stage_area\database\response directory.
See Also:
■ "Creating a Database with Noninteractive/Silent DBCA" in Oracle Database Administrator's Guide
■ "Oracle ASM Configuration Assistant Command-Line Interface" section in Oracle Automatic Storage Management Administrator's Guide for information about running Oracle ASMCA in noninteractive mode

Postinstallation Configuration Using a Response File
C-8 Oracle Database Installation Guide
C.5.2 Progress Only Mode of Database Configuration AssistantUse the -progressOnly flag in combination with the -responseFile flag, to set the mode to progress only. As it configures and starts the database, Database Configuration Assistant displays a window that contains status messages and a progress bar. This window is similar to the window that is displayed when you choose to create a preconfigured database during an Enterprise Edition or Standard Edition installation.
In this mode, Database Configuration Assistant uses values that you specify, in the response file or as command line options, to create a database.
C.5.3 Running Database Configuration Assistant in Response File ModeTo create an Oracle Database Configuration Assistant response file:
1. Copy the dbca.rsp response file template from the response file directory to a directory on your system.
The dbca.rsp response file is located in the database\response directory on the Oracle Database installation media.
2. Open the dbca.rsp response file in a text editor.
3. Edit the dbca.rsp file, following the instructions in the file.
Oracle Database Configuration Assistant fails if you do not correctly configure the dbca.rsp response file.
To run Oracle Database Configuration Assistant using the response file you just created, run Oracle Database Configuration Assistant in silent or response file mode using the following syntax:
C:\ORACLE_HOME\bin> dbca {-progressOnly | -silent} -responseFile local_dir/dbca.rsp
where:
■ -silent runs Oracle Database Configuration Assistant in silent mode
■ -progressOnly runs Oracle Database Configuration Assistant in response file mode
■ local_dir is the full path of the directory where you copied the dbca.rsp response file template.
For example:
C:\> ORACLE_HOME\bin> dbca -progressOnly -responseFileC:\oracle_response_files\mydbca.rsp
As an alternative to creating a database using a response file, you can run dbca at the command line by specifying all the required information as command line options. Database Configuration Assistant writes progress messages to stdout. For information about the list of options supported, enter the following command:
C:\ORACLE_HOME\bin\dbca -help
C.6 Postinstallation Configuration Using a Response FileUse the following sections to create and run a response file configuration after installing Oracle software.

Postinstallation Configuration Using a Response File
Installing and Configuring Oracle Database Using Response Files C-9
C.6.1 About the Postinstallation Configuration FileWhen you run a silent or response file installation, you provide information about your servers in a response file that you otherwise provide manually during a graphical user interface installation. However, the response file does not contain passwords for user accounts that configuration assistants require after software installation is complete. The configuration assistants are started with a script called configToolAllCommands. You can run this script in response file mode by using a password response file. The script uses the passwords to run the configuration tools in succession to complete configuration.
If you keep the password file to use for clone installations, then Oracle strongly recommends that you store it in a secure location. In addition, if you must stop an installation to fix an error, you can run the configuration assistants using configToolAllCommands and a password response file.
The configToolAllCommands password response file consists of the following syntax options:
■ internal_component_name is the name of the component that the configuration assistant configures
■ variable_name is the name of the configuration file variable
■ value is the desired value to use for configuration.
The command syntax is as follows:
internal_component_name|variable_name=value
For example:
oracle.assistants.asm|S_ASMPASSWORD=welcome
Oracle strongly recommends that you maintain security with a password response file:
■ Permissions on the response file should be set to 600.
■ The owner of the response file should be the installation owner user, with the group set to the central inventory (oraInventory) group.
C.6.2 Running Postinstallation Configuration Using a Response FileTo run configuration assistants with the configToolAllCommands script:
1. Create a response file using the syntax filename.properties. For example:
C:\> copy nul cfgrsp.properties
2. Open the file with a text editor, and cut and paste the password template, modifying as needed.
Example C–1 Password response file for Oracle Grid Infrastructure for a standalone server
Oracle Grid Infrastructure requires passwords for Oracle Automatic Storage Management Configuration Assistant (ASMCA), and for Intelligent Platform Management Interface Configuration Assistant (IPMICA) if you have a BMC card and you want to enable this feature. Provide the following response file,
oracle.assistants.asm|S_ASMPASSWORD=passwordoracle.assistants.asm|S_ASMMONITORPASSWORD=password

Postinstallation Configuration Using a Response File
C-10 Oracle Database Installation Guide
Example C–2 Password response file for Oracle Database
Oracle Database configuration requires the SYS, SYSTEM, and DBSNMP passwords for use with Database Configuration Assistant (DBCA). The S_ASMSNMPPASSWORD password is necessary only if the database is using Oracle ASM for storage. Similarly, the S_PDBADMINPASSWORD password is necessary only if you create a multitenant container database (CDB) with one or more pluggable databases (PDBs). Also, if you selected to configure Oracle Enterprise Manager, then you must provide the password for the Oracle software installation owner for the S_EMADMINPASSWORD password.
oracle.assistants.server|S_SYSPASSWORD=passwordoracle.assistants.server|S_SYSTEMPASSWORD=passwordoracle.assistants.server|S_DBSNMPPASSWORD=passwordoracle.assistants.server|S_PDBADMINPASSWORD=passwordoracle.assistants.server|S_EMADMINPASSWORD=passwordoracle.assistants.server|S_ASMSNMPPASSWORD=password
If you do not want to enable Oracle Enterprise Manager or Oracle ASM, then leave those password fields blank
3. Secure the cfgrsp.properties file by changing permissions in Properties page. Right-click the file to open the Properties page. Select the Security tab, click the Edit button, select a group or user, then select Deny check box against Read permissions to remove read access for unwanted users.
4. Change directory to ORACLE_HOME\cfgtoollogs
5. Before running configToolAllCommands, rename it using the following command:
copy configToolAllCommands configToolAllCommands.bat
6. Run the configuration script using the following syntax:
configToolAllCommands.bat RESPONSE_FILE=\path\name.properties
for example:
C:\> configToolAllCommands.bat RESPONSE_FILE=C:\oracle\cfgrsp.properties

D
Configuring Oracle Database Globalization Support D-1
D Configuring Oracle Database Globalization Support
This appendix describes the following Globalization Support topics:
■ Installing and Using Oracle Components in Different Languages
■ Running Oracle Universal Installer in Different Languages
D.1 Installing and Using Oracle Components in Different LanguagesThis section describes the following procedures:
■ Configuring Oracle Components to Run in Different Languages
■ Installing Translation Resources
D.1.1 Configuring Oracle Components to Run in Different LanguagesYou can specify the language and the territory, or locale, in which you want to use Oracle components. The locale setting of a component determines the language of the user interface of the component and the globalization behavior, such as date and number formatting. Depending on the Oracle component, the locale of the component is either inherited from the operating system session that started the component, or is defined by the NLS_LANG environment variable.
The operating system locale usually influences Oracle components that are based on Java technology. The NLS_LANG environment variable usually influences Oracle components that use Oracle Client libraries such as OCI.
This section describes the following procedures:
■ Determining the Operating System Locale
■ Configuring Locale and Character Sets Using the NLS_LANG Environment Variable
■ NLS_LANG Settings in Console Mode and Batch Mode
See Also: Oracle Database Globalization Support Guide for an overview of globalization support for Oracle Database
Note: The user interface of an Oracle component is displayed in a selected language only if the appropriate translation is available and has been installed. Otherwise, the user interface is displayed in English.
Installing and Using Oracle Components in Different Languages
D-2 Oracle Database Installation Guide
D.1.1.1 Determining the Operating System Locale The locale setting of your operating system session determines the language of the user interface and the globalization behavior for components such as Oracle Universal Installer, Oracle Net Configuration Assistant, and Oracle Database Configuration Assistant. It also determines the globalization behavior of Oracle Database sessions created by a user application through Oracle JDBC driver, unless overridden by the application.
Open the Control Panel from the Start menu to modify the operating system locale settings. In the classic view of the Control Panel on Windows, click Regional and Language Options. In the default view of the Control Panel on Windows, click Change keyboards or other input methods.
To set locale for the current operating system user on Windows, select the desired locale from the Current format pop-up list on the Formats tab.
Some of the locales may be unavailable until you install required operating system support files.
Some Oracle components, such as SQL*Plus, require that the Windows System Locale is also set to the language in which the components are to be run. System Locale is called Language for non-Unicode programs on Windows. On Windows, click the Change system locale... button on the Administrative tab, accept the use of administrative privileges, if User Account Control is active, and select the locale from the pop-up list in the opened dialog box.
D.1.1.2 Configuring Locale and Character Sets Using the NLS_LANG Environment VariableThe NLS_LANG environment variable determines the language of the user interface and the globalization behavior for components such as SQL*Plus, exp, and imp. It sets the language and territory used by the client application and the database user session. It also declares the character set for entering and displaying data by the client application.
The NLS_LANG environment variable uses the following format:
NLS_LANG=language_territory.characterset
In this format:
■ language specifies the language used for displaying Oracle messages, sorting, day names, and month names
■ territory specifies the conventions for default date, monetary and numeric formats
■ characterset specifies the encoding used by the client application
In most cases, this is the Oracle character set that corresponds to the Windows ANSI Code Page as determined by the System Locale.
The NLS_LANG parameter on Windows can be set
■ in Registry under the subkey corresponding to a given Oracle home,
■ as an environment variable.
Note: The operating system must be restarted after the System Locale is changed. See the operating system documentation for further information about Windows locale settings.
Installing and Using Oracle Components in Different Languages
Configuring Oracle Database Globalization Support D-3
When you install Oracle Database components and the NLS_LANG parameter is not yet set in the Registry subkey of the target Oracle home, Oracle Universal Installer sets the NLS_LANG parameter to a default value derived from the operating system locale for the current user. See the following table.
For example:
■ Arabic (U.A.E.) - ARABIC_UNITED ARAB EMIRATES.AR8MSWIN1256
■ Chinese (PRC) - SIMPLIFIED CHINESE_CHINA.ZHS16GBK
■ Chinese (Taiwan) - TRADITIONAL CHINESE_TAIWAN.ZHT16MSWIN950
■ English (United Kingdom) - ENGLISH_UNITED KINGDOM.WE8MSWIN1252
■ English (United States) - AMERICAN_AMERICA.WE8MSWIN1252
■ French (Canada) - CANADIAN FRENCH_CANADA.WE8MSWIN1252
■ French (France) - FRENCH_FRANCE.WE8MSWIN1252
■ German (Germany) - GERMAN_GERMANY.WE8MSWIN1252
■ Hebrew - HEBREW_ISRAEL.IW8MSWIN1255
■ Japanese - JAPANESE_JAPAN.JA16SJISTILDE
■ Russian - RUSSIAN_RUSSIA.CL8MSWIN1251
■ Spanish (Spain) - SPANISH_SPAIN.WE8MSWIN1252
■ Spanish (Mexico) - MEXICAN SPANISH_MEXICO.WE8MSWIN1252
■ Spanish (Venezuela) - LATIN AMERICAN SPANISH_VENEZUELA.WE8MSWIN1252
D.1.1.3 NLS_LANG Settings in Console Mode and Batch ModeBefore you can use Oracle utilities such as SQL*Plus, SQL Loader, Import, and Export from the Command Prompt window, you may have to set the character set field of the NLS_LANG parameter to a value different than the one set in Registry.
This is required because programs running in console mode use, with a few exceptions, a different code page (character set) from programs running in GUI mode. The default Oracle home NLS_LANG parameter in the Registry is always set to the appropriate GUI code page. If you do not set the NLS_LANG parameter for the console mode session correctly, incorrect character conversion can corrupt error messages and data.
For Japanese, Korean, Simplified Chinese, Traditional Chinese, Thai, and Vietnamese, the console (OEM) code page is identical to the GUI (ANSI) code page. In this case, you are not required to set the NLS_LANG parameter. For other languages, set the correct character set value of NLS_LANG by issuing a SET NLS_LANG command in the same Command Prompt window in which you want to start the affected utility.
See Also:
■ Oracle Database Platform Guide for Microsoft Windows for more information about the subkey locations for multiple Oracle homes
■ Oracle Database Globalization Support Guide for information about the NLS_LANG parameter and Globalization Support initialization parameters

Installing and Using Oracle Components in Different Languages
D-4 Oracle Database Installation Guide
Similarly, in batch mode, set the correct character set value of NLS_LANG by inserting a SET NLS_LANG command at the start of the batch procedure, according to the character set of the files to be processed in the procedure.
To find the current console code page, issue the CHCP command in the Command Prompt window. Use the reported code page number to look up the corresponding Oracle character set name in Table D–1.
Table D–1 lists the Oracle character sets that correspond to the console mode code pages.
D.1.2 Installing Translation ResourcesTo view the user interface of Oracle components in different languages, you must install the appropriate language translations along with the component.
To install translation resources:
1. Start Oracle Universal Installer.
2. In the Configure Security Updates screen enter the relevant information and click Next.
Table D–1 Oracle Character Sets for Console Mode (OEM) Code Pages
OEM Code Page Oracle Character Set for Console Mode
437 (US) US8PC437
737 (Greek) EL8PC737
775 (Baltic) BLT8PC775
850 (Multilingual Latin I) WE8PC850
852 (Latin II) EE8PC852
855 (Cyrillic) RU8PC855
857 (Turkish) TR8PC857
858 (Multilingual Latin I + Euro)
WE8PC858
866 (Russian) RU8PC866
874 (Thai) TH8TISASCII
932 (Japanese Shift-JIS) JA16SJISTILDE
936 (Simplified Chinese GBK)
ZHS16GBK
949 (Korean) KO16MSWIN949
950 (Traditional Chinese Big5)
ZHT16MSWIN950
1258 (Vietnam) VN8MSWIN1258
Note: Part of Oracle Database Vault user interface text is stored in database tables in the DVSYS schema. By default, only the English language is loaded into these tables. You can use Oracle Database Vault Configuration Assistant to add more languages to Oracle Database Vault. For the necessary steps, see Appendix C in Oracle Database Vault Administrator's Guide

Running Oracle Universal Installer in Different Languages
Configuring Oracle Database Globalization Support D-5
3. In the Download Software Updates and Apply Software Updates screens, enter the relevant information and click Next.
4. In the Select Installation Option screen, select the installation option and click Next.
5. In the System Class screen, select the type of system class for installing the database, and click Next.
6. In the Grid Installation Options screen, select the type of database installation you want to perform, and click Next.
7. In the Select Product Languages screen, select the language in which you want to run the product from the Available Languages field.
8. Use the > arrow to move the selected language to the Selected Languages field, and then click Next.
D.2 Running Oracle Universal Installer in Different LanguagesThe operating system locale determines the language in which Oracle Universal Installer runs. Oracle Universal Installer may run in one of the following languages:
■ Brazilian Portuguese
■ English
■ French
■ German
■ Italian
■ Japanese
■ Korean
■ Simplified Chinese
■ Spanish
■ Traditional Chinese
To run Oracle Universal Installer in a desired language
1. Change the locale for the operating system user and the System Locale as described in the "Determining the Operating System Locale" section.
2. Run Oracle Universal Installer by following the instructions in the "Installing the Oracle Database Software" section.
Note: The Available Languages field lists all languages supported by Oracle globalization libraries. The set of languages for which a translation is actually available is usually smaller and depends on a particular component. The scope of translation for a given component may differ between languages. For example, some translations may include all user interface text, while others may include only error messages and no help files.
Note: Oracle Universal Installer ignores languages in the Selected Languages field for which no translation is available.

Running Oracle Universal Installer in Different Languages
D-6 Oracle Database Installation Guide
If the selected language is not one of the listed earlier, Oracle Universal Installer runs in English.
E
Managing Oracle Database Port Numbers E-1
EManaging Oracle Database Port Numbers
This appendix lists the default port numbers and describes how to change the assigned port after installation:
■ About Managing Ports
■ Viewing Port Numbers and Access URLs
■ Port Numbers and Protocols of Oracle Components
■ Changing the Oracle Services for Microsoft Transaction Server Port
E.1 About Managing PortsDuring installation, Oracle Universal Installer assigns port numbers to components from a set of default port numbers. Many Oracle Database components and services use ports. As an administrator, it is important to know the port numbers used by these services, and to ensure that the same port number is not used by two services on your host.
Most port numbers are assigned during installation. Every component and service has an allotted port range, which is the set of port numbers Oracle Database attempts to use when assigning a port. Oracle Database starts with the lowest number in the range and performs the following checks:
■ Is the port used by another Oracle Database installation on the host?
The installation may be up or down at the time; Oracle Database can still detect if the port is used.
■ Is the port used by a process that is currently running?
This could be any process on the host, even a non-Oracle Database process.
If the answer to any of the preceding questions is yes, Oracle Database moves to the next highest port in the allotted port range, and continues checking until it finds a free port.
E.2 Viewing Port Numbers and Access URLsIn most cases, the port number of the Oracle Database component is listed in the tool used to configure the port. In addition, ports for some Oracle Database applications are listed in the portlist.ini file. This file is located in the ORACLE_HOME\install directory.

Port Numbers and Protocols of Oracle Components
E-2 Oracle Database Installation Guide
If you change a port number, it is not updated in the portlist.ini file, so you can only rely on this file immediately after installation. To find or change a port number, use the methods described in this appendix.
E.3 Port Numbers and Protocols of Oracle ComponentsTable E–1 lists the port numbers and protocols used by components that are configured during the installation. By default, the first port in the range is assigned to the component, if it is available.
Table E–1 Ports Used in Oracle Components
Component and Description Default Port Number Port Range Protocol
Oracle Net Listener
Allows Oracle client connections to the database by using Oracle Net services. You can configure this port number during installation. To reconfigure this port, use Net Configuration Assistant.
1521 Port number changes to the next available port.
Modifiable manually to any available port.
TCP
Connection Manager
Listening port for Oracle client connections. It is not configured during installation, but can be configured using Net Configuration Assistant.
1630 1630 TCP
Oracle XML DB
The Oracle XML DB HTTP port is used if web-based applications need to access an Oracle database from an HTTP listener. It is configured during installation, but you cannot view it afterward.
See Also: "Using HTTP(S) on a Standard Port Instead of an Oracle XML DB Default Port" in Oracle XML DB Developer's Guide
0 Configured Manually
HTTP
Oracle XML DB
The Oracle XML DB FTP is used when applications need to access an Oracle database from an FTP listener. It is configured during installation, but you cannot view it afterward.
See Also: "Using FTP on the Standard Port Instead of the Oracle XML DB Default Port" in Oracle XML DB Developer's Guide
0 Configured Manually
FTP

Changing the Oracle Services for Microsoft Transaction Server Port
Managing Oracle Database Port Numbers E-3
E.4 Changing the Oracle Services for Microsoft Transaction Server Port In most cases, you are not required to reconfigure the port number. If you must, then you can use the Registry Editor to edit its value in the HKEY_LOCAL_MACHINE\SOFTWARE\ORACLE\OracleMTSRecoveryService\Protid_0 Registry Editor key to any available port within the range 1024 to 65535.
During installation, Oracle Universal Installer takes the value for the port from the key, if it exists. Otherwise, a free port ranging from 49152 to 65535 is chosen.
Cluster Synchronization Service (CSS)
CSS service internode connection for Group Manager. The port number is assigned automatically. You cannot view or modify it afterward.
42424 Dynamic TCP
Oracle Cluster Registry
The port number is assigned automatically during installation. You cannot view or modify it afterward.
Dynamic Dynamic TCP
Oracle Services for Microsoft Transaction Server
The port number for Microsoft Transaction Server is configured when you enter its value in Oracle Universal Installer the first time you install the software on a particular server. If you install the software in multiple Oracle homes on the same server, then Oracle Universal Installer uses the same port number that you specified during the first installation.
In most cases, you do not have to reconfigure the port number. "Changing the Oracle Services for Microsoft Transaction Server Port" on page E-3 explains how to change its port number.
Dynamic 49152-65535 TCP
See Also:
■ Oracle Enterprise Manager Cloud Control Advanced Installation and Configuration Guide for information on Oracle Management Agent ports
■ Oracle Real Application Clusters Installation Guide for Microsoft Windows x64 (64-Bit) for a list of clusterware ports used in Oracle components
Table E–1 (Cont.) Ports Used in Oracle Components
Component and Description Default Port Number Port Range Protocol

Changing the Oracle Services for Microsoft Transaction Server Port
E-4 Oracle Database Installation Guide

F
Troubleshooting the Oracle Database Installation F-1
FTroubleshooting the Oracle Database Installation
This appendix contains the following information about troubleshooting:
■ Verifying Requirements
■ Encountering Installation Errors
■ Reviewing the Log of an Installation Session
■ Silent Mode Response File Error Handling
■ Troubleshooting Host Name Changes and CSS
■ Troubleshooting Configuration Assistants
■ Troubleshooting Inventory Issues
■ Troubleshooting Screen Display Issues
■ Cleaning Up After a Failed Installation
■ Continuing Installations or Upgrades After Server Restarts
F.1 Verifying RequirementsBefore you try any of the troubleshooting steps in this appendix, do the following:
■ Check Chapter 2, "Oracle Database Preinstallation Tasks" to ensure that the system meets the requirements and that you have completed all of the preinstallation tasks.
■ Read the release notes for the product on your platform before installing it. You can find the latest version of the release notes on the Oracle Technology Network website:
http://www.oracle.com/technetwork/index.html
See Also:
■ Chapter 8, "Removing Oracle Database Software"
■ Chapter 6, "Troubleshooting Oracle Configuration Manager" in Oracle Configuration Manager Installation and Administration Guide for information about some errors that may occur while using Oracle Configuration Manager and tips to troubleshoot these errors

Encountering Installation Errors
F-2 Oracle Database Installation Guide
F.2 Encountering Installation ErrorsIf you encounter an error during installation:
■ Do not exit Oracle Universal Installer.
■ If you clicked Next after you entered incorrect information about one of the installation windows, click Back to return to the window and correct the information.
■ If you encounter an error while Oracle Universal Installer is copying or linking files, see "Reviewing the Log of an Installation Session" on page F-2 for interactive installations or "Silent Mode Response File Error Handling" on page F-2 for more information.
■ If you encounter an error while a configuration assistant is running, see the "Troubleshooting Configuration Assistants" section on page F-3.
■ If you cannot resolve the problem, remove the failed installation by following the steps listed in the "Cleaning Up After a Failed Installation" section on page F-4.
F.3 Reviewing the Log of an Installation SessionDuring an installation, Oracle Universal Installer records all the actions that it performs in a log file. If you encounter problems during the installation, review the log file for information about possible causes of the problem. By default, the log files are located in the following directory:
SYSTEM_DRIVE:\Program Files\Oracle\Inventory\logs
Log filenames from interactive installations take the form:
installActionsdate_time.logoraInstalldate_time.erroraInstalldate_time.out
For example, if an interactive installation occurred at 9:00:56 a.m. on October 14, 2005, the log file would be named:
installActions2005-10-14_09-00-56AM.log
F.4 Silent Mode Response File Error HandlingTo determine whether a silent-mode installation succeeds or fails, check the silentInstallActionsdate_time.log file, located in DRIVE_LETTER:\Program Files\Oracle\Inventory\logs.
If necessary, see Section F.3, "Reviewing the Log of an Installation Session" for information about determining the location of the Inventory directory.
A silent installation fails if:
■ You do not specify a response file.
Note: Do not delete or manually alter the Inventory directory or its contents. Doing so can prevent Oracle Universal Installer from locating products that you install on your system.
See Also: Silent Mode Response File Error Handling on page F-2

Troubleshooting Configuration Assistants
Troubleshooting the Oracle Database Installation F-3
■ You specify an incorrect or incomplete response file.
■ Oracle Universal Installer encounters an error, such as insufficient disk space.
Oracle Universal Installer or a configuration assistant validates the response file at run time. If the validation fails, the silent-mode installation or configuration process ends.
F.5 Troubleshooting Host Name Changes and CSSIf you change the host name for Oracle Automatic Storage Management, then the Oracle CSS service does not start. In order to solve this problem, use the following steps:
1. Log in as a user with Administrator privileges.
2. Run roothas.pl to deconfigure CSS.
C:\> cd \app\oracle\product\12.1.0\grid\crs\installperl roothas.pl -deconfig -force
This removes any configuration related files on the system that referenced the old host name.
3. Run gridconfig.bat script to reconfigure CSS using the new host name:
C:\> cd \app\oracle\product\12.1.0\grid\crs\configgridconfig.bat
4. Go to the grid home's bin directory. Use the srvctl add database command with the -c SINGLE flag to add the database in an Oracle Restart configuration. Also use the srvctl add command to add the listener, the Oracle ASM instance, all Oracle ASM disk groups, and any database services to the Oracle Restart configuration.
F.6 Troubleshooting Configuration AssistantsTo troubleshoot an installation error that occurs when a configuration assistant is running:
■ Review the installation log files listed in the "Reviewing the Log of an Installation Session" section on page F-2.
■ Review the specific configuration assistant log file located in the ORACLE_BASE\cfgtoollogs directory. Try to fix the issue that caused the error.
■ If you see the "Fatal Error. Reinstall message", look for the cause of the problem by reviewing the log files. See "Irrecoverable Errors" on page F-4 for more information.
F.6.1 Configuration Assistant FailuresOracle configuration assistant failures are noted at the bottom of the installation window. The configuration assistant interface displays additional information, if
See Also: "Reviewing the Log of an Installation Session" on page F-2 for information about interactive installation log files
See Also: "srvctl add" in Oracle Database Administrator's Guide
Note: Ensure that there is no space in the path.

Troubleshooting Inventory Issues
F-4 Oracle Database Installation Guide
available. The configuration assistant execution status is stored in the installActionsdate_time.log file.
The execution status codes are listed in the following table:
F.6.2 Irrecoverable ErrorsIf you receive an irrecoverable error while a configuration assistant is running:
1. Remove the failed installation as described in the "Cleaning Up After a Failed Installation" section on page F-4.
2. Correct the cause of the irrecoverable error.
3. Reinstall the Oracle software.
F.7 Troubleshooting Inventory IssuesIf you face any of the following situations for Oracle home, then run the opatch lsinventory -detail command to list the contents of the inventory and see section "Recovering from inventory corruption" in the Oracle Universal Installer and OPatch User's Guide for Windows and UNIX for information about fixing the issue.
■ Oracle home is cloned without completing the inventory steps.
■ There is bad inventory.
■ Inventory is not available but it is created when the Oracle Enterprise Manager Agent is installed in a separate Oracle home.
F.8 Troubleshooting Screen Display IssuesIf you connect to Oracle database with the screen resolution 640 X 480 or 800 X 600, then the Next button in the GUI is not visible as it hides behind the Taskbar. In order to counter this problem, do one of the following:
■ Hide the Taskbar.
■ Move the Oracle Universal Installer screen up.
■ Set the screen resolution to 1024 X 768 or higher.
F.9 Cleaning Up After a Failed InstallationIf an installation fails, you must remove files that Oracle Universal Installer created during the attempted installation and remove the Oracle home directory.
Follow the instructions in "Removing Oracle Database Software" to run the Deinstallation tool.
Status Result Code
Configuration assistant succeeded 0
Configuration assistant failed 1
Configuration assistant canceled -1

Continuing Installations or Upgrades After Server Restarts
Troubleshooting the Oracle Database Installation F-5
F.10 Continuing Installations or Upgrades After Server RestartsDuring an Oracle Grid Infrastructure for a standalone server installation or upgrade, the server might require a restart and you may see an error similar to the following:
ACFS-9427 Failed to unload ADVM/ACFS drivers. A system reboot is recommendedACFS-9428 Failed to load ADVM/ACFS drivers. A system reboot is recommended
The workaround is to perform the following steps:
1. Restart the computer.
2. Log in as the Oracle Installation User for the Oracle home, and run the gridconfig.bat script located in the path Grid_home\crs\config.
3. To complete the installation or upgrade, run the configToolAllCommands script, located in the path ORACLE_HOME\cfgtoollogs\configToolAllCommands.
See Also: "Postinstallation Configuration Using a Response File"

Continuing Installations or Upgrades After Server Restarts
F-6 Oracle Database Installation Guide

G
Frequently Asked Questions About Installation G-1
G Frequently Asked Questions About Installation
Use the following guidelines to decide how to install Oracle Database components:
■ Installing Oracle Database or Oracle Database Client
■ Installing Oracle Database Tools
■ Installing Oracle Database with Oracle Applications
■ Installing Oracle Database Heterogeneous Connectivity Tools (Gateways)
G.1 Installing Oracle Database or Oracle Database ClientThe following are frequently asked questions about installing Oracle database:
■ I only need one instance of Oracle Database or I just want to install a test database to get familiar with the product. How do I install Oracle Database for these situations?
■ How can I create an Oracle database that can handle transaction-heavy or data warehousing applications?
■ What’s the best way to install multiple Oracle databases?
■ How do I configure client connections to an Oracle database?
■ What is the best way to install Oracle Database Client if my client nodes have limited disk space?
■ How do I upgrade Oracle Database?
■ The computers at my site have been configured to run as a cluster. How should I install Oracle Database?
■ How do I migrate my non-Oracle databases to Oracle Database?
I only need one instance of Oracle Database or I just want to install a test database to get familiar with the product. How do I install Oracle Database for these situations?■ If you want a quick installation using the default installation settings, then see the
platform-specific Oracle Database Quick Installation Guide.
■ If your site has special requirements, then see this guide for more information.

Installing Oracle Database or Oracle Database Client
G-2 Oracle Database Installation Guide
How can I create an Oracle database that can handle transaction-heavy or data warehousing applications?If you want to create a starter database designed for transaction-heavy or data warehousing applications, then see this guide for more details. Select the Advanced Installation method, and then select the database type you want on the Select Database Configuration screen.
Alternatively, you can install Oracle OLAP during the Oracle Database installation. Oracle OLAP provides optimal support for database environments that must meet OLAP requirements. To do so, in the Select Database Edition screen, select Enterprise Edition. Click the Select Options button, and from the Choose Components screen, select Oracle OLAP.
What’s the best way to install multiple Oracle databases?Use this guide to install Oracle Database using either of the following methods:
■ Installing with response files: This method lets you run Oracle Universal Installer at a command line using a response file that contains settings specific to each computer.
■ Cloning a database: Install Oracle Database on one computer using interactive mode. You can also clone databases. The instructions for cloning databases are described in Oracle Database Administrator's Guide.
How do I configure client connections to an Oracle database?1. Install Oracle Database on a server by using this guide for more information.
2. Use platform-specific Oracle Database Client Installation Guide to install Oracle Database Client on each client node, and select the Instant Client installation type.
If you have many client nodes, consider staging the software centrally, mapping the drive, and running Oracle Universal Installer in the silent or response file mode.
If the client nodes only require a default installation into a new Oracle home directory, consider using this guide for more information.
What is the best way to install Oracle Database Client if my client nodes have limited disk space?1. Install Oracle Database onto a server by using this guide for more details.
2. Use platform-specific Oracle Database Client Installation Guide to install Oracle Database Client on each client node, and select the Instant Client installation type.
If you have many client nodes, then consider running Oracle Universal Installer in silent or response file mode.
How do I upgrade Oracle Database?See Oracle Database Upgrade Guide.
See Also: Oracle Database Data Warehousing Guide after installation
See Also:
■ Oracle OLAP User's Guide
■ Oracle OLAP DML Reference
■ Oracle OLAP Java API Reference

Installing Oracle Database Tools
Frequently Asked Questions About Installation G-3
The computers at my site have been configured to run as a cluster. How should I install Oracle Database?Use any of the following installation scenarios:
■ If you want to run a single-instance Oracle Database in a clustered environment, then install Oracle Grid Infrastructure either before or after you install Oracle Database.
■ If you want a consolidated pool of storage for all databases in a cluster, then install Oracle Grid Infrastructure, and use Oracle Automatic Storage Management (Oracle ASM) to manage this storage. Afterward, install Oracle Database (which can be either a single instance database or Real Application Clusters).
■ If you plan to use Oracle Real Application Clusters, first install Oracle Grid Infrastructure, and then install Oracle Real Application Clusters.
See platform-specific Oracle Grid Infrastructure Installation Guide and Oracle Real Application Clusters Installation Guide for the platform to install Oracle Clusterware or Oracle Real Application Clusters. See this guide which explains how to install Oracle ASM and Oracle Database.
Oracle Clusterware is a key component required by Oracle Real Application Clusters installations. Oracle Clusterware is an integrated cluster management solution that can bind multiple servers to act as a single system. This is referred to as a cluster. It performs workload management and component restart. For example, when an instance supporting a particular service fails, Oracle Clusterware restarts the service on the next available instance that you have configured for that service. Oracle Clusterware can monitor non-Oracle programs, if they are defined within the Oracle Clusterware environment using the High Availability API.
How do I migrate my non-Oracle databases to Oracle Database?Use Oracle SQL Developer to migrate your non-Oracle databases and applications to Oracle. Oracle SQL Developer software and documentation is available at:
http://www.oracle.com/technetwork/developer-tools/sql-developer/overview/index.html
G.2 Installing Oracle Database ToolsThe following are frequently asked questions about installing Oracle database tools:
■ How do I install Oracle WebLogic Server?
■ How can I administer and monitor my Oracle Database products?
■ How do I manage security for my Oracle Database products?
■ How do I use Oracle Database to manage my XML data?
■ Does Oracle Database provide OLAP tools so that I can analyze data such as trends and time series in my database?
■ Does Oracle Database provide data mining tools that I can use to discover hidden meaning in my data and predict likely outcomes based on my data?
■ How do I perform backup and recovery operations for Oracle Database?
■ Is Oracle Workflow included with Oracle Database?
■ Is there a migration plan for customers that have built solutions using Oracle Workflow?

Installing Oracle Database Tools
G-4 Oracle Database Installation Guide
How do I install Oracle WebLogic Server?Refer to Oracle Fusion Middleware Installation Guide for Oracle WebLogic Server.
For more information on Oracle WebLogic Server refer to the product documentation at:
http://www.oracle.com/technetwork/middleware/weblogic/documentation/index.html
How can I administer and monitor my Oracle Database products?To perform regular administrative functions such as creating, configuring, or deleting databases, or managing database templates, use one of the following methods:
To manage only the single database and listener that you are installing:
1. Use this guide to install Oracle Database.
2. From Oracle Database, use Database Configuration Assistant to manage your databases.
You can also administer and monitor the database with Oracle Enterprise Manager Cloud Control, which is installed by default with Oracle Database. Oracle Enterprise Manager Cloud Control requires an agent which is not installed by default.
Oracle Enterprise Manager Cloud Control includes the Oracle Management Agent, Oracle Management Service, and Oracle Management Repository, as well as Cloud Control, a browser-based central console through which administrators can perform all monitoring, administration, and configuration tasks for the enterprise.
To perform advanced administration tasks, such as monitoring Oracle Database and managing multiple hosts, application servers, and databases including the one that you are installing, install Oracle Enterprise Manager as follows:
1. Use this guide to install Oracle Database.
If you plan to use Oracle Real Application Clusters, then install Oracle Database by using the platform-specific Oracle Grid Infrastructure Installation Guide and Oracle Real Application Clusters Installation Guide.
2. Use Oracle Enterprise Manager Cloud Control Advanced Installation and Configuration Guide to install and configure Oracle Enterprise Manager. For postconfiguration tasks, use Oracle Enterprise Manager Cloud Control Administrator's Guide. See the documentation available on Oracle Technology Network website at:
http://www.oracle.com/technetwork/indexes/documentation/index.html
See Also: Oracle Enterprise Manager Cloud Control Advanced Installation and Configuration Guide and Oracle Enterprise Manager Cloud Control Basic Installation Guide
Documentation available on the Oracle Technology Network website at:
http://www.oracle.com/technetwork/indexes/documentation/index.html

Installing Oracle Database Tools
Frequently Asked Questions About Installation G-5
How do I manage security for my Oracle Database products?Oracle provides a wide range of security solutions for your enterprise environment, including centralized administration and security features integrated with Oracle Internet Directory. The set of Oracle security services called Oracle Platform Security integrates the security features built into Oracle Database, Oracle WebLogic Server, and the Oracle Identity Management infrastructure. Combined, these features enable the development and deployment of secure e-business applications.
Oracle Identity Management includes Oracle Internet Directory, a centralized repository that simplifies administration of users and applications in the Oracle environment with the following components:
■ Oracle Internet Directory client tools, including LDAP command-line tools, the Oracle Internet Directory SDK, and Oracle Directory Manager.
■ Oracle Internet Directory server components, including the directory server, the directory replication server, the directory integration server, and various tools for starting and stopping them.
Oracle Database includes the Oracle Internet Directory client tools, but not the Oracle Internet Directory server components. To install the Oracle Internet Directory server components, see Oracle Fusion Middleware Installation Guide for Oracle Identity and Access Management and the Oracle Identity Management documentation at:
http://www.oracle.com/technetwork/middleware/id-mgmt/overview/index.html
How do I use Oracle Database to manage my XML data?Use Oracle XML DB, which is installed as part of Oracle Database. Oracle XML DB enables you to efficiently store, generate, retrieve, query, and manage XML data on your site. Oracle XML DB provides all the advantages of a relational database, for example, allowing you to control the referential integrity of XML data with constraints and triggers. It works well with large amounts of XML data by storing it in a parsed, relational form, which improves access performance.
Oracle XML DB supports XML Type, which is a native data type for XML data, for which you can choose various storage options depending on your needs. In addition, Oracle XML DB supports XML Schema processing, structured and unstructured storage, a content repository that you can access by using common protocols (FTP, HTTP(S), and WebDAV), and SQL/XML, which is a standard for SQL with XML. For Oracle Database 11g Release 1 (11.1), Oracle XML DB introduced support for the XQuery language for querying, transforming, and constructing XML; the ability for users to define their own metadata for schema-based XML; a set of new SQL functions for DML operations on XML data; and more.
You can use Oracle XML DB with Oracle XML Developer’s Kit (XDK) to build applications that run on either Oracle Database or Oracle WebLogic Server.
See Also:
■ Oracle Database Security Guide
■ Oracle Database Enterprise User Security Administrator's Guide
■ Oracle Label Security Administrator's Guide
■ Oracle Technology Network topics on database security: http://www.oracle.com/technetwork/topics/security/whatsnew/index.html

Installing Oracle Database Tools
G-6 Oracle Database Installation Guide
Does Oracle Database provide OLAP tools so that I can analyze data such as trends and time series in my database?Yes, install Oracle OLAP, which is provided in the Oracle Database installation. Oracle OLAP provides optimal support for database environments that must meet OLAP requirements.
Use either of the following methods in Oracle Database Installation Guide to install Oracle OLAP:
■ When you run Oracle Universal Installer, in the Select Database Edition screen, select Enterprise Edition. Click the Select Options button, and from the Choose Components screen, select Oracle OLAP.
■ Select the Enterprise Edition installation type, and then on the Select Database Configuration screen, select the Data Warehouse configuration.
Does Oracle Database provide data mining tools that I can use to discover hidden meaning in my data and predict likely outcomes based on my data?Yes, you must have an Oracle Enterprise Edition license to use Oracle Data Mining tools. Oracle Data Mining is an option of the Enterprise Edition, as described in Table 5–1, " Oracle Universal Installer Windows", in the Select Database Edition row.
With the Oracle Data Mining option, you can create and execute predictive and descriptive data mining models that use a variety of algorithms.
Use the following method in this guide to install Oracle Data Mining:
1. When you run Oracle Universal Installer, select the Enterprise Edition installation type.
2. In the Select Database Configuration screen, select the General Purpose/Transaction Processing configuration.
See Also:
■ Oracle XML DB Developer's Guide
■ Oracle XML Developer's Kit Programmer's Guide
See Also:
■ Oracle OLAP User's Guide
■ Oracle OLAP DML Reference
■ Oracle OLAP Java API Reference
See Also: Oracle Database Data Warehousing Guide after installation
See Also: The following manuals for information about Oracle Data Mining:
■ Oracle Data Mining Concepts
■ Oracle Data Mining User's Guide
■ Oracle Database PL/SQL Packages and Types Reference (search for Data Mining)

Installing Oracle Database with Oracle Applications
Frequently Asked Questions About Installation G-7
How do I perform backup and recovery operations for Oracle Database?Use Oracle Database Recovery Manager (RMAN), which is a backup and recovery tool integrated into Oracle Database. This tool satisfies the pressing demands of high-performance, manageable backup, and recovery. Recovery Manager is native to the database server, automatically tracks database structure changes, and optimizes operations accordingly. In addition, Recovery Manager is integrated with leading tape media management products, so that Oracle database backups can be integrated with your existing networked data protection infrastructure.
Is Oracle Workflow included with Oracle Database?Starting with Oracle Database 11g, Oracle Workflow is no longer released with the database. Oracle Workflow is available with the Oracle E-Business Suite releases.
Is there a migration plan for customers that have built solutions using Oracle Workflow?Starting January 2006, customers are encouraged to re-create and implement workflows using Oracle SOA Suite. Refer to the following technical migration guide for detailed recommendations about migrating Oracle Workflow processes to Oracle SOA Suite (formerly known as Oracle BPEL Process Manager):
http://www.oracle.com/technetwork/middleware/ias/owf2bpel-132189.pdf
G.3 Installing Oracle Database with Oracle ApplicationsThe following are frequently asked questions about installing Oracle database with Oracle applications:
■ How do I install my Oracle applications with Oracle Database?
■ How can I create web applications that communicate with Oracle Database?
■ Which web server can my Oracle applications use?
■ How can I migrate my non-Oracle applications to Oracle?
How do I install my Oracle applications with Oracle Database?In most cases, install Oracle Database itself, then install the Oracle application. The Oracle Universal Installer for that application prompts you for the connection information. Check the application documentation requirements.
If you must implement your applications with Oracle Real Applications Clusters databases, see Oracle Real Application Clusters Installation Guide, and platform-specific Oracle Grid Infrastructure Installation Guide.
See Also:
■ Oracle Database Backup and Recovery User's Guide
■ Oracle Database Backup and Recovery Reference
See Also: Oracle Workflow statement of direction http://www.oracle.com/technetwork/middleware/ias/overview/index.html
See Also: Oracle Workflow statement of direction:
http://www.oracle.com/technetwork/middleware/ias/workflow-sod-089843.html

Installing Oracle Database Heterogeneous Connectivity Tools (Gateways)
G-8 Oracle Database Installation Guide
How can I create web applications that communicate with Oracle Database?Install Oracle Application Express and a web server. Use this guide to install Oracle Database. Oracle Application Express is automatically installed, when you install Oracle database.
Which web server can my Oracle applications use?Install Oracle HTTP Server, which ships on separate media, or use the XML DB HTTP Protocol Server and the embedded PL/SQL Gateway that installs with Oracle Database 12c.
How can I migrate my non-Oracle applications to Oracle? Use Oracle SQL Developer to migrate your non-Oracle applications to Oracle. Oracle SQL Developer software and documentation is available at:
http://www.oracle.com/technetwork/developer-tools/sql-developer/overview/index.html
G.4 Installing Oracle Database Heterogeneous Connectivity Tools (Gateways)
The following section discusses the Gateway products:
How can my Oracle applications access data in a non-Oracle database system?
How can my Oracle applications access data in a non-Oracle database system?You can use Oracle Database Gateway as the connectivity tool to enable Oracle applications to access data in non-Oracle databases. The following are the functions of Oracle Database Gateway:
■ Integrates a non-Oracle database into your Oracle Database environment.
■ Enables Oracle PL/SQL applications to integrate with APPC-enabled transactions, or access messages in IBM Websphere MQ.
You can install the Gateway product on a computer independent of the Oracle application, Oracle database, and non-Oracle database.
For example, suppose you have the following scenario:
■ Oracle Database is installed on a Linux computer.
■ The Oracle application is installed on a Microsoft Windows computer and accesses data from the Oracle database on the Linux computer.
■ The Oracle application needs to join data in a DB2 database on Solaris Operating System and an Oracle Database on Linux.
You have the option of installing the Database Gateway for DRDA on the Solaris computer where DB2 is running, on Linux where Oracle is running, or on a third computer.
Table G–1 lists the non-Oracle database systems that you can access from Oracle applications, and the Gateways products that are available for those systems.
See Also: Oracle Application Express Installation Guide

Installing Oracle Database Heterogeneous Connectivity Tools (Gateways)
Frequently Asked Questions About Installation G-9
Table G–1 Oracle Gateway Products
Non-Oracle Database Oracle Gateway Products and Documentation
IBM DB2 Universal Database (UDB)
Oracle Database Gateway for DRDA.
Use Oracle Database Gateway Installation and Configuration Guide for Microsoft Windows and Oracle Database Gateway for DRDA User's Guide.
IBM DB2 z/OS Oracle Database Gateway for DRDA.
Use Oracle Database Gateway Installation and Configuration Guide for Microsoft Windows and Oracle Database Gateway for DRDA User's Guide.
IBM DB2/400 Oracle Database Gateway for DRDA.
Use Oracle Database Gateway Installation and Configuration Guide for Microsoft Windows and Oracle Database Gateway for DRDA User's Guide.
WebSphere MQ Oracle Database Gateway for WebSphere MQ.
Oracle Database Gateway for WebSphere MQ Installation and User's Guide.
CICS/TS
IMSTM
Oracle Database Gateway for APPC.
Use Oracle Database Gateway for APPC Installation and Configuration Guide for Microsoft Windows
Use Oracle Database Gateway for APPC User's Guide
SQL Server Oracle Database Gateway for SQL Server.
Use Oracle Database Gateway Installation and Configuration Guide for Microsoft Windows and Oracle Database Gateway for SQL Server User's Guide.
Sybase Adaptive Server Oracle Database Gateway for Sybase.
Use Oracle Database Gateway Installation and Configuration Guide for Microsoft Windows and Oracle Database Gateway for Sybase User's Guide.
Teradata Oracle Database Gateway for Teradata.
Use Oracle Database Gateway Installation and Configuration Guide for Microsoft Windows and Oracle Database Gateway for Teradata User's Guide.
Informix Server Oracle Database Gateway for Informix.
Use Oracle Database Gateway Installation and Configuration Guide for Microsoft Windows and Oracle Database Gateway for Informix User's Guide.

Installing Oracle Database Heterogeneous Connectivity Tools (Gateways)
G-10 Oracle Database Installation Guide

Glossary-1
Glossary
automatic undo management mode
A mode of Oracle Database in which undo data is stored in a dedicated undo tablespace. Unlike in manual undo management mode, the only undo management that you must perform is the creation of the undo tablespace. All other undo management is performed automatically.
connect descriptor
A specially formatted description of the destination for a network connection. A connect descriptor contains destination service and network route information.
The destination service is indicated by using its service name for the Oracle Database or its Oracle system identifier (SID) for Oracle databases. The network route provides, at a minimum, the location of the listener through use of a network address.
connect identifier
A name, net service name, or service name that resolves to a connect descriptor. Users initiate a connect request by passing a user name and password along with a connect identifier in a connect string for the service to which they want to connect, for example:
SQL> CONNECT user_name@connect_identifierEnter password: password
control files
Files that record the physical structure of a database and contain the database name, the names and locations of associated databases and online undo tablespace, the time stamp of the database creation, the current log sequence number, and checkpoint information.
default domain
The network domain within which most client requests take place. It can be the domain where the client resides, or a domain from which the client often requests network services. The default domain is also the client configuration parameter that determines what domain to append to unqualified network name requests. A name request is unqualified if it does not have a "." character within it.
directory naming
A naming method that specifies a directory server to resolve a net service name into a connect descriptor. The net service name is stored centrally in a directory server.

directory server
Glossary-2
directory server
A Lightweight Directory Access Protocol (LDAP)-compliant directory server. A directory can provide centralized storage and retrieval of database network components, user and corporate policies preferences, user authentication, and security information, replacing client-side and server-side localized files.
external procedures
Procedure or function written in the C programming language and stored in a shared library. An Oracle server can call external procedures or functions using PL/SQL routines. For Oracle Database to connect to external procedures, the server must be configured with a net service name and the listener must be configured with protocol address and service information.
global database name
The full database name that uniquely distinguishes it from any other database in your network domain.
For example:
sales.us.example.com
where sales is the name you want to call your database and us.example.com is the network domain in which the database is located.
initialization response file
An ASCII text file that contains information needed to initialize a database and instance.
instance
Process associated with a running Oracle Database instance. When a database is started on a database server (regardless of the type of computer), Oracle Database allocates a memory area called the System Global Area and starts one or more Oracle Database processes. This combination of the System Global Area and Oracle Database processes is called an instance. The memory and processes of an instance manage the associated database's data efficiently and serve the users of the database.
installation type
A predefined component set that automatically selects which components to install. See "Oracle Database Editions" on page 1-10 for a list of installation types available with each top-level component.
Interprocess Communication (IPC)
A protocol that client applications use that resides on the same node as the listener to communicate with the database. IPC can provide a faster local connection than TCP/IP.
listener
A process that resides on the server and whose responsibility is to listen for incoming client connection requests and manage the traffic to the server.
When a client requests a network session with a database server, a listener receives the actual request. If the client information matches the listener information, then the listener grants a connection to the database server.
listener.ora file
A configuration file for the listener that identifies the:

OPS$
Glossary-3
■ Listener name
■ Protocol addresses on which it is accepting connection requests
■ Services for which it is listening
The listener.ora file resides in the ORACLE_HOME\network\admin directory.
An Oracle Database 12c does not require identification of the database service because of service registration. However, static service configuration is required for an Oracle Database 12c if you plan to use Oracle Enterprise Manager.
local naming
A naming method that resolves a net service name into a connect descriptor. This name is configured and stored in the tnsnames.ora file on each individual client.
manual undo management mode
A mode of the database in which undo blocks are stored in user-managed rollback segments.
naming method
A resolution method used by a client application to resolve a connect identifier to a network address when attempting to connect to a database service. Oracle Net Services supports the following naming methods:
■ Local naming
■ Directory naming
■ Host naming
■ External naming
net service name
A simple name for a service that resolves to a connect descriptor. Users initiate a connect request by passing a user name and password along with a net service name in a connect string for the service to which they want to connect:
SQL> CONNECT user_nameEnter password: passwordSQL> @net_service_name
Depending on your needs, net service names can be stored in a variety of places, including:
■ Local configuration file, tnsnames.ora, on each client
■ Directory server
■ External naming service, such as Network Information Service (NIS) or Cell Directory Service (CDS)
OPS$
Acronym for operating system specific. The initialization file parameter OS_AUTHENT_PREFIX enables users to specify a prefix that Oracle uses to authenticate users attempting to connect to the database. Oracle concatenates the value of this parameter to the beginning of the user's operating system account name and password. When a connection request is attempted, Oracle compares the prefixed user name with Oracle user names in the database.

Oracle Automatic Storage Management disk group
Glossary-4
The default value of this parameter is "" (a null string), thereby eliminating the addition of any prefix to operating system account names. In earlier releases, OPS$ was the default setting.
Oracle Automatic Storage Management disk group
A set of disk devices that Oracle Automatic Storage Management (Oracle ASM) manages as a unit. Each disk device can be an individual physical disk, a multiple disk device such as a RAID storage array or logical volume, or even a partition on a physical disk. You can create the Oracle ASM disk group when you create the Oracle Automatic Storage Management instance, or with Oracle Database Configuration Assistant.
Oracle Automatic Storage Management instance
The Oracle instance that manages an Oracle Automatic Storage Management disk group. It is created automatically when you install and configure Oracle Automatic Storage Management. See also Oracle system identifier (SID).
Oracle Automatic Storage Management
Enables creation of a single disk group from a collection of individual disk devices. It balances I/O to the disk group across all of the devices in the disk group. It also implements striping and mirroring to improve I/O performance and data reliability.
ORACLE_BASE
ORACLE_BASE is the root of the Oracle Database directory tree. The Oracle Base directory is the top level directory that you can use to install the various oracle software products. You can use the same Oracle base directory for multiple installations. If you install an OFA-compliant database using Oracle Universal Installer defaults, then ORACLE_BASE is X:\app\username, where X is any hard drive (for example, C:\app\username\product\12.1.0).
ORACLE_HOME
Corresponds to the environment in which Oracle Database products run. This environment includes location of installed product files, PATH variable pointing to products' binary files, registry entries, net service name, and program groups.
If you install an OFA-compliant database, using Oracle Universal Installer defaults, Oracle home (known as \ORACLE_HOME in this guide) is located beneath X:\ORACLE_BASE. The default Oracle home is db_n where n is the Oracle home number. It contains subdirectories for Oracle Database software executables and network files. See also Oracle home.
Oracle home
The directory path to install Oracle components (for example, C:\app\oracle\product\12.1.0\dbhome_n). You are prompted to enter an Oracle home in the Path field of the Specify File Locations window. See also ORACLE_HOME.
Oracle schema
A set of rules that determine what can be stored in an LDAP-compliant directory server. Oracle has its own schema that is applied to many types of Oracle entries, including Oracle Net Services entries. The Oracle schema for Oracle Net Services entries includes the attributes the entries may contain.

service registration
Glossary-5
Oracle Net foundation layer
A networking communication layer that establishes and maintains the connection between the client application and server, as well as exchanging messages between them.
protocol address
An address that identifies the network address of a network object.
When a connection is made, the client and the receiver of the request, such as the listener, or Oracle Connection Manager, are configured with identical protocol addresses. The client uses this address to send the connection request to a particular network object location, and the recipient "listens" for requests on this address. It is important to install the same protocols for the client and the connection recipient, and to configure the same addresses.
raw partitions
Portions of a physical disk that are accessed at the lowest possible disk (block) level.
redo log files
Files that contain a record of all changes made to data in the database buffer cache. If an instance failure occurs, then an administrator can use the redo log files to recover the modified data that was in memory.
registry
A Windows repository that stores configuration information for a computer.
repository
A set of tables located in any Oracle database accessible to the Oracle Management Server. Oracle Management Server uses a repository to store all system data and application data, information about the state of managed nodes distributed throughout the environment, as well as information about the separately licensable management packs.
service registration
A feature by which the LREG process (an instance background process) automatically registers information with a listener. Because this information is registered with the listener, the listener.ora file must not be configured with this static information.
Service registration provides the listener with the following information:
■ Service names for each running instance of the database
■ Instance names of the database
■ Service handlers (dispatchers and dedicated servers) available for each instance
This allows the listener to direct a client's request appropriately.
■ Dispatcher, instance, and node load information
This allows the listener to determine which dispatcher can best handle a client connection's request. If all dispatchers are blocked, the listener can spawn a dedicated server for the connection.
This information allows the listener to determine how best to service a client connection request.

SID
Glossary-6
SID
The Oracle system identifier that distinguishes the database from all other databases on your computer. The SID automatically defaults to the database name portion of the global database name (sales in the example sales.us.example.com) until you reach eight characters or enter a period. You can accept or change the default value.
The SID can also see an Oracle Automatic Storage Management instance SID, available when you install Oracle Automatic Storage Management.
sqlnet.ora file
A configuration file for the client or server that specifies the:
■ Client domain to append to unqualified service names or net service names
■ Order of naming methods for the client to use when resolving a name
■ Logging and tracing features to use
■ Route of connections
■ External naming parameters
■ Oracle Advanced Security parameters
The sqlnet.ora file resides in ORACLE_HOME\network\admin.
Secure Sockets Layer (SSL)
An industry standard protocol designed by Netscape Communications Corporation for securing network connections. SSL provides authentication, encryption, and data integrity using public key infrastructure (PKI).
SSL
See Secure Sockets Layer (SSL).
System Global Area
A group of shared memory structures that contain data and control information for an Oracle Database instance.
system identifier
See SID.
tablespace
A logical storage unit within a database. Tablespaces are divided into logical units of storage called segments, which are further divided into extents.
tnsnames.ora file
A configuration file that contains net service names mapped to connect descriptors. This file is used for the local naming method. The tnsnames.ora file resides in ORACLE_HOME\network\admin.
undo tablespace
An tablespace that contains one or more undo segments. The creation of any other types of segment (for example, tables, indexes) in undo tablespaces is not allowed.
In the automatic mode, each Oracle instance is assigned one and only one undo tablespace. Each undo tablespace is composed of a set of undo files. Undo blocks are grouped in extents. At any point in time, an extent is either allocated to (and used by) a transaction table, or is free.

User Account Control
Glossary-7
Blocks in undo tablespaces are grouped into the following categories:
■ File control blocks, bitmap blocks, and so forth used for space management
■ Undo segments containing transaction table blocks, undo blocks, and extent-map blocks used for transaction management
■ Free blocks that are unallocated to file control or undo segments
unqualified name
A net service name that does not contain a network domain.
User Account Control
A Microsoft Windows feature that helps prevent unauthorized changes by asking for permission or administrator privileges to perform certain operations. Some Oracle administration tasks require Windows administrator privileges granted through User Account Control.

User Account Control
Glossary-8

Index-1
Index
Aaccessibility software, Java Access Bridge, A-1account control, 3-8accounts
ANONYMOUS, 7-6APEX_030200, 7-6APEX_PUBLIC_USER, 7-6BI, 7-6CTXSYS, 7-6DBSNMP, 7-6DIP, 7-6EXFSYS, 7-6FLOWS_FILES, 7-6HR, 7-6IX, 7-6LBACSYS, 7-6MDDATA, 7-6MDSYS, 7-7OE, 7-7ORACLE_OCM, 7-7ORDPLUGINS, 7-7ORDSYS, 7-7OUTLN, 7-7PM, 7-7SCOTT, 7-7SH, 7-7SI_INFORMTN_SCHEMA, 7-7SYS, 7-7SYSTEM, 7-8WMSYS, 7-8XDB, 7-8
ACFS, 4-3requirements, 4-3
admin directory, B-4administrative user names, listed, 7-5Administrators group, requirements for Oracle
installations, 5-2ADVM, 4-3
requirements, 4-3AL32UTF8 character set
upgrade considerations, 5-5aliases, multiple on computers, 2-7ANONYMOUS administrative user name, 7-6APEX_030200 administrative user name, 7-6APEX_PUBLIC_USER administrative user
name, 7-6APPC-enabled databases, G-9applications, migrating non-Oracle applications to
Oracle, G-8ASMCA, 7-2asmcmd utility, 4-13asmtool utility, 4-12asmtoolg utility, 4-11authentication support
preinstallation requirements, 2-14Automatic Memory Management, 1-8Automatic Storage Management (Oracle ASM)
configuring Oracle Database to communicate with, 6-11
Bbackups of database
flash_area_recovery directory, B-4Oracle Database Recovery Manager, G-7perform before upgrading, 5-2
Basic installation methodSee also Advanced installation method
BI administrative user name, 7-6bind order of the adapters
about, 2-8
CCDBs, 5-4, 5-16, 5-17, 5-18, 7-8, C-10certification, hardware and software, 1-4, 2-5cloning an Oracle home, 5-19Cloud Control. See Oracle Enterprise Manager Cloud
ControlCluster Synchronization Services (CSS)
Oracle Automatic Storage Management, 1-14ports, ranges and protocol, E-3
clustersinstallation guidelines, 5-3See also Oracle Clusterware, Oracle Real
Application Clusterscommands
runcluvfy.bat, 4-15setup.exe, 4-15
compilerssupported, 2-4

Index-2
componentsfor single Oracle homes, 1-8installation of single Oracle home
components, 1-8computers with multiple aliases, 2-7computers, non-networked, 2-7configuration assistants
suppressing during silent or response file installation, C-6
troubleshooting, F-3See also Oracle Database Configuration Assistant
(DBCA), Net Configuration Assistant (NetCA)configuring disks for Oracle ASM, 4-6 to 4-13configuring disks for Oracle Automatic Storage
Management, 5-6Connection Manager
ports, ranges and protocol, E-2control files
about, 7-12using Oracle Enterprise Manager Database Control
with, 7-12CRS. See Oracle ClusterwareCTXSYS administrative user name, 7-6custom database
failure groups for Oracle ASM, 4-8requirements when using Automatic Storage
Management, 4-8
DDAS (direct attached storage) disks, 4-9data files
about, 7-11creating separate directories for, 2-14managing with Oracle Automatic Storage
Management, 1-14minimum disk space for, 2-13options for placing on file systems, 2-13recommendations for file system, 2-13
data lossminimizing with Oracle Automatic Storage
Management, 4-8data mining tools
Oracle Data Mining, G-6data warehousing
Enterprise Edition installation type, 1-10preconfigured database type, 1-12
data warehousing toolOracle OLAP, G-6
Database Securitypreinstallation requirements, 2-14
Database Upgrade Assistant, computers with minimum memory, 5-2
databasesaccounts, listed, 7-5cloning an Oracle home, 5-19control files, 7-12custom, management options, 1-17data files, 7-11initialization parameter file, 7-11
naming, 5-16non-Oracle
APPC-enabled, G-9non-Oracle, listed, G-9OLAP support (Oracle OLAP), G-6Oracle Automatic Storage Management (Oracle
ASM)requirements, 4-6
recovery with Oracle Backup and Recovery, G-7redo log files, 7-12security management, G-5starting, 7-3stopping, 7-3storage options, 1-13tablespaces, 7-11types, preconfigured, 1-12upgrade requirements, 1-18
DB_DOMAIN parameter, 7-10DB_NAME
parameter, 7-10DB2 database, G-9DB2 z/OS database, G-9DB2/400 database, G-9DBCA. See Oracle Database Configuration Assistantdbca.rsp file
about, C-4using, C-8
DBSNMP administrative user nameabout, 7-6
default control files, 7-12default data files, 7-11default initialization parameter file, init.ora, 7-11default tablespaces, 7-11Deinstallation Tool
about, 8-1description
database restart, 4-1Oracle Restart, 4-1
Desktop Classabout, 1-9
device namescreating with asmtool, 4-12creating with asmtoolg, 4-11
differences between installing Oracle on Windows and UNIX, 1-3
DIP administrative user name, 7-6directory
creating separate data file directories, 2-14database file directory, 2-13
disk devicesin Oracle Automatic Storage Management, 1-14managing with Oracle Automatic Storage
Management, 1-14multiple, 1-13
disk spacechecking, 2-3requirements for preconfigured database in Oracle
ASM, 4-8diskpart.exe tool
about, 4-10
Index-3
syntax, 4-10disks
configuring for Oracle Automatic Storage Management, 4-6 to 4-13, 5-6
supported for Oracle Automatic Storage Management, 4-9
DVD drive, installing from, 5-6
EEnterprise Edition installation type
about, 1-10Enterprise Manager. See Oracle Enterprise Managerenvironment variables
NLS_LANG, D-2ORACLE_BASE
set in Registry, 1-3ORACLE_HOME
preventing installation, 5-2set in Registry, 1-3
ORACLE_HOSTNAME, 2-7ORACLE_SID
set in Registry, 1-3PATH
set in Registry, 1-3TEMP and TMP
hardware requirements, 2-3TMP and TMPDIR, 4-3
errorsconfiguration assistants, F-3installation, F-2, F-4silent mode, F-2
EXAMPLE tablespacedescription, 7-11example01.DBF data file, 7-11
example01.DBF data file, 7-11examples
Oracle Automatic Storage Management failure groups, 4-8
EXFSYS administrative user name, 7-6external redundancy
Oracle Automatic Storage Management redundancy level, 4-7
Ffailure groups
about, 1-15characteristics in Oracle Automatic Storage
Management, 4-8examples in Oracle Automatic Storage
Management, 4-8FAQ for installation, G-1 to G-9Fast Recovery Area, 6-12fatal errors, F-4file systems
data file and recovery file placement options, 2-13
system requirements, 2-2using for data files, 2-13
fileslistener.ora
using for current release, 6-8Oracle Universal Installer log files, F-2tnsnames.ora, 6-8
Flash Recovery AreaSee Fast Recovery Area
flash_area_recovery directory, B-4FLOWS_FILES administrative user name, 7-6For, 2-12frequently asked installation questions, G-1 to G-9
GGateways products FAQ, G-8general purpose/transaction processing
preconfigured database type, 1-12generic documentation references
Windows-specific parameter file name and location, 7-11
Windows-specific redo log file location, 7-12Windows-specific redo log file size, 7-12
Global Database Nameabout, 5-16
global database nameabout, 7-10identifying, 7-10
global database name, defined, 7-10globalization support, D-1
Hhardware certification, 1-4, 2-5hardware requirements, 4-2high redundancy
Oracle Automatic Storage Management redundancy level, 4-7
host name, setting before installation, 2-7hosts file
editing for multihomed computers, 2-7location, 2-7
HR administrative user name, 7-6
IIBM DB2 database, G-9IBM DB2 z/OS database, G-9IBM DB2/400 database, G-9IBM WebSphere MQ databases, G-9Informix Server database, G-9initialization parameter file
about, 7-11in database, 7-11init.ora, 7-11
installActions.log file, F-2installation
accessing installation software, 5-6available products, 1-10cloning an Oracle home, 5-19clusters, installation guidelines, 5-3completing, 5-12

Index-4
component-specific guidelines, 5-3computer aliases, multiple, 2-7configuration options, about, 1-12database editions, 1-10differences between installing Oracle on UNIX and
Windows, 1-3downloading software from Oracle Technology
Network, 5-8DVD drive, 5-6errors
log session, F-2while configuration assistant runs, F-4
FAQ for Oracle Database products, G-1 to ??guidelines, 5-12Java Access Bridge, A-2laptops, 2-7log files, F-2Oracle Automatic Storage Management (Oracle
ASM)requirements, 4-6
Oracle Universal Installer, about, 1-6overview, 1-1 to ??planning, 1-1postinstallation tasks, 6-1 to 6-14preinstallation considerations, 5-1 to 5-3procedure, 5-10 to ??remote installation with remote access
software, 5-8remote installation, DVD drive, 5-7response file mode error handling, F-3response files, C-1
errors, F-2restrictions on installing in pre-8.1.5 homes, 1-6restrictions on using old Oracle Installer, 1-6reviewing a log of an installation session, F-2silent mode error handling, F-3single Oracle home components, 1-8troubleshooting, F-1 to F-4upgrading, G-2with other components, G-1 to ??
installation methods. See Desktop Class, Server Classinstallation software, accessing, 5-6Installing
Oracle restart, 4-16IP addresses, multiple, 2-6IX administrative user name, 7-6
JJava Access Bridge
about, A-1installing, A-2
Java Runtime Environment. See JREJobs system, 6-10JRE (Java Runtime Environment)
requirements, 2-2restrictions on modifying, 1-6version used by Oracle, 1-6
Llanguages
installing Oracle components in different languages, D-5
using Oracle components in different languages, D-4
laptops, installing Oracle Database on, 2-7LBACSYS administrative user name, 7-6listener.ora file
using listener from current release, 6-8listeners
stopping existing listener process, 3-8local device, using for data files, 2-13log files, F-2
reviewing an installation session, F-2troubleshooting, F-2
log files locations in OFA, B-8Logical Volume Manager (LVM)
multiple disks, 1-13recommendations for Automatic Storage
Management, 4-7loopback adapters
about, 2-8checking if installed, 2-9computers with multiple aliases, 2-7installing, 2-8 to 2-11installing on Windows Server 2008, 2-9, 2-10non-networked computers, 2-7removing, 2-11See also network adapters, primary network
adapters
MMDDATA administrative user name, 7-6MDSYS administrative user name, 7-7memory requirements, 4-2migrating applications to Oracle, G-8migrating non-Oracle databases to Oracle, G-3mirroring Oracle ASM disk groups, 4-7multihomed computers, installing on, 2-6multiple aliases, computers with, 2-7multiple Oracle homes
setting, 2-7System Identifier (SID), 7-10
multitenant container databases. See CDBsMy Oracle Support site
about, 1-4accessing, 1-4
NNet Configuration Assistant (NetCA)
response files, C-6running at command prompt, C-6suppressing during silent or response file
installation, C-6troubleshooting, F-3
Net Services Configuration Assistant, computers with minimum memory, 5-2

Index-5
netca.rsp fileabout, C-4using, C-6
network adapterscomputers with multiple aliases, 2-7how primary adapter is determined, 2-8non-networked computers, 2-7primary, on computers with multiple aliases, 2-7See also loopback adapters, primary network
adaptersnetwork cards, multiple, 2-6network protocols, supported, 2-4network topics
about, 2-6computers with multiple aliases, 2-7laptops, 2-7listed, 2-6 to 2-11loopback adapters, 2-8 to 2-11multiple network cards, 2-6non-networked computers, 2-7
new featuresnew software updates option, 1-10
NLS_LANG environment variable, D-2non-networked computers, 2-7non-Oracle databases, listed, G-9normal redundancy, Oracle Automatic Storage
Management redundancy level, 4-7NTFS system requirements, 2-2
OOE administrative user name, 7-7OEM. See Oracle Enterprise ManagerOLAP tools
about, G-6Oracle OLAP, G-6
operating systemreviewing common practices, 2-6
operating systems, supported, 2-4Optimal Flexible Architecture
advantages, B-1overview, B-1standard, B-1
Optimal Flexible Architecture (OFA)changes for this release, B-2default Optimal Flexible Architecture
database, B-5differences since previous releases, B-2directory naming conventions, B-3nondefault Optimal Flexible Architecture database
2, B-5Oracle base directory, B-7Oracle Database directory tree, affect on, B-2Oracle home directory, B-5symbolic links, B-7Windows and UNIX differences, B-6
Oracle ACFS, 4-3enabling, 4-21requirements, 4-3restrictions, 4-4
Oracle Administration Assistant for Windowsbehavior with multiple Oracle homes, 1-8configuration, 6-7
Oracle ADVM, 4-3requirements, 4-3restrictions, 4-4
Oracle applicationsinstalling with Oracle Database, G-7
Oracle ASM. See Automatic Storage ManagementOracle Automatic Storage Management
asmcmd utility, 4-13configuring disks, 5-6considerations before installing, 4-5installation, testing, 4-13password file, 4-5SPFILE server parameter file, 4-5
Oracle Automatic Storage Management (Oracle ASM)asmtool utility, 4-12asmtoolg utility, 4-11configuring disks, 4-6 to 4-13DAS disks, 4-9disk devices, 1-14disk groups. See Oracle ASM disk groupsdisks, supported, 4-9failure groups
characteristics, 4-8examples, 4-8identifying, 4-8
getting started using, 7-2managing, 7-2mirroring, 4-7Oracle ASM asmcmd utility, 7-2Oracle ASM disk groups
about, 1-14managing, 7-2recommendations for, 4-7templates, 1-15
Oracle ASM instanceabout, 1-15
partition creation, 4-9redundancy levels, 4-7SAN disks, 4-9silent or response file mode installations, C-2space required for preconfigured database, 4-8starting and stopping, 7-2templates, 1-15
Oracle Automatic Storage Management Cluster File System, 4-3
Oracle Automatic Storage Management Configuration Assistant, 7-2
Oracle base directoryabout, 1-6, B-3example, B-5installation, 1-6location on UNIX, B-7location on Windows, B-7
Oracle Cluster Registry port, E-3Oracle Clusterware
about, G-3installed before Oracle Database, 5-3

Index-6
used with Oracle Real Application Clusters, G-3when to install, 2-15
Oracle componentsusing in different languages, D-4
Oracle Data Miningabout, G-6installing, G-6
Oracle Databaseadministering and monitoring, G-4Automatic Storage Management, configuring
communication with, 6-11checking installed contents, 7-1cloning an Oracle home, 5-19creating data file directories, 2-14getting started using, 7-1 to 7-13
accessing, 7-4starting and stopping database, 7-4
installing with Oracle applications, G-7installing with other Oracle
components, G-1 to ??minimum disk space requirements, 2-13naming, 5-16requirements with Oracle Automatic Storage
Management, 4-8security management, G-5starting and stopping, 7-3upgrading, G-2Windows Terminal Services support, 2-5See also installation, postinstallation, removing,
requirementsOracle Database Advanced Queuing, 6-7Oracle Database Client
configuring connections, G-2requirements, 2-5
Oracle Database componentsadministering and monitoring, G-4connectivity FAQ, G-8FAQ on installing, G-1 to ??installing with Oracle applications, G-7installing with Oracle Database tools, G-4
Oracle Database Configuration Assistant (DBCA)about, 1-12computers with minimum memory, 5-2modes during database installation, 1-12response files, C-7suppressing during silent or response file
installation, C-6troubleshooting, F-3
Oracle Database directory tree, B-2Oracle Database Gateway
listed products, G-8Oracle Database Recovery Manager (RMAN)
about, G-7Oracle Database SID
about, 5-16naming rules, 5-16ORACLE_SID environment variable, 1-3
Oracle Database Upgrade Assistant, computers with minimum memory, 5-2
Oracle Database Vault
audit policy, 1-8postinstallation task, 6-8
Oracle Enterprise Management Agentwhere installed, 1-16
Oracle Enterprise ManagerDatabase Control
using to modify control files, 7-12using to modify redo log files, 7-12using to view control files, 7-12using to view redo log files, 7-12
Oracle Enterprise Manager (OEM)about, 1-15deploying, 1-15jobs system, setting correct credentials, 6-10options, 1-15preinstallation requirements, 2-15See also Oracle Enterprise Manager Database
Express, Oracle Enterprise Manager Cloud Control
Oracle Enterprise Manager Cloud Control, 1-16about, 1-16how installed, 1-16
Oracle Enterprise Manager Database Expresslogging into, 7-2password management, 7-9port number, 7-2
Oracle home directoryabout, 1-7examples, B-5location, B-3multiple homes, network considerations, 2-6multiple homes, precedence of components, 1-8Optimal Flexible Architecture, B-5single Oracle home components, 1-8specifying, B-5
Oracle host name, setting before installation, 2-7Oracle Internet Directory, G-5Oracle Messaging Gateway feature, 6-7Oracle Net Listener
portsranges and protocol, E-2
Oracle Net Servicesconfiguring, 6-8postinstallation task, 6-8stopping existing listener, 3-8
Oracle Net Services Configuration Assistant, computers with minimum memory, 5-2
Oracle OLAPabout, G-6
Oracle Oracle Services for Microsoft Transaction Server
portschanging, E-3
Oracle Provider for OLE DBbehavior with multiple Oracle homes, 1-8
Oracle Real Application Clusters (Oracle RAC)Oracle Automatic Storage Management, 1-14
Oracle Real Application Clusters (RAC)installed before Oracle Database, 5-3installing with Oracle Enterprise Manager, G-4

Index-7
Oracle Clusterware, 2-15about, G-3
requirements, 2-15Oracle Restart
description, 4-1Installing, 4-16
Oracle Services for Microsoft Transaction Serverports
ranges and protocol, E-3Oracle SQL Developer
accessing, 7-4migrating non-Oracle applications to Oracle, G-8migrating non-Oracle databases to Oracle, G-3
Oracle Technology Network (OTN)downloading software from, 5-8
Oracle Text knowledge base, 6-9Oracle Universal Installer
location of executable, C-5running in different languages, D-5
Oracle Universal Installer (OUI)about, 1-6cloning an Oracle home, 5-19guidelines in using, 5-3installation guidelines, 5-3log files, F-2response files, C-1restrictions on installing in pre-8.1.5 homes, 1-6running at command line, C-5
Oracle WebLogic Server, G-4Oracle XML DB
about, G-5ports, ranges and protocol, E-2XDB administrative user name, 7-8
ORACLE_BASE directory. See Oracle base directoryORACLE_BASE environment variable
set in Registry, 1-3ORACLE_HOME directory. See Oracle home
directory, ORACLE_HOME environment variable
ORACLE_HOME environment variablepreventing installation, 5-2set in Registry, 1-3
ORACLE_HOSTNAME environment variableabout, 2-7computers with multiple aliases, 2-7multihomed computers, 2-7setting before installation, 2-7
ORACLE_OCM administrative user name, 7-7ORACLE_SID environment variable
set in Registry, 1-3See also Oracle Database SID
Oracle-managed files feature, 2-15ORADATA directory, explained, B-4ORDPLUGINS administrative user name, 7-7ORDSYS administrative user name, 7-7OTN. See Oracle Technology NetworkOUI. See Oracle Universal InstallerOUTLN administrative user name, 7-7
Ppartitions
creation for Oracle Automatic Storage Management disks, 4-9
using with Oracle Automatic Storage Management, 4-7
See also diskpart.exe toolpassword file for Oracle Automatic Storage
Management, 4-5passwords
for administrative accounts, 7-5guidelines, 7-8managing in SQL*Plus, 7-9specifying for response files, C-2See also security
patch set information, downloading, 6-1PATH environment variable
set in Registry, 1-3PDBs, 5-4, 5-17, C-10Personal Edition installation type, 1-10PL/SQL
external procedures postinstallation task, 6-9modules, validating, 6-2
pluggable databases. See PDBsPM administrative user name, 7-7portlist.ini file, E-1ports
access URLs, E-1Cluster Synchronization Services, ranges and
protocol, E-3configured for applications, E-1Connection Manager, ranges and protocol, E-2default ranges, E-1Oracle Cluster Registry, E-3Oracle Net Listener
ranges and protocol, E-2Oracle Services for Microsoft Transaction Server
changing, E-3Oracle Services for Microsoft Transaction Server,
ranges and protocol, E-3Oracle XML DB, ranges and protocol, E-2
postinstallation tasks, 6-1 to 6-14changing passwords, 7-8configuring secure sockets layer, 6-2database-to-Automatic Storage Management
communication, 6-11getting started using Oracle Database, 7-1 to 7-13Jobs system, 6-10Oracle Administration Assistant for
Windows, 6-7Oracle Messaging Gateway feature, 6-7Oracle Net Services, 6-8Oracle Text knowledge base, 6-9PL/SQL external procedures, 6-9setting job system credentials for Enterprise
Manager, 6-10shared server support, 6-10validating invalid PL/SQL modules, 6-2
preconfigured databaseOracle Automatic Storage Management disk space
Index-8
requirements, 4-8requirements when using Oracle Automatic
Storage Management, 4-8preinstallation
perform database backup, 5-2requirements for Oracle Database Security, 2-14requirements for Oracle Enterprise Manager, 2-15
preinstallation considerations, 5-1 to 5-3primary network adapters
how determined, 2-8See also loopback adapters, network adapters
process, stopping existing listener process, 3-8
RRAC. See Oracle Real Application ClustersRAID (Redundant Array of Independent Disks)
multiple disks, 1-13recommended Oracle ASM redundancy level, 4-7using for Oracle data files, 2-13
RAM requirements, 4-2readme.txt file, E-1recommendations
on perfomring software-only installations, 4-14recovery files, options for placing on file
system, 2-13recovery of databases
Oracle Backup and Recovery, G-7redo log files
in starter database, 7-12using Oracle Enterprise Manager Database Control
with, 7-12redundancy level
and space requirements for preconfigured database, 4-8
for Oracle Automatic Storage Management, 4-7Redundant Array of Independent Disks. See RAIDrelease notes, 1-1remote access software, 5-8remote installations
DVD drive, 5-7remote access software, 5-8
removingresponse files, using, C-6
requirementsfor JRE, 2-2for Oracle Enterprise Manager, 2-15for upgrading a database, 1-18hard disk space, 2-2hardware, 2-1, 4-2hardware certification, 2-5hardware, verifying, 2-3Oracle Database Client, 2-5software, 2-4software certification, 2-5Web browser support, 2-5Windows Terminal Services, 2-5
response file modeabout, C-1error handling, F-2
reasons for using, C-2See also response files, silent mode, C-1
response file mode. See response file moderesponse files
about, C-1creating
with record mode, C-4with template, C-3
dbca.rsp, C-4error handling, F-2general procedure, C-2Net Configuration Assistant, C-6netca.rsp, C-4Oracle Automatic Storage Management (Oracle
ASM), C-2Oracle Database Configuration Assistant
(DBCA), C-7passing values at command line, C-2passwords, C-2security, C-2specifying with Oracle Universal Installer, C-5using, C-1 to C-8See also silent mode, response file mode, C-1
response files installationabout, C-1
roadmap for installing Oracle Database components, G-1 to ??
root user, 5-12
SSample Schemas
administrative user names, 7-6tablespaces and data files, 7-11
SAN (storage area network) disks, 4-9schemas
database schema passwords, 5-18Sample Schemas administrative user names, 7-6Sample Schemas tablespaces and data files, 7-11
SCOTT administrative user name, 7-7security
management tools, G-5Oracle Database Security Strong Authentication
requirements, 2-14See also passwords
Server Classabout, 1-9See also Desktop Class
server parameter file (SPFILE), 4-5SERVICE_NAMES parameter, 7-10services, stopping, 3-7setup.exe. See Oracle Universal Installer (OUI)SH administrative user name, 7-7shared server support, 6-10SI_INFORMTN_SCHEMA administrative user
name, 7-7SID. See Oracle Database SIDsilent mode
about, C-1error handling, F-2

Index-9
errors, F-2reasons for using, C-2See also response file mode, response files, C-1
single Oracle home components, 1-8software certification, 1-4, 2-5software updates option, 4-17SPFILE server parameter file, 4-5SQL Developer
accessing, 7-4SQL Server database, G-9SQL*Plus
accessing, 7-4password management, 7-9
sqlnet.ora file, enabling Windows native authentication, 6-11
SSL, 6-2Standard Edition installation type, 1-10starter database accounts, 7-6 to 7-8stopping existing services, 3-7storage area network disks, 4-9storage management. See Oracle Automatic Storage
Management (Oracle ASM)swap space
requirements, 4-2Sybase Adapter Server database, G-9symbolic links, B-7SYS administrative user name, 7-7SYSTEM
tablespace, description, 7-11SYSTEM administrative user name, 7-8system requirements
on NTFS file systems, 2-2system01.dbf data file, 7-11
Ttablespaces, 7-11
expanding for large sorts, 7-11in database, 7-11SYSTEM, 7-11TEMP, 7-11UNDOTBS, 7-11USERS, 7-12
TEMPtablespace (temp01.dbf), 7-11
TEMP environment variable, hardware requirements, 2-3
temp01.dbf data file, 7-11temporary directory, 2-3temporary disk space
checking, 2-3freeing, 2-3requirements, 4-2
Teradata database, G-9tmp directory
checking space in, 2-3freeing space in, 2-3
TMP environment variable, 4-3hardware requirements, 2-3
TMPDIR environment variable, 4-3
tnsnames.ora file, 6-8transaction processing
Enterprise Edition installation type, 1-10troubleshooting, F-1 to F-4
fatal errors, F-4Inventory log files, F-2
UUNDOTBS
tablespace (undotbs01.dbf), 7-11UNIX
differences between installing Oracle on Windows, 1-3
unsupported componentson Windows Terminal Services, 2-5
upgradingAL32UTF8 character set, 5-5backing up before upgrading, 5-2considerations, 1-18operating sytem, 1-18Oracle ASM, 1-19Oracle Database, 1-18
user account control, 3-8user accounts, managing, 3-8user names
ANONYMOUS, 7-6APEX_030200, 7-6APEX_PUBLIC_USER, 7-6BI, 7-6changing passwords, 7-8CTXSYS, 7-6DBSNMP, 7-6DIP, 7-6EXFSYS, 7-6FLOWS_FILES, 7-6HR, 7-6IX, 7-6LBACSYS, 7-6MDDATA, 7-6MDSYS, 7-7OE, 7-7ORACLE_OCM, 7-7ORDPLUGINS, 7-7ORDSYS, 7-7OUTLN, 7-7PM, 7-7SCOTT account, 7-7SH, 7-7SI_INFORMTN_SCHEMA, 7-7SYS, 7-7SYSTEM, 7-8WMSYS, 7-8XDB, 7-8
USERStablespace (users01.dbf), 7-12
utlrp.sql file, 6-2
Index-10
WWeb browser support, 2-5WebSphere MQ database, G-9Windows
compilers, supported, 2-4credentials for job system, 6-10network protocol, supported, 2-4operating systems, supported, 2-4Oracle Database installation differences with
UNIX, 1-3Windows 7
user account control, 3-8Windows 8
user account control, 3-8Windows Server 2008
user account control, 3-8Windows Server 2008 R2
user account control, 3-8Windows Services utility, starting and stopping
databases, 7-3Windows Terminal Services
support, 2-5unsupported components, 2-5
WMSYS administrative user name, 7-8
XXDB administrative user name, 7-8XML data, G-5


