E-Notebook SQL 12.0
20
E-Notebook SQL 12.0 Desktop Database Installation Guide E-Notebook SQL 12.0 Desktop Database Installation Guide
-
Upload
lore181190 -
Category
Documents
-
view
229 -
download
0
Transcript of E-Notebook SQL 12.0

8/10/2019 E-Notebook SQL 12.0
http://slidepdf.com/reader/full/e-notebook-sql-120 1/19
E-Notebook SQL 12.0 Desktop Database Installation Guide
E-Notebook SQL 12.0 Desktop DatabaseInstallation Guide
8/10/2019 E-Notebook SQL 12.0
http://slidepdf.com/reader/full/e-notebook-sql-120 2/19
E-Notebook SQL 12.0 Desktop Database Installation Guide
1. Introduction ................................................................................................................. 3
2. Database System ......................................................................................................... 3
2.1. Software requirements.......................................................................................... 3
2.2. Database Creation and Configuration .................................................................. 4
2.2.1. Create and share E-Notebook data folders (optional) ................................... 4
2.2.2.
Create New E-Notebook Database ............................................................... 8
2.3. Configure E-Notebook Client to connect to the database .................................. 12
2.4. Configure Adobe PDF printer on E-Notebook client......................................... 14
2.5. Confirm proper configuration of the database and client ................................... 14
3. Remote Client Configuration .................................................................................... 15
3.1. Software requirements........................................................................................ 15
3.2. E-Notebook client-server connection configuration .......................................... 16
3.3. Configure Adobe PDF printer on E-Notebook client......................................... 19
3.4. Confirm proper configuration of the remote connection ................................... 19
Page 2 of 19

8/10/2019 E-Notebook SQL 12.0
http://slidepdf.com/reader/full/e-notebook-sql-120 3/19
E-Notebook SQL 12.0 Desktop Database Installation Guide
1. Introduction
This document describes the steps required to create and configure the CambridgeSoft E- Notebook SQL 12.0 Desktop database on a desktop or workstation computer. There are
two main components to the installation:
Create and configure the E-Notebook database and client on a computer with SQL
Server Express Edition with Advanced Services Configure the E-Notebook client on remote systems to connect to the database
2. Database System
2.1. Software requirements
Operating system version: Windows XP Pro SP2/SP3 or Windows Vista Business
SP1/SP2Operating system architecture: 32 bit
Microsoft Office: Office XP SP3, Office 2003 SP3, Office 2007 SP1
CambridgeSoft Applications: SKU with ChemDraw ActiveX control and E- Notebook client
SQL Server version: SQL Server 2005 Express Edition with Advanced Services SP3(as installed by the CambridgeSoft version 12 Installation Wizard)
.Net Framework: .Net Framework 2.0 SP2
Page 3 of 19

8/10/2019 E-Notebook SQL 12.0
http://slidepdf.com/reader/full/e-notebook-sql-120 4/19

8/10/2019 E-Notebook SQL 12.0
http://slidepdf.com/reader/full/e-notebook-sql-120 5/19
E-Notebook SQL 12.0 Desktop Database Installation Guide
• Right click the ‘Structure Index Files’ folder and from the context menu select
‘Sharing and Security’ on Windows XP. On Windows Vista (with the share
wizard turned off) select ‘Share…’ and click ‘Advanced Sharing’. Check ‘Sharethis folder’ and type a network ‘Share name’.
Windows XP Windows Vista
• Click the ‘Permissions’ button.
•
Click ‘Add…’ and select all the users and/or user groups that will be using E- Notebook. <OK>
• Select the users or user group and in the ‘Permissions’ section check ‘change’ and‘read’. <OK>
Page 5 of 19
8/10/2019 E-Notebook SQL 12.0
http://slidepdf.com/reader/full/e-notebook-sql-120 6/19
E-Notebook SQL 12.0 Desktop Database Installation Guide
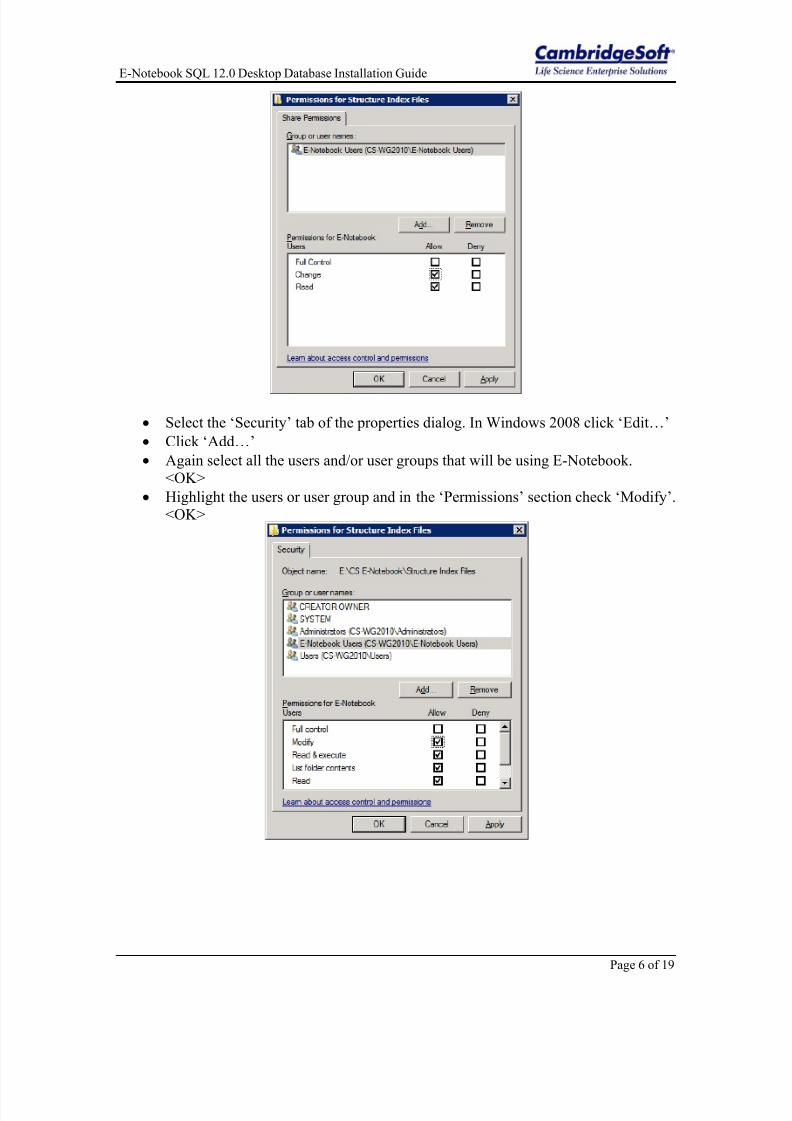
• Select the ‘Security’ tab of the properties dialog. In Windows 2008 click ‘Edit…’
• Click ‘Add…’
• Again select all the users and/or user groups that will be using E-Notebook.
<OK>
• Highlight the users or user group and in the ‘Permissions’ section check ‘Modify’.<OK>
Page 6 of 19

8/10/2019 E-Notebook SQL 12.0
http://slidepdf.com/reader/full/e-notebook-sql-120 7/19
E-Notebook SQL 12.0 Desktop Database Installation Guide
• Right click the ‘Configuration File’ folder and from the context menu select
‘Sharing and Security’ on Windows XP. On Windows Vista select ‘Share…’ and
click ‘Advanced Sharing’. Check ‘Share this folder’ and type a network ‘Sharename’.
Windows XP Windows Vista
• Click the ‘Permissions’ button.
•
Click ‘Add…’ and select all the users and/or user groups that will be using E- Notebook. <OK>
Only the ‘read’ permission is required for the Configuration file folder. <OK>
Page 7 of 19

8/10/2019 E-Notebook SQL 12.0
http://slidepdf.com/reader/full/e-notebook-sql-120 8/19
E-Notebook SQL 12.0 Desktop Database Installation Guide
2.2.2. Create New E-Notebook Database
If you plan to only use E-Notebook as a stand-alone application on one computer without
sharing the database, you can leave all the settings in the dialogs at default.
• From the Windows start menu run the E-Notebook 12.0 application
The E-Notebook application will check if there is already a connection setup to anexisting database. If none is found a dialog will be displayed asking you if you would like
to create a new database or setup a connection to an existing database.
• Press ‘Yes’ to continue
Page 8 of 19
8/10/2019 E-Notebook SQL 12.0
http://slidepdf.com/reader/full/e-notebook-sql-120 9/19
E-Notebook SQL 12.0 Desktop Database Installation Guide
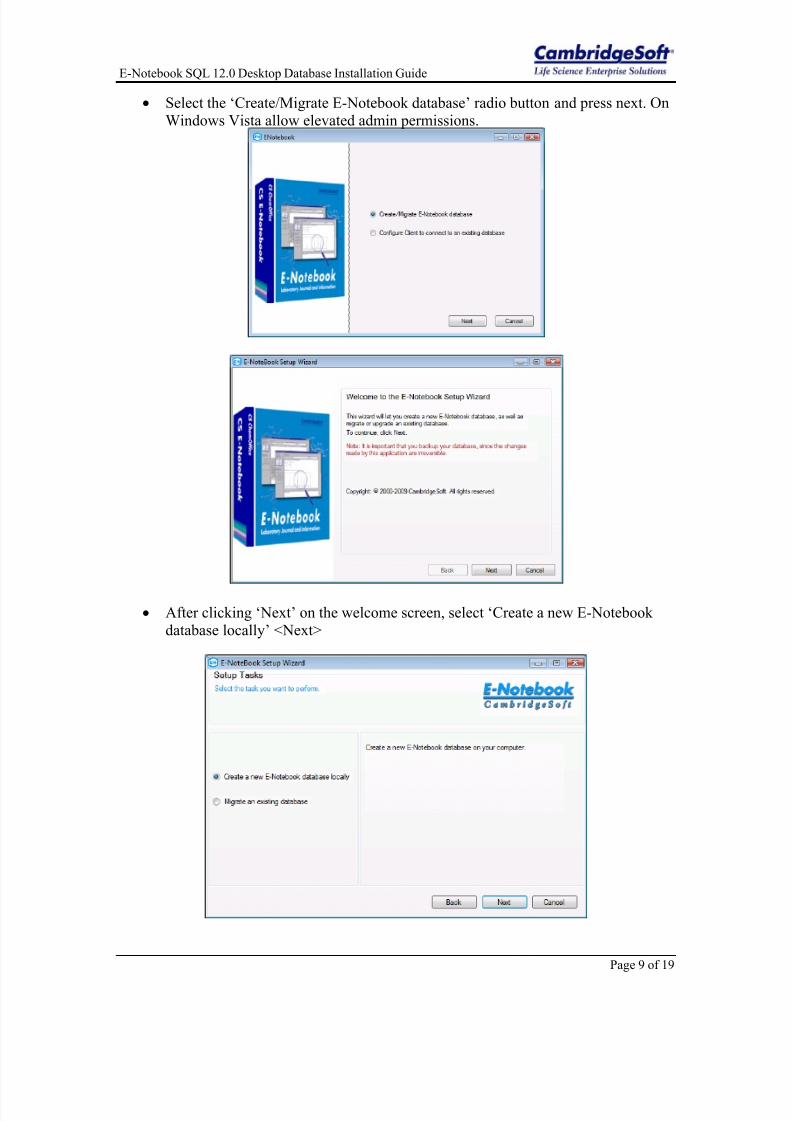
• Select the ‘Create/Migrate E-Notebook database’ radio button and press next. On
Windows Vista allow elevated admin permissions.
• After clicking ‘Next’ on the welcome screen, select ‘Create a new E-Notebookdatabase locally’ <Next>
Page 9 of 19

8/10/2019 E-Notebook SQL 12.0
http://slidepdf.com/reader/full/e-notebook-sql-120 10/19
E-Notebook SQL 12.0 Desktop Database Installation Guide
• The entries for the server name and information to login to the SQL server
Express can be left at default. The ‘local’ value will automatically be converted to
the name of your computer.
• Enter a name for your E-Notebook database or leave it at the suggested default.<Next>
• Browse to the ‘database’, ‘Structure Index Files’ and ‘Configuration File’ folders
if you have created them earlier. If you plan to share your database with other E-
Notebook clients, you will have to use the ‘UNC’ or network path of the shared
folder for the ‘Structure Index Files’ (which will look something like“\\computer\E-Notebook Structure Index files”). This path will be used in the
‘SqlConfig.xml’ configuration file (that is saved in the ‘Configuration File’
folder). Each client connects to ‘SqlConfig.xml’ on login to determine the SQLServer Express with the connection settings and the path to the Structure Index
Files that it needs to use. Leave the two check boxes checked.
Page 10 of 19

8/10/2019 E-Notebook SQL 12.0
http://slidepdf.com/reader/full/e-notebook-sql-120 11/19
E-Notebook SQL 12.0 Desktop Database Installation Guide
• A summary dialog is displayed with the database that will be created in SQL
Server Express. Press ‘Create’ to start the process. Depending on the SQL server
system configuration the process will take some time to finish.
After successfully creating the database, a confirmation dialog will be displayed. A
default E-Notebook administrator account is created with the following credentials (note
the capitalization):Username: ELNAdmin
Password: ELNAdmin
This is a SQL login account that is used to do the initial login and user creation. It can be
disabled once at least one other SQL or Windows E-Notebook user is created that is anadministrator.
Page 11 of 19

8/10/2019 E-Notebook SQL 12.0
http://slidepdf.com/reader/full/e-notebook-sql-120 12/19
E-Notebook SQL 12.0 Desktop Database Installation Guide
2.3. Configure E-Notebook Client to connect to the database
• After successfully creating the database, the wizard will show a dialog asking if
you want to configure the E-Notebook client on the system to connect to the
newly created database. Press ‘Yes’.
If you chose all the defaults during the database creation, you can also use the defaults in
the Client Configuration tool.
• Enter a ‘service name’ or leave it at the suggested default. This name can be
anything and will show on the E-Notebook login dialog.
• Keep the authentication set to ‘SQL Server’ so that you will get a login screenthat asks for a username and password.
• Keep the ‘server connection’ radio button set to ‘Server Configuration File’ and
browse to the location where you created the Sqlconfig.xml file.
Page 12 of 19

8/10/2019 E-Notebook SQL 12.0
http://slidepdf.com/reader/full/e-notebook-sql-120 13/19
E-Notebook SQL 12.0 Desktop Database Installation Guide
• Press ‘OK’ to save the ‘ENClientConfig.xml’ file. A dialog confirming the
completion of the configuration will be shown. <OK>
• In the login dialog that now appears enter ‘ELNAdmin/ELNAdmin’ for theusername and password and press ‘Connect’.
The E-Notebook client will now start and connect to the database.
Page 13 of 19

8/10/2019 E-Notebook SQL 12.0
http://slidepdf.com/reader/full/e-notebook-sql-120 14/19
E-Notebook SQL 12.0 Desktop Database Installation Guide
2.4. Configure Adobe PDF printer on E-Notebook client
If you wish to make use of the export to PDF functionality in E-Notebook, it is required
that Adobe Acrobat Pro is installed. The PDF printer on these clients needs to have the
option 'Rely on System Fonts only: do not use document fonts' unchecked.
2.5. Confirm proper configuration of the database and client
It is recommended to confirm the proper setup of the database and client by logging into
E-Notebook and performing some basic tasks.
• Launch E-Notebook from the start menu and login using the pre-defined SQL
administrative user account with login/password ‘ELNAdmin/ELNAdmin’.
• Create a new ‘Chemistry Notebook’ with a reaction page
• Draw a reaction and save it to the database
•
Do a structure search for one of the reagents you just submitted• Export the notebook page to MS Word and/or PDF
• Create a new non-admin E-Notebook user (SQL authentication) and login as thisuser.
During these tasks no errors should show otherwise there is a problem with one of thesettings. If you are unable to trouble shoot the problem, please contact CambridgeSoft
support.
Page 14 of 19
8/10/2019 E-Notebook SQL 12.0
http://slidepdf.com/reader/full/e-notebook-sql-120 15/19
E-Notebook SQL 12.0 Desktop Database Installation Guide
3. Remote Client Configuration
3.1. Software requirements
Operating system version: Windows XP Pro SP2/SP3 or Windows Vista BusinessSP1/SP2
Operating system architecture: 32 bit
Microsoft Office: Office XP SP3, Office 2003 SP3, Office 2007 SP1
CambridgeSoft Applications: SKU with ChemDraw ActiveX control and E-
Notebook client
SQL Server version: SQL Server 2005 native client (installed by the CambridgeSoft
version 12 Installation Wizard)
.Net Framework: .Net Framework 2.0 SP2
Page 15 of 19
8/10/2019 E-Notebook SQL 12.0
http://slidepdf.com/reader/full/e-notebook-sql-120 16/19
E-Notebook SQL 12.0 Desktop Database Installation Guide
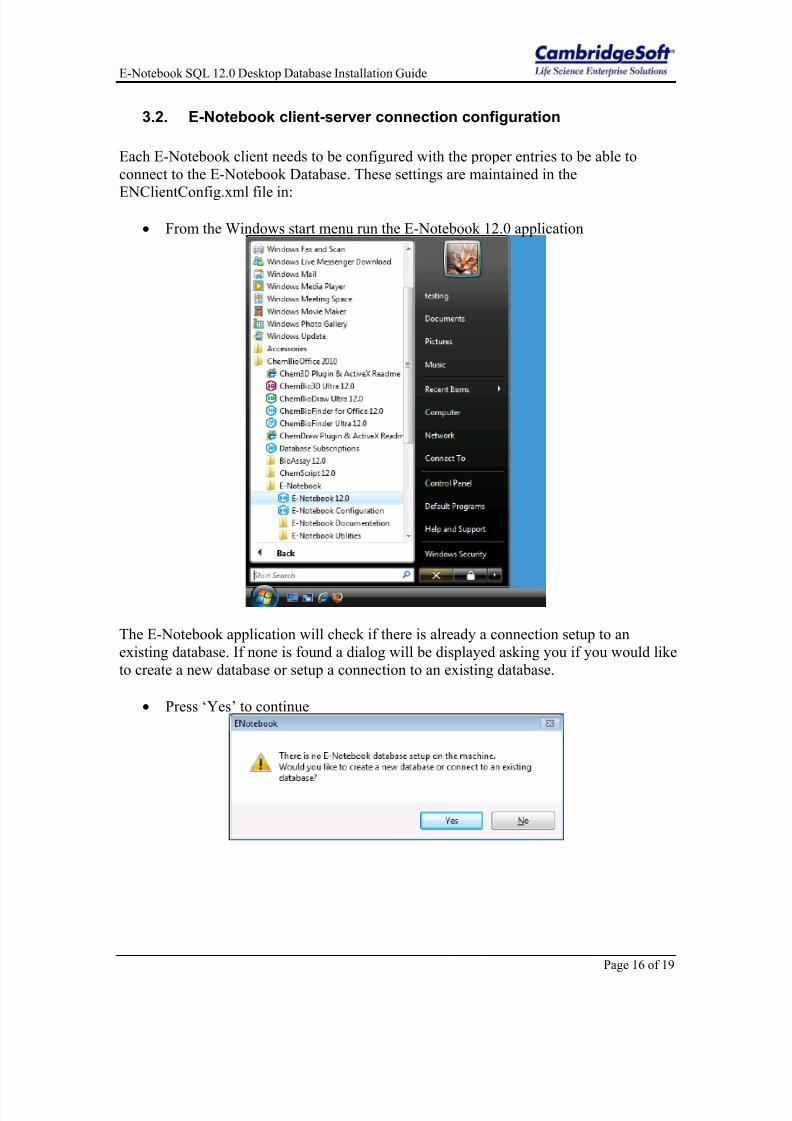
3.2. E-Notebook client-server connection configuration
Each E-Notebook client needs to be configured with the proper entries to be able to
connect to the E-Notebook Database. These settings are maintained in the
ENClientConfig.xml file in:
• From the Windows start menu run the E-Notebook 12.0 application
The E-Notebook application will check if there is already a connection setup to an
existing database. If none is found a dialog will be displayed asking you if you would like
to create a new database or setup a connection to an existing database.
• Press ‘Yes’ to continue
Page 16 of 19
8/10/2019 E-Notebook SQL 12.0
http://slidepdf.com/reader/full/e-notebook-sql-120 17/19
E-Notebook SQL 12.0 Desktop Database Installation Guide
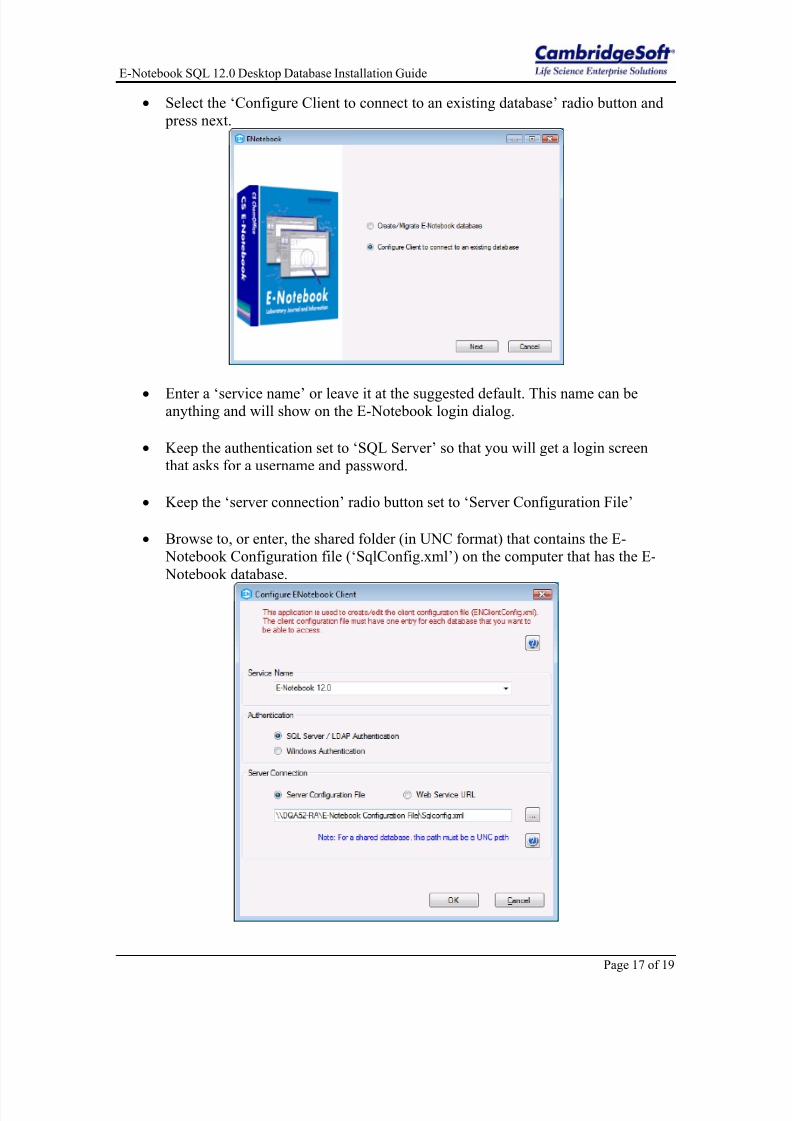
• Select the ‘Configure Client to connect to an existing database’ radio button and
press next.
•
Enter a ‘service name’ or leave it at the suggested default. This name can beanything and will show on the E-Notebook login dialog.
• Keep the authentication set to ‘SQL Server’ so that you will get a login screen
that asks for a username and password.
• Keep the ‘server connection’ radio button set to ‘Server Configuration File’
• Browse to, or enter, the shared folder (in UNC format) that contains the E- Notebook Configuration file (‘SqlConfig.xml’) on the computer that has the E-
Notebook database.
Page 17 of 19

8/10/2019 E-Notebook SQL 12.0
http://slidepdf.com/reader/full/e-notebook-sql-120 18/19
E-Notebook SQL 12.0 Desktop Database Installation Guide
• Press ‘OK’ to save the ‘ENClientConfig.xml’ file. A dialog confirming the
completion of the configuration will be shown. <OK>
• In the login dialog that now appears enter the username and password that is setupfor the remote user (or use the default admin account ‘ELNAdmin/ELNAdmin’)
and press ‘Connect’.
The E-Notebook client will now start and connect to the database.
Page 18 of 19

8/10/2019 E-Notebook SQL 12.0
http://slidepdf.com/reader/full/e-notebook-sql-120 19/19
E-Notebook SQL 12.0 Desktop Database Installation Guide
3.3. Configure Adobe PDF printer on E-Notebook client
On all clients that wish to make use of the export to PDF functionality, it is required that
Adobe Acrobat Pro is installed. The PDF printer on these clients needs to have the option
'Rely on System Fonts only: do not use document fonts' unchecked.
3.4. Confirm proper configuration of the remote connection
It is recommended to confirm the proper setup of the client by logging into E-Notebookand performing some basic tasks.
• Launch E-Notebook from the start menu and login using a user account that was
setup by the E-Notebook administrator.
• Create a new ‘Chemistry Notebook’ with a reaction page
• Draw a reaction and save it to the database
•
Do a structure search for one of the reagents you just submitted• Export the notebook page to MS Word and/or PDF
•
Create a new non-admin E-Notebook user (Windows, LDAP or SQL
authentication) and login as this user.
During these tasks no errors should show otherwise there is a problem with one of the
settings. If you are unable to trouble shoot the problem, please contact CambridgeSoft
support.
P 19 f 19