DXE-CAT-S1 - Aurora Multimedia Corp. · 2013-03-06 · • DXE-CAT-TX1 x 1 • DXE-CAT-E1 Wall /...
13
i Manual Number: 130305 USERS GUIDE DXE-CAT-S1 HDMI HDBaseT CAT Extender 70m (230ft)
Transcript of DXE-CAT-S1 - Aurora Multimedia Corp. · 2013-03-06 · • DXE-CAT-TX1 x 1 • DXE-CAT-E1 Wall /...

i
Manual Number: 130305
USERS GUIDE
DXE-CAT-S1
HDMI HDBaseT CAT Extender 70m (230ft)

i
User Guide
SAFETY INSTRUCTIONS
Please review the following safety precautions. If this is the first time using this model, then read this manual before installing or using the product. If the product is not functioning properly, please contact your local dealer or Aurora for further instructions.
The lightning symbol in the triangle is used to alert you to the presence of dangerous voltage inside the product that may be sufficient to constitute a risk of electric shock to anyone opening the case. It is also used to indicate improper installation or handling of the product that could damage the electrical system in the product or in other equipment attached to the product.
The exclamation point in the triangle is used to alert you to important operating and maintenance instructions. Failure to follow these instructions could result in injury to you or damage to the product.
Be careful with electricity: Power outlet: To prevent electric shock, be sure the electrical plug used on the product power cord
matches the electrical outlet used to supply power to the Aurora product. Use only the power adapter and power connection cables designed for this unit.
Power cord: Be sure the power cord is routed so that it will not be stepped on or pinched by heavy items.
Lightning: For protection from lightning or when the product is left unattended for a long period, disconnect it from the power source. .
Also follow these precautions: Ventilation: Do not block the ventilation slots if applicable on the product or place any heavy object
on top of it. Blocking the air flow could cause damage. Arrange components so that air can flow freely. Ensure that there is adequate ventilation if the product is placed in a stand or cabinet. Put the product in a properly ventilated area, away from direct sunlight or any source of heat.
Overheating: Avoid stacking the Aurora product on top of a hot component such as a power amplifier.
Risk of Fire: Do not place unit on top of any easily combustible material, such as carpet or fabric. Proper Connections: Be sure all cables and equipment are connected to the unit as described in
this manual. Object Entry: To avoid electric shock, never stick anything in the slots on the case or remove the
cover. Water Exposure: To reduce the risk of fire or electric shock, do not expose to rain or moisture. Cleaning: Do not use liquid or aerosol cleaners to clean this unit. Always unplug the power to the
device before cleaning. ESD: Handle this unit with proper ESD care. Failure to do so can result in failure.
FCC This device complies with Part 15 of the FCC Rules. Operation is subject to the following two conditions: (1) This device may not cause harmful interference. (2) This device must accept any interferences received, including interference that may cause undesired
operation. Trademarks All trademarks in this document are the properties of their respective owners.

ii
User Guide
TABLE OF CONTENTS
PACKAGE CONTENTS ............................................................................................................. 1
INTRODUCTION ........................................................................................................................ 2
About ..................................................................................................................................................... 2
Features ................................................................................................................................................ 2
Front & Rear Panel DXE-CAT-TX1 ....................................................................................................... 3
Front & Rear Panel DXE-CAT-RX1 ...................................................................................................... 4
IR EXTENDERS ......................................................................................................................... 5
IR Connections ..................................................................................................................................... 5
IR Jack Pinout ....................................................................................................................................... 5
CONNECTOR PIN DEFINITION ................................................................................................ 6
HDMI ..................................................................................................................................................... 6
CAT5e/6/7 ............................................................................................................................................. 6
APPENDIX 1 Troubleshooting ............................................................................................. 7
APPENDIX 2 Technical Specifications ................................................................................ 8
APPENDIX 3 Warranty ......................................................................................................... 9
1
User Guide
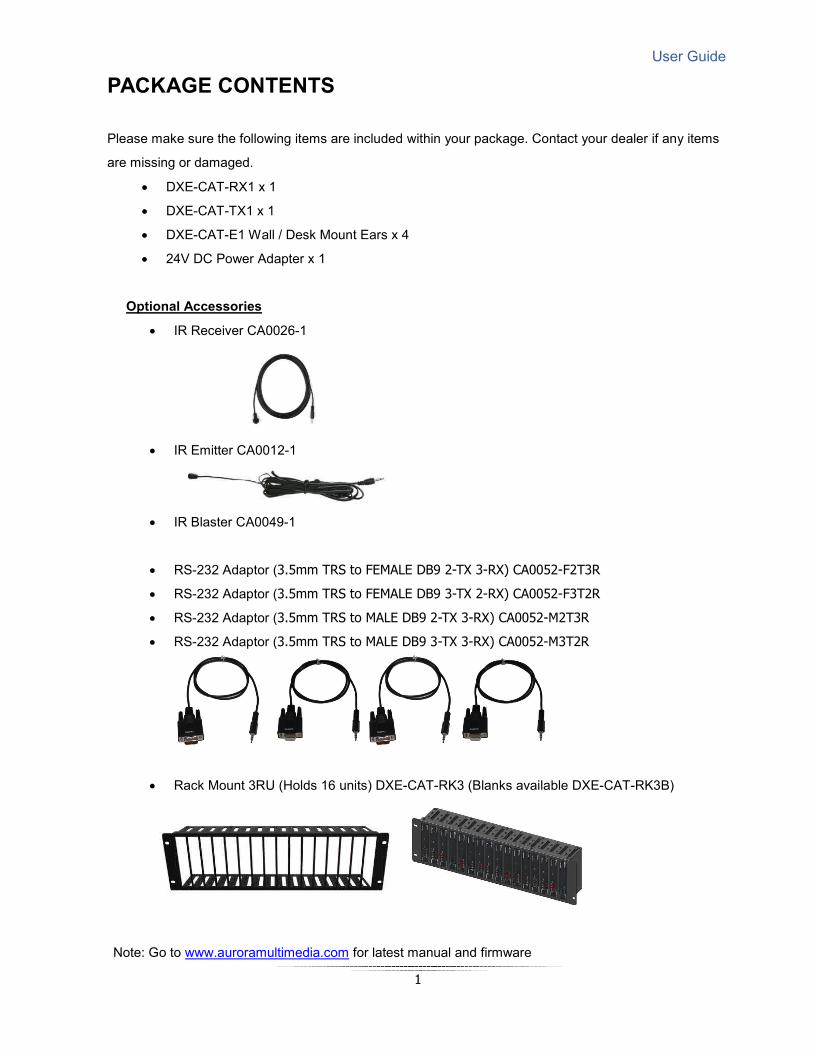
PACKAGE CONTENTS Please make sure the following items are included within your package. Contact your dealer if any items
are missing or damaged.
• DXE-CAT-RX1 x 1
• DXE-CAT-TX1 x 1
• DXE-CAT-E1 Wall / Desk Mount Ears x 4
• 24V DC Power Adapter x 1
Optional Accessories
• IR Receiver CA0026-1
• IR Emitter CA0012-1
• IR Blaster CA0049-1
• RS-232 Adaptor (3.5mm TRS to FEMALE DB9 2-TX 3-RX) CA0052-F2T3R
• RS-232 Adaptor (3.5mm TRS to FEMALE DB9 3-TX 2-RX) CA0052-F3T2R
• RS-232 Adaptor (3.5mm TRS to MALE DB9 2-TX 3-RX) CA0052-M2T3R
• RS-232 Adaptor (3.5mm TRS to MALE DB9 3-TX 3-RX) CA0052-M3T2R
• Rack Mount 3RU (Holds 16 units) DXE-CAT-RK3 (Blanks available DXE-CAT-RK3B)
Note: Go to www.auroramultimedia.com for latest manual and firmware

2
User Guide
INTRODUCTION About The DXE-CAT-S1 is part of the growing Digital Xtreme Series. This product is different than the typical CAT extender found on the market today as it not only breaks the price barrier but the feature and usability aspects as well. All connectors are on one side to make wiring cleaner and rack mounting easier. Having the ability to power the device with the choice of transmit or receive reduces the installation time and keeps things neat. An industry first is Aurora’s exclusive Flex-PowerTM circuit (Patents Pending), which allows both the transmitter and receiver to be powered from either side with the one wall supply. Being able to go the distance is important too, and HDBaseT technology helps achieve that. With a single CAT cable, the DXE-CAT can go up to 230ft 1080p 60Hz 36bit color depth depending on model. In addition, the RS-232 and IR can be sent over the same cable bi-directionally.
Features Transmit HDMI up to 1080p 60Hz 36bit 230ft over one CAT 5e/6/7 cable
Supports 4K x 2K & HDMI 3D
HDCP Compliant
All connectors on one side for easier installation
Bi-directional RS-232 & IR
Power both units from TX or RX side with wall power supply (HDBaseT POE)
Status LED for all connections on front
Various mounting options
Warning: Do not plug RJ-45 HDBaseT output to non-HDBaseT complaint devices or damage may occur
to either product.

3
User Guide
Front & Rear Panel DXE-CAT-TX1
Front LED Indicators • IR Out – Blinks when emitting IR to device from IR Port. It is normal to be lit if nothing is plug
into IR port. • IR In – Blinks when receiving IR from IR port. It is normal to be lit if nothing is plug into IR port. • TX – RS-232 Transmit. Blinking rate and intensity will vary with baud rate. • RX – RS-232 Receive. Blinking rate and intensity will vary with baud rate. • HDBT – Lights when HDBaseT RJ-45 has proper connection between an RX/TX pair. Blinks
when in sleep mode. • HDMI – Will light solid if HDMI is plugged in on both RX/TX and HDCP is present. If no HDCP
LED will blink. • POWER – Lights green when power is present. • STATUS – Will blink steady if unit is working properly. Front Pin-hole buttons • Reset – Use paper clip or similar object to reset unit by pushing into hole. • Setup – Not used for DXE-CAT-TX1. Rear Connections • 24V DC – Power connector for 15 watt 24VDC power supply. Note only 1 supply is required to
power both units. Either side can send power to the other unit. • IR – Plug the IR receiver or emitter into this port. It will auto detect the mode of operation
required. • RS-232 – Connect RS-232 device up to 115k baud. • HDBaseT – Connect CAT 5e/6/7 cable. Shield cable is not necessary unless the environment
has a lot of electrically noise. • HDMI Input – Plug HDMI cable from source device like a BluRay player. Note the HDMI cable
should be rated for the bandwidth you are using.

4
User Guide
Front & Rear Panel DXE-CAT-RX1
Front LED Indicators • IR Out – Blinks when emitting IR to device from IR Port. It is normal to be lit if nothing is plug
into IR port. • IR In – Blinks when receiving IR from IR port. It is normal to be lit if nothing is plug into IR port. • TX – RS-232 Transmit. Blinking rate and intensity will vary with baud rate. • RX – RS-232 Receive. Blinking rate and intensity will vary with baud rate. • HDBT – Lights when HDBaseT RJ-45 has proper connection between an RX/TX pair. Blinks
when in sleep mode. • HDMI – Will light solid if HDMI is plugged in on both RX/TX and HDCP is present. If no HDCP
LED will blink. • POWER – Lights green when power is present. • STATUS – Will blink steady if unit is working properly. Front Pin-hole buttons • Reset – Use paper clip or similar object to reset unit by pushing into hole. • Setup – Not used for DXE-CAT-TX1. Rear Connections • 24V DC – Power connector for 15 watt 24VDC power supply. Note only 1 supply is required to
power both units. Either side can send power to the other unit. • IR – Plug the IR receiver or emitter into this port. It will auto detect the mode of operation
required. • RS-232 – Connect RS-232 device up to 115k baud. • HDBaseT – Connect CAT 5e/6/7 cable. Shield cable is not necessary unless the environment
has a lot of electrically noise. • HDMI Output – Plug HDMI cable from destination device like an LCD display. Note the HDMI
cable should be rated for the bandwidth you are using.

5
User Guide
IR EXTENDERS
IR Blaster IR Receiver
IR Connections The DXE-CAT Series has the ability to auto detect on the IR port if a receiver or a blaster / emitter is connected.
IR Blaster / Emitter: Plug in an IR blaster to emit all IR command signals received from the IR receiver to control the associated devices with built-in IR sensor
IR Receiver: Plug in an IR receiver to receive all IR command signals from the IR remote controls of the associated devices. Note if you are not using an approved Aurora branded receiver make certain you do not exceed the 5v signal level limitation as some devices use 12v. Failure to do so will result in damage.
IR Jack Pinout
IR Blaster IR Receiver
Emitters must be mono plug or have ring and sleeve tied to ground. Receivers must be stereo plug. Ring is 5v power. If using another brand receiver, note carrier frequency must be stripped and IR signal cannot exceed 5v or damage to port may occur.
6
User Guide
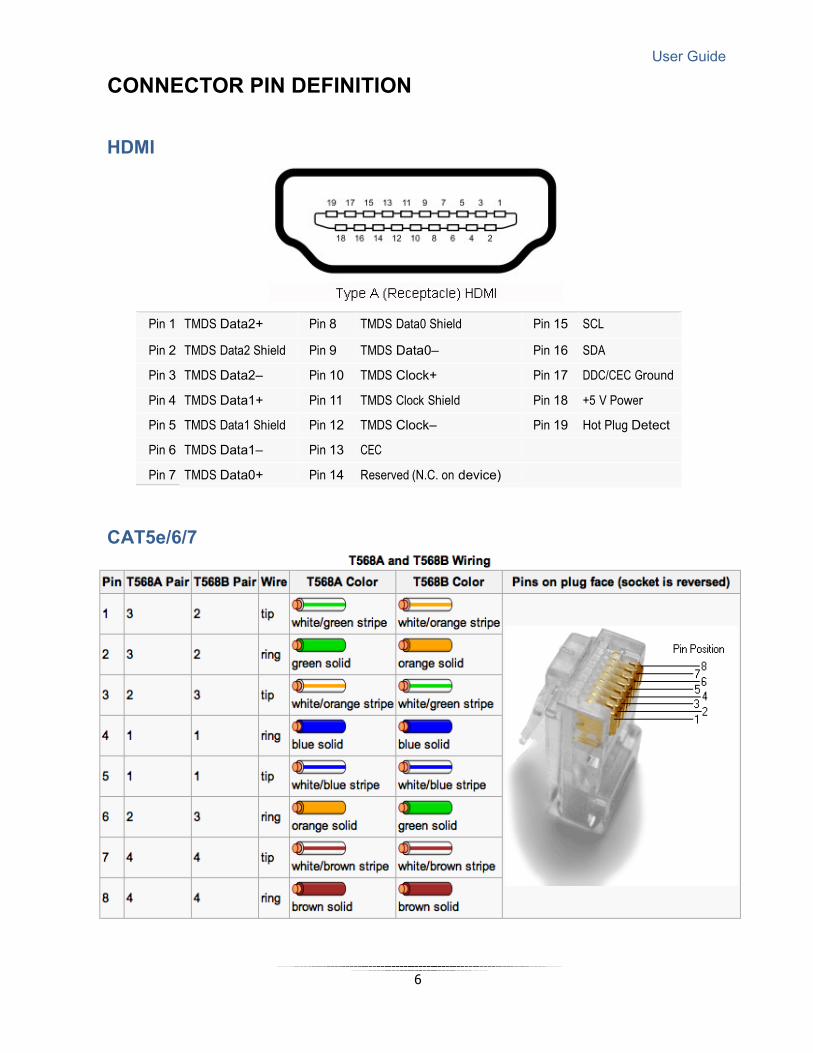
CONNECTOR PIN DEFINITION HDMI
Pin 1 TMDS Data2+ Pin 8 TMDS Data0 Shield Pin 15 SCL
Pin 2 TMDS Data2 Shield Pin 9 TMDS Data0– Pin 16 SDA
Pin 3 TMDS Data2– Pin 10 TMDS Clock+ Pin 17 DDC/CEC Ground
Pin 4 TMDS Data1+ Pin 11 TMDS Clock Shield Pin 18 +5 V Power Pin 5 TMDS Data1 Shield Pin 12 TMDS Clock– Pin 19 Hot Plug Detect Pin 6 TMDS Data1– Pin 13 CEC Pin 7 TMDS Data0+ Pin 14 Reserved (N.C. on device)
CAT5e/6/7

7
User Guide
APPENDIX 1 Troubleshooting Problem Solution
1. No Video Signal.
a. Check that the power plug is properly inserted into a functioning power outlet.
b. Make certain source is on. c. Verify pin-out of connector at each end.
2. LED is not lit a. Check 24v power supply is plugged in. b. Check to see if Wall supply is plugged into wall outlet. c. Make certain wall outlet has power.
3. IR not working a. Verify using proper emitter or receiver to specifications outlined. Use Aurora branded accessories for best results.
4. DXE-CAT-RX is very warm b. This is normal. HDBaseT receivers do run very warm when signal is applied. You will note the transmitter runs much cooler.
1. All transmission distances are measured using Belden 1583A CAT5e 125MHz Solid UTP cable. The transmission distance is defined as the distance between the video source and the display.
2. To reduce the interference among the unshielded twisted pairs of wires in UTP cable, you can use shielded STP cables to improve EMI problems, which is worsen in long transmission.
Warning: Do not plug RJ-45 HDBaseT output to non-HDBaseT complaint devices or damage may occur to either product.
8
User Guide
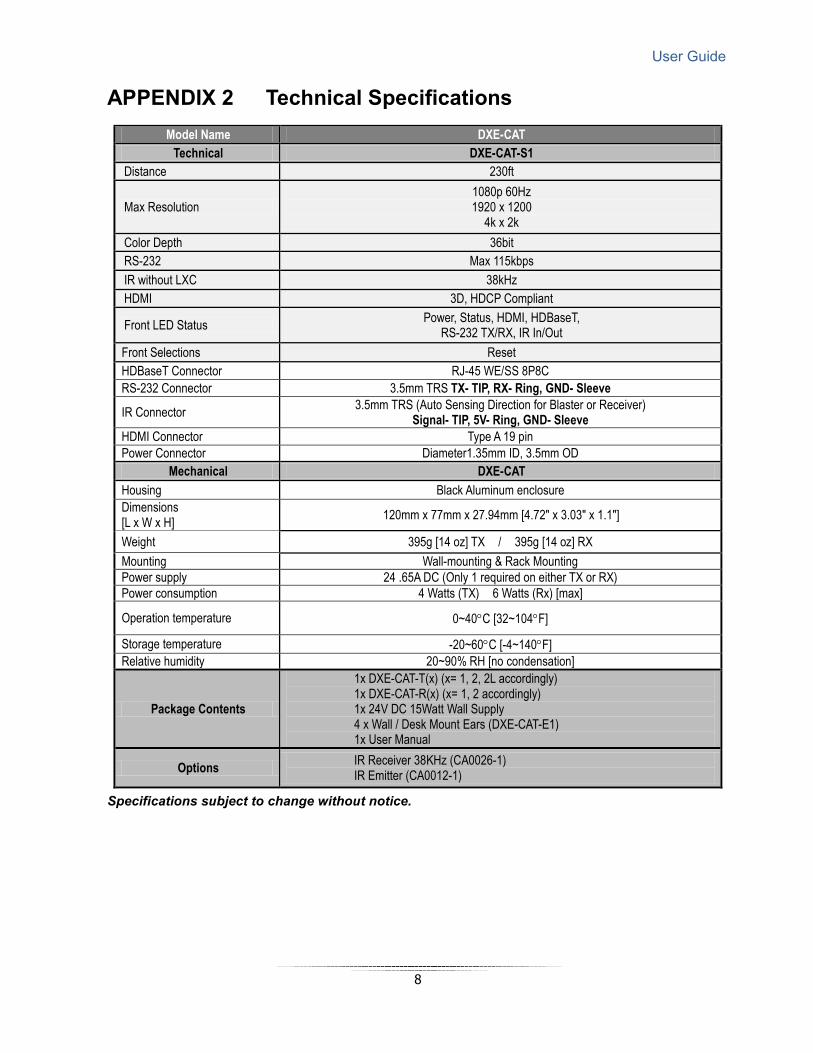
APPENDIX 2 Technical Specifications Model Name DXE-CAT
Technical DXE-CAT-S1 Distance 230ft
Max Resolution 1080p 60Hz 1920 x 1200
4k x 2k Color Depth 36bit RS-232 Max 115kbps IR without LXC 38kHz HDMI 3D, HDCP Compliant
Front LED Status Power, Status, HDMI, HDBaseT, RS-232 TX/RX, IR In/Out
Front Selections Reset HDBaseT Connector RJ-45 WE/SS 8P8C RS-232 Connector 3.5mm TRS TX- TIP, RX- Ring, GND- Sleeve
IR Connector 3.5mm TRS (Auto Sensing Direction for Blaster or Receiver) Signal- TIP, 5V- Ring, GND- Sleeve
HDMI Connector Type A 19 pin Power Connector Diameter1.35mm ID, 3.5mm OD
Mechanical DXE-CAT Housing Black Aluminum enclosure Dimensions [L x W x H] 120mm x 77mm x 27.94mm [4.72" x 3.03" x 1.1"]
Weight 395g [14 oz] TX / 395g [14 oz] RX Mounting Wall-mounting & Rack Mounting Power supply 24 .65A DC (Only 1 required on either TX or RX) Power consumption 4 Watts (TX) 6 Watts (Rx) [max]
Operation temperature 0~40°C [32~104°F]
Storage temperature -20~60°C [-4~140°F] Relative humidity 20~90% RH [no condensation]
Package Contents
1x DXE-CAT-T(x) (x= 1, 2, 2L accordingly) 1x DXE-CAT-R(x) (x= 1, 2 accordingly) 1x 24V DC 15Watt Wall Supply 4 x Wall / Desk Mount Ears (DXE-CAT-E1) 1x User Manual
Options IR Receiver 38KHz (CA0026-1) IR Emitter (CA0012-1)
Specifications subject to change without notice.

9
User Guide
APPENDIX 3 Warranty
Limited 3 Year Warranty
Aurora Multimedia Corp. (“Manufacturer”) warrants that this product is free of defects in both materials and
workmanship for a period of 3 years as defined herein for parts and labor from date of purchase. This Limited
Warranty covers products purchased in the year of 2009 and after. Motorized mechanical parts (Hard Drives, DVD,
etc), mechanical parts (buttons, doors, etc), remotes and cables are covered for a period of 1 year. Touch screen
displays are covered for 1 year; touch screen overlay components are covered for 90 days. Supplied batteries are not
covered by this warranty. During the warranty period, and upon proof of purchase, the product will be repaired or
replaced (with same or similar model) at our option without charge for parts or labor for the specified product
lifetime warranty period.
This warranty shall not apply if any of the following:
A. The product has been damaged by negligence, accident, lightning, water, act-of-God or mishandling; or,
B. The product has not been operated in accordance with procedures specified in operating instructions: or,
C. The product has been repaired and or altered by other than manufacturer or authorized service center; or,
D. The product's original serial number has been modified or removed: or,
E. External equipment other than supplied by manufacturer, in determination of manufacturer, shall have
affected the performance, safety or reliability of the product.
F. Part(s) are no longer available for product.
In the event that the product needs repair or replacement during the specified warranty period, product should be
shipped back to Manufacturer at Purchaser's expense. Repaired or replaced product shall be returned to Purchaser
by standard shipping methods at Manufacturer's discretion. Express shipping will be at the expense of the
Purchaser. If Purchaser resides outside the contiguous US, return shipping shall be at Purchaser's expense.
No other warranty, express or implied other than Manufacturer's shall apply.
Manufacturer does not assume any responsibility for consequential damages, expenses or loss of revenue or
property, inconvenience or interruption in operation experienced by the customer due to a malfunction of the
purchased equipment. No warranty service performed on any product shall extend the applicable warranty period.
This warranty does not cover damage to the equipment during shipping and Manufacturer assumes no responsibility
for such damage.

10
User Guide
This product warranty extends to the original purchaser only and will be null and void upon any assignment or
Aurora Multimedia Corp. 205 Commercial Court
Morganville, NJ 07751
Phone: 732-591-5800 Fax: 732-591-6801
www.auroramultimedia.com