DX4500/DX4600 Series Digital Video Recorder of DX4500/DX4600 Setup Window ... equipment generates,...
40
I N S T A L L A T I O N C2673M-D (8/10) DX4500/DX4600 Series Digital Video Recorder
Transcript of DX4500/DX4600 Series Digital Video Recorder of DX4500/DX4600 Setup Window ... equipment generates,...
I N S T A L L A T I O N
C2673M-D (8/10)
DX4500/DX4600 Series Digital Video Recorder


C2673M-D (8/10) 3
Contents
Regulatory Notices . . . . . . . . . . . . . . . . . . . . . . . . . . . . . . . . . . . . . . . . . . . . . . . . . . . . . . . . . . . . . . . . . . . . . . . . . . . . . . . . . . . . . . . . . . . . . . . . . . . . 5
Description. . . . . . . . . . . . . . . . . . . . . . . . . . . . . . . . . . . . . . . . . . . . . . . . . . . . . . . . . . . . . . . . . . . . . . . . . . . . . . . . . . . . . . . . . . . . . . . . . . . . . . . . . . . 6Features . . . . . . . . . . . . . . . . . . . . . . . . . . . . . . . . . . . . . . . . . . . . . . . . . . . . . . . . . . . . . . . . . . . . . . . . . . . . . . . . . . . . . . . . . . . . . . . . . . . . . . . . 7Models and Features . . . . . . . . . . . . . . . . . . . . . . . . . . . . . . . . . . . . . . . . . . . . . . . . . . . . . . . . . . . . . . . . . . . . . . . . . . . . . . . . . . . . . . . . . . . . . . 7Model Numbers . . . . . . . . . . . . . . . . . . . . . . . . . . . . . . . . . . . . . . . . . . . . . . . . . . . . . . . . . . . . . . . . . . . . . . . . . . . . . . . . . . . . . . . . . . . . . . . . . . 8Maximum IPS Recording Rates . . . . . . . . . . . . . . . . . . . . . . . . . . . . . . . . . . . . . . . . . . . . . . . . . . . . . . . . . . . . . . . . . . . . . . . . . . . . . . . . . . . . . . 8
Before You Begin . . . . . . . . . . . . . . . . . . . . . . . . . . . . . . . . . . . . . . . . . . . . . . . . . . . . . . . . . . . . . . . . . . . . . . . . . . . . . . . . . . . . . . . . . . . . . . . . . . . . . . 9Package Contents . . . . . . . . . . . . . . . . . . . . . . . . . . . . . . . . . . . . . . . . . . . . . . . . . . . . . . . . . . . . . . . . . . . . . . . . . . . . . . . . . . . . . . . . . . . . . . . . . 9Parts List . . . . . . . . . . . . . . . . . . . . . . . . . . . . . . . . . . . . . . . . . . . . . . . . . . . . . . . . . . . . . . . . . . . . . . . . . . . . . . . . . . . . . . . . . . . . . . . . . . . . . . . . 9Important Information Worksheet . . . . . . . . . . . . . . . . . . . . . . . . . . . . . . . . . . . . . . . . . . . . . . . . . . . . . . . . . . . . . . . . . . . . . . . . . . . . . . . . . . . 10
Front Panel . . . . . . . . . . . . . . . . . . . . . . . . . . . . . . . . . . . . . . . . . . . . . . . . . . . . . . . . . . . . . . . . . . . . . . . . . . . . . . . . . . . . . . . . . . . . . . . . . . . . . . . . . . 11
Back Panel . . . . . . . . . . . . . . . . . . . . . . . . . . . . . . . . . . . . . . . . . . . . . . . . . . . . . . . . . . . . . . . . . . . . . . . . . . . . . . . . . . . . . . . . . . . . . . . . . . . . . . . . . . 14
Remote Control . . . . . . . . . . . . . . . . . . . . . . . . . . . . . . . . . . . . . . . . . . . . . . . . . . . . . . . . . . . . . . . . . . . . . . . . . . . . . . . . . . . . . . . . . . . . . . . . . . . . . . 15
System Overview . . . . . . . . . . . . . . . . . . . . . . . . . . . . . . . . . . . . . . . . . . . . . . . . . . . . . . . . . . . . . . . . . . . . . . . . . . . . . . . . . . . . . . . . . . . . . . . . . . . . . 17
Equipment Placement and Rack Mounting . . . . . . . . . . . . . . . . . . . . . . . . . . . . . . . . . . . . . . . . . . . . . . . . . . . . . . . . . . . . . . . . . . . . . . . . . . . . . . . . . 18Desktop Mounting . . . . . . . . . . . . . . . . . . . . . . . . . . . . . . . . . . . . . . . . . . . . . . . . . . . . . . . . . . . . . . . . . . . . . . . . . . . . . . . . . . . . . . . . . . . . . . . 18Rack Mounting . . . . . . . . . . . . . . . . . . . . . . . . . . . . . . . . . . . . . . . . . . . . . . . . . . . . . . . . . . . . . . . . . . . . . . . . . . . . . . . . . . . . . . . . . . . . . . . . . . 18
Hardware Setup. . . . . . . . . . . . . . . . . . . . . . . . . . . . . . . . . . . . . . . . . . . . . . . . . . . . . . . . . . . . . . . . . . . . . . . . . . . . . . . . . . . . . . . . . . . . . . . . . . . . . . 19Basic Connections. . . . . . . . . . . . . . . . . . . . . . . . . . . . . . . . . . . . . . . . . . . . . . . . . . . . . . . . . . . . . . . . . . . . . . . . . . . . . . . . . . . . . . . . . . . . . . . . 19Connecting PTZ Cameras . . . . . . . . . . . . . . . . . . . . . . . . . . . . . . . . . . . . . . . . . . . . . . . . . . . . . . . . . . . . . . . . . . . . . . . . . . . . . . . . . . . . . . . . . . 20Connecting Alarms . . . . . . . . . . . . . . . . . . . . . . . . . . . . . . . . . . . . . . . . . . . . . . . . . . . . . . . . . . . . . . . . . . . . . . . . . . . . . . . . . . . . . . . . . . . . . . . 21Connecting Relay Outputs . . . . . . . . . . . . . . . . . . . . . . . . . . . . . . . . . . . . . . . . . . . . . . . . . . . . . . . . . . . . . . . . . . . . . . . . . . . . . . . . . . . . . . . . . 22
Overview of DX4500/DX4600 Setup Window. . . . . . . . . . . . . . . . . . . . . . . . . . . . . . . . . . . . . . . . . . . . . . . . . . . . . . . . . . . . . . . . . . . . . . . . . . . . . . . 23
Operation and Initial System Configuration . . . . . . . . . . . . . . . . . . . . . . . . . . . . . . . . . . . . . . . . . . . . . . . . . . . . . . . . . . . . . . . . . . . . . . . . . . . . . . . . 24Powering On and Logging On to the DVR. . . . . . . . . . . . . . . . . . . . . . . . . . . . . . . . . . . . . . . . . . . . . . . . . . . . . . . . . . . . . . . . . . . . . . . . . . . . . . 24Logging Off . . . . . . . . . . . . . . . . . . . . . . . . . . . . . . . . . . . . . . . . . . . . . . . . . . . . . . . . . . . . . . . . . . . . . . . . . . . . . . . . . . . . . . . . . . . . . . . . . . . . . 25Turning Off the DVR . . . . . . . . . . . . . . . . . . . . . . . . . . . . . . . . . . . . . . . . . . . . . . . . . . . . . . . . . . . . . . . . . . . . . . . . . . . . . . . . . . . . . . . . . . . . . . 25Selecting the Monitor. . . . . . . . . . . . . . . . . . . . . . . . . . . . . . . . . . . . . . . . . . . . . . . . . . . . . . . . . . . . . . . . . . . . . . . . . . . . . . . . . . . . . . . . . . . . . 26
Displaying Video on the Analog Monitor . . . . . . . . . . . . . . . . . . . . . . . . . . . . . . . . . . . . . . . . . . . . . . . . . . . . . . . . . . . . . . . . . . . . . . . . . 26Displaying Video on the VGA Monitor. . . . . . . . . . . . . . . . . . . . . . . . . . . . . . . . . . . . . . . . . . . . . . . . . . . . . . . . . . . . . . . . . . . . . . . . . . . . 26
Setting the System Language. . . . . . . . . . . . . . . . . . . . . . . . . . . . . . . . . . . . . . . . . . . . . . . . . . . . . . . . . . . . . . . . . . . . . . . . . . . . . . . . . . . . . . . 27Setting the System Time . . . . . . . . . . . . . . . . . . . . . . . . . . . . . . . . . . . . . . . . . . . . . . . . . . . . . . . . . . . . . . . . . . . . . . . . . . . . . . . . . . . . . . . . . . 29Configuring Daylight Saving . . . . . . . . . . . . . . . . . . . . . . . . . . . . . . . . . . . . . . . . . . . . . . . . . . . . . . . . . . . . . . . . . . . . . . . . . . . . . . . . . . . . . . . . 31Network Configuration . . . . . . . . . . . . . . . . . . . . . . . . . . . . . . . . . . . . . . . . . . . . . . . . . . . . . . . . . . . . . . . . . . . . . . . . . . . . . . . . . . . . . . . . . . . . 33
Configuring TCP/IP. . . . . . . . . . . . . . . . . . . . . . . . . . . . . . . . . . . . . . . . . . . . . . . . . . . . . . . . . . . . . . . . . . . . . . . . . . . . . . . . . . . . . . . . . . . 33Configuring DDNS . . . . . . . . . . . . . . . . . . . . . . . . . . . . . . . . . . . . . . . . . . . . . . . . . . . . . . . . . . . . . . . . . . . . . . . . . . . . . . . . . . . . . . . . . . . 35
Client Software Installation . . . . . . . . . . . . . . . . . . . . . . . . . . . . . . . . . . . . . . . . . . . . . . . . . . . . . . . . . . . . . . . . . . . . . . . . . . . . . . . . . . . . . . . . 36Recommended System Requirements. . . . . . . . . . . . . . . . . . . . . . . . . . . . . . . . . . . . . . . . . . . . . . . . . . . . . . . . . . . . . . . . . . . . . . . . . . . . 36Installing the Client Application . . . . . . . . . . . . . . . . . . . . . . . . . . . . . . . . . . . . . . . . . . . . . . . . . . . . . . . . . . . . . . . . . . . . . . . . . . . . . . . . 36
Specifications . . . . . . . . . . . . . . . . . . . . . . . . . . . . . . . . . . . . . . . . . . . . . . . . . . . . . . . . . . . . . . . . . . . . . . . . . . . . . . . . . . . . . . . . . . . . . . . . . . . . . . . 37
Appendix . . . . . . . . . . . . . . . . . . . . . . . . . . . . . . . . . . . . . . . . . . . . . . . . . . . . . . . . . . . . . . . . . . . . . . . . . . . . . . . . . . . . . . . . . . . . . . . . . . . . . . . . . . . 38Time Zone Conversion Chart. . . . . . . . . . . . . . . . . . . . . . . . . . . . . . . . . . . . . . . . . . . . . . . . . . . . . . . . . . . . . . . . . . . . . . . . . . . . . . . . . . . . . . . . 38
4 C2673M-D (8/10)
List of Illustrations
1 Package Contents . . . . . . . . . . . . . . . . . . . . . . . . . . . . . . . . . . . . . . . . . . . . . . . . . . . . . . . . . . . . . . . . . . . . . . . . . . . . . . . . . . . . . . . . . . . . . . . . . 9 2 Front Panel . . . . . . . . . . . . . . . . . . . . . . . . . . . . . . . . . . . . . . . . . . . . . . . . . . . . . . . . . . . . . . . . . . . . . . . . . . . . . . . . . . . . . . . . . . . . . . . . . . . . . 11 3 Back Panel. . . . . . . . . . . . . . . . . . . . . . . . . . . . . . . . . . . . . . . . . . . . . . . . . . . . . . . . . . . . . . . . . . . . . . . . . . . . . . . . . . . . . . . . . . . . . . . . . . . . . . 14 4 Remote Control. . . . . . . . . . . . . . . . . . . . . . . . . . . . . . . . . . . . . . . . . . . . . . . . . . . . . . . . . . . . . . . . . . . . . . . . . . . . . . . . . . . . . . . . . . . . . . . . . . 15 5 Connecting Devices to the DX4500/DX4600 . . . . . . . . . . . . . . . . . . . . . . . . . . . . . . . . . . . . . . . . . . . . . . . . . . . . . . . . . . . . . . . . . . . . . . . . . . . 17 6 Attaching Chassis Brackets . . . . . . . . . . . . . . . . . . . . . . . . . . . . . . . . . . . . . . . . . . . . . . . . . . . . . . . . . . . . . . . . . . . . . . . . . . . . . . . . . . . . . . . . 18 7 Rack Mount Installation . . . . . . . . . . . . . . . . . . . . . . . . . . . . . . . . . . . . . . . . . . . . . . . . . . . . . . . . . . . . . . . . . . . . . . . . . . . . . . . . . . . . . . . . . . . 18 8 Basic Connections. . . . . . . . . . . . . . . . . . . . . . . . . . . . . . . . . . . . . . . . . . . . . . . . . . . . . . . . . . . . . . . . . . . . . . . . . . . . . . . . . . . . . . . . . . . . . . . . 19 9 Connecting PTZ Camera Serial Communication Lines . . . . . . . . . . . . . . . . . . . . . . . . . . . . . . . . . . . . . . . . . . . . . . . . . . . . . . . . . . . . . . . . . . . . 20
10 Connecting Alarm Devices . . . . . . . . . . . . . . . . . . . . . . . . . . . . . . . . . . . . . . . . . . . . . . . . . . . . . . . . . . . . . . . . . . . . . . . . . . . . . . . . . . . . . . . . . 21 11 Connecting Relays . . . . . . . . . . . . . . . . . . . . . . . . . . . . . . . . . . . . . . . . . . . . . . . . . . . . . . . . . . . . . . . . . . . . . . . . . . . . . . . . . . . . . . . . . . . . . . . 22 12 Setup Window . . . . . . . . . . . . . . . . . . . . . . . . . . . . . . . . . . . . . . . . . . . . . . . . . . . . . . . . . . . . . . . . . . . . . . . . . . . . . . . . . . . . . . . . . . . . . . . . . . 23 13 DX4500/DX4600 Power On Startup Screen . . . . . . . . . . . . . . . . . . . . . . . . . . . . . . . . . . . . . . . . . . . . . . . . . . . . . . . . . . . . . . . . . . . . . . . . . . . . 24 14 Application Window and Toolbar . . . . . . . . . . . . . . . . . . . . . . . . . . . . . . . . . . . . . . . . . . . . . . . . . . . . . . . . . . . . . . . . . . . . . . . . . . . . . . . . . . . . 24 15 Virtual Keyboard . . . . . . . . . . . . . . . . . . . . . . . . . . . . . . . . . . . . . . . . . . . . . . . . . . . . . . . . . . . . . . . . . . . . . . . . . . . . . . . . . . . . . . . . . . . . . . . . . 25 16 Setup Window: Camera Page. . . . . . . . . . . . . . . . . . . . . . . . . . . . . . . . . . . . . . . . . . . . . . . . . . . . . . . . . . . . . . . . . . . . . . . . . . . . . . . . . . . . . . . 27 17 Display Page Options . . . . . . . . . . . . . . . . . . . . . . . . . . . . . . . . . . . . . . . . . . . . . . . . . . . . . . . . . . . . . . . . . . . . . . . . . . . . . . . . . . . . . . . . . . . . . 28 18 OSD Settings. . . . . . . . . . . . . . . . . . . . . . . . . . . . . . . . . . . . . . . . . . . . . . . . . . . . . . . . . . . . . . . . . . . . . . . . . . . . . . . . . . . . . . . . . . . . . . . . . . . . 28 19 System Page . . . . . . . . . . . . . . . . . . . . . . . . . . . . . . . . . . . . . . . . . . . . . . . . . . . . . . . . . . . . . . . . . . . . . . . . . . . . . . . . . . . . . . . . . . . . . . . . . . . . 29 20 Date/Time Settings. . . . . . . . . . . . . . . . . . . . . . . . . . . . . . . . . . . . . . . . . . . . . . . . . . . . . . . . . . . . . . . . . . . . . . . . . . . . . . . . . . . . . . . . . . . . . . . 29 21 Date Setting Entry Box . . . . . . . . . . . . . . . . . . . . . . . . . . . . . . . . . . . . . . . . . . . . . . . . . . . . . . . . . . . . . . . . . . . . . . . . . . . . . . . . . . . . . . . . . . . . 30 22 DST Time Shift . . . . . . . . . . . . . . . . . . . . . . . . . . . . . . . . . . . . . . . . . . . . . . . . . . . . . . . . . . . . . . . . . . . . . . . . . . . . . . . . . . . . . . . . . . . . . . . . . . 31 23 Daylight Saving Settings . . . . . . . . . . . . . . . . . . . . . . . . . . . . . . . . . . . . . . . . . . . . . . . . . . . . . . . . . . . . . . . . . . . . . . . . . . . . . . . . . . . . . . . . . . 31 24 Network Page Options . . . . . . . . . . . . . . . . . . . . . . . . . . . . . . . . . . . . . . . . . . . . . . . . . . . . . . . . . . . . . . . . . . . . . . . . . . . . . . . . . . . . . . . . . . . . 33 25 TCP/IP Properties . . . . . . . . . . . . . . . . . . . . . . . . . . . . . . . . . . . . . . . . . . . . . . . . . . . . . . . . . . . . . . . . . . . . . . . . . . . . . . . . . . . . . . . . . . . . . . . . 34 26 DDNS User Name . . . . . . . . . . . . . . . . . . . . . . . . . . . . . . . . . . . . . . . . . . . . . . . . . . . . . . . . . . . . . . . . . . . . . . . . . . . . . . . . . . . . . . . . . . . . . . . . 35
List of TablesA Product Models and Features . . . . . . . . . . . . . . . . . . . . . . . . . . . . . . . . . . . . . . . . . . . . . . . . . . . . . . . . . . . . . . . . . . . . . . . . . . . . . . . . . . . . . 7B DX4500/DX4600 Model Numbers . . . . . . . . . . . . . . . . . . . . . . . . . . . . . . . . . . . . . . . . . . . . . . . . . . . . . . . . . . . . . . . . . . . . . . . . . . . . . . . . . . 8C DX4500/DX4600 Maximum IPS Recording . . . . . . . . . . . . . . . . . . . . . . . . . . . . . . . . . . . . . . . . . . . . . . . . . . . . . . . . . . . . . . . . . . . . . . . . . . . 8D Video Coaxial Cable Requirements . . . . . . . . . . . . . . . . . . . . . . . . . . . . . . . . . . . . . . . . . . . . . . . . . . . . . . . . . . . . . . . . . . . . . . . . . . . . . . . . 19E Data Port Descriptions . . . . . . . . . . . . . . . . . . . . . . . . . . . . . . . . . . . . . . . . . . . . . . . . . . . . . . . . . . . . . . . . . . . . . . . . . . . . . . . . . . . . . . . . . . 20F Alarm Terminal Block Description . . . . . . . . . . . . . . . . . . . . . . . . . . . . . . . . . . . . . . . . . . . . . . . . . . . . . . . . . . . . . . . . . . . . . . . . . . . . . . . . . 21G Relay Terminal Block Description . . . . . . . . . . . . . . . . . . . . . . . . . . . . . . . . . . . . . . . . . . . . . . . . . . . . . . . . . . . . . . . . . . . . . . . . . . . . . . . . . 22

Regulatory NoticesThis device complies with Part 15 of the FCC Rules. Operation is subject to the following two conditions: (1) this device may not cause harmful interference, and (2) this device must accept any interference received, including interference that may cause undesired operation.
RADIO AND TELEVISION INTERFERENCE
This equipment has been tested and found to comply with the limits of a Class A digital device, pursuant to Part 15 of the FCC Rules. These limits are designed to provide reasonable protection against harmful interference when the equipment is operated in a commercial environment. This equipment generates, uses, and can radiate radio frequency energy and, if not installed and used in accordance with the instruction manual, may cause harmful interference to radio communications. Operation of this equipment in a residential area is likely to cause harmful interference in which case the user will be required to correct the interference at his own expense.
Changes and modifications not expressly approved by the manufacturer or registrant of this equipment can void your authority to operate this equipment under Federal Communications Commission’s rules.
In order to maintain compliance with FCC regulations shielded cables must be used with this equipment. Operation with non-approved equipment or unshielded cables is likely to result in interference to radio and television reception.
This Class A digital apparatus complies with Canadian ICES-003.
Cet appareil numérique de la classe A est conforme à la norme NMB-003 du Canada.
Video Quality CautionFRAME RATE NOTICE REGARDING USER-SELECTED OPTIONS
Pelco systems are capable of providing high quality video for both live viewing and playback. However, the systems can be used in lower quality modes, which can degrade picture quality, to allow for a slower rate of data transfer and to reduce the amount of video data stored. The picture quality can be degraded by either lowering the resolution, reducing the picture rate, or both. A picture degraded by having a reduced resolution may result in an image that is less clear or even indiscernible. A picture degraded by reducing the picture rate has fewer frames per second, which can result in images that appear to jump or move more quickly than normal during playback. Lower frame rates may result in a key event not being recorded by the system.
Judgment as to the suitability of the products for user’s purposes is solely the user’s responsibility. Users shall determine the suitability of the products for their own intended application, picture rate and picture quality. In the event user intends to use the video for evidentiary purposes in a judicial proceeding or otherwise, user should consult with its attorney regarding any particular requirements for such use.
C2673M-D (8/10) 5

DescriptionThe DX4500/DX4600 Series digital video recorder (DVR) is the latest generation in entry-level DVRs. Equipped with an embedded operating system, the DVR offers camera capacity, features, and functionality exceeding other DVRs. The DX4500/DX4600 is designed for the entry-level market that requires 8 or 16 camera inputs; greater internal hard drive storage capacity; fast frame rate recording; and powerful playback, search, and export capability. The DX4500/DX4600 not only replaces the traditional VCR and multiplexer combination, but it also offers the benefits derived from the latest in digital video processing.
Designed to work with today’s broadband networks, the DX4500/DX4600 uses MPEG-4 compression, allowing you to view and control the DVR across local or wide area networks. Recording at resolutions of up to 704 x 480 (4CIF), the DX4500/DX4600 captures crystal clear pictures, creating effective footage for later use and retrieval. Exported video is easily reviewed at the DX4500/DX4600 server or remote client computer using the Export Viewer. Each DVR input channel can be configured individually to meet a specific security application requirement for video retention. Video critical to investigation and archiving is easily exported to a USB memory device or to an optional CD-RW or DVD±RW device.
Operation of the unit is made easy through the front panel, remote control keypad, or USB mouse. The remote DX4500/DX4600 Client application can interface with up to sixteen DX4500/DX4600 servers simultaneously. User-configurable disk partitioning is used to allocate specific hard disk space for storing continuous video data, and event-initiated video data. The retention time can be different for retaining continuous recorded video, and event-initiated recorded video.
For surveillance applications requiring pan/tilt/zoom (PTZ) capability, the DX4500/DX4600 addresses and controls PTZ equipment such as Spectra® domes and Esprit® positioning systems, or third-party cameras. An optional Pelco KBD300A keyboard can be connected to the DX4500/DX4600 to operate PTZ devices. The DX4500/DX4600 supports Pelco C (Coaxitron®), Pelco D, and Pelco P protocols. Pelco C allows you to operate Pelco PTZ cameras up to a distances of 1,500 feet (457m).
With the ability to trigger recording and response to events (such as alarm inputs, motion detection, and video loss), the DX4500/DX4600 Series becomes an automated monitoring system as well. The DX4600 Series DVR supports multi-event recording. Multi-event recording includes any single or combination of events associated with an alarm, motion, or instant recording event. The DX4600 allows you to schedule each camera to record in a single or multiple-event mode across a 24-hour timeline. You can also configure each camera to record at a specific resolution, quality, and image rate when an event is triggered.
The DX4500/DX4600 video outputs provide for efficient control and effective deterrence. The choice of VGA or composite main monitor output provides flexibility for the user. The main monitor output can be adjusted to display one, four, nine, or sixteen cameras, or it can be adjusted for a custom display. The DX4500/DX4600’s spot monitor output can be used for public viewing or alarm call-up.
The DX4500/DX4600 is designed to deliver robust and reliable performance for security professionals. From the incorporation of watermarking technology to prevent alterations to captured video, to the ability to capture log entries, to the inclusion of Pelco’s world renowned customer service promise, the DX4500/DX4600 embodies the ideal entry-level DVR to protect people and assets.
6 C2673M-D (8/10)
FEATURES• 8- or 16-channel digital video recorder
• MPEG-4 compression
• Up to 704 x 480 (NTSC), 704 x 576 (PAL) recording resolution
• Up to 480 ips recording rate
• Up to 8 TB of internal storage
• DX4600 support for multi-event recording
• Play back exported video at the server
• Partition recording
• Channel resolution, quality, and frame rate settings configurable per individual camera
• Picture-in-picture display for live and playback video
• Remote client with administration functions
• Support for normal, motion, alarm, and scheduled recording
• Local, remote, and KBD300A PTZ control
• Pelco C, Pelco D, Pelco P, and third-party PTZ protocols
• Up to 4 audio inputs and 1 audio output
• Pre- and post-alarm recording
• Up to 16 alarm inputs and up to 4 relay outputs
• Main monitor for VGA or analog display, analog spot monitor
• Multilanguage on-screen display
• USB, CD-RW, or DVD±RW for video export
• Event notification by e-mail, emergency agent, or sound
• Time/date, event, bookmark, export, and pixel search
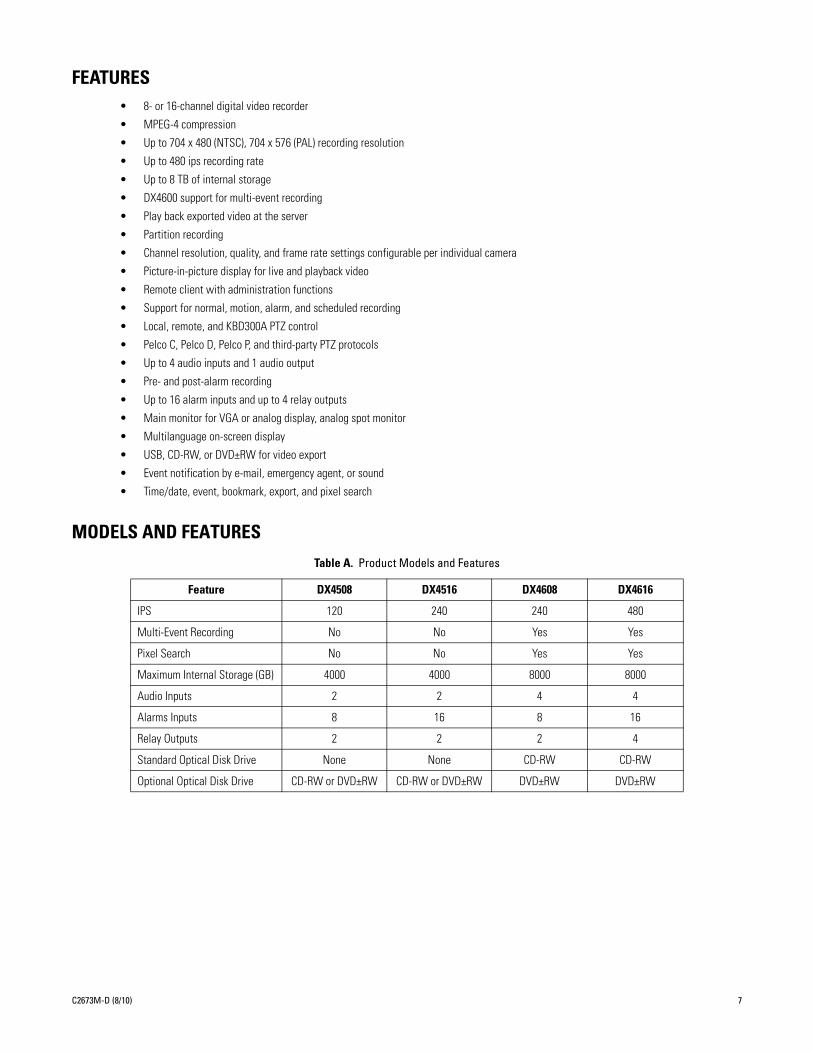
MODELS AND FEATURES
Table A. Product Models and Features
Feature DX4508 DX4516 DX4608 DX4616
IPS 120 240 240 480
Multi-Event Recording No No Yes Yes
Pixel Search No No Yes Yes
Maximum Internal Storage (GB) 4000 4000 8000 8000
Audio Inputs 2 2 4 4
Alarms Inputs 8 16 8 16
Relay Outputs 2 2 2 4
Standard Optical Disk Drive None None CD-RW CD-RW
Optional Optical Disk Drive CD-RW or DVD±RW CD-RW or DVD±RW DVD±RW DVD±RW
C2673M-D (8/10) 7
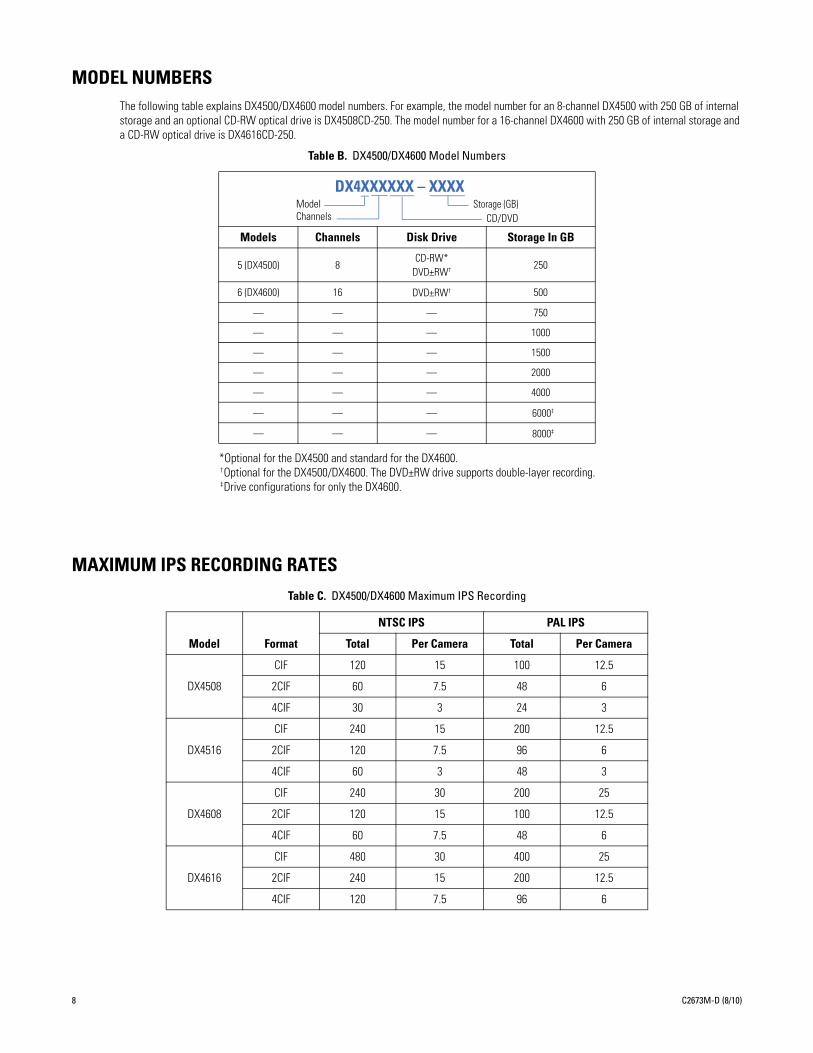
MODEL NUMBERSThe following table explains DX4500/DX4600 model numbers. For example, the model number for an 8-channel DX4500 with 250 GB of internal storage and an optional CD-RW optical drive is DX4508CD-250. The model number for a 16-channel DX4600 with 250 GB of internal storage and a CD-RW optical drive is DX4616CD-250.
MAXIMUM IPS RECORDING RATES
Table B. DX4500/DX4600 Model Numbers
Models Channels Disk Drive Storage In GB
5 (DX4500) 8CD-RW*
DVD±RW† 250
6 (DX4600) 16 DVD±RW† 500
— — — 750
— — — 1000
— — — 1500
— — — 2000
— — — 4000
— — — 6000‡
— — — 8000‡
*Optional for the DX4500 and standard for the DX4600.†Optional for the DX4500/DX4600. The DVD±RW drive supports double-layer recording.‡Drive configurations for only the DX4600.
Table C. DX4500/DX4600 Maximum IPS Recording
Model Format
NTSC IPS PAL IPS
Total Per Camera Total Per Camera
DX4508
CIF 120 15 100 12.5
2CIF 60 7.5 48 6
4CIF 30 3 24 3
DX4516
CIF 240 15 200 12.5
2CIF 120 7.5 96 6
4CIF 60 3 48 3
DX4608
CIF 240 30 200 25
2CIF 120 15 100 12.5
4CIF 60 7.5 48 6
DX4616
CIF 480 30 400 25
2CIF 240 15 200 12.5
4CIF 120 7.5 96 6
DX4XXXXXX – XXXXModelChannels CD/DVD
Storage (GB)
8 C2673M-D (8/10)
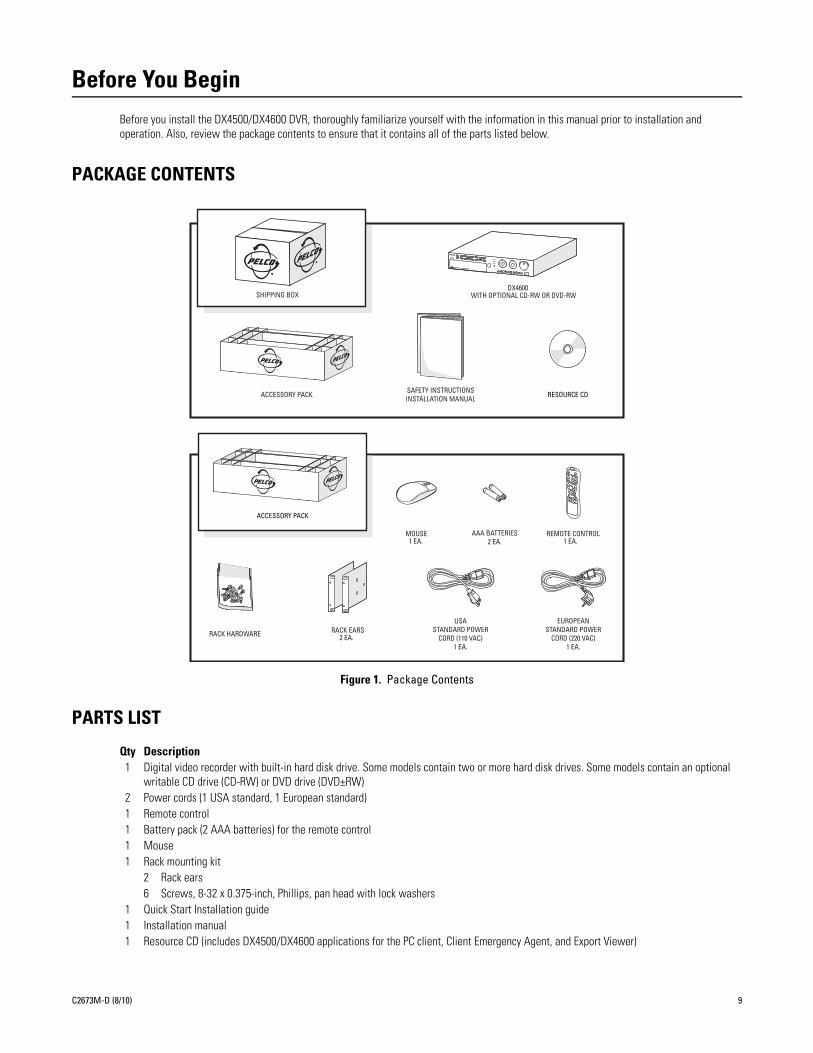
Before You BeginBefore you install the DX4500/DX4600 DVR, thoroughly familiarize yourself with the information in this manual prior to installation and operation. Also, review the package contents to ensure that it contains all of the parts listed below.
PACKAGE CONTENTS
Figure 1. Package Contents
PARTS LIST
Qty Description1 Digital video recorder with built-in hard disk drive. Some models contain two or more hard disk drives. Some models contain an optional
writable CD drive (CD-RW) or DVD drive (DVD±RW)2 Power cords (1 USA standard, 1 European standard) 1 Remote control 1 Battery pack (2 AAA batteries) for the remote control 1 Mouse1 Rack mounting kit
2 Rack ears6 Screws, 8-32 x 0.375-inch, Phillips, pan head with lock washers
1 Quick Start Installation guide1 Installation manual1 Resource CD (includes DX4500/DX4600 applications for the PC client, Client Emergency Agent, and Export Viewer)
SHIPPING BOXDX4600
WITH OPTIONAL CD-RW OR DVD-RW
ACCESSORY PACK SAFETY INSTRUCTIONSINSTALLATION MANUAL RESOURCE CD
ACCESSORY PACK
REMOTE CONTROL1 EA.
RACK EARS2 EA.
MOUSE1 EA.
AAA BATTERIES2 EA.
RACK HARDWARE
USASTANDARD POWER
CORD (110 VAC) 1 EA.
EUROPEANSTANDARD POWER
CORD (220 VAC) 1 EA.
C2673M-D (8/10) 9

IMPORTANT INFORMATION WORKSHEETInstalling the DX4500/DX4600 DVR on a network will require support from your network administrator. The minimum network requirements for DX4500/DX4600 Series DVRs include a switched Ethernet LAN with a bandwidth of 100 Mbps. Contact your administrator to assist you in configuring the network features of the unit.
Before installing or operating the DX4500/DX4600, be sure to obtain, record, and save the following information from your network administrator:
1. A unique site name for each DVR. (Site names can be up to 25 characters and can include spaces.)
_____________________ _____________________
_____________________ _____________________
2. The TCP/IP port numbers that will be used by all DX4500/DX4600 servers and clients on the network.
9005 (fixed) 13900 (fixed)
Base Port Upgrade Port Emergency Agent Port Information Port Ping Port
(Default = 9001) (Default = 9003) (Default = 9002) (Default = 9005) (Default = 13900)
If your network is not configured for DHCP, be sure to obtain, record, and save the following information from your network administrator:
1. A unique IP address for each DVR. (For example, 10.0.0.101, 10.0.0.102, 10.0.0.103, and so forth.)
____.____.____.____ ____.____.____.____
____.____.____.____ ____.____.____.____
2. The subnet mask for each IP address. (For example, is 255.0.0.0.)
____.____.____.____ ____.____.____.____
____.____.____.____ ____.____.____.____
3. The default gateway IP address for each unit.
____.____.____.____ ____.____.____.____
____.____.____.____ ____.____.____.____
4. The Primary DNS Server IP address for each unit.
____.____.____.____ ____.____.____.____
____.____.____.____ ____.____.____.____
5. The Secondary DNS Server IP address for each unit.
____.____.____.____ ____.____.____.____
____.____.____.____ ____.____.____.____
6. The Multicast Group IP address.
____.____.____.____ ____.____.____.____
____.____.____.____ ____.____.____.____
10 C2673M-D (8/10)

Front PanelThe DX4500/DX4600 front panel allows you to operate the DVR without having to use the remote control or mouse (refer to Figure 2).
Figure 2. Front Panel
Access Door: Provides access to the power switch and optical CD/DVD drive.
Channel and Camera Control Buttons:• Button [1]: Only selects camera 1.
• Buttons [2–8], Eight-Channel Unit or [2–16], Sixteen-Channel Unit: Selects the respective camera and its alternate function. (Press the Shift button to access the alternate function).
[2] OSD: Toggles on and off the display of the toolbar.[3] COPY: Copies recorded video data to the target media.[4] MARK: Sets the beginning point from which to search recorded data.[5] FOCUS-: Decreases camera focus.[6] FOCUS+: Increases camera focus.[7] IRIS-: Close camera iris.[8] IRIS+: Opens camera iris.[9] ALM OFF: Turns off active alarm state.[10] INFO: Toggles on and off the display of system information.[11] LOG: Toggles on and off the display of the log list.[12] AUX: Sends an auxiliary command.[13] SET: Starts the PTZ programming mode.[14] CLR: Clears a programmed event.[15] PATTERN: Assigns the recorded PTZ actions to the user-specified pattern number.[16] PRESET: Assigns the position of the selected camera to a user-specified preset number.
Remote Sensor: Communicates between the DVR and remote control.
System Status Indicators:• NET: Is lit when the network is connected.
• BACKUP: Is lit when the backup process is active.
• HDD: Blinks when the hard drive is accessed.
• ALARM: Is lit when the alarm out is in progress.
C2673M-D (8/10) 11
Selection Control:• Directional Arrows: (Up, down, left, and right) Navigate between the options of the Menu, Options, and Properties panes.
• Enter: Selects the highlighted option in the Menu, Option, and Properties panes.
Playback Controls:
Left Arrow: Provides two functions.
• Reverse: Searches recorded video at normal speed. Repeatedly press the button to search recorded video in the reverse direction at 2x, 3x, or 4x the normal speed.
• Reverse Skip: Activates when playback is paused. Press the button to play back video frame-by-frame, or press the button repeatedly to quickly skip through video in the reverse direction. Press and hold the button to go directly to the beginning of the recorded video.
Right Arrow: Provides two functions.
• Forward: Searches recorded video at normal speed. Repeatedly press the button to search recorded video in the forward direction at 2x, 3x, or 4x the normal speed.
• Forward Skip: Activates when playback is paused. Press the button to search video frame-by-frame, or press the button repeatedly to quickly skip through video in the forward direction. Press and hold the button to go directly to the end of the recorded video.
STOP: Stops playback.
PAUSE: Pauses playback.
Play: Provides an alternate playback function for viewing video. Press to start playback in forward direction; press again to play back video in the reverse direction.
Jog Control (inner dial): Navigates through various mode options.• Menu Mode: Increases (clockwise) or decreases (counter-clockwise) the selected option values.
• Date/Time Search Mode: Increases (clockwise) or decreases (counter-clockwise) to select the start time from which to begin playback. Played back video is displayed in the picture-in-picture view. The picture-in-picture view is displayed in one or four panes.
• Event Search Mode: During the initial video playback mode, the inner jog dial does not change the playback parameters. Once the shuttle dial is used to pause played back video, the inner jog allows you to search forward (clockwise) or backward (counter-clockwise) through each frame.
• Bookmark Search Mode: Once the shuttle dial is used to pause played back video, the jog dial allows you to search forward (clockwise) or backward (counter-clockwise) through each frame.
• Pixel Search Mode: In the pixel search setup view, the jog dial navigates through the options. Once an option is selected, the jog dial increases (clockwise) or decreases (counter-clockwise) the option’s value.
Shuttle Dial (outer ring):
• Quick Lift and Release Action (clockwise or counter-clockwise): For any of the above search modes, the initial quick lift and release of the shuttle causes the played back video to pause. Subsequent quick lift and release actions searches the played back video in the forward (clockwise) or reverse (counter-clockwise) direction, one frame at a time.
• Turn and Hold Action (clockwise or counter-clockwise): Turn the shuttle a little further to search the played back video in the forward (clockwise) or reverse (counter-clockwise) direction faster, frame-by-frame. Turning the shuttle a full rotation in either direction searches the playback at the fastest rate. The playback returns to pause when the shuttle is released.
High-Speed USB 2.0 Ports: One port on the front and two on the back of the DVR.
LOGIN: Displays the login dialog box if a user is not logged on to the system. If a user is already logged on, pressing this button logs off the user. When a user is logged on, the button is lit blue; when a user is not logged on, the button is not lit. This button performs the same
function as the Login icon on the toolbar.
12 C2673M-D (8/10)

Monitor Selection:• Main: Displays the Selecting Starting Channel dialog box, to select the window presentation as viewed on the VGA or main analog
monitor. Use in conjunction with buttons 1–8 or 1–16, to select which camera input is displayed first on the VGA or main analog monitor. This button performs the same function as the MAIN icon on the GUI toolbar.
• VGA monitor selection: If the main video is displayed on the analog monitor, use the MAIN button to switch the display of to the VGA monitor.
• SPOT: Displays the Selecting Starting Channel dialog box, to select the window presentation as viewed on a spot monitor. Use in conjunction with buttons 1–8 or 1–16 to configure the first camera displayed. This button performs the same function as the SPOT icon on the GUI toolbar.
• Analog Main BNC output: If the main video is displayed on the VGA monitor, use the SPOT button to switch the display to the analog monitor connected to MAIN-OUT BNC.
PTZ: Displays the PTZ dialog box for a camera configured for PTZ control. This button performs the same function as the PTZ icon on the GUI toolbar.
ZOOM: Zooms a camera in and out.
MENU/ESC:• Displays the setup menu.
• Closes the setup menu.
REC: Manually starts and stops recording.
SEARCH: Displays the Search window and is organized into the following categories:• INTERNAL HDD: Selects the target media to search for data.
• Data/Time Search: Displays the date/time monthly calendar view. The search criteria is based on the date, time, and camera/channel.
• Event Search: Displays the event type view and selections (SENSOR, ALL, and MOTION). The event search criteria includes date, time, camera/channel, and event type: SENSOR, ALL, and MOTION.
• Bookmark Search: Displays the bookmark search view to locate previously recorded bookmarks (data and channel/camera number).
SHIFT: Switches the operation of the camera control buttons from the primary to secondary function.
DVD drive: Accepts DVD disks.
Power switch: Turns on and off power to the unit.
C2673M-D (8/10) 13

Back Panel
Figure 3. Back Panel
RS-422/RS-485 (compliant) Connector: Provides two RS-422/RS-485 connections (DATA 1 and DATA 2) for interfacing multiple devices
Camera Outputs: Eight or sixteen BNC camera outputs
Camera Inputs: Eight or sixteen BNC camera inputs
Relay Outputs: Four normally open outputs
Autoranging AC power input: Voltage range between 100 VAC and 240 VAC, 50/60 Hz
Alarm Inputs: Eight or sixteen normally closed inputs
High-Speed USB 2.0 Ports: One USB port on the front and two on the back of unit
VGA Monitor Output: 15-pin output
Spot Monitor: Analog main monitor BNC output
Main Monitor: Analog spot monitor BNC output
Ethernet Adapter Port: 100 Mbps port
Audio Output: One RCA line-level audio output
Audio Input: Two or four RCA line-level inputs
RS-232C: 9-pin serial port
14 C2673M-D (8/10)

Remote ControlThe DX4500/DX4600 remote control allows you to operate the DVR without having to use the mouse or front panel controls. Figure 4 shows the remote control and describes the function of each button.
Figure 4. Remote Control.
POWER:• Turns on the unit.
• If the DVR is turned on but a user is not logged on, the message “You have to login first” appears.
• If a user is already logged on, the message “Please enter the password” appears. If there is no activity for a period of time, the dialog box disappears.
Channel Selection:• MAIN: Displays the Selecting Starting Channel dialog box, to select the window presentation as viewed on the VGA or main analog
monitor. Use in conjunction with buttons 1–8 or 1–16 to configure the first camera input displayed on the VGA or main analog (MAIN-OUT BNC) monitor. This button performs the same function as the MAIN icon on the GUI toolbar.
• SPOT: Displays the Selecting Starting Channel dialog box, to select the window presentation as viewed on a spot monitor. Use in conjunction with buttons 1–8 or 1–16 to configure the first camera input is displayed. This button performs the same function as
Login icon on the GUI toolbar.
LOGIN: Displays the login dialog box if a user is not logged on to the system. If a user is logged on, pressing this button logs the user out. When a user is logged on, the button is lit blue; if a user is not logged on, the button is not lit. This button performs the same function as the person icon on the GUI toolbar.
C2673M-D (8/10) 15

ALM.OFF: Turns off an active alarm for the selected camera. Also cancels alarm activation and returns the system to the condition before the alarm was activated.
MENU/ESC: Toggles on and off the display of the setup menu.
Selection Controls:• Arrow Buttons: Selects menu options.
• ENTER: Selects the highlighted menu item.
SEARCH: Displays the Search menu.
Playback Controls:• PAUSE: Pauses playback.
• STOP: Stops playback.
• REC: Starts and stops recording.
• REVERSE: Searches recorded video in the reverse direction.
• FORWARD: Searches recorded video in the forward direction.
System Buttons:• System Information: Displays the System Information dialog box.
• System Log: Displays the System Log dialog box.
PTZ Controls:• ZOOM +/-: Zooms in and out on the video image displayed in live and playback mode.
• FOCUS +/- : Adjusts the camera’s focus.
• IRIS +/-: Adjusts the camera’s iris.
• PTZ: Starts the PTZ mode for the selected device and displays the on-screen control.
• AUX: Sends an auxiliary command to the specified PTZ camera.
• CLR: Clears a programmed event.
• SET: Starts the PTZ programming mode.
• PATTERN: Assigns the recorded PTZ actions to the user-specified pattern number.
• PRESET: Assigns the position of the selected camera to a user-specified preset number.
Numeric Keypad (0 to 9): Assigns the system ID, PTZ preset and pattern numbers, auxiliary command, and selects the camera channel in the search mode.
MARK: Sets the starting location from which to conduct a search.
COPY: Copies the specified recorded data to an external device.
OSD: Toggles on and off the display of the system toolbar.
ID: Sets the appropriate DVR system ID through which to operate. Press the ID button, and then press the number button (within two seconds) to select the system ID of the DVR. If you set the system ID to 0 (zero), you can control multiple DVRs at the same time.
16 C2673M-D (8/10)
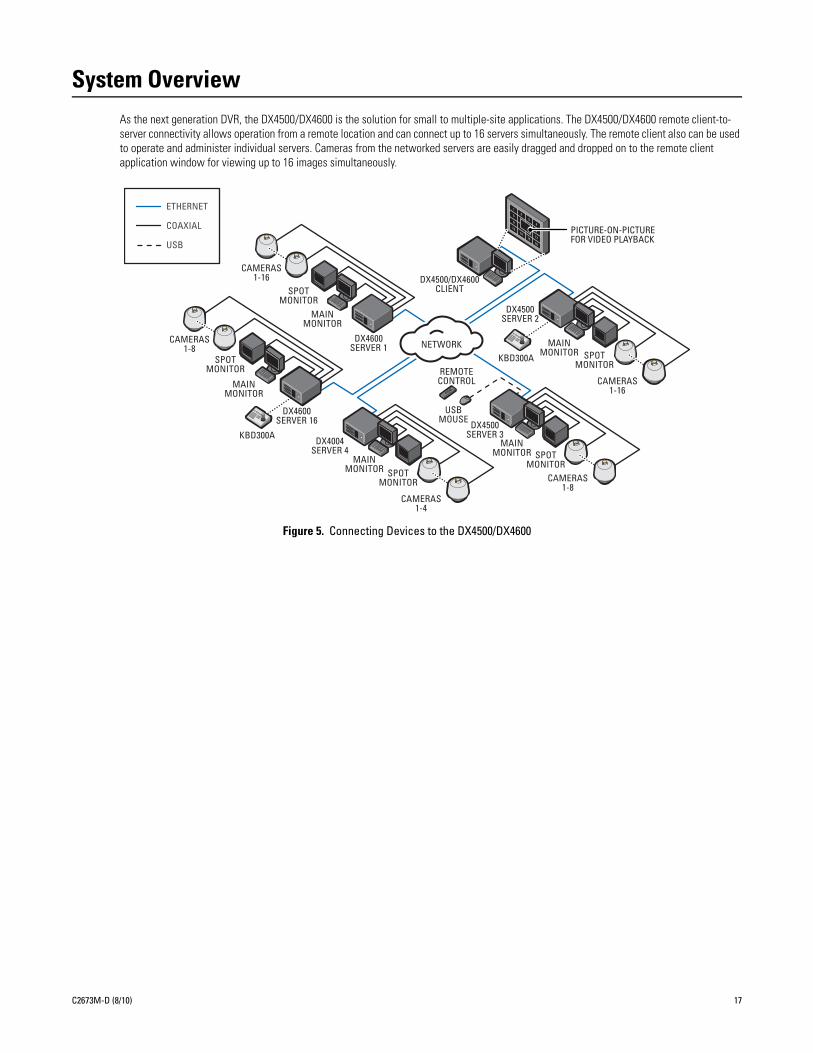
System OverviewAs the next generation DVR, the DX4500/DX4600 is the solution for small to multiple-site applications. The DX4500/DX4600 remote client-to-server connectivity allows operation from a remote location and can connect up to 16 servers simultaneously. The remote client also can be used to operate and administer individual servers. Cameras from the networked servers are easily dragged and dropped on to the remote client application window for viewing up to 16 images simultaneously.
Figure 5. Connecting Devices to the DX4500/DX4600
CAMERAS1-16
DX4600SERVER 1
MAINMONITOR
SPOTMONITOR
CAMERAS1-8
DX4600SERVER 16
KBD300A
MAINMONITOR
SPOTMONITOR
CAMERAS1-4
DX4004SERVER 4
MAINMONITOR SPOT
MONITOR
PICTURE-ON-PICTUREFOR VIDEO PLAYBACK
DX4500/DX4600CLIENT
CAMERAS1-8
DX4500SERVER 3
REMOTECONTROL
USBMOUSE
MAINMONITOR SPOT
MONITOR
CAMERAS1-16
DX4500SERVER 2
KBD300A
MAINMONITOR SPOT
MONITOR
NETWORK
ETHERNET
COAXIAL
USB
C2673M-D (8/10) 17

Equipment Placement and Rack Mounting The DX4500/DX4600 can be placed on any flat surface (desk or table), or it can be mounted in an equipment rack.
DESKTOP MOUNTING1. To prevent surface damage, install the rubber feet on the bottom of the unit.
2. Do not install the two chassis brackets. If already installed, remove the two chassis brackets from the sides of the unit. Using a Phillips screwdriver, remove the eight 10-32 x 0.25-inch Phillips pan head screws (three per bracket). Save the brackets and screws for possible future use.
3. Position the unit to allow for cable and power cord clearance at the rear of the unit. Be sure that the air flow around the unit is not obstructed.
RACK MOUNTING1. Remove the four rubber feet from the bottom of the unit (if already attached). Save the rubber feet and screws for possible future use.
2. Using the six 10-32 x 0.375-inch Phillips screws, attach the two chassis brackets to the left and right sides of the unit (refer to Figure 6).
Figure 6. Attaching Chassis Brackets
3. Place the unit into the rack. This step may require two people to hold the unit in place.
4. Fasten the rack brackets to the rack using the four 10-32 x 0.750-inch pan head screws.
Allow at least one rack unit (1.75 inches or 4.44 cm) of spacing between units. Slots and openings in the cabinet provide ventilation and prevent the unit from overheating.
Figure 7. Rack Mount Installation
WARNING: Do not place the DX4500/DX4600 unit on its side. In this position, the unit is likely to fall over and may cause equipment damage or personal injury.
WARNING: Do not block these openings. Never place the DVR near or over a radiator or heat register. Do not place it in a built-in installation, such as a rack, unless proper ventilation is provided.
18 C2673M-D (8/10)

Hardware Setup
BASIC CONNECTIONSNOTE: Refer to the KBD300USBKIT Installation manual for information about installing the KBD300A keyboard.
To make the basic equipment connections to the DX4500/DX4600, refer to Figure 8 and do the following:
1. Connect the USB mouse to the bottom USB connector. The mouse allows you to operate the DVR using the GUI and on-screen PTZ control.
2. Connect a VGA monitor (not supplied).
3. Connect the cameras to the BNC connectors. Refer to Table D for video coaxial cable requirements. Connect power to the cameras.
4. Connect the appropriate power cord to the back of the unit and to a power source. The DX4500/DX4600 contains an autoranging power supply. It is recommended that the recorder be connected to an uninterruptible power supply (UPS) capable of supplying 2 A for 120 VAC power systems or 1 A for 230 VAC power systems.
Figure 8. Basic Connections
NOTE: You might experience operational issues when a camera device is not correctly terminated. When connecting camera devices, use a normal load termination of 75 ohms. When looping through DVR inputs, ensure that the signal is terminated at the end device. For additional information about terminating a specific camera device, refer to the device’s installation manual.
The following table describes the coaxial cable requirements.
Table D. Video Coaxial Cable Requirements
Cable Type* Maximum Distance
RG59/U
RG6/U
RG11/U
750 ft (229 m)
1,000 ft (305 m)
1,500 ft (457 m)
*Cable requirements:75-ohms impedanceAll-copper center conductorAll-copper braided shield with 95% braid coverage.
C2673M-D (8/10) 19

CONNECTING PTZ CAMERASPTZ devices can be connected to the DX4500/DX4600 using the two RS-422/RS-485 ports located on the back of the unit: DATA 1 and DATA 2. PTZ camera control is achieved by using the respective protocol for that camera. For information about configuring the DVR to communicate with the PTZ device, refer to the DX4500/DX4600 Operation/Configuration manual.
DX4500/DX4600 support for PTZ camera connection is summarized as follows:
• 8-channel DVRs supports up to 8 serial PTZ cameras
• 16-channel DVRs supports up to 16 serial PTZ cameras
• Maximum distance for serial communication lines is 4,000 ft (1219 m)
• Multiple PTZ cameras are connected by daisy-chaining the camera connections
To connect a PTZ camera to the DX4500/DX4600:
1. Using a small screwdriver (or similar tool), push in the DATA 1 TX- terminal block retainer.
2. Insert the RX- serial data line from the PTZ camera into the TX- connector, and then release the terminal block retainer.
3. Verify that the RX- data line is securely fastened to the TX- terminal block.
4. Repeat steps 1 through 3 to connect the RX+ data line.
Figure 9. Connecting PTZ Camera Serial Communication Lines
The following table describes the RS-422/RS-485 ports.
Table E. Data Port Descriptions
RS-422/RS-485 Terminal Description
TX - (DATA -) Data Transmission
TX + (DATA +) Data Transmission
RX - (DATA -) Data Reception
RX + (DATA +) Data Reception
GND Shield
20 C2673M-D (8/10)

CONNECTING ALARMSThe DX4500/DX4600 provides a numbered terminal block for connecting alarm devices. Alarms are programmed for normally open or normally closed inputs. Eight-channel DVRs support up to 8 alarm devices; 16-channel DVRs support up to 16 alarm devices. For information about configuring the alarm inputs, refer to the DX4500/DX4600 Operation/Configuration manual.
1. Using a small screwdriver (or similar tool), push in one of the alarm terminal block wire retainers (1 to 4, 5 to 8, 9 to 12, or 14 to 16).
2. Connect one wire from the alarm device to the receptacle of the depressed retainer, and then release the retainer.
3. Push in one of the alarm ground terminal block retainers.
4. Connect the second wire from the alarm device to the ground receptacle.
5. Repeat steps 1 through 4 for any additional alarm devices to be connected to the DVR.
Figure 10. Connecting Alarm Devices
The following table describes pinouts for the alarm terminal block.
Table F. Alarm Terminal Block Description
Terminal Alarm Input Terminal Alarm Input
1 1 9 9
2 2 10 10
3 3 11 11
4 4 12 12
G Ground G Ground
5 5 13 13
6 6 14 14
7 7 15 15
8 8 16 16
G Ground G Ground
C2673M-D (8/10) 21

CONNECTING RELAY OUTPUTSThe DX4500/DX4600 provides a numbered terminal block for connecting relays devices. Relay outputs are not programmable, and by design are configured to operate as normally open circuits. A signal from a relay output will operate the device connected to the output. The maximum relay power rating is 120 VAC, 0.5 A; 24 VDC, 1 A. DX4500 Series DVRs provide two relay outputs; DX4600 Series DVRs provide four relay outputs. For information about configuring the DX4500/DX4600 to use relay outputs, refer to the DX4500/DX4600 Operation/Configuration manual.
NOTE: The internal switching relays are rated for 0.5 A at 125 V AC or 1 A at 30 V DC. If the electric current is higher, the unit can be damaged.
1. Using a small screwdriver (or similar tool), push in one of the relay terminal block wire retainers (DX4500: 1 or 2; DX4600: 1 to 4).
2. Connect one wire from the device to the receptacles of the depressed retainer, and then release the retainer.
Relay outputs do not have to correspond numerically to alarm inputs. All sensor input and relay output actions can be linked through programming.
3. Push in the relay ground terminal block wire retainer.
4. Connect the second wire from the device to the ground receptacle.
5. Repeat steps 1 through 4 for any additional relay devices to be connected to the DVR.
Figure 11. Connecting Relays
The following table describes pinouts for the alarm terminal block..
Table G. Relay Terminal Block Description
DX4500 DX4600
Terminal Relay Output Terminal Relay Output
1 1 1 1
2 2 2 2
3* 3* 3 3
4* 4* 4 4
G† G† G† G†
*No operation† Ground
22 C2673M-D (8/10)

Overview of DX4500/DX4600 Setup WindowThe features of the DX4500/DX4600 can be controlled and configured through the front panel, remote control, or mouse and can be accessed through the Setup window.
Figure 12. Setup Window
Pane Front Panel/Remote Control Mouse
Menu: Displays the menu commands.
• Press the up/down arrow buttons to move to a menu command.
• Press ENTER to select a menu command. When a menu command is selected, the cursor moves to the Option pane.
Click a menu command.
Option: Displays the options for the selected menu command.
• Press the up/down arrow buttons to move to an option. Options are displayed for each highlighted option.
• Press ENTER to select an option. When an option is selected, the cursor moves to the Properties pane.
Left click a command, property, or option to select it. Right- or left-click a selected settings box to increase or decrease the value.
Properties: Displays the properties and settings available for each option.
• Press the up/down arrow buttons to move to a property. Properties and related settings are displayed for each highlighted option.
• Press the left/right arrow buttons to navigate the Property settings boxes. After an entry box is selected, press ENTER to choose a value. (Some property support settings have multiple parts. For example, the date property supports three settings: a separate entry box for the month, day, and year [MM/DD/YYYY]).
• Press ENTER to select a property or settings box. The selected box changes color.
Click a property or settings box. Right- or left-click to choose a value.
C2673M-D (8/10) 23

Operation and Initial System ConfigurationThe DX4500/DX4600 is ready for configuration and operation once the hardware installation has been completed. Depending on your specific application and installation requirements, there might be topics that do not apply for your specific installation. Advanced configuration details are described in the server and client operation manuals. Be sure to read the information in Overview of DX4500/DX4600 Setup Window on page 23 before performing the setup instructions described in this section. You must log on with administrator access to configure the DX4500/DX4600.
POWERING ON AND LOGGING ON TO THE DVRYou must log on to the DX4500/DX4600 with a valid user name (ID) and password to operate the DVR. User names and passwords are case sensitive. By default, the DX4500/DX4600 comes with one login account: the user name is admin and the default password is admin.
NOTE: If you are logging on for the first time, the system does not prompt you to change the default password (admin). If you keep the default password, access to the DVR is easily accomplished by anyone who knows the user name (ID) and default password. Therefore, Pelco strongly recommends that the system administrator change the password and keep it in a secured location. (The user name or access level, which by default is Administrator, cannot be changed.) For information about changing the administrator password and creating new user accounts, refer to the DX4500/DX4600 Operation/Configuration manual.
1. On the front panel or remote control, press and hold the POWER button until your hear a beep, and then release the button. After a few seconds, the startup screen is displayed.
Figure 13. DX4500/DX4600 Power On Startup Screen
2. Wait until the DVR displays the DX4500/DX4600 application window.
Figure 14. Application Window and Toolbar
24 C2673M-D (8/10)

3. On the front panel or remote control, press LOGIN. Using the mouse, click the Login icon . The Login dialog box opens. Use the virtual keyboard to enter the password.
Figure 15. Virtual Keyboard
4. To enter the default password, do one of the following:
• On the front panel or remote control, press any of the arrow buttons to select the first password character. Press ENTER. Repeat this process to select the remaining password characters.
• Using the mouse, click each password character.
5. On the front panel or remote control, press any of the arrow buttons to select OK, and then press ENTER. Using the mouse, click OK. The system logs you on and the Login icon turns blue, indicating you have successfully logged on to the DVR.
LOGGING OFFOn the front panel or remote control, press LOGIN. Using the mouse, click the Login icon . The Login icon changes from blue to black, indicating you are logged off.
TURNING OFF THE DVRYou must be logged on to the DVR with administrator level permission to turn off the DX4500/DX4600.
1. On the front panel or remote control, press and hold the POWER button until you hear a beep.• If you are not logged in at the Administrator level, do the following:
(1) Log in at the Administrator level.
(2) Press and hold the POWER button until you hear a beep.
The Login dialog box opens. You have approximately 20 seconds to enter the password, before the dialog box closes.
2. To enter the password, do one of the following:
• On the front panel or remote control, press any of the arrow buttons to select the password character on the virtual keyboard, and then press ENTER. Repeat this process until you have entered every character of the password.
• Click each password character on the virtual keyboard.
Asterisks representing each password character are displayed in the Password entry box.
3. On the front panel or remote control, press any of the arrow buttons to select OK, and then press ENTER. Using the mouse, click OK. The system turns off.
C2673M-D (8/10) 25

SELECTING THE MONITORThe main video output can be displayed on a VGA or analog monitor. The DX4500/DX4600 does not display video on both monitors simultaneously. By default, main video is output to the VGA connector. In this case, if a VGA monitor is connected to the VGA connector, video from the DVR is displayed on the monitor.
The DX4500/DX4600 provides two front panel buttons to select the monitor on which the main video is displayed:
• SPOT button: If the main video is displayed on the VGA monitor, use the SPOT button to switch the display to the analog monitor connected to the MAIN-OUT BNC.
• MAIN button: If the main video is displayed on the analog monitor, use the MAIN button to switch the display to the VGA monitor.
DISPLAYING VIDEO ON THE ANALOG MONITOR
To switch the video display from the VGA monitor to the analog monitor:
1. Connect the analog monitor to the MAIN-OUT BNC.
2. Turn on the analog monitor. (Make sure the power source is AC 100~240V, 50/60Hz.)
3. On the front panel, press and hold the SPOT button. After approximately five seconds the system will beep and restart.
4. Verify that main video is displayed on the analog monitor.
DISPLAYING VIDEO ON THE VGA MONITOR
To switch the video display from the analog monitor to the VGA monitor:
1. On the front panel, press and hold the MAIN button. After approximately five seconds the system will beep and restart.
2. Verify that main video is displayed on the VGA monitor.
26 C2673M-D (8/10)

SETTING THE SYSTEM LANGUAGEThe DX4500/DX4600 supports 12 languages; English (United States) is the default language. You must log on with administrator level permission to change the language. The following languages are supported:
• Chinese
• English (Default)
• French
• German
• Italian
• Japanese
• Korean
• Polish
• Portuguese
• Russian
• Spanish
• Turkey
To change the language:
1. Log on to the DVR at the administrator level. The DVR application window and toolbar are displayed.
2. On the front panel, press the MENU/ESC button, or press the MENU/ESC button on the remote control. Using the mouse, click the
Setup icon . The Setup window opens and the default Camera menu is selected.
Figure 16. Setup Window: Camera Page
C2673M-D (8/10) 27
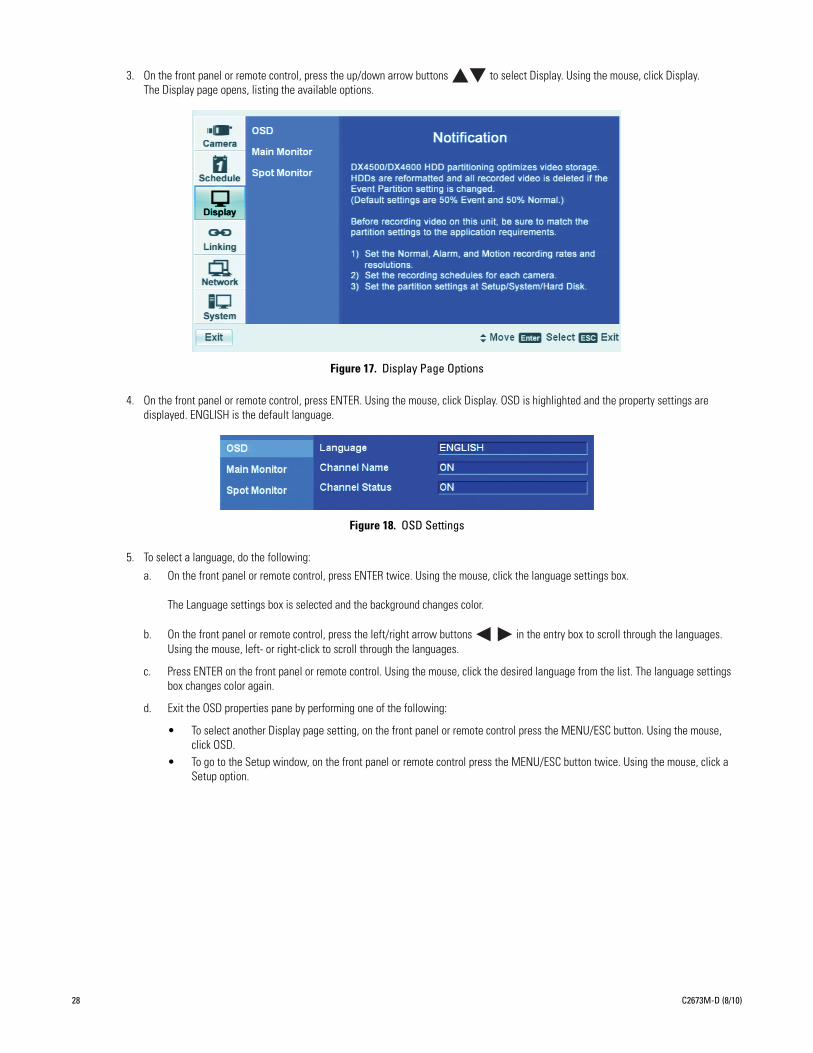
3. On the front panel or remote control, press the up/down arrow buttons to select Display. Using the mouse, click Display. The Display page opens, listing the available options.
Figure 17. Display Page Options
4. On the front panel or remote control, press ENTER. Using the mouse, click Display. OSD is highlighted and the property settings are displayed. ENGLISH is the default language.
Figure 18. OSD Settings
5. To select a language, do the following:
a. On the front panel or remote control, press ENTER twice. Using the mouse, click the language settings box.
The Language settings box is selected and the background changes color.
b. On the front panel or remote control, press the left/right arrow buttons in the entry box to scroll through the languages. Using the mouse, left- or right-click to scroll through the languages.
c. Press ENTER on the front panel or remote control. Using the mouse, click the desired language from the list. The language settings box changes color again.
d. Exit the OSD properties pane by performing one of the following:
• To select another Display page setting, on the front panel or remote control press the MENU/ESC button. Using the mouse, click OSD.
• To go to the Setup window, on the front panel or remote control press the MENU/ESC button twice. Using the mouse, click a Setup option.
28 C2673M-D (8/10)
SETTING THE SYSTEM TIMEThe System menu contains the Date/Time configuration option.
• Date: Sets the DX4500/DX4600 date and establishes the DVR’s internal calendar for all recorded video.
• Time: Sets the system time and establishes the time for all recorded video.
• Date Format: Selects the date format for the displayed date and establishes the format that is saved with the video as it is recorded. Choices are MM/DD/YYYY, DD/MM/YYYY, and YYYY/MM/DD.
• Time Format: Sets the display time format and establishes the format that is saved with the video as it is recorded. Choices are 12- and 24-hour time format.
• Time Zone: Selects the time zone in which the DX4500/DX4600 is located. Time zones are determined based on the number of hours they are offset from the Greenwich Mean Time (GMT).
• Daylight Saving: Ensures that the recorded video displays the correct time, reflecting the annual change to daylight saving time (DST). Select this setting if the DX4500/DX4600 is located in a state or country that observes daylight saving time.
You must configure daylight saving time on both the DX4500/DX4600 and the computer on which the remote client application is running. Configure the time zone on the remote client system, using the System menu in the Setup window. For information about configuring the time zone on the remote client PC, refer to the client operation manual. For information about the time zone for your area, refer to Appendix on page 38.
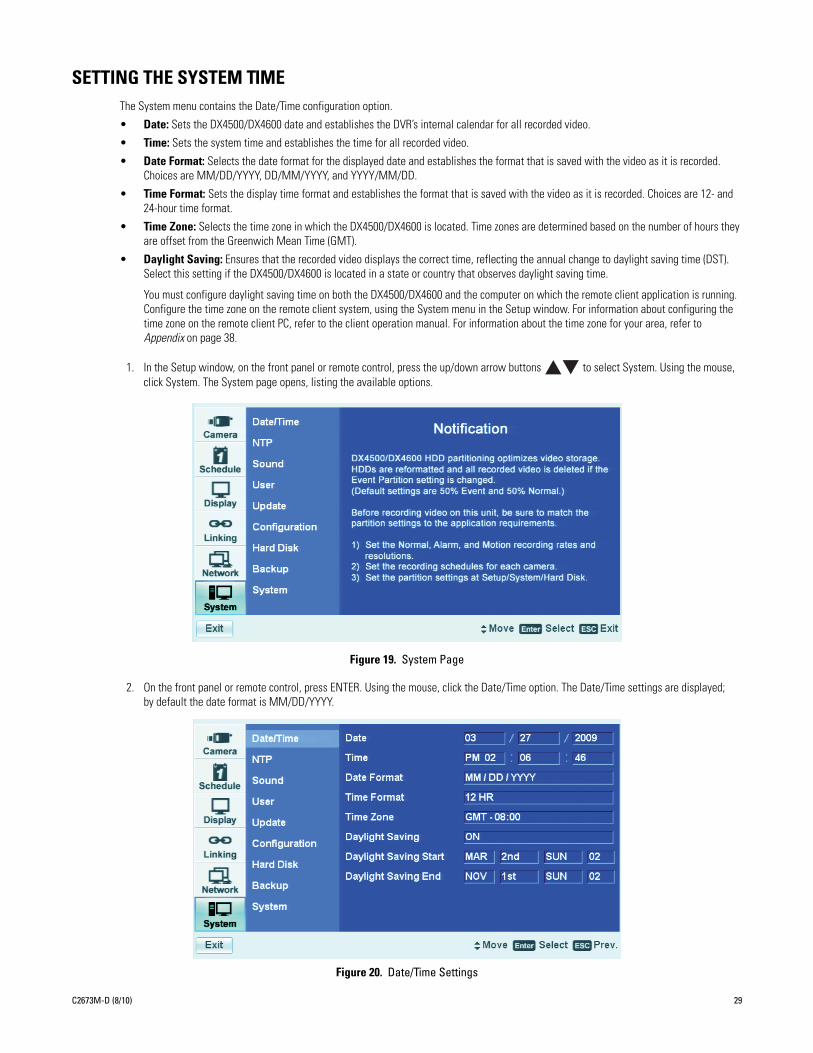
1. In the Setup window, on the front panel or remote control, press the up/down arrow buttons to select System. Using the mouse, click System. The System page opens, listing the available options.
Figure 19. System Page
2. On the front panel or remote control, press ENTER. Using the mouse, click the Date/Time option. The Date/Time settings are displayed; by default the date format is MM/DD/YYYY.
Figure 20. Date/Time Settings
C2673M-D (8/10) 29

3. Select the date.
a. On the front panel or remote control, press ENTER twice. Using the mouse, click the month settings box. The month settings box changes color.
b. On the front panel or remote control, press the left/right arrow buttons to display the desired month, and then press ENTER. Using the mouse, click the settings box.
Figure 21. Date Setting Entry Box
c. Press the left/right arrow buttons to highlight the day settings box and press ENTER. Using the mouse, click the settings box. The day settings box changes color.
d. On the front panel or remote control, press the left/right arrow buttons to display the desired date, and then press ENTER. Using the mouse, click the settings box.
e. Press the left/right arrow buttons to highlight the year settings box press ENTER. Using the mouse, click the year settings box. The day settings box changes color.
f. On the front panel or remote control, press the left/right arrow buttons to display the year, and then press ENTER. Using the mouse, click the settings box.
4. Select the time.
a. On the front panel or remote control, press the up/down arrow buttons to highlight the Time property, and then press ENTER. Using the mouse, click the hour settings box. The settings box changes color.
b. On the front panel or remote control, press the left/right arrow buttons to display the desired hour, and then press ENTER. Using the mouse, click the settings box.
c. Press the left/right arrow buttons to highlight the minutes settings box and press ENTER. Using the mouse, click the minutes settings box. The minutes settings box changes color.
d. On the front panel or remote control, press the left/right arrow buttons to display the desired minute, and then press ENTER. Using the mouse, click the settings box.
e. Press the left/right arrow buttons to highlight the seconds settings box and press ENTER. Using the mouse, click the seconds settings box. The seconds settings box changes color.
f. On the front panel or remote control, press the left/right arrow buttons to display the desired second, and then press ENTER. Using the mouse, click the settings box.
5. Set the date format.
a. On the front panel or remote control, press the up/down arrow buttons to highlight the Date Format property, and then press ENTER. Using the mouse, click the Date Format settings box. The settings box changes color.
b. On the front panel or remote control, press the left/right arrow buttons to display the date format, and then press ENTER. Using the mouse, click the settings box.
6. Set the time format.
a. On the front panel or remote control, press the up/down arrow buttons to highlight Time Format, and then press ENTER. Using the mouse, click the Time Format settings box. The settings box changes color.
b. On the front panel or remote control, press the left/right arrow buttons to display the time format, and then press ENTER. Using the mouse, click the settings box.
7. Set the time zone.
a. On the front panel or remote control, press the up/down arrow buttons to highlight Time Zone and then press ENTER. Using the mouse, click the Time Zone settings box. The settings box changes color.
b. On the front panel or remote control, press the left/right arrow buttons to display the time zone, and then press ENTER. Using the mouse, click the settings box.
8. If you want to configure DST, proceed with the following steps. If you do not want to configure DST, go to step 5 of Configuring Daylight Saving.
30 C2673M-D (8/10)

CONFIGURING DAYLIGHT SAVINGThe DVR has the following conditions when the DST feature is used:
• Daylight Saving OFF: By default, the Daylight Saving feature is set to OFF. In this case, there is no change in the system time stamp for recorded data throughout the year. The effective date is set using the Date, Time, Date Format, and Time Zone options.
• Daylight Saving OFF, but later is set to ON: For example, the DVR is installed in a location where DST is already in observance and the DVR’s time is set to the local time. Sometime in the future, the Daylight Savings option is set to ON. In this case, there is no change in the system time stamp for recorded data. When the Daylight Saving End date and time occur, the unit’s time adjusts backward one hour.
Figure 22. DST Time Shift
1. On the front panel or remote control, press the up/down arrow buttons to highlight Daylight Saving, and then press ENTER. Using the mouse, click the Daylight Saving settings box. The settings changes color.
Figure 23. Daylight Saving Settings
2. On the front panel or remote control, press the left/right arrow buttons to change the setting to ON, and then press ENTER. Using the mouse, click the settings box.
3. To select the Daylight Saving Start date.
a. Press the up/down arrow buttons to highlight Daylight Saving Start, and then press ENTER. Using the mouse, click the Daylight Saving Start settings box. The day settings box changes color.
b. On the front panel or remote control press the left/right arrow buttons to display the desired month, and then press ENTER. Using the mouse, click the settings box.
c. Press the left/right arrow buttons to highlight the week settings box, and then press ENTER. Using the mouse, click the settings box. The settings box changes color.
d. On the front panel or remote control, press the left/right arrow buttons to display the desired week, and then press ENTER. Using the mouse, click the settings box.
DST (Daylight Saving Time) ON
1:00 am
1:59 am 1:59 am
3:00 am
Fall Season = DST PFF
November, 1st SundayMarch, 2nd Sunday
Example: Based on Pacific time zone (GMT-8)
C2673M-D (8/10) 31

e. Press the left/right arrow buttons to highlight the day settings box, and then press ENTER. Using the mouse, click the day settings box. The settings box changes color.
f. On the front panel or remote control, press the left/right arrow buttons to display the desired name of the day, and then press ENTER. Using the mouse, click the settings box.
g. Press the left/right arrow buttons to highlight the hour of the day settings box, and then press ENTER. Using the mouse, click the day settings box. The settings box changes color.
h. On the front panel or remote control, press the left/right arrow buttons to display the desired hour of the day, and then press ENTER. Using the mouse, click the settings box.
4. To select the Daylight Saving End date.
a. Press the up/down arrow buttons to highlight Daylight Saving End, and then press ENTER. Using the mouse, click the daylight saving end settings box. The day settings box changes color.
b. On the front panel or remote control, press the left/right arrow buttons to display the desired month, and then press ENTER. Using the mouse, click the settings box.
c. Press the left/right arrow buttons to highlight the week settings box, and then press ENTER. Using the mouse, click the settings box. The settings box changes color.
d. On the front panel or remote control, press the left/right arrow buttons to display the desired week, and then press ENTER. Using the mouse, click the settings box.
e. Press the left/right arrow buttons to highlight the day settings box, and then press ENTER. Using the mouse, click the day settings box. The settings box changes color.
f. On the front panel or remote control, press the left/right arrow buttons to display the desired name of the day, and then press ENTER. Using the mouse, click the settings box.
g. Press the left/right arrow buttons to highlight the hour of the day settings box, and then press ENTER. Using the mouse, click the day settings box. The settings box changes color.
h. On the front panel or remote control, press the left/right arrow buttons to display the desired hour of the day, and then press ENTER. Using the mouse, click the settings box.
i. Press ENTER on the front panel or remote control. If using the mouse, click Daylight Saving End. The settings box changes color.
5. To save the changes.
a. Do one of the following:
• On the front panel, press the MENU/ESC button or on the remote control press the MENU/ESC button until the “Configuration data is changed. Save the new settings message?” dialog box is displayed.
• Using the mouse, click Exit. The “Configuration data is changed. Save the new settings?” dialog box is displayed.
b. On the front panel or remote control, press the left/right arrow buttons to highlight OK, and then press ENTER. Using the mouse, click OK. The changes are saved and the live view mode is displayed.
32 C2673M-D (8/10)
NETWORK CONFIGURATIONIf you are installing the DX4500/DX4600 in a network environment and you want to use the remote client application to access the DVR server, you must configure the DVR network settings. Using the TCP/IP protocol, the DX4500/DX4600 remote client application can connect with up to 16 DX4500/DX4600 servers simultaneously for individual remote viewing, operation, and administration. The DX4500/DX4600 also supports event notification, e-mail, and emergency agent notification.
The DX4500/DX4600 must be turned on, connected to a network, and you must be logged on at the administrator level to configure network software settings. You must reboot the DVR for any network configuration changes to take effect, and you must restart the system before the changes take effect. Before you change network settings, be sure you are not recording any video that cannot be interrupted.
CONFIGURING TCP/IP
To configure the TCP/IP network settings:
1. Log on to the DVR at the administrator level. The DVR application window opens.
2. On the front panel, press the MENU/ESC button, or the remote control, press the MENU/ESC button . Using the mouse, click the
Setup icon . The Setup window opens to the Camera menu, displaying the options.
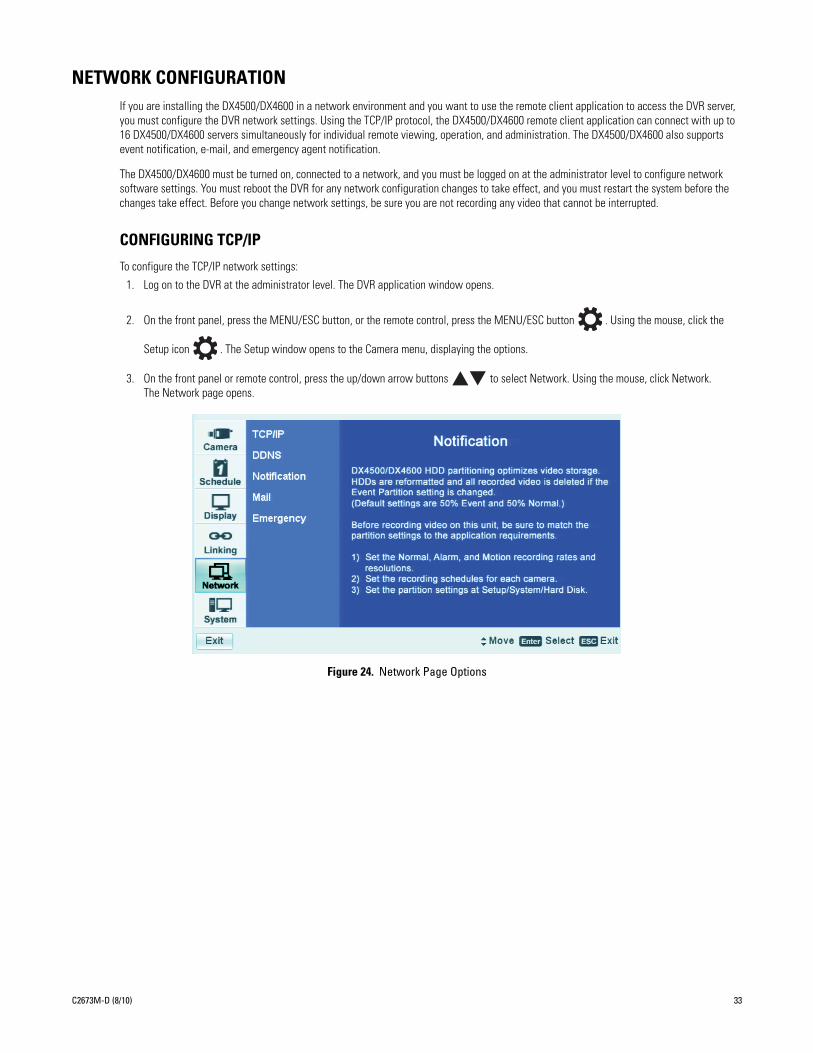
3. On the front panel or remote control, press the up/down arrow buttons to select Network. Using the mouse, click Network. The Network page opens.
Figure 24. Network Page Options
C2673M-D (8/10) 33
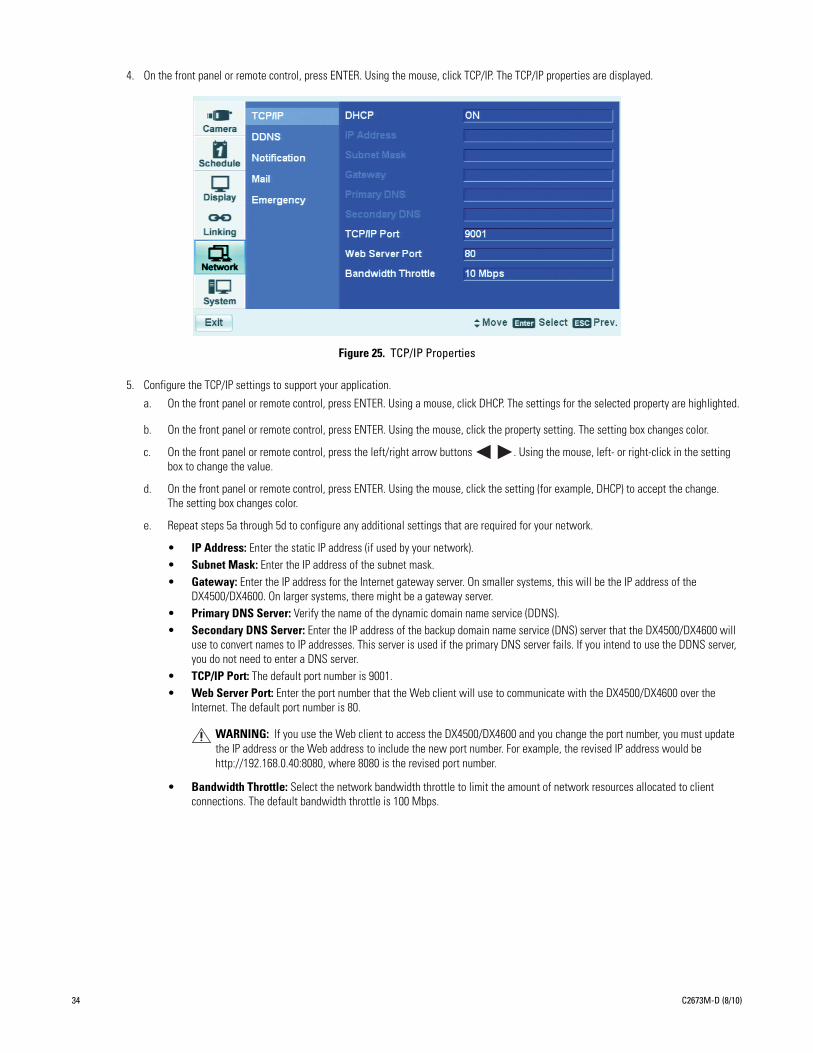
4. On the front panel or remote control, press ENTER. Using the mouse, click TCP/IP. The TCP/IP properties are displayed.
Figure 25. TCP/IP Properties
5. Configure the TCP/IP settings to support your application.
a. On the front panel or remote control, press ENTER. Using a mouse, click DHCP. The settings for the selected property are highlighted.
b. On the front panel or remote control, press ENTER. Using the mouse, click the property setting. The setting box changes color.
c. On the front panel or remote control, press the left/right arrow buttons . Using the mouse, left- or right-click in the setting box to change the value.
d. On the front panel or remote control, press ENTER. Using the mouse, click the setting (for example, DHCP) to accept the change. The setting box changes color.
e. Repeat steps 5a through 5d to configure any additional settings that are required for your network.
• IP Address: Enter the static IP address (if used by your network). • Subnet Mask: Enter the IP address of the subnet mask.• Gateway: Enter the IP address for the Internet gateway server. On smaller systems, this will be the IP address of the
DX4500/DX4600. On larger systems, there might be a gateway server.• Primary DNS Server: Verify the name of the dynamic domain name service (DDNS). • Secondary DNS Server: Enter the IP address of the backup domain name service (DNS) server that the DX4500/DX4600 will
use to convert names to IP addresses. This server is used if the primary DNS server fails. If you intend to use the DDNS server, you do not need to enter a DNS server.
• TCP/IP Port: The default port number is 9001.• Web Server Port: Enter the port number that the Web client will use to communicate with the DX4500/DX4600 over the
Internet. The default port number is 80.
• Bandwidth Throttle: Select the network bandwidth throttle to limit the amount of network resources allocated to client connections. The default bandwidth throttle is 100 Mbps.
WARNING: If you use the Web client to access the DX4500/DX4600 and you change the port number, you must update the IP address or the Web address to include the new port number. For example, the revised IP address would be http://192.168.0.40:8080, where 8080 is the revised port number.
34 C2673M-D (8/10)

CONFIGURING DDNS
Specify a dynamic domain name service (DDNS) user name and password by doing the following:
1. In the Setup window, on the front panel or remote control, press the up/down arrow buttons to select Network. Using the mouse, click Network. The Network page opens.
2. On the front panel or remote control, press ENTER, and then press the up/down arrow buttons to select DDNS. Using the mouse, click DDNS. The DDNS properties are displayed.
3. Enter the DDNS user name settings.
a. On the front panel or remote control, press ENTER. Using the mouse, click User Name. The settings for the selected property are highlighted.
b. On the front panel or remote control, press ENTER. Using the mouse, click the property setting. The settings box changes color and the virtual keyboard opens.
4. Enter the DDNS user name (use the Shift button to display uppercase or lowercase characters.)
a. On the front panel or remote control, press any of the arrow buttons to move the cursor to a character, and then press ENTER. Using the mouse, click a character. The selected character appears in the text entry box.
b. Repeat step 4a to enter the remaining characters of the user name.
5. On the front panel or remote control, press any of the arrow buttons to highlight OK, and then press ENTER. Using the mouse, click OK. The user name is displayed in the User Name setting box.
Figure 26. DDNS User Name
6. To enter the DDNS password, on the front panel or remote control, press the up/down arrow buttons to highlight Password. Using the mouse, click Password.
7. On the front panel or remote control, press ENTER. Using the mouse, click the settings box. The virtual keyboard opens.
8. Entering the DDNS password:
a. On the front panel or remote control, press the up/down arrow buttons to move the cursor to a character, and then press ENTER. Using the mouse, click a character. An asterisk is displayed in the text entry box for each character entered.
b. Repeat step 8a to enter the remaining password characters.
9. On the front panel or remote control, press any of the arrow buttons to highlight OK, and then press ENTER. Using the mouse, click OK. Asterisks are displayed in the Password setting box.
10. Save the changes.
a. Do one of the following:
• On the front panel, press the MENU/ESC button or press the MENU/ESC button on the remote control until the
“Configuration data is changed. Save the new settings message?” dialog box is displayed. • Click Exit. “The Configuration data is changed. Save the new Settings?” dialog box is displayed.
• On the front panel or remote control, press the left/right arrow buttons to highlight OK, and then press ENTER. Using the mouse, click OK. The changes are saved and the Live View mode is displayed.
C2673M-D (8/10) 35
CLIENT SOFTWARE INSTALLATION
RECOMMENDED SYSTEM REQUIREMENTS
The following are the recommended system requirements for the DX4500/DX4600 client, export viewer, and emergency agent software applications.
Minimum PC Requirements
Minimum recommended system requirements for the DX4500/DX4600 Client, DX4500/DX4600 Emergency Agent, and DX4500/DX4600 Viewer software applications are as follows:
• Operating system: Microsoft® Windows® 2000 (SP4) or later, Windows XP (SP2), and DirectX® 8.1 or later
• Processor: Intel® Pentium® 4 or later
• Memory: 512 MB
• Video Card: VGA card with minimum 64 MB video RAM
• Hard Drive: 40 GB hard drive with a minimum of 15 GB of available space
Recommended PC Requirements
• Operating System: Windows XP (SP3), Windows Vista®, or Windows 7
• Processor: 1 GHz or faster 32-bit (x86) or 64-bit (x64) processor
• Memory: 1 GB (32-bit) or 2 GB (64-bit) RAM
• Video Card: DirectX 9 graphics card with WDDM 1.0 or higher driver and 128 MB of graphics memory
• Hard Drive: 40 GB hard drive with a minimum of 20 GB of available space
• Remote Administration: Full remote control through TCP/IP network
INSTALLING THE CLIENT APPLICATION
1. Start the Windows operating system.
2. Close all programs, including any antivirus software.
3. Insert the DX4500/DX4600 resource CD into the remote computer CD/DVD drive, and wait for the window to open.
4. Click Software. The DX4500/DX4600 software installation options are displayed.
5. Click Client/Emergency Agent/Viewer. The Pelco DX4500_DX4600 Client InstallShield Wizard opens.
6. Click Next. The Software License Agreement opens.
7. Click Yes to accept the terms of the license agreement. The Ready to Install the Program dialog box opens.
8. Click Install. The installation process starts. After the software is installed the InstallShield Wizard Complete dialog box opens.
9. Click Finish to complete the installation process.
36 C2673M-D (8/10)
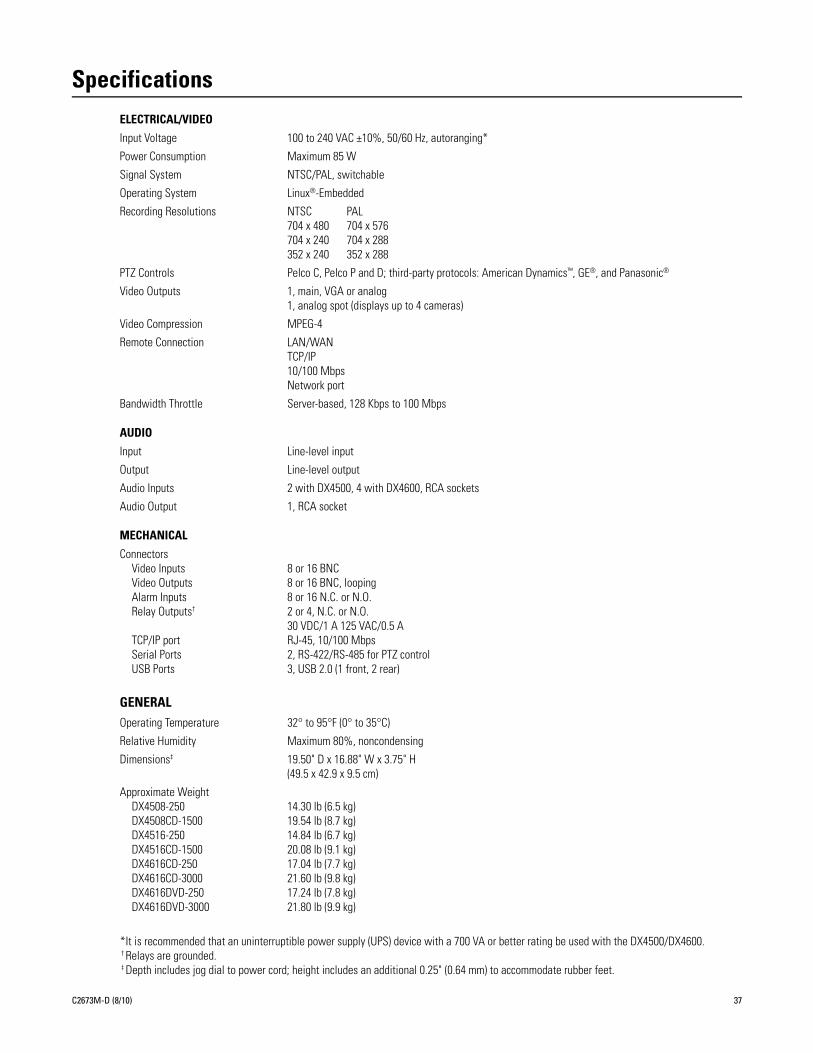
SpecificationsELECTRICAL/VIDEO
Input Voltage 100 to 240 VAC ±10%, 50/60 Hz, autoranging*
Power Consumption Maximum 85 W
Signal System NTSC/PAL, switchable
Operating System Linux®-Embedded
Recording Resolutions NTSC PAL704 x 480 704 x 576704 x 240 704 x 288352 x 240 352 x 288
PTZ Controls Pelco C, Pelco P and D; third-party protocols: American Dynamics™, GE®, and Panasonic®
Video Outputs 1, main, VGA or analog1, analog spot (displays up to 4 cameras)
Video Compression MPEG-4
Remote Connection LAN/WANTCP/IP10/100 MbpsNetwork port
Bandwidth Throttle Server-based, 128 Kbps to 100 Mbps
AUDIO
Input Line-level input
Output Line-level output
Audio Inputs 2 with DX4500, 4 with DX4600, RCA sockets
Audio Output 1, RCA socket
MECHANICAL
ConnectorsVideo Inputs 8 or 16 BNCVideo Outputs 8 or 16 BNC, loopingAlarm Inputs 8 or 16 N.C. or N.O.Relay Outputs† 2 or 4, N.C. or N.O.
30 VDC/1 A 125 VAC/0.5 ATCP/IP port RJ-45, 10/100 MbpsSerial Ports 2, RS-422/RS-485 for PTZ controlUSB Ports 3, USB 2.0 (1 front, 2 rear)
GENERALOperating Temperature 32° to 95°F (0° to 35°C)
Relative Humidity Maximum 80%, noncondensing
Dimensions‡ 19.50" D x 16.88" W x 3.75" H (49.5 x 42.9 x 9.5 cm)
Approximate Weight DX4508-250 14.30 lb (6.5 kg)DX4508CD-1500 19.54 lb (8.7 kg)DX4516-250 14.84 lb (6.7 kg)DX4516CD-1500 20.08 lb (9.1 kg)DX4616CD-250 17.04 lb (7.7 kg)DX4616CD-3000 21.60 lb (9.8 kg)DX4616DVD-250 17.24 lb (7.8 kg)DX4616DVD-3000 21.80 lb (9.9 kg)
*It is recommended that an uninterruptible power supply (UPS) device with a 700 VA or better rating be used with the DX4500/DX4600.† Relays are grounded.‡ Depth includes jog dial to power cord; height includes an additional 0.25" (0.64 mm) to accommodate rubber feet.
C2673M-D (8/10) 37

38 C2673M-D (8/10)
Appendix
TIME ZONE CONVERSION CHARTTo determine your time, add the standard, daylight saving, or summer time to the Universal Time (UT).
Table H. Time Zone Conversion Chart
Time Zone Standard Time
Daylight Saving and Summer Time
International Date Line East (IDLE) +12 hours
New Zealand Standard Time (NZST) +12 hours
New Zealand Time (NZT) +10 hours
Guam Standard Time (GST) +10 hours
Australian Eastern Standard Time (AEST) (AEDT) +10 hours +11 hours
Australian Central Standard Time (ACST) (ACDT) +9.5 hours +10.5 hours
Japan Standard Time (JST) +9 hours
China Coast Time (CCT) +8 hours
Australian Western Standard Time (AWST) +8 hours
India Standard Time (IST) +5.5 hours
Russian Zone 3 +4 hours
Baghdad Time (BT) +3 hours
Russian Zone 2 +3 hours
Moscow Time (MSK) (MSD) +3 hours +4 hours
Eastern European Time (EET) (EEST) +2 hours +3 hours
Russian Zone 1 +2 hours
Central Europe Summer Time (CEST) +2 hours
Central European Time (CET) +1 hour
Middle European Time (MET) +1 hour
Swedish Winter Time (SWT) 0 hours
Greenwich Mean Time (GMT) 0 hours
Universal Time (UT) 0 hours
Western European Time (WET) (WEST) 0 hours +1 hour
British Summer Time (BST) +1 hour
Irish Summer Time (IST) +1 hour
West African Time (WAT) –1 hour
Newfoundland Standard Time (NST) (NDT) –3.5 hours –2.5 hours
Atlantic Standard Time (AST) (ADT) –4 hours –3 hours
Eastern Standard Time (EST) (EDT) –5 hours –4 hours
Central Standard Time (CST) (CDT) –6 hours –5 hours
Mountain Standard Time (MST) (MDT) –7 hours –6 hours
Pacific Standard Time (PST) (PDT) –8 hours –7 hours
Alaskan Standard Time (AKST) (AKDT) –9 hours –8 hours
Hawaiian Standard Time (HST) –10 hours
International Date Line West (IDLW) –12 hours

PRODUCT WARRANTY AND RETURN INFORMATION
WARRANTYPelco will repair or replace, without charge, any merchandise proved defective inmaterial or workmanship for a period of one year after the date of shipment.
Exceptions to this warranty are as noted below:• Five years:
– Fiber optic products– Unshielded Twisted Pair (UTP) transmission products– CC3701H-2, CC3701H-2X, CC3751H-2, CC3651H-2X, MC3651H-2, and
MC3651H-2X camera models• Three years:
– Pelco-designed fixed network cameras and network dome cameras withSarix™ technology.
– Pelco-branded fixed camera models (CCC1390H Series, C10DN Series,C10CH Series, and IP3701H Series)
– EH1500 Series enclosures– Spectra® IV products (including Spectra IV IP)– Camclosure® Series (IS, ICS, IP) integrated camera systems– DX Series digital video recorders (except DX9000 Series which is covered
for a period of one year), DVR5100 Series digital video recorders, DigitalSentry® Series hardware products, DVX Series digital video recorders, andNVR300 Series network video recorders
– Endura® Series distributed network-based video products– Genex® Series products (multiplexers, server, and keyboard)– PMCL200/300/400 Series LCD monitors– PMCL5xx Series FHD monitors
• Two years:– Standard varifocal, fixed focal, and motorized zoom lenses– DF5/DF8 Series fixed dome products– Legacy® Series integrated positioning systems– Spectra III™, Spectra Mini, Spectra Mini IP, Esprit®, ExSite®, and PS20
scanners, including when used in continuous motion applications.– Esprit Ti and TI2500 Series thermal imaging products– Esprit and WW5700 Series window wiper (excluding wiper blades).– CM6700/CM6800/CM9700 Series matrix– Digital Light Processing (DLP®) displays (except lamp and color wheel). The
lamp and color wheel will be covered for a period of 90 days. The air filter isnot covered under warranty.
– Intelli-M® eIDC controllers• One year:
– Video cassette recorders (VCRs), except video heads. Video heads will becovered for a period of six months.
• Six months:– All pan and tilts, scanners, or preset lenses used in continuous motion
applications (preset scan, tour, and auto scan modes).Pelco will warrant all replacement parts and repairs for 90 days from the date ofPelco shipment. All goods requiring warranty repair shall be sent freight prepaidto a Pelco designated location. Repairs made necessary by reason of misuse,alteration, normal wear, or accident are not covered under this warranty.
Pelco assumes no risk and shall be subject to no liability for damages or lossresulting from the specific use or application made of the Products. Pelco’s liabilityfor any claim, whether based on breach of contract, negligence, infringement ofany rights of any party or product liability, relating to the Products shall not exceedthe price paid by the Dealer to Pelco for such Products. In no event will Pelco beliable for any special, incidental, or consequential damages (including loss of use,loss of profit, and claims of third parties) however caused, whether by thenegligence of Pelco or otherwise.
The above warranty provides the Dealer with specific legal rights. The Dealer mayalso have additional rights, which are subject to variation from state to state.
If a warranty repair is required, the Dealer must contact Pelco at (800) 289-9100 or(559) 292-1981 to obtain a Repair Authorization number (RA), and provide thefollowing information:
1. Model and serial number2. Date of shipment, P.O. number, sales order number, or Pelco invoice number3. Details of the defect or problem
If there is a dispute regarding the warranty of a product that does not fall underthe warranty conditions stated above, please include a written explanation withthe product when returned.
Method of return shipment shall be the same or equal to the method by which theitem was received by Pelco.
RETURNSTo expedite parts returned for repair or credit, please call Pelco at (800) 289-9100or (559) 292-1981 to obtain an authorization number (CA number if returned forcredit, and RA number if returned for repair) and designated return location.
All merchandise returned for credit may be subject to a 20 percent restocking andrefurbishing charge.
Goods returned for repair or credit should be clearly identified with the assignedCA or RA number and freight should be prepaid.
The materials used in the manufacture of this document and its components are compliant to the requirements of Directive 2002/95/EC.
This equipment contains electrical or electronic components that must be recycled properly to comply with Directive 2002/96/EC of the European Union regarding the disposal of waste electrical and electronic equipment (WEEE). Contact your local dealer for procedures for recycling this equipment.
2-10-10
REVISION HISTORY
Manual # Date CommentsC2673M 8/07 Original version.C2673M-A 1/08 Revised chassis back panel illustrations to show correct labeling of the main and spot monitor BNC, added camera termination note, and updated the DST procedure.C2673M-B 7/09 Added new features including multi-event recording and playback of exported video at the server.C2673M-C 12/09 Corrected the default user name and password.C2673M-D 8/10 Updated the DX4500 and DX4600 internal storage capacities and minimum and recommended PC system requirements.
Pelco, the Pelco logo, and other trademarks associated with Pelco products referred to in this publication are trademarks of Pelco, Inc. or its affiliates. © Copyright 2010, Pelco, Inc. All other product names and services are the property of their respective companies. All rights reserved.Product specifications and availability are subject to change without notice.

Pelco, Inc. Worldwide Headquarters 3500 Pelco Way Clovis, California 93612 USAUSA & Canada Tel (800) 289-9100 Fax (800) 289-9150
International Tel +1 (559) 292-1981 Fax +1 (559) 348-1120
www.pelco.com