DVD/VCR User’s Guide - Voxx International of Contents 1 continued on next page Chapter 1:...
64
DVD/VCR User’s Guide Changing Entertainment. Again. DRC6200N
Transcript of DVD/VCR User’s Guide - Voxx International of Contents 1 continued on next page Chapter 1:...

DVD/VCRUser’s Guide
Changing Entertainment. Again.
DRC6200N DRC6200N. Cover 7/28/03, 9:30 AM1

Important Information
This symbol indicates "dangerous voltage"inside the product that presents a risk ofelectric shock or personal injury.
WARNINGTo reduce the risk of fire or electricshock, do not expose this product torain or moisture. No objects filled withliquids, such as vases, shall be placedon the apparatus.
This symbol indicates importantinstructions accompanying theproduct.
CAUTIONRISK OF ELECTRIC SHOCK DO
NOT OPEN
Caution: To prevent electric shock, match wide blade of plug to wide slot, fully insert.
Attention: Pour éviter les chocs électriques, introduire la lame la plus large de la fichedans la borne correspondante de la prise et pousser jusqú au fond.
Refer to the identification/rating label located on the back panel of your product for itsproper operating voltage.
This symbol indicates that this product incorporates doubleinsulation between hazardous mains voltage and useraccessible parts. When servicing use only identicalreplacement parts.
Product Registration
Please fill out the product registration card (packed separately) and return it immediately. For U.S. customers: YouRCA Consumer Electronics product may also be registered at www.rca.com/productregistration. Registering thisproduct allows us to contact you if needed.
Product Information
Keep your sales receipt to obtain warranty parts and service and for proof of purchase. Attach it here and record theserial and model numbers in case you need them. The numbers are located on the back of the product.
Model No. _______________________________________________________________________
Serial No. ________________________________________________________________________
Purchase Date: ___________________________________________________________________
Dealer/Address/Phone: _____________________________________________________________
CAUTIONFCC Regulations state thatunauthorized changes ormodifications to this equipmentmay void the user’s authority tooperate it.
Cable TV Installer: This reminder is provided to call your attention to Article 820-40 of the National Electrical Code(Section 54 of the Canadian Electrical Code, Part 1) which provides guidelines for proper grounding and, inparticular, specifies that the cable ground shall be connected to the grounding system of the building as close tothe point of cable entry as practical.
DRC6200N. Cover 7/28/03, 9:30 AM2

CAUTIONTHIS PRODUCT UTILIZES A LASER. USEOF CONTROLS OR ADJUSTMENTS ORPERFORMANCE OF PROCEDURESOTHER THAN THOSE SPECIFIED HEREINMAY RESULT IN HAZARDOUSRADIATION EXPOSURE. DO NOT OPENCOVERS AND DO NOT REPAIRYOURSELF. REFER SERVICING TOQUALIFIED PERSONNEL.
Note:This DVD/VCR player is designed and manufactured torespond to the Region Management Information. Ifthe Region number of a DVD disc does not correspondto the Region number of this DVD/VCR player, thisplayer cannot play the disc. The Region number forthis DVD/VCR player is Region No 1.
Important Information
Note:This device is protected by U.S. patent numbers 4,631,603and 4,577,216 and 4,819,098 and other intellectualproperty rights. The use of Macrovision’s copy protectiontechnology in the device must be authorized byMacrovision and is intended for home and other limitedpay-per-view uses only, unless otherwise authorized inwriting by Macrovision. Reverse engineering ordisassembly is prohibited.
This product incorporates copyright protection technology that is protected by method claims of certain U.S.patents and other intellectual property rights owned by Macrovision Corporation and other rights owners. Use ofthis copyright protection technology must be authorized by Macrovision Corporation, and is intended for home useonly unless otherwise authorized by Macrovision Corporation. Reverse engineering or disassembly is prohibited.
CLASS 1
LASER
PRODUCT
DRC6200N. Cover 7/28/03, 9:30 AM3

Important Information
FCC Declaration of Conformity and Industry Canada InformationThis device complies with Part 15 of the FCC rules. Operation is subject to the following twoconditions: (1) This device may not cause harmful interference, and (2) this device must accept anyinterference received, including interference that may cause undesired operation.
Trade Name: RCAModel: DRC6200NEquipmentClassification: TV Interface Device
Responsible Party: Thomson Inc.10330 N. Meridian St.Indianapolis, IN 46290Phone: (580) 634-0151
This equipment has been tested and found to comply with the limits for a Class B digital device,pursuant to Part 15 of the FCC Rules.
These limits are designed to provide reasonable protection against harmful interference in aresidential installation. This equipment generates, uses, and can radiate radio frequency energy and,if not installed and used in accordance with the instructions, may cause harmful interference to radiocommunications. However, there is no guarantee that interference will not occur in a particularinstallation. If this equipment does cause harmful interference to radio or television reception, whichcan be determined by turning the equipment off and on, the user is encouraged to try to correct theinterference by one or more of the following measures:
• Reorient or relocate the receiving antenna.
• Increase the separation between the equipment and receiver.
• Connect the equipment into an outlet on a circuit different from that to which the receiver isconnected.
• Consult the dealer or an experienced radio/TV technician for help.
FCC Regulations state that unauthorized changes or modifications to this equipment may void theuser's authority to operate it.
Industry Canada Compliance NoticeThis Class B digital apparatus complies with Canadian ICES-003.
Cet appareil numérique de la classe B conforme à la norme NMB-003 du Canada.
DRC6200N. Cover 7/28/03, 9:30 AM4

Table of Contents
1
continued on next page
Chapter 1: Connections and SetupThings to Consider Before You Connect .......................................................................5
Protect Against Power Surges ........................................................................... 5Protect Components from Overheating ........................................................... 5Position Cables Properly to Avoid Audio Interference .................................... 5Connection Pictures ........................................................................................... 5
Compatible Discs .............................................................................................................6Cables Needed to Connect Components to Your DVD/VCR ............................ 6
DVD/VCR + TV .................................................................................................................7DVD/VCR + TV + Audio Receiver ...................................................................................8Install Batteries in the Remote ......................................................................................9Point the Remote in the Right Direction and Put it in DVD or VCR Mode ...............9
Turn on the TV and DVD/VCR ............................................................................ 9Using the Remote Control to Choose On-screen Menu Items ................................ 10
Complete the VCR Setup ................................................................................. 10Language Select ............................................................................................... 10Auto Channel Search ....................................................................................... 10Cable Box Setup ............................................................................................... 11Clock Set ........................................................................................................... 11
Next Steps .................................................................................................................... 12What to Expect ............................................................................................................ 12
DVD and VCR Modes ........................................................................................ 12Menu Systems ................................................................................................... 12User’s Guide ...................................................................................................... 12
Chapter 2: Remote ControlButton Descriptions for DVD and VCR Modes........................................................... 13
DVD and VCR function buttons listed alphabetically .................................... 13Button description for TV function buttons ................................................... 14Using the INPUT Button ................................................................................... 15Using the remote to Navigate through On-Screen Menus ............................ 15
Chapter 3: Playing DiscsRegional Coding ........................................................................................................... 16Using Different Menus ................................................................................................ 16To Load and Play a DVD Disc ...................................................................................... 17Search Options ............................................................................................................. 17
DRC6200N. TOC 7/28/03, 9:30 AM1

2
Table of Contents
Picture Scan ...................................................................................................... 17Freeze Frame and Frame Advance .................................................................. 17Slow Motion (in Freeze Frame Mode) ............................................................ 18
Playback Options .......................................................................................................... 18Chapter Advance .............................................................................................. 18Zoom ................................................................................................................. 18
Using the On-Screen Info Display .............................................................................. 19DVD Disc Info Display ................................................................................................................. 19Audio CD Info Display ................................................................................................................. 19Video CD (VCD) Disc Info Display .............................................................................................. 19
How to Navigate the Info Display ................................................................... 20Time Display (all Info Displays) ........................................................................ 20Title/Track Icon (all Info Displays) .................................................................... 20Chapter Icon (DVD Info Display) ..................................................................... 20Subtitles Icon (DVD Info Display) .................................................................... 21Audio Language Icon (DVD Info Display) ....................................................... 21Play Mode ......................................................................................................... 22Repeat ............................................................................................................... 22AB Repeat ......................................................................................................... 22Random (Audio CD and mp3) ......................................................................... 23Program Play (DVD and Audio CD Info Displays) ........................................... 23Changing the Camera Angle (DVD Info Display) ........................................... 23PBC - Playback Control (Video CD Info Display) ............................................. 24
Playing mp3 and WMA music files and displaying JPEG files ................................. 24Displaying JPEG files or playing mp3 or WMA files ....................................... 24
Chapter 4: VCR FeaturesVCR Basics ..................................................................................................................... 26
Playing a tape ................................................................................................... 26Automatic Rewind ........................................................................................... 26Tape Eject .......................................................................................................... 26
Basic Recording ............................................................................................................ 26Check the Safety Tab ........................................................................................ 26
Recording Features ...................................................................................................... 27Express Recording (XPR) .................................................................................. 27Timer Recording ............................................................................................... 27
Time Counter ................................................................................................................ 29Info Display ................................................................................................................... 29Pro-Tect Plus™ Locking Feature ................................................................................. 30Explanation of the Menu System ............................................................................... 30
DRC6200N. TOC 7/28/03, 9:30 AM2

Table of Contents
3
continued on next page
Clock Set ........................................................................................................... 30Timer Recordings .............................................................................................. 31Channel Set ....................................................................................................... 31Functions ........................................................................................................... 32Index Search ..................................................................................................... 33Go-To Search ..................................................................................................... 34Set Auto Repeat ............................................................................................... 34Language Select ............................................................................................... 34
Chapter 5: DVD Menu SystemThe DVD Player Menu System ..................................................................................... 35Language Menu ............................................................................................................ 35Video Menu ................................................................................................................... 36
TV Aspect .......................................................................................................... 36Video Out.......................................................................................................... 37Scan Mode ........................................................................................................ 37
Audio Menu .................................................................................................................. 37Digital Out ........................................................................................................ 37Dynamic Range ................................................................................................. 38
Others Menu ................................................................................................................. 38OSD ................................................................................................................... 38Screen Saver ...................................................................................................... 38Defaults ............................................................................................................. 38Parental ............................................................................................................. 39Changing Parental Controls ............................................................................ 39Changing Your Password ................................................................................. 39Resetting Your Password ................................................................................. 40
Pro-Tect Plus™ Locking Feature ................................................................................. 40
Chapter 6: Additional InformationTroubleshooting ............................................................................................................ 41Handling Cautions ........................................................................................................ 48
Maintenance of Cabinet .................................................................................. 48Formation of Condensation ............................................................................ 48Handling Discs .................................................................................................. 48
Cleaning Discs ............................................................................................................... 48Back of the DVD/VCR .................................................................................................. 49
Description of Jacks .......................................................................................... 49
DRC6200N. TOC 7/28/03, 9:30 AM3
4
Table of Contents
Front of the DVD/VCR ................................................................................................. 50Front Panel Display ...................................................................................................... 51
Display Messages .............................................................................................. 51Explanation of Input Jacks and Cables ...................................................................... 52
Component Video (Y, Pb, Pr) Jacks and Cables ............................................... 52S-Video Jacks and Cables ................................................................................. 52Audio/Video Jacks and Cables (RCA-type) ...................................................... 52
Limited Warranty ......................................................................................................... 53How to find your TV’s Video Input Channel .............................................................. 55
Video Input Channel Variations ...................................................................... 55Accessory Information ................................................................................................. 56
How to Order ................................................................................................... 56
DRC6200N. TOC 7/28/03, 9:30 AM4

Chapter 1 5Graphics contained within this publication are for representation only.
Chapter 1: Connections and Setup
Things to Consider Before You Connect
Protect Against Power Surges• Connect all components before you plug any of their power cords into the wall outlet.
• Turn off the TV and/or components before you connect or disconnect any cables.
• Make sure all antennas and cables are properly grounded. Refer to the Important Safeguards sheetpacked with your DVD/VCR.
Protect Components from Overheating• Don’t block ventilation holes on any of the components. Arrange the components so that air can
circulate freely.
• Don’t stack components.
• When you place components in a stand, make sure you allow adequate ventilation.
• If you connect an audio receiver or amplifier, place it on the top shelf so the heated air from itwon’t flow around other components.
Position Cables Properly to Avoid Audio Interference• Insert each cable firmly into the designated jack.
• If you place components above the TV, route all cables down the side of the back of the TV insteadof straight down the middle of the back of the TV.
• If your antenna uses 300-ohm twin lead cables, do not coil the cables. Also, keep the twin leadcables away from audio/video cables.
Connection PicturesAudio/video cables are usually bundled together. For better visibility, the connection pictures in thisbook show each cable separately (audio left, audio right, and video).
DRC6200N.01 Connections 7/28/03, 9:30 AM5

6 Chapter 1
Connections and Setup
Cables Needed to Connect Components to Your DVD/VCRThe pictures below show the cables needed for the connections represented in this book.
Note: Audio/Video cables (A/V cables for short) are usually sold as a bundled set, but the connection pictures in thisbook show each cable separately for better visibility.
RF coaxial cable S-Video cable
Optical digital audio cable
Audio/Videocables
Component Videocables
Compatible DiscsThis DVD player is capable of playing the following types ofdiscs: DVDs, audio CDs, Video CDs, CDs with mp3 files, WMAfiles (Windows Media Audio), and CDs with JPEG files onthem. Before you put a disc in the player, make sure it iscompatible.
You can’t play the following types of discs: Laserdiscs, CD-I,CD-ROM (computer-only discs), DVD-ROM, discs recordedusing other broadcast standards (i.e. PAL or SECAM), or CD-Gdiscs.
Note: Some discs may not be compatible due to laser pickup anddisc design.
DVD+Rewritable
Coaxial digital audio cable
DRC6200N.01 Connections 7/28/03, 9:30 AM6
Chapter 1 7
Connections and Setup
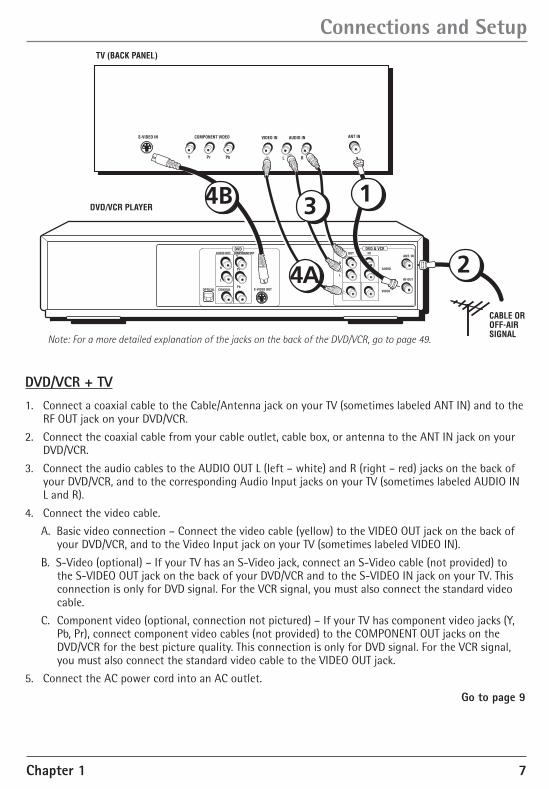
DVD/VCR + TV1. Connect a coaxial cable to the Cable/Antenna jack on your TV (sometimes labeled ANT IN) and to the
RF OUT jack on your DVD/VCR.
2. Connect the coaxial cable from your cable outlet, cable box, or antenna to the ANT IN jack on yourDVD/VCR.
3. Connect the audio cables to the AUDIO OUT L (left – white) and R (right – red) jacks on the back ofyour DVD/VCR, and to the corresponding Audio Input jacks on your TV (sometimes labeled AUDIO INL and R).
4. Connect the video cable.
A. Basic video connection – Connect the video cable (yellow) to the VIDEO OUT jack on the back ofyour DVD/VCR, and to the Video Input jack on your TV (sometimes labeled VIDEO IN).
B. S-Video (optional) – If your TV has an S-Video jack, connect an S-Video cable (not provided) tothe S-VIDEO OUT jack on the back of your DVD/VCR and to the S-VIDEO IN jack on your TV. Thisconnection is only for DVD signal. For the VCR signal, you must also connect the standard videocable.
C. Component video (optional, connection not pictured) – If your TV has component video jacks (Y,Pb, Pr), connect component video cables (not provided) to the COMPONENT OUT jacks on theDVD/VCR for the best picture quality. This connection is only for DVD signal. For the VCR signal,you must also connect the standard video cable to the VIDEO OUT jack.
5. Connect the AC power cord into an AC outlet.
Go to page 9
Note: For a more detailed explanation of the jacks on the back of the DVD/VCR, go to page 49.
DVD/VCR PLAYER
DVD & VCR
ANT. IN
RF OUT
AUDIO OUT
COAXIALOPTICAL S-VIDEO OUT
DVD
L
R
COMPONENT OUT
Pr
Pb
YOUT IN
R
L
AUDIO
VIDEO
CABLE OR OFF-AIR SIGNAL
VIDEO IN AUDIO IN COMPONENT VIDEO
L R Y Pr Pb
S-VIDEO IN
TV (BACK PANEL)
ANT IN
13
24A
4B
DRC6200N.01 Connections 7/28/03, 9:30 AM7

8 Chapter 1
Connections and Setup
DVD/VCR + TV + Audio ReceiverBoth Dolby Digital® and DTS® are audio formats used to record 5.1-channel audio signals onto thedigital track of film (while the film is being made). Both of these formats provide up to six separatechannels: left, right, center, left rear, right rear, and common subwoofer. The disc will play 5.1-channelsound only if you’ve connected a DTS or Dolby Digital receiver or decoder and if the disc is encoded inthe Dolby Digital or DTS format.
Please Read This Before Using the DIGITAL AUDIO OUT Jack!
This player’s digital output jack is designed for a connection to a Dolby Digital or DTS receiver or decoder. Olderdigital equipment may not be compatible with the Dolby Digital bitstream. Such a connection can create a high levelof noise that may be harmful to your ears, and could damage headphones or speakers. It is important to choose thecorrect Digital Out setting in the DVD Player’s Audio menu, especially when you use either of the DIGITAL AUDIO OUTjacks. For more information, go to page 37.
1. Connect the left and right audio cables to your audio/video receiver and to the AUDIO OUT L (left –white) and R (right – red) jacks on the back of your DVD/VCR.
2. If you have a Dolby Digital or DTS receiver, use one of the DIGITAL AUDIO OUT jacks to connect thereceiver to the DVD/VCR. You must also set the Digital Out setting in the Audio menu (go to page37).
Note: The DIGITAL AUDIO OUT jack has two options: OPTICAL and COAXIAL. Some Dolby Digital receivers have onetype of Digital Audio Input jack, and some have both. Under most conditions, optical and coaxial connections workequally well — the only difference is the type of cable you connect to the jack.
If you want to use a less expensive cable, connect a coaxial cable to the COAXIAL jack. Rarely, but sometimes, coaxialcables — especially long ones, pick up radio frequency (RF) interference from household appliances, nearby powerlines, and/or broadcast towers.
If you would rather use the OPTICAL jack, connect an optical digital cable to the DVD/VCR and to the correspondingdigital optical input jack on the receiver.
3. Connect the video cable.
A. Basic video connection – Connect the video cable (yellow) to the VIDEO OUT jack on the back ofyour DVD/VCR player, and to the Video Input jack on your TV (sometimes labeled VIDEO IN).
B. S-Video (optional) – If your TV has an S-Video jack, connect an S-Video cable (not provided) tothe S-VIDEO OUT jack on the back of your DVD/VCR player and to the S-VIDEO jack on your TV.This connection is only for DVD signal. For the VCR signal, you must also connect the standardvideo cable.
C. Component video (optional, connection not pictured) – If your TV has component video jacks (Y,Pb, Pr), connect component video cables (not provided) to the COMPONENT OUT jacks on theDVD/VCR player for the best picture quality. This connection is only for DVD signal. For the VCRsignal, you must also connect the standard video cable.
4. Connect the AC power cord into an AC outlet.
Manufactured under license from Dolby Laboratories. “Dolby” and the double-D symbol are trademarks of DolbyLaboratories. Confidential unpublished works. ® 1992-1997 Dolby Laboratories, Inc. All rights reserved.
DTS is a registered trademark of Digital Home Theater Systems, Inc.
DRC6200N.01 Connections 7/28/03, 9:30 AM8

Chapter 1 9
Connections and Setup
Install Batteries in the Remote1. Remove the battery compartment cover on the back of the remote.
2. Insert new batteries. Match the polarities (+ and –) on the batteries with the diagram on theremote.
3. Put the battery compartment cover back on the remote.
Important Battery Information• If you’re not going to use the remote for a month or more, be sure to remove the batteries because
they can leak and cause damage.
• Dispose of batteries in the proper manner, according to federal, state, and local regulations.
• Any battery may leak electrolyte if mixed with a different battery type, if inserted incorrectly, if allbatteries are not replaced at the same time, if disposed of in fire, or if an attempt is made to chargea battery not intended to be recharged.
• Discard leaky batteries immediately. Leaking batteries can cause skin burns or other personal injury.
Point the Remote in the Right Direction and Put it in DVD or VCR ModeWhen you want the remote to operate the DVD/VCR, point the remote at the DVD/VCR, not the TV. Theremote has to be pointed in the correct direction and toward the correct component in order for theremote control’s signal to communicate with the sensor on the component. Make sure there is a clearpath between the remote control and the component you want to operate, so the signal isn’t blocked.
Turn on the TV and DVD/VCR1. Turn on your TV and tune it to the correct Video Input Channel.
• If you used a coaxial cable to connect your DVD/VCR to your TV, tune the TV to channel 3. YourTV must be set to channel 3 the first time you set up the DVD/VCR. See page 32 for instructionson how to change the output channel once you have started setup.
• If you used audio/video cables to connect your DVD/VCR, tune the TV to its Video Input Channel(see page 55 for help).
2. Press the DVD or VCR button to turn on the DVD/VCR.
• To operate the DVD part, press the DVD button.
• To operate the VCR part, press the VCR button.
3. The default language for the DVD and VCR on-screen displays is English. If you want to change it,see pages 10 and 35
DRC6200N.01 Connections 7/28/03, 9:30 AM9

10 Chapter 1
Connections and Setup
Using the Remote Control to Choose On-screen Menu ItemsPress the MENU button to bring up the Main Menu. Selecting a menu item can take you to anothermenu, activate a choice, or activate a data entry field (such as the hour field in the CLOCK SET menu).
Complete the VCR SetupTo set up the VCR, you’ll need to set a few important menuitems the first time you turn on the unit.
This is the VCR Main menu.
SETUP
CLOCK SETTIMER RECORDINGSCHANNEL SETFUNCTIONSLANGUAGE SELECT
Move: Select:End: MENU
OK
LANGUAGE SELECT
Select a language.
EnglishSpanishFrench
Move: Select:End: MENU
OK
Language SelectThe language setting determines the language in which theon-screen displays and menus appear. You can choose fromEnglish, Spanish, or French. The default is English. If youwant to choose a different language, follow the steps below.
1. Make sure the remote is in VCR mode by pressing the VCRbutton.
2. Press MENU to display the VCR SETUP MENU.
3. Press the down arrow button until LANGUAGE SELECT ishighlighted, and press OK (the LANGUAGE SELECT menuappears).
4. Press the down arrow button until the desired languageis selected, then press OK.
5. When finished, press MENU to exit.
Auto Channel SearchBefore you can watch channels through the VCR, you mustset the type of signal you have (cable or TV) and search forall available channels.
1. Make sure the remote is in VCR mode by pressing the VCRbutton.
2. Press MENU to display the VCR SETUP MENU.
3. Press the down arrow button until CHANNEL SET ishighlighted, and press OK (the CHANNEL SET menuappears).
4. AUTO CHANNEL SEARCH is already highlighted, so pressOK.
CHANNEL SET
Auto Channel SearchAdd/Remove ChannelsSignal Type: CABLECable Box SetupChannel Change: CH3
Move: Select:End: MENU
OK
DRC6200N.01 Connections 7/28/03, 9:30 AM10

Chapter 1 11
Connections and Setup
A screen appears asking what kind of signal you have connected (Cable, Antenna, or DetectAutomatically). Press the down arrow button to choose the signal type, and press OK (auto channelsearch starts). This may take several seconds.
When finished, your available channels appear. To add or delete any channels, see page 31.
CABLE BOX SETUP
On what channel does the VCR receive signalsfrom the cable box?
- -
(usually 3, 4, or Video)
Enter 01-13 or INPUT
Press MENU to cancel
CLOCK SET
Time and Date SetAuto DST : ON
Move: Select:End: MENU
OK
Cable Box SetupThis setup applies only when all channels are receivedthrough a cable box. In this case, the VCR will default to thechannel used to view cable box programming during timerrecordings.
1. Make sure the remote is in VCR mode by pressing the VCRbutton.
2. Press MENU to display the VCR SETUP MENU.
3. Press the down arrow button until CHANNEL SET ishighlighted, and press OK (the CHANNEL SET menuappears).
4. Press the down arrow button until Cable Box Setup ishighlighted, and press OK (the CABLE BOX SETUP menuappears).
5. Enter the output channel of the cable box (usually 03 or04), or if A/V jacks connect the VCR to the cable box,press the INPUT button on the VCR’s remote control.
Clock Set
Time and Date SetTime and Date Set allows you to manually set the VCR’s timeand date information.
1. Make sure the remote is in VCR mode by pressing the VCRbutton.
2. Press MENU to display the VCR SETUP MENU.
3. CLOCK SET is already highlighted, so press OK (the CLOCKSET menu appears).
4. Use the number buttons on the remote to enter theinformation — you must press 0 before single digits (forexample, 08/17/03 for August 17th, 2003). To move tothe next entry, press the right arrow button. To change asetting, press the up or down arrow button.
Auto DST (Daylight Savings Time)Adjust this setting to allow for daylight savings time (DST).
If you choose OK, the VCR sets the clock using any DSTinformation broadcast in the channel’s signal.
Note: All additional VCR menu items are explained in Chapter 4.
DRC6200N.01 Connections 7/28/03, 9:31 AM11

12 Chapter 1
Connections and Setup
Next StepsThis chapter is dedicated to connecting your DVD/VCR. Before you start playingdiscs, you might want to get familiar with the remote control — Chapter 2 hasdetails.
If you want to skip straight to playing discs, go to Chapter 3 (page 16). It explainsplayback features of DVDs, Audio CDs, Video CDs, discs that contain MP3 files.
The VCR features are described in Chapter 4, including how to record and set upthe VCR (page 26). The DVD/VCR’s menu system is outlined in Chapter 5 (page 35),and Chapter 6 contains troubleshooting assistance, your Limited Warranty, andadditional information about your DVD/VCR.
What to Expect
DVD and VCR ModesAs you familiarize yourself with this product, keep in mind that you need to tellthe remote which part of the unit you want to operate — the DVD part of the unitor the VCR part. To operate the DVD part of the DVD/VCR, press the DVD button onthe remote. To operate the VCR part, press the VCR button. (You can also changemodes on the front of the unit by pressing the DVD/VCR button.)
Menu SystemsSince this product combines a DVD player with a VCR, the menu systems areseparate. The settings in one menu system don’t affect the other. For example, youhave to set the menu language for the VCR menu and then set the language forthe DVD menu.
User’s GuideIn this user’s guide, the product is generally referred to as a DVD/VCR. You mightsee features referenced separately as DVD or VCR features, or you might see themcombined, depending on the feature.
DRC6200N.01 Connections 7/28/03, 9:31 AM12

Chapter 2 13Graphics contained within this publication are for representation only.
Chapter 2: Using the Remote Control
Button Descriptions for DVD and VCR ModesIn addition to operating your DVD/VCR, the remote that came with it will operate most RCA, GE, andProscan TVs. However, this section only describes the buttons on the remote that you will use with yourDVD/VCR.
For descriptions of remote control buttons to be used with your TV (RCA, GE, and Proscan only), go tothe next page.
DVD and VCR function buttons listed alphabetically(0-9) Number buttons Use to input information such aschapter numbers, track numbers, or to make selections onsome menu screens. In VCR mode, enter channel numbers.
AGAIN Quick reverse - replays the last few seconds of a DVDmovie.
ANGLE Accesses the Camera Angle icon of DVD disc InfoDisplay.
Arrow buttons Use the arrows to navigate through themenu screens and make selections.
AUDIO Accesses the Audio icon in the Info Display thatenables you to play a disc in a different language.
CH+/- In VCR mode, selects next higher or lower channel inthe channel list and adjusts tracking. In DVD mode, selectsthe next/preceding chapter or track when playing a disc.
CLEAR Removes on-screen menus and displays or clearsmenus. In VCR mode, resets the time counter.
DVD Turns on the DVD/VCR and puts the remote in DVDmode. Likewise, you can change to the VCR mode by pressingthe VCR button.
FORWARD Fast forwards the tape when the VCR is in stopmode. In DVD and VCR mode, searches forward if pressedduring playback. In DVD mode, during play-pause mode, thisbutton starts slow-motion advance and each press of thebutton during slow-motion advance increases the speedincrementally.
GO BACK/RETURN Goes back to the previous menu.
INFO Shows the status displays on screen of your RCA, GE, orProscan TV, or DVD/VCR (whichever component the remote isset to control). Displays the on-screen Info Display whenplaying DVD discs.
INPUT In VCR or TV mode, selects between the Video InputChannels and the tuner. Video Input Channel refers to thesignal coming from the component connected to audio/video input jacks on the DVD/VCR or TV.
ON• OFF
MUTE
G O B A C K
RETURN
INPUT PLAY MODE
TV• VCR
1 2 3
4 5 6
7 8
0
9
VOL CH
VCR TV
DVD
MENUCLEAR
INFO
ANGLE
TITLE
GUIDE
AUDIO
LOC K
SUBTITLE
TIMER
REVERSE PLAY FORWARD
PAUSESTOPRECORD
AGAIN
SPE ED
OPEN• CLOSEZO OM
SEARCH
DRC6200N.02 Remote 7/28/03, 9:31 AM13

14 Chapter 2
Using the Remote Control
LOCK Locks the buttons on the front of the unit.
MENU Displays the on-screen menu system. (To see the VCR Main menu, press VCR and then MENU. Tosee the DVD Main menu, press DVD and then MENU).
OK Selects the setting or menu that is highlighted.
ON•OFF Turns DVD/VCR on or off.
OPEN•CLOSE In DVD mode, opens and closes disc tray. In VCR mode, ejects a tape.
PAUSE Pauses playback or recording modes (in VCR mode). Press PAUSE again to return to activeplayback or recording.
PLAY Plays a tape or DVD disc.
PLAY MODE In DVD mode, accesses Play Mode icon in the Info Display.
RECORD In VCR mode, starts record mode on tapes with the safety tab intact. Press repeatedly to seta recording duration for the Express Recording feature.
REVERSE Rewinds the tape when the VCR is in stop mode. In DVD and VCR mode, searches backwardthrough a tape or disc during playback mode. In DVD mode, starts slow motion playback during play-pause mode with each press of the button decreasing the slow-motion speed.
SEARCH In VCR mode, accesses Index search feature.
SPEED In VCR mode, selects tape speed.
STOP Stops the current DVD/VCR function (record, playback, rewind, etc).
SUBTITLE In DVD mode, accesses the Subtitle part of the on-screen Info Display, and turns Subtitles onand off (if subtitles are available on the disc you are playing).
TIMER In VCR mode, accesses the timer recording menu.
TITLE/GUIDE In DVD mode, accesses the DVD disc guide (if available).
TV•VCR Functions as a TV/VCR button in VCR mode.
VCR Turns on the DVD/VCR and puts the remote control in VCR mode. Likewise, you can change toDVD mode by pressing the DVD button.
ZOOM In DVD mode, enlarges the image on the screen so you can zoom in on details. To panhorizontally and vertically while you’re zooming, press the arrow buttons on the remote.
Button description for TV function buttonsThis remote operates most TVs that carry the RCA, GE, or Proscan brand. The following list (inalphabetical order) provides basic information about how these buttons will operate when in TV mode.
(0-9) Number buttons Enter channel numbers.
CH +/- Changes channels.
GO BACK/RETURN Goes back to the last channel the TV was tuned to.
GUIDE Accesses the GUIDE Plus+ programming guide if the TV has that feature.
INPUT Tunes to the TV’s Video Input Channel(s). For more information about Video Input Channels, goto page 55.
DRC6200N.02 Remote 7/28/03, 9:31 AM14

Chapter 2 15
Using the Remote Control
Use the arrow buttons tohighlight on-screen options.Use the OK button to selectan option that ishighlighted.
MUTE Lowers the volume to minimum level. Press again to restore volume.
ON•OFF Turns off a compatible RCA, GE, or Proscan TV.
TV Turns on a compatible RCA, GE, or Proscan TV and puts the remote in TV mode.
VOL +/- buttons Decreases and increases volume level.
Using the INPUT ButtonUse the INPUT button to scroll through the available Video Input Channels (LINE1 and LINE2) andregular broadcast signals. The Video Input Channels allow you to view images from a device connectedto the DVD/VCR (like a camcorder).
1. Make sure the component you want to view is turned on.
2. Press the remote control’s VCR button to enter VCR mode. Make sure that the DVD/VCR is turnedON.
3. Press the remote control’s INPUT button to tune to the Video Input Channel. LINE1 represents therear A/V jacks and LINE2 represents the front A/V jacks).
ON• OFF
MUTE
G O B A C K
RETURN
INPUT PLAY MODE
TV• VCR
1 2 3
4 5 6
7 8
0
9
VOL CH
VCR TV
DVD
MENUCLEAR
INFO
ANGLE
TITLE
GUIDE
AUDIO
LOC K
SUBTITLE
TIMER
REVERSE PLAY FORWARD
PAUSESTOPRECORD
AGAIN
SPE ED
OPEN• CLOSEZO OM
SEARCH
4. Turn on your TV and tune it to the correct Video InputChannel.
• If you used a coaxial cable to connect your DVD/VCRto your TV, tune the TV to channel 3. Your TV must beset to channel 3 the first time you set up the DVD/VCR. See page 32 for instructions on how to changethe output channel once you have started setup.
• If you used audio/video cables to connect your DVD/VCR, tune the TV to its Video Input Channel (see page55 for help).
5. To tune back to the broadcast signal you were previouslywatching through the DVD/VCR, press the INPUT buttonagain.
Using the remote to Navigate through On-ScreenMenusNo matter which on-screen display you’re using (the DVDplayer’s menu, the Info Display that appears during playback,the VCR Main menu, or a disc’s menu), you’ll use the samebuttons on the remote control to move through the on-screen display: the four arrow buttons and the OK button.Use the arrow buttons on the remote to move through on-screen menus in the direction of the arrow button (to goright, press the right arrow button; to move left, press theleft arrow button, etc.). The arrow buttons are used tohighlight an option. Once highlighted, press the OK buttonto select that menu option.
Arrowbuttons
OKbutton
DRC6200N.02 Remote 7/28/03, 9:31 AM15

16 Chapter 3Graphics contained within this publication are for representation only.
Chapter 3: Playing Discs
Regional CodingBoth the DVD/VCR and the discs are coded by region. Theseregional codes must match in order for the disc to play. Ifthe codes don’t match, the disc won’t play. This player’s codeis region 1.
ALL means all regions. Other regions are: 2: Europe, theMiddle East, Rep. of South Africa, Japan - 3: SoutheastAsia,Taiwan - 4: Central America, South America, Australia,Mexico, New Zealand - 5: Russian Federation, Africa (exceptEgypt and Rep. of South Africa), India, Pakistan - 6: China.
Using Different MenusEach disc is programmed with different features. There arethree separate types of menus that you can use to accessfeatures:
• The Disc menu – The Disc menu is part of each disc andis separate from the DVD player’s menu. The contents ofeach Disc menu vary according to how the disc wasauthored and what features are included.
The Disc menu is turned on and off (while the disc isplaying) with the MENU button on the remote.
• The DVD player’s Info Display – The Info Display appearsas icons across the top of the screen when a disc isplaying. It can only be accessed while you are playing adisc. It’s turned on and off with the INFO button on theremote.
• The DVD player menu – The DVD player’s menu system isaccessed only when a disc isn’t playing. It appearsautomatically when you press STOP and then MENU onthe remote.
Remember: A feature will only work if the disc wasprogrammed with that feature. For example, if you choosesubtitles on the Info Display, the subtitles will only appear ifthe disc was created with subtitles. If a menu or icon is“grayed out” it means that item (or feature) isn’t available.
This DVD player is capable of playing thefollowing types of discs: DVDs, audio CDs,Video CDs, CDs with mp3 files, WMA files(Windows Media Audio), and CDs withJPEG files on them. Before you put a discin the player, make sure it is compatible.
You can’t play the following types ofdiscs: Laserdiscs, CD-I, CD-ROM(computer-only discs), DVD-ROM, discsrecorded using other broadcast standards(i.e. PAL or SECAM), or CD-G discs.
Note: Some discs may not becompatible due to laser pickup and discdesign.
DVD+Rewritable
DRC6200N.03 Playing Discs 7/28/03, 9:31 AM16

Chapter 3 17
Playing Discs
To Load and Play a DVD DiscTurn on the TV and your DVD/VCR (press ON•OFF on theremote or press the Power button on the DVD/VCR).
1. If necessary, tune the TV to its Video Input Channel (ifyou need more information, go to page 55).
2. Press the OPEN•CLOSE button (the disc tray opens).
3. Place a disc gently into the tray with the disc’s labelfacing up (double-sided discs have content on bothsides, so you can place either side up).
4. Press the OPEN•CLOSE or PLAY button. The disc traycloses. The DVD/VCR reads the disc’s table of contents,and then one of three things happens depending on howthe disc was programmed:
• The disc starts playing.
• The disc menu appears on the screen. One of theoptions will start disc play. Highlight that option andpress OK.
When you stop playing a disc, the player remembers whereyou stopped. When you start playing the disc again, theDVD/VCR picks up where you left off unless the disc isremoved or the unit is unplugged, or if you press the STOPbutton twice.
Can't Catch UpCan't Catch Up
Can'
tCat
ch
Up (Widescreen Version)
This is an exampleof a one-sided disc.
This is an example ofa two-sided disc –the title is usually inthe center of thedisc.
Search OptionsTo search a disc, you can use the FORWARD button or the REVERSE button. You can also utilize thefollowing search features:
Picture ScanWhen you’re playing a disc, each time you press FORWARD or REVERSE, your DVD/VCR scans the discfaster until you reach the fastest scan speed. To resume normal playback, press PLAY.
Freeze Frame and Frame AdvanceWhile a disc is playing, press PAUSE to freeze the picture. To advance one frame at a time, press PAUSEagain (the on-screen icon changes from PAUSE to FRAME). Each time you press the FORWARD orREVERSE button, the picture goes to the next (or previous) frame. To resume normal playback, pressPLAY.
Note: If you pause a DVD disc or VCD disc for a long period of time, the video will disappear from the screen. Pressany button on the remote to revert to the place on the disc where you paused playback.
DRC6200N.03 Playing Discs 7/28/03, 9:31 AM17

18 Chapter 3
Playing Discs
Slow Motion (in Freeze Frame Mode)While a disc is playing, press PAUSE. Press REVERSE or FORWARD (each time you press REVERSE orFORWARD the slow motion will get even slower until you reach the slowest speed). To resume normalplayback, press PLAY.
Playback OptionsMany of your DVD/VCR’s playback features are accessed through the Info Display (described on pages19 through 23). Additionally, with some discs you can access playback features directly from theremote control.
Chapter AdvanceWhile a disc is playing, you can skip forward or backward a chapter or track at a time by pressing theCH+ and/or CH- buttons (also labeled and ).
Zoom1. While you’re playing a disc, press ZOOM (the player zooms in on the image). Each time you press
ZOOM, the picture is magnified even more (until you get to the maximum zoom level). To resumenormal playback, press PLAY.
2. To see other parts of the picture when you’ve zoomed in on the image, press the up, down, left,and/or right arrow buttons. This feature is called pan and scan.
DRC6200N.03 Playing Discs 7/28/03, 9:31 AM18

Chapter 3 19
Playing Discs
Using the On-Screen Info DisplayThe Info Display appears when you press the INFO button on the remote while you’re playing a disc.Use the up and down arrow buttons to highlight different icons. Once an icon is highlighted, followthe on-screen instructions, and use the left and right buttons on the remote to scroll through theoptions.
You can only access the Info Display when you’re playing a disc. Also, the Info Display features are onlyavailable if the disc was created with that particular feature.
The invalid symbol appears on the screen when you press a button that doesn’t have anyfunction. To make the Info Display disappear from the screen, press INFO on the remote.
Time display
Title
Chapter
Subtitles
AudioRepeat Mode
Angle
DVD Disc Info Display
Audio CD Info Display
Video CD (VCD) Disc Info Display
T
C
DISPLAYDISPLAY
0 0 1 / 0 0 3
0 0 1 / 0 2 3
0 0 : 0 1 : 0 3
0 1 / 0 3 E N G
0 1 / 0 3 E N G
O F F
0 1 / 0 4
T
DISPLAYDISPLAY
0 0 1 / 0 0 3
0 0 : 0 1 : 0 3
O F F
Time display
Track
Repeat Mode
T
C
DISPLAYDISPLAY
0 0 1 / 0 0 3
0 0 : 0 1 : 0 3
O F F
O F F
Time display
Title
Repeat Mode
PBC (Playback Control)
DRC6200N.03 Playing Discs 7/28/03, 9:31 AM19

20 Chapter 3
Playing Discs
HourMinutes
Seconds
How to Navigate the Info DisplayTo access the Info Display, press the INFO button on theremote while you’re playing a disc.
Use the up and down arrow buttons on the remote tohighlight different icons. Once an icon is highlighted, followthe on-screen instructions, and use the left or right arrowbuttons to scroll through options.
Time Display (all Info Displays)This feature displays the time that has elapsed duringplayback. For DVD discs, the time displayed refers to thecurrent title and acts as a Time Search feature. You can skipright to any scene.
Highlight the Time Display icon, and use the numberbuttons on the remote to enter the elapsed time youwant to go to. You must use two digits for each field. Forexample, if you enter 01:35:12, playback will start 1hour, 35 minutes, and 12 seconds into the title.
Note: For Audio CDs, the time displayed refers to the track that’splaying.
Title/Track Icon (all Info Displays)Some DVD discs contain more than one title. Each title isdivided into chapters. CDs are divided into separate tracks.To select a title/track:
Highlight the Title/Track icon, and use the numberbuttons on the remote to enter the title number (or tracknumber), and press OK, or press the left or right arrowbuttons to scroll through the titles/tracks.
Note: Many discs only have one title.
Chapter Icon (DVD Info Display)A title can be divided into individual chapters (similar totracks on a CD). To skip to a specific chapter:
Highlight the Chapter icon, and use the number buttonson the remote to enter the chapter number and pressOK, or press the left or right arrow buttons to scrollthrough the chapters.
Note: The Chapter feature won’t work if the disc isn’t formattedwith separate chapters.
Arrowbuttons
OKbutton
Shortcut
While you’re playing a disc, you canuse the CH +/- buttons to go to thenext chapter/ previous chapter.
T
C
DRC6200N.03 Playing Discs 7/28/03, 9:31 AM20
Chapter 3 21
Playing Discs
Subtitles Icon (DVD Info Display)By default, subtitles are off. To turn subtitles on:
Highlight the Subtitle icon, and press the left or rightarrow buttons to scroll through the available subtitlelanguages (the subtitle language options appear in thebox at the bottom of the Info Display), then press OK.
Notes:
Changing the subtitle language with the Info Display will onlyaffect the disc you are currently playing. When the disc isremoved or the player is turned off, the subtitle language willrevert to the language setting specified through the DVD player’smain menu.
If the disc doesn’t contain the language you want to use, thedisc’s default language is automatically selected.
Some discs are programmed to only allow you to access thesubtitle feature through the disc’s menu. During playback, pressMENU to access the disc’s menu.
Audio Language Icon (DVD Info Display)If the disc was created with different language tracks(recorded in different languages), you can change thelanguage while you’re playing the disc.
Highlight the Audio icon, and press the left or rightarrow buttons to scroll through the available languages,then press OK.
Notes:
The language feature only works if the disc was created withmultiple language tracks. If the disc doesn’t contain the languageyou selected, the disc will play in the default language.
When you choose an audio language during disc playback, youonly override the audio language setting in the DVD Player’s mainmenu temporarily.
The audio language can also be changed through the DVD playermenu.
Shortcut
Press the AUDIO button, while the disc isplaying.
DRC6200N.03 Playing Discs 7/28/03, 9:31 AM21
22 Chapter 3
Playing Discs
Play ModeThe Play Mode options available depend upon the type ofdisc you’re playing. The default play mode (standard play)plays the disc’s contents in the order in which the disc wascreated (i.e., track 1 plays first, followed by track 2, etc.).
Play Mode OptionsRepeat: DVDs, Audio CDs, VCDs and mp3s.
Random Play: Audio CDs and mp3s (tracks play in random order).
Program Play: DVDs, Audio CDs and VCDs (create your own playlist by defining the order of the tracks— page 23.)
RepeatThe options available depend upon the type of disc you’re playing.
• With DVD discs you can repeat the title, chapter, or use AB repeat.
• With Audio CDs you can repeat the disc, a track, or create a program that plays repeatedly.
• With mp3s you can repeat the disc or a track.
Repeating Discs, Titles, Chapters, or TracksWhile a disc is playing, press the PLAY MODE button to toggle through the available play mode options.
To return to normal play, press PLAY MODE repeatedly until OFF appears.
AB RepeatAB Repeat lets you define a specific segment on the disc that you want to repeat. For example, youmight want to watch the dogfight in the movie Top Gun. To watch this scene over and over:
1. While a disc is playing, press PLAY MODE repeatedly until A? appears. Press OK when the disc getsto the beginning point of the segment (the A point) that you want to repeat.
2. Allow the disc to play to the end of the segment you want to repeat. Don’t fast forward — youmust let the disc play in standard playback mode to set the B point (the ending point of thesegment). Press OK to set the B point (the segment you marked will play repeatedly until you turnoff the Repeat feature).
3. To turn off the Repeat feature, press PLAY MODE repeatedly until OFF appears.Note: Repeat is also cancelled when you eject the disc.
DRC6200N.03 Playing Discs 7/28/03, 9:31 AM22

Chapter 3 23
Playing Discs
Random (Audio CD and mp3)1. While a disc is playing, press PLAY MODE repeatedly until RANDOM appears (the tracks start playing
in random order).
To switch back to Standard Playback, press PLAY MODE repeatedly until OFF appears.Note: The player defaults to Standard Playback whenever you put a new CD into the DVD player.
Program Play (DVD and Audio CD Info Displays)This feature allows you to set a playlist according to theorder you want to play chapters or tracks on DVDs or CDs.
1. While a disc is playing, press PLAY MODE repeatedly untilthe PROGRAM menu appears.
2. Enter the chapter (or track) you want to play first.
3. Repeat step 2 until you’ve programmed all the chaptersor tracks you want to play.
4. Press PLAY to start program play.
• To change to the next or previous tracks in your playlist,use the CH +/- buttons.
• To stop program play, press PLAY MODE until OFFappears.
Changing the Camera Angle (DVD Info Display)Some discs contain multiple angles of a particular scene orsequence. If the disc only has one angle, this feature won’twork. Currently, very few discs have this feature.
1. While a disc is playing, press ANGLE on the remote. If thedisc wasn’t created with multiple angles, (the invalidsymbol) appears. If the disc contains multiple angles, theAngle icon appears with the current angle number andthe number of angles available. For example, 01/04indicates that Angle 1 is displayed and there are 4different angles available.
2. Press ANGLE repeatedly to toggle the available angles.
3. To resume normal playback, continuing pressing ANGLEuntil you get to the original camera angle.
PROGRAMPROGRAM
TRACK SEL.000 1-20
TRACK TRACK01 - - - - - 06 - - - - -02 - - - - - 07 - - - - - 03 - - - - - 08 - - - - -04 - - - - - 09 - - - - -05 - - - - - 10 - - - - -
PRG. PLAY: PLAY SELECT: OK EXIT:PLAY MODE
The audio CD PROGRAM menu.
DRC6200N.03 Playing Discs 7/28/03, 9:31 AM23

24 Chapter 3
Playing Discs
Example of folder list.
PBC - Playback Control (Video CD Info Display)Playback Control functions allow you to interact with thesystem via menus, search functions, or other typicalcomputerlike operations. Moreover, still pictures of highresolution can be played if they are included on the disc.
1. While the Video CD is playing, press INFO (the InfoDisplay appears).
2. Highlight the PBC icon. Press the left and right arrowbuttons to toggle between on and off.
Playing mp3 and WMA music files and displaying JPEG filesmp3 is an audio file format which compresses recorded music. It was developed by FraunhoferGesellschaft in collaboration with Thomson Inc. The main advantage of the mp3 format is that it meansCD-quality music tracks can be stored on a personal computer in user-friendly, compressed files.
WMA (Windows Media Audio) is another audio file format developed by Microsoft.
JPEG files are image files.Note: The time taken for the contents of the disc to be displayed varies according to the size and number of JPEGfiles actually on the disc. If nothing is displayed after a few minutes, it is likely that certain files are too large. Tryreducing the files’ resolution and write another disc.
Displaying JPEG files or playing mp3 or WMA filesBefore inserting a disc, check that it is compatible with the player.
1. Open the tray by pressing the OPEN•CLOSE button.
2. Place the disc with the printed side facing up.
FILTER MP3 ONLYREPEAT TRACK
00:00 / 00:00 ❑���� OK MENU
..DIR--01
DIR--02
DIR--03
DISC:3. Select a folder using the up and down arrow buttons on
the remote control, then press OK to display the list offiles or press PLAY to start playing all the files containedin the folder.
• To change the FILTER, or sort mode (MP3 only, JPGonly, MP3 and JPG, or MIXED), press the rightarrow button to highlight the current FILTERsetting, and then press OK to toggle the availablesort methods.
• To change the REPEAT mode, press the right arrowbutton to highlight the current REPEAT mode, andthen press OK to toggle the available modes.
• To return to the folder and files lists at the top ofthe screen, press the left arrow button.
4. Select a file using the arrow buttons, then press PLAY tostart playback.
DRC6200N.03 Playing Discs 7/28/03, 9:31 AM24

Chapter 3 25
Playing Discs
• mp3 or WMA file: the player begins by playing the selected file, then all the files andsubfolders contained in the same folder. The player then plays the contents of the folders atthe same level as the folder containing the file selected at the start.
Note: While listening you can use the or buttons to go back to the previous track or go on to the next oneand press the MENU button to display the disc’s contents.
• JPEG file: the player starts the slide show with the JPEG file you have selected and proceedsto display all the JPEG files in the same folder, then all the JPEG files in the subfolders locatedin the same folder.
Note: During the slide show you can use the ZOOM button to magnify the picture, the or buttons to goback to the previous picture or go on to the next one and the MENU button to interrupt the slide show and displaythe disc’s contents.
5. Press the INFO button to display the Info menu during playback.
• mp3 file: press the PLAY MODE repeatedly to select a playback mode (standard, random, repeat).
6. When the player has played all the files the music or slide show stops and the disc’s contentsappear.
7. Press STOP to end playback.
DRC6200N.03 Playing Discs 7/28/03, 9:31 AM25

26 Chapter 4Graphics contained within this publication are for representation only.
Chapter 4: VCR Features
VCR BasicsOnce your initial settings are complete, you can begin using your DVD/VCR. In order to begin, you mustfirst understand some basic concepts.
Playing a tape1. Tune the TV to your DVD/VCR viewing channel (03, 04, or the Video Input Channel).
2. Insert a tape in the DVD/VCR.
• Press FORWARD or REVERSE to cue the tape to the desired position during Play mode.
• To advance the tape 30 seconds at a time during Play mode, press the SEARCH button on theremote control (each time you press SEARCH, 30 seconds is added to the amount of tape thatis scanned — up to 5 minutes).
• Press PLAY (if necessary) to begin tape play.
• Press PAUSE to stop action. For slow-motion playback, press FORWARD and/or REVERSE (whilepicture is paused). To move one frame at a time, press FORWARD on the remote (whilepaused).
• Press CHANNEL +/- (or CH +/- on the remote) to remove any streaks from the picture, ifnecessary.
• Press STOP to stop playback.
Automatic RewindThe DVD/VCR automatically rewinds the tape if it reaches the end of the tape during playback. Whilerewinding, you can press the ON•OFF button (the DVD/VCR will turn off after it rewinds the tape). Ifthe tape has no safety tab, it will be ejected.
Tape EjectPress the EJECT button on the DVD/VCR when stopped to eject the tape. You can also press and holdthe OPEN•CLOSE button on the remote control for three seconds.
Basic Recording1. Set the tape speed by pressing the SPEED button on the remote control.
2. Press the RECORD button to begin recording.
3. Press the STOP button to halt recording.
If you just want to pause the recording for a short time (like during a commercial), press PAUSEinstead of STOP.
Safety Tab
Check the Safety TabMake sure there is a tape in the DVD/VCR with its safety tabin place. You cannot record on a tape if the safety tab hasbeen removed. If the safety tab is removed and you want torecord, simply cover the hole with adhesive tape.
DRC6200N.04 VCR Features 7/28/03, 9:31 AM26

Chapter 4 27
VCR Features
Recording FeaturesYour DVD/VCR provides many ways to record programming. Basic recording is explained in detail onpage 26. The following recording techniques are also available.
• Recording – lets you press one button to record a program.
• Express Recording (XPR) – allows recording to start while a program is being watched. This featureautomatically stops recording after a designated period of time.
• Timer Recording – program the DVD/VCR for a daily, weekly, or one-time recording which willautomatically start and stop at the times you set.
Express Recording (XPR)Use XPR to quickly record the remaining portion of a program being watched. XPR is a great way tocapture the end of a sporting event that has run into overtime or a live broadcast that runs long. XPRworks in 30-minute increments. You can capture the last 30, 60, 90, etc. minutes of programming(depending on tape length), up to 9 hours total.
To Activate XPR:1. Turn on the DVD/VCR and tune it to the channel with the desired programming.
2. Insert a tape with its safety tab in place into the DVD/VCR. Make sure it is cued to record at theproper starting point.
Note: To override the preferred tape speed setting, press the SPEED button on the remote control repeatedly totoggle between SP and SLP choices.
3. Press the RECORD to start recording.
4. Repeatedly press RECORD to set up the recording duration.
• Press RECORD until RECORD TIME 0:00 appears.
• Each time you press the RECORD button, 30 minutes is added.
• The DVD/VCR automatically turns off after it has recorded the set amount of time.
• To stop an XPR recording, press and hold STOP for several seconds until STOP appears on thescreen.
Timer RecordingYou can set up to 8 different TV programs to be recorded. Before a Timer Recording will work, the VCRneeds to be set up correctly.
• VCR’s clock must be set correctly.
• If you’ve set up the VCR for a cable box for all channels, the output of your cable box appears inthe channel item of the Timer Recordings menu.
• PROGRAMS OVERLAP appears if two programs whose times overlap are entered.
• The timer indicator appears in the display when you turn off the VCR and a timer recording hasbeen set. The timer indicator flashes if there is no tape in the VCR when a timer recording has beenset and the unit is turned off.
• For a cable box or satellite receiver, turn it on and tune it to the channel you want to record beforethe recording is to begin.
• Insert a tape with its safety tab in place and enough tape to record the program.
DRC6200N.04 VCR Features 7/28/03, 9:31 AM27

28 Chapter 4
VCR Features
To Set Up as Many as Eight Timer Recording Programs:
1. Press the MENU button to display the VCR SETUP MENU.
2. Press the down arrow button until TIMER RECORDINGSis highlighted, and press OK (the TIMER RECORDINGSmenu appears).
3. Make a New Program is already be highlighted, so justpress OK ( a screen appears asking how often you wantto record).
4. Select how often you want the program to record.
5. Enter the data for the program with the numberbuttons. To move to the next entry, press the right arrowbutton. To change a setting, press the up or down arrowbutton.
The data includes the channel number, and start and endtimes (including AM or PM), and the recording speed.
6. Review the information to make sure it is correct.
7. Press the MENU button to save.
Stopping a Timer RecordingTo stop or cancel a timer recording in progress (even anExpress Recording):
Press and hold the STOP button for several seconds untilSTOP appears in the on-screen display.
Reviewing and Clearing ProgramsTo review programs that you have already set up:
1. Press the MENU button to display the VCR SETUP MENU.
2. Press the down arrow button until TIMER RECORDINGSis highlighted, and press OK (the TIMER RECORDINGSmenu appears).
3. Press the down arrow button until Review/ CancelPrograms is highlighted, and press OK (the PROGRAMmenu appears).
3. Press the down arrow button to choose the programnumber you want to check or clear (1-8).
To erase, press CLEAR.
TIMER RECORDINGS
Make a New ProgramReview/Cancel Programs
Move: Select:End: SETUP
ENTER
How often do you wantto record program?
One TimeDaily (Sun-Sat)Weekdays (Mon-Fri)Weekly (Once a Week)
Move: Select:End: MENU
OK
PROGRAM 1 has been saved.
For program recording,insert a cassette.
To leave your cable boxon and tuned to presetchannel.
PROGRAM1 (ONE TIME)
Channel 104 CableStart Date 06 / 04 Start Time 10 : 10 AMEnd Time 11 : 10 AMTape Speed SP
Move: Input:Video: End: MENUINPUT
DRC6200N.04 VCR Features 7/28/03, 9:31 AM28

Chapter 4 29
VCR Features
Time CounterThe time counter shows the actual time used when recording or playing a tape. The time counter helpslocate the beginning or end of recorded events. It resets to 0:00:00 whenever a tape is ejected fromthe DVD/VCR.
For example, if you record a 30–minute program at the beginning of a tape, rewind it, and then wantto go to the end of the first program to start another recording:
1. Press the INFO button twice to display only the timecounter.
2. Press the CLEAR button to reset the time counter to0:00:00.
3. Press the remote control’s FORWARD button to advancea tape until the time counter reads 0:30:00.
4. Press the STOP button. This is the approximate end of a30-minute program (you may want to press the PLAYbutton to verify). When the tape is cued correctly, youcan begin recording.
5. Press the INFO button to remove the time counter fromthe screen and return to the normal display mode.
0:30:00
Minutes
Seconds
Hours
1. Press the INFO button to show the on-screen displays.The current time is also displayed in the VCR’s frontpanel.
Info DisplayTo find out the status of the VCR, press the INFO button on the remote control. Each time you pressINFO, different information appears on the screen. See the following examples.
Note: The date and time must be set before they can be displayed.
0:30:00
2
Time counter only (does not time out)
STOP0:30:00
CH 05
SLP
06/25/2003 WED 03:46PM
1
On-screen display (times out)
2. Press INFO again to have only the time counter remainon the screen. The time counter is also displayed in theVCR’s front panel for a short time.
continued on next page
DRC6200N.04 VCR Features 7/28/03, 9:31 AM29

30 Chapter 4
VCR Features
Explanation of the Menu SystemThe on-screen menus you saw the first time you turned onyour VCR were explained in Chapter 1. This chapter listsother menus that you can access through the VCR MAINMENU (press MENU on the remote control). Some menushave on-screen instructions for more complicated settings.
Clock Set
Time and Date SetTime and Date Set allows you to manually set the VCR’s timeand date information. When the CLOCK SET menu is on thescreen, use the number buttons on the remote to enter theinformation — you must press 0 before single digits (forexample, 08/17/03 for August 17th, 2003). To move to thenext entry, press the right arrow button. To change a setting,press the up or down arrow button.
Displaying Time and Date
Pressing the INFO button on the remotecontrol displays the time and date onscreen temporarily.
SETUP
CLOCK SETTIMER RECORDINGSCHANNEL SETFUNCTIONSLANGUAGE SELECT
Move: Select:End: MENU
OK
CLOCK SET
Time and Date SetAuto DST : ON
Move: Select:End: MENU
OK
3. Press INFO again to have no displays appear on the TVscreen. The time counter remains in the VCR’s displaypanel. This is useful for dubbing tapes.
4. Press the INFO button again to return to the normaldisplay. The current time is displayed in the VCR’s displaypanel.
Note: Turning off the DVD/VCR also resets the displays.
No displays will appear (usefulfor dubbing)
Pro-Tect Plus™ Locking FeatureTo disable DVD/VCR usage or to protect set timer recordings, the unit can be locked so that the buttonson the front of the unit or remote control don’t work.
• To Lock: Press and hold the remote control’s ON•OFF button until LOCK appears on the front of theDVD/VCR. LOCK flashes if a button is pressed while the unit is locked.
• To Unlock: Press and hold the remote control’s ON•OFF button until LOCK stops flashing on thefront of the unit. This is the only way to unlock the DVD/VCR.
DRC6200N.04 VCR Features 7/28/03, 9:31 AM30

Chapter 4 31
VCR Features
CHANNEL SET
Auto Channel SearchAdd/Remove ChannelsSignal Type: CABLECable Box SetupChannel Change: CH3
Move: Select:End: MENU
OK
Auto DST (Daylight Savings Time)Adjust this setting to allow for daylight savings time (DST).
If you choose OK, the VCR sets the clock using any DST information broadcast in the channel’s signal.
Timer RecordingsThe Timer Recordings feature programs the VCR to record automatically. This feature is explained indetail on page 27.
Channel SetChannel Set tells the VCR where to find channels and storesthem in the VCR’s channel list.
Auto Channel SearchUse Auto Channel Search to place all available channels inmemory.
If you ever change cable or antenna signals, you may needto run the Auto Channel Search feature again.
Select one of the three options:
Cable TV searches for cable stations.
Antenna searches for local broadcast stations.
Detect Automatically selects the appropriate inputautomatically.
Note: With Detect Automatically, a strong cable or antenna signalin your area may cause channels to be detected inaccurately. Ifthis should happen, you will need to select either Cable TV orAntenna manually.
When scanning is complete, the VCR tunes to the lowestchannel available. After completing Auto Channel Search,press the remote control’s CH + or - buttons to select activechannels.
Add/Remove ChannelsYour VCR may come with a list of channels preset at the factory. Even though it may come with such alist, you may want to add or delete certain channels.
Note: If you use a cable box to view all channels, this step is not necessary.
To go to the channel you want to add or remove, use the up or down arrow buttons or enter a specificchannel number using the number buttons.
To remove a channel from the channel list, press the left arrow button. To add a channel to the channellist, press the right arrow button.
Note: To view active channels, use the remote control’s up and down arrow buttons. You can also access channelsthat aren’t available in the active channel list by using the remote control’s number buttons to enter the specificchannel number.
DRC6200N.04 VCR Features 7/28/03, 9:31 AM31

32 Chapter 4
VCR Features
FUNCTIONS
Auto Play: ONAuto TV/VCR: ONIndex SearchGo-To Search
Move: Select:End: MENU
OK
Set Auto Repeat
Signal TypeThis feature is useful if your cable signal goes out; it allows you to switch to a regular antenna foralternate television reception.
Press the OK button to toggle between Cable or Antenna until the correct signal type is shown.
CABLE BOX SETUP
On what channel does the VCR receive signalsfrom the cable box?
- -
(usually 3, 4, or Video)
Enter 01-13 or INPUT
Press MENU to cancel
Cable Box SetupThis setup applies only when all channels are receivedthrough a cable box. Cable box setup is explained in detailon page 11.
Channel Change (VCR Output Channel)Use this option to change the VCR’s output channel. Thedefault is channel 3. Press the OK button to toggle betweenCH3 or CH4. If you change the output channel to 4, youmust tune your TV to channel 4 to watch channels or play atape.
FunctionsThe settings in this menu let you customize your VCRfeatures.
Auto PlayWith Auto Play turned on (the factory default setting), theVCR automatically starts playback when you insert a tapewith its safety tab removed.
Auto TV/VCRAuto TV/VCR Controls whether the VCR’s TV/VCR settingchanges automatically to VCR-viewing mode when turnedon.
Note: Pressing the TV•VCR button on the remote control willswitch between VCR and TV-viewing modes. When in VCR-viewingmode, VCR is displayed on the front panel. The VCR indicator turnsoff when in TV-viewing mode.
DRC6200N.04 VCR Features 7/28/03, 9:31 AM32

Chapter 4 33
VCR Features
Index SearchThe VCR has a VHS Index Search System that automatically records index marks on the tape every timeyou start a recording. During playback you can locate the program you want to play by the number ofindex marks or by scanning. The VCR will search forward or reverse from the location you are at onthe tape.
To Activate Index Search:
1. While playing back, press the STOP button to stop thetape.
2. Press the MENU button to display the VCR SETUP MENU.
3. Press the down arrow button until FUNCTIONS ishighlighted, and press OK (the FUNCTIONS menuappears).
4. Press the down arrow button until Index Search ishighlighted, and press OK (the INDEX SEARCH screenappears).
5. If you want to search through a certain number of indexmarks, press two number buttons to enter the number ofmarks you want to search. Press the CLEAR button onthe remote control to correct an entry.
6. Press the FORWARD button to search forward or theREVERSE button to search in reverse. The VCR will locateyour index mark and begin playback. If you did not entera specific index number, the VCR will locate the nextindex mark and begin playback.
7. Press STOP to stop Index Search.
Notes: Certain index marks may be missed by the VCR including:
• Marks too close to the current location of the tape.
• Those at the beginning of a recording lasting five minutesor less.
• Index marks that start at the beginning of the tape.
INDEX SEARCH
Press REW or FFto begin searching
orEnter a specificindex number
- -
End: MENU
DRC6200N.04 VCR Features 7/28/03, 9:31 AM33

34 Chapter 4
VCR Features
Go-To SearchThe Go-To Search feature enables the VCR to quickly locate a counter reading anywhere on the tape.When the VCR locates the counter reading, it will begin playback.
To Activate Go-To Search:
1. While playing back, press the STOP button to stop thetape.
2. Press the MENU button to display the VCR SETUP MENU.
3. Press the down arrow button until FUNCTIONS ishighlighted, and press OK (the FUNCTIONS menuappears).
4. Press the down arrow button until Index Search ishighlighted, and press OK (the INDEX SEARCH screenappears).
Set Auto RepeatYou can set the DVD/VCR to play the same segment of atape over and over in a repeating loop.
The Set Auto Repeat menu will ask for a loop end time tobe specified. To turn off Set Auto Repeat, press theCLEAR button.
Language SelectSelect your preferred language to determine how the on-screen displays will appear. The language setting is explainedin detail on page 10.
GO-TO SEARCH
Current tape counter is
2 : 17 : 18
Press REW or FFto go to - : - - : 00
End: MENU
LANGUAGE SELECT
Select a language.
EnglishSpanishFrench
Move: Select:End: MENU
OK
DRC6200N.04 VCR Features 7/28/03, 9:31 AM34

Chapter 5 35Graphics contained within this publication are for representation only.
Chapter 5: DVD Menu System
The DVD Player Menu SystemThe DVD player menu system is not the same as the disc menu or the Info Display. The DVD playermenu comes up when there is no disc playing. If you are playing a disc, press STOP on the remotecontrol to stop playback and bring up the DVD player menu. If a screensaver is on the screen, press anybutton. (Remember that you have to put the remote in DVD mode by pressing the DVD button if it’s inVCR mode.)
Use the left and right arrow buttons on the remote to toggle the different menu. Then use the up anddown arrow buttons to highlight the menu items. Press OK to select a item that is highlighted.
Throughout the menu system, text appears at the bottom of the screen to explain what to do.
The first menu you see in the DVD Playermenu is the LANGUAGE menu.
OSD LANGUAGE ENGLISHENGLISH
AUDIO ENGLISH
SUBTITLE ENGLISH
DISC MENU ENGLISH
LANGUAGE VIDEO AUDIO OTHERS
MOVE : ���� SELECT: OK EXIT: MENU
Language MenuThe Languages menu enables you to set preferred languageoptions for:
• OSD Language (the DVD Player’s menu system)
• Audio (the dialogue of DVD titles)
• Subtitle
• Disc Menu
The way you choose languages is the same for each of theLanguage submenus.
1. With no disc playing, press MENU (the Languages menuappears).
2. Use the up or down arrow buttons to highlight theoption you want to change, and press OK (the optionchanges).
Notes:
Discs are created differently. The DVD player can’t override somelanguage preferences. If a disc’s software was created to play themovie (title) in a preferred language, the preference you set mightbe ignored.
Also, if the language isn’t available on the movie you’re playing,the disc’s default language will be chosen. You must turn on theSubtitle feature in order for them to appear when you’re playing adisc. If the disc wasn’t created with subtitles, you won’t be able touse the Subtitle feature.
If the disc wasn’t created with the Subtitle language you chose inthe Subtitles menu, the discs default subtitle language will bechosen.
DRC6200N.05 DVD Menu System 7/28/03, 9:31 AM35

36 Chapter 5
DVD Menu System
Video MenuThe VIDEO menu contains the settings that affect how adisc’s content looks on your TV.
TV AspectTV ASPECT adjusts the way a movie appears on your TV.Standard TVs are 4 x 3 format. Depending on the type oftelevision you have, you may want to adjust the screensetting (also called the aspect ratio).
1. With no disc playing, press MENU (the LANGUAGE menuappears).
2. Press the right arrow button until VIDEO is highlighted(the VIDEO menu appears).
3. TV ASPECT is highlighted, so press OK to toggle theavailable options. The options are explained below.
4:3 LB (4 x 3 Letterbox) – Choose this setting if you want tosee movies in their original aspect ratio (height-to-widthratio). You’ll see the entire frame of the movie, but it willtake up a smaller portion of the screen vertically. The moviemight appear with black bars at the top and bottom of thescreen.
TV ASPECT 4:3 LB4:3 LB
VIDEO OUT COMPONENT
SCAN MODE INTERLACED
LANGUAGE VIDEO AUDIO OTHERS
MOVE : ���� SELECT: OK EXIT: MENU
16:9 WIDE (16 x 9 Widescreen) – Choose this setting if yourDVD player is connected to a widescreen TV. If you choosethis setting and you don’t have a widescreen TV, the imageson the screen might appear distorted due to horizontalcompression. If you play a disc recorded in 4 x 3 format on awidescreen TV, the left and right sides of the screen willappear black.
DRC6200N.05 DVD Menu System 7/28/03, 9:31 AM36

Chapter 5 37
DVD Menu System
4:3 PS (4 x 3 Standard) – Choose this setting if you wantthe movie to fill the entire screen of your TV. This mightmean that parts of the picture (the left and right edges)won’t be seen. Most discs produced in a widescreen formatcan’t be cropped in this fashion. This means the black barswill appear at the top and the bottom of the screen.
Video OutThis setting allows you to change the video output mode between component video and S-Video.
1. From the VIDEO menu, press the down arrow button to highlight VIDEO OUT, then press OK totoggle the available options.
Note: If VIDEO OUT is set to S-Video, SCAN MODE is not available.
Scan ModeYou can change how the video signal is output to your TV as either progressive scan or interlaced.
1. From the VIDEO menu, press the down arrow button until SCAN MODE is highlighted, then press OKto toggle the available options.
Important: If you lose the picture signal when connected to your TV with component video cables, toggle theprogressive scan/interlace mode as mentioned above.
Note: If VIDEO OUT is set to S-Video, SCAN MODE is not available.
Audio MenuThe AUDIO menu lets you adjust the player’s settings tomatch the equipment you connected to your DVD/VCR, andto use the DVD player’s Sound features.
Digital OutIf you connected your DVD/VCR to a receiver via the DigitalAudio Out jacks (COAXIAL or OPTICAL) on the back of theplayer, this setting allows you to choose the correct outputsetting.
1. With no disc playing, press MENU (the LANGUAGE menuappears).
2. Press the right arrow button until AUDIO is highlighted(the AUDIO menu appears).
3. Press the down arrow button until DIGITAL OUT ishighlighted, and press OK to toggle the availableoptions.
DIGITAL OUT BITSTREAMBITSTREAM
DYNAMIC RANGE OFF
LANGUAGE VIDEO AUDIO OTHERS
MOVE : ���� SELECT: OK EXIT: MENU
3D OFF
DRC6200N.05 DVD Menu System 7/28/03, 9:31 AM37

38 Chapter 5
DVD Menu System
Dynamic RangeThe Dynamic Range feature compresses the dynamic range (quietest sound toloudest sound) of a disc’s soundtrack to even out the range of volume.
1. From the AUDIO menu, press the down arrow button until DYNAMIC RANGE ishighlighted, then press OK to toggle the available options.
Note: The performance of the Dynamic Range feature varies depending upon theequipment you have connected to your DVD/VCR and also the audio format of the discyou’re playing.
Others MenuYou can adjust some of the more advanced settings of yourDVD/VCR and set up ratings limits in order to control thetype of content that is available for viewing through theOTHERS menu.
OSD ONON
SCREEN SAVER ON
DEFAULTS RESET
PARENTAL 8 ADULT
LANGUAGE VIDEO AUDIO OTHERS
MOVE : ���� SELECT: OK EXIT: MENU
OSDThis feature lets you choose whether the on-screen displays (OSDs) (e.g. PLAY, PAUSE, etc.) appear whenaccessing certain functions of a disc.
1. With no disc playing, press MENU (the LANGUAGE menu appears).
2. Press the right arrow button until OTHERS is highlighted (the OTHERS menu appears).
3. OSD is already highlighted, so press OK to toggle the available options.
Screen SaverThe screen saver protects your TV from being damaged when images are on the screen too long. Thedefault is to have the screen saver on, which is recommended.
1. From the OTHERS menu, press the down arrow button until SCREEN SAVER is highlighted, thenpress OK to toggle it on or off.
DefaultsThis feature resets all settings to the factory defaults (except for the parental control settings).
1. From the OTHERS menu, press the down arrow button until DEFAULTS is highlighted, then press OKto reset the settings.
DRC6200N.05 DVD Menu System 7/28/03, 9:31 AM38

Chapter 5 39
DVD Menu System
ParentalThe Parental feature lets you determine what types of discs can be played in theplayer, and what types of discs will require a password to override the rating limitthat you’ve set. In the U.S., the ratings feature is based on the ratings set up bythe MPAA (Motion Pictures Association of America) such as R, PG, G, etc.
The system ranks the ratings from 1 to 8 in order to accommodate ratings systemsused in other countries (1 is considered material that is least offensive and 8 isconsidered the most offensive).
Note: In order for the ratings to be enforced, the disc you’re playing must contain a movie(or a title) that is rated.
The following are the two states the DVD player can be set to:
Locked: You need to enter the password in order to play discs that have a higherrating than what you’ve allowed. When the player is locked, nobody can accessthe PARENTAL menu without entering the password.
Unlocked: No password required to play discs.
Changing Parental Controls1. From the OTHERS menu, press the down arrow button until the current
PARENTAL setting is highlighted, then press OK (INPUT PASSWORD appears).
2. Use the number buttons on the remote control to enter your password(CHANGE PASSWORD appears). Press OK repeatedly until the desired ratingappears (the parental control will now be set to that setting).
Notes: Once the player is locked, you’ll need to enter the password every time you accessthe Parental Control menu.
The player is shipped without any rating limits set. You need to set Ratings Limits (seeabove for instructions) in order for the player to prevent people from playing discs withcertain ratings.
Changing Your PasswordYou can change your password, but the player must be locked.
1. From the OTHERS menu, press the down arrow button until the currentPARENTAL setting is highlighted, then press OK (INPUT PASSWORD appears).
2. Use the number buttons on the remote control to enter your password(CHANGE PASSWORD appears).
3. Press the down arrow button to highlight the CHANGE PASSWORD entry.
4. Enter your new password, and press OK (CHANGE OK appears).
DRC6200N.05 DVD Menu System 7/28/03, 9:31 AM39

40 Chapter 5
DVD Menu System
Resetting Your PasswordIf you forget your password, you can reset it using the following steps.
1. From the OTHERS menu, press the down arrow button until the currentPARENTAL setting is highlighted, then press OK (INPUT PASSWORD appears).
2. Enter 3308 as your current password. This is the default when you forget yourpassword.
3. Press the down arrow button to highlight the CHANGE PASSWORD entry.
4. Enter your new password, and press OK (CHANGE OK appears).
Pro-Tect Plus™ Locking FeatureTo disable DVD/VCR usage, the unit can be locked so that the buttons on the frontof the unit or remote control don’t work.
• To Lock: Press and hold the remote control’s ON•OFF button until LOCKappears on the front of the DVD/VCR. LOCK flashes if a button is pressed whilethe unit is locked.
• To Unlock: Press and hold either the remote control’s ON•OFF button untilLOCK stops flashing on the front of the unit. This is the only way to unlockthe DVD/VCR.
DRC6200N.05 DVD Menu System 7/28/03, 9:31 AM40

Chapter 6 41Graphics contained within this publication are for representation only.
Chapter 6: Additional Information
TroubleshootingMost problems you encounter with your product can be corrected by consulting the followingtroubleshooting list.
Note: If you prefer, we can provide you with the name of an Authorized Service Representative who will visit yourhome for a fee to install your electronic entertainment system and to instruct you in its operation. For details aboutthis service, call 1-888-206-3359. For additional assistance while using your RCA product, please visit www.rca.com/customersupport.
General Problems
Player won’t work• Try unplugging the AC power cord and plugging it back in.
No power• Plug in the DVD/VCR. Make sure both ends of the AC power cord are securely plugged into the
player and into an AC outlet.• Make sure the DVD/VCR isn’t plugged into an outlet controlled by a light switch.
Player turns off automatically• The power automatically turns off after the player has been in stop mode for approximately 30
minutes. Turn power back on.
No picture• Turn your TV to its Video Input Channel (go to page 55).• Turn on the TV.• Make sure your player is connected properly.• If you’re using component video cables to connect to your TV, toggle the progressive scan/interlace
mode (see page 37).
No sound or distorted sound• Make sure your player is connected properly. Make sure all cables are securely inserted into the
appropriate jacks.• You may need to readjust the Digital Out setting (from the AUDIO menu). Go to page 37. If you’ve
connected a compatible receiver or decoder and chose the correct setting in the Digital Out menu,and the disc doesn’t support the correct audio format, you won’t hear any audio or you’ll heardistorted audio.
• Turn your TV to its Video Input Channel (go to page 55).• Sound is muted when you’re using search features (fast forward, reverse, frame advance, etc.).• If you connected an audio receiver to your DVD/VCR, make sure you chose the correct input setting
on the receiver.
DRC6200N.06 Additional 7/28/03, 9:31 AM41

42 Chapter 6
Additional Information
Remote control won’t work• You might be in the wrong mode. To operate the DVD functions of your DVD/VCR, press DVD on the
remote before you press any other buttons. To operate the VCR, press the VCR button first. If you’reoperating the TV, press the TV button first, etc. (This remote operates most RCA, GE, and ProscanTVs).
• Check battery installation—the direction on the + and - on the batteries must match theinformation in the battery compartment cover.
• Insert new batteries in the remote.• Operate the remote control at a distance of no more than 20 feet.• Remove any obstacles between the remote and the DVD/VCR or other component. If your DVD/VCR
is in an entertainment cabinet, the glass doors might obstruct the remote control from operatingthe unit. Open the doors.
• Reset the remote — remove the batteries; press and hold the 1 button for 60 seconds; replace thebatteries and try the remote again.
General DVD Problems
No power• Plug in the DVD/VCR. Make sure both ends of the AC power cord are securely plugged into the
player and into an AC outlet.• Make sure the DVD/VCR isn’t plugged into an outlet controlled by a light switch.
Remote control won’t work• You might be in the wrong mode. To operate the DVD functions of your DVD/VCR, press DVD on the
remote before you press any other buttons.For other remote troubleshooting, see above section.
Disc won’t play• Insert a disc with the label side facing up.• Check the type of disc you put into the player. This player only plays DVD video discs, DVD audio
discs, Video CDs, CDs with mp3 files, discs with WMA files and/or JPEG files on the them, and audioCDs.
• If you’re trying to play a disc with JPEG files on it, the player might not read the disc if it has largerfiles on it.
• Both the player and the disc are coded by region. If the regional codes don’t match, the disc cannotbe played. This player is Region No. 1.
Play starts, but then stops immediately• The disc is dirty. Clean it.• Condensation has formed. Allow player to dry out.
Can’t advance through a movie• You can’t advance through the opening credits and warning information that appear at the
beginning of movies because the disc is programmed to prohibit that action.
DRC6200N.06 Additional 7/28/03, 9:31 AM42

Chapter 6 43
Additional Information
The invalid icon appears on screenThe feature or action cannot be completed at this time for one of the following reasons:• The disc’s software restricts it.
• The disc’s software doesn’t support that feature (e.g., angles).
• The feature is not available at the moment.
• You’ve requested a title or chapter number that is out of range.
The picture is distorted• The disc might be damaged. Try another disc.
Picture is distorted during forward and reverse scan• It is normal for some distortion to appear while scanning.
A screen saver appears on the TV• Your player is equipped with a screen saver that appears on the TV after your player has been idle
for several minutes. To make it disappear, press STOP or CLEAR on the remote.
Subtitle and/or audio language is not the one selected from the initial setting• If the subtitle and/or audio language does not exist on the disc, the initial settings will not be seen/
heard. The disc’s priority language is selected instead. Set the subtitle and/or audio languagemanually through the Info Display or the player menu.
The menu is displayed in a foreign language• The Language menu (OSD LANGUAGE) is set to that language. Go to LANGUAGE (In Spanish, shown
as Idioma; in French, as Langue) in the main DVD player menu and select the OSD LANGUAGEoption (In Spanish, shown as Menús del Lector; in French, as Menus Lecteur) Highlight the languageyou prefer, and press OK.
Play doesn’t begin• The rating of the title on the disc exceeds the rating limit set in the PARENTAL menu. Change the
rating limit.
No forward or reverse scan• Some discs have sections that prohibit rapid scanning, or title and chapter skip.• If you’re trying to skip through the warning information and credits at the beginning of a movie,
you won’t be able to. This part of the movie is often programmed to prohibit skipping through it.
Desired angle cannot be changed• Most discs don’t have the multi-camera angle system, and some discs only have multiple angles
during certain parts of the movie.
DRC6200N.06 Additional 7/28/03, 9:31 AM43

44 Chapter 6
Additional Information
Picture is too tall and thin• Change the aspect ratio: go to the main menu, select VIDEO, select TV ASPECT, then choose the
correct setting. Go to page 36 for more information.
Picture is too short and wide• Change the aspect ratio: go to the main menu, select VIDEO, select TV ASPECT, then choose the
correct setting. Go to page 36 for more information.
General VCR Problems
No power• Plug in the DVD/VCR. Make sure both ends of the AC power cord are securely plugged into the
player and into an AC outlet.• Make sure the DVD/VCR isn’t plugged into an outlet controlled by a light switch.
Remote control won’t work• You might be in the wrong mode. To operate the VCR functions of your DVD/VCR, press VCR on the
remote before you press any other buttons.For other remote troubleshooting, see page 42.
There’s poor quality or no picture for normal TV viewing• If using RF coaxial cables to connect the DVD/VCR to the TV, make sure the VCR indicator is not
displayed on the DVD/VCR’s front panel (press the remote control’s TV/VCR button to togglebetween VCR and TV-viewing modes).
If using A/V jacks and cables to connect the DVD/VCR to the TV, press the remote control’s INPUTbutton when in TV mode to access the TV’s Video Input Channel.
• Tune the TV to an active channel.
• All cables should be securely inserted and connected to the proper jacks.
The buttons on the front of the unit won’t work (and LOCK flashes)• The buttons are locked. Press and hold the ON•OFF button on the remote until LOCK disappears.
Cannot select channels over 69• Cable channels over 69 can only be selected if SIGNAL TYPE is set to CABLE in the CHANNEL SET
menu. Go to page 10 for instructions.
The timer indicator flashes on the DVD/VCR front panel• The clock is not set. Go to page 11 for instructions.
• Make sure there is a tape in the DVD/VCR when a timer recording is set.
Rewind does not operate• Make sure the tape isn’t already rewound.• Make sure the tape isn’t damaged or broken.
DRC6200N.06 Additional 7/28/03, 9:31 AM44

Chapter 6 45
Additional Information
The incorrect time or date is shown• Check AUTO DST (Daylight-Saving settings) in the CLOCK SET menu.
• Make sure the DVD/VCR player or cable box is tuned to the time data channel (check with yourcable service provider for information about time data).
The time did not adjust for Daylight-Saving Time• Make sure the AUTO DST feature is set correctly in the CHANNEL SET menu.
The DVD/VCR makes noise when it is stopped• This is normal. The DVD/VCR removes the tape from the playheads when stopping. The cylinders
inside the unit will continue to rotate for a few minutes after stopping.
The DVD/VCR won’t find active channels correctly using the Auto Channel Search feature• Make sure all cable connections are secure and correct.• Make sure that SIGNAL TYPE is set correctly in the CHANNEL SET menu.• Auto Channel Search may not be necessary if using a cable box to view all channels. Contact your
local cable company for more information.
On-screen menus appear in a foreign language• Check the LANGUAGE menu to choose a preferred on-screen language.
Recording Problems
Will not record• Make sure there is a recordable tape in the DVD/VCR.• Eject then reinsert the tape.• Make sure the tape is not broken.• Make sure the DVD/VCR player is not in pause mode. Press PAUSE or PLAY to return to normal
playback.• Make sure the tape’s safety tab is intact.
Timer recording was not made or the wrong program was recorded• Make sure the program was entered correctly (the wrong channel or times may be entered).• Make sure the cable box or satellite receiver was turned on when recording was to begin.• There may have been a power interruption. Reset the time and date.• Check to see if time and date are correct – including AM/PM.• Make sure the program did not exceed the tape’s length and the tape was rewound beforehand.• Make sure the DVD/VCR was turned off at the time recording started.• Make sure there was a tape in the DVD/VCR with its safety tab intact.• The DVD/VCR ejects tapes when the end is reached during a timer recording.
DRC6200N.06 Additional 7/28/03, 9:31 AM45

46 Chapter 6
Additional Information
Playback Problems
Snowy or no picture during playback• Press the remote control’s TV/VCR button to activate VCR mode. VCR appears in the front panel
display when active.• Check the TV channel selected (3 or 4) to make sure it matches the VCR channel output setting.• Check to make sure the TV’s fine tuning is correct for the channel selected.• If you use A/V cables and jacks to connect the DVD/VCR to the TV, check all connections for snug
and correct connections.• If you are using A/V cables, make sure the TV is set to the Video Input Channel. Go to page 55 for
instructions.• If you are not using A/V cables, make sure the DVD/VCR is not in Video Input Channel mode. Press
INPUT on the remote control to return to normal viewing.• Try another tape.• Some snow/streaks are normal during search, stop action, frame advance, and slow-motion
playback.
Streaks in picture during normal playback• Press one of the CHANNEL +/- buttons on the front of the unit (or CH +/- on the remote) to move
streaks up or down for the best picture.• Make sure the tape is of good quality and not worn out.
Time counter not working or time counter not working in search modes• The time counter does not advance during unrecorded portions of tape. When an unrecorded
segment of tape is encountered, the time counter will hold its count until recorded material isdetected again.
• A minus (–) will appear in front of the time if you rewind the tape farther back than a counterreading of 0:00:00.
• The time counter disappears during search; this is normal.
Tape won’t play• Make sure there is a tape in the DVD/VCR.• Try ejecting and reinserting the cassette.• Make sure the tape is not broken.• Make sure the DVD/VCR is not in pause mode. Press PAUSE or PLAY to return to normal playback.
Auto Channel Search doesn’t work• Make sure the antenna connections are secure and correct.• Make sure the SIGNAL TYPE feature is set correctly.• May not be necessary if using a cable box for all channels. Contact your local cable company for
more information.
Tape plays back in slow motion• Press PLAY to return to normal playback.
DRC6200N.06 Additional 7/28/03, 9:31 AM46

Chapter 6 47
Additional Information
Tape with safety tab removed doesn’t start playing• Make sure the AUTO PLAY ON/OFF feature is set to ON.
Time counter disappears during searching• This is normal.
There is no stereo sound during playback• You must connect the DVD/VCR to the TV using A/V cables (not provided) to hear true stereo sound
during playback. Go to page 7 for instructions.
The stereo Audio is too noisy• Press either the CHANNEL – or + button on the front of the unit (or CH +/- on the remote) to
minimize picture noise.
Cannot copy discs to video tape• You can’t record DVD discs onto videocassettes because the discs are encoded with anti-copy
protection.
Disc won’t eject• When you put a disc into the player, the player may take up to 15 seconds to read the disc. You
won’t be able to eject the disc during this time. Wait 15 seconds and try again.
I get an “Incompatible file” message when I try to play JPEG files• Some JPEG files might be too large to be displayed, or a large file is blocking the player from
displaying all the other JPEG files on the disc.
I forgot my password• Enter 3308 as the password and then change it to a new one.
DRC6200N.06 Additional 7/28/03, 9:31 AM47

48 Chapter 6
Additional Information
Handling Cautions• Before connecting other components to this player, be sure to turn all components off.
• Don’t move the player while a disc is being played. The disc may get scratched or broken, and theplayer’s internal parts may be damaged.
• Don’t put any container filled with liquid or any small metal objects on the player.
• Be careful not to put your hand into the disc tray.
• Don’t place anything other than the disc in the disc tray.
• Exterior influences such as lightning and static electricity can affect normal operation of thisplayer. If this occurs, turn the player off and on again, or disconnect and then reconnect the ACpower cord to the AC power outlet. The player will operate normally.
• Be sure to remove the disc and turn off the player after use.
Maintenance of CabinetFor safety reasons, when cleaning the cabinet be sure to disconnect the AC power cord from the ACoutlet.
• Do not use benzene, thinner, or other solvents for cleaning.• Wipe the cabinet with a soft cloth.
Formation of Condensation• Due to sharp changes in temperature and humidity, condensation may form if warm air comes in
contact with any cold parts inside the player.• When condensation forms inside the player, the player may not operate correctly. If this occurs,
leave the player at room temperature until the inside of the player becomes dry and operational.• If condensation forms on a disc, wipe the disc with a soft, dry cloth by moving the cloth from the
center hole toward the outer edge.
Handling Discs• Don’t touch the disc’s signal surfaces. Hold by the edges or by one edge and the hole in the center.• Don’t affix labels or adhesive tape to label surfaces. Don’t scratch or damage the label.• Do not use damaged (cracked or warped) discs.
Cleaning Discs• Dirty discs can cause reduced video and audio performance. Always keep discs clean by wiping
them gently with a soft cloth from the inner edge toward the outer perimeter.
• If a disc becomes very dirty, wet a soft cloth in water, wring it out well. Wipe the dirt away gently,and remove any water drops with a dry cloth.
• Do not use record-cleaning sprays or antistatic agents on discs. Also, never clean the discs withbenzene, thinner, or other volatile solvents which may cause damage to the disc surface.
DRC6200N.06 Additional 7/28/03, 9:31 AM48

Chapter 6 49
Additional Information
Back of the DVD/VCRWhen connecting, make sure you connect Output jacks to Input jacks, Video to Video, Right Audio toRight Audio, etc. A description of each jack follows.
Description of Jacks (from left to right)DIGITAL AUDIO OUT (OPTICAL and COAXIAL)
Use one of these jacks to connect your DVD/VCR to a receiver or decoder with Dolby Digital or DTScapability. Some receivers have either the COAXIAL or OPTICAL type of Digital Audio Input jack, andsome have both. Under most conditions, optical and coaxial connections work equally well — theonly difference is the type of cable you connect to the jack.
If you want to use a less expensive cable, connect a coaxial cable to the COAXIAL jack if yourreceiver has a COAXIAL input jack. Rarely, but sometimes, coaxial digital cables — especially longones, pick up radio frequency (RF) interference from household appliances, nearby power lines, and/or broadcast towers.
OPTICAL - connect an optical cable (SPDIF) to the OPTICAL jack on the DVD/VCR and DigitalAudio Optical Input jack on your receiver.
COAXIAL - connect digital cable to this jack and to the Digital Audio Coaxial Input jack on yourreceiver. The cable is not a black coaxial cable, but an RCA-type cable.
AUDIO OUT— Use these jacks to connect your DVD/VCR to an audio/video receiver.
COMPONENT VIDEO OUT (Y, Pb, Pr) – Use these jacks to connect to a TV with component videoinput jacks. Unlike a single video input, component video maintains the video signal as threeseparate signals through these three jacks. This connection provides optimum quality. To ensuremaximum picture quality, use three video-grade cables for the Y, Pb, and Pr connections. It isessential to match the color-coded connectors with a compatible TV. This connection is only forDVD signal. For the VCR signal, you must also connect the standard video cable.
S-VIDEO OUT – If your TV has an S-VIDEO jack, connect an S-Video cable to the DVD/VCR’s S-VIDEO jack and to the TV’s S-Video jack to achieve better picture quality than using the VIDEO jack.S-Video only carries the picture, so you must connect the audio cables, as well. This connection isonly for DVD signal. For the VCR signal, you must also connect the standard video cable.
DVD & VCR
ANT. IN
RF OUT
AUDIO OUT
COAXIALOPTICAL S-VIDEO OUT
DVD
L
R
COMPONENT OUT
Pr
Pb
YOUT IN
R
L
AUDIO
VIDEO
DIGITAL AUDIO OUT
DRC6200N.06 Additional 7/28/03, 9:31 AM49

50 Chapter 6
Additional Information
Front of the DVD/VCR (from left to right)ON/STANDBY – Turns the player on and off. The indicator lights when you turn off the DVD/VCR.
Audio/Video Input jacks – Allows you to connect an external video component, such as a camcorderor video game system. (Found behind the door on the right side on the front of the unit.)
EJECT – Ejects a tape.
REC – In VCR mode, press to begin recording on a tape.
CHANNEL -/+ – Press to change the VCR channel.
DVD/VCR – Switches between DVD and VCR modes.
STOP – Stops disc or tape play.
REV (Reverse) – Searches backward on a disc or tape.
PLAY/PAUSE – Press to begin playback. During playback, press to pause.
FWD (Fast forward) – Searches forward on a disc or tape.
OPEN – Opens and closes the disc tray.
Description of Jacks (continued)DVD/VCR OUT (AUDIO/VIDEO) – If you are using color-coded red, yellow and white RCA cables,connect these jacks to the corresponding jacks on your TV.
VCR IN (AUDIO/VIDEO) – If you are using color-coded red, yellow and white RCA cables, connectthese jacks to a video input component, such as a video game system or camcorder.
ANT. IN – Connect you off-air antenna or cable.
RF OUT – Connect to your TV.
DRC6200N.06 Additional 7/28/03, 9:31 AM50

Chapter 6 51
Additional Information
Front Panel Display1. P-S — Progressive scan mode is selected.
2. Tape icon — A tape is loaded. If flashing, you need to insert a tape.
3. VCR — The VCR mode is selected.
4. AM — Time is AM (PM is not displayed).
5. DTS — A disc with a DTS soundtrack is loaded.
6. Title icon — Shows the currently-playing CD title number.
7. REC — A recording is in progress.
8. Timer icon — A timer recording is programmed or in progress.
9. Chapter icon — Shows the currently-playing DVD chapter number.
10. Number display — The current time, counter, remaining time on a video tape, time expired on adisc, or the current DVD/VCR status (PLAY, REC, etc.).
11. DVD — The DVD mode is selected.
12. Disc icon — A disc is loaded. Flashes when no disc is loaded.
13. 3D icon — 3D sound is on.
1
4 105
11
12
13
Display MessagesThe following are some messages you might see inthe DVD/VCR display.
CLOSE — Disc tray is closing.
CUE — Tape is searching forward during playback.
NO DISC (with Disc icon flashing) — No disc isloaded.
EJECT — Tape is ejecting.
ER DISC — Disc has an error.
FF — Tape is fast forwarding.
LOAD — Loading a disc.
MENU — Main Menu is displayed.
SETUP — Setup menu is displayed.
OFF — Power is off.
ON — Power is on.
OPEN — Disc tray is opening.
PLAY — Playing a VCR tape.
STILL — Tape is paused.
REC — Tape is recording.
REV — Tape is searching backward duringplayback.
REW — Tape is rewinding.
LOCK — Child lock is active.
SP, SLP — Tape recording speed.
STOP — Tape is stopped.
2
3 6
7 8 9
DRC6200N.06 Additional 7/28/03, 9:31 AM51

52 Chapter 6
Additional Information
Explanation of Input Jacks and CablesThis section describes the jacks and cables you can use to make connections (only audio/video cablesare packed with your DVD/VCR — you can purchase cables by calling 1-800-338-0376, details are onpage 56 or order online at www.rca.com, or go to your local electronics store). There are several ways toconnect your DVD/VCR to your TV depending upon the cables you have and the jacks that are on theback of your TV.
Different jacks and cables provide a different level of performance. It’s important to remember, we’retalking about degrees of picture improvement for comparison. If your TV has Component jacks (Y, Pb,Pr), S-VIDEO, and composite video (often color-coded yellow and grouped with Audio Left and Rightjacks that are white and red); Component (Y, Pb, Pr), would be considered excellent, S-Video would bevery good, and the composite video jack (yellow) would be considered good.
Component Video (Y, Pb, Pr) Jacks and CablesThe Y, Pb, Pr jacks provide optimum picture quality because the video is separated into three signals(two signals are dedicated to the color portion of the image, and the other signal is dedicated to theblack and white part of the image).
To ensure maximum picture quality, use three video-grade cables for the connection. There are bundledcomponent video cables sold that are color-coded to match the Y, Pb, Pr jacks (red, green, and blue).Component Video Input jacks are usually found on Digital Televisions (HDTV).
Note: Also, remember to connect the left and right audio cables because the Y, Pb, Pr jacks and cables carry only thepicture signal, not the sound.
S-Video Jacks and CablesThe S-Video (separate video) jack provides better picture quality than a composite video jack(sometimes labeled VIDEO and color-coded yellow) because S-Video keeps the color (chrominance, alsocalled chroma) part of the signal separate from the black and white (luminance) part of the picture.
S-Video cables are designed to keep the color information separated. If your TV has an S-VIDEO jack,connect the DVD Player to the TV with an S-Video cable (not provided) for a better quality picture.
Note: Remember to connect the left and right audio cables because the S-Video cable carries only the picture signal,not the sound.
Audio/Video Jacks and Cables (RCA-type)
AudioThese jacks are used to send the audio from the disc you’re playing in the DVD/VCR to the TV. Theaudio jacks and cables are often color-coded (red for right audio, and white for left audio). You mustconnect audio cables to the AUDIO L and R jacks on the DVD/VCR and the corresponding AudioInput Jacks on the TV no matter which Video jack you connect (VIDEO; S-VIDEO; Y, Pb, Pr)
Note: If your component has only one input for audio (mono), connect it to the left (white L/Mono) audio jack onthe TV and don’t connect the right audio part of the cable.
VideoThe basic Video jack (usually color-coded yellow) jack is also referred to as composite video.Composite video doesn’t keep color information separated (like S-Video), but it’s better than thevideo quality you get from an RF coaxial cable (the type used to plug the cable feed into a TV).
DRC6200N.06 Additional 7/28/03, 9:31 AM52

Chapter 6 53
Additional Information
Limited Warranty
What your warranty covers:• Defect in materials or workmanship.
For how long after your purchase:
• 90 days from date of purchase - Unit exchange, which includes parts and labor.
• 91 days to 1 year from date of purchase - Unit exchange, which includes parts only; you pay thelabor.
• The warranty for rental units begins with the first rental or 45 days from date of shipment to therental firm, whichever comes first.
What we will do:During the initial 90 days:
• Provide you with a new, or at our option, a refurbished unit. The exchange unit is under warrantyfor the remainder of the original product’s warranty period.
After the 90 days and within one year:
Provide you with a new or, at our option, refurbished unit. The exchange unit is under warranty for theremainder of the original product’s warranty period. We will bill you a flat exchange charge to replacea defective unit. This charge covers the labor cost for its repair.
How to make a warranty claim:
• Properly pack your unit. Include any cables, etc., which were originally provided with the product.We recommend using the original carton and packing materials.
• Proof of purchase in the form of a bill of sale or receipted invoice which is evidence that theproduct is within the warranty period must be presented to obtain warranty service. For rentalfirms, proof of first rental is also required.
• Also print your name and address and a description of the defect. Send via standard UPS or itsequivalent to:
Thomson Inc.
11721 B Alameda Avenue
Socorro, Texas 79927
• Pay any charges billed to you by the Exchange Center for service not covered by the warranty.
• Insure your shipment for loss or damage. Thomson accepts no liability in case of damage or loss enroute to Thomson.
• A new or refurbished unit will be shipped to you freight prepaid.
continued on next page
DRC6200N.06 Additional 7/28/03, 9:31 AM53

54 Chapter 6
Additional Information
What your warranty does not cover:• Acts of nature, such as but not limited to lightning damage.
• Adjustment of customer controls.
• Damage from misuse or neglect.
• A unit that has been modified or incorporated into other products or is used for institutional orother commercial purposes.
• Batteries.
• Units purchased or serviced outside the U.S.A.
• Shipping damage if the unit was not packed and shipped in the manner prescribed by Thomson.
Product Registration:Please complete the online Product Registration on RCA.com/productregistration or complete and mailthe Product Registration Card packed with your unit. It will make it easier to contact you should it everbe necessary. The return of the card is not required for warranty coverage.
Limitation of Warranty:• THE WARRANTY STATED ABOVE IS THE ONLY WARRANTY APPLICABLE TO THIS PRODUCT. ALL OTHER
WARRANTIES, EXPRESS OR IMPLIED (INCLUDING ALL IMPLIED WARRANTIES OF MERCHANTABILITYOR FITNESS FOR A PARTICULAR PURPOSE) ARE HEREBY DISCLAIMED. NO VERBAL OR WRITTENINFORMATION GIVEN BY THOMSON INC., ITS AGENTS OR EMPLOYEES SHALL CREATE A GUARANTYOR IN ANY WAY INCREASE THE SCOPE OF THIS WARRANTY.
• REPAIR OR REPLACEMENT AS PROVIDED UNDER THIS WARRANTY IS THE EXCLUSIVE REMEDY OFTHE CONSUMER. THOMSON INC. SHALL NOT BE LIABLE FOR INCIDENTAL OR CONSEQUENTIALDAMAGES RESULTING FROM THE USE OF THIS PRODUCT OR ARISING OUT OF ANY BREACH OF ANYEXPRESS OR IMPLIED WARRANTY ON THIS PRODUCT. THIS DISCLAIMER OF WARRANTIES ANDLIMITED WARRANTY ARE GOVERNED BY THE LAWS OF THE STATE OF INDIANA. EXCEPT TO THEEXTENT PROHIBITED BY APPLICABLE LAW, ANY IMPLIED WARRANTY OF MERCHANTABILITY ORFITNESS FOR A PARTICULAR PURPOSE ON THIS PRODUCT IS LIMITED TO THE APPLICABLEWARRANTY PERIOD SET FORTH ABOVE.
How state law relates to warranty:• Some states do not allow the exclusion nor limitation of incidental or consequential damages, or
limitations on how long an implied warranty lasts, so the above limitations or exclusions may notapply to you.
• This warranty gives you specific legal rights, and you also may have other rights that vary fromstate to state.
If you purchased your product outside the United States:
* This warranty does not apply. See your dealer for warranty information.
DRC6200N.06 Additional 7/28/03, 9:31 AM54

Chapter 6 55
Additional Information
How to find your TV’s Video Input ChannelIn order to see what’s playing on your DVD/VCR, you need to tune the TV to the Video InputChannel that corresponds to the jacks you used to hook up the unit to the TV. The Video InputChannel(s) varies for different brands and different models of TVs. Below are some things to try.
• Consult the Owner’s Manual that came with your TV.
• If you can’t find the information in the manual, or can’t find the manual, review the following listof ways to access Video Input Channels on TVs.
• There might be a button on the TV’s remote control that accesses the Video Input Channel (seetable below for examples).
• You might select the Video Input Channel from the TV’s menu system.
• You might tune to it by pressing a specific channel number (see table below)
• Press the Channel up and/or down buttons on the TV’s remote control (sometimes the Video InputChannel is stored in the channel list).
Video Input Channel Variations
Button/Switch Button on the Channel
on the TV TV remote Number
VIDEO VID1 S-VID 00 93
SIGNAL LINE INPUT 90 VID 1
VID 1 VID SOURCE 91 VID 2
VID 2 VIDEO AUX 92 INPUT
DRC6200N.06 Additional 7/28/03, 9:31 AM55

56 Chapter 6
Additional Information
S-Video Cable: has multi-pinconnectors on each end forconnecting S-Videocomponents to your TV.
VH976 (6-ft) $7.95
V H913 (12-ft) $14.95
Screw-on Cable: attaches tothe round antennaconnectors (called 75-ohm F-type) on the back of yourVCR or TV. The ends screwonto the connectors for asecure connection.
VH81 (3-ft) $3.95
VH82 (6-ft) $4.95
Monaural VCR Dubbing Cable:Double cable that lets youconnect the video and audiojacks of two VHS VCRs toduplicate tapes. Can also beused to connect a VCR to yourTV. Cable is color-coded andshielded. Has RCA-type phonoplugs on each end.
VH83 (6-ft) $5.952-way Signal Splitter Helpsyou connect a second TV orVCR.
VH47 $3.95
Remote Control: This is theremote control that came packedwith your TV. Replacements orspares can be ordered as needed.
RCR311DA1 (260607) $31.55
Amplified Antenna: Allowsyou to quickly switch from theantenna signal to the cable orsatellite signal withoutdisconnecting the antenna.
ANT200 $49.95
Accessory InformationBelow are accessories available to compliment your product. Prices are subject to change withoutnotice. All accessories are subject to availability.
A shipping and handling fee will be charged upon ordering, and we are required by law to collect theappropriate sales tax for each individual state, county and locality to which the merchandise is beingsent.
How to OrderTo place an order by phone, have your Visa, MasterCard or Discover Card ready and call the toll-freenumber listed below. Use this number only to place an order for accessory items.
1-800-338-0376
Some of these accessories are also available on-line at
www.rca.com
Prices are subject to change without notice. All accessories are subject to availability.
Stereo VCR Dubbing Cable:Triple cable that lets youconnect the VIDEO and AUDIO
jacks of stereo components.
VH84 (6-ft) $9.95
ON• OFF
MUTE
G O B A C K
RETURN
INPUT PLAY MODE
TV• VCR
1 2 3
4 5 6
7 8
0
9
VOL CH
VCR TV
DVD
MENUCLEAR
INFO
ANGLE
TITLE
GUIDE
AUDIO
LOC K
SUBTITLE
TIMER
REVERSE PLAY FORWARD
PAUSESTOPRECORD
AGAIN
SPE ED
OPEN• CLOSEZO OM
SEARCH
DRC6200N.06 Additional 7/28/03, 9:31 AM56

This page left intentionally blank.
DRC6200N.06 Additional 7/28/03, 9:31 AM57

This page left intentionally blank.
DRC6200N.06 Additional 7/28/03, 9:31 AM58

DRC6200N.06 Additional 7/28/03, 9:31 AM59

Thomson Inc.10330 North Meridian StreetIndianapolis, IN 46290
Please do not send any products to the Indianapolis address listed in this manual or on the carton. Thiswill only add delays in service for your product.
©2003 Thomson Inc.Trademark(s)® RegisteredMarca(s) Registrada(s)Printed in KoreaTOCOM 16293410
Visit the RCA website at www.rca.com
DRC6200N.06 Additional 7/28/03, 9:31 AM60