DVD Camcorder Instruction Manual English -...
80
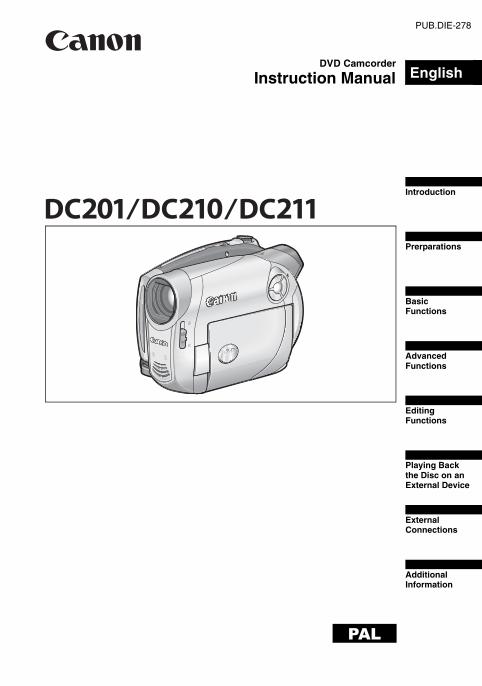
PUB.DIE-278 PAL DVD Camcorder Instruction Manual English Introduction Prerparations Basic Functions Advanced Functions Editing Functions Playing Back the Disc on an External Device External Connections Additional Information
-
Upload
nguyendien -
Category
Documents
-
view
230 -
download
1
Transcript of DVD Camcorder Instruction Manual English -...
PUB.DIE-278
PAL
DVD Camcorder
Instruction Manual English
Introduction
Prerparations
Basic Functions
Advanced Functions
Editing Functions
Playing Back the Disc on an External Device
External Connections
Additional Information
2
IntroductionImportant Usage InstructionsWARNING!
TO REDUCE THE RISK OF ELECTRIC SHOCK, DO NOT REMOVE COVER (OR BACK). NO USER SERVICEABLE PARTS INSIDE. REFER SERVICING TO QUALIFIED SERVICE PERSONNEL.
WARNING!TO REDUCE THE RISK OF FIRE OR ELECTRIC SHOCK, DO NOT EXPOSE THIS PRODUCT TO RAIN OR MOISTURE.
CAUTION:TO REDUCE THE RISK OF ELECTRIC SHOCK AND TO REDUCE ANNOYING INTERFERENCE, USE THE RECOMMENDED ACCESSORIES ONLY.
CAUTION:DISCONNECT THE MAINS PLUG FROM THE SUPPLY SOCKET WHEN NOT IN USE.
The Mains plug is used as the disconnect device. The Mains plug shall remain readily operable to disconnect the plug in case of an accident.
While using the compact power adapter, do not wrap it or cover it with a piece of cloth, and do not place it in confined narrow spaces. Heat may build up, the plastic case may deform and it could result in electric shock or fire.
CA-570 identification plate is located on the bottom.
Using any device other than the Compact Power Adapter CA-570 may damage the camcorder.
This product has been classified under IEC60825-1:1993 and EN60825-1:1994.
CLASS 1 LASER PRODUCT
European Union (and EEA) only.This symbol indicates that this product is not to be disposed of with your household waste, according to the WEEE Directive (2002/96/EC) and your national law. This product should be handed over to a designated collection point, e.g., on an authorized one-for-one basis when you buy a new similar product or to an authorized collection site for recycling waste electrical and electronic equipment (EEE). Improper handling of this
type of waste could have a possible negative impact on the environment and human health due to potentially hazardous substances that are generally associated with EEE. At the same time, your cooperation in the correct disposal of this product will contribute to the effective usage of natural resources. For more information about where you can drop off your waste equipment for recycling, please contact your local city office, waste authority, approved WEEE scheme or your household waste disposal service. For more information regarding return and recycling of WEEE products, please visitwww.canon-europe.com/environment.(EEA: Norway, Iceland and Liechtenstein)
3In
trod
uctio
n
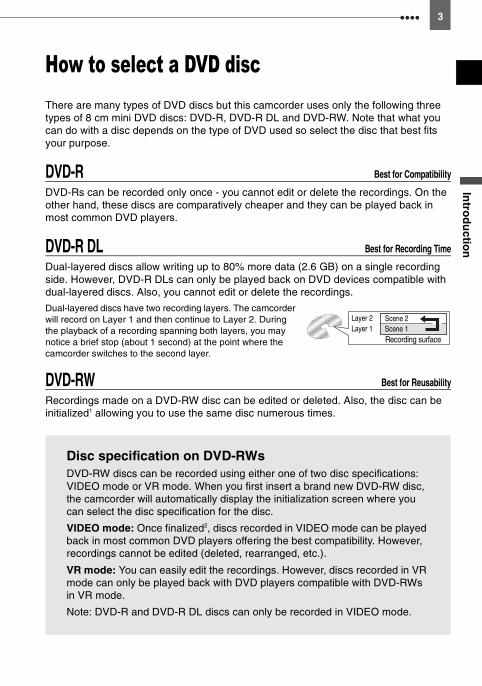
How to select a DVD discThere are many types of DVD discs but this camcorder uses only the following three types of 8 cm mini DVD discs: DVD-R, DVD-R DL and DVD-RW. Note that what you can do with a disc depends on the type of DVD used so select the disc that best fits your purpose.
DVD-Rs can be recorded only once - you cannot edit or delete the recordings. On the other hand, these discs are comparatively cheaper and they can be played back in most common DVD players.
Dual-layered discs allow writing up to 80% more data (2.6 GB) on a single recording side. However, DVD-R DLs can only be played back on DVD devices compatible with dual-layered discs. Also, you cannot edit or delete the recordings.
Dual-layered discs have two recording layers. The camcorder will record on Layer 1 and then continue to Layer 2. During the playback of a recording spanning both layers, you may notice a brief stop (about 1 second) at the point where the camcorder switches to the second layer.
Recordings made on a DVD-RW disc can be edited or deleted. Also, the disc can be initialized1 allowing you to use the same disc numerous times.
DVD-R Best for Compatibility
DVD-R DL Best for Recording Time
DVD-RW Best for Reusability
Disc specification on DVD-RWsDVD-RW discs can be recorded using either one of two disc specifications: VIDEO mode or VR mode. When you first insert a brand new DVD-RW disc, the camcorder will automatically display the initialization screen where you can select the disc specification for the disc.
VIDEO mode: Once finalized2, discs recorded in VIDEO mode can be played back in most common DVD players offering the best compatibility. However, recordings cannot be edited (deleted, rearranged, etc.).
VR mode: You can easily edit the recordings. However, discs recorded in VR mode can only be played back with DVD players compatible with DVD-RWs in VR mode.
Note: DVD-R and DVD-R DL discs can only be recorded in VIDEO mode.
Scene 2Scene 1
Layer 2Layer 1
Recording surface
4
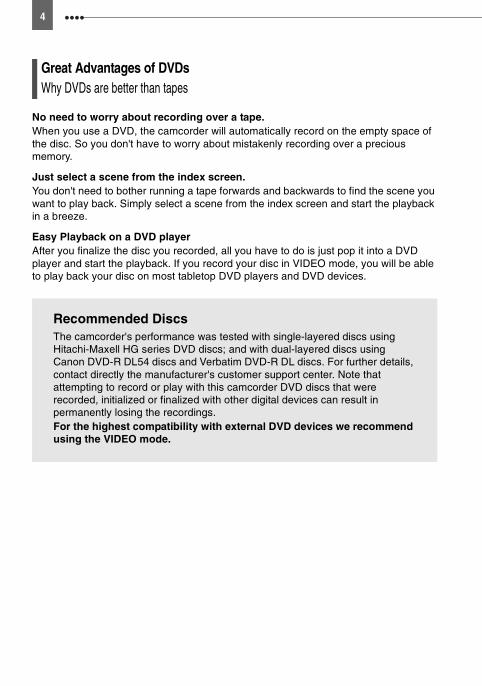
No need to worry about recording over a tape.When you use a DVD, the camcorder will automatically record on the empty space of the disc. So you don't have to worry about mistakenly recording over a precious memory.
Just select a scene from the index screen.You don't need to bother running a tape forwards and backwards to find the scene you want to play back. Simply select a scene from the index screen and start the playback in a breeze.
Easy Playback on a DVD playerAfter you finalize the disc you recorded, all you have to do is just pop it into a DVD player and start the playback. If you record your disc in VIDEO mode, you will be able to play back your disc on most tabletop DVD players and DVD devices.
Great Advantages of DVDsWhy DVDs are better than tapes
Recommended DiscsThe camcorder's performance was tested with single-layered discs using Hitachi-Maxell HG series DVD discs; and with dual-layered discs using Canon DVD-R DL54 discs and Verbatim DVD-R DL discs. For further details, contact directly the manufacturer's customer support center. Note that attempting to record or play with this camcorder DVD discs that were recorded, initialized or finalized with other digital devices can result in permanently losing the recordings.For the highest compatibility with external DVD devices we recommend using the VIDEO mode.
5In
trod
uctio
n
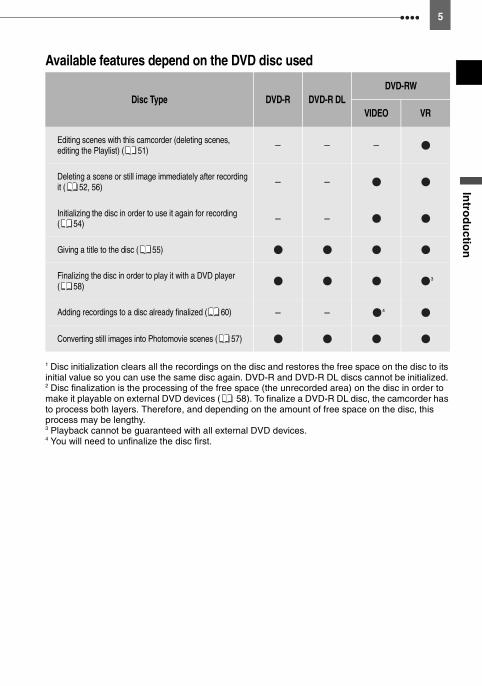
Available features depend on the DVD disc used
1 Disc initialization clears all the recordings on the disc and restores the free space on the disc to its initial value so you can use the same disc again. DVD-R and DVD-R DL discs cannot be initialized. 2 Disc finalization is the processing of the free space (the unrecorded area) on the disc in order to make it playable on external DVD devices ( 58). To finalize a DVD-R DL disc, the camcorder has to process both layers. Therefore, and depending on the amount of free space on the disc, this process may be lengthy.3 Playback cannot be guaranteed with all external DVD devices.4 You will need to unfinalize the disc first.
Disc Type DVD-R DVD-R DLDVD-RW
VIDEO VR
Editing scenes with this camcorder (deleting scenes, editing the Playlist) ( 51) – – –
Deleting a scene or still image immediately after recording it ( 52, 56) – –
Initializing the disc in order to use it again for recording ( 54) – –
Giving a title to the disc ( 55)
Finalizing the disc in order to play it with a DVD player ( 58)
3
Adding recordings to a disc already finalized ( 60) – – 4
Converting still images into Photomovie scenes ( 57)
6
IntroductionHow to select a DVD disc ............................................................................... 3
About this ManualAbout the Joystick and the Joystick Guide ..................................................... 9About the Power Switch................................................................................ 10About the Operating Modes .......................................................................... 10
Getting to Know the CamcorderSupplied Accessories.................................................................................... 11Components Guide ....................................................................................... 12Screen Displays ............................................................................................ 14
PreparationsGetting Started
Charging the Battery Pack ............................................................................ 17Inserting and Removing a Disc ..................................................................... 19Preparing the Camcorder.............................................................................. 20Adjusting the LCD Screen............................................................................. 21
Using the MenusSelecting a FUNC. Menu Option................................................................... 22Selecting an Option from the Setup Menus .................................................. 22
First Time SettingsChanging the Language................................................................................ 23Changing the Time Zone............................................................................... 23Setting the Date and Time ............................................................................ 24
Basic FunctionsRecording
Shooting Video.............................................................................................. 25Selecting the Aspect Ratio of your Recordings (16:9 Widescreen or 4:3) .... 26Taking Photos ............................................................................................... 27Zooming ........................................................................................................ 28Quick Start Function...................................................................................... 28
PlaybackPlaying Back the Video ................................................................................. 29Displaying the Photos ................................................................................... 30Magnifying Photos during Playback.............................................................. 32
Advanced FunctionsMenu Options Lists
FUNC. Menu ................................................................................................. 33Setup Menus................................................................................................. 34
Camera Setup (Digital Zoom, Image Stabilizer, etc.) .......................... 34Disc Operations (Photomovie, Finalize, etc.)...................................... 36Still Image Operations (Erase all still images) .................................... 37Display Setup (LCD Brightness, Language, etc.) ............................... 37System Setup (Volume, Beep, etc.).................................................... 38Date/Time Setup................................................................................. 39
Table of contents
7In
trod
uctio
n
Recording ProgramsUsing the Recording Programs .....................................................................40
Flexible Recording: Changing the Aperture and Shutter Speed ...............41Special Scene: Recording Programs to Match Special Conditions ...............42
Adjusting the Picture: Exposure, Focus and ColorManual Exposure Adjustment........................................................................43Manual Focus Adjustment .............................................................................43White Balance ...............................................................................................44Image Effects.................................................................................................45
Still Image Recording OptionsSelecting the Size and Quality of Still Images ...............................................46Automatic Focus Priority................................................................................47
Other FunctionsOn-Screen Displays.......................................................................................48Self Timer ......................................................................................................49Digital Effects.................................................................................................49
Editing FunctionsManaging Scenes
Adding Scenes to the Playlist ........................................................................51Moving Scenes in the Playlist........................................................................52Deleting Scenes ............................................................................................52Dividing a Scene............................................................................................53
Managing the DiscProtecting the Disc ........................................................................................54Initializing the Disc.........................................................................................54Changing the Disc Title .................................................................................55
Managing PhotosErasing Photos ..............................................................................................56Converting Photos into Photomovie Scenes .................................................57
Playing Back the Disc on an External DeviceFinalizing the Disc .........................................................................................58Playing Back your Disc on a DVD Player or a Computer’s DVD Drive .........59Unfinalizing the Disc - Additional Recordings on a Finalized Disc ................60
External ConnectionsConnecting to a TV or VCR
Connection Diagrams ....................................................................................61Playback on a TV Screen ..............................................................................62Recording to a VCR or Digital Video Recorder .............................................62
Additional InformationTrouble?
Troubleshooting .............................................................................................63List of Messages............................................................................................67
Do’s and Don’tsHandling Precautions ....................................................................................69Maintenance/Others ......................................................................................71Using the Camcorder Abroad ........................................................................72

8
General InformationSystem Diagram ........................................................................................... 73Optional Accessories .................................................................................... 74Specifications ................................................................................................ 76Index ............................................................................................................. 78
About this Manual 9In
trod
uctio
n
About this Manual
Thank you for purchasing the Canon DC201/DC210/DC211. Please read this manual carefully before you use the camcorder and retain it for future reference. Should your camcorder fail to operate correctly, refer to the Troubleshooting table ( 63).
Conventions Used in the Manual IMPORTANT: Precautions related to the camcorder’s operation. NOTES: Additional topics that complement the basic operating procedures. POINTS TO CHECK: Restrictions that apply if the function described is not available in all operating modes (the operating mode to which the camcorder should be set, the type of disc required, etc.). : Reference page number. : Option or feature that applies or is available only with a specific model. The following terms are used in the manual:
“Screen” refers to the LCD and the viewfinder screen.“Scene” refers to one movie unit from the point you press the start/stop button to start recording until you press again to pause the recording.The terms “Photo” and “Still image” are used interchangeably with the same meaning.
The photos included in the manual are simulated pictures taken with a still camera. Note that unless indicated otherwise, illustrations in this manual refer to the
model.
About the Joystick and the Joystick Guide
About this Manual
First Time Settings
Pre
para
tion
s
29
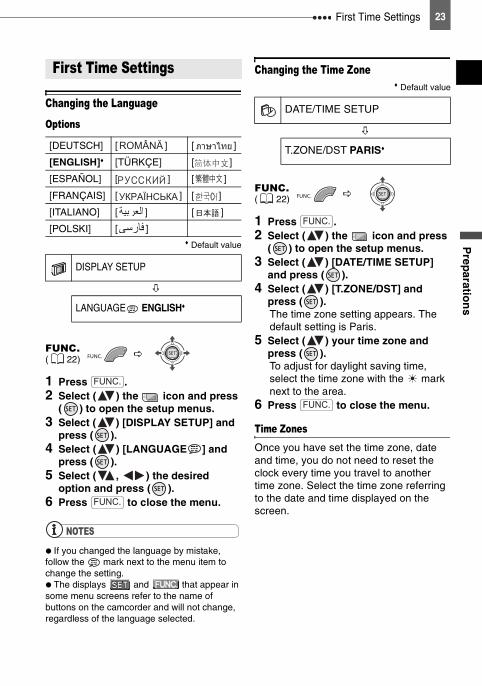
First Time Settings
Changing the Language
Options
Default value
1 Press .
2 Select ( ) the icon and press
( ) to open the setup menus.
3 Select ( ) [DISPLAY SETUP] and
press ( ).
4 Select ( ) [LANGUAGE ] and
press ( ).
5 Select ( , ) the desired
option and press ( ).
6 Press to close the menu.
NOTES
If you changed the language by mistake, follow the mark next to the menu item to change the setting. The displays and that appear in some menu screens refer to the name of buttons on the camcorder and will not change, regardless of the language selected.
Changing the Time Zone
Default value
1 Press .
2 Select ( ) the icon and press
( ) to open the setup menus.
3 Select ( ) [DATE/TIME SETUP]
and press ( ).
4 Select ( ) [T.ZONE/DST] and
press ( ).
The time zone setting appears. The default setting is New York. The default setting is Paris.
5 Select ( ) your time zone and
press ( ).
To adjust for daylight saving time, select the time zone with the mark next to the area.
6 Press to close the menu.
Time Zones
Once you have set the time zone, date and time, you do not need to reset the clock every time you travel to another time zone. Select the time zone referring to the date and time displayed on the screen.
First Time Settings
[DEUTSCH] [ ] [ ]
[ENGLISH] [TÜRKÇE] [ ]
[ESPAÑOL] [ ] [ ]
[FRANÇAIS] [ ] [ ]
[ITALIANO] [ ] [ ]
[POLSKI] [ ]
DISPLAY SETUP
LANGUAGE ENGLISH
FUNC.( 28)
ROMANA
FUNC.
FUNC.
DATE/TIME SETUP
T.ZONE/DST NEW YORK
DATE/TIME SETUP
T.ZONE/DST PARIS
FUNC.( 28)
FUNC.
FUNC.
Menu item shown at its default position
Names of buttons and switches other than the joystick are indicated within a “button” frame (for example ).FUNC.
Brackets [ ] and capital letters are used to refer to menu options as they are displayed on screen. Menu options in boldface indicate the default setting (for example [ON], [OFF]).
Buttons and switches to be perated
Press the joystick itself ( ) to save the settings or confirm an action. On menu screens, this is indicated by the icon .
Push the joystick up, down, left or right ( , ) to select an item or change settings.
10 About this Manual
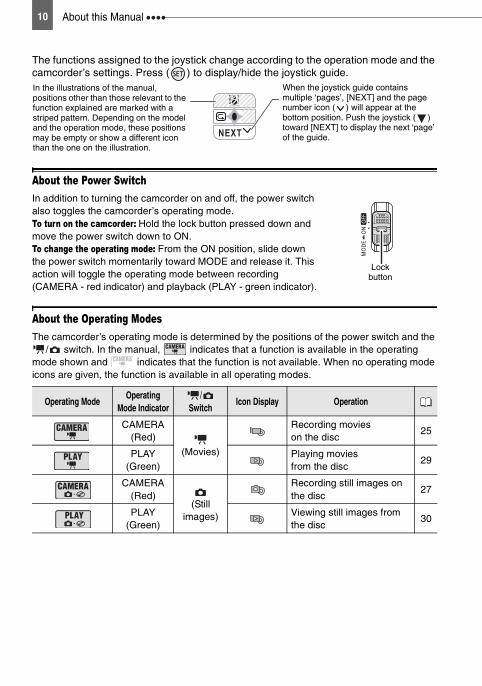
The functions assigned to the joystick change according to the operation mode and the camcorder’s settings. Press ( ) to display/hide the joystick guide.
About the Power SwitchIn addition to turning the camcorder on and off, the power switch also toggles the camcorder’s operating mode.To turn on the camcorder: Hold the lock button pressed down and move the power switch down to ON.To change the operating mode: From the ON position, slide down the power switch momentarily toward MODE and release it. This action will toggle the operating mode between recording (CAMERA - red indicator) and playback (PLAY - green indicator).
About the Operating ModesThe camcorder’s operating mode is determined by the positions of the power switch and the
/ switch. In the manual, indicates that a function is available in the operating mode shown and indicates that the function is not available. When no operating mode icons are given, the function is available in all operating modes.
Operating ModeOperating
Mode Indicator/
SwitchIcon Display Operation
CAMERA(Red)
(Movies)
Recording movies on the disc
25
PLAY(Green)
Playing movies from the disc
29
CAMERA
(Red) (Still
images)
Recording still images on the disc
27
PLAY
(Green)Viewing still images from the disc
30
NEXT
In the illustrations of the manual, positions other than those relevant to the function explained are marked with a striped pattern. Depending on the model and the operation mode, these positions may be empty or show a different icon than the one on the illustration.
When the joystick guide contains multiple ‘pages’, [NEXT] and the page number icon ( ) will appear at the bottom position. Push the joystick ( ) toward [NEXT] to display the next ‘page’ of the guide.
Lock button
Getting to Know the Camcorder 11In
trod
uctio
n
Getting to Know the Camcorder
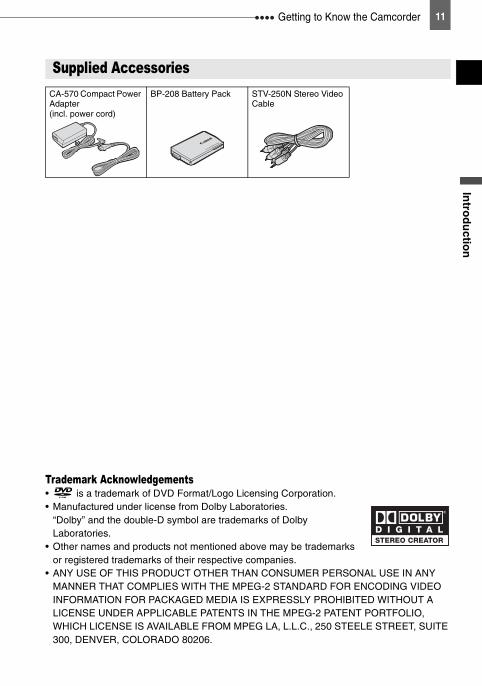
Supplied AccessoriesCA-570 Compact Power Adapter (incl. power cord)
BP-208 Battery Pack STV-250N Stereo Video Cable
Trademark Acknowledgements• is a trademark of DVD Format/Logo Licensing Corporation.• Manufactured under license from Dolby Laboratories.
“Dolby” and the double-D symbol are trademarks of Dolby Laboratories.
• Other names and products not mentioned above may be trademarks or registered trademarks of their respective companies.
• ANY USE OF THIS PRODUCT OTHER THAN CONSUMER PERSONAL USE IN ANY MANNER THAT COMPLIES WITH THE MPEG-2 STANDARD FOR ENCODING VIDEO INFORMATION FOR PACKAGED MEDIA IS EXPRESSLY PROHIBITED WITHOUT A LICENSE UNDER APPLICABLE PATENTS IN THE MPEG-2 PATENT PORTFOLIO, WHICH LICENSE IS AVAILABLE FROM MPEG LA, L.L.C., 250 STEELE STREET, SUITE 300, DENVER, COLORADO 80206.
12 Getting to Know the Camcorder
Names of buttons and switches other than the joystick are indicated within a “button” frame (for example ).
Components Guide
Left side view
Front view
Right Side View
DISP. button ( 48)FUNC. button ( 22, 33)
QUICK START button and standby lamp ( 28)AV terminal ( 61)
Terminal coverBATT. (battery release) switch ( 17)RESET button ( 63)
Serial numberBattery attachment unit ( 17)Lens cover switch ( 25, 27)
( open, closed)Disc compartment cover ( 19)Grip belt ( 20)
DC IN terminal ( 17)Stereo microphone
FUNC.

Getting to Know the Camcorder 13In
trod
uctio
n
Names of buttons and switches other than the joystick are indicated within a “button” frame (for example ).
Back view
Top view
Bottom view
PLAY mode indicator (green) ( 10)Joystick ( 9)
CAMERA mode indicator (red) ( 10)LCD screen ( 21)
(fast reverse) button ( 30) /
Zoom out W (wide-angle) button ( 28) (fast forward) button ( 30) /
Zoom in T (telephoto) button ( 28)
/ (play/pause) button ( 29) / START/STOP button ( 25)
(stop) button ( 29) /
PLAYLIST button ( 51)Viewfinder ( 20)Dioptric adjustment lever ( 20)
/ (movies/still images) switch ( 10)DISC access indicator ( 25, 27) / CHG (charge) indicator ( 17)
Start/stop button ( 25)Power switch ( 10)OPEN (disc cover) switch ( 19)
Grip belt ( 20)Mode switch ( 40)Zoom lever ( 28)
PHOTO button ( 27)Speaker ( 30)Tripod socket ( 26)
Strap mount
FUNC.
14 Getting to Know the Camcorder
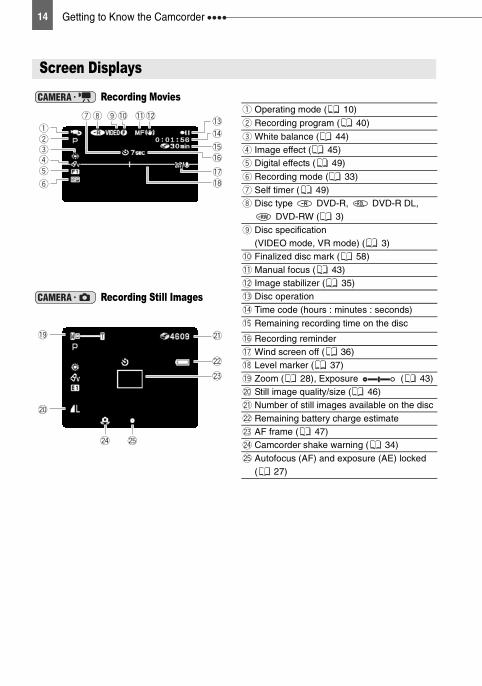
Screen Displays Recording Movies
Operating mode ( 10)
Recording program ( 40)
White balance ( 44)Image effect ( 45)Digital effects ( 49)
Recording mode ( 33)
Self timer ( 49)Disc type DVD-R, DVD-R DL,
DVD-RW ( 3)
Disc specification (VIDEO mode, VR mode) ( 3)Finalized disc mark ( 58)
Manual focus ( 43)Image stabilizer ( 35)
Recording Still Images Disc operation
Time code (hours : minutes : seconds)
Remaining recording time on the disc
Recording reminderWind screen off ( 36)Level marker ( 37)
Zoom ( 28), Exposure ( 43)Still image quality/size ( 46)Number of still images available on the disc
Remaining battery charge estimateAF frame ( 47)Camcorder shake warning ( 34)
Autofocus (AF) and exposure (AE) locked ( 27)
Getting to Know the Camcorder 15In
trod
uctio
n
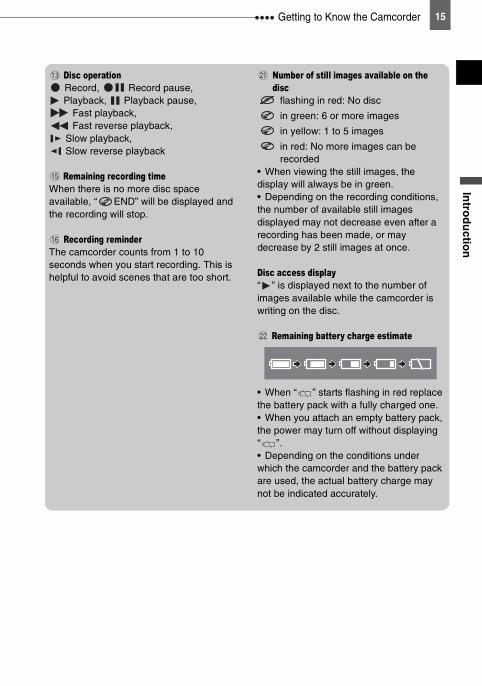
Disc operationRecord, Record pause, Playback, Playback pause,
Fast playback, Fast reverse playback,
Slow playback, Slow reverse playback
Remaining recording timeWhen there is no more disc space available, “ END” will be displayed and the recording will stop.
Recording reminderThe camcorder counts from 1 to 10 seconds when you start recording. This is helpful to avoid scenes that are too short.
Number of still images available on the disc flashing in red: No disc
in green: 6 or more images
in yellow: 1 to 5 images
in red: No more images can be recorded
• When viewing the still images, the display will always be in green.• Depending on the recording conditions, the number of available still images displayed may not decrease even after a recording has been made, or may decrease by 2 still images at once.
Disc access display“ ” is displayed next to the number of images available while the camcorder is writing on the disc.
Remaining battery charge estimate
• When “ ” starts flashing in red replace the battery pack with a fully charged one.• When you attach an empty battery pack, the power may turn off without displaying “ ”.• Depending on the conditions under which the camcorder and the battery pack are used, the actual battery charge may not be indicated accurately.
16 Getting to Know the Camcorder
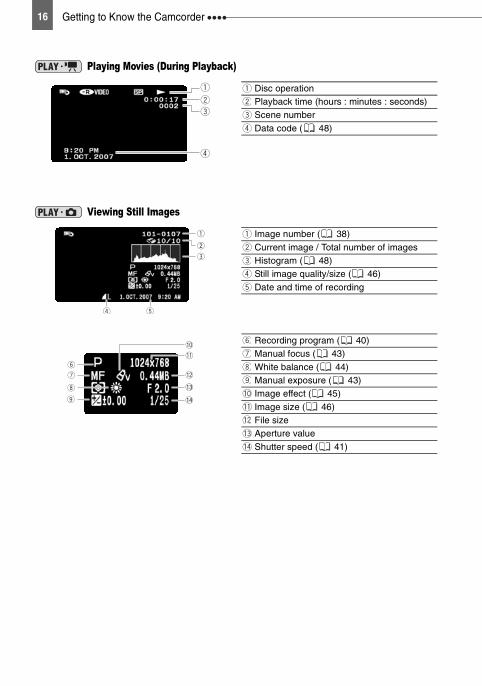
Playing Movies (During Playback)
Disc operationPlayback time (hours : minutes : seconds)Scene number
Data code ( 48)
Viewing Still Images
Image number ( 38)
Current image / Total number of images Histogram ( 48)Still image quality/size ( 46)
Date and time of recording
Recording program ( 40)Manual focus ( 43)
White balance ( 44)Manual exposure ( 43)Image effect ( 45)
Image size ( 46)File sizeAperture value
Shutter speed ( 41)
Getting StartedP
reparatio
ns
17
Preparations
Getting Started
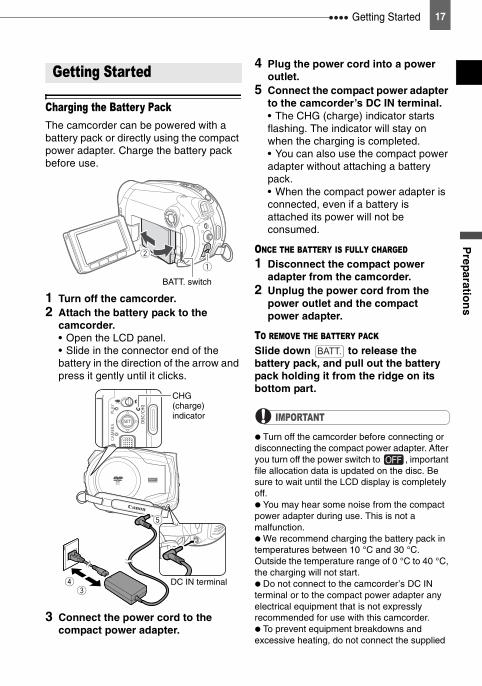
Charging the Battery PackThe camcorder can be powered with a battery pack or directly using the compact power adapter. Charge the battery pack before use.
1 Turn off the camcorder.2 Attach the battery pack to the
camcorder.• Open the LCD panel.• Slide in the connector end of the battery in the direction of the arrow and press it gently until it clicks.
3 Connect the power cord to the compact power adapter.
4 Plug the power cord into a power outlet.
5 Connect the compact power adapter to the camcorder’s DC IN terminal.• The CHG (charge) indicator starts flashing. The indicator will stay on when the charging is completed.• You can also use the compact power adapter without attaching a battery pack.• When the compact power adapter is connected, even if a battery is attached its power will not be consumed.
ONCE THE BATTERY IS FULLY CHARGED 1 Disconnect the compact power
adapter from the camcorder.2 Unplug the power cord from the
power outlet and the compact power adapter.
TO REMOVE THE BATTERY PACK Slide down to release the battery pack, and pull out the battery pack holding it from the ridge on its bottom part.
IMPORTANT
Turn off the camcorder before connecting or disconnecting the compact power adapter. After you turn off the power switch to , important file allocation data is updated on the disc. Be sure to wait until the LCD display is completely off. You may hear some noise from the compact power adapter during use. This is not a malfunction. We recommend charging the battery pack in temperatures between 10 °C and 30 °C. Outside the temperature range of 0 °C to 40 °C, the charging will not start. Do not connect to the camcorder’s DC IN terminal or to the compact power adapter any electrical equipment that is not expressly recommended for use with this camcorder. To prevent equipment breakdowns and excessive heating, do not connect the supplied
Getting Started
BATT. switch
DC IN terminal
CHG (charge)indicator
BATT.
Getting Started 18
compact power adapter to voltage converters for overseas travels or special power sources such as those on aircraft and ships, DC-AC inverters, etc.
NOTES
The CHG (charge) indicator also serves as a rough estimate of the battery charge status.Continuously on: Battery fully charged.
Flashes approx. twice per second: Battery over 50% charged.Flashes approx. once per second: Battery less than 50% charged. The charging time will vary depending on the surrounding temperature and the battery pack’s initial charge condition. In cold places, the effective usage time of the battery will decrease. We recommend that you prepare battery packs 2 to 3 times longer than you think you might need.
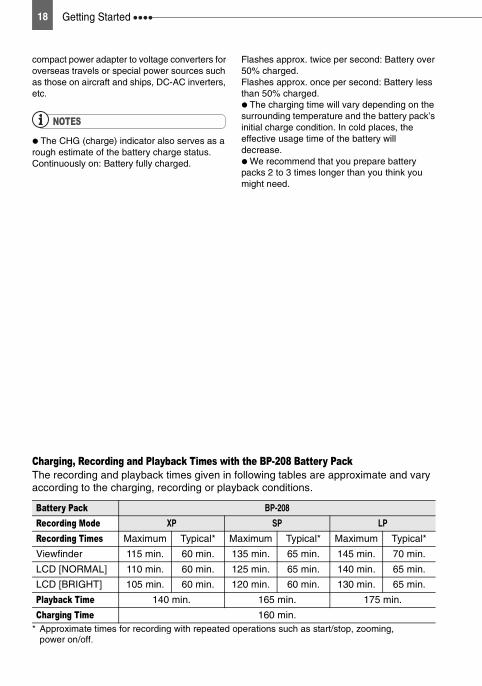
Charging, Recording and Playback Times with the BP-208 Battery PackThe recording and playback times given in following tables are approximate and vary according to the charging, recording or playback conditions.
* Approximate times for recording with repeated operations such as start/stop, zooming, power on/off.
Battery Pack BP-208
Recording Mode XP SP LP
Recording Times Maximum Typical* Maximum Typical* Maximum Typical*
Viewfinder 115 min. 60 min. 135 min. 65 min. 145 min. 70 min.
LCD [NORMAL] 110 min. 60 min. 125 min. 65 min. 140 min. 65 min.
LCD [BRIGHT] 105 min. 60 min. 120 min. 60 min. 130 min. 65 min.
Playback Time 140 min. 165 min. 175 min.
Charging Time 160 min.
Getting StartedP
reparatio
ns
19
Inserting and Removing a Disc
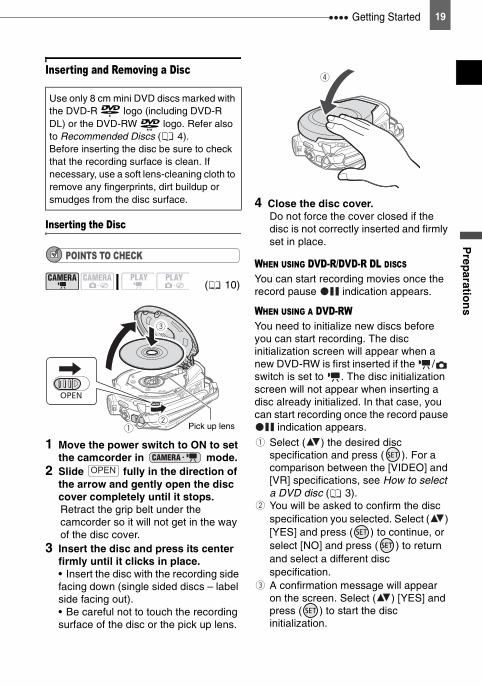
Inserting the Disc
POINTS TO CHECK
1 Move the power switch to ON to set the camcorder in mode.
2 Slide fully in the direction of the arrow and gently open the disc cover completely until it stops.Retract the grip belt under the camcorder so it will not get in the way of the disc cover.
3 Insert the disc and press its center firmly until it clicks in place.• Insert the disc with the recording side facing down (single sided discs – label side facing out).• Be careful not to touch the recording surface of the disc or the pick up lens.
4 Close the disc cover.Do not force the cover closed if the disc is not correctly inserted and firmly set in place.
WHEN USING DVD-R/DVD-R DL DISCS You can start recording movies once the record pause indication appears.
WHEN USING A DVD-RW You need to initialize new discs before you can start recording. The disc initialization screen will appear when a new DVD-RW is first inserted if the / switch is set to . The disc initialization screen will not appear when inserting a disc already initialized. In that case, you can start recording once the record pause
indication appears.
Select ( ) the desired disc specification and press ( ). For a comparison between the [VIDEO] and [VR] specifications, see How to select a DVD disc ( 3).You will be asked to confirm the disc specification you selected. Select ( ) [YES] and press ( ) to continue, or select [NO] and press ( ) to return and select a different disc specification.A confirmation message will appear on the screen. Select ( ) [YES] and press ( ) to start the disc initialization.
Use only 8 cm mini DVD discs marked with the DVD-R logo (including DVD-R DL) or the DVD-RW logo. Refer also to Recommended Discs ( 4).Before inserting the disc be sure to check that the recording surface is clean. If necessary, use a soft lens-cleaning cloth to remove any fingerprints, dirt buildup or smudges from the disc surface.
( 10)
Pick up lens
OPEN
Getting Started 20
• The disc initialization will take approximately one minute. Avoid moving the camcorder while the operation is in progress.• You can start recording movies once the record pause indication appears.
NOTES
The process of recognizing a disc may take a moment. The display will move while the disc is being read. Wait until the camcorder finishes recognizing the disc before you start recording.
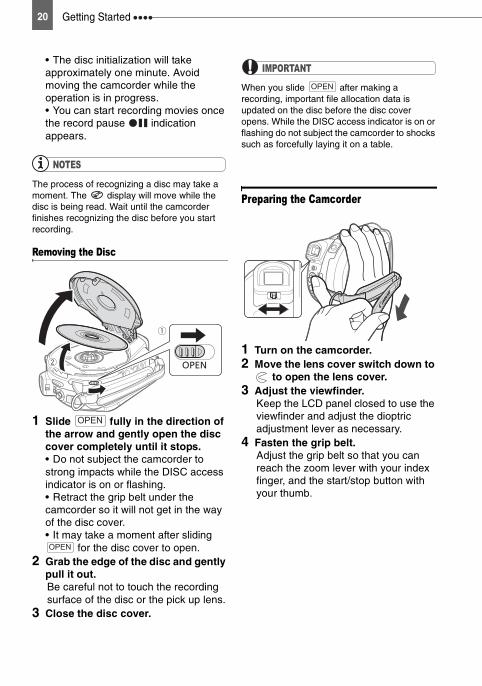
Removing the Disc
1 Slide fully in the direction of the arrow and gently open the disc cover completely until it stops.• Do not subject the camcorder to strong impacts while the DISC access indicator is on or flashing.• Retract the grip belt under the camcorder so it will not get in the way of the disc cover.• It may take a moment after sliding
for the disc cover to open.2 Grab the edge of the disc and gently
pull it out. Be careful not to touch the recording surface of the disc or the pick up lens.
3 Close the disc cover.
IMPORTANT
When you slide after making a recording, important file allocation data is updated on the disc before the disc cover opens. While the DISC access indicator is on or flashing do not subject the camcorder to shocks such as forcefully laying it on a table.
Preparing the Camcorder
1 Turn on the camcorder.2 Move the lens cover switch down to
to open the lens cover.3 Adjust the viewfinder.
Keep the LCD panel closed to use the viewfinder and adjust the dioptric adjustment lever as necessary.
4 Fasten the grip belt.Adjust the grip belt so that you can reach the zoom lever with your index finger, and the start/stop button with your thumb.
OPEN
OPEN
OPEN
Getting StartedP
reparatio
ns
21
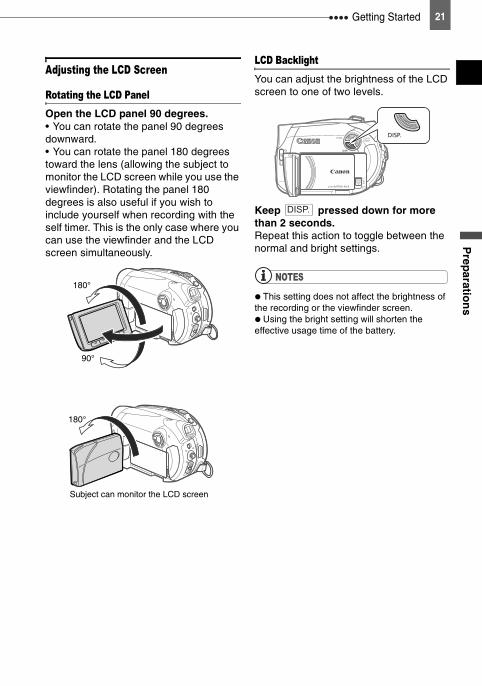
Adjusting the LCD Screen
Rotating the LCD PanelOpen the LCD panel 90 degrees.• You can rotate the panel 90 degrees downward.• You can rotate the panel 180 degrees toward the lens (allowing the subject to monitor the LCD screen while you use the viewfinder). Rotating the panel 180 degrees is also useful if you wish to include yourself when recording with the self timer. This is the only case where you can use the viewfinder and the LCD screen simultaneously.
LCD BacklightYou can adjust the brightness of the LCD screen to one of two levels.
Keep pressed down for more than 2 seconds.Repeat this action to toggle between the normal and bright settings.
NOTES
This setting does not affect the brightness of the recording or the viewfinder screen. Using the bright setting will shorten the effective usage time of the battery.
Subject can monitor the LCD screen
180°
90°
180°
DISP.
Using the Menus 22
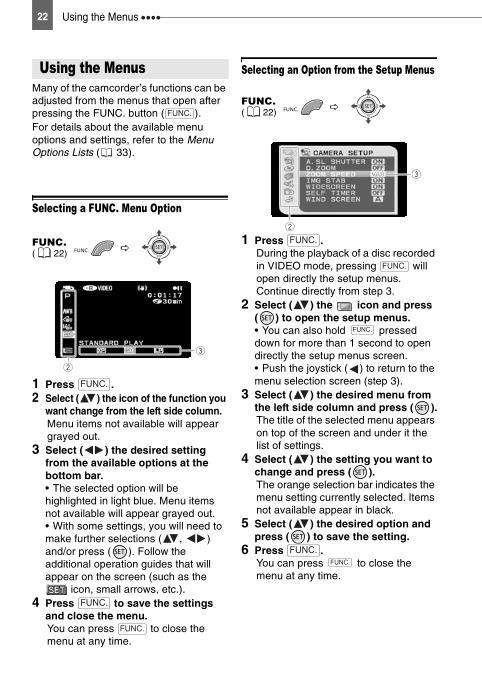
Using the Menus
Many of the camcorder’s functions can be adjusted from the menus that open after pressing the FUNC. button ( ). For details about the available menu options and settings, refer to the Menu Options Lists ( 33).
Selecting a FUNC. Menu Option
1 Press .2 Select ( ) the icon of the function you
want change from the left side column.Menu items not available will appear grayed out.
3 Select ( ) the desired setting from the available options at the bottom bar.• The selected option will be highlighted in light blue. Menu items not available will appear grayed out.• With some settings, you will need to make further selections ( , ) and/or press ( ). Follow the additional operation guides that will appear on the screen (such as the
icon, small arrows, etc.).4 Press to save the settings
and close the menu.You can press to close the menu at any time.
Selecting an Option from the Setup Menus
1 Press .During the playback of a disc recorded in VIDEO mode, pressing will open directly the setup menus. Continue directly from step 3.
2 Select ( ) the icon and press ( ) to open the setup menus.• You can also hold pressed down for more than 1 second to open directly the setup menus screen.• Push the joystick ( ) to return to the menu selection screen (step 3).
3 Select ( ) the desired menu from the left side column and press ( ).The title of the selected menu appears on top of the screen and under it the list of settings.
4 Select ( ) the setting you want to change and press ( ). The orange selection bar indicates the menu setting currently selected. Items not available appear in black.
5 Select ( ) the desired option and press ( ) to save the setting.
6 Press .You can press to close the menu at any time.
Using the Menus
FUNC.( 22)
FUNC.
FUNC.
FUNC.
FUNC.
FUNC.( 22)
FUNC.
FUNC.
FUNC.
FUNC.FUNC.
First Time SettingsP
reparatio
ns
23
First Time Settings
Changing the LanguageOptions
Default value
1 Press .2 Select ( ) the icon and press
( ) to open the setup menus.3 Select ( ) [DISPLAY SETUP] and
press ( ).4 Select ( ) [LANGUAGE ] and
press ( ).5 Select ( , ) the desired
option and press ( ).6 Press to close the menu.
NOTES
If you changed the language by mistake, follow the mark next to the menu item to change the setting. The displays and that appear in some menu screens refer to the name of buttons on the camcorder and will not change, regardless of the language selected.
Changing the Time Zone Default value
1 Press .2 Select ( ) the icon and press
( ) to open the setup menus.3 Select ( ) [DATE/TIME SETUP]
and press ( ).4 Select ( ) [T.ZONE/DST] and
press ( ).The time zone setting appears. The default setting is Paris.
5 Select ( ) your time zone and press ( ).To adjust for daylight saving time, select the time zone with the mark next to the area.
6 Press to close the menu.
Time ZonesOnce you have set the time zone, date and time, you do not need to reset the clock every time you travel to another time zone. Select the time zone referring to the date and time displayed on the screen.
First Time Settings
[DEUTSCH] [ ] [ ]
[ENGLISH] [TÜRKÇE] [ ]
[ESPAÑOL] [ ] [ ]
[FRANÇAIS] [ ] [ ]
[ITALIANO] [ ] [ ]
[POLSKI] [ ]
DISPLAY SETUP
LANGUAGE ENGLISH
FUNC.( 22)
ROMANA
FUNC.
FUNC.
DATE/TIME SETUP
T.ZONE/DST PARIS
FUNC.( 22)
FUNC.
FUNC.
First Time Settings 24
Setting the Date and Time
1 Press .2 Select ( ) the icon and press
( ) to open the setup menus.3 Select ( ) [DATE/TIME SETUP]
and press ( ).4 Select ( ) [DATE/TIME] and press
( ).The first field of the date will be displayed in orange and indicated with up/down arrows.
5 Push the joystick ( ) to set the date and time and ( ) to move between the fields of the date and time.
6 Press ( ) to start the clock.7 Press to close the menu.
IMPORTANT
When you do not use the camcorder for about 3 months, the built-in rechargeable lithium battery may discharge completely and the date and time setting may be lost. In such case, recharge the built-in lithium battery ( 70) and set the time zone, date and time again. You can also change the date format ( 39).
DATE/TIME SETUP
DATE/TIME 1.JAN.2007 12:00 AM
FUNC.( 22)
FUNC.
FUNC.
RecordingB
asic Fu
nctio
ns
25
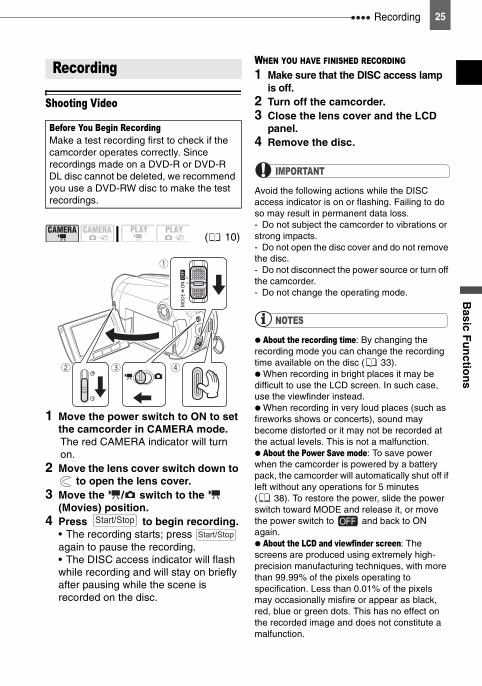
Basic FunctionsRecording
Shooting Video
1 Move the power switch to ON to set the camcorder in CAMERA mode.The red CAMERA indicator will turn on.
2 Move the lens cover switch down to to open the lens cover.
3 Move the / switch to the (Movies) position.
4 Press to begin recording.• The recording starts; press again to pause the recording.• The DISC access indicator will flash while recording and will stay on briefly after pausing while the scene is recorded on the disc.
WHEN YOU HAVE FINISHED RECORDING 1 Make sure that the DISC access lamp
is off.2 Turn off the camcorder.3 Close the lens cover and the LCD
panel. 4 Remove the disc.
IMPORTANT
Avoid the following actions while the DISC access indicator is on or flashing. Failing to do so may result in permanent data loss.- Do not subject the camcorder to vibrations or strong impacts.- Do not open the disc cover and do not remove the disc.- Do not disconnect the power source or turn off the camcorder.- Do not change the operating mode.
NOTES
About the recording time: By changing the recording mode you can change the recording time available on the disc ( 33). When recording in bright places it may be difficult to use the LCD screen. In such case, use the viewfinder instead. When recording in very loud places (such as fireworks shows or concerts), sound may become distorted or it may not be recorded at the actual levels. This is not a malfunction. About the Power Save mode: To save power when the camcorder is powered by a battery pack, the camcorder will automatically shut off if left without any operations for 5 minutes ( 38). To restore the power, slide the power switch toward MODE and release it, or move the power switch to and back to ON again. About the LCD and viewfinder screen: The screens are produced using extremely high-precision manufacturing techniques, with more than 99.99% of the pixels operating to specification. Less than 0.01% of the pixels may occasionally misfire or appear as black, red, blue or green dots. This has no effect on the recorded image and does not constitute a malfunction.
Recording
Before You Begin RecordingMake a test recording first to check if the camcorder operates correctly. Since recordings made on a DVD-R or DVD-R DL disc cannot be deleted, we recommend you use a DVD-RW disc to make the test recordings.
( 10)
Start/StopStart/Stop
Recording 26
When using a tripod: Do not leave the viewfinder exposed to direct sunlight as it may melt (due to concentration of the light by the lens). Do not use tripods with fastening screws longer than 5.5 mm. Doing so may damage the camcorder. When recording movies, try to get a calm, stable picture.Excessive camcorder movement while shooting and extensive use of fast zooms and panning can result in fidgety, jittery scenes. In extreme cases, the playback of such scenes may result in visually induced motion sickness. If you experience such a reaction, immediately stop the playback and take a rest break as necessary.
Reviewing the Last Scene Recorded
1 If the joystick guide does not appear on screen, press ( ) to display it.
2 Push the joystick ( ) toward .• If does not appear on the joystick guide, repeatedly push the joystick ( ) toward [NEXT] to display the joystick guide in the illustration above. When the mode switch is set to AUTO, only one joystick guide will appear.• The camcorder plays back the last scene (but without sound) and returns to record pause mode.• While reviewing the scene, select ( ) the icon and press ( ) to return to the recording mode. • If you are using a DVD-RW disc, you can also delete the scene immediately after recording it. Select ( ) the icon to delete the scene while reviewing it ( 52).
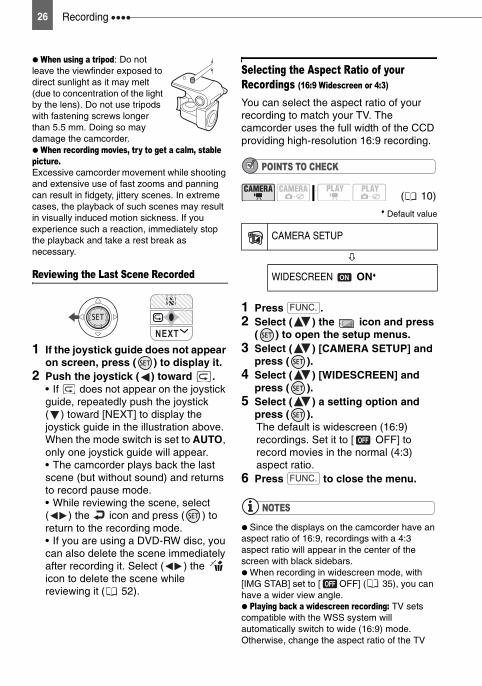
Selecting the Aspect Ratio of your Recordings (16:9 Widescreen or 4:3)
You can select the aspect ratio of your recording to match your TV. The camcorder uses the full width of the CCD providing high-resolution 16:9 recording.
POINTS TO CHECK
Default value
1 Press .2 Select ( ) the icon and press
( ) to open the setup menus.3 Select ( ) [CAMERA SETUP] and
press ( ).4 Select ( ) [WIDESCREEN] and
press ( ).5 Select ( ) a setting option and
press ( ).The default is widescreen (16:9) recordings. Set it to [ OFF] to record movies in the normal (4:3) aspect ratio.
6 Press to close the menu.
NOTES
Since the displays on the camcorder have an aspect ratio of 16:9, recordings with a 4:3 aspect ratio will appear in the center of the screen with black sidebars. When recording in widescreen mode, with [IMG STAB] set to [ OFF] ( 35), you can have a wider view angle. Playing back a widescreen recording: TV sets compatible with the WSS system will automatically switch to wide (16:9) mode. Otherwise, change the aspect ratio of the TV
NEXT
( 10)
CAMERA SETUP
WIDESCREEN ON
FUNC.
FUNC.
RecordingB
asic Fu
nctio
ns
27
manually. To play back on a TV with normal aspect ratio (4:3) change the [TV TYPE] setting accordingly ( 38).
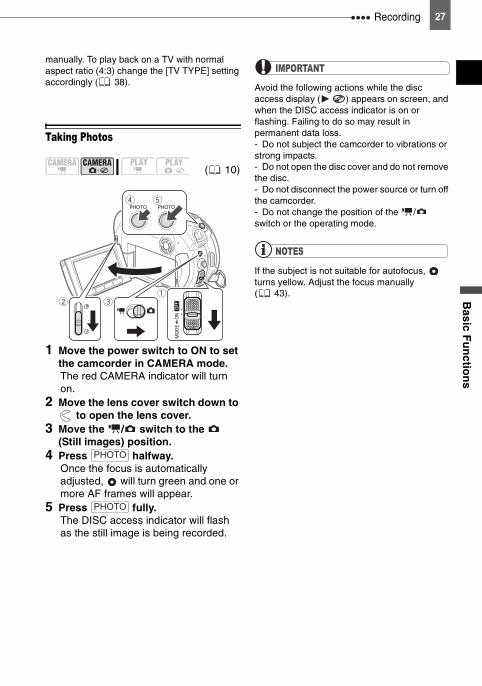
Taking Photos
1 Move the power switch to ON to set the camcorder in CAMERA mode.The red CAMERA indicator will turn on.
2 Move the lens cover switch down to to open the lens cover.
3 Move the / switch to the (Still images) position.
4 Press halfway.Once the focus is automatically adjusted, will turn green and one or more AF frames will appear.
5 Press fully.The DISC access indicator will flash as the still image is being recorded.
IMPORTANT
Avoid the following actions while the disc access display ( ) appears on screen, and when the DISC access indicator is on or flashing. Failing to do so may result in permanent data loss.- Do not subject the camcorder to vibrations or strong impacts.- Do not open the disc cover and do not remove the disc.- Do not disconnect the power source or turn off the camcorder.- Do not change the position of the / switch or the operating mode.
NOTES
If the subject is not suitable for autofocus, turns yellow. Adjust the focus manually ( 43).
( 10)
PHOTO
PHOTO
Recording 28
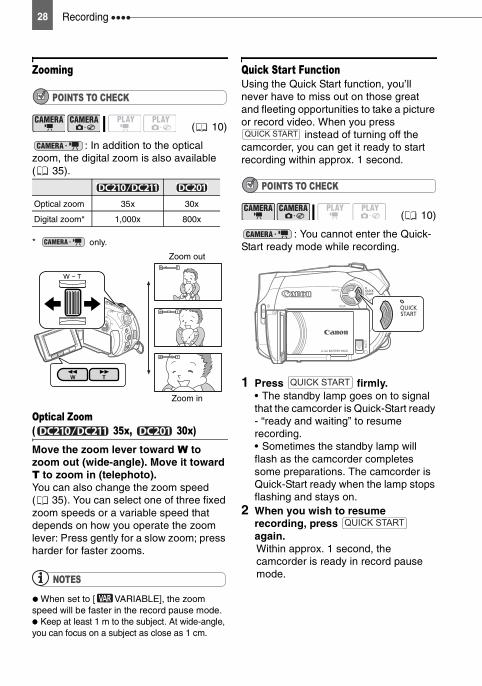
Zooming
POINTS TO CHECK
: In addition to the optical zoom, the digital zoom is also available ( 35).
* only.
Optical Zoom ( 35x, 30x)Move the zoom lever toward W to zoom out (wide-angle). Move it toward T to zoom in (telephoto).You can also change the zoom speed ( 35). You can select one of three fixed zoom speeds or a variable speed that depends on how you operate the zoom lever: Press gently for a slow zoom; press harder for faster zooms.
NOTES
When set to [ VARIABLE], the zoom speed will be faster in the record pause mode. Keep at least 1 m to the subject. At wide-angle, you can focus on a subject as close as 1 cm.
Quick Start FunctionUsing the Quick Start function, you’ll never have to miss out on those great and fleeting opportunities to take a picture or record video. When you press
instead of turning off the camcorder, you can get it ready to start recording within approx. 1 second.
POINTS TO CHECK
: You cannot enter the Quick-Start ready mode while recording.
1 Press firmly.• The standby lamp goes on to signal that the camcorder is Quick-Start ready - “ready and waiting” to resume recording. • Sometimes the standby lamp will flash as the camcorder completes some preparations. The camcorder is Quick-Start ready when the lamp stops flashing and stays on.
2 When you wish to resume recording, press again.Within approx. 1 second, the camcorder is ready in record pause mode.
( 10)
Optical zoom 35x 30x
Digital zoom* 1,000x 800x
Zoom out
Zoom in
( 10)
QUICK START
QUICK START
QUICK START
PlaybackB
asic Fu
nctio
ns
29
NOTES
When you wake up the camcorder from standby mode, the following settings will be changed automatically:- Manual focus returns to automatic focus (AF).- Manual exposure adjustment returns to automatic exposure.- Zoom position returns to full wide angle W. In standby mode, the camcorder consumes only half the power used in record pause mode. Using this mode you can save energy when using a battery pack. The camcorder will shut off if left in the Quick-Start ready mode for 10 minutes, regardless of the [POWER SAVE] setting ( 38). You can select the length of time until shut-off with the [ STANDBY OFF] setting ( 38).To restore the power if the camcorder shut off, slide the power switch toward MODE and release it, or move the power switch to and back to ON again. If you perform any of the following actions while in standby mode (while the standby lamp is on), the camcorder will return to record pause mode.- Open the disc compartment cover.- Slide the power switch toward MODE.- Change the position of the / switch.
Playback
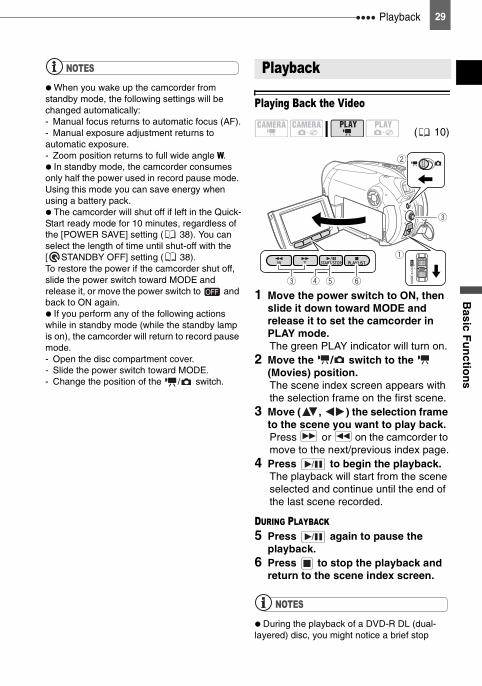
Playing Back the Video
1 Move the power switch to ON, then slide it down toward MODE and release it to set the camcorder in PLAY mode.The green PLAY indicator will turn on.
2 Move the / switch to the (Movies) position.The scene index screen appears with the selection frame on the first scene.
3 Move ( , ) the selection frame to the scene you want to play back. Press or on the camcorder to move to the next/previous index page.
4 Press to begin the playback.The playback will start from the scene selected and continue until the end of the last scene recorded.
DURING PLAYBACK 5 Press again to pause the
playback.6 Press to stop the playback and
return to the scene index screen.
NOTES
During the playback of a DVD-R DL (dual-layered) disc, you might notice a brief stop
Playback
( 10)
/
/
Playback 30
(approx. 1 second) at the point where the playback switches from Layer 1 to Layer 2. You can display the date and time of the recording and other camcorder data registered when the recording was made ( 48).
TO ADJUST THE VOLUMEThe camcorder plays the sound with the built-in speaker. The sound will be muted when you close the LCD panel or connect the stereo video cable to the AV terminal. During the playback of a scene:1 If the joystick guide does not appear
on screen, press ( ) to display it.2 Push the joystick ( ) toward or
to adjust the volume.• To turn off the volume completely, keep pressing ( ) until the volume icon changes to .• You can press ( ) again to hide the joystick guide during playback.
SPECIAL PLAYBACK MODES Fast PlaybackDuring normal playback, press or
on the camcorder. Repeatedly press the button to increase the playback speed. Fast playback: 5x → 15x → 25x
the normal speed. Slow PlaybackDuring playback pause, press or on the camcorder. Repeatedly press the button to increase the playback speed. Slow playback: 1/16 → 1/8 → 1/4
the normal speed. Skipping ScenesDuring playback, push the joystick ( ) to skip to the next scene. Push the joystick ( ) to skip to the beginning of the current scene. Push the joystick ( ) twice to skip to the previous scene.
Note that you do not have to display the joystick guide above to skip the scene.
NOTES
There is no sound during special playback modes. During some special playback modes, you may notice some video problems (blocky video artifacts, banding, etc.) in the playback picture. Slow playback is not available with discs initialized in VIDEO mode. Depending on the recording, you might occasionally notice a brief stop of the picture or sound at the point where the scene changes.
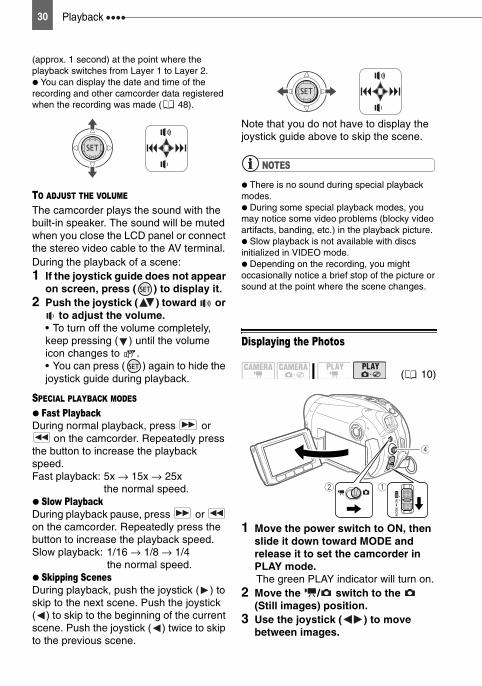
Displaying the Photos
1 Move the power switch to ON, then slide it down toward MODE and release it to set the camcorder in PLAY mode.The green PLAY indicator will turn on.
2 Move the / switch to the (Still images) position.
3 Use the joystick ( ) to move between images.
( 10)
PlaybackB
asic Fu
nctio
ns
31
IMPORTANT
The following may not be displayed correctly.- Images not recorded with this camcorder.- Images edited on or uploaded from a computer.- Images whose file names have been changed. Avoid the following actions while the disc access display ( ) appears on screen, and when the DISC access indicator is on or flashing. Failing to do so may result in permanent data loss.- Do not subject the camcorder to vibrations or strong impacts.- Do not open the disc cover and do not remove the disc.- Do not disconnect the power source or turn off the camcorder.- Do not change the position of the / switch or the operating mode.
Slideshow
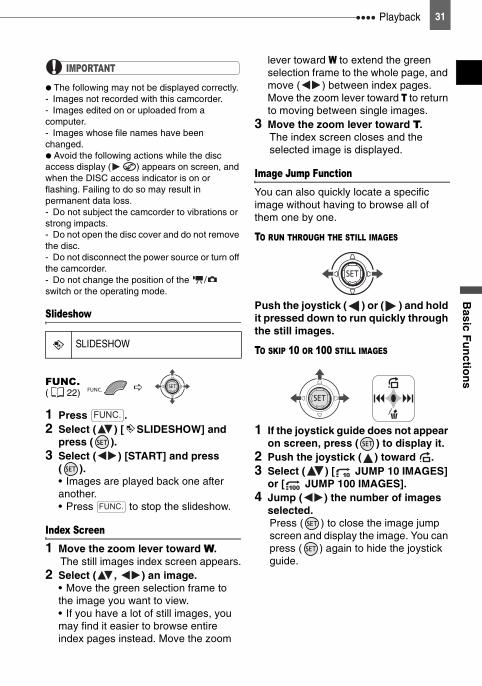
1 Press .2 Select ( ) [ SLIDESHOW] and
press ( ).3 Select ( ) [START] and press
( ).• Images are played back one after another.• Press to stop the slideshow.
Index Screen1 Move the zoom lever toward W.
The still images index screen appears.2 Select ( , ) an image.
• Move the green selection frame to the image you want to view.• If you have a lot of still images, you may find it easier to browse entire index pages instead. Move the zoom
lever toward W to extend the green selection frame to the whole page, and move ( ) between index pages. Move the zoom lever toward T to return to moving between single images.
3 Move the zoom lever toward T.The index screen closes and the selected image is displayed.
Image Jump FunctionYou can also quickly locate a specific image without having to browse all of them one by one.
TO RUN THROUGH THE STILL IMAGES
Push the joystick ( ) or ( ) and hold it pressed down to run quickly through the still images.
TO SKIP 10 OR 100 STILL IMAGES
1 If the joystick guide does not appear on screen, press ( ) to display it.
2 Push the joystick ( ) toward .3 Select ( ) [ JUMP 10 IMAGES]
or [ JUMP 100 IMAGES].4 Jump ( ) the number of images
selected. Press ( ) to close the image jump screen and display the image. You can press ( ) again to hide the joystick guide.
SLIDESHOW
FUNC.( 22)
FUNC.
FUNC.
Playback 32
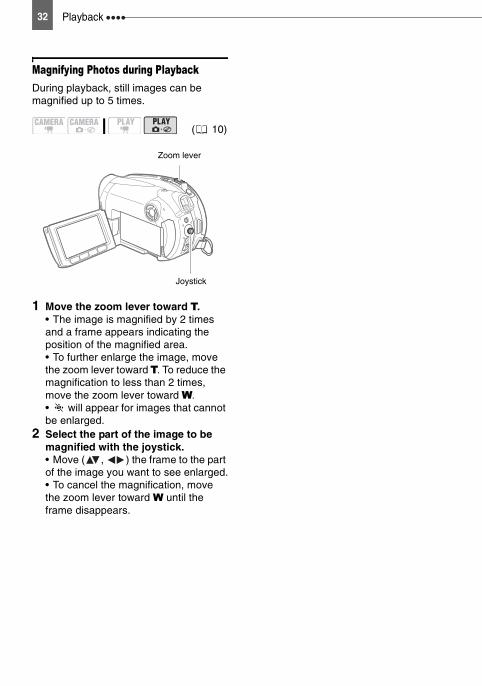
Magnifying Photos during PlaybackDuring playback, still images can be magnified up to 5 times.
1 Move the zoom lever toward T.• The image is magnified by 2 times and a frame appears indicating the position of the magnified area.• To further enlarge the image, move the zoom lever toward T. To reduce the magnification to less than 2 times, move the zoom lever toward W.• will appear for images that cannot be enlarged.
2 Select the part of the image to be magnified with the joystick.• Move ( , ) the frame to the part of the image you want to see enlarged.• To cancel the magnification, move the zoom lever toward W until the frame disappears.
( 10)
Zoom lever
Joystick
Menu Options ListsA
dvan
ced F
un
ction
s33
Advanced Functions
Menu Options Lists
Menu items not available appear grayed out in the FUNC. menu or in black in the setup menus. For details about how to select an item, refer to Using the Menus ( 22).
FUNC. Menu
Mode switch: P[ PROGRAM AE], [ SHUTTER-PRIO. AE], Special scene recording programs:[ PORTRAIT], [ SPORTS], [ NIGHT], [ SNOW], [ BEACH], [ SUNSET], [ SPOTLIGHT], [ FIREWORKS]
Mode switch: P[ AUTO], [ DAYLIGHT], [ TUNGSTEN], [ SET]
Mode switch: P[ IMAGE EFFECT OFF], [ VIVID], [ NEUTRAL], [ SOFT SKIN DETAIL]
Mode switch: P[ D.EFFECT OFF], [ FADE-T], [ WIPE], [ BLK&WHT], [ SEPIA], [ ART], [ MOSAIC]
Mode switch: P[ D.EFFECT OFF], [ BLK&WHT], [ SEPIA]
[ HIGH QUALITY], [ STANDARD PLAY], [ LONG PLAY]The table below gives the approximate recording times with a brand new DVD disc (on a single recording side).
Recording in LP mode gives you a longer recording time; however, depending on the condition of the disc (long usage, imperfections, etc.) the picture and sound recorded in LP mode may be distorted. We recommend using the XP or SP mode for important recordings. The camcorder uses a variable bit rate (VBR) when encoding the video data so the actual recording times will vary depending on the content of the scenes.
Menu Options Lists
Recording programs ( 40)
White balance ( 44)
Image effect ( 45)
Digital effects ( 49)
Recording mode
RecordingMode
Disc Type
DVD-R, DVD-RW
DVD-R DL
20 min. 36 min.
30 min. 54 min.
60 min. 108 min.

Menu Options Lists 34
Size:[L 1024x768], [S 640x480]
Quality: [ SUPER FINE], [ FINE], [ NORMAL]
Disc type: • VR mode[ALL SCENES], [ONE SCENE], [CANCEL]Add a scene to the playlist. This option is available only from the original index screen.
Disc type: • VR modeMove a scene in the playlist. This option is available only from the playlist index screen.
Disc type: • VR modeDivide a scene.
Disc type: • VR modeDelete a scene.
Convert a single still image into a 3-second Photomovie scene.
[CANCEL], [START]
Setup MenusCamera Setup (Digital Zoom, Image Stabilizer, etc.)
CAMERA SETUP
Mode switch: AUTO or P (only in the [ PROGRAM AE] recording program)[ ON], [ OFF]The camcorder automatically uses slow shutter speeds to obtain brighter recordings in places with insufficient lighting. The camcorder uses shutter speeds down to 1/25 (1/12 when recording still images). If a trailing afterimage appears, set the slow shutter to [ OFF]. If (camcorder shake warning) appears, we recommend stabilizing the camcorder, for example, by mounting it on a tripod.
Still image size/quality ( 46)
ADD TO PLAYLIST ( 51)
MOVE ( 52)
DIVIDE ( 53)
DELETE ( 52)
CONVERT TO SCENE ( 57)
SLIDESHOW ( 31)
A.SL SHUTTER
Menu Options ListsA
dvan
ced F
un
ction
s35
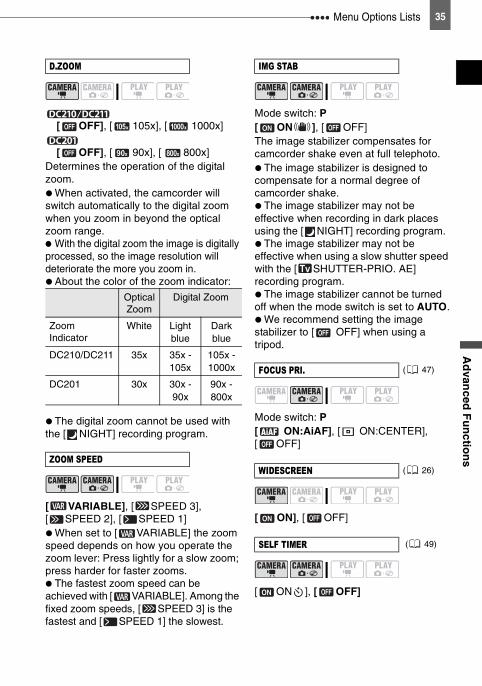
[ OFF], [ 105x], [ 1000x]
[ OFF], [ 90x], [ 800x]Determines the operation of the digital zoom. When activated, the camcorder will switch automatically to the digital zoom when you zoom in beyond the optical zoom range. With the digital zoom the image is digitally processed, so the image resolution will deteriorate the more you zoom in. About the color of the zoom indicator:
The digital zoom cannot be used with the [ NIGHT] recording program.
[ VARIABLE], [ SPEED 3], [ SPEED 2], [ SPEED 1] When set to [ VARIABLE] the zoom speed depends on how you operate the zoom lever: Press lightly for a slow zoom; press harder for faster zooms. The fastest zoom speed can be achieved with [ VARIABLE]. Among the fixed zoom speeds, [ SPEED 3] is the fastest and [ SPEED 1] the slowest.
Mode switch: P[ ON ], [ OFF]The image stabilizer compensates for camcorder shake even at full telephoto. The image stabilizer is designed to compensate for a normal degree of camcorder shake. The image stabilizer may not be effective when recording in dark places using the [ NIGHT] recording program. The image stabilizer may not be effective when using a slow shutter speed with the [ SHUTTER-PRIO. AE] recording program. The image stabilizer cannot be turned off when the mode switch is set to AUTO. We recommend setting the image stabilizer to [ OFF] when using a tripod.
Mode switch: P[ ON:AiAF], [ ON:CENTER], [ OFF]
[ ON], [ OFF]
[ ON ], [ OFF]
D.ZOOM
Optical Zoom
Digital Zoom
Zoom Indicator
White Light blue
Dark blue
DC210/DC211 35x 35x - 105x
105x - 1000x
DC201 30x 30x - 90x
90x - 800x
ZOOM SPEED
IMG STAB
FOCUS PRI. ( 47)
WIDESCREEN ( 26)
SELF TIMER ( 49)
Menu Options Lists 36
Mode switch: P[ AUTO], [ OFF ]The camcorder automatically reduces the background sound of wind when recording outdoors. The wind screen cannot be turned off when the mode switch is set to AUTO. Some low-frequency sounds will be suppressed along with the sound of wind. When recording in surroundings unaffected by wind or if you want to record low-frequency sounds, we recommend setting the wind screen to [ OFF ].
Disc Operations (Photomovie, Finalize, etc.)
DISC OPERATIONS
Displays a screen where you can verify the details regarding the disc. The disc information includes the disc title, the disc type (DVD-R, DVD-R DL or DVD-RW), the disc specification (VIDEO mode or VR mode), and icons that indicate if the disc is finalized ( ) or protected ( ).
Disc type: [VIDEO], [VR], [CANCEL]
[NO], [YES]
Disc type: • VIDEO mode • Finalized[NO], [YES]
Disc type: • VR mode[NO], [YES]This option is available only in the original index screen.
Disc type: • VR mode[NO], [YES]This option is available only in the playlist index screen.
Disc type: • VR mode[NO], [YES]
[NO], [YES]
WIND SCREEN
DISC INFO
DISC INITIALIZE ( 54)
FINALIZE ( 58)
UNFINALIZE ( 60)
MOVIES ALL DEL ( 53)
PLAYLST ALL DEL ( 53)
DISC PROTECT ( 54)
PHOTOMOVIE ( 57)
DISC TITLE ( 55)
Menu Options ListsA
dvan
ced F
un
ction
s37
Still Image Operations (Erase all still images)
STILL IMG OPER.
[NO], [YES]
Display Setup (LCD Brightness, Language, etc.)
DISPLAY SETUP
Adjusts the brightness of the LCD screen. Use the joystick ( ) to adjust the brightness to your preference. Changing the brightness of the LCD screen does not affect that of the viewfinder or the recordings.
[ ON], [ OFF]When the LCD panel is rotated 180 degrees to face the subject, most screen displays will disappear and the image displayed will be as if the subject was looking at a mirror.
[ ON], [ OFF]When set to [ ON], the camcorder’s on-screen displays will appear also on the screen of a connected TV or monitor.
[ DATE], [ TIME], [ DATE & TIME], [ CAMERA DATA]
[ OFF], [ LEVEL(WHT)], [ LEVEL(GRY)], [ GRID(WHT)], [ GRID(GRY)]You can display a grid or a horizontal line at the center of the screen. The markers are available in white or gray. Use the markers as a reference to make sure your subject is framed correctly (vertically and/or horizontally). Using the markers will not affect the recordings on the disc.
[DEUTSCH], [ENGLISH], [ESPAÑOL], [FRANÇAIS], [ITALIANO], [POLSKI], [ ], [TÜRKÇE], [ ], [ ], [ ], [ ], [ ], [ ], [ ], [ ], [ ]
ERASE ALL IMAGES ( 56)
BRIGHTNESS
LCD MIRROR
TV SCREEN
DATA CODE ( 48)
MARKERS
LANGUAGE ( 23)
ROMANA
Menu Options Lists 38
System Setup (Volume, Beep, etc.)
SYSTEM SETUP
[ HIGH VOLUME], [ LOW VOLUME], [ OFF]A beep will accompany some operations like turning on the camcorder, the self-timer countdown, etc. It also serves as a warning beep under unusual conditions.
[ ON], [ OFF]In order to save power when the camcorder is powered by a battery pack, it will automatically shut off if left without any operation for 5 minutes. Approximately 30 seconds before the camcorder shuts off, the message “ AUTO POWER OFF” will appear. In Quick-Start ready mode, the camcorder will shut off after the time selected for the [ STANDBY OFF] setting.
[ 10 min], [ 20 min], [ 30 min]Select the length of time after which the camcorder will end the Quick-Start ready mode and shut off automatically.
[ RESET], [ CONTINUOUS]Select the image numbering method to be used on a new disc.Images are automatically assigned consecutive image numbers from 0101 to 9900, and stored in folders containing up to 100 images. Folders are numbered from 101 to 998.[ RESET]: Image numbers will restart from 101-0101 every time you insert a new disc.[ CONTINUOUS]: Image numbers will continue from the number following that of the last image recorded with the camcorder. If the disc you insert already contains an image with a larger number, a new image will be assigned a number one higher than that of the last image on the disc. We recommend using the [ CONTINUOUS] setting.
[ NORMAL TV], [ WIDE TV]In order to display the picture in full and in the correct aspect ratio, select the setting according to the type of television to which you will connect the camcorder.[ NORMAL TV]: TV sets with 4:3 aspect ratio.[ WIDE TV]: TV sets with 16:9 aspect ratio. When the TV type is set to [ NORMAL TV], if you play back a recording made in widescreen (16:9) the picture displayed on the LCD screen will be smaller than the full display area.
VOLUME ( 30)
BEEP
POWER SAVE
STANDBY OFF ( 28)
FILE NOS.
TV TYPE
Menu Options ListsA
dvan
ced F
un
ction
s39
You can verify the current version of the camcorder’s firmware. This menu option is usually grayed out.
Date/Time Setup
DATE/TIME SETUP
[Y.M.D (2007.1.1 AM 12:00)], [M.D,Y (JAN. 1, 2007 12:00 AM)], [D.M.Y (1.JAN.2007 12:00 AM)]Changes the date format for on-screen displays.
FIRMWARE
T.ZONE/DST ( 23)
DATE/TIME ( 24)
DATE FORMAT
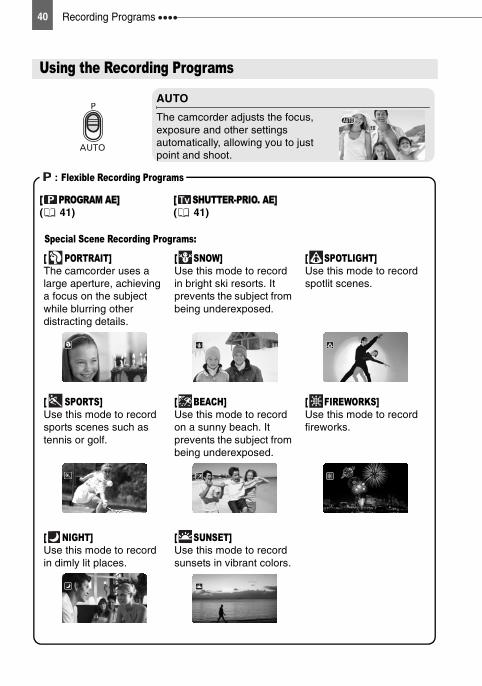
Recording Programs 40
Recording Programs
Using the Recording Programs
AUTO
The camcorder adjusts the focus, exposure and other settings automatically, allowing you to just point and shoot.
: Flexible Recording Programs
[ PROGRAM AE] [ SHUTTER-PRIO. AE] ( 41) ( 41)
Special Scene Recording Programs:
[ PORTRAIT]The camcorder uses a large aperture, achieving a focus on the subject while blurring other distracting details.
[ SNOW]Use this mode to record in bright ski resorts. It prevents the subject from being underexposed.
[ SPOTLIGHT]Use this mode to record spotlit scenes.
[ SPORTS]Use this mode to record sports scenes such as tennis or golf.
[ BEACH]Use this mode to record on a sunny beach. It prevents the subject from being underexposed.
[ FIREWORKS]Use this mode to record fireworks.
[ NIGHT]Use this mode to record in dimly lit places.
[ SUNSET]Use this mode to record sunsets in vibrant colors.
Recording ProgramsA
dvan
ced F
un
ction
s41
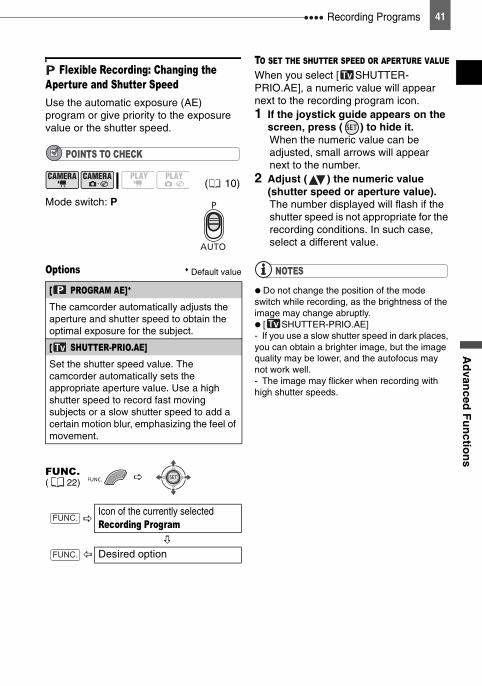
Flexible Recording: Changing the Aperture and Shutter Speed Use the automatic exposure (AE) program or give priority to the exposure value or the shutter speed.
POINTS TO CHECK
Mode switch: P
Options Default value
TO SET THE SHUTTER SPEED OR APERTURE VALUEWhen you select [ SHUTTER-PRIO.AE], a numeric value will appear next to the recording program icon.1 If the joystick guide appears on the
screen, press ( ) to hide it.When the numeric value can be adjusted, small arrows will appear next to the number.
2 Adjust ( ) the numeric value (shutter speed or aperture value).The number displayed will flash if the shutter speed is not appropriate for the recording conditions. In such case, select a different value.
NOTES
Do not change the position of the mode switch while recording, as the brightness of the image may change abruptly. [ SHUTTER-PRIO.AE]- If you use a slow shutter speed in dark places, you can obtain a brighter image, but the image quality may be lower, and the autofocus may not work well.- The image may flicker when recording with high shutter speeds.
( 10)
[ PROGRAM AE]The camcorder automatically adjusts the aperture and shutter speed to obtain the optimal exposure for the subject.
[ SHUTTER-PRIO.AE]Set the shutter speed value. The camcorder automatically sets the appropriate aperture value. Use a high shutter speed to record fast moving subjects or a slow shutter speed to add a certain motion blur, emphasizing the feel of movement.
FUNC.( 22)
Icon of the currently selected Recording Program
Desired option
FUNC.
FUNC.

Recording Programs 42
Shutter speed guidelines
Note that on screen only the denominator is displayed – “ 250” indicates a shutter speed of 1/250 second, etc.
Special Scene: Recording Programs to Match Special ConditionsRecording in a very bright ski resort or capturing the full colors of a sunset or a fireworks display becomes as easy as selecting a special scene recording program.
POINTS TO CHECK
Mode switch: P
NOTES
Do not change the position of the mode switch while recording, as the brightness of the image may change abruptly. [ PORTRAIT]/[ SPORTS]/[ BEACH]/[ SNOW]- The picture may not appear smooth during playback.
[ PORTRAIT]- The blur effect of the background increases the more you zoom in (T).
[ NIGHT]- Moving subjects may leave a trailing afterimage.- Picture quality may not be as good as in other modes.- White points may appear on the screen.- Autofocus may not work as well as in other modes. In such case, adjust the focus manually.
[ SNOW]/[ BEACH]- The subject may become overexposed on cloudy days or in shaded places. Check the image on the screen.
[ FIREWORKS]- To avoid camcorder shake, we recommend using a tripod. Make sure to use a tripod especially in , as the shutter speed slows down.
1/6, 1/12, 1/251/2, 1/3, 1/6, 1/12, 1/25
For recording subjects in dark places.
1/501/50
For general recordings.
1/1201/120
For recording indoor sports scenes.
1/250, 1/500, 1/10001/250, 1/500
For recording from within a car or train, or for recording moving subjects such as roller coasters.
1/2000
For recording outdoor sports such as golf or tennis on sunny days.
( 10)
FUNC.( 22)
Icon of the currently selected Recording Program
Last icon on the right (icon of the currently selected Special Scene)
Desired option
FUNC.
FUNC.
Adjusting the Picture: Exposure, Focus and ColorA
dvan
ced F
un
ction
s43
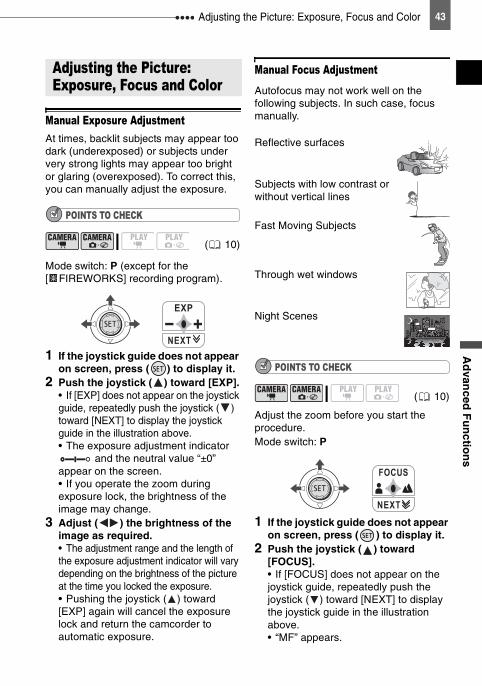
Adjusting the Picture: Exposure, Focus and Color
Manual Exposure AdjustmentAt times, backlit subjects may appear too dark (underexposed) or subjects under very strong lights may appear too bright or glaring (overexposed). To correct this, you can manually adjust the exposure.
POINTS TO CHECK
Mode switch: P (except for the [ FIREWORKS] recording program).
1 If the joystick guide does not appear on screen, press ( ) to display it.
2 Push the joystick ( ) toward [EXP].• If [EXP] does not appear on the joystick guide, repeatedly push the joystick ( ) toward [NEXT] to display the joystick guide in the illustration above. • The exposure adjustment indicator
and the neutral value “±0” appear on the screen.• If you operate the zoom during exposure lock, the brightness of the image may change.
3 Adjust ( ) the brightness of the image as required.• The adjustment range and the length of the exposure adjustment indicator will vary depending on the brightness of the picture at the time you locked the exposure.• Pushing the joystick ( ) toward [EXP] again will cancel the exposure lock and return the camcorder to automatic exposure.
Manual Focus AdjustmentAutofocus may not work well on the following subjects. In such case, focus manually.
Reflective surfaces
Subjects with low contrast or without vertical lines
Fast Moving Subjects
Through wet windows
Night Scenes
POINTS TO CHECK
Adjust the zoom before you start the procedure.Mode switch: P
1 If the joystick guide does not appear on screen, press ( ) to display it.
2 Push the joystick ( ) toward [FOCUS]. • If [FOCUS] does not appear on the joystick guide, repeatedly push the joystick ( ) toward [NEXT] to display the joystick guide in the illustration above. • “MF” appears.
Adjusting the Picture: Exposure, Focus and Color
( 10)
NEXT
EXP
( 10)
NEXT
FOCUS
Adjusting the Picture: Exposure, Focus and Color 44
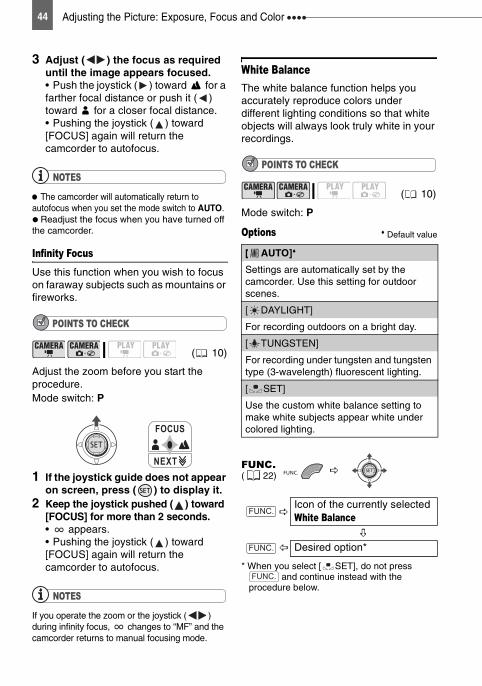
3 Adjust ( ) the focus as required until the image appears focused.• Push the joystick ( ) toward for a farther focal distance or push it ( ) toward for a closer focal distance.• Pushing the joystick ( ) toward [FOCUS] again will return the camcorder to autofocus.
NOTES
The camcorder will automatically return to autofocus when you set the mode switch to AUTO. Readjust the focus when you have turned off the camcorder.
Infinity FocusUse this function when you wish to focus on faraway subjects such as mountains or fireworks.
POINTS TO CHECK
Adjust the zoom before you start the procedure.Mode switch: P
1 If the joystick guide does not appear on screen, press ( ) to display it.
2 Keep the joystick pushed ( ) toward [FOCUS] for more than 2 seconds. • appears.• Pushing the joystick ( ) toward [FOCUS] again will return the camcorder to autofocus.
NOTES
If you operate the zoom or the joystick ( ) during infinity focus, changes to “MF” and the camcorder returns to manual focusing mode.
White BalanceThe white balance function helps you accurately reproduce colors under different lighting conditions so that white objects will always look truly white in your recordings.
POINTS TO CHECK
Mode switch: P
Options Default value
* When you select [ SET], do not press and continue instead with the
procedure below.
( 10)
NEXT
FOCUS
( 10)
[ AUTO]
Settings are automatically set by the camcorder. Use this setting for outdoor scenes.
[ DAYLIGHT]
For recording outdoors on a bright day.
[ TUNGSTEN]
For recording under tungsten and tungsten type (3-wavelength) fluorescent lighting.
[ SET]
Use the custom white balance setting to make white subjects appear white under colored lighting.
FUNC.( 22)
Icon of the currently selected White Balance
Desired option*
FUNC.
FUNC.
FUNC.
Adjusting the Picture: Exposure, Focus and ColorA
dvan
ced F
un
ction
s45
TO SET THE CUSTOM WHITE BALANCE 1 Point the camcorder at a white
object, zoom in until it fills the whole screen and press ( ).When the adjustment is completed,
stops flashing and stays on. The camcorder retains the custom setting even if you turn off the camcorder.
2 Press to save the setting and close the menu.
NOTES
When you have set the custom white balance: - Depending on the light source, may keep flashing. The result will still be better than with [ AUTO].- Reset the white balance when the lighting condition changes.- Turn off the digital zoom. The camcorder retains the custom white balance setting even if you turn it off. Custom white balance may provide better results in the following cases:- Changing lighting conditions- Close-ups- Subjects in a single color (sky, sea or forest)- Under mercury lamps and certain types of fluorescent lights
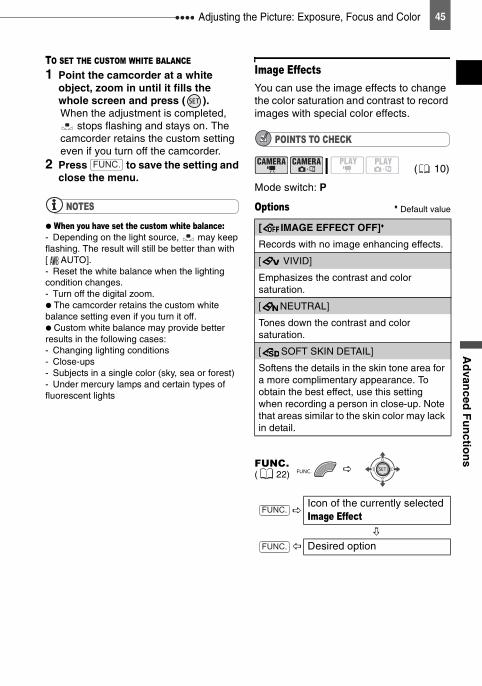
Image EffectsYou can use the image effects to change the color saturation and contrast to record images with special color effects.
POINTS TO CHECK
Mode switch: P
Options Default value
FUNC. ( 10)
[ IMAGE EFFECT OFF]
Records with no image enhancing effects.
[ VIVID]
Emphasizes the contrast and color saturation.
[ NEUTRAL]
Tones down the contrast and color saturation.
[ SOFT SKIN DETAIL]
Softens the details in the skin tone area for a more complimentary appearance. To obtain the best effect, use this setting when recording a person in close-up. Note that areas similar to the skin color may lack in detail.
FUNC.( 22)
Icon of the currently selected Image Effect
Desired option
FUNC.
FUNC.
Still Image Recording Options 46
Still Image Recording Options
Selecting the Size and Quality of Still ImagesStill images are recorded on the disc using the JPEG (Joint Photographic Experts Group) compression. As a general rule select a larger image size for higher quality.
OptionsImage size options vary depending on the model. The following table summarizes the approximate numbers of still images that can be recorded on different medias by image size/quality.
Default value
* The number displayed on the right corner indicates the approximate number of images that can be recorded with the current quality/size setting.
Approximate number of still images on a disc
1 : [SUPER FINE], : [FINE], : [NORMAL]2 This is the number of images that can be recorded on the disc. However, the maximum number of
remaining still images displayed on the screen will be 9999.
Still Image Recording Options
( 10)
L 1024x768/FINE
FUNC.( 22)
Icon of the currently selected Image Quality/Size
Desired image size*
Press ( )
Desired image quality*
FUNC.
FUNC.
Disc Type/ Disc Specification
DVD-R or DVD-RW VIDEO mode
DVD-R DLVIDEO mode
DVD-RWVR mode
Image Quality1 → Image Size ↓L 1024x768 2,690 3,910 7,830 4,890 7,115 9,999 2,735 3,980 7,965
S 640x480 6,625 9,570 9,999 9,999 9,999 9,999 6,740 9,735 17,5252
Still Image Recording OptionsA
dvan
ced F
un
ction
s47
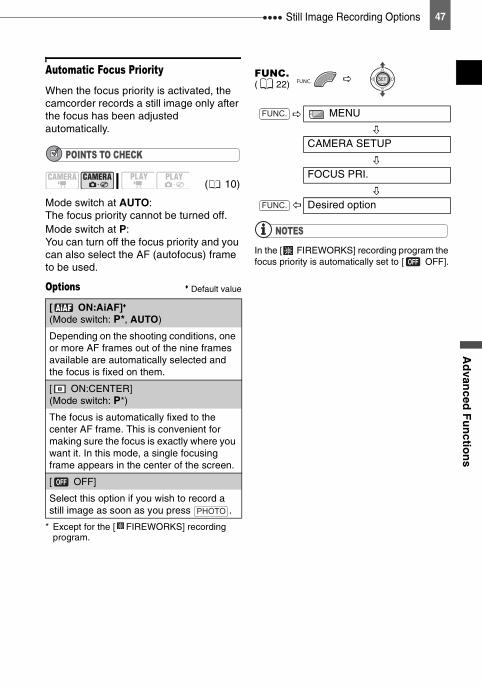
Automatic Focus PriorityWhen the focus priority is activated, the camcorder records a still image only after the focus has been adjusted automatically.
POINTS TO CHECK
Mode switch at AUTO:The focus priority cannot be turned off.Mode switch at P:You can turn off the focus priority and you can also select the AF (autofocus) frame to be used.
Options Default value
* Except for the [ FIREWORKS] recording program.
NOTES
In the [ FIREWORKS] recording program the focus priority is automatically set to [ OFF].
( 10)
[ ON:AiAF](Mode switch: P*, AUTO)
Depending on the shooting conditions, one or more AF frames out of the nine frames available are automatically selected and the focus is fixed on them.
[ ON:CENTER] (Mode switch: P*)
The focus is automatically fixed to the center AF frame. This is convenient for making sure the focus is exactly where you want it. In this mode, a single focusing frame appears in the center of the screen.
[ OFF]
Select this option if you wish to record a still image as soon as you press .PHOTO
FUNC.( 22)
MENU
CAMERA SETUP
FOCUS PRI.
Desired option
FUNC.
FUNC.
Other Functions 48
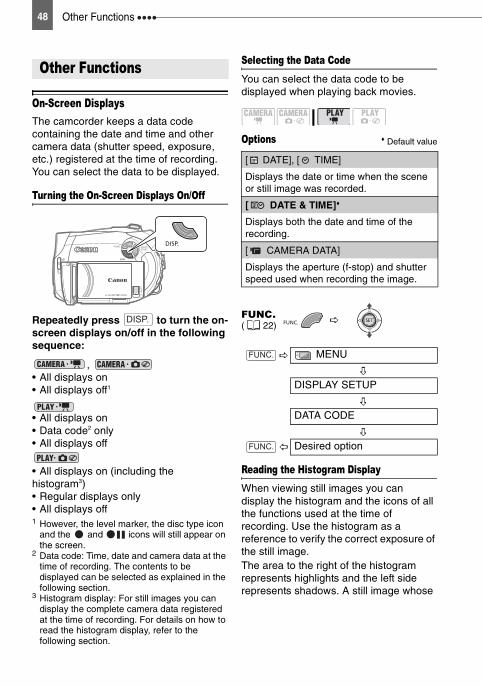
Other Functions
On-Screen DisplaysThe camcorder keeps a data code containing the date and time and other camera data (shutter speed, exposure, etc.) registered at the time of recording. You can select the data to be displayed.
Turning the On-Screen Displays On/Off
Repeatedly press to turn the on-screen displays on/off in the following sequence:
, • All displays on• All displays off1
• All displays on• Data code2 only• All displays off
• All displays on (including the histogram3)• Regular displays only• All displays off1 However, the level marker, the disc type icon
and the and icons will still appear on the screen.
2 Data code: Time, date and camera data at the time of recording. The contents to be displayed can be selected as explained in the following section.
3 Histogram display: For still images you can display the complete camera data registered at the time of recording. For details on how to read the histogram display, refer to the following section.
Selecting the Data CodeYou can select the data code to be displayed when playing back movies.
Options Default value
Reading the Histogram DisplayWhen viewing still images you can display the histogram and the icons of all the functions used at the time of recording. Use the histogram as a reference to verify the correct exposure of the still image.The area to the right of the histogram represents highlights and the left side represents shadows. A still image whose
Other Functions
DISP.
[ DATE], [ TIME]
Displays the date or time when the scene or still image was recorded.
[ DATE & TIME]
Displays both the date and time of the recording.
[ CAMERA DATA]
Displays the aperture (f-stop) and shutter speed used when recording the image.
FUNC.( 22)
MENU
DISPLAY SETUP
DATA CODE
Desired option
FUNC.
FUNC.
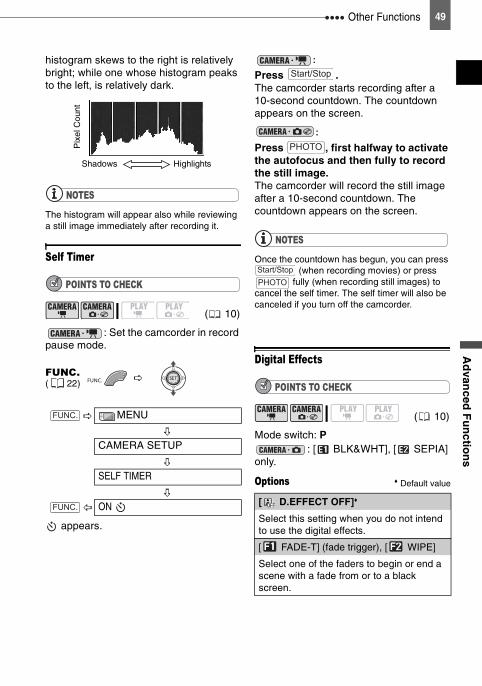
Other FunctionsA
dvan
ced F
un
ction
s49
histogram skews to the right is relatively bright; while one whose histogram peaks to the left, is relatively dark.
NOTES
The histogram will appear also while reviewing a still image immediately after recording it.
Self Timer
POINTS TO CHECK
: Set the camcorder in record pause mode.
appears.
:
Press .The camcorder starts recording after a 10-second countdown. The countdown appears on the screen.
:
Press , first halfway to activate the autofocus and then fully to record the still image.The camcorder will record the still image after a 10-second countdown. The countdown appears on the screen.
NOTES
Once the countdown has begun, you can press (when recording movies) or press
fully (when recording still images) to cancel the self timer. The self timer will also be canceled if you turn off the camcorder.
Digital Effects
POINTS TO CHECK
Mode switch: P: [ BLK&WHT], [ SEPIA]
only.
Options Default value
( 10)
FUNC.( 22)
MENU
CAMERA SETUP
SELF TIMER
ON
Shadows
Pix
el C
ount
Highlights
FUNC.
FUNC.
( 10)
[ D.EFFECT OFF]
Select this setting when you do not intend to use the digital effects.
[ FADE-T] (fade trigger), [ WIPE]
Select one of the faders to begin or end a scene with a fade from or to a black screen.
Start/Stop
PHOTO
Start/StopPHOTO

Other Functions 50
NOTES
When you apply a fader, not only the picture but also the sound will fade in or out. When you apply an effect, the sound will be recorded normally. The camcorder retains the setting last used even if you turn off the digital effects or change the recording program.
Setting
* You can preview the effect on the screen.** The icon of the selected effect appears.
Applying
1 If the joystick guide does not appear on screen, press ( ) to display it.
2 Push the joystick ( ) toward .• If does not appear on the joystick guide, repeatedly push the joystick ( ) toward [NEXT] to display the joystick guide in the illustration above. • The icon of the selected effect turns green.• Push the joystick ( ) toward again to deactivate the fader/effect.
TO FADE INPush the joystick ( ) toward in record pause mode ( ), then press to start recording with a fade in.
TO FADE OUT
Push the joystick ( ) toward while recording ( ), then press to fade out and pause the recording.
TO ACTIVATE AN EFFECT: Push the joystick ( )
toward while recording or in record pause mode.
: Push the joystick ( ) toward and then press to record the
still image.
[ BLK&WHT]
Records images in black and white.
[ SEPIA]
Records images in sepia tones for an “old” look.
[ ART], [ MOSAIC]
Select one of the other digital effects to add flavor to your recordings.
FUNC.( 22)
Icon of the currently selected Digital Effect
** Desired fader/effect*
FUNC.
FUNC.
NEXT
Start/Stop
Start/Stop
PHOTO
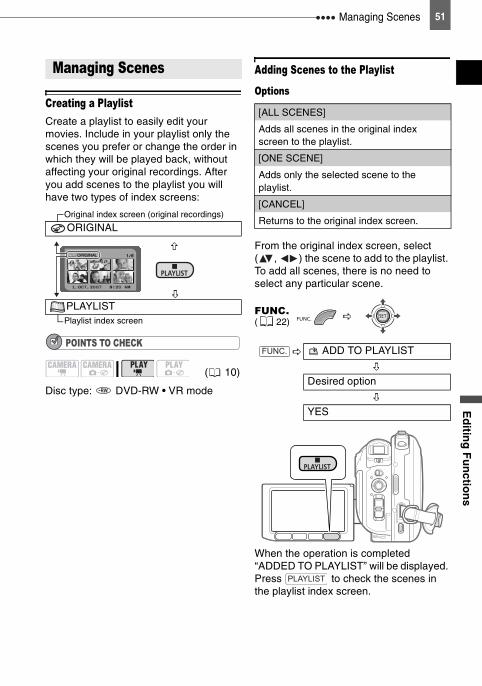
Managing ScenesE
ditin
g F
un
ction
s51
Editing FunctionsManaging Scenes
Creating a PlaylistCreate a playlist to easily edit your movies. Include in your playlist only the scenes you prefer or change the order in which they will be played back, without affecting your original recordings. After you add scenes to the playlist you will have two types of index screens:
POINTS TO CHECK
Disc type: DVD-RW • VR mode
Adding Scenes to the Playlist
Options
From the original index screen, select ( , ) the scene to add to the playlist. To add all scenes, there is no need to select any particular scene.
When the operation is completed “ADDED TO PLAYLIST” will be displayed. Press to check the scenes in the playlist index screen.
Managing Scenes
Original index screen (original recordings)
ORIGINAL
PLAYLISTPlaylist index screen
( 10)
[ALL SCENES]
Adds all scenes in the original index screen to the playlist.
[ONE SCENE]
Adds only the selected scene to the playlist.
[CANCEL]
Returns to the original index screen.
FUNC.( 22)
ADD TO PLAYLIST
Desired option
YES
FUNC.
PLAYLIST
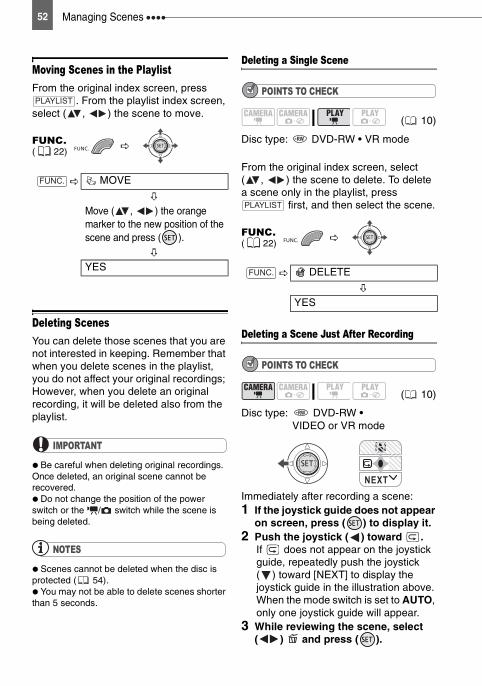
Managing Scenes 52
Moving Scenes in the PlaylistFrom the original index screen, press
. From the playlist index screen, select ( , ) the scene to move.
Deleting ScenesYou can delete those scenes that you are not interested in keeping. Remember that when you delete scenes in the playlist, you do not affect your original recordings; However, when you delete an original recording, it will be deleted also from the playlist.
IMPORTANT
Be careful when deleting original recordings. Once deleted, an original scene cannot be recovered. Do not change the position of the power switch or the / switch while the scene is being deleted.
NOTES
Scenes cannot be deleted when the disc is protected ( 54). You may not be able to delete scenes shorter than 5 seconds.
Deleting a Single Scene
POINTS TO CHECK
Disc type: DVD-RW • VR mode
From the original index screen, select ( , ) the scene to delete. To delete a scene only in the playlist, press
first, and then select the scene.
Deleting a Scene Just After Recording
POINTS TO CHECK
Disc type: DVD-RW • VIDEO or VR mode
Immediately after recording a scene:1 If the joystick guide does not appear
on screen, press ( ) to display it.2 Push the joystick ( ) toward .
If does not appear on the joystick guide, repeatedly push the joystick ( ) toward [NEXT] to display the joystick guide in the illustration above. When the mode switch is set to AUTO, only one joystick guide will appear.
3 While reviewing the scene, select ( ) and press ( ).
FUNC.( 22)
MOVE
Move ( , ) the orange marker to the new position of the scene and press ( ).
YES
PLAYLIST
FUNC.
( 10)
FUNC.( 22)
DELETE
YES
( 10)
PLAYLIST
FUNC.
NEXT
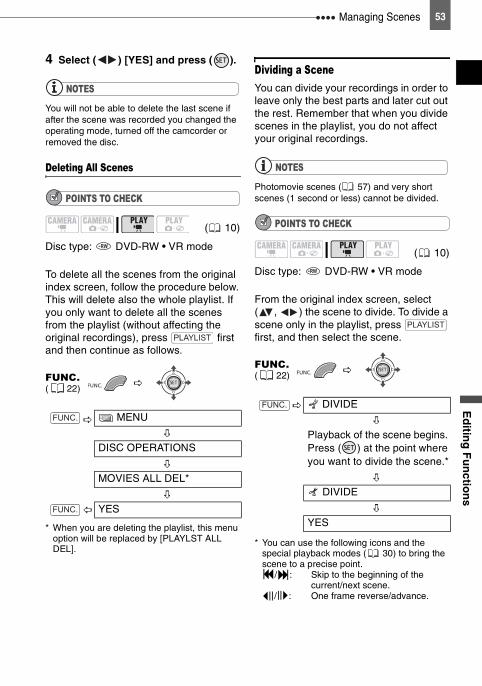
Managing ScenesE
ditin
g F
un
ction
s53
4 Select ( ) [YES] and press ( ).
NOTES
You will not be able to delete the last scene if after the scene was recorded you changed the operating mode, turned off the camcorder or removed the disc.
Deleting All Scenes
POINTS TO CHECK
Disc type: DVD-RW • VR mode
To delete all the scenes from the original index screen, follow the procedure below. This will delete also the whole playlist. If you only want to delete all the scenes from the playlist (without affecting the original recordings), press first and then continue as follows.
* When you are deleting the playlist, this menu option will be replaced by [PLAYLST ALL DEL].
Dividing a SceneYou can divide your recordings in order to leave only the best parts and later cut out the rest. Remember that when you divide scenes in the playlist, you do not affect your original recordings.
NOTES
Photomovie scenes ( 57) and very short scenes (1 second or less) cannot be divided.
POINTS TO CHECK
Disc type: DVD-RW • VR mode
From the original index screen, select ( , ) the scene to divide. To divide a scene only in the playlist, press first, and then select the scene.
* You can use the following icons and the special playback modes ( 30) to bring the scene to a precise point.
/ : Skip to the beginning of the current/next scene.
/ : One frame reverse/advance.
( 10)
FUNC.( 22)
MENU
DISC OPERATIONS
MOVIES ALL DEL*
YES
PLAYLIST
FUNC.
FUNC.
( 10)
FUNC.( 22)
DIVIDE
Playback of the scene begins. Press ( ) at the point where you want to divide the scene.*
DIVIDE
YES
PLAYLIST
FUNC.
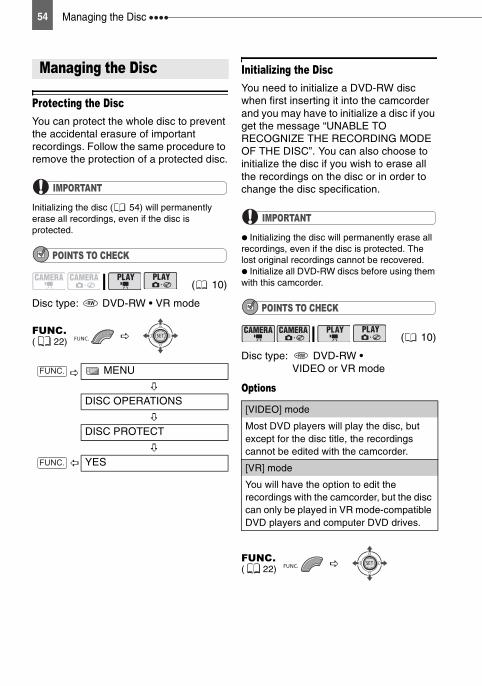
Managing the Disc 54
Managing the Disc
Protecting the DiscYou can protect the whole disc to prevent the accidental erasure of important recordings. Follow the same procedure to remove the protection of a protected disc.
IMPORTANT
Initializing the disc ( 54) will permanently erase all recordings, even if the disc is protected.
POINTS TO CHECK
Disc type: DVD-RW • VR mode
Initializing the DiscYou need to initialize a DVD-RW disc when first inserting it into the camcorder and you may have to initialize a disc if you get the message “UNABLE TO RECOGNIZE THE RECORDING MODE OF THE DISC”. You can also choose to initialize the disc if you wish to erase all the recordings on the disc or in order to change the disc specification.
IMPORTANT
Initializing the disc will permanently erase all recordings, even if the disc is protected. The lost original recordings cannot be recovered. Initialize all DVD-RW discs before using them with this camcorder.
POINTS TO CHECK
Disc type: DVD-RW • VIDEO or VR mode
Options
Managing the Disc
( 10)
FUNC.( 22)
MENU
DISC OPERATIONS
DISC PROTECT
YES
FUNC.
FUNC.
( 10)
[VIDEO] mode
Most DVD players will play the disc, but except for the disc title, the recordings cannot be edited with the camcorder.
[VR] mode
You will have the option to edit the recordings with the camcorder, but the disc can only be played in VR mode-compatible DVD players and computer DVD drives.
FUNC.( 22)
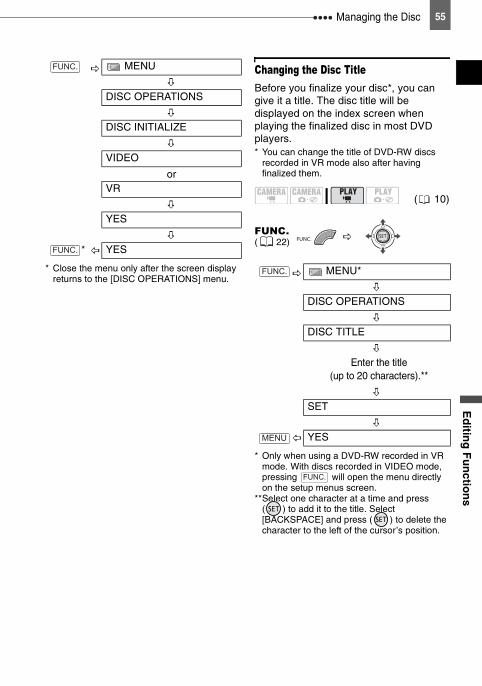
Managing the DiscE
ditin
g F
un
ction
s55
* Close the menu only after the screen display returns to the [DISC OPERATIONS] menu.
Changing the Disc TitleBefore you finalize your disc*, you can give it a title. The disc title will be displayed on the index screen when playing the finalized disc in most DVD players.* You can change the title of DVD-RW discs
recorded in VR mode also after having finalized them.
* Only when using a DVD-RW recorded in VR mode. With discs recorded in VIDEO mode, pressing will open the menu directly on the setup menus screen.
**Select one character at a time and press ( ) to add it to the title. Select [BACKSPACE] and press ( ) to delete the character to the left of the cursor’s position.
MENU
DISC OPERATIONS
DISC INITIALIZE
VIDEO
orVR
YES
* YES
FUNC.
FUNC.
( 10)
FUNC.( 22)
MENU*
DISC OPERATIONS
DISC TITLE
Enter the title (up to 20 characters).**
SET
YES
FUNC.
MENU
FUNC.
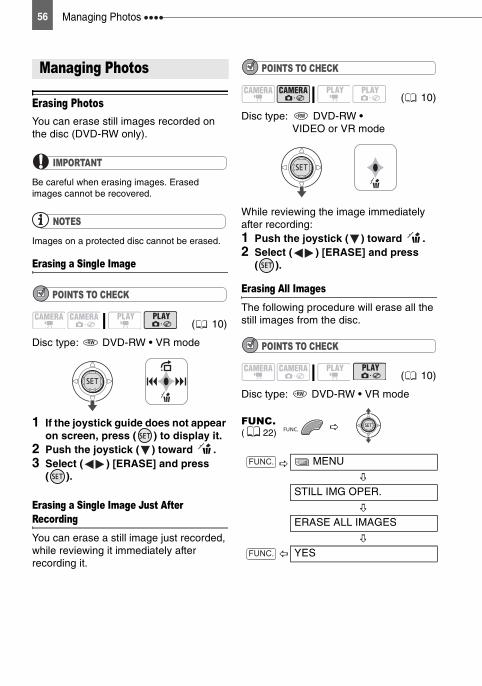
Managing Photos 56
Managing Photos
Erasing PhotosYou can erase still images recorded on the disc (DVD-RW only).
IMPORTANT
Be careful when erasing images. Erased images cannot be recovered.
NOTES
Images on a protected disc cannot be erased.
Erasing a Single Image
POINTS TO CHECK
Disc type: DVD-RW • VR mode
1 If the joystick guide does not appear on screen, press ( ) to display it.
2 Push the joystick ( ) toward .3 Select ( ) [ERASE] and press
( ).
Erasing a Single Image Just After RecordingYou can erase a still image just recorded, while reviewing it immediately after recording it.
POINTS TO CHECK
Disc type: DVD-RW • VIDEO or VR mode
While reviewing the image immediately after recording:1 Push the joystick ( ) toward .2 Select ( ) [ERASE] and press
( ).
Erasing All ImagesThe following procedure will erase all the still images from the disc.
POINTS TO CHECK
Disc type: DVD-RW • VR mode
Managing Photos
( 10)
( 10)
( 10)
FUNC.( 22)
MENU
STILL IMG OPER.
ERASE ALL IMAGES
YES
FUNC.
FUNC.
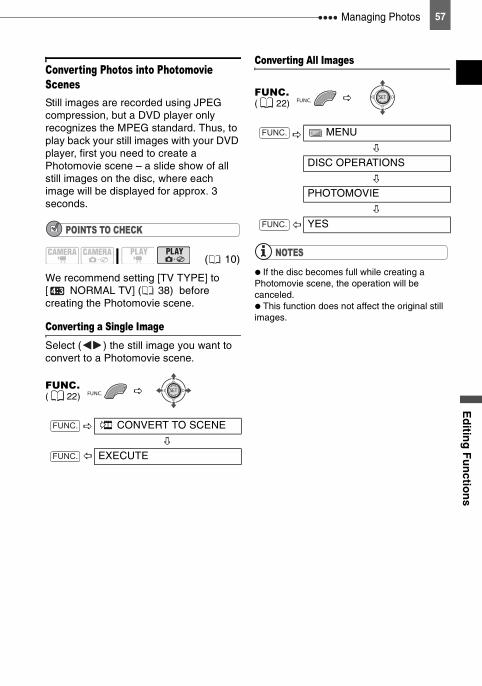
Managing PhotosE
ditin
g F
un
ction
s57
Converting Photos into Photomovie ScenesStill images are recorded using JPEG compression, but a DVD player only recognizes the MPEG standard. Thus, to play back your still images with your DVD player, first you need to create a Photomovie scene – a slide show of all still images on the disc, where each image will be displayed for approx. 3 seconds.
POINTS TO CHECK
We recommend setting [TV TYPE] to [ NORMAL TV] ( 38) before creating the Photomovie scene.
Converting a Single ImageSelect ( ) the still image you want to convert to a Photomovie scene.
Converting All Images
NOTES
If the disc becomes full while creating a Photomovie scene, the operation will be canceled. This function does not affect the original still images.
( 10)
FUNC.( 22)
CONVERT TO SCENE
EXECUTE
FUNC.
FUNC.
FUNC.( 22)
MENU
DISC OPERATIONS
PHOTOMOVIE
YES
FUNC.
FUNC.
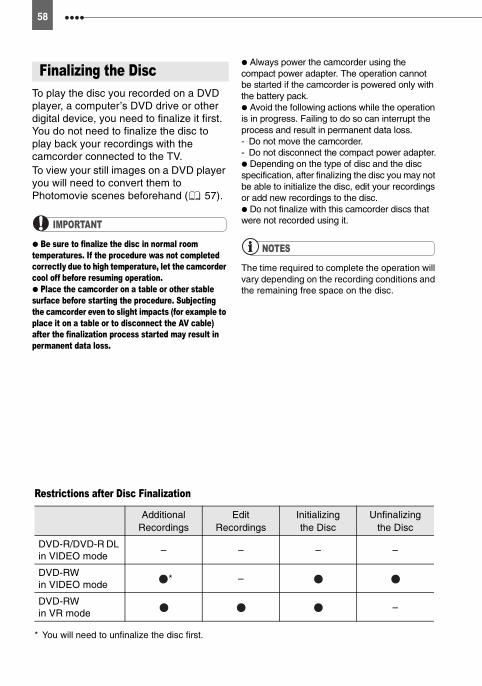
58
Playing Back the Disc on an External Device
To play the disc you recorded on a DVD player, a computer’s DVD drive or other digital device, you need to finalize it first. You do not need to finalize the disc to play back your recordings with the camcorder connected to the TV.To view your still images on a DVD player you will need to convert them to Photomovie scenes beforehand ( 57).
IMPORTANT
Be sure to finalize the disc in normal room temperatures. If the procedure was not completed correctly due to high temperature, let the camcorder cool off before resuming operation. Place the camcorder on a table or other stable surface before starting the procedure. Subjecting the camcorder even to slight impacts (for example to place it on a table or to disconnect the AV cable) after the finalization process started may result in permanent data loss.
Always power the camcorder using the compact power adapter. The operation cannot be started if the camcorder is powered only with the battery pack. Avoid the following actions while the operation is in progress. Failing to do so can interrupt the process and result in permanent data loss.- Do not move the camcorder.- Do not disconnect the compact power adapter. Depending on the type of disc and the disc specification, after finalizing the disc you may not be able to initialize the disc, edit your recordings or add new recordings to the disc. Do not finalize with this camcorder discs that were not recorded using it.
NOTES
The time required to complete the operation will vary depending on the recording conditions and the remaining free space on the disc.
Restrictions after Disc Finalization
* You will need to unfinalize the disc first.
Additional
RecordingsEdit
RecordingsInitializing the Disc
Unfinalizing the Disc
DVD-R/DVD-R DL in VIDEO mode
– – – –
DVD-RW in VIDEO mode
* –
DVD-RW in VR mode
–
Finalizing the Disc
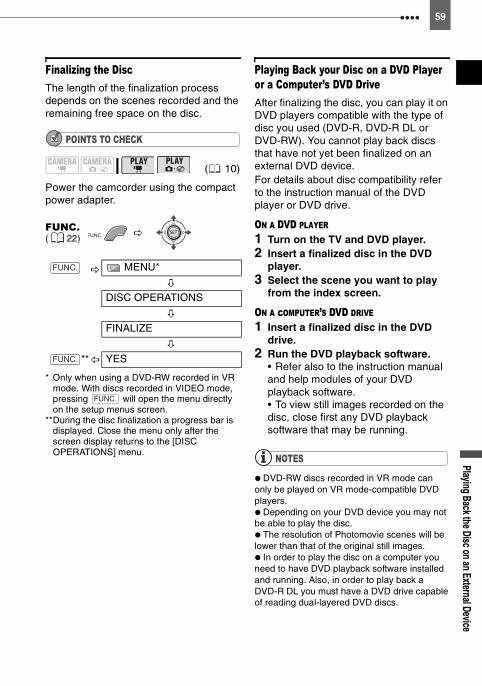
Playing Back the Disc on an External Device59
Finalizing the DiscThe length of the finalization process depends on the scenes recorded and the remaining free space on the disc.
POINTS TO CHECK
Power the camcorder using the compact power adapter.
* Only when using a DVD-RW recorded in VR mode. With discs recorded in VIDEO mode, pressing will open the menu directly on the setup menus screen.
**During the disc finalization a progress bar is displayed. Close the menu only after the screen display returns to the [DISC OPERATIONS] menu.
Playing Back your Disc on a DVD Player or a Computer’s DVD DriveAfter finalizing the disc, you can play it on DVD players compatible with the type of disc you used (DVD-R, DVD-R DL or DVD-RW). You cannot play back discs that have not yet been finalized on an external DVD device.For details about disc compatibility refer to the instruction manual of the DVD player or DVD drive.
ON A DVD PLAYER1 Turn on the TV and DVD player.2 Insert a finalized disc in the DVD
player.3 Select the scene you want to play
from the index screen.
ON A cOMPUTER’S DVD DRIVE1 Insert a finalized disc in the DVD
drive.2 Run the DVD playback software.
• Refer also to the instruction manual and help modules of your DVD playback software.• To view still images recorded on the disc, close first any DVD playback software that may be running.
NOTES
DVD-RW discs recorded in VR mode can only be played on VR mode-compatible DVD players. Depending on your DVD device you may not be able to play the disc. The resolution of Photomovie scenes will be lower than that of the original still images. In order to play the disc on a computer you need to have DVD playback software installed and running. Also, in order to play back a DVD-R DL you must have a DVD drive capable of reading dual-layered DVD discs.
( 10)
FUNC.( 22)
MENU*
DISC OPERATIONS
FINALIZE
** YES
FUNC.
FUNC.
FUNC.
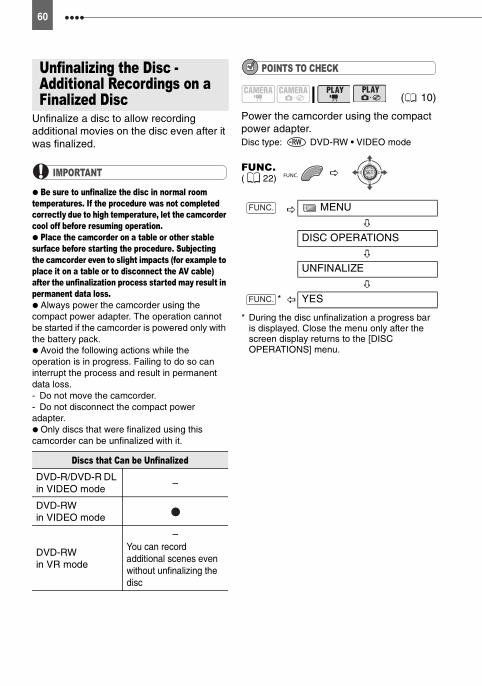
60
Unfinalize a disc to allow recording additional movies on the disc even after it was finalized.
IMPORTANT
Be sure to unfinalize the disc in normal room temperatures. If the procedure was not completed correctly due to high temperature, let the camcorder cool off before resuming operation. Place the camcorder on a table or other stable surface before starting the procedure. Subjecting the camcorder even to slight impacts (for example to place it on a table or to disconnect the AV cable) after the unfinalization process started may result in permanent data loss. Always power the camcorder using the compact power adapter. The operation cannot be started if the camcorder is powered only with the battery pack. Avoid the following actions while the operation is in progress. Failing to do so can interrupt the process and result in permanent data loss.- Do not move the camcorder.- Do not disconnect the compact power adapter. Only discs that were finalized using this camcorder can be unfinalized with it.
POINTS TO CHECK
Power the camcorder using the compact power adapter.Disc type: DVD-RW • VIDEO mode
* During the disc unfinalization a progress bar is displayed. Close the menu only after the screen display returns to the [DISC OPERATIONS] menu.
Unfinalizing the Disc - Additional Recordings on a Finalized Disc
Discs that Can be UnfinalizedDVD-R/DVD-R DL in VIDEO mode
–
DVD-RW in VIDEO mode
DVD-RW in VR mode
–You can record additional scenes even without unfinalizing the disc
( 10)
FUNC.( 22)
MENU
DISC OPERATIONS
UNFINALIZE
* YES
FUNC.
FUNC.
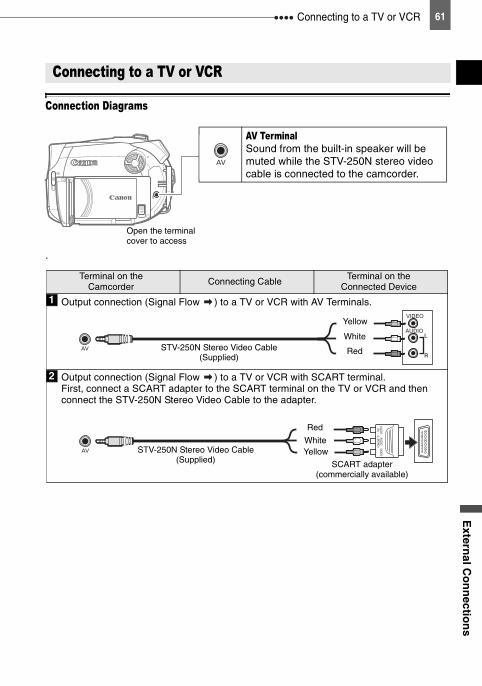
Connecting to a TV or VCRE
xternal C
on
nectio
ns
61
External Connections
Connecting to a TV or VCR
Connection Diagrams
.
Connecting to a TV or VCR
AV TerminalSound from the built-in speaker will be muted while the STV-250N stereo video cable is connected to the camcorder.
Open the terminal cover to access
Terminal on the Camcorder Connecting Cable
Terminal on the Connected Device
1VIDEO
AUDIO
R
L
Output connection (Signal Flow ) to a TV or VCR with AV Terminals.
STV-250N Stereo Video Cable (Supplied)
Yellow
White
Red
2 Output connection (Signal Flow ) to a TV or VCR with SCART terminal. First, connect a SCART adapter to the SCART terminal on the TV or VCR and then connect the STV-250N Stereo Video Cable to the adapter.
STV-250N Stereo Video Cable(Supplied)
YellowWhite
Red
SCART adapter (commercially available)
Connecting to a TV or VCR 62
Playback on a TV Screen
POINTS TO CHECK
Before connecting the camcorder, select the [TV TYPE] setting according to the TV set to which you will connect the camcorder - [WIDE TV]: TV sets with 16:9 aspect ratio or [NORMAL TV]: TV sets with 4:3 aspect ratio ( 38).
ConnectingConnect the camcorder to the TV following one of the connection diagrams shown in the previous section Connection Diagrams ( 61).
Playback1 Turn on the camcorder and the
connected TV or VCR.On a TV: Select as the video input the same terminal to which you connected the camcorder. On a VCR: Set the input selector to the external video input (usually labeled LINE IN).
2 Start the playback of the movies ( 29) or still images ( 30).
NOTES
Turn off all the devices before starting the connections. Sound from the built-in speaker will be muted while the STV-250N Stereo Video Cable is connected to the camcorder. We recommend powering the camcorder using the compact power adapter.
Recording to a VCR or Digital Video RecorderYou can copy your recordings by connecting the camcorder to a VCR or a digital video device.
ConnectingConnect the camcorder to the VCR following one of the connection diagrams shown in the previous section Connection Diagrams ( 61).
Recording1 Connected device: Load a blank
cassette or disc and set the device to record pause mode.
2 This camcorder: Locate the scene you wish to copy and pause playback shortly before the scene.
3 This camcorder: Resume the movie playback.
4 Connected device: Begin recording when the scene you wish to copy appears. Stop recording when copying is complete.
5 This camcorder: Stop playback.
NOTES
We recommend powering the camcorder using the compact power adapter. By default, the on-screen displays will be embedded in the output video signal, but you can change the displays by repeatedly pressing
( 48).
( 10)
( 10)
DISP.
Trouble? 63A
dd
ition
al Info
rmatio
n
Additional Information
Trouble?
If you have a problem with your camcorder, refer to this checklist. Consult your dealer or a Canon Service Center if the problem persists.
Power Source
Recording/Playback
Troubleshooting
Problem Solution
• Camcorder will not turn on.• The camcorder switches off
by itself.• The disc compartment cover
will not open.• LCD/viewfinder switches on
and off.
Battery pack is exhausted. Replace or charge the battery pack. 17
Attach the battery pack correctly.
The charge indicator flashes rapidly (approx. twice per second)
Charging has stopped because the compact power adapter or the battery pack is faulty.
–
• Battery pack will not charge.• The charge indicator flashes
very slowly (about once every 2 seconds).
Charge the battery pack in temperatures between 0 °C and 40 °C.
–
Battery packs become hot with use and may not charge. When the battery pack is outside the charging temperature range, the CHG (charge) indicator will flash irregularly. The charging will start once the battery pack temperature is below 40 °C.
–
The battery pack is damaged. Use a different battery pack. –
Problem Solution
Buttons will not work. Turn on the camcorder. –
Load a disc. 19
Abnormal characters appear on the screen. The camcorder does not operate properly.
Disconnect the power source and reconnect it after a short time. If the problem still persists, disconnect the power source and press the RESET button with a pointed item. Pressing the RESET button resets all settings.
–
“ ” flashes on the screen. Load a disc. 19
“ ” flashes on the screen. Battery pack is exhausted. Replace or charge the battery pack. 17
Video noise appears on screen. When using the camcorder in a room where a plasma TV is located, keep a distance between the camcorder and the plasma TV.
–
Video noise appears on the TV screen.
When using the camcorder close to devices that emit strong electromagnetic fields (plasma TVs, cellular phones, etc.), keep a distance between the camcorder and these devices.
–
Even without a disc loaded, when closing the disc compartment cover a motor sound can be heard.
The camcorder is checking if a disc is loaded or not. This is not a malfunction.
–
64 Trouble?
Recording
The disc cannot be ejected. Turn off the camcorder, disconnect the compact power adapter and remove the battery pack. Restore the power supply and try again.
–
The camcorder has exceeded its operational temperature. Turn off the camcorder and let it cool down before resuming use.
The disc cannot be recognized. The disc is dirty. Clean the disc with a soft lens-cleaning cloth. If the problem persists replace the disc.
70
The disc is not correctly loaded. Check the disc. 19
Verify that the camcorder supports the type of DVD disc you inserted.
3
The camcorder vibrates. Depending on the condition of the disc, the camcorder might vibrate occasionally. This is not a malfunction.
–
• The disc’s rotation can be faintly heard.
• Occasionally the operation sound can be heard.
The disc is activated from time to time. This is not a malfunction. –
After using the camcorder for a long time, “ ” lights up in red.
This is not a malfunction. Turn the camcorder off and let it cool for a while before resuming operation.
–
Problem Solution
Image will not appear on the screen.
Set the camcorder to . 25
Open the lens cover.
“SET THE TIME ZONE, DATE AND TIME” appears on the screen.
Set the time zone, date and time. 23
Recharge the built-in lithium battery and set the time zone, date and time.
70
Pressing the start/stop button will not start recording.
Set the camcorder to . 25
Load a recommended disc. 4
The disc is full (“ END” flashes on the screen). Delete some recordings (DVD-RW in VR mode) to free some space or replace the disc.
1952
The camcorder has exceeded its operational temperature. Turn off the camcorder and let it cool down before resuming use.
–
Remove the disc protection. 54
Unfinalize the disc (DVD-RW in VIDEO mode). 60
Even after stopping recording, the disc access indicator does not go off.
The scene or still image is being recorded on the disc. This is not a malfunction.
2527
The point where the start/stop button was pressed does not match the beginning/end of the recording.
There is a slight interval between pressing the start/stop button and the actual start of the recording on the disc. This is not a malfunction.
–
Problem Solution
Trouble? 65A
dd
ition
al Info
rmatio
n
Playback/Editing
The recording suddenly stops shortly after starting recording.
The disc is dirty. Clean the disc with a soft lens-cleaning cloth. If the problem persists replace the disc.
70
The camcorder has exceeded its operational temperature. Turn off the camcorder and let it cool down before resuming use.
–
Camcorder will not focus. Autofocus does not work on that subject. Focus manually. 43
Adjust the viewfinder with the dioptric adjustment lever. 20
Lens is dirty. Clean the lens with a soft lens-cleaning cloth. Never use tissue paper to clean the lens.
71
Sound is distorted. When recording near loud sounds (such as fireworks or concerts), sound may become distorted. This is not a malfunction.
–
A vertical light bar appears on the screen.
Bright light in a dark scene may cause a vertical light bar (smear) to appear. This is not a malfunction.
–
Viewfinder picture is blurred. Adjust the viewfinder with the dioptric adjustment lever. 20
Problem Solution
Pressing the playback button does not start playback.
Load a disc. 19
Set the camcorder to . 29
You may not be able to play with this camcorder, discs recorded or edited with other DVD recorders or computer DVD drives.
–
If using a single-sided disc, check that the disc is inserted with the label side facing up.
19
The camcorder has exceeded its operational temperature. Turn off the camcorder and let it cool down before resuming use.
–
• During playback there is video noise and the sound is distorted.
• The disc cannot be read.
The disc is dirty. Clean the disc with a soft lens-cleaning cloth. 70
You may not be able to play with the camcorder discs recorded or edited with other DVD recorders or computer DVD drives.
–
Cannot add scenes to the playlist.
The disc is full (“ END” flashes on the screen). Delete some recordings to free some space.
52
You cannot add more than 999 scenes to the playlist. –
Remove the disc protection. 54
Cannot divide the scene. You cannot edit or delete scenes on a disc that was protected in another digital device.
–
You cannot divide the scene if there are already 999 scenes on the disc.
–
You cannot divide the scene if it is too short (1 second or less). –
Problem Solution
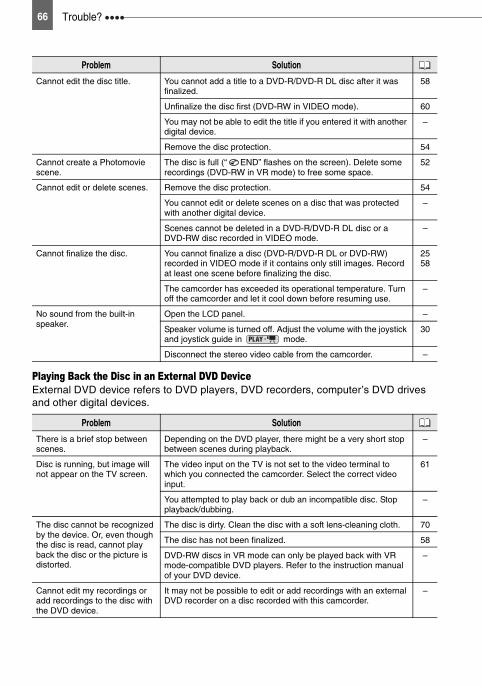
66 Trouble?
Playing Back the Disc in an External DVD DeviceExternal DVD device refers to DVD players, DVD recorders, computer’s DVD drives and other digital devices.
Cannot edit the disc title. You cannot add a title to a DVD-R/DVD-R DL disc after it was finalized.
58
Unfinalize the disc first (DVD-RW in VIDEO mode). 60
You may not be able to edit the title if you entered it with another digital device.
–
Remove the disc protection. 54
Cannot create a Photomovie scene.
The disc is full (“ END” flashes on the screen). Delete some recordings (DVD-RW in VR mode) to free some space.
52
Cannot edit or delete scenes. Remove the disc protection. 54
You cannot edit or delete scenes on a disc that was protected with another digital device.
–
Scenes cannot be deleted in a DVD-R/DVD-R DL disc or a DVD-RW disc recorded in VIDEO mode.
–
Cannot finalize the disc. You cannot finalize a disc (DVD-R/DVD-R DL or DVD-RW) recorded in VIDEO mode if it contains only still images. Record at least one scene before finalizing the disc.
2558
The camcorder has exceeded its operational temperature. Turn off the camcorder and let it cool down before resuming use.
–
No sound from the built-in speaker.
Open the LCD panel. –
Speaker volume is turned off. Adjust the volume with the joystick and joystick guide in mode.
30
Disconnect the stereo video cable from the camcorder. –
Problem Solution
There is a brief stop between scenes.
Depending on the DVD player, there might be a very short stop between scenes during playback.
–
Disc is running, but image will not appear on the TV screen.
The video input on the TV is not set to the video terminal to which you connected the camcorder. Select the correct video input.
61
You attempted to play back or dub an incompatible disc. Stop playback/dubbing.
–
The disc cannot be recognized by the device. Or, even though the disc is read, cannot play back the disc or the picture is distorted.
The disc is dirty. Clean the disc with a soft lens-cleaning cloth. 70
The disc has not been finalized. 58
DVD-RW discs in VR mode can only be played back with VR mode-compatible DVD players. Refer to the instruction manual of your DVD device.
–
Cannot edit my recordings or add recordings to the disc with the DVD device.
It may not be possible to edit or add recordings with an external DVD recorder on a disc recorded with this camcorder.
–
Problem Solution
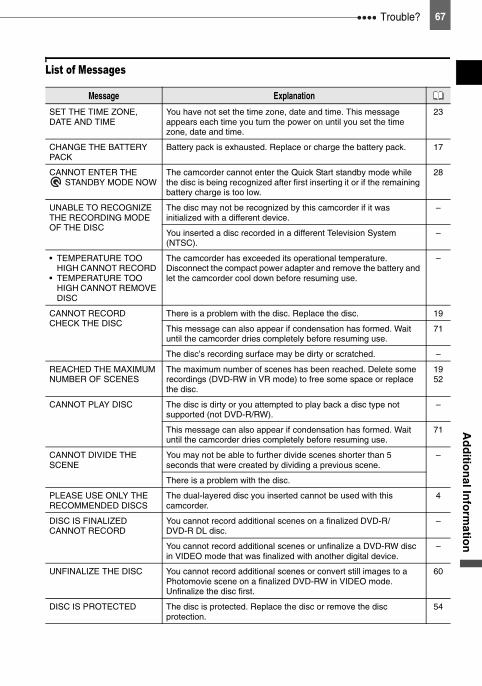
Trouble? 67A
dd
ition
al Info
rmatio
n
List of Messages
Message Explanation
SET THE TIME ZONE, DATE AND TIME
You have not set the time zone, date and time. This message appears each time you turn the power on until you set the time zone, date and time.
23
CHANGE THE BATTERY PACK
Battery pack is exhausted. Replace or charge the battery pack. 17
CANNOT ENTER THE STANDBY MODE NOW
The camcorder cannot enter the Quick Start standby mode while the disc is being recognized after first inserting it or if the remaining battery charge is too low.
28
UNABLE TO RECOGNIZE THE RECORDING MODE OF THE DISC
The disc may not be recognized by this camcorder if it was initialized with a different device.
–
You inserted a disc recorded in a different Television System (NTSC).
–
• TEMPERATURE TOO HIGH CANNOT RECORD
• TEMPERATURE TOO HIGH CANNOT REMOVE DISC
The camcorder has exceeded its operational temperature. Disconnect the compact power adapter and remove the battery and let the camcorder cool down before resuming use.
–
CANNOT RECORDCHECK THE DISC
There is a problem with the disc. Replace the disc. 19
This message can also appear if condensation has formed. Wait until the camcorder dries completely before resuming use.
71
The disc’s recording surface may be dirty or scratched. –
REACHED THE MAXIMUM NUMBER OF SCENES
The maximum number of scenes has been reached. Delete some recordings (DVD-RW in VR mode) to free some space or replace the disc.
1952
CANNOT PLAY DISC The disc is dirty or you attempted to play back a disc type not supported (not DVD-R/RW).
–
This message can also appear if condensation has formed. Wait until the camcorder dries completely before resuming use.
71
CANNOT DIVIDE THE SCENE
You may not be able to further divide scenes shorter than 5 seconds that were created by dividing a previous scene.
–
There is a problem with the disc.
PLEASE USE ONLY THE RECOMMENDED DISCS
The dual-layered disc you inserted cannot be used with this camcorder.
4
DISC IS FINALIZED CANNOT RECORD
You cannot record additional scenes on a finalized DVD-R/DVD-R DL disc.
–
You cannot record additional scenes or unfinalize a DVD-RW disc in VIDEO mode that was finalized with another digital device.
–
UNFINALIZE THE DISC You cannot record additional scenes or convert still images to a Photomovie scene on a finalized DVD-RW in VIDEO mode. Unfinalize the disc first.
60
DISC IS PROTECTED The disc is protected. Replace the disc or remove the disc protection.
54
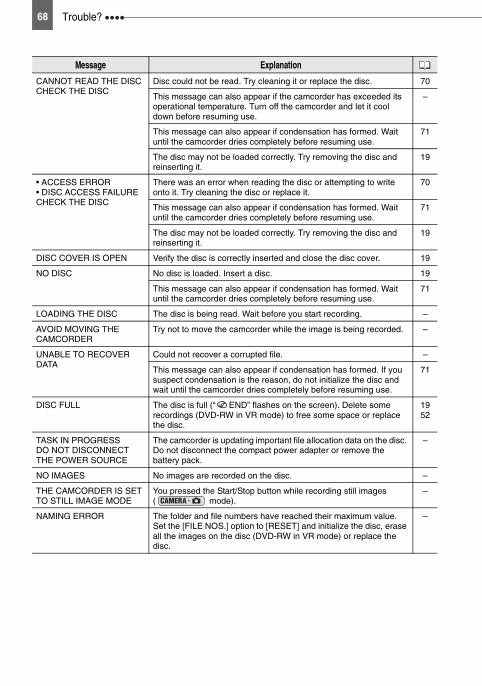
68 Trouble?
CANNOT READ THE DISCCHECK THE DISC
Disc could not be read. Try cleaning it or replace the disc. 70
This message can also appear if the camcorder has exceeded its operational temperature. Turn off the camcorder and let it cool down before resuming use.
–
This message can also appear if condensation has formed. Wait until the camcorder dries completely before resuming use.
71
The disc may not be loaded correctly. Try removing the disc and reinserting it.
19
• ACCESS ERROR• DISC ACCESS FAILURECHECK THE DISC
There was an error when reading the disc or attempting to write onto it. Try cleaning the disc or replace it.
70
This message can also appear if condensation has formed. Wait until the camcorder dries completely before resuming use.
71
The disc may not be loaded correctly. Try removing the disc and reinserting it.
19
DISC COVER IS OPEN Verify the disc is correctly inserted and close the disc cover. 19
NO DISC No disc is loaded. Insert a disc. 19
This message can also appear if condensation has formed. Wait until the camcorder dries completely before resuming use.
71
LOADING THE DISC The disc is being read. Wait before you start recording. –
AVOID MOVING THE CAMCORDER
Try not to move the camcorder while the image is being recorded. –
UNABLE TO RECOVER DATA
Could not recover a corrupted file. –
This message can also appear if condensation has formed. If you suspect condensation is the reason, do not initialize the disc and wait until the camcorder dries completely before resuming use.
71
DISC FULL The disc is full (“ END” flashes on the screen). Delete some recordings (DVD-RW in VR mode) to free some space or replace the disc.
1952
TASK IN PROGRESSDO NOT DISCONNECT THE POWER SOURCE
The camcorder is updating important file allocation data on the disc. Do not disconnect the compact power adapter or remove the battery pack.
–
NO IMAGES No images are recorded on the disc. –
THE CAMCORDER IS SET TO STILL IMAGE MODE
You pressed the Start/Stop button while recording still images ( mode).
–
NAMING ERROR The folder and file numbers have reached their maximum value. Set the [FILE NOS.] option to [RESET] and initialize the disc, erase all the images on the disc (DVD-RW in VR mode) or replace the disc.
–
Message Explanation
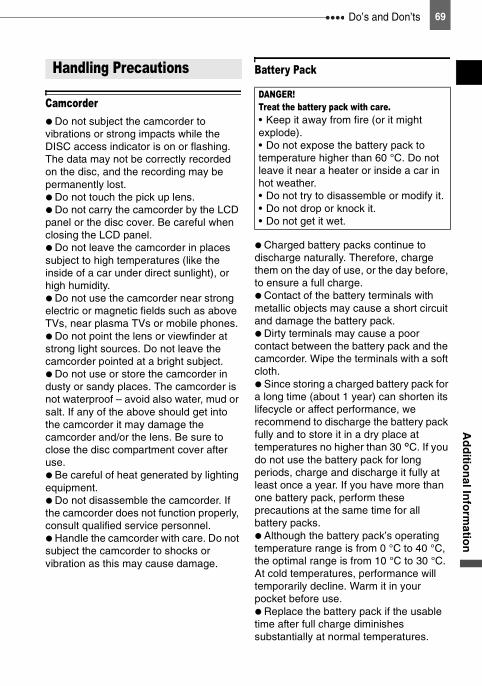
Do’s and Don’ts 69A
dd
ition
al Info
rmatio
n
Do’s and Don’ts
Camcorder Do not subject the camcorder to vibrations or strong impacts while the DISC access indicator is on or flashing. The data may not be correctly recorded on the disc, and the recording may be permanently lost. Do not touch the pick up lens. Do not carry the camcorder by the LCD panel or the disc cover. Be careful when closing the LCD panel. Do not leave the camcorder in places subject to high temperatures (like the inside of a car under direct sunlight), or high humidity. Do not use the camcorder near strong electric or magnetic fields such as above TVs, near plasma TVs or mobile phones. Do not point the lens or viewfinder at strong light sources. Do not leave the camcorder pointed at a bright subject. Do not use or store the camcorder in dusty or sandy places. The camcorder is not waterproof – avoid also water, mud or salt. If any of the above should get into the camcorder it may damage the camcorder and/or the lens. Be sure to close the disc compartment cover after use. Be careful of heat generated by lighting equipment. Do not disassemble the camcorder. If the camcorder does not function properly, consult qualified service personnel. Handle the camcorder with care. Do not subject the camcorder to shocks or vibration as this may cause damage.
Battery Pack
Charged battery packs continue to discharge naturally. Therefore, charge them on the day of use, or the day before, to ensure a full charge. Contact of the battery terminals with metallic objects may cause a short circuit and damage the battery pack. Dirty terminals may cause a poor contact between the battery pack and the camcorder. Wipe the terminals with a soft cloth. Since storing a charged battery pack for a long time (about 1 year) can shorten its lifecycle or affect performance, we recommend to discharge the battery pack fully and to store it in a dry place at temperatures no higher than 30 °C. If you do not use the battery pack for long periods, charge and discharge it fully at least once a year. If you have more than one battery pack, perform these precautions at the same time for all battery packs. Although the battery pack’s operating temperature range is from 0 °C to 40 °C, the optimal range is from 10 °C to 30 °C. At cold temperatures, performance will temporarily decline. Warm it in your pocket before use. Replace the battery pack if the usable time after full charge diminishes substantially at normal temperatures.
Handling PrecautionsDANGER!Treat the battery pack with care.• Keep it away from fire (or it might explode).• Do not expose the battery pack to temperature higher than 60 °C. Do not leave it near a heater or inside a car in hot weather.• Do not try to disassemble or modify it.• Do not drop or knock it.• Do not get it wet.
70 Do’s and Don’ts
Mini DVD DiscThe recording surface of DVD discs is extremely delicate. If handled or stored in an incorrect manner, the camcorder may stop recognizing or may not be able to play back the disc. Be sure to observe the following precautions when storing/handling your discs. Always remove the disc from the camcorder after you finish recording. Do not store the camcorder with a disc left inside. Keep the disc clean of dust, dirt or smudges. Even very small smudges or particles of dust can lead to problems when recording or playing back the disc. Carefully inspect the recording surface of the disc before inserting it in the camcorder. If the disc gets dirty use a dry, soft lens-cleaning cloth to remove any fingerprints, dirt buildup or smudges from the disc surface. Clean the disc in a radial motion from its center outwards. Never use a chemically treated cloth or flammable solvents such as paint thinner to clean the disc. Do not bend, scratch or wet the disc and do not subject it to strong shocks. Do not attach any labels or stickers on the disc surfaces. The disc may not rotate in a stable manner and this may cause malfunctions. To protect the disc, return it to its case for storage. When writing on the label side of the disc, avoid hard tip pens. Use waterproof soft-tipped felt pens instead. Moving a disc rapidly between hot and cold temperatures may cause condensation to form on its surfaces. If condensation forms on the disc, put it aside until the water droplets have evaporated completely.
Never expose the disc to direct sunlight and do not store it in places subject to high temperatures or high humidity. Always finalize a disc before inserting it into an external DVD device. Failing to do so can result in the loss of the recorded data.
Built-in Rechargeable Lithium BatteryThe camcorder has a built-in rechargeable lithium battery to keep the date/time and other settings. The built-in lithium battery is recharged while you use the camcorder, however, it will become totally discharged if you do not use the camcorder for about 3 months.To recharge the built-in lithium battery: Connect the compact power adapter to the camcorder and leave it connected for 24 hours with the power switch set to
.
Do’s and Don’ts 71A
dd
ition
al Info
rmatio
n
Storage If you do not intend to use the camcorder for a long time, store it in a place free of dust, in low humidity, and at temperatures not higher than 30 °C.
Cleaning
Camcorder Body Use a soft, dry cloth to clean the camcorder body. Never use chemically treated cloth or volatile solvents such as paint thinner.
Pick Up Lens Remove any dust or dirt particles using a non-aerosol type blower brush. Never touch the pick up lens directly to clean it.
Lens and Viewfinder If the lens surface is dirty, the autofocus may not work properly. Remove any dust or dirt particles using a non-aerosol type blower brush. Use a clean, soft lens-cleaning cloth to gently wipe the lens or viewfinder. Never use tissue paper.
LCD Screen Clean the LCD screen using a clean, soft lens-cleaning cloth. Condensation may form on the surface of the screen when the temperature changes suddenly. Wipe it with a soft dry cloth.
CondensationMoving the camcorder rapidly between hot and cold temperatures may cause condensation (water droplets) to form on its internal surfaces. Stop using the camcorder if condensation is detected. Continued use may damage the camcorder.
Condensation may form in the following cases:When the camcorder is moved from an air-conditioned room to a warm, humid place
When the camcorder is moved from a cold place to a warm room
When the camcorder is left in a humid room
When a cold room is heated rapidly
Maintenance/Others
72 Do’s and Don’ts
TO AVOID CONDENSATION Do not expose the camcorder to sudden or extreme changes in temperature. Unload the disc, place the camcorder in an airtight plastic bag and let it adjust to temperature changes slowly before removing it from the bag.
WHEN CONDENSATION IS DETECTED The camcorder automatically shuts off. If a disc is loaded, remove the disc immediately and leave the disc cover open. Leaving the disc in the camcorder may damage it. A disc cannot be loaded when condensation is detected.
RESUMING USE The precise time required for water droplets to evaporate will vary depending on the location and weather conditions. As a general rule, wait for 2 hours before resuming use of the camcorder.
Using the Camcorder Abroad
Power SourcesYou can use the compact power adapter to operate the camcorder and to charge battery packs in any country with power supply between 100 and 240 V AC, 50/60 Hz. Consult the Canon Service Center for information on plug adapters for overseas use.
Playback on a TV ScreenYou can only play back your recordings on TVs compatible with the PAL system. The PAL system is used in the following countries/areas:Algeria, Australia, Austria, Bangladesh, Belgium, Brunei, China, Croatia, Czech Republic, Denmark, Finland, Germany, Hong Kong Special Administrative Region, Iceland, India, Indonesia, Iraq, Iran, Ireland, Israel, Italy, Jordan, Kenya, Kuwait, Liberia, Malaysia, Malta, Montenegro, Mozambique, the Netherlands, New Zealand, North Korea, Norway, Oman, Pakistan, Poland, Portugal, Qatar, Romania, Serbia, Sierra Leone, Singapore, Slovakia, Slovenia, South Africa, Spain, Sri Lanka, Swaziland, Sweden, Switzerland, Tanzania, Thailand, Turkey, Uganda, Ukraine, United Arab Emirates, United Kingdom, Yemen, Zambia.
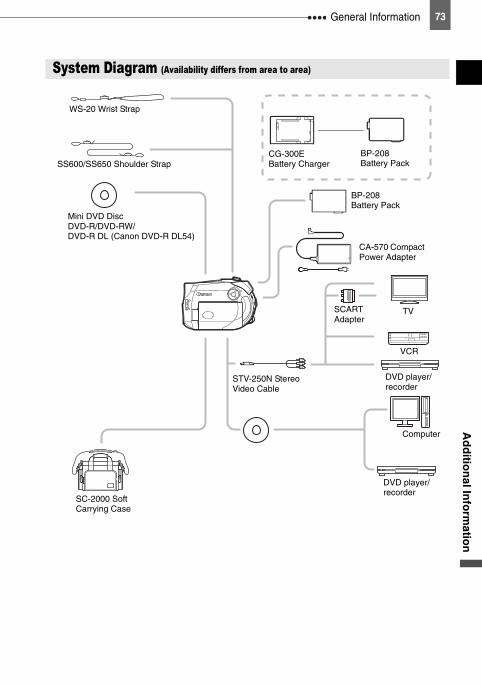
General Information 73A
dd
ition
al Info
rmatio
n
General Information
System Diagram (Availability differs from area to area)
BP-208Battery Pack
CG-300EBattery Charger
STV-250N Stereo Video Cable
CA-570 Compact Power Adapter
SC-2000 Soft Carrying Case
WS-20 Wrist Strap
SS600/SS650 Shoulder StrapBP-208Battery Pack
TV
Computer
VCR
Mini DVD DiscDVD-R/DVD-RW/DVD-R DL (Canon DVD-R DL54)
DVD player/recorder
SCART Adapter
DVD player/recorder
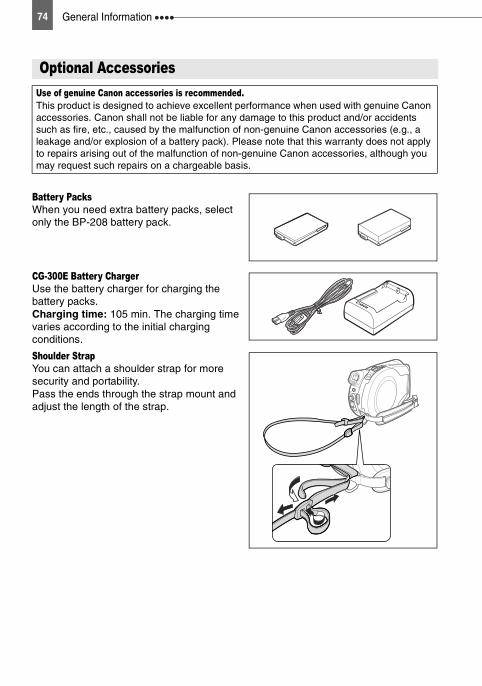
74 General Information
Battery PacksWhen you need extra battery packs, select only the BP-208 battery pack.
CG-300E Battery ChargerUse the battery charger for charging the battery packs.Charging time: 105 min. The charging time varies according to the initial charging conditions.
Shoulder StrapYou can attach a shoulder strap for more security and portability.Pass the ends through the strap mount and adjust the length of the strap.
Optional AccessoriesUse of genuine Canon accessories is recommended.This product is designed to achieve excellent performance when used with genuine Canon accessories. Canon shall not be liable for any damage to this product and/or accidents such as fire, etc., caused by the malfunction of non-genuine Canon accessories (e.g., a leakage and/or explosion of a battery pack). Please note that this warranty does not apply to repairs arising out of the malfunction of non-genuine Canon accessories, although you may request such repairs on a chargeable basis.
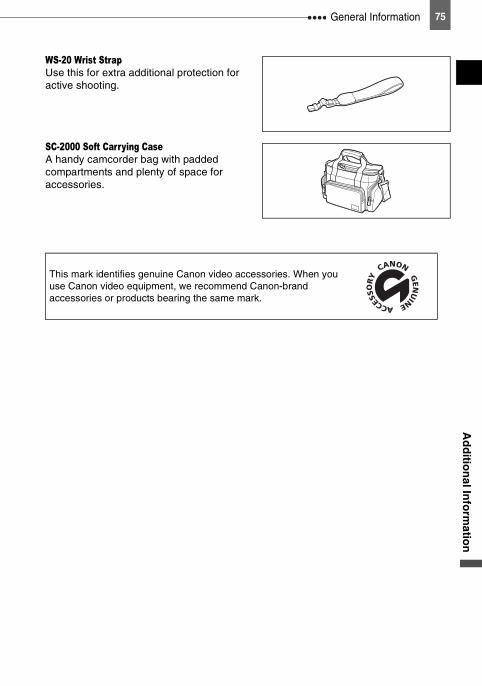
General Information 75A
dd
ition
al Info
rmatio
n
WS-20 Wrist StrapUse this for extra additional protection for active shooting.
SC-2000 Soft Carrying CaseA handy camcorder bag with padded compartments and plenty of space for accessories.
This mark identifies genuine Canon video accessories. When you use Canon video equipment, we recommend Canon-brand accessories or products bearing the same mark.
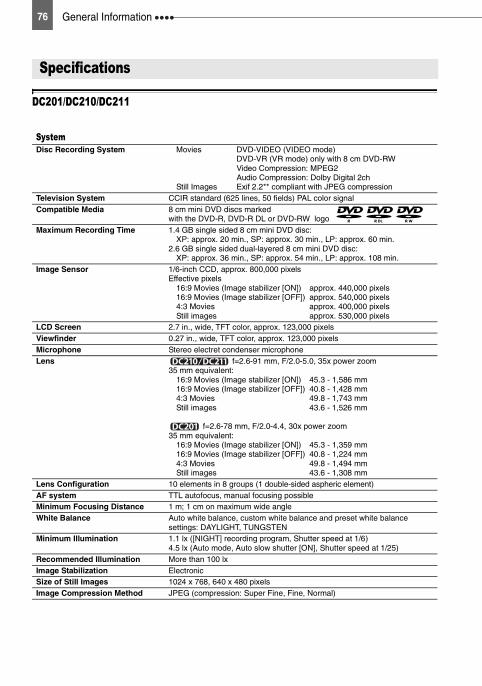
76 General Information
DC201/DC210/DC211
Specifications
SystemDisc Recording System Movies DVD-VIDEO (VIDEO mode)
DVD-VR (VR mode) only with 8 cm DVD-RWVideo Compression: MPEG2Audio Compression: Dolby Digital 2ch
Still Images Exif 2.2** compliant with JPEG compressionTelevision System CCIR standard (625 lines, 50 fields) PAL color signalCompatible Media 8 cm mini DVD discs marked
with the DVD-R, DVD-R DL or DVD-RW logoMaximum Recording Time 1.4 GB single sided 8 cm mini DVD disc:
XP: approx. 20 min., SP: approx. 30 min., LP: approx. 60 min.2.6 GB single sided dual-layered 8 cm mini DVD disc:
XP: approx. 36 min., SP: approx. 54 min., LP: approx. 108 min.Image Sensor 1/6-inch CCD, approx. 800,000 pixels
Effective pixels16:9 Movies (Image stabilizer [ON]) approx. 440,000 pixels16:9 Movies (Image stabilizer [OFF]) approx. 540,000 pixels4:3 Movies approx. 400,000 pixelsStill images approx. 530,000 pixels
LCD Screen 2.7 in., wide, TFT color, approx. 123,000 pixelsViewfinder 0.27 in., wide, TFT color, approx. 123,000 pixelsMicrophone Stereo electret condenser microphoneLens f=2.6-91 mm, F/2.0-5.0, 35x power zoom
35 mm equivalent:16:9 Movies (Image stabilizer [ON]) 45.3 - 1,586 mm16:9 Movies (Image stabilizer [OFF]) 40.8 - 1,428 mm4:3 Movies 49.8 - 1,743 mmStill images 43.6 - 1,526 mm
f=2.6-78 mm, F/2.0-4.4, 30x power zoom35 mm equivalent:
16:9 Movies (Image stabilizer [ON]) 45.3 - 1,359 mm16:9 Movies (Image stabilizer [OFF]) 40.8 - 1,224 mm4:3 Movies 49.8 - 1,494 mmStill images 43.6 - 1,308 mm
Lens Configuration 10 elements in 8 groups (1 double-sided aspheric element)AF system TTL autofocus, manual focusing possibleMinimum Focusing Distance 1 m; 1 cm on maximum wide angleWhite Balance Auto white balance, custom white balance and preset white balance
settings: DAYLIGHT, TUNGSTENMinimum Illumination 1.1 lx ([NIGHT] recording program, Shutter speed at 1/6)
4.5 lx (Auto mode, Auto slow shutter [ON], Shutter speed at 1/25)Recommended Illumination More than 100 lxImage Stabilization ElectronicSize of Still Images 1024 x 768, 640 x 480 pixelsImage Compression Method JPEG (compression: Super Fine, Fine, Normal)
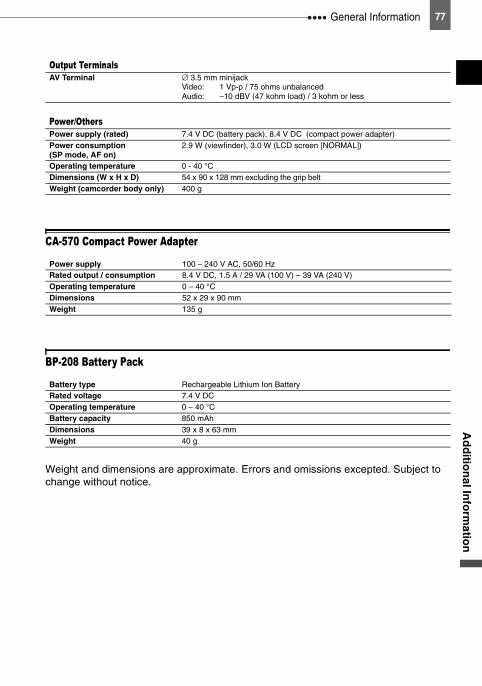
General Information 77A
dd
ition
al Info
rmatio
n
CA-570 Compact Power Adapter
BP-208 Battery Pack
Weight and dimensions are approximate. Errors and omissions excepted. Subject to change without notice.
Output TerminalsAV Terminal ∅ 3.5 mm minijack
Video: 1 Vp-p / 75 ohms unbalancedAudio: –10 dBV (47 kohm load) / 3 kohm or less
Power/OthersPower supply (rated) 7.4 V DC (battery pack), 8.4 V DC (compact power adapter)Power consumption (SP mode, AF on)
2.9 W (viewfinder), 3.0 W (LCD screen [NORMAL])
Operating temperature 0 - 40 °CDimensions (W x H x D) 54 x 90 x 128 mm excluding the grip beltWeight (camcorder body only) 400 g
Power supply 100 – 240 V AC, 50/60 HzRated output / consumption 8.4 V DC, 1.5 A / 29 VA (100 V) – 39 VA (240 V)Operating temperature 0 – 40 °CDimensions 52 x 29 x 90 mmWeight 135 g
Battery type Rechargeable Lithium Ion BatteryRated voltage 7.4 V DCOperating temperature 0 – 40 °CBattery capacity 850 mAhDimensions 39 x 8 x 63 mmWeight 40 g
78 General Information
16:9 aspect ratio . . . . . . . . . . . . . . . . . . 269 Point AiAF (Autofocus) . . . . . . . . . . . . 47
AAbroad, using the camcorder. . . . . . . . . 72Auto (recording program). . . . . . . . . . . . 40Auto slow shutter . . . . . . . . . . . . . . . . . . 34Autofocus (AF) . . . . . . . . . . . . . . . . . . . . 47AV terminal. . . . . . . . . . . . . . . . . . . . . . . 61
BBattery pack, charging . . . . . . . . . . . . . . 17Battery pack, remaining charge . . . . . . . 15Beach (recording program) . . . . . . . . . . 40Beep. . . . . . . . . . . . . . . . . . . . . . . . . . . . 38Built-in backup battery . . . . . . . . . . . . . . 70
CCenter point (Autofocus) . . . . . . . . . . . . 47Compact power adapter. . . . . . . . . . . . . 17Condensation. . . . . . . . . . . . . . . . . . . . . 71Connection to a TV/VCR . . . . . . . . . . . . 61
DData code. . . . . . . . . . . . . . . . . . . . . . . . 48Date and time. . . . . . . . . . . . . . . . . . . . . 24Daylight saving time. . . . . . . . . . . . . . . . 23Digital effects . . . . . . . . . . . . . . . . . . . . . 49Digital zoom . . . . . . . . . . . . . . . . . . . . . . 35Disc title . . . . . . . . . . . . . . . . . . . . . . . . . 55Disc types
(DVD-R, DVD-R DL, DVD-RW). . . . . . . 3
EErasing still images . . . . . . . . . . . . . . . . 56Error messages . . . . . . . . . . . . . . . . . . . 67
FFile numbers . . . . . . . . . . . . . . . . . . . . . 38Finalizing the disc . . . . . . . . . . . . . . . . . 58Fireworks (recording program). . . . . . . . 40Focus priority . . . . . . . . . . . . . . . . . . . . . 35FUNC. menu . . . . . . . . . . . . . . . . . . 22, 33
GGrip belt . . . . . . . . . . . . . . . . . . . . . . . . .20
IImage effects . . . . . . . . . . . . . . . . . . . . .45Image jump. . . . . . . . . . . . . . . . . . . . . . .31Image stabilizer . . . . . . . . . . . . . . . . . . .35Index screen - Movies . . . . . . . . . . . . . .29Index screen - Still images . . . . . . . . . . .31Initialization - Disc . . . . . . . . . . . . . . . . .54
JJoystick. . . . . . . . . . . . . . . . . . . . . . . . . . .9Joystick guide. . . . . . . . . . . . . . . . . . . . . .9
LLanguage . . . . . . . . . . . . . . . . . . . . . . . .23LCD backlight . . . . . . . . . . . . . . . . . . . . .21LCD screen . . . . . . . . . . . . . . . . . . . . . .21LP mode . . . . . . . . . . . . . . . . . . . . . . . . .33
MMagnifying a still image . . . . . . . . . . . . .32Maintenance. . . . . . . . . . . . . . . . . . . . . .71Manual exposure adjustment . . . . . . . . .43Manual focus . . . . . . . . . . . . . . . . . . . . .43Mode switch . . . . . . . . . . . . . . . . . . . . . .40
NNight (recording program) . . . . . . . . . . .40Normal TV (4:3) . . . . . . . . . . . . . . . . . . .38
OOriginal recordings . . . . . . . . . . . . . . . . .51
PP (recording program) . . . . . . . . . . . . . .41Photomovie scene . . . . . . . . . . . . . . . . .57Playback - Movies . . . . . . . . . . . . . . . . .29Playback - Still images . . . . . . . . . . . . . .30Playlist . . . . . . . . . . . . . . . . . . . . . . . . . .51Portrait (recording program) . . . . . . . . . .40Power save. . . . . . . . . . . . . . . . . . . . . . .38Protecting the disc . . . . . . . . . . . . . . . . .54
Index
General Information 79A
dd
ition
al Info
rmatio
n
QQuick Start function . . . . . . . . . . . . . . . . 28
RRecommended discs. . . . . . . . . . . . . . . . 4Recording - Movies . . . . . . . . . . . . . . . . 25Recording - Still images . . . . . . . . . . . . 27Recording data . . . . . . . . . . . . . . . . . . . 48Recording mode . . . . . . . . . . . . . . . . . . 33Recording programs . . . . . . . . . . . . . . . 40Recording reminder. . . . . . . . . . . . . . . . 15RESET . . . . . . . . . . . . . . . . . . . . . . . . . 63Reviewing - Movies (Record review). . . 26
SScene editing . . . . . . . . . . . . . . . . . . . . 51Screen displays. . . . . . . . . . . . . . . . . . . 14Screen markers. . . . . . . . . . . . . . . . . . . 37Selecting the on-screen displays . . . . . 48Self timer . . . . . . . . . . . . . . . . . . . . . . . . 49Serial number . . . . . . . . . . . . . . . . . . . . 12Setup menus . . . . . . . . . . . . . . . . . . 22, 34Shoulder strap. . . . . . . . . . . . . . . . . . . . 74Slideshow . . . . . . . . . . . . . . . . . . . . . . . 31Snow (recording program) . . . . . . . . . . 40SP mode . . . . . . . . . . . . . . . . . . . . . . . . 33Sports (recording program) . . . . . . . . . . 40Spotlight (recording program) . . . . . . . . 40Still image quality . . . . . . . . . . . . . . . . . 46Still image size . . . . . . . . . . . . . . . . . . . 46Sunset (recording program) . . . . . . . . . 40
TTelephoto . . . . . . . . . . . . . . . . . . . . . . . . 28Time zone . . . . . . . . . . . . . . . . . . . . . . . 23Tripod. . . . . . . . . . . . . . . . . . . . . . . . . . . 26Troubleshooting . . . . . . . . . . . . . . . . . . . 63Tv (recording program) . . . . . . . . . . . . . 41
VVIDEO mode (disc specification). . . . . . . 3Viewfinder, dioptric adjustment . . . . . . . 20Volume. . . . . . . . . . . . . . . . . . . . . . . . . . 30VR mode (disc specification) . . . . . . . . . . 3
WWhite balance . . . . . . . . . . . . . . . . . . . . 44Wide angle. . . . . . . . . . . . . . . . . . . . . . . 28Wide TV (16:9) . . . . . . . . . . . . . . . . . . . 38Widescreen . . . . . . . . . . . . . . . . . . . . . . 26Wind screen. . . . . . . . . . . . . . . . . . . . . . 36
XXP mode . . . . . . . . . . . . . . . . . . . . . . . . 33
ZZoom . . . . . . . . . . . . . . . . . . . . . . . . . . . 28Zoom speed. . . . . . . . . . . . . . . . . . . . . . 35
CANON INC.
Canon Europa N.V.P.O. Box 2262, 1180 EG Amstelveen, the Netherlands
Canon UK Ltd.CCI Service Centre, Unit 130Centennial Park, Borehamwood, Hertfordshire, WD6 3SE, EnglandTelephone 0870-241-2161
Canon Australia Pty. Ltd.Info-Line: 131383www.canon.com.au
Canon New Zealand Ltd.Customer Care: (09) 489 0470www.canon.co.nz
Canon Singapore Pte. Ltd1 HarbourFront Avenue, #04-01 Keppel Bay Tower, Singapore 098632Tel: (65) 6799 8888Fax: (65) 6799 8882
Canon Hongkong Company Ltd19/F., The Metropolis Tower, 10 Metropolis Drive, Hunghom, Kowloon, Hong Kong
Canon Latin America, Inc.Sales & Enquiries: 703 Waterford Way Suite 400 Miami, FL 33126 USA
The information on this manual is verified as of 1 January 2007.
00??W???PUB.DIE-2780000A/Ni0.0
© CANON INC. 2007PRINTED IN JAPAN
Printed on 100% reused paper.