DRIVER’S GUIDE - Just Trains...8 RWA Railjet Advanced – Driver’s Guide CREATING A CONSIST...
34
DRIVER’S GUIDE
Transcript of DRIVER’S GUIDE - Just Trains...8 RWA Railjet Advanced – Driver’s Guide CREATING A CONSIST...

DRIVER’S GUIDE
The Spirit of Train Simulation
Available to buy online at www.justtrains.net
www.justtrains.net
RWA Railjet Advanced – Driver’s Guide3
Driver’s GuideAdvanced locomotive expansion for Train Simulator
CONTENTS
INTRODUCTION .........................................................................................................4
Repaints ..................................................................................................................5
INSTALLATION, UPDATES AND SUPPORT .............................................................6
CREATING A CONSIST ..............................................................................................8
TAURUS LOCOMOTIVE .............................................................................................9
Cab overview and key assignments – 1116 locomotive ........................................9
Quick locomotive start-up procedure ...................................................................13
Realistic locomotive start-up procedure ..............................................................14
If you are driving outside Austria .....................................................................15
8090 DRIVING TRAILER ..........................................................................................18
Cab overview and key assignments – driving car ................................................18
Quick driving trailer start-up procedure ...............................................................21
Realistic driving trailer start-up procedure ...........................................................22
OPERATING PROCEDURES ....................................................................................24
Emergency braking (loco only) .............................................................................24
Horn ......................................................................................................................25
Cab lights ..............................................................................................................25
AFB (cruise control) ..............................................................................................25
Door system .........................................................................................................26
SIFA ......................................................................................................................26
Electrodynamic brake ...........................................................................................26
RWA Railjet Advanced – Driver’s Guide4
Roadrunner (train length indicator) .......................................................................27
Driving in Switzerland ...........................................................................................27
Light mode selector ..............................................................................................27
PZB90 SYSTEM ........................................................................................................28
ZUB SYSTEM ............................................................................................................30
SCENARIOS ..............................................................................................................31
CREDITS ...................................................................................................................32
COPYRIGHT..............................................................................................................32
SOFTWARE PIRACY ................................................................................................32
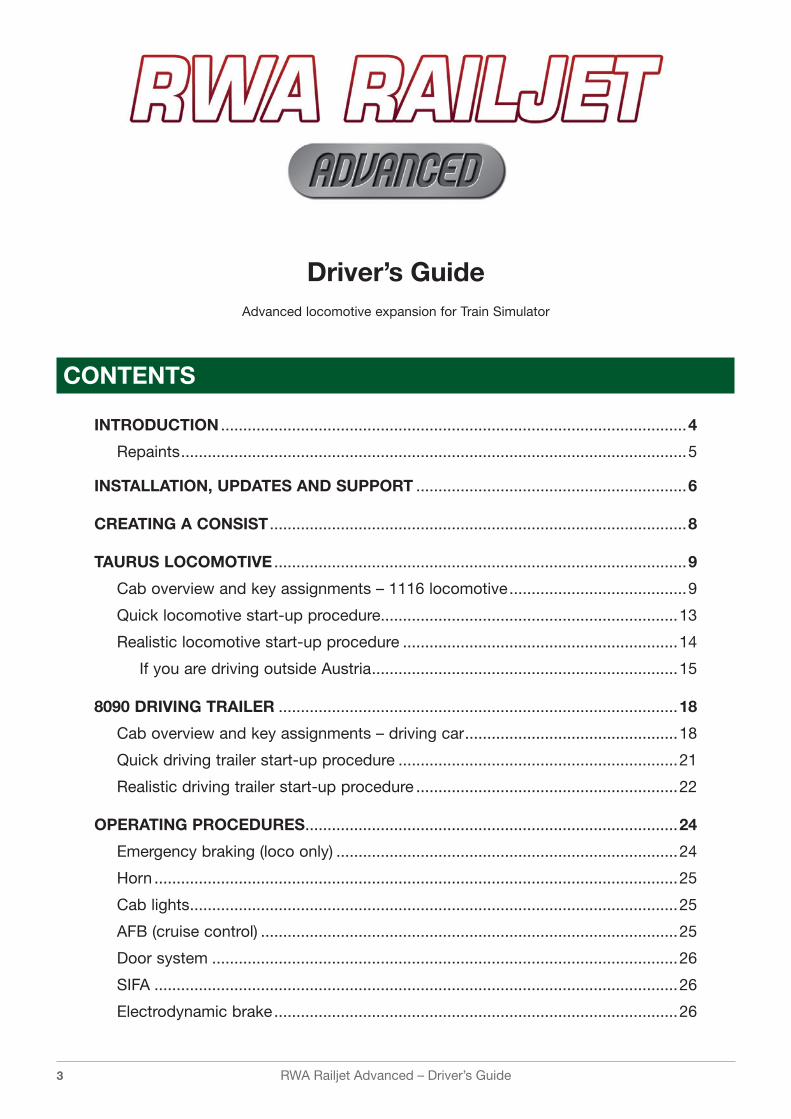
INTRODUCTION
This product was created with friendly permission from the Austrian Federal Railways (ÖBB) and MRCE. All logos are used with the permission of both companies. We would also like to thank the staff of the ÖBB for their tremendous support.
We would also like to thank RSSLO for their help and support, DispoTaurus for his fantastic textures and also the beta testing team.
The Railjet is a modern high speed train developed by Siemens and built by the ÖBB in Linz. The train was introduced in 2008 and is used to connect several capitals and major cities across Europe. It is limited to a speed of 230 km/h (143 mph) although its maximum speed is certified to 250 km/h (156 mph).
RWA Railjet Advanced – Driver’s Guide5
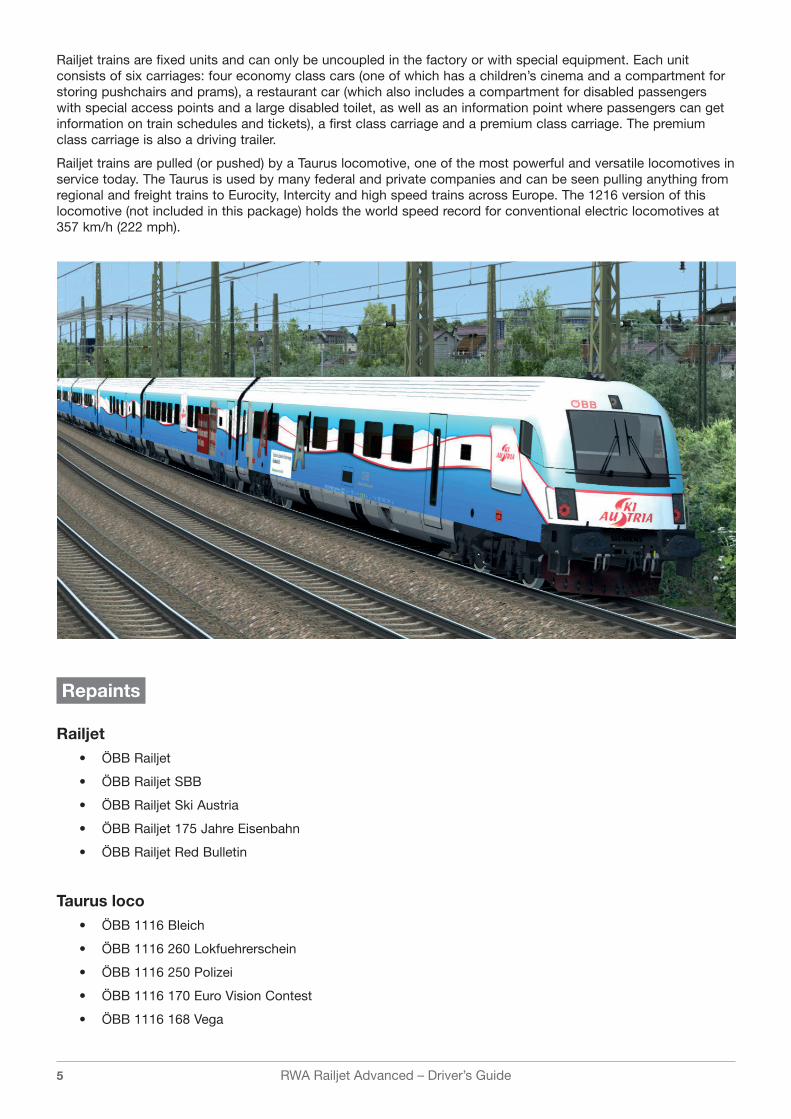
Railjet trains are fixed units and can only be uncoupled in the factory or with special equipment. Each unit consists of six carriages: four economy class cars (one of which has a children’s cinema and a compartment for storing pushchairs and prams), a restaurant car (which also includes a compartment for disabled passengers with special access points and a large disabled toilet, as well as an information point where passengers can get information on train schedules and tickets), a first class carriage and a premium class carriage. The premium class carriage is also a driving trailer.
Railjet trains are pulled (or pushed) by a Taurus locomotive, one of the most powerful and versatile locomotives in service today. The Taurus is used by many federal and private companies and can be seen pulling anything from regional and freight trains to Eurocity, Intercity and high speed trains across Europe. The 1216 version of this locomotive (not included in this package) holds the world speed record for conventional electric locomotives at 357 km/h (222 mph).
Repaints
Railjet• ÖBB Railjet
• ÖBB Railjet SBB
• ÖBB Railjet Ski Austria
• ÖBB Railjet 175 Jahre Eisenbahn
• ÖBB Railjet Red Bulletin
Taurus loco• ÖBB 1116 Bleich
• ÖBB 1116 260 Lokfuehrerschein
• ÖBB 1116 250 Polizei
• ÖBB 1116 170 Euro Vision Contest
• ÖBB 1116 168 Vega
RWA Railjet Advanced – Driver’s Guide6
• ÖBB 1116 153 OEAMTC
• ÖBB 1116 143 Montan
• ÖBB 1116 141 Siemens
• ÖBB 1116 138 Heeressport
• ÖBB 1116 130 Frontrunner
• ÖBB 1116 130 E-Card
• ÖBB 1116 126 Licht ins Dunkel
• ÖBB 1116 077 Galileo
• ÖBB 1116 016 RCA
• ÖBB 1116 003 RCA
• ÖBB 1116
• ÖBB 1016
• ÖBB 1016 048 Feuerwehr
• ÖBB 1016 023 Greenpoints
• MRCE ES64U2 067 ETCS Trainguard
INSTALLATION, UPDATES AND SUPPORT
You can install this add-on as often as you like on the same computer system.
1. To start the installation, double-click on the RWA Railjet file that you have downloaded.
2. Choose your set-up language and click ‘OK’.
3. If installing for the first time, you will see the Product Authentication window. Please enter your account details to verify your purchase.
4. When verified, you will see the installer Welcome window. Click ‘Next’ to continue.
5. On the next window, you will see the EULA (End User Licence Agreement). Please read this and – if you agree with the terms – click ‘Yes’.
6. The next window will show you the path to where Train Simulator is installed. If this is correct, click ‘Next’. If Train Simulator is installed in a different location, just ‘Browse’ to the correct location and then press ‘Next’.
7. You will then see the ‘Select components’ window. Here you can select which parts of the Railjet package you wish to install. Installation of the Railjet Base Package is mandatory, but installation of the following items is optional:
• Additional Railjet liveries
• Taurus livery package
• MRCE package
By default, these are all set to install. If you do not wish to install them, however, please untick the appropriate boxes.
8. You can always add or remove your installed choices by running the installer again, selecting ‘Modify’ and ticking or unticking the appropriate boxes on the ‘Select components’ window.
9. When you have made your selections, click ‘Next’. The Railjet will then install.
10. When the installation is complete, a window will display – click on ‘Finish’ and the installation is complete.

RWA Railjet Advanced – Driver’s Guide7
To re-download the RWA Railjet Advanced software:
1. Click on the ‘Account’ tab on the Just Trains website.
2. Log in to your account.
3. Click on the ‘Your Orders’ button.
4. A list of your purchases will appear and you can then re-download the software you require.
Website updates
Please check the Just Trains website for any news or updates for this RWA Railjet Advanced add-on and for our other products.
Technical Support
To obtain technical support (in English) please visit the Customer Service section on the Just Trains website. As a Just Trains customer you can obtain free technical support for any Just Trains or Just Flight product.
Regular news
To get the latest news about Just Trains products, sign up for our Newsletter and regular emails.
You can also keep up to date with Just Trains via Facebook and Twitter.
Uninstalling the software
To uninstall this software from your system:
• Go to the Windows Start menu and select ‘Control Panel’ (if you are in Windows Classic view, Control Panel will be found under ‘Settings’).
• Double-click on the item ‘Add or Remove Programs’ (Windows XP) or ‘Programs and Features’ (Windows Vista or 7). In Windows 8 and 10 move your mouse to the bottom left corner, right-click with your mouse, then left-click on the ‘Programs and Features’ menu that appears.
• Select the program you want to uninstall from the list provided and click the ‘Uninstall’ option.
• Follow the on-screen instructions to uninstall the program.
Uninstalling or deleting this software in any other way may cause problems when using this program in the future or with your Windows set-up.
RWA Railjet Advanced – Driver’s Guide8
CREATING A CONSIST
Railjet trains are fixed units and cannot be uncoupled!
All Railjet trains point in the same direction. The loco always points west. For scenarios on the Just Trains Three Country Corner Route, all Railjet units must be placed so that the loco points towards Lindau.
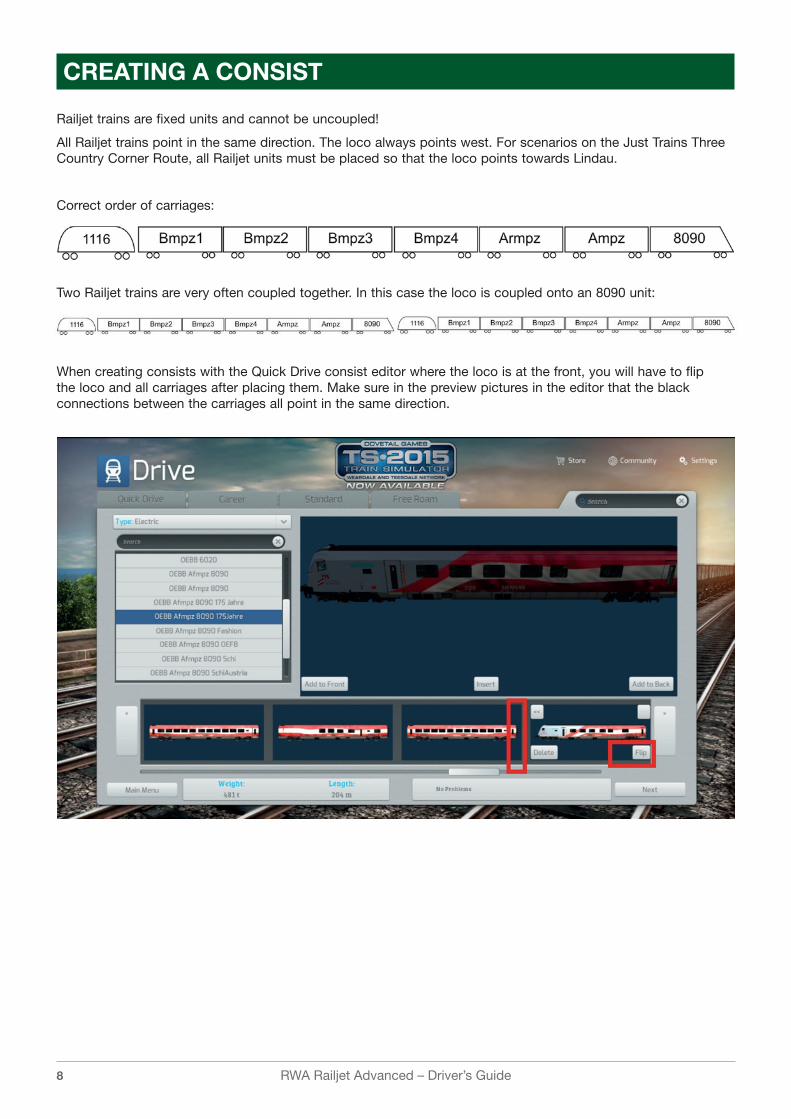
Correct order of carriages:
Two Railjet trains are very often coupled together. In this case the loco is coupled onto an 8090 unit:
When creating consists with the Quick Drive consist editor where the loco is at the front, you will have to flip the loco and all carriages after placing them. Make sure in the preview pictures in the editor that the black connections between the carriages all point in the same direction.

RWA Railjet Advanced – Driver’s Guide9
TAURUS LOCOMOTIVE
Cab overview and key assignments – 1116 locomotive
The items in square brackets refer to keystrokes on your PC keyboard.
1. Power lever [A]+[D] / [E]+[A] to unlock
2. AFB lever [Y] / [C]
3. Power connection for carriages
4. Reverser [W] / [S]
5. Door selector/locking [T] / [R]
6. Cab lights [L] / [Shift]+[L]
7. Instrument lights [I] / [Shift]+[I]
8. Headlights (low beam / high beam) [H] / [Shift]+[H]
9. Headlight main switch [H]
10. Train brake [;] increase / [#]decrease
11. Dynamic brake [,] increase / [.] decrease
12. Power indicator
13. PZB indicator
14. Speed indicator
15. Power indicator (overhead wires)
16. DDI (Digital Driver Interface)
17. Sander [X]

RWA Railjet Advanced – Driver’s Guide10
Other key assignments relevant for this screen:
Roadrunner (train length indicator) Press the [E] key twice
Split dynamic brake from train brake Press [-] and [.] at the same time
In order to use the electrodynamic brake in unison with the train brake, the train brake must be in position F and the electro brake in position FA before braking begins.
AFB (Cruise Control) [A] / [Shift]+[A]
Side mirrors [M] (keep pressed)
Automatic start-up [Ctrl]+[Shift]+[Z]
SIFA reset [Space bar]
1. Brake indicators
2. Loco brake [/]
3. Door open/close switch [T]
4. Horn (low and high ) [B] / [N]
5. Wipers switch (interval/slow/fast) [V] / [Shift]+[V]
RWA Railjet Advanced – Driver’s Guide11
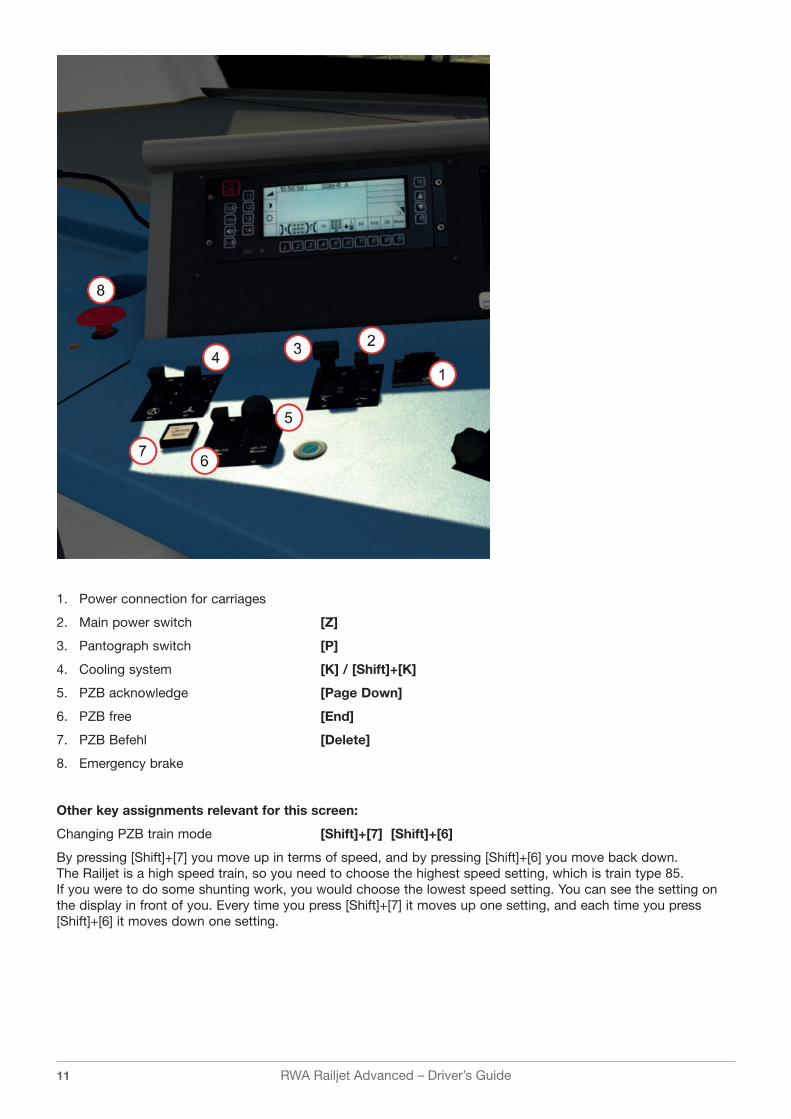
1. Power connection for carriages
2. Main power switch [Z]
3. Pantograph switch [P]
4. Cooling system [K] / [Shift]+[K]
5. PZB acknowledge [Page Down]
6. PZB free [End]
7. PZB Befehl [Delete]
8. Emergency brake
Other key assignments relevant for this screen:
Changing PZB train mode [Shift]+[7] [Shift]+[6]
By pressing [Shift]+[7] you move up in terms of speed, and by pressing [Shift]+[6] you move back down. The Railjet is a high speed train, so you need to choose the highest speed setting, which is train type 85. If you were to do some shunting work, you would choose the lowest speed setting. You can see the setting on the display in front of you. Every time you press [Shift]+[7] it moves up one setting, and each time you press [Shift]+[6] it moves down one setting.
RWA Railjet Advanced – Driver’s Guide12
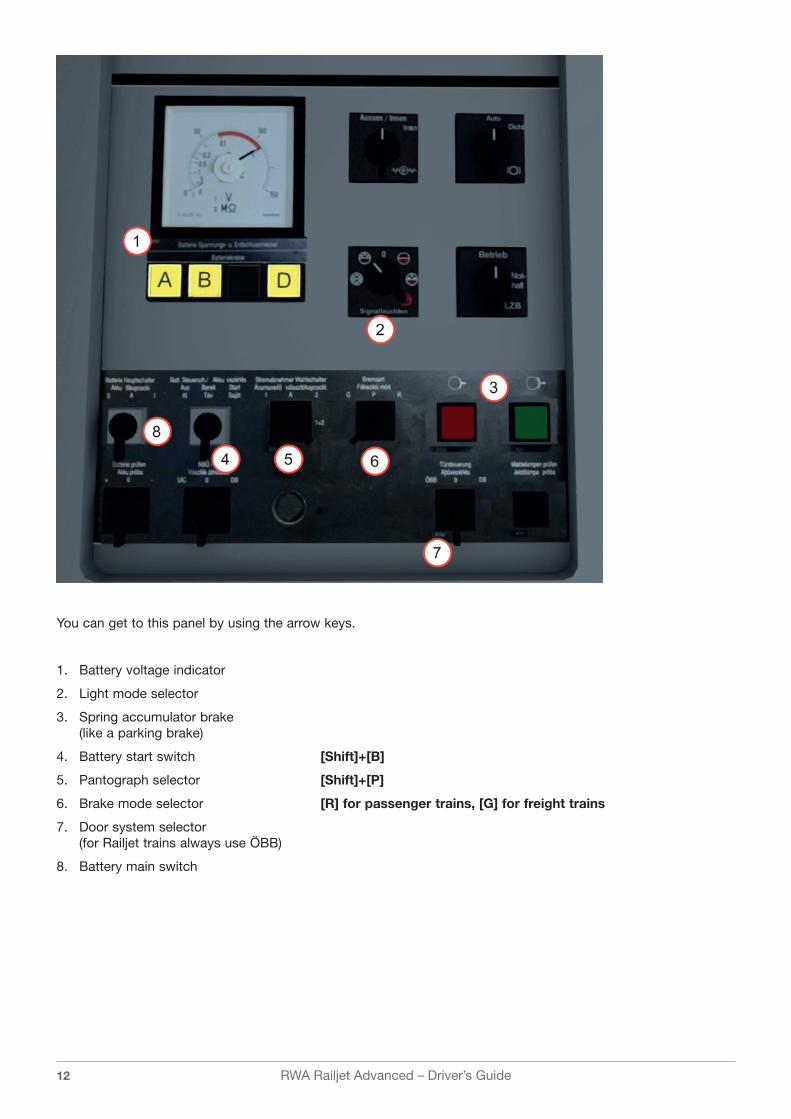
You can get to this panel by using the arrow keys.
1. Battery voltage indicator
2. Light mode selector
3. Spring accumulator brake (like a parking brake)
4. Battery start switch [Shift]+[B]
5. Pantograph selector [Shift]+[P]
6. Brake mode selector [R] for passenger trains, [G] for freight trains
7. Door system selector (for Railjet trains always use ÖBB)
8. Battery main switch

RWA Railjet Advanced – Driver’s Guide13
You can get to this panel by using the arrow keys.
1. Circuit breaker for SIFA system [Ctrl]+[Shift]+[S]
2. Circuit breaker for PZB system [Ctrl]+[Shift]+[A]
3. Circuit breaker for LZB system [Ctrl]+[Shift]+[D]
Quick locomotive start-up procedure
We have tried to make this add-on as accessible as possible. You can either perform the full start-up procedure and drive with systems like AFB, PZB and SIFA, or you can simply jump in the driver’s cab, de-activate all the safety systems and drive.
Quick start-up procedure (with all safety systems switched off):
• Press [1] to enter the cab
• Press [Ctrl]+[-] to switch to the forward-facing cab if necessary
• Press [Ctrl]+[Shift]+[Z] simultaneously. This will begin the automatic start-up procedure.
• Wait until the start-up procedure is complete.
• Use the arrow keys to access the fuse box and pull the SIFA and PZB circuit breakers. (Alternatively, press [Ctrl]+[Shift]+[A] and [Ctrl]+[Shift]+[S]).
The train is now ready to go.
The power lever is locked. When you first set off, press [E]+[A] to unlock it. You can then accelerate by using the [A] key and decelerate by using the [D] key. If you are on 0% power and you press the [D] key again, the power lever will be in the locked position again.

RWA Railjet Advanced – Driver’s Guide14
Realistic locomotive start-up procedure
Important! The 1116 locomotive has two cabs which are not identical; cab 2 has a different panel on the back wall. Certain things therefore can only be done in cab 1.
Railjet trains are usually pulled by the Taurus loco with cab 1 pointing backwards. Because of this you first need to access cab 1. Start the procedure there and then switch to cab 2. This is what the real-world train drivers have to do as well.
To identify the cab you are in, just look up at the ceiling. Above the windscreen there is a blue sign indicating either ‘Fuehrerstand 1’ (cab 1) or ‘Fuehrerstand 2’ (cab 2).
• Press [1] to access the cab
• Use the arrow keys to turn around until you see the panel on the back wall
• Turn the battery start switch to the right and wait until the battery has come online (indication on the voltmeter and yellow lights)
• Turn the pantograph selector knob to either the left or the right (if the loco is pulling a Railjet train, use pantograph 1)
• Use the arrow keys to look forward again and switch cab (with the [Ctrl]+[-] keys) if necessary
• Move the reverser one notch forward to position M (you can press [W] once)
• Wait until the screens have booted up and you hear two beeping noises
• Move the reverser all the way forward (use the [W] key)
RWA Railjet Advanced – Driver’s Guide15
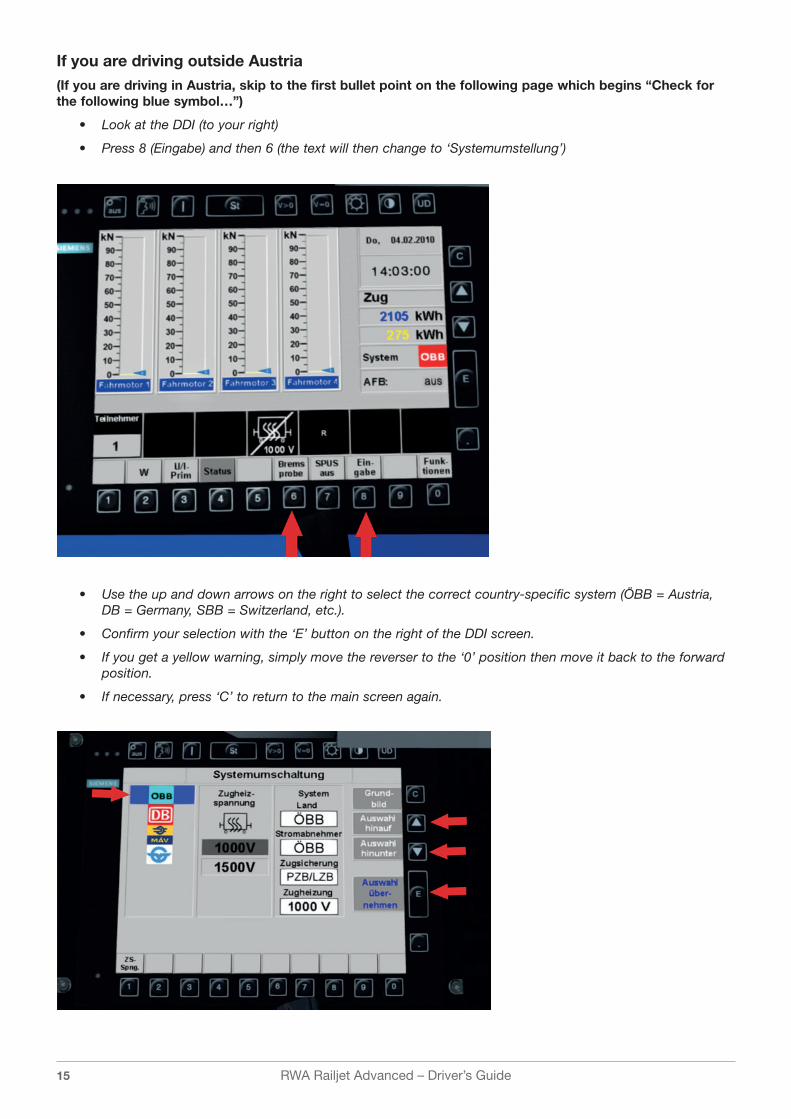
If you are driving outside Austria(If you are driving in Austria, skip to the first bullet point on the following page which begins “Check for the following blue symbol…”)
• Look at the DDI (to your right)
• Press 8 (Eingabe) and then 6 (the text will then change to ‘Systemumstellung’)
• Use the up and down arrows on the right to select the correct country-specific system (ÖBB = Austria, DB = Germany, SBB = Switzerland, etc.).
• Confirm your selection with the ‘E’ button on the right of the DDI screen.
• If you get a yellow warning, simply move the reverser to the ‘0’ position then move it back to the forward position.
• If necessary, press ‘C’ to return to the main screen again.
RWA Railjet Advanced – Driver’s Guide16
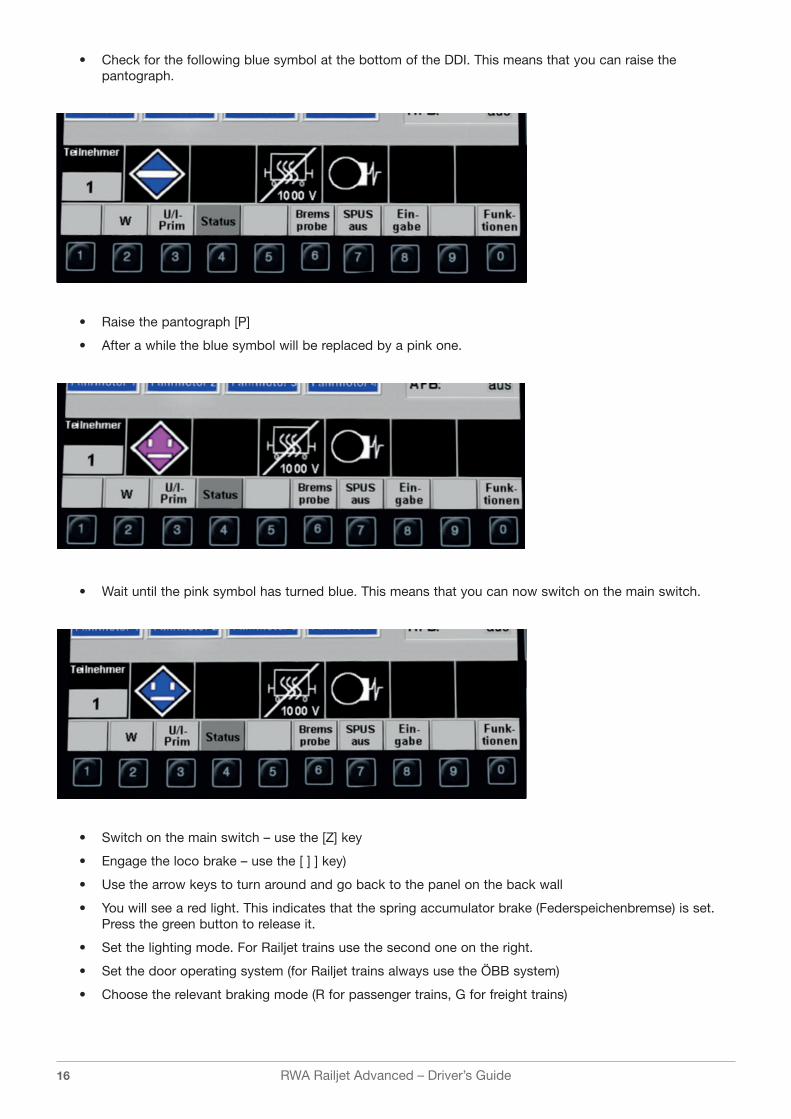
• Check for the following blue symbol at the bottom of the DDI. This means that you can raise the pantograph.
• Raise the pantograph [P]
• After a while the blue symbol will be replaced by a pink one.
• Wait until the pink symbol has turned blue. This means that you can now switch on the main switch.
• Switch on the main switch – use the [Z] key
• Engage the loco brake – use the [ ] ] key)
• Use the arrow keys to turn around and go back to the panel on the back wall
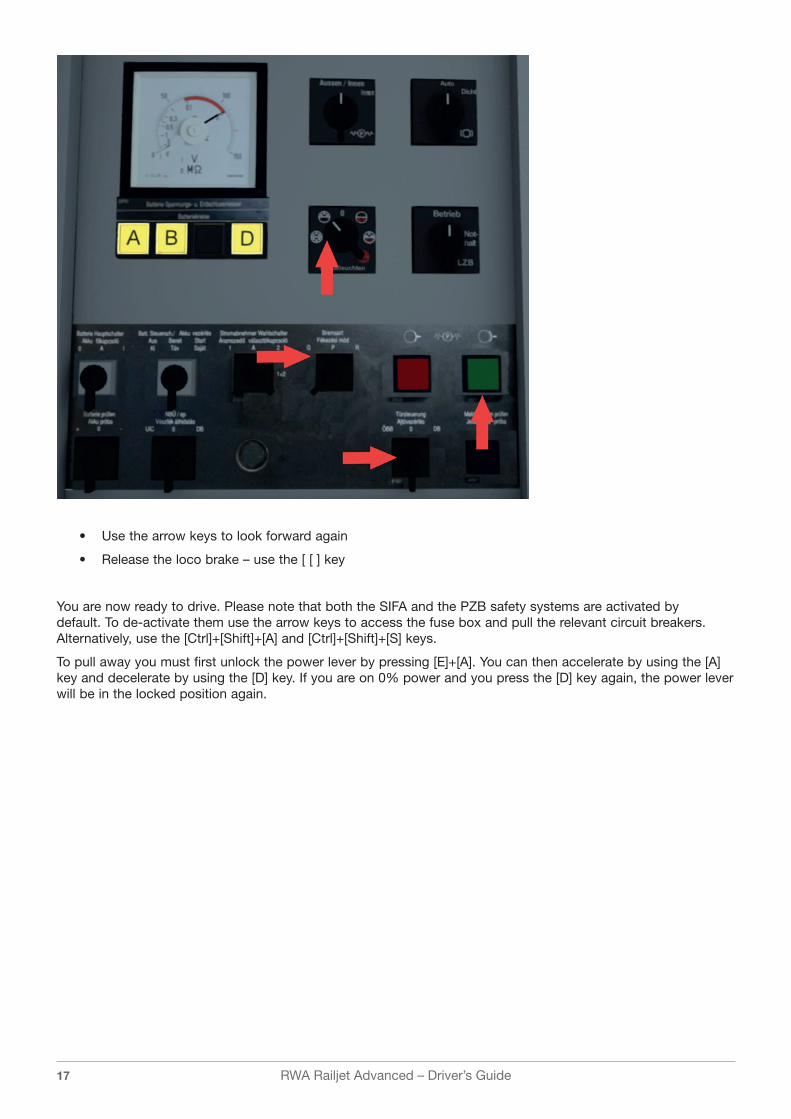
• You will see a red light. This indicates that the spring accumulator brake (Federspeichenbremse) is set. Press the green button to release it.
• Set the lighting mode. For Railjet trains use the second one on the right.
• Set the door operating system (for Railjet trains always use the ÖBB system)
• Choose the relevant braking mode (R for passenger trains, G for freight trains)
RWA Railjet Advanced – Driver’s Guide17
• Use the arrow keys to look forward again
• Release the loco brake – use the [ [ ] key
You are now ready to drive. Please note that both the SIFA and the PZB safety systems are activated by default. To de-activate them use the arrow keys to access the fuse box and pull the relevant circuit breakers. Alternatively, use the [Ctrl]+[Shift]+[A] and [Ctrl]+[Shift]+[S] keys.
To pull away you must first unlock the power lever by pressing [E]+[A]. You can then accelerate by using the [A] key and decelerate by using the [D] key. If you are on 0% power and you press the [D] key again, the power lever will be in the locked position again.

RWA Railjet Advanced – Driver’s Guide18
8090 DRIVING TRAILER
Cab overview and key assignments – driving car
1. Speed indicator
2. Power indicator
3. PZB indicator
4. Brake valve
5. Spring accumulator brake (like a parking brake)
6. Cab lights [L] / [Shift]+[L]
7. Headlights (low beam/high beam) [H] / [Shift]+[H]
8. Sander [X]
9. Door selector / locking [T] / [R]
10. Train brake [;] increase / [#]decrease
11. Dynamic brake [,] increase / [.] decrease
12. Loco brake [/]
13. Horn (low and high) [B] / [N]
14. DDI (Digital Driver Interface)

RWA Railjet Advanced – Driver’s Guide19
Other key assignments relevant for this screen:
Roadrunner (train length indicator) Press the [E] key twice
In order to use the electrodynamic brake in unison with the train brake, the train brake must be in position F and the electro brake in position FA before braking begins.
AFB (Cruise Control) [A] / [Shift]+[A]
Side mirrors [M]
Automatic start-up [Ctrl]+[Shift]+[Z]
SIFA reset Space bar
1. Reverser [W]
2. Power lever [A]+[D] / [E]+[A] to unlock
3. AFB lever [Y] / [C]
4. Power connection for carriages
5. Main power switch [Z]
6. Pantograph switch [P]
7. Cooling system [K] / [Shift]+[K]
8. PZB acknowledge [Page Down]
9. PZB free [End]
10. PZB Befehl [Delete]
Other key assignments relevant for this screen:
Circuit breaker for SIFA system [Ctrl]+[Shift]+[S]
Circuit breaker for PZB system [Ctrl]+[Shift]+[A]
Changing PZB train mode [Shift]+[7] [Shift]+[6]

RWA Railjet Advanced – Driver’s Guide20
1. Door system selector (for Railjet trains always use ÖBB)
2. Emergency brake (non-functional)
1. Battery start switch [Shift]+[B]
2. LZB circuit breaker [Shift]+[Ctrl]+[D]
3. PZB circuit breaker [Shift]+[Ctrl]+[A]
4. ZUB reset button (after an emergency stop – only installed in SBB trains)

RWA Railjet Advanced – Driver’s Guide21
1. AFB main switch [Shift]+[A]
2. Wiper selector (three speeds available) [V] and [Shift]+[V]
Quick driving trailer start-up procedure
We have tried to make this add-on as accessible as possible. You can either perform the full start-up procedure and drive with systems like AFB, PZB and SIFA, or you can simply jump in the driver’s cab, de-activate all the safety systems and drive.
Quick start-up procedure (with all safety systems switched off):
• Press [1] to enter the cab
• Press [Ctrl]+[Shift]+[Z] simultaneously). This will begin the automatic start-up procedure.
• Wait until the start-up procedure is complete
• Press [Ctrl]+[Shift]+[A] and [Ctrl]+[Shift]+[S] to de-activate the safety systems.
The train is now ready to go.
The power lever is locked. When you first set off, press [E]+[A] to unlock it. You can then accelerate by using the [A] key and decelerate by using the [D] key. If you are on 0% power and you press the [D] key again, the power lever will be in the locked position again.

RWA Railjet Advanced – Driver’s Guide22
Realistic driving trailer start-up procedure
• Press [1] to access the cab
• Look at the back wall (using the arrow keys), turn the battery start switch to the right and wait until the battery has come online (indicated by the second ‘battery on’ message)
• Turn around and move the door system selector to the ÖBB selection
• Move the reverser one notch forward to position M (you can press [W] once)
• Wait until the screens have booted up and the pink symbol on the DDI has turned blue
• Move the reverser all the way forward (use the [W] key)
• Look to the right at the DDI
• Click on the light selector symbol on the bottom right (this DDI is a touchscreen version)
• Choose the lowermost selection and confirm by pressing ‘OK’

RWA Railjet Advanced – Driver’s Guide23
• Click on the ÖBB symbol on the bottom right
• Select the appropriate system for the country you are operating in
• Press ‘OK’
• Should you see a yellow warning, move the reverser all the way to the ‘0’ position and then forward again.
• If necessary, you can return to the main screen by pressing the ‘G’ button
RWA Railjet Advanced – Driver’s Guide24
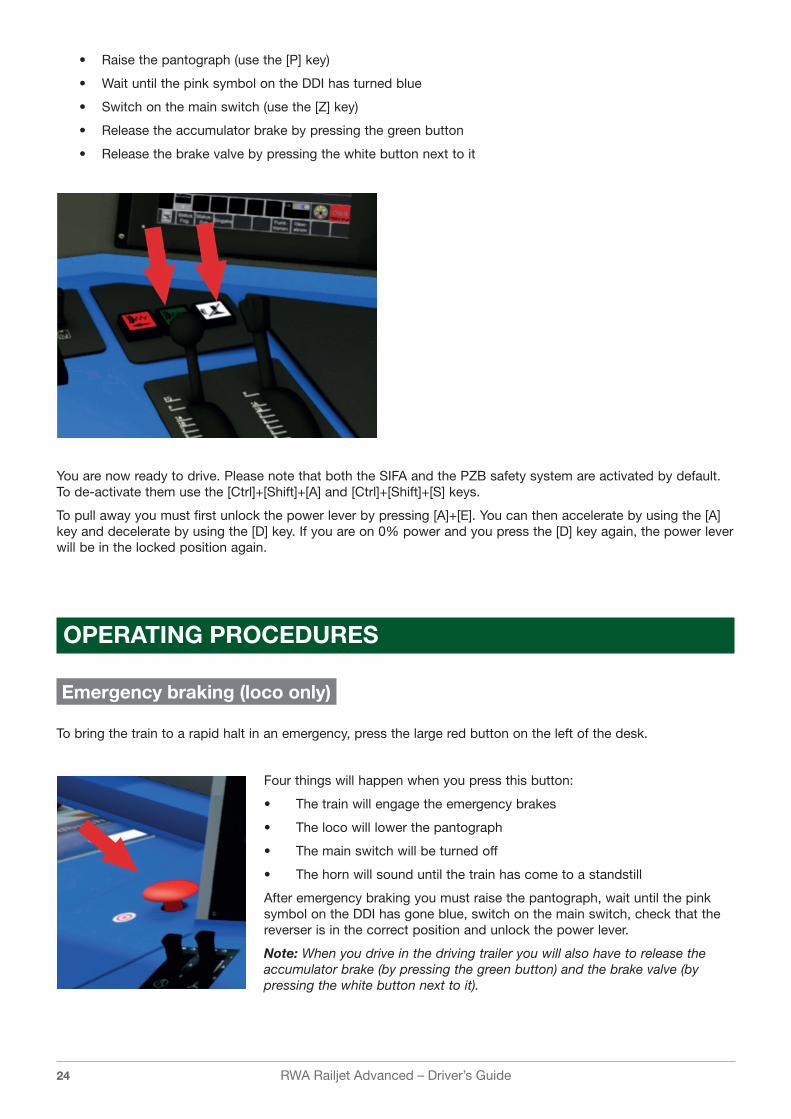
• Raise the pantograph (use the [P] key)
• Wait until the pink symbol on the DDI has turned blue
• Switch on the main switch (use the [Z] key)
• Release the accumulator brake by pressing the green button
• Release the brake valve by pressing the white button next to it
You are now ready to drive. Please note that both the SIFA and the PZB safety system are activated by default. To de-activate them use the [Ctrl]+[Shift]+[A] and [Ctrl]+[Shift]+[S] keys.
To pull away you must first unlock the power lever by pressing [A]+[E]. You can then accelerate by using the [A] key and decelerate by using the [D] key. If you are on 0% power and you press the [D] key again, the power lever will be in the locked position again.
OPERATING PROCEDURES
Emergency braking (loco only)
To bring the train to a rapid halt in an emergency, press the large red button on the left of the desk.
Four things will happen when you press this button:
• The train will engage the emergency brakes
• The loco will lower the pantograph
• The main switch will be turned off
• The horn will sound until the train has come to a standstill
After emergency braking you must raise the pantograph, wait until the pink symbol on the DDI has gone blue, switch on the main switch, check that the reverser is in the correct position and unlock the power lever.
Note: When you drive in the driving trailer you will also have to release the accumulator brake (by pressing the green button) and the brake valve (by pressing the white button next to it).
RWA Railjet Advanced – Driver’s Guide25
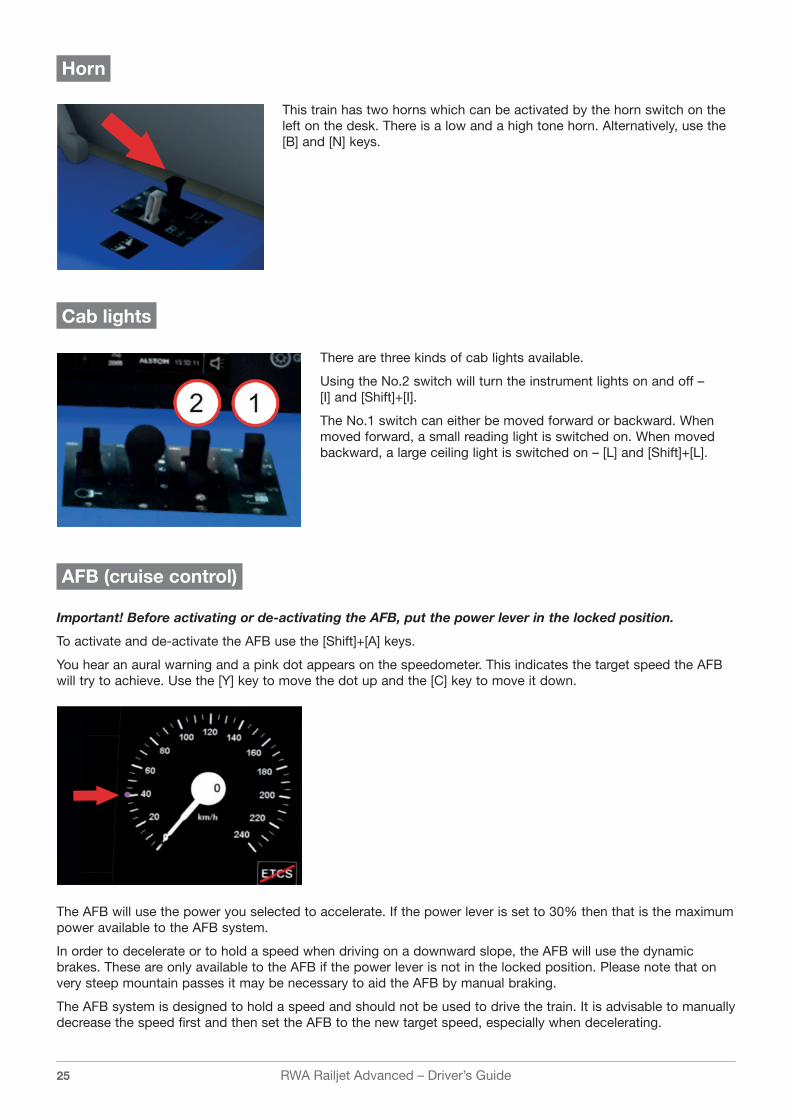
Horn
This train has two horns which can be activated by the horn switch on the left on the desk. There is a low and a high tone horn. Alternatively, use the [B] and [N] keys.
Cab lights
There are three kinds of cab lights available.
Using the No.2 switch will turn the instrument lights on and off – [I] and [Shift]+[I].
The No.1 switch can either be moved forward or backward. When moved forward, a small reading light is switched on. When moved backward, a large ceiling light is switched on – [L] and [Shift]+[L].
AFB (cruise control)
Important! Before activating or de-activating the AFB, put the power lever in the locked position.
To activate and de-activate the AFB use the [Shift]+[A] keys.
You hear an aural warning and a pink dot appears on the speedometer. This indicates the target speed the AFB will try to achieve. Use the [Y] key to move the dot up and the [C] key to move it down.
The AFB will use the power you selected to accelerate. If the power lever is set to 30% then that is the maximum power available to the AFB system.
In order to decelerate or to hold a speed when driving on a downward slope, the AFB will use the dynamic brakes. These are only available to the AFB if the power lever is not in the locked position. Please note that on very steep mountain passes it may be necessary to aid the AFB by manual braking.
The AFB system is designed to hold a speed and should not be used to drive the train. It is advisable to manually decrease the speed first and then set the AFB to the new target speed, especially when decelerating.

RWA Railjet Advanced – Driver’s Guide26
Door system
When you arrive at a station, use the [T] key to open the doors. If you have selected the ÖBB door system on the back wall panel (or at the front in the driving trailer) you will hear a clicking noise after a while. This indicates that the doors are closed but are not locked. You will not be able to pull away until the doors are locked.
Move the door selector upright to the locked position (R key). The clicking noise will stop and you are ready to depart.
SIFA
SIFA stands for ‘Sicherheitsfahrschaltung’ (safety driving switch) and is a system designed to check if the driver is still alert.
There is a pedal underneath the desk on which the driver can rest his feet and every few seconds he must press this pedal down. If he fails to do so a visual warning will appear on the main display (‘SIFA’). If this is ignored, an aural warning will sound (‘SIFA, SIFA’). If the pedal is still not pressed the train will engage an emergency brake.
To press the pedal, use the space bar on your keyboard.
You can activate and de-activate this system by pressing [Ctrl]+[Shift]+[S] or by using the arrow buttons to go to the fuse box and pull the relevant circuit breaker.
Electrodynamic brake
In order to use the electrodynamic brake in unison with the train brake, the train brake must be in position F and the electro brake in position FA before braking begins.
In the loco only:
You can also increase the power fed into the dynamic brake system. If you use the Taurus locomotive to pull a heavy freight train you might want to make use of this option.
To do so, go to the DDI on your right in the cab and press the 0 button (Funktionen).
This will open a new screen which will give you several options. The topmost option is called ‘E Bremse Erhöhung’ (dynamic brake increase). Press the 1 button at the bottom left (‘EB ein’). You will see that the status of the dynamic brake increase has changed from ‘aus’ (off) to ‘ein’ (on). Confirm your selection with the ‘E’ button and press the ‘0’ button to get back to the main menu.
RWA Railjet Advanced – Driver’s Guide27
Roadrunner (train length indicator)
When passing a speed limit sign or when entering a station with a short platform it is often good to know when the last carriage has passed a certain point.
The Taurus has a system called ‘Roadrunner’. Whenever you want to know when the last carriage will pass a specific point press the [E] key twice. This will start the Roadrunner and it will inform you when the last carriage has passed the point where you pressed the button. You will hear a sound very similar to that made by the Roadrunner comic figure (“meep meep”), hence the name for the system.
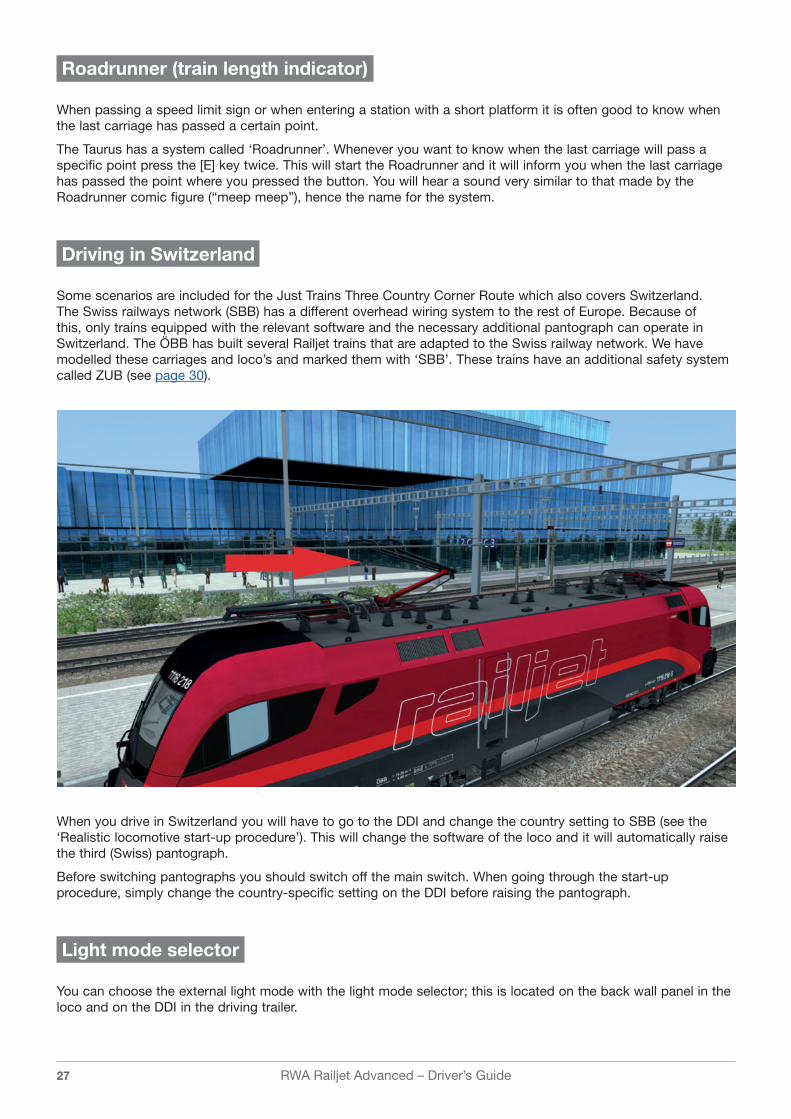
Driving in Switzerland
Some scenarios are included for the Just Trains Three Country Corner Route which also covers Switzerland. The Swiss railways network (SBB) has a different overhead wiring system to the rest of Europe. Because of this, only trains equipped with the relevant software and the necessary additional pantograph can operate in Switzerland. The ÖBB has built several Railjet trains that are adapted to the Swiss railway network. We have modelled these carriages and loco’s and marked them with ‘SBB’. These trains have an additional safety system called ZUB (see page 30).
When you drive in Switzerland you will have to go to the DDI and change the country setting to SBB (see the ‘Realistic locomotive start-up procedure’). This will change the software of the loco and it will automatically raise the third (Swiss) pantograph.
Before switching pantographs you should switch off the main switch. When going through the start-up procedure, simply change the country-specific setting on the DDI before raising the pantograph.
Light mode selector
You can choose the external light mode with the light mode selector; this is located on the back wall panel in the loco and on the DDI in the driving trailer.

RWA Railjet Advanced – Driver’s Guide28
The following modes are available:
• Lights off – 0 position
• Loco white, rear of train automatic – first selection to the left (for shunting)
• Loco white, rear of train white – second selection to the left
• Loco red – first selection to the right
• Loco white, rear of train red – second selection to the right (use this selection for Railjets)
• All lights red – third selection to the right (only for emergency use)
Note: In the driving trailer the light modes can be selected on the DDI.
PZB90 SYSTEM
PZB stands for ‘Punktfoermige Zugbeeinflussung’ and is a very complex system designed to monitor the train driver’s actions.
How does it work?
This is only a brief summary that will help you to use it correctly and avoid emergency braking.
All locomotives and driving trailers are equipped with a sensor on the bogies. These exchange information with magnets that are placed at specific points along the line. The magnets in turn are linked to the signalling system.
Whenever a signal changes to ‘stop’ or ‘pass at 60 km/h’ the magnet transmits this information via the sensors into the on-board PZB system. The relevant information is displayed on the main screen in the cab. If the driver ignores the information, or fails to follow the required procedures, the system initiates an emergency stop.
Changing train modes
Before you set off you will have to tell the system what kind of train you are in. In simple terms there are three different modes linked to three different maximum speeds:
• Train type O – the standard setting for all high speed and fast passenger services
• Train type M – trains limited to 125 km/h
• Train type U – trains limited to 105 km/h
You can select the train type by pressing [Shift]+[7] and [Shift]+[6]. This will move the selection up and down. The indication on the main screen is as follows:

RWA Railjet Advanced – Driver’s Guide29
If you have selected train type O the screen will display a blue square with the number 85 in it:
If you have selected train type M the screen will display a blue square with the number 70 in it:
If you have selected train type U the screen will display a blue square with the number 55 in it:
Restrictive mode
When you first boot up the system you may notice that the blue squares indicating the selected train type are flashing. When this is the case it means that the system has gone into restrictive mode. As long as this mode is active the train is limited to 40 km/h. If you exceed this speed the system will initiate emergency braking.
You can free yourself from this system by pressing the ‘free’ button (use the [End] key on your keyboard).
Please note that sometimes the system won’t allow you to free yourself and you will have to drive at 40 km/h until the restrictive mode is lifted. This mode was introduced after a major train crash in Germany and restricts the train to a low speed in certain situations.
Driving with PZB90
When you approach a warning signal and it shows two green lights you do not have to do anything.
If the warning signal shows yellow lights or green and yellow lights, it means that the next main signal either shows ‘stop’ (red) or ‘proceed at limited speed’. In both cases you must tell the system that you have seen the warning signal. Once you pass it you have four seconds to press ‘Acknowledge’ (use the [Page down] key). Failure to do so will result in emergency braking.
After that you must slow the train down. There are several rules regarding the slowing down process which differ for each train type. Railjets must be slowed down to 85 km/h within 23 seconds. If you don’t slow down fast enough, the system will engage the emergency brakes.

RWA Railjet Advanced – Driver’s Guide30
Note: If you slow down and then pass a combined main/warning signal where the warning signal shows anything else but two greens, you will have to acknowledge the warning signal again.
If emergency braking is activated you will have to wait until the train has come to a complete stop. Move the reverser into the locked position and press ‘Free’ (i.e. the [End] key) and wait until the brakes have been released. When you are in the driving trailer you will also have to release the spring accumulator brakes.
You will be in restricted mode and won’t be allowed to free yourself from it. Proceed at 40 km/h until the system is happy for you to drive any faster (the blue squares on the display will stop flashing).
ZUB SYSTEM
The ZUB system is the Swiss equivalent to the PZB system and works almost exactly the same. Unlike the PZB system, you don’t have to select a train mode before setting off. This is done automatically.
Please note that at the time of writing this manual there are no routes that support the ZUB system. Because of this we have designed our own ZUB system and included it in the latest installer for the Just Trains Three Country Corner route. In this new version you will find a fully functioning ZUB system on the Swiss section of the route.The Just Trains Railjet is also the only train that can communicate with and interpret this system correctly. To all other trains it will work like a normal PZB.
Please note that the ZUB system will only work if the Swiss (SBB) system has been selected in the DDI. Also note that this system is only installed on trains that are certified to operate in Switzerland; these trains are marked with ‘SBB’ in the name.
When you are driving in the driving trailer there is no difference to the PZB system and you are required to use the exact same controls.
In the loco, however, there is an additional panel on the left hand side:
With switch 1 you can cancel all warnings after forced emergency braking. This is the equivalent to the red switch on the back wall in the driving trailer.
Switch 2 can be moved either to the left or to the right. To acknowledge a warning signal, move it to the right (or press the [-] key). When you want to free yourself from restrictive mode you move it to the left (or press [Shift]+[-] at the same time).
Switch 3 is the equivalent of ‘Befehl’ in PZB. You can either press the button or use the [Num lk] key.

RWA Railjet Advanced – Driver’s Guide31
SCENARIOS
Please note that the following routes are not included in Train Simulator by default and are not supplied with this Railjet add-on. You can purchase them either from the Just Trains website or from the STEAM store.
Three Country Corner RouteJT – Railjet: Rorschach – Feldkirch
Difficulty: Medium
Length: 45 minutes
The line between Feldkirch and Switzerland is closed due to maintenance and all trains are routed via Rorschach (this has happened in the past). Take over the Railjet train to Vienna and drive it to Feldkirch. Remember that you will have to set the Swiss software for driving in Switzerland.
JT – Railjet: Feldkirch – Lindau
Difficulty: Medium
Length: 45 minutes
The Railjet from Vienna has just arrived. Take it on its last stretch to Lindau. This is a double unit that has to be uncoupled in Bregenz. Only the front unit can proceed to Lindau.
JT – Railjet: Bludenz – St. Anton
Difficulty: Easy
Length: 40 minutes
Take over this double unit and drive it up the pass. It is raining heavily so be careful!
DTG SemmeringbahnJT – Railjet: Muerzzuschlag – Gloggnitz
Difficulty: Medium
Length: 45 minutes
It’s a cold winter’s day and your job is to drive a Railjet across the pass.
JT – Railjet: Gloggnitz – Muerzzuschlag
Difficulty: Easy
Length: 45 minutes
Your job is to drive a Railjet across the pass. This train stops at Semmering.
Munich – Rosenheim Route Add-OnJT – Railjet: Rosenheim – Munich
Difficulty: Easy
Length: 30 minutes
Take over the Railjet from Vienna to Munich and drive it to Munich. Please note that real-world Railjet trains drive non-stop from Salzburg (Austria) to Munich. Because this route is not long enough you will be following an Intercity schedule.

RWA Railjet Advanced – Driver’s Guide32
CREDITS
RWA Railjet Advanced
Stefan Lorenz
Thomas Bendinger
Andreas Miniberger
Guenter Kusternig
Lukas Florian
Just Trains
Project Management Alex Ford
Installer Martin Wright
Manual Stefan Lorenz
Artwork Fink Creative
Technical Support Martin Wright
COPYRIGHT
©2017 Just Trains. All rights reserved. Just Trains and the Just Trains logo are trademarks of JustFlight London Limited, St. George’s House, George Street, Huntingdon, PE29 3GH, UK. All trademarks and brand names are trademarks or registered trademarks of the respective owners and their use herein does not imply any association or endorsement by any third party.
SOFTWARE PIRACY
This software is copy protected.
At Just Trains we have invested significant time, effort and money in developing, manufacturing and publishing all of our rail simulation products. This includes rewarding the programmers and artists whose creativity contributes so much to the products we all enjoy.
A pirate, otherwise known as a thief, makes a profit from the sale of other people’s hard work. In some cases he makes more profit than the publishers and developers make from the sale of an original title. Piracy is not just the domain of the casual domestic user in his or her back room, but it is also a multi-million-pound business conducted by criminals, often with associations with the illegal drugs trade. Buying or downloading pirated copies of programs directly support these illegal operations.
Don’t be fooled by a load of old tosh about file ‘sharing’. The sites that host these ‘shared’ files cover their backsides with the excuse that they are simply a ‘gateway’ to the files. In fact, they actively encourage piracy and are often funded by advertising. Most of them are illegal money laundering operations by another name.
The people who really suffer from game piracy are the artists, programmers and other committed game development staff. Piracy and theft directly affects people and their families. Loss of revenue to the games industry through piracy means many are losing their jobs due to cutbacks that have to be made to ensure developers and publishers survive. The logical outcome of this is that eventually the supply of rail simulation programs will dry up because developers think it is not worth the hassle.
It’s not just copying software that is against the law. Owning copied software also constitutes a criminal offence, so anyone buying or downloading from these people is also at risk of arrest and prosecution.

The Spirit of Train Simulation
Available to buy online at www.justtrains.net
www.justtrains.net

www.justtrains.net