Downton Abbey® Christmas - Andover Fabricsandoverfabrics.com/Quilts/Downton Abbey -...
8
Free Pattern Download Available 12/29/14 1384 Broadway New York, NY 10018 Tel. (800) 223-5678 • andoverfabrics.com FABRICS BY KATHY HALL Downton Abbey® Christmas Vintage Christmas Quilt Design: Heidi Pridemore Quilt Size: 84" x 84" andoverfabrics.com Downton™ and Downton Abbey®.©2014 Carnival Film & Television Limited. All Rights Reserved.
Transcript of Downton Abbey® Christmas - Andover Fabricsandoverfabrics.com/Quilts/Downton Abbey -...
Free Pattern Download Available
12/29/14
1384 Broadway New York, NY 10018Tel. (800) 223-5678 • andoverfabrics.com
FABRICS BY KATHY HALL
Downton Abbey®Christmas
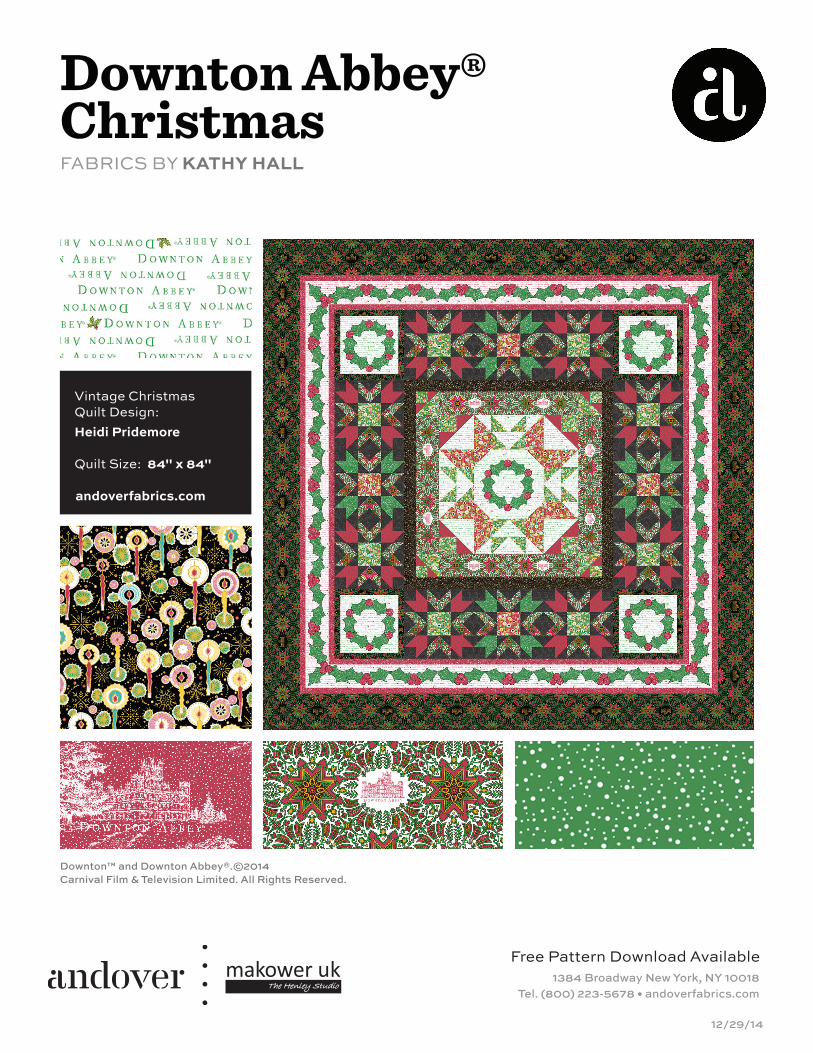
Vintage ChristmasQuilt Design:Heidi Pridemore
Quilt Size: 84" x 84"
andoverfabrics.com
Downton™ and Downton Abbey®.©2014Carnival Film & Television Limited. All Rights Reserved.
Free Pattern Download Available at www.andoverfabrics.com 12/29/14
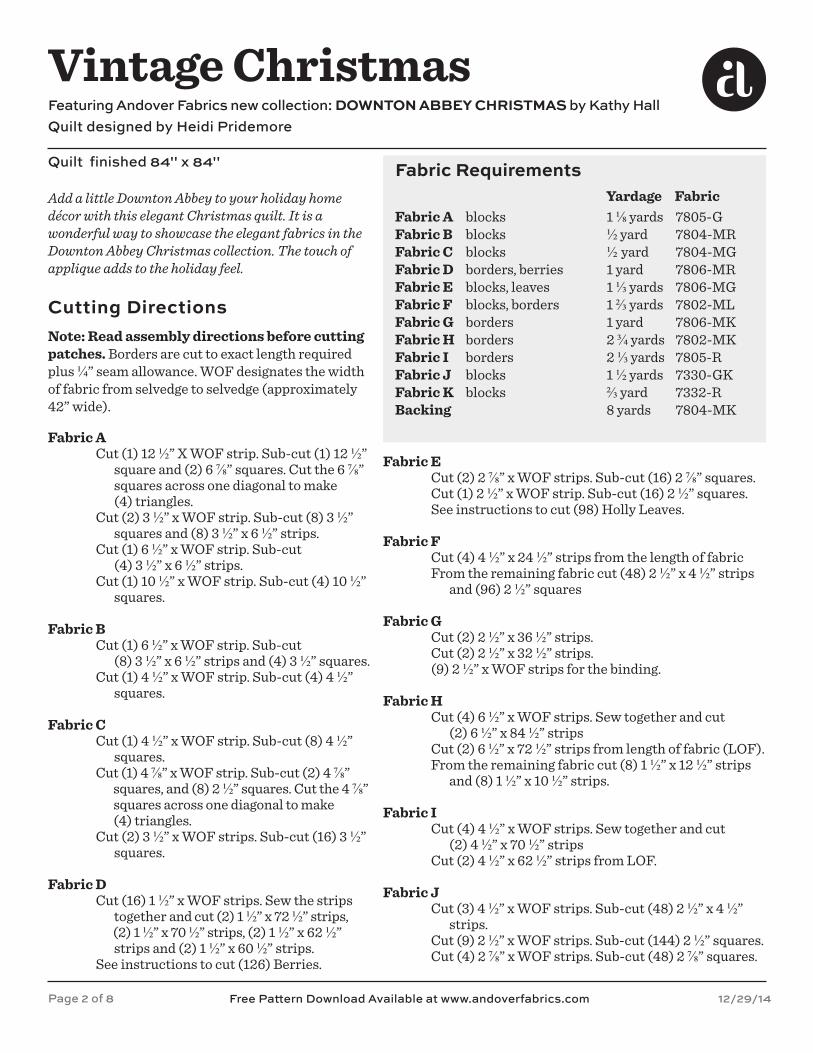
Vintage ChristmasFeaturing Andover Fabrics new collection: DOWNTON ABBEY CHRISTMAS by Kathy HallQuilt designed by Heidi Pridemore
Quilt finished 84" x 84"
Add a little Downton Abbey to your holiday home décor with this elegant Christmas quilt. It is a wonderful way to showcase the elegant fabrics in the Downton Abbey Christmas collection. The touch of applique adds to the holiday feel.
Cutting Directions
Yardage Fabric
Fabric Requirements
Fabric A Fabric B Fabric C Fabric DFabric EFabric FFabric GFabric HFabric IFabric JFabric K Backing
Page 2 of 8
blocksblocksblocksborders, berriesblocks, leavesblocks, bordersbordersbordersbordersblocksblocks
1 ⅛ yards½ yard½ yard1 yard1 ⅓ yards1 ⅔ yards1 yard2 ¾ yards2 ⅓ yards1 ½ yards⅔ yard8 yards
7805-G7804-MR7804-MG7806-MR7806-MG7802-ML7806-MK7802-MK7805-R7330-GK7332-R7804-MK
Note: Read assembly directions before cutting patches. Borders are cut to exact length required plus ¼” seam allowance. WOF designates the width of fabric from selvedge to selvedge (approximately 42” wide).
Fabric A Cut (1) 12 ½” X WOF strip. Sub-cut (1) 12 ½” square and (2) 6 ⅞” squares. Cut the 6 ⅞” squares across one diagonal to make (4) triangles. Cut (2) 3 ½” x WOF strip. Sub-cut (8) 3 ½” squares and (8) 3 ½” x 6 ½” strips. Cut (1) 6 ½” x WOF strip. Sub-cut (4) 3 ½” x 6 ½” strips. Cut (1) 10 ½” x WOF strip. Sub-cut (4) 10 ½” squares.
Fabric B Cut (1) 6 ½” x WOF strip. Sub-cut (8) 3 ½” x 6 ½” strips and (4) 3 ½” squares. Cut (1) 4 ½” x WOF strip. Sub-cut (4) 4 ½” squares.
Fabric C Cut (1) 4 ½” x WOF strip. Sub-cut (8) 4 ½” squares. Cut (1) 4 ⅞” x WOF strip. Sub-cut (2) 4 ⅞” squares, and (8) 2 ½” squares. Cut the 4 ⅞” squares across one diagonal to make (4) triangles. Cut (2) 3 ½” x WOF strips. Sub-cut (16) 3 ½” squares.
Fabric D Cut (16) 1 ½” x WOF strips. Sew the strips together and cut (2) 1 ½” x 72 ½” strips, (2) 1 ½” x 70 ½” strips, (2) 1 ½” x 62 ½” strips and (2) 1 ½” x 60 ½” strips. See instructions to cut (126) Berries.
Fabric E Cut (2) 2 ⅞” x WOF strips. Sub-cut (16) 2 ⅞” squares. Cut (1) 2 ½” x WOF strip. Sub-cut (16) 2 ½” squares. See instructions to cut (98) Holly Leaves.
Fabric F Cut (4) 4 ½” x 24 ½” strips from the length of fabric From the remaining fabric cut (48) 2 ½” x 4 ½” strips and (96) 2 ½” squares
Fabric G Cut (2) 2 ½” x 36 ½” strips. Cut (2) 2 ½” x 32 ½” strips. (9) 2 ½” x WOF strips for the binding.
Fabric H Cut (4) 6 ½” x WOF strips. Sew together and cut (2) 6 ½” x 84 ½” strips Cut (2) 6 ½” x 72 ½” strips from length of fabric (LOF). From the remaining fabric cut (8) 1 ½” x 12 ½” strips and (8) 1 ½” x 10 ½” strips.
Fabric I Cut (4) 4 ½” x WOF strips. Sew together and cut (2) 4 ½” x 70 ½” strips Cut (2) 4 ½” x 62 ½” strips from LOF.
Fabric J Cut (3) 4 ½” x WOF strips. Sub-cut (48) 2 ½” x 4 ½” strips. Cut (9) 2 ½” x WOF strips. Sub-cut (144) 2 ½” squares. Cut (4) 2 ⅞” x WOF strips. Sub-cut (48) 2 ⅞” squares.
Vintage Christmas
Free Pattern Download Available at www.andoverfabrics.com 12/29/14
Making the Quilt1.
2.
3.
4.
5.
6.
7.
8.
9.
Diagram 1
Diagram 3
Diagram 5
Diagram 4
Diagram 6
Diagram 7
Diagram 8 Diagram 9Diagram 2
Page 3 of 8
You will also need: Fusible Web
Fabric K Cut (2) 2 ½” x WOF strips. Sub-cut (32) 2 ½” squares. Cut (3) 2 ⅞” x WOF strips. Sub-cut (36) 2 ⅞” squares. Cut (4) squares across one diagonal to make (8) small triangles Cut (1) 3 ⅞” x WOF strip. Sub-cut (4) 3 ⅞” squares. Cut the squares across one diagonal to make (8) large triangles.
Backing Cut (3) 92” x WOF strips. Sew the strips together and trim to make (1) 92” x 92” backing.
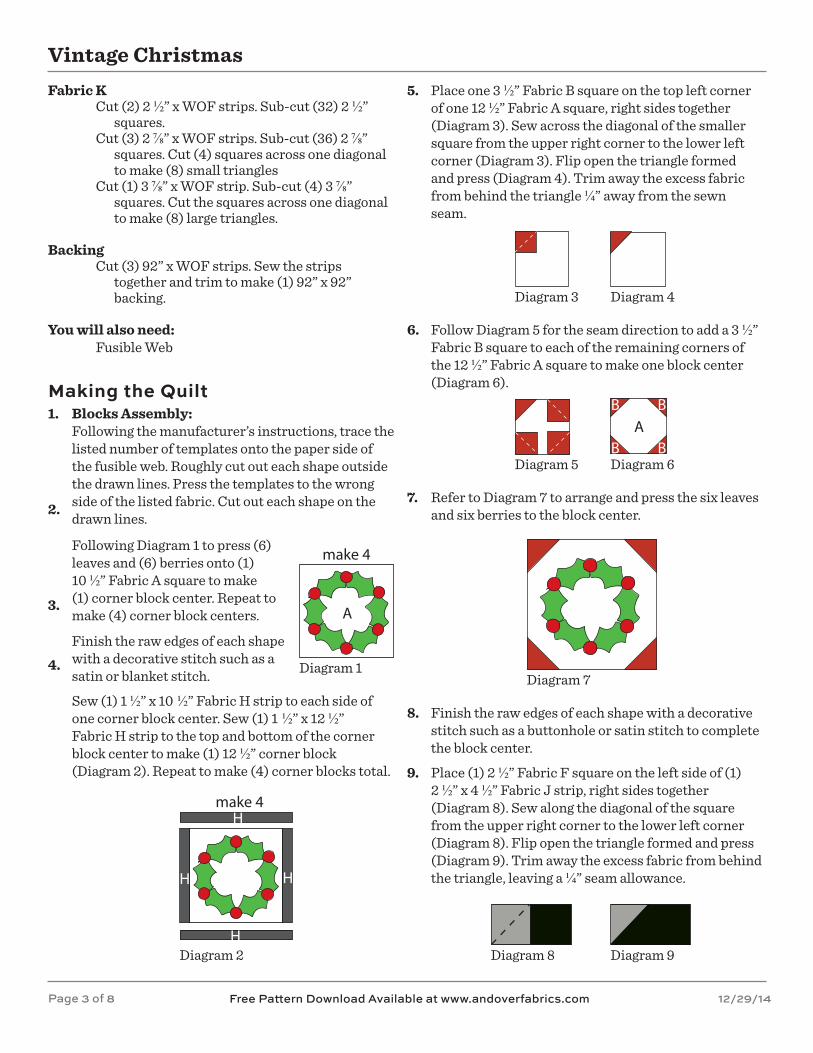
Blocks Assembly: Following the manufacturer’s instructions, trace the listed number of templates onto the paper side of the fusible web. Roughly cut out each shape outside the drawn lines. Press the templates to the wrong side of the listed fabric. Cut out each shape on the drawn lines.
Following Diagram 1 to press (6) leaves and (6) berries onto (1) 10 ½” Fabric A square to make (1) corner block center. Repeat to make (4) corner block centers.
Finish the raw edges of each shape with a decorative stitch such as a satin or blanket stitch.
Sew (1) 1 ½” x 10 ½” Fabric H strip to each side of one corner block center. Sew (1) 1 ½” x 12 ½” Fabric H strip to the top and bottom of the corner block center to make (1) 12 ½” corner block (Diagram 2). Repeat to make (4) corner blocks total.
make 4
A
make 4H
H H
H
Place one 3 ½” Fabric B square on the top left corner of one 12 ½” Fabric A square, right sides together (Diagram 3). Sew across the diagonal of the smaller square from the upper right corner to the lower left corner (Diagram 3). Flip open the triangle formed and press (Diagram 4). Trim away the excess fabric from behind the triangle ¼” away from the sewn seam.
Follow Diagram 5 for the seam direction to add a 3 ½” Fabric B square to each of the remaining corners of the 12 ½” Fabric A square to make one block center (Diagram 6).
AB B
BB
Refer to Diagram 7 to arrange and press the six leaves and six berries to the block center.
Finish the raw edges of each shape with a decorative stitch such as a buttonhole or satin stitch to complete the block center.
Place (1) 2 ½” Fabric F square on the left side of (1) 2 ½” x 4 ½” Fabric J strip, right sides together (Diagram 8). Sew along the diagonal of the square from the upper right corner to the lower left corner (Diagram 8). Flip open the triangle formed and press (Diagram 9). Trim away the excess fabric from behind the triangle, leaving a ¼” seam allowance.
Vintage Christmas
Free Pattern Download Available at www.andoverfabrics.com 12/29/14Page 4 of 8
10.
11.
12.
13.
14.
15.
16.
17.
18.
19.
20.
Diagram 10 Diagram 11
Diagram 17
Diagram 18
Diagram 19
Diagram 20
Diagram 21
Diagram 12
Diagram 13
Diagram 14 Diagram 15 Diagram 16
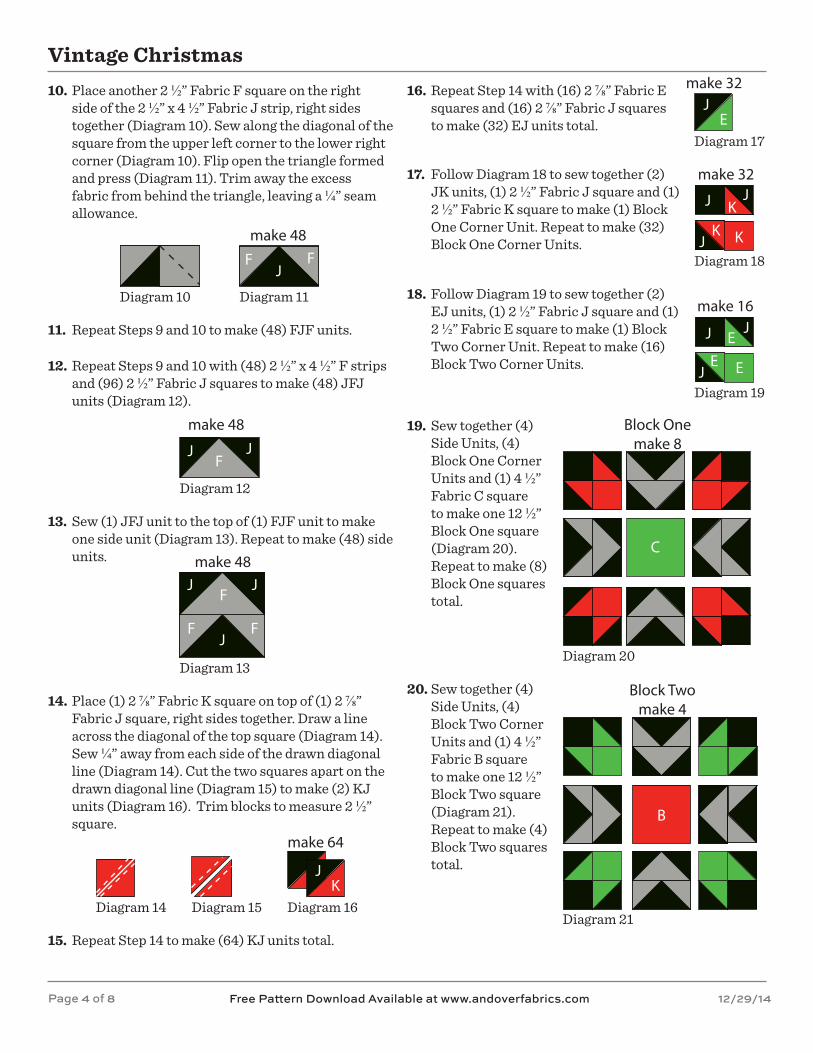
Place another 2 ½” Fabric F square on the right side of the 2 ½” x 4 ½” Fabric J strip, right sides together (Diagram 10). Sew along the diagonal of the square from the upper left corner to the lower right corner (Diagram 10). Flip open the triangle formed and press (Diagram 11). Trim away the excess fabric from behind the triangle, leaving a ¼” seam allowance.
make 48
JF F
Repeat Steps 9 and 10 to make (48) FJF units.
Repeat Steps 9 and 10 with (48) 2 ½” x 4 ½” F strips and (96) 2 ½” Fabric J squares to make (48) JFJ units (Diagram 12).
Sew (1) JFJ unit to the top of (1) FJF unit to make one side unit (Diagram 13). Repeat to make (48) side units.
Place (1) 2 ⅞” Fabric K square on top of (1) 2 ⅞” Fabric J square, right sides together. Draw a line across the diagonal of the top square (Diagram 14). Sew ¼” away from each side of the drawn diagonal line (Diagram 14). Cut the two squares apart on the drawn diagonal line (Diagram 15) to make (2) KJ units (Diagram 16). Trim blocks to measure 2 ½” square.
make 48
J JF
make 48J J
F F
F
J
JK
make 64
Repeat Step 14 to make (64) KJ units total.
Repeat Step 14 with (16) 2 ⅞” Fabric E squares and (16) 2 ⅞” Fabric J squares to make (32) EJ units total.
Follow Diagram 18 to sew together (2) JK units, (1) 2 ½” Fabric J square and (1) 2 ½” Fabric K square to make (1) Block One Corner Unit. Repeat to make (32) Block One Corner Units.
JE
make 32
J
J
J
K
KK
make 32
Follow Diagram 19 to sew together (2) EJ units, (1) 2 ½” Fabric J square and (1) 2 ½” Fabric E square to make (1) Block Two Corner Unit. Repeat to make (16) Block Two Corner Units.
J
J
J
EE
E
make 16
Sew together (4) Side Units, (4) Block One Corner Units and (1) 4 ½” Fabric C square to make one 12 ½” Block One square (Diagram 20). Repeat to make (8) Block One squares total.
C
Block Onemake 8
Sew together (4) Side Units, (4) Block Two Corner Units and (1) 4 ½” Fabric B square to make one 12 ½” Block Two square (Diagram 21). Repeat to make (4) Block Two squares total.
B
Block Twomake 4
Vintage Christmas
Free Pattern Download Available at www.andoverfabrics.com 12/29/14Page 5 of 8
21. 26.
27.
28.
22.
23.
24.
25.
Diagram 22
Diagram 28
Diagram 29
Diagram 30
Diagram 23 Diagram 24
Diagram 25
Diagram 26
Diagram 27
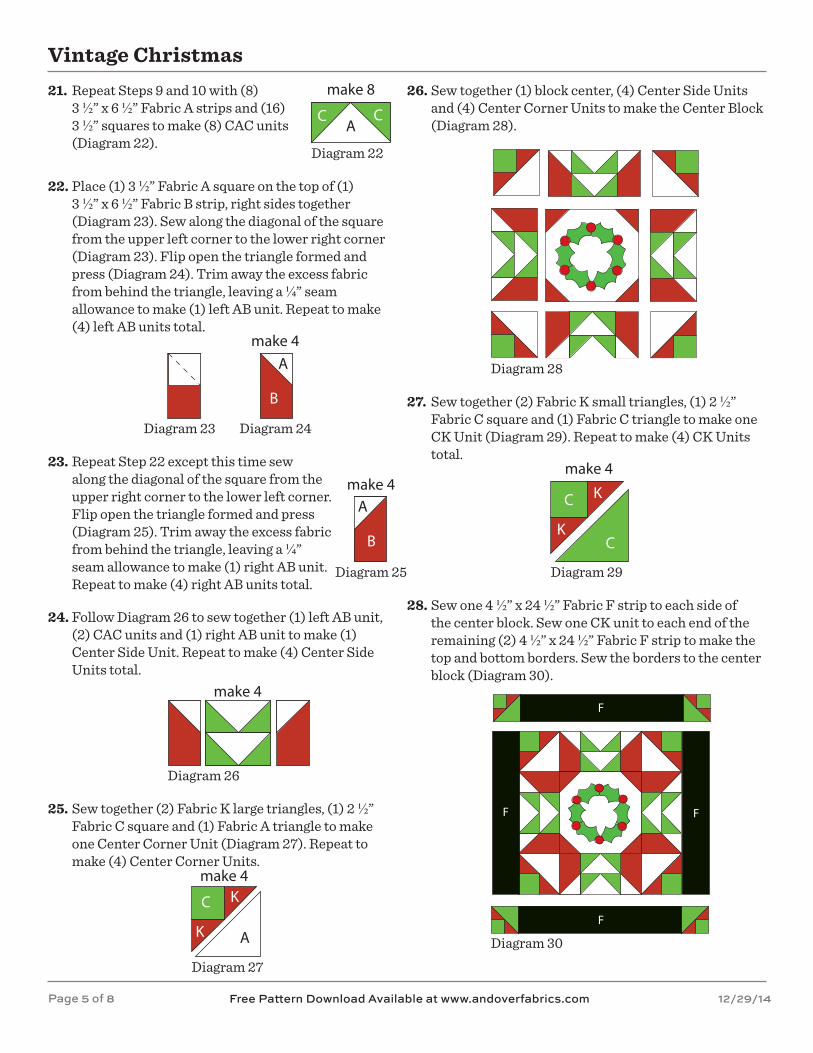
Repeat Steps 9 and 10 with (8) 3 ½” x 6 ½” Fabric A strips and (16) 3 ½” squares to make (8) CAC units (Diagram 22).
make 8
C CA
Place (1) 3 ½” Fabric A square on the top of (1) 3 ½” x 6 ½” Fabric B strip, right sides together (Diagram 23). Sew along the diagonal of the square from the upper left corner to the lower right corner (Diagram 23). Flip open the triangle formed and press (Diagram 24). Trim away the excess fabric from behind the triangle, leaving a ¼” seam allowance to make (1) left AB unit. Repeat to make (4) left AB units total.
B
Amake 4
Repeat Step 22 except this time sew along the diagonal of the square from the upper right corner to the lower left corner. Flip open the triangle formed and press (Diagram 25). Trim away the excess fabric from behind the triangle, leaving a ¼” seam allowance to make (1) right AB unit. Repeat to make (4) right AB units total.
B
Amake 4
Follow Diagram 26 to sew together (1) left AB unit, (2) CAC units and (1) right AB unit to make (1) Center Side Unit. Repeat to make (4) Center Side Units total.
make 4
Sew together (2) Fabric K large triangles, (1) 2 ½” Fabric C square and (1) Fabric A triangle to make one Center Corner Unit (Diagram 27). Repeat to make (4) Center Corner Units.
K
KC
A
make 4
Sew together (1) block center, (4) Center Side Units and (4) Center Corner Units to make the Center Block (Diagram 28).
Sew together (2) Fabric K small triangles, (1) 2 ½” Fabric C square and (1) Fabric C triangle to make one CK Unit (Diagram 29). Repeat to make (4) CK Units total.
K
KC
C
make 4
Sew one 4 ½” x 24 ½” Fabric F strip to each side of the center block. Sew one CK unit to each end of the remaining (2) 4 ½” x 24 ½” Fabric F strip to make the top and bottom borders. Sew the borders to the center block (Diagram 30).
F
F
F F
Vintage Christmas
Free Pattern Download Available at www.andoverfabrics.com 12/29/14
29.
30.
34.
35.
31.
32.
33.
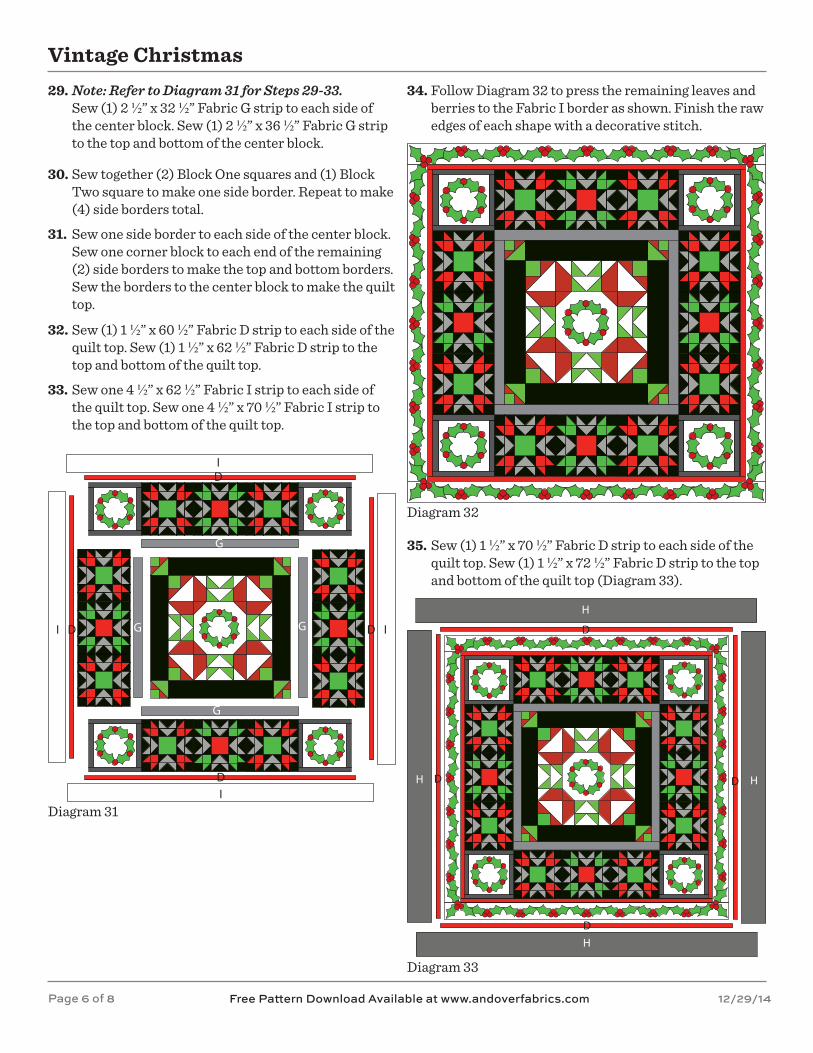
Note: Refer to Diagram 31 for Steps 29-33.Sew (1) 2 ½” x 32 ½” Fabric G strip to each side of the center block. Sew (1) 2 ½” x 36 ½” Fabric G strip to the top and bottom of the center block.
G
G G
G
I
I
I
I
D
D
D
D
Diagram 31
Diagram 32
Diagram 33
Sew together (2) Block One squares and (1) Block Two square to make one side border. Repeat to make (4) side borders total.
Sew one side border to each side of the center block. Sew one corner block to each end of the remaining (2) side borders to make the top and bottom borders. Sew the borders to the center block to make the quilt top.
Sew (1) 1 ½” x 60 ½” Fabric D strip to each side of the quilt top. Sew (1) 1 ½” x 62 ½” Fabric D strip to the top and bottom of the quilt top.
Sew one 4 ½” x 62 ½” Fabric I strip to each side of the quilt top. Sew one 4 ½” x 70 ½” Fabric I strip to the top and bottom of the quilt top.
Follow Diagram 32 to press the remaining leaves and berries to the Fabric I border as shown. Finish the raw edges of each shape with a decorative stitch.
Sew (1) 1 ½” x 70 ½” Fabric D strip to each side of the quilt top. Sew (1) 1 ½” x 72 ½” Fabric D strip to the top and bottom of the quilt top (Diagram 33).
H
H
H H
D
D
D D
Page 6 of 8

Vintage Christmas
Free Pattern Download Available at www.andoverfabrics.com 12/29/14
36.
37.
38.
39.
Sew (1) 6 ½” x 72 ½” Fabric H strip to each side of the quilt top. Sew (1) 6 ½” x 84 ½” Fabric H border to the top and bottom of the quilt top.
Finishing the QuiltLayer and quilt as desired.
Sew the nine 2 ½” x WOF Fabric G strips together, end to end with 45-degree seams, to make the binding. Fold this long strip in half lengthwise with wrong sides together and press.
Bind as desired.
Holly LeavesTrace 96Fabric E
BerriesTrace 126Fabric D
Page 7 of 8
Free Pattern Download Available1384 Broadway New York, NY 10018
Tel. (800) 223-5678 • andoverfabrics.com
Downton Abbey®ChristmasFABRICS BY KATHY HALL
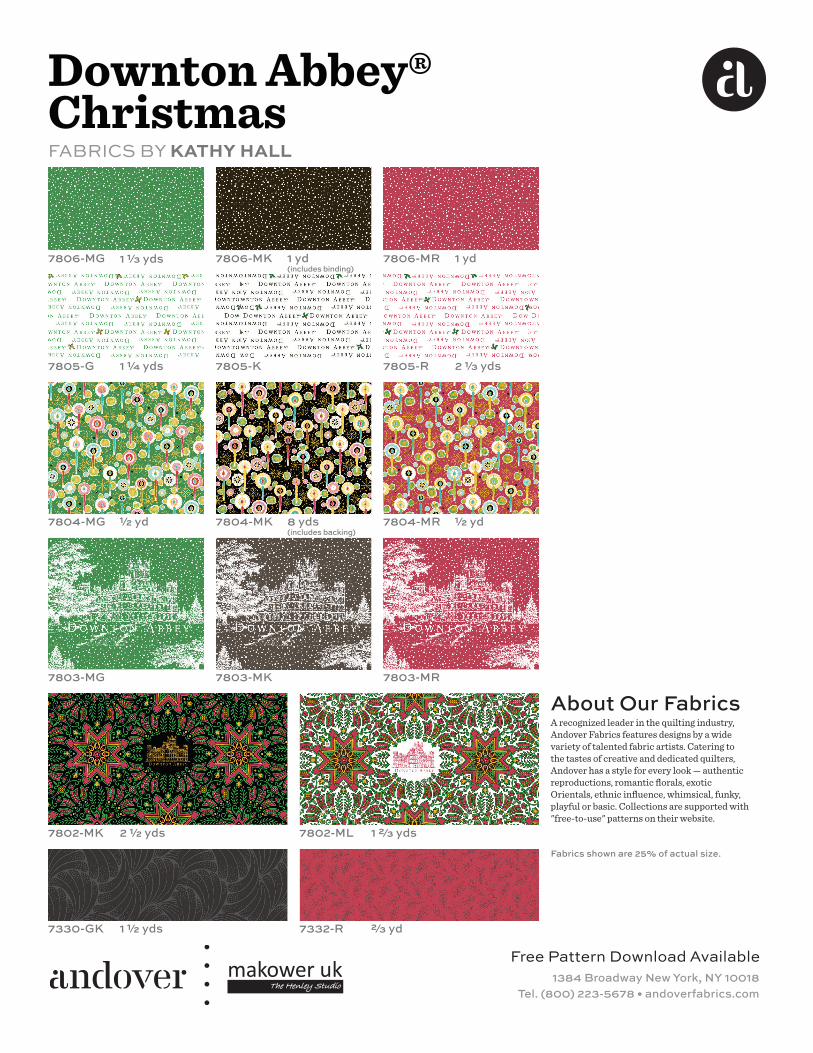
Fabrics shown are 25% of actual size.
A recognized leader in the quilting industry,Andover Fabrics features designs by a wide variety of talented fabric artists. Catering to the tastes of creative and dedicated quilters, Andover has a style for every look — authentic reproductions, romantic florals, exotic Orientals, ethnic influence, whimsical, funky, playful or basic. Collections are supported with "free-to-use" patterns on their website.
About Our Fabrics
7806-MG
7804-MG
7803-MG
7802-MK
7330-GK
7802-ML
7332-R
7805-G
7806-MK
7804-MK
7803-MK
7805-K
7806-MR
7804-MR
7803-MR
7805-R
1 1/3 yds
1/2 yd1/2 yd
1 1/4 yds
1 2/3 yds
2/3 yd
2 1/2 yds
2 1/3 yds
1 1/2 yds
8 yds
1 yd 1 yd
(includes backing)
(includes binding)