How to Download Census Data from American Factfinder and ...

Tufts GIS Center
1
Downloading Census Data from American Factfinder2 for use in ArcGIS Written by Barbara Parmenter , revised November 18, 2011
OBTAINING DATA FROM AMERICAN FACTFINDER2 ............................................................................................... 1
PREPARING AMERICAN FACTFINDER DATA FOR USE IN ARCMAP .......................................................................... 4
OBTAINING GIS FILES FOR CENSUS GEOGRAPHY .................................................................................................... 7
JOINING THE AFF TABLE TO YOUR CENSUS TRACT POLYGONS IN ARCMAP ............................................................ 9
SETTING A PROJECTED COORDINATE SYSTEM FOR YOUR MAP ............................................................................ 13
In this tutorial, we will be obtaining Census Tract level data from the 2010 Census using American Factfinder2
Obtaining Data from American FactFinder2 1. Data management is critical when dealing with the multiple tables of the Census. Before
beginning this tutorial: a. Create a Census 2010 folder in your personal workspace b. Create two subfolders: AFF Data and Census Geography
2. Go to the US Census web site – http://census.gov and then select American FactFinder
3. Select factfinder2.census.gov 4. Click on Geographies on the left column – this brings up the Select Geographies overlay 5. Type a State name in the search box, then click Go

Tufts GIS Center
2
6. Under Geography Filter Options, click on Census Tract

Tufts GIS Center
3
7. In the resulting Geography Results list, checkmark All Tracts within your county of interest then
click on ADD (at the top of the list)
8. Close the Select Geographies overlay
9. Be sure that the Your Selections box says what you want – all census tracts within your selected county and state. If it does not say this, clear your selections and start over from Step 5 above.
10. Click on Dataset under Topics (left column) and choose 2010 SF1 100% Data
Tufts GIS Center
4
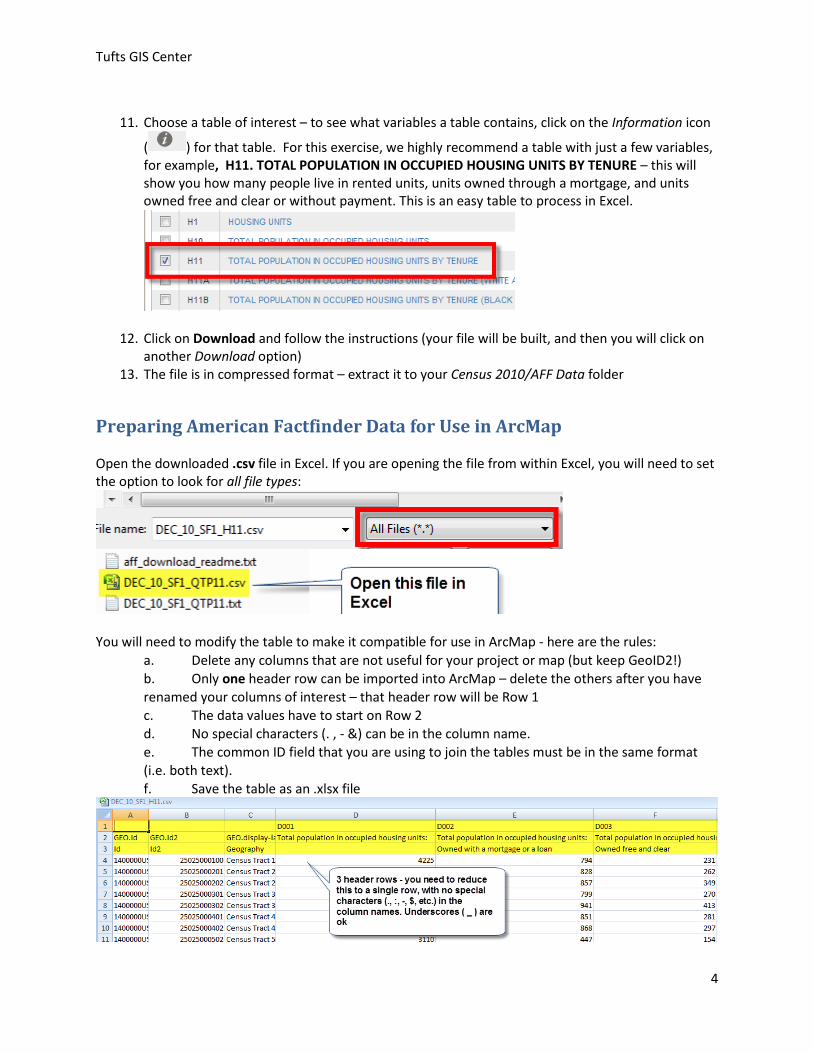
11. Choose a table of interest – to see what variables a table contains, click on the Information icon
( ) for that table. For this exercise, we highly recommend a table with just a few variables, for example, H11. TOTAL POPULATION IN OCCUPIED HOUSING UNITS BY TENURE – this will show you how many people live in rented units, units owned through a mortgage, and units owned free and clear or without payment. This is an easy table to process in Excel.
12. Click on Download and follow the instructions (your file will be built, and then you will click on another Download option)
13. The file is in compressed format – extract it to your Census 2010/AFF Data folder
Preparing American Factfinder Data for Use in ArcMap Open the downloaded .csv file in Excel. If you are opening the file from within Excel, you will need to set the option to look for all file types:
You will need to modify the table to make it compatible for use in ArcMap - here are the rules:
a. Delete any columns that are not useful for your project or map (but keep GeoID2!) b. Only one header row can be imported into ArcMap – delete the others after you have renamed your columns of interest – that header row will be Row 1 c. The data values have to start on Row 2 d. No special characters (. , - &) can be in the column name. e. The common ID field that you are using to join the tables must be in the same format (i.e. both text). f. Save the table as an .xlsx file

Tufts GIS Center
5
You can accomplish this in any way that suits you. The method we used is to keep the header row that has the GeoID and GeoID2, and adjust the column names to meet the requirements, using information from the other rows (in the above examples, the third row is giving us the type of housing tenure so we need to incorporate that into the field name. Our modified table is below:
After you have modified your column names you have 5 important steps left.
1. The Geo ID in the Census Tracts polygon attribute table to which you will be joining this data table is in a text format. GEOID2 in this Excel file must also be text for the join to work properly.
a. Click on the GEOID2 to highlight the entire column b. Click on the Excel Tab for Data, then click on Text to Columns:
c. Click Next to leave the first setting at Delimited d. Click Next to leave the second setting at Tab
Tufts GIS Center
6
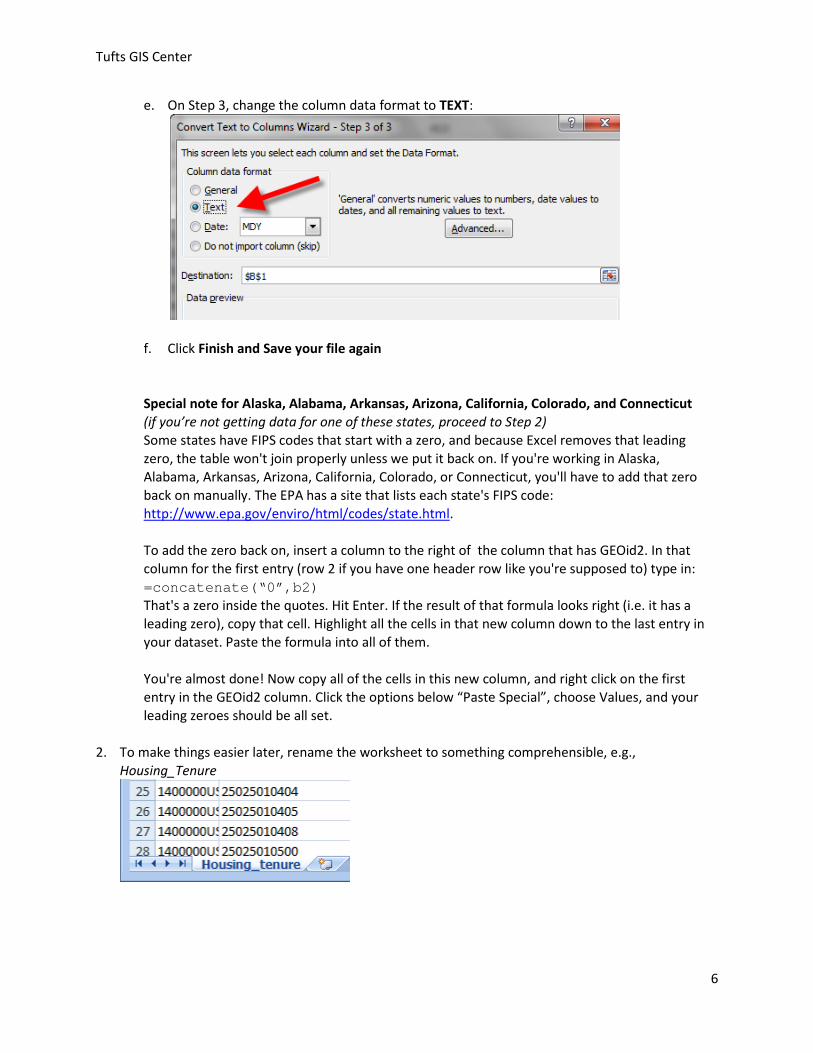
e. On Step 3, change the column data format to TEXT:
f. Click Finish and Save your file again Special note for Alaska, Alabama, Arkansas, Arizona, California, Colorado, and Connecticut (if you’re not getting data for one of these states, proceed to Step 2) Some states have FIPS codes that start with a zero, and because Excel removes that leading zero, the table won't join properly unless we put it back on. If you're working in Alaska, Alabama, Arkansas, Arizona, California, Colorado, or Connecticut, you'll have to add that zero back on manually. The EPA has a site that lists each state's FIPS code: http://www.epa.gov/enviro/html/codes/state.html. To add the zero back on, insert a column to the right of the column that has GEOid2. In that column for the first entry (row 2 if you have one header row like you're supposed to) type in: =concatenate(“0”,b2) That's a zero inside the quotes. Hit Enter. If the result of that formula looks right (i.e. it has a leading zero), copy that cell. Highlight all the cells in that new column down to the last entry in your dataset. Paste the formula into all of them. You're almost done! Now copy all of the cells in this new column, and right click on the first entry in the GEOid2 column. Click the options below “Paste Special”, choose Values, and your leading zeroes should be all set.
2. To make things easier later, rename the worksheet to something comprehensible, e.g., Housing_Tenure
Tufts GIS Center
7
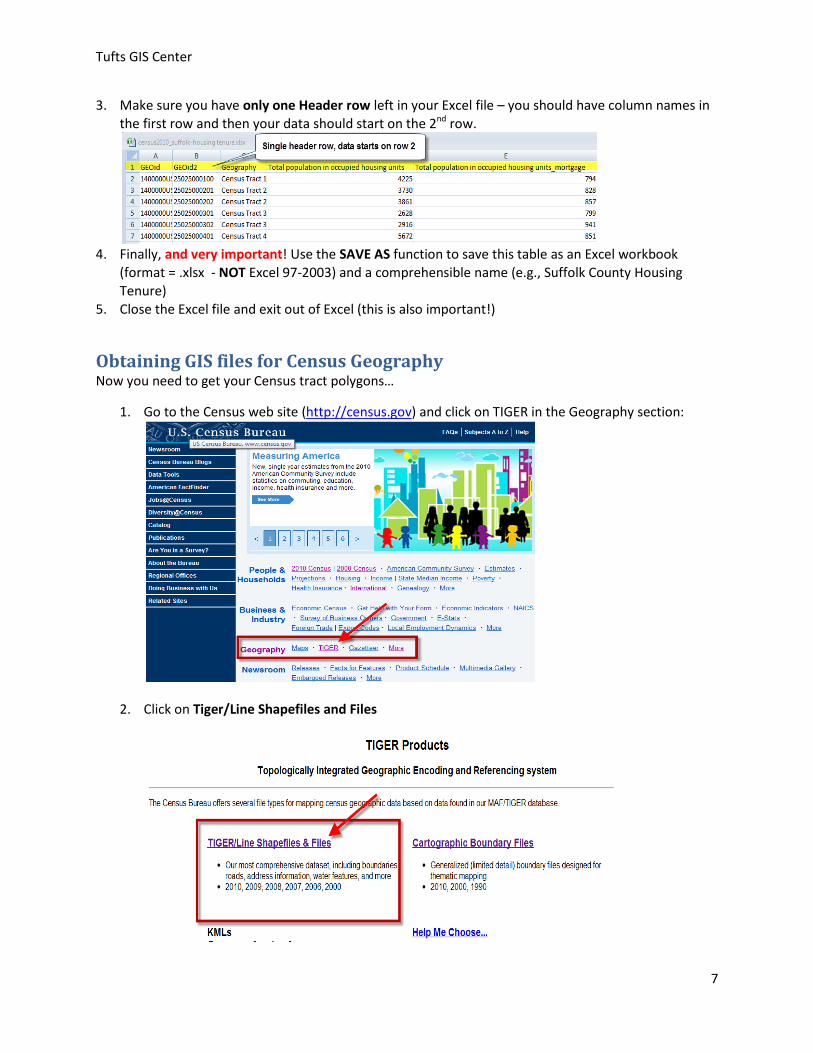
3. Make sure you have only one Header row left in your Excel file – you should have column names in the first row and then your data should start on the 2nd row.
4. Finally, and very important! Use the SAVE AS function to save this table as an Excel workbook
(format = .xlsx - NOT Excel 97-2003) and a comprehensible name (e.g., Suffolk County Housing Tenure)
5. Close the Excel file and exit out of Excel (this is also important!)
Obtaining GIS files for Census Geography Now you need to get your Census tract polygons…
1. Go to the Census web site (http://census.gov) and click on TIGER in the Geography section:
2. Click on Tiger/Line Shapefiles and Files

Tufts GIS Center
8
3. Click on the link for the 2010 Tiger/Line Shapefile Main Page
4. Click on Download Shapefiles
5. Choose Census Tracts for your Layer Type

Tufts GIS Center
9
6. The next choice you make is very important – look at the graphic below. In this tutorial, we will
be choosing Census Tract 2010, but if you were getting older data, you would need to choose Census Tract 2000. Select your state of interest under Census Tract (2010) and click Submit:
7. Select your county of interest:
8. Download the data set – it is compressed in a .zip file 9. Unzip the downloaded file to your Census Geography folder
Joining the AFF table to your Census Tract polygons in ArcMap Now you’re ready for mapping!
1. Start a session of ArcMap with a blank map 2. Add your Census Tracts geography data set to the map (e.g., tl_2010_25025_tract10) 3. Rename your Census Tract geography layer to Census Tracts 4. Open the Census Tracts polygon attribute table and take a look at it
Tufts GIS Center
10
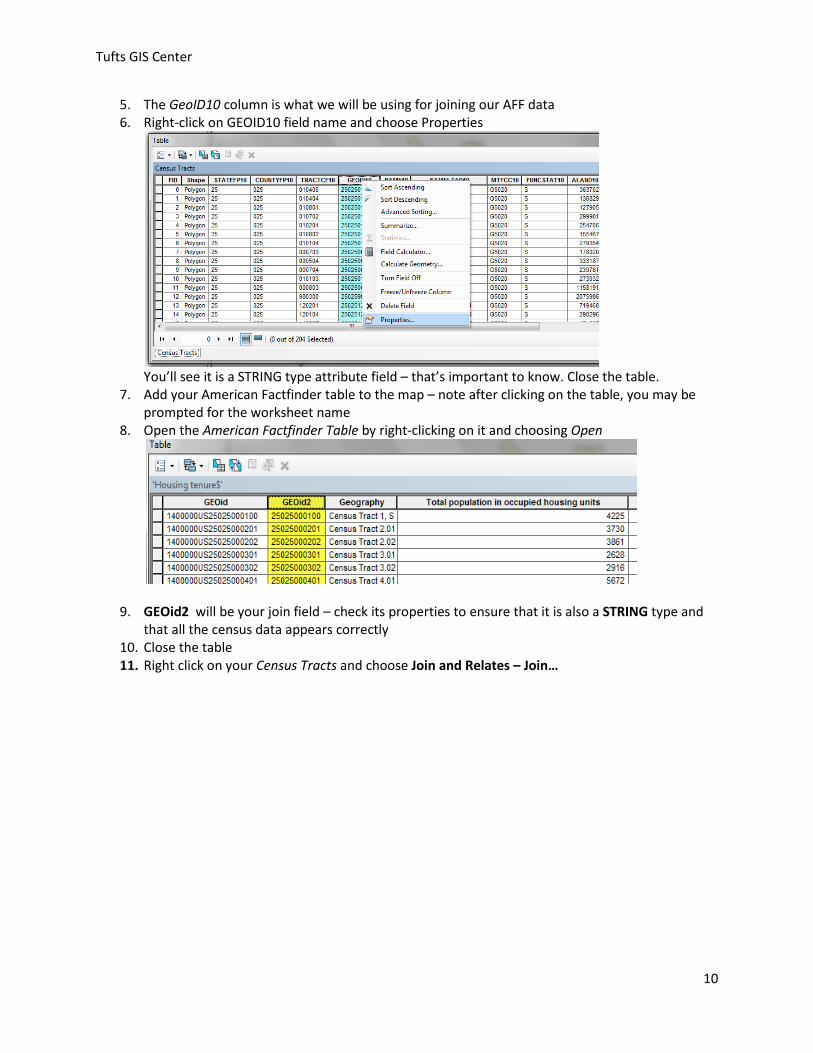
5. The GeoID10 column is what we will be using for joining our AFF data 6. Right-click on GEOID10 field name and choose Properties
You’ll see it is a STRING type attribute field – that’s important to know. Close the table.
7. Add your American Factfinder table to the map – note after clicking on the table, you may be prompted for the worksheet name
8. Open the American Factfinder Table by right-clicking on it and choosing Open
9. GEOid2 will be your join field – check its properties to ensure that it is also a STRING type and that all the census data appears correctly
10. Close the table 11. Right click on your Census Tracts and choose Join and Relates – Join…

Tufts GIS Center
11
12. Fill in the dialog box as follows – you are joining attributes from a table, using GEOID10 in your
Census Tracts layer and GEOid2 in your AFF table – click OK when done:
13. Open the Census Tracts attribute table to ensure that the join was made correctly. If it was, you should see your AFF data when you scroll to the right in the table.
Now you can make a map of your data following the usual methods.
One tip – if your area of interest is near water or has water features in it (like Boston), your tract data set may look like this – it includes a lot of water:
Tufts GIS Center
12
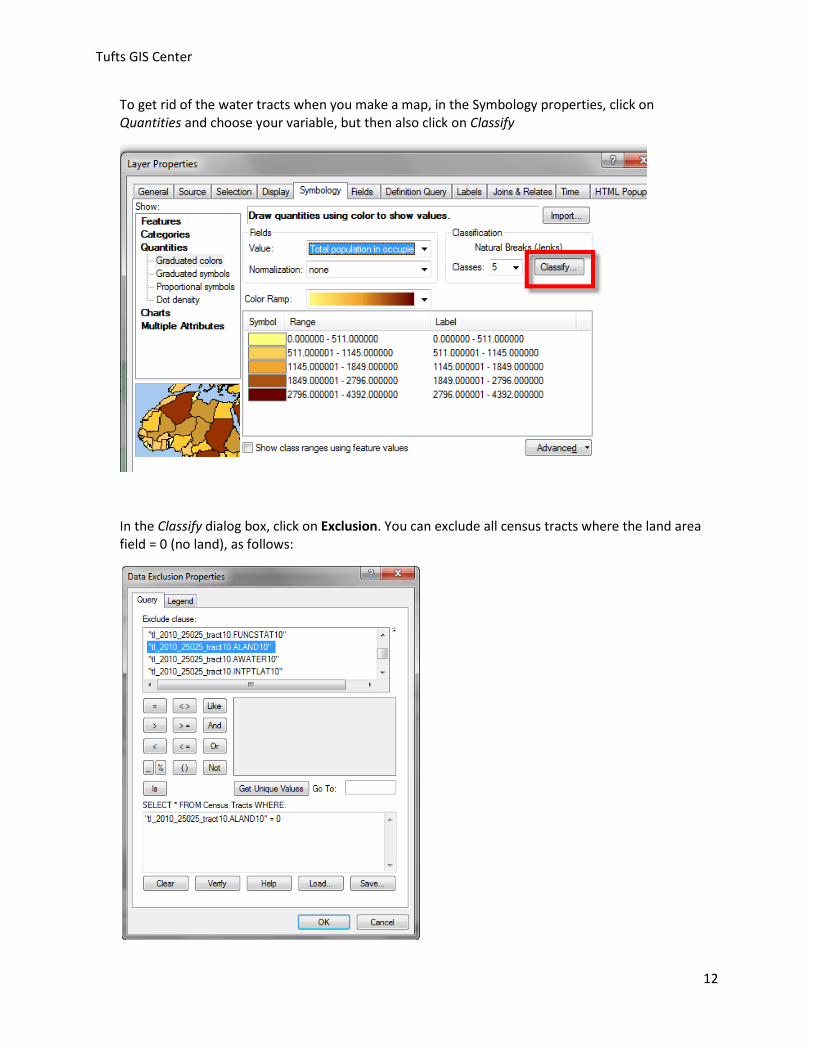
To get rid of the water tracts when you make a map, in the Symbology properties, click on Quantities and choose your variable, but then also click on Classify
In the Classify dialog box, click on Exclusion. You can exclude all census tracts where the land area field = 0 (no land), as follows:
Tufts GIS Center
13
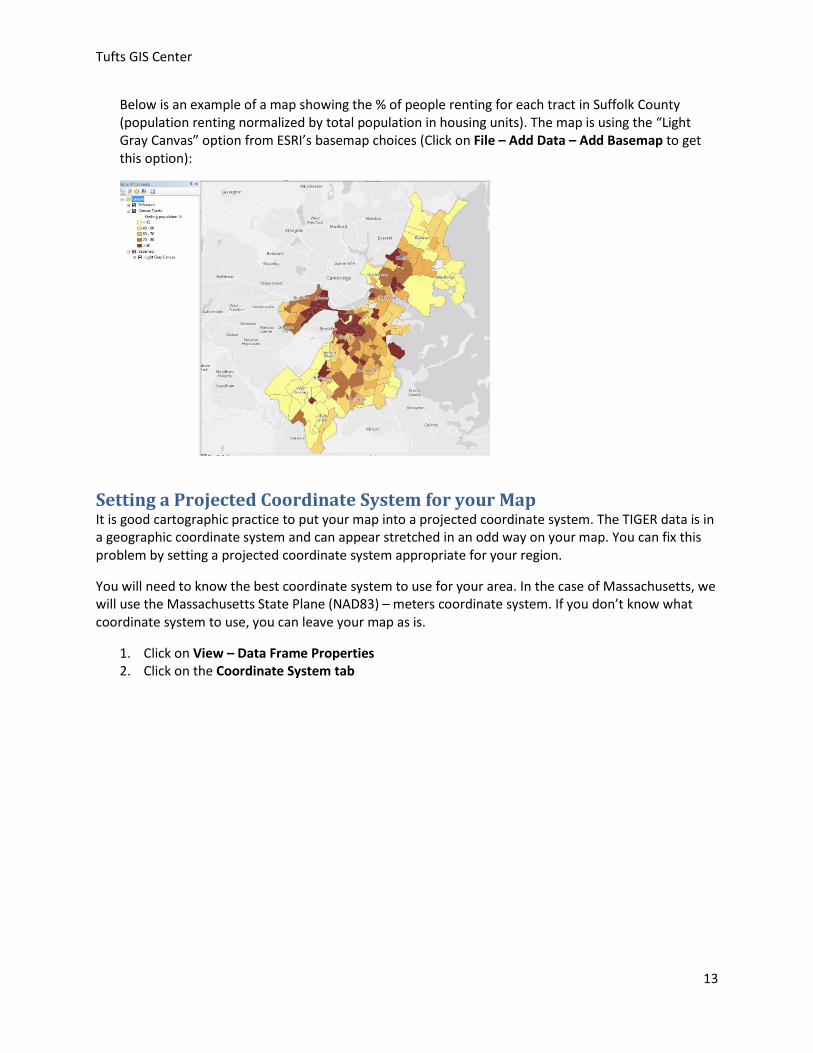
Below is an example of a map showing the % of people renting for each tract in Suffolk County (population renting normalized by total population in housing units). The map is using the “Light Gray Canvas” option from ESRI’s basemap choices (Click on File – Add Data – Add Basemap to get this option):
Setting a Projected Coordinate System for your Map It is good cartographic practice to put your map into a projected coordinate system. The TIGER data is in a geographic coordinate system and can appear stretched in an odd way on your map. You can fix this problem by setting a projected coordinate system appropriate for your region.
You will need to know the best coordinate system to use for your area. In the case of Massachusetts, we will use the Massachusetts State Plane (NAD83) – meters coordinate system. If you don’t know what coordinate system to use, you can leave your map as is.
1. Click on View – Data Frame Properties 2. Click on the Coordinate System tab
Tufts GIS Center
14
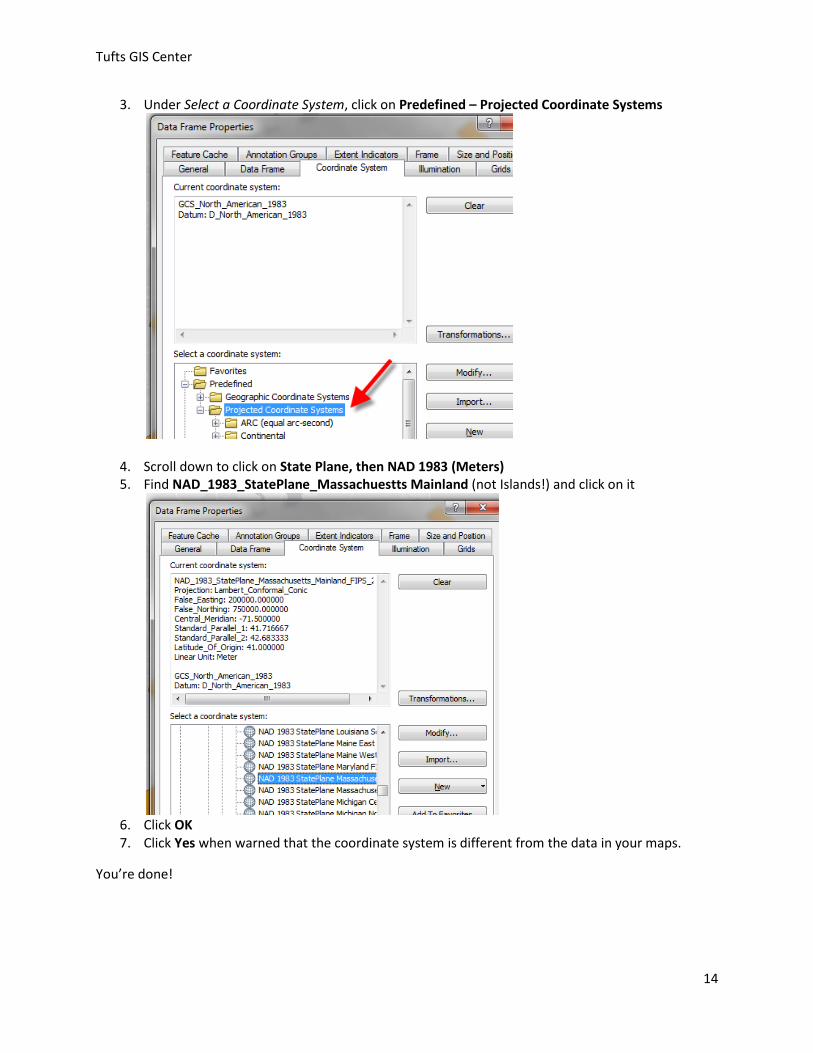
3. Under Select a Coordinate System, click on Predefined – Projected Coordinate Systems
4. Scroll down to click on State Plane, then NAD 1983 (Meters) 5. Find NAD_1983_StatePlane_Massachuestts Mainland (not Islands!) and click on it
6. Click OK 7. Click Yes when warned that the coordinate system is different from the data in your maps.
You’re done!