Documentum Client Cache Cleaning Guidelines - KBR Client Cache Cleaning Guidelines Page 2 of 9 This...
9
Documentum Client Cache Cleaning Guidelines Page 1 of 9 Documentum Client Cache Cleaning Guidelines Version Date Author Issue Purpose 1.0 30-Apr-12 Robert Lay Sharath Neravetla Updated and issued to business 2.0 01-May- 12 Robert Lay Minor corrections made. 3.0 07-July-12 Sharath Neravetla Updated instructions for IE8. 4.0 24-Dec-15 Hari Pasumarthi Update to support IE11.
Transcript of Documentum Client Cache Cleaning Guidelines - KBR Client Cache Cleaning Guidelines Page 2 of 9 This...

Documentum Client Cache Cleaning Guidelines Page 1 of 9
Documentum Client Cache Cleaning Guidelines
Version Date Author Issue Purpose
1.0 30-Apr-12 Robert Lay Sharath Neravetla
Updated and issued to business
2.0 01-May-12
Robert Lay Minor corrections made.
3.0 07-July-12 Sharath Neravetla Updated instructions for IE8.
4.0 24-Dec-15 Hari Pasumarthi Update to support IE11.

Documentum Client Cache Cleaning Guidelines Page 2 of 9
This document details the instructions for cleaning IE, UCF and JRE cache on the client/user machine. Please refer to the appropriate sections according to your client specifications. Below are the major sections: Section I: Documentum Client cache cleaning Guidelines for Win 7 and IE11 Users
Note: Please refer “Documentum Client Configuration Guidelines” document to
check if the Client configurations are set as per Documentum recommended standards.
Documentum Client Cache Cleaning Guidelines Page 3 of 9
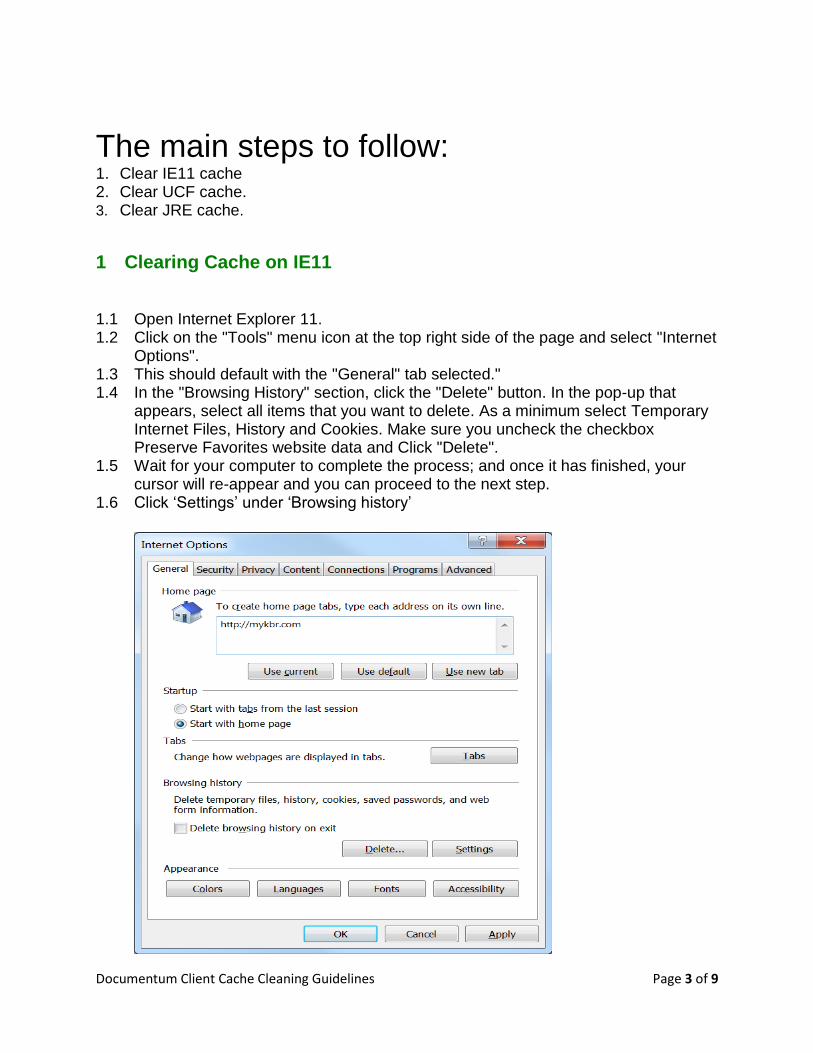
The main steps to follow: 1. Clear IE11 cache 2. Clear UCF cache. 3. Clear JRE cache.
1 Clearing Cache on IE11
1.1 Open Internet Explorer 11. 1.2 Click on the "Tools" menu icon at the top right side of the page and select "Internet
Options". 1.3 This should default with the "General" tab selected." 1.4 In the "Browsing History" section, click the "Delete" button. In the pop-up that
appears, select all items that you want to delete. As a minimum select Temporary Internet Files, History and Cookies. Make sure you uncheck the checkbox Preserve Favorites website data and Click "Delete".
1.5 Wait for your computer to complete the process; and once it has finished, your cursor will re-appear and you can proceed to the next step.
1.6 Click ‘Settings’ under ‘Browsing history’

Documentum Client Cache Cleaning Guidelines Page 4 of 9
1.7 Under ‘Check for newer versions of stored pages’ Select ‘Every time I visit the webpage’.

Documentum Client Cache Cleaning Guidelines Page 5 of 9
1.8 Click ‘View Objects’. A window should open to ‘C:\Windows\Downloaded Program Files’. Delete the files in this folder as shown in the below screen shot and once completed close this window.
Note: Delete these files only if you see issues with Drag and Drop Functionality.
1.9 Click ‘OK’ till you are out of the ‘Internet Options’ window.

Documentum Client Cache Cleaning Guidelines Page 6 of 9
2 UCF cache cleaning Guidelines
2.1 In Windows Explorer, locate the following folder and delete the ‘ucf’ folder in the path ‘C:\Users\<your userid>\Documentum’
Note: If you receive ‘The action can’t be completed because the folder or a file in
it is open in another program’ pop up message then close all the open windows,
Log Off of the system, Log back in and try again.
2.2 Close Windows Explorer.

Documentum Client Cache Cleaning Guidelines Page 7 of 9
3 JRE cache cleaning Guidelines
3.1 Go to start -> Control Panel -> Programs

Documentum Client Cache Cleaning Guidelines Page 8 of 9
3.2 When Programs window opens, double click on ‘java’ icon, it opens the ‘Java
Control Panel’ window as shown below.
3.3 Click on ‘Settings’ under ‘Temporary Internet Files’
Documentum Client Cache Cleaning Guidelines Page 9 of 9
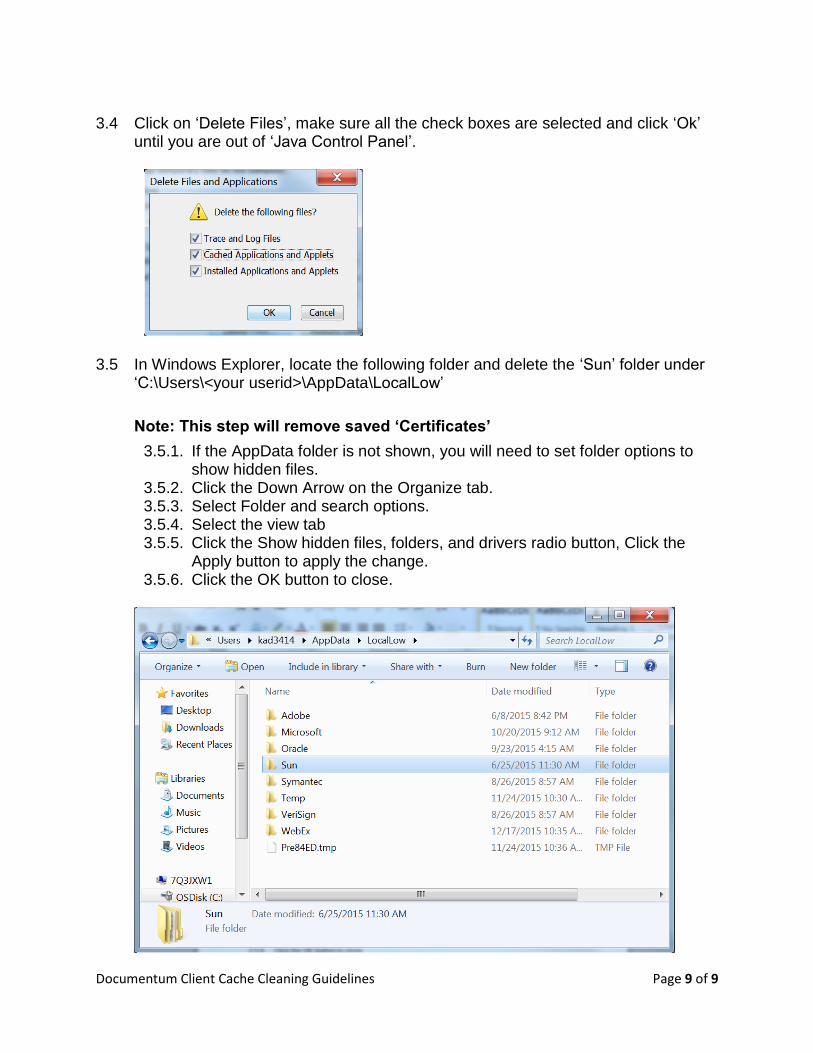
3.4 Click on ‘Delete Files’, make sure all the check boxes are selected and click ‘Ok’
until you are out of ‘Java Control Panel’.
3.5 In Windows Explorer, locate the following folder and delete the ‘Sun’ folder under
‘C:\Users\<your userid>\AppData\LocalLow’
Note: This step will remove saved ‘Certificates’
3.5.1. If the AppData folder is not shown, you will need to set folder options to show hidden files.
3.5.2. Click the Down Arrow on the Organize tab. 3.5.3. Select Folder and search options. 3.5.4. Select the view tab 3.5.5. Click the Show hidden files, folders, and drivers radio button, Click the
Apply button to apply the change. 3.5.6. Click the OK button to close.