DOCUMENT RESUME CE 003 387 Kemp, Louie E., … · DOCUMENT RESUME CE 003 387. Kemp, Louie E., ......
124
ED 105 127 AUTHOR TITLE DOCUMENT RESUME CE 003 387 Kemp, Louie E., Comp. "Sew" You're an Alterationist. Student Manual and Teacher Manual. INSTITUTION Mississippi Research Coordinating Unit for Vocational-Technical Education, State College.; Mississippi State Dept. of Education, Jackson. Div. of Vocational and Technical Education. 74 124p. PUB DATE NOTE EDRS PRICE DESCRIPTORS MF-$0.76 HC-$5.70 PLUS POSTAGE Behavioral Obje'-tives; *Guides; Home Economics Education; Instructional Materials; Learning Activities; *Needle Trades; *Occupational Home Economics; Seamstresses; *Sewing Instruction; Sewing Machine Operators; *Skill Development; Study Guides; Teaching Guides IDENTIFIERS *Alterationists ABSTRACT The Home Economics Related Occupation Student Learning Packet on sewing instruction is designed to give an understanding of the duties and responsibilities of an alteration worker to learn the skills needed to perform the job of an alteration worker. Upon completion of this training, the student should have developed sewing instruction skills based on 14 specified behavioral objectives. The learning packet consists of 14 lessons: the sewing machine, alteration tools and safety pretest and post-test, basic markings and symbols, alteration tags and tickets, terms used by alterationists, hand stitching, hems and hem finishes, types of fasteners, fitting customers, work records, dart alterations, skirt and dress alterations, cuffing, and working relationships. Each lesson contains an introduction, specific concepts and objectives, instructions, and learning experiences. The student manual is accompanied by a teacher's manual which contains instructions for the teacher, a statement of purpose, detailed instructional objectives for each lesson, pre- and post-tests, and related work sheets and materials for each of the lessons. Appended are supplemental materials. (BP)
-
Upload
nguyenphuc -
Category
Documents
-
view
216 -
download
0
Transcript of DOCUMENT RESUME CE 003 387 Kemp, Louie E., … · DOCUMENT RESUME CE 003 387. Kemp, Louie E., ......

ED 105 127
AUTHORTITLE
DOCUMENT RESUME
CE 003 387
Kemp, Louie E., Comp."Sew" You're an Alterationist. Student Manual andTeacher Manual.
INSTITUTION Mississippi Research Coordinating Unit forVocational-Technical Education, State College.;Mississippi State Dept. of Education, Jackson. Div.of Vocational and Technical Education.74124p.
PUB DATENOTE
EDRS PRICEDESCRIPTORS
MF-$0.76 HC-$5.70 PLUS POSTAGEBehavioral Obje'-tives; *Guides; Home EconomicsEducation; Instructional Materials; LearningActivities; *Needle Trades; *Occupational HomeEconomics; Seamstresses; *Sewing Instruction; SewingMachine Operators; *Skill Development; Study Guides;Teaching Guides
IDENTIFIERS *Alterationists
ABSTRACTThe Home Economics Related Occupation Student
Learning Packet on sewing instruction is designed to give anunderstanding of the duties and responsibilities of an alterationworker to learn the skills needed to perform the job of an alterationworker. Upon completion of this training, the student should havedeveloped sewing instruction skills based on 14 specified behavioralobjectives. The learning packet consists of 14 lessons: the sewingmachine, alteration tools and safety pretest and post-test, basicmarkings and symbols, alteration tags and tickets, terms used byalterationists, hand stitching, hems and hem finishes, types offasteners, fitting customers, work records, dart alterations, skirtand dress alterations, cuffing, and working relationships. Eachlesson contains an introduction, specific concepts and objectives,instructions, and learning experiences. The student manual isaccompanied by a teacher's manual which contains instructions for theteacher, a statement of purpose, detailed instructional objectivesfor each lesson, pre- and post-tests, and related work sheets andmaterials for each of the lessons. Appended are supplementalmaterials. (BP)


"SEW" YOU'RE AN ALTERATIONIST
Student Manual
Compiled byLouie E. Kemp
Instructional Materials SpecialistHome Economics
Published by
Division of Vocational andTechnical Education
State Department of EducationJackson, Mississippi
Research and Curriculum Unitfor Vocational and TechnicalEducation
College of EducationMississippi State UniversityMississippi State, Mississippi
Home Economics Publication Number 6019
1974
3
Mississippi State University does not discriminate on the groundsof race, color, national origin, religion, or sex,
4
TABLE OF CONTENTS
PageSTUDENT SECTION INTRODUCTION 1
LESSON I - The Sewing MachineIntroduction 7
LESSON II - Alteration Tools and SafetyPretest and Post Test 11
Introduction 13
Information Sheet 1 15
Information Sheet 2 17
Information Sheet 3 19
LESSON III - Basic Markings and SymbolsIntroduction 21
Information Sheet 1 23
Information Sheet 2 25
Information Sheet 3 27
LESSON IV Alteration Tags and TicketsIntroduction 29.
Information Sheet 31
LESSON V - Terms Used by AlterationistsIntroduction 33
Information Sheet 35
LESSON VI - Hand StitchingPretest and Post Test 37
Introduction 39
InformaLion Sheet 41
Operation Sheet 45
LESSON VII Hems and Hem FinishesIntroduction 47
Information Sheet 1 49
Information Sheet 2 51
Operation Sheet 53
LESSON VIII Types of FastenersIntroduction 55
Operation Sheet 1 57
Operation Sheet 2 59
Information Sheet 1 61
Operation Sheet 3 63
Information Sheet 2 65
Operation Sheet 4 67
Operation Sheet 5 69
LESSON IX - FittingIntroductionInformation Sheet
iii
71
73

Lesson X - Customer Work RecordsIntroduction 77
LESSON XI - Dart AlterationsIntroductionOperation Sheet
LESSON XII Skirt and Dress AlterationsIntroductionOperation Sheet 1Operation Sheet 2
LESSON XTII CuffingIntroductionOperation Sheet
LESSON XIV Working RelationshipsIntroductionInformation Sheet
iv
6
79
81
85
87
89
93
95
97
99

e
HOME ECONOMICS RELATED OCCUPATION
LEARNING PACKAGE
Identification Page
Title: "Sew" You're an Alterationist
Subject: Clothing Services
Performance Level: Apprentice Alterationist
Purpose: This package is designed to aid the studentin developing competencies needed to becomeemployable as an apprentice alterationist.
Producer: Louie KempResearch and Curriculum UnitDrawer DXMississippi State, MS 39762
Artist Illustrator: Donna Breckenridge
Date: 1974
7

"SEW" YOU'RE AN ALTERATIONIST*
STUDENT SECTION
Introduction
ALICE ALTERATIONIST -watch for her
super sewing hints!
Hi! So glad you decided to join us in a
brand new adventure. People who learn to
change the shape of ready-made clothes are
known as alteration specialists, alteration
assistants, or alteration apprentices. As
you learn and try new ways of doing many sewing
tasks, you will also learn and try old tasks
that have been used for many years. Who knows,
you may discover some sewing "tricks" that
will make you as famous as Mr. Singer and
his machine.
You will also learn alteration or sewing skills that will prepare
you to enter the world of work. Dress shops, men's stores, department
stores, and other special show; will need and will hire people who can
alter clothes as long as people wear clothes. Often, the first altera-
tion that a learner needs to make is in his attitude toward learning.
Learning can be fun. Get where the action is, listen to the "hum of
the machine," "sew"a "fit" on every garment, and prepare to watch the
money roll in.
* Alterationist: An individual who competently performs basic altera-tion skills, such as measuring, pressing, pinning, seam ripping, and
hand and machine sewir-
81

Learning Objectives
This packet is designed to help you understand the duties and
responsibilities of an alteration worker and to help you learn the
skills needed to perform the job of an alteration worker. When you
complete the learning experiences in this packet, you should be able to
perform the following:
A. You will show and tell the teacher that you can correctly:
1. Open the machine, lift the head, and plug the cord into the
electric outlet.
2. Name the parts of the sewing machine.
3. Turn machine light switch to "on."
4. Thread the bobbin and the machine, put the bobbin in the bobbin
case, and join the bobbin thread with the top thread.
5. Remove and replace a machine needle, presser foot, throat plate,
bobbin, and foot control.
6. Stitch a 5/8 inch seam and reverse the stitches at the beginning
and end of the seam.
7. Adjust stitch length regulator and presser foot pressure.
8. Control the speed of the machine.
9. Close the machine.
B. From a treasure chest of tools, you will find and correctly name 2
measuring tools, 2 marking tools, 2 ripping tools, 2 basting tools,
2 cutting tools, 2 sewing tools, and 2 pressing tools. After your
teacher shows you the correct way to use each tool, you will show
the correct use of each tool according to standards set by her.
3 3

C. After studying information sheets, viewing transparencies, and
watching demonstrations, you will show and tell your teacher the
symbols and markings used to shorten, lengthen, make new crease
lines, old crease lines, new hem lines, new seam lines, and new
dart lines. As you perform these tasks, your performance will be
checked according to the standards set by your teacher.
D. After viewing transparencies,studying, and listening to the teacher
explain the information needed on an alteration tag or ticket, you
will be given an alteration tag and ticket to prepare. You will
write on the tag and ticket alteration symbols, markings, and other
information that may be needed by an alterationist. The alteration
tag and ticket will be checked according to standards set by your
teacher.
E. Given a written list of words and terms most often used by alteration
workers and an explanation of their meanings by your teacher, you
will define and explain orally or in writing the meaning of these
words and terms. You explanations will be checked according to
standards set by your teacher.
F. After viewing transparencies, studying handouts, watching demon-
strations, and examining examples of lock stitching, blind stitching
and catch stitching, you will practice these stitches. You will
show your teacher your hand stitching skill; your performance will
be checked according to standards set by your teacher.
G. You will be given fabric, plain seam binding, bias seam binding, bias
hem facing, bias strips of lightweight fabric, hemming lace, sewing
needle, thread, and a sewing machine. Your teacher or an experienced
4
10

e alterationist will demonstrate for you methods of finishing hems
using plain and bias seam binding, bias facings, and hemming lace.
They will show you the following hem finishes: stitched and overcast,
stitched. and pinked, and turner' and stitched. You will observe
demonstrations, practice, and perform each hem finish according to
standards set by your teacher.
h. After studying information sheets, viewing transparencies, watching
demonstrations by your teacher, and identifying properly sewn
fasteners on four garments, you will practice the skill of sewing
zippers, snaps, hooks and eyes, and buttons to fabric. You will
satisfactorily perform these skills according to standards set by
your teacher.
1. Given written sheets of information, a written and oral explanation
of the tasks to be performed, a visual and oral explanation of two
methods of "pinning to fit," and demonstrations of ways of "pinning
to fit," you will accurately pin at least one garment to fit a
classmate. You will mark the wrong side with pins and/or chalk and
will stitch the marked seam line. You will rip out any stitches
that are not needed. Your teacher will check your performance
according to standards set by her and future employers.
J. After studying three examples of customer work records and sheets,
viewing transparencies, and listening to your teacher explain how
to get the information needed to complete the forms, you will choose
two individuals in your classroom as customers; you will complete
one work record on one customer and one work sheet on the other.
The completed sheets will be checked according to standards set by
your teacher.
5
Lti
K. Given pictures and written information about kinds of darts; ways to
relocate, alter, lengthen, or shorten darts; and oral instructions
and demonstrations by your teacher, you will alter one straight and
one double-pointed dart. Your performance will be checked according
to standards set by your teacher and an employer.
L. After watching your teacher show the tools, symbols, and markings
needed, and the correct way to mark, cut, baste and sew, you will
shorten a hemline, shorten a bodice, and perform a hipline altera-
tion by following directions given by your teacher. You will judge
one classmate's finished operations using a checklist given you by
your teacher. Your teacher will also check your finished operations
by the same checklist.
M. After being given information and operation sheets on cuffing pant;,
you will view transparencies and listen to ar explanation of a simple
way to properly cuff pants. You will practice this skill on paper
and on scraps. Your teacher will check your work. When you have
gained sufficient skill, you will cuff a pair of pants that you
select from the "grab box." Your performance will be checked
according to standards set by your teacher and an employer.
N. After reading and talking about the handout Employer - Alterationist -
Customer, listening to an employer and a customer explain their
feelings about an alterationist's role at work, and interviewing
another customer, you will demonstrate the proper way to greet,
service and talk with a customer. Your performance will be checked
_iccording to standards set by your teacher.
126

The Sewing Machine
Introduction
Your close and trustworthy friend, the sewing machine, is begging
for some attention. It feels needed when you are at the controls, and
it feels secure when you operate it correctly. You make a happy and
successful couple. Congratulations!
Concept
The sewing machine
Objective
You will show and tell the teacher that you can correctly:
1. Open the machine, lift the head, and plug the cord into the
electric outlet.
2. Name the parts of the sewing machine.
3. Turn machine light switch to "on."
4. Thread the bobbin and the machine, put the bobbin in the bobbin
case, and join the bobbin thread with the top thread.
5. Remove and replace a machine needle, presser.foot, throat plate,
bobbin, an` foot control.
6. Stitch a 5/8 inch seam and reverse the stitches at the beginning
and end of the seam.
7. Adjust stitch length regulator and presser foot pressure.
8. Control the speed of the machine.
9. Close the machine.
7
13
Instructions
Complete Learal
Experiences 5
Learning ler
1. Read rYp.
Teen
Iccate,
3. Given t
the -1!!r:,
4. ;..ive:' 1
the
pusItt_r .
Y,a1K .prei
5. Read pp.
Threadin.7
411

6. Ask your teacher for a manual or a direction sheet that gives
you directions for threading a machine and bobbin. Thread the
machine and bobbin. Ask your teacher to check your work. She
will tell you whether or not you are ready for the next learning
experience.
7. Read again pp. 246-247, "Controlling Your Speed," Steps in
Clothing Skills. Go to the machine and practice controlling
your speed when operating the machine. Ask your teacher to
check your progress. She will tell you whether or not you are
ready for the next learning experience.
8. Given a blank Sewing Machine Operator's License," Complete the
instruction listed on the sheet. Your teacher will watch you
in action as you complete each task. When your teacher signs
your license, you will be capable of operating a sewing machine
in your classroom. Happy sewing!
AREN'Tyou pRouo of
Lioupsets? I KNELOU COU1,/, 1-EIOW
To OPERATE A-SEWING-
MACHINE !
A rirILI 9

LESSON II
Alteration Tools and Safety
Pretest and Post Test
Look at the pictures and name the alteration tools, shown at the
bottom of this page. Do not write on this page. When you think you
can name them and use them, ask your teacher to let you "show and tell"
the names and uses of two of each kind of tool listed in the objectives
for Lesson II on the following page. Your teacher will explain how she
wants you to show the use of the tools, and she will give you paper or
fabric to use in your demonstration. If the teacher decides that you
know the names of the tools and can properly use them, she will ask you
to skip Lesson II and go to Lesson III.
I f l I I I I
)4 z3ft
11111 1 I
2
ililip3
IIIIIII4
III 11 I
5
IIIIII1 1
t----*1 inch 11
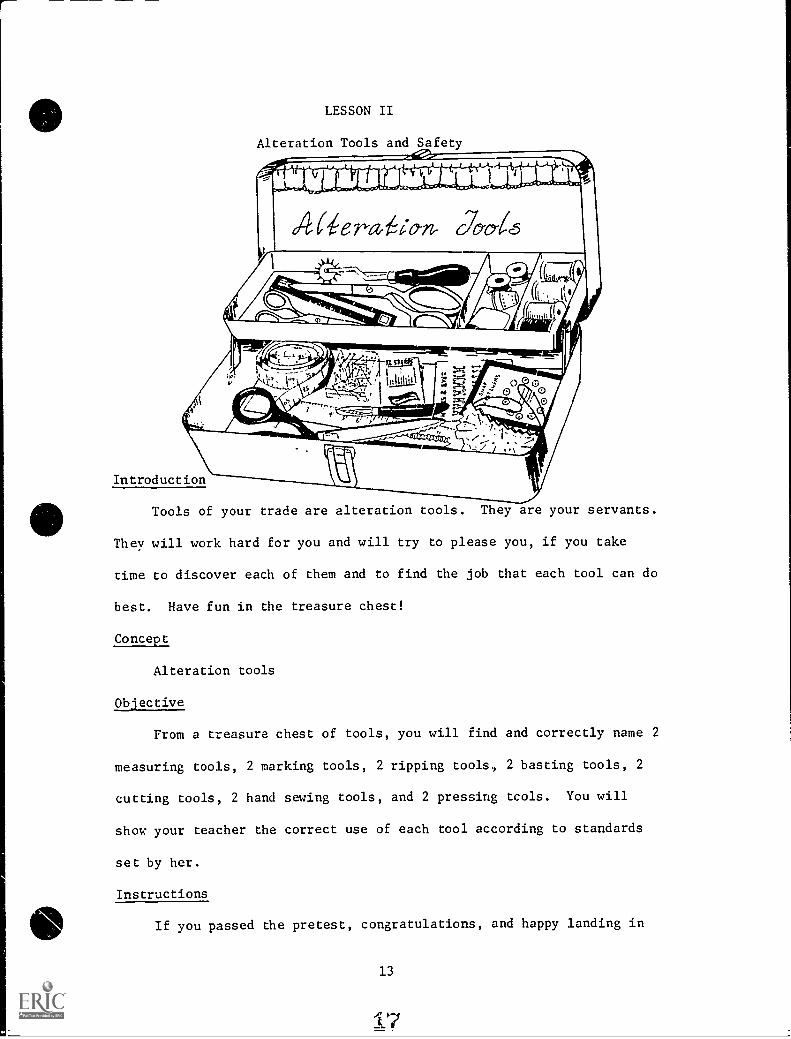
LESSON II
Alteration Tools and Safety...121
Introduction
Tools of your trade are alteration tools. They are your servants.
They will work hard for you and will try to please you, if you take
time to discover each of them and to find the job that each tool can do
best. Have fun in the treasure chest!
Concept
Alteration tools
Objective
From a treasure chest of tools, you will find and correctly name 2
measuring tools, 2 marking tools, 2 ripping tools., 2 basting tools, 2
cutting tools, 2 hand sewing tools, and 2 pressing tools. You will
show your teacher the correct use of each tool according to standards
set by her.
Instructions
If you passed the pretest, congratulations, and happy landing in
13
17

Lesson III. If you did not pass the pretest, dig a little deeper in
the treasure chest of knowledge. Finish the following learning
experiences.
Learning experiences
1. Read and study the Information Sheets for Lesson II, pages 15-20.
2. Watch and listen to your teacher show the proper use of two
of each type of alteration tool.
3. Role play: Customer - Alterationist. You are the alterationist.
You will "show and tell" the proper use of each alteration tool
to a classmate "customer."
4. Show your teacher the name and proper use of each alteration
tool she chooses for you to use. If your demonstration is
approved by her, you are ready to begin Lesson III.
5. Tell your teacher the five common sewing machine illnesses
and explain their causes and cures. Explain in your own words
why an alteration worker should learn to cure these illnesses.
6. Demonstrate to your teacher the safe and proper way to iron
and to press.
DID 4014KNOW THERE WARE
So MAN4 THING-5 "r0LEARN To 8e A81-c'
To ALTERC 1.0TH E-5
14
18

e
Pinking
shears
Sewingscissors
LESSON II
Alteration Tools and Safety
Information Sheet 1
Electricscissors
Snips
.1....04110.0 11.
Seam
rippe
Marking pencils
Hem gauge
454 inch,.
Bent handledressmaker shears
eeswax
Tape measure
Pin cushion
.,\
Pins
Tracing wheels
11111111 1111111 1111111 1111111 w11 1IX, yzNi
2_ 3_ 4 5
t..-----t1 inch
15
Ruler

ALTERATION TOOLS
(Too large for tool box)
Pressing Cloth
Yardstick
Hem Markers
Padded Ironing Board
Tailor's Cushion
Press Mitt
Padded Sleeveboard
16
Steam Iron
20

LESSON II
Alteration Tools and Safety
Information Sheet 2
1. Is there a difference in ironing and pressing? Yes, pressing means
lifting the iron and setting down the iron. Hear and moisture
press shape into a garment, so for most fabrics, press with a steam
iron or use a dampened press cloth and a regular iron.
2. Should most of the pressing be done on the outside or the inside
of the garment? Inside the garment. Seams need to be pressed
open, and hems and darts also need to be pressed.
3. Should pins and bastings be pressed over? No, because the pin
heads and the bastings will leave marks. (Basting done with silk
thread will not leave marks.)
4. Will a dry press cloth protect the right side of a garment from
shine? Yes, most garments that have been altered need touch-up
pressing on the outside. Use cheesecloth or drill cloth.
17
21

LESSON II
Alteration Tools and Safety
Information Sheet 3
Safety Rules for Working in an Alteration Center
1. Keep working surfaces clean.
2. Keep hands clean.
3. Write correct information onalteration tags or tickets to pre-vent wrong alterations.
4. Place pins in pincushion, not inthe mouth.
5. Adjust lighting to avoid eyestrain.
6. Carefully and correctly handleshears and scissors.
7. Keep cutting and ripping tools ina convenient but safe place.
8. Prevent cutting fabric with seamripper, scissors, or razor whenripping seams.
9. Do not use an unprotected double-edged razor blade to rip seams.
10, Carefully place scissors on a flatsurface to avoid dropping them.
11. Maintain good posture to preventfatigue accidents.
12. Do not place fingers too close tothe machine needle.
13. Do not unplug the machine cord froma wall outlet by pulling the electric
wire.
19
22
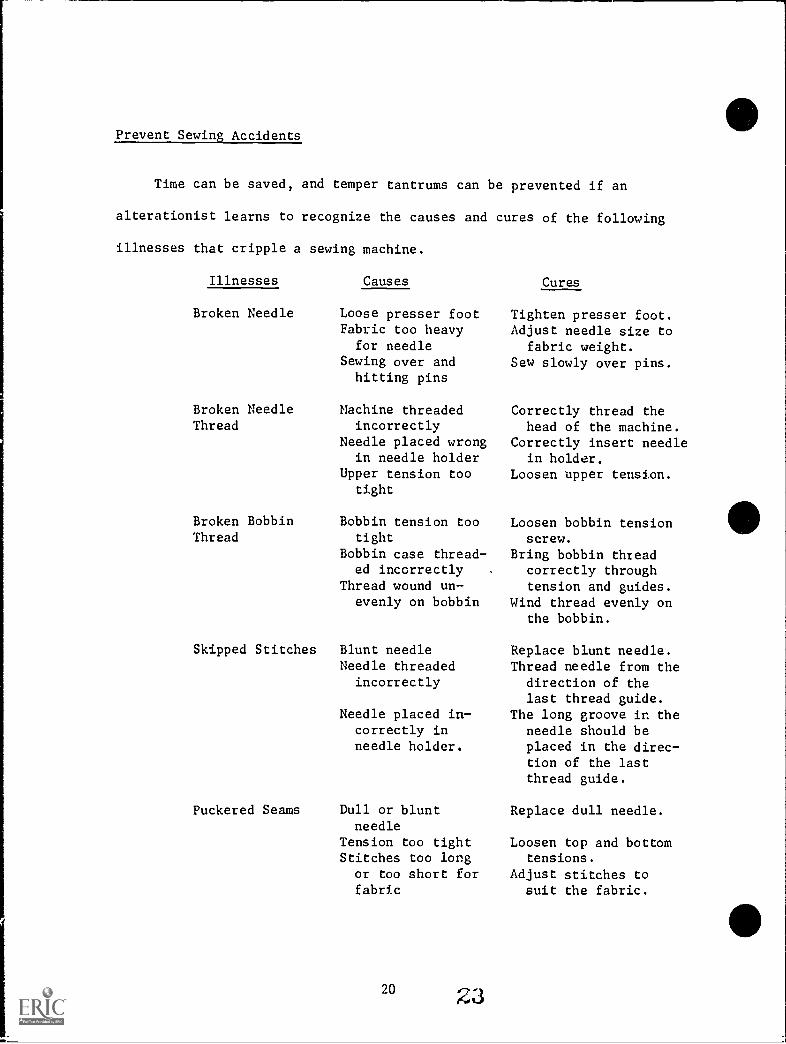
Prevent Sewing Accidents
Time can be saved, and temper tantrums can be prevented if an
alterationist learns to recognize the causes and cures of the following
illnesses that cripple a sewing machine.
Illnesses
Broken Needle
Broken NeedleThread
Broken BobbinThread
Skipped Stitches
Puckered Seams
Causes
Loose presser footFabric too heavy
for needleSewing over andhitting pins
Machine threadedincorrectly
Needle placed wrongin needle holder
Upper tension tootight
Bobbin tension tootight
Bobbin case thread-ed incorrectly
Thread wound un-evenly on bobbin
Blunt needleNeedle threadedincorrectly
Needle placed in-correctly inneedle holder.
Dull or bluntneedle
Tension too tightStitches too longor too short forfabric
20
Cures
Tighten presser foot.Adjust needle size to
fabric weight.Sew slowly over pins.
Correctly thread thehead of the machine.
Correctly insert needlein holder.
Loosen upper tension.
Loosen bobbin tensionscrew.
Bring bobbin threadcorrectly throughtension and guides.
Wind thread evenly onthe bobbin.
Replace blunt needle.Thread needle from the
direction of thelast thread guide.
The long groove in theneedle should beplaced in the direc-tion of the lastthread guide.
Replace dull needle.
Loosen top and bottomtensions.
Adjust stitches tosuit the fabric.
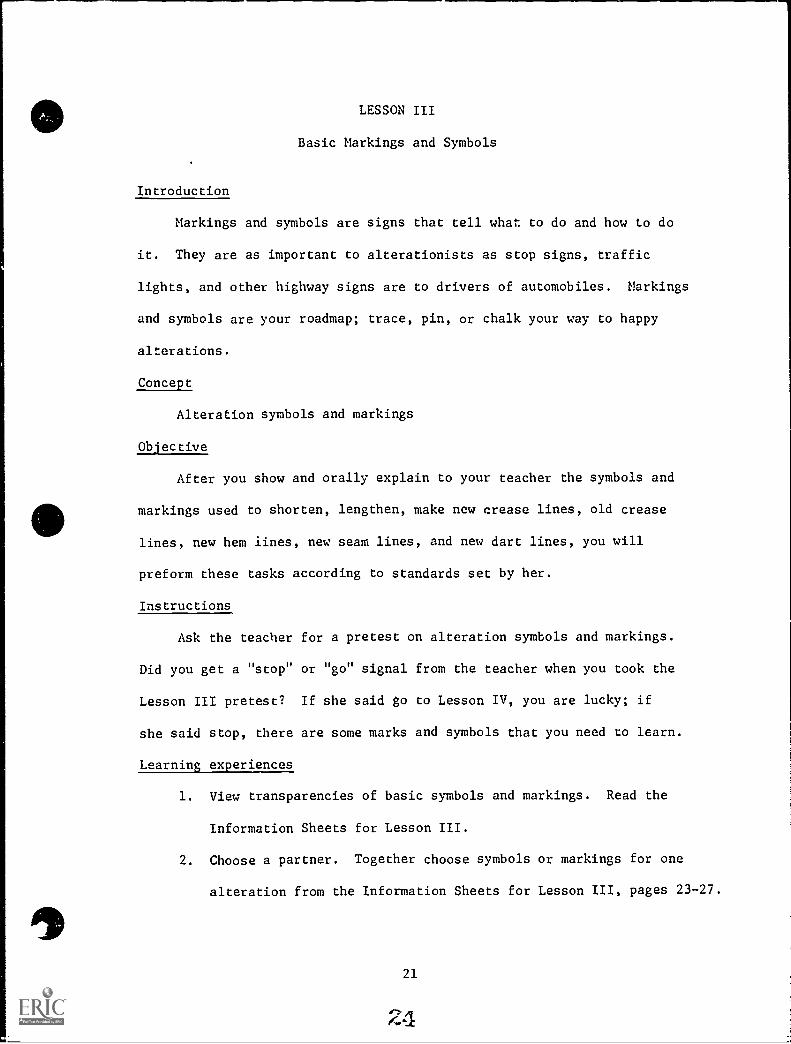
LESSON III
Basic Markings and Symbols
Introduction
Markings and symbols are signs that tell what to do and how to do
it. They are as important to alterationists as stop signs, traffic
lights, and other highway signs are to drivers of automobiles. Markings
and symbols are your roadmap; trace, pin, or chalk your way to happy
alterations.
Concept
Alteration symbols and markings
Objective
After you show and orally explain to your teacher the symbols and
markings used to shorten, lengthen, make new crease lines, old crease
lines, new hem lines, new seam lines, and new dart lines, you will
preform these tasks according to standards set by her.
Instructions
Ask the teacher for a pretest on alteration symbols and markings.
Did you get a "stop" or "go" signal from the teacher when you took the
Lesson III pretest? If she said go to Lesson IV, you are lucky; if
she said stop, there are some marks and symbols that you need to learn.
Learning experiences
1. View transparencies of basic symbols and markings. Read the
Information Sheets for Lesson III.
2. Choose a partner. Together choose symbols or markings for one
alteration from the Information Sheets for Lesson III, pages 23-27.
21
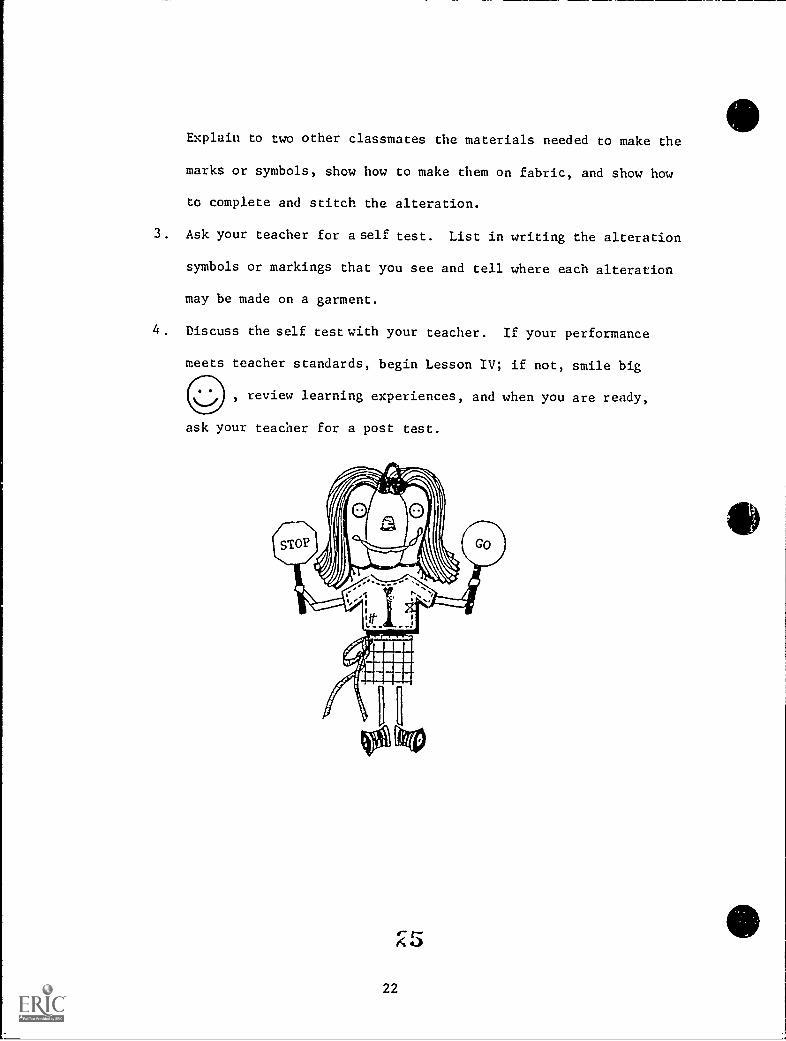
Explain to two other classmates the materials needed to make the
marks or symbols, show how to make them on fabric, and show how
to complete and stitch the alteration.
3. Ask your teacher for a self test. List in writing the alteration
symbols or markings that you see and tell where each alteration
may be made on a garment.
4. Discuss the self test with your teacher. If your performance
meets teacher standards, begin Lesson IV; if not, smile big
review learning experiences, and when you are ready,
ask your teacher for a post test.
22

it
LESSON III
Basic Markings and Symbols
Information Sheet 1
New Hem deptht Bottom or Hem Edge
New Crease Line
Chalk Symbol which means to shorten
Original Crease Line
Bottom Edge of Garment
Chalk symbol which means to lengthen
Original Crease Line
New Crease Line
23

LESSON III
Basic Markings and Symbols
Information Sheet 2
Lengthen or Shorten Dress or Skirt
Shorten Symbol
Lengthen Symbol
.4*--1.-""%"'""#4.-"#"".""...""*.
CHALK SYMBOL
1'A" shorten
0110111D MONO.
MARKED HEM CREASE LINE
NEW HEM EDGE
NEW HEM DEPTH
CHALK MARK(will be newcrease line)
CREASE LINE(original)
BOTTOM EDGE
CREASE L:NE(original)
NEW CREASE LINE(in chalk)
25
BOTTOM EDGE
7

LESSON III
Basic Markings and Symbols
Information Sheet 3
Shorten or Lengthen the Bodice
....
MARKS FROM OLDLINE OF STITCHING
SKIRT
CHALK MARK FORNEW SEAMLINE
MINNI gnaw*
CHALK MARKifmewl.. MINIMS. 0111111M 1 MEOWED
BODICE
CHALK MARK FORNEW SEAMLINE
NEW SEAMALLOWANCE
BODICE EDGE SKIRT WAISTLINE EDGE
27
ti
Shorten Symbol
tt 1
Lengthen Symbol

o
O
LESSON IV
Alteration Tags and Tickets
Introduction
Have you ever been given a prescription for medicine by a doctor?
An alteration ticket is just as important. All directions for altering
are written in sign language on the ticket. If you cannot read the
ticket, you cannot alter a garment; this means "No read, no job." Learn
well.
Concept
Alteration tags and tickets
Objective
After you watch, study, and listen to your teacher, explain the
symbols and markings on an alteration ticket. You will make an
alteration ticket and will list on it alteration symbols and markings
required by your teacher. The alteration ticket will be checked by her
according to standards set by her.
Instructions
Complete the following learning experiences.
Learning experiences
1. Read and study the Information Sheet for Lesson IV, pages
31-32.
2. Observe transparencies of information on alteration tickets,
including directions for using symbols and markings, and listen
to an explanation of what each means and how each is used.
3. Construct and prepare two possible types of alteration tickets
that will give all the information needed by an alterationist
29
i9

to lengthen a skirt and to return the altered garment to the
correct customer.
4. Ask your teacher for a self test. When you complete the self
test, check your answers. Discuss your test and your answers
with your teacher. If she approves your answers, you may begin
Lesson V. If she does not approve your answers, ask for more
help. When you complete the new learning experience, ask your
teacher for a post test. If she approves the answers on the
post test, begin Lesson V.
AN ALTERATIONTAG- oR r/cAwr
"TELLS IT L./Ia./7 IS"To AN
ALTERATIOAIIST.
.7t."
30
LESSON IV
Alteration Tags and Tickets
Information Sheet
In each type of business, employees have developed skills which help
them to work better when altering clothing. A knowledge of methods used
by various business establishments should help you understand the methods
used at your particular training station or classroom.
To alter a garment:
1. Follow instructions on the tag.
2. Know where to start.
3. Know when more than one alteration is needed.
4. Know which alteration to perform first.
5. Use time wisely.
6. Keep work area clean and in order.
7. Use proper alteration skills.
8. Satisfy customers.
The alterationist is usually called when a garment needs changes
to achieve proper fit for the customer. The alterationist must learn
knowledge and gain experience in alteration procedures to be able to
decide what changes are possible. The garment is pinned by the altera-
tionist to indicate the type and location of the needed alterations and
is tagged to tell specific alterations needed. (These changes may also
be done by a fitter.)
The garment is taken to the alteration department. The person
making the alteration reads the tag and interprets the markings. The
alterations are completed by the workers in the alteration department.
31al

Once each garment is tagged with information telling the altera-
tion to be made, it is very important that these instructions be followed
exactly as written so that the correct alteration is made. A perfect
alteration will lead to customer satisfaction and help to maintain good
customer-employee relations.
The alteration tags and tickets often serve as the means of
communication between the sales department and the alteration department
of the retail store and between the customer service and alteration
workers at the dry cleaners. The alterationist must know the meaning
of all marks and terms on the alteration tags in order to satisfy
customers and correctly alter garments.
Examples of two alteration tags are:
///f
()
ALTERATION TICKET
No.
Date Promised,
Dress
Coat
Pants
Other
Charges.
Customer Name:
Address_
Salesman
Alterationist
116110,11.
Front
32
32

LESSON V
Terms Used by Alterationists
Introduction
A picture may be worth a thousand words, but words deliver many
messages from one person to another. To speak the "language of the
trade" of an alterationist will be interesting and most helpful to you.
Concept
Terms used by alterationists
Obj ective
Given a written list of words and terms most often used by altera-
tion workers and an explanation of their meanings by your teacher, you
will correctly list, define, and explain orally the meanings of these
words and terms according to standards set by your teacher.
Instructions
"Stop, go, or slow?" Ask your teacher and you will know. If
your sig-i reads slow or stop, ask you teacher for help. Complete the
following learning experiences.
Learning experiences
1. Ask your teacher to give you a pretest. Pronounce each word
listed onthe pretest; tell your teacher the meaning of each word
and explain why the words need to be used by an alteration
worker.
2. Study the Information Sheet for Lesson V, pages 35-36.
3. Present "Bank of Knowledge," a television program. Your
teacher will act as Master of Ceremonies. There will be a
panel of 5 students. The names of alteration terms will be
33
83
drawn out of a sewing box or kit, and the panel will be asked by
the Master of Ceremonies to pronounce and define the words
drawn. She will decide which students are ready to go to
Lesson VI and which students need to review.
4. Observe garments on display in the classroom. Ask your teacher
for the "match box." Match the terms that you draw from the
box to parts of the garments on display that may require these
terms in altering a similar garment,
5. Ask your teacher for a self test. If she approves your answers,
go happily to Lesson VI. If she does not approve, ask her for
help,and later approval to go to Lesson VI.
34
34
e

LESSON V
Terms Used by Alterationists
Information Sheet
Terms Definitions
1. Alteration tools All tools used to help you alter clothes
2. Sewing gauge
3. Ruler
4. Tape measure
5. Scissors
6. Shears
7. Pin cushion
8. Thread
9. Tracing wheel
10. Tracing paper
11. Pins
12. Thimble
13. Hand needle
35
A tool that has a sliding marker tohelp you measure hems, spaces betweenbuttons, etc.
A wooden or plastic straight edge tool,6, 12 or 18 inches long
A plastic or fiber glass 60-inch tapewith number markings on both sides
A cutting tool about 5 or 6 inches longwith straight blades and matching
rings for handles
A cutting tool about 7 or 8 inches longwith one ring larger than the other,bent or straight handles, and availablefor left or right hand
A small cushion to hold pins and needlesfor sewing and fitting or for storingall pins and needles
Spools of different sizes, fibers, andcolors to use for basting, hand, ormachine stitching
A marking tool; a small, smooth or saw-tooth wheel attached to a short handle
Double-faced carbon paper to mark twopieces of fabric at one time, used withtracing wheel
Sharp, pointed, slender metal spikes with
a head, used to hold pieces of fabricand to mark alterations
Metal or plastic cover that fits andprotects middle finger while handsewing
Small,slender metal spike with an eyefor thread at one end and a sharp pointat the other

14. Marking pencils Chalk or wax pencils that usually havea brush at one end
15. Beeswax
16. Yardstick
Containers of beeswax that thread canrun through: Beeswax makes threadstrong and tangle-free.
A 36-inch, thin wooden stick marked infractions of an inch on both sides ofthe stick
17. Spray and dry steam iron Steam vents are in front of the soleplate; temperature range is great.
18. Ironing board A level, sturdy, adjustable board withpadding and a silicone-treated cover
19. Sewing machine
20. Press cloth
21. Full length mirror
22. Skirt marker
23. Seam ripper
Straight stitch and zigzag machinesthat sew backward are best for mostbasic alterations.
Cheesecloth is a good general presscloth, and it is transparent.
Mirror to view the whole garment andindividual
A yardstick on a sturdy stand to usewith pins or chalk
A pin-like tool with a small blade
36
t./

LESSON VI
Hand Stitching
Pretest and Post Test
(Ask your teacher for directions.)
On scraps of fabric that the teacher will give you, prepare
examples of the following hand stitches and explain where each hand
stitch can be used by an alterationist.
1. Catch Stitch
2. Blind Stitch
3. Lock Stitch
GET wiTFI IT.IF q0u.. PASS ThisTEST, Loa CAN
511:P THE Rg5T.
(oF LEs6oN
r -
37
e-7
71

LESSON VI
Hand Stitching
Introduction
"The proof of the pudding is in the eating," and the proof of
skill in stitching is in the viewing. Hand stitching can be fun for
almost everyone.
Concept
Hand Stitching
Ob'ective
You will first demonstrate the skills of threading a needle, tying
a knot, and using a thimble. After viewing a transparency, studying a
handout, watching a demonstration by your teacher, and examining examples
of lock stitching, blind stitching, and catch stitching, you will
practice these stitches until you feel secure to perform them for your
teacher. You will show ynur teacher your hand stitching skills, and
these gkills will be checked according to standards set by her.
Learning Experiences
1. View the transparencies on threading a needle, using a thimble
and hand stitches. Study the Information and Operation Sheets
for Lesson VI, pages 41-46. Experiment in your own area; try,
on scraps of fabric, to lock stitch, blind stitch, and catch
stitch. Ask your teacher to check your stitches.
2. "Show and Tell." Your teacher or an experienced alterationist
will show the proper way to lock stitch, blind stitch, and
catch stitch. She will answer questions concerning these
stitches. She will ask you to draw from her "Stitchology"
39

basket one hand stitch, name the stitch, and tell what type
fabric it would best suit.
3. Read pages 469-473 in Steps in Clothing Skills. Ask your
teacher or a classmate to discuss with you Steps in Blind
Stitching for Right Handed Persons. Complete Things To Do
1, 2, 3, and 4 as directed on page 473.
40
REMEMBER-(40uR TEACHER/5 READ4 AND
WILLIN& ToHELP!

LESSON VI
Hand Stitching
Information Sheet
How to Thread a Needle
1. Have the correct size needle and thread.
2. Cut the thread a length convenient for sewing; usually this is
about 18 inches, or the distance from your fingertips to your elbow.
3. Cut the end of the thread on a slant (below left). Pointed thread
is easier co put through the eye of the needle.
4. Hold the needle in the left hand, between the thumb and first finger.
5. Hold the thread in the right hand; push it through the eye of the
needle (below.)
How to Ti. a Knot in the End of Thread
1. Wind the thread once or twice around the end of the first finger;
hold the thread in place with the thumb.
2. Roll the thread tightly between the thumb and first finger until
the loop is pushed off the end of the finger.
3. Pull the loop into a small knot at the end of the thread.
(See illustrations on the following pages.)
41
40

How to Tie a Tailor's (slip) Knot
Hold bottom and top threads together and make a loop; put the ends
of the thread through the loop. Hold the ends of the thread tightly
and push the loop toward the fabric. Pull the ends of the thread
opposite the fabric.,...---
How to Tie a Square Knot
Loop bottom and top threads together and pull tightly against the
Tailor's Knot
fabric. Make a second loop of the top and bottom threads and pull
Square Knottightly against the first loop.
.....ma.104.1wo
How to Use a Thimb"le
The thimble is worn on the second finger of the right hand and is
used to direct and force the needle through the fabric. A thimble will
prevent your finger from being roughened and sore and will enable you
to sew better and faster. (See picture below.)
4142

You will use the side of the thimble to push the needle for some
kinds of sewing and the end of the thimble for other kinds. Look closely
at the position of the fingers and the thumb in each picture below.
Practice pushing the needle through material in both ways before you
begin to sew. (See picture below.)
42
43

LESSON VI
Hand Stitching
Operation Sheet
Lock stitch
The lock stitch is used to repair and/or finish seams in order to
prevent ripping of facings or interfacings.
Step 1. To make a lockstitch, begin by putting the needle in the
garment 1/2 inch above the seam rip; make three or four
small running stitches, from right to left, through the
seam thickness. (These stitches will show on the outside
of the seam.)
Step 2. After making three or four running stitches, bring the
needle and thread to the outside of the seam.
Step 3. Insert the needle the same distance from the seam and
directly across from the present stitc.
Step 4. Continue this pattern of stitching until the seam has
been repaired or finished.
45
43
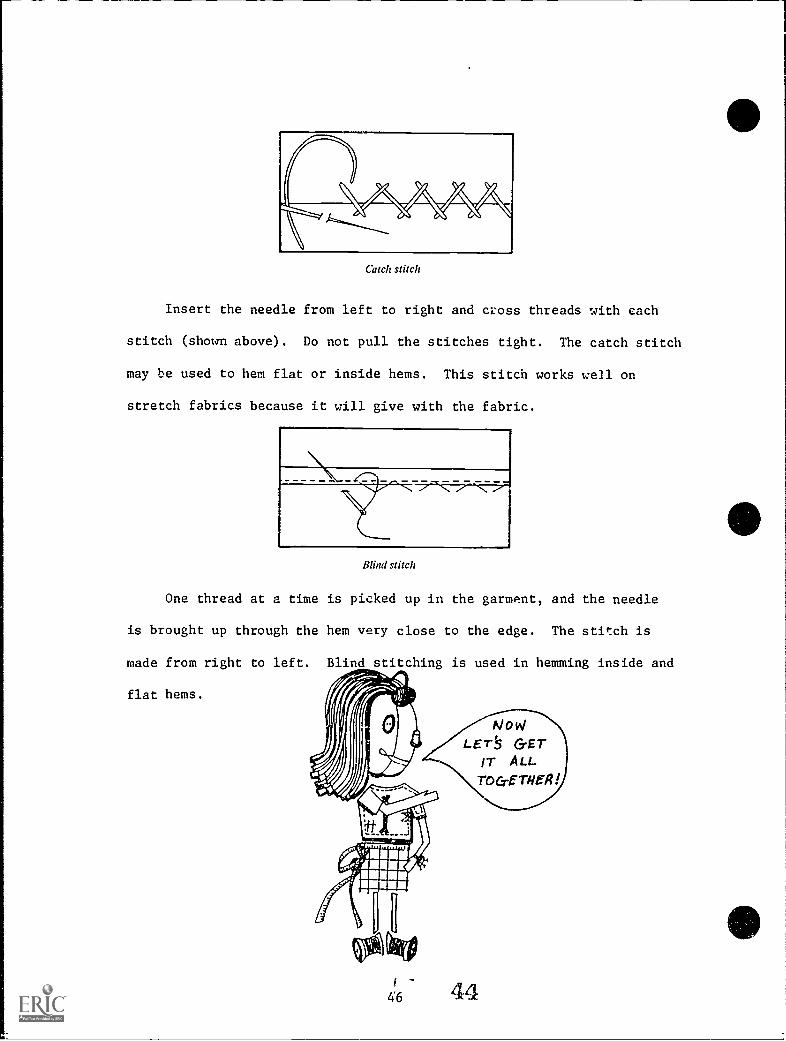
Catch stitch
Insert the needle from left to right and cross threads with each
stitch (shown above). Do not pull the stitches tight. The catch stitch
may be used to hem flat or inside hems. This stitch works well on
stretch fabrics because it will give with the fabric.
Blituistiwh
One thread at a time is picked up in the garment, and the needle
is brought up through the hem very close to the edge. The stitch is
made from right to left. Blind stitching is used in hemming inside and
flat hems.
N o KI
LETS GETIT ALLrocrrin
i
46 44
s

LESSON VII
Hems and Hem Finishes
Introduction
What do you know about hems, except that any length today seems
O.K. as long as it flatters you? An alterationist will probably find
that she will alter many hems during her career. Let's play Sherlock
Holmes and explore the wonders of hems and hem finishes.
Concept
Hems and hem finishes
Objective
You will be given fabric, plain seam binding, bias seam binding,
bias hem facing, bias strips of lightweight fabric, hemming lace, a
sewing needle, thread, and a sewing machine. Your teacher or an
experienced alterationist will demonstrate for you methods of finishing
hems using plain and bias seam binding, bias facings, and hemming lace.
She will demonstrate the following hem finishes: stitched and ove-ccast,
stitched and pinked, and turned and stitched. You will watch demonstrations
and practice and perform each hem finish according to standards set by
your teacher.
Instructions
Complete the following learning experiences.
Learning experiences
1. Read and study the Operation Sheet and Information Sheets for
Lesson VII, pages 49-54, Ask the teacher to demonstrate ways
to mark hems, identify hem lengths, finish raw hem edges, ease
fullness in a hem, and face a hem.
47
45

2. You have become an alterationist aide at the "Fashion Filly."
This shop caters to females of all ages. Hems come down and
go up - we aim to please each customer. The alterationist
has been handed a work order that specifies the following hem
finishes: plain seam binding, stitched and overcast, and
stitched and pinked. The alterationist assigns the job of hem
finishing to you. Practice the hem finishes explained in the
Operation Sheet for Lesson VII. When you have finished your
jobs, present them to your teacher for her evaluation.
3. S.O.S. for an alterationist aide: Sue must have white pants
lengthened 7/8 inch to wear tomorrow night. The pants are
sheer polyester knit; they must be faced, and the hem must be
invisible from the outside. Choose a piece of sheer polyester
knit and the proper facing from the "Scraps and Things" box
on your teacher's desk. Demonstrate the correct way to face
Sue's pants. Ask your teacher to check your work. If she
approves, you are ready for Lesson VIII.
STITCHES SHOW.NEVER 8E SEEN
BY cUSTMERSLOH° PALf THE
GREEN I
1
4846

Hemline lengths
LESSON VII
Hems and Hem Finishes
Information Sheet 1
MicroMiniMini
Short
Knee Length
Below Knee
--- MidCalfMO
MaxiEveningFloor
The customer may choose one of theabove skirt lengths.
Garments To Be Hemmed Hem Depths
Blouses, ruffles, lingerie,extremely flared skirts 3/8"
1.
Short sleeves, circular skirts 1"
2.
Sleeves, jackets, pants,shorts, blouses 1 i/2 " -2"
Average hem width fordresses, skirts, and coats
311
3.
Floor length garments 2"-4"
Full skirts in sheer 4.
fabrics 5"-10"
49
47
Points To Remember
The heavier the fabric ormore flared the garment, thenarrower the hem.
Keep customer height and hemdepth in proportion-if tall,allow for a slightly deeperhem; if short, a narrowerhem
Longer dresses usually needdeeper hems.
Let bias skirt or garmenthang 24 hours before makinghem.

LESSON VII
Hems and Hem Finishes
Information Sheet 2
Marking Tools to Use when Marking Hems:
1. Ruler
2. Hem Marker
3. Hem gauge
4. Yardstick
Steps to Follow when Hemming a Garment:
1. Find customer's desired hem length.
-.9 Measure the desired hem length on the customer. Mark the
hemline all around with a yardstick or hem marker to insure
an even hemline.
3. Pin hem by placing the points of the pins about two inches
apart toward the raw edge of the hem.
4. Measure proper hem depth with a ruler or a hem gauge and trim
excess fabric.
5. Construct one of the hem finishes shown for Lesson VII.
LESSON VII
Hems and Hem Finishes
Operation Sheet
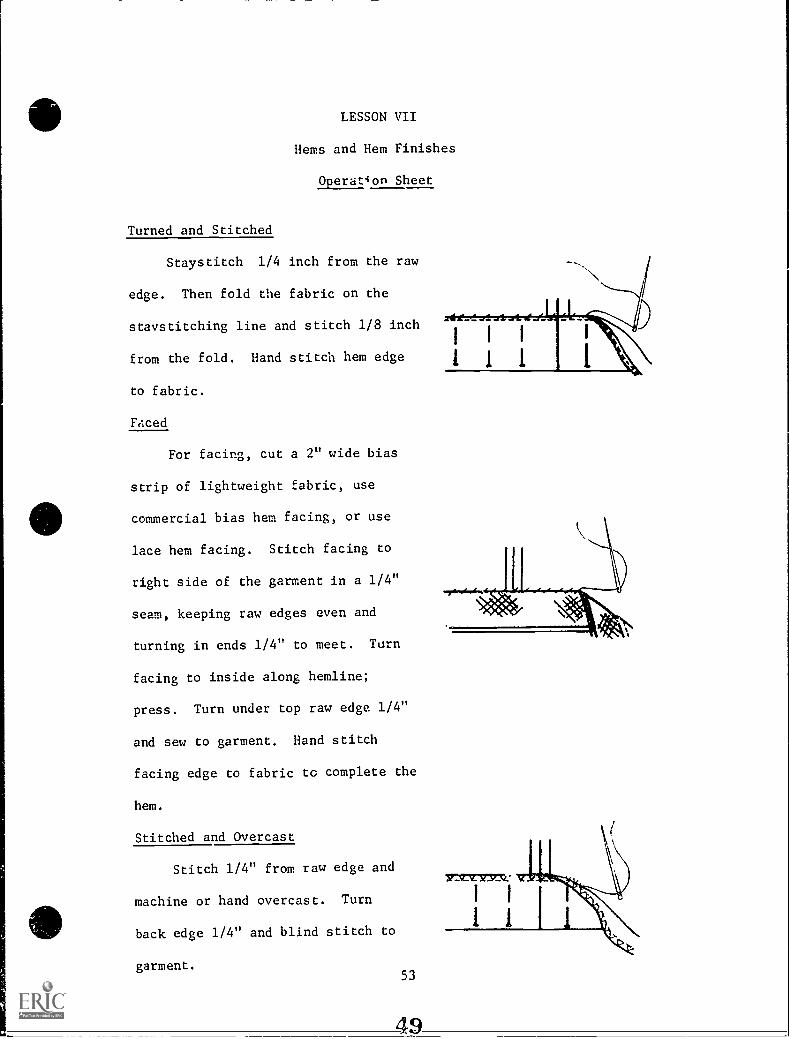
Turned and Stitched
Staystitch 1/4 inch from the raw
edge. Then fold the fabric on the
staystitching line and stitch 1/8 inch
from the fold. Hand stitch hem edge
to fabric.
FAced
For facing, cut a 2" wide bias
strip of lightweight fabric, use
commercial bias hem facing, or use
lace hem facing. Stitch facing to
right side of the garment in a 1/4"
seam, keeping raw edges even and
turning in ends 1/4" to meet. Turn
facing to inside along hemline;
press. Turn under top raw edge 1/4"
and sew to garment. Hand stitch
facing edge to fabric to complete the
hem.
Stitched and Overcast
Stitch 1/4" from raw edge and
machine or hand overcast. Turn
back edge 1/4" and blind stitch to
garment.53
4

Stitched artd Pinked
Stitch 1/4" from raw edge and
trim with pinking or scalloping
shears. Turn pinked edge back 1/4"
and blind stitch to garment.
Seam Finding
On straight or slightly eased
hems, lap seam binding 1/4 " over
raw edge. Stitch 1/8 " from edge of
seam binding. Overlap ends, turn
under and sew hem to garment with
a hemming stitch.
,-----440LeRE NOW
HAI-FINAL( uP THELADDER To A succEs.5-
FuL. ALTERATIoNisTCAREER I

LESSON VIII
Types of Fasteners
Introduction
Snaps, hooks and eyes, zippers, and buttons are fasteners that may
come unfastened from many garments. They also have to be removed from
many garments when alterations are made. Alterationists have many fasteners
to resew, and this lesson should help you learn the skill of resewing
fasteners.
Concept
Fasteners
Objective
After studying information sheets, viewing transparencies, watching
demonstrations by your teacher, and identifying properly sewn fasteners
on four garments, you will practice the skills of sewing zippers, snaps,
hooks and eyes, and buttons to fabric, and you will satisfactorily
perform these skills according to the standards set by your teacher.
Learning experiences
1. Read and study Information and Operation Sheets for Lesson VIII,
pages 57-70.
2. The "clothes basket" has items of clothing that need repairing.
Choose an item that needs a round hook and eye replaced. Re-
place it by following the directions listed on the Information
and Operation sheets. Check your own work; ask a classmate to
check your work; then, ask your teacher to check your work.
3. Sue is going to a party. She found the top button on her
blouse hanging by one thread. She needs to have the button
55
0t--1-4.

sewn on properly. Please ask your teacher for the blouse,
resew the button, and leave it with your teacher. She will
check your work and discuss her decision with you.
4. Ask your teacher for a box containing "scraps" and "snaps."
Demonstrate your snap sewing skill by sewing the ball and the
socket onto a piece of fabric. When you have completed the
operation, ask your teacher to check it.
5. Reach once again into the "clothes basket." Find a garment that
needs a zipper replaced. Read the Information Sheets for
Lesson VIII. Ask your teacher to help you if you do not under-
stand the Information Sheets. If you do understand the
Information Sheets, read the Operation Sheets. Best wishes
for a perfect zipper application. Show your zipper to your
teacher. If you need help, she will help you. If you do not
need help, you are ready to develop a new skill in the next
lesson.

LESSON VIII
Types of Fasteners
Operation Sheet 1
Correct Ways to Sew on Hooks and Eyes
Straight eye and hook Round eye and hook
The following pictures will help you learn to sew on hooks and eyes.
I. Place needle
through fabric
and one ring
ofhook.
3. Bring needle
through bottom hole.
Wrong side of garment
2. Bring thread under
point of .7i.edle as
shown and pull tightly.
4. Take two or three
stitches in bill of hook.
Wrong side of garment
Right side of garment
Correct placement of straight eye and hook
57
03t--
Wrong side of garment
Correct placement ofround eye and hook

i .
LESSON VIII
Types of Fasteners
Operation Sheet 2.
Correct Ways to Sew on Buttons
I. Use double thread:
take one or two small
stitchcs to mark the
place where the button
is lc be sew i on.
S. Take several stitches over
the pin and through the
fabric. (A 4hole button
is sewed on in the same
way as a 2hole button.)
2. Place the button over
the marked spot; hold
a pin across the top of
the button and bring
needle and thread up
through a hole in the
button: take a stitch
over the phi and down
into another hole in
the button.
4. Remove the pin and
bring the needle and
threat, through the
fabric.
S. Wind the thread around
the thread under the button
several times. Return the
thread to the wrong side of
the fabric and fasten it.
For a button with a shank, take
several stitches through the hole in
the shank and th ,ugh the fabric.
Return the thread to the wrong side
of the fabric and fasten it.
59
54

LESSON VIII
Types of Fasteners
Information Sheet 1
Sewing on Snaps
There is a time and place for everything, including fasteners for
garments. Snaps, hooks and eyes, and buttons are items that we depend
on to hold us together. Read the following information, look at the
pictures, watch a snap sewing demonstration, and you will soon be
skilled at attaching these fasteners.
To place the ball part of the snap:
The ball part of the snap should be
placed on the under side of the part
of the garment that overlaps.
To sew on the ball of the snap:
The edge of the snap should be about 1/4 inch from the edge of the
garment opening.
between the layers of fabric, place the knot of the thread where
the snap is to be sewn.
Place the ball of the snap over the knot, with the ball side of
the snap facing 2E.
Sew well in each hole around the edge of the snap; make 4 stitches
per hole.
To place the socket part of the snap:
The socket part of the snap should be placed on the top of the
garment underlap.
Ball of the Snap Socket of the Snap
61

To sew the socket of the snap to the opposite underlap of the garmentclosing:
Mark the placement of the socket on the top of the garment underlap:
Close the opening to form a snuff fitting closing.
Place the point of the needle through the center of the ball
of the snap to mark the position of the socket on the underlap.
Or, rub chalk on the ball of the snap, and with the fingers
firmly press the ball of the snap against the underlap.
Center a knot where the socket is to be sewn. (A knot may be
made by making two small stitches in the spot where the
fasteners will be sewn.)
Place the socket, with the hole up, over the knot or the
stitches.
Sew overcast or buttonhole stitches in each hole around the
edge of the socket. Sew at least four stitches per hole.
Tie the thread by sewir.g two or three stitches over each
other or by tying a knot.
COPIRECTLeiSEWN SNAPS
PREVENT &APSAND OVER-
LAPS !
5662
I

LESSON VIII
Types of Fasteners
Operation Sheet 3
Correct Way to Sew on Snaps
I. Mark the locsticn of the
snap by using two pins
as shown above.
3. Place stitches close to-
gether: go over the edge
of the snap and through
the material several
times, as shown above.
63
i7
2. Take small stitch to mark
a spot to place the center
of the snap.
4. Place the needle under
the snap and into the
next hole; continue
stitching until all holes
have been sewn. Fasten
thread on the wrong side
of the fabric. under snap.
when the snap is securely
attached to the garment.

LESSON VIII
Types of Fasteners
Information Sheet 2
Replacing Zippers
An alterationist will replace zippers many times during her career.
There are several kinds of zippers and several ways to sew them into
openings in garments. A smart and easy way to learn to replace a zipper
is to watch closely as you rip the old zipper from the garment. Replace
the zipper by using the same method that was used by the manufacturer.
Before you attempt to sew in the zipper, hold it in place in the opening
and look carefully to see if you can discover each step that you need to
take to replace it. You will learn several zipper application methods,
and with practice you will be able to replace zippers that give the
appearance of factory inserted zippers.
To better understand zippers and how to insert them, learn the
following terms;
1. Slider A piece of metal that slides up and down to open or
close the teeth or the coil of a zipper
2. Teeth and/or Coil - Metal teeth or synthetic coil that form
the chain of the zipper
3. Top stop - Metal bar on one side of the zipper tape to stop
the slider
4. Bottom stop - Metal bar that covers the teeth or coil at the
bottom of the zipper; it stops the slider.
5. Tab - Metal pull attached to the slider
65

6. Chain - Entire length of the metal teeth or synthetic coil
7. Tape - Fabric on which the zipper chain is attached
8. Guide line - Marks, usually a line of raised thread, to use as
a guide to sew in a zipper
Top stop Slider
Chain
66
Tab
Teeth or coil
Guide line
Bottom stop
5(3

LESSON VIII
Types of Fasteners
Operation Sheet 4
Replacing Centered Application Zippers
I. Examine old zipper application. Do not remove a zipper until you
find how the zipper was sewed in. Use the old folds and stitching
lines after you remove the zipper.
II. Remove old zipper. Rip stitches very carefully. A seam ripper or
sewing scissors may be the safest ripping tools to rip out zippers.
Ask your teacher to demonstrate a safe way to rip out a zipper.
III. Measure old zipper. Use a new zipper the size of the old zipper.
Apply new zipper to opening.
IV. Replace center back or front opening zippers:
A. Machine baste the seam from which the oldzipper was removed.
B. Close the zipper and place the right side of thezipper to the wrong side of the basted seam.Press seam open.
C. Center the teeth or coil of the zipper on thebasted seam.
D. Pin the zipper in place. Place pins diagonally;begin pinning at the top of the zipper. Placepins about one inch apart on each side of thezipper, with the points of the pins toward theseam line.
E. Mark the bottom of the zipper by placing a pinjust below the bottom stop.
F. Use a regular presser foot or attach a zipperfoot to the machine.
G. Begin stitching from the top of the zipper, afteropening the zipper about 1 1/2 inches to avoidpassing the zipper tab.
67
60

H. Stitch on old stitching line, or 1/4 to 1/2inch from the seam. (The width will depend onthe fabric, the garment, and the type zipper.)
I. Remove pins as the presser foot reachers themto prevent puckers in the fabric.
J. After stitching about 1 1/4 inches, lower theneedle, raise the presser foot, and push thezipper tab to the top of the zipper.
K. Set the presser foot down and stitch to thebottom of the zipper. Leave the needle in thefabric, raise the presser foot, turn fabric,lower presser foot, stitch slowly, and countstitches to the seam line; count the samenumber of stitches from the seam line, leaveneedle in fabric, raise the presser foot, turnfabric, lower presser foot, and stitch towardtop of the zipper.
L. About 1 1/2 inches below the top of the zipper,leave the needle in the fabric, raise thepresser foot, and pull the tab to open thezipper about two inches. Lower the presserfoot and stitch straight to the top of thezipper.
61
68

LESSON VIII
Types of Fasteners
Operation Sheet 5
Replacing Skirt Lapped Application Zippers
Steps I, II and III are the same as in the directions given in
Operation Sheet 1, Replacing Centered Application Zippers. The following
steps give directions for replacing skirt zippers that have been sewn
in by the lapped method. Skirt side zippers are placed on the left
side of the skirt.
Fold !Jr front coil
Stitch near fold edge --
Begin stitching
I/
//
/
/
//
Outside
. Place original fold of back side of openingabout 1/8 inch from the zipper teeth or coil.Pin zipper in place with points toward coil.Begin stitching at the bottom of the zipperand stitch as near as possible to the edgeof the fold. Remove pins.
B. Lap front fold over zipper. This is calledthe overlap. Pin outer edge of fold to thestitching line. Place pins parallel tothe zipper coil.
C. Place machine needle down at the seam atthe bottom of the zipper. Follow the oldstitching line, or sew across the zipperbottom; leave the needle in the fabric, andraise the presser foot; turn the skirt,lower the presser foot, and follow the oldstitching line, or stitch about 1/2 inchfrom the fold.
D. Stitc;1 toward the top of the zipper. Stop
1 inch before reaching the top. Remove oneor two pins and slide the tab down at least2 inches below the top. Replace pins.
Stitch straight to the top of the zipper.Remove pins.
69
6Z
The lapped method can be applied to front or back dress and neck
openings. The correct lap for the center back is left over right;
for the center front it is right over left. Seam allowance must be at
least 5/8 inches. If a seam is less than 5/8 inches, the seam allowance
will not be caught in the stitching of the overlap.
6370

e LESSON IX
Fitting
Introduction
Fashions that fit! If customers know that the clothes they choose
will dit and if they feel that a simple alteration or two will make
them fit, you can bet your latest crush that they will buy over and over
again. If you are on the alteration team, you may be assigned the task
of fitting. We have information to help you become prepared.
Concept
Fitting
Objective
Given written sheets of information, a written and oral explanation
of the tasks to be performed, a visual and oral explanation of two
methods of "pinning to fit," and demonstrations of ways of "pinning to
fit," you will accurately pin at least one garment of fit a classmate.
You will mark the wrong side with pins and/or chalk and will stitch the
marked seam line. You will rip out any stitches that are not needed.
Your teacher will evaluate your performance according to criteria set
by the teacher and future employers.
Instructions
Ask your teacher for a pretest on fitting. Congratulations to you
if you passed the pretest, and more power to you if you did not pass
the pretest. Learning can be fun; let's prove it.
Learning experiences
1. Read and study the Information Sheet for Lesson IX, pages
73-75. Ask your teacher for help if you don't understand the
information given.
71
2. Choose a classmate to be your customer. Pin one garment to
fit her by the "hold-up" method. Work ;through the steps listed
according to directions given on pages 73-74. Have the customer
"try on" the garment and ask your teacher to evaluate your
performance according to standards set by her and an employer.
-----
IF THEFir.. ,RIGHT,
irs."Dy,41-0-14ire
65
72

LESSON IX
Fitting
Information Sheet
Would you believe that wrinkles could ever be helpful? They are
one of the best friends of an alterationist, because they lead your
eye to the site of a needed alteration. An alterationist has many
other helpful friends, such as pins, chalk, marking gauges, rulers, and
tape measures. These friends aid the alterationist as she performs the
following tasks:
1. Pins the needed correction to fit.
2. Marks the pinned line on the wrong side with pins, chalk, or
thread.
3. Removes pins.
4. Rips necessary seams or stitches.
5. Re-pins new seam lines on wrong side.
6. Bastes, stitches, and presses new seam lines.
7. Completes related alterations.
Two Methods of "Pinning To Fit"
I. "Hold-up" Method: Hold up the fabric and pin it. Pins
should be placeu close together on the right side of the
garment and in the same direction of the fold. The pins
will serve as markers for the new line or stitching. The
"hold-up" method is easily learned, and when correctly
done, it results in a proper fit.
"Pinning to fit" is done with the garment right side out,
so all of the pins are on the right side. The corrected
1
1
Step 1
73
66
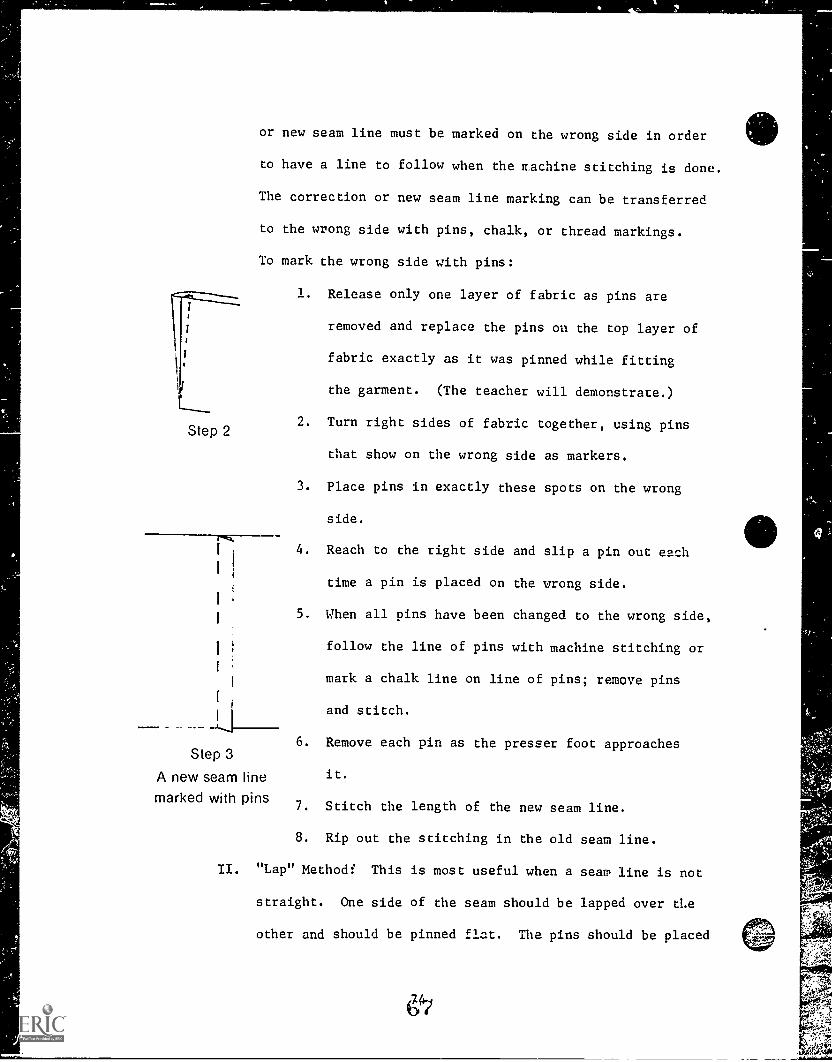
or new seam line must be marked on the wrong side in order
to have a line to follow when the nachine stitching is done.
The correction or new seam line marking can be transferred
to the wrong side with pins, chalk, or thread markings.
To mark the wrong side with pins:
1. Release only one layer of fabric as pins are
!
removed and replace the pins on the top layer of
fabric exactly as it was pinned while fitting
the garment. (The teacher will demonstrate.)
Step 22. Turn right sides of fabric together, using pins
that show on the wrong side as markers.
3. Place pins in exactly these spots on the wrong
side.
4. Reach to the right side and slip a pin out each
time a pin is placed on the wrong side.
i
5. When all pins have been changed to the wrong side,
follow the line of pins with machine stitching or
1
I
mark a chalk line on line of pins; remove pins
and stitch.
4
1
I
6. Remove each pin as the presser foot approachesStep 3
A new seam line it.
marked with pins7. Stitch the length of the new seam line.
8. Rip out the stitching in the old seam line.
II. "Lap" Method:" This is most useful when a seam line is not
straight. One side of the seam should be lapped over the
other and should be pinned flat. The pins should be placed
g'?

t
7
i-
Lap one side over
the other and pin flat
at right angles to the fold. Slip baste and fold from the
right side. Remove pins. Slip stitch along the edge of
the fold. The slip stitching will mark a new seam of
stitching line on the wrong side. Machine stitch along
marked line. Rip stitches from the original seam line.
LESSON X
Customer Work Records
Introduction
Customers are the power behind the throne. They are the future of
every business, and they are the future of our jobs. Let's keep re
cords on them. We don't want to lose our future.
Concept,
Customer work records and work sheets
Objective
After studying three examples of customer work records and sheets,
viewing transparencies, and listening to your teacher explain how to
get the information needed to complete the forms, you will choose two
individuals in your classroom as customers; you will complete one work
record on one customer and one work sheet on the other. The completed
sheets will be checked according to standards set by your teacher.
Instructions
You will complete the following learning experiences.
Learning experiences
1. Ask your teacher for 2 blank customer work records and 1 blank
customer work sheet. Study the outline of each.
2. View the transparencies and listen to the explanation given by
your teacher.
3. Choose two "classmate" customers. Complete one work sheet on
one customer and one work record on aother. Your teacher will
evaluate your performance according to standards set by her.
(;9 77

LESSON XI
Dart Alterations
Introduction
There is an art to altering a dart. If this skill can be learned,
many dollars can be earned. Good luck!
Concept
Dart alterations
Objective
Given pictures of ways to relocate and to alter darts; written
information concerning kinds of darts and ways to relocate, alter,
lengthen, or shorten them; oral instructions; and demonstrations by
the teacher, you will alter one straight and one double-pointed dart.
Your performance will be evaluated according to standards set by your
teacher and an employer.
Instructions
Complete the following learning experiences.
Learniug exneriences
1. Study the Operation Sheet for Lesson XI, pages 81-83. Ask
your teacher for help if y2u do not understand the information.
2. Practice on fabric and trace, with a tracing wheel and tracing
paper, straight darts and double-pointed darts. Practice
drawing marks on fabric to lengthen and to shorten darts.
Stitch and press the dart alterations and ask the teacher to
evaluate your practice work.

3. Choose a "classmate customer." Relocate a straight dart by
performing the five tasks listed on the operation sheet. Your
teacher will evaluate your performance according to standards
set by employers and her.
71
80

LESSON XI
Dart Alterations
Operation Sheet
Darts in clothing may have to be relocated, shortened, or lengthened.
If darts have been trimmed, notched, or clipped too close to the stitch-
ing line, they cannot be altered.
Two kinds of darts:
1. Straight or basic - tapers to a point at one end.
2. Double-pointed - tapers to a point at each end.
Altering Bust Darts
The alteration most often done for the bust dart is to move the
point. The darts should point to the bustline. If it is too high or
too low, the corrected will be marked on the garment by the fitter or
alterationist.
Tasks to be Performed
1. Rip the stitching of the underarm seams and the darts (A).
2. Make a chalk mark at the new
point of the dart. Draw lines
from the beginning of the original
dart at the underarm seamline to
the new point. -0-3. Stitch the new dart on the wrong side of the garment along drawn lines.
4. Press the dart.
5. Restitch the underarm seams.
81
1,

Altering Double-Pointed Darts
A double-pointed dart may be altered if the dart has not been
clipped to the seamline, or if the widest part is not at the waistline.
To relocate this type of dart follow these steps:
1. Mark the position of the waistline on the dart, using chalk..
2. If the width at the widest part of
the dart is greatee than 1 1/2 inches,
the entire dart will have to be ripped.
Draw new dart lines with chalk andnew
11
find the widest part of the dart at the da
waistline. If the width is less than originaldart line 1
11 1/2 inches, redraw only the widest part 0
waistline
of the dart and stitch again, leaving the two
points in their original positions. If
the garment is fitted, change the side
seams to match the relocated darts.
ti
Lengthening Dartsti
1. Rip the side seam in the dart area -ir
(to e_ her lengthen or shorten the
dart).
2. To lengthen a dart, draw a chalk
line from the base of the dart to
the new point. Stitch along the
chalk line, being careful to taper
the dart to nothing at the point
to prevent a pucker at the end of
the dart.82
rt line
'73
seam ripper
old dart line
new pointchalk line
3. Press the dart.
4. Restitch the side seam.
Shortening Darts
1. To shorten a dart, mark the point
at which the dart should end.
Make a chalk line and stitch
to the new point, following line.
2. Rip the original stitching which
extends beyond the new point and
below the new stitching line.
new point
old dart line
LESSON XII
Skirt and Dress Alterations
Introduction
Many changes need to be made on many dresses and skirts because
people are built differently. When skills such as these are needed,
future alterationists should be ready to learn them.
Concept
Simple skirt and dress alterations
Objective
After studying the Information and Operation Sheets for Lesson XII,
you will have private conferences with your teacher and will perform
tasks assigned by her. Your performance will be checked according to
standards set by your teacher and future employers.
Instructions
Complete the following learning experiences.
Learning experiences
1. Study Operation Sheet 1 for Lesson XII, page 87 . Practice
on paper the information given. Show your practice papers to
your teacher.
2. View a transparency, Hip Line Alteration Directions and Chalk
Alteration Symbols. Listen to your teacher explain the
meanings of the directions and symbols. Ask questions and
answer questions asked by her.
3. Study Operation Sheet 2 for Lesson XII. Ask your teacher for
a conference to set a definite task assignment.
85
Jr--fOr--
11li

LESSON XII
Skirt and Dress Alterations
Operation Sheet 1
Lengthen or Shorten Dress or Skirt
Use proper sewing skills to make alterations in shortening or
lengthening skirts or dresses.
When a dress or skirt is to be shortened, the following procedures
may be followed:
1. Check the information on the tag
with markings on the garment. lr Shorten Symbol2. Observe and check carefully the
Alteration1 1method used in sewing the present Ticket
hem; remove the stitches. dress:
Aikot4%7E 4d,Lengthen Symbol
3. Lightly press the crease of the rne144-eX
hem, leaving a slight crease line 7/Y
as a guide for marking the new hem.
This makes marking easier and
more accurate.
Chalk mark4. To shorten a skirt, measure from (will be New
the crease line of the old hemcrease line)
make a chalk mark above the old
crease line (See figure). Continue bottom edge
to .ke these marks close to each
other all around the skirt. The
marks serve as a new crease line.
crease linethe amount to be shortened and (original)
87

LESSON XII
Skirt and Dress Alterations
Operation Sheet 2
Shorten or Lengthen Bodice
The instructions on the tag are important and must be checked
with the markings on the garment before alterations are attempted. The
following steps may be taken to shorten the bodice.
1. Measure the distance around the waistline of the garment; write
it on the alteration tag. (When altering a pleated skirt,
measure about one inch below the waistline and baste the pleats
in position. The basting will hold them in place after the
waistline seam has been ripped.)
2. Remove hooks, eyes, buttons, zippers, snaps, or belt loops,
etc., which are on the waistline seam. Put them in a box,
envelope, or another safe place.
3. Rip the waistline seam, and if there is a zipper, remove it.
4. Measur,..i the distance from the old
seamline to the top edge of the
skirt; write the measurements on
a piece of paper. This will serveMarks from old
as a guide when the aeam is line of stitchingfrom old
restitched.
5. Press the lower edge of the
bodice to remove the crease. Do
not press over the fitting marks.
Pressing will remove the marks.
578'z
seamline to waistlineedge of skirt
89
Skirt

6. Find the measurement you listed
in Step 4. Mark the new seam
allowance on the bodice.
7. Trim away the fabric at the Mark for newseam line
old line to prevent bulkiness at
the waistline.
8. If there are belt loops, rip
the side seam far enough to
remove them. Replace belt loops
in the side seams. (They should be
in the same position on both sidesOld seam line
old seam line
-
Bottom edge of bodice
of the garment.) Stitch loops in
place. Restitch the side seams.
9. Pin the bodice and skirt together;
make sure the side seams, all
other seams, and darts match.
10. Stitch the waistline seam. A
seam gauge may be used to keep
the seam even in width.
11. Check to see that all seams meet and that the waistline side
seam meets at the placket opening.
12. Measure around the waistline, Make sure that it is the same
measurement as it was before the alteration was made.
13. Press the seam; replace the hooks, eyes, snaps, and/or zippers.
(If skirt is pleated, remove basting.)
90
78

NOTE: After completing Steps 1, 2, and 3, the bodice may also be
lengthened as much as the waistline seam will allow,
usually about 1/4 inch. The final seam is bound or
finished with an overcasting stitch to prevent raveling and
weakening of the seam.
STOP
STOP TOCATCH 1. OUR
REATH THEW STARTHUFF/Ala PUFFING,
AND CUFF/Aler INLESSON YDI
011.1talftft
7.9
0115111111160011111NWINIIIIIIMEW

e LESSON XIII
Cuffing
Introduction
Men, women, short legs, long legs, or in-between - they all wear
pants. There must be pants to fit everyone, and alterationists must
make sure points are the right length and that cuffed pants are cuffed
properly.
Concept
Pants Cuffs
Objective
After being given information and operation sheets on cuffing
pants, you will view transparencies and listen to an explanation of a
simple way to properly cuff pants. You will practice this skill on
paper and on scraps. Your teacher will check your work. When you have
gained sufficient skills, you will cuff a pair of pants that you select
from the "grab box." Your performance will be checked according to
standards set by your teacher and an employer.
Instructions
Request a pretest. Complete it and the following learning experiences.
Learning experiences
1. Study the Operation Sheet for Lesson XIII, pages 95-96. Ask
the teacher for help if you do not understand the directions.
2. After viewing transparencies and listening to explanations of
each step in the process of cuffing pants, practice this by
marking, pinning, and taping cuffs in place.
3. Ask your teacher for a conference to discuss a specific assign-
ment to cuff pants.93
81)

LESSON XIII
Cuffing
Operation Sheet
Cuffing Pants
Pants are constructed with and without cuffs. They are made from
permanent press and regular fabrics that require cleaning and pressing.
The wishes of the customer and the type of fabric that the pants are
made of will determine how the cuffs are altered. There are two general
types of cufr alterations: (1) Regular cuff alterations and (2) Per-
manent-press cuff alterations.
To cuff pants:
1. Pick out the tack stitches at the side of the cuff and rip
out the hem.
2. Unfold cuff.
3. Press out creases.
4. Turn and pin, wrong sides together, on desired length line
(line l) that has been marked with tailor's chalk or basting
stitches.
5. Mark a line (line 2) 1 3/4 inches to 2 inches below the
desired length line.
6. Mark another line (line 3) 1 3/4 inches to 2 inches below line
2.
7. Mark a line 1/2 to 5/8 inches below line 3 to form a single turn
hem allowance. Trim away any leftover fabric.
8. Crease pants cu line 2 by turning wrong sides of fabric
together. Pin baste or hand baste 1/8 inch from the fold.
(This forms the new edge of the cuff.) Press fold.
95
81
41,
9. Baste on line 1 :o hold lines 1 and 3 together.
10. Fold along line 3 and turn up to form cuff. Baste through all
four layers of fabric about 1/2 inch from the fold. Press.
1'. Turn the cuff down. Machine stitch on the wrong side of the
parts leg, 1/4 inch from the cut edge of the hem.
12. Turn cuff up, as in step 10, remove bastings, and press. Tack
the cuff to the leg by tacking the inside of the cuff to the
leg at each side seam.
The procedure for altering cuffs on garments made from permanent
press fabrics is slightly different from the procedure described above.
Certain general limitations should be remembered when altering permanent
press cuffs: (1) most pants cannot be shortened over two inches without
tapering the pants legs on both seams, and (2) to lengthen and recuff
permanent press pants, a false French cuff must be made.
Complete directions for altering permanent press cuffs can be
obtained from your teacher.
.--
115 BEENWORK 1 BUT
rris 6EENFu !
P2
LESSON XIV
Working Relationships
Introduction
How does it feel to know that you are soon going to be entering
an almost new world? You will have many decisions to make; among these
will be whether to be happy and enjoy working or whether to be a sad
sack and make your co-workers miserable. Try to decide that you will
make all of your co-workers, your bosses, and your customers like you,
and see how quickly your whole working vorld becomes happy and cheerful.
Concept
Employer - Alterationist Customer
Objective
After reading and discussing the handout Employer Alterationist
Customer, listening to an employer and a customer explain their feelings
conerning an alterationist's role at work, and interviewing another
customer, you will demonstrate the proper way to greet, service and talk
with a customer. Your performance will be checked according to standards
set by your teacher.
Instructions
Complete the following learning experiences.
Learning experiences
1. Study the Information Sheet for Lesson XIV, pages 99-101.
Discuss the information with a classmate.
2. Your teacher will choose a panel of three to discuss, answer
questions, and present new and related information concerning
employees' becoming assets to their places of employment.
97
83
Your teacher will act as moderator. If you are not chosen as
a panel member, list in writing three questions to be answered
by the panel. Give your teacher a copy of your questions.
Listen and write the answers given by the panel.
3. Listen to an employer and a customer conduct a "cross question
and answer period" concerning what they expect of an altera-
tionist at work. List in writing three points with which you
agreed.
4. Interview one person (any age, sex, or race) to obtain the
answer to the following phrase: "Things I may discover if
I walk 24 hours in someone else's shoes." Ask your teacher for
a list of suggested questions to help you interview the person.
5. Debate the following statement:
I think that the motto of an alterationist should be: "Treat
others as you would like for others to treat you."
Your teacher may ask you to draw slips of paper from a box on
her desk. The slips will have "for" or "against" written on
them. The slip you draw will decide which side of the debate
you will be on. Your teacher may ask you to be one of the
judges to listen to the debate and to help decide which side
wins. ksk her for instructions.
6. Role play the proper way ro approach, ervice, and talk with
a customer when she comes for alteration services. Request
the help of one or more classmates to aid you in performing
this role.
8498

LESSON XIV
Working Relationships
information Sheet
Employer Alterationist - Customer
The three most important people in your world of work will be your
employer, your customer, and yourself. The attitude that each of you
have toward the other will make your work experience pleasant or un-
pleasant. If you have a desire to succeed, you will succeed. Take a
look at yourself - are you willing to go the extra mile, perform extra
duties, or accept res-onsibility that should really be given to another
employee? If the answers to these questions are yes, you are well on
your way to success.
Your employer, your customer, and you have different roles and
responsibilities which need to be understood by all of you. They are as
follows:
Responsibilities of an Employer
1. To select, employ, and release employees.
2. To pay employees' salaries.
3. To finance all business stock or supplies.
4. To finance all advertising.
5. To establish a reputable business.
6. To provide leadership for employees.
7. To recognize strengths and weaknesses of employees.
8. To build confidence and trust in the customers.
9. To show appreciation for earnest efforts of employees and for
continued patronage by customers.
99

10. To provide as comfortable and safe work environment as possible.
11. To present an image of stability, honesty, and trustworthiness.
12. To establish and maintain a good living and working relation-
ship among the employees.
Responsibilities of the Customer
1. To show respect for employees, service., and merchandise
while shopping.
2. To pay debts made accordiag to the contract or understanding
node with the business man-ger.
Responsibilities of the Employee
1. To show a positive or good attitude toward work.
2. To be loyal to the employer and the job.
3. To cheerfully serve each customer.
4. To prove to employers and customers that one can be trusted.
5. To work as competently as possible.
6. To accept new responsibilities as the need arises,
7. To continually strive to improve personality.
6. To be well-groomed at all times.
9. To establish good public relations with each customer.
10. To remember that the customer is always right until the
"boss" decides that he is wrong.
Daily Duties of anAlterationist
1. Prepare alteration equipment and area for use.
2. Approach, greet, and perform fitting and alterations needed
by customers.
3. Use specific sewing skills each day.

4. Work cooperatively with customers.
5. Clean alteration equipment and area.
6. Record all work started and/or completed.
7. Strive to please customers by having a cheerful personality
and performing alteration skills that are satisfactory.
101
S7

TeacherManual
r."t''t,t0.1".16C.G, &At tr. R
1.4o,T1114..it, 0
, _% %
41t
*-3.1
14'
(.eminure an
ZIAN 2 0 1975
"SEW" YOU'RE AN ALTERATIONIST
Teacher Manual
Compiled byLouie E. Kemp
Instructional Materials SpecialistHome Economics
Published by
Division of Vocational andTechnical Education
State Depattment of EducationJackson, Mississippi
Research and Curriculum Unitfor Vocational and TechnicalEducation
College of EducationMississippi State UniversityMississippi State, Mississippi
Home Economics Publication Number 6018
1974
89

Mississippi State University does not discriminate on the groundsof race, color, national origin, religion, or sex.
90

TABLE OF CONTENTS
INSTRUCTIONS TO THE TEACHER
TEACHER SECTION INTRODUCTION
Page
1
5
LESSON I The Sewing MachinePretest and Post Test 11
Pretest and Post Test Key 13
Sewing Machine Operator License 15
LESSON III - Basic Markings and SymbolsPretest and Post Test 17
LESSON IV Alteration Tags and TicketsPretest and Post Test
LESSON V Terms Used by AlterationistsPretest and Post Test
19
21
LESSON IX - FittingPretest and Post Test 23
Pretest and Post Test Key 25
LESSON X Customer Work RecordsOperation Sheet 1 27
Operation Sheet 2 29
Operation Sheet 3 31
LESSON XII- Skirt and Dress AlterationsInformation Sheet 33
LESSON XIII - CuffingPretest and Post Test 35
Pretest and Post Test Key, Information Sheet 37
LESSON XIV Working RelationshipsOperation Sheet 39
APPENDIX A 41
APPENDIX B 43
APPENDIX C 47
iii
91

HOME ECONOMICS RELATED OCCUPATION
LEARNING rACKAGE
Identification Page
Title:
Subject:
Performance Level:
Purpose:
Producer:
"Sew You're an Alterationist
Clothing Services
Apprentice Alterationist
This package is designed to aid the studentin developing competencies needed to becomeemployable as an apprentice alterationist.
Louie KempResearch and Curriculum UnitDrawer DXMississippi State, MS 39762
Artist Illustrator: Donna Breckenridge
Date: 1974
v
92

INSTRUCTIONS TO THE TEACHER
I. Instructional Approach
The student section of this learning package will utilize a quasi-
discovery approach. The student will be provided with factual
information but will also be allowed and encouraged to explore and
to use new and varied learning media and materials. This approach
will aid the student in developing competencies needed to become
employable as an alterationist aid or alterationist assistant.
(See Appendix A, page 41.)
II. Identification of Learners
This learning package is constructed for the person who is preparing
to enter the world of work with salable, basic alteration skills.
III. Special instructions
A. Equipment needed
Sewing machines, overhead projector, filmstrip projector, tape
player, thread, bobbin, bobbin case, tracing wheel, machine
needles, tailors' chalk, seam ripper, and scissors.
B. Materials needed
1. Books:
Opportunities in Clothing, McDermitt, Irene E., and Norric,
Jean L., Peoria, Illinois: Chas A. Bennett Co., Inc., 1968.
Steps In Clothing Skills, Dunn, Lucille; Bailey, Annetta;and Vansickle, ',panda. Peoria, Illinois: Chas. A. Bennett
Co., Inc., 1970.
Ready Set Sew2 Perry, Patricia. Altoona, Penns 'vania:
Butterick Fashion Marketing Co., 1971.
Teen Guide to Home-Making, Barclay, Marion S. and Champion,
Francis. Dallas, Texas: McGraw-Hill Book Co., 1961.
1

2. Bulletin boards:
Target-Alterations
It's Time for Stitchometry
(See Appendix C, pages 47-51.)
C. Instruction sheets needed
1. Pretest, self test, post test and answer keys. Some
information sheets serve as answer keys.
2. Information and operation sheets to aid the students in
attaining each objective.
D. Media needed
1. Transparency Masters
a. Symbols and markings f. Sewing on snaps
b. Alteration ticket g. Sewing on hooks and eyes
c. Hand stitches h. Dart alterations
d. Machine head i. Cuffing
e. Sewing on buttons j. Simple skirt and dressalterations
2. Tapes
It is suggested that key readings and instructions be taped
and be made available to students who prefer them or who
will learn more effectively by listening.
IV. Instructions for Evaluation
Three instruments for evaluation are included in this package.
They are a pretest, a self test, and a post test. The pretest will
assess the present knowledge and skills possessed by the student;
the self te' ;; will allow the student to become aware of his know-
ledge and skill development. The post test should identify compe-
tencies developed by the student following his learning cm-el-fences.
2

V. Suagested Instructional Procedure
1. Read cc the students the introduction and the learning objectivesin the student section.
2. Explain to the students that the pretest will be administeredto assess their knowledge of alteration skills. Remind thestudents that they will not write on the sample pretest in thelearning package, and that they will not get a grade on thepretest. Copies of the Pretests, Information Sheets, andOperation Sheets which are to be duplicated for student useare included in the Teacher's Manual only. (LESSON No. I, III,
IV, V, IX, X, XII, XIII, and XIV)
3. Following the pretest, the students will begin Lesson I. Thecomponent and the objectives explain what they will learn.The instructions direct them to the learning experiences andexplain the number of learning experiences they must success-fully complete befcre attempting Lesson II. This procedureis repeated for most lessons. There are lessons that do not
require a pretest. (LESSONS No. VII, VIII, and XI)
4. Follow the same procedure through the remaining lessons.
5. When the students have satisfactorily completed their lastlearning experience and feel that they are ready for a finaltest, instruct them to ask the teacher for a post test. Thepretest, self test and post test are the same, but are givenat different intervals. A grade should be given on the post
test.
6. Identify the equipment, materials, and media that will beneeded by the students and point cut the locations of theseavailable supplies. Students should ask to use the supplies
and request assistance if needed.
7. Show and explain to the students the method of obtaining andreplacing individualized learning packages in the file. The
following is a suggested method of filing.
a. Each learning package will be kept in a manila folder.Each folder will have a number and the name of thelearning package written on it.
b. The folders containing the learning packages will be keptin a file drawer or a box on a table beside the teacher's
desk.
c. When the student comes to class, she should get a manilafolder that ccntains a number that has been assigned toher and a learnin?, package in which she will work. This
''.1.1111111MINFIZAs

folder will be taken from the file drawer or box. At the
end of the period, she will replace the folder and thelearning package in the same file drawer or box. She willnot take the learning package out of the classroom.
8. Instruct the students not to write on or in the package.Tests or any other written assignment sheets should be madeavailable to the students upon request. An adequate supplyof work sheets should be available when students begin the
package.
4

"SEW" YOU'RE AN ALTERATIONIST
TEACHER SECTION
I. STATEMENT OF PURPOSE
A. Concept
The student will develop clothing construction and fitting
knowledge and skills m_essary to perform at varying competence
levels as an alteration worker. (See Appendix B, pages 43-45.)
B. Components
1. Identify parts, operate, and maintain a sewing machine.
2. Identify and operate tools for measuring, marking, ripping,
4-
cutting, basting, sewing, and pressing; follow safety rules
for sewing.
3. Identify and interpret symbols and markings that indicate
specific alteration directions.
4. Prepare and interpret an alteration ticket.
5. Define and explain alteration terms.
6. Perform basic handstitches needed for alterations.
7. Perform specific specialized techniques in finishing hems.
8. Demonstrate skills in sewing fasteners to garments.
9. Demonstrate skills in fitting simple garments.
10. Prepare and interpret a customer work sheet and a customer
work record.
11. Demonstrate skills in altering and relocating darts.
12. Demonstrate skills in simple skirt and dress alterations.
13. Demonstrate skills in cuffing pants.
14. Demonstrate desirable methods of approaching, greeting and
working with customers.5

II. INSTRUCTIONAL OBJECTIVES
A. Lesson I: G_ven a sewing machine, machine needle, bobbin,
thread, lined paper, and fabric, the student will identify the
machine parts, properly insert the needle, thread the head of the
machine, thread the bobbin, insert the bobbin in the bobbin
case, and demonstrate the operation of the sewing machine
according to the criteria established by the teacher.
B. Lesson II: Given a treasure chest of tools, the student will
identify and demonstrate the use of each measuring, marking,
ripping, basting, cutting, sewing and pressing tool in the
chest and will be evaluated according to the criteria established
by the teacher.
C. Lesson III: Given examples of alteration symbols and markings,
the student will identify them and orally explain and demon-
strate making symbols and markings for shortening, lengthening,
new crease lines, original crease lines, new hem edges, new seam
lines, and new dart lines according to criteria established by
the teacher.
D. Lesson IV: After viewing an alteration tag and ticket and
listening to an explanation of the information needed on the
tag and ticket, the student will correctly prepare an alteration
tag and ticket according to standards set by the teacher.
E. Lesson V: Given a written list of words and terms used by
alterationists and an explanation of their meanings, the student
will orally define terms that are commonly used by alteration
workers and will interpret the meaning of each word defined by
6
S8

using it appropriately in conversation in a role play, by a panel
discussion with peers, or by orally answering questions pre-
sented by the teacher. The correct definition and the appro-
priate use of the words will be determined by criteria established
by the teacher.
F. Lesson VI: After viewing transparencies, studying instruction
sheets, examining samples of handstitching, and watching a
demonstration of handstitching by an experienced alterationist,
the student will practice the skills of blind stitching, catch
stitching, and lock stitching and will satisfactorily perform
acceptable stitches according to criteria set by the teacher.
G. Lesson VII: Given a sewing machine, plain seam binding, hemming
lace, bias hem facing, bias strips, and thread and needle, the
student will demonstrate the proper procedure as outlined and
demonstrated by the teacher for stitched and pinked, turned and
stitched, and stitched and overcast hem finishes and will be
evaluated according to standards set by the teacher.
H. Lesson VIII: After studying information sheets, viewing
transparencies, watching demonstrations by the teacher, and
identifying properly sewn fasteners on four garments, the student
will practice the skill of sewing zippers, snaps, hooks and
eyes, and buttons to fabric and will satisfactorily perform
these skills according to standards established by the teacher.
I. Lesson IX: Given written sheets of information, a written and
oral explanation of the tasks to be performed, a visual and oral
explanation of two methods of "pinning to fit," and demonstrations
7
99

of methods of "pinning to fit," the student will perform the
following tasks: accurately pin at least one garment to fit a
classmate, mark the wrong side with pins and/or chalk, stitch
the marked seam line, and rip out any stitches that are not
needed. The teacher will evaluate the student's performance
according to criteria set by the teacher and future employers.
J. Lesson X: Given a blank customer worksheet, a customer work
record, and a visual and oral explanation of the two forms by
the teacher, the student will satisfactorily complete in
writing one customer work sheetand one customer work record
according to criteria established by the teacher.
K. Lesson XI: Given pictures and written information concerning
kinds of darts and ways to relocate, alter, lengthen, or shorten
darts and oral instructions and demonstrations by the teacher,
the student will alter one straight and one double-pointed
dart. The student's perfdTmance will be evaluated according
to standards .et by the teacher and an employer.
L. Lesson XII: After watching the teacher demonstrate the tools,
symbols, and markings needed and the correct way to mark, cut,
baste, and sew, the student will shorten a hemline, shorten a
bodice, and perform a hipline alteration by following directions
given by the teacher. The student will judge one classmate's
finished operations using a checklist given by the teacher.
The teacher will check the student's finished operations by the
same checklist.
8
too

M. Lesson XIII: After reading information and operation sheets on
cuffing pants, the student will view transparencies and listen
to an explanation of a simple way to properly cuff pants and
will practice this skill on paper and on scraps. When the
student has gained sufficient competence, she will cuff a pair
of pants that she selects from the "grab box." The student's
performance will be evaluated according to criteria set by the
teacher and an employer.
N. Lesson XIV: After listening to resource people, observing
demonstrations by the teacher, and participating in role plays,
interviews, and panel discussions, the student will ..emonscrate
desirable methods of approaching, greeting, and working with
customers who are in need of alteration services. The demon
stration will be assessed according to standards established
by the teacher.
9
101

LESSON I
The Sewing Machine
Pretest and Post Test
1. List in writing, on the lines in the drawing below, the names of the
parts of the sewing machine.
2. You will perform the following tasks for the teacher according to
standards set by the teacher:
a. Thread the machine properly.
b. Wind the bobbin properly.c. Insert the bobbin in the bobbin case.d. zeplace the needle properly.e. Remove and replace the presser foot properly.
f. Remove and replace the throat plate properly.
g. Remove and replace the foot control properly.
h. Sew a straight seam using the 5/8 inch guide on the bed of the
machine as a guide.
11
102
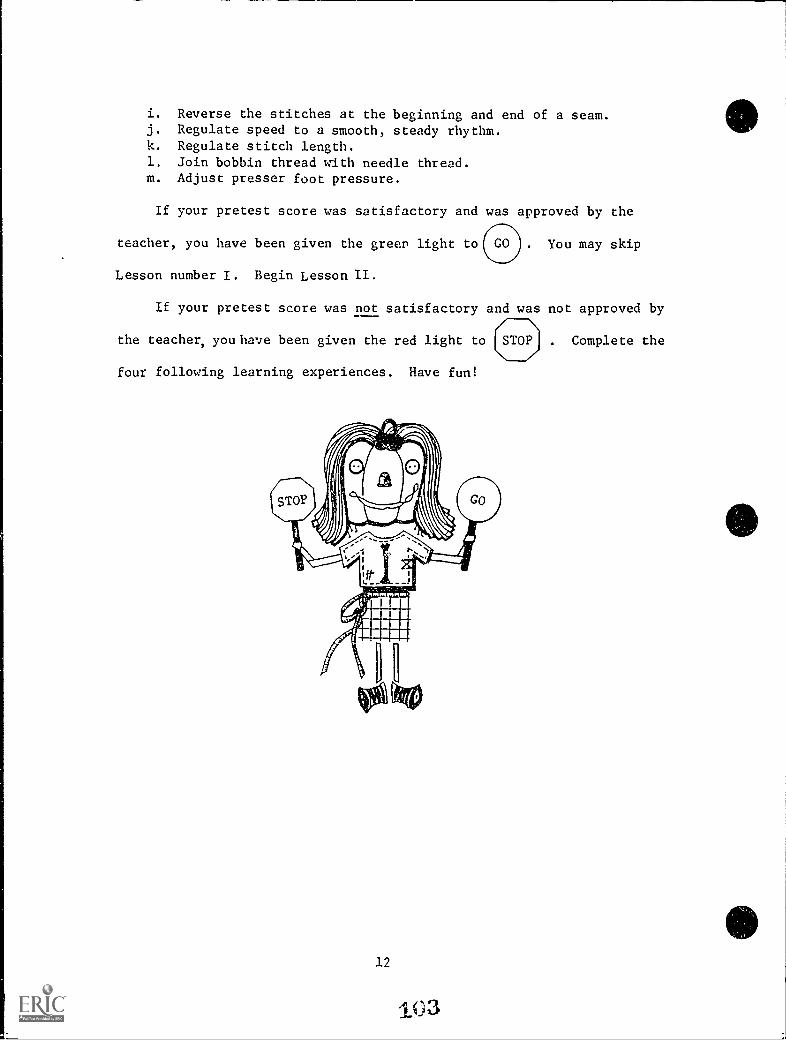
i. Reverse the stitches at the beginning and end of a seam.j. Regulate speed to a smooth, steady rhythm.k. Regulate stitch length.1, Join bobbin thread with needle thread.m. Adjust presser foot pressure.
If your pretest score was satisfactory and was approved by the
i----teacher, you have been given the green light to CO . You may skip
Lesson number I. Begin Lesson II.
If your pretest score was not satisfactory and was not approved by
the teacher, you have been given the red light to Complete the
four following learning experiences. Have fun!
12

Tak
e-U
p Le
ver
Pre
Lser
Bar
Lev
er
, ,,P
ress
er F
oot
Thr
oat P
late
Nee
dle
Thr
ead
Ten
sion
Fee
d D
ogS
lide
Pla
te
Han
d W
heel
Bob
bin
Win
der
Stit
ch R
egul
ator
Thr
oat P
late
Pos
ition
ing
Leve
r
Cou
rtes
y of
:C
urric
ulum
and
Inst
ruct
iona
l Mat
eria
ls C
ente
r, S
tate
Dep
artm
ent o
f Voc
atio
nal a
nd T
echn
ical
Edu
catio
n, S
tillw
ater
, Okl
ahom
a 74
074.

Name
Date
SEWING MACHINE OPERATOR LICENSE
This is to certify thatsuccessfully accomplished the following tasks:
has
1. Name and identify the parts of the sewing machine.2. Thread the machine properly.
3. Thread the bobbin properly.4. Insert the bobbin in the bobbin case.5. Replace the needle properly.
6. Remove and replace the presser foot properly.7. Remove and replace the throat plate properly.8. Remove and replace the foot control properly.
9. Sew a straight seam using the 5/8 inch guide on the bed
of the machine as a guide.10. Reverse the stitches at the beginning and the end of a seam.
11. Regulate speed to a smooth, steady rhythm.12. Regulate stitch length.13. Join bobbin thread with needle thread.14. Adjust presser foot pressure.
SignedHome Economics Teacher
To insert needle - The long groove of the needle goes in the direction
of the last thread guide.
15

*
/
LESSON III
Basic Markings and Symbols
Pretest and Post Test
17
1 (36

LESSON IV
Alteration Tags and Tickets
Pretest and Post Test
List the information that should be included on an alteration
ticket and on an alteration tag. Use the examples below to write your
answers.
19
1C7
Alteration Tag

LESSON V
Terms Used by Alterationists
Pretest and Post Test
Terms Orally explain the mlaning of these terms to the teacher
1. Alteration tools
2. Sewing gauge
3. Ruler
4. Tape measure
5. Scif,sors
6. Shears
7. Pin cushions
8. Thread
9. Tracing wheel
10. Tracing paper
11. Pins
12. Thimble
13. Hand needle
14. Marking pencil
15. Beeswax
16. Yardstick
17. Spray and dry steam iron
18. Ironing board
19. Sewing machine
20. Press cloth
21. Full length mirror
22. Skirt marker
23. Seam ripper
21
1c8

LESSON IX
Fitting
Pretest and Post Test
1. List two methods of fitting.
A.
B.
2. List the steps in completing method A.
23
1(39
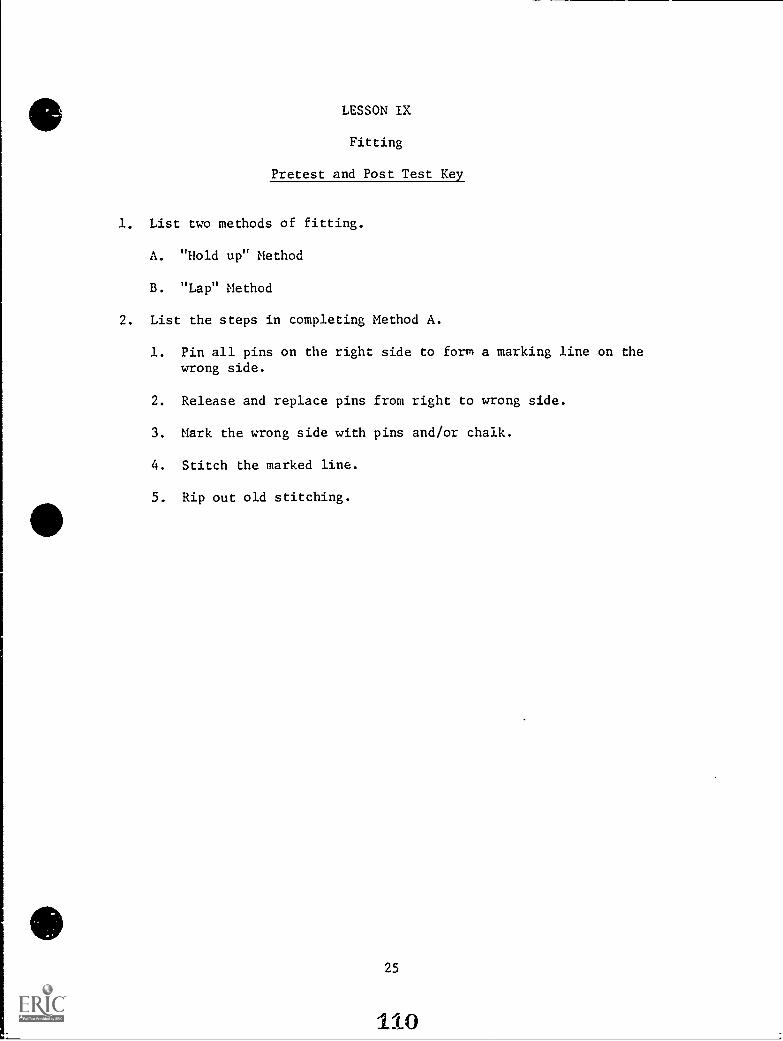
e
*
LESSON IX
Fitting
Pretest and Post Test Key
1. List two methods of fitting.
A. "Hold up" Method
B. "Lap" Method
2. List the steps in completing Method A.
1. Pin all pins on the right side to form a marking line on thewrong side.
2. Release and replace pins from right to wrong side.
3. Mark the wrong side with pins and/or chalk.
4. Stitch the marked line.
5. Rip out old stitching.
25
110

LESSON X
Customer Work Records
Operation Sheet 1
CUSTOMER WORK RECORD
CUSTOMER'S NAMEADDRESS &
PHONE :UMBER
CUSTOMER'SMEASUREMENTS
ALTERATIONSNEEDED
COST
REMARKS:
27
111
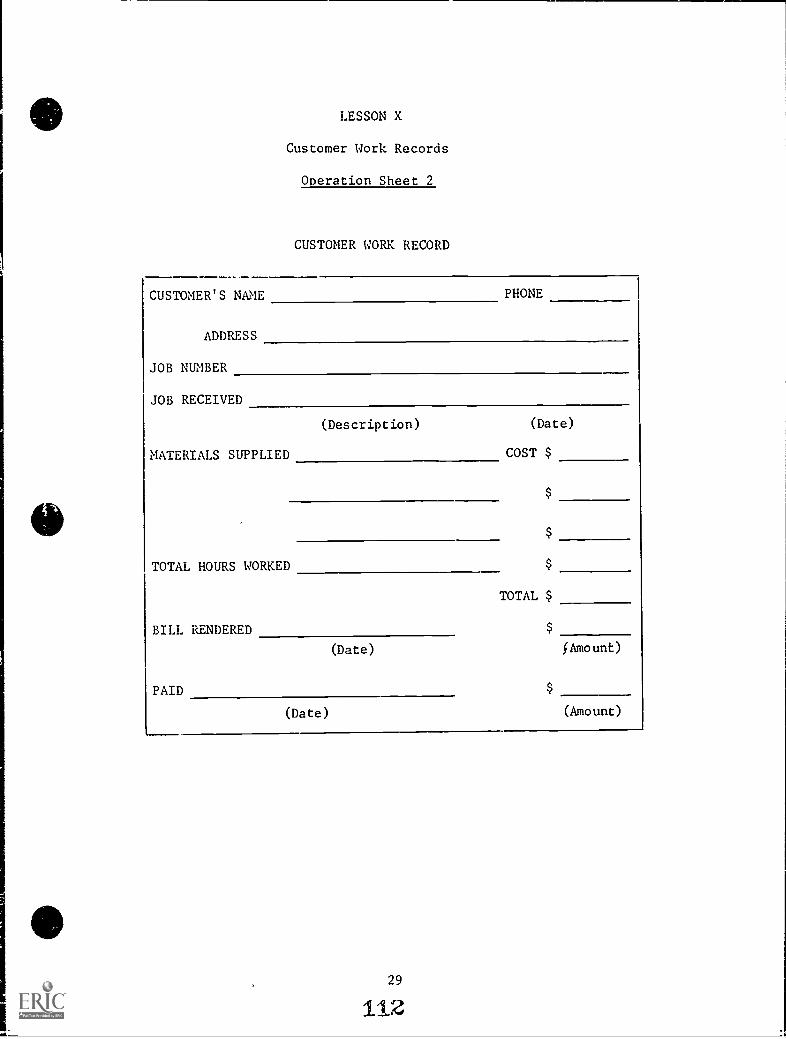
LESSON X
Customer Work Records
Operation Sheet 2
CUSTOMER WORK RECORD
CUSTOMER'S NAME PHONE
ADDRESS
JOB NUMBER
JOB RECEIVED
MATERIALS SUPPLIED
(Description) (Date)
TOTAL HOURS WORKED
BILL RENDERED
PAID
(Date)
(Date)
COST $
TOTAL $
$
fAmount)
(Amount)
29
112

NAME
LESSON X
Customer Work Records
Operation Sheet 3
CUSTOMER WORK SHEET
ADDRESS: (Home)
DATE
(Business)
PHONE: (Home) (Business)
LOCATION MEASUREMENTS ADJUSTMENTS+ or -
FINISHEDGARMENT
Bust (fullest part)Above bust atarmholeOne inch belowbust
WaistBack waistlenght
Front waistlength
Dress lengthSkirt frontlength
Skirt backlength
Sleeve lengthShoulder toelbowElbow towaistAround upperarmAround lowerarmAround waist
Hemline to floor
Dart
adjustmentBustWaistSkirt
31
1 1 3

LESSON XII
Skirt and Dress Alterations
Information Sheet
Hip Line Alteration Directions
1110 One side only to be altered Shrink by pressing Stretch by pressingor drawing in
SICE VIEW
Chalk Alteration Symbols
Let out space between
3X
original new --)% .seamline seamline t
t .
FRONT VIEW
Take in one side only
33
114
X
Take in space between
Space to be altered

LESSON XIII
Cuffing
Pretest and Post Test
AIM
MOWN'OIMmal 0111MIO IMMID 4111111 ...1MID 01=
.1111=11101
ON
OM.OM
01111MI.
MINED =MP
35
115

LESSON XIII
Cuffing
Pretest and Post Test Key
Information Sheet
.111111 411.0.M. ,IIMISIND
BODICE
= OMEN, alim New Crease Line
Bottom or Hem EdgeMMINII MI=1. will
New Seam Line
End of Bodice
CUFF ALTERATIONS ON PANTS
1 1. Desired length line1 2. Top of cuff crease line1 3. Single turn hem lineI 4. 1/2 to % fabric allowanceI 5. Inseam
1
Width of cuff2
3
4
37
116

LESSON XIV
Suggested Interview Questions
Operation Sheet
1. Do you work? Where? Are you happy with your job? Why?
2. Do you have a "best friend?" Do you think that you are very much
alike or very different?
3. Do you live with.your family, friends, or do you live alone?
Would you like to live some other place?
4. What fun things do you do?
5. Are you satisfied with the amount of money you have to spend:
6. Are you in good health? Do you feed good most of the time?
7. Do you ever really try to make someone like you?
8. Can you think of anything you'd like to change in your way of living?
39
Ii?
Appendix A
Job Descriptions
Alteration Tailor (Dictionary of Occupational Titles, 785.281): Alters
clothes to fit individual customers or repairs defective garments,
following alteration or repair tags or marks on garments; examines tag
or garment to ascertain necessary alterations; removes stitches from
garment, using hem ripper or razor blade; shortens or lengthens s2eeves
and legs, expands or narrows waist and chest . . , resews garment,
using needle and thread or sewing machine . . . may fit garment on
customer to determine required alteration . . . may be designated
according to type of garment altered or repaired as tailor, men's ready
to wear; tailor, women's garment alterations; or according to garment
part altered or repaired as pants bushelman, vest bushelman.
Alterationist: An individual who competently performs basic alteration
skills, such as measuring, pressing, pinning, seam ripping, and hand
and machine sewing.
41
1 1 8

Appendix B
Tasks Performed by an Alterationist
1. Analyzes fitting problems of customer.
2. Fits garment on customer, finding:
a. Location and slope of shoulder line
b. Position of waistline
c. Location of grainline
d. Length of bodice and sleeve
e. Position of darts at bodice and elbow
f. Ease at bust
g. Measurement of waistline
h. Ease at hipline
3. Marks or pins garment to indicate desired alterations.
4. Prepares a tag to indicate alterations and gives instructions.
5. Estimates cost and determines pick-up date.
6. Makes claim check.
7. Uses various types of sewing machines.
8. Uses small sewing equipment, such as seam ripper, ruler, andattachments.
9. Alters length of ladies coat, skirt, dress, slacks, sleeves, and
waist.
10. Alters shoulder length, waistline of skirts at darts, and side seamlocations.
11. Makes various types of hems.
12. Replaces zippers.
13. Attaches and/or replaces hooks and eyes, snaps, and buttons.
14. Rips stitches without injuring fabric.
43

15. Presses to mold shape into garment.
16. Presses with warp to avoid stretching.
17. Arranges efficient work center with sewing machine, iron, pressingequipment and sewing tools.
18. Selects and purchases sewing notions (such as zippers, thread,buttons, and fabric).
19. Replaces or changes labels.
44
120

Competencies Needed to Perform Alterations
1. Demonstrate precision performance of sewing skills.
2. Demonstrate sewing techniques that are unique to each constructiondetail involved in alteration.
3. Demonstrate skill in determining possible and/or impossible fittingcorrections by applying basic fitting principles to solve fittingand/or alteration problems.
4. Satisfactorily perform the following procedures for basic alterations:
a. Pin to correct simple fitting problems.
b. Prepare customer work sheets, work records, alteration tickets,and tags.
c. Perform basic hand stitches.
d. Identify and interpret alteration symbols.
e. Rip stitching safely.
f. Pin corrected stitching line, mark on wrong side, matchmarkings, repin, and stitch.
g. Conduct effective customer relations.
h. Know pressing techniques.
i. Complete related alterations.

1Appendix C
Bulletin Board Ideas
47
22

I
dr
(tI
4,
I

4) 1 rs. Prariz 0)wry- JwiemZWAY
124