Document Part No.: APEM27285/151229 - Online Help...
116
Transcript of Document Part No.: APEM27285/151229 - Online Help...

Trend Micro Incorporated reserves the right to make changes to this document and tothe product described herein without notice. Before installing and using the product,review the readme files, release notes, and/or the latest version of the applicabledocumentation, which are available from the Trend Micro website at:
http://docs.trendmicro.com/en-us/home.aspx
© 2016 Trend Micro Incorporated. All Rights Reserved.Trend Micro, the Trend Microt-ball logo, and TrendLabs are trademarks or registered trademarks of Trend MicroIncorporated. All other product or company names may be trademarks or registeredtrademarks of their owners.
Document Part No.: APEM27285/151229
Release Date: December 2016
Protected by U.S. Patent No.: Patents pending.
This documentation introduces the main features of the product and/or providesinstallation instructions for a production environment. Read through the documentationbefore installing or using the product.
Detailed information about how to use specific features within the product may beavailable at the Trend Micro Online Help Center and/or the Trend Micro KnowledgeBase.
Trend Micro always seeks to improve its documentation. If you have questions,comments, or suggestions about this or any Trend Micro document, please contact us [email protected].
Evaluate this documentation on the following site:
http://docs.trendmicro.com/en-us/survey.aspx


i
Table of ContentsPreface
Preface .................................................................................................................. v
Documentation .................................................................................................. vi
Audience ............................................................................................................ vii
Document Conventions .................................................................................. vii
About Trend Micro ........................................................................................ viii
Chapter 1: IntroductionAbout Deep Discovery Email Inspector .................................................... 1-2
What's New ..................................................................................................... 1-2
Chapter 2: DeploymentDeployment Overview ................................................................................... 2-2
Network Topology Considerations ............................................................. 2-2BCC Mode ............................................................................................... 2-3MTA Mode .............................................................................................. 2-4SPAN/TAP Mode ................................................................................. 2-5Control Manager Deployment ............................................................. 2-7
Recommended Network Environment .................................................... 2-10
Items to Prepare ........................................................................................... 2-10
Chapter 3: InstallationSystem Requirements ..................................................................................... 3-2
Control Manager System Requirements ............................................. 3-3Configuring Internet Explorer ............................................................. 3-3
Ports Used by Deep Discovery Email Inspector ...................................... 3-3
Installing Deep Discovery Email Inspector ............................................... 3-6
Deep Discovery Email Inspector 2.5 Installation and Deployment Guide
ii
Chapter 4: Using the Command Line InterfaceUsing the CLI .................................................................................................. 4-2
Entering the CLI ............................................................................................. 4-2
Command Line Interface Commands ......................................................... 4-3Entering Privileged Mode ..................................................................... 4-4CLI Command Reference ..................................................................... 4-4
Chapter 5: Upgrading Deep Discovery Email InspectorSystem Updates ............................................................................................... 5-2
Managing Patches ........................................................................................... 5-2
Upgrading Firmware ...................................................................................... 5-3
Backing Up or Restoring a Configuration .................................................. 5-4
Chapter 6: Technical SupportTroubleshooting Resources .......................................................................... 6-2
Contacting Trend Micro ................................................................................ 6-3
Sending Suspicious Content to Trend Micro ............................................. 6-4
Other Resources ............................................................................................. 6-5Documentation Feedback ..................................................................... 6-5
Appendix A: Getting StartedGetting Started Tasks .................................................................................... A-2
Configuring Management Console Access ........................................ A-4Opening the Management Console .................................................... A-5Managing Your Product License ......................................................... A-7Configuring System Time ..................................................................... A-7Configuring Network Settings ............................................................. A-8Configuring the Notification SMTP Server .................................... A-10Configuring Limits and Exceptions ................................................. A-11Importing Virtual Analyzer Images .................................................. A-13Configuring Virtual Analyzer Network and Filters ........................ A-13Adding File Passwords ....................................................................... A-14

Table of Contents
iii
Configuring Message Delivery Settings ........................................... A-15Alerts ..................................................................................................... A-16Configuring the Actions ..................................................................... A-16Policy Exceptions ................................................................................ A-18Control Manager Settings ................................................................... A-19
IndexIndex .............................................................................................................. IN-1


v
Preface
PrefaceTopics include:
• Documentation on page vi
• Audience on page vii
• Document Conventions on page vii
• About Trend Micro on page viii
Deep Discovery Email Inspector 2.5 Installation and Deployment Guide
vi
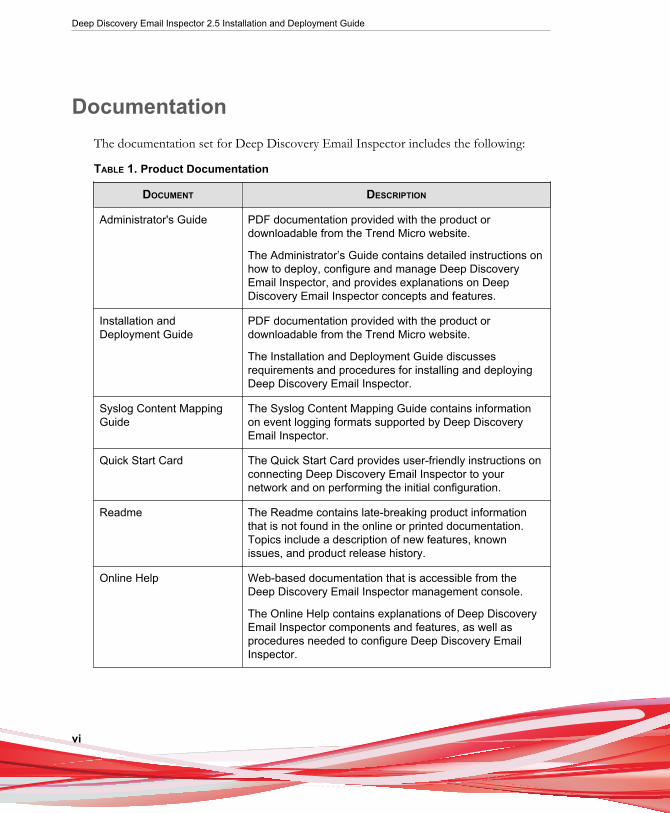
DocumentationThe documentation set for Deep Discovery Email Inspector includes the following:
TABLE 1. Product Documentation
DOCUMENT DESCRIPTION
Administrator's Guide PDF documentation provided with the product ordownloadable from the Trend Micro website.
The Administrator’s Guide contains detailed instructions onhow to deploy, configure and manage Deep DiscoveryEmail Inspector, and provides explanations on DeepDiscovery Email Inspector concepts and features.
Installation andDeployment Guide
PDF documentation provided with the product ordownloadable from the Trend Micro website.
The Installation and Deployment Guide discussesrequirements and procedures for installing and deployingDeep Discovery Email Inspector.
Syslog Content MappingGuide
The Syslog Content Mapping Guide contains informationon event logging formats supported by Deep DiscoveryEmail Inspector.
Quick Start Card The Quick Start Card provides user-friendly instructions onconnecting Deep Discovery Email Inspector to yournetwork and on performing the initial configuration.
Readme The Readme contains late-breaking product informationthat is not found in the online or printed documentation.Topics include a description of new features, knownissues, and product release history.
Online Help Web-based documentation that is accessible from theDeep Discovery Email Inspector management console.
The Online Help contains explanations of Deep DiscoveryEmail Inspector components and features, as well asprocedures needed to configure Deep Discovery EmailInspector.
Preface
vii
DOCUMENT DESCRIPTION
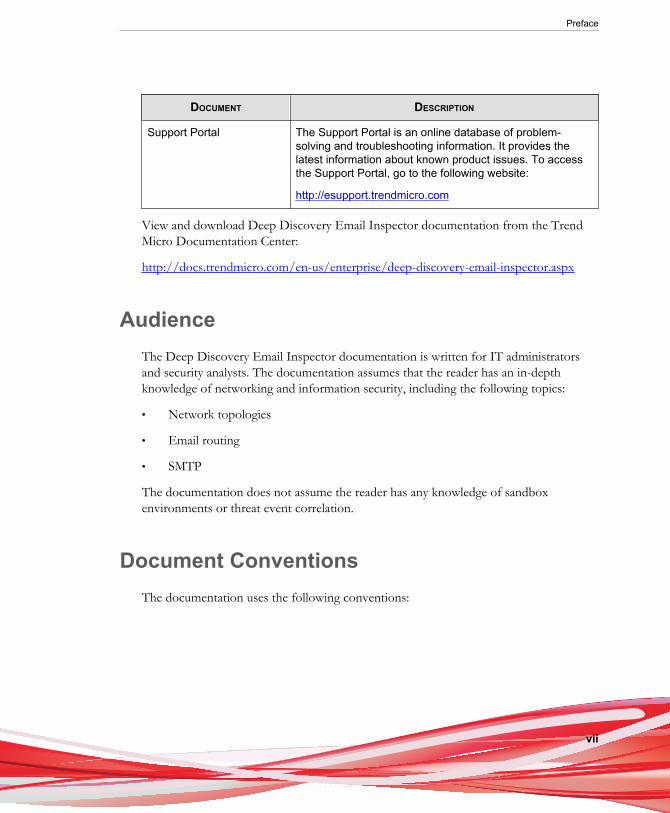
Support Portal The Support Portal is an online database of problem-solving and troubleshooting information. It provides thelatest information about known product issues. To accessthe Support Portal, go to the following website:
http://esupport.trendmicro.com
View and download Deep Discovery Email Inspector documentation from the TrendMicro Documentation Center:
http://docs.trendmicro.com/en-us/enterprise/deep-discovery-email-inspector.aspx
AudienceThe Deep Discovery Email Inspector documentation is written for IT administratorsand security analysts. The documentation assumes that the reader has an in-depthknowledge of networking and information security, including the following topics:
• Network topologies
• Email routing
• SMTP
The documentation does not assume the reader has any knowledge of sandboxenvironments or threat event correlation.
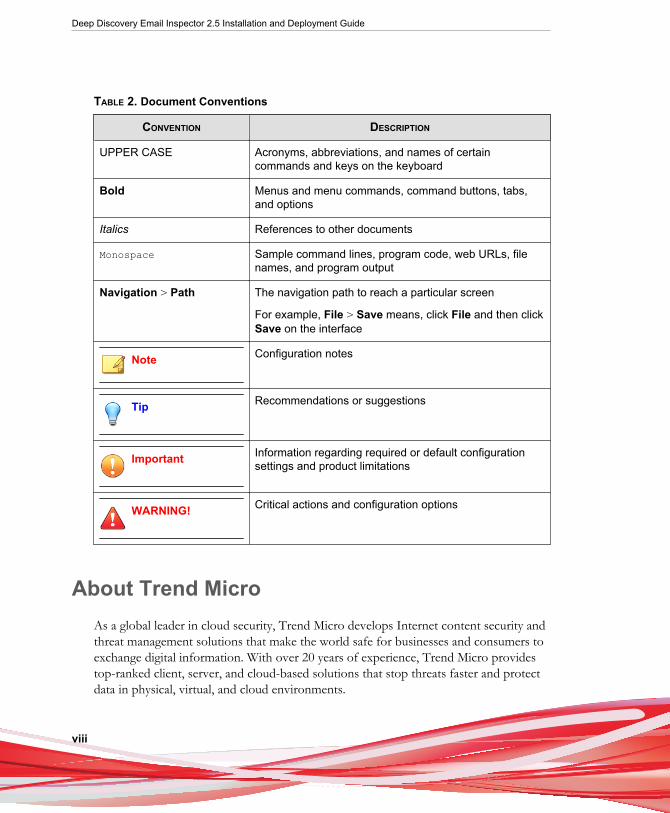
Document ConventionsThe documentation uses the following conventions:
Deep Discovery Email Inspector 2.5 Installation and Deployment Guide
viii
TABLE 2. Document Conventions
CONVENTION DESCRIPTION
UPPER CASE Acronyms, abbreviations, and names of certaincommands and keys on the keyboard
Bold Menus and menu commands, command buttons, tabs,and options
Italics References to other documents
Monospace Sample command lines, program code, web URLs, filenames, and program output
Navigation > Path The navigation path to reach a particular screen
For example, File > Save means, click File and then clickSave on the interface
Note Configuration notes
Tip Recommendations or suggestions
Important Information regarding required or default configurationsettings and product limitations
WARNING! Critical actions and configuration options
About Trend MicroAs a global leader in cloud security, Trend Micro develops Internet content security andthreat management solutions that make the world safe for businesses and consumers toexchange digital information. With over 20 years of experience, Trend Micro providestop-ranked client, server, and cloud-based solutions that stop threats faster and protectdata in physical, virtual, and cloud environments.
Preface
ix
As new threats and vulnerabilities emerge, Trend Micro remains committed to helpingcustomers secure data, ensure compliance, reduce costs, and safeguard businessintegrity. For details, visit:
http://www.trendmicro.com
Trend Micro and the Trend Micro t-ball logo are trademarks of Trend MicroIncorporated and are registered in some jurisdictions. All other marks are the trademarksor registered trademarks of their respective companies.


1-1
Chapter 1
IntroductionTopics include:
• About Deep Discovery Email Inspector on page 1-2
• What's New on page 1-2
Deep Discovery Email Inspector 2.5 Installation and Deployment Guide
1-2
About Deep Discovery Email InspectorDeep Discovery Email Inspector stops sophisticated targeted attacks and cyber threatsby scanning, simulating, and analyzing suspicious links and attachments in emailmessages before they can threaten your network. Designed to integrate into yourexisting anti-spam/antivirus network topology, Deep Discovery Email Inspector can actas a Mail Transfer Agent in the mail traffic flow or as an out-of-band appliance silentlymonitoring your network for cyber threats.
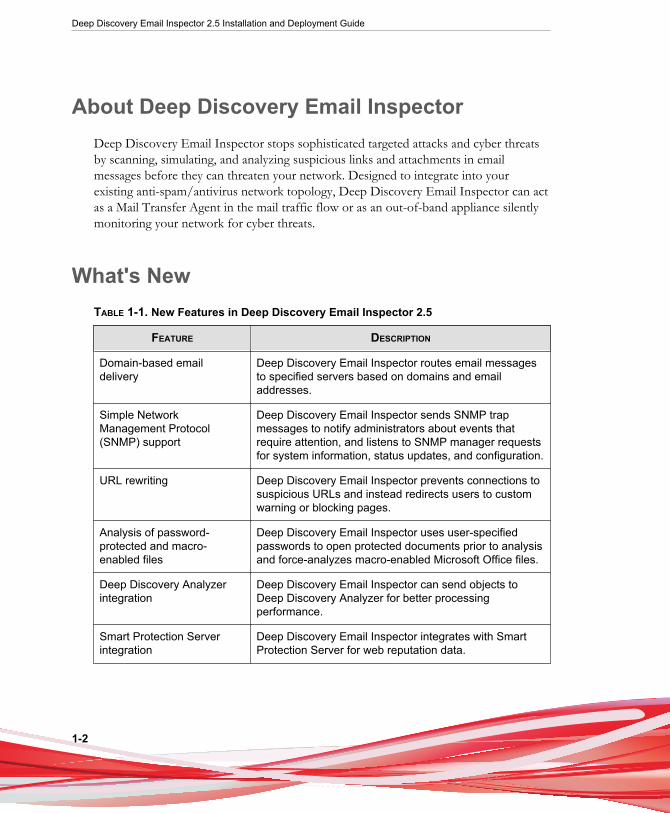
What's NewTABLE 1-1. New Features in Deep Discovery Email Inspector 2.5
FEATURE DESCRIPTION
Domain-based emaildelivery
Deep Discovery Email Inspector routes email messagesto specified servers based on domains and emailaddresses.
Simple NetworkManagement Protocol(SNMP) support
Deep Discovery Email Inspector sends SNMP trapmessages to notify administrators about events thatrequire attention, and listens to SNMP manager requestsfor system information, status updates, and configuration.
URL rewriting Deep Discovery Email Inspector prevents connections tosuspicious URLs and instead redirects users to customwarning or blocking pages.
Analysis of password-protected and macro-enabled files
Deep Discovery Email Inspector uses user-specifiedpasswords to open protected documents prior to analysisand force-analyzes macro-enabled Microsoft Office files.
Deep Discovery Analyzerintegration
Deep Discovery Email Inspector can send objects toDeep Discovery Analyzer for better processingperformance.
Smart Protection Serverintegration
Deep Discovery Email Inspector integrates with SmartProtection Server for web reputation data.
Introduction
1-3
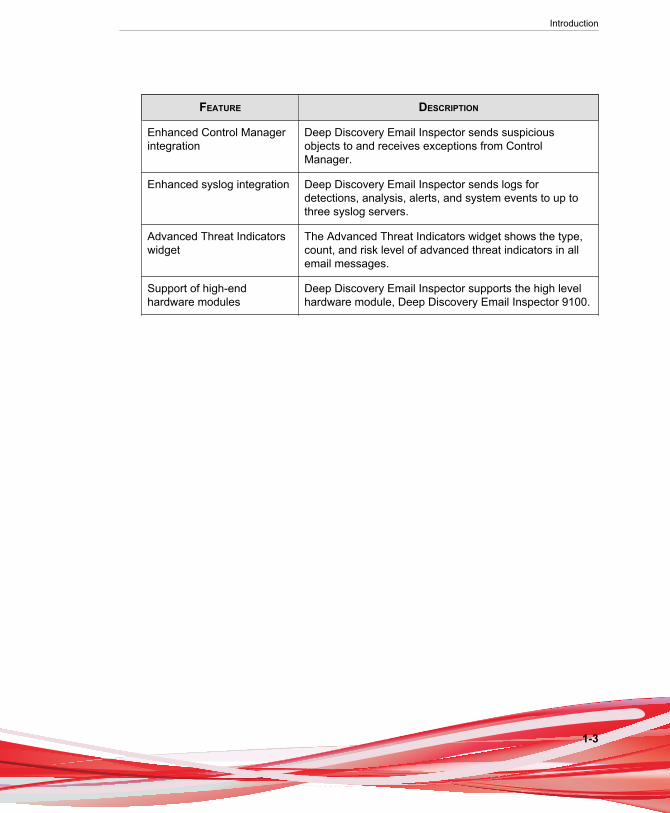
FEATURE DESCRIPTION
Enhanced Control Managerintegration
Deep Discovery Email Inspector sends suspiciousobjects to and receives exceptions from ControlManager.
Enhanced syslog integration Deep Discovery Email Inspector sends logs fordetections, analysis, alerts, and system events to up tothree syslog servers.
Advanced Threat Indicatorswidget
The Advanced Threat Indicators widget shows the type,count, and risk level of advanced threat indicators in allemail messages.
Support of high-endhardware modules
Deep Discovery Email Inspector supports the high levelhardware module, Deep Discovery Email Inspector 9100.

2-1
Chapter 2
DeploymentTopics include:
• Deployment Overview on page 2-2
• Network Topology Considerations on page 2-2
• Recommended Network Environment on page 2-10
• Items to Prepare on page 2-10

Deep Discovery Email Inspector 2.5 Installation and Deployment Guide
2-2
Deployment OverviewThe following procedure provides an overview for planning the deployment andinstalling Deep Discovery Email Inspector.
Note
If you are migrating from an older version of Deep Discovery Email Inspector, see theUpgrading Firmware topic in the Deep Discovery Email Inspector Administrator’s Guidefor the version of Deep Discovery Email Inspector that is currently deployed.
Procedure
1. Decide the deployment mode.
See Network Topology Considerations on page 2-2.
2. Review the system requirements.
See System Requirements on page 3-2.
3. Install Deep Discovery Email Inspector.
See Installing Deep Discovery Email Inspector on page 3-6.
4. Complete the getting started tasks.
See Getting Started Tasks on page A-2.
Network Topology ConsiderationsDeploy Deep Discovery Email Inspector between the anti-spam gateway and thenetwork's internal mail servers.
Deploying Deep Discovery Email Inspector behind the anti-spam gateway improvesperformance and reduces false positives by reducing the total email messages required toinvestigate.
Deployment
2-3
Make sure that the management interface eth0 (on the back of the appliance) isaccessible via TCP port 22 for the Command Line Interface (SSH) and TCP port 443for the management console (HTTPS).
BCC ModeWhile in BCC mode, Deep Discovery Email Inspector acts as an out-of-band appliancethat does not interfere with network traffic. Deep Discovery Email Inspector discards allreplicated email messages after they are checked for threats. No replicated emailmessages are delivered to the recipients.
Use BCC mode to understand how Deep Discovery Email Inspector processes emailmessages and identifies risks before fully deploying the product as an MTA. Configurean upstream MTA to mirror email traffic and handle message delivery. Deep DiscoveryEmail Inspector sends alert notifications whenever a suspicious email message passesthrough the network, but does not deliver email messages.
The following figure shows how an email message passes through a network with DeepDiscovery Email Inspector deployed in BCC mode. The email message enters thenetwork and routes through the anti-spam gateway. The anti-spam gateway sends theemail message through the network to the recipient and sends a copy of the email

Deep Discovery Email Inspector 2.5 Installation and Deployment Guide
2-4
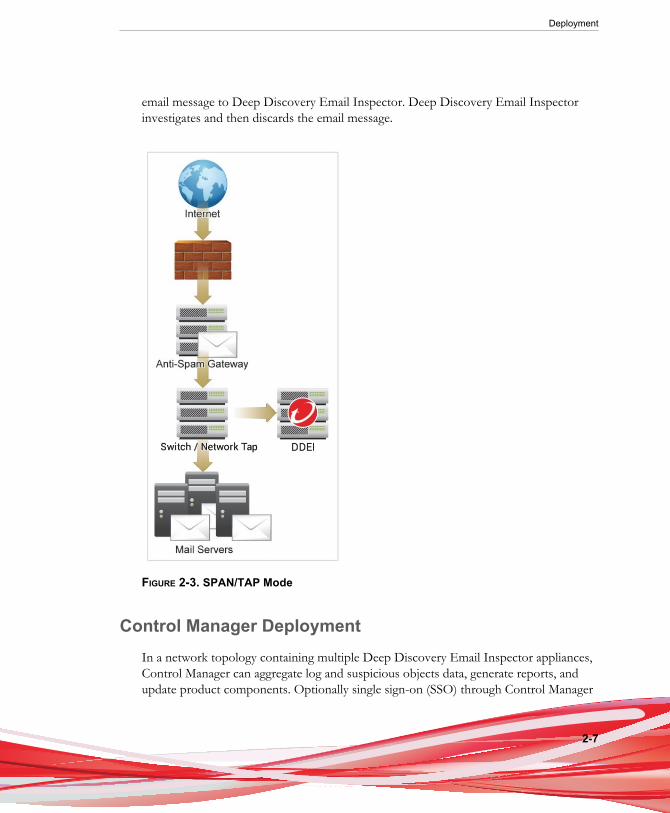
message to Deep Discovery Email Inspector. Deep Discovery Email Inspectorinvestigates and then discards the email message.
FIGURE 2-1. BCC Mode
MTA Mode
While in MTA mode, Deep Discovery Email Inspector serves as a Message TransferAgent (MTA) in the line of the mail traffic flow. In a typical configuration, DeepDiscovery Email Inspector receives email messages from an upstream MTA, such as ananti-spam gateway, and delivers the email messages to a downstream MTA.
The following figure shows how an email message passes through a network with DeepDiscovery Email Inspector configured in MTA mode. The email message enters thenetwork and routes through the anti-spam gateway to Deep Discovery Email Inspector.If the email message passes inspection, Deep Discovery Email Inspector routes theemail message to downstream MTAs. Based on the policy configuration, Deep

Deployment
2-5
Discovery Email Inspector performs user-configured actions on messages that containmalicious file attachments, embedded URLs, or suspicious message characteristics. DeepDiscovery Email Inspector then notifies recipients.
FIGURE 2-2. MTA Mode
SPAN/TAP Mode
While in SPAN/TAP mode, Deep Discovery Email Inspector acts as an out-of-bandappliance that does not interfere with network traffic. Deep Discovery Email Inspectordiscards all replicated email messages after they are checked for threats. No replicatedemail messages are delivered to the recipients.

Deep Discovery Email Inspector 2.5 Installation and Deployment Guide
2-6
Configure a switch or network tap to send mirrored traffic to Deep Discovery EmailInspector. Deep Discovery Email Inspector sends alert notifications whenever asuspicious email message passes through the network, but does not deliver emailmessages.
The following figure shows how an email message passes through a network with DeepDiscovery Email Inspector deployed in SPAN/TAP mode. The email message entersthe network and routes through the switch or network tap. The switch or network tapsends the email message through the network to the recipient and sends a copy of the
Deployment
2-7
email message to Deep Discovery Email Inspector. Deep Discovery Email Inspectorinvestigates and then discards the email message.
FIGURE 2-3. SPAN/TAP Mode
Control Manager DeploymentIn a network topology containing multiple Deep Discovery Email Inspector appliances,Control Manager can aggregate log and suspicious objects data, generate reports, andupdate product components. Optionally single sign-on (SSO) through Control Manager

Deep Discovery Email Inspector 2.5 Installation and Deployment Guide
2-8
to the management console of any registered Deep Discovery Email Inspectorappliance.
The following figure shows how an email message passes through a network withmultiple Deep Discovery Email Inspector appliances configured in MTA mode andregistered to Control Manager. Each Deep Discovery Email Inspector appliance

Deployment
2-9
independently processes email messages as an MTA while management is centralizedthrough Control Manager.
FIGURE 2-4. Control Manager Deployment

Deep Discovery Email Inspector 2.5 Installation and Deployment Guide
2-10
For details about configuring Control Manager settings, see Deep Discovery EmailInspector Administrator's Guide.
Recommended Network EnvironmentDeep Discovery Email Inspector requires connection to a management network. Afterdeployment, administrators can perform configuration tasks from any computer on themanagement network.
Connection to a custom network is recommended to simulate malware behavior whenconnecting to the Internet. For best results, Trend Micro recommends an Internetconnection without proxy settings, proxy authentication, and connection restrictions.
The networks must be independent of each other so that malicious objects in thecustom network do not affect entities in the management network.
Typically, the management network is the organization’s Intranet, while the customnetwork is an environment isolated from the Intranet, such as a test network withInternet connection.
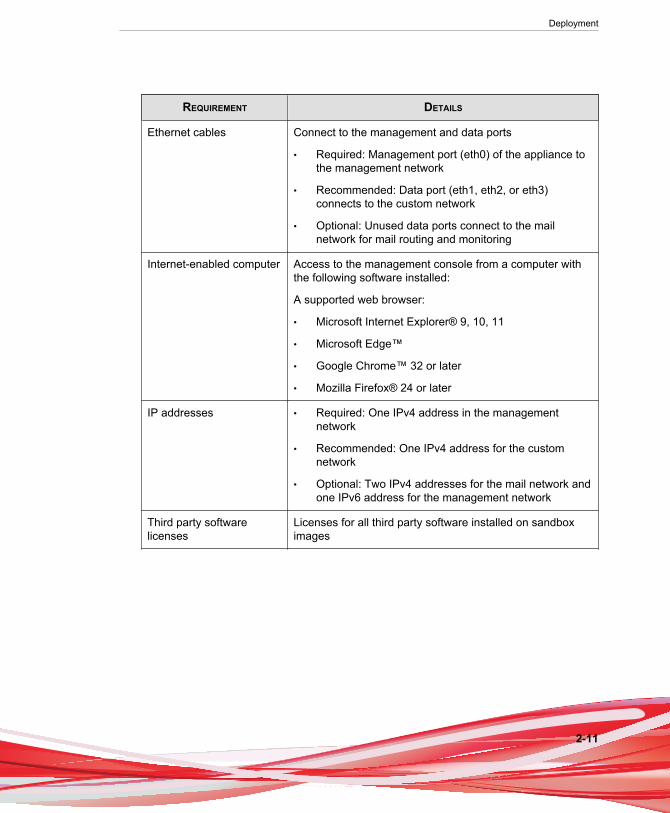
Items to Prepare
REQUIREMENT DETAILS
Activation Code Obtain from Trend Micro
Monitor and VGA cable Connects to the VGA port of the appliance
USB keyboard Connects to a USB port of the appliance
USB mouse Connects to a USB port of the appliance
Deployment
2-11
REQUIREMENT DETAILS
Ethernet cables Connect to the management and data ports
• Required: Management port (eth0) of the appliance tothe management network
• Recommended: Data port (eth1, eth2, or eth3)connects to the custom network
• Optional: Unused data ports connect to the mailnetwork for mail routing and monitoring
Internet-enabled computer Access to the management console from a computer withthe following software installed:
A supported web browser:
• Microsoft Internet Explorer® 9, 10, 11
• Microsoft Edge™
• Google Chrome™ 32 or later
• Mozilla Firefox® 24 or later
IP addresses • Required: One IPv4 address in the managementnetwork
• Recommended: One IPv4 address for the customnetwork
• Optional: Two IPv4 addresses for the mail network andone IPv6 address for the management network
Third party softwarelicenses
Licenses for all third party software installed on sandboximages


3-1
Chapter 3
InstallationTopics include:
• System Requirements on page 3-2
• Ports Used by Deep Discovery Email Inspector on page 3-3
• Installing Deep Discovery Email Inspector on page 3-6

Deep Discovery Email Inspector 2.5 Installation and Deployment Guide
3-2
System RequirementsTrend Micro provides the Deep Discovery Email Inspector appliance hardware. Noother hardware is supported.
Deep Discovery Email Inspector is a self-contained, purpose-built, and performance-tuned Linux operating system. A separate operating system is not required.
Note
Trend Micro recommends viewing the console using a monitor that supports 1280 x 1024resolution or greater.
The following table lists the minimum software requirements to access the CommandLine Interface and the management console that manage Deep Discovery EmailInspector.
TABLE 3-1. Minimum Software Requirements
APPLICATION REQUIREMENTS DETAILS
SSH client SSH protocol version 2 Set the Command Line Interfaceterminal window size to 80columns and 24 rows.
Internet Explorer™ Versions 9, 10, 11 Use only a supported browser toaccess the management console.
Using the data port IP addressyou set during the initialconfiguration, specify the followingURL:
https://[Appliance_IP_Address]:443
Microsoft Edge™ Windows 10
Mozilla Firefox™ Version 26 or later
Google Chrome™ Version 31 or later
Installation
3-3
Note
• SSH service is disabled by default when using the SSH client. To enable SSH service,see configure service ssh enable on page 4-12.
• Internet Explorer requires additional configuration. For details, see ConfiguringInternet Explorer on page 3-3.
Control Manager System Requirements
Control Manager is a separately licensed product. For information about ControlManager system requirements, go to:
http://docs.trendmicro.com/en-us/enterprise/control-manager.aspx
Configuring Internet Explorer
Disable Protected Mode if you are accessing the management console from InternetExplorer.
Procedure
1. From the Internet Explorer menu, go to Tools > Internet Options > Security.
2. Click Internet.
3. Clear Enable Protected Mode.
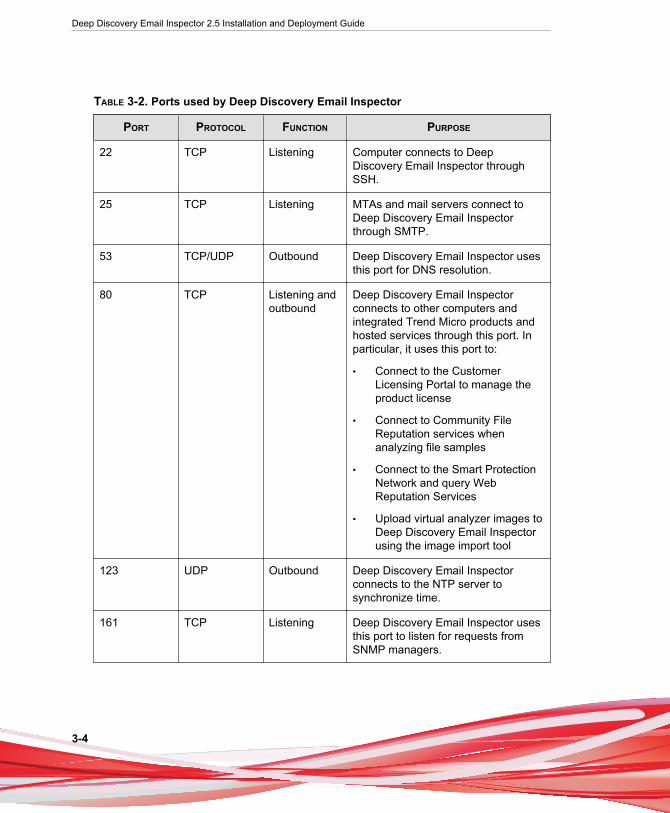
Ports Used by Deep Discovery Email InspectorThe following table shows the ports that are used with Deep Discovery Email Inspectorand why they are used.
Deep Discovery Email Inspector 2.5 Installation and Deployment Guide
3-4
TABLE 3-2. Ports used by Deep Discovery Email Inspector
PORT PROTOCOL FUNCTION PURPOSE
22 TCP Listening Computer connects to DeepDiscovery Email Inspector throughSSH.
25 TCP Listening MTAs and mail servers connect toDeep Discovery Email Inspectorthrough SMTP.
53 TCP/UDP Outbound Deep Discovery Email Inspector usesthis port for DNS resolution.
80 TCP Listening andoutbound
Deep Discovery Email Inspectorconnects to other computers andintegrated Trend Micro products andhosted services through this port. Inparticular, it uses this port to:
• Connect to the CustomerLicensing Portal to manage theproduct license
• Connect to Community FileReputation services whenanalyzing file samples
• Connect to the Smart ProtectionNetwork and query WebReputation Services
• Upload virtual analyzer images toDeep Discovery Email Inspectorusing the image import tool
123 UDP Outbound Deep Discovery Email Inspectorconnects to the NTP server tosynchronize time.
161 TCP Listening Deep Discovery Email Inspector usesthis port to listen for requests fromSNMP managers.

Installation
3-5
PORT PROTOCOL FUNCTION PURPOSE
162 TCP Outbound Deep Discovery EmailInspectorconnects to SNMP mangersto send SNMP trap messages.
443 TCP Listening andoutbound
Deep Discovery Email Inspector usesthis port to:
• Access the management consolewith a computer through HTTPS
• Communicate with Trend MicroControl Manager
• Connect to the Smart ProtectionNetwork and query WebReputation Services
• Connect to Trend Micro ThreatConnect
• Send anonymous threatinformation to Smart Feedback
• Update components byconnecting to the ActiveUpdateserver
• Send product usage informationto Trend Micro feedback servers
• Verify the safety of files throughthe Certified Safe SoftwareService
5274 TCP Outbound Deep Discovery Email Inspector usesthis port as the default port to connectto the Smart Protection Server for webreputation services.
User-defined N/A Outbound Deep Discovery Email Inspector usesthe specified port to send logs tosyslog servers.

Deep Discovery Email Inspector 2.5 Installation and Deployment Guide
3-6
Installing Deep Discovery Email Inspector
Important
The Deep Discovery Email Inspector appliance comes with the appliance softwareinstalled. The following procedure provides a reference for fresh installs only.
Trend Micro provides the Deep Discovery Email Inspector appliance hardware. Noother hardware is supported. For information about software requirements, see SystemRequirements on page 3-2.
WARNING!
The installation deletes any existing data or partitions on the selected disk. Back up existingdata before installing Deep Discovery Email Inspector.
Procedure
1. Power on the server.
2. Insert the Deep Discovery Email Inspector Installation DVD into the optical discdrive.
3. Restart the server.
4. The server boots from the Deep Discovery Email Inspector Installation DVD andthe installation begins. Select Install Appliance.

Installation
3-7
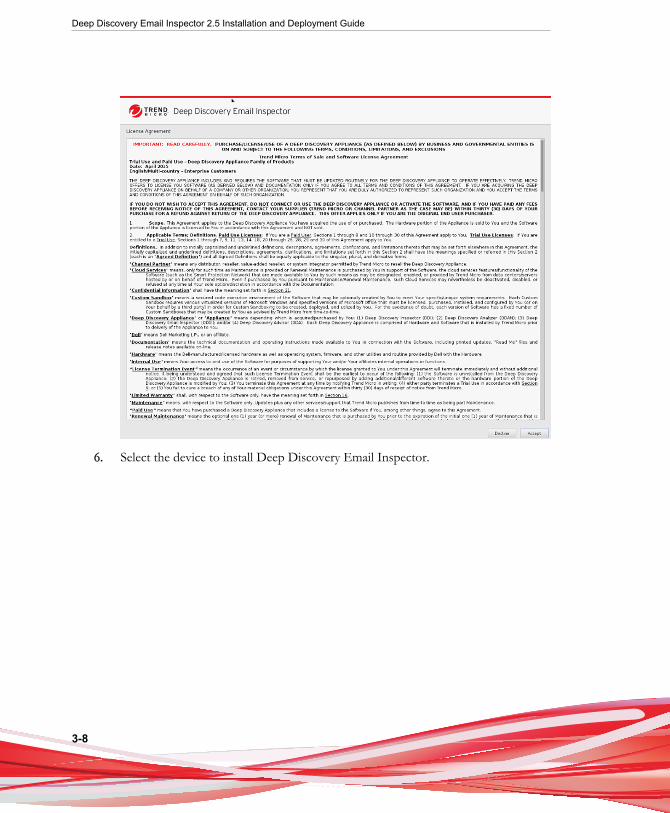
After the setup initializes, the License Agreement screen appears.
5. Click Accept.
Deep Discovery Email Inspector 2.5 Installation and Deployment Guide
3-8
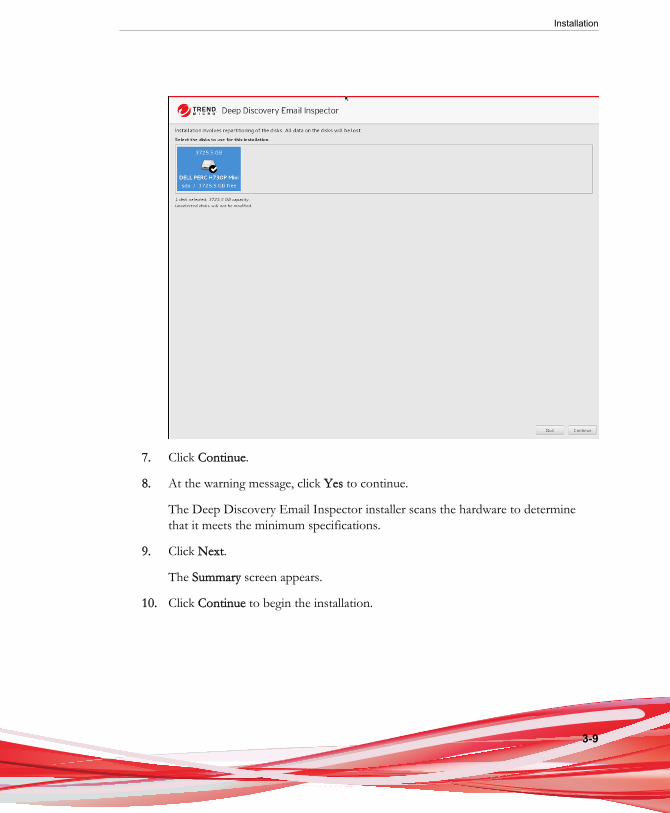
6. Select the device to install Deep Discovery Email Inspector.
Installation
3-9
7. Click Continue.
8. At the warning message, click Yes to continue.
The Deep Discovery Email Inspector installer scans the hardware to determinethat it meets the minimum specifications.
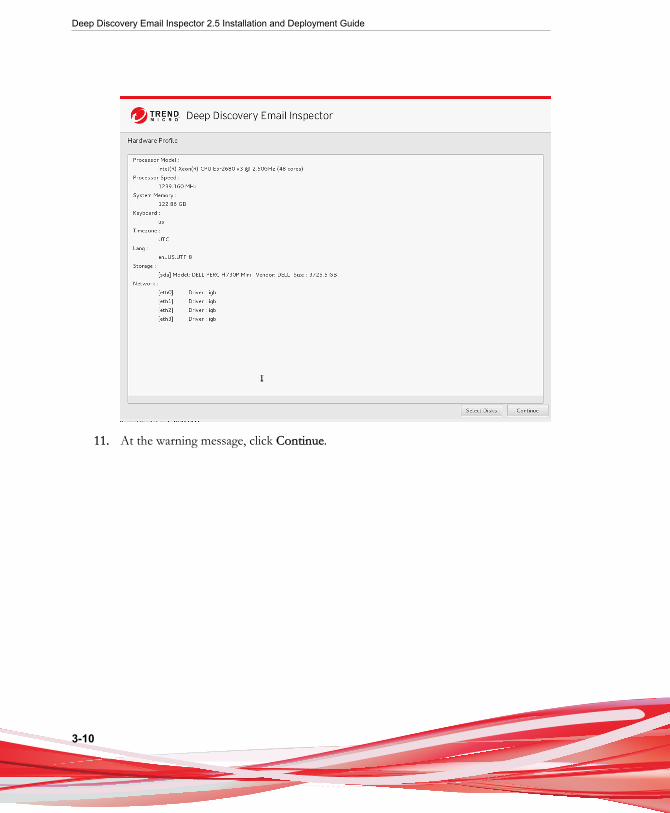
9. Click Next.
The Summary screen appears.
10. Click Continue to begin the installation.
Deep Discovery Email Inspector 2.5 Installation and Deployment Guide
3-10
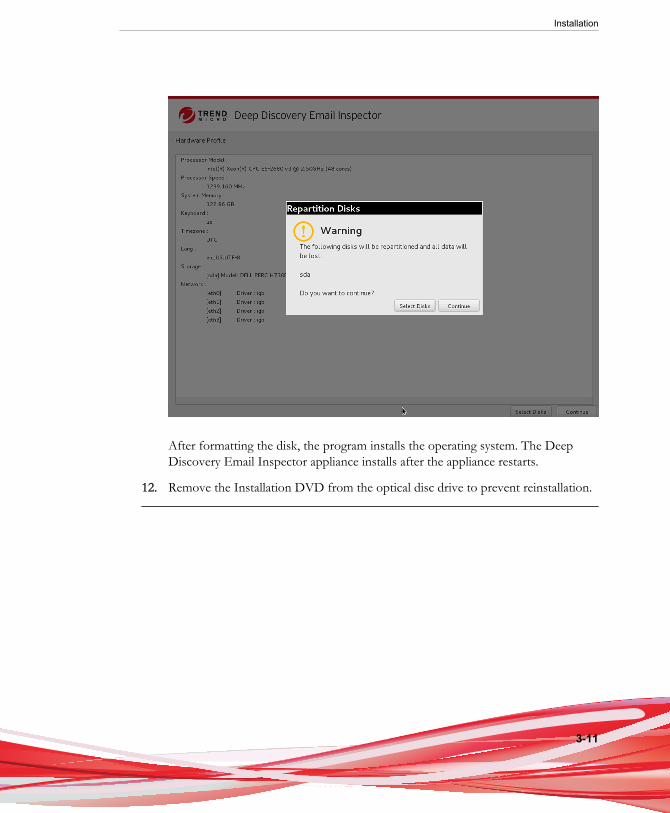
11. At the warning message, click Continue.
Installation
3-11
After formatting the disk, the program installs the operating system. The DeepDiscovery Email Inspector appliance installs after the appliance restarts.
12. Remove the Installation DVD from the optical disc drive to prevent reinstallation.

4-1
Chapter 4
Using the Command Line InterfaceTopics include:
• Using the CLI on page 4-2
• Entering the CLI on page 4-2
• Command Line Interface Commands on page 4-3
Deep Discovery Email Inspector 2.5 Installation and Deployment Guide
4-2
Using the CLIUse the Command Line Interface (CLI) perform the following tasks:
• Configure initial settings, such as the device IP address and host name
• Restart the device
• View device status
• Debug and troubleshoot the device
Note
Do not enable scroll lock on your keyboard when using HyperTerminal. If scroll lock isenabled, you cannot enter data.
Entering the CLITo log on to the CLI, either connect directly to the server or connect using SSH.
Procedure
• To connect directly to the server:
a. Connect a monitor and keyboard to the server.
b. Log on to the CLI.
Note
The default credentials are:
• User name: admin
• Password: ddei
• To connect using SSH:
Using the Command Line Interface
4-3
a. Verify the computer you are using can ping Deep Discovery EmailInspector’s IP address.
b. Use an SSH client to connect to Deep Discovery Email Inspector's IP addressand TCP port 22.
Note
The default IP address / subnet mask is 192.168.252.1 / 255.255.0.0.
Command Line Interface CommandsThe Deep Discovery Email Inspector CLI commands are separated into two categories:normal and privileged commands. Normal commands are basic commands to obtainspecific low security risk information and to perform simple tasks. Privileged commandsprovide full configuration control and advanced monitoring and debugging features.Privileged commands are protected by an additional layer of credentials: the Enableaccount and password.
After you open the CLI menu, the screen appears.
0) Exit: Leaves the CLI.
1) Device Information and Status: Monitor hardware items, such as CPU usage, harddisk status, and disk space.
2) Network Settings: Modify the device host name, IP address, subnet mask, and thenetwork default gateway address and DNS servers. You can also select the active dataport.
3) Maintenance: Restarts the device, rescues the application, unregisters from the parent,or re-registers to the parent if the parent IP address was modified.
4) Utility: Modifies access to the management console and SSH access to the Data port.You can also enter the Linux-like shell environment for debugging and modify thedevice time zone, date, and time.
5) Shutdown: Reboots or powers off the device.
Deep Discovery Email Inspector 2.5 Installation and Deployment Guide
4-4
Entering Privileged Mode
WARNING!
Enter the shell environment only if your support provider instructs you to performdebugging operations.
Procedure
1. Log on to the CLI.
See Entering the CLI on page 4-2.
2. At the prompt, type enable and press ENTER to enter privileged mode.
3. Type the default password, trend#1, and then press ENTER.
The prompt changes from > to #.
CLI Command Reference
The following tables explain the CLI commands.
Note
CLI commands require privileged mode. For details, see Entering Privileged Mode on page4-4.
configure product management-port
TABLE 4-1. configure product management-port
Set the management port IP address
Syntax:
configure product management-port [ipv4 | ipv6] <ip> <mask>
Using the Command Line Interface
4-5
View Privileged
Parameters ipv4: Configure IPv4 settings
ipv6: Configure IPv6 settings
<ip>: IP address for the interface
<mask>: Network mask for the NIC
Example:
To set the management port IPv4 address:
configure product management-port ipv4 192.168.10.21 255.255.255.0
configure product operation-modeTABLE 4-2. configure product operation-mode
Set the Deep Discovery Email Inspector operation mode
Syntax:
configure product operation-mode [BCC | MTA | TAP]
View Privileged
Parameters BCC: Deploy in BCC mode
MTA: Deploy in MTA mode
TAP: Deploy in SPAN/TAP mode
Example:
To deploy in BCC mode:
configure product operation-mode BCC

Deep Discovery Email Inspector 2.5 Installation and Deployment Guide
4-6
configure network basicTABLE 4-3. configure network basic
Configures basic network settings, including host name, IP address, subnet mask,gateway, and DNS.
Syntax:
configure network basic
View Privileged
Parameters None
Examples:
***Network Configuration***
Specify value for each item and press ENTER. Settings apply to themanagement port (Eth0) and require a restart.
Host name: mail.com
IPv4 address: 10.64.70.151
Subnet mask: 255.255.254.0
IPv4 gateway: 10.64.70.1
Preferred IPv4 DNS: 10.64.1.55
Alternate IPv4 DNS: 10.64.1.54
IPv6 address:
Prefix length:
IPv6 gateway:
Preferred IPv6 DNS:
Alternate IPv6 DNS:
Confirm changes and restart (Y/N):
Using the Command Line Interface
4-7
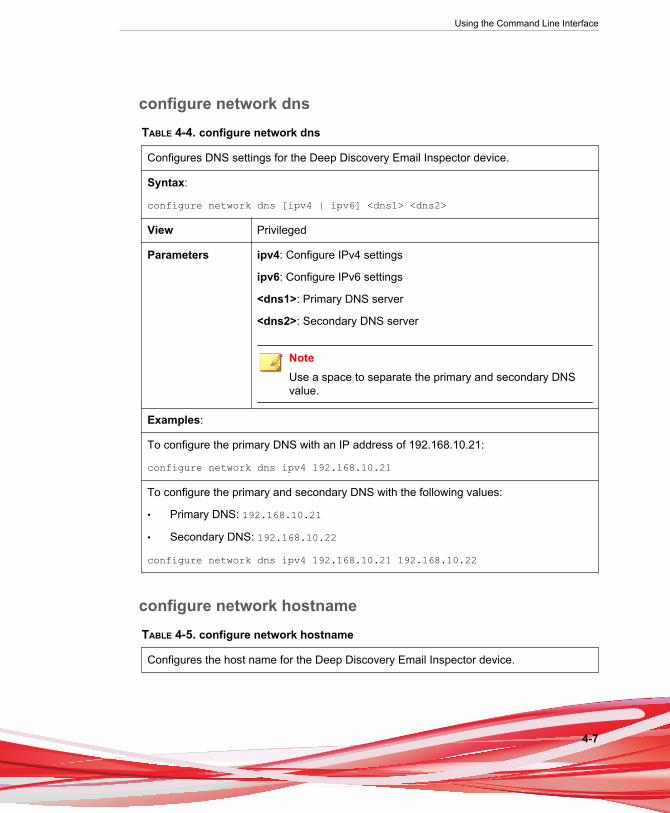
configure network dnsTABLE 4-4. configure network dns
Configures DNS settings for the Deep Discovery Email Inspector device.
Syntax:
configure network dns [ipv4 | ipv6] <dns1> <dns2>
View Privileged
Parameters ipv4: Configure IPv4 settings
ipv6: Configure IPv6 settings
<dns1>: Primary DNS server
<dns2>: Secondary DNS server
NoteUse a space to separate the primary and secondary DNSvalue.
Examples:
To configure the primary DNS with an IP address of 192.168.10.21:
configure network dns ipv4 192.168.10.21
To configure the primary and secondary DNS with the following values:
• Primary DNS: 192.168.10.21
• Secondary DNS: 192.168.10.22
configure network dns ipv4 192.168.10.21 192.168.10.22
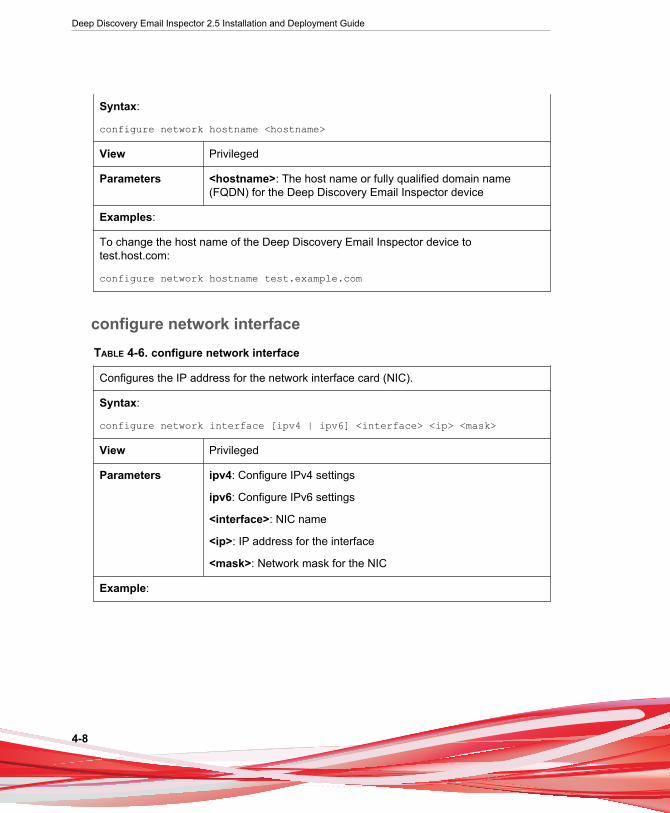
configure network hostnameTABLE 4-5. configure network hostname
Configures the host name for the Deep Discovery Email Inspector device.
Deep Discovery Email Inspector 2.5 Installation and Deployment Guide
4-8
Syntax:
configure network hostname <hostname>
View Privileged
Parameters <hostname>: The host name or fully qualified domain name(FQDN) for the Deep Discovery Email Inspector device
Examples:
To change the host name of the Deep Discovery Email Inspector device totest.host.com:
configure network hostname test.example.com
configure network interfaceTABLE 4-6. configure network interface
Configures the IP address for the network interface card (NIC).
Syntax:
configure network interface [ipv4 | ipv6] <interface> <ip> <mask>
View Privileged
Parameters ipv4: Configure IPv4 settings
ipv6: Configure IPv6 settings
<interface>: NIC name
<ip>: IP address for the interface
<mask>: Network mask for the NIC
Example:

Using the Command Line Interface
4-9
To configure an NIC with the following values:
• Interface: eth0
• IPv4 address: 192.168.10.10
• IPv4 subnet mask: 255.255.255.0
configure network interface ipv4 eth0 192.168.10.10 255.255.255.0
configure network route add
TABLE 4-7. configure network route add
Adds a new route entry
Syntax:
configure network route add [ipv4 | ipv6] <ip_prefixlen> <via> <dev>
View Privileged
Parameters ipv4: Configure IPv4 settings
ipv6: Configure IPv6 settings
<ip_prefixlen>: Destination network ID with format IP_Address/Prefixlen
<via>: IP address of the next hop
<dev>: Device name
Example:
To add a new route entry:
configure network route add ipv4 172.10.10.0/24 192.168.10.1 eth1
configure network route default
TABLE 4-8. configure network route default
Sets the default route for an Deep Discovery Email Inspector device

Deep Discovery Email Inspector 2.5 Installation and Deployment Guide
4-10
Syntax:
configure network route default [ipv4 | ipv6] <gateway>
View Privileged
Parameter ipv4: Configure IPv4 settings
ipv6: Configure IPv6 settings
<gateway>: IP address of default gateway
Example:
To set the default route for an Deep Discovery Email Inspector device:
configure network route default ipv4 192.168.10.1
configure network route delTABLE 4-9. configure network route del
Deletes a route for an Deep Discovery Email Inspector device
Syntax:
configure network route del [ipv4 | ipv6] <ip_prefixlen> <via> <dev>
View Privileged
Parameters ipv4: Configure IPv4 settings
ipv6: Configure IPv6 settings
<ip_prefixlen>: Destination network ID with format IP_Address/Prefixlen
<via>: IPv4 address of the next hop
<dev>: Device name
Example:
To delete a route for an Deep Discovery Email Inspector device:
configure network route del ipv4 172.10.10.0/24 192.168.10.1 eth1

Using the Command Line Interface
4-11
configure network route del default/default ipv6TABLE 4-10. configure network route del default/default ipv6
Deletes the default IPv6 gateway for a Deep Discovery Email Inspector device
Syntax:
configure network route del default ipv6 <gateway> <device>
View Privileged
Parameters gateway: IPv6 Address of the default gateway
device: Link local to IPv6 default gateway
Example:
To delete the default IPv6 gateway fe80::20c:29ff:fe75:b579 on device eth0: configurenetwork route del default ipv6 fe80::20c:29ff:fe75:b579 eth0
configure service ssh disableTABLE 4-11. configure service ssh disable
Disables SSH on all network interface cards (NIC).
Syntax:
configure service ssh disable
View Privileged
Parameters None
Examples:
To disable SSH on all NICs:
configure service ssh disable
Deep Discovery Email Inspector 2.5 Installation and Deployment Guide
4-12
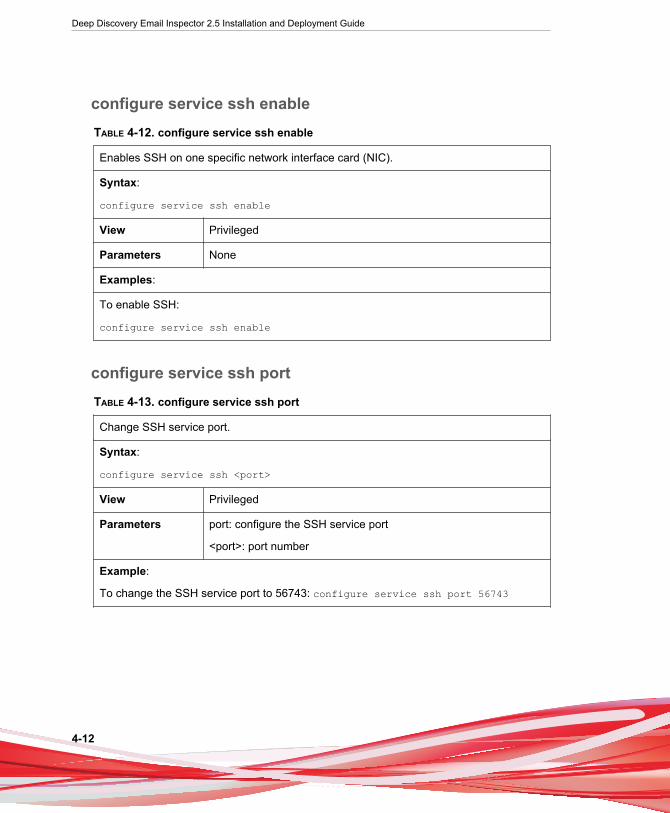
configure service ssh enableTABLE 4-12. configure service ssh enable
Enables SSH on one specific network interface card (NIC).
Syntax:
configure service ssh enable
View Privileged
Parameters None
Examples:
To enable SSH:
configure service ssh enable
configure service ssh portTABLE 4-13. configure service ssh port
Change SSH service port.
Syntax:
configure service ssh <port>
View Privileged
Parameters port: configure the SSH service port
<port>: port number
Example:
To change the SSH service port to 56743: configure service ssh port 56743

Using the Command Line Interface
4-13
configure service ntpTABLE 4-14. configure service ntp
Synchronize the Deep Discovery Email Inspector system time with an NTP server.
Syntax:
configure service ntp [enable | disable | server-address <address>]
View Privileged
Parameters enable: Enable NTP
disable: Disable NTP
server-address: Configure the NTP server address
<address>: Specify the FQDN or IP address of the NTP server
Examples:
To configure the NTP server address as 192.168.10.21:
configure service ntp server-address 192.168.10.21
To enable synchronization with the NTP server:
configure service ntp enable
configure system dateTABLE 4-15. configure system date
Configures the time and date and saves the data in CMOS.
Syntax:
configure system date <date> <time>
View Privileged
Parameters <date>: Set the date using the following format: yyyy-mm-dd
<time>: Set the time with the following format: hh:mm:ss
Example:

Deep Discovery Email Inspector 2.5 Installation and Deployment Guide
4-14
To set the date to August 12, 2010 and the time to 3:40 PM:
configure system date 2010-08-12 15:40:00
configure system password enableTABLE 4-16. configure system password enable
To change the password required to enter Privileged mode.
Syntax:
configure system password enable
View Privileged
Parameters None
Examples:
To change the password required to enter Privileged mode:
configure system password enable
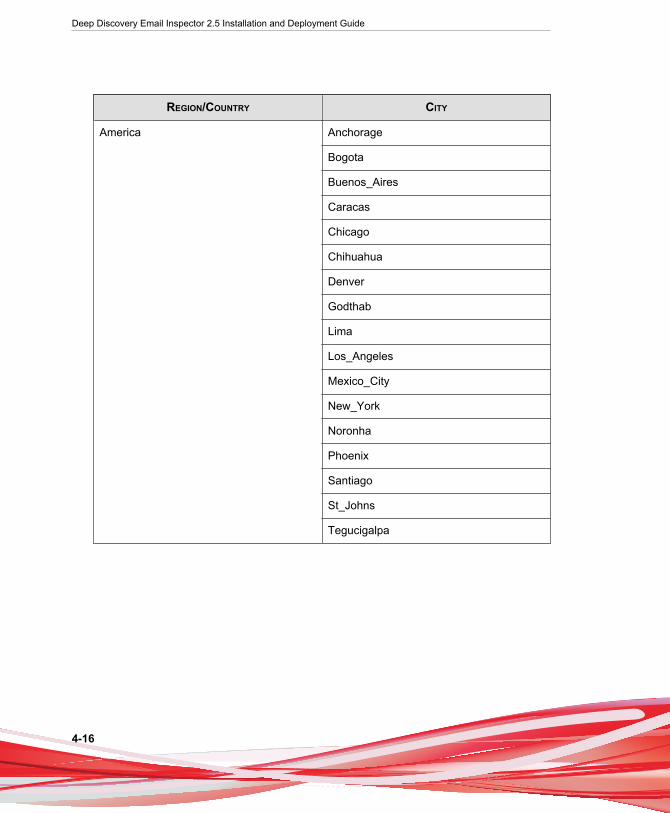
configure system timezoneTABLE 4-17. configure system timezone
Configures the time zone used by Deep Discovery Email Inspector.
Syntax:
configure system timezone <region> <city>
View Privileged
Parameters <region>: Region name
<city>: City name
Example:
Using the Command Line Interface
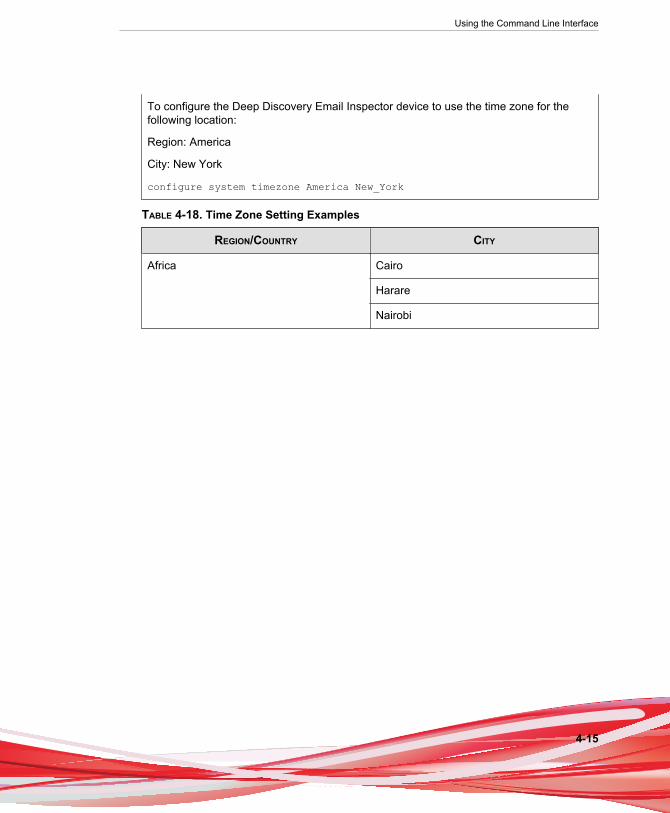
4-15
To configure the Deep Discovery Email Inspector device to use the time zone for thefollowing location:
Region: America
City: New York
configure system timezone America New_York
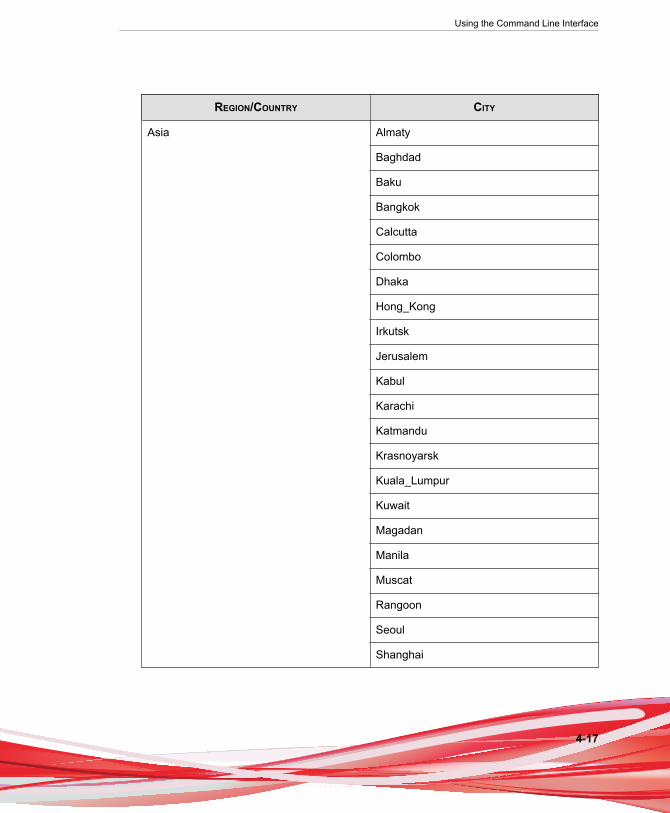
TABLE 4-18. Time Zone Setting Examples
REGION/COUNTRY CITY
Africa Cairo
Harare
Nairobi
Deep Discovery Email Inspector 2.5 Installation and Deployment Guide
4-16
REGION/COUNTRY CITY
America Anchorage
Bogota
Buenos_Aires
Caracas
Chicago
Chihuahua
Denver
Godthab
Lima
Los_Angeles
Mexico_City
New_York
Noronha
Phoenix
Santiago
St_Johns
Tegucigalpa
Using the Command Line Interface
4-17
REGION/COUNTRY CITY
Asia Almaty
Baghdad
Baku
Bangkok
Calcutta
Colombo
Dhaka
Hong_Kong
Irkutsk
Jerusalem
Kabul
Karachi
Katmandu
Krasnoyarsk
Kuala_Lumpur
Kuwait
Magadan
Manila
Muscat
Rangoon
Seoul
Shanghai

Deep Discovery Email Inspector 2.5 Installation and Deployment Guide
4-18
REGION/COUNTRY CITY
Asia (Continued) Singapore
Taipei
Tehran
Tokyo
Yakutsk
Atlantic Azores
Australia Adelaide
Brisbane
Darwin
Hobart
Melbourne
Perth
Europe Amsterdam
Athens
Belgrade
Berlin
Brussels
Bucharest
Dublin
Moscow
Paris

Using the Command Line Interface
4-19
REGION/COUNTRY CITY
Pacific Auckland
Fiji
Guam
Honolulu
Kwajalein
Midway
US Alaska
Arizona
Central
East-Indiana
Eastern
Hawaii
Mountain
Pacific
enable
TABLE 4-19. enable
Enters privileged mode so privileged commands can be provided.
Syntax:
enable
View Normal
Parameters None
Example:
Deep Discovery Email Inspector 2.5 Installation and Deployment Guide
4-20
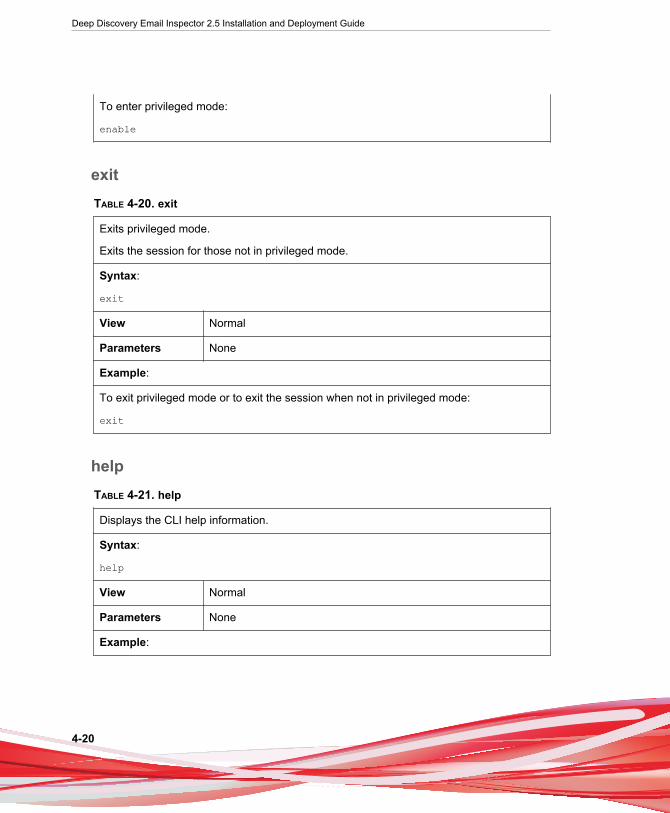
To enter privileged mode:
enable
exitTABLE 4-20. exit
Exits privileged mode.
Exits the session for those not in privileged mode.
Syntax:
exit
View Normal
Parameters None
Example:
To exit privileged mode or to exit the session when not in privileged mode:
exit
helpTABLE 4-21. help
Displays the CLI help information.
Syntax:
help
View Normal
Parameters None
Example:

Using the Command Line Interface
4-21
To display the CLI help information:
help
historyTABLE 4-22. history
Displays the current session's command line history.
Syntax:
history [limit]
View Normal
Parameters [limit]: Specifies the size of the history list for the current session
Specifying "0" retains all commands for the session.
Example:
To specify six commands for the size of the history list:
history 6
logoutTABLE 4-23. logout
Logs out of the current CLI session.
Syntax:
logout
View Normal
Parameters None
Example:

Deep Discovery Email Inspector 2.5 Installation and Deployment Guide
4-22
To logout from the current session:
logout
ping
TABLE 4-24. ping
Pings a specified host.
Syntax:
ping [-c num_echos] [-i interval] <dest>
View Normal
Parameters [-c num_echos]: Specifies the number of echo requests to besent. Default value is 5.
[-i interval]: Specifies the delay interval in seconds between eachpacket. Default value is 1 second.
<dest>: Specifies the destination host name or IP address
Examples:
To ping the IP address 192.168.1.1:
ping 192.168.1.1
To ping the host remote.host.com:
ping remote.host.com
ping6
TABLE 4-25. ping6
Pings a specified IPv6 host through interface eth0.
Syntax:
ping6 [-c num_echos] [-i interval] <dest>

Using the Command Line Interface
4-23
View Normal
Parameters [-c num_echos]: Specifies the number of echo requests to besent. Default value is 5.
[-i interval]: Specifies the delay interval in seconds between eachpacket. Default value is 1 second.
<dest>: Specifies the destination host name or IP address
Examples:
To ping the IPv6 address fe80::21a:a5ff:fec1:1060:
ping6 fe80::21a:a5ff:fec1:1060
To ping the host remote.host.com:
ping6 remote.host.com
start task postfix dropTABLE 4-26. start task postfix drop
Deletes a specified message or all messages in the email message queue.
Syntax:
start task postfix drop { <mail_id> | all }
View Privileged
Parameters <mail_id>: Specifies the message ID in the postfix queue to delete
Examples:
To delete email message D10D4478A5 from the email message queue:
start task postfix drop D10D4478A5
To delete all email messages from the email message queue:
start task postfix drop all
Deep Discovery Email Inspector 2.5 Installation and Deployment Guide
4-24
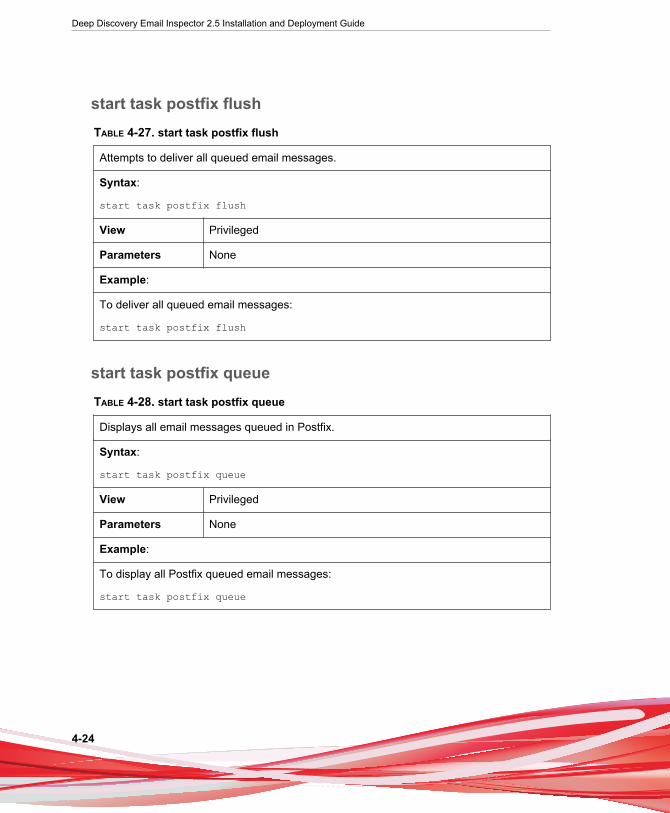
start task postfix flushTABLE 4-27. start task postfix flush
Attempts to deliver all queued email messages.
Syntax:
start task postfix flush
View Privileged
Parameters None
Example:
To deliver all queued email messages:
start task postfix flush
start task postfix queueTABLE 4-28. start task postfix queue
Displays all email messages queued in Postfix.
Syntax:
start task postfix queue
View Privileged
Parameters None
Example:
To display all Postfix queued email messages:
start task postfix queue
Using the Command Line Interface
4-25
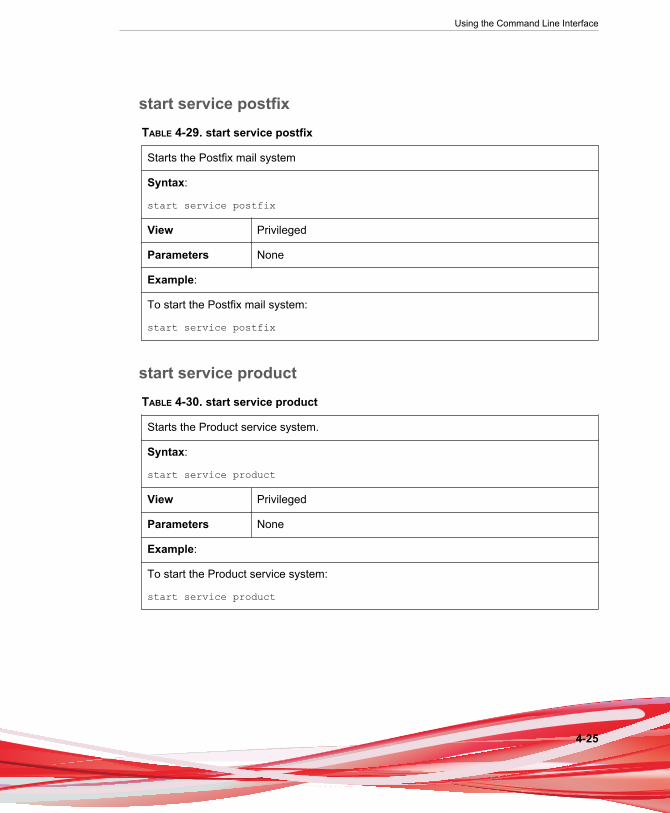
start service postfixTABLE 4-29. start service postfix
Starts the Postfix mail system
Syntax:
start service postfix
View Privileged
Parameters None
Example:
To start the Postfix mail system:
start service postfix
start service productTABLE 4-30. start service product
Starts the Product service system.
Syntax:
start service product
View Privileged
Parameters None
Example:
To start the Product service system:
start service product
Deep Discovery Email Inspector 2.5 Installation and Deployment Guide
4-26
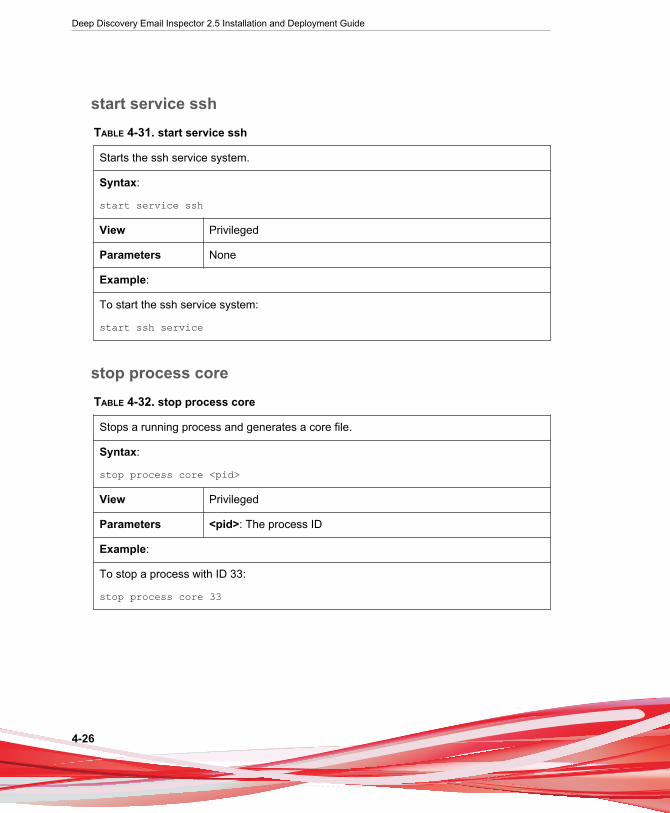
start service sshTABLE 4-31. start service ssh
Starts the ssh service system.
Syntax:
start service ssh
View Privileged
Parameters None
Example:
To start the ssh service system:
start ssh service
stop process coreTABLE 4-32. stop process core
Stops a running process and generates a core file.
Syntax:
stop process core <pid>
View Privileged
Parameters <pid>: The process ID
Example:
To stop a process with ID 33:
stop process core 33

Using the Command Line Interface
4-27
stop service postfixTABLE 4-33. stop service postfix
Stops the Postfix mail system.
Syntax:
stop service postfix
View Privileged
Parameters None
Example:
To stop the Postfix mail system:
stop service postfix
stop service productTABLE 4-34. stop service product
Stops the Product service system.
Syntax:
stop service product
View Privileged
Parameters None
Example:
To stop the Product service system:
stop service product
Deep Discovery Email Inspector 2.5 Installation and Deployment Guide
4-28
stop service ssh
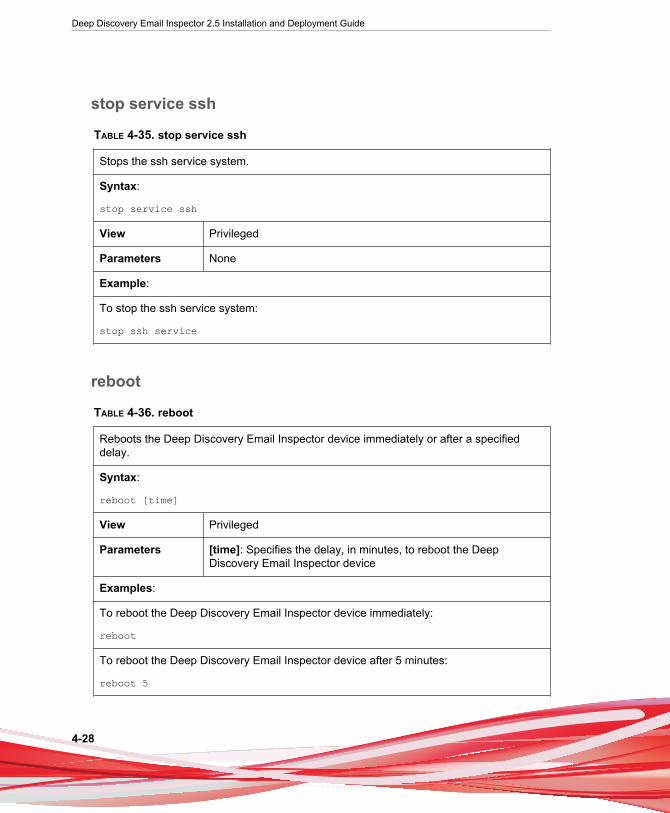
TABLE 4-35. stop service ssh
Stops the ssh service system.
Syntax:
stop service ssh
View Privileged
Parameters None
Example:
To stop the ssh service system:
stop ssh service
reboot
TABLE 4-36. reboot
Reboots the Deep Discovery Email Inspector device immediately or after a specifieddelay.
Syntax:
reboot [time]
View Privileged
Parameters [time]: Specifies the delay, in minutes, to reboot the DeepDiscovery Email Inspector device
Examples:
To reboot the Deep Discovery Email Inspector device immediately:
reboot
To reboot the Deep Discovery Email Inspector device after 5 minutes:
reboot 5

Using the Command Line Interface
4-29
resolve
TABLE 4-37. resolve
Resolves an IPv4 address from a host name or resolves a host name from an IPv4address.
Syntax:
resolve <dest>
View Privileged
Parameter <dest>: Specifies the IPv4 address or host name to resolve
Examples:
To resolve the host name from IP address 192.168.10.1:
resolve 192.168.10.1
To resolve the IP address from host name parent.host.com:
resolve parent.host.com
show storage statistic
TABLE 4-38. show storage statistic
Displays the file system disk space usage.
Syntax:
show storage statistic [partition]
View Normal
Parameters [partition]: Specify a partition. This is optional.
Example:
To display the file system disk space usage of the Deep Discovery Email Inspectordevice:
show storage statistic
Deep Discovery Email Inspector 2.5 Installation and Deployment Guide
4-30
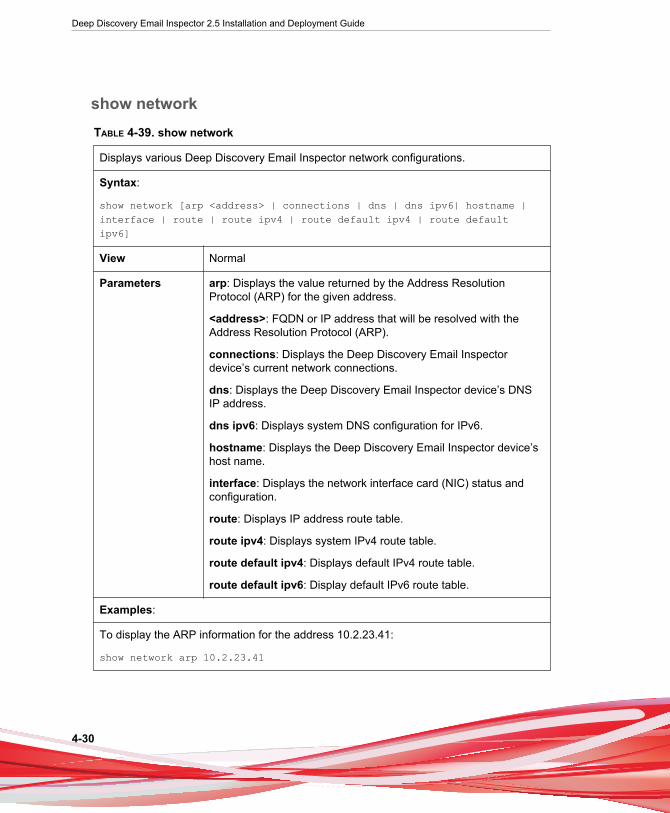
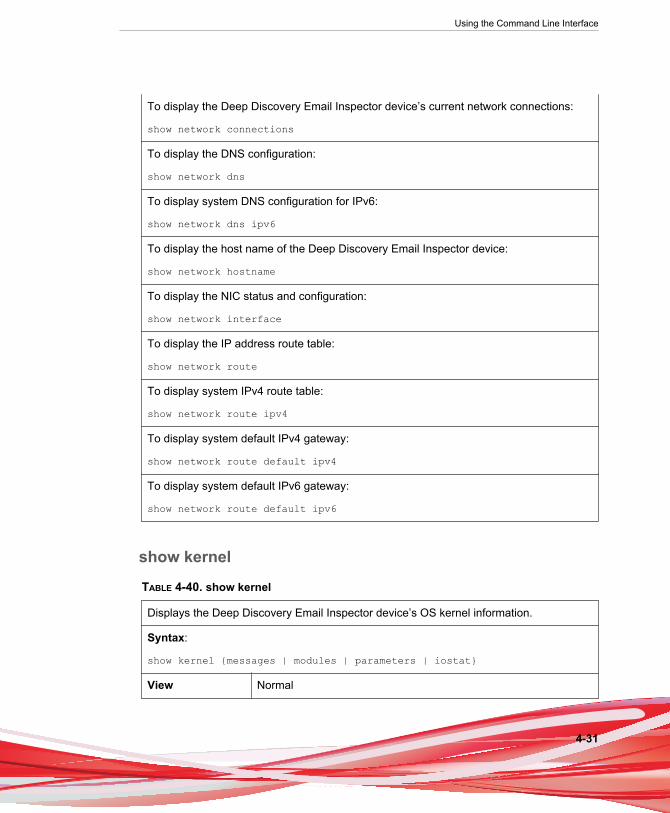
show networkTABLE 4-39. show network
Displays various Deep Discovery Email Inspector network configurations.
Syntax:
show network [arp <address> | connections | dns | dns ipv6| hostname |interface | route | route ipv4 | route default ipv4 | route defaultipv6]
View Normal
Parameters arp: Displays the value returned by the Address ResolutionProtocol (ARP) for the given address.
<address>: FQDN or IP address that will be resolved with theAddress Resolution Protocol (ARP).
connections: Displays the Deep Discovery Email Inspectordevice’s current network connections.
dns: Displays the Deep Discovery Email Inspector device’s DNSIP address.
dns ipv6: Displays system DNS configuration for IPv6.
hostname: Displays the Deep Discovery Email Inspector device’shost name.
interface: Displays the network interface card (NIC) status andconfiguration.
route: Displays IP address route table.
route ipv4: Displays system IPv4 route table.
route default ipv4: Displays default IPv4 route table.
route default ipv6: Display default IPv6 route table.
Examples:
To display the ARP information for the address 10.2.23.41:
show network arp 10.2.23.41
Using the Command Line Interface
4-31
To display the Deep Discovery Email Inspector device’s current network connections:
show network connections
To display the DNS configuration:
show network dns
To display system DNS configuration for IPv6:
show network dns ipv6
To display the host name of the Deep Discovery Email Inspector device:
show network hostname
To display the NIC status and configuration:
show network interface
To display the IP address route table:
show network route
To display system IPv4 route table:
show network route ipv4
To display system default IPv4 gateway:
show network route default ipv4
To display system default IPv6 gateway:
show network route default ipv6
show kernel
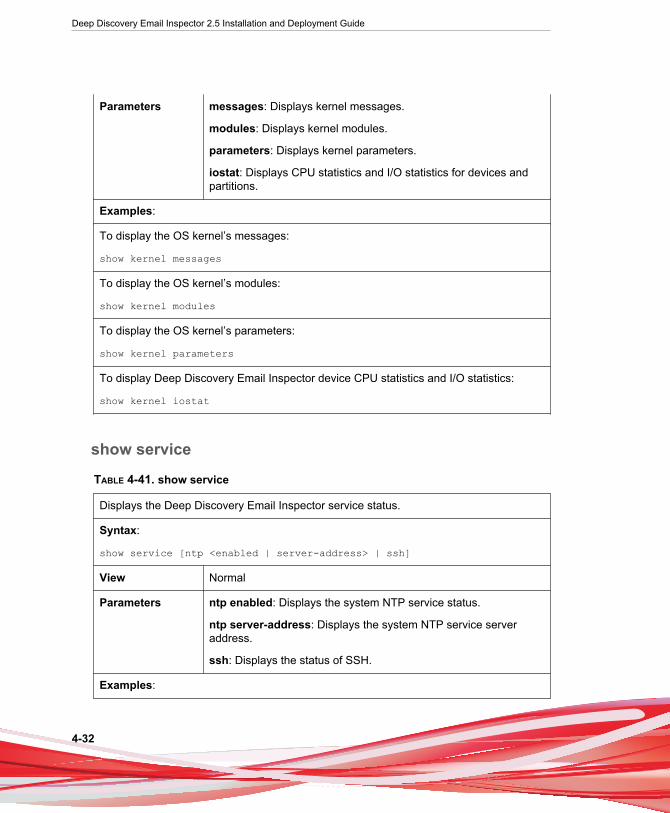
TABLE 4-40. show kernel
Displays the Deep Discovery Email Inspector device’s OS kernel information.
Syntax:
show kernel {messages | modules | parameters | iostat}
View Normal
Deep Discovery Email Inspector 2.5 Installation and Deployment Guide
4-32
Parameters messages: Displays kernel messages.
modules: Displays kernel modules.
parameters: Displays kernel parameters.
iostat: Displays CPU statistics and I/O statistics for devices andpartitions.
Examples:
To display the OS kernel’s messages:
show kernel messages
To display the OS kernel’s modules:
show kernel modules
To display the OS kernel’s parameters:
show kernel parameters
To display Deep Discovery Email Inspector device CPU statistics and I/O statistics:
show kernel iostat
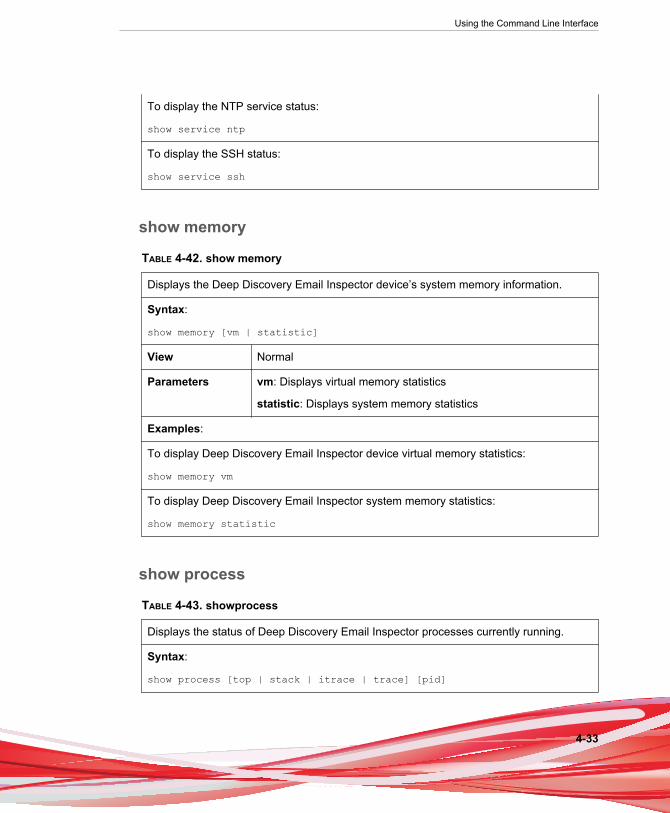
show service
TABLE 4-41. show service
Displays the Deep Discovery Email Inspector service status.
Syntax:
show service [ntp <enabled | server-address> | ssh]
View Normal
Parameters ntp enabled: Displays the system NTP service status.
ntp server-address: Displays the system NTP service serveraddress.
ssh: Displays the status of SSH.
Examples:
Using the Command Line Interface
4-33
To display the NTP service status:
show service ntp
To display the SSH status:
show service ssh
show memory
TABLE 4-42. show memory
Displays the Deep Discovery Email Inspector device’s system memory information.
Syntax:
show memory [vm | statistic]
View Normal
Parameters vm: Displays virtual memory statistics
statistic: Displays system memory statistics
Examples:
To display Deep Discovery Email Inspector device virtual memory statistics:
show memory vm
To display Deep Discovery Email Inspector system memory statistics:
show memory statistic
show process
TABLE 4-43. showprocess
Displays the status of Deep Discovery Email Inspector processes currently running.
Syntax:
show process [top | stack | itrace | trace] [pid]

Deep Discovery Email Inspector 2.5 Installation and Deployment Guide
4-34
View Normal
Parameters top: Displays the status of Deep Discovery Email Inspectorprocesses currently running and system related processes
stack: Print a stack trace of a running process
itrace: Trace the library call
trace: Trace system calls and signals
pid: The process id number
Examples:
To display the status of Deep Discovery Email Inspector processes currently running:
show process
To display the stack trace of process 1233:
show process stack 1233
To display the system call of process 1233:
show process trace 1233
To display the library call of process 1233:
show process itrace 1233
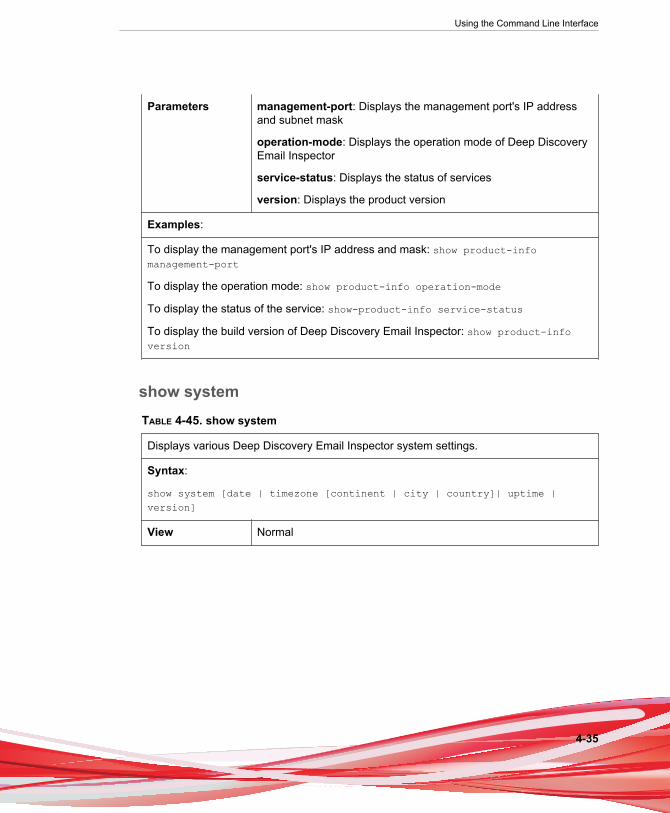
show product-infoTABLE 4-44. show product-info
Displays the Deep Discovery Email Inspector product information.
Syntax:
show product-info [management-port | operation-mode | service-status |version
View Normal
Using the Command Line Interface
4-35
Parameters management-port: Displays the management port's IP addressand subnet mask
operation-mode: Displays the operation mode of Deep DiscoveryEmail Inspector
service-status: Displays the status of services
version: Displays the product version
Examples:
To display the management port's IP address and mask: show product-infomanagement-port
To display the operation mode: show product-info operation-mode
To display the status of the service: show-product-info service-status
To display the build version of Deep Discovery Email Inspector: show product-infoversion
show systemTABLE 4-45. show system
Displays various Deep Discovery Email Inspector system settings.
Syntax:
show system [date | timezone [continent | city | country]| uptime |version]
View Normal

Deep Discovery Email Inspector 2.5 Installation and Deployment Guide
4-36
Parameters date: Displays the current time and date.
timezone: Displays the Deep Discovery Email Inspector device’stimezone settings. You can optionally specify the timezoneinformation to view:
• continent: Displays the system continent
• city: Displays the system city
• country: Displays the system country
uptime: Displays how long the Deep Discovery Email Inspectordevice has been running.
version: Displays version number for the Deep Discovery EmailInspector device.
Examples:
To display the current time and date of the Deep Discovery Email Inspector device:
show system date
To display the Deep Discovery Email Inspector device’s timezone settings:
show system timezone
To display the Deep Discovery Email Inspector device's continent:
show system timezone continent
To display the Deep Discovery Email Inspector device's city:
show system timezone city
To display the Deep Discovery Email Inspector device's country:
show system timezone country
To display how long Deep Discovery Email Inspector has been running:
show system uptime
To display Deep Discovery Email Inspector’s version number:
show system version

Using the Command Line Interface
4-37
shutdownTABLE 4-46. shutdown
Specifies shutting down the Deep Discovery Email Inspector device immediately or aftera specified delay.
Syntax:
shutdown [time]
View Privileged
Parameters [time]: Shuts down the Deep Discovery Email Inspector deviceafter a specified delay in minutes.
Examples:
To shut down the Deep Discovery Email Inspector device immediately:
shutdown
To shut down the Deep Discovery Email Inspector device after a 5 minute delay:
shutdown 5
tracerouteTABLE 4-47. traceroute
Displays the tracking route to a specified destination.
Syntax:
traceroute [-h hops] <dest>
View Normal
Parameters [-h hops]: Specifies the maximum number of hops to thedestination. The minimum number is 6.
<dest>: Specifies the remote system to trace
Examples:

Deep Discovery Email Inspector 2.5 Installation and Deployment Guide
4-38
To display the route to IP address 172.10.10.1 with a maximum of 6 hops:
traceroute 172.10.10.1
To display the route to IP address 172.10.10.1 with a maximum of 30 hops:
traceroute -h 30 172.10.10.1

5-1
Chapter 5
Upgrading Deep Discovery EmailInspector
Topics include:
• System Updates on page 5-2
• Managing Patches on page 5-2
• Upgrading Firmware on page 5-3

Deep Discovery Email Inspector 2.5 Installation and Deployment Guide
5-2
System UpdatesAfter an official product release, Trend Micro releases system updates to address issues,enhance product performance, or add new features.
TABLE 5-1. System Updates
SYSTEM UPDATE DESCRIPTION
Hot fix A hot fix is a workaround or solution to a single customer-reportedissue. Hot fixes are issue-specific, and are not released to allcustomers.
NoteA new hot fix may include previous hot fixes until TrendMicro releases a patch.
Security patch A security patch focuses on security issues suitable fordeployment to all customers. Non-Windows patches commonlyinclude a setup script.
Patch A patch is a group of hot fixes and security patches that solvemultiple program issues. Trend Micro makes patches available ona regular basis.
Your vendor or support provider may contact you when these items become available.Check the Trend Micro website for information on new hot fix, patch, and service packreleases:
http://www.trendmicro.com/download
Managing PatchesFrom time to time, Trend Micro releases a patch for a reported known issue or anupgrade that applies to the product. Find available patches at http://downloadcenter.trendmicro.com.
Upgrading Deep Discovery Email Inspector
5-3
Procedure
1. Go to Administration > Product Updates > Hot Fixes / Patches.
2. Under History, verify the software version number.
3. Manage the product patch.
• Upload a patch by browsing to the patch file provided by Trend MicroSupport and then clicking Install under Install Hot Fix / Patch.
• Roll back a patch by clicking Roll Back under History. After rollback, DeepDiscovery Email Inspector uses the most recent previous configuration. Forexample, rolling back patch 3 returns Deep Discovery Email Inspector to apatch 2 state.
Upgrading FirmwareFrom time to time, Trend Micro releases a patch for a reported known issue or anupgrade that applies to the product. Find available patches at http://downloadcenter.trendmicro.com.
Updating the firmware ensures that Deep Discovery Email Inspector has access to newand improved security features when they become available.
Note
Ensure that you have finished all management console tasks before proceeding. Theupgrade process may take some time to complete, and upgrading from Deep DiscoveryEmail Inspector 2.1 to Deep Discovery Email Inspector 2.5 may take an hour or more.Trend Micro recommends starting the upgrade during off-peak office hours. Installing theupdate restarts Deep Discovery Email Inspector.
Procedure
1. Back up configuration settings.
Backing Up or Restoring a Configuration on page 5-4
Deep Discovery Email Inspector 2.5 Installation and Deployment Guide
5-4
2. Obtain the firmware image.
• Download the Deep Discovery Email Inspector firmware image from theTrend Micro Download Center at:
http://downloadcenter.trendmicro.com
• Obtain the firmware package from your Trend Micro reseller or supportprovider.
3. Save the image to any folder on a computer.
4. Go to Administration > Product Updates > Firmware.
5. Next to Software version, verify your firmware version.
6. Browse for the firmware update package.
7. Click Install.
After the installation completes, the command line interface appears.
8. Perform the following post-installation steps:
• Clear the browser.
• Manually log on to the console.
Backing Up or Restoring a ConfigurationExport settings from the management console to back up the Deep Discovery EmailInspector configuration. If a system failure occurs, you can restore the settings byimporting the configuration file that you previously backed up.
Important
Deep Discovery Email Inspector only supports restoring configurations from other DeepDiscovery Email Inspector servers running the same version. For example, you cannotrestore a server running version 2.5 with a configuration file backed up from a serverrunning version 2.1.
Upgrading Deep Discovery Email Inspector
5-5
Note
When exporting/importing your settings, the database will be locked. Therefore, all DeepDiscovery Email Inspector actions that depend on database access will not function.
Trend Micro recommends:
• Backing up the current configuration before each import operation
• Performing the operation when Deep Discovery Email Inspector is idle. Importingand exporting affects Deep Discovery Email Inspector performance.
Back up settings to create a copy of Deep Discovery Email Inspector applianceconfiguration to restore the configuration in another Deep Discovery Email Inspectorappliance or to revert to the backup settings at a later time. Replicate a configurationacross several Deep Discovery Email Inspector appliances by restoring the sameconfiguration file into each appliance.

6-1
Chapter 6
Technical SupportLearn about the following topics:
• Troubleshooting Resources on page 6-2
• Contacting Trend Micro on page 6-3
• Sending Suspicious Content to Trend Micro on page 6-4
• Other Resources on page 6-5

Deep Discovery Email Inspector 2.5 Installation and Deployment Guide
6-2
Troubleshooting ResourcesBefore contacting technical support, consider visiting the following Trend Micro onlineresources.
Using the Support PortalThe Trend Micro Support Portal is a 24x7 online resource that contains the most up-to-date information about both common and unusual problems.
Procedure
1. Go to http://esupport.trendmicro.com.
2. Select from the available products or click the appropriate button to search forsolutions.
3. Use the Search Support field to search for available solutions.
4. If no solution is found, click Contact Support and select the type of supportneeded.
Tip
To submit a support case online, visit the following URL:
http://esupport.trendmicro.com/srf/SRFMain.aspx
A Trend Micro support engineer investigates the case and responds in 24 hours orless.
Threat EncyclopediaMost malware today consists of “blended threats” which combine two or moretechnologies to bypass computer security protocols. Trend Micro combats this complexmalware with products that create a custom defense strategy. The Threat Encyclopedia

Technical Support
6-3
provides a comprehensive list of names and symptoms for various blended threats,including known malware, spam, malicious URLs, and known vulnerabilities.
Go to http://www.trendmicro.com/vinfo/us/threat-encyclopedia/#malware to learnmore about:
• Malware and malicious mobile code currently active or “in the wild”
• Correlated threat information pages to form a complete web attack story
• Internet threat advisories about targeted attacks and security threats
• Web attack and online trend information
• Weekly malware reports
Contacting Trend MicroIn the United States, Trend Micro representatives are available by phone, fax, or email:
Address Trend Micro, Inc., 225 E. John Carpenter Freeway, Suite 1500,Irving, Texas 75062
Phone Phone: +1 (817) 569-8900
Toll free: (888) 762-8736
Website http://www.trendmicro.com
Email address [email protected]
• Worldwide support offices:
http://www.trendmicro.com/us/about-us/contact/index.html
• Trend Micro product documentation:
http://docs.trendmicro.com
Speeding Up the Support CallTo improve problem resolution, have the following information available:
Deep Discovery Email Inspector 2.5 Installation and Deployment Guide
6-4
• Steps to reproduce the problem
• Appliance or network information
• Computer brand, model, and any connected hardware or devices
• Amount of memory and free hard disk space
• Operating system and service pack version
• Version of the installed agent
• Serial number or activation code
• Detailed description of install environment
• Exact text of any error message received
Sending Suspicious Content to Trend MicroSeveral options are available for sending suspicious content to Trend Micro for furtheranalysis.
Email Reputation ServicesQuery the reputation of a specific IP address and nominate a message transfer agent forinclusion in the global approved list:
https://ers.trendmicro.com
Refer to the following Knowledge Base entry to send message samples to Trend Micro:
http://esupport.trendmicro.com/solution/en-US/1112106.aspx
File Reputation ServicesGather system information and submit suspicious file content to Trend Micro:
http://esupport.trendmicro.com/solution/en-us/1059565.aspx

Technical Support
6-5
Record the case number for tracking purposes.
Web Reputation ServicesQuery the safety rating and content type of a URL suspected of being a phishing site, orother so-called “disease vector” (the intentional source of Internet threats such asspyware and malware):
http://global.sitesafety.trendmicro.com
If the assigned rating is incorrect, send a re-classification request to Trend Micro.
Other ResourcesIn addition to solutions and support, there are many other helpful resources availableonline to help you stay up to date, learn about innovations, and to be aware of the latestsecurity trends.
Download CenterFrom time to time, Trend Micro may release a patch for a reported known issue or anupgrade that applies to a specific product or service. To find out whether any patchesare available, go to:
http://downloadcenter.trendmicro.com
If a patch has not been applied (patches are dated), open the Readme to determinewhether it is relevant to your environment. The Readme also contains installationinstructions.
Documentation FeedbackTrend Micro always seeks to improve its documentation. If you have questions,comments, or suggestions about this or any Trend Micro document, please go to thefollowing site:

Deep Discovery Email Inspector 2.5 Installation and Deployment Guide
6-6
http://www.trendmicro.com/download/documentation/rating.asp

A-1
Appendix A
Getting StartedTopics include:
• Getting Started Tasks on page A-2
Deep Discovery Email Inspector 2.5 Installation and Deployment Guide
A-2
Getting Started TasksGetting Started Tasks provides a high-level overview of all procedures required to getDeep Discovery Email Inspector up and running as quickly as possible. Each step linksto more detailed instructions later in the document. The getting started process is thesame for BCC, SPAN/TAP and MTA modes.
Procedure
1. Configure network settings to access the management console.
For details, see Configuring Management Console Access on page A-4.
2. Open the management console.
For details, see Opening the Management Console on page A-5.
3. Activate the Deep Discovery Email Inspector product license.
For details, see Managing Your Product License on page A-7.
4. Configure the system time.
For details, see Configuring System Time on page A-7.
5. Configure network settings.
For details, see Configuring Network Settings on page A-8.
6. Configure the notification SMTP server.
For details, see Configuring the Notification SMTP Server on page A-10.
7. Configure the mail limits and exceptions.
For details, see Configuring Limits and Exceptions on page A-11.
8. Configure Virtual Analyzer custom network settings.
For details, see Configuring Virtual Analyzer Network and Filters on page A-13.
9. Import Virtual Analyzer images.
For details, see Importing Virtual Analyzer Images on page A-13.

Getting Started
A-3
Important
At least one Virtual Analyzer image is required to perform analysis.
10. Configure the password to open archive files and document files.
For details, see Adding File Passwords on page A-14.
11. Configure email routing for downstream MTAs.
For details, see Configuring Message Delivery Settings on page A-15.
12. Add at least one notification recipient to all critical and important alerts.
For details, see Alerts on page A-16.
13. (Optional) Configure policy rules.
For details, see Configuring the Actions on page A-16.
14. (Optional) Configure policy exceptions.
For details, see Policy Exceptions on page A-18.
15. (Optional) Register with Trend Micro Control Manager for central management.
For details, see Control Manager Settings on page A-19.
16. Configure upstream MTAs or SPAN/TAP devices.
a. If Deep Discovery Email Inspector is operating in BCC or MTA mode,configure the upstream MTAs to route email traffic to Deep Discovery EmailInspector.
Note
Configuring the upstream MTA requires different settings for MTA mode andBCC mode. See the supporting documentation provided by the MTA servermanufacturer for instructions about configuring MTA settings.
• In MTA mode, configure the MTA to forward email traffic to DeepDiscovery Email Inspector.
• In BCC mode, configure the MTA to copy email traffic to DeepDiscovery Email Inspector.
Deep Discovery Email Inspector 2.5 Installation and Deployment Guide
A-4
b. If Deep Discovery Email Inspector is operating in SPAN/TAP mode,configure the SPAN/TAP device to mirror traffic to Deep Discovery EmailInspector.
Note
See the supporting documentation provided by the SPAN/TAP devicemanufacturer for instructions about configuring settings.
Configuring Management Console AccessAfter completing the installation, the server restarts and loads the Command LineInterface (CLI). Configure Deep Discovery Email Inspector network settings to gainaccess to the management console.
The following procedure explains how to log on to the CLI and configure the followingrequired network settings:
• Management IP address and netmask
• Host name
• DNS
• Gateway
Procedure
1. Log on to the CLI with the default credentials.
• User name: admin
• Password: ddei
2. At the prompt, type enable and press Enter to enter privileged mode.
3. Type the default password, trend#1, and then press Enter.
The prompt changes from > to #.
4. Configure network settings with the following command:

Getting Started
A-5
configure network basic
5. Configure the following network settings and press Enter after typing each setting.
Note
IPv6 settings are optional.
• Host name
• IPv4 address
• Subnet mask
• IPv4 gateway
• Preferred IPv4 DNS
• Alternate IPv4 DNS
• IPv6 address
• Prefix length
• IPv6 gateway
• Preferred IPv6 DNS
• Alternate IPv6 DNS
6. Type Y to confirm settings and restart.
Deep Discovery Email Inspector implements specified network settings and thenrestarts all services.
The initial configuration is complete and the management console is accessible.
Opening the Management ConsoleDeep Discovery Email Inspector provides a built-in management console that you canuse to configure and manage the product.

Deep Discovery Email Inspector 2.5 Installation and Deployment Guide
A-6
View the management console using any supported web browser. For informationabout supported browsers, see System Requirements on page 3-2.
For information about configuring required network settings before accessing themanagement console, see Configuring Management Console Access on page A-4.
Procedure
1. In a web browser, type the IP address of the Deep Discovery Email Inspectorserver.
Note
The default management console IP address / subnet mask is 192.168.252.1 /255.255.0.0.
The logon screen appears.
2. Specify the logon credentials (user name and password).
Note
Use the default administrator logon credentials when logging on for the first time:
• User name: admin
• Password: ddei
3. Click Log On.
The management console Dashboard appears.
Important
Trend Micro recommends changing the password to prevent unauthorized changesto the management console.
For details, see the Deep Discovery Email Inspector Administrator's Guide.
Getting Started
A-7
Managing Your Product License
Procedure
1. Go to Administration > License.
2. Click Specify New Code.
The Activation Code screen displays.
3. Specify the new Activation Code.
4. Read the license agreement and select I have read and accept the terms of theTrend Micro License Agreement.
5. Click Apply.
The Deep Discovery Email Inspector activates.
6. View your product license.
Configuring System TimeNetwork Time Protocol (NTP) synchronizes computer system clocks across theInternet. Configure NTP settings to synchronize the server clock with an NTP server,or manually set the system time. Specify the format to display the date and time in.
Procedure
1. Go to Administration > System Settings > Time.
2. Set the system time.
• To synchronize with an NTP server, select Synchronize appliance time withan NTP server and then specify the domain name or IP address of the NTPserver.
• To manually set the system time, select Set time manually and then select thedate and time or select the time zone.
Deep Discovery Email Inspector 2.5 Installation and Deployment Guide
A-8
• To display the date and time in another format, select the format from theDate and time format drop-down list.
3. Click Save.
Configuring Network SettingsPerform initial network configurations with the Command Line Interface (CLI). Use themanagement console to make changes to the network interface settings and to select theDeep Discovery Email Inspector operation mode.
For details about the available operating modes, see Network Topology Considerationson page 2-2.
Procedure
1. Go to Administration > System Settings > Network.
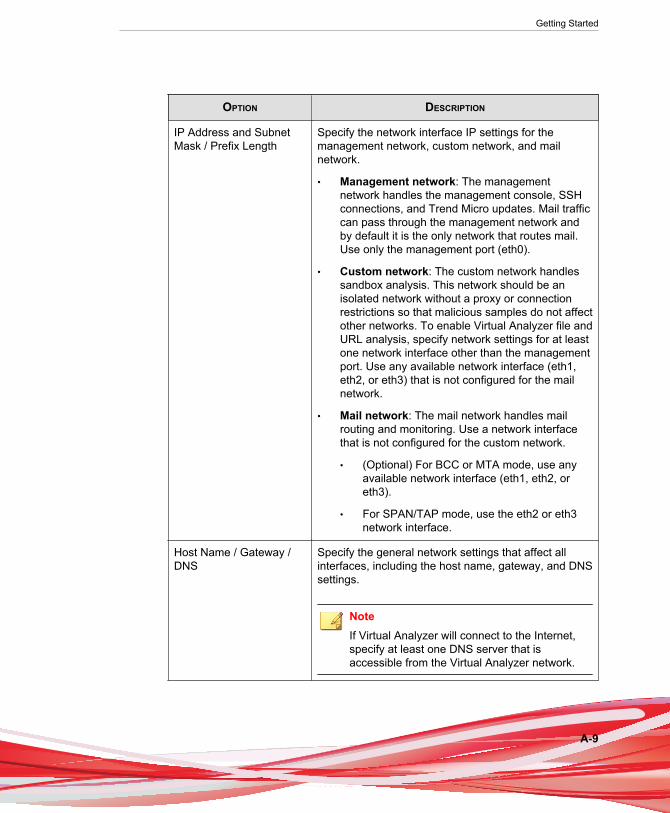
2. Specify the network settings.
Getting Started
A-9
OPTION DESCRIPTION
IP Address and SubnetMask / Prefix Length
Specify the network interface IP settings for themanagement network, custom network, and mailnetwork.
• Management network: The managementnetwork handles the management console, SSHconnections, and Trend Micro updates. Mail trafficcan pass through the management network andby default it is the only network that routes mail.Use only the management port (eth0).
• Custom network: The custom network handlessandbox analysis. This network should be anisolated network without a proxy or connectionrestrictions so that malicious samples do not affectother networks. To enable Virtual Analyzer file andURL analysis, specify network settings for at leastone network interface other than the managementport. Use any available network interface (eth1,eth2, or eth3) that is not configured for the mailnetwork.
• Mail network: The mail network handles mailrouting and monitoring. Use a network interfacethat is not configured for the custom network.
• (Optional) For BCC or MTA mode, use anyavailable network interface (eth1, eth2, oreth3).
• For SPAN/TAP mode, use the eth2 or eth3network interface.
Host Name / Gateway /DNS
Specify the general network settings that affect allinterfaces, including the host name, gateway, and DNSsettings.
NoteIf Virtual Analyzer will connect to the Internet,specify at least one DNS server that isaccessible from the Virtual Analyzer network.
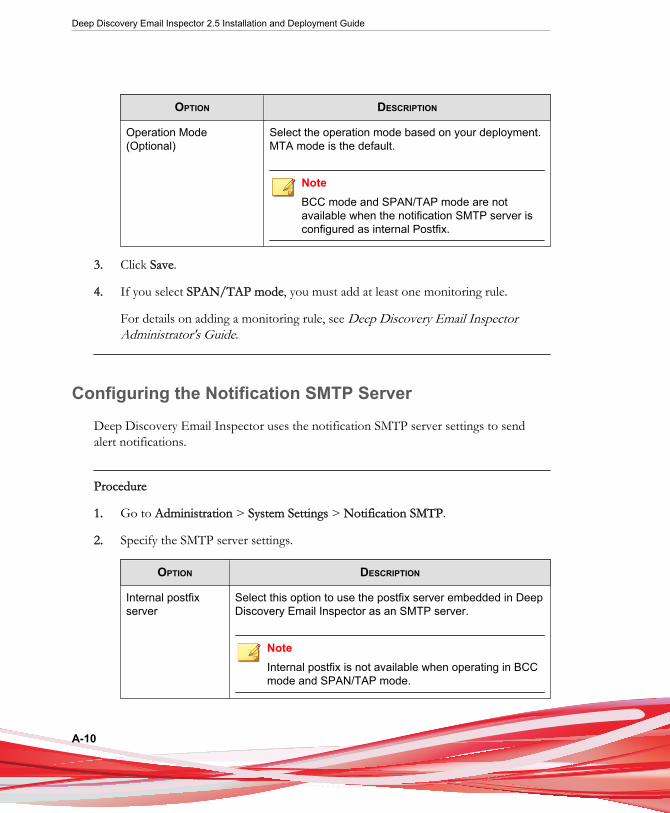
Deep Discovery Email Inspector 2.5 Installation and Deployment Guide
A-10
OPTION DESCRIPTION
Operation Mode(Optional)
Select the operation mode based on your deployment.MTA mode is the default.
NoteBCC mode and SPAN/TAP mode are notavailable when the notification SMTP server isconfigured as internal Postfix.
3. Click Save.
4. If you select SPAN/TAP mode, you must add at least one monitoring rule.
For details on adding a monitoring rule, see Deep Discovery Email InspectorAdministrator's Guide.
Configuring the Notification SMTP Server
Deep Discovery Email Inspector uses the notification SMTP server settings to sendalert notifications.
Procedure
1. Go to Administration > System Settings > Notification SMTP.
2. Specify the SMTP server settings.
OPTION DESCRIPTION
Internal postfixserver
Select this option to use the postfix server embedded in DeepDiscovery Email Inspector as an SMTP server.
NoteInternal postfix is not available when operating in BCCmode and SPAN/TAP mode.
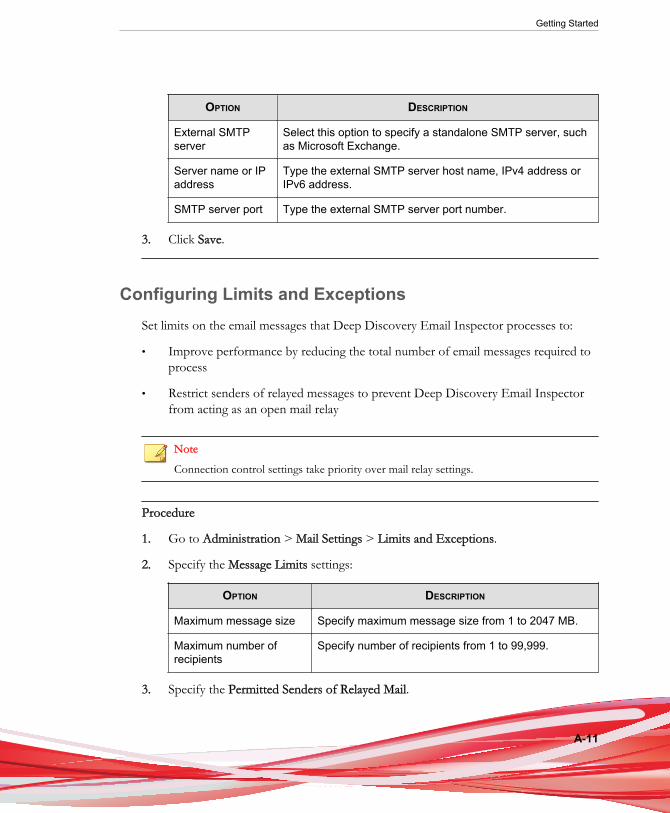
Getting Started
A-11
OPTION DESCRIPTION
External SMTPserver
Select this option to specify a standalone SMTP server, suchas Microsoft Exchange.
Server name or IPaddress
Type the external SMTP server host name, IPv4 address orIPv6 address.
SMTP server port Type the external SMTP server port number.
3. Click Save.
Configuring Limits and ExceptionsSet limits on the email messages that Deep Discovery Email Inspector processes to:
• Improve performance by reducing the total number of email messages required toprocess
• Restrict senders of relayed messages to prevent Deep Discovery Email Inspectorfrom acting as an open mail relay
Note
Connection control settings take priority over mail relay settings.
Procedure
1. Go to Administration > Mail Settings > Limits and Exceptions.
2. Specify the Message Limits settings:
OPTION DESCRIPTION
Maximum message size Specify maximum message size from 1 to 2047 MB.
Maximum number ofrecipients
Specify number of recipients from 1 to 99,999.
3. Specify the Permitted Senders of Relayed Mail.

Deep Discovery Email Inspector 2.5 Installation and Deployment Guide
A-12
• Deep Discovery Email Inspector only
• Hosts in the same subnet
• Hosts in the same address class
Note
When this option is selected, Deep Discovery Email Inspector will check if theIP address of Deep Discovery Email Inspector and hosts are in the sameaddress class and subnet.
• Deep Discovery Email Inspector will only allow hosts to relay messages ifthey are in the same address class and subnet.
For example:
• Class A: The Deep Discovery Email Inspector IP address is 10.1.2.3,and the hosts’ IP address is 10.1.2.x.
Class B: The Deep Discovery Email Inspector IP address is172.31.2.3, and the hosts’ IP address is 172.31.x.x.
Class C: The Deep Discovery Email Inspector IP address is192.168.10.3, and the hosts’ IP address is 192.168.10.x.
• Deep Discovery Email Inspector will not allow hosts to relay messages ifthey are in the same address class, but not in the same subnet.
For example:
• Class A: The Deep Discovery Email Inspector IP address is 10.1.2.3,and the hosts’ IP address is 11.2.3.x.
Class B: The Deep Discovery Email Inspector IP address is172.31.2.3, and the hosts’ IP address is 172.32.x.x.
Class C: The Deep Discovery Email Inspector IP address is192.168.10.3, and the hosts’ IP address is 192.168.11.x.
• Specified IP addresses
Note
Import settings from a file by clicking Import from a File.
Export settings to a file by clicking Export.

Getting Started
A-13
4. Click Save.
Importing Virtual Analyzer ImagesVirtual Analyzer supports OVA files between 1GB and 20GB in size.
Note
Virtual Analyzer stops analysis and keeps all samples in the queue whenever an image isadded or deleted, or when instances are modified. All instances are also automaticallyredistributed whenever you add images.
Procedure
1. Go to Administration > Scanning / Analysis > Virtual Analyzer > Overview >Images.
2. Click Import.
The Import Image screen appears.
3. Select an image source and configure the applicable settings.
• Local or network folder
• HTTP or FTP server
Configuring Virtual Analyzer Network and FiltersTo reduce the number of files in the Virtual Analyzer queue, configure the filesubmission filters and enable exceptions.
Object analysis is paused and settings are disabled whenever Virtual Analyzer is beingconfigured.
Procedure
1. Go to Administration > Scanning / Analysis > Virtual Analyzer.

Deep Discovery Email Inspector 2.5 Installation and Deployment Guide
A-14
2. Specify Settings.
OPTION DESCRIPTION
NetworkConnection
Select how Virtual Analyzer connects to the network.
Submission Filters Files: Submit only highly suspicious files or submit highlysuspicious files and force analyze all selected file types.
Exceptions: Select Certified Safe Software Service to reducethe likelihood of false-positive detections.
Timeout Settings Select how long Virtual Analyzer should wait before timing outa submitted object. Virtual Analyzer does not assign any risklevel to objects that have time out. Timed out objects stillreceive risk levels from other scan engines.
3. Click Save.
Adding File PasswordsA maximum of 100 passwords is allowed.
Procedure
1. Go to Administration > Scanning / Analysis > Other Settings > File Passwords.
2. Click Add password.
3. Type a password with only ASCII characters.
Note
Passwords are case-sensitive and must not contain spaces.
4. Optional: Click Add password and type another password.
5. Optional: Drag and drop the password to move it up or down the list.
6. Optional: Delete a password by clicking the x icon beside the corresponding textbox.

Getting Started
A-15
7. Click Save.
Configuring Message Delivery Settings
The following procedure explains how to configure message delivery settings fordownstream mail servers.
Specify settings for email message delivery to Deep Discovery Email Inspectordownstream mail servers. Deep Discovery Email Inspector checks the recipient domainsor email addresses, determines destination servers, and sends the message to the nextSMTP host for the matched domain or email address.
Procedure
1. Go to Administration > Mail Settings > Message Delivery.
2. Click Add.
The Add Delivery Profile screen appears.
3. Select the status of the delivery profile.
4. Specify the recipient domain or email address. Type a wildcard (*) to manage emailmessage delivery from a domain and any subdomains.
• * (Include all domains)
• example.com (Include only example.com)
• *.example.com (Include example.com and any subdomains)
5. Select either of the following from the Destination servers drop-down list:
• Look up MX record: Specify the MX record name, and a port number whenconnecting through a non-default port.
• Specify server: Specify the IP address or fully qualified domain name, portnumber, and priority to forward email messages.

Deep Discovery Email Inspector 2.5 Installation and Deployment Guide
A-16
Note
• The lower the priority value, the higher the priority.
• Optionally add multiple destination servers by clicking on Add server.
• To disable a destination server, click on the check mark for the serverbehind the Priority field. Then the check mark becomes a dash mark. Toenable the server again, click the dash mark.
6. Click Save.
Alerts
Alerts provide immediate intelligence about the state of Deep Discovery EmailInspector. Alerts are classified into three categories:
• Critical alerts are triggered by events that require immediate attention
• Important alerts are triggered by events that require observation
• Informational alerts are triggered by events that require limited observation (mostlikely benign)
The threshold to trigger each alert is configurable.
Configuring the Actions
Procedure
1. Go to Policy > Policy > Actions.
2. In Actions by Risk Level, configure the settings for High, Medium, and Low riskmessages.
a. Specify the Action.
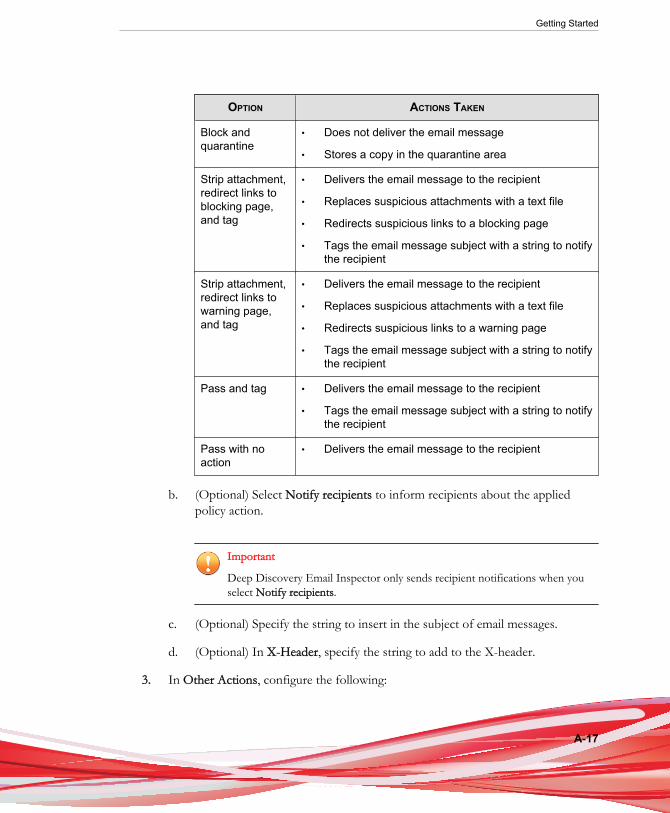
Getting Started
A-17
OPTION ACTIONS TAKEN
Block andquarantine
• Does not deliver the email message
• Stores a copy in the quarantine area
Strip attachment,redirect links toblocking page,and tag
• Delivers the email message to the recipient
• Replaces suspicious attachments with a text file
• Redirects suspicious links to a blocking page
• Tags the email message subject with a string to notifythe recipient
Strip attachment,redirect links towarning page,and tag
• Delivers the email message to the recipient
• Replaces suspicious attachments with a text file
• Redirects suspicious links to a warning page
• Tags the email message subject with a string to notifythe recipient
Pass and tag • Delivers the email message to the recipient
• Tags the email message subject with a string to notifythe recipient
Pass with noaction
• Delivers the email message to the recipient
b. (Optional) Select Notify recipients to inform recipients about the appliedpolicy action.
Important
Deep Discovery Email Inspector only sends recipient notifications when youselect Notify recipients.
c. (Optional) Specify the string to insert in the subject of email messages.
d. (Optional) In X-Header, specify the string to add to the X-header.
3. In Other Actions, configure the following:
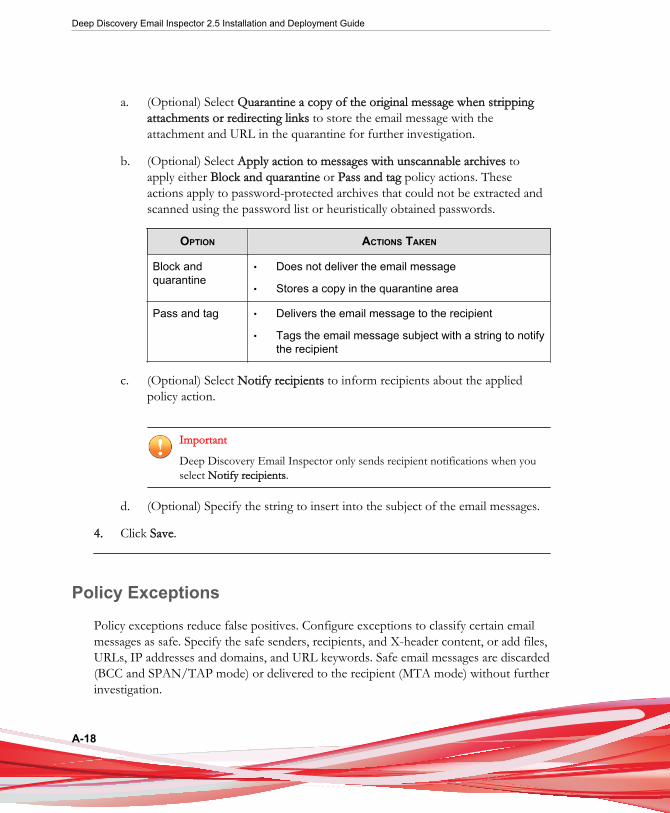
Deep Discovery Email Inspector 2.5 Installation and Deployment Guide
A-18
a. (Optional) Select Quarantine a copy of the original message when strippingattachments or redirecting links to store the email message with theattachment and URL in the quarantine for further investigation.
b. (Optional) Select Apply action to messages with unscannable archives toapply either Block and quarantine or Pass and tag policy actions. Theseactions apply to password-protected archives that could not be extracted andscanned using the password list or heuristically obtained passwords.
OPTION ACTIONS TAKEN
Block andquarantine
• Does not deliver the email message
• Stores a copy in the quarantine area
Pass and tag • Delivers the email message to the recipient
• Tags the email message subject with a string to notifythe recipient
c. (Optional) Select Notify recipients to inform recipients about the appliedpolicy action.
Important
Deep Discovery Email Inspector only sends recipient notifications when youselect Notify recipients.
d. (Optional) Specify the string to insert into the subject of the email messages.
4. Click Save.
Policy Exceptions
Policy exceptions reduce false positives. Configure exceptions to classify certain emailmessages as safe. Specify the safe senders, recipients, and X-header content, or add files,URLs, IP addresses and domains, and URL keywords. Safe email messages are discarded(BCC and SPAN/TAP mode) or delivered to the recipient (MTA mode) without furtherinvestigation.

Getting Started
A-19
Control Manager SettingsTrend Micro Control Manager is a software management solution that gives you theability to control antivirus and content security programs from a central location,regardless of the program's physical location or platform. This application can simplifythe administration of a corporate antivirus and content security policy.
On Deep Discovery Email Inspector, use the Administration > System Settings >Control Manager tab to perform the following tasks:
• Register to a Control Manager server.
• Check the connection status between Deep Discovery Email Inspector andControl Manager.
• Unregister from a Control Manager server.
Note
Ensure that both Deep Discovery Email Inspector and the Control Manager server belongto the same network segment. If Deep Discovery Email Inspector is not in the samenetwork segment as Control Manager, configure the port forwarding settings for DeepDiscovery Email Inspector.


IN-1
IndexAabout
deployment, 2-2administration, 5-2–5-5, A-7, A-8, A-10, A-11,A-13–A-15
archive file passwords, A-14back up settings, 5-4, 5-5network settings, A-8notification SMTP server, A-10product upgrades, 5-2, 5-3restore settings, 5-4, 5-5SMTP, A-11SMTP routing, A-15system and accounts, A-7Virtual Analyzer, A-13
alerts, A-16
Bbackup, 5-4, 5-5block action, A-16
CCLI, 4-1command line interface
entering the shell environment, 4-4overview, 4-3
Command Line Interface, 4-1accessing, 4-2using, 4-2
configurationmanagement console, A-4, A-5overview, A-2policy, A-16
configureMessaged Delivery settings, A-15
message delivery settings, A-11, A-15configure system time, A-7contacting, 6-5
documentation feedback, 6-5Control Manager
about, A-19system requirements, 3-3
critical alerts, A-16
Ddeployment
installation, 3-6network topology, 2-2overview, 2-2system requirements, 3-2
documentation feedback, 6-5Download Center, 5-2, 5-3
Eemail scanning
archive file passwords, A-14enter CLI, 4-1Ethernet cables, 2-11export settings, 5-5
Ffirmware update, 5-3
Ggetting started
management console, A-5management console access, A-4summary, A-2
Iimages, A-13
Deep Discovery Email Inspector 2.5 Installation and Deployment Guide
IN-2
important alerts, A-16import settings, 5-5informational alerts, A-16installation
network topology, 2-3–2-5operating system, 3-6software requirements, 3-2
internal postfix, A-10Intranet, 2-10
MMalware Lab Network, 2-10management console, A-4, A-5management network, 2-10management port, A-8message delivery, A-15message delivery settings, A-15Message Delivery settings
configure, A-15message tags, A-16message tokens, A-16minimum requirements, 3-2
Nnetwork environment, 2-10network settings, A-8network topology, 2-2notification SMTP server, A-10
Ooperation mode, A-8operation modes
BCC mode, 2-3MTA mode, 2-4SPAN/TAP mode, 2-5
Ppass action, A-16
patches, 5-3permitted senders, A-11policy, A-16
actions, A-16configuration, A-16exceptions, A-18
policy actions, A-16product upgrade, 5-2, 5-3
Qquarantine action, A-16
Rrequirements, 3-2restore, 5-4, 5-5
Ssafe recipients, A-18safe senders, A-18shell environment, 4-4SMTP greeting, A-11SMTP routing, A-15SMTP server, A-10system requirements, 3-2
Control Manager, 3-3system updates, 5-2
Ttag action, A-16test network, 2-10triggered alerts, A-16
Uusing CLI, 4-1
VVirtual Analyzer, A-14
archive file passwords, A-14exceptions, A-13

Index
IN-3
file types, A-13images, A-13network settings, A-13
XX-header, A-18