DNAevolution 4.5 User Guide - StorageDNA Support · Description Page No. 1. Archive and Job...
58
+1.949.480.7937 | www.storagedna.com | 19800 MacArthur Blvd., Suite 880, Irvine, CA 92612 USA 1 of 58 September 2017 | DNAevolution 4.5 User Guide | © 2017 StorageDNA, Inc., All rights reserved. DNAevolution 4.5: User Guide DNAevolution 4.5 User Guide © 2017 StorageDNA, Inc. All rights reserved. The owner or authorized user of a valid copy of DNAevolution may reproduce this publication for the purpose of learning to use such software. No part of this publication may be reproduced or transmitted for commercial purposes, such as selling copies. The StorageDNA, DNAevolution and DNAsync are trademarks of StorageDNA, Inc. Third-party trademarks are the property of their respective owners.
Transcript of DNAevolution 4.5 User Guide - StorageDNA Support · Description Page No. 1. Archive and Job...
+1.949.480.7937 | www.storagedna.com | 19800 MacArthur Blvd., Suite 880, Irvine, CA 92612 USA 1 of 58
September 2017 | DNAevolution 4.5 User Guide | © 2017 StorageDNA, Inc., All rights reserved.
DNAevolution 4.5: User Guide
DNAevolution 4.5User Guide
© 2017 StorageDNA, Inc. All rights reserved.
The owner or authorized user of a valid copy of DNAevolution may reproduce this publication for the purpose of learning to use such software. No part of this publication may be reproduced or transmitted for commercial purposes, such as selling copies.
The StorageDNA, DNAevolution and DNAsync are trademarks of StorageDNA, Inc. Third-party trademarks are the property of their respective owners.

Description Page No.
1. Archive and Job Management: Concepts.................................................................................. 6
Understanding Archives................................... ............................................................................ 6
Understanding Jobs...................................................................................................................... 6
Understanding File/Folder-Based Archiving, Restore, Access...................................................... 6
Understanding Ticket-Based Archiving, Restore, Access............................................................. 7
DNAEvolution How Ticket Archiving Works........................................................................... 7
Understanding Checksum Verification.......................................................................................... 7
2. Quick Start: Archive, Browse, Search, Restore......................................................................... 8
DNA Evolution’s Interface........................................................................................................... 9
Label and Format a Tape (Standalone Drive)............................................................................. 10
Format a Tape (Autoloader)........................................................................................................ 12
Create an Archive....................................................................................................................... 13
Create An Archive Group............................................................................................................ 15
Start Archiving............................................................................................................................ 15
Archive Folders........................................................................................................................... 17
Archive Camera Magazines......................................................................................................... 17
Archiving Individual Cards, Other Removable Media, or Multiple Cards............................. 18
Archive via Drag ‘n’ Drop........................................................................................................... 20
Archive via Automated Watch Folders....................................................................................... 20
Archive Tickets (AAF/XML/BIN/PROJECTS): Manually.............................................................. 20
Archive Tickets (AAF/XML/BIN/PROJECTS): Automated........................................................... 21
Archive Avid Projects Manually.................................................................................................. 22
Archive Avid Projects Automated............................................................................................... 22
Archive Avid Projects Manually.................................................................................................. 23
Archive Adobe Projects Automated........................................................................................... 24
Monitoring the Archiving Process............................................................................................... 24
Viewing Previous Runs and Reports........................................................................................... 25
+1.949.480.7937 | www.storagedna.com | 19800 MacArthur Blvd., Suite 880, Irvine, CA 92612 USA
September 2017 | DNAevolution 4.5 User Guide | © 2017 StorageDNA, Inc., All rights reserved.
2 of 58
TABLE OF CONTENTS
DNAevolution 4.5: User Guide

+1.949.480.7937 | www.storagedna.com | 19800 MacArthur Blvd., Suite 880, Irvine, CA 92612 USA
September 2017 | DNAevolution 4.5 User Guide | © 2017 StorageDNA, Inc., All rights reserved.
3 of 58
DNAevolution 4.5: User Guide
Description Page No.
Archive Asset Manager: Browse, Search, View Clips, and Proxies........................................... 26 Browse Files........................................................................................................................... 26 Determining Folder Size and Other Details............................................................................ 26 Search Files and Reveal Location........................................................................................... 27 Browse Clips And Reveal Location......................................................................................... 28 Play Previews, Extended Metadata View............................................................................... 29 Proxy Preview........................................................................................................................ 29 Clip Notes.............................................................................................................................. 30 Custom Metadata Tagging (Single and Bulk)......................................................................... 31 Native metadata.................................................................................................................... 33 Global Search......................................................................................................................... 34 Performing Global File Searches............................................................................................ 34 Performing Global Clip & Content Searches.......................................................................... 35 Restore Using the Web Interface........................................................................................... 37 Restore Using AAF/XML Tickets............................................................................................ 39 Restore via Conform from LTO.............................................................................................. 40 Verifying your Tapes: Before You Delete media files on Disk.............................................. 40
3. Avid Media Composer Workflows............................................................................................. 41 Avid media Composer Bin and Project Archiving....................................................................... 41 Archive Manager Setup And Avid Workspace Mounting....................................................... 41 Setup Standalone Workstation....................................................................................... 41 Setup Shared SAN or NAS............................................................................................. 42 Archiving Avid Bins and/or Projects..................................................................................... 42 Archiving Avid Projects and Bin (AMA-Linked or Other non-Avid Elements e.g. Graphics)... 42 Resolving Missing AMA Linked Files and Paths............................................................. 43 Archiving Avid Projects and Bins (Native Avid Op Atom MXF Files)............................ 43 Avid Media Composer Project Backup & Dr............................................................................... 45 Archive Manager Setup And Avid Workspace Mounting...................................................... 45 Backup Ama Avid Projects (Ama-linked Or Other Non-avid Elements E.G. Graphics)........... 45 Backup Native Avid Projects.......................................................................................... 46
TABLE OF CONTENTS
+1.949.480.7937 | www.storagedna.com | 19800 MacArthur Blvd., Suite 880, Irvine, CA 92612 USA
September 2017 | DNAevolution 4.5 User Guide | © 2017 StorageDNA, Inc., All rights reserved.
4 of 58
DNAevolution 4.5: User Guide
Description Page No.
Tips........................................................................................................................................ 46 Archiving Bins From Shared or External Projects............................................................. 46 Organizing Archived Media by Bins.................................................................................. 46 P2 Media........................................................................................................................... 47
4. ADOBE Premiere Workflows.................................................................................................... 48 ADOBE Project Archiving........................................................................................................... 48 ADOBE Archive Manager Setup And Adobe Workspace Mounting...................................... 48 Setup Standalone Workstation......................................................................................... 48 Setup Shared SAN or NAS................................................................................................ 49 Archiving Adobe Projects..................................................................................................... 49 Resolving Missing Files And Path.................................................................................... 49 ADOBE Project Backup And Dr................................................................................................. 50 Archive Manager Setup And Adobe Workspace Mounting.................................................. 50 Backup Adobe Projects..................................................................................................... 50
5. Options and Advanced Operations........................................................................................... 52 Dashboard................................................................................................................................... 52 Advanced Archiving and Restore Options.................................................................................. 52 Option: Tape Pooling............................................................................................................. 52 Option: Labels....................................................................................................................... 54 Option: Including/Excluding Files Based on Extensions....................................................... 54 Option: Limit Scan Speed..................................................................................................... 54 Option: Skip Empty Folders.................................................................................................. 55 Option: Pre/Post-Scripting.................................................................................................... 55 Option: Post File Move and Link Creation............................................................................ 55 Option: Enable Email Notification........................................................................................ 56 Option: Custom Media Label and Strip Path Information.................................................... 56 Option: Setting Copy Buffer Size......................................................................................... 56 Option: Specifying a Tape Device Affinity........................................................................... 56 Tapepooling.......... ..................................................................................................................... 56
TABLE OF CONTENTS

+1.949.480.7937 | www.storagedna.com | 19800 MacArthur Blvd., Suite 880, Irvine, CA 92612 USA
September 2017 | DNAevolution 4.5 User Guide | © 2017 StorageDNA, Inc., All rights reserved.
5 of 58
DNAevolution 4.5: User Guide
Description Page No.
Managing Special Characters..................................................................................................... 57 Avid® Interplay™ and CatDV Integration.................................................................................. 57
Advanced LTO Operations......................................................................................................... 57
Batch Format, Batch Verification, Batch Duplicate, Batch Import........................................ 57
Discovery Channel Specifications: Delivery........................................................................... 58
Job Status Error Codes............................................................................................................... 58
TABLE OF CONTENTS
September 2017 | DNAevolution 4.5 User Guide | © 2017 StorageDNA, Inc., All rights reserved.
+1.949.480.7937 | www.storagedna.com | 19800 MacArthur Blvd., Suite 880, Irvine, CA 92612 USA 6 of 58
DNAevolution 4.5: User Guide
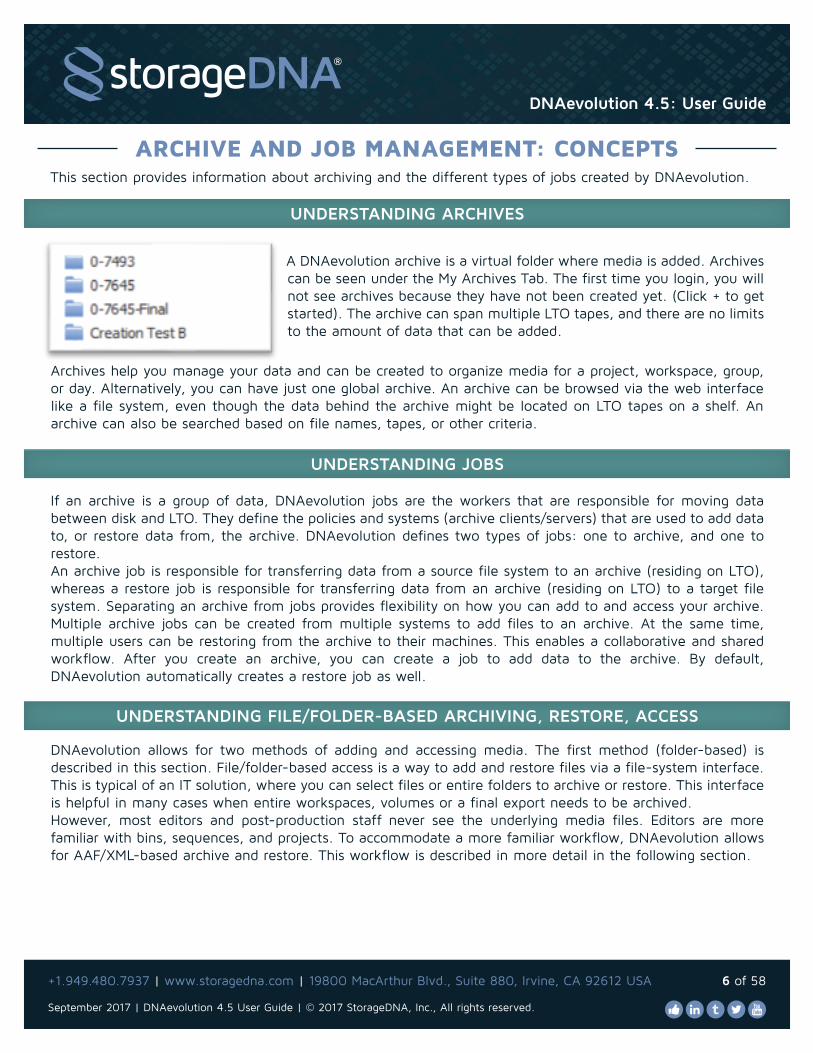
A DNAevolution archive is a virtual folder where media is added. Archives can be seen under the My Archives Tab. The first time you login, you will not see archives because they have not been created yet. (Click + to get started). The archive can span multiple LTO tapes, and there are no limits to the amount of data that can be added.
ARCHIVE AND JOB MANAGEMENT: CONCEPTS
UNDERSTANDING ARCHIVES
If an archive is a group of data, DNAevolution jobs are the workers that are responsible for moving data between disk and LTO. They define the policies and systems (archive clients/servers) that are used to add data to, or restore data from, the archive. DNAevolution defines two types of jobs: one to archive, and one to restore.An archive job is responsible for transferring data from a source file system to an archive (residing on LTO), whereas a restore job is responsible for transferring data from an archive (residing on LTO) to a target file system. Separating an archive from jobs provides flexibility on how you can add to and access your archive. Multiple archive jobs can be created from multiple systems to add files to an archive. At the same time, multiple users can be restoring from the archive to their machines. This enables a collaborative and shared workflow. After you create an archive, you can create a job to add data to the archive. By default, DNAevolution automatically creates a restore job as well.
UNDERSTANDING JOBS
UNDERSTANDING FILE/FOLDER-BASED ARCHIVING, RESTORE, ACCESS
DNAevolution allows for two methods of adding and accessing media. The first method (folder-based) is described in this section. File/folder-based access is a way to add and restore files via a file-system interface. This is typical of an IT solution, where you can select files or entire folders to archive or restore. This interface is helpful in many cases when entire workspaces, volumes or a final export needs to be archived.However, most editors and post-production staff never see the underlying media files. Editors are more familiar with bins, sequences, and projects. To accommodate a more familiar workflow, DNAevolution allows for AAF/XML-based archive and restore. This workflow is described in more detail in the following section.
This section provides information about archiving and the different types of jobs created by DNAevolution.
Archives help you manage your data and can be created to organize media for a project, workspace, group, or day. Alternatively, you can have just one global archive. An archive can be browsed via the web interface like a file system, even though the data behind the archive might be located on LTO tapes on a shelf. An archive can also be searched based on file names, tapes, or other criteria.

+1.949.480.7937 | www.storagedna.com | 19800 MacArthur Blvd., Suite 880, Irvine, CA 92612 USA
September 2017 | DNAevolution 4.5 User Guide | © 2017 StorageDNA, Inc., All rights reserved.
7 of 58
DNAevolution 4.5: User Guide
UNDERSTANDING TICKET-BASED ARCHIVING, RESTORE, ACCESS
DNAevolution allows for ticket based (Project/AAF/XML) archives and restores.
The ticket workflow is based on the following concept:A user can use the DNAevolution web interface to browse and pick an Avid Project, Adobe Project or an AAF/XML file). DNAevolution then processes the ticket. It identifies all media files and archives the project metadata files, relevant AAF/XML and the referenced media. Once the files are archived, users can login to DNAevolution via the web interface and search for and restore those same media files to their systems.
DNAEVOLUTION HOW TICKET ARCHIVING WORKS
UNDERSTANDING CHECKSUM VERIFICATION
DNAevolution utilizes an advanced form of data verification and checksum verification that allows it to archive and checksum at the same time. This saves the time required to perform a full verification, which is essentially a full restore, after performing an archive. A large part of this efficiency is provided by LTO’s “Read-Verify-Write” technology. LTO utilizes two heads during an archive: one head to write and another head following to read and checksum what was just written. This means any data provided to LTO is verified automatically after writing.However, this arrangement does not guarantee against a corrupt write if the LTO layer was provided with corrupted data in the first place. In this case, LTO will write and verify the corrupt data to tape. To protect against this scenario, DNAevolution checksums all data as it reads it from the source and as it writes it to the LTO layer. This guarantees that data provided to the LTO layer is not corrupt and is free of errors.
While DNAevolution checksums all content on-the-fly during archiving, it is highly recommended to run a secondary tape verification before deleting source files. Tape verification is covered in the “Administrator Guide”.
FAQ: Does’t all this checksumming slow down the transfer? Modern CPUs handle checksummingextremely efficiently and do not effect or have a negligeble affect on performance of transfers.
+1.949.480.7937 | www.storagedna.com | 19800 MacArthur Blvd., Suite 880, Irvine, CA 92612 USA
September 2017 | DNAevolution 4.5 User Guide | © 2017 StorageDNA, Inc., All rights reserved.
8 of 58
DNAevolution 4.5: User Guide
QUICK START: ARCHIVE, BROWSE, SEARCH, RESTOREThis section is designed to get you up to speed with the basics of DNAevolution workflows for standalone drives and automation units. Once you learn how to archive, search, browse, and restore, you can apply this knowledge to additional settings and more complex workflows. Two keys ways to archive will be covered: + Archiving by selecting folders in a file system + Archiving by providing bins, sequences, and projects via an AAF/XML file Two key ways to restore will be covered: + Web-based retrieval + Ticket-based (AAF/XML) retrieval
Although this chapter provides a working knowledge of AAF/XML-based archiving and restore operations, refer to your specific applications’ workflow guides for more details.
The tutorial that follows includes these procedures for archiving and restoring:+ The web interface+ Format an LTFS tape+ Create an archive+ Assign tape to archive+ Create an Archive job to add content to the archive+ Run the Archive job+ Browse the archive+ Search the archive+ Restore from the archive
+1.949.480.7937 | www.storagedna.com | 19800 MacArthur Blvd., Suite 880, Irvine, CA 92612 USA
September 2017 | DNAevolution 4.5 User Guide | © 2017 StorageDNA, Inc., All rights reserved.
9 of 58
DNAevolution 4.5: User Guide
DNAEVOLUTION’S INTERFACE
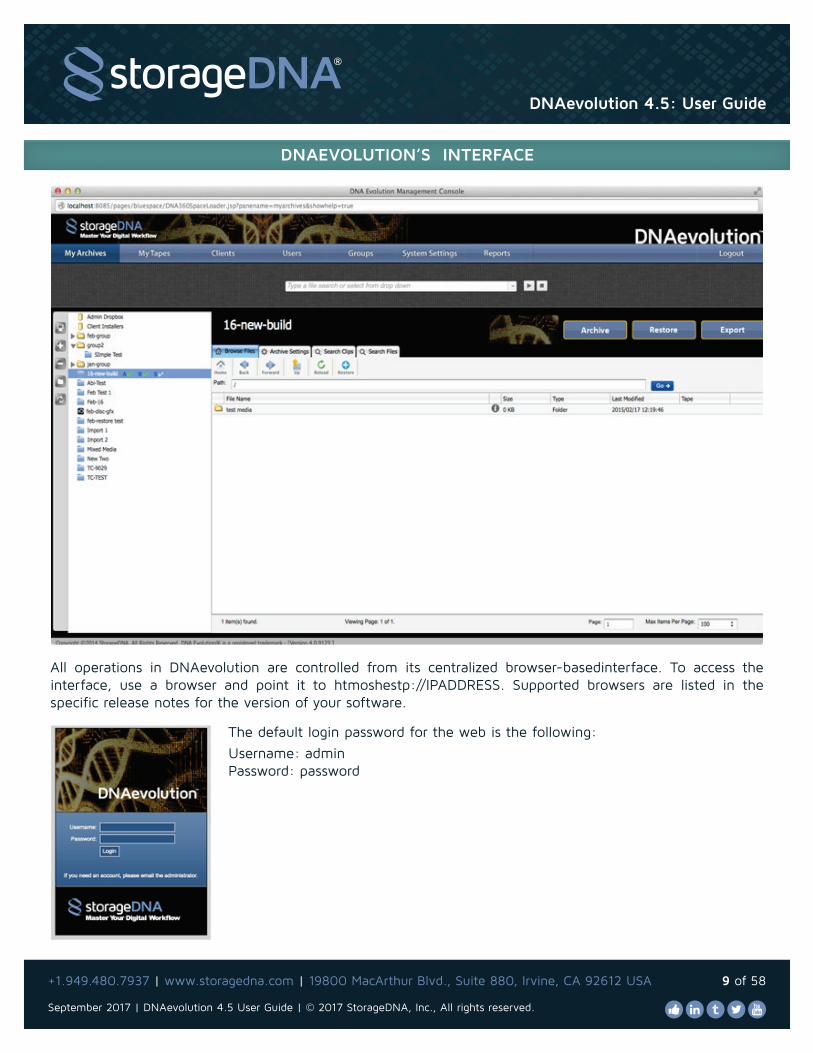
All operations in DNAevolution are controlled from its centralized browser-basedinterface. To access the interface, use a browser and point it to htmoshestp://IPADDRESS. Supported browsers are listed in the specific release notes for the version of your software.
The default login password for the web is the following: Username: admin Password: password
DNAEVOLUTION’S INTERFACE
+1.949.480.7937 | www.storagedna.com | 19800 MacArthur Blvd., Suite 880, Irvine, CA 92612 USA
September 2017 | DNAevolution 4.5 User Guide | © 2017 StorageDNA, Inc., All rights reserved.
10 of 58
DNAevolution 4.5: User Guide
LABEL AND FORMAT A TAPE (STANDALONE DRIVE)
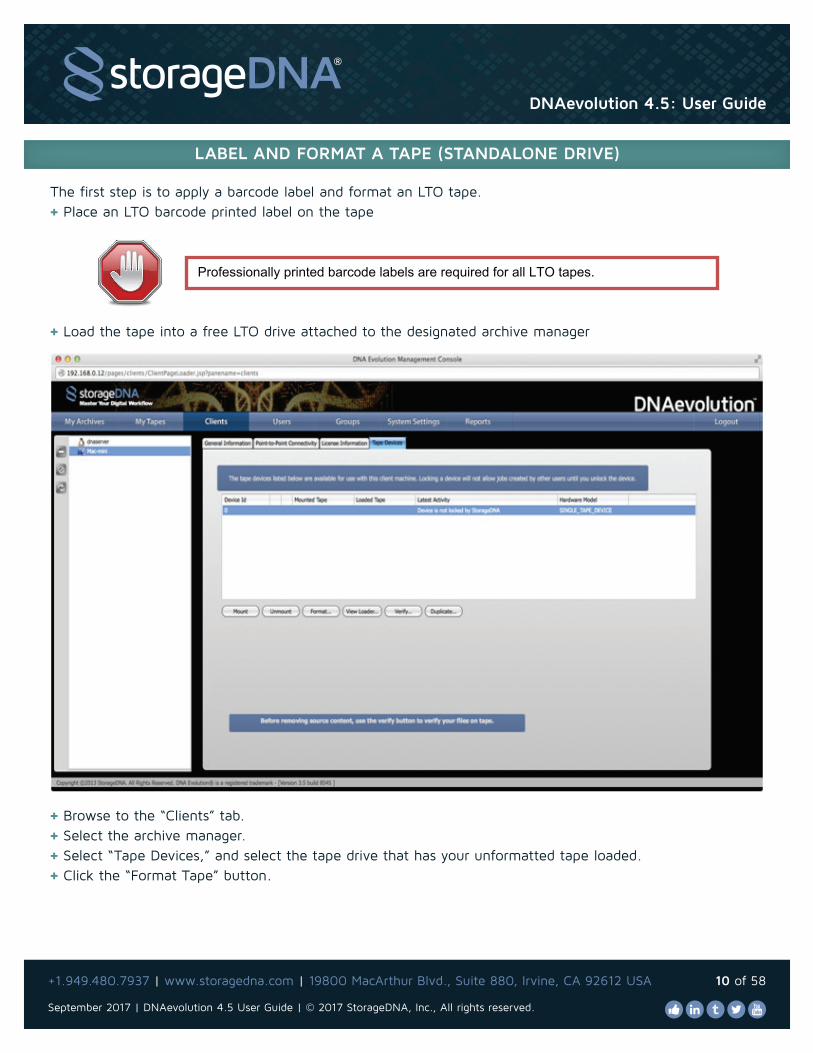
The first step is to apply a barcode label and format an LTO tape.+ Place an LTO barcode printed label on the tape
+ Load the tape into a free LTO drive attached to the designated archive manager
+ Browse to the “Clients” tab.+ Select the archive manager.+ Select “Tape Devices,” and select the tape drive that has your unformatted tape loaded.+ Click the “Format Tape” button.
Professionally printed barcode labels are required for all LTO tapes.

+1.949.480.7937 | www.storagedna.com | 19800 MacArthur Blvd., Suite 880, Irvine, CA 92612 USA
September 2017 | DNAevolution 4.5 User Guide | © 2017 StorageDNA, Inc., All rights reserved.
11 of 58
DNAevolution 4.5: User Guide
+ Provide the six-character serial number of the barcode label. (NOTE: You cannot format a tape with the same serial number as a previously formatted tape).+ Select the format type as “Normal”.+ NOTE: In an autoloader, DNAevolutionwill auto-select the LTFS volume serial number to match the tape label serial number.
The barcode serial number and the LTFS volume name MUST MATCH
+ Once formatted you can mount the tape using the “Mount Tape” button, and ensure you see the correct serial number.+ After the tape has been formatted, switch to the “My Tapes” tab, and ensure that you see the tape in the list.+ Finally, unmount the tape if you wish to eject it, using the “Unmount Tape” button in the Tape Devices tab.
You cannot format a tape with an existing serial number–you have to pick a new serialnumber not registered in the database.

-
+1.949.480.7937 | www.storagedna.com | 19800 MacArthur Blvd., Suite 880, Irvine, CA 92612 USA
September 2017 | DNAevolution 4.5 User Guide | © 2017 StorageDNA, Inc., All rights reserved.
12 of 58
DNAevolution 4.5: User Guide
To batch format multiple tapes, refer to the “Administrator Guide”. This guide onlycovers formatting one tape at a time.
Follow these steps for manually formatting one or more tapes in an autoloader:+ Label all tapes you wish to load into an autoloader. Each tape must have a unique six-digit bar code label attached to it.
FORMAT A TAPE (AUTOLOADER)
DNAevolution relies on the bar code label for library automation and cannot functionwithout tape labels.
+ Load the tapes into the slot magazine and load the magazine into the library.
+ Once the tapes are loaded, browse to the “Clients” tab.+ Select the archive manager connected to the automation unit.+ Select the “Tape Devices” tab, and select the automation unit.+ Click on the “View Auto Loader” button.The following window will open:
Make sure NO TAPES are loaded in the autoloader drives and are unloaded into theiroriginal slots. Loading tapes into a slot that was previously occupied by a tape in a drivecan cause the autoloader to malfunction.
UNFORMATTED TAPE – NOT PART OF SYSTEM
FORMATTED TAPE – PART OF SYSTEM

+1.949.480.7937 | www.storagedna.com | 19800 MacArthur Blvd., Suite 880, Irvine, CA 92612 USA
September 2017 | DNAevolution 4.5 User Guide | © 2017 StorageDNA, Inc., All rights reserved.
13 of 58
DNAevolution 4.5: User Guide
CREATE AN ARCHIVE
+ In the screen above, any unformatted tapes will appear as “No” in the “Part of System” field; any formatted tapes will appear as “Yes”.+ First, load the tape you wish to format to the appropriate drive.Do this by selecting the tape, selecting the drive from the dropdown, and clicking “Load Tape” for the appropriate drive.+ Once the tape is loaded, you can format it: Close this window, and return to the previous window; here, you can click the “Format Tape” button.+ In an autoloader, it will auto-select the LTFS volume serial number to match the tape label serial number.+ Once the tape is formatted, mount it, and ensure you see the correct serial number.+ After the tape has been formatted, switch to the “My Tapes” tab, and ensure that you see the tape in the list.+ Finally, unmount the tape if you wish to eject it.
After formatting your first tape, you can create an archive. An archive is a virtual folder that holds all the content you have copied from disk to tapeunder that archive name. It gives you a single namespace that you can browse and search. In addition, an archive can span multiple tapes.
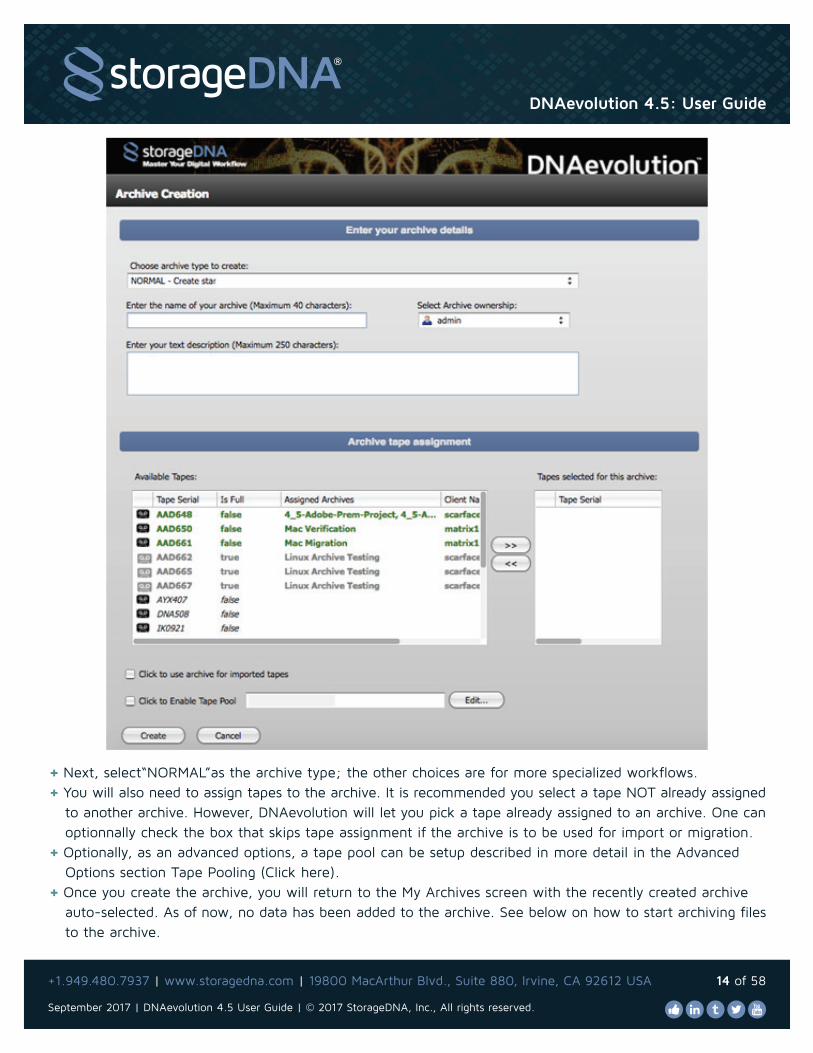
+ Browse to the “My Archives” tab+ Click on “Create Archive”button+ Provide a name, ownership, and description (NOTE: As an admin, you can assign the archive to another user or group). (See the next screenshot.)
September 2017 | DNAevolution 4.5 User Guide | © 2017 StorageDNA, Inc., All rights reserved.
+1.949.480.7937 | www.storagedna.com | 19800 MacArthur Blvd., Suite 880, Irvine, CA 92612 USA 14 of 58
+ Next, select“NORMAL”as the archive type; the other choices are for more specialized workflows.+ You will also need to assign tapes to the archive. It is recommended you select a tape NOT already assigned to another archive. However, DNAevolution will let you pick a tape already assigned to an archive. One can optionnally check the box that skips tape assignment if the archive is to be used for import or migration.+ Optionally, as an advanced options, a tape pool can be setup described in more detail in the Advanced Options section Tape Pooling (Click here).+ Once you create the archive, you will return to the My Archives screen with the recently created archive auto-selected. As of now, no data has been added to the archive. See below on how to start archiving files to the archive.
DNAevolution 4.5: User Guide

September 2017 | DNAevolution 4.5 User Guide | © 2017 StorageDNA, Inc., All rights reserved.
+1.949.480.7937 | www.storagedna.com | 19800 MacArthur Blvd., Suite 880, Irvine, CA 92612 USA 15 of 58
CREATE AN ARCHIVE GROUP
DNAevolution allows you to create archive Groups. Archive Groups are useful to help organize your archives as the number of your archives grows. (See the next screenshot.)
TO CREATE OR EDIT A GROUP:
Create a Group:+ To create an archive Group, click on the “Group” button on the action toolbar on the My Archives main page.+ After the Group add/edit screen opens, click on Add Group. (See next screenshot.)
+ Select a name and click ok.
Add/Edit a Group+ After the Group add/edit screen opens, select the Group that you want to add or remove archives from the dropdown.+ Add or remove archives using the greater than/ less than arrows.+ Click Update.
START ARCHIVING
+ To start archiving media files, select the archive you wish to copy content into and click on the “Archive” button in the main action pane (shown above).
DNAevolution 4.5: User Guide

September 2017 | DNAevolution 4.5 User Guide | © 2017 StorageDNA, Inc., All rights reserved.
+1.949.480.7937 | www.storagedna.com | 19800 MacArthur Blvd., Suite 880, Irvine, CA 92612 USA 16 of 58
DNAevolution 4.5: User Guide
+ The archive window will open and a popup will instruct you to create a job.
TIP: Popup blockers may prevent the archive screen from opening. In such cases, enable thepopup for the DNAevolution site, close the archive screen and reopen via the “Archive” button.
+ A job is the worker (as described earlier) that ties an archive manager, an archive client (optional),and selected options together within DNAevolution.+ NOTE: The first time you click on the Archive button, you will be promptedto create at least one job (see previous screenshot). Click Ok. You may have a popup blocker (see next screenshot). Allow popups to be opened from the DNAevolution server.
+ You will need to select the source and target machine (see next screenshot). In most case, the source and target machines are going to be the same (an archive manager). If you wish to archive between two different machines, select an archive client and manager.

September 2017 | DNAevolution 4.5 User Guide | © 2017 StorageDNA, Inc., All rights reserved.
+1.949.480.7937 | www.storagedna.com | 19800 MacArthur Blvd., Suite 880, Irvine, CA 92612 USA 17 of 58
DNAevolution 4.5: User Guide
+ You will need to provide the username and password of a user on the source machine.+ Once done, you are ready to start archiving.
ARCHIVE FOLDERS
+ By default, the archive consoleis in “Folder” modevisible in the Summary section (seenext screenshot).
+ To add folders for archiving, click on the “Add Folder” button and navigate to the desired source location. Check off the volume(s) or folders(s) you want to have DNAevolution archive.+ Once selected, click the “Start” icon to begin archiving.
ARCHIVE CAMERA MAGAZINES
Archiving camera magazines is similar to archiving folders (as described in the previous section). However, the interface gives you the ability to quickly tailor labels and paths for camera masters.
September 2017 | DNAevolution 4.5 User Guide | © 2017 StorageDNA, Inc., All rights reserved.
+1.949.480.7937 | www.storagedna.com | 19800 MacArthur Blvd., Suite 880, Irvine, CA 92612 USA 18 of 58
DNAevolution 4.5: User Guide
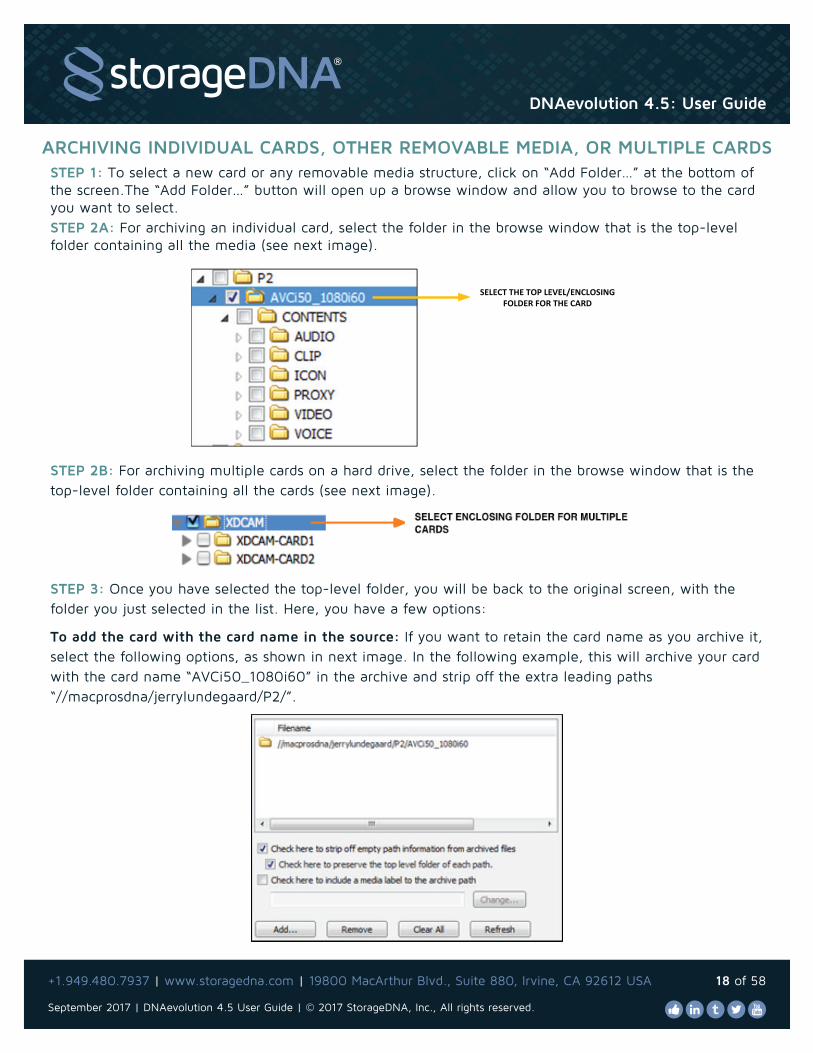
ARCHIVING INDIVIDUAL CARDS, OTHER REMOVABLE MEDIA, OR MULTIPLE CARDSSTEP 1: To select a new card or any removable media structure, click on “Add Folder…” at the bottom of the screen.The “Add Folder…” button will open up a browse window and allow you to browse to the card you want to select.STEP 2A: For archiving an individual card, select the folder in the browse window that is the top-level folder containing all the media (see next image).
SELECT THE TOP LEVEL/ENCLOSING
FOLDER FOR THE CARD
STEP 2B: For archiving multiple cards on a hard drive, select the folder in the browse window that is the top-level folder containing all the cards (see next image).
STEP 3: Once you have selected the top-level folder, you will be back to the original screen, with the folder you just selected in the list. Here, you have a few options:
To add the card with the card name in the source: If you want to retain the card name as you archive it, select the following options, as shown in next image. In the following example, this will archive your card with the card name “AVCi50_1080i60” in the archive and strip off the extra leading paths “//macprosdna/jerrylundegaard/P2/”.
September 2017 | DNAevolution 4.5 User Guide | © 2017 StorageDNA, Inc., All rights reserved.
+1.949.480.7937 | www.storagedna.com | 19800 MacArthur Blvd., Suite 880, Irvine, CA 92612 USA 19 of 58
DNAevolution 4.5: User Guide
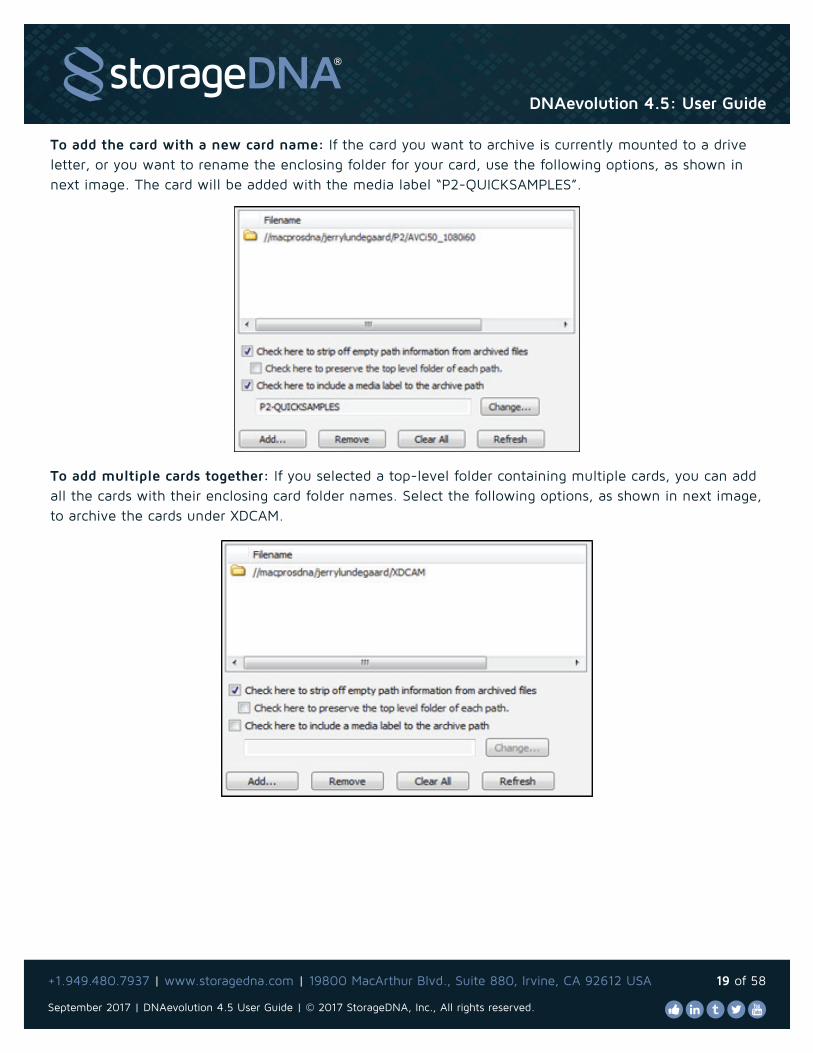
To add the card with a new card name: If the card you want to archive is currently mounted to a drive letter, or you want to rename the enclosing folder for your card, use the following options, as shown in next image. The card will be added with the media label “P2-QUICKSAMPLES”.
To add multiple cards together: If you selected a top-level folder containing multiple cards, you can add all the cards with their enclosing card folder names. Select the following options, as shown in next image, to archive the cards under XDCAM.

September 2017 | DNAevolution 4.5 User Guide | © 2017 StorageDNA, Inc., All rights reserved.
+1.949.480.7937 | www.storagedna.com | 19800 MacArthur Blvd., Suite 880, Irvine, CA 92612 USA 20 of 58
DNAevolution 4.5: User Guide
ARCHIVE VIA DRAG ‘N’ DROP
DNAevolution allows for a “drag ‘n’ drop” workflow. Once setup, you can simply drag files and folders that you want to archive into a pre-defined folder and DNAevolution auto-archives the files/folders, eliminating the need for end user intervention.
+ To setup a drag ‘n’ drop workflow, ensure the archive is in “Folder” mode.+ Click on “Add Folder” to select a designated drag ‘n’ drop folder.+ Tips on establishing a drag ‘n’ drop folder:
1. Pick or create a drop folder that is local to a shared volume: This means that when end users drag files into the drop folder, the files are “moved” rather than copied. This prevents a lengthy file-by-file copy into the drop folder. To ensure this, you may have to create a drop folder local to every volume. As an example if you have a SAN with multiple volumes mounted at different mount points, (/Volumes/SAN-VOL1; /Volumes/SAN-VOL2), you may have to create multiple drop folders.
2. Also instruct end users to drop files into the designated drop folder local to that volume.+ Once you have selected the appropriate drop folder, you will need to setup an automation schedule, so changes to the drop folder are automatically identified and archived. To setup automation, click on the “Configure” button next to the “Automation:OFF” item in the Archive Summary section of the UI. Pick a scheduled interval based on need. NOTE: It may be inefficient to set a 1 minute interval.+ Now end users can drag files into this folder for automated archiving.
Similar to setting up a drag ‘n’ drop folder, you can have DNAevolution monitor existing folders and workspaces for incremental archiving.+ To setup automated archiving of existing folders, ensure the archive is in “Folder” mode.+ Click on “Add Folder” and select the folder you want to setup for watch-folder archiving. You can select multiple folders this way.+ Once you have selected your watch folders, you will need to setup an automation schedule, so changes to the folders are automatically identified and incrementally archived. To setup automation, click on the “Configure” button next to the “Automation:OFF” item in the Archive Summary section of the UI. Pick a scheduled interval based on need. NOTE: It may be inefficient to set a 1 minute interval.+ DNAevolution will now auto-monitor and incrementally archive any changes.
In addition to archiving via folders, DNAevolution enables you to archive media connected to bins, sequences and projects using tickets.+ To archive via tickets, first ensure the archive is in ticket mode. Since, the archive is by default in folder mode (see next image), you will need to click the “Switch to Tickets” mode.+ Once in ticket mode, click on “Add Ticket”.
ARCHIVE VIA AUTOMATED WATCH FOLDERS
ARCHIVE TICKETS (AAF/XML/BIN/PROJECTS): MANUALLY

September 2017 | DNAevolution 4.5 User Guide | © 2017 StorageDNA, Inc., All rights reserved.
+1.949.480.7937 | www.storagedna.com | 19800 MacArthur Blvd., Suite 880, Irvine, CA 92612 USA 21 of 58
DNAevolution 4.5: User Guide
+ You can now browse and select the folder where you have exported AAF/XML files or have bin/projects files.+ Tips on creating a ticket drop folder:
1. It is best to export tickets to a drop folder that is easy for the end user to find.
2. All tickets in the folder will be processed.
3. Additionally, DNAevolution will process 1-level deep subfolders.+ Along with the drop folder, you will need to select the configuration for how the tickets will be processed. A description of each ticket can be found on the Ticket submission window in the Configuration Description area, and will change based on the selected ticket type.+ Upon clicking on “Add Archive Ticket”, each ticket will be processed separately.+ Each ticket processed will appear in the archive tickets listing. Tickets processed with warnings (e.g., files not online) will show up with a yellow warning icon, while tickets with no warnings show up with a green check mark icon.+ Media files found in each ticket can be viewed by clicking on “View File Listing”, while details of the conversion can be found by clicking on “View Conversion Log”.
Rather than manually processing tickets, end users can automate the process by simply dropping tickets into a watch folder for automatic conversion.+ To archive via tickets, first ensure the archive is in ticket mode. Since the archive is in folder mode by default, you will need to click the “Switch to Tickets” mode.+ Then click on Automation - “Configure” (see next image).
+ The automation configuration screen allows you to setup ticket-based automations.+ Enable the automation check box at the top of the window.+ Select the drop folder where end users will drop the tickets.+ Specify the configuration by which the tickets will be parsed. (NOTE: It is advisable to run a few manual ticket conversions to ensure that tickets are being properly processed before running automation.)+ An optional Target Label can be provided which is a sub-folder in the root archive under which files will be added.+ Save the automation with a username and password of the client machine.+ As end users drop tickets into the designated watch folder, they will now be auto-processed and archived.
ARCHIVE TICKETS (AAF/XML/BIN/PROJECTS): AUTOMATED
September 2017 | DNAevolution 4.5 User Guide | © 2017 StorageDNA, Inc., All rights reserved.
+1.949.480.7937 | www.storagedna.com | 19800 MacArthur Blvd., Suite 880, Irvine, CA 92612 USA 22 of 58
DNAevolution 4.5: User Guide
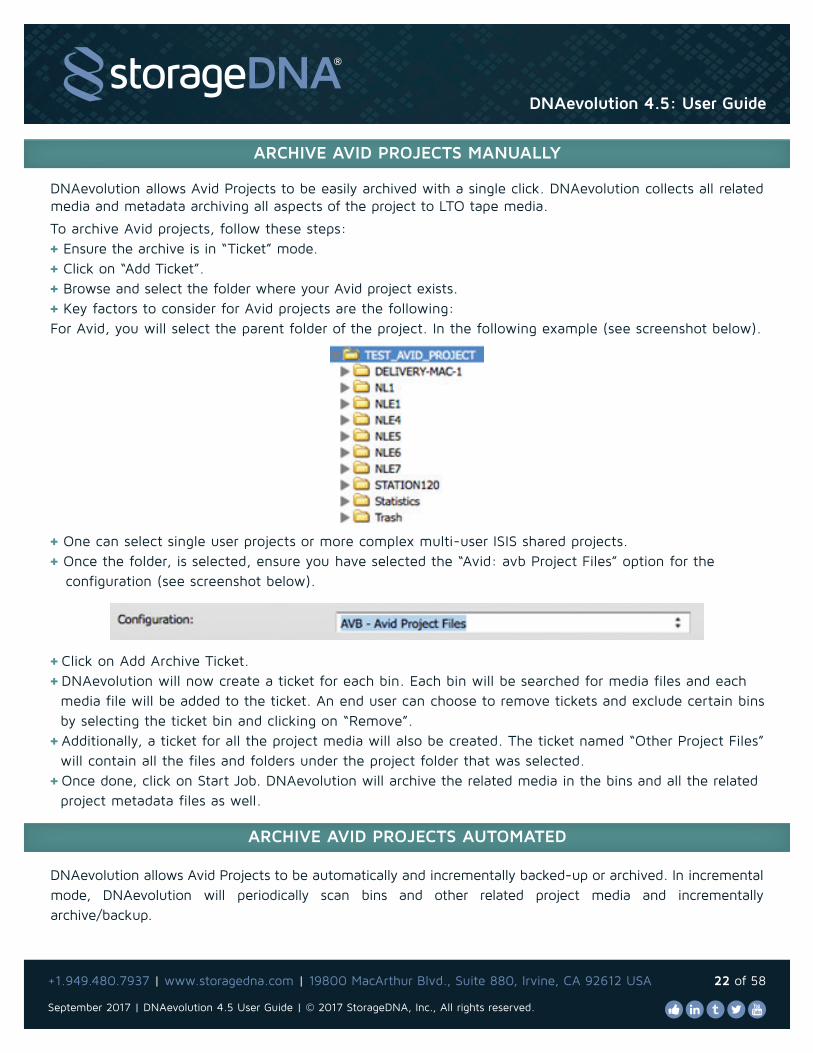
DNAevolution allows Avid Projects to be easily archived with a single click. DNAevolution collects all related media and metadata archiving all aspects of the project to LTO tape media.
To archive Avid projects, follow these steps:+ Ensure the archive is in “Ticket” mode.+ Click on “Add Ticket”.+ Browse and select the folder where your Avid project exists.+ Key factors to consider for Avid projects are the following:For Avid, you will select the parent folder of the project. In the following example (see screenshot below).
+ One can select single user projects or more complex multi-user ISIS shared projects.+ Once the folder, is selected, ensure you have selected the “Avid: avb Project Files” option for the configuration (see screenshot below).
+ Click on Add Archive Ticket.+ DNAevolution will now create a ticket for each bin. Each bin will be searched for media files and each media file will be added to the ticket. An end user can choose to remove tickets and exclude certain bins by selecting the ticket bin and clicking on “Remove”.+ Additionally, a ticket for all the project media will also be created. The ticket named “Other Project Files” will contain all the files and folders under the project folder that was selected.+ Once done, click on Start Job. DNAevolution will archive the related media in the bins and all the related project metadata files as well.
DNAevolution allows Avid Projects to be automatically and incrementally backed-up or archived. In incremental mode, DNAevolution will periodically scan bins and other related project media and incrementally archive/backup.
ARCHIVE AVID PROJECTS MANUALLY
ARCHIVE AVID PROJECTS AUTOMATED

September 2017 | DNAevolution 4.5 User Guide | © 2017 StorageDNA, Inc., All rights reserved.
+1.949.480.7937 | www.storagedna.com | 19800 MacArthur Blvd., Suite 880, Irvine, CA 92612 USA 23 of 58
DNAevolution 4.5: User Guide
To archive/backup Avid projects automatically, follow these steps:+ Ensure the archive is in “Ticket” mode.+ Click on “Configure Automation”. (see screenshot below)
+ The automation window will appear. First check the box that says “Click here to enable automation”.+ In configuration, pick “AVB: Avid Project Files”.+ Click “Add Location” and select the Avid project folder you would like to monitor. NOTE: You can add multiple projects and folders here.+ Select you scan interval in which the project will be monitored.+ Provide the username and password of the machine this will run on and click Update.+ The system will auto-scan and incrementally archive/backup Avid projects and related media.
DNAevolution allows Adobe Projects to be easily archived with a single click. DNAevolution collects all related media and metadata archiving all aspects of the project to LTO tape media.To archive Adobe, follow these steps:+ Ensure the archive is in “Ticket” mode.+ Click on “Add Ticket”.+ Browse and select the folder where your Adobe project exists.+ Key factors to consider for Adobe projects are the following: For Adobe, you will select the parent folder of the project. This is the folder that must contain your prproj project files. NOTE: Adobe tends to put all prproj files into a flat directory. It is important that when you create your project or before you archive that you must move the project file to its own directory.+ Once the folder, is selected, ensure you have selected the “Prproj: Adobe Project Files” option for the configuration (see screenshot below).
+ Click on Add Archive Ticket.+ DNAevolution will now create a ticket for the project. + Additionally, a ticket for all project file will also be created. + Once done, click on Start Job. DNAevolution will archive the related media in the bins and all the related project metadata files as well.
ARCHIVE AVID PROJECTS MANUALLY

September 2017 | DNAevolution 4.5 User Guide | © 2017 StorageDNA, Inc., All rights reserved.
+1.949.480.7937 | www.storagedna.com | 19800 MacArthur Blvd., Suite 880, Irvine, CA 92612 USA 24 of 58
DNAevolution 4.5: User Guide
DNAevolution allows Adobe Projects to be automatically and incrementally backed-up or archived. In incremental mode, DNAevolution will periodically scan bins and other related project media and incrementally archive/backup.To archive/backup Avid projects automatically, follow these steps:+ Ensure the archive is in “Ticket” mode.+ Click on “Configure Automation”. (see screenshot below)
+ The automation window will appear. First check the box that says “Click here to enable automation”.+ In configuration, pick “Prproj: Adobe Project Files”.+ Click “Add Location” and select the Avid project folder you would like to monitor. NOTE: You can add multiple projects and folders here.+ Select you scan interval in which the project will be monitored.+ Provide the username and password of the machine this will run on and click Update+ The system will auto-scan and incrementally archive/backup Adobe projects and related media.
The archive screen provides an easy way to monitor the running job. The summary section shows a view of the current job (shown in next image).
In addition, detailed progress can be monitored by clicking the “View Progress” icon (next image).
ARCHIVE ADOBE PROJECTS AUTOMATED
MONITORING THE ARCHIVING PROCESS

September 2017 | DNAevolution 4.5 User Guide | © 2017 StorageDNA, Inc., All rights reserved.
+1.949.480.7937 | www.storagedna.com | 19800 MacArthur Blvd., Suite 880, Irvine, CA 92612 USA 25 of 58
DNAevolution 4.5: User Guide
TIP: The archive screen and job progress both have their own unique URL. End users can monitorthe archive simply by opening this URL in Firefox.
Additionally, progress can be monitored via the dashboard. The dashboard can be accessed via clicking the icon on the action toolbar.
The archive screen also shows previous job runs (shown in next image). Details of each job run can be seen by selecting the run and clicking on “View History Details”.
VIEWING PREVIOUS RUNS AND REPORTS

September 2017 | DNAevolution 4.5 User Guide | © 2017 StorageDNA, Inc., All rights reserved.
+1.949.480.7937 | www.storagedna.com | 19800 MacArthur Blvd., Suite 880, Irvine, CA 92612 USA 26 of 58
DNAevolution 4.5: User Guide
Once an archive job has run successfully, you can browse your archive and perform searches. DNAevolution offers you a number of ways to search and browse your media.
BROWSE FILESThe first tab, “Browse Files”, allows you to browse your entire archive like a file-system. You can view the contents of the entire archive (across tapes) in this tab. You can use the toolbar icons above to navigate your archive. For every file (NOT FOLDER), you can see details:
The tape signifies the tape where the file is stored. The tape itself can be sitting offline on a shelf. From the “Browse Files” tab, you can multi-select files and folders for restores.
DETERMINING FOLDER SIZE AND OTHER DETAILSAdditional information about each folder archived can be viewed by clicking the “I/info” icon for each folder. A new window opens and provides useful information about that folder (see next image). Size of the folder, number of files, tapes used, and previous runs to the folder can be found in this report.
ARCHIVE ASSET MANAGER: BROWSE, SEARCH, VIEW CLIPS, AND PROXIES

September 2017 | DNAevolution 4.5 User Guide | © 2017 StorageDNA, Inc., All rights reserved.
+1.949.480.7937 | www.storagedna.com | 19800 MacArthur Blvd., Suite 880, Irvine, CA 92612 USA 27 of 58
DNAevolution 4.5: User Guide
SEARCH FILES AND REVEAL LOCATIONThe last tab allows you to search across filenames and operating system attributes. You can perform full and partial text search with wildcards across file names, path, and tape names. Examples include:Sample: Search across filenames
The search shown above: A00*.mxf tells DNAevolution to search for all files that begin with “A00” but end with “.mxf” in the archive.
Sample: Search across tape-names
The above search lists all files on a particular tape.
TIP: You can use a forward slash “/”, then “return” to “show all” files in a given archive

September 2017 | DNAevolution 4.5 User Guide | © 2017 StorageDNA, Inc., All rights reserved.
+1.949.480.7937 | www.storagedna.com | 19800 MacArthur Blvd., Suite 880, Irvine, CA 92612 USA 28 of 58
DNAevolution 4.5: User Guide
TIP: Once a file or directory has been found, you can click the “Reveal” icon to have the systembring you to the containing directory. This is useful to determine the exact location of the file within thearchive. Additionally, you can double-click on a file or folder to browse to the parent location in Browse Files.
BROWSE CLIPS AND REVEAL LOCATION
The “Search Clips” tab allows you to view your content as clips (shown in the previous image) rather than as a file-system. It shows you all clips across the entire archive without having to browse the archive as a file-system.
Icons for Metadata and Proxy are next to the Clip type icon.
+ Metadata icon (Tag) indicates there has been user metadata added to the clip
+ Proxy icon (eyeball) indicates there is a low resolution proxy available to use for preview Double-clicking on any selected clip reveals a proxy player and the Clip Info extended metadata window
DNAevolution automatically creates clips as content is archived. Clips are created using the following algorithms for different file types:
+ Clips for complex file types (e.g., P2, XDCAM, Avid Op Atom MXF): For complex file types that have a multi-file structure per media element (or clip), DNAevolution presents the entire media element as a single clip. The clip name for Avid OP-Atom files is obtained from the “User Clip Name” field embedded in the MXF file. For P2 and XDCAM, clip names are extracted from the name of the video filename.
NOTE: Clips may not be available up to five minutes after the archive finishes.running. This is due to the indexer running in the background every five minutes.

September 2017 | DNAevolution 4.5 User Guide | © 2017 StorageDNA, Inc., All rights reserved.
+1.949.480.7937 | www.storagedna.com | 19800 MacArthur Blvd., Suite 880, Irvine, CA 92612 USA 29 of 58
DNAevolution 4.5: User Guide
+ Clips for simple file types (e.g., MOVs, etc.): For file types that have a one-to-one mapping between file and clip, DNAevolution simply uses the filename.
You can select a clip and restore it via the “Restore” icon. DNAevolution automatically collects the appropriate files (for complex clips) and paths.
You can additionally see a detailed metadata and preview view as described below.
Additionally, you can “Goto Directory” on clips to highlight the containing folder.
PLAY PREVIEWS, EXTENDED METADATA VIEWThe detailed Clip Info view has a number of sections:
PROXY PREVIEW
NOTE: Previews may not be available up to fifteen minutes after the preview is dropped into the previews folder. This is due to the indexer running in the background every fifteen minutes
September 2017 | DNAevolution 4.5 User Guide | © 2017 StorageDNA, Inc., All rights reserved.
+1.949.480.7937 | www.storagedna.com | 19800 MacArthur Blvd., Suite 880, Irvine, CA 92612 USA 30 of 58
DNAevolution 4.5: User Guide
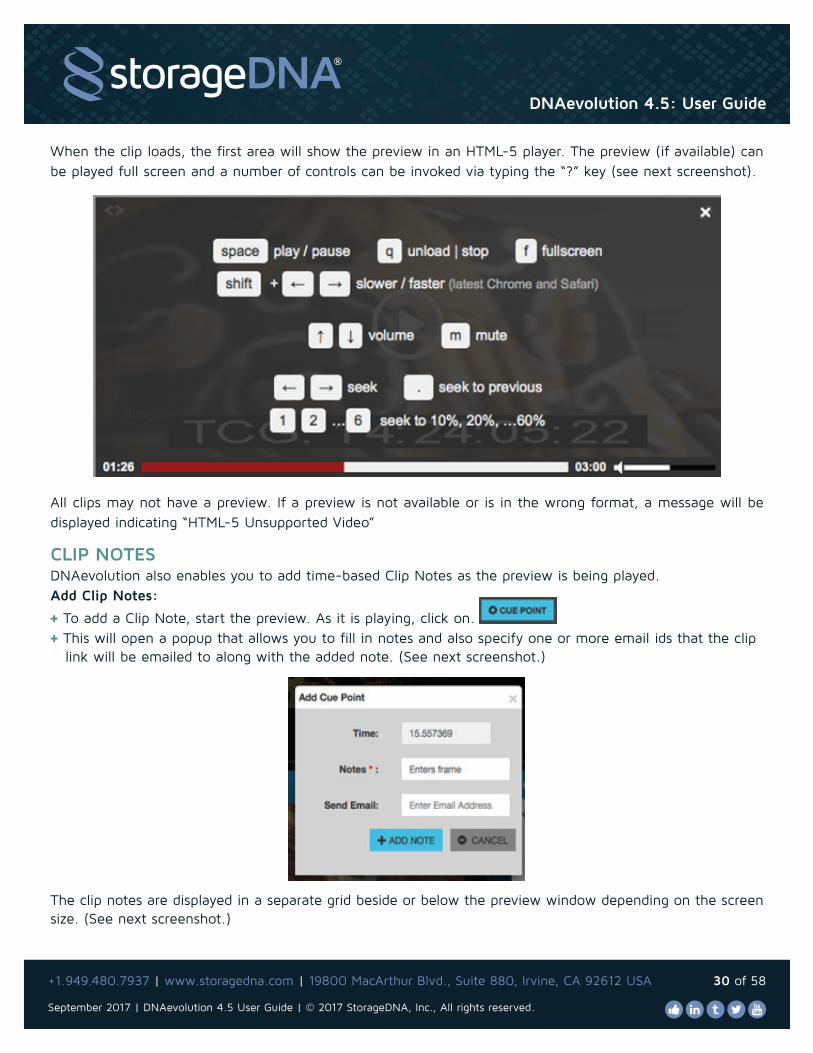
When the clip loads, the first area will show the preview in an HTML-5 player. The preview (if available) can be played full screen and a number of controls can be invoked via typing the “?” key (see next screenshot).
All clips may not have a preview. If a preview is not available or is in the wrong format, a message will be displayed indicating “HTML-5 Unsupported Video”
CLIP NOTESDNAevolution also enables you to add time-based Clip Notes as the preview is being played.Add Clip Notes:
+ To add a Clip Note, start the preview. As it is playing, click on.+ This will open a popup that allows you to fill in notes and also specify one or more email ids that the clip link will be emailed to along with the added note. (See next screenshot.)
The clip notes are displayed in a separate grid beside or below the preview window depending on the screen size. (See next screenshot.)

September 2017 | DNAevolution 4.5 User Guide | © 2017 StorageDNA, Inc., All rights reserved.
+1.949.480.7937 | www.storagedna.com | 19800 MacArthur Blvd., Suite 880, Irvine, CA 92612 USA 31 of 58
DNAevolution 4.5: User Guide
Deleting Clip Notes:
+ To delete a Clip Note, select the Clip Note on the grid.+ Right click and click on “Delete this record”Jump to and search Clip Notes:+ To jump to different sections of the preview, simply click on the desired Clip Note. + To search Clip Notes, click on the Filter icon and type a search term. (See next screenshot.) Once found, you can jump to the desired point in the video. All Clip Notes are searchable as part of global search as well. (Described in the section: “Global Search”).
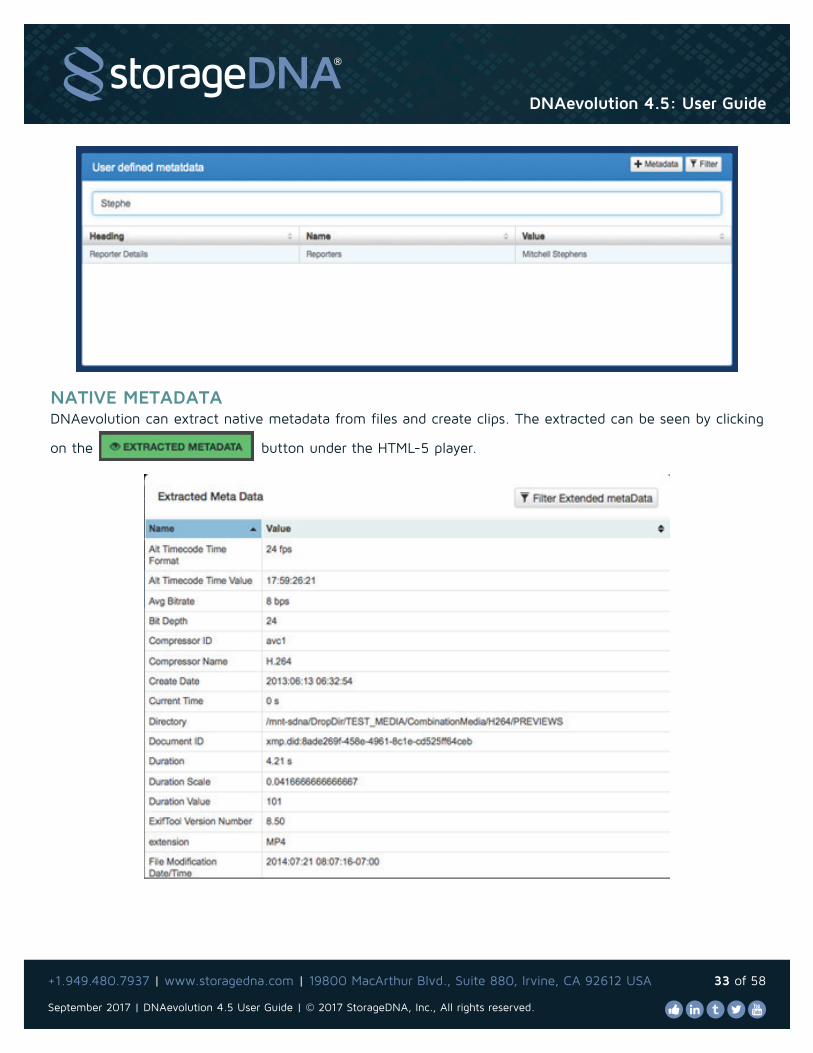
CUSTOM METADATA TAGGING (SINGLE AND BULK)DNAevolution enables you to add custom metadata. Custom metadata is displayed in a grid below the Clip Notes (see next screenshot). Templates can be added by the administrator described in the “Administrator Guide”.
Add custom metadata to single clip:
+ To add custom metadata to a clip, click on the +Metadata in the User Metadata section of the accordion.+ Select the desired template from the dropdown (see next image) NOTE: The Update Template is an administrator operation.+ Upon selecting the template, the meta-data tagging window will open

September 2017 | DNAevolution 4.5 User Guide | © 2017 StorageDNA, Inc., All rights reserved.
+1.949.480.7937 | www.storagedna.com | 19800 MacArthur Blvd., Suite 880, Irvine, CA 92612 USA 32 of 58
DNAevolution 4.5: User Guide
+ Upon completion of tagging, click on “Save Data”
Add custom metadata to multiple clips (Bulk Tagging):+ To add custom metadata to multiple clips go to the Browse clips section of the desired archive in My Archives. + Select the desired clips and click on the (Tag) icon. + A popup will open where you can select the desired metadata template. (NOTE: Leave the ticket name as the default) (Screenshot below)+ Upon selection of the template, you can tag the content as shown earlier. The tags will apply to all clips selected.
Search custom metadata:
+ To search across custom metadata, click on the Filter icon and type a search term. (See next screenshot). All custom metadata is searchable as part of global search as well. (Described in the section: “Global Search”).
September 2017 | DNAevolution 4.5 User Guide | © 2017 StorageDNA, Inc., All rights reserved.
+1.949.480.7937 | www.storagedna.com | 19800 MacArthur Blvd., Suite 880, Irvine, CA 92612 USA 33 of 58
DNAevolution 4.5: User Guide
NATIVE METADATADNAevolution can extract native metadata from files and create clips. The extracted can be seen by clicking
on the button under the HTML-5 player.

September 2017 | DNAevolution 4.5 User Guide | © 2017 StorageDNA, Inc., All rights reserved.
+1.949.480.7937 | www.storagedna.com | 19800 MacArthur Blvd., Suite 880, Irvine, CA 92612 USA 34 of 58
DNAevolution 4.5: User Guide
Search native metadata:
+ To search across native extracted metadata, click on the Filter icon and type a search term. (See next screenshot). Certain native metadata is searchable as part of global search as well. (Described in the section: “Global Search”).
GLOBAL SEARCHDNAevolution also includes a global search feature. The global search bar is located in the My Archives page. (See next screenshot)
How It Works: When a search is conducted in the global search bar, the search is performed across all archives and archives that return a hit are highlighted. When the archive with a hit is selected, the search is shown under that archive (shown in next image). If an archive in a Group returns a hit, the Group can be expanded to reveal the highlighted archive.
PERFORMING GLOBAL FILE SEARCHESA file search allows you to conduct searches across file metadata. This includes filename, directories, tape-ids, and checksums. This search does not conduct a search into clip metadata that can be conducted via the clip and contents search dropdown.

September 2017 | DNAevolution 4.5 User Guide | © 2017 StorageDNA, Inc., All rights reserved.
+1.949.480.7937 | www.storagedna.com | 19800 MacArthur Blvd., Suite 880, Irvine, CA 92612 USA 35 of 58
DNAevolution 4.5: User Guide
To conduct a file search, type directly into the search bar and click “enter” or click on the start icon.
This results in a file search across all archives. When a highlighted archive is selected, the screen automatically selects the “Search Files” tab where your search results will be highlighted. (See next screenshot)
+ Upon seeing the search results, you can select an element and click on the (Reveal) icon to jump to browse to determine the exact location of the item.
PERFORMING GLOBAL CLIP & CONTENT SEARCHESDNAevolution also allows for global clip name and clip metadata searches. To perform a global search by clip name or clip contents instead of typing directly into the search bar, click on the dropdown and select “Search for clips by name” or “Search for clips by content”. (See next screenshot.) The following examples are performed on clip name but can be used for both clip names and content.
Upon selecting the dropdown, a popup box will open, where you will type your search. Clip name and content search is slightly different in that it allows for a number of types of searches. For this example, we have the following clips in an archive:

September 2017 | DNAevolution 4.5 User Guide | © 2017 StorageDNA, Inc., All rights reserved.
+1.949.480.7937 | www.storagedna.com | 19800 MacArthur Blvd., Suite 880, Irvine, CA 92612 USA 36 of 58
DNAevolution 4.5: User Guide
Ends with searches:
+ Ends with searches can be conducted by typing in a part of the search term preceded by a “*” (See next screenshot). In this example, we searched for any clip that ends with “21_07240Q” and three clips were returned
Starts with searches:
+ Starts with searches can be conducted by typing in a part of the search term followed by a “*” (See next screenshot). In this example, we searched for any clip that starts with with “A002_C021” and four clips were returned.

September 2017 | DNAevolution 4.5 User Guide | © 2017 StorageDNA, Inc., All rights reserved.
+1.949.480.7937 | www.storagedna.com | 19800 MacArthur Blvd., Suite 880, Irvine, CA 92612 USA 37 of 58
DNAevolution 4.5: User Guide
Clip Restore: Contents search is conducted on a number of clip fields. This includes the clip name,Clip Notes, user metadata and any native metadata containing the words title, keyword or description.
AND/OR/NOT searches:
+ The search engine also supports logical searches. To search for logical terms provide a $AND$ $OR$ $NOT$ 1. E.g. red $AND$ green will search all occurrences of metadata that has the word red and green. NOTE that searching for “red and green” will search for the literal text “red and green”. 2. Similarly $OR$, $NOT$ terms can be used as well.
Other wildcard searches:
+ DNAevolution also allows for the use of ? and * for the substitution of one or many characters for more complex searches.
DNAevolution allows you to select files, folders and clips for restoring using the web. You can select one or more (multi-select) files, folders and clips for restore, while browsing or searching.
+ During browse/search, select one or more files, folders or clips and click on the “Restore” button from the Browse toolbar. (See next screenshot)
+ You can choose to restore the files to their original location or to an alternative location (see next image)
Multiselect Clip Notes: Press the Shift key to select multiple files, folders or clips.
RESTORE USING THE WEB INTERFACE
September 2017 | DNAevolution 4.5 User Guide | © 2017 StorageDNA, Inc., All rights reserved.
+1.949.480.7937 | www.storagedna.com | 19800 MacArthur Blvd., Suite 880, Irvine, CA 92612 USA 38 of 58
DNAevolution 4.5: User Guide
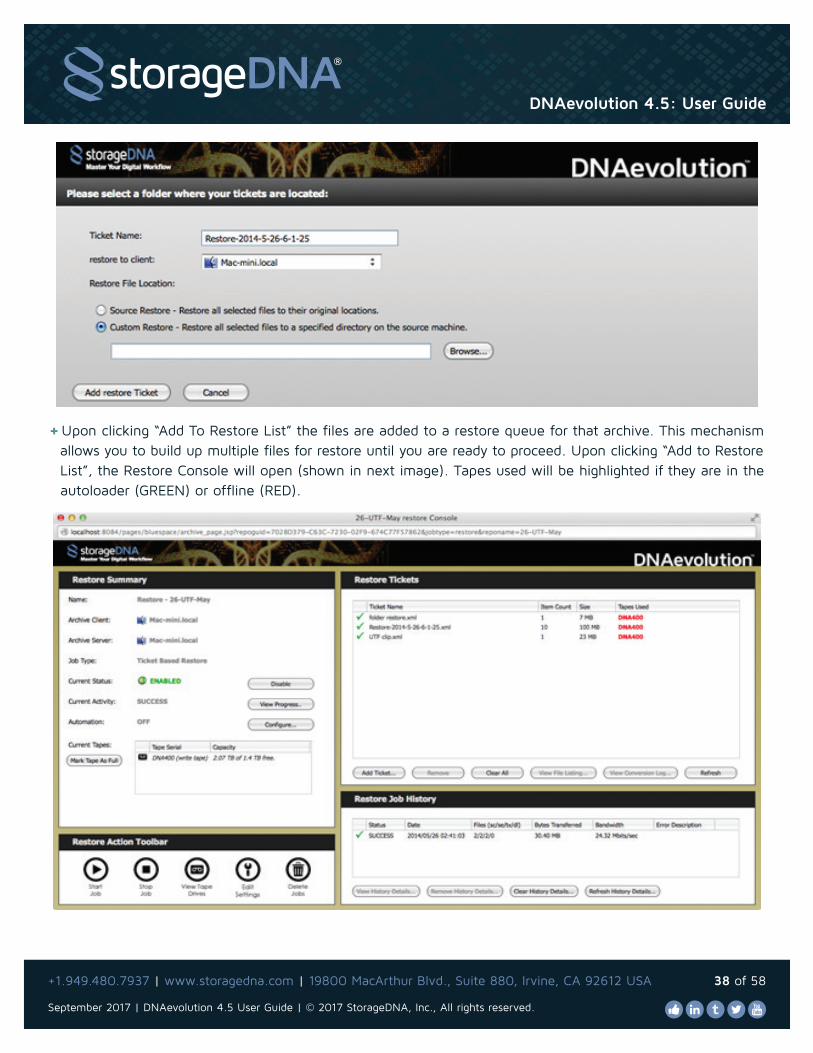
+ Upon clicking “Add To Restore List” the files are added to a restore queue for that archive. This mechanism allows you to build up multiple files for restore until you are ready to proceed. Upon clicking “Add to Restore List”, the Restore Console will open (shown in next image). Tapes used will be highlighted if they are in the autoloader (GREEN) or offline (RED).
September 2017 | DNAevolution 4.5 User Guide | © 2017 StorageDNA, Inc., All rights reserved.
+1.949.480.7937 | www.storagedna.com | 19800 MacArthur Blvd., Suite 880, Irvine, CA 92612 USA 39 of 58
DNAevolution 4.5: User Guide
+ After you have added all the restore requests and Tapes Used list indicates all tapes are online, you can run the restore job by clicking the “Start Job” button.
In addition to restoring via the web, you can restore by providing an AAF/XML ticket. The provided ticket is parsed for media elements and each element is searched for in the archive. If a match is found, the file is added for restore.
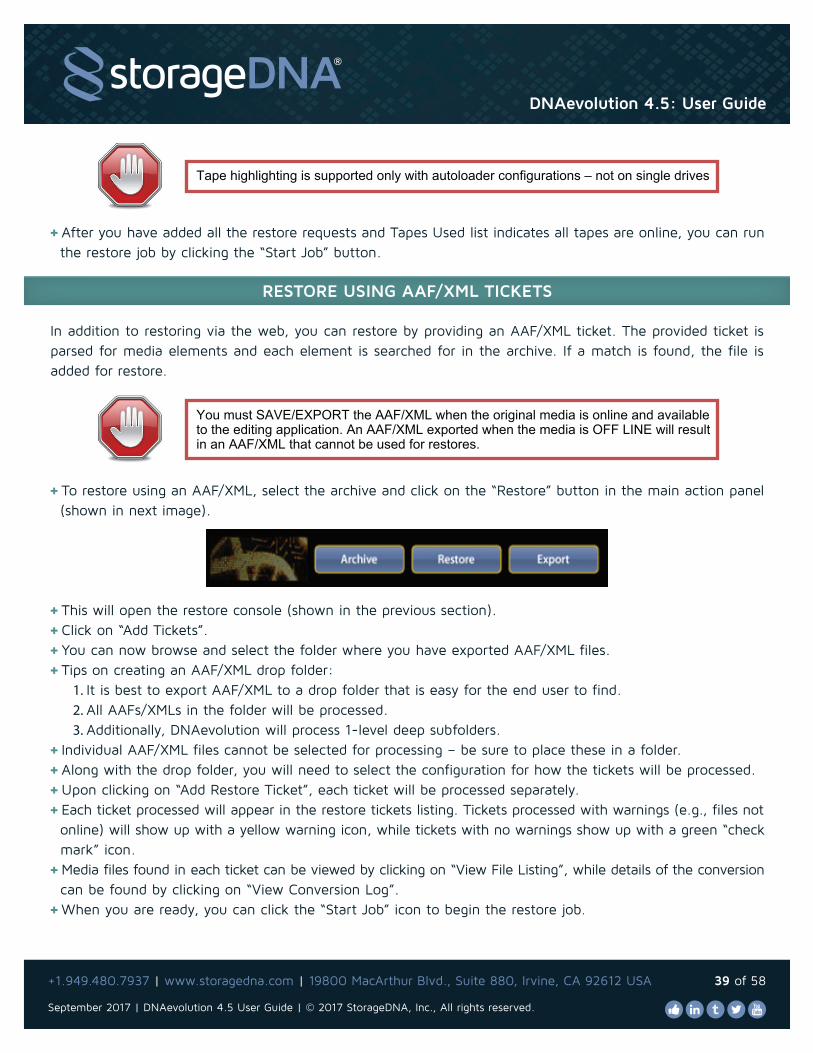
+ To restore using an AAF/XML, select the archive and click on the “Restore” button in the main action panel (shown in next image).
+ This will open the restore console (shown in the previous section).+ Click on “Add Tickets”.+ You can now browse and select the folder where you have exported AAF/XML files.+ Tips on creating an AAF/XML drop folder:
1. It is best to export AAF/XML to a drop folder that is easy for the end user to find. 2. All AAFs/XMLs in the folder will be processed. 3. Additionally, DNAevolution will process 1-level deep subfolders.
+ Individual AAF/XML files cannot be selected for processing – be sure to place these in a folder.+ Along with the drop folder, you will need to select the configuration for how the tickets will be processed.+ Upon clicking on “Add Restore Ticket”, each ticket will be processed separately.+ Each ticket processed will appear in the restore tickets listing. Tickets processed with warnings (e.g., files not online) will show up with a yellow warning icon, while tickets with no warnings show up with a green “check mark” icon.+ Media files found in each ticket can be viewed by clicking on “View File Listing”, while details of the conversion can be found by clicking on “View Conversion Log”.+ When you are ready, you can click the “Start Job” icon to begin the restore job.
Tape highlighting is supported only with autoloader configurations – not on single drives
RESTORE USING AAF/XML TICKETS
You must SAVE/EXPORT the AAF/XML when the original media is online and availableto the editing application. An AAF/XML exported when the media is OFF LINE will resultin an AAF/XML that cannot be used for restores.

September 2017 | DNAevolution 4.5 User Guide | © 2017 StorageDNA, Inc., All rights reserved.
+1.949.480.7937 | www.storagedna.com | 19800 MacArthur Blvd., Suite 880, Irvine, CA 92612 USA 40 of 58
DNAevolution 4.5: User Guide
In addition to restoring files, you can also conform hi-resolution media from low-resolution sequences. The process of conforming is similar to that of a ticket based restore as described above. The key differences are below:
+ Instead of providing an AAF/XML/EDL that directly references the high-resolution media you wish to restore, you will be providing an AAFXML/EDL of a sequence currently linked to the low-resolution media.+ Based on the configuration, DNAevolution will search for the corresponding hi-resolution media and restore that. A number of pre-defined configurations exist for AAF conform workflows, Final Cut Pro®-7 XML conform workflows and EDL conform workflows.+ Please refer to the dropdown in the Add Ticket screen (see next screenshot) accessible when you click on Add Tickets button on the Restore screen. If your conform configuration is not available please contact StorageDNA support.
Detailed instructions on how to verify your tapes are covered in the DNAevolution Administrator Guide.
RESTORE VIA CONFORM FROM LTO
VERIFYING YOUR TAPES: BEFORE YOU DELETE MEDIA FILES ON DISK
You must SAVE/EXPORT the AAF/XML when the original media is online and availableto the editing application. An AAF/XML exported when the media is OFF LINE will resultin an AAF/XML that cannot be used for restores.

September 2017 | DNAevolution 4.5 User Guide | © 2017 StorageDNA, Inc., All rights reserved.
+1.949.480.7937 | www.storagedna.com | 19800 MacArthur Blvd., Suite 880, Irvine, CA 92612 USA 41 of 58
DNAevolution 4.5: User Guide
DNAevolution is a clustered architecture where multiple archive managers can work in parallel with a centralized controller. More details can be found in the V4.1 DNAevolution Administrator Guide. For Avid workflows, the archive manager that you wish to use for archiving Avid bins or projects must have access to the Avid projects, AMA linked media and Avid workspaces. Refer to the Admin guide on how to setup an Archive Manager with an Avid Media composer standalone workstation or a shared Adobe SAN e.g. Avid ISIS, Facilis, Studio Network Solutions for Avid Media Composer archiving.
Setup Standalone Workstation
In the case of a standalone environment, one or more Avid Media Composer workstations can be archived over the network. Follow these steps:
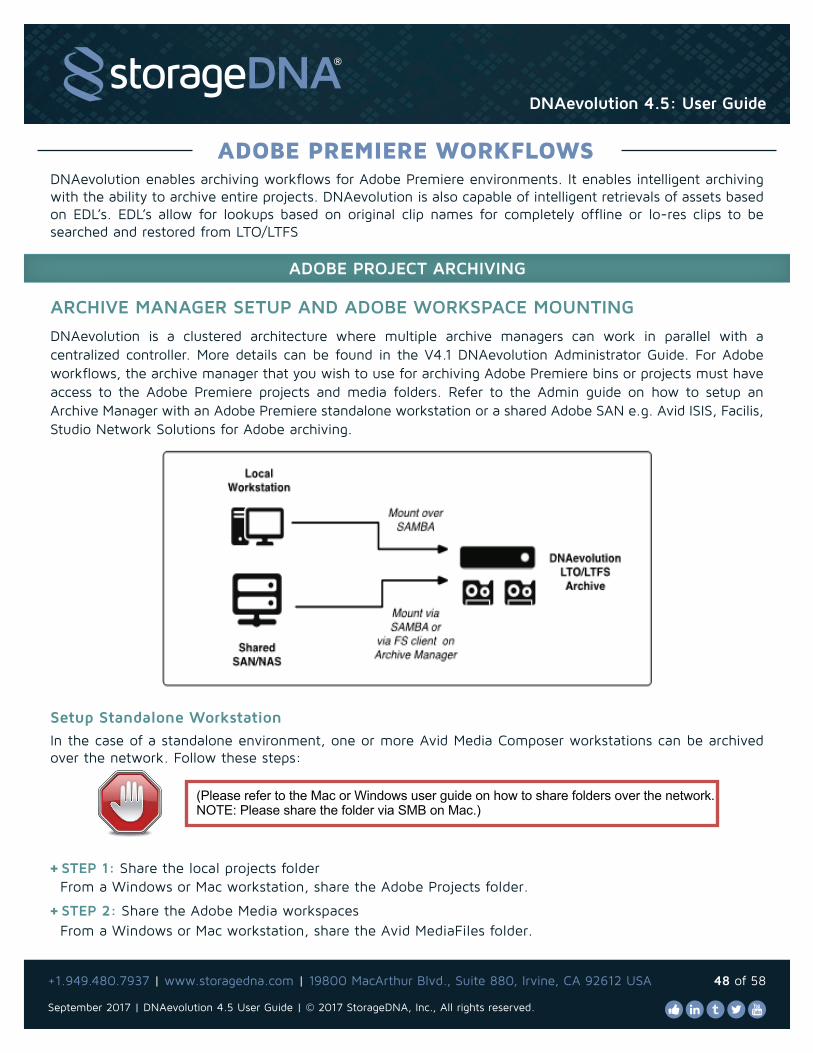
+ STEP 1: Share the local projects folder From a Windows or Mac workstation, share the Avid Projects folder.
+ STEP 2: Share the Avid Media workspaces From a Windows or Mac workstation, share the Avid MediaFiles folder.
AVID MEDIA COMPOSER BIN AND PROJECT ARCHIVING
(Please refer to the Mac or Windows user guide on how to share folders over the network.NOTE: Please share the folder via SMB on Mac.)
AVID MEDIA COMPOSER WORKFLOWSDNAevolution enables archiving workflows for Avid Media Composer environments. It enables intelligent archiving with the ability to archive via AAF constructs for sequences, bin-based and entire projects. Further, DNAevolution allows for AMA-based media and non-AMA/native Avid media as well.
ARCHIVE MANAGER SETUP AND AVID WORKSPACE MOUNTING
September 2017 | DNAevolution 4.5 User Guide | © 2017 StorageDNA, Inc., All rights reserved.
+1.949.480.7937 | www.storagedna.com | 19800 MacArthur Blvd., Suite 880, Irvine, CA 92612 USA 42 of 58
DNAevolution 4.5: User Guide
+ STEP 3: Share the AMA linked workspaces If you are using AMA-linked media, graphics or any non-Avid media, then you will also need to share out these local folders.
+ STEP 4: Mount each of the above Once these folders have been shared, they will need to be mounted on the archive manager you wish to use for archiving these projects.
To mount these folders on a Mac archive manager, simply use Finder->Go->Connect to Server and mount these folders.
To mount these folders on a Linux archive manager, use the SystemSettings->NetworkShares tab as described in the DNAevolution-v4.1-Administrators Guide.
Setup Shared San Or NasIn the case of a shared NAS or SAN, both the shared projects folder and workspaces need to be setup. Follow these steps:
+ STEP 1: Install the needed SAN/NAS client software on the archive manager. Please contact StorageDNA if you need help with this.
+ STEP 2: Mount the project workspaces
+ STEP 3: Mount the AMA media workspaces
+ STEP 4: Mount the Avid Media workspaces
ARCHIVING AVID BINS AND/OR PROJECTSOnce the project and media folders have been mounted on the archive manager, you can begin archiving. Please note that DNAevolution allows you to archive all elements of an Avid Project including AMA-linked, external elements (like graphics) and native Avid media. Different options during archiving allow you to perform an AMA archive, Native Avid media archive or both. We describe each separately below but both can be selected.
Archiving Avid Projects And Bins (Ama-linked Or Other Non-avid Elements E.G. Graphics)+ To archive AMA-linked or other non-Avid elements, open up the Archive window and select Ticket mode. (Explained here)
+ Select “Add Ticket”
+ In the Ticket window, click Browse in the “Ticket Folder Location”. Browse to the Avid projects folder where the project you want to archive is stored. Select the top-level project folder.
+ From the Ticket configuration dropdown, select the “AVB: Avid Project Files – AMA only” option.
+ Click on Add Ticket. All bins detected (done via looking for .avb files in the project folder) are parsed for AMA linked or other non-Avid media (e.g. graphics). Each bin is parsed separately and will contain its own ticket. Bins can be added or removed from this list. One ticket for all the related project files (.avp, .avs etc) is also created.
If the shared storage is a NAS with open SMB/NFS file sharing, please refer to Step 4 ofthe previous section.

September 2017 | DNAevolution 4.5 User Guide | © 2017 StorageDNA, Inc., All rights reserved.
+1.949.480.7937 | www.storagedna.com | 19800 MacArthur Blvd., Suite 880, Irvine, CA 92612 USA 43 of 58
DNAevolution 4.5: User Guide
Resolving Missing AMA Linked Files And Paths+ The “Alternate Paths” window (See below) in the “Add Tickets” window shows all paths that will also be searched. To add additional paths, click on Add. Browse and select each workspace.
+ Add paths that make the look-up process easier. Adding paths e.g. /mnt or /Volumes will cause the match-up engine to perform multiple searches slowing down the process. Adding a path the reveals a more exact lookup will help the system resolve missing files.
Archiving Avid Projects And Bins (Native Avid Op Atom Mxf Files)+ To archive Avid bins or projects, open up the Archive window and select Ticket mode. (Explained here)+ Select “Add Ticket”+ In the Ticket window, click Browse in the “Ticket Folder Location”. Browse to the Avid projects folder where the project you want to archive is stored. Select the top-level project folder.+ From the Ticket configuration dropdown, select the “AVB: Avid Project Files – NATIVE only option.
+ The “Avid Media-Workspaces Path” window (See below) shows all workspaces that are currently available for indexing. PLEASE NOTE that Avid Nexis workspaces will not appear here but are auto-detected. If you have mounted other 3rd party storage e.g. Facilis, Editshare, Studio Network Solutions for shared editing, these Avid Media Files workspaces have to be explicitly added here. To add additional workspaces, click on Add. Browse and select each workspace.
Managing Files Not Found: Note that the paths extracted from a bin point to the local pathof machine the media files the bin was created on. However, the archive manager couldhave a different path to the files referenced in the bin. To resolve this, refer to the next step.
Avid media in a bin or project is referenced by MOBIDs. Hence to determine the mediafiles referenced in a bin, the relevant Avid workspaces must be scanned and indexed.Hence, to archive a bin or project, it is important that DNAevolution index the relevantworkspaces where media is referenced. Once a workspace has been indexed, mediafiles referenced in a bin can be found. See the following steps on indexing workspaces.
NOTE: You can select only folders that have an “Avid MediaFiles” sub-folder rightbelow it.

September 2017 | DNAevolution 4.5 User Guide | © 2017 StorageDNA, Inc., All rights reserved.
+1.949.480.7937 | www.storagedna.com | 19800 MacArthur Blvd., Suite 880, Irvine, CA 92612 USA 44 of 58
DNAevolution 4.5: User Guide
+ After adding all the workspaces, click on Index.
+ The workspaces index list will open (See below).
+ In this window, you can see a number of columns per workspaces. For each workspace, you will see the following information:
1. Workspace Name: This is the workspace path 2. Files Found: This field shows the total of MXF op atom files found in the workspace after indexing. 3. Bytes Found: This field shows the total of bytes of MXF op atom files found in the workspace after indexing. 4. Workspace Last Indexed: This is the last time the workspace was indexed. 5. Last Modified Time: This is the last time the workspace was modified by Avid. This time is determined by the last mod time of .mdb database file created by Avid Media Composer in the workspace.
Please note that only one global indexer runs across all workspaces.

September 2017 | DNAevolution 4.5 User Guide | © 2017 StorageDNA, Inc., All rights reserved.
+1.949.480.7937 | www.storagedna.com | 19800 MacArthur Blvd., Suite 880, Irvine, CA 92612 USA 45 of 58
+ If you notice that a workspace has not been indexed, it is important to index it. Workspaces that have not been indexed after being modified OR not indexed at all will result in missing media files when archiving.+ Normally, the workspaces are indexed incrementally. Hence, after the first full index, re-indexing will be relatively faster. If you want to reset a workspace and index it from scratch, select the workspace and click on “Reset Index Folder”. This will result in the workspaces to be re-indexed. Once the index has been deleted, you can re-index the workspace(s).+ Once the relevant workspaces being referenced by the project has been indexed, you can click on Add Archive Ticket.+ Each bin is parsed separately and will contain its own ticket. Bins can be added or removed from this list. One ticket for all the related project files is also created.
ARCHIVE MANAGER SETUP AND AVID WORKSPACE MOUNTINGPlease follow the steps documented earlier in the section “Archive Manager Setup and Avid Workspace Mounting” under “Avid Media Composer Project Archive” for steps on how to setup your environment to enable Avid Project Backups. Once your archive manager has been setup and workspaces mounted, follow these steps.
Backup Ama Avid Projects (Ama-linked Or Other Non-avid Elements E.G. Graphics)+ To automatically backup an AMA-linked or other non-Avid elements project, open up the Archive window and select Ticket mode. (Explained here)+ Click “Configure” on the Automation setup (See screenshot below).
+ Check the box to enable Automation.+ From the Ticket configuration dropdown, select the “AVB: Avid Project Files – AMA only” option.+ Click on “Add Location” under Drop Folder Locations. Select the folder where your avb files live for that project. All bins detected (done via looking for .avb files in the drop folders) are parsed for AMA linked or other non-Avid media (e.g. graphics). Each bin is parsed separately and will be converted to its own ticket. One ticket for all the related project files (.avp, .avs etc) is also created.
Green or Red Row: If the workspace has been indexed after the last time the workspacewas modified by Avid, it appears in Green. If the workspace needs indexing because itwas modified after the last index, it appears in Red.
AVID MEDIA COMPOSER PROJECT BACKUP & DR
Managing Files Not Found: Note that the paths extracted from a bin point to the local pathof machine the media files the bin was created on. However, the archive manager couldhave a different path to the files referenced in the bin. To resolve this, refer to the next step.
DNAevolution 4.5: User Guide

September 2017 | DNAevolution 4.5 User Guide | © 2017 StorageDNA, Inc., All rights reserved.
+1.949.480.7937 | www.storagedna.com | 19800 MacArthur Blvd., Suite 880, Irvine, CA 92612 USA 46 of 58
+ To look for the files in alternate locations, one can use the “AMA Linked Folders” to add alternate
paths for files. A detailed description can be seen by clicking the icon.
+ Select your scan interval and provide a username and password to schedule the automation.Once setup, the automation engine will scan the drop folder, pick up the bins, scan for media and incrementally back it up.
Backup Native Avid Projects+ To automatically backup an AMA-linked or other non-Avid elements project, open up the Archive window and select Ticket mode. (Explained here)+ Click “Configure” on the Automation setup (See screenshot below).
+ Check the box to enable Automation.+ From the Ticket configuration dropdown, select the “AVB: Avid Project Files – AMA only” option.+ Click on “Add Location” under Drop Folder Locations. Select the folder where your avb files live for that project. All bins detected (done via looking for .avb files in the drop folders) are parsed for AMA linked or other non-Avid media (e.g. graphics). Each bin is parsed separately and will be converted to its own ticket. One ticket for all the related project files (.avp, .avs etc) is also created.+ Select your scan interval and provide a username and password to schedule the automation.+ Once setup, the automation engine will scan the drop folder, pick up the bins, scan for media and incrementally back it up.
ARCHIVING BINS FROM SHARED OR EXTERNAL PROJECTS+ Editors and workflows often utilize bins (e.g. Stock graphics, Stock audio) across multiple projects. Please note that these bins will not be automatically archived unless the original project that these bins are saved in are also archived. Alternatively, if these elements are copied into the current bins of the project, then they will be archived as well.
ORGANIZING ARCHIVED MEDIA BY BINS+ It is important to organize Avid bin or project archives to make restores and re-purposing easy. It is important to use the Labels function to help in the process of restoring media. Labels are described in more details Option: Labels. Here are some examples:
If a bin called “QuickShots” is being archived, then add the label “Date-Time-QuickShots”. This will automatically create a folder called Date-Time-QuickShots. Under this folder the media and other elements (.avp, .avb etc.) will be archived. This allows you to restore the base folder Date-Time-QuickShots for a complete bin and media restore.
TIPS
Similar to archiving a native Avid project, backup also needs workspace indexing to besetup. Please contact StorageDNA support for setting up automated indexing.
DNAevolution 4.5: User Guide
September 2017 | DNAevolution 4.5 User Guide | © 2017 StorageDNA, Inc., All rights reserved.
+1.949.480.7937 | www.storagedna.com | 19800 MacArthur Blvd., Suite 880, Irvine, CA 92612 USA 47 of 58
P2 MEDIASince P2 follows the same Avid Op Atom file structure, it is possible for the following to occur:
+ If you transcoded P2 media into native Avid Opatom media in a bin and then proceeded to move the native media to another bin, then running a NATIVE or BOTH options on the original bin will pick up the transcoded Avid media even though that media has been moved out of the original bin.
DNAevolution 4.5: User Guide
September 2017 | DNAevolution 4.5 User Guide | © 2017 StorageDNA, Inc., All rights reserved.
+1.949.480.7937 | www.storagedna.com | 19800 MacArthur Blvd., Suite 880, Irvine, CA 92612 USA 48 of 58
DNAevolution is a clustered architecture where multiple archive managers can work in parallel with a centralized controller. More details can be found in the V4.1 DNAevolution Administrator Guide. For Adobe workflows, the archive manager that you wish to use for archiving Adobe Premiere bins or projects must have access to the Adobe Premiere projects and media folders. Refer to the Admin guide on how to setup an Archive Manager with an Adobe Premiere standalone workstation or a shared Adobe SAN e.g. Avid ISIS, Facilis, Studio Network Solutions for Adobe archiving.
Setup Standalone WorkstationIn the case of a standalone environment, one or more Avid Media Composer workstations can be archived over the network. Follow these steps:
+ STEP 1: Share the local projects folder From a Windows or Mac workstation, share the Adobe Projects folder.
+ STEP 2: Share the Adobe Media workspaces From a Windows or Mac workstation, share the Avid MediaFiles folder.
ADOBE PROJECT ARCHIVING
(Please refer to the Mac or Windows user guide on how to share folders over the network.NOTE: Please share the folder via SMB on Mac.)
ADOBE PREMIERE WORKFLOWSDNAevolution enables archiving workflows for Adobe Premiere environments. It enables intelligent archiving with the ability to archive entire projects. DNAevolution is also capable of intelligent retrievals of assets based on EDL’s. EDL’s allow for lookups based on original clip names for completely offline or lo-res clips to be searched and restored from LTO/LTFS
ARCHIVE MANAGER SETUP AND ADOBE WORKSPACE MOUNTING
DNAevolution 4.5: User Guide

September 2017 | DNAevolution 4.5 User Guide | © 2017 StorageDNA, Inc., All rights reserved.
+1.949.480.7937 | www.storagedna.com | 19800 MacArthur Blvd., Suite 880, Irvine, CA 92612 USA 49 of 58
+ STEP 3: Mount each of the above Once these folders have been shared, they will need to be mounted on the archive manager you wish to use for archiving these projects. To mount these folders on a Mac archive manager, simply use Finder->Go->Connect to Server and mount these folders. To mount these folders on a Linux archive manager, use the SystemSettings->NetworkShares tab as described in the DNAevolution-v4.1-Administrators Guide.
Setup Shared San Or NasIn the case of a shared NAS or SAN, both the shared projects folder and workspaces need to be setup. Follow these steps:+ STEP 1: Install the needed SAN/NAS client software on the archive manager. Please contact StorageDNA if you need help with this.
+ STEP 2: Mount the Adobe project workspaces+ STEP 3: Mount the Adobe media workspaces
ARCHIVING ADOBE PROJECTSOnce the project and media folders have been mounted on the archive manager, you can begin archiving. Please note that DNAevolution allows you to archive all elements of an Adobe Project including audio, video and graphic elements.+ To archive Adobe projects, open up the Archive window and select Ticket mode. (Explained here)+ Select “Add Ticket”+ In the Ticket window, click Browse in the “Ticket Folder Location”. Browse to the Adobe projects folder where the project you want to archive is stored. Select the top-level project folder. NOTE: The Adobe prproj project file must reside in a folder.+ From the Ticket configuration dropdown, select the “Adobe Project” option.+ Click on Add Ticket. The prproj file will be parsed and all elements related to the project file including the project file will be collected.
Resolving Missing Files And Path+ The “Alternate Paths” window (See below) in the “Add Tickets” window shows all paths that will also be searched. To add additional paths, click on Add. Browse and select each workspace.
If the shared storage is a NAS with open SMB/NFS file sharing, please refer to Step 4 of the previous section.
Managing Files Not Found: Note that the paths extracted from a bin point to the local path of machine the media files the bin was created on. However, the archive manager could have a different path to the files referenced in the bin. To resolve this, refer to the previous section on resolving missing paths
DNAevolution 4.5: User Guide
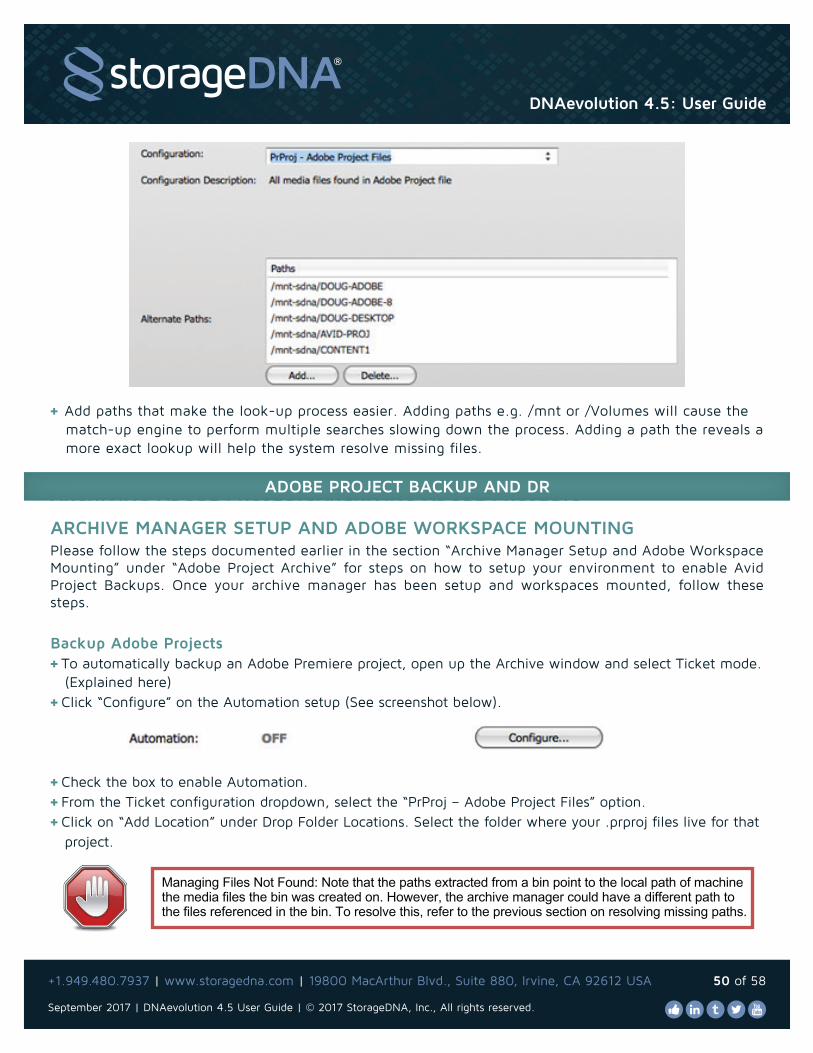
September 2017 | DNAevolution 4.5 User Guide | © 2017 StorageDNA, Inc., All rights reserved.
+1.949.480.7937 | www.storagedna.com | 19800 MacArthur Blvd., Suite 880, Irvine, CA 92612 USA 50 of 58
+ Add paths that make the look-up process easier. Adding paths e.g. /mnt or /Volumes will cause the match-up engine to perform multiple searches slowing down the process. Adding a path the reveals a more exact lookup will help the system resolve missing files.
ARCHIVING ADOBE PROJECTSARCHIVING ADOBE PROJECTS
ARCHIVE MANAGER SETUP AND ADOBE WORKSPACE MOUNTINGPlease follow the steps documented earlier in the section “Archive Manager Setup and Adobe Workspace Mounting” under “Adobe Project Archive” for steps on how to setup your environment to enable Avid Project Backups. Once your archive manager has been setup and workspaces mounted, follow these steps.
Backup Adobe Projects+ To automatically backup an Adobe Premiere project, open up the Archive window and select Ticket mode. (Explained here)+ Click “Configure” on the Automation setup (See screenshot below).
+ Check the box to enable Automation. + From the Ticket configuration dropdown, select the “PrProj – Adobe Project Files” option.+ Click on “Add Location” under Drop Folder Locations. Select the folder where your .prproj files live for that project.
ADOBE PROJECT BACKUP AND DR
Managing Files Not Found: Note that the paths extracted from a bin point to the local path of machine the media files the bin was created on. However, the archive manager could have a different path to the files referenced in the bin. To resolve this, refer to the previous section on resolving missing paths.
DNAevolution 4.5: User Guide

September 2017 | DNAevolution 4.5 User Guide | © 2017 StorageDNA, Inc., All rights reserved.
+1.949.480.7937 | www.storagedna.com | 19800 MacArthur Blvd., Suite 880, Irvine, CA 92612 USA 51 of 58
+ Select your scan interval and provide a username and password to schedule the automation.
Once setup, the automation engine will scan the drop folder, pick up the prproj file, scan for media and incrementally back it up.
DNAevolution 4.5: User Guide
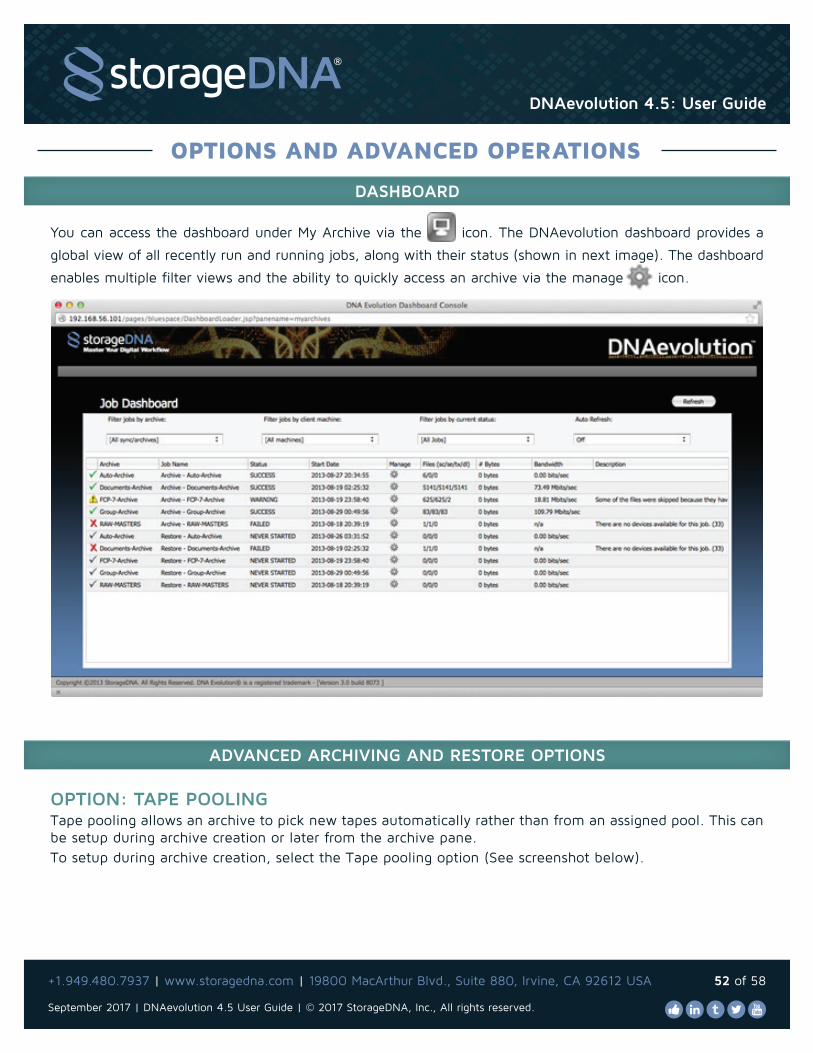
September 2017 | DNAevolution 4.5 User Guide | © 2017 StorageDNA, Inc., All rights reserved.
+1.949.480.7937 | www.storagedna.com | 19800 MacArthur Blvd., Suite 880, Irvine, CA 92612 USA 52 of 58
DASHBOARD
OPTIONS AND ADVANCED OPERATIONS
You can access the dashboard under My Archive via the icon. The DNAevolution dashboard provides a
global view of all recently run and running jobs, along with their status (shown in next image). The dashboard
enables multiple filter views and the ability to quickly access an archive via the manage icon.
OPTION: TAPE POOLINGTape pooling allows an archive to pick new tapes automatically rather than from an assigned pool. This can be setup during archive creation or later from the archive pane.To setup during archive creation, select the Tape pooling option (See screenshot below).
ADVANCED ARCHIVING AND RESTORE OPTIONS
DNAevolution 4.5: User Guide
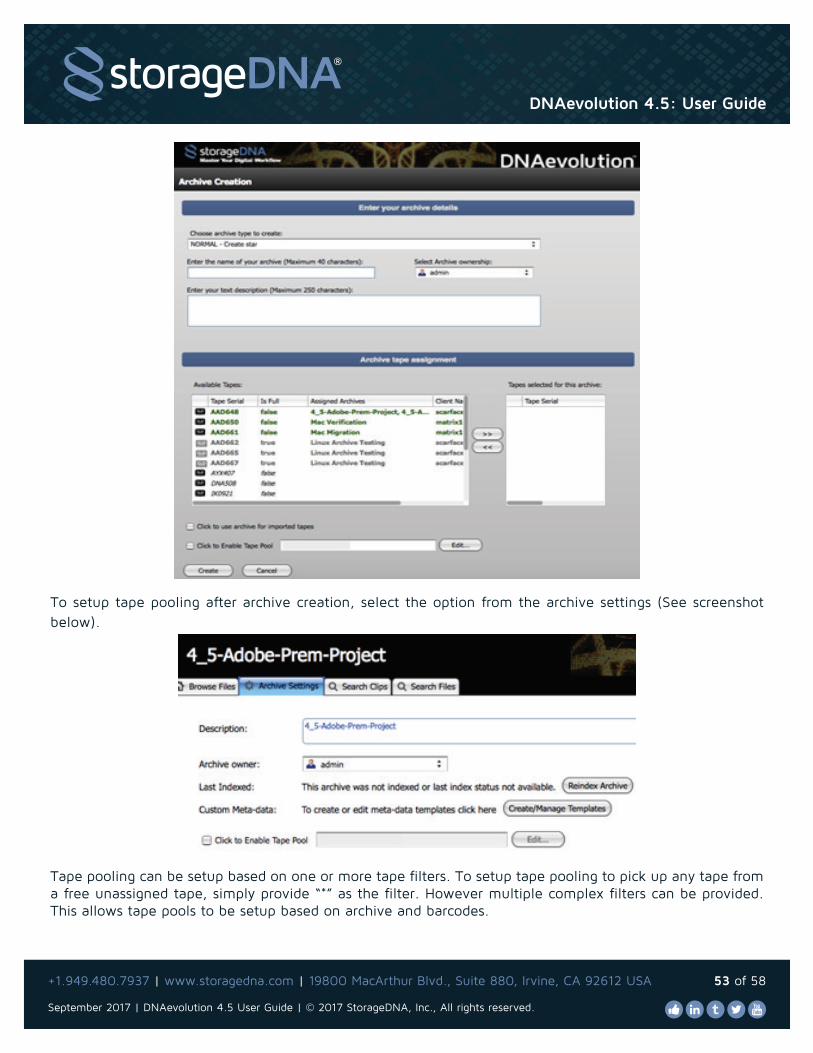
September 2017 | DNAevolution 4.5 User Guide | © 2017 StorageDNA, Inc., All rights reserved.
+1.949.480.7937 | www.storagedna.com | 19800 MacArthur Blvd., Suite 880, Irvine, CA 92612 USA 53 of 58
To setup tape pooling after archive creation, select the option from the archive settings (See screenshot below).
Tape pooling can be setup based on one or more tape filters. To setup tape pooling to pick up any tape from a free unassigned tape, simply provide “*” as the filter. However multiple complex filters can be provided. This allows tape pools to be setup based on archive and barcodes.
DNAevolution 4.5: User Guide

September 2017 | DNAevolution 4.5 User Guide | © 2017 StorageDNA, Inc., All rights reserved.
+1.949.480.7937 | www.storagedna.com | 19800 MacArthur Blvd., Suite 880, Irvine, CA 92612 USA 54 of 58
OPTION: LABELSThis option is available below the Folders Selected window in the archive window (See below). Labels are useful in organizing content in an archive. When a label is selected, a folder with the Label name is automatically created and all data archived in that session is placed under that root folder “Label”. This serves multiple purposes such as categorization, ability to re-archive content (adding a label will cause all selected data to get re-archived).
OPTION: INCLUDING/EXCLUDING FILES BASED ON EXTENSIONSThis option is available from the Edit Settings -> Filters on the Archive or Restore screen.
You can apply one or more “include” and “exclude” file filters. Include and exclude filters provide you with a way to limit your archive or restore to only certain file types. In other cases, you can use exclude filters to remove files such as .DS_store files from the archive.
NOTE: By default, DNAevolution excludes several hidden file and folders types created by operating systems. Deselect this filter if you do not want these files to be excluded.Option: Selecting Files Based on Policies (Last Modified, Size, etc.)
This option is available from the Edit Settings -> Policies on the Archive or Restore screen.
To add a file selection filter, follow these steps:+ Select the type of filter. You can select from:
1. Filename 2. Path 3. Size 4. Modified Times
+ For each option, you can provide a rule and then add the rule to the policy list.
OPTION: LIMIT SCAN SPEEDThis option is available from the Edit Settings -> Options on the Archive or Restore screen.
DNAevolution 4.5: User Guide

September 2017 | DNAevolution 4.5 User Guide | © 2017 StorageDNA, Inc., All rights reserved.
+1.949.480.7937 | www.storagedna.com | 19800 MacArthur Blvd., Suite 880, Irvine, CA 92612 USA 55 of 58
You can control the total number of IO requests sent to the source disk subsystem by filling in the “Limit Scan Speed” option. Please refer to your disk subsystem manuals for what settings you should use here. This option prevents the job from overloading the disk system so that primary tasks, such as, editing, can be used without interruption.
OPTION: SKIP EMPTY FOLDERSThis option is available from the Edit Settings -> Options on the Archive or Restore screen. The option allows you to not include empty folders for archive or restore.
OPTION: PRE/POST-SCRIPTINGThis option is available from the Edit Settings -> Options on the Archive or Restore screen.
To configure pre/post scripts, follow these instructions:+ Browse and select the “Directory” that will contain the pre/post scripts you wish to run.+ Follow this naming convention for pre-scripts:
1. Name any pre-scripts with a preceding “s_”. 2. The job automatically will run any scripts with this convention in alphabetical order.
+ Follow this naming convention for post-scripts: 1. Name any post-scripts with a preceding “e_”. 2. DNAevolution automatically will run any scripts with this convention in alphabetical order.
NOTE: Anytime during the execution process, if the return status is non-successful (exit code nonzero), the job will fail, and the next step will not be run. As an example, if any of the pre-scripts fail, the archive will not run, and the job status will report “Pre-Script Failed” as the status. If the job fails, the post-scripting will not run. If any of the post-scripts fail, then the server will report “Post-Script Failed” on the web interface.
OPTION: POST FILE MOVE AND LINK CREATIONDNAevolution allows a file to be linked or moved after a file has been successfully archived or restored. The options are available from Edit Settings -> Options on the Archive or Restore screen. Three types of operations are possible:
+ Create a hard link: 1. Hard links create another file pointing to the same data. This allows an exact replica of the data to exist. Hard links are useful if after archiving or restore, the file needs to be read and then possibly deleted by another third-party process (e.g., transcoder or FTP engine) 2. Check the hard link box and select the folder where the hard links will be created.
3. Filters allow you to specify one or more extensions for which the the links should be created. For example, if you are archiving multiple file types and want to transcode only certain file types, (e.g. MOVs), you can specify that in the Filters option. You can specify multiple filters using comma separation.
+ Create a soft link: A soft link or alias functions similar to a hard link except that it can be created across volumes.
Hard links cannot be created across volumes. It must be in the same volume as thesource file.
DNAevolution 4.5: User Guide
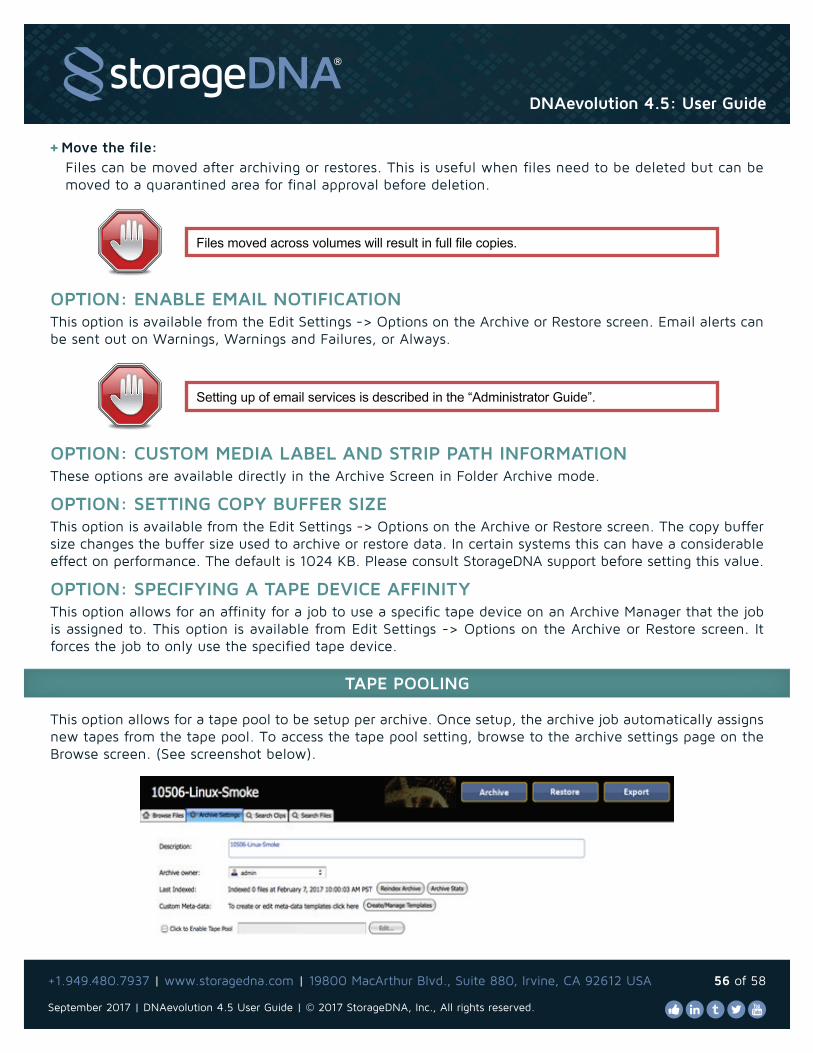
September 2017 | DNAevolution 4.5 User Guide | © 2017 StorageDNA, Inc., All rights reserved.
+1.949.480.7937 | www.storagedna.com | 19800 MacArthur Blvd., Suite 880, Irvine, CA 92612 USA 56 of 58
+ Move the file: Files can be moved after archiving or restores. This is useful when files need to be deleted but can be moved to a quarantined area for final approval before deletion.
OPTION: ENABLE EMAIL NOTIFICATIONThis option is available from the Edit Settings -> Options on the Archive or Restore screen. Email alerts can be sent out on Warnings, Warnings and Failures, or Always.
OPTION: CUSTOM MEDIA LABEL AND STRIP PATH INFORMATIONThese options are available directly in the Archive Screen in Folder Archive mode.
OPTION: SETTING COPY BUFFER SIZEThis option is available from the Edit Settings -> Options on the Archive or Restore screen. The copy buffer size changes the buffer size used to archive or restore data. In certain systems this can have a considerable effect on performance. The default is 1024 KB. Please consult StorageDNA support before setting this value.
OPTION: SPECIFYING A TAPE DEVICE AFFINITYThis option allows for an affinity for a job to use a specific tape device on an Archive Manager that the job is assigned to. This option is available from Edit Settings -> Options on the Archive or Restore screen. It forces the job to only use the specified tape device.
This option allows for a tape pool to be setup per archive. Once setup, the archive job automatically assigns new tapes from the tape pool. To access the tape pool setting, browse to the archive settings page on the Browse screen. (See screenshot below).
Files moved across volumes will result in full file copies.
Setting up of email services is described in the “Administrator Guide”.
TAPE POOLING
DNAevolution 4.5: User Guide

September 2017 | DNAevolution 4.5 User Guide | © 2017 StorageDNA, Inc., All rights reserved.
+1.949.480.7937 | www.storagedna.com | 19800 MacArthur Blvd., Suite 880, Irvine, CA 92612 USA 57 of 58
+ Select the checkbox to enable tape pooling. (See screenshot below)
+ Once the tape filters are specified, click OK.
The LTFS file-system recommends the following for file and directory names:
"LTFS supports valid characters in W3C Extensible Markup Language (XML) 1.0 standard, except for the / (slash) and : (colon), for file and directory names. To maintain portability between multiple platforms, the following characters should not be used in LTFS on Linux and OS X systems:
* ? < > " | \
These characters cannot be used on Windows because of additional restrictions for characters used as file names."
To make it easier for the user to archive and restore from LTO/LTFS, DNAevolution performs the following operations:
+ Automatically substitutes leading and trailing spaces on ALL PLATFORMS.
+ Automatically substitutes the : (colon) character from file names on Mac and Linux PLATFORMS. (NOTE: Colon cannot appear in file names on Windows)
+ As mentioned, the use of above characters including * ? < > " | \ is not recommended. DNAevolution allows these characters to be used for archive and/or restore.
DNAevolution now integrates as an archive middleware for CatDV and Avid Interplay. Please refer to the CatDV and Avid Interplay Integration documents for more information.
BATCH FORMAT, BATCH VERIFICATION, BATCH DUPLICATE, BATCH IMPORTDNAevolution enables bulk operations for tape. These operations are described in detail in theDNAevolution: Administrator Guide.
MANAGING SPECIAL CHARACTERS
TIP: Third-party application: Name Mangler is a useful utility to fix illegal characters.
AVID® INTERPLAY™ AND CATDV INTEGRATION
ADVANCED LTO OPERATIONS
DNAevolution 4.5: User Guide

September 2017 | DNAevolution 4.5 User Guide | © 2017 StorageDNA, Inc., All rights reserved.
+1.949.480.7937 | www.storagedna.com | 19800 MacArthur Blvd., Suite 880, Irvine, CA 92612 USA 58 of 58
DNAevolution 4.5: User Guide
DISCOVERY CHANNEL SPECIFICATIONS: DELIVERYDNAevolution allows for the Discovery specification LTO/LTFS tape deliveries for footage, graphics and program masters. Detailed workflow steps can be found in DNAevolution 3.0: Workflow Guide for Discovery Channel Specifications.
CONNECTION_LOST: This status represents a permanent connection loss during a transfer.
FAILED: If any file transfer errors were encountered that are not included in the WARNING, this will result in an overall status of FAILED.
FILE_LOCKED: This status is reported if a file is locked and cannot be updated.
FILE_OUT_OF_SPACE: This status is reported if the target system runs out of space.
FILE_PERMISSIONS: This status is reported if the source or target files do not have the correct permissions to be read or written.
FILE_TARGET_NAME_TOO_LONG: This status is reported if a file name is too long for the target LTFS file system.
FIILE_TRANSFERRING: This status is reported if the job is actively moving files.
INTERNAL_ERROR: This status represents an error that needs to be diagnosed by a StorageDNA representative.
NO_DIRECTORIES: This status is reported if the source or target folders are missing because of deletion or because someone moved them.
OUT_OF_MEM: This status is reported when the archive process has run out of memory.
PRE/POST_SCRIPT_FAILED: This status is reported when one or more pre- or post-scripts have failed.
SCANNING: This status is reported when files are being scanned actively during a transfer.
SCRIPTING_DIR_NOT_FOUND: This status is reported if the selected scripting directory is not found.
SUCCESS: The job completed successfully with no known errors.
UNDIAGNOSED: This status is reported when there is an unknown error.
WARNING: This status represents a partial success. The job completed, but it is possible some files or folders were not successfully moved. If any file could not be moved for one of the following reasons, the job will be marked with a WARNING state:
+ File changed in content during the sync.+ File size changed during the sync.+ File vanished during the sync.
WRITE_ERROR: This status is reported when a disk or file system error is encountered.
JOB STATUS ERROR CODES