DMYCO® HD 2K CAR DASH CAM · •Boot Sound: OFF / ON Turn On/Off the voice of boot •Stream...
19
DMYCO® HD 2K CAR DASH CAM Instruction Manual Streaming Media·Reversing Aid · Parking monitor ·G-Sensor
Transcript of DMYCO® HD 2K CAR DASH CAM · •Boot Sound: OFF / ON Turn On/Off the voice of boot •Stream...

DMYCO® HD 2K CAR DASH CAM
Instruction Manual
Streaming Media·Reversing Aid · Parking monitor ·G-Sensor

Contents
※ Foreword --------------------------------------------------------------------------------------1
※ Precautions ----------------------------------------------------------------------------------- 2
※ Name of Parts--------------------------------------------------------------------------------- 3
Body ------------------------------------------------------------------------------------------ 3Accessories---------------------------------------------------------------------------------- 4
※ Setting the Video Recording Mode--------------------------------------------------------5
Video Recording Mode Touch Operations----------------------------------------------5
Video Recording Mode Setting ---------------------------------------------------------- 8
※ Setting the Photograph Mode-------------------------------------------------------------10
Photograph Mode Touch Operations --------------------------------------------------10
Photograph Mode Setting----------------------------------------------------------------12
※ Technical Data-------------------------------------------------------------------------------13
※ Installation Guide---------------------------------------------------------------------------14
※ Frequently Asked Questions -------------------------------------------------------------15
※ Warranty-------------------------------------------------------------------------------------16
※ Customer Service Support----------------------------------------------------------------17

※ Foreword
Thanks for purchasing our DMYCO HD 2K ( 2560*1440 ) Car Dash Cam.This dash cam uses high-performance chips to To show high-definition videos and seamlessdynamic images. Pass the strict certification of European CE and American FCC, and itsupports 2K ( 2560*1440 )true HD camera. Please read this manual carefully before useand keep it in a safe place. We hope that this product can meet your needs and serve youfor a long time!
-1-
※ Precautions
1. Since the machine moves during transportation, it is attached with a protective filmtoprevent damage. When using for the first time, please shoot two videosto test thequality of camera.
2. Since the battery capacity of this product is very small, if you want to use the hostvehicle monitoring function for a long time, or if you want to use this engine after afterturning it off,please always supply power to the product. Please be safe. Therefore, it isrecommended touse the car charger connection adapter for charging duringoperationLogger.
3. If you want to use the parking monitoring or motion detection function, you need astep-down line that connects the line record to the car battery (the buck line is soldseparately.)
4. Please clean the product with a soft cloth to remove dust.Be careful not to usechemical cleaners, gasoline, alcohol or antistatic sprays to clean the product.
5. This product is suitable for small cars. If you want to connect the product to a large car,please pay attention to the length of the car charger line.
-2-

※ Name of Body Parts - Body
○1 USB Interface ○2 Rear Camera Interface ○3 TF Card Slot
○4 GPS Interface ○5 Reset Button ○6 Power Button Power button1) Function 1- As a power switch
Start up:press and hold the Power Button for 2 seconds to turn on the power, and themachine will start working automatically.Shut down:Press and hold the Power Buttonfor 2 second to automatically save thevideo file and user settings, the machine will shut down.
2) Function 2-Turn off/on the displayPress Power Button in the power on state to turn off the display, and tap again to turnon the display.
-3-

※Name of Body Parts –Accessories
Rear Cam External Power Installation Tool
Reset Tool 32GB TF card
-4-
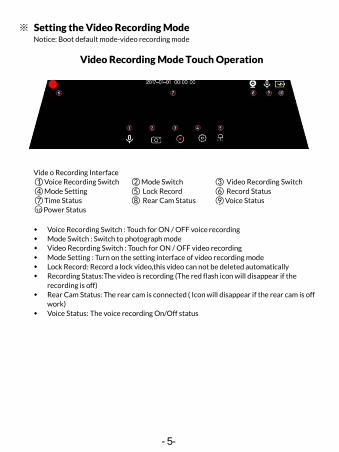
※ Setting the Video Recording Mode Notice: Boot default mode-video recording mode
Video Recording Mode Touch Operation
Vide o Recording Interface
○1 Voice Recording Switch ○2 Mode Switch ○3 Video Recording Switch
○4 Mode Setting ○5 Lock Record ○6 Record Status
○7 Time Status ○8 Rear Cam Status ○9 Voice Status○10 Power Status
Voice Recording Switch : Touch for ON / OFF voice recording Mode Switch : Switch to photograph mode Video Recording Switch : Touch for ON / OFF video recording Mode Setting : Turn on the setting interface of video recording mode Lock Record: Record a lock video,this video can not be deleted automatically Recording Status:The video is recording (The red flash icon will disappear if the
recording is off) Rear Cam Status: The rear cam is connected ( Icon will disappear if the rear cam is off
work) Voice Status: The voice recording On/Off status
-5-

Operation 1 Adjust the scope of the camera window Slides up and down1/3 part of the left side of the screen
Operation 2 Adjust the screen brightnessSlides up and down1/3 part of the screen right side
Operation 3 Turn on the video mode setting menu interface Slide the screen from up to down
-6-
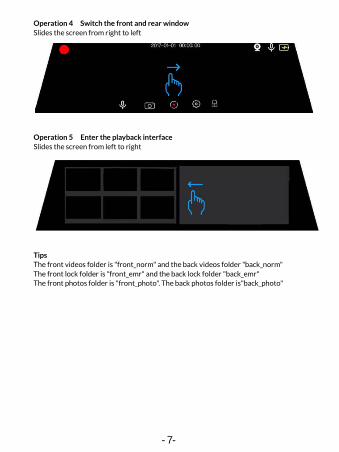
Operation 4 Switch the front and rear window Slides the screen from right to left
Operation 5 Enter the playback interface Slides the screen from left to right
Tips The front videos folder is "front_norm" and the back videos folder "back_norm" The front lock folder is "front_emr" and the back lock folder "back_emr" The front photos folder is "front_photo". The back photos folder is"back_photo"
-7-
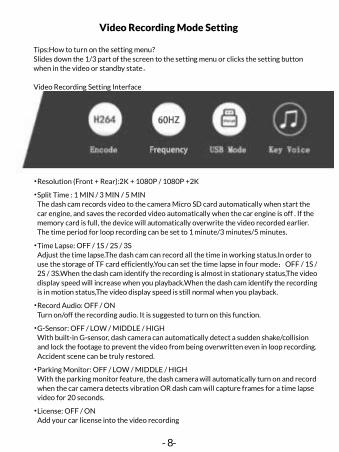
Video Recording Mode Setting
Tips:How to turn on the setting menu?Slides down the 1/3 part of the screen to the setting menu or clicks the setting buttonwhen in the video or standby state。 Video Recording Setting Interface
•Resolution (Front + Rear):2K + 1080P / 1080P +2K
•Split Time : 1 MIN / 3 MIN / 5 MINThe dash cam records video to the camera Micro SD card automatically when start thecar engine, and saves the recorded video automatically when the car engine is off . If thememory card is full, the device will automatically overwrite the video recorded earlier.The time period for loop recording can be set to 1 minute/3 minutes/5 minutes.
•Time Lapse: OFF / 1S / 2S / 3SAdjust the time lapse.The dash cam can record all the time in working status.In order touse the storage of TF card efficiently.You can set the time lapse in four mode:OFF / 1S /2S / 3S.When the dash cam identify the recording is almost in stationary status,The videodisplay speed will increase when you playback.When the dash cam identify the recordingis in motion status,The video display speed is still normal when you playback.
•Record Audio: OFF / ONTurn on/off the recording audio. It is suggested to turn on this function.
•G-Sensor: OFF / LOW / MIDDLE / HIGHWith built-in G-sensor, dash camera can automatically detect a sudden shake/collisionand lock the footage to prevent the video from being overwritten even in loop recording.Accident scene can be truly restored.
•Parking Monitor: OFF / LOW / MIDDLE / HIGHWith the parking monitor feature, the dash camera will automatically turn on and recordwhen the car camera detects vibration OR dash cam will capture frames for a time lapsevideo for 20 seconds.
•License: OFF / ONAdd your car license into the video recording
-8-
唐家锋-Jimmy
图章

•Screen Dormant: OFF / 1 MIN / 3 MINAdjust the time of screen dormant
•Video Encode: H264 / 265Adjust the video encode of video.H265 is the newest video encode,but H264 has bettercompatibility.
•Video Frequency: 50HZ / 60HZ
Adjust the video frequency of video.
•USB ModeConnects the USB cable, selects USB in the settings, pop-up window: USB storage, USBcamera, USB video three modes.
•Key Voice: OFF / ONTurn On/Off the key voice
•Speaker: MUTE / LOW / MIDDLE / HIGHAdjust the sound strength of speaker
•Boot Sound: OFF / ONTurn On/Off the voice of boot
•Stream Media: OFF / ONWhen the stream media is "on", the default full-screen is rear camera display whilestarting the car engine, and when the streaming media is "off", the default full-screen isfront camera display while starting the car engine.
•Language: English /中文简体 / 中文繁体 / 日本语 / русский / ا ةيبرعل/Destsch
•Time SettingPress up and down to adjust the date and time.[Note] Please set the correct date and time before using the camera to insure they areaccurate on the accident recording used as evidence.After setting, please turn off thedash cam. The date and time setting is completed
•Format SDFormat the TF card.[Note] Please format the Micro SD card before use
•ResetReset all the setting.
•AboutSoftware version
-9-
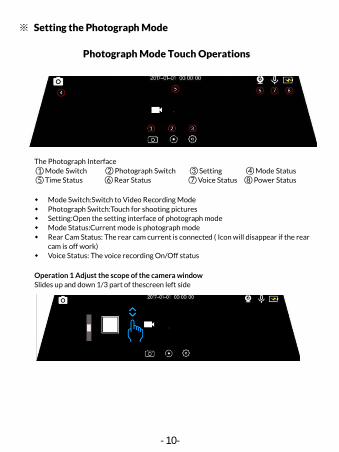
※ Setting the Photograph Mode
The Photograph Interface
○1 Mode Switch ○2 Photograph Switch ○3 Setting ○4 Mode Status
○5 Time Status ○6 Rear Status ○7 Voice Status ○8 Power Status
Mode Switch:Switch to Video Recording Mode Photograph Switch:Touch for shooting pictures Setting:Open the setting interface of photograph mode Mode Status:Current mode is photograph mode Rear Cam Status: The rear cam current is connected ( Icon will disappear if the rear
cam is off work) Voice Status: The voice recording On/Off status
Operation 1 Adjust the scope of the camera windowSlides up and down 1/3 part of thescreen left side
-10-
Photograph Mode Touch Operations

Operation 2 Adjust the screen brightnessSlides up and down 1/3 part of the right side of the screen
Operation 3 Open the video mode setting menu interface Slide the screen from up to down
Operation 4 Switch the front and rear window Slides the screen from right to left
-11-

Operation 5 Enter the playback interface Slides the screen from left to right
Photograph Mode SettingTips:How to turn on the setting interface?In the video or standby state, the 1/3 part of the screen slides down to the setting interfaceor clicks the setting button.
•G-Sensor: OFF / LOW / MIDDLE / HIGHWith built-in G-sensor, dash camera can automatically detect a sudden shake/collisionand lock the footage to prevent the video from being overwritten even in loop recording.Accident scene can be truly restored.
•Parking Monitor: OFF / LOW / MIDDLE / HIGHAdjust the trigger sensitivity of parking monitoring. If the car has a slight vibration in theoff status, the recorder will automatically start recording for 20 seconds and then shutdown when the parking monitoring function is turned on.
•Screen Dormant: OFF / 1 MIN / 3 MINAdjust the time of screen dormant
•USB ModeConnects the USB cable, selects USB in the settings, pop-up window: USB storage, USBcamera, 3 USB Video Modes
•Key Voice: OFF / ON
-12-
Potograph Mode Setting Interface
唐家锋-Jimmy
图章

Turn On/Off the key voice
•Speaker: MUTE / LOW / MIDDLE / HIGH Adjust the sound strength of speaker
•Boot Sound: OFF / ON Turn On/Off the voice of boot
•Streaming Media: OFF / ON When the streaming media is "on", the default full-screen is rear camera display while starting the car engine, and when the streaming media is "off", the default full-screen is front camera display while starting the car engine.
•Language: English /中文简体/中文繁体/日本语/русский/ ا ةيبرعل /Destsch
•Time Setting Press up and down to adjust the date and time. [Note] Please set the correct date and time before using the camera to insure they are accurate on the accident recording used as evidence.
•Format SD Format the TF card. [Note] Please format the Micro SD card before use
•Reset Reset all the setting.
•About Software version
※ Technical Data
Built-in Image Sensor 200W and 400W
Front+Rear Resolution Front 2560*1440(2K)+ Rear 1920*1080P (1080 P)Front 1920*1080P(1080 P)+ Rear 2560*1440 (2K)
Lens angle 170 degrees
Display Dimensions 12 inchesVideo Frequency 50HZ / 60HZ
Video Format MP4Touch TP Support, single touchstored Temperature -30℃~80℃Operating Temperature -20℃~70℃Operating Humidity 15-65%RHMemory Card Capacity Maximum support for 64GStandard Voltage DC5V
-13-

※ Installation Guide
1. Turn off the car engine.
2. Insert the TF card into the recorder card slot. [Note] Please use high-speed TF card (Class10 or above), the capacity is not less than 8GB, and the TF card supports up to 64GB.
3. Fix the recorder to the original rearview mirror of the car.
4. Insert the car charger into the car cigarette lighter.
5. Connect the recorder's USB port to the car charger with a charging extension cable. [Note] The wiring cable can be laid along the edge of the car windshield while wiring.
6. Install the rear camera on the rear of the vehicle and pay attention to the direction while installing. Wiring can be laid along the roof of the vehicle. Connect the rear plug to the rear camera after the installation.
7. Adjust the lens position to ensure that the lens is level with the ground.
8. Start the engine and check that the dash cam is installed correctly. [Note] The indicator lights on when the dash cam is installed correctly; the recording indicator flashes when dash cam enters the recording state. Please check if the picture on the display is normal. If the display is inverted,please check if the camera install correctly or contact us in time.
-14-

※ Frequently Asked Questions
1. What if the dash cam can not be turned on? A. Please plug the car charger and try to turn it on by pressing On-Off key for about 3 seconds. B. Charge the dash cam for about 5 minutes before turning it on, and then manually restore the factory settings. C. Press the Reset button through the pin to restore factory settings.
2. What if the dash cam turns on or off automatically? A: The dash cam needs to plug in the car charger for using, the built-in battery is small capacity and used for parking monitor mode to record an important file. B: Support C10 or above Micro SD Card, please format the card before use.
3. What if the product cannot read the card? Please use the genuine C10 or above Micro SD Card, format the SD Card on the computer before use, and then insert the card in the correct way (there will be slight rebound resistance when the card is correctly inserted).
4. What if the video function cannot be used normally? Please format the micro SD card in the dash cam before using. Support 16GB/32GB/64GB micro SD card, Class 10 or above is recommended (32GB SD card INCLUDED).
5. What if the product cannot be used normally after working for a period of time? A. It is possible that G-sensor function is set in the product, which leads to too many locked files recorded and cannot be recorded in a loop. When this situation occurs, it is necessary to delete the locked files manually. B. Check if the sensitivity of G-sensor is set as High .If the sensitivity of G-sensor is too high, the files might be easily locked due to road bumps while driving. The locked files could not be overwritten. If too many files are locked, the SD card could be full and loop videos could not be recorded. You can set the G-sensor from high to medium or low. C. Use motion detection when not driving.
6. What if the rear camera doesn't work? A: The rear camera is not connected properly. Please check whether the rear camera is connected correctly. B: The rear camera's wiring is not firm, and there is a loose contact at the interface. Please check whether the rear camera's wiring is normal or not.
7. What if the rear camera is upside down? Rear camera is installed in the wrong direction. When this situation occurs, please adjust the correct installation mode.
8. What if the screen turns black after turning it on for about one minute? When this situation occurs, the Screen Dormant function is turned on in the system
-15-

setting bar . Please turn off the function.
9. What if the product cannot set the date and time correctly? Please ensure that the product has enough power to be turned on normally, enter the system setting bar to find the date and time option, and enter this option to set. After setting, the date and time setting can only be completed by manually turning off the dash cam.
10. Why does the product automatically heat up? A. The product has been used for long time. B. The temperature in the car is too high.
11.Drove for a couple of days and took the sd card out to view the recordings. Every single recording has a January date and the wrong time. Fix? Answer: You can set the date+time through the settings menu. After setting, manually turn off the dash cam. Time setting is completed.
12. The recorded image is not clear. A. There is a protective film is attached to prevent damage for both front and rear camera lenses. Please peel off both films before use. B. Check if the windshield is clean.
13. I think the sound of the button is very noisy. Please select “OFF” for the operation voice (OFF / ON) button in the system settings.
※ Warranty 30-day money-back guarantee for any reason For 30 days after the date of purchase, return your undamaged DMYCO product and receive a full refund for ANY reason. 12-month warranty for quality-related issues For 12 months after the date of purchase, we take care of all quality related issues with a REPLACEMENT OR FULL REFUND. Friendly reminder: make sure to first read any enclosed user manual and that you have used the product as instructed. When contacting us for help, be sure to have your DYMCO product handy for troubleshooting! Limitations • Our returns and exchange service is limited to all purchases made from DYMCO. If you purchased through a different retailer, please contact them directly. (Unauthorized reselling of DYMCO products is prohibited.)
-16-

※ Customer Service Support
•Phone Call:(888)985-9801
Receiver [email protected]
Subject Return / Exchange Request
The contents of the e-mail
Order number:
Reason for return and exchange:
Contact phone number:
Advice and Suggestions
-17-
•Email: