
Dlpe 940 Pg a00 en-us
128
Product Guide Revision A McAfee Data Loss Prevention Endpoint 9.4.0 For use with McAfee ePolicy Orchestrator
-
Upload
adnankapetanovicdado -
Category
Documents
-
view
76 -
download
9
description
dsds
Transcript of Dlpe 940 Pg a00 en-us

Product GuideRevision A
McAfee Data Loss Prevention Endpoint9.4.0For use with McAfee ePolicy Orchestrator

COPYRIGHT
Copyright © 2015 McAfee, Inc., 2821 Mission College Boulevard, Santa Clara, CA 95054, 1.888.847.8766, www.intelsecurity.com
TRADEMARK ATTRIBUTIONSIntel and the Intel logo are registered trademarks of the Intel Corporation in the US and/or other countries. McAfee and the McAfee logo, McAfee ActiveProtection, McAfee DeepSAFE, ePolicy Orchestrator, McAfee ePO, McAfee EMM, McAfee Evader, Foundscore, Foundstone, Global Threat Intelligence,McAfee LiveSafe, Policy Lab, McAfee QuickClean, Safe Eyes, McAfee SECURE, McAfee Shredder, SiteAdvisor, McAfee Stinger, McAfee TechMaster, McAfeeTotal Protection, TrustedSource, VirusScan are registered trademarks or trademarks of McAfee, Inc. or its subsidiaries in the US and other countries.Other marks and brands may be claimed as the property of others.
LICENSE INFORMATION
License AgreementNOTICE TO ALL USERS: CAREFULLY READ THE APPROPRIATE LEGAL AGREEMENT CORRESPONDING TO THE LICENSE YOU PURCHASED, WHICH SETSFORTH THE GENERAL TERMS AND CONDITIONS FOR THE USE OF THE LICENSED SOFTWARE. IF YOU DO NOT KNOW WHICH TYPE OF LICENSE YOUHAVE ACQUIRED, PLEASE CONSULT THE SALES AND OTHER RELATED LICENSE GRANT OR PURCHASE ORDER DOCUMENTS THAT ACCOMPANY YOURSOFTWARE PACKAGING OR THAT YOU HAVE RECEIVED SEPARATELY AS PART OF THE PURCHASE (AS A BOOKLET, A FILE ON THE PRODUCT CD, OR AFILE AVAILABLE ON THE WEBSITE FROM WHICH YOU DOWNLOADED THE SOFTWARE PACKAGE). IF YOU DO NOT AGREE TO ALL OF THE TERMS SETFORTH IN THE AGREEMENT, DO NOT INSTALL THE SOFTWARE. IF APPLICABLE, YOU MAY RETURN THE PRODUCT TO MCAFEE OR THE PLACE OFPURCHASE FOR A FULL REFUND.
2 McAfee Data Loss Prevention Endpoint 9.4.0 Product Guide

Contents
Preface 7About this guide . . . . . . . . . . . . . . . . . . . . . . . . . . . . . . . . . . 7
Audience . . . . . . . . . . . . . . . . . . . . . . . . . . . . . . . . . . 7Conventions . . . . . . . . . . . . . . . . . . . . . . . . . . . . . . . . . 7
Find product documentation . . . . . . . . . . . . . . . . . . . . . . . . . . . . . . 8
1 Introduction 9Protecting data . . . . . . . . . . . . . . . . . . . . . . . . . . . . . . . . . . . 9McAfee DLP Endpoint overview . . . . . . . . . . . . . . . . . . . . . . . . . . . . 10
Classify . . . . . . . . . . . . . . . . . . . . . . . . . . . . . . . . . . 10Track . . . . . . . . . . . . . . . . . . . . . . . . . . . . . . . . . . . 11Protect . . . . . . . . . . . . . . . . . . . . . . . . . . . . . . . . . . . 12Monitor . . . . . . . . . . . . . . . . . . . . . . . . . . . . . . . . . . . 13
Product modules and how they interact . . . . . . . . . . . . . . . . . . . . . . . . . 13McAfee DLP Endpoint client software . . . . . . . . . . . . . . . . . . . . . . . . . . 15
Deployment and installation2 Deployment options and scenarios 21
Choosing an endpoint product option . . . . . . . . . . . . . . . . . . . . . . . . . . 21Recommended installation . . . . . . . . . . . . . . . . . . . . . . . . . . . . . . 23Verify the system requirements . . . . . . . . . . . . . . . . . . . . . . . . . . . . 24
3 Installing the McAfee DLP Endpoint software 27Install and license the McAfee DLP extension . . . . . . . . . . . . . . . . . . . . . . 27Check in the McAfee DLP Endpoint package to McAfee ePO . . . . . . . . . . . . . . . . . 28
4 Deploying McAfee DLP Endpoint client 29Deploy McAfee DLP Endpoint client with McAfee ePO . . . . . . . . . . . . . . . . . . . 29Verify the installation . . . . . . . . . . . . . . . . . . . . . . . . . . . . . . . . 30Deploy policies with McAfee ePO . . . . . . . . . . . . . . . . . . . . . . . . . . . . 30
Assign a policy or client configuration . . . . . . . . . . . . . . . . . . . . . . 31Refresh the policy . . . . . . . . . . . . . . . . . . . . . . . . . . . . . . 31
Configuration and use5 Configuring system components 35
Policy Catalog . . . . . . . . . . . . . . . . . . . . . . . . . . . . . . . . . . . 35Edit McAfee DLP server settings . . . . . . . . . . . . . . . . . . . . . . . . . . . . 35Define a Rights Management server . . . . . . . . . . . . . . . . . . . . . . . . . . 36Documenting events with evidence . . . . . . . . . . . . . . . . . . . . . . . . . . 37
Creating evidence folders . . . . . . . . . . . . . . . . . . . . . . . . . . . 38Configure evidence folders . . . . . . . . . . . . . . . . . . . . . . . . . . . 39
Users and permission sets . . . . . . . . . . . . . . . . . . . . . . . . . . . . . . 39
McAfee Data Loss Prevention Endpoint 9.4.0 Product Guide 3

Create and define McAfee DLP roles . . . . . . . . . . . . . . . . . . . . . . . 40DLP permission sets . . . . . . . . . . . . . . . . . . . . . . . . . . . . . 40Create a McAfee DLP permission set . . . . . . . . . . . . . . . . . . . . . . . 41Protecting confidentiality with redaction . . . . . . . . . . . . . . . . . . . . . 42
Configuring McAfee DLP in the Policy Catalog . . . . . . . . . . . . . . . . . . . . . . 43Import or export the McAfee DLP Endpoint configuration . . . . . . . . . . . . . . . 43Client configuration . . . . . . . . . . . . . . . . . . . . . . . . . . . . . . 43
6 Protecting removable media 47Protecting devices . . . . . . . . . . . . . . . . . . . . . . . . . . . . . . . . . 47Device classes . . . . . . . . . . . . . . . . . . . . . . . . . . . . . . . . . . . 48
Define a device class . . . . . . . . . . . . . . . . . . . . . . . . . . . . . 48Device definitions . . . . . . . . . . . . . . . . . . . . . . . . . . . . . . . . . 50
Working with device definitions . . . . . . . . . . . . . . . . . . . . . . . . . 50Device properties . . . . . . . . . . . . . . . . . . . . . . . . . . . . . . 52
Create device rules . . . . . . . . . . . . . . . . . . . . . . . . . . . . . . . . . 55Create a Citrix device rule . . . . . . . . . . . . . . . . . . . . . . . . . . . 55Create a fixed hard drive device rule . . . . . . . . . . . . . . . . . . . . . . . 56Create a plug and play device rule . . . . . . . . . . . . . . . . . . . . . . . . 56Create a removable storage device rule . . . . . . . . . . . . . . . . . . . . . . 57Create a removable storage file access rule . . . . . . . . . . . . . . . . . . . . 57Create a TrueCrypt device rule . . . . . . . . . . . . . . . . . . . . . . . . . 58
7 Classifying sensitive content 59The Classification module . . . . . . . . . . . . . . . . . . . . . . . . . . . . . . 59Manual classification . . . . . . . . . . . . . . . . . . . . . . . . . . . . . . . . 59Using classifications . . . . . . . . . . . . . . . . . . . . . . . . . . . . . . . . . 60
Text extraction . . . . . . . . . . . . . . . . . . . . . . . . . . . . . . . . 61How McAfee DLP Endpoint categorizes applications . . . . . . . . . . . . . . . . . 62
Classification definitions and criteria . . . . . . . . . . . . . . . . . . . . . . . . . . 62Dictionary definitions . . . . . . . . . . . . . . . . . . . . . . . . . . . . . 64Advanced pattern definitions . . . . . . . . . . . . . . . . . . . . . . . . . . 65Classifying content with document properties or file information . . . . . . . . . . . . 65Application templates . . . . . . . . . . . . . . . . . . . . . . . . . . . . . 66
Create and configure classifications . . . . . . . . . . . . . . . . . . . . . . . . . . 66Create a classification . . . . . . . . . . . . . . . . . . . . . . . . . . . . . 66Create classification criteria . . . . . . . . . . . . . . . . . . . . . . . . . . 67Create tagging criteria . . . . . . . . . . . . . . . . . . . . . . . . . . . . 67Assign manual classification permissions . . . . . . . . . . . . . . . . . . . . . 68
Registered documents . . . . . . . . . . . . . . . . . . . . . . . . . . . . . . . . 69Whitelisted text . . . . . . . . . . . . . . . . . . . . . . . . . . . . . . . . . . 69Upload registered documents . . . . . . . . . . . . . . . . . . . . . . . . . . . . . 69Upload files to whitelist text . . . . . . . . . . . . . . . . . . . . . . . . . . . . . 70Create classification definitions . . . . . . . . . . . . . . . . . . . . . . . . . . . . 71
Create or import a dictionary definition . . . . . . . . . . . . . . . . . . . . . . 71Create an advanced pattern . . . . . . . . . . . . . . . . . . . . . . . . . . 72Integrate Titus Message Classification software with classification criteria . . . . . . . . 73Integrate Boldon James Email Classifier with classification criteria . . . . . . . . . . . 74
Classifying by file location . . . . . . . . . . . . . . . . . . . . . . . . . . . . . . 75Define network parameters . . . . . . . . . . . . . . . . . . . . . . . . . . . 75
Classifying by file destination . . . . . . . . . . . . . . . . . . . . . . . . . . . . . 76Working with email . . . . . . . . . . . . . . . . . . . . . . . . . . . . . . 77Working with printers . . . . . . . . . . . . . . . . . . . . . . . . . . . . . 78Controlling information uploaded to websites . . . . . . . . . . . . . . . . . . . 78
Contents
4 McAfee Data Loss Prevention Endpoint 9.4.0 Product Guide

8 Using rules to protect sensitive content 81How rules work . . . . . . . . . . . . . . . . . . . . . . . . . . . . . . . . . . 81
Protecting user data transfer with data protection rules . . . . . . . . . . . . . . . 82Business justification . . . . . . . . . . . . . . . . . . . . . . . . . . . . . 82Protecting removable media with device control rules . . . . . . . . . . . . . . . . 83Protecting files with discovery rules . . . . . . . . . . . . . . . . . . . . . . . 85Reactions available for rule types . . . . . . . . . . . . . . . . . . . . . . . . 85
Protecting files with rights management . . . . . . . . . . . . . . . . . . . . . . . . 87How McAfee DLP works with rights management . . . . . . . . . . . . . . . . . . 88Supported RM servers . . . . . . . . . . . . . . . . . . . . . . . . . . . . . 88
Rule sets . . . . . . . . . . . . . . . . . . . . . . . . . . . . . . . . . . . . . 89Create and configure rules and rule sets . . . . . . . . . . . . . . . . . . . . . . . . 90
Create a rule set . . . . . . . . . . . . . . . . . . . . . . . . . . . . . . . 90Create a rule . . . . . . . . . . . . . . . . . . . . . . . . . . . . . . . . 90Enable, disable, or delete rules . . . . . . . . . . . . . . . . . . . . . . . . . 91Configure rule or rule set columns . . . . . . . . . . . . . . . . . . . . . . . . 91Customizing end-user messages . . . . . . . . . . . . . . . . . . . . . . . . 92Create a justification definition . . . . . . . . . . . . . . . . . . . . . . . . . 92Create a notification definition . . . . . . . . . . . . . . . . . . . . . . . . . 93
9 Endpoint discovery 95How discovery scanning works . . . . . . . . . . . . . . . . . . . . . . . . . . . . 95Find content with the Endpoint Discovery crawler . . . . . . . . . . . . . . . . . . . . . 96
Create and define a discovery rule . . . . . . . . . . . . . . . . . . . . . . . . 96Create a scheduler definition . . . . . . . . . . . . . . . . . . . . . . . . . . 97Set up a scan . . . . . . . . . . . . . . . . . . . . . . . . . . . . . . . . 97Restore quarantined files or email items . . . . . . . . . . . . . . . . . . . . . 98
10 Working with policies 101How definitions work . . . . . . . . . . . . . . . . . . . . . . . . . . . . . . . . 101Edit a DLP policy . . . . . . . . . . . . . . . . . . . . . . . . . . . . . . . . . 102
Monitoring and reporting11 Monitoring and reporting events 107
Working with incidents . . . . . . . . . . . . . . . . . . . . . . . . . . . . . . . 107View incidents . . . . . . . . . . . . . . . . . . . . . . . . . . . . . . . 107Manage incidents . . . . . . . . . . . . . . . . . . . . . . . . . . . . . . 111
12 Collecting and managing data 115DLP Incident Manager . . . . . . . . . . . . . . . . . . . . . . . . . . . . . . . 115
How the Incident Manager works . . . . . . . . . . . . . . . . . . . . . . . . 115Create a Set Reviewer task . . . . . . . . . . . . . . . . . . . . . . . . . . 117Create an automatic email task . . . . . . . . . . . . . . . . . . . . . . . . 117Create a purge events task . . . . . . . . . . . . . . . . . . . . . . . . . . 118Edit server tasks . . . . . . . . . . . . . . . . . . . . . . . . . . . . . . 119Monitor task results . . . . . . . . . . . . . . . . . . . . . . . . . . . . . 119
13 Creating reports 121Report types . . . . . . . . . . . . . . . . . . . . . . . . . . . . . . . . . . . 121Report options . . . . . . . . . . . . . . . . . . . . . . . . . . . . . . . . . . 121
Predefined dashboards . . . . . . . . . . . . . . . . . . . . . . . . . . . . 122
Index 125
Contents
McAfee Data Loss Prevention Endpoint 9.4.0 Product Guide 5

Contents
6 McAfee Data Loss Prevention Endpoint 9.4.0 Product Guide

Preface
This guide provides the information you need to work with your McAfee product.
Contents About this guide Find product documentation
About this guideThis information describes the guide's target audience, the typographical conventions and icons usedin this guide, and how the guide is organized.
AudienceMcAfee documentation is carefully researched and written for the target audience.
The information in this guide is intended primarily for:
• Administrators — People who implement and enforce the company's security program.
• Security officers — People who determine sensitive and confidential data, and define thecorporate policy that protects the company's intellectual property.
ConventionsThis guide uses these typographical conventions and icons.
Book title, term,emphasis
Title of a book, chapter, or topic; a new term; emphasis.
Bold Text that is strongly emphasized.
User input, code,message
Commands and other text that the user types; a code sample; a displayedmessage.
Interface text Words from the product interface like options, menus, buttons, and dialogboxes.
Hypertext blue A link to a topic or to an external website.
Note: Additional information, like an alternate method of accessing anoption.
Tip: Suggestions and recommendations.
Important/Caution: Valuable advice to protect your computer system,software installation, network, business, or data.
Warning: Critical advice to prevent bodily harm when using a hardwareproduct.
McAfee Data Loss Prevention Endpoint 9.4.0 Product Guide 7

Find product documentationAfter a product is released, information about the product is entered into the McAfee online KnowledgeCenter.
Task1 Go to the Knowledge Center tab of the McAfee ServicePortal at http://support.mcafee.com.
2 In the Knowledge Base pane, click a content source:
• Product Documentation to find user documentation
• Technical Articles to find KnowledgeBase articles
3 Select Do not clear my filters.
4 Enter a product, select a version, then click Search to display a list of documents.
PrefaceFind product documentation
8 McAfee Data Loss Prevention Endpoint 9.4.0 Product Guide

1 Introduction
McAfee®
Data Loss Prevention Endpoint (McAfee DLP Endpoint) software is a content-based agentsolution that inspects enterprise users’ actions concerning sensitive content in their own workenvironment, their computers.
See also Choosing an endpoint product option on page 21
Contents Protecting data McAfee DLP Endpoint overview Product modules and how they interact McAfee DLP Endpoint client software
Protecting dataData loss is when confidential or private information leaves the enterprise as a result of unauthorizedcommunication through channels such as applications, physical devices, or network protocols. Dataloss prevention software enforces predefined information security policies to prevent such losses.
Data to be protected can be usefully categorized according to three vectors — data-in use,data-in-motion, and data-at-rest.
Table 1-1 Data vector descriptions
Data vector Description Associated products
Data-in-use Data-in-use applies to the actions of users onendpoint devices. Examples are copying data andfiles to removable media, printing files to a localprinter, and taking screen captures.
McAfee® Data Loss PreventionEndpoint (McAfee DLP Endpoint)
Data-in-motion Data-in-motion applies to live traffic on yournetwork. Traffic is analyzed, categorized, andstored in the McAfee® Data Loss Prevention(McAfee DLP) database.
• McAfee® Data Loss PreventionMonitor (McAfee DLP Monitor)
• McAfee® Data Loss PreventionPrevent (McAfee DLP Prevent)
Data-at-rest Data-at-rest applies to data residing indatabases, file shares, and repositories. McAfeeDLP can scan, track, and perform remedialactions on data at rest.
• McAfee® Data Loss PreventionDiscover (McAfee DLP Discover)
• McAfee DLP Endpoint discovery
McAfee DLP Endpoint works primarily with the data-in-use vector. It uses advanced text patterns,predefined dictionaries, defined keywords, and file properties to identify sensitive content and canblock actions or quarantine files. It incorporates device management and encryption, and can workwith third-party software for additional layers of control.
1
McAfee Data Loss Prevention Endpoint 9.4.0 Product Guide 9

McAfee DLP Endpoint overviewMcAfee DLP Endpoint is a content-based agent solution that inspects enterprise users’ actionsconcerning sensitive content in their own work environment, their computers.
McAfee DLP safeguards sensitive enterprise information by deploying policies consisting of definitions,classifications, rule sets, and endpoint client configurations. It then monitors the policies and blocksdefined actions containing sensitive content, as required. Alternately, it can encrypt sensitive contentbefore allowing the action to proceed. Finally, theMcAfee DLP software creates reports for review andcontrol of the process, and can store sensitive content as evidence.
Figure 1-1 The McAfee DLP protection process
The McAfee DLP Endpoint client is responsible for the classify, track, and protect aspects of theprocess. The McAfee DLP extension in McAfee ePO is responsible for configuring the classificationconditions, tracking criteria, and protection rules that apply to data copied, sent, printed, ortransmitted from the managed endpoint system. The McAfee DLP extension together with the McAfeeePO user interface are responsible for the monitor aspects of the process.
ClassifyTo protect sensitive content, the McAfee DLP administrator starts by defining and classifying what is tobe protected.
Content is classified by defining classifications and classification criteria. Classification criteria definethe conditions to classify data by its true file type, advanced patterns (regular expressions combinedwith validation algorithms), dictionaries, keywords, proximity between text patterns and keywords andfile properties such as author or title.
1 IntroductionMcAfee DLP Endpoint overview
10 McAfee Data Loss Prevention Endpoint 9.4.0 Product Guide

Source or destination location Define sources by the application (application template) used tocreate the content, or by the end-user group creating or receivingthe content.Define locations by URL or network share.
Source locations, that is, location-based tagging rules, are notsupported in McAfee Device Control.
Datadefinitions
Content type Define content type by the application that created the file,document properties, file information, or True File Type.
Specific terms Dictionaries define lists of sensitive words. For example, to protectprivate medical information, the HIPAA dictionary lists medical termsthat may be required to be kept confidential. Built-in or userdefined.
Advancedpatterns
Advanced patterns (text patterns) can be strings, such as CompanyConfidential, or regular expressions used to identify credit cardnumbers or other regular patterns.
You can classify email using the supported classification software, Titus Message Classification orBoldon James Email Classifier. The classifications are defined as keywords in classification criteria. Youcan classify any file using Titus Classification for Desktop classifications. The integration is in Titususing classifications you define in McAfee DLP Endpoint, and works in a similar manner to manualclassification.
Third-party classification software is not supported in McAfee Device Control.
Every rule specifies at least one classification to apply. This is done by parsing content and matching itagainst the definitions in the classification or tagging criteria.
TrackMcAfee DLP can classify content based on its origin using two techniques – registered documents andtagging criteria.
Using these techniques, you can, for example, specify that all files downloaded from the engineeringSharePoint site are tracked and classified as Intellectual Property.
• Registered documents
The registered documents feature is based on pre-scanning all files in specified repositories (suchas the engineering SharePoint) and creating signatures of fragments of each file in theserepositories. These signatures are then distributed to all managed endpoints. The McAfee DLPEndpoint client is then able to track any paragraph copied from one of these documents andclassify it according to the classification of the registered document signature.
Registered documents use extensive memory which might affect performance, as each documentthat the McAfee DLP Endpoint client inspects is compared to all registered document signatures toidentify its origin. To minimize the number of signatures and the performance implications of thistechnique, we recommend only using it to track the most sensitive documents.
• Tagging
• Tagging is a content tracking technique unique to the McAfee DLP Endpoint product. Theadministrator creates a set of tagging criteria that define the file location and the classification tagto place on files from that location. McAfee DLP Endpoint client tracks any file that is opened fromthe locations defined in the tagging criteria and creates signatures of these files in real time whenthe files are accessed. It then uses these signatures to track the files or fragments of the files.Tagging criteria can be defined by location (UNC path or URL) or the application used to access thefile.
IntroductionMcAfee DLP Endpoint overview 1
McAfee Data Loss Prevention Endpoint 9.4.0 Product Guide 11

Support for persistent tag information
Tags are stored in a file's extended file attributes (EA) or alternate data streams (ADS). Wheneversuch files are accessed, McAfee DLP Endpoint software tracks data transformations and maintains theclassification of the sensitive content persistently, regardless of how it is being used. For example, if auser opens a tagged Word document, copies a few paragraphs of it into a text file, and attaches thetext file to an email message, the outgoing message has the same tag as the original document.
For file systems that do not support EA or ADS, McAfee DLP Endpoint software stores tag informationas a metafile on the disk. The metafiles are stored in a hidden folder named ODB$, which the McAfeeDLP Endpoint client software creates automatically.
Tags and tagging criteria are not supported in McAfee Device Control.
ProtectProtection is defined in Rule Sets in the DLP Policy Manager. Each rule set can contain multiple DataProtection, Device Control, and Discovery rules. Multiple parameters and Boolean AND, OR, NOT logicallow for rule exceptions and filtering.
A rule set does not need to contain all three types of rules. One rule of one type is enough to define arule set.
Data Protection rules
Data protection rules prevent unauthorized distribution of classified data. When a user attempts tocopy or attach classified data, McAfee DLP Endpoint intercepts the attempt and uses the dataprotection rules to determine what action to take. Actions include allow (No Action), Block, or RequestJustification. In this case, McAfee DLP Endpoint halts the attempt and displays a dialog to the enduser. The user inputs the justification for the attempt, and processing continues.
In McAfee Device Control, only removable storage data protection rules are available. For OS X endpointcomputers, no data protection rules are available in this release.
Device Control rules
Device Control rules monitor and potentially block the system from loading physical devices such asremovable storage devices, Bluetooth, Wi-Fi, and other Plug and Play devices. Device Control rulesconsist of device definitions and reaction specifications, and can be assigned to specific end-usergroups by filtering the rule with end-user group definitions.
Endpoint Discovery rules
Endpoint Discovery is a crawler that runs on managed computers. It scans the local endpoint filesystem and the local email (cached) inbox and PST files. Local file system and email storage discoveryrules define whether the content is to be quarantined, tagged, or encrypted. They can also definewhether the classified file or email is reported as an event to the DLP Incident Manager, and whetherto store the file or email as evidence for the event.
Discovery rules are not supported in McAfee Device Control.
File system scans are not supported on server operating systems.
1 IntroductionMcAfee DLP Endpoint overview
12 McAfee Data Loss Prevention Endpoint 9.4.0 Product Guide

Policies and policy deployment
Protection is applied by assigning rule sets to a DLP Policy in the McAfee ePO Policy Catalog. Inaddition to rule sets, policies contain policy assignment information and definitions. Policies aredeployed by McAfee ePO software to the enterprise’s managed computers (computers with McAfee
®
Agent installed).
MonitorWhen the application of a rule blocks, monitors, or causes some other action, an event is generated,sent to the McAfee ePO Event Parser, and stored in a database. The event can also contain evidence ofthe rule violation. In addition, administrative events are generated by system events such as policydeployment or discovery scans. The events generated by McAfee DLP Endpoint are monitored in DLPIncident Manager, and can be used to create reports and charts which can be displayed in McAfee ePOdashboards. The policy monitor function includes:
• Incident monitoring — The DLP Incident Manager page in McAfee ePO allows administrators toview agent events and evidence as they are received.
• Administrative event monitoring — The DLP Operational Events page in McAfee ePO allowsadministrators to view administrative events.
• Evidence collection — If protection rules are defined to collect evidence, a copy of the taggeddata is saved and linked to the specific event. This information can help determine the severity orexposure of the event. Evidence is encrypted using the AES algorithm before being saved.
• Hit highlighting — Evidence can be saved with highlighting of the text that caused the event.Highlighted evidence is stored as a separate encrypted HTML file.
In addition, event trends can be displayed in McAfee ePO dashboards.
Product modules and how they interactMcAfee DLP Endpoint consists of four modules. In addition, it uses the McAfee ePO Policy Catalog,Server Tasks, Server Settings, and Permission Sets.
McAfee DLP Endpoint version 9.4 has a reorganized workflow with increased granularity.
Classifications
The Classification module stores classification criteria, tagging criteria, and the definitions used toconfigure them. It is also the place for setting up registered documents repositories, userauthorization for manual tagging, and whitelisted text.
Classifications are required for configuring data protection and endpoint discovery rules.
DLP Policy Manager
The DLP Policy Manager module defines the rule sets, policy assignments, and definitions that makeup a DLP policy.
DLP rule sets define data protection, device control, and discovery rules. Each rule in a rule set caninclude any or all three types of rules. You can include multiple rules in a rule set, and assign multiplerule sets to a DLP policy.
IntroductionProduct modules and how they interact 1
McAfee Data Loss Prevention Endpoint 9.4.0 Product Guide 13

Workflow
Use the following workflow to create policies and deploy them to endpoint computers.
1 Create classification and tagging criteria and the definitions required to define them. (You cancreate definitions as needed for defining criteria.)
2 Create data protection, device, and discovery rules and the definitions required to define them.
Data protection and discovery rules include assigning a classification as part of defining the rule.
3 Assign rule sets to DLP policies. Create discovery scan definitions in the DLP policies.
4 Assign and deploy the policies in the System Tree.
Figure 1-2 Workflow
Policy Catalog
The McAfee ePO Policy Catalog stores the policies that are deployed to the endpoint computers. Toview or edit the McAfee DLP policies, select Policy Catalog | Product | Data Loss Prevention 9.4.
McAfee DLP Endpoint policies have three components:
• DLP Policy — Contains Rule Sets, Endpoint Discovery scans, and Settings for privileged users,application strategy, and device class overrides
• Client Configuration — Contains information for the end-user computer
1 IntroductionProduct modules and how they interact
14 McAfee Data Loss Prevention Endpoint 9.4.0 Product Guide

Table 1-2 Client configuration
Setting Notes
Advanced configuration Endpoint and access protection settings
Application File Access Protection Used to add whitelisted processes
Clipboard Protection Enables the Microsoft Office clipboard; used to add whitelistedprocesses
Content Tracking Text extractor settings
Corporate connectivity Used to configure VPN servers for data protection options
Debugging and Logging Set up logging and memory dumps for troubleshooting
Discovery (Endpoint) Sets scan performance parameters and prefix for quarantinedemails
Email Protection Settings for email protection rules and third party softwareintegration
Evidence Copy Service Settings for evidence storage share, file size, and evidence age
Operational Mode and Modules Sets operation mode for Device Control or McAfee DLP Endpoint;activates add-ins and handlers
Printing Protection Used to add whitelisted processes
Quarantine Settings for quarantine folder
Removable Storage Protection Sets deletion mode for removable storage
Screen Capture Protection Adds screen capture application support
User Interface Components Defines the endpoint user interface
Web Post Protection Sets HTTP GET request behavior, Google Chrome version support,timeout strategy, and whitelisted URLs
Incident Manager and Operational EventsThe DLP Incident Manager displays security events from policy violations. A Details page for eachentry displays evidence specified in the client configuration, as well as rules and classifications appliedother details. DLP Operational Events displays administrative events such as deployments or policyupdates.
McAfee DLP Endpoint client softwareThe McAfee DLP Endpoint client software is deployed as a McAfee Agent plug-in, and enforces thepolicies defined in the McAfee DLP policy. The McAfee DLP Endpoint client software audits useractivities to monitor, control, and prevent unauthorized users from copying or transferring sensitivedata. It then generates events recorded by the McAfee ePO Event Parser.
McAfee DLP Endpoint on the OS X platformMcAfee
®
Device Control client for OS X prevents unauthorized use of removable media devices, themost widespread, and costly source of data loss in many companies today, on Macintosh computers.
McAfee DLP Endpoint on the Microsoft Windows platformMicrosoft Windows computers can be protected with either McAfee Device Control or McAfee DLPEndpoint. The McAfee DLP Endpoint client software uses advanced discovery technology, text patternrecognition, and predefined dictionaries. It identifies sensitive content, and incorporates devicemanagement and encryption for added layers of control.
IntroductionMcAfee DLP Endpoint client software 1
McAfee Data Loss Prevention Endpoint 9.4.0 Product Guide 15

Information Rights Management (IRM) software protects sensitive files using encryption andmanagement of access permissions. McAfee DLP Endpoint supports Microsoft Rights ManagementService (RMS) and Seclore FileSecure as complementary methods of data protection. A typical use isto prevent copying files that are not IRM protected.
Classification software verifies that emails and other files are consistently classified and protectivelylabeled. McAfee DLP Endpoint integrates with Titus Message Classification, and Boldon James EmailClassifier for Microsoft Outlook to create email protection rules based on the applied classifications.
Screen reader support
Job Access With Sound (JAWS), the widely used screen reader software for the visually impaired, issupported on endpoint computers. The following McAfee DLP Endpoint features are supported:
• End-user notification popup — If the popup dialog is set to close manually (in DLP PolicyManager), dialog text is read allowing a visually impaired person to navigate the buttons and links.
• End-user justification dialog — The combo box is accessible with the tab key, and justificationcan be selected with arrow keys.
• End-user console Notification History tab — When the tab is selected, JAWS reads,"Notification history tab selected." There is no actionable content. All information in the right paneis read.
• End-user console Discovery tab — When the tab is selected, JAWS reads, "Discovery tabselected." There is no actionable content. All information in the right pane is read.
• End-user console Tasks tab — When the tab is selected, JAWS reads, "Tasks tab selected." Allsteps are accessible with the tab key, and appropriate instructions are read.
• End-user console About tab — When the tab is selected, JAWS reads, "About tab selected."There is no actionable content. All information in the right pane is read.
Online/offline operation
Device and protection rules can monitor or protect sensitive data when the managed computer isonline (within the enterprise network), offline, or both. There are three settings: connected to thecorporate network, connected to the network by VPN, and not connected.
Multiple user sessions
The McAfee DLP Endpoint client software supports Fast User Switching (FUS) with multiple usersessions on those versions of the Windows operating system that support FUS. Virtual desktop supportcan also lead to multiple users sessions on a single host computer.
Event parser
Events generated by the McAfee DLP Endpoint client software are sent to the McAfee ePO EventParser, and recorded in tables in the McAfee ePO database. Events are stored in the database forfurther analysis and used by other system components.
Endpoint console
The endpoint console was designed to share information with the user and to facilitateself-remediation of problems. It is configured on the Client Configuration | User Interface Service tab.
On Microsoft Windows computers, the console is activated from the icon in the System Tray byselecting Manage Features | DLP Endpoint Console. Fully configured, it has four tabbed pages:
• Events History — Displays events, including details of aggregated events.
• Discovery — Displays details of discovery scans.
1 IntroductionMcAfee DLP Endpoint client software
16 McAfee Data Loss Prevention Endpoint 9.4.0 Product Guide

• Tasks — Generates ID codes and enter release codes for agent bypass and quarantine.
• About — Displays information about agent status, active policy, configuration, and computerassignment group, including revision ID numbers.
On OS X endpoints, the console is activated from the McAfee menulet on the status bar. TheDashboard is integrated with other installed McAfee software such as McAfee
®
VirusScan®
for Mac, anddisplays an overview of the status of all installed McAfee software. The History page displays recentMcAfee software events. Click an entry to view the details.
Figure 1-3 OS X endpoint display
To activate the agent bypass screen, select Preferences from the menulet.
IntroductionMcAfee DLP Endpoint client software 1
McAfee Data Loss Prevention Endpoint 9.4.0 Product Guide 17

1 IntroductionMcAfee DLP Endpoint client software
18 McAfee Data Loss Prevention Endpoint 9.4.0 Product Guide
Deployment and installationDetermine the deployment option that best suits your environment, theninstall the software and deploy the McAfee DLP Endpoint clients to theenterprise computers.
Chapter 2 Deployment options and scenariosChapter 3 Installing the McAfee DLP Endpoint softwareChapter 4 Deploying McAfee DLP Endpoint client
McAfee Data Loss Prevention Endpoint 9.4.0 Product Guide 19

Deployment and installation
20 McAfee Data Loss Prevention Endpoint 9.4.0 Product Guide

2 Deployment options and scenarios
Classifying corporate information into different data loss prevention categories is a key step indeploying and administering McAfee Data Loss Prevention Endpoint software. While guidelines andbest practices exist, the ideal schema is dependent on your enterprise goals and needs, and is uniquefor each installation. Choosing between the two DLP options — McAfee Device Control and full McAfeeDLP Endpoint — is the first step in determining how those needs will be met.
Because it might be difficult to determine in advance exactly what your unique needs are, werecommend initial deployment to a sample group of 15 to 20 users for a trial period of about a month.During this trial no data is classified, and a policy is created to monitor, not block, transactions. Themonitoring data helps the security officers make good decisions about where and how to classifycorporate data. The policies created from this information should be tested on a larger test group (or,for very large companies, on a series of successively larger groups) before being deployed to theentire enterprise.
McAfee DLP Endpoint policy design and monitoring software is installed in McAfee ePO. In a simpleinstallation, a single McAfee ePO server with Microsoft SQL Server is used, but for larger enterprisesmultiple server installations or cluster environments are possible.
McAfee DLP Endpoint client software can be deployed to Microsoft Windows servers, workstations, andlaptops in either Device Control or full McAfee DLP Endpoint versions.
Currently, a version of Device Control is available for OS X computers.
Contents Choosing an endpoint product option Recommended installation Verify the system requirements
Choosing an endpoint product optionMcAfee offers several McAfee ePO-based Data Loss Prevention options. The products use the sameinstalled software, and are differentiated by licensing.
Understanding McAfee DLP options
McAfee DLP software is available in two Device Control configurations, full McAfee DLP Endpoint, andMcAfee
®
Data Loss Prevention Discover (McAfee DLP Discover).
• McAfee Device Control for Small to Medium Businesses — Provides Device Control only
• McAfee Device Control for Enterprise —Provides removable storage protection rules(content-sensitive rules) in addition to Device Control
2
McAfee Data Loss Prevention Endpoint 9.4.0 Product Guide 21
• Data Protection and Device — Full McAfee DLP Endpoint, including endpoint discovery
• McAfee DLP Discover — Provides network discovery crawling, and can be installed alone or togetherwith either Device Control or McAfee DLP Endpoint
The current release supports OS X only with the Device Control options.
What is McAfee Device Control?
Device Control software prevents unauthorized use of removable media devices, the most widespread,and costly source of data loss in many companies today.
Device Control software provides:
• Persistent data protection for devices — Controls what data can be copied to removabledevices, filtering by user, file extension, or file name; controls the devices themselves, blockingthem completely or making them read-only. Blocks applications run from removable drives
• Protection on the go — For USB drives, iPods, Bluetooth devices, CDs, DVDs, and otherremovable media, and for non-system hard disks
Device Control for OS X in the current release is limited to removable storage device rules.
What is McAfee Device Control with content-sensitive rules?
Device Control with content-sensitive rules provides:
Persistent content-aware data protection for devices — Adds control by content of data copiedto devices, using advanced patterns, dictionaries, document properties, or file information
What is full McAfee DLP Endpoint?
McAfee DLP Endpoint software provides:
• Universal protection — Protects against data loss through the broadest set of data-loss channels:removable devices, non-system hard disks, email or email attachments, web posts, clipboard andscreen capture, printing, file system, and more
• Persistent content-aware data protection — Protects against data loss regardless of theformat in which data is stored or manipulated. Enforces data loss policies without disruptinglegitimate user activities
• Protection on the go — Prevents transmission of sensitive data from desktops and laptops,whether they are connected to the enterprise network or used outside the network
2 Deployment options and scenariosChoosing an endpoint product option
22 McAfee Data Loss Prevention Endpoint 9.4.0 Product Guide
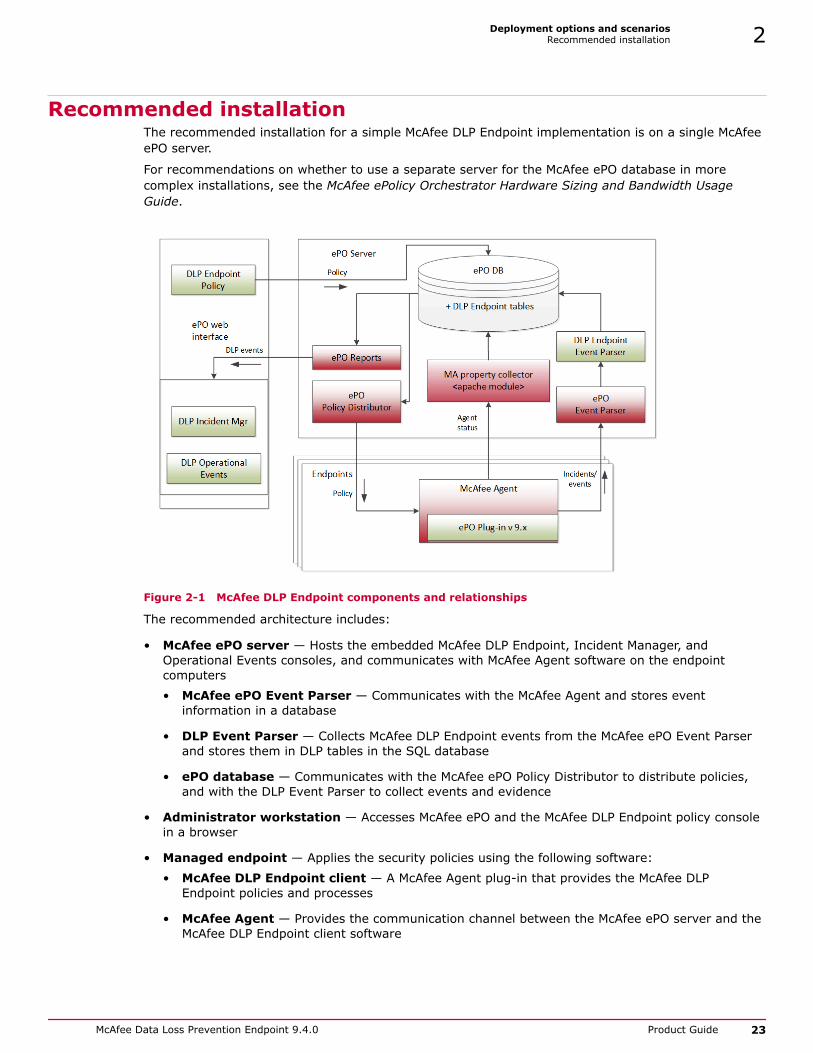
Recommended installationThe recommended installation for a simple McAfee DLP Endpoint implementation is on a single McAfeeePO server.
For recommendations on whether to use a separate server for the McAfee ePO database in morecomplex installations, see the McAfee ePolicy Orchestrator Hardware Sizing and Bandwidth UsageGuide.
Figure 2-1 McAfee DLP Endpoint components and relationships
The recommended architecture includes:
• McAfee ePO server — Hosts the embedded McAfee DLP Endpoint, Incident Manager, andOperational Events consoles, and communicates with McAfee Agent software on the endpointcomputers
• McAfee ePO Event Parser — Communicates with the McAfee Agent and stores eventinformation in a database
• DLP Event Parser — Collects McAfee DLP Endpoint events from the McAfee ePO Event Parserand stores them in DLP tables in the SQL database
• ePO database — Communicates with the McAfee ePO Policy Distributor to distribute policies,and with the DLP Event Parser to collect events and evidence
• Administrator workstation — Accesses McAfee ePO and the McAfee DLP Endpoint policy consolein a browser
• Managed endpoint — Applies the security policies using the following software:
• McAfee DLP Endpoint client — A McAfee Agent plug-in that provides the McAfee DLPEndpoint policies and processes
• McAfee Agent — Provides the communication channel between the McAfee ePO server and theMcAfee DLP Endpoint client software
Deployment options and scenariosRecommended installation 2
McAfee Data Loss Prevention Endpoint 9.4.0 Product Guide 23
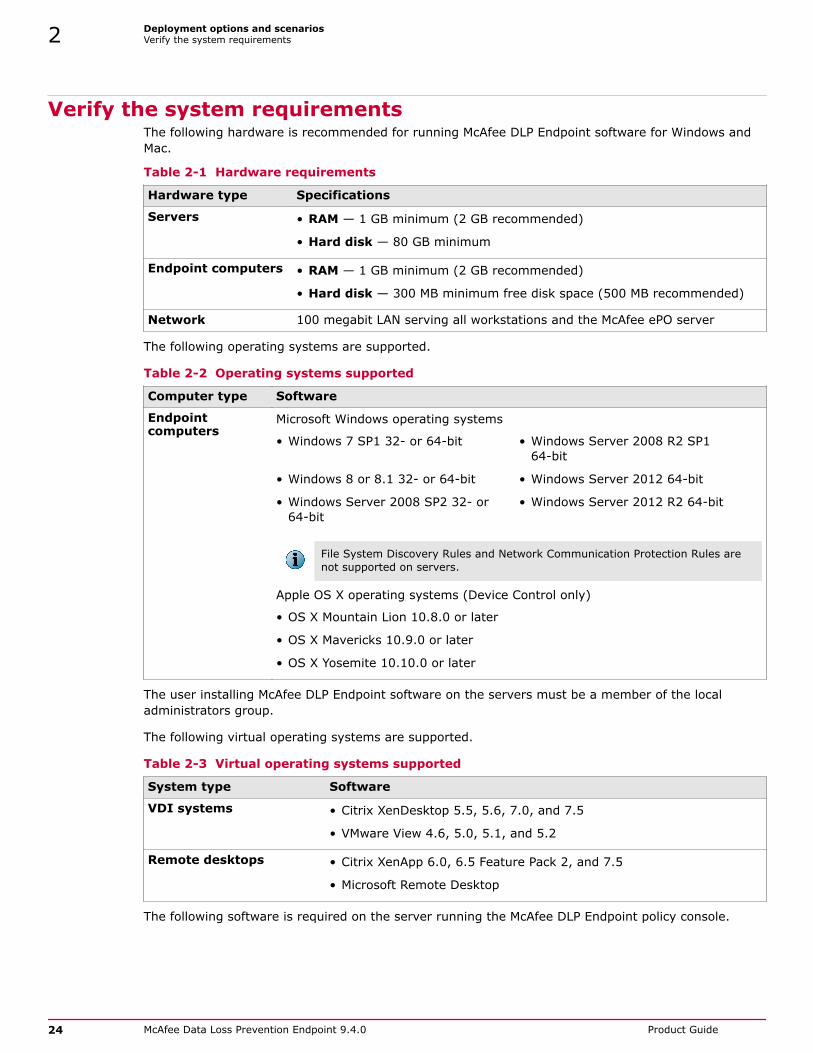
Verify the system requirements The following hardware is recommended for running McAfee DLP Endpoint software for Windows andMac.
Table 2-1 Hardware requirements
Hardware type Specifications
Servers • RAM — 1 GB minimum (2 GB recommended)
• Hard disk — 80 GB minimum
Endpoint computers • RAM — 1 GB minimum (2 GB recommended)
• Hard disk — 300 MB minimum free disk space (500 MB recommended)
Network 100 megabit LAN serving all workstations and the McAfee ePO server
The following operating systems are supported.
Table 2-2 Operating systems supported
Computer type Software
Endpointcomputers
Microsoft Windows operating systems
• Windows 7 SP1 32- or 64-bit • Windows Server 2008 R2 SP164-bit
• Windows 8 or 8.1 32- or 64-bit • Windows Server 2012 64-bit
• Windows Server 2008 SP2 32- or64-bit
• Windows Server 2012 R2 64-bit
File System Discovery Rules and Network Communication Protection Rules arenot supported on servers.
Apple OS X operating systems (Device Control only)
• OS X Mountain Lion 10.8.0 or later
• OS X Mavericks 10.9.0 or later
• OS X Yosemite 10.10.0 or later
The user installing McAfee DLP Endpoint software on the servers must be a member of the localadministrators group.
The following virtual operating systems are supported.
Table 2-3 Virtual operating systems supported
System type Software
VDI systems • Citrix XenDesktop 5.5, 5.6, 7.0, and 7.5
• VMware View 4.6, 5.0, 5.1, and 5.2
Remote desktops • Citrix XenApp 6.0, 6.5 Feature Pack 2, and 7.5
• Microsoft Remote Desktop
The following software is required on the server running the McAfee DLP Endpoint policy console.
2 Deployment options and scenariosVerify the system requirements
24 McAfee Data Loss Prevention Endpoint 9.4.0 Product Guide

Table 2-4 Server software requirements
Software Supported versions
McAfee ePO • 4.6.9 or later
• 5.1.1or later
McAfee Agent • 4.8.2 or later
• 5.0 or later
McAfee Agent for Mac
• 4.6 Patch 3 or later
• 4.8 or later
The McAfee DLP Endpoint package DLP_Mgmt_9.4_Package.zip includes the extensions installedthrough McAfee ePO.
The McAfee DLP Endpoint client (McAfee Agent plug-in) includes the files for distributing the clientsoftware to endpoint computers from the McAfee ePO repository: HDLP_Agent_9_4_0_x.zip forMicrosoft Windows, DLPAgentInstaller.zip for Mac OS X.
Deployment options and scenariosVerify the system requirements 2
McAfee Data Loss Prevention Endpoint 9.4.0 Product Guide 25

2 Deployment options and scenariosVerify the system requirements
26 McAfee Data Loss Prevention Endpoint 9.4.0 Product Guide

3 Installing the McAfee DLP Endpointsoftware
The McAfee DLP Endpoint console is fully integrated in McAfee ePO. McAfee DLP Endpoint clients aredeployed by McAfee ePO to the enterprise computers.
Contents Install and license the McAfee DLP extension Check in the McAfee DLP Endpoint package to McAfee ePO
Install and license the McAfee DLP extensionThe extension provides the user interface for configuring McAfee DLP in McAfee ePO.
Before you begin• Download the McAfee DLP extension from the McAfee download site.
You can also navigate in McAfee ePO to Menu | Software | Software Manager to view, download,and install the software.
• Verify that the McAfee ePO server name is listed under Trusted Sites in the InternetExplorer security settings.
TaskFor option definitions, click ? in the interface.
1 In McAfee ePO, select Menu | Software | Extensions, then click Install Extension.
2 Browse to the extension .zip file and click OK.
The installation dialog box displays the file parameters to verify that you are installing the correctextension.
3 Click OK. The extension is installed.
4 Install licenses and components to customize the installation.
Installing the license activates the related McAfee ePO components and McAfee ePO Policy Catalogpolicies. License options are:
• McAfee Device Control
• McAfee DLP Endpoint (Includes McAfee Device Control)
• McAfee DLP Discover
3
McAfee Data Loss Prevention Endpoint 9.4.0 Product Guide 27

• McAfee Device Control plus McAfee DLP Discover
• McAfee DLP Endpoint plus McAfee DLP Discover
a Select Menu | Data Protection.
b Select either DLP Policy Manager or McAfee DLP Discover and click Yes when prompted to enter thelicense.
The Server Settings | Data Loss Prevention page opens.
c In the Key field, enter the license, then click Add.
d If necessary, add another license.
5 In the Default Evidence Storage field, enter the path.
The evidence storage path must be a network path, that is \\[server]\[localpath]. This step isrequired to save the settings and activate the software.
6 Click Save.
McAfee DLP modules appear in Menu | Data Protection according to the license.
See also Creating evidence folders on page 38Edit McAfee DLP server settings on page 35Configure evidence folders on page 39
Check in the McAfee DLP Endpoint package to McAfee ePOAny enterprise computer with data protected by McAfee software must have the McAfee Agentinstalled, making it a managed computer. To add data loss protection, you must also deploy theMcAfee DLP Endpoint plug-in for McAfee Agent. The installation can be performed using the McAfeeePO infrastructure.
TaskFor option definitions, click ? in the interface.
1 In McAfee ePO, select Menu | Software | Master Repository.
2 In the Master Repository, select Check In Package.
3 Select package type Product or Update (.ZIP). Click Browse.• For Microsoft Windows client, browse to ...\HDLP_Agent_9_4_0_xxx.zip
• For Mac OS X client, browse to ...\DLPAgentInstaller
4 click Next.
The Check in Package page appears.
5 Review the details on the screen, then click Save.
The package is added to the Master Repository.
3 Installing the McAfee DLP Endpoint softwareCheck in the McAfee DLP Endpoint package to McAfee ePO
28 McAfee Data Loss Prevention Endpoint 9.4.0 Product Guide

4 Deploying McAfee DLP Endpoint client
McAfee DLP Endpoint policies are enforced by the McAfee Agent on endpoint computers.
The first step is deployment of the McAfee DLP Endpoint client software, a McAfee Agent plug-in, tothe endpoints.
Contents Deploy McAfee DLP Endpoint client with McAfee ePO Verify the installation Deploy policies with McAfee ePO
Deploy McAfee DLP Endpoint client with McAfee ePOBefore policies can be applied, McAfee DLP Endpoint client must be deployed to the endpointcomputers by McAfee ePO.
Before you beginA current version of McAfee Agent must be installed in McAfee ePO and deployed to thetarget computers before McAfee DLP Endpoint is deployed:
• For Microsoft Windows endpoint computers, install McAfee Agent 4.8 Patch 2 or later.
• For Mac OS X endpoint computers, install McAfee Agent for Mac 4.6 Patch 3 or later. ForOS X 10.10, McAfee Agent 4.8 Patch 2 or later is required.
Consult the McAfee ePO documentation on how to verify the version, and how to install it ifnecessary.
TaskFor option definitions, click ? in the interface.
1 In McAfee ePO, select Menu | System Tree.
2 In the System Tree, select the level at which to deploy McAfee DLP Endpoint.
Leaving the level at My Organization deploys to all workstations managed by McAfee ePO.
If you select a level under My Organization, the right pane displays the available workstations. You canalso deploy McAfee DLP Endpoint to individual workstations.
3 Open the Client Task Builder wizard: click the Assigned Client Tasks tab. Select Actions | New Client TaskAssignment.
The Client Task Builder wizard opens.
4
McAfee Data Loss Prevention Endpoint 9.4.0 Product Guide 29

4 Fill in the Task Builder fields:
• In the Product field, select McAfee Agent.
• In the Task Type field, select Product Deployment.
5 Click Create New Task.
6 In the Products and Components field, select Data Loss Prevention 9.4. The Action field automatically resets toInstall. Click Save.
7 Change the Schedule type to Run immediately. Click Next.
8 Review the task summary. When you are satisfied that it is correct, click Save. The task is scheduledfor the next time the McAfee Agent updates the policy. To force the installation to take placeimmediately, issue an agent wake-up call.
9 After McAfee DLP Endpoint has been deployed, restart the managed computers.
Verify the installationAfter installing McAfee DLP Endpoint software, you should verify the installation in the DLP OperationalEvents console.
Task
1 In McAfee ePO, select Menu | Data Protection | DLP Operational Events. Click an event to view the details.
Figure 4-1 DLP Operational Events details pane
2 Verify the McAfee DLP Endpoint client software installation from the McAfee Agent system tray iconon the endpoint computer by selecting About. Scroll through the information for McAfee DLPEndpoint.
Deploy policies with McAfee ePOMcAfee DLP Endpoint policies contain rule sets, classifications, definitions, and client and serverconfigurations.
McAfee DLP Endpoint works with these policies:
• DLP policy
• Client configuration
4 Deploying McAfee DLP Endpoint clientVerify the installation
30 McAfee Data Loss Prevention Endpoint 9.4.0 Product Guide

Each of these policies is assigned the revision number 1 when it is created, and the number isincremented each time the policy is changed. The revision number is important for supportingtroubleshooting processes, to ensure that policy changes are actually applied to the endpointcomputers. It is also used when requesting a client bypass or uninstall key. The DLP Endpoint consoleon the client computer displays the current policy revision numbers.
Before applying a policy, verify that:
• All settings are configured correctly.
• All rules are enabled.
• End User Groups (where required) are assigned to each rule.
Tasks• Assign a policy or client configuration on page 31
Policies applied to McAfee ePO must be assigned and deployed to managed computers inorder to be used.
• Refresh the policy on page 31The system policy deployment relies on the McAfee ePO server, and the policy refresh onthe managed computer is performed in accordance with the McAfee Agent settings. Youcan, however, refresh in McAfee ePO without waiting for the scheduled refresh.
Assign a policy or client configurationPolicies applied to McAfee ePO must be assigned and deployed to managed computers in order to beused.
TaskFor option definitions, click ? in the interface.
1 In McAfee ePO, select Menu | System Tree.
2 Locate the directory containing the computers that will be assigned a policy, and select them.
3 Select Actions | Agent | Wake Up Agents.
4 Select Agent Wake-Up Call, and set Randomization to 0 minutes. Click OK.
5 When the agent wake-up call is completed, you are returned to the System Tree. Reselect thecomputers that will be assigned a policy, and click Actions | Agent | Set Policy & Inheritance.
6 On the Assign Policy page, select Data Loss Prevention 9.4 from the drop-down Product list.
The Category column displays two policies: DLP Policy and Client Configuration.
7 For each policy that you want to assign:
a Click Edit Assignment in the Actions column for one of the categories.
b Click the Break inheritance... option, then select the policy to assign from the drop-down list. ClickSave.
Refresh the policyThe system policy deployment relies on the McAfee ePO server, and the policy refresh on the managedcomputer is performed in accordance with the McAfee Agent settings. You can, however, refresh inMcAfee ePO without waiting for the scheduled refresh.
Deploying McAfee DLP Endpoint clientDeploy policies with McAfee ePO 4
McAfee Data Loss Prevention Endpoint 9.4.0 Product Guide 31

TaskFor option definitions, click ? in the interface.
1 In McAfee ePO, select Menu | System Tree, then select the computer or computers to be refreshed.
2 Click More Actions | Wake Up Agents.
3 Select the wake-up call type, and set Randomization to 0 minutes. Click OK.
Policies are updated on a scheduled basis by the McAfee ePO server. Users of managed computersdo not refresh policies manually unless specifically instructed to do so.
4 Deploying McAfee DLP Endpoint clientDeploy policies with McAfee ePO
32 McAfee Data Loss Prevention Endpoint 9.4.0 Product Guide

Configuration and useConfigure the software for optimized use in the enterprise environmentbased on management decisions of what content to protect, and how best toprotect it.
Chapter 5 Configuring system componentsChapter 6 Protecting removable mediaChapter 7 Classifying sensitive contentChapter 8 Using rules to protect sensitive contentChapter 9 Endpoint discoveryChapter 10 Working with policies
McAfee Data Loss Prevention Endpoint 9.4.0 Product Guide 33

Configuration and use
34 McAfee Data Loss Prevention Endpoint 9.4.0 Product Guide

5 Configuring system components
System components can be customized to best fit the needs of your enterprise. By configuring theagent and system options, you can optimize the system to safeguard sensitive enterprise informationefficiently.
In addition to settings in the McAfee DLP modules, configuration settings that affect the administrationof McAfee DLP are found in McAfee ePO Server Settings, Registered Servers, and Server Tasks.
Contents Policy Catalog Edit McAfee DLP server settings Define a Rights Management server Documenting events with evidence Users and permission sets Configuring McAfee DLP in the Policy Catalog
Policy CatalogThe McAfee ePO Policy Catalog displays the following McAfee DLP policy configurations:
• Client Configuration — Contains the configuration settings for the McAfee DLP Endpoint clients.The settings determine how clients apply McAfee DLP policies on the endpoint computers
• DLP Policy — Contains the Rule Sets assigned to the policy, scheduled Endpoint Discovery scans,and Settings for application strategy, device class overrides, and privileged users
Edit McAfee DLP server settingsMcAfee DLP Endpoint inserts default configuration settings in McAfee ePO server settings. Thesesettings can be edited as required.
5
McAfee Data Loss Prevention Endpoint 9.4.0 Product Guide 35

TaskFor option definitions, click ? in the interface.
1 In McAfee ePO, select Menu | Configuration | Server Settings | Data Loss Prevention.
2 Click Edit.
3 You can edit the following parameters.
Option Definition
License Key Determines the installed version: McAfee Device Control or fullMcAfee DLP Endpoint. You can also add a license for McAfee DLPDiscover to either.
Default Evidence Storage UNC path to the storage share. The path must be a network share,that is, it must include the server name.
Shared Password Override password for uninstalling the software, removing filesfrom quarantine, encrypting evidence, and temporary clientbypass.
Challenge-Response keylength
Used by Help Desk for releasing quarantined files or setting clientbypass mode.
Enforce system treepermissions
System Tree permissions can be used to filter incidents in the DLPIncident Manager and DLP Operational Events consoles. Use thissetting to Use or Ignore System Tree permissions.
Last Backup Displays the last backup, and allows you to save the currentsettings to a file.
Last Restore Displays the last restored version, and allows you to restore savedsettings from a file.
Define a Rights Management serverMcAfee DLP Endpoint supports two Rights Management (RM) systems: Microsoft Windows RightsManagement Services (RMS) and Seclore FileSecure™. To use these systems, configure the serverproviding the RM policies in McAfee ePO.
Before you begin• Set up the RM servers and create users and policies. Obtain the URL and password for
all servers – policy template, certification, and licensing. For Seclore, you need the HotFolder Cabinet ID and passphrase, and information on advanced licenses, if any.
• Verify that you have permission to view, create, and edit Microsoft RMS and Secloreservers. In McAfee ePO, select Menu | User Management | Permission Sets, and verify that youbelong to a group that has the required permissions in Registered Servers.
TaskFor option definitions, click ? in the interface.
1 In McAfee ePO, select Menu | Registered Servers.
2 Click New Server.
The Registered Servers description page opens.
3 From the Server type drop-down list, select the type of server you want to configure: Microsoft RMSServer or Seclore Server.
5 Configuring system componentsDefine a Rights Management server
36 McAfee Data Loss Prevention Endpoint 9.4.0 Product Guide
4 Type a name for the server configuration, then click Next.
5 Fill in the required details. When you have entered the required fields, click Test Connectivity to verifythe data entered.
• RMS settings also include a DLP enforcement settings section. The Local path to RMS template field isoptional, but the URL fields for certification and licensing are required unless you choose the ADauto-service discovery option.
• Seclore requires HotFolder Cabinet information, but additional license information is optional.
6 Click Save when you have completed the configuration.
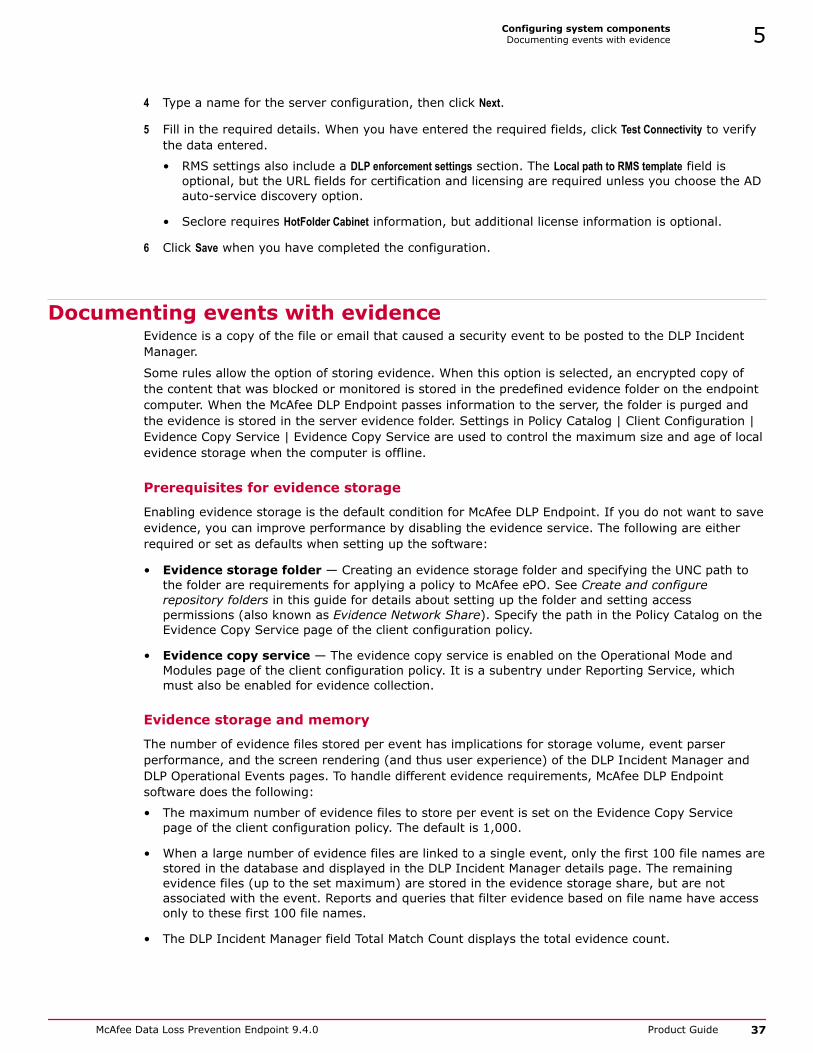
Documenting events with evidenceEvidence is a copy of the file or email that caused a security event to be posted to the DLP IncidentManager.
Some rules allow the option of storing evidence. When this option is selected, an encrypted copy ofthe content that was blocked or monitored is stored in the predefined evidence folder on the endpointcomputer. When the McAfee DLP Endpoint passes information to the server, the folder is purged andthe evidence is stored in the server evidence folder. Settings in Policy Catalog | Client Configuration |Evidence Copy Service | Evidence Copy Service are used to control the maximum size and age of localevidence storage when the computer is offline.
Prerequisites for evidence storage
Enabling evidence storage is the default condition for McAfee DLP Endpoint. If you do not want to saveevidence, you can improve performance by disabling the evidence service. The following are eitherrequired or set as defaults when setting up the software:
• Evidence storage folder — Creating an evidence storage folder and specifying the UNC path tothe folder are requirements for applying a policy to McAfee ePO. See Create and configurerepository folders in this guide for details about setting up the folder and setting accesspermissions (also known as Evidence Network Share). Specify the path in the Policy Catalog on theEvidence Copy Service page of the client configuration policy.
• Evidence copy service — The evidence copy service is enabled on the Operational Mode andModules page of the client configuration policy. It is a subentry under Reporting Service, whichmust also be enabled for evidence collection.
Evidence storage and memory
The number of evidence files stored per event has implications for storage volume, event parserperformance, and the screen rendering (and thus user experience) of the DLP Incident Manager andDLP Operational Events pages. To handle different evidence requirements, McAfee DLP Endpointsoftware does the following:
• The maximum number of evidence files to store per event is set on the Evidence Copy Servicepage of the client configuration policy. The default is 1,000.
• When a large number of evidence files are linked to a single event, only the first 100 file names arestored in the database and displayed in the DLP Incident Manager details page. The remainingevidence files (up to the set maximum) are stored in the evidence storage share, but are notassociated with the event. Reports and queries that filter evidence based on file name have accessonly to these first 100 file names.
• The DLP Incident Manager field Total Match Count displays the total evidence count.
Configuring system componentsDocumenting events with evidence 5
McAfee Data Loss Prevention Endpoint 9.4.0 Product Guide 37

Hit highlighting
The hit highlighting option helps administrators identify exactly which sensitive content caused anevent. When selected, it stores an encrypted HTML file containing extracted text. For tags and contentcategories, the text consists of a highlighted word or phrase and 100 characters before and after (forcontext) organized by the tag or content category that triggered the event, and including a count ofthe number of events per tag/content category. For secured text patterns and dictionaries, the exacttext is extracted. Regex and exact match keywords display up to 100 hits per expression; dictionariescan display a maximum of 250 hits per dictionary entry. Display options are set on the Evidence CopyService page of the client configuration policy in the Classification matches file field:
• Create abbreviated results (default) — Displays 1500 characters (5–7 hits) per section.
• Create all matches — Displays all hits, with limitations as described previously.
• Disabled — Disables the hit highlighting feature.
Rules allowing evidence storage
The following rules have the option of storing evidence:
Table 5-1 Evidence saved by rules
Rule What is saved
Application File Access Protection Rule Copy of the file
Clipboard Protection Rule Copy of the clipboard
Cloud Protection Rule Copy of the file
Email Protection Rule Copy of the email
Network Share Protection Rule Copy of the file
Printer Protection Rule Copy of the file
Removable Storage Protection Rule Copy of the file
Screen Capture Protection Rule JPEG of the screen
Web Post Protection Rule Copy of the web post
File System Discovery Rule Copy of the file
Email Storage Discovery Rule Copy of the .msg file
Creating evidence foldersEvidence folders contain information used by the McAfee DLP software for creating policies and forreporting. Depending on your McAfee DLP installation, certain folders and network shares must becreated, and their properties and security settings must be configured appropriately.
The folders do not need to be on the same computer as the McAfee DLP Database server, but it isusually convenient to put them there.
Evidence folder — Certain rules allow for storing evidence, so you must designate, in advance, aplace to put it. If, for example, a file is blocked, a copy of the file is placed in the evidence folder.
We suggest the following folder paths, folder names, and share names, but you can create others asappropriate for your environment.
• c:\dlp_resources\
• c:\dlp_resources\evidence
The evidence storage path must be a network share, that is, it must include the McAfee ePO servername.
5 Configuring system componentsDocumenting events with evidence
38 McAfee Data Loss Prevention Endpoint 9.4.0 Product Guide
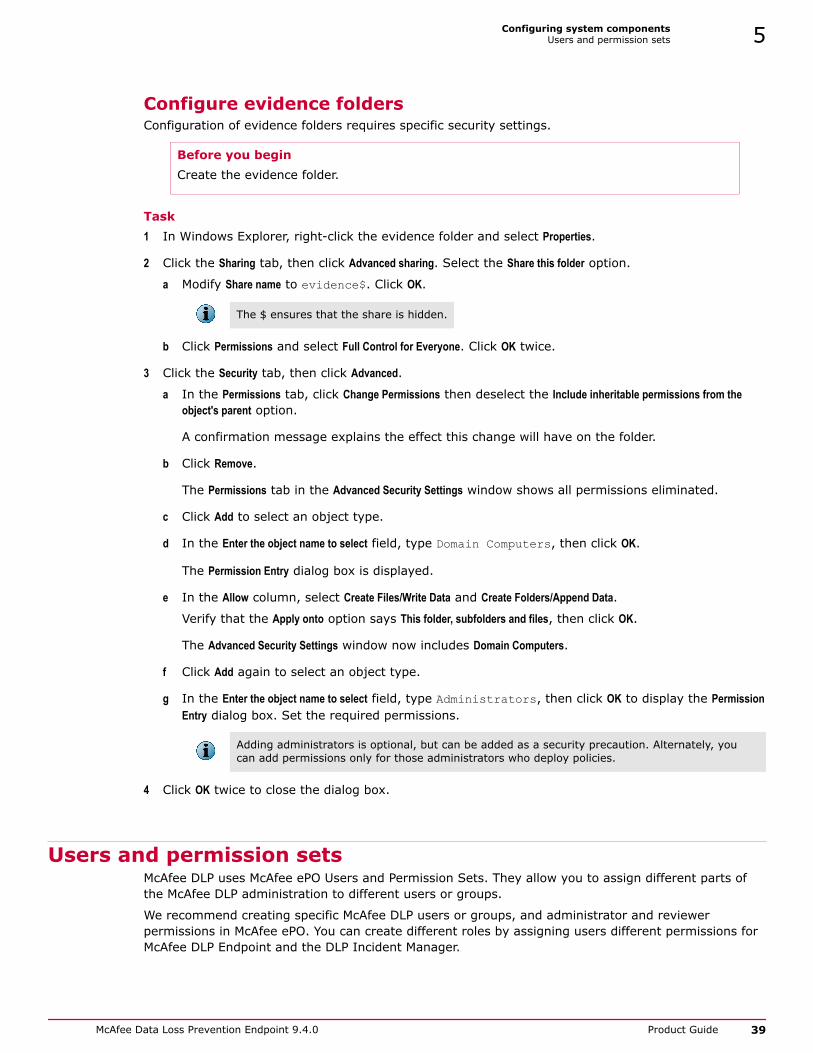
Configure evidence foldersConfiguration of evidence folders requires specific security settings.
Before you beginCreate the evidence folder.
Task1 In Windows Explorer, right-click the evidence folder and select Properties.
2 Click the Sharing tab, then click Advanced sharing. Select the Share this folder option.
a Modify Share name to evidence$. Click OK.
The $ ensures that the share is hidden.
b Click Permissions and select Full Control for Everyone. Click OK twice.
3 Click the Security tab, then click Advanced.
a In the Permissions tab, click Change Permissions then deselect the Include inheritable permissions from theobject's parent option.
A confirmation message explains the effect this change will have on the folder.
b Click Remove.
The Permissions tab in the Advanced Security Settings window shows all permissions eliminated.
c Click Add to select an object type.
d In the Enter the object name to select field, type Domain Computers, then click OK.
The Permission Entry dialog box is displayed.
e In the Allow column, select Create Files/Write Data and Create Folders/Append Data.
Verify that the Apply onto option says This folder, subfolders and files, then click OK.
The Advanced Security Settings window now includes Domain Computers.
f Click Add again to select an object type.
g In the Enter the object name to select field, type Administrators, then click OK to display the PermissionEntry dialog box. Set the required permissions.
Adding administrators is optional, but can be added as a security precaution. Alternately, youcan add permissions only for those administrators who deploy policies.
4 Click OK twice to close the dialog box.
Users and permission setsMcAfee DLP uses McAfee ePO Users and Permission Sets. They allow you to assign different parts ofthe McAfee DLP administration to different users or groups.
We recommend creating specific McAfee DLP users or groups, and administrator and reviewerpermissions in McAfee ePO. You can create different roles by assigning users different permissions forMcAfee DLP Endpoint and the DLP Incident Manager.
Configuring system componentsUsers and permission sets 5
McAfee Data Loss Prevention Endpoint 9.4.0 Product Guide 39

System Tree filtering permissions support
McAfee DLP Endpoint supports McAfee ePO System Tree filtering permissions in the DLP IncidentManager and DLP Operational Events. When System Tree filtering is enabled, McAfee ePO operatorscan only see incidents from computers in their permitted System Tree portion. Group Administratorsdo not have any permissions in the McAfee ePO System Tree by default. Regardless of permissionsassigned in the Data Loss Prevention permission set, they cannot see any incidents in DLP IncidentManager or DLP Operational Events. System Tree filtering is disabled by default, but can be enabled inMenu | Server Settings | Data Loss Prevention.
Customers who have been using Group Administrators in Data Loss Prevention permission sets areadvised to give Group Administrators View "System Tree" tab permission (under Systems) and System Treeaccess permissions at the appropriate level.
Sensitive data redaction and the McAfee ePO permission sets
To meet the legal demand in some markets to protect confidential information in all circumstances,McAfee DLP Endpoint software offers a data redaction feature. Fields in the DLP Incident Manager andDLP Operational Events consoles containing confidential information can be redacted to preventunauthorized viewing, and links to sensitive evidence are hidden. The feature is designed with a"double key" release. Thus, to use the feature, you must create two permission sets: one to view theincidents and events and another to view the redacted fields (supervisor permission). Both roles canbe assigned to the same user.
Create and define McAfee DLP rolesCreate administrative and reviewer credentials.
TaskFor option definitions, click ? in the interface.
1 In McAfee ePO, select Menu | Users.
2 Click New User.
3 Type a user name and specify logon status, authentication type, and permission sets.
DLP Admin and DLP Reviewer are predefined permission sets.
4 Click Save.
DLP permission setsDLP permission sets assign permissions to view and save policies, and view redacted fields. They arealso used to assign role-based access control (RBAC).
Installing the McAfee DLP server software adds a new McAfee ePO permission set: Data LossPrevention 9.4. If a previous version of McAfee DLP is installed on the same McAfee ePO server, theData Loss Prevention permission set also appears.
Permissions in the Data Loss Prevention 9.4 permission set cover all sections of the managementconsole, not just the Incident Manager. There are three levels of permissions:
• Use — The user can see only names of objects (definitions, classifications, and so forth), notdetails.
For policies, the minimum permission is no permission.
5 Configuring system componentsUsers and permission sets
40 McAfee Data Loss Prevention Endpoint 9.4.0 Product Guide

• View and use — The user can view details of objects, but cannot change them.
• Full permission — The user can create and change objects.
You can set permissions for seven sections of the management console, giving administrators andreviewers different permissions as required. The sections are grouped by logical hierarchy, forexample, selecting Classifications automatically selects Definitions because configuring classification criteriarequires using definitions. The permissions groups are:
• Policy Catalog
• DLP Policy Manager
• Classifications
• Definitions
• DLP Policy Manager
• Classifications
• Definitions
• Classifications
• Definitions
Incident Management and Operational Events can be selected separately.
Permissions for Data Loss Prevention Actions have been moved to the Help Desk Actions permission set.These permissions allow administrators to generate client bypass and uninstall keys, release fromquarantine keys, and master keys.
In addition to the default permission for the section, you can set an override for each object. Theoverride can either increase or decrease the permission level. For example, in the DLP Policy Managerpermissions, all rule sets existing when the permission set is created are listed. You can set a differentoverride for each one. When new rule sets are created, they receive the default permission level.
Create a McAfee DLP permission setPermission sets are used to define different administrative and reviewer roles in McAfee DLP software.
TaskFor option definitions, click ? in the interface.
1 In McAfee ePO, select Menu | Permission Sets.
2 Select a predefined permission set or click New to create a permission set.
a Type a name for the set and select users.
b Click Save.
Configuring system componentsUsers and permission sets 5
McAfee Data Loss Prevention Endpoint 9.4.0 Product Guide 41

3 In the Data Loss Prevention 9.4 field for the permission set, click Edit.
4 In the left pane, select a data protection module.
Definitions, Incident Management, and Operational Events can be selected separately. Other optionsautomatically create predefined groups.
5 Select a default permission. For groups, select a default permission for each module in the group.
The default level determines the permissions for all present and future objects in the module. Forgrouped modules, you can select a different permission level for each.
6 (Optional) Select override permissions. For groups, select overrides for each module in the group.
All existing objects are displayed. You can select a separate override value for each.
Use case — DLP administratorUse the following selections for a DLP administrator who only creates policies and has noevent review responsibilities.
1 In the Data Loss Prevention 9.4 permissions set, select Policy Catalog.
DLP Policy Manager, Classifications, and Definitions are selected automatically.
2 Give the user Full permissions.
3 (Optional) Select Incident Management, and select User can view all incidents.
The administrator can now create and change policies, rules, classifications, and definitions,and can manage incidents.
If you skip step 3, the DLP 9.4 Incident Manager does not appear in Menu | Data Protection, andthe user cannot view incidents.
Protecting confidentiality with redactionData redaction is the obscuring of confidential information to prevent unauthorized viewing. Somecountries require redaction practices be followed, and it is considered Best Practice (even when notrequired by law) to separate incident and operational events reviewing permissions, and to blocksensitive data from those not required to view it.
Redacted information is obscured in:
• The DLP 9.4 Incident Manager display
• The DLP 9.4 Operational Events display
Currently, the fields computer name and user name are predefined as private.
To give a user permission to view redacted fields, select Supervisor permission on the Incident Managementpermissions page.
Use case — redacted fields reviewerThis example requires setting permissions for two reviewers: one to review events andincidents, one to view the redacted fields. Assuming that reviewer roles are separated frompolicy administrator roles, make the following selections:
5 Configuring system componentsUsers and permission sets
42 McAfee Data Loss Prevention Endpoint 9.4.0 Product Guide

• For both reviewers — Select only Incident Management and Operational Events modules.
• For the incident reviewer — In the Incidents Reviewer section, select any option. In theIncident Data Redaction section, select Obfuscate sensitive incident data.
• For the redaction reviewer — In the Incidents Reviewer section, do not select any option.In the Incident Data Redaction section, select Supervisor permission.
Configuring McAfee DLP in the Policy CatalogMcAfee DLP uses the McAfee ePO Policy Catalog to store policies and client configurations.
McAfee DLP creates policies in the McAfee ePO Policy Catalog:
• Client configuration
• DLP Policy
The Client Configuration policy contains settings that determine how the endpoint computers work withpolicies.
The DLP Policy consists of Rule Sets, the Endpoint Discovery configuration, and Settings.
Import or export the McAfee DLP Endpoint configurationPolicy configurations can be saved in HTML format for backup or to transfer policies to other McAfeeePO servers. Importing and exporting policies is performed from the McAfee ePO Policy Catalog.
TaskFor option definitions, click ? in the interface.
1 In McAfee ePO, select Policy Catalog | Product | Data Loss Prevention 9.4.
2 Do one of the following:
• To export, click Export. In the Export window, right-click the file link and select Save Link As to savethe policy as an XML file.
The Export button exports all policies. You can export an individual policy by selecting Export in theActions column in the policy name row.
• To import a saved policy, click Import. In the Import Policies window, browse to a saved policy, clickOpen, then OK.
The import window opens, displaying the policies you are about to import and whether there is anaming conflict. You can deselect any conflicting policies and not import them. If you choose toimport a policy with a name conflict, it overwrites the existing policy and assumes its assignments.
Client configurationThe McAfee DLP Endpoint client software for McAfee Agent resides on enterprise computers andexecutes the defined policy. The software also monitors user activities involving sensitive content.Client configuration is stored in the policy, which is deployed to managed computers.
The Policy Catalog comes with McAfee default policies for endpoint configuration and endpoint policy.Click Duplicate (in the Actions column) to create an editable copy as a base for your policy.
Configuring system componentsConfiguring McAfee DLP in the Policy Catalog 5
McAfee Data Loss Prevention Endpoint 9.4.0 Product Guide 43

The client configuration is stored in the policy, which is deployed to managed computers by McAfeeePO. If the configuration is updated, you must redeploy the policy.
Client Service WatchDog
To maintain normal operation of McAfee DLP Endpoint software even in the event of maliciousinterference, McAfee DLP Endpoint runs a protective service called the Client Service WatchDog. Thisservice monitors the McAfee DLP Endpoint software, and restarts it if it stops running for any reason.The service is enabled by default. If you want to verify that it is running, look in the MicrosoftWindows Task Manager processes for the service named fcagswd.exe.
OS X support for client configuration parametersClient configuration settings can apply to both Microsoft Windows and OS X endpoint computers. TheMcAfee DLP Endpoint client software on OS X ignores parameters that are not specifically supportedon that operating system.
Table 5-2 Debugging and Logging page
Parameter Operating system support
Administrative events reported by theclients
The filter settings that apply to both OS X and Microsoft Windows are:• Client Enters Bypass Mode • Policy Change
• Client Leaves Bypass Mode • Release Code Locked
• Client Installed
All other settings apply to Microsoft Windows endpoints only.
Logging Supported on both Microsoft Windows and OS X.
Table 5-3 User Interface Components page
Section Parameter Operating system support
Client User Interface Show DLP Console (all options) Microsoft Windows only
Enable end-user notification popup OS X and Microsoft Windows
Show request justification dialog Microsoft Windows only
Challenge and Response all options OS X and Microsoft Windows
Release code lockout policy all options OS X and Microsoft Windows
Client Banner Image all options Microsoft Windows only
Client configuration settingsClient configuration settings determine how the endpoint software operates.
We recommend reviewing the client configuration settings when configuring the software to verify thatthey meet your requirements. Most of the settings have reasonable defaults that can be used for initialsetup and testing without alteration. The following table lists some of the more important settings youshould verify.
Table 5-4 Endpoint configuration
Setting Details Description
Advanced Configuration Run DLP client in SafeMode
Disabled by default. When enabled, there is arecovery mechanism in case the McAfee DLP Endpointclient causes a boot failure.
Content Tracking Use the followingfallback ANSI codepage
If no language is set, the fallback is the defaultlanguage of the endpoint computer.
5 Configuring system componentsConfiguring McAfee DLP in the Policy Catalog
44 McAfee Data Loss Prevention Endpoint 9.4.0 Product Guide

Table 5-4 Endpoint configuration (continued)
Setting Details Description
Corporate connectivity Server address You can apply different prevent actions to endpointcomputers in the corporate network, outside thenetwork, or connected by VPN. To use the VPN option,set the server Address IP.
Evidence Copy Service Evidence Storage Storageshare UNC
Replace the example text with the evidence storageshare.
Operational Mode andModules
To improve performance, we recommend you deselectmodules you are not using.
Web Post Protection Supported Chromeversion
If you use Google Chrome, set the supported version.
Configuring system componentsConfiguring McAfee DLP in the Policy Catalog 5
McAfee Data Loss Prevention Endpoint 9.4.0 Product Guide 45

5 Configuring system componentsConfiguring McAfee DLP in the Policy Catalog
46 McAfee Data Loss Prevention Endpoint 9.4.0 Product Guide

6 Protecting removable media
McAfee®
Device Control protects enterprises from the risk associated with unauthorized transfer ofsensitive content whenever storage devices are used.
McAfee Device Control is a component of McAfee DLP Endpoint that is sold as a separate product. Whilethe term Device Control is used throughout this section, all features and descriptions apply to McAfeeDLP Endpoint as well.
Contents Protecting devices Device classes Device definitions Create device rules
Protecting devicesUSB drives are the smallest, easiest, cheapest, and least-traceable method of downloading largeamounts of data. They are often considered the "weapon of choice" for unauthorized data transfer.Device Control software monitors and controls USB drives and other external devices, includingsmartphones, Bluetooth devices, plug and play devices, audio players, and non-system hard disks.Device Control runs on most Windows and OS X operating systems, including servers. See the systemrequirements page in this guide for details.
McAfee Device Control protection is built in three layers:
• Device classes — Collections of devices that have similar characteristics and can be managed in asimilar manner.
• Device definitions — Identify and group devices according to their common properties.
• Device Rules — Control the behavior of devices.
Device class is one of several parameters that can be specified in a device definition.
A device rule consists of a list of the device definitions included or excluded from the rule, and theaction taken when use of the device triggers the rule. In addition, it can specify end-users included orexcluded from the rule. Removable storage protection rules include classifications to define thesensitive content that triggers the rule. They can optionally include an application definition to filterthe rule according to the source of the sensitive content.
6
McAfee Data Loss Prevention Endpoint 9.4.0 Product Guide 47

Device classesA device class is a collection of devices that have similar characteristics and that can be managed in asimilar manner.
Device classes name and identify the devices used by the system. Each device class definition includesa name and one or more globally unique identifiers (GUIDs).
Device classes are not applicable to OS X devices.
For example, the Intel® PRO/1000 PL Network Connection and Dell wireless 1490 Dual Band WLANMini-Card are two devices that belong to the Network Adapter device class.
Device classes are categorized by status:
• Managed devices are specific plug and play or removable storage devices that are managed byDevice Control.
• Unmanaged devices are not managed by Device Control, but they can be changed to a managedstatus.
To avoid causing a system or operating system malfunction, McAfee recommends that you do notchange the built-in device classes list. Instead, add a new user-defined class to the list.
For troubleshooting devices, you can create temporary overrides to device class status and filter typesettings. This option is set on the Policy Catalog | Data Loss Prevention 9.4 | DLP Policy | Settings |Device Classes page.
See also Create a device class on page 49
Define a device classIf a suitable device class does not exist on the predefined list, or is not created automatically whennew hardware is installed, you can create a new device class in the McAfee DLP Endpoint PolicyManager console.
Tasks• Create a device class on page 49
Create a device class if a suitable device class does not exist on the pre‑defined list or isnot created automatically when new hardware is installed.
Obtain a GUIDDevice class definitions require a name and one or more globally unique identifiers (GUIDs).
Some hardware devices install their own new device class. To control the behavior of plug and playhardware devices that define their own device class, you must first add a new device class to theManaged status in the Device Classes list.
A device class is defined by two properties: a name and a GUID. The name of a new device isdisplayed in the device manager, but the GUID is displayed only in the Windows Registry and there isno easy way to obtain it. To ease the retrieval of new device names and GUIDs, the Device Controlclient reports a New Device Class Found event to the DLP Incident Manager when a hardware devicethat does not belong to a recognized device class is plugged into the host computer.
6 Protecting removable mediaDevice classes
48 McAfee Data Loss Prevention Endpoint 9.4.0 Product Guide

TaskFor option definitions, click ? in the interface.
1 In McAfee ePO, select (Menu | Data Protection | DLP Incident Manager | Incident List).
2 Click Edit next to the Filter drop-down list to edit the filter criteria.
3 In the Available Properties list (left pane), select Incident Type.
4 Verify that the Comparison drop-down list value is Equals.
5 From the Values drop-down list, select Device New Class Found.
6 Click Update Filter.
The Incident List displays the new device classes found on all endpoint computers.
7 To view the name and GUID of a specific device, double-click the item to display the incidentdetails.
Create a device classCreate a device class if a suitable device class does not exist on the pre‑defined list or is not createdautomatically when new hardware is installed.
Before you beginObtain the device GUID before beginning this task.
TaskFor option definitions, click ? in the interface.
1 In McAfee ePO, select Menu | Data Protection | DLP Policy Manager | Definitions.
2 In the left pane, select Device Control | Device Class, then select Actions | New.
3 Enter a unique Name and optional Description.
4 Verify the Status and Filter Type required.
5 Enter the GUID, then click Add.
The GUID must be in the correct format. You are prompted if you enter it incorrectly.
6 Click Save.
See also Device classes on page 48Device definitions on page 50
Protecting removable mediaDevice classes 6
McAfee Data Loss Prevention Endpoint 9.4.0 Product Guide 49

Device definitionsDevice rules use device definitions to specify the properties associated with devices.
Available device definitions types are:
• Fixed hard drive devices attach to the computer and are not marked by the operating system asremovable storage. Device Control can control fixed hard drives other than the boot drive.
• Plug and play devices are added to the managed computer without any configuration or manualinstallation of DLLs and drivers. Plug and play devices include most Microsoft Windows devices.
• Removable storage devices are external devices containing a file system that appear on themanaged computer as drives. Removable storage device definitions support either Windows or OSX operating systems.
• Whitelisted plug and play devices do not interact with device management properly and mightcause the system to stop responding or cause other serious problems.
Whitelisted plug and play device definitions are added automatically to the excluded list in everyplug and play device rule. They are never managed, even if the parent device class is managed.
Some device properties are the same for plug and play and removable storage device definitions,while other properties are exclusive to the specific device type. Removable storage device definitionsare more flexible and include additional properties related to the removable storage devices. McAfeerecommends using the removable storage device definitions and rules to control devices that can beclassified as either, such as USB mass storage devices.
See also Create a device class on page 49
Working with device definitionsMultiple parameters are added to device definitions as either logical OR (by default) or logical AND.Multiple parameter types are always added as logical AND.
For example, the following parameter selection:
Creates this definition:
• Bus Type is one of: Firewire (IEEE 1394) OR USB
• AND Device Class is one of Memory Devices OR Windows Portable Devices
6 Protecting removable mediaDevice definitions
50 McAfee Data Loss Prevention Endpoint 9.4.0 Product Guide

Create a device definitionDevice definitions specify the properties of a device to trigger the rule.
Create whitelisted plug and play definitions for devices that do not cleanly handle management, whichcould cause the system to stop responding or create other serious problems. No action will be taken onthese devices even when a rule is triggered.
TaskFor option definitions, click ? in the interface.
1 In McAfee ePO, select Menu | Data Protection | DLP Policy Manager | Definitions.
2 In the left pane, select Device Control | Device Definitions.
3 Select Actions | New, then select the type of definition.
4 Enter a unique Name and optional Description.
5 Select properties for the device.
The available properties list varies depending on the type of device.
• To add a property, click >.
• To remove a property, click <.
• To add additional values for the property, click +.Values are added as logical OR by default. Click the and/or button to change it to AND.
• To remove properties, click -.
6 Click Save.
Create a whitelisted plug and play definitionThe purpose of whitelisted plug and play devices is to deal with those devices that do not handledevice management well, and might cause the system to stop responding or cause other seriousproblems. We recommend adding such devices to the whitelisted device list to avoid compatibilityproblems.
Whitelisted plug and play devices are added automatically to the excluded list in all plug and playdevice rules when the policy is applied. They are never managed, even if their parent device class ismanaged.
TaskFor option definitions, click ? in the interface.
1 In McAfee ePO, select Menu | Data Protection | DLP Policy Manager | Definitions.
2 In the left pane, select Device Control | Device Definitions, then select Actions | New | Whitelisted Plug and PlayDevice Definition.
3 Enter a unique Name and optional Description.
4 Select properties for the device.
• To add a property, click >.
• To remove a property, click <.
Protecting removable mediaDevice definitions 6
McAfee Data Loss Prevention Endpoint 9.4.0 Product Guide 51
• To add additional values for the property, click +.Values are added as logical OR by default. Click the and/or button to change it to AND.
• To remove properties, click -.
5 Click Save.
Create a removable storage device definitionA removable storage device is an external device containing a file system that appears on themanaged computer as a drive. Removable storage device definitions are more flexible than plug andplay device definitions, and include additional properties related to the devices.
TaskFor option definitions, click ? in the interface.
1 In McAfee ePO, select Menu | Data Protection | DLP Policy Manager | Definitions.
2 In the left pane, select Device Control | Device Definitions, then select Actions | New | Removable Storage DeviceDefinition.
3 Enter a unique Name and optional Description.
4 Select the Applies to option for Microsoft Windows or OS X devices.
The Available Properties list changes to match properties for the operating system selected.
5 Select properties for the device.
• To add a property, click >.
• To remove a property, click <.
• To add additional values for the property, click +.Values are added as logical OR by default. Click the and/or button to change it to AND.
• To remove properties, click -.
6 Click Save.
Device propertiesDevice properties specify device characteristics such as the device name, bus type, or file systemtype.
The table provides device property definitions, which definition types use the property, and whichoperating system they apply to.
6 Protecting removable mediaDevice definitions
52 McAfee Data Loss Prevention Endpoint 9.4.0 Product Guide
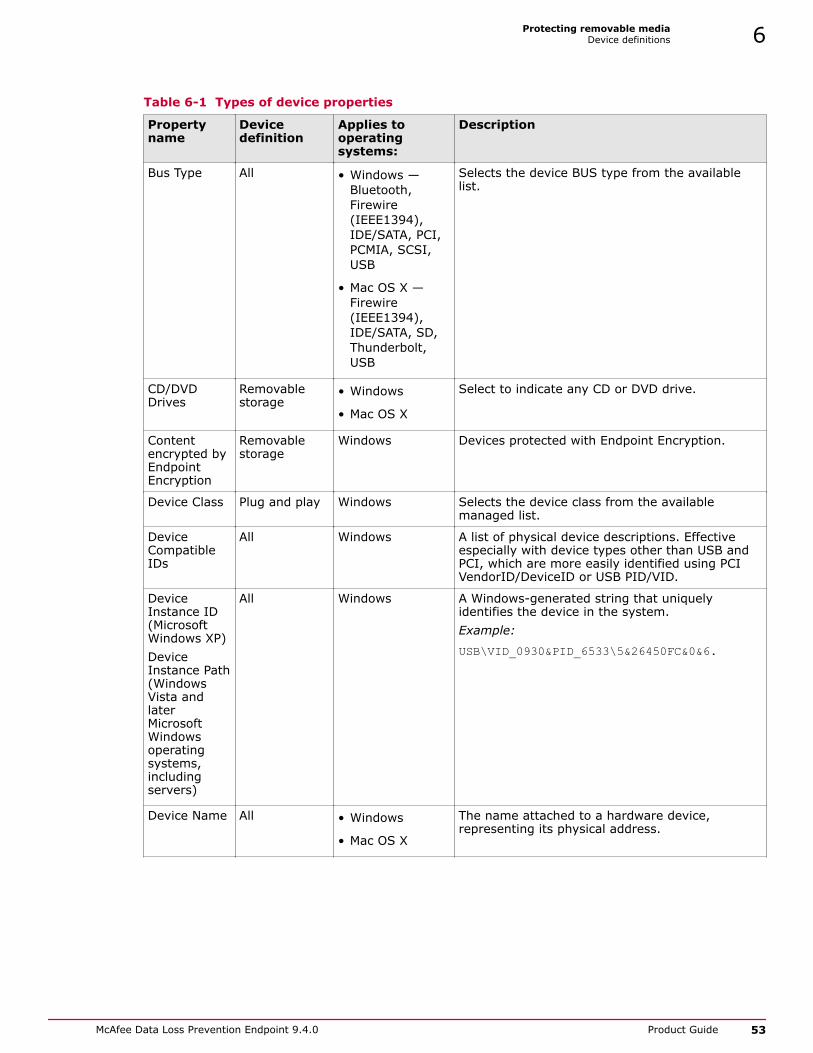
Table 6-1 Types of device properties
Propertyname
Devicedefinition
Applies tooperatingsystems:
Description
Bus Type All • Windows —Bluetooth,Firewire(IEEE1394),IDE/SATA, PCI,PCMIA, SCSI,USB
• Mac OS X —Firewire(IEEE1394),IDE/SATA, SD,Thunderbolt,USB
Selects the device BUS type from the availablelist.
CD/DVDDrives
Removablestorage
• Windows
• Mac OS X
Select to indicate any CD or DVD drive.
Contentencrypted byEndpointEncryption
Removablestorage
Windows Devices protected with Endpoint Encryption.
Device Class Plug and play Windows Selects the device class from the availablemanaged list.
DeviceCompatibleIDs
All Windows A list of physical device descriptions. Effectiveespecially with device types other than USB andPCI, which are more easily identified using PCIVendorID/DeviceID or USB PID/VID.
DeviceInstance ID(MicrosoftWindows XP)DeviceInstance Path(WindowsVista andlaterMicrosoftWindowsoperatingsystems,includingservers)
All Windows A Windows-generated string that uniquelyidentifies the device in the system.Example:
USB\VID_0930&PID_6533\5&26450FC&0&6.
Device Name All • Windows
• Mac OS X
The name attached to a hardware device,representing its physical address.
Protecting removable mediaDevice definitions 6
McAfee Data Loss Prevention Endpoint 9.4.0 Product Guide 53

Table 6-1 Types of device properties (continued)
Propertyname
Devicedefinition
Applies tooperatingsystems:
Description
File SystemType
• Fixed harddisk
• Removablestorage
• Windows —CDFS, exFAT,FAT16, FAT32,NTFS, UDFS
• Mac OS X —CDFS, exFAT,FAT16, FAT32,HFS/HFS+,NTFS, UDFS
Mac OS Xsupports FAT onlyon disks otherthan the bootdisk. Mac OS Xsupports NTFS asread-only.
The type of file system.• For hard disks, select one of exFAT, FAT16,
FAT32, or NTFS.
• For removable storage devices, any of theabove plus CDFS or UDFS.
File SystemAccess
Removablestorage
• Windows
• Mac OS X
The access to the file system: read only orread-write.
File SystemVolume Label
• Fixed harddisk
• Removablestorage
• Windows
• Mac OS X
The user-defined volume label, viewable inWindows Explorer. Partial matching is allowed.
File SystemVolume SerialNumber
• Fixed harddisk
• Removablestorage
Windows A 32-bit number generated automatically when afile system is created on the device. It can beviewed by running the command-line commanddir x:, where x: is the drive letter.
PCIVendorID /DeviceID
All Windows The PCI VendorID and DeviceID are embedded inthe PCI device. These parameters can beobtained from the Hardware ID string of physicaldevices.Example:
PCI\VEN_8086&DEV_2580&SUBSYS_00000000&REV_04
TrueCryptdevices
Removablestorage
Windows Select to specify a TrueCrypt device.
USB ClassCode
Plug and play Windows Identifies a physical USB device by its generalfunction. Select the class code from the availablelist.
6 Protecting removable mediaDevice definitions
54 McAfee Data Loss Prevention Endpoint 9.4.0 Product Guide
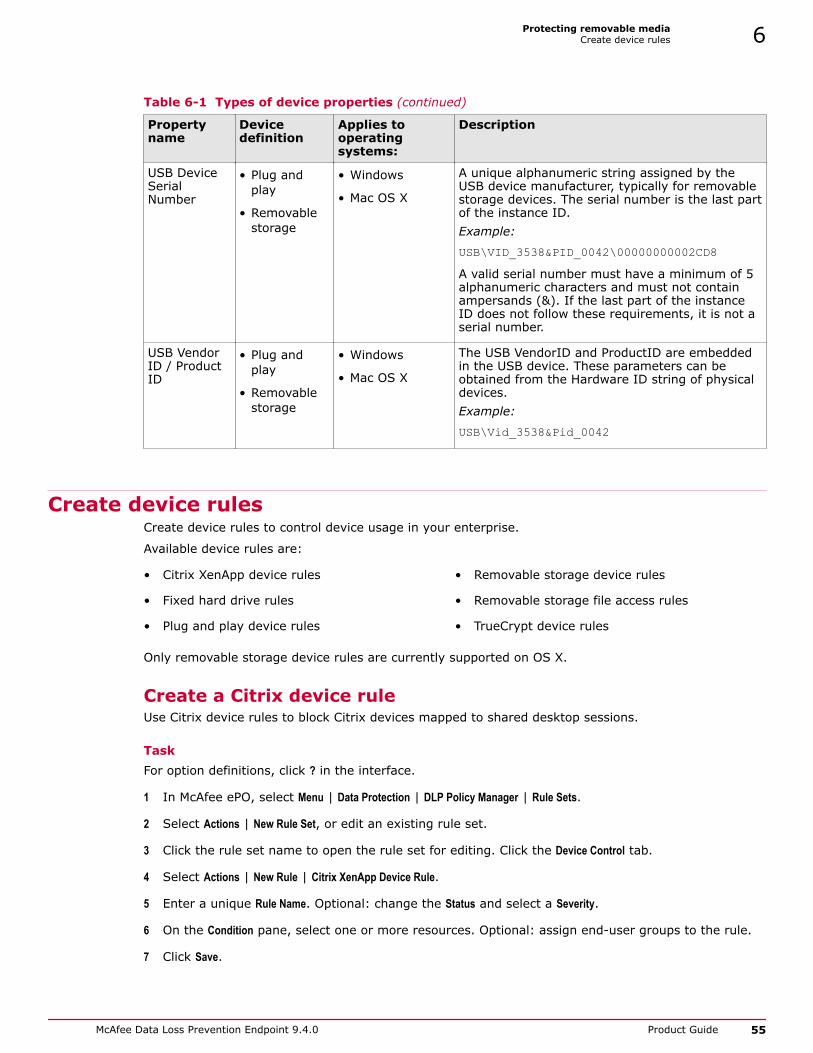
Table 6-1 Types of device properties (continued)
Propertyname
Devicedefinition
Applies tooperatingsystems:
Description
USB DeviceSerialNumber
• Plug andplay
• Removablestorage
• Windows
• Mac OS X
A unique alphanumeric string assigned by theUSB device manufacturer, typically for removablestorage devices. The serial number is the last partof the instance ID.Example:
USB\VID_3538&PID_0042\00000000002CD8A valid serial number must have a minimum of 5alphanumeric characters and must not containampersands (&). If the last part of the instanceID does not follow these requirements, it is not aserial number.
USB VendorID / ProductID
• Plug andplay
• Removablestorage
• Windows
• Mac OS X
The USB VendorID and ProductID are embeddedin the USB device. These parameters can beobtained from the Hardware ID string of physicaldevices.Example:
USB\Vid_3538&Pid_0042
Create device rulesCreate device rules to control device usage in your enterprise.
Available device rules are:
• Citrix XenApp device rules • Removable storage device rules
• Fixed hard drive rules • Removable storage file access rules
• Plug and play device rules • TrueCrypt device rules
Only removable storage device rules are currently supported on OS X.
Create a Citrix device ruleUse Citrix device rules to block Citrix devices mapped to shared desktop sessions.
TaskFor option definitions, click ? in the interface.
1 In McAfee ePO, select Menu | Data Protection | DLP Policy Manager | Rule Sets.
2 Select Actions | New Rule Set, or edit an existing rule set.
3 Click the rule set name to open the rule set for editing. Click the Device Control tab.
4 Select Actions | New Rule | Citrix XenApp Device Rule.
5 Enter a unique Rule Name. Optional: change the Status and select a Severity.
6 On the Condition pane, select one or more resources. Optional: assign end-user groups to the rule.
7 Click Save.
Protecting removable mediaCreate device rules 6
McAfee Data Loss Prevention Endpoint 9.4.0 Product Guide 55

The selected resources are blocked.
The only Prevent Action for Citrix rules is Block. You do not need to set the action on the Reaction pane.
Create a fixed hard drive device ruleUse fixed hard drive device rules to control hard drives attached to the computer and not marked bythe operating system as removable storage.
TaskFor option definitions, click ? in the interface.
1 In McAfee ePO, select Menu | Data Protection | DLP Policy Manager | Rule Sets.
2 Select Actions | New Rule Set, or edit an existing rule set.
3 Click the rule set name to open the rule set for editing. Click the Device Control tab.
4 Select Actions | New Rule | Fixed Hard Drive Rule.
5 Enter a unique Rule Name. Optional: change the Status and select a Severity.
6 On the Condition pane, select one or more fixed hard drive device definitions. Optional: assignend-user groups to the rule.
Device definitions can define devices that are included (is one of) or excluded (is none of). Including atleast one definition is required.
7 On the Reaction pane, select a Prevent Action. Optional: add a User Notification, and Report Incident.
If you don't select Report Incident there is no record of the incident in the DLP Incident Manager.
8 Optional: Select a different Prevent Action when the end-user is working outside the corporatenetwork.
9 Click Save.
Create a plug and play device rulePlug and play devices can be added to the managed computer without any configuration or manualinstallation of dlls and drivers. Use Plug and Play device rules to prevent the endpoint computer fromloading these devices.
TaskFor option definitions, click ? in the interface.
1 In McAfee ePO, select Menu | Data Protection | DLP Policy Manager | Rule Sets.
2 Select Actions | New Rule Set, or edit an existing rule set.
3 Click the rule set name to open the rule set for editing. Click the Device Control tab.
4 Select Actions | New Rule | Plug and Play Device Rule.
5 Enter a unique Rule Name. Optional: change the Status and select a Severity.
6 On the Condition pane, select one or more plug and play device definitions. Optional: assignend-user groups to the rule.
Device definitions can define devices that are included (is one of) or excluded (is none of). Including atleast one definition is required.
6 Protecting removable mediaCreate device rules
56 McAfee Data Loss Prevention Endpoint 9.4.0 Product Guide

7 On the Reaction pane, select a Prevent Action. Optional: add a User Notification, and Report Incident.
If you don't select Report Incident there is no record of the incident in the DLP Incident Manager.
8 Optional: Select a different Prevent Action when the end-user is working outside the corporatenetwork, or is connected by VPN.
9 Click Save.
Create a removable storage device ruleRemovable storage devices appear on the managed computer as drives. Use removable storage devicerules to block use of removable devices, or to set them to read-only.
TaskFor option definitions, click ? in the interface.
1 In McAfee ePO, select Menu | Data Protection | DLP Policy Manager | Rule Sets.
2 Select Actions | New Rule Set, or edit an existing rule set.
3 Click the rule set name to open the rule set for editing. Click the Device Control tab.
4 Select Actions | New Rule | Removable Storage Device Rule.
5 Enter a unique Rule Name. Optional: change the Status and select a Severity.
6 On the Condition pane, select one or more removable storage device definitions. Optional: assignend-user groups and a Process Name to the rule.
Device definitions can define devices that are included (is one of) or excluded (is none of). Including atleast one definition is required.
7 On the Reaction pane, select a Prevent Action. Optional: add a User Notification, and Report Incident.
If you don't select Report Incident there is no record of the incident in the DLP Incident Manager.
8 Optional: Select a different Prevent Action when the end-user is working outside the corporatenetwork.
9 Click Save.
Create a removable storage file access ruleUse removable storage file access rules to block executables on plug-in devices from running.
TaskFor option definitions, click ? in the interface.
1 In McAfee ePO, select Menu | Data Protection | DLP Policy Manager | Rule Sets.
2 Select Actions | New Rule Set, or edit an existing rule set.
3 Click the rule set name to open the rule set for editing. Click the Device Control tab.
4 Select Actions | New Rule | Removable Storage File Access Rule.
5 Enter a unique Rule Name. Optional: change the Status and select a Severity.
Protecting removable mediaCreate device rules 6
McAfee Data Loss Prevention Endpoint 9.4.0 Product Guide 57

6 On the Condition pane, select one or more removable storage device definitions. Optional: assignend-user groups to the rule.
Device definitions can define devices that are included (is one of) or excluded (is none of). Including atleast one definition is required.
7 Optional: Enter a File Name to be excluded from the rule.
By default, executable files are included in the rule with the File Extension option. You can edit thisoption as required. The File Name exclusion is for applications that must be allowed to run. Anexample is encryption applications on encrypted drives.
8 On the Reaction pane, select a Prevent Action. Optional: add a User Notification, and Report Incident.
If you don't select Report Incident there is no record of the incident in the DLP Incident Manager.
9 Optional: Select a different Prevent Action when the end-user is working outside the corporatenetwork.
10 Click Save.
Create a TrueCrypt device ruleUse TrueCrypt device rules to block or monitor TrueCrypt virtual encryption devices, or set them toread-only.
TaskFor option definitions, click ? in the interface.
1 In McAfee ePO, select Menu | Data Protection | DLP Policy Manager | Rule Sets.
2 Select Actions | New Rule Set, or edit an existing rule set.
3 Click the rule set name to open the rule set for editing. Click the Device Control tab.
4 Select Actions | New Rule | TrueCrypt Device Rule.
5 Enter a unique Rule Name. Optional: change the Status and select a Severity.
6 Optional: On the Condition pane, assign end-user groups to the rule.
7 On the Reaction pane, select a Prevent Action. Optional: add a User Notification, and Report Incident.
If you don't select Report Incident there is no record of the incident in the DLP Incident Manager.
8 Optional: Select a different Prevent Action when the end-user is working outside the corporatenetwork.
9 Click Save.
6 Protecting removable mediaCreate device rules
58 McAfee Data Loss Prevention Endpoint 9.4.0 Product Guide
7 Classifying sensitive content
Classifications identify and track sensitive content and files.
Contents The Classification module Manual classification Using classifications Classification definitions and criteria Create and configure classifications Registered documents Whitelisted text Upload registered documents Upload files to whitelist text Create classification definitions Classifying by file location Classifying by file destination
The Classification moduleThe Classification module in McAfee ePO stores classification criteria , tagging criteria , and thedefinitions used to configure them. It is also the place for setting up registered documentsrepositories, user authorization for manual tagging, and whitelisted text .
The module provides these features:
• Manual Classification — Configures the end-user groups allowed to manually classify or tag content
• Definitions — Defines the content, properties, and location of files for classification
• Classification — Creates classifications and defines classification and tagging criteria
• Register Documents — Uploads files containing known sensitive content
• Whitelisted Text — Uploads files containing text for whitelisting
Manual classificationEnd users can manually apply or remove classification or tagging criteria to files.The simplest method of classifying files or content is manual classification. By default, end users donot have permission to view, add, or remove classifications. You can, however, assign definedclassifications to specific user groups. Those users can then apply the classification to files as theywork. Manual classification can also allow you to maintain your organization’s classification policy evenin special cases of sensitive or unique information that the system does not tag automatically.
7
McAfee Data Loss Prevention Endpoint 9.4.0 Product Guide 59

Use case
A worker for a health provider knows that all patient records must be considered confidential underHIPAA rules. To provide this protection, create a classification for PHI (Protected Health Information)and assign the users creating the health records with manual classification permission for thisclassification. The user classifies the patient records as they are created by right-clicking on the fileand selecting Manual Tagging.
Using classificationsClassifications identify and track sensitive content by applying tags or classification criteria to files andcontent.
McAfee DLP Endpoint identifies and tracks sensitive content with user-defined classifications. Two basictypes are supported: tags and classification criteria. Tags label the sensitive information, and the labelstays with the content even if it is copied into another document or saved to a different format.
Classification criteria
Classification criteria identify sensitive text patterns, dictionaries, keywords, or combinations of these.Combinations can be simply multiple named properties, or properties with a defined relationshipknown as proximity . They can also specify file conditions such as the file type, document properties,file encryption, or location in the file (header/body/footer).
Tagging criteria
Tagging criteria are applied to files or content based one of these options:
• Application-based — The application that created or changed the file
• Location-based — The network share or the removable storage definition of where the file isstored
• Web-based — The web addresses that opened or downloaded the files
7 Classifying sensitive contentUsing classifications
60 McAfee Data Loss Prevention Endpoint 9.4.0 Product Guide

All data and file conditions available to classification criteria are also available to tagging criteria,allowing tags to combine the functionality of both criteria types.
Tagging criteria are stored in a file's extended file attributes (EA) or alternate data streams (ADS) andare applied to a file when the file is saved. If a user copies or moves tagged content to another file,the tagging criteria are applied to that file. If the tagged content is removed from the file, the taggingcriteria are also removed.
McAfee DLP Endpoint applies tagging criteria to files after a policy is applied regardless of whether theclassification is used in a protection rule or not.
Applying criteria
Criteria are applied to a file in one of these ways:
• McAfee DLP Endpoint applies criteria when:
• The file matches a configured classification.
• The file or sensitive content is moved or copied to a new location.
• A file is matched during a discovery scan.
• A user with permission manually adds criteria to a file.
See also Create classification criteria on page 67Create tagging criteria on page 67Assign manual classification permissions on page 68
Text extractionThe text extractor parses the file content when files are opened or copied and compares it to textpatterns and dictionary definitions in the classification rules. When a match occurs, the criteria areapplied to the content.
The text extractor can run multiple processes depending on the number of cores in the processor.
• A single core processor runs only one process.
• Dual-core processors run up to two processes.
• Multi-core processors run up to three simultaneous processes.
If multiple users are logged on, each user has their own set of processes. Thus, the number of textextractors depends on the number of cores and the number of user sessions. The multiple processescan be viewed in the Windows Task Manager. Maximum memory usage for the text extractor isconfigurable. The default is 75 MB.
McAfee DLP Endpoint software supports accented characters. When an ASCII text file contains a mix ofaccented characters, such as French and Spanish, as well as some regular Latin characters, the textextractor might not correctly identify the character set. This issue occurs in all text extractionprograms. There is no known method or technique to identify the ANSI code page in this case. Whenthe text extractor cannot identify the code page, text patterns and tag signatures are not recognized.The document cannot be properly classified, and the correct blocking or monitoring action cannot betaken. To work around this issue, McAfee DLP Endpoint client software uses a fallback code page. Thefallback is either the default language of the computer or a different language set by the administrator.
Classifying sensitive contentUsing classifications 7
McAfee Data Loss Prevention Endpoint 9.4.0 Product Guide 61

How McAfee DLP Endpoint categorizes applicationsBefore you create classifications or rule sets using applications, you should understand how McAfeeDLP Endpoint categorizes them, and the effect this has on system performance.
McAfee DLP Endpoint software divides applications into four categories called strategies. These affecthow the software works with different applications. You can change the strategy to achieve a balancebetween security and the computer’s operating efficiency.
The strategies, in order of decreasing security, are:
• Editor — Any application that can modify file content. This includes “classic” editors like MicrosoftWord and Microsoft Excel, as well as browsers, graphics software, accounting software, and soforth. Most applications are editors.
• Explorer — An application that copies or moves files without changing them, such as MicrosoftWindows Explorer or certain shell applications.
• Trusted — An application that needs unrestricted access to files for scanning purposes. Examplesare McAfee® VirusScan® Enterprise, backup software, and desktop search software such as GoogleDesktop.
• Archiver — An application that can reprocess files. Examples are compression software such asWinZip, and encryption applications such as McAfee Endpoint Encryption software or PGP.
How to work with DLP strategies
Change the strategy as necessary to optimize performance. For example, the high level of observationthat an editor application receives is not consistent with the constant indexing of a desktop searchapplication. The performance penalty is high, and the risk of a data leak from such an application islow. Therefore, you should use the trusted strategy with these applications.
You can override the default strategy on the DLP Policy | Settings | Application Strategy page. Createand remove overrides as necessary to experiment with fine-tuning the policy.
You can also create more than one template for an application and assign it more than one strategy.Use the different templates in different classifications and rules to achieve different results in differentcontexts. You must be careful, however, in assigning such templates within rule sets to avoid conflicts.McAfee DLP Endpoint resolves potential conflicts according to the following hierarchy: archiver >trusted > explorer > editor. That is, editor has the lowest ranking. If an application is an editor in onetemplate and anything else in another template in the same rule set, McAfee DLP Endpoint does nottreat the application as an editor.
Classification definitions and criteriaClassification definitions and criteria contain one or more conditions describing the content or fileproperties.
Table 7-1 Available conditions
Property Applies to: Definition
Advanced Pattern Definitions,criteria
Regular expressions or phrases used to match data such as datesor credit card numbers.
Dictionary Definitions,criteria
Collections of related keywords and phrases such as profanity ormedical terminology.
Keyword Criteria A string value.You can add multiple keywords to a tag definition. The defaultBoolean for multiple keywords is OR, but can be changed to AND.
7 Classifying sensitive contentClassification definitions and criteria
62 McAfee Data Loss Prevention Endpoint 9.4.0 Product Guide

Table 7-1 Available conditions (continued)
Property Applies to: Definition
Proximity Criteria Defines a conjunction between two properties based on theirlocation to each other.Advanced patterns, dictionaries, or keywords can be used foreither property.
The Closeness parameter is defined as "less than x characters,"where the default is 1. You can also specify a Match countparameter to determine the minimum number of matches totrigger a hit.
DocumentProperties
Definitions,criteria
Contains these options:• Any Property • Last saved by
• Author • Manager Name
• Category • Security
• Comments • Subject
• Company • Template
• Keywords (Tags) • Title
Any Property is a user-defined property.
File Encryption Criteria Contains these options:• Not encrypted
• McAfee Encrypted Self-Extractor
• McAfee Endpoint Encryption
• Microsoft Rights Management encryption
• Seclore Rights Management encryption
• Unsupported encryption types or password protected file
File Information Definitions,criteria
Contains these options:• Date Accessed • File Name
• Date Created • File Owner
• Date Modified • File Size
• File Extension
True File Type Definitions,criteria
Groups of file types.For example, the built-in Microsoft Excel group includes Excel XLS,XLSX, and XML files, as well as Lotus WK1 and FM3 files, CSV andDIF files, Apple iWork files, and more.
Location in file Criteria The section of the file the data is located in.• Microsoft Word documents — the classification engine can
identify Header, Body, and Footer.
• PowerPoint documents — WordArt is considered Header;everything else is identified as Body.
• Other documents — Header and Footer are not applicable. Theclassification criteria does not match the document if they areselected.
Classifying sensitive contentClassification definitions and criteria 7
McAfee Data Loss Prevention Endpoint 9.4.0 Product Guide 63
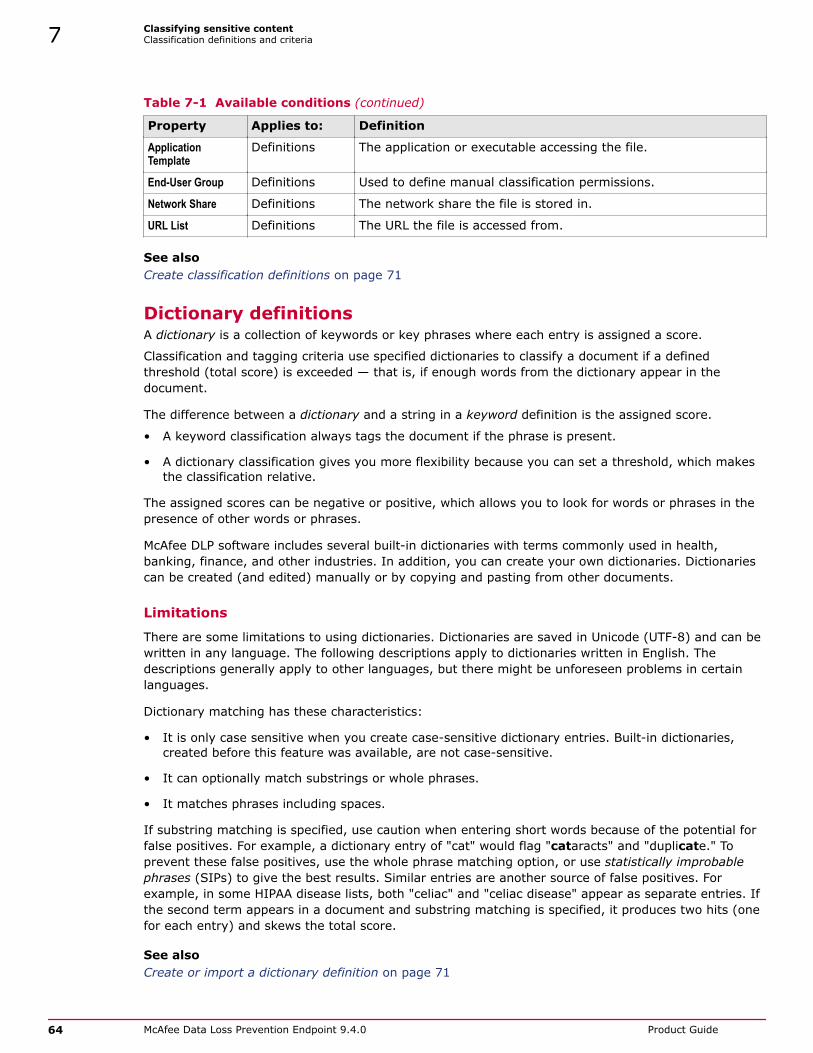
Table 7-1 Available conditions (continued)
Property Applies to: Definition
ApplicationTemplate
Definitions The application or executable accessing the file.
End-User Group Definitions Used to define manual classification permissions.
Network Share Definitions The network share the file is stored in.
URL List Definitions The URL the file is accessed from.
See also Create classification definitions on page 71
Dictionary definitionsA dictionary is a collection of keywords or key phrases where each entry is assigned a score.
Classification and tagging criteria use specified dictionaries to classify a document if a definedthreshold (total score) is exceeded — that is, if enough words from the dictionary appear in thedocument.
The difference between a dictionary and a string in a keyword definition is the assigned score.
• A keyword classification always tags the document if the phrase is present.
• A dictionary classification gives you more flexibility because you can set a threshold, which makesthe classification relative.
The assigned scores can be negative or positive, which allows you to look for words or phrases in thepresence of other words or phrases.
McAfee DLP software includes several built-in dictionaries with terms commonly used in health,banking, finance, and other industries. In addition, you can create your own dictionaries. Dictionariescan be created (and edited) manually or by copying and pasting from other documents.
Limitations
There are some limitations to using dictionaries. Dictionaries are saved in Unicode (UTF-8) and can bewritten in any language. The following descriptions apply to dictionaries written in English. Thedescriptions generally apply to other languages, but there might be unforeseen problems in certainlanguages.
Dictionary matching has these characteristics:
• It is only case sensitive when you create case-sensitive dictionary entries. Built-in dictionaries,created before this feature was available, are not case-sensitive.
• It can optionally match substrings or whole phrases.
• It matches phrases including spaces.
If substring matching is specified, use caution when entering short words because of the potential forfalse positives. For example, a dictionary entry of "cat" would flag "cataracts" and "duplicate." Toprevent these false positives, use the whole phrase matching option, or use statistically improbablephrases (SIPs) to give the best results. Similar entries are another source of false positives. Forexample, in some HIPAA disease lists, both "celiac" and "celiac disease" appear as separate entries. Ifthe second term appears in a document and substring matching is specified, it produces two hits (onefor each entry) and skews the total score.
See also Create or import a dictionary definition on page 71
7 Classifying sensitive contentClassification definitions and criteria
64 McAfee Data Loss Prevention Endpoint 9.4.0 Product Guide
Advanced pattern definitionsAdvanced patterns use regular expressions (regex) that allow complex pattern matching, such as insocial security numbers or credit card numbers. Definitions use the Google RE2 regular expressionsyntax.
Advanced patterns can also define complex word patterns, as in the cellular operator call log orfinancial report examples in the built-in patterns.
For word patterns, regex patterns begin and end with \b by default, the standard regex notation forword separation. Thus, text pattern matching for phrases, is, by default, whole-word matching toreduce false positives.
Advanced pattern definitions include a score (required), as with dictionary definitions. They can alsoinclude an optional false positive expression, either keyword or regex, and a validator — an algorithmused to test regular expressions. Use of the proper validator can also significantly reduce falsepositives. You can import multiple keywords at once for false positives.
Advanced patterns indicate sensitive text. Sensitive text patterns are redacted in hit highlightedevidence.
If both an included pattern and an excluded pattern are specified, the excluded pattern has priority.This allows you to specify a general rule and add exceptions to it without rewriting the general rule.
See also Create an advanced pattern on page 72
Classifying content with document properties or fileinformationDocument property definitions classify content by predefined metadata values. File informationdefinitions classify content by file metadata.
Document properties
Document properties can be retrieved from any Microsoft Office document or PDF, and can be used inclassification definitions. Partial matching is supported using the Contains comparison.
There are three types of document properties:
• Predefined properties — Standard properties such as author and title.
• Custom properties — Custom properties added to the document metadata are allowed by someapplications such as Microsoft Word. A custom property can also reference a standard documentproperty that is not on the predefined properties list, but cannot duplicate a property that is on thelist.
• Any property — Allows defining a property by value alone. This feature is useful in cases wherethe keyword has been entered in the wrong property parameter or when the property name isunknown. For example, adding the value Secret to the Any property parameter classifies alldocuments that have the word Secret in at least one property.
File information
File information definitions are used in data protection and discovery rules, and in classifications, toincrease granularity. File information includes date created, date modified, file owner, and file size. Thedate properties have both exact (before, after, between) and relative (in last X days, weeks, years)date options. File Type (extensions only) is a predefined, extensible list of file extensions.
Classifying sensitive contentClassification definitions and criteria 7
McAfee Data Loss Prevention Endpoint 9.4.0 Product Guide 65

Application templatesAn application template controls specific applications using properties such as product or vendorname, executable file name, or window title.
An application template can be defined for a single application, or a group of similar applications.There are built-in (predefined) templates for a number of common applications such as WindowsExplorer, web browsers, encryption applications, and email clients.
Application templates can use any of the following parameters:
• Command line — Allows command line arguments, for example: java-jar, that can controlpreviously uncontrollable applications.
• Executable directory — The directory where the executable is located. One use of this parameteris to control U3 applications.
• Executable file hash — The application display name, with an identifying SHA2 hash.
• Executable file name — Normally the same as the display name (minus the SHA2 hash), butcould be different if the file is renamed.
• Original executable file name — Identical to the executable file name, unless the file has beenrenamed.
• Product name — The generic name of the product, for example, Microsoft Office 2012, if listed inthe executable file's properties.
• Vendor name — The company name, if listed in the executable file's properties.
• Window title — A dynamic value that changes at runtime to include the active file name.
All parameters except the SHA2 application name and the executable directory accept substringmatches.
Create and configure classificationsCreate classifications and criteria, and upload files for registration or whitelisting.
Tasks• Create a classification on page 66
Data protection and discovery rules require classification definitions in their configuration.
• Create classification criteria on page 67Apply classification criteria to files based on file content and properties.
• Create tagging criteria on page 67Apply tagging criteria to files based on the application or file location.
• Assign manual classification permissions on page 68Configure users allowed to manually classify files.
Create a classificationData protection and discovery rules require classification definitions in their configuration.
7 Classifying sensitive contentCreate and configure classifications
66 McAfee Data Loss Prevention Endpoint 9.4.0 Product Guide

TaskFor option definitions, click ? in the interface.
1 In McAfee ePO, select Menu | Data Protection | Classification.
2 Click New Classification.
3 Enter a name and optional description.
4 Click OK.
5 Add end user groups to manual classification, or registered documents to the classification, byclicking Edit for the respective component.
6 Add classification criteria or tagging criteria with the Actions control.
Create classification criteriaApply classification criteria to files based on file content and properties.
You build classification criteria from data and file Definitions. If a required definition does not exist, youcan create it as you define the criteria.
TaskFor option definitions, click ? in the interface.
1 In McAfee ePO, select Menu | Data Protection | Classification.
2 Select the classification to add the criteria to, then select Actions | New Classification Criteria.
3 Enter the name.
4 Select one or more properties and configure the comparison and value entries.
• To remove a property, click <.
• For some properties, click ... to select an existing property or to create a new one.
• To add additional values to a property, click +.
• To remove values, click -.
5 Click Save.
See also Using classifications on page 60
Create tagging criteriaApply tagging criteria to files based on the application or file location.
TaskFor option definitions, click ? in the interface.
1 In McAfee ePO, select Menu | Data Protection | Classification.
2 Select the classification to add the criteria to.
3 Select Actions | New Tagging Criteria, then select the type of tagging criteria.
Classifying sensitive contentCreate and configure classifications 7
McAfee Data Loss Prevention Endpoint 9.4.0 Product Guide 67

4 Enter the name and specify additional information based on the type of tagging criteria.
• Application — Click ... to select one or more applications.
• Location — Click ... to select one or more network shares. If needed, specify the type ofremovable media.
• Web application — Click ... to select one or more URL lists.
5 (Optional) Select one or more properties and configure the comparison and value entries.
• To remove a property, click <.
• For some properties, click ... to select an existing property or to create a new one.
• To add additional values to a property, click +.
• To remove values, click -.
6 Click Save.
See also Using classifications on page 60
Assign manual classification permissionsConfigure users allowed to manually classify files.
TaskFor option definitions, click ? in the interface.
1 In McAfee ePO, select Menu | Data Protection | Classification.
2 Click the Manual Classification tab.
3 Use the Group by drop-down list to select either Classifications or User Groups.
You can assign classifications to user groups or user groups to classifications, which ever is moreconvenient. The Group by list controls the display.
4 If you are grouping by classifications:
a Select a classification from the displayed list.
b Select Actions | Select End-User Groups.
c In the Choose from existing values window, select user groups or click New Item to create a new group.Click OK.
5 If you are grouping by user groups:
a Select a user group from the displayed list.
b Select Actions | Select Classifications.
c In the Choose from existing values window, select classifications. Click OK.
7 Classifying sensitive contentCreate and configure classifications
68 McAfee Data Loss Prevention Endpoint 9.4.0 Product Guide

Registered documentsThe registered documents feature is an extension of location-based tagging. It gives administratorsanother way to define sensitive information, to protect it from being distributed in unauthorized ways.
Registered documents are predefined as sensitive, for example sales estimate spreadsheets for theupcoming quarter. The McAfee DLP Endpoint software categorizes and fingerprints the contents ofthese files. The signatures created are language-agnostic, that is, the process works for all languages.When you create a package, the signatures are loaded to the McAfee ePO database to be distributedto all endpoint workstations. The McAfee DLP Endpoint client on the managed computers controls thedistribution of documents containing registered content fragments.
To use registered documents, you upload files on the Register Documents tab of the Classificationmodule, assigning them to a classification as you upload them. The endpoint client ignoresclassifications that don't apply. For example, registered document packages classified with fileproperties are ignored when email is being parsed for sensitive content.
There are two viewing options: Statistics and Classifications. The statistics view displays totals fornumber of files, file size, number of signatures, and so forth, in the left pane, and statistics per file inthe right pane. Use this data to remove less important packages if the signature limit is approached.The classifications view displays uploaded files per classification. Information about last packagecreation and changes to the file list are displayed in the upper right.
When you create a package, the software processes all files on the list, and loads the fingerprints tothe McAfee ePO database for distribution. When you add or delete documents, you must create a newpackage. The software makes no attempt to calculate whether some of the files have already beenfingerprinted. It always processes the entire list.
The Create Package command works on the registered documents list and the whitelisted documentslist simultaneously to create a single package. The maximum number of signatures per package is 1million each for registered documents and whitelisted documents.
See also Upload registered documents on page 69
Whitelisted textMcAfee DLP Endpoint ignores whitelisted text when processing file content.
You can upload files containing text to McAfee ePO for whitelisting. Whitelisted text will not causecontent to be classified or tagged, even if parts of it match classification or tagging criteria. Usewhitelisting for text that commonly appears in files, such as boilerplates, legal disclaimers, andcopyright information.
• Files for whitelisting must contain at least 400 characters.
• If a file contains both tagged or classified and whitelisted data, it is not ignored by the system. Allrelevant tagging or classification criteria associated with the content remain in effect.
See also Upload files to whitelist text on page 70
Upload registered documentsSelect and classify documents to distribute to the endpoint computers.
Classifying sensitive contentRegistered documents 7
McAfee Data Loss Prevention Endpoint 9.4.0 Product Guide 69

TaskFor option definitions, click ? in the interface.
1 In McAfee ePO, select Menu | Data Protection | Classification.
2 Click the Register Documents tab.
3 Click File Upload.
4 Browse to the file, select whether or not to overwrite a file if the file name exists, and select aclassification.
File Upload processes a single file. To upload multiple documents, create a .zip file.
5 Click OK.
The file is uploaded and processed, and statistics are displayed on the page.
When you have completed the file list, click Create Package. A signature package of all registereddocuments and all whitelisted documents is loaded to the McAfee ePO database for distribution to theendpoint computers.
You can create a package of just registered or whitelisted documents by leaving one list blank. Whenfiles are deleted, remove them from the list and create a new package to apply the changes.
See also Registered documents on page 69
Upload files to whitelist textUpload files containing commonly used text for whitelisting.
TaskFor option definitions, click ? in the interface.
1 In McAfee ePO, select Menu | Data Protection | Classification.
2 Click the Whitelisted Text tab.
3 Click File Upload.
4 Browse to the file and select wether or not to overwrite a file if the file name exists.
5 Click OK.
See also Whitelisted text on page 69
7 Classifying sensitive contentUpload files to whitelist text
70 McAfee Data Loss Prevention Endpoint 9.4.0 Product Guide

Create classification definitionsPredefined classification definitions cannot be modified or deleted. Create new definitions as needed.
Tasks• Create or import a dictionary definition on page 71
A dictionary is a collection of keywords or key phrases where each entry is assigned ascore. Scores allow for more granular rule definitions.
• Create an advanced pattern on page 72Advanced patterns are used to define classifications. An advanced pattern definition canconsist of a single expression or a combination of expressions and false positive definitions.
• Integrate Titus Message Classification software with classification criteria on page 73Specific keywords are required to define a classification that recognizes Titus classificationsfor email protection rules.
• Integrate Boldon James Email Classifier with classification criteria on page 74Create classification criteria to integrate Boldon James Email Classifier.
See also Classification definitions and criteria on page 62
Create or import a dictionary definitionA dictionary is a collection of keywords or key phrases where each entry is assigned a score. Scoresallow for more granular rule definitions.
TaskFor option definitions, click ? in the interface.
1 In McAfee ePO, select Menu | Data Protection | Classification.
2 Click the Definitions tab.
3 In the left pane, select Dictionary.
4 Select Actions | New.
5 Enter a name and optional description.
6 Add entries to the dictionary.
To import entries:
a Click Import Entries.
b Enter words or phrases, or cut and paste from another document.
The text window is limited to 20,000 lines of 50 characters per line.
c Click OK.
All entries are assigned a default score of 1.
d If needed, updated the default score of 1 by clicking Edit for the entry.
e Select the Start With, End With, and Case Sensitive columns as needed.
Start With and End With provide substring matching.
Classifying sensitive contentCreate classification definitions 7
McAfee Data Loss Prevention Endpoint 9.4.0 Product Guide 71

To manually create entries:
a Enter the phrase and score.
b Select the Start With, End With, and Case Sensitive columns as needed.
c Click Add.
7 Click Save.
Create an advanced patternAdvanced patterns are used to define classifications. An advanced pattern definition can consist of asingle expression or a combination of expressions and false positive definitions.
Advanced patterns are defined using regular expressions (regex). A discussion of regex is beyond thescope of this document. There are a number of regex tutorials on the Internet where you can learnmore about this subject.
TaskFor option definitions, click ? in the interface.
1 In McAfee ePO, select Menu | Data Protection | Classification.
2 Select the Definitions tab, then select Advanced pattern in the left pane.
The available patterns appear in the right pane.
To view only the user-defined advanced patterns, deselect the Include Built-in items checkbox.User-defined patterns are the only patterns that can be edited.
3 Select Actions | New.
The New Advanced pattern definition page appears.
4 Enter a name and optional description.
5 Under Matched Expressions, do the following:
a Enter an expression in the text box. Add an optional description.
b Select a validator from the drop-down list.
McAfee recommends using a validator when possible to minimize false positives, but it is notrequired. If you don't want to specify a validator, or if validation is not appropriate for theexpression, select No Validation.
c Enter a number in the Score field.
This number indicates the weight of the expression in threshold matching. This field is required.
d Click Add.
6 Under False Positive, do the following:
a Enter an expression in the text box.
If you have text patterns stored in an external document, you can copy-paste them into thedefinition with Import Entries.
7 Classifying sensitive contentCreate classification definitions
72 McAfee Data Loss Prevention Endpoint 9.4.0 Product Guide

b In the Type field, select RegEx from the drop-down list if the string is a regular expression, orKeyword if it is text.
c Click Add.
7 Click Save
Integrate Titus Message Classification software withclassification criteria Specific keywords are required to define a classification that recognizes Titus classifications for emailprotection rules.
Titus Message Classification for Microsoft Outlook is a widely used email solution that ensures everyemail is classified and protectively labeled before it is sent. McAfee DLP Endpoint software canintegrate with Titus and block emails based on Titus classifications.
The McAfee DLP Endpoint client software determines if an email has been classified by Titus (to reducefalse positives), and what the classification is. You use both of these strings to define the protectionrule.
TaskFor option definitions, click ? in the interface.
1 Set up Titus for McAfee DLP Endpoint compatibility:
a In the Titus Message Classification Administration Tool, on the License Info tab, note the OrganizationName.
b In Microsoft Outlook, in the Titus Labs pane, note the classifications for which you are creatingMcAfee DLP Endpoint rules.
c In the Policy Catalog, open the current Client Configuration. Select Settings | Operational Modes andModules. Verify that Outlook Add-ins | Activate 3rd Party Add-in Integration is selected.
d In Settings | Email Protection, in the Outlook 3rd Party Add-in Integration section, select Titus from the VendorName drop-down list.
2 Create a Titus classification.
For each required classification, perform the following steps:
a In McAfee ePO, select Menu | Data Protection | Classification.
b Select the Classification tab, then click New Classification.
c Type a unique Name and an optional Description.
d Click Actions | New Classification Criteria.
The Classification Criteria page appears.
e Select the Keyword property. In the Value field, type Classification=[Titus classification].Click +.
f In the Value field, type TLPropertyRoot=[Organization Name]. Click the selection button (or) tochange it to and.
3 In McAfee ePO, select Menu | Data Protection | DLP Rule Sets.
Classifying sensitive contentCreate classification definitions 7
McAfee Data Loss Prevention Endpoint 9.4.0 Product Guide 73

4 On the Rule Sets tab, do one of the following.
• Select Actions | New Rule Set.
• Select an existing rule set.
5 Select Actions | New Rule | Email Protection.
An email protection definition form appears.
6 Enter a unique Rule Name.
7 On the Condition tab, select Body from the drop-down list (instead of the default Email), then selectthe appropriate Titus Classification. Select appropriate End-User, Email Envelope, and Recipients options.
The McAfee DLP Endpoint client considers the Titus classification to be part of the email body.Limiting the definition to scan only the body makes the rule more efficient.
8 On the Reaction tab, select the appropriate Prevent Action, User Notification, Report Incident, and Severityparameters. Set the Status to Enabled, then click Save.
Integrate Boldon James Email Classifier with classificationcriteriaCreate classification criteria to integrate Boldon James Email Classifier.
Boldon James Email Classifier is an email solution that labels and classifies emails. McAfee DLPEndpoint software can integrate with Email Classifier and block emails based on assignedclassifications. You can choose what string Email Classifier sends to McAfee DLP Endpoint when youset up the Email Classifier software. Use this string to define the classification criteria.
TaskFor option definitions, click ? in the interface.
1 Set up Boldon James compatibility in McAfee DLP Endpoint:
a In the Policy Catalog, open the current Client Configuration. Select Settings | Operational Modes andModules. Verify that Outlook Add-ins | Activate 3rd Party Add-in Integration is selected.
b In Settings | Email Protection, in the Outlook 3rd Party Add-in Integration section, select Boldon Jamesfrom the Vendor Name drop-down list.
2 Create a Boldon James classification.
For each required classification, perform the following steps:
a In McAfee ePO, select Menu | Data Protection | Classification.
b Select the Classification tab, then click New Classification.
c Type a unique Name and an optional Description.
d Click Actions | New Classification Criteria.
The Classification Criteria page appears.
e Select the Keyword property. In the Value field, type[Boldon James classification].
[Boldon James classification] is the string you selected in the Email Classifier setup tosend to McAfee DLP Endpoint
f Repeat, creating a classification criteria definition for each Boldon James classification.
3 In McAfee ePO, select Menu | Data Protection | DLP Rule Sets.
7 Classifying sensitive contentCreate classification definitions
74 McAfee Data Loss Prevention Endpoint 9.4.0 Product Guide

4 On the Rule Sets tab, do one of the following.
• Select Actions | New Rule Set.
• Select an existing rule set.
5 Select Actions | New Rule | Email Protection.
An Email Protection definition form appears.
6 Enter a unique Rule Name.
7 On the Condition tab, select Body from the drop-down list (instead of the default Email), then selectthe appropriate Boldon James Classification. Select appropriate End-User, Email Envelope, and Recipientsoptions.
The McAfee DLP Endpoint client considers the Boldon James classification to be part of the emailbody. Limiting the definition to scan only the body makes the rule more efficient.
8 On the Reaction tab, select the appropriate Prevent Action, User Notification, Report Incident, and Severityparameters. Set the Status to Enabled, then click Save.
Classifying by file locationSensitive content can be can be defined by where it is located (stored) or by where it is used (fileextension or application).
McAfee DLP Endpoint uses several methods to locate and classify sensitive content. Data-at-rest is theterm used to describe file locations. It classifies content by asking questions like "where is it in thenetwork?" or "which folder is it in?" Data-in-use is the term used to define content by how or where itis used. It classifies content by asking questions like "which application called it?" or "what is the fileextension?"
The McAfee DLP Endpoint discovery feature finds your data-at-rest. It can search for content inendpoint computer files or email storage (PST, mapped PST, and OST) files.
Define network parametersNetwork definitions serve as filter criteria in network protection rules.
• Network Addresses monitor network connections between an external source and a managedcomputer. The definition can be a single address, a range, or a subnet. You can include and excludedefined network addresses in network communication protection rules.
• Network Port definitions in network communication protection rules allow you to exclude specificservices as defined by their network ports. A list of common services and their ports is built in. Youcan edit the items on the list, or create your own definitions.
• Network Share definitions specify shared network folders in network share protection rules. Youcan include or exclude defined shares.
Create a network address rangeNetwork address ranges serve as filter criteria in network communication protection rules.
Classifying sensitive contentClassifying by file location 7
McAfee Data Loss Prevention Endpoint 9.4.0 Product Guide 75

TaskFor each required definition, perform steps 1–4: For option definitions, click ? in the interface.
1 In McAfee ePO, select Menu | Data Protection | DLP Policy Manager | Definitions.
2 In the left pane select Network Address (IP address), then click Actions | New.
3 Enter a unique name for the definition and an optional description.
4 Enter an address, a range, or a subnet in the text box. Click Add.
Correctly formatted examples are displayed on the page.
5 When you have entered all required definitions, click Save.
Create a network port rangeNetwork port ranges serve as filter criteria in network communication protection rules.
TaskFor option definitions, click ? in the interface.
1 In McAfee ePO, select Menu | Data Protection | DLP Policy Manager | Definitions.
2 In the left pane select Network Port, then click Actions | New.
You can also edit the built-in definitions.
3 Enter a unique name and optional description.
4 Enter the port numbers, separated by commas, and optional description. Click Add.
5 When you have added all required ports, click Save.
Classifying by file destinationIn addition to classifying content by its originating location, you can classify and control where contentis being sent. In data loss prevention parlance, this is known as data-in-motion.
File protection rules controlling destinations include:
• Cloud protection rules
• Email Protection rules
• Network communication protection rules (outgoing)
• Printer protection rules
• Removable storage protection rules
• Web post protection rules
Contents Working with email Working with printers Controlling information uploaded to websites
7 Classifying sensitive contentClassifying by file destination
76 McAfee Data Loss Prevention Endpoint 9.4.0 Product Guide
Working with emailMcAfee DLP Endpoint protects sensitive data in email headers, body, or attachments when emails aresent. Email storage discovery detects emails with sensitive data in OST or PST files and either tags orquarantines them.
McAfee DLP Endpoint protects sensitive content in email by classifying and tagging content andblocking emails with sensitive content from being sent. The email protection policy can specifydifferent rules for different users and email destinations, or for emails protected with encryption orRights Management.
Client configuration
Set controls for email functionality behavior in McAfee ePO Policy Catalog | Data Loss Prevention 9.4 | ClientConfiguration | Email Protection. Settings on this page include:
• Email Caching — Stores tag signatures from emails to disk to eliminate re-parsing emails.
• Email Handling API — Outgoing email is handled by either Outlook Object Model (OOM) or MessagingApplication Programming Interface (MAPI). OOM is the default API, but some configurations requireMAPI.
• Outlook 3rd party add-in integration — Two third-party classification applications are supported: Titus andBoldon James.
• Email Timeout Strategy — Sets the maximum time to analyze an email and the action if the time isexceeded.
Create email destinationsEmail destination definitions are predefined email domains or specific email addresses that can bereferenced in email protection rules.
To get granularity in email protection rules, you include some email addresses and exclude others.Make sure to create both types of definitions.
TaskFor option definitions, click ? in the interface.
1 In McAfee ePO, select Menu | Data Protection | DLP Policy Manager | Definitions.
2 In the left pane, select Email Address, then Actions | New.
3 Enter a Name and optional Description.
4 Select an Operator from the drop-down list.
Operators are:
• Domain name is
• Email address is
• Display name is
• Display name contains
5 Enter a value, then click Add.
6 Click Save when you have finished adding email addresses.
Classifying sensitive contentClassifying by file destination 7
McAfee Data Loss Prevention Endpoint 9.4.0 Product Guide 77

Working with printersPrinter protection rules manage both local and network printers, and either block or monitor theprinting of confidential material.
Printer protection rules in McAfee DLP Endpoint 9.4 support advanced mode and V4 printers. Definedprinters and end-users can be included or excluded from a rule. Image printers and PDF printers canbe included in the rule.
Printer protection rules can include application definitions. You can define whitelisted processes thatare exempted from printer protection rules in the Policy Catalog | Data Loss Prevention 9.4 | ClientConfiguration | Printing Protection setting.
Create a network printer definitionUse network printer definitions to create granular printer protection rules. Defined printers can beincluded or excluded from rules.
Before you beginObtain the UNC path of the printer in the network.
TaskFor option definitions, click ? in the interface.
1 In McAfee ePO, select Menu | Data Protection | DLP Policy Manager | Definitions.
2 In the left panel, select Network Printer, then select Actions | New.
3 Enter a unique Name and optional Description.
4 Enter the UNC path.
All other fields are optional.
5 Click Save.
Controlling information uploaded to websitesWeb addresses are used in web post protection rules.
You can use web address definitions to block tagged data from being posted to defined webdestinations (websites or specific pages in a website), or use them to prevent tagged data from beingposted to websites that are not defined. Typically, the web address definitions define any internalwebsites as well as external websites where posting tagged data is allowed.
Create a URL list definitionURL list definitions are used to define web post protection rules. They are added to rules as Web address(URL) conditions.
TaskFor each URL required, perform steps 1–4. For option definitions, click ? in the interface.
1 In McAfee ePO, select Menu | Data Protection | DLP Policy Manager | Definitions.
2 In the left pane, select URL List, then select Actions | New.
3 Enter a unique Name and optional Definition.
7 Classifying sensitive contentClassifying by file destination
78 McAfee Data Loss Prevention Endpoint 9.4.0 Product Guide

4 Do one of the following:
• Enter the Protocol, Host, Port, and Path information in the text boxes, then click Add.
• Paste a URL in the Paste URL text box, then click Parse, then click Add.
The URL fields are filled in by the software.
5 When all required URLs are added to the definition, click Save.
Classifying sensitive contentClassifying by file destination 7
McAfee Data Loss Prevention Endpoint 9.4.0 Product Guide 79

7 Classifying sensitive contentClassifying by file destination
80 McAfee Data Loss Prevention Endpoint 9.4.0 Product Guide

8 Using rules to protect sensitive content
McAfee DLP Endpoint protects sensitive content with a combination of data protection rules, devicecontrol rules, and discovery rules. The rules are combined into rule sets and applied to McAfee DLPpolicies.McAfee ePO deploys the McAfee DLP policies to the endpoint computers. McAfee DLP Endpoint clientsoftware then applies the policies to protect the sensitive content.
Contents How rules work Protecting files with rights management Rule sets Create and configure rules and rule sets
How rules workUse rules to detect and take action against data policy violations.
Events and data transfers detected by McAfee DLP are compared against the active rules. Rulescontain two configuration components — the condition and the reaction. If the event or transfermatches the condition in the rule, the rule is triggered and McAfee DLP enforces the reaction for therule, such as blocking the action or creating an incident. The conditions and reactions available dependon the type of rule configured.
There are three categories of rules.
Rule category Available for: Description
Data protectionrules
McAfee DLPEndpoint
Detect attempts made to transfer data.Depending on the type of data protection rule, conditionsinclude items such as classifications, end users, andapplications.
Available reactions include blocking the attempt or allowingwith a justification.
Device controlrules
McAfee DLPEndpoint, McAfeeDevice Control
Detect applications such as Citrix XenApp or TrueCrypt, and todetect when removable storage devices are connected to theendpoint machine.Available reactions include blocking for read-only access of theapplication or device.
Discovery rules McAfee DLPEndpoint,
Scan file systems for files that meet matching criteria.Available reactions include quarantining or moving thematching file.
Use rule sets to group related rules. To activate enabled rules, apply rule sets to your McAfee DLPpolicies.
8
McAfee Data Loss Prevention Endpoint 9.4.0 Product Guide 81

Bypassing protection
When there is a legitimate business need, a user can be given permission to bypass policies, to accessor transfer sensitive information for a limited time. During this time, all sensitive information ismonitored, rather than blocked, according to existing rules. Both the user and the systemadministrator receive messages about the bypass status when it is enabled and disabled.
Bypass permission is administered with the Help Desk software module in McAfee ePO. The endpointuser supplies an identification code and revision number to the administrator. The administrator thensupplies the user with a release code from Help Desk. The policy bypass applies for a preset amount oftime, determined by the administrator.
See also Protecting user data transfer with data protection rules on page 82Protecting removable media with device control rules on page 83Protecting files with discovery rules on page 85Reactions available for rule types on page 85Create a rule on page 90
Protecting user data transfer with data protection rulesData protection rules control the flow of data by taking action when an attempt is made to transfersensitive data.
Data protection rules control user actions such as writing to removable storage devices, printing files,or using the clipboard. All data protection rule conditions include a classification and an end user.Depending on the rule type, other conditions might be available.
Table 8-1 Available data protection rules
Rule type Controls...
Application File Access Protection Files based on the application that accessed the file.
Clipboard Protection Copy and paste functionality of the clipboard.
Cloud Protection Cloud services such as DropBox.
Email Protection Email messages sent between specific users and destinations.
Network CommunicationProtection
Incoming our outgoing network data.
Network communication protection rules are supported only onnon-server Windows operating systems.
Network Share Protection Files being copied or moved to or from a network share.
Printer Protection Files sent to a printer.
Removable Storage Protection Data written to a removable storage device.
Screen Capture Protection Use of the screenshots.
Web Post Protection Data posted to websites, including web-based email sites.
Business justificationThe business justification feature defines alternate actions for rules.
Some data protection rules allow a Request Justification prevent action. This option allows theadministrator to define up to three different prevent actions, depending on the user response.Justification definitions include defined justifications and actions, and optional user input. Becausethey pre-define prevent actions, they are specific to rule types. Attempting to use a Justificationdefinition in a rule it does not match produces an error message.
8 Using rules to protect sensitive contentHow rules work
82 McAfee Data Loss Prevention Endpoint 9.4.0 Product Guide
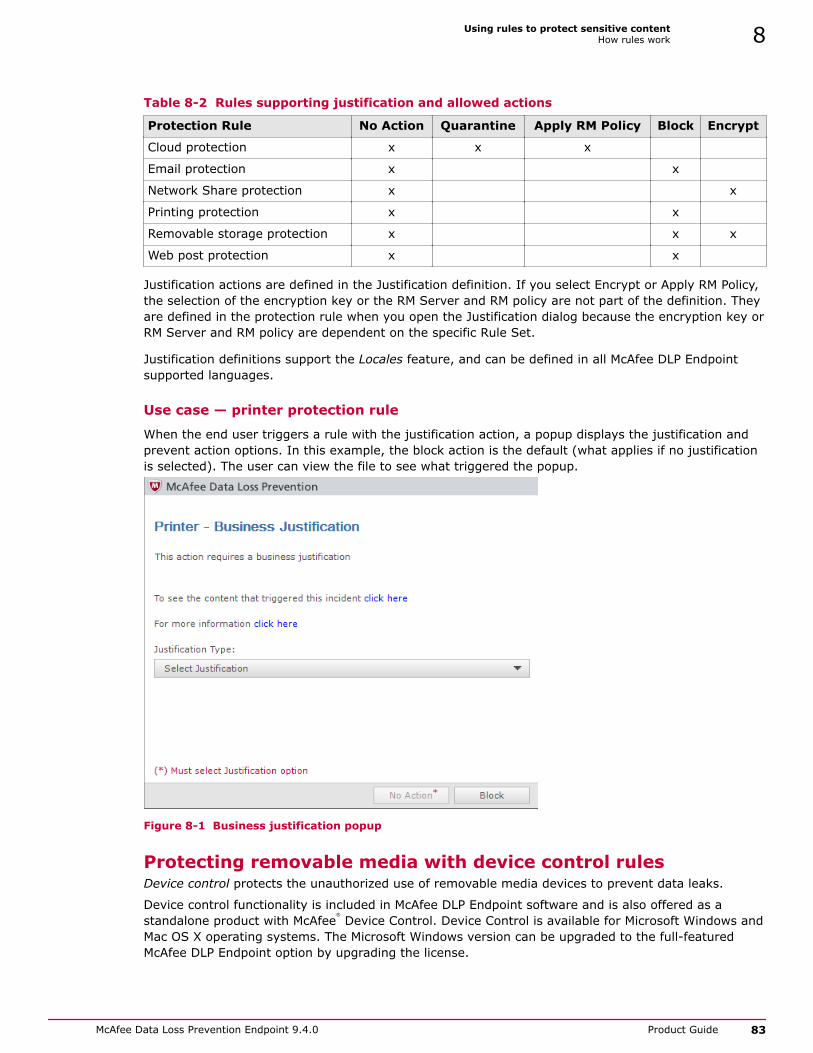
Table 8-2 Rules supporting justification and allowed actions
Protection Rule No Action Quarantine Apply RM Policy Block Encrypt
Cloud protection x x x
Email protection x x
Network Share protection x x
Printing protection x x
Removable storage protection x x x
Web post protection x x
Justification actions are defined in the Justification definition. If you select Encrypt or Apply RM Policy,the selection of the encryption key or the RM Server and RM policy are not part of the definition. Theyare defined in the protection rule when you open the Justification dialog because the encryption key orRM Server and RM policy are dependent on the specific Rule Set.
Justification definitions support the Locales feature, and can be defined in all McAfee DLP Endpointsupported languages.
Use case — printer protection rule
When the end user triggers a rule with the justification action, a popup displays the justification andprevent action options. In this example, the block action is the default (what applies if no justificationis selected). The user can view the file to see what triggered the popup.
Figure 8-1 Business justification popup
Protecting removable media with device control rulesDevice control protects the unauthorized use of removable media devices to prevent data leaks.
Device control functionality is included in McAfee DLP Endpoint software and is also offered as astandalone product with McAfee
®
Device Control. Device Control is available for Microsoft Windows andMac OS X operating systems. The Microsoft Windows version can be upgraded to the full-featuredMcAfee DLP Endpoint option by upgrading the license.
Using rules to protect sensitive contentHow rules work 8
McAfee Data Loss Prevention Endpoint 9.4.0 Product Guide 83
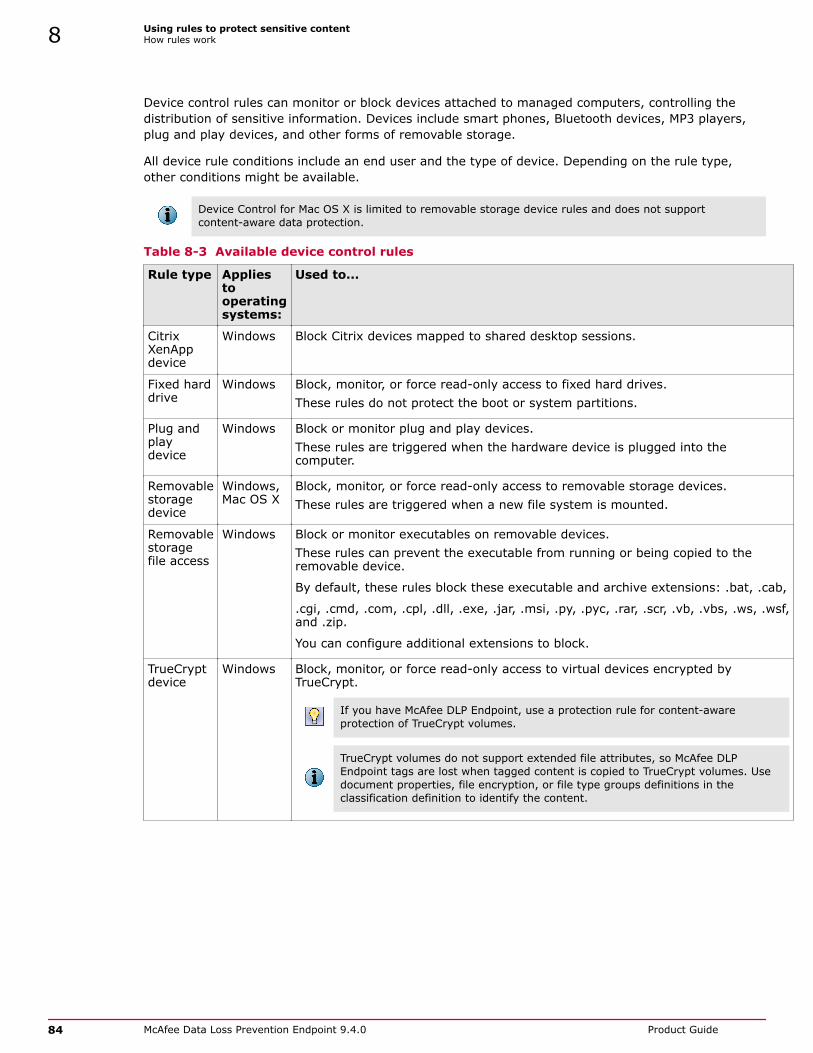
Device control rules can monitor or block devices attached to managed computers, controlling thedistribution of sensitive information. Devices include smart phones, Bluetooth devices, MP3 players,plug and play devices, and other forms of removable storage.
All device rule conditions include an end user and the type of device. Depending on the rule type,other conditions might be available.
Device Control for Mac OS X is limited to removable storage device rules and does not supportcontent-aware data protection.
Table 8-3 Available device control rules
Rule type Appliestooperatingsystems:
Used to...
CitrixXenAppdevice
Windows Block Citrix devices mapped to shared desktop sessions.
Fixed harddrive
Windows Block, monitor, or force read-only access to fixed hard drives.These rules do not protect the boot or system partitions.
Plug andplaydevice
Windows Block or monitor plug and play devices.These rules are triggered when the hardware device is plugged into thecomputer.
Removablestoragedevice
Windows,Mac OS X
Block, monitor, or force read-only access to removable storage devices.These rules are triggered when a new file system is mounted.
Removablestoragefile access
Windows Block or monitor executables on removable devices.These rules can prevent the executable from running or being copied to theremovable device.
By default, these rules block these executable and archive extensions: .bat, .cab,
.cgi, .cmd, .com, .cpl, .dll, .exe, .jar, .msi, .py, .pyc, .rar, .scr, .vb, .vbs, .ws, .wsf,and .zip.
You can configure additional extensions to block.
TrueCryptdevice
Windows Block, monitor, or force read-only access to virtual devices encrypted byTrueCrypt.
If you have McAfee DLP Endpoint, use a protection rule for content-awareprotection of TrueCrypt volumes.
TrueCrypt volumes do not support extended file attributes, so McAfee DLPEndpoint tags are lost when tagged content is copied to TrueCrypt volumes. Usedocument properties, file encryption, or file type groups definitions in theclassification definition to identify the content.
8 Using rules to protect sensitive contentHow rules work
84 McAfee Data Loss Prevention Endpoint 9.4.0 Product Guide

Table 8-4 Device control terminology
Term Applies to operatingsystems:
Definition
Device class Windows A collection of devices that have similar characteristics andcan be managed in a similar manner.
Device definition Windows, Mac OS X Device definitions are used in the condition of a rule tospecify the type and properties of the device.
Device property Windows, Mac OS X Device properties are predefined parameters to definedevice characteristics. Device properties include items suchas bus type, file system type, device name, or serialnumber.The available device properties depend on the type ofdevice definition.
See also Create a rule on page 90Reactions available for rule types on page 85
Protecting files with discovery rulesDiscovery rules define the content that McAfee DLP searches for when scanning repositories anddetermine the action taken when matching content is found.
Depending on the type of rule, files matching a scan can be copied, moved, encrypted, quarantined,tagged, or have a rights management policy applied. All discovery rule conditions include aclassification.
When using email storage discovery rules with the Quarantine prevent action, verify that the OutlookAdd-in is enabled (Policy Catalog | Data Loss Prevention 9.4 | Client Configuration | Operational Modesand Modules). You cannot release emails from quarantine when the Outlook Add-in is disabled.
Table 8-5 Available discovery rules
Rule type Product Controls files discovered from...
Local File System McAfee DLP Endpoint Local file system scans.
Local Email (OST, PST) McAfee DLP Endpoint Email storage system scans.
Reactions available for rule typesThe available reactions for a rule vary depending on the rule type.
• Data protection rules are available for McAfee DLP Endpoint.
• Device control rules are available for McAfee DLP Endpoint and Device Control.
Table 8-6 Available reactions
Reaction Applies to rules: Result
No Action All Allows the action.
Block • Data protection
• Device control
Blocks the action.
Read-only Device control Forces read-only access.
Using rules to protect sensitive contentHow rules work 8
McAfee Data Loss Prevention Endpoint 9.4.0 Product Guide 85
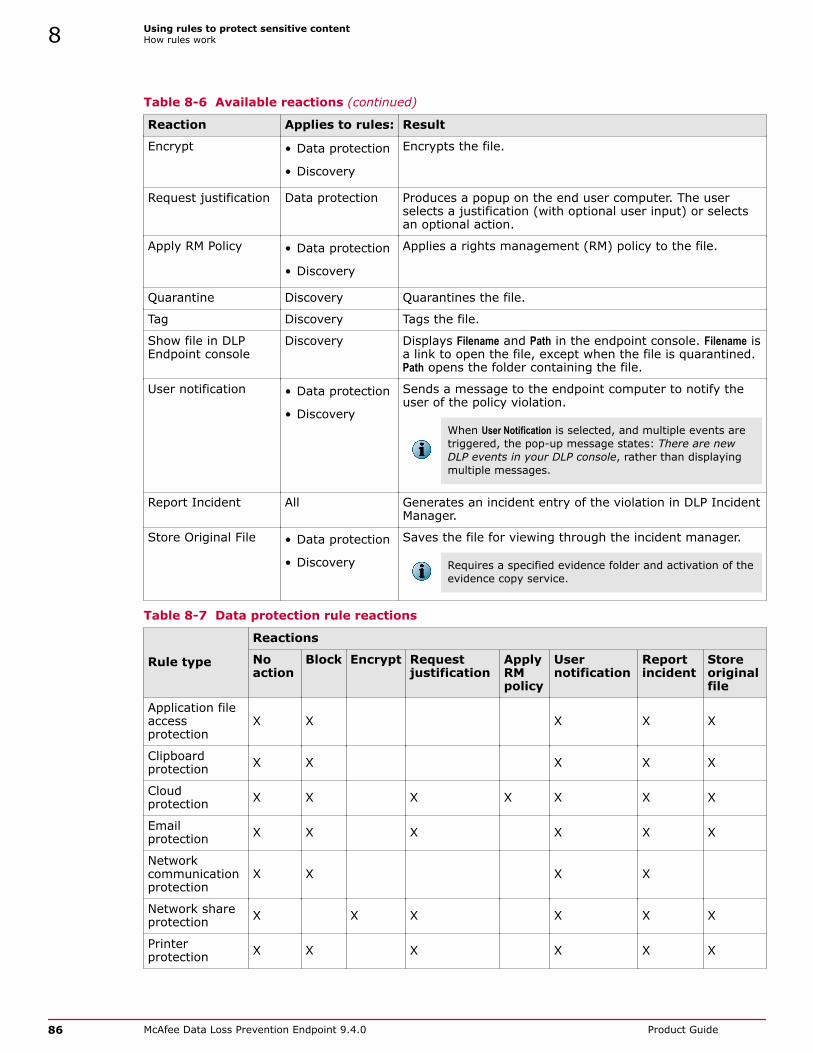
Table 8-6 Available reactions (continued)
Reaction Applies to rules: Result
Encrypt • Data protection
• Discovery
Encrypts the file.
Request justification Data protection Produces a popup on the end user computer. The userselects a justification (with optional user input) or selectsan optional action.
Apply RM Policy • Data protection
• Discovery
Applies a rights management (RM) policy to the file.
Quarantine Discovery Quarantines the file.
Tag Discovery Tags the file.
Show file in DLPEndpoint console
Discovery Displays Filename and Path in the endpoint console. Filename isa link to open the file, except when the file is quarantined.Path opens the folder containing the file.
User notification • Data protection
• Discovery
Sends a message to the endpoint computer to notify theuser of the policy violation.
When User Notification is selected, and multiple events aretriggered, the pop-up message states: There are newDLP events in your DLP console, rather than displayingmultiple messages.
Report Incident All Generates an incident entry of the violation in DLP IncidentManager.
Store Original File • Data protection
• Discovery
Saves the file for viewing through the incident manager.
Requires a specified evidence folder and activation of theevidence copy service.
Table 8-7 Data protection rule reactions
Rule type
Reactions
Noaction
Block Encrypt Requestjustification
ApplyRMpolicy
Usernotification
Reportincident
Storeoriginalfile
Application fileaccessprotection
X X X X X
Clipboardprotection X X X X X
Cloudprotection X X X X X X X
Emailprotection X X X X X X
Networkcommunicationprotection
X X X X
Network shareprotection X X X X X X
Printerprotection X X X X X X
8 Using rules to protect sensitive contentHow rules work
86 McAfee Data Loss Prevention Endpoint 9.4.0 Product Guide

Table 8-7 Data protection rule reactions (continued)
Rule type
Reactions
Noaction
Block Encrypt Requestjustification
ApplyRMpolicy
Usernotification
Reportincident
Storeoriginalfile
Removablestorageprotection
X X X X X X X
Screen captureprotection X X X X X
Web postprotection X X X X X X
Table 8-8 Device control rule reactions
RulesReactions
No action Block Read-only User notification Report incident
Citrix XenApp device X
Fixed hard drive X X X X X
Plug and play device X X X X
Removable storage device X X X X X
Removable storage file access X X X X
TrueCrypt device X X X X X
Table 8-9 Discovery rule reactions
Rules
Reactions
Noaction Copy Move Encrypt
ApplyRMpolicy
Quarantine Tag
Showfile inMcAfeeDLPEndpointconsole
Reportincident
Storeoriginalfile
Endpointfilesystem
X X X X X X X X
Endpointmailstorageprotection
X X X X X X
Protecting files with rights managementMcAfee DLP Endpoint can integrate with rights management (RM) servers to apply protections to filesthat match rule classifications.
You can apply an RM policy reaction to these data protection and discovery rules:
Using rules to protect sensitive contentProtecting files with rights management 8
McAfee Data Loss Prevention Endpoint 9.4.0 Product Guide 87
• Cloud protection
• Endpoint file system
RM policies cannot be used with device control rules.
McAfee DLP Endpoint can recognize RM protected files by adding a file encryption property to eitherclassification or tagging criteria. These files can be included or excluded from the classification.
See also Define a Rights Management server on page 36
How McAfee DLP works with rights managementMcAfee DLP follows a workflow to apply RM policies to files.
RM workflow
1 Create and apply a data protection or a discovery rule with a reaction to apply RM policy. Thereaction requires an RM server and an RM policy entry. You can also create a tagging rule to add atag to RM protected files.
2 When a file triggers the rule, McAfee DLP sends the file to the RM server.
3 The RM server applies protections based on the specified policy, such as encrypting the file, limitingthe users allowed to access or decrypt the file, and limiting the conditions in which the file can beaccessed.
4 The RM server sends the file back to the source with the applied protections.
5 If you've configured a tag for the file, McAfee DLP can monitor the file.
When the McAfee DLP software applying the file system discovery rule finds a file to protect, it usesthe template GUID as a unique identifier to locate the template and apply protection.
Limitations
McAfee DLP Endpoint software does not inspect RM protected files for content. When a tagged file isRM protected, only static tags (location and application) are maintained. If a user modifies the file, alltags are lost when the file is saved.
Supported RM serversMcAfee DLP Endpoint supports Microsoft Windows Rights Management Services (Microsoft RMS) andSeclore FileSecure™ information rights management (IRM).
Microsoft RMS
McAfee DLP Endpoint supports Microsoft RMS on Windows Server 2003 and Active Directory RMS(AD-RMS) on Windows Servers 2008 and 2012. You can apply Windows Rights Management Servicesprotection to:
• Microsoft Word 2007, Word 2010, and Word 2013 documents
• Microsoft Excel 2007, Excel 2010, and Excel 2013 documents
• Microsoft PowerPoint 2007, PowerPoint 2010, and PowerPoint 2013 documents
8 Using rules to protect sensitive contentProtecting files with rights management
88 McAfee Data Loss Prevention Endpoint 9.4.0 Product Guide

• SharePoint 2007 documents
• Exchange Server 2007 documents
With Microsoft RMS, McAfee DLP Endpoint software can inspect the content of protected files if thecurrent user has view permissions.
For more information on Microsoft RMS, go to http://technet.microsoft.com/en-us/library/cc772403.aspx.
Seclore IRM
McAfee DLP Endpoint supports Seclore FileSecure RM, which supports over 140 file formats includingmost commonly used document formats:
• Microsoft Office documents
• Open Office documents
• Text and text-based formats, including CSV, XML, and HTML
• Image formats, including JPEG, BMP, GIF and so forth
• Engineering design formats, including DWG, DXF, and DWF
The McAfee DLP Endpoint client works with the FileSecure desktop client to provide online and offlineintegration.
For more information on Seclore IRM, go to http://seclore.com/seclorefilesecure_overview.html.
Rule setsRule sets define McAfee DLP Endpoint policies. Rule sets can contain a combination of data protection,device control, and discovery rules.
The Rule Sets page displays a list of defined rule sets and the status of each. The display includes thenumber of incidents logged for each rule set, how many rules have been defined, and how manyenabled. Colored icons indicate the types of rules enabled. The ToolTip displayed when mousing overicons shows the type of rule and number of enabled rules.
Using rules to protect sensitive contentRule sets 8
McAfee Data Loss Prevention Endpoint 9.4.0 Product Guide 89

Create and configure rules and rule setsCreate and configure rules for your McAfee DLP Endpoint, Device Control, and McAfee DLP Discoverpolicies.
Tasks
• Create a rule set on page 90Rule sets combine multiple device protection, data protection, and discovery scan rules.
• Create a rule on page 90The processes for creating a rule is similar for all rule types.
• Enable, disable, or delete rules on page 91You can delete or change the state of multiple rules at once.
• Configure rule or rule set columns on page 91Move, add, or remove columns displayed for rules or rule sets.
• Customizing end-user messages on page 92Two types of messages are used to communicate with end-users: notifications and userjustification messages.
• Create a justification definition on page 92Business justification definitions define parameters for the justification prevent action inrules.
• Create a notification definition on page 93User notifications appear in popups or the end-user console when user actions violatepolicies.
Create a rule setRule sets combine multiple device protection, data protection, and discovery scan rules.
TaskFor option definitions, click ? in the interface.
1 In McAfee ePO, select Menu | Data Protection | DLP Policy Manager.
2 Click the Rule Sets tab.
3 Select Actions | New Rule Set.
4 Enter the name and optional note, then click OK.
Create a ruleThe processes for creating a rule is similar for all rule types.
TaskFor option definitions, click ? in the interface.
1 In McAfee ePO, select Menu | Data Protection | DLP Policy Manager.
2 Click the Rule Sets tab.
3 Click the name of a rule set and if needed, select the appropriate tab for the Data Protection, DeviceControl, or Discovery rule.
4 Select Actions | New Rule, then select the type of rule.
8 Using rules to protect sensitive contentCreate and configure rules and rule sets
90 McAfee Data Loss Prevention Endpoint 9.4.0 Product Guide
5 On the Condition tab, enter the information.
• For some conditions, such as classifications or device definitions, click ... to select an existing orcreate a new item.
• To add additional criteria, click +.
• To remove criteria, click -.
6 On the Reaction tab, configure the reaction.
7 Click Save.
See also How rules work on page 81
Enable, disable, or delete rulesYou can delete or change the state of multiple rules at once.
TaskFor option definitions, click ? in the interface.
1 In McAfee ePO, select Menu | Data Protection | DLP Policy Manager.
2 Click the Rule Sets tab.
3 Click the name of a rule set and if needed, click the appropriate tab for the Data Protection, DeviceControl, or Discovery rule.
4 Select one or more rules.
5 Update or delete the selected rules.
• To enable the rules, select Actions | Change State | Enable.
• To disable the rules, select Actions | Change State | Disable.
• To delete the rules, select Actions | Delete.
Configure rule or rule set columnsMove, add, or remove columns displayed for rules or rule sets.
TaskFor option definitions, click ? in the interface.
1 In McAfee ePO, select Menu | Data Protection | DLP Policy Manager.
2 Click the Rule Sets tab.
3 Access the Select the Columns to Display page.
• Rule sets — Select Actions | Choose Columns.
• Rules — Select a rule set, then select Actions | Choose Columns.
Using rules to protect sensitive contentCreate and configure rules and rule sets 8
McAfee Data Loss Prevention Endpoint 9.4.0 Product Guide 91

4 Modify the columns.
• In the Available Columns pane, click items to add columns.
• In the Selected Columns pane, click the arrows or x to move or delete columns.
• Click Use Defaults to restore the columns to the default configuration.
5 Click Save.
Customizing end-user messagesTwo types of messages are used to communicate with end-users: notifications and user justificationmessages.
Notification and justification definitions can specify Locales (languages) and add placeholders that arereplaced by their real values. When locales are defined, the messages and option buttons (for businessjustifications) appear in the default language of the endpoint computer.
User notification
User notifications are pop up messages that notify the user of a policy violation.
When multiple events are triggered by a rule, the pop-up message states: There are new DLP events inyour DLP console, rather than displaying multiple messages.
User notification messages are defined in DLP Policy Manager | Definitions | Notifications.
Business justification
Business justification is a form of policy bypass. When Request Justification is specified as the preventaction in a rule, the user can enter the justification to continue without being blocked.
Business justification messages are defined in DLP Policy Manager | Definitions | Justification.
Placeholders
Placeholders are a way of entering variable text in messages, based on what triggered the end-usermessage. The available placeholders are:
• %c for classifications
• %r for rule-set name
• %v for vector (email protection, web protection, and so forth)
• %a for action
• %s for string value (file name, device name, and so forth)
Create a justification definitionBusiness justification definitions define parameters for the justification prevent action in rules.
TaskFor option definitions, click ? in the interface.
1 In McAfee ePO, select Menu | Data Protection | DLP Policy Manager.
2 Click the Definitions tab, then select Notification | Justification.
8 Using rules to protect sensitive contentCreate and configure rules and rule sets
92 McAfee Data Loss Prevention Endpoint 9.4.0 Product Guide

3 Select Actions | New.
4 Enter a unique name and optional description.
5 To create justification definitions in more than one language, select Locale Actions | New Locale. Foreach required locale, select a locale from the drop-down list.
The selected locales are added to the list.
6 For each locale, do the following:
a In the left pane, select the locale to edit. Enter text in the text boxes and select checkboxes asrequired.
Show Match Strings provides a link on the popup to display the hit-highlighted content. More Infoprovides a link to a document or intranet page for information.
When entering a locale definition, checkboxes and actions are not available. You can only enterbutton labels, overview, and title. In the Justification Options section, you can replace the defaultdefinitions with the locale version by using the Edit feature in the Actions column.
b Enter a Justification Overview and optional Dialog Title.
The overview is a general instruction for the user, for example: This action requires a businessjustification. Maximum entry is 500 characters.
c Enter text for button labels and select button actions. Select the Hide button checkbox to create atwo-button definition.
Button actions must match the prevent actions available for the type of rule that uses thedefinition. For example, network share protection rules can have only No Action, Encrypt, or RequestJustification for prevent actions. If you select Block for one of the button actions, and attempt touse the definition in a network share protection rule definition, an error message appears.
d Enter text in the text box and click Add to add to the list of Justification Options. Select the Showjustifications options checkbox if you want the end user to view the list.
You can use placeholders to customize the text, indicating what caused the popup to trigger.
7 When all locales are complete, click Save.
See also Customizing end-user messages on page 92
Create a notification definitionUser notifications appear in popups or the end-user console when user actions violate policies.
TaskFor option definitions, click ? in the interface.
1 In McAfee ePO, select Menu | Data Protection | DLP Policy Manager.
2 Click the Definitions tab, then select Notification | User Notification.
3 Select Actions | New.
4 Enter a unique name and optional description.
5 To create user notification definitions in more than one language, select Locale Actions | New Locale. Foreach required locale, select a locale from the drop-down list.
The selected locales are added to the list.
Using rules to protect sensitive contentCreate and configure rules and rule sets 8
McAfee Data Loss Prevention Endpoint 9.4.0 Product Guide 93

6 For each locale, do the following:
a In the left pane, select the locale to edit.
You can set any locale to be the default by selecting the Default locale checkbox.
b Enter text in the text box.
You can use placeholders to customize the text, indicating what caused the popup to trigger.
c Optional: Select the Show link to more information checkbox and enter a URL to provide moredetailed information.
Available only in the default locale.
7 When all locales are complete, click Save.
See also Customizing end-user messages on page 92
8 Using rules to protect sensitive contentCreate and configure rules and rule sets
94 McAfee Data Loss Prevention Endpoint 9.4.0 Product Guide

9 Endpoint discovery
Discovery is a crawler that runs on endpoint computers. It searches local file system and email storagefiles, and applies rules to protect sensitive content.
Contents How discovery scanning works Find content with the Endpoint Discovery crawler
How discovery scanning worksUse endpoint discovery scans to locate local file system or email storage files with sensitive contentand tag or quarantine them.McAfee DLP Endpoint discovery is a crawler that runs on client computers. When it finds predefinedcontent, it can monitor, quarantine, tag, encrypt, or apply an RM policy to the files containing thatcontent. Endpoint discovery can scan computer files or email storage (PST, mapped PST, and OST)files. Email storage files are cached on a per-user basis.
To use endpoint discovery, you must activate the Discovery modules on the Policy Catalog | Client configuration| Operational Mode and Modules page.
At the end of each discovery scan, the McAfee DLP Endpoint client sends a Discovery Summary eventto the DLP Operational Events console in McAfee ePO to log the details of the scan. The event includesan evidence file that lists the files that could not be scanned and the reason for not scanning each ofthese files. There is also an evidence file with files matching the classification and the action taken.
When can you search?Schedule discovery scans on the Policy Catalog | DLP Policy | Endpoint Discovery page. You can run a scan at aspecific time daily, or on specified days of the week or month. You can specify start and stop dates, orrun a scan when the McAfee DLP Endpoint configuration is enforced. You can suspend a scan when thecomputer's CPU or RAM exceed a specified limit.
If you change the discovery policy while an endpoint scan is running, rules and schedule parameterswill change immediately. Changes to which parameters are enabled or disabled will take effect with thenext scan. If the computer is restarted while a scan is running, the scan continues where it left off.
What content can be discovered?You define discovery rules with a classification. Any file property or data condition that can be addedto classification criteria can be used to discover content.
What happens to discovered files with sensitive content?You can quarantine or tag email files. You can encrypt, quarantine, tag, or apply an RM policy to localfile system files. You can store evidence for both file types.
9
McAfee Data Loss Prevention Endpoint 9.4.0 Product Guide 95

Find content with the Endpoint Discovery crawlerThere are four steps to running the discovery crawler.
1 Create and define classifications to identify the sensitive content.
2 Create and define a discovery rule. The discovery rule includes the classification as part of thedefinition.
3 Create a schedule definition.
4 Set up the scan parameters. The scan definition includes the schedule as one of the parameters.
Tasks
• Create and define a discovery rule on page 96Discovery rules define the content the crawler searches for, and what to do when thiscontent is found.
• Create a scheduler definition on page 97The scheduler determines when and how frequently a discovery scan is run.
• Set up a scan on page 97Discovery scans crawl the local file system or mailboxes for sensitive content.
• Restore quarantined files or email items on page 98When McAfee DLP Endpoint discovery finds sensitive content, it moves the affected files oremail items into a quarantine folder, replacing them with placeholders that notify users thattheir files or emails have been quarantined. The quarantined files and email items are alsoencrypted to prevent unauthorized use.
Create and define a discovery ruleDiscovery rules define the content the crawler searches for, and what to do when this content is found.
Changes to a discovery rule take effect when the policy is deployed. Even if a scan is in progress, anew rule takes effect immediately.
For email storage (PST, mapped PST, and OST) scans, the crawler scans email items (body andattachments), calendar items, and tasks. It does not scan public folders or sticky notes.
TaskFor option definitions, click ? in the interface.
1 In McAfee ePO, select Menu | Data Protection | DLP Policy Manager.
2 On the Rule Sets page, select Actions | New Rule Set. Enter a name and click OK.
You can also add discovery rules to an existing rule set.
3 On the Discovery tab, select Actions | New Endpoint Discovery Rule, then select either Local Email or Local FileSystem.
The appropriate page appears.
4 Enter a Rule Name and select a classification.
5 Click Reaction. Select a Prevent Action from the drop-down list.
6 Optional: Select Report Incident options, set the State to Enabled, and select a Severity designation fromthe drop-down list.
7 Click Save.
9 Endpoint discoveryFind content with the Endpoint Discovery crawler
96 McAfee Data Loss Prevention Endpoint 9.4.0 Product Guide

Create a scheduler definitionThe scheduler determines when and how frequently a discovery scan is run.
Five schedule types are provided:
• Run immediately • Weekly
• Once • Monthly
• Daily
TaskFor option definitions, click ? in the interface.
1 In McAfee ePO, select Menu | Data Protection | DLP Policy Manager | Definitions.
2 In the left pane, click Scheduler
If both McAfee DLP Discover and McAfee DLP Endpoint are installed, the list of existing schedulesdisplayed includes schedules for both.
3 Select Actions | New.
The New Scheduler page appears.
4 Enter a unique Name, and select the Schedule type from the drop-down list.
The display changes when you select the schedule type to provide the necessary fields for thattype.
5 Fill in the required options and click Save.
Set up a scanDiscovery scans crawl the local file system or mailboxes for sensitive content.
Before you beginVerify that the rule sets you want to apply to the scans have been applied to the DLP Policy.This information is displayed on the DLP Policy | Rule Sets tab.
Changes in discovery setting parameters take effect on the next scan. They are not applied to scansalready in progress.
TaskFor option definitions, click ? in the interface.
1 In McAfee ePO, select Menu | Policy | Policy Catalog.
2 Select Product Data Loss Prevention 9.4, then select the active DLP Policy.
3 On the Endpoint Discovery tab, select Actions | New Endpoint Scan, then select either Local Email or Local FileSystem.
4 Enter a Name for the scan, then select a Schedule from the drop-down list.
5 Optional: Change the Incident Handling and Error Handling defaults. Set the State to Enabled.
Error handling refers to when text cannot be extracted.
Endpoint discoveryFind content with the Endpoint Discovery crawler 9
McAfee Data Loss Prevention Endpoint 9.4.0 Product Guide 97

6 On the Folders tab, do one of the following:
• For file system scans, select Actions | Select Folders. Select a defined folder definition or click NewItem to create one. Define the folder as Include or Exclude.
• For email scans, select the file types (OST, PST) and the mailboxes to be scanned.
7 Optional: On the Filters tab (file system scans only) select Actions | Select Filters. Select a fileinformation definition or click New Item to create one. Define the filter as Include or Exclude.Click OK.
The default is All Files. Defining a filter makes the scan more efficient.
8 On the Rules tab, verify the rules that apply.
All discovery rules from rule sets applied to the policy are run.
Restore quarantined files or email itemsWhen McAfee DLP Endpoint discovery finds sensitive content, it moves the affected files or email itemsinto a quarantine folder, replacing them with placeholders that notify users that their files or emailshave been quarantined. The quarantined files and email items are also encrypted to preventunauthorized use.
Before you beginTo display the McAfee DLP icon in Microsoft Outlook, the Show Release from Quarantine Controls inOutlook option must be enabled in Policy Catalog | Client Policy | Operational Mode and Modules. Whendisabled, both the icon and the right-click option for viewing quarantined emails areblocked, and you cannot release emails from quarantine.
When you set a file system discovery rule to Quarantine and the crawler finds sensitive content, it movesthe affected files into a quarantine folder, replacing them with placeholders that notify users that theirfiles have been quarantined. The quarantined files are encrypted to prevent unauthorized use.
For quarantined email items, McAfee DLP Endpoint discovery attaches a prefix to the Outlook Subject toindicate to users that their emails have been quarantined. Both the email body and any attachmentsare quarantined.
The mechanism has been changed from previous McAfee DLP Endpoint versions, which could encrypteither the body or attachments, to prevent signature corruption when working with the email signingsystem.
Microsoft Outlook calendar items and tasks can also be quarantined.
Figure 9-1 Quarantined email example
Task1 To restore quarantined files:
a In the system tray of the managed computer, click the McAfee Agent icon, and select Manage Features| DLP Endpoint Console.
The DLP Endpoint Console opens.
9 Endpoint discoveryFind content with the Endpoint Discovery crawler
98 McAfee Data Loss Prevention Endpoint 9.4.0 Product Guide

b On the Tasks tab, select Open Quarantine Folder.
The quarantine folder opens.
c Select the files to be restored. Right-click and select Release from Quarantine.
The Release from Quarantine context-sensitive menu item only appears when selecting files oftype *.dlpenc (DLP encrypted).
The Release Code pop-up window appears.
2 To restore quarantined email items: Click the McAfee DLP icon, or right-click and select Release fromQuarantine.
a In Microsoft Outlook, select the emails (or other items) to be restored.
b Click the McAfee DLP icon.
The Release Code pop-up window appears.
3 Copy the challenge ID code from the pop-up window and send it to the DLP administrator.
4 The administrator generates a response code and sends it to the user. (This also sends an event toDLP Operational Events recording all the details.)
5 The user enters the release code in the Release Code pop-up window and clicks OK.
The decrypted files are restored to their original location. If the release code lockout policy hasbeen activated (in the Agent Configuration | Notification Service tab) and you enter the code incorrectlythree times, the pop-up window times out for 30 minutes (default setting).
For files, if the path has been changed or deleted, the original path is restored. If a file with thesame name exists in the location, the file is restored as xxx-copy.abc
Endpoint discoveryFind content with the Endpoint Discovery crawler 9
McAfee Data Loss Prevention Endpoint 9.4.0 Product Guide 99

9 Endpoint discoveryFind content with the Endpoint Discovery crawler
100 McAfee Data Loss Prevention Endpoint 9.4.0 Product Guide

10Working with policies
McAfee DLP Endpoint stores policies and configurations in the McAfee ePO Policy Catalog.
DLP Policies in the McAfee ePO Policy Catalog consist of rule sets (protection rules) and theirassociated classifications and definitions. They can also include endpoint discovery scan configurationsand server settings.
You create rules and rule sets in the DLP Policy Manager. Rule sets can contain multiple DataProtection, Device Control, and Discovery rules. The rules in a rule set are logical OR, that is, the ruleset applies if the inspected content matches any of the rules. Within a rule, some parameters arelogical AND or NOT, and some parameter combinations are either AND, OR, or NOT, as specified by theadministrator.
Workflow
The steps to managing policies are:
1 Create and save the rule sets on the DLP Policy Manager | Rule Sets page.
2 Most rules require classifications. Define the classifications in the Classification module.
3 Assign the rule set to a DLP Policy on the DLP Policy Manager | Policy Assignment page.
4 Create or edit definitions.
5 Apply the policies to McAfee ePO in the Policy Catalog.
In the Policy Catalog, you can also create new policies by duplicating a default or other existing policy.
Contents How definitions work Edit a DLP policy
How definitions workDefinitions are used to configure rules, classification criteria, and discovery scans.
McAfee DLP definitions are stored in a definitions catalog. Once defined, they are available to allMcAfee DLP features. While all definitions are user-configurable, some definitions are also predefined.
View Built-in definitions by selecting the checkbox.
Table 10-1 Definitions available by McAfee DLP feature
Classifications Rule Sets
Data Advanced Pattern* File Extension*
Dictionary*
10
McAfee Data Loss Prevention Endpoint 9.4.0 Product Guide 101

Table 10-1 Definitions available by McAfee DLP feature (continued)
Classifications Rule Sets
Document Properties
File Extension*
File Information
True File Type*
Device Control Device Class
Device Definitions
Notification Justification
User Notification
Other Scheduler
Source/Destination Application Template
Email Address
End-User Group
Local Folder
Network Address (IP address)
Network Port
Network Printer
Network Share
Process Name
URL List
Windows Title
* indicates that predefined (Built-in) definitions are available
Edit a DLP policy DLP policy configuration consists of rule sets, policy assignments, and definitions.
TaskFor option definitions, click ? in the interface.
1 In McAfee ePO, select Menu | DLP Policy Manager. Create at least one rule set to assign to the DLPpolicy.
See Create a rule set in this manual for details.
2 In McAfee ePO, select Menu | Policy Catalog | Product: Data Loss Prevention 9.4. Open a DLP Policyconfiguration.
Select a DLP Policy label in the Category column, and click in the Name column.
3 Select the Active Rule Sets tab.
If any rule sets have been assigned to the policy, they appear listed on the page.
10 Working with policiesEdit a DLP policy
102 McAfee Data Loss Prevention Endpoint 9.4.0 Product Guide

4 To assign new rule sets to the policy:
a Select Menu | DLP Policy Manager | Policy Assignment.
b Select Actions | Assign Rule Sets to a policy.
Alternately, you can assign a rule set to multiple policies from the Actions menu.
c In the selection window, select a policy from the drop-down list and select the rule sets toassign with the checkboxes. Click OK.
The selected rule sets are applied to the policy.
5 To remove rule sets from the policy:
a Select Actions | Assign Rule Sets to a policy.
b Deselect the boxes in the selection window for the rule sets to remove from the policy. Click OK.
Selected rule sets are removed from the policy.
6 Select the Endpoint Discovery tab.
7 Select Actions | New Endpoint Scan, and select the type of scan you want to run: Local Email or Local FileSystem.
A scan setup page appears. On the page you select a Schedule definition, and select Rules to apply,as well as other scan details. Click Save when you have filled in all required details.
8 Select the Settings tab. On this page you cans set the following options.
• Default application strategy, and override application strategy for selected applications.
• Device class overrides and filter types.
• Add privileged users or user groups.
9 When you have completed all edits, click Apply Policy.
The changes are applied to the McAfee ePO database.
Working with policiesEdit a DLP policy 10
McAfee Data Loss Prevention Endpoint 9.4.0 Product Guide 103

10 Working with policiesEdit a DLP policy
104 McAfee Data Loss Prevention Endpoint 9.4.0 Product Guide

Monitoring and reportingYou can use McAfee DLP Endpoint software components to track and reviewpolicy violations, and to track administrative (operational) events
Chapter 11 Monitoring and reporting eventsChapter 12 Collecting and managing dataChapter 13 Creating reports
McAfee Data Loss Prevention Endpoint 9.4.0 Product Guide 105

Monitoring and reporting
106 McAfee Data Loss Prevention Endpoint 9.4.0 Product Guide

11 Monitoring and reporting events
McAfee DLP divides events into two classes: incidents (that is, policy violations) and administrativeevents. These events are viewed in the two consoles, DLP Incident Manager and DLP OperationalEvents.
When McAfee DLP determines a policy violation has occurred, it generates an event and sends it to theMcAfee ePO Event Parser. These events are viewed, filtered, and sorted in the DLP Incident Managerconsole, allowing security officers or administrators to view events and respond quickly. If applicable,suspicious content is attached as evidence to the event.
As McAfee DLP takes a major role in an enterprise’s effort to comply with all regulation and privacylaws, the DLP Incident Manager presents information about the transmission of sensitive data in anaccurate and flexible way. Auditors, signing officers, privacy officials and other key workers can usethe DLP Incident Manager to observe suspicious or unauthorized activities and act in accordance withenterprise privacy policy, relevant regulations or other laws.
The system administrator or the security officer can follow administrative events regarding agents andpolicy distribution status.
The DLP Operational Events console displays details on client deployment, policy changes, policydeployment, Safe Mode logons, agent overrides, and other administrative events.
Working with incidentsWhen McAfee DLP receives data that matches parameters defined in a rule, a violation is triggered andMcAfee DLP generates an incident.
Using the incident manager in McAfee ePO, you can view, sort, group, and filter incidents to findimportant violations. You can view details of incidents or delete incidents that are not useful.
View incidentsThe incident manager displays all incidents reported by McAfee DLP devices. You can alter the wayincidents appear to help you locate important violations more efficiently.When McAfee DLP processes an object—such as an email message—that triggers multiple rules, theincident manager collates and displays the violations as one incident, rather than separate incidents.
11
McAfee Data Loss Prevention Endpoint 9.4.0 Product Guide 107
Tasks• Sort and filter incidents on page 108
Arrange the way incidents appear based on attributes such as time, location, user, orseverity.
• Configure column views on page 108Use views to arrange the type and order of columns displayed in the incident manager.
• Configure incident filters on page 109Use filters to display incidents that match specified criteria.
• View incident details on page 110View the information related to an incident.
Sort and filter incidentsArrange the way incidents appear based on attributes such as time, location, user, or severity.
TaskFor option definitions, click ? in the interface.
1 In McAfee ePO, select DLP Incident Manager.
2 Perform any of these tasks.
• To sort by column, click a column header.
• To change columns to a custom view, from the View drop-down list, select a custom view.
• To filter by time, from the Time drop-down list, select a time frame.
• To apply a custom filter, from the Filter drop-down list, select a custom filter.
• To group by attribute:
1 From the Group By drop-down list, select an attribute.
A list of available options appears. The list contains up to 250 of the most frequentlyoccurring options.
2 Select an option from the list. Incidents that match the selection are displayed.
ExampleSelect User ID to display the names of users that have triggered violations. Select a user nameto display all incidents for that user.
Configure column viewsUse views to arrange the type and order of columns displayed in the incident manager.
TaskFor option definitions, click ? in the interface.
1 In McAfee ePO, select DLP Incident Manager.
2 From the View drop-down list, select Default and click Edit.
11 Monitoring and reporting eventsWorking with incidents
108 McAfee Data Loss Prevention Endpoint 9.4.0 Product Guide

3 Configure the columns.
a From the Available Columns list, click an option to move it to the Selected Columns area.
b In the Selected Columns area, arrange and delete columns as needed.
• To remove a column, click x.
• To move a column, click the arrow buttons, or drag and drop the column.
c Click Update View.
4 Configure the view settings.
a Next to the View drop-down list, click Save.
b Select one of these options.
• Save as new view — Specify a name for the view.
• Override existing view — Select the view to save.
c Select who can use the view.
• Public — Any user can use the view.
• Private — Only the user that created the view can use the view.
d Specify if you want the current filters or groupings applied to the view.
e Click OK.
You can also manage views in the Incident Manager by selecting Actions | View.
Configure incident filtersUse filters to display incidents that match specified criteria.
Example: You suspect a particular user has been sending connections containing sensitive data to arange of IP addresses outside the company. You can create a filter to display incidents that match theuser name and the range of IP addresses.
TaskFor option definitions, click ? in the interface.
1 In McAfee ePO, select DLP Incident Manager.
2 From the Filter drop-down list, select (no custom filter) and click Edit.
3 Configure the filter parameters.
a From the Available Properties list, select a property.
b Enter the value for the property.
To add additional values for the same property, click +.
c Select additional properties as needed.
To remove a property entry, click <.
d Click Update Filter.
Monitoring and reporting eventsWorking with incidents 11
McAfee Data Loss Prevention Endpoint 9.4.0 Product Guide 109

4 Configure the filter settings.
a Next to the Filter drop-down list, click Save.
b Select one of these options.
• Save as new filter — Specify a name for the filter.
• Override existing filter — Select the filter to save.
c Select who can use the filter.
• Public — Any user can use the filter.
• Private — Only the user that created the filter can use the filter.
d Click OK.
You can also manage filters in the incident manager by selecting Actions | Filter.
Incident types and detailsIncidents are categorized based on the type of violation that occurred.
The incident manager displays incidents generated by all McAfee DLP software products. The DLPIncident Manager details page displays all details relating to a particular incident.
The information and options displayed vary depending on the type of incident. For example, the detailsof Network Share Protection incidents contain destination information, while Device Control incidentscontain device information.
All incidents contain the Rules, Audit Logs, and Comments tabs, but some incident types, such asNetwork Share Protection, also contain the Evidence and Classifications tabs.
View incident detailsView the information related to an incident.
TaskFor option definitions, click ? in the interface.
1 In McAfee ePO, select DLP Incident Manager.
2 Click an Incident ID.
The page displays general details and source information. Depending on the incident type,destination or device details appear.
3 To view additional information, perform any of these tasks.
• To view user information, click the user name in the Source area.
• To view evidence files:
1 Click the Evidence tab.
2 Click a file name to open the file with an appropriate program.
• To view rules that triggered the incident, click the Rules tab.
• To view classifications, click the Classifications tab.
The Classifications tab does not appear for some incident types.
• To view incident history, click the Audit Logs tab.
11 Monitoring and reporting eventsWorking with incidents
110 McAfee Data Loss Prevention Endpoint 9.4.0 Product Guide

• To view comments added to the incident, click the Comments tab.
• To return to the incident manager, click OK.
Manage incidentsUse the incident manager to update and manage incidents.To delete incidents, configure a task to purge events.
Tasks
• Update a single incident on page 111Update incident information such as the severity, status, and reviewer.
• Update multiple incidents on page 111Update multiple incidents with the same information simultaneously.
• Manage labels on page 112A label is a custom attribute used to identify incidents that share similar traits.
• Delete incidents on page 113Delete incidents that are not useful.
Update a single incidentUpdate incident information such as the severity, status, and reviewer.
The Audit Logs tab reports all updates and modifications performed on an incident.
TaskFor option definitions, click ? in the interface.
1 In McAfee ePO, select DLP Incident Manager.
2 Click an incident.
3 Perform any of these tasks.
• To update the severity, status, or resolution:
1 From the Severity, Status, or Resolution drop-down lists, select an option.
2 Click Save.
• To update the reviewer:
1 Next to the Reviewer field, click ...
2 Select the group or user and click OK.
3 Click Save.
• To add a comment:
1 Select Actions | Add Comment.
2 Enter a comment, then click OK.
Update multiple incidentsUpdate multiple incidents with the same information simultaneously.
Example: You have applied a filter to display all incidents from a particular user, and you want tochange the severity of these incidents to Major.
Monitoring and reporting eventsWorking with incidents 11
McAfee Data Loss Prevention Endpoint 9.4.0 Product Guide 111

TaskFor option definitions, click ? in the interface.
1 In McAfee ePO, select DLP Incident Manager.
2 Select the checkboxes of the incidents to update.
To update all incidents displayed by the current filter, click Select all in this page.
3 Perform any of these tasks.
• To add a comment, select Actions | Add Comment, enter a comment, then click OK.
• To send the incidents in an email, select Actions | Email Selected Events, enter the information, thenclick OK.
• To modify the properties, select Actions | Set Properties, modify the options, then click OK.
Manage labelsA label is a custom attribute used to identify incidents that share similar traits.
You can assign multiple labels to an incident and you can reuse a label on multiple incidents.
Example: You have incidents that relate to several projects your company is developing. You cancreate labels with the name of each project and assign the labels to the respective incidents.
TaskFor option definitions, click ? in the interface.
1 In McAfee ePO, select DLP Incident Manager.
2 Select the checkboxes of one or more incidents.
To update all incidents displayed by the current filter, click Select all in this page.
3 Perform any of these tasks.
• To add labels:
1 Select Actions | Manage Labels | Attach.
2 To add a new label, enter a name and click Add.
3 Select one or more labels.
4 Click OK.
• To remove labels from an incident:
1 Select Actions | Manage Labels | Detach.
2 Select the labels to remove from the incident.
3 Click OK.
• To delete labels:
1 Select Actions | Manage Labels | Delete Labels.
2 Select the labels to delete.
3 Click OK.
11 Monitoring and reporting eventsWorking with incidents
112 McAfee Data Loss Prevention Endpoint 9.4.0 Product Guide

Delete incidentsDelete incidents that are not useful.
TaskFor option definitions, click ? in the interface.
1 In McAfee ePO, select Menu | Data Protection | DLP Incident Manager | Incident Tasks.
2 In the Task Type (left) pane, select Purge events. If multiple incident types are available, select the type(Data in-use/motion, Data at-rest, and so forth) from the drop down list.
You can purge from the Incident List or the Incident History, according to your selection on this list.
3 Select Actions | New Task
The Purge Rule page appears.
4 Enter a unique name and optional description. Click Next.
The State is Enabled by default. You can change the state to Disabled if you do not plan to run the ruleright away.
5 Click > to select criteria, select the Comparison, and enter or select the Value. Click < to removecriteria. Click Save.
By default, purge tasks are set to run daily.
Monitoring and reporting eventsWorking with incidents 11
McAfee Data Loss Prevention Endpoint 9.4.0 Product Guide 113

11 Monitoring and reporting eventsWorking with incidents
114 McAfee Data Loss Prevention Endpoint 9.4.0 Product Guide

12 Collecting and managing data
Monitoring the system consists of gathering and reviewing evidence and events, and producingreports. Incident and event data from the DLP tables in the McAfee ePO database is viewed in the DLPIncident Manager and DLP Operational Events pages or is collated into reports and dashboards.
By reviewing recorded events and evidence, administrators determine when rules are too restrictive,causing unnecessary work delays, and when they are too lax, allowing data leaks.
DLP Incident ManagerUse the DLP Incident Manager page in McAfee ePO to view the security events from policy violations.
The incident manager has three tabbed sections:
• Incident List — The current list of policy violation events.
• Incident Tasks — A list of actions you can take on the list or selected parts of it. They includeassigning reviewers to incidents, setting automatic email notifications, and purging all or part ofthe list.
• Incident History — A list containing all historic incidents. Purging the incident list does not affect thehistory.
Use the DLP Operational Events module to view administrative events such as agent deployments. Themodule is organized identically, with three tabbed pages: Operational Event List, Operational EventTasks, and Operational Event History.
How the Incident Manager worksThe Incident List tab of the DLP Incident Manager has all of the functionality needed to review policyviolation incidents. Event details are viewed by clicking on a specific event. You can create and savefilters to modify the view or use the predefined filters in the Group By pane. You can also modify theview by selecting and ordering columns. Color-coded icons and numerical ratings for severity facilitatequick visual scanning of events.
The Incident List tab works with McAfee ePO Queries & Reports to create reports and display data onMcAfee ePO dashboards.
Operations you can perform on events include:
• Labels — Set a label for filtering by label.
• Set properties — Edit the severity, status, or resolution; assign a user or group for incidentreview.
• Release redaction — Remove redaction to view protected fields (requires correct permission).
12
McAfee Data Loss Prevention Endpoint 9.4.0 Product Guide 115

The DLP Operational Events page works in an identical manner with administrative events.
Figure 12-1 DLP Incident Manager
Incident tasks/Operational Event tasks
Use the Incident Tasks or Operational Event Tasks tab to set criteria for scheduled tasks. Tasks set upon the pages work with the McAfee ePO Server Tasks feature to schedule tasks.
Both tasks tabs are organized by Task Type (left pane). The Incident Tasks tab is also organized byincident type, so that it is actually a 4 x 3 matrix, the information displayed depending on which twoparameters you select.
Data in-use/motion Data at-rest (Endpoint) Data in-use/motion(History)
Set Reviewer x x
Automatic mail notification x x
Purge events x x x
Use case — setting propertiesProperties are data added to an incident that requires follow-up. You can add theproperties from Actions | Set Properties or from the details pane of the incident. The propertiesare:
• Severity • Reviewing Group
• Status • Reviewing User
• Resolution
The reviewer can be any McAfee ePO user. The reason severity can be changed is that ifthe administrator determines that the status is False Positive, then the original severity isno longer meaningful.
Use case — changing the viewIn addition to using filters to modify the view, you can also customize the fields and theorder of display. Customized views can be saved and reused.
Creating a filter involves the following tasks:
12 Collecting and managing dataDLP Incident Manager
116 McAfee Data Loss Prevention Endpoint 9.4.0 Product Guide

1 Click Actions | View | Choose Columns to open the view edit window.
2 Use the x icon to delete columns, and the arrow icons to move columns to the left orright.
3 Click Update View to apply the customized view, and Actions | View | Save View to save forfuture use. When you save the view, you can also save the time and custom filters.Saved views can be chosen from the drop-down menu at the top of the page.
Create a Set Reviewer taskYou can assign reviewers for different incidents and operational events to divide the workload in largeorganizations.
Before you beginIn McAfee ePO User Management | Permission Sets, create a reviewer, or designate a groupreviewer, with Set Reviewer permissions for DLP Incident Manager and DLP OperationalEvents.
The Set Reviewer task assigns a reviewer to incidents/events according to the rule criteria. The taskonly runs on incidents where a reviewer has not been assigned. You cannot use it to reassign incidentsto a different reviewer.
TaskFor option definitions, click ? in the interface.
1 In McAfee ePO, select Menu | Data Protection | DLP Incident Manager or Menu | Data Protection | DLP OperationalEvents.
2 Click the Incident Tasks or Operational Event Tasks tab.
3 Select an incident type from the drop-down list (Incident Tasks only), select Set Reviewer in the TaskType pane, then click Actions | New Rule.
4 Enter a name and optional description. Select a reviewer or group, then click Next.
Rules are enabled by default. You can change this setting to delay running the rule.
5 Click > to add criteria, < to remove them. Set the Comparison and Value parameters. When you havefinished defining criteria, click Save.
If there are multiple Set Reviewer rules you can reorder the rules in the list.
The task runs hourly.
Once a reviewer is set, it is not possible to override the reviewer through the Set Reviewer task.
See also Edit server tasks on page 119
Create an automatic email taskYou can set automatic email notifications of incidents and operational events to administrators,managers, or users.
Collecting and managing dataDLP Incident Manager 12
McAfee Data Loss Prevention Endpoint 9.4.0 Product Guide 117

TaskFor option definitions, click ? in the interface.
1 In McAfee ePO, select Menu | Data Protection | DLP Incident Manager or Menu | Data Protection | DLP OperationalEvents.
2 Click the Incident Tasks or Operational Events Tasks tab.
3 Select an incident type from the drop-down list (Incident Tasks only), select Automatic mail Notificationin the Task Type pane, then click Actions | New Rule.
4 Enter a name and optional description.
Rules are enabled by default. You can change this setting to delay running the rule.
5 Select the events to process.
• Process all incidents/events (of the selected incident type).
• Process incidents/events since the last mail notification run.
6 Select Recipients.
This field is required. At least one recipient must be selected.
7 Enter a subject for the email.
This field is required.
You can insert variables from the drop-down list as required.
8 Enter the body text of the email.
You can insert variables from the drop-down list as required.
9 (Optional) Select the checkbox to attach evidence information to the email. Click Next
10 Click > to add criteria, < to remove them. Set the Comparison and Value parameters. When you havefinished defining criteria, click Save.
The task runs hourly.
See also Edit server tasks on page 119
Create a purge events taskYou create incident and event purge tasks to clear the database of data that is no longer needed.
Purge tasks can be created for the Incident List, data in-use incidents on the History list, or theOperational Event List.
TaskFor option definitions, click ? in the interface.
1 In McAfee ePO, select Menu | Data Protection | DLP Incident Manager or Menu | Data Protection | DLP OperationalEvents.
2 Click the Incident Tasks or Operational Event Tasks tab.
12 Collecting and managing dataDLP Incident Manager
118 McAfee Data Loss Prevention Endpoint 9.4.0 Product Guide

3 Select an incident type from the drop-down list (Incident Tasks only), select Purge events in the TaskType pane, then click Actions | New Rule.
Data in-use/motion (Archive) purges events from the History.
4 Enter a name and optional description, then click Next.
Rules are enabled by default. You can change this setting to delay running the rule.
5 Click > to add criteria, < to remove them. Set the Comparison and Value parameters. When you havefinished defining criteria, click Save.
The task runs daily for live data and every Friday at 10:00 PM for historical data.
See also Edit server tasks on page 119
Edit server tasksMcAfee DLP uses the McAfee ePO Server Tasks to run DLP Incident Manager and DLP OperationalEvents tasks.
Each incident and operational events task is predefined in the server tasks list. The only optionsavailable are to enable/disable them or to change the scheduling.
TaskFor option definitions, click ? in the interface.
1 In McAfee ePO, select Menu | Automation | Server Tasks.
2 Select the task to edit.
Use the Quick find field to filter the list.
3 Select Actions | Edit, then click Schedule.
4 Edit the schedule as required, then click Save.
See also Create a Set Reviewer task on page 117Create an automatic email task on page 117Create a purge events task on page 118
Monitor task resultsMonitor the results of incident and operational event tasks.
TaskFor option definitions, click ? in the interface.
1 In McAfee ePO, select Menu | Automation | Server Task Log.
2 Locate the completed McAfee DLP tasks.
Enter DLP in the Quick find field or set a custom filter.
3 Click the name of the task.
The details of the task appear, including any errors if the task failed.
Collecting and managing dataDLP Incident Manager 12
McAfee Data Loss Prevention Endpoint 9.4.0 Product Guide 119

12 Collecting and managing dataDLP Incident Manager
120 McAfee Data Loss Prevention Endpoint 9.4.0 Product Guide

13 Creating reports
McAfee DLP Endpoint uses McAfee ePO reporting features. Several pre-programmed reports areavailable, as well as the option of designing custom reports.
See the Querying the Database topic in the McAfee ePolicy Orchestrator Product Guide for details.
Contents Report types Report options
Report typesUse the McAfee ePO reporting features to monitor McAfee DLP Endpoint performance.
Two types of reports are supported:
• DLP properties reports
• DLP events reports
Six DLP properties reports are displayed in the DLP: Status Summary dashboards. Twelve predefinedevents queries are provided. All 28 queries, including the rollup queries, can be found in the McAfeeePO console under Menu | Reporting | Queries & Reports | Shared Groups.
McAfee ePO includes a rollup function, which runs queries that report on summary data from multipleMcAfee ePO databases. All the McAfee DLP Endpoint reports are set up to support rollup queries.
Report optionsMcAfee DLP software uses McAfee ePO Reports to review events. In addition, you can view informationon product properties on the McAfee ePO Dashboard.
McAfee ePO Reports
McAfee DLP Endpoint software integrates reporting with the McAfee ePO reporting service. Forinformation on using the McAfee ePO reporting service, see the McAfee ePolicy Orchestrator ProductGuide.
McAfee ePO rollup queries and rolled up reports, which summarize data from multiple McAfee ePOdatabases, are supported.
McAfee ePO Notifications are supported. See the Sending Notifications topic in the McAfee ePolicyOrchestrator Product Guide for details.
13
McAfee Data Loss Prevention Endpoint 9.4.0 Product Guide 121

ePO Dashboards
You can view information on McAfee DLP product properties in the McAfee ePO Menu | Dashboards page.There are three predefined dashboards:
• DLP: Incident Summary
• DLP: Operations Summary
• DLP: Policy Summary
Dashboards can be edited and customized, and new monitors can be created. See the McAfee ePOdocumentation for instructions.
The predefined reports summarized in the Dashboards are available by selecting Menu | Queries & Reports.They are listed under Shared Groups (McAfee ePO 4.6) or McAfee Groups (McAfee ePO 5.1). In addition,there is a DLP rollup report, Events by type.
Predefined dashboardsThe following table describes the predefined McAfee DLP dashboards.
Table 13-1 Predefined DLP dashboards
Category Option Description
Incident summary
Number of Incidents per day These charts show total incidents, and give differentbreakdowns to help analyze specific problems.Number of Incidents per severity
Number of Incidents per type
Number of Incidents per rule set
Operations summary Number of Operational events perday
Displays all administrative events.
Agent Status Displays all agents and their status.
Agent Version Displays the distribution of endpoints in theenterprise. Used to monitor agent deploymentprogress.
Agent Operation Mode Displays a pie chart of agents by DLP operationmodes. Operation modes are:• Device control only mode
• Device control and full content protection mode
• Device control and content aware removablestorage protection mode
• Unknown
Operational events per type
Discovery (endpoint) Local FileSystem Scan Status
Discovery (Endpoint) Local EmailStorage Scan Status
Policy summary Policy distribution Displays the DLP policy distribution by versionthroughout the enterprise. Used to monitor progresswhen deploying a new policy.
Enforced Rule Sets per endpointcomputers
Bypassed Users
13 Creating reportsReport options
122 McAfee Data Loss Prevention Endpoint 9.4.0 Product Guide

Table 13-1 Predefined DLP dashboards (continued)
Category Option Description
Undefined Device Classes
Privileged Users
Policy revision distribution Similar to Policy distribution, but displays revisions –that is, updates to an existing version.
Creating reportsReport options 13
McAfee Data Loss Prevention Endpoint 9.4.0 Product Guide 123

13 Creating reportsReport options
124 McAfee Data Loss Prevention Endpoint 9.4.0 Product Guide

Index
Aabout this guide 7administrators, defining 40
advanced patternscreating 72
agent configurationMac OS support 44
all_evidences.csv file 37
application definitionsstrategy 62
application templatesabout 66
assignment groupsdefinition 12
Bbusiness justification 82
business justification, customizing 92
Cchallenge-response key length 35
challenge/response 98
Citrix XenApp 83
classification 59
classification criteria 60, 67
classification rules 10
classification, manual 68
classifications 66
about 59
client configuration 43
assigning with ePolicy Orchestrator 31
components, Data Loss Prevention (diagram) 23
conventions and icons used in this guide 7
Ddashboards, report options 122
dataclassifying 64
data-in-motion 78
Data Loss Prevention software, description 21
data-at-rest 9, 95
data-in use 9data-in-motion 9
definitions 101
dictionaries 64
document properties 65
file extension 65
network 75
registered documents 69
text pattern 65
web destination 78
device classes 48
Device Control 81, 83
device definitions 50
removable storage 52
device GUID 48
device rulesdefinition 12
deviceslists, adding plug and play definitions 51
devices properties 52
dictionariesabout 64
creating 71
importing entries 71
discoveryabout 95
creating a file system discovery rule 96
setup 97
discovery rules 11
DLP administrators, defining 40
DLP data, classifying 65
DLP Discover 95
DLP Endpointchecking in to ePolicy Orchestrator 28
deploying 29
deployment verification 30
wake-up call 31
DLP Incident Manager 115
responding to events 107
DLP policy 102
DLP Policy console, installing 27
DLP rulesclassification 10
device 12
protection 12
tagging 11
McAfee Data Loss Prevention Endpoint 9.4.0 Product Guide 125

document properties definitions 65
documentationaudience for this guide 7product-specific, finding 8typographical conventions and icons 7
Eemail 77
email destinationscreating 77
endpoint console 15
ePO notifications 121
ePO reports 121
eventsmonitoring 107
evidenceendpoint events 107
storage for encrypted content 37
evidence folder 38
evidence folder, configuring 39
Ffile extensions
definitions 65
filtersnetwork definitions 75
GGUID, See device GUID
Hhardware requirements 24
hit highlighting, events 37
Iincident manager 115
incident tasks 115, 119
incidentsdeleting 113
details 110
filtering 108, 109
labels 112
sorting 108
types 110
updating 111
views 108
JJAWS support 15
Kkeywords
for Titus Message Classification integration 73
Llicense key 35
locales 82
location, classifying by 75
Mmanual classification 68
McAfee ServicePortal, accessing 8monitoring 115
Nnetwork definitions
about 75
address range 75
port range 76
notifications, ePolicy Orchestrator 121
Ooperational event tasks 119
operational events 115
OS X support 15
OST files 77
Ppermission sets, defining 41
permission sets, system tree filtering 39
placeholders 92
plug and play deviceswhitelisted definition, creating 51
policies 13
assigning with 31
definition 12
refreshing 31
policy assignment 102
policy backup 35
policy catalog 43
protection rulesdefinition 12
PST files 77
Qquarantine
release from 37
restoring files or email items from 98
Rreactions 85
Index
126 McAfee Data Loss Prevention Endpoint 9.4.0 Product Guide

redaction 39
about 42
registered documents 69
restore a policy 35
rights management 36, 87
role-based access control 41
roles and permissions 38
rolled up reports 121
rule setsabout 89
creating 90
rule sets, adding to policies 102
rulesabout 81
device control 83
reactions 85
tagging 11
types 81
Sserver settings 35
server software requirements 24
server tasks 119
ServicePortal, finding product documentation 8strategy, See application definitions supported operating systems 24
system requirements 24
Ttagging 59
about 60
tagging criteria 60, 67
tagging rulesdefinition 11
technical support, finding product information 8text extractor 61
text patternsabout 65
Titus Message Classification, integration 73
TrueCrypt 83
Uupgrade Device Control to full DLPE, See license key URL lists
creating 78
user notification, customizing 92
Vvalidators 65
verifying the installation 30
Wwake-up call 31
web destinationsabout 78
whitelisted text 70
whitelists 12
plug and play definitions, creating 51
Index
McAfee Data Loss Prevention Endpoint 9.4.0 Product Guide 127

A00