
Ditch Your Desktop! Lead Your Team into Cloud Computing! (workbook)
14
Ditch Your Desktop! Lead Your Team into Cloud Computing! A Grace Hopper Celebration of Women in Computing Workshop http://ibm.biz/ghc15-workbook Lauren Schaefer @Lauren_Schaefer 10/14/15 #ghc15 #DitchYourDesktop
-
Upload
lauren-hayward-schaefer -
Category
Software
-
view
997 -
download
0
Transcript of Ditch Your Desktop! Lead Your Team into Cloud Computing! (workbook)

Ditch Your Desktop! Lead Your Team into Cloud Computing! A Grace Hopper Celebration of Women in Computing Workshop
http://ibm.biz/ghc15-workbook
Lauren Schaefer @Lauren_Schaefer
10/14/15 #ghc15
#DitchYourDesktop

1
Table of Contents The App Revolution, Cloud Computing, & Platforms as a Service .............................................................................2
Software as a Service ..................................................................................................................................................5
DevOps .................................................................................................................................................................... 10

2
The App Revolution, Cloud Computing, & Platforms as a Service
Learn this!
1. The app revolution fundamentally changes the way we interact with technology.
2. Cloud services can remove pain: Infrastructure as a Service (removes some pain), Platform as a
Service (removes more pain), and Software as a Service (removes the most pain).
3. Platforms as a service allow you to focus on your app—not the infrastructure behind it.
4. Platforms as a service typically provide a command line client and/or user interface for
deploying apps.
5. Platforms as a service typically have services like databases, auto-scaling, and load balancing
that make creating and managing apps easier.
Try this!
1. Sign Up for IBM Bluemix and IBM Bluemix DevOps Services
We’ll begin by signing up for IBM Bluemix (a PaaS) and IBM Bluemix DevOps Services (a SaaS).
a. Navigate to http://ibm.biz/ghc-bluemix and sign up.
Note: Be sure to use an e-mail address to which you currently have access as you will
need to confirm your account.
b. As part of the Bluemix registration process, you will receive an e-mail asking you to
confirm your account. If you do not confirm, you are not registered. If you do not
receive a confirmation e-mail, send an email to [email protected].
c. Navigate to http://ibm.biz/ghc-devops.
d. Click LOG IN.
e. Authenticate with the IBM id you created in the step above.
f. Input an alias and click Finish.
g. Click Continue.
2. Deploy an app on a PaaS
Now that you’re signed up, let’s create an app! In this section, you’ll deploy a Bluemix
Boilerplate (sample app) to quickly get an app running on Bluemix. The app leverages the
Watson Personality Insights Service (remember Watson – the supercomputer that competed on
Jeopardy?) and the Monitoring and Analytics service to analyze the personality traits of an
author.
a. Deploy an app
3
i. Navigate to http://ibm.biz/ghc-bluemix.
ii. Log in if you are not already authenticated.
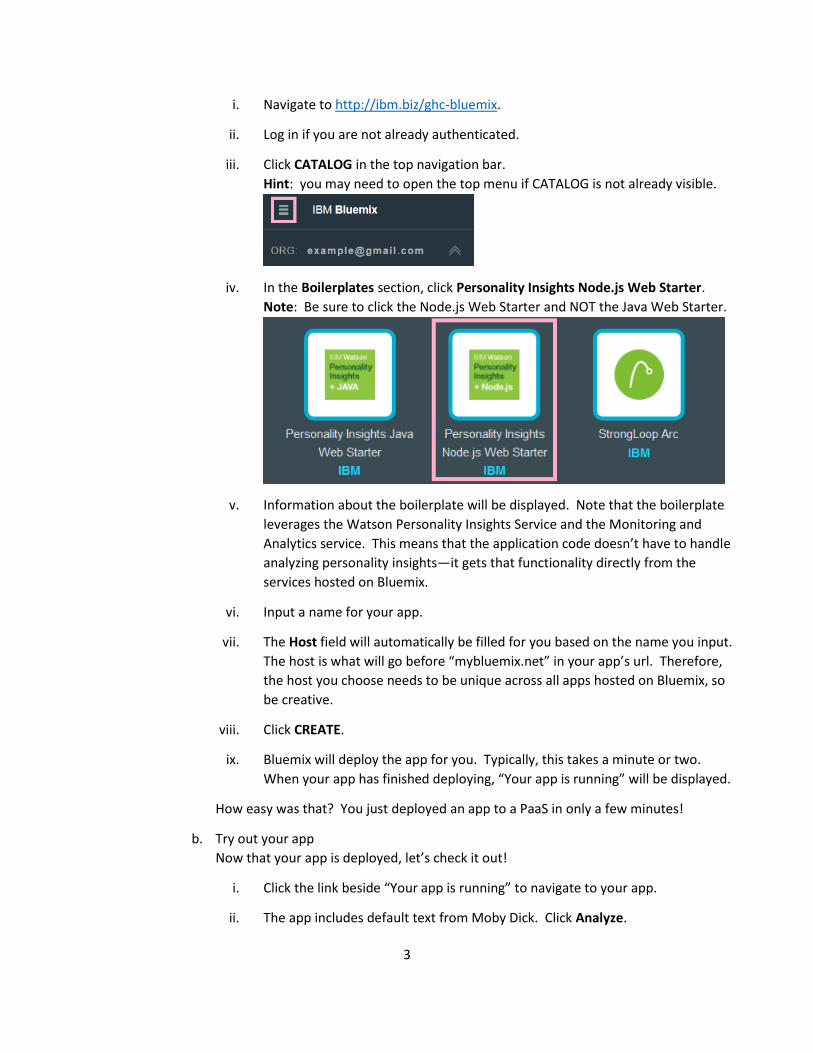
iii. Click CATALOG in the top navigation bar.
Hint: you may need to open the top menu if CATALOG is not already visible.
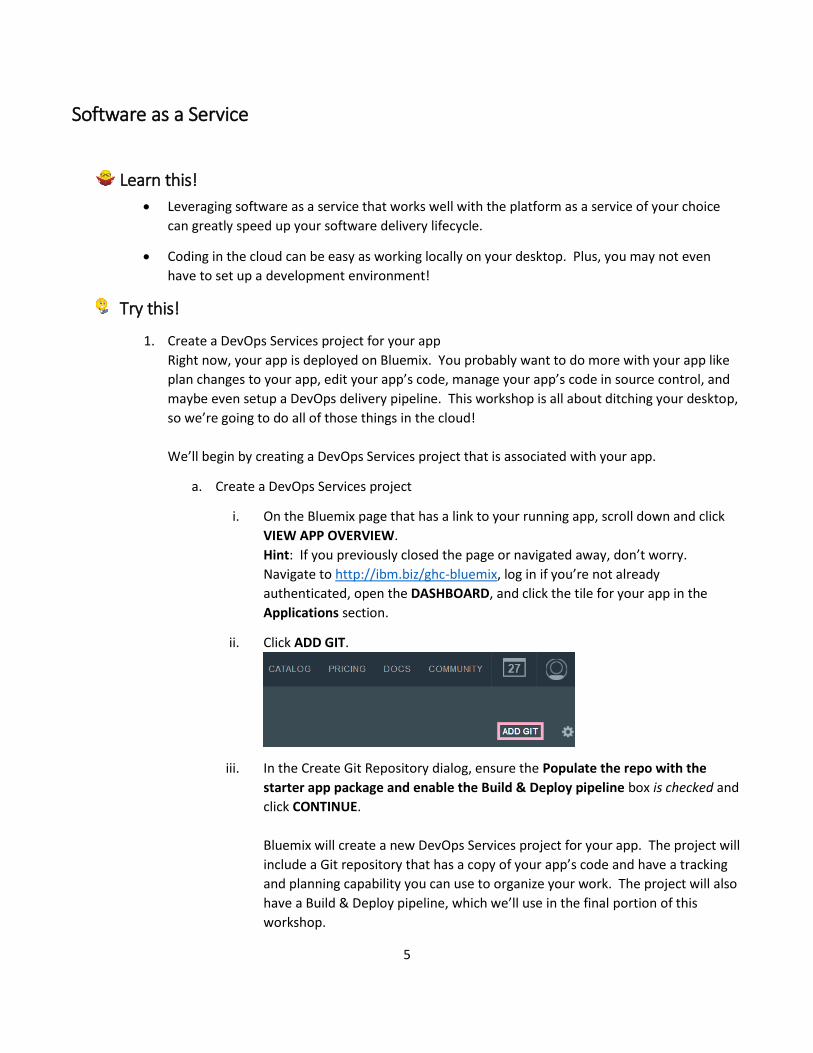
iv. In the Boilerplates section, click Personality Insights Node.js Web Starter.
Note: Be sure to click the Node.js Web Starter and NOT the Java Web Starter.
v. Information about the boilerplate will be displayed. Note that the boilerplate
leverages the Watson Personality Insights Service and the Monitoring and
Analytics service. This means that the application code doesn’t have to handle
analyzing personality insights—it gets that functionality directly from the
services hosted on Bluemix.
vi. Input a name for your app.
vii. The Host field will automatically be filled for you based on the name you input.
The host is what will go before “mybluemix.net” in your app’s url. Therefore,
the host you choose needs to be unique across all apps hosted on Bluemix, so
be creative.
viii. Click CREATE.
ix. Bluemix will deploy the app for you. Typically, this takes a minute or two.
When your app has finished deploying, “Your app is running” will be displayed.
How easy was that? You just deployed an app to a PaaS in only a few minutes!
b. Try out your app
Now that your app is deployed, let’s check it out!
i. Click the link beside “Your app is running” to navigate to your app.
ii. The app includes default text from Moby Dick. Click Analyze.

4
iii. Personality traits about Moby Dick’s author, Herman Melville, are displayed.
Tweet this!
Just deployed an app to the cloud in minutes by leveraging a #PaaS. Check it out: [insert link to
your app] #DitchYourDesktop #ghc15
Get creative
In Bluemix, navigate to the Catalog. Explore the various boilerplates, runtimes, and services.
Brainstorm apps you could rapidly create by leveraging these assets. Note your ideas here, on
your blog, or on Twitter.
Use your new app to analyze the personality of various authors. Consider analyzing text from
your favorite blogger, your local newspaper, or your manager’s e-mail!
Additional resources
The Mobile Apps Revolution is Here to Stay http://www.computerworlduk.com/in-
depth/applications/3536724/the-mobile-apps-revolution-is-here-to-stay/
Mobile App Revolution Rivals Industrial Revolution
http://www.cio.com/article/2380501/mobile/mobile-app-revolution-rivals-industrial-
revolution.html
The Mobile App Revolution: What’s Holding You Back?
http://blogs.salesforce.com/company/2013/06/mobile-app-revolution.html
Computerworld Forecast Study 2015 http://www.idgenterprise.com/report/computerworld-
forecast-study-2015
MQTT Starfighter, JazzHub, Bluemix and live Scaling Out
https://www.youtube.com/watch?v=b9hkCHmH7H4
Transforming Enterprise Cloud Services
http://books.google.com/books?id=yyiPyIXgbxMC&pg=PA55#v=onepage&q&f=false
5
Software as a Service
Learn this!
Leveraging software as a service that works well with the platform as a service of your choice
can greatly speed up your software delivery lifecycle.
Coding in the cloud can be easy as working locally on your desktop. Plus, you may not even
have to set up a development environment!
Try this!
1. Create a DevOps Services project for your app
Right now, your app is deployed on Bluemix. You probably want to do more with your app like
plan changes to your app, edit your app’s code, manage your app’s code in source control, and
maybe even setup a DevOps delivery pipeline. This workshop is all about ditching your desktop,
so we’re going to do all of those things in the cloud!
We’ll begin by creating a DevOps Services project that is associated with your app.
a. Create a DevOps Services project
i. On the Bluemix page that has a link to your running app, scroll down and click
VIEW APP OVERVIEW.
Hint: If you previously closed the page or navigated away, don’t worry.
Navigate to http://ibm.biz/ghc-bluemix, log in if you’re not already
authenticated, open the DASHBOARD, and click the tile for your app in the
Applications section.
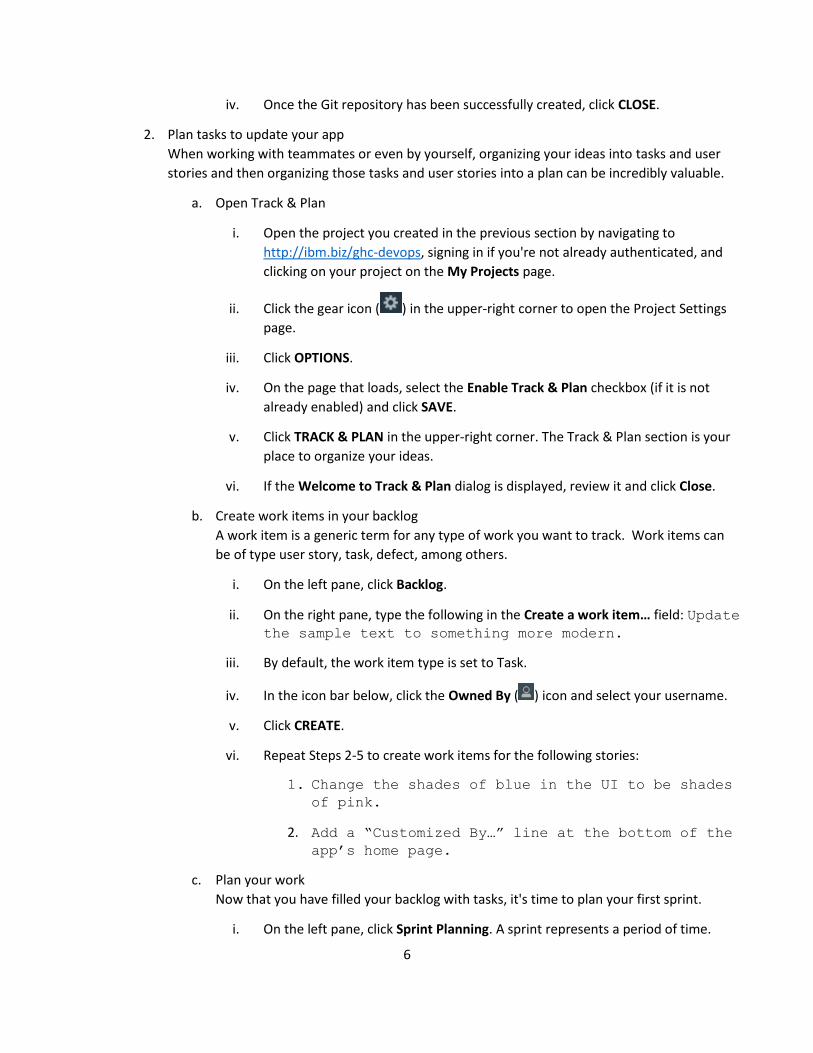
ii. Click ADD GIT.
iii. In the Create Git Repository dialog, ensure the Populate the repo with the
starter app package and enable the Build & Deploy pipeline box is checked and
click CONTINUE.
Bluemix will create a new DevOps Services project for your app. The project will
include a Git repository that has a copy of your app’s code and have a tracking
and planning capability you can use to organize your work. The project will also
have a Build & Deploy pipeline, which we’ll use in the final portion of this
workshop.
6
iv. Once the Git repository has been successfully created, click CLOSE.
2. Plan tasks to update your app
When working with teammates or even by yourself, organizing your ideas into tasks and user
stories and then organizing those tasks and user stories into a plan can be incredibly valuable.
a. Open Track & Plan
i. Open the project you created in the previous section by navigating to
http://ibm.biz/ghc-devops, signing in if you're not already authenticated, and
clicking on your project on the My Projects page.
ii. Click the gear icon ( ) in the upper-right corner to open the Project Settings
page.
iii. Click OPTIONS.
iv. On the page that loads, select the Enable Track & Plan checkbox (if it is not
already enabled) and click SAVE.
v. Click TRACK & PLAN in the upper-right corner. The Track & Plan section is your
place to organize your ideas.
vi. If the Welcome to Track & Plan dialog is displayed, review it and click Close.
b. Create work items in your backlog
A work item is a generic term for any type of work you want to track. Work items can
be of type user story, task, defect, among others.
i. On the left pane, click Backlog.
ii. On the right pane, type the following in the Create a work item… field: Update the sample text to something more modern.
iii. By default, the work item type is set to Task.
iv. In the icon bar below, click the Owned By ( ) icon and select your username.
v. Click CREATE.
vi. Repeat Steps 2-5 to create work items for the following stories:
1. Change the shades of blue in the UI to be shades
of pink.
2. Add a “Customized By…” line at the bottom of the
app’s home page.
c. Plan your work
Now that you have filled your backlog with tasks, it's time to plan your first sprint.
i. On the left pane, click Sprint Planning. A sprint represents a period of time.

7
ii. Click Add Sprints.
iii. Configure the sprints so you have at least two and click Create.
iv. In the Backlog tile of the Sprint Planning page (the page you’re currently
viewing), rearrange your stories so they are in a ranked order by dragging and
dropping them. Put Add a “Customized By…” line at the
bottom of the app’s home page as the top item in the list.
v. Click the Sprint 1 dropbdown box and select Sprint 1 so that Sprint 1 appears to
the right of the backlog.
Hint: You may need to select Sprint 2 and then select Sprint 1 in order for the
sprint to appear.
vi. Assume you have time to complete one task per sprint. Drag the topmost item
in the list to Sprint 1 (on the right).
vii. In the sprint dropdown box, select Sprint 2.
viii. Drag the new top most item to Sprint 2.
d. Track your work
You’ve planned your first two sprints (easy, right?), so let’s start Sprint 1!
i. In the sprint dropdown box, select Sprint 1.
ii. In the Sprint 1 section, click the Status: New icon ( ) for the story planned
for Sprint 1.
iii. In the Status dialog, click Start Working.
iv. Note the task ID for your task because you will need it later in this workshop.
3. Implement the task
Next, implement the task Add a “Customized By…” line at the bottom of
the app’s home page. You might be thinking, “Oh no! I need to code, and I don’t have
an IDE currently installed on my device.” Don’t worry – we’re going to code in the cloud! (For
those of you who love coding in your favorite IDE, that’s totally cool. It’s easy to connect to your
project’s Git repository, but we won’t get into how to do that here.)
i. Click EDIT CODE in the upper-right. The web IDE will load.
ii. In the toolbar, toggle on Live Edit (it may take a moment for the option to be
displayed).
iii. Click OK in the confirmation dialog.
Live Edit is a handy feature that will automatically deploy changes you make to
your app. It makes coding in the cloud as fast and easy as coding on your
8
desktop.
Changes that you make to static files (for example, Jade or CSS files) are
reflected almost instantaneously in your deployed app. To deploy changes to
Node.js modules, you must do a fast app restart (not a full redeploy) because
the server caches Node.js modules in memory. You can do a fast app restart by
clicking the Restart button ( ) in the toolbar.
iv. In the code navigation pane, expand Views and click index.jade.
v. At the end of line 43, create a new line, begin typing at the beginning of the line
(you may need to delete several spaces that are added by default for you), add 4
spaces, and type the following: div.col-xs-12 Customized by [YOUR NAME HERE].
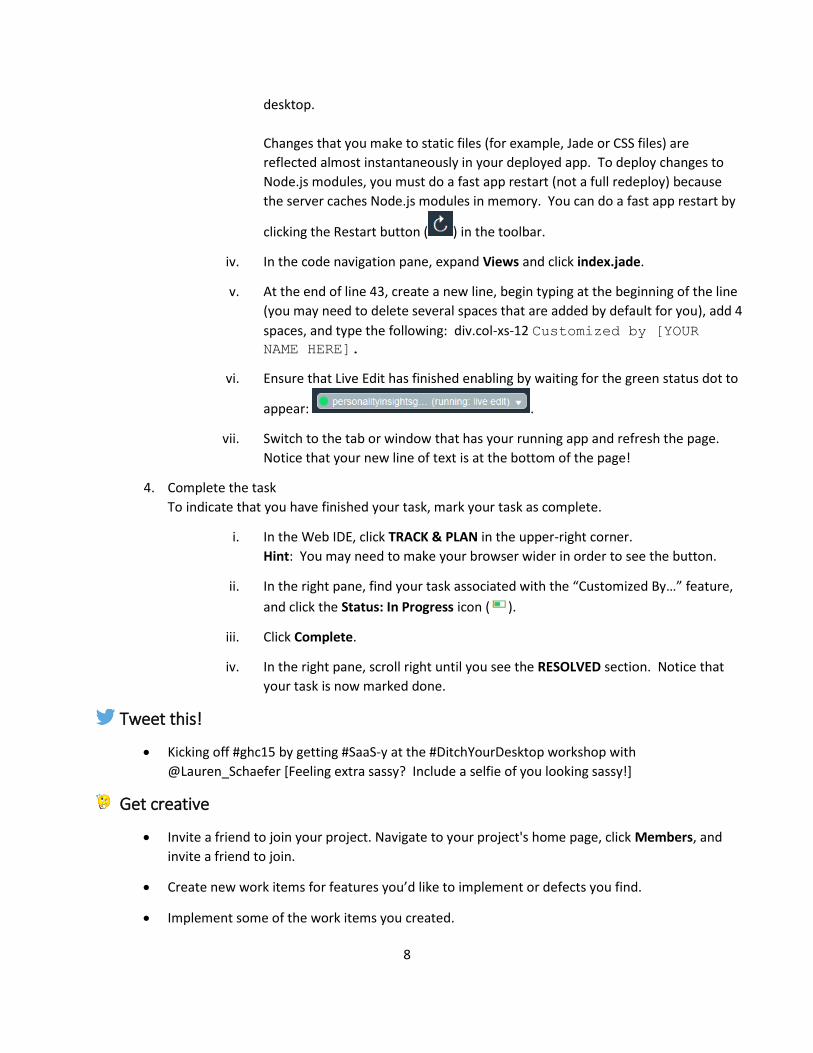
vi. Ensure that Live Edit has finished enabling by waiting for the green status dot to
appear: .
vii. Switch to the tab or window that has your running app and refresh the page.
Notice that your new line of text is at the bottom of the page!
4. Complete the task
To indicate that you have finished your task, mark your task as complete.
i. In the Web IDE, click TRACK & PLAN in the upper-right corner.
Hint: You may need to make your browser wider in order to see the button.
ii. In the right pane, find your task associated with the “Customized By…” feature,
and click the Status: In Progress icon ( ).
iii. Click Complete.
iv. In the right pane, scroll right until you see the RESOLVED section. Notice that
your task is now marked done.
Tweet this!
Kicking off #ghc15 by getting #SaaS-y at the #DitchYourDesktop workshop with
@Lauren_Schaefer [Feeling extra sassy? Include a selfie of you looking sassy!]
Get creative
Invite a friend to join your project. Navigate to your project's home page, click Members, and
invite a friend to join.
Create new work items for features you’d like to implement or defects you find.
Implement some of the work items you created.

9
Additional resources
Managing Distributed Teams
https://www.scrumalliance.org/community/articles/2013/july/managing-distributed-
teams.aspx
So Long Scrum, Hello Kanban https://stormpath.com/blog/so-long-scrum-hello-kanban/
Rapidly create a Node.js app using a Bluemix boilerplate and DevOps Services
http://www.ibm.com/developerworks/library/d-bluemix-devops90/
10
DevOps
Learn this!
DevOps aims to get software released faster and more frequently by bridging the gaps between
various teams supporting the software.
Deployment automation is one of the keys to a successful DevOps approach.
Try this!
You can configure a multi-stage build and deployment pipeline to support your DevOps approach to
software development. In this section, you will configure a builder and a deployment to your
development (dev) space. You could also configure a deployment to a new production space; the
production space would store the app your end users would use. To save time, we won’t configure
a deployment to a production space during this workshop.
1. Open the Pipeline
You can configure a multi-stage build and deployment pipeline to support your DevOps
approach to software development. Note that the pipeline only includes changes that have
been pushed to your project’s repository; changes that are in your workspace in the Web IDE
that have not been pushed to your project’s repository will NOT be deployed as part of the
pipeline.
a. Open the Personality Insights project you created in the previous section by navigating
to DevOps Services (http://ibm.biz/ghc-devops), signing in if you're not already
authenticated, and clicking on your project on the My Projects page.
b. Click BUILD & DEPLOY in the upper-right corner.
2. Investigate the Build Stage
As part of using a Bluemix Boilerplate and choosing to Add Git, a simple delivery pipeline was
created for you. The pipeline has a Build Stage and a Deploy Stage.
a. In the Build Stage tile, click the Stage Configuration icon ( ) and select Configure
Stage.
b. On the JOBS tab, note that the the Builder Type is set to Simple. This app can use the
Simple builder since it does not require a build step (whereas a Java app would require a
build step).
c. On the INPUT tab, note that the Run jobs whenever a change is pushed to Git option is
selected. This means that whenever you or a member of your team pushes code to your
project’s repository, a build will automatically be kicked off for you.
11
d. Click Back to Pipeline.
3. Configure the Deploy Stage
The Deploy Stage deploys to the space that represents your development space. Some might
call this a quality assurance or test space. It is a place where developers can test their code live
in a production quality environment without actually putting it in production. The pipeline is
configured by default to deploy to the same name and url as your existing app. To allow you to
have your own personal deployed app where you can test your changes as well as a shared app
where developers on your team can test the app as part of your DevOps delivery pipeline, we
will update the Deploy Stage configuration to deploy to a new name and url.
a. In the Deploy Stage tile, click the Stage Configuration icon ( ) and select Configure
Stage.
b. Update the Application Name to be a new name that is unique to your Bluemix dev
space.
c. We want your app to deploy to a consistent place where developers on your team will
be able to test their code. In the Script section, after cf push “${CF_APP}”
add -n whateverYouWantYourUrlToBe.
Note: the url needs to be unique across all Bluemix apps, so be creative.
d. On the INPUT tab, note that the Run jobs when the previous stage is completed option
is selected by default. The pipeline is now configured so that whenever someone
pushes code to your project’s repository, the build step will run, and, if it succeeds, a
deploy to the dev space will be kicked off.
e. Click SAVE.
4. Kick off the pipeline
Now that we have the build pipeline configured, it’s time to try it out! One way to kick off the
pipeline is to manually trigger it by clicking the Run Stage button ( ) in the Build. To
demonstrate the DevOps flow, we’ll instead kick off the pipeline by pushing code to the
project’s Git repository.
a. Click EDIT CODE in the upper right corner.
b. In the leftmost bar of icons, click the Git Repository button ( ).
c. In the box in the Working Directory Changes section, type a comment similar to the
following, being sure to replace 20 with the task ID associated with the task you
created: Added a Customized By line to the home page as
described in work item 20.
d. Select each change in the Working Directory Changes section and click the COMMIT
button.
12
e. In the OUTGOING section, click PUSH.
f. If you are prompted for your committer information, enter it and click OK.
5. Discover the traceability
When you added a comment in your commit that mentioned your task, a link was automatically
created for you between the change and the task.
a. Click TRACK & PLAN in the upper right corner.
b. In the right pane, scroll to the Resolved view if you are not currently viewing your
resolved work items.
c. Click the textual summary of the work item associated with adding the “Customized
By…” line to open it.
d. In the work item, click the Links tab.
e. In the LINKS section, notice that a link was automatically generated for you. Click the
link. The Git Log displays.
f. Observe that you have a summary of the Git commit and its associated work items.
g. Click GIT LOG in the left navigation to see a list of all of your git commits.
6. Observe the delivery pipeline
The build pipeline was triggered when you pushed your changes to the Git repository. Let’s
check its progress!
a. Click BUILD & DEPLOY in the upper right corner.
b. In the Build Stage tile, click View logs and history. Observe the logs and the artifacts
that were generated as part of the build.
c. Click Back to Pipeline.
d. In the Deploy Stage tile, wait until the stage is listed as passed.
e. In the LAST EXECUTION RESULT section, click the url for your app (it may take a moment
for the url to be displayed). Try it out! This is the place where your development team
would run automated and/or manual tests to ensure the app is in good shape.
Tweet this!
Dove into #DevOps by creating a delivery pipeline for my app. [attach a screenshot of the Build
& Deploy page for your app] #ghc15 #DitchYourDesktop
13
Get creative
In a full DevOps pipeline, you’ll likely want to deploy to multiple spaces: a development or
quality assurance space, a production space, and more. Configure your pipeline to deploy to a
production space.
Hint: check out this article: http://www.ibm.com/developerworks/cloud/library/cl-intro4-app/.
Zero downtime deployments are very important to web applications. Design and implement a
strategy to deploy your app to your production space without any downtime.
Hint: check out this article: http://www.ibm.com/developerworks/cloud/library/cl-bluemix-
rollingpipeline/.
Additional resources
DevOps for Dummies ebook http://ibm.co/devopsfordummies
Top 10 Practices for Effective DevOps http://www.drdobbs.com/architecture-and-design/top-
10-practices-for-effective-devops/240149363
Cloud Computing Trends: 2014 State of the Cloud Survey
http://www.rightscale.com/blog/cloud-industry-insights/cloud-computing-trends-2014-state-
cloud-survey
DevOps Embracing Cloud Services http://www.midsizeinsider.com/en-us/article/devops-
embracing-cloud-services#.VJmrScABg