Distribution Training Guide - · PDF fileBlanket!PO!Type! ......
53
Distribution Training Guide D120 Purchase Order Management: Basic
Transcript of Distribution Training Guide - · PDF fileBlanket!PO!Type! ......

Distribution Training Guide
D120 Purchase Order Management: Basic

D120 & D260 Purchase Management Page 2 of 53
Certification Course Prerequisites This course consists of Hands-‐On guide that will walk you through the specifics of the Purchasing features. The guide is intended for a 1 day on-‐site training. While many have completed this course online, you might encounter some challenges that you would otherwise not face when done in our classroom setting.
You will perform the exercises in your installed copy of Acumatica, using the “Demo” data provided with the Acumatica installation package version 4.20.
To begin, activate all the features of the application using the Common Settings:
1. Open the Enable/Disable Features form (screen ID CS100000): Configuration > Common Settings > Licensing > Enable/Disable Features
2. Click the Modify button on the toolbar.
3. Confirm that the features are enabled/disabled as follows: (When you come to a field not specified in the table below, either populate it as you see fit or leave it as is.)
Field Value Organization {checked}
Customer Management {checked} Project Management {checked} Time Reporting on Activity {checked}
Finance {checked} Multi-‐Branch Support {checked}
Inter-‐Branch Transactions {checked} Multi-‐Currency Accounting {checked} Deferred Revenue Management {checked} Subaccounts {checked} Fixed Assets Management {checked} VAT Reporting {checked} Invoice Rounding {unchecked} Support for Expense Reclassification {unchecked} Contract Management {checked} Tax Entry from GL Module {unchecked} Consolidated Posting to GL {checked} Volume Pricing {unchecked}
Distribution {checked} Inventory Subitems {checked} Automatic Packaging {checked} Warehouses {checked}
Warehouse Locations {checked} Blanket Purchase Orders {checked}

D120 & D260 Purchase Management Page 3 of 53
Drop Shipments {checked} Multiple Unit of Measure {checked}
Misc {checked} Row-‐Level Security {checked} Field-‐Level Audit {checked} Avalara Tax Integration {checked}
Address Validation {checked} Notification Module {unchecked}
4. Save your changes.
5. Click the Enable button on the toolbar.
6. Open Segmented Keys (CS202000): Configuration > Common Settings > Segmented Keys > Segmented Keys
Screen Section Field Value Summary Segmented Key ID INSUBITEM Details Segment ID 1 Details Include in Cost {checked} Details Segment ID 2 Details Include in Cost {checked}
7. Enter into Segmented Key ID field = INSUBITEM
8. Make sure Include in Cost is checked for both lines.
9. Since branch accounting is enabled, verify that you are working in the MAIN branch and that it is configured correctly:
a. Verify that you are connected to the MAIN branch. The information is located at the top of the screen:
b. It is important that you work in the MAIN branch throughout this certification class.

D120 & D260 Purchase Management Page 4 of 53
10. In the General Ledger module, confirm that all the period of the current fiscal year are actives: Finance > General Ledger > Work Area > Manage > Financial Periods
11. Open Users (screen ID SM201010): Configuration > User Security > Manage > Users
Screen Section Field Value Summary Username Beauvoir Roles Details Role Name Employee {Checked} Roles Details Role Name Internal User {Checked} Roles Details Role Name Main Users {Checked} Roles Details Role Name OfficeAdministrator {Checked} Roles Details Role Name Sales {Checked}
12. Save your changes 13. Log Out 14. Login with = Beauvoir
a. Password = setup b. New Password = 123 c. Confirm Password = 123
15. Log out 16. Login with = ADMIN
a. Password = setup Repeat the same steps 11-‐ 14 for Michael Andrews
Important Note: Training Documentation was tested with build 4.20.078

D120 & D260 Purchase Management Page 5 of 53
Table of contents Certification Course Prerequisites ................................................................. Error! Bookmark not defined.
Purchasing Objectives .................................................................................................................................. 7
Purchasing Overview ................................................................................................................................... 7
Purchasing Process Overview ...................................................................................................................... 7
Benefits and Additional Features ................................................................................................................. 7
#1: Configure Purchasing Preferences ..................................................................................................... 9
#2: FOB Points ........................................................................................................................................ 12
#4: Ship Via Codes .................................................................................................................................. 13
#4: Landed Cost ...................................................................................................................................... 15
#5: Vendor Inventory ............................................................................................................................. 18
#6: Purchase Order Approval ................................................................................................................. 19
Company Tree .................................................................................................................................... 19
Assignment and Approval Map Process ............................................................................................. 19
Create Notification ............................................................................................................................. 21
Schedule Notification Process ............................................................................................................ 23
#7: Mailing Settings ................................................................................................................................ 25
Create Notification Template ............................................................................................................. 25
Vendor Class ....................................................................................................................................... 25
Vendor ............................................................................................................................................... 26
Purchase Order Preferences .............................................................................................................. 26
#8: Purchase Order Processes ................................................................................................................ 27
Create Purchase Orders ..................................................................................................................... 27
Print/Email Purchase Orders .............................................................................................................. 27
Release Purchase Receipts ................................................................................................................. 27

D120 & D260 Purchase Management Page 6 of 53
Release Landed Costs ......................................................................................................................... 27
Update Vendor Prices ........................................................................................................................ 28
#9: Purchase Order ................................................................................................................................ 28
Normal PO Type ................................................................................................................................. 34
Drop Ship PO Type ............................................................................................................................. 36
Blanket PO Type ................................................................................................................................. 36
Standard PO Type .............................................................................................................................. 38
Transfer Request PO Type .................................................................................................................. 39
#10: Purchase Receipts .......................................................................................................................... 40
Partial PO Receipt: ............................................................................................................................. 45
Landed Costs: ..................................................................................................................................... 46
#11: AP Bills and Adjustments ............................................................................................................... 47
Bar Code ................................................................................................................................................. 49
Appendix A: Reports .............................................................................................................................. 50
Appendix B: Accounting Transactions .................................................................................................... 52
Appendix C: Flow Charts ........................................................................................................................ 53

D120 & D260 Purchase Management Page 7 of 53
Purchasing Objectives The Objectives are:
• Understand an overview of the Purchasing module
• Understand how the Purchasing module fits into the available suite of modules for Acumatica system
• Understand the benefits and additional features that are available in the Purchasing module
Purchasing Overview The Purchase Orders module incorporates the functionality required for managing purchase-‐related activities, such as placing purchase orders, receiving purchases, and entering various additional costs associated with purchasing operations. The Purchase Orders module integrates with the Accounts Payable and Inventory modules. It also updates General Ledger with inventory accrual amounts.
Purchasing Process Overview The Purchase Orders module helps you organize and control the purchasing process, plan purchasing expenses, and reduce spending on goods and services. Acumatica ERP automates the purchasing process: issuing purchase orders, receiving orders, and creating Accounts Payable bills. With the Purchase Orders module, you gain complete visibility into the whole purchasing process, from planning purchases to paying the bills.
Benefits and Additional Features Multiple Purchase Order Type
The Purchase Orders module supports the following purchase order types: Normal, Drop ship, Blanket, and Standard. Orders of different types have different functionality and fulfillment flows, for example, orders of the Standard type serve as templates for Normal orders.
Default Settings Multiple default settings, if they hold the values your employees use most frequently, help users save time and avoid input errors in the process of data entry. Some default settings are defined within the Purchase Orders module, while others are defined in the modules that integrate closely with purchasing. Users can, of course, override these values at any time.
Integration with Inventory and Accounting Because of this module’s seamless integration with financial and inventory modules, you can generate back orders, view item availability data, generate invoices for drop-ship orders, and view customer demand when you create purchase orders. You can automatically generate Accounts Payable bills and inventory receipts and issues. Such integration eliminates repetitive data entry and automates workflows for the complete purchasing cycle.

D120 & D260 Purchase Management Page 8 of 53
Vendor Price List To maintain up-‐to-‐date information on vendor prices in Acumatica ERP, you can create vendor catalogs and update them periodically. For updating, you can use information on released vendor documents or import vendor price lists. Also, you can specify minimum and maximum order quantities, lot sizes, alternative IDs used by vendors for products they sell, and other related information.
Flexible Approval Procedures Most organizations require that purchase orders be approved by designated persons before they can be emailed or printed for sending by mail to the vendor. You can configure approval to be performed in parallel by multiple employees or as a sequential, multi-‐step process. The rules for automatic assignment of orders for approval can be based on the type of order, vendor information, order amount, and other order-‐specific information.
Processing of Drop-‐Ship Orders Drop shipping is a type of sales order fulfillment in which the customer’s order goods from your company, receive them directly from a vendor (wholesaler or manufacturer), and send payments for the orders to your company. The quantities of stock items on drop-‐ship orders do not update the item availability data in the Inventory module.
Processing of Returns For damaged goods or services not rendered, you can create returns. To a return, you can add a purchase order, order line, or specify the items with their quantities manually. You can configure the system on release of returns to automatically create IN issues for stock items. Further processing of returns depend on the policies established in your company: You can choose whether to create a debit adjustment and later apply it against a refund or against other bills, or to later create a new receipt for replacements of damaged items.
Landed Cost tracking By using the Purchase Orders module, you can account for additional costs that your company can incur in the process of purchasing goods, such as transportation costs, taxes, shipment insurances, and other charges.
Barcode Support Scanning product barcodes on receipt of goods to warehouses simplifies data entry. By using warehouse and location IDs printed as barcodes and scanned on data entry, you can more easily maintain correct item allocation data, which helps your employees effectively fulfill orders.
Inclusive VAT Support With Acumatica ERP, you can configure automatic calculation of taxes included in item prices. Tax amounts will be calculated appropriately, recorded to proper tax claimable accounts, and excluded from item costs.
Audit Trail The Purchase Orders module provides a complete audit trail of all purchasing transactions. After a transaction is released, it cannot be deleted; to correct mistakes, you must enter a transaction to reverse the incorrect entry. The system keeps the details of all purchasing transactions, including information about users who entered, approved, and modified records. Also, you can attach scanned copies of original documents and notes directly to the documents.

D120 & D260 Purchase Management Page 9 of 53
Other Features and Options • Integration with the Inventory module: You can purchase goods for inventory replenishment, and when
the goods are received at the warehouse and the purchase order is released, the system automatically generates an inventory adjustment document.
• Attach scanned images of vendor documents or images of items received from vendor to receipts or returns
• Add notes with handling instructions to receipts • Link receipts to purchase orders or to specific lines of purchase order to easily trace the process of
purchase order fulfillment. • Support of non-‐stock items on purchase receipts. • Automatic conversion of units of measure (and resulting item costs). • Ability to specify service charges and shipping and handling fees on purchase orders and receipts. • You can set up automatic printing of purchase orders to further send them to vendors by mail, or
automatic emailing of such orders. • Automatic update of item costs, depending on the valuation methods chosen for inventory items, with
vendor prices specified on purchase receipts. • Item availability information is conveniently displayed on the screen when the users create purchase
orders. • Automatic calculation of taxes on purchases depending on the tax zone of the shipping location.
#1: Configure Purchasing Preferences Learning Objects:
• Learn about Purchasing Preference Settings
Hands on – Configure Purchasing Preferences
You use this screen to provide the general settings for the Purchase Orders module, such as numbering sequences for purchasing documents, validation requirements for purchase orders and receipts, approval and mailing settings, and the default freight expense account and subaccount.
Field Descriptions:
Field Description Blanket Order Numbering Sequence
The numbering sequence used for assigning reference numbers to purchase orders of the Blanket type.
Regular Order Numbering Sequence
The numbering sequence used for assigning reference numbers to purchase orders of all other types except Blanket.
Receipt Numbering Sequence
The numbering sequence used for assigning reference numbers to purchase receipts.

D120 & D260 Purchase Management Page 10 of 53
Field Description For Receipts A check box that indicates (if selected) that the system will validate totals for
purchase receipts on entry (that is, when a user clicks Save with the Hold check box cleared).
For Normal and Standard Orders
A check box that indicates (if selected) that the system will validate totals for purchase orders with Normal and Standard types on entry—when a user clicks Save with the Hold check box cleared.
For Blanket Orders A check box that indicates (if selected) that the system will validate totals for purchase orders with the Blanket type on entry—when a user clicks Save with the Hold check box cleared.
For Drop-‐Ship Orders A check box that indicates (if selected) that the system will validate totals for purchase orders with the Drop Ship type during data entry—when a user clicks Save with the Hold check box cleared.
Create Bill on Receipt Release
A check box that indicates (if selected) that the system will generate an Accounts Payable bill automatically on release of a purchase receipt.
Freight Expense Account
The default account to be used for collecting the freight expenses.
Freight Expense Sub. The corresponding default subaccount to be used for collecting the freight expenses.
PO Return Reason Code
The default reason code to be used for all purchase returns.
Release IN Documents Automatically
A check box that indicates (if selected) to the system that inventory receipts should be automatically released on release of purchase receipts.
Release LC IN Adjustments Automatically
A check box that indicates (if selected) to the system that inventory adjustments for landed costs should be released automatically on release of purchase receipts.
Release AP Documents Automatically
A check box that indicates (if selected) to the system that all Accounts Payable documents associated with purchase receipts should be released automatically.
Hold Receipts On Entry A check box that indicates (if selected) that by default the purchase receipts will be saved with the On Hold status. If the check box is cleared, the documents, by default, will be saved with the Balanced status.
Update Sub. on Order Owner Change
A check box that indicates (if selected) that the expense subaccount shown for each non-‐stock item listed on a document should be updated when the document is assigned to another owner. The expense subaccount is combined (according to the posting class of the expense) from multiple related subaccounts, including (if applicable) the subaccount associated with the employee handling the order or receipt.
Copy Line Descriptions from Sales Orders
A check box that indicates (if selected) that line descriptions should be copied from sales orders to purchase orders based on these sales orders.
Copy Line Notes from Sales Orders
A check box that indicates (if selected) that line notes should be copied from sales orders to purchase orders based on these sales orders.
Automatically Add Receipt Line for Barcode
A check box that indicates (if selected) that when a barcode scanner is used, lines should be added to purchase receipts automatically once a barcode is scanned or entered. The selected option is used as the default option for the Add Receipt Line dialog box, which is called from the Purchase Receipts screen (from the Add Line action on the Document Details tab).
Add One Unit per Barcode
A check box that indicates (if selected) that the item quantity should be increased by one unit each time an item barcode is entered into the system, manually or by using a barcode scanner. The selected option is used as the default option on the Add Receipt Line dialog box, called from the Purchase Receipts screen.

D120 & D260 Purchase Management Page 11 of 53
Field Description Receipt Assignment Map
The assignment map used for defining how purchase receipts are assigned to employees for approval. You can view and modify the assignment rules using the Assignment and Approval Maps (EP205000) screen.
Vendor Price Update The method used to automatically update vendor prices based on vendor documents; for details, see Vendor Catalog. Choose one of the following options:
• None: To not perform price updating automatically. • On PO Entry: To update the vendor prices in the vendor catalog when a
purchase order is being saved. Only prices of items listed on a newly saved order will be updated.
• On Receipt Entry: To update the vendor prices in the vendor catalog when a purchase receipt is being saved. Only prices of items listed on a newly saved receipt will be updated.
• On Receipt Release: To update the vendor prices in the vendor catalog upon release of purchase receipts. Only prices of items listed on the receipts being released will be updated.
• On AP Bill Release: To update the vendor prices in the vendor catalog upon release of Accounts Payable bills. Only prices of items listed on the bills being released will be updated.
Default Ship. Dest. Type
The default shipping destination type for purchase orders, specified on the Shipping Instructions tab of the Purchase Orders screen. Select one of the following options:
• Branch Location: To set Branch Location (your company’s branch) as the default destination type
• Warehouse: To set Warehouse as the default destination type
Approval Tab Require Approval A check box that indicates (if selected) that the listed assignment maps will be used
to assign documents for approvals. If it is cleared, no approvals are required and any assignment maps listed in the table will not be used.
PO Type The type of purchase order. Select the type from the following options: Normal, Drop Ship, Blanket, and Standard.
Approval Map The map to be used for the specified type of purchase order. To view or modify the assignment rules, use the Assignment Rules screen.
Mail Settings Tab Mailing ID The unique identifier of the mailing. Default Email Account The system email account to be used by default for sending emails for this mailing.
If no account is specified, the default system account will be used. Report The report that, by default, will be used to structure the information available in a
purchase order. For the email, the report will be used as the email’s body (or attachment), if a report is used rather than an email template.
For each mailing, you can use as the email’s body either a report or a notification template.
Notification Template The template to be used by default to generate emails for the mailing, if an email template is used rather than a report.
Format The format in which the report (if applicable) will be sent by default if no preferences are specified for a particular recipient on the Vendors (AP303000) screen. Select one of the following options: Text, HTML, Excel, or PDF.

D120 & D260 Purchase Management Page 12 of 53
Field Description Active A check box that indicates (if selected) that this mailing is active. Emails are
generated only for active mailings. Contact Type The type of contact to receive emails for the mailing. Choose one of the following
options: • Primary: A primary contact of the vendor • Remittance: A remittance contact of the vendor • Shipping: A shipping contact of the vendor • Employee: A employee of your company who handles documents of
specific vendor classes or specific vendors, or is otherwise associated with either of them
Contact ID The specific contact. This column is not used for vendor contacts—that is, the Primary, Remittance, and Shipping settings in the Contact Type column. If you have selected the Employee type, you can select one of your company’s employees here; this person will receive all emails generated for this mailing in the Purchase Orders module, if the mailing is active.
Format The format in which the report (if applicable) will be sent to recipients of this type. Select one of the following options: Text, HTML, Excel, or PDF.
Active A check box that indicates (if selected) that the recipient is active. Only recipients of active types can be configured to receive emails for the mailing.
BCC A check box that indicates (if selected) that the recipient will receive a blind carbon copy (BCC) of the emails for the selected mailing.
1. Open Purchase Order Preferences screen (screen ID PO101000): Distribution > Purchase Order > Configuration > Setup > Purchase Order Preferences
#2: FOB Points Learning Objects:
• Learn how to configure new FOB Points
FOB Points
You use this screen to create and maintain the list of FOB (which means freight on board or free on board) points. At these FOB points, the vendor delivers the goods and pays for the freight (cargo) to be loaded to the transportation provided by the carrier. The freight and other expenses for the cargo from that point are borne by the customer
Field Descriptions:
Field Description

D120 & D260 Purchase Management Page 13 of 53
Field Description FOB Point IB The identifier of the point (such as a city or town) where the title of goods passes
from the company to the customer or from the vendor to the company. An alphanumeric string of up to 20 characters may be used.
Description A description of the FOB point. An alphanumeric string of up to 30 characters may be used.
1. Open FOB Points screen (screen ID CS208500): Distribution > Purchase Order > Configuration > Setup > FOB Points
#4: Ship Via Codes Learning Objects:
• Learn how to setup a Ship Via
Hands on – Define Ship Via Codes
Use the Ship Via screen to maintain information about each carrier your company uses for shipping goods and about your company's own shipping options. A ship via code denotes a possible method your company uses to ship goods to customers.
This screen has slightly different options for ship via codes associated with non-‐integrated and integrated carriers. For each non-‐integrated carrier whose services are used by your company or for shipping options provided by your company, you specify freight rates for shipments of different weights and volumes on this screen.
Field Descriptions:
Field Description Ship Via The unique code associated with the non-‐integrated carrier, a method of the
integrated carrier, or a shipping option of your company. You can use an alphanumeric string of up to 15 characters.
Description A description of this shipping service or option. You can use an alphanumeric string of up to 30 characters.
External Plug-‐in A check box that you select if a plug-‐in is used to provide integration with the carrier for this ship via code. If this option is selected, you can specify the integrated carrier, its service method, and other options on the Details tab, which has slightly different elements depending on whether you select this check box.
Calendar The calendar associated with the carrier. A calendar reflects the carrier's work hours
and the days when the carrier ships the goods. Carrier The carrier associated with this ship via code. This element is available for only codes
for which external plug-‐ins are used. Service Method The carrier method to be used by your company under this ship via code. This element
is available for only codes for which external plug-‐ins are used.

D120 & D260 Purchase Management Page 14 of 53
Field Description Calculation Method The method used to calculate freight charges, by using the rate breakdown specified
on the Freight Rates tab. (This element appears only if the External Plug-‐in check box is cleared—that is, if this ship via code has been defined for a non-‐integrated carrier.) The following options are available:
• Per Unit: The rates are specified as rates per weight unit. • Net: The rates are specified as flat rates.
Base Rate The flat-‐rate charge to be added to the freight amount, which is calculated as specified on the Freight Rates tab. This element appears only if the External Plug-‐in check box is cleared.
Common Carrier A check box that indicates whether this carrier is a common carrier. Because common carriers deliver goods from a company branch to the customer location that is the sales point, this check box controls which set of taxes applies to the invoice. If the check box is selected, the taxes from the customer tax zone are applied. If the check box is cleared, the taxes from the tax zone associated with the selling branch are applied.
Confirmation for Each Box is Required
A check box that indicates (if selected) that confirmation for each box used for shipment is required to confirm the whole shipment. This check box appears only if the External Plug-‐in option is selected.
At Least One Package is Required
A check box that indicates (if selected) that at least one package is required to ship under this code. This check box appears only if the External Plug-‐in option is selected.
Tax Category The tax category to be applied to the freight amount when goods are shipped with this code.
Freight Sales Account The General Ledger account of the income type that is used to record the freight charges to be paid to the company.
Freight Sales Sub The corresponding subaccount. Freight Expense Account
The General Ledger account of the expense type to be used to record the freight charges to be paid to the carrier.
Freight Expense Sub The corresponding subaccount. Weight The minimum weight to which the rate may be applied. Volume The minimum volume to which the rate may be applied. Zone ID The shipping zone to which the goods with the specified weight and volume are
shipped. Rate The flat rate or rate per weight unit, depending on the option (Net or Per Unit)
selected in the Calculation Method element on the Details tab. The freight amount is calculated as follows:
• With the Net option selected, the freight amount equals this value for the shipment.
• With the Per Unit option selected, the freight amount equals this value multiplied by the shipment weight.
Box ID The identifier of the box used by the carrier under this ship via code. Max. Weight The maximum weight a box of the type can hold. Length The length of a box of the type. Width The width of a box of the type. Height The height of a box of the type. Description A description of the type of box.

D120 & D260 Purchase Management Page 15 of 53
1. Open Ship Via Codes screen (screen ID CS207500): Distribution > Purchase Order > Configuration > Setup > Ship Via
Ship Via will be covered in more detail in D230: Advanced Sales Order Fulfillment.
#4: Landed Cost Learning Objects:
• Learn how to configure new Landed Cost
Landed Cost
Define the landed cost codes that are used in your system for specifying additional costs incurred for delivering purchased goods to your company warehouses or to customer locations if the goods are drop-‐shipped. You can add new codes, modify existing codes, and delete unused codes.
For each code, you should assign a specific vendor and the account and subaccount to accrue landed costs of the type.
The total cost of goods purchased generally includes the purchase price, as well as additional charges, such as freight or other shipping costs and insurance; for an international shipment, it may also include customs duties and other taxes. All these charges, often referred to as landed costs, affect the total product cost. Landed costs are the costs incurred, beyond the purchase price the vendor charges for the goods, in the process of bringing the goods to one of your company’s warehouses.
Upon release, an Inventory adjustment updates the inventory costs of items differently depending on the valuation method of the item:
• For inventory items with the FIFO or specific valuation method, the cost on the particular cost layer (created by the receipt) is updated as follows:
o If the layer still has the original quantity, the cost of all items on the layer is updated, and the landed cost amount from the LC Accrual account is transferred to the inventory account assigned to the item.
o If the current quantity on the layer is less than the original quantity, the landed cost amount is moved from the LC accrual account to update the COGS account and the inventory account in proportion with the sold and unsold quantities respectively.
• For items with the average cost valuation method, the landed cost amount from the LC Accrual account is transferred to the inventory account assigned to the item and updates the average cost of the unit.
• For the standard cost valuation method, the amount from the LC Accrual account is moved to the Standard Cost Variance account.
D120 & D260 Purchase Management Page 16 of 53
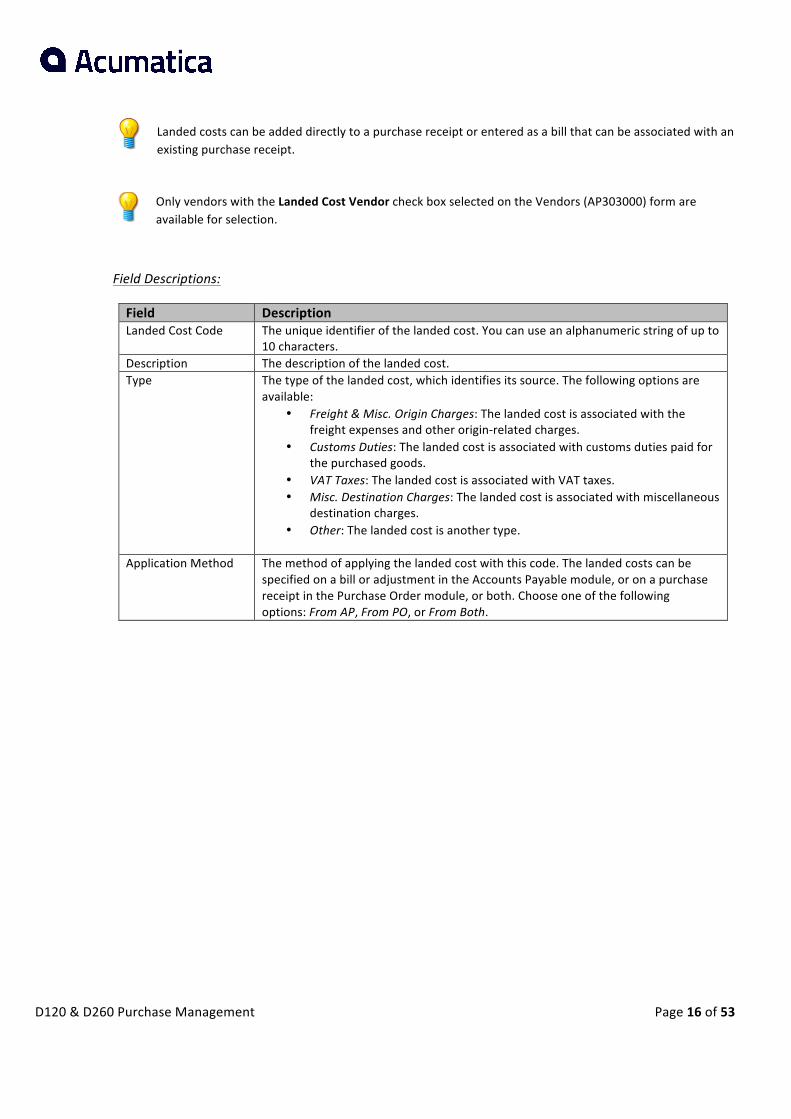
Landed costs can be added directly to a purchase receipt or entered as a bill that can be associated with an existing purchase receipt.
Only vendors with the Landed Cost Vendor check box selected on the Vendors (AP303000) form are available for selection.
Field Descriptions:
Field Description Landed Cost Code The unique identifier of the landed cost. You can use an alphanumeric string of up to
10 characters. Description The description of the landed cost. Type The type of the landed cost, which identifies its source. The following options are
available: • Freight & Misc. Origin Charges: The landed cost is associated with the
freight expenses and other origin-‐related charges. • Customs Duties: The landed cost is associated with customs duties paid for
the purchased goods. • VAT Taxes: The landed cost is associated with VAT taxes. • Misc. Destination Charges: The landed cost is associated with miscellaneous
destination charges. • Other: The landed cost is another type.
Application Method The method of applying the landed cost with this code. The landed costs can be
specified on a bill or adjustment in the Accounts Payable module, or on a purchase receipt in the Purchase Order module, or both. Choose one of the following options: From AP, From PO, or From Both.

D120 & D260 Purchase Management Page 17 of 53
Field Description Allocation Method The method of allocating these landed costs to the purchased goods. The allocation
method defines how the landed cost amount is distributed among the purchased inventory items. Select one of the following options:
• By Quantity: The landed costs are allocated to the purchased goods based on the quantities of different goods. The percent of the landed cost allocated to each purchased stock item depends on the portion of this item’s quantity in the total quantity of all items purchased. If other than base UOMs are specified for items, item quantities are calculated with respect to the base UOMs.
Use this option only for purchase orders that include similar items with the same base UOM or similar base UOMs. Do not use this option for purchase orders which include disparate items with incomparable base units such as pallets and tons, or meters and pounds, and so forth.
• By Cost: The landed costs are allocated to the purchased goods based on the costs of purchased goods. The percent of the landed cost allocated to each purchased item depends on the portion of this item’s cost in the total cost of all different items purchased.
• By Weight: The landed costs are allocated to the purchased goods based on the weights of purchased goods. The percent of the landed cost allocated to each purchased item depends on the portion of this item’s weight in the total weight of all items purchased.
• By Volume: The landed costs are allocated to the purchased goods based on the volumes of purchased goods. The percent of the landed cost allocated to each purchased item depends on the portion of this item’s volume in the total volume of all items purchased.
• None: The landed costs are not allocated to item costs; only an Accounts Payable bill will be created for the landed cost.
Vendor The vendor this landed cost is associated with, which is not necessarily the vendor of
the goods. Only vendors with the Landed Cost Vendor check box selected on the Vendors (AP303000) form are available for selection.
Location The vendor location with which the landed cost is associated. Terms The credit terms for this landed cost. Credit terms are defined on the Credit
Terms (CS206500) form. Reason Code The reason code to be used by default for cost adjustment transactions generated
for the purchased goods. Landed Cost Accrual Account
The account used to accumulate the landed costs before applying them to make the cost adjustments for the purchased goods.
Landed Cost Accrual Sub.
The associated subaccount used for accumulating the landed costs before applying them to make the cost adjustments for the purchased goods.
Tax Category The tax category to be used for the landed costs with this code. Landed Cost Variance Account
The landed cost variance account (expense) to be used to record any differences between the landed costs specified on the purchase receipts and Inventory receipts.
Landed Cost Variance Sub.
The corresponding landed cost variance subaccount.

D120 & D260 Purchase Management Page 18 of 53
1. Open Landed Cost Codes screen (screen ID PO202000): Distribution > Purchase Order > Configuration > Setup > Landed Cost Codes
#5: Vendor Inventory Learning Objects:
• Learn how to manage Vendor Inventory
Hands on – Manage Vendor Inventory
Maintain vendor inventory catalogs—lists of items purchased from a particular vendor location and their prices. The system uses this information when users create purchase orders.
You can choose to maintain this catalog automatically if you select an appropriate option as the Vendor Price Update setting on the Purchase Orders Preferences form (screen ID PO101000); the catalog is then updated automatically on release of receipts or on release of bills. Also, you can maintain the catalog manually by entering the data and periodically updating each list, which includes vendor-‐ and location-‐specific information about these items, such as the pending vendor price, the date when the price will become effective, and the purchase unit of measure used by the vendor, the allowed order frequency, and the maximum order size. If sub items are used in your system, a vendor inventory ID can be assigned to each inventory item–sub item pair.
1. Open Vendor Inventory screen (screen ID PO201000): Distribution > Purchase Order > Work Area > Manage > Vendor Inventory
Min order Quantity, Max order Quantity, Lot Size, EOQ (Economic Order Quantity) are information purposes only. Does not verify in the Purchase Order or Receipt Screen.
Screen Section Field Value Summary Vendor COMPENVIR Summary Location MAIN Transaction Details Active {CHECKED} Transaction Details All Locations {CHECKED} Transaction Details Inventory ID D000000050 Transaction Details SubItem 0-‐0 Transaction Details Vendor Inventory ID E1005 Transaction Details Pending Vendor Price $ 10,440.00 Transaction Details Pending Eff. Date {Today’s Date} Transaction Details Active {CHECKED}

D120 & D260 Purchase Management Page 19 of 53
Screen Section Field Value Transaction Details All Locations {CHECKED} Transaction Details Inventory ID D000000033 Transaction Details SubItem 0-‐0 Transaction Details Vendor Inventory ID F5300S Transaction Details Pending Vendor Price $ 12,576.00 Transaction Details Pending Eff. Date {Today’s Date}
2. Save your changes 3. Click on Update Prices button 4. Click Update button
#6: Purchase Order Approval Learning Objects:
• Learn how to setup Approval process for Purchase Orders
Hands on – Purchase Order Approval
Company Tree Learn how to create a company tree in order to create a hierarchy of workgroups in all branches of your company. This hierarchy is used for escalating work items (such as cases, leads, time sheets, purchase orders and receipts) based on the order of groups specified by the structure. Items can be escalated from an assigned group up to the next level and, eventually, to the top. When creating the hierarchy, take into account the organization structure if it includes multiple branches and actual approval work flows, whether escalation originated in one of the branches continues up to the top of the tree or stops at a certain workgroup in the same branch.
1. Open Company Tree form (screen ID EP204060): Organization > Organization Structure > Manage > Company Tree (EP.20.40.60)
We will be using the Company tree already setup in this Demo database
Assignment and Approval Map Process Learn how to create or edit a set of assignment rules for a particular entity—leads, cases, expense claims, time sheets, sales orders, shipments, purchase orders, purchase order receipts, requests, or requisitions.
We will be using the Assignment and Approval Map already setup in this Demo database

D120 & D260 Purchase Management Page 20 of 53
1. Open Assignment and Approval Maps form (screen ID EP205000): Organization > Organization Structure
> Manage > Assignment and Approval Maps 2. Click the “+” button from the tool bar 3. Populate the fields as follows to complete an example for Purchase Order Approval:
From the Summary Area:
Form Section Field Value Summary Map PO 2-‐Step Approval Summary Name PO 2-‐Step Approval Summary Entity Purchase Orders
*Distribution > Purchase Orders > Work Area > Enter > Purchase Orders a. Save your changes
From the Assignment Rules Detail Area:
Form Section Field Value Assignment Rules Detail Area Seq {accept default} Assignment Rules Detail Area Type Assign Assignment Rules Detail Area Name Approve by Accountant Assignment Rules Detail Area Jump To {blank} Assignment Rules Detail Area Assign To Finance Assignment Rules Detail Area Assign To Layla Beauvoir -‐ EP00000003 Assignment Rules Detail Area Position {accept default} Assignment Rules Detail Area Department {accept default} Assignment Rules Detail Area Owner Source {blank} Assignment Rules Detail Area Use Workgroup {unchecked}
b. Save your changes
From the Rule Type Area: Rule Type Entity Field Name Condition Field Value All Conditions are True Purchase
Order Hold Equals {Unchecked}
All Conditions are True Purchase Order
Approval Workgroup ID Is Null {blank}
c. Save your changes
From the Assignment Rules Detail Area:
d. Click the “+” button from the tool bar
Form Section Field Value Assignment Rules Detail Area Seq {accept default} Assignment Rules Detail Area Type Assign Assignment Rules Detail Area Name Approve by Executive Assignment Rules Detail Area Jump To {blank} Assignment Rules Detail Area Assign To Executive

D120 & D260 Purchase Management Page 21 of 53
Form Section Field Value Assignment Rules Detail Area Assign To Michael Andrews -‐ EP00000001 Assignment Rules Detail Area Position {accept default} Assignment Rules Detail Area Department {accept default} Assignment Rules Detail Area Owner Source {blank} Assignment Rules Detail Area Use Workgroup {unchecked}
e. Save your changes
From the Rule Type Area:
Rule Type Entity Field Name Condition Field Value All Conditions are True
Purchase Order
Hold Equals {Unchecked}
All Conditions are True
Purchase Order
Approval Workgroup ID
Is Not Null {blank}
All Conditions are True
Purchase Order
Order Total Is Greater than
5,000.00
f. Save your changes
4. In order to use that Approval map for your purchase order, you will need to assign that map to the
Purchase Orders Preferences (screen ID PO101000): Distribution > Purchase Orders > Configuration > Setup > Purchase Orders Preferences
On the Approval tab, populate the fields as follows:
Form Section Field Value Approval Require Approval {Checked} Approval PO Type Normal Approval Approval Map PO 2-‐Step Approval
5. Save your changes
Create Notification
The hands-‐on exercises below will walk you through the creation of a notification for the expense claims. Each Purchase Order status goes to status “Pending Approval”, the system will send and notification to the desired user showing that there is new expense claims pending approval.
1) Open Automation Notifications screen (screen ID SM205040): System > Automation > Manage > Automation Notifications
2) Create the Notification as follows:
Form Section Field Value Automation Notification Summary Screen ID Purchase Orders Automation Notification Summary Notification ID <NEW>

D120 & D260 Purchase Management Page 22 of 53
Form Section Field Value Automation Notification Summary Description PO Pending Approval Automation Notification Summary Active <checked> Automation Notification Summary Public <unchecked> Automation Notification Summary Subject Purchase Order Pending Approval Automation Notification Summary Data Source None Automation Notification Summary Report ID {accept default} Automation Notification Summary Report Format {accept default} Automation Notification Summary Embedded {accept default} Automation Notification Summary Action Name {accept default} Automation Notification Summary Menu Text {accept default}
3) From the Message tab, insert text below in the email body: Purchase Order Pending Approval details.: Purchase Order Number: ((CurrentDocument.OrderNbr)) Purchase Order Type: ((CurrentDocument.OrderType)) Vendor: ((CurrentDocument.VendorID_description)) Document Date: ((CurrentDocument.OrderDate)) Document Description: ((CurrentDocument.OrderDesc)) Document Total Amount: ((CurrentDocument.OpenOrderTotal) Direct Link to document: {servername/domain} – must be replace with your server/domain name Purchase Order Screen (PO301000) Template http://{servername/domain}/Main.aspx?ScreenId=PO301000&Type=((Transactions.OrderType))&OrderNbr=((CurrentDocument.OrderNbr)) To determine the correct URL link with required values to populate.
a. Open the desired Screen b. Populate the key fields to return data already in the system. c. Click on Help > Get Link d. Copy the External Link
i. Example: http://localhost/AcumaticaERP/Main.aspx?ScreenId=PO301000&OrderType=RO&OrderNbr=PORG000086
e. Replace the actual values with the correct placeholders. i. http://localhost/AcumaticaERP/Main.aspx?ScreenId=PO301000&OrderType=((Transacti
ons.OrderType))&OrderNbr=((CurrentDocument.OrderNbr))
4) Click the “+” button from the Conditions tab, to establish the condition of the notification:
Form Section Field Value Conditions Active <checked> Conditions Field Name Status Conditions Condition Equals Conditions Is Relative <unchecked>

D120 & D260 Purchase Management Page 23 of 53
Form Section Field Value Conditions Value Pending Approval Conditions Value 2 {blank}
5) Click the “+” button from the Addresses tab, to establish the recipient of the email notification:
Form Section Field Value Addresses Active <checked> Addresses Source User Addresses Email {Select the user where your email address is configure} Addresses Type To
6) Click the “+” button from the Fields tab, to establish which field the system is monitoring changes:
Form Section Field Value Addresses Active <checked> Addresses Field Name Status
7) Save your changes
Schedule Notification Process In order for the Notification Email to be sent each time purchase order status changes to Pending Approval, the system runs a process to send the emails. That process can be automated by creating a schedule.
1. Open Send Notifications form (screen ID SM205050): System > Automation > Schedule > Send Notifications
2. Click the Schedules drop down menu and select Add 3. Fill the Automation Schedule window as follows:
Form Section Field Task 1 Summary Screen ID Send Notifications Summary Schedule ID <NEW> Summary Description PO Approval Notification Summary Action Name {accept default} Summary Active <checked> Summary Execution Limit 0 Summary No Execution Limit <checked> Summary Executed {accept default} Summary Start on {today’s date} Summary No expiration date <checked> Summary Expires On {blank} Summary Last Executed On {accept default}
From the Details tab:
Form Section Field Task 1 Details Schedule Type Daily Details Next Execution Date {today’s date}

D120 & D260 Purchase Management Page 24 of 53
Form Section Field Task 1 Details Daily – Every: 1 days
From the Hours tab:
Form Section Field Task 1 Hours Starts On 05:00 AM Hours Stop On {blank} Hours Every 00:01* Hours Next Execution Time 05:00 AM
*The notification will run every 1 minute. From the Conditions tab:
Form Section Field Task 1 Conditions Active <checked> Conditions Field Name Status Conditions Condition Equals Conditions Is Relative <unchecked> Conditions Value Pending Condition Value 2 {blank}
From the Filter Values tab, accept all the default fields.
4. Save your changes
Purchase Order Preferences
1. Open Purchase Order Preferences screen (screen ID PO101000): Distribution > Purchase Order > Setup > Purchase Order Preferences
a. On General Settings tab: i. Populate Receipt Assignment Map – Optional
b. From the Approval tab:
Field Value Require Approval {checked} PO Type Normal Approval Map PO 2-‐Step Approval
Before you create a map for an entity or document type, make sure that all workgroups involved in its processing or approval and escalation are represented on the company tree. If not, add the required workgroups and specify their members and wait times by using the Company Tree (EP.20.40.60) form. Only groups specified on the company tree can be used in assignment and approval maps.

D120 & D260 Purchase Management Page 25 of 53
#7: Mailing Settings Learning Objects:
Learn how to setup mailing setting and create Notification Template
The Mailing Settings tab contains the list of predefined mailings that can be used for sending purchase orders and other documents to vendors electronically (by email). Mailing settings specified on this tab are used as the default values for mailing settings specified for vendor classes, which in turn are used as the default values for setting up mailings for particular vendors.
Create Notification Template
Use this screen to create and edit notification and email templates. Notification and email templates define the look and content of the emails to be sent to employees or contacts of customers or vendors. You can insert placeholders—system variables enclosed in double parentheses, such as ((CustomerFullName))—to use recipient data to personalize notification emails when they’re sent. Placeholders can be used in the email template’s body as well as in the email properties such as Subject, To, CC, and BCC.
Acumatica provides Purchase Order Notification and Purchase Receipt Notification as standard Purchase notification templates out of the box.
1) Open Notification Template screen (screen ID SM204003): Configuration > Email > Manage > Notification Template
a. Set Notification = PurchaseOrderNotification
This provides an example what can be accomplished with Notification templates.
You can modify the existing Notification Template. It is recommended to create a separate Notification template if you need to make changes.
Vendor Class You can facilitate the process of setting up sending of electronic purchase orders to vendors by using the mailing settings of vendor classes as the default settings for vendors of the respective classes. If vendors of the class are shared among multiple branches of your company, you can set up the mailing of orders differently for different branches. Also, you can configure emails to be sent to authorize employees of your company branches about orders of particular vendor classes.
Mailing settings for the vendor class serve as the default settings for vendors of the class but can be overwritten by the settings for a particular vendor.

D120 & D260 Purchase Management Page 26 of 53
1. Open Vendor Class screen (screen ID AP201000): Finance > Accounts Payable > Configuration > Setup > Vendor Classes
a. On Mailing Settings tab
Refer to F100 certification or Acumatica Help for more detail information to setup.
Vendor You can set up sending specific documents by email to particular vendors and employees who work with these vendors. Mailings are used to set up sending electronic versions of specific documents to vendor contacts and company employees specified as recipients for the vendors. By default, mailings selected for the vendor class are listed, but you can select other mailings from the list of mailings defined on the Purchase Orders Preferences (screen ID PO101000) and Accounts Payable Preferences screens.
1. Open Vendor screen (screen ID AP303000): Finance > Accounts Payable > Work Area > Manage > Vendor a. On Mailing Settings tab
Refer to F100 certification or Acumatica Help for more detail information to setup.
Purchase Order Preferences 1. Open Purchase Order Preferences screen (screen PO101000): Distribution > Purchase Order >
Configuration > Setup > Purchase Order Preferences a. On Mailing Settings tab
Section Field Value Default Source Mailing ID PURCHASE ORDER Default Source Default Email Account [email protected] Default Source Report PO.64.10.00 Default Source Notification Template PurchaseOrderNotification Default Source Format PDF Default Source Active {checked} Default Recipients Contact Type Primary Default Recipients Contact ID {blank} Default Recipients Format PDF Default Recipients Active {checked} Default Recipients Bcc {unchecked}
2. Save your changes

D120 & D260 Purchase Management Page 27 of 53
#8: Purchase Order Processes
Create Purchase Orders Use this screen to create purchase orders for transfer orders, replenishment requests, and any sales orders for which the Mark for PO check box was selected on the Sales Orders screen (screen ID SO301000). You can view the generated purchase orders on the Purchase Orders screen (screen ID PO301000).
Automation Schedules, you can schedule automatic execution of a specific operation for documents matching certain conditions.
1. Open Create Purchase Orders screen (screen ID PO505000): Distribution > Purchase Order > Processes > Daily > Create Purchase Order
Print/Email Purchase Orders Can print or send by email selected purchase orders. Also, can apply the Mark as Do not Email action to selected orders, to ensure that they aren’t sent by email. This selects the Don’t Email check box on the Purchase Orders screen (screen ID PO301000) for the particular orders.
Automation Schedules, you can schedule automatic execution of a specific operation for documents matching certain conditions.
1. Open Print/Email Purchase Orders screen (screen ID PO503000): Distribution > Purchase Order > Processes > Daily > Print/Email Purchase Orders
Release Purchase Receipts Use this screen to view and release selected purchase receipt or return documents with the Balanced status. The list of documents displayed on this form includes the purchase receipts or returns created using the Purchase Receipts form (screen ID PO302000).
Automation Schedules, you can schedule automatic execution of a specific operation for documents matching certain conditions.
1. Open Release Purchase Receipts screen (screen ID PO501000): Distribution > Purchase Order > Processes > Daily > Release Purchase Receipts
Release Landed Costs Can view and manually process the landed costs associated with purchase receipts, if the landed costs were not processed automatically.
Automation Schedules, you can schedule automatic execution of a specific operation for documents matching certain conditions.
1. Open Release Landed Costs screen (screen ID PO506000): Distribution > Purchase Order > Processes > Daily > Release Landed Costs

D120 & D260 Purchase Management Page 28 of 53
Update Vendor Prices Can view and mass-‐update the vendor prices that were entered on the Vendor Inventory form (screen ID PO201000). The Update Vendor Prices form lets you make pending prices effective.
Automation Schedules, you can schedule automatic execution of a specific operation for documents matching certain conditions.
1. Open Update Vendor Prices screen (screen ID PO504000): Distribution > Purchase Order > Processes > Recurring > Update Vendor Prices
#9: Purchase Order Learning Objects:
• Learn how to create a Purchase Order
Hands on –Purchase Order
On this screen, you can view existing purchase orders, create new purchase orders, and add lines to purchase orders. You can compose a purchase order based on existing sales orders or by adding separate lines of sales orders. Once an order has been saved, it can be approved, rejected, or canceled by employees assigned to review this purchase order.
Field Descriptions:
Field Description

D120 & D260 Purchase Management Page 29 of 53
Field Description Type The type of the purchase order, which can be one of these options:
• Normal: A purchase order for products and services purchased on credit or paid in cash. This is the most common type of purchase order.
• Drop Ship: A purchase order for goods delivered directly from the vendor to a customer. The list of items and the shipping instructions are copied automatically from drop-‐ship sales orders to the drop-‐ship purchase order.
• Blanket: A purchase order for a large stock quantity that exceeds the quantity currently needed. This order reserves a certain quantity of vendor inventory for future purchasing. Blanket orders may be used to purchase products that are rarely available from vendors or that have special discounts for high volumes.
• Standard: A purchase order that can be issued repeatedly for a certain inventory quantity within a definite period of time. Orders of this type are used when the demand for ordered products is predictable and does not change over time.
• Transfer Request: An order created to fulfill a sales order that requires transferring items from one warehouse to another. For orders of this type, you can select a branch as a vendor.
Order Nbr. The unique reference number of the purchase order, which the system assigns based on the numbering sequence assigned to this type of purchase order, as specified on the Purchase Orders Preferences (PO101000) screen.
Hold A check box that you select to give the purchase order the On Hold status. You can clear the check box to change the status of the order to Open.
Status The system-‐generated status of the purchase order. The following options are available:
• On Hold: Indicates that the purchase order is a draft and can be edited manually.
• Open: Indicates that the order was processed in accordance with the settings on the Purchase Order Preferences screen, but has not been completed yet.
• Pending Approval: Indicates that the purchase order has not been approved by all the assigned persons. The purchase order’s assignment for approval is performed according to the assignment rules defined on the Assignment and Approval Maps (EP205000) screen.
• Rejected: Indicates that the order was rejected by one of its approvers. • Pending Printing: Indicates that printing is required for the document, but
printing has not been performed yet. The purchase order should be printed if the Print Order option on the Vendors (AP303000) screen is selected for the vendor.
• Pending Email: Indicates that the emailing is required for this document, but it has not been performed yet. The purchase order should be printed if the Email Order option on the Vendors screen is selected for the vendor.
• Closed: Indicates that all the ordered goods were received. • Canceled: Indicates that the order was canceled through the Cancel
Order option of the Actions menu. An order with this status cannot be edited, and purchase receipts cannot be based on it.
Approved A check box that indicates (if selected) that the purchase order has been approved. This check box is shown only if the Require Approval check box is selected on the Purchase Orders Preferences screen.
Date The date when the purchase order was created. All transactions included in this document will have this transaction date.

D120 & D260 Purchase Management Page 30 of 53
Field Description Promised On The date when the vendor promised that the products listed in the order will be
received at their destination location. Description A brief description of the purchase order. Vendor The vendor from which the products will be purchased, by its ID. In case of transfer
requests, it is a branch of your organization. Location The vendor location from which the products will be received. Owner The user name of the employee who is responsible for the purchase order. Currency The currency the purchase order will be paid in. Vendor Ref. The reference number of the vendor document related to this purchase order. Line Total The total sum of the Extended Amount entries for all lines in the current purchase
order. This value is calculated by the system and users cannot manually change it. VAT Exempt Total The document total that is exempt from VAT; it is calculated as the taxable amount
for the tax with the Use to calculate tax-‐exempt totals option selected on the Taxes screen.
VAT Taxable Total The document total that is subjected to VAT. Tax Total The total tax amount for all lines added to the current purchase order. This value,
also calculated by the system, is the sum of the tax amounts for each line. Order Total The total sum for the purchase order, including taxes. This read-‐only value is the
sum of the Line Total and Tax Total values. Control Total The order’s total amount (including taxes), which you must enter manually when
you attempt to save the order with the Balanced status. This box appears only if the validation of purchase orders is required, as specified on the Purchase Orders Preferences screen.
Document Details Tab Inventory ID The identifier of the product. You can select non-‐stock items as well as stock items.
Stock items are defined on the Stock Items (IN202500) screen, while non-‐stock items are configured by using the Non-‐Stock Items (IN202000) screen.
Subitem The subitem code, if subitems are used in your system; subitems are not used with non-‐stock items.
Line Type The type of the purchase order line, which can be one of the following options: • Goods for IN: An item ordered for inventory • Non-‐Stock: A non-‐stock item • Service: A service • Freight: An applicable freight amount • Description: A description of the previous line
Warehouse The warehouse to receive the item listed on the order. UOM The unit of measure (UOM) of the item. Order Qty. The quantity of the item that has been ordered. Received Qty. The quantity of the item that has been received. Unit Cost The cost per unit of the inventory item. Extended Amt. The extended amount of the item. The system calculates the extended amount
(which is the unit cost multiplied by the ordered quantity of the product) automatically when the document is saved or its status changes. For documents with the On Hold status, you can edit the value manually—for example, to round the number.
Received Amt. The amount received on this purchase order for this item. The system automatically calculates this value by using the data available on purchase receipts associated with this purchase order, including unreleased purchase receipts.
Alternate ID The alternate ID used for this inventory item. The system uses the Alternate ID value defined in the Vendor Part Number line type on the Cross-‐Reference tab of the Stock Items screen.

D120 & D260 Purchase Management Page 31 of 53
Field Description Line Description A description of the purchase order line, which, by default, is copied from the item’s
description. Min. Receipt (%) The minimum quantity of the item, expressed as a percentage of the ordered
quantity that is required for the item to be accepted at the warehouse. If a smaller quantity arrives, the item will not be accepted. A larger quantity can be accepted as long as its percentage of the ordered quantity is less than the percentage specified as the Max. Receipt (%) value.
Max. Receipt (%) The maximum quantity of the item, expressed as a percentage of the ordered quantity that is required for the item to be accepted at the warehouse. If a larger quantity arrives, the item will not be accepted. A smaller quantity can be accepted as long as its percentage of the ordered quantity is greater than the percentage specified as the Min. Receipt (%) value.
Complete On (%) The minimum percentage of the ordered quantity for the inventory item that must be received to complete the purchase order line.
Receipt Action The action the user should perform when receiving the ordered item if its quantity is greater than the Max. Receipt value or less than the Min. Receipt value. The following options are available:
• Reject: The item specified in this line of the purchase order will be rejected. • Accept but Warn: The item specified in this line of the purchase order will
be accepted, but the system will display a warning. • Accept: The inventory item will be accepted.
Tax Category The tax category assigned to the ordered inventory item. Account The account used to record the purchase; the default account is provided by the
posting class of the item. If the item is a non-‐stock item and has no posting class assigned, it is the expense account associated with the item.
Description The description of the account used. Sub. The subaccount used to record the purchase; the default subaccount is provided by
the posting class of the item. If the item is a non-‐stock item, not assigned to any posting class, the subaccount on the order is generated in accordance with the rule defined in the Combine the Expense Sub. from text box on the Accounts Payable Preferences screen.
Project The project with which this purchase order is associated. Project Task The project task with which this purchase order is associated. Requested The date when the item was requested. Promised The date when the item’s delivery was promised. Completed A check box that indicates (if selected) that the purchasing of the item requested by
this line of the purchase order has been completed. Canceled A check box that indicates (if selected) that this line of the purchase order has been
canceled. Order Type The type of the order this order is related to (for normal orders based on blanket or
standard orders). Order Nbr. The reference number of the blanket or standard order (for normal orders based on
a blanket or standard orders). Tax Details Tab
Will not be discuss in this class
Shipping Instructions Tab

D120 & D260 Purchase Management Page 32 of 53
Field Description Shipping Destination Type
The type of the shipping destination. The default option can be selected by using the Purchase Orders Preferences (PO101000) screen. If needed, you can select an appropriate destination type from the list, which includes the following options: Branch Location (meaning a branch of your company), Customer, Vendor, and Warehouse.
Ship To The particular destination of the selected type. For Branch Location type, the box displays the list of branches. For Customer or Vendor type, the box displays the list of customers or vendors respectively. The box does not appear for the Warehouse type of destination.
Warehouse The particular warehouse to be used as the destination. This box appears only for the Warehouse type of destination.
Override A check box that you select to override (edit) the default contact settings for this shipping destination.
Attention The attention line as it is used in your company’s business letters, which is used to direct the letter to the proper person if the letter is not addressed to any specific person. The box may contain something like Purchase Orders Department or To whom it may concern.
Business Name The vendor’s shipping department name, if it is different from vendor’s business name.
Phone 1 The main phone number of the person to contact on matters related to shipping of this purchase order.
Email The email address of the person to contact on matters related to shipping of this purchase order.
Override A check box that you select to override (that is, to edit) the default address settings for the selected destination.
Validated A check box that indicates (if selected) that the address has been validated with a third-‐party specialized software or service.
Address Line 1 The first line of the address for the selected destination. Address Line 2 The second line of the address for the destination. City The city where the destination is located. Country The country of the destination. State The state where the destination is located. Postal Code The postal code for the destination. FOB Point The FOB point where the title of goods (listed on this purchase order) is transferred
from the vendor to the company. Ship Via The carrier selected to ship the goods for the purchase order.
Shipping Instructions Tab Override A check box that you select to override (edit) the default contact settings for the
vendor. Business Name The business name of the vendor contact for matters related to this purchase order. Attention The attention line as it is used in your company’s business letters, which would be
used to direct the letter to the proper person if the letter is not addressed to any specific person. The box may contain something like Purchase Orders Department or To whom it may concern.
Phone 1 The main phone number of the vendor contact for matters related to this purchase order.
Email The email address of the vendor contact for matters related to this purchase order. Override A check box that you select to override (that is, to edit) the default shipping address
for the vendor.

D120 & D260 Purchase Management Page 33 of 53
Field Description Validated A check box that indicates (if selected) that the address has been validated with a
third-‐party specialized software or service. Address Line 1 The first line of the vendor’s contact address. Address Line 2 The second line of the vendor’s contact address. City The city of the vendor’s contact address. Country The country of the vendor’s contact address. State The state of the vendor’s contact address. Postal Code The postal code of the vendor’s contact address. Terms The specific credit terms to be used for the purchase order. Vendor Tax Zone The tax zone of the vendor’s location.
Approval Details Tab Workgroup The workgroup of the employee assigned to approve the purchase order. Assigned Approver ID The employee ID of the person assigned to approve the purchase order. Employee Name The name of the employee assigned to approve the purchase order. Approver ID The employee ID of the person who actually approved this purchase order. Employee Name The name of the employee who actually approved the purchase order. Date The date of approval. Status The status of the purchase order, which is Pending Approval, Approved, or Rejected,
depending on the approval action performed. Other Information Tab
Branch The branch associated with the purchase order. Sales Order Type The type of the sales order associated with the purchase order. Sales Order Nbr. The identifier of the sales order associated with the purchase order. Requisition Ref. Nbr. The reference number of the requisition document associated with the purchase
order, if any. Workgroup ID The workgroup to which the purchase order was assigned for processing. Don’t Print A check box that indicates (if selected) that the current purchase order should not
be printed. Printed A check box that indicates (if selected) that the current purchase order was printed.
To print the purchase order, select Print Purchase Order from the Reports menu. Don’t Email A check box that indicates (if selected) indicates that the purchase order should not
be emailed. Emailed A check box that indicates (if selected) indicates that the current purchase order was
emailed. To email a purchase order, select Email Purchase Order option, found in the Actions menu.
Open Quantity The difference between the quantities of ordered and received products. The system calculates this value based on released receipts only.
Open Balance The amount of ordered but not received products. The system calculates the open balance based on released receipts only.
Line Types:
This field identifies the type of goods or services to associate with the purchase order. The Line Type field contains one of the following types of goods or services:
Goods for IN: A receipt is entered for the stock item in the Inventory ID field. Updates inventory and matches an Accounts Payable voucher to the receipt. Can only be used with items that are flagged as Stock Items.

D120 & D260 Purchase Management Page 34 of 53
Non-‐Stock: A receipt is entered for the item but does not update inventory. Instead, the costs are expensed, and matches an Accounts Payable voucher to the receipt. Can only be used with items that are flagged as Non-‐Stock items.
Service: A receipt is not entered for the items. Instead, matches an Accounts Payable voucher directly to the purchase order. The costs are expensed and pull the account and subaccount default from the values entered in the Vendors screen (screen ID AP303000). The Inventory ID field can either be populated with a Non-‐Stocked item or empty.
Service is the only Line Type that is permitted to create an AP Bill directly from the Purchase Order. When generating AP Bill, it can be for the full PO quantity or partial quantity. When other items not of Line Type “Service” will not get pushed to AP Bill until the receipt is released.
Freight: Used to enter freight charges. The account and subaccount default from the values entered in the PO Preference screen (screen ID PO101000). A receipt is entered for this option. Don’t populate the Inventory ID field
Description: Used to enter additional lines of description on the purchase order. A receipt is not entered for this option. Don’t populate the Inventory ID field
Normal PO Type Situation:
The warehouse recently did a physical count and determined a need to order the following Stock items from Computer Environment Solution.
Create Purchase Order
Create PO
Receipt
Release PO
Receipt
Normal PO
Email / Print
Purchase Order
Create AP Bill
Update Inventory
1. Open Purchase Order screen (screen ID PO301000): Distribution > Purchase Order > Work Area > Enter > Purchase Order
2. Create a new Purchase Order
Screen Section Field Value Summary Type Normal Summary Date {Today’s Date} Summary Vendor COMPENVIR Transaction Details Inventory ID P000MLG019 Transaction Details Subitem 0-‐0 Transaction Details Warehouse WHOLPURCH

D120 & D260 Purchase Management Page 35 of 53
Screen Section Field Value Transaction Details Quantity 20 Transaction Details UOM PC Transaction Details Unit Cost 91.12 Transaction Details Inventory ID S000000310 Transaction Details Subitem 0-‐0 Transaction Details Warehouse WHOLPURCH Transaction Details Quantity 32 Transaction Details UOM PC Transaction Details Unit Cost 3834.23 Transaction Details Inventory ID D000000033 Transaction Details Subitem 0-‐0 Transaction Details Warehouse WHOLPURCH Transaction Details Quantity 40 Transaction Details UOM PC Transaction Details Unit Cost 524.00 Transaction Details Inventory ID L000000101 Transaction Details Subitem 0-‐0 Transaction Details Warehouse WHOLPURCH Transaction Details Quantity 16 Transaction Details UOM PC Transaction Details Unit Cost 830
3. Save your changes 4. Unselect Hold 5. Enter Control Total
For this class: These settings can be changed on the Vendors screen (APA303000) > Purchase Settings > Default Location Settings section (Print Orders, Send Orders by Email)
a. Click on Other Information tab i. Click on Don’t Email
6. Save your changes 7. Logout then login as BEAUVOIR to approve Purchase Order
a. Open Purchase Orders screen b. Select Order Nbr. recently created c. Click on Actions
i. Select Approve 8. Logout then login as ADMIN to continue process 9. Open Print/Email Purchase Orders screen (screen ID PO503000): Distribution > Purchase Order >
Processes > Daily > Print/Email Purchase Orders 10. Set action to Print Purchase Order
a. Select Purchase Order(s) to print b. Click on Process
Receipt Process: Refer to Purchase Receipt section to finish processing the transaction.

D120 & D260 Purchase Management Page 36 of 53
Drop Ship PO Type This PO type is primarily used with Sales Order type “SO” and PO source “Drip-‐Shipment”. One can create a Purchase Order of Drop Ship but requires the following high level steps to process and requires association to a Sales Order.
Link to Sales Order
Create Purchase Order
Create PO
Receipt
Prepare Drop-Ship Invoice
Email / Print
Invoice
Release Invoice
Drop Ship
Email / Print
Purchase Order
Release PO
Receipt
Create AP Bill
Update Inventory
1. Create PO 2. Email / Print PO 3. Open Sale Order and link to PO 4. Create Receipt 5. Release Receipt
Receipt Process: Refer to Purchase Receipt section to finish processing the transaction.
Blanket PO Type Situation:
After analyzing past years purchases and projected 6 month needs. Our purchasing agent was able to negotiate a great price if we agree to purchase 100 monitor of the next 6 months. We want to create a blanket purchase order to keep track of purchase and reference the blanket order.
Create Blanket
PO
Create Purchase Order
Create PO
Receipt
Release PO
Receipt
Create AP Bill
Blanket PO
Email / Print
Purchase Order Update
Inventory
1. Open Purchase Order screen (screen ID PO301000): Distribution > Purchase Order > Work Area > Enter > Purchase Order
2. Create a new Purchase Order
Screen Section Field Value Summary Type Blanket Summary Date {Today’s Date} Summary Vendor COMPENVIR

D120 & D260 Purchase Management Page 37 of 53
Screen Section Field Value Transaction Details Inventory ID P000MLG019 Transaction Details Subitem 0-‐0 Transaction Details Warehouse WHOLPURCH Transaction Details Quantity 100 Transaction Details UOM PC Transaction Details Unit Cost 76.34
3. Unselect Hold 4. Save your changes
When ready to place order 5. Open Purchase Order Screen (screen ID PO301000): Distribution > Purchase Order > Work Area > Enter >
Purchase Order
Screen Section Field Value Summary Type Normal Summary Date {Today’s Date} Summary Vendor COMPENVIR Transaction Details Inventory ID P000MLG019 Transaction Details Subitem 0-‐0 Transaction Details Warehouse WHOLPURCH Transaction Details Quantity 20 Transaction Details UOM PC
a. Populate the top section in accordance to a normal PO b. On the Document Details tab
i. Click on Add Blanket PO or Add Blanket PO Line hyperlink ii. Change the Order Qty to the correct amount.
6. Enter Control Total 7. Unselect Hold
For this class: These settings can be changed on the Vendors screen (APA303000) > Purchase Settings > Default Location Settings section (Print Orders, Send Orders by Email)
a. Click on Other Information tab iii. Click on Don’t Print iv. Click on Don’t Email
8. Save your changes 9. Logout then login as BEAUVOIR to approve Purchase Order
a. Open Purchase Orders screen b. Select Order Nbr. recently created c. Click on Actions
i. Select Approve 10. Logout then login as ADMIN to continue process

D120 & D260 Purchase Management Page 38 of 53
11. Open Print/Email Purchase Orders screen (screen ID PO503000): Distribution > Purchase Order > Processes > Daily > Print/Email Purchase Orders
12. Set action to Print Purchase Order a. Select Purchase Order(s) to print b. Click on Process
If you return to the Blanket Purchase Order, the received quantity is now equal to the Purchase Order quantity. Has additional POs are created from this Blanket order. The Received quantity will adjust accordingly. The next time selecting Blanket PO to populate the PO document details, the remaining quantity is what populates in the Order Qty. field. The option to run any one of the following 4 reports will provide current blanket PO information (Blanket PO Summary, Blanket PO Details by Vendor, Blanket PO Details by Inventory and Purchase Order Summary).
Receipt Process: Refer to Purchase Receipt section to finish processing the transaction.
Standard PO Type
Situation:
We negotiated a reduce rate for IT Support of 50 hours a month and will be sending a monthly Purchase as approval for the work.
Create Standard
PO
Create Purchase Order
Create PO
Receipt
Release PO
Receipt
Standard PO
Email / Print
Purchase Order
Create AP Bill
Update Inventory
1. Open Purchase Order screen (screen ID PO301000): Distribution > Purchase Order > Work Area > Enter >
Purchase Order 2. Create a new Purchase Order
Screen Section Field Value Summary Type Standard Summary Date {Today’s Date} Summary Vendor ACITAISYST Summary Currency USD Transaction Details Inventory ID LBRGENERAL Transaction Details Quantity 50

D120 & D260 Purchase Management Page 39 of 53
Screen Section Field Value Transaction Details UOM HOUR Transaction Details Unit Cost 85.00
3. Unselect Hold 4. Enter Control Total 5. Save your changes When ready to place order 6. Open Purchase Order Screen (screen ID PO301000): Distribution > Purchase Order > Work Area > Enter >
Purchase Order a. Populate the top section in accordance to a normal PO b. On the Document Details tab
i. Click on Add Blanket PO or Add Blanket PO Line hyperlink ii. Select the correct Standard Order created earlier
7. Enter Control Total 8. Unselect Hold 9. Save your changes 10. Approval Purchase order 11. Print/Email Purchase Order
Receipt Process: Refer to Purchase Receipt section to finish processing the transaction.
Transfer Request PO Type This PO type is primarily used with Sales Order type “SO” and PO source “Transfer to Order”. One can create a PO of Transfer Request but requires the following high level steps to process. Would be quicker to handle in Inventory Transfer screen
Open Sales Order and
Create Shipment
Confirm Shipment
Prepare Invoice
Email / Print
Invoice
Release Invoice
Print Packing Slip
Transfer to Order
Create Purchase Order
Create SO
Transfer Order
Create SO
Shipment
Create Purchase Order
Receipt
Release Purchase Order
Receipt
Email / Print
Purchase Order
Create AP Bill
Update Inventory
Link to Sales Order
1. Create PO 2. Email/Print PO 3. Link to Sale Order 4. Create SO Transfer Order 5. Open Sale Order “TR” 6. Create SO Shipment 7. Confirm SO Shipment 8. Update IN 9. Create PO Receipt 10. Release Receipt

D120 & D260 Purchase Management Page 40 of 53
#10: Purchase Receipts Learning Objects:
• Learn how to receive and return Purchase order items
Hands on – Purchase Order Receipts
Using this screen, you can view the existing purchase receipts and returns. You can also create a new purchase receipt or return based on a purchase order (or lines of purchase orders) and release the document.
Field Descriptions:
Field Description Type The type of the document, which can be one of the following options:
• Receipt: For a purchase receipt to be used for • Return: For a purchase return
Receipt Nbr. The unique reference number of the purchase receipt or return, which the system
automatically assigns according to the numbering sequence specified on the Purchase Orders Preferences screen.
Status The current status of the purchase receipt or return. The following options are available:
• On Hold: This status indicates that the purchase receipt or return is a draft and can be edited manually.
• Balanced: This status indicates that the purchase receipt or return is balanced and can be released. A document with balanced status can be modified or deleted, but changes can be saved only if the control total is equal to the new total amount.
• Released: This status indicates that the receipt or return has been released and cannot be edited or deleted.
Hold A check box that indicates (if selected) that the purchase receipt or return has
the On Hold status. The check box is selected by default for a new receipt if the Hold Receipts on Entry option on the Purchase Orders Preferences screen is selected.
Date The date when the purchase receipt or return was created. All transactions included in this document will have this transaction date.
Post Period The financial period to which transactions from the receipt or return should be posted.
Vendor The vendor from which the items are received or to which they are returned. Location The vendor location from which the items should be received or to which they
should be returned. Currency The currency the vendor uses for billing. Create Bill A check box that you select if the system should create an appropriate bill (or
adjustment) automatically when the purchase receipt or return is released. The bill or adjustment will include all lines from the current receipt or return.
Vendor Ref. The reference number of the vendor document this receipt or return is based on.

D120 & D260 Purchase Management Page 41 of 53
Field Description Total Qty. The total quantity of items received from or returned to the vendor. The system
automatically calculates this value as a sum of all quantities of all inventory items listed in the Document Details tab of this screen.
Control Qty. The total quantity of goods on the receipt or return, which you must enter if the Validate Totals on Entry option on the Purchase Orders Preferences screen is selected for receipts. If the option is not selected, the box is not available.
VAT Exempt Total The document total that is exempt from VAT (is calculated as the taxable amount for the tax with the Use to calculate tax-‐exempt totals option selected on the Taxes screen).
VAT Taxable Total The document total that is subjected to VAT. Total Amt. The total amount calculated for items received from or returned to the vendor. The
system automatically calculates this value as a sum of all amounts of all inventory items listed in the Document Details tab of this screen.
Control Amt. The total amount of the receipt or return, which you manually enter. (This box appears only if the Validate Totals on Entry option on the Purchase Orders Preferences screen is selected.) The system validates that the entered amount equals the total amount, which it calculates automatically. If the values are not equal, the system generates a warning message, and the document can be saved only with the On Hold status.
Document Details Tab Branch The branch for which the item is purchased. Inventory ID The inventory ID of the received item. The Stock Items (IN202500) screen contains
the inventory item’s details. Line Type The type of the purchase receipt line. The value in this column cannot be changed
if it comes from a purchase order or a purchase order line added to the purchase receipt. The available options are listed below:
• Goods for IN: An item ordered for inventory • Non-‐Stock: A non-‐stock item • Freight: An applicable freight expense
Subitem The subitem code for the inventory item, if subitems are used in your system. Warehouse The warehouse where the item is received. Location The location where the item is received. Transaction Descr. The description of the receipt or return transaction. UOM The unit of measure (UOM) used for the purchased item. By default, it is the
purchase unit. Ordered Qty. The quantity of the purchased item (in the specified UOM). Receipt Qty. The quantity of the item received (in the specified UOM). Unit Cost The cost of a unit of the purchased item. Amount The amount of the transaction. Tax Category The tax category assigned to the inventory item. Account The account used to record the purchase. Description The description of this account. Sub. The subaccount used for the transaction. Project The project with which the document is associated. Project Task The project task with which the document is associated. Expiration Date The expiration date of the received item. Lot/Serial Nbr. The lot or serial number assigned to the purchased item. PO Order Type The type of the purchase order related to this purchase receipt. PO Order Nbr. The reference number of the purchase order related to this purchase receipt. PO Line Nbr. The line number of the purchase order related to this line of the purchase receipt.

D120 & D260 Purchase Management Page 42 of 53
Field Description Complete PO Line A check box that indicates to the system (if selected) that the purchase order line
added to this receipt line should be considered completed upon release of this purchase receipt. You use this check box to override the purchase order line completion requirements (the Min. Receipt, Max. Receipt, and Complete On values) set for the order on the Purchase Orders (PO301000) screen.
Tax Details Tab Will not be discuss in this class
Financial Details Tab
Branch The branch involved in billing the vendor. Terms The credit terms used in relations with the vendor. Bill Date The date of the invoice generated for the receipt. Due Date The due date of the bill. Cash Discount Date The date until which the cash discount from the vendor is available for the bill. Cash Discount The cash discount amount. Vendor Tax Zone The tax zone of the vendor. Unbilled Balance The purchase receipt amount not yet included in the existing bills. Unbilled Quantity The quantity of items on this receipt that are not yet billed. Unbilled Line Total The line amount that is not yet included in the bills. Unbilled Tax Total The tax amount on the purchase receipt that is not yet included in the bills. Workgroup The workgroup to which the purchase receipt is assigned. Owner The owner of this purchase receipt.
Landed Costs Tab Landed Cost Code The landed cost code associated with the purchase receipt. These codes
are defined on the Landed Cost Codes (PO202000) form Description The description of the landed cost code. AP Bill Nbr. The number of the Accounts Payable document for the landed cost. Vendor The vendor for which the landed cost is applied. Location The location of the selected vendor. AP Bill Date The date of the Accounts Payable bill for the landed cost. Currency The currency used for the landed cost. Amount The amount of the landed cost. Tax Category The tax category applicable to the landed cost of the type. By default, it’s
the tax category associated with vendor’s tax zone. Terms The credit terms used in relations with the landed cost vendor. Inventory ID The inventory ID of a non-stock item that defines the landed costs
associated with this code. AP Doc. Type The type of the Accounts Payable document generated for the landed cost. AP Ref. Nbr. The reference number of the AP document generated for the landed cost. IN Doc. Type The type of the document generated in the Inventory module for this
landed cost. IN Ref. Nbr. The reference number of the document generated in the Inventory
module for this landed cost. Postpone AP Bill Creation
A check box that indicates (if selected) that a related Accounts Payable bill should be created when the vendor’s bill is actually received.
Acumatica ERP provides the functionality of assignment maps for assigning receipts to employees.

D120 & D260 Purchase Management Page 43 of 53
There is two options to create a receipt. From the Purchase order, click on Actions and select Enter PO Receipt. The other option is from Purchase Receipts screen and Add PO.
Situation:
Receiving department verified quantity and put away stock items from an order received today. Now need to enter into Acumatica system.
Screen Section Field Value Summary Date {Today’s Date} Summary Post Period {Default} Summary Vendor COMPENVIR Summary Vendor Ref CV34567 Transaction Details Inventory ID P000MLG019 Transaction Details Location WR01 Transaction Details Receipt Qty 20
Option 1:
1. Open Purchase Order screen (screen ID PO301000): Distribution > Purchase Order > Work Area > Enter > Purchase Order
2. Enter / Select correct Order Nbr 3. Click on Actions button and select Enter PO Receipt 4. Purchase Receipts screen (screen ID PO302000), automatically loads with Receipt Number: Distribution >
Purchase Order > Work Area > Enter > Purchase Receipts Option 2:
1. Open Purchase Receipts screen (screen ID PO302000): Distribution > Purchase Order > Work Area > Enter > Purchase Receipts
2. Enter/Select Vendor 3. In the Documents Details tab
a. Click on Add PO b. Select Order Number with items to populate the Receipt c. Click on Add &Close button d. Enter / Select the correct Location for each item
5. Enter Vendor Ref. 6. Enter Control Qty. 7. Enter Control Amt. 8. Save your changes 9. Unselect Hold 10. Click on Release button

D120 & D260 Purchase Management Page 44 of 53
Do not have to go through the following steps if Purchase Orders Preferences > General Settings tab > Release IN Documents Automatically is CHECKED
11. Open Release IN Documents screen (screen ID IN501000): Distribution > Inventory > Processes > Daily > Release IN Documents
12. Select Reference Nbr to release. 13. Click on Release button
Situation:
Quality Control verify the products received and determine a couple items came damaged. We have received a RMA and need to return the items.
1. Open Purchase Receipts screen (screen ID PO302000): Distribution > Purchase Order > Work Area > Enter > Purchase Receipts
Screen Section Field Value Summary Type Return Summary Date {Today’s Date} Summary Post Period {Default} Summary Vendor COMPENVIR Summary Vendor Ref CVR87654 Transaction Details Inventory ID P000MLG019 Transaction Details Location R01C01L02 Transaction Details Receipt Qty. 2
2. Change Type 3. Enter Vendor 4. Enter Vendor Ref. 5. In the Documents Details tab
a. Click on Add PO b. Select Order Number with items to populate the Receipt c. Click on Add&Close button d. Enter / Select the correct Location for each item
6. Enter Receipt Qty. 7. Enter Total Qty. 8. Enter Control Amt. 9. Unselect Hold 10. Click on Release button
Do not have to go through the following steps if Purchase Orders Preferences > General Settings tab > Release IN Documents Automatically is CHECKED
11. Open Release IN Documents screen (screen ID IN501000): Distribution > Inventory > Processes > Daily > Release IN Documents
12. Select Reference Nbr to release.

D120 & D260 Purchase Management Page 45 of 53
13. Click on Release button
Now can go back to Purchase order and see PO is open and waiting to receive the final 2 items. Run one of the several reports available to see the current status of this and other Purchase Orders.
Situation:
Receiving department just verified quantity and put away stock items from an order received today. They noticed some items are on back order. Now need to enter into Acumatica system to mark which items have been received and which items are on back ordered.
Partial PO Receipt: Screen Section Field Value Summary Date {Today’s Date} Summary Post Period {Default} Summary Vendor COMPENVIR Summary Vendor Ref CV781234 Transaction Details Inventory ID P000MLG019 Transaction Details Warehouse WHOLEPURCH Transaction Details Location WR01 Transaction Details Receipt Qty. 20 Transaction Details Inventory ID S000000310 Transaction Details Warehouse WHOLEPURCH Transaction Details Location WR01 Transaction Details Receipt Qty. 15 Transaction Details Inventory ID D000000033 Transaction Details Warehouse WHOLEPURCH Transaction Details Location WR01 Transaction Details Receipt Qty. 10 Transaction Details Inventory ID L000000101 Transaction Details Warehouse WHOLEPURCH Transaction Details Location WR01 Transaction Details Receipt Qty. 25
1. Open Purchase Receipts screen (screen ID PO302000): Distribution > Purchase Order > Work Area > Enter > Purchase Receipts
2. Enter/Select Vendor 3. In the Documents Details tab
a. Click on Add PO b. Select Order Number with items to populate the Receipt c. Click on Add &Close button

D120 & D260 Purchase Management Page 46 of 53
d. Enter / Select the correct Location for each item 4. Enter Vendor Ref. 5. Enter Control Qty. 6. Enter Control Amt. 7. Save your changes 8. Unselect Hold 9. Click on Release button
Now can go back to Purchase order and see PO is open and waiting to receive back order items. Run one of the several reports available to see the current status of this and other Purchase Orders.
Landed Costs: Situation:
Receiving department just verified quantity and put away stock items from an order received today. The items received is based on a purchase order partially received earlier. This time we also received landed cost information and need to add while entering the receipt.
Screen Section Field Value Summary Inventory ID L000000101 GL Accounts Landed Cost Variance Account 604000 GL Accounts Landed Cost Variance Sub US-‐00-‐SS-‐00-‐000
1. Open Stock Items screen (screen ID IN202500): Distribution > Inventory > Work Area > Manage > Stock Items
a. Click on GL Accounts tab b. Populate the Landed Cost Account and Sub fields
Screen Section Field Value Summary Date {Today’s Date} Summary Post Period {Default} Summary Vendor COMPENVIR Summary Vendor Ref CV7998 Transaction Details Inventory ID L000000101 Transaction Details Warehouse WHOLEPURCH Transaction Details Location WR01 Transaction Details Receipt Qty. 6 Landed Costs Landed Cost Code TRADEMARK Landed Costs Amount 60 Landed Costs Postpone AP Bill Creation {Checked}

D120 & D260 Purchase Management Page 47 of 53
2. Open Purchase Receipts screen (screen ID PO302000): Distribution > Purchase Order > Work Area > Enter
> Purchase Receipts a. Click on Landed Costs tab
i. Populate required fields ii. Determine if need to Postpone creation of AP Bill creation of the Landed Cost.
1. If true then check the box. Use this option when there are a lot of landed costs and the Landed Cost Vendor sends vouchers with multiple transactions from different receipts. 2. When ready go to Bills and Adjustments screen (screen ID AP301000) to finish
the Landed Cost process b. Release PO Receipt as normal.
Screen Section Field Value Summary Type Bill Summary Date {Today’s Date} Summary Post Period {Default} Summary Vendor COMPENVIR Summary Vendor Ref CV7998 Landed Costs Landed Cost Code TRADEMARK Landed Costs Amount 60 Landed Costs PO Receipt Nbr {Default} Landed Costs Landed Cost Code TRADEMARK Landed Costs Amount 100 Landed Costs PO Receipt Nbr {First Partial PO Receipt #}
1. Open Bills and Adjustments screen (screen ID AP301000): Finance > Accounts Payable > Work Area > Enter > Bills and Adjustments
a. Enter valid landed cost Vendor b. Enter valid Vendor Ref c. Click on Landed Cost tab
i. Option 1 1. In the event the Landed Cost was enter into PO Receipt but the Postpone AP
Bill creation was checked. Click on Add Postpone Landed Cost link to select and add the landed costs.
ii. Option 2 1. Enter / Select Landed Cost Code 2. Enter line Amount 3. Enter / Select PO Receipt Nbr.
d. Enter document Amount e. Uncheck Hold f. Click Release
#11: AP Bills and Adjustments Learning Objects:

D120 & D260 Purchase Management Page 48 of 53
• Learn how to create AP Bills and Adjustments
Hands on – AP Bills and Adjustments
Using this screen, you can view the existing purchase receipts and returns. You can also create a new purchase receipt or return based on a purchase order (or lines of purchase orders) and release the document.
Creating AP Bill or Adjustment from Release Receipt Process
1. Open Purchase Receipts screen (screen ID PO302000): Distribution > Purchase Order > Work Area > Enter > Purchase Receipts Before Releasing Receipts
a. Make sure Create Bill Box is checked b. Click on Release button
Creating AP Bill or Adjustment after Release Receipt Process
The Receipt was Release with the Create Bill boxed unchecked
1. Open Purchase Receipts screen (screen ID PO302000): Distribution > Purchase Order > Work Area > Enter > Purchase Receipts
a. Click on Actions > Enter AP Bill
2. Open Bills and Adjustments screen (screen ID AP301000): Finance > Accounts Payable > Work Area > Enter > Bills and Adjustments
a. Enter Vendor b. In the Document Details section, click on one of the following
i. Add PO Receipt – All Items released from PO Receipt ii. Add PO Receipt Line – Individual Items released from PO Receipt iii. Add PO -‐ For PO Line Type: Service
Creating AP Bill or Adjustment after Release Receipt Process
When creating Purchase with items as Line Type “Service”
1. Open Purchase Orders screen (screen ID PO301000): Distribution > Purchase Order > Work Area > Enter > Purchase Orders
a. Click on Actions > Enter AP Bill
1. Open Bills and Adjustments screen (screen ID AP301000): Finance > Accounts Payable > Work Area > Enter > Bills and Adjustments
a. Enter Vendor b. In the Document Details section, click on
i. Add PO -‐ For PO Line Type: Service

D120 & D260 Purchase Management Page 49 of 53
Bar Code In Acumatica ERP, you can use product barcodes as alternative identifiers for inventory items. For details on allowed types of alternative IDs. You can enter barcodes for items on the Stock Items form, the Cross-‐References tab, manually or by scanning them. The scanner’s software converts the scanned barcode to an alphanumeric string that is immediately visible in the appropriate box as if it had been typed. You can add any number of different barcode strings to the item record in the database. Barcodes are not necessarily associated with particular vendors or customers.
Barcode scanning can be used to effectively receive products at a warehouse and enter warehouse location information for them.
From the Purchase Receipts form (PO302000), you can invoke the Add Receipt Line dialog box, which has been designed for the following scenario: You scan a product barcode, and the system finds the item record, brings up the item information with the quantity copied from a matching purchase order, and automatically adds a new line to the receipt.
To use the dialog box for barcode scanning, make sure the Add Receipt Line Automatically option is selected. Then, once the dialog box elements are filled in, the system creates a new line automatically.
If you select the Add One Unit per Barcode check box in the dialog box, each time you scan a barcode, the item quantity for the receipt will be increased by one unit. If you clear the check box, when a user scans an item barcode, the system searches for a purchase order that matches the vendor and inventory ID associated with the barcode, and inserts the quantity of the item from the purchase order. If no such order is found, the system inserts one unit.
If no item is found in the system after the item barcode has been scanned, you can enter the inventory ID of the item manually. In this case, this new barcode is automatically associated with the item.
To further simplify data entry in warehouses, you can print barcodes for warehouse IDs and warehouse location IDs. You can print barcodes for such identifiers by using customized Acumatica ERP reports.
Barcodes of the warehouse and its locations also can be used when you create receipts using the following scenarios:
• If you create receipts at a desk, print barcodes on a sheet of paper, and put it close at hand. When you’re creating a receipt line for an item, scan the barcode from the item, warehouse, and location barcodes from the paper.
• If you generally create receipts from a cart (equipped with a scanner and a computer) after you place items in appropriate locations, perform the following actions prior to receiving goods: print location IDs as barcodes on special labels, and stick them to appropriate shelves, bins, or other storage structures available in your warehouse. Then, take items one-‐by-‐one from the cart, and read the item barcode and location barcode from the shelf. Appropriate receipt lines will be added automatically.

D120 & D260 Purchase Management Page 50 of 53
Appendix A: Reports With the wide variety of reports for the Purchase Orders module, you can promptly get detailed information about the purchase orders, purchase receipts, and returns. You can also analyze the data by various criteria and track the purchase of goods at different warehouses and locations.
Because the Purchase Orders module is tightly integrated with other modules—such as Accounts Payable, Sales Orders, General Ledger, and Taxes—you can find and analyze the precise information you need. Flexible selection
options and data links allow you to easily drill down from a financial report to any supporting details.
Because Purchase Orders reports are generated by user request, they run on only accounts and subaccounts that the user is authorized to access, based on the user’s roles and membership in restriction groups.
All Purchase Orders reports can be generated in different formats, including PDFs, and can be printed or sent by email. Some reports generated as PDFs require digital signatures; see Site Security Options for more details.
The Purchase Orders module includes the following reports:
• Forms
o Purchase Order (PO641000): Displays the purchase orders created in the Purchase Orders module, and allows you to print and email them.
o Purchase Receipt (PO646000): Displays the purchase receipts created in the Purchase Orders module, and allows you to print and email them.
• Audit
o Blanket Purchase Order Summary (PO641500): Displays summary information about blanket purchase orders.
o Blanket Purchase Order Details By Vendor (PO642000): Gives you detailed information about blanket purchase orders. The data in this report is grouped by vendor.
o Blanket Purchase Order Details By Inventory Item (PO642500): Shows detailed information about blanket purchase orders. The data in this report is grouped by inventory item.
o Purchase Order Summary (PO610500): For the time interval you select, shows summary information about purchase orders that are neither closed nor canceled.
o Purchase Order Details by Vendor (PO611000): For the time interval you select, displays detailed information about purchase orders that are neither closed nor canceled. The data in this report is grouped by vendor.
o Purchase Order Details by Inventory Item (PO611500): For the time interval you select, gives you detailed information about purchase orders that are neither closed nor canceled. The data in this report is grouped by inventory item.
o Purchase Order Details by Account (PO612000): For the time interval you select, gives you detailed information about purchase orders that are neither closed nor canceled. The data in this report is grouped by the account specified in the purchase order.

D120 & D260 Purchase Management Page 51 of 53
o Purchase Receipt Summary (PO620500): Displays detailed information about purchase receipts and returns created in the Purchase Orders module.
o Purchase Receipt Details By Vendor (PO621000): Presents detailed information about purchase receipts and returns created in the Purchase Orders module, with the data grouped by vendor.
o Purchase Receipt Billing Summary (PO631500): Provides summary information for the bills generated upon the purchase receipts and returns.
o Purchase Receipt Billing Details (PO632000): Displays detailed information for the bills generated upon the purchase receipts and returns.
o Purchase Receipt Accrual Details (PO631000): Shows detailed information for the purchase receipts and returns by the accounts they used.
o Purchase Receipt Accrual Summary (PO630500): Displays summary information for the purchase receipts and returns by the accounts they used.
o Purchase Receipt History (PO643000): Shows detailed information about the receipts performed on purchase orders.

D120 & D260 Purchase Management Page 52 of 53
Appendix B: Accounting Transactions Normal Purchase Order, Receipt and AP Bill and Adjustment: *** Return does reversing entry Accounts Payable
Credit: Accounts Payable Debit: PO Accrual, Taxes Payable
Inventory Credit: PO Accrual, Land Cost Accrual Debit: Inventory
Drop Purchase Order, Receipt and AP Bill and Adjustment: *** Return does reversing entry Accounts Payable
Credit: Accounts Payable Debit: PO Accrual, Taxes Payable
Inventory Debit: Goods In transit Credit: PO Accrual
PO Transfer Request Inventory
Debit: Inventory Credit: Goods In transit
*** Creating a Sales Order Invoice relieves Inventory of cost and quantity
Blanket and Standard Order do not create Accounting entries on initial document creation. Once document is converted into Normal Purchase Order or Drop Ship and process. The above accounting rules are created.
Accounts Payable: Looks to Vendor screen (AP303000) > GL Accounts > AP Account and AP Subaccount
PO Accrual: Looks to the Stock Item screen (IN202500) > Posting Class to determine where to pull the Account and Subaccount values from
Taxes Payable: Pulls from Taxes screen (TX205000) > GL Accounts tab
Inventory: Looks to the Stock Item screen (IN202500) > Posting Class to determine where to pull the Account and Subaccount values from
Non-‐Stock items: Pulls from Accounts Payable Preference screen (AP101000) > Data Entry Settings > Combine Expense Sub. from
Freight Expense: Pulls from Purchase Order Preference screen (PO101000)
Landed Cost Expense: Pulls from Landed Cost Codes screen (PO202000) In-‐Transit: Pulls from Inventory Preference screen (IN101000)

D120 & D260 Purchase Management Page 53 of 53
Appendix C: Flow Charts
Create Purchase Order
Create PO
Receipt
Release PO
Receipt
Normal PO
Email / Print
Purchase Order
Create AP Bill
Update Inventory
Create Standard
PO
Create Purchase Order
Create PO
Receipt
Release PO
Receipt
Standard PO
Email / Print
Purchase Order
Create AP Bill
Update Inventory
Create Blanket
PO
Create Purchase Order
Create PO
Receipt
Release PO
Receipt
Create AP Bill
Blanket PO
Email / Print
Purchase Order Update
Inventory
Link to Sales Order
Create Purchase Order
Create PO
Receipt
Prepare Drop-Ship Invoice
Email / Print
Invoice
Release Invoice
Drop Ship
Email / Print
Purchase Order
Release PO
Receipt
Create AP Bill
Update Inventory
Open Sales Order and
Create Shipment
Confirm Shipment
Prepare Invoice
Email / Print
Invoice
Release Invoice
Print Packing Slip
Transfer to Order
Create Purchase Order
Create SO
Transfer Order
Create SO
Shipment
Create Purchase Order
Receipt
Release Purchase Order
Receipt
Email / Print
Purchase Order
Create AP Bill
Update Inventory
Link to Sales Order