Direct Recording - Rolandcms.rolandus.com/assets/media/pdf/MV8800WS06.pdf · The MV-8800’s Direct...
10
MV-8800 Production Studio © 2007 Roland Corporation U.S. All rights reserved. No part of this publication may be reproduced in any form without the written permission of Roland Corporation U.S. MV8800WS06 Direct Recording ®ÂØÒňΠ® Workshop
Transcript of Direct Recording - Rolandcms.rolandus.com/assets/media/pdf/MV8800WS06.pdf · The MV-8800’s Direct...

�
MV-8800 Production Studio
© 2007 Roland Corporation U.S.All rights reserved. No part of this publication may be reproduced in any form without the
written permission of Roland Corporation U.S.
MV8800WS06
Direct Recording
®ÂØÒňή Workshop

�
About the MV-8800 Workshop Series
Roland’s MV-8800 Production Studio is packed with features for making music. It’s a heavy-duty sampler that can do all sorts of things with sounds you sample or import. Its sequencer has 136 tracks for MIDI sequencing and playing back audio, and its set of editing tools is deep. It’s a great box for performing—using its pads or an attached MIDI keyboard—and, of course, it can even burn a CD of your final master mix.
Each MV-8800 Workshop Series booklet focuses on one MV-8800 topic, and is intended as a companion to your MV-8800 Owner’s Manuals.
About This Booklet
The MV-8800’s Direct Recording feature lets you record vocals or instruments into the MV-8800 alongside your sequenced tracks—there’s no sampling involved, just straight-ahead recording. This booklet explains how to use Direct Recording.
The Buttons, the LCD, or a VGA?
On the MV-8800, you can work on the built-in color LCD or on an optional VGA monitor. You can use the MV-8800’s front-panel controls, or a mouse on your VGA screen. No matter how you like to work, there’s an easy way to get things done.
Probably the best idea is to work primarily with a mouse on a VGA, using the MV-8800’s buttons to quickly get in and out of MV-8800 screens. The procedures in this booklet typically assume you’ll be working this way.
If you’re not, don’t worry, because the VGA windows and LCD screens are essentially the same. There are clickable VGA icons for all of the MV-8800’s buttons. You can also press an onscreen button by clicking your mouse or by pressing an F button on the MV-8800. The main difference has to do with how you deal with settings—or “parameters”—and how you select objects.
If you’re using a mouse: If you’re using the MV-8800’s buttons:
You select parameters and objects with a left click. You change the selected
parameter’s value by turning the scroll wheel. You can display an object’s menu by
right-clicking the object.
You select parameters and objects with the 3, 4, 5, and 6 CURSOR buttons.
Change a selected parameter’s value by turning the VALUE dial or by pressing DEC
and INC.
Left click Right click
Scrollwheel
Understanding the Symbols in This Booklet
Throughout this booklet, you’ll come across information that deserves special attention—that’s the reason it’s labeled with one of the following symbols.
A note is something that adds information about the topic at hand.
A tip offers suggestions for using the feature being discussed.
Warnings contain important information that can help you avoid possible damage to your equipment, your data, or yourself.
Hot Links
Each Workshop booklet is meant to be read in order from beginning to end. However, if we mention an upcoming section—and you see this arrow—you can click the arrow to jump there immediately.

�
Where Direct Recording Gets Recorded
When you record vocals or instruments with Direct Recording, the MV-8800 stashes your audio in its sample RAM, and holds it there until you save your current project. When you save the project, everything in sample RAM is saved onto the MV-8800’s hard drive in the project’s SAMPLE folder.
Since your recordings aren’t permanently saved until you save their project, it’s critically important that you save the project before turning off the MV-8800 or loading another project. If you don’t save the project first, your recordings will be lost.
Obviously, the larger your sample RAM, the more recordings you can fit in there. The MV-8800 ships with a generous 128 MB of sample RAM, which amounts to over 25 minutes of mono Direct Recording, or just shy of 13 minutes of stereo Direct Recording. You can expand your sample RAM up to 512 MB, as described in the MV-8800 Owner’s Manual.
Direct Recording shares sample RAM with anything you’ve sampled, as well as with the samples played by any instruments you’ve loaded. As a result, when you’ve got samples loaded, there’ll be less Direct Recording time available.
The Direct Recording Session
The Direct Recording Hookup
Connect your mic(s) or instrument to the MV-8800 using its rear-panel ANALOG INPUT jacks.
When you’re Direct Recording, keep the included shorting pin inserted in the PHONO jacks.
If you’re using:
a single mic, an electric guitar, bass, or other single-output instrument—connect it to the MIC/LINE L jack.
a keyboard or other stereo instrument—connect its left and right outputs to the MIC/LINE L and R jacks, respectively.
If you’ve installed an optional MV8-OP1 Audio I/O Expansion board in your MV-8800, you can connect a digital device—such as a synth with digital outputs—to one of the MV8-OP1’s digital inputs.
Turning On Your Inputs
After making your connection, you’ve got to tell the MV-8800 which jacks you want to use.
Press the SYSTEM button.
Select Global from the SYSTEM menu to display the GLOBAL window.
If you’ve installed an optional MV8-OP1 expansion board, you’ll see its digital connectors here.
For recording from the MV-8800’s analog input jacks, set Input Type to:
Analog—for stereo recording from both inputs.
Analog(L+R)—to record in mono using both inputs.
Analog—to record in mono from the left input only.
•
•
��
��
��
•••

�
The Input Select parameter is automatically set to Analog unless you’ve installed an MV8-OP1. If you have, you can select a stereo digital input: Coaxial, Optical, or R-BUS.
Setting Your Direct Recording Level
Press the MIXER button to display the MIXER (AUX/FX/AUDIO PHRASE/INPUT) window.
IN (A) level
If the AUX/Phrs/In pane isn’t visible—as shown here—click its tab at the top of the window to bring it forward.
Set the IN (A) level to 100, as shown above.
While listening to the sound you want to record, adjust the front-panel SENS knob for each analog input you’re using so the level shown in the IN (A) meters onscreen is as loud as possible without lighting its red Clip indicators.
Clip indicators
��
��
��
If you’re recording in stereo, set the L and R knobs to the same position.
Once they light, the Clip indicators stay lit to make sure you see that there’s been a too-loud moment even if you didn’t see it happening. To switch the Clip indicators back off, click the Reset Peak button.
The Direct Recording Setup
Select the pattern or song you want to record into.
Select an unused audio track. Each audio track has a little audio symbol to its left, shown here.
If you have no available audio tracks, press the MENU button and select Add Audio Tracks... to create the desired number of new audio tracks.
Use the MEAS 7 and/or 8 buttons to move to the location in the project where you want to begin recording.
Press the REC button—the metronome starts and the RECORDING PARAMETER (AUDIO) window appears.
We’re in Pattern mode, so this is the PATTERN RECORDING PARAMETER (AUDIO) window. If you’re in Song mode, the RECORDING PARAMETER (AUDIO) window is displayed, and the Pattern Length and Loop Rest parameters aren’t visible.
��
��
��
��
�
Set:
Rec Mode—to Direct Rec.
Sample Type—to:
Mono—if you’re recording only from the MIC/LINE L jack.
Stereo—if you’re recording from both the MIC/LINE L and R jacks, the two PHONO inputs, or a digital input.
Count In—to the number of measures you want to hear before recording actually begins.
Pattern Length (in Pattern mode)—to change the length of the current pattern.
Metronome Mode—as desired. It can play during recording only, during recording and playback, or all the time.
If you’re recording along to already-sequenced tracks, you won’t want to hear the metronome. To turn it off, set Metronome Mode to Off. To learn more about the metronome, see the MV-8800 Owner’s Manual.
We’ll discuss two of the remaining parameters in the “Auto Punch” section. (Pattern mode’s Loop Rest parameter has no bearing on, and Input Quantize parameter isn’t available for, direct recording.)
The Direct Recording Process
Press the PLAY button to begin recording. The countoff measures go by and recording starts.
When you’ve finished recording, press the STOP button.
To play back your recording, press the TOP button or use the 7 and 8 buttons to move to the beginning of your recording, and then hit PLAY.
If you don’t like what you’ve recorded, press the UNDO/REDO button to get rid of it. When you do this, UNDO/REDO flashes to show that you can change your mind and get back your recording by pressing UNDO/REDO once more. You can change your mind until you make your next recording.
��
••
••
•
•
•
��
��
��
Once you’ve got a recording you like, press PROJECT, and then select Save Project to store your work on the MV-8800 hard drive. This ensures that you won’t forget to save the project later. Use Save Project often as you work.
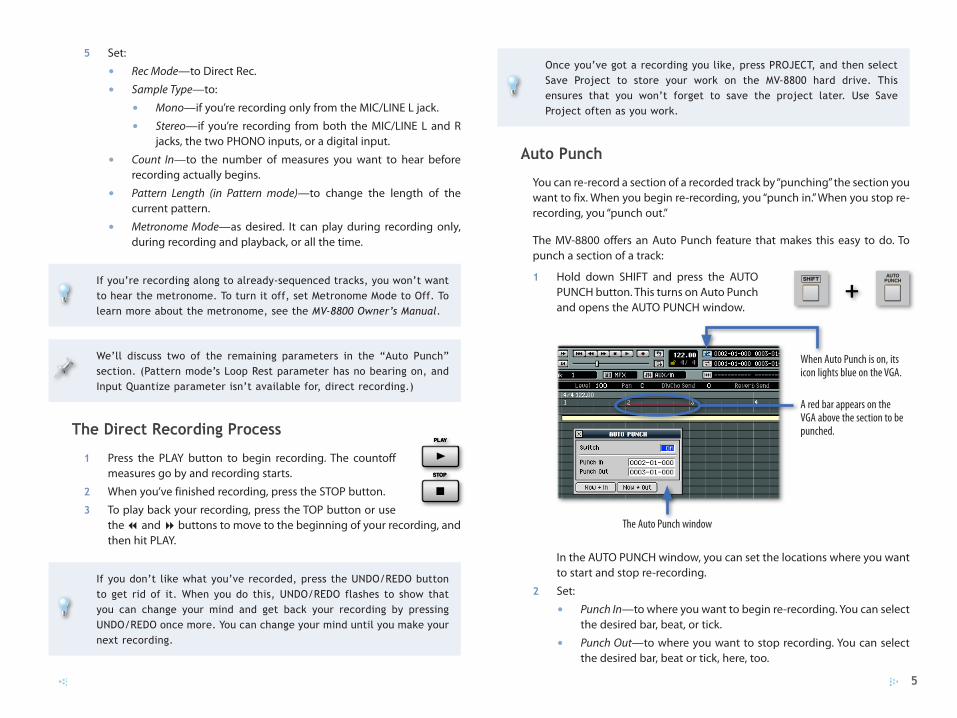
Auto Punch
You can re-record a section of a recorded track by “punching” the section you want to fix. When you begin re-recording, you “punch in.” When you stop re-recording, you “punch out.”
The MV-8800 offers an Auto Punch feature that makes this easy to do. To punch a section of a track:
Hold down SHIFT and press the AUTO PUNCH button. This turns on Auto Punch and opens the AUTO PUNCH window.
When Auto Punch is on, its icon lights blue on the VGA.
A red bar appears on the VGA above the section to be punched.
The Auto Punch window
In the AUTO PUNCH window, you can set the locations where you want to start and stop re-recording.
Set:
Punch In—to where you want to begin re-recording. You can select the desired bar, beat, or tick.
Punch Out—to where you want to stop recording. You can select the desired bar, beat or tick, here, too.
��
��
•
•
+

�
If you don’t want to be bothered with bars, beats, and ticks, just play the section you want to punch. Click the AUTO PUNCH window’s Now In button when you get to the place where you want to start recording, and click the Now Out button where you want to stop recording.
When you’re ready, press the REC button—you’ll see your punch points in the RECORDING PARAMETER (AUDIO) window.
Use 7 and/or 8 to move to a place before the section you want to punch.
Press PLAY—the MV-8800 waits to actually begin recording until it reaches the Punch In location, and automatically stops recording when it reaches the Punch Out location.
Press STOP when you’re done.
Naming the Track
It’s a good idea to name each recorded track so you don’t have to remember which one it is. To name a track:
Double-click on the track’s name to display the EDIT TRACK NAME window, or press MENU and select Track Name...
Click the jump button to learn how to name tracks when you’re working on the built-in LCD.
In the EDIT TRACK NAME window, name the track as desired and click OK.
��
��
��
��
��
��
Editing a Direct Recording
You can edit your recording the same way you’d edit the audio on any MV-8800 audio track. A detailed discussion of track-editing is beyond the scope of this booklet, but here are a few tips to get you started.
See the MV-8800 Owner’s Manual for details on editing sequence tracks.
Selecting What You Want to Edit
Click the jump button to learn how to edit audio when you’re working on the built-in LCD.
To select a recording for editing on the VGA, click directly on the recording so it turns dark.
To select a portion of a recording for editing:
Click the audio symbol next to its track name so it turns dark.
Select the Range tool and drag from left to right over the portion of the recording you want to edit.
Remember to click the Arrow button to the left of the Range tool once you’ve finished selecting the portion of the recording you want to edit.
��
�� The Range tool

�
The Edit Pop-Up
When you’ve selected a recording—or a portion of it—right-click it with your mouse to display the Edit pop-up. It’s filled with editing options for the recording.
The same menu appears when you’re editing MIDI tracks—the items that aren’t available when you’re working with audio are for MIDI editing only.
This menu item: Allows you to:
Move... move the selected audio to a different time location and/or track.
Copy & Paste... copy the selected audio to a different time location and/or track, replacing whatever’s already there.
Copy & Insert... copy the selected audio to a different time location and/or track, inserting it at the desired location. If audio’s already there, that audio is pushed back in time so it starts at the end of the inserted audio.
Erase replace the selected audio with silence.
Cut delete the selected audio, sliding any audio that follows it into its place.
Copy as Audio Phrase... assign the selected audio to one of the MV-8800 pads as an audio phrase.
Audio Event Parameter control the behavior of the recording. We’ll get into the AUDIO EVENT PARAMETER window in detail in “Audio Event Parameters.”
Paste MIDI Clip becomes available in Song mode. Copy as New Pattern and Paste Pattern have to do with managing MV-8800 patterns. We’re not concerned with any of these menu items during direct recording.
Dragging, Dropping
You can also use your mouse to move and/or copy the recording on your VGA. To:
move the recording—click the recording and drag it to the desired position.
copy the recording—hold down SHIFT and drag a copy of the recording to the desired position.
Audio Event Parameters
When you select Audio Event Parameter from the Edit pop-up, the AUDIO EVENT PARAMETER window appears.
This parameter: Sets:
Level the basic level of the recording.
Coarse Tune the tuning of the recording, in keyboard steps, or “semitones.”
Fine Tune the tuning of the recording, in 100ths of a semitone.
BPM Sync whether or not the recording’s tempo is locked to the sequence tempo so it automatically stays in time even if the sequence tempo changes after Direct Recording.
Stretch Type the algorithm the MV-8800 uses to keep the recording in time when BPM Sync is on. Higher values result in higher audio quality. If you’re not sure of the setting to use, set this to Auto.
•
•

8
This parameter: Sets:
BPM the tempo of the recording. This is set by default to the sequence’s tempo during Direct Recording.
Click the onscreen Move button to change the recording’s starting location. Click the Sample Edit button to display a window where you can—among other things—normalize the recording to make it as loud as possible, or convert a stereo recording into a mono one.
Working on the Built-In LCD: Special Cases
Usually—as we’ve said—there are only small differences between working on a VGA or on the built-in LCD. This booklet contains a few exceptions, though: naming a track, selecting audio for editing, and opening the Edit Pop-Up menu. The following sections explain how to do these things on the LCD.
If you’re working on a VGA, you can jump ahead—you’ve already learned how to do these things.
Naming a Track on the Built-In LCD
Press PATTERN or SONG to display the desired screen.
Use 6 or 5 to select the desired track.
The track label becomes dark when the track is
selected.
��
��
Press MENU, and select Track Name... to open the EDIT TRACK NAME window.
Use the VALUE dial and the 3 and 4 buttons to enter the name you want.
Press F5 (OK) when you’re done.
If you jumped to this section from Page 6, click here to jump back.
Editing on the Built-In LCD
Selecting a Recorded Region for Editing
Press PATTERN or SONG to display the desired screen.
Press F5 (Seq Edit) to display the SEQUENCE EDIT screen.
Use 6 or 5 to select the track you want to edit, and then press F1 (Track Sel) so a small white square appears to the right of the track’s name. If you’d like to edit all of your tracks at the same time, hit F2 (All Track Sel).
If you see any numbers in the Region In/Out box, press F3 (Rgn In/Out) once or twice to remove them.
Press F3 (Rgn In/Out) to clear this box.
This little white square means the track is selected for editing.
Move to the beginning of the section you want to edit, and then press F3 (Rgn In/Out).
��
��
��
��
��
��
��
��

�
Move to the end of the section you want to edit—as you do, the selected region becomes highlighted.
Press F3 (Rgn In/Out) again. If you’d like to start over again, hit F3 (Rgn In/Out) twice.
If you jumped to this section from Page 6, click here to jump back.
Quick-Selecting a Single Measure for Editing
You can use the Quick Region feature to choose a single measure for editing. Here’s how:
Press PATTERN or SONG to display the desired screen.
Press F5 (Seq Edit) to display the SEQUENCE EDIT screen.
Use 6 or 5 to select the track you want to edit.
We’ve selected Track 2 here.
��
��
��
��
��
Move to the beginning of the measure you want to edit, and then press F4 (Quick Rgn)—the measure turns dark to show that it’s now selected for editing.
To start over again, hit F3 (Rgn In/Out).
If you jumped to this section from Page 6, click here to jump back.
Opening the Edit Menu on the Built-In LCD
After selecting the desired audio region on the SEQUENCE EDIT screen, press F5 (Command) to open the Edit Menu.
Select the desired menu item and hit ENTER.
To jump to a list of the menu items that have to do with editing your recording, click here.
��
��
��

�0
The End
We hope you’ve found this workshop helpful. Keep an eye out for other MV-8800 Workshop booklets, all available for downloading at www.RolandUS.com.
For the latest MV-8800 updates and support tools, visit the Roland U.S. Web site at www.RolandUS.com. If you need personal assistance, call our amazing Product Support team at 323-890-3745.