DIP 3000 Field Install Guide - Bosch Global · If deploying new Bosch video devices in a non DHCP...
14
CCTV | IP Network Video | Technical Brief | DIVAR IP 3000 Field Installation Guide | 1 Bosch Security Systems, Inc. 800.289.0096 www.boschsecurity.us DIVAR IP 3000 Field Installation Guide Overview The purpose of this guide is to provide the step-by-step process of installing a DIVAR IP 3000 Recording Appliance in a field situation. Prior to Starting: Prior to starting the installation process you should be aware of certain technical details and obtain the following: • USB mouse and keyboard: These items are not included in the initial release of the product • Consult your local IT Administrator to obtain a valid IP address range to be used with your DIP 3000 and associated devices o Determine if the initial installation is on a DHCP network. If not then you will need to follow steps outlined in the document in order to assign valid IP addresses to your video devices. • A VGA cable • In certain scenarios covered in this guide you may need Bosch Configuration Manager: This can be downloaded from www.boschsecurity.us o The latest version at the time of this writing it located at: http://resource.boschsecurity.com/software/SW_CM_4.44.0027_Software_ConfigurationManager_4.44.0027_all_465 9671819.zip • This guide is based on DIVAR IP 3000 recording appliances with BVMS 4.5.1 installed, and Bosch IP encoders and cameras that are at firmware 5.80 or lower. See the BVMS 4.5.1 technical release documentation to determine the recommended firmware version the video devices that you are installing. Physical Installation and Connections When deploying the DIVAR IP 3000 for the first time there are certain physical connections on the back of the appliance that must be made for the deployment to be successful. • Video Connections: Viewing the back of the appliance there are two video connections that can be made, a VGA connection and a DVI connection. For initial deployment you must use the VGA connection! o Due to the physical architecture of the appliance the DVI connection is not available for up to 2 minutes after the operating system boots. • An active Ethernet link is also required prior to initial power up sequence: o Ensure that the network switch you are connecting to has power
Transcript of DIP 3000 Field Install Guide - Bosch Global · If deploying new Bosch video devices in a non DHCP...

CCTV | IP Network Video | Technical Brief | DIVAR IP 3000 Field Installation Guide | 1
Bosch Security Systems, Inc. 800.289.0096 www.boschsecurity.us
DIVAR IP 3000 Field Installation Guide Overview The purpose of this guide is to provide the step-by-step process of installing a DIVAR IP 3000 Recording Appliance in a field situation. Prior to Starting: Prior to starting the installation process you should be aware of certain technical details and obtain the following:
• USB mouse and keyboard: These items are not included in the initial release of the product • Consult your local IT Administrator to obtain a valid IP address range to be used with your DIP 3000 and associated devices
o Determine if the initial installation is on a DHCP network. If not then you will need to follow steps outlined in the document in order to assign valid IP addresses to your video devices.
• A VGA cable • In certain scenarios covered in this guide you may need Bosch Configuration Manager: This can be downloaded from
www.boschsecurity.us o The latest version at the time of this writing it located at:
http://resource.boschsecurity.com/software/SW_CM_4.44.0027_Software_ConfigurationManager_4.44.0027_all_4659671819.zip
• This guide is based on DIVAR IP 3000 recording appliances with BVMS 4.5.1 installed, and Bosch IP encoders and cameras that are at firmware 5.80 or lower. See the BVMS 4.5.1 technical release documentation to determine the recommended firmware version the video devices that you are installing.
Physical Installation and Connections When deploying the DIVAR IP 3000 for the first time there are certain physical connections on the back of the appliance that must be made for the deployment to be successful.
• Video Connections: Viewing the back of the appliance there are two video connections that can be made, a VGA connection and a DVI connection. For initial deployment you must use the VGA connection!
o Due to the physical architecture of the appliance the DVI connection is not available for up to 2 minutes after the operating system boots.
• An active Ethernet link is also required prior to initial
power up sequence: o Ensure that the network switch you are
connecting to has power

CCTV | IP Network Video | Technical Brief | DIVAR IP 3000 Field Installation Guide | 2
Bosch Security Systems, Inc. 800.289.0096 www.boschsecurity.us
Initial Boot Sequence Upon initial boot sequence you will be taken to the Windows Storage Server 2008 R2 set up process.
• The first step in the set up process is to choose your language. Select the appropriate language for your installation, and then select the “Next” tab.
• The second step in the setup process will require you to select:
o Country or region o Time and currency o Keyboard layout
• Once you make the appropriate selections select the “Next” tab.
• The last step in the Windows set up process is “License Agreement”:
o Accept the license terms for Windows o Accept the license terms for your computer
hardware o Select the “Start” tab.

CCTV | IP Network Video | Technical Brief | DIVAR IP 3000 Field Installation Guide | 3
Bosch Security Systems, Inc. 800.289.0096 www.boschsecurity.us
• After selecting “Start” Windows should initialize and you should receive the message “Preparing your desktop…” o This may take a moment, be patient o Once initialization is finished you will be prompted to log in o Select “CTRL + ALT + DELETE” to log into Windows
(Windows Initializing) (Log on prompt)
• After selecting “CTRL + ALT + DELETE” you will be taken to the Window log on page o The default user account and password for all Divar IP Appliances is
USER: BVRAdmin Password: WSS4Bosch
o These are case sensitive o After entering the credentials for the first time you will receive a message “The user password must be changed
before logging on for the first time” o Select “OK”
• After selecting OK you will be taken to a “create
password screen” o For support reasons you should enter the
same credentials from the previous step o Select the “Next” arrow o You should see a message that your
password was successfully changed. Select “OK”

CCTV | IP Network Video | Technical Brief | DIVAR IP 3000 Field Installation Guide | 4
Bosch Security Systems, Inc. 800.289.0096 www.boschsecurity.us
• Once you are logged into Windows there will be a
series of automated scripts that run. These scripts perform important setup tasks that include:
o Drive letter assignment o VHD creations o iSCSI target creation o LUN formatting
• Script processing may take several minutes, be patient
o Do NOT interrupt this process o Process interruption may lead to the need to
re image the appliance.
NOTE: After this process the appliance will reboot. If the DVI video connection is the preferred connection switch adapters during re-boot.
Kiosk Mode and Device IP Assignment Upon reboot, the appliance will automatically boot to a KIOSK interface. This interface allows access to the following:
• BVMS Configuration Wizard • BVMS Operator Client • BVMS Configuration Client
If deploying new Bosch video devices in a non DHCP environment, all devices will be configured with their factory default IP address of 192.168.0.1. Initial configuration using the Configuration Wizard will not be possible. You have two options to configure static addresses to your Bosch IP cameras and encoders
• BVMS Configuration Client • Bosch Configuration Manager
Both of these options will be covered prior to covering the Configuration Wizard.
CCTV | IP Network Video | Technical Brief | DIVAR IP 3000 Field Installation Guide | 5
Bosch Security Systems, Inc. 800.289.0096 www.boschsecurity.us
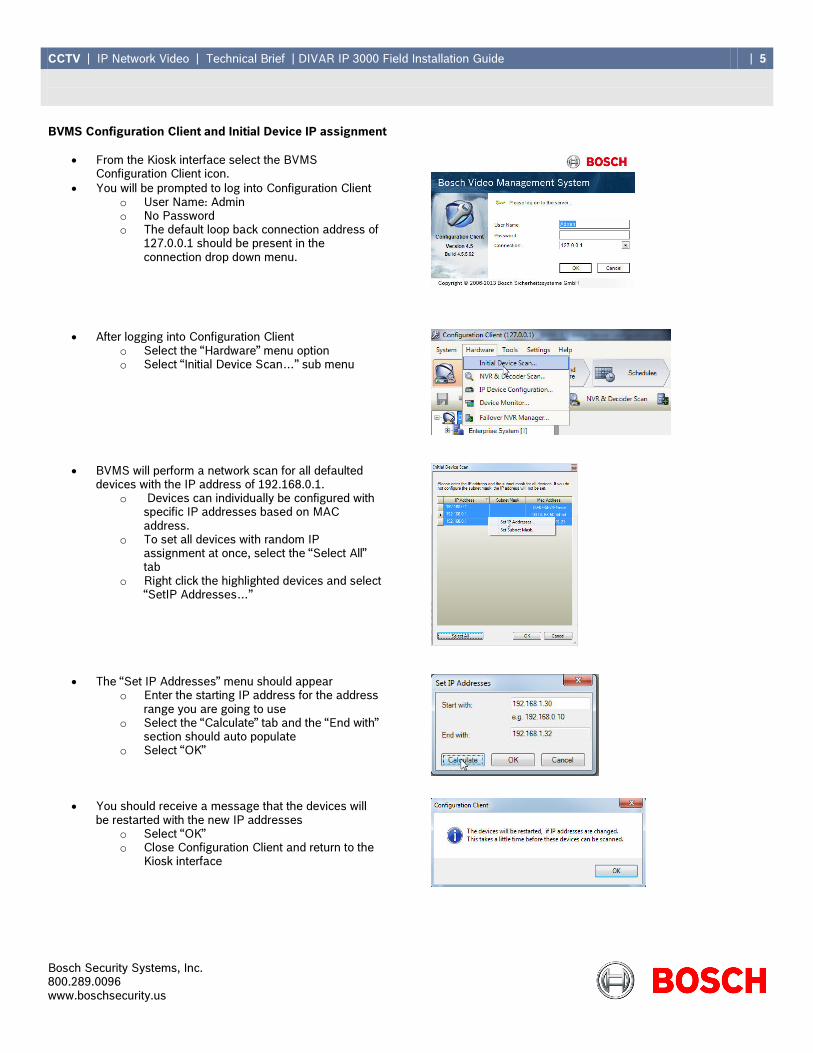
BVMS Configuration Client and Initial Device IP assignment
• From the Kiosk interface select the BVMS Configuration Client icon.
• You will be prompted to log into Configuration Client o User Name: Admin o No Password o The default loop back connection address of
127.0.0.1 should be present in the connection drop down menu.
• After logging into Configuration Client o Select the “Hardware” menu option o Select “Initial Device Scan…” sub menu
• BVMS will perform a network scan for all defaulted devices with the IP address of 192.168.0.1.
o Devices can individually be configured with specific IP addresses based on MAC address.
o To set all devices with random IP assignment at once, select the “Select All” tab
o Right click the highlighted devices and select “SetIP Addresses…”
• The “Set IP Addresses” menu should appear o Enter the starting IP address for the address
range you are going to use o Select the “Calculate” tab and the “End with”
section should auto populate o Select “OK”
• You should receive a message that the devices will be restarted with the new IP addresses
o Select “OK” o Close Configuration Client and return to the
Kiosk interface

CCTV | IP Network Video | Technical Brief | DIVAR IP 3000 Field Installation Guide | 6
Bosch Security Systems, Inc. 800.289.0096 www.boschsecurity.us
Bosch Configuration Manager and Initial Device IP assignment
• If using Bosch Configuration Manager for initial IP assignment you must be aware of the following: o This application can be run from you technicians laptop or the Divar IP Appliance o If installing this application on your DIP 3000 you must first exit the Kiosk Interface o To exit the Kiosk interface select “CTRL + ALT + DELETE” o When prompted select “Switch User” while holding down the “SHIFT” key o Log into the appliance with the user credentials specified: BVRAdmin, WSS4Bosch o The first time the application runs after installation a Wizard opens. CLOSE IT
• By default Configuration Manager runs in “Basic” mode. Before proceeding you must change to “Advanced Mode”:
o Select the “File” menu o Select “Advanced Mode”
• Under the “Network” tab all unconfigured devices should appear:
o Individual devices can be selected, or multiple devices can be selected by holding the “CTRL” key during the selection process
o Once the devices are selected right click to access the “Device Network Settings..” menu
• A “Network settings” pop up menu should appear o Enter the desired IP address and subnet
information o If multiple devices were selected there will
be a auto calculate option o Select “OK” o The devices will reboot with assigned IP
addresses
CCTV | IP Network Video | Technical Brief | DIVAR IP 3000 Field Installation Guide | 7
Bosch Security Systems, Inc. 800.289.0096 www.boschsecurity.us
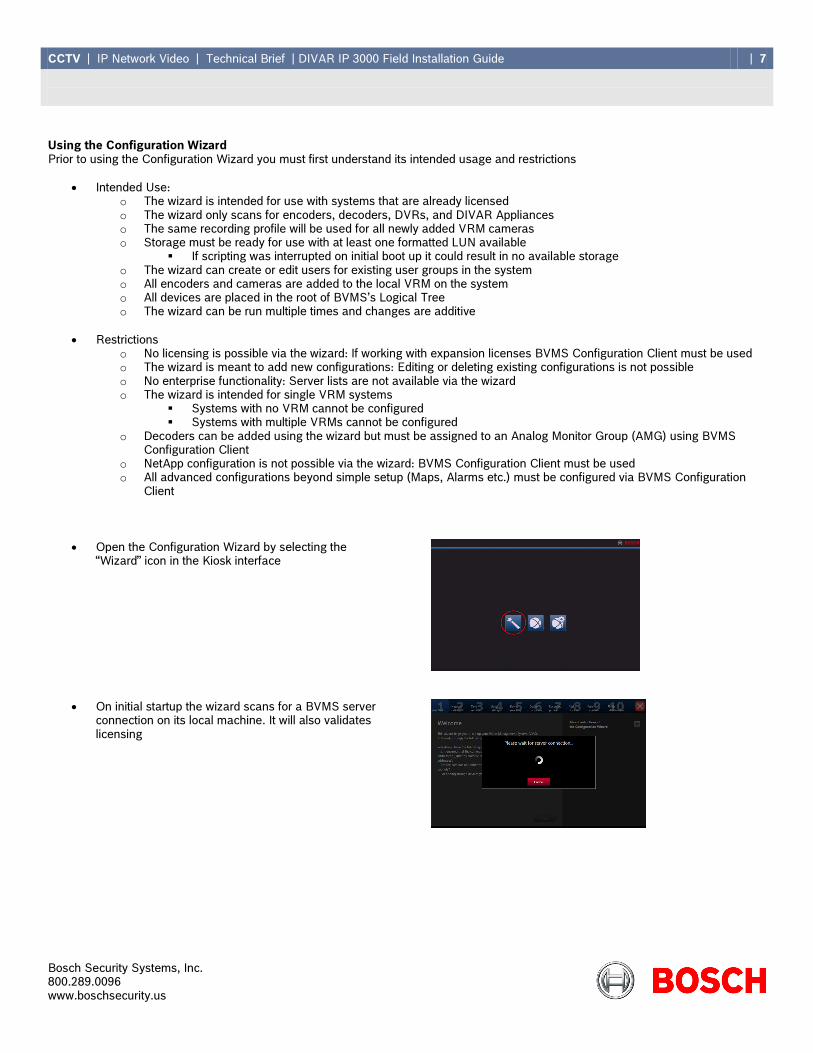
Using the Configuration Wizard Prior to using the Configuration Wizard you must first understand its intended usage and restrictions
• Intended Use: o The wizard is intended for use with systems that are already licensed o The wizard only scans for encoders, decoders, DVRs, and DIVAR Appliances o The same recording profile will be used for all newly added VRM cameras o Storage must be ready for use with at least one formatted LUN available
If scripting was interrupted on initial boot up it could result in no available storage o The wizard can create or edit users for existing user groups in the system o All encoders and cameras are added to the local VRM on the system o All devices are placed in the root of BVMS’s Logical Tree o The wizard can be run multiple times and changes are additive
• Restrictions o No licensing is possible via the wizard: If working with expansion licenses BVMS Configuration Client must be used o The wizard is meant to add new configurations: Editing or deleting existing configurations is not possible o No enterprise functionality: Server lists are not available via the wizard o The wizard is intended for single VRM systems
Systems with no VRM cannot be configured Systems with multiple VRMs cannot be configured
o Decoders can be added using the wizard but must be assigned to an Analog Monitor Group (AMG) using BVMS Configuration Client
o NetApp configuration is not possible via the wizard: BVMS Configuration Client must be used o All advanced configurations beyond simple setup (Maps, Alarms etc.) must be configured via BVMS Configuration
Client
• Open the Configuration Wizard by selecting the “Wizard” icon in the Kiosk interface
• On initial startup the wizard scans for a BVMS server connection on its local machine. It will also validates licensing

CCTV | IP Network Video | Technical Brief | DIVAR IP 3000 Field Installation Guide | 8
Bosch Security Systems, Inc. 800.289.0096 www.boschsecurity.us
• Once the scan is complete you will receive a “Welcome” page:
o You will receive a “License Valid” message in green
o To the right the is a restrictions and information drop down
o Select the “Next” tab to proceed
• Step 2 is the “Network settings” menu: o Computer name: if making changes to the
computer name a reboot is required for the changes to take affect
o Network Settings: The default IP address of 192.168.178.200 should appear using the “Local Area Connection”
o Changes can be made to the IP address, Subnet Mask, Default gateway, and DNS server.
o Select the “Next” tab to proceed
• Step 3 is the “Time settings” menu: o Select your Time Zone o DST settings o Time Server should configured with the
appliances IP address o Select the “Next” tab to proceed
• Step 4 is the “Latest saved configuration menu”:
o If there is an existing configuration on the appliance all associated devices will be listed in the window
o Import configuration option: You have the option to import and existing configuration
o Any imported configuration is subject to the restrictions outlined previously in this document
o Select the “Next” tab to proceed

CCTV | IP Network Video | Technical Brief | DIVAR IP 3000 Field Installation Guide | 9
Bosch Security Systems, Inc. 800.289.0096 www.boschsecurity.us
• Step 5 is the “Device selection” menu”
o The wizard will auto scan for devices on your local area network o After the scan is complete all available devices will appear in the device window o Devices that you wish to add or exclude from the system can be “checked” or “unchecked” o If the number of cameras added to the system exceeds the appliance’s license for you will receive a “License status”
failure o You also have the option of changing scan options from the local subnet to all pingable devices in all local subnets o Select the “Next” tab to proceed
• Step 6 is the “Device passwords” menu: o If you are working with devices that have
been previously configured with passwords you can enter the passwords individually
o If all devices have the same password, enter the password into the “Default password” menu and select “Apply”
o This allows BVMS access to the devices o Select the “Next “ tab to proceed

CCTV | IP Network Video | Technical Brief | DIVAR IP 3000 Field Installation Guide | 10
Bosch Security Systems, Inc. 800.289.0096 www.boschsecurity.us
• Step 7 is the “Recording profile” menu:
o From the drop down you can select one of six default recording profiles
o Before selecting a recording profile you must understand BVMS default “Schedules” o Shown below is the default “Time Schedule” used for all recording profiles in BVMS
This schedule chart can only be modified using BVMS Configuration Client
o Once the recording profile is selected all video devices will use the default settings for Stream 1 to record o Shown below is the default “Stream Quality Settings” used for all devices added to BVMS
These encoder profiles can only be modified using BVMS Configuration Client

CCTV | IP Network Video | Technical Brief | DIVAR IP 3000 Field Installation Guide | 11
Bosch Security Systems, Inc. 800.289.0096 www.boschsecurity.us
o If selecting: Continuous Alarm Recording , Alarm Recording Night and Weekend, or Alarm Recording the encoders or
cameras must be separately configured to perform Motion+ or IVA in BVMS Configuration Client o Shown below is the default “Recording Profile Details” used for all devices in BVMS
These recording profiles can only be modified using BVMS Configuration Client
o All devices selected in step 5 will be assigned the same recording profile To assign different recording profiles to different groups of cameras you must run the wizard twice
• First run: Add camera group one in step 5 and select the desired recording profile in step 7. Finish the wizard through step 10 and save the configuration
• Second run: Add camera group two in step 5 and select the desired profile in step 7. Finish the wizard through to step 10 and save the configuration
o Select the desired recording profile from the drop down o Select the “Next” tab to proceed

CCTV | IP Network Video | Technical Brief | DIVAR IP 3000 Field Installation Guide | 12
Bosch Security Systems, Inc. 800.289.0096 www.boschsecurity.us
• Step 8 is the “Add storage” menu:
o The appliance should auto detect its internal storage
o The storage will appear with the configured IP address of the appliance
o “Storage type” column should denote the type of appliance being installed; shown to the right is the set up of a DIP 7000
o Select the “Next” tab to proceed
• Step 9 is the “User accounts” menu: o There are two base User Groups configured
in the appliances: “Admin Group” and “Operator Group”
o Users can be added to existing user groups by selecting the “Add user…” tab
• After select the “Add user..” tab you should receive a “Add user” pop up menu o Enter the “Login name”, “Full name”, and “Description” o Select “Ok” o You can now enter and apply a password for the new user and select “Apply” o Select the “Next” tab to proceed
CCTV | IP Network Video | Technical Brief | DIVAR IP 3000 Field Installation Guide | 13
Bosch Security Systems, Inc. 800.289.0096 www.boschsecurity.us
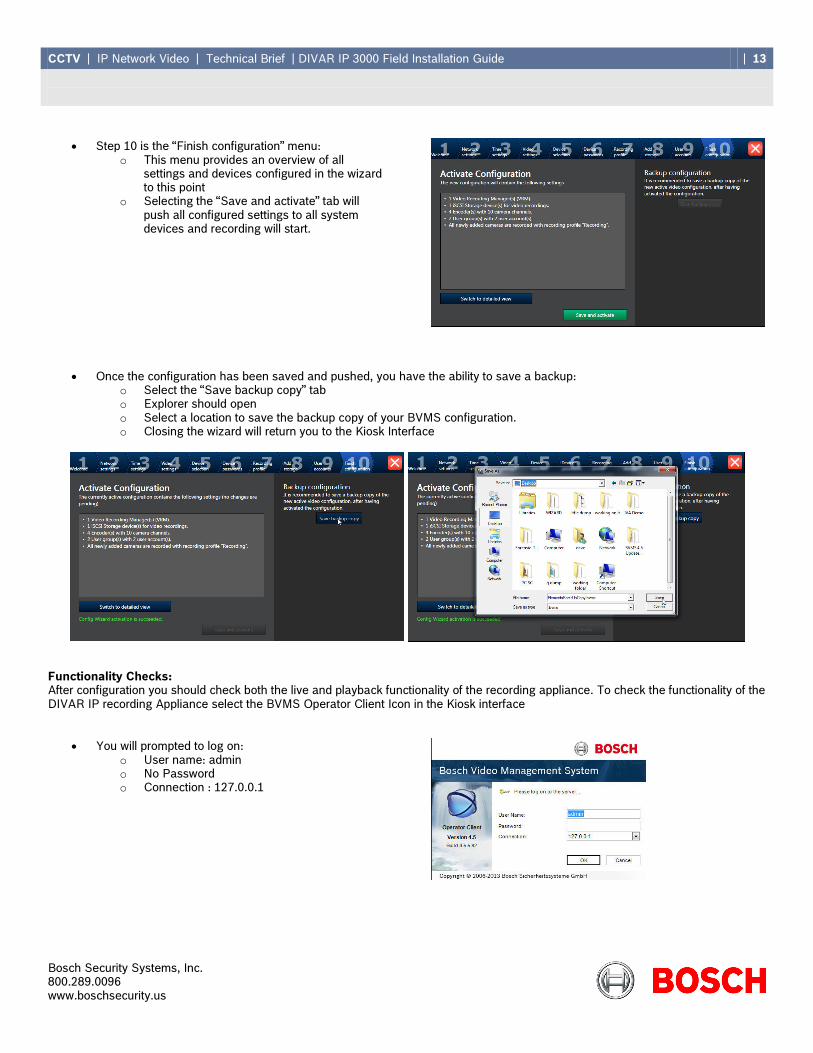
• Step 10 is the “Finish configuration” menu:
o This menu provides an overview of all settings and devices configured in the wizard to this point
o Selecting the “Save and activate” tab will push all configured settings to all system devices and recording will start.
• Once the configuration has been saved and pushed, you have the ability to save a backup: o Select the “Save backup copy” tab o Explorer should open o Select a location to save the backup copy of your BVMS configuration. o Closing the wizard will return you to the Kiosk Interface
Functionality Checks: After configuration you should check both the live and playback functionality of the recording appliance. To check the functionality of the DIVAR IP recording Appliance select the BVMS Operator Client Icon in the Kiosk interface
• You will prompted to log on: o User name: admin o No Password o Connection : 127.0.0.1

CCTV | IP Network Video | Technical Brief | DIVAR IP 3000 Field Installation Guide | 14
Bosch Security Systems, Inc. 800.289.0096 www.boschsecurity.us
• Live functionality checks can be done on a per camera basis: o Select a camera and drag it to a viewing cameo
• Recording functionality can be checked by one of several ways
o Cameras in the “Logical Tree” with a red dot imbedded in the icon are recording
o Cameras being viewed live will have a red dot in the camera’s icon in the viewing cameo
You will have the ability to switch to “Instant Playback”
o If a camera is viewed in playback mode the time line should be populated with the associated video
If you are experiencing issues with recording consult our BVMS installation manual for advanced user instructions when using BVMS Configuration Client.