Accès, routage et sécurisation pour les réseaux sans fil ...

Operating InstructionsMode d'emploi
Digital Wireless Speaker SystemEnceinte sans fil pour transmission numérique
XW-HT1
Register your product atwww.pioneerelectronics.com• Protect your new investment
The details of your purchase will be on file for reference in the event of an insurance claim such as loss or theft.
• Improve product developmentYour input helps us continue to design products that meet your needs.
• Receive a free Pioneer newsletterRegistered customers can opt in to receive a monthly newsletter.
• Receive free tips, updates and service bulletins on your new product
En_XW-HT1.book 1 ページ 2004年6月24日 木曜日 午後5時10分

The exclamation point within an equilateral triangle is intended to alert the user to the presence of important operating and maintenance (servicing) instructions in the literature accompanying the appliance.
The lightning flash with arrowhead, within an equilateral triangle, is intended to alert the user to the presence of uninsulated "dangerous voltage" within the product's enclosure that may be of sufficient magnitude to constitute a risk of electric shock to persons.
CAUTION:TO PREVENT THE RISK OF ELECTRIC SHOCK, DO NOT REMOVE COVER (OR BACK). NO USER-SERVICEABLE PARTS INSIDE. REFER SERVICING TO QUALIFIED SERVICE PERSONNEL.
CAUTIONRISK OF ELECTRIC SHOCK
DO NOT OPEN
D1-4-2-3_En
IMPORTANT NOTICE – THE SERIAL NUMBER FOR THIS EQUIPMENT IS LOCATED IN THE REAR. PLEASE WRITE THIS SERIAL NUMBER ON YOUR ENCLOSED WARRANTY CARD AND KEEP IN A SECURE AREA. THIS IS FOR YOUR SECURITY. D1-4-2-6-1_En
WARNING: Handling the cord on this product or cords associated with accessories sold with the product will expose you to lead, a chemical known to the State of California and other governmental entities to cause cancer and birth defects or other reproductive harm.Wash hands after handling. D36-P4_En
Thank you for buying this Pioneer product. Please read through these operating instructions so you will know how to operate your model properly. After you have finished reading the instructions, put them away in a safe place for future reference.
CAUTION – TO PREVENT ELECTRIC SHOCK DO NOT USE THIS (POLARIZED) PLUG WITH AN EXTENSION CORD.
RECEPTACLE OR OTHER OUTLET UNLESS THE BLADES CAN BE FULLY INSERTED TO PREVENT BLADE EXPOSURE.
ATTENTION – POUR PREVENIR LES CHOCS ELECTRIQUES, NE PAS UTILISER CETTE FICHE POLARISEE AVEC UN PROLONGATEUR, UNE PRISE DE COURANT, OU UNE AUTRE SORTIE DE COURANT, SAUF SI LES LAMES PEUVENT ETRE INSEREES A FOND SANS EN LAISSER AUCUNE PARTIE A DECOUVERT. D2-4-4-1_EF
WARNING: This equipment is not waterproof. To prevent a fire or shock hazard, do not place any container filed with liquid near this equipment (such as a vase or flower pot) or expose it to dripping, splashing, rain or moisture. D3-4-2-1-3_A_En
Nous vous remercions pour cet achat d’un produit Pioneer.Nous vous demandons de lire soigneusement ce mode d’emploi ; vous serez ainsi à même de faire fonctionner l’appareil correctement. Après avoir bien lu le mode d’emploi, le ranger dans un endroit sûr pour pouvoir s’y référer ultérieurement.Dans certains pays ou certaines régions, la forme de la fiche d’alimentation et de la prise d’alimentation peut différer de celle qui figure sur les schémas, mais les branchements et le fonctionnement de l’appareil restent les mêmes.
Ce point d’exclamation, placé dans un triangle équilatéral, a pour but d’attirer l’attention de l’utilisateur sur la présence, dans les documents qui accompagnent l’appareil, d’explications importantes du point de vue de l’exploitation ou de l’entretien.
Ce symbole de l’éclair, placé dans un triangle équilatéral, a pour but d’attirer l’attention de l’utilisateur sur la présence, à l’intérieur du coffret de l’appareil, de “tensions dangereuses” non isolées d’une grandeur suffisante pour représenter un risque d’électrocution pour les êtres humains.
ATTENTION:POUR ÉVITER TOUT RISQUE D’ÉLECTROCUTION, NE PAS ENLEVER LE COUVERCLE (NI LE PANNEAU ARRIÈRE). AUCUNE PIÈCE RÉPARABLE PAR L’UTILISATEUR NE SE TROUVE À L’INTÉRIEUR. CONFIER TOUT ENTRETIEN À UN PERSONNEL QUALIFIÉ UNIQUEMENT.
ATTENTIONDANGER D´ELECTROCUTION
NE PAS OUVRIR
D1-4-2-3_Fr
CAUTIONRISK OF ELECTRIC SHOCK. DRY LOCATION USE ONLY.ATTENTIONRISQUE DE DECHARGE ELECTRIQUE. A UTILISER SEULE MENT DANS UN ENDROIT SEC.
En_XW-HT1.book 2 ページ 2004年6月24日 木曜日 午後5時10分

READ INSTRUCTIONS — All the safety and operating instructions should be read before the product is operated.
RETAIN INSTRUCTIONS — The safety and operating instructions should be retained for future reference.
HEED WARNINGS — All warnings on the product and in the operating instructions should be adhered to.
FOLLOW INSTRUCTIONS — All operating and use instructions should be followed.
CLEANING — The product should be cleaned only with a polishing cloth or a soft dry cloth. Never clean with furniture wax, benzine, insecticides or other volatile liquids since they may corrode the cabinet.
ATTACHMENTS — Do not use attachments not recommended by the product manufacturer as they may cause hazards.
WATER AND MOISTURE — Do not use this product near water — for example, near a bathtub, wash bowl, kitchen sink, or laundry tub; in a wet basement; or near a swimming pool; and the like.
ACCESSORIES — Do not place this product on an unstable cart, stand, tripod, bracket, or table. The product may fall, causing serious injury to a child or adult, and serious damage to the product. Use only with a cart, stand, tripod, bracket, or table recommended by the manufacturer, or sold with the product. Any mounting of the product should follow the manufacturer’s instructions, and should use a mounting accessory recommended by the manufacturer.
CART — A product and cart combination should be moved with care. Quick stops, excessive force, and uneven surfaces may cause the product and cart combination to overturn.
VENTILATION — Slots and openings in the cabinet are provided for ventilation and to ensure reliable operation of the product and to protect it from overheating, and these openings must not be blocked or covered. The openings should never be blocked by placing the product on a bed, sofa, rug, or other similar surface. This product should not be placed in a built-in installation such as a bookcase or rack unless proper ventilation is provided or the manufacturer’s instructions have been adhered to.
POWER SOURCES — This product should be operated only from the type of power source indicated on the marking label. If you are not sure of the type of power supply to your home, consult your product dealer or local power company.
LOCATION – The appliance should be installed in a stable location.
NONUSE PERIODS – The power cord of the appliance should be unplugged from the outlet when left un-used for a long period of time.
GROUNDING OR POLARIZATION• If this product is equipped with a polarized
alternating current line plug (a plug having one blade wider than the other), it will fit into the outlet only one way. This is a safety feature. If you are unable to insert the plug fully into the outlet, try reversing the plug. If the plug should still fail to fit, contact your electrician to replace your obsolete outlet. Do not defeat the safety purpose of the polarized plug.
• If this product is equipped with a three-wire grounding type plug, a plug having a third (grounding) pin, it will only fit into a grounding type power outlet. This is a safety feature. If you are unable to insert the plug into the outlet, contact your electrician to replace your obsolete outlet. Do not defeat the safety purpose of the grounding type plug.
POWER-CORD PROTECTION — Power-supply cords should be routed so that they are not likely to be walked on or pinched by items placed upon or against them, paying particular attention to cords at plugs, convenience receptacles, and the point where they exit from the product.
OUTDOOR ANTENNA GROUNDING — If an outside antenna or cable system is connected to the product, be sure the antenna or cable system is grounded so as to provide some protection against voltage surges and built-up static charges. Article 810 of the National Electrical Code, ANSI/NFPA 70, provides information with regard to proper grounding of the mast and supporting structure, grounding of the lead-in wire to an antenna discharge unit, size of grounding conductors, location of antenna-discharge unit, connection to grounding electrodes, and requirements for the grounding electrode. See Figure A.
LIGHTNING — For added protection for this product during a lightning storm, or when it is left unattended and unused for long periods of time, unplug it from the wall outlet and disconnect the antenna or cable system. This will prevent damage to the product due to lightning and power-line surges.
POWER LINES — An outside antenna system should not be located in the vicinity of overhead power lines or other electric light or power circuits, or where it can fall into such power lines or circuits. When installing an outside antenna system, extreme care should be taken to keep from touching such power lines or circuits as contact with them might be fatal.
OVERLOADING — Do not overload wall outlets, extension cords, or integral convenience receptacles as this can result in a risk of fire or electric shock.
OBJECT AND LIQUID ENTRY — Never push objects of any kind into this product through openings as they may touch dangerous voltage points or short-out parts that could result in a fire or electric shock. Never spill liquid of any kind on the product.
SERVICING — Do not attempt to service this product yourself as opening or removing covers may expose you to dangerous voltage or other hazards. Refer all servicing to qualified service personnel.
DAMAGE REQUIRING SERVICE — Unplug this product from the wall outlet and refer servicing to qualified service personnel under the following conditions:
• When the power-supply cord or plug is damaged.
• If liquid has been spilled, or objects have fallen into the product.
• If the product has been exposed to rain or water.• If the product does not operate normally by
following the operating instructions. Adjust only those controls that are covered by the operating instructions as an improper adjustment of other controls may result in damage and will often require extensive work by a qualified technician to restore the product to its normal operation.
• If the product has been dropped or damaged in any way.
• When the product exhibits a distinct change in performance — this indicates a need for service.
REPLACEMENT PARTS — When replacement parts are required, be sure the service technician has used replacement parts specified by the manufacturer or have the same characteristics as the original part. Unauthorized substitutions may result in fire, electric shock, or other hazards.
SAFETY CHECK — Upon completion of any service or repairs to this product, ask the service technician to perform safety checks to determine that the product is in proper operating condition.
WALL OR CEILING MOUNTING — The product should not be mounted to a wall or ceiling.
HEAT — The product should be situated away from heat sources such as radiators, heat registers, stoves, or other products (including amplifiers) that produce heat.
GROUNDCLAMP
ELECTRICSERVICEEQUIPMENT
ANTENNALEAD IN WIRE
ANTENNADISCHARGE UNIT(NEC SECTION 810-20)
GROUNDING CONDUCTORS(NEC SECTION 810-21)
GROUND CLAMPS
POWER SERVICE GROUNDINGELECTRODE SYSTEM(NEC ART 250, PART H)
NEC — NATIONAL ELECTRICAL CODE
Fig. A
IMPORTANT SAFETY INSTRUCTIONS
D1-4-2-2_En
This product is for general household purposes. Any failure due to use for other than household purposes (such as long-term use for business purposes in a restaurant or use in a car or ship) and which requires repair will be charged for even during the warranty period. K041_En
Ce produit est destiné à une utilisation domestique générale. Toute panne due à une utilisation autre qu'à des fins privées (comme une utilisation à des fins commerciales dans un restaurant, dans un autocar ou sur un bateau) et qui nécessite une réparation sera aux frais du client, même pendant la période de garantie. K041_Fr
En_XW-HT1.book 3 ページ 2004年6月24日 木曜日 午後5時10分

This Class B digital apparatus complies with Canadian ICES-003.
Cet appareil numérique de la Classe B est conforme à la norme NMB-003 du Canada. D8-10-1-3_EF
NOTE: This equipment has been tested and found to comply with the limits for a Class B digital device, pursuant to Part 15 of the FCC Rules. These limits are designed to provide reasonable protection against harmful interference in a residential installation. This equipment generates, uses, and can radiate radio frequency energy and, if not installed and used in accordance with the instructions, may cause harmful interference to radio communications. However, there is no guarantee that interference will not occur in a particular installation. If this equipment does cause harmful interference to radio or television reception, which can be determined by turning the equipment off and on, the user is encouraged to try to correct the interference by one or more of the following measures:
– Reorient or relocate the receiving antenna. – Increase the separation between the equipment and receiver. – Connect the equipment into an outlet on a circuit different from that to which the receiver is connected. – Consult the dealer or an experienced radio/TV technician for help. D8-10-1-2_En
Information to UserAlteration or modifications carried out without appropriate authorization may invalidate the user’s right to operate the equipment. D8-10-2_En
CAUTION: This product satisfies FCC regulations when shielded cables and connectors are used to connect the unit to other equipment. To prevent electromagnetic interference with electric appliances such as radios and televisions, use shielded cables and connectors for connections. D8-10-3a_En
En_XW-HT1.book 4 ページ 2004年6月24日 木曜日 午後5時10分

[For U.S. model]
Changes or modifications not expressly approved by the manufacturer (party responsible) for compliance could not void the user's authority to operate the equipment.
[For Canadian model]
Operation is subject to the following two conditions: (1) this device may not cause interference, and (2) this device must accept any interference, including interference that may cause undesired operation of the device.
[Pour le modele Canadien]
L'utilisation de l'appareil est soumise aux deux conditions suivantes: (1) il ne provoque pas de brouillage, et (2) il peut supporter tous les brouillages, y compris ceux qui sont en mesure de provoquer une anomalie de fonctionnement de l'appareil.
[For Canadian model]
To prevent radio interference to the licensed service, this device is intended to be operated indoors and away from windows to provide maximum shielding. Equipment (or its transmit antenna) that is installed outdoors is subject to licensing.
[Pour le modèle Canadien]
Pour éviter le brouillage radioélectrique des emetteurs ayant une licence, cet appareil doit etre utilisé à l'intérieur des habitations et loin des fenêtres de manière à assurer la protection maximale. Un équipement (ou son antenne d'emission) lorsqu'il est installé à l'extérieur ne peut être utilisé qu'après obtention d'une licence.
Power cord caution
Handle the power cord by the plug part. Do not pull out the plug by tugging the cord, and never touch the power cord when your hands are wet, as this could cause a short circuit or electric shock. Do not place the unit, a piece of furniture, or other object on the power cord or pinch the cord in any other way. Never
make a knot in the cord or tie it with other cords. The power cord should be routed so that they are not likely to be stepped on. A damaged power cord can cause a fire or give you an electric shock. Check the power cord once in a while. If you find it damaged, ask your nearest Pioneer authorized service center or your dealer for a replacement.
For safety in operation
Do not use the system in the proximity of electronic equipment that requires high-accuracy control or handling of very low-level signals.
• The system may affect the electronic equipment, causing malfunction or accident. Examples of such electronic equipment: Hearing aid, cardiac pacemaker, other electrical medical equipment, fire alarm, automatic door, and other automated control equipment. If you use a pacemaker or other electrical medical equipment, consult the manufacturer or dealer to check the effects of radio waves on it.
Do not use the system in places where its use is prohibited, for example near aircraft equipment and in hospitals.
• The system may affect electronic equipment or electrical medical equipment, causing an accident. Follow the instructions given by the aircraft company or medical institution.
Important
• We do not assume any liability for the damages incurred due to improper use of the product by the user or third party, malfunction during use, other troubles or use of the product, unless indemnity for damages is admitted by the law.
En_XW-HT1.book 5 ページ 2004年6月24日 木曜日 午後5時10分

S001_En
Selecting fine audio equipment such as the unit you’ve just purchased is only the start of your musical enjoyment. Now it’s time to consider how you can maximize the fun and excitement your equipment offers. This manufacturer and the Electronic Industries Association’s Consumer Electronics Group want you to get the most out of your equipment by playing it at a safe level. One that lets the sound come through loud and clear without annoying blaring or distortion-and, most importantly, without affecting your sensitive hearing.
Sound can be deceiving. Over time your hearing “comfort level” adapts to higher volumes of sound. So what sounds “normal” can actually be loud and harmful to your hearing. Guard against this by setting your equipment at a safe level BEFORE your hearing adapts.
To establish a safe level: • Start your volume control at a low setting.• Slowly increase the sound until you can hear it
comfortably and clearly, and without distortion.
Once you have established a comfortable sound level:• Set the dial and leave it there.
Taking a minute to do this now will help to prevent hearing damage or loss in the future. After all, we want you listening for a lifetime.
We Want You Listening For A Lifetime
Used wisely, your new sound equipment will provide a lifetime of fun and enjoyment. Since hearing damage from loud noise is often undetectable until it is too late, this manufacturer and the Electronic Industries Association’s Consumer Electronics Group recommend you avoid prolonged exposure to excessive noise. This list of sound levels is included for your protection.
DecibelLevel Example
30 Quiet library, soft whispers 40 Living room, refrigerator, bedroom away from traffic 50 Light traffic, normal conversation, quiet office 60 Air conditioner at 20 feet, sewing machine 70 Vacuum cleaner, hair dryer, noisy restaurant 80 Average city traffic, garbage disposals, alarm clock at two feet.
THE FOLLOWING NOISES CAN BE DANGEROUS UNDER CONSTANT EXPOSURE
90 Subway, motorcycle, truck traffic, lawn mower 100 Garbage truck, chain saw, pneumatic drill 120 Rock band concert in front of speakers, thunderclap 140 Gunshot blast, jet plane 180 Rocket launching pad
Information courtesy of the Deafness Research Foundation.
En_XW-HT1.book 6 ページ 2004年6月24日 木曜日 午後5時10分

7
En
Contents
Contents . . . . . . . . . . . . . . . . . . . . . .7
Checking the supplied accessories . . . . . . . 7
Before you start. . . . . . . . . . . . . . . .8
Features. . . . . . . . . . . . . . . . . . . . . . . . . . . . . . 8Using the remote control. . . . . . . . . . . . . . . . 9
Controls and displays . . . . . . . . . .10
Transmitter . . . . . . . . . . . . . . . . . . . . . . . . . . 10Wireless speaker . . . . . . . . . . . . . . . . . . . . . 12Remote control . . . . . . . . . . . . . . . . . . . . . . . 13
Connecting up . . . . . . . . . . . . . . . .14
Connecting a DVD player . . . . . . . . . . . . . . 14Connecting a TV or mini component system . . . . . . . . . . . . . . . . . . . . . . . . . . . . . . 16
Listening in surround sound . . . .18
Using the surround modes . . . . . . . . . . . . . 18Placing the wireless speaker system . . . . . 21
Additional information. . . . . . . . .22
Troubleshooting . . . . . . . . . . . . . . . . . . . . . . 22Taking care of the unit . . . . . . . . . . . . . . . . . 23Radio wave reflections . . . . . . . . . . . . . . . . . 24Scope of operation . . . . . . . . . . . . . . . . . . . . 25Specifications . . . . . . . . . . . . . . . . . . . . . . . . 25
Checking the supplied accessories
Please check that you've received the following supplied accessories:
• Remote control unit
• Lithium battery (CR2025)
• RCA/phono stereo audio cable
• Power cord
• AC adapter
• These operating instructions
• Radio wave caution sheet
• Warranty card
CS CINEMA CS MUSIC W.STEREO
W.STEREOTV
MUSICCINEMA
VOLUME
SURROUND MODE
MUTE
DVD
INPUT ATTWIRELESS OFF
WSSTOC.fm 7ページ 2004年6月29日 火曜日 午後2時54分

Before you start01
8
En
Chapter 1
Before you start
Features
• Realistic surround sound using only this unit and your TV
You can achieve realistic surround sound by using your TV for front sound along with this wireless speaker behind the listening position for a true surround experience.
• SRS Labs patented SRS Circle Surround II technology
This system uses SRS Labs’ patented SRS Circle Surround II technology, capable of providing 5.1 channels of high quality surround sound from all content (excluding DVDs) including mono, typical stereo sources (such as MP3 files), and other matrix surround-encoded material.
Other benefits include the SRS Dialog Clarity feature, which allows the listener to easily discern actors' dialog from the rest of the soundtrack and TruBass technology, which creates the sensation of rich, cinema-like bass from the front channels.
Circle Surround II, SRS and symbol are trademarks of SRS Labs, Inc.Circle Surround II technology is incorporated under license from SRS Labs, Inc.
• 2.4GHz wireless high-quality uncompressed audio delivery
You can enjoy CD quality sound from this system thanks to the incorporation of Freespan digital technology for pure, uncompressed audio delivery.
• Three surround sound listening modes
For each input source (
DVD
or
TV
), you can select one of three surround listening modes for a truly versatile home theater system, flexible enough to deal with all types
of material; movies, live broadcasts and music.
• Easy connection and setup with other components in your system
Using the TV input on this system, you can connect stereo components easily for realistic surround sound from the wireless speaker. Using a TV is one possibility, but mini-component systems can also be connected to create a concert hall or movie theater experience when using the wireless speaker.
As well, a subwoofer jack is provided with this system to complete your home theater sound setup. Deep and rich bass tones will give true dimension to the sound, allowing you to experience the feeling of 5.1 channel listening from your speaker system.
Wireless speaker Transmitter
En_XW-HT1.book 8 ページ 2004年6月24日 木曜日 午後5時10分

Before you start 01
9
En
En
glish
Using the remote control
Inserting the battery
Insert the lithium battery (CR2025) into the remote control as shown below. When you notice a decrease in the operating range, replace the battery in the same manner.
1 Insert a screwdriver (or other sharp object) where shown to loosen the battery casing.
2 Pull out the battery casing.
3 Place the battery in the casing.
Make sure the
side of the battery is facing up when you place it in the space provided.
4 Push the battery casing back into place.
Make sure the battery casing is inserted properly before pushing it in.
Caution
When using lithium batteries, please observe the following:
• Danger of explosion if the battery is incorrectly replaced. Replaced only with the same or equivalent type recommended by the manufacturer.
• Dispose of used battery cells immediately after replacement. Keep away from children.
• If swallowed, please contact a doctor immediately.
• Lithium batteries may present a fire or chemical burn hazard if misused. Do not disassemble, heat above 100˚C (212˚F), or incinerate.
• Make sure that the plus and minus end of the battery match the indications in the battery compartment.
• Remove the battery if the unit isn’t going to be used for a month or more.
• When disposing of used batteries, please comply with governmental regulations or environmental public instruction’s rules that apply in your country or area.
• Be careful never to insert the battery holder in a wrong orientation, for this will result in damage.
1
2
4
3
En_XW-HT1.book 9 ページ 2004年6月24日 木曜日 午後5時10分

Controls and displays02
10
En
Chapter 2
Controls and displays
Transmitter
VOLUME CHANNEL SURROUND MODE
1 2 3
VOLUME
DVD
CSCINEMA MUSIC
CINEMA MUSICW.STEREO W.STEREO WIRELESSOFF
ATT/MUTE
CHANNEL
1 2 3 4
TV
CS
VOLUME
DVD
CSCINEMA MUSIC
CINEMA MUSICW.STEREO W.STEREO WIRELESSOFF
ATT/MUTE
CHANNEL
1 2 3 4
TV
CS
9 107 8654
En_XW-HT1.book 10ページ 2004年6月24日 木曜日 午後5時10分

Controls and displays 02
11
En
En
glish
1 VOLUME +/–
Press to adjust the volume of the wireless speaker (and subwoofer, if connected).
2 CHANNEL
In case of poor reception due to interference from other electrical devices, you can improve reception by selecting another channel. Each time you press the button, the channel changes sequentially:
Note
• Poor reception may cause the audio to be interrupted or stopped. This is not a malfunction. Try changing the location or orientation of the transmitter and/or the wireless speaker to improve reception.
• See also
Placing the wireless speaker system
on page 21,
Radio wave reflections
on page 24 and
Scope of operation
on page 25 for more on reception troubleshooting.
3 SURROUND MODE
Press to switch the surround mode. See
Using the front panel controls
on page 20.
Note
• Since the surround modes work in conjunction with the corresponding input (
DVD
or
TV
), make sure the mode you’ve selected corresponds with the input source.
4 VOLUME / CHANNEL indicators
Shows the volume level of the wireless speaker; blinks when the volume is changed (does not light when
WIRELESS OFF
is selected).
When a channel is selected, the corresponding channel indicator blinks for five seconds before returning to the volume display.
Note
• The step level for each LED in the volume indicator is shown below.
5 DVD input mode indicators
Light to indicate the surround mode set for the DVD input (
CS II CINEMA
,
CS II MUSIC
or
W.STEREO
). See
DVD input surround modes
on page 18.
6 TV input mode indicators
Light to indicate the surround mode set for the TV input (
CINEMA
,
MUSIC
or
W.STEREO
). See
TV input surround modes
on page 19.
7 WIRELESS OFF indicator
Lights when sound from the wireless speaker is switched off.
8 ATT/MUTE indicator
Lights when output to the wireless speaker is being attenuated. Blinks when output is muted.
9 Remote sensor
Receives the signals from the remote control.
• Make sure that there are no obstacles between the remote and the remote sensor on the unit.
• The remote has a range of about 7 meters, within 30º either side of the remote sensor.
• Remote operation may become unreliable if strong sunlight or fluorescent light is shining on the unit's remote sensor.
10 Transmitter antenna
Transmits signals to the wireless speaker.
CH 2 CH 3 CH 4CH 1
VOLUME
(1–10) (11–20) (21–30) (31–40) (MAX)
02_Controls _Displays.fm 11 ページ 2004年6月28日 月曜日 午後3時47分

Controls and displays02
12
En
Wireless speaker
1 TUNED indicator
Lights when the signal from the transmitter is properly received.
2 POWER indicator
Lights when the wireless speaker is switched on.
3 POWER
Press to switch the unit on or off.
4 AC IN cord inlet
5 Wireless speaker antenna
Receives signals from the transmitter.
• Note that if you choose to adjust the antenna, turning it too far to the left or right (shown above) may damage the unit.
POWEROFF ON
TUNED
POWEROFF ON
TUNED
1 2 3
AC IN
150°150°
Adjustable antenna
4
5
En_XW-HT1.book 12ページ 2004年6月24日 木曜日 午後5時10分

Controls and displays 02
13
En
En
glish
Remote control
1 VOLUME +/–
Press to adjust the wireless speaker volume.
2 SURROUND MODE buttons
Press to switch the surround mode. See
Using the surround modes
on page 18.
3 WIRELESS OFF
Press to switch off sound from the wireless speaker (the TV or mini component outputs sound in stereo). Use one of the
SURROUND MODE
buttons to enjoy surround sound from the wireless speaker again. See also
Using the surround modes
on page 18.
Note
• The DVD input is automatically selected when
WIRELESS OFF
is pressed.
4 MUTE
Press to mute/restore sound from the wireless speaker.
5 INPUT ATT
Press to attenuate high level signals to prevent distortion from the wireless speaker (press again to switch the attenuator off).
You can set the input attenuator on or off separately for the DVD and TV inputs.
CS CINEMA CS MUSIC W.STEREO
W.STEREOTV
MUSICCINEMA
VOLUME
SURROUND MODE
MUTE
DVD
INPUT ATTWIRELESS OFF
1
2
4
3 5
En_XW-HT1.book 13ページ 2004年6月24日 木曜日 午後5時10分
Connecting up03
14
En
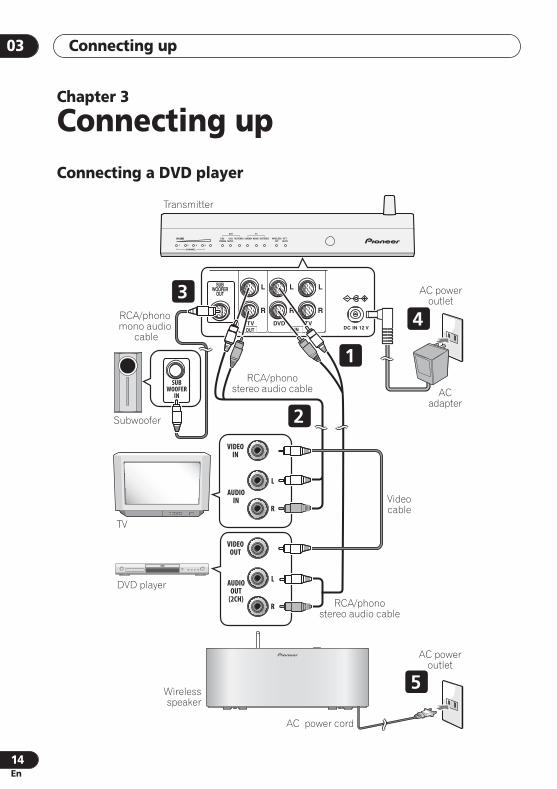
Chapter 3
Connecting up
Connecting a DVD player
DC IN 12 VTVTV DVD
LLL
RRR
SUBWOOFER
OUT
INOUT
SUB WOOFER
IN
VOLUME
DVD
CSCINEMA MUSIC
CINEMA MUSICW.STEREO W.STEREO WIRELESSOFF
ATT/MUTE
CHANNEL
1 2 3 4
TV
CS
4
5
3
2
1
TV
DVD player
Wireless speaker
RCA/phono stereo audio cable
RCA/phono mono audio
cable
Videocable
RCA/phono stereo audio cable
AC poweroutlet
AC poweroutlet
AC power cord
AC adapter
Transmitter
Subwoofer
AUDIO IN
AUDIO OUT
(2CH)
L
R
L
R
VIDEO OUT
VIDEO IN
En_XW-HT1.book 14ページ 2004年6月24日 木曜日 午後5時10分

Connecting up 03
15
En
En
glish
Important
• When connecting, make sure that all components are switched off and unplugged.
• Do not use the supplied cords or AC adapter for any other purpose than that described here.
1 Connect the DVD IN jacks on the transmitter to a set of stereo output jacks on your DVD player.
Use a commercially available RCA/phono stereo audio cable to do this.
2 Connect the TV OUT jacks on the transmitter to the stereo audio input jacks on your TV.
Use the supplied RCA/phono stereo audio cable to do this.
3 If you have a subwoofer, connect the SUBWOOFER OUT jack on the transmitter to the input jack on your subwoofer.
Use a commercially available RCA/phono mono audio cable to do this.
• If you don’t own a subwoofer, you can omit this step and still achieve convincing surround sound from your system.
• Please refer to the operating instructions supplied with your subwoofer when connecting.
4 Connect the supplied AC adapter to the DC IN inlet on the rear panel of the transmitter, then plug into a power outlet.
5 Connect the wireless speaker AC power cord to the AC IN inlet on the rear panel of the wireless speaker, then plug into a power outlet.
En_XW-HT1.book 15ページ 2004年6月24日 木曜日 午後5時10分

Connecting up03
16
En
Connecting a TV or mini component system
DC IN 12 VTVTV DVD
LLL
RRR
SUBWOOFER
OUT
INOUT
VOLUME
DVD
CSCINEMA MUSIC
CINEMA MUSICW.STEREO W.STEREO WIRELESSOFF
ATT/MUTE
CHANNEL
1 2 3 4
TV
CS
SUB WOOFER
IN
4
32
1
or
Wireless speaker
AC poweroutlet
AC poweroutlet
AC power cord
AC adapter
Transmitter
Subwoofer
AUDIO OUT
L
R
Mini-component
TVRCA/phono
stereo audio cable
RCA/phono mono audio
cable
En_XW-HT1.book 16ページ 2004年6月24日 木曜日 午後5時10分

Connecting up 03
17
En
En
glish
Important
• When connecting, make sure that all components are switched off and unplugged.
• Do not use the supplied cords or AC adapter for any other purpose than that described here.
1 Connect the TV IN jacks on the transmitter to the stereo audio output jacks on your TV or mini-component system.
Use the supplied RCA/phono stereo audio cable to do this.
2 If you have a subwoofer, connect the SUBWOOFER OUT jack on the transmitter to the input jack on your subwoofer.
Use a commercially available RCA/phono mono audio cable to do this.
• If you don’t own a subwoofer, you can omit this step and still achieve convincing surround sound from your system.
• Please refer to the operating instructions supplied with your subwoofer when connecting.
3 Connect the supplied AC adapter to the DC IN inlet on the rear panel of the transmitter, then plug into a power outlet.
4 Connect the wireless speaker AC power cord to the AC IN inlet on the rear panel of the wireless speaker, then plug into a power outlet.
En_XW-HT1.book 17ページ 2004年6月24日 木曜日 午後5時10分
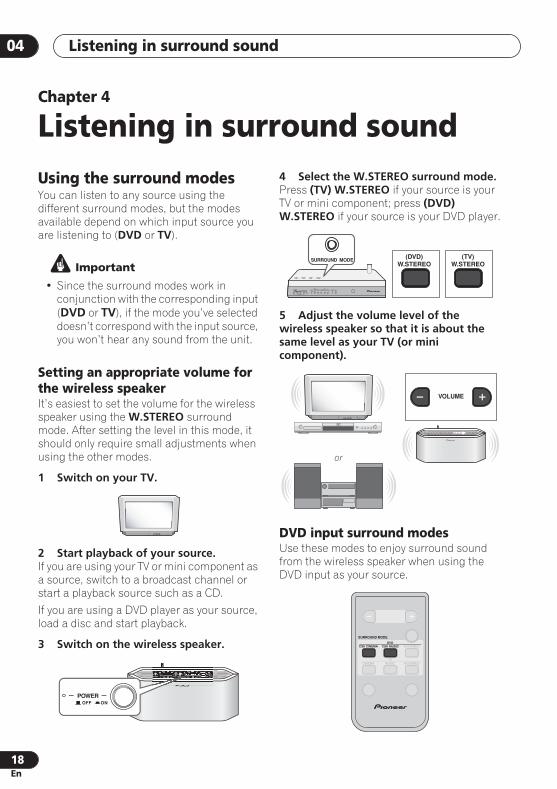
Listening in surround sound04
18En
Chapter 4
Listening in surround soundUsing the surround modesYou can listen to any source using the different surround modes, but the modes available depend on which input source you are listening to (DVD or TV).
Important
• Since the surround modes work in conjunction with the corresponding input (DVD or TV), if the mode you’ve selected doesn’t correspond with the input source, you won’t hear any sound from the unit.
Setting an appropriate volume for the wireless speakerIt’s easiest to set the volume for the wireless speaker using the W.STEREO surround mode. After setting the level in this mode, it should only require small adjustments when using the other modes.
1 Switch on your TV.
2 Start playback of your source.If you are using your TV or mini component as a source, switch to a broadcast channel or start a playback source such as a CD.
If you are using a DVD player as your source, load a disc and start playback.
3 Switch on the wireless speaker.
4 Select the W.STEREO surround mode.Press (TV) W.STEREO if your source is your TV or mini component; press (DVD) W.STEREO if your source is your DVD player.
5 Adjust the volume level of the wireless speaker so that it is about the same level as your TV (or mini component).
DVD input surround modesUse these modes to enjoy surround sound from the wireless speaker when using the DVD input as your source.
POWEROFF ON
(TV)W.STEREO
VOLUME
DVD
CSCINEMA MUSIC
CINEMA MUSICW.STEREO W.STEREO WIRELESSOFF
ATT/MUTE
CHANNEL
1 2 3 4
TV
CS
SURROUND MODE (DVD)W.STEREO
or
POWEROFF ON
TUNED
VOLUME
CSII CINEMA CSII MUSIC W.STEREO
W.STEREOTV
MUSICCINEMA
SURROUND MODE
DVD
04_Listening_in.fm 18ページ 2004年6月28日 月曜日 午後3時44分
Listening in surround sound 04
19
En
En
glish
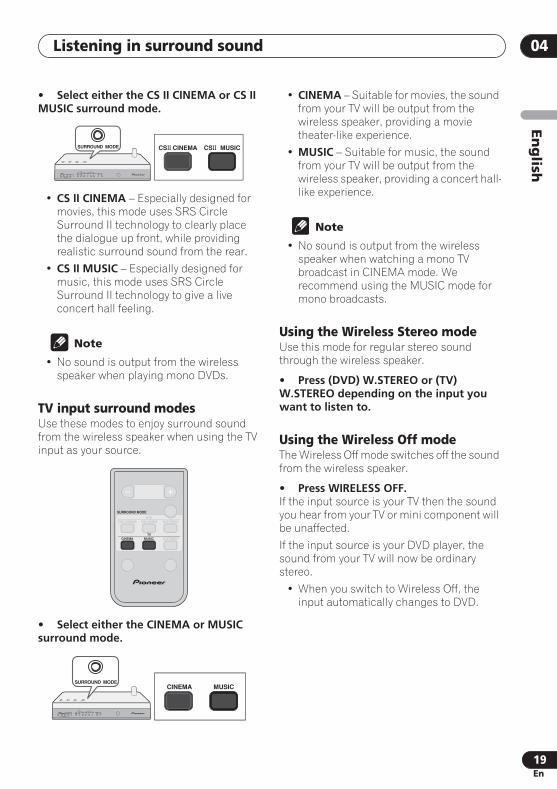
• Select either the CS II CINEMA or CS II MUSIC surround mode.
•
CS II CINEMA
– Especially designed for movies, this mode uses SRS Circle Surround II technology to clearly place the dialogue up front, while providing realistic surround sound from the rear.
•
CS II MUSIC
– Especially designed for music, this mode uses SRS Circle Surround II technology to give a live concert hall feeling.
Note
• No sound is output from the wireless speaker when playing mono DVDs.
TV input surround modes
Use these modes to enjoy surround sound from the wireless speaker when using the TV input as your source.
• Select either the CINEMA or MUSIC surround mode.
•
CINEMA
– Suitable for movies, the sound from your TV will be output from the wireless speaker, providing a movie theater-like experience.
•
MUSIC
– Suitable for music, the sound from your TV will be output from the wireless speaker, providing a concert hall-like experience.
Note
• No sound is output from the wireless speaker when watching a mono TV broadcast in CINEMA mode. We recommend using the MUSIC mode for mono broadcasts.
Using the Wireless Stereo mode
Use this mode for regular stereo sound through the wireless speaker.
• Press (DVD) W.STEREO or (TV) W.STEREO depending on the input you want to listen to.
Using the Wireless Off mode
The Wireless Off mode switches off the sound from the wireless speaker.
• Press WIRELESS OFF.
If the input source is your TV then the sound you hear from your TV or mini component will be unaffected.
If the input source is your DVD player, the sound from your TV will now be ordinary stereo.
• When you switch to Wireless Off, the input automatically changes to DVD.
CS CINEMA CS MUSIC
VOLUME
DVD
CSCINEMA MUSIC
CINEMA MUSICW.STEREO W.STEREO WIRELESSOFF
ATT/MUTE
CHANNEL
1 2 3 4
TV
CS
SURROUND MODE
CSII CINEMA CSII MUSIC W.STEREO
W.STEREOTV
MUSICCINEMA
SURROUND MODE
DVD
CINEMA MUSIC
VOLUME
DVD
CSCINEMA MUSIC
CINEMA MUSICW.STEREO W.STEREO WIRELESSOFF
ATT/MUTE
CHANNEL
1 2 3 4
TV
CS
SURROUND MODE
04_Listening_in.fm 19ページ 2004年6月29日 火曜日 午後1時6分

Listening in surround sound04
20
En
Using the front panel controls
You can also use the
SURROUND MODE
button on the transmitter to switch between surround modes.
Press repeatedly to select the surround mode you want:
*
Automatically switches to DVD input when selected.
FAQ
• The wireless speaker is switched on and connected, but there is still no sound!
Make sure the surround mode you’ve selected corresponds with the input you’re using (
DVD
or
TV
).
• The wireless speaker doesn’t seem to have a particularly strong surround effect.
You may have to adjust the level of the wireless speaker. Experiment by increasing the level slightly for a more pronounced surround effect.
Note
• When connected to the
TV
input, there is no sound from the
TV
output.
• No sound is output from the wireless speaker when the input signal is mono using some surround modes. We therefore recommend using different surround modes depending on whether the signal is mono or stereo. The table below summarizes which surround modes are compatible with mono and stereo signals.
VOLUME CHANNEL SURROUND MODE
SURROUND MODE
CS II CINEMA
CS II MUSIC
W.STEREO
WIRELESS OFF*
W.STEREO
CINEMA
MUSIC
DVD
DVD
DVD
TV
TV
TV
DVD
Surround mode
CS CINEMA
CS MUSIC
W.STEREO
CINEMA
MUSIC
W.STEREO
Stereo signal
Mono signal
DVD input
TV input
04_Listening_in.fm 20ページ 2004年6月29日 火曜日 午後1時6分

Listening in surround sound 04
21
En
En
glish
Placing the wireless speaker system
The illustration below shows a typical speaker setup using the wireless speaker for multichannel sound.
Where you put the wireless speaker has a big effect on the quality of the sound. The following guidelines should help you to get the best sound from your system. See also
Radio wave reflections
on page 24 and
Scope of operation
on page 25 for more on reception troubleshooting.
• For best surround sound, make sure to place the wireless speaker directly behind the center of the listening position and no higher than ear level.
• Placing the wireless speaker too far behind the listening position will result in little surround sound effect.
• Make sure that the wireless speaker is securely installed. This not only improves sound quality, but also reduces the risk of damage or injury resulting from the speaker being knocked over or falling in the event of external shocks such as earthquakes. The subwoofer can be placed on the floor.
• The wireless speaker can be used at distances of up to 10m from the transmitter. This range may change depending on the environment.
• Poor reception may cause the audio to be interrupted or stopped. This is not a malfunction. Try changing the location or orientation of the transmitter and/or the wireless speaker to improve reception.
• Placing the wireless speaker and transmitter too close together may result in poor reception. Keep a distance of least 1m for best sound quality.
TV/DVD player(or mini-component)
Listening position
Wireless speaker
Transmitter
Subwoofer
En_XW-HT1.book 21ページ 2004年6月24日 木曜日 午後5時10分
Additional information05
22
En
Chapter 5
Additional information
Troubleshooting
• Incorrect operations are often mistaken for trouble and malfunctions. If you think that there is something wrong with this component, check the points below. If the trouble cannot be rectified even after exercising the checks listed below, ask your nearest Pioneer authorized service center or your dealer to carry out repair work.
• If you are experiencing problems with the wireless speaker system, make sure to bring both the transmitter and the wireless speaker in for repair so that they can be tested properly.
Symptom Cause & Remedy
Audio is interrupted. • This system uses high frequency radio waves that have properties similar to light, such as linearity, reflection, refraction, diffraction, and interference. Therefore, placement of the system can result in weak radio waves and/or interruption.
• The distance between the transmitter and wireless speaker may be too large. Use the wireless speaker within the reach of radio wave from the transmitter.
• The system may be close to a location generating electrical noise. If this is the case, find a location that does not affect the sound adversely.
Audio is suddenly interrupted.
• There may be radio communication equipment using the same frequency band (2.4 GHz) as this system, such as a Bluetooth device, cordless phones, radio LAN device or microwave oven, operating nearby.
Audio cannot be received.
• The radio wave reception is variable depending on locations due to the effects of obstacles and reflecting objects. Try changing the location of the wireless speaker a little.
• The transmitter and wireless speaker are designed and sold as a pair, and they identify each other in communication. This means that communication is not available between separately purchased transmitter and wireless speaker.
Horizontal stripe noise interference on a TV set near the transmitter.
• Is there a piece of A/V equipment with an antenna near the transmitter? If so, move the transmitter away from the antenna input terminal of the AV equipment.
No sound from the wireless speaker.
• Make sure the surround mode you’ve selected matches the input you’re using (
DVD
or
TV
). See
Using the surround modes
on page 18 for more on this.
• If the source you’re listening to is in mono, surround sound may not be possible. See the note on page 20 for more on this.
• Make sure the wireless speaker is connected correctly (see
Connecting up
on page 14).
En_XW-HT1.book 22ページ 2004年6月24日 木曜日 午後5時10分
Additional information 05
23
En
En
glish
Taking care of the unit
Cleaning the unit’s exterior
• Use a polishing cloth or dry cloth to wipe off dust and dirt. If the surfaces are very dirty, wipe with a soft cloth dipped in some neutral cleanser diluted five or six times with water and wrung out well, then wipe again with a dry cloth.
• Do not use furniture wax or cleaners. Never use thinners, benzine or insecticide sprays or other chemicals on or near this unit since they will corrode the surfaces.
• If you use a chemical-impregnated cleaning cloth, read the instructions carefully before use. These cloths may leave smear marks on half-mirror finish surfaces; if this happens, finish with a dry cloth.
• Unplug the unit when cleaning.
Problems with condensation
Condensation may form inside the unit if it is brought into a warm room from outside, or if the temperature of the room rises quickly. Although the condensation won’t damage the unit, it may temporarily impair its performance. For this reason you should leave it to adjust to the warmer temperature for about an hour before switching on and using.
Hints on installation
We want you to enjoy using this unit for years to come, so please bear in mind the following points when choosing a suitable location for it:
Do...
• Use in a well-ventilated room.
• Place on a solid, flat, level surface, such as a table, shelf or stereo rack.
• Be sure to switch the wireless speaker off when not in use.
Don’t...
• Use in a place exposed to high temperatures or humidity, including near radiators and other heat-generating appliances.
• Place on a window sill or other place where the unit will be exposed to direct sunlight.
• Use in an excessively dusty or damp environment.
• Place directly on top of an amplifier, or other component in your stereo system that becomes hot in use.
• Use near a television or monitor as you may experience interference—especially if the television uses an indoor antenna.
• Use in a kitchen or other room where the unit may be exposed to smoke or steam.
The
POWER
indicator goes out when the switch is on or the system is in operation.
• It is likely that the system is malfunctioning. Ask your nearest Pioneer authorized service center or your dealer to carry out repair work.
Symptom Cause & Remedy
Caution
Static electricity or other external influences may cause malfunctioning of this unit. In this case, unplugging the power cord and then re-plugging it in will usually reset the unit for proper operation. If this does not correct the problem, please consult your nearest Pioneer service center.
En_XW-HT1.book 23ページ 2004年6月24日 木曜日 午後5時10分

Additional information05
24
En
• Use on a thick rug or carpet, or cover with cloth—this may prevent proper cooling of the unit.
• Place on an unstable surface, or one that is not large enough to support all four of the unit’s feet.
Moving the wireless speaker
If you need to move the wireless speaker, first press
POWER
on the top panel to turn the unit off. Unplug the power cord.
AC adapter and power cord caution
• Do not leave the power cord near heating equipment. The coating of the cord may melt, which could lead to fire and/or electrocution.
• Make sure to grasp the body of the AC adapter when removing it from the power outlet. If you pull the power cord, it may become damaged which could lead to fire and/or electrocution.
• Do not attempt to plug in or remove the AC adapter with wet hands. This may result in electrocution.
• Insert the prongs of the AC adapter all the way into the power outlet. If the connection is incomplete, heat may be generated which could lead to fire. Furthermore, contact with the connected prongs of the adapter may result in electrocution.
• Do not insert the AC adapter into a power outlet where the connection remains loose despite inserting the prongs all the way into the outlet. Heat may be generated which could lead to fire. Consult with the retailer or an electrician regarding replacement of the power outlet.
Radio wave reflections
The radio waves received by the wireless speaker include the radio wave coming directly from the transmitter (direct wave) and waves coming from various directions due to reflections by walls, furniture and building (reflected waves). The reflected waves (due to obstacles and reflecting objects) further produce a variety of reflected waves as well as variation in reception condition depending on locations. If the audio cannot be received properly due to this phenomenon, try moving the location of the wireless speaker a little. Also note that audio may be interrupted due to the reflected waves when a person crosses or approaches the space between the transmitter and wireless speaker.
Radio wave caution
This wireless speaker system uses a 2.4GHz radio wave frequency, which is a band used by other wireless systems (see list below). To prevent noise or interrupted communication, do not use this system nearby such devices, or make sure these devices are switched off during use. You can also try switching the channel on the transmitter (see
Transmitter
on page 10) for better reception.
• Cordless phones
• Wireless broadband routers
• Wireless AV equipment
• Microwave-based health aids
• Microwave ovens
• Wireless controllers for game systems
• Bluetooth equipment
• Some baby monitors
Other, less common, equipment that may operate on the same frequency:
• Anti-theft systems
• Warehouse logistic management systems
• Amateur radio stations (HAM)
• Discrimination systems for train or emergency vehicles
En_XW-HT1.book 24ページ 2004年6月24日 木曜日 午後5時10分
Additional information 05
25
En
En
glish
Note
• If the transmitter is used near A/V equipment with an antenna input terminal, such as a TV, VCR, BS tuner or CS tuner, you may experience noise interference on a TV near the transmitter. In such cases, place the transmitter at a larger distance from the antenna input terminal of the A/V equipment.
• If there is something obstructing the path between the transmitter and the wireless speaker (such as a metal door, concrete wall, or insulation containing tinfoil), you may need to change the location of your system to prevent signal noise and interruptions.
Scope of operation
Use of this equipment is limited to home use. (Transmission distances may be reduced depending on communication environment).
In the following locations, poor condition or inability to receive radio waves may cause the audio to be interrupted or stopped:
• In reinforced concrete buildings or steel-framed or iron-framed buildings.
• Near large metallic furniture.
• In a crowd of people or near a building or obstacle.
• In a location exposed to the magnetic field, static electricity or radio wave interference from radio communication equipment using the same frequency band (2.4 GHz) as this system, such as a Bluetooth device, radio LAN device or microwave oven.
• If you live in a heavily populated residential area (apartment, townhouse, etc.) and if your neighbor’s microwave is placed near your system, you may experience radio wave interference or no sound from the speaker. If this occurs, move your unit to a different place. When the microwave is not in use, there will be no radio wave interference.
Specifications
General
Digital Wireless Speaker System(Transmitter/Wireless speaker)
Transmitter
AC adapterPower requirements . . . . . . AC 120V, 50/60HzRated output . . . . . . . . . . . . . . . . . 12V/500mA
Power consumption (without AC adapter) . . . . . . . . . . . . . . . . . . . . . . . . . . . . . . 7WInput . . . . . . . . . . . . . . . . . . . . . . . . . . . . RCA jackWeight . . . . . . . . . . . . . . . . . . . . 0.6 kg / 1 lb 5 oz.Dimensions . . . . 255(W) x 58.5(H) x 121(D) mm
10(W) x 2
5
/
16
(H) x 4
3
/
4
(D)in.
Wireless speaker
Power requirements . . . . . . . . . . AC 120V, 60HzPower consumption . . . . . . . . . . . . . . . . . . . 26WAmplifier characteristicsMaximum power output . . . . . . . . . . . . . 10W/ch
RMS (1kHz, THD10%, 4
Ω
)Speaker unit . . . . . . . . . . . . . . .7cm cone type x 2Weight . . . . . . . . . . . . . . . . . . . 2.9 kg / 6 lbs 6 ozDimensions (without antenna) . . . . . . 461.5(W) x 176.5(H) x 95(D) mm
18
3
/
16
(W) x 6
15
/
16
(H) x 3
3
/
4
(D)in.Depth with antenna. . . . . . . . .110 mm / 4
5
/
16
in.
Accessories
Remote control . . . . . . . . . . . . . . . . . . . . . . . . . . 1Lithium battery (CR2025) . . . . . . . . . . . . . . . . . . 1AC adapter . . . . . . . . . . . . . . . . . . . . . . . . . . . . . . 1RCA/phono stereo audio cable . . . . . . . . . . . . . 1Power cord . . . . . . . . . . . . . . . . . . . . . . . . . . . . . . 1Radio wave caution sheet . . . . . . . . . . . . . . . . . . 1Warranty card . . . . . . . . . . . . . . . . . . . . . . . . . . . 1These operating instructions
Note
• The specifications and design of this product are subject to change without notice, due to improvement.
05_Additional_Information.fm 25 ページ 2004年6月30日 水曜日 午後2時1分

Précautions concernant le cordon d’alimentationSaisissez le cordon d’alimentation au niveau de la prise. Ne tentez pas de débrancher la fiche du cordon d’alimentation en tirant sur le cordon; ne touchez pas le cordon quand vous avez les mains mouillées, vous pourriez provoquer un court-circuit ou ressentir une secousse électrique. Ne posez ni l’appareil, ni un meuble, ni aucun objet sur le cordon d’alimentation et évitez de l’écraser de quelque manière que ce soit. Ne nouez pas le cordon d’alimentation et ne l’attachez pas à d’autres cordons ou câbles. Le cordon d’alimentation doit cheminer de manière qu’il ne puisse pas être piétiné. Un cordon endommagé peut être la cause d’un incendie, voire d’une électrocution. Vérifiez régulièrement l’état du cordon d’alimentation. Si vous notez qu’il est endommagé, demandez au centre d’entretien Pioneer ou au revendeur qu’il soit remplacé.
Par mesure de sécuritéN’utilisez pas l’appareil au voisinage d’autres équipements électroniques qui exigent une très grande précision de commande ou qui traitent des signaux à très bas niveau.
• L’appareil peut perturber ces équipements électroniques, provoquer des anomalies de fonctionnement voire un accident. Exemples d’équipements électroniques concernés: Appareils auditifs, stimulateurs cardiaques, autres appareils médicaux, alarmes incendie, portes à fonctionnement automatique, autres appareils à commande automatique. Si vous portez un stimulateur cardiaque ou faites usage d’un appareil médical électronique, il est conseillé de consulter le fabricant ou le revendeur pour connaître quels effets les ondes radioélectriques peuvent avoir sur son fonctionnement.
N’utilisez pas l’appareil dans les lieux où son emploi est interdit, par exemple à proximité d’un avion ou dans un hôpital.
• L’appareil peut perturber ces équipements électroniques, provoquer
des anomalies de fonctionnement voire un accident. Respectez les instructions de la compagnie aérienne ou de l’institution médicale.
Important
• Nous ne saurions accepter aucune responsabilité pour les dommages provenant de l’emploi incorrect de l’appareil, que ce soit le fait de l’utilisateur ou d’une tierce personne, pour les anomalies de fonctionnement, pour les inconvénients résultant de l’appareil, à moins que des compensations soient clairement prévues par la loi.
FR_XW-HT1.book Page 2 Wednesday, June 30, 2004 3:58 PM

3Fr
Fran
çais
Table des matièresTable des matières . . . . . . . . . . . . .3Vérification des accessoires fournis. . . . . . . 3
Avant de commencer . . . . . . . . . . .4Particularités. . . . . . . . . . . . . . . . . . . . . . . . . . 4Utilisation du boîtier de télécommande . . . . 5
Commandes et afficheurs. . . . . . . .6Émetteur . . . . . . . . . . . . . . . . . . . . . . . . . . . . . 6Enceinte sans fil . . . . . . . . . . . . . . . . . . . . . . . 8Boîtier de télécommande . . . . . . . . . . . . . . . 9
Raccordements . . . . . . . . . . . . . . .10Raccordement à un lecteur de DVD. . . . . . 10Raccordement d’un téléviseur ou d’une mini-chaîne . . . . . . . . . . . . . . . . . . . . . . . . . . 12
Écoute des sonorités d’ambiance. . . . . . . . . . . . . . . . . . .14Utilisation des modes d’ambiance . . . . . . . 14Disposition de l’enceinte sans fil . . . . . . . . 17
Informations complémentaires. . . . . . . . . . . . . .18Guide de dépannage . . . . . . . . . . . . . . . . . . 18Soin de l’appareil . . . . . . . . . . . . . . . . . . . . . 19Réflexions des ondes radioélectriques. . . . 21Domaine d’utilisation de l’appareil. . . . . . . 21Caractéristiques techniques . . . . . . . . . . . . 22
Vérification des accessoires fournisVeuillez vous assurer que vous disposez des accessoires suivants:
• Boîtier de télécommande
• Pile au lithium (CR2025)
• Câble audio stéréophonique à fiches Cinch (RCA)
• Cordon d’alimentation
• Adaptateur secteur
• Ce mode d’emploi
• Feuillet d’avertissement concernant les ondes radio
• Carte de garantie
CS CINEMA CS MUSIC W.STEREO
W.STEREOTV
MUSICCINEMA
VOLUME
SURROUND MODE
MUTE
DVD
INPUT ATTWIRELESS OFF
FR_XW-HT1.book Page 3 Wednesday, June 30, 2004 3:58 PM

Avant de commencer01
4Fr
Chapitre 1
Avant de commencerParticularités• Restitution réa liste des sons d’ambiance grâce à cet appareil et aux haut-parleurs du téléviseurIl est possible de reproduire de manière réaliste les sonorités d’ambiance en n’utilisant que les haut-parleurs du téléviseur et cette enceinte sans fil placée derrière la position d’écoute.
• Technique SRS Circle Surround II sous licence SRS LabsCet appareil bénéficie de la technique SRS Circle Surround II mise au point par SRS Labs, qui permet de créer 5.1 voies d’ambiance sonore de très belle qualité à partir de toutes les sources (sauf les DVD), qu’elles soient monophoniques, stéréophoniques (fichiers MP3, par exemple) ou à codage matriciel.
Parmi les autres avantages apportés par cette technique SRS, citons d’une part l’amélioration de la clarté des dialogues (Dialog Clarity) qui se détachent plus clairement du reste de la piste sonore, et
d’autre part la technique TruBass qui enrichit les graves émis par les enceintes avant pour leur donner une présence comparable à celle obtenue dans les salles de cinéma.Circle Surround II, SRS et le symbole sont des marques de commerce appartenant à SRS Labs, Inc.La technique Circle Surround II est employée sous licence de SRS Labs, Inc.• Restitution audio sa ns compression et de grande qualité à 2,4GHzGrâce à cet ensemble, vous pouvez profiter de sonorités ayant la qualité de celles gravées sur CD, cela en raison de la présence de la technique numérique Freespan de restitution du signal audio sans compression.
• 3 modes de reproduction des sonorités d’ambianceÀ chaque source (DVD ou TV) sont associés 3 modes de reproduction vous offrant un vrai cinéma à domicile quel que soit le domaine sonore (films, émissions en direct, concerts).• Raccordement aux au tres appareils de la chaîne et mise en service simplifiésGrâce à l’entrée TV de cet appareil, vous pouvez obtenir de l’enceinte sans fil une restitution réaliste des sonorités d’ambiance produites par les appareils stéréophoniques de la chaîne. Outre le téléviseur, vous pouvez relier toute mini-chaîne et profiter de sonorités comparables à celles des salles de cinéma.Par ailleurs, cet appareil est muni d’une prise pour un caisson de graves qui peut donc venir compléter votre installation de cinéma à domicile si vous le désirez. Des graves riches et puissants s’ajouteront alors aux belles sonorités pour vous restituer 5.1 voies de pur plaisir auditif.
VOLUME
DVDCS
CINEMA MUSIC CINEMA MUSIC
W.STEREOW.STEREO WIRELESS
OFFATT/
MUTE
CHANNEL
12
34
TV/LINECS
Enceinte sans fil Émetteur
FR_XW-HT1.book Page 4 Wednesday, June 30, 2004 3:58 PM
Avant de commencer 01
5Fr
Fran
çais
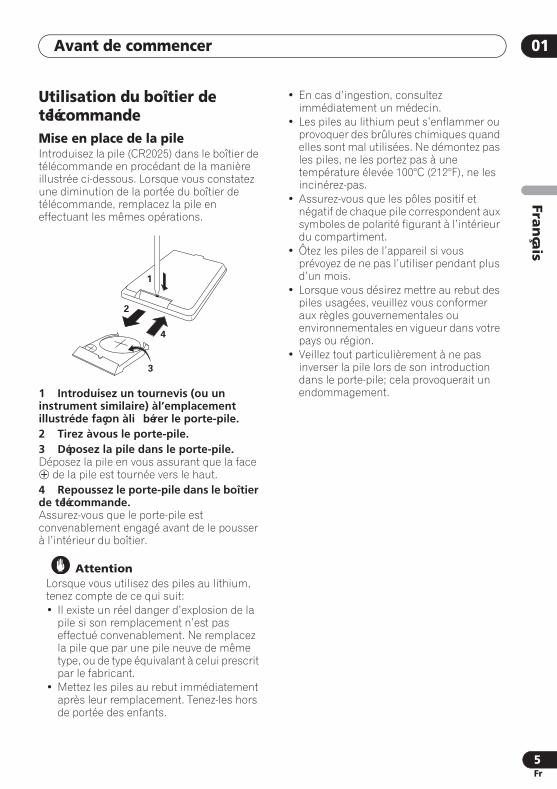
Utilisation du boîtier de télécommandeMise en place de la pileIntroduisez la pile (CR2025) dans le boîtier de télécommande en procédant de la manière illustrée ci-dessous. Lorsque vous constatez une diminution de la portée du boîtier de télécommande, remplacez la pile en effectuant les mêmes opérations.
1 Introduisez un tournevis (ou un instrument similaire) à l’emplacement illustré de façon à li bérer le porte-pile.2 Tirez à vous le porte-pile.3 Déposez la pile dans le porte-pile.Déposez la pile en vous assurant que la face de la pile est tournée vers le haut.4 Repoussez le porte-pile dans le boîtier de télécommande.Assurez-vous que le porte-pile est convenablement engagé avant de le pousser à l’intérieur du boîtier.
AttentionLorsque vous utilisez des piles au lithium, tenez compte de ce qui suit:• Il existe un réel danger d’explosion de la
pile si son remplacement n’est pas effectué convenablement. Ne remplacez la pile que par une pile neuve de même type, ou de type équivalant à celui prescrit par le fabricant.
• Mettez les piles au rebut immédiatement après leur remplacement. Tenez-les hors de portée des enfants.
• En cas d’ingestion, consultez immédiatement un médecin.
• Les piles au lithium peut s’enflammer ou provoquer des brûlures chimiques quand elles sont mal utilisées. Ne démontez pas les piles, ne les portez pas à une température élevée 100°C (212°F), ne les incinérez-pas.
• Assurez-vous que les pôles positif et négatif de chaque pile correspondent aux symboles de polarité figurant à l’intérieur du compartiment.
• Ôtez les piles de l’appareil si vous prévoyez de ne pas l’utiliser pendant plus d’un mois.
• Lorsque vous désirez mettre au rebut des piles usagées, veuillez vous conformer aux règles gouvernementales ou environnementales en vigueur dans votre pays ou région.
• Veillez tout particulièrement à ne pas inverser la pile lors de son introduction dans le porte-pile; cela provoquerait un endommagement.
1
2
4
3
FR_XW-HT1.book Page 5 Wednesday, June 30, 2004 3:58 PM

Commandes et afficheurs02
6Fr
Chapitre 2
Commandes et afficheursÉmetteur
VOLUME CHANNEL SURROUND MODE
1 2 3
VOLUME
DVD
CSCINEMA MUSIC
CINEMA MUSICW.STEREO W.STEREO WIRELESSOFF
ATT/MUTE
CHANNEL
1 2 3 4
TV
CS
VOLUME
DVD
CSCINEMA MUSIC
CINEMA MUSICW.STEREO W.STEREO WIRELESSOFF
ATT/MUTE
CHANNEL
1 2 3 4
TV
CS
9 107 8654
FR_XW-HT1.book Page 6 Wednesday, June 30, 2004 3:58 PM

Commandes et afficheurs 02
7Fr
Fran
çais
1 VOLUME +/–Utilisez ces touches pour régler le niveau de sortie de l’enceinte sans fil (et du caisson de graves si l’installation en comporte un).2 CHANNELSi la réception est médiocre du fait de brouillage provoqué par d’autres appareils électriques, tentez de l’améliorer en sélectionnant un autre canal. Chaque pression sur la touche sélectionne un autre canal, dans l’ordre:
Remarque• Lorsque la réception est médiocre, le son
peut être interrompu ou très affaibli. Il ne s’agit pas d’un défaut de fonctionnement de l’appareil. Tentez d’abord de changer l’emplacement de l’émetteur ou son orientation, puis procédez pareillement avec l’enceinte sans fil.
• Pour de plus amples détails sur les questions de réception, reportez-vous également aux paragraphes Disposition de l’enceinte sans fil, page 17, Réflexions des ondes radioélectriques , page 21, et Domaine d’utilisation de l’appareil, page 21.
3 SURROUND MODEAppuyez sur cette touche pour sélectionner le mode d’ambiance. Reportez-vous à Utilisation des commandes de la face avant, page 16.
Remarque
• Étant donné que le mode d’ambiance doit être associé à la source la source (DVD ou TV), assurez-vous de sélectionner le mode qui correspond à la source adoptée.
4 Témoins VOLUME/CHANNELLe niveau de sortie de l’enceinte sans fil figure ici; un clignotement indique une modification du niveau (aucune indication n’existe pour WIRELESS OFF).
Lors de la sélection d’une voie, le témoin qui lui correspond clignote pendant 5 secondes avant que le niveau ne s’affiche à nouveau.
Remarque
• Le niveau correspondant à chaque diode est indiqué ci-dessous.
5 Témoins du mode d’entrée DVDIls s’éclairent en fonction du mode d’ambiance retenu pour l’entrée DVD (CS II CINEMA, CS II MUSIC ou W.STEREO). Reportez-vous à Modes d’ambiance pour l’entrée DVD , page 15.6 Témoins du mode d’entrée TVIls s’éclairent en fonction du mode d’ambiance retenu pour l’entrée TV (CINEMA, MUSIC ou W.STEREO). Reportez-vous à Modes d’ambiance pour l’entrée TV , page 15.7 Témoin WIRELESS OFFCe témoin s’éclaire lorsque les sons de l’enceinte sans fil sont coupés.8 Témoin ATT/MUTECe témoin s’éclaire lorsque la sortie vers l’enceinte sans fil est atténuée. Il clignote lorsque la sortie est rendue silencieuse.9 Capteur de télécommandeCe capteur reçoit les signaux émis par le boîtier de télécommande.
• Veillez à ce qu’aucun obstacle ne soit interposé entre le boîtier de télécommande et le capteur de télécommande de l’appareil.
• La portée du boîtier de télécommande est de l’ordre de 7 mètres, à moins de 30º de l’axe du capteur.
• Le fonctionnement de la télécommande peut être perturbé par la lumière du soleil ou un éclairage fluorescent frappant le capteur de télécommande.
10 Antenne d’émissionElle émet les signaux destinés à l’enceinte sans fil.
CH 2 CH 3 CH 4CH 1
VOLUME
(1–10) (11–20) (21–30) (31–40) (MAX)
FR_XW-HT1.book Page 7 Wednesday, June 30, 2004 3:58 PM

Commandes et afficheurs02
8Fr
Enceinte sans fil
1 Témoin TUNEDIl s’éclaire lorsque le signal provenant de l’émetteur est reçu convenablement. 2 Témoin POWERIl s’éclaire lorsque l’enceinte sans fil est en service.3 POWERAppuyez sur cette touche pour allumer l’appareil ou le mettre en veille.4 Prise pour le cordon d’alimentation AC IN5 Antenne de l’enceinte sans filElle reçoit le signal émis par l’émetteur.
• Sachez que si vous tournez l’antenne trop à gauche ou trop à droite (voyez ci-dessus), tandis que vous la réglez, vous pouvez endommager l’appareil.
POWEROFF ON
TUNED
POWEROFF ON
TUNED
1 2 3
AC IN
150°150°
Antenne réglable
4
5
FR_XW-HT1.book Page 8 Wednesday, June 30, 2004 3:58 PM

Commandes et afficheurs 02
9Fr
Fran
çais
Boîtier de télécommande
1 VOLUME +/–Tournez cette commande pour régler le niveau émis par l’enceinte sans fil.2 Touches SURROUND MODEAppuyez sur cette touche pour allumer l’appareil ou le mettre en veille. Reportez-vous à Utilisation des modes d’ambiance, page 14.3 WIRELESS OFFAppuyez sur cette touche pour rendre silencieuse l’enceinte sans fil (le téléviseur ou la mini-chaîne émettent les sons en stéréophonie). Utilisez une des touches SURROUND MODE pour profiter à nouveau des sons d’ambiance produits par l’enceinte sans fil. Reportez-vous à Utilisation des modes d’ambiance, page 14.
Remarque• L’entrée DVD est automatiquement
sélectionnée lorsque vous appuyez sur WIRELESS OFF.
4 MUTEAppuyez sur cette touche pour rendre silencieuse la sortie de l’enceinte sans fil, ou la rétablir.5 INPUT ATTAppuyez sur cette touche pour atténuer les signaux de grande amplitude de manière à éviter la distorsion que ne manquerait pas de produire l’enceinte sans fil (appuyez une nouvelle fois sur cette touche pour supprimer l’atténuation).
CS CINEMA CS MUSIC W.STEREO
W.STEREOTV
MUSICCINEMA
VOLUME
SURROUND MODE
MUTE
DVD
INPUT ATTWIRELESS OFF
1
2
4
3 5
FR_XW-HT1.book Page 9 Wednesday, June 30, 2004 3:58 PM

Raccordements03
10Fr
Chapitre 3
RaccordementsRaccordement à un lecteur de DVD
DC IN 12 VTVTV DVD
LLL
RRR
SUBWOOFER
OUT
INOUT
SUB WOOFER
IN
VOLUME
DVD
CSCINEMA MUSIC
CINEMA MUSICW.STEREO W.STEREO WIRELESSOFF
ATT/MUTE
CHANNEL
1 2 3 4
TV
CS
4
5
3
2
1
Téléviseur
Lecteur de DVD
Enceinte sans fil
Câble audio stéréophonique
à fiche Cinch (RCA)
Câble audio monophonique à fiche Cinch (RCA)
Câble video
Câble audio stéréophonique
à fiche Cinch (RCA)
Vers la prise secteur
Vers la prise secteur
Cordon d’alimentation secteur
Adaptateur secteur
Émetteur
Caisson de graves
AUDIO IN
AUDIO OUT
(2CH)
L
R
L
R
VIDEO OUT
VIDEO IN
FR_XW-HT1.book Page 10 Wednesday, June 30, 2004 3:58 PM

Raccordements 03
11Fr
Fran
çais
Important• Avant d’effecteur quelque connexion que
ce soit, assurez-vous que tous les appareils sont hors tension et que la fiche de leur cordon d’alimentation est débranchée.
• N’utilisez ni les cordons d’alimentation ni l’adaptateur secteur fournis, pour un objet autre que celui décrit ici.
1 Reliez les prises DVD IN de l’émetteur à un jeu de prises stéréophoniques de sortie du lecteur de DVD. Pour cela, utilisez un câble audio stéréophonique muni de fiches Cinch (RCA) disponible dans le commerce.2 Reliez les prises TV OUT de l’émetteur aux prises stéréophoniques d’entrée audio du téléviseur.Pour cela, utilisez le câble audio stéréophonique muni de fiches Cinch (RCA) fourni.3 Si vous disposez d’un caisson de graves, reliez la prise SUBWOOFER OUT de l’émetteur à la prise d’entrée du caisson de graves.Pour cela, utilisez un câble audio monophonique muni de fiches Cinch (RCA) disponible dans le commerce.
• Si vous n’avez pas de caisson de graves, ignorez cette opération; vous bénéficierez malgré tout de bonnes sonorités d’ambiance.
• Pour le raccordement du caisson de graves, reportez-vous au mode d’emploi qui l’accompagne.
4 Reliez l’adaptateur secteur fourni à la prise d’entrée DC IN placée sur le panneau arrière de l’émetteur puis branchez-le sur une prise secteur.
5 Reliez le cordon d’alimentation secteur de l’enceinte sans fil à la prise AC IN, sur le panneau arrière de l’enceinte, puis branchez la fiche de ce cordon sur une prise secteur.
FR_XW-HT1.book Page 11 Wednesday, June 30, 2004 3:58 PM
Raccordements03
12Fr
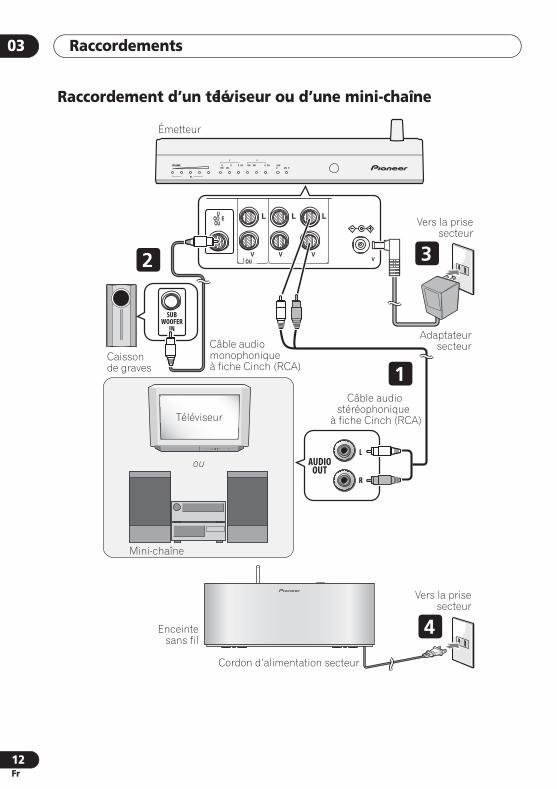
Raccordement d’un téléviseur ou d’une mini-chaîne
DC IN 12 VTVTV DVD
LLL
RRR
SUBWOOFER
OUT
INOUT
VOLUME
DVD
CSCINEMA MUSIC
CINEMA MUSICW.STEREO W.STEREO WIRELESSOFF
ATT/MUTE
CHANNEL
1 2 3 4
TV
CS
SUB WOOFER
IN
4
32
1
ou
Enceinte sans fil
Vers la prise secteur
Vers la prise secteur
Cordon d’alimentation secteur
Adaptateur secteur
Émetteur
Caisson de graves
AUDIO OUT
L
R
Mini-chaîne
Téléviseur
Câble audio stéréophonique
à fiche Cinch (RCA)
Câble audio monophonique à fiche Cinch (RCA)
FR_XW-HT1.book Page 12 Wednesday, June 30, 2004 3:58 PM

Raccordements 03
13Fr
Fran
çais
Important• Avant d’effecteur quelque connexion que
ce soit, assurez-vous que tous les appareils sont hors tension et que la fiche de leur cordon d’alimentation est débranchée.
• N’utilisez ni les cordons d’alimentation ni l’adaptateur secteur fournis, pour un objet autre que celui décrit ici.
1 Reliez les prises TV IN de l’émetteur aux prises stéréophoniques de sortie audio du téléviseur ou de la mini-chaîne. Pour cela, utilisez le câble audio stéréophonique muni de fiches Cinch (RCA) fourni.2 Si vous disposez d’un caisson de graves, reliez la prise SUBWOOFER OUT de l’émetteur à la prise d’entrée du caisson de graves.Pour cela, utilisez un câble audio monophonique muni de fiches Cinch (RCA) disponible dans le commerce.
• Si vous n’avez pas de caisson de graves, ignorez cette opération; vous bénéficierez malgré tout de bonnes sonorités d’ambiance.
• Pour le raccordement du caisson de graves, reportez-vous au mode d’emploi qui l’accompagne.
3 Reliez l’adaptateur secteur fourni à la prise d’entrée DC IN placée sur le panneau arrière de l’émetteur puis branchez-le sur une prise secteur.4 Reliez le cordon d’alimentation secteur de l’enceinte sans fil à la prise AC IN, sur le panneau arrière de l’enceinte, puis branchez la fiche de ce cordon sur une prise secteur.
FR_XW-HT1.book Page 13 Wednesday, June 30, 2004 3:58 PM

Écoute des sonorités d’ambiance04
14Fr
Chapitre 4
Écoute des sonorités d’ambianceUtilisation des modes d’ambianceVous pouvez écouter n’importe quelle source et lui associer un mode d’ambiance, mais les modes disponibles dépendent de la source sélectionnée (DVD ou TV).
Important
• Étant donné que le mode d’ambiance doit être associé à la source (DVD ou TV), vous n’entendrez aucun son si le mode sélectionné ne correspond pas à la source.
Réglage du niveau de sortie convenable de l’enceinte sans filIl est plus aisé de régler le niveau de sortie de l’enceinte sans fil en utilisant le mode W.STEREO. Ce réglage effectué, des corrections légères sont alors seules requises pour les autres modes.1 Mettez en service le téléviseur.
2 Commandez la lecture sur la source.Si la source est le téléviseur ou une mini-chaîne, choisissez un canal sur lequel est diffusée une émission, ou commandez la lecture d’un CD par exemple.Si la source est un lecteur de DVD, déposez un disque dans le lecteur et commandez son fonctionnement.
3 Mettez en service l’enceinte sans fil.
4 Sélectionnez le mode d’ambiance W.STEREO.Appuyez sur (TV) W.STEREO si la source est le téléviseur ou la mini-chaîne; appuyez sur (DVD) W.STEREO si la source est le lecteur de DVD.
5 Réglez le niveau de sortie de l’enceinte sans fil de manière qu’il soit identique à celui du téléviseur (ou de la mini-chaîne).
POWEROFF ON
(TV)W.STEREO
VOLUME
DVD
CSCINEMA MUSIC
CINEMA MUSICW.STEREO W.STEREO WIRELESSOFF
ATT/MUTE
CHANNEL
1 2 3 4
TV
CS
SURROUND MODE (DVD)W.STEREO
ou
POWEROFF ON
TUNED
VOLUME
FR_XW-HT1.book Page 14 Wednesday, June 30, 2004 3:58 PM

Écoute des sonorités d’ambiance 04
15Fr
Fran
çais
Modes d’ambiance pour l’entrée DVDUtilisez ces modes pour profiter, à l’aide de l’enceinte sans fil, de sons avec effets sonores lorsque le lecteur de DVD est la source.
• Sélectionnez le mode d’ambiance CS II CINEMA ou CS II MUSIC.
• CS II CINEMA – Spécialement étudié pour les films, ce mode fait appel à la technique SRS Circle Surround II pour situer les dialogues bien en avant, tout en fournissant les sonorités d’ambiance de l’arrière.
• CS II MUSIC – Ce mode, spécifique à la musique, utilise la technique SRS Circle Surround II pour recréer l’ambiance d’une salle de concert.
Remarque• L’enceinte sans fil n’émet aucun son
pendant la lecture d’un DVD portant une gravure monophonique.
Modes d’ambiance pour l’entrée TVUtilisez ces modes pour profiter, à l’aide de l’enceinte sans fil, de sons avec effets sonores lorsque le téléviseur est la source.
• Sélectionnez un mode d’ambiance, soit CINEMA soit MUSIC.
• CINEMA – Convient aux films; les sons produits par le téléviseur sont émis par l’enceinte sans fil pour créer une atmosphère comparable à celle d’une salle de cinéma.
• MUSIC – Convient aux concerts; les sons produits par le téléviseur sont émis par l’enceinte sans fil pour créer une atmosphère comparable à celle d’une salle de concert.
Remarque• L’enceinte sans fil n’émet aucun son
pendant la réception d’émissions de télévision monophoniques dès lors que vous avez choisi le mode CINEMA. Nous vous conseillons de choisir le mode MUSIC pour les émissions monophoniques.
CSII CINEMA CSII MUSIC W.STEREO
W.STEREOTV
MUSICCINEMA
SURROUND MODE
DVD
CS CINEMA CS MUSIC
VOLUME
DVD
CSCINEMA MUSIC
CINEMA MUSICW.STEREO W.STEREO WIRELESSOFF
ATT/MUTE
CHANNEL
1 2 3 4
TV
CS
SURROUND MODE
CSII CINEMA CSII MUSIC W.STEREO
W.STEREOTV
MUSICCINEMA
SURROUND MODE
DVD
CINEMA MUSIC
VOLUME
DVD
CSCINEMA MUSIC
CINEMA MUSICW.STEREO W.STEREO WIRELESSOFF
ATT/MUTE
CHANNEL
1 2 3 4
TV
CS
SURROUND MODE
FR_XW-HT1.book Page 15 Wednesday, June 30, 2004 3:58 PM

Écoute des sonorités d’ambiance04
16Fr
Utilisation du mode Wireless StereoUtilisez ce mode pour reproduire un signal stéréophonique ordinaire à l’aide de l’enseinte sans fil.• Appuyez sur (DVD) W.STEREO ou sur (TV) W.STEREO, en fonction de l’entrée désirée.
Utilisation du mode Wireless OffLe mode Wireless Off coupe les sons normalement émis par l’enceinte sans fil.• Appuyez sur WIRELESS OFF.Si le téléviseur est la source, les sons provenant du téléviseur ou de la mini-chaîne sont inchangés. Si le lecteur de DVD est la source, les sons provenant du téléviseur sont en stéréophonie ordinaire.
• Pour la valeur Wireless Off, l’entrée est automatiquement le lecteur de DVD.
Utilisation des commandes de la face avantVous pouvez également sélectionner le mode au moyen de la touche SURROUND MODE de l’émetteur.
Appuyez de manière répétée sur cette touche pour sélectionner le mode désiré:
* L’entrée DVD est automatiquement sélectionnée lorsque cette option est adoptée.
Questions répétitives
• L’enceinte sans fil est reliée et en service, mais elle n’émet aucun son.
Assurez-vous que le mode d’ambiance choisi correspond à l’entrée sélectionnée (DVD ou TV).
• L’enceinte sans fil ne semble pas produire un effet d’ambiance important.
Il se peut qu’un réglage du niveau de sortie de l’enceinte soit nécessaire. Faites des essais en augmentant peu à peu le niveau jusqu’à ce que les effets d’ambiance soient plus prononcés.
Remarque• Dans le cas d’une liaison à l’entrée TV,
aucune son n’est présent sur la sortie TV.• L’enceinte sans fil n’émet aucun son
lorsque le signal d’entrée est monophonique, y compris dans le cas où un mode d’ambiance a été sélectionné. Nous vous conseillons donc d’utiliser des modes d’ambiance différents selon que le signal est monophonique ou
VOLUME CHANNEL SURROUND MODE
SURROUND MODE
CS II CINEMA
CS II MUSIC
W.STEREO
WIRELESS OFF*
W.STEREO
CINEMA
MUSIC
DVD
DVD
DVD
TV
TV
TV
DVD
FR_XW-HT1.book Page 16 Wednesday, June 30, 2004 3:58 PM

Écoute des sonorités d’ambiance 04
17Fr
Fran
çais
stéréophonique. Le tableau qui suit indique les modes d’ambiance compatibles avec les signaux monophoniques et stéréophoniques.
Disposition de l’enceinte sans filL’illustration ci-dessous propose une disposition standard faisant appel aux enceintes sans fil pour la restitution des sonorités multivoies.
L’emplacement de l’enceinte sans fil dans la pièce joue un rôle essentiel sur la qualité des sons. Les conseils suivants devraient vous aider dans la détermination de la disposition optimale. Pour de plus amples détails sur les questions de réception, reportez-vous également aux paragraphes Réflexions des ondes radioélectriques , page 21 et Domaine d’utilisation de l’appareil, page 21.
• Pour restituer au mieux les sons d’ambiance, l’enceinte sans fil doit être placée derrière la position d’écoute, à une hauteur qui ne doit pas être supérieure à celle des oreilles.
• Si l’enceinte sans fil est trop éloignée de la position d’écoute, les effets sonores d’ambiance sont médiocres.
• Veillez à ce que l’enceinte sans fil soit convenablement installée. Cela améliore la qualité sonore et réduit les risques de dommages ou de blessures pouvant survenir du fait de la chute de l’enceinte provoquée par un choc ou un tremblement de terre. Le caisson de graves peut être posé à même le plancher.
• L’enceinte sans fil peut être utilisée à une distance de 10m de l’émetteur. La portée de ce dernier varie en fonction de l’environnement.
• Lorsque la réception est médiocre, le son peut être interrompu ou très affaibli. Il ne s’agit pas d’un défaut de fonctionnement de l’appareil. Tentez d’abord de changer l’emplacement de l’émetteur ou son orientation, puis procédez pareillement avec l’enceinte sans fil.
• Si vous approchez l’enceinte sans fil trop près de l’émetteur, la réception des signaux émis par celui-ci peut être médiocre. Pour que les sons soient de bonne qualité, veillez à ce que la distance séparant ces appareils soit au moins d’un mètre.
Mode d’ambiance
CS CINEMA
CS MUSIC
W.STEREO
CINEMA
MUSIC
W.STEREO
Signal stéréo
Signal mono
Entrée DVD
Entrée TV
Téléviseur ou lecteur de DVD
(ou mini-chaîne)
Position d’écoute
Enceinte sans fil
ÉmetteurCaisson de graves
FR_XW-HT1.book Page 17 Wednesday, June 30, 2004 3:58 PM
Informations complémentaires05
18Fr
Chapitre 5
Informations complémentairesGuide de dépannage
• Un erreur d’utilisation est souvent prise pour un défaut ou une anomalie de fonctionnement. Si vous pensez que le fonctionnement de l’appareil est anormal, vérifiez tout d’abord ce qui suit. Si cela ne vous permet pas de corriger la situation, consultez un centre d’entretien agréé par Pioneer ou encore le revendeur pour obtenir la réparation de l’appareil.
• Si vous constatez une anomalie dans le fonctionnement de l’enceinte sans fil, rapportez au service d’entretien l’enceinte sans fil et l’émetteur de manière qu’ils puissent être essayés ensemble.
Symptômes Causes probables et remèdes
Le son est coupé. • Cet ensemble utilise des ondes radioélectriques à très haute fréquence qui en termes de propagation, de réflexion, de réfraction, de diffraction et de brouillage présentent des propriétés voisines de celles de la lumière. En conséquence l’emplacement choisi peut conduire à une réception médiocre, voire à une interruption de la réception des ondes radioélectriques.
• La distance entre l’émetteur et l’enceinte sans fil peut être trop grande. Utilisez l’enceinte sans fil dans la zone couverte par les ondes radioélectriques provenant de l’émetteur.
• L’ensemble est peut-être trop près d’un appareil produisant du bruit électrique. En ce cas, recherchez un endroit où les sons ne sont pas perturbés.
Le son est soudainement coupé.
• Il se peut qu’un appareil de radiocommunication opérant dans la même gamme (2,4 GHz) – un équipement Bluetooth, un téléphone sans fil, un réseau local; radio, un four à micro-ondes – fonctionne à proximité.
Il est impossible de recevoir le son.
• La réception des ondes radioélectriques dépend de l’emplacement choisi en raison des obstacles et des réflexions possibles. Tentez de déplacer légèrement l’enceinte sans fil.
• L’émetteur et l’enceinte sans fil sont conçus comme une paire et vendus comme tels; ils s’identifient l’un à l’autre pendant les communications. Cela veut dire que les communications sont impossibles entre un émetteur et l’enceinte sans fil achetés séparément.
Une bande de bruit horizontale apparaît sur l’écran du téléviseur placé près de l’émetteur.
• Un appareil audiovisuel possédant une antenne est-il installé près de l’émetteur? Si oui, éloignez l’émetteur de la borne d’entrée antenne de l’appareil audiovisuel.
FR_XW-HT1.book Page 18 Wednesday, June 30, 2004 3:58 PM

Informations complémentaires 05
19Fr
Fran
çais
Soin de l’appareilNettoyage de l’extérieur de l’appareil
• Utilisez un torchon de nettoyage ou un chiffon sec pour enlever la poussière et la saleté. Si les surfaces sont très sales, nettoyez-les avec un chiffon doux humecté d’un produit nettoyant neutre dilué cinq ou six fois dans de l’eau, essorez soigneusement le chiffon et terminez avec un autre chiffon sec.
• N’utilisez ni cire pour les meubles ni autres produits de nettoyage. N’utilisez ni diluants, ni essence, ni insecticides en bombe aérosol, ni aucun produit chimique, que ce soit directement sur l’appareil ou à proximité car cela pourrait endommager les surfaces.
• Si vous utilisez un chiffon imprégné de produits chimiques, respectez attentivement les instructions d’utilisation. Ces chiffons peuvent laisser des marques sur les surfaces vitrées; dans ce cas, essuyez avec un chiffon sec.
• Débranchez l’appareil lors de son nettoyage.
Problèmes liés à la condensationDe la condensation risque de se former à l’intérieur de l’appareil si vous le transportez de l’extérieur dans une pièce chaude, ou si la température de la pièce augmente rapidement. Bien que la condensation ne puisse pas endommager l’appareil, elle risque de dégrader provisoirement ses performances. Pour cette raison, attendez environ une heure, le temps pour l’appareil de prendre la température ambiante plus élevée, avant de l’allumer et de l’utiliser.
L’enceinte sans fil n’émet aucun son.
• Assurez-vous que le mode d’ambiance choisi correspond à l’entrée sélectionnée (DVD ou TV). Pour de plus amples détails concernant cette question, Utilisation des modes d’ambiance, page 14.
• Si la source est monophonique, la production de sonorités d’ambiance peut être impossible. Pour de plus amples détails concernant cette question, reportez-vous à la remarque de la page 16.
• Veillez à ce que l’enceinte sans fil soit convenablement reliée (reportez-vous à Raccordements, page 10).
Le témoin POWER s’éteint lorsque le commutateur est sur la position de marche ou que l’ensemble est en fonctionnement.
• L’ensemble présente vraisemblablement une anomalie. Demandez à un service après-vente agréé par Pioneer ou au distributeur d’effectuer la réparation.
Symptômes Causes probables et remèdes
AttentionL’électricité statique et d’autres causes extérieures peuvent provoquer une anomalie de fonctionnement. En ce cas, débrancher la fiche du cordon d’alimentation puis la rebrancher suffit en général à rétablir les conditions normales. Si cela n’est pas le cas, consultez un centre d’entretien agréé par Pioneer.
FR_XW-HT1.book Page 19 Wednesday, June 30, 2004 3:58 PM
Informations complémentaires05
20Fr
Conseils d’installationNous souhaitons que vous puissiez utiliser cet appareil pendant de nombreuses années; les consignes suivantes vous aideront à choisir un emplacement adéquat:
Ce que vous devez faire…• Utiliser l’appareil dans une pièce bien
aérée.• Placer l’appareil sur une surface
horizontale stable, telle qu’une table, une étagère ou un rack stéréo.
• Ne pas oublier de couper l’alimentation de l’enceinte sans fil quand elle n’est pas utilisée.
Ce que vous ne devez pas faire…• Utiliser l’appareil dans un endroit où il
sera exposé à des températures ou un degré d’humidité élevés, y compris à proximité de radiateurs ou autres appareils de chauffage.
• Placer l’appareil devant une fenêtre ou tout autre endroit où il serait directement exposé au soleil.
• Utiliser l’appareil dans un environnement très poussiéreux ou très humide.
• Placer l’appareil directement au-dessus d’un amplificateur, ou autre composant de votre chaîne stéréo susceptible de dégager de la chaleur au cours de son utilisation.
• Utiliser l’appareil à proximité d’un téléviseur ou d’un moniteur; en effet, il risque de provoquer des brouillages, notamment si le téléviseur est équipé d’une antenne interne.
• Utiliser l’appareil dans une cuisine ou toute autre pièce où il serait exposé à la fumée ou à la vapeur.
• Poser l’appareil sur de la moquette ou un tapis épais, le recouvrir d’un linge; vous empêcheriez son refroidissement correct.
• Placer le l’appareil sur une surface instable ou trop petite pour porter les quatre pieds de son socle.
Avant de déplacer l’enceinte sans filAvant de déplacer l’enceinte sans fil, mettez-la hors service en appuyant sur l’interrupteur POWER placée sur le panneau supérieur. Débranchez la fiche du cordon d’alimentation.
Précautions concernant l’adaptateur secteur et le cordon d’alimentation
• Ne conservez pas le cordon d’alimentation à proximité d’un appareil de chauffage. L’isolant pourrait fondre, ce qui pourrait entraîner un incendie ou une électrocution.
• Pour débrancher l’adaptateur au niveau de la prise secteur, veillez à saisir l’adaptateur lui-même. Si vous tirez sur le cordon d’alimentation, vous risquez de l’endommager, ce qui peut entraîner un incendie ou une électrocution.
• Ne branchez pas, ne débranchez pas l’adaptateur secteur quand vous avez les mains mouillées. Vous pourriez vous électrocuter.
• Veillez à ce que les broches de l’adaptateur soient complètement introduites dans la prise secteur. Si la connexion n’est pas totale, de la chaleur peut se dégager, ce qui peut provoquer un incendie. De plus, tout contact avec la partie à nu des broches de l’adaptateur peut entraîner une électrocution.
• Ne branchez pas l’adaptateur secteur sur une prise qui n’assurerait pas un contact étroit, même lorsque les broches sont entièrement introduites dans la prise. De la chaleur peut se dégager, ce qui peut entraîner un incendie. Consultez un revendeur ou un électricien si la prise secteur doit être remplacée.
FR_XW-HT1.book Page 20 Wednesday, June 30, 2004 3:58 PM

Informations complémentaires 05
21Fr
Fran
çais
Réflexions des ondes radioélectriquesLes ondes reçues par l’enceinte sans fil se composent d’ondes provenant directement de l’émetteur (ondes directes) et d’ondes qui ont été réfléchies par les murs, le plafond et les meubles (ondes réfléchies). Les ondes réfléchies (qu’elles proviennent d’obstacles ou d’objets) engendrent d’autres ondes réfléchies et des variations dans les conditions de réception en chaque point de la pièce. Si vous notez que la réception est médiocre, déplacez un peu l’enceinte sans fil. Sachez aussi que le signal sonore peut s’interrompre, en raison des ondes réfléchies, au moment où une personne traverse ou s’approche de l’espace qui sépare l’émetteur et l’enceinte sans fil.
Précautions concernant les ondes radioCette enceinte sans fil travaille à la fréquence de 2,4GHz, c’est-à-dire dans une bande qui est réservée aux systèmes sans fil (reportez-vous à la liste ci-dessous). Pour éviter les brouillages et les interruptions de communication, n’utilisez pas cet appareil à proximité d’autres systèmes travaillant dans la même bande, ou bien veillez à les mettre hors tension. Pour améliorer la réception, vous pouvez également sélectionner un autre canal d’émission (reportez-vous à Émetteur , page 6).
• Téléphone sans fil• Routeur sans fil à large bande• Appareil audiovisuel sans fil• Aides médicales micro-ondes• Fours à micro-ondes• Contrôleurs sans fil pour jeux• Appareil Bluetooth• Appareils de surveillance pour les bébés
Autres appareils, moins courants, mais pouvant travailler dans la même bande de fréquence:
• Systèmes antivol• Systèmes de gestion des magasins• Station de radio-amateur (HAM)• Systèmes discriminatifs pour les trains et
les véhicules d’urgence
Remarque• Si l’émetteur est placé au voisinage d’un
appareil audiovisuel équipé d’une antenne, par exemple un téléviseur, un magnétoscope, un syntoniseur pour satellite ou un syntoniseur CS, vous pouvez constater le brouillage du téléviseur placé près de l’émetteur. Si cela se produit, éloignez l’émetteur de la borne d’entrée antenne de l’appareil audiovisuel.
• Si un obstacle se trouve sur le trajet entre l’émetteur et l’enceinte sans fil (par exemple, une porte métallique, un mur en béton ou un isolant thermique avec pare-vapeur en aluminium), il se peut que vous soyez contraint de modifier l’emplacement de l’appareil pour éviter les brouillages et les interruptions de propagation.
Domaine d’utilisation de l’appareilCet appareil a été conçu pour une utilisation domestique. (La distance de transmission peut être réduite en fonction de l’environnement).Dans les cas suivants, les conditions de réception peuvent se dégrader au point que le son soit interrompu ou très affaibli:
• l’intérieur d’un bâtiment en béton ou d’un habitation ayant une structure métallique.
• Près d’un meuble métallique de grande taille.
• Dans la foule, au voisinage d’un bâtiment ou à l’ombre d’un obstacle.
• Dans les endroits exposés au champ magnétique, à l’électricité statique ou au brouillage radioélectrique dus à des équipements de communication travaillant dans la même gamme de fréquence (2,4GHz) que celle de cet ensemble, par exemple les appareils Bluetooth ou ceux des réseaux locaux radioélectriques, ou encore les fours à micro-ondes.
FR_XW-HT1.book Page 21 Wednesday, June 30, 2004 3:58 PM

Informations complémentaires05
22Fr
• Si vous habitez dans une zone très peuplée (appartements, immeubles résidentiels, etc.) et si un de vos voisins possède un four à micro-ondes installé dans une pièce proche de votre ensemble, il se peut que vous notiez des brouillages radioélectriques ou que l’enceinte n’émette aucun son. En ce cas, placez l’appareil dans un autre endroit. Lorsque le four à micro-ondes n’est pas utilisé, il ne peut pas produire de brouillage radioélectrique.
Caractéristiques techniquesGénéralitésEnceinte sans fil pour transmission numérique(Émetteur, enceinte sans fil)
ÉmetteurAdaptateur secteur
Alimentation. . . . . . . . . . . . . AC 120V, 50/60HzSortie nominale . . . . . . . . . . . . 12V CC, 500mA
Consommation (sans adaptateur secteur) . . 7WEntrée . . . . . . . . . . . . . . . . . . . Prise Cinch (RCA)Poids . . . . . . . . . . . . . . . . . . . . . . 0,6 kg / 1 lb 5 oz.Dimensions . . . . .255(W) x 58.5(H) x 121(P) mm
10(W) x 25/16(H) x 43/4(P)in.
Enceinte sans filAlimentation. . . . . . . . . . . . . . . . . .AC 120V, 60HzConsommation . . . . . . . . . . . . . . . . . . . . . . . 26WCaractéristiques de l’amplificateurPuissance de sortie maximum. . . . . . . 10W/voie
valeur efficace (1kHz, DHT 10%, 4Ω)Haut-parkeur . . .Membrane conique de 7cm x 2Poids . . . . . . . . . . . . . . . . . . . . . 2,9 kg / 6 lbs 6 oz.Dimensions (sans l’antenne). . . . . . . . . . . . . . 461.5(W) x 106.5(H) x 95(P) mm
183/16(W) x 615/16(H) x 33/4(P)in.Profondeur avec antenne . . . . 110 mm / 45/16 in.
AccessoiresBoîtier de télécommande . . . . . . . . . . . . . . . . . . 1Pile au lithium (CR2025) . . . . . . . . . . . . . . . . . . . 1Adaptateur secteur . . . . . . . . . . . . . . . . . . . . . . . 1Câble audio stéréophonique à fiches Cinch (RCA). . . . . . . . . . . . . . . . . . . . . . . . . . . . . . . . . . . 1Cordon d’alimentation . . . . . . . . . . . . . . . . . . . . 1Feuillet d’avertissement concernant les ondes radio. . . . . . . . . . . . . . . . . . . . . . . . . . . . . . 1Carte de garantie . . . . . . . . . . . . . . . . . . . . . . . . . 1Ce mode d’emploi
Remarque• Les caractéristiques et la présentation
peuvent être modifiées, sans avis préalable, dans un souci d’amélioration.
Publication de Pioneer Corporation.Copyright © 2004 Pioneer Corporation.Tous droits réservés.
FR_XW-HT1.book Page 22 Wednesday, June 30, 2004 3:58 PM

Should this product require service in the U.S.A. and you wish to locate the nearest Pioneer Authorized Independent Service Company, or if you wish to purchase replacement parts, operating instructions, service manuals, or accessories, please call the number shown below.
8 0 0 – 4 2 1 – 1 4 0 4
Please do not ship your product to Pioneer without first calling the Customer Support Division at the above listed number for assistance.
Pioneer Electronics (USA) Inc.Customer Support DivisionP.O. BOX 1760, Long Beach,CA 90801-1760, U.S.A.
For warranty information please see the Limited Warranty sheet included with your product.
Should this product require service in Canada, please contact a Pioneer Canadian Authorized Dealer to locate the nearest Pioneer Authorized Service Company in Canada.Alternatively, please contact the Customer Satisfaction Department at the following address:
Pioneer Electronics of Canada, Inc.Customer Satisfaction Department300 Allstate Parkway, Markham, Ontario L3R OP21(877)283-5901
For warranty information please see the Limited Warranty sheet included with your product.
Si ce produit doit être réparé au Canada, veuillez vous adresser à un distributeur autorisé Pioneer du Canada pour obtenir le nom du Centre de Service Autorisé Pioneer le plus près de chez-vous. Vous pouvez aussi contacter le Service à la clientèle de Pioneer:
Pioneer Électroniques du Canada, Inc.Service à la clientèle300, Allstate Parkway, Markham, Ontario L3R OP21(877)283-5901
Pour obtenir des renseignements sur la garantie, veuillez vous reporter au feuillet sur la garantie restreinte qui accompagne le produit.
S018_A_EF
Published by Pioneer Corporation.Copyright © 2004 Pioneer Corporation.All rights reserved.
PIONEER CORPORATION4-1, Meguro 1-Chome, Meguro-ku, Tokyo 153-8654, JapanPIONEER ELECTRONICS (USA) INC.P.O. BOX 1540, Long Beach, California 90810-1540, U.S.A. TEL: (800) 421-1404PIONEER ELECTRONICS OF CANADA, INC.300 Allstate Parkway, Markham, Ontario L3R OP2, Canada TEL: 1-877-283-5901PIONEER EUROPE NVHaven 1087, Keetberglaan 1, B-9120 Melsele, Belgium TEL: 03/570.05.11PIONEER ELECTRONICS ASIACENTRE PTE. LTD.253 Alexandra Road, #04-01, Singapore 159936 TEL: 65-6472-7555PIONEER ELECTRONICS AUSTRALIA PTY. LTD.178-184 Boundary Road, Braeside, Victoria 3195, Australia, TEL: (03) 9586-6300PIONEER ELECTRONICS DE MEXICO S.A. DE C.V.Blvd.Manuel Avila Camacho 138 10 piso Col.Lomas de Chapultepec, Mexico,D.F. 11000 TEL: 55-9178-4270
K002_A_En
<04G00001> <ARE7351-A>Printed in / Imprimé au
En_XW-HT1.book 26ページ 2004年6月24日 木曜日 午後5時10分