Digital sound in silicon MPEX - dia.baessgen.dedia.baessgen.de/download/hbmpex-en.pdf ·...
50
Digital sound in silicon MPEX Instruction Manual © BÄSSGEN AV-Technik GmbH * Hauptstr. 58 * 79104 Freiburg Tel. 0761-23953 Fax 0761-35042 http://www.baessgen.de
Transcript of Digital sound in silicon MPEX - dia.baessgen.dedia.baessgen.de/download/hbmpex-en.pdf ·...

Digital sound in silicon
MPEXInstruction Manual
© BÄSSGEN AV-Technik GmbH * Hauptstr. 58 * 79104 FreiburgTel. 0761-23953 Fax 0761-35042 http://www.baessgen.de

2
Table of contents
© BÄSSGEN AV-Technik GmbH - MPEX - Instruction manual, version 1.08 3
Table of contents
Table of contents ...........................................................................................................3Digital sound by silicium --- MPEX ................................................................................7
General information ................................................................................................7Advantages MPEX offers on practical work...............................................................7Introduction............................................................................................................9
MPEX – First steps ......................................................................................................11Switch-on procedure ................................................................................................11Basic information on the MPEX and its storage card .................................................11How to connect storage card to PC............................................................................11How to prepare the MPEX.........................................................................................12The MP3-Tool ...........................................................................................................13
How to register the MP3-Tool.................................................................................13A demo music ..........................................................................................................14How to play demo back.............................................................................................15Summary .................................................................................................................15
Working with the MPEX...............................................................................................17How to handle the MPEX-menu ................................................................................17Save configuration....................................................................................................17
Summary – menu system ......................................................................................18Structure of the MPEX..............................................................................................18
The MP3-Player .....................................................................................................18The IMAGIX-Player................................................................................................18Further MPEX-players...........................................................................................19Command language...............................................................................................19Triggering .............................................................................................................19Batch processing, batch files .................................................................................19The LED's of the MPEX..........................................................................................19
How to run the MPEX (standalone) ...........................................................................20MPEX working as a controllable sound generator...................................................20The MP3-Tool ........................................................................................................20
How to run the MPEX together with IMAGIX .............................................................22Operation with IMAGIX 5 ......................................................................................22
Reference of MPEX ......................................................................................................25General information .................................................................................................25Files on the card.......................................................................................................25Menu functions ........................................................................................................25„Play File“-menu.......................................................................................................25„Tone“-menu ............................................................................................................25„Configuration“-menu...............................................................................................26
„Ext. function keys“-menu.....................................................................................26„Infrared Remote“-menu........................................................................................27„Trigger Mode“-menu.............................................................................................27
„Advanced functions“-menu......................................................................................28„Serial baud rate“-menu ........................................................................................28„DMX-Addressing“-menu.......................................................................................28„MIDI-Addressing“-menu.......................................................................................28„Exit at End“-menu ...............................................................................................28

Table of contents
© BÄSSGEN AV-Technik GmbH - MPEX – Instruction manual, version 1.084
„RS232 Echo“-menu..............................................................................................28„Autolink“-menu ...................................................................................................28„Global Autoloop“-menu ........................................................................................29AUTOEXEC.BAT....................................................................................................29„Player Loop“-menu...............................................................................................29„Power fail save“-menu ..........................................................................................29„Ignore IMX-Stops“-menu ......................................................................................29„Do IMX-Comments“-menu....................................................................................29„Default Player“-menu ...........................................................................................30
„Diagnostics"-menu ..................................................................................................30„Revision + ID“-men ..............................................................................................30„MP3-Encoder Key“-menu......................................................................................30„DMX-512 Input“-menu.........................................................................................30„Ext. function keys“-menu.....................................................................................30„CF-Card directory“-menu .....................................................................................31
„Config Memory“-menu.............................................................................................31„Save configs“-menu..............................................................................................31„Restore configs“-menu..........................................................................................31„Default configs“-menu..........................................................................................31
Command language used in MPEX ...........................................................................32Particularities in serial control ...............................................................................32Player Address ......................................................................................................32Options.................................................................................................................33Time data..............................................................................................................33Short commands...................................................................................................33Commands being incorporated in IMAGIX-files ......................................................33
Commands...............................................................................................................34ASSIGN.................................................................................................................34PREPARE..............................................................................................................35PLAY.....................................................................................................................35PAUSE ..................................................................................................................35STOP ....................................................................................................................36MAXPLAY..............................................................................................................36LOCATE................................................................................................................36LPLAY ...................................................................................................................37LCPREP ................................................................................................................37LINK .....................................................................................................................37CALL.....................................................................................................................38DIR .......................................................................................................................38JUMP....................................................................................................................39MUTE ...................................................................................................................39DEMUTE...............................................................................................................39TASC ....................................................................................................................40THEX....................................................................................................................40SET.......................................................................................................................41GET ......................................................................................................................43VOLUME...............................................................................................................43BASS, TREBLE......................................................................................................44
Controlling of the MPEX by means of DMX-512.........................................................45\DMX-512\-folder.................................................................................................45Simple example: ....................................................................................................45

Table of contents
© BÄSSGEN AV-Technik GmbH - MPEX - Instruction manual, version 1.08 5
Controlling of the MPEX by MIDI ..............................................................................45\MIDI\-folder........................................................................................................45Simple example: ....................................................................................................45
Summary .................................................................................................................46Time-Code player .....................................................................................................46V24-Player ...............................................................................................................46
Description of the V24-file format ..........................................................................47Technical addendum ...................................................................................................48
Assignment of connection sockets.............................................................................48V24 in-socket........................................................................................................48CAN/DMX Out-socket ...........................................................................................48CAN/DMX IN-socket .............................................................................................48AC-24-socket ........................................................................................................49MIDI IN-socket ......................................................................................................49MIDI OUT-socket...................................................................................................49

Introduction
© BÄSSGEN AV-Technik GmbH - MPEX – Instruction manual, version 1.086

Introduction
© BÄSSGEN AV-Technik GmbH - MPEX - Instruction manual, version 1.08 7
Digital sound by silicium --- MPEXGeneral information
The MPEX is a compact audio playback device, able to be applied in specialtasks in media techniques as well. Unlike traditional audio playback devices(cassette, DAT, CD) it is working without any accessories. All information issaved in semi-conductors, i.e. silicon chips, being part of the exchangeablestorage card. The Compact-Flash cards being used are standard products havingbeen developed by SanDisk. Such cards are used as well in digital cameras forexample. To keep volume of information saved as low as possible, to enablehigher playback time, sound data is compressed. Used is the standard accordingto MPEG-procedure (Layer 3) shortly called MP3. Data volume can therefore bereduced in a way enabling economic use of storage cards. Data compressing isdone by the "Encoder" (encode = xxxx). As data compressing is a highlyintensive computing procedure, the PC will always be going to work as anencoder whenever working with MPEX. MPEX is equipped with an integrated"decoder", reversing compressing on playing back. Sound data therefore areprocessed by the PC, copied to the storage card by means of an adapter and maythen be played back by MPEX.
Advantages MPEX offers on practical workCompared to traditional audio playback devices, the MPEX-technique offers awide range of advantages:
1) Life timeEven with sound data being used frequently, there will be almost no wear.Compact Flash-cards by SanDisk may be recorded about 1000000 times.Number of data readings from such card is unlimited. On using your MPEX toenter music on hold into your phone installation, MPEX will be able to play thatmusic back without any wear being caused.
2) Synchronized playbackAs all time sequences within MPEX are controlled by one and the same quartz,MPEX is able to carry out a great number of synchronization taskssynchronously to sound playback, i.e. issuing of an SMPTE time code orsynchronous playback of an IMAGIX slide show. That subjects will be going to beexplained in detail. The additional interfaces – MIDI, DMX-512, RS-232 andCAN-bus may be used to trigger external events synchronously to sound. It cantherefore be used in a lot of applications from the multimedia field.
3) TriggeringAs the MPEX is working without mechanical moving parts, it is also able to reactvery quickly to external influences. External events may "trigger" differentsounds that can be played back without almost any time lag. Possibleapplications are ghost trains where multiple sounds have to be triggered by arange of light barriers, or announcement devices or of course slide shows set tomusic with live comment, supported by a speaker (Speaker Support).

Introduction
© BÄSSGEN AV-Technik GmbH - MPEX – Instruction manual, version 1.088
Introduction
© BÄSSGEN AV-Technik GmbH - MPEX - Instruction manual, version 1.08 9
IntroductionThe present instruction manual is divided up into three sections.
The first section, „First steps“, will be going to explain how to activate the MPEX,how to load a sound-file from PC onto Compact-Flash card and how to play itback.
The second section, „Working with MPEX“, will be going to give explanations onbasic structure of menu control enabling to "surf" through functions andsettings of the MPEX. Once having read that section, you will be able to handlethe menu. Later on, we will just be going to detail effects of respective settings.By means of adequate examples we want to improve technical comprehension toenable you to successfully integrate the MPEX in your application environment.
The third section, „MPEX references“, is an information pool on any possiblefunction of the MPEX. MPEX enables a great variety of settings. They are goingto be explained in detail in that section, in form of a table. By means of a fewsomewhat professional remarks, we will be going to improve comprehension. Inthat section, internal command language of the MPEX will also be going to beexplained in detail together with the possibility to control the MPEX by means ofDMX-512 commands as well as MIDI commands.
The „Technical Addendum“ showing assignment of the different connectionsockets will be going to complete our instruction manual.
Demo musicWe added a demo music to the installation program of the MP3-Tool being partof the MPEX. We got the authorization from Highland Musikarchiv to use thatmusic for demonstration purposes.
Highland Musikarchiv is producing music that is not subject to GEMA fees.Such music can be bought there for different application purposes. Pleasecontact:
Highland Musikarchiv * Wolfhager Str. 300 * D-34128 Kassel.
More info and MP3 audio examples are available on the following homepage:
http://www.highland-musikarchiv.com
Trade marks used in the present manual are intellectual property of respectiveowners.
Freiburg, November 2000
If you wish to provide friends of yours with our instruction manual, please refer to our homepagehttp://www.baessgen.de where its integral version is available in Adobe pdf format

Introduction
© BÄSSGEN AV-Technik GmbH - MPEX – Instruction manual, version 1.0810
- Personal notes -

First steps
© BÄSSGEN AV-Technik GmbH - MPEX - Instruction manual, version 1.08 11
MPEX – First steps
Switch-on procedureTime has come to activate the MPEX. Connect the power unit AC-24 having beensupplied to the socket labeled "AC-24" and connect it to an outlet box (powerunit is designed for a power supply of 230V; with different power supply pleaseuse an adequate power unit). Display should now be illuminated; the welcomingtext should be going to appear. During that time, the MPEX will be going to buildup internal data structures and try to detect a Compact Flash-card.
Base screen of the MPEX will then be going to appear:
It will be going to show total number offiles as well as remaining storagecapacity. The four keys are beingdisplayed. The first menu item maytherefore be called by means of thebottom key being marked.
Caution: Total number of files is higher than the number of MP3-files being able tobe played back. This is due to the fact that each MP3-file will have its index-file.More details are to follow.
At first, your storage card won't contain any playback-files or no storage card atall will have been installed in your MPEX. As a matter of fact, we recommendstorage cards be not exchanged on operation. Doing so will cause the MPEX tocompletely reboot.
Caution: Inserting or removing of storage cards on operation may cause strongcrackling that might damage your loudspeakers. Reduce volume at first, prior tocarrying out such operations!
MPEX-display without card: Display with empty card:
Basic information on the MPEX and its storage cardIn its current version, the MPEX is a mere reader for Compact-Flash cards. Ingeneral, content of a storage card is generated by means of a computer.Presentations can then be made without that computer. There are different waysto connect Compact-Flash cards to a computer to record the necessary data.
„Image-Mate“ by SanDisk is an external read-write device that offers good valuefor money. „Image-Mate“ is available with either a parallel or an USB-port. Mostnotebook computers are equipped with an integrated PCMCIA-insert allowingrecording of Compact-Flash cards by means of a small adapter. Drivers issuedby Sandisk once having been installed, the storage card will be going to appearon your computer as a hard-disk drive together with respective drive label.
How to connect storage card to PCThe example stated is based on an "Image Mate" by SanDisk that is working witha parallel port. The storage card being used is a SanDisk-product as well.

First steps
© BÄSSGEN AV-Technik GmbH - MPEX – Instruction manual, version 1.0812
Caution! Not all Compact-Flash cards offered by other manufacturers are at 100%compatible with SanDisk-cards. Correct function can only be guaranteed on use ofSanDisk-cards.
ImageMate by SanDisk.
The driver software supplied with theSanDisk „Image-Mate“ once having beenloaded, a Compact-Flash card havingbeen installed will be going to appearunder Windows as a hard disk drivetogether with respective drive label.
d
Storage card with 96 MB
Connect the SanDisk „Image-Mate“ to your computer, according tomanufacturer's instructions enclosed and install driver software having beensupplied with your equipment. Installation should be complete Windows oncehaving been rebooted. Once a storage card has been inserted into the „Image-Mate“ check by means of the Windows Explorer whether a new drive label hasbeen generated.
In case you used a different technique to record storage cards on your PC, theinstructions to follow will be going to apply as well, based on the assumptionthat a drive representing the card is available.
How to prepare the MPEXIn a very first step, some sound shall now be played back from the storage card.To do so, the MPEX first has to be connected to our audio chain by means of theaudio outputs being located on the rear side of the MPEX.
In 2-channel versions, respective sockets are labeled L and R; in 4-channelversions, sockets are labeled 1, 2, 3, 4.
Connect either an amplifier or active loudspeaker boxes. Always consider thatstrong crackling may be caused on switching the MPEX on or off as well as onexchanging storage cards.

First steps
© BÄSSGEN AV-Technik GmbH - MPEX - Instruction manual, version 1.08 15
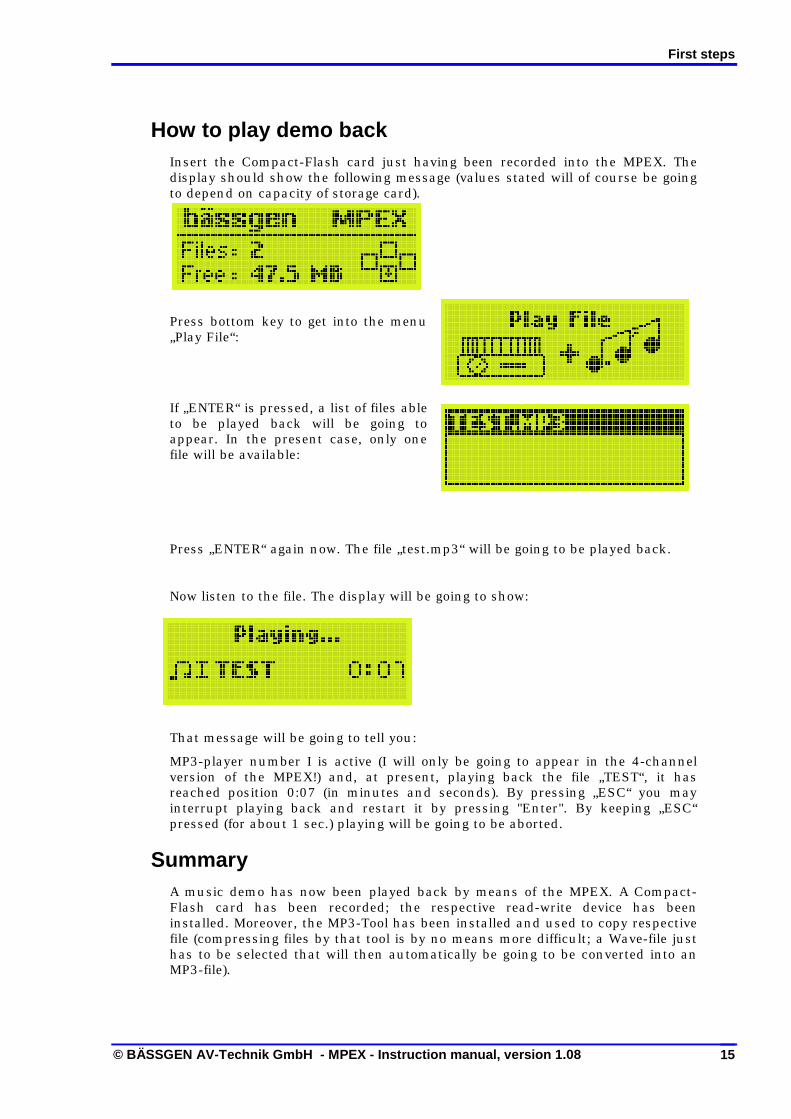
How to play demo backInsert the Compact-Flash card just having been recorded into the MPEX. Thedisplay should show the following message (values stated will of course be goingto depend on capacity of storage card).
Press bottom key to get into the menu„Play File“:
If „ENTER“ is pressed, a list of files ableto be played back will be going toappear. In the present case, only onefile will be available:
Press „ENTER“ again now. The file „test.mp3“ will be going to be played back.
Now listen to the file. The display will be going to show:
That message will be going to tell you:
MP3-player number I is active (I will only be going to appear in the 4-channelversion of the MPEX!) and, at present, playing back the file „TEST“, it hasreached position 0:07 (in minutes and seconds). By pressing „ESC“ you mayinterrupt playing back and restart it by pressing "Enter". By keeping „ESC“pressed (for about 1 sec.) playing will be going to be aborted.
SummaryA music demo has now been played back by means of the MPEX. A Compact-Flash card has been recorded; the respective read-write device has beeninstalled. Moreover, the MP3-Tool has been installed and used to copy respectivefile (compressing files by that tool is by no means more difficult; a Wave-file justhas to be selected that will then automatically be going to be converted into anMP3-file).

First steps
© BÄSSGEN AV-Technik GmbH - MPEX – Instruction manual, version 1.0816
- Personal notes -
Working with the MPEX
© BÄSSGEN AV-Technik GmbH - MPEX - Instruction manual, version 1.08 17
Working with the MPEXThat section will be giving an introduction into the structure of the MPEX as wellas some basic explanations and practical examples dealing with differentapplications.
How to handle the MPEX-menuAs in other BÄSSGEN-players that are equipped with 4 keys on the front plate,the MPEX allows a lot of settings in a menu system. Those are often functions tobe enabled one by one but it may as well be a setting to be saved later on. Theyall have an impact on the operation of the MPEX. The menu has a hierarchicalstructure obeying to the following rules:
1) Whenever the MPEX is switched on, the top-level menu will be going toappear.
2) By means of the two center keys at the front plate, (also called "cursor keys",despite the fact they aren't showing any arrows) you may move through thedifferent menu functions to select a specific one.
3) By pressing the „ESC“-key a menu function will be quit. There will be a shiftupwards towards the item on top without any modifications being carriedout. This means, pressing „ESC“ as often as needed allows returning to thefirst menu function, without any modification being carried out. That's quiteuseful in case "you got totally wrong". All the same, the menu system of theMPEX is by no means a highly sophisticated one.
4) Menu functions are selected by the „ENTER“-key. Consequences: You willeither get to next lower menu level. That level obeys to the same rules as anyother menu level. On the other hand, lowest menu level having been reached,respective menu function will be carried out or selected. In selection menus,such menu functions are mostly followed by a *. The menu is also offeringdifferent items in which a function is directly carried out on condition the„ENTER“-key is pressed, i.e. playing a file back.
If a menu contains more than three items, only part of it will be going to bedisplayed, as the display will normally show three lines only. A small scroll barwill then be going to appear at the right-hand side, showing approximateposition in the menu. You surely are already familiar with that technique as it isalso used in cell phones.
Save configurationThe settings made in the menu system have not yet been saved. So if the MPEXis simply switched off after some settings having been made, they will be lostafterwards. To keep settings active, they first have to be saved in theconfiguration memory. Any setting of the MPEX whatsoever is saved there.Whenever the MPEX is switched on, that memory will be read and the wholedevice will be going to be configured accordingly.
Caution: Re-configuration will also be done whenever storage cards areexchanged!
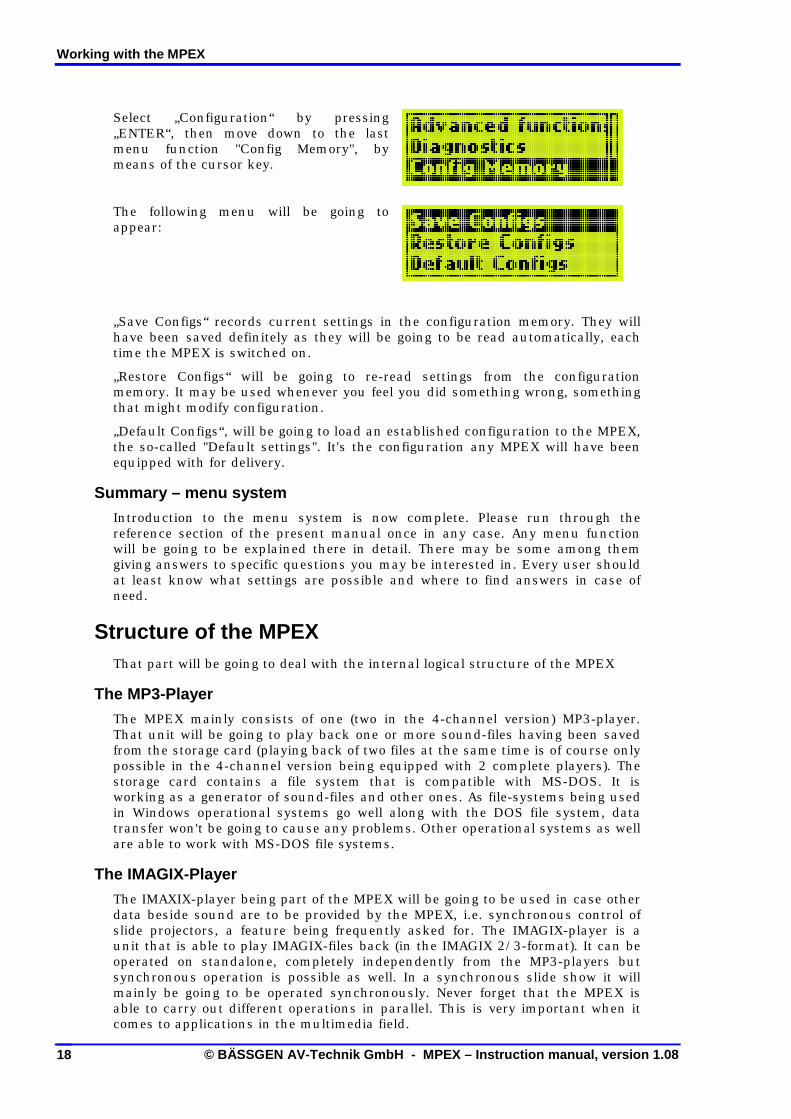
There are particular menu functions to definitely save configuration. First select"Configuration"-menu in the top-level menu.
The four menu functions of the main menuare shown in graph format; the menus lyingbelow will be going to be shown in a lineformat.

Working with the MPEX
© BÄSSGEN AV-Technik GmbH - MPEX – Instruction manual, version 1.0818
Select „Configuration“ by pressing„ENTER“, then move down to the lastmenu function "Config Memory", bymeans of the cursor key.
The following menu will be going toappear:
„Save Configs“ records current settings in the configuration memory. They willhave been saved definitely as they will be going to be read automatically, eachtime the MPEX is switched on.
„Restore Configs“ will be going to re-read settings from the configurationmemory. It may be used whenever you feel you did something wrong, somethingthat might modify configuration.
„Default Configs“, will be going to load an established configuration to the MPEX,the so-called "Default settings". It's the configuration any MPEX will have beenequipped with for delivery.
Summary – menu systemIntroduction to the menu system is now complete. Please run through thereference section of the present manual once in any case. Any menu functionwill be going to be explained there in detail. There may be some among themgiving answers to specific questions you may be interested in. Every user shouldat least know what settings are possible and where to find answers in case ofneed.
Structure of the MPEXThat part will be going to deal with the internal logical structure of the MPEX
The MP3-PlayerThe MPEX mainly consists of one (two in the 4-channel version) MP3-player.That unit will be going to play back one or more sound-files having been savedfrom the storage card (playing back of two files at the same time is of course onlypossible in the 4-channel version being equipped with 2 complete players). Thestorage card contains a file system that is compatible with MS-DOS. It isworking as a generator of sound-files and other ones. As file-systems being usedin Windows operational systems go well along with the DOS file system, datatransfer won't be going to cause any problems. Other operational systems as wellare able to work with MS-DOS file systems.
The IMAGIX-PlayerThe IMAXIX-player being part of the MPEX will be going to be used in case otherdata beside sound are to be provided by the MPEX, i.e. synchronous control ofslide projectors, a feature being frequently asked for. The IMAGIX-player is aunit that is able to play IMAGIX-files back (in the IMAGIX 2/3-format). It can beoperated on standalone, completely independently from the MP3-players butsynchronous operation is possible as well. In a synchronous slide show it willmainly be going to be operated synchronously. Never forget that the MPEX isable to carry out different operations in parallel. This is very important when itcomes to applications in the multimedia field.

Working with the MPEX
© BÄSSGEN AV-Technik GmbH - MPEX - Instruction manual, version 1.08 19
Further MPEX-playersThe MPEX is equipped with other players that are quite useful in the field ofmedia techniques. They can be operated synchronously to sound. These areunits generating MIDI or DMX-512 signals. The players described are not yetimplemented in the current firmware-release 1.00 of MPEX.
Command languageThe MPEX-players may be controlled by a command language. It is somewhatsimilar to a command line entries like the ones being used on MS-DOSoperational systems. You won't be going to need that command language tocarry out a simple slide show for example. But it can be quite useful when itcomes to using the MPEX in media applications. By a command of the type„ASSIGN 1 TEST.MP3“, the respective file will be going to be assigned to player 1and opened; "Play 1" will be going to play the file back.. „LOCATE 1 25000“ forexample will set playback position to 25 sec. For detailed information oncommands please refer to reference section.
TriggeringIf other devices are to trigger the MPEX in a media field command languagedescribed will be going to be used. The same commands may be transmitted tothe MPEX by means of a RS-232-interface. The MPEX will then be going to carryout commands transmitted.
Batch processing, batch filesBatch files now may also be written by an ordinary text editor. Those are filescontaining different commands; every line contains its own command. By callinga batch-file different commands may therefore be enabled.
Practical example: a slide show set to sound is supposed to be triggered by a lightbarrier. The storage card will contain the respective IMAGIX-file, the respectiveMP3-file as well as a command-file called „E1.BAT“, containing commands totrigger respective slide show. The light barrier will have been connected to externalinput 1 of MPEX. In the MPEX-configuration, the file „E1.BAT“ will have beenassigned to external input 1. The show will be going to start as soon as the lightbarrier will have been interrupted.
The LED's of the MPEXInternal status of the MPEX is shown by three LED's.
LED „CTRL“ flashing: the MPEX has received an external command, usually acommand transmitted by the infrared remote control or a trigger signaltransmitted by means of an interface having been selected.
LED „PLAY“ lighting: one of the MP3-players is in playback mode. The LEDdescribed should be lighting, as soon as sound will start being transmitted. Therespective LED flashing means the MPEX is in "Pause state". The file to beplayed back will still remain opened; MPEX will be waiting at respective playbackposition. Another play command, i.e. pressing the "Enter"-key will be causingthe MPEX to continue playing back.
LED „SYNC“: from its SYNC-output, the MPEX is transmitting a control signalbeing addressed to a projector control device for example. Such a signal willalways be transmitted whenever the IMAGIX-player will be playing back anIMAGIX-file. The respective LED will be flashing with the IMAGIX-player being inthe operational state "Pause".
Working with the MPEX
© BÄSSGEN AV-Technik GmbH - MPEX – Instruction manual, version 1.0820
How to run the MPEX (standalone)The present section will be going to give information on how to apply the MPEXin a typical media environment. Its use in slide projection will be going to bedescribed in an own chapter.
MPEX working as a controllable sound generatorThe following rule will always have to be obeyed to, no matter in what way theMPEX will be going to be used as a sound generator: in any case whatsoever,sound first has to processed by means of a PC and copied to the storage card.Use of the MP3-Tool having been supplied is absolutely compulsory. Therespective program is waiting for sound having been converted into WAVE-files.One or more of them may be selected. They will be going to be compressed intothe MP3-format. The MP3-tool will be equipped with an MP3-encodermanufactured by Fraunhofer Society. Once the MP3-Tool having compressedrespective sound, the MP3-file will be going to be read once again; respectiveindex-file will be going to be generated. That file is a vital one as it ensurescorrect function of the MPEX. If for any reason whatsoever the integratedencoder will not be going to be used or if, for example, sound is only available inan already compressed version, the MP3-Tool may also be used to generate justthe index-file. Please refer to the following section dealing with the MP3-Tool.
Prior to initiate the storage card we recommend referring to the section dealingwith the tool described. Start it, enter registration code on first use, then copythe file requested onto the card and start the MPEX. For controlling protocolsand menu settings please see reference section.
The MP3-ToolThe MP3-Tool is supposed to compress sound-files and to generate thenecessary index-files. Start the program, the MP3-Tool once having beeninstalled on your PC.
The following screen should be displayed when the program is started for thefirst time:
Respective registration code will now have to be entered. Select menu functionConfiguration -> Diagnostics -> MP3 Encoder Key from the MPEX. A 16-digitkey-number will be going to be displayed. Select "Options" from the MP3-Tool;enter that number in respective box. Quit that box by "Ok"; quit the MP3-Tool by"Exit".

Working with the MPEX
© BÄSSGEN AV-Technik GmbH - MPEX - Instruction manual, version 1.08 21
On restarting the MP3-Tool now, registration should have been completed. Yourscreen will now be going to display:
By means of the control panel „files“ you may now select files. From the dialogueto follow you may select several files at once. The dialogue being quit, the filesselected will be going to be registered in the list of the MP3-Tool. You mayactivate the control panel "files" several times. By doing so, the list of files to beprocessed can be enlargened.
By means of the control panel „Cancel“ you may remove files having beenmarked from the list.
OptionsBy means of the controlpanel „Options“ you mayinfluence functioning of theMP3-Tool
By means of the boxes „Bitrate“, „Operating mode“,„Sampling rate“ you mayinfluence quality of theencoder. With high qualityrequirements werecommend a bit rate of112 or 128kB be alwaysused. Only in applications where quality requirements are low, you may switchover to a lower quality, to save considerable storage capacity.
With the switch „Generate MP3-files“ not having been marked; no MP3-file willbe going to be generated from a WAVE-file. Respective file will simply be going tobe copied into the destination folder.
With the switch „Generate MP3-Index-Data“ not having been marked, no index-file will be going to be generated. That switch should absolutely be marked onworking with the MPEX.
Generally speaking, further files showing other extensions will just be going tobe copied into destination folder (Imagix-files for example).
If sound-files are already available in the MP3-format, the MP3-Tool will justhave to be used to generate the necessary index-files. Select respective MP3-files

Working with the MPEX
© BÄSSGEN AV-Technik GmbH - MPEX – Instruction manual, version 1.0822
by means of the control panel "Files". Make sure the switch „Generate MP3-Index-Data“ will have been marked. The MP3-files will be going to be copied intodestination file. Afterwards, the index-files will be going to be generated.
How to start compressingProcedure has to be started by activating the control panel "Start". The twoprogress bars at the bottom of the screen will be going to indicate progress ofcompressing. One bar stands for progress within the file being currentlycompressed; the other one stands for progress with regard to the whole list offiles to be processed.
How to quit the MP3-ToolTask once having been accomplished, quit the MP3-Tool by means of controlpanel „Exit“.
Technical notice: Many notebooks are equipped with a serial PCMICA-insert,allowing recording storage cards directly by using an adapter. On recording astorage card being installed in a notebook by means of an Ethernet network, makesure network configuration has been set in a way to provide you the necessaryrecording rights with regard to your storage card. Otherwise, the MP3-Tool will ofcourse not be able to record the card.
How to run the MPEX together with IMAGIXWhen working with IMAGIX Vers. 3.xx only, the statements made with regard to„standalone“-operation will be going to apply here as well. By means of the MP3-Tool make sure the IMAGIX-file is copied onto the card; an MP3-file showing thesame name (except extension) is generated together with the index-file and savedon the card.
On working with IMAGIX 5, IMAGIX must at least be available in its version5.04. Version 5.04 and later ones are equipped with a support for the MPEX. Aspecific dialogue will enable you to prepare data transfer onto the card. Imagix5.04 will be going to start the MP3-Tool on its own and to transmit the necessaryparameters. Details are to follow below.
Operation with IMAGIX 5Let's assume you programmed a slide show by means of IMAGIX 5 and you nowwant to play it back by means of the MPEX. It doesn't matter whether that showis a completely programmed one or a Speaker Support Show. In case of aSpeaker Support Show, automatic stops will have been programmed that will begoing to be converted into the IMAGIX-format. On playing back, they will begoing to cause the MPEX to pause at the stops having been programmed.
IMAGIX 5 ( from 5.04 onwards) is equipped with a menu function going toassure preparing of the storage card. To put it quite clearly, we once again listedall the steps that have to be carried out in that procedure (They may also becarried out one by one on their own, result will be same!)

Working with the MPEX
© BÄSSGEN AV-Technik GmbH - MPEX - Instruction manual, version 1.08 23
1) Call menu function „Export IMAGIX 2/3 file“ and save file on storage card.
2) Call Merge-function that will be going to convert any sound into a WAVE-file.That WAVE-file will be going to be saved on the disk.
3) Start the MP3-Tool that will be going to compress the whole WAVE-file and torecord it onto the storage card as an MP3-file.
4) The MP3-Tool will now be going to generate the necessary index-file.
5) The MP3-Tool will be going to end.
That steps can all be started at once (from version 5.04 onwards) by means ofthe menu function MPEX/APEX in the main menu.
Some information must be made available to enable that procedure.
In IMAGIX 5, call menu function MPEX/APEX. The following dialogue will begoing to appear:
In the entry box on top, enter a filename under which IMAGIX will be going tosave sound that hasn't been compressed yet. The name to be selected will betaken over on the storage card. Please consider that with the MPEX such entriesare limited to 8 signs due to the fact it is ruled by the MS-DOS file-system!
You may also use that temporary WAVE-file to record an audio CD that will begoing to contain sound that hasn't been compressed.
Please make sure enough storage capacity to record that WAVE-file as atemporary file is available in the folder selected.
In the next box you will have to enter location where IMAGIX 5 can find theMP3-Tool. It is usual to install it in the same folder as IMAGIX itself.
From the bottom box, select the drive on which your storage card can bereached.
Start process by activating the control panel "Start". In a first step, the IMAGIX-file will be going to be copied to the card. Afterwards, mixing of audio events willbe going to be started. You may follow that procedure by observing progressingof locator. Once the WAVE-file having been generated, the MP3-Tool will bestarted automatically. Progress will be going to be indicated by the blue bars inthe two bottom boxes.
Working with the MPEX
© BÄSSGEN AV-Technik GmbH - MPEX – Instruction manual, version 1.0824
Personal notes

References of MPEX
© BÄSSGEN AV-Technik GmbH - MPEX - Instruction manual, version 1.08 25
Reference of MPEX
General informationThe reference section will be going to provide detailed information on any menufunction as well as on any protocol. Get somewhat familiar with it. You will thenknow what possibilities the MPEX is offering even if you will be going to needthem later on only. Users working exclusively with slide shows normally won'tneed that technical background information.
Files on the cardAll files being recorded on the card must be included in the main directory. Sub-directories are not supported by current software. The LCD-display being quitesmall long names with many directories couldn't be shown without difficulties.The card has a maximum storage capacity of 500 files.
Exception:Special BATCH-files to be used in external triggering of the MPEX by means ofDMX-512 or MIDI signals are included in special sub-directories being on the card!
Menu functions
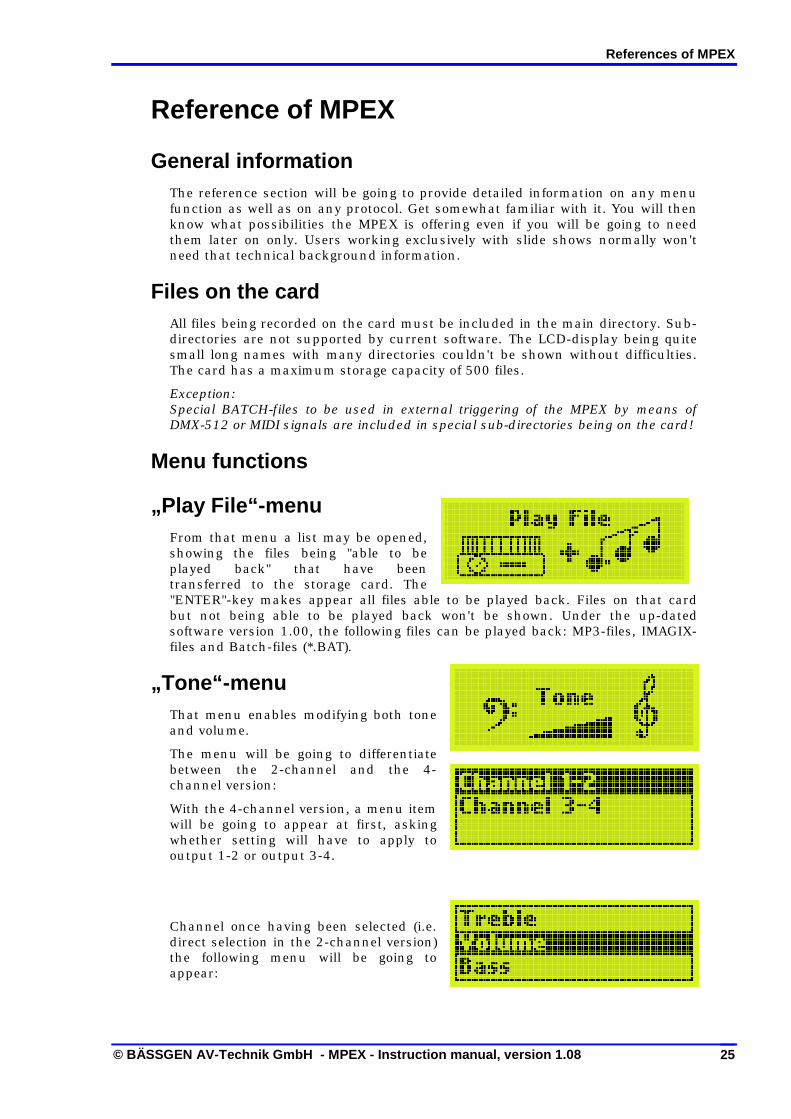
„Play File“-menuFrom that menu a list may be opened,showing the files being "able to beplayed back" that have beentransferred to the storage card. The"ENTER"-key makes appear all files able to be played back. Files on that cardbut not being able to be played back won't be shown. Under the up-datedsoftware version 1.00, the following files can be played back: MP3-files, IMAGIX-files and Batch-files (*.BAT).
„Tone“-menuThat menu enables modifying both toneand volume.
The menu will be going to differentiatebetween the 2-channel and the 4-channel version:
With the 4-channel version, a menu itemwill be going to appear at first, askingwhether setting will have to apply tooutput 1-2 or output 3-4.
Channel once having been selected (i.e.direct selection in the 2-channel version)the following menu will be going toappear:

References of MPEX
© BÄSSGEN AV-Technik GmbH - MPEX – Instruction manual, version 1.0826
Select parameter you wish to adjust:
„Treble“ (pitch tones) and „Bass“ (low tones) both have a setting range rankingfrom –15 dB to +15 dB. Tone therefore can be set to perfection.
Notice: On amplifying either treble or bass (increase, i.e. a positive DB-value); theinternal signal processor may reduce overall volume to prevent overshootingcausing distortions. It seams at first sight as if reducing bass carried outamplifying treble. That's wrong. On increasing volume on your amplifier you willget aware of the difference.
Volume setting range ranks from –30 dB to 0 dB. –30 dB means strong reducing;0 dB corresponds to nominal volume.
Important notice ! A subsequent amplifier must compensate any volume reducing.We absolutely recommend that setting be kept at 0 dB. Better modify volume bymeans of an audio mixer or an amplifier succeeding the MPEX. It's no use toreduce volume at first and to amplify it afterwards. Any secondary noise, hum etc.will as well be going to be amplified to the extent a subsequent amplifier will haveto amplify volume. Clicks due to switching on and off devices connected will alsoget stronger. Therefore, whenever possible, volume setting should be kept at 0dB.
„Configuration“-menu„Configuration“-menu is a kind ofgateway giving access to a wide range ofsub-menus. Almost all of them aredealing with configuration.
„Ext. function keys“-menuThat menu enables assigning functions to both the four direct external inputs ofthe MPEX and the four keys F1-F4 of the infrared remote control. The fourexternal inputs are located on four contacts of the V24/EXT IN-socket. Pleaserefer to the menu or the technical addendum to check the numbers of contactsdescribed. The two pins indicated just have to be connected by a contact toenable function. Pin 5 is the connection to earth of the MPEX, the other one willbe going to be kept at about +12V by means of a Pull-up resistor.
Select the input to be used for aspecific function.
"Off" may be activated for any externalkey and the F1-F4-keys. The respective key will be disabled by that function. Adirectly pre-defined BAT-file may be started for any input. Such files mayenclose different commands.
References of MPEX
© BÄSSGEN AV-Technik GmbH - MPEX - Instruction manual, version 1.08 27
The last function to be named is „XX.BAT if idle“. That setting makes sure aBAT-file will only be started with the MPEX being in idle state. Let's assume anapplication in media showroom. If music is to be triggered by means of a lightbarrier, it must be made sure, that music won't start anew if the light barrier isinterrupted once again. That's exactly what „XX.BAT if idle“ is doing. The MPEXwill only have to react, once the piece of music having run down.
Please also refer to the parameter „Exit at End“ in „Advanced functions“, that isalso related to that function.
At the external keyboard inputs, E1 and E2-key, there are two more specialsettings: „Start func“ (with E1) and „Stop func“ (with E2). That function is thestandard being used to control „Speaker Support“-slide shows. With the slideshow running and being automatically stopped at a previously programmedposition, it may be restarted by means of „Start func“. Therefore, if a speaker isquite far from the MPEX, both the ESC-key and the ENTER-key may be imitatedby means of a cable-connected remote control.
Take Ext 1 as an example: specialsetting has been selected. Both theexternal keys E3 and E4 aren'tequipped with any special setting;"reserved" will be going to appear atrespective position.
If a BAT-file having been selected doesn't exist, respective function will be goingto remain disabled. As any other setting, those configurations will have to besaved in the configuration memory, to make sure they will still be going to beactive on restart.
„Infrared Remote“-menuBy means of that menu, the infrared remote control may easily be disabled bymeans of the settings „On“ and „Off“. Switching the infrared remote control offmay be useful on working with several BÄSSGEN-devices in the same room,granted that only one will be going to be supposed to react.
„Trigger Mode“-menuThere are three different possibilities to run the MPEX in serial environments:
1) Ordinary RS232-control
2) Control in DMX-512-environments
3) Control in MIDI-environments.
Only one of the three possibilities described can be used at a time.
Select one of the three triggering possibilities from that menu:
Basic setting is „Serial trigger“ (i.e.RS232-standard).
Notice:
All DMX-512-functions as well as theMIDI-functions (including Diagnosticfunctions) won't be going to work without having been set to respective type ofsignal.
That parameter therefore is essential in multimedia environments!!

References of MPEX
© BÄSSGEN AV-Technik GmbH - MPEX – Instruction manual, version 1.0828
„Advanced functions“-menuThat menu includes the somewhat more sophisticated functions:
„Serial baud rate“-menuSet serial data rate for the RS232/V24-interface. Any standard baud rate from300 up to 38400 baud may be set. Default setting is 9600 baud.
„DMX-Addressing“-menuSelect a DMX-512-address on which the MPEX will be going to receive DMX-512-commands, whenever it is supposed to be triggered by means of a DMX-512light mixer.
„MIDI-Addressing“-menuSelect a valid MIDI-address within the range from 1 to 16, on which the MPEXwill be going to receive MIDI-signals.
„Exit at End“-menuBy means of that setting you may configure state to which the MPEX will have toswitch over to, playing back of an MP3-file once having been completed. If "off" isset, the MPEX will be going to switch over to "Pause" after a file will have beenplayed completely back. It will all the same never be going to switch completelyover to idle state. A time period may be set as well. That period having run down,the MPEX will be going to switch back to base state.
The function described is very important with regard to external inputs. A timeperiod may be set making sure a whole installation may only be restarted theperiod fixed having run down.
„RS232 Echo“-menuAn echo on the RS232-interface may be switched on or off. With the echo-function being switched on, the MPEX will be going to return all bytes havingbeen transmitted as commands to the V24-input socket as a copy. That functionmay be quite useful with some of the tests that can be carried out by means ofthe MPEX in connection with a terminal program.
„Autolink“-menuAutolink-function is very important in the Speaker Support-field, on running theMPEX together with slide projectors. In that case "Autolink" should be enabledas it has the following functions:
If an MP3-file gets started by means of the „Play File“-command, an IMAGIX-fileshowing the same name (except for extension) will automatically be started atthe same time. Moreover, an MP3-file will be going to be started in a way tomake sure stop marks (if any) included in the IMAGIX-file will really stop sound.The philosophy of the MPEX also allows standalone playing back. That mode isanything but desirable in Speaker Support. For more information about possibleoperating modes with regard to playing back please refer to commands overview.
Furthermore, playing back of an IMAGIX-file will be going to be started in anoperating mode making sure that the IMAGIX-player won't continue workingwhen respective MP3-file is stopped.
Notice:To start a Speaker Support Show you may start either the IMAGIX-file or the MP3-file. "Autolink" makes sure they will both be going to be started in the correctmode. Filename must be the same (except extension). Example: „TEST.MP3“ and„TEST.IMX“.

References of MPEX
© BÄSSGEN AV-Technik GmbH - MPEX - Instruction manual, version 1.08 29
„Global Autoloop“-menuIn certain applications a continuous presentation is to be run. That presentationis supposed to start anew when the MPEX will have returned to idle state. Thefunction „Global Autoloop“ will be going to take over the task requested. A BAT-file from the storage card will be needed; its name is „AUTOLOOP.BAT“. TheMPEX will be going to execute the AUTOLOOP.BAT-file whenever it is in idlestate, granted that that file exists and the parameter „Global Autoloop“ will havebeen enabled. Playing back of one or more files may be started in that file forexample.
AUTOEXEC.BATWe want to mention another characteristic of the MPEX that is working withoutmenu setting. If there is an "AUTOEXEC.BAT"-file on the storage card, it will beexecuted just once on putting the MPEX into operation. It helps to carry out amedia application in the morning, when power is switched on: let that be anannouncement or making travel projectors to a previously established position.
„Player Loop“-menuEnable a loop function separately for both the two MP3-players (only 4-channelversion) and the IMAGIX-player. This means, as soon as one player will havefinished playing back its file, it will be going to restart independently from theothers. That function is frequently used if, on using a 4-channel version,continuous music is to be played in two different rooms, with pieces of musicbeing of different length.
„Power fail save“-menuIn some applications the MPEX should continue playing at the position at whichit has been interrupted by a power failure. There are also applications in whichthat function shouldn't be active (if other systems not being equipped with thatcharacteristic are integrated). That function may be enabled or disabled in theMPEX. If "Power fail save" is set to "on", playing position will be going to be savedin an internal non-transitory memory in case of power failure. On switching on,the MPEX will continue playing at the position having been saved.
Caution! It is forbidden to exchange storage card following a power failure. TheMPEX wouldn't be able to find correct position on the other storage card as suchposition will partly be saved in sector addresses. Please also note it will alwaysbe going to take a short while on switching on, time needed for initializing astorage card.
„Ignore IMX-Stops“-menuThat menu function being set to „on“, the MPEX will be going to ignore the stopshaving been programmed in an IMAGIX-file. For Speaker Support slide showssuch stops are very important. Default setting is "off". It is normally only set to"on" for test purposes.
„Do IMX-Comments“-menuThat menu function being set to „on“, the comments included in the IMAGIX-filewill be going to be interpreted as commands to be executed once respective linebeing carried out. Such comments may be edited by IMAGIX 2 (MS-DOS) orIMAGIX 3. That function allows programming complex processes. Default settingis "off". Comment lines beginning with "#" will be going to be ignored in any case.

References of MPEX
© BÄSSGEN AV-Technik GmbH - MPEX – Instruction manual, version 1.0830
„Default Player“-menuThat menu function only exists in the 4-channel version. If a file to be playedback is started from the menu „Play File“, a 4-channel MPEX will first be goingto use the MP3-player having been selected as its „Default Player“. In case thatplayer was already taken, the other one will be going to be used.
„Diagnostics"-menuThe whole „Diagnostics“-menu consists of test functions giving information onstate of the MPEX or that may be used to test external cable connections.
„Revision + ID“-menThat menu function will be going to show current software state of the MPEX aswell as its internal ID-number. The ID-number is a specific serial number beingpart of your device. That number will remain the same, even if an up-datedsoftware version is installed for example. Up-dated software versions beingissued by us are usually made available for download on our internet site:http://www.baessgen.de
„MP3-Encoder Key“-menuThat menu will be going to provide you the enabling code related to the MP3-Tool-software being part of your MPEX. Enter the 16-digit code in the respectivebox of the MP3-Tool-software to get authorization for regular use.
„DMX-512 Input“-menuIf the MPEX is used in a DMX-512environment (to control sound-files bymeans of a light mixer for example) thatmenu will be going to help you to easilycheck your cabling. Two channels maybe selected; their values may be checked either in decimals, hexadecimals orpercent. The cursor keys "Up" and "Down" allow switching the channel forward.
„Ext. function keys“-menuThe MPEX is equipped with fourexternal inputs allowing direct playingback of four MP3-files or other ones inmedia applications. Connections ofthose four external keys may be checkedby means of „Ext. function keys“-menu. As soon as a key will have been enabled,the respective "-"-sign will be going to turn into an "X"-sign.

References of MPEX
© BÄSSGEN AV-Technik GmbH - MPEX - Instruction manual, version 1.08 31
„CF-Card directory“-menuThat menu allows displaying all files being included in the main directory of thestorage card. Index-files of the MP3-files are showing the extension *.MFI (MPEGFile Index). Current up-dated software version doesn't support sub-directories.Operation of the MPEX won't be affected if there are sub-directories containingfiles on the storage card. The card will then just be going to show less memorycapacity. No sub-directories are used at present, as they would only rendermenu structure more complicated. Moreover, the LCD-display is too small toallow displaying of a complete name.
Notice:Triggering the MPEX by DMX-512 or MIDI requires two specific sub-directories;they won't be going to be displayed in that menu.
„Config Memory“-menuThat menu is to supervise configurationmemory. Whenever configuration ismodified; that modification will only begoing to last until the device will havebeen switched off. On switching onagain, configuration being saved in theconfiguration memory will be set. If a modification shall remain active, call menufunction „Save configs“ once modifications having been carried out.
„Save configs“-menuAny current setting of the MPEX will be going to be copied to the configurationmemory. On switching on again (or reset of the MPEX, due to exchange ofstorage card for example) that setting will be called.
„Restore configs“-menuSetting of the configuration memory will be going to be read. Current setting ofthe MPEX will be going to be same as the setting having been saved.
„Default configs“-menuThe MPEX will be going to be set to a base setting, corresponding to the one thedevice will be going to be equipped with on delivery. Configuration memory won'tbe going to be affected. If you wish to set configuration memory as well to basesetting, you will have to recover it by „Save configs“ now.

References of MPEX
© BÄSSGEN AV-Technik GmbH - MPEX – Instruction manual, version 1.0832
Command language used in MPEXCommand language used in MPEX has been developed for advanced users and commercialapplications. Basic knowledge in command-line orientated programming will be going to be
needed. By means of that language, the MPEX may be configured for use in a wide range ofapplications.
As mentioned earlier on, the MPEX may be operated by means of a commandlanguage, i.e., commands consisting of ASCII-lines. They enable controlling theplayers being integrated. That command language is the backbone of the MPEX.It is used on serial triggering of the MPEX by means of RS-232-commands or onusing BATCH-files. Those are ordinary text files enclosing a set of commandshaving been integrated. A separate line has to be used for each command.
Notice:Seen the fact an MS-DOS file-system is used, filenames mustn't enclose more than8 signs as well as an extension of 3 signs at maximum. Extension will be going todefine file-type and can't be freely chosen. On working with sound-files, the MPEXwill always be looking for files showing the extension "MP3". Using mutatedvowels such as ä, ö, ü as well as dots, colons or blanks in filenames is alsoforbidden!
Particularities in serial controlOn controlling the MPEX by serial commands, baud rate having been set in themenu of MPEX will always be used. Use the option "V24 Echo" on doing testswith a terminal program. That option will be going to return signs having beentyped and will therefore enable you to detect spelling errors for example.
Neither cursor keys nor special keys will be enabled in such case!By the same token, make sure the parameter "Trigger mode" will have been set to"Serial". Otherwise, the MPEX will be going to look for entries being made bymeans of the DMX-512 or the MIDI-input.
Commands always have to be completed by an end-of-line (OD hex.).
Player AddressThe different players integrated in the MPEX have invariable addresses by whichthey may be called. When it comes to ASSIGN, there are different addresses, asonly one player at a time may be called by that command. All other commandsallow calling different players at the same time. Addresses may simply be addedas they are construed in powers of two. Exact simultaneous calling of differentplayers is therefore possible (time needed for transmission by means of serialinterface would become audible already if the two MP3-players were started atthe same time for example). An example will be given later on.
The table below shows the different addresses being used in the MPEX:
Player Address Address f. ASSIGNMP3-player A 1 1MP3-player B (only with 4-channel version) 2 2Time code-player (virtual player) 16 5IMAGIX – player 32 6V24-player 256 9
Further player addresses are reserved and haven't been implemented in thecurrent software version yet.

References of MPEX
© BÄSSGEN AV-Technik GmbH - MPEX - Instruction manual, version 1.08 33
OptionsSome commands are furthermore equipped with one or more options. They arepreceded by a backslash, followed by a sign (number or letter). Options will begoing to be explained together with respective command.
Time dataIn some commands exact time data are transmitted. Such time data are alwaysexpressed in milliseconds (1 millisecond = 1 / 1000 second).
MP3-files are made of "frames" whose length may slightly vary according to bitrate and sampling rate. Variation is about 25ms. More precision can't be achievedas only whole frames may be played back. As a time unit, we all the same usedmilliseconds, as it is easy to use and doesn't depend on sampling rate etc.
Short commandsAny command of command language mentioned may be abbreviated. Anabbreviated command consists exactly of the first two command letters.Therefore, instead of "PLAY", you may also write "PL". In applications with serialtransmission where time is critical (p.e. low baud rate) time may be saved bydoing so. Commands being incorporated in IMAGIX can only be entered thatway, entries being limited to 20 signs (please refer to following section).
Commands being incorporated in IMAGIX-filesThat function is for experienced users, but enables trouble shooting even in complexe installations!
The IMAGIX-player being integrated in the MPEX plays back files showing theextension .IMX. Such files may directly be edited by IMAGIX 3-software. IMAGIX3 is a classic line editor. A comment may be added to any command line, itslength being limited to 20 signs. An IMAGIX-file being played back, it is possibleto cause the MPEX to interpret respective comment as a command fromcommand language. That function first has to be enabled by means of the menufunction „Do IMX Comments“ (from the menu „Adv. Functions“). That functionhaving been enabled, the MPEX will be going to interpret any comment in anIMAGIX-file as a command to be directly executed by the MPEX. Highly complexprocesses may be programmed. MP3-players may be started or external devicesmay simultaneously be controlled by means of TASC/THEX-commands forexample. Range of possibilities is wide, but use requires sound experience inprogramming. As a matter of fact, by using the possibilities described a greatnumber of problems arising in a media station may be solved.
Real comments to be used in such a program that mustn't be transmitted to thecommand interpreter of the MPEX will have to be preceded by an "#". Such lineswill be going to be completely ignored by the MPEX.

References of MPEX
© BÄSSGEN AV-Technik GmbH - MPEX – Instruction manual, version 1.0834
CommandsASSIGN
ASSIGN will be going to open both a file and a player. No data will yet be going tobe read from the file, no playing back will yet be going to take place. Callingseveral players at the same time by ASSIGN is forbidden.
General pattern:
ASSIGN player filename options
Caution: ASSIGN is ruled by a different address assignment than othercommands! ASSIGN must always be used with only one player at a time.
Addresses (for ASSIGN only)
MP3-player A 1MP3-player B (only in 4-channel version) 2IMAGIX -player 6
Options:
Player selected being an MP3-player and /I being entered under "options"means: ignore stop marks from IMAGIX-player. In that case, the MP3-player willcontinue working even with the IMAGIX-player getting stopped by an X-mark.With no option entered, ASSIGN will be going to set the MP3-player to theoperative mode in which stopping of the IMAGIX-player will also be going to stopthe MP3-player. That feature is very import with Speaker Support mode.
Player selected being the IMAGIX-player, three different options will be available:/1, /2 or /6. That option establishes the source of the time base the IMAGIX-player will be going to work on. If the IMAGIX-player is opened by /1, it will runas a slave of the MP3-player no 1. If the MP3-player stops, the IMAGIX-playerwill be going to stop as well. /2 selects the MP3-player 2 as a time base. If theIMAGIX-player is opened by /6, it will work freely, ruled by its own internalclock.
Notice:
With a player being started at the MPEX manually, the menu function "Autolink"being active, and both an MP3-file and an IMAGIX-file of the same name existing,both will be started together. As a time base the IMAGIX-player will always begoing to use the MP3-player 1 having been started at the same time. The MP3-player will be going to obey to the stop marks of the IMAGIX-file.
Examples:
ASSIGN 1 TEST.MP3MP3-player 1 is going to be opened for TEST.MP3
ASSIGN 6 TEST.IMX /1
IMAGIX-Player is going to be opened for TEST.IMX, player 1 will be registered asa time base.
ASSIGN 2 SOUND.MP3 /iMP3-player 2 (4-channel MPEX !) is going to be opened for SOUND.MP3. Player 2is supposed to continue working even with the IMAGIX-player obeying to stopmarks.
References of MPEX
© BÄSSGEN AV-Technik GmbH - MPEX - Instruction manual, version 1.08 35
PREPAREPREPARE will be going to make one or more players ready for playing back.Reading from the storage card will already get started; all buffer memories willbe going to be filled with data. That command is especially important with thetwo players of the 4-channel version having to work absolutely synchronously.Even if extremely short answering times are requested, procedure will getquicker if PREPARE is called first, prior to PLAY, a command going to bedescribed later on. In applications, where fractions of seconds do not matter,PREPARE may well be left aside, as PLAY will implicitly be going to callPREPARE at first if that command hadn't been called already.
General pattern:
PREPARE player
PREPARE may be called for several players by simply adding the numbers of thedifferent players. Please refer to examples:
PREPARE 1MP3-player 1 will be going to be prepared.
PREPARE 35Both the MP3-players 1 and 2 and the IMAGIX-player will be going to be madeready for playing back ( 35 = 1 + 2 + 32 )
PLAYPLAY starts one or more players synchronously. That/those player(s) firsthas/have to be opened by ASSIGN; a filename will have to be assigned otherwisethat command will not become effective. If PREPARE wasn't called that step willbe going to be carried out now.
General pattern:
PLAY player
Examples:
PLAY 1MP3-player 1 will be going to be started.
PLAY 33Both the MP3-player 1 and the IMAGIX-player will be going to be started ( 33 = 1+ 32 )
PAUSEPAUSE interrupts one or more players synchronously. The player(s) must firsthave been started by PLAY, otherwise that command will not become effective.One (or more) player(s) being on PAUSE may be restarted at the same positionby PLAY.
General pattern:
PAUSE player
Examples:
PAUSE 1MP3-player 1 will be going to be stopped.
PAUSE 33Both the MP3-player 1 and the IMAGIX-player will be going to be stopped ( 33 =1 + 32 )
References of MPEX
© BÄSSGEN AV-Technik GmbH - MPEX – Instruction manual, version 1.0836
STOPSTOP will be going to stop one or more players completely. The file enclosed onthe storage card will as well be closed; the assignment player-to-file will be goingto be cancelled. That file may only be restarted after another ASSIGN-commandhaving been issued.
General pattern:
STOP player
Example:
STOP 1MP3-player 1 will be going to be definitely stopped.
MAXPLAYMAXPLAY enables setting a stop mark in a file. The MPEX will automatically begoing to stop playing back once having reached that mark. Many applicationsrequire a certain sequence of a file be played back. MAXPLAY sets a virtual end-of-file. Together with LOCATE, a sequence may be established by a fewcommands. That sequence may then be started without a controlling computerhaving to supervise switch-off.
General pattern:
MAXPLAY player time
In the parameter "player" an MP3-player has to be named; time meansmaximum playback position expressed in milliseconds. Only MP3-players maybe called by that command. The IMAGIX-player isn't able to interpret thatcommand.
Example:
MAXPLAY 1 180000MP3-player 1 will be going to be limited to a playback position of 3.00 min (min.= 180 sex. = 180000 ms)
LOCATELOCATE is very important. That command sets a player (one or more players) toa position having been established. Such player(s) must be on PAUSE, if not,it/they will automatically be set to PAUSE. LOCATE once having been called, theplayer(s) will at first have to be restarted by means of PLAY to make them startplaying back at that position.
General pattern:
LOCATE player time
In the parameter "player" an MP3-player has to be named; time means the newplayback position expressed in milliseconds.
Example:
LOCATE 33 184000Both the MP3-player 1 and the IMAGIX-player will be going to be set to aplayback position of 3:04 min. ( 3:04 min = 184 sec. = 184000 ms; 33 = 1 + 32)

References of MPEX
© BÄSSGEN AV-Technik GmbH - MPEX - Instruction manual, version 1.08 37
LPLAYLPLAY (= LOCATE + PLAY) will at first be going to execute a LOCATE-commandfollowed by a PLAY-command for the players having been selected. One or moreplayers (having of course been opened by ASSIGN at first) may be started at anestablished position by just one command.
General pattern
LPLAY player time
In the parameter "player" a player has to be named; time means the newplayback position expressed in milliseconds.
Example:
LPLAY 35 210000
Both the MP3-player 1 and 2 and the IMAGIX-player will be going to be set to aplayback position of 3:30 min. and started from there ( 3:30 min = 210 sec. =210000 ms; 35 = 1 + 2 + 32 )
LCPREPLCPREP (= LOCATE + PREPARE) will at first be going to execute a LOCATE-command followed by a PREPARE-command for the players having beenselected. One or more players (having of course been opened by ASSIGN at first)may be set to a position having been established and made ready for start byjust one command.
General pattern:
LCPREP player time
In the parameter "player" a player has to be named; time means the newplayback position expressed in milliseconds.
Example:
LCPREP 35 210000Both the MP3-player 1 and 2 and the IMAGIX-player will be going to be set to aplayback position of 3:30 min. and made ready for start. ( 3:30 min = 210 sec. =210000 ms; 35 = 1 + 2 + 32 ). Start will be executed by a PLAY-command tofollow.
LINKLINK is mainly used to simply start a slide show. A filename will be going to betransmitted to that command; the MPEX will then be going to look for anIMAGIX-file and an MP3-file showing the same name. The only difference will betheir extension. Both files will then be going to be started at the same time. Thatprocedure corresponds to manual start of a file with "Autolink"-option havingbeen set (please refer to reference: Menu of the MPEX).
General pattern:
LINK filename
Example
LINK TEST.MP3The MPEX will be going to start both TEST.MP3 and TEST.IMX, if found,together with the correct options to play a slide show back (Speaker Support).

References of MPEX
© BÄSSGEN AV-Technik GmbH - MPEX – Instruction manual, version 1.0838
CALLCALL will be going to call a BATCH ( = batch processing). By that command,BAT-files being on the storage card may be started by means of serial interface.As mentioned earlier on, BAT-files always enclose further commands in anordinary ASCII-format.
Extension must always be *.BAT.
A BAT-file mustn't call further BAT-files. CALL may therefore only be executedserially. It mustn't be executed within a BAT-file.
General pattern:
CALL filename
Example
CALL TEST.BATThat command causes searching for the file TEST.BAT on the storagecard and executing of commands being enclosed.
DIRDIR is supposed to transmit information on the files enclosed on the storagecard to a device being remote controlled by the MPEX by means of the V24/RS-232 serial interface. Once having received a DIR-command, the MPEX will begoing to transmit any filenames found on the storage card by its serial interface.Each name will be transmitted in an own line; a blank line stands for end oftransmission. That command doesn't support any parameters. A possiblyrequired file-selection is to be done by the machine asking for such information.
Make sure „Trigger Mode“ is set to „Serial“, otherwise transmitting would not begoing to be done by means of the V24-interface. Although possible, executing thatcommand within a Batch-file is generally useless.
General pattern:
DIR
Example
DIRThat command causes transmitting of any file found on the storagecard by means of serial interface.
References of MPEX
© BÄSSGEN AV-Technik GmbH - MPEX - Instruction manual, version 1.08 39
JUMPJUMP is quite similar to LOCATE. Playback position may be modified. UnlikeLOCATE that command may not only be used in PAUSE-mode, it furthermoreallows modifying playback dynamically as well. The pre-loading buffer will begoing to be emptied. Seen the volume of pre-loading buffer, there will be going tobe a short delay until the jump may be perceived outside as well, but there willbe no pause that can't be prevented on using the commands LOCATE or LPLAY.
General pattern
JUMP player time
In the parameter "player", a player will have to be named; time is the newdesired playback position in milliseconds.
Example:
JUMP 3 65000Both the MP3-players 1 and 2 will be going to jump to a playback position of1:05 minutes. With players being in the "Play-mode", that jump will be carriedout dynamically, i.e. without any pause arising ( 1:05 Min = 65 sec. = 65000 ms;3 = 1 + 2)
Technical notice:
In huge MP3-files playing back may not be continuous due to technical reasons:shifting the file pointer takes more time in huge files, as FAT-file-system on thestorage card needs more time to carry out that operation. During that time, theMPEX will have to draw information from the buffer. If file-system needs more timethan buffer is able to compensate there will be fading.
MUTEMUTE will be going to mute an MP3-player. That function may be reversed byDEMUTE.
General pattern:
MUTE player
With MP3-players only.
Example
MUTE 1That command will be going to mute MP3-player 1.
DEMUTEDEMUTE reverses muting of an MP3-player.
General pattern:
DEMUTE player
With MP3-players only.
Example
DEMUTE 1That command will be going to de-mute MP3-player 1.

References of MPEX
© BÄSSGEN AV-Technik GmbH - MPEX – Instruction manual, version 1.0840
TASCTASC (=Transmit ASCII) transmits any ASCII-string by means of serial interface."Trigger Mode" setting of the MPEX must absolutely be correct. To make suresigns are transmitted by the V24/RS-232-interface, "Serial" must have been set.Purpose of that command is to control further devices by means of the MPEX(another MPEX, video-players, special effects-devices etc.). That command canbe incorporated in Batch-files or in an IMAGIX-file. TASC is only able to transmitconcrete ASCII-signs. Transmission of binary signs is done by THEX.
General pattern:
TASC string
A string may also include blanks. Any sign from the first to the last concrete onewill be going to be transmitted. Strings are limited to 64 signs at maximum.
Example
TASC Candlelight magicThat command will be going to transmit the string Candlelightmagic by means of serial interface.
THEXTHEX (=Transmit HEX) transmits any binary sign by means of serial interface."Trigger Mode" setting of the MPEX must absolutely be correct. To make suresigns are transmitted by the V24/RS-232-interface, "Serial" must have been set.Purpose of that command is to control further devices by means of the MPEX(another MPEX, video-players, special effects-devices etc.). That command canbe incorporated in Batch-files or in an IMAGIX-file. THEX is supposed totransmit binary signs. To transmit huge volumes of ASCII-signs TASC should beused.
General pattern:
THEX xx xx xx .... xx
The dyads xx represent bytes in hexadecimals that will be going to betransmitted. Blanks between the hex-signs may be omitted; but number ofhexadecimal signs must be even-numbered. Those signs will afterwards be goingto be transmitted; one byte for two signs each. THEX may be followed by 64signs at maximum.
Examples
THEX 0D 0AThat command transmits an end-of-line consisting of CR-LF.
THEX 41420D0AThat command transmits the string "AB" as well as the CR-LF dyad.

References of MPEX
© BÄSSGEN AV-Technik GmbH - MPEX - Instruction manual, version 1.08 41
SETSET enables settings that can also be made by using the menu of the MPEX bemade by command. Any setting made in the "Configuration"-menu may bemodified. If specific settings are required in a commercial installation, they mayfor example be realized by an AUTOEXEC.BAT-file enclosing a range of SET-commands. Users will just have to exchange storage card; the MPEX will begoing to be programmed according to their needs. Even on remote control by asupervising computer or in case of incorporated IMAGIX-commandsconfiguration may be modified dynamically.
SET will always be going to show the following pattern:
SET variable value
A value will be going to be assigned to a variable. There are two different types ofvariables: to the first one, a numerical value can be assigned; to the second one,a value from a list of possible values can be assigned (enumeration). Menufunctions to which only the value "On" or "Off" can be assigned will have to beset by means of the values 0 or 1. For detailed description, please refer to tablegiven below stating values that the MPEX is able to process. Values stated in the"Default"-column are the ones that will have been set by the manufacturer.
Variables with a numerical value
Description (same as in menu) Name of variable Value range DefaultDMX-512 address (DMX-ADR) DMXADR 1..512 1MIDI-address(MIDI CH) MIDIADR 1..16 1Default player DEFPLAY 0..1 0RS232 Echo V24ECHO 0..1 1Autolink AUTOLINK 0..1 1Infrared remote IRMODE 0..1 1Global Autoloop AUTOLOOP 0..1 0Player Loop PLAYLOOP 0..7 0Power fail save RECOVER 0..1 0Ignore IMX-Stops IGNOSTOP 0..1 0Do IMX-Comments EXECIMX 0..1 0
The variable „Player Loop“ is a specific one. It allows setting of that functionseparately for both the two MP3-players (in 4-channel version) and the IMAGIX-player. The following interrelationship will be going to apply to:
Value MP3-1 on Loop MP3-2 on Loop IMAGIX-Player Loop0 no no no1 yes no no2 no yes no3 yes yes no4 no no yes5 yes no yes6 no yes yes7 yes yes yes
If single players are configured as loops, each of them will be going to startplaying over again immediately once having finished its playing task. "GlobalAutoloop"-function on the other hand causes the AUTOLOOP.Bat-file to beexecuted once all players having finished their task.

References of MPEX
© BÄSSGEN AV-Technik GmbH - MPEX – Instruction manual, version 1.0842
Variables with enumeration
Description (in themenu)
Name ofvariable
Values enabled Default
Trigger Mode TRIG SERIAL, DMX, MIDI SERIALSerial baud rate BAUD 300, 600, 1200, 2400,
4800, 9600, 19200, 384009600
Exit at End EXITEND 0, 1, 2, 5, 10, 25, 60, 120,300, 600
1
Ext 1 (Pin 1-5) EKEY1 OFF, DEF, RUN, RUNIF DEFExt 2 (Pin 6-5) EKEY2 OFF, DEF, RUN, RUNIF DEFExt 3 (Pin 8-5) EKEY3 OFF, DEF, RUN, RUNIF OFFExt 4 (Pin 9-5) EKEY4 OFF, DEF, RUN, RUNIF OFFIR-Key F1 IRKEY1 OFF, RUN, RUNIF OFFIR-Key F2 IRKEY2 OFF, RUN, RUNIF OFFIR-Key F3 IRKEY3 OFF, RUN, RUNIF OFFIR-Key F4 IRKEY4 OFF, RUN, RUNIF OFF
The different values correspond to the functions that may be selected in therespective menu.
Examples:
SET DMXADR 70DMX-512-receiver address is set to 70.
SET IRMODE 0Locks infrared remote control
SET EXECIMX 1Enables execution of incorporated IMAGIX-commands.
SET EKEY2 RUNIFExternal key 2 will be going to start the E2.BAT-file, but only with the MPEXbeing in "Idle-mode", i.e. with all the players being in stop-mode.
SET EKEY1 RUNExternal key 1 will immediately be going to start the E1.BAT-file regardless ofstate the MPEX is in.
SET BAUD 19200Sets baud rate to 19200. Caution: if that command is executed serially, the nextcommand will have to show a new baud rate, maybe a short break will have tobe foreseen to enable re-configuring of serial interface. That command on theother hand is well suited to definitely set baud rate in an AUTOEXEC.BAT-fileright from the beginning.
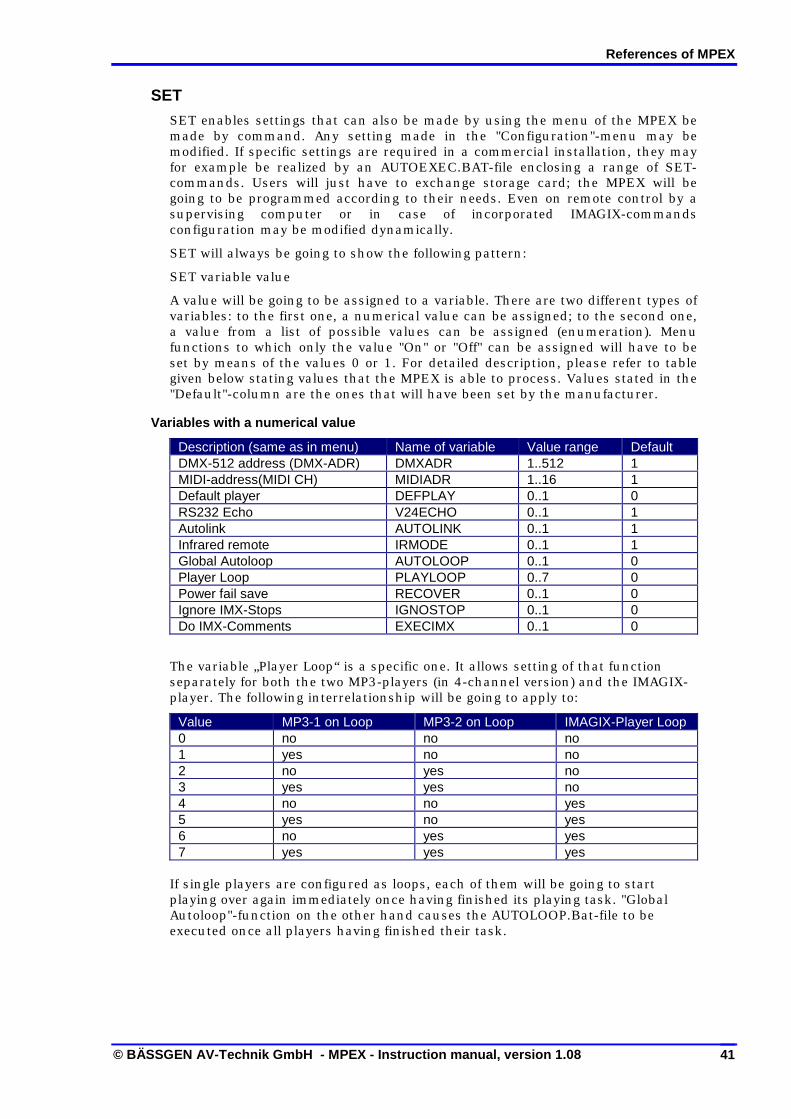
References of MPEX
© BÄSSGEN AV-Technik GmbH - MPEX - Instruction manual, version 1.08 43
GETGET authorizes a supervising system being connected to the MPEX to checkconfiguration having been set. The values of the variables being asked for aretransmitted in the same format in which they may as well be modified by meansof SET.
GET, general pattern:
GET variable
Value of the variable will be re-transmitted by serial interface. Value once havingbeen transmitted, an end-of-line will automatically be going to be issued. Makesure "Trigger Mode" is set to "Serial", otherwise answers won't be transmitted tothe RS-232-interface.
For information on names of existing variables please refer to the table stated inthe "SET"-command section.
Example:
GET EKEY1The MPEX will be going to answer by stating value of respective variable. Apossible answer may be „RUNIF“.
Special case: version checkGET is able to recognize two variables that can be read but not recovered. Thosevariables show both a version string as well as the current up-dated softwareversion of the MPEX. That command is available from version 1.07 onwards. It isused to distinguish variables having been modified later on or to recognizecommands being included in the MPEX that were not available in earlierversions.
GET VERSimply re-transmits up-dated software version in an x.yy-format,i.e. 1.08 followed by an end-of-line.
GET VERSIONRe-transmits the whole version string, i.e. "MPEX 4-CH V.1.08". Itis therefore possible to find out whether a 2-channel or a 4-channel version has been connected.
VOLUMEVOLUME enables modifying volume of the MP3-players.
VOLUME, general pattern:
VOLUME player value option
Player stands for the address of the MP3-Player. Both the MP3-players may beinfluenced at the same time. Value stands for the new volume value expressed indB. Values ranking from 0 to 30dB are admissible. Values entered may bepositive or negative, absolute amount will always be calculated. 0dB means fullvolume, the standard value on switching on. Volume may be reduced down to30dB. If "/D" is added as an option, the value won't be an absolute volume valuein dB but a relative one being based on current volume. Positive values will begoing to increase volume by the number of dB required.

References of MPEX
© BÄSSGEN AV-Technik GmbH - MPEX – Instruction manual, version 1.0844
Examples:
VOLUME 3 -10Both the MP3-players in a 4-channel MPEX are set to a volume of –10 dB.
VOLUME 1 +1 /DVolume of MP3-player 1 will be increased by 1 dB.
Notice:Excessive volume reducing has to be compensated by means of a subsequentamplifier. Secondary noise and interferences will be going to be amplified to thesame extent.
BASS, TREBLEThose commands are used to remotely control integrated tone regulation of theMPEX.
General pattern of command:
BASS player value optionTREBLE player value option
Player stands for the MP3-players. Both the MP3-players may be influenced atthe same time. Value stands for the new value of an increase/decrease in dB.Admissible are values ranking from –15 to +15dB. If "/D" is added as an option,the value won't be an absolute volume value in dB but a relative one being basedon present volume. Positive values will be going to increase amplifying ofrespective tone level by the number of dB required.
Examples:
BASS 3 -5Basses in both MP3-players are reduced by 5 dB.
TREBLE 1 +4 /DTrebles in MP3-player 1 are going to be increased by 4 dB, taking the valuehaving been set at present as a base.
Notice:If basses and/or trebles are increased, the MPEX will automatically be going toreduce overall volume, regardless of value of increase. Such reduction isnecessary, as a simple increase of a tone level might cause over-shootings thatcan't be expressed in the digital range within the 16-bit resolution being used.Strong increase of the nonlinear distortion factor would be going to result. That isthe somewhat strange characteristic of pure digital tone regulating. It doesn't at allmatter in equilibrating acoustics of the room where a show is going to take place.

References of MPEX
© BÄSSGEN AV-Technik GmbH - MPEX - Instruction manual, version 1.08 45
Controlling of the MPEX by means of DMX-512The MPEX is easy to control by a DMX-512 light mixer system and offers a widerange of possibilities in that field. Integrating sound or noise on stage may easilybe realized.
\DMX-512\-folderTechnical principle is quite simple: by means of the PC a folder showing thename \DMX-512\ has to be generated on the storage card. That folder will nowbe enclosing a large number of BAT-files. Those BAT-files are all named XX.BAT.
XX expresses brightness value of respective DMX-channel in hexadecimals.
Simple example:1) In the menu, the MPEX will have been addressed to DMX-channel 234.
2) Value on channel 234 will be going to jump from 0 to 3F (hex).
3) The MPEX will be going to execute the BAT-file 3F.BAT in the \DMX-512\-folder.
4) Nothing will be going to happen as long as the value on channel 234 won'thave gone to change.
5) Value on channel 234 once having changed, a new BAT-file will be going tobe started.
6) Case apart: value being 0 will always be going to stop all players.
Controlling of the MPEX by MIDIAnalogously to DMX-512, the MPEX may easily be controlled by MIDI and offersa wide range of possibilities in that field.
\MIDI\-folderTechnical principle is quite simple: by means of the PC a folder showing thename \MIDI\ has to be generated on the storage card. That folder will now beenclosing a large number of BAT-files. Those BAT-files are all named XX.BAT.
XX expresses hexadecimal value of a MIDI-program number (0-7F)
Simple example:1) In the menu, the MPEX will have been addressed to MIDI-channel 7.
2) A „Program Change 4D“-command (hex) will follow.
3) The MPEX will then be going to execute the BAT-file 4D.BAT in the \MIDI\-folder.
4) Another „Program Change“-command to follow will be going to start anotherBAT-file.
5) Case apart: „Program Change 0“ will be going to stop all players.
Caution! If the operative modes described are used (DMX-512 or MIDI), the menu-function „Trigger-Mode“ has to be set correctly, otherwise functioning will be goingto be impeded!

References of MPEX
© BÄSSGEN AV-Technik GmbH - MPEX – Instruction manual, version 1.0846
SummaryThe two examples stated show that both sound and noise may be integrated inan installation. Reliability with regard to triggering is very high; there will be nowear at all.
Time-Code playerTime-code player generates a continuous SMPTE time-code with 25 frames asecond. It can't be that to be a real player, as no file will be going to be playedback. It is a time-code generator that may be called by the same syntax as allother players.
The commands ASSIGN, PAUSE, PLAY, STOP and LOCATE do exist here as well.LOCATE more or less sets a start value, from which the player will be going to bestarted. An end-of-time at which time-code generating will be going to be stoppedmay be set by means of MAXPLAY.
Time-code player has been designed for sophisticated media applications. It mayonly be started by commands from Batch-files. No displaying of the activities ofthe time-code generator has been foreseen.
V24-PlayerIn an all-round show, control of external devices is often required. Many mediadevices may be externally controlled by an RS232/V24. The V24-player havingbeen already described enables transmitting sign strings synchronously tosound at any moment. As many devices are equipped with deferring protocols, acompletely abstract protocol has been established, transmitting simple signstrings. Such sign strings together with times they are to be transmitted at aresaved in a binary file being enclosed on the CF-card.
Only users having experience in the field of commands and simple programming should use theV24-Player!
V24-player may be controlled by ordinary command language. Operation bymeans of menu keys as well as detailed activity displaying hasn't been foreseen.The player should be started from a Batch-file together with all other necessarycommands.
The commands ASSIGN, PAUSE, PLAY, STOP and LOCATE work in the sameway as commands in the other players.
Technical notices:
If current position within a V24-file is modified by means of LOCATE, commandshaving been left aside won't be transmitted. Generally speaking, that would beuseless in any case.
Baud rate will have to be set in the menu or in a Batch-file by means of a SET-command. The MPEX is equipped with an integrated 256 byte-deep emissionbuffer. Users have to make sure that buffer won't overflow. With bufferoverflowing, a delay will be caused that might require playing back to beinterrupted. Basing yourself on density of sign strings transmitted and baud rate,check whether buffer capacity will be sufficient. V24-player doesn't needPREPARE-command, entering it would be useless seen the fact it won't cause anyeffects.

References of MPEX
© BÄSSGEN AV-Technik GmbH - MPEX - Instruction manual, version 1.08 47
V24-Player may alternatively work being ruled by its own frequency (systemfrequency of the MPEX) or draw its synchronization from one of the MP3-players.In the second case, after an MP3-player will have stopped the V24-player will begoing to be interrupted as well after 0,5 sec at latest. Respective frequencygenerator will have to be included in the ASSIGN-command.
Description of the V24-file formatThat description is to be seen as a reference of the V24-file format. It allowsdeveloping own computer programs by means of which control files for otherdevices may be realized.
To enable the MPEX to recognize V24-files, they all must show the extension*.V24. Such files are lists of data sets showing all the same length. So even inlarge files, you can easily get access to any position whatsoever. A file maycontain up to 30000 data sets at maximum. That description applies to the V1.0format.
File-headerAny V24-file has to start with header with a fixed length of 256 bytes. The first12 bytes are assigned to the following values:
MPEX V24 V10
0 has been assigned to the 244 remaining bytes. That version number makessure that compatibility will remain preserved when extensions are made later on.The header will then be followed by respective data sets.
Data setsEach data set includes a string whose length is variable and a time at which thatstring will have to be transmitted.
Caution!
It is absolutely compulsory, data sets be classified in ascending time order! Anyirregularity in that classifying order might affect correct functioning. EspeciallyLOCATE working with a quick search algorithm might fail and cause malfunction.Classifying work that may be required therefore has to be carried out by means ofa user program generating the respective V24-file.
Structure of data set with 128 bytes:
Byte 0..3 Time expressed in a 32bit-value in ms.
Byte 4 Number of bytes to be transmitted (max. 120)
Byte 5..6 reserved (must be zero!)
Byte 7 Version identification, must be 0 with V1.0
Byte 8..127 Data
Data bytes that won't be transmitted due to byte 4 stating an insufficientnumber will be going to be ignored. Data are directly read in binary mode.Therefore, the whole 8-bit sign set may be used.
According to Intel-convention storing of the 32-bit value of time in the memorywill be going to start by the lowest byte.

Technical addendum
© BÄSSGEN AV-Technik GmbH - MPEX – Instruction manual, version 1.0848
Technical addendum
Assignment of connection socketsV24 in-socket
1 Ext 1 (External input 1)2 TxD (Data input )3 RxD (Data output)4 not assigned5 Connection to Ground BASIX6 Ext 2 (External input 2)7 not assigned8 Ext 3 (External input 3)9 Ext 4 (External input 4)
PIN 1, 6, 8, 9 are equipped with internal Pull-up resistors against +12 V.
CAN/DMX Out-socket
1 DMX-512 minus (inv. output)2 CAN Bus (low)3 Ground MPEX4 DMX-512 plus ( not-inv. output)5 Connection to Ground MPEX6 Connection to Ground MPEX7 CAN Bus (high)8 not assigned9 Output *12V max. 50 mA
Total load voltage on Pin 9 of both the sockets CAN/DMX OUT and CAN/DMX INmustn't exceed 50 mA in total!
CAN/DMX IN-socket
1 DMX-512 minus (inv. input)2 CAN Bus (low)3 Connection to Ground MPEX4 DMX-512 Plus (un-inv. input)5 Connection to Ground MPEX6 Connection to Ground MPEX7 CAN Bus (high)8 not assigned9 Output *12V max. 50 mA
Total load voltage on Pin 9 of both the sockets CAN/DMX OUT and CAN/DMX INmustn't exceed 50 mA in total!
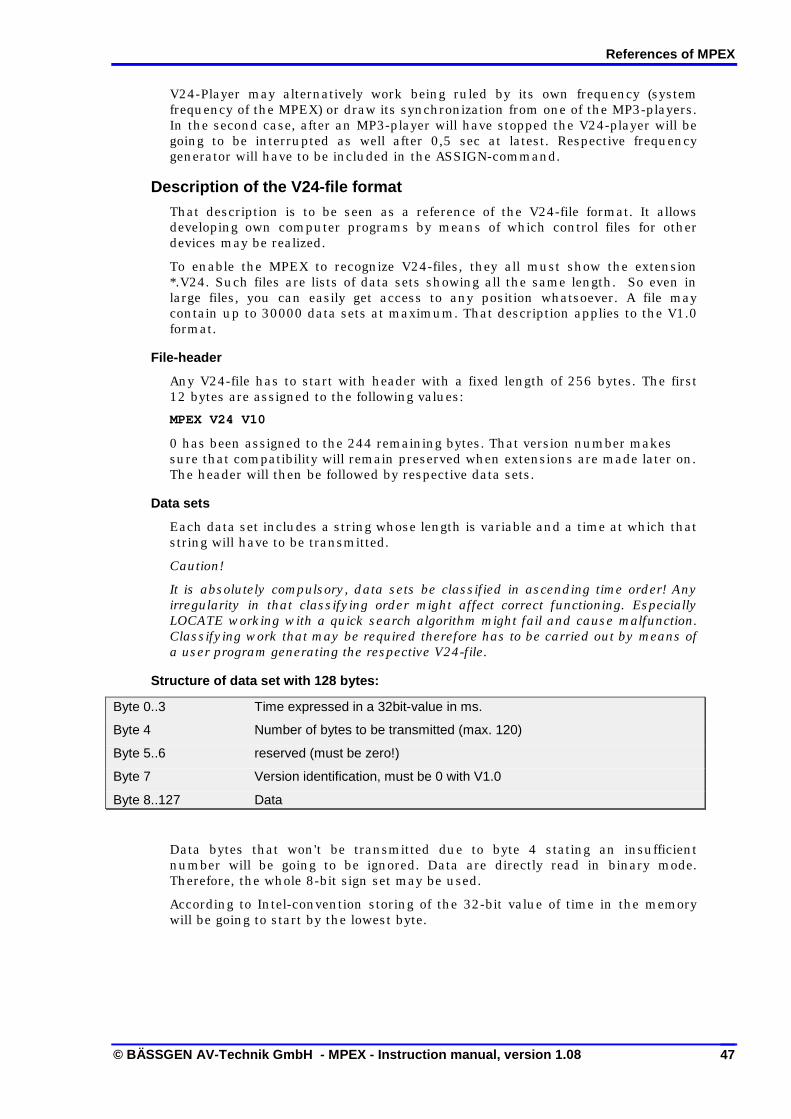
Technischer Anhang
© BÄSSGEN AV-Technik GmbH - MPEX - Instruction manual, version 1.08 49
AC-24-socket
2 Connection to Ground BASIX5 24 V input, power supply
The remaining pins of the MPEX are not used.
MIDI IN-socket
MIDI OUT-socketThe MIDI-sockets are showing the standardized MIDI-assignment. According tospecification, MIDI-input is conductively separated by an photocoupler.

Technical addendum
© BÄSSGEN AV-Technik GmbH - MPEX – Instruction manual, version 1.0850
Raum für Notizen