Digital Photo Printer CHC-S6145 Printer Driver Ver.1 ... cs2 English.pdf · sinfonia technology...
38
Digital Photo Printer CHC-S6145 Printer Driver Ver.1 Instruction Manual Contents Using your printer with Windows computers---------------------------- 1 System requirements ---------------------------------------------------------1 Notes------------------------------------------------------------------------------ 2 Installing the printer driver for Windows XP-----------------------------3 Uninstalling the printer driver for Windows XP -------------------------6 Installing the printer driver for Windows Vista --------------------------9 Uninstalling the printer driver for Windows Vista--------------------- 12 Installing the printer driver for Windows 7 ----------------------------- 16 Uninstalling the printer driver for Windows 7-------------------------- 21 Printing from application software --------------------------------------- 27 To cancel printing------------------------------------------------------------ 32 Color adjustment------------------------------------------------------------- 33 Split Print----------------------------------------------------------------------- 37 Troubleshooting -------------------------------------------------------------- 38 YTE8-J0534E Rev.1
Transcript of Digital Photo Printer CHC-S6145 Printer Driver Ver.1 ... cs2 English.pdf · sinfonia technology...

Digital Photo Printer
CHC-S6145
Printer Driver Ver.1
Instruction Manual
Contents
Using your printer with Windows computers----------------------------1
System requirements ---------------------------------------------------------1
Notes------------------------------------------------------------------------------2
Installing the printer driver for Windows XP-----------------------------3
Uninstalling the printer driver for Windows XP -------------------------6
Installing the printer driver for Windows Vista --------------------------9
Uninstalling the printer driver for Windows Vista--------------------- 12
Installing the printer driver for Windows 7 ----------------------------- 16
Uninstalling the printer driver for Windows 7-------------------------- 21
Printing from application software --------------------------------------- 27
To cancel printing ------------------------------------------------------------ 32
Color adjustment------------------------------------------------------------- 33
Split Print----------------------------------------------------------------------- 37
Troubleshooting -------------------------------------------------------------- 38
YTE8-J0534E Rev.1

SINFONIA TECHNOLOGY CO., LTD. SOFTWARE LICENSE AGREEMENT IMPORTANT
READ THIS AGREEMENT CAREFULLY BEFORE USING THE SOFTWARE ON THE
CD-ROM SUPPLIED WITH THE PRINTER.
BY USING THIS SOFTWARE, YOU AGREE TO BE BOUND BY THE TERMS OF THIS
AGREEMENT.
IF YOU DO NOT AGREE TO THE TERMS AND CONDITIONS OF THIS AGREEMENT,
DO NOT USE THE SOFTWARE INCLUDING THE DOCUMENTS ON THE CD-ROM
PROVIDED, AND PROMPTLY RETURN THE WHOLE PRODUCT TO YOUR DEALER.
1. LICENSE
SINFONIA TECHNOLOGY CO., LTD. ("SINFONIA") grants you the non-exclusive right to
use one copy of the SOFTWARE under the terms and conditions of this Agreement.
2. RESTRICTIONS ON USE
You may use the SOFTWARE on a single computer. You may not modify, reverse engineer,
decompile, or disassemble the SOFTWARE.
3. DISCLAIMER OF WARRANTY
This SOFTWARE is provided to you "AS IS" and without any warranty and liability
of any kind.
SINFONIA, its licensors or suppliers do not warrant that the functions contained in the
SOFTWARE will meet your requirements or that the operation of the SOFTWARE will be
uninterrupted or error free.
4. LIMITATION OF LIABILITY
In no event will SINFONIA, its licensors or suppliers be liable to you for any consequential,
indirect, incidental, punitive or special damages, including any lost profits or lost savings,
or other damages arising from the use or inability to use the SOFTWARE even if advised
of the possibility of such damages.
Some States or jurisdictions do not allow the exclusion or limitation of incidental or
consequential damages, so the above limitations may not apply to you.
5. TERM; TERMINATION
This license is effective until terminated. You may terminate this license at any time by
destroying the SOFTWARE and all copies in any form. This license will terminate without
notice to you if you fail to comply with any term or condition of this license. Upon
termination you must destroy the SOFTWARE and all copies in any form.
6. EXPORT RESTRICTIONS
You agree to comply fully with all international and national laws and regulations that apply
to the SOFTWARE, and your use thereof, including, but not limited to, end-user, end-use
and destination restrictions issued by Japanese and other governments. Without limiting
the generality of the foregoing, you agree not to export, directly or indirectly, re-export,
divert, or transfer the SOFTWARE or any direct product thereof to any destination,
company or person restricted or prohibited by national and international laws or
regulations or laws or regulations of any other applicable jurisdiction.

1
Using your printer with Windows computers
The supplied CHC-S6145 printer driver enables you to print an image stored on your
computer with the CHC-S6145 digital photo printer. To print an image from the computer,
you need appropriate application software that can open the image and print with the
printer.
Microsoft and Windows are either registered trademarks or trademarks of Microsoft
Corporation. In this instruction manual, Microsoft(R) Windows(R) operating system are
written as follows:
Abbreviated name Registered trademarks of Microsoft Corporation
Windows XP Microsoft(R) Windows(R) XP
Windows Vista Microsoft(R) Windows Vista(R)
Windows 7 Microsoft(R) Windows(R) 7
System requirements
To use the supplied printer driver, you need a computer that meets the following system
requirements:
OS: Windows XP Home Edition SP3 / Windows XP Professional SP3 (32 bit)
Windows Vista SP1 (32bit)
Windows 7 (32bit / 64bit)
CPU: Pentium 300 MHz or better (Windows XP Home Edition / Windows XP Professional)
x86 processor 1 GHz or better (Windows Vista / Windows 7)
x64 processor 1 GHz or better (Windows 7 64bit)
RAM: 128 MB or more (Windows XP Home Edition / Windows XP Professional)
512 MB or more (Windows Vista Home Basic)
1 GB or more (Windows Vista Home Premium / Business / Ultimate / Windows 7)
Disk free space: 1.5 GB or more (Windows XP Home Edition / Windows XP Professional)
15 GB or more (Windows Vista)
16 GB or more (Windows 7)
Port: A built-in USB port on the personal computer.
CD-ROM drive: For software installation.

2
Notes
(1) Be sure to connect the printer directly to your computer. Connecting it via a USB hub
may cause the printer to not operate properly.
(2) Do not use the printer together with other USB devices except a USB keyboard or
mouse.
(3) Do not connect two or more CHC-S6145 digital photo printers at the same time.
(4) Do not unplug the USB cable during data transferring or printing. To do so may cause
the printer to not operate properly.
(5) The printer driver cannot be used for network printer.
(6) Due to over print spool size restriction for Windows (example, Windows XP: 4 GB),
printing will be stopped. Please delete the print jobs, and re-print after divide the print
jobs into several groups.
(7) Microsoft and Windows are either registered trademarks or trademarks of Microsoft
Corporation.
(8) Other names and products not mentioned above may be registered trademarks or
trademarks of their respective companies.
(9) If you have any questions or problems please contact [email protected]
3
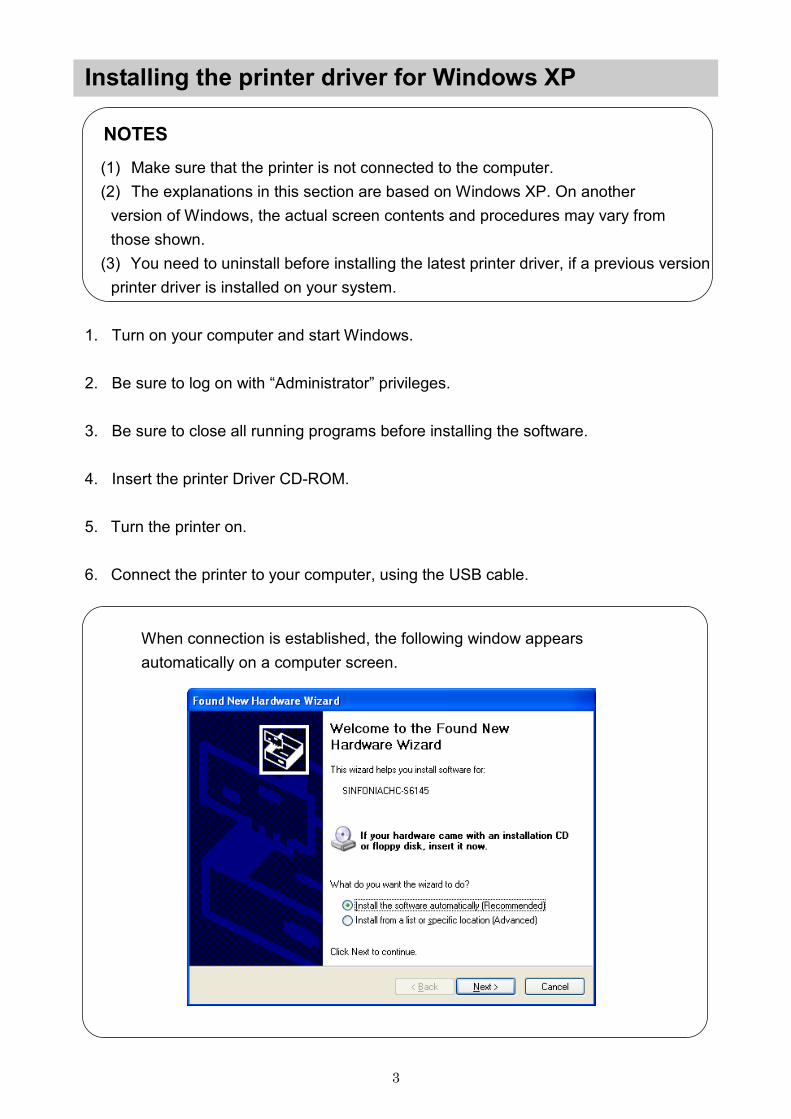
Installing the printer driver for Windows XP
NOTES
(1) Make sure that the printer is not connected to the computer.
(2) The explanations in this section are based on Windows XP. On another
version of Windows, the actual screen contents and procedures may vary from
those shown.
(3) You need to uninstall before installing the latest printer driver, if a previous version
printer driver is installed on your system.
1. Turn on your computer and start Windows.
2. Be sure to log on with “Administrator” privileges.
3. Be sure to close all running programs before installing the software.
4. Insert the printer Driver CD-ROM.
5. Turn the printer on.
6. Connect the printer to your computer, using the USB cable.
When connection is established, the following window appears
automatically on a computer screen.

4
7. Click "Next".
8. Please wait while the wizard
searches...
9. Click "Continue Anyway".
10. Copying Files…

5
11. Click "Finish".
12. The "SINFONIA CHC-S6145"
printer icon appears in the
"Printers and Faxes" window.
6
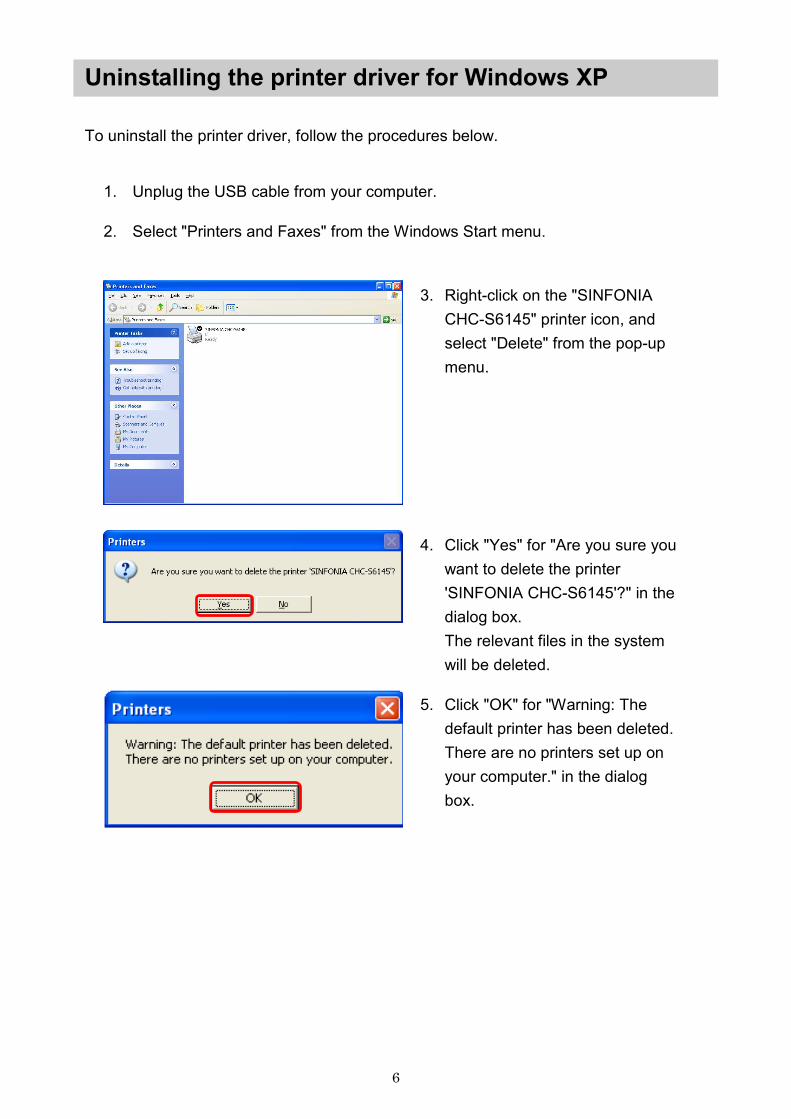
Uninstalling the printer driver for Windows XP
To uninstall the printer driver, follow the procedures below.
1. Unplug the USB cable from your computer.
2. Select "Printers and Faxes" from the Windows Start menu.
3. Right-click on the "SINFONIA
CHC-S6145" printer icon, and
select "Delete" from the pop-up
menu.
4. Click "Yes" for "Are you sure you
want to delete the printer
'SINFONIA CHC-S6145'?" in the
dialog box.
The relevant files in the system
will be deleted.
5. Click "OK" for "Warning: The
default printer has been deleted.
There are no printers set up on
your computer." in the dialog
box.

7
6. Right-Click on the "Printers and
Faxes" window, and select
"Server Properties".
7. Select the "Drivers" tab, select
"SINFONIA CHC-S6145", and
then click "Remove".
8. Click "Yes" for "Are you sure you
want to delete SINFONIA
CHC-S6145?" in the dialog box.
9. Open the Run window from
Windows Start menu, and then
write "regedit" and click "OK".

8
10. Delete the folder of
"HKEY_LOCAL_MACHINE\SYS
TEM\CurrentControlSet\Control\
Print\Monitors\S6145 Language
Monitor".
11. Click "Yes".
12. Reboot your computer.

9
Installing the printer driver for Windows Vista
NOTES
(1) The explanations in this section are based on Windows Vista Business. On
another edition of Windows Vista, the actual screen contents and procedures may vary
from those shown.
(2) You need to uninstall before installing the latest printer driver, if a previous version
printer driver is installed on your system.
1. Make sure that the printer is turned off and not connected to the computer.
2. Turn on your computer to start the Windows.
・・・・Be sure to log on Windows as “Administrator”
・・・・Be sure to turn off any virus protection programs and to close other running programs
before installing the driver.
3. Insert the Printer Driver CD-ROM into the CD-ROM drive.
4. Turn the printer on.
5. Connect the printer to your computer, using the USB cable.
When connection is established, the following window appears
automatically on a computer screen.

10
6. Click "Locate and install driver
software (recommended)".
7. Click "Next".
8. Searching disc for software…
9. Click "Install this driver software
anyway".

11
10. Installing driver software…
11. Click "Close".
12. The "SINFONIA CHC-S6145"
printer icon appears in the
"Printers" window.
12
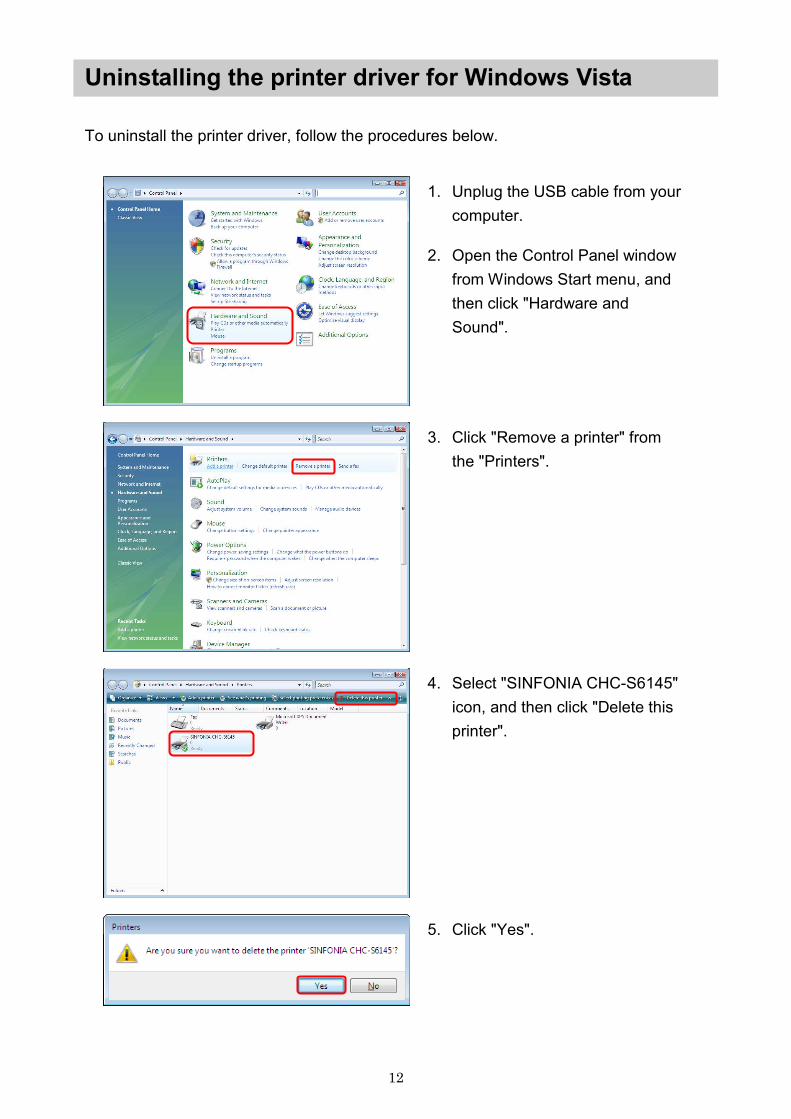
Uninstalling the printer driver for Windows Vista
To uninstall the printer driver, follow the procedures below.
1. Unplug the USB cable from your
computer.
2. Open the Control Panel window
from Windows Start menu, and
then click "Hardware and
Sound".
3. Click "Remove a printer" from
the "Printers".
4. Select "SINFONIA CHC-S6145"
icon, and then click "Delete this
printer".
5. Click "Yes".

13
6. Right-click on the “Printers”
window, and select "Run as
administrator", and then click
“Server Properties...”.
Note: User Account Control
message may appear stating
that the Windows needs your
permission to continue. Click
"Continue" to allow the driver to
install.
7. Select the "Drivers" tab, select
"SINFONIA CHC-S6145", and
then click "Remove..."
8. Select "Remove driver and driver
package.", and then click "OK".

14
9. Click "Yes".
10. Click "Delete".
11. Click "OK".

15
12. Open the Start Search from
Windows Start menu, and then
write "regedit" and press the
“Enter” key.
13. Click “Continue”.
14. Delete the folder of
"HKEY_LOCAL_MACHINE\SYST
EM\CurrentControlSet\Control\Pri
nt\Monitors\S6145 Language
Monitor".
15. Click "Yes".
16. Reboot your computer.

16
Installing the printer driver for Windows 7
NOTES
(1) The explanations in this section are based on Windows 7 Home Premium. On
another edition of Windows 7, the actual screen contents and procedures may vary
from those shown.
(2) You need to uninstall before installing the latest printer driver, if a previous version
printer driver is installed on your system.
1. Make sure that the printer is turned off and not connected to the computer.
2. Turn on your computer to start the Windows.
・・・・Be sure to log on Windows as “Administrator”
・・・・Be sure to turn off any virus protection programs and to close other running programs
before installing the driver.
3. Turn the printer on.
4. Connect the printer to your computer, using the USB cable.
When connection is established, the following balloon tip appears
automatically on the taskbar. Click the balloon tip.

17
5. Click "Skip obtaining driver
software from Windows Update".
6. Click "Yes".
7. Wait until the “No driver found”
appears on the right of
“SINFONIACHC-S6145”, and then
click “Close”.
8. Click “Devices and Printers” from
Windows Start menu.

18
9. Right-click on “CHC-S6145” icon,
and then click “Properties”.
10. Select the “Hardware” tab, select
“SINFONIACHC-S6145”, and then
click “Properties”.
11. Click "Change settings".

19
12. Select the “Driver” tab, and then
click “Update Driver…”.
13. Click “Browse my computer for
driver software”.
14. Insert the Printer Driver CD-ROM
into the CD-ROM drive. Click
“Browse…” to select the “S6145”
subfolder under the folder for
Windows 7.
For Windows 7 32bit:
“F:\Driver\WinXP_Vista_7_32bit\Engli
sh\S6145”
For Windows 7 64bit:
“F:\Driver\Win7_64bit\English\S6145”
Click “Next”.
20
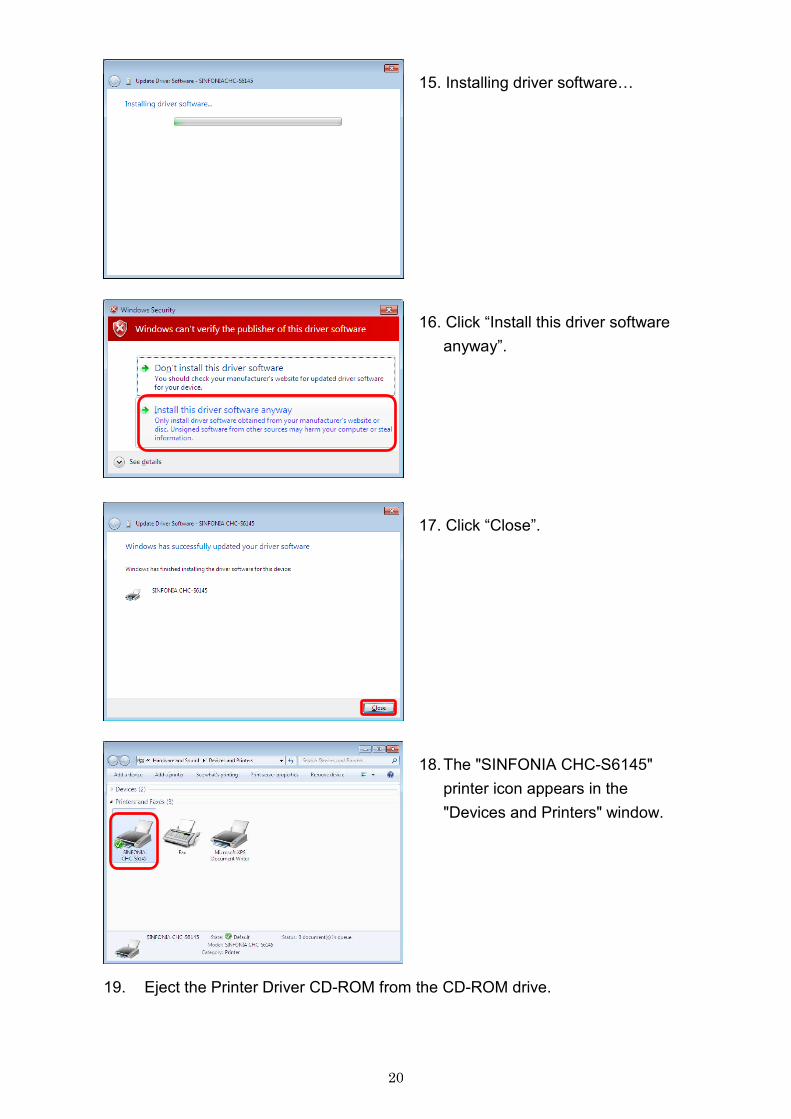
15. Installing driver software…
16. Click “Install this driver software
anyway”.
17. Click “Close”.
18. The "SINFONIA CHC-S6145"
printer icon appears in the
"Devices and Printers" window.
19. Eject the Printer Driver CD-ROM from the CD-ROM drive.
21
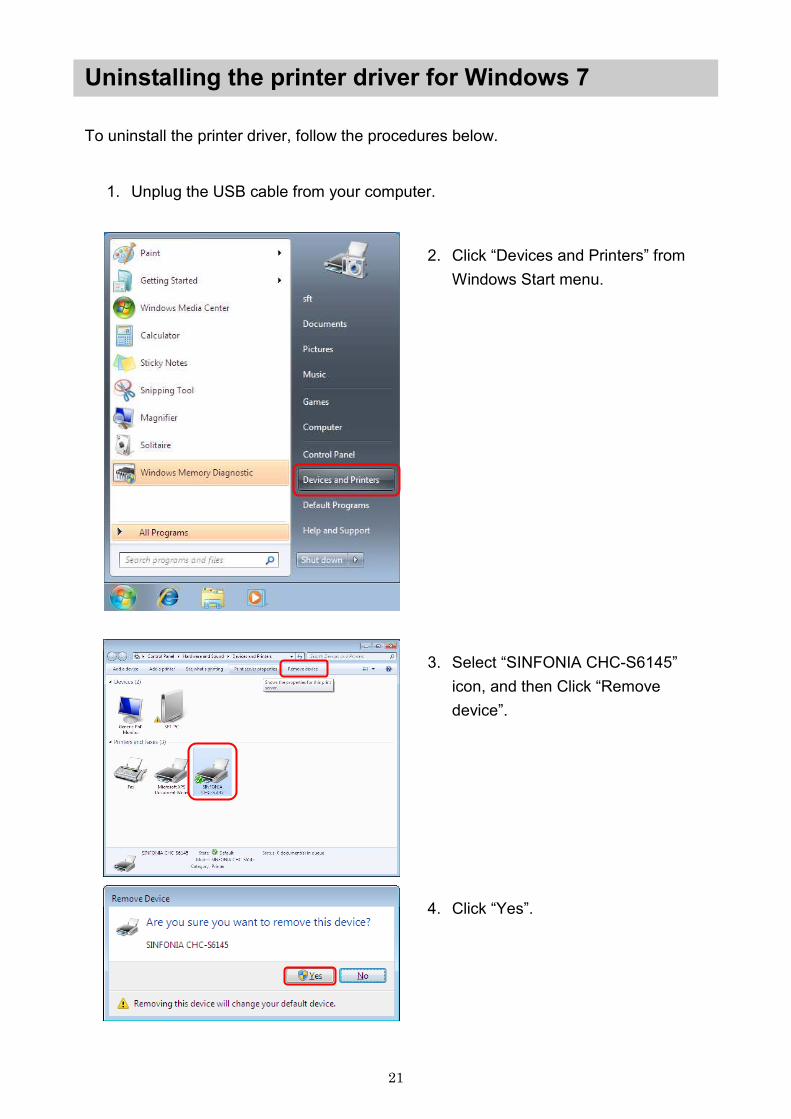
Uninstalling the printer driver for Windows 7
To uninstall the printer driver, follow the procedures below.
1. Unplug the USB cable from your computer.
2. Click “Devices and Printers” from
Windows Start menu.
3. Select “SINFONIA CHC-S6145”
icon, and then Click “Remove
device”.
4. Click “Yes”.
22
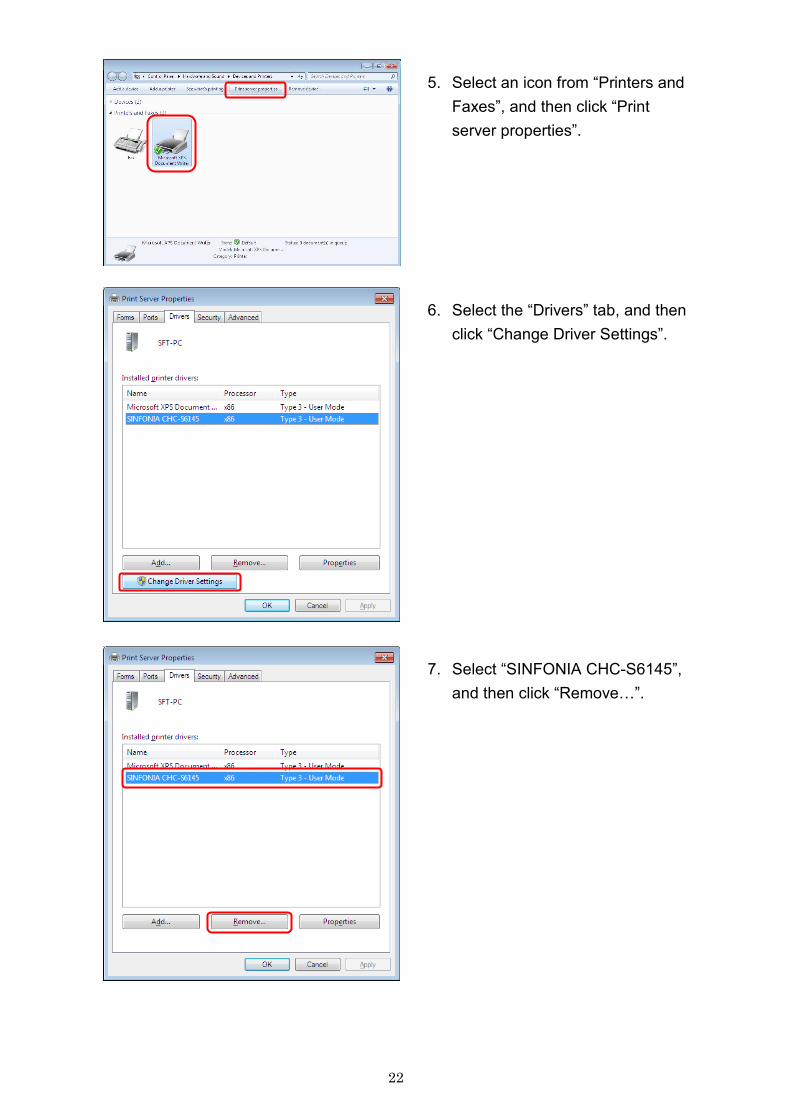
5. Select an icon from “Printers and
Faxes”, and then click “Print
server properties”.
6. Select the “Drivers” tab, and then
click “Change Driver Settings”.
7. Select “SINFONIA CHC-S6145”,
and then click “Remove…”.

23
8. Select “Remove driver and driver
package.”, and then click “OK”.
9. Click “Yes”.
10. Click “Delete”.
11. Click “OK”.

24
12. Open the Start Search from
Windows Start menu, and then
write “regedit” and press the
“Enter” key.
Note: User Account Control
message may appear stating
that the Windows needs your
permission to continue. Click
"Yes" to allow the driver to
uninstall.
13. Right-click on the folder of
“HKEY_LOCAL_MACHINE\SYS
TEM\CurrentControlSet\Control\
Print\Monitors\S6145 Language
Monitor”, and then click “Delete”.
14. Click “Yes”.
15. Reboot your computer.

27
Printing from application software
You can use the "Print" command of application software to print an image from your
computer with CHC-S6145 digital photo printer.
NOTES
(1) Before printing, make sure that the printer is properly connected to your
computer with a proper USB cable.
(2) This section describes setting up the driver and printing from the Windows
"Paint" program as typical application software.
(3) The explanation in this section is based on Windows XP.
(4) The maximum image size for each paper size is as follow.
Paper size selected Maximum image size in pixel units
4x6inch/10x15cm 1,240 x 1,844
5x7inch/13x18cm 1,548 x 2,140
6x8inch/15x20cm 1,844 x 2,434
6x8inch/15x20cm(Split-2UP) 1,844 x 2,492

28
1. Start the application software, and open the image to print.
2. Click "Page Setup" from the "File" menu of the application.
The "Page Setup" dialog box appears.
3. Page Setup.
Your application software may show a
different appearance.
3-1. Click "Printer..." to show the
"Page Setup" dialog box.
3-2. Select "SINFONIA CHC-S6145"
3-3. Click "Properties..." to show the
"SINFONIA CHC-S6145
Properties" dialog box.

29
3-4. Paper size
Choose a paper size you want to
print.
3-5. Split print
When you use the "Split Print"
function, select a combination of
finished print size.
Currently one combination of two 4
x 6 inch prints is available.
3-6. Print orientation
Select the Print orientation of an
image either from "Portrait" or
"Landscape".
3-7. Number of copies
Set the number of copies.
Effective Range: 1 ~ 30 (Default: 1)
3-8. Zoom-in / out
Set percentage at "Zoom-in / out".
The origin for image scaling is on
the center.
Effective Range: 25 ~ 400 (Default: 100)
3-9. Print quality
Currently, you can not choose print
quality, and gray out the drop down
list.
3-10. Lamination
Choose a lamination of prints from
“Glossy” or “Matte” or “OP Skip”
3-11. Paper cut mode
Set the “Paper cut mode” function
to your CHC-S6145 printer.
Check on: “Paper cut mode: on”.
Check off: “Paper cut mode: off”.

30
3-12. Remaining ink ribbon
This item shows approximate
number of available prints with the
loaded ink ribbon.
3-13. Total print count
This item shows total print counts
stored in the internal memory of the
printer.
NOTES The actual number of prints may
vary from the figure displayed depending on how the successive printing is performed.
3-14. Color adjustment
Clicking this button shows the
"Color adjustment" window to
adjust the prints.
See the section of "Color
adjustment" in this document.
31
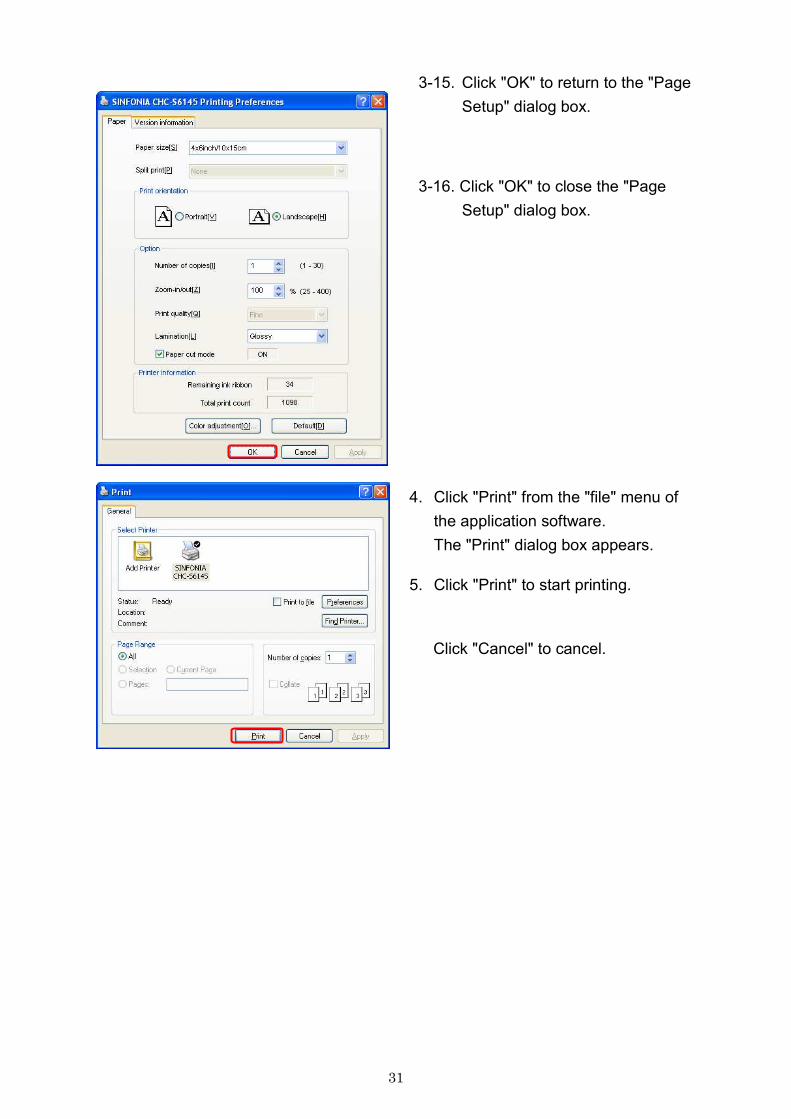
3-15. Click "OK" to return to the "Page
Setup" dialog box.
3-16. Click "OK" to close the "Page
Setup" dialog box.
4. Click "Print" from the "file" menu of
the application software.
The "Print" dialog box appears.
5. Click "Print" to start printing.
Click "Cancel" to cancel.
32
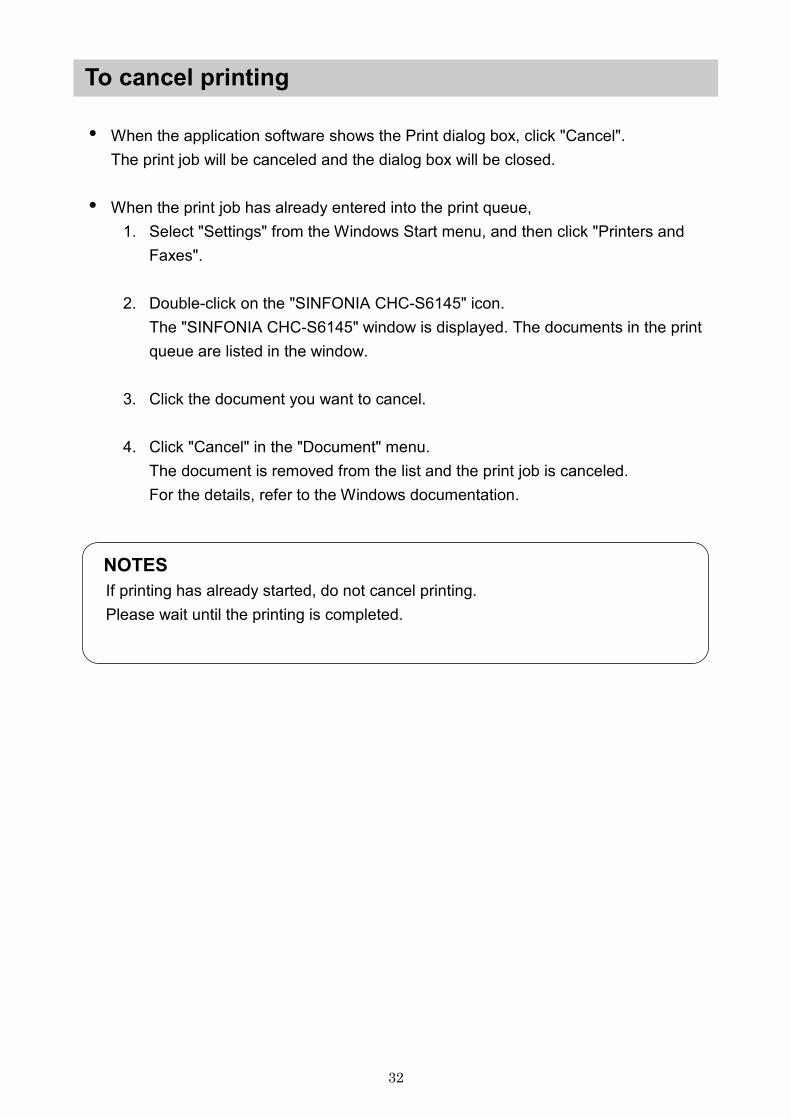
To cancel printing
i When the application software shows the Print dialog box, click "Cancel".
The print job will be canceled and the dialog box will be closed.
i When the print job has already entered into the print queue,
1. Select "Settings" from the Windows Start menu, and then click "Printers and
Faxes".
2. Double-click on the "SINFONIA CHC-S6145" icon.
The "SINFONIA CHC-S6145" window is displayed. The documents in the print
queue are listed in the window.
3. Click the document you want to cancel.
4. Click "Cancel" in the "Document" menu.
The document is removed from the list and the print job is canceled.
For the details, refer to the Windows documentation.
NOTES
If printing has already started, do not cancel printing.
Please wait until the printing is completed.

33
Color adjustment
Color adjustment window
You can select various kinds of printing options for color adjustment in the "Color
adjustment" window.
Sample image
The upper image will preview the effects of color adjustments. The lower image represents the original sample image. NOTES The preview image shows the approximate effects of color adjustment and may not represent the actual printing result.
Load bitmap file button
Clicking this button displays open dialog window to load a bitmap file to replace the default sample image. Acceptable bitmap file: 24-bit full color, 480(H) x 680(W) pixels or less.
Color Matching checkbox
Checking this checkbox enables the color matching process for input images.
Set ICC Profile button
Clicking this button displays the "Color Matching" window to allow you to define how the color matching applies to an input image.
Input ICC Profile:
The input ICC profile name is displayed to be used for the color matching process.

34
Output ICC Profile:
The output ICC profile name is displayed to be used for the color matching process.
Save settings button
Clicking this button displays the open dialog window to save the settings of color adjustment to an external file.
Load settings button
Clicking this button displays the open dialog window to load the settings of color adjustment from an external file.
Color adjustment checkbox
Checking this checkbox enables every settings of "Color adjustment" option.
Gamma editbox / slider bar
This option adjusts the midtone of the print image. Drag the slider bar to the right to decrease the lightness of the midtone or to the left to increase it. You can also enter a value directly in the editbox. Adjustable range: 0.30 ~ 3.00 (Default: 1.00)
Brightness editbox / slider bar
This option adjusts the brightness of the print image. Drag the slider bar to the right to increase the brightness or to the left to decrease it. You can also enter a value directly in the editbox. Adjustable range: -20 ~ 20 (Default: 0)
Contrast editbox / slider bar
This option adjusts the contrast of the print image. Drag the slider bar to the right to increase the contrast or to the left to decrease it. You can also enter a value directly in the editbox. Adjustable range: -20 ~ 20 (Default: 0)
Saturation editbox / slider bar
This option adjusts the saturation of the print image. Drag the slider bar to the right to increase the saturation or to the left to decrease it. You can also enter a value directly in the editbox. Adjustable range: -20 ~ 20 (Default: 0)
Cyan – Red editbox / slider bar
This option adjusts the color balance between Cyan and Red elements. The higher you set the value, the more the Red element increase while the Cyan element decrease – and vice versa. Adjustable range: -20 ~ 20 (Default: 0)
35
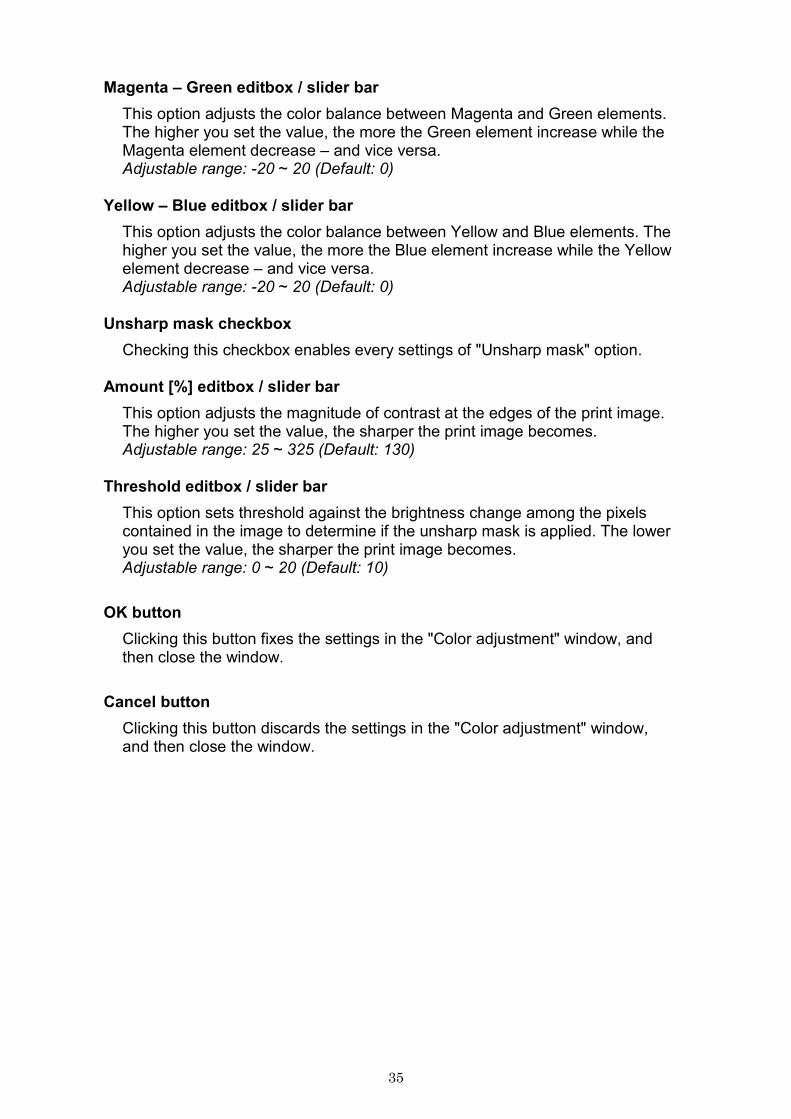
Magenta – Green editbox / slider bar
This option adjusts the color balance between Magenta and Green elements. The higher you set the value, the more the Green element increase while the Magenta element decrease – and vice versa. Adjustable range: -20 ~ 20 (Default: 0)
Yellow – Blue editbox / slider bar
This option adjusts the color balance between Yellow and Blue elements. The higher you set the value, the more the Blue element increase while the Yellow element decrease – and vice versa. Adjustable range: -20 ~ 20 (Default: 0)
Unsharp mask checkbox
Checking this checkbox enables every settings of "Unsharp mask" option.
Amount [%] editbox / slider bar
This option adjusts the magnitude of contrast at the edges of the print image. The higher you set the value, the sharper the print image becomes. Adjustable range: 25 ~ 325 (Default: 130)
Threshold editbox / slider bar
This option sets threshold against the brightness change among the pixels contained in the image to determine if the unsharp mask is applied. The lower you set the value, the sharper the print image becomes. Adjustable range: 0 ~ 20 (Default: 10)
OK button
Clicking this button fixes the settings in the "Color adjustment" window, and then close the window.
Cancel button
Clicking this button discards the settings in the "Color adjustment" window, and then close the window.

36
Color Matching window You can choose ICC profiles and a Rendering Intent.
Input Profile: Current input ICC profile name in use is displayed.
Output Profile: Current output ICC profile name in use is displayed.
Set Profile... button Clicking this button allows you to load an input ICC profile or an output ICC profile respectively. At the "Input Profile", load an ICC profile for the input device by which the current image was created. At the "Output Profile", load an ICC profile (S6145_2.ICC) for the printer.
Rendering Intent You can choose Rendering Intent from the three options as shown in the table below.
Rendering Intent Features
Perceptual (Photographic) Maps color smoothly, preserving relationships between similar colors, and generally provides the best reproduction of photographs.
Relative Colorimetric (Digital Proofing)
Represents any remaining out of gamut colors by the closest match and is generally a good choice for proof print.
Saturation (CG, Logo Colors) Prints punchy business charts and graphs, preserving the saturation or brightness of colors.
OK button Clicking this button fixes the settings in the "Color Matching" window, and then close the window.
Cancel button Clicking this button discards the settings in the "Color Matching" window, and then close the window.
37
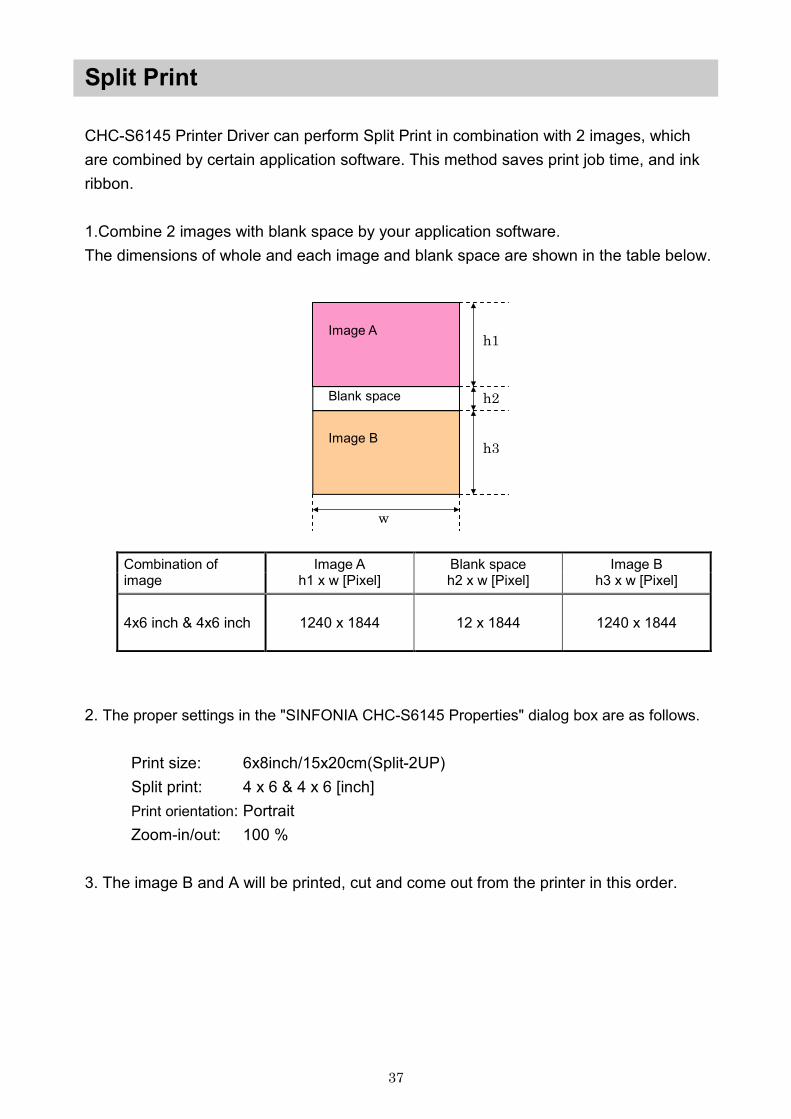
Split Print
CHC-S6145 Printer Driver can perform Split Print in combination with 2 images, which
are combined by certain application software. This method saves print job time, and ink
ribbon.
1.Combine 2 images with blank space by your application software.
The dimensions of whole and each image and blank space are shown in the table below.
Combination of image
Image A h1 x w [Pixel]
Blank space h2 x w [Pixel]
Image B h3 x w [Pixel]
4x6 inch & 4x6 inch 1240 x 1844 12 x 1844 1240 x 1844
2. The proper settings in the "SINFONIA CHC-S6145 Properties" dialog box are as follows.
Print size: 6x8inch/15x20cm(Split-2UP)
Split print: 4 x 6 & 4 x 6 [inch]
Print orientation: Portrait
Zoom-in/out: 100 %
3. The image B and A will be printed, cut and come out from the printer in this order.
Image A
Image B
Blank space
h1
h3
h2
w

38
Troubleshooting
When the printer driver displays a Printer Status on the Printer Folder, refer to the following table below for its cause and correction.
Printer Folder
Printer Folder Possible Causes Possible Solutions
A hardware malfunction may have occurred in the printer.
Consult the distributor of the printer or our support center.
The operation panel is in use. Exit from the “Test Print Mode” of the
printer.
A paper jam has occurred. Remove the jammed paper in accordance with the user manual of the printer.
The printer cover is open. Close the printer cover.
The ink ribbon has run out or is not loaded.
Remove the used ink ribbon and load a new one.
The paper roll has run out or is not loaded.
Load a new one.
The size of paper loaded in the printer does not match the size specified in the current print job.
Load the correct size of paper to the printer or cancel the print job and print again with the correct paper size.
Color adjustment window
Error Messages Possible Causes Possible Solutions
Can not use this profile on current ribbon and image mode.
Incorrect ICC profile(s) are specified for the current settings.
Check if the ICC profile(s) are compatible with the current settings.
Can not find right ICC Profile. The selected ICC profile is not found; or the ICC Profile has collapsed.
Check if the ICC Profile exists and is not broken.
Can not load bitmap file. The selected bitmap file is not supported.
Load an acceptable bitmap file that is in 24-bit full color and up to 480 pixels in height and 680 pixels in width.


![[Partitura] Berio - Sinfonia](https://static.fdocuments.us/doc/165x107/577cd5b61a28ab9e789b7046/partitura-berio-sinfonia.jpg)