Digital Heart Rate Monitor - Timexassets.timex.com/user_guides/W267_M536/W267_M536_NA_EN.pdf · 1...
36
Digital Heart Rate Monitor digital heart rate monitor user guide ©2010 Timex Group USA, Inc. TIMEX, TRIATHLON, NIGHT-MODE, INDIGLO, FLEX TECH and RACE TRAINER are trademarks of Timex Group B.V. and its subsidiaries. ANT+ and the ANT+ Logo are trademarks of Dynastream Innovations, Inc. IRONMAN and M-DOT are registered trademarks of World Triathlon Corporation. W-267 536-095000 NA English page 1 Français page 71 Español página 151
Transcript of Digital Heart Rate Monitor - Timexassets.timex.com/user_guides/W267_M536/W267_M536_NA_EN.pdf · 1...
Digital Heart Rate Monitor
dig
ita
l h
ea
rt r
ate
mo
nit
or
us
er
gu
ide
©2010 Timex Group USA, Inc. TIMEX, TRIATHLON, NIGHT-MODE, INDIGLO, FLEX TECH and RACETRAINER are trademarks of Timex Group B.V. and its subsidiaries. ANT+ and the ANT+ Logo aretrademarks of Dynastream Innovations, Inc. IRONMAN and M-DOT are registered trademarks ofWorld Triathlon Corporation.
W-2
67 5
36-0
95000 N
A
English page 1
Français page 71
Español página 151
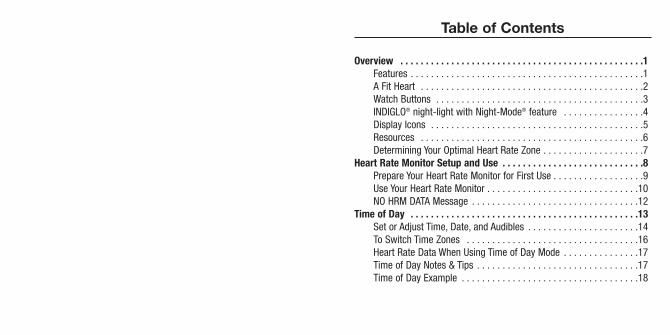
Table of Contents
Overview . . . . . . . . . . . . . . . . . . . . . . . . . . . . . . . . . . . . . . . . . . . . . . . .1Features . . . . . . . . . . . . . . . . . . . . . . . . . . . . . . . . . . . . . . . . . . . . . .1A Fit Heart . . . . . . . . . . . . . . . . . . . . . . . . . . . . . . . . . . . . . . . . . . . .2Watch Buttons . . . . . . . . . . . . . . . . . . . . . . . . . . . . . . . . . . . . . . . . .3INDIGLO® night-light with Night-Mode® feature . . . . . . . . . . . . . . . .4Display Icons . . . . . . . . . . . . . . . . . . . . . . . . . . . . . . . . . . . . . . . . . .5Resources . . . . . . . . . . . . . . . . . . . . . . . . . . . . . . . . . . . . . . . . . . . .6Determining Your Optimal Heart Rate Zone . . . . . . . . . . . . . . . . . . . .7
Heart Rate Monitor Setup and Use . . . . . . . . . . . . . . . . . . . . . . . . . . . .8Prepare Your Heart Rate Monitor for First Use . . . . . . . . . . . . . . . . . .9Use Your Heart Rate Monitor . . . . . . . . . . . . . . . . . . . . . . . . . . . . . .10NO HRM DATA Message . . . . . . . . . . . . . . . . . . . . . . . . . . . . . . . . .12
Time of Day . . . . . . . . . . . . . . . . . . . . . . . . . . . . . . . . . . . . . . . . . . . . .13Set or Adjust Time, Date, and Audibles . . . . . . . . . . . . . . . . . . . . . .14To Switch Time Zones . . . . . . . . . . . . . . . . . . . . . . . . . . . . . . . . . .16Heart Rate Data When Using Time of Day Mode . . . . . . . . . . . . . . .17Time of Day Notes & Tips . . . . . . . . . . . . . . . . . . . . . . . . . . . . . . . .17Time of Day Example . . . . . . . . . . . . . . . . . . . . . . . . . . . . . . . . . . .18
Review . . . . . . . . . . . . . . . . . . . . . . . . . . . . . . . . . . . . . . . . . . . . . . . . .38About Review Mode . . . . . . . . . . . . . . . . . . . . . . . . . . . . . . . . . . . .38Review Workout Data . . . . . . . . . . . . . . . . . . . . . . . . . . . . . . . . . . .39Review Mode Data . . . . . . . . . . . . . . . . . . . . . . . . . . . . . . . . . . . . .40
HRM Setup . . . . . . . . . . . . . . . . . . . . . . . . . . . . . . . . . . . . . . . . . . . . . .42Device Pairing . . . . . . . . . . . . . . . . . . . . . . . . . . . . . . . . . . . . . . . .42Selecting a Target Heart Rate Zone . . . . . . . . . . . . . . . . . . . . . . . .44Custom Target Heart Rate Zone . . . . . . . . . . . . . . . . . . . . . . . . . . .45Personal Data . . . . . . . . . . . . . . . . . . . . . . . . . . . . . . . . . . . . . . . . .46HRM Setup Notes & Tips . . . . . . . . . . . . . . . . . . . . . . . . . . . . . . . .48
Alarm 1, 2, or 3 . . . . . . . . . . . . . . . . . . . . . . . . . . . . . . . . . . . . . . . . . .49Set the Alarm . . . . . . . . . . . . . . . . . . . . . . . . . . . . . . . . . . . . . . . . .49Alarm Mode Notes & Tips . . . . . . . . . . . . . . . . . . . . . . . . . . . . . . . .51
Sync . . . . . . . . . . . . . . . . . . . . . . . . . . . . . . . . . . . . . . . . . . . . . . . . . . .52To Sync the Watch with a Computer . . . . . . . . . . . . . . . . . . . . . . . .53Sync Error Messages . . . . . . . . . . . . . . . . . . . . . . . . . . . . . . . . . . .54
Care & Maintenance . . . . . . . . . . . . . . . . . . . . . . . . . . . . . . . . . . . . . .55Watch Battery Replacement . . . . . . . . . . . . . . . . . . . . . . . . . . . . . .55INDIGLO® night-light . . . . . . . . . . . . . . . . . . . . . . . . . . . . . . . . . . . .56Water Resistance . . . . . . . . . . . . . . . . . . . . . . . . . . . . . . . . . . . . . .56Heart Rate Sensor and Strap Maintenance . . . . . . . . . . . . . . . . . . .56Transmitter Battery Life . . . . . . . . . . . . . . . . . . . . . . . . . . . . . . . . .57Transmitter Battery Replacement . . . . . . . . . . . . . . . . . . . . . . . . . .57
Chrono . . . . . . . . . . . . . . . . . . . . . . . . . . . . . . . . . . . . . . . . . . . . . . . . .19Chrono Terminology . . . . . . . . . . . . . . . . . . . . . . . . . . . . . . . . . . . .19Operate the Chrono . . . . . . . . . . . . . . . . . . . . . . . . . . . . . . . . . . . .20Heart Rate Data When Using Chrono Mode . . . . . . . . . . . . . . . . . . .21Chrono Display Format . . . . . . . . . . . . . . . . . . . . . . . . . . . . . . . . . .22Chrono Mode Notes & Tips . . . . . . . . . . . . . . . . . . . . . . . . . . . . . . .22Chrono Mode Example . . . . . . . . . . . . . . . . . . . . . . . . . . . . . . . . . .23
Interval . . . . . . . . . . . . . . . . . . . . . . . . . . . . . . . . . . . . . . . . . . . . . . . .24Interval Terminology . . . . . . . . . . . . . . . . . . . . . . . . . . . . . . . . . . . .25Set or Adjust Intervals . . . . . . . . . . . . . . . . . . . . . . . . . . . . . . . . . .25Operate the Interval Timer . . . . . . . . . . . . . . . . . . . . . . . . . . . . . . .27Heart Rate Data When Using Interval Mode . . . . . . . . . . . . . . . . . .28Interval Mode Notes & Tips . . . . . . . . . . . . . . . . . . . . . . . . . . . . . .28Interval Mode Example . . . . . . . . . . . . . . . . . . . . . . . . . . . . . . . . . .30
Timer . . . . . . . . . . . . . . . . . . . . . . . . . . . . . . . . . . . . . . . . . . . . . . . . . .31Set the Timer . . . . . . . . . . . . . . . . . . . . . . . . . . . . . . . . . . . . . . . . .32Operate the Timer . . . . . . . . . . . . . . . . . . . . . . . . . . . . . . . . . . . . .32Timer Mode Notes & Tips . . . . . . . . . . . . . . . . . . . . . . . . . . . . . . . .34Timer Mode Example . . . . . . . . . . . . . . . . . . . . . . . . . . . . . . . . . . .34
Recovery . . . . . . . . . . . . . . . . . . . . . . . . . . . . . . . . . . . . . . . . . . . . . . .35About Recovery Heart Rate . . . . . . . . . . . . . . . . . . . . . . . . . . . . . .35Manually Determine a Recovery Heart Rate . . . . . . . . . . . . . . . . . .36
1
Overview
Congratulations!The Ironman® Triathlon® Digital Heart Rate Monitor is like hiring a personaltrainer. This high-tech tool is designed for demanding athletes like you tomeasure how you track against your workout goals and offers you theability to track, store, and analyze key indicators of your personal fitnesslevel for up to 50 laps.You will find your Heart Rate Monitor is a user-friendly fitness tool. But,like any new device, you should take the time to familiarize yourself withits components to optimize its usefulness.So, check out the features and functions of your Heart Rate Monitor todevelop a basic understanding of this fitness tool. But most of all, enjoyyour new partner on the road to increased fitness!
FeaturesThe Ironman® Triathlon® Digital Heart Rate Monitor features a 10-workoutmemory that gathers elapsed time and heart rate data when you run itschronograph or interval timer. What makes this interval timer unique isthat each of the linked segments can be set for both heart rate zone andduration, so your workout can incorporate time-and-effort trainingguidance - just like having a coach on your wrist.
Warranty & Service . . . . . . . . . . . . . . . . . . . . . . . . . . . . . . . . . . . . . . .58Declaration of Conformity . . . . . . . . . . . . . . . . . . . . . . . . . . . . . . . . . .64
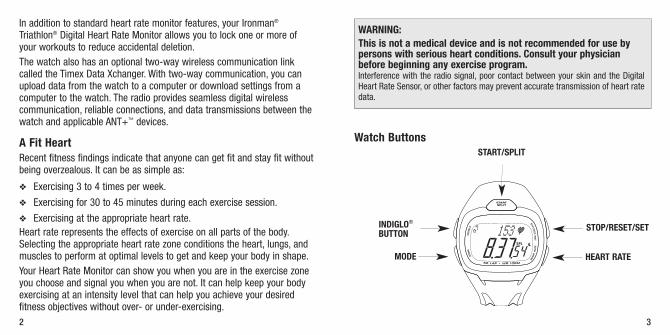
Watch Buttons
3
START/SPLIT
STOP/RESET/SET
HEART RATEMODE
INDIGLO®BUTTON
WARNING:This is not a medical device and is not recommended for use bypersons with serious heart conditions. Consult your physicianbefore beginning any exercise program.Interference with the radio signal, poor contact between your skin and the DigitalHeart Rate Sensor, or other factors may prevent accurate transmission of heart ratedata.
2
In addition to standard heart rate monitor features, your Ironman®
Triathlon® Digital Heart Rate Monitor allows you to lock one or more ofyour workouts to reduce accidental deletion. The watch also has an optional two-way wireless communication linkcalled the Timex Data Xchanger. With two-way communication, you canupload data from the watch to a computer or download settings from acomputer to the watch. The radio provides seamless digital wirelesscommunication, reliable connections, and data transmissions between thewatch and applicable ANT+™ devices.
A Fit HeartRecent fitness findings indicate that anyone can get fit and stay fit withoutbeing overzealous. It can be as simple as:
Exercising 3 to 4 times per week.
Exercising for 30 to 45 minutes during each exercise session.
Exercising at the appropriate heart rate. Heart rate represents the effects of exercise on all parts of the body.Selecting the appropriate heart rate zone conditions the heart, lungs, andmuscles to perform at optimal levels to get and keep your body in shape.Your Heart Rate Monitor can show you when you are in the exercise zoneyou choose and signal you when you are not. It can help keep your bodyexercising at an intensity level that can help you achieve your desiredfitness objectives without over- or under-exercising.
5
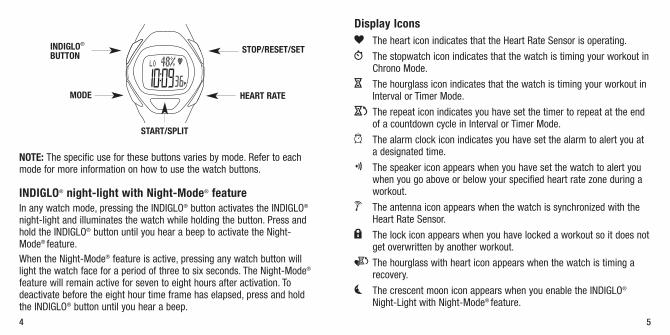
Display Iconsg The heart icon indicates that the Heart Rate Sensor is operating.
W The stopwatch icon indicates that the watch is timing your workout inChrono Mode.
H The hourglass icon indicates that the watch is timing your workout inInterval or Timer Mode.
J The repeat icon indicates you have set the timer to repeat at the endof a countdown cycle in Interval or Timer Mode.
a The alarm clock icon indicates you have set the alarm to alert you ata designated time.
s The speaker icon appears when you have set the watch to alert youwhen you go above or below your specified heart rate zone during aworkout.
V The antenna icon appears when the watch is synchronized with theHeart Rate Sensor.
l The lock icon appears when you have locked a workout so it does notget overwritten by another workout.
e The hourglass with heart icon appears when the watch is timing arecovery.
k The crescent moon icon appears when you enable the INDIGLO®
Night-Light with Night-Mode® feature.
4
NOTE: The specific use for these buttons varies by mode. Refer to eachmode for more information on how to use the watch buttons.
INDIGLO® night-light with Night-Mode® featureIn any watch mode, pressing the INDIGLO® button activates the INDIGLO®
night-light and illuminates the watch while holding the button. Press andhold the INDIGLO® button until you hear a beep to activate the Night-Mode® feature. When the Night-Mode® feature is active, pressing any watch button willlight the watch face for a period of three to six seconds. The Night-Mode®
feature will remain active for seven to eight hours after activation. Todeactivate before the eight hour time frame has elapsed, press and holdthe INDIGLO® button until you hear a beep.
START/SPLIT
STOP/RESET/SET
HEART RATEMODE
INDIGLO®BUTTON
Determining Your Optimal Heart Rate Zone
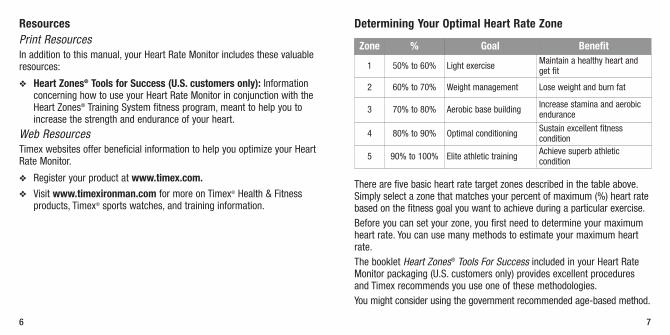
There are five basic heart rate target zones described in the table above.Simply select a zone that matches your percent of maximum (%) heart ratebased on the fitness goal you want to achieve during a particular exercise.Before you can set your zone, you first need to determine your maximumheart rate. You can use many methods to estimate your maximum heartrate. The booklet Heart Zones® Tools For Success included in your Heart RateMonitor packaging (U.S. customers only) provides excellent proceduresand Timex recommends you use one of these methodologies.You might consider using the government recommended age-based method.
7
Zone % Goal Benefit
1 50% to 60% Light exercise Maintain a healthy heart andget fit
2 60% to 70% Weight management Lose weight and burn fat
3 70% to 80% Aerobic base building Increase stamina and aerobicendurance
4 80% to 90% Optimal conditioning Sustain excellent fitnesscondition
5 90% to 100% Elite athletic training Achieve superb athleticcondition
ResourcesPrint ResourcesIn addition to this manual, your Heart Rate Monitor includes these valuableresources:
Heart Zones® Tools for Success (U.S. customers only): Informationconcerning how to use your Heart Rate Monitor in conjunction with theHeart Zones® Training System fitness program, meant to help you toincrease the strength and endurance of your heart.
Web ResourcesTimex websites offer beneficial information to help you optimize your HeartRate Monitor.
Register your product at www.timex.com.
Visit www.timexironman.com for more on Timex® Health & Fitnessproducts, Timex® sports watches, and training information.
6
Prepare Your Heart Rate Monitor for First UseOnce you have determined your fitness goals and maximum heart rate,Timex recommends you pair the watch with your Heart Rate Sensor, setthe time, and set other important data in HRM Setup Mode before usingyour Heart Rate Monitor.Note: For best results, Timex recommends that you wash your heart ratesensor in warm soapy water to remove any manufacturing oils beforeusing for the first time.
Pairing the Watch and Heart Rate Sensor: Timex recommends thatyou pair the Heart Rate Sensor and watch to minimize the possibility ofpicking up a signal from another person’s Heart Rate Sensor. Toaccurately pair the watch with the Heart Rate Sensor, go immediatelyto HRM Setup Mode prior to stopping at or using any other mode. Formore information on “Device Pairing” see the Table of Contents underHRM setup.
Setting the Time of Day: The Heart Rate Monitor uses the time set onthe watch to record data. To ensure you are recording data at thecorrect time, set the watch for your local time in Time of Day Mode.For more information on Time of Day Mode see its section in the Tableof Contents.
Entering Your Personal Data: Before using your watch it is importantto enter your weight and maximum heart rate in HRM Setup Mode.This will allow you to tailor your Heart Rate Monitor to your personal
9
Begin with the number 220 and then subtract your age. For instance, a 35 year old would begin with 220 and subtract 35 (the person’s age),which gives an estimated maximum heart rate of 185. Once you knowyour maximum heart rate, you can enter it in HRM Setup Mode and thewatch will automatically setup your zones as described in the table on theprevious page.
Heart Rate Monitor Setup and UseChrono and Interval Timer Modes collect heart rate data and recorddetailed statistics for a workout. The Heart Rate Monitor can storeinformation for up to 10 workouts.NOTE: The watch will collect heart rate data without the Chrono or IntervalTimer running. This information will not be available in Review Mode, butcan be transferred from the watch to a computer (Timex® Data XchangerUSB device is required). If you have the optional USB device, you canupload workout data to a computer for storage and viewing. When thewatch can store less than five hours, or only three more sessions, of heartrate data, the watch will display the MEMORY LOW message. When thewatch has reached its storage capacity limits, the display will readMEMORY FULL.When the watch is not used with a computer these messages will beskipped. Unless you lock a workout, you will automatically over-write anolder workout when you have reached your 10-workout limit.
8
11
5. Press the START/SPLIT button and begin your workout.
6. If the watch is set to alert you when you go above or below yourchosen target heart rate zone press and hold HEART RATE to turn theaudible alert off. Otherwise it will continue beeping until you return toyour target zone. When you are turning the audible alert off, you willsee the message HOLD FOR ALERT OFF. Conversely, when turning theaudible alert on, you will see the message HOLD FOR ALERT ON.
7. When you have finished your workout, press the STOP/RESET/SETbutton to stop recording data for the workout if you are using Chronoor Interval Timer Modes.
8. Remove the Heart Rate Sensor from your chest and the watch will stoprecording further heart rate data in approximately one minute.
9. Press MODE until you see Review Mode. This Mode includes heart rateand other statistical data about your workout.
Note: Thoroughly clean your Heart Rate Sensor to maintain itsperformance. The FLEX TECH™ strap can be machine washed in coldwater with the transmitter removed. Hang it to dry away from direct heator sunlight. Dry the metal contacts on the transmitter and the strap toprevent corrosion.
parameters. For more information see the “Personal Data” section inthe Table of Contents under HRM setup.
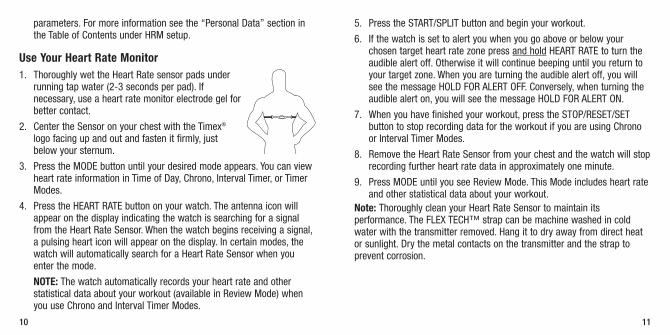
Use Your Heart Rate Monitor1. Thoroughly wet the Heart Rate sensor pads under
running tap water (2-3 seconds per pad). Ifnecessary, use a heart rate monitor electrode gel forbetter contact.
2. Center the Sensor on your chest with the Timex®
logo facing up and out and fasten it firmly, justbelow your sternum.
3. Press the MODE button until your desired mode appears. You can viewheart rate information in Time of Day, Chrono, Interval Timer, or TimerModes.
4. Press the HEART RATE button on your watch. The antenna icon willappear on the display indicating the watch is searching for a signalfrom the Heart Rate Sensor. When the watch begins receiving a signal,a pulsing heart icon will appear on the display. In certain modes, thewatch will automatically search for a Heart Rate Sensor when youenter the mode.
NOTE: The watch automatically records your heart rate and otherstatistical data about your workout (available in Review Mode) whenyou use Chrono and Interval Timer Modes.
10
Time of DayYour watch can act as an ordinary timepiece, displaying the time, date,and day for two different time zones using a 12- or 24-hour format.START/SPLITPress to peak at or switch time zones or increase or toggle a setting item.INDIGLO® BUTTONPress to light the watch, activate/de-activate the Night-Mode® feature.MODEPress to move to the next mode, setting option, digit, or group.STOP/RESET/SETPress to start or complete the setting process. HEART RATEPress to activate the Heart Rate Monitor, decrease or toggle the settingitem, or switch display views.
1312
NO HRM DATA MessageIf the watch is not receiving heart rate information, you may receive themessage NO HRM DATA on the watch display. Try the following:
Shorten the distance between the watch and the Heart Rate Sensor.
Adjust the position of the Heart Rate Sensor and elastic chest strap.
Make sure the Heart Rate Sensor pads are wet or use conductive gel.
Check the battery in the Heart Rate Sensor and replace it if necessary. Move away from other heart rate monitors or other sources of radio or
electrical interference.
15
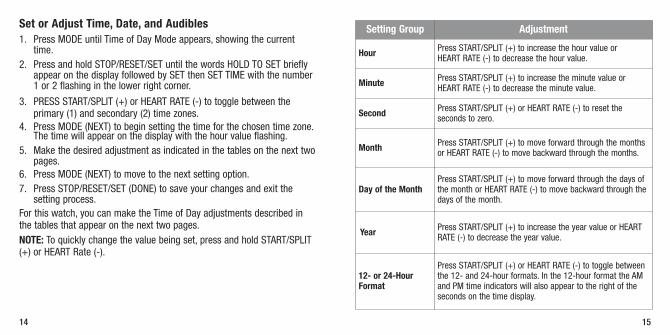
Setting Group Adjustment
Hour Press START/SPLIT (+) to increase the hour value or HEART RATE (-) to decrease the hour value.
Minute Press START/SPLIT (+) to increase the minute value orHEART RATE (-) to decrease the minute value.
Second Press START/SPLIT (+) or HEART RATE (-) to reset theseconds to zero.
Month Press START/SPLIT (+) to move forward through the monthsor HEART RATE (-) to move backward through the months.
Day of the MonthPress START/SPLIT (+) to move forward through the days ofthe month or HEART RATE (-) to move backward through thedays of the month.
Year Press START/SPLIT (+) to increase the year value or HEARTRATE (-) to decrease the year value.
12- or 24-HourFormat
Press START/SPLIT (+) or HEART RATE (-) to toggle betweenthe 12- and 24-hour formats. In the 12-hour format the AMand PM time indicators will also appear to the right of theseconds on the time display.
Set or Adjust Time, Date, and Audibles1. Press MODE until Time of Day Mode appears, showing the current
time.2. Press and hold STOP/RESET/SET until the words HOLD TO SET briefly
appear on the display followed by SET then SET TIME with the number1 or 2 flashing in the lower right corner.
3. PRESS START/SPLIT (+) or HEART RATE (-) to toggle between theprimary (1) and secondary (2) time zones.
4. Press MODE (NEXT) to begin setting the time for the chosen time zone.The time will appear on the display with the hour value flashing.
5. Make the desired adjustment as indicated in the tables on the next twopages.
6. Press MODE (NEXT) to move to the next setting option.7. Press STOP/RESET/SET (DONE) to save your changes and exit the
setting process.For this watch, you can make the Time of Day adjustments described inthe tables that appear on the next two pages.NOTE: To quickly change the value being set, press and hold START/SPLIT(+) or HEART Rate (-).
14
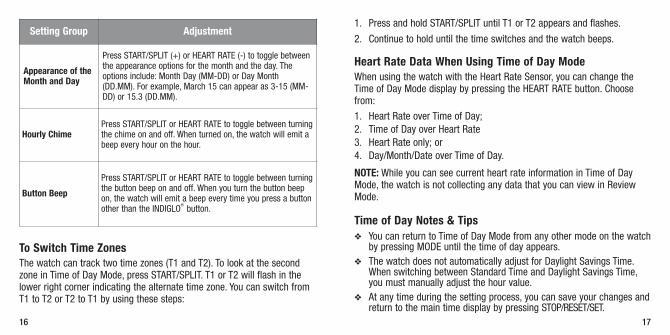
1. Press and hold START/SPLIT until T1 or T2 appears and flashes.
2. Continue to hold until the time switches and the watch beeps.
Heart Rate Data When Using Time of Day ModeWhen using the watch with the Heart Rate Sensor, you can change theTime of Day Mode display by pressing the HEART RATE button. Choosefrom:
1. Heart Rate over Time of Day;2. Time of Day over Heart Rate3. Heart Rate only; or4. Day/Month/Date over Time of Day.
NOTE: While you can see current heart rate information in Time of DayMode, the watch is not collecting any data that you can view in ReviewMode.
Time of Day Notes & Tips You can return to Time of Day Mode from any other mode on the watch
by pressing MODE until the time of day appears. The watch does not automatically adjust for Daylight Savings Time.
When switching between Standard Time and Daylight Savings Time,you must manually adjust the hour value.
At any time during the setting process, you can save your changes andreturn to the main time display by pressing STOP/RESET/SET.
1716
To Switch Time ZonesThe watch can track two time zones (T1 and T2). To look at the secondzone in Time of Day Mode, press START/SPLIT. T1 or T2 will flash in thelower right corner indicating the alternate time zone. You can switch fromT1 to T2 or T2 to T1 by using these steps:
Setting Group Adjustment
Appearance of theMonth and Day
Press START/SPLIT (+) or HEART RATE (-) to toggle betweenthe appearance options for the month and the day. Theoptions include: Month Day (MM-DD) or Day Month(DD.MM). For example, March 15 can appear as 3-15 (MM-DD) or 15.3 (DD.MM).
Hourly ChimePress START/SPLIT or HEART RATE to toggle between turningthe chime on and off. When turned on, the watch will emit abeep every hour on the hour.
Button Beep
Press START/SPLIT or HEART RATE to toggle between turningthe button beep on and off. When you turn the button beepon, the watch will emit a beep every time you press a buttonother than the INDIGLO
®button.
ChronoChrono Mode operates as the main workout data center for your watch. Itcan record elapsed time for up to 100 hours. It can also record informationfor up to 50 laps. START/SPLITPress to begin timing, take a lap or split, or continue timing after a pause.INDIGLO® BUTTONPress to light the watch, activate/de-activate the Night-Mode® feature.MODEPress to move to the next mode or quickly display a new lap or split.STOP/RESET/SETPress to stop or pause the chrono, save chrono data and clear the chrono,or change chrono formatHEART RATEPress to switch display views.
Chrono Terminology Chronograph: The chronograph records timed segments for the
duration of your workout.
Lap: Lap time records the time or duration of individual segments ofyour workout.
19
While setting the watch, if you do not press any buttons on the watchfor a period of 2 to 3 minutes, the watch will automatically savewhatever changes you have made and exit the setting process.
During a Leap Year, the watch will automatically move from February28 to February 29. For other years, the watch will move from February28 to March 1.
Alarms are triggered by the time set in Time of Day Mode.
Time of Day Example
18
Assume that you live in San Francisco and work with a client in New York. Like allbusy people, it is imperative you keep track of time, so you set T1 to your local time.But it is also important to have a quick reminder of your client’s time, so you set T2to New York time. With both time zones available, you can quickly check your client’stime or even switch your watch to display T2 when you travel to New York.
21
Sensor and the recovery timer is not set to “off”. For more informationabout recovery heart rate, see the Recovery Mode section.
7. Press START/SPLIT to continue timing OR press and holdSTOP/RESET/SET to clear the chronograph display and set it back tozero. This also saves chrono data in the watch database.
NOTE: If all workouts are locked you will see the message WORKOUTSLOCKED - UNLOCK IN REVIEW. In this instance, the watch cannot saveany data for a workout.
Heart Rate Data When Using Chrono ModeWhen you operate the watch in Chrono Mode with the Heart Rate Sensor,you will accumulate heart rate related data in Review Mode, including:
1. Amount of time your heart rate stays within your target heart rate zone(shown as IN ZONE in Review Mode);
2. The average heart rate for the complete time the Heart Rate Sensorwas operating and the chronograph was running (shown as AVERAGEin Review Mode);
3. The average heart rate for each recorded lap (shown as LAP DATA inReview Mode); and
4. Peak and minimum heart rates for the complete time the Heart RateSensor was operating and the chronograph was running (shown asPEAK and MINIMUM in Review Mode)
Split: Split time records the total elapsed time since the beginning ofyour current workout.
Taking a lap or split: When you take a lap or split, the chronograph records the time for the current segment andautomatically begins timing a new one.
Operate the Chrono1. Press MODE until CHRONO appears.
2. Press and hold STOP/RESET/SET to save chrono data (if necessary)and reset the chrono.
3. Press START/SPLIT to begin timing.
4. Press START/SPLIT again to take a lap or split. The watch will displaythe lap or split number and average heart rate (for the lap or split) ifreceiving data from the Heart Rate Sensor.
5. Press MODE to immediately display new lap or split information ORwait a few seconds and the watch will automatically begin to displaydata for a new lap or split.
6. Press STOP/RESET/SET to stop timing when you want to take a breakor you reach the end of your workout.
NOTE: The recovery heart rate timer will begin automatically (for 30seconds or 1-, 2-, 5-, or 10-minutes, as user-specified) after pressingSTOP/RESET/SET if the watch is receiving data from the Heart Rate
20
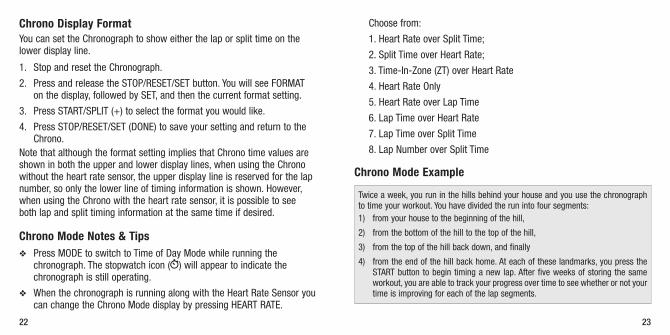
Choose from:
1. Heart Rate over Split Time;
2. Split Time over Heart Rate;
3. Time-In-Zone (ZT) over Heart Rate
4. Heart Rate Only
5. Heart Rate over Lap Time
6. Lap Time over Heart Rate
7. Lap Time over Split Time
8. Lap Number over Split Time
Chrono Mode Example
23
Twice a week, you run in the hills behind your house and you use the chronographto time your workout. You have divided the run into four segments: 1) from your house to the beginning of the hill,
2) from the bottom of the hill to the top of the hill,
3) from the top of the hill back down, and finally
4) from the end of the hill back home. At each of these landmarks, you press theSTART button to begin timing a new lap. After five weeks of storing the sameworkout, you are able to track your progress over time to see whether or not yourtime is improving for each of the lap segments.
Chrono Display FormatYou can set the Chronograph to show either the lap or split time on thelower display line.
1. Stop and reset the Chronograph.
2. Press and release the STOP/RESET/SET button. You will see FORMATon the display, followed by SET, and then the current format setting.
3. Press START/SPLIT (+) to select the format you would like.
4. Press STOP/RESET/SET (DONE) to save your setting and return to theChrono.
Note that although the format setting implies that Chrono time values areshown in both the upper and lower display lines, when using the Chronowithout the heart rate sensor, the upper display line is reserved for the lapnumber, so only the lower line of timing information is shown. However,when using the Chrono with the heart rate sensor, it is possible to seeboth lap and split timing information at the same time if desired.
Chrono Mode Notes & Tips Press MODE to switch to Time of Day Mode while running the
chronograph. The stopwatch icon (W) will appear to indicate thechronograph is still operating.
When the chronograph is running along with the Heart Rate Sensor youcan change the Chrono Mode display by pressing HEART RATE.
22

25
Interval Terminology Interval Training: You can use interval training to help you vary the
intensity level within one workout, ultimately helping you work outlonger and harder.
Interval: Intervals relate your exercise to specific periods of time. Forinstance, you can run for ten minutes, walk for two, run for twentyminutes, and then walk for five – this would represent four trainingintervals.
Repetitions (Reps): The number of times you choose to perform aninterval group. In the example above, if you choose to run the intervalgroup three times, you will go through your series of ten, two, twenty,and five minute timings three times in sequence. This would represent3 reps.
Set or Adjust IntervalsYou can set the watch to set and store up to five intervals labeled INT 1through INT 5.
1. Press MODE until Interval Mode appears, showing the most recentinterval settings.
2. Press STOP/RESET/SET until the words INT TIMER SET briefly appearon the display followed by SET followed by the current setting forInterval 1 and INT with the number 1 flashing at the top of the display.
Interval Interval Timer Mode offers a flexible five-interval countdown timer that canbe set to repeat up to 99 times. This mode is useful when your workoutincludes distinct segments such as using a run/walk method in which yourun for a specified period of time and then walk for a specified period oftime.
START/SPLITPress to begin timing, continue timing after a pause, or increase or togglea setting item.INDIGLO® BUTTONPress to light the watch, activate/de-activate the Night-Mode® feature.MODEPress to move to the next mode, digit, or setting option or group.STOP/RESET/SETPress to start or complete the setting process, pause or stop the intervaltimer, or clear and save data.HEART RATEPress to switch display views or decrease or toggle a setting item.
24
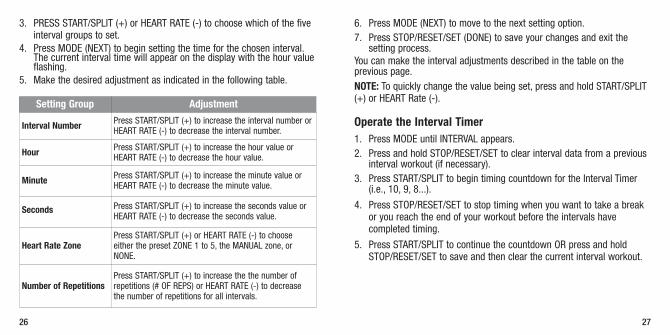
3. PRESS START/SPLIT (+) or HEART RATE (-) to choose which of the fiveinterval groups to set.
4. Press MODE (NEXT) to begin setting the time for the chosen interval.The current interval time will appear on the display with the hour valueflashing.
5. Make the desired adjustment as indicated in the following table.
27
6. Press MODE (NEXT) to move to the next setting option.7. Press STOP/RESET/SET (DONE) to save your changes and exit the
setting process.You can make the interval adjustments described in the table on theprevious page.NOTE: To quickly change the value being set, press and hold START/SPLIT(+) or HEART Rate (-).
Operate the Interval Timer1. Press MODE until INTERVAL appears.2. Press and hold STOP/RESET/SET to clear interval data from a previous
interval workout (if necessary).3. Press START/SPLIT to begin timing countdown for the Interval Timer
(i.e., 10, 9, 8...).
4. Press STOP/RESET/SET to stop timing when you want to take a breakor you reach the end of your workout before the intervals havecompleted timing.
5. Press START/SPLIT to continue the countdown OR press and holdSTOP/RESET/SET to save and then clear the current interval workout.
Setting Group Adjustment
Interval Number Press START/SPLIT (+) to increase the interval number orHEART RATE (-) to decrease the interval number.
Hour Press START/SPLIT (+) to increase the hour value orHEART RATE (-) to decrease the hour value.
Minute Press START/SPLIT (+) to increase the minute value orHEART RATE (-) to decrease the minute value.
Seconds Press START/SPLIT (+) to increase the seconds value orHEART RATE (-) to decrease the seconds value.
Heart Rate ZonePress START/SPLIT (+) or HEART RATE (-) to chooseeither the preset ZONE 1 to 5, the MANUAL zone, orNONE.
Number of RepetitionsPress START/SPLIT (+) to increase the the number ofrepetitions (# OF REPS) or HEART RATE (-) to decreasethe number of repetitions for all intervals.
26
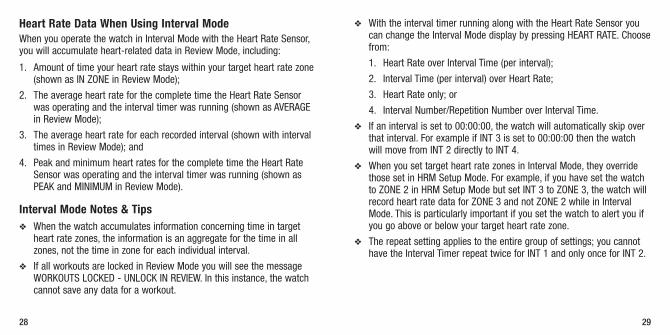
With the interval timer running along with the Heart Rate Sensor youcan change the Interval Mode display by pressing HEART RATE. Choosefrom:
1. Heart Rate over Interval Time (per interval);
2. Interval Time (per interval) over Heart Rate;
3. Heart Rate only; or
4. Interval Number/Repetition Number over Interval Time.
If an interval is set to 00:00:00, the watch will automatically skip overthat interval. For example if INT 3 is set to 00:00:00 then the watchwill move from INT 2 directly to INT 4.
When you set target heart rate zones in Interval Mode, they overridethose set in HRM Setup Mode. For example, if you have set the watchto ZONE 2 in HRM Setup Mode but set INT 3 to ZONE 3, the watch willrecord heart rate data for ZONE 3 and not ZONE 2 while in IntervalMode. This is particularly important if you set the watch to alert you ifyou go above or below your target heart rate zone.
The repeat setting applies to the entire group of settings; you cannothave the Interval Timer repeat twice for INT 1 and only once for INT 2.
2928
Heart Rate Data When Using Interval ModeWhen you operate the watch in Interval Mode with the Heart Rate Sensor,you will accumulate heart-related data in Review Mode, including:
1. Amount of time your heart rate stays within your target heart rate zone(shown as IN ZONE in Review Mode);
2. The average heart rate for the complete time the Heart Rate Sensorwas operating and the interval timer was running (shown as AVERAGEin Review Mode);
3. The average heart rate for each recorded interval (shown with intervaltimes in Review Mode); and
4. Peak and minimum heart rates for the complete time the Heart RateSensor was operating and the interval timer was running (shown asPEAK and MINIMUM in Review Mode).
Interval Mode Notes & Tips When the watch accumulates information concerning time in target
heart rate zones, the information is an aggregate for the time in allzones, not the time in zone for each individual interval.
If all workouts are locked in Review Mode you will see the messageWORKOUTS LOCKED - UNLOCK IN REVIEW. In this instance, the watchcannot save any data for a workout.
31
TimerTimer Mode allows you to set a fixed time from which the watch countsdown to zero (i.e., 10, 9, 8, ...). In addition you can set the watch to repeat,stop or switch to Chrono Mode at the end of the countdown (if thechronograph is off and cleared) and alert you when you are halfwaythrough a timing sequence.
START/SPLIT Press to begin timing, continue timing after a pause, or increase or togglea setting item.INDIGLO® BUTTON Press to light the watch, activate/de-activate the Night-Mode® feature.MODEPress to move to the next mode, digit, setting option, or group.STOP/RESET/SETPress to start or complete the setting process, pause or stop the timer, orclear data.HEART RATEPress to switch display views or decrease or toggle a setting item.NOTE: You can press any button in Timer Mode to silence the alert thatsounds when the timer reaches zero.
30
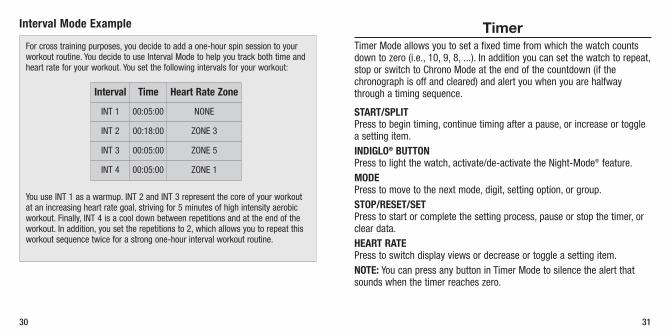
Interval Mode Example
For cross training purposes, you decide to add a one-hour spin session to yourworkout routine. You decide to use Interval Mode to help you track both time andheart rate for your workout. You set the following intervals for your workout:
You use INT 1 as a warmup. INT 2 and INT 3 represent the core of your workoutat an increasing heart rate goal, striving for 5 minutes of high intensity aerobicworkout. Finally, INT 4 is a cool down between repetitions and at the end of theworkout. In addition, you set the repetitions to 2, which allows you to repeat thisworkout sequence twice for a strong one-hour interval workout routine.
Interval Time Heart Rate Zone
INT 1 00:05:00 NONE
INT 2 00:18:00 ZONE 3
INT 3 00:05:00 ZONE 5
INT 4 00:05:00 ZONE 1
33
of the timer (if necessary). You cannot start another countdown withoutresetting the timer.
2. Press START/SPLIT to start the timer countdown. The hourglass icon Hwill appear on the display.
3. Pause the countdown by pressing STOP/RESET/SET.
4. Resume the countdown by pressing START/SPLIT again or reset thetimer by pressing and holding STOP/RESET/SET again until the wordsHOLD TO RESET briefly appear on the display followed by the originalcountdown time.
5. When the timer reaches the halfway point (if HALFWAY ALERT is set) abrief chime will sound.
6. When the timer reaches zero, an alert will sound. Press any button tosilence the alert.
7. The timer will stop after the alert if set to STOP; or
The timer will begin another countdown if set to REPEAT and continueuntil you press STOP/RESET/SET. The display will show REP and anumber (for example, REP 2). REP indicates the timer is repeating andthe number indicates how many times the timer has cycled throughthe repeat countdown. You will also see the repeating hourglass icon I, indicating the timer is set to repeat.; orThe timer will switch to Chrono Mode if the chronograph is off andcleared. You will see the stopwatch icon W indicating the timer will
32
Set the Timer1. Press MODE until TIMER appears.
2. Press STOP/RESET/SET until TIMER SET then SET briefly appear on thedisplay followed by the timer with the hours value flashing.
3. Press START/SPLIT (+) to increase or toggle the values or HEART RATE(-) to decrease or toggle the value. This applies for hours, minutes,seconds, end action, and halfway alert.
NOTE: The end action setting allows you to choose how the timeroperates at the completion of a timing countdown. Options includeSTOP, REPEAT, or CHRONO. If you choose CHRONO, the watchautomatically switches to Chrono Mode at the end of the countdown (if the chronograph is off and reset to zero) and begins operating thechronograph.
NOTE: To quickly change the value being set, press and holdSTART/SPLIT (+) or HEART Rate (-).
4. Press MODE (NEXT) to move to the next value for hours, minutes,seconds, end action, and halfway alert.
5. Press STOP/RESET/SET (DONE) to save your changes and exit thesetting process.
Operate the Timer1. Press and hold STOP/RESET/SET to clear data from any previous use
Recovery
About Recovery Heart RateHeart rate recovery provides an indicator of fitness and training level. Asyou become more fit, your heart rate should return more quickly to a lowerheart rate value at the end of your workout, indicating a higher level ofcardiovascular fitness. Your recovery rate represents the change in your heart rate over a period oftime. You can set your Heart Rate Monitor to record the change in your heartrate for a 30-second or a 1-, 2-, 5-, or 10-minute period, or the recoverytimer can be set to OFF.
START/SPLITPress to start or restart the recovery timer.INDIGLO® BUTTONPress to light the watch, activate/de-activate the Night-Mode® feature.MODEPress to move to the next mode.STOP/RESET/SETPress to choose from a 30-second, a 1-, 2-, 5- or 10-minute, or norecovery time, or to stop or reset the recovery timer.
35
A smaller recovery result might indicate a need to take a break from training due tofatigue, illness, or other factors.
switch modes at the end of the countdown and the hourglass icon Hindicating the timer is operating.
Timer Mode Notes & Tips You can press MODE within Timer Mode to switch the display to
another mode without disrupting the operation of the timer. Thehourglass H will continue to display to indicate the timer is operating.
When you use the halfway alert the watch will beep when you havereached the halfway point of the set countdown time.
With the timer running along with the Heart Rate Sensor, you canchange the Timer Mode display by pressing HEART RATE. Choose from:
1. Heart Rate Over Countdown Time;
2. Countdown Time Over Heart Rate;
3. Heart Rate only; or
4. Timer Setting (or Rep # if set to REPEAT) over Countdown Time.
Timer Mode Example
34
As part of your overall health plan, you decide to take a 30-minute walk duringyour lunch hour two times a week. To help keep track of time so you do not returnlate from your lunch hour, you set the timer to 15 minutes and then set the endaction to CHRONO. After 15 minutes the watch beeps telling you to begin walkingback to your office. The watch moves to Chrono Mode and begins timing. Thishelps you determine how much time it takes to return to your office.
37
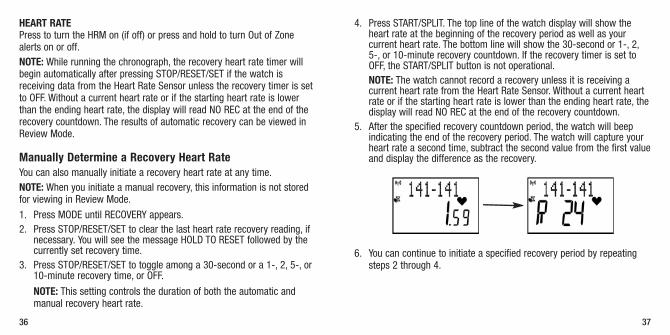
4. Press START/SPLIT. The top line of the watch display will show theheart rate at the beginning of the recovery period as well as yourcurrent heart rate. The bottom line will show the 30-second or 1-, 2,5-, or 10-minute recovery countdown. If the recovery timer is set toOFF, the START/SPLIT button is not operational.NOTE: The watch cannot record a recovery unless it is receiving acurrent heart rate from the Heart Rate Sensor. Without a current heartrate or if the starting heart rate is lower than the ending heart rate, thedisplay will read NO REC at the end of the recovery countdown.
5. After the specified recovery countdown period, the watch will beepindicating the end of the recovery period. The watch will capture yourheart rate a second time, subtract the second value from the first valueand display the difference as the recovery.
6. You can continue to initiate a specified recovery period by repeatingsteps 2 through 4.
HEART RATEPress to turn the HRM on (if off) or press and hold to turn Out of Zonealerts on or off.NOTE: While running the chronograph, the recovery heart rate timer willbegin automatically after pressing STOP/RESET/SET if the watch isreceiving data from the Heart Rate Sensor unless the recovery timer is setto OFF. Without a current heart rate or if the starting heart rate is lowerthan the ending heart rate, the display will read NO REC at the end of therecovery countdown. The results of automatic recovery can be viewed inReview Mode.
Manually Determine a Recovery Heart RateYou can also manually initiate a recovery heart rate at any time.NOTE: When you initiate a manual recovery, this information is not storedfor viewing in Review Mode.
1. Press MODE until RECOVERY appears.2. Press STOP/RESET/SET to clear the last heart rate recovery reading, if
necessary. You will see the message HOLD TO RESET followed by thecurrently set recovery time.
3. Press STOP/RESET/SET to toggle among a 30-second or a 1-, 2, 5-, or10-minute recovery time, or OFF.
NOTE: This setting controls the duration of both the automatic andmanual recovery heart rate.
36
Without the Heart Rate Sensor, you will see total time and Lap orInterval Recall in Review Mode, along with your last recorded recoveryheart rate.
If no interval has completed its countdown the watch will display NOINTS DONE. This will only occur while the interval timer is running andbefore the watch has finished timing a full interval cycle.
If you did not record separate laps during a chronograph workout, thewatch will display NO LAPS STORED when you get to the lap recallsegment of Review Mode. This will only occur when the chronograph isrunning and the watch has not finished timing during the first lap of aworkout.
Review Workout Data
1. Press MODE until REVIEW appears.
2. Press START/SPLIT to scroll through stored workouts. Stored workoutsare labeled by the date and time of the workout.
NOTE: Workouts recorded in Chrono Mode are marked with thestopwatch icon W and workouts recorded in Interval Mode are markedwith the hourglass icon H.
39
If the Chrono or Interval Timer are running when you enter Review Mode you canonly see current workout information. You cannot review any stored workouts untilthe Chrono and Interval Timer are stopped and reset.
38
ReviewReview Mode allows you to recall overall information recorded in Chronoand Interval Modes for stored workouts. You can review your last 10 storedworkouts. You can also lock a workout to ensure the workout does not getdropped out of the review queue once you go beyond 10 workouts.START/SPLITPress to select a workout for review or scroll through workout data for aselected workout.INDIGLO® BUTTON Press to light the watch, activate/de-activate the Night-Mode® feature.MODEPress to move to the next mode.STOP/RESET/SETPress to initiate the review for a selected workout.HEART RATEPress to lock or unlock a workout or scroll through workout data for aselected workout
About Review Mode Review Mode collects and stores the data gathered while the
chronograph or interval timer were running. You can use this mode toview important measures of your progress during your workouts.

Peak Heart Rate: The highest recorded heart rate during a workout.
Minimum Heart Rate: The lowest recorded heart rate during aworkout.
Total Calories: The number of calories burned during a workout. Thisnumber is dependent on the weight you entered when you set yourHeart Rate Monitor, your heart rate during a workout, and the time youspent in the workout.
Average Lap: The average time for all laps recorded in a workout.
Best Lap: The shortest lap recorded during a workout.
Lap or Interval Recall: The amount of time and average heart rate foreach segment of your workout. Chrono workouts include lap data andInterval workouts include interval data. If the Interval workout is set toRepeat, the watch will also display the interval repeat number.
Recovery Heart Rate: The result of the most recent automaticrecovery heart rate calculation when running the chronograph orinterval timer. Manual recovery calculations are not stored.
41
3. Press HEART RATE to lock or unlock a workout. When you lock aworkout, the lock icon l will appear next to the workout. This workoutwill not be automatically deleted as new ones come in.
4. Press STOP/RESET/SET to access review data for a selected workout.
5. Press START/SPLIT or HEART RATE to scroll through workout data.
6. Press STOP/RESET/SET to return to the main Review menu to chooseanother workout to review.
Review Mode DataReview Mode includes data stored for workouts recorded in Chrono orInterval Timer Mode as indicated in the following list. NOTE: If the Heart Rate Monitor is not used the only data you will see istotal time and lap or interval data.
Total Time: The amount of time the chronograph or interval timer wasrunning during your workout in Chrono or Interval Timer Modes.
Time in Zone: The amount of time during a workout when your heartrate is between the lower and upper target zone limits you set. For aninterval workout you may set each interval to a different target zone,so Review Mode will show the sum of the time in zone for the variouszones for each interval.
Average Heart Rate: The average heart rate achieved during aworkout.
40
To pair your watch to your chest strap, use the following procedure:
1. Remove the chest strap from your body, and let it sit for at least fiveminutes to ensure it is completely shut down.
2. Find a location far away from any other Heart Rate Monitor cheststraps that may be transmitting.
3. On the watch, repeatedly press the MODE button until HRM Setupappears in the top line of the display.
4. Press and hold the HEART RATE button. The message HOLD TO PAIRshould appear for about two seconds, followed by the instructionsWEAR STRAP, then PRESS MODE TO PAIR WATCH WITH STRAP.
5. Press the MODE button. A message saying WAIT FOR BEEP shouldappear. The watch is now searching for a chest strap with which topair.
6. Now pick up your chest strap and hold it firmly with your thumbstouching the sensor pads that normally contact your chest. Rub yourthumbs back and forth across the sensor pads a few times. Thiscontact should be enough to start the strap transmitting.
7. If the pairing operation completes successfully, PAIRING DONE willappear on the display and a confirmation tone will sound. If for some
43
To properly pair the watch with the Heart Rate Sensor, you must go directly to HRMSetup Mode without stopping at any other mode first.
HRM SetupHRM Setup Mode allows you to select and set key pieces of personal datathat will be tracked by your Heart Rate Monitor. You can also pair thewatch to your Heart Rate Sensor.START/SPLITPress to select a target heart rate zone or increase or toggle a settingitem.INDIGLO® BUTTONPress to light the watch, activate/de-activate the Night-Mode® feature.MODEPress to move to the next mode, digit, or setting group.STOP/RESET/SETPress to start or complete the setting process.HEART RATEPress to initiate the pairing process or decrease or toggle the setting item.
Device PairingPairing is required to ensure that your watch does not receive datatransmitted by someone else’s chest strap. Note: Pairing should be performed before your very first use, and after abattery change for either the Heart Rate Sensor or the watch. It does notneed to be performed before each workout.
42
45
3. Press START/SPLIT to cycle through the target heart rate zones(labeled ZONE 1 to ZONE 5 or custom ZONE C1 to Zone C5).
4. For preset heart rate zones, press MODE to save your selected targetheart rate zone and exit HRM Setup Mode. For the custom heart ratezone, you will need to take some additional steps described in the nextsection.
When you leave HRM Setup Mode, the watch will use the target heart ratezone you have selected as the basis for all HRM-based calculations. Thisdoes not apply to workouts already saved before selecting a target heartrate zone.
Custom Target Heart Rate ZoneThe custom target heart rate zone allows you to customize your lower andupper target heart rate zone limits. You might use a custom target heartrate zone when the 10% ranges in the preset heart rate zones is either toolarge or too small a range for your exercise goals.NOTE: The difference between the lower and upper limits for the manualheart rate range must be at least five beats per minute.To set the manual target heart rate zone:
1. Press MODE until HRM Setup Mode appears.
2. Press START/SPLIT until one of the custom zones appears — ZONE C1to ZONE C5.
reason the pairing fails, repeat the above steps immediately beginningwith step 4.
Selecting a Target Heart Rate ZoneYou can choose one of the preset target heart rate zones or set the manualtarget heart rate zone for a more customized target heart rate zone. Thepreset heart rate zones described in the table below correspond to yourmaximum heart rate (MHR) value.
To choose a target heart rate zone:
1. Determine the zone you want to use by reviewing the table above.
2. Press MODE until HRM Setup Mode appears.
44
Zone % Goal Benefit
1 50% to 60% Light exercise Maintain a healthy heart andget fit
2 60% to 70% Weight management Lose weight and burn fat
3 70% to 80% Aerobic base building Increase stamina and aerobicendurance
4 80% to 90% Optimal conditioning Sustain excellent fitnesscondition
5 90% to 100% Elite athletic training Achieve superb athleticcondition
47
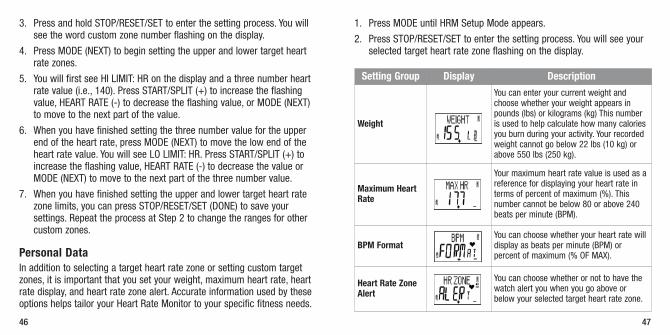
1. Press MODE until HRM Setup Mode appears.
2. Press STOP/RESET/SET to enter the setting process. You will see yourselected target heart rate zone flashing on the display.
3. Press and hold STOP/RESET/SET to enter the setting process. You willsee the word custom zone number flashing on the display.
4. Press MODE (NEXT) to begin setting the upper and lower target heartrate zones.
5. You will first see HI LIMIT: HR on the display and a three number heartrate value (i.e., 140). Press START/SPLIT (+) to increase the flashingvalue, HEART RATE (-) to decrease the flashing value, or MODE (NEXT)to move to the next part of the value.
6. When you have finished setting the three number value for the upperend of the heart rate, press MODE (NEXT) to move the low end of theheart rate value. You will see LO LIMIT: HR. Press START/SPLIT (+) toincrease the flashing value, HEART RATE (-) to decrease the value orMODE (NEXT) to move to the next part of the three number value.
7. When you have finished setting the upper and lower target heart ratezone limits, you can press STOP/RESET/SET (DONE) to save yoursettings. Repeat the process at Step 2 to change the ranges for othercustom zones.
Personal DataIn addition to selecting a target heart rate zone or setting custom targetzones, it is important that you set your weight, maximum heart rate, heartrate display, and heart rate zone alert. Accurate information used by theseoptions helps tailor your Heart Rate Monitor to your specific fitness needs.
46
Setting Group Display Description
Weight
You can enter your current weight andchoose whether your weight appears inpounds (lbs) or kilograms (kg) This numberis used to help calculate how many caloriesyou burn during your activity. Your recordedweight cannot go below 22 lbs (10 kg) orabove 550 lbs (250 kg).
Maximum HeartRate
Your maximum heart rate value is used as areference for displaying your heart rate interms of percent of maximum (%). Thisnumber cannot be below 80 or above 240beats per minute (BPM).
BPM FormatYou can choose whether your heart rate willdisplay as beats per minute (BPM) orpercent of maximum (% OF MAX).
Heart Rate ZoneAlert
You can choose whether or not to have thewatch alert you when you go above orbelow your selected target heart rate zone.
Alarm 1, 2, or 3You can use your watch as an alarm clock for up to three separate alarms,accessed as separate modes. You can set an alarm to sound at the sametime every day, or only weekdays, weekends, or even only one day aweek.START/SPLITPress to increase or toggle the setting value or turn an alarm ON or OFF.INDIGLO® BUTTONPress to light the watch, activate/de-activate the Night-Mode® feature.MODEPress to move to the next mode, digit, or setting group STOP/RESET/SETPress to start or complete the setting process.HEART RATEPress to decrease or toggle the setting value.When the watch reaches the scheduled time, the alarm tone sounds andthe INDIGLO® night-light flashes for a period of 20 seconds. To help youidentify which alarm has sounded, each alarm has a unique melody.
Set the Alarm1. Press MODE until Alarm Mode 1, 2, or 3 appears.
2. Press STOP/RESET/SET until ALARM SET and then SET briefly appearon the display followed by time with the hour value flashing.
4948
3. Press MODE (NEXT) to begin setting your personal data and settings.
4. Make the desired adjustment by pressing START/SPLIT (+) or HEARTRATE (-). In some setting groups pressing START/SPLIT (+) willincrease a value and pressing HEART RATE (-) will decrease a value. Atother times pressing START/SPLIT (+) or HEART RATE (-) will togglebetween two options or cycle through a setting group.
5. Press MODE (NEXT) to move to the next digit or setting group you wantto set.
6. Press STOP/RESET/SET to save your changes and exit the settingprocess.
7. Press MODE to exit HRM Setup.
HRM Setup Notes & Tips At any time during the setting process, you can save your changes and
return to the main heart rate display by pressing STOP/RESET/SET(DONE).
While setting the watch, if you do not press any buttons on the watchfor a period of 2 to 3 minutes, the watch will automatically savewhatever changes you have made and exit the setting process.
If a setting falls either above or below the limits for setting heart rateor weight the watch will automatically correct the setting to matchwatch limits. Auto correction may lead to unpredictable results. Checkyour watch settings.
51
Alarm Mode Notes & Tips To turn an alarm ON or OFF without entering the setting state, press
START/SPLIT while in Alarm Mode.
If you change any alarm settings, you automatically turn the alarm on.
When you set the alarm, the alarm clock icon a appears on the displayin Time of Day Mode.
While the alarm sounds, you can silence it by pressing any button.
The once a week alarm (i.e., MON, TUES, WED...) is especially usefulfor reminding you about appointments.
If you do not silence the alarm before the alert finishes, a backupalarm will sound after 5 minutes.
3. Press START/SPLIT (+) to increase the hour value or HEART RATE (-) todecrease the hour value.
NOTE: To quickly change the value being set, press and holdSTART/SPLIT (+) or HEART Rate (-).
4. Press MODE (NEXT) to move to the minute value.
5. Press START/SPLIT (+) to increase the minute value or HEART RATE (-)to decrease the minute value.
6. Press MODE (NEXT) to move to the AM/PM value (if you have set thewatch to 12-hour format).
7. Press START/SPLIT (+) or HEART RATE (-) to toggle between AM and PM.
8. Press MODE (NEXT) to move to the alarm type value.9. Press START/SPLIT (+) or HEART RATE (-) to move among the alarm
types. Alarm types include:
DAILY will sound every day at a specified time;
WEEKDAYS will sound Monday through Friday at same selected time;
WEEKENDS will sound Saturday and Sunday at the same selectedtime; or
Once a week alarm (i.e., MON, TUES, WED...) will sound on a specifiedday at a specified time.
10. Press STOP/RESET/SET (DONE) to save your changes and exit thesetting process.
50
To Sync the Watch with a Computer1. Make sure the Data Xchanger USB device is plugged into a USB port
on your computer and the Timex® Trainer device agent desktopsoftware is running.
2. Press MODE until Sync Mode appears.
3. You will see the message SYNC READY indicating the watch is ready toinitiate communication with a computer.
4. Press HEART RATE to begin the sync process.
5. The watch will suspend and reset all other watch activity and beginsearching for a computer. You will see the message SEARCHING FORPC.
6. Plug the USB device into a computer and open the device agentsoftware.
7. When the link is established with a computer, the watch will displaythe device message SYNCING WATCH until the sync process is finishedat which time the watch will display the message SYNCING DONE. Thewatch will sound an alert and return to the SYNC READY state.
5352
SyncThis mode allows you to transfer your workout data to Timex® Trainersoftware when used with the optional Timex® Data Xchanger USB device. START/SPLITPress to cancel the search for or sync with a computer once the syncprocess has begun.INDIGLO® BUTTONPress to light the watch, activate/de-activate the Night-Mode® feature.MODEPress to move to the next mode.STOP/RESET/SETPress to cancel the search for or sync with a computer once the syncprocess has begun.HEART RATEPress to enable the receiver and startsearching for a computerNOTE: Once you have initiated the sync process, you can press any buttonto cancel. You will see the message SYNC CANCEL. The watch will beep,the receiver will shut down, and the watch will return to the SYNC READYstate.

55
Care & Maintenance
Watch Battery ReplacementWhen the battery of the watch is running low, the display or INDIGLO®
night-light will dim. This watch uses a CR2032 lithium battery. To avoid the possibility of permanently damaging the watch, TIMEXSTRONGLY RECOMMENDS TAKING YOUR HEART RATE MONITOR WATCH TOA LOCAL RETAILER OR JEWELER TO HAVE THE BATTERY REPLACED.If you do choose to change the battery, makesure to install it with the “+” side facing up.Note: For the Race Trainer™ Pro watch, thebattery compartment is located above theSTART/SPLIT button, under the exposed screwsand the Ironman® M-Dot® logo. The stainlesssteel caseback has tamper-resistant screwsbecause the area behind the display has nocustomer serviceable parts.
Sync Error MessagesIf an error is encountered during the communication process, the watchwill generate an alert and briefly display an error message, beforereturning to the READY state. Following is a list of the error messages andsome suggestions for remedies:
HARDWARE ERROR: This message appears if there is an internal errorwith the watch’s radio transceiver. Contact Timex Customer Service.
SYNC ERROR: This message indicates that a communication error wasencountered. This is usually caused by interference from a wirelessdevice such as a cordless phone, wireless keyboard or mouse, orBluetooth accessory.
LINK TO PC BUSY: This message will appear if the computer is alreadyin communication with another Timex® watch. If this message appearsregularly and you are certain that there are no other Timex watcheswithin 20 feet of your computer, contact Timex Customer Service.
NO PC FOUND: If the watch is unable to establish a link to yourcomputer within 30 seconds, it will display this message. Check tomake sure that the device agent software is running and that theTimex Data Xchanger USB is plugged into a working USB port. You mayalso try removing the Data Xchanger and plugging it in again beforeretrying the sync process.
54
Transmitter Battery LifeBattery life of the transmitter should exceed two years, based upon usingit an hour a day. Greater usage will shorten the battery life. Replacetransmitter battery when any of the following occur:
• The watch no longer receives heart rate information from the chesttransmitter when properly worn on the chest.
• Error messages (COMM ERR, SIGNAL LOST) appear with increasedfrequency on the display.
Transmitter Battery ReplacementNOTE: You’ll need to have a device (such as a watch) capable of displayingheart rate information to verify that the new battery has been insertedcorrectly. Use a coin to open the battery compartment cover (back ofsensor).
• Insert new battery (CR2032 or equivalent) with “+” facing you.
• Push the reset button next to the battery by using a toothpick orstraightened paper clip.
• Reinstall battery cover.
• Perform quick test of the unit:
1. Move away from sources of electrical or radio interference.
2. Liberally moisten the Heart Rate Sensor pads and put the chest straparound your chest, securely against your skin.
57
INDIGLO® night-lightPress the INDIGLO® button to activate the night-light. Thiselectroluminescent technology illuminates the watch display at night andin low light conditions.
Water Resistance Your 100 Meter Water Resistant watch withstands water pressure to
140 p.s.i.a. (equals immersion to 328 feet below sea level).
The watch is only water-resistant as long as the lens, pushbuttons, andcase remain intact.
Timex recommends rinsing your wrist monitor with fresh water afterexposure to salt water.
WARNING: TO MAINTAIN WATER-RESISTANCE, DO NOT PRESS ANYBUTTONS UNDER WATER.
Heart Rate Sensor and Strap MaintenanceRinse Heart Rate Sensor and strap in fresh water to avoid build up ofmaterials that can interfere with the measurement of your heart rate.The FLEX TECH™ strap can be machine washed in cold water with thetransmitter removed. Hang it to dry away from direct heat or sunlight. Drythe metal contacts on the transmitter and the strap to prevent corrosion.
56
Please note that Timex may, at its option, repair your Heart Rate Monitorby installing new or thoroughly reconditioned and inspected componentsor replace it with an identical or similar model. IMPORTANT: PLEASE NOTE THAT THIS WARRANTY DOES NOT COVERDEFECTS OR DAMAGES TO YOUR HEART RATE MONITOR:
1. after the warranty period expires;
2. if the Heart Rate Monitor was not originally purchased from anauthorized Timex retailer;
3. from repair services not performed by Timex;
4. from accidents, tampering or abuse; and
5. lens or crystal, strap or band, Heart Rate Monitor case, attachments orbattery. Timex may charge you for replacing any of these parts.
THIS WARRANTY AND THE REMEDIES CONTAINED HEREIN ARE EXCLUSIVEAND IN LIEU OF ALL OTHER WARRANTIES, EXPRESS OR IMPLIED,INCLUDING ANY IMPLIED WARRANTY OF MERCHANTABILITY OR FITNESSFOR PARTICULAR PURPOSE.TIMEX IS NOT LIABLE FOR ANY SPECIAL, INCIDENTAL OR CONSEQUENTIALDAMAGES. Some countries and states do not allow limitations on impliedwarranties and do not allow exclusions or limitations on damages, sothese limitations may not apply to you. This warranty gives you specificlegal rights and you may also have other rights which vary from country tocountry and state to state.
59
3. Activate the heart rate monitor function on the watch.
4. Within a few seconds, the heart symbol on the watch display shouldbegin flashing, indicating that the sensor is active. This confirms thatthe battery was installed correctly. NOTE: A heart rate value does notneed to appear on the display during this test.
IF FLASHING HEART DOES NOT APPEAR ON WATCH:
• Press the reset switch in the battery compartment again and replacethe battery cover.
• Reinstall the battery, and repeat test procedure above.
Water ResistanceThe Heart Rate Sensor withstands water pressure to 30M or 60 p.s.i.a.WARNING: The Heart Rate Sensor will not display heart rate whenoperated under water.
Warranty & Service
Timex International Warranty (U.S. Limited Warranty)Your Timex® Heart Rate Monitor is warranted against manufacturingdefects by Timex for a period of ONE YEAR from the original purchasedate. Timex Group USA, Inc. and its worldwide affiliates will honor thisInternational Warranty.
58
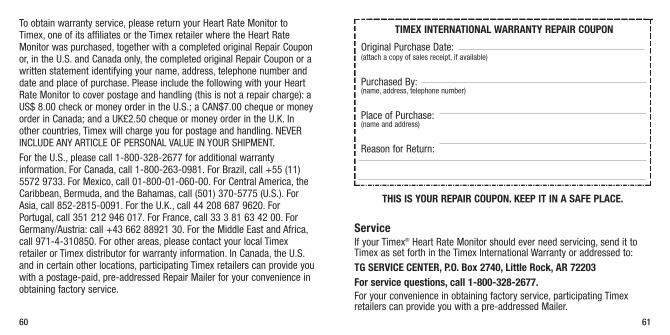
THIS IS YOUR REPAIR COUPON. KEEP IT IN A SAFE PLACE.
ServiceIf your Timex® Heart Rate Monitor should ever need servicing, send it toTimex as set forth in the Timex International Warranty or addressed to:TG SERVICE CENTER, P.O. Box 2740, Little Rock, AR 72203 For service questions, call 1-800-328-2677. For your convenience in obtaining factory service, participating Timexretailers can provide you with a pre-addressed Mailer.
61
TIMEX INTERNATIONAL WARRANTY REPAIR COUPON
Original Purchase Date: (attach a copy of sales receipt, if available)
Purchased By:(name, address, telephone number)
Place of Purchase:(name and address)
Reason for Return:
60
To obtain warranty service, please return your Heart Rate Monitor toTimex, one of its affiliates or the Timex retailer where the Heart RateMonitor was purchased, together with a completed original Repair Couponor, in the U.S. and Canada only, the completed original Repair Coupon or awritten statement identifying your name, address, telephone number anddate and place of purchase. Please include the following with your HeartRate Monitor to cover postage and handling (this is not a repair charge): aUS$ 8.00 check or money order in the U.S.; a CAN$7.00 cheque or moneyorder in Canada; and a UK£2.50 cheque or money order in the U.K. Inother countries, Timex will charge you for postage and handling. NEVERINCLUDE ANY ARTICLE OF PERSONAL VALUE IN YOUR SHIPMENT.For the U.S., please call 1-800-328-2677 for additional warrantyinformation. For Canada, call 1-800-263-0981. For Brazil, call +55 (11)5572 9733. For Mexico, call 01-800-01-060-00. For Central America, theCaribbean, Bermuda, and the Bahamas, call (501) 370-5775 (U.S.). ForAsia, call 852-2815-0091. For the U.K., call 44 208 687 9620. ForPortugal, call 351 212 946 017. For France, call 33 3 81 63 42 00. ForGermany/Austria: call +43 662 88921 30. For the Middle East and Africa,call 971-4-310850. For other areas, please contact your local Timexretailer or Timex distributor for warranty information. In Canada, the U.S.and in certain other locations, participating Timex retailers can provide youwith a postage-paid, pre-addressed Repair Mailer for your convenience inobtaining factory service.
— Reorient or relocate the receiving antenna.— Increase the separation between the equipment and receiver.— Connect the equipment into an outlet on a circuit different from that to
which the receiver is connected.— Consult the dealer or an experienced radio TV technician for help.This Class [B] digital apparatus complies with Canadian ICES-003. Cetappareil numérique de la classe [B] est conforme à la norme NMB-003du Canada
63
See the Timex International Warranty for specific instructions on the careand service of your Timex® Heart Rate Monitor.Should you need a replacement strap or band, call 1-800-328-2677.
FCC Notice (U.S.) / IC Notice (Canada):This device complies with Part 15 of the FCC Rules. Operation is subject tothe following two conditions: (1) this device may not cause harmfulinterference, and (2) this device must accept any interference received,including interference that may cause undesired operation.Warning: Changes or modifications to this unit not expressly approved bythe party responsible for compliance could void the user's authority tooperate the equipment.NOTE: This equipment has been tested and found to comply with the limitsfor a Class B digital device, pursuant to Part 15 of the FCC Rules. Theselimits are designed to provide reasonable protection against harmfulinterference in a residential installation. This equipment generates, uses,and can radiate radio frequency energy and, if not installed and used inaccordance with the instructions, may cause harmful interference to radiocommunications. However, there is no guarantee that interference will notoccur in a particular installation. If this equipment does cause harmfulinterference to radio or television reception, which can be determined byturning the equipment off and on, the user is encouraged to try to correctthe interference by one or more of the following measures:
62

Supplemental Information: The product herewith complies with the requirements of theRadio & Telecommunications Terminal Equipment Directive 1999/05/EC, the Low VoltageDirective 2006/95/EC, and carries the CE marking accordingly.
Agent:
Roger H. HuntQuality Regulatory EngineerDate: 24 September, 2010, Middlebury, Connecticut, U.S.A.
Declaration of Conformity
Manufacturers Name: Timex Group USA, Inc.Manufacturers Address: 555 Christian Road
Middlebury, CT 06762United States of America
declares that the product:
Product Name: Timex® Ironman® Race Trainer™ Digital Heart Rate Monitor
Model Numbers: M175, M501, M502, M503, M536, M843, M844
conforms to the following specifications:
R&TTE: 1999/05/EC
ETSI EN 300 330-1 V1.3.1 (M843, M844)ETSI EN 300-330-2 V1.1.1 (M843, M844)ETSI EN 300 440-1 V1.3.1:2001 (M501, M536, M843, M844)ETSI EN 300 440-2 V1.1.2:2004 (M501, M536, M843, M844)ETSI EN 300 440-1 V1.4.1:2008 (M175, M502, M503)ETSI EN 300 440-2 V1.2.1:2008 (M175, M502, M503)ETSI EN 301 489-1 V1.6.1:2005 (M501)ETSI EN 301 489-1 V1.8.1: 2008 (M175, M503, M536ETSI EN 301 489-3 V1.4.1: 2002 (M175, M501, M502, M503, M536)
LVD: 2006/95/EC
Standards: CENELEC EN 60950-1
6564