What is Filmmaking | 5 Stages of Filmmaking | Who is a Filmmaker? | SimplyInfo.net

Digital Filmmaking Secrets!
The success of The Blair Witch Project shows that video is indeed a viable medium for feature films. The amazing thing about this movie is that it was shot on Hi-8 (a low level video format), rather than state-of-the-art digital video (DV). The camera had one color chip instead of the three found in professional equipment. In addition, the filmmakers used only a simple camera mounted light. They pushed the envelope with this approach, yet it takes audiences only a few minutes to adjust to the movie's grainy look and minimalist shooting style. As you probably know, it went on to make cinema history by earning over two hundred million dollars!
Complete DV "Studio" - Under $4000
Today, state-of-the-art digital equipment is capable of stunning quality. The typical audience often doesn't know whether they are watching DV or film, and there are several interesting production strategies that capitalize on this. Some filmmakers originate on DV and transfer to 35mm film for theatrical release, while others shoot on 16mm film, transfer to DV for editing, then transfer to 35mm for release (no match-back to the 16mm negative).
Inexpensive broadcast quality equipment has democratized both production and distribution, but interestingly, it has opened the floodgates for substandard movies. The Independent Feature Project (IFP) reports that entries are at an all time high, with 50% of last year's entries originating on digital media; HOWEVER, quality has fallen dramatically. Why this sudden drop in quality? Why can one movie become a Blair Witch and another fall by the wayside? The answer to these questions is what this website is all about...
SCREENWRITING The screenplay tells a story using character and action. The most common pitfall in writing a screenplay is making it one-dimensional. Stories that concentrate too much on action tend to be shallow, while those that concentrate too much on character tend to be dull. The best stories avoid this by developing clearly defined action and realistic, complex characters. Both of these ingredients are essential to a screenplay's entertainment and thematic value.
To achieve this balance, the main character, or protagonist, must be involved in two story lines. One story line deals with his/her outer motivation, and the other deals with his/her inner motivation. The inner and outer stories are fleshed out through conflict and theme. Let's take a closer look at these elements:
Outer Motivation
The outer motivation is about the protagonist's outward goal or desire. This goal must be tangible and manifests itself in physical action. The action need not be high energy, but it must be clear to the audience. The outer motivation is resolved when the protagonist succeeds or fails at achieving his goal. In Rocky, the outer motivation is Rocky's desire to win the championship fight.
The outer motivation is about physical action, so it provides most of the script's entertainment value. It moves the story forward by keeping the audience interested in the outcome. Without a strong outer motivation there is little momentum and it results in a boring script.
The outer story is about: a tangible goal action entertainment
Inner Motivation
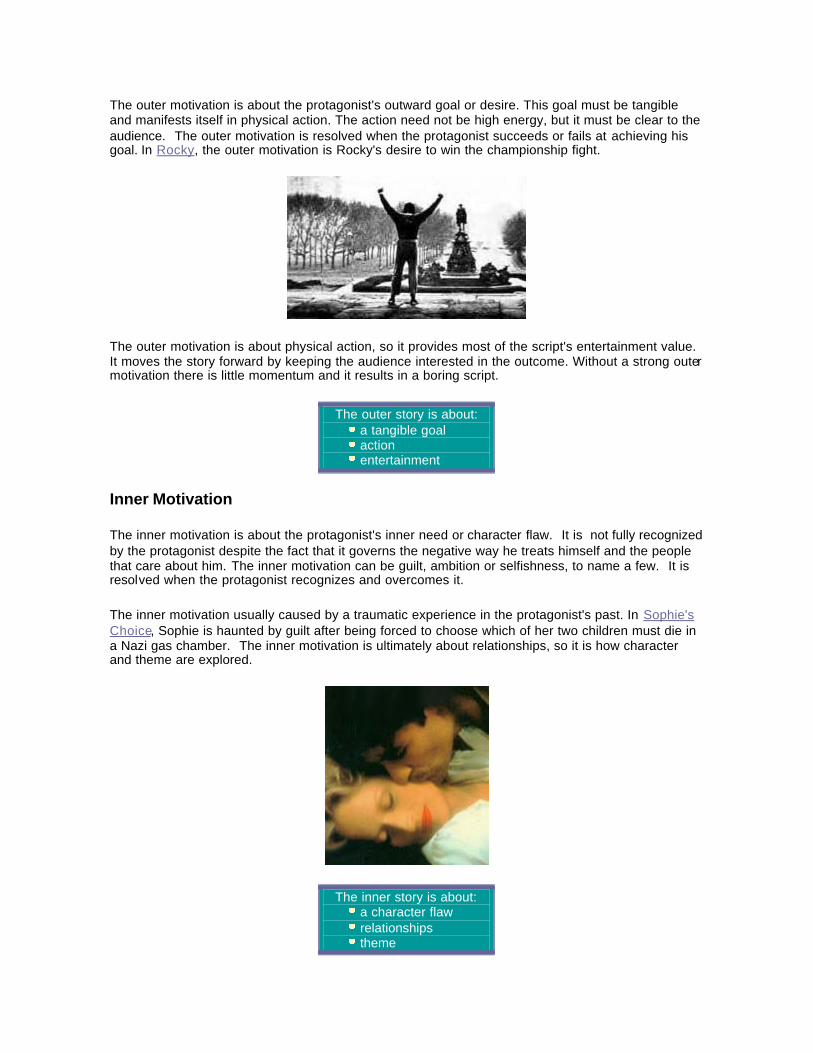
The inner motivation is about the protagonist's inner need or character flaw. It is not fully recognized by the protagonist despite the fact that it governs the negative way he treats himself and the people that care about him. The inner motivation can be guilt, ambition or selfishness, to name a few. It is resolved when the protagonist recognizes and overcomes it.
The inner motivation usually caused by a traumatic experience in the protagonist's past. In Sophie's Choice, Sophie is haunted by guilt after being forced to choose which of her two children must die in a Nazi gas chamber. The inner motivation is ultimately about relationships, so it is how character and theme are explored.
The inner story is about: a character flaw relationships theme
Inner vs. Outer Motivation - The inner motivation gives depth to the story because it explores character and theme. It is, however, slow moving and depends heavily upon the outer motivation to hook the audience with exciting action. For this reason, the outer motivation is called the spine of the script.
Conflict
Conflict is opposition between characters. When faced with conflict, the protagonist is forced to take action. As the story progresses, each new conflict must become seemingly more insurmountable and provocative than the last. Ultimately, the protagonist must develop a plan of action to succeed.
Both the inner and outer stories must contain conflict. The outer story involves conflict with an opponent who prevents the protagonist from achieving his goal. The inner story involves conflict with an ally, such as a love interest or friend, who is trying to help the protagonist. The inner story deals with personal struggle so it gives the protagonist depth and realism.
Conflict can be in the form of a dispute, challenge, deficiency, decision, threat or an obstacle. It creates tension in the audience and curiosity about the outcome. This makes for a quick moving, interesting story. Conflict, therefore, is the single most effective story element for keeping the audience involved. It is the essence of drama!
Conflict: is the opposition of characters drives the story forward keeps the audience interested
Theme
Theme is an idea presented in a story, usually about the meaning of life or the human condition. By its nature, theme embodies the writer's opinions about the issues dealt with in the screenplay. All great movies explore one or more themes.
Theme is developed through the inner story line, which deals with character growth and interpersonal relationships. In a properly structured story, action converges as the protagonist encounters increasing conflict. At the same time, theme expands as values of the protagonist are revealed and tested.
If theme is too obvious it will dominate the story and seem pretentious. It must, therefore, be implicit in the action. Any use of symbols, metaphors and motifs must be woven subtly into the fabric of the story. The least effective way to convey theme is through direct dialogue.
Theme: is a statement about life is developed though the inner story must be implicit in the action

DIRECTING Shots are the smallest unit of dramatic action in the movie and serve as building blocks for scenes . Each shot must have a purpose in the scene, otherwise it should not be used. Once the shot's purpose is achieved, it's time to cut to the next shot. Shots are designed by the director, whose chief concerns are subject size, angle, perspective and movement:
Subject Size
Subject size is the size of the subject as it appears in the frame. The most common sizes are the wide shot, medium shot and close shot. At the far ends of the spectrum are the extreme wide shot and extreme close shot. The main function of subject size is to convey story information by orienting the audience and emphasizing (or de-emphasizing) the subject.
Subject size helps to: orient the audience emphasize the subject
Wide Shot - The wide shot is primarily used to establish location and is often referred to as an establishing shot. Since objects appear small in the frame, the wide shot can be used for de-emphasis and is ideal for conveying a character's isolation. The following shot from Vertigo accomplishes both of these goals:
Close Shot - The close shot is the exact opposite of the wide shot in that the subject is very large in the frame. Consequently, it is used for emphasis. When the subject is an actor, anything closer than mid-chest is considered a close shot, or close-up. Here, the actor's head dominates the composition.
Medium Shot - As the name indicates, the medium shot falls between the close shot and wide shot. When the subject is an actor, the upper body dominates the frame, usually the from the thighs up. Films are primarily constructed of medium shots, with wide shots and close shots used for orientation and emphasis, respectively.
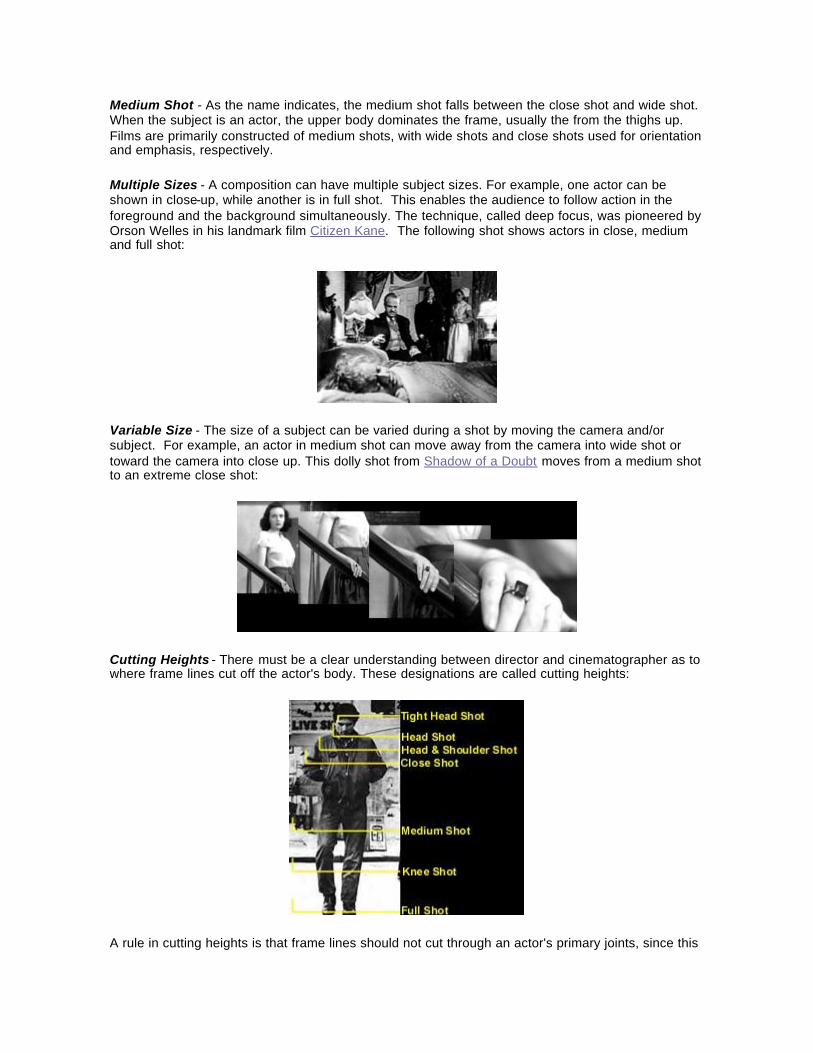
Multiple Sizes - A composition can have multiple subject sizes. For example, one actor can be shown in close-up, while another is in full shot. This enables the audience to follow action in the foreground and the background simultaneously. The technique, called deep focus, was pioneered by Orson Welles in his landmark film Citizen Kane. The following shot shows actors in close, medium and full shot:
Variable Size - The size of a subject can be varied during a shot by moving the camera and/or subject. For example, an actor in medium shot can move away from the camera into wide shot or toward the camera into close up. This dolly shot from Shadow of a Doubt moves from a medium shot to an extreme close shot:
Cutting Heights - There must be a clear understanding between director and cinematographer as to where frame lines cut off the actor's body. These designations are called cutting heights:
A rule in cutting heights is that frame lines should not cut through an actor's primary joints, since this

has a strange look on screen. Primary joints include the neck, waist, knees and ankles.
Angle
Angle is the horizontal and vertical position of the camera in relation to the subject. Through the use of angle, the director positions the subject within the frame. It has a great impact on how the audience perceives both the subject and the action.
Vertical Angle - The camera's vertical angle can be used to affect the perceived dominance and speed of the subject. Low camera angles-- looking up at the subject-- tend to increases the subject's dominance and speed. High camera angles-- looking down at the subject-- tend to decrease the subject's dominance and speed.
Horizontal Angle - The camera's horizontal angle is used to affect the perceived depth of the subject. Horizontal angles include full front, 3/4 front, side, full rear and 3/4 rear. 3/4 angles shows two sides of the subject, so they maximize depth. The side angle yields a rather flat image and should be avoided unless such a look is desired.
Oblique Angle - The oblique angle is when the image appears tilted in the frame. It is achieved by vertically slanting the camera. The screened image is not level and appears unnatural to the eye, so it can be used to convey a character's bizarre environment or mental state. The creation scene in The Bride of Frankenstein made wonderful use of oblique angles. The approach is highly stylized and not often used.
Oblique Angle
Perspective
Perspective has several meanings in moviemaking. In terms of directing, perspective is the psychological position of the camera as it records the action. There are three perspectives: objective, subjective and point of view (POV).
Objective Shot - In an objective shot, the camera is placed in a neutral position and does not take the perspective of any character within the scene. It gives the audience the best, unbiased view of
the action.
Objective Shot
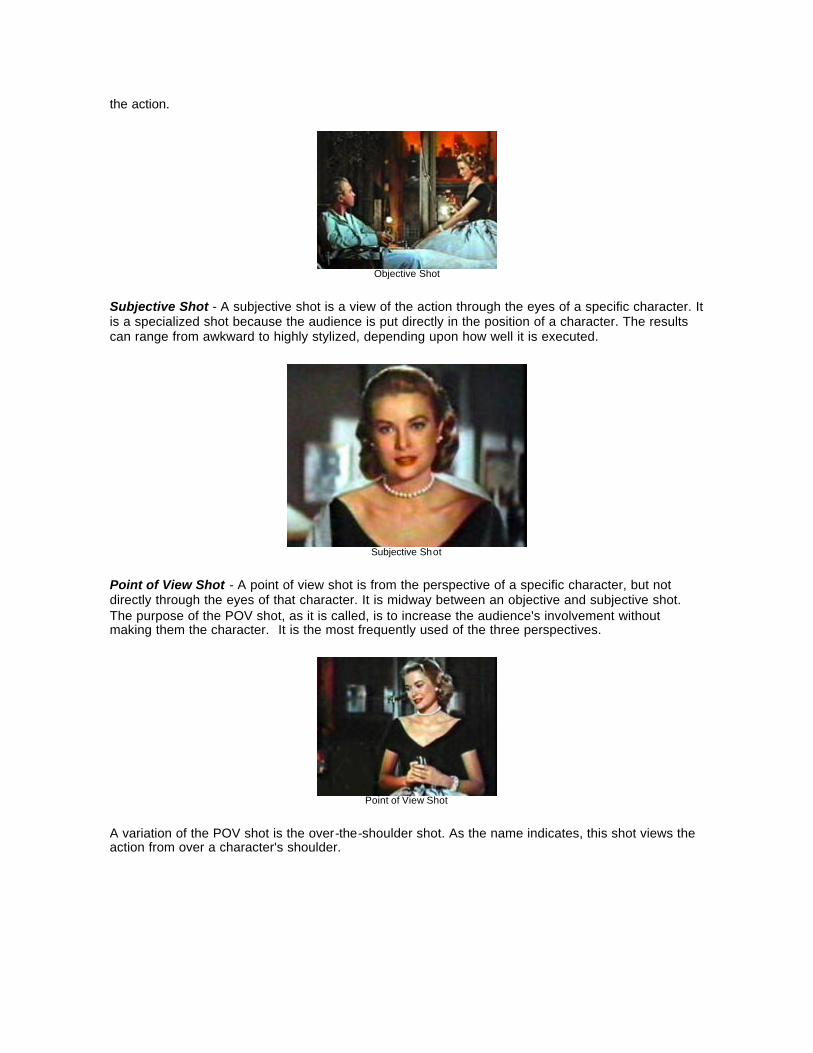
Subjective Shot - A subjective shot is a view of the action through the eyes of a specific character. It is a specialized shot because the audience is put directly in the position of a character. The results can range from awkward to highly stylized, depending upon how well it is executed.
Subjective Shot
Point of View Shot - A point of view shot is from the perspective of a specific character, but not directly through the eyes of that character. It is midway between an objective and subjective shot. The purpose of the POV shot, as it is called, is to increase the audience's involvement without making them the character. It is the most frequently used of the three perspectives.
Point of View Shot
A variation of the POV shot is the over-the-shoulder shot. As the name indicates, this shot views the action from over a character's shoulder.

Over-the-Shoulder Shot
Movement
Movement in a shot is a powerful tool for screen storytelling for two reasons. First, it helps generate energy and tension through the action of the movement. Second, it allows you to change or maintain subject size during a shot, rather than cut to a new shot. Movement is created using the actor and/or the camera.
Movement of in the frame: helps generate energy and tension allows subject size to be changed or maintained
Actor Movement - Actor movement toward or away from the camera is, in effect, recomposing the frame. The results can be visually dynamic when properly motivated by the scene. The drawback is that all elements (i.e. size, angle, perspective, pace, etc.,) are fixed within the shot and can't be changed during editing. This can be problematic if the shot does not play as the director intended. Consequently, many directors like to shoot enough coverage to fix potential problems. When a shot must unconditionally run without cutting, careful planning is required.
Camera Movement - Camera movement can take many forms:
• Pan and Tilt - A pan and tilt involves pivoting of the camera on its axis. Pans are horizontal pivots, while tilts are vertical pivots. These simple camera moves are used to cover action that is too broad for a stationary camera. They are also used to relate one subject to another during a shot.
• Dolly - A dolly is the physical movement of the camera on a wheeled platform called a dolly. Dollies come in all shapes and sizes, from simple medical wheelchairs to heavy-duty devices with hydraulic lifts and seating for the director, camera operator and camera assistant. Dollies are probably the most common method of moving the camera.
• Boom - A boom involves a short vertical movement of the camera, usually up to 12 feet. It is accomplished with a jib arm, which attaches directly to tripod or dolly. The jib arm is essentially a lever with the camera attached to one end.

Jib Arm (Ez Fx Jib)
• Crane - A crane is similar to a boom except that the distance traveled is much greater. It is not uncommon for a camera to be raised or lowered 30 feet or more during a crane shot. Crane shots must be justified within the shot, otherwise they will call attention to themselves.
A rising crane shots conveys a sense of revelation as more and more of the scene becomes visible. A descending crane shots conveys a sense of surveillance as the camera closes in on a specific point of interest. A stunning example is found in Hitchcock’s Notorious, where the camera traverses the breadth of a ballroom to settle on a key in Alicia's hand.
• Handheld - As the name implies, a handheld camera move is when the operator holds the camera in his hands and moves with it. Despite being associated with a rough, low budget look, handheld shots can be surprisingly smooth in the hands of a skilled cameraperson, using a wide angle lens to minimize shake. They are an acceptable alternative to more costly, time consuming camera moves.
• Steadicam - This is similar to a handheld shot in that the cameraperson carries the camera. The difference is that the camera is mounted on a shock absorbing apparatus called a Steadicam. The Steadicam can be used to follow an actor just about anywhere with amazing smoothness. Steadicam shots are costly because they require a Steadicam operator along with the specialized equipment.
Steadicam
• Tracking and Traveling - A tracking shot is when the camera follows a moving subject a reasonably long distance. The camera can be mounted on a dolly, Steadicam or handheld. The primary purpose of a tracking shot is to keep a fixed subject size. A traveling shot is more expansive than a tracking shot and requires that the camera be mounted on a vehicle. Just about every type of vehicle has been used for this purpose, including cars, trucks and helicopters. Shots that require a vehicle are also known as vehicle shots.
CINEMATOGRAPHY
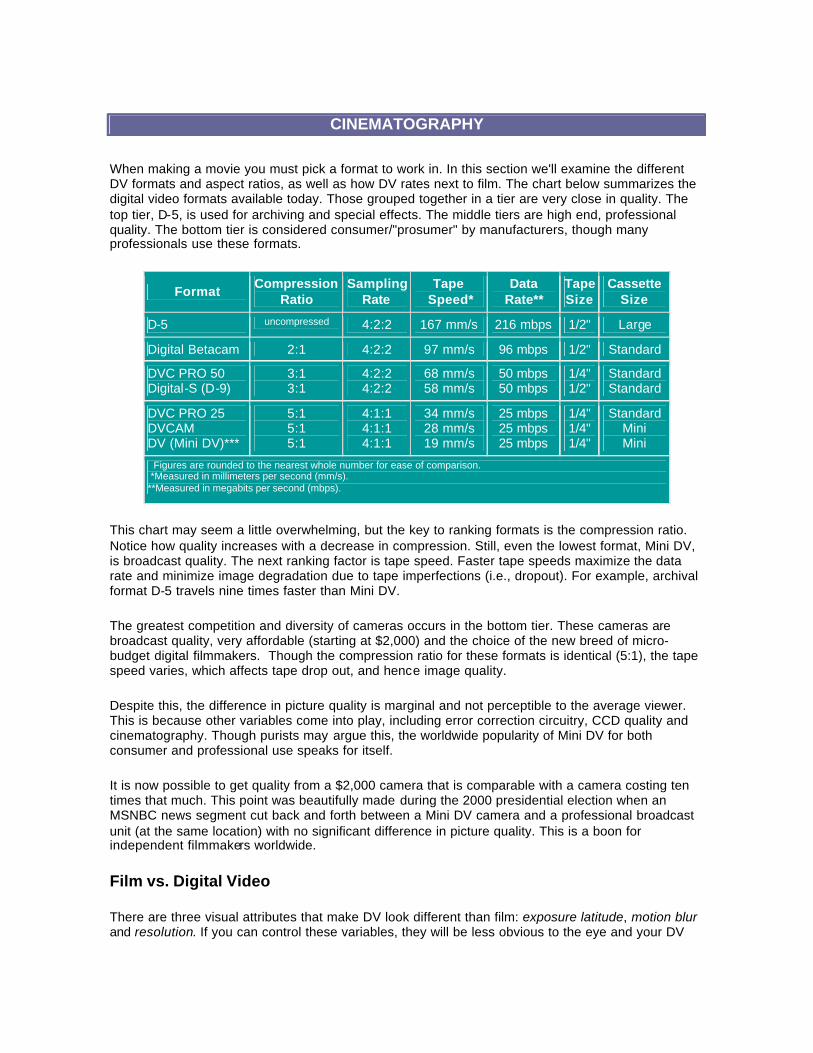
When making a movie you must pick a format to work in. In this section we'll examine the different DV formats and aspect ratios, as well as how DV rates next to film. The chart below summarizes the digital video formats available today. Those grouped together in a tier are very close in quality. The top tier, D-5, is used for archiving and special effects. The middle tiers are high end, professional quality. The bottom tier is considered consumer/"prosumer" by manufacturers, though many professionals use these formats.
Format Compression Ratio
Sampling Rate
Tape Speed*
Data Rate**
Tape Size
Cassette Size
D-5 uncompressed 4:2:2 167 mm/s 216 mbps 1/2" Large
Digital Betacam 2:1 4:2:2 97 mm/s 96 mbps 1/2" Standard DVC PRO 50 Digital-S (D-9)
3:1 3:1
4:2:2 4:2:2
68 mm/s 58 mm/s
50 mbps 50 mbps
1/4" 1/2"
Standard Standard
DVC PRO 25 DVCAM DV (Mini DV)***
5:1 5:1 5:1
4:1:1 4:1:1 4:1:1
34 mm/s 28 mm/s 19 mm/s
25 mbps 25 mbps 25 mbps
1/4" 1/4" 1/4"
Standard Mini Mini
Figures are rounded to the nearest whole number for ease of comparison. *Measured in millimeters per second (mm/s). **Measured in megabits per second (mbps).
This chart may seem a little overwhelming, but the key to ranking formats is the compression ratio. Notice how quality increases with a decrease in compression. Still, even the lowest format, Mini DV, is broadcast quality. The next ranking factor is tape speed. Faster tape speeds maximize the data rate and minimize image degradation due to tape imperfections (i.e., dropout). For example, archival format D-5 travels nine times faster than Mini DV.
The greatest competition and diversity of cameras occurs in the bottom tier. These cameras are broadcast quality, very affordable (starting at $2,000) and the choice of the new breed of micro-budget digital filmmakers. Though the compression ratio for these formats is identical (5:1), the tape speed varies, which affects tape drop out, and hence image quality.
Despite this, the difference in picture quality is marginal and not perceptible to the average viewer. This is because other variables come into play, including error correction circuitry, CCD quality and cinematography. Though purists may argue this, the worldwide popularity of Mini DV for both consumer and professional use speaks for itself.
It is now possible to get quality from a $2,000 camera that is comparable with a camera costing ten times that much. This point was beautifully made during the 2000 presidential election when an MSNBC news segment cut back and forth between a Mini DV camera and a professional broadcast unit (at the same location) with no significant difference in picture quality. This is a boon for independent filmmakers worldwide.
Film vs. Digital Video
There are three visual attributes that make DV look different than film: exposure latitude, motion blur and resolution. If you can control these variables, they will be less obvious to the eye and your DV
will come closer to the elusive "film look":
Exposure Latitude - A key difference between DV and film is exposure latitude, which affects contrast and detail. Color negative has a usable exposure range of 7 stops, with normal exposure approximately in the middle. Most stocks provide 4 stops overexposure and 3 stops underexposure where detail is still visible.
Video has a usable exposure latitude of 5 stops, providing 2 stops overexposure and 3 stops underexposure where detail is still visible. Exposure beyond the -/+ limits results in tonal compression and is reproduced as either pure white or pure black, respectively. Obviously, there is a loss of detail as well.
Since highlights tend to be more troublesome than shadow areas, exposure is generally geared to highlights, letting shadows fall where they may. This avoids the "burn-out" often associated with poorly shot video. Still, it's important to stay within video's usable exposure and contrast range.
Motion Blur - Film yields a slight blur in moving objects. This is known as motion blur and it results in a distinct fluidity of movement -- a prime contributor to the "film look." Motion blur is caused by film's relatively low frame rate of 24 frames per second. A telltale sign of video is its extreme sharpness and lack of motion blur.
NTSC video runs at 30 fps so how can such a small difference account for the radical increase in sharpness? The reason is that there are two interlaced fields for every frame of video, so the effective rate is actually 60 images per second (= 30 fps x 2 fields). This virtually eliminates motion blur, creating an image that is a bit too sharp and devoid of fluidity (the dreaded "video look").
The answer to this is a technical breakthrough called progressive scanning, where each frame is scanned once. In other words, the frame is scanned as a single field, with no interlacing. The lower image rate reproduces motion blur comparable to film.
These cameras generally use frame rates of 24fps to 30fps. 24 frames progressive, called 24p, simplifies combining video and film footage because there is a one-to-one frame relationship. The PAL version, 25p, matches the European film speed of 25fps. Many state of the art cameras have switchable frame rates and resolutions.
Another benefit of progressive scanning is a dramatic increase in resolution. This occurs because progressive scanning eliminates interlace artifacts (combed edges in movement) and interline flicker (noise in fine patterns). There is a study by William E. Glenn showing that perceived resolution in progressive scanning is 50% greater than interlace scanning (“Understanding Camera Resolution,” Broadcast Engineering, August 1999).
Resolution - The final visual difference between video and film is resolution. Although great strides are being made in this department, film is still far ahead. NTSC video has a maximum resolution of 349,920 pixels (720x486). PAL is 19% better at 414,720 pixels (720x576). Both come nowhere near the resolving power of 35mm film, which is close to 3,000,000 pixels!
There is no way to change this disparity except to make sure that nothing degrades the image quality while shooting. For example, improper exposure will diminish the apparent resolution of video by compressing tones and destroying detail.
Arguably, the disparity in resolution has less of an impact on the look of DV than exposure latitude and motion blur. It is not noticeable to the average audience, except of when aliasing rears its ugly head. Aliasing can be minimized by avoiding fine patterns, particularly checkered and striped

clothing.
DV has an interesting advantage over film that may, in part, make up for its lower resolution. It can "see" in low light almost like the human eye and captures beautiful images during sunrise and sunset. In fact, gain can be boosted to +12 dB with minimal consequence. This is true for Mini DV as well.
Transfer to 35mm Film
The ability to shoot on DV and release theatrically on 35mm film has taken great strides, with some interesting developments along the way. The trend started with The Celebration in 1998 and is picking up momentum. Nearly 50% of all IFP submissions in 2000 originated on DV with hopes of theatrical release.
A combination of high quality DV cameras (Mini DV included) and progressive labs like Swiss Effects have produced truly stunning prints. Such transfers are made with a laser recorder. This state-of-the-art machine uses three laser beams to record RGB video directly to each frame of color negative.
If you anticipate transferring DV to 35mm, there are certain decisions and settings that you must make in terms of the camera, namely:
• decided on 4:3 or 16:9 aspect ratio (discussed below) • switch on the dynamic contrast control • switch off the digital zoom • switch off the electronic picture stabilizer • lower the detail level (or sharpness)
Some labs have preferred settings for different cameras. You should consult with the lab before shooting begins and run a test to see that your expectations are met.
4:3 vs. 16:9 Aspect Ratio
A camera’s aspect ratio is a function of the CCDs shape. There are two video aspect ratios in use today. The standard ratio is 4:3, which provides the square broadcast TV image. The widescreen ratio is 16:9 and conforms to theatrical film and HDTV standards. Most professional cameras allow one button switching between ratios.
Some mid-range cameras have a 16:9 mode but do not have a true 16:9 CCD. Rather, they use a 4:3 CCD and simulate the wide-screen aspect ratio by masking the top and bottom of the image. This creates a widescreen effect, but uses less vertical lines in the process.
4:3 Chip in 16:9 Mode
(shaded area appears black)
A true 16:9 chip uses all vertical scan lines, so resolution is superior. It has side panels that are used in the 4:3 mode and ignored in the 16:9 mode.
16:9 Chip
(uses all vertical scan lines, none masked)
You can tell whether the camera has a true 16:9 CCD by observing the image while switching to the 16:9 mode. If the horizontal view expands, the chip is 16:9. If the vertical view crops, the chip is 4:3 masked to simulate 16:9. In some cameras the both the vertical and horizontal changes. If this happens, the acid test is whether the horizontal view really broadens. If so, the chip is 16:9.
Whether you use 4:3 or 16:9 mode the resolution inside the visible frame is the same (you simply mask the top and bottom scan lines in the 16:9 mode). Consequently the choice is really a matter of aesthetics rather than quality.
When transferring to 35mm it is desirable to use all vertical scan lines (rather than mask some) to maximize resolution. That's why a true 16:9 chip is important. In the absence of a 16:9 camera, some filmmakers use an anamorphic lens to squeeze all the vertical scan lines into to the 16:9 aspect ratio. You should consult the lab when attempting this.
If a 16:9 camera or anamorphic lens are not available, take comfort in the fact that the 4:3 chip yields surprisingly good results in both 4:3 and 16:9 modes when transferred to 35mm. Whatever approach you take, it is important to do a test transfer beforehand. The test should include short clips under various lighting conditions and ratios. Also, shoot different close-knit patterns to see how your camera handles aliasing.
SOUND
When working on a DV production of some significance (e.g., a feature), the question of how to record sound invariably comes up. Specifically, do you record sound directly into the camera or use a separate audio recorder? The knee-jerk response is often to use a separate audio recorder because the quality is better. Is this true, or are you just creating extra work for yourself?
State-Of-The-Art DV Sound
Recall, double system sound involves recording picture and sound separately with a camera and audio recorder, then syncing them up in post-production. Single system sound, on the other hand, involves recording picture and sound together on the same medium. No syncing is required. Early video cameras left much to be desired in terms of sound, but many professionals used a single system approach anyway, recording directly into the camera. The main reasons were ease of operation and portability of equipment (at that time, video was primarily used for documentaries and news gathering).
Today, many filmmakers still believe that video sound is inferior, but this in not the case. State-of-the-art cameras offer 16 bit digital stereo sound that rivals CD quality! Even 12 bit cameras provide

extraordinary audio.
State-of-the-art DV sound rivals CD quality.
The Argument Against Double System Sound There are several interesting reasons why it's preferable to record directly into the camera. Taken individually they seem like minor inconveniences, however, as a whole they make a compelling argument against using a double system:
• When recording double system sound, two media files are created rather than one. This requires complex media management in post-production.
• Picture and sound must be synced prior to editing. This necessitates shuttling, dragging, pasting, etc., which is time consuming. (No, you can't batch capture!)
• Shuttling camera and sound tapes risks damaging them, so protection copies must be made to protect original tapes.
• If a synced shot is somehow corrupted, it must be replaced. This entails resyncing and possibly recapturing picture and sound, depending upon the situation.
• When recording original sound, XLR connectors are used to insure a noise-free signal flow. This is defeated when sound is transferred to an NLE using the standard mini-jack input found on computers.
• Since the material will eventually wind up on DV, what's the point of recording double system sound to begin with?!
Camera vs. Recorder
In most cases, the best approach to capturing DV sound is to record it directly into the camera using a mixer and quality microphones. As usual, mics are placed as close to the subject as possible using the hierarchy of microphone techniques (boom, plant, lavaliere, wireless, etc.). Gain levels are controlled using the mixer rather than the camera, which gives the soundperson room to work. This is accomplished by referencing the camera and mixer to each other.
The main drawback of recording directly into the camera is that the mixer is tied to the camera by a cable, which limits mobility. This is the strength of using double system sound-- no umbilical cord. Picture and sound are referenced to each other with time code, which is used to sync them later. Depending on the production, mobility may be an important factor and it may outweigh the post-production problems caused by double system sound. If this is the case, then double system is the way to go. Obviously, your budget and schedule must be factored in as well.
Ultimately, the decision to use double or single system sound is be based on shooting requirements rather than quality differences. In most cases, you'll find that single system sound is faster, less expensive and yields great results.

Micing Techniques
There are four basic mic placements from which all mic setups are built: boom, plant and lavaliere. This priority is sometimes referred to as the Hierarchy of Microphone Techniques. Let's examine each approach:
Boom - Booming involves mounting the microphone to a boompole, and suspending it in front of the subject for optimal sound pickup. Booming is done by a boom operator. The process is exacting since it involves juggling many variables at once, such as holding the mic as close as possible to the subject, moving the mic from one subject to the next, and keeping the mic out of the picture frame.
The rule of thumb when booming is to get as close as possible to the subject, which is just outside the camera frame line. The further the mic is away from subject, the greater the background noise and echo, so every inch closer improves sound quality. The mic is normally be several inches to a foot over the actors head. Up to two feet may be acceptable depending on the situation.
The rule of thumb when booming is to get as close as possible to the subject-- right outside the camera frame is ideal.
Plant - A plant is any microphone fixed in place. It is used to cover a static subject when it is impractical to use a boom. Plants can be conventional condenser mics or lavalieres. They type of microphone used depends on the situation.
Placement is important because plant mics are effective only if dialogue is directed within their pickup pattern and range. Another important consideration is that the mic be properly hidden (planted). Mics can be hidden just about anywhere: behind, on top and below props, furniture and walls. The possibilities are limited only by your imagination. The newer lavs are so small the can be used in plain sight and go unrecognized as a mic.
Lavaliere - The next approach in the mic hierarchy is the lavaliere. Lavalieres, called lavs for short, are tiny microphones worn on the actor's body, either inside or outside the clothing. Most lavalieres are omnidirectional, which is preferable because they must be mounted at many odd angles depending on the situation.
Wireless - Wireless (radio) mics send the audio signal over the airwaves using a transmitter and receiver. Their main drawback is that they are subject to RF interference, so a wired mic should be used whenever possible. They are helpful when the boom operator cannot get close to the action and it is impractical to run a lav cable.
EDITING Through editing, shots are combined in accordance with the script to create the finished movie. A shot must be as short as possible while still achieving its purpose. If it is too long, the audience will be bored; if it is too short, they will be frustrated. Once the audience grasps the meaning of a shot, it's time to cut to the next shot in the scene.
A shot must be as short as possible while still achieving its purpose.
When To Cut
Several factors contribute to determining proper shot length:
Audience Expectation - In most cases the editor cuts to a new shot simply because the audience expects it. The audience may need to get closer, further away or angled differently to see the action. Audience expectation works on a subliminal level. Still, if the expectation is not met they will feel it and react negatively.
For example, if a character is injured in wide shot, the audience will want to see a close-up in order to clarify what happened. If the first shot drags on too long, it will frustrate the audience and, possibly, impede their understanding the action. Running a shot too long is common error with novice filmmakers.
Comprehension - Shots require various viewing times for the audience to comprehend them. Simple compositions, static subjects and shots similar to their predecessor need minimal screen time for comprehension. On the other hand, complicated compositions, moving subjects and shots vastly different than their predecessor need more screen time. Despite this, the speed with an audience can absorb the meaning and purpose of a shot should not be underestimated.
Don't underestimate how quickly the audience can absorb the meaning of a shot.
Action Requirements - Some shots contain an action that must be completed before cutting to the next shot. If the action is too long to hold audience interest, you should compress it using the

techniques discussed later in the course.
Editor Imposed - In the above situations, the editor determines shot length based on audience needs. Occasionally, the editor will impose a cut to create a response in the audience. This can be to: create emphasis, maintain rhythm, jar the audience, or make a symbolic point.
Nonlinear Editing Systems
As of this writing, the two dominant manufacturers of nonlinear editing systems are Avid and Apple. Avid introduced the first NLE system over twenty years ago and has dominated the industry ever since. Apple, the maker of Final Cut Pro, is determined to change this by working from the grassroots up. Another strong contender is imaging specialist, Adobe. These popular NLE systems are discussed below.
Avid - Avid is the granddaddy of digital editing and has set the standard for other manufacturers to compare. The company has five products, each intended for a different segment of the market.
The three systems below are Avid's anchor products, which can be used in both film and video production. When working in film, they can generate a negative cut list for matching back to camera original negative. Each system is progressively more complex, and prices range from $10,000 to over $100,000:
Xpress
Media Composer
Symphony
Avid also has two systems that are geared to digital video:
Xpress DV - Xpress DV is designed to compete directly with Apple's Final Cut Pro. The system can be purchased as a stand alone application and marks Avid's first shift away from turnkey packaging. As of this writing, the price of Xpress DV is $1,700.
Free DV - This is a stripped down version of Xpress DV, which is designed to compete with Final Cut Express. There is a big difference, though-- it's free! This goodwill marketing strategy is designed to develop a grassroots following like Apple's.
These systems feature superior titling, compositing and special effects. In addition, third party developers support them with numerous specialized plug-ins.
Originally, Avids were designed to run on Apple computers, but the company has been drifting towards PCs since the introduction of Final Cut Pro. This is understandable now that Avid and Apple are in direct competition with each other. Currently, new Avids can be adapted to either Apple or PC

platforms.
Apple - In 1990s, Apple purchased the rights to a program being developed by Macromedia, code named "Key Grip." Apple finished the program and released it as "Final Cut Pro." It took the industry by storm and has become a serious threat to Avid's long term market dominance. There are several reasons:
Program vs. Turnkey - Apple proved once and for all that NLE systems are essentially software applications. While Avid forces you to buy a turnkey package (computer, proprietary software, service contract, etc.), Apple sells Final Cut Pro as a stand alone computer program. This allows you to buy and configure your own hardware.
Price - At the time of Final Cut Pro's release, Avids ranged in price from $50,000 to well over $100,000. Final Cut Pro was (and still is) priced at $1,000, with Apple "G" series computers starting at a mere $1,500. After adding extra memory and storage, the entire system costs less than $3,500. This is a far cry from Avid pricing and it levels the field for low budget filmmakers.
Features - Final Cut Pro is jam-packed with features. Not only is it an editing program, but it incorporates special effects, compositing, titling and DAW features as well. The fact that it has garnered such a huge following so early in its life attests to the versatility and long term potential of this application.
Apple currently has three NLE products:
Final Cut Pro - This is Apple's professional level system. As discussed, it is a full featured application with a relatively low price of $1,000. Out of the box, it is geared to digital video editing. It can be enhanced for film editing using Apple's CinemaTools, which includes negative match-back capability.
Final Cut Express - Apple released Final Cut Express for the serious amateur. It looks and functions like Final Cut Pro, except that it doesn't have certain advanced features like visible time code and EDL support. The cost is $300.
iMovie - This amazing little program comes bundled with new Apple computers or you can download it for free. It allows you to do broadcast quality editing in native DV. You can add sophisticated transitions and titles, and do sound design using two tracks. Your final product can be exported using various compression ratios, depending on your needs.
Apple programs can only be used in conjunction with Apple computers.
Adobe - Adobe's entry into the NLE market is Premiere. Early versions of Premiere left much to be desired, but version 6 has been highly acclaimed. The program can run on either Apples or PCs.
Other benefits include perfect integration with Adobe's outstanding imaging software (e.g., Photoshop, After Effects), an excellent audio mixer and an amazing price of only $550. Adobe offers a free, downloadable tryout of Premiere. Here's a direct link: premiere tryout.
PRODUCING
Whatever happened to the French New Wave? The technology of the late 1950s promised to free filmmakers from the constraints of cumbersome equipment and overly complex production techniques. This freedom was supposed to push creative boundaries in cinematic storytelling. Indeed, it started that way, spearheaded by a group of young French filmmakers; but despite lighter

and more compact equipment, the technical liberation did not continued.
An Alternate Model of Production
Today, production equipment is lighter than ever, yet each generation of young filmmakers overlooks the creative potential of this technology, falling into the same trap as the last. They pack their scripts with complex shots and then spend huge amounts of money on tons of rental equipment (most of which lay dormant in trucks during production). Why? Because they aspire to be part of the movie industry and this is their perception of it.
On Location in New York city
Hollywood has defined, refined and pushed the envelope in cinema, turning out some of the most entertaining and endearing movies ever made. These movies are indeed costly to make, which is compounded by a tendency towards exorbitance. Trying to emulate Hollywood moviemaking without Hollywood financing has resulted in the stifling of potentially great new talent. Hollywood, therefore, is not the ideal model for the aspiring filmmakers.
Independent filmmakers need an alternate model of production. This is achieved by maximizing creativity and productivity within budgetary constraints.
The goal of an alternate model of production is to maximize creativity and productivity within budgetary constraints.
Budget Dictates Script Parameters
A story can be told in different ways depending upon the budget. Each variation will yield the same story, but it will be designed differently. To use an analogy, a house can be built with $100,000 or $1,000,000. Both va riations will be a house, but the designs will be different based on budget constraints. The builder with $100,000 can afford a modest house, while the builder with $1,000,00 can afford a mansion with all the extras. Similarly, a movie's budget defines how the story is told in terms of variables such as locations, characters, special effects, etc.
This sounds like common sense, but it's amazing how many filmmakers infuse a script with expensive elements such as night locations, crowd scenes, complicated camera moves, etc., knowing full well what the financial limitations are. The root of the problem is that it occurs cumulatively, one scene at a time, sometimes one shot at a time. Ultimately, they try to build a $1,000,000 house with a $100,000 budget.
It's unrealistic and creates many problems during production, including the possibility of an unfinished film. The final product is usually substandard because resources are spread too thin. This is the most common and dangerous blunder made by both novice and veteran moviemakers alike. Ironically, it is the most avoidable.

Every Penny Must Go On Screen
Traveling to locations, unloading equipment trucks, rigging lights, laying dolly track, organizing crowd scenes, etc. is time consuming and expensive. Most importantly, this work does not appear on screen per se. In order to make a successful low budget movie, you must put every penny on the screen.
If a story can be told with 10 locations, why use 20? If it can be told with a cast of 6, why use 12? Are elaborate lighting setups and camera moves adding to the story or are they just burning up the budget and pulling down overall quality? You must ask these hard questions.
One reason filmmakers refuse to be economical in terms of equipment and story variables is that they fear a rough, low quality look. The truth is, economy does not mean low quality. It means telling a story within one's means. This results in higher production values because every penny is put on the screen.
When you try to a make bigger movie than the budget can support, you spread resources too thin. As money runs out, you may take short cuts and foolish chances. This results in lower quality.
Compromise Is Your Bunkmate
During a revealing Actors Studio interview, Steven Spielberg said that "compromise is a your bunkmate." He covets his second and third ideas, since they have been the keys to successful problem solving. This is a great lesson for aspiring filmmakers who often feel that they must shoot the movie as conceived.
It would be nice to capture a movie exactly as planned, but if the choice is getting an ideal incomplete film or a modest complete film, the latter wins. Orson Welles' Touch of Evil was a low budget film by Hollywood standards, yet the story is not hampered. This was due to the progressiveness of Orson Welles, who, incidentally, was forced to work low budget for most of his career despite his early successes.
Orson Welles
Though an American production, Touch of Evil is considered a forerunner of the French new wave.
Story is King
Without name actors, a low budget movie must rely exclusively on the quality of its story to attract audiences. The story must be intriguing and must contain unwavering conflict. The conflict, whether physical or dramatic, must be:
• intense • elevated

• memorable
When done right, this is what creates the word of mouth buzz that surrounds a movie. Remember: story is king. If you only take one thing away from this website, let it be this principle!