Digital Court Recording System
127
Digital Court Recording System Version 6.2
Transcript of Digital Court Recording System

Digital Court RecordingSystem
Version 6.2

Digital Court Recording System2
Table of Contents
Part I General Information 5
................................................................................................................................... 51 Overview
................................................................................................................................... 52 What's New in Version 6.2?
................................................................................................................................... 63 Version Information
................................................................................................................................... 124 Components and Requirements
................................................................................................................................... 135 Features
................................................................................................................................... 156 Implementation Steps
................................................................................................................................... 157 Registering Digital Court Recorder
................................................................................................................................... 158 Installing the Digital Court Recorder
................................................................................................................................... 169 Installing the Digital Court Player
................................................................................................................................... 1610 Uninstalling the Digital Court Programs
Part II Using Digital Court Recorder 17
................................................................................................................................... 171 Starting Digital Court Recorder
................................................................................................................................... 172 Stopping Digital Court Recorder
................................................................................................................................... 173 Configuring Digital Court Recorder
.......................................................................................................................................................... 17Configuring Digital Court Recorder
.......................................................................................................................................................... 18Using the Recording Dialog
.......................................................................................................................................................... 22Using the Video Dialog
.......................................................................................................................................................... 23Using the Playback Dialog
.......................................................................................................................................................... 25Using the New Files Dialog
.......................................................................................................................................................... 27Using the Mirroring Dialog
.......................................................................................................................................................... 29Using the Burning Dialog
.......................................................................................................................................................... 30Using the General Dialog
.......................................................................................................................................................... 32Using the Hot Keys Dialog
.......................................................................................................................................................... 32Using the Clock Dialog
.......................................................................................................................................................... 33Using the StartUp Dialog
.......................................................................................................................................................... 34Using the Touch Screen Dialog
.......................................................................................................................................................... 35Using the Remote Monitoring Dialog
.......................................................................................................................................................... 35Using the Security Dialog
.......................................................................................................................................................... 37Using the Bookmark Titles Dialog
.......................................................................................................................................................... 37Using the Predefined Bookmarks Dialog
.......................................................................................................................................................... 38Using the Broadcast Dialog
.......................................................................................................................................................... 39Exporting and Importing Configuration Options
................................................................................................................................... 394 Using Digital Court Recorder
................................................................................................................................... 405 Digital Court Recorder Main Window
................................................................................................................................... 446 Recording
................................................................................................................................... 457 Monitoring a Recording
................................................................................................................................... 468 Using a PA System During a Recording
................................................................................................................................... 469 Broadcasting a Recording

3Contents
3
................................................................................................................................... 4710 Playback of a Recording
................................................................................................................................... 4711 Time Keeping
................................................................................................................................... 4812 Synchronization with an Outside Clock
................................................................................................................................... 4813 Mirroring Files to Disk
................................................................................................................................... 5014 Writing to Compact Discs
................................................................................................................................... 5215 Burning Files to CD/DVD
................................................................................................................................... 5316 Using Text Substitution
................................................................................................................................... 5817 Using a Touch Screen View
................................................................................................................................... 6018 Using the Assistive View
................................................................................................................................... 6019 Using the Command Line
................................................................................................................................... 6120 Keyboard shortcuts
Part III Using Digital Court Player 63
................................................................................................................................... 631 Starting Digital Court Player
................................................................................................................................... 632 Stopping Digital Court Player
................................................................................................................................... 633 Configuring Digital Court Player
.......................................................................................................................................................... 63Configuring Digital Court Player
.......................................................................................................................................................... 64Using the Playback Dialog
.......................................................................................................................................................... 66Using the Speed Dialog
.......................................................................................................................................................... 67Using the StartUp Dialog
.......................................................................................................................................................... 67Using the Hot Keys Dialog
.......................................................................................................................................................... 68Using the Foot Control Dialog
.......................................................................................................................................................... 68Using the General Dialog
.......................................................................................................................................................... 70Using the Security Dialog
.......................................................................................................................................................... 70Using the Bookmark Titles Dialog
.......................................................................................................................................................... 71Exporting and Importing Configuration Options
................................................................................................................................... 714 Using Digital Court Player
................................................................................................................................... 755 Using the Selection Panel
................................................................................................................................... 766 Using the Thin View
................................................................................................................................... 777 Playback
.......................................................................................................................................................... 77Playing a Sound File
.......................................................................................................................................................... 78Using Online Playback
.......................................................................................................................................................... 79Automatic Pauses
.......................................................................................................................................................... 79Playback with Different Speeds
.......................................................................................................................................................... 80Using Automatic Gain Control
.......................................................................................................................................................... 80Suppressing Noise
.......................................................................................................................................................... 81Adjusting the Tone
.......................................................................................................................................................... 81Playing Back Channels
................................................................................................................................... 838 Foot Control
.......................................................................................................................................................... 83Using a Foot Control
.......................................................................................................................................................... 83Associating Functions to Foot Pedals
.......................................................................................................................................................... 84Using the Foot Control Wizard
................................................................................................................................... 859 Bookmarks
.......................................................................................................................................................... 85Working with Bookmarks
.......................................................................................................................................................... 89Editing Bookmarks
.......................................................................................................................................................... 92Using Predefined Bookmarks

Digital Court Recording System4
.......................................................................................................................................................... 101Using Special Characters
.......................................................................................................................................................... 102Working with Sealed Recordings
.......................................................................................................................................................... 103Jumping to Time Points in a Recording
.......................................................................................................................................................... 104Finding Text in File Notes and Bookmarks
.......................................................................................................................................................... 104Replacing Text in File Notes and Bookmarks
.......................................................................................................................................................... 105Navigation Using Bookmarks
.......................................................................................................................................................... 105Private Notes in Bookmarks
.......................................................................................................................................................... 106Importing Bookmarks from a BMR File to a DCR File
.......................................................................................................................................................... 107Exporting File Notes or Bookmarks to a Text File
.......................................................................................................................................................... 109Copying File Notes or Bookmarks to the Clipboard
.......................................................................................................................................................... 109Printing File Notes or Bookmarks
................................................................................................................................... 11010 Exporting a File
................................................................................................................................... 11211 Exporting a File to an Audio CD
................................................................................................................................... 11412 Exporting a File to PDF Format
................................................................................................................................... 11613 File Notes
................................................................................................................................... 11714 File Search Facility
................................................................................................................................... 11815 Analyzing a DCR File
................................................................................................................................... 11916 Collecting Trace Information
................................................................................................................................... 12017 Setting Up the Indexing Service
................................................................................................................................... 12118 Disassociating DCR Files with a Digital Court Program
................................................................................................................................... 12119 Keyboard shortcuts
Index 123

General Information 5
1 General Information
1.1 Overview
The Digital Court Recording Solution is a system you can use to record up to 32 separate (mono) audiostreams onto a PC. A separate player provides playback facilities for the captured streams.
This is useful in a court setting. For example, you can place one microphone in front of each of four people andrecord the court activities in four channels. During playback, you can listen to any of the four channelsindividually. This allows courts to reduce the time spent managing the audio recordings of court proceedings.
The following shows how a court reporter can use the Digital Court Recording Solution to monitor the progressof a recording, and add bookmarks at different points in the recording.
1.2 What's New in Version 6.2?
Version 6.2 includes the following new features.
Digital Court Recorder
• Support for Windows 7.
• Toolbar customization. For example, you can choose which buttons appear on a toolbar and the order inwhich they appear.
• Work with multiple text-substitution shortcuts at once, such as to highlight them.
• An option to broadcast video without having the video saved as part of the recording file.
• Replace text in file notes and bookmarks.
Digital Court Player

Digital Court Recording System6
• Support for Windows 7.
• Toolbar customization. For example, you can choose which buttons appear on a toolbar and the order inwhich they appear.
• Speed up access in listen-only mode when used with the NTFS file system.
• Bookmarks and file notes are now available in listen-only mode.
• Replace text in file notes and bookmarks.
Note: The “Find in Notes” feature has been moved from the main window to the Bookmarks window andrenamed to simply “Find”.
To obtain more detailed information about the features of the Digital Court Recording Solution, review the “Features” section.
1.3 Version Information
Version 6.2 May 2010
Digital Court Recorder
• Support for Windows 7.
• Toolbar customization. For example, you can choose which buttons appear on a toolbar and the order inwhich they appear.
• Work with multiple text-substitution shortcuts at once, such as to highlight them.
• An option to broadcast video without having the video saved as part of the recording file.
• Replace text in file notes and bookmarks.
Digital Court Player
• Support for Windows 7.
• Toolbar customization. For example, you can choose which buttons appear on a toolbar and the order inwhich they appear.
• Speed up access in listen-only mode when used with the NTFS file system.
• Bookmarks and file notes are now available in listen-only mode.
• Replace text in file notes and bookmarks.
Version 6.0 August 12, 2009
Digital Court Recorder
• Attach documents, such as evidence documents, to a recording file. You can open attachments, deleteattachments, seal/unseal attachments, and optionally include them when exporting recording files.
• Stream proceedings to a server which enables multiple users to view the proceedings in real time.
• Configuration options can be exported and imported. This allows you to set up multiple computers with thesame configuration.
• Text substitution shortcuts can be exported and imported. This allows you to standardize on the shortcutsbeing used.
• The interface is now compliant with Section 508 of the Rehabilitation Act.
• The ability to manually mirror a recording has been removed and replaced with the ability to burn a recordingonto CD or DVD.
• Default values can be set for any of the docket fields. You can also choose which fields you want to use.
• When printing, the header and footer information is saved. You can also have the file name and print timeautomatically inserted.
• The list of predefined bookmarks can be sorted alphabetically.

General Information 7
Digital Court Player
• You can open file attachments, delete attachments, seal/unseal attachments, and optionally include themwhen exporting recording files.
• Configuration options can be exported and imported. This allows you to set up multiple computers with thesame configuration.
• The interface is now compliant with Section 508 of the Rehabilitation Act.
• When exporting a file to WAV or AVI format, you can select the media format from a drop-down list of pastvalues.
• When printing, the header and footer information is saved. You can also have the file name and print timeautomatically inserted.
Version 5.2 March 7, 2009
Digital Court Recorder
• Enhanced text substitution capabilities, including the ability to use abbreviations that allow you to quickly enterany amount of predefined text, support for multi-line text, and the use of colors for text.
• Ability to specify a default folder to be used when creating and opening predefined-bookmarkfiles.
• Automatically load a predefined-bookmark file each time the Digital Court Recorder program starts.
• A bookmark can be assigned a color, which allows you to highlight or classify bookmarks. For example, youcan use different colored bookmarks to differentiate child witnesses, sensitive information, etc.
Digital Court Player
• Export a file, including bookmarks, audio, and video to PDF format. The media file can be created and savedseparately from the PDF document so that the audio/video links will work properly after you move the file onto aWindows Media Server folder to be streamed to the end users.
• Export a dcr file as a Windows Media file (wma, wmv).• A bookmark can be assigned a color, which allows you to highlight or classify bookmarks. For example, youcan use different colored bookmarks to differentiate child witnesses, sensitive information, etc.
Version 5.1 May 25, 2008
Digital Court Recorder
• Support for Windows Vista.
• The SPEEX codec is now used for the default sound quality of recordings.
• When mirroring to CD in ISO format, the Recorder burns the CD itself without the use of a system burningwizard (Windows XP and Vista only).
• When mirroring to CD in UDF format, the Recorder can automatically format a blank disc (Windows Vistaonly).
• Improvements in capturing and managing trace data.
• Tooltips are now available in the Touch Screen Full View and the Touch Screen Control View.
• Visual styles in Windows XP and Windows Vista are now supported, which allow you to change the visualstyle of the user interface.
• The font specified in your system properties is now applied to the Digital Court Recorder program.
• The program is now packaged as an MSI file and uses the Windows Installer for installation.
Digital Court Player
• Support for Windows Vista.
• The "Go to End" button has been added to allow a user to quickly go to the end of a recording.
• A new utility is available within the Player to check the integrity of a DCR file.
• When exporting a file to an audio CD, the Player burns the CD itself without the use of a system burning

Digital Court Recording System8
wizard (Windows XP and Vista only).
• Improvements in capturing and managing trace data.
• You can open a file in listen-only mode, which allows you to listen to a file but prevents you from making anyupdates.
• Tooltips are now available in the Thin View.
• Visual styles in Windows XP and Windows Vista are now supported, which allow you to change the visualstyle of the user interface.
• The font specified in your system properties is now applied to the Digital Court Player program.
• The program is now packaged as an MSI file and uses the Windows Installer for installation.
Version 5.0 July 3, 2007
Digital Court Recorder
• Ability to restore a predefined bookmark when a case is stood down.
• Many improvements have been made to the search facilities:
• When searching for text in DCR files, you can search files and docket-specific fields, search by date or adate range, search for an exact phrase, specify a list of folders to search, use a phonetic algorithm, andother enhancements. The search results are displayed as a list of files and a list of dockets.
• When searching for text within the current file, you can search for an exact phrase or as separate words,search all text areas, and use a phonetic algorithm.
• Date and time can be included on each video frame.
• When the process of mirroring a recording to a CD is stopped, a new button allows you to close the currentfile and eject the CD.
• Additional data, such as the user that made the recording, the product version, and other product informationcan be displayed as part of a file's properties.
• A confirmation alert can be issued when you try to create a new file and another file is already open.
• Improved behavior in how separators are marked as used.
• A desktop shortcut for this program can be automatically created during installation time.
Digital Court Player
• Export the audio data from a DCR file directly to an audio CD. Previously, you would need to convert the DCRfile into a WAV file and then use CD-burning software to write the data to a CD. To avoid creating a very largefile and to facilitate playback, you can have the file automatically split based on bookmarks or file size (inminutes).
• A desktop shortcut for this program can be automatically created during installation time.
Version 4.5 November 18, 2006
Digital Court Recorder
• A Plaintiff field has been added for dockets.
• More granular settings for the data which is included when printing bookmarks, exporting bookmarks to a textfile, or copying bookmarks to the clipboard.
• When you use a predefined bookmark, you can use a visual indication the bookmark has been used.
• Improvements to the Predefined Bookmarks window include the following:
• Appending a file to the file you currently have open allows you to merge files together.
• Customize the way the list of bookmarks appears by inserting a separator, moving a bookmark up ordown, or highlighting the background color used for a bookmark.
• Move, highlight, or delete multiple bookmarks all at once.
• A main toolbar provides quick access to common operations such as creating a new bookmark or docket,opening a file, and customizing the list of bookmarks.

General Information 9
• Additional menu options are now available allowing you to perform all operations using menu items.
• A shortcut menu allows you to create a new bookmark or docket bookmark, insert a separator, delete abookmark, highlight a bookmark, and insert a bookmark into a recording.
• Improvements to the Text Substitution window include the following:
• A main toolbar provides quick access to common operations such as creating a new shortcut,rearranging the list of shortcuts, and inserting text.
• Additional menus are now available allowing you to perform all operations using menu items.
• A shortcut menu allows you to create a new shortcut, delete a shortcut, and insert text.
• Another touch screen view, called Touch Screen Control View, is available. This allows you to quickly andeasily start recording.
• Support for special characters and symbols in the fields used for bookmarks and dockets, and when usingsuch features as find in files and text substitution.
• Ability to stop a search when searching files for text.
Digital Court Player
• A Plaintiff field has been added for dockets.
• More granular settings for the data which is included when printing bookmarks, exporting bookmarks to a textfile, or copying bookmarks to the clipboard.
• A Selection panel has been added to the main Digital Court Player window. On this panel, you can use aslider and other controls to select part of a recording. This is particularly useful when you want to export onlypart of a file.
• Online playback allows you to play back a file as it is being mirrored.
• Support for special characters and symbols in the fields used for bookmarks and dockets, and when usingsuch features as find in files and find in notes.
• Ability to stop a search when searching files for text.
Version 4.4 July 12, 2006
Digital Court Recorder
• Ability to lock or seal all, or parts, of a recording.
• Ability to write to CDs in ISO-data format when mirroring a recording after it has completed.
• Multiple copies of a CD can be made when mirroring a recording.
• The remote monitoring feature enables you to use the Digital Network Monitor program to monitor the activity(both sound and video) in up to four court rooms. You can add bookmarks and dockets, record new files,append to existing files, and playback the current recording.
• Ability to change the columns that are displayed, their titles, and the order in which they appear when workingwith bookmarks, dockets, and predefined bookmarks, and when using Digital Definition Editor.
• Support for a touch-screen view that makes it easier for you to use a touch screen.
• At installation time, you can indicate that users without Administrator privileges have "Read-only" access andare not allowed to change the program's configuration options.
• Customizable headers and footers can be used when printing.
• Additional start-up options to start Digital Court Recorder when Windows starts and to load a new file whenDigital Court Recorder starts.
• Ability to search for text in the Speaker field.
• Notification via an audible tone can take place when sound is absent in all channels.
• In the Predefined Bookmarks window, there is now an indication (grayed icon) that a predefined bookmarkhas been used.
• New menus are available for working with predefined bookmarks.
• Digital Court Recorder can be minimized to the Thin View.

Digital Court Recording System10
Digital Court Player
• Ability to change the bookmark columns that are displayed and the order in which they appear, and thenames of the docket bookmark fields.
• Export sealed recordings with a password or to an unsealed format.
• Customizable headers and footers can be used when printing.
• Digital Court Player can be minimized to the Thin View.
Version 4.3 December 29, 2005
Digital Court Recorder
• Support for predefined bookmarks that you can define in advance and then later insert them into your actualrecordings.
• A new program, Digital Definition Editor, allows you to predefine bookmarks on a PC on which Digital CourtRecorder is not installed.
• A file search facility lets you search for text, times, and dates across files.
• Improvements in the use of text-substitution shortcuts that allow you quick access to your predefinedshortcuts.
• 2-character channel names can be used in place of the channel numbers.
• A script can be automatically run when creating a new docket.
• A new file can be automatically created for each new docket.
• Bookmarks now contain a Speaker field.
• Ability to set the font used in bookmarks and notes.
• Show/hide different fields in the Bookmarks window.
• Ability to enhance the volume levels during playback.
• Digital Court Recorder can automatically complete the mirroring process for files that were unsuccessfullymirrored.
• An Alert pop-up message can be issued when there are low sound levels on all recording channels.
• You can select the channels for playback as the file is monitored in a PA System.
• A command-line interface lets you use your system scheduler to schedule a recording.
• Support for read-only files. Users can open and play read-only files but are unable to edit them.
• Ability to disassociate DCR files with this program.
Digital Court Player
• Sound quality improvements using Automatic Gain Control (AGC).
• A file search facility lets you search for text, times, and dates across files.
• An audio tone can be issued when the playback of a recording is stopped or paused.
• 2-character channel names can be displayed in place of the channel numbers.
• Both absolute and relative times can be displayed in the Thin View.
• When exporting a segment of a file, you can select the segment based on absolute times.
• Bookmarks now contain a Speaker field.
• Ability to set the font used in bookmarks and notes.
• Show/hide different fields in the Bookmarks window.
• Automatically step-back a specified number of seconds when releasing your foot pedal during fast-forwardoperations.
• Support for read-only files. Users can open and play read-only files but are unable to edit them.
• Ability to disassociate DCR files with this program.
Version 4.2 August 08, 2005

General Information 11
Digital Court Recorder
• Support for compressed video, thereby providing support for additional cameras.
• Maximum frame rate for video recording has increased from 20 fps to 30 fps.
• Standard camera controls can be used to adjust the quality of video recordings, including brightness,contrast, and saturation.
• Support for display clocks from Applied Technical Systems.
• Printing options for bookmarks and file notes allow you to add a title, change the font, print page numbers,and preview the printed output.
• A Thin view reduces the main window to show only the channel recording levels.
• Special bookmarks, called dockets, can be used to distinguish cases within the same file.
• Advanced settings for video codecs, as determined by your compressor.
• New options for previewing video, including zoom and fit-in-window features.
• Hide/show PA System area of the main window.
• Optionally, have the File Notes window automatically displayed when opening files.
Digital Court Player
• Suppress the level of noise and adjust the tone when playing files.
• Export captured video as an AVI file.
• Optionally, include video data and file notes when exporting a file.
• Ability to open files from the Thin View.
• Rewind files using a foot control.
• Printing options for bookmarks and file notes allow you to add a title, change the font, print page numbers,and preview the printed output.
• Optionally, have the File Notes window automatically displayed when opening files.
• Digital Court Player is installed as a common application where options can be set for each user or sharedamongst multiple users of the same computer.
Version 4.1 June 11, 2005
• Introduced additional user controls for devices that do not support the standard Windows mixer.
Version 4.0 May 3, 2005
Internal release only.
Version 3.0 April 15, 2005
Digital Court Recorder
• Video recording.
• Shortcut keys allow you to quickly insert predefined text into bookmarks and file notes.
• New options for mirroring recordings let you initiate the mirror process manually, write the mirrored file to CD,and test the ability to write to the location specified.
• File notes and bookmarks can be exported as a text file, copied to the clipboard, or printed.
• Activate a clock display to indicate actual recording periods.
• Optional confirmation prompts for stopping and pausing a recording.
• Tailor the display of bookmark information by showing/hiding different fields.
Digital Court Player
• Video playback.
• Ability to adjust the levels of individual channels.
• Export a selected area of a file instead of the entire file.

Digital Court Recording System12
• Ability to search for text within file notes.
• Export file notes to a text file.
• File notes and bookmarks can be copied to the clipboard or printed.
• Tailor the display of bookmark information by showing/hiding different fields.
Version 2.0 November 16, 2004
Digital Court Recorder:
• Playback of recordings in both WAVE and ASIO modes.
• Playback dialog allows you to play parts of the current file being recorded without using Digital Court Player.
• Mirroring of recordings onto local/network disks.
• Indicators for active channels.
• Private notes can be used in bookmarks, and optionally excluded when exporting a bookmark to a text file.
• Synchronize time between your PC and a digital display clock.
• Use of a PA system for playing recorded sound to an output audio device.
• Keeping of time points using auto-bookmarks during a recording.
Digital Court Player
• Export to a WAV or DCR file with any combination of channels.
• Export bookmarks or parts of bookmarks to a text file.
• Import bookmarks and file notes from BMR files created with Digital Notes or Digital Word-Notes.
• Search capability for text within bookmarks.
• Indicators for active channels.
• Private notes can be used in bookmarks, and optionally excluded when exporting a bookmark to a text file.
• Jump-to-time feature during playback allows easy navigation within a file.
• Retain last position in a file when it is closed and restore it when loading.
• Preserve tone automatically during high-speed playback.
Version 1.2 July 14, 2004
• Ability to record in ASIO (Audio Streaming Input-Output) mode for devices with a corresponding ASIO driver.
• Ability to play any combination of channels.
• Extended program priority settings that can help provide cleaner recordings.
Version 1.1 March 17, 2004
The version was released.
1.4 Components and Requirements
Digital Court Recording Solution is composed of both software and hardware.
The software components are the Digital Court Recorder and the Digital Court Player.
The Digital Court Player is a no-cost download, available from the Digital Recording web site, and provides in-the-courtroom playback on the same PC on which the Recorder is active. The Player allows users to accessand listen to individual channels within a Digital Court Recorder file (i.e. a .dcr file). Any combination ofindividual channels may be selected during playback. The Digital Court Player can also be used to export a .dcrfile into another .dcr file, or to a mono .wav file that may be played with other players such as Windows MediaPlayer.
The software and hardware requirements are described below. Contact BIS Digital Inc. for further assistance.
Digital Court Recorder

General Information 13
The minimum computer requirements for using the Digital Court Recorder and associated multi-channelsound cards are:
• Standard PC or laptop with the Windows XP SP2 operating system or later.
• 2GHz Processor or faster.
• 256MB Memory (RAM) or greater.
• An appropriate connection port (USB 2.0 or Firewire) or an available PCI slot, as determined in conjunctionwith your Digital sales representative.
• A standard Windows-compatible mono sound card with headphones, if you want to listen to sound files andmonitor recording levels as the files are being recorded.
• Sufficient hard-drive space to save the audio recording files.
• The Digital Court Recorder supports a number of different multi-channel sound cards through industrystandard interfaces. Support includes WAV devices (including WDM) and ASIO devices. Consult BIS Digital oryour Digital dealer for more information about suitable sound cards to address your requirements.
• You must also provide sufficient storage capacity to retain the recordings, either on your local computer or ona central data repository.
The multi-channel wav files created by the Digital Court Recorder are standard computer files and can bemoved, copied and saved, just as any other computer file. Digital Court Recorder includes a data mirroringcapability that provides a backup of your data files.
Digital Court PlayerThe minimum computer requirements for using the Digital Court Player are:
• A standard PC or laptop with the Windows 2000 operating system or later.
• A standard Windows-compatible mono sound card with headphones or speakers that will be used for audioplayback.
• Optionally, playback can be controlled using a VEC Infinity USB foot-pedal. You can obtain this pedal from athird party vendor or from BIS Digital and associated Digital dealers.
1.5 Features
Some of the features of the Digital Court Recording Solution are listed below:
Digital Court Recorder
• Supports recording in ASIO (Audio Streaming Input-Output) mode for devices with a corresponding ASIOdriver.
• Supports recording in Windows mode for standard Windows audio devices.
• Supports video recording.
• Burning of a recording onto CD or DVD.
• Attach documents, such as evidence documents, to a recording file. You can open attachments, deleteattachments, seal/unseal attachments, and optionally include them when exporting recording files.
• Stream proceedings to a server which enables multiple users to view the proceedings in real time.
• Playback of recordings in both WAVE and ASIO modes.
• Playback dialog allows you to play parts of the current file being recorded without using Digital Court Player.
• Supports up to 32-channel recording.
• Channel names can be assigned and used in place of channel numbers.
• Meters show the level of a recording being made onto the appropriate media.
• Indicators for active channels.
• Ability to listen to a recording as it is being made.

Digital Court Recording System14
• Create new files or append to existing files.
• Mirroring of recordings onto local disks, network disks, and CDs.
• Keeping of time points using auto-bookmarks during a recording.
• Two touch-screen views allow you to control activity from a touch screen.
• An assistive view is available to comply with Section 508 of the Rehabilitation Act.
• Synchronize time between your PC and a digital display clock.
• Use of a PA system for playing recorded sound to an output audio device.
• Bookmarks allow you to navigate quickly in a sound file and store notes at chosen positions in a sound file.
• Special bookmarks, called dockets, can be used to distinguish cases.
• Docket information can be written to an ODBC-compliant database.
• You can use sealed bookmarks to seal all, or parts, of a recording.
• Bookmarks can be defined in advance and later inserted during the actual recording process.
• A bookmark can be assigned a color, which allows you to highlight or classify bookmarks. For example, youcan use different colored bookmarks to differentiate child witnesses, sensitive information, etc.
• The Digital Definition Editor program allows you to predefine bookmarks on a PC on which Digital CourtRecorder is not installed.
• The Digital Network Monitor program allows you to monitor the activity (both sound and video) in up to fourcourt rooms. You can add bookmarks and dockets, record new files, append to existing files, and playback thecurrent file being recorded.
• Shortcuts allow you to quickly insert predefined text into bookmarks and file notes using either keycombinations or abbreviations.
• File notes can be added to a recording file, and include both notes and private notes.
• File notes, bookmarks, or bookmarks based on their type can be exported as a text file, copied to theclipboard, or printed. You can choose which data fields to include.
• Configuration settings and text-substitution shortcuts can be exported and imported.
• Alert notification for a paused recording and when there is a low level of sound in all channels.
• Specification of valid file name formats.
• A file search facility lets you search for text across files and within dockets.
• Support for special characters and symbols that don't appear on your keyboard.
• A command-line interface can be used to initiate a recording.
Digital Court Player
• Playback of audio and video recordings, including a file that is currently being mirrored.
• Ability to work with file attachments. You can open attachments, delete attachments, seal/unseal attachments,and optionally include them when exporting recording files.
• Bookmarks allow you to navigate quickly in a sound file and store notes at chosen positions in a sound file.
• A bookmark can be assigned a color, which allows you to highlight or classify bookmarks. For example, youcan use different colored bookmarks to differentiate child witnesses, sensitive information, etc.
• An assistive view is available to comply with Section 508 of the Rehabilitation Act.
• File notes can be added to a recorded file.
• Private notes can be used in bookmarks, and optionally excluded when exporting a bookmark to a text file.
• File notes, bookmarks, or bookmarks based on their type can be exported as a text file, copied to theclipboard, or printed. You can choose which data fields to include.
• Export sealed recordings with a password or to an unsealed format.
• Preserve tone automatically during high-speed playback.
• Search and replace capability for text within bookmarks.
• Ability to play any combination of one or more channels.
• Export a file, or part of a file, directly to an audio CD.
• Export a file, or part of a file, to a WMA/WMV, WAV, AVI or DCR file with any combination of channels, and

General Information 15
optionally with video.
• Export a file, including bookmarks, audio, video, and attachments to PDF format. The media file can becreated and saved separately from the PDF document so that the audio/video links will work properly after youmove the file onto a Windows Media Server folder to be streamed to the end users.
• Configuration settings can be exported and imported.
• Indicators for active channels.
• Jump-to-time feature during playback allows easy navigation within a file.
• Retain last position in a file when it is closed and restore it when loading.
• A foot pedal can be used for playback.
• A file search facility lets you search for text across files and within dockets.
1.6 Implementation Steps
This section describes the high-level steps to implement the Digital Court Recording Solution.
At minimum, you should take the following steps:
1. Install the hardware.
2. Install the Digital Court Recorder program. Refer to “Installing the Digital Court Recorder”.
3. Install the Digital Court Player program. Refer to “Installing the Digital Court Player”.
Digital Court Recorder and Digital Court Player use the Image Mastering API from Microsoft to burn CDs. ThisAPI is included as part of Windows Vista. For Windows XP users, you must install this API separately if youplan to mirror files in ISO format (i.e. after a recording has completed) or export files to audio CDs. You candownload it by searching the Internet for: WindowsXP-KB932716-x86-ENU.exe.
1.7 Registering Digital Court Recorder
After installing and verifying Digital Court Recorder works properly, you should obtain a license file from BISDigital or an authorized dealer. If the program is not licensed then your use of Digital Court Recorder is limitedto 60 days.
To register Digital Court Recorder:
1. Obtain a license file by following the instructions on BIS Digital Inc.’s web site: http://www.BISDigital.com,
2. Copy the license file to the same folder where you installed Digital Court Recorder.
3. Rename the license file to regkey.bsh.
4. Restart Digital Court Recorder.
5. From the Help menu, click About, to check that the program is registered.
1.8 Installing the Digital Court Recorder
Digital Court Recorder is installed as a common application. It supports an "All Users" install to allow differentusers to work with the program on the same computer. At installation time, you can indicate that users withoutAdministrator privileges have "Read-only" access and are not allowed to change the program's configurationoptions.
The Digital Court Recorder program is packaged as an MSI file and uses the Windows Installer for installation.To install the program, take the following steps:
1. Run the dcr62re.msi program.
2. Follow the instructions on the screen.
If you receive a message during installation to stop Windows Indexing Service then take the following steps.
Digital Court Recording System16
1. From the Control Panel, choose "Administrative Tools - Computer Management”.
2. In the Computer Management tree, choose “Services and Applications - Indexing Service”.
3. Press the Stop button (black rectangle) in the toolbar to stop Indexing Service.
4. If you are installing Digital Court Player on the same machine, you can install this program when theinstallation of Digital Court Recorder completes.
5. When the installation completes, restart Indexing Service by clicking "Indexing Service" in the ComputerManagement tree, and then press the Start button on the toolbar.
Post-install ProcedureIf you are upgrading from an earlier release and have DCR files stored in a directory on the machine whereDigital Court Player or Digital Court Recorder are installed, then take the following steps:
1. From the Control Panel, choose "Administrative Tools - Computer Management”.
2. In the Computer Management tree, choose “Services and Applications - Indexing Service”.
3. Start a full scan of each of the directories where DCR are currently stored, as described below.
a) In the console tree, under "Indexing Service – System", click "Directories".
b) In the details pane, click the directory you want to scan.
c) On the "Action" menu, point to "All Tasks", click "Rescan (Full)" for a full scan of the selected directory, andconfirm you want to initiate a rescan.
d) Repeat steps a) to c) for each of the directories in the list.
For more information, refer to the Windows online help for Indexing Service.
1.9 Installing the Digital Court Player
Digital Court Player is installed as a common application. It supports an "All Users" install to allow differentusers to work with the program on the same computer.
The Digital Court Player program is packaged as an MSI file and uses the Windows Installer for installation. Toinstall the program, take the following steps:
1. Run the dcr62pe.msi program.
2. Follow the instructions on the screen.
See also "Installing the Digital Court Recorder".
1.10 Uninstalling the Digital Court Programs
To uninstall Digital Court Recorder:• From the Windows Start menu, choose “Programs” – “Digital Court Recorder” – “Program Maintenance”. Onthe Program Maintenance window, select "Remove".
To uninstall Digital Court Player:• From the Windows Start menu, choose “Programs” – “Digital Court Player” – “Program Maintenance”. On theProgram Maintenance window, select "Remove".
Alternatively, to uninstall any of the Digital Court programs, use “Start – Settings – Control Panel - Add/RemovePrograms”.

Using Digital Court Recorder 17
2 Using Digital Court Recorder
2.1 Starting Digital Court Recorder
To start Digital Court Recorder:
• From the Windows Start menu, choose “Programs” – Digital Court Recorder” – Digital Court Recorder”. Themain Digital Court Recorder window appears. For more information on the parts of this window, refer to “UsingDigital Court Recorder” later in this document.
2.2 Stopping Digital Court Recorder
To stop Digital Court Recorder:
• From the main Digital Court Recorder window, either select “File - Exit”, or click the X button in the upper right-hand corner.
2.3 Configuring Digital Court Recorder
2.3.1 Configuring Digital Court Recorder
To configure the system, you use the Digital Court Recorder program to set configuration options. Note that you can export and import configuration options when setting up similar systems.
To set configuration options: • From the main Digital Court Recorder window, select “View - Options”. A dialog appears from which you canaccess different configuration options. You can select from the following:
Dialog Use this dialog to set options for
Recording Recording source, sound quality, channel names, confirmations,notifications
Video Recording video
Playback Playback devices
New Files Creating new files
Mirroring Setting parameters for mirroring files to disk
Burning Burning files to other media
General Priority level, minimizing Digital Court Recorder application, windowdisplays, behavior when program closes, temporary files
Hot Keys Setting hot keys
Clock Setting synchronization parameters when using a digital clock
StartUp Starting Digital Court Recorder
Touch Screen Using a touch screen
Remote Monitoring Using Digital Network Monitor for remote monitoring of court rooms
Security Enabling a recording to be sealed
Bookmark Titles Specifying titles for the columns on the Predefined Bookmarks window, andfor specifying which docket fields to use, the names of the docket fields, and

Digital Court Recording System18
their default values.
PredefinedBookmarks
Specifying indicators for a predefined bookmark once you insert it into arecording
Broadcast Broadcasting a recording in real time
You can use the following buttons:
Button Function
OK Save your changes and exit the configuration dialogs.
Cancel Cancel all of your changes that have not been saved.
Apply Save your changes and keep the current dialog open.
Restore defaults Restore default settings for current dialog
Each of the configuration options is described in detail in the following sections.
2.3.2 Using the Recording Dialog
Use the Recording dialog to set options for recording.When you select Recording, the following dialog appears.
Source – specifies devices and channels used for recording.
Number of channels – select the number of channels to be used for recording.Type of driver – select a category for the devices used for recording. You can choose either "WaveDevices” (Windows mode) or "ASIO Device". Windows mode includes support for devices referencing WDMand MME. If your hardware platform supports both ASIO and Windows mode, it is recommended you choose“ASIO Device”. If you select wave mode for recording, then the confidence monitoring and PA outputs of the recorder must alsobe in wave mode. If you select ASIO mode for recording, then confidence monitoring and PA outputs may beeither ASIO or wave.If you select "ASIO Device", you can press the "Advanced" button to select an option to test the ASIO device

Using Digital Court Recorder 19
when Digital Court Recorder starts. The following dialog box appears.
By selecting the "Check ASIO device when program starts" check box, each time Digital Court Recorder starts,it will try to initialize the ASIO device and try to record something. You will be notified of any errors with thisprocess.
Recording devices for channels – click this button to specify the channels and devices. The dialog thatappears depends upon the number of channels and the type of driver you have selected.
For example, with 4 channels using WAVE devices, the following dialog appears:
With 8 channels using WAVE devices, the following dialog appears:
Active Channels - Select the channels to be used for recording.
Devices for Channels - Select the device for recording the pair of channels to the left. For example, the firstselection is the device used for channels 1 and 2.
With 4 channels using ASIO device, the following dialog appears:

Digital Court Recording System20
Active Channels - Select the channels to be used for recording.
ASIO Device for Channels - Select the ASIO device for recording all of the channels.
ASIO Control Panel – Click this button to display the Control Panel for the ASIO device (if it exists). Refer to thedocumentation for your hardware device for more information.
Channel namesYou can choose to replace the channel numbers with 2-character names. These names will appear in place ofthe channel numbers, such as in the channel selection buttons, in the display of recording levels, and so on.The names you choose are stored as part of the actual recording. Optionally, the channel names can bedisplayed when playing a file in Digital Court Player. When you change the channel names, the changes takeeffect for the next recording.
To replace a channel number with a channel name, take the following steps:
1. Click the "Channel names" button. The following dialog appears.
2. Select the "Use channel names" check box.
3. Select a channel in the list of available channels.
4. In the "Channel name" field, specify the name you want to use for the selected channel. You can use 1 or 2alphanumeric characters for this name.

Using Digital Court Recorder 21
5. Optionally, in the "Description" field, specify a description for this channel.
Sound qualityUse the “Change” button to change the sound file format and parameters for recording. A system dialogappears with the sound formats and parameters that are available on your system. The default format isSPEEX with attributes “16.6 kBit/s, 16.0 kHz, Mono, Q5”.
Confirm when stopping recordingClear the check box if you do not want to be prompted each time a recording stops.
Confirm when pausing recordingClear the check box if you do not want to be prompted each time a recording pauses.
Notification during recordingPress this button to select options for notifications during recording. The following dialog appears.
Notification when recording is paused
When a recording is paused, notification may take the form of a tone being generated on your speakers, or theDigital Court Recorder icon on the task bar may be flashed.
Flash the icon in Task Bar – The Digital Court Recorder icon will flash for 30 seconds in the task bar.
Generate a simple tone on the speaker – issue a simple tone. You can click the "Change" button and adjustthe tone settings on the dialog box shown below.
You can click the button to listen to the tone.

Digital Court Recording System22
This method will not work if you are playing sound through your sound card and your card does not allow themixing of sounds.
Notification when sound or video is absent
Select the "Display pop-up message" check box if you want automatic notification when the audio signal isabsent in all channels during a recording. A pop-up warning message is issued whenever there is anabsence of sound in all channels for specified period. If this alert is activated, the user should confirm that the system hardware is connected, powered-on andfunctioning properly. Regardless of the fact the alert has been issued, the Digital system will attempt tocontinue recording across all channels and the user may continue by simply clicking OK on the alert Windowafter the hardware setup has been confirmed.
For notification, you can use the "Duration of low levels in all channels before alert" field to specify the durationof low levels (in seconds) before the alert notification is issued. You can use the "Duration of absence of videostream" field to specify the duration of absence of video stream (in seconds) before the alert notification isissued.
2.3.3 Using the Video Dialog
Use the Video dialog to set options for video recording.When you select Video, the following dialog appears.
Enable video capture – check this box to enable the capturing of video.
Source:Device – select the video-capture device on your system. If the video-capture device has more than onephysical input, or supports more than one hardware path for data, then the video-capture device contains thevideo crossbar. Use the Crossbar button to display and set the “Crossbar properties” as shown below.
Resolution – select the resolution supported by your video-capture device.
Frame rate – select the number of frames per second.
Advanced – press this button to select the pixel depth and compression setting.
Save video in recording file – clear this check box if you do not want the video saved as part of the recording.This gives you the option of broadcasting video without saving the video into the recording file.
Compression:

Using Digital Court Recorder 23
Compressor – select the compressor used when recording video, or select "None" for uncompressed format.
Quality – select the compression quality. The Quality setting for compression ranges from 0 to 100. This is arelative range that controls the quality of the video recording. You should not change this setting unlessadvised to do so by Technical Support.
Key frame every n frames – select the key-frame rate (i.e. number of frames per key frame). The default is 5,which means a key frame occurs every 5 frames. You should not change this default unless advised to do soby Technical Support.
Advanced – press this button to set advanced configuration options, if your compressor supports additionaloptions.
Crossbar propertiesSelect options when the video-capture device contains the video crossbar.
Crossbar - lists the video crossbars available. Depending on the hardware, the video-capture device maycontain more than one instance of the video crossbar. Select the crossbar appropriate for your input source.
Input – select the input line from the list of available input connection lines.
Output – select the output line from the list of available output connection lines.
Advanced - press this button to set advanced configuration options. The resulting dialog depends upon thespecific video capture device you are using.
2.3.4 Using the Playback Dialog
Use the Playback dialog to set devices for playback, both for confidence monitoring and for use with a PAsystem.When you select Playback, the following dialog appears.

Digital Court Recording System24
Confidence MonitoringThese options are for monitoring during the recording process to ensure the recording is actually beingrecorded correctly.
Type of driverSelect the type of driver to use. The list of available devices depends on the type of driver you select.
DeviceFor WAVE mode, select your audio device (sound card) for recording. If the setting is “system default”, thenDigital Court Recorder uses the device specified in your system audio settings (e.g. Start - Settings - ControlPanel - Multimedia - Audio).For ASIO mode, select one of the device channels. Confidence monitoring and PA system outputs can beeither ASIO or WAVE.
Use digital boostIf you want to boost the volume levels during playback, select this check box, and choose the amount of boostfrom the drop-down list.
PA SystemThese options are for playback using a PA System.
Type of driverSelect the type of driver to use. The list of available devices depends on the type of driver you select.DeviceFor WAVE mode, select your audio device (sound card) for recording. If the setting is “system default”, thenDigital Court Recorder uses the device specified in your system audio settings (e.g. Start - Settings - ControlPanel - Multimedia - Audio).For ASIO mode, select one of the device channels. Confidence monitoring and PA system outputs can beeither ASIO or WAVE.
Use digital boostIf you want to boost the volume levels during playback, select this check box, and choose the amount of boostfrom the drop-down list.
Advanced Use this button to display the “Advanced Playback Settings”. The dialog looks like this:

Using Digital Court Recorder 25
The Mixer device lets you control the volume of sound and other playback parameters. Many Wave devices haveassociated Mixer devices. Normally, the default settings (i.e. “Use an associated mixer device” checked andspecified “Mixer device”) are sufficient. Some Wave devices do not have an associated Mixer device. Youshould not choose the Mixer device of other Wave devices. Digital Court Recorder will not work properly if youchoose an incorrect device.A mixing device is available only in WAVE mode.
Use an associated mixer deviceThis box is checked if your Wave device has an associated Mixer device. The associated Mixer device appearsin the “Mixer device” field. You can uncheck this box if using the associated Mixer device results in problems.This box is unchecked and the “Mixer device” field is grayed out if there is no associated Mixer device.
Mixer device Select a mixer device only if a Wave device has incorrectly found an associated Mixer device.
Sound processing for playing all channelsDefault settings are normally acceptable. Only change these settings under the advice of Technical Support.
2.3.5 Using the New Files Dialog
Use the New Files dialog to set options for the creation of new files. When you select New Files, the following dialog appears.

Digital Court Recording System26
Default folder for creating and opening filesSet a default folder for creating and opening files. Digital Court Recorder can use the previously used folder asthe default (select “Last used folder”) or you can specify the default folder yourself (select “This folder” andspecify the location).If you type in the name of a new folder then Digital Court Recorder automatically creates this folder when youclick on the OK or Apply button.
File name prefixFiles are generated with names containing the date and time in the format yyyymmdd_hhmnss. Optionally,specify a prefix for the automatically generated file names. Since this prefix is used as a prefix for file names,restricted characters are based on Windows file name restrictions. An example of a file name is:test_20051125_182614.dcr (timestamp, representing 18:26:14 on November 25, 2005, with a prefix of test).
Prompt for file name
Check this box if you want to be prompted for the file name and location when you initiate each recording. Thisallows you to override the defaults for these options.
Confirm new file during a recording
Select this check box if you want a confirmation alert issued when you try to create a new file and another file isalready open. This helps prevent you from mistakenly creating a new file when you have a recording already inprogress.
Continuous recording
Select this check box if you want recording to automatically continue when a new file is created (i.e. whencreating a new file for a new docket or when creating a new file during a recording). Otherwise, you mustmanually resume recording.
Create New Docket
Use this section to identify options when you create a new docket
Create new file for each new docket – select this check box if you want a new file created each time a newdocket is created during a recording. When a user creates a new docket, the recording is stopped, the previousfile is closed, and the new docket is inserted into a newly created file. Recording will continue only if the"Continuous recording" check box is selected above.
Use docket number in file name – select this check box if you want the docket number to be included as partof the new file name. This number appears after the prefix and before the timestamp.
Call this script - select this check box if you want to run a script when a new docket is created. This is useful,for example, if you want to use a script to write information into a database. Type the location of the script or
use the button to locate the script.

Using Digital Court Recorder 27
When a new docket is to be created, Digital Court Recorder executes the specified script, and passes to it thedocket information as a string in XML format. This string has the following fields:
Field Description
DOCKET node name for the XML document
DOCKNO Docket No.
JUDGE Judge
PLAINTIFF Plaintiff Attorney
PLAINMAN Plaintiff
DEFENSE Defense Attorney
DEFENDANT Defendant
CMNT Comment
CRTMUTC Creation time in UTC format
CRTMLOC Creation time in Local Time Zone format
FLPATH Path to the DCR file
FLNAME Name of the DCR file
Confirm predefined docket bookmarks - select this check box if you want the "New Docket" window to pop upeach time you insert a predefined docket bookmark into a recording.
2.3.6 Using the Mirroring Dialog
Use the Mirroring dialog to set options for mirroring files that you record onto disk. Files can be mirrored to alocal drive, a network drive, or a compact disc (CD).When you select Mirroring, the following dialog appears:

Digital Court Recording System28
Enable MirroringSelect this box to enable mirroring of the files you record.
WhenSelect when the mirroring will take place:• During recording - mirroring process starts when the recording starts and continues to mirror the file as it isbeing recorded.• After recording has stopped - once the recording stops, the file is mirrored.
WhereDisk type – select the type of disk on which the mirrored file will be created. You can choose "Local", "Network",or "CD". In the “Folder” field, specify the full path of the folder where mirrored files are saved. The "Total Size" and "FreeSpace" fields display information about the location you specify. For a compact disc, you can specify thenumber of copies to make.
Test Use this button to test that Digital Court Recorder can write to the location specified and in the format you havespecified.
After successful mirroring and closing file
Choose options after a file has been successfully mirrored and closed.Remove 'Archive' attribute - When you finish successfully a mirroring of a file, the attribute “Archive” for theoriginal file will be removed.Delete source file - When you close a file that has been mirrored, it is automatically deleted. A source file,which has been mirrored, is also deleted if you close Digital Court Recorder.
Advanced Use this button to display the “Advanced Mirroring Settings”. The dialog looks like this:

Using Digital Court Recorder 29
If a file was not mirrored successfully, Digital Court Recorder will try to complete the mirroring process in thebackground. If you want to change this behavior, clear the option "Complete unsuccessful mirroring".
Digital Court Recorder can mirror a recording after it has completed to an ISO-formatted CD. If you want to useISO format when mirroring to a compact disc, select "Use ISO-data format". You will also need to ensure thatCD recording for your drive has been enabled. You can also indicate you want to use UDF-format along with anautoformat feature for blank CDs. For more information, see "Writing to Compact Discs".
2.3.7 Using the Burning Dialog
Use the Burning dialog to set options for burning files that you record onto other media, such as CD. When you select Burning, the following dialog appears:
Enable burningSelect this box to enable burning of the files you record.
WhenSelect when the burning will take place:• Only manual burning – burning of a file takes place only when you initiate it through the "File – Burn to
CD/DVD" menu option or by clicking on the button in the Status panel for an open file. • After recording has stopped - burning process starts when the recording has finished. A confirmation dialogappears before the burning process actually starts.
WhereDisk type – select the type of disc on which the file will be burned. You can choose "CD" or "DVD". In the “Drive” field, specify the name of the drive used to burn the media.
Advanced

Digital Court Recording System30
Use this button to display the “Advanced Burning Settings”. The dialog looks like this:
Multiple DiscsWhen creating multiple discs, Digital Court Recorder will overlap a sound stream using the "Sound streamoverlap" setting. For example, when it creates the second disc, it will include the last 10 seconds from the firstdisc, by default.
FormatBy default, Digital Court Recorder will burn recordings using ISO format. This is the recommended setting.
Optionally, you can choose to use UDF-format. When using UDF format, Digital Court Recorder canautomatically format a blank CD to be used in the burning process. This feature requires all of the following:
• Digital Court Recorder is running on Windows Vista.
• Your system settings related to what happens when you insert a blank CD or DVD should either be set to"Take no action", or "Use AutoPlay for all media or devices" should be disabled.
• Digital Court Recorder is run under the Administrators or Backup Operators group account, unless the UserAccount Control is turned on. If the User Account Control is turned on, you should run Digital Court Recorderwith the "Run as administrator" function, which is located in the pop-up menu and in the shortcut for theprogram by going to "Properties - Shortcut - Advanced".
2.3.8 Using the General Dialog
Use the General dialog to set options for priority level, minimizing the Digital Court Recorder application, thewindows to display, and the behavior when closing the program.When you select General, the following dialog appears.

Using Digital Court Recorder 31
Priority levelChoose the priority level of the Digital Court Recorder program. You can use this setting to improve the systemresource utilization of the program. Select one of the following:High - set the priority to the highest level. Above normal - set the priority at an intermediate level between "Normal" and "High". Normal - default priority.Because sound recording is a real-time process, buffers can get out of sequence. This can lead to echoesand other problems in a recording. The Priority level setting helps eliminate such problems and providescleaner recordings. If the default setting of “Normal” results in such problems, change the priority setting to"Above normal". If problems arise at this setting, change the priority setting to "High". Note: If Digital Count Recorder is not on a dedicated machine, it is recommended that high-utilizationapplications such as virus checkers are not being run during a recording.
Minimize toChoose the behavior when you minimize the Digital Court Recorder application. Select one of the following:Task Bar – appears minimized in the Task Bar. This is the normal behavior.System Tray – appears as an icon in the System Tray.Thin View – display Digital Court Recorder's Thin View, where only the channel recording levels are displayed.For more information, see "Using the Thin View".
Automatically show File Notes windowCheck this box if you want to have the File Notes window automatically displayed when opening a file thatcontains file notes.
Automatically show Bookmarks windowCheck this box if you want to have the Bookmarks window automatically displayed when opening a file thatcontains bookmarks.
Behavior when program closes
You can select Log off user to log off the current user when you close the Digital Court Recorder program, oryou can select Shut down Windows to shut down Windows when the program closes.
AdvancedClick the Advanced button if you want to specify a folder for temporary files. The size of a recording file can bequite large. Because of this, the Digital Court Recorder application saves recorded information in a temporaryfile rather than in memory.When you first start the Digital Court Recorder application, it sets the folder for temporary files based on thefollowing:• If the system environment variable TMP exists, it uses its value.• Else, if the TEMP system environment variable exists, it uses its value.

Digital Court Recording System32
• Otherwise, it uses the folder where the application is installed.
2.3.9 Using the Hot Keys Dialog
Use the Hot Keys dialog to set hot keys for quick access to common commands.When you select Hot Keys, the following dialog appears.
Enable Hot KeysCheck this box if you want to use global hot keys.
Setting Hot KeysTo change a hot key setting, take the following steps: 1. Click on the item in the list of commands that you want to change.2. In the “Press new key” box press the keyboard combination you want to use as a hot key.3. Click OK or Apply.
You can use “Clear” to disable a hot key or “Clear All” to set all hot keys to “None”.If any of these combinations is used by another active application or shortcut, the combination will not workwith Digital Court Recorder.
2.3.10 Using the Clock Dialog
Use the Clock dialog to set options for synchronization with an outside clock device.When you select Clock, the following dialog appears.

Using Digital Court Recorder 33
Synchronize time with Display ClockCheck this box to synchronize time with an outside clock device.
Type of Display ClockSelect the type of display clock: Applied Technical Systems or Digital Display Systems.
Attached to portSelect the COM-port to which your clock device is connected.
Synchronization directionSelect the direction for synchronization:• PC sets time on Display clock - display your PC’s time on the display clock. • Display Clock resets PC time – set your PC’s time from the clock device. In this case, you need to havesufficient user rights in your operating system.
Activate time display when recordingSelect this option if you want to use the clock to indicate recording status. If the clock time appears, recording istaking place. If the clock time does not appear, recording has been turned off.
2.3.11 Using the StartUp Dialog
Use the StartUp dialog to set options for the start of the Digital Court Recorder application.When you select Startup, the following dialog appears.
Minimize when program starts

Digital Court Recording System34
Check this box to minimize the main window after the Digital Court Recorder application starts. The behaviorwhen you minimize is based on the minimize method you specify under View - Options – General. It can beminimized to the task bar or to the system tray.
Load a file when program starts You can optionally select a file to be automatically loaded when Digital Court Recorder starts. Choose one ofthe following:Load new file and use default file name – create a new file each time Digital Court Recorder starts. The nameof the file is based on your "New Files" settings.Load last-used file – load the file Digital Court Recorder last used (either played/recorded).Load this file – locate the specific file to be loaded.If the file no longer exists, or has been moved, this has no effect.
ActionYou can optionally start recording when the Digital Court Recorder program starts, by selecting the "Startrecording" check box. To record for a specified period, specify the duration in hours (hh) and minutes (mm).Optionally, select the "Close program when complete" check box to close Digital Court Recorder when it hasrecorded for the duration you have specified.
To have Digital Court Recorder automatically start when Windows starts, select “Start program automaticallywhen Windows starts”.
2.3.12 Using the Touch Screen Dialog
Use the Touch Screen dialog to set options for using a touch screen with Digital Court Recorder.When you select Touch Screen, the following dialog appears.
With a touch screen, you can use either the Touch Screen Full view or the Touch Screen Control View.
Touch Screen Control view – touch screen view with only the controls available. This is useful when you justwant to record and don't require bookmarks or video.
Touch Screen Full view – full-function touch screen view
Use Touch Screen view
Select this option to enable the use of a touch screen.
Hot key to switch between views
The hot key combinations are used to switch between the different views: TS (Touch Screen) Full view, TS(Touch Screen) Control view, and Standard view. The default hot key combinations are:

Using Digital Court Recorder 35
Hot Key Combination Switch to…
Ctrl + Alt + F Touch Screen Full view
Ctrl + Alt + C Touch Screen Control view
Ctrl + Alt + S Standard view
To change a default: place your cursor in the box, press a key combination, and click “Apply”. The statusindicates whether this key combination is allowed.
Activate when program starts
Select which Touch Screen view you want to appear each time Digital Court Recorder starts.
See also "Using a Touch Screen View".
2.3.13 Using the Remote Monitoring Dialog
Use the Remote Monitoring dialog to set options that allow the use of remote monitoring and control using theseparately licensed Digital Network Monitor program.
When you select Remote Monitoring, the following dialog appears.
Enable remote monitoring
Select this option to enable the remote monitoring facility.
Recorder's IP address
You may have more than one IP address on your PC. You must specify the IP address on this PC to use forremote monitoring using one of these options:
Use IP address from list – select an IP address from the list of IP addresses for all adapters.
Use this IP address - if, for any reason, an IP address cannot be determined, specify the address to be usedfor remote monitoring in the box to the right.
Listening port
Specify the port on which Digital Court Recorder listens for a remote PC being used to monitor and controlrecordings.
2.3.14 Using the Security Dialog
Use the Security dialog to set options to enable the sealing of a recording or parts of a recording.When you select Security, the following dialog appears.

Digital Court Recording System36
Enable security
Select this option if you want to allow a recording or parts of a recording to be sealed. This allows you to usespecial bookmarks, called sealed bookmarks. Audio saved between a Begin Seal bookmark and an End Sealbookmark will be encrypted and can only be played by supplying the appropriate password.
See also "Working with Sealed Recordings".
When you enable security, the following dialog appears:
Specify Passwords
Complete the following password fields. Each password must be at least six characters long.
New Recording password – password used to seal data.
Confirm new Recording password – re-enter the recording password.
New Override password – an override password you need to supply if you want to change the current recordingpassword.
Confirm new override password – re-enter the override password.
Changing a Password
It is not recommended you change a password. Previous recordings made with a different password will notbe playable using Digital Court Recorder.
You can change either the Recording password or the Override password by taking the following steps:
1. Click Change passwords. The Specify Passwords dialog box appears.
2. In the Old Recording or Override Password field, specify either the current recording password or theoverride password.
3. Select the password you want to change, enter the new password, and confirm the new password.

Using Digital Court Recorder 37
2.3.15 Using the Bookmark Titles Dialog
Use the Bookmark Titles dialog to customize the column titles that appear on the Predefined Bookmarkswindow, and for specifying which docket fields to use, the names of the docket fields, and their default values.
When you select Bookmark Titles, the following dialog appears.
Select the fields you want to use.You can replace a default title by typing the new title in the corresponding text field in the “Title” column. You can specify a default value for any of the fields by typing the default value in the corresponding text field inthe “Default Value” column.
2.3.16 Using the Predefined Bookmarks Dialog
Use the Predefined Bookmarks dialog to specify options for working with predefined-bookmark files and tospecify indicators for used bookmarks in the Predefined Bookmarks window.When you select Predefined Bookmarks, the following dialog appears.
Default folder for creating and opening filesSet a default folder for creating and opening predefined-bookmark files. Digital Court Recorder can use thepreviously used folder as the default (select “Last used folder”) or you can specify the default folder yourself

Digital Court Recording System38
(select “This folder” and specify the location).If you type in the name of a new folder then Digital Court Recorder automatically creates this folder when youclick the OK or Apply button.
Load a file when program starts You can optionally select a predefined-bookmark file to be automatically loaded when Digital Court Recorderstarts. Choose one of the following:Load last-used file – load the predefined-bookmark file Digital Court Recorder last used.Load this file – locate the specific file to be loaded.If the file no longer exists, or has been moved, this has no effect.
When you insert a predefined bookmark into a recording, Digital Court Recorder can visually indicate, in thePredefined Bookmarks window, the bookmark has been used. You can choose any combination of thefollowing options:
Grey button – change the button at the left of the bookmark in the list to the following:
Demote bookmark – move the bookmark to the end of the unused bookmarks in the list. The order of usedand unused bookmarks depends on the order in which they appear in the file and does not depend on theorder in which you insert them. If you reset all of the usage indicators then all of the bookmarks are rearrangedto their original order. When a bookmark is demoted, all separator bookmarks that are directly below it in thelist of bookmarks are also demoted.
Highlight background – highlight the used bookmark's background with the color you choose. Click the“Change” button to choose the color you want to use for highlighting.
When a bookmark is demoted, all separator bookmarks that are directly below it in the list of bookmarks arealso demoted.
Bookmarks should inherit colors – select this option if you want to retain the color of a predefined bookmarkwhen you use it as a bookmark in your recording.
2.3.17 Using the Broadcast Dialog
Use the Broadcast dialog to set options for broadcasting, or streaming, a recording in real time. When you select Broadcast, the following dialog appears.

Using Digital Court Recorder 39
Use Broadcast feature – select this check box to enable a recording to be broadcasted, or streamed, in realtime.
Push to serverSelect this check box if you want the recorder to initiate the connection to a server running Microsoft MediaServer (MMS). This allows multiple users to monitor the same stream via Digital Network Monitor. Specify the“Server name” and “Publishing point” name, and click the “Log on as” button to specify a valid user name andpassword that has permission to log on to the Microsoft Media server.
The default port number is 80. If the server is using a different port, specify the port number in the “Servername” field. For example, "http://MyServer:8080" specifies port number 8080.
Pull from RecorderSelect this check box if you want a Microsoft Media server or player to initiate a connection to the recorder usingthe HTTP protocol. This allows users to browse to the address of the recording machine to access the stream.You can change the default port number of 8080.
Include video – if selected, the video data will be included in the broadcast.Use multiple bit rates (MBR) - if selected, the video output consists of a single input encoded multiple times,each with different bit-rate settings. When a file with MBR encoding is read, the reader will determine whichstream to use based on the available bandwidth.
Click the “Change Format” button to adjust format parameters.
Start broadcasting when program starts – select this check box if you want to have broadcasting startedautomatically when Digital Court Recorder starts.
2.3.18 Exporting and Importing Configuration Options
You may want to set up similar Digital Court Recorder systems with the same configuration options. From onesystem, you can export the configuration options as a file and then import that file to another system.
To export all of your configuration options for Digital Court Recorder, take the following steps:1. From the main window, click Tools, and then Export Configuration Options.2. Specify the name and location for the exported file.
To import configuration options to Digital Court Recorder, take the following steps:1. If you have a recording file open, you will need to close it.2. From the main window, click Tools, and then Import Configuration Options.3. Specify the name and location for the file containing the configuration options you want to import.Once the file has been imported successfully, you must restart Digital Court Recorder to continue to use it.
2.4 Using Digital Court Recorder
Digital Court Recorder allows you to have multiple windows open. By resizing and repositioning the windowson your workspace, you can work with different windows simultaneously. The following shows one way oforganizing your workspace. You can monitor the progress of a recording, add bookmarks (includingpredefined bookmarks) at different points in the recording, and use text-substitution shortcuts.

Digital Court Recording System40
2.5 Digital Court Recorder Main Window
The Digital Court Recorder main window consists of different parts, as shown below:

Using Digital Court Recorder 41
Digital Court Recorder MenusFrom the main Digital Court Recorder window, you can use the following menus:
Menu Use this menu to …
File Create/open/close files, display file properties, burn a file, exit the program.
Audio Record, pause, stop, broadcast, display ASIO Control Panel, play in real time, setchannels being played, enable confidence monitoring and the use of a PA system,enable channel-mixing mode for playback.
View Show/hide different options (i.e. toolbar, tooltips, always on top, PA Systeminformation, confidence monitoring), change the font, switch to a different view (touchscreen, assistive, thin), customize the toolbars, and set configuration options.
Tools Display Playback window, define text-substitution shortcuts, create and usepredefined bookmarks, find text in files, export/import configuration settings.
Help Display online help, display program and registration information, activate tracefacility.
ToolbarThe toolbar allows you easy access to common operations. You can use the following buttons, and associatedmenu items and shortcut keys on the default toolbar:

Digital Court Recording System42
Button Description Menu Shortcut Key
Create a new sound file. File – New Ctrl + N
Open an existing sound file. File – Open Ctrl + O
Change configuration options. View – Options Alt + F7
Show or hide the File Noteswindow.
View – File Notes
Show or hide the Bookmarkswindow.
Bookmarks – Show Bookmarks Alt + F2
Show or hide the Video window. View – Video Preview
Display Playback window View – Playback Window
Switch to the Thin View. View – Thin View Alt + F5
Show or hide the TextSubstitution window.
Tools – Text Substitution
Show or hide the PredefinedBookmarks window.
Tools – Predefined Bookmarks
Find data in files Tools – Find in Files
Customizing the ToolbarYou can customize the different toolbars used in Digital Court Recorder. For example, you can choose whichbuttons appear on the toolbar and the order in which they appear.
On the View menu, click Customize Toolbar. The following dialog box appears.

Using Digital Court Recorder 43
To lock the toolbar to prevent it from being repositioned, select Lock toolbar.
To show/hide the toolbar, select/clear the Visible check box.
To add a toolbar button, select a button from the list of Available toolbar buttons, and then click Add.Alternatively, you can drag-and-drop a button from one list to the other.
To remove a toolbar button, select a button from the list of Current toolbar buttons, and then click Remove.Alternatively, you can drag-and-drop a button from one list to the other.
To change the position of buttons on the toolbar, select a button from the list of Current toolbar buttons, andthen click Move Up or Move Down.
To restore the toolbar buttons to their default settings, click Restore default.
You can also customize the toolbar by right-clicking the toolbar, and then clicking Customize.
StatusThis group displays status and length of the current file. You can select “File – Properties” for more informationabout the current file.
RecordYou can use the following buttons, menus and shortcuts:
Button Description Menu Shortcut Key
Record Audio – Record Ctrl + R
Pause/continue Audio - Pause Ctrl + U
Stop Audio - Stop Ctrl + T
A meter for each of the channels being recorded shows the level of the recording for the associated channel.

Digital Court Recording System44
This is the level of the recording being output to the recording media, and not the level of the input coming fromthe microphones (although these levels should be the same if everything is working properly).
2.6 Recording
Recording VideoIf you want to record video as well as audio, use "View – Options – Video" to set your options for videorecording, and select “Enable video capture”. When you start to record, Digital Court Recorder records videoand embeds it into the .dcr file it creates.
Starting a Recording
To record a sound file, click on the button or select “Audio – Record”. The application starts to record thefile from the end position.
Viewing Video during a Recording
During a recording, you can display what is being captured on video. The icon in the Action displayindicates video recording is enabled, as shown below.
To display the video being recorded, select "View – Video Preview", or press the button on the maintoolbar. A separate window opens that you can drag around your screen as required.
The Video Preview window looks like this:
The status bar shows the video device name, the current frame rate, and the current size of the video area.
From the View menu, you can show/hide the status bar, zoom in and out, and adjust the video size to fit in thewindow.
From the Settings menu, you can adjust the quality of the video, indicate whether the date and time shouldappear, and where the date and time should appear.
Pausing a Recording
To interrupt a recording, click on the button or select “Audio – Pause”. To resume a paused recording,
click on the button or select “Audio – Pause”.
Stopping a Recording
To stop recording, click on the button or select “Audio – Stop”.
Creating a new bookmark during recording You can create bookmarks during a recording.To create a new bookmark:

Using Digital Court Recorder 45
With the Bookmarks window open, click the button on the bookmark toolbar, or from the Edit menu, clickNew Bookmark.
Creating a new docket during recording You can create docket bookmarks during a recording.To create a new docket:
With the Bookmarks window open, click the button on the bookmark toolbar, or from the Edit menu, clickNew Docket.
2.7 Monitoring a Recording
Confidence monitoring of a recording allows you to listen to a recording as it is being made. You canlisten to any of the recording channels being used.To set options for confidence monitoring, use “Options - Playback”. Then you can use the following dialog onthe main window to use confidence monitoring.
Confidence monitoring during recording
Click the “Enable” box, if you want to play your recording as it is being made. This allows you to determine thatthe recordings are being made onto the appropriate media and that they are at a level of loudness sufficient tobe easily understood during playback.
The slider in this section controls the volume of playback during recording. However, it is only available whenyou use WAVE mode to monitor playback.
Use the button to the right of the “All channels” button to indicate whether any combination of channels canbe mixed during playback.
• When the button looks like , mixed mode is switched off. This means the program can play only onechannel at a time or all channels together.
• When the button looks like , mixed mode is switched on. This means the program can play anycombination of channels you choose below.
Indication of active channels
To indicate what channels are played back, the buttons that turn them on and off are different colors.
A small image appears to the far right of a switched-on channel to indicate it is active. In the example below,channels 1, 2, 3 and 4 are active:

Digital Court Recording System46
2.8 Using a PA System During a Recording
A PA System lets you play a recording to any audio device attached to your PC. Digital Court Recorder can playback sound using a PA System in both WAVE and ASIO modes.
To set options for your PA System, use “Options - Playback”. When the PA System is turned on in your options,the main Digital Court Recorder window includes the following:
You can show/hide these options from the View menu.
Clearing the “Enable software playback” checkbox allows you to mute and free up the output channel so thatyou can use Digital Court Player to play back a file which is not the current file being recorded.
The slider in this section controls the volume of playback during recording. It is available only when you areusing WAVE mode to monitor playback. The Volume control for ASIO mode depends upon the device driver andcannot be changed in Digital Court Recorder.
You can select the channels for playback as it is monitored in a PA System. Use the button to the right of the“All channels” button to indicate whether any combination of channels can be mixed during playback.
• When the button looks like , mixed mode is switched off. This means the program can play only onechannel at a time or all channels together.
• When the button looks like , mixed mode is switched on. This means the program can play anycombination of channels you choose below.
2.9 Broadcasting a Recording
The Broadcast feature allows a recording to be broadcast, or streamed, in real time. To set options forbroadcasting, use “Options - Broadcast”.
A recording can be pushed to a server, such as a Microsoft Media Server (MMS), where it would be available tomultiple users to view in real time. This feature can be used internally to allow court supervisors to monitorcourt operations, or it can be used externally to allow the public to listen and watch the proceedings inreal-time.
To review the streamed data, a user browses to the site using the appropriate MMS link and then clicks the linkto launch Windows Media Player.
A recording can also be pulled from the recorder. This allows a user to access the stream by browsing to theaddress of the recording machine. This would only be used for internal or supervisory access and not over theInternet.
Broadcasting can automatically be started when Digital Court Recorder starts. Alternatively, as long as thebroadcast feature has been enabled, you can start broadcasting by doing one of the following:
• From the Audio menu, click Broadcast.
• Start a recording.
The icon indicates that broadcasting is active.

Using Digital Court Recorder 47
2.10 Playback of a Recording
To play back the current audio recording using Digital Court Recorder, use “Tools - Playback Window”.
The following dialog appears:
This dialog provides most of the same functions for playing recorded files as Digital Court Player has. You canlisten to audio that has been recorded, edit bookmarks, and work with attached files. However, you cannot viewthe video recording.
The file you are recording is loaded automatically. If you want to listen to another file, you will need to play itusing Digital Court Player.
2.11 Time Keeping
During recording, Digital Court Recorder automatically creates the following bookmarks:
• Event-based bookmarks for these events: Start Recording, Pause, Resume, Stop Recording. The names ofthese bookmarks include the date and time in local time and a short name for the event.
• Time-keeping bookmarks that allow you to easily jump to different time points within a file. These bookmarksdo not appear in the list of bookmarks.
You can show or hide auto-bookmarks from the list of bookmarks that appears in the Bookmarks window.From the Bookmarks window in Digital Court Recorder or Digital Court Player, use “View - Show Auto-bookmarks” to show or hide auto-bookmarks.
A list of bookmarks, including some auto-bookmarks, appears below:

Digital Court Recording System48
2.12 Synchronization with an Outside Clock
This feature allows Digital Court Recorder to synchronize the time on your PC with a digital clock.Synchronization can be done in either direction. The current system time and date on your PC can be sent to adigital clock or you can use the time and date from a digital clock to set these parameters on your PC (DigitalDisplay Systems only).
Synchronization between your PC and a digital clock occurs each minute.
When the synchronization process is performed, the following icon appears in the right-bottom corner of the“Status” area in main window:
If an error occurs, the following icon appears, and detailed information about the error appears in the “Options- Clock” dialog.
.
2.13 Mirroring Files to Disk
You can automatically mirror a recorded file to a location on your local machine, to a network location if youhave sufficient user rights to write to that location, or to a CD. Mirroring takes place automatically whenrecording. You set mirroring options using “View - Options - Mirroring”.

Using Digital Court Recorder 49
See also "Writing to Compact Discs".
Mirroring During RecordingIf “During recording” is selected, mirroring of the file starts when the recording starts. During recording, thefollowing icon appears in the top-right corner of the “Status” area in the main window:
When you stop a recording that is being mirrored to CD, the following button appears in the top-right corner ofthe "Status" area in the main window. This allows you to close the current file and eject the CD.
Hint: On some systems, the CD/DVD hardware eject button may not work or may not work consistently.
Therefore, it is recommended you click to eject the CD tray.
Using Digital Court Player, you can play back a file as it is being mirrored. For more information, see "UsingOnline Playback".
If an error occurs when recording with mirroring, the following icon appears, and detailed information about theerror appears in the “Options - Mirroring” dialog.
If the connection has been lost and you stop recording, a progress bar appears at the bottom of the primarywindow for about 10 seconds and you can then retry or cancel the mirroring process.
Mirroring After Recording StopsIf “After recording stops” is selected, the mirroring starts each time you stop the recording. A progress barappears at the “Status” area of the main window and you have the option to cancel the mirroring process.
Mirroring to a Network DiskWhen mirroring to a network disk, Digital Court Recorder waits for any network connection problems to beresolved. When you are using mirroring during recording, the following icon appears if a connection cannot beestablished:
Completing the Mirroring Process
By default, if a file was not mirrored successfully, Digital Court Recorder will try to complete the mirroring

Digital Court Recording System50
process in the background. You can change this behavior using the "Mirroring" configuration option.
2.14 Writing to Compact Discs
You can use Digital Court Recorder to mirror a recording to a compact disc in either ISO format or UDF format.You can also use Digital Court Player to export the audio data in a DCR file directly to an audio CD. For moreinformation, see "Exporting a File to an Audio CD".
ISO Format
An ISO-format CD can be created by any PC with a CD burner that is either running the Windows Vistaoperating system or the Windows XP operating system. Digital Court Recorder uses the Image Mastering APIfrom Microsoft to write in ISO format. This API is included as part of Windows Vista. For Windows XP, you mustinstall this API separately. You can download it by searching the Internet for:WindowsXP-KB932716-x86-ENU.exe.
This type of CD can be read on another PC that is running any of the Windows operating systems. AnISO-format CD can be created by Digital Court Recorder when mirroring a recording to a CD only after therecording has completed.
UDF Format
Windows Vista can create a Universal Disk Format (UDF) CD. For Windows XP, third-party software (such asRoxio Easy CD Creator or Record Now!) is required to allow the CDs to be read on other PCs. Usually, thissoftware can be obtained at no extra cost from the creator of the UDF-burning software.
Choosing Which Format to Use
If you want to mirror to a CD in real time, you must use UDF format to burn the CD. ISO formatting cannot beused if you want to mirror to CD in real time while a recording is taking place.
Remember to use the Test button on the Mirroring dialog box to test that Digital Court Recorder can write to thelocation specified and in the format you have specified.
Using ISO Format
To enable the creation of ISO-format CDs when mirroring a recording, you must ensure the following:
1. Mirroring is enabled. On the "View - Options – Mirroring" tab, select "Enable Mirroring".
2. Mirroring will take place when a recording has stopped. On the "View - Options – Mirroring" tab, select "After recording has stopped".

Using Digital Court Recorder 51
3. On the "View - Options – Mirroring" tab, press the Advanced button, and select "Use ISO-data format".
4. CD recording has been enabled for your CD drive. From Windows Explorer, you can right click on your CDdrive and select Properties. On the Recording tab, check that "Enable CD recording on this drive" is selected,as shown below.
Using UDF Format
If you enable mirroring and choose to mirror a recording to a compact disc, the CD will use UDF format by

Digital Court Recording System52
default. Unlike mirroring to CD using ISO format, you can mirror to CD using UDF format in real time while arecording is taking place.
When using UDF format, Digital Court Recorder can automatically format a blank CD to be used in themirroring process. This feature requires all of the following:
• Digital Court Recorder is running on Windows Vista.
• Your system settings related to what happens when you insert a blank CD or DVD should either be set to"Take no action", or "Use AutoPlay for all media or devices" should be disabled.
• Digital Court Recorder is run under the Administrators or Backup Operators group account, unless the UserAccount Control is turned on. If the User Account Control is turned on, you should run Digital Court Recorderwith the "Run as administrator" function, which is located in the pop-up menu and in the shortcut for theprogram by going to "Properties - Shortcut - Advanced".
To use the autoformat feature:
• On the "View - Options – Mirroring" tab, click the Advanced button, and select the "Autoformat blank disc"check box below.
Formatting a CD-R disc takes approximately 20 seconds; formatting a CD-RW disc takes approximately 20minutes.
Once the disc is formatted, Digital Court Recorder labels the disc as dcr_date_time, where date is in YYMMDDformat, and time is in HHMM format.
2.15 Burning Files to CD/DVD
You can burn a recorded file to another media such as a CD or DVD. You can choose to copy all discs or anindividual disc.
You can initiate burning of a file manually or you can have burning take place automatically when a recordinghas stopped. You set burning options using “View - Options - Burning”.
If “After recording has stopped” is selected, a prompt appears when the recording stops asking you if theburning process should start. If “Only manual burning” is selected, the burning process starts only when you
initiate it from the "File – Burn to CD/DVD" menu or by clicking the button in the Status panel for an openfile.
Once you have confirmed the burning process, you can choose to burn the file to all of the discs or you canchoose a specific disc number to burn. For example, specifying 3 in the "Copy disc number" field will burn onlydisc number 3.

Using Digital Court Recorder 53
While burning a CD/DVD, a progress bar appears in the “Status” area of the main window and you have theoption to cancel the burning process.
2.16 Using Text Substitution
Use Text Substitution to set shortcuts for substituting text you use frequently in file notes, bookmarks, dockets,or predefined bookmarks. For example, you could use a shortcut key combination to quickly insert a person’sname into a bookmark. Or you could define an abbreviation such as HTA010 to automatically substitute the textassociated with Section 010 of the Highway Traffic Act into a bookmark. The text you use can have anassociated shortcut key combination or abbreviation or both.
The Text Substitution feature also supports colors in the text. If a color is used in a text substitution entry, thenthe bookmark in which the substitution is used will inherit that color. This allows you to establish a standardset of colors for different types of text substitutions.
You can keep the Text Substitution dialog open for quick access to your shortcuts.
Text substitution shortcuts can be exported as a file and then imported to another system to allow forstandardization amongst different users.
When you select “Tools - Text Substitution” or press the button, the following dialog appears.

Digital Court Recording System54
Customizing the Text Substitution WindowFrom the View menu, you can customize the look of the Text Substitution window as follows:
• Use “Choose Columns” to select the columns you want displayed.
• Use “Show Fields” to show or hide different fields.
• Use “Choose Order” to choose whether the list of text-substitution shortcuts should be in alphabetical order
or allowed to be rearranged manually.
You can customize toolbar used in the Text Substitution window. For example, you can choose which buttonsappear on the toolbar and the order in which they appear. For more information, refer to “Digital Court RecorderMain Window”.
Defining Text-Substitution ShortcutsInitially, there are some predefined shortcut key combinations defined: Ctrl+F1 – Ctrl+F9. To define atext-substitution shortcut, you can edit one of these predefined shortcuts or define a new one. When not editing
shortcuts, you can click the button to hide/show the bottom portion of the dialog.
To define a text-substitution shortcut from the existing list, take the following steps: 1. From the list of text-substitution shortcuts, select the one that you want to edit.2. In the “Enter text” field, enter the text you want to be inserted when you use a shortcut combination key orabbreviation. 3. If you want to use an abbreviation for this text, type the abbreviation in the “Abbreviation” field.
Note that If you do not want to use the shortcut key combination for this text, move your cursor to the "Press key"box and delete the shortcut key combination.
To define a new shortcut, take the following steps:
1. Do one of the following:

Using Digital Court Recorder 55
• Click the button.
• From the Edit menu, click New Shortcut.
• Right-click in the list of shortcuts and click New Shortcut from the shortcut menu.
2. In the “Enter text” field, enter the text you want to be inserted when you use the shortcut key.3. If you want to use an abbreviation for this text, type the abbreviation in the “Abbreviation” field. 4. If you want to use a shortcut key combination for this text:
a) Move your cursor to the "Press key" box. b) In the “Press key” box, press the keyboard combination you want to use as a shortcut. Note that if this
keyboard combination is used by another active application or shortcut, the combination will not workwith Digital Court Recorder.
The following shows a list of text-substitution shortcuts.
Highlighting a Text-Substitution Shortcut
Text-substitution shortcuts support the use of colors. When you use text substitution in a bookmark, thebookmark inherits the color of the text.
To highlight a text substitution with a background color, take the following steps:
1. Click the text substitution in the list. You can use Ctrl+Click or Shift+Click to select more than one shortcut.
2. Do one of the following:
• Click the left side of the button to highlight the selection with the current color (as displayed on the
button), or click the arrow on the button and select the highlight color from the drop-down list. You canchoose "None" to remove a highlight.
• On the Edit menu, click Highlight with Current Color to highlight the selection with the current color, or clickHighlight with… and select the highlight color from the drop-down list. You can choose "None" to remove ahighlight.

Digital Court Recording System56
Alternatively, you can right click in the list of text substitutions to select the item you want to highlight. From theshortcut menu, click Highlight with Current Color to highlight the selection with the current color.
If you want to change the color being used as the current color, based on the color of a bookmark or docket inyour list, take the following steps:1. Right-click in the list to select the item whose color you want to use. 2. From the shortcut menu, click Update Current Color.
Moving a Text-Substitution ShortcutThe order of text-substitution shortcuts can be alphabetic or manual. If the order is set to manual (“View –Choose Order – Manual”), you can rearrange the list of text-substitution shortcuts by moving a shortcut up ordown in the list.To move a text-substitution shortcut, take the following steps: 1. In the list of text-substitution shortcuts, click on the item that you want to move. You can use Shift+Click toselect a group of consecutive shortcuts.
2. Do one of the following:
• Click the button to move the selection up in the list, or click the button to move the selection down inthe list.
• On the Edit menu, click Move Up to move the selection up in the list, or click Move Down to move the selectiondown in the list.
Deleting a Text-substitution ShortcutTo delete a text-substitution shortcut, take the following steps: 1. In the list of text-substitution shortcuts, click on the item that you want to delete. You can use Ctrl+Click orShift+Click to select more than one shortcut.
2. Click the button, or from the Edit menu, click Delete Shortcut.3. Reply to the confirmation prompt.
Alternatively, you can right click on the item you want to delete and click Delete Shortcut from the shortcutmenu.
Using the Edit List Button
You can use the (Edit List) button to minimize the Text Substitution window, and display only the text,abbreviations, and shortcut key combinations, as shown below. This is useful when all text-substitution
shortcuts have been entered and you want to work with them during a recording. You can click , or from theView menu, click Edit List to toggle the display.

Using Digital Court Recorder 57
Inserting Text using a Text-substitution Shortcut
You can use text substitution in the text fields for bookmarks, dockets, predefined bookmarks, and file notes.To insert text at the location of your cursor, you can use a shortcut key combination, an abbreviation, or both,depending on how you have defined the shortcut.
To insert text using a shortcut key combination, you can simply press the keyboard shortcut.To insert text using an abbreviation, you can type the full abbreviation or display a pop-up window from whichyou can select the corresponding text.
· If the “Insert - Show Pop-up Window when using Ctrl+Space” option is not set, press Ctrl+Space, typethe full abbreviation, and press Enter.
· If the “Insert - Show Pop-up Window when using Ctrl+Space” option is set, you do not have to type thefull abbreviation. For example, if you want to use the text associated with the abbreviation HTA010, you cantype HTA and press Ctrl+Space. A list of all text-substitution shortcuts appears, with the first possiblematch highlighted. You can scroll through the list, select the text you want to use, and then double-click toinsert it.

Digital Court Recording System58
If the Text Substitution dialog is open, you can also use any of these methods to insert text using yourtext-substitution shortcuts:
• Click the button in the first column for the shortcut.
• Double-click the entry in the list.
• Right-click the shortcut in the list, and click Insert Text from the menu.
• Highlight the shortcut in the list, and either click the button, press Enter, or from the Insert menu, clickInsert Text.
Exporting and Importing Text Substitution ShortcutsYou may want to standardize the text substitution shortcuts amongst different users. You can export theshortcuts as a file and then import that file to another system.
To export all of your text substitution shortcuts, take the following steps:1. From the Text Substitution window, click Tools, and then Export Shortcuts.2. Specify the location for the exported file.
To import text substitution shortcuts, take the following steps:1. From the Text Substitution window, click Tools, and then Import Shortcuts.2. Specify the location for the file containing the text substitution shortcuts.
2.17 Using a Touch Screen View
Instead of using Digital Court Recorder's standard view, or interface, you can use a Touch Screen view. Youcan choose to use the Touch Screen Full View or the Touch Screen Control View, and switch between thedifferent types of views as required.
Note: To use a Touch Screen View, your screen resolution must be set to 800 pixels (width) by 600 pixels(height).
When Digital Court Recorder starts, it can automatically present one of the Touch Screen views. This is basedon your "Options - Touch View" settings.
To display a Touch Screen view from the Standard view, use “View - Touch Screen Full View”, “View - Touch

Using Digital Court Recorder 59
Screen Control View”, or press the hot-key combination you defined in your "Touch View" settings.
Touch Screen Full ViewThe following is an example of the Touch Screen Full View. This is similar to the standard view, however, youcan click on the “Keyboard” toolbar icon to invoke the Microsoft on-screen keyboard and use this to type in yourinformation.
Touch Screen Control ViewThe following is an example of the Touch Screen Control View. This is useful when all you want to do is toquickly start recording and you do not need to add bookmarks or view video.

Digital Court Recording System60
Switching ViewsTo close a Touch Screen view and return to the Standard view or the other Touch Screen view, press the hot-key combination you defined in your "Touch View" settings.
2.18 Using the Assistive View
A special view is available in both Digital Court Recorder and Digital Court Player to meet the requirements forcompliance with Section 508 of the Rehabilitation Act.
To activate or deactivate this view, take the following steps:1. Close any open recording files and predefined bookmark files.2. From the View menu, click Assistive View.3. Restart the program.
2.19 Using the Command Line
Digital Court Recorder can be run from the command line. For example, you can use your system scheduler tostart recording by specifying the location of the Digital Court Recorder executable and passing it someparameters.
The syntax to run Digital Court Recorder from the command line is:
dcourtre.exe [Filename] [-newfile] [-Record] [-Duration=[hh][:mm]] [-Minimize] [-Close]
The parameters are explained below:

Using Digital Court Recorder 61
[Filename] – specifies the name of a file you want Digital Court Recorder to open. Include the full path to thefile. If the path contains spaces, enclose it in double quotes. The Filename parameter is not required if youwant to record to a new file.
[-newfile] – create a new file. You can abbreviate this parameter as [-n].
[-Record] – indicates you want to start recording. If you specify an existing file name, the recording appends tothe existing file. Otherwise, Digital Court Recorder creates this file using the rules you've specified for filenaming, and begins recording to this file. You can abbreviate this parameter as [-r].
[-Duration] – identifies the length of the recording in hours (hh) and minutes (mm). The recording stops afterthe duration specified. You can abbreviate this parameter as [-d].
[-Minimize] – indicates the program should run in minimized mode. You can abbreviate this parameter as [-m].
[-Close] – indicates the program should close when recording has finished. You can abbreviate this parameteras [-c].
Example
The following example creates a new file (based on your file naming rules), records data to that file for 1minute, and then closes the Digital Court Recorder program.
"C:\Program Files\BISDigital\DigitalCourtRecorder\dcourtre.exe" -Record -Duration=00:01 -Close
2.20 Keyboard shortcuts
Use the shortcut keys for quick access to common commands.
You can use the following shortcut keys in the Main window:
Description Shortcut Key Button Menu
Create a new recording file Ctrl + N File – New
Open an existing recording file Ctrl + O File – Open
Start recording Ctrl + R Audio – Record
Pause / continue Ctrl + U Audio – Pause
Stop recording Ctrl + T Audio – Stop
Enable confidence monitoring Ctrl + P Audio – Confidence Monitoring
Play all channels of confidence monitoring Ctrl + 0 Audio – Playing All Channels
(monitoring)
Play a specific channel of confidence
monitoring
Ctrl + (1-8) Audio – Playing Channel (n)
(monitoring)
Change configuration options Alt + F7 View – Options
Show or hide the Bookmarks window Alt + F2 View – Bookmarks
Switch to the Thin View Alt + F5 View – Thin View
Switch to the Touch Screen Full View Ctrl + Alt + F View – Touch Screen Full
View
Switch to the Touch Screen Control View Ctrl + Alt + C View – Touch Screen Control
View
Switch to the Standard View Ctrl + Alt + S
You can use the following shortcut keys in the Bookmarks window:

Digital Court Recording System62
Description Shortcut Key Button Menu
Create a new bookmark F2 Edit – New Bookmark
Create a new docket Ctrl + F2 Edit – New Docket
Find text in bookmarks Ctrl + Shift + F Edit – Find
You can use the following shortcut keys in the Playback window:
Description Shortcut Key Button Menu
Play Ctrl + P Playback – Play
Stop Ctrl + T Playback – Stop
Rewind to the beginning Ctrl + H Playback – Go To – Home
Left (one step) Ctrl + F Playback – Go To – Left
Right (one step) Ctrl + G Playback – Go To – Right
Decrease the playback speed Ctrl + Shift + D Playback – Speed Play –
Decrease
Restore the normal speed Ctrl + Shift + N x1 Playback – Speed Play –
Normal
Increase the playback speed Ctrl + Shift + I Playback – Speed Play –
Increase
Play all channels Ctrl + 0 Playback – Playing All
Channels
Play a specific channel Ctrl + (1-8) Playback – Plaing Channel (n)
Create a new bookmark F2 Bookmarks – New Bookmark
Find text in bookmarks Ctrl + Shift + F Bookmarks – Find
You can use the following shortcut keys in the Predefined Bookmarks window:
Description Shortcut Key Button Menu
Create a new file of predefined bookmarks Ctrl + N File – New
Open an existing file of predefined
bookmarks
Ctrl + O File – Open
Create a new bookmark F2 Edit – New Bookmark
Create a new docket Ctrl + F2 Edit – New Docket
Move a bookmark or docket up in the list Alt + Up arrow Edit – Move Up
Move a bookmark or docket down in the list Alt + Down arrow Edit – Move Down
Restore the last-used predefined bookmark
and mark it as not used
Ctrl + Alt + Z Action – Restore Last-used
Bookmark
Refresh the list of predefined bookmarks F5 View – Refresh
You can use the following shortcut keys in the Text Substitution window:
Description Shortcut Key Button Menu
Create a text-substitution shortcut F2 Edit – New Shortcut

Using Digital Court Recorder 63
Move a text-substitution shortcut up in the
list
Alt + Up arrow Edit – Move Up
Move a text-substitution shortcut down in
the list
Alt + Down arrow Edit – Move Down
Refresh the list of text-substitution shortcuts F5 View – Refresh
3 Using Digital Court Player
3.1 Starting Digital Court Player
To start Digital Court Player:• From the Windows Start menu, choose “Programs” – “Digital Court Player” – “DigitalCourt Player”.
3.2 Stopping Digital Court Player
To stop Digital Court Player:• From the main Digital Court Player window, either select “File - Exit”, or click the X button in the upper right-hand corner.
3.3 Configuring Digital Court Player
3.3.1 Configuring Digital Court Player
To configure the system, you use the Digital Court Player program to set configuration options.
To set configuration options: • From the main Digital Court Player window, select “View - Options”. A dialog appears from which you canaccess different configuration options. You can select from the following:
Dialog Use this dialog to set options for
Playback Playback devices, behavior for automatic and manual pauses
Speed Altering playback speeds
StartUp Starting Digital Court Player
Hot Keys Setting hot keys
Foot Control Using a foot control to control playback
General Folders, displaying bookmarks window, minimizing the Digital Court Playerapplication, using channel names, opening files, temporary files
Security Enabling the playback of sealed sections of a recording
Bookmark Titles Specifying which docket bookmark fields to use and the names of these fields.
You can use the following buttons:
Button Function
OK Save your changes and exit the configuration dialogs.
Cancel Cancel all of your changes that have not been saved.

Digital Court Recording System64
Apply Save your changes and keep the current dialog open.
Restoredefaults
Restore default settings for current dialog
Each of the configuration options is described in detail in the following sections.
3.3.2 Using the Playback Dialog
Use the Playback dialog to set options for playing files. When you select Playback, the following dialog appears.
Wave deviceSelect your audio device (sound card) for playing. If the setting is “system default”, then Digital Court Playeruses the device specified in your system audio settings (e.g. Start - Settings - Control Panel - Multimedia -Audio).
Playback with automatic pausesDigital Court Recorder provides an automatic-pause mode for more effective transcription. When enabled, thisfeature plays a recording, pauses the playback, and then resumes the playback. This play/pause/play cyclecontinues for the duration of the file playback. You can use this feature to automatically pause the playback atcertain intervals, and allow you to catch up in transcribing. In some cases, this can eliminate the need for a footpedal or the use of hot keys to control playback.Duration of continuous playback - Specify the duration of continuous playback, in seconds.Size of automatic pause - Specify the size of the pause, in seconds.Size of step back after automatic pause - Specify the size of the step back, in seconds.For example, if you set “Duration of continuous playback” to 15 seconds, “Size of pause” to 5 seconds, and“Size of step back after pause” to 3 seconds, then a file plays for 15 seconds, pauses for 5 seconds, and thengoes back 3 seconds and starts playing from there.
Automatically step back after manual pauseThis feature automatically rewinds the recording a specified number of seconds whenever you pauseplayback. This applies when using a foot pedal or when using the Pause button on Digital Court Player’sprimary window.Use step back - Check this box if you want to use a step back after a manual pause.Size of step - Specify the size of the step back, in seconds.
Retain last positionSelect this option to retain the last position of the file being played when it is closed. When you start to play thefile again, playback starts from where it left off.

Using Digital Court Player 65
Notification when recording is stoppedYou can be notified via an audible tone when playback is paused or stopped. This alerts you that the playbackof a recording was turned off. This is useful when the auto-bookmarks are not visible, such as when using theThin View or when Digital Court Player is minimized.
To generate a simple tone when playback is stopped or paused, take the following steps:
1. Press the "Notification when recording is stopped..." button. The following dialog appears:
2. Select “Generate a simple tone during playback”. You can adjust the frequency and duration of the tone. The
volume depends on your current system settings. To select tone parameters, click on the button.Note: This method will not work if you are playing sound through your sound card and your card does not allowthe mixing of sounds.
Advanced Use this button to display the “Advanced Playback Settings” dialog.The dialog looks like this:
Mixer deviceThe Mixer device lets you control the volume of sound and other playback parameters. Many Wave devices haveassociated Mixer devices. Normally, the default settings (i.e. Use an associated mixer device checked andspecified Mixer device) are sufficient. Some Wave devices do not have an associated Mixer device. You shouldnot choose the Mixer device of other Wave devices. Digital Court Player will not work properly if you choose anincorrect device.Use an associated mixer deviceThis box is checked if your Wave device has an associated Mixer device. The associated Mixer device appearsin the “Mixer device” field. You can uncheck this box if using the associated Mixer device results in problems.This box is unchecked and the “Mixer device” field is grayed out if there is no associated Mixer device.

Digital Court Recording System66
Mixer device - Select a mixer device only if a Wave device has incorrectly found an associated Mixer device.
Sound processing for playing all channelsDefault settings are normally acceptable. Only change these settings under the advice of Technical Support.
Speech Enhancements - Use Voice Activity Detector (VAD) for AGCThis check box activates/deactivates the noise suppression amplification algorithm called Voice ActivityDetector (VAD). When this function is active, the AGC algorithm reacts only to fragments that contain voice. Thismakes the algorithm’s performance more accurate when processing voice recordings, and it prevents theprogram from raising the noise level during long pauses.
3.3.3 Using the Speed Dialog
Use the Speed dialog to set options for playback speeds. You can increase the playback speed beyond itsnormal speed and you can reduce the playback speed below its normal speed. Playback speeds arecontrolled through the Increase and Decrease Playback Speed buttons on the main Digital Court Playerwindow. Note that these buttons are only visible during playback. The amount by which the speed increases ordecreases is controlled by the settings you specify on the Speed dialog.
When you select Speed, the following dialog appears.
Preserve tone automatically during high-speed playbackWhen this option is selected, Digital Court Player tries to preserve tones when playing back a recording at ahigher than normal speed.
Retain altered playback speedCheck this box if you want to keep this altered speed setting. Otherwise, the speed value for each newplayback is reset to the normal speed (i.e. x1). For more information, refer to “Playback with Different Speeds”later in this document.
Step for altering playback speeds, when they are beyond the normal playback speedThis step is used to alter playback speeds in a range from 1-times to 2-times the normal speed. When theplayback speed is above normal, this step is used when you increase or decrease speed. For example, if the playback speed is set at normal and this step is set to .3, then the first time you press theIncrease Playback Speed button, the playback speed increases to 1.3 times the normal speed. The next timeyou press the Increase Playback Speed button, the playback speed increases to 1.6 times the normal speed,and so on. If you press the Decrease Playback Speed button while the speed is greater than normal, then thespeed decreases by .3 times the normal speed.
Step for altering playback speeds, when they are less than the normal playback speed This step is used to alter playback speeds in a range from .5-times to 1-times the normal speed. When theplayback speed is below normal, this step is used when you increase or decrease speed.For example, if the playback speed is set at normal and this step is set to .2, then the first time you press the“Decrease Playback Speed” button, the playback speed decreases to .8 times the normal speed. The next timeyou press the “Decrease Playback Speed” button, the playback speed decreases to .6 times the normalspeed, and so on. If you press the “Increase Playback Speed” button while the speed is less than normal, then

Using Digital Court Player 67
the speed increases by .2 times the normal speed.
3.3.4 Using the StartUp Dialog
Use the StartUp dialog to set options for the start of the Digital Court Player application.When you select Startup, the following dialog appears.
Minimize when program startsCheck this box to minimize the main window after the application starts. The behavior when you minimize isbased on the minimize method (Options – Minimize).
Load a file when program starts You can optionally select a file to be automatically loaded when Digital Court Player starts. Choose one of thefollowing:Load last-used file – load the file Digital Court Player last played.Load this file – locate the specific file to be loaded.If the file no longer exists, or has been moved, this has no effect.
Action Select “Start playback” if you want to automatically start playback of the file specified above after the applicationstarts.
3.3.5 Using the Hot Keys Dialog
Use the Hot Keys dialog to set hot keys for quick access to common commands.When you select Hot Keys, the following dialog appears.

Digital Court Recording System68
Enable Hot KeysCheck this box if you want to use global hot keys.
Setting Hot KeysTo change a hot key setting, take the following steps: 1. Click on the item in the list of commands that you want to change.2. In the “Press new key” box, press the keyboard combination you want to use as a hot key.3. Click OK or Apply.You can use “Clear” to disable a hot key or “Clear all” to set all hot keys to “None”.
If any of these combinations is used by another active application or shortcut, the combination will not workwith Digital Court Player.
3.3.6 Using the Foot Control Dialog
Use the Foot Control dialog to set options for using a foot control to control playback.When you select Foot Control, the following dialog appears.
Enable Foot ControlCheck this box if you want to use a foot control.
DeviceSelect your foot-pedal device from the drop-down list.
Number of pedalsSelect the number of foot pedals. You can use a 2 or 3-pedal device.
Set pedal functionsUse this button to display the “Pedal Functions” dialog. This dialog lets you assign functions for each devicepedal and enables you to control the playback of sound data.
Foot Control WizardIn order for the foot control to work properly, you should define a mapping of events. For example, you canautomatically step forward a specified number of seconds when you press the left pedal. You use the FootControl Wizard to map events.
For more information on using foot controls, refer to “Using a Foot Control”.
3.3.7 Using the General Dialog
Use the General dialog to set options for default folders, displaying of the Bookmarks window, and minimizingof the Digital Court Player application. When you select General, the following dialog appears.

Using Digital Court Player 69
Default folder Set a default folder for opening and saving a file. Digital Court Player can use the previously used folder as thedefault (select “Last used folder”) or you can specify the default folder yourself (select “This folder” and specifythe location).If you type in the name of a new folder then Digital Court Player automatically creates this folder when you clickon the OK or Apply button.
Minimize toChoose the behavior when you minimize the Digital Court Player application. Select one of the following:Task Bar - appears minimized in the Task Bar. This is the normal behavior.System Tray - appears as an icon in the System Tray.Thin View – display Digital Court Player's Thin View. For more information, see "Using the Thin View".
Automatically show
Choose the windows you want to have displayed automatically.
File notes window - select this box if you want to have the File Notes window automatically displayed whenopening a file that contains file notes.
Bookmarks window - select this box if you want to have the Bookmarks window automatically displayed whenopening a file that contains bookmarks.
Video window - select this box if you want to have the Video window automatically displayed when opening afile that contains video.
Use channel namesCheck this box if you want to display the names of channels in place of their numbers. Channel names, if usedduring the recording, will be displayed wherever channel numbers would normally appear, such as in thedisplay of channel levels.
Always open file in listen-only mode
Select this check box if you want to always open files in listen-only mode. This allows you to listen to a file anddisplay file notes and bookmarks but prevents you from making any updates. This is useful for administratorswho won't be updating files, and it prevents the file from being locked.
Note: Listen-only mode only works properly in an NTFS environment.
Advanced
Click the "Advanced" button if you want to specify a folder for temporary files. The size of a recording file can bequite large. Because of this, the application saves recorded information in a temporary file rather than inmemory.When you first start the Digital Court Player application, it sets the folder for temporary files based on thefollowing:• If the system environment variable TMP exists, it uses its value.• Else, if the TEMP system environment variable exists, it uses its value.

Digital Court Recording System70
• Otherwise, it uses the folder where the application is installed.
3.3.8 Using the Security Dialog
Use the Security dialog to enable you to playback sealed sections of a recording.
When you select Security, the following dialog appears.
Enable security
Select this option if you want to playback sealed sections of a recording. You can disable security by simplyclearing the Enable security check box.
If you want to specify a password, click the "Change password" button. The Specify Password dialog boxappears:
Specify Password
Complete the following fields:
New Recording password – password that is being used by Digital Court Recorder to seal data.
Confirm new Recording password – re-enter the recording password.
Once you specify the Recording password, then you can use Digital Court Player to play sealed sections of arecording that were recorded using this same password.
If you do not specify a password and security is enabled, then you will be prompted when you try to open asealed recording to either supply the correct password or skip the sealed segments.
See also "Working with Sealed Recordings".
3.3.9 Using the Bookmark Titles Dialog
Use the Bookmark Titles dialog to select which docket bookmark fields to use and to customize the titles, ornames, for these fields.
When you select Bookmark Titles, the following dialog appears.

Using Digital Court Player 71
Select the fields you want to use.You can replace a default title by typing the new title in the corresponding text field in the “Title” column.
3.3.10 Exporting and Importing Configuration Options
You may want to set up Digital Court Player on similar systems with the same configuration options. From onesystem, you can export the configuration options as a file and then import that file to another system.
To export all of your configuration options for Digital Court Player, take the following steps:1. From the main window, click Tools, and then Export Configuration Options.2. Specify the name and location for the exported file.
To import configuration options to Digital Court Player, take the following steps:1. If you have a recording file open, you will need to close it.2. From the main window, click Tools, and then Import Configuration Options.3. Specify the name and location for the file containing the configuration options you want to import.
Once the file has been imported successfully, you must restart Digital Court Player to continue to use it.
3.4 Using Digital Court Player
The Digital Court Player main window consists of different parts, as shown below:

Digital Court Recording System72
Digital Court Player MenusFrom the main Digital Court Player window, you can use the following menus:
Menu Use this menu to …
File Open/close a file, export data, display file properties, exit the program.
Playback Play, pause, stop, adjust the playing speed, set channels being played, useautomatic pauses, jump to a time.
View Show/hide different options (i.e. toolbar, tooltips, recording levels, Bookmarkswindow, etc.), customize the font, switch the type of view, customize the toolbars, setconfiguration options.
Tools Insert symbols, activate speech enhancements, find text in files, export/importconfiguration settings.
Selection Select part of a recording.
Help Display online help, activate trace facility, analyze DCR file, display programinformation.
ToolbarThe toolbar allows you easy access to common operations. You can use the following buttons, and associatedmenu items and shortcut keys on the default toolbar:
Button Description Menu Shortcut Key

Using Digital Court Player 73
Open an existing DCR file. File – Open Ctrl + O
Export to WMV, WAV, AVI or DCRfile.
File – Export Ctrl + Shift + E
Playback with automaticpauses.
Playback – Automatic Pauses Ctrl + Q
Jump to time position inrecording.
Playback – Jump to time
Change configuration options. View – Options Alt + F7
Show or hide the File Noteswindow.
View – File Notes
Show or hide the Bookmarkswindow.
View – Bookmarks Alt + F2
Show or hide the Video window. View – Video
Switch to the Thin View. View – Thin View Alt + F5
Find data in files Tools – Find in Files
Customizing the ToolbarYou can customize the different toolbars used in Digital Court Player. For example, you can choose whichbuttons appear on the toolbar and the order in which they appear.
On the View menu, click Customize Toolbar. The following dialog box appears.
To lock the toolbar to prevent it from being repositioned, select Lock toolbar.

Digital Court Recording System74
To show/hide the toolbar, select/clear the Visible check box.
To add a toolbar button, select a button from the list of Available toolbar buttons, and then click Add.Alternatively, you can drag-and-drop a button from one list to the other.
To remove a toolbar button, select a button from the list of Current toolbar buttons, and then click Remove.Alternatively, you can drag-and-drop a button from one list to the other.
To change the position of buttons on the toolbar, select a button from the list of Current toolbar buttons, andthen click Move Up or Move Down.
To restore the toolbar buttons to their default settings, click Restore default.
You can also customize the toolbar by right-clicking the toolbar, and then clicking Customize.
StatusDisplays status, length of file, absolute date and time, and time positions relative to the start and end of the file.Both the current position in a sound file (in seconds) and the time remaining in the file (in seconds) isdisplayed. When Digital Court Player can determine the time value for the current position, this time value isdisplayed in the “Time” field.You can select “File – Properties” for more information about the current file.
Slider (below Position)Displays the current position in a sound file. You can move the slider back and forth.
Selection PanelAllows you to select a part of a recording file. For more information, see "Using the Selection Panel".
Playing channelsControls which channels are being played. You can switch between the different channel selections using yourmouse, a hot key, or your foot pedal. If you are using more than eight channels, you can use the arrows to theright to scroll.
The button to the right indicates whether any combination of channels can be mixed during playback.

Using Digital Court Player 75
• When the button looks like , mixed mode is switched off. This means the program can play only onechannel at a time or all channels together.
• When the button looks like , mixed mode is switched on. This means the program can play anycombination of channels you choose.
VolumeYou can use the volume slider to control the playback volume. The indicator to the left indicates the sound level.
You can use the following buttons, menus and shortcuts:
Button Description Menu Shortcut Key
Play Playback – Play Ctrl + P
Pause/continue Playback – Pause Ctrl + U
Stop Playback – Stop Ctrl + T
Rewind to the beginning Playback – Go To – Home Ctrl + H
Left (one step) Playback – Go To – Left Ctrl + F
Right (one step) Playback – Go To – Right Ctrl + G
Go to end Playback – Go To - End Ctrl + E
After the and buttons is a list where you can select the step these buttons use when positioning yourrecording.
3.5 Using the Selection Panel
The Selection panel in Digital Court Player lets you select a part of a recording. The main use of this feature isto allow you to export part of a file.
An example of the Selection Panel is shown below:
Selection Panel Buttons
You can use the following buttons on the Selection panel and the corresponding items on the Selection menu:
Button Description Selection Menu Shortcut Key
Set the left selection boundary to the currentslider position.
Set Beginning ofSelection
Ctrl + Shift + P
Move the current position of the slider to theleft selection boundary.
Go to Beginning ofSelection
Clear the selection. Clear Selection

Digital Court Recording System76
Button Description Selection Menu Shortcut Key
Move the current position of the slider to theright selection boundary.
Go to End ofSelection
Set the right selection boundary to the currentslider position.
Set End of Selection Ctrl + Shift + T
Position the selection boundaries. Theselection boundary moves 1 second left andright. The main slider’s position does notchange. The left set of buttons is forpositioning the beginning of the selection;the right set of buttons is for positioning theend of the selection.
Stop playing at the next selection boundary. Stop Playing atSelection Boundary
Below the buttons, the following information appears when you make a selection:• Absolute and relative times of the beginning of the selection.• Size of the selection, in units of time.• Absolute and relative times of the end of the selection.
You can show or hide the Selection panel. From the Selection menu, click Show Selection Panel.
3.6 Using the Thin View
Digital Court Recorder and Digital Court Player each have a "Thin View" to reduce the information in their mainwindows. This mode frees up screen space and allows more room for you to work with other applications onyour computer.
Note: The Thin View always works in the “Always On Top” mode.
Displaying the Thin View
To display the Thin View, click the button on the main toolbar or select “View – Thin View”.
Moving the Thin ViewTo move the Thin View, click in the window area outside of any button, and drag it to the desired location onyour screen.
Digital Court RecorderWhen you are recording, you can switch to the "Thin View", where only the channel recording levels aredisplayed. You can also have the "Thin View" automatically displayed when Digital Court Recorder isminimized. The following is an example of the Thin View for Digital Court Recorder:
Digital Court Player

Using Digital Court Player 77
The “Thin View” reduces the main Digital Court Player window to a single bar with a minimum set of controls. The following is an example of the Thin View for Digital Court Player:
The Thin View consists of the following elements:
Element Description
Digital Court Player icon
Open file
Play
Change playback speed (visible only during playback)
Pause/continue
Stop
Rewind to beginning
Left (one step)
Current position in sound file
Right (one step)
Select channels to play
Restore main window
Close application
Current position indicatorThe indicator of the current position has the following display modes.
- shows the absolute time (hh:mn:ss AM or PM) of the current position.
- shows time (hh:mn:ss) from the beginning of the file to the current position.
- shows time (-hh:mn:ss) from the current position to the end of the file.
To switch modes, click anywhere in the indicator area.
3.7 Playback
3.7.1 Playing a Sound File
Before you Begin PlayingSet your playing device and other parameters, if they have not been set. Select “View – Options” and select the“Playback” dialog.
If you want to view video during playback, select "View – Video", or press the button on the main toolbar.The Video window appears. The window remains black until there is some video to display.

Digital Court Recording System78
Starting the Playback
To play a sound file, open the file to be played, and then click on the button or select “Playback – Play”.The application starts playing the file either from the current position or from the beginning if the currentposition is set to the end of the file.
Viewing Video During Playback
If a sound file contains video, you can select "View – Video" to display the recorded video in a separatewindow. The status bar shows the current frame size and the size of the video area. From the View menu, youcan show/hide the status bar, adjust the quality of the video, zoom in and out, and adjust the video size to fit inthe window.
Pausing the Playback
To interrupt the playing of a sound file, click on the button or select “Playback – Pause”. To resume a
paused playback, click on the button or select “Playback – Pause”.
Moving Within a File
To move forward or backward in a sound file, you can use the slider or the buttons. You can also move
right or left with a fixed step using the and buttons, or by using the corresponding menu items orshortcuts.
Changing the Speed of PlaybackYou can change speed of playback. It can be useful for fast searches or for more effective transcription. Formore information about changing the speed, refer to “Playback with Different Speeds”.
Step Back after Manual PauseYou can use a step back after a manual pause. This is equivalent to the operations: Stop and Move left onestep. To set step-back parameters, select “View – Options” and select the “Playback” dialog.
Automatic PausesThis mode can be useful for more effective transcription. For more information about playback with automaticpauses, refer to “Automatic Pauses”.
Using a Foot Control for Controlling PlaybackYou can control playback using a foot control. This is especially useful, for example, when transcribing sounddata into a text document. You can continue to type without interruption. For more information about using a footpedal, refer to “Using a Foot Control”.
Using Speech EnhancementsBefore playing a file or during playback, you can suppress the level of noise and adjust the tone. Select "Tools– Speech Enhancements". For more information, refer to "Adjusting the Tone" and "Suppressing Noise".
Stopping Playback
To stop playing, click on the button or select “Audio – Stop“.
3.7.2 Using Online Playback
You can use online playback in Digital Court Player to play a file that is currently being mirrored. This is usefulwhen you want to start transcribing a file while it is still being recorded.
To play back a file in online mode, take the following steps:
1. From the File menu on Digital Court Player's main window, click Open.
2. Select the file currently being mirrored from the mirror directory. The file opens in online mode and you canthen use some of the playback features.
When you open a file in online mode, the bookmarks and notes are not available, and some features such as

Using Digital Court Player 79
exporting the file and finding text are not available.
Once a sufficient amount of data has been mirrored, the slider will be enabled, allowing you to navigate withinthe file.
3.7.3 Automatic Pauses
You can use the “automatic pauses” mode for controlling playback. This is especially useful, for example,when transcribing sound data into a text document. You can continue to type without interruption.
Before you Begin PlayingSet autopause parameters, if they have not been set. Select “View – Options”, select “Playback”, and chooseyour “Playback with automatic pauses” settings.
Starting PlaybackAfter setting your autopause parameters, you can start the playback and indicate that you want automatic
pauses. Click the button on the main toolbar, or select “Playback – Automatic Pauses” then click on the
button.
Changing the Autopause Parameters During PlaybackYou can change parameters during playback using the “Autopause parameters” dialog. 1. Select “Playback – Autopause Parameters” or use the Ctrl+Alt+Q hot key to launch the following dialog.This dialog shows the current settings and allows you to change any of these values. The “Last value” columnshows the previous values you used.
2. Choose your settings for each of the following:
- Specify the duration of continuous playback, in seconds.
- Specify the size of the pause, in seconds.
- Specify the size of step back, in seconds.You can also click on “Enable automatic pauses” to enable/disable automatic pauses during playback. 3. Click OK.
3.7.4 Playback with Different Speeds
You can change the playback speed. This is useful for quick searches and for more effective transcription.
To change the playback speed of a sound file, use the buttons, which are visible during
playback ( ). To increase the speed, click on the button, or from the “Playback - Speed Play” menu,
select “Increase”. To decrease the speed, click on the button, or from the “Playback - Speed Play” menu,select “Decrease”. To restore the normal speed, click on the “x1” button, or from the “Playback - Speed Play”menu, select “Normal”.
The speed can be changed in a range from 0.5 times up to 3 times the normal speed. You can set the stepused to alter the speed using the “View - Options – Playback” dialog.

Digital Court Recording System80
For quick access to these functions you can use global hot keys. For more information about global hot keys,refer to “Using the Hot Keys Dialog”.
Playback usually starts with normal speed. However, you can use the “Retain altered playback speed” option,in the “View - Options – Playback” dialog, to retain a speed for the next play. Note that the value of the lastspeed works only within the same session of Digital Court Player.
3.7.5 Using Automatic Gain Control
Digital Court Player can use Automatic Gain Control (AGC) to control the sound level of speech recordingduring playback. By default, this feature is turned on.
To use Automatic Gain Control, take the following steps:
1. From the Digital Court Player main window, select "Tools – Speech Enhancements". The following dialogappears.
2. Select the "Use Automatic Gain Control (AGC)" check box.
3.7.6 Suppressing Noise
You can enhance the quality of reproduced sound by suppressing unwanted noise in a recording. By default,this option is turned on.
To suppress noise in a recording, take the following steps:
1. From the Digital Court Player main window, select "Tools – Speech Enhancements". The following dialogappears.

Using Digital Court Player 81
2. Select the "Use noise suppression" check box.
3. Move the slider to indicate the level of reduction. Note that it takes 1-2 seconds before the reduction takesplace.
The recommended value is 80%. Normally, noise is suppressed in the mixed result as opposed tosuppressing noise for each channel individually. If this does not have the desired result, you can change thissetting on the Advanced Playback Settings dialog.
3.7.7 Adjusting the Tone
To adjust the tone of a recording, take the following steps:
1. From the Digital Court Player main window, select "Tools – Speech Enhancements". The following dialogappears.
2. Select the "Use tone control" check box.
3. Move the slider to the left for more bass; move the slider to the right for more treble. The center positionmeans the file is played back with no change in tone. Note that it takes 1-2 seconds before the change takesplace.
3.7.8 Playing Back Channels
You can control which channels are being played back. This allows you to listen to all channelssimultaneously, listen to a particular channel, or listen to any combination of channels.

Digital Court Recording System82
Selecting ChannelsSelect channels from the main menu, or use the “Playback – Playing Channels” menu.
Selecting channels depends on the mixed mode that has been set. To choose this mode, use the button to the right of the channel number buttons or select “Audio – PlayingChannels - Enable Mixed Mode”.
• When the button looks like , mixed mode is switched off. This means the program can play only onechannel at a time or all channels together.
• When the button looks like , mixed mode is switched on. This means the program can play anycombination of channels you choose.
You can select a channel using your mouse or a hot key. When mixed mode is off:• Selecting a channel causes only that channel to be selected. When mixed mode is on:• Selecting a channel causes that channel to be selected in addition to the channels already selected.
You can also use a foot pedal to tab through the different channel selections. The behavior is the sameregardless of the mixed mode. Only one channel is selected at a time.
Displaying recording level for each channel
When Digital Court Player plays a sound file, the composite recording level is displayed on the right-hand side
of the dialog. In addition, the sound level of each channel appears, as shown below. The icon shows youwhich channels are active.
Changing the recording levels for individual channelsYou can adjust the levels for each channel individually by using the sliders to the right of the channel levelindicators, as shown below.
The default level for each channel is 100% (i.e. the level is not changed). For this default level, the slider is inthe center position. You can adjust the level from 25% to 400%. To restore the default level for all channels to
100%, use the button.

Using Digital Court Player 83
3.8 Foot Control
3.8.1 Using a Foot Control
You can control playback using a foot control. This is especially useful, for example, when transcribing sounddata into a text document as it allows you to continue typing without interruption.
Digital Court Player supports the Infinity Foot Control connected to a USB port.
After connecting the foot control, you must adjust settings in the “Options – Foot Control” dialog and run theFoot Control Wizard. The Foot Control Wizard sets the mapping of events for use with Digital Court Player.
Using the “Pedal Functions” dialog you can associate a function with each foot pedal.
Instead using a foot control for transcription, you can also use hot keys. For more information, refer to “Usingthe Hot Keys Dialog”.
3.8.2 Associating Functions to Foot Pedals
The “Pedal Functions” dialog looks like this:
This dialog lets you assign functions for each device pedal and enables you to control the playback of sounddata.
Step back by x sec. - move backward from current position each time the pedal is pressed. You can adjust thesize of the step from 1 to 999 seconds.Rewind with n times normal speed - rewind from the current position while the pedal is pressed. You canadjust the speed from 0.5 times to 3 times the normal speed.Play while pressed / Stop when released - play while the pedal is pressed; stop when the pedal is released.Play / Step back by x sec. when released - play while the pedal is pressed; stop when the pedal is releasedand automatic move backward from current position. You can adjust the size of the step from 1 to 999seconds.Step forward by x sec. - move forward from current position each time the pedal is pressed. You can adjust

Digital Court Recording System84
the step from 1 to 999 seconds.Forward with n times normal speed - fast forward from the current position while the pedal is pressed. Youcan adjust the speed from 0.5 times to 3 times the normal speed. When using this option it may be useful toautomatically step back a specified number of seconds when you release the foot pedal. You can specify thenumber of seconds in the "and step back by x sec. when released" field.Switch between the playing channels - tab through the channel selections: All channels, Channel 1, Channel2, and so on.
3.8.3 Using the Foot Control Wizard
The Foot Control Wizard helps you map events for your foot control. For more information about using a footcontrol, refer to the “Using a Foot Control” section of this document.You can run this wizard at any time by selecting “View – Options – Foot Control” and clicking on the “FootControl Wizard” button.
Before running the Foot Control Wizard, you should connect your foot control to your PC.The Foot Control Wizard consists of the following pages:• A Welcome page• Choice of device• Analysis and mapping of pedal movements• Completion of Foot Pedal Wizard.
Analysis and mapping of pedal movementsThe page looks like this:
To analyze and map the pedal movements, take the following steps:1. Click the “Start” button to start the Foot Control Wizard.2. Press and release the pedals of your device, as follows:
• For a 2-pedal control: press the left pedal, release the left pedal, press the right pedal, release the rightpedal.• For a 3-pedal control: press the left pedal, release the left pedal, press the middle pedal, release themiddle pedal, press the right pedal, release the right pedal.

Using Digital Court Player 85
3. Click the “Stop” button to stop the Foot Control Wizard, if it has not stopped automatically after releasing thelast pedal. A message appears indicating whether or not the wizard was able to successfully set map thepedal movements.If the red indicators do not light up while you press the pedals, the Foot Pedal Wizard cannot map the pedalmovements. This can be caused by the following:• Your device is switched off, it is not connected, or it does not work properly.• You have a non-standard device and the Foot Pedal Wizard was not able to detect the pedal movements.
3.9 Bookmarks
3.9.1 Working with Bookmarks
Bookmarks allow you to:• navigate quickly in a sound file• store notes at chosen positions in a sound file.• work with file attachments, such as evidence documents.• store time points in a recording by using auto-bookmarks.• distinguish cases by using a special bookmark called a docket.• standardize or classify bookmarks based on color (e.g. use different colored bookmarks to differentiate childwitnesses, sensitive information, etc.)• seal all of a recording or parts of a recording.
Bookmarks are automatically created during a recording at regular time intervals and for certain events, suchas when a recording starts. The notation for each bookmark consists of the date (mm/dd/yy), the time ofoccurrence (hh:mn:ss), and the short name of the event. For example:• 10/24/2004 11:20:23 PM - Start Recording
In addition to automatic bookmarks created during a recording, you can manually create bookmarks usingDigital Court Recorder and Digital Court Player. To save time, you can use either Digital Court Recorder orDigital Definition Editor to predefine bookmarks before a recording, and then insert them as you need themduring your recording. You can also use text-substitution shortcuts to automatically insert predefined text intothese bookmarks with a keyboard shortcut or abbreviation.
Optionally, you can exclude different parts of a file when exporting a .dcr file to another file or when exportingbookmarks to a text file.
Displaying the Bookmarks Window
To display the Bookmarks window, click the button on the main toolbar, or select “View – Bookmarks”. Thefollowing is an example of the Bookmarks window in Digital Court Player:

Digital Court Recording System86
The bookmarks window consists of a list of bookmarks, sorted by the position within the sound file. Below thisare the fields you can edit.
Customizing the Bookmarks Window
You can customize what information appears on the Bookmarks window and change its appearance. Forexample, you can choose which columns of information to display and change the order in which the columnsare displayed across your screen. See also "Customizing the Column Settings".
You can also use the following options from the View menu:
View Menu Option Function
Toolbar Show/hide the Bookmarks toolbar.
Show Auto-bookmarks Show/hide automatically created bookmarks.
Show Icon Show/hide the icon in the first column.
Show Date Show/hide the date in the Time column.
Choose Columns Select the columns you want displayed and the order in which youwant them to appear.
Show Fields Show/hide different fields in the display for each bookmark
You can also use "View – Font" from the main Digital Court Recorder window to change the font used forheadings and text fields in the Bookmarks window.
ToolbarThe toolbar allows you easy access to common operations. You can use the following buttons, and associatedmenu items and shortcut keys on the default toolbar:

Using Digital Court Player 87
Button Description Recorder's BookmarksMenu
Player's BookmarksMenu
New bookmark Edit – New Bookmark Edit – New Bookmark
New docket Edit – New Docket -
New attachment Edit – Attach File -
Delete bookmarks Edit – Delete Edit – Delete
Begin seal Edit – Begin Seal Edit – Begin Seal
End seal Edit – End Seal Edit – End Seal
Change position or length ofbookmark
- Edit – Reposition
Highlight a bookmark ordocket
Edit – Highlight with … Edit – Highlight with …
Find text in file notes Edit – Find Edit – Find
Scroll through list ofbookmarks as position insound file changes
- Position – Auto Scroll
You can customize toolbar used in the Bookmarks window. For example, you can choose which buttonsappear on the toolbar and the order in which they appear. For more information, refer to “Using Digital CourtPlayer”.
Customizing the Column Settings
You can customize the look of the Bookmarks window by selecting the columns of information you wantdisplayed and the order in which they appear across your screen.
Selecting the Columns to Display
To select the columns you want displayed, do one of the following:
• Right-click any column title. On the menu that appears, click the name of the column to add it or remove itfrom the list of columns to be displayed.
• Right-click any column title, and click More. Or, on the View menu, click Choose Columns. The ColumnSettings dialog box appears, as shown below. Select the columns you want displayed. You can either click thecheck box or click the column title to highlight it and click Show.

Digital Court Recording System88
Changing the Order of the Columns
To change the order in which the columns are displayed, you can click the column you want to move, hold yourmouse down, and drag the column to its new position. This is similar to moving columns in Windows Explorer.The screen below shows the Notes column being moved to the right. Notice the grey shading that appearswhen you drag the column name.
Alternatively, you can take the following steps to change the column order:
1. Do one of the following:
• Right-click any column title, and select More.
• On the View menu, click Choose Columns.

Using Digital Court Player 89
The Column Settings dialog box appears. The names of the columns from top to bottom reflect the order inwhich the columns appear from left to right on your screen.
2. Click the name of the column you want to move to highlight it.
3. Use the Move Up or Move Down button to change the order in which the name of the column appears.
3.9.2 Editing Bookmarks
Creating a new bookmarkIf you want to mark a point in a sound file, you can create a positional bookmark by taking the following steps:1. Use the Slider to set the current position (Digital Court Player only).
2. Use the F2 shortcut, click the button on the bookmark toolbar, or from the Edit menu, select “NewBookmark”.3. A new bookmark appears in the list and you are placed in the first field below.4. Type the information you want to store in the new bookmark.
Creating a sealed bookmark
You can use sealed bookmarks to seal or protect parts of a recording. Sealed sections of a recording require apassword for them to be played.
To seal part of a recording, click the button on the bookmark toolbar, or from the Edit menu, select "BeginSeal". The recording will be sealed until an End Seal bookmark is encountered. To create an End Seal
bookmark, click the button on the bookmark toolbar, or from the Edit menu, select "End Seal".
Editing bookmark notes You can edit the notation of a bookmark by taking the following steps:1. Select the bookmark.2. Click in the “Note” field.3. Update the notation, as required.
Creating a new docketFrom Digital Court Recorder, you can create a special bookmark called a docket. This allows you to distinguishcases within the same file. A docket uses a predefined format.
To create a docket, take the following steps:

Digital Court Recording System90
1. Use the Ctrl+Alt+F2 shortcut, click the button on the bookmark toolbar, or from the Edit menu, select “NewDocket”. The following dialog appears.
2. Complete the information as required. If you want the docket to be sealed, select Seal Docket. A passwordwill be required to listen to information pertaining to this docket.
3. Press OK to add the docket to the list of bookmarks.
Editing a docket You can edit the information in a docket by selecting it in the list of bookmarks and updating the note.
Attaching a File
From Digital Court Recorder, you can attach files, such as evidence documents, to a recording file. You canopen attachments, delete attachments, seal/unseal attachments, and optionally include them when exportingrecording files.
File attachments appear in lists of bookmarks, which means you can work with them just as you do any othertype of bookmark or docket.
To attach a file, take the following steps:
1. Click the button on the bookmark toolbar, or from the Edit menu, select Attach File. The following dialogappears.

Using Digital Court Player 91
2. Locate and select the file you want to attach.
3. Optionally, add any notes in the Notes field.
4. If you want the attached file to be sealed within an unsealed section of the recording, select SealAttachment. Note that by default, an attachment is automatically sealed if it is inserted within a sealed sectionof the recording. A password will be required to display the information in a sealed attachment.
5. Click the Open button to add the attached file to the list of bookmarks.
Opening an Attached File
To open a file attachment in a recording:
· Select the attachment in the list of bookmarks, and then from the Edit menu, click Open Attached File,or click the Open button in the bottom part of the dialog box.
The attached file will be opened in read-only mode in the corresponding program.
Sealing and Unsealing an Attached File During Playback
During playback, you can seal and unseal files attached to a recording.
To seal an attachment:
· Select the attachment in the list of bookmarks, and then from the Bookmarks menu, click SealAttached File.
To unseal an attachment:
· Select the attachment in the list of bookmarks, and then from the Bookmarks menu, click UnsealAttached File.
Highlighting a bookmark or docket
To highlight a bookmark or docket with a background color, take the following steps:

Digital Court Recording System92
1. Click the bookmark or docket in the list.
2. Do one of the following:
• Click the left side of the button to highlight the selection with the current color (as displayed on the
button), or click the arrow on the button and select the highlight color from the drop-down list. You canchoose "None" to remove a highlight.
• On the Edit menu, click Highlight with Current Color to highlight the selection with the current color, or clickHighlight with… and select the highlight color from the drop-down list. You can choose "None" to remove ahighlight.
Alternatively, you can right click in the list of bookmarks and dockets to select the item you want to highlight.From the shortcut menu, click Highlight with Current Color to highlight the selection with the current color.
Tip: You can press Ctrl+Click or Shift+Click to select multiple items to highlight all at once.
If you want to change the color being used as the current color, based on the color of a bookmark or docket inyour list, take the following steps:1. Right-click in the list to select the item whose color you want to use. 2. From the shortcut menu, click Update Current Color.
Deleting a Bookmark, Docket, or Attachment
To delete a bookmark, docket, or attachment, take the following steps:
1. Click the bookmark, docket, or attachment in the list.
2. Click the button on the bookmark toolbar, or from the Edit menu, select Delete.
Repositioning a bookmark You can change the position of an existing positional bookmark by taking the following steps:1. Use the Slider to set the new position.2. Select the bookmark.
3. Click the button on the bookmark toolbar, or from the “Edit” bookmark menu, select “Reposition”.
3.9.3 Using Predefined Bookmarks
To save time, you can define bookmarks in advance and then later insert them into your actual recordings.These predefined bookmarks are stored in a file with a .xml extension. You can have different files containingdifferent bookmarks, and load each file as required, even after a recording has started.You can predefine bookmarks using Digital Court Recorder, Digital Definition Editor, or Digital NetworkMonitor. The Digital Definition Editor program allows you to predefine bookmarks on a PC on which DigitalCourt Recorder is not installed.
Setting Up a New File for Predefined Bookmarks
To set up a new file for predefined bookmarks, take the following steps:
1. From the Tools menu, click Predefined Bookmarks, or press the button on the main toolbar. Thefollowing dialog appears:

Using Digital Court Player 93
2. The first time this dialog appears, you need to specify the location and name of a file to store your predefined
bookmarks. Click the button, or from the File menu, click New, to locate the directory where you want tostore your predefined bookmarks.
3. In the "File name" field, specify a name for the file. Note that Digital Court Recorder will create this file andadd the .xml extension to the name you specify.
4. Click "Save". Digital Court Recorder creates the file in the directory you choose, and opens it for editing.
Once you set up a file to store predefined bookmarks, you can open the file as required and do the following:
• Insert bookmarks and dockets into a recording.
• Create, edit, and delete bookmarks and dockets.
• Customize the list of bookmarks and dockets you create by moving them up or down in the list, adding aseparator, highlighting the background color used, or by changing the column settings.
• Append the contents of another bookmark file to the file you have open.
Opening a File of Predefined Bookmarks
To open a file of predefined bookmarks, take the following steps:
1. If the Predefined Bookmarks dialog is not open, from the Tools menu, click Predefined Bookmarks, or
press the button on the main toolbar. The "Predefined Bookmarks" dialog appears.
2. Do one of the following:
• Click the button, and select the file you want to open.OR• From the File menu, click Open, and select the file you want to open.OR•Click on the arrow button next to the File field, and use the drop-down list of past entries to locate the file youwant to open.
The file opens with any predefined bookmarks and dockets displayed in a list, as shown below.

Digital Court Recording System94
Creating a New Bookmark
To create a new bookmark, take the following steps:
1. Do one of the following:
• Click the button.
• On the Edit menu, click New Bookmark.
• Right click in the list of bookmarks and dockets. From the shortcut menu, click New Bookmark.
If the "Edit List" at the bottom of the screen is not visible, click the button, or from the View menu, click EditList.
The following dialog appears:

Using Digital Court Player 95
2. Fill in the fields below. Digital Court Recorder adds the bookmark to the list of predefined bookmarks.
Creating a New Docket
To create a new docket bookmark, take the following steps:
1. Do one of the following:
• Click the button.
• On the Edit menu, click New Docket.
• Right click in the list of bookmarks and dockets. From the shortcut menu, click New Docket.
If the "Edit List" at the bottom of the screen is not visible, click the button, or from the View menu, click EditList.

Digital Court Recording System96
2. Fill in the fields below. If you want the docket to be sealed, select Seal Docket. A password will be requiredto listen to information in the sealed docket. Digital Court Recorder adds the docket bookmark to the list ofpredefined bookmarks.
Deleting a Bookmark or Docket
To delete a bookmark or docket, take the following steps:
1. Click the bookmark or docket in the list.
2. Do one of the following:
• Click the button.
• On the Edit menu, click Delete.
Alternatively, you can right click on the bookmark or docket to select it. From the shortcut menu, click Delete.
3. Reply to the confirmation prompt.
Tip: You can press Ctrl+Click or Shift+Click to select multiple items for deletion.
Editing a Predefined Bookmark
To edit the contents of a bookmark or docket, take the following steps:
1. Select the bookmark or docket in the list.
2. Edit the fields below. If the fields are not visible, click the button, or from the View menu, click Edit List.
Inserting a Predefined Bookmark into a Recording
To insert a predefined bookmark into a recording, open the file containing the predefined bookmark you want to
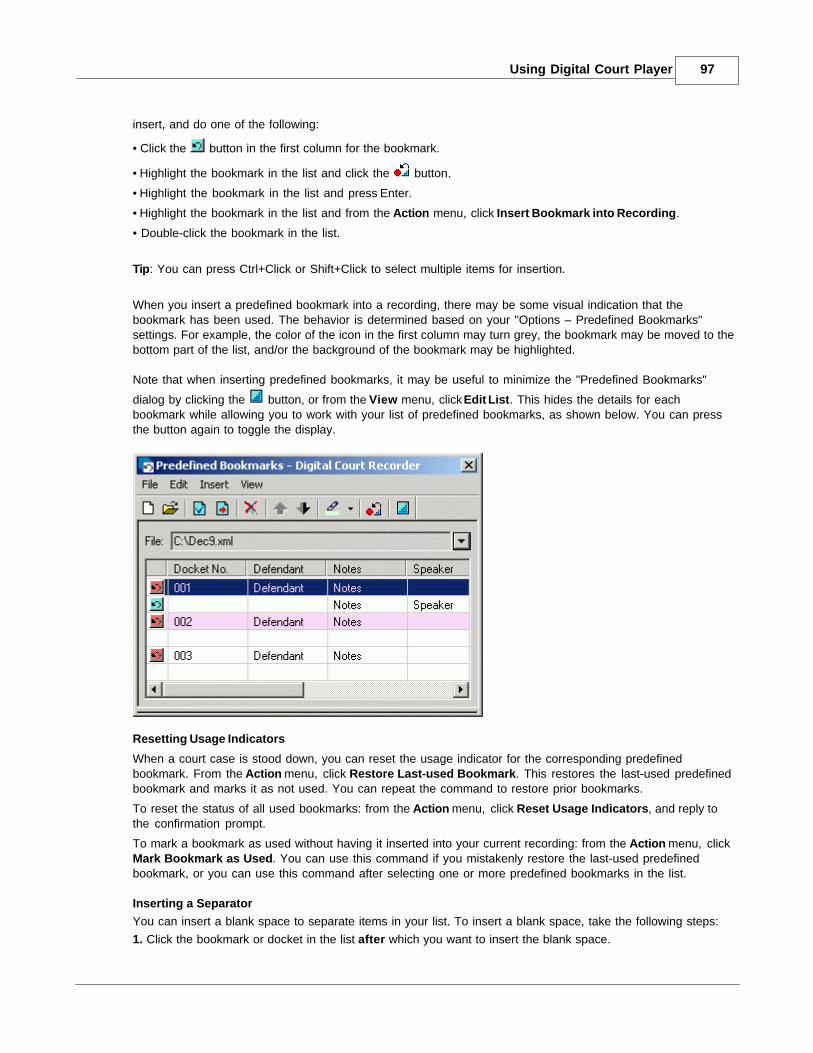
Using Digital Court Player 97
insert, and do one of the following:
• Click the button in the first column for the bookmark.
• Highlight the bookmark in the list and click the button.
• Highlight the bookmark in the list and press Enter.
• Highlight the bookmark in the list and from the Action menu, click Insert Bookmark into Recording.
• Double-click the bookmark in the list.
Tip: You can press Ctrl+Click or Shift+Click to select multiple items for insertion.
When you insert a predefined bookmark into a recording, there may be some visual indication that thebookmark has been used. The behavior is determined based on your "Options – Predefined Bookmarks"settings. For example, the color of the icon in the first column may turn grey, the bookmark may be moved to thebottom part of the list, and/or the background of the bookmark may be highlighted.
Note that when inserting predefined bookmarks, it may be useful to minimize the "Predefined Bookmarks"
dialog by clicking the button, or from the View menu, click Edit List. This hides the details for eachbookmark while allowing you to work with your list of predefined bookmarks, as shown below. You can pressthe button again to toggle the display.
Resetting Usage Indicators
When a court case is stood down, you can reset the usage indicator for the corresponding predefinedbookmark. From the Action menu, click Restore Last-used Bookmark. This restores the last-used predefinedbookmark and marks it as not used. You can repeat the command to restore prior bookmarks.
To reset the status of all used bookmarks: from the Action menu, click Reset Usage Indicators, and reply tothe confirmation prompt.
To mark a bookmark as used without having it inserted into your current recording: from the Action menu, clickMark Bookmark as Used. You can use this command if you mistakenly restore the last-used predefinedbookmark, or you can use this command after selecting one or more predefined bookmarks in the list.
Inserting a Separator
You can insert a blank space to separate items in your list. To insert a blank space, take the following steps:
1. Click the bookmark or docket in the list after which you want to insert the blank space.

Digital Court Recording System98
2. On the Edit menu, click Insert Separator. A blank space appears after your selection.
Alternatively, you can right click in the list of bookmarks and dockets where you want to insert a separator. Fromthe shortcut menu, click Insert Separator.
Changing the Order of Items in the ListYou can sort the list of predefined bookmarks alphabetically or you can move bookmarks or dockets up ordown in the list.
From the View menu, click Choose Order, and choose whether the list of predefined bookmarks should be inalphabetical order or allowed to be rearranged manually.
Sorting the List of Predefined Bookmarks
To sort the list of predefined bookmarks alphabetically:
· If the up and down arrows on the toolbar are not grayed out, from the View menu, click Choose Order, andselect Alphabetic.
You can click any of the column headers to sort the list alphabetically based on that column.
Moving a Bookmark or Docket
To move a bookmark or docket up or down in the list, take the following steps:
1. If the up and down arrows on the toolbar are grayed out, from the View menu, click Choose Order, andselect Manual.
2. Click the bookmark or docket in the list.3. Do one of the following:
• Click the button to move the selection up in the list, or click the button to move the selection down inthe list.
• On the Edit menu, click Move Up to move the selection up in the list, or click Move Down to move the selectiondown in the list.
Tip: You can press Shift+Click to select a group of items and move them all at once.
Highlighting a Bookmark or Docket
To highlight a bookmark or docket with a background color, take the following steps:
1. Click the bookmark or docket in the list.
2. Do one of the following:
• Click the left side of the button to highlight the selection with the current color (as displayed on the
button), or click the arrow on the button and select the highlight color from the drop-down list. You canchoose "None" to remove a highlight.
• On the Edit menu, click Highlight with Current Color to highlight the selection with the current color, or clickHighlight with… and select the highlight color from the drop-down list. You can choose "None" to remove ahighlight.
Alternatively, you can right click in the list of bookmarks and dockets to select the item you want to highlight.From the shortcut menu, click Highlight with Current Color to highlight the selection with the current color.
Tip: You can press Ctrl+Click or Shift+Click to select multiple items to highlight all at once.
Appending One File to Another
You can append the bookmarks and dockets from a file to the file that is currently open in the PredefinitionBookmarks window.
To append a file, take the following steps:
1. From the File menu, click Append. The Append dialog appears.

Using Digital Court Player 99
2. Locate the file you want to append, and click Open. An empty bookmark (separator) is inserted at the bottomof the current file followed by all of the bookmarks and dockets from the appended file.
Customizing the ToolbarYou can customize toolbar used in the Predefined Bookmarks window. For example, you can choose whichbuttons appear on the toolbar and the order in which they appear. For more information, refer to “Digital CourtRecorder Main Window”.
Customizing the Column Settings
You can customize the look of the Predefined Bookmarks window by selecting the columns of information youwant displayed, the order in which they appear across your screen, and the titles for the docket bookmarkfields.
Selecting the Columns to Display
To select the columns you want displayed, do one of the following:
• Right-click any column title. On the menu that appears, click the name of the column to add it or remove itfrom the list of columns to be displayed.
• Right-click any column title, and click More. Or, on the View menu, click Choose Columns. The ColumnSettings dialog box appears, as shown below. Select the columns you want displayed. You can either click thecheck box or click the column title to highlight it and click Show.
Changing the Order of the Columns
To change the order in which the columns are displayed, you can click the column you want to move, hold yourmouse down, and drag the column to its new position. This is similar to moving columns in Windows Explorer.The screen below shows the Notes column being moved to the right. Notice the grey shading that appearswhen you drag the column name.

Digital Court Recording System100
Alternatively, you can take the following steps to change the column order:
1. Do one of the following:
• Right-click any column title, and select More.
• On the View menu, click Choose Columns.
The Column Settings dialog box appears. The names of the columns from top to bottom reflect the order inwhich the columns appear from left to right on your screen.
2. Click the name of the column you want to move to highlight it.
3. Use the Move Up or Move Down button to change the order in which the name of the column appears.
Changing the Titles of the Columns
To change the titles of the columns and the names of the docket fields, from the main Digital Court Recorderwindow, use "View – Options" and select Bookmark Titles. Customize the fields as required.
Closing a File of Predefined Bookmarks

Using Digital Court Player 101
To close a file of predefined bookmarks:• From the File menu, click Close.
3.9.4 Using Special Characters
You can use special characters and symbols that don't appear on your keyboard for the text you type in differentplaces, including the following:
• Fields for bookmarks and dockets, including notes.
• Text field when using "Find in Files" to search files.
• Text field when using "Find Text in Notes" to search notes.
• Text area of the Text Substitution window.
For example, you can use international characters such as à and ë, or symbols such as ¢ and ¼.
Inserting a Special Character
To insert a special character or symbol, take the following steps:
1. Click where you want to insert the character.
2. Use the Symbol dialog box to insert the character. You can access this dialog from the following places:
Recorder or Player Location To access…
Digital Court Recorder Main window On the Tools menu, click Insert Symbol.
Digital Court Recorder Playback window On the Bookmarks menu, click Insert Symbol.
Digital Court Recorder New docket dialog box Click the button.
Digital Court Recorder Touch Screen View Click the button.
Digital Court Player Main window On the Tools menu, click Insert Symbol.
The Symbol dialog box is shown below.

Digital Court Recording System102
3. Double-click the character you want to insert. Alternatively, you can select the character and click Insert, use the "Shortcut key" displayed in the Symbol dialogbox, or press Alt+ the symbol code. If you click Insert and Close, the symbol will be inserted and the Symboldialog box closes.
Note: The "Symbol code” that appears on the Symbol dialog shows you information regarding the standardWindows key combination for entering a character. If you know the character code for a character, you do notneed to open the Symbol dialog box. You can simply click where you want to insert the character, hold downthe Alt key, and use the numeric keys on the right side of your keyboard to type the "Symbol code". This featuredepends on your operating system. You can use this combination to insert a symbol in any text field in anydialog and is not limited to the places listed above.
3.9.5 Working with Sealed Recordings
You can seal a recording or parts of a recording. This secures the sealed sections of the recording and thesesections can only be played (unsealed) under special circumstances. Sometimes the audio may be unsealedpermanently and become part of the regular public record. Other times, the audio may be unsealedtemporarily.
During a recording or after a recording has been made, you can seal the recording between a Begin Sealbookmark and an End Seal bookmark. This causes that section of the recording to be encrypted. Users withthe appropriate security can play back sealed parts of a recording.
Using Security with Digital Court Recorder
To enable recordings to be sealed: use "View - Options – Security" in Digital Court Recorder, select Enablesecurity, and specify and confirm a recording password and override password. This allows you to use BeginSeal and End Seal bookmarks in a recording to secure the data between them. If you try to open a sealedrecording later then you must use the same password for full access to the entire recording.
If security was not enabled when a recording took place then you will not be able to add sealed bookmarks toit, even if security is now enabled.
If you try to open a file previously recorded where security was enabled, but now security has been disabled,then you will be able to open the file, but you will only be able to play unsealed audio. You will not be able tocreate or delete any sealed bookmarks.
Using Security with Digital Court Player
If you want to use Digital Court Player to play the sealed sections of a recording, you can use "View - Options –Security" in Digital Court Player to enable security and to specify the same recording password you specifiedin Digital Court Recorder. You will have complete access to the entire audio and all of the bookmarks that usedthe same recording password to secure the file. You can export any part of the audio.
If security is enabled in Digital Court Player, but either the password has not been specified or it does notmatch the password used to encrypt the file you want to play, you will be prompted as you open a sealedrecording to either specify the correct password or to skip the sealed segments. If security is not enabled in Digital Court Player then you will not receive any prompts when you open a sealedrecording. Sealed segments will be automatically skipped. This is useful on public-use PCs in the courthousewhere people should not be listening to the sealed portions of recordings.
Exporting a File with Sealed SegmentsYou can use Digital Court Player with the correct recording password to export a file with sealed segments.There are four different options available to deal with the sealed segments.
Export with sealed segments – export the file with all sealed segments. A password is required to listen to thesealed segments.
Export with sealed segments and a new access password – export the file keeping all sealed segmentsencrypted, but access to the sealed segments will require a different access password. Specify and verify anaccess password for this file. A user that wants to listen to the sealed sections must supply this samepassword.
Export and delete any sealed segments - export the file and delete all sealed segments. Automatic stop/start

Using Digital Court Player 103
bookmarks are substituted to indicate where the sealed segments were removed. This is useful when youwant a recording to be unsealed permanently and made part of the standard public record.
Export and unseal any sealed segments – export the file with all sealed segments unsealed. The sealedbookmarks are removed. None of the data in the file will require a password for access.
3.9.6 Jumping to Time Points in a Recording
When you open a file, there are time points at regular intervals and also for events such as when a recordingstarts or stops. Time points in a file allow you to jump to positions based on absolute time and date values.
The current time position in the file is displayed in the “Time” field in Digital Court Player’s main window. In thefollowing example, the recorded file is 4:19 seconds long. The recording is positioned at 4/8/2005 10:41:13AM, which is 3 seconds from the beginning of the file and it is 4:16 seconds to the end of the file.
To jump to a time point, take the following steps:
1. In the main Digital Court Player window, use “Playback - Jump to time” or press on the toolbar. Thefollowing dialog appears:
2. In the “Date” field, select a date from the list of dates that appear in the file. Optionally, you can use the “Setcurrent position” button to fill the Date and Time fields with the current position.
3. In the “Time” field, specify the time. You can press the button to display a list of previous time values youhave used, and select a time from the list.
4. Press the “Jump” button.
Digital Court Player jumps to the time/date location in the file, if it exists. Otherwise, the “Jump to nearestposition” dialog appears, from which you can choose the nearest time position (i.e. either the previous or next).

Digital Court Recording System104
3.9.7 Finding Text in File Notes and Bookmarks
You can search for text in file notes and bookmarks within an open file in Digital Court Recorder or Digital CourtPlayer.These programs also have a search facility you can use to find text across a number of DCR files. See "FileSearch Facility" for more information.
Digital Court Recorder and Digital Court Player also have a search facility you can use to find text across anumber of DCR files. See "File Search Facility" for more information.
To find text in file notes or bookmarks within an open file, take the following steps:1. Do one of the following:
· In the Bookmarks window, from the Edit menu, select Find.
· Click on the toolbar.
The following dialog appears:
2. In the Find what field, enter the text on which you want to search.3. If you want to find the exact phrase you typed above, select the Find the exact phrase check box. Otherwise,the program looks for any of the words you typed.4. If you want to use a phonetic algorithm, select the Use a phonetic algorithm check box. The Metaphonealgorithm is used unless you have chosen the Soundex algorithm in the Advanced Find Settings dialog boxwhen using the file search facility. 5. Click the Find Next button to start the search process.
If the text is found, it becomes highlighted in the first instance found. You can then use the Find next button tofind the next instance of the text. You can use the Previous button to display the previous search result.
3.9.8 Replacing Text in File Notes and Bookmarks
You can search and replace text in file notes and bookmarks within an open file in Digital Court Recorder orDigital Court Player.

Using Digital Court Player 105
To find and replace text in file notes or bookmarks within an open file, take the following steps:1. Do one of the following:
· In the Bookmarks window, from the Edit menu, select Replace.
· In the Playback window, from the Bookmarks menu, select Replace.
The following dialog appears:
2. In the Find what field, enter the text on which you want to search.3. If you want to match the exact case, select Match case.4. In the Replace with field, type the replacement text.5. Do one of the following:
· To find the next occurrence of the text, click Find Next.
· To replace an occurrence of the text, click Replace. After you click Replace, the program moves to the nextoccurrence of the text.
3.9.9 Navigation Using Bookmarks
Bookmarks allow you to navigate quickly in a sound file.
To get to a bookmarked position in a sound file, you can do one of the following:• Double click on the bookmark.• Select a bookmark and from the “Position” bookmark menu, select “Go to Current”.
To get to the position of the previous bookmark: from the “Position” bookmark menu, select “Go to Previous”.
To get to the position of the next bookmark: from the “Position” bookmark menu, select “Go to Next”.
Special Bookmarks functionsYou can use the following special bookmark functions.
Auto ScrollWhen this function is activated, the cursor in the list of bookmarks automatically moves together with theposition in the sound file. For example, you can use this option to automatically see the full contents of eachbookmark while listening to a recording.
To activate this function, check the button on the bookmark toolbar, or from the “Position” bookmark menu,select “Auto Scroll”.
Select ClosestThis feature finds the closest bookmark to the current position in a sound file. In the Bookmarks window, select“Position - Select Closest”.
3.9.10 Private Notes in Bookmarks
The text of each bookmark you create can consist of two parts – a note and a private note. Private notes allowyou to store additional information as a separate part, and you can optionally exclude this information whenexporting bookmarks to a text file and when exporting a .dcr file (see “Exporting File Notes or Bookmarks to a

Digital Court Recording System106
Text File”, “Exporting a File”).
You cannot edit notes in auto-bookmarks.
You can show or hide private notes in the Bookmarks window by using “View – Show Fields - Show PrivateNotes”.
3.9.11 Importing Bookmarks from a BMR File to a DCR File
With Digital Notes and Digital Word-Notes, you can create a bookmark file and save it as a BMR file (i.e. with afile extension of .bmr). Using Digital Court Player, you can import a BMR file into a DCR file that was createdwith Digital Court Recorder.
Note: To import a BMR file into a DCR file, the DCR file must contain auto-bookmarks for time keeping
To import a BMR file into a DCR file, take the following steps:
1. From Digital Court Player, open the DCR file.
2. If the Bookmarks window is not displayed, select “View – Bookmarks”.
3. From the Bookmarks window, select “File – Import from BMR file”. The following dialog appears:

Using Digital Court Player 107
4. Select the directory containing the .bmr file. 5. In the “File name” field, enter the name of the file or select it from the list above.
6. In the “File Notes” section, select the method for importing the file notes:
• Append - the file note from the BMR file is added to the existing one in the DCR file.
• Overwrite - the file note in the DCR file is cleared before importing.
7. In the “Bookmarks” section, select the method for importing bookmarks:
• Insert – all bookmarks from the BMR file are added to the DCR file except when an identical bookmarkwith the same note text and position already exists in the DCR file. Note that different bookmarks can havethe same position in a DCR file as long as their text is different.
• Overwrite – all bookmarks in the DCR file are deleted before the import occurs.
8. Select the destination for bookmark text:
• Notes – bookmark text is copied to the note of a bookmark.
• Private notes – bookmark text is copied to the private note of a bookmark.
9. Press “Open”.
3.9.12 Exporting File Notes or Bookmarks to a Text File
With Digital Court Recorder and Digital Court Player, you can export text information contained in file notes andbookmarks to a text file.
To export file notes or bookmarks from a file, take the following steps:
1. Open the file in Digital Court Recorder or Digital Court Player.
2. If the Bookmarks window is not open, choose "View – Bookmarks" to open it.
3. From the Bookmarks window, choose “File - Export to Text File". The following dialog appears:

Digital Court Recording System108
3. In the “File name” field, specify the name of the file to which the bookmarks will be saved. This file will becreated automatically.
4. In the “Include data” options, select the data you want to export. "(empty)" indicates the field contains no data.
5. Press “Save”.
The following is a sample text file containing exported file notes and bookmarks:

Using Digital Court Player 109
3.9.13 Copying File Notes or Bookmarks to the Clipboard
With Digital Court Recorder and Digital Court Player, you can copy text contained in file notes or bookmarks tothe Windows clipboard.
To copy file notes or bookmarks to the clipboard, take the following steps:
1. Open the file in Digital Court Recorder or Digital Court Player.
2. If the Bookmarks window is not open, choose "View – Bookmarks" to open it.
3. From the Bookmarks window, choose “File - Copy to Clipboard”. The following dialog appears:
4. In the “Include data” options, select the data you want to copy. "(empty)" indicates the field contains no data.
5. Press “Copy”.
3.9.14 Printing File Notes or Bookmarks
With Digital Court Recorder and Digital Court Player, you can print file notes or bookmarks.
To print file notes or bookmarks, take the following steps:
1. Open the file in Digital Court Recorder or Digital Court Player.
2. If the Bookmarks window is not open, choose "View – Bookmarks" to open it.

Digital Court Recording System110
3. From the Bookmarks window, choose “File - Print”. The following dialog appears:
4. In the “Include data” options, select the data you want to copy. "(empty)" indicates the field contains no data.
5. In the “Include area” options, select any of the following:
• Title of document – include a title at the beginning of the output. Select this option to customize the title.
• Header – include a header on each page of the output. Select this option to customize the header.
• Footer – include a footer on each page of the output. Select this option to customize the footer.
You can click the button to include the file name within the title, header, or footer. You can click the button to include the current time within the title, header, or footer.
6. Press "Format" to change the font and set options for page numbers.
7. Press "Page setup" to change the default page settings.
8. By default, the output will be printed to your default printer. If you want to choose another printer or set otherprinter options, press "Advanced print".
9. Press “Print”.
3.10 Exporting a File
You can export a dcr file to a Windows Media file, wave file or AVI file so that you can play the file on a machinethat does not have the Digital Court Player. You can also export a dcr file to another dcr file and choose whichbookmarks, types of bookmarks, video, file notes, attached files, and channels to export. This is useful whenyou want to export a multi-channel file and exclude private notes. You can choose to export part of a file byspecifying a time range or export the entire file. You can also export a sealed recording with different options.
If the file you export contains video then the video portion of the file is exported as well, as long as you areexporting to another dcr file.
You can also export a dcr file, including bookmarks, audio, video, and attachments to PDF format. For moreinformation, see "Exporting a File to PDF Format".
You can also export a dcr file, including bookmarks, audio, and video, to PDF format. For more information, see"Exporting a File to PDF Format".

Using Digital Court Player 111
To export a dcr file, take the following steps:1. Open the file in Digital Court Player. 2. If you want to export only part of a file, it is recommended you use the Selection Panel to select the fragmentyou want to export. You can adjust this selection later in this process if you need to.3. Choose “File – Export”. The following dialog appears.
4. Specify the file name and location.5. In the “Save as type” field, select the type of exported file: Windows Media, AVI, Wave, or DCR.6. Optionally, you can select a previously used format from the drop-down list or use the “Change format”button to change the file format.7. By default, the entire file will be exported unless you have selected part of the file on the Selection Panel. Youcan choose to export part of the file by pressing the "Change selection” button and specifying a start time andan end time (using displacement times or absolute times) on the dialog below.

Digital Court Recording System112
8. By default, any sealed sections of the recording within the file, or part of the file, being exported, will bedeleted. You can use the “Change security” button to change this behavior. For more information, see "Workingwith Sealed Recordings".9. Use the “Channels” list to indicate which channels to export. You can select all channels or you can selectany combination of them. 10. In the “Include data” section, select the data to be exported. Auto-bookmarks are automatically included.Note that bookmarks and file notes cannot be exported to an AVI file.11. Click Save.
When a file is exported, the channels are mixed into one. By default, Gate & Limiter technology is used to mixthe channels, and this helps preserve the level of loudness in the output file. You can change this behaviorusing the “Advanced” button when setting Playback options in Digital Court Recorder.
3.11 Exporting a File to an Audio CD
You can export the audio data in a dcr file directly to an audio CD. This CD can then be used in any computerCD-ROM drive or audio CD player.
Digital Court Player uses the Image Mastering API from Microsoft to export a file to an audio CD. This API isincluded as part of Windows Vista. For Windows XP, you must install this API separately. You can download itby searching the Internet for: WindowsXP-KB932716-x86-ENU.exe.
To avoid creating a very large file and to facilitate playback, you can have the file automatically split based onbookmarks or file size (in minutes). You can choose to export part of a file by specifying a time range or exportthe entire file. You can also export a sealed recording with different options.
To export a dcr file to an audio CD, take the following steps:1. Open the file in Digital Court Player. 2. If you want to export only part of a file, it is recommended you use the Selection Panel to select the fragmentyou want to export. You can adjust this selection later in this process if you need to.3. Choose “File – Export to Audio CD”. The following dialog box appears.

Using Digital Court Player 113
4. Complete the fields described below.
Export to - Audio CD by burning – if this option is selected, Digital Court Player creates an audio (CDDA) disc.You should insert a blank CD-R/RW disc into your CD drive.
Export to - Audio files on hard drive – if this option is selected, Digital Court Player creates files on theselected drive. Select the file type, either wav or mp3. Normally, the default setting is acceptable.
Target drive/folder – specifies either the CD drive, when exporting to CD, or the folder where the files will becreated, when exporting to your hard drive. If this folder does not exist, you will be prompted to create it duringthe export process.
File names – displays the naming convention for the files to be created during export. This will be the name ofthe file being exported followed by “__cdda__” followed by * to represent a sequential number. The extensionis .wav or .mp3. If the target folder already contains files that match this naming convention then you will beasked if you want to replace them during the export process.
Selection – By default, the entire file will be exported unless you have selected part of the file on the SelectionPanel. You can choose to export part of the file by pressing the "Change selection” button and specifying a starttime and an end time (using displacement times or absolute times) on the dialog box below.

Digital Court Recording System114
Security - By default, any sealed sections of the recording within the file, or part of the file, being exported, willbe deleted. You can use the “Change security” button to change this behavior. For more information, see"Working with Sealed Recordings".
Minimum file size is the minimum length, in minutes, of each file that is created during export. This value mustbe from 1 to 120 minutes. The default value is 1 minute. This setting applies only when splitting the file basedon bookmarks.
Maximum file size is the maximum length, in minutes, of each file that is created during export. This valuemust be in the range from 1 to 120 minutes. The default value is 5 minutes. A file is split once it exceeds itsmaximum size regardless of whether the file is to be split based on bookmarks.
Split file based on bookmarks – select this check box if you want to split the file based on bookmarks. You canhave the file automatically split on any bookmark or only on docket bookmarks. Once a file has reached theminimum file size specified above, the file will be split based on your bookmark setting or when the maximumfile size is reached, whichever comes first.
5. Click the Export button.
Exporting a file requires a lot of free space on your hard disk. For example, one hour of audio in WAV formatrequires about 635 MB. The program first checks how much free hard-disk space is available and issues amessage if there is insufficient space.
Exporting a file to a CD may take a long time. A progress bar indicates the status and the title bar shows thepercentage of the file exported.
When the export process completes, you can use CD-burning software to copy the files to a CD. If you areusing the CD Writing Wizard, then it starts once the files have been successfully created in the target folder.
3.12 Exporting a File to PDF Format
You can export the data in a dcr file to PDF format. This PDF file can then be browsed using Adobe AcrobatReader. You can choose to export part of a file by specifying a time range or export the entire file. The media filecan be created and saved separately from the PDF document so that the audio/video links will work properlyafter you move the file onto a Windows Media Server folder to be streamed to the end users.
All of the data, including file notes, bookmarks, audio, and video can be exported to the PDF file. If you exportany of the media, green arrows in the PDF file indicate bookmark positions, as shown below. You can click onany of these arrows and playback will jump to that point in the file and launch Windows Media Player.

Using Digital Court Player 115
To export a dcr file to PDF format, take the following steps:1. Open the file in Digital Court Player. 2. If you want to export only part of a file, it is recommended you use the Selection Panel to select the fragmentyou want to export. You can adjust this selection later in this process if you need to.3. From the File menu, click Export to Adobe PDF. The following dialog box appears.
4. Specify the file name and location.5. Optionally, you can use the “Change format” button to change the file format.6. By default, the entire file will be exported unless you have selected part of the file on the Selection Panel. Youcan choose to export part of the file by pressing the "Change selection” button and specifying a start time andan end time (using displacement times or absolute times) on the dialog below.

Digital Court Recording System116
7. By default, any sealed sections of the recording within the file, or part of the file, being exported, will bedeleted. You can use the “Change security” button to change this behavior. For more information, see "Workingwith Sealed Recordings".8. In the “Include data” section, you can choose which media to export. You can export the audio and video, theaudio only, or neither the audio nor the video. Select the “Attached files” check box if you want to includeattached files when exporting the dcr file to PDF.9. For the media file, you have the following options:Embed into PDF file - select this option if you want the media file embedded in the resulting PDF document. Create separate WMA/WMV file – select this option if you want the media file to be created and savedseparately from the PDF document. Initially, it will be saved into the same folder as the PDF document with theintention of later moving it onto a Windows Media Server folder to be streamed to the end users. In the "Prefix"field, specify the URL associated with the media server folder and not the folder on the PC to which it is initially
saved. For example:mms://server/connection_point/subfolder. This enables the audio/video links in the PDFdocument to work properly after you move the media file to the media server.10. Click Save.
When a file is exported, the channels are mixed into one. By default, Gate & Limiter technology is used to mixthe channels, and this helps preserve the level of loudness in the output file. You can change this behaviorusing the “Advanced” button when setting Playback options in Digital Court Recorder.
Exporting a file to PDF format may take a long time. A progress bar indicates the status and the title bar showsthe percentage of the file exported.
3.13 File Notes
You can add notes to a file after it has been recorded. You can use either Digital Court Recorder or DigitalCourt Player to add or edit file notes.
To display notes associated with a new/open file, click the button on the main toolbar or choose “View –File Notes”.Here is a sample display:
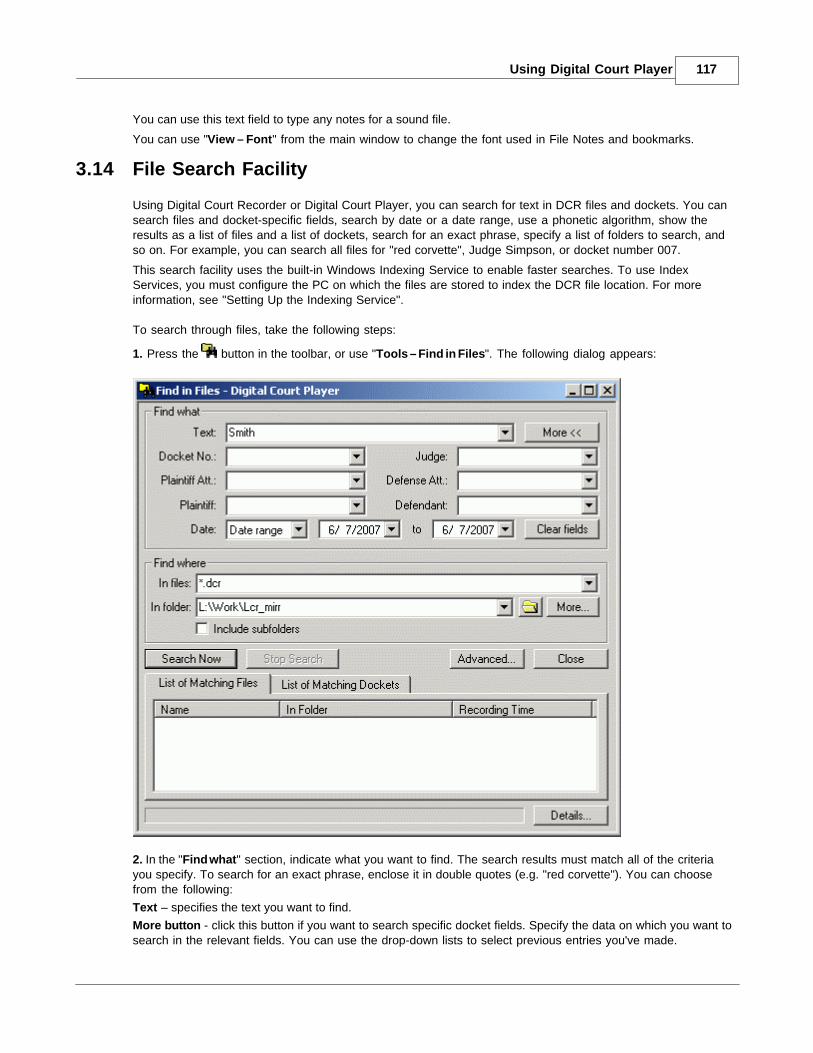
Using Digital Court Player 117
You can use this text field to type any notes for a sound file.
You can use "View – Font" from the main window to change the font used in File Notes and bookmarks.
3.14 File Search Facility
Using Digital Court Recorder or Digital Court Player, you can search for text in DCR files and dockets. You cansearch files and docket-specific fields, search by date or a date range, use a phonetic algorithm, show theresults as a list of files and a list of dockets, search for an exact phrase, specify a list of folders to search, andso on. For example, you can search all files for "red corvette", Judge Simpson, or docket number 007.
This search facility uses the built-in Windows Indexing Service to enable faster searches. To use IndexServices, you must configure the PC on which the files are stored to index the DCR file location. For moreinformation, see "Setting Up the Indexing Service".
To search through files, take the following steps:
1. Press the button in the toolbar, or use "Tools – Find in Files". The following dialog appears:
2. In the "Find what" section, indicate what you want to find. The search results must match all of the criteriayou specify. To search for an exact phrase, enclose it in double quotes (e.g. "red corvette"). You can choosefrom the following:
Text – specifies the text you want to find.
More button - click this button if you want to search specific docket fields. Specify the data on which you want tosearch in the relevant fields. You can use the drop-down lists to select previous entries you've made.

Digital Court Recording System118
Date – you can have the search ignore dates, search for a specific date, or search in a date range.
To clear the fields in the "Find what" section, click the "Clear fields" button.
3. In the "Find where" section, indicate where you want the search to look. You can choose from the following:
In files – enter the file-name mask for searching files. This is similar to using Windows Explorer for searchingfiles. You can use “*” to match any number of characters, and “?” to match a single character. The default valueis “*.dcr”, which means search for all files with an extension of "dcr”. Note that you can search only through fileswith an extension of .dcr.
In folder – specifies one or more folders to search. You can type the names, separated by a semi-colon (;) or
click the buttons to the right. Click the button to select one folder or click the "More" button to select multiplefolders.
Include subfolders – select this option if you want the search to include subfolders of the starting folder. Thisis the default.
4. Click the "Search Now" button to start the search. You can interrupt a search at any time by clicking the"Stop Search" button.
Reviewing the Results
The results of your search are shown at the bottom of the dialog box. The files that match your search criteriaare listed on the "List of Matching Files" tab. The dockets that match your search criteria are listed on the "Listof Matching Dockets" tab. You can sort any column by clicking on the column title.
You can double-click on a line in your search results to open the associated file name or docket.
Using Advanced Settings
If you don't want to use Indexing Service for faster searches, press the "Advanced" button and clear the "UseIndex Services for faster searches" check box.
By default, the file search facility uses a phonetic algorithm. This is an algorithm for indexing words by theirsound, when pronounced in English. On the "Advanced Find Settings" dialog box, you can choose not to use aphonetic algorithm or switch the algorithm that is being used.
3.15 Analyzing a DCR File
Digital Court Player has a built-in utility to analyze a DCR file and to validate its integrity. When problems occurwith a DCR file, Technical Support may ask you to analyze the file, by taking the following steps.
1. From the Help menu in Digital Court Player, click "Analyze DCR File". The following dialog box appears.

Using Digital Court Player 119
2. In the "DCR file to be analyzed" field, specify the full path to the file to be analyzed, or click the button to locateand select the file.3. Click the "Start" button.
When the analysis is complete, a dialog box appears with a summary of the results. If a problem is foundduring the analysis, Technical Support may ask you to select "Use log file" and "Copy footer to file" on the"Analyze DCR File" dialog box, rerun the analysis, and send them the resultant files. These files can help the
Technical Support Team determine and resolve problems associated with the DCR file.
3.16 Collecting Trace Information
To help identify and diagnose problems, Digital Court Recorder and Digital Court Player can collect diagnostic,or trace, information. You can set different types of traces when advised by the Technical Support Team.
Technical Support may ask you to collect information for a problem, by taking the following steps.
1. From the Help menu, click "Debug". The following dialog box appears.
2. Technical Support will advise you which options to select on this dialog box and on the "Advanced DebugSettings" dialog box.
Each program collects and stores a limited amount of trace information in hidden files so that when a problemdoes arise, there is already some trace information available. When you select "Store GENERAL traceinformation in file" or "Store MIRRORING information in file", the program copies trace information from ahidden file to the file you specify for storing the information.
The Mirroring trace file contains a subset of information in the General trace file and is used specifically for

Digital Court Recording System120
diagnosing problems with mirroring.
Trace information is automatically cleaned up. Information which is older than 7 days is automatically purgedfrom the General trace file; information which is older than 30 days is automatically purged from the Mirroringtrace file.
3.17 Setting Up the Indexing Service
The file search facility, invoked from "Tools - Find in Files", is designed to use the Windows Indexing Service forfaster searches. To use this service, you need to set it up to index the DCR files you store. Indexing Service isdesigned to run continuously. After it is set up, all operations are automatic.
To set up the Indexing Service for your DCR files, take the following steps:
1. From the Control Panel, choose "Administrative Tools - Computer Management”.
2. In the Computer Management tree, choose “Services and Applications - Indexing Service”.
3. If the Indexing Service is running, press the Stop button (black rectangle) in the toolbar to stop it.
4. In the tree view, under "System", select “Directories”, as shown below:
5. In the right panel, there is a list of directories to be indexed. If you are not currently using the Indexing Service,delete each of these directories from the list. Select a directory, and from the right-click menu, select “Delete”.
6. Right click in the Directory list, and select "New – Directory". The following dialog appears.

Using Digital Court Player 121
7. Press the “Browse” button, and select the folder where DCR files are stored.
8. If your DCR files are stored in different directories, repeat steps 6. and 7. for each directory.
9. Start the Indexing Service by clicking "Indexing Service" in the Computer Management tree, and then pressthe Start button on the toolbar. The first time this service is started, you are prompted to have it automaticallystarted each time Windows starts. You should answer “Yes”.
The Indexing Service locates the files in the path you have specified and indexes them. As new files are added,they are automatically indexed.
For more information, refer to the Windows online help for Indexing Service.
3.18 Disassociating DCR Files with a Digital Court Program
DCR files are associated with either Digital Court Recorder or Digital Court Player. When you double-click on aDCR file name in Windows Explorer, the associated program is automatically opened. If both programs areinstalled, DCR files are automatically associated with Digital Court Player.
If this association causes problems, you can disassociate DCR files from Digital Court Player or Digital CourtRecorder by taking the following steps:
1. Choose "View – Options".
2. Select the "General" tab.
3. Press the “Advanced” button. The following dialog appears.
4. Clear the “Associate program with DCR files” check box.
3.19 Keyboard shortcuts
Use the shortcut keys for quick access to common commands.
You can use the following shortcut keys in the Main window:
Description Shortcut Key Button Menu
Open an existing DCR file Ctrl + O File – Open
Play Ctrl + P Playback – Play
Pause / continue Ctrl + U Playback – Pause
Stop Ctrl + T Playback – Stop

Digital Court Recording System122
Play all channels Ctrl + 0 Playback – Playing All
Channels
Play a specific channel Ctrl + (1-8) Playback – Playing Channel
(n)
Decrease the playback speed Ctrl + Shift + D Playback – Speed Play –
Decrease
Restore the normal speed Ctrl + Shift + N x1 Playback – Speed Play –
Normal
Increase the playback speed Ctrl + Shift + I Playback – Speed Play –
Increase
Playback with automatic pauses Ctrl + Q Playback – Automatic Pauses
Change the autopause parameters Ctrl + Alt + Q Playback – Autopause
Parameters
Rewind to the beginning Ctrl + H Playback – Go To – Home
Left (one step) Ctrl + F Playback – Go To – Left
Right (one step) Ctrl + G Playback – Go To – Right
Go to end Ctrl + E Playback – Go To – End
Set the left selection boundary to the current
slider position
Ctrl + Shift + P Selection – Set Beginning of
Selection
Set the right selection boundary to the
current slider position
Ctrl + Shift + T Selection – Set End of
Selection
Export to WMV, WAV, AVI or DCR file Ctrl + Shift + E File – Export
Change configuration options Alt + F7 View – Options
Show or hide the Bookmarks window Alt + F2 View – Bookmarks
Switch to the Thin View Alt + F5 View – Thin View
You can use the following shortcut keys in the Bookmarks window:
Description Shortcut Key Button Menu
Create a new bookmark F2 Edit – New Bookmark
Find text in bookmarks Ctrl + Shift + F Edit – Find
Move current position to previous bookmark Shift + F4 Position – Go to Previous
Move current position to current bookmark F4 Position – Go to Current
Move current position to next bookmark Ctrl + F4 Position – Go to Next

Index 123
Index- A -abbreviation 53, 85
above normal priority 30
absent 18
Adobe PDF 114
AGC 64, 80
algorithm 117
alphabetic 53
always on top 76
analyze 118
append 44, 47
ASIO control panel 18
ASIO device 18
assistive 60
association 30, 121
attached 47
attribute 27
audio CD 112
audio device 64
auto 103
autoformat 27, 50
automatic pauses 64, 77, 79
autopause parameters 79
AVI 110
- B -backup 27
bass 81
BMR file 106
bookmark 30, 37, 40, 44, 47, 68, 70, 85, 89, 92,103, 105, 106, 107, 109
bookmarks 37, 104
boost 23
broadcast 38, 46
burn 29, 52, 112
burning 29, 52
- C -capture 22
CD 29, 48, 52
channel 18, 76, 81
channel name 18
clipboard 109
clock 32, 48
close 33, 34, 40, 60
closest 105
color 37, 53, 89
columns 37, 85, 92
COM port 83
command line 60
compact 27, 29, 50, 52
component 12
compressor 22
configuring 17, 18, 23, 25, 32, 33, 53, 63, 64, 66,67, 68, 83
confirm 18, 25
control panel 18
control view 58
copy 109
create 89
crossbar 22
customize 40, 71, 85, 92
- D -date 117
dcr 110, 112
DCR files 121
debug 119
decrease speed 76, 79
default folder 25
default program 121
delete 27, 85, 89
demote 37
description 18
device 18, 23, 64, 68, 84
disassociation 121
disc 27, 29, 48, 50, 52
disk 48
display 32, 48
docket 25, 85, 92
docket fields 37, 70
dockets 117
drive 27, 29
duration 33, 60
DVD 29, 52

Liberty Court Recording System124
- E -edit list 53
eject 48
encrypt 102
encryption 35
event 68
export 39, 40, 71, 102, 107, 110, 112, 114
- F -feature 5, 13
file 33, 37, 40, 47, 48, 116, 120
file notes 30, 40, 68, 104, 109
file size 112
file type 121
filename 25, 60
find 85, 104, 105, 117
fit in window 44
folder 25, 30, 37, 68
folders 117
font 109
foot control 68, 83
foot control wizard 68, 84
foot pedal 68, 83, 84
footer 109
format 18
forward 83
frame rate 22
full view 58
functions 68, 83
- G -gain 64, 80
game port 83
global hot key 32, 67
- H -header 109
headphones 45
high priority 30
highlight 37, 53, 89
hot key 32, 61, 67, 121
- I -implementation 15
import 39, 71, 106
increase speed 76, 79
Indexing Service 15, 120
indicator 40
information 6
insert 92, 101
inserting text 53
install 15, 16
international characters 101
interval 85
IP address 35
ISO 27, 50
ISO format 29, 52
- J -jump 103
- K -K buttons 75
keep position 64
keeping 47, 103
key 61, 121
key frame 22
keyboard 61, 121
- L -last 33, 37
length 40
level 80, 81
level indicator 40
license file 15
limit 15
listener 35
listen-only 68
load 33, 37, 67
local 27, 48
lock 102
log off 30

Index 125
- M -main buttons 40
main toolbar 40
main window 40
mapping 84
match case 104
MBR 38, 46
media server 114
menus 71
Microsoft Media server 38, 46
minimize 30, 33, 60, 67, 68
mirror 40, 48
mirrored file 78
mirroring 27
mixed mode 81
mixer 23, 64
MMS 38, 46
monitoring 45
moving 53
mp3 112
msi 15, 16
multiple bit rates 38, 46
- N -navigation 105
network 27, 48
new 5, 6, 85, 89, 92
new file 25, 60
noise 80
normal priority 30
normal speed 76, 79
note 105
notes 116
notification 18
number 18
number of pedals 68
- O -online 78
open 40
open file 76
options 17, 18, 23, 25, 32, 33, 40, 53, 63, 64, 66,67, 68, 83
order 53, 92
overlap 29
override 35
overview 5
- P -PA System 46
page numbers 109
password 35, 70
pause 18, 40, 44, 47, 76, 77, 79
PDF 114
pedal 68, 83, 84
pedal functions 68, 83
phonetic 117
phrase 104, 117
play 64, 66, 67, 76, 77, 78, 79, 81, 83
play volume 40
playback 23, 40, 47, 64, 66, 83, 84
player 12, 71
pop-up 18
pop-up window 53
port 35, 38, 46, 83
position 85, 89, 103, 105
post-install 15
predefined 92
prefix 114
preview video 40, 44
print 40, 109
priority 30, 68
private 105
prompt 25
properties 40
public 105
pull 38, 46
push 38, 46
- Q -quality 18, 22, 80
- R -read-only 15
record 40, 44, 45, 46, 47, 60, 76
record volume 40
recorder 12, 39

Liberty Court Recording System126
recording 18
registration 15
Rehabilitation Act 60
remote 35
remove 16
replace 104
reposition 89
requirement 12
rescan 15
resolution 22
restore 27, 92
results 117
resume 44, 47, 76, 77, 79
rewind 83
- S -script 25
scroll 85, 105
seal 35, 70, 85, 89, 102, 110, 112
search 117, 120
Section 508 60
security 35, 70
selection 75, 110, 112, 114
server 38, 46
service 120
setup 15, 16
shortcut 61, 121
shortcut key 53
shortcuts 53
shut down 30
slider 40
solution 12
sound card 64
sound quality 18
special 105
special character 101
speech 64, 80, 81
speed play 66, 76, 77, 79
SPEEX 18
split 112
standard view 58
start 17, 44, 47, 63, 76, 77, 83
start recording 33
startup 33, 67
step 83
step back 64, 77, 79, 83
step forward 83
stop 17, 40, 44, 47, 63, 76, 77, 83
streaming 38, 46
subfolders 117
substituting text 53
support 118, 119
switch 58
switch channel 83
symbol 101
synchronization 32, 48
system tray 30, 68
- T -task bar 30, 68
temporary folder 30, 68
text 104, 116, 117, 120
text file 107, 109
text substitution 40
thin view 30, 40, 76
time 32, 47, 48, 103
title 37, 70, 85, 92, 109
tone 81
toolbar 40, 71, 85
touch screen 34, 58
trace 119
treble 81
trial 15
- U -UDF 27, 50
UDF format 29, 52
uninstall 16
upgrade 15
usage 37, 92
USB port 83
- V -version 5, 6
video 22, 44, 71, 77
video quality 44
view 34, 58
voice 64
volume 23, 80
volume slider 40

Index 127
- W -wave 110, 112
wave device 18, 23, 64
Windows Media file 110, 114
wizard 68, 84
wma 110, 114
wmv 110, 114
- X -XML 92
- Z -zoom 44