DIGITAL CAMERA C-750 Ultra Zoom - olympusamerica.com · We recommend that you take test shots to...
260
DIGITAL CAMERA C-750 Ultra Zoom REFERENCE MANUAL Explanation of digital camera functions and operating instructions. Explanation of how to download images between your digital camera and PC. DIGITAL CAMERA - PC CONNECTION OPERATION MANUAL CAMERA OPERATION MANUAL
Transcript of DIGITAL CAMERA C-750 Ultra Zoom - olympusamerica.com · We recommend that you take test shots to...

DIGITAL CAMERA
C-750 Ultra Zoom
REFERENCE MANUAL
Explanation of digital camera functions and operating instructions.
Explanation of how to download images between your digital camera and PC.
DIGITAL CAMERA - PC CONNECTION OPERATION MANUAL
CAMERA OPERATION MANUAL

Thank you for purchasing an Olympus digital camera. Before you start to use your new camera, please read these instructions carefully to enjoy optimum performance and a longer service life. Keep this manual in a safe place for future reference.We recommend that you take test shots to get accustomed to your camera before taking important photographs.In the interest of continually improving products, Olympus reserves the right to update or modify information contained in this manual.
DIGITAL CAMERA
C-750 Ultra ZoomREFERENCE MANUAL

For customers in North and South America
For customers in Europe
Trademarks• IBM is a registered trademark of International Business Machines Corporation.• Microsoft and Windows are registered trademarks of Microsoft Corporation.• Macintosh is a trademark of Apple Computer Inc.• All other company and product names are registered trademarks and/or
trademarks of their respective owners.• The standards for camera file systems referred to in this manual are the “Design
Rule for Camera File System/DCF” standards stipulated by the Japan Electronics and Information Technology Industries Association (JEITA).
“CE” mark indicates that this product complies with the European requirements for safety, health, environment and customer protection. “CE” mark cameras are intended for sales in Europe.
For customers in USADeclaration of ConformityModel Number : C-750 Ultra ZoomTrade Name : OLYMPUSResponsible Party : Olympus America Inc.Address : 2 Corporate Center Drive, Melville, New York
11747-3157 U.S.A.Telephone Number : 631-844-5000
Tested To Comply With FCC StandardsFOR HOME OR OFFICE USE
This device complies with Part 15 of the FCC rules. Operation is subject to the following two conditions:(1) This device may not cause harmful interference.(2) This device must accept any interference received, including
interference that may cause undesired operation.
For customers in CanadaThis Class B digital apparatus meets all requirements of the Canadian Interference-Causing Equipment Regulations.
2

0
1
2
3
4
5
6
7
8
9
1
Advanced PhotographyTo get that particular shot using various effects or for fine-tuning the settings.
Getting started
Using the menus
Shooting basics
Flash
Advanced shooting
Adjusting the image quality and exposure
Useful functions
Print setting
Miscellaneous
For playing back and editing pictures
Settings that make the camera easier to operate.
Printing pictures
Troubleshooting and other information
Contents
Names of parts
P.4
P.10
P.17
P.32
P.42
P.55
P.67
P.99
P.116
P.137
P.163
P.174
Playback
Basic Photography
Introduction of the camera’s functions
Specifications
Glossary of terms
P.195
P.197
Index P.201
3

ContentsContents . . . . . . . . . . . . . . . . . . . . . . . . . . . . . . . . . . . . . . . . . . 4Names of parts . . . . . . . . . . . . . . . . . . . . . . . . . . . . . . . . . . . . 10
Camera . . . . . . . . . . . . . . . . . . . . . . . . . . . . . . . . . . . . . . . 10Viewfinder and monitor indications . . . . . . . . . . . . . . . . . . 12
How to use this manual . . . . . . . . . . . . . . . . . . . . . . . . . . . . . . 16
1 Getting started 17Attaching the strap. . . . . . . . . . . . . . . . . . . . . . . . . . . . . . . . . . 17Loading the batteries . . . . . . . . . . . . . . . . . . . . . . . . . . . . . . . . 18
Selecting optional batteries or an AC adapter. . . . . . . . . . 20Inserting a card . . . . . . . . . . . . . . . . . . . . . . . . . . . . . . . . . . . . 22
Card basics . . . . . . . . . . . . . . . . . . . . . . . . . . . . . . . . . . . . 22Removing the card . . . . . . . . . . . . . . . . . . . . . . . . . . . . . . 23
Power on/off . . . . . . . . . . . . . . . . . . . . . . . . . . . . . . . . . . . . . . 24Startup/Shutdown screen . . . . . . . . . . . . . . . . . . . . . . . . . 25If the card is not recognized (card check) . . . . . . . . . . . . . 25
Selecting a language . . . . . . . . . . . . . . . . . . . . . . . . . . 26Setting the date and time . . . . . . . . . . . . . . . . . . . . . . . . 28Adjusting the viewfinder. . . . . . . . . . . . . . . . . . . . . . . . . . . . . . 30Holding the camera . . . . . . . . . . . . . . . . . . . . . . . . . . . . . . . . . 31
2 Using the menus 32About the menus . . . . . . . . . . . . . . . . . . . . . . . . . . . . . . . . . . . 32How to use the menus. . . . . . . . . . . . . . . . . . . . . . . . . . . . . . . 33Shortcut menus . . . . . . . . . . . . . . . . . . . . . . . . . . . . . . . . . . . . 35Mode Menus . . . . . . . . . . . . . . . . . . . . . . . . . . . . . . . . . . . . . . 37
3 Shooting basics 42Shooting modes. . . . . . . . . . . . . . . . . . . . . . . . . . . . . . . . . . . . 42Taking still pictures . . . . . . . . . . . . . . . . . . . . . . . . . . . . . . . . . 46
4

Contents
If correct focus cannot be obtained . . . . . . . . . . . . . . . . . . . . . 49Using the Focus Lock function . . . . . . . . . . . . . . . . . . . . . 49Subjects that are difficult to focus on . . . . . . . . . . . . . . . . 50
Recording movies . . . . . . . . . . . . . . . . . . . . . . . . . . . . . . . 51Zoom . . . . . . . . . . . . . . . . . . . . . . . . . . . . . . . . . . . . . . . . . . . . 53
Using the optical zoom . . . . . . . . . . . . . . . . . . . . . . . . . . . 53DIGITAL ZOOM - Using the digital zoom . . . . . . . . . . . . . 54
4 Flash 55Flash shooting . . . . . . . . . . . . . . . . . . . . . . . . . . . . . . . . . . 55Using the slow synchronization flash . . . . . . . . . . . . . 61Flash intensity control . . . . . . . . . . . . . . . . . . . . . . . . . . . . 62External flash (optional) . . . . . . . . . . . . . . . . . . . . . . . . . . . . . . 63
Using the external flash. . . . . . . . . . . . . . . . . . . . . . . . . . . 63Using commercially available external flashes . . . . . . . . . 65Compatible commercially available external flashes. . . . . 66
5 Advanced shooting 67A/S/M mode. . . . . . . . . . . . . . . . . . . . . . . . . . . . . . . . . . . . . . . 67Aperture priority shooting . . . . . . . . . . . . . . . . . . . . . . . . . . 68Shutter priority shooting . . . . . . . . . . . . . . . . . . . . . . . . . . . 69Manual shooting . . . . . . . . . . . . . . . . . . . . . . . . . . . . . . . . 70Using My Mode . . . . . . . . . . . . . . . . . . . . . . . . . . . . . . . . 71Focusing applications . . . . . . . . . . . . . . . . . . . . . . . . . . . . . . . 72
AF MODE - Changing the focus range . . . . . . . . . . . . . . . 72FULLTIME AF - A reliable time-saving way to focus. . . . . 73AF AREA – Changing the position of the AF target mark . 74AF LOCK – Locking the focus. . . . . . . . . . . . . . . . . . . . . . 75Manual focus. . . . . . . . . . . . . . . . . . . . . . . . . . . . . . . . . . . 77
Metering . . . . . . . . . . . . . . . . . . . . . . . . . . . . . . . . . . . . . . 79Spot metering . . . . . . . . . . . . . . . . . . . . . . . . . . . . . . . . . . 79MULTI METERING . . . . . . . . . . . . . . . . . . . . . . . . . . . . . . 80
AE LOCK - Locking the exposure . . . . . . . . . . . . . . . . . 82
5

Contents
Macro mode shooting . . . . . . . . . . . . . . . . . . . . . . . . . . . . 84Super macro mode shooting . . . . . . . . . . . . . . . . . . . . . . 85Self-timer shooting . . . . . . . . . . . . . . . . . . . . . . . . . . . . . . 86Remote control shooting . . . . . . . . . . . . . . . . . . . . . . . . . . . 87Sequential shooting . . . . . . . . . . . 89
Sequential shooting, high speed sequential shooting and AF sequential shooting . . . . . . . . . . . . . . 89
Auto bracketing . . . . . . . . . . . . . . . . . . . . . . . . . . . 90PANORAMA - Panorama shooting . . . . . . . . . . . . . . . . . . . . . 922 IN 1 - Taking two-in-one pictures . . . . . . . . . . . . . . . 94FUNCTION - Adding special effects to pictures . . . . . . . . . . . 96Recording sound with still pictures . . . . . . . . . . . . . . . . . . . 97Recording sound with movies . . . . . . . . . . . . . . . . . . . . . . 98
6 Adjusting the image quality and exposure 99Record mode . . . . . . . . . . . . . . . . . . . . . . . . . . . . . . . . . . 99
Selecting a record mode . . . . . . . . . . . . . . . . . . . . . . . . . 1013:2 Resolution . . . . . . . . . . . . . . . . . . . . . . . . . . . . . . . . . 103ENLARGE SIZE . . . . . . . . . . . . . . . . . . . . . . . . . . . . . . . 103
ISO sensitivity . . . . . . . . . . . . . . . . . . . . . . . . . . . . . . . . . . . . 104Exposure compensation . . . . . . . . . . . . . . . . . . . . . . . . . 105White balance . . . . . . . . . . . . . . . . . . . . . . . . . . . . . . . 106
Auto white balance . . . . . . . . . . . . . . . . . . . . . . . . . . . . . 106Preset white balance. . . . . . . . . . . . . . . . . . . . . . . . . . . . 107One-touch white balance . . . . . . . . . . . . . . . . . . . . 107White balance adjustment . . . . . . . . . . . . . . . . . . . 109
SHARPNESS . . . . . . . . . . . . . . . . . . . . . . . . . . . . . . . . . 110CONTRAST . . . . . . . . . . . . . . . . . . . . . . . . . . . . . . . . . . 111SATURATION . . . . . . . . . . . . . . . . . . . . . . . . . . . . . . . . 112NOISE REDUCTION . . . . . . . . . . . . . . . . . . . . . . . . . . . . . . . 113Histogram display . . . . . . . . . . . . . . . . . . . . . . . . . . . . . . 114
6

Contents
7 Playback 116Viewing still pictures . . . . . . . . . . . . . . . . . . . . . . . . . . . . 116
QUICK VIEW. . . . . . . . . . . . . . . . . . . . . . . . . . . . . . . . . . 117Close-up playback . . . . . . . . . . . . . . . . . . . . . . . . . . . . . . 118Index display . . . . . . . . . . . . . . . . . . . . . . . . . . . . . . . . . 119
Selecting the number of pictures. . . . . . . . . . . . . . . . . . . 120Slideshow . . . . . . . . . . . . . . . . . . . . . . . . . . . . . . . . . . . . 121Viewing movies . . . . . . . . . . . . . . . . . . . . . . . . . . . . . . . 122Editing movies . . . . . . . . . . . . . . . . . . . . . . . . . . . . . . . . . . . . 124
INDEX - Creating an index . . . . . . . . . . . . . . . . . . . . . . . 124EDIT - Editing a movie . . . . . . . . . . . . . . . . . . . . . . . . . . 126
Playback on a TV . . . . . . . . . . . . . . . . . . . . . . . . . . . . . . . . . 128Picture rotation . . . . . . . . . . . . . . . . . . . . . . . . . . . . . 129
Recording sound . . . . . . . . . . . . . . . . . . . . . . . . . . . . . . . 130Editing still pictures . . . . . . . . . . . . . . . . . . . . . . . . . . . . . . . . 131
Resizing . . . . . . . . . . . . . . . . . . . . . . . . . . . . . . . . . . 131Trimming . . . . . . . . . . . . . . . . . . . . . . . . . . . . . . . . . 132
Protecting pictures . . . . . . . . . . . . . . . . . . . . . . . . . . . . . 134Erasing pictures . . . . . . . . . . . . . . . . . . . . . . . . . . . . . . . . 135
Single-frame erase . . . . . . . . . . . . . . . . . . . . . . . . . . 135All-frame erase . . . . . . . . . . . . . . . . . . . . . . . . . . . . 136
8 Useful functions 137ALL RESET – Saving the camera’s settings . . . . . . . . . . . . . 137CUSTOM BUTTON . . . . . . . . . . . . . . . . . . . . . . . . . . . . . 139
Setting the custom button . . . . . . . . . . . . . . . . . . . . . . . . 140Using the custom button . . . . . . . . . . . . . . . . . . . . . . . . . 141
SHORT CUT . . . . . . . . . . . . . . . . . . . . . . . . . . . . . . . . . . . . . 142Setting the shortcut menu . . . . . . . . . . . . . . . . . . . . . . . . 143Using the shortcut menu . . . . . . . . . . . . . . . . . . . . . . . . . 144
MY MODE SETUP . . . . . . . . . . . . . . . . . . . . . . . . . . . . . 145CARD SETUP - Formatting Cards . . . . . . . . . . . . . . . . . 148Information display . . . . . . . . . . . . . . . . . . . . . . . . . . 150
7

Contents
Monitor/viewfinder brightness Adjustment . . . . . . . . . . . 151REC VIEW. . . . . . . . . . . . . . . . . . . . . . . . . . . . . . . . . . . . . . . 152SLEEP - Sleep Timer . . . . . . . . . . . . . . . . . . . . . . . . . . . . . . 153Beep . . . . . . . . . . . . . . . . . . . . . . . . . . . . . . . . . . . . . . . 154SHUTTER SOUND . . . . . . . . . . . . . . . . . . . . . . . . . . . . . . . . 155VOLUME - Playback Volume . . . . . . . . . . . . . . . . . . . . . . . . 156POWER ON/OFF SETUP - Power on/off display/sound setting . . . . . . . . . . . . . . . . . . . 157SCREEN SETUP. . . . . . . . . . . . . . . . . . . . . . . . . . . . . . . . . . 158FILE NAME . . . . . . . . . . . . . . . . . . . . . . . . . . . . . . . . . . . . . . 159PIXEL MAPPING. . . . . . . . . . . . . . . . . . . . . . . . . . . . . . . . . . 160Measurement units . . . . . . . . . . . . . . . . . . . . . . . . . . . 161VIDEO OUT - Video output selection . . . . . . . . . . . . . . . . . . 162
9 Print setting 163How to print pictures . . . . . . . . . . . . . . . . . . . . . . . . . . . . . . . 163All-frame reservation . . . . . . . . . . . . . . . . . . . . . . . . . . . 165Single-frame reservation . . . . . . . . . . . . . . . . . . . . . . . . . 167Trimming . . . . . . . . . . . . . . . . . . . . . . . . . . . . . . . . . . . . . 170Resetting print reservation data . . . . . . . . . . . . . . . . . . . 172
10 Miscellaneous 174Error codes . . . . . . . . . . . . . . . . . . . . . . . . . . . . . . . . . . . . . . 174Troubleshooting. . . . . . . . . . . . . . . . . . . . . . . . . . . . . . . . . . . 175List of menus . . . . . . . . . . . . . . . . . . . . . . . . . . . . . . . . . . . . . 182List of factory default settings . . . . . . . . . . . . . . . . . . . . . . . . 188Modes and Shooting Functions . . . . . . . . . . . . . . . . . . . . . . . 191Camera maintenance . . . . . . . . . . . . . . . . . . . . . . . . . . . . . . 194Specifications . . . . . . . . . . . . . . . . . . . . . . . . . . . . . . . . . . . . 195Glossary of terms . . . . . . . . . . . . . . . . . . . . . . . . . . . . . . . . . 197Index . . . . . . . . . . . . . . . . . . . . . . . . . . . . . . . . . . . . . . . . . . . 201
8

Contents
Indications used in this manuall
Important information on factors which may lead to a malfunction or operational problems. Also warns of operations that should be absolutely avoided.Useful information and hints that will help you get the most out of your camera.Reference pages describing details or associated information.
Note
9

Names of parts
Camera
Lens
Strap eyelet gP.17
Self-timer/Remote control lampRemote control receiver gP.86, 87
Hot shoe gP.63
Microphone gP.97, 98, 130
DC-IN jack gP.20
Flash gP.55
A/V OUT jack (MONO)gP.128
USB connector
Connector cover gP.20, 128
Mode dial gP.42
Shutter button gP.46
Zoom lever (W/T•GU) gP.53, 118, 119
Speaker gP.156
10

Names of parts
Viewfinder gP.12, 30, 46
AEL/Custom button (x)gP.80, 82, 139
Print button (<) gP.165
Power switch gP.24
Monitor button (QUICK VIEW f) gP.46, 117
Card cover gP.22Card access lamp gP.46
Arrow pad (acbd) gP.32
OK/Menu button (e) gP.32
Monitor gP.12, 46
Flash mode button (#) gP.55
Macro/Spot button (() gP.79, 84
Diopter adjustment dial gP.30
Self-timer/Remote control button (Z) gP.86, 87
Protect button (0) gP.134
Rotation button (y) gP.129
Flash lever gP.55
Battery compartment cover gP.18
Battery compartment lock gP.18
Tripod socket
Erase button (S) gP.135
11

Names of parts
Viewfinder and monitor indications
INFO setting allows you to select how much information to display on the screen. Screens with the Information display set to ON are shown below. g“Information display” (P.150)
Shooting modes
Still picture Movie
Item Indications Ref. Page
1 Shooting modes P, A, S, M, N, o, m, L, K, J, I, s P.42
2 Shutter speed 16 – 1/1000 P.69
3 Aperture value F2.8 – F8.0 P.68
4 Exposure compensationExposure differential
-2.0 – +2.0-3.0 – +3.0
P.105P.70
5 Battery check e, f P.15
6 Green lamp P.47
7 Flash stand-byCamera movement warning/Flash charge
# (Lights)# (Blinks) P.57
8 Macro modeSuper macro modeManual focus
&%MF
P.84P.85P.77
9 Noise reduction O P.113
F2.8F2.8
1600 12001600 1200SQ1SQ1
F2.8F2.8
12

Names of parts
10 Flash mode !, #, $, #SLOW1, HSLOW1, #SLOW2
P.55
11 Flash intensity control w -2.0 – +2.0 P.62
12 Drive o, j, i, k, BKT P.89
13 Self-timerRemote control
Y<
P.86P.87
14 Sound record R P.97, 98, 130
15 Record mode TIFF, SHQ, HQ, SQ1, SQ2 P.99
16 Resolution 2288 × 1712, 1280 × 960,640 × 480, 320 × 240 etc. P.100
17 AF target mark [ ] P.46
18 Number of storable still picturesSeconds remaining
30
36"
P.100
P.51
19 AE lockAE memory
BC
P.82
20 Spot metering n P.79
21 ISO ISO 50, ISO 100, ISO 200, ISO 400 P.104
22 White Balance 5, 3, 1, w, x, y, V P.106
23 White balance compensation
B1 – B7, R1 – R7P.109
24 Saturation T -5 – +5 P.112
25 Sharpness N -5 – +5 P.110
26 Contrast J -5 – +5 P.111
27 Memory gauge a, b, c, d P.15
Item Indications Ref. Page
13

Names of parts
Playback mode
Still picture Movie
Item Indications Ref. Page
1 Battery check e, f P.15
2 Print reservation, Number of printsMovie
< × 10
n
P.165P.122
3 Sound record H P.97
4 Protect 9 P.134
5 Record mode TIFF, SHQ, HQ, SQ1, SQ2 P.99
6 Resolution 2288 × 1712, 1280 × 960,640 × 480, 320 × 240 etc. P.100
7 Aperture value F2.8 – F8.0 P.68
8 Shutter speed 16 – 1/1000 P.69
9 Exposure compensation -2.0 – +2.0 P.105
10 White Balance WB AUTO, 5, 3, 1, w, V P.106
11 ISO ISO 50, ISO 100, ISO 200, ISO 400 P.104
12 Date and time '03.06.17 15:30 P.28
13 File number, Frame numberPlaying time/total recording time
FILE : 100 – 0030, 30
0"/20" P.159
SQ1SQ116001600 12001200
14

Names of parts
• The indications that appear on a movie picture that has been selected and displayed from the index display are different from those that appear when the movie picture is displayed using the movie playback function.
Memory gaugeThe memory gauge lights up when you take a still picture. While the gauge is lit, the camera is storing the picture on the card. The memory gauge indication changes as shown below depending on the shooting status. The indication is not displayed during movie recording.
Battery checkIf the remaining battery power is low, the battery check indication changes as follows when the camera is turned on or while the camera is in use.
Note
F2.8F2.8
1600 12001600 1200SQ1SQ1
Battery check
Memory gauge
Before shooting
(Gauge is off)
No more pictures can be taken
(Fully lit)Wait until the gauge returns to the status on the left to take the next shot.
One picturetaken(Lit)
More thantwo taken
(Lit)
Shoot Shoot Shoot
Waita b c d
Lights (green)(Goes off after a while)
Remaining power level: high
Remaining power level: exhaustedReplace with new batteries.
Blinks (red)
Remaining power level: lowReady new batteries.
No indicatione f
15

How to use this manual
This sample page is only for your reference. It may differ from the actual page in this manual.
Follow the arrows to perform menu operations. For details on operating procedures, see “How to use the menus” (P.33).
Set the mode dial to any of the marks shown here.
This represents the arrow pad. Only arrows applicable to the operation are shown.
16

Getting started
1
1 Getting startedAttaching the strap
1 Pass the lens cap string through the hole in the lens cap, then pass the other end through the loop and pull tight.
2 Pull the ends of the strap out of the stopper and ring.
3 Thread one end of the strap (A) through the string loop (attached to the lens cap in step 1). Then thread it through the strap eyelet on the camera.
4 Thread the end of the strap back through the ring and stopper as indicated by the arrows. Adjust the strap to the desired length.
5 Pull the strap through the stopper (B) to make sure it is fastened securely.
6 Attach the strap to the other eyelet following steps 3 to 5.
• Be careful with the strap when you carry the camera, as it can easily catch on stray objects, causing injury or damage.
• Attach the strap correctly as shown above so that the camera does not fall off. If the strap is attached incorrectly and the camera falls off, Olympus is not responsible for any damages.
Stopper
Ring
A
Strap eyelet
B
Note
17

1
Getting started
Loading the batteriesThis camera uses two CR-V3 lithium battery packs or four AA (R6) NiMH batteries, NiCd batteries, alkaline batteries or lithium batteries.
1 Make sure the camera is turned off.• The monitor is off.• The viewfinder is off.• The lens is not extended.
2 Slide the battery compartment lock from = to ).
3 Slide the battery compartment cover in the direction of A, then lift in the direction of B.• Use the ball of your finger to slide the cover.
Do not use your fingernail as this could result in injury.
4 Insert the batteries, making sure that they are correctly oriented as shown in the illustration.
• When using rechargeable AA (R6) batteries, charge them before use.
When using AA (R6) batteries When using CR-V3 lithium battery packs
The correct way to insert the AA (R6) batteriesis indicated on the bottom of the camera.
• CR-V3 lithium batteries cannot be recharged.• Do not peel off the label from a CR-V3 lithium battery pack.• Manganese (zinc-carbon) batteries cannot be used.
Important
Battery compartment cover
Battery compartment lock
B
A
Battery alignment
18

Loading the batteriesG
etting started
1
5 Close the battery compartment cover, then press it down C and slide it in the direction shown D.• Press the center of the cover, as it may be
difficult to close properly by pressing the edge.
• Make sure the cover is closed securely.
6 Slide the battery compartment lock from ) to =.
• If the camera is left for about 1 hour with the batteries removed, some of the internal settings may revert to the factory default settings.
C
D
Note
The amount of power consumed varies considerably depending on the operations performed on the digital camera. If you use exhausted batteries or alkaline batteries, the camera may turn off without displaying the battery level warning (P.15).
Precautions when using batteries
19

Loading the batteries
1
Getting started
Selecting optional batteries or an AC adapter
In addition to the batteries provided with the camera, the following types of battery or AC adapter can be used. Choose the power source best suited to the situation.
CR-V3 lithium battery packs (Not rechargeable)Since the CR-V3 lithium battery pack has a long service life, it is convenient when traveling.
NiMH batteries (Rechargeable)Olympus NiMH batteries are rechargeable and economical.However, if the batteries are repeatedly recharged before they are completely exhausted, the working time will gradually be reduced.
AA (R6) alkaline batteriesWhen you need batteries in a hurry, you can use AA (R6) alkaline batteries, which are easy to obtain anywhere. However, the number of pictures that you can take may vary considerably depending on the battery manufacturer, shooting conditions, etc. When taking pictures, use the viewfinder and turn off the monitor whenever possible to save power.
AC adapterAn AC adapter is useful for time-consuming tasks such as image downloads.An optional Olympus CAMEDIA-brand AC adapter allows you to power your digital camera from a common AC wall outlet. Be sure to use the specified AC adapter.Use an AC adapter designed to operate on the AC voltage in the area the camera is being used.Consult your nearest Olympus dealer or Service center for details.
DC-IN jack (black)
AC wall outlet
Power plug
AC adapter
Connection cord plug
20

Loading the batteriesG
etting started
1
• If the battery power runs out while the camera is connected to a PC, the image data may be lost or damaged. You are recommended to use the AC adapter when transferring images to a PC. Do not connect or disconnect the AC adapter while the camera is communicating with the PC.
• Do not remove or load the batteries or connect or disconnect the AC adapter while the camera is turned on. Doing so could affect the camera’s internal settings or functions.
• The life of the batteries may vary according to the type of battery, manufacturer, shooting conditions, etc.
• Power is consumed continuously during the conditions described below. This could shorten the life of the batteries.
• When the monitor is turned on.• When the monitor is in the playback mode for an extended
period of time.• Repeated zoom adjustments.• Repeated auto-focus by depressing the shutter button
halfway.• When the FULLTIME AF mode is turned on.• When the camera is connected to a PC.
• When using an AC adapter, power is supplied to the camera by the AC adapter even if batteries are loaded in the camera. The AC adapter does not charge batteries in the camera.
• Carefully read the AC adapter’s instructions before use.
Note
21

1
Getting started
Inserting a card“Card” in this manual refers to the xD-Picture Card. The camera uses the card to record pictures.
Card basics
The card corresponds to normal camera film for recording the pictures you have taken. Pictures recorded and stored on the card can easily be erased, overwritten, and/or edited on a PC.
Index areaYou can write down the card’s contents.Contact areaComes into contact with the camera’s signal read contacts.
Compatible cards• xD-Picture Card (16 – 256MB)
• This camera may not recognize a non-Olympus card or a card that was formatted on another device (such as a PC, etc.). Before use, be sure to format the card on this camera. g“CARD SETUP - Formatting Cards” (P.148)
1 Make sure the camera is turned off.• The monitor is off.• The viewfinder is off.• The lens is not extended.
2 Open the card cover.
Note
Card cover
22

Inserting a cardG
etting started
1
3 Insert the card in the appropriate direction.• Insert the card while keeping it straight.• The card will stop with a click when it is inserted all
the way to the end.• Inserting the card the wrong way or at an angle
could damage the contact area or cause the card to jam.
• If the card is not inserted all the way, data may not be written to the card.
4 Close the card cover securely until it clicks.
Removing the card
1 Push the card all the way in to unlock it, then let it return slowly.• The card is ejected a short way and then stops.
Hold the card straight and pull it out.
• Do not press on the card with hard or pointed items such as ballpoint pens.• Never open the card cover, or remove the card or the batteries while
the camera is turned on. Doing so could destroy the data stored on the card. Once destroyed, data cannot be restored.
Index area sideNotch
Card inserted correctly
Releasing your finger quickly after pushing the card all the way in may cause it to eject forcefully out of the slot.
Note
Note
23

1
Getting started
Power on/off1 Press the tabs on the lens cap
as indicated by the arrows and remove the lens cap.
2 Press the power switch.• The power turns on and the lens
extends when the mode dial is set to any mode other than q. The viewfinder turns on.
• When the mode dial is set to q, the camera turns on in the playback mode and the monitor turns on.
3 To turn the camera off, press the power switch again.
TIPS• To save battery power, the camera automatically enters the sleep
mode and stops the operation after about 3 minutes of non-operation. The camera activates again as soon as you operate the shutter button or zoom lever. The sleep time interval can be set in any shooting mode (except q). g“SLEEP - Sleep Timer” (P.153)
Mode dial
24

Power on/offG
etting started
1
Startup/Shutdown screen
You can register a picture that will be displayed on the monitor and sound that will be played when turning the camera on or off. (P.157) You can also adjust the volume of the sound. (P.156)
If the card is not recognized (card check)
When the power is turned on, the camera checks the card automatically. If there is no card in the camera or a card that is not supported by this camera is inserted, the following screen is displayed.
• All data stored on the card is erased when the card is formatted.
Monitor indication Corrective action
qNO CARD
There is no card in the camera or the card is not inserted properly.→→→→ Insert a card. If a card is already inserted,
remove it and insert it again correctly.The card cannot record, play back or erase pictures. Format the card or replace it with a new one.→→→→ Press ac to select POWER OFF, then press
e. Replace the card with a new one.→→→→ Format the card.
Press ac to select I FORMAT, then press e to display the confirmation screen. Select YES and press e.Formatting starts. If the card was successfully formatted, the camera is ready to take pictures.
Startup/Shutdown screen(Factory default setting)
Note
POWER%OFF
FORMAt
CARD%SEtUP
SELECt GO
NO
CAUtION ERASING%ALL
SELECt GO
FORMAt
YES
25

1
Getting started
Selecting a languageYou can select a language for on-screen display. This reference manual shows the English on-screen display in the illustrations and explanations. Available language vary depending on the area where you purchased this camera.
1 Set the mode dial to P and press the power switch to turn the camera on.
2 Press e.• The top menu is displayed.
3 Press d on the arrow pad to select MODE MENU.
4 Press ac to select the SETUP tab, then press d.
Arrow pad
OK button
Mode dialPower switch
WB
DRIVE
MODE MENU
Top menu
CARD
SEtUP
CAM
PIC
ALL RESEt ONONENGLISHENGLISH
ONON
3 MIN3 MINSLEEP
REC VIEW
PW ON/OFF SEtUP
SETUP tab
26

Selecting a languageG
etting started
1
5 Press ac to select W, then press d.
6 Press ac to select a language, then press e.
7 Press e again to exit the menu.
8 To turn the camera off, press the power switch.
CAM
PICCARD
SEtUP ONON
3 MIN3 MINSLEEP
REC VIEW
PW ON/OFF SEtUP
ALL RESEt ONONENGLISHENGLISH
ENGLISH
DEUtSCH
SELECt GO
FRANCAIS
ESPAÑOL
Power switch
e button
27

1
Getting started
Setting the date and time1 Set the mode dial to P and press
the power switch to turn the camera on.
2 Press e.• The top menu is displayed.
3 Press d on the arrow pad to select MODE MENU.
4 Press ac to select the SETUP tab, then press d.
5 Press ac to select X, then press d.• The green frame moves to the selected
item.
Arrow pad
OK button
Mode dialPower switch
Top menu
WB
DRIVE
MODE MENU
CARD
SEtUP
CAM
PIC
ALL RESEt ONONENGLISHENGLISH
ONON
3 MIN3 MINSLEEP
REC VIEW
PW ON/OFF SEtUP
SETUP tab
CARD
SEtUP
FILE NAME
MY MODE SEtUPCAM
PIC
'03.01.01'03.01.0100.0000.00
RESEtRESEt
PIXEL MAPPING
28

Setting the date and timeG
etting started
1
6 Press ac to select one of the following date formats: Y-M-D (Year/Month/Day), M-D-Y (Month/Day/Year), D-M-Y (Day/Month/Year). Then press d.• Move to the year setting.• The following steps show the procedure
used when the date and time settings are set to Y-M-D.
7 Press ac to set the year, then press d to move to the month setting.• To move back to the previous setting,
press b.• The first two digits of the year are fixed.
8 Repeat this procedure until the date and time are completely set.• The time is displayed in the 24-hour format.
Consequently, 2 p.m. is displayed as 14:00.
9 Press e.• For a more accurate setting, press e
when the time signal hits 00 seconds. The clock starts when you press the button.
10 To turn the camera off, press the power switch.
• The current settings are retained even when the power is turned off, unless they are readjusted.
• The date and time settings will be canceled if the camera is left without batteries for approximately 1 hour. The settings will be canceled more quickly if the batteries were only loaded in the camera for a short time before being removed. Before taking important pictures, check that the date and time settings are correct.
Y M D
SELECt GOSEt
SELECt GOSEt
Power switch
e button
Note
29

1
Getting started
Adjusting the viewfinderTo make the camera easier to use, adjust the viewfinder to match the eyesight (visual acuity) of the person using the camera.
1 Set the mode dial to h and press the power switch.• The camera and the viewfinder turn on.
2 While looking through the viewfinder, slowly turn the diopter adjustment dial.
3 Turn the dial until the AF target mark can be seen clearly.
Power switchMode dial
Diopter adjustment dial
Viewfinder
2288 17122288 1712
AF target mark
30

Getting started
1
Holding the cameraHold the camera firmly with both hands while keeping your elbows at your sides to prevent the camera from moving. When taking pictures in the vertical position, hold the camera so that the flash is higher than the lens.Keep your fingers and the strap away from the lens and flash.
• Clear pictures cannot be obtained if the camera moves as the shutter button is pressed. Hold the camera correctly, and press the shutter button gently.
Horizontal grip Vertical grip
Top view
Do not hold this part of the lens.
Note
31

2
Using the m
enus
2 Using the menusAbout the menus
When you turn on the camera and press e, the top menu is displayed on the monitor (or viewfinder). The functions of this camera are set from the menus. This chapter explains how the menus work, using the P mode screens.
CARD
SEt
PICCAMERA DRIVE
ISO
A/S/M
SLOW SLOW1SLOW1
WB
DRIVE
MODE MENU
CARD
SEt
PICCAMERA DRIVE
ISO
A/S/M
SLOW
AF
BKt
HI
• Take you directly to the setting screens.
• Display operational buttons at the bottom of the screen.
• The functions registered in the shortcut menus can also be accessed from the MODE MENU.
• The shortcut menus can be replaced in modes other than hnq.g“Setting the shortcut menu” (P.143)
• Lets you access the menu selections to set the ISO, sharpness, etc.
• Categorizes the settings into 4 tabs.• Press ac to select a tab and
display the associated menu items.• There is no mode menu in h
mode.
Use the arrow pad to select a menu.
Press e.
The top menu is displayed.
Tab
MODE MENUSHORTCUT MENUS
Top menu
32

Using the m
enus
2
How to use the menus
WB
DRIVE
MODE MENU
SEt
CAM
PICCARD
CARD%SEtUP
CARD
SEtUP
CAM
PIC
ALL RESEt ONONENGLISHENGLISH
ONON
3 MIN3 MINSLEEP
REC VIEW
PW ON/OFF SEtUP
1 Press e to display the top menu. Press d.
Top menu CAMERA tab
PICTURE tab
CARD tab
SETUP tab
2 Press ac to select a tab, then press d.
Press b to return to the tab selection screen.continued overleaf)
CARD
SEt
PICCAMERA DRIVE
ISO
A/S/M
SLOW SLOW1SLOW1
CARD
SEt
CAM
PICtURE
HQHQ
WB AUtOAUtO
SHARPNESS
CONtRASt
Arrow pad
OK/Menu button
ac
ac
ac
dd
b
continued overleaf.
33

How to use the menus
2
Using the m
enus
• Not all items can be selected depending on the status of the camera and the settings performed.
• In the shooting modes, you can take pictures by pressing the shutter button even when menus are displayed.
• If you want to save the settings after the camera is turned off, set ALL RESET to OFF. g“ALL RESET – Saving the camera’s settings” (P.137)
CARD
SEt
PICCAMERA DRIVE
ISO
SLOW
AUtO
200
400
50
100A/S/M
CARD
SEt
PICCAMERA DRIVE
ISO
SLOW
A/S/M
AUtO
200
400
50
100
4 Press acto select a setting. Press e to complete setting. Press e again to exit the menu and return to shooting status.
The green frame moves to the selected item.
b or e
3 Press ac to select an item, then press d.
To return to select an item, press b or e.
CARD
SEt
PICCAMERA DRIVE
ISO
A/S/M
SLOW SLOW1SLOW1
CARD
SEt
PICCAMERA DRIVE
ISO
A/S/M
SLOW SLOW1SLOW1
ac
ac
d
Note
34

Using the m
enus
2
Shortcut menusShooting modes
h mode i j k l mo r p P
modes
n mode
(Factory default setting)
Selects a shooting mode from o (single-frame shooting), j (sequential shooting), i (high speed sequential shooting), k (AF sequential shooting) and BKT (auto bracketing).
P.89
Extends the maximum optical zoom, making possible up to approx. 40x zoom. P.54
Sets the image quality and resolution.Still picture : TIFF, SHQ, HQ, SQ1, SQ2Movie : HQ, SQ
P.99
Sets the appropriate white balance according to the light source. P.106
Sets the date and time. P.28
Formats a card. P.148
DRIVE
CARD SEtUP
WB
DRIVE
MODE MENU
WB
DIGItAL ZOOM
MODE MENU
DRIVE
DIGITAL ZOOM
K
WB
X
CARD SETUP
35

Shortcut menus
2
Using the m
enus
Playback mode
TIPS• The functions registered in the shortcut menus can also be
accessed from the MODE MENU. The shortcut menus can be replaced in modes other than hnq. g“Setting the shortcut menu” (P.143)
Still picture Movie
Runs through all saved pictures one after another. P.121
MOVIE PLAYBACK
Plays back movies. P.122
INDEX Creates an index picture of a movie in 9 frames. P.124
EDIT Edits a movie. P.126
Displays all the shooting information on the monitor. P.150
Displays a histogram showing the luminance distribution of still pictures. P.114
INFO MODE MENU INFO MODE MENU
MOVIE PLAY
m
MOVIE PLAY
INFO
u
36

Using the m
enus
2
Mode MenusThe MODE MENU has 4 tabs. Press ac to select a tab and display the associated menu items.
Shooting modes
CAMERA tab
DRIVE
Selects a shooting mode from o (single-frame shooting), j (sequential shooting), i (high speed sequential shooting), k (AF sequential shooting) and BKT (auto bracketing).
P.89
ISO Selects the ISO sensitivity from AUTO, 50, 100, 200 and 400. P.104
A/S/M
Selects the shooting mode from A (Aperture priority shooting), S (Shutter priority shooting) and M (Manual shooting).
P.67
r1/2/3/4 Selects a mode to be activated when taking pictures in r mode. P.71
wAdjusts the amount of light emitted by the flash. P.62
#SLOW
Selects from #SLOW1 (1st curtain), HSLOW1 (1st curtain with red-eye reduction) and #SLOW2 (2nd curtain) when the flash mode is set to #SLOW (slow synchronization).
P.61
NOISE REDUCTION Reduces the noise that affects pictures during long exposures. P.113
MULTI METERING
Meters the brightness of the subject at up to 8 different points to set the optimal exposure based on the average brightness.
P.80
CARD
SEt
PICCA
MERA DRIVE
ISO
A/S/M
SLOW SLOW1SLOW1
CAMERA tab
PICTURE tab
CARD tab
SETUP tab
37

Mode Menus
2
Using the m
enus
DIGITAL ZOOM Extends the maximum optical zoom, making possible up to approx. 40x zoom. P.54
FULLTIME AFKeeps the image in focus at all times without having to press the shutter button halfway.
P.73
AF MODE Selects the auto focus method (iESP or SPOT). P.72
% Allows pictures to be taken as close as 3 cm/1.2" from the subject. P.85
PANORAMA Allows panorama pictures to be taken with Olympus CAMEDIA-brand cards. P.92
2 IN 1Combines two still pictures taken in succession and stores them as a single picture.
P.94
FUNCTIONAdds special effects to pictures (BLACK & WHITE, SEPIA, WHITE BOARD, BLACK BOARD).
P.96
AF AREA Changes the position of the AF target mark using the arrow pad. P.74
INFO
Selects whether to display all the information such as shutter speed and white balance, or only the minimum information.
P.150
uDisplays a histogram showing the luminance distribution of still pictures. P.114
R (still pictures) Sound can be recorded when taking still pictures. P.97
R (movies) Selects whether to record sound when shooting a movie. P.98
PICTURE tab
KSets the image quality and resolution.Still picture: TIFF, SHQ, HQ, SQ1, SQ2Movie : HQ, SQ
P.99
WB Sets the appropriate white balance according to the light source. P.106
>Makes fine changes to the white balance. P.109
SHARPNESS Adjusts the sharpness of the image. P.110
38

Mode MenusU
sing the menus
2
CONTRAST Adjusts the contrast of the image. P.111
SATURATION Adjusts the level of color depth without changing the tint. P.112
CARD tabCARD SETUP Formats a card. P.148
SETUP tab
ALL RESET Selects whether to keep the current camera settings when you turn off the power. P.137
W Selects a language for on-screen display. P.26
PW ON/OFF SETUP Sets the picture and sound that come on when the power is turned on and off. P.157
REC VIEW Selects whether to display pictures on the monitor while saving them to a card. P.152
SLEEP Sets the sleep timer. P.153
MY MODE SETUP Customizes settings which are activated in the r mode. P.145
FILE NAME Changes how file names are assigned. P.159
PIXEL MAPPING Checks the CCD and image processing functions for errors. P.160
sAdjusts the brightness of the monitor or viewfinder. P.151
X Sets the date and time. P.28
m/ft Sets the measurement unit (m/ft) used during manual focus. P.161
VIDEO OUTSelects NTSC or PAL according to your TV’s video signal type. TV video signal types differ depending on the region.
P.162
SHORT CUT Assigns frequently used functions as shortcut menus. P.142
CUSTOM BUTTON Assigns a frequently used function to the camera’s custom button. P.139
8Sets the beep sound used for button operations and warnings, and adjusts the volume.
P.154
SHUTTER SOUND Sets the sound made when the shutter button is pressed and adjusts the volume. P.155
39

Mode Menus
2
Using the m
enus
Playback mode
PLAY tab∗1
RAdds sound to a still picture already taken. P.130
∗1 The PLAY tab is not displayed during movie playback.
EDIT tab∗2
Q Makes the file size smaller and saves it as a new file. P.131
P Crops part of a picture and saves it as a new file. P.132
∗2 The EDIT tab is not displayed during movie playback.
CARD tab
CARD SETUP Erases all image data stored on the card or format the card.
P.136, 148
SETUP tab
ALL RESETSelects whether to keep the current camera settings when you turn off the power.
P.137
WSelects a language for on-screen display. P.26
PW ON/OFF SETUP Sets the picture and sound that come on when the power is turned on and off. P.157
SCREEN SETUPRegisters a stored picture for use as the picture displayed when the power is turned on and off.
P.158
s Adjusts the brightness of the monitor. P.151
CARD
SEt
EDItPLAYPLAY tab
EDIT tab
CARD tab
SETUP tab
40

Mode MenusU
sing the menus
2
X Sets the date and time. P.28
VIDEO OUTSelects NTSC or PAL according to your TV’s video signal type. TV video signal types differ depending on the region.
P.162
GSelects the number of frames in the index display. P.120
8Sets the beep sound used for button operations and warnings, and adjusts the volume.
P.154
VOLUMEAdjusts the sound volume during playback. Also adjusts the volume of the sound selected in PW ON/OFF SETUP.
P.156
41

3
Shooting basics
3 Shooting basicsShooting modes
The shooting modes include modes where the optimal settings for the situation are automatically selected, and modes where you can select the settings best suited to the shooting conditions and the effect you wish to achieve.You can change the shooting mode before and after turning the camera on.
Situation-related modesh Full-auto shooting
Allows you to take still pictures using no special functions or manual adjustments. The camera sets the optimal focusing and exposure. This is the simplest of all shooting modes.
i Portrait shooting
Suitable for taking a portrait-style shot of a person. This mode features an in-focus subject against a blurred background. The camera automatically sets the optimal shooting conditions.
j Sports shooting
Suitable for capturing fast-moving action (such as sports) without blur. Even a fast-moving subject will be clear and sharp, as if it is not moving, enabling
Setting-related modes
Shooting modes
Situation-related modesPlayback mode gP.116
Mode dial
42

Shooting modesShooting basics
3
you to capture facial expressions and detailed activity. The camera automatically sets the optimal shooting conditions.
k Landscape+Portrait shooting
Suitable for taking pictures of both your subject and the landscape. The picture is taken with the background as well as the subject in the foreground in focus. You can take pictures of your subject against a beautiful sky or landscape. The camera automatically sets the optimal shooting conditions.
l Landscape shooting
Suitable for taking pictures of landscapes and other outdoor scenes. Both the foreground and the background are in focus. Since blues and greens are vividly reproduced in this mode, it is excellent for shooting natural scenery. The camera automatically sets the optimal shooting conditions.
m Night Scene shooting
Suitable for shooting pictures in the evening or at night. The camera sets a slower shutter speed than is used in normal shooting. For example, if you take a picture of a street at night in h mode, the lack of brightness will result in a dark picture with the background underexposed and without details. In the Night Scene shooting mode, the true appearance of the street is captured. The camera automatically selects the optimal settings for this type of shooting condition. Since the shutter speed is slow, make sure you stabilize the camera by using a tripod.
o Self-Portrait shooting
Enables you to take a picture of yourself while holding the camera. Point the lens towards yourself and the focus will be locked on you. The camera automatically sets the optimal shooting conditions. The zoom is fixed in the wide position and cannot be changed.
43

Shooting modes
3
Shooting basics
Setting-related modesP Program shooting
Allows you to take still pictures. The camera sets the aperture and shutter speed. Other functions, such as flash modes and drive modes, can be adjusted manually.
p Aperture priority/Shutter priority/Manual shooting
When the mode dial is set to p, the following items can be set with the menus. g “A/S/M mode” (P.67).
A Aperture priority shooting
Allows you to set the aperture manually. The camera sets the shutter speed automatically. By decreasing the aperture value (F-number), the camera will focus within a smaller range, producing a picture with a blurred background. Increasing the value forces the camera to focus over a wider range in the forward and backward directions, resulting in increased “depth of field”, in which both the subject and the background are in focus.g“Aperture priority shooting” (P.68)
S Shutter priority shooting
Allows you to set the shutter speed manually. The camera sets the aperture automatically. Set the shutter speed according to the subject and the type of effect you want.g“Shutter priority shooting” (P.69)
Aperture (F-number) is decreased.
Aperture (F-number) is increased.
44

Shooting modesShooting basics
3
M Manual shootingAllows you to set the aperture and shutter speed manually. To check the exposure, refer to the exposure differential. This mode gives you more creative control, allowing you to make the settings you need to get the type of picture you want, regardless of optimum exposure.g“Manual shooting” (P.70)
r My Mode
Allows you to save your favorite settings as your own personal mode and use these customized settings when taking pictures. Current settings can also be saved for retrieving by this mode. g“MY MODE SETUP” (P.145)g“Using My Mode” (P.71)
n Movie record
Allows you to record movies. The camera sets the aperture and shutter speed automatically. Even if the subject moves during recording or the distance to the subject changes, correct focusing and exposure are maintained continuously. If R is set to ON, soud is recorded at the same time.g“Recording movies” (P.51)
• The available settings vary depending on the mode. g“Modes and Shooting Functions” (P.191)
Setting the shutter speed higher lets you capture fast-moving action without blur.The subject will be clear and sharp, as if it is not moving.
Setting the shutter speed lower blurs a moving subject, giving the impression of movement.
Note
45

3
Shooting basics
Taking still picturesYou can take still pictures using either the viewfinder or the monitor.
1 Set the mode dial to h i j k l m o r p P and press the power switch.g“Power on/off” (P.24)
• The viewfinder turns on.
2 Decide the composition of the picture.
Mode dial
Shutter buttonMode dial
Card access lampPower switchPower switch
f button
Flash lever
To shoot using the monitor, press f to turn the monitor on.
F2.8F2.8
1600 12001600 1200SQ1SQ1
AF target mark
46

Taking still picturesShooting basics
3
3 Press the shutter button gently (halfway) to adjust the focus.
• When the focus and exposure are locked, the green lamp lights (focus lock).
• The AF target mark moves to the focused position.
• The shutter speed and aperture value automatically set by the camera are displayed (except in M mode).
• # blinks to warn of camera movement. Push the flash lever up to make the flash pop up. (P.55)
• When # lights after the flash has popped up, the flash is ready to fire. The flash fires automatically when the shutter button is pressed all the way.
4 Press the shutter button all the way (fully).• The camera takes the picture.• The card access lamp blinks while the picture is
stored on the card.
TIPSThe subject cannot be focused on.
g“If correct focus cannot be obtained” (P.49)The green lamp blinks.→→→→ You are too close to the subject. Take the picture at least 7 cm/2.8"
(wide-angle) (1.2 m/3.9 ft. (telephoto)) away from the subject. If you use the super macro mode, you can take pictures as close as 3 cm/1.2" from the subject. (P.85)
→→→→ Depending on the subject, the focus and exposure may not be locked. g“Subjects that are difficult to focus on” (P.50)
# blinks when the shutter button is pressed halfway.→→→→ The flash is charging. Wait until the lamp goes off.
To check the picture you have just taken immediately→→→→ Set Rec View to ON. g“REC VIEW” (P.152)
F2.8F2.8
1600 12001600 1200SQ1SQ1
Green lamp#mark
47

Taking still pictures
3
Shooting basics
To record sound with the picture→→→→ You can record sound when taking still pictures. Set R to ON.
g“Recording sound with still pictures” (P.97) You can also add sound to a picture that has already been taken. g“Recording sound” (P.130)
The viewfinder or monitor turns off automatically→→→→ If the camera is not used for over 3 minutes, the viewfinder and
monitor turn off automatically. Operate the shutter button or zoom lever to turn the viewfinder or monitor on. g“SLEEP - Sleep Timer” (P.153)
To adjust the brightness of the viewfinder or monitor→→→→ Go to “Monitor brightness Adjustment” and adjust the brightness.
g“Monitor/viewfinder brightness Adjustment” (P.151)
The viewfinder or monitor is hard to see→→→→ Bright light, such as direct sunlight, may cause vertical lines
(smears) to appear on the image in the viewfinder or monitor. This does not affect recorded pictures.
To check the area the camera is focusing on→→→→ If you press f while pressing the
shutter button halfway, the area you are focusing on is enlarged. Pressing f once more returns the size to normal. This function is not available in the digital zoom range. g“DIGITAL ZOOM - Using the digital zoom” (P.54)
• Press the shutter button gently using the ball of your finger. If it is pressed hard, the camera may move and pictures may come out blurred.
• Recorded pictures will be saved on the card regardless of whether the camera is turned off or the batteries are replaced or removed.
• Never open the card cover, remove the batteries or disconnect the AC adapter while the card access lamp is blinking. Doing so could destroy stored pictures and prevent storage of pictures you have just taken.
• When taking pictures against strong backlight, the area of the picture in shadow may appear colored.
F2.8F2.8
1600 12001600 1200SQ1SQ1
Note
48

Shooting basics
3
If correct focus cannot be obtainedWhen the subject cannot be focused on, you can focus the camera on another point at roughly the same distance (focus lock) and take the picture as explained below.
Using the Focus Lock function
1 Position the AF target mark on the subject you want to focus on.• When shooting a hard-to-focus subject or
a fast-moving subject, point the camera at an object about the same distance away as the subject.
2 Press the shutter button halfway until the green lamp lights.• When the focus and exposure are locked,
the green lamp lights.• The AF target mark moves to the focused
position.• When the green lamp blinks, the focus
and exposure are not locked. Release your finger from the shutter button, re-position your subject and press the shutter button halfway again.
3 Keeping the shutter button pressed halfway, recompose your shot.
Mode dial
F2.8F2.8
1600 12001600 1200SQ1SQ1
AF target mark
Shutter button
F2.8F2.8
1600 12001600 1200SQ1SQ1
49

If correct focus cannot be obtained
3
Shooting basics
4 Press the shutter button fully.
TIPSThe frame in which you focus on a subject is different from the frame in which you lock the exposure.g“AE LOCK - Locking the exposure” (P.82)Fix the focus position.g“AF LOCK – Locking the focus” (P.75)Focus on the subject in the center of the frame.g“AF MODE - Changing the focus range” (P.72)
Subjects that are difficult to focus on
Under certain types of conditions, the auto focus may not work properly. If this happens, focus on an object with high contrast at the same distance as the intended subject (focus lock), recompose your shot and then take the picture. If the subject has no vertical lines, hold the camera vertically and focus the camera using the focus lock function by pressing the shutter button halfway, then return the camera to the horizontal position while keeping the button pressed halfway and take the picture.If the subject still cannot be focused on, use the manual focus. g “Manual focus” (P.77)
Shutter button
The green lamp blinks.The subject cannot be brought into focus.
Subject with low contrast
Subject with an extremely bright area in the center of the frame
Subject without vertical lines
Subjects at different distances
Fast-moving subject The subject to be focused on is not in the center of the frame.
The green lamp lights, but the subject cannot be brought into focus.
50

Shooting basics
3
Recording moviesThis function allows you to record movies. If R is set to ON, sound is recorded at the same time.
1 Set the mode dial to n and press the power switch.g“Power on/off” (P.24)
• The viewfinder turns on.• The available recording time on the card
that you are using is displayed.
2 Decide the composition of the picture.• You can use the zoom lever to enlarge
your subject.
3 Press the shutter button fully to start recording.• You can adjust the zoom during movie
recording.• The card access lamp blinks while the
movie is stored on the card.• During movie recording, N lights red.
4 Press the shutter button again to stop recording.• When the remaining recording time has been used up, recording stops
automatically.• When there is space in the card memory, the remaining recording time
is displayed, and the camera is ready to shoot.
Mode dial
Shutter buttonMode dial
Card access lampPower switch
F2.8F2.8
Seconds remaining
51

Recording movies
3
Shooting basics
• Depending on the card, the remaining recording time may drop rapidly during recording. Try using the card again after formatting it with your camera. g“CARD SETUP - Formatting Cards” (P.148)
• When R is set to ON, the position of the optical zoom cannot be changed during movie recording. To use the zoom during recording, set DIGITAL ZOOM to ON. g“DIGITAL ZOOM - Using the digital zoom” (P.54)
• In n mode, the flash and manual focus (MF) cannot be used.
Note
• Recording will continue until the card is full unless stopped by pressing the shutter button.
• A long recorded movie cannot be edited. (P.124)• If a single movie recording uses up all of the card’s memory, create
space on the card by deleting the movie or downloading it to a PC.
Notes for recording movies over a long time
52

Shooting basics
3
ZoomTelephoto and wide-angle shooting are possible at 10x magnification (the optical zoom limit, equivalent to 38 mm – 380 mm on a 35 mm camera). When taking still pictures, you can increase zoom magnification to a maximum of approximately 40x by combining the optical zoom with the digital zoom. During movie recording, the digital zoom magnification is 2.5x.Camera movement is likely to occur at higher magnifications. Stabilize the camera with a tripod, etc. to avoid camera movement.
Using the optical zoom
1 Push or pull the zoom lever.
Mode dial
Zoom lever
Wide-angle:Push the zoom lever toward W to zoom out.
Telephoto:Pull the zoom lever toward T to zoom in.
53

Zoom
3
Shooting basics
DIGITAL ZOOM - Using the digital zoom
1 In the top menu, select MODE MENU CAMERA DIGITAL ZOOM ON, and press e.g“How to use the menus” (P.33)
• Press e again to exit the menu.
In the top menu, select DIGITAL ZOOM ON, and press eeee.
2 Pull the zoom lever toward T.• The white area of the zoom indicator
indicates the optical zoom. If the digital zoom is set to ON, a red area appears on the zoom indicator. When you reach the limit of the optical zoom, the digital zoom is enabled.
• Pictures taken with the digital zoom may appear grainy.
Mode dial
Arrow pad
OK button
Zoom lever
Mode dial
F2.8F2.8
1600 12001600 1200SQ1SQ1
The cursor moves up and down on the zoom indicator according to the zoom magnification.The cursor turns orange when inside the digital zoom field.
Note
54

Flash
4
4 FlashFlash shooting
Select the flash mode best suited to the light conditions and the effect you want to achieve. You can also adjust the amount of light emitted using the flash intensity control.
1 Push the flash lever up. ( )• The flash pops up. ( )
2 Set the flash mode by repeatedly pressing #.
• The flash mode changes in the sequence shown below (when all modes are available).
• If no operation is performed for about 3 seconds, the flash mode is set and the mode selector screen is automatically exited.
• To prevent the flash from firing, press down on the top of the flash to retract it.
Mode dial
Shutter button
#Flash mode button
SLOWAuto (Auto-flash)
#SLOW (Slow synchronization)
! (Red-eye reduction flash)
#(Fill-in flash)
55

Flash shooting
4
Flash
3 Press the shutter button halfway.• In conditions where the flash will fire, #
lights.
4 Press the shutter button fully to take the picture.
Flash working rangeW (max.): Approx. 0.3 m to 4.5 m (1.0 ft. to 14.8 ft.)T (max.) : Approx. 1.2 m to 3.5 m (3.9 ft. to 11.5 ft.)
Function restrictions according to mode
F2.8F2.8
1600 12001600 1200SQ1SQ1
# mark
:Available, – :Not available, :Factory default setting∗ The factory default settings and available modes vary depending on
the selected mode.
Modeh i j k
l m or∗ p
PFlash mode A S MAuto –! –# – –#SLOW1 –#SLOW2 –HSLOW1 – –$
56

Flash shootingFlash
4
TIPSThe # (flash standby) indication blinks.→→→→ The flash is charging. Wait until # goes off.
Camera movement warning (Auto-flash, red-eye reduction flash, fill-in flash)→→→→ When # (camera movement warning) lights, the shutter speed
locks at its current level. This helps prevent camera shake problems (shutter speeds that are too slow can cause blur). However, if the zoom magnification is increased, the camera will increase the locked shutter speed accordingly.
• The flash does not fire in the following situations:In the movie record mode, during auto bracketing, during super-macro shooting, when FUNCTION is set to WHITE BOARD/BLACK BOARD, and during Panorama shooting
• The flash may not give you the optimum result in macro mode, especially with wide-angle shooting. Check the resulting picture on the monitor.
• If a conversion lens is attached to the camera, do not use the flash.
Zoom position Shutter speedW (max.) 1/30 sec.T (max.) 1/320 sec.
Note
57

Flash shooting
4
Flash
Auto-flash (No indication)The flash fires automatically in low light or backlight conditions.To shoot a subject with backlight, position the AF target mark over the subject.
Red-eye reduction flash (!)The light from the flash may make the subject’s eyes appear red in the picture. The red-eye reduction flash mode significantly reduces this phenomenon by emitting pre-flashes before firing the regular flash. This helps accustom the subject’s eyes to the bright light and minimizes the red-eye phenomenon.
• After the pre-flashes, it takes about 1 second before the shutter is released. Hold the camera firmly to avoid camera movement.
• Effectiveness may be limited if the subject is not looking directly at the pre-flashes, or if the shooting range is too far. Individual physical characteristics may also limit effectiveness.
Fill-in flash (#)The flash fires regardless of the available light. This mode is useful for eliminating shadows on the subject’s face (such as shadows from tree leaves), in a backlight situation, or for correcting the color shift produced by artificial lighting (especially fluorescent light).
• The fill-in flash may not have the desired effect under excessively bright light.
The subject’s eyes appear red.
Note
Note
58

Flash shootingFlash
4
Flash off ($)The flash does not fire even in low light conditions. Use this mode in situations where flash photography is not desired or is prohibited, such as in an art museum. You can also use this mode when you want to shoot a natural-looking twilight or night scene.
• Since a slow shutter speed is automatically selected in low light situations when in the flash off mode, the use of a tripod is recommended to prevent your pictures from being blurred by camera movement.
Slow Synchronization (#SLOW1 #SLOW2 HSLOW)The slow synchronization flash is designed for slow shutter speeds. Normally, when shooting with a flash, shutter speeds cannot go below a certain level to prevent camera movement. But when shooting a night scene background, fast shutter speeds can make the background too dark. Slow synchronization flash allows both a slow shutter speed for the background and a flash for the subject. Since the shutter speed is slow, make sure you stabilize the camera by using a tripod. Otherwise, camera movement may cause the picture to be blurred.
1st curtain (front curtain) #SLOW1Usually, regardless of the shutter speed, the flash fires right after the shutter fully opens. This is called 1st curtain. Unless you change it, this is how the flash always fires. The slow synchronization factory default setting is #SLOW1.
Note
59

Flash shooting
4
Flash
2nd curtain (rear curtain) #SLOW2With 2nd curtain, the flash fires just before the shutter closes. Changing the flash timing can create interesting effects in your picture, such as expressing the movement of a car by showing the tail-lights streaming backwards. The slower the shutter speed, the better the effects turn out.The slowest possible shutter speed depends on the shooting mode:M mode : 16 sec.P, A, S, m mode : 4 sec.
1st curtain with red-eye reduction HSLOW1This mode is for when you want to use slow synchronization, yet also reduce the red-eye phenomenon. For instance, when shooting a person against a brightly lit night background. A normal flash might make the person’s eyes red, but 1st curtain with red-eye reduction lets you capture the background correctly and reduce the red-eye phenomenon at the same time. 2nd curtain with red-eye reduction is not available.
rear curtain
2nd curtain flash fires
Shutter closes
1st curtain flash fires
front curtain
Shutter fully opens
When the shutter speed is set to 4 sec.
4sec.
4sec. 0
60

Flash
4
Using the slow synchronization flash
1 In the top menu, select MODE MENU CAMERA #SLOW #SLOW1, HSLOW, #SLOW2, and press e.g“How to use the menus” (P.33)
• Press e again to exit the menu.
Mode dial
Arrow pad
OK button
CARD
SEt
PICCA
MERA DRIVE
ISO
A/S/M
SLOW SLOW2
SLOW1
SLO W
61

4
Flash
Flash intensity controlYou can adjust the amount of light emitted by the flash.In some situations, you may get better results by adjusting the light emission. Examples include small subjects, distant backgrounds, or situations when increased contrast is desired. You can adjust the exposure in the range of ±2.0 in 1/3 EV steps.
1 In the top menu, select MODE MENU CAMERA w, and press d.g“How to use the menus” (P.33)
2 Press ac to select a setting.a: Light emission is increased by 1/3EV
each time you press the button. (EV : Exposure Value)
c : Light emission is decreased by 1/3 EV each time you press the button.
• Press e again to exit the menu.
• The flash adjustment effect may not be sufficient if the shutter speed is too fast.
Mode dial
Arrow pad
OK buttonCARD
SEt
PICCA
MERA DRIVE
ISO
A/S/M
SLOW
0.0
Note
62

Flash
4
External flash (optional)
Using the external flash
Various types of flash shooting are possible with the FL-20 or FL-40 external flash.If an external flash is used, the flash mode and exposure compensation will be detected automatically by the camera like the built-in flash.You cannot use the built-in flash and the external flash together.
1 Slide the shoe cover off in the direction of the arrow and attach the external flash.• For instructions on how to attach the
flash, refer to the manual for the external flash.
• Keep the shoe cover in a safe place to prevent it getting lost, and replace it on the camera when you have finished using the external flash.
2 Turn on the external flash.• When using the FL-20, set the mode dial to
TTL-AUTO.• When using the FL-40, the external flash
begins communicating with the camera and automatically switches to TTL-AUTO. During communication, TTL-AUTO is displayed.
• Be sure to attach the flash to the camera before turning the flash on.
Mode dial
Shoe cover
63

External flash (optional)
4
Flash
3 Press # to set the flash mode.g“Flash shooting” (P.55)
• If close-up pictures are overexposed, try using the built-in flash by itself.
Note
64

External flash (optional)Flash
4
Using commercially available external flashes
Provided that the flash can be connected to the hot shoe, a commercially available external flash may be used. (Unlike the FL-20 and FL-40, the amount of light emitted cannot be adjusted on commercially available external flashes.)For details on compatible commercially available external flashes, refer to the next page.
1 Attach the external flash to the hot shoe and connect it to the camera.• For instructions on how to attach the flash,
refer to the manual for the external flash.
2 Select M mode. Adjust the shutter speed and aperture.g“Manual shooting” (P.70)
• Remember that a slow shutter speed can produce blurred images. For the best results, we recommend that you set the shutter speed from 1/200 to 1/300 seconds.
3 Turn on the external flash.• Be sure to attach the flash to the camera
before turning the flash on.
4 Set the mode that automatically controls the amount of light emitted by the external flash. Also set the ISO sensitivity and aperture on the external flash to match the camera’s settings.• Refer to the user’s manual for the external flash to select its mode.
• The camera’s flash mode will have no effect on the external flash. The external flash will fire even when the camera’s flash mode is set to $ (off).
• Confirm in advance that the external flash you are using is synchronized with the camera.
Mode dial
Note
65

External flash (optional)
4
Flash
Compatible commercially available external flashes
When selecting an external flash, use products which meet the following basic conditions.(1) Some flashes available on the market operate with a high voltage synchro
terminal. If one of these is used, it may damage the camera, and/or the camera may not function normally. Contact the manufacturer of the flash you are using concerning the specifications of the flash’s synchro terminal.
(2) Some flashes available on the market have the polarity of the synchro terminal reversed. In this case, even if the flash is connected, it will not fire. Contact the manufacturer of the flash for more information.
(3) Exposures when using an external flash require that adjustments be made on the external flash unit. If an external flash is used in the auto mode, match it with the F value and ISO sensitivity settings on the camera.
(4) Even if the auto F value and ISO sensitivity of the external flash are set to the same conditions as those on the camera, depending on the photographic conditions, it is possible that the correct exposure may not be obtained anyway. In such a case, adjust the auto F value or ISO value on the external flash unit or calculate the distance in the manual mode and use it that way. Generally, however, the auto F value and ISO value can only be adjusted 1 step and beyond that, exposure compensation cannot be made. (Exposure compensation in the camera is made invalid in external flash photography.)
(5) Use a flash which is capable of covering an illumination angle for a 38 mm or larger lens when calculated for 35 mm film. However, in close-up photography with the lens on the wide setting, the bottom of the image may not expose correctly. The ideal is to have a wide angle adapter to fit on the flash and spread the illumination angle so it is wider.
(6) Use a flash unit with a flash time of 1/200 sec. or less when using the flash at full strength. For devices with a long flash time, such as a ring flash, a portion of the light emitted will not contribute to the exposure.
(7) If a flash unit or other accessory TTL flash that has additional communications functions other than the FL-20 or FL-40 is used, it may not only fail to function normally, but may also cause damage to the camera’s circuitry. Do not use such a device.
66

Advanced shooting
5
5 Advanced shootingA/S/M mode
Select the shooting mode to be used when the mode dial is set to p.
1 In the top menu, select MODE MENU CAMERA A/S/M A, S or M, and press e.g“How to use the menus” (P.33)
• Press e again to exit the menu.
Mode dial
Arrow pad
OK buttonCARD
SEt
PICCA
MERA DRIVE
ISO
A/S/M
SLOW M
S
A
67

5
Advanced shooting
Aperture priority shooting
1 Select A mode.g“A/S/M mode” (P.67)
2 Press ac to set the aperture value.a : The aperture value increases.c : The aperture value decreases.
If the aperture value is displayed in red, the aperture setting is unsuitable for the conditions. Take the following steps. (When the aperture value is displayed in green, the setting will provide optimum exposure.)
Aperture range :Toward W: f2.8 to f8.0Toward T : f3.7 to f8.0
• When the flash is set to the auto-flash mode, the shutter speed is fixed at 1/30 sec. in the maximum wide angle, or 1/320 sec. in the maximum telephoto, and will not go slower.
Mode dial
ac
Aperture value
appears : The image is overexposed.Press a to increase the aperture value.
appears : The image is underexposed.Press c to decrease the aperture value.
F2.8F2.81/10001/1000
1600 12001600 1200SQ1SQ1
4"4"
1600 12001600 1200SQ1SQ1
Note
68

Advanced shooting
5
Shutter priority shooting
1 Select S mode.g“A/S/M mode” (P.67)
2 Press ac to set the shutter speed.a : Sets a faster shutter speed.c : Sets a slower shutter speed.
If the shutter speed is displayed in red, the setting is unsuitable for the conditions. Take the following steps. (When the shutter speed is displayed in green, the setting will provide optimum exposure.)
Shutter speed range : 1 to 1/1000 sec.
• Shutter speeds that can be set differ according to the flash setting.
Mode dial
ac
Shutter speed
appears : The image is overexposed.Press a to set a faster shutter speed.
appears : The image is underexposed.Press c to set a slower shutter speed.
1/50
1600 12001600 1200SQ1SQ1
1/800 F2.8F2.8
1600 12001600 1200SQ1SQ1
Note
69

5
Advanced shooting
Manual shooting
1 Select M mode.g“A/S/M mode” (P.67)
2 Use the arrow pad to set the aperture value and shutter speed.d : The aperture value increases.b : The aperture value decreases.a : Sets a faster shutter speed.c : Sets a slower shutter speed.
• When the shutter button is halfway pressed, the difference (ranging from -3.0 to +3.0 EV) between the exposure determined by the currently selected aperture and shutter speed compared to the exposure level considered optimal by the camera is displayed.
• If the exposure differential appears in red, it indicates that the exposure differential is less than -3.0 EV or more than +3.0 EV.
• When you press x, the screen on the right appears with the bar indicating current exposure settings.
Aperture value: f2.8 to f8.0 (W)f3.7 to f8.0 (T)
Shutter speed : 16 to 1/1000 sec.
• To avoid camera movement, you are recommended to use a tripod when taking pictures requiring a slow shutter speed.
Mode dial
Arrow padxAELCustom button
F2.8F2.8
1600 12001600 1200SQ1SQ1
Exposure differential
F2.8F2.8
Note
70

Advanced shooting
5
Using My ModeWhen you use r mode, the settings you selected with the menus in My Mode are activated.Saving the shooting mode or function settings you want to use in advance lets you shoot with your favorite settings straightaway. You can also save the settings you are currently using. You can create and save up to 4 different patterns. g“MY MODE SETUP” (P.145)
1 In the top menu, select MODE MENU CAMERA MY MODE MY MODE 1 to MY MODE 4, and press e.g“How to use the menus” (P.33)
• Press e again to exit the menu.• Only the settings in MY MODE 1 have
already been saved. You cannot select MY MODE 2 to MY MODE 4 if no settings have been saved in them.g“MY MODE SETUP” (P.145)
• Although the settings you are using can be saved, the saved zoom position may not be the same as the one being used.
Mode dial
Arrow pad
OK button
Note
71

5
Advanced shooting
Focusing applications
AF MODE - Changing the focus range
This function allows you to select the focus range of your subject.
iESP Focus selection is based on the entire picture on the screen. Even when the subject is not in the center of the screen, focusing is possible.
SPOT Focus selection is based on the subject within the AF target mark.
1 In the top menu, select MODE MENU CAMERA AF MODE iESP or SPOT, and press e.g“How to use the menus” (P.33)
• Press e again to exit the menu.
• In h and n mode, the AF MODE is fixed at iESP and cannot be changed.
Mode dial
Arrow pad
OK button
CARD
SEt
PICCA
MERA NOISE REDUCtION
MULtI MEtERING
DIGItAL ZOOM
FULLtIME AF
AF MODE
iESP
SPOt
Note
72

Focusing applicationsA
dvanced shooting
5
FULLTIME AF - A reliable time-saving way to focus
FULLTIME AF keeps the subject in front of the lens in focus at all times, without having to press the shutter button halfway. When ON is selected, the focusing time is reduced, letting you take successive snapshots.
1 In the top menu, select MODE MENU CAMERA FULLTIME AF ON, and press e.g“How to use the menus” (P.33)
• Press e again to exit the menu.
• Battery life is reduced when FULLTIME AF is used.
Mode dial
Arrow pad
OK button
CARD
SEt
PICCA
MERA NOISE REDUCtION
MULtI MEtERING
DIGItAL ZOOM
FULLtIME AF
AF MODE
OFF
ON
Note
73

Focusing applications
5
Advanced shooting
AF AREA – Changing the position of the AF target mark
You can select the area you want to focus on by changing the position of the AF target mark.
1 Set the AF MODE to SPOT.g“AF MODE - Changing the focus range” (P.72)
2 In the top menu, select MODE MENU CAMERA AF AREA, and press d.
3 Use the arrow pad to move the AF target mark to the area you want to focus on.• The AF target mark at the center of the
screen can be moved vertically or horizontally.
4 Take the picture.• To restore the AF target mark to its original
position (at the center), press e.• Press e again to exit AF target mark selection mode.
• AF AREA is not available when the digital zoom is set to ON.• The location of the AF target mark cannot be saved.
Mode dial
Arrow pad
OK button
AF AREA
SELECt CANCEL
AF target mark
Note
74

Focusing applicationsAdvanced shooting
5
AF LOCK – Locking the focus
Registering the AF lock function on the x in advance enables easy locking of the focus.
1 Register the AF lock function on x.g“Setting the custom button” (P.140)
2 Position the AF target mark on the subject you want to focus on and press x.• The focus is locked and the AF LOCK mark is displayed.• To reset the AF LOCK, press x again to cancel the AF LOCK.
Each time you press x, AF LOCK is alternately engaged and canceled.
3 Press the shutter button fully.
When x is pressed When focus is locked
Mode dial
x AEL/Custom button
Shutter button
F2.8F2.8
1600 12001600 1200SQ1SQ1
AF LOCK
F2.8F2.8
1600 12001600 1200SQ1SQ1
AF LOCK mark
75

Focusing applications
5
Advanced shooting
TIPSHow to save the locked focus after shooting (AF MEMORY)
Hold down x for more than 1 second. The AF MEMORY mark appears. When the mark appears, the locked focus is memorized. To cancel AF MEMORY, press x again.
AF LOCK was canceled.Do not operate any of the buttons or the mode dial after performing AF LOCK. AF LOCK will be canceled.The camera had emerged from sleep mode or the power was turned off.
• The focus may be compromised by operating the zoom after setting the AF LOCK. Complete zoom operations before setting the AF LOCK.
• AF LOCK is not available when a menu is displayed on the screen. Exit the menu. g“How to use the menus” (P.33)
F2.8F2.8
1600 12001600 1200SQ1SQ1
AF MEMORY
AF MEMORY mark
Note
76

Focusing applicationsA
dvanced shooting
5
Manual focus
If auto focus is unable to focus on a subject, use manual focus.
1 Hold down e for more than 1 second. When the focus distance selection screen appears on the monitor, press b to select MF.
2 Press ac to set the focus distance.• During operation, the area you are
focusing on is enlarged. This lets you check whether the focus is in the right position.
• The distance indicator on the left of the monitor is for reference only.
• When the indicator is moved to less than 2 m (6.6 ft.), the display automatically switches to the 7 cm (2.8") to 2 m (6.6 ft.) display.
3 Hold down e for more than 1 second to save the setting.• MF is displayed in red on the monitor.
Mode dial
Arrow pad
OK button
MF AFMF AF
MF AFMFMF AFMF AF
F2.8F2.8
MF AFMF AF
F2.8F2.8
77

Focusing applications
5
Advanced shooting
4 Take the picture.• The focus is locked at the distance you have set.
To cancel manual focus1 Hold down e for more than 1
second to display the focus distance selection screen.
2 Press d to select AF, then press e.• Manual focus is canceled.
TIPSHow to shoot while keeping the same focus distance at all times
The focus can be fixed at the same distance as when you perform focus lock.1 Position the AF target mark on a subject at the desired distance
and press the shutter button halfway.2 Keeping the shutter button half-pressed, press e.
• The distance indicator is displayed.• MF is selected and the focus is locked at the same distance as
when you performed focus lock.
Even if you move the cursor to the top of the distance indicator, focusing is not possible at ).
Adjust the cursor position by pressing ac while watching the monitor.
• If the zoom lever is pressed after performing manual focus, the saved focus distance may be changed. Perform setting again.
MF AFMF AF
MF AFMFMF AF
F2.8F2.8
Note
78

Advanced shooting
5
MeteringThere are three ways of measuring the brightness of a subject.
Digital ESP metering Meters the center of the subject and the surrounding area separately.
Spot metering Exposure is determined by metering within the AF target area. In this mode, a subject can be shot with optimal exposure regardless of the background light. gP.79
Multi-metering Meters the brightness of the subject at up to 8 different points to set the optimal exposure based on the average brightness. This method is useful with a high contrast subject. gP.80
Spot metering
1 Select n or ( by repeatedly pressing (.• If no operation is performed for about 3
seconds, the selected mode is set and the mode selector screen is automatically exited.
• ( is not available in manual focus mode. g“Manual focus” (P.77)
Mode dial
( Macro/Spot button
79

Metering
5
Advanced shooting
MULTI METERING
1 When using the camera in the p mode, multi-metering is not available in the M mode. Set to any mode except M.g“A/S/M mode” (P.67)
• If a function other than AE lock is registered on x, set AE lock to the button.g“Setting the custom button” (P.140)
2 Press ( repeatedly to set n.g“Spot metering” (P.79)
3 In the top menu, select MODE MENU CAMERA MULTI METERING ON, and press e.g“How to use the menus” (P.33)
• Press e again to exit the menu.
4 Position the AF target mark on the area you want to meter and press x. The brightness is metered at up to 8 different points.• Multi-metering bar appears.• Brightness meter readings are ignored
after the 9th reading.• To perform metering again, press x for more than 1 second to display C. Press x again to cancel the metering values.
Mode dial
Arrow pad
OK button
xAEL/Custom button
( Macro/Spot button
F2.8F2.8
80

MeteringA
dvanced shooting
5
TIPSTo save the locked multi-metering exposure after shooting (AE memory)
After metering in step 4, hold down x for more than 1 second. C appears. While C is displayed, the exposure is saved. Press x again to cancel the AE memory.
The multi-metering exposure is canceled.If you operate any of the buttons or the mode dial after metering in step 4, the multi-metering exposure is canceled.
F2.8F2.8
When Z moves more than ±3 from the center of the bar (the average reading), red X Y appear.
Ex: When metering 2 points (pressing x twice)
The aperture and shutter speed as calculated from the average values obtained by metering at 2 points. These values are recalculated every time another metering point is added.
The average for the 2 metering points. The average is always shown at the center of the bar.
Indicates how much the present exposure you are metering differs from the average exposure value. The present exposure can be fixed by pressing the shutter button halfway.(The present exposure is not added to the average value unless you press x.)
The reading with x was pressed. Z indicates the number of times you have pressed the button. Z indicates the difference between the metered and average readings.
81

5
Advanced shooting
AE LOCK - Locking the exposureThis function is suitable for situations when optimal exposure is difficult to achieve, such as when there is excessive contrast between the subject and the surroundings.For example, if the sun is in the frame and shooting with automatic exposure results in a dark subject, recompose your shot so that the sun is not in the frame. Then press x to lock the metered value (exposure) temporarily. Next, compose your shot again with the sun in the frame and take the picture.
1 When using the camera in the p mode, AE lock is not available in the M mode. Set to any mode except M.g“A/S/M mode” (P.67)
• If a function other than AE lock is registered on x, set AE lock to the button.g“Setting the custom button” (P.140)
2 Compose the picture where you want to lock the metered value (exposure), then press x.• The exposure is memorized.• If you want to lock a different exposure, press x again to cancel
AE lock. Each time you press x, AE lock is alternately engaged and canceled.
Mode dial
x AEL/Custom button
82

AE LOCK - Locking the exposureAdvanced shooting
5
3 Position the AF target mark on the subject you want to focus on and press the shutter button halfway.• The green lamp lights.• AE lock cannot be canceled while the
shutter button is pressed halfway.
4 Press the shutter button fully.• AE lock is automatically canceled after
one shot.
TIPSTo save the locked metered value (exposure) after shooting (AE memory)
After step 2 or 3, hold down x for more than 1 second. C appears. While C is displayed, the exposure is saved. Press x again to cancel the AE memory.
AE lock was canceled.Do not operate any of the buttons or the mode dial after performing AE lock. Doing so will cancel AE lock.The camera had emerged from sleep mode or the power was turned off.
• AE lock is not available when multi-metering is enabled. Turn multi-metering off. g“MULTI METERING” (P.80)
• AE lock is not available when a menu is displayed on the screen. Exit the menu. g“How to use the menus” (P.33)
During AE lock, AEL is displayed.
F2.8F2.8
1600 12001600 1200SQ1SQ1
F2.8F2.8
1600 12001600 1200SQ1SQ1
Note
83

5
Advanced shooting
Macro mode shootingFocusing is usually slow when you get close to a subject (W: 7 cm/2.8" to 60 cm/2.0 ft., T: 1.2 m/3.9 ft. to 2 m/6.6 ft.). However, in the & mode focusing is performed quickly. When the optical zoom lever is at the maximum wide position and you are as close as 7 cm/2.8" to your subject, you can fill the entire frame with your subject.If the center of the frame (within the AF target mark) is metered when you are close to the subject and you shoot with the optimal exposure, the picture will turn out well (spot metering+macro mode). (P.79)
1 Select & or ( by repeatedly pressing (.• The selected mode is set.• If no operation is performed for 3
seconds, the mode selector screen is automatically exited.
• You cannot select & and ( in manual focus mode. Set to AF.g“Manual focus” (P.77)
Normal shooting With the macro mode
Mode dial
( Macro/Spot button
84

Advanced shooting
5
Super macro mode shootingThis mode lets you shoot from as close as 3 cm/1.2" to your subject. Subjects measuring up to approximately 4 × 3 cm (1.6" × 1.2") can be captured on the monitor.In the % mode, normal shooting is also possible, but the position of the zoom is fixed automatically and cannot be changed.
1 In the top menu, select MODE MENU CAMERA % ON, and press e.g“How to use the menus” (P.33)
• Press e again to exit the menu.
TIPSThe subject is in shadow
When taking pictures close to the subject, shadows may become conspicuous, and the auto focus may not be able to maintain correct focus. If this happens, use the manual focus. g“Manual focus” (P.77)
• During super macro shooting, zoom is not available.• During super macro shooting, the built-in flash is not available. You
can use an external flash, but vignetting may occur. Check the recorded image on the monitor.
Mode dial
Arrow pad
OK button
Note
85

5
Advanced shooting
Self-timer shootingThis function lets you take pictures using the self-timer. Fix the camera securely on a tripod for self-timer shooting. This function is useful for taking pictures where you want to be included in the photograph.
1 Select Y by repeatedly pressing Z• If no operation is performed for about 3
seconds, the selected mode is set and the mode selector screen is automatically exited.
2 Press the shutter button fully to take the picture.• Pressing the shutter button halfway locks
the focus and exposure.• The self-timer/remote control lamp lights
for approximately 10 seconds, then starts blinking. After blinking for approximately 2 seconds, the picture is taken.
• To stop shooting while in n mode, press the shutter button fully again.
• To cancel the self-timer, press Z.• The self-timer mode is automatically canceled after one shot.
• If sequential shooting is attempted in self-timer mode, the camera shoots max. 5 frames regardless of the setting.
Mode dial
Z Self-timer/Remote control button
Shutter button
Self-timer/Remote control lamp
Note
86

Advanced shooting
5
Remote control shootingShooting is possible using the remote control device. This is useful when you want to take a picture with yourself in it, or a night scene, without touching the camera.
1 Mount the camera on a tripod or place it on a stable, flat surface.
2 Select < by repeatedly pressing Z.• If no operation is performed for about 3
seconds, the selected mode is set and the mode selector screen is automatically exited.
• You can operate the zoom on the camera using the remote control device. gP.88
3 Press the shutter button on the remote control device.• The focus and exposure are locked. The
self-timer/remote control lamp blinks for about 2 seconds before taking the picture.
Mode dial
Z Self-timer/Remote control button
Self-timer/Remote control lamp(Remote control receiver)
87

Remote control shooting
5
Advanced shooting
TIPSThe self-timer/remote control lamp does not blink after pressing the shutter button on the remote control device.
The remote control device may be too far from the camera. Move closer to the camera and press the shutter button on the remote control device again.There is signal interference. Change the channel as described in the remote control device’s instruction manual.
How to operate the zoom using the remote control device.Point the remote control device at the remote control receiver on the camera. For zooming, press the W or T button on the remote control device. During operation, the self-timer/remote control lamp blinks.
How to cancel the remote control mode.The remote control mode is not canceled automatically after shooting. Perform step 2 and set the mode to OFF.
• If the remote control receiver is exposed to strong light, the effective signal distance may be reduced or shooting may not take place.
• To shoot sequential shots using the remote control device, press and hold the shutter button on the remote control device. If the camera does not receive the remote control signal properly, sequential shooting may stop.
• Read the remote control device’s instruction manual for information on playback by remote control device.
Note
88

Advanced shooting
5
Sequential shootingThere are 4 sequential shooting modes: sequential shooting, high speed sequential shooting, AF sequential shooting and auto bracketing. Sequential shooting modes can be selected from the DRIVE mode menu.Sequential shooting cannot be performed when the record mode is set to TIFF.
Drive modeo : Shoots 1 frame at a time when the shutter button is pressed.
(Normal shooting mode, single-frame shooting)j : Focus, exposure and white balance are locked at the first frame.
Approx. 8 frames at 1.3 frames/sec. (in HQ mode)i : Pictures can be taken at a faster speed than normal sequential
shooting. The sequential shooting speed varies depending on the record mode setting.2 frames at 1.8 frames/sec.
k : Focus is individually locked for each frame. The AF sequential shooting speed is slower than for normal sequential shooting.
BKT : g“Auto bracketing BKT” (P.90)
Sequential shooting, high speed sequential shooting and AF sequential shooting j i k
1 In the top menu, select MODE MENU CAMERA DRIVE j, i or k, and press e.g“How to use the menus” (P.33)
• Press e again to exit the menu.
Mode dial
Arrow pad
OK button
89

Sequential shooting
5
Advanced shooting
2 Take the picture.• Press the shutter button fully and keep it
pressed. The camera will take pictures in sequence until you release the button.
• During sequential shooting, the subject does not appear on the viewfinder and monitor.
Auto bracketing BKT
Under some conditions, you may obtain better results shooting with exposure compensation than by using the exposure setting considered optimal by the camera.When auto bracketing is set, the exposure is changed automatically for each frame when you start shooting. The exposure differential and number of frames can be selected in the menus. The focus and white balance are locked at the first frame.
Ex: When BKT is set to ±1.0 ×3
1 In the top menu, select MODE MENU CAMERA DRIVE BKT, and press d.g“How to use the menus” (P.33)
-1.0 ±0.0 +1.0
CARD
SEt
PICCA
MERA DRIVE
ISO
A/S/M
SLOW
AF
BKt
HI
Mode dial
Arrow pad
OK button
90

Sequential shootingA
dvanced shooting
5
2 Select the exposure differential. Press ac to select ±0.3, ±0.7 or ±1.0, then press d.
3 Select the number of shots. Press ac to select ×3 or ×5, then press e. • Press e repeatedly until the menu disappears.
4 Take the picture.• Press the shutter button fully and keep it pressed to shoot the preset
number of pictures. You can stop shooting at any time by releasing the shutter button.
• Auto bracketing is not possible in M mode.• Sequential shooting (j, i, k, BKT) is not possible in the
following situations:– When the TIFF or SHQ record mode is set to ENLARGE SIZE– When NOISE REDUCTION is set to ON.
• The built-in flash and external flash do not fire in BKT mode.• If there is not enough space available on the card for the number of
frames you have set during auto bracketing, you cannot continue shooting.
• If the battery power is low and the battery check blinks during sequential shooting, shooting stops and the camera starts saving the pictures you have taken. Whether or not all of the shots are saved depends on how much battery power remains.
• Since the shutter speed is set to max. 1/30 sec., exposure is decreased when shooting a dark subject.
• To use the external flash during sequential shooting, set the external flash so that it fires for each frame.
BKt
GOSELECtCANCEL
Note
91

5
Advanced shooting
PANORAMA - Panorama shootingYou can take advantage of panorama shooting with Olympus CAMEDIA-brand cards (xD-Picture Card). Panorama shooting lets you connect pictures with overlapping edges into a single panoramic picture, using the CAMEDIA Master software.
1 In the top menu, select MODE MENU CAMERA PANORAMA, and press d.g“How to use the menus” (P.33)
• The PANORAMA mode is set.
2 Use the arrow pad to choose at which edge you want to connect the pictures.d : The next picture is connected at the
right edgeb : The next picture is connected at the
left edgea : The next picture is connected at the
topc : The next picture is connected at the
bottom
Mode dial
Arrow pad
OK button
Connects pictures from left to right
Connects pictures from bottom to top
92

PANORAMA - Panorama shootingA
dvanced shooting
5
3 Make sure that the edges of the pictures overlap, then take pictures.• Focus, exposure and white balance are set by the first picture. Do not
select an extremely bright subject (such as the sun) for the first picture.• You cannot adjust the zoom after the first picture.• Panorama shooting is possible for up to 10 pictures.
• When you have taken 10 pictures, a warning mark appears.
4 Press e to finish panorama shooting.• The frame on the screen disappears and the camera returns to the
normal shooting mode.
• The panorama mode is only available with Olympus CAMEDIA-brand cards.
• Your computer’s memory may be insufficient if you take too many panorama pictures in HQ or SHQ mode. You are recommended to use SQ mode for panorama shooting.
• During panorama shooting, the flash and sequential shooting are not available.
• Images are saved in JPEG format when panorama shooting is done in the TIFF mode. The size of the image does not change.
• If the mode dial is operated during panorama shooting, the camera cancels the panorama mode and returns to normal shooting.
• The camera itself cannot connect panorama pictures. The CAMEDIA Master software is necessary to connect the pictures.
The part of the previous picture where it will be joined to the next picture does not remain in the frame on the edge of the screen. You have to remember what the part in the frame looked like and take the next picture so it overlaps. Compose your shots so that the right edge of the previous picture overlaps with the left edge of the next picture if you are connecting pictures from left to right (or vice versa if you are connecting pictures from right to left).
Note
93

5
Advanced shooting
2 IN 1 - Taking two-in-one picturesThis function allows you to combine two pictures taken in succession and store them as a single picture. You can combine two different subjects in one picture.
1 In the top menu, select MODE MENU CAMERA 2 IN 1, and press d.g“How to use the menus” (P.33)
• The 2 IN 1 picture mode is set.
2 Take the first shot.• The subject will be positioned on the left in
the combined picture.
3 Take the second shot.• The subject will be positioned on the right
in the combined picture.• The BUSY bar is displayed during
processing. After the image is saved, the camera returns to the mode menu.
Picture when played back
Mode dial
Arrow pad
OK button
F2.8F2.8
1600 12001600 1200
Image when shot
F2.8F2.8
1600 12001600 1200
94

2 IN 1 - Taking two-in-one picturesA
dvanced shooting
5
• During 2 IN 1 picture shooting, the panorama and sequential shooting modes are not available.
• To cancel the 2 IN 1 picture mode after the first shot has been taken, press e. The first shot will not be saved.
• Operating the mode dial will exit 2 IN 1 picture mode.• If the camera enters sleep mode after the first shot, 2 IN 1 picture
mode will be canceled.
Note
95

5
Advanced shooting
FUNCTION - Adding special effects to picturesThis feature lets you add special effects to your pictures during shooting. 4 effects are available.
BLACK & WHITE Takes pictures in black and white.SEPIA Gives pictures a sepia tone.WHITE BOARD Pictures are in black and white, with black letters on a white
background emphasized to make them easier to read.BLACK BOARD Pictures are in black and white, with white letters on a black
background emphasized to make them easier to read.
1 In the top menu, select MODE MENU CAMERA FUNCTION, then select a mode and press e.g“How to use the menus” (P.33)
• WHITE BOARD and BLACK BOARD are not available in n mode.
• Press e again to exit the menu.
TIPSLetters do not show clearly with WHITE BOARD or BLACK BOARD.
Use exposure compensation. g“Exposure compensation” (P.105)
• When WHITE/BLACK BOARD is selected, the flash is automatically set to off.
• WB, > and SATURATION cannot be used in Function shooting.
Mode dial
Arrow pad
OK button
CARD
SEt
PICCA
MERA
PANORAMA
2 IN 1
FUNCtION
AF AREA
SEPIA
BLACK & WHItE
WHItE BOARD
BLACK BOARD
OFF
Note
96

Advanced shooting
5
Recording sound with still picturesSound can be recorded when taking still pictures. Recording starts about 0.5 seconds after the shutter is released and lasts about 4 seconds.When this function is enabled, sound is recorded automatically every time you take a picture.
1 In the top menu, select MODE MENU CAMERA R ON, and press e.g“How to use the menus” (P.33)
• Press e again to exit the menu.
2 When recording starts, turn the camera microphone towards the source of the sound you want to record.• The BUSY bar is displayed during
recording.
TIPS• H appears on all still pictures and movies that have recorded
sound. During playback, sound is output from the speaker. The volume can be adjusted. g“VOLUME - Playback Volume” (P.156)
• Sound can be added later to still pictures. Recorded sound can also be changed. g“Recording sound” (P.130)
Mode dial
Arrow pad
OK button
Shutter button
Microphone
97

Recording sound with movies
5
Advanced shooting
• If the camera is more than 1 m (3.3 ft.) away from the source of the sound, sound may not be recorded clearly.
• It is not possible to take another picture during sound recording.• Sound recording is not possible in the following cases:
the record mode is set to TIFF/the drive mode is set to sequential shooting (j, i, k, BKT)
• Sound recording may also pick up camera noises, such as button operations, shutter movement, etc.
Sound can be recorded while shooting a movie.
1 In the top menu, select MODE MENU CAMERA R ON, and press e.g“How to use the menus” (P.33)
2 Recording starts at the same time as shooting.
• When R is set to ON, the optical zoom position is locked during movie recording. If you wish to use the zoom during movie recording, set DIGITAL ZOOM to ON. If R is set to OFF, you can use both the optical zoom and digital zoom during movie recording.
• If the camera is more than 1 m (3.3 ft.) away from the source of the sound, sound may not be recorded clearly.
Note
Recording sound with movies
Mode dial
Arrow pad
OK button
Note
98

Adjusting the im
age quality and exposure
6
6 Adjusting the image quality and exposureRecord mode
You can select a record mode in which to take pictures or shoot movies. Choose the best record mode for your purpose (printing, editing on a PC, website editing, etc.). For details of the different record modes, resolutions and number of pictures storable on the card, refer to the table on the next page. The numbers in the table are approximate.
Record mode Description Quality File size
TIFF
The highest quality mode. As the images are saved as uncompressed data, this is the best mode for printing or image-processing on a PC. This mode has different resolutions to choose from, depending on your purpose. Selecting lets you print the entire image without losing its borders - almost the same image size as that used by photo labs.
Clearer
Normal
Larger
Smaller
SHQ
A high quality mode using the JPEG format. Because the compression rate is very low, high quality can be maintained. Selecting
lets you print the entire image without losing its borders - almost the same image size as that used by photo labs. The ENLARGE SIZE function is useful when printing on large-format paper.
HQ
A high quality mode with medium compression. Because the compression rate is higher than SHQ, file sizes are smaller, so more images can be saved to a card. Like SHQ, resolution can be changed by using
or the ENLARGE SIZE function.
SQ1SQ2
The most compressed modes. For each resolution, you can choose HIGH (to reduce noise) or NORMAL (to save more images). Select the best setting for your purpose (printing, Internet pages, etc.).
3:2
3:2
3:2
99

Record mode
6
Adjusting the im
age quality and exposure
Still Picture Record Modes
∗ HIGH uses low compression/NORMAL uses normal compression
Movie Record Modes
Record mode Compression File
format
Memory capacity in no. of shotsResolution 32MB
With sound Without sound
TIFF
2288 × 1712
Uncompressed TIFF
— 22288 × 1520 — 32048 × 1536 — 31600 × 1200 — 51280 × 960 — 81024 × 768 — 13
640 × 480 — 33
SHQ
2288 × 1712Low
compression
JPEG
11 112288 × 1520 12 12
ENLARGE SIZE 3200 × 2400 5 5
HQ
2288 × 1712
NORMAL
31 322288 × 1520 34 36
ENLARGE SIZE 3200 × 2400 16 16
SQ1
2048 ×1536HIGH
∗
17 17NORMAL 39 40
1600 × 1200HIGH 22 22
NORMAL 60 64
1280 × 960HIGH 33 34
NORMAL 90 99
SQ21024 × 768
HIGH 51 53NORMAL 132 153
640 × 480HIGH 117 132
NORMAL 248 331
Record mode Resolution32MB
With sound Without soundHQ 320 × 240 (15frames/sec.) 93 sec. 96 sec.SQ 160 × 120 (15frames/sec.) 374 sec. 424 sec.
3:2
3:2
3:2
100

Record modeA
djusting the image quality and exposure
6
• The card memory capacity listed in the table is approximate.• The number of remaining pictures may change according to the
subject or factors like whether print reservations have been made or not. In certain instances, the number of remaining pictures does not change even when you take pictures or stored images are erased.
• If movies are shot with VIDEO OUT set to PAL and the AV cable connected, the movie recording time will differ from the time listed in the Movie Record Modes table.
Selecting a record mode
1 In the top menu, select MODE MENU PICTURE K, and press d.g“How to use the menus” (P.33)
• If K is displayed on the top menu as a shortcut menu, press the arrow pad in the same direction as the arrow shown next to K.g“SHORT CUT” (P.142)
In the top menu, press b to select K, and choose SHQ 2288 × 1712, HQ 2288 × 1712, SQ1 1280 × 960 or SQ2 640 × 480. gGo to Step 4.
In the top menu, press b to select K, then press ac to select HQ or SQ. gGo to Step 4.
Note
Mode dial
Arrow pad
OK button
Mode dial
MODE MENU
WB
DIGItAL ZOOM
Mode dial
101

Record mode
6
Adjusting the im
age quality and exposure
2 Press ac to select the desired record mode from TIFF, SHQ, HQ, SQ1 and SQ2, then press d.
3 Press ac to select the resolution.If you have selected SQ1 or SQ2, press d after choosing the resolution, then choose HIGH or NORMAL by pressing ac.
4 Press e.• Press e again to exit the menu.
TIPS• Resolution
The number of pixels (horizontal × vertical) used when saving an image. If the image will be printed, higher resolutions (larger numbers) are recommended so that the image will be clearer. However, higher resolutions make the file size (amount of data) larger, so the number of pictures that can be saved will be fewer.
• Resolution and picture size on a computer screenWhen a picture is transferred to a computer, the size of the picture on the computer screen varies depending on the computer’s monitor setting. For instance, a picture taken in 1024 × 768 resolution is the same size as the screen if you set the picture to 1x when the monitor setting is 1024 × 768. However, if the monitor setting is over 1024 × 768 (such as 1280 × 1024), the picture only takes up part of the screen.
• Compression rateIn record modes other than TIFF, image data are compressed. The higher the compression rate, the less clear the image will be.
• File formatThis camera saves images in either TIFF or JPEG format. In record modes other than TIFF, images are compressed in the JPEG format. The compression rate also varies in each mode. (Movies are in Motion JPEG format (.mov).)
CANCEL GOSELECt
SHQ
ENLARGE SIZE
2288*17122288*1712
2288*15202288*1520
3200*2400
102

Record modeA
djusting the image quality and exposure
6
3:2 Resolution
The image aspect ratio is normally 4:3. If the aspect ratio is changed to 3:2, the image can be printed at a photo lab without losing the image borders. When is activated, the resolution is 2288 × 1520 pixels. resolution can be selected in the TIFF, SHQ or HQ mode. resolution is not available in h or n mode.
ENLARGE SIZE
When ENLARGE SIZE is selected, the actual 4 million pixels used by this camera can be increased to the equivalent of approx. 8 million pixels (3200 × 2400). This allows you to make quality prints in larger sizes, such as A3 (297 mm × 420 mm/11.7" × 16.5"). However, file sizes also become larger. ENLARGE SIZE can be selected in the SHQ or HQ mode. ENLARGE SIZE is not available in the h or n mode.
• If the SHQ record mode is set to ENLARGE SIZE, sequential shooting modes (j, i, k, BKT) are not available.
F2.8F2.8
2288 15202288 1520HQHQ
Monitor display when is set3:2
3:23:2
3:2
Note
103

6
Adjusting the im
age quality and exposure
ISO sensitivityThe higher the ISO value, the greater the camera’s light sensitivity and the better its ability to shoot in low light conditions. However, higher values also introduce electrical noise into the resulting image, which may give them a grainy appearance.
AUTO Sensitivity is automatically adjusted according to the light conditions and the subject brightness.
50/100/200/400 With a lower ISO setting, you can shoot clear, sharp images in daylight. With a higher ISO setting, you can use faster shutter speeds with the same amount of light.
1 In the top menu, select MODE MENU CAMERA ISO, then choose the most suitable ISO sensitivity and press e.g“How to use the menus” (P.33)
• AUTO is not available in p mode.• Press e again to exit the menu.
• Higher ISO settings produce more electrical noise.• ISO is standardized based on the sensitivity of normal camera film.
The scale is approximate.• When ISO is set to AUTO and you are shooting in dark conditions
without a flash, the sensitivity automatically increases, otherwise the shutter speed will be reduced, possibly resulting in camera movement and blurred images.
• If the subject is too far away for the flash illumination to reach when ISO is set to AUTO, the sensitivity is automatically increased.
Mode dial
Arrow pad
OK button
CARD
SEt
PICCA
MERA DRIVE
ISO
SLOW
A/S/M
AUtO
200
400
50
100
Note
104

Adjusting the im
age quality and exposure
6
Exposure compensationThis function allows you to make fine changes to the present exposure setting using the arrow pad. In some situations, you may get better results when the exposure that the camera sets is compensated (adjusted) manually. You can adjust the exposure in the range of ±2.0 in 1/3 steps. When the setting is changed, you can check the result on the monitor or viewfinder.
1 Press b d to select a setting.• Adjust toward + : Press d to adjust up to
+2.0 in 1/3 steps.• Adjust toward - : Press b to adjust up to
-2.0 in 1/3 steps.
TIPS• Often bright subjects (such as snow) will turn out darker than their
natural colors. Adjusting toward + makes these subjects closer to their real shades. For the same reason, adjust toward - when shooting dark subjects.
• You can set the aperture by pressing b d in M mode. g“Manual shooting” (P.70)
• If the flash is used, the image brightness (exposure) may differ from the intended brightness.
• Exposure compensation cannot correct the image if the surroundings of the subject are extremely bright or dark.
Mode dial
bd
−2.0 0.0 +2.0
Note
105

6
Adjusting the im
age quality and exposure
White balanceColor reproduction differs depending on the light conditions. For instance, when daylight, the setting sun or tungsten lighting are reflected on white paper, the shade of white produced will be slightly different for each. By setting the WB (white balance), you can achieve more natural-looking colors.
1 In the top menu, select MODE MENU PICTURE WB, and press d.g“How to use the menus” (P.33)
• If WB is displayed on the top menu as a shortcut menu, press the arrow pad in the same direction as the arrow shown next to WB.g“SHORT CUT” (P.142)
2 Press ac to select AUTO, PRESET or V according to the shooting conditions.
AUTO Press e. Press e again to exit the menu.PRESET Press d to display the next selection screen.
g“Preset white balance” (P.107)V Press d to display the next selection screen.
g“One-touch white balance” (P.107)
Auto white balance
Automatically adjusts the white balance for any light source.
Mode dial
Arrow pad
OK buttonCARD
SEt
CAM
PICtURE AUtO
PRESEt
WB
SHARPNESS
CONtRASt
106

White balanceA
djusting the image quality and exposure
6
Preset white balance
Select a preset white balance setting according to the type of light. Press ac to select one of the following settings, then press e.Press e again to exit the menu.
5 : For shooting on a sunny day.3 : For shooting on a cloudy day.1 : For shooting under a tungsten light
(3000K)∗ .w : For shooting under a daylight fluorescent
lamp (6700K)∗. This type of lamp is used mainly in homes.
x : For shooting under a neutral white fluorescent lamp (5,000K)∗ . This type of lamp is generally used in desk lamps, etc.
y : For shooting under a cool white fluorescent lamp (4,200K)∗. This type of lamp is generally used in offices, etc.
∗ The color temperature values (K) are approximate. They are not an accurate indication of color.
TIPS• You can also preview different color tones by trying the different
PRESET WB settings under the actual light source and checking the result on the monitor.
One-touch white balance
This function is useful when you need a more precise white balance than PRESET WB can provide. To set the optimum white balance for the shooting conditions, point the camera at a white object under the light source you want to use and adjust the white balance.
1 Display V screen and point the camera at a sheet of white paper.• Position the paper so that it fills the screen,
making sure there are no shadows.
GOSELECt
PRESEt WB
CANCEL
GOCANCEL
107

White balance
6
Adjusting the im
age quality and exposure
2 Press e.• The white balance is set
and the screen returns to the mode menu.
• To cancel one-touch white balance, press b.
3 Press e repeatedly to exit the menu.
• When setting the white balance by pointing the camera at a sheet of white paper, the correct setting may not be obtained if the light reflected by the paper is too bright or too dark.
• White balance may not be effective under some special light sources.
• After setting a white balance other than AUTO, play back the picture and check the colors on the monitor.
• When the flash is fired with a white balance setting other than AUTO, colors may appear different in the resulting picture from the colors you see on the monitor.
e button
F2.8F2.8
1600 12001600 1200SQ1SQ1
One-touch white balance
Note
108

White balanceA
djusting the image quality and exposure
6
White balance adjustment
This function lets you make fine changes to the current white balance setting.
1 In the top menu, select MODE MENU PICTURE >, and press d.g“How to use the menus” (P.33)
• The white balance adjustment indicator appears on the screen.
2 The color becomes bluer each time you press a, and redder each time you press c, depending on the original white balance conditions. Press e to save your adjustment.• The white balance can be adjusted in 7
increments in both red and blue directions.• After saving the adjustment, press e again to exit the menu.
Mode dial
Arrow pad
OK button
GOADJUSt
109

6
Adjusting the im
age quality and exposure
SHARPNESSThis function adjusts the sharpness of the image.
1 In the top menu, select MODE MENU PICTURE SHARPNESS, and press d.g“How to use the menus” (P.33)
2 Press ac to adjust the sharpness between +5 and -5.• To increase the sharpness (+) :
Press a. The image contours are emphasized, making the image appear sharper and more vivid. Use this setting when you want to print pictures.
• To reduce the sharpness (–) : Press c. The image contours are softened. Use this setting when you want to edit images on a PC.
• When you have finished setting the sharpness, press e. Press e again to exit the menu.
• If you adjust the sharpness too far toward +, noise may become conspicuous in the picture.
Mode dial
Arrow pad
OK button
CARD
SEt
CAM
PICtURE
SHARPNESS
CONtRASt
WB
Note
110

Adjusting the im
age quality and exposure
6
CONTRASTThis function adjusts the contrast of images. For example, you can make images with marked differences in light and shadow softer, and those with less differences more vivid.
1 In the top menu, select MODE MENU PICTURE CONTRAST, and press d.g“How to use the menus” (P.33)
2 Press ac to adjust the contrast between +5 and -5.• To increase the contrast (+) :
Press a. The light and dark areas are defined more clearly, making the image look crisper.
• To reduce the contrast (–) : Press c. The light and dark areas become less defined, giving the image a softer impression. Use this setting when you want to edit images on a PC.
• When you have finished setting the contrast, press e. Press e again to exit the menu.
Mode dial
Arrow pad
OK buttonCARD
SEt
CAM
PICtURE
SHARPNESS
CONtRASt
WB
111

6
Adjusting the im
age quality and exposure
SATURATIONThis function adjusts the color depth.
1 In the top menu, select MODE MENU PICTURE SATURATION, and press d.g“How to use the menus” (P.33)
2 Press ac to adjust the saturation between +5 and -5.• To increase the saturation (+) :
Press a. Colors become darker and more intense.
• To reduce the saturation (–) : Press c. Colors become lighter.
• When you have finished setting the saturation, press e. Press e again to exit the menu.
Mode dial
Arrow pad
OK button
CARD
SEt
CAM
PICtURE
SAtURAtION
112

Adjusting the im
age quality and exposure
6
NOISE REDUCTIONThis function reduces the noise that is generated during long exposures. When shooting night scenes, shutter speeds become slower and noise tends to appear on images. When noise reduction is set to ON, the camera automatically reduces noise to produce clearer images. However, shooting time is approximately twice as long as usual.Noise reduction can only be used when the shutter speed is set slower than 1/2 sec.
1 In the top menu, select MODE MENU CAMERA NOISE REDUCTION ON or OFF, and press e.g“How to use the menus” (P.33)
• Press e again to exit the menu.
• Noise reduction is always enabled in the m mode.• When noise reduction is set to ON, the camera implements noise-
reducing processes after each shot to produce clearer images. However, shooting time is approximately twice as long as usual. During this time, the next shot cannot be taken.
• When noise reduction is set to ON, sequential shooting (j, i, k, BKT) and 2 IN 1 are not possible.
• This function may not work effectively with some shooting conditions or subjects.
• As the shutter speed is relatively slow, the use of a tripod is recommended.
Noise Reduction: OFF Noise Reduction: ONThe purpose of these pictures is to illustrate the effects of noise reduction. They are not actual pictures.
Mode dial
Arrow pad
OK button
Note
113

6
Adjusting the im
age quality and exposure
Histogram displayDuring shooting and playback, you can display a histogram showing the brightness and contrast of your subject in the monitor or viewfinder.Checking the histogram enables precise exposure control when taking pictures.During playback, you can display a histogram showing the brightness and contrast of recorded pictures.The histogram display can be set separately for shooting mode and playback mode.
Ex: When a histogram is displayed in P mode
When the image is bright When the image is dark
F2.8F2.8
SQ1SQ1
The part indicated in green in the histogram shows the luminance distribution within the AF target mark.
F2.8F2.8
SQ1SQ1
F2.8F2.8
SQ1SQ1
If the peak fills too much of the right frame, the image will appear mostly white.
If the peak fills too much of the left frame, the image will appear mostly black.
114

Histogram displayA
djusting the image quality and exposure
6
1 In the top menu, select MODE MENU CAMERA ON or OFF, and press e.g“How to use the menus” (P.33)
• When ON is selected, the histogram is displayed.
• Press e again to exit the menu.
Press c in the top menu.g“How to use the menus” (P.33)
• The histogram is displayed.• To return to the normal playback screen,
press e again to display the top menu and press c.
• The histogram is not displayed in the following situations even if histogram display is set to ON.
During M mode, panorama shooting, 2 IN 1 shooting and multi-metering
• The histogram displayed during shooting may differ from the histogram displayed during playback.
• A histogram may not appear when you play back pictures shot on another camera.
Mode dial
Arrow pad
OK button
Mode dial
F2.8F2.8
'0303.0606.1717 1515:3030
1/10001/10000.00.0
ISO100ISO100
SQ1SQ1
Playback mode
Note
115

7
Playback
7 PlaybackViewing still pictures
1 Set the mode dial to q and press the power switch.g“Power on/off” (P.24)
• The monitor turns on and displays the last picture taken. (Single-frame playback)
2 Use the arrow pad to play back other pictures.
• If the camera is not used for over 3 minutes, the camera enters the sleep mode and the monitor turns off.
Mode dial
Power switchMode dial
Arrow pad
Displays the next picture.
Displays the previous picture.
Jumps to the picture 10 frames back.
Jumps to the picture 10 frames ahead.
Note
116

Viewing still picturesPlayback
7
QUICK VIEW
This function lets you play back pictures while the camera is in the shooting mode. This is useful when you want to check shooting results and resume shooting quickly.Functions available in normal playback mode are also available in QUICK VIEW.
1 Press f twice quickly (double-click) while in the shooting mode.• The camera immediately enters the
playback mode and displays the last picture taken. (Single-frame playback)
2 Press the shutter button halfway to return to the shooting mode.
Mode dial
Shutter button
117

7
Playback
Close-up playbackPictures displayed on the monitor can be enlarged 1.5, 2, 2.5, 3, 3.5 or 4 times.
1 Select the still picture you want to enlarge.• You cannot enlarge pictures with n.
2 Pull the zoom lever toward T (U).• Each time you pull the zoom lever, the
picture is enlarged gradually.• By using the arrow pad while the
enlarged picture is displayed, you can shift the picture in the desired direction, enabling you to view a different portion.
• To return the picture to the original size (1x), push the zoom lever toward W.
• Pictures cannot be stored in an enlarged state.
Mode dial
Zoom lever
Note
118

Playback
7
Index displayThis function lets you show several pictures at the same time on the monitor. The number of pictures shown can be 4, 9 or 16. g“Selecting the number of pictures” (P.120)
1 In the single-frame playback mode, push the zoom lever toward W (G).
• Use the arrow pad to select the picture.b : Moves to the previous frame.d : Moves to the next frame.a : Jumps to the previous index display
(the frames before the top left frame).c : Jumps to the next index display (the
frames following the bottom right frame).
• To return to the single-frame playback, pull the zoom lever toward T.
Mode dial
Zoom lever
119

Index display
7
Playback
Selecting the number of pictures
This function lets you select the number of pictures in an index display from 4, 9 and 16.
1 In the top menu, select MODE MENU SETUP G 4, 9 or 16, and press e.• Press e again to exit the menu.
g“How to use the menus” (P.33)
Mode dial
Arrow pad
OK buttonPLAY
EDIt
CARD
SEtUP
120

Playback
7
SlideshowThis function displays still pictures stored in the card one after another. Only the first frame of movies is played back.
1 Select a still picture, then press e to display the top menu.
2 Press a to start the slideshow.
3 Press e to stop the slideshow.• The slideshow will not stop until you
cancel it by pressing e.
• You are recommended to use the optional AC adapter when running a slideshow for a long period of time. If batteries are used, the camera will enter the sleep mode after about 30 minutes and stop the slideshow automatically.
Mode dial
e button
a button
INFO MODE MENU
Note
121

7
Playback
Viewing movies
1 Use the arrow pad to display the picture with n you want to play back.g“Viewing still pictures” (P.116)
2 Press e.• The top menu is displayed.
3 Press a to select MOVIE PLAY.
4 Press ac to select MOVIE PLAYBACK, then press e.• The movie is played back. When playback
ends, the display automatically returns to the beginning of the movie.
• Fast forward/fast rewind functions are available during playback.d : Fast forward. Each press switches
the speed between ×1, ×2 and ×20.b : Fast rewind. Each press switches the
speed between ×1, ×2 and ×20.
Mode dial
Arrow pad
OK button
n mark
MOVIE PLAY
INFO MODE MENU
CANCEL GOSELECt
MOVIE PLAYBACK
MOVIE PLAY
INDEX
EDIt
122

Viewing moviesPlayback
7
• Press e again after playback ends to display the menu.PLAYBACK Plays back the entire
movie again.FRAME BY FRAME
Plays back the movie manually one frame at a time.
EXIT Leaves the movie playback mode.
Press ac to select PLAYBACK, FRAME BY FRAME or EXIT, then press e.
When FRAME BY FRAME is selecteda: Displays the first frame of the movie.c : Displays the last frame of the movie.d : Displays the next frame. The movie can be played continuously by
holding the button down.b : Displays the previous frame. The movie can be played continuously in
reverse by holding the button down.e : Displays the MOVIE PLAYBACK menu.
TIPS• Movies can also be played back in the shooting mode using QUICK
VIEW. g“QUICK VIEW” (P.117)
• The card access lamp blinks while the camera is reading the movie from the card. Reading of movies may take considerable time. Do not open the card cover while the card access lamp is blinking, as this may cause not only the data on the card to be damaged, but may also render the card unusable.
FRAME%BY%FRAME
EXIt
MOVIE%PLAYBACK
PLAYBACK
SELECt GO
Note
123

7
Playback
Editing moviesThis function lets you create indexes as well as edit movies. However, you cannot edit movies of the following lengths:Movies without sound : Longer than approximately 30 seconds in HQ mode
Longer than approximately 150 seconds in SQ modeMovies with sound : Longer than approximately 30 seconds in HQ mode
Longer than approximately 130 seconds in SQ mode
INDEX 9 frames extracted from a movie are displayed as an index to show the movie at a glance. Indexes can be stored on the card as a still picture.
EDIT This function lets you erase parts of the movie that you do not want.
1 Use the arrow pad to select a picture with n.
2 In the top menu, select MOVIE PLAY, then choose each item.g“How to use the menus” (P.33)
• Select INDEX gP.124• Select EDIT gP.126
INDEX - Creating an index
3 Press ac to select INDEX, then press e.• When there is insufficient card memory, a
warning screen appears and the display returns to the setting screen.
Arrow pad
OK button
Mode dial
MOVIE PLAY
INFO MODE MENU
CANCEL GOSELECt
MOVIE PLAYBACK
MOVIE PLAY
INDEX
EDIt
124

Editing moviesPlayback
7
4 Use the arrow pad to select the first frame of the index and press e.a: Jumps to the first frame of the movie.c : Jumps to the last frame of the movie.d : Displays the next frame. The movie can
be played continuously by holding the button down.
b : Displays the previous frame. The movie can be played continuously in reverse by holding the button down.
5 As in Step 4, use the arrow pad to select the last frame of the index and press e.
6 Press ac to select OK, then press e.• The 9 frames extracted from the movie
appear as an index display, then the camera returns to the playback mode. The index is stored as a new picture.
• If you want to select different frames, select RESET and press e and repeat the procedure from Step 4.
• To quit the editing function, select CANCEL and press e.
TIPS• The index is stored as a still picture in a different record mode from
the original movie.
Record mode when the movie was shot
Record mode when stored as an index
HQ SQ2 (1024 × 768 pixels: HIGH)SQ SQ2 (640 × 480 pixels: HIGH)
OK
OK
GOSELECt
OK
RESEt
INDEX
CANCEL
125

Editing movies
7
Playback
• The interval between the frames that are automatically picked out varies depending on the length of the movie.
• An index consists of 9 frames.• You cannot create an index if there is insufficient memory space on
the card.
EDIT - Editing a movie
3 Press ac to select EDIT, then press e.
4 Use the arrow pad to select the first frame of the part you want to keep and press e.a: Jumps to the first frame of the movie.c : Jumps to the last frame of the movie.d : Displays the next frame. The movie can
be played continuously by holding the button down.
b : Displays the previous frame. The movie can be played continuously in reverse by holding the button down.
5 As in Step 4, use the arrow pad to select the last frame of the part you want to keep and press e.
Note
CANCEL GOSELECt
MOVIE PLAYBACK
MOVIE PLAY
INDEX
EDIt
OK
OK
126

Editing moviesPlayback
7
6 Press ac to select OK, then press e.• If you want to select different frames,
select RESET and press e and repeat the procedure from Step 4.
• To quit the editing function, select CANCEL and press e.
7 Press ac to select NEW FILE or OVERWRITE, then press e. NEW FILE Stores the edited movie as
a new movie.OVERWRITE Stores the edited movie with
the same name as the original. The original movie is not stored.
• The edited movie is stored and the screen returns to the playback mode.
• You cannot edit movies with sound which were taken with another digital camera.
• You cannot select NEW FILE if there is insufficient memory space on the card.
GOSELECt
OK
EDIt
RESEt
CANCEL
CANCEL GOSELECt
NEW FILE
OVERWRItE
EDIt
Note
127

7
Playback
Playback on a TVUse the AV cable provided with the camera to play back recorded images on your TV. You can play back both still pictures and movies on your TV.
1 Make sure that the TV and camera are turned off. Connect the A/V OUT jack on the camera to the Video input terminal on the TV using the AV cable.
2 Turn the TV on and set it to the video input mode.• For details of switching to video input, refer to your TV’s instruction
manual.
3 Set the mode dial to q and turn the camera on.• The last picture taken is displayed on the TV. Use the arrow pad to
select the picture you want to display.• The close-up playback, index display and slideshow functions can also
be used on a TV screen.
TIPS• You are recommended to use the optional AC adapter when using
the camera with a TV.
• Make sure that the camera’s video output signal type is the same as the TV’s video signal type. g“VIDEO OUT - Video output selection” (P.162)
• The camera’s monitor or viewfinder turns off automatically when the AV cable is connected to the camera.
• Be sure to use the AV cable provided to connect the camera to the TV.
• The picture may appear off-center on the TV screen.
Mode dial
Connect to the TV’s video input (yellow) and audio input (white) terminals.
AV cable
A/V OUT jack (MONO)
Note
128

Playback on a TVPlayback
7
• When pictures are compressed in order to fit the entire picture on the TV screen, a black frame appears around the picture. If the picture is output to a video printer via the TV, the black frame may be printed.
Picture rotation
Pictures taken with the camera held vertically are displayed horizontally. This function lets you turn such pictures 90 degrees counterclockwise or clockwise so that they are displayed vertically.
1 In the single-frame playback mode, press y.• Each pressing rotates the image in the
following sequence: 90 degrees counterclockwise, 90 degrees clockwise, and back to the original.
• The following pictures cannot be rotated.Movies, protected pictures, pictures that have been edited on a PC, and pictures taken with another camera.
• New picture orientations are saved even when the power is turned off.
Mode dial
y Rotation button
Note
129

7
Playback
Recording soundSound can be added to a still picture that you have already taken. (This is known as “after-recording”.) You can also re-record over the sound that has already been recorded. Total recording time per picture is approximately 4 seconds.
1 Use the arrow pad to select the still picture you want to add sound to.
2 In the top menu, select MODE MENU PLAY R.g“How to use the menus” (P.33)
3 Press d to display START.
4 Turn the camera microphone toward the sound you want to record and press e to start recording.• The BUSY bar is displayed during recording.
• To obtain the optimum sound, the microphone should be placed no farther than 1 m (3.3 ft.) away from the subject.
• If you re-record the sound, the original sound is erased.• You may not be able to record sound when there is insufficient card
memory (the “CARD FULL” message is displayed).• Sound recording may pick up camera noises, such as button
operation or shutter movement.• Once sound is added to a picture, it is not possible to erase only the
sound. In this case, make a re-recording with silence.
Mode dial
Arrow pad
OK button
Microphone
StARt
CARD
SEt
EDItPLAY
Note
130

Playback
7
Editing still picturesThis function lets you edit still pictures and store them as new pictures. The following editing operations are possible.
Resizing Q Changes the picture size to 640 × 480 or 320 × 240 and stores the picture as a new file.
Trimming P Crops part of a picture and saves it as a new file.
1 Use the arrow pad to select the still picture you want to edit.
2 In the top menu, select MODE MENU EDIT, then choose each item.g“How to use the menus” (P.33)
• Select Q gP.131• Select P gP.132
Resizing
3 Select Q, then press d.
4 Press ac to select the picture size, then press e.• The BUSY bar is displayed during
resizing. After the image is saved, the camera returns to the playback mode.
• To quit the resizing function, select CANCEL, then press e.
• Resizing is not possible in the following cases.Movies, pictures that have been edited on a PC, or when there is insufficient memory space on the card.
• If the size of the selected picture is 640 × 480, you cannot select 640 × 480.
Mode dial
Arrow pad
OK button
Zoom lever
320*240
CANCEL
EXIt GO
640*480
SELECt
Note
131

Editing still pictures
7
Playback
Trimming
3 Select P, then press d.
4 Press ac to select P, then press e.
5 Use the arrow pad and zoom lever to decide the trimming position and size.• Press acbd to move the trimming
frame.• Use the zoom lever to decide the trimming
size. The trimming frame changes from horizontal to vertical and vice versa when the maximum or minimum size is reached.
6 Press e.
7 Press ac to select OK, then press e.• The BUSY bar is displayed during
trimming. After the image is saved, the camera returns to the playback mode.
• The trimmed picture is stored as a separate picture from the original.
• If you want to trim the picture again, select RESET and press e and repeat the procedure from Step 5.
• To quit the trimming function, select CANCEL and press e.
CANCEL
EXIt GOSELECt
OK
OK
GOSELECt
OK
RESEt
CANCEL
132

Editing still picturesPlayback
7
• Trimming is not possible in the following cases.Movies, when there is insufficient memory space on the card, or when the picture was taken with the record mode set to ENLARGE SIZE
• It may not be possible to trim pictures taken with another camera.• If pictures recorded in 3:2 are trimmed, the image proportions are
changed to the standard 4:3 aspect ratio.• If a trimmed picture is printed out, it may appear grainy.
Note
133

7
Playback
Protecting picturesYou are recommended to protect important pictures to avoid accidentally erasing them. Protected pictures cannot be erased by the single-frame/all-frame erase function.
1 Use the arrow pad to display the picture you want to protect.g“Viewing still pictures” (P.116)
2 Press 0.• To cancel protection, press 0 again.
• Protected pictures cannot be erased by the single-frame/all-frame erase function, but they are all erased by formatting.
Mode dial
Arrow pad
OK button
0 Protect button
Displayed when a pictureis protected.
Note
134

Playback
7
Erasing picturesThis function erases recorded pictures. Pictures can be erased either one frame at a time or all the pictures in the card.
• You cannot erase protected pictures. Cancel protection before erasing such pictures.
• Once erased, pictures cannot be restored. Check each picture before erasing to avoid accidentally erasing pictures you want to keep. g“Protecting pictures” (P.134)
Single-frame erase
1 Use the arrow pad to display the picture you want to erase.g“Viewing still pictures” (P.116)
2 Press S.• The S ERASE screen is displayed.
3 Press ac to select YES, then press e.• The picture is erased and the menu is
closed.
Note
Mode dial
Arrow pad
OK button
S Erase button
YES
NO
SELECt GO
ERASE
135

Erasing pictures
7
Playback
All-frame erase
This function erases all the pictures on the card.
1 In the top menu, select MODE MENU CARD CARD SETUP and press d.g“How to use the menus” (P.33)
2 Press ac to select R ALL ERASE, then press e.
3 Press ac to select YES, then press e.• All the pictures are erased.
Mode dial
Arrow pad
OK button
CARD%SEtUP
ALL%ERASE
CANCEL GOSELECt
FORMAt
YES
CAUtION ERASING%ALL
SELECt GO
ALL%ERASE
NO
136

Useful functions
8
8 Useful functionsALL RESET – Saving the camera’s settings
This function lets you choose whether or not to save the current camera settings after the power is turned off. The settings affected by ALL RESET are listed on the next page.The All Reset setting (ON/OFF) applies to all the modes. If ALL RESET is set to OFF in one shooting mode, this setting applies to all the other modes, both shooting and playback.
ON All settings are returned to the factory default settings after the power is turned off.
OFF The settings made before the power is turned off are saved.
1 In the top menu, select MODE MENU SETUP ALL RESET OFF or ON, and press e.g“How to use the menus” (P.33)
• Press e again to exit the menu.
• My Mode settings and the settings in the SETUP tab in the MODE MENU (ALL RESET, W, 8, etc.) are saved even when ALL RESET is set to ON.
Mode dial
Arrow pad
OK button
Note
137

ALL RESET – Saving the camera’s settings
8U
seful functions
Functions that All Reset affects
∗ This sets whether the monitor turns on or not when the camera is turned on.
FunctionFactory default setting
Ref. Page Function
Factory default setting
Ref. Page
F No F2.8 P.68 FULLTIME AF OFF P.73SHUTTER 1/1000 P.69 AF MODE iESP P.72F 0.0 P.105 R (still pictures) OFF P.97FLASH MODE AUTO P.55 R (movie) OFF P.98w ±0 P.62 % OFF P.85AF/MF AF P.77 FUNCTION OFF P.96( OFF P.79,
84INFO OFF P.150
Z OFF P.86, 87
u OFF P.114
LCD∗ OFF – K HQ P.99OPTICAL ZOOM WIDE P.53 WB AUTO P.106DRIVE o P.89 > ±0 P.109BKT ±1,
3 pictures P.90 SHARPNESS ±0 P.110
ISO AUTO/50 P.104 CONTRAST ±0 P.111A/S/M A P.67 SATURATION ±0 P.112#SLOW #SLOW1 P.61 TIFF, SHQ, HQ 2288 × 1712 P.101NOISE REDUCTION
OFFP.113
SQ1 1280 × 960 NORMAL P.101
MULTI METERING
OFF P.80 SQ2 640 × 480 NORMAL P.101
DIGITAL ZOOM OFF P.54 INFO OFF P.150
138

Useful functions
8
CUSTOM BUTTONFunctions listed in the table below can be assigned to the custom button on the camera. This makes it easy to jump to frequently used functions simply by pressing the custom button without having to select a shortcut menu or MODE MENU from the top menu.
Available functions Settings Ref. Page
AE LOCK (factory default setting)
– P.82
AF LOCK – P.75DRIVE o, j, i, k, BKT P.89ISO AUTO, 50, 100, 200, 400 P.104A/S/M A, S, M P.67
#SLOW #SLOW1, HSLOW1, #SLOW2 P.61NOISE REDUCTION OFF, ON P.113DIGITAL ZOOM OFF, ON P.54FULLTIME AF OFF, ON P.73AF MODE iESP, SPOT P.72% OFF, ON P.85FUNCTION OFF, BLACK & WHITE, SEPIA, WHITE
BOARD, BLACK BOARD P.96
INFO OFF, ON P.150u OFF, ON P.114K TIFF, SHQ, HQ, SQ1, SQ2 P.99WB AUTO, 5, 3, 1, w, x, y P.106R (still pictures) OFF, ON P.97
x button
139

CUSTOM BUTTON
8U
seful functions
Setting the custom button
1 In the top menu, select MODE MENU SETUP CUSTOM BUTTON, and press d.g“How to use the menus” (P.33)
2 Press ac to select a function, then press d.• Press e again to exit the menu.
Mode dial
Arrow pad
OK button
GOSELECt
CUStOM BUttON
AE LOCK
ISO
DRIVE
AF LOCK
140

CUSTOM BUTTONU
seful functions
8
Using the custom button
1 Press x.• The monitor turns on and the function
currently set to the custom button appears.
Ex: When DRIVE is set on the custom button
TIPSWhen ISO is set to the custom button but you want to use AE lock→→→→ The AE lock function cannot be used when a different function is
set to the custom button. Reset AE lock to the custom button by following “Setting the custom button” (P.140).
• You cannot set the custom button separately in each time.
Mode dial
x AEL/Custom button
Set by repeatedly
pressing the button.
Note
141

8U
seful functions
SHORT CUTYou can set three shortcut menus (A, B, C) on the top menu in a still picture shooting mode (except h).This is useful when you want to go quickly to frequently used functions.
Functions that can be set in the shortcut menu
Ref. Page
Functions that can be set in the shortcut menu
Ref. Page
DRIVE P.89 PANORAMA P.92ISO P.104 2 IN 1 P.94A/S/M P.67 FUNCTION P.96r1/2/3/4 P.71 AF AREA P.74w P.62 INFO P.150#SLOW P.61 u P.114NOISE REDUCTION P.113 K P.99MULTI METERING P.80 WB P.106DIGITAL ZOOM P.54 > P.109FULLTIME AF P.73 SHARPNESS P.110AF MODE P.72 CONTRAST P.111% P.85 SATURATION P.112
R (still pictures) P.97
Top menu
WB
DRIVE
MODE MENU
A
B
C
Default settingA : DRIVEB : KC: WB
142

SHORT CUTU
seful functions
8
Setting the shortcut menu
You can set the three shortcut menus designated by A, B and C on the diagram shown right.
1 In the top menu, select MODE MENU SETUP SHORT CUT, and press d.g“How to use the menus” (P.33)
2 Press ac to select A, B or C, then press d.
3 Press ac to select a function, then press e.• The shortcut menu is set.• Press e again to exit the menu.
MODE MENU
Mode dial
Arrow pad
OK button
GOSELECt
SHORt CUt
DRIVEDRIVE
WBWB
GOSELECt
SHORt CUt
DRIVE
ISOA/S/M
1/2/3/4
143

SHORT CUT
8U
seful functions
Using the shortcut menu
When you have set a shortcut menu, you can use it to jump to the setting screen for that function.
1 Press e to display the top menu.• The shortcut menu you have set appears
on the top menu.
2 Press ab or c to select the shortcut menu.• The monitor jumps directly to the setting
screen for that function.
Ex: When > is set in shortcut menu A
• You cannot set the custom button separately in each mode.
Mode dial
Arrow pad
OK button
ISO
AF MODE MODE MENU
Press e
ISO
AF MODE MODE MENU
Top menu
Pressing a takes you directly to > screen.
GOADJUSt
Note
144

Useful functions
8
MY MODE SETUPYou can set shooting-related functions in MY MODE. When the camera is in P, A, S or M mode, you can also save the current settings in MY MODE.When the mode dial is set to r, your customized settings are activated. You can save up to 4 different settings in MY MODE 1 to 4. Only MY MODE 1 has a factory default setting.
Functions affected by MY MODE SETUP
∗1 This will set the monitor to ON or OFF when the camera is turned on.∗2 In the r mode, available zoom positions are 38 mm/50 mm/100 mm/
200 mm and 380 mm (these numbers are based on the focal length of a 35 mm camera).
Functions that can be set in MY MODE
Default setting
Ref. Page
Functions that can be set in MY MODE
Default setting
Ref. Page
P/A/S/M/S-Prg P P.44 FULLTIME AF OFF P.73F No F 2.8 P.68 AF MODE iESP P.72SHUTTER 1/1000 P.69 % OFF P.85F 0.0 P.105 PANORAMA OFF P.92LCD ∗1 OFF – 2 IN 1 OFF P.94ZOOM ∗2 38 mm – FUNCTION OFF P.96FLASH MODE AUTO P.55 INFO OFF P.150( OFF P.79, 84 OFF P.114Z OFF P.86, 87 K HQ P.99DRIVE o P.89 WB AUTO P.106AF/MF AF P.77 > ±0 P.109ISO AUTO P.104 SHARPNESS ±0 P.110w ±0 P.62 CONTRAST ±0 P.111
#SLOW #SLOW1 P.61 SATURATION ±0 P.112NOISE REDUCTION
OFF P.113 R (still pictures) OFF P.97
DIGITAL ZOOM OFF P.54
145

MY MODE SETUP
8U
seful functions
1 In the top menu, select MODE MENU SETUP MY MODE SETUP, and press d.g“How to use the menus” (P.33)
2 Press ac to select the type of setting, then press d.
PRESENT Saves the current camera settings.
RESET Restores the factory default settings.
CUSTOM Saves settings one by one.
• The MY MODE SETUP screen appears.
3 Select a MY MODE number.• Press ac to select MY MODE number
from 1 to 4, then press e.
When selecting PRESENT in Step 24 Press ac to select SET, then
press e.• The current camera settings are saved in
the selected MY MODE.
Mode dial
Arrow pad
OK button
PLAY
EDIt
CARD
SEtUP
PRESENt
RESEt
CUStOMPIXEL MAPPING
FILE NAME
MY MODE SEtUP
CANCEL GOSELECt
MY MODE1
MY MODE2
MY MODE3
MY MODE4
GOSELECt
CANCEL
SEt
SEt PRESENt SEttING
MY MODE SEtUP
146
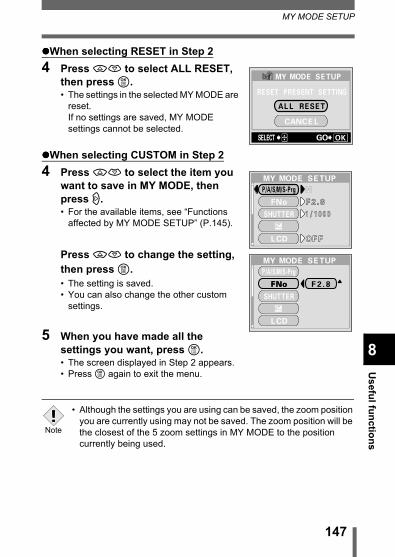
MY MODE SETUPU
seful functions
8
When selecting RESET in Step 24 Press ac to select ALL RESET,
then press e.• The settings in the selected MY MODE are
reset.If no settings are saved, MY MODE settings cannot be selected.
When selecting CUSTOM in Step 24 Press ac to select the item you
want to save in MY MODE, then press d.• For the available items, see “Functions
affected by MY MODE SETUP” (P.145).
Press ac to change the setting, then press e.• The setting is saved.• You can also change the other custom
settings.
5 When you have made all the settings you want, press e.• The screen displayed in Step 2 appears.• Press e again to exit the menu.
• Although the settings you are using can be saved, the zoom position you are currently using may not be saved. The zoom position will be the closest of the 5 zoom settings in MY MODE to the position currently being used.
GOSELECt
CANCEL
ALL RESEt
RESEt PRESENt SEttING
MY MODE SEtUP
M
FNo
SHUttER
F2.8F2.8
OFFOFF
1/10001/1000
P/A/S/M/S-PrgMY MODE SEtUP
LCD
FNoFNo
SHUttER
F2.8
P/A/S/M/S-PrgMY MODE SEtUP
LCD
Note
147

8U
seful functions
CARD SETUP - Formatting CardsThis function lets you format a card. Formatting prepares cards to receive data. Before using non-Olympus cards or cards which have been formatted on a PC, you must format them with this camera.
All existing data, including protected pictures, are erased when the card is formatted. Make sure that you save or transfer important data to a PC before formatting a card.
1 In the top menu, select MODE MENU CARD CARD SETUP, and press d.g“How to use the menus” (P.33)
• The I FORMAT screen is displayed.
In the top menu, press d to select CARD SETUP.
In the top menu, select MODE MENU CARD CARD SETUP, and press d. Press ac to select I FORMAT, then press e.
Mode dial
Arrow pad
OK buttonMode dial
Mode dial
148

CARD SETUP - Formatting CardsU
seful functions
8
2 Press a to select YES, then press e.• The BUSY bar is displayed and the card is
formatted.
Never do the following during formatting, as they may cause the card to malfunction.• Open the card cover.• Remove the battery.• Connect or disconnect the AC adapter.
NO
CAUtION ERASING%ALL
SELECt GO
FORMAt
YES
BUSY
Note
149

8U
seful functions
Information displayThis function lets you display detailed shooting information on the monitor for approx. 3 seconds in the playback mode. For details of the information displayed, see “Viewfinder and monitor indications” (P.12).
1 In the top menu, select MODE MENU CAMERA INFO ON or OFF, and press e.g“How to use the menus” (P.33)
Pressing b in the top menu displays the full amount of shooting information on the monitor (ON).• To turn INFO off, press e to display the top menu and press b again.
Ex. Playback mode
• If the picture has been taken with a different camera, setting INFO to ON in q mode may still not display all the information.
• If u is set, the histogram is displayed regardless of whether INFO is set to ON or OFF.
When INFO is ON When INFO is OFF
Mode dial
Arrow pad
OK button
Mode dial
SQ1SQ116001600 12001200
Note
150

Useful functions
8
Monitor/viewfinder brightness AdjustmentThis function lets you adjust the brightness of the monitor and viewfinder respectively.
1 In the top menu, select MODE MENU SETUP s, and press d.g“How to use the menus” (P.33)
2 Press ac to adjust the brightness while looking in the monitor or viewfinder, and when you have set the desired level, press e.• Pressing a brightens the monitor or
viewfinder, and pressing c darkens it.• Press e again to exit the menu.
Mode dial
Arrow pad
OK button
ADJUSt GO
151

8U
seful functions
REC VIEWYou can choose whether or not to display the picture you have just taken on the monitor.
ON The picture being recorded to the card is displayed. This is useful for making a brief check of the picture you have just taken. Pressing the shutter button halfway during Rec View lets you resume shooting immediately.
OFF The picture being recorded to the card is not displayed. This is useful when you want to prepare for your next shot while the previous picture is being recorded.
1 In the top menu, select MODE MENU SETUP REC VIEW OFF or ON, and press e.g“How to use the menus” (P.33)
• Press e again to exit the menu.
Mode dial
Arrow pad
OK button
152

Useful functions
8
SLEEP - Sleep TimerThe camera automatically enters the sleep mode and stops the operation when the preset time has elapsed with no operations performed. The camera activates again as soon as you touch the shutter button or arrow pad.
1 In the top menu, select MODE MENU SETUP SLEEP 30 SEC, 1 MIN, 3 MIN, 5 MIN or 10 MIN, and press e.g“How to use the menus” (P.33)
• Press e again to exit the menu.
• The sleep mode is not activated when using the AC adapter.• In q mode, the sleep mode is activated after 3 minutes regardless
of the setting and the monitor turns off.• If a slideshow lasts more than 30 minutes, the camera automatically
enters the sleep mode and the monitor turns off.
Mode dial
Arrow pad
OK button
Note
153

8U
seful functions
BeepYou can set the kind of beep sound used for button operations or warnings. You can also set the volume of each kind of sound to LOW or HIGH. The factory default settings are 1 for the kind of sound and LOW for the volume. You can turn the sound off completely by setting OFF.
1 In the top menu, select MODE MENU SETUP 8, and press d.g“How to use the menus” (P.33)
2 Select 1 or 2 and press d. Then select LOW or HIGH and press e.• To turn off the beep sound, select OFF
and press e.• Press e again to exit the menu.
Mode dial
Arrow pad
OK button
OFF
LOW
HIGH
GOSELECt
154

Useful functions
8
SHUTTER SOUNDYou can select from 2 kinds of sound for the shutter button. You can also set the volume of each kind of sound to LOW or HIGH. The factory default settings are 1 for the kind of sound and LOW for the volume. You can turn the sound off completely by setting OFF.
1 In the top menu, select MODE MENU SETUP SHUTTER SOUND, and press d.g“How to use the menus” (P.33)
2 Select 1 or 2 and press d. Then select LOW or HIGH and press e.• To turn off the shutter sound, select OFF
and press e.• Press e again to exit the menu.
Mode dial
Arrow pad
OK button
SHUttER SOUND
OFF
LOW
HIGH
GOSELECt
155

8U
seful functions
VOLUME - Playback VolumeYou can adjust the volume when playing back a still picture with sound or a movie, as well as the volume of the sound generated when the power is turned on or off. There are 5 levels to choose from.
1 In the top menu, select MODE MENU SETUP VOLUME, and press d.g“How to use the menus” (P.33)
2 Press ac to set the volume, then press e.• Press e again to exit the menu.
Mode dial
Arrow pad
OK button
PLAY
EDIt
CARD
SEtUP
VOLUMEVOLUME
VIDEO OUtVIDEO OUt
Selecting this level will mute the sound completely.
156

Useful functions
8
POWER ON/OFF SETUP - Power on/off display/sound settingYou can select a picture and/or sound to be displayed/output when the power is turned on and off. It is also possible to register your favorite picture. g“SCREEN SETUP” (P.158)
1 In the top menu, select MODE MENU SETUP PW ON/OFF SETUP, and press d.g“How to use the menus” (P.33)
2 Press ac to select SCREEN, then press d. Press ac to select OFF, 1 or 2, then press b.
OFF No picture is displayed.1 Factory default setting2 Selects a picture already registered. If
there is no picture registered, nothing is displayed when the power is turned on or off.
3 Press ac to select SOUND, then press d. Press ac to select OFF or ON, then press b.
OFF There is no startup/shutdown sound.ON Factory default setting• The volume level is the same as that set
for the playback volume.g“VOLUME - Playback Volume” (P.156)
• When you have made all the settings you want, press e.Press e repeatedly until the menu disappears.
Mode dial
Arrow pad
OK button
GOSELECt
SOUND
SCREEN OFF
PW ON/OFF SEtUP
GOSELECt
SOUND
SCREEN
OFF
ON
PW ON/OFF SEtUP
157

8U
seful functions
SCREEN SETUPYou can register your favorite picture to be displayed when the power is turned on and off. The desired picture can be registered from the card. Make the POWER ON/OFF SETUP to display the registered picture.g“POWER ON/OFF SETUP - Power on/off display/sound setting” (P.157)
1 In the top menu, select MODE MENU SETUP SCREEN SETUP, and press d.g“How to use the menus” (P.33)
• If a picture is already registered, the IMAGE EXISTING screen is displayed asking if you want to cancel the currently registered picture and register a new one. To register a new picture, select RESET and press e. If you select KEEP, the screen returns to the menu.
2 Select the picture you want to register using the arrow pad and press e.
3 Press ac to select OK, then press e.• The picture is registered and the screen
returns to the menu.• Press e again to exit the menu.
• You cannot register pictures and movie frames that cannot be played back on this camera.
Mode dial
Arrow pad
OK button
GOSELECt
KEEP
RESEt
IMAGE EXIStING
SCREEN SEtUP
CANCEL
GOSELECt
CANCEL
OK
SEt AS PW ON/OFF SCREEN
SCREEN SEtUP
CANCEL
Note
158

Useful functions
8
FILE NAMEThe camera automatically creates file names and folder names for images to be stored in. Files can be numbered from 0001 to 9999 and folders can be numbered from 100 to 999. Examples are shown below.
There are two settings from which you can choose: RESET or AUTO. Choose the one that is best for you when transferring images to a PC.
File name settingsRESET The file number and folder number are reset every time a new card
is inserted in the camera. The folder number returns to No. 100 and the file number returns to No. 0001. This method is useful when grouping files on separate cards.
AUTO Even if a new card is inserted, the folder number and file number are retained from the previous card, so the same file number is not used on different cards. This helps you to manage multiple cards. This method is useful when you want to manage all your files with sequential numbers.
1 In the top menu, select MODE MENU SETUP FILE NAME RESET or AUTO, and press e.g“How to use the menus” (P.33)
• Press e again to exit the menu.
\ D C I M \ * * * O L Y M P \ P m d d * * * * . j p g
Folder No.(100 – 999)
File nameFolder name
Month(1 – C)
Day (01 – 31)
File No.(0001 – 9999)
• Month: Jan. – Sep. = 1 – 9, Oct. = A, Nov. = B, Dec. = C
Mode dial
Arrow pad
OK button
159

PIXEL MAPPING
8U
seful functions
• When the File No. reaches 9999, the file number returns to 0001 and the folder number changes.
• When both the Folder and File No. reach their respective maximum number (999/9999), the number of storable pictures becomes 0 even if the card is not full. No more pictures can be taken. Replace the card with a new one.
The Pixel Mapping feature allows the camera to check and adjust the CCD and image processing functions. It is not necessary to operate this function frequently. Approximately once a year is recommended. Wait a few minutes after the monitor is used or continuous shots are taken to allow for proper performance of the Pixel Mapping function.
1 In the top menu, select MODE MENU SETUP PIXEL MAPPING, and press d. g“How to use the menus” (P.33)
• START appears.
2 Press e.• The BUSY bar is displayed during Pixel
Mapping. When Pixel Mapping is finished, the screen returns to the mode menu.
Note
PIXEL MAPPING
Mode dial
Arrow pad
OK button
BUSY
160

Measurement unitsU
seful functions
8
• If you accidentally turn the camera off during Pixel Mapping, start again from Step 1.
The measurement unit can be selected from either meters or feet in the manual focus mode.
m At long ranges, the camera measures in meters, and at shorts ranges in centimeters.
ft At long ranges, the camera measures in feet, and at short ranges in inches.
1 In the top menu, select MODE MENU SETUP m/ft m or ft, and press e.g“How to use the menus” (P.33)
• Press e again to exit the menu.
Note
Measurement units
Mode dial
Arrow pad
OK button
161
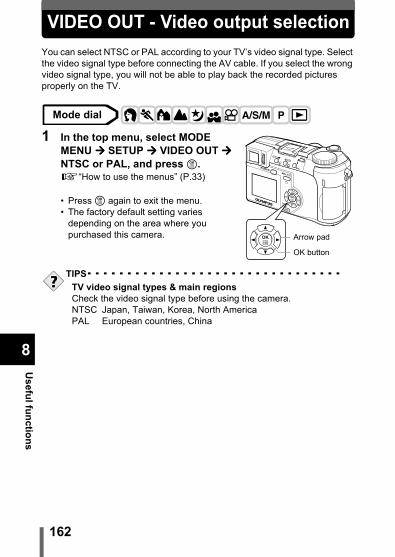
8U
seful functions
VIDEO OUT - Video output selectionYou can select NTSC or PAL according to your TV’s video signal type. Select the video signal type before connecting the AV cable. If you select the wrong video signal type, you will not be able to play back the recorded pictures properly on the TV.
1 In the top menu, select MODE MENU SETUP VIDEO OUT NTSC or PAL, and press e.g“How to use the menus” (P.33)
• Press e again to exit the menu.• The factory default setting varies
depending on the area where you purchased this camera.
TIPSTV video signal types & main regionsCheck the video signal type before using the camera.NTSC Japan, Taiwan, Korea, North AmericaPAL European countries, China
Mode dial
Arrow pad
OK button
162

Print setting
9
9 Print settingHow to print pictures
Several different printing options are available when you want to print out pictures.
Printing at a photo lab that supports DPOF or printing on a DPOF-compatible printer
Store the print reservation data on the card. Print reservation allows you to save printing data (number of prints, date/time information, etc.) with the pictures stored on the card.• What is DPOF?DPOF is short for Digital Print Order Format. DPOF is the format used to record automatic print information from digital cameras.If a card containing print reservation data is taken to a photo lab that supports the DPOF format, the pictures can be printed according to the DPOF reservations. Or pictures can be printed out at home on a personal DPOF-compatible printer.
Printing on an Olympus CAMEDIA P-400 or P-200 digital printer
Printing is possible directly from a card containing print reservation data without using a PC. For more details, refer to the printer’s instruction manual.The xD-Picture Card cannot be inserted directly into the printer. Use the card adapter (sold separately).
Transferring pictures to a PC and printing them from a printer connected to the PC
If your PC has software applications installed that support JPEG images (internet browser, Paint Shop Pro, Photoshop, etc.), you can print out your pictures on a printer connected to the PC. (Printing is also possible using CAMEDIA Master software.) Check your software before printing. For details, refer to the application software’s instructions.For instructions on how to transfer images, or connect the camera to a PC, see “DIGITAL CAMERA-PC CONNECTION OPERATION MANUAL” on the CD-ROM.
163

How to print pictures
9Print setting
TIPSPicture size and printingThe resolution of a computer/printer is generally based on the number of dots (pixels) per square inch. This is called dpi (dots per inch). The higher the dpi value, the better the printed results. Keep in mind, however, that the dpi of the picture does not change. This means that when you print an image with a higher resolution, the size of the printed picture will be smaller. Although you can print magnified images, picture quality will decrease.If you want to print large, high-quality pictures, set the record mode as high as possible when taking the pictures. g“Record mode” (P.99)
• DPOF reservations set by another device cannot be changed by this camera. Make changes using the original device.
• If a card contains DPOF reservations set by another device, entering reservations using this camera may overwrite the previous reservations.
• You may not be able to enter print reservations if there is insufficient memory space available on the card. (The “CARD FULL” message is displayed.)
• You can print up to 999 images from one card using the DPOF reservation function.
• Even if an image appears with the message “PICTURE ERROR”, it may be possible to make print reservations. In this case, the print reservation icon (<) does not appear when an image is displayed for full view. < appears when multiple images are displayed (index display), allowing you to confirm the print reservation.
• Not all functions may be available on all printers or at all photo labs.• Some TIFF images cannot be printed.• Print reservation may take considerable time when saving printing
data to a card.
Note
164

Print setting
9
All-frame reservationUse this feature to print all the pictures stored on the card. Select the desired number of prints and whether you want the date and time included.
1 Play back a still picture.• You cannot make the print reservation for
pictures with n.
2 Press <. The < PRINT ORDER screen appears. Press ac to select U, then press e.• If print reservation data is already stored
on the card, the < PRINT ORDER SETTING screen appears, giving you the choice of resetting the data or keeping it.
3 Press ac to select <<<<x (number of prints) or X (date/time), then press d.
Mode dial
Arrow pad
OK button
< Print button
EXIt GOSELECt
PRINt%ORDER
165

All-frame reservation
9Print setting
4 Perform each setting as illustrated.
Set the number of printsPress ac to set the number of prints, then press e.a : Increases the number.c : Decreases the number.
Set the date/time printing dataPress ac to select NO, DATE or TIME, then press e.NO The pictures are printed without the date and time.DATE All the pictures are printed with the shooting date.TIME All the pictures are printed with the shooting time.• After completing all the print reservations, press e to return to the
playback screen.
EXIt GOSELECt
*0*
EXIt GOSELECt
NO
DAtE
tIME
*
Select <x.
Select X.
SEt GOSELECt
*
166

Print setting
9
Single-frame reservationUse this feature to print only selected pictures. Display the picture to be printed and select the desired number of prints.
1 Play back a still picture.• You cannot make the print reservation for
pictures with n.
2 Press <. The < PRINT ORDER screen appears. Press ac to select <, then press e.• If data is already stored on the card, the <
PRINT ORDER SETTING screen appears, giving you the choice of resetting the data or keeping it.
3 Select the frame you want to print using the arrow pad and press e.
Mode dial
Arrow pad
OK button
< Print button
EXIt GOSELECt
PRINt%ORDER
GOSELECt
SQ1SQ1
167

Single-frame reservation
9Print setting
4 Select the appropriate item using the arrow pad.MORE Sets the number of prints,
date/time and trim size. Go to Step 5.
SINGLE PRINT Sets single-frame print. The date/time and trimming settings are not available.
Go to Step 8.CANCEL Cancels the print reservation for the displayed picture.
g “Resetting print reservation data” (P.172)END Completes the print reservation.
Go to Step 10.
5 Press ac to select <<<<x (number of prints), X (date/time) or P (trimming), then press d.
6 Perform each setting.Set the number of prints
Press ac to set the number of prints, then press e.a : Increases the number.c : Decreases the number.
Set the date/time printing dataPress ac to select NO, DATE or TIME, then press e.NO The pictures are printed without the date
and time.DATE All the pictures with print reservation are
printed with the shooting date.TIME All the pictures with print reservation are
printed with the shooting time.
MOREEND
CANCEL
SINGLE PRINt
Single-frame reservation menu
GOSELECt
0
DAtEDAtE
NONO
SEt
*
EXIt GOSELECt
*0
EXIt GOSELECt
DAtE
NO
tIME
*
168

Single-frame reservationPrint setting
9
Trim the pictureg“Trimming” (P.170)
7 After setting all the print reservations, press e to complete the reservations.• The screen in Step 3 is restored and <
appears on the displayed picture.
8 Press e to display the single-frame reservation menu.
9 Press b to select END.• The < PRINT ORDER screen appears.
10 Press b repeatedly until the playback screen appears.
GOSELECt
SQ1SQ1SQ1SQ1
22
MOREEND
CANCEL
SINGLE PRINt
169

9Print setting
TrimmingThis function enables you to crop part of a recorded picture and print out the enlarged section only.
1 Press ac on the single-frame reservation screen to select P (trimming) and press d.g“Single-frame reservation” (P.167)• If trimming has already been set, the P
screen appears. Press ac to select RESET, then press e.
2 Use the arrow pad and zoom lever to decide the trimming position and size.• Press acbd to move the trimming
frame.• Use the zoom lever to decide the
trimming size. The trimming frame changes from horizontal to vertical and vice versa when the maximum or minimum size is reached.
3 Press e.
Mode dial
GOSELECt
RESEt
CANCEL
OK
Arrow pad
OK button
Zoom lever
GO
170

TrimmingPrint setting
9
4 Press ac to select OK, then press e.OK Saves the current trimming size
and returns to the single-frame reservation screen.
RESET Sets a new trimming size. Go to Step 2.
CANCEL Cancels the current trimming setting and returns to the single-frame reservation screen.
5 Press e to complete the print reservations and return to the picture selection screen. Press e again.
6 Press b to select END.• The < PRINT ORDER screen appears.• Press b repeatedly until the playback
screen appears.
• The size of the printed picture varies depending on the printer settings. If the trimmed picture size is small, printing magnification increases accordingly, resulting in a printed picture with lower resolution.
• For best results with trimmed pictures, you are recommended to use the TIFF, SHQ or HQ mode.
• The original picture is not trimmed. If your printer does not have the trimming function, the picture will be printed untrimmed.
• Do not rotate pictures that have been trimmed, otherwise the cropped area will change.
• If images recorded in 3:2 are trimmed, the ratio is fixed at 4:3.
GOSELECt
RESEt
CANCEL
OK
MOREEND
CANCEL
SINGLE PRINt
Note
171

9Print setting
Resetting print reservation dataThis function allows you to reset the print reservation data for pictures stored on the card. There are two ways to reset print reservation: you can reset all print reservation data or you can reset the print reservation data for only the frames you do not need.
1 Play back a still picture with <.
2 Press <.• If print reservation data is already stored
on the card, the < PRINT ORDER SETTING screen appears.
3 To reset all print reservation data, press ac to select RESET, then press e. Press b to return to the playback screen.To reset only the print reservation data for the frames that you do not need, press ac to select KEEP, then press e. • If there is no print reservation data stored on the card, the < PRINT
ORDER SETTING screen does not appear.
4 Press ac to select < on the < PRINT ORDER screen, then press e.
Mode dial
Arrow pad
OK button
< Print button
RESEt
KEEP
PRINt%ORDER%SEttING
PRINt%ORDERED
SELECtEXIt GO
172

Resetting print reservation dataPrint setting
9
5 Press acbd to display the frame whose print reservation data you want to reset, then press e.• The single-frame reservation menu is
displayed.
6 Press c to select CANCEL.• Print reservation is canceled, and the
screen in step 5 is restored.
7 If you are finished resetting print reservation data, press e to display the single-frame reservation menu. Press b.
8 Press b repeatedly until the playback screen appears.
GOSELECt
SQ1SQ1SQ1SQ1
22
MOREEND
CANCEL
SINGLE PRINt
173

10
Miscellaneous
10 MiscellaneousError codes
Monitor indication Possible cause Corrective action
qNO CARD
The card is not inserted, or it cannot be recognized.
Insert a card or insert a different card.Wipe the gold contacts with a commercially available cleaning paper and insert the card again. If the problem persists, format the card. If the card cannot be formatted, it cannot be used.
qCARD ERROR
There is a problem with the card.
Use a different card. Insert a new card.
qWRITE-
PROTECT
Writing to the card is prohibited.
The recorded image has been protected (read-only) on a PC. Download the image to a PC and cancel the read-only setting.
qCARD FULL
The card is full. No more pictures, movies or information such as print reservation can be recorded.
Replace the card or erase unwanted pictures. Before erasing, download important images to a PC.
LNO PICTURE
There are no pictures on the card.
The card contains no pictures. Record pictures.
rPICTURE ERROR
The recorded image cannot be played back with this camera.
Use image processing software to view the picture on a PC. If that cannot be done, the image file is damaged.
CARD COVER OPEN
The card cover is open. Close the card cover.
The card is not formatted.
Format the card.POWER%OFF
FORMAt
CARD%SEtUP
SELECt GO
174

Miscellaneous
10
TroubleshootingThe camera does not work
Possible cause Corrective action Ref. Page
The camera does not turn on or function buttons do not respond.The power is off. Press the power switch and turn on the camera. P.24The batteries are loaded incorrectly.
Reload the batteries correctly. P.18
The batteries are exhausted.
Replace the batteries with new ones. P.15
The batteries are temporarily unable to function because of the cold.
Warm the batteries by putting them in your pocket for a while.
—
The camera is in the sleep mode.
Operate the camera (press the shutter button or the zoom lever).
P.24
There is condensation∗ inside the camera.
Wait until the camera dries before turning it on again.
—
The camera is connected to a PC.
The camera will not operate while it is connected to a PC.
—
∗ Condensation: When it is cold outside, the water vapor in the air is rapidly cooled and turns to droplets of water. Condensation occurs when the camera is suddenly taken from a cold place into a warm room.
No picture is taken when the shutter button is pressed.The camera is in the playback mode.
Set the mode dial to any position except q. P.42
The flash has not finished charging.
Remove your finger from the shutter button, and wait until the # (flash standby) indication stops blinking. Press the shutter button again.
P.57
The card is full. Erase unwanted pictures or insert a new card. Before erasing, download important images to a PC.
P.22, 135
The batteries ran out of power during shooting or while the images were being written to the card. (Monitor turns off, or the battery check indicator blinks.)
Replace the batteries with new ones. (If images are being recorded on the card, wait until recording is finished.)
P.18
175

Troubleshooting
10
Miscellaneous
Possible cause Corrective action Ref. PageThe memory gauge is full.
Wait until there is room in the memory gauge. P.15
There is a problem with the card.
Refer to “Error codes”. P.174
The flash does not fire.The flash is retracted.
Push the flash lever up to make the flash pop up. P.55
The subject is illuminated.
If you want the flash to fire on a brightly illuminated subject, set the flash to fill-in mode.
P.55
Auto bracketing is set.
The flash does not fire in the auto bracketing mode.Set anoter mode in the DRIVE menu.
P.89
The camera is in the movie mode.
The flash does not fire in the movie mode. Set a different shooting mode.
P.51
FUNCTION is set to BLACK/WHITE BOARD.
The flash does not fire in the BLACK/WHITE BOARD mode.
P.96
Super macro mode is set.
The flash does not fire in the super macro mode. Set the super macro mode to OFF.
P.85
Panorama mode is set.
The flash does not fire in the panorama mode. Cancel the panorama mode.
P.92
The viewfinder does not turn on.The monitor is turned on.
Press f to switch to the viewfinder. P.46
The camera is in the sleep mode.
Operate the camera (press the shutter button or the zoom lever).
P.24
The monitor does not turn on.The viewfinder is turned on.
Press f to turn the viewfinder off. P.46
The camera is in the sleep mode.
Operate the camera (press the shutter button or the zoom lever).
P.24
176

TroubleshootingM
iscellaneous
10
Possible cause Corrective action Ref. Page
The viewfinder or monitor is hard to see.The diopter is not adjusted properly.
Adjust the diopter so that the AF target mark is clearly visible.
P.30
The brightness of the viewfinder or monitor is not adjusted properly.
Select s in the mode menu and adjust the brightness.
P.151
The monitor is exposed to direct sunlight.
Block the sunlight with your hand or use the viewfinder.
—
Vertical lines appear on the image in the viewfinder or monitor.
Bright light, such as direct sunlight, may cause vertical lines to appear on the image. This is not a malfunction.
—
Pictures you have taken do not appear on the monitor.The power is off. Set the mode dial to q before pressing the
power switch to turn the camera on.P.116
The camera is in the shooting mode.
Press f twice quickly, or set the mode dial to q.
P.116, 117
There are no pictures on the card.
NO PICTURE appears on the monitor. Record pictures.
—
There is a problem with the card.
Refer to “Error codes”. P.174
The camera is connected to a TV.
The monitor does not function when the AV cable is connected to the camera.
P.128
The date recorded with the image data is wrong.The date/time is not set.
Set the date/time. The clock adjustment is not factory-preset.
P.28
The batteries are exhausted.
When the batteries run out, the date/time setting may be canceled. Replace the batteries with new ones and set the date/time again.
P.18, 28
The camera has been left with the batteries removed.
If the camera is left for several hours with the batteries removed, the date/time setting is canceled. Set the date/time again.
P.18, 28
Single-frame erase or all-frame erase cannot be performed.The picture you want to erase is protected.
Display the protected image (with 9) and press 0 to cancel the protection.
P.134
177

Troubleshooting
10
Miscellaneous
Possible cause Corrective action Ref. Page
The settings are returned to the factory default settings when the camera is turned off.ALL RESET is set to ON.
Select the SETUP tab in the mode menu and set ALL RESET to OFF.
P.137
No picture is displayed on the TV when connected to the camera.The video output signal is incorrect.
Set the video output signal according to the region where used.
P.162
The TV video signal setting is incorrect.
Set the TV to the video input mode. P.128
178

TroubleshootingM
iscellaneous
10
The image quality is poor.Possible cause Corrective action Ref. Page
The picture is too bright.The flash was set to the fill-in flash mode.
Select a flash mode other than fill-in flash. P.55
The subject was excessively illuminated.
Adjust the exposure compensation toward minus (–) or change the camera position.
P.105
The picture is too dark.The flash was blocked by your finger.
Hold the camera correctly, keeping your fingers away from the flash.
P.31
The subject was out of the working range of the flash.
Shoot within the flash working range. P.56
The flash was not enabled.
Push the flash lever up to make the flash pop up. P.55
The subject was too small and was backlit.
Set the flash to fill-in mode, or use the spot metering mode.
P.55, 79
The sequential shooting mode was used.
Higher shutter speeds are used when the sequential shooting mode is selected, which may result in pictures that are darker than usual. Select o in the DRIVE menu.
P.89
When shooting a bright subject such as a landscape, the picture comes out darker than the actual colors.
Adjust the exposure compensation toward plus (+).
P.105
The colors of pictures taken indoors look unnatural.Indoor lighting can affect the picture’s colors.
Set the white balance according to the lighting. P.106
No white in frame. Include something white in the picture, or shoot using the fill-in flash mode.
P.55
The white balance setting is wrong.
Adjust the white balance according to the light source.
P.106
179

Troubleshooting
10
Miscellaneous
Possible cause Corrective action Ref. Page
The picture has obscured edge(s).The lens was partly blocked by your finger or the strap.
Hold the camera correctly, keeping your fingers and the strap away from the lens.
P.31
The picture is out of focus.The camera moved when the shutter button was pressed.
Hold the camera correctly and press the shutter button gently.
P.31
The subject was too close.
Move further away from the subject. To take pictures closer than 7 cm (2.8") with the zoom in the maximum WIDE position, use the super macro mode.
P.84, 85
The flash was not enabled in a lighting condition requiring use of the flash.
Push the flash lever up to make the flash pop up. Camera movement occurs easily with slower shutter speeds. Use a tripod, or hold the camera firmly.
P.55
The lens was dirty. Clean the lens. Use a commercially available blower blush and then wipe with a lens cleaner to remove dust. Mold may form on the lens surface if the lens is left dirty.
P.194
The picture was out of focus even though the green lamp was lit.
Focus the camera on an object at the same distance as the intended subject using the focus lock function before composing your shot.
P.49
Halation produces unnatural colors in the picture.This may be caused by excessively bright ultraviolet light on the subject, such as sunlight shining through the leaves of trees, window frames in bright light at night, reflection of metal in direct sunlight, etc.
• Use a UV filter. As this may upset the overall color balance, it should only be used in the conditions described on the left.
• Process the picture on a PC using a graphics application (Photoshop, Paint Shop Pro, etc.). For example, after picking up unnatural colors with a syringe tool, etc. you can select color areas, and try color conversion or saturation adjustment. For details, refer to the manual for the graphics application you are using.
—
180
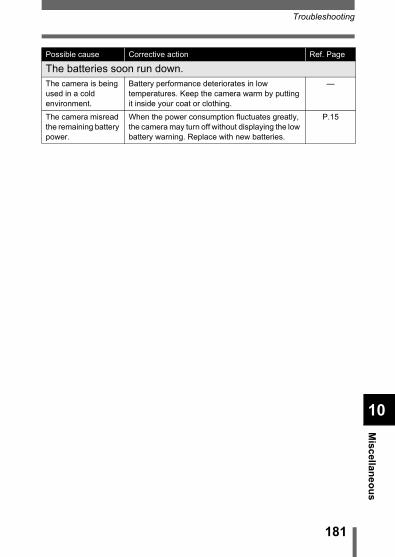
TroubleshootingM
iscellaneous
10
Possible cause Corrective action Ref. Page
The batteries soon run down.The camera is being used in a cold environment.
Battery performance deteriorates in low temperatures. Keep the camera warm by putting it inside your coat or clothing.
—
The camera misread the remaining battery power.
When the power consumption fluctuates greatly, the camera may turn off without displaying the low battery warning. Replace with new batteries.
P.15
181

10
Miscellaneous
List of menush mode
Top menu Setting Ref. PageDRIVE o, j, i, k P.89K SHQ 2288 × 1712, HQ 2288 × 1712,
SQ1 1280 × 960, SQ2 640 × 480P.99
X P.28CARD SETUP YES, NO P.148
182
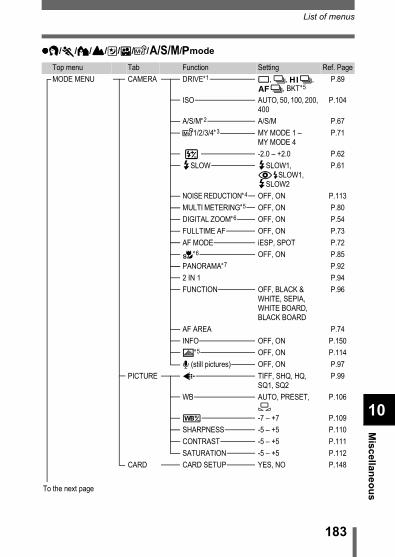
List of menusM
iscellaneous
10
i/j/k/l/m/o/r/p/PmodeTop menu Tab Function Setting Ref. PageMODE MENU CAMERA DRIVE∗1 o, j, i,
k, BKT∗5P.89
ISO AUTO, 50, 100, 200, 400
P.104
A/S/M∗2 A/S/M P.67r1/2/3/4∗3 MY MODE 1 –
MY MODE 4P.71
-2.0 – +2.0 P.62#SLOW #SLOW1,
HSLOW1, #SLOW2
P.61
NOISE REDUCTION∗4 OFF, ON P.113MULTI METERING∗5 OFF, ON P.80DIGITAL ZOOM∗6 OFF, ON P.54FULLTIME AF OFF, ON P.73AF MODE iESP, SPOT P.72%∗6 OFF, ON P.85PANORAMA∗7 P.922 IN 1 P.94FUNCTION OFF, BLACK &
WHITE, SEPIA, WHITE BOARD, BLACK BOARD
P.96
AF AREA P.74INFO OFF, ON P.150u∗5 OFF, ON P.114R (still pictures) OFF, ON P.97
PICTURE K TIFF, SHQ, HQ, SQ1, SQ2
P.99
WB AUTO, PRESET, V
P.106
> -7 – +7 P.109SHARPNESS -5 – +5 P.110CONTRAST -5 – +5 P.111SATURATION -5 – +5 P.112
CARD CARD SETUP YES, NO P.148
To the next page
183

List of menus
10
Miscellaneous
i/j/k/l/m/o/r/p/Pmode (cont.)
∗1 Not available in m mode.∗2 Only available in p modes.∗3 Only available in r mode.∗4 Not available in i j k l m o modes.∗5 Not available in M mode.∗6 Not available in o mode.∗7 Not available in o p modes.∗8 Not available in r mode.
Top menu Tab Function Setting Ref. PageMODE MENU SETUP ALL RESET∗8 OFF, ON P.137
W ENGLISH, FRANCAIS, DEUTSCH, ESPAÑOL
P.26
PW ON/OFF SETUP OFF, 1, 2 P.157REC VIEW OFF, ON P.152SLEEP 30 SEC, 1 MIN, 3
MIN, 5 MIN, 10 MINP.153
MY MODE SETUP PRESENT, RESET, CUSTOM
P.145
FILE NAME RESET, AUTO P.159PIXEL MAPPING P.160s P.151X P.28m/ft m, ft P.161VIDEO OUT NTSC, PAL P.162SHORT CUT A, B, C P.142CUSTOM BUTTON P.1398 OFF, 1, 2 P.154SHUTTER SOUND OFF, 1, 2 P.155
(DRIVE)Functions set as shortcuts(K)
(WB)
184

List of menusM
iscellaneous
10
n modeTop menu Tab Function Setting Ref. PageMODE MENU CAMERA ISO AUTO, 50, 100, 200,
400P.104
FULLTIME AF OFF, ON P.73% OFF, ON P.85FUNCTION OFF, BLACK &
WHITE, SEPIAP.96
R OFF, ON P.98PICTURE > -7 – +7 P.109
SHARPNESS -5 – +5 P.110CONTRAST -5 – +5 P.111SATURATION -5 – +5 P.112
CARD CARD SETUP YES, NO P.148SETUP ALL RESET OFF, ON P.137
W ENGLISH, FRANCAIS, DEUTSCH, ESPAÑOL
P.26
PW ON/OFF SETUP OFF, 1, 2 P.157FILE NAME RESET, AUTO P.159PIXEL MAPPING P.160s P.151X P.28VIDEO OUT NTSC, PAL P.1628 OFF, 1, 2 P.154
DIGITAL ZOOM OFF, ON P.54K HQ, SQ P.99WB AUTO, PRESET,
VP.106
185

List of menus
10
Miscellaneous
q mode (still pictures)Top menu Tab Function Setting Ref. PageMODE MENU PLAY R START P.130
EDIT Q 640 × 480, 320 × 240, CANCEL
P.131
P NEW FILE, CANCEL
P.132
CARD CARD SETUP ALL ERASE, FORMAT
P.136, 148
SETUP ALL RESET OFF, ON P.137W ENGLISH,
FRANCAIS, DEUTSCH, ESPAÑOL
P.26
PW ON/OFF SETUP OFF, 1, 2 P.157SCREEN SETUP P.158s P.151X P.28VIDEO OUT NTSC, PAL P.162G 4, 9, 16 P.1208 OFF, 1, 2 P.154VOLUME P.156
m P.121INFO P.150u P.114
186

List of menusM
iscellaneous
10
q mode (movies)Top menu Tab Function Setting Ref. PageMODE MENU CARD CARD SETUP ALL ERASE,
FORMATP.136,
148SETUP ALL RESET OFF, ON P.137
W ENGLISH, FRANCAIS, DEUTSCH, ESPAÑOL
P.26
PW ON/OFF SETUP OFF, 1, 2 P.157s P.151X P.28VIDEO OUT NTSC, PAL P.162G 4, 9, 16 P.1208 OFF, 1, 2 P.154VOLUME P.156
MOVIE PLAY MOVIE PLAYBACK PLAYBACK, FRAME BY FRAME, EXIT
P.122
INDEX OK, RESET, CANCEL
P.124
EDIT OK, RESET, CANCEL
P.126
INFO P.150
187

10
Miscellaneous
List of factory default settingsThe functions are set as follows when the camera leaves the factory.
Shooting mode
F No F2.8SHUTTER 1/1000ZOOM WIDELCD OFFF 0.0FLASH AUTO (S, M: #SLOW1, n: $)( OFFAF/MF AFZ OFFDRIVE o
BKT ±1 EV, 3ISO AUTO (A, S, M: 50)p Ar1/2/3/4 MY MODE 1w ±0#SLOW #SLOW1NOISE REDUCTION OFF (m: fixed on ON)MULTI METERING OFFDIGITAL ZOOM OFFFULLTIME AF OFF (n: ON)AF MODE iESP (n: fixed on iESP)% OFFPANORAMA OFF2 IN 1 OFFFUNCTION OFFAF AREA CENTERINFO OFFu OFFK HQ (2288 × 1712, n: 320 × 240)
188

List of factory default settingsM
iscellaneous
10
TIFF 2288 × 1712SHQ 2288 × 1712HQ 2288 × 1712SQ1 1280 × 960 NORMALSQ2 640 × 480 NORMALWB AUTO> ±0SHARPNESS ±0CONTRAST ±0SATURATION ±0REC VIEW ONSLEEP 3 MINFILE NAME RESETm/ft m
SHORT CUT A: DRIVE, B: KC: WB
CUSTOM BUTTON AE LOCKSHUTTER SOUND 1-LOWR (still pictures) OFFR (movies) OFF
189

List of factory default settings
10
Miscellaneous
Playback mode
Others
∗ Settings differ according to the region where the camera is sold.
INFO OFFu OFF0 OFFy 0°< OFFG 9R OFFVOLUME 3
ALL RESET ONW ENGLISHPW ON/OFF SETUP 1s NORMALX Y-M-D 2003.01.01 00:00VIDEO OUT *8 1-LOW
190

Miscellaneous
10
Modes and Shooting FunctionsIn r mode, available functions vary depending on the modes set in the MY MODE SETUP menu.
Modeh
ijklmo
p
P nFunction A S M
p — —ZoomDIGITAL ZOOM — ∗1
AF MODE — —FULLTIME AF —AF AREA — —Manual focus — —
FLAS
H M
OD
E
AUTO — —! — —# — — —#SLOW1 — —HSLOW — — —#SLOW2 — —$
w — —#SLOW — —n — —MULTI METERING — — —AEL — —AF LOCK — —&
% — ∗1
Y
191

Modes and Shooting Functions
10
Miscellaneous
j, i, k ∗2 —BKT — ∗2 — —PANORAMA — ∗1 — —2 IN 1 — —
FUN
CTI
ON BLACK&WHITE —
SEPIA —WHITE BOARD — —BLACK BOARD — —
R — —R (movie) —K
ISO —F — —WB —> —SHARPNESS —CONTRAST —SATURATION —NOISE REDUCTION — —INFO — —u — — —ALL RESET — ∗3
W —PW ON/OFF SETUP —REC VIEW — —SLEEP —MY MODE SETUP — —
Modeh
ijklmo
pP nFunction A S M
192

Modes and Shooting FunctionsM
iscellaneous
10
: Available — : Not available
∗1 Cannot be selected in o mode.∗2 Cannot be selected in m mode.∗3 Cannot be selected in r mode.
FILE NAME —PIXEL MAPPING —s —X
m/ft — —VIDEO OUT —SHORT CUT — —CUSTOM BUTTON — —8 —SHUTTER SOUND — —
Modeh
ijklmo
pP nFunction A S M
193

10
Miscellaneous
Camera maintenanceAfter use
Turn off the power and fit the lens cap on the lens.If you are not going to use the camera for a long time, remove the batteries.
Cleaning the camera1 Turn off the camera. gP.24
2 Remove the batteries. gP.18 (If you are using an AC adapter, unplug the AC adapter from the camera first before removing the plug from the AC outlet.)
3 Exterior:→→→→ Wipe gently with a soft cloth. If the camera is very dirty, soak the cloth
in mild soapy water and wring well. Wipe the camera with the damp cloth and then dry it with a dry cloth. If you have used the camera at the beach, use a cloth soaked in clean water and well wrung.
Monitor and viewfinder:→→→→ Wipe gently with a soft cloth.Lens:→→→→ Blow dust off the lens with a commercially available blower, then
wipe gently with a lens cleaning paper.Card:→→→→ Wipe gently with a soft, dry cloth.
• Do not use strong solvents such as benzene or alcohol, or chemically treated cloth.
• Cleaning should be done only after the batteries have been removed or the AC adapter has been disconnected.
• Mold may form on the lens surface if the lens is left dirty.
Note
194

Miscellaneous
10
SpecificationsProduct type : Digital camera (for shooting and displaying)Recording systemStill picture : Digital recording, TIFF (non-compression), JPEG
(in accordance with Design rule for Camera File system (DCF)), Exif 2.2, Digital Print Order Format (DPOF), and PRINT Image Matching II
Sound with still pictures
: Wave format
Movie : QuickTime Motion JPEG supportMemory : xD-Picture Card (16 – 256 MB)Resolution : 3200 × 2400 pixels (ENLARGE SIZE: SHQ, HQ)
2288 × 1712pixels (TIFF, SHQ, HQ)2288 × 1520pixels (3:2 TIFF, SHQ, HQ)2048 × 1536 pixels (TIFF, SQ1)1600 × 1200 pixels (TIFF, SQ1)1280 × 960 pixels (TIFF, SQ2)1024 × 768 pixels (TIFF, SQ2)640 × 480 pixels (TIFF, SQ2)
No. of storable pictures(When using a 32 MB card) (Without sound)
: Approx. 2 frames (TIFF: 2288 × 1712)Approx. 11 frames (SHQ: 2288 × 1712)Approx. 32 frames (HQ: 2288 × 1712)Approx. 99 frames (SQ1: 1280 × 960 NORMAL)Approx. 331 frames (SQ2: 640 × 480 NORMAL)
No. of effective pixels
: 4,000,000 pixels
Image pickup device
: 1/2.5" CCD solid-state image pickup, 4,220,000 pixels (gross)
Lens : Olympus lens 6.3 mm to 63 mm, f2.8 to f3.7, 11 elements in 7 groups(equivalent to 38 mm to 380 mm lens on a 35 mm camera)
Photometric system : Digital ESP metering, Spot metering systemAperture : f2.8 to f8.0Shutter speed : 16 to 1/1000 sec.Shooting range : 0.6 m to ) (W), 2 m to ) (T) (NORMAL)
0.07 m to ) (W), 1.2 m to ) (T) (macro mode)Viewfinder : 0.44" TFT color LCD display, 180,000 pixels
195

Specifications
10
Miscellaneous
Monitor : 1.5" TFT color LCD display, 114,000 pixelsAuto focus : TTL system autofocus
Contrast detection systemOuter connector : DC-IN jack, USB connector (mini-B),
A/V OUT jackAutomatic calendar system
: Up to 2099
Operating environmentTemperature : 0°C to 40°C (32°F to 104°F) (operation)
-20°C to 60°C (-4°F to 140°F) (storage)Humidity : 30% to 90% (operation)/10% to 90% (storage)Power supply : 2 CR-V3 lithium battery packs, or 4 AA (R6)
alkaline batteries, lithium batteries, NiMH batteries or NiCd batteries.AC adapter (optional) Manganese (zinc-carbon) batteries cannot be used.
Dimensions : 107.5 mm (W) × 66 mm (H) × 68 mm (D)(4.2" × 2.6" × 2.7")(excluding protrusions)
Weight : 305 g (0.7 lb.) (without batteries or card)
SPECIFICATIONS ARE SUBJECT TO CHANGE WITHOUT ANY NOTICE OR OBLIGATION ON THE PART OF THE MANUFACTURER.
196

Miscellaneous
10
Glossary of termsA (Aperture Priority) ModeYou set the aperture yourself and the camera automatically varies the shutter speed so that the picture is taken with the best exposure.
AE (Automatic Exposure)The camera automatically sets the exposure. The 3 AE modes available on this camera are P mode, in which the camera selects both the aperture and shutter speed, A mode, in which the user selects the aperture and the camera sets the shutter speed, and S mode, in which the user selects the shutter speed and the camera sets the aperture.In M mode, the user selects both the aperture and the shutter speed.
ApertureThe adjustable lens opening which controls the amount of light that enters the camera. The larger the aperture, the shorter the depth of field and the fuzzier the background. The smaller the aperture, the greater the depth of field and the sharper the background. Aperture is measured in f/stops. Larger aperture values indicate smaller apertures, and smaller aperture values indicate larger apertures.
CCD (Charge-Coupled Device)This converts light passing through the lens into electrical signals. On this camera, light is picked up and converted into RGB signals to build a single image.
Contrast Detection MethodThis is used to measure the distance to the subject. The camera determines if the image is focused by the level of contrast in the subject.
Conventional PhotographThis refers to recording images using silver halide (the method for recording images in conventional, non-digital photography). This system is in contrast to still video and digital photography.
DCF (Design rule for Camera File system)A standard for image files by the Japan Electronics and Information Technology Industries Association (JEITA).
Digital ESP (Electro-Selective Pattern) Light MeteringThis determines the exposure by metering and calculating the light levels in the center and other areas of the image separately.
197

Glossary of terms
10
Miscellaneous
DPOF (Digital Print Order Format)This is for saving desired print settings on digital cameras. By entering which images to print and the number of copies of each, the user can easily have the desired images printed by a printer or print lab that supports the DPOF format.
Eclipsing (Vignetting)This refers to when an object obscures part of the field of view so that the whole subject is not photographed. Vignetting also refers to when the image seen through the viewfinder does not exactly match the image shot through the objective lens, so the photographed image includes objects not seen through the viewfinder. In addition, vignetting can occur when an incorrect lens hood is used, causing shadowing to appear in the corners of the image.
Effective Pixel ResolutionThe number of pixels used in the CCD to create the image.
EV (Exposure Value)A system for measuring exposure. EV0 is when the aperture is at F1 and the shutter speed is 1 second. The EV then increases by 1 each time the aperture increases by one F stop or the shutter speed increases by one increment. EV can also be used to indicate brightness and ISO settings.
ExposureThe amount of light used to capture an image. The exposure is determined by the time the shutter is open (shutter speed) and the amount of light that passes through the lens (aperture).
Flash BracketA mount used to attach an external flash to the camera. Shadows on the subject can be changed by detaching the flash. The flash is used in combination with the flash cable.
Gross Pixel ResolutionThe total number of pixels in a CCD. Not all pixels are used to create the image.
ISOA method for indicating film speed by the International Organization for Standardization (ISO) (e.g. “ISO100”). Higher ISO values indicate greater sensitivity to light, so images can be exposed even in low-light conditions.
198

Glossary of termsM
iscellaneous
10
JPEG (Joint Photographic Experts Group)A compression format for color still images. Photographs (images) shot using this camera are recorded onto the card in JPEG format when the Record mode is set to SHQ, HQ, SQ1 or SQ2. By downloading these images to a personal computer, users can edit them using graphics application software or view the images using an Internet web browser.
M (Manual) ModeThe user sets both the aperture and shutter speed.
NTSC (National Television Systems Committee) / PAL (Phase Alternating Line)Television formats. NTSC is mainly used in Japan, North America and Korea. PAL is mainly used in Europe and China.
P (Program) ModeAlso called Program AE mode. The camera automatically sets the best shutter speed and aperture for the shot.
PixelsA pixel is the smallest unit (dot) used to make up an image. Clear large-sized printed images require millions of pixels.
Ring FlashA flash unit that uses a circular xenon fluorescent tube as its light source. It is used for taking close-ups.
S (Shutter Priority) ModeAlso called Shutter Priority AE mode. The user selects the shutter speed and the camera automatically varies the aperture so that the picture is taken with the best exposure.
Sleep ModeA mode designed to save battery life. The camera automatically enters the sleep mode if you do not operate it for a certain time. To get out of the sleep mode, use any button on the camera (shutter button, arrow pad, etc.).
Synchro TerminalsTerminals on an external flash unit for connecting it to the camera.
TIFF (Tagged Image File Format)An uncompressed format used for saving highly detailed black and white or color image data. TIFF image files can be handled by software programs for scanners and graphics applications.
199

Glossary of terms
10
Miscellaneous
TFT (Thin-Film Transistor) Color MonitorA color monitor constructed using thin-film transistor.
TTL (Through-The taking-Lens) SystemTo help adjust exposure, a light receptor built into the camera directly measures the light passing through the lens.
TTL-AUTOFor use with an external flash. Light emitted by the flash is measured by the light receptor in the camera as it passes through the lens. A signal is then sent to adjust the external flash intensity.
200

Index3:2 . . . . . . . . . . . . . . . . . . . . . . . 103
AA/V OUT jack. . . . . . . . . . . . 10, 128AC adapter . . . . . . . . . . . . . . . . . 20AE lock B . . . . . . . . . . . . . . . . 82AE memory C . . . . . . . . . . . . . 83AEL/custom button
x . . . . . 80, 82, 139AF AREA . . . . . . . . . . . . . . . . . . . 74AF LOCK . . . . . . . . . . . . . . . . . . . 75AF MODE . . . . . . . . . . . . . . . . . . 72AF sequential
shooting k . . . . . . 89AF target mark. . . . . . . . . . . . 46, 74Alkaline battery . . . . . . . . . . . . . . 20ALL RESET . . . . . . . . . . . . . . . . 137All-frame erase R . . . . . . . . . . 136All-frame reservation . . . . . . . . . 165Aperture priority
shooting A . . . . . . . 44, 68Aperture value . . . . . . . . . . . . . . . 68Arrow pad . . . . . . . . . . . 11, 32, 116Auto bracketing BKT . . . . . . . . . . 90Auto flash . . . . . . . . . . . . . . . . . . 58Auto focus . . . . . . . . . . . . . . . . . . 50Auto white balance . . . . . . . . . . 106AV cable . . . . . . . . . . . . . . . . . . 128
BBatteries . . . . . . . . . . . . . . . . . . . 18Battery check. . . . . . . . . . . . . . . . 15Battery compartment cover . . 11, 18Battery compartment lock . . . 11, 18Beep sound 8 . . . . . . . . . . . . . 154BKT . . . . . . . . . . . . . . . . . . . . . . . 90BLACK & WHITE. . . . . . . . . . . . . 96BLACK BOARD. . . . . . . . . . . . . . 96
CCamera movement warning . . . . .57Card . . . . . . . . . . . . . . . . . . . . . . .22Card access lamp . . . . . . . . . .11, 46Card check . . . . . . . . . . . . . . . . . .25Card cover . . . . . . . . . . . . . . .11, 22CARD SETUP. . . . . . . . . . . . . . .148Close-up playback U . . . . . . . . .118Cloudy day 3 . . . . . . . . . . . . . .107Connector cover . . . . . . . . . .10, 128CONTRAST . . . . . . . . . . . . . . . .111CUSTOM BUTTON . . . . . . . . . .139
DDate/time setting X . . . . . . . . . .28DC-IN jack . . . . . . . . . . . . . . .10, 20DIGITAL ZOOM . . . . . . . . . . . . . .54Diopter adjustment dial . . . . . . . . 30DPOF . . . . . . . . . . . . . . . . . . . . .163DRIVE. . . . . . . . . . . . . . . . . . . . . .89
EEditing movies . . . . . . . . . . . . . .124ENLARGE SIZE . . . . . . . . . . . . .103Erasing pictures . . . . . . . . . . . . .135Error codes . . . . . . . . . . . . . . . . .174ESP metering . . . . . . . . . . . . . . . .79Exposure compensation F . . . .105Exposure differential . . . . . . . . . . .70
FFILE NAME. . . . . . . . . . . . . . . . .159File number. . . . . . . . . . . . . . . . .159Fill-in flash # . . . . . . . . . . . . . . . .58Flash . . . . . . . . . . . . . . . . . . . . . . .55Flash charge . . . . . . . . . . . . . .12, 57Flash intensity control w . . . . . . .62Flash mode . . . . . . . . . . . . . . . . . .55Flash mode button # . . . . . . . . . .55
201

Index
Flash off $ . . . . . . . . . . . . . . . . . 59Flash stand-by. . . . . . . . . . . . 12, 57Fluorescent lamp >. . . . . . . . . 107Focus lock . . . . . . . . . . . . . . . . . . 49Formatting . . . . . . . . . . . . . . . . . 148Front curtain #SLOW1 . . . . . . . . 59Front curtain with red-eye reduction
HSLOW1 . . . . . . . . 60Full-auto shooting h . . . . . . . 42FULLTIME AF . . . . . . . . . . . . . . . 73Fully pressed . . . . . . . . . . . . . . . . 47FUNCTION . . . . . . . . . . . . . . . . . 96
GGreen lamp . . . . . . . . . . . . . . . . . 47
HHalfway pressed . . . . . . . . . . . . . 47High quality . . . . . . . . . . . . . . . . 100High speed sequential
shooting i . . . . . . . 89Histogram display u . . . . . . . . 144Hot shoe . . . . . . . . . . . . . . . . 10, 63Hot shoe cover . . . . . . . . . . . . . . 63HQ . . . . . . . . . . . . . . . . . . . . . . . . 99
IiESP . . . . . . . . . . . . . . . . . . . . . . 72Index (Creating an index) . . . . . 124Index display G . . . . . . . . . . . 119Information display INFO. . . . . . 150ISO sensitivity . . . . . . . . . . . . . . 104
LLandscape shooting l . . . . . . . 43Landscape+Portrait
shooting k. . . . . . . . . . 43Language setting W. . . . . . . . 26Lens. . . . . . . . . . . . . . . . . . . . . . . 10Lens cap . . . . . . . . . . . . . . . . . . . 17
Lens cap string . . . . . . . . . . . . . . .17Lithium battery pack . . . . . . . . . . .20
MMacro/spot
button ( . . . . .79, 84Macro mode shooting & . . . . . . .84Manual focus . . . . . . . . . . . . . . . .77Manual shooting M. . . . . . . . .45, 70Measurement units m/ft . . . . . . .161Memory gauge . . . . . . . . . . . . . . .15Metering n . . . . . . . . . . . . . . . . .79Microphone. . . . . . . . . . .10, 97, 130Mode. . . . . . . . . . . . . . . . . . . . . . .42Mode dial . . . . . . . . . . . . . . . . . . .42MODE MENU . . . . . . . . . . . . . . . .32Monitor . . . . . . . . . . . . . . . . .46, 116Monitor brightness
adjustment s. . . . . . .151Monitor butten f . . . . . . . .46, 117Movie n. . . . . . . . . . . . . . . . . . . .51MOVIE PLAY . . . . . . . . . . . . . . .122MULTI METERING. . . . . . . . . . . .80MY MODE SETUP . . . . . . . . . . .145My mode shooting r. . . . . . . . . .71
NNight scene shooting m . . . . . . . .43NiMH battery. . . . . . . . . . . . . . . . .20NOISE REDUCTION . . . . . . . . .113No. of storable still pictures. . . . .100Normal quality. . . . . . . . . . . . . . .100NTSC . . . . . . . . . . . . . . . . .162, 198
OOK/Menu button e . . . . . . . .11, 32One-touch white balance V . . .107Optical zoom. . . . . . . . . . . . . . . . .53
202

Index
PPAL . . . . . . . . . . . . . . . . . . 162, 198PANORAMA . . . . . . . . . . . . . . . . 92Picture rotation y . . . . . . . . . . . 129PIXEL MAPPING. . . . . . . . . . . . 160Playback mode . . . . . . . . . . . . . . 14Playback volume . . . . . . . . . . . . 156Playing back movies . . . . . . . . . 122Playing back pictures
on a TV . . . . . . . . . . . . 128Portrait shooting i . . . . . . . . . . . 42Power switch . . . . . . . . . . . . . . . . 24Preset white balance . . . . . . . . . 107Print button < . . . . . . . . . . . . . . 165Print reservation . . . . . . . . 165, 167Program shooting P . . . . . . . . . . 44Protect button 0. . . . . . . . . . . 134Protecting . . . . . . . . . . . . . . . . . 134PW ON/OFF SETUP . . . . . . . . . 157
QQUICK VIEW. . . . . . . . . . . . . . . 117
RRear curtain #SLOW2 . . . . . . . . 60REC VIEW. . . . . . . . . . . . . . . . . 152Rechargeable batteries . . . . . . . . 20Recording movies n . . . . . . . . . 51Recording sound R . . . . . . . . . . 130Recording sound with still
pictures R . . . . . . . . . . . 97Recording sound with movies R . 98Red-eye reduction flash ! . . . . 58Remote control < . . . . . . . . . . . . . 87Remote control Receiver . . . . 10, 87Resizing Q . . . . . . . . . . . . . . . 131Resolution . . . . . . . . . . . . . . . . . 100Rotation button y . . . . . . . . . . . 129
SSATURATION. . . . . . . . . . . . . . .112SCREEN SETUP . . . . . . . . . . . .158Seconds remaining . . . . . . . . . . . .51Self-portrait shooting o . . . . . . . .43Self-timer Y . . . . . . . . . . . . . . . . .86Self-timer/Remote control
button Z . . .11, 86, 87Self-timer/Remote control
lamp . . . . . . . . . .10, 86, 87SEPIA . . . . . . . . . . . . . . . . . . . . . .96Sequential shooting j . . . . . . . .89SHARPNESS . . . . . . . . . . . . . . .110Shooting mode . . . . . . . . . . . . . . .12Shooting mode menu . . . . . . . . . .42SHORT CUT. . . . . . . . . . . . . . . .142SHQ . . . . . . . . . . . . . . . . . . . . . . .99Shutter button . . . . . . . . . . . . .10, 47Shutter priority shooting S . . .44, 69SHUTTER SOUND. . . . . . . . . . .155Shutter speed . . . . . . . . . . . . . . . .69Single-frame erase S . . . . . . . . .135Single-frame playback . . . . . . . .116Single-frame reservation. . . . . . .167Single-frame shooting. . . . . . .46, 89SLEEP . . . . . . . . . . . . . . . . . . . .153Slideshow m. . . . . . . . . . . . . . .121Slow synchronization
#SLOW. . . . . . . . . .59, 61Speaker . . . . . . . . . . . . . . . .10, 156Specifications . . . . . . . . . . . . . . .195Sports shooting j. . . . . . . . . . . .42Spot metering n. . . . . . . . . . . . .79SQ. . . . . . . . . . . . . . . . . . . . . . . . .99Strap . . . . . . . . . . . . . . . . . . . . . . .17Strap eyelet. . . . . . . . . . . . . . .10, 17Sunny day 5 . . . . . . . . . . . . . . .107Super macro mode
shooting % . . . . . . . . . .85
203

Index
TTIFF. . . . . . . . . . . . . . . . . . . . . . . 99Top menu . . . . . . . . . . . . . . . . . . 32Trimming P . . . . . . . . . . . . . . . 132Tripod socket. . . . . . . . . . . . . . . . 11Troubleshooting. . . . . . . . . . . . . 175Tungsten light 1 . . . . . . . . . . . 107Two-in-one pictures 2 IN 1 . . . . . 94
UUSB connector . . . . . . . . . . . . . . 10
VVIDEO OUT. . . . . . . . . . . . . . . . 162Viewfinder . . . . . . . . . . . . . . . 11, 30VOLUME . . . . . . . . . . . . . . . . . . 156
WWhite balance WB. . . . . . . . . . . 106White balance adjustment
> . . . . . . . . . . . . . . 109WHITE BOARD . . . . . . . . . . . . . . 96
XxD-Picture Card. . . . . . . . . . . . . . 22
ZZoom lever . . . . . . . . . 54, 118, 119
204

http://www.olympus.com/
2003 OLYMPUS OPTICAL CO., LTD.VT422301
Customer support (Japanese language only): Tel. 0426-42-7499 TokyoOLYMPUS OPTICAL CO., LTD.
Two Corporate Center Drive, Melville, NY 11747-3157, U.S.A. Tel. 631-844-5000
Technical Support (USA)24/7 online automated help: http://support.olympusamerica.com/Phone customer support: Tel. 1-888-553-4448 (Toll-free)Our phone customer support is available from 8 am to 10 pm(Monday to Friday) ETE-Mail: [email protected] software updates can be obtained at: http://olympus.com/digital/
OLYMPUS AMERICA INC.
Premises/Goods delivery: Wendenstrasse 14-18, 20097 Hamburg, GermanyTel. +49 (0) 40-23 77 30/+49 (0) 40-23 77 33
Letters: Postfach 10 49 08, 20034 Hamburg, Germany
European Technical Customer Support:Please visit our homepage http://www.olympus-europa.com or call our TOLL FREE NUMBER : 00800 - 67 10 83 00
for Austria, Belgium, Denmark, Finland, France, Germany, Italy, Luxemburg, Netherlands, Norway, Portugal, Spain, Sweden, Switzerland, United Kingdom • Please note some (mobile) phone services/provider do not permit access or
request an additional prefix to +800 numbers.
For all not listed European Countries and in case that you can’t get connected to the above mentioned number please make use of the following CHARGED NUMBERS: +49 (0) 180 5-67 10 83 or +49 (0) 40-23 77 38 99Our Technical Customer Support is available from 9 am to 6 pm MET (Monday to Friday)
OLYMPUS OPTICAL CO. (EUROPA) GMBH.

How to use your PC to get the most from images taken with
your digital camera.
Thank you for purchasing an Olympus digital camera.This manual provides instructions on how to install the USB driver. To ensure correct installation, refer only to these installation procedures.
DIGITAL CAMERA
PERSONAL COMPUTER
DIGITAL CAMERA — PC CONNECTIONOPERATION MANUAL

Introduction
This manual explains in detail how to connect your Olympus digital camera to a computer. Read it carefully and keep it in a safe place for future reference.
About this manualThe information contained in this manual may be subject to change without notice. For the latest information on the product, please consult your local Olympus representative.The information contained in this manual has been compiled by taking all possible measures to ensure its accuracy. However, if you find any errors or incomplete information, please contact your local Olympus representative.It is prohibited by copyright laws to duplicate in part or in whole the information contained in this manual, except for personal use. Reproduction without permission of the copyright owner is prohibited.The PC screens shown in this manual may differ slightly from the actual displays on some PC models.
TrademarksMicrosoft and Windows are registered trademarks of Microsoft Corporation.Macintosh is a trademark of Apple Computer Inc.All other company and product names are registered trademarks and/or trademarks of their respective owners.
2

Macintosh
Window
sINDEX
Flowchart . . . . . . . . . . . . . . . . . . . . . . . . 4
Identifying the OS . . . . . . . . . . . . . . . . . 6
Windows (98/Me/2000/XP) . . . . . . . . . . . 8
Macintosh (OS 9/X). . . . . . . . . . . . . . . . 23
Downloading image files using other OS (For other OS users). . . . . . . . . . . . . . . 31
3

Flowchart
By connecting the camera to a computer with the provided USB cable, images on a card can be transferred to the computer. Some OS’s (operating systems) may need a special setup before connecting to the camera for the first time. Follow the chart below.
* Even if your computer has a USB connector, data transfer may not function correctly if you are using one of the operating systems listed below or if you have an add-on USB connector (extension card, etc.).Windows 95/NT 4.0Windows 98/98 SE upgrade from Windows 95Mac OS 8.6 or lower (except Mac OS 8.6 equipped with USB MASS Storage Support 1.3.5 installed at the factory)Data transfer is not guaranteed on a home-built PC system or PCs with no factory installed OS.
Identifying the OS (p.6)
Windows 98/98 SE (Second Edition) Windows Me/2000/XP MacOS 9.0 - 9.1/OS X
* For OS 8.6, see below.
Installing the USB driver for Windows 98 (p.9)
Connecting the camera to the computer using the provided USB cable(Windows p.11, Mac p.24)
Confirming the computer recognizes the camera (p.14)
Downloading image files(Windows p.17, Mac p.26)
Disconnecting the USB cable(Windows p.20, Mac p.30)
4

Flowchart
• When connecting the camera to the computer, make sure that there is sufficient remaining battery power. When connected (transmitting) to the computer, the camera does not enter the sleep mode nor will the camera’s power turn off automatically. Depending on the camera model, when the battery power runs out or the internal temperature rises, the camera may stop operating automatically. This could cause the computer to malfunction, and any image data (file) being transmitted may be lost. Be careful when downloading files for a long period of time. Use the AC adapter (optional) when downloading files.
• If you connect or disconnect the AC adapter when the camera is connected to the computer and is running on battery power, it may result in the loss of image data on the card or cause a malfunction in the computer. Before connecting or disconnecting the AC adapter, disconnect the camera from the computer and make sure that the camera is turned off.
• To avoid computer malfunctions, do not turn off the camera when the camera is connected to a computer.
• If the camera is connected to the computer via a USB hub, operation may not be stable if there are any compatibility problems between the computer and the hub. In such cases, do not use the hub and connect the camera directly to the computer.
• You can view images using: graphics applications that support the JPEG file format (Paint Shop Pro, Photoshop, etc.); Internet browsers (Netscape Communicator, Microsoft Internet Explorer, etc.); CAMEDIA Master software; or other software. For details on using commercial graphics applications, refer to their instruction manuals.
• QuickTime is needed for playing back movies. QuickTime is included on the provided software CD.
• If you want to process images, make sure to download them to your computer first. Depending on the software, image files may be destroyed if the images are processed (rotated, etc.) while they are on the card.
5

Identifying the OS
Identify the OS on your computer before connecting the camera. How to identify the OS depends on the computer.
Windows
1 Double-click the “My Computer” icon on your desktop.When the “My computer” icon is not on your desktop, click “Control Panel” from the “Start” menu.
2 Double-click the “Control Panel” icon.
3 Double-click the “System” icon.
The way the file icons inside the folder appear may vary depending on your version of Windows. If you don’t see the icon you are looking for, click on “view all Control Panel options” on the left of the window.
6

Identifying the OS
4 A System Properties window will appear. Note and record the “System:” information.Confirm that your system is Windows 98, 98 SE, Me, 2000 Professional or Windows XP, then press “OK” to close the window.
If your OS is Windows 98/98 SE, proceed to “Installing the USB driver for Windows 98” ( p.9).Users running Windows Me/2000/XP p.11Users running other OS p.31
Mac OS (Macintosh)
Select “About This Computer” from the Apple menu on the menu bar. A window appears with the name of the computer’s OS.Confirm that the OS is OS 9.0-9.1 or OS X.
Users running Mac OS 9/X p.23Users running other OS p.31
7

Win
dow
sWindows
Using Windows 98/Me/2000/XP
Your computer is turned on and Windows is running. If you are running any applications, quit them all.You are recommended to power the camera using the optional AC adapter. If the battery power runs out while the computer is accessing the card in the camera, the camera will turn off in the middle of the operation and this could destroy image files (data). If you are using batteries, make sure that there is sufficient remaining battery power.
Installing the USB driver for Windows 98 (When using Windows 98/98 SE) ....................................................................................... 9Connecting the camera to the computer ................................. 11Confirming the computer recognizes the camera .................. 14Confirming the USB driver is installed .................................... 15Downloading images to your computer................................... 17Disconnecting the camera from your computer ..................... 20
Make sure that:
8

Window
sInstalling the USB driver for Windows 98(When using Windows 98/98 SE)
If your OS is Windows 98/98 SE, you must install the USB driver. Follow the instructions below to install the USB driver in your computer. Once it is fully installed, you do not need to repeat the procedure again. If your OS is Windows Me/2000/XP, you do not need to install the USB driver. Proceed to “Connecting the camera to the computer” ( p.11).
1 Insert the provided software CD into your CD-ROM drive.
2 The Olympus Windows Installer should automatically launch. Click “USB Driver”.If the USB driver is already installed in your computer, this option will not appear. • This option will not appear if you are
using Windows Me/2000/XP.
If the installer is not automatically launched, select “Run..” on the “Start” menu and then execute “(drive letter):/ Information.exe”.
The drive letter of the CD-ROM varies depending on the computer.To identify the drive letter, double-click “My Computer” on the desktop.
9

Installing the USB driver for Windows 98 (When using Windows 98/98 SE)
1
Win
dow
s
3 Click “Continue”. The installation of the USB driver will start.
4 Click “OK” to restart your computer and the installation is complete.
5 When the computer has restarted, installation is complete. If the Olympus Windows Installer screen appears, click “Close” and remove the CD-ROM from the CD-ROM drive.
0

Window
sConnecting the camera to the computer
Users running Windows 98/98SE need to install the USB drive before connecting the camera to your computer for the first time. ( p.9)
1 Insert the marked end of the provided USB cable into the USB port on your computer as shown below.
2 After making sure that the camera is turned off, connect the end of the USB cable to the USB connector on the camera.The location of the USB connector or multi connector varies depending on the camera model. Refer to the camera manual for details.
The location of the USB port varies depending on the computer. For details, refer to your computer's manual.
Look for this mark.
USB port
Terminal
Camera with a USB connector
USB port
Computer
USB connector
USB cable
Smaller terminalRectangular terminal
Camera with a multi connector
USB cable
Smaller terminal
USB port
Computer
Rectangular terminal
Camera’s multi connector (USB, A/V OUT)
11

Connecting the camera to the computer
1
Win
dow
s
3 Turn the camera on.Camera with a lens barrierThe power turns on automatically, with the exception of some models which require you to press the (monitor) button.When the camera is turned on, the lamp on the right of the viewfinder lights up.
Camera with a modeSet the mode dial to . (If the camera has a power switch as well as a mode dial, turn the power switch to ON.)
Camera with a mode (Camera setup/connection mode) Set the mode dial to to turn the camera on.
Lens barrier
Lamp
(monitor) button
Mode dial
Mode dial
Power switch
Mode dial
Power switch
2

Connecting the camera to the computer
Windows
4 The computer recognizes the camera as a new device.When you connect the camera to the computer for the first time, the computer automatically recognizes the camera. Click “OK” when the message saying that the installation is completed appears. The computer recognizes the camera as a “Removable Disk”.
Windows XPYou can download image files from the camera easily.Select “Copy pictures to folder on my computer using Microsoft Scanner and Camera Wizard”, then follow the on-screen instructions. You may also select “take no action” to bypass the Microsoft Scanner and Camera Wizard. You may then use a more advanced image viewing/editing program such as Olympus CAMEDIA Master software. For detailed instructions on downloading, refer to the CAMEDIA Master software user’s guide.
When the camera is connected to the computer, none of the camera buttons are functional.
13

1
Win
dow
sConfirming the computer recognizes the camera
1 Double-click the “My Computer” icon on the desktop.For users running Windows XP, click “My Computer” from the “Start” menu.
2 Make sure the “Removable Disk” icon appears in the window.There may already be other “Removable Disk” icons for other devices, such as a removable media drive or USB SmartMedia Reader/Writer. In this case, the digital camera is recognized as another “Removable Disk”.If you cannot find the icon, the camera and computer are not connected properly. Turn the camera off, disconnect the camera from the computer and connect again, or proceed to “Confirming the USB driver is installed” ( p.15) to make sure that the USB driver is fully installed.
4

Window
sConfirming the USB driver is installed
If the computer does not recognize the camera as a Removable Disk, follow the procedure below to check whether the USB driver has been fully installed.
1 Open “My Computer” and double-click the “Control Panel” icon.For users running Windows XP, open “Control Panel” from the “Start” menu.
2 Double-click the “System” icon.
3 The System window will appear. Click the “Device Manager” tab.
15

Confirming the USB driver is installed
1
Win
dow
s
4 Confirm that “OLYMPUS Digital Camera” is in the “Universal Serial Bus Controller” category.If you cannot find the “OLYMPUS Digital Camera”, turn the camera off, disconnect the camera from the computer and start again.Users running Windows 98/98 SE start again from “Confirming the USB driver is installed”, and Users running Window Me/2000/XP start from “Connecting the camera to the computer”.
If the USB driver was successfully installed, you can find the following in the “Device Manager”.
– the name of the camera you have connected listed under “Disk drives”– “OLYMPUS Digital Camera” listed as one of the items in the “Universal
Serial Bus Controller” category
6

Window
sDownloading images to your computer
1 Double-click the “My Computer” icon on the desktop.For users running Windows XP, click “Control Panel” from the “Start” menu.
2 Double-click the “Removable Disk” icon.A new “Removable Disk” icon appears when the camera is connected to the computer, as the digital camera is recognized as a “Removable Disk”.
3 Double-click the “Dcim” folder.
If an error message appears when you double-click the icon, there may be a problem with one of the following:
the camera’s power source (the AC adapter is not properly connected or the battery power is low)Make sure that the AC adapter is correctly connected or that the batteries are not running low.the card (there is no card in the camera or there is a problem with the card)Check that you can play back pictures stored on the card on the monitor of your digital camera.
17

Downloading images to your computer
1
Win
dow
s
4 Double-click the “100olymp” folder.Image files (JPEG files) with files names such as “P1010001.jpg” are displayed.
5 Double-click the “My Documents” icon on the desktop.If you cannot find the icon on the desktop, select “Explorer” on the Start menu and double-click the “My Documents” icon.
• The camera automatically assigns folder names and file names according to the following rules.
• Serial numbers of image files run from 0001 to 9999.• Serial numbers of folders run from 100 to 999.• When file number 9999 is reached, a new folder is created and assigned
the next number.• Months January through September are expressed by the numbers 1
through 9, October by the letter A, November by B and December by C.
Folder name(Example)
File name(Example)
Serial number Month / Day / Serial number
8

Downloading images to your computer
Windows
The “My Documents” window is displayed.
6 Drag & drop the image you want to save in the computer (in this case, P1010012.jpg) to the “My Documents” window.The image is saved in the computer (in My Documents folder).• To select all files, choose Edit > Select all.
When the image file has been downloaded to the computer, you can view images by double-clicking the image files downloaded to your computer. The files will be opened in the default image viewer of the operating system. If you want to view the image a different size or process it, you will need to open the image with software that supports JPEG or TIFF images files, such as Paint Shop Pro, Photoshop or CAMEDIA Master software.
The lamp on the right of the viewfinder or the card access lamp blinks while the image is being copied. Never open the card cover on the camera, load or remove the batteries, or connect or disconnect the AC adapter while the lamp is blinking as the image files may be destroyed.
19

2
Win
dow
sDisconnecting the camera from your computer
If your OS is Windows Me/2000, proceed to “Windows Me/2000/XP” ( p.21).
Windows 98
1 Make sure that the lamp on the right of the viewfinder or the card access lamp is not blinking.Some camera models have either a lamp on the right of the viewfinder or a card access lamp, and the location varies depending on the model. Refer to your camera’s reference manual.
2 Double-click the “My Computer” icon and right-click the “Removable Disk” to display the menu.
3 Click “Eject” on the menu.
Lamp
Card access lamp
0

Disconnecting the camera from your computer
Windows
4 Make sure that the lamp on the right of the viewfinder or the card access lamp is not blinking.
5 Remove the USB cable from the camera.
6 Remove the USB cable from your computer.
Windows Me/2000/XP
1 Make sure that the lamp on the right of the viewfinder or the card access lamp is not blinking.Some camera models have either a lamp on the right of the viewfinder or a card access lamp, and the location varies depending on the model. Refer to your camera's reference manual.
Lamp
Lamp
21

Disconnecting the camera from your computer
2
Win
dow
s
2 Click the “Unplug or Eject Hardware” icon on the task bar.The message saying that the drive has been stopped appears.
3 Click on the message.The “Unplug or Eject Hardware” window appears.
4 When a message appears, click “OK”.
5 Remove the USB cable from the camera.
6 Remove the USB cable from your computer.
If the window returns the following message when you click “Unplug or Eject Hardware”, first make sure that no image data is being downloaded from the camera, and then remove the USB cable.
2

Macintosh
Macintosh
Using Mac OS (9/X)
Your computer is turned on and Mac OS is running.If you are running any applications, quit them all.You are recommended to power the camera using the optional AC adapter. If the battery power runs out while the computer is accessing the card in the camera, the camera will turn off in the middle of the operation and this could destroy image files (data). If you are using batteries, make sure that there is sufficient remaining battery power.
If you are running Mac OS X, the connection to the computer and downloading the image data are verified. Restrictions such as the following may occur due to the OS.
The image file properties are not displayed correctly.Images in the camera cannot be opened without first downloading them. etc.
For more details, visit the Olympus web site.
Connecting the camera to the computer ................................. 24Downloading images to your computer................................... 26Disconnecting the camera from your computer ..................... 30
Make sure that:
23

2
Mac
into
shConnecting the camera to the computer
1 Insert the marked end of the USB cable into the USB port on your computer as shown below.
2 After making sure that the camera is turned off, connect the end of the USB cable to the USB connector on the camera.The location of the USB connector or multi connector varies depending on the camera model. Refer to the camera manual for details.
The location of the USB port varies depending on the computer. For details, refer to your computer's manual.
Look for this mark.
Terminal
USB port
Camera with a USB connector
USB port
Computer
USB connector
USB cableSmaller terminal
Rectangular terminal
Camera with a multi connector
USB cable
Smaller terminal
USB port
Computer
Rectangular terminal
Camera’s multi connector (USB, A/V OUT)
4

Connecting the camera to the computer
Macintosh
3 Turn the camera on.Camera with a lens barrierThe power turns on automatically, with the exception of some models which require you to press the (monitor) button.When the camera is turned on, the green lamp on the right of the viewfinder lights up.
Camera with a modeSet the mode dial to . (If the camera has a power switch as well as a mode dial, turn the power switch to ON.)
Camera with a mode (Camera setup/connection mode) Set the mode dial to to turn the camera on.
4 The computer recognizes the camera as a new device.The computer recognizes the camera automatically and an “Untitled” icon appears on the desktop.If you cannot find this icon, turn off the camera and connect again.
Mac OS XWhen the computer has recognized the camera, the Apple Image Capture software automatically launches. p.29
When the camera is connected to the computer, none of the camera buttons are functional.
Lens barrier
Lamp
(monitor) button
Mode dial
Power switch
Mode dial
Power switch
25

2
Mac
into
shDownloading images to your computer
Mac OS 9
You can download images from the camera and save them in your computer (in this case, in the Hard Disk).
1 Double-click the “Untitled” icon displayed on the desktop when the camera is connected to the computer.
2 Double-click the “Dcim” folder.
3 Double-click the “100OLYMP” folder.
If you cannot find this icon, or if an error message appears when you double-click the icon, there may be a problem with one of the following:
the camera’s power source (the AC adapter is not properly connected or the battery power is low)the card (there is no card in the camera or there is a problem with the card)Check that you can play back pictures on the monitor of your camera.the USB cable (the camera is not properly connected to the computer by the USB cable).Apple “File Exchange” extension is not enabled.• Please refer to your Apple operating system manual for instructions on
how to enable this extension.
6

Downloading images to your computer
Macintosh
Image files (JPEG files) with files names such as “P1010001.JPG” are displayed.
4 Double-click the “Macintosh HD” icon on the desktop.
• The camera automatically assigns folder names and file names according to the following rules.
• Serial numbers of image files run from 0001 to 9999.• Serial numbers of folders run from 100 to 999.• When file number 9999 is reached, a new folder is created and assigned
the next number.• Months January through September are expressed by the numbers 1
through 9, October by the letter A, November by B and December by C.
Folder name(Example)
File name(Example)
Serial number Month / Day / Serial number
27

Downloading images to your computer
2
Mac
into
sh
The “Hard Disk” window is displayed.
5 Drag & drop the image you want to save in the computer (in this case, P1010012.JPG) to the “Hard Disk” window.The image is saved in the computer (in the Hard disk).• To select all images,
click Edit > Select all.
When the image file has been copied to the computer, you can view images by double-clicking the image files in the “Hard Disk” folder. The files will be opened in the default image viewer of the operating system. If you want to view the image a different size or process it, you will need to open the image with software that supports JPEG or TIFF images files, such as Paint Shop Pro, Photoshop or CAMEDIA Master software.
The lamp on the right of the viewfinder or the card access lamp blinks while the image is being copied. Never open the card cover on the camera, load or remove the batteries, or connect or disconnect the AC adapter while the lamp is blinking as the image files may be destroyed.
8

Downloading images to your computer
Macintosh
Mac OS X
Malfunctions such as the following may occur due to the OS.• If the camera is not connected correctly, a malfunction occurs in the
computer.• Date and time information of image files is not accurately displayed.• If the card cover of the camera is opened while connecting to the computer,
the “untitled” icon does not disappear from the desktop. etc.
When the computer has recognized the camera, the Apple Image Capture software dialog appears.
1 From the “Download To” menu, select a destination folder.
2 To download all images, click “Download All”.To selectively download images, click “Download Some” and highlight the desired images.The images are transferred from the camera to your computer.
If you are operating Mac OS X and you want to download images using the same procedure as for Mac OS 9, select “File > Close” and exit the Apple Image Capture software. At this time, the camera is indicated as “unlabeled”.
If you use the Apple Image Capture software, images downloaded to your computer and transferred back to a card may not play back on the camera or may have other problems.
29

3
Mac
into
shDisconnecting the camera from your computer
1 Make sure that the lamp on the right of the viewfinder or the card access lamp is not blinking.
2 Drag the “untitled” icon on the desktop to “Trash”.
3 Make sure that the lamp on the right of the viewfinder or the card access lamp is not blinking.
4 Remove the USB cable from the camera.
5 Remove the USB cable from your computer.
Lamp
Card access lamp
Lamp
0

Downloading image files using other OS(For other OS users)
Users running other OS cannot connect the camera directly to a computer. Windows 95 Windows NT Mac OS before OS 9You can download images directly to your computer using an optional floppy disk adapter or PC card adapter.
Does your computer have a USB interface?Is there a port marked on your computer?
Does your computer have a built-in PC card slot?
Consult your nearest Olympus representative.
Is your OS one of the following?•Windows 98•Windows 2000•Windows Me•Windows XP•Mac OS 9/X
YesNo
No
Yes
Connect the camera directly to your computer using the provided USB cable.
Use the optional USB reader/writer.**Certain card readers may not be compatible with Mac OS X.
Check the Olympus website for the most up-to-date compatibility information.
Use the optional PC card adapter*.
*Not supported by Windows NT4.0 or lower
Does your computer have a built-in floppy disk drive?
No
Yes
Use the optional FlashPath floppy disk adapter.
(For SmartMedia only)
No
Yes
31

http://www.olympus.com/
2003 OLYMPUS OPTICAL CO., LTD.VT422301
Customer support (Japanese language only): Tel. 0426-42-7499 TokyoOLYMPUS OPTICAL CO., LTD.
Two Corporate Center Drive, Melville, NY 11747-3157, U.S.A. Tel. 631-844-5000
Technical Support (USA)24/7 online automated help: http://support.olympusamerica.com/Phone customer support: Tel. 1-888-553-4448 (Toll-free)Our phone customer support is available from 8 am to 10 pm(Monday to Friday) ETE-Mail: [email protected] software updates can be obtained at: http://olympus.com/digital/
OLYMPUS AMERICA INC.
Premises/Goods delivery: Wendenstrasse 14-18, 20097 Hamburg, GermanyTel. +49 (0) 40-23 77 30/+49 (0) 40-23 77 33
Letters: Postfach 10 49 08, 20034 Hamburg, Germany
European Technical Customer Support:Please visit our homepage http://www.olympus-europa.com or call our TOLL FREE NUMBER : 00800 - 67 10 83 00
for Austria, Belgium, Denmark, Finland, France, Germany, Italy, Luxemburg, Netherlands, Norway, Portugal, Spain, Sweden, Switzerland, United Kingdom • Please note some (mobile) phone services/provider do not permit access or
request an additional prefix to +800 numbers.
For all not listed European Countries and in case that you can’t get connected to the above mentioned number please make use of the following CHARGED NUMBERS: +49 (0) 180 5-67 10 83 or +49 (0) 40-23 77 38 99Our Technical Customer Support is available from 9 am to 6 pm MET (Monday to Friday)
OLYMPUS OPTICAL CO. (EUROPA) GMBH.

This manual contains guidelines for using Olympus C-750 Ultra Zoom.In the interest of continually improving products, Olympus reserves the right to update or modify information contained in this manual.
DIGITAL CAMERA
MANUAL FOR DIRECT PRINTINGManual outlining new features added to the camera with firmware update.
C-750 Ultra Zoom

2
About this manualUpdate the camera’s firmware to enable PictBridge on your camera. This will allow you to print pictures directly from the camera by connecting it to a printer that supports PictBridge with the USB cable.This manual explains additional functions, and different operations that are available when the camera’s firmware has been updated. These functions and operations are different than what is stated in the Reference Manual that originally provided with your camera.
What is PictBridge? … It is the standard for connecting digital cameras and printers of different makers and printing out pictures directly.
Indications used in this manual
Important information on factors which may lead to a malfunction or operational problems. Also warns of operations that should be absolutely avoided.
Useful information and hints that will help you get the most out of your camera.
Reference pages describing details or associated information.Reference pages describing details or associated information in the CD reference manual. See the ENGLISH Reference manual.
Note

3
Contents
1 Functions changed by updating the firmware 4Camera display language . . . . . . . . . . . . . . . . . . . . . . . 4Connection to a computer . . . . . . . . . . . . . . . . . . . . . . . . . . . . . 5Direct printing function. . . . . . . . . . . . . . . . . . . . . . . . . . . . . . . . 6
2 Direct printing 7Using the direct printing function . . . . . . . . . . . . . . . . . . . . . . . . 7Connecting the camera to a printer . . . . . . . . . . . . . . . . . . . . . . 8Printing pictures. . . . . . . . . . . . . . . . . . . . . . . . . . . . . . . . . . . . . 9
PRINT mode/MULTI PRINT mode . . . . . . . . . . . . . . . . . . . 9ALL PRINT mode . . . . . . . . . . . . . . . . . . . . . . . . . . . . . . . 13ALL INDEX mode/PRINT ORDER mode . . . . . . . . . . . . . 15Trim the picture . . . . . . . . . . . . . . . . . . . . . . . . . . . . . . . . . 17
Exiting direct printing . . . . . . . . . . . . . . . . . . . . . . . . . . . . . . . . 19If an error code is displayed . . . . . . . . . . . . . . . . . . . . . . . . . . 20Troubleshooting. . . . . . . . . . . . . . . . . . . . . . . . . . . . . . . . . . . . 21

1 Functions changed by updating the firmwareCamera display language
Since you selected ENGLISH for the camera’s display on the web site’s firmware update page, only ENGLISH is displayed. It is not possible to switch to other languages (see below).
Before updating “Menu List” (P.184 to 187)
After updating
Top menu Tab Function SettingMODE MENU
SETUP ENGLISH, FRANCAIS, DEUTSCH, ESPAÑOL
Top menu Tab Function SettingMODE MENU
SETUP ENGLISH
4

5
Connection to a computerWhen the USB cable is used to connect the camera to a computer, follow the procedure below to select PC in the camera settings.
1 Insert the marked end of the provided USB cable into the USB port on your computer as shown below.
• The location of the USB port varies depending on the computer. For details, refer to your computer’s manual.
2 Set the camera’s mode dial to q.
3 Plug the other end of the USB cable into the camera’s USB connector.
4 Press the power switch to turn the camera on.
5 The selection screen for the USB connection (shown right) is displayed on the monitor. Press ac to select PC and press e.
6 The computer recognizes the camera as a new device.• When you connect the camera to the computer for the first time, the
computer automatically recognizes the camera. Click “OK” when the message saying that the installation is completed appears.
• The computer recognizes the camera as a “Removable Disk”.
Look for this mark.
USB port
Terminal
Note
GOSELECt
Power switch Mode dial

Direct printing functionAfter updating the camera’s firmware to enable PictBridge, pictures can be printed directly from the camera. By connecting the camera directly to a printer that supports PictBridge with the USB cable, you can print pictures stored on the card inside the camera without a need to use a computer.For details of printing instructions, see “Direct printing” (gP.7).
6

2 Direct printingUsing the direct printing function
By connecting the camera to a PictBridge-compatible printer with the USB cable, you can print out recorded pictures directly without the use of a computer. With the camera connected to the printer, select the pictures you want to print and the number of prints on the camera’s monitor. It is also possible to print out pictures using the print reservation data. “Print setting” (P.163)To find out if your printer is compatible with PictBridge, refer to the printer’s instruction manual.
What is PictBridge? … It is the standard for connecting digital cameras and printers of different makers and printing out pictures directly.
< STANDARD … All printers that support PictBridge have standard print settings. Selecting < STANDARD on the settings screens (g P.10 to 15), images are printed according to the default settings. See the instruction manual for your printer for its standard settings or inquire with the printer manufacturers.
TIPS• For details of printing paper types, ink cassettes, etc., refer to the
printer’s instruction manual.
• You are recommended to use the optional AC adapter when printing pictures. If you use rechargeable batteries, make sure that they are fully charged. If you are using alkaline batteries, make sure that you use new batteries. If the camera stops operating while communicating with the printer, the printer may malfunction or image data may be lost.
• Images recorded movies cannot be printed.• The camera will not enter sleep mode when connected to the USB
cable.
Note
7

Connecting the camera to a printerUse the USB cable provided to connect the camera to a PictBridge-compatible printer.
1 Turn the printer on and plug the printer end of the USB cable into the printer’s USB port.• For details of how to turn the printer on
and the position of the USB port, refer to the printer’s instruction manual.
2 Set the camera’s mode dial to q and plug the USB cable into the camera’s USB connector.
3 Press the power switch to turn the camera on.• The monitor turns on and the selection
screen for the USB connection is displayed.
4 Press ac to select PRINT, then press e. • ONE MOMENT is displayed and the
camera and printer are connected. The PRINT MODE SELECT screen is displayed on the monitor. Make the print settings on the camera’s monitor.g Go to “Printing pictures” (P.9).
• If PC is selected in step 4, the PRINT mode screen is not displayed. If the screen is not displayed after several minutes, turn off the camera and start again from step 1.
Power switch
GOSELECt
Note
8

Printing picturesWhen the camera is connected to a PictBridge-compatible printer, the PRINT MODE SELECT screen is displayed on the monitor. Use this screen to select the print mode. You can choose from the following print modes.
PRINT Prints the selected picture.g“PRINT mode/MULTI PRINT mode” (P.9)
ALL PRINT Prints all the pictures stored on the card.g“ALL PRINT mode” (P.13)
MULTI PRINT * Prints one picture in multiple layout format.g“PRINT mode/MULTI PRINT mode” (P.9)
ALL INDEX * Prints an index of all the pictures stored on the card.g“ALL INDEX mode/PRINT ORDER mode” (P.15)
PRINT ORDER * Prints the pictures according to the print reservation data on the card. If no print reservations (P.163) have been made, this option is not available. g“ALL INDEX mode/PRINT ORDER mode” (P.15)
* This option may not be available depending on the type of printer.
PRINT mode/MULTI PRINT mode
1 In the PRINT MODE SELECT screen, press ac to select PRINT or MULTI PRINT, then press e.• The print size settings screen is
displayed.
GOSELECtEXIt
Zoom lever
OK button
Arrow pad
9

Printing pictures
2 Press ac to select the paper size, then press d.• PRINT mode: Go to Step 3.• MULTI PRINT mode: Go to Step 4.• The available paper size settings vary
depending on the type of printer.• When the PRINT PAPER screen is not
displayed, SIZE, BORDERLESS and PICS/SHEET are set to < STANDARD. Go to step 5.
3 Use ac to select framed or unframed, then press e. Go to step 5.
OFF ( ) The image is printed inside a blank frame.
ON ( ) The image is printed filling the entire page.
4 Press ac to select PICS/SHEET, then press e.• PICS/SHEET depends on the paper size
set in Step 2 and the capabilities of your printer.
5 Press bd to select the picture you want to print.• Turn the zoom lever toward W to display
the pictures in index format. You can then select the pictures you want to print from the index.
6 Select the print reservation method.SINGLE PRINT Makes a single-frame print reservation for the
selected picture according to standard settings.MORE Sets the number of prints of the selected picture in
the print reservation data. You can also add the date or file name, and trim the picture.
PRINt PAPER
SIZE BORDERLESS
CANCEL GOSELECt
StANDARDStANDARD
PRINt PAPER
SIZE BORDERLESS
StANDARDStANDARD
GOSELECt
SIZE
16StANDARD
GOSELECt
PRINt PAPER
PICS/SHEEt
SELECt PRINtSINGLE PRINt MORE
PRINT MODE screen
10

Printing pictures
Set a SINGLE PRINT reservationPress a.• Press a when < is displayed to cancel
the reservation.
Set MORE print reservationsPress c.• Print information setting screen is displayed.
Press ac to select the item you want to set, then press d.• Press ac to select the item, then
press e.• The available options vary depending
on the type of printer. Items outside the capability of the printer are not available.
× Sets the number of prints.You can select up to 10 prints.
DATE ( ) If you select WITH, pictures are printed with the date and time.
FILE NAME ( ) If you select WITH, pictures are printed with the file name.
P Crops part of a recorded picture so that only the enlarged section is printed. g“Trim the picture” (P.17)
• DATE and FILE NAME are not available in MULTI PRINT mode.
SELECt PRINtCANCEL MORE
Print reservation mark is displayed.
GOSELECt SEt
1X
FILE NAME WItHOUtWItHOUt
WItHOUtWItHOUt
NONO
11

Printing pictures
When you have finished all the settings for MORE, press e.• The screen displayed in Step 5 appears.
• To print more than one picture in Print and/or Multi-print mode, repeat Steps 5 and 6 and make single and/or multiple print reservations for all the pictures you want to print.
• is displayed in MULTI PRINT mode.
7 Press e.• The PRINT screen is displayed.
8 Print the pictures.• Press ac to select OK or CANCEL,
then press e.
OK Printing starts.CANCEL The settings are
canceled and the monitor returns to the PRINT MODE SELECT screen.
• When printing is finished, the monitor returns to the PRINT MODE SELECT screen.g“Exiting direct printing” (P.19)
To cancel printingPressing e during print data transfer displays the screen for selecting whether to continue or cancel printing. To cancel printing, press ac to select CANCEL, then press e.
SELECt PRINtCANCEL MORE
The settings you have made are displayed.
CANCEL GOSELECt
OK
CANCEL
GO
CONtINUE
CANCEL
SELECt
12

Printing pictures
ALL PRINT mode
1 In the PRINT MODE SELECT screen, press ac to select ALL PRINT, then press e.• The print size settings screen is
displayed.
2 Press ac to select the paper size, then press d.• The available paper size settings vary
depending on the type of printer.• When the PRINT PAPER screen is not
displayed, SIZE and BORDERLESS are set to < STANDARD. Go to Step 4.
3 Use ac to select framed or unframed, then press e.OFF ( ) The image is printed inside
a blank frame.ON ( ) The image is printed filling
the entire page.• The print size settings screen is displayed.
4 Press ac to select the item you want to set, then press d.• Press ac to select the item, then press e.
• If PRINT INFO cannot be set with your printer, go to Step 6.
• The available options vary depending on the type of printer. Items outside the capability of the printer are not available.
• Only one print of each image can be made at a time.DATE ( ) If you select WITH, pictures are printed
with the date and time.FILE NAME ( ) If you select WITH, pictures are printed
with the file name.
GOSELECtEXIt
PRINt PAPER
SIZE BORDERLESS
CANCEL GOSELECt
StANDARDStANDARD
PRINt PAPER
SIZE BORDERLESS
StANDARDStANDARD
GOSELECt
GOSELECt SEt
1X
FILE NAME
WItHOUtWItHOUt
WItHOUtWItHOUt
NONO
13

Printing pictures
5 Press e.• The PRINT screen is displayed.
6 Print the pictures.• Press ac to select OK or CANCEL,
then press e.
OK Printing starts.CANCEL The settings are
canceled and the monitor returns to the PRINT MODE SELECT screen.
• When printing is finished, the monitor returns to the PRINT MODE SELECT screen.g“Exiting direct printing” (P.19)
To cancel printingPressing e during print data transfer displays the screen for selecting whether to continue or cancel printing. To cancel printing, press ac to select CANCEL, then press e.
CANCEL GOSELECt
OK
CANCEL
TRANSFERRING screen
tRANSFERRINGtRANSFERRINGtRANSFERRING
CANCEL
GO
CONtINUE
CANCEL
SELECt
14

Printing pictures
ALL INDEX mode/PRINT ORDER mode
1 In the PRINT MODE SELECT screen, press ac to select ALL INDEX or PRINT ORDER, then press e.• The print size settings screen is
displayed.
2 Press ac to select the paper size, then press d.• The available paper size settings vary
depending on the type of printer.• Depending on the selected print mode,
SIZE and BODERLESS cannot be selected.
• When the PRINT PAPER screen is not displayed, SIZE and BORDERLESS are set to < STANDARD. Go to Step 4.
3 Use ac to select framed or unframed, then press e.
OFF ( ) The image is printed inside a blank frame.
ON ( ) The image is printed filling the entire page.
• The print screen is displayed.• BORDERLESS is not available in ALL INDEX mode.
Press e and go to Step 4.
GOSELECtEXIt
PRINt PAPER
SIZE BORDERLESS
CANCEL GOSELECt
StANDARDStANDARD
PRINt PAPER
SIZE BORDERLESS
StANDARDStANDARD
GOSELECt
15

Printing pictures
4 Print the pictures.• Press ac to select OK or CANCEL,
then press e.
OK Printing starts.CANCEL The settings are canceled
and the monitor returns to the PRINT MODE SELECT screen.
• When printing is finished, the monitor returns to the PRINT MODE SELECT screen.g“Exiting direct printing” (P.19)
To cancel printingPressing e during print data transfer displays the screen for selecting whether to continue or cancel printing. To cancel printing, press ac to select CANCEL, then press e.
• In ALL INDEX mode, the printer automatically selects the number of pictures per sheet, etc.
• ALL INDEX printing is only available on printers with an index function.
• The PRINT ORDER function is only available on DPOF-compatible printers.
CANCEL GOSELECt
OK
CANCEL
TRANSFERRING screen
tRANSFERRINGtRANSFERRINGtRANSFERRING
CANCEL
GO
CONtINUE
CANCEL
SELECt
Note
16

17
Printing pictures
Trim the picture
To set the trim by MORE in PRINT or MULTI PRINT mode (P. 9), follow the procedure below.
1 Use the arrow pad and zoom lever to select the trimming position and size.• Use the zoom lever to decide the
trimming size. The orientation of the trimming frame changes from horizontal to vertical and vice versa when the maximum or minimum size is reached.
• If trimming has already been set, the P screen appears. Press ac to select RESET, then press e.
2 Press e.
3 Press ac to select OK, then press e.
OK Saves the current trimming size.
RESET Sets a new trimming size. → Repeat the procedure from Step 1.
CANCEL Cancels the current trimming setting.
• Press e to complete trimming setting and return to the PRINT INFO screen.
Zoom lever
OK button
Arrow pad
GO
4:34:3
GOSELECt
RESEt
CANCEL
OK

18
Printing pictures
• The size of the printed picture varies depending on the printer settings. If the trimmed picture size is small, printing magnification increases accordingly, resulting in a printed picture with lower resolution.
• For best results with close-up prints, you are recommended to use the TIFF, SHQ or HQ mode.
Note

Exiting direct printingWhen you have finished printing, disconnect the camera from the printer.
1 In the PRINT MODE SELECT screen, select b.
• The message is displayed.
2 Press the power switch to turn the camera off.
3 Remove the USB cable from the camera.
4 Remove the USB cable from the printer
GOSELECtEXIt
TURN OFF THE POWER
Power switch
19

If an error code is displayedIf an error code appears on the camera’s monitor during direct print setting or printing, see the following table.For more details, refer to the printer’s instruction manual.
TIPS• If an error code other than those shown above is displayed, refer to
“Error codes” ( P.174).
Monitor indication Possible cause Corrective action
NO CONNECTION
The camera is not connected to the printer correctly.
Disconnect the camera and connect it again correctly.
NO PAPER
There is no paper in the printer.
Load some paper in the printer.
NO INK
The printer has run out of ink.
Replace the ink cartridge in the printer.
JAMMED
The paper is jammed. Remove the jammed paper.
SETTINGS CHANGED
The printer’s paper cassette has been removed or the printer has been manipulated while making settings on the camera.
Do not manipulate the printer while making settings on the camera.
PRINT ERROR
There is a problem with the printer and/or camera.
Turn off the camera and printer. Check the printer and remedy any problems before turning the power on again.
20

TroubleshootingIf you have trouble connecting the camera to a printer after updating the firmware, take the action described below.
The printer fails to connect
Possible cause Corrective action Ref. PagePC was selected on the monitor after connecting to the printer with a USB cable.
Disconnect the USB cable from the camera and start again from the beginning.
g P.8
21

http://www.olympus.com/
2003 OLYMPUS CORPORATIONVT763801
Shinjuku Monolith, 3-1 Nishi-Shinjuku 2-chome, Shinjuku-ku, Tokyo, JapanOLYMPUS CORPORATION
Two Corporate Center Drive, Melville, NY 11747-3157, U.S.A. Tel. 631-844-5000
Technical Support (USA)24/7 online automated help: http://www.olympusamerica.com/supportPhone customer support: Tel. 1-888-553-4448 (Toll-free)
Our phone customer support is available from 8 am to 10 pm(Monday to Friday) ETE-Mail: [email protected] software updates can be obtained at: http://www.olympus.com/digital
OLYMPUS AMERICA INC.
Premises/Goods delivery: Wendenstrasse 14-18, 20097 Hamburg, GermanyTel: +49 40-23 77 3-0 / Fax: +49 40-23 07 61
Letters: Postfach 10 49 08, 20034 Hamburg, Germany
European Technical Customer Support:Please visit our homepage http://www.olympus-europa.com or call our TOLL FREE NUMBER* : 00800 - 67 10 83 00
for Austria, Belgium, Denmark, Finland, France, Germany, Italy, Luxemburg, Netherlands, Norway, Portugal, Spain, Sweden, Switzerland, United Kingdom * Please note some (mobile) phone services/provider do not permit access or
request an additional prefix to +800 numbers.
For all not listed European Countries and in case that you can’t get connected to the above mentioned number please make use of the following CHARGED NUMBERS: +49 180 5 - 67 10 83 or +49 40 - 237 73 899Our Technical Customer Support is available from 9 am to 6 pm MET (Monday to Friday)
Olympus Europa GmbH