DIGITAL CAMERA C-60 ZOOM - Olympus Corporation · DIGITAL CAMERA C-60 ZOOM REFERENCE MANUAL Thank...
205
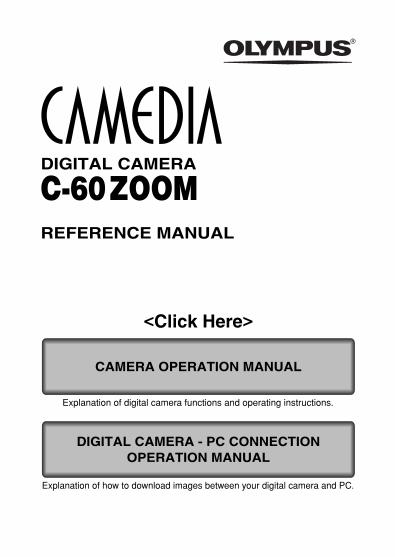
CAMERA OPERATION MANUAL DIGITAL CAMERA REFERENCE MANUAL <Click Here> C-60 ZOOM DIGITAL CAMERA - PC CONNECTION OPERATION MANUAL Explanation of digital camera functions and operating instructions. Explanation of how to download images between your digital camera and PC.
Transcript of DIGITAL CAMERA C-60 ZOOM - Olympus Corporation · DIGITAL CAMERA C-60 ZOOM REFERENCE MANUAL Thank...
CAMERA OPERATION MANUAL
DIGITAL CAMERA
REFERENCE MANUAL
<Click Here>
C-60 ZOOM
DIGITAL CAMERA - PC CONNECTIONOPERATION MANUAL
Explanation of digital camera functions and operating instructions.
Explanation of how to download images between your digital camera and PC.
DIGITAL CAMERA
C-60 ZOOMREFERENCE MANUAL
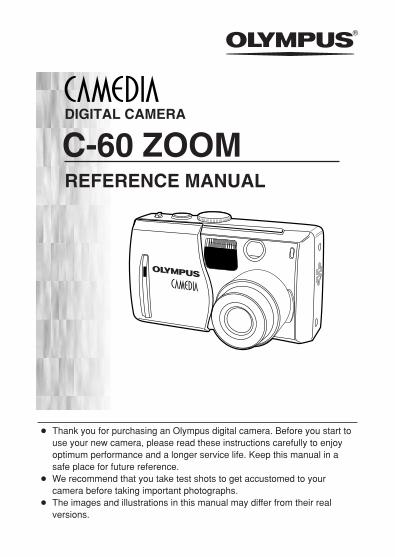
● Thank you for purchasing an Olympus digital camera. Before you start touse your new camera, please read these instructions carefully to enjoyoptimum performance and a longer service life. Keep this manual in asafe place for future reference.
● We recommend that you take test shots to get accustomed to yourcamera before taking important photographs.
● The images and illustrations in this manual may differ from their realversions.

2
For customers in North and South America
For customers in Europe
“CE” mark indicates that this product complies with the Europeanrequirements for safety, health, environment and customer protection.“CE” mark cameras are intended for sales in Europe.
Trademarks• IBM is a registered trademark of International Business Machines Corporation.• Microsoft and Windows are registered trademarks of Microsoft Corporation.• Macintosh is a trademark of Apple Computer Inc.• All other company and product names are registered trademarks and/or trademarks oftheir respective owners.
• The standards for camera file systems referred to in this manual are the “Design Rule forCamera File System/DCF” standards stipulated by the Japan Electronics and InformationTechnology Industries Association (JEITA).
For customers in USA
Declaration of ConformityModel Number : C-60 ZOOM
RM-2 (Remote control)Trade Name : OLYMPUSResponsible Party : Olympus America Inc.Address : 2 Corporate Center Drive, Melville, New York
11747-3157 U.S.A.Telephone Number : 1-631-844-5000
Tested To Comply With FCC StandardsFOR HOME OR OFFICE USE
This device complies with Part 15 of the FCC rules. Operation is subjectto the following two conditions:(1) This device may not cause harmful interference.(2) This device must accept any interference received, including
interference that may cause undesired operation.
For customers in Canada
This Class B digital apparatus meets all requirements of the CanadianInterference-Causing Equipment Regulations.
3
Printing pictures
Settings that make thecamera easier to operate
Basic photography
Introduction to thecamera's functions
1 Getting started P. 15
2 Using the menus P. 27
3 Shooting basics P. 35
Find out how to adjustsettings manually formore creative control
4 Advanced shooting P. 58
Playing back and editing pictures
7 Useful functions P. 103
8 Print setting (DPOF) P. 125
9 Direct printing (PictBridge) P. 129
Troubleshooting andother information 10 Miscellaneous P. 143
5 Adjusting the image P. 79
quality and exposure
6 Playback P. 89
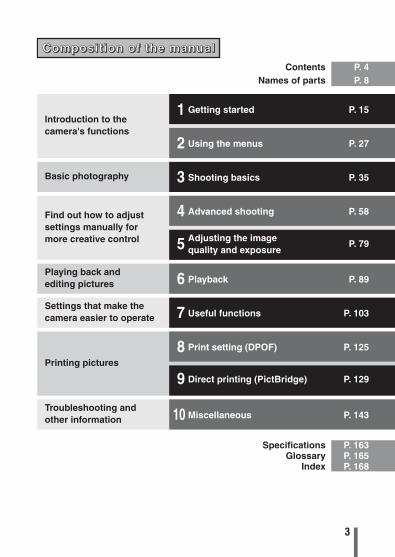
CCCCoooommmmppppoooossssiiii tttt iiiioooonnnn ooooffff tttthhhheeee mmmmaaaannnnuuuuaaaa llll
Contents P. 4Names of parts P. 8
Specifications P. 163Glossary P. 165
Index P. 168

Contents
4
Composition of the manual . . . . . . . . . . . . . . . . . . . . . . . . . . . . . . . . . . . . . 3Names of parts . . . . . . . . . . . . . . . . . . . . . . . . . . . . . . . . . . . . . . . . . . . . . . . 8Monitor indications . . . . . . . . . . . . . . . . . . . . . . . . . . . . . . . . . . . . . . . . . . .10
Memory gauge . . . . . . . . . . . . . . . . . . . . . . . . . . . . . . . . . . . . . . . . . . . . . 13Battery check . . . . . . . . . . . . . . . . . . . . . . . . . . . . . . . . . . . . . . . . . . . . . . 13
How to use this manual . . . . . . . . . . . . . . . . . . . . . . . . . . . . . . . . . . . . . . . 14
1 Getting started 15Attaching the strap . . . . . . . . . . . . . . . . . . . . . . . . . . . . . . . . . . . . . . . . . . . 15Battery/Card basics. . . . . . . . . . . . . . . . . . . . . . . . . . . . . . . . . . . . . . . . . . . 16
Battery basics . . . . . . . . . . . . . . . . . . . . . . . . . . . . . . . . . . . . . . . . . . . . . . 16Card basics . . . . . . . . . . . . . . . . . . . . . . . . . . . . . . . . . . . . . . . . . . . . . . . 17Loading/Unloading the battery/card . . . . . . . . . . . . . . . . . . . . . . . . . . . . . 18Using an optional AC adapter . . . . . . . . . . . . . . . . . . . . . . . . . . . . . . . . . . 20
Power on/off. . . . . . . . . . . . . . . . . . . . . . . . . . . . . . . . . . . . . . . . . . . . . . . . . 21Shooting mode . . . . . . . . . . . . . . . . . . . . . . . . . . . . . . . . . . . . . . . . . . . . . 21Playback mode . . . . . . . . . . . . . . . . . . . . . . . . . . . . . . . . . . . . . . . . . . . . . 21Startup/Shutdown screen . . . . . . . . . . . . . . . . . . . . . . . . . . . . . . . . . . . . . 22If the card is not recognized (Card check) . . . . . . . . . . . . . . . . . . . . . . . . 23
Date/time setting . . . . . . . . . . . . . . . . . . . . . . . . . . . . . . . . . . . . . . . . . . 24Language selection . . . . . . . . . . . . . . . . . . . . . . . . . . . . . . . . . . . . . . 26
2 Using the menus 27What are the menus? . . . . . . . . . . . . . . . . . . . . . . . . . . . . . . . . . . . . . . . . . 27How to use the menus . . . . . . . . . . . . . . . . . . . . . . . . . . . . . . . . . . . . . . . . 28Shortcut menus (shooting/playback) . . . . . . . . . . . . . . . . . . . . . . . . . . . . 30MODE MENU (shooting) . . . . . . . . . . . . . . . . . . . . . . . . . . . . . . . . . . . . . . . 31MODE MENU (playback) . . . . . . . . . . . . . . . . . . . . . . . . . . . . . . . . . . . . . . . 33
3 Shooting basics 35Shooting modes . . . . . . . . . . . . . . . . . . . . . . . . . . . . . . . . . . . . . . . . . . . . . 35Holding the camera . . . . . . . . . . . . . . . . . . . . . . . . . . . . . . . . . . . . . . . . . . . 39How to press the shutter button . . . . . . . . . . . . . . . . . . . . . . . . . . . . . . . . 40Taking still pictures. . . . . . . . . . . . . . . . . . . . . . . . . . . . . . . . . . . . . . . . . . . 41
Taking still pictures using the monitor . . . . . . . . . . . . . . . . . . . . . . . . . . . . 41Taking still pictures using the viewfinder . . . . . . . . . . . . . . . . . . . . . . . . . . 42Comparison of the monitor & viewfinder . . . . . . . . . . . . . . . . . . . . . . . . . . 44How to turn off the monitor . . . . . . . . . . . . . . . . . . . . . . . . . . . . . . . . . . . . 45
5
Contents
If correct focus cannot be obtained . . . . . . . . . . . . . . . . . . . . . . . . . . . . . 46Determine the position of the subject after focusing (Focus Lock) . . . . . . 46When Auto focus does not work
(Subjects that are difficult to focus on) . . . . . . . . . . . . . . . . . . . . . . . . . . 48Movie recording . . . . . . . . . . . . . . . . . . . . . . . . . . . . . . . . . . . . . . . . . . 49Zoom. . . . . . . . . . . . . . . . . . . . . . . . . . . . . . . . . . . . . . . . . . . . . . . . . . . . . . . 51
Using the optical zoom.. . . . . . . . . . . . . . . . . . . . . . . . . . . . . . . . . . . . . . . 51DIGITAL ZOOM — Using the digital zoom . . . . . . . . . . . . . . . . . . . . . . . . 52
Flash shooting. . . . . . . . . . . . . . . . . . . . . . . . . . . . . . . . . . . . . . . . . . . . . . . 53Using the flash . . . . . . . . . . . . . . . . . . . . . . . . . . . . . . . . . . . . . . . . . . . . . 55Flash intensity control . . . . . . . . . . . . . . . . . . . . . . . . . . . . . . . . . . . . . 57
4 Advanced shooting 58Aperture priority shooting A . . . . . . . . . . . . . . . . . . . . . . . . . . . . . . . . . . . 58Shutter priority shooting S . . . . . . . . . . . . . . . . . . . . . . . . . . . . . . . . . . . . 59Manual shooting M . . . . . . . . . . . . . . . . . . . . . . . . . . . . . . . . . . . . . . . . . . 60FULLTIME AF — A reliable time-saving way to focus . . . . . . . . . . . . . . . 61Selecting the metering area . . . . . . . . . . . . . . . . . . . . . . . . . . . . . . . . . 62Macro mode shooting — Taking close-up pictures . . . . . . . . . . . . . . . 63Super macro shooting . . . . . . . . . . . . . . . . . . . . . . . . . . . . . . . . . . . . . 64Self-timer shooting . . . . . . . . . . . . . . . . . . . . . . . . . . . . . . . . . . . . . . . . 65Remote control shooting . . . . . . . . . . . . . . . . . . . . . . . . . . . . . . . . . . . . . 66Sequential shooting BKT . . . . . . . . . . . . . . . . . . . . . . . . . . . . . . . 68
Sequential shooting & AF sequential shooting . . . . . . . . . . . . . . 68Auto bracketing — Shooting pictures sequentially with a
different exposure for each frame BKT . . . . . . . . . . . . . . . . . . . . . . . . 69Panorama shooting. . . . . . . . . . . . . . . . . . . . . . . . . . . . . . . . . . . . . . . . . . . 71Taking two-in-one pictures 2 IN 1 . . . . . . . . . . . . . . . . . . . . . . . . . . . . . . 73FUNCTION — Adding special effects to pictures. . . . . . . . . . . . . . . . . . . 74Recording sound with still pictures . . . . . . . . . . . . . . . . . . . . . . . . . . . 75Recording sound with movies . . . . . . . . . . . . . . . . . . . . . . . . . . . . . . . 77Using the optional accessories . . . . . . . . . . . . . . . . . . . . . . . . . . . . . 78

6
Contents
5 Adjusting the image quality and exposure 79Record mode . . . . . . . . . . . . . . . . . . . . . . . . . . . . . . . . . . . . . . . . . . . . . . . . 79
Selecting still picture record modes . . . . . . . . . . . . . . . . . . . . . . . . . . . . . 81Selecting movie record modes . . . . . . . . . . . . . . . . . . . . . . . . . . . . . . . . . 82
ISO sensitivity . . . . . . . . . . . . . . . . . . . . . . . . . . . . . . . . . . . . . . . . . . . . . . . 83Exposure . . . . . . . . . . . . . . . . . . . . . . . . . . . . . . . . . . . . . . . . . . . . . . . . . . . 84White balance WB. . . . . . . . . . . . . . . . . . . . . . . . . . . . . . . . . . . . . . . . . . . . 85SHARPNESS . . . . . . . . . . . . . . . . . . . . . . . . . . . . . . . . . . . . . . . . . . . . . . . . 86CONTRAST . . . . . . . . . . . . . . . . . . . . . . . . . . . . . . . . . . . . . . . . . . . . . . . . . 87NOISE REDUCTION. . . . . . . . . . . . . . . . . . . . . . . . . . . . . . . . . . . . . . . . . . . 88
6 Playback 89Viewing still pictures. . . . . . . . . . . . . . . . . . . . . . . . . . . . . . . . . . . . . . . . . . 89
Close-up playback . . . . . . . . . . . . . . . . . . . . . . . . . . . . . . . . . . . . . . . . 90Index display . . . . . . . . . . . . . . . . . . . . . . . . . . . . . . . . . . . . . . . . . . . . 91Selecting the number of pictures . . . . . . . . . . . . . . . . . . . . . . . . . . . . . 91Slideshow . . . . . . . . . . . . . . . . . . . . . . . . . . . . . . . . . . . . . . . . . . . . . . 92Picture rotation . . . . . . . . . . . . . . . . . . . . . . . . . . . . . . . . . . . . . . . . . . 93
Viewing movies . . . . . . . . . . . . . . . . . . . . . . . . . . . . . . . . . . . . . . . . . . . . . . 94INDEX — Creating an index . . . . . . . . . . . . . . . . . . . . . . . . . . . . . . . . . . . 96
Playback on a TV . . . . . . . . . . . . . . . . . . . . . . . . . . . . . . . . . . . . . . . . . . . . . 97Recording sound . . . . . . . . . . . . . . . . . . . . . . . . . . . . . . . . . . . . . . . . . . 98Editing still pictures . . . . . . . . . . . . . . . . . . . . . . . . . . . . . . . . . . . . . . . 99Protecting pictures . . . . . . . . . . . . . . . . . . . . . . . . . . . . . . . . . . . . . . . 100Erasing pictures . . . . . . . . . . . . . . . . . . . . . . . . . . . . . . . . . . . . . . . . 101
Single-frame erase . . . . . . . . . . . . . . . . . . . . . . . . . . . . . . . . . . . . . . 101All-frame erase . . . . . . . . . . . . . . . . . . . . . . . . . . . . . . . . . . . . . . . . . 102
7 Useful functions 103ALL RESET — Saving the camera’s settings . . . . . . . . . . . . . . . . . . . . . 103SHORT CUT . . . . . . . . . . . . . . . . . . . . . . . . . . . . . . . . . . . . . . . . . . . . . . . . 105
Registering functions to the shortcut menus. . . . . . . . . . . . . . . . . . . . . . 106Using the shortcut menu . . . . . . . . . . . . . . . . . . . . . . . . . . . . . . . . . . . . . 107
MY MODE SETUP — Registering customized settings in the mode . . . . . . . . . . . . . . . . . . . . . . . . . . . . . . . . . . . . . . . . . . . . 108
INFO — Displaying shooting information on the monitor INFO . . . . . 111Histogram display — Displaying the brightness distribution of still pictures . . . . . . . . . . . . . . . . . . . . . . . . . . . . . . . 113
7
Contents
CARD SETUP — Formatting cards . . . . . . . . . . . . . . . . . . . . . . . . . . . 115Monitor brightness adjustment . . . . . . . . . . . . . . . . . . . . . . . . . . . . . 117Beep — Setting the warning tone . . . . . . . . . . . . . . . . . . . . . . . . . . . 117SHUTTER SOUND — Setting the shutter sound . . . . . . . . . . . . . . . . . . 118VOLUME — Adjusting the playback volume. . . . . . . . . . . . . . . . . . . . . . 119PW ON/OFF SETUP — Power on/off display/sound volume setting . . . . . . . . . . . . . . . . . . . . . . . . . . . . . . . . . . . . . . . 120
REC VIEW — Checking the picture immediately after shooting . . . . . . 121SLEEP — Sleep timer . . . . . . . . . . . . . . . . . . . . . . . . . . . . . . . . . . . . . . . . 122VIDEO OUT — Selecting the video signal type . . . . . . . . . . . . . . . . . . . 122FILE NAME — Assigning a file name . . . . . . . . . . . . . . . . . . . . . . . . . . . 123PIXEL MAPPING — Checking the image processing functions . . . . . . 124
8 Print setting (DPOF) 125How to print pictures . . . . . . . . . . . . . . . . . . . . . . . . . . . . . . . . . . . . . . . . 125Applying print reservation to a card . . . . . . . . . . . . . . . . . . . . . . . . . 127
9 Direct printing (PictBridge) 129Using the direct printing function . . . . . . . . . . . . . . . . . . . . . . . . . . . . . . 129Connecting the camera to a printer. . . . . . . . . . . . . . . . . . . . . . . . . . . . . 130Printing pictures . . . . . . . . . . . . . . . . . . . . . . . . . . . . . . . . . . . . . . . . . . . . 131
Printing basics. . . . . . . . . . . . . . . . . . . . . . . . . . . . . . . . . . . . . . . . . . . . . 132PRINT mode/MULTI PRINT mode . . . . . . . . . . . . . . . . . . . . . . . . . . . . . 133ALL PRINT mode . . . . . . . . . . . . . . . . . . . . . . . . . . . . . . . . . . . . . . . . . . 137ALL INDEX mode/PRINT ORDER mode. . . . . . . . . . . . . . . . . . . . . . . . . 139
Exiting direct printing . . . . . . . . . . . . . . . . . . . . . . . . . . . . . . . . . . . . . . . . 141If an error code is displayed. . . . . . . . . . . . . . . . . . . . . . . . . . . . . . . . . . . 142
10 Miscellaneous 143Error codes . . . . . . . . . . . . . . . . . . . . . . . . . . . . . . . . . . . . . . . . . . . . . . . . 143Troubleshooting . . . . . . . . . . . . . . . . . . . . . . . . . . . . . . . . . . . . . . . . . . . . 145Menu directory. . . . . . . . . . . . . . . . . . . . . . . . . . . . . . . . . . . . . . . . . . . . . . 154Camera maintenance . . . . . . . . . . . . . . . . . . . . . . . . . . . . . . . . . . . . . . . . 161
How to replace the battery (CR2025) of the remote control device . . . . 162Specifications . . . . . . . . . . . . . . . . . . . . . . . . . . . . . . . . . . . . . . . . . . . . . . 163Glossary . . . . . . . . . . . . . . . . . . . . . . . . . . . . . . . . . . . . . . . . . . . . . . . . . . . 165Index . . . . . . . . . . . . . . . . . . . . . . . . . . . . . . . . . . . . . . . . . . . . . . . . . . . . . . 168
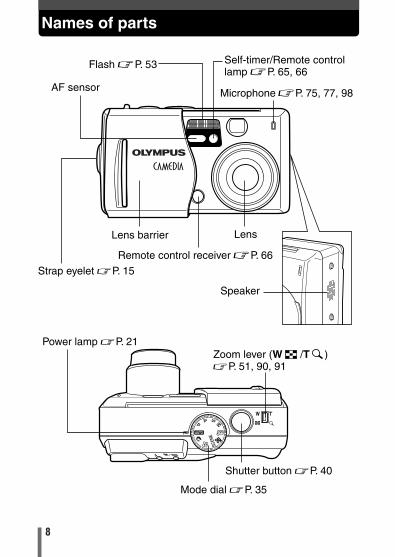
Names of parts
8
SCEN
E
Flash ~P. 53 Self-timer/Remote control lamp ~P. 65, 66
Microphone ~P. 75, 77, 98AF sensor
Strap eyelet ~P. 15
LensLens barrier
Remote control receiver ~P. 66
Shutter button ~P. 40
Mode dial ~P. 35
Speaker
Zoom lever (W /T )~P. 51, 90, 91
Power lamp ~P. 21
9
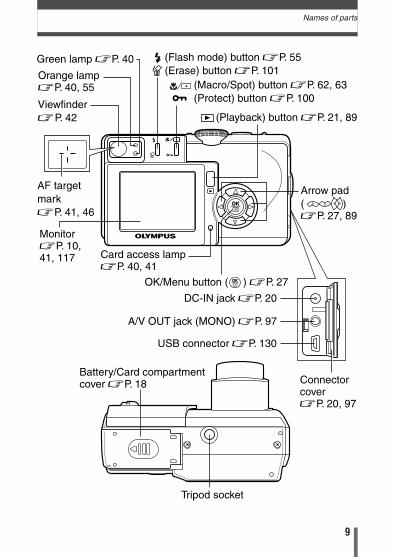
Names of parts
(Flash mode) button ~P. 55 (Erase) button ~P. 101
Green lamp ~P. 40
Orange lamp~P. 40, 55
Viewfinder~P. 42
AF target mark ~P. 41, 46
Monitor~P. 10, 41, 117
(Playback) button ~P. 21, 89
Card access lamp ~P. 40, 41
DC-IN jack ~P. 20
Connector cover ~P. 20, 97
A/V OUT jack (MONO) ~P. 97
USB connector ~P. 130
Tripod socket
Battery/Card compartment cover ~P. 18
OK/Menu button ( ) ~P. 27
Arrow pad( ) ~P. 27, 89
(Macro/Spot) button ~P. 62, 63(Protect) button ~P. 100

Monitor indications
10
P 1/800 F2.8 +0.3
HQ 2816x2112
1
5
6 7 8 9
2 3 4
P 1/800 F2.8 +0.3
+2.0
HQ 2816x2112
1012
13
11
2215
14
16
18
19
17
2120
NRNR ISO 100
When INFO is set to ON
� Indications during shooting
When INFO is set to OFF
When INFO is set to ON
� Indications during still picture playback
When INFO is set to OFF
When INFO is set to ON
� Indications during movie playback
When INFO is set to OFF
HQ
’04.07.01 16:0000:00/00:20
31 2530
27 28
32
100-0015 6 HQSIZE: 320x240
+0.3WB AUTOWB AUTO
’04.07.01 16:0000:00/00:20
67422
100-0015
100-0018 HQ
’04.07.01 12:3018
10 23 2524
6
28
29
27
26
30
42221
7
23
100-0018 HQSIZE: 2816x2112F2.8 1/800 +0.3
ISO100’04.07.01 12:30
18
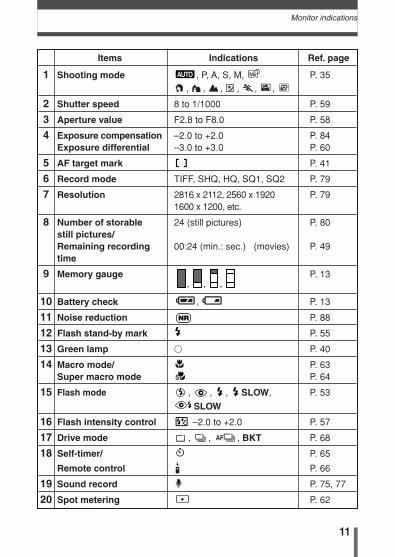
Items Indications Ref. page
1 Shooting mode , P, A, S, M, P. 35, , , , , ,
2 Shutter speed 8 to 1/1000 P. 59
3 Aperture value F2.8 to F8.0 P. 58
4 Exposure compensation –2.0 to +2.0 P. 84Exposure differential –3.0 to +3.0 P. 60
5 AF target mark P. 41
6 Record mode TIFF, SHQ, HQ, SQ1, SQ2 P. 79
7 Resolution 2816 x 2112, 2560 x 1920 P. 791600 x 1200, etc.
8 Number of storable 24 (still pictures) P. 80still pictures/Remaining recording 00:24 (min.: sec.) (movies) P. 49time
9 Memory gauge P. 13
10 Battery check P. 13
11 Noise reduction P. 88
12 Flash stand-by mark P. 55
13 Green lamp � P. 40
14 Macro mode/ P. 63Super macro mode P. 64
15 Flash mode , , , SLOW, P. 53
SLOW
16 Flash intensity control –2.0 to +2.0 P. 57
17 Drive mode , , , BKT P. 68
18 Self-timer/ P. 65
Remote control P. 66
19 Sound record P. 75, 77
20 Spot metering P. 62
,
11
Monitor indications
, , ,
12
Monitor indications
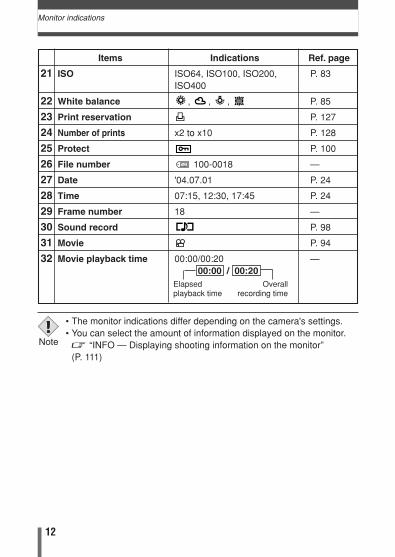
Items Indications Ref. page
21 ISO ISO64, ISO100, ISO200, P. 83ISO400
22 White balance , , , P. 85
23 Print reservation P. 127
24 Number of prints x2 to x10 P. 128
25 Protect P. 100
26 File number 100-0018 —
27 Date '04.07.01 P. 24
28 Time 07:15, 12:30, 17:45 P. 24
29 Frame number 18 —
30 Sound record P. 98
31 Movie P. 94
32 Movie playback time 00:00/00:20 —00:00 / 00:20
Overallrecording time
Elapsedplayback time
• The monitor indications differ depending on the camera's settings.• You can select the amount of information displayed on the monitor. ~ “INFO — Displaying shooting information on the monitor” (P. 111)
Note
13
Monitor indications
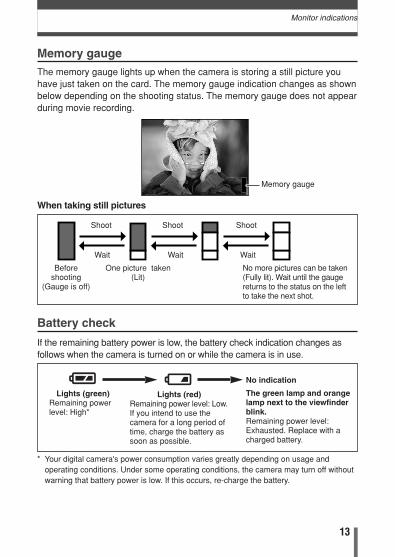
The memory gauge lights up when the camera is storing a still picture youhave just taken on the card. The memory gauge indication changes as shownbelow depending on the shooting status. The memory gauge does not appearduring movie recording.
Memory gauge
Shoot
Wait
Beforeshooting
(Gauge is off)
Battery check
Lights (green)Remaining powerlevel: High*
Lights (red)Remaining power level: Low.If you intend to use thecamera for a long period oftime, charge the battery assoon as possible.
No indication
The green lamp and orangelamp next to the viewfinderblink.Remaining power level:Exhausted. Replace with acharged battery.
If the remaining battery power is low, the battery check indication changes asfollows when the camera is turned on or while the camera is in use.
One picture taken (Lit)
When taking still pictures
Shoot Shoot
Wait Wait
No more pictures can be taken(Fully lit). Wait until the gaugereturns to the status on the leftto take the next shot.
* Your digital camera's power consumption varies greatly depending on usage andoperating conditions. Under some operating conditions, the camera may turn off withoutwarning that battery power is low. If this occurs, re-charge the battery.
Memory gauge
4
Ad
vanced
sho
otin
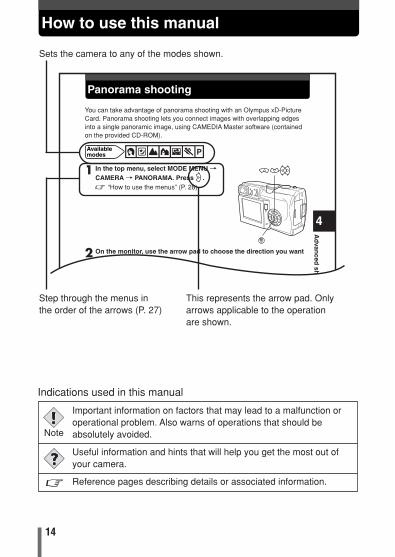
Panorama shooting
1 In the top menu, select MODE MENU TCAMERA T PANORAMA. Press .~ “How to use the menus” (P. 28)
2 On the monitor, use the arrow pad to choose the direction you wantthe pictures connected.
: Connects the pictures from left to right.
: Connects the pictures from right to left.
You can take advantage of panorama shooting with an Olympus xD-PictureCard. Panorama shooting lets you connect images with overlapping edgesinto a single panoramic image, using CAMEDIA Master software (containedon the provided CD-ROM).
Available modes
How to use this manual
14
Sets the camera to any of the modes shown.
Step through the menus inthe order of the arrows (P. 27)
This represents the arrow pad. Onlyarrows applicable to the operationare shown.
Important information on factors that may lead to a malfunction oroperational problem. Also warns of operations that should beabsolutely avoided.
Useful information and hints that will help you get the most out ofyour camera.
Reference pages describing details or associated information.~
Note
Indications used in this manual
15
Attaching the strap1 Getting started
1
Gettin
g started
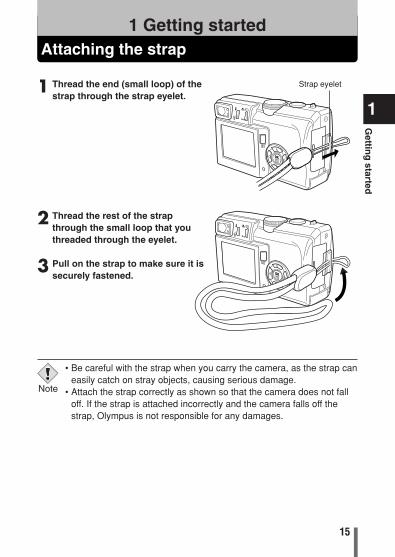
1 Thread the end (small loop) of thestrap through the strap eyelet.
2 Thread the rest of the strapthrough the small loop that youthreaded through the eyelet.
3 Pull on the strap to make sure it issecurely fastened.
Strap eyelet
• Be careful with the strap when you carry the camera, as the strap caneasily catch on stray objects, causing serious damage.
• Attach the strap correctly as shown so that the camera does not falloff. If the strap is attached incorrectly and the camera falls off thestrap, Olympus is not responsible for any damages.
Note
16
1
Gettin
g started
Battery/Card basics
Battery basics
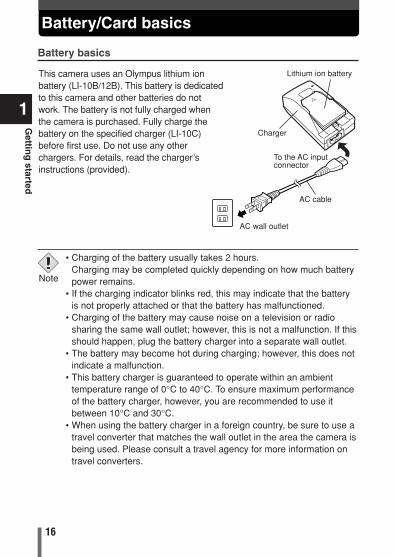
This camera uses an Olympus lithium ionbattery (LI-10B/12B). This battery is dedicatedto this camera and other batteries do notwork. The battery is not fully charged whenthe camera is purchased. Fully charge thebattery on the specified charger (LI-10C)before first use. Do not use any otherchargers. For details, read the charger’sinstructions (provided).
To the AC inputconnector
AC cable
Lithium ion battery
Charger
AC wall outlet
• Charging of the battery usually takes 2 hours.Charging may be completed quickly depending on how much batterypower remains.
• If the charging indicator blinks red, this may indicate that the batteryis not properly attached or that the battery has malfunctioned.
• Charging of the battery may cause noise on a television or radiosharing the same wall outlet; however, this is not a malfunction. If thisshould happen, plug the battery charger into a separate wall outlet.
• The battery may become hot during charging; however, this does notindicate a malfunction.
• This battery charger is guaranteed to operate within an ambienttemperature range of 0°C to 40°C. To ensure maximum performanceof the battery charger, however, you are recommended to use itbetween 10°C and 30°C.
• When using the battery charger in a foreign country, be sure to use atravel converter that matches the wall outlet in the area the camera isbeing used. Please consult a travel agency for more information ontravel converters.
Note
17
Battery/Card basics
1
Gettin
g started
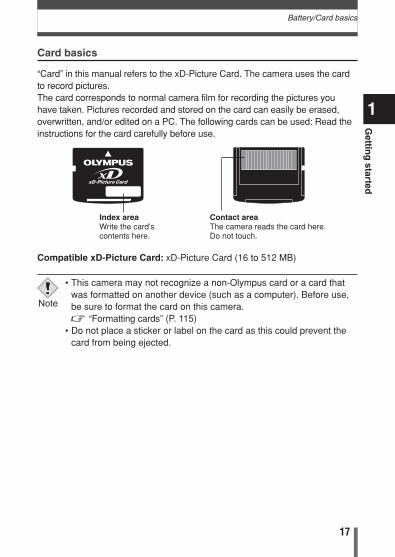
Card basics
“Card” in this manual refers to the xD-Picture Card. The camera uses the cardto record pictures.The card corresponds to normal camera film for recording the pictures youhave taken. Pictures recorded and stored on the card can easily be erased,overwritten, and/or edited on a PC. The following cards can be used: Read theinstructions for the card carefully before use.
Index areaWrite the card’scontents here.
Compatible xD-Picture Card: xD-Picture Card (16 to 512 MB)
Contact areaThe camera reads the card here.Do not touch.
• This camera may not recognize a non-Olympus card or a card thatwas formatted on another device (such as a computer). Before use,be sure to format the card on this camera. ~ “Formatting cards” (P. 115)
• Do not place a sticker or label on the card as this could prevent thecard from being ejected.
Note
18
1
Gettin
g started
Battery/Card basics
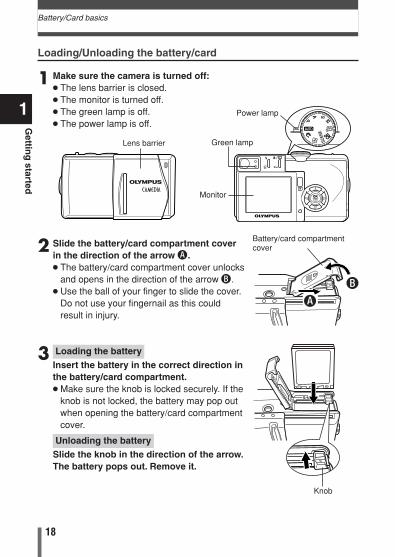
1 Make sure the camera is turned off:● The lens barrier is closed.● The monitor is turned off.● The green lamp is off.● The power lamp is off.
2 Slide the battery/card compartment coverin the direction of the arrow A.● The battery/card compartment cover unlocks
and opens in the direction of the arrow B.● Use the ball of your finger to slide the cover.
Do not use your fingernail as this couldresult in injury.
3 Loading the battery
Insert the battery in the correct direction inthe battery/card compartment.● Make sure the knob is locked securely. If the
knob is not locked, the battery may pop outwhen opening the battery/card compartmentcover.
Unloading the battery
Slide the knob in the direction of the arrow.The battery pops out. Remove it.
SCEN
E
Lens barrier
Monitor
Loading/Unloading the battery/card
Knob
Green lamp
A
B
Power lamp
Battery/card compartmentcover
19
1
Gettin
g started
Battery/Card basics
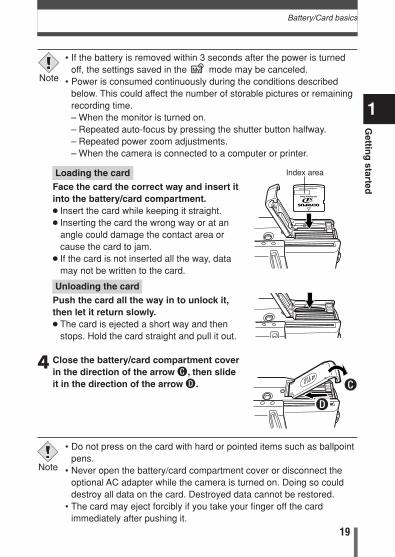
Loading the cardFace the card the correct way and insert itinto the battery/card compartment.● Insert the card while keeping it straight. ● Inserting the card the wrong way or at an
angle could damage the contact area orcause the card to jam.
● If the card is not inserted all the way, datamay not be written to the card.
Unloading the cardPush the card all the way in to unlock it,then let it return slowly.● The card is ejected a short way and then
stops. Hold the card straight and pull it out.
4 Close the battery/card compartment coverin the direction of the arrow C, then slideit in the direction of the arrow D.
D
C
• Do not press on the card with hard or pointed items such as ballpointpens.
• Never open the battery/card compartment cover or disconnect theoptional AC adapter while the camera is turned on. Doing so coulddestroy all data on the card. Destroyed data cannot be restored.
• The card may eject forcibly if you take your finger off the cardimmediately after pushing it.
Note
• If the battery is removed within 3 seconds after the power is turnedoff, the settings saved in the mode may be canceled.
• Power is consumed continuously during the conditions describedbelow. This could affect the number of storable pictures or remainingrecording time.– When the monitor is turned on.– Repeated auto-focus by pressing the shutter button halfway.– Repeated power zoom adjustments.– When the camera is connected to a computer or printer.
Note
Index area
20
1
Gettin
g started
Battery/Card basics
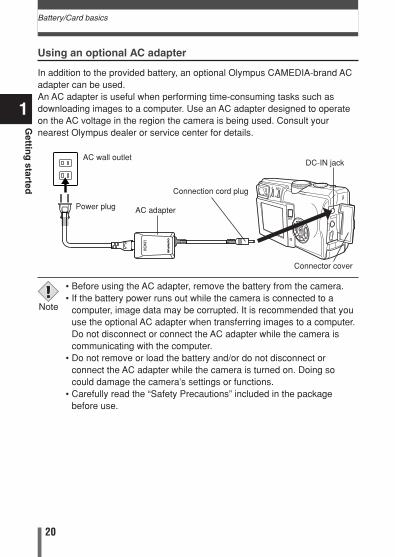
Using an optional AC adapter
In addition to the provided battery, an optional Olympus CAMEDIA-brand ACadapter can be used.An AC adapter is useful when performing time-consuming tasks such asdownloading images to a computer. Use an AC adapter designed to operateon the AC voltage in the region the camera is being used. Consult yournearest Olympus dealer or service center for details.
AC adapter
AC wall outletDC-IN jack
Connection cord plug
Power plug
• Before using the AC adapter, remove the battery from the camera.• If the battery power runs out while the camera is connected to a
computer, image data may be corrupted. It is recommended that youuse the optional AC adapter when transferring images to a computer.Do not disconnect or connect the AC adapter while the camera iscommunicating with the computer.
• Do not remove or load the battery and/or do not disconnect orconnect the AC adapter while the camera is turned on. Doing socould damage the camera’s settings or functions.
• Carefully read the “Safety Precautions” included in the packagebefore use.
Note
Connector cover
21
1
Gettin
g started
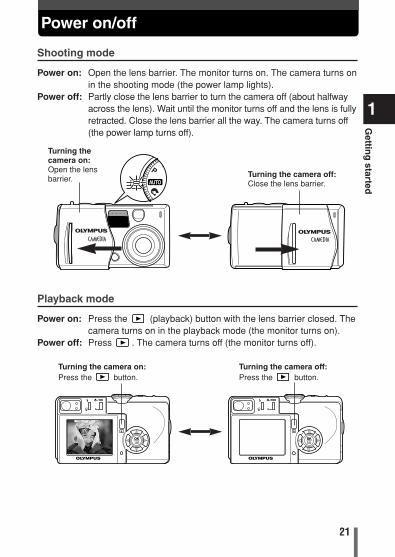
Power on/off
Turning thecamera on:Open the lensbarrier. Turning the camera off:
Close the lens barrier.
Shooting mode
Power on: Open the lens barrier. The monitor turns on. The camera turns onin the shooting mode (the power lamp lights).
Power off: Partly close the lens barrier to turn the camera off (about halfwayacross the lens). Wait until the monitor turns off and the lens is fullyretracted. Close the lens barrier all the way. The camera turns off(the power lamp turns off).
Playback mode
Power on: Press the (playback) button with the lens barrier closed. Thecamera turns on in the playback mode (the monitor turns on).
Power off: Press . The camera turns off (the monitor turns off).
Turning the camera on:Press the button.
Turning the camera off:Press the button.
22
1
Gettin
g started
Power on/off
• The camera automatically enters the sleep mode* to save powerwhen the power is left on and no operations are performed. Thecamera activates again as soon as you operate any button. Sleeptime interval can be set. ~ P. 122* In the playback mode, the camera always turns off if no operation is
performed for 3 minutes regardless of the sleep mode setting.• The power lamp stays lit in the following cases:
– When the camera is connected to a computer.– When the camera is in the sleep mode.
• When closing the lens barrier, do not push the lens barrier againstthe lens. Forcing the lens barrier may damage the camera body orcause a malfunction.
Note
Startup/Shutdown screen
You can select whether to display the startup/shutdown screen or adjust thesound volume when the power is turned on/off. ~ “PW ON/OFF SETUP – Power on/off display/sound volume setting”(P.120)

23
1
Gettin
g started
Power on/off
If the card is not recognized (Card check)
NO CARD
TIPS
There is no card in the camera or the card isnot locked into place.T Insert a card. If a card is already inserted,
remove it and insert it again.
There is a problem with the card.TFormat the card, if this does not correct the
problem, use a different card.
The card cannot be recognized with thiscamera system.TPress to select POWER OFF, then
press . Replace the card with a new one.
TFormat the card.1 Press to select FORMAT, then
press .
The FORMAT screen appears.2 Press to select YES, then press
to start formatting.When formatting is complete, the camerais ready for shooting.
CARD ERROR
Indications
CARD SETUP
POWER OFF
FORMAT
FORMAFORMAT
YES
NO
CAUTION ERASING ALL
• All data stored on the card is erased when the card is formatted.
Note
When the power is turned on, the camera checks the card automatically. Ifthere is no card in the camera or a card that is not supported by this camerais inserted, the following screen is displayed.
24
1
Gettin
g started
Date/time setting
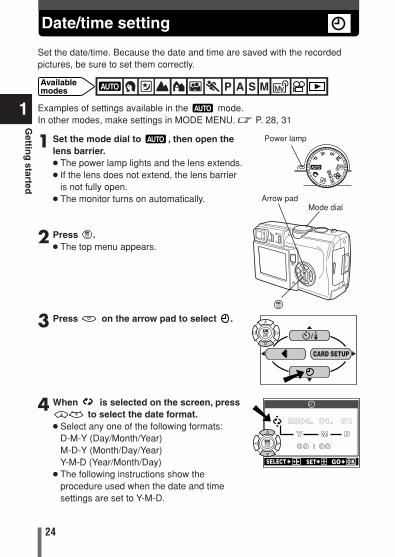
1 Set the mode dial to , then open thelens barrier.● The power lamp lights and the lens extends.● If the lens does not extend, the lens barrier
is not fully open.● The monitor turns on automatically.
2 Press .● The top menu appears.
3 Press on the arrow pad to select .
4 When is selected on the screen, pressto select the date format.
● Select any one of the following formats:D-M-Y (Day/Month/Year)M-D-Y (Month/Day/Year)Y-M-D (Year/Month/Day)
● The following instructions show theprocedure used when the date and timesettings are set to Y-M-D.
Set the date/time. Because the date and time are saved with the recordedpictures, be sure to set them correctly.
CARD SETUP
Mode dialArrow pad
SELECT SET GO
2004. 01. 01
Available modes
Examples of settings available in the mode.In other modes, make settings in MODE MENU. ~ P. 28, 31
Power lamp
SCEN
E
25
1
Gettin
g started
Date/time setting
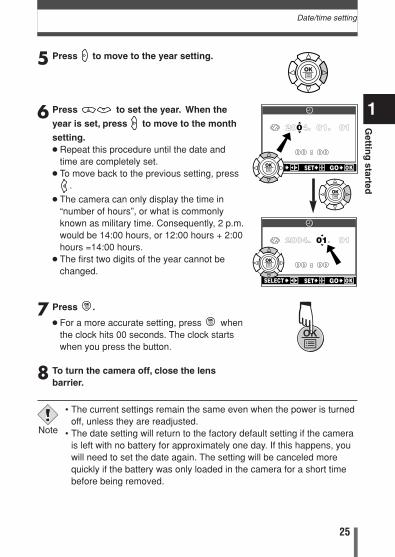
5 Press to move to the year setting.
6 Press to set the year. When the
year is set, press to move to the month
setting.● Repeat this procedure until the date and
time are completely set.● To move back to the previous setting, press
.
● The camera can only display the time in“number of hours”, or what is commonlyknown as military time. Consequently, 2 p.m.would be 14:00 hours, or 12:00 hours + 2:00hours =14:00 hours.
● The first two digits of the year cannot bechanged.
7 Press .
● For a more accurate setting, press whenthe clock hits 00 seconds. The clock startswhen you press the button.
8 To turn the camera off, close the lensbarrier.
SELECT SET GO
2004. 01. 01
SELECT SET GO
2004. 01. 01
• The current settings remain the same even when the power is turnedoff, unless they are readjusted.
• The date setting will return to the factory default setting if the camerais left with no battery for approximately one day. If this happens, youwill need to set the date again. The setting will be canceled morequickly if the battery was only loaded in the camera for a short timebefore being removed.
Note
26
1
Gettin
g started
Language selection
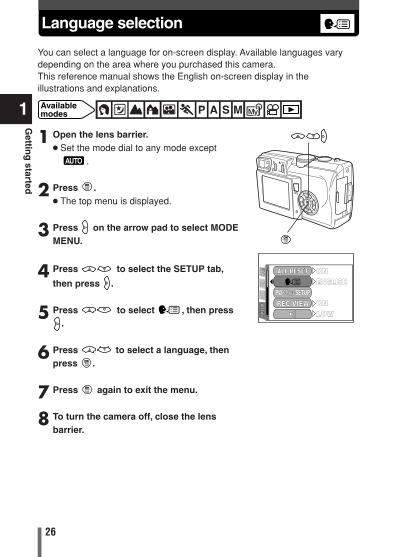
Available modes
You can select a language for on-screen display. Available languages varydepending on the area where you purchased this camera.This reference manual shows the English on-screen display in theillustrations and explanations.
1 Open the lens barrier.● Set the mode dial to any mode except
.
2 Press .● The top menu is displayed.
3 Press on the arrow pad to select MODEMENU.
4 Press to select the SETUP tab,
then press .
5 Press to select , then press.
6 Press to select a language, thenpress .
7 Press again to exit the menu.
8 To turn the camera off, close the lensbarrier.
SETU
PSE
TUP
CAM
CAM
CARD
PIC ENGLISH
REC VIEWREC VIEW
ALL RESETALL RESET
ON
ON
LOW
PW ONON/OFFOFF SETUP
27
What are the menus?2 Using the menus
2
Usin
g th
e men
us
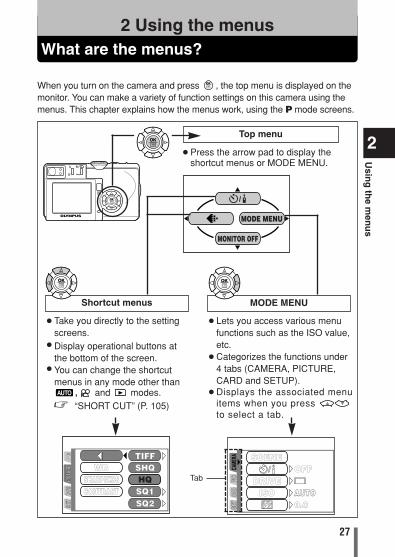
When you turn on the camera and press , the top menu is displayed on themonitor. You can make a variety of function settings on this camera using themenus. This chapter explains how the menus work, using the P mode screens.
MODE MENU
MONITOR OFF
PICTU
REPIC
TURE
CAM
SET
SET
CARD
CARD
WB
CONTRASTSHARPNESS HQ
SQ1SQ2
TIFFSHQ
PIC
PIC
SET
SET
CARD
CARD ISO
CAME
RA
DRIVE
SCENEOFF
AUTOAUTO0.0
Shortcut menus MODE MENU
● Take you directly to the settingscreens.
● Display operational buttons atthe bottom of the screen.
● You can change the shortcutmenus in any mode other than
, and modes.~ “SHORT CUT” (P. 105)
Top menu
● Press the arrow pad to display theshortcut menus or MODE MENU.
● Lets you access various menufunctions such as the ISO value,etc.
● Categorizes the functions under4 tabs (CAMERA, PICTURE,CARD and SETUP).
● Displays the associated menuitems when you press to select a tab.
Tab
How to use the menus
28
2
Usin
g th
e men
us
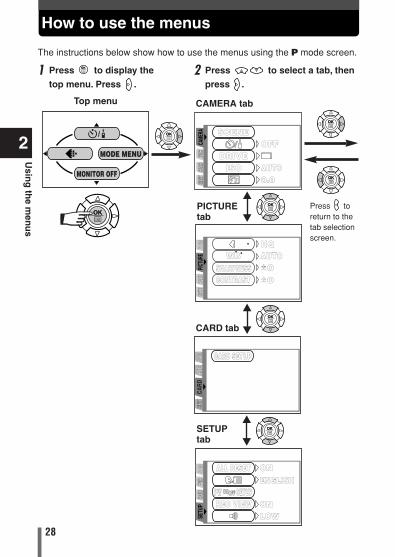
The instructions below show how to use the menus using the P mode screen.
MODE MENU
MONITOR OFF
PICTU
RECA
MSE
TSE
TCA
RDCA
RD
AUTOHQ
WB
CONTRASTSHARPNESS �0
�0
PIC
PIC
SET
SET
CARD
CARD ISO
CAME
RA
DRIVE
SCENEOFF
AUTO0.0
CAM
SET
SET
PIC
CARD SETUP
CARD
SETU
PCA
MCA
RDCA
RDPI
CPI
C ENGLISHON
REC VIEW
ALL RESET
ONLOW
PW ONON/OFFOFF SETUP
SETUPtab
Top menu CAMERA tab
PICTUREtab
CARD tab
¥
˙
¥
˙
¥
˙
Press toreturn to thetab selectionscreen.
1 Press to display the
top menu. Press .2 Press to select a tab, then
press .
29
How to use the menus
2
Usin
g th
e men
us
SETU
PCA
MCA
RDCA
RDPI
CPI
C ENGLISH
REC VIEW
ALL RESET
ON
ON
LOW
PW ONON/OFFOFF SETUP
SETU
PCA
MCA
RDCA
RDPI
CPI
C ENGLISH
REC VIEW
ALL RESET
ONLOW
ON
PW ONON/OFFOFF SETUP
SETU
PCA
MCA
RDCA
RDPI
CPI
C
REC VIEW
ALL RESET
OFFON
PW ONON/OFFOFF SETUPSE
TUP
CAM
CARD
CARD
PIC
PIC
REC VIEW
ALL RESET
OFFON
PW ONON/OFFOFF SETUP
¥
˙
¥
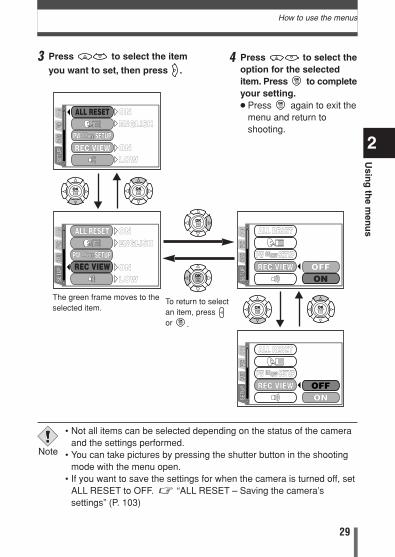
˙The green frame moves to theselected item.
To return to selectan item, press or .
• Not all items can be selected depending on the status of the cameraand the settings performed.
• You can take pictures by pressing the shutter button in the shootingmode with the menu open.
• If you want to save the settings for when the camera is turned off, setALL RESET to OFF. ~ “ALL RESET – Saving the camera’ssettings” (P. 103)
Note
3 Press to select the item
you want to set, then press .4 Press to select the
option for the selecteditem. Press to completeyour setting.● Press again to exit the
menu and return toshooting.
Shortcut menus (shooting/playback)
30
2
Usin
g th
e men
us
CARD SETUP
top menu
MODE MENU
MONITOR OFF
P, A, S, M, ,
SCENE, or top menu
MONITOR OFF
MODE MENUWB
top menu
MODE MENUINFO
top menu(for still pictures)
MODE MENU
MOVIE PLAY
INFO
top menu(for movies)
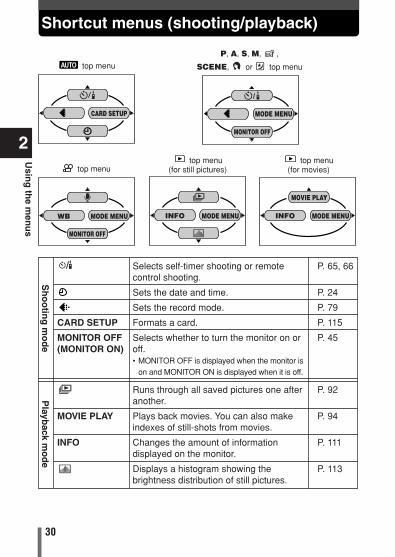
Selects self-timer shooting or remote P. 65, 66control shooting.
Sets the date and time. P. 24
Sets the record mode. P. 79
CARD SETUP Formats a card. P. 115
MONITOR OFF Selects whether to turn the monitor on or P. 45(MONITOR ON) off.
• MONITOR OFF is displayed when the monitor is on and MONITOR ON is displayed when it is off.
Runs through all saved pictures one after P. 92another.
MOVIE PLAY Plays back movies. You can also make P. 94indexes of still-shots from movies.
INFO Changes the amount of information P. 111displayed on the monitor.
Displays a histogram showing the P. 113brightness distribution of still pictures.
Sh
oo
ting
mo
de
Playb
ack mo
de
31
MODE MENU (shooting)
2
Usin
g th
e men
us
CAMERA tab
PIC
SET
CARD ISO
CAME
RA
DRIVE
SCENEOFF
AUTO0.0
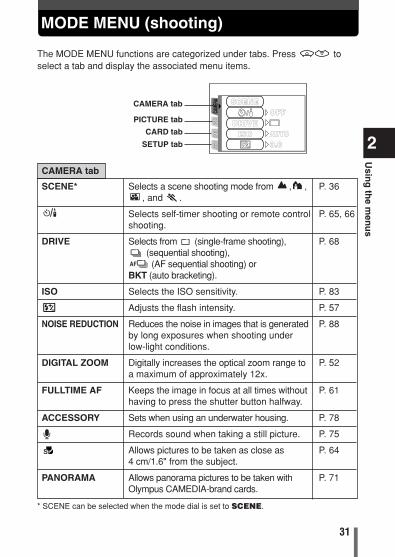
The MODE MENU functions are categorized under tabs. Press toselect a tab and display the associated menu items.
SCENE* Selects a scene shooting mode from , , P. 36 , and .
Selects self-timer shooting or remote control P. 65, 66shooting.
DRIVE Selects from (single-frame shooting), P. 68(sequential shooting), (AF sequential shooting) or
BKT (auto bracketing).
ISO Selects the ISO sensitivity. P. 83
Adjusts the flash intensity. P. 57
NOISE REDUCTION Reduces the noise in images that is generated P. 88by long exposures when shooting under low-light conditions.
DIGITAL ZOOM Digitally increases the optical zoom range to P. 52a maximum of approximately 12x.
FULLTIME AF Keeps the image in focus at all times without P. 61having to press the shutter button halfway.
ACCESSORY Sets when using an underwater housing. P. 78
Records sound when taking a still picture. P. 75
Allows pictures to be taken as close as P. 644 cm/1.6" from the subject.
PANORAMA Allows panorama pictures to be taken with P. 71Olympus CAMEDIA-brand cards.
CAMERA tab
CARD tab
PICTURE tab
SETUP tab
* SCENE can be selected when the mode dial is set to SCENE.
32
MODE MENU (shooting)
2
Usin
g th
e men
us
CARD tab
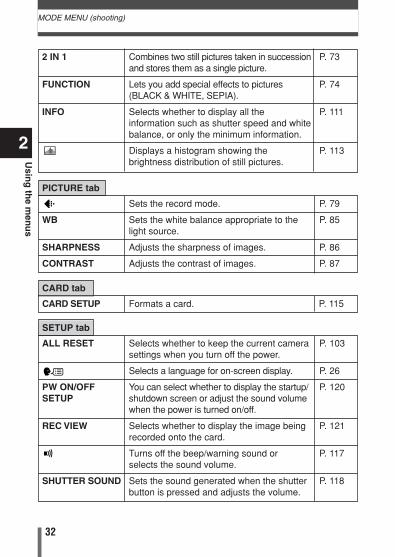
CARD SETUP Formats a card. P. 115
SETUP tab
ALL RESET Selects whether to keep the current camera P. 103settings when you turn off the power.
Selects a language for on-screen display. P. 26
PW ON/OFF You can select whether to display the startup/ P. 120SETUP shutdown screen or adjust the sound volume
when the power is turned on/off.
REC VIEW Selects whether to display the image being P. 121recorded onto the card.
Turns off the beep/warning sound or P. 117selects the sound volume.
SHUTTER SOUND Sets the sound generated when the shutter P. 118button is pressed and adjusts the volume.
PICTURE tab
Sets the record mode. P. 79
WB Sets the white balance appropriate to the P. 85light source.
SHARPNESS Adjusts the sharpness of images. P. 86
CONTRAST Adjusts the contrast of images. P. 87
2 IN 1 Combines two still pictures taken in succession P. 73and stores them as a single picture.
FUNCTION Lets you add special effects to pictures P. 74(BLACK & WHITE, SEPIA).
INFO Selects whether to display all the P. 111information such as shutter speed and white balance, or only the minimum information.
Displays a histogram showing the P. 113brightness distribution of still pictures.
33
MODE MENU (shooting)
2
Usin
g th
e men
us
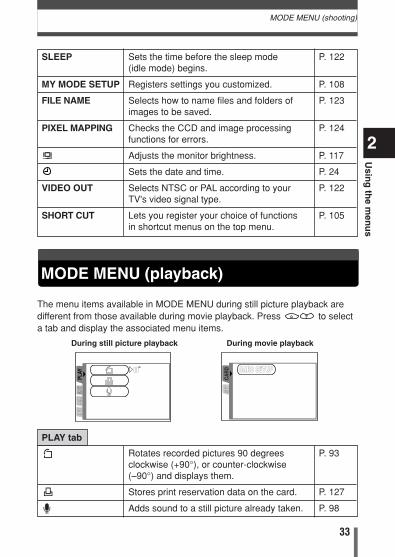
The menu items available in MODE MENU during still picture playback aredifferent from those available during movie playback. Press to selecta tab and display the associated menu items.
CARD
SET
CARD SETUP
SET
0
PLAY
EDIT
EDIT
CARD
During movie playbackDuring still picture playback
PLAY tab
Rotates recorded pictures 90 degrees P. 93clockwise (+90°), or counter-clockwise (–90°) and displays them.
Stores print reservation data on the card. P. 127
Adds sound to a still picture already taken. P. 98
SLEEP Sets the time before the sleep mode P. 122(idle mode) begins.
MY MODE SETUP Registers settings you customized. P. 108
FILE NAME Selects how to name files and folders of P. 123images to be saved.
PIXEL MAPPING Checks the CCD and image processing P. 124functions for errors.
Adjusts the monitor brightness. P. 117
Sets the date and time. P. 24
VIDEO OUT Selects NTSC or PAL according to your P. 122TV's video signal type.
SHORT CUT Lets you register your choice of functions P. 105in shortcut menus on the top menu.
MODE MENU (playback)
34
MODE MENU (playback)
2
Usin
g th
e men
us
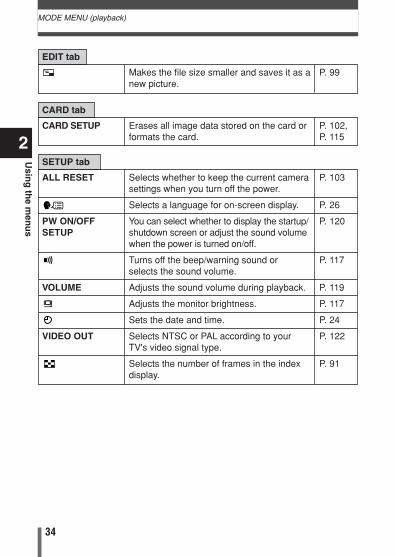
SETUP tab
ALL RESET Selects whether to keep the current camera P. 103settings when you turn off the power.
Selects a language for on-screen display. P. 26
PW ON/OFF You can select whether to display the startup/ P. 120SETUP shutdown screen or adjust the sound volume
when the power is turned on/off.
Turns off the beep/warning sound or P. 117selects the sound volume.
VOLUME Adjusts the sound volume during playback. P. 119
Adjusts the monitor brightness. P. 117
Sets the date and time. P. 24
VIDEO OUT Selects NTSC or PAL according to your P. 122TV's video signal type.
Selects the number of frames in the index P. 91display.
CARD tab
CARD SETUP Erases all image data stored on the card or P. 102, formats the card. P. 115
EDIT tab
Makes the file size smaller and saves it as a P. 99new picture.
35
Shooting modes3 Shooting basics
3
Sh
oo
ting
basics
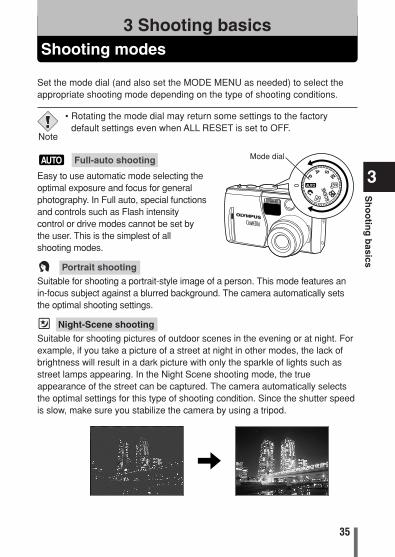
Full-auto shooting
Easy to use automatic mode selecting theoptimal exposure and focus for generalphotography. In Full auto, special functionsand controls such as Flash intensitycontrol or drive modes cannot be set bythe user. This is the simplest of allshooting modes.
Portrait shooting
Suitable for shooting a portrait-style image of a person. This mode features anin-focus subject against a blurred background. The camera automatically setsthe optimal shooting settings.
Night-Scene shooting
Suitable for shooting pictures of outdoor scenes in the evening or at night. Forexample, if you take a picture of a street at night in other modes, the lack ofbrightness will result in a dark picture with only the sparkle of lights such asstreet lamps appearing. In the Night Scene shooting mode, the trueappearance of the street can be captured. The camera automatically selectsthe optimal settings for this type of shooting condition. Since the shutter speedis slow, make sure you stabilize the camera by using a tripod.
Set the mode dial (and also set the MODE MENU as needed) to select theappropriate shooting mode depending on the type of shooting conditions.
• Rotating the mode dial may return some settings to the factorydefault settings even when ALL RESET is set to OFF.
Note
SCEN
E
Mode dial
36
Shooting modes
3
Sh
oo
ting
basics
SCENE Scene shooting
Enables you to select one of the following scene shooting modes available in themenu. ~ “How to use the menus” (P. 28), “MODE MENU (shooting)” (P. 31)• SCENE can be selected on the MODE MENU only when the mode dial is set
to SCENE.• It is useful to assign SCENE to the shotcut menu so you can access quickly.~ “SHORT CUT” (P. 105)
Landscape+Scene shootingSuitable for taking pictures of landscapes and other outdoor scenes. Thismode produces clear, sharp pictures with excellent detail, making it idealfor shooting natural scenery.
Landscape+Portrait shootingSuitable for taking photos of both your subject and the background. Thepicture is taken with the background as well as the subject in theforeground in focus. The camera automatically sets the optimal shootingsettings.
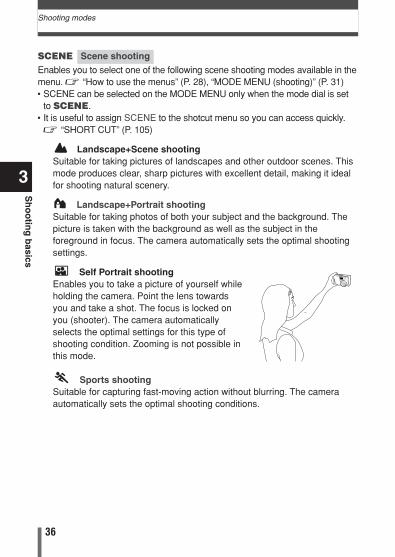
Self Portrait shootingEnables you to take a picture of yourself whileholding the camera. Point the lens towardsyou and take a shot. The focus is locked onyou (shooter). The camera automaticallyselects the optimal settings for this type ofshooting condition. Zooming is not possible inthis mode.
Sports shootingSuitable for capturing fast-moving action without blurring. The cameraautomatically sets the optimal shooting conditions.
37
Shooting modes
3
Sh
oo
ting
basics
Movie recording
Allows you to record movies. The camera sets the aperture and shutter speedautomatically. ~ “Movie recording” (P. 49)
My Mode
Enables you to make settings manually and register them in the mode dial'smode so you can call up your own shooting mode whenever you want.
Also, if you like the current settings you are using in the P, A, S or M mode,you can shift them to the mode to register.~ “MY MODE SETUP —Registering customized settings in the mode” (P. 108)
P Program shootingAllows you to shoot using an aperture and shutter speed that the camera sets.You can set the flash, white balance, or other functions manually.
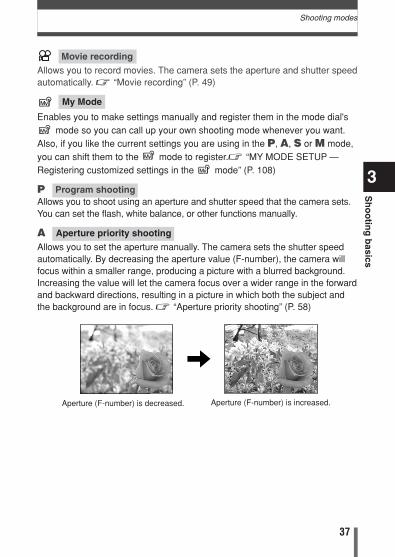
A Aperture priority shooting
Allows you to set the aperture manually. The camera sets the shutter speedautomatically. By decreasing the aperture value (F-number), the camera willfocus within a smaller range, producing a picture with a blurred background.Increasing the value will let the camera focus over a wider range in the forwardand backward directions, resulting in a picture in which both the subject andthe background are in focus. ~ “Aperture priority shooting” (P. 58)
Aperture (F-number) is decreased. Aperture (F-number) is increased.
38
Shooting modes
3
Sh
oo
ting
basics
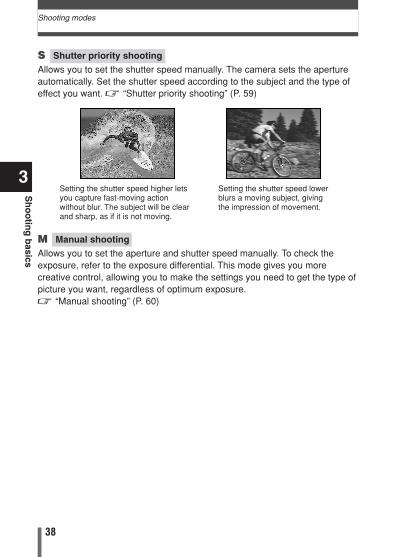
Setting the shutter speed higher letsyou capture fast-moving actionwithout blur. The subject will be clearand sharp, as if it is not moving.
Setting the shutter speed lowerblurs a moving subject, givingthe impression of movement.
S Shutter priority shootingAllows you to set the shutter speed manually. The camera sets the apertureautomatically. Set the shutter speed according to the subject and the type ofeffect you want. ~ “Shutter priority shooting” (P. 59)
M Manual shooting
Allows you to set the aperture and shutter speed manually. To check theexposure, refer to the exposure differential. This mode gives you morecreative control, allowing you to make the settings you need to get the type ofpicture you want, regardless of optimum exposure. ~ “Manual shooting” (P. 60)
39
3
Sh
oo
ting
basics
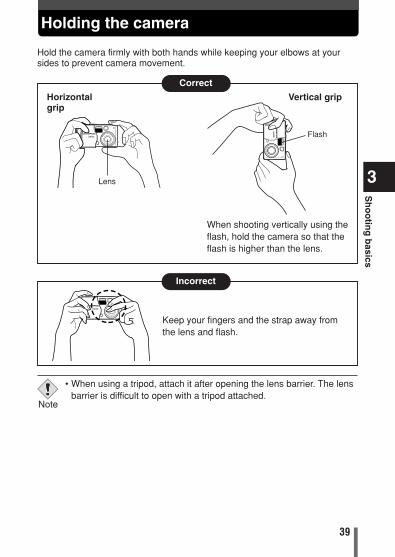
Holding the camera
Hold the camera firmly with both hands while keeping your elbows at yoursides to prevent camera movement.
• When using a tripod, attach it after opening the lens barrier. The lensbarrier is difficult to open with a tripod attached.
Note
Vertical gripHorizontalgrip
Flash
Keep your fingers and the strap away fromthe lens and flash.
Correct
Incorrect
When shooting vertically using theflash, hold the camera so that theflash is higher than the lens.
Lens
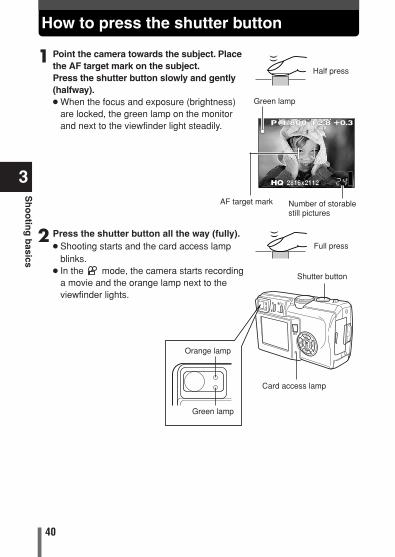
1 Point the camera towards the subject. Placethe AF target mark on the subject.Press the shutter button slowly and gently(halfway).● When the focus and exposure (brightness)
are locked, the green lamp on the monitorand next to the viewfinder light steadily.
2 Press the shutter button all the way (fully).● Shooting starts and the card access lamp
blinks.● In the mode, the camera starts recording
a movie and the orange lamp next to theviewfinder lights.
40
3
Sh
oo
ting
basics
How to press the shutter button
Half press
Full press
P 1/800 F2.8 +0.3
HQ 2816x21122816x2112
Number of storablestill pictures
AF target mark
Green lamp
Card access lamp
Shutter button
Green lamp
Orange lamp
41
Taking still pictures
3
Sh
oo
ting
basics
Available modes
AF target mark
Number of storable still pictures
Memory gauge
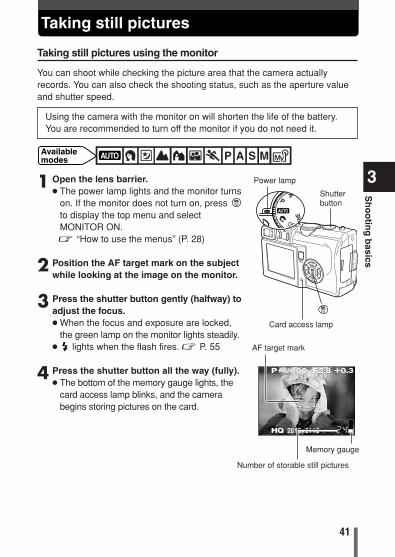
Taking still pictures using the monitor
You can shoot while checking the picture area that the camera actuallyrecords. You can also check the shooting status, such as the aperture valueand shutter speed.
1 Open the lens barrier.● The power lamp lights and the monitor turns
on. If the monitor does not turn on, press to display the top menu and selectMONITOR ON.~ “How to use the menus” (P. 28)
2 Position the AF target mark on the subjectwhile looking at the image on the monitor.
3 Press the shutter button gently (halfway) toadjust the focus.● When the focus and exposure are locked,
the green lamp on the monitor lights steadily.● lights when the flash fires. ~ P. 55
4 Press the shutter button all the way (fully).● The bottom of the memory gauge lights, the
card access lamp blinks, and the camerabegins storing pictures on the card.
Shutterbutton
Card access lamp
Power lamp
Using the camera with the monitor on will shorten the life of the battery.You are recommended to turn off the monitor if you do not need it.
P 1/800 F2.8 +0.3
HQ 2816x2112
SCEN
E
42
Taking still pictures
3
Sh
oo
ting
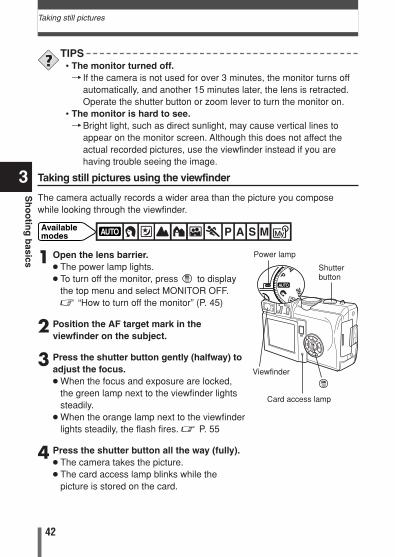
basics 1 Open the lens barrier.
● The power lamp lights.● To turn off the monitor, press to display
the top menu and select MONITOR OFF.~ “How to turn off the monitor” (P. 45)
2 Position the AF target mark in theviewfinder on the subject.
3 Press the shutter button gently (halfway) toadjust the focus.● When the focus and exposure are locked,
the green lamp next to the viewfinder lightssteadily.
● When the orange lamp next to the viewfinderlights steadily, the flash fires. ~ P. 55
4 Press the shutter button all the way (fully).● The camera takes the picture.● The card access lamp blinks while the
picture is stored on the card.
Taking still pictures using the viewfinder
The camera actually records a wider area than the picture you composewhile looking through the viewfinder.
Shutterbutton
Viewfinder
Available modes
Card access lamp
Power lamp
SCEN
E
TIPS• The monitor turned off.T If the camera is not used for over 3 minutes, the monitor turns off
automatically, and another 15 minutes later, the lens is retracted.Operate the shutter button or zoom lever to turn the monitor on.
• The monitor is hard to see.TBright light, such as direct sunlight, may cause vertical lines to
appear on the monitor screen. Although this does not affect theactual recorded pictures, use the viewfinder instead if you arehaving trouble seeing the image.
43
Taking still pictures
3
Sh
oo
ting
basics
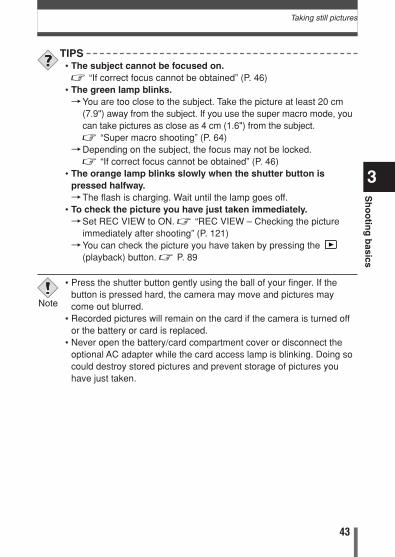
TIPS• The subject cannot be focused on.~ “If correct focus cannot be obtained” (P. 46)
• The green lamp blinks.TYou are too close to the subject. Take the picture at least 20 cm
(7.9") away from the subject. If you use the super macro mode, youcan take pictures as close as 4 cm (1.6") from the subject.~ “Super macro shooting” (P. 64)
TDepending on the subject, the focus may not be locked. ~ “If correct focus cannot be obtained” (P. 46)
• The orange lamp blinks slowly when the shutter button ispressed halfway.TThe flash is charging. Wait until the lamp goes off.
• To check the picture you have just taken immediately.TSet REC VIEW to ON. ~ “REC VIEW – Checking the picture
immediately after shooting” (P. 121)TYou can check the picture you have taken by pressing the
(playback) button. ~ P. 89
• Press the shutter button gently using the ball of your finger. If thebutton is pressed hard, the camera may move and pictures maycome out blurred.
• Recorded pictures will remain on the card if the camera is turned offor the battery or card is replaced.
• Never open the battery/card compartment cover or disconnect theoptional AC adapter while the card access lamp is blinking. Doing socould destroy stored pictures and prevent storage of pictures youhave just taken.
Note
44
Taking still pictures
3
Sh
oo
ting
basics
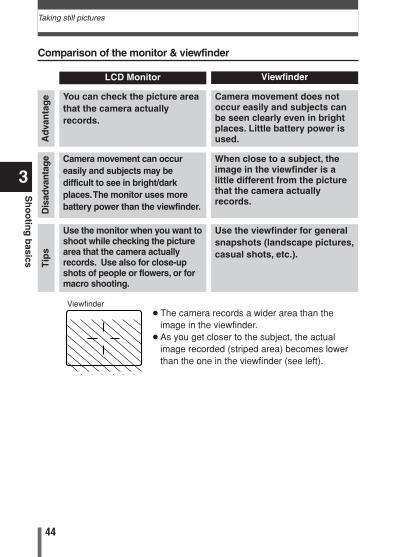
Comparison of the monitor & viewfinder
Viewfinder LCD Monitor
Camera movement does notoccur easily and subjects canbe seen clearly even in brightplaces. Little battery power isused.
You can check the picture areathat the camera actuallyrecords.
When close to a subject, theimage in the viewfinder is alittle different from the picturethat the camera actuallyrecords.
Camera movement can occureasily and subjects may bedifficult to see in bright/darkplaces.The monitor uses morebattery power than the viewfinder.
Use the viewfinder for generalsnapshots (landscape pictures,casual shots, etc.).
Use the monitor when you want toshoot while checking the picturearea that the camera actuallyrecords. Use also for close-upshots of people or flowers, or formacro shooting.
● The camera records a wider area than theimage in the viewfinder.
● As you get closer to the subject, the actualimage recorded (striped area) becomes lowerthan the one in the viewfinder (see left).
Viewfinder
Ad
van
tag
eD
isad
vant
age
Tip
s

45
Taking still pictures
3
Sh
oo
ting
basics
How to turn off the monitor
You can set the monitor to turn on or off when the camera is powered on inthe shooting mode.
1 Press .● The top menu is displayed.
2 Press .
3 The monitor turns off (MONITOR OFF).● To turn the monitor back on, press to
display the top menu and press toselect MONITOR ON. MONITOR ON is displayed on the top menuwhen the monitor is set to off.
MODE MENU
MONITOR OFF
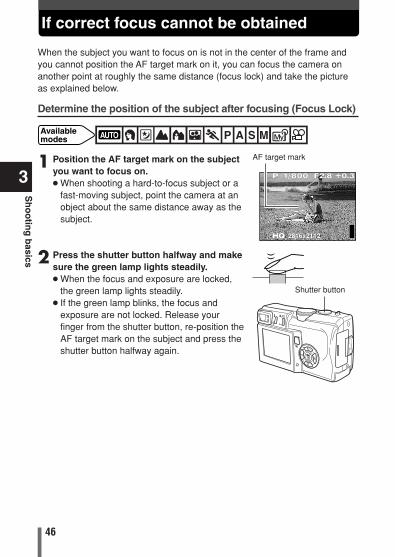
If correct focus cannot be obtained
46
3
Sh
oo
ting
basics
Determine the position of the subject after focusing (Focus Lock)
AF target mark1 Position the AF target mark on the subjectyou want to focus on.● When shooting a hard-to-focus subject or a
fast-moving subject, point the camera at anobject about the same distance away as thesubject.
2 Press the shutter button halfway and makesure the green lamp lights steadily.● When the focus and exposure are locked,
the green lamp lights steadily.● If the green lamp blinks, the focus and
exposure are not locked. Release yourfinger from the shutter button, re-position theAF target mark on the subject and press theshutter button halfway again.
Available modes
Shutter button
When the subject you want to focus on is not in the center of the frame andyou cannot position the AF target mark on it, you can focus the camera onanother point at roughly the same distance (focus lock) and take the pictureas explained below.
P 1/800 F2.8 +0.3
HQ 2816x2112
47
If correct focus cannot be obtained
3
Sh
oo
ting
basics
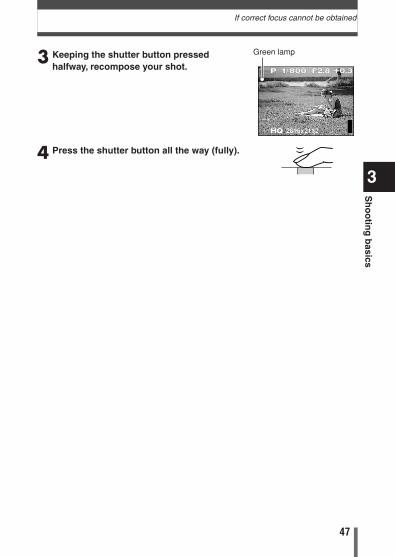
3 Keeping the shutter button pressedhalfway, recompose your shot.
4 Press the shutter button all the way (fully).
Green lamp
P 1/800 F2.8 +0.3
HQ 2816x2112
48
If correct focus cannot be obtained
3
Sh
oo
ting
basics
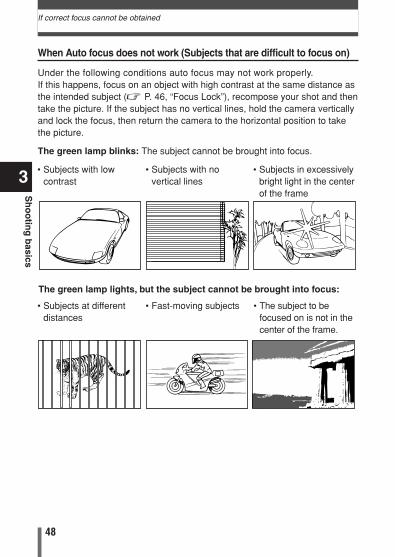
When Auto focus does not work (Subjects that are difficult to focus on)
Under the following conditions auto focus may not work properly.If this happens, focus on an object with high contrast at the same distance asthe intended subject (~ P. 46, “Focus Lock”), recompose your shot and thentake the picture. If the subject has no vertical lines, hold the camera verticallyand lock the focus, then return the camera to the horizontal position to takethe picture.
The green lamp blinks: The subject cannot be brought into focus.
• Subjects with lowcontrast
• Subjects with novertical lines
• Subjects in excessivelybright light in the centerof the frame
The green lamp lights, but the subject cannot be brought into focus:
• Subjects at differentdistances
• Fast-moving subjects • The subject to befocused on is not in thecenter of the frame.
49
3
Sh
oo
ting
basics
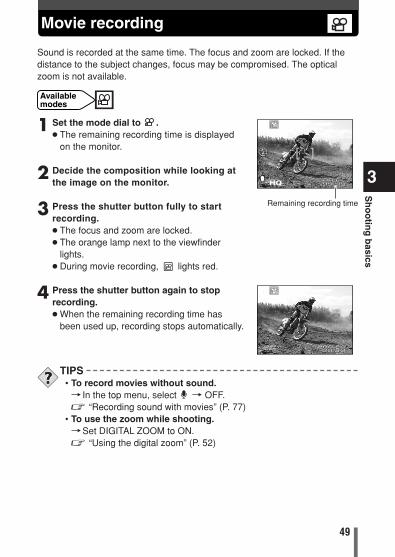
Movie recording
1 Set the mode dial to .● The remaining recording time is displayed
on the monitor.
2 Decide the composition while looking atthe image on the monitor.
3 Press the shutter button fully to startrecording.● The focus and zoom are locked.● The orange lamp next to the viewfinder
lights.● During movie recording, lights red.
4 Press the shutter button again to stoprecording.● When the remaining recording time has
been used up, recording stops automatically.
Available modes
Remaining recording time
Sound is recorded at the same time. The focus and zoom are locked. If thedistance to the subject changes, focus may be compromised. The opticalzoom is not available.
HQ
TIPS• To record movies without sound.T In the top menu, select T OFF. ~ “Recording sound with movies” (P. 77)
• To use the zoom while shooting.TSet DIGITAL ZOOM to ON. ~ “Using the digital zoom” (P. 52)
50
3
Sh
oo
ting
basics
Movie recording
• The flash cannot be used.• It takes longer to store movies than still pictures.• The remaining recording time depends on the selected record mode,
free space available on the card, etc.
Note
• Recording will continue until the card is full unless stopped by pressingthe shutter button.
• If a single movie recording uses up all of the card’s memory, createspace on the card by deleting the movie or downloading it to a PC.
Notes for recording movies over a long time
51
Zoom
3
Sh
oo
ting
basics
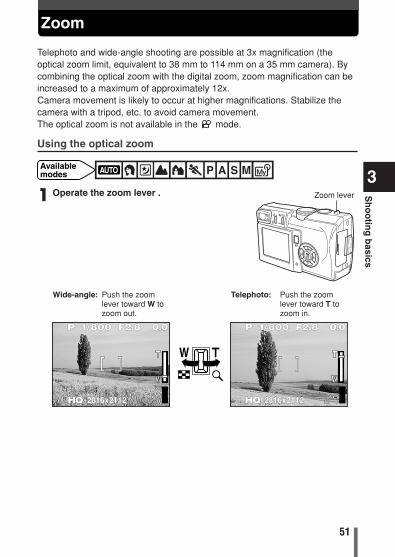
Telephoto and wide-angle shooting are possible at 3x magnification (theoptical zoom limit, equivalent to 38 mm to 114 mm on a 35 mm camera). Bycombining the optical zoom with the digital zoom, zoom magnification can beincreased to a maximum of approximately 12x. Camera movement is likely to occur at higher magnifications. Stabilize thecamera with a tripod, etc. to avoid camera movement.The optical zoom is not available in the mode.
Using the optical zoom
Available modes
1 Operate the zoom lever .
Wide-angle: Push the zoomlever toward W tozoom out.
Telephoto: Push the zoomlever toward T tozoom in.
HQ 2816x2112 HQ 2816x2112
P 1/800 F2.8 0.0P 1/800 F2.8 0.0
Zoom lever
52
3
Sh
oo
ting
basics
Zoom
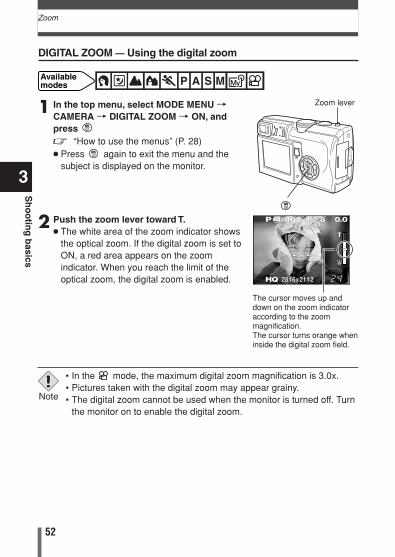
1 In the top menu, select MODE MENU TCAMERA T DIGITAL ZOOM T ON, andpress ~ “How to use the menus” (P. 28)● Press again to exit the menu and the
subject is displayed on the monitor.
2 Push the zoom lever toward T.● The white area of the zoom indicator shows
the optical zoom. If the digital zoom is set toON, a red area appears on the zoomindicator. When you reach the limit of theoptical zoom, the digital zoom is enabled.
DIGITAL ZOOM — Using the digital zoom
Available modes
Zoom lever
The cursor moves up anddown on the zoom indicatoraccording to the zoommagnification.The cursor turns orange wheninside the digital zoom field.
• In the mode, the maximum digital zoom magnification is 3.0x.• Pictures taken with the digital zoom may appear grainy.• The digital zoom cannot be used when the monitor is turned off. Turn
the monitor on to enable the digital zoom.
Note
P 1/800 F2.8 0.0
HQ 2816x21122816x2112
53
3
Sh
oo
ting
basics
Flash shooting
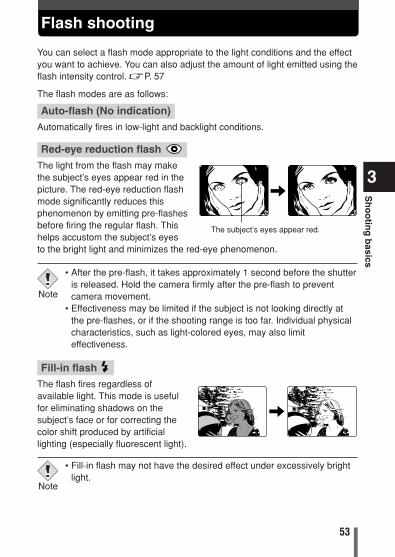
Fill-in flash The flash fires regardless ofavailable light. This mode is usefulfor eliminating shadows on thesubject’s face or for correcting thecolor shift produced by artificiallighting (especially fluorescent light).
Red-eye reduction flash The light from the flash may makethe subject’s eyes appear red in thepicture. The red-eye reduction flashmode significantly reduces thisphenomenon by emitting pre-flashesbefore firing the regular flash. Thishelps accustom the subject’s eyes to the bright light and minimizes the red-eye phenomenon.
You can select a flash mode appropriate to the light conditions and the effectyou want to achieve. You can also adjust the amount of light emitted using theflash intensity control. ~P. 57
The flash modes are as follows:
The subject’s eyes appear red.
Auto-flash (No indication)Automatically fires in low-light and backlight conditions.
• After the pre-flash, it takes approximately 1 second before the shutteris released. Hold the camera firmly after the pre-flash to preventcamera movement.
• Effectiveness may be limited if the subject is not looking directly atthe pre-flashes, or if the shooting range is too far. Individual physicalcharacteristics, such as light-colored eyes, may also limiteffectiveness.
Note
• Fill-in flash may not have the desired effect under excessively brightlight.
Note
54
3
Sh
oo
ting
basics
Flash shooting
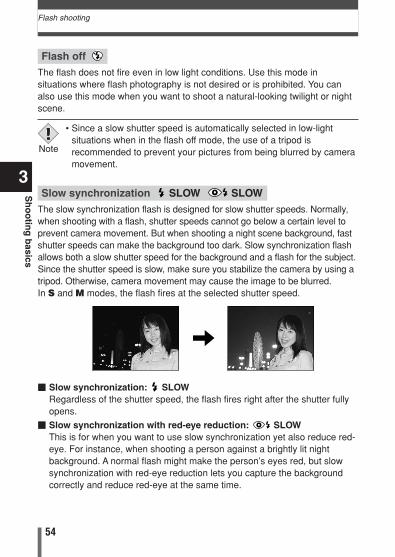
Slow synchronization SLOW SLOWThe slow synchronization flash is designed for slow shutter speeds. Normally,when shooting with a flash, shutter speeds cannot go below a certain level toprevent camera movement. But when shooting a night scene background, fastshutter speeds can make the background too dark. Slow synchronization flashallows both a slow shutter speed for the background and a flash for the subject.Since the shutter speed is slow, make sure you stabilize the camera by using atripod. Otherwise, camera movement may cause the image to be blurred.In S and M modes, the flash fires at the selected shutter speed.
Flash off The flash does not fire even in low light conditions. Use this mode insituations where flash photography is not desired or is prohibited. You canalso use this mode when you want to shoot a natural-looking twilight or nightscene.
� Slow synchronization: SLOWRegardless of the shutter speed, the flash fires right after the shutter fullyopens.
� Slow synchronization with red-eye reduction: SLOWThis is for when you want to use slow synchronization yet also reduce red-eye. For instance, when shooting a person against a brightly lit nightbackground. A normal flash might make the person’s eyes red, but slowsynchronization with red-eye reduction lets you capture the backgroundcorrectly and reduce red-eye at the same time.
• Since a slow shutter speed is automatically selected in low-lightsituations when in the flash off mode, the use of a tripod isrecommended to prevent your pictures from being blurred by cameramovement.
Note

55
3
Sh
oo
ting
basics
Flash shooting
Using the flash
1 Press the (flash mode) buttonrepeatedly until the desired flash modeindication appears.
● If is not pressed for 2 seconds, theselection screen disappears.
2 Take the picture.● The orange lamp and the (flash standby)
mark light when the flash is ready to fire.
Flash working rangeW (max.): Approx. 0.2 m to 3.4 m (0.6 ft to 11.2 ft)T (max.) : Approx. 0.3 m to 2.0 m (1.0 ft to 6.6 ft)
Auto-flash
SLOW SLOW
Mode indication
button Shutter button
Available modes
Orange lamp
�
�
�
�
��
P 1/30 F2.8
HQ 2816x2112
0.0
mark
P 1/30 F2.8
HQ 2816x2112
0.0
56
3
Sh
oo
ting
basics
Flash shooting
–
–
–
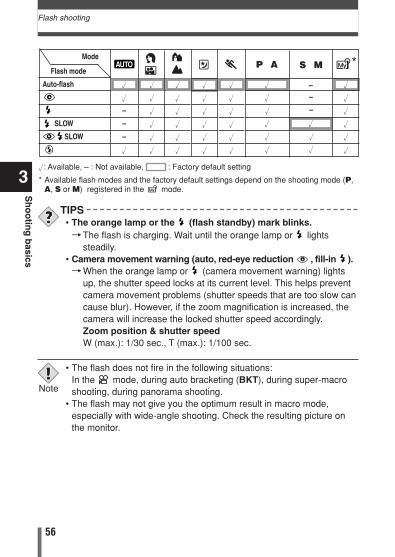
: Available, – : Not available, : Factory default setting
* Available flash modes and the factory default settings depend on the shooting mode (P,A, S or M) registered in the mode.
Mode
Flash mode
Auto-flash
SLOW
SLOW
––
–
P A *
S M
TIPS• The orange lamp or the (flash standby) mark blinks.TThe flash is charging. Wait until the orange lamp or lights
steadily.• Camera movement warning (auto, red-eye reduction , fill-in ).TWhen the orange lamp or (camera movement warning) lights
up, the shutter speed locks at its current level. This helps preventcamera movement problems (shutter speeds that are too slow cancause blur). However, if the zoom magnification is increased, thecamera will increase the locked shutter speed accordingly.Zoom position & shutter speedW (max.): 1/30 sec., T (max.): 1/100 sec.
• The flash does not fire in the following situations:In the mode, during auto bracketing (BKT), during super-macroshooting, during panorama shooting.
• The flash may not give you the optimum result in macro mode,especially with wide-angle shooting. Check the resulting picture onthe monitor.
Note
57
3
Sh
oo
ting
basics
Flash shooting
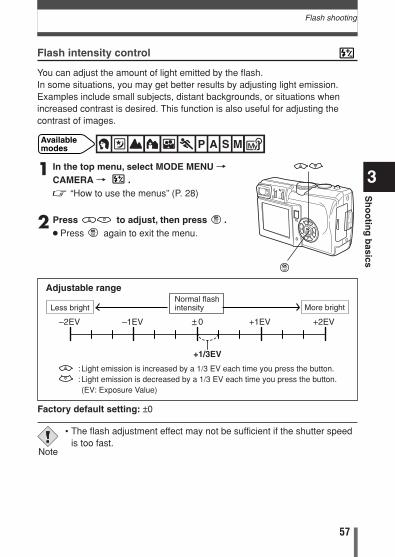
+1/3EV
Less brightNormal flash intensity More bright
Adjustable range
: Light emission is increased by a 1/3 EV each time you press the button.: Light emission is decreased by a 1/3 EV each time you press the button. (EV: Exposure Value)
1 In the top menu, select MODE MENU TCAMERA T .~ “How to use the menus” (P. 28)
2 Press to adjust, then press .● Press again to exit the menu.
Factory default setting: ±0
Available modes
Flash intensity control
You can adjust the amount of light emitted by the flash.In some situations, you may get better results by adjusting light emission.Examples include small subjects, distant backgrounds, or situations whenincreased contrast is desired. This function is also useful for adjusting thecontrast of images.
• The flash adjustment effect may not be sufficient if the shutter speedis too fast.
Note
58
4
Ad
vanced
sho
otin
g
Aperture priority shooting4 Advanced shooting
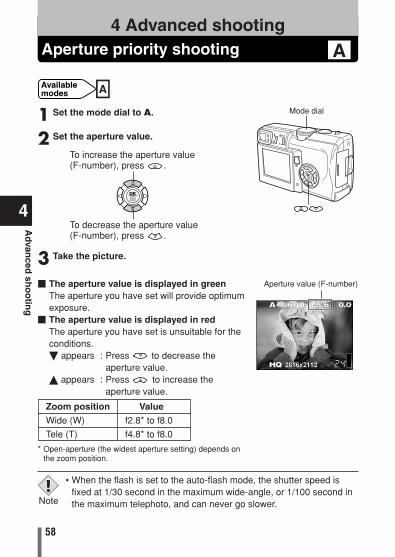
1 Set the mode dial to A.
2 Set the aperture value.
3 Take the picture.
� The aperture value is displayed in greenThe aperture you have set will provide optimumexposure.
� The aperture value is displayed in redThe aperture you have set is unsuitable for theconditions.� appears : Press to decrease the
aperture value.� appears : Press to increase the
aperture value.
Aperture value (F-number)
Zoom position Value
Wide (W) f2.8* to f8.0
Tele (T) f4.8* to f8.0
A 1/600 F5.6
HQ 2816x21122816x2112
0.0
Available modes
To increase the aperture value(F-number), press .
To decrease the aperture value(F-number), press .
* Open-aperture (the widest aperture setting) depends onthe zoom position.
• When the flash is set to the auto-flash mode, the shutter speed isfixed at 1/30 second in the maximum wide-angle, or 1/100 second inthe maximum telephoto, and can never go slower.Note
Mode dial
A
59
4
Ad
vanced
sho
otin
gShutter priority shooting
S 1/750 F2.8
HQ 2816x2112
0.0
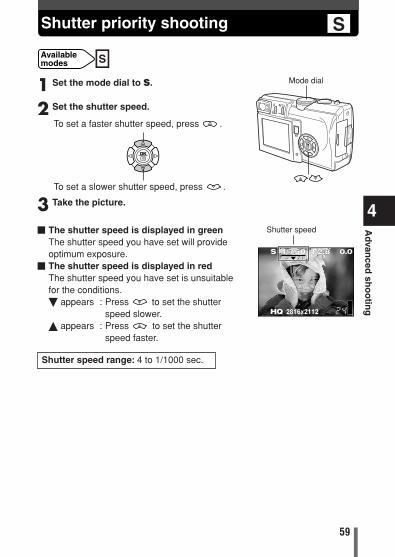
1 Set the mode dial to S.
2 Set the shutter speed.
3 Take the picture.
� The shutter speed is displayed in greenThe shutter speed you have set will provideoptimum exposure.
� The shutter speed is displayed in redThe shutter speed you have set is unsuitablefor the conditions.� appears : Press to set the shutter
speed slower.� appears : Press to set the shutter
speed faster.
Shutter speed
Shutter speed range: 4 to 1/1000 sec.
To set a faster shutter speed, press .
To set a slower shutter speed, press .
Available modes
Mode dial
S
60
4
Ad
vanced
sho
otin
g
Manual shooting
M 1/800 F2.8 –1.0
HQ 2816x21122816x2112
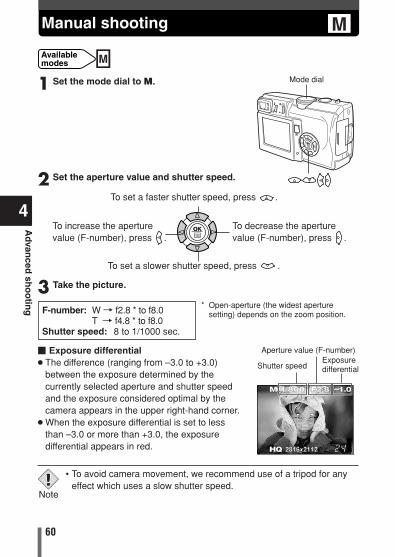
1 Set the mode dial to M.
2 Set the aperture value and shutter speed.
3 Take the picture.
Aperture value (F-number)
Shutter speedExposuredifferential
F-number: W T f2.8 * to f8.0T T f4.8 * to f8.0
Shutter speed: 8 to 1/1000 sec.
� Exposure differential● The difference (ranging from –3.0 to +3.0)
between the exposure determined by thecurrently selected aperture and shutter speedand the exposure considered optimal by thecamera appears in the upper right-hand corner.
● When the exposure differential is set to lessthan –3.0 or more than +3.0, the exposuredifferential appears in red.
To increase the aperturevalue (F-number), press .
To decrease the aperturevalue (F-number), press .
To set a faster shutter speed, press .
To set a slower shutter speed, press .
Available modes
* Open-aperture (the widest aperturesetting) depends on the zoom position.
• To avoid camera movement, we recommend use of a tripod for anyeffect which uses a slow shutter speed.
Note
Mode dial
M
61
4
Ad
vanced
sho
otin
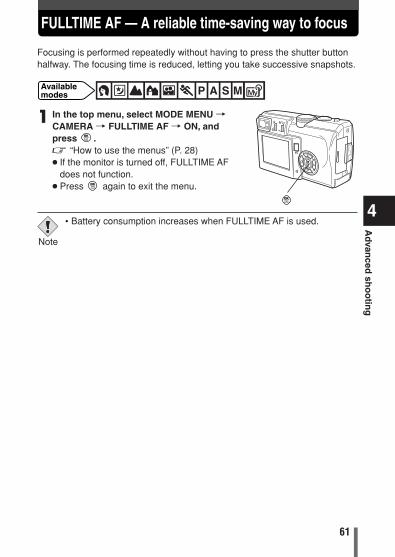
gFULLTIME AF — A reliable time-saving way to focus
Focusing is performed repeatedly without having to press the shutter buttonhalfway. The focusing time is reduced, letting you take successive snapshots.
1 In the top menu, select MODE MENU TCAMERA T FULLTIME AF T ON, andpress .~ “How to use the menus” (P. 28)● If the monitor is turned off, FULLTIME AF
does not function.● Press again to exit the menu.
Available modes
• Battery consumption increases when FULLTIME AF is used.
Note
62
4
Ad
vanced
sho
otin
g
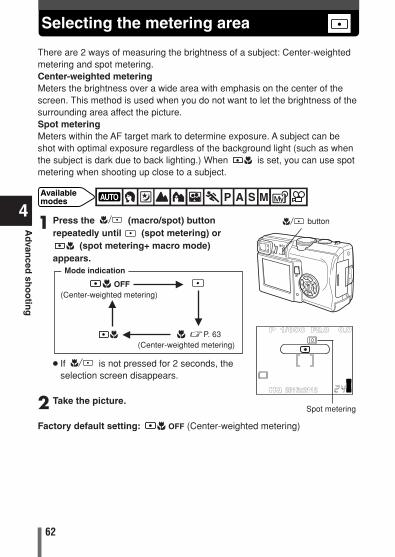
Selecting the metering area
There are 2 ways of measuring the brightness of a subject: Center-weightedmetering and spot metering.Center-weighted meteringMeters the brightness over a wide area with emphasis on the center of thescreen. This method is used when you do not want to let the brightness of thesurrounding area affect the picture.Spot meteringMeters within the AF target mark to determine exposure. A subject can beshot with optimal exposure regardless of the background light (such as whenthe subject is dark due to back lighting.) When is set, you can use spotmetering when shooting up close to a subject.
1 Press the (macro/spot) buttonrepeatedly until (spot metering) or
(spot metering+ macro mode)appears.
● If is not pressed for 2 seconds, theselection screen disappears.
2 Take the picture.
Factory default setting: OFF (Center-weighted metering)
Available modes
button
Spot metering
P 1/800 F2.8
HQ 2816x2112
0.0
OFF(Center-weighted metering)
~P. 63(Center-weighted metering)
Mode indication
�
�
�
�

63
4
Ad
vanced
sho
otin
gMacro mode shooting — Taking close-up pictures
1 Press the (macro/spot) buttonrepeatedly until (macro mode) or (spot metering+ macro mode) appears.
● If is not pressed for 2 seconds, theselection screen disappears.
2 Take the picture while observing yoursubject on the monitor.
Macro shooting rangeWide (W) : 20 cm to 50 cm (0.7 ft to 1.6 ft)Tele (T) : 30 cm to 50 cm (1.0 ft to 1.6 ft)
Macro shooting allows you to shoot from as close as 30 cm (1.0 ft) to a subjectwhile the zoom lever is pressed to the maximum T position. You can fill theentire frame with a very small subject. As the center of the frame (within the AFtarget mark) is metered and optimal exposure is obtained when is set, thepicture turns out well. ~ “Selecting the metering area” (P. 62)
Normal shooting Macro mode shooting
Available modes
P 1/800 F2.8
HQ 2816x21122816x2112
0.0
Macro mark
button
Factory default setting: OFF (Center-weighted metering)
• If you use the flash in macro shooting, shadows may be noticeableand the correct exposure may not be achieved.
Note
OFF(Center-weighted metering)
(Center-weighted metering)
Mode indication
�
�
�
�
64
4
Ad
vanced
sho
otin
g
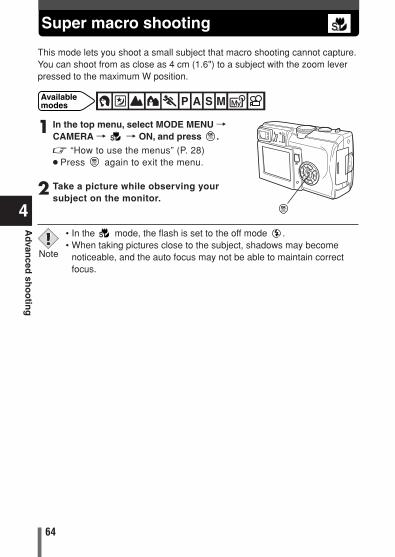
Super macro shooting
This mode lets you shoot a small subject that macro shooting cannot capture.You can shoot from as close as 4 cm (1.6") to a subject with the zoom leverpressed to the maximum W position.
Available modes
1 In the top menu, select MODE MENU TCAMERA T T ON, and press .
~ “How to use the menus” (P. 28)● Press again to exit the menu.
2 Take a picture while observing yoursubject on the monitor.
• In the mode, the flash is set to the off mode .• When taking pictures close to the subject, shadows may become
noticeable, and the auto focus may not be able to maintain correctfocus.
Note
65
4
Ad
vanced
sho
otin
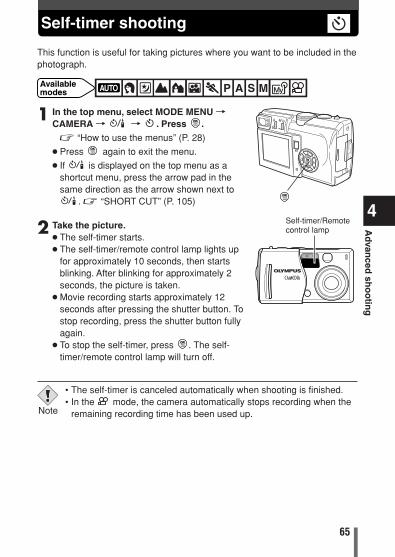
gSelf-timer shooting
1 In the top menu, select MODE MENU TCAMERA T T . Press .~ “How to use the menus” (P. 28)
● Press again to exit the menu.
● If is displayed on the top menu as ashortcut menu, press the arrow pad in thesame direction as the arrow shown next to
. ~ “SHORT CUT” (P. 105)
2 Take the picture.● The self-timer starts.● The self-timer/remote control lamp lights up
for approximately 10 seconds, then startsblinking. After blinking for approximately 2seconds, the picture is taken.
● Movie recording starts approximately 12seconds after pressing the shutter button. Tostop recording, press the shutter button fullyagain.
● To stop the self-timer, press . The self-timer/remote control lamp will turn off.
This function is useful for taking pictures where you want to be included in thephotograph.
Available modes
Self-timer/Remotecontrol lamp
• The self-timer is canceled automatically when shooting is finished.• In the mode, the camera automatically stops recording when the
remaining recording time has been used up.Note
66
4
Ad
vanced
sho
otin
g
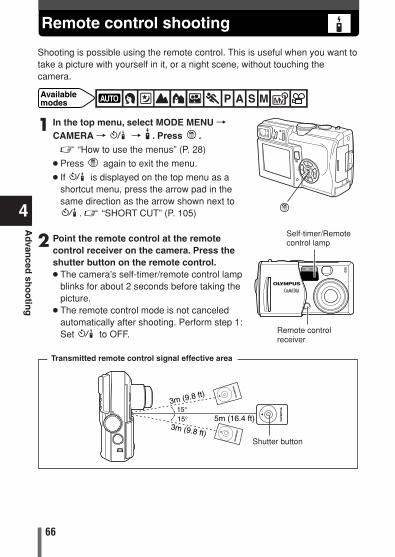
Remote control shooting
1 In the top menu, select MODE MENU TCAMERA T T . Press .
~ “How to use the menus” (P. 28)
● Press again to exit the menu.
● If is displayed on the top menu as ashortcut menu, press the arrow pad in thesame direction as the arrow shown next to
. ~ “SHORT CUT” (P. 105)
2 Point the remote control at the remotecontrol receiver on the camera. Press theshutter button on the remote control.● The camera’s self-timer/remote control lamp
blinks for about 2 seconds before taking thepicture.
● The remote control mode is not canceledautomatically after shooting. Perform step 1:Set to OFF.
Shooting is possible using the remote control. This is useful when you want totake a picture with yourself in it, or a night scene, without touching thecamera.
Available modes
Remote controlreceiver
Shutter button
Self-timer/Remotecontrol lamp
5m (16.4 ft)15°15°
3m (9.8 ft)
3m (9.8 ft)
Transmitted remote control signal effective area
67
4
Ad
vanced
sho
otin
gRemote control shooting
TIPS• If the camera’s self-timer/remote control lamp does not blink
after pressing the shutter button on the remote control.TThe remote control may be too far away from the camera. Move
the remote control or change your position as necessary so thatthe remote control signal can reach the camera, then press theshutter button again on the remote control.
TThe battery in the remote control device is running low. Replacewith a new battery. ~ “How to replace the battery (CR2025) ofthe remote control device” (P. 162)
• If the remote control receiver is exposed to strong light, such asdirect sunlight, shooting may not take place, even if the remotecontrol is within the effective signal distance.
• To shoot sequential shots using the remote control, press and hold theshutter button on the remote control. If the camera does not receivethe remote control signal properly, sequential shooting may stop.
Note
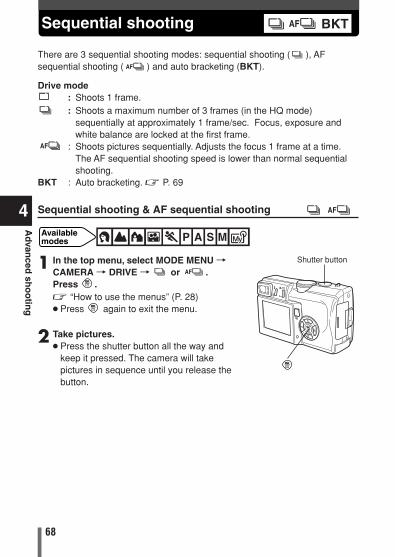
68
4
Ad
vanced
sho
otin
g
Sequential shooting
Sequential shooting & AF sequential shooting
1 In the top menu, select MODE MENU TCAMERA T DRIVE T or .Press .~ “How to use the menus” (P. 28)● Press again to exit the menu.
2 Take pictures.● Press the shutter button all the way and
keep it pressed. The camera will takepictures in sequence until you release thebutton.
Available modes
Shutter button
There are 3 sequential shooting modes: sequential shooting ( ), AFsequential shooting ( ) and auto bracketing (BKT).
Drive mode: Shoots 1 frame.: Shoots a maximum number of 3 frames (in the HQ mode)
sequentially at approximately 1 frame/sec. Focus, exposure and white balance are locked at the first frame.
: Shoots pictures sequentially. Adjusts the focus 1 frame at a time.The AF sequential shooting speed is lower than normal sequential shooting.
BKT : Auto bracketing. ~ P. 69
BKT
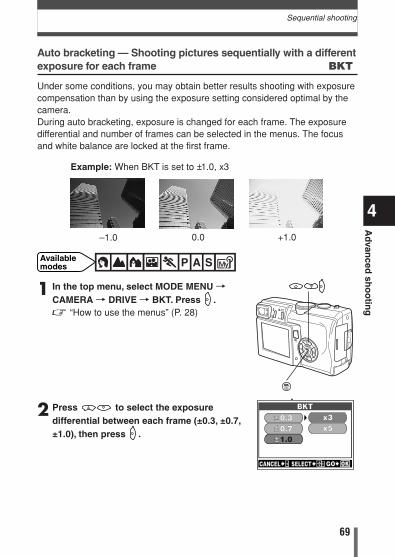
69
4
Ad
vanced
sho
otin
gSequential shooting
Example: When BKT is set to ±1.0, x3
1 In the top menu, select MODE MENU TCAMERA T DRIVE T BKT. Press .~ “How to use the menus” (P. 28)
2 Press to select the exposuredifferential between each frame (±0.3, ±0.7,±1.0), then press .
BKTBKT
CANCEL SELECT GO
0.70.3 x3
x51.0
Available modes
Auto bracketing — Shooting pictures sequentially with a differentexposure for each frame BKT
Under some conditions, you may obtain better results shooting with exposurecompensation than by using the exposure setting considered optimal by thecamera. During auto bracketing, exposure is changed for each frame. The exposuredifferential and number of frames can be selected in the menus. The focusand white balance are locked at the first frame.
–1.0 0.0 +1.0
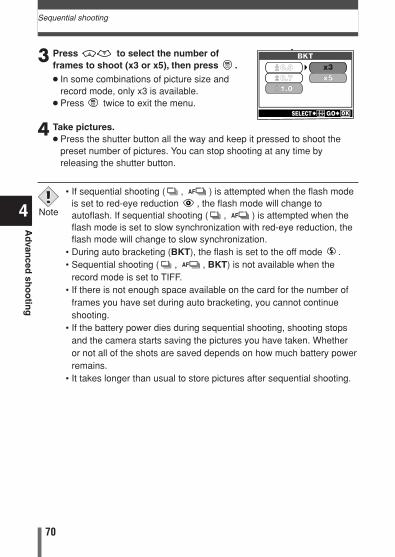
70
4
Ad
vanced
sho
otin
g
Sequential shooting
3 Press to select the number offrames to shoot (x3 or x5), then press .
● In some combinations of picture size andrecord mode, only x3 is available.
● Press twice to exit the menu.
4 Take pictures.● Press the shutter button all the way and keep it pressed to shoot the
preset number of pictures. You can stop shooting at any time byreleasing the shutter button.
BKTBKT
0.70.3 x3
x51.0
SELECT GO
• If sequential shooting ( , ) is attempted when the flash modeis set to red-eye reduction , the flash mode will change toautoflash. If sequential shooting ( , ) is attempted when theflash mode is set to slow synchronization with red-eye reduction, theflash mode will change to slow synchronization.
• During auto bracketing (BKT), the flash is set to the off mode .• Sequential shooting ( , , BKT) is not available when the
record mode is set to TIFF.• If there is not enough space available on the card for the number of
frames you have set during auto bracketing, you cannot continueshooting.
• If the battery power dies during sequential shooting, shooting stopsand the camera starts saving the pictures you have taken. Whetheror not all of the shots are saved depends on how much battery powerremains.
• It takes longer than usual to store pictures after sequential shooting.
Note
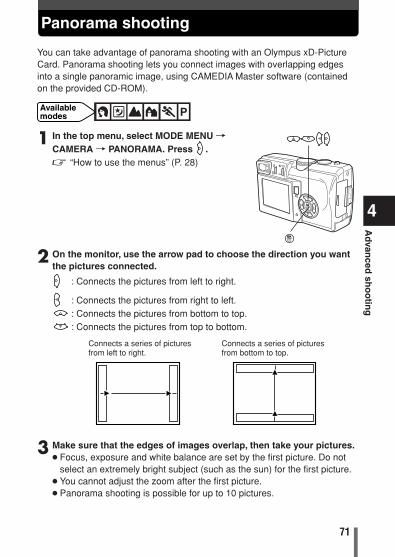
71
4
Ad
vanced
sho
otin
gPanorama shooting
1 In the top menu, select MODE MENU TCAMERA T PANORAMA. Press .~ “How to use the menus” (P. 28)
2 On the monitor, use the arrow pad to choose the direction you wantthe pictures connected.
: Connects the pictures from left to right.
: Connects the pictures from right to left.: Connects the pictures from bottom to top.: Connects the pictures from top to bottom.
3 Make sure that the edges of images overlap, then take your pictures.● Focus, exposure and white balance are set by the first picture. Do not
select an extremely bright subject (such as the sun) for the first picture.● You cannot adjust the zoom after the first picture.● Panorama shooting is possible for up to 10 pictures.
You can take advantage of panorama shooting with an Olympus xD-PictureCard. Panorama shooting lets you connect images with overlapping edgesinto a single panoramic image, using CAMEDIA Master software (containedon the provided CD-ROM).
Available modes
Connects a series of picturesfrom left to right.
Connects a series of picturesfrom bottom to top.
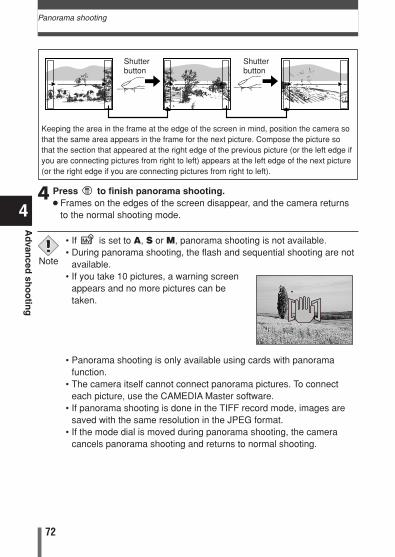
72
4
Ad
vanced
sho
otin
g
Panorama shooting
4 Press to finish panorama shooting.● Frames on the edges of the screen disappear, and the camera returns
to the normal shooting mode.
Keeping the area in the frame at the edge of the screen in mind, position the camera sothat the same area appears in the frame for the next picture. Compose the picture sothat the section that appeared at the right edge of the previous picture (or the left edge ifyou are connecting pictures from right to left) appears at the left edge of the next picture(or the right edge if you are connecting pictures from right to left).
Shutterbutton
Shutterbutton
• If is set to A, S or M, panorama shooting is not available.• During panorama shooting, the flash and sequential shooting are not
available.• If you take 10 pictures, a warning screen
appears and no more pictures can betaken.
• Panorama shooting is only available using cards with panoramafunction.
• The camera itself cannot connect panorama pictures. To connecteach picture, use the CAMEDIA Master software.
• If panorama shooting is done in the TIFF record mode, images aresaved with the same resolution in the JPEG format.
• If the mode dial is moved during panorama shooting, the cameracancels panorama shooting and returns to normal shooting.
Note
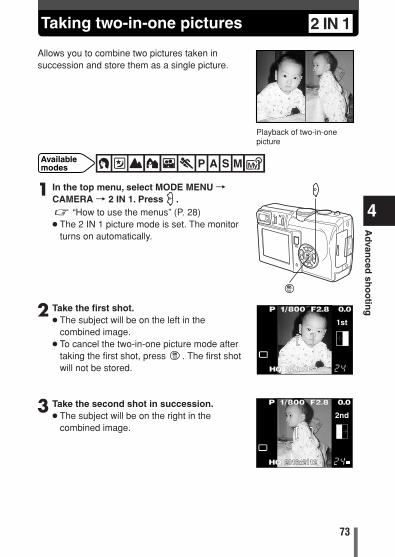
73
4
Ad
vanced
sho
otin
gTaking two-in-one pictures
Allows you to combine two pictures taken insuccession and store them as a single picture.
Available modes
1 In the top menu, select MODE MENU TCAMERA T 2 IN 1. Press .~ “How to use the menus” (P. 28)● The 2 IN 1 picture mode is set. The monitor
turns on automatically.
2 Take the first shot.● The subject will be on the left in the
combined image.● To cancel the two-in-one picture mode after
taking the first shot, press . The first shotwill not be stored.
3 Take the second shot in succession.● The subject will be on the right in the
combined image.
2 IN 1
Playback of two-in-onepicture
P 1/800 F2.8 0.0
HQ 2816x2112
1st
P 1/800 F2.8 0.0
HQ 2816x21122816x2112
2nd
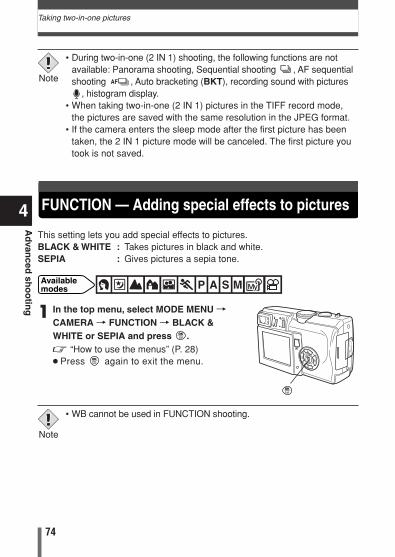
74
4
Ad
vanced
sho
otin
g
Taking two-in-one pictures
1 In the top menu, select MODE MENU TCAMERA T FUNCTION T BLACK &WHITE or SEPIA and press .~ “How to use the menus” (P. 28)● Press again to exit the menu.
This setting lets you add special effects to pictures.BLACK & WHITE : Takes pictures in black and white.SEPIA : Gives pictures a sepia tone.
Available modes
FUNCTION — Adding special effects to pictures
• During two-in-one (2 IN 1) shooting, the following functions are notavailable: Panorama shooting, Sequential shooting , AF sequentialshooting , Auto bracketing (BKT), recording sound with pictures
, histogram display.• When taking two-in-one (2 IN 1) pictures in the TIFF record mode,
the pictures are saved with the same resolution in the JPEG format.• If the camera enters the sleep mode after the first picture has been
taken, the 2 IN 1 picture mode will be canceled. The first picture youtook is not saved.
Note
• WB cannot be used in FUNCTION shooting.
Note
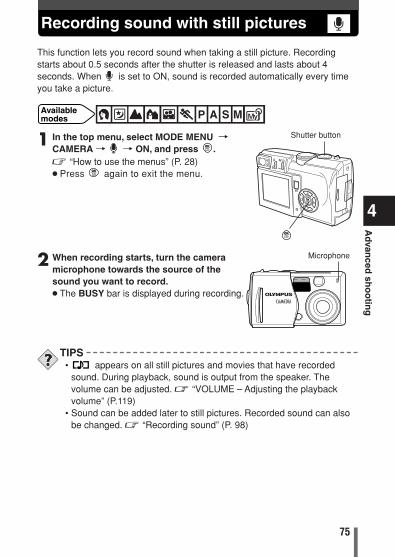
75
4
Ad
vanced
sho
otin
gRecording sound with still pictures
1 In the top menu, select MODE MENU TCAMERA T T ON, and press .~ “How to use the menus” (P. 28)● Press again to exit the menu.
2 When recording starts, turn the cameramicrophone towards the source of thesound you want to record.● The BUSY bar is displayed during recording.
This function lets you record sound when taking a still picture. Recordingstarts about 0.5 seconds after the shutter is released and lasts about 4seconds. When is set to ON, sound is recorded automatically every timeyou take a picture.
Available modes
Shutter button
Microphone
TIPS• appears on all still pictures and movies that have recorded
sound. During playback, sound is output from the speaker. Thevolume can be adjusted. ~ “VOLUME – Adjusting the playbackvolume” (P.119)
• Sound can be added later to still pictures. Recorded sound can alsobe changed. ~ “Recording sound” (P. 98)
76
4
Ad
vanced
sho
otin
g
Recording sound with still pictures
• If the camera is more than 1 m (3.3 ft.) away from the source of thesound, sound may not be recorded clearly.
• It is not possible to take another picture during sound recording. • Sound recording is not possible in the following cases: When the
record mode is set to TIFF, during sequential shooting ( , ,BKT), Panorama shooting, two-in-one picture shooting
• Sound recording may also pick up camera noises, such as buttonoperations, shutter movement, etc.
• If memory space is insufficient on the card, recording sound may notbe possible.
Note
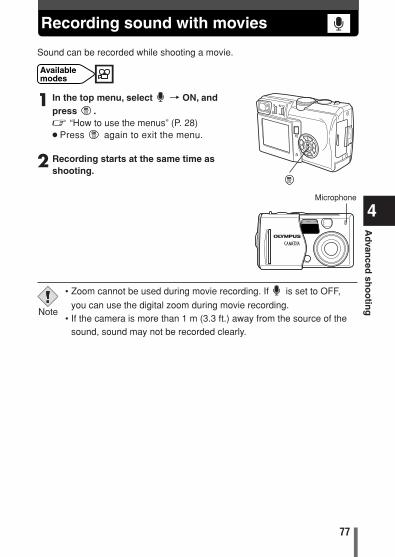
77
4
Ad
vanced
sho
otin
gRecording sound with movies
1 In the top menu, select T ON, andpress .~ “How to use the menus” (P. 28)● Press again to exit the menu.
2 Recording starts at the same time asshooting.
Sound can be recorded while shooting a movie.
Available modes
Microphone
• Zoom cannot be used during movie recording. If is set to OFF,
you can use the digital zoom during movie recording.• If the camera is more than 1 m (3.3 ft.) away from the source of the
sound, sound may not be recorded clearly.
Note
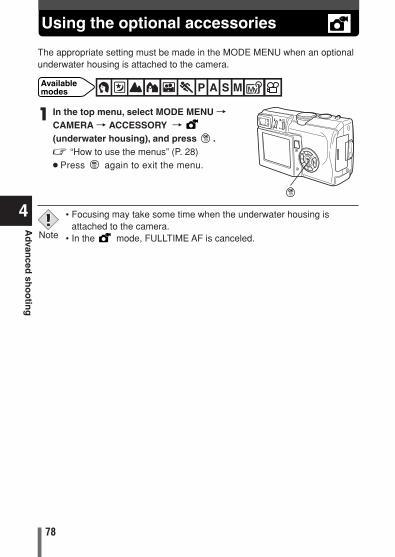
78
4
Ad
vanced
sho
otin
g
Using the optional accessories
1 In the top menu, select MODE MENU TCAMERA T ACCESSORY T(underwater housing), and press .~ “How to use the menus” (P. 28)● Press again to exit the menu.
The appropriate setting must be made in the MODE MENU when an optionalunderwater housing is attached to the camera.
Available modes
• Focusing may take some time when the underwater housing isattached to the camera.
• In the mode, FULLTIME AF is canceled.Note
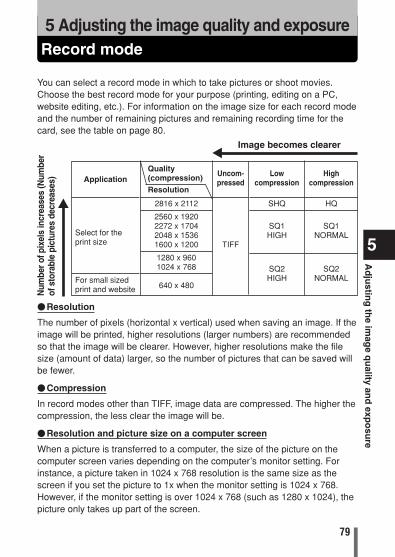
79
Record mode5 Adjusting the image quality and exposure
5
Ad
justin
g th
e imag
e qu
ality and
expo
sure
You can select a record mode in which to take pictures or shoot movies.Choose the best record mode for your purpose (printing, editing on a PC,website editing, etc.). For information on the image size for each record modeand the number of remaining pictures and remaining recording time for thecard, see the table on page 80.
Application
Select for theprint size
For small sizedprint and website
Quality(compression)Resolution
2816 x 2112
2560 x 19202272 x 17042048 x 15361600 x 1200
1280 x 9601024 x 768
640 x 480
Uncom-pressed
TIFF
Lowcompression
SHQ
SQ1HIGH
SQ2HIGH
Highcompression
HQ
SQ1NORMAL
SQ2NORMAL
Image becomes clearer
˙
ß
�Resolution
The number of pixels (horizontal x vertical) used when saving an image. If theimage will be printed, higher resolutions (larger numbers) are recommendedso that the image will be clearer. However, higher resolutions make the filesize (amount of data) larger, so the number of pictures that can be saved willbe fewer.
�Compression
In record modes other than TIFF, image data are compressed. The higher thecompression, the less clear the image will be.
�Resolution and picture size on a computer screen
When a picture is transferred to a computer, the size of the picture on thecomputer screen varies depending on the computer’s monitor setting. Forinstance, a picture taken in 1024 x 768 resolution is the same size as thescreen if you set the picture to 1x when the monitor setting is 1024 x 768.However, if the monitor setting is over 1024 x 768 (such as 1280 x 1024), thepicture only takes up part of the screen.
Num
ber o
f pix
els
incr
ease
s (N
umbe
rof
sto
rabl
e pi
ctur
es d
ecre
ases
)

80
Record mode
5
Ad
justin
g th
e imag
e qu
ality and
expo
sure
�Record mode and the number of storable pictures
The approximate number of pictures that can be stored is determined bydividing the memory capacity of the card by the file size of the pictures. Whena card is inserted into the camera, the number of storable pictures isdisplayed on the monitor.
Still Picture Record Modes
Resolution Com-pression
File format
Number of storable pictures
32MB
TIFF
2816 x 2112
TIFF
1 Approx. 17.9 2560 x 1920 2 Approx. 14.82272 x 1704 2 Approx. 11.62048 x 1536 3 Approx. 9.51600 x 1200 5 Approx. 5.81280 x 960 8 Approx. 3.71024 x 768 13 Approx. 2.4640 x 480 34 Approx. 0.9
SHQ 2816 x 2112
JPEG
Approx. 4.4
HQ 2816 x 2112
7 7
2121
882625
Approx. 1.5
Approx. 3.7Approx. 1.2
SQ12272 x 1704
2560 x 1920
11 11 Approx. 2.9
HIGHNORMAL
HIGHNORMAL
HIGHNORMAL
HIGHNORMAL
HIGHNORMAL
HIGHNORMAL
HIGHNORMAL
32 33 Approx. 1.0
2048 x 153613 13 Approx. 2.3
39 40 Approx. 0.8
1600 x 120022 22 Approx. 1.4
62 66 Approx. 0.5
SQ2
1280 x 96034 35 Approx. 0.9
94 104 Approx. 0.3
1024 x 76852 55 Approx. 0.6
132 153 Approx. 0.2
640 x 480124 142 Approx. 0.2284 398 Approx. 0.1
———
—————
Record mode
File size (MB)
With sound Without sound
Uncom-pressed
Low com-pressionHigh com-pression
*HIGH uses low compression/NORMAL uses high compression
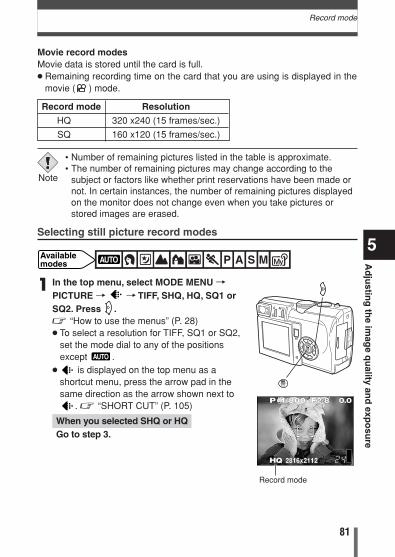
81
5
Ad
justin
g th
e imag
e qu
ality and
expo
sure
Record mode
1 In the top menu, select MODE MENU TPICTURE T TTIFF, SHQ, HQ, SQ1 orSQ2. Press .~ “How to use the menus” (P. 28)● To select a resolution for TIFF, SQ1 or SQ2,
set the mode dial to any of the positionsexcept .
● is displayed on the top menu as ashortcut menu, press the arrow pad in thesame direction as the arrow shown next to
. ~ “SHORT CUT” (P. 105)
When you selected SHQ or HQGo to step 3.
P 1/800 F2.8
HQ 2816x2112
0.0
Movie record modesMovie data is stored until the card is full.● Remaining recording time on the card that you are using is displayed in the
movie ( ) mode.
Record mode Resolution
HQ 320 x240 (15 frames/sec.)
SQ 160 x120 (15 frames/sec.)
Record mode
Available modes
Selecting still picture record modes
• Number of remaining pictures listed in the table is approximate.• The number of remaining pictures may change according to the
subject or factors like whether print reservations have been made ornot. In certain instances, the number of remaining pictures displayedon the monitor does not change even when you take pictures orstored images are erased.
Note
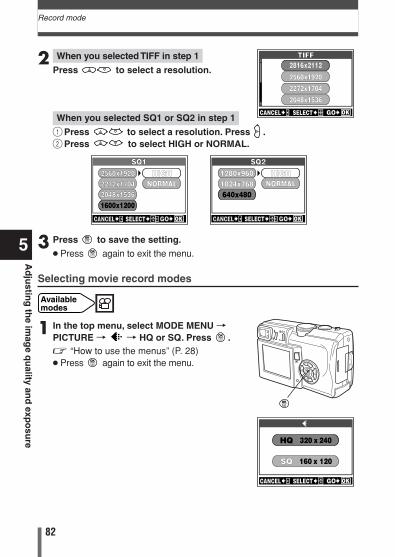
82
5
Ad
justin
g th
e imag
e qu
ality and
expo
sure
Record mode
2 When you selected TIFF in step 1
Press to select a resolution.
When you selected SQ1 or SQ2 in step 1
1 Press to select a resolution. Press .2 Press to select HIGH or NORMAL.
3 Press to save the setting.● Press again to exit the menu.
Selecting movie record modes
1 In the top menu, select MODE MENU TPICTURE T T HQ or SQ. Press .~ “How to use the menus” (P. 28)● Press again to exit the menu.
Available modes
TIFFTIFF
2560x19202816x2112
2272x17042048x1536
CANCEL SELECT GO
SQ1SQ12560x19202560x19202272x17042272x17042048x15362048x15361600x1200
CANCELCANCEL SELECT GOGO
HIGHNORMAL
SQ2SQ21280x9601024x768640x480
CANCELCANCEL SELECT GOGO
HIGHNORMAL
320 x 240HQ
160 x 120SQ
CANCEL SELECT GO
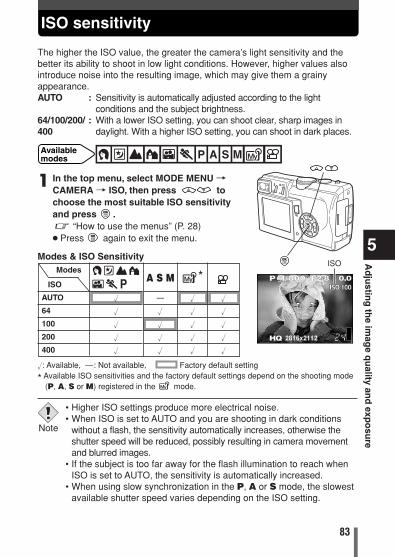
83
5
Ad
justin
g th
e imag
e qu
ality and
expo
sure
ISO sensitivity
�: Available, — : Not available, : Factory default setting
* Available ISO sensitivities and the factory default settings depend on the shooting mode(P, A, S or M) registered in the mode.
P 1/800 F2.8
HQ
ISO 100ISO 100
2816x2112
0.0
ISO
The higher the ISO value, the greater the camera’s light sensitivity and thebetter its ability to shoot in low light conditions. However, higher values alsointroduce noise into the resulting image, which may give them a grainyappearance.AUTO : Sensitivity is automatically adjusted according to the light
conditions and the subject brightness.64/100/200/ : With a lower ISO setting, you can shoot clear, sharp images in 400 daylight. With a higher ISO setting, you can shoot in dark places.
1 In the top menu, select MODE MENU TCAMERA T ISO, then press tochoose the most suitable ISO sensitivityand press .~ “How to use the menus” (P. 28)● Press again to exit the menu.
Available modes
Modes
ISO
AUTO
64
100
200
400
*
�
�
�
�
�
�
�
�
�
�
—
�
�
�
�
�
�
�
�
�
Modes & ISO Sensitivity
A S M
• Higher ISO settings produce more electrical noise.• When ISO is set to AUTO and you are shooting in dark conditions
without a flash, the sensitivity automatically increases, otherwise theshutter speed will be reduced, possibly resulting in camera movementand blurred images.
• If the subject is too far away for the flash illumination to reach whenISO is set to AUTO, the sensitivity is automatically increased.
• When using slow synchronization in the P, A or S mode, the slowestavailable shutter speed varies depending on the ISO setting.
Note
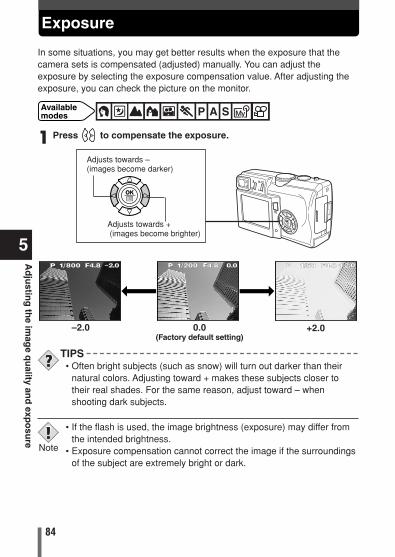
84
5
Ad
justin
g th
e imag
e qu
ality and
expo
sure
Exposure
In some situations, you may get better results when the exposure that thecamera sets is compensated (adjusted) manually. You can adjust theexposure by selecting the exposure compensation value. After adjusting theexposure, you can check the picture on the monitor.
P 1/800 F4.8 2.0 P 1/200 F4.8 0.0 P 1/50 F4.8 +2.0
–2.0 0.0(Factory default setting)
+2.0
Adjusts towards +(images become brighter)
Adjusts towards – (images become darker)
Available modes
1 Press to compensate the exposure.
TIPS• Often bright subjects (such as snow) will turn out darker than their
natural colors. Adjusting toward + makes these subjects closer totheir real shades. For the same reason, adjust toward – whenshooting dark subjects.
• If the flash is used, the image brightness (exposure) may differ fromthe intended brightness.
• Exposure compensation cannot correct the image if the surroundingsof the subject are extremely bright or dark.
Note
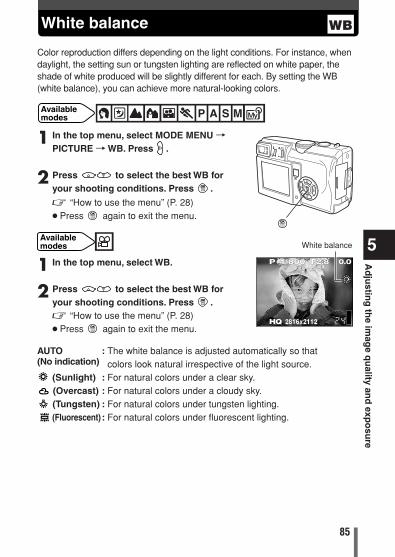
85
5
Ad
justin
g th
e imag
e qu
ality and
expo
sure
P 1/800 F2.8
HQ 2816x2112
0.0
White balance
White balance
Color reproduction differs depending on the light conditions. For instance, whendaylight, the setting sun or tungsten lighting are reflected on white paper, theshade of white produced will be slightly different for each. By setting the WB(white balance), you can achieve more natural-looking colors.
1 In the top menu, select MODE MENU TPICTURE T WB. Press .
2 Press to select the best WB foryour shooting conditions. Press .
~ “How to use the menu” (P. 28)● Press again to exit the menu.
Available modes
AUTO : The white balance is adjusted automatically so that (No indication) colors look natural irrespective of the light source.
(Sunlight) : For natural colors under a clear sky.(Overcast) : For natural colors under a cloudy sky.(Tungsten) : For natural colors under tungsten lighting.(Fluorescent) : For natural colors under fluorescent lighting.
1 In the top menu, select WB.
2 Press to select the best WB foryour shooting conditions. Press .~ “How to use the menu” (P. 28)● Press again to exit the menu.
Available modes
WB
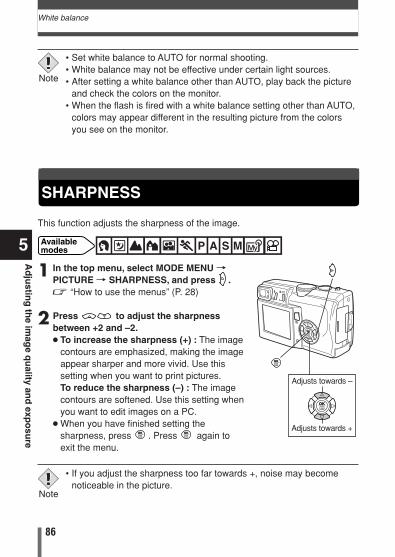
86
White balance
5
Ad
justin
g th
e imag
e qu
ality and
expo
sure
SHARPNESS
This function adjusts the sharpness of the image.
Available modes
1 In the top menu, select MODE MENU TPICTURE T SHARPNESS, and press .~ “How to use the menus” (P. 28)
2 Press to adjust the sharpnessbetween +2 and –2.● To increase the sharpness (+) : The image
contours are emphasized, making the imageappear sharper and more vivid. Use thissetting when you want to print pictures.To reduce the sharpness (–) : The imagecontours are softened. Use this setting whenyou want to edit images on a PC.
● When you have finished setting thesharpness, press . Press again toexit the menu.
Adjusts towards –
Adjusts towards +
• If you adjust the sharpness too far towards +, noise may becomenoticeable in the picture.
Note
• Set white balance to AUTO for normal shooting.• White balance may not be effective under certain light sources.• After setting a white balance other than AUTO, play back the picture
and check the colors on the monitor.• When the flash is fired with a white balance setting other than AUTO,
colors may appear different in the resulting picture from the colorsyou see on the monitor.
Note
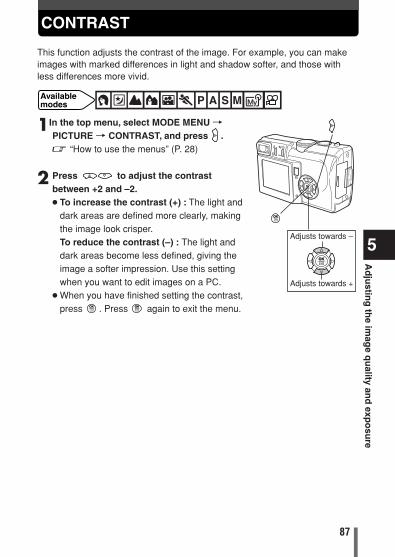
87
CONTRAST
5
Ad
justin
g th
e imag
e qu
ality and
expo
sure
This function adjusts the contrast of the image. For example, you can makeimages with marked differences in light and shadow softer, and those withless differences more vivid.
Available modes
1In the top menu, select MODE MENU TPICTURE T CONTRAST, and press .~ “How to use the menus” (P. 28)
2 Press to adjust the contrastbetween +2 and –2.● To increase the contrast (+) : The light and
dark areas are defined more clearly, makingthe image look crisper.To reduce the contrast (–) : The light anddark areas become less defined, giving theimage a softer impression. Use this settingwhen you want to edit images on a PC.
● When you have finished setting the contrast,press . Press again to exit the menu.
Adjusts towards –
Adjusts towards +
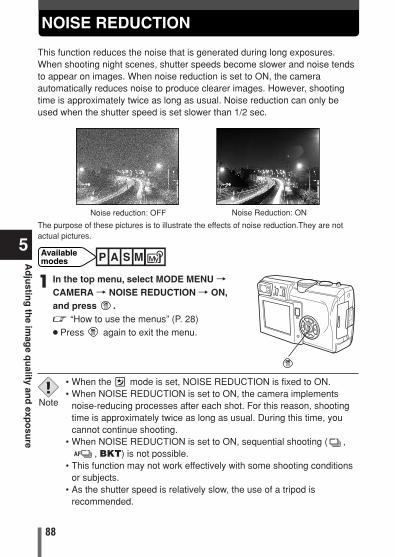
NOISE REDUCTION
88
5
Ad
justin
g th
e imag
e qu
ality and
expo
sure
This function reduces the noise that is generated during long exposures.When shooting night scenes, shutter speeds become slower and noise tendsto appear on images. When noise reduction is set to ON, the cameraautomatically reduces noise to produce clearer images. However, shootingtime is approximately twice as long as usual. Noise reduction can only beused when the shutter speed is set slower than 1/2 sec.
Noise reduction: OFF Noise Reduction: ON
Available modes
1 In the top menu, select MODE MENU TCAMERA T NOISE REDUCTION T ON,and press .~ “How to use the menus” (P. 28)● Press again to exit the menu.
The purpose of these pictures is to illustrate the effects of noise reduction.They are notactual pictures.
• When the mode is set, NOISE REDUCTION is fixed to ON.• When NOISE REDUCTION is set to ON, the camera implements
noise-reducing processes after each shot. For this reason, shootingtime is approximately twice as long as usual. During this time, youcannot continue shooting.
• When NOISE REDUCTION is set to ON, sequential shooting ( ,, BKT) is not possible.
• This function may not work effectively with some shooting conditionsor subjects.
• As the shutter speed is relatively slow, the use of a tripod isrecommended.
Note
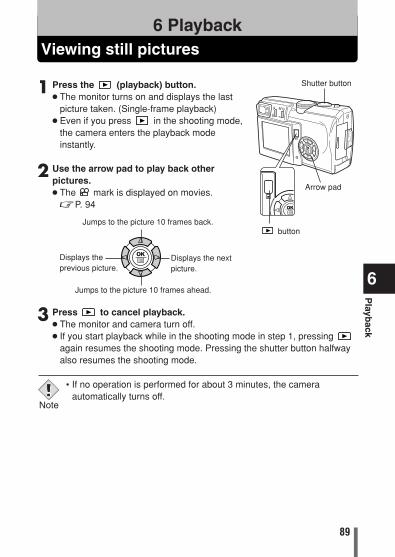
89
Viewing still pictures6 Playback
6
Playb
ack
1 Press the (playback) button.● The monitor turns on and displays the last
picture taken. (Single-frame playback)● Even if you press in the shooting mode,
the camera enters the playback modeinstantly.
2 Use the arrow pad to play back otherpictures.● The mark is displayed on movies.~P. 94
3 Press to cancel playback.● The monitor and camera turn off.● If you start playback while in the shooting mode in step 1, pressing
again resumes the shooting mode. Pressing the shutter button halfwayalso resumes the shooting mode.
Displays the nextpicture.
Jumps to the picture 10 frames back.
Jumps to the picture 10 frames ahead.
Displays theprevious picture.
Arrow pad
button
Shutter button
• If no operation is performed for about 3 minutes, the cameraautomatically turns off.
Note
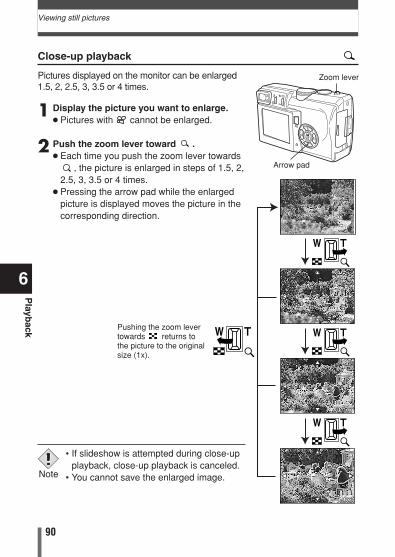
1 Display the picture you want to enlarge.● Pictures with cannot be enlarged.
2 Push the zoom lever toward .● Each time you push the zoom lever towards
, the picture is enlarged in steps of 1.5, 2,2.5, 3, 3.5 or 4 times.
● Pressing the arrow pad while the enlargedpicture is displayed moves the picture in thecorresponding direction.
90
Viewing still pictures
6
Playb
ack
• If slideshow is attempted during close-upplayback, close-up playback is canceled.
• You cannot save the enlarged image.Note
Close-up playback
Pictures displayed on the monitor can be enlarged1.5, 2, 2.5, 3, 3.5 or 4 times.
Arrow pad
Zoom lever
2.5x2.5x
3.5x3.5x
4.0x4.0x
Pushing the zoom levertowards returns tothe picture to the originalsize (1x).
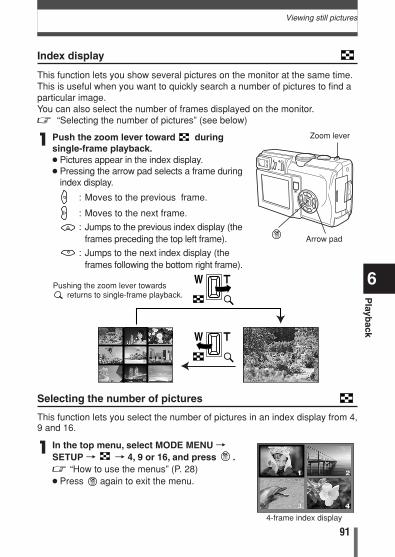
91
Viewing still pictures
6
Playb
ack
Pushing the zoom lever towards returns to single-frame playback.
Index display
This function lets you show several pictures on the monitor at the same time.This is useful when you want to quickly search a number of pictures to find aparticular image. You can also select the number of frames displayed on the monitor. ~ “Selecting the number of pictures” (see below)
Arrow pad
Zoom lever1 Push the zoom lever toward duringsingle-frame playback.● Pictures appear in the index display.● Pressing the arrow pad selects a frame during
index display.
: Moves to the previous frame.
: Moves to the next frame.
: Jumps to the previous index display (theframes preceding the top left frame).
: Jumps to the next index display (the frames following the bottom right frame).
1
4
7
2
5
8 9
3
6
1 In the top menu, select MODE MENU TSETUP T T 4, 9 or 16, and press .~ “How to use the menus” (P. 28)● Press again to exit the menu.
1 2
3 4
4-frame index display
Selecting the number of pictures
This function lets you select the number of pictures in an index display from 4,9 and 16.
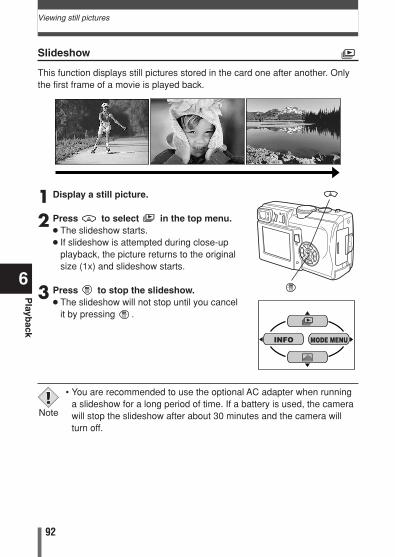
92
Viewing still pictures
6
Playb
ack
1 Display a still picture.
2 Press to select in the top menu.● The slideshow starts.● If slideshow is attempted during close-up
playback, the picture returns to the originalsize (1x) and slideshow starts.
3 Press to stop the slideshow.● The slideshow will not stop until you cancel
it by pressing .
Slideshow
This function displays still pictures stored in the card one after another. Onlythe first frame of a movie is played back.
• You are recommended to use the optional AC adapter when runninga slideshow for a long period of time. If a battery is used, the camerawill stop the slideshow after about 30 minutes and the camera willturn off.
Note
MODE MENUINFO
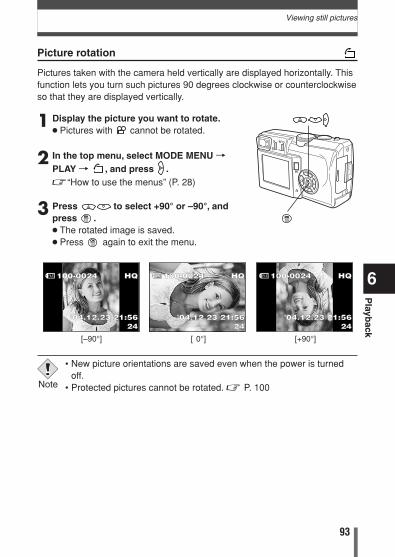
93
Viewing still pictures
6
Playb
ack
Picture rotation
Pictures taken with the camera held vertically are displayed horizontally. Thisfunction lets you turn such pictures 90 degrees clockwise or counterclockwiseso that they are displayed vertically.
1 Display the picture you want to rotate.● Pictures with cannot be rotated.
2 In the top menu, select MODE MENU TPLAY T , and press .~“How to use the menus” (P. 28)
3 Press to select +90° or –90°, andpress .● The rotated image is saved.● Press again to exit the menu.
• New picture orientations are saved even when the power is turnedoff.
• Protected pictures cannot be rotated. ~ P. 100Note
100-0024 HQ
’04.12.23 21:5624
100-0024 HQ
’04.12.23 21:5624
100-0024 HQ
’04.12.23 21:5624
[–90°] [ 0°] [+90°]
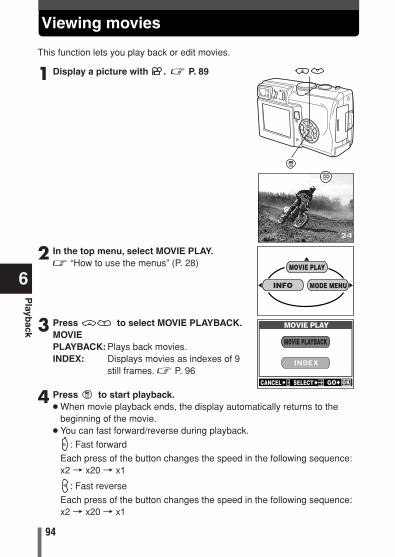
Viewing movies
94
6
Playb
ack
1 Display a picture with . ~ P. 89
2 In the top menu, select MOVIE PLAY.~ “How to use the menus” (P. 28)
3 Press to select MOVIE PLAYBACK.MOVIE PLAYBACK: Plays back movies.INDEX: Displays movies as indexes of 9
still frames. ~ P. 96
4 Press to start playback.● When movie playback ends, the display automatically returns to the
beginning of the movie.● You can fast forward/reverse during playback.
: Fast forward
Each press of the button changes the speed in the following sequence:x2 T x20 T x1
: Fast reverse
Each press of the button changes the speed in the following sequence:x2 T x20 T x1
This function lets you play back or edit movies.
MOVIE PLAYBACK
INDEX
MOVIE PLAY
CANCEL SELECT GO
MODE MENU
MOVIE PLAY
INFO
24
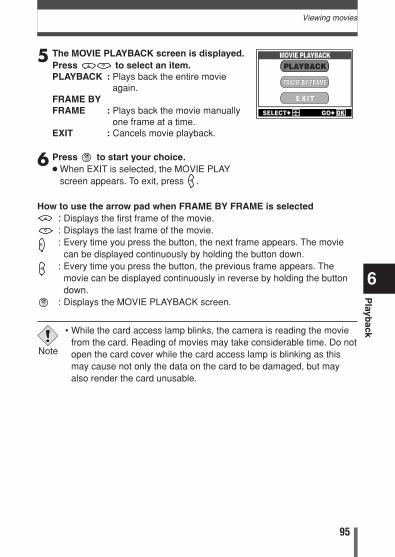
95
Viewing movies
6
Playb
ack
5 The MOVIE PLAYBACK screen is displayed.Press to select an item.PLAYBACK : Plays back the entire movie
again.FRAME BY FRAME : Plays back the movie manually
one frame at a time.EXIT : Cancels movie playback.
6 Press to start your choice.● When EXIT is selected, the MOVIE PLAY
screen appears. To exit, press .
How to use the arrow pad when FRAME BY FRAME is selected: Displays the first frame of the movie.: Displays the last frame of the movie.: Every time you press the button, the next frame appears. The movie
can be displayed continuously by holding the button down.: Every time you press the button, the previous frame appears. The
movie can be displayed continuously in reverse by holding the button down.
: Displays the MOVIE PLAYBACK screen.
PLAYBACK
FRAME BY FRAMEFRAME BY FRAME
EXIT
MOVIE PLAYBACK
• While the card access lamp blinks, the camera is reading the moviefrom the card. Reading of movies may take considerable time. Do notopen the card cover while the card access lamp is blinking as thismay cause not only the data on the card to be damaged, but mayalso render the card unusable.
Note
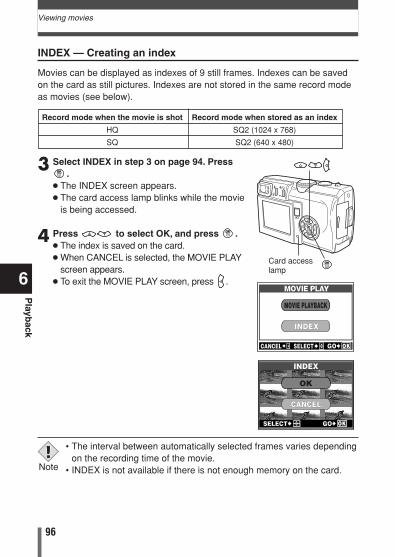
96
Viewing movies
6
Playb
ack
3 Select INDEX in step 3 on page 94. Press.
● The INDEX screen appears.● The card access lamp blinks while the movie
is being accessed.
4 Press to select OK, and press .● The index is saved on the card.● When CANCEL is selected, the MOVIE PLAY
screen appears. ● To exit the MOVIE PLAY screen, press .
Card accesslamp
MOVIE PLAYBACK
INDEX
MOVIE PLAY
CANCEL SELECT GO
Record mode when the movie is shot Record mode when stored as an index
HQ SQ2 (1024 x 768)
SQ SQ2 (640 x 480)
INDEX — Creating an index
Movies can be displayed as indexes of 9 still frames. Indexes can be savedon the card as still pictures. Indexes are not stored in the same record modeas movies (see below).
• The interval between automatically selected frames varies dependingon the recording time of the movie.
• INDEX is not available if there is not enough memory on the card.Note
OK
CANCEL
INDEX
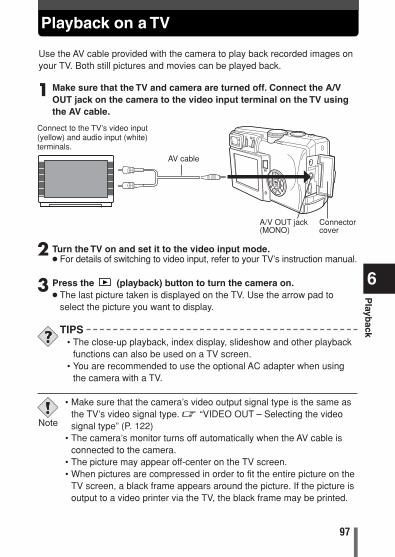
97
Playback on a TV
6
Playb
ack
1 Make sure that the TV and camera are turned off. Connect the A/VOUT jack on the camera to the video input terminal on the TV usingthe AV cable.
2 Turn the TV on and set it to the video input mode.● For details of switching to video input, refer to your TV’s instruction manual.
3 Press the (playback) button to turn the camera on.● The last picture taken is displayed on the TV. Use the arrow pad to
select the picture you want to display.
Use the AV cable provided with the camera to play back recorded images onyour TV. Both still pictures and movies can be played back.
AV cable
A/V OUT jack(MONO)
Connect to the TV’s video input(yellow) and audio input (white)terminals.
TIPS• The close-up playback, index display, slideshow and other playback
functions can also be used on a TV screen.• You are recommended to use the optional AC adapter when using
the camera with a TV.
• Make sure that the camera’s video output signal type is the same asthe TV’s video signal type. ~ “VIDEO OUT – Selecting the videosignal type” (P. 122)
• The camera’s monitor turns off automatically when the AV cable isconnected to the camera.
• The picture may appear off-center on the TV screen.• When pictures are compressed in order to fit the entire picture on the
TV screen, a black frame appears around the picture. If the picture isoutput to a video printer via the TV, the black frame may be printed.
Note
Connectorcover
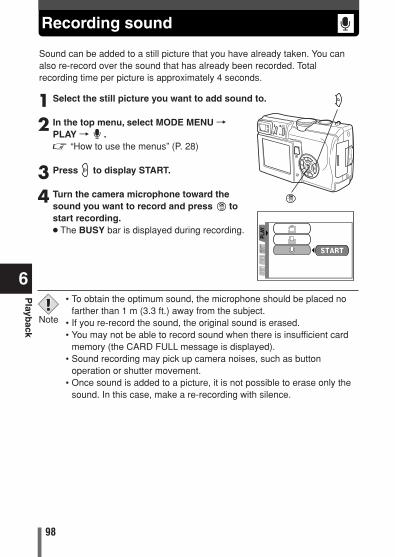
Recording sound
98
6
Playb
ack
1 Select the still picture you want to add sound to.
2 In the top menu, select MODE MENU TPLAY T .~ “How to use the menus” (P. 28)
3 Press to display START.
4 Turn the camera microphone toward thesound you want to record and press tostart recording.● The BUSY bar is displayed during recording.
Sound can be added to a still picture that you have already taken. You canalso re-record over the sound that has already been recorded. Totalrecording time per picture is approximately 4 seconds.
STARTSE
TPL
AYED
ITED
ITCA
RD
• To obtain the optimum sound, the microphone should be placed nofarther than 1 m (3.3 ft.) away from the subject.
• If you re-record the sound, the original sound is erased.• You may not be able to record sound when there is insufficient card
memory (the CARD FULL message is displayed).• Sound recording may pick up camera noises, such as button
operation or shutter movement.• Once sound is added to a picture, it is not possible to erase only the
sound. In this case, make a re-recording with silence.
Note
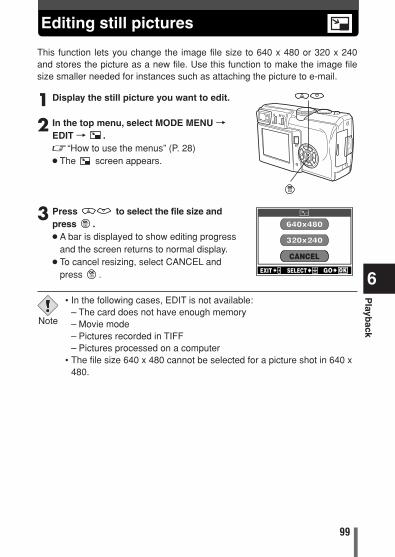
99
Editing still pictures
6
Playb
ack
This function lets you change the image file size to 640 x 480 or 320 x 240and stores the picture as a new file. Use this function to make the image filesize smaller needed for instances such as attaching the picture to e-mail.
1 Display the still picture you want to edit.
2 In the top menu, select MODE MENU TEDIT T .~“How to use the menus” (P. 28)● The screen appears.
3 Press to select the file size andpress .● A bar is displayed to show editing progress
and the screen returns to normal display.● To cancel resizing, select CANCEL and
press .
640x480
320x240
CANCEL
EXIT SELECT GO
• In the following cases, EDIT is not available:– The card does not have enough memory– Movie mode– Pictures recorded in TIFF– Pictures processed on a computer
• The file size 640 x 480 cannot be selected for a picture shot in 640 x480.
Note
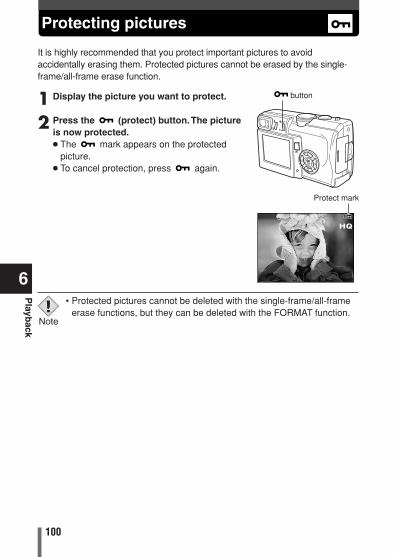
Protecting pictures
100
6
Playb
ack
1 Display the picture you want to protect.
2 Press the (protect) button.The pictureis now protected.● The mark appears on the protected
picture.● To cancel protection, press again.
Protect mark
HQ
It is highly recommended that you protect important pictures to avoidaccidentally erasing them. Protected pictures cannot be erased by the single-frame/all-frame erase function.
button
• Protected pictures cannot be deleted with the single-frame/all-frameerase functions, but they can be deleted with the FORMAT function.
Note
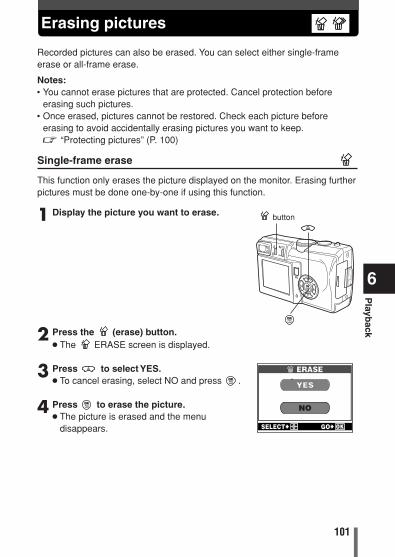
101
Erasing pictures
6
Playb
ack
1 Display the picture you want to erase.
2 Press the (erase) button.● The ERASE screen is displayed.
3 Press to select YES.● To cancel erasing, select NO and press .
4 Press to erase the picture.● The picture is erased and the menu
disappears.
Recorded pictures can also be erased. You can select either single-frameerase or all-frame erase.
Notes:• You cannot erase pictures that are protected. Cancel protection before
erasing such pictures.• Once erased, pictures cannot be restored. Check each picture before
erasing to avoid accidentally erasing pictures you want to keep. ~ “Protecting pictures” (P. 100)
ERASE
YES
NO
SELECT GO
button
Single-frame erase
This function only erases the picture displayed on the monitor. Erasing furtherpictures must be done one-by-one if using this function.
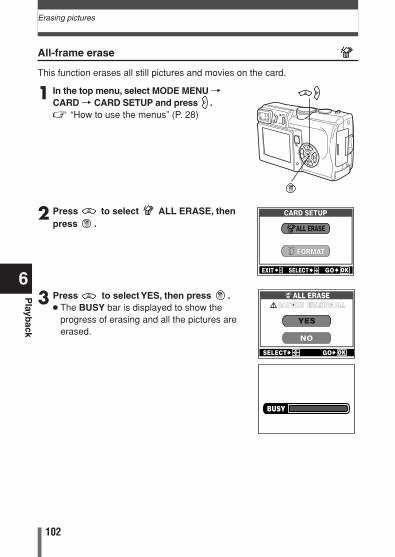
102
Erasing pictures
6
Playb
ack
1 In the top menu, select MODE MENU TCARD T CARD SETUP and press .~ “How to use the menus” (P. 28)
2 Press to select ALL ERASE, thenpress .
3 Press to select YES, then press .● The BUSY bar is displayed to show the
progress of erasing and all the pictures areerased.
EXIT SELECT GO
ALL ERASE
CARD SETUP
FORMAT
All-frame erase
This function erases all still pictures and movies on the card.
ALL ERASE
SELECT GO
YES
NO
CAUTION ERASING ALL
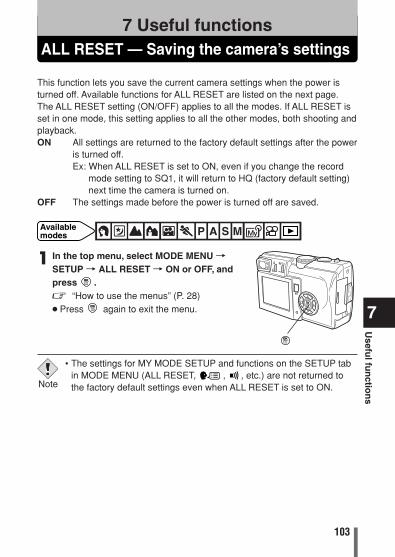
103
ALL RESET — Saving the camera’s settings7 Useful functions
7
Usefu
l fun
ction
s
This function lets you save the current camera settings when the power isturned off. Available functions for ALL RESET are listed on the next page.The ALL RESET setting (ON/OFF) applies to all the modes. If ALL RESET isset in one mode, this setting applies to all the other modes, both shooting andplayback.ON All settings are returned to the factory default settings after the power
is turned off.Ex: When ALL RESET is set to ON, even if you change the record
mode setting to SQ1, it will return to HQ (factory default setting)next time the camera is turned on.
OFF The settings made before the power is turned off are saved.
1 In the top menu, select MODE MENU TSETUP T ALL RESET T ON or OFF, andpress .~ “How to use the menus” (P. 28)● Press again to exit the menu.
Available modes
• The settings for MY MODE SETUP and functions on the SETUP tabin MODE MENU (ALL RESET, , , etc.) are not returned tothe factory default settings even when ALL RESET is set to ON.Note
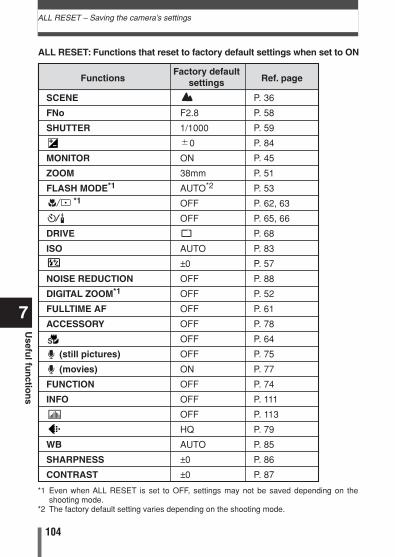
104
ALL RESET – Saving the camera’s settings
7
Usefu
l fun
ction
s
ALL RESET: Functions that reset to factory default settings when set to ON
FunctionsFactory default
Ref. pagesettings
SCENE P. 36
FNo F2.8 P. 58
SHUTTER 1/1000 P. 59
�0 P. 84
MONITOR ON P. 45
ZOOM 38mm P. 51
FLASH MODE*1 AUTO*2 P. 53*1 OFF P. 62, 63
OFF P. 65, 66
DRIVE P. 68
ISO AUTO P. 83
±0 P. 57
NOISE REDUCTION OFF P. 88
DIGITAL ZOOM*1 OFF P. 52
FULLTIME AF OFF P. 61
ACCESSORY OFF P. 78
OFF P. 64
(still pictures) OFF P. 75
(movies) ON P. 77
FUNCTION OFF P. 74
INFO OFF P. 111
OFF P. 113
HQ P. 79
WB AUTO P. 85
SHARPNESS ±0 P. 86
CONTRAST ±0 P. 87
*1 Even when ALL RESET is set to OFF, settings may not be saved depending on theshooting mode.
*2 The factory default setting varies depending on the shooting mode.
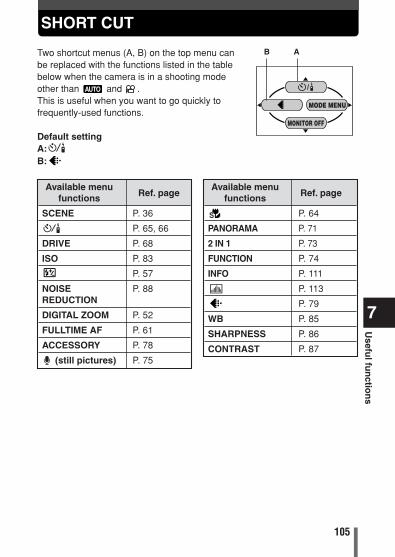
105
SHORT CUT
7
Usefu
l fun
ction
s
Two shortcut menus (A, B) on the top menu canbe replaced with the functions listed in the tablebelow when the camera is in a shooting modeother than and .This is useful when you want to go quickly tofrequently-used functions.
Default settingA:B:
MODE MENU
MONITOR OFF
Available menuRef. pagefunctions
SCENE P. 36
P. 65, 66
DRIVE P. 68
ISO P. 83
P. 57
NOISE P. 88REDUCTION
DIGITAL ZOOM P. 52
FULLTIME AF P. 61
ACCESSORY P. 78
(still pictures) P. 75
Available menuRef. pagefunctions
P. 64
PANORAMA P. 71
2 IN 1 P. 73
FUNCTION P. 74
INFO P. 111
P. 113
P. 79
WB P. 85
SHARPNESS P. 86
CONTRAST P. 87
AB
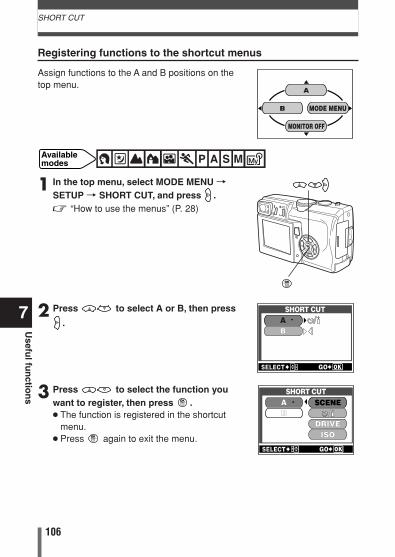
106
SHORT CUT
7
Usefu
l fun
ction
s
1 In the top menu, select MODE MENU TSETUP T SHORT CUT, and press .~ “How to use the menus” (P. 28)
2 Press to select A or B, then press
.
3 Press to select the function youwant to register, then press .● The function is registered in the shortcut
menu.● Press again to exit the menu.
Available modes
A
B MODE MENU
MONITOR OFF
SHORT CUTAB
SELECTSELECT GO
SHORT CUTAB
SELECTSELECT GO
ISODRIVE
SCENE
Registering functions to the shortcut menus
Assign functions to the A and B positions on thetop menu.

107
SHORT CUT
7
Usefu
l fun
ction
s
Using the shortcut menu
Ex: When SCENE is assigned to shortcut menu A
MODE MENU
MONITOR OFF
SCENECA
MERA
PIC
SET
CARD ISO
DRIVE
SCENE
Press thisbutton.
Pressing takes you directly
to the SCENE screen.
1 Press to display the top menu.● The function you have registered in the
shortcut menu appears on the top menu.
2 Press or to select the function.● The monitor jumps directly to the setting
screen for that menu function.
Available modes
• You cannot assign different functions to the shortcut menus for eachmode.
Note
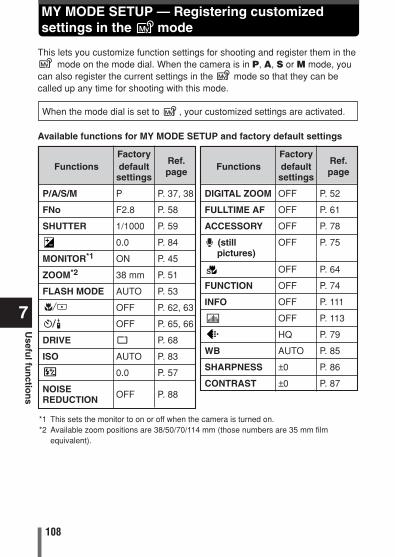
108
7
Usefu
l fun
ction
s
MY MODE SETUP — Registering customizedsettings in the mode
Available functions for MY MODE SETUP and factory default settings
*1 This sets the monitor to on or off when the camera is turned on.*2 Available zoom positions are 38/50/70/114 mm (those numbers are 35 mm film
equivalent).
Factory Ref.
Functions default pagesettings
P/A/S/M P P. 37, 38
FNo F2.8 P. 58
SHUTTER 1/1000 P. 59
0.0 P. 84
MONITOR*1 ON P. 45
ZOOM*2 38 mm P. 51
FLASH MODE AUTO P. 53
OFF P. 62, 63
OFF P. 65, 66
DRIVE P. 68
ISO AUTO P. 83
0.0 P. 57
NOISE OFF P. 88REDUCTION
Factory Ref.
Functions default pagesettings
DIGITAL ZOOM OFF P. 52
FULLTIME AF OFF P. 61
ACCESSORY OFF P. 78
(still OFF P. 75pictures)
OFF P. 64
FUNCTION OFF P. 74
INFO OFF P. 111
OFF P. 113
HQ P. 79
WB AUTO P. 85
SHARPNESS ±0 P. 86
CONTRAST ±0 P. 87
This lets you customize function settings for shooting and register them in themode on the mode dial. When the camera is in P, A, S or M mode, you
can also register the current settings in the mode so that they can becalled up any time for shooting with this mode.
When the mode dial is set to , your customized settings are activated.
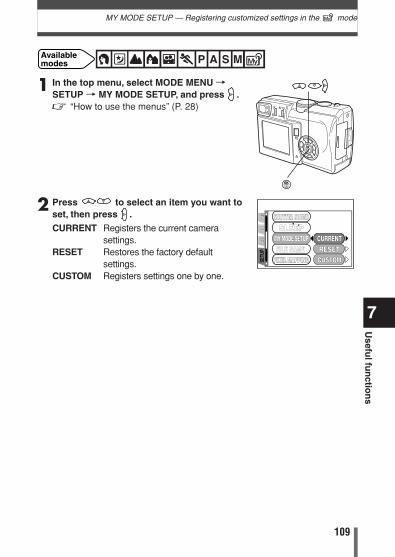
109
MY MODE SETUP — Registering customized settings in the mode
7
Usefu
l fun
ction
s
1 In the top menu, select MODE MENU TSETUP T MY MODE SETUP, and press .~ “How to use the menus” (P. 28)
2 Press to select an item you want toset, then press .
CURRENT Registers the current camerasettings.
RESET Restores the factory defaultsettings.
CUSTOM Registers settings one by one.
Available modes
SETU
PCA
MCA
RDPI
C SLEEPSHUTTER SOUNDSHUTTER SOUND
CURRENTCURRENTRESETRESETCUSTOMCUSTOM
MY MODE SETUPFILE NAME
PIXEL MAPPING PIXEL MAPPING
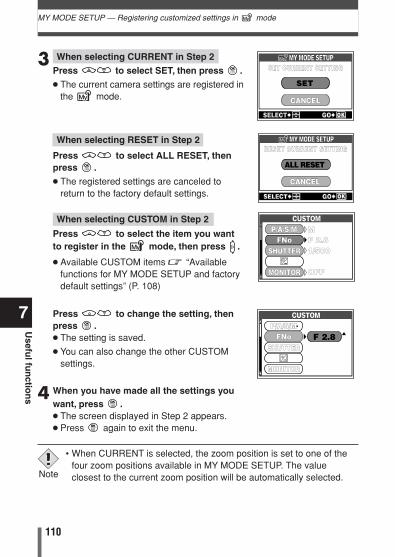
110
MY MODE SETUP — Registering customized settings in mode
7
Usefu
l fun
ction
s
3 When selecting CURRENT in Step 2
Press to select SET, then press .
● The current camera settings are registered inthe mode.
When selecting RESET in Step 2
Press to select ALL RESET, thenpress .
● The registered settings are canceled toreturn to the factory default settings.
When selecting CUSTOM in Step 2
Press to select the item you wantto register in the mode, then press .
● Available CUSTOM items ~ “Availablefunctions for MY MODE SETUP and factorydefault settings” (P. 108)
Press to change the setting, thenpress .● The setting is saved.
● You can also change the other CUSTOMsettings.
4 When you have made all the settings youwant, press .● The screen displayed in Step 2 appears.● Press again to exit the menu.
F 2.8
CUSTOMP/A/S/M
FNoSHUTTER
MONITOR
1/500F 2.8M
OFF
CUSTOMP/A/S/M
FNoSHUTTER
MONITOR
MY MODE SETUPMY MODE SETUPSET CURRENT SETTING
SET
CANCEL
MY MODE SETUPMY MODE SETUPRESET CURRENT SETTING
ALL RESET
CANCEL
• When CURRENT is selected, the zoom position is set to one of thefour zoom positions available in MY MODE SETUP. The valueclosest to the current zoom position will be automatically selected.Note
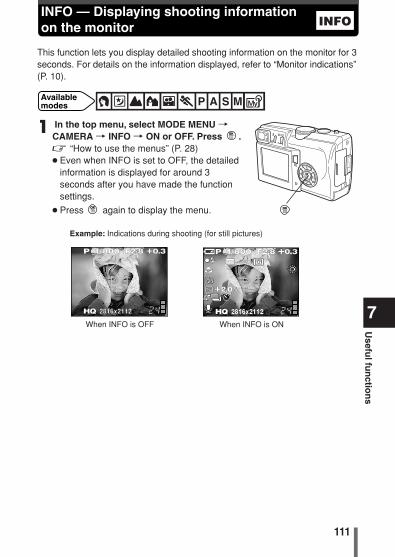
111
7
Usefu
l fun
ction
sINFO — Displaying shooting information on the monitor
1 In the top menu, select MODE MENU TCAMERA T INFO T ON or OFF. Press .~ “How to use the menus” (P. 28)● Even when INFO is set to OFF, the detailed
information is displayed for around 3seconds after you have made the functionsettings.
● Press again to display the menu.
This function lets you display detailed shooting information on the monitor for 3seconds. For details on the information displayed, refer to “Monitor indications”(P. 10).
Available modes
P 1/800 F2.8 +0.3
HQ 2816x21122816x2112
When INFO is ONWhen INFO is OFF
Example: Indications during shooting (for still pictures)
P 1/800 F2.8 +0.3
+2.0
HQ 2816x2112
NR
INFO
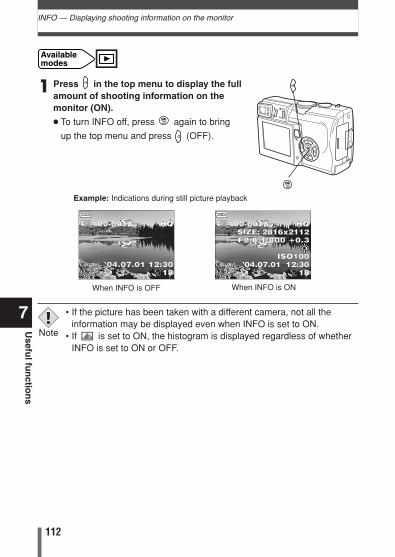
112
INFO — Displaying shooting information on the monitor
7
Usefu
l fun
ction
s
100-0018 HQ
’04.07.01 12:30 18
100-0018 HQSIZE: 2816x2112F2.8 1/800 +0.3
ISO100’04.07.01 12:30
18
When INFO is OFF When INFO is ON
Example: Indications during still picture playback
1 Press in the top menu to display the fullamount of shooting information on themonitor (ON).
● To turn INFO off, press again to bring
up the top menu and press (OFF).
Available modes
• If the picture has been taken with a different camera, not all theinformation may be displayed even when INFO is set to ON.
• If is set to ON, the histogram is displayed regardless of whetherINFO is set to ON or OFF.
Note
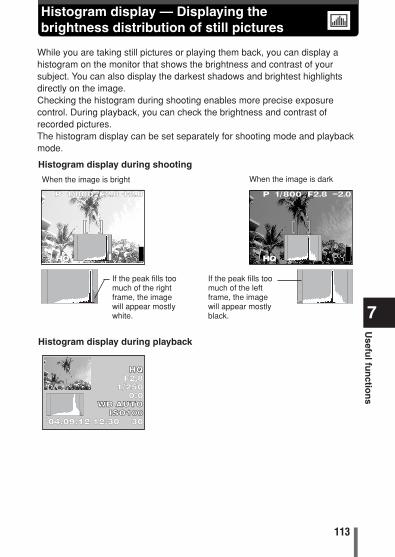
113
7
Usefu
l fun
ction
sHistogram display — Displaying the brightness distribution of still pictures
P 1/800 F2.8 +2.0 P 1/800 F2.8 –2.0
HQ HQ
While you are taking still pictures or playing them back, you can display ahistogram on the monitor that shows the brightness and contrast of yoursubject. You can also display the darkest shadows and brightest highlightsdirectly on the image.Checking the histogram during shooting enables more precise exposurecontrol. During playback, you can check the brightness and contrast ofrecorded pictures.The histogram display can be set separately for shooting mode and playbackmode.
When the image is bright When the image is dark
If the peak fills toomuch of the rightframe, the imagewill appear mostlywhite.
If the peak fills toomuch of the leftframe, the imagewill appear mostlyblack.
Histogram display during shooting
HQHQF2.8
1/2500.0
WB AUTOWB AUTOISO100ISO100
’04.09.12 12:30 30
Histogram display during playback
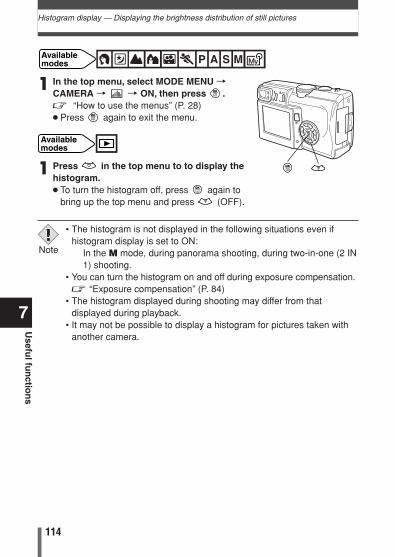
114
Histogram display — Displaying the brightness distribution of still pictures
7
Usefu
l fun
ction
s
1 Press in the top menu to to display thehistogram.● To turn the histogram off, press again to
bring up the top menu and press (OFF).
Available modes
1 In the top menu, select MODE MENU TCAMERA T T ON, then press .~ “How to use the menus” (P. 28)● Press again to exit the menu.
Available modes
• The histogram is not displayed in the following situations even ifhistogram display is set to ON:
In the M mode, during panorama shooting, during two-in-one (2 IN1) shooting.
• You can turn the histogram on and off during exposure compensation.~ “Exposure compensation” (P. 84)
• The histogram displayed during shooting may differ from thatdisplayed during playback.
• It may not be possible to display a histogram for pictures taken withanother camera.
Note

115
CARD SETUP — Formatting cards
7
Usefu
l fun
ction
s
1 In the top menu, select CARD SETUP.~ “What are the menus?” (P. 27)
1 In the top menu, select MODE MENU TCARD T CARD SETUP. Press .
~ “How to use the menus” (P. 28)
1 In the top menu, select MODE MENU T
CARD T CARD SETUP. Press . Press
to select FORMAT, then press .~ “How to use the menus” (P. 28)
This function lets you format a card. Formatting prepares cards to receive data.Olympus CAMEDIA-brand cards are highly recommended for use with thiscamera. If you are going to use non-OLYMPUS cards or cards formatted by otherdevices such as a computer, you must format them with the camera before use.All data stored on the card, including protected pictures, is erased whenthe card is formatted. When formatting a used card, confirm there are nopictures that you still want to keep on the card.
Available modes
Available modes
Available modes
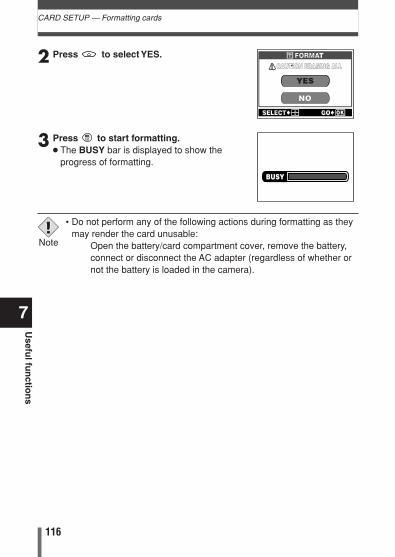
116
CARD SETUP — Formatting cards
7
Usefu
l fun
ction
s
2 Press to select YES.
3 Press to start formatting.● The BUSY bar is displayed to show the
progress of formatting.
• Do not perform any of the following actions during formatting as theymay render the card unusable:
Open the battery/card compartment cover, remove the battery,connect or disconnect the AC adapter (regardless of whether ornot the battery is loaded in the camera).
Note
FORMAFORMAT
YES
NO
CAUTION ERASING ALLCAUTION ERASING ALL
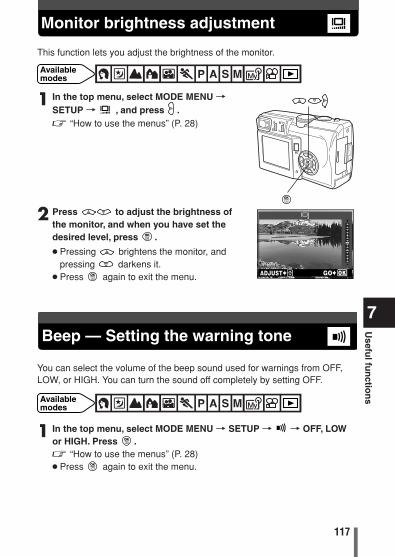
117
7
Usefu
l fun
ction
sMonitor brightness adjustment
This function lets you adjust the brightness of the monitor.
1 In the top menu, select MODE MENU TSETUP T , and press .~ “How to use the menus” (P. 28)
2 Press to adjust the brightness ofthe monitor, and when you have set thedesired level, press .
● Pressing brightens the monitor, andpressing darkens it.
● Press again to exit the menu.
Available modes
ADJUST GO
1 In the top menu, select MODE MENU T SETUP T T OFF, LOWor HIGH. Press .~ “How to use the menus” (P. 28)● Press again to exit the menu.
You can select the volume of the beep sound used for warnings from OFF,LOW, or HIGH. You can turn the sound off completely by setting OFF.
Available modes
Beep — Setting the warning tone
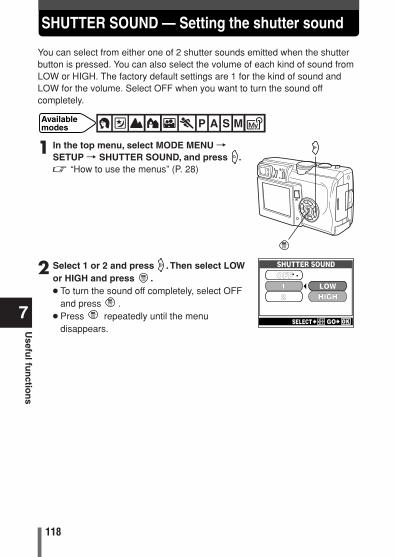
118
7
Usefu
l fun
ction
s
SHUTTER SOUND — Setting the shutter sound
You can select from either one of 2 shutter sounds emitted when the shutterbutton is pressed. You can also select the volume of each kind of sound fromLOW or HIGH. The factory default settings are 1 for the kind of sound andLOW for the volume. Select OFF when you want to turn the sound offcompletely.
1 In the top menu, select MODE MENU TSETUP T SHUTTER SOUND, and press .~ “How to use the menus” (P. 28)
2 Select 1 or 2 and press . Then select LOWor HIGH and press .● To turn the sound off completely, select OFF
and press .● Press repeatedly until the menu
disappears.
Available modes
12
SHUTTER SOUNDOFF
LOWHIGH
SELECT GO

119
7
Usefu
l fun
ction
sVOLUME — Adjusting the playback volume
1 In the top menu, select MODE MENU TSETUP T VOLUME, and press .
~ “How to use the menus” (P. 28)
2 Press to select the volume level,then press .
● Press again to exit the menu.
You can adjust the volume when playing back a still picture with sound or amovie. You can select the volume from LOW or HIGH. Select OFF when youwant to turn the sound off completely.
Available modes
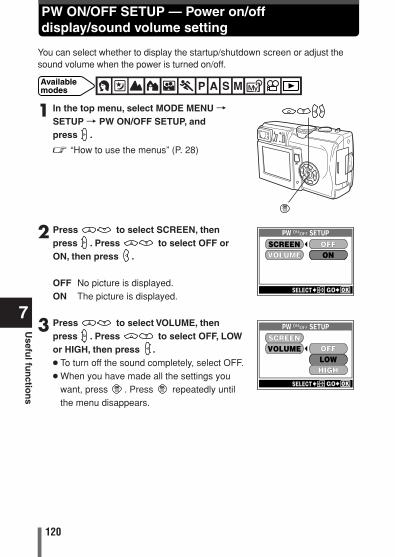
120
7
Usefu
l fun
ction
s
PW ON/OFF SETUP — Power on/offdisplay/sound volume setting
You can select whether to display the startup/shutdown screen or adjust thesound volume when the power is turned on/off.
1 In the top menu, select MODE MENU TSETUP T PW ON/OFF SETUP, and press .
~ “How to use the menus” (P. 28)
2 Press to select SCREEN, thenpress . Press to select OFF orON, then press .
OFF No picture is displayed.ON The picture is displayed.
3 Press to select VOLUME, thenpress . Press to select OFF, LOWor HIGH, then press .● To turn off the sound completely, select OFF.● When you have made all the settings you
want, press . Press repeatedly untilthe menu disappears.
Available modes
PW ONON/OFFOFF SETUP
SELECTSELECT GOGO
OFFSCREENVOLUME ON
PW ONON/OFFOFF SETUP
SELECTSELECT GOGO
OFFSCREENVOLUME
LOWHIGH
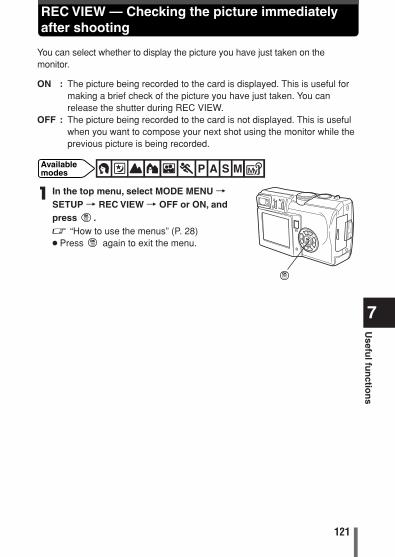
121
7
Usefu
l fun
ction
sREC VIEW — Checking the picture immediatelyafter shooting
You can select whether to display the picture you have just taken on themonitor.
ON : The picture being recorded to the card is displayed. This is useful formaking a brief check of the picture you have just taken. You can release the shutter during REC VIEW.
OFF : The picture being recorded to the card is not displayed. This is useful when you want to compose your next shot using the monitor while the previous picture is being recorded.
1 In the top menu, select MODE MENU TSETUP T REC VIEW T OFF or ON, andpress .~ “How to use the menus” (P. 28)● Press again to exit the menu.
Available modes
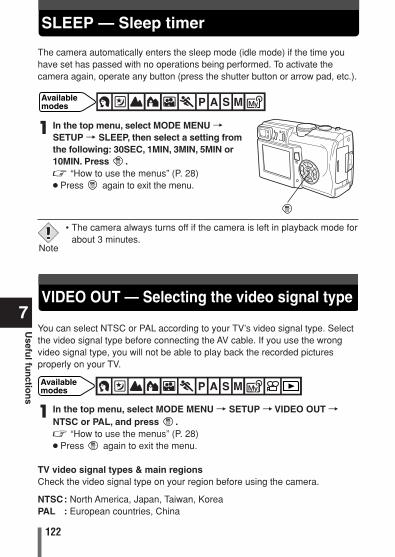
SLEEP — Sleep timer
122
7
Usefu
l fun
ction
s
The camera automatically enters the sleep mode (idle mode) if the time youhave set has passed with no operations being performed. To activate thecamera again, operate any button (press the shutter button or arrow pad, etc.).
Available modes
1 In the top menu, select MODE MENU T
SETUP T SLEEP, then select a setting fromthe following: 30SEC, 1MIN, 3MIN, 5MIN or10MIN. Press .~ “How to use the menus” (P. 28)● Press again to exit the menu.
• The camera always turns off if the camera is left in playback mode forabout 3 minutes.
Note
You can select NTSC or PAL according to your TV’s video signal type. Selectthe video signal type before connecting the AV cable. If you use the wrongvideo signal type, you will not be able to play back the recorded picturesproperly on your TV.
1 In the top menu, select MODE MENU T SETUP T VIDEO OUT TNTSC or PAL, and press .~ “How to use the menus” (P. 28)● Press again to exit the menu.
TV video signal types & main regionsCheck the video signal type on your region before using the camera.
NTSC: North America, Japan, Taiwan, KoreaPAL : European countries, China
Available modes
VIDEO OUT — Selecting the video signal type
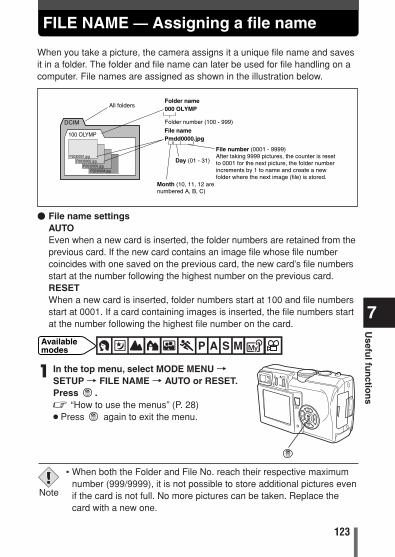
123
7
Usefu
l fun
ction
sFILE NAME — Assigning a file name
When you take a picture, the camera assigns it a unique file name and savesit in a folder. The folder and file name can later be used for file handling on acomputer. File names are assigned as shown in the illustration below.
File namePmdd0000.jpg
DCIM
100 OLYMP
P2030001.jpgP2030002.jpg
P2030003.jpgP2030004.jpg
All folders
Folder number (100 - 999)
Month (10, 11, 12 are numbered A, B, C)
Day (01 - 31)
File number (0001 - 9999)After taking 9999 pictures, the counter is reset to 0001 for the next picture, the folder number increments by 1 to name and create a new folder where the next image (file) is stored.
Folder name000 OLYMP
� File name settingsAUTOEven when a new card is inserted, the folder numbers are retained from theprevious card. If the new card contains an image file whose file numbercoincides with one saved on the previous card, the new card’s file numbersstart at the number following the highest number on the previous card.RESETWhen a new card is inserted, folder numbers start at 100 and file numbersstart at 0001. If a card containing images is inserted, the file numbers startat the number following the highest file number on the card.
1 In the top menu, select MODE MENU TSETUP T FILE NAME T AUTO or RESET.Press .~ “How to use the menus” (P. 28)● Press again to exit the menu.
Available modes
• When both the Folder and File No. reach their respective maximumnumber (999/9999), it is not possible to store additional pictures evenif the card is not full. No more pictures can be taken. Replace thecard with a new one.
Note
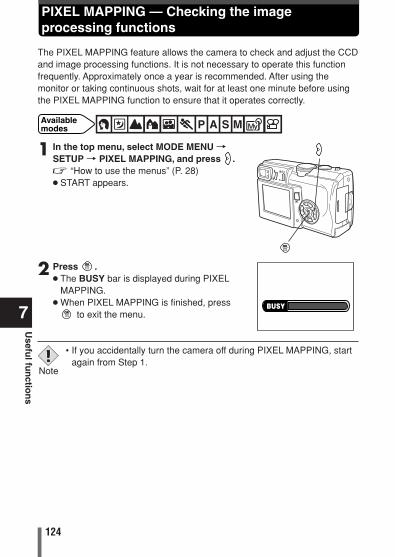
124
7
Usefu
l fun
ction
s
PIXEL MAPPING — Checking the imageprocessing functions
The PIXEL MAPPING feature allows the camera to check and adjust the CCDand image processing functions. It is not necessary to operate this functionfrequently. Approximately once a year is recommended. After using themonitor or taking continuous shots, wait for at least one minute before usingthe PIXEL MAPPING function to ensure that it operates correctly.
1 In the top menu, select MODE MENU TSETUP T PIXEL MAPPING, and press .~ “How to use the menus” (P. 28)● START appears.
2 Press .● The BUSY bar is displayed during PIXEL
MAPPING. ● When PIXEL MAPPING is finished, press
to exit the menu.
Available modes
• If you accidentally turn the camera off during PIXEL MAPPING, startagain from Step 1.
Note
125
How to print pictures8 Print setting (DPOF)
8
Prin
t setting
(DP
OF
)
Print reservation allows you to save printing data (the number of prints andthe date/time information) with the pictures stored on the card.With print reservation, you can print out pictures easily either at home using apersonal DPOF-compatible printer or at a print shop that supports DPOF.DPOF is a standard format used to record automatic print information fromdigital cameras. You can print out pictures automatically, at home or in a printshop, by storing such data as which pictures you wish to print and the numberof prints on a card.
Pictures taken with print reservation can be printed using the followingprocedures.Printing using a DPOF-compatible print shop.
You can print the pictures using the print reservation data.
Printing using a DPOF-compatible printer.
Printing is possible directly from a card containing print reservation datawithout using a PC. For more details, refer to the printer’s instruction manual. A PC card adapter may also be necessary.
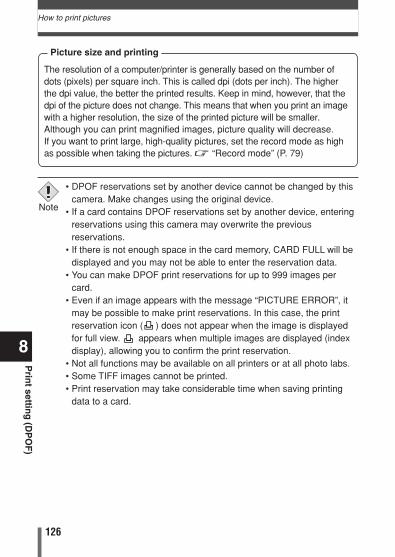
126
How to print pictures
8P
rint settin
g (D
PO
F)
The resolution of a computer/printer is generally based on the number ofdots (pixels) per square inch. This is called dpi (dots per inch). The higherthe dpi value, the better the printed results. Keep in mind, however, that thedpi of the picture does not change. This means that when you print an imagewith a higher resolution, the size of the printed picture will be smaller.Although you can print magnified images, picture quality will decrease.If you want to print large, high-quality pictures, set the record mode as highas possible when taking the pictures. ~ “Record mode” (P. 79)
Picture size and printing
• DPOF reservations set by another device cannot be changed by thiscamera. Make changes using the original device.
• If a card contains DPOF reservations set by another device, enteringreservations using this camera may overwrite the previousreservations.
• If there is not enough space in the card memory, CARD FULL will bedisplayed and you may not be able to enter the reservation data.
• You can make DPOF print reservations for up to 999 images percard.
• Even if an image appears with the message “PICTURE ERROR”, itmay be possible to make print reservations. In this case, the printreservation icon ( ) does not appear when the image is displayedfor full view. appears when multiple images are displayed (indexdisplay), allowing you to confirm the print reservation.
• Not all functions may be available on all printers or at all photo labs.• Some TIFF images cannot be printed.• Print reservation may take considerable time when saving printing
data to a card.
Note
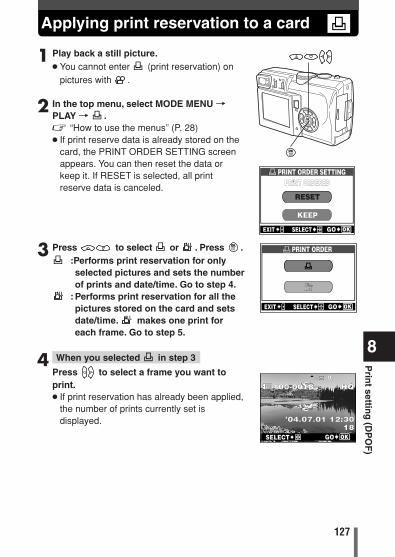
127
Applying print reservation to a card
8
Prin
t setting
(DP
OF
)
EXIT SELECT GO
PRINT ORDER
EXIT SELECT GO
PRINT ORDER SETTINGPRINT ORDERED
RESET
KEEP
100-0018 HQ
’04.07.01 12:30 18
0
GOSELECT
1 Play back a still picture.● You cannot enter (print reservation) on
pictures with .
2 In the top menu, select MODE MENU TPLAY T .~ “How to use the menus” (P. 28)● If print reserve data is already stored on the
card, the PRINT ORDER SETTING screenappears. You can then reset the data orkeep it. If RESET is selected, all printreserve data is canceled.
3 Press to select or . Press .:Performs print reservation for onlyselected pictures and sets the numberof prints and date/time. Go to step 4.
: Performs print reservation for all thepictures stored on the card and setsdate/time. makes one print foreach frame. Go to step 5.
4 When you selected in step 3
Press to select a frame you want toprint.● If print reservation has already been applied,
the number of prints currently set isdisplayed.
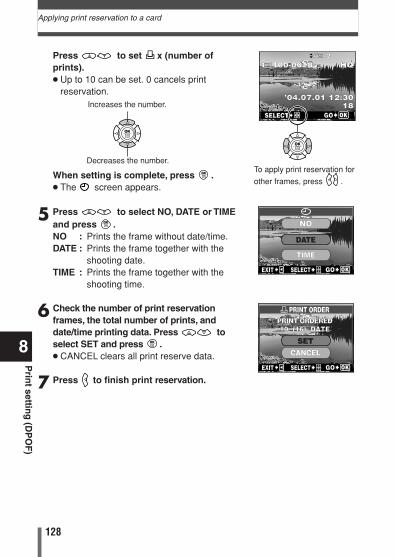
128
Applying print reservation to a card
8P
rint settin
g (D
PO
F)
Press to set x (number ofprints).● Up to 10 can be set. 0 cancels print
reservation.
When setting is complete, press .● The screen appears.
5 Press to select NO, DATE or TIMEand press .NO : Prints the frame without date/time.DATE : Prints the frame together with the
shooting date.TIME : Prints the frame together with the
shooting time.
6 Check the number of print reservationframes, the total number of prints, anddate/time printing data. Press toselect SET and press .● CANCEL clears all print reserve data.
7 Press to finish print reservation.
Increases the number.
100-0018 HQ
’04.07.01 12:30 18
2
GOSELECT
Decreases the number.To apply print reservation for
other frames, press .
EXIT SELECT GO
CANCELSET
PRINT ORDEREDPRINT ORDERED10 (16) DATE10 (16) DATE
PRINT ORDER
EXIT SELECT GO
DATE
NO
TIME
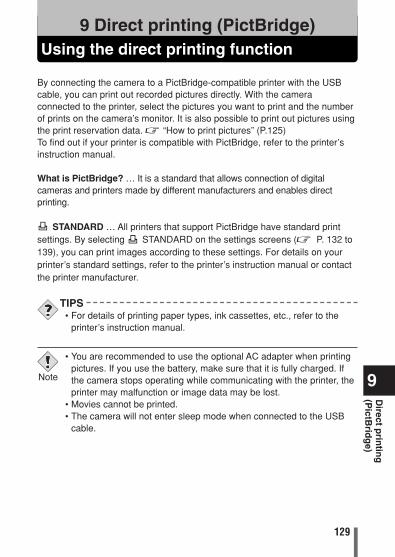
129
Using the direct printing function9 Direct printing (PictBridge)
9
Direct p
rintin
g(P
ictBrid
ge)
By connecting the camera to a PictBridge-compatible printer with the USBcable, you can print out recorded pictures directly. With the cameraconnected to the printer, select the pictures you want to print and the numberof prints on the camera’s monitor. It is also possible to print out pictures usingthe print reservation data. ~ “How to print pictures” (P.125)To find out if your printer is compatible with PictBridge, refer to the printer’sinstruction manual.
What is PictBridge? … It is a standard that allows connection of digitalcameras and printers made by different manufacturers and enables directprinting.
STANDARD … All printers that support PictBridge have standard printsettings. By selecting STANDARD on the settings screens (~ P. 132 to139), you can print images according to these settings. For details on yourprinter’s standard settings, refer to the printer’s instruction manual or contactthe printer manufacturer.
TIPS• For details of printing paper types, ink cassettes, etc., refer to the
printer’s instruction manual.
• You are recommended to use the optional AC adapter when printingpictures. If you use the battery, make sure that it is fully charged. Ifthe camera stops operating while communicating with the printer, theprinter may malfunction or image data may be lost.
• Movies cannot be printed.• The camera will not enter sleep mode when connected to the USB
cable.
Note
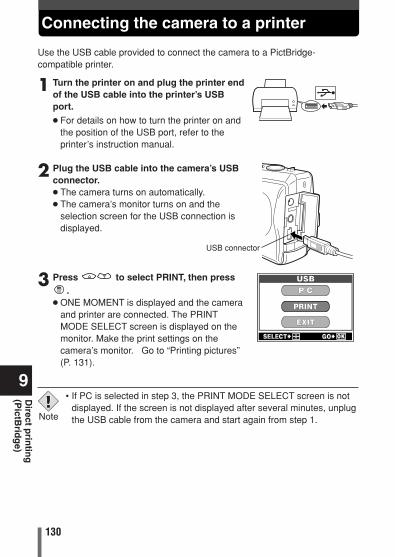
Connecting the camera to a printer
130
9D
irect prin
ting
(P
ictBrid
ge)
1 Turn the printer on and plug the printer endof the USB cable into the printer’s USBport.● For details on how to turn the printer on and
the position of the USB port, refer to theprinter’s instruction manual.
2 Plug the USB cable into the camera’s USBconnector.● The camera turns on automatically.● The camera’s monitor turns on and the
selection screen for the USB connection isdisplayed.
3 Press to select PRINT, then press.
● ONE MOMENT is displayed and the cameraand printer are connected. The PRINTMODE SELECT screen is displayed on themonitor. Make the print settings on thecamera’s monitor. Go to “Printing pictures”(P. 131).
Use the USB cable provided to connect the camera to a PictBridge-compatible printer.
P C
EXIT
USB
• If PC is selected in step 3, the PRINT MODE SELECT screen is notdisplayed. If the screen is not displayed after several minutes, unplugthe USB cable from the camera and start again from step 1.Note
USB connector

131
Printing pictures
9
Direct p
rintin
g(P
ictBrid
ge)
When the camera is connected to a PictBridge-compatible printer, the PRINT MODE SELECTscreen is displayed on the monitor. Use thisscreen to select the print mode. You can choosefrom the following print modes.
PRINT Prints the selected picture.~ “PRINT mode/MULTI PRINT mode” (P. 133)
ALL PRINT Prints all the pictures stored on the card.~ “ALL PRINT mode” (P. 137)
MULTI PRINT Prints one picture in multiple layout format.~ “PRINT mode/MULTI PRINT mode” (P. 133)
ALL INDEX Prints an index of all the pictures stored on the card.~ “ALL INDEX mode/PRINT ORDER mode” (P. 139)
PRINT ORDER Prints the pictures according to the print reservation dataon the card. If no print reservations (P. 125) have beenmade, this option is not available.~ “ALL INDEX mode/PRINT ORDER mode” (P. 139)
EXIT SELECT GO
PRINT MODE SELECTPRINT MODE SELECTPRINT
ALL PRINTMULTI PRINTALL INDEX
The available print modes and settings such as paper size varydepending on the type of printer.For details, refer to the printer’s instructions.
Print modes and the settings
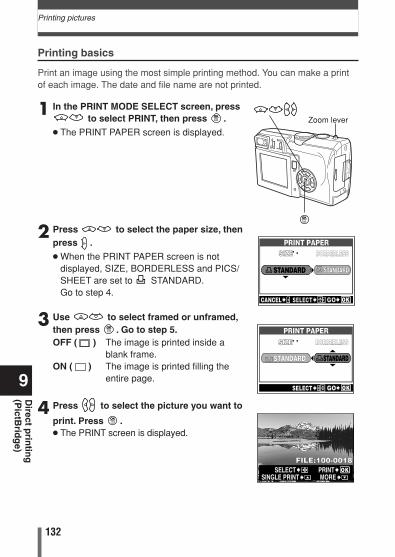
132
Printing pictures
9D
irect prin
ting
(P
ictBrid
ge)
Printing basics
Print an image using the most simple printing method. You can make a printof each image. The date and file name are not printed.
1 In the PRINT MODE SELECT screen, pressto select PRINT, then press .
● The PRINT PAPER screen is displayed.
2 Press to select the paper size, thenpress .
● When the PRINT PAPER screen is notdisplayed, SIZE, BORDERLESS and PICS/SHEET are set to STANDARD. Go to step 4.
3 Use to select framed or unframed,then press . Go to step 5.OFF ( ) The image is printed inside a
blank frame.ON ( ) The image is printed filling the
entire page.
4 Press to select the picture you want to
print. Press .● The PRINT screen is displayed.
Zoom lever
SIZESIZE BORDERLESS
STANDARD STSTANDARDANDARD
PRINT PAPER
CANCEL SELECTSELECT GOGO
SIZESIZE BORDERLESS
STANDARD STANDARD
PRINT PAPER
SELECT GO
FILE:100-0018SELECT PRINT
MORESINGLE PRINT

133
Printing pictures
9
Direct p
rintin
g(P
ictBrid
ge)
PRINT mode/MULTI PRINT mode
1 In the PRINT MODE SELECT screen, pressto select PRINT or MULTI PRINT,
then press .● The PRINT PAPER screen is displayed.
2 Press to select the paper size, thenpress .
PRINT mode Go to Step 3.
MULTI PRINT mode Go to Step 4.
● When the PRINT PAPER screen is notdisplayed, SIZE, BORDERLESS and PICS/SHEET are set to STANDARD. Go to step 5.
Zoom lever
5 Press to select OK, then press .● Printing starts.● If you select CANCEL and press , the
monitor returns to the PRINT MODESELECT screen.
● When printing is finished, the monitor returnsto the screen in step 4. Repeat steps 4 and5 to continue printing.
OK
CANCEL
CANCEL SELECT GO
SIZESIZE BORDERLESS
STANDARD STSTANDARDANDARD
PRINT PAPER
CANCELCANCEL SELECTSELECT GOGO
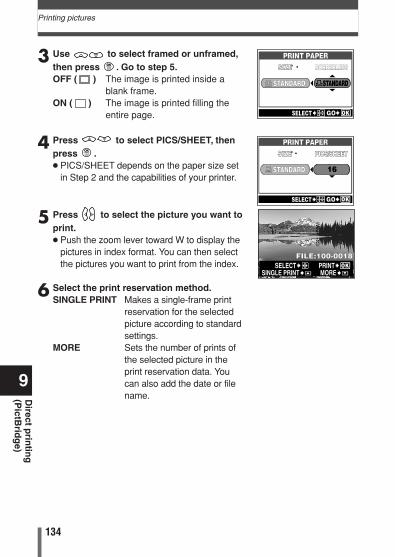
134
9D
irect prin
ting
(P
ictBrid
ge)
Printing pictures
3 Use to select framed or unframed,then press . Go to step 5.OFF ( ) The image is printed inside a
blank frame.ON ( ) The image is printed filling the
entire page.
4 Press to select PICS/SHEET, thenpress .● PICS/SHEET depends on the paper size set
in Step 2 and the capabilities of your printer.
5 Press to select the picture you want toprint.● Push the zoom lever toward W to display the
pictures in index format. You can then selectthe pictures you want to print from the index.
6 Select the print reservation method.SINGLE PRINT Makes a single-frame print
reservation for the selectedpicture according to standardsettings.
MORE Sets the number of prints ofthe selected picture in theprint reservation data. Youcan also add the date or filename.
SIZESIZE BORDERLESS
STANDARD STANDARD
PRINT PAPER
SELECT GO
SIZESIZE PICS/SHEETPICS/SHEET
STANDARD
PRINT PAPER
SELECT GO
16
FILE:100-0018SELECT PRINT
MORESINGLE PRINT
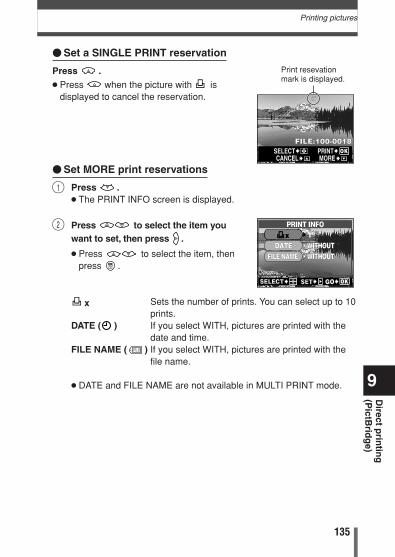
135
9
Direct p
rintin
g(P
ictBrid
ge)
Printing pictures
� Set a SINGLE PRINT reservation
Press .● Press when the picture with is
displayed to cancel the reservation.
� Set MORE print reservations
1 Press .● The PRINT INFO screen is displayed.
2 Press to select the item youwant to set, then press .
● Press to select the item, thenpress .
x Sets the number of prints. You can select up to 10prints.
DATE ( ) If you select WITH, pictures are printed with thedate and time.
FILE NAME ( ) If you select WITH, pictures are printed with thefile name.
● DATE and FILE NAME are not available in MULTI PRINT mode.
Print resevationmark is displayed.
FILE:100-0018SELECT PRINT
MORECANCEL
PRINT INFO
DATEx
FILE NAME WITHOUTWITHOUT
1
SELECTSELECT SETSET GO
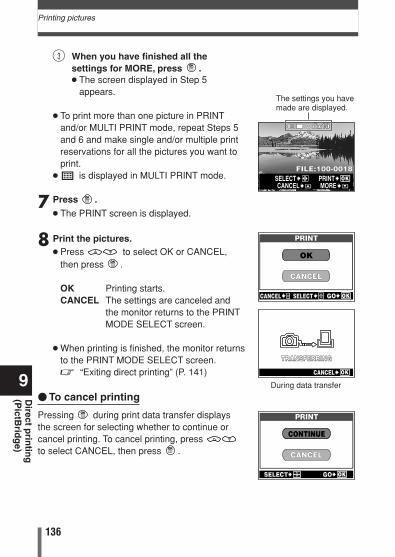
136
9D
irect prin
ting
(P
ictBrid
ge)
Printing pictures
3 When you have finished all thesettings for MORE, press .● The screen displayed in Step 5
appears.
● To print more than one picture in PRINTand/or MULTI PRINT mode, repeat Steps 5and 6 and make single and/or multiple printreservations for all the pictures you want toprint.
● is displayed in MULTI PRINT mode.
7 Press .
● The PRINT screen is displayed.
8 Print the pictures.● Press to select OK or CANCEL,
then press .
OK Printing starts.CANCEL The settings are canceled and
the monitor returns to the PRINTMODE SELECT screen.
● When printing is finished, the monitor returnsto the PRINT MODE SELECT screen.~ “Exiting direct printing” (P. 141)
� To cancel printing
Pressing during print data transfer displaysthe screen for selecting whether to continue orcancel printing. To cancel printing, press to select CANCEL, then press .
The settings you havemade are displayed.
FILE:100-0018SELECT PRINT
MORECANCEL
OK
CANCEL
CANCEL SELECT GO
TRANSFERRINGTRANSFERRING
CANCEL
During data transfer
CONTINUE
CANCEL
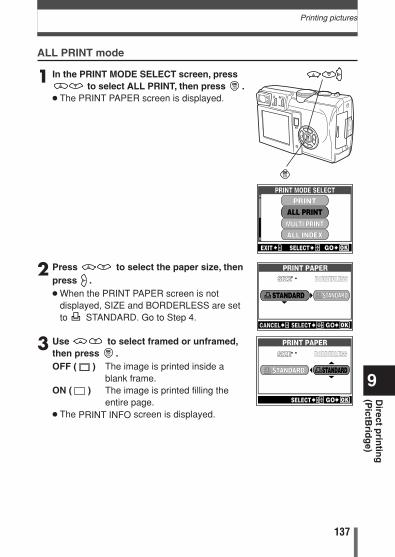
137
9
Direct p
rintin
g(P
ictBrid
ge)
Printing pictures
ALL PRINT mode
1 In the PRINT MODE SELECT screen, pressto select ALL PRINT, then press .
● The PRINT PAPER screen is displayed.
2 Press to select the paper size, thenpress .● When the PRINT PAPER screen is not
displayed, SIZE and BORDERLESS are setto STANDARD. Go to Step 4.
3 Use to select framed or unframed,then press .OFF ( ) The image is printed inside a
blank frame.ON ( ) The image is printed filling the
entire page.● The PRINT INFO screen is displayed.
EXIT SELECT GO
PRINT MODE SELECTPRINT MODE SELECTPRINT
ALL PRINTMULTI PRINTALL INDEX
SIZESIZE BORDERLESS
STANDARD STSTANDARDANDARD
PRINT PAPER
CANCELCANCEL SELECTSELECT GOGO
SIZESIZE BORDERLESS
STANDARD STANDARD
PRINT PAPER
SELECT GO
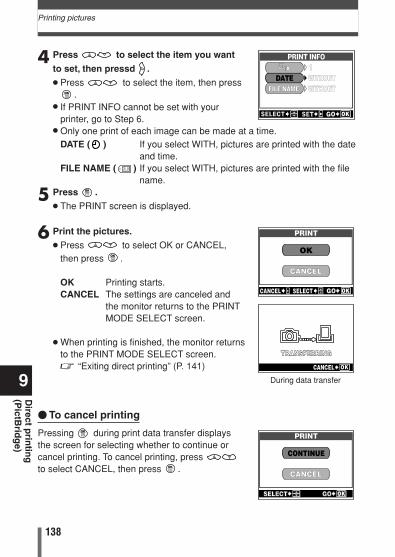
138
9D
irect prin
ting
(P
ictBrid
ge)
Printing pictures
4 Press to select the item you want
to set, then pressd .
● Press to select the item, then press.
● If PRINT INFO cannot be set with yourprinter, go to Step 6.
● Only one print of each image can be made at a time.DATE ( ) If you select WITH, pictures are printed with the date
and time.FILE NAME ( ) If you select WITH, pictures are printed with the file
name.
5 Press .
● The PRINT screen is displayed.
6 Print the pictures.
● Press to select OK or CANCEL,then press .
OK Printing starts.CANCEL The settings are canceled and
the monitor returns to the PRINTMODE SELECT screen.
● When printing is finished, the monitor returnsto the PRINT MODE SELECT screen.~ “Exiting direct printing” (P. 141)
� To cancel printing
Pressing during print data transfer displaysthe screen for selecting whether to continue orcancel printing. To cancel printing, press to select CANCEL, then press .
OK
CANCEL
CANCEL SELECT GO
TRANSFERRINGTRANSFERRING
CANCEL
During data transfer
CONTINUE
CANCEL
PRINT INFO
DATEx
FILE NAME WITHOUTWITHOUT
1
SELECTSELECT SETSET GO
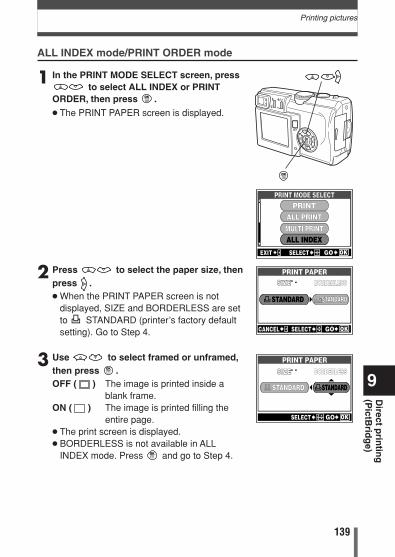
139
9
Direct p
rintin
g(P
ictBrid
ge)
Printing pictures
ALL INDEX mode/PRINT ORDER mode
1 In the PRINT MODE SELECT screen, pressto select ALL INDEX or PRINT
ORDER, then press .● The PRINT PAPER screen is displayed.
2 Press to select the paper size, thenpress .● When the PRINT PAPER screen is not
displayed, SIZE and BORDERLESS are setto STANDARD (printer’s factory defaultsetting). Go to Step 4.
3 Use to select framed or unframed,then press .OFF ( ) The image is printed inside a
blank frame.ON ( ) The image is printed filling the
entire page.● The print screen is displayed.● BORDERLESS is not available in ALL
INDEX mode. Press and go to Step 4.
EXIT SELECT GO
PRINT MODE SELECTPRINT MODE SELECTPRINT
ALL PRINTMULTI PRINTALL INDEX
SIZESIZE BORDERLESS
STANDARD STSTANDARDANDARD
PRINT PAPER
CANCEL SELECT GO
SIZESIZE BORDERLESS
STANDARD STANDARD
PRINT PAPER
SELECT GO
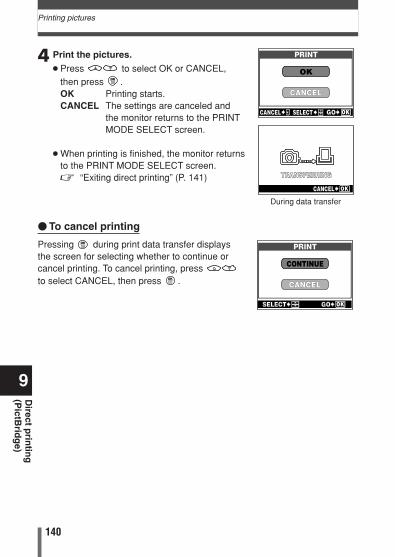
140
9D
irect prin
ting
(P
ictBrid
ge)
Printing pictures
4 Print the pictures.
● Press to select OK or CANCEL,then press .OK Printing starts.CANCEL The settings are canceled and
the monitor returns to the PRINTMODE SELECT screen.
● When printing is finished, the monitor returnsto the PRINT MODE SELECT screen.~ “Exiting direct printing” (P. 141)
� To cancel printing
Pressing during print data transfer displaysthe screen for selecting whether to continue orcancel printing. To cancel printing, press to select CANCEL, then press .
OK
CANCEL
CANCEL SELECT GO
TRANSFERRINGTRANSFERRING
CANCEL
During data transfer
CONTINUE
CANCEL

141
9
Direct p
rintin
g(P
ictBrid
ge)
Exiting direct printing
1 In the PRINT MODE SELECT screen, select.
● The message is displayed.
2 Remove the USB cable from the camera.● The camera turns off.
3 Remove the USB cable from the printer.
When you have finished printing, disconnect the camera from the printer.
EXIT SELECT GO
PRINT MODE SELECTPRINT MODE SELECTPRINT
ALL PRINTMULTI PRINTALL INDEX
REMOVE USB CABLE
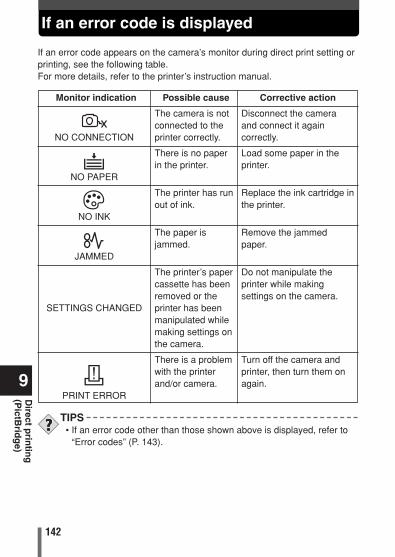
142
9D
irect prin
ting
(P
ictBrid
ge)
If an error code is displayed
If an error code appears on the camera’s monitor during direct print setting orprinting, see the following table.For more details, refer to the printer’s instruction manual.
Monitor indication
NO CONNECTION
NO PAPER
NO INK
JAMMED
SETTINGS CHANGED
PRINT ERROR
Corrective action
Disconnect the cameraand connect it againcorrectly.
Load some paper in theprinter.
Replace the ink cartridge inthe printer.
Remove the jammedpaper.
Do not manipulate theprinter while makingsettings on the camera.
Turn off the camera andprinter, then turn them onagain.
Possible cause
The camera is notconnected to theprinter correctly.
There is no paperin the printer.
The printer has runout of ink.
The paper isjammed.
The printer’s papercassette has beenremoved or theprinter has beenmanipulated whilemaking settings onthe camera.
There is a problemwith the printerand/or camera.
TIPS• If an error code other than those shown above is displayed, refer to
“Error codes” (P. 143).

143
Error codes10 Miscellaneous
10
Miscellan
eou
s
Possible cause
The card is not inserted,or it cannot berecognized.
There is a problemwith the card.
Writing to the card isprohibited.
The card is full. Nomore pictures, moviesor information such asresizing can berecorded.
There are no pictureson the card.
Monitor indication
NO CARD
CARD ERROR
WRITE PROTECT
CARD FULL
NO PICTURE
Corrective action
Insert a card or insert adifferent card. If the problempersists, format the card. Ifthe card cannot beformatted, it cannot be used.
Use a different card. Insert anew card.
The recorded image has beenprotected (read-only) on a PC.Download the image to a PCand cancel the read-onlysetting.
Replace the card or eraseunwanted pictures. Beforeerasing, download importantimages to a PC.
The card contains nopictures. Record pictures.
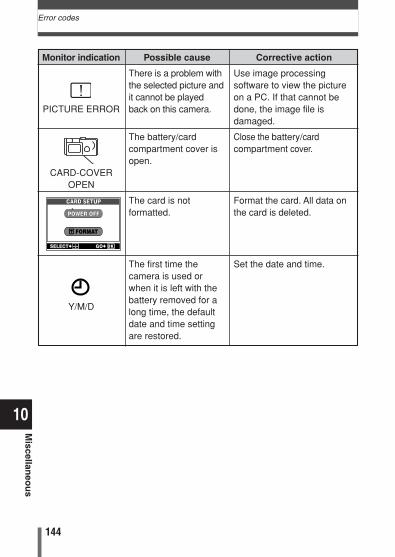
144
Error codes
10
Miscellan
eou
s
Possible cause
There is a problem withthe selected picture andit cannot be playedback on this camera.
The battery/cardcompartment cover isopen.
The card is notformatted.
The first time thecamera is used orwhen it is left with thebattery removed for along time, the defaultdate and time settingare restored.
Monitor indication
PICTURE ERROR
CARD-COVEROPEN
Y/M/D
Corrective action
Use image processingsoftware to view the pictureon a PC. If that cannot bedone, the image file isdamaged.
Close the battery/cardcompartment cover.
Format the card. All data onthe card is deleted.
Set the date and time.
CARD SETUP
POWER OFF
FORMAT
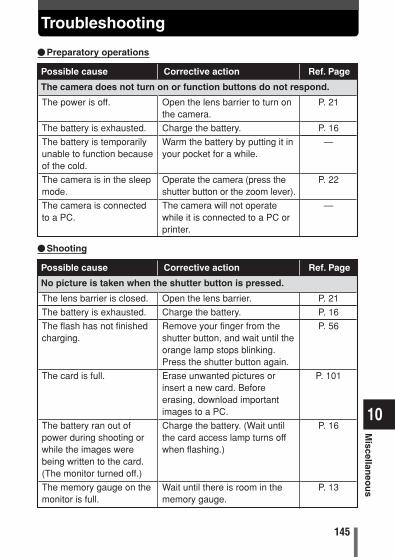
145
Troubleshooting
10
Miscellan
eou
s
Possible cause Corrective action Ref. Page
�Preparatory operations
The camera does not turn on or function buttons do not respond.
Possible cause Corrective action Ref. Page
�Shooting
No picture is taken when the shutter button is pressed.
The power is off.
The battery is exhausted.
The battery is temporarilyunable to function becauseof the cold.
The camera is in the sleepmode.
The camera is connectedto a PC.
Open the lens barrier to turn onthe camera.
Charge the battery.
Warm the battery by putting it inyour pocket for a while.
Operate the camera (press theshutter button or the zoom lever).
The camera will not operatewhile it is connected to a PC orprinter.
P. 21
P. 16
—
P. 22
—
The lens barrier is closed.
The battery is exhausted.
The flash has not finishedcharging.
The card is full.
The battery ran out ofpower during shooting orwhile the images werebeing written to the card.(The monitor turned off.)
The memory gauge on themonitor is full.
Open the lens barrier.
Charge the battery.
Remove your finger from theshutter button, and wait until theorange lamp stops blinking.Press the shutter button again.
Erase unwanted pictures orinsert a new card. Beforeerasing, download importantimages to a PC.
Charge the battery. (Wait untilthe card access lamp turns offwhen flashing.)
Wait until there is room in thememory gauge.
P. 21
P. 16
P. 56
P. 101
P. 16
P. 13
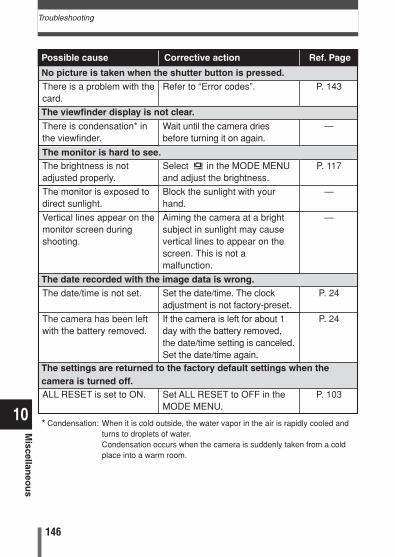
No picture is taken when the shutter button is pressed.
146
Troubleshooting
10
Miscellan
eou
s
The date recorded with the image data is wrong.
Possible cause Corrective action Ref. Page
* Condensation: When it is cold outside, the water vapor in the air is rapidly cooled andturns to droplets of water. Condensation occurs when the camera is suddenly taken from a coldplace into a warm room.
The monitor is hard to see.
The settings are returned to the factory default settings when thecamera is turned off.
The viewfinder display is not clear.
There is a problem with thecard.
There is condensation* inthe viewfinder.
The brightness is notadjusted properly.
The monitor is exposed todirect sunlight.
Vertical lines appear on themonitor screen duringshooting.
The date/time is not set.
The camera has been leftwith the battery removed.
ALL RESET is set to ON.
P. 143
—
P. 117
—
—
P. 24
P. 24
P. 103
Refer to “Error codes”.
Wait until the camera driesbefore turning it on again.
Select in the MODE MENUand adjust the brightness.
Block the sunlight with yourhand.
Aiming the camera at a brightsubject in sunlight may causevertical lines to appear on thescreen. This is not amalfunction.
Set the date/time. The clockadjustment is not factory-preset.
If the camera is left for about 1day with the battery removed,the date/time setting is canceled.Set the date/time again.
Set ALL RESET to OFF in theMODE MENU.
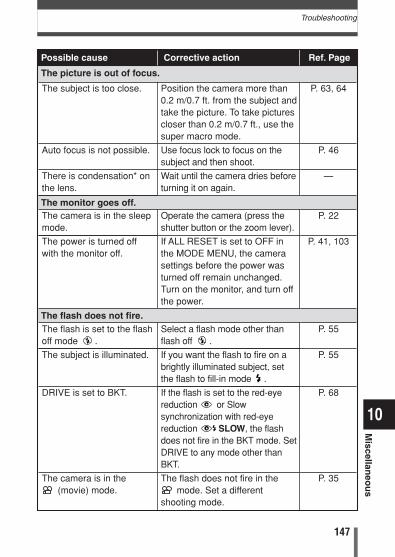
147
Troubleshooting
10
Miscellan
eou
s
Possible cause Corrective action Ref. Page
The picture is out of focus.
The monitor goes off.
The flash does not fire.
Position the camera more than0.2 m/0.7 ft. from the subject andtake the picture. To take picturescloser than 0.2 m/0.7 ft., use thesuper macro mode.
Use focus lock to focus on thesubject and then shoot.
Wait until the camera dries beforeturning it on again.
Operate the camera (press theshutter button or the zoom lever).
If ALL RESET is set to OFF inthe MODE MENU, the camerasettings before the power wasturned off remain unchanged.Turn on the monitor, and turn offthe power.
Select a flash mode other thanflash off .
If you want the flash to fire on abrightly illuminated subject, setthe flash to fill-in mode .
If the flash is set to the red-eyereduction or Slowsynchronization with red-eyereduction SLOW, the flashdoes not fire in the BKT mode. SetDRIVE to any mode other thanBKT.
The flash does not fire in themode. Set a different
shooting mode.
P. 63, 64
P. 46
—
P. 22
P. 41, 103
P. 55
P. 55
P. 68
P. 35
The subject is too close.
Auto focus is not possible.
There is condensation* onthe lens.
The camera is in the sleepmode.
The power is turned offwith the monitor off.
The flash is set to the flashoff mode .
The subject is illuminated.
DRIVE is set to BKT.
The camera is in the (movie) mode.
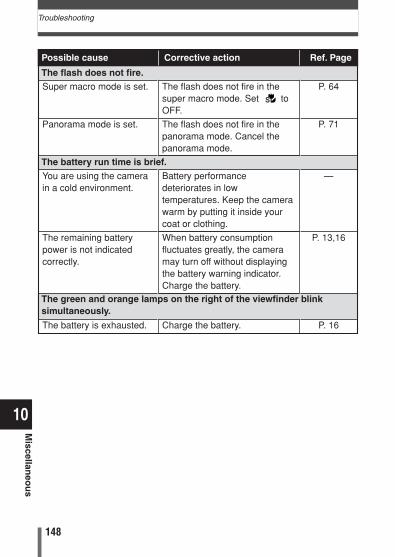
The flash does not fire.
148
Troubleshooting
10
Miscellan
eou
s
Possible cause Corrective action Ref. Page
The battery run time is brief.
The green and orange lamps on the right of the viewfinder blinksimultaneously.
Super macro mode is set.
Panorama mode is set.
You are using the camerain a cold environment.
The remaining batterypower is not indicatedcorrectly.
The battery is exhausted.
P. 64
P. 71
—
P. 13,16
P. 16
The flash does not fire in thesuper macro mode. Set toOFF.
The flash does not fire in thepanorama mode. Cancel thepanorama mode.
Battery performancedeteriorates in lowtemperatures. Keep the camerawarm by putting it inside yourcoat or clothing.
When battery consumptionfluctuates greatly, the cameramay turn off without displayingthe battery warning indicator.Charge the battery.
Charge the battery.
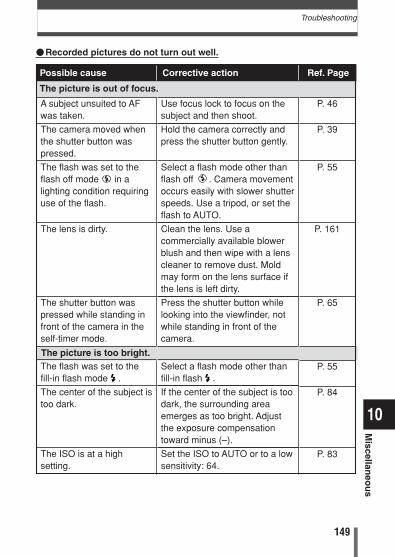
The picture is too bright.
149
Troubleshooting
10
Miscellan
eou
s
Possible cause Corrective action Ref. Page
�Recorded pictures do not turn out well.
The picture is out of focus.
Use focus lock to focus on thesubject and then shoot.
Hold the camera correctly andpress the shutter button gently.
Select a flash mode other thanflash off . Camera movementoccurs easily with slower shutterspeeds. Use a tripod, or set theflash to AUTO.
Clean the lens. Use acommercially available blowerblush and then wipe with a lenscleaner to remove dust. Moldmay form on the lens surface ifthe lens is left dirty.
Press the shutter button whilelooking into the viewfinder, notwhile standing in front of thecamera.
Select a flash mode other thanfill-in flash .
If the center of the subject is toodark, the surrounding areaemerges as too bright. Adjustthe exposure compensationtoward minus (–).
Set the ISO to AUTO or to a lowsensitivity: 64.
P. 46
P. 39
P. 55
P. 161
P. 65
P. 55
P. 84
P. 83
A subject unsuited to AFwas taken.
The camera moved whenthe shutter button waspressed.
The flash was set to theflash off mode in alighting condition requiringuse of the flash.
The lens is dirty.
The shutter button waspressed while standing infront of the camera in theself-timer mode.
The flash was set to thefill-in flash mode .
The center of the subject istoo dark.
The ISO is at a highsetting.
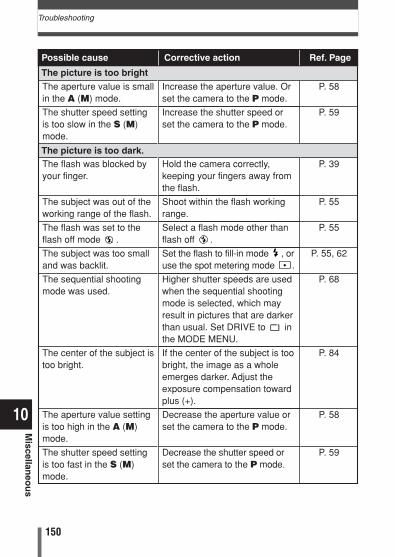
The picture is too dark.
150
10
Miscellan
eou
s
The picture is too bright
Troubleshooting
Possible cause Corrective action Ref. Page
Increase the aperture value. Orset the camera to the P mode.
Increase the shutter speed orset the camera to the P mode.
Hold the camera correctly,keeping your fingers away fromthe flash.
Shoot within the flash workingrange.
Select a flash mode other thanflash off .
Set the flash to fill-in mode , oruse the spot metering mode .
Higher shutter speeds are usedwhen the sequential shootingmode is selected, which mayresult in pictures that are darkerthan usual. Set DRIVE to inthe MODE MENU.
If the center of the subject is toobright, the image as a wholeemerges darker. Adjust theexposure compensation towardplus (+).
Decrease the aperture value orset the camera to the P mode.
Decrease the shutter speed orset the camera to the P mode.
P. 58
P. 59
P. 39
P. 55
P. 55
P. 55, 62
P. 68
P. 84
P. 58
P. 59
The aperture value is smallin the A (M) mode.
The shutter speed settingis too slow in the S (M)mode.
The flash was blocked byyour finger.
The subject was out of theworking range of the flash.
The flash was set to theflash off mode .
The subject was too smalland was backlit.
The sequential shootingmode was used.
The center of the subject istoo bright.
The aperture value settingis too high in the A (M)mode.
The shutter speed settingis too fast in the S (M)mode.
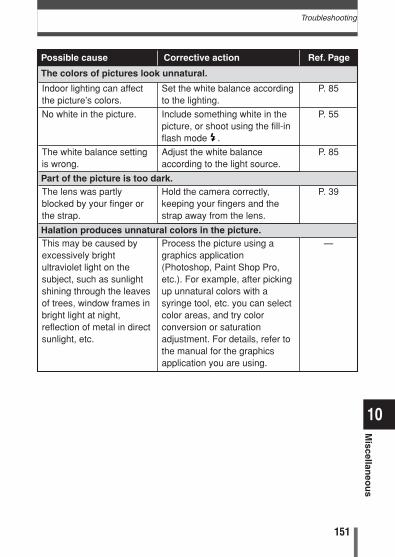
Halation produces unnatural colors in the picture.
Part of the picture is too dark.
151
10
Miscellan
eou
sTroubleshooting
The colors of pictures look unnatural.
Indoor lighting can affectthe picture’s colors.
No white in the picture.
The white balance settingis wrong.
The lens was partlyblocked by your finger orthe strap.
This may be caused byexcessively brightultraviolet light on thesubject, such as sunlightshining through the leavesof trees, window frames inbright light at night,reflection of metal in directsunlight, etc.
Set the white balance accordingto the lighting.
Include something white in thepicture, or shoot using the fill-inflash mode .
Adjust the white balanceaccording to the light source.
Hold the camera correctly,keeping your fingers and thestrap away from the lens.
Process the picture using agraphics application(Photoshop, Paint Shop Pro,etc.). For example, after pickingup unnatural colors with asyringe tool, etc. you can selectcolor areas, and try colorconversion or saturationadjustment. For details, refer tothe manual for the graphicsapplication you are using.
P. 85
P. 55
P. 85
P. 39
—
Possible cause Corrective action Ref. Page
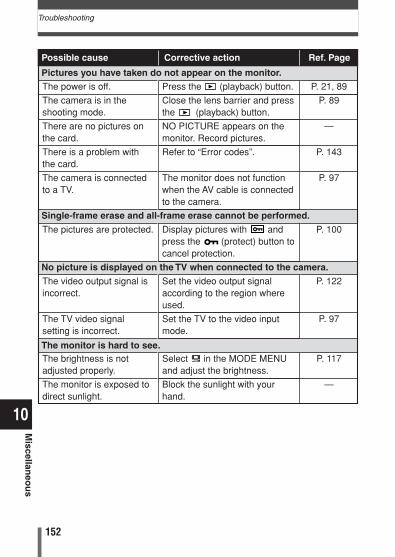
No picture is displayed on the TV when connected to the camera.
The monitor is hard to see.
Single-frame erase and all-frame erase cannot be performed.
152
10
Miscellan
eou
s
Pictures you have taken do not appear on the monitor.
Troubleshooting
The power is off.
The camera is in theshooting mode.
There are no pictures onthe card.
There is a problem withthe card.
The camera is connectedto a TV.
The pictures are protected.
The video output signal isincorrect.
The TV video signalsetting is incorrect.
The brightness is notadjusted properly.
The monitor is exposed todirect sunlight.
Press the (playback) button.
Close the lens barrier and pressthe (playback) button.
NO PICTURE appears on themonitor. Record pictures.
Refer to “Error codes”.
The monitor does not functionwhen the AV cable is connectedto the camera.
Display pictures with andpress the (protect) button tocancel protection.
Set the video output signalaccording to the region whereused.
Set the TV to the video inputmode.
Select in the MODE MENUand adjust the brightness.
Block the sunlight with yourhand.
P. 21, 89
P. 89
—
P. 143
P. 97
P. 100
P. 122
P. 97
P. 117
—
Possible cause Corrective action Ref. Page
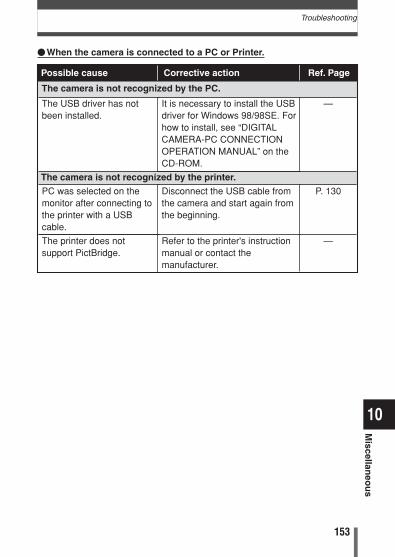
153
10
Miscellan
eou
sTroubleshooting
�When the camera is connected to a PC or Printer.
The camera is not recognized by the PC.
The USB driver has notbeen installed.
PC was selected on themonitor after connecting tothe printer with a USBcable.
The printer does notsupport PictBridge.
It is necessary to install the USBdriver for Windows 98/98SE. Forhow to install, see “DIGITALCAMERA-PC CONNECTIONOPERATION MANUAL” on theCD-ROM.
Disconnect the USB cable fromthe camera and start again fromthe beginning.
Refer to the printer's instructionmanual or contact themanufacturer.
—
P. 130
—
Possible cause Corrective action Ref. Page
The camera is not recognized by the printer.
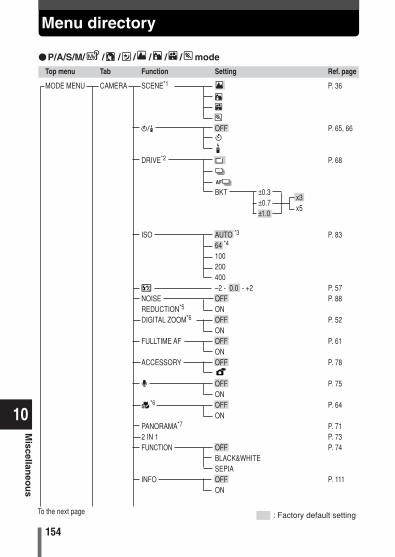
154
10
Miscellan
eou
s
Menu directory
Top menu Tab Function Setting Ref. page
MODE MENU CAMERA SCENE*1 P. 36
OFF P. 65, 66
DRIVE*2 P. 68
BKT ±0.3±0.7
x3
±1.0x5
ISO AUTO *3 P. 8364 *4
100200400–2 - 0.0 - +2 P. 57
NOISE OFF P. 88REDUCTION*5 ONDIGITAL ZOOM*6 OFF P. 52
ONFULLTIME AF OFF P. 61
ONACCESSORY OFF P. 78
OFF P. 75ON
*6 OFF P. 64ON
PANORAMA*7 P. 712 IN 1 P. 73FUNCTION OFF P. 74
BLACK&WHITESEPIA
INFO OFF P. 111ON
To the next page
�P/A/S/M/ / / / / / / mode
: Factory default setting
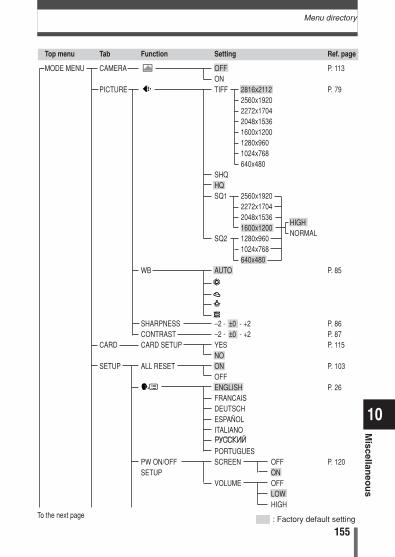
155
10
Miscellan
eou
sMenu directory
: Factory default setting
Top menu Tab Function Setting Ref. page
MODE MENU CAMERA OFF P. 113ON
PICTURE TIFF 2816x2112 P. 792560x19202272x17042048x15361600x12001280x9601024x768640x480
SHQHQSQ1 2560x1920
2272x17042048x15361600x1200
HIGH
SQ2 1280x960NORMAL
1024x768640x480
WB AUTO P. 85
SHARPNESS –2 - ±0 - +2 P. 86CONTRAST –2 - ±0 - +2 P. 87
CARD CARD SETUP YES P. 115NO
SETUP ALL RESET ON P. 103OFFENGLISH P. 26FRANCAISDEUTSCHESPAÑOLITALIANO
PORTUGUESPW ON/OFF SCREEN OFF P. 120SETUP ON
VOLUME OFFLOWHIGH
To the next page
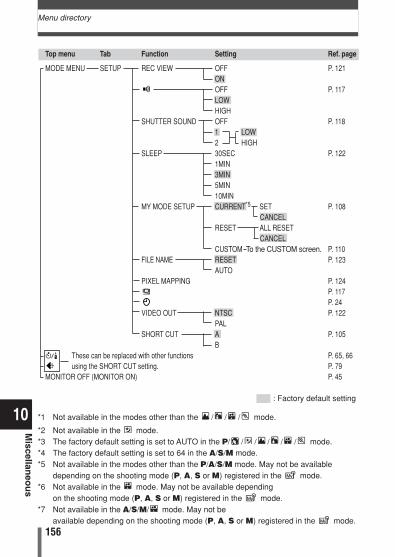
156
10
Miscellan
eou
s
Menu directory
Top menu Tab Function Setting Ref. page
MODE MENU SETUP REC VIEW OFF P. 121ONOFF P. 117LOWHIGH
SHUTTER SOUND OFF P. 1181 LOW2 HIGH
SLEEP 30SEC P. 1221MIN3MIN5MIN10MIN
MY MODE SETUP CURRENT*5 SET P. 108CANCEL
RESET ALL RESETCANCEL
CUSTOM To the CUSTOM screen. P. 110FILE NAME RESET P. 123
AUTOPIXEL MAPPING P. 124
P. 117P. 24
VIDEO OUT NTSC P. 122PAL
SHORT CUT A P. 105B
These can be replaced with other functions P. 65, 66using the SHORT CUT setting. P. 79
MONITOR OFF (MONITOR ON) P. 45
*1 Not available in the modes other than the / / / mode.
*2 Not available in the mode.*3 The factory default setting is set to AUTO in the P/ / / / / / mode.*4 The factory default setting is set to 64 in the A/S/M mode.*5 Not available in the modes other than the P/A/S/M mode. May not be available
depending on the shooting mode (P, A, S or M) registered in the mode.*6 Not available in the mode. May not be available depending
on the shooting mode (P, A, S or M) registered in the mode.*7 Not available in the A/S/M/ mode. May not be
available depending on the shooting mode (P, A, S or M) registered in the mode.
: Factory default setting
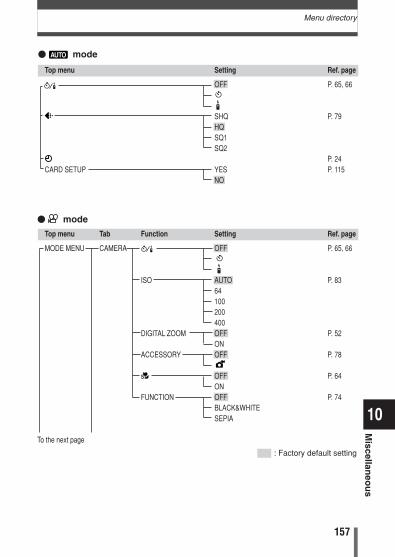
157
10
Miscellan
eou
sMenu directory
Top menu Setting Ref. page
OFF P. 65, 66
SHQ P. 79HQSQ1SQ2
P. 24CARD SETUP YES P. 115
NO
� mode
� mode
Top menu Tab Function Setting Ref. page
MODE MENU CAMERA OFF P. 65, 66
ISO AUTO P. 8364100200400
DIGITAL ZOOM OFF P. 52ON
ACCESSORY OFF P. 78
OFF P. 64ON
FUNCTION OFF P. 74BLACK&WHITESEPIA
To the next page
: Factory default setting
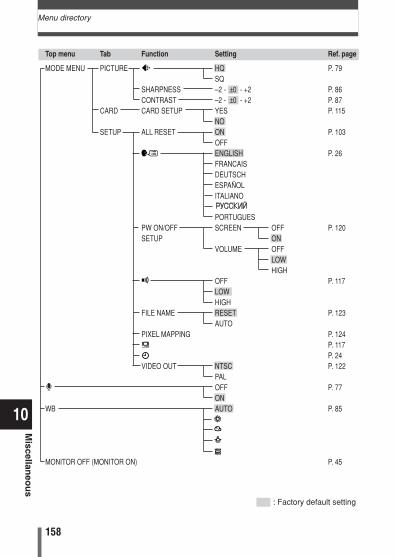
158
10
Miscellan
eou
s
Menu directory
Top menu Tab Function Setting Ref. page
MODE MENU PICTURE HQ P. 79SQ
SHARPNESS –2 - ±0 - +2 P. 86CONTRAST –2 - ±0 - +2 P. 87
CARD CARD SETUP YES P. 115NO
SETUP ALL RESET ON P. 103OFFENGLISH P. 26FRANCAISDEUTSCHESPAÑOLITALIANO
PORTUGUESPW ON/OFF SCREEN OFF P. 120SETUP ON
VOLUME OFFLOWHIGH
OFF P. 117LOWHIGH
FILE NAME RESET P. 123AUTO
PIXEL MAPPING P. 124P. 117P. 24
VIDEO OUT NTSC P. 122PALOFF P. 77ON
WB AUTO P. 85
MONITOR OFF (MONITOR ON) P. 45
: Factory default setting
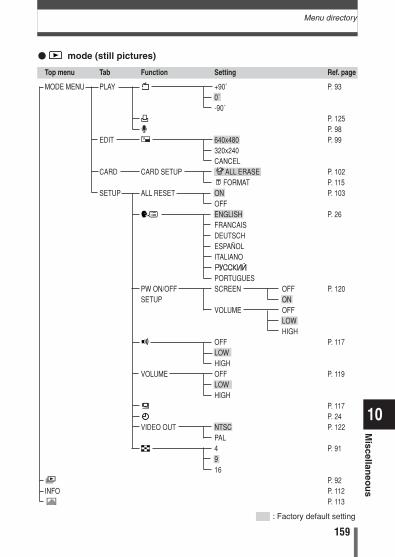
159
10
Miscellan
eou
sMenu directory
� mode (still pictures)
: Factory default setting
Top menu Tab Function Setting Ref. page
MODE MENU PLAY +90˚ P. 930˚-90˚
P. 125P. 98
EDIT 640x480 P. 99320x240CANCEL
CARD CARD SETUP ALL ERASE P. 102FORMAT P. 115
SETUP ALL RESET ON P. 103OFFENGLISH P. 26FRANCAISDEUTSCHESPAÑOLITALIANO
PORTUGUESPW ON/OFF SCREEN OFF P. 120SETUP ON
VOLUME OFFLOWHIGH
OFF P. 117LOWHIGH
VOLUME OFF P. 119LOWHIGH
P. 117P. 24
VIDEO OUT NTSC P. 122PAL4 P. 91916
P. 92INFO P. 112
P. 113
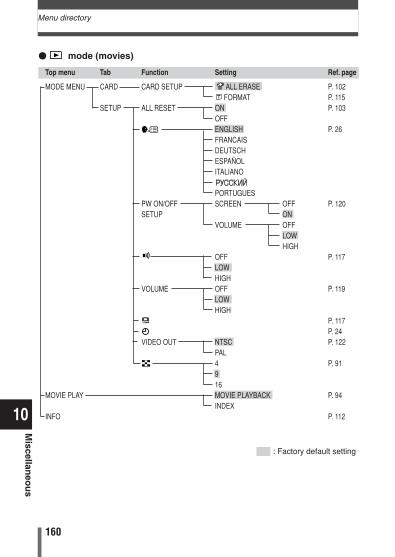
160
10
Miscellan
eou
s
Menu directory
� mode (movies)
: Factory default setting
Top menu Tab Function Setting Ref. page
MODE MENU CARD CARD SETUP ALL ERASE P. 102FORMAT P. 115
SETUP ALL RESET ON P. 103OFFENGLISH P. 26FRANCAISDEUTSCHESPAÑOLITALIANO
PORTUGUESPW ON/OFF SCREEN OFF P. 120SETUP ON
VOLUME OFFLOWHIGH
OFF P. 117LOWHIGH
VOLUME OFF P. 119LOWHIGH
P. 117P. 24
VIDEO OUT NTSC P. 122PAL4 P. 91916
MOVIE PLAY MOVIE PLAYBACK P. 94INDEX
INFO P. 112
161
10
Miscellan
eou
sCamera maintenance
� Cleaning the camera
1 Close the lens barrier and turn off the camera.
2 Remove the battery. ~ P. 18 ● If you are using an AC adapter, unplug the AC adapter from the camera
first before removing the plug from the AC outlet.
3 ExteriorT Wipe gently with a soft cloth. If the camera is very dirty, soak the cloth
in mild soapy water and wring well. Wipe the camera with the dampcloth and then dry it with a dry cloth. If you have used the camera atthe beach, use a cloth soaked in clean water and well wrung.
Monitor and viewfinderT Wipe gently with a soft cloth.LensT Blow dust off the lens with a commercially available blower, then wipe
gently with a lens cleaner.CardT Wipe gently with a soft, dry cloth.
� Storage
● When storing the camera for extended periods, remove the battery and thecard, and keep in a cool, dry place that is well ventilated.
● Replace the battery periodically and test camera functions.
• Do not use strong solvents such as benzene or alcohol, or chemicallytreated cloth.
• Cleaning should be done only after the battery has been removed orthe AC adapter has been disconnected.
• Mold may form on the lens surface if the lens is left dirty. • Avoid leaving the camera in places where chemical products are
handled since this may result in corrosion.
Note
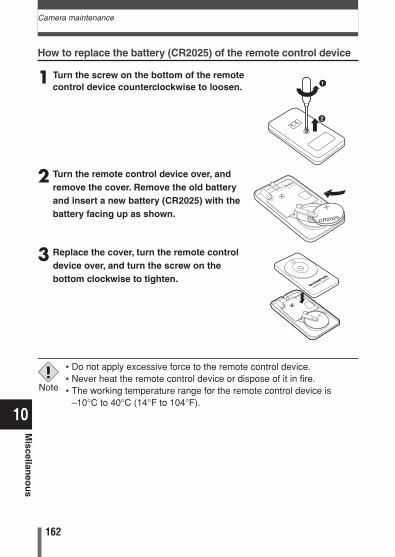
162
Camera maintenance
10
Miscellan
eou
s
How to replace the battery (CR2025) of the remote control device
1 Turn the screw on the bottom of the remotecontrol device counterclockwise to loosen.
2 Turn the remote control device over, andremove the cover. Remove the old batteryand insert a new battery (CR2025) with thebattery facing up as shown.
3 Replace the cover, turn the remote controldevice over, and turn the screw on thebottom clockwise to tighten.
• Do not apply excessive force to the remote control device.• Never heat the remote control device or dispose of it in fire.• The working temperature range for the remote control device is
–10°C to 40°C (14°F to 104°F).
Note
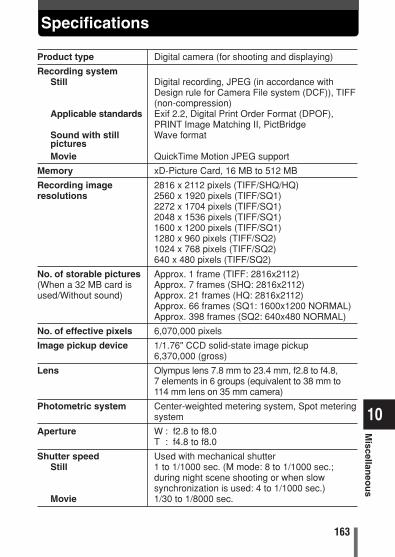
163
10
Miscellan
eou
sSpecifications
Product type Digital camera (for shooting and displaying)
Recording systemStill Digital recording, JPEG (in accordance with
Design rule for Camera File system (DCF)), TIFF(non-compression)
Applicable standards Exif 2.2, Digital Print Order Format (DPOF), PRINT Image Matching II, PictBridge
Sound with still Wave formatpicturesMovie QuickTime Motion JPEG support
Memory xD-Picture Card, 16 MB to 512 MB
Recording image 2816 x 2112 pixels (TIFF/SHQ/HQ)resolutions 2560 x 1920 pixels (TIFF/SQ1)
2272 x 1704 pixels (TIFF/SQ1)2048 x 1536 pixels (TIFF/SQ1)1600 x 1200 pixels (TIFF/SQ1)1280 x 960 pixels (TIFF/SQ2)1024 x 768 pixels (TIFF/SQ2)640 x 480 pixels (TIFF/SQ2)
No. of storable pictures Approx. 1 frame (TIFF: 2816x2112)(When a 32 MB card is Approx. 7 frames (SHQ: 2816x2112)used/Without sound) Approx. 21 frames (HQ: 2816x2112)
Approx. 66 frames (SQ1: 1600x1200 NORMAL)Approx. 398 frames (SQ2: 640x480 NORMAL)
No. of effective pixels 6,070,000 pixels
Image pickup device 1/1.76" CCD solid-state image pickup6,370,000 (gross)
Lens Olympus lens 7.8 mm to 23.4 mm, f2.8 to f4.8, 7 elements in 6 groups (equivalent to 38 mm to114 mm lens on 35 mm camera)
Photometric system Center-weighted metering system, Spot meteringsystem
Aperture W : f2.8 to f8.0T : f4.8 to f8.0
Shutter speed Used with mechanical shutter Still 1 to 1/1000 sec. (M mode: 8 to 1/1000 sec.;
during night scene shooting or when slowsynchronization is used: 4 to 1/1000 sec.)
Movie 1/30 to 1/8000 sec.
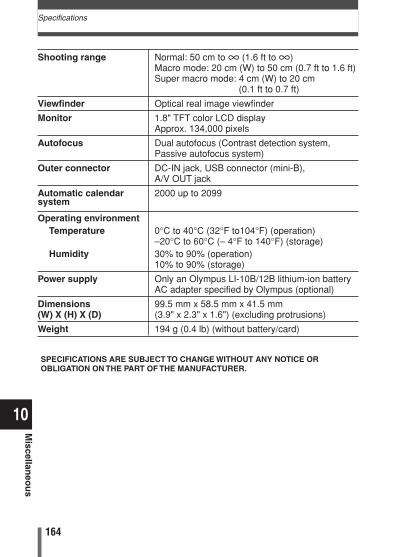
164
10
Miscellan
eou
s
Specifications
Shooting range Normal: 50 cm to ∞ (1.6 ft to ∞) Macro mode: 20 cm (W) to 50 cm (0.7 ft to 1.6 ft) Super macro mode: 4 cm (W) to 20 cm
(0.1 ft to 0.7 ft)
Viewfinder Optical real image viewfinder
Monitor 1.8" TFT color LCD display Approx. 134,000 pixels
Autofocus Dual autofocus (Contrast detection system,Passive autofocus system)
Outer connector DC-IN jack, USB connector (mini-B), A/V OUT jack
Automatic calendar 2000 up to 2099system
Operating environmentTemperature 0°C to 40°C (32°F to104°F) (operation)
–20°C to 60°C (– 4°F to 140°F) (storage)Humidity 30% to 90% (operation)
10% to 90% (storage)
Power supply Only an Olympus LI-10B/12B lithium-ion battery AC adapter specified by Olympus (optional)
Dimensions 99.5 mm x 58.5 mm x 41.5 mm(W) X (H) X (D) (3.9" x 2.3" x 1.6") (excluding protrusions)
Weight 194 g (0.4 lb) (without battery/card)
SPECIFICATIONS ARE SUBJECT TO CHANGE WITHOUT ANY NOTICE OROBLIGATION ON THE PART OF THE MANUFACTURER.
165
10
Miscellan
eou
sGlossary
A (Aperture Priority) ModeYou set the aperture yourself and the camera automatically varies the shutterspeed so that the picture is taken with the best exposure.
AE (Automatic Exposure)The camera’s built-in exposure meter automatically sets the exposure. The 3AE modes available on this camera are P mode, in which the camera selectsboth the aperture and shutter speed, A mode, in which the user selects theaperture and the camera sets the shutter speed, and S mode, in which theuser selects the shutter speed and the camera sets the aperture. In M mode,the user selects both the aperture and the shutter speed.
ApertureThe adjustable lens opening which controls the amount of light that enters thecamera. The larger the aperture, the shorter the depth of field and the fuzzierthe background. The smaller the aperture, the greater the depth of field andthe sharper the background. Larger aperture values indicate smallerapertures, and smaller aperture values indicate larger apertures.
BacklightA light source to illuminate the monitor from behind the screen.
CCD (Charge-Coupled Device)This converts light passing through the lens into electrical signals. With thiscamera, light is picked up and converted into RGB signals to build a singleimage.
Contrast Detection MethodThis is used to measure the distance to the subject. The camera determines ifthe image is focused by the level of contrast in the subject.
Conventional PhotographThis refers to images recorded using silver halide (the method for recordingimages in conventional, non-digital photography). This system is differentfrom that used in still video and digital photography.
DCF (Design rule for Camera File system)A standard for image files by the Japan Electronics and InformationTechnology Industries Association (JEITA).

166
10
Miscellan
eou
s
Glossary
DPOF (Digital Print Order Format)This is for saving desired print settings on digital cameras. By entering whichimages to print and the number of copies of each, the user can easily havethe desired images printed by a printer or print lab that supports the DPOFformat.
Dual Auto FocusAn auto focus system that uses two different focus detection systems incombination. This camera uses the CCD’s contrast detection system incombination with the passive autofocus system, nullifying the shortcomings ofeach system.
EV (Exposure Value)A system for measuring exposure. EV0 is when the aperture is at F1 and theshutter speed is 1 second. The EV then increases by 1 each time theaperture increases by one F stop or the shutter speed increases by oneincrement. EV can also be used to indicate brightness and ISO settings.
ExposureThe amount of light used to capture an image. The exposure is determined bythe time the shutter is open (shutter speed) and the amount of light thatpasses through the lens (aperture).
ISOA method for indicating film speed by the International Organization forStandardization (ISO) (e.g. “ISO100”). Higher ISO values indicate greatersensitivity to light, so images can be exposed even in low-light conditions.
JPEG (Joint Photographic Experts Group)A compression format for still images. Photographs (images) shot using thiscamera are recorded onto the card in JPEG format when the Record mode isset to SHQ, HQ, SQ1 or SQ2. By downloading these images to a personalcomputer, users can edit them using graphics application software or view theimages using an Internet web browser.
M (Manual) ModeThe user sets both the aperture and shutter speed.
NTSC (National Television Systems Committee) / PAL (PhaseAlternating Line)Television formats. NTSC is mainly used in Japan, North America and Korea.PAL is mainly used in Europe and China.
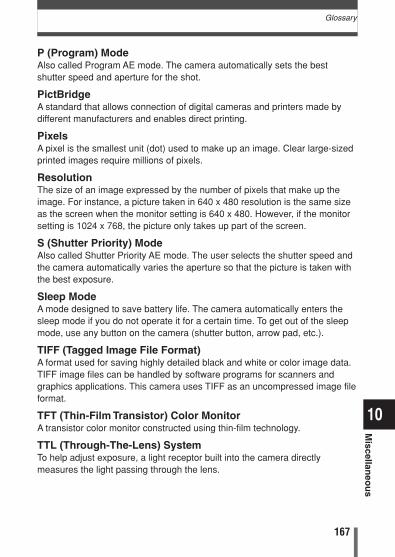
167
10
Miscellan
eou
sGlossary
P (Program) ModeAlso called Program AE mode. The camera automatically sets the bestshutter speed and aperture for the shot.
PictBridgeA standard that allows connection of digital cameras and printers made bydifferent manufacturers and enables direct printing.
PixelsA pixel is the smallest unit (dot) used to make up an image. Clear large-sizedprinted images require millions of pixels.
ResolutionThe size of an image expressed by the number of pixels that make up theimage. For instance, a picture taken in 640 x 480 resolution is the same sizeas the screen when the monitor setting is 640 x 480. However, if the monitorsetting is 1024 x 768, the picture only takes up part of the screen.
S (Shutter Priority) ModeAlso called Shutter Priority AE mode. The user selects the shutter speed andthe camera automatically varies the aperture so that the picture is taken withthe best exposure.
Sleep ModeA mode designed to save battery life. The camera automatically enters thesleep mode if you do not operate it for a certain time. To get out of the sleepmode, use any button on the camera (shutter button, arrow pad, etc.).
TIFF (Tagged Image File Format)A format used for saving highly detailed black and white or color image data.TIFF image files can be handled by software programs for scanners andgraphics applications. This camera uses TIFF as an uncompressed image fileformat.
TFT (Thin-Film Transistor) Color MonitorA transistor color monitor constructed using thin-film technology.
TTL (Through-The-Lens) SystemTo help adjust exposure, a light receptor built into the camera directlymeasures the light passing through the lens.
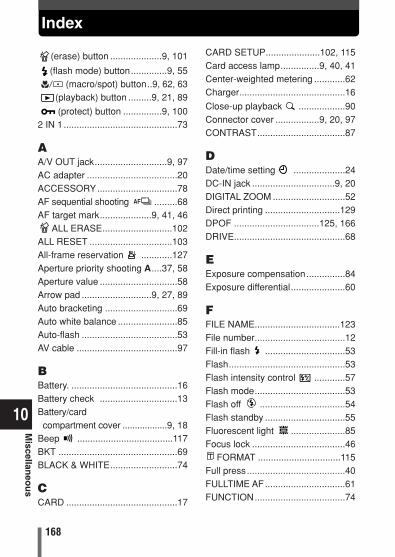
168
10
Miscellan
eou
s
Index
(erase) button ....................9, 101
(flash mode) button..............9, 55 (macro/spot) button..9, 62, 63
(playback) button .........9, 21, 89
(protect) button ...............9, 1002 IN 1............................................73
AA/V OUT jack............................9, 97AC adapter ...................................20ACCESSORY...............................78AF sequential shooting .........68AF target mark....................9, 41, 46
ALL ERASE...........................102ALL RESET ................................103All-frame reservation ............127Aperture priority shooting A....37, 58Aperture value ..............................58Arrow pad ...........................9, 27, 89Auto bracketing ............................69Auto white balance .......................85Auto-flash .....................................53AV cable .......................................97
BBattery. .........................................16Battery check ..............................13Battery/cardcompartment cover ..................9, 18
Beep .....................................117BKT ..............................................69BLACK & WHITE..........................74
CCARD ...........................................17
CARD SETUP.....................102, 115Card access lamp...............9, 40, 41Center-weighted metering ............62Charger.........................................16
Close-up playback ..................90Connector cover .................9, 20, 97CONTRAST..................................87
DDate/time setting ....................24DC-IN jack ................................9, 20DIGITAL ZOOM ............................52Direct printing .............................129DPOF .................................125, 166DRIVE...........................................68
EExposure compensation...............84Exposure differential.....................60
FFILE NAME.................................123File number...................................12Fill-in flash ...............................53Flash.............................................53Flash intensity control ............57Flash mode...................................53Flash off .................................54Flash standby ...............................55Fluorescent light .....................85Focus lock ....................................46
FORMAT ................................115Full press......................................40FULLTIME AF ...............................61FUNCTION...................................74
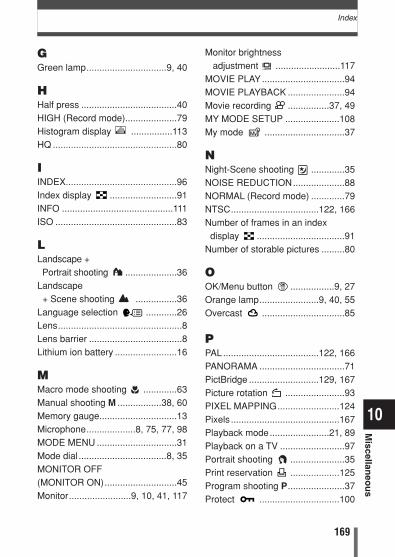
169
10
Miscellan
eou
sIndex
GGreen lamp...............................9, 40
HHalf press .....................................40HIGH (Record mode)....................79Histogram display ................113HQ ................................................80
IINDEX...........................................96Index display ..........................91INFO ...........................................111ISO ...............................................83
LLandscape + Portrait shooting ....................36
Landscape+ Scene shooting ................36
Language selection ............26Lens................................................8Lens barrier ....................................8Lithium ion battery ........................16
MMacro mode shooting .............63Manual shooting M .................38, 60Memory gauge..............................13Microphone...................8, 75, 77, 98MODE MENU ...............................31Mode dial ..................................8, 35MONITOR OFF(MONITOR ON)............................45Monitor........................9, 10, 41, 117
Monitor brightnessadjustment .........................117
MOVIE PLAY................................94MOVIE PLAYBACK ......................94Movie recording ................37, 49MY MODE SETUP .....................108My mode ...............................37
NNight-Scene shooting .............35NOISE REDUCTION....................88NORMAL (Record mode) .............79NTSC..................................122, 166Number of frames in an indexdisplay ..................................91
Number of storable pictures .........80
OOK/Menu button .................9, 27Orange lamp.......................9, 40, 55Overcast ................................85
PPAL.....................................122, 166PANORAMA .................................71PictBridge ...........................129, 167Picture rotation .......................93PIXEL MAPPING........................124Pixels ..........................................167Playback mode.......................21, 89Playback on a TV .........................97Portrait shooting .....................35Print reservation ...................125Program shooting P......................37Protect ...............................100
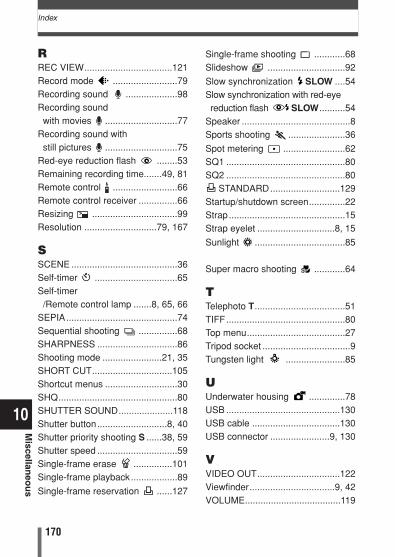
170
10
Miscellan
eou
s
Index
RREC VIEW..................................121Record mode .........................79Recording sound ....................98Recording soundwith movies ............................77
Recording sound with still pictures ............................75
Red-eye reduction flash ........53Remaining recording time.......49, 81Remote control .........................66Remote control receiver ...............66Resizing .................................99Resolution ............................79, 167
SSCENE .........................................36Self-timer ................................65Self-timer/Remote control lamp .......8, 65, 66
SEPIA...........................................74Sequential shooting ...............68SHARPNESS ...............................86Shooting mode .......................21, 35SHORT CUT...............................105Shortcut menus ............................30SHQ..............................................80SHUTTER SOUND.....................118Shutter button...........................8, 40Shutter priority shooting S ......38, 59Shutter speed ...............................59Single-frame erase ...............101Single-frame playback..................89
Single-frame reservation ......127
Single-frame shooting ............68Slideshow ..............................92
Slow synchronization SLOW ....54Slow synchronization with red-eyereduction flash SLOW..........54
Speaker ..........................................8Sports shooting ......................36
Spot metering ........................62SQ1 ..............................................80SQ2 ..............................................80
STANDARD...........................129Startup/shutdown screen..............22Strap.............................................15Strap eyelet ..............................8, 15
Sunlight ...................................85
Super macro shooting ............64
TTelephoto T...................................51TIFF..............................................80Top menu......................................27Tripod socket ..................................9Tungsten light .......................85
UUnderwater housing ..............78USB ............................................130USB cable ..................................130USB connector .......................9, 130
VVIDEO OUT................................122Viewfinder.................................9, 42VOLUME.....................................119

171
10
Miscellan
eou
s
WWhite balance...............................85Wide-angle W ...............................51
XxD-Picture Card............................17
ZZoom lever ...................8, 51, 90, 91
Index

http://www.olympus.com/
© 2004 OLYMPUS CORPORATION
OLYMPUS CORPORATIONShinjuku Monolith, 3-1 Nishi-Shinjuku 2-chome, Shinjuku-ku, Tokyo, Japan
OLYMPUS AMERICA INC.Two Corporate Center Drive, Melville, NY 11747-3157, U.S.A. Tel. 1-631-844-5000
Technical Support (USA) 24/7 online automated help: http://www.olympusamerica.com/supportPhone customer support: Tel. 1-888-553-4448 (Toll-free)
Our phone customer support is available from 8 am to 10 pm (Monday to Friday) ETE-Mail: [email protected] software updates can be obtained at: http://olympus.com/digital
Olympus Europa GmbHPremises/Goods delivery: Wendenstrasse 14-18, 20097 Hamburg, Germany
Tel. +49 40 - 23 77 3-0 / Fax +49 40 - 23 07 61Letters: Postfach 10 49 08, 20034 Hamburg, Germany
European Technical Customer Support:Please visit our homepage http://www.olympus-europa.comor call our TOLL FREE NUMBER*: 00800 - 67 10 83 00
for Austria, Belgium, Denmark, Finland, France, Germany, Italy, Luxemburg,Netherlands, Norway, Portugal, Spain, Sweden, Switzerland, UnitedKingdom* Please note some (mobile) phone services/provider do not permit access
or request an additional prefix to +800 numbers.
For all not listed European Countries and in case that you can’t get connectedto the above mentioned number please make use of the followingCHARGED NUMBERS: +49 180 5 - 67 10 83 or +49 40 - 237 73 899Our Technical Customer Support is available from 9 am to 6 pm MET (Mondayto Friday)
VT713901
Thank you for purchasing an Olympus digital camera.This manual provides instructions on how to install the USB driver. To ensure correct installation, refer only to these installation procedures.
DIGITAL CAMERA
PERSONAL COMPUTER
DIGITAL CAMERA — PC CONNECTIONOPERATION MANUAL
How to use your PC to get the most from images taken with
your digital camera.

Introduction
This manual explains in detail how to connect your Olympus digital camera to a computer. Read it carefully and keep it in a safe place for future reference.
About this manualThe information contained in this manual may be subject to change without notice. For the latest information on the product, please consult your local Olympus representative.The information contained in this manual has been compiled by taking all possible measures to ensure its accuracy. However, if you find any errors or incomplete information, please contact your local Olympus representative.It is prohibited by copyright laws to duplicate in part or in whole the information contained in this manual, except for personal use. Reproduction without permission of the copyright owner is prohibited.The PC screens shown in this manual may differ slightly from the actual displays on some PC models.
TrademarksMicrosoft and Windows are registered trademarks of Microsoft Corporation.Macintosh is a trademark of Apple Computer Inc.All other company and product names are registered trademarks and/or trademarks of their respective owners.
2
Macintosh
Window
sINDEX
Flowchart . . . . . . . . . . . . . . . . . . . . . . . . 4
Identifying the OS . . . . . . . . . . . . . . . . . 6
Windows (98/Me/2000/XP) . . . . . . . . . . . 8
Macintosh (OS 9/X). . . . . . . . . . . . . . . . 23
Downloading image files using other OS (For other OS users). . . . . . . . . . . . . . . 31
3
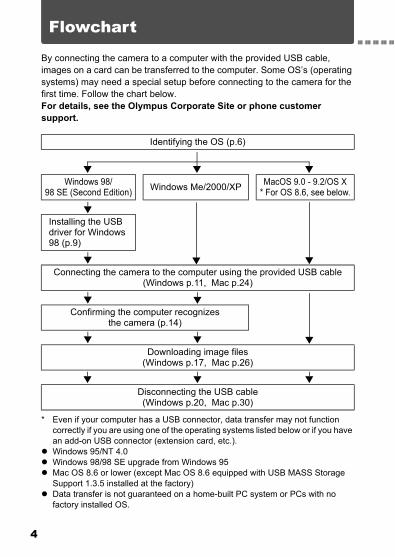
Flowchart
By connecting the camera to a computer with the provided USB cable, images on a card can be transferred to the computer. Some OS’s (operating systems) may need a special setup before connecting to the camera for the first time. Follow the chart below.For details, see the Olympus Corporate Site or phone customer support.
* Even if your computer has a USB connector, data transfer may not function correctly if you are using one of the operating systems listed below or if you have an add-on USB connector (extension card, etc.).Windows 95/NT 4.0Windows 98/98 SE upgrade from Windows 95Mac OS 8.6 or lower (except Mac OS 8.6 equipped with USB MASS Storage Support 1.3.5 installed at the factory)Data transfer is not guaranteed on a home-built PC system or PCs with no factory installed OS.
Identifying the OS (p.6)
Windows 98/98 SE (Second Edition) Windows Me/2000/XP MacOS 9.0 - 9.2/OS X
* For OS 8.6, see below.
Installing the USB driver for Windows 98 (p.9)
Connecting the camera to the computer using the provided USB cable(Windows p.11, Mac p.24)
Confirming the computer recognizes the camera (p.14)
Downloading image files(Windows p.17, Mac p.26)
Disconnecting the USB cable(Windows p.20, Mac p.30)
4
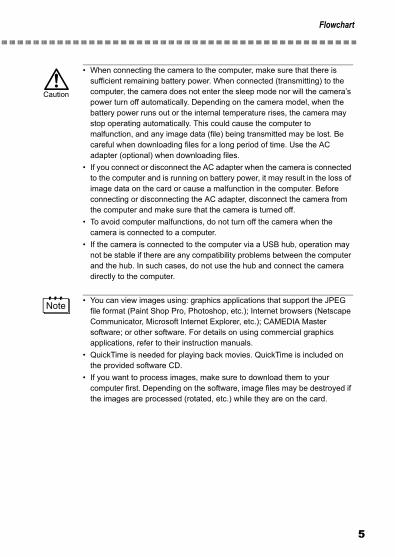
Flowchart
• When connecting the camera to the computer, make sure that there is sufficient remaining battery power. When connected (transmitting) to the computer, the camera does not enter the sleep mode nor will the camera’s power turn off automatically. Depending on the camera model, when the battery power runs out or the internal temperature rises, the camera may stop operating automatically. This could cause the computer to malfunction, and any image data (file) being transmitted may be lost. Be careful when downloading files for a long period of time. Use the AC adapter (optional) when downloading files.
• If you connect or disconnect the AC adapter when the camera is connected to the computer and is running on battery power, it may result in the loss of image data on the card or cause a malfunction in the computer. Before connecting or disconnecting the AC adapter, disconnect the camera from the computer and make sure that the camera is turned off.
• To avoid computer malfunctions, do not turn off the camera when the camera is connected to a computer.
• If the camera is connected to the computer via a USB hub, operation may not be stable if there are any compatibility problems between the computer and the hub. In such cases, do not use the hub and connect the camera directly to the computer.
• You can view images using: graphics applications that support the JPEG file format (Paint Shop Pro, Photoshop, etc.); Internet browsers (Netscape Communicator, Microsoft Internet Explorer, etc.); CAMEDIA Master software; or other software. For details on using commercial graphics applications, refer to their instruction manuals.
• QuickTime is needed for playing back movies. QuickTime is included on the provided software CD.
• If you want to process images, make sure to download them to your computer first. Depending on the software, image files may be destroyed if the images are processed (rotated, etc.) while they are on the card.
5
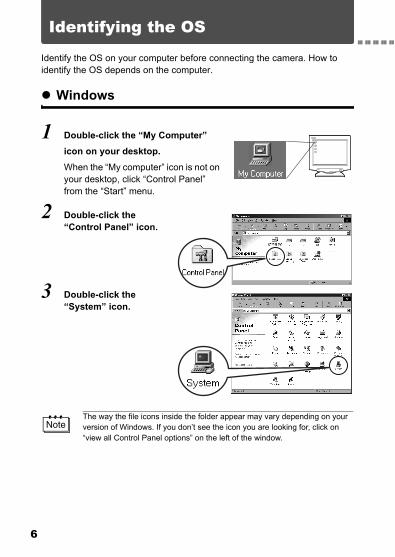
Identifying the OS
Identify the OS on your computer before connecting the camera. How to identify the OS depends on the computer.
Windows
1 Double-click the “My Computer” icon on your desktop.When the “My computer” icon is not on your desktop, click “Control Panel” from the “Start” menu.
2 Double-click the “Control Panel” icon.
3 Double-click the “System” icon.
The way the file icons inside the folder appear may vary depending on your version of Windows. If you don’t see the icon you are looking for, click on “view all Control Panel options” on the left of the window.
6
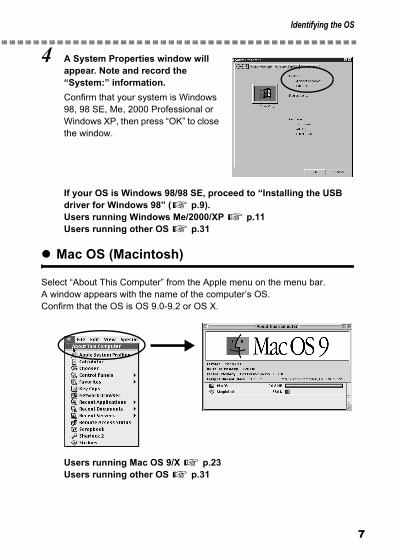
Identifying the OS
4 A System Properties window will appear. Note and record the “System:” information.Confirm that your system is Windows 98, 98 SE, Me, 2000 Professional or Windows XP, then press “OK” to close the window.
If your OS is Windows 98/98 SE, proceed to “Installing the USB driver for Windows 98” ( p.9).Users running Windows Me/2000/XP p.11Users running other OS p.31
Mac OS (Macintosh)
Select “About This Computer” from the Apple menu on the menu bar.A window appears with the name of the computer’s OS.Confirm that the OS is OS 9.0-9.2 or OS X.
Users running Mac OS 9/X p.23Users running other OS p.31
7
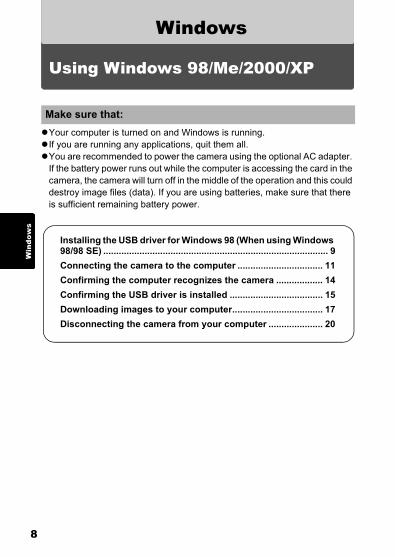
Win
dow
sWindows
Using Windows 98/Me/2000/XP
Your computer is turned on and Windows is running.If you are running any applications, quit them all.You are recommended to power the camera using the optional AC adapter. If the battery power runs out while the computer is accessing the card in the camera, the camera will turn off in the middle of the operation and this could destroy image files (data). If you are using batteries, make sure that there is sufficient remaining battery power.
Installing the USB driver for Windows 98 (When using Windows 98/98 SE) ....................................................................................... 9Connecting the camera to the computer ................................. 11Confirming the computer recognizes the camera .................. 14Confirming the USB driver is installed .................................... 15Downloading images to your computer................................... 17Disconnecting the camera from your computer ..................... 20
Make sure that:
8
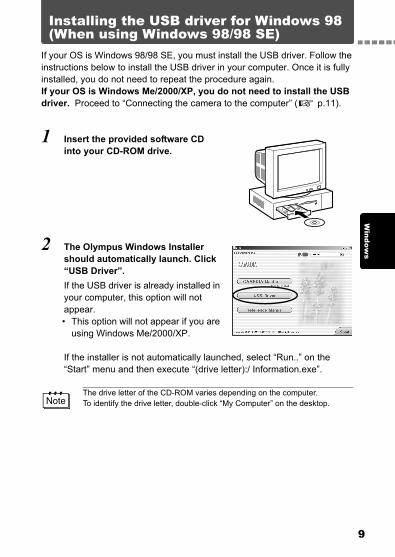
Window
sInstalling the USB driver for Windows 98(When using Windows 98/98 SE)
If your OS is Windows 98/98 SE, you must install the USB driver. Follow the instructions below to install the USB driver in your computer. Once it is fully installed, you do not need to repeat the procedure again.If your OS is Windows Me/2000/XP, you do not need to install the USB driver. Proceed to “Connecting the camera to the computer” ( p.11).
1 Insert the provided software CD into your CD-ROM drive.
2 The Olympus Windows Installer should automatically launch. Click “USB Driver”.If the USB driver is already installed in your computer, this option will not appear. • This option will not appear if you are
using Windows Me/2000/XP.
If the installer is not automatically launched, select “Run..” on the “Start” menu and then execute “(drive letter):/ Information.exe”.
The drive letter of the CD-ROM varies depending on the computer. To identify the drive letter, double-click “My Computer” on the desktop.
9
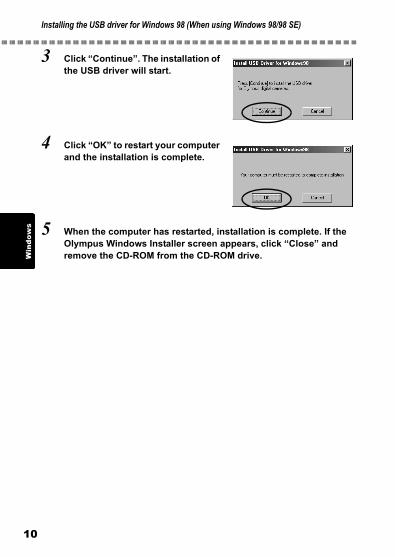
Installing the USB driver for Windows 98 (When using Windows 98/98 SE)
1
Win
dow
s
3 Click “Continue”. The installation of the USB driver will start.
4 Click “OK” to restart your computer and the installation is complete.
5 When the computer has restarted, installation is complete. If the Olympus Windows Installer screen appears, click “Close” and remove the CD-ROM from the CD-ROM drive.
0
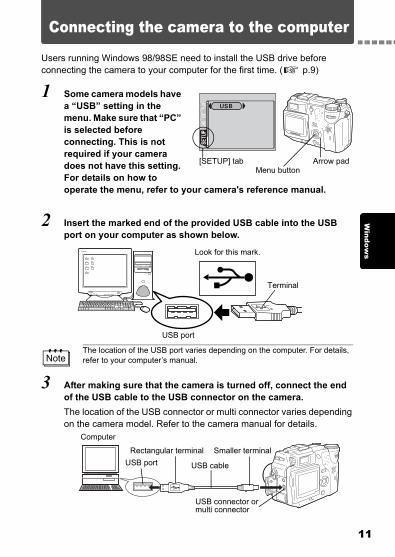
Window
sConnecting the camera to the computer
Users running Windows 98/98SE need to install the USB drive before connecting the camera to your computer for the first time. ( p.9)
1 Some camera models have a “USB” setting in the menu. Make sure that “PC” is selected before connecting. This is not required if your camera does not have this setting. For details on how to operate the menu, refer to your camera's reference manual.
2 Insert the marked end of the provided USB cable into the USB port on your computer as shown below.
3 After making sure that the camera is turned off, connect the end of the USB cable to the USB connector on the camera.The location of the USB connector or multi connector varies depending on the camera model. Refer to the camera manual for details.
The location of the USB port varies depending on the computer. For details, refer to your computer’s manual.
PLAY
EDIt
CARD
SEtUP
[SETUP] tabMenu button
Arrow pad
Look for this mark.
USB port
Terminal
USB port
Computer
USB connector or multi connector
USB cable
Smaller terminalRectangular terminal
11

Connecting the camera to the computer
1
Win
dow
s
4 Turn the camera on in (playback) mode.• Most cameras with a lens barrier
turn on automatically in Step 3, with the exception of some models which require you to press the (monitor) button or button.
5 When the screen shown right appears on the monitor in Step 4, use the arrow pad to select “PC” and press the OK button.
6 The computer recognizes the camera as a new device.• Depending on the camera model, when you
connect the camera to the computer, the lamp on the right of the viewfinder or the self-timer lamp may light.
When you connect the camera to the computer for the first time, the computer automatically recognizes the camera. Click “OK” when the message saying that the installation is completed appears. The computer recognizes the camera as a “Removable Disk”.
button or button
Lens barrier
Mode dial
Power switch
Power switch
OK button
Arrow pad
GOSELECt
Lamp
2

Connecting the camera to the computer
Windows
Windows XPYou can download image files from the camera easily.Select “Copy pictures to folder on my computer using Microsoft Scanner and Camera Wizard”, then follow the on-screen instructions.You may also select “take no action” to bypass the Microsoft Scanner and Camera Wizard. You may then use a more advanced image viewing/editing program such as Olympus CAMEDIA Master software. For detailed instructions on downloading, refer to the CAMEDIA Master software user’s guide.
When the camera is connected to the computer, none of the camera buttons are functional.
13
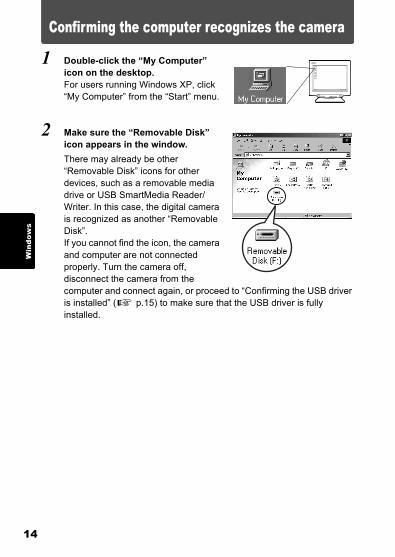
1
Win
dow
sConfirming the computer recognizes the camera
1 Double-click the “My Computer” icon on the desktop.For users running Windows XP, click “My Computer” from the “Start” menu.
2 Make sure the “Removable Disk” icon appears in the window.There may already be other “Removable Disk” icons for other devices, such as a removable media drive or USB SmartMedia Reader/Writer. In this case, the digital camera is recognized as another “Removable Disk”.If you cannot find the icon, the camera and computer are not connected properly. Turn the camera off, disconnect the camera from the computer and connect again, or proceed to “Confirming the USB driver is installed” ( p.15) to make sure that the USB driver is fully installed.
4
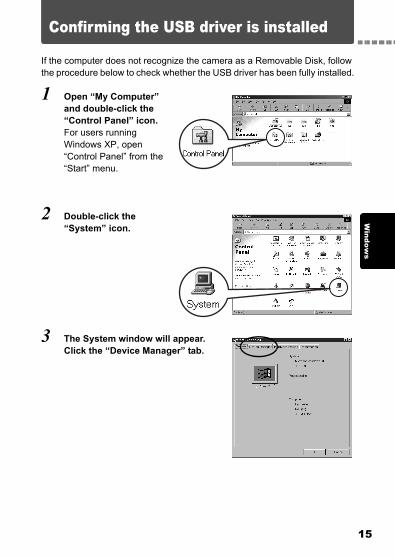
Window
sConfirming the USB driver is installed
If the computer does not recognize the camera as a Removable Disk, follow the procedure below to check whether the USB driver has been fully installed.
1 Open “My Computer” and double-click the “Control Panel” icon.For users running Windows XP, open “Control Panel” from the “Start” menu.
2 Double-click the “System” icon.
3 The System window will appear. Click the “Device Manager” tab.
15
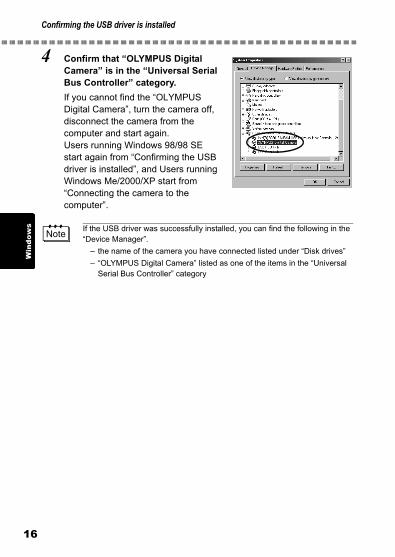
Confirming the USB driver is installed
1
Win
dow
s
4 Confirm that “OLYMPUS Digital Camera” is in the “Universal Serial Bus Controller” category.If you cannot find the “OLYMPUS Digital Camera”, turn the camera off, disconnect the camera from the computer and start again. Users running Windows 98/98 SE start again from “Confirming the USB driver is installed”, and Users running Windows Me/2000/XP start from “Connecting the camera to the computer”.
If the USB driver was successfully installed, you can find the following in the “Device Manager”.
– the name of the camera you have connected listed under “Disk drives”– “OLYMPUS Digital Camera” listed as one of the items in the “Universal
Serial Bus Controller” category
6
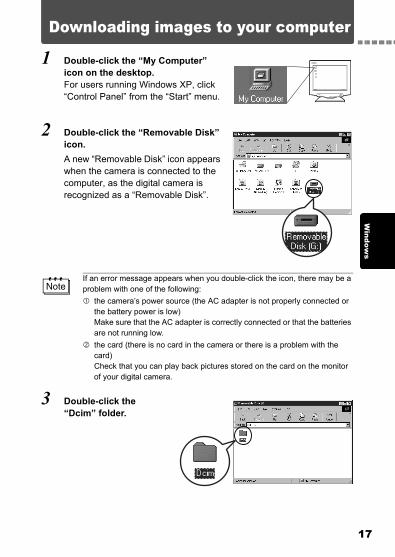
Window
sDownloading images to your computer
1 Double-click the “My Computer” icon on the desktop.For users running Windows XP, click “Control Panel” from the “Start” menu.
2 Double-click the “Removable Disk” icon.A new “Removable Disk” icon appears when the camera is connected to the computer, as the digital camera is recognized as a “Removable Disk”.
3 Double-click the “Dcim” folder.
If an error message appears when you double-click the icon, there may be a problem with one of the following:
the camera’s power source (the AC adapter is not properly connected or the battery power is low)Make sure that the AC adapter is correctly connected or that the batteries are not running low.the card (there is no card in the camera or there is a problem with the card)Check that you can play back pictures stored on the card on the monitor of your digital camera.
17
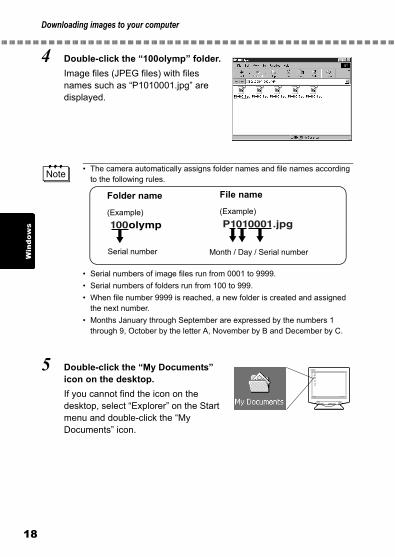
Downloading images to your computer
1
Win
dow
s
4 Double-click the “100olymp” folder.Image files (JPEG files) with files names such as “P1010001.jpg” are displayed.
5 Double-click the “My Documents” icon on the desktop.If you cannot find the icon on the desktop, select “Explorer” on the Start menu and double-click the “My Documents” icon.
• The camera automatically assigns folder names and file names according to the following rules.
• Serial numbers of image files run from 0001 to 9999.• Serial numbers of folders run from 100 to 999.• When file number 9999 is reached, a new folder is created and assigned
the next number.• Months January through September are expressed by the numbers 1
through 9, October by the letter A, November by B and December by C.
Folder name(Example)
File name(Example)
Serial number Month / Day / Serial number
8

Downloading images to your computer
Windows
The “My Documents” window is displayed.
6 Drag & drop the image you want to save in the computer (in this case, P1010012.jpg) to the “My Documents” window.The image is saved in the computer (in My Documents folder).• To select all files, choose Edit > Select all.
When the image file has been downloaded to the computer, you can view images by double-clicking the image files downloaded to your computer. The files will be opened in the default image viewer of the operating system. If you want to view the image a different size or process it, you will need to open the image with software that supports JPEG or TIFF images files, such as Paint Shop Pro, Photoshop or CAMEDIA Master software.
The lamp on the right of the viewfinder or the card access lamp blinks while the image is being copied. Never open the card cover on the camera, load or remove the batteries, or connect or disconnect the AC adapter while the lamp is blinking as the image files may be destroyed.
19
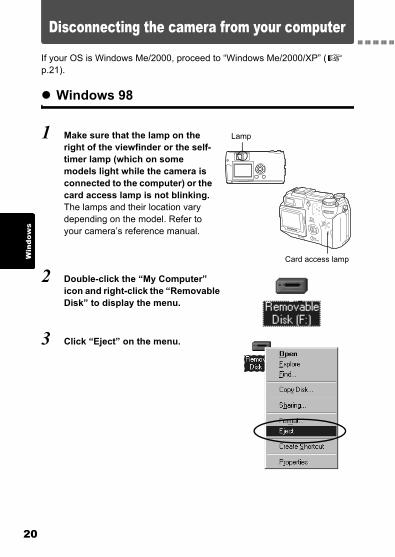
2
Win
dow
sDisconnecting the camera from your computer
If your OS is Windows Me/2000, proceed to “Windows Me/2000/XP” ( p.21).
Windows 98
1 Make sure that the lamp on the right of the viewfinder or the self-timer lamp (which on some models light while the camera is connected to the computer) or the card access lamp is not blinking.The lamps and their location vary depending on the model. Refer to your camera’s reference manual.
2 Double-click the “My Computer” icon and right-click the “Removable Disk” to display the menu.
3 Click “Eject” on the menu.
Lamp
Card access lamp
0
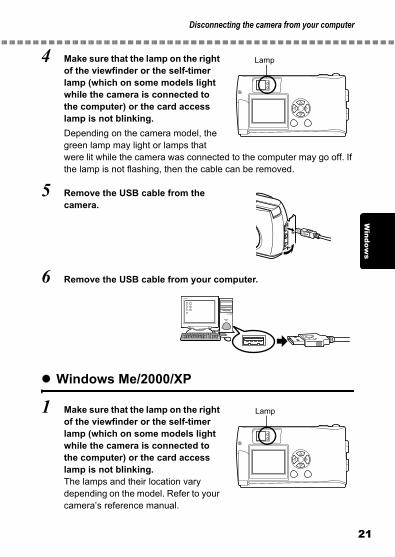
Disconnecting the camera from your computer
Windows
4 Make sure that the lamp on the right of the viewfinder or the self-timer lamp (which on some models light while the camera is connected to the computer) or the card access lamp is not blinking.Depending on the camera model, the green lamp may light or lamps that were lit while the camera was connected to the computer may go off. If the lamp is not flashing, then the cable can be removed.
5 Remove the USB cable from the camera.
6 Remove the USB cable from your computer.
Windows Me/2000/XP
1 Make sure that the lamp on the right of the viewfinder or the self-timer lamp (which on some models light while the camera is connected to the computer) or the card access lamp is not blinking.The lamps and their location vary depending on the model. Refer to your camera’s reference manual.
Lamp
Lamp
21
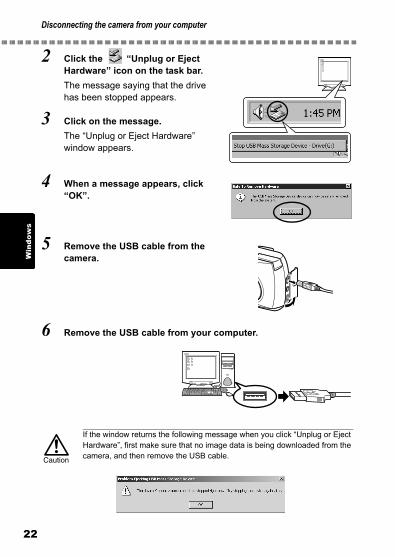
Disconnecting the camera from your computer
2
Win
dow
s
2 Click the “Unplug or Eject Hardware” icon on the task bar.The message saying that the drive has been stopped appears.
3 Click on the message.The “Unplug or Eject Hardware” window appears.
4 When a message appears, click “OK”.
5 Remove the USB cable from the camera.
6 Remove the USB cable from your computer.
If the window returns the following message when you click “Unplug or Eject Hardware”, first make sure that no image data is being downloaded from the camera, and then remove the USB cable.
2
Macintosh
Macintosh
Using Mac OS (9/X)
Your computer is turned on and Mac OS is running.If you are running any applications, quit them all.You are recommended to power the camera using the optional AC adapter. If the battery power runs out while the computer is accessing the card in the camera, the camera will turn off in the middle of the operation and this could destroy image files (data). If you are using batteries, make sure that there is sufficient remaining battery power.
If you are running Mac OS X, the connection to the computer and downloading the image data are verified. Restrictions such as the following may occur due to the OS.The image file properties are not displayed correctly.Images in the camera cannot be opened without first downloading them. etc.
For more details, visit the Olympus web site.
Connecting the camera to the computer ................................. 24Downloading images to your computer................................... 26Disconnecting the camera from your computer ..................... 30
Make sure that:
23
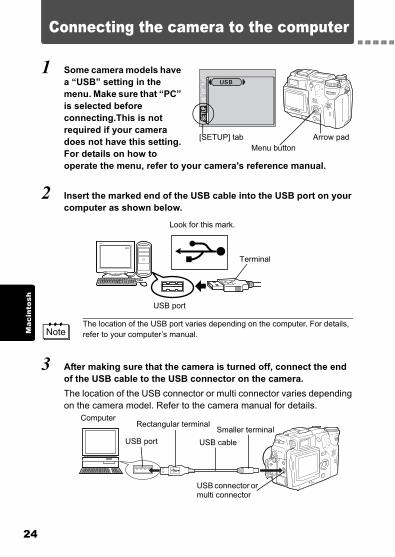
2
Mac
into
shConnecting the camera to the computer
1 Some camera models have a “USB” setting in the menu. Make sure that “PC” is selected before connecting.This is not required if your camera does not have this setting.For details on how to operate the menu, refer to your camera's reference manual.
2 Insert the marked end of the USB cable into the USB port on your computer as shown below.
3 After making sure that the camera is turned off, connect the end of the USB cable to the USB connector on the camera.The location of the USB connector or multi connector varies depending on the camera model. Refer to the camera manual for details.
The location of the USB port varies depending on the computer. For details, refer to your computer’s manual.
Menu buttonArrow pad
PLAY
EDIt
CARD
SEtUP
[SETUP] tab
Look for this mark.
USB port
Terminal
USB port
Computer
USB connector or multi connector
USB cableSmaller terminal
Rectangular terminal
4
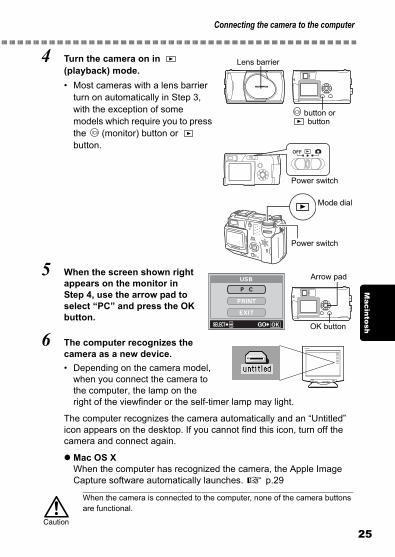
Connecting the camera to the computer
Macintosh
4 Turn the camera on in (playback) mode.• Most cameras with a lens barrier
turn on automatically in Step 3,with the exception of some models which require you to press the (monitor) button or button.
5 When the screen shown right appears on the monitor in Step 4, use the arrow pad to select “PC” and press the OK button.
6 The computer recognizes the camera as a new device.• Depending on the camera model,
when you connect the camera to the computer, the lamp on the right of the viewfinder or the self-timer lamp may light.
The computer recognizes the camera automatically and an “Untitled” icon appears on the desktop. If you cannot find this icon, turn off the camera and connect again.
Mac OS XWhen the computer has recognized the camera, the Apple Image Capture software automatically launches. p.29
When the camera is connected to the computer, none of the camera buttons are functional.
button or button
Lens barrier
Mode dial
Power switch
Power switch
OK button
Arrow pad
GOSELECt
25
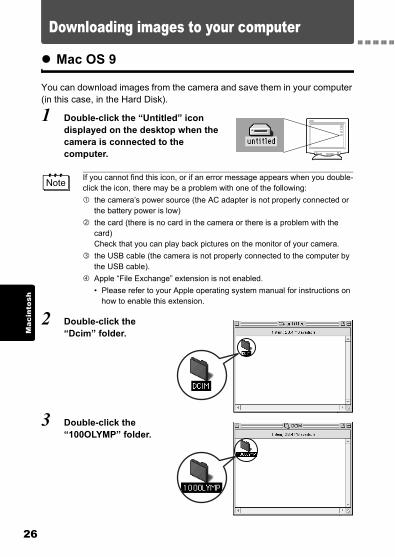
2
Mac
into
shDownloading images to your computer
Mac OS 9
You can download images from the camera and save them in your computer (in this case, in the Hard Disk).
1 Double-click the “Untitled” icon displayed on the desktop when the camera is connected to the computer.
2 Double-click the “Dcim” folder.
3 Double-click the “100OLYMP” folder.
If you cannot find this icon, or if an error message appears when you double-click the icon, there may be a problem with one of the following:
the camera’s power source (the AC adapter is not properly connected or the battery power is low)the card (there is no card in the camera or there is a problem with the card)Check that you can play back pictures on the monitor of your camera.the USB cable (the camera is not properly connected to the computer by the USB cable).Apple “File Exchange” extension is not enabled.• Please refer to your Apple operating system manual for instructions on
how to enable this extension.
6
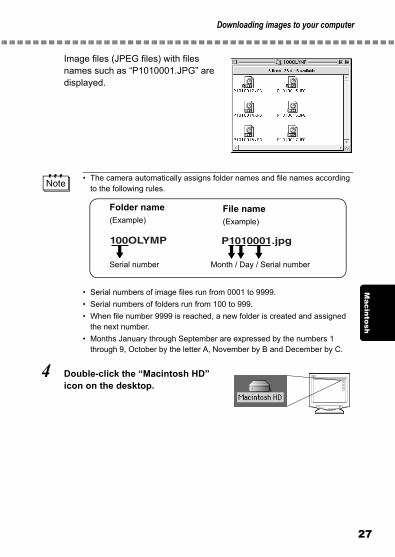
Downloading images to your computer
Macintosh
Image files (JPEG files) with files names such as “P1010001.JPG” are displayed.
4 Double-click the “Macintosh HD” icon on the desktop.
• The camera automatically assigns folder names and file names according to the following rules.
• Serial numbers of image files run from 0001 to 9999.• Serial numbers of folders run from 100 to 999.• When file number 9999 is reached, a new folder is created and assigned
the next number.• Months January through September are expressed by the numbers 1
through 9, October by the letter A, November by B and December by C.
Folder name(Example)
File name(Example)
Serial number Month / Day / Serial number
27
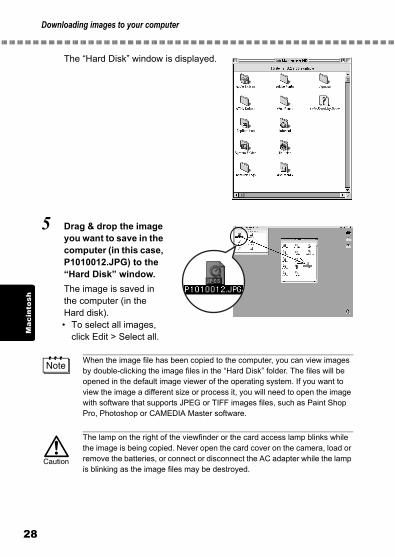
Downloading images to your computer
2
Mac
into
sh
The “Hard Disk” window is displayed.
5 Drag & drop the image you want to save in the computer (in this case, P1010012.JPG) to the “Hard Disk” window.The image is saved in the computer (in the Hard disk).• To select all images,
click Edit > Select all.
When the image file has been copied to the computer, you can view images by double-clicking the image files in the “Hard Disk” folder. The files will be opened in the default image viewer of the operating system. If you want to view the image a different size or process it, you will need to open the image with software that supports JPEG or TIFF images files, such as Paint Shop Pro, Photoshop or CAMEDIA Master software.
The lamp on the right of the viewfinder or the card access lamp blinks while the image is being copied. Never open the card cover on the camera, load or remove the batteries, or connect or disconnect the AC adapter while the lamp is blinking as the image files may be destroyed.
8
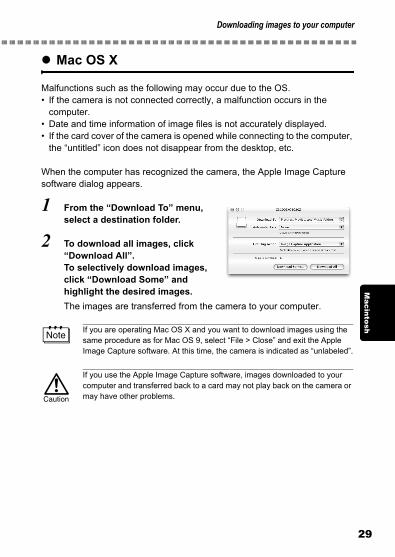
Downloading images to your computer
Macintosh
Mac OS X
Malfunctions such as the following may occur due to the OS.• If the camera is not connected correctly, a malfunction occurs in the
computer.• Date and time information of image files is not accurately displayed.• If the card cover of the camera is opened while connecting to the computer,
the “untitled” icon does not disappear from the desktop, etc.
When the computer has recognized the camera, the Apple Image Capture software dialog appears.
1 From the “Download To” menu, select a destination folder.
2 To download all images, click “Download All”.To selectively download images, click “Download Some” and highlight the desired images.The images are transferred from the camera to your computer.
If you are operating Mac OS X and you want to download images using the same procedure as for Mac OS 9, select “File > Close” and exit the Apple Image Capture software. At this time, the camera is indicated as “unlabeled”.
If you use the Apple Image Capture software, images downloaded to your computer and transferred back to a card may not play back on the camera or may have other problems.
29
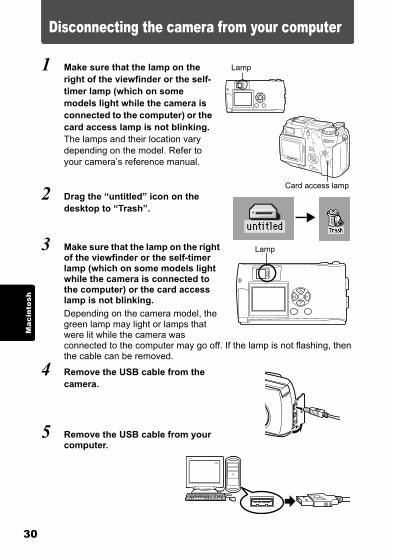
3
Mac
into
shDisconnecting the camera from your computer
1 Make sure that the lamp on the right of the viewfinder or the self-timer lamp (which on some models light while the camera is connected to the computer) or the card access lamp is not blinking.The lamps and their location vary depending on the model. Refer to your camera’s reference manual.
2 Drag the “untitled” icon on the desktop to “Trash”.
3 Make sure that the lamp on the right of the viewfinder or the self-timer lamp (which on some models light while the camera is connected to the computer) or the card access lamp is not blinking.Depending on the camera model, the green lamp may light or lamps that were lit while the camera was connected to the computer may go off. If the lamp is not flashing, then the cable can be removed.
4 Remove the USB cable from the camera.
5 Remove the USB cable from your computer.
Lamp
Card access lamp
Lamp
0
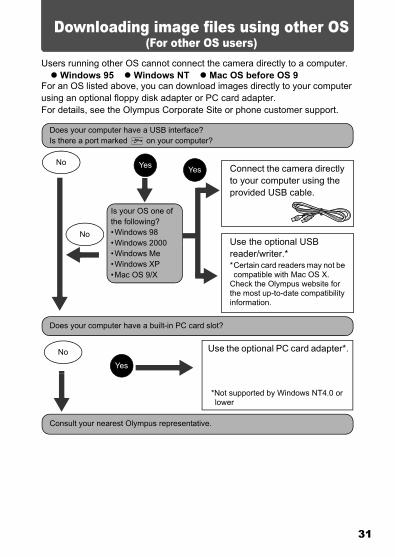
Downloading image files using other OS(For other OS users)
Users running other OS cannot connect the camera directly to a computer. Windows 95 Windows NT Mac OS before OS 9For an OS listed above, you can download images directly to your computer using an optional floppy disk adapter or PC card adapter.For details, see the Olympus Corporate Site or phone customer support.
Does your computer have a USB interface?Is there a port marked on your computer?
Does your computer have a built-in PC card slot?
Consult your nearest Olympus representative.
Is your OS one of the following?•Windows 98•Windows 2000•Windows Me•Windows XP•Mac OS 9/X
YesNo
No
Yes
Connect the camera directly to your computer using the provided USB cable.
Use the optional USB reader/writer.**Certain card readers may not be compatible with Mac OS X.
Check the Olympus website for the most up-to-date compatibility information.
Use the optional PC card adapter*.
*Not supported by Windows NT4.0 or lower
No
Yes
31

http://www.olympus.com/
2004 OLYMPUS CORPORATIONVT713901
Shinjuku Monolith, 3-1 Nishi-Shinjuku 2-chome, Shinjuku-ku, Tokyo, JapanOLYMPUS CORPORATION
Two Corporate Center Drive, Melville, NY 11747-3157, U.S.A. Tel. 631-844-5000
Technical Support (USA)24/7 online automated help: http://www.olympusamerica.com/supportPhone customer support: Tel. 1-888-553-4448 (Toll-free)Our phone customer support is available from 8 am to 10 pm(Monday to Friday) ETE-Mail: [email protected] software updates can be obtained at: http://www.olympus.com/digital
OLYMPUS AMERICA INC.
Premises/Goods delivery: Wendenstrasse 14-18, 20097 Hamburg, GermanyTel: +49 40-23 77 3-0 / Fax: +49 40-23 07 61
Letters: Postfach 10 49 08, 20034 Hamburg, Germany
European Technical Customer Support:Please visit our homepage http://www.olympus-europa.com or call our TOLL FREE NUMBER* : 00800 - 67 10 83 00
for Austria, Belgium, Denmark, Finland, France, Germany, Italy, Luxemburg, Netherlands, Norway, Portugal, Spain, Sweden, Switzerland, United Kingdom * Please note some (mobile) phone services/provider do not permit access or
request an additional prefix to +800 numbers.
For all not listed European Countries and in case that you can’t get connected to the above mentioned number please make use of the following CHARGED NUMBERS: +49 180 5 - 67 10 83 or +49 40 - 237 73 899Our Technical Customer Support is available from 9 am to 6 pm MET (Monday to Friday)
Olympus Europa GmbH