
U2 l5 long division with 2 digit numbers and one digit dividends and three digit divisors

Contents:
From Dark to Light Edward Bowman FRPS
Leica Digilux 4.3 Neville Whitney ARPS
Underwater Jackie Major LRPS
Two into One Goes Ray Wallace Thompson ARPS
Here and There Anthony Healy ARPS
Digital Photography Robin Mellor ARPS
Captured Digitally Denis Toff ARPS
Quantity for Quality Peter Dishart
Printing what you See Clive Haynes FRPS
My Digit Two Jim Buckley
DIGIT Issue 14 January 2001
The Digital Imaging Group www .digit.org.uk
The Royal Photographic Society

Digit
From Dark to Light
Over the years I assembled a nice darkroom complete with a very good enlarger, dishes, sundry bottles of chemicals, and half empty boxes of paper from Hungary and Bulgaria. Papers with lots of silver embedded in the gelatine to produce really black punchy, in· your- face pictures. I also acquired a heavy medium format camera with the big lens.
Suddenly, one Spring morning on an impulse, I sold my darkroom in order to spend even more money on a computer. It came with lots of wire at the back. Why should the children get it all? thought I. So it came to pass, as the good book says, that I metamorphosed into a digital imaging person. My membership of the local photographic society became at risk because I am now suspected of image cheating, a heinous crime worthy of instant excommunication.
In the good old days I was a fine upstanding photographer, someone of the Washington tendency who never told a photographic lie. I exposed the film and made a print and the result was a record of what I saw. Well, not quite. I had to make a few teeny little adjustments in the pursuit of truth, such as removing parts of the image, called cropping in the trade. Then there was this problem with tones. I could never get the sky quite right, so I had to resort to a little jigger pokery with multigrade and extra exposure here and there. You would hardly notice. In really desperate cases I might borrow a sky from somewhere else or even use a red fi lter to make the sky dr.tmatic, though it did distort what I had originally seen through my 300mm telephoto lens.
In the end I got the print I liked. It wasn't what I saw when I first took the picture, but people would never know. No, I would never cheat.
In those far off happy darkroom evenings (extending into the wee small hours), all my work was done with lots of lovely ox tail brown Windsor soup smelly developer and a deliciously pungent fixer, but enough of nostalgia.
Now I use a computer and I am deeply conscious that I am regarded like one of those dubious people who work in the City. No more darkroom subtleties, the
2
work is often a total fraud and computer prints should be marked with hazard notices. However, I do avoid the "Filters" menu as these little extras do make the print look too manipulated. I like to fool the viewers into thinking the work to be a 'straight'
Print, with perhaps something just out of kilter in order to generate a little 'angst'. When I show my work at meetings, I am sometimes asked to show a "straight" photographic print so that my audience can compare my computer work with the true photographic "evidence". I tend to respond to my suspicious audience with a short discussion on surrealism, because neither the photographic nor the computer image may remotely resemble what was really there. I could write a book about that.
ln digital work, altering tones is a question of moving a little slider on the screen. Altering colours is carried out by moving another IHtle slider. What's more I can solarise the image in a split second, I can blur it or sharpen it and even get a little tune from the computer when it's happy. To paraphrase Von Clausewitz, computing is photography by other means and done in the comfort of a sitting room. All this is a little disconcerting for the creative photographer who has spent years in the darkroom producing a seriously 'macho' colour solarisation.
So mdical is this approach that the serious monochrome workers, especially those who work in the exhausting and demanding field of 'old processes', might justifiably conclude that computing is a completely different and rather offensive art form that should be sent off somewhere else - preferably into deep space.
We might take a leaf from the animal rights liberation movement. Darkroom buffs could sharpen their print tongs and stick all digital workers on sight. Computer fanatics might turn to the Meldrew option, sneaking into darkrooms to pour a little hypo in the developer dish. We shall fight them on the beaches. There is unfortunately a downside to all this.
In the fair world of "strnight" photography an old RPS Leica can be worth a fortune which increases the longer you lay it down in your cellar. Old computers however, i.e. those over three years old are not worth the paper their receipts are written on. I bought this nice new state of the art
thingy and two months later out came a much better one for less money. Computers will never become collectibles like minty old cameras - I supposed it 's because computers get used.
You simply can't win on this one. The r.tte of advance in computing hardware and software is so great that anything you buy now will become obsolete within the year. There is never a good time to buy a computer but even if it does go out of date it will still do the job extremely well.
The biggest problem up to quite recently has been that there was no cheap way to output image from the computer on to paper. Epson made the breakthrough about a year ago. They now have a r.tnge of really inexpensive printers that make true photographic quality prints. Some even turn orange all on their own.
At this stage, The serious monochrome worker's eyes will light up saying in voice triumphant "but computer prints fade". They are not "Archival". This Archival thing is big business in the Fine Print department because photographers hope, rightly, that they are suffering from the Vincent van Goch syndrome. i.e. although completely unknown in their lifetime, they will become immortal and world famous after they die.
As they play their harp on the proverbial cloud they will look down on an audience of millions admiring their work. Sounds really good especially for the photographic trade.
However, computer buffs need not despair, I am now using archival inks. The reason is pmctical and self preserving. I don't want irate clients chasing me down the street waving my faded prints, demanding their money back. As far as immortality is concerned, I suspect I will lose complete interest in the whole thing.
Edward Bowman FRPS

Leica Digilux 4.3
When you first switch on this latest digital camera from the Leica stable a friendly "HELLO" appears on the LCD panel at the rear of the camera. After five seconds delay, whilst the electronics is sorting itself out, the display goes into its functional mode allowing you to see what the camera settings are and provides facilities to change them for the task in hand.
The Digilux 4.3, is a 'badged' version of the Fuji 4700 and seems to be following the Leica policy of co-operating with Fuji in the digital camera market.
The Digilux 4.3 breaks new ground in the way in which it captures the image on CCD, Fuji has called it a Super-CCD and claims a far superior image quality than the so called conventional CCDs. The arguments are still raging in the press and technical magazines but the main points are centred on the fact that the Super-CCD uses octagonal photodiodes (as opposed to rectangular ones), which can be packed in a higher density for any given area and the Fuji software can interpolate for the spaces much more accur-,1tely than the conventional rectangular photodiode layout.
For those of you who are technically minded (and interested in this subject) there are plenty of articles in the popular magazines and manufacturers publicity leaflets. The finest image file size of 4 .3Mb is made more manageable by reducing it to approximately 1.7Mb using JPEG, this compares with the earlier Digilux of 0.6Mb. theoretically increasing the resolution by a factor of 3. Using the FI E setting can soon use up the 32Mb Smart Media storage card, supplied with the camera, limiting you to just 18 images. If you can afford it buy a 64Mb card as a backup.
Talking about backups, it would be considered prudent to invest in a pair of rechargeable batteries. The handbook implies that high powered non-rechargeable AA batteries may be used but I found that Duracells did not work. The LCD monitor reduces the life of a fully charged battery by a factor of 3 so use the optical viewfinder as much as possible and don 't review your in1ages too long if you want to preserve the batteries.
F4.5 in telephoto mode which is equivalent to 108mm in 35mm format. The electronic shutter range is from 3 seconds to 1/2000 second in the automatic mode. There is a built-in flash which pops up on demand and you have a selection of 4 modes, auto, red eye reduction, forced flash and slow sync.
The Photography Mode switch at the top of the camera offers a wide variety of modes and to my mind this is where Leica could have dispensed with three of them, they are Portrait, Landscape and Night Scene. These are superfluous for serious photographers and I am sure the money could have been used for other facilities like giving us an option for colour or monochrome. One other mode is the Movie setting, here you can take up to 80 seconds worth of continuous shooting with sound! Yes there is a built-in microphone and a speaker for the replay. I did try it out just for curiosity's sake and was quite impressed with the quality but I couldn't think of a genuine reason to use it, another saving could have been made by not having this facility.
Having used the earlier Leica Digilux I found it easy to get to grips with the 4.3 and I am sure that a few sessions with this camera would be all that was necessary for anyone to achieve good results when starting from scratch. I fi.nd that these little cameras are remarkable and so versatile and will do 75% of the work I require.
Personally I use a computer to download my images and print off any I think worthy enough, if you do not have a computer then you can select any image/s for normal printing by programming the memory
The lens has a maximum apern1re of F2.8 card and get them processed at most film at wide angle (36mm in 35mm format) and laboratories.
Issue 14 The final touch is when you nirn the battery off, a brief "Bye!" message appears whilst the lens is being retracted into the camera body and the silver protective shutter moves into place.
Neville Whitney ARPS
The underwater diving magazine said 'Enjoy ten days in the beautiful Portuguese Island of Madeira. Bring all your gear, or none! ' Wow, I thought, all I'll need is some undies and my cameras. I wrote off at once for full details and price. "Hey" said hubby, "that looks good. Can I come?" ext it was his best mate and then his wife and finally my daughter, as it just happened to be half term. The ten days grew to two months, i11 a flat, all of us! Hardly the relaxing get away break I had dreamed of. Anyway, there we were, just hubby and I, as the best mate and wife did not show up ... lost in the mists of the twilight zone?? (We never did find out.) Daughter came just for the last few days. Off to the resort to get fitted out and on day two my husband burst his eardrum. An old wound and not painful, but very funny to see smoke literally coming out of his ear! "What shall I do now?" he said. "Go over to the mainland and have a look around" I said. He came down to the Algarve, and the next thing I knew, we had a deposit on a house!
We live in the western end of the Algarve, in a village called Bensafrim, just outside Lagos. Until the new bridge ·was built over the river Arade a few years ago, no one came further west than Portimao. Consequentially it is unspoilt, with some unique flora, and masses of (small) wildlife. The West Coast is very similar to Cornwall, Wales and Scotland - just 15 degrees warmer!
I finally turned my hobby into a profession about three years ago, having got an L from the RPS and the BIPP. I am classed as an Impresario Individual, so much grander than self-employed don't you think? I must say it is hard, and all I can hope to be is a GP I got my first break from a local paper who asked me to get a photo of the year 3s dressed for their nativity play. I had it all
3

Di,git sorted in my mind, who would stand where etc. Now, smile, please, p I e a s e. Two into One goes ..
and I are ill' and they were with us in five hours ... what wonderful days.
othing! My husband finished up making them all laugh by using a monkey glove puppet who kept pinching my kit . It made the front page and I was on my way. To say it is hard is true, but so misleading. When the phone rings it could be for me to climb scaffolding, take a snap of someone's dog, visit a rock concert, o r photogr-Jph a flower. How lucky I am and sunshine too. The taxman has sadly got hin1self a computer, so life promises to be more 'correct' from now on, and as a European l have no excuse. "What does that mean?" say Portuguese friends. "Well, no more lunches for four when I work on my own.
The time was 1956 and I'd bought a new camera ... a strange animal, a 35mm thing, and life began again after the 39/45 War. During that conflict I travelled to India, realised that there was a big World and decided I wanted to be part of it. That can1era began things and in 1958, becoming the Editor of the Photo Colour News, found a gateway, through it began to make friendships in other parts of the
Globe.
Even nowadays we have friends coming from Canada and USA, we know two are coming in May and maybe a third. Photography is such a wonderful maker of friendships. Of course we made a return visit to many of them in USA.
As the years passed by old friends passed to another studio, but others have come along. The remoteness of RPS has disappeared and a willingness to exchange views and expertise has replaced it.
owadays it is particularly noticed in the Digital Imaging Group of the RPS and the Electronic Imaging Division of the PSA, as web sites develop it has become easier to make both direct and group contacts.
o more fuel when I'm doing a car rally. o more, oh you know: They laugh." For
goodness sake, it will be years before they know what to do with the information. And anyway, you are far too small a fish ." "Thank!" but I see what they mean. This is Southern Europe after all, where one noted politician has just got his fingers smacked for insider trading! "Oooops", he is reported to have said.
I have given in at last to digital. with computers, scanners, printers and sound. What a horror story it is just to update something. I thought it would be nice to see if I could get my beast to go faster. The eyes of the engineer lit up, "but you'll need more memory, a new sound card, networking, and of course SB". At last my machine has settled down (ntn in?), as I now no longer need to reboot several
However there was a missing something or other and in then early in the 196o·s investigated membership of the Royal Photographic Society and the Photographic Society of America. What I found was a diversity of approach to
photography. TI1e Royal was somewhat ·superior' in those days in a learned and rather remote way, making personal contacts proved difficult unti l I delved into stereoscopicity, met the late Phil Shenton ARPS and joined the Colour Group. Then, as of now, it was only after you had a few RPS acceptances that you became accepted. Publications from the Royal, every month, were anticipated with a little fear for one never quite knew what to make of some of them,
It is very good to see British Photographers exhibiting in the Gallery of
ations nm by Milan Sedio and another organising one of the PSOA EID Internet Digital Circuits. The two societies share much nowadays to members munial advantage and pleasure .
1 am often asked why l have a membership in each together and the above must surely tell why. Membership of the two societies has enriched my life, both photographically and generJlly. Since those early
1960 days la Bosse and I have derived tremendous friendships, help, and knowledge and we hope that we have repaid and returned it. So TWO Societies do go well into ONE member.
times just to get to Photoshop. Trying very hard not to throw 'it' out of the window was a feat of tinbelievable willpower. I've also got a ikon Coolpix 950 camera. It's brilliant and I don't care how out of date it will get, it will be with me till it - or I -give up the ghost . A few examples: with the Fisheye Converter I can show clients what a room will look like, therefore no need for Polaroid. I can use it for my Am Dram group, as I do the small program photos. 1 also use it for advertising in the papers showing us in rehearsal. I have
Then the Grande Dame of Stereoscopy, the late Ruth Bauer FPSA of Cincinnati persuaded me to join the PSA, and it seemed that a wholly balanced photographic life was being formed and my paradigms began tO surge around a lot
Each society had a different approach and whereas the RPS had that remote feeling, the PSA was embracing. It was as though the two organisations just nanirally slipped into complimentary top gear and this was evident when one recalls that always the top British International Salons carried PSA Recognition and PSA medals.
It is, of course, my stated hope that one day our two presidents will visit, much as
we have.
Ray Wallace Thompson ARPS. ,HonPSA. ,FPSA. ,APAGB. ,AllPC.
even got shots from a car crash downloaded direct to one paper's computer. Wonderful! I must admit to not doing anything digital other than cleaning up, dust and scrJtches etc from my negs, but I hope to one day join the ranks of the Digit
elite.
My best to you all, and sec you down ...
Jackie Major I.RPS
4
Over the years my MMD (Marital Mg Dr)('er in't Kitchen) and I found ourselves talking to, meeting, and entertaining many wandering photographers from distant lands. In those days we had a big four bedroomed house which loved visitors. A call from Edinburgh - ' Ray, I caught no salmon, can I visit ' ... and he did. A young honeymoon couple from Canada, on their honeymoon tandem cycle tour, literally dropped in, the late Fred Bond, Father of Colour Printing, called from Madrid.' Kate
Passion, experience, help, adv~ce, happy stories, sad tales, tech~1cal details sales pitches, complaints, ' . thanks innovations, conservatism, ' . new ideas, old ideas, discussion,
arguments, personalities, philosophy, art, controversy why the RPS, who the RPS,
where the RPS!, news, updates, contacts,
encouragement, sharing ... See the back page for instructions
for subscribing to the DIGIT email list. Essential or what!?!
Here and There
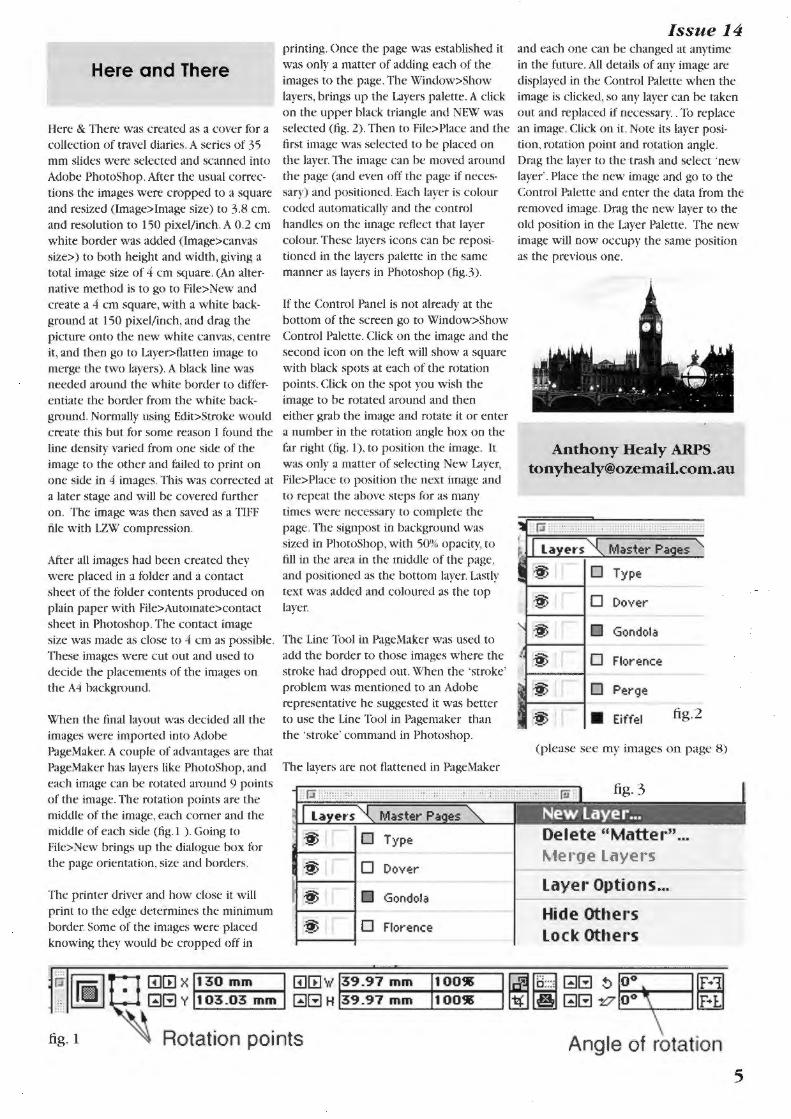
Here & There was created as a cover for a collection of travel diaries. A series of 35 mm slides were selected and scanned into Adobe PhotoShop. After the usual corrections the images were cropped to a square and resized (lmage>lmage size) to 3.8 cm. and resolution to 150 pixel/inch. A 0.2 cm white border was added (lmage>canvas size>) to both height and width, giving a total image size of 4 cm square. (An alternative method is to go to File>New and create a 4 cm square, with a white background at 150 pixel/inch, and drag the picture onto the new white canvas, centre it, and then go to Layer>flatten image to merge the two layers). A black line was needed around the white border to differentiate the border from the white background. Normally using Edit>Stroke would create this but for some reason I found the line density varied from one side of the image to the other and failed to print on one side in 4 images. This was corrected at a later stage and will be covered further on. The image was then saved as a TIFF file with LZW compression.
After all images had been created they were placed in a fo lder and a contact sheet of the folder contents produced on p lain paper with File>Automate>contact sheet in Photoshop. The contact image size was made as close to 4 cm as possible. These images were cut out and used to decide the placements of the images on the A4 background.
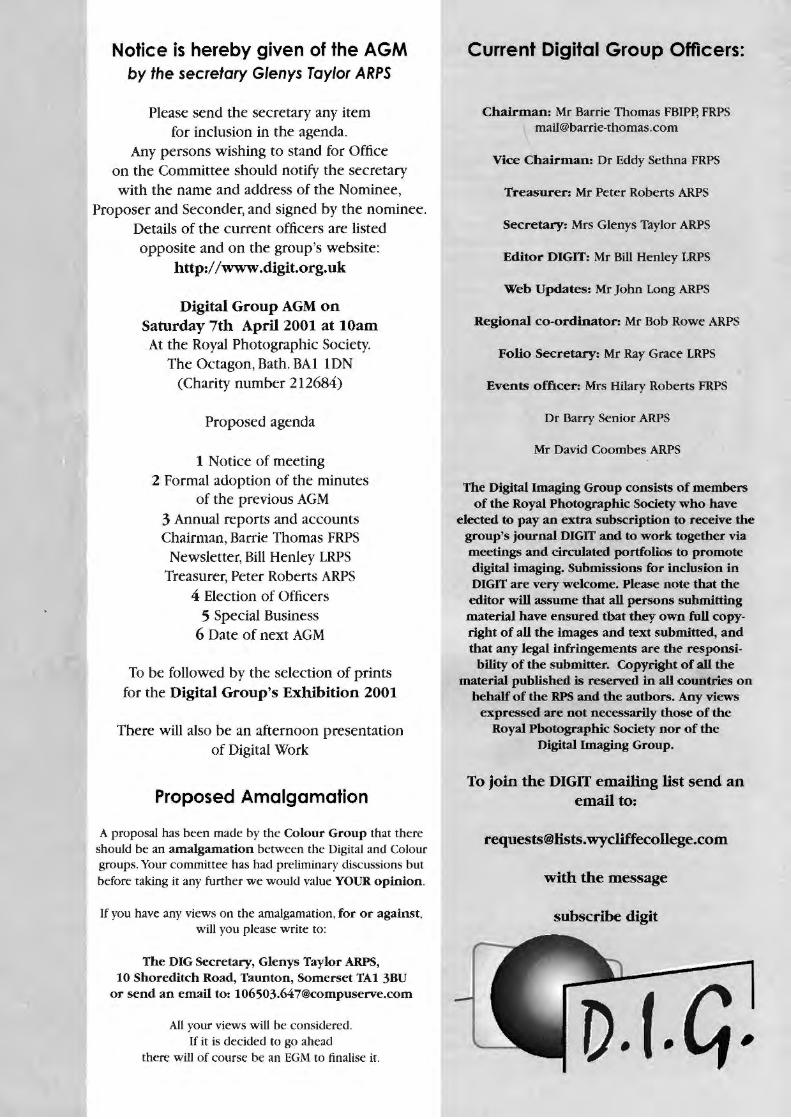
When the final layout was decided all the images were imported into Adobe PageMaker. A couple of advantages are that PageMaker has layers like PhotoShop, and each image can be rotated around 9 points of the image. The rotation points are the middle of the image, each corner and the middle of each side (fig. I ). Going to File> ew brings up the dialogue box for the page orientation, size and borders.
The printer driver and how close it will print to the edge determines the minimum border. Some of the images were placed knowing they would be cropped off in
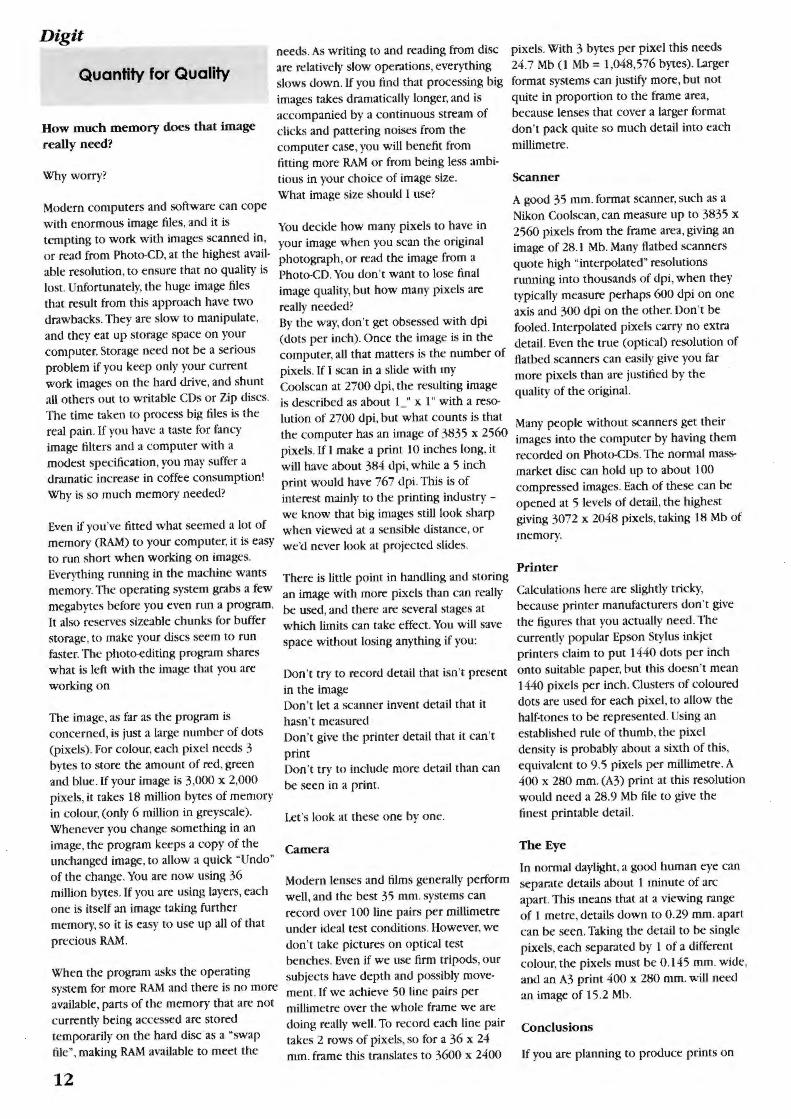
printing. Once the page was established it was only a matter of adding each of the images to the page. The Window>Show layers, brings up the Layers palette. A click on the upper black triangle and EW was selected (fig. 2). Then to File>Place and the first image was selected to be placed on the layer. The image can be moved around the page (and even off the page if necessary) and positioned. Each layer is colour coded automatically and the control handles on the image reflect that layer colour. These layers icons can be repositioned in the layers palette in the same manner as layers in Photoshop (fig.3).
If the Control Panel is not already at the bottom of the screen go tO Wimlow>Show Control Palette. Click on the image and the second icon on the left will show a square with black spots at each of the rotation points. Click on the spot you wish the image to be rotated around and then either grab the image and rotate it or enter a number in the rotation angle box on the far right (fig. 1), to position the image. It was only a matter of selecting · ew Layer, File>Place to position the next image and tO repeat the above steps for as many times were necessary to complete the page. The signpost in background was sized in PhotoShop, with 50% opacity, to filJ in the area in the middle of the page, and positioned as the bottom layer. Lastly text was added and coloured as the top layer.
The Line Tool in PageMaker was used to acid the border to those images where the stroke had dropped out. When the 'stroke' problem was mentioned to an Adobe representative he suggested it was better to use the Line Tool in Pagemaker than the 'stroke' command in Photoshop.
The layers are not flattened in PageMaker
Mas ter Pa
§> D Type
§> 0 Dover
§> ii Gondola
§> 0 Florence
Issue 14 and each one can be changed at anytime in the future. All details of any image are displayed in the Control Palette when the image is clicked, so any layer can be taken out and replaced if necessary .. To replace an image. Click on it. Note its layer position, rotation point and rotation angle. Drag the layer to the trash and select 'new layer' . Place the new in1age and go to the Control Palette and enter the data from the removed image. Drag the new layer to the old position in the Layer Palette. The new image wilJ now occupy the same position as the previous one.
Anthony Healy ARPS [email protected]
Master Pa es
Type
§> 0 Dover
§> D Gondola
§> 0 Florence
§> D Perge
§> • Eiffel fig.2
(please see my images on page 8)
De I ete "Matter" ...
Layer Options ... -~---Hide others Lock others
µ , , l~GJITJ X ~1_3_0_m_m __ G]IT] W 39.97 mm I) •. [;)8 Y 103.03 mm [;)8 H 39 .97 mm
fig. 1 Rotation points
100~ 100~ ii~~ !~~
Angle of rotation
5

Digit
Digital Photography
Digital Imaging or Digital Photography as I prefer to call it, can mean all things to all men. Everyone uses it in a different way.
For me it has two uses. I use a computer and Photoshop to process my photographs. Often this simply means producing what, under most circumstances, can be described as straight prints.
The other use to which I put digital photography is the production of montage photographs. Sometimes this will simply be a combination of elements pasted together, or it can be a number of images merged and blended.
All photography is a lie. Nothing is as it is shown in a photograph. Photography changes dimensions, colours, angles, tones and so on. Even in a, so-called, straight picnire the photographer has brought his or her imagination and feelings into play. This is particularly so in the field of pictorial photography. Montage techniques enable me to delve even deeper into myself - portraying, not just my feelings about a single view, but an imaginative 'photo-scape' into which I invite you all.
Making the montage "The Twentieth Century"
It is, of course, impossible to sum up a whole century in just one picture. 1 wanted to use Digital Imaging, which provides really good tools for montage making, to make a picmre with a message about the Twentieth Century. I cleciclecl to produce a montage that warns us in the new Millennium to avoid the war and famine that cost so many millions of lives in the past l 00 years.
The idea came from a basic tree photograph, a dead elm which I felt looked like
6
a tree left on a battlefield. Among my other photographs I fou nd pictures of cracked earth, a cross and the Death mask. I scanned these into my PC and all the elements were ready.
Using Photoshop 5 I started by spotting and sharpening each photograph and, where necessary, using levels to improve contrast and brightness. I used the tree image as the base layer and treated it with the Transparency>Eliminate White filter which is obtainable free from the Internet site http://graphicssoft.about.com/ compute/software/graphicssoft/ msubplugins0.htm. l placed the cracked earth image on the layer below the tree.
For the third picture, of the Death Head mask, I applied a layer mask to eliminate all the background, leaving just the face and hood showing. This was then added as a layer above the tree and treated with the Artistic>Rough Pastels filter (stroke length-6, stroke detail-4, texture-sandstone, light direction-bottom). l set the opacity of the Death Head layer at 70%. Then I had to
acid a layer mask to the Cracked Earth Layer so I could remove any lines that showed through the Death Head.
For this I used a paint brush on the layer mask, and used the same technique to make the overlapping tree branches stand out. I noticed some green scanner lines on the Death Head so I toned these down with Image>Acljust> Hue/Saturation> Edit Green>Desaturate.
Finally I applied a layer mask to the picture of the cross and isolated just the part of the cross I wanted to use. I placed the cross on a layer above the tree and the Death Mask and copied it twice to make three crosses to create an image that echoes the crosses of Calvary. The three crosses were re-sized using Edit> Transform>Scale.
I moved the cross layers around until I was satisfied with their position and darkened them slightly using Image>Adjust>Curves. The Death Head was too prominent and so I reduced its opacity further to 50%.
The last thing was to select the Tree Layer and use Jmage>Adjust>Hue/Saturation>Edit blue to alter the colour of the sky to make the whole effect more surreal. After a total time of between 12 and 2 hours I was ready to make a test print.
This image is reproduced top left of colour page 7. Of course, not everyone will like my picture,
but it represents my vision of the last 100 years.
Robin Mellor LRPS
John Long ARPS
,_.
Jackie Major LRPS


Anthony Healy ARPS
(ti& pages 5 cl 13)
Jim Budcley < .. ,. l5)
To share your images Join the
FOLIO email list:

Mike Brown ARPS
Jackie Major LRPS
Don Trott ARPS
Patricia French LRPS


Captured Digitally
Popular wisdom has it that when one acquires a digital camera one immediately goes out and photographs flowers. I am not a proper naturalist but, I believe in common with most photographers, I have enjoyed the beauty of so many plants or flowers that I've taken compulsively over the years with nothing in mind other than to record them for enjoyment in some future undetermined purpose.
By coincidence, shortly before becoming the proud owner of my first digital camera, a Nikon Coolpix 950, I had joined a group in a walk over the marsh behind our home in Dorset with the leader bringing to our attention many of its several hundred wild flowers. The emphasis was on those so small as to be unseen by the casual eye, many less than an inch in diameter and buried in the bracken.
The next two days found me c.awling over the muddy grassland, Coolpix in one hand and the other frantically trying to reveal the whereabouts of the elusive miniatures of the marsh that had previously been recorded only mentally. What better way to discover the talents of the Coolpix and in particular its macro minimum 0.8", focussing capability?
The result was the acquisition of some 250 in1ages (very many duplicates) in 'fine' (approx 1 :4 jpeg) format, an appreciation of the advantages of digital capture and the technical qualities the of the Coolpix and its forgiving software. Of these I selected 30 which could be cropped to provide the 'picture' and still achieve l 2"xl0" prints of an acceptable quality without any more than 'standard' processing.
In addition to the macro focus there is, in common with most digital cameras, the ability to see what you have immediately and discard what is obviously not worth keeping. Being able to frame-up accurately on the LCD screen one can avoid the greatest of all digital sins, wasting pixels.
I am fortu nate in already having a mininotebook computer and although it only has an 8" screen is extremely portable, loaded with Photoshop, has a PCMCIA slot into which the Compact Flash Card and adapter can be inserted and the image files transferred to the hard disk for safekeeping at the end of the day
This is faster, safer and does not drain the camera batteries or necessitate using an AC adapter with the camera supplied cables and software. The screen is not good enough for final preparation of the images but is more than adequate for appraisal of what was left after field selection in the camera. Taken to far off parts it provides perhaps the greatest of all digital advantages, knowing for sure that you got what you thought and hoped you had without waiting for the film to be processed when it is too late to return.
In addition to being able to select Automatic or Program (with overides), Aperture or Shutter priority modes, the camera provides just about all the controls that are found on a high end electronic film camera, more than one would normalJy use, and many more that are purely digitally related. The latest 990 model has even more controls including one which highlights on the LCD screen those parts of the image which are in focus.
The disadvantage of digital capture? The one gripe I have is not that the LCD screen is battery intensive since spare sets of
ickel Metal Hydride batteries cost less than some retailer's charge for the alkaline throwaway product and are easily recharged.
The problem is that they do not come in a flat plastic 4 pack size case and such a thing has so far proved in1possible to find. So that although the battery hunger of the camera can be met by having 2 or 3 spare sets charged and ready they are difficult to store.
The happy end to this story is that while seeking the advice of a local botanist to identify some of the flowers that I could not positively name from my own books, she suggested that I show them to the curator of the local museum who in turn asked if I would like a 5 week show of my own in the height of this year's Summer tourist season!
Issue 14 Of course that meant mounting,
framing and hanging the 30 prints but that is another story!
Please see my flower images opposite.
Dennis Toff ARPS
Its Been Stolen!
I'm writing this to let you know about an International Stolen and lost items register available on the
Internet at http:/ /www.itsbeenstolen.com
It's totally free, all you need is access to the Internet.
The idea is that you can list anything that is identifiable that has been
lost or stolen, so that people buying second hand goods can first check to see if the item is registered, and if the
item is recovered its rightful owner can be contacted.
I am also in the process of contacting as many Photographic shops as
possible to let them know they can search the database, but if you could
also advise your local camera shop we should be able to cover the whole country which would then make it
extremely difficult for people to sell stolen cameras.
I hope that you will find this information useful , and also let all of your
friends and colleagues know about the service.
Richard Webster http://www.ItsBeenStolen.com
G,~~ t>~ needs
your input! (on disk
or by email)
11
Digit
Quantity for Quality
How much memory does that image really need?
Why worry?
Modern computers and software can cope w ith enormous image files , and it is tempting to work with images scanned in, or read from Photo-CD, at the highest available resolution, to ensure that no quality is lost. Unfortunately, the huge image files that result from this approach have two drawbacks. They are slow to manipulate, and they eat up storage space on your compute r. Storage need not be a serious problem if you keep only your current work images on the hard drive, and shunt all others out to writable CDs or Zip discs. The time taken to process big files is the real pain. If you have a taste for fancy image filters and a computer with a modest specification, you may sufft:r a dramatic increase in coffee consumption! Why is so much memory needed?
Even if you've fitted what seemed a lot of memory (RAM) to your computer, it is easy to run short when working on images. Everything running in the machine wants memory. The open1ting system grabs a few megabytes before you even run a program. It also reserves sizeable chunks for buffer storage, to make your discs seem to run faster. The photo-editing program shares what is left with the image that you are
working on
The image, as far as the program is concerned, is just a large number of dots (pixels). For colour, each pixel needs 3 bytes to store the amount of red, green and blue. If your image is 3,000 x 2,000 pixels, it takes 18 million bytes of memory in colour, (only 6 million in greyscale). Whenever you change something in an image, the program keeps a copy of the unchanged image, to allow a quick "Undo " of the change. You are now using 36 million bytes. If you are using layers, each one is itself an in1age taking further memory, so it is easy to use up all of that precious RAM.
needs. As w riting to and reading from disc are relatively slow operations, everything slows down. If you find that processing big images takes dramatically longer, and is accompanied by a continuous stream of clicks and pattering noises from the computer case, you will benefit from fitting more RAM or from being less ambitious in your choice of image size. What image size should I use?
You decide how many pixels to have in your image when you scan the original photograph, or read the image from a Photo-CD. You don 't want to lose final image quality, but how many pixels are really needed? By the way, don' t get obsessed with dpi (dots per inch) . Once the image is in the computer, all that matters is the number of pixels. If I scan in a slide w ith my Coolscan at 2700 dpi, the resulting image is described as about 1 _" x l " with a resolution of 2700 dpi, but what counts is that the computer has an image of 3835 x 2560 pixels. If I make a print 10 inches long, it w ill have about 384 dpi, while a 5 inch print would have 767 dpi. This is of interest mainly to the printing industry -we know that big images sti ll look sharp when viewed at a sensible distance, or we'd never look at projected slides.
There is little p oint in handling and storing an image with more pixels than can really be used, and there are several stages at which limits can take effect. You will save space without losing anything if you:
Don't try to record detail that isn't present in the image Don' t let a scanner invent detail that it hasn 't measured Don't give the printer detail that it can' t print Don' t try to include more detail than can be seen in a print.
Let's look at these one by one.
Camera
When the program asks the operating system for more RAM and there is no more available, parts of the memory that are not currently being accessed are stored temporarily on the hard disc as a "swap file", making RAM available to meet the
Modern lenses and films generally perform well, and the best 35 mm. systems can record over 100 line pairs per millimetre under ideal test conditions. However, we don't take pictures on optical test benches. Even if we use firm tripods, our subjects have depth and possibly movement. If we achieve 50 line pairs per millin1etre over the whole frame we are doing really well. To record each line pair takes 2 rows of pixels, so for a 36 x 24 mm. frame this translates to 3600 x 2400
12
pixels. With 3 bytes per pixel this needs 24.7 Mb ( 1 Mb = 1,048,576 bytes). Larger format systems can justify more, but not quite in proportion to the frame area, because lenses that cover a larger format don't pack quite so much detai l into each millimetre.
Scanner
A good 35 mm. format scanner, such as a Nikon Coolscan, can measure up to 3835 x 2560 pixels from the frame area, giving an image of 28. I Mb. Many flatbed scanners quote high "interpolated" resolutions running into thousands of dpi, when th ey typically measure perhaps 600 dpi on one axis and 300 dpi on the other. Don' t be fooled. Interpolated pixels carry no extr-a detail. Even the true (optical) resolution of flatbed scanners can easily give you far more pixels than are justified by the quality of the original.
Many people w ithout scanners get their images into the computer by having them recorded on Photo-CDs. The normal massmarket disc can hold up to about 100 compressed images. Each of these can be opened at 5 levels of detail , the highest giving 3072 x 2048 pixels, taking 18 Mb of memory.
Printer
Calculations here arc slightly tricky, because printer manufacturers don't give the figures that yo u actually need . The currently popular Epson Stylus inkjet printers claim to put 1440 dots per inch onto suitable paper, but this doesn' t mean 1440 pixels per inch . Clusters of coloured dots are used for each pixel, to allow the half-tones to be represented. Using an established rule of thumb, the pixel density is probably about a sixth of this, equivalent to 9.5 pixels per millimetre. A 400 x 280 mm. (A3) print at this resolution wouJd need a 28.9 Mb file to give the finest printable detail.
The Eye
In normal daylight, a good human eye can separate details about 1 minute of arc apart. This means that at a viewing range of 1 metre, detai ls down to 0.29 mm. apart can be seen. Taking the detail to be single pixels, each separated by l of a different colour, the pixels must be 0.145 mm. wide, and an A3 print 400 x 280 mm . wiJI need an image of 15.2 Mb.
Conclusions
If you are planning to produce prints on

A3 paper, to be viewed from about 1 metre, use final (flattened or merged single layer) images of 15 to 20 Mb. Any more than this and you are handling detail that won't be seen. A well produced Photo-CD at its highest detail level seems to be just right for sharp images.
Is there any advantage to be had from the larger files that cameras and scanners appear to justify? Is it just "specmanship" by the manufacturers? The benefit that I can see is in the ability to use around half of the original image to get the 15 Mb that you actually need. This degree of selective enlargement has long been practical for the darkroom photographer, and the digital worker should not be excluded.
I'm aware that suggesting the adequacy of modest image sizes is a bit heretical when 4000 dpi scanners are becoming trendy, but the conclusions are supported by experience. Have you seen the quality obtainable from a 3.3 megapixel digital camera? I wouldn't choose one for traditional architectural work, but for most types of subject matter the images can reasonably be printed up to A3. The image as printed is about l O MB, though it is interesting that the camera would normally have had it compressed for storage into about !MB.JPEG and other compression techniques are much maligned, but that is another topic.
Peter Dishart
Who let that rude man in here?
Curious, isn't it, how a small event can trigger a whole series of events. Take for instance one of my pet hates, language mangling. How often have you heard judges (and others, I'm even handed in my distaste), refer to the photographer as "the author of the picture".
Where did they learn their English language? At the slaughter house by the sound of it. I won't bore you with a definition of author, but it came flooding back to me recently that photographers could do with a course in authoring, or at the very least, titling. Imagine the scene, it's the judging of the DIG annual competition. The three distinguished judges were
exercising their majority verdicts with commendable grace (well I was struggling there for a minute) and the author (slight hint here) of this piece, who was picking the selected prints off the - board, in a moment of total rashness, read out the title as well as the name of the photograph (there we go again). Golly gosh, it was staggering. A picture of a bicycle, nicely printed and subtly manipulated was entitled "bicycle". I could hardly stand the excitement.
The next picture was of a Victorian pier and was entitled I am sure you have got the drift of this already. You may be able to tell that I do like words. What can be more descriptive than the English language used at its sinuous, seductive best? Shakespeare isn't revered because he is a lapsed of Warwickshire County Cricket Club, but because of the stunning quality of his prose and poetry and that 's a judgement nearly four hundred years after he died.
So fellow digitisers, PLEASE, if only to make me a little happier, and to make us culturally enriched in the process, please think about the titles of your picture. Nothing arty farty, or so complex that the long version of the OED is required to understand it; just a little thought and imagination. Remember the old sore "if it looks like a duck, walks like a duck and sounds like a duck, then it probably is a duck".
So avoid the tediously obvious. The photography, if our competition was anything tO go by, is moving on and up at a satisfyingly splendid rate. So use a microgram, well a kilogram, more of your creativity on the title, and lets try and match the words to the pixels. (The author is an itinerant soul in the great adventure of life)
Geoffrey Carver LRPS
Homemade Borders
Although today, most photographs are borderless, there are time when one likes to add a border to their in1age. Indeed this has been recognised by some software companies, such as AUTO FIX, who sell programs that supply borders & edges to add to your work of art. But if you are like me you may prefer to make your own. The
Issue 14 border surrounding the "Bangkok" image is one such result.
In this instance it started with a rather "busy" image full of detail and colour. (fig.I). To this image was added a couple of Filter>Brush Strokes>Spatter commands. Water colour filter applied several times is another option. Next Filter>Distort> Glass was applied using the 'frosted' texture. The final filter step was to apply Filter>Artistic>Plastic Wrap.
The next step is to create a colour balance that complements your main picture. Go to Image>Adjust>Hue/Saturation and crank up the saturation. Then select the various colours in the Hue option and increase or decrease them individually to get a balance that suits your needs (fig. 2). At this point in the exercise a black patch was inserted in the image by using the Marquee rectangle and selecting an area and filling it with the Edit>Fill command but the Paint bucket could also be used (fig. 3). The fill can also be any colour you like. This filled area is slightly larger than the image to be inserted into the border.
At this stage the main image was opened and using the Move tool, dragged onto the black area and put into position. The Type tool was then selected, clicked onto the image, and when the dialogue box appeared, a font with an eastern flavour was selected, together with a colour for the font. In this case the font was Calligrapher. At this stage one would normally go to Layer>Flatten Image but if you want to be able to come back to the work and perhaps modify it later, save a copy in the File Menu and flatten that.
You need to remember that the image you start to modify for the border should be the same resolution as the main image to be inserted and of course it will be larger by the amount of border you wish to add. It can also be a cropped area that is selected and not necessarily the whole frame. If you prefer a ragged edge get a piece of paper of the right proportions, tear around the edges, and then scan the image to create a mask. Black or coloured paper is best as is separates the paper from the scanner pressure plate. The use of Filters other than those nominated above will obviously offer further options for artistic expression. (see page 8)
Anthony Healy ARPS
13

Digit
Printing What You See
Gamma' to the Red, Blue Green Gamma, click in the small box to ' tick' or 'untick' as appropriate.
My experience and that of my colleagues, suggests that all papers can be printed as 'Photo Quality Glossy Film' without any problem.
One of the most frustrating things about any imaging program is the inability at times for the printed output to resemble what you see on the monitor screen.
'Hardware whitepoint' is usually 6,500K (daylight). Making a Test Strip
We have all experienced this and it's very annoying - there it is, your masterpiece in all its glory on the screen and when printed, the colours are slightly different or there is a colour caste. What to do?
The good news is that something can be done. The bad news is that the same ·cure' will not work for everyone. And the other bad news is that papers vary from type to type, giving rise to changes in printed tone. In order to have a good chance of printing what you see, I lay out some basic guidelines. These are based on my experience and those of a number of my colleagues.
What follows is based on using an Epson printer - I have a 1270 model so some of the dialogue boxes may be different to other models (let alone makes) but most Epson printers will follow much the same route.
I also suggest that as it 's an Epson printer, you begin your tests with Epson paper (say, 'Glossy') as at least both paper and printer should be compatible!
Setting Your Monitor
The first thing to do is to make certain that your monitor is properly adjusted. Open the 'Adobe Gamma' program to do this. Adobe Gamma is usually to be found by this route, Start > Settings > Control Panel > Adobe Gamma.
Follow the Adobe Gamma 'wizard' instructions. Remember to set everything up under whatever 'normal' ambient lighting conditions you prefer. The light falling on the monitor screen will influence your colour set up.
When setting the Brightness & Contrast, do try to make the almost-dark square in the centre of the black square with the white border so it 's just visible. To better adjust the 'single gamma' and Red, Green, Blue gamma settings, I find it best to be at arms length (and I'm 6'3" tall!) and squint slightly to diffuse the image - this way the squares and horizontal lines merge more successfully. To change from 'Single
14
If you choose 'Control Panel' (as opposed to 'Step by Step Wizard') in the initial Adobe Gamma dialogue box, you will find all options available at the same time. Note that the top, apparently solid black horizontal band, in the Brightness & Contract box does in fact have an almost black alternate pattern set within it. You'll need to look hard, however it takes the place of the black/white rectangle in the 'Wizard' instructions.
Colour Space
Set your Photoshop Colour Space to the favoured 'Bruce RGB' choice - see separate information about this.
Printer Settings
\'v'hen making the print the following printer settings are suggested.
Goto: File > Print
In the first dialogue box in the 'Space' box, click on the drop down arrow and choose (and here it depends upon your printer) for a 1270 'Bruce RGB' or possibly 'EPSON Stylus Pro 1210·.
If a 1520 printer then either the preferred 'Bruce RGB' or alternatively, ' EPSO StylusCOLOR 1520 Glossy Film 1440' or the printer type/model YOU have (say EPSON StylusEX) or again, 'Bruce RGB'.
Print Quality = High. Next:
Select 'Setup .. .' > Properties> Media Type > Choose 'Photo Quality Glossy Film'.
Make certain that you select 1440 dpi for best quality and that under Advanced / More Settings that 'ICM' is sc:lected.
Choose 'Quality' rather than 'Speed'. Select 'Custom' . Click 'Advanced' Print Quality: choose 1440 dpi Color Management area - choose ICM
To check your image before you print you can select an appropriate area of your picture by using the rectangular marquee (remembering to merge/flatten your layers first). Alternatively, copy the image by the File > Save a Copy, route if you wish and experiment with changes here - flattening/ merging/adjusting, etc.
Copy the rectangular area you selected and paste it to a new layer. Remember to 'switch off the layer displaying the whole image - as you don't wish to print this just yet. Print the small rectangular section as seen. Should changes be required, make these and print again and again if you need to. Remember to move the image between each print, as you can use the same piece of paper to make successive prints for sideby-side comparisons. When you are happy, return to the original image and make the changes (if any).
Commercial Alternatives
A useful tool for comparisons and adjustments is the 'Print Tuner· cd available from Creative Monochrome Ltd., Courtney House, 62 Jarvis Road, South Croydon, Surrey. CR2 6HU tel 020 8686 3282 - it costs around £20 and is most useful.
ova also produce a disc that may be helpful in setting up. This is based on the standard grey reference and operates like a 'ring-around' - this also costs around £20.
Nova Darkroom Equipment Limited Unit IA, Harris Road, Wedgnock Industrial Estate, Warwick. CV34 5JU tel: 01926 403090. E-mail: [email protected]
And Finally
As you experiment with different papers, corrections and adjustments are inevitable.
Clive R Haynes FRPS
Once you've done all of this, the settings can be 'saved' via 'Save settings' - type in an appropriate name and it's all ready for next time when you go to Properties > Custom Settings: choose the one you saved.
one of a number of excellent articles on Clive's web site:
http:/ / members.aolcom/crhfoto

My Digit Two
Encouraged by seeing my first image in the OIGn~ I became bolder - only to realise that 'keep it simple' works best. And the maxim preached by the gurus in DIGIT is hard-won from their professional experience. Read them carefully and don't hesitate to imitate tO gain confidence. And certainly you must have a good image as a starting point. That said it's certainly possible to recover otherwise lost shots by bumping up the contrast or brightness.
I have experimented with a number of software packages, most of them the free or modestly priced. But I am trying to use just a few tools well rather than following my inclination to have a go at every thing on ofter. I've also fo llowed the advice in DIGIT and make use of a graphics tablet. Goodness how much strain that saves on the wrist and fingers and allows a much finer control at the same time.
My first image of the tulips in Parliament Square is from an old slide - it was tranquil but needed just a little spice. I used Soap, an intuitive bur quirky package, and knocked back the colour first and just put some back for a couple of tulips. Soap provided the idea for the background and the way image is placed on it in the frame
My second image is real digital through and through. An evening trip on the London millennium produced some interesting photographs but the best shot was taken at ground level as the sun went down. Using a Kodak digital camera
Iss u e 14 borrowed from the office, the results were surprisingly good and came all I needed was a slight change tO "replace" some of the colours in the sunset using the tools in the Paint Shop. The rest seemed tO look after itself.
The third, black and white image came from 400 ASA stock and was very flat, as was everything else I wok on that dull day. I saw the manikin in what seemed to be an abandoned shed and pre-visualised what I wanted. Of course it didn't quite work; for one thing I couldn't deal with the reflections from the glass. So I used a little manipulation to over paint some areas and increase the contrast. I was looking for a sense of mystery, even the occult.
It's surprisingly easy to produce rubbish using powerful image editing software, I've discovered. To produce the sort of work that we see from the leaders in digital imagery requires a much more subtle t0uch and approach. (see page 8)
DIGIT
Jim Buckley article and photograph
Printed Publication, Web Site and List Server
The RPS journal arrived packed in its neat plastic jacket. When opened, out dropped a leaflet advertising a CD ROM for the state of the art digital imaging and a registration form for an exhibition about the same. The journal has featured a number of articles
on digital techniques and the editor Roy Green is keen to accept more. The news stands have a range of specialist digital imaging magazines. The standard photographic
journals all have digital articles, as do most of the computing magazines. Other magazines for digital video, multimedia and fi lm making all relate to the use of a
computer for ·'photographic" purposes. The editors are electric keen for material for publication.
Since the first issues of DIGIT for the RPS digital imaging group (produced by Ba1Tie Thomas) the digital scene has been transformed both technically and i11 terms ~1f
general acceptance. The use the Internet has become commonplace and essenti.' I. Commercial and personal web sites abound. Digital cameras arc now the choice en
many professionals and amateurs with large areas of all photographic stores devoted to digital processes. Digital prints can be obtained from "processing labs" via the Internet. Images are published and marketed in the same manner with an increasing number of
photographers earning their living by such technologies.
What is the role of DIGIT in this new technological and publishing climate (to which the DI Group has made such a positive contribution)? What do members of the digital
imaging group want from a printed group newsletter that is not already available in other journals or could not be published via a web site or email list?
Is there sufficient suitable material available from the members for a separate printed publication? I believe that the group now needs to realistically re-examine the role of
DIGIT in the light of members' needs and their contributions.
As editor I have been extremely grateful for the many contributors over the past years. Glenys Taylor and John Long have given a great deal of support, with Jolui veq1 kindly
taking over the onerous task of stuffing and mailing the journal in addition to maintaining the web site.
When I raised the ro le of the DIGIT on the email list I received a number of encouraging and appreciative responses, which were very kind. I hope that what I have
written is seen i11 the positive manner in which it is intended.
I believe that the digital imaging group and indeed the RPS will need to
constantly re-invent itself as the pace of technology and society's use of it
develops at a rapid rate.
Bill Henley I.RPS editor
15
Notice is hereby given of the AGM by the secretary Glenys Taylor ARPS
Please send the secretary any item for inclusion in the agenda.
Any persons wishing to stand for Office on the Committee should notify the secretary with the name and address of the Nominee,
Proposer and Seconder, and signed by the nominee. Details of the current officers are listed opposite and on the group's website:
http:/ /www.digit.org.uk
Digital Group AGM on Saturday 7th April 2001 at 10am At the Royal Photographic Society.
The Octagon, Bath. BAI IDN (Charity number 212684)
Proposed agenda
1 Notice of meeting 2 Formal adoption of the minutes
of the previous AGM 3 Annual reports and accounts Chairman, Barrie Thomas FRPS
Newsletter, Bill Henley LRPS Treasurer, Peter Roberts ARPS
4 Election of Officers 5 Special Business
6 Date of next AGM
To be followed by the selection of prints for the Digital Group's Exhibition 2001
There will also be an afternoon presentation of Digital Work
Proposed Amalgamation
A proposal has been made by the Colour Group that there should be an amalgamation between the Digital and Colour groups. Your committee has had preliminary discussions but before taking it any further we would value YOUR opinion.
If you have any views on the amalgamation, for or against, will you please write to:
The DIG Secretary, Glenys Taylor ARPS, 10 Shoreditch Road, Taunton, Somerset TAl 3BU
or send an email to: [email protected]
All your views will be considered. If it is decided to go ahead
there will of course be an EGM to finalise it.
Current Digital Group Officers:
Chairman: Mr Barrie Thomas FBIPP, FRPS [email protected]
Vice Chairman: Dr Eddy Sethna FRPS
Treasurer: Mr Peter Roberts ARPS
Secretary: Mrs Glenys Taylor ARPS
Editor DIGIT: Mr Bill Henley LRPS
Web Updates: Mr John Long ARPS
Regional co-ordinator: Mr Bob Rowe ARPS
Folio Secretary: Mr Ray Grace LRPS
Events officer: Mrs Hilary Roberts FRPS
Dr Barry Senior ARPS
Mr David Coombes ARPS
The Digital Imaging Group consists of members of the Royal Photographic Society who have
elected to pay an extra subscription to receive the group's journal DIGIT and to work together via meetings and circulated portfolios to promote digital imaging. Submissions for inclusion in DIGIT are very welcome. Please note that the editor will assume that all persons submitting material have ensured that they own full copyright of all the images and text submitted, and that any legal infringements are the responsi-
bility of the submitter. Copyright of all the material published is reserved in all countries on
behalf of the RPS and the authors. Any views expressed are not necessarily those of the
Royal Photographic Society nor of the Digital Imaging Group.
To join the DIGIT emailing list send an email to:
with the message
subscribe digit
o. f.