Developing for and Deploying an ADF Web Application to the ...
25
1 | Page www.waterplacid.com Sunil Babu K C Developing for and Deploying an ADF Web Application to the Oracle Public Cloud (DBaaS and JCS) In the article you are reading right now, I will discuss the development of a straightforward ADF Web application with Business Components that access the HR schema inside an DBaaS database instance in the public cloud. After locally developing this application, we will deploy it to the JCS instance shown in the figure below and run it entirely inside the public cloud. The first thing we need to do is create a JDBC connection in our JDeveloper application to the HR schema in the MyJCSDB database. This can only be done if port 1521 has been opened on the compute node that contains the DBaaS instance – and if we have the public IP address for this node. App to be deployed can be downloaded from HERE
Transcript of Developing for and Deploying an ADF Web Application to the ...

1 | P a g e w w w . w a t e r p l a c i d . c o m S u n i l B a b u K C
Developing for and Deploying an ADF Web Application to the Oracle Public Cloud (DBaaS and JCS)
In the article you are reading right now, I will discuss the development of a straightforward ADF Web application with Business Components that access the HR schema inside an DBaaS database instance in the public cloud. After locally developing this application, we will deploy it to the JCS instance shown in the figure below and run it entirely inside the public cloud.
The first thing we need to do is create a JDBC connection in our JDeveloper application to the HR schema in the MyJCSDB database. This can only be done if port 1521 has been opened on the compute node that contains the DBaaS instance – and if we have the public IP address for this node.
App to be deployed can be downloaded from HERE

2 | P a g e w w w . w a t e r p l a c i d . c o m S u n i l B a b u K C
Start JDeveloper and create a new ADF application. Then create a new JDBC Database Connection, using the public IP address and the name name of the database service for the demos pluggable database in the MyJCSDB instance, as shown in the next figure.
You can verify whether this connection yields the results that we expect:

3 | P a g e w w w . w a t e r p l a c i d . c o m S u n i l B a b u K C
Create Business Components for the tables Departments and Employees in the HR schema that is accessed through the new database connection. The fact that this connection refers to a DBaaS instance instead of a local database has no consequence for the creation of the business components.

4 | P a g e w w w . w a t e r p l a c i d . c o m S u n i l B a b u K C
The next step is the creation of one or more ADF Faces web pages – as visualized in the next figure.
The end result of some dragging and dropping in JDeveloper:

5 | P a g e w w w . w a t e r p l a c i d . c o m S u n i l B a b u K C
This screenshot shows nothing that is specific for the DBaaS instance that the ADF BC components interact with or for the JCS instance that the application will be deployed to.
Creating the JDBC Data Source on the JCS instance
Before we can deploy the application to the JCS instance in the Oracle Public Cloud, we need to set up a JDBC Data Source that refers to the HR schema in MyJCSDB. The JNDI name of this data source is defined in the ADF BC Application Module configuration as shown in the next figure:

6 | P a g e w w w . w a t e r p l a c i d . c o m S u n i l B a b u K C
The JNDI name is: jdbc/HR_MyJCSDBDS.
We can create this JDBC Data Source in both WLS Admin Console or EM FMW Control.
Open the EM Fusion Middleware Control console. Click on the cluster node, select JDBC Data Sources from the menu. Then click on Changes | Lock & Edit to create an editing session.

7 | P a g e w w w . w a t e r p l a c i d . c o m S u n i l B a b u K C
The Create button is now enabled. Click on that button and select Generic Data Source.
The wizard for creating a JDBC Data Source appears. In the first page, the most important property to set is the JNDI name:

8 | P a g e w w w . w a t e r p l a c i d . c o m S u n i l B a b u K C
This property should be set to the value that we saw earlier in the ADF BC Application Module configuration: jdbc/HR_MyJCSDBDS.
Click Next.
On this second page, we need to specify the Database URL. The exact value required here can be found in the DBaaS Monitor available for the MyJCSDB instance on the DBaaS service:

9 | P a g e w w w . w a t e r p l a c i d . c o m S u n i l B a b u K C
The Database Url voor de demos PDB is: jdbc:oracle:thin:@//myjcsdb:1521/demos.lucasjellema.oraclecloud.internal as we can tell from this page. We use this value for the property Database Url. The username and password are set (both to HR in this case).

10 | P a g e w w w . w a t e r p l a c i d . c o m S u n i l B a b u K C
We can use the button Test Database Connection to verify whether the Database Url and username/password are indeed correct and yield a successful connection.
Press Next. Accept the defaults on the tab Transaction Properties. Press Next again. Accept the defaults for ONS properties. Press Next.
Accept the default settings for targets – to have the JDBC Data Source created on both managed servers in the cluster. Click Next.

11 | P a g e w w w . w a t e r p l a c i d . c o m S u n i l B a b u K C
The next page shows a review of all collected data. Press Create to complete configuration of the JDBC data source.
The change session needs to be activated as shown in the next figure – to actually carry out the creation of the JDBC Data Source.
The confirmation is shown
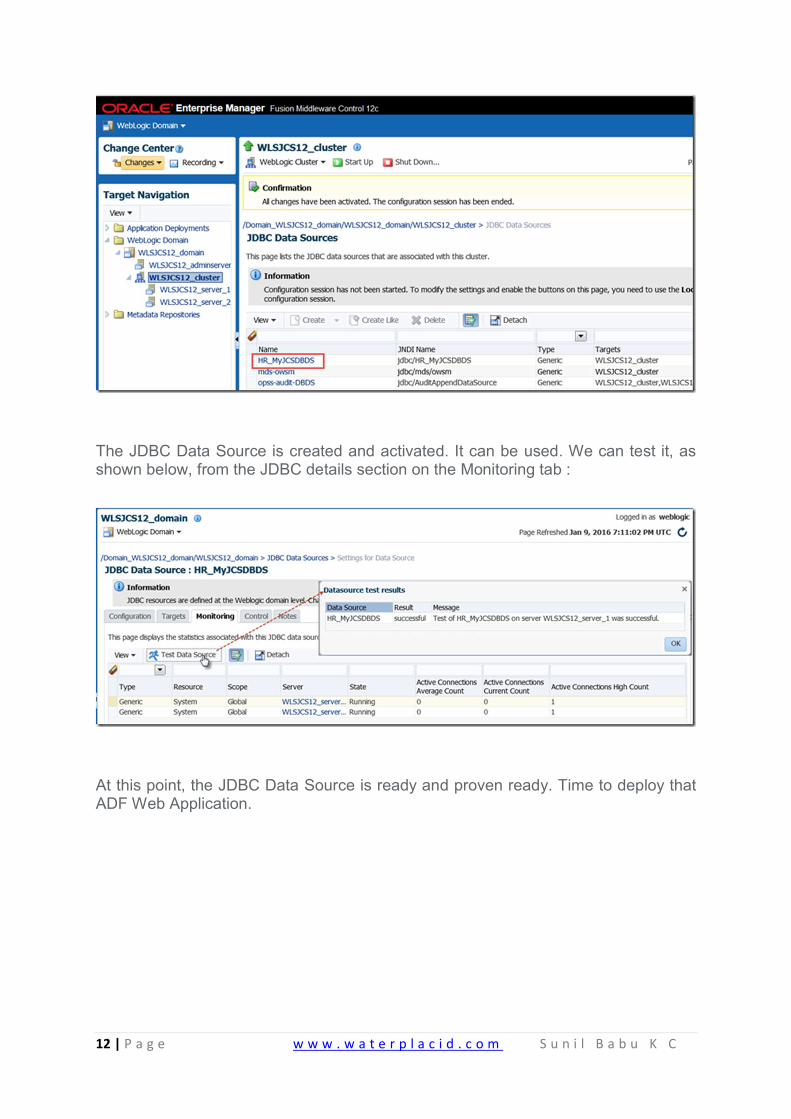
12 | P a g e w w w . w a t e r p l a c i d . c o m S u n i l B a b u K C
The JDBC Data Source is created and activated. It can be used. We can test it, as shown below, from the JDBC details section on the Monitoring tab :
At this point, the JDBC Data Source is ready and proven ready. Time to deploy that ADF Web Application.

13 | P a g e w w w . w a t e r p l a c i d . c o m S u n i l B a b u K C
Deploying the ADF Web Application
Deployment to the JCS instance is done in two steps: first build the EAR file, then upload and deploy that EAR file to the WebLogic instance on JCS.
Building the EAR file is done in JDeveloper from the Application dropdown menu. Before building the file, we have to configure a property at application level – to prevent the error “No credential mapper entry found for password indirection” that I initially ran into, click on the icon to bring up the Application Dropdown Menu. Click on Application Properties.
Open the node Deployment | WebLogic. See the next figure.

14 | P a g e w w w . w a t e r p l a c i d . c o m S u n i l B a b u K C
Uncheck the checkbox “Auto Generate and Synchronize weblogic-jdbc.xml Descriptors During Deployment” as shown in the screenshot. Click on OK to save the change and close the window.
Now we can go ahead and generate the EAR file. Click on the menu option Deploy in the application menu, to bring up the sub menu with the deployment profile for the Fusion Web Application. Click on that option.

15 | P a g e w w w . w a t e r p l a c i d . c o m S u n i l B a b u K C
In the deployment wizard, select EAR as the deployment target
Press Next. Press Finish in the Summary that appears next.
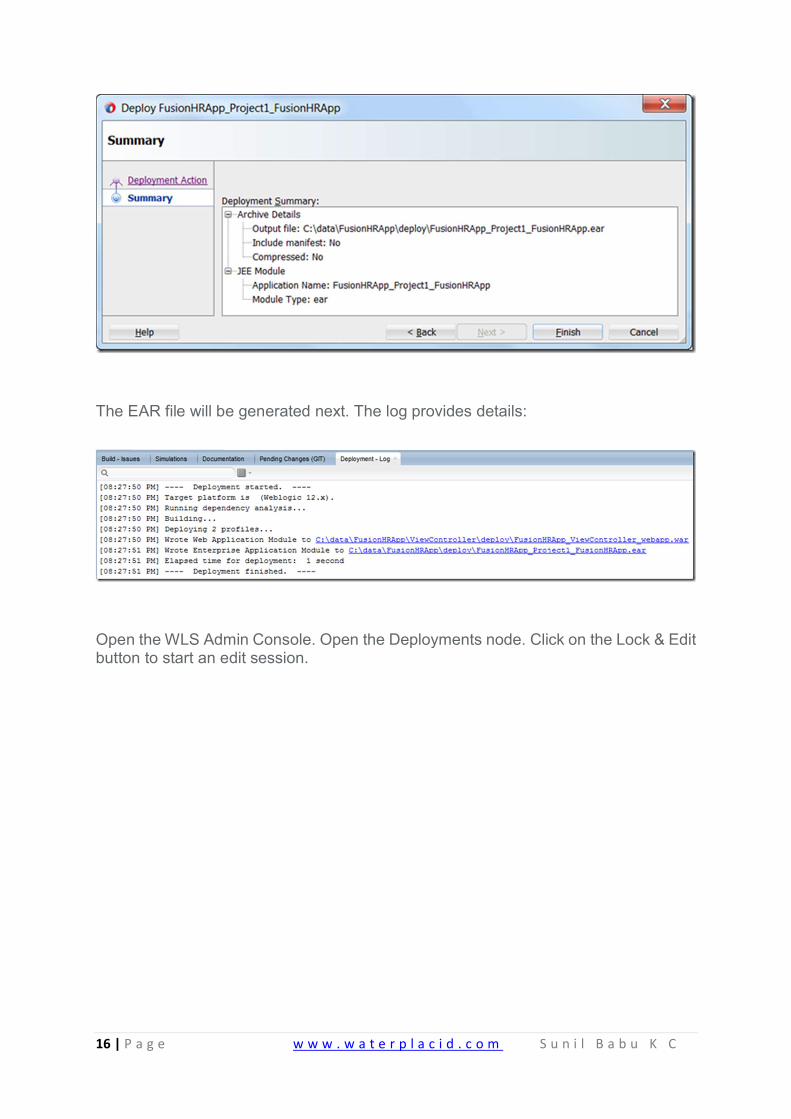
16 | P a g e w w w . w a t e r p l a c i d . c o m S u n i l B a b u K C
The EAR file will be generated next. The log provides details:
Open the WLS Admin Console. Open the Deployments node. Click on the Lock & Edit button to start an edit session.

17 | P a g e w w w . w a t e r p l a c i d . c o m S u n i l B a b u K C
Click on Install to start deployment and installation.

18 | P a g e w w w . w a t e r p l a c i d . c o m S u n i l B a b u K C
The Install Application Assistant wizard appears.
Browse for the EAR file generated from JDeveloper for the Fusion Web Application. Press Next.
In the next pages – accept the default settings by pressing Next on each page, as shown below:

19 | P a g e w w w . w a t e r p l a c i d . c o m S u n i l B a b u K C
On the next page, specify the Cluster – and all nodes in the cluster – as the deployment target. Then press Next.

20 | P a g e w w w . w a t e r p l a c i d . c o m S u n i l B a b u K C
Finally, press the Finish button. The application is deployed now.

21 | P a g e w w w . w a t e r p l a c i d . c o m S u n i l B a b u K C
When deployment is done, the console overview for application deployments appears again. Press the Activate Changes button.
A confirmation appears:
And wait – you are not done yet (I thought I was – but I was wrong). The application has been deployed, but it has not yet been started or activated.
Find the application in the list of deployments. It will probably have the status Installed. Select the checkbox. Then select Start | Servicing All Requests, as shown in the next figure.

22 | P a g e w w w . w a t e r p l a c i d . c o m S u n i l B a b u K C
The Start Application Assistant appears. Just press Yes.
A confirmation message appears:

23 | P a g e w w w . w a t e r p l a c i d . c o m S u n i l B a b u K C
After a little while, refresh the page:
and now the application is Active, ready to receive requests.
When we send a request from the browser running locally on my laptop, to the public IP address for the load balancer at port 443, the application responds as expected:

24 | P a g e w w w . w a t e r p l a c i d . c o m S u n i l B a b u K C
Data is fetched from the database – the HR schema in de demos PDB in the MyJCSDB DBaaS instance.
The situation after deployment can be visualized as is shown here:

25 | P a g e w w w . w a t e r p l a c i d . c o m S u n i l B a b u K C
The browser on my local laptop accesses the Public IP address of the Load Balancer on port 443 – the default port for SSL interaction. The request is received by the load balancer and forwarded to one of the two managed servers in the cluster where the ADF application is running. When the ADF application is first accessed, the business components for Departments and Employees are initialized. At that point, ADF BC requests the JDBC Data Source from the Java EE application server. This Data Source was defined earlier on – and refers to the HR schema in the MyJCSDB database instance in the DBaaS service in the local identity domain.
The important fact: the laptop does not contain any resources. Neither database or application [server] are running on the laptop. And the ADF application is not just accessible from the laptop on which it was developed: it can be accessed from any laptop anywhere in the world – provided it is connected to the internet obviously. And not just laptops – other devices too.