DESIGNED & QUILTED by Shades of Autumn Runner€¦ · of their real counterparts have faded....
4
From Quilter's World magazine, October 2010, Vol. 32, No. 5, Copyright © 2010 Quilter's World magazine Shades of Autumn Runner DESIGNED & QUILTED BY CAROLYN S. VAGTS
Transcript of DESIGNED & QUILTED by Shades of Autumn Runner€¦ · of their real counterparts have faded....
From Quilter's World magazine, October 2010, Vol. 32, No. 5, Copyright © 2010 Quilter's World magazine
Shades of Autumn Runner
D E S I G N E D & Q U I LT E D by C A R O LY N S . VAG T S
From Quilter's World magazine, October 2010, Vol. 32, No. 5, Copyright © 2010 Quilter's World magazine
S P E C I F I C AT I O N S
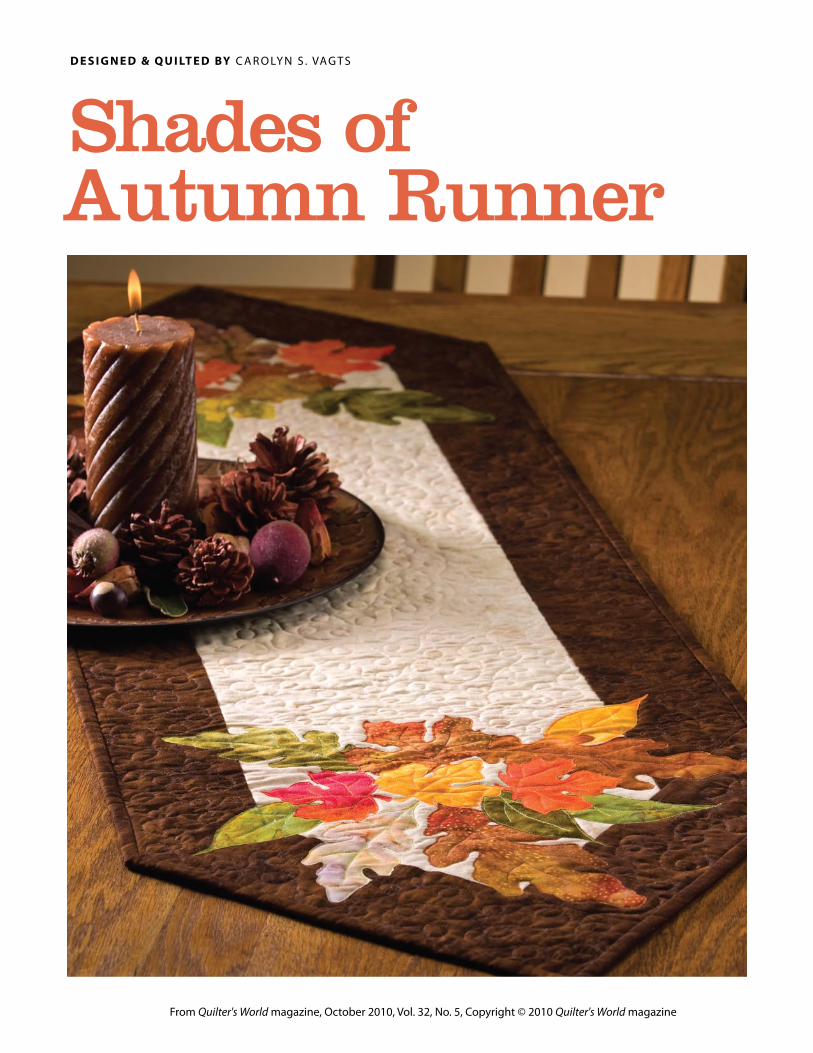
Skill Level: BeginnerRunner Size: 50" x 141/2"
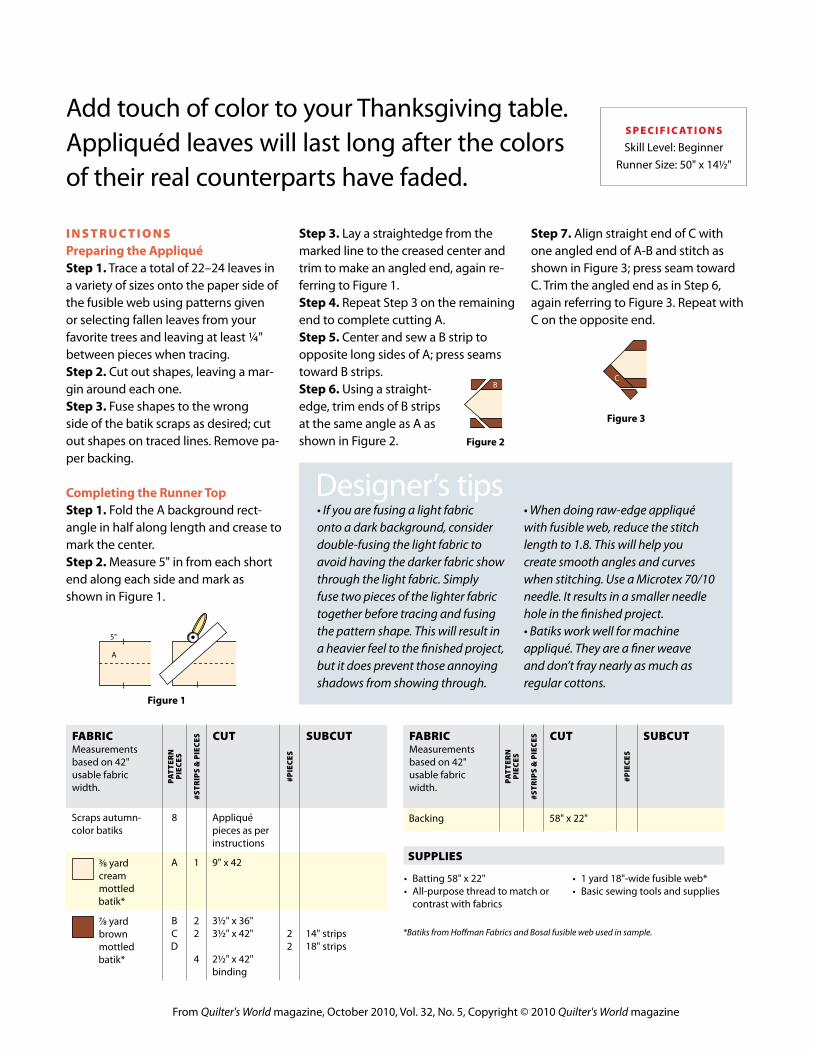
Step 3. Lay a straightedge from the marked line to the creased center and trim to make an angled end, again re-ferring to Figure 1.Step 4. Repeat Step 3 on the remaining end to complete cutting A.Step 5. Center and sew a B strip to opposite long sides of A; press seams toward B strips.Step 6. Using a straight-edge, trim ends of B strips at the same angle as A as shown in Figure 2.
Step 7. Align straight end of C with one angled end of A-B and stitch as shown in Figure 3; press seam toward C. Trim the angled end as in Step 6, again referring to Figure 3. Repeat with C on the opposite end.
Add touch of color to your Thanksgiving table. Appliquéd leaves will last long after the colors of their real counterparts have faded.
13-1966923352_Shades of Autumn Runner Chart
FAbRICMeasurements based on 42" usable fabric width.
PATT
ERN
PIEC
ES
#STR
IPS
& P
IECE
S CUT
#PIE
CES
SUbCUT
Scraps autumn-color batiks
8 Appliqué pieces as per instructions
3/8 yard cream mottled batik*
A 1 9" x 42
7/8 yard brown mottled batik*
BCD
22
4
31/2 " x 36"31/2 " x 42"
21/2 " x 42" binding
22
14" strips18" strips
FAbRICMeasurements based on 42" usable fabric width.
PATT
ERN
PIEC
ES
#STR
IPS
& P
IECE
S CUT
#PIE
CES
SUbCUT
Backing 58" x 22"
SUPPlIES
• Batting 58" x 22"• All-purpose thread to match or
contrast with fabrics
• 1 yard 18"-wide fusible web*• Basic sewing tools and supplies
*Batiks from Hoff man Fabrics and Bosal fusible web used in sample.
Figure 1
5"
A
Figure 2
B
Figure 3
C
I N S T R U C T I O N SPreparing the AppliquéStep 1. Trace a total of 22–24 leaves in a variety of sizes onto the paper side of the fusible web using patterns given or selecting fallen leaves from your favorite trees and leaving at least 1/4" between pieces when tracing.Step 2. Cut out shapes, leaving a mar-gin around each one.Step 3. Fuse shapes to the wrong side of the batik scraps as desired; cut out shapes on traced lines. Remove pa-per backing.
Completing the Runner TopStep 1. Fold the A background rect-angle in half along length and crease to mark the center.Step 2. Measure 5" in from each short end along each side and mark as shown in Figure 1.
• If you are fusing a light fabric onto a dark background, consider double-fusing the light fabric to avoid having the darker fabric show through the light fabric. Simply fuse two pieces of the lighter fabric together before tracing and fusing the pattern shape. This will result in a heavier feel to the finished project, but it does prevent those annoying shadows from showing through.
• When doing raw-edge appliqué with fusible web, reduce the stitch length to 1.8. This will help you create smooth angles and curves when stitching. Use a Microtex 70/10 needle. It results in a smaller needle hole in the finished project.• Batiks work well for machine appliqué. They are a finer weave and don’t fray nearly as much as regular cottons.
Designer’s tips
From Quilter's World magazine, October 2010, Vol. 32, No. 5, Copyright © 2010 Quilter's World magazine
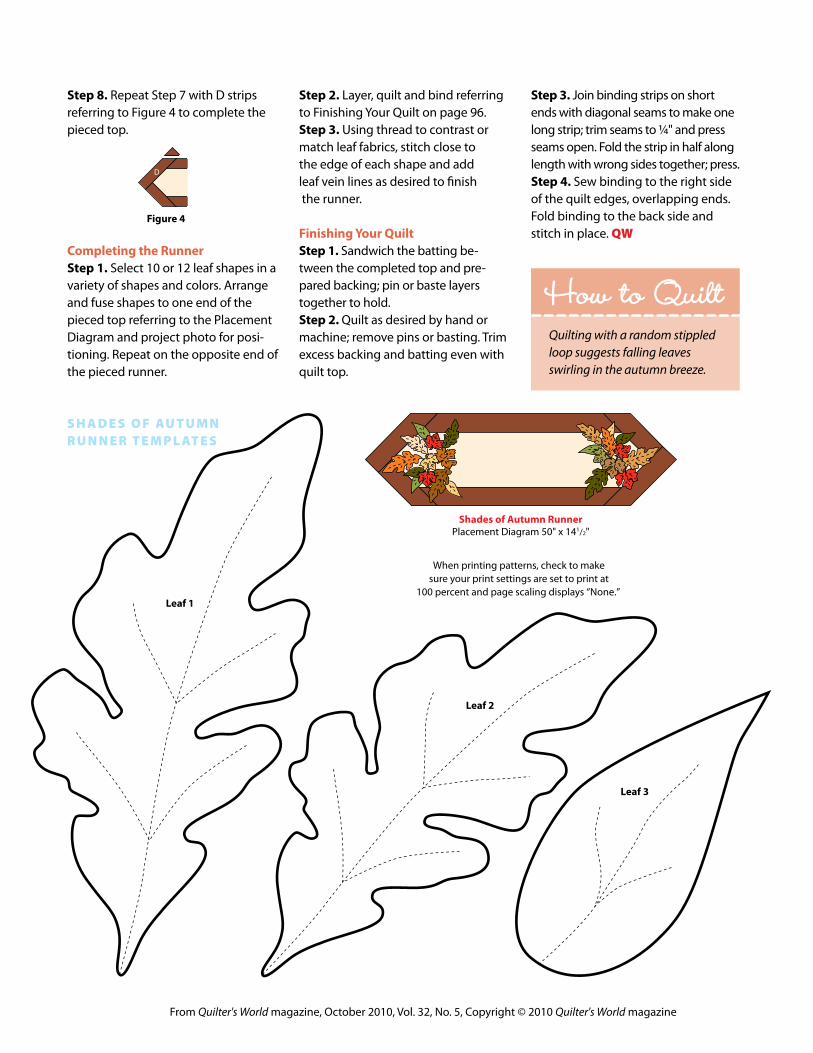
Leaf 1
Leaf 2
When printing patterns, check to make sure your print settings are set to print at
100 percent and page scaling displays “None.”
Leaf 2
When printing patterns, check to make sure your print settings are set to print at
100 percent and page scaling displays “None.”
Leaf 3
Step 8. Repeat Step 7 with D strips referring to Figure 4 to complete the pieced top.
Completing the RunnerStep 1. Select 10 or 12 leaf shapes in a variety of shapes and colors. Arrange and fuse shapes to one end of the pieced top referring to the Placement Diagram and project photo for posi-tioning. Repeat on the opposite end of the pieced runner.
Step 2. Layer, quilt and bind referring to Finishing Your Quilt on page 96.Step 3. Using thread to contrast or match leaf fabrics, stitch close to the edge of each shape and add leaf vein lines as desired to finish the runner.
Finishing your QuiltStep 1. Sandwich the batting be-tween the completed top and pre-pared backing; pin or baste layers together to hold. Step 2. Quilt as desired by hand or machine; remove pins or basting. Trim excess backing and batting even with quilt top.
Step 3. Join binding strips on short ends with diagonal seams to make one long strip; trim seams to 1/4" and press seams open. Fold the strip in half along length with wrong sides together; press.Step 4. Sew binding to the right side of the quilt edges, overlapping ends. Fold binding to the back side and stitch in place. QW
Quilting with a random stippled loop suggests falling leaves swirling in the autumn breeze.
How to Quilt
S h A d E S O F AU T U m N R U N N E R T E m P l AT E S
Figure 4
D
Shades of Autumn RunnerPlacement Diagram 50" x 141/2"
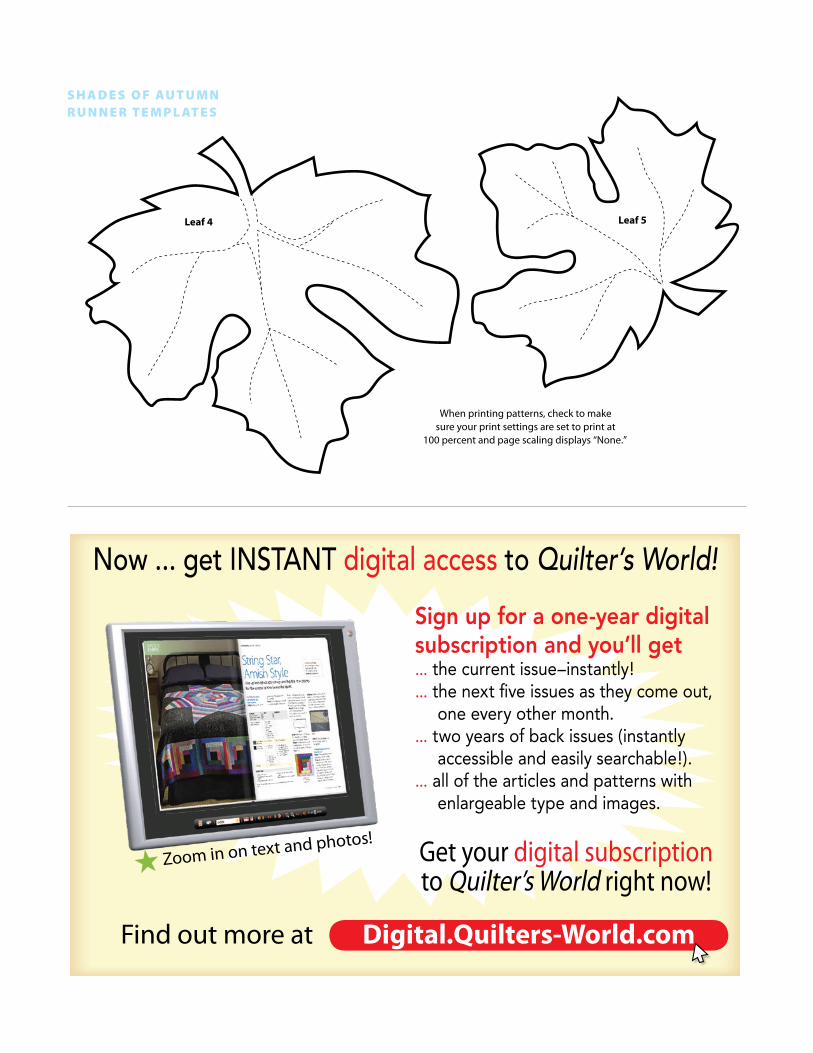
Leaf 5Leaf 4
S h A d E S O F AU T U m N R U N N E R T E m P l AT E S
Get your digital subscription to Quilter’s World right now!
Digital.Quilters-World.com
Zoom in on text and photos!
Now ... get INSTANT digital access to Quilter’s World!
Sign up for a one-year digital subscription and you’ll get... the current issue–instantly!... the next five issues as they come out, one every other month.... two years of back issues (instantly accessible and easily searchable!).... all of the articles and patterns with enlargeable type and images.
Find out more at
When printing patterns, check to make sure your print settings are set to print at 100 percent and page scaling displays “None.” Compare printed
pattern size to pattern in magazine before using.
Leaf 2
When printing patterns, check to make sure your print settings are set to print at
100 percent and page scaling displays “None.”