Deployment Guide VeloCloud Virtual Edge - VMware...Contents 1 VeloCloud Virtual Edge Deployment...
17
VeloCloud Virtual Edge Deployment Guide VMware SD-WAN by VeloCloud 3.3
Transcript of Deployment Guide VeloCloud Virtual Edge - VMware...Contents 1 VeloCloud Virtual Edge Deployment...

VeloCloud Virtual EdgeDeployment Guide
VMware SD-WAN by VeloCloud 3.3

You can find the most up-to-date technical documentation on the VMware website at:
https://docs.vmware.com/
If you have comments about this documentation, submit your feedback to
VMware, Inc.3401 Hillview Ave.Palo Alto, CA 94304www.vmware.com
Copyright © 2019 VMware, Inc. All rights reserved. Copyright and trademark information.
VeloCloud Virtual Edge Deployment Guide
VMware, Inc. 2

Contents
1 VeloCloud Virtual Edge Deployment Guide 4Overview of Virtual Edge 4
Deployment Prerequisites 4
Other Considerations 5
Overview of cloud-init 5
Install Virtual Edge on KVM 7
Considerations 7
Validate or Enable SR-IOV 7
Installation Steps 9
Install Virtual Edge on VMware ESXi 12
VMware, Inc. 3

VeloCloud Virtual EdgeDeployment Guide 1This guide describes VeloCloud Virtual Edge deployment.
This chapter includes the following topics:
n Overview of Virtual Edge
n Deployment Prerequisites
n Other Considerations
n Overview of cloud-init
n Install Virtual Edge on KVM
n Install Virtual Edge on VMware ESXi
Overview of Virtual EdgeThe Virtual Edge is available as a virtual machine that can be installed on standard hypervisors.
The following sections provide information on how to install the Virtual Edge on KVM and VMware ESXihypervisors.
Deployment PrerequisitesThis section describes deployment prerequisites and instance requirements.
Virtual Edge RequirementsFor the Virtual Edge, you need:
n 2 x Intel vCPUs with AES-NI instruction set
n 4Gb of memory
n Virtual disk (approximately 8 Gb of disk space)
n 3 to 8 vNICs (default is 2 x L2 interfaces and 6 x L3 interfaces)
VMware, Inc. 4

Firewall/NAT RequirementsIf the VeloCloud Virtual Edge is deployed behind the Firewall and/or a NAT device, the followingrequirements apply:
n The Firewall must allow outbound traffic from the VeloCloud Virtual Edge to TCP/443 (forcommunication with the VeloCloud Orchestrator).
n The Firewall must allow traffic outbound to Internet on ports UDP/2426 (VCMP).
Other ConsiderationsVeloCloud Virtual Edge deployment involves the following considerations.
n The VeloCloud Edge is a latency-sensitive application. Consult the VMware documentation to tunethe Virtual Machine as a latency-sensitive application.
n For best performance, set the CPU scheduling affinity to dedicate CPU cores to the Virtual Edge andturn on Intel Virtualization Technology (Intel VT) on the hypervisor.
n For best performance, VMware and KVM should be set with SR-IOV support. KVM instructions areprovided in the document below. For VMware, see the following documentation: https://pubs.vmware.com/vsphere-51/index.jsp#com.vmware.vsphere.networking.doc/GUID-C5043E19-F84D-4E2E-9162-16D9967C2DB8.html
n The default username for the VCE ssh console: root
Overview of cloud-initThis section provides an overview of the cloud-init package.
About cloud-initCloud-init is a Linux package responsible for handling early initialization of instances. If available in thedistributions, it allows for configuration of many common parameters of the instance directly afterinstallation. This creates a fully functional instance that is configured based on a series of inputs. Thismode of installation requires two files, meta-data and user-data.
Cloud-init's behavior can be configured via user-data. User-data can be given by the user at the time oflaunching the instance. This is typically done by attaching a secondary disk in ISO format that cloud-initwill look for at first boot time. This disk contains all early configuration data that will be applied at thattime.
The VeloCloud Virtual Edge supports cloud-init and all essential configurations packaged in an ISOimage.
Create the cloud-init meta-data and user-data Files
Note This section has been updated for the 3.3.0 release.
VeloCloud Virtual Edge Deployment Guide
VMware, Inc. 5

The final installation configuration options are set with a pair of cloud-init configuration files. The firstinstallation configuration file contains the metadata. Create this file with a text editor and name it meta-data. This file provides information that identifies the instance of the VeloCloud Virtual Edge beinginstalled. The instance-id can be any identifying name, and the local-hostname should be a host namethat follows your site standards.
1 Create the meta-data file that contains the instance name.instance-id: vedge1local-hostname:vedge1
2 Create the network-config file that contains the WAN configuration. Only WAN interfaces thatrequire static IP addressing need to be specified here. By default, all VCE WAN interfaces areconfigured for DHCP. Multiple interfaces can be specified.
version: 1
config:
- type: physical
name: GE3
subnets:
- type: static
address: 10.1.0.2
netmask: 255.255.255.0
gateway: 10.1.0.1
3 Create the user-data file. This file contains three main modules: VCO, Activation Code, and IgnoreCertificates Errors.
Module Description
vco IP Address/URL of the VCO.
activation_code Activation code for the Virtual Edge. The activation code is generated while creating an Edge instanceon the VCO.
vco_ignore_cert_errors Option to verify or ignore any certificate validity errors.
The activation code is generated while creating an Edge instance on the VCO.
Important There is no default password in VCE image. The password must be provided in cloud-config:
#cloud-config
password: passw0rd
chpasswd: { expire: False }
ssh_pwauth: True
velocloud:
vce:
vco: 10.32.0.3
activation_code: F54F-GG4S-XGFI
vco_ignore_cert_errors: true
VeloCloud Virtual Edge Deployment Guide
VMware, Inc. 6

Create the ISO FileOnce you have completed your files, they need to be packaged into an ISO image. This ISO image isused as a virtual configuration CD with the virtual machine. This ISO image (called seed.iso in theexample below), is created with the following command on Linux system:
genisoimage -output seed.iso -volid cidata -joliet -rock user-data meta-data network-config
Including network-config is optional. If the file is not present, the DHCP option will be used by default.
Once the ISO image is generated, transfer the image to a datastore on the host machine.
Install Virtual Edge on KVMThis section describes how to install and activate the Virtual Edge on KVM using a cloud-init config file.The cloud-init config contains interface configurations and the activation key of the Edge. The VirtualEdge has been tested on host OS Ubuntu 14.04.LTS with KVM version 2.0.
ConsiderationsKVM provides multiple ways to provide networking to virtual machines. The following have been used byVeloCloud:
n SR-IOV
n Linux Bridge
n OpenVSwitch Bridge
Validate or Enable SR-IOVThis section is necessary only if you need to enable SR-IOV on the HOST.
To properly validate that SR-IOV is ready to be used:
n Verify this by running:
lspci | grep -i ethernet
n Verify that you have Virtual Functions:
01:10.0 Ethernet controller: Intel Corporation 82599 Ethernet Controller Virtual Function (rev 01)
If you don’t have Virtual Functions, but you have a NIC that supports Virtual Functions, you will need toenable it.
Generally, enabling SR-IOV consists of the following in three steps:
1 Enable SR-IOV in BIOS.
VeloCloud Virtual Edge Deployment Guide
VMware, Inc. 7

This will be dependent on your BIOS. Login to the BIOS console and look for SR-IOV Support/DMA.You can verify support on prompt by checking that Intel has the correct CPU flag.
cat /proc/cpuinfo | grep vmx
2 Add the Options on Boot (in /etc/default/grub).
GRUB_CMDLINE_LINUX="intel_iommu=on"
a After this. run the following commands:
update-grub
update-initramfs -u
b Reboot and make sure iommu is enabled.
velocloud@KVMperf3:~$ dmesg | grep -i IOMMU
[ 0.000000] Command line: BOOT_IMAGE=/vmlinuz-3.13.0-107-generic root=/dev/mapper/qa--
multiboot--002--vg-root ro intel_iommu=on splash quiet vt.handoff=7
[ 0.000000] Kernel command line: BOOT_IMAGE=/vmlinuz-3.13.0-107-generic root=/dev/mapper/qa--
multiboot--002--vg-root ro intel_iommu=on splash quiet vt.handoff=7
[ 0.000000] Intel-IOMMU: enabled
[ 0.083191] dmar: IOMMU 0: reg_base_addr fbffc000 ver 1:0 cap d2078c106f0466 ecap f020de
[ 0.083197] dmar: IOMMU 1: reg_base_addr c7ffc000 ver 1:0 cap d2078c106f0466 ecap f020de
velocloud@KVMperf3:~$
3 Add the ixgbe Driver in Linux by clicking the link below. https://downloadcenter.intel.com/download/14687/Intel-Network-Adapter-Driver-for-PCIe-Intel-10-Gigabit-Ethernet-Network-Connections-Under-Linux-a On the left section of the Intel website ( Other Versions section), click the 5.2.1 link.
b Download ixgbe from Intel. Follow compile options.
c Configure ixgbe config (tar and sudo make install).
velocloud@KVMperf1:~$ cat /etc/modprobe.d/ixgbe.conf
d If the file doesn’t exist, create it.
options ixgbe max_vfs=32,32
options ixgbe allow_unsupported_sfp=1
options ixgbe MDD=0,0
blacklist ixgbevf
e Execute the following command and reboot:
update-initramfs -u
VeloCloud Virtual Edge Deployment Guide
VMware, Inc. 8

f Use modinfo to see if it is property installed.
velocloud@KVMperf1:~$ modinfo ixgbe and ip link
filename: /lib/modules/4.4.0-62-generic/updates/drivers/net/ethernet/intel/ixgbe/ixgbe.ko
version: 5.0.4
license: GPL
description: Intel(R) 10GbE PCI Express Linux Network Driver
author: Intel Corporation, <[email protected]>
srcversion: BA7E024DFE57A92C4F1DC93
After rebooting the VM, you should see the interfaces.
Installation StepsThese steps explain how to run VeloCloud Virtual Edge on KVM using the libvirt. This deployment wastested in Ubuntu 14.04LTS.
To run VeloCloud Virtual Edge on KVM using the libvirt:
1 Use gunzip to extract the qcow2 file to the image location (for example, /var/lib/libvirt/images).
2 Create the Network pools that you are going to use for the device. Provided below sample on poolusing SR-IOV and pool using OpenVswitch.
SR-IOV Sample
<network>
<name>sriovpool</name> <!--This is the name of the file you created-->
<forward mode='hostdev' managed='yes'>
<pf dev='eth1'/> <!--Use the netdev name of your SR-IOV devices PF here-->
</forward >
</network>
OpenVSwitch Sample
<network>
<name>passthrough</name>
<model type='virtio'/>
<forward mode="bridge"/>
<bridge name="passthrough"/>
<virtualport type='openvswitch'>
</virtualport>
<vlan trunk='yes'>
<tag id='33' nativeMode='untagged'/>
<tag id='200'/>
<tag id='201'/>
<tag id='202'/>
</vlan>
</network>
Bridge
<network>
<name>passthrough</name>
<model type='virtio'/>
<forward mode="bridge"/>
VeloCloud Virtual Edge Deployment Guide
VMware, Inc. 9

</network>
<domain type='kvm'>
<name>vedge1</name>
<memory unit='KiB'>4194304</memory>
<currentMemory unit='KiB'>4194304</currentMemory>
<vcpu placement='static'>2</vcpu>
<resource>
<partition>/machine</partition>
</resource>
<os>
<type arch='x86_64' machine='pc-i440fx-trusty'>hvm</type>
<boot dev='hd'/>
</os>
<features>
<acpi/>
<apic/>
<pae/>
</features>
<!--
Set the CPU mode to host model to leverage all the available features on the host CPU
-->
<cpu mode='host-model'>
<model fallback='allow'/>
</cpu>
<clock offset='utc'/>
<on_poweroff>destroy</on_poweroff>
<on_reboot>restart</on_reboot>
<on_crash>restart</on_crash>
<devices>
<emulator>/usr/bin/kvm-spice</emulator>
<!--
Below is the location of the qcow2 disk image
-->
<disk type='file' device='disk'>
<driver name='qemu' type='qcow2'/>
<source file='/var/lib/libvirt/images/edge-VC_KVM_GUEST-x86_64-2.3.0-18- R23-20161114-GA-updatable-
ext4.qcow2'/>
<target dev='sda' bus='sata'/>
<address type='drive' controller='0' bus='0' target='0' unit='0'/>
</disk>
<!--
If using cloud-init to boot up virtual edge, attach the 2nd disk as CD-ROM
-->
<disk type='file' device='cdrom'>
<driver name='qemu' type='raw'/>
<source file='/home/vcadmin/cloud-init/vedge1/seed.iso'/>
<target dev='sdb' bus='sata'/>
<readonly/>
<address type='drive' controller='1' bus='0' target='0' unit='0'/>
</disk>
<controller type='usb' index='0'>
<address type='pci' domain='0x0000' bus='0x00' slot='0x01' function='0x2'/>
</controller>
<controller type='pci' index='0' model='pci-root'/>
<controller type='sata' index='0'>
VeloCloud Virtual Edge Deployment Guide
VMware, Inc. 10

<address type='pci' domain='0x0000' bus='0x00' slot='0x05' function='0x0'/>
</controller>
<controller type='ide' index='0'>
<address type='pci' domain='0x0000' bus='0x00' slot='0x01' function='0x1'/>
</controller>
<!--
The first two interfaces are for the default L2 interfaces, NOTE VLAN support just for SR-IOV and
OpenvSwitch
-->
< interfacetype='network'>
< modeltype='virtio'/>
< sourcenetwork='LAN1'/>
< vlan>< tagid='#hole2_vlan#'/></ vlan>
< aliasname=LAN1/>
< addresstype='pci' domain='0x0000' bus='0x00' slot='0x12' function='0x0'/>
</ interface>
< interfacetype='network'>
< modeltype='virtio'/>
< sourcenetwork=LAN2/>
< vlan>< tagid='#LAN2_VLAN#'/></ vlan>
< aliasname='hostdev1'/>
< addresstype='pci' domain='0x0000' bus=' 0x00' slot='0x13' function='0x0'/>
</ interface>
<!--
The next two interfaces are for the default L3 interfaces. Note that additional 6 routed interfaces
are supported for a combination of 8 interfaces total
-->
< interfacetype='network'>
< modeltype='virtio'/>
< sourcenetwork=WAN1/>
< vlan>< tagid='#hole2_vlan#'/></ vlan>
< aliasname=LAN1/>
< addresstype='pci' domain='0x0000' bus='0x00' slot='0x12' function='0x0'/>
</ interface>
< interfacetype='network'>
< modeltype='virtio'/>
< source network=LAN2/>
< vlan>< tag id='#LAN2_VLAN#'/></ vlan>
< aliasname='hostdev1'/>
< addresstype='pci' domain='0x0000' bus='0x00' slot='0x13' function='0x0'/>
</ interface>
<serial type='pty'>
<target port='0'/>
</serial>
<console type='pty'>
<target type='serial' port='0'/>
</console>
<input type='mouse' bus='ps2'/>
<input type='keyboard' bus='ps2'/>
<graphics type='vnc' port='-1' autoport='yes' listen='127.0.0.1'>
<listen type='address' address='127.0.0.1'/>
</graphics>
<sound model='ich6'>
<address type='pci' domain='0x0000' bus='0x00' slot='0x04' function='0x0'/>
</sound>
VeloCloud Virtual Edge Deployment Guide
VMware, Inc. 11

<video>
<model type='cirrus' vram='9216' heads='1'/>
<address type='pci' domain='0x0000' bus='0x00' slot='0x02' function='0x0'/>
</video>
<memballoon model='virtio'>
<address type='pci' domain='0x0000' bus='0x00' slot='0x06' function='0x0'/>
</memballoon>
</devices>
</domain>
Instructions1 Save the above domain XML file (for example, vedge1.xml).
2 Run the following command to create the VM:
virsh define vedge1.xml
3 Run the following command to start the VM:
virsh start vedge1
Note vedge1 is the name of the VM defined in the <name> element of the domain XML file. Replacevedge1 with the name you specify in the <name> element.
The Cloud-init already includes the activation key, which was generated while creating a new Virtual Edgeon the VCO. The Virtual Edge is configured with the config settings from the Cloud-init file. This willconfigure the interfaces as the Virtual Edge is powered up. Once the Virtual Edge is online, it will activatewith the VCO using the activation key. The VCO IP address and the activation key have been defined inthe Cloud-init file.
Install Virtual Edge on VMware ESXiThis section describes how to install Virtual Edge on VMware ESXi.
To install:
1 Use the vSphere client to deploy an OVF template, and then select the VCE OVA file.
VeloCloud Virtual Edge Deployment Guide
VMware, Inc. 12
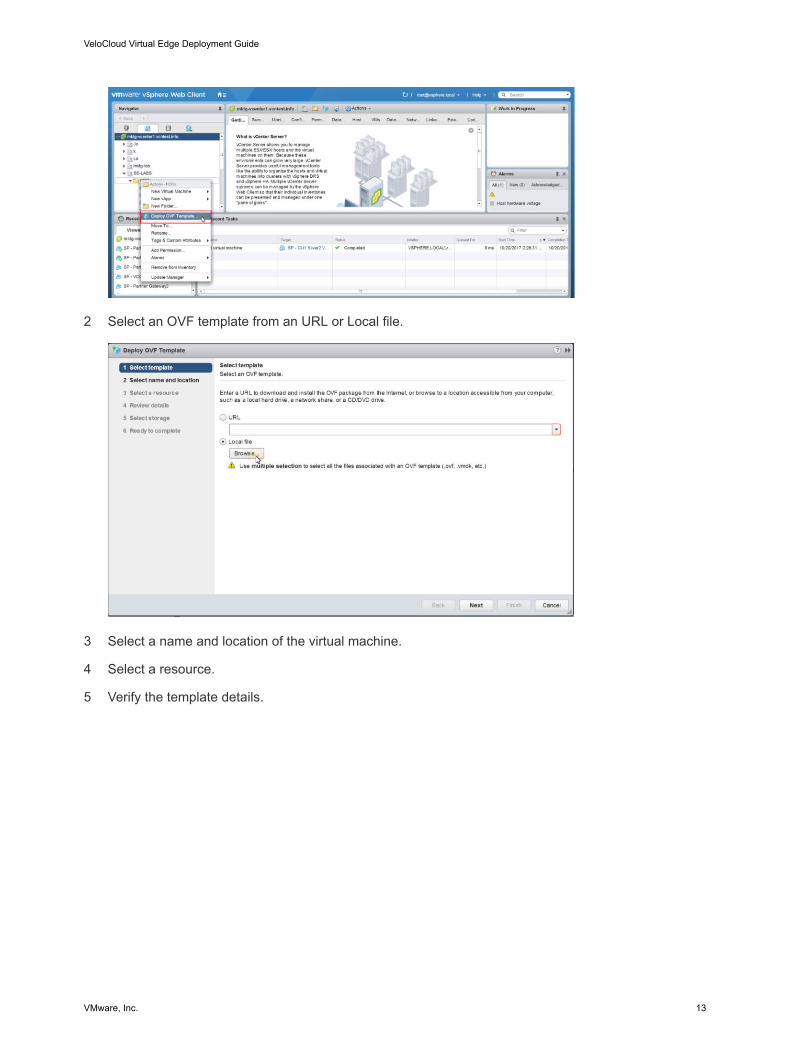
2 Select an OVF template from an URL or Local file.
3 Select a name and location of the virtual machine.
4 Select a resource.
5 Verify the template details.
VeloCloud Virtual Edge Deployment Guide
VMware, Inc. 13

6 Select the storage location to store the files for the deployment template.
7 Configure the networks for each of the interfaces.
Note Skip this step if you are using a cloud-init file to provision the Virtual Edge on ESXi.
VeloCloud Virtual Edge Deployment Guide
VMware, Inc. 14

8 Customize the template by specifying the deployment properties. See the image below of the VCOthat highlights the following substeps.
a From the VCO UI, retrieve the VCO URL/IP Address. You will need this address for Step cbelow.
b Create a new Virtual Edge on the VCO for the Enterprise. Once the Edge is created, copy theActivation Key. You will need the Activation Key for Step c" below.
c On the customize template page shown in the image below, type in the Activation Code that youretrieved in Step b above, and the VCO URL/IP Address retrieved in Step a above, into thecorresponding fields.
VeloCloud Virtual Edge Deployment Guide
VMware, Inc. 15

9 Review the configuration data.
10 Power on the Virtual Edge.
VeloCloud Virtual Edge Deployment Guide
VMware, Inc. 16

Once the Edge powers up, it will establish connectivity to the VCO.
VeloCloud Virtual Edge Deployment Guide
VMware, Inc. 17