Deploying Windows 7 with MDT 2010 – Basic...
90
Microsoft Corporation Deploying Windows 7 with MDT 2010 – Basic scenarios Gautier CONFIANT 6/16/2009
Transcript of Deploying Windows 7 with MDT 2010 – Basic...

Microsoft Corporation
Deploying Windows 7 with MDT 2010 – Basic scenarios
Gautier CONFIANT 6/16/2009

1
Table of Contents 1 Introduction ..................................................................................................................................... 3
1.1 Purposes of this document ...................................................................................................... 3
1.2 Known limitations and restrictions ......................................................................................... 3
2 Understanding MDT 2010 ............................................................................................................... 3
2.1 What is MDT 2010? ................................................................................................................. 3
2.2 What’s new since MDT 2008 Update 1? ................................................................................. 3
2.3 Do I need to be PowerShell trained? ....................................................................................... 4
2.4 What’s the WAIK? ................................................................................................................... 4
2.5 LTI, ZTI or SCCM, what do I need? ........................................................................................... 4
2.6 What’s the purpose of the SQL Database? ............................................................................. 4
3 Description of the scenario ............................................................................................................. 5
4 Preparing the environment ............................................................................................................. 5
4.1 MDT Server .............................................................................................................................. 5
4.2 Preparing the installation sources folder ................................................................................ 5
4.2.1 Base Components ............................................................................................................ 6
4.2.2 Operating system ............................................................................................................ 6
4.2.3 Applications packages ..................................................................................................... 7
4.2.4 Drivers ............................................................................................................................. 7
4.2.5 OS Packages ..................................................................................................................... 9
4.2.6 How to: Retrieve specific drivers or Hotfixes for Windows 7 and others products? .... 10
4.3 Prepare the environment ...................................................................................................... 11
4.3.1 Product installation ....................................................................................................... 11
4.3.2 Preparing the environment ........................................................................................... 11
4.4 Quick Look : MDT 2010 files and folders structure (1) .......................................................... 33
4.5 Quick Look : MDT 2010 and PowerShell ............................................................................... 35
5 Implementing the Imaging process ............................................................................................... 36
5.1 The Task Sequence ................................................................................................................ 36
5.1.1 Create the imaging process Task Sequence .................................................................. 36
5.1.2 Exploring the Task Sequence ......................................................................................... 40
5.2 Manage the Deployment Share / Creation of the WINPE wim ............................................. 41
5.3 Create and capture the Reference image ............................................................................. 48

2 Deploying Windows 7 with MDT 2010 – Basic scenarios
5.4 Adding the Reference image to the WorkBench. .................................................................. 53
6 Implementing the Deployment process ........................................................................................ 56
6.1 Creation of the Production Deployment Share ..................................................................... 56
6.1.1 Creation of the Production Selection Profile ................................................................. 57
6.1.2 Creation of the Production Linked Deployment Share ................................................. 59
6.2 Customization of the Production Deployment Share ........................................................... 62
6.2.1 Implementing the Driver Filtering ................................................................................. 62
6.2.2 Creating the Deployment Task Sequences .................................................................... 67
6.2.3 Create the automation Rules ........................................................................................ 72
6.2.4 Hide the Netmon 3.3 application .................................................................................. 75
6.2.5 Create the WinPE for the deployment .......................................................................... 75
6.3 Deploy a computer in Production ......................................................................................... 76
7 Annexes ......................................................................................................................................... 80
7.1 Annex 1: Basic Packaging of Office 2007 within MDT 2010. ................................................. 80
7.2 Annex 2 : Using Windows Deployment Services to boot WinPE Images .............................. 84
7.2.1 Initial configuration ....................................................................................................... 84
7.2.2 Adding the MDT 2010 WinPE boot images ................................................................... 86
7.3 Annex 3: Script to retrieve WMI Computer Make and Model variables ............................... 88

3 Introduction
1 Introduction
1.1 Purposes of this document When I have started my job at Microsoft, I have to work with Business Desktop Deployment 2.0, then
BDD 2.5, BDD2007, MDT 2008 and now MDT 2010.
There is a lot of information about these Solution Accelerators, but not a document that lead you in a
way like: “What do I need to do first?”
So this White Paper will try to:
Explain the basics of MDT 2010 and Windows 7 deployment
Give guidance to realize a complete Proof of Concept for a basic Deployment Methodology
for Windows 7
Give best practices from the field expert
This document is the third I have made, but the two first versions have never been published, they
were for internal purpose only.
I hoped this document will help you to apprehend correctly these exciting technologies.
1.2 Known limitations and restrictions This document is based on Beta and RC products. So, some features, captured screens or scripts,
could be different from the RTM and RTW one.
2 Understanding MDT 2010
2.1 What is MDT 2010? Microsoft Deployment Toolkit 2010 is a Solution Accelerator
Solutions Accelerators are a set of documents, scripts, job aids and methodology to help customer in
designing, deploying and maintaining Microsoft technologies and products.
Solutions Accelerators are completely free!
You could find all the Solutions Accelerators here: http://technet.microsoft.com/en-
us/solutionaccelerators/default.aspx
2.2 What’s new since MDT 2008 Update 1? MDT 2010 main changes’ are:
Whole new interface
Multi user simultaneous access
PowerShell based
Selection Profile Feature
Task Sequence and log capability optimized

4 Deploying Windows 7 with MDT 2010 – Basic scenarios
Deployment on any partition
…
2.3 Do I need to be PowerShell trained? In fact, no. Only the advanced scenarios need PowerShell competencies.
But if you want to begin with PowerShell, you have access to these aids:
In MDT 2010, at the end of each wizard, you will have a button that leads you to the
PowerShell scripts performing the actions.
On TechNet web site , “Scripting with PowerShell” :
http://www.microsoft.com/technet/scriptcenter/hubs/msh.mspx
2.4 What’s the WAIK? Windows Automated Installation Kit is the set of tools used by MDT 2010 to perform its operations.
This is a requisite for MDT 2010.
WAIK gave to us the following main tools:
IMAGEX, our imaging tool that generates WIM image.
DISM, the tool that performs off-line servicing of the WIM image.
WSIM, the graphical interface used to edit unattend.xml files.
A lot of other tools, help and documentation are also in this kit.
The particularity of MDT 2010 is that it will encapsulate the utilization of these tools. So, we will not
cover these tools in this guide, the documentation in the WAIK are very complete and easy to use if
you want to deep dive in these subjects.
2.5 LTI, ZTI or SCCM, what do I need? You need to know 2 things:
First, if you have SCCM installed in your enterprise, add MDT 2010 to extend deployment,
scenario and have more customization options.
Second, if you don’t have SCCM, use MDT 2010 to organize and help you in the deployment
process
SCCM without MDT is also a solution, but indeed, MDT 2010 eases the deployment that it would be
an error to not evaluate it.
We will not see the usage of SCCM I this document.
2.6 What’s the purpose of the SQL Database? The SQL database is not needed by MDT 2010. This is just an optional component that will open the
more advanced scenarios and the way to a full automation with a central provisioning.

5 Description of the scenario
We will not see in this document the installation and the parameters for the use of a SQL server.
3 Description of the scenario This scenario will be followed along this document:
Your enterprise need to deploy a international Windows 7 image with corporate applications.
The deployment must be the shorter possible, and some specific applications need to be installed
only on laptop.
French division needs specific application too.
You need to do this work with MDT 2010. At this time, there is not any automation need.
4 Preparing the environment First, before anything else, we must prepare the MDT server and the Sources Folder.
4.1 MDT Server The MDT Server could be virtual or physical. Just keep in mind that a virtual environment could be
slower than a physical machine, if you use a low end material.
Prepare a machine with the following material:
512 Mo to 2048 Mo of RAM, depending of the roles installed on it (DC, and/or SQL)
o 1024 Mo recommended
A partition with 60 Go free
The machine, with 2008 must have installed:
File services Role
WDS Role (If in a Domain)
ADDS Role (If a Domain Controller)
DHCP Role (If necessary)
Windows PowerShell Feature
SQL Server will be installed later in this document, but on the same machine.
4.2 Preparing the installation sources folder There are three reasons to prepare a sources folder:
- You can prepare this with an online PC, and then work off-line in a lab environment
- The sources prepared could be reused for another POC or project without downloading
all the necessary sources again.
- You will spend time when you begin the installation process if you don’t have all you
need at start.
So first, create a folder named “Sources”:
6 Deploying Windows 7 with MDT 2010 – Basic scenarios
C:\Sources\
\Drivers
\Applications
\OS
\OS packages
\Languages Pack
\Security packages
\Feature Packages
\Tools
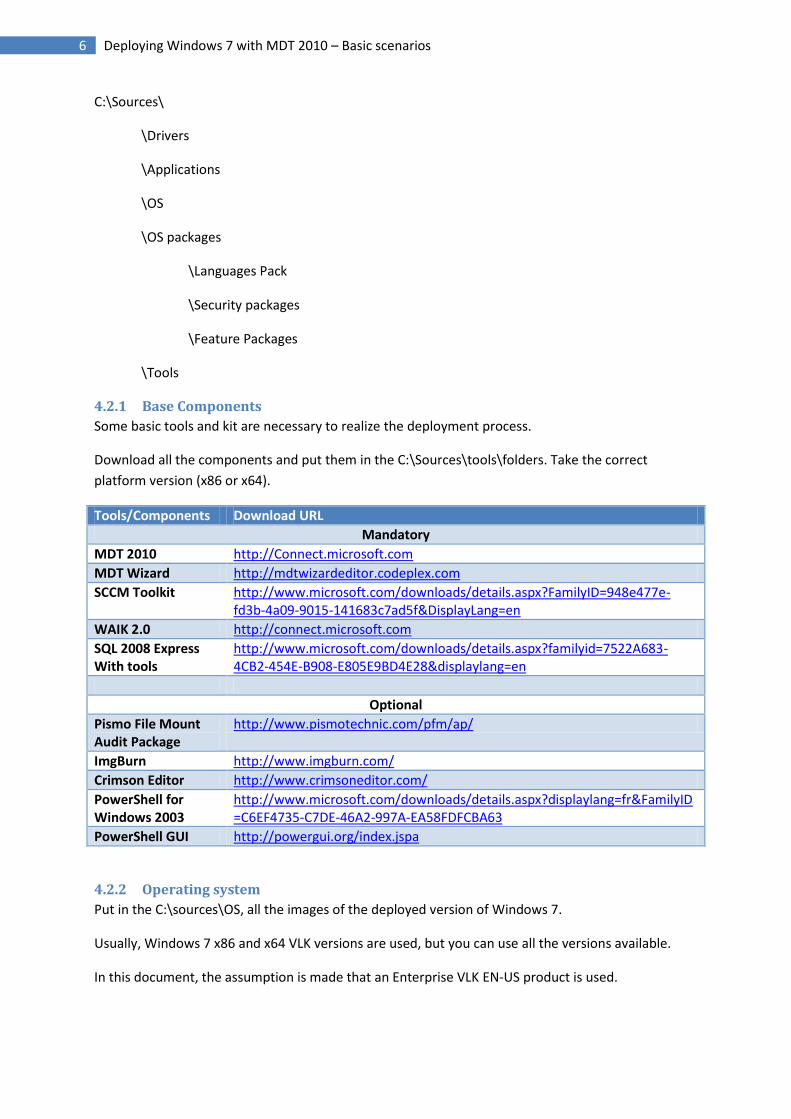
4.2.1 Base Components
Some basic tools and kit are necessary to realize the deployment process.
Download all the components and put them in the C:\Sources\tools\folders. Take the correct
platform version (x86 or x64).
Tools/Components Download URL
Mandatory
MDT 2010 http://Connect.microsoft.com
MDT Wizard http://mdtwizardeditor.codeplex.com
SCCM Toolkit http://www.microsoft.com/downloads/details.aspx?FamilyID=948e477e-fd3b-4a09-9015-141683c7ad5f&DisplayLang=en
WAIK 2.0 http://connect.microsoft.com
SQL 2008 Express With tools
http://www.microsoft.com/downloads/details.aspx?familyid=7522A683-4CB2-454E-B908-E805E9BD4E28&displaylang=en
Optional
Pismo File Mount Audit Package
http://www.pismotechnic.com/pfm/ap/
ImgBurn http://www.imgburn.com/
Crimson Editor http://www.crimsoneditor.com/
PowerShell for Windows 2003
http://www.microsoft.com/downloads/details.aspx?displaylang=fr&FamilyID=C6EF4735-C7DE-46A2-997A-EA58FDFCBA63
PowerShell GUI http://powergui.org/index.jspa
4.2.2 Operating system
Put in the C:\sources\OS, all the images of the deployed version of Windows 7.
Usually, Windows 7 x86 and x64 VLK versions are used, but you can use all the versions available.
In this document, the assumption is made that an Enterprise VLK EN-US product is used.

7 Preparing the environment
You can copy here the ISO files, you do not need to expand them. PISMO will let you mount ISO
easily.
4.2.3 Applications packages
Create a sub folder for each application package.
These applications packages must be silent and fully automatized. You could use the packages
already done for SCCM, or other management software.
The package must not reboot by itself! We will reboot after installation, with the correct process in
MDT 2010.
For example, for a MSI based installation: MSIEXEC /i:name_of_msi.msi /qn /norestart
Office 2007 could be packaged within MDT 2010.
For the silent packaging of Office 2007 see Annex 1
For Demonstration purpose, this document will use these specific applications:
Name Link
Office 2007 Enterprise On MVLS, MDSN or Technet
ForeFront Client Security
On MVLS, MSDN or Technet
XMLNotepad
http://www.microsoft.com/downloads/details.aspx?familyid=72d6aa49-
787d-4118-ba5f-4f30fe913628&displaylang=en
NetWorkMonitor 3.3 http://www.microsoft.com/downloads/details.aspx?familyid=983B941D-06CB-4658-B7F6-3088333D062F&displaylang=en
But you should add the Antivirus of your own.
4.2.4 Drivers
Windows 7 has a lot of drivers already included. But you may want use newer one, or add some
unknown one.
First, in “drivers” folder, create a subfolder structure based on” .\Name_of_OEM\Name_of_model”.
For example:
Drivers\
HP\
\NX6125
DELL\

8 Deploying Windows 7 with MDT 2010 – Basic scenarios
\D600
LENOVO\
\T61P
\W500
For each model you want to install by MDT 2010, you need to do the following:
1. Download the drivers from the OEM
2. For each driver, expand the archive or installer in a temporary folder
3. Identify where the driver only is located, and just copy these files in the correct “Sources”
subfolder.
There are multiple reasons to do that:
1. Archives or installers are not usable to install a desktop in an industrial manner and are not
usable in WINPE and offline servicing.
2. Installers always install tools and agent with the drivers:
a. Agents will slow the startup and the responsiveness of the machine
b. Agents and tools could add some security or instability concerns and should need to
be patched
c. Generally, your users will not use these agents or tools.
But, if you need a tools or an agent, for example for a 3G WWAN modem, then you may launch the
installer as an application.

9 Preparing the environment
4.2.5 OS Packages
OS Packages are Hotfixes, Language pack or feature pack needed to be installed before the first
launch of the OS.
Language Packs have a shorter install if they are installed by this way.
The OS Packages are installed during the offline servicing pass, that’s mean just after the wim image
is applied during the winpe phase.
For demonstration purposes, this document will use the following OS Packages:
Name Link
Language pack (FR-FR
in particular)
http://Connect.microsoft.com
Windows 7 Virtual PC http://www.microsoft.com/windows/virtual-pc/download.aspx
KB971180 – IE8 update package
http://catalog.update.microsoft.com/v7
Do the search with the KB name. Download both 32 and 64 bits versions.
… …
When you done offline servicing, Windows 7 will start with all fix already installed. If security is a
primary concern, then you must use these feature of offline servicing to integrate security fix before
the first boot of Windows 7.

10 Deploying Windows 7 with MDT 2010 – Basic scenarios
4.2.6 How to: Retrieve specific drivers or Hotfixes for Windows 7 and others products?
You could download specific hotfixes and drivers at this location:
http://catalog.update.microsoft.com/v7/site/home.aspx
This web site is based on Microsoft Update, but here, you can download any fix and used it later,
during the deployment for example.
11 Preparing the environment
4.3 Prepare the environment Now that the sources are complete, we could start installing MDT 2010 and all the tools needed.
In this chapter we will install and fill the environment with all the sources, and we will prepare the
WorkBench for the Imaging process and the Deployment Process.
4.3.1 Product installation
On the MDT Server, install, with default parameters, the following products:
1. Windows AIK 2.0
2. MDT 2010
3. SCCM ToolKit
4. PISMO File mount Audit package (or another tool for mounting an ISO file)
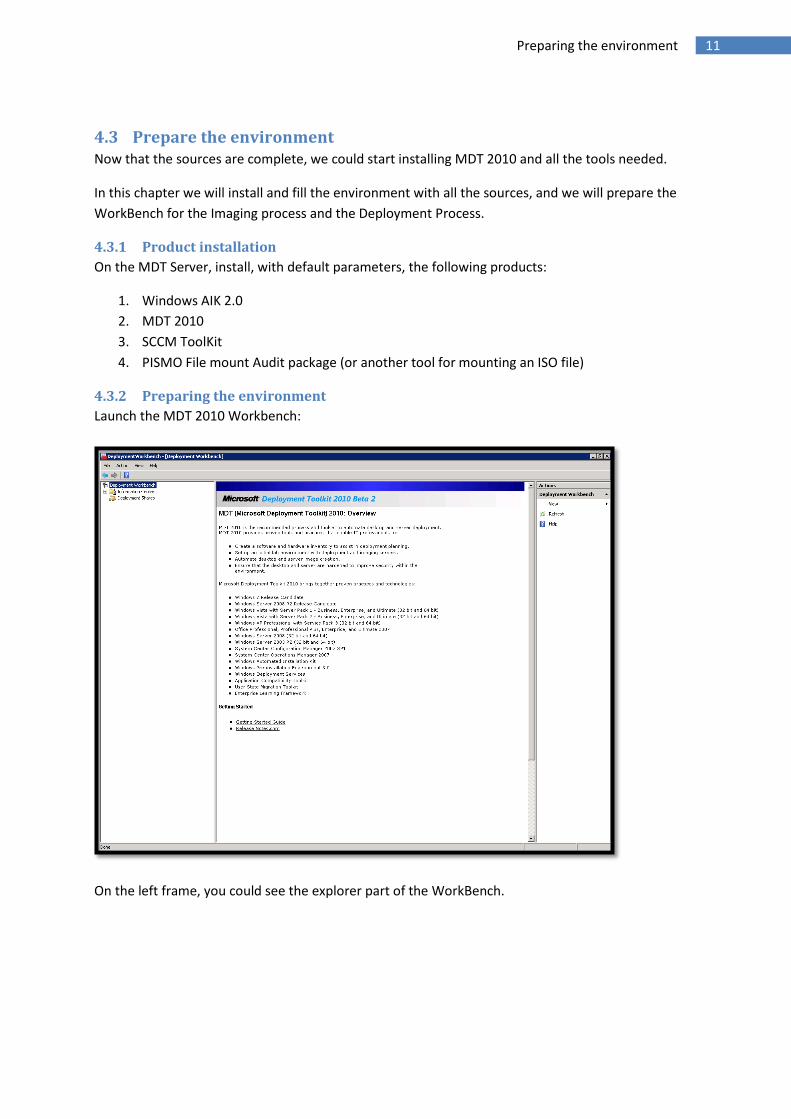
4.3.2 Preparing the environment
Launch the MDT 2010 Workbench:
On the left frame, you could see the explorer part of the WorkBench.

12 Deploying Windows 7 with MDT 2010 – Basic scenarios
Expand the different folders here, and you could see:
Information center where you could find all the
documentation needed for MDT 2010
Components needed for MDT 2010 and the links to download
them if necessary.
You can see also “Deployment Shares”. In MDT 2010 Deployment
Shares are the primary element needed to start a deployment. In MDT 2008 and before, these were
name “Deployment Point”.
Deployment Points were known also as DP. The new name will not be confusing anymore with the Distribution Point (AKA DP) for SCCM.
4.3.2.1 Create a Share for the First” Deployment Share”
Before you could create your first Deployment Share you must create… A share!
So, let’s create a folder on C:\, name it MainShare and share it as MainShare.
Put the correct security right to let the administrator of the MDT Server a Full control of the folder,
across the share.
4.3.2.2 Create the First” Deployment Share”
Let’s go back to the workbench.
Action Screen Click on “Deployment Shares” On the right frame, in the Action pane, you could see 2 options
New Deployment Share o This option is used to create a whole
new deployment share
Open Deployment Share o This option is used to open an
existing MDT 2010 deployment share
Click on “New Deployment Share”

13 Preparing the environment
Type the path C:\MainShare and click Next:
By default, if you have already create the share, the correct value for the share name is indicated. Click Next:
Type the user friendly Name of the Deployment Share, Main Share and click Next:

14 Deploying Windows 7 with MDT 2010 – Basic scenarios
This pane asks you, if you want to do an image capture on this Deployment Share. Yes you will, so keep the box checked. Click Next:
During the installation process of the image, you could type the local admin password. You will configure that in another manner. Keep the box unchecked and click Next:
During the installation process, the Wizard could ask you for a Windows 7 product key. In this document, you will use Volume License media that will not use Product Key but a KMS services. And, more, with this deployment share, you will only install desktops for the imaging process. These installations do not need to be activated. Keep the box unchecked and click Next:

15 Preparing the environment
Review the summary screen and click Next:
At the end of the operations, review the confirmation and click Next…
Now, you will have the Main Share appeared in Deployment Shares:

16 Deploying Windows 7 with MDT 2010 – Basic scenarios
You can expand the root of the Deployment Shares folder:
You could see the following folders
Name of the SubFolder Purpose
Applications All applications will be add here
Operating Systems All OS will be add here
Out-Of-Box-Drivers All drivers will add here
Packages All packages ( Security, fix, feature and language)
Task Sequences The Task Sequences (TS) are the backbone of the deployment. All the TS you create are stored here.
Adv Conf : Selection Profiles SP are logical group of resources (OS, App, Drives, TS and packages) that let you make advanced filtration and selective replication
Adv Conf : Linked Deployment Shares LDS are used to synchronize multiple Deployment Shares with the same main DS.
Adv Conf : Media This part let you generate a deployment media (DVD, USB Flash or Disk)
Adv Conf : Database In this folder, you could create and connect to the SQL Database needed in the more advanced scenarios.

17 Preparing the environment
4.3.2.3 Adding applications to the “Main Share “ DS
4.3.2.3.1 Create folder for the Selection profiles
We have different type of applications, for different purpose and different perimeter.
The sub folders created here must reflect the way you will install and use these applications.
For example, you should have these types of applications:
Subfolder name Purpose
ImageIntegrated All the applications needed in the image
ForLapTop All the applications needed by a laptop
FrenchUser All the applications and language pack needed for French users
… …
Create these three subfolders:
Action Screen Click on Applications under Main Share: On the right frame, in the Action pane, you could see 2 options
New Application o This option is used to add a new
application package in the WorkBench
New Folder o This option is used to add a
subfolder in the applications folder Click on New Folder:
Add the folder name ImageIntegrated and click Next:

18 Deploying Windows 7 with MDT 2010 – Basic scenarios
Review the summary and click Next:
Review the confirmation Screen and click Finish.
Do these actions for each subfolder needed.
You should have the following folder structure.

19 Preparing the environment
4.3.2.3.2 Adding applications to the Workbench
Now it’s time to add your applications.
Add all applications, based on the following Table:
Name SubFolder Command line
XMLNotepad FrenchUser msiexec.exe /i XmlNotepad.msi /qn /norestart
NETMON ForLaptop NM33_x86.exe /Q
Office 2007 ImageIntegrated Setup.exe
Antivirus (here FCS) ImageIntegrated Setup.exe /nomom
For each application, do the following actions. Choose the correct subfolder, based on the structure
decided above.
Action Screen To add Office 2007: Click on ImageIntegrated under Applications: In the right frame, in the Actions pane, click on New Applications:
You will add Applications with Source files, so the first option is the good one. The others option are:
An application stored on another network share and you don’t want to copy it locally.
An application Bundle is a set of multiple applications installed in a sequential way. Before using Application Bundle, you need to Add Applications in the WorkBench. This function is useful, when you must install a list of applications, sorted and linked (For example, you can bundle Office 2007, with Communicator 2007 R2 and the LiveMeeting console)
Keep Application with sources files selected and Click Next:

20 Deploying Windows 7 with MDT 2010 – Basic scenarios
Here, you could put the details of the applications added. More of them are optional. Add the details you need, and click Next:
You must specify the path to the sources you have made earlier. Here : C:\sources\applications\en_office_enterprise_2007_VL Then click Next:
Enter the name of directory where the applications will be stored. You can let the default folder. Click Next:

21 Preparing the environment
You must enter here the command lien for the execution of the package. For office 2007, enter Setup.exe. Keep the Working directory unchanged, the default is the best. Click Next:
Check the Summary screen, and click next:
Check the Confirmation screen and click Finish.

22 Deploying Windows 7 with MDT 2010 – Basic scenarios
Now you should have at least, the following structure:

23 Preparing the environment
4.3.2.4 Adding Operating Systems to the “Main Share “ DS
4.3.2.4.1 Create folder for the Selection Profiles
Like Applications, we need to create subfolders, for the future use of Selection Profile.
Create the Structure based on the following tables:
Subfolder name Purpose
Windows 7 Enterprise X86 Image of Windows 7 Enterprise x86
Windows 7 Enterprise X64 Image of Windows 7 Enterprise x64
Corporate Image x86 Master (captured image) x86
Corporate Image x64 Master (Captured image) x64
… …
The needed operations to do these subfolders are identical in the manner to the Applications
subfolder. So, there is not screen capture and step-by-step
for this part.
You should have this structure in the Workbench:
4.3.2.4.2 Adding Operating Systems to the WorkBench
Add all operating systems, based on the following Table:
Name SubFolder
Windows 7 Enterprise x86
Windows 7 Enterprise X86
Windows 7 Enterprise x64
Windows 7 Enterprise X64
You can use PISMO FMP, for mounting the ISO you have put in the sources.
Action Screen Click Windows 7 Enterprise x86 under Operating Systems: In the right frame, in the Actions pane, click on Import Operating Systems:

24 Deploying Windows 7 with MDT 2010 – Basic scenarios
Here, you have 3 options. Full set of sources files is the choice to import a media containing the installation sources (from MVLS or your retail version). Custom Image File will let you add a captured image. Windows Deployment Services images will let you add an image hosted on a WDS server. By default, Full set of source files is checked, click Next:
Select here the source folder containing the installation media, for our example : C:\Sources\OS\7100.0.090421-1700_x86fre_enterprise_en-us_VL_OEM_Enterprise-GRC1CENVOL_EN_DVD.iso Click Next
You can enter here the directory where the sources will be copied in the Distribution Share. Type Windows 7 x86 RC and click Next:

25 Preparing the environment
Check the Summary screen and click Next:
Check the Confirmation screen and click Finish.
You should have the following structure:

26 Deploying Windows 7 with MDT 2010 – Basic scenarios
4.3.2.5 Adding Drivers to the “Main Share “ DS
4.3.2.5.1 Create folder for the Selection Profiles
Again, create the folder structure based on same folder as you
have done during the preparation of the sources.
The needed operations to do these subfolders are identical in the
manner to the Applications subfolder. So, there is not screen
capture and step-by-step for this part.
You should have this type of structure in the Workbench:
4.3.2.5.2 Adding Drivers to the WorkBench
Add the drivers, in each correct subfolder. If, during the preparation of the sources, you have filtered
only the drivers, you can import all the drivers for a machine, in one action. Else, it is recommended
to import driver by driver to avoid the import of useless files.
Action Screen Click Dell Latitude D630 under Out-of-Box Drivers: On the right frame, in the action pane, Click on Import Drivers:

27 Preparing the environment
On the Specify Directory screen, type the path to the folder containing the drivers to be imported. Always check the box to duplicate drivers. Click Next:
Check the Summary screen, and click Next to start the importation.
The process could last a while…

28 Deploying Windows 7 with MDT 2010 – Basic scenarios
Check the Confirmation screen and click Finish. If you have some error here, the reason could be that the drivers do not have the correct inf files. You could review the confirmation screen to isolate the incorrect driver.
You should have structure like these, in each folder you have created:
Eventually, you may create on folder per driver type. This will be easier to change or remove a
specific one.

29 Preparing the environment
4.3.2.6 Adding OS packages to the “Main Share “ DS
4.3.2.6.1 Create folders for the Selection Profiles
Again, we need to create the folder structure for the future Selection Profiles.
The table below will guide to create the needed subfolders for the scenario:
Subfolder name Purpose
Language Packs\FR-FR Store the French Language Pack
Language Packs\Other Store the others language Pack
Feature Packs Store the feature pack needed in the image
Update Packs\MasterIntegrated Store the security fix needed in the image
Update Packs\On the Fly Will Store the security fix not already integrated in the image
… …
The needed operations to do these subfolders are identical in the
manner to the precedent subfolders. So, there is not screen capture
and step-by-step for this part.
You should have this type of structure in the Workbench:
4.3.2.6.2 Adding Os packages to the WorkBench
Add the OS packages, in each correct subfolder.
Action Screen Click FR-FR under Packages\Language Packs: In the right frame, in the Actions pane, click on Import OS Packages:

30 Deploying Windows 7 with MDT 2010 – Basic scenarios
In the Specify Directory screen, select the FR language pack and click Next:
Check the Summary screen and click Next:
The importation begins…

31 Preparing the environment
Check the Confirmation screen and click Finish…
Do this procedure for each folder containing OS packages.
You should obtain the following structures:

32 Deploying Windows 7 with MDT 2010 – Basic scenarios
At this time, you do not have Os packages in the On The Fly folder. This is because the next step is to
create the Reference image. The Reference Image must be up to date when you create it.

33 Preparing the environment
4.4 Quick Look : MDT 2010 files and folders structure Now, you have imported all what you need to create the reference Image.
Let’s have a look to files and folders which powered MDT 2010 in back-scene.
In an Explorer view, you can expand the folder C:\MainShare:
The table below explains the purposes of each folder:
Name Purposes
$OEM$ Needed by MDT 2010 for retrocompatibility with Windows XP and 2003
Applications Store each application package you add in the workbench
Boot Store the boot image with WINPE, in WIM
format and ISO format
Captures Store the images captured during Imaging Process

34 Deploying Windows 7 with MDT 2010 – Basic scenarios
Control Store all the XML files configuring the MDT 2010 environment
Operating Systems
Store the different images you add in the workbench (Sources or captured)
Out-Of-Box Drivers
Store all the drivers you add in the workbench
Packages Store all the OS package you add in the
workbench
Scripts Store all the script needed by the task Sequences
35 Preparing the environment
Tools Contain all the tools needed to create, service and deploy Windows 7
USMT Will contain the User State Migration Tool
Audit.log This is the log where each action in the Workbench is filed.
In normal scenario, you do not have to manipulate files and folders manually. MDT 2010 will do it for
you.
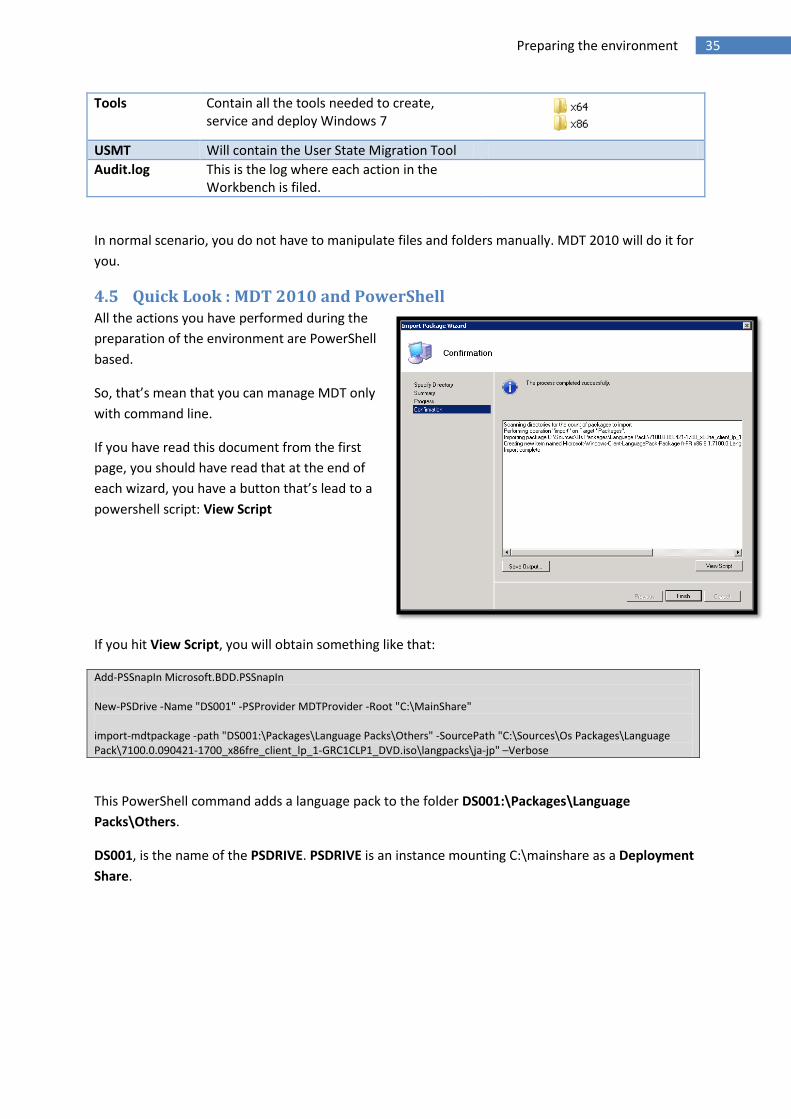
4.5 Quick Look : MDT 2010 and PowerShell All the actions you have performed during the
preparation of the environment are PowerShell
based.
So, that’s mean that you can manage MDT only
with command line.
If you have read this document from the first
page, you should have read that at the end of
each wizard, you have a button that’s lead to a
powershell script: View Script
If you hit View Script, you will obtain something like that:
Add-PSSnapIn Microsoft.BDD.PSSnapIn New-PSDrive -Name "DS001" -PSProvider MDTProvider -Root "C:\MainShare" import-mdtpackage -path "DS001:\Packages\Language Packs\Others" -SourcePath "C:\Sources\Os Packages\Language Pack\7100.0.090421-1700_x86fre_client_lp_1-GRC1CLP1_DVD.iso\langpacks\ja-jp" –Verbose
This PowerShell command adds a language pack to the folder DS001:\Packages\Language
Packs\Others.
DS001, is the name of the PSDRIVE. PSDRIVE is an instance mounting C:\mainshare as a Deployment
Share.

36 Deploying Windows 7 with MDT 2010 – Basic scenarios
5 Implementing the Imaging process So, let’s have a quick look of the job done.
You have imported all you need to create the Imaging process and the Deployment process.
You have, Operating systems, Applications, Drivers and Os Packages.
But, to realize your first image, you lack something… The Task Sequence!
5.1 The Task Sequence What is a task sequence? Well this is the backbone of the deployment solution.
This is the object linking together all the components you have add in the workbench, and all the
variables you will manage through the customization files and the Wizard.
The Task Sequence engine is a powerful tool, which will help you to realize all the action you need at
the time you need, without scripting complex VBS file.
So, let’s create your first Task Sequence.
5.1.1 Create the imaging process Task Sequence
Expand the Workbench and the Deployment share.
Action Screen Click Task Sequences: In the right frame, in the Actions pane, click on New Task Sequence:

37 Implementing the Imaging process
In General Settings: Type the Task Sequence ID : CRE_REF_32 Type the Task sequence name: Creation of the 32 bits Reference Image If needed, you can add some comments… Click Next:
In Select Template, you can choose between multiple pre-created Task Sequences:
Capture Only o Used to capture a computer you
have made by yourself (manually)
Standard Client Task Sequence o Used to deploy or create an image
on a new computer
Standard Client Replace Task Sequence o Used to backup a computer that will
be replaced by a newer one.
Custom Task Sequence o If you want to create your own task
sequence…
LiteTouch OEM Task Sequence o Used to create an OEM image
Standard Server Task Sequence o Used to Install a Server with Roles
Post OS installation Task Sequence o Used to install a computer only with
the last action (OS already deployed before)
Select Standard Client Task Sequence and click Next:

38 Deploying Windows 7 with MDT 2010 – Basic scenarios
In Select OS, you choose the Operating System to be deployed. You can see the list of OS and the folders you have created before. Select the Windows 7 enterprise x86 and click Next:
In Specify Product Key, you can add the key you want in you OS. As you are deploying Windows 7 Enterprise, you will not use key, but a KMS. If not, type in the MAK key. Keep checked Do not specify a product key at this time and click Next:
In OS Settings, you will type your basic information: Full name, Organization and Internet Explorer Home page: Once done, click Next:

39 Implementing the Imaging process
In Admin Password, the wizard asks you to type the local administrator password. Type in twice your password and click Next:
Review the Summary screen and click Next:
Review the Confirmation screen and click Finish.

40 Deploying Windows 7 with MDT 2010 – Basic scenarios
The PowerShell script used to realize the creation of the Task Sequences is the following one:
Add-PSSnapIn Microsoft.BDD.PSSnapIn New-PSDrive -Name "DS001" -PSProvider MDTProvider -Root "C:\MainShare" import-mdttasksequence -path "DS001:\Task Sequences" -Name "Creation of the 32 bits Reference Image" -Template "Client.xml" -Comments "" -ID "CRE_REF_32" -Version "1.0" -OperatingSystemPath "DS001:\Operating Systems\Windows 7 Enterprise x86\Windows 7 ENTERPRISE in Windows 7 x86 RC install.wim" -FullName "Windows User" -OrgName "Contoso" -HomePage "http://www.live.com" -AdminPassword "Azerty1" -Verbose
In the WorkBench, you should have this:
5.1.2 Exploring the Task Sequence
Double click on the Task sequence just created:
Action Screen On the First Tab, General, you have basic information. In particular, you have the capacity to hide and/or enable this Task Sequence in the Deployment Wizard. Click on the Task sequence Tab:

41 Implementing the Imaging process
This is the Heart of the Task Sequence! All the processes realize during the installation of a computer are linked all together. Here you can view, add, modify or delete the different tasks you need. Feel free to explore now the task Sequence; but we do not have to modify anything at this time. Click on the OS Info Tab:
Here, you can edit the unattend.xml file needed to perform the installation. If you want, you can explore the unattend.xml files with the Windows Setup Image Manager. But, again, at this time we do not have to modify anything. Click Cancel.
5.2 Manage the Deployment Share / Creation of the WINPE wim Now, you are at one step to
create your first automated
Windows 7 RC image with
MDT 2010.
Expand the Workbench and
click on your Deployment
share, Main Share:

42 Deploying Windows 7 with MDT 2010 – Basic scenarios
Action Screen Click Main Share: In the right frame, in the Actions pane, click on Properties:
On the General Tab, you can configure the UNC Path to your share, the Local Path and the Platforms Supported. Unchecked the versions the platforms you do not need. The check box implied the generation of the WINPE for the same platform. So, if you want to keep some time, check only the platform needed. Click on the Rules Tab
The Rules Tab is very important. This is in fact the Customsettings.ini file, present in the Control folder of the Deployment Share. These rules will define the way the Task Sequence and the Wizard will perform. You can add here all the variables you need.
For French user only: For optimization, you want to customize the rules for the Imaging process.
TimeZoneName=Romance Standard Time UILanguage=fr-FR UserLocale=040C:0000040C

43 Implementing the Imaging process
Type the rules on the right in the Default section of the Rules tab of your Deployment Share
InputLocale= 040C:0000040C KeyboardLocale= 040c:0000040c SkipBitLocker=YES SkipBitLockerDetails=YES SkipComputerBackup=YES SKipDeploymentType=YES SkipDomainMemberShip=YES SkipLocaleSelection=YES SkipTimeZOne=YES SkipUserData=YES
For other user: For optimization, you want to customize the rules for the Imaging process. Type the rules on the right in the Default section of the Rules tab of your Deployment Share Note : If you want to customize the environment based on your own local, just take the French model, and replace the local code with yours.
SkipBitLocker=YES SkipBitLockerDetails=YES SkipComputerBackup=YES SKipDeploymentType=YES SkipDomainMemberShip=YES SkipLocaleSelection=YES SkipTimeZOne=YES SkipUserData=YES
You must obtain something like that: Then, click on the BootStrap.ini button:

44 Deploying Windows 7 with MDT 2010 – Basic scenarios
Bootstrap.ini, is a file like the customsettings.ini, but it will be processed from the start, before connecting to the Main Share. I will be copied in the boot WIM. So at each time you need to modify it, the WINPE WIM will regenerated.
For French user only: Type the rules on the right in the Default section of the BootStrap.ini file
SkipBDDWelcome= Yes InputLocale= 040C:0000040C KeyboardLocale= 040c:0000040c
For French user only: You must have the following bootstrap.ini file Click File and save your file… Select the Windows PE x86 Settings tab.
What have you done? In fact MDT comes with a lot of wizard. Generally, be prompted by a wizard where you always type the same thing is particularly annoying! So you just have disabled the following Wizard:
45 Implementing the Imaging process
Bitlocker
Computerbackup
Locals, time zone etc…
Admin password
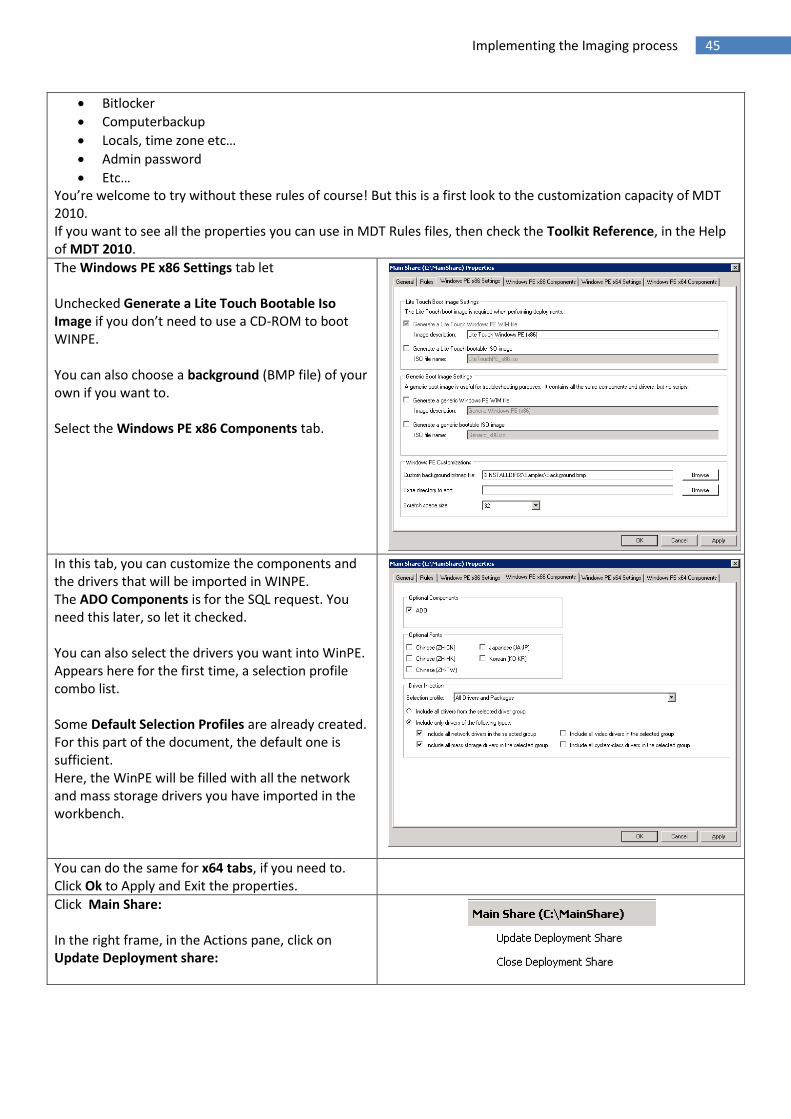
Etc… You’re welcome to try without these rules of course! But this is a first look to the customization capacity of MDT 2010. If you want to see all the properties you can use in MDT Rules files, then check the Toolkit Reference, in the Help of MDT 2010.
The Windows PE x86 Settings tab let Unchecked Generate a Lite Touch Bootable Iso Image if you don’t need to use a CD-ROM to boot WINPE. You can also choose a background (BMP file) of your own if you want to. Select the Windows PE x86 Components tab.
In this tab, you can customize the components and the drivers that will be imported in WINPE. The ADO Components is for the SQL request. You need this later, so let it checked. You can also select the drivers you want into WinPE. Appears here for the first time, a selection profile combo list. Some Default Selection Profiles are already created. For this part of the document, the default one is sufficient. Here, the WinPE will be filled with all the network and mass storage drivers you have imported in the workbench.
You can do the same for x64 tabs, if you need to. Click Ok to Apply and Exit the properties.
Click Main Share: In the right frame, in the Actions pane, click on Update Deployment share:
46 Deploying Windows 7 with MDT 2010 – Basic scenarios
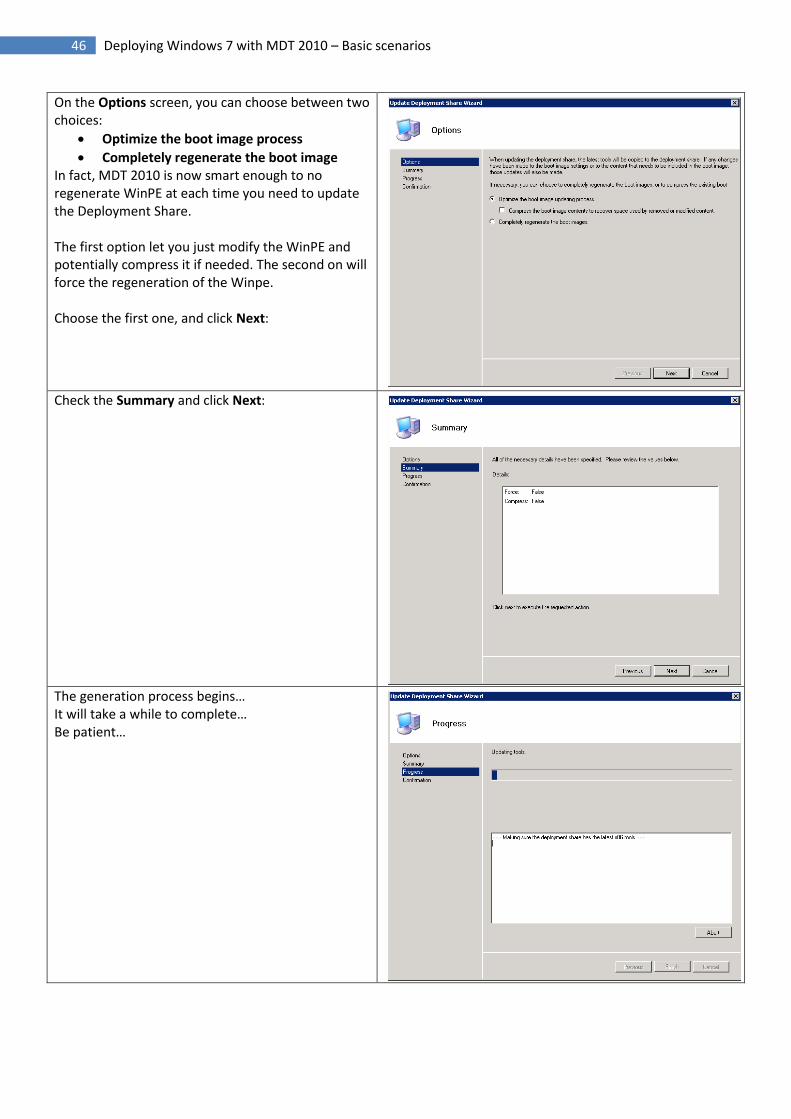
On the Options screen, you can choose between two choices:
Optimize the boot image process
Completely regenerate the boot image In fact, MDT 2010 is now smart enough to no regenerate WinPE at each time you need to update the Deployment Share. The first option let you just modify the WinPE and potentially compress it if needed. The second on will force the regeneration of the Winpe. Choose the first one, and click Next:
Check the Summary and click Next:
The generation process begins… It will take a while to complete… Be patient…

47 Implementing the Imaging process
Check the Summary screen and click Finish.
The PowerShell script used to Create the WinPE WIM is the following one:
Add-PSSnapIn Microsoft.BDD.PSSnapIn New-PSDrive -Name "DS001" -PSProvider MDTProvider -Root "C:\MainShare" update-MDTDeploymentShare -path "DS001:" -Force -Verbose

48 Deploying Windows 7 with MDT 2010 – Basic scenarios
5.3 Create and capture the Reference image Put the WIM file on the WDS Server and start your machine on PXE mode.
See Annex 2 if you need help about WDS management.
The document will show you captured screen from a Virtual PC environment.
Action Screen Start your imaging computer or VM and boot on PXE. If you have only one WinPE boot image, the process will start immediately:
Type in your account necessary to access to the shared folder. Click Ok when you are done.
Here, you can see all the Task Sequences present in the Deployment Share. Select the correct Task Sequence for the creation of the reference computer and click Next.

49 Implementing the Imaging process
Type the name of the reference computer. Click Next.
The language packs you have added to the workbench earlier appear here. You do not need to select them at this time. Click Next.
Check each application you need into your corporate image. For this document, these will be Office 2007, ForeFront Client Security and Adobe Flash. Click Next.

50 Deploying Windows 7 with MDT 2010 – Basic scenarios
Check “Capture an image of this reference computer”. Keep the default name and location. Click Next.
Check the Summary screen. Note that you can see TaskSequence variables filled in the details part. Click Begin.
The Task Sequence is started and begin with the creation of the partition and then format the C: drive.

51 Implementing the Imaging process
The Windows setup is used to apply the retail image.
Windows start for the first time and install the applications…
Then, the Task Sequence executes the Sysprep.

52 Deploying Windows 7 with MDT 2010 – Basic scenarios
The Task Sequence captures the Reference image in the WIM format. This will take a while… Because the capture process will heavily compress and optimize the wim image. The deployment time will be really shorter.
The capture Process is now finished. Shutdown the computer.

53 Implementing the Imaging process
5.4 Adding the Reference image to the WorkBench. Now, you need to add the recently captured image to the
WorkBench.
In the WorkBench, browse to Mainshare\Operating
Systems\Corporate image x86:
Action Screen Click Corporate Image x86: In the right frame, in the Actions pane, click on Import Operating System:
Select Custom Image file and click Next.

54 Deploying Windows 7 with MDT 2010 – Basic scenarios
Select the file you have just captured: C:\Mainshare\captures\CRE_REF_32.WIM Check “Move the files to the DS…” With this option, the image is only moved not copied to the correct folder. This is very faster and less size consuming. Click Next
Check “Copy Windows Vista, Window Server 2008…” Select the folder : “C:\MainShare\Operating Systems\Windows 7 x86 RC” where you must have the retail version of Windows Seven x86. You must copy the setup files at each time you add a custom wim image! Else, your deployment will failed if you have a DS without the setup available. Click Next
Enter the directory name (within the DS) where the Image will be copied. Eventually, add a version at the end of the folder, in case you have to make multiple wim images. Click Next

55 Implementing the Imaging process
Review the Summary Screen. Click Next
Check the Confirmation screen and click Finish
You have added a Custom image in the WorkBench.

56 Deploying Windows 7 with MDT 2010 – Basic scenarios
6 Implementing the Deployment process Now, we have the corporate image, and we will create the Deployment Process.
For this, we need a new Deployment Share, named Production.
On this DS, only the elements needed for production purposes will be replicated by the way of the
Linked Deployment Share.
The LDS could be used to replicate specific part of the MainShare, with filter base on a selection
profile.
So, in the first part of this chapter, we will create a new deployment share, create the selection
profile for production purpose and create the Linked Deployment Share to replicate.
6.1 Creation of the Production Deployment Share Some steps are already detailed earlier in this document, so we will not detail them.
Create and share a folder named Production (Shared as Production$) on the Deployment Server.
Put the correct security right to let the administrator of the MDT Server a Full control of the folder,
across the share.
In the Work bench, add the Production DS, keep the default parameters.
You must have this:

57 Implementing the Deployment process
6.1.1 Creation of the Production Selection Profile
Now open the Mainshare DS in the Workbench and browse to advanced Configuration\Selection
Profiles:
You can see some basic Selection profiles.
You will now create a specific selection profile that contains all you need to deploy a computer in the
production area.
Action Screen Click Selection Profiles: In the right frame, in the Actions pane, click on new Selection Profiles:
Type the Selection profile Name, for example Production. Click Next

58 Deploying Windows 7 with MDT 2010 – Basic scenarios
Select each folder needed to be replicated on the Production share:
- Applications\ForLapTop - Applications\FrenchUser - OS\Corporate Image x86 - Out-Of-Box Drivers - Packages\Update Pack\On the Fly - Packages\Language Packs\FR-FR
Click Next.
Check the Summary screen and click Next.
Review the result and click Finish.

59 Implementing the Deployment process
You can see this in the WorkBench:
With the Selection Profile, you can filter easily what you need to be replicated, or to be added to the
computer during the deployment.
6.1.2 Creation of the Production Linked Deployment Share
In the WorkBench, in the MainShare DS, browse to advanced configuration\Linked Deploymenet
Share:
Action Screen Click Linked Deployment Share: In the right frame, in the Actions pane, click on new Linked Deployment Share:

60 Deploying Windows 7 with MDT 2010 – Basic scenarios
Type the UNC path to the Production share you have made earlier. Select the Production selection profile. Keep “Merge the selected contents…” This option will give us the opportunity to make some customization on the production share which will be not erased during replication. Click Next
As usual, review the Summary Screen and click Next.
Again, review the Confirmation Screen and click Finish.

61 Implementing the Deployment process
Now, you have linked the Mainshare with the Production share, through the filter made by the
Production Selection profile.
This is a very easy way to manage multiple DS across your enterprise.
Right Click on the Linked DS you have made and select Properties:
Action Screen Uncheck “Automatically update boot images after replicating content…” We do not want to generate the boot images at this time. Some customization needs to be done before. Click Ok

62 Deploying Windows 7 with MDT 2010 – Basic scenarios
Right click on the Linked DS you have made and select Replicate Content: The Replication process will began….
Check the Confirmation screen and click Finish.
6.2 Customization of the Production Deployment Share Now, you have a production share with all you need in a computer.
We have to create:
- The Rules and Selection profiles for Driver Filtering, needed to present the correct set of
drivers to the correct computer.
- The deployment Task Sequence needed to do the installation.
- The Tasks to add specific Applications for the LapTop
- The Rules to automatize
6.2.1 Implementing the Driver Filtering
The Driver Filtering is recommended as a very Best practice!
The intention is to avoid the presentation of incorrect drivers to every computer.
63 Implementing the Deployment process
In the best of the world, with Plug’n’play, all will be detected by process, but in the real world, the
different vendors, do not evolve the drivers version when the hardware changes. So, some time, the
driver for the N version of a network card, does not work for the N+1 version. But they have the
same ID, and so on, the PNP process will choose the better driver to fit, the latest in date.
6.2.1.1 Create the Selection profile
Let’s go to create the Selection Profiles needed by the process.
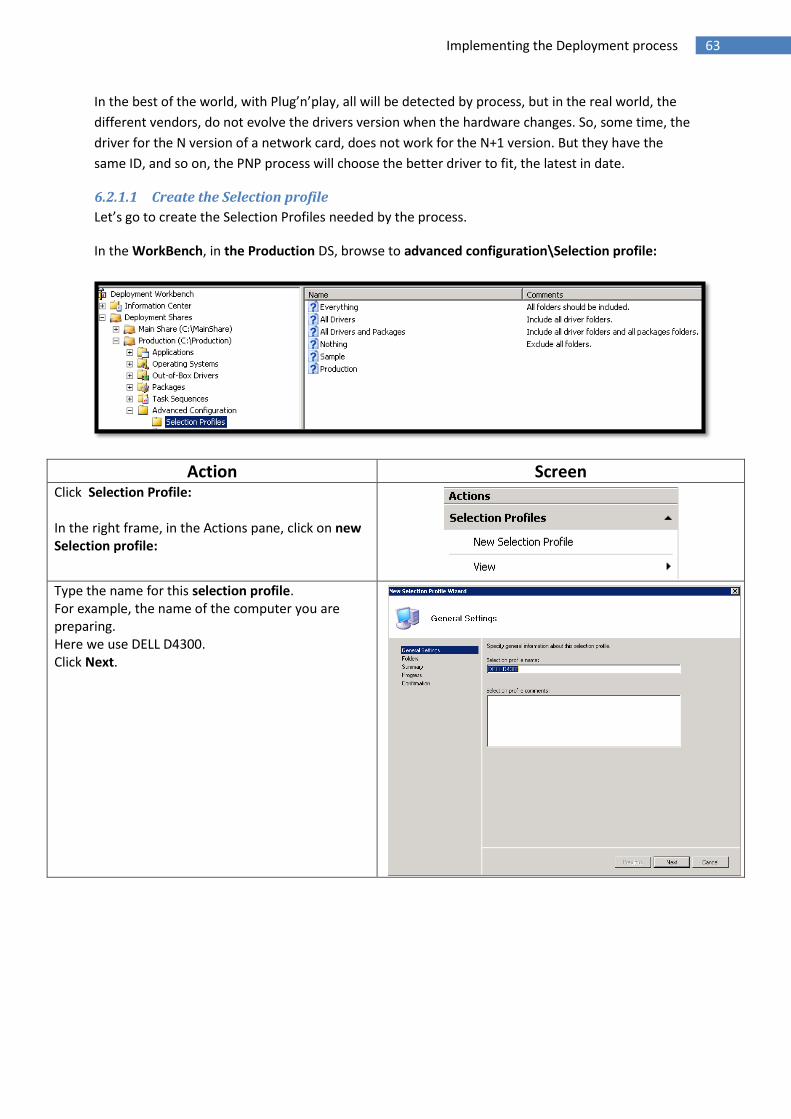
In the WorkBench, in the Production DS, browse to advanced configuration\Selection profile:
Action Screen Click Selection Profile: In the right frame, in the Actions pane, click on new Selection profile:
Type the name for this selection profile. For example, the name of the computer you are preparing. Here we use DELL D4300. Click Next.
64 Deploying Windows 7 with MDT 2010 – Basic scenarios
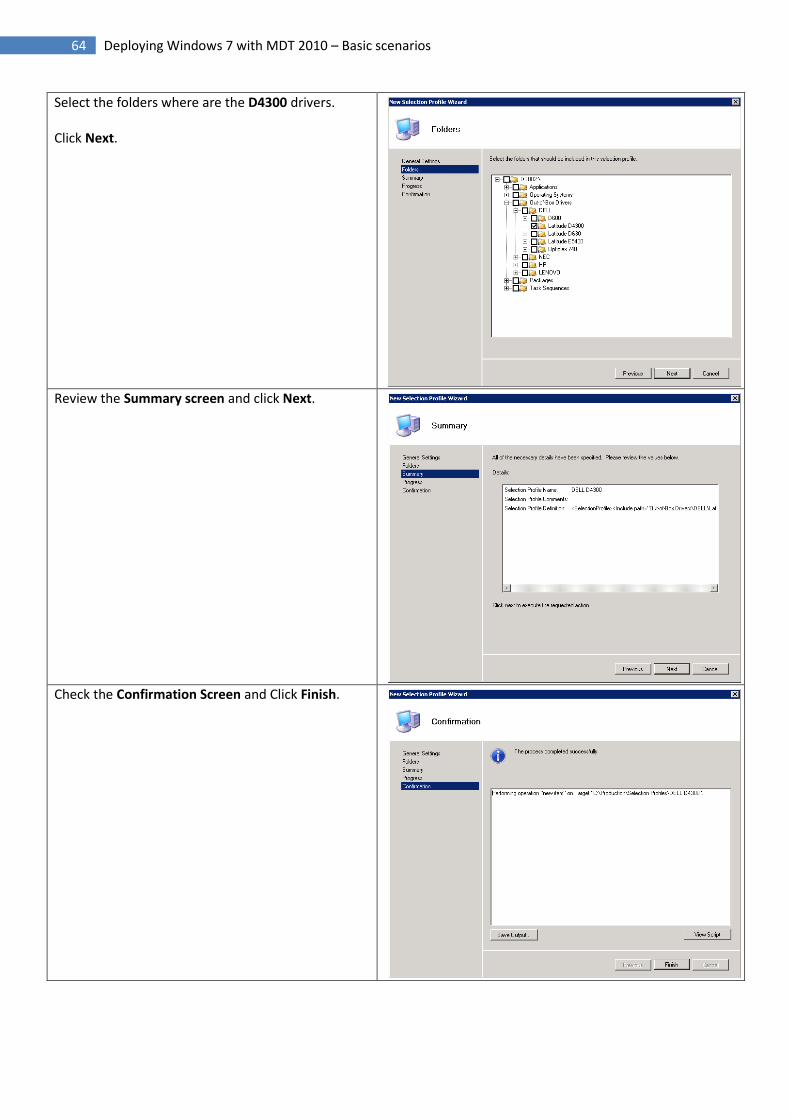
Select the folders where are the D4300 drivers. Click Next.
Review the Summary screen and click Next.
Check the Confirmation Screen and Click Finish.

65 Implementing the Deployment process
Do this procedure, for all the models you have to deploy.
6.2.1.2 Create the Rules
Now you must have some Selection profiles, each filtering on type of model.
The Rules will be the part of the process that will map, during the deployment, the drivers and the
computer.
In the WorkBench, select the Production DS:
Action Screen Click Production DS: In the right frame, in the Actions pane, click on properties:

66 Deploying Windows 7 with MDT 2010 – Basic scenarios
Uncheck x64, click Apply and select the Rules tab.
We must add specific section, to accomplish the driver filtering. First you need to know the WMI model name of your computer. For example, you can use this little VBS script you could find in Annex 3.
In the Section [Settings], modify the priority Line to add Model, just before Default. Do not forget the comma after model.
[Settings] Priority=Model,Default
At the end of the Rules, create a new section, named with the WMI model name. For example D630. Add a variable named DriverSelectionProfile equal to the name of the selection profile you have added earlier.
[D630] DriverSelectionProfile= DELL D630
Do the same for each SelectionProfile you have done.

67 Implementing the Deployment process
You must have something like that:
Click ok.
In this chapter, you have seen how to deliver the correct drivers to the correct computer. This will
save you a lot of time during test and deployment.
6.2.2 Creating the Deployment Task Sequences
In the WorkBench, in the Production TS create a new Client Task Sequence based on the custom
image you have added.
Reference Value
Task Sequence ID DEPL_PROD
Task Sequence Name Deployment Production
Template Standard Client task Sequence
Select OS The custom image CRE_REF_32.WIM
Product Key None
Full Name Your organization
Organization Your service
Passsword Type the password for the local admin
68 Deploying Windows 7 with MDT 2010 – Basic scenarios
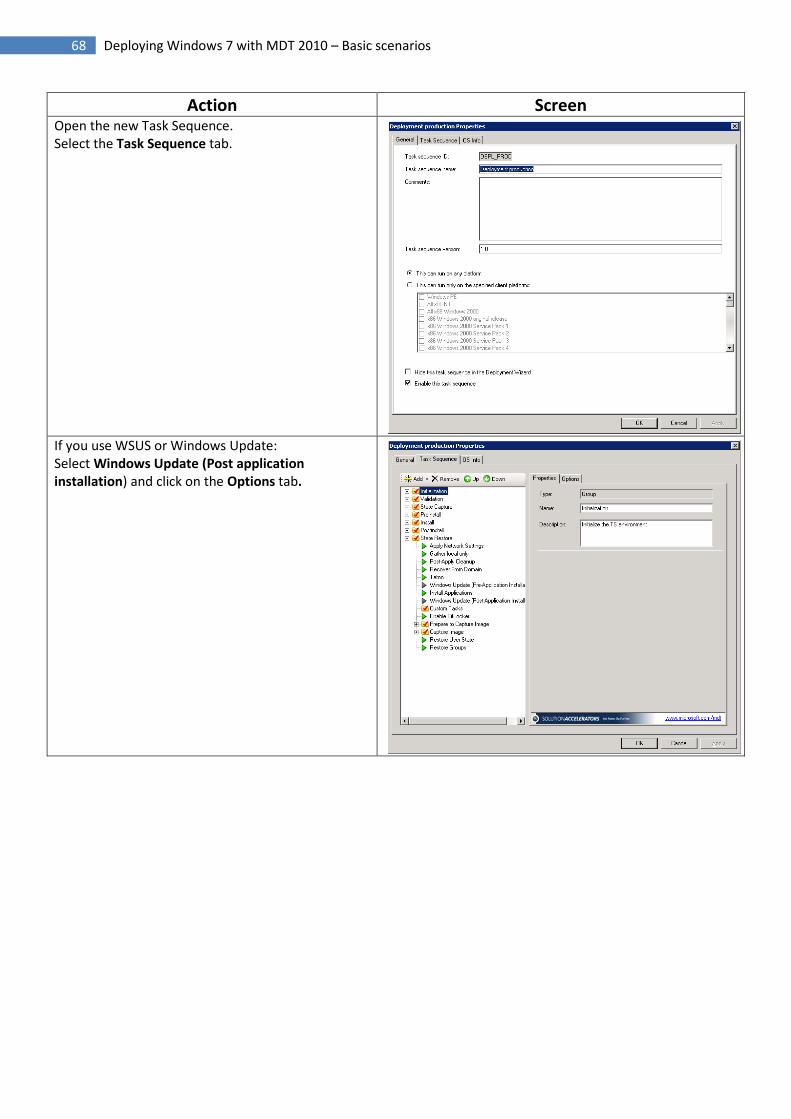
Action Screen Open the new Task Sequence. Select the Task Sequence tab.
If you use WSUS or Windows Update: Select Windows Update (Post application installation) and click on the Options tab.

69 Implementing the Deployment process
Unchecked Disable this step, and click Ok.
Click on Install Applications tasks and select the Properties Tab. On the top of the TS, click Add
Select General:
70 Deploying Windows 7 with MDT 2010 – Basic scenarios
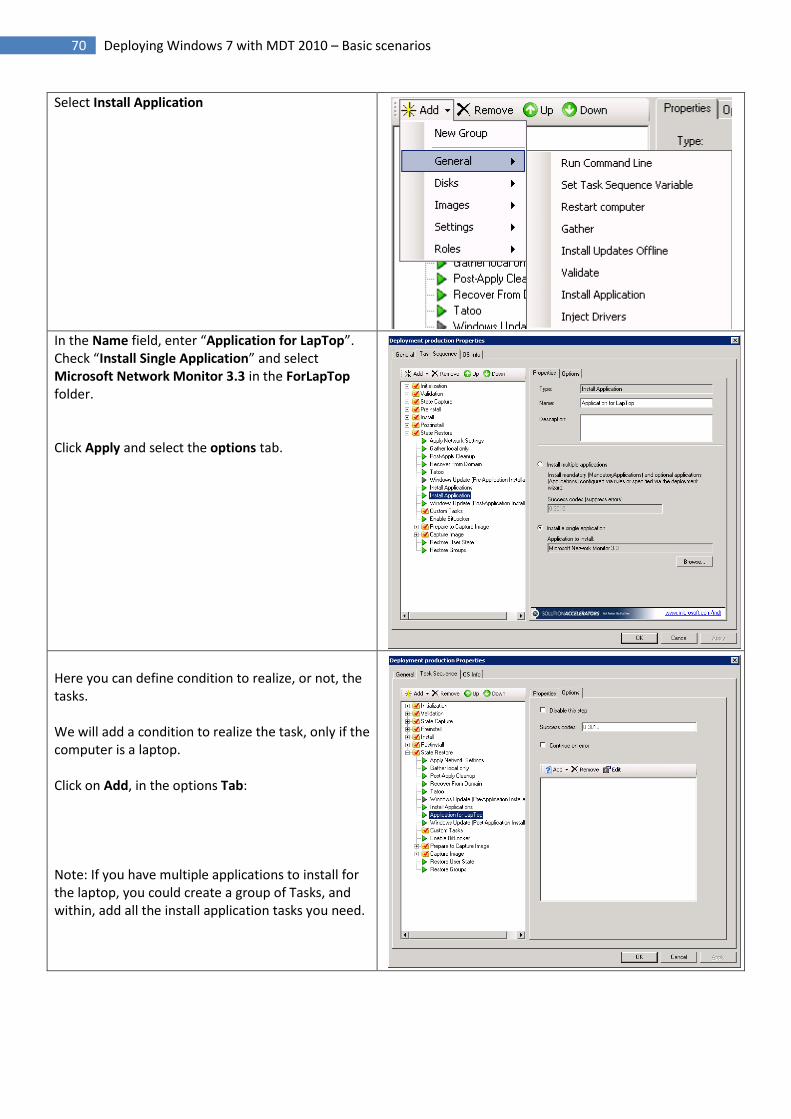
Select Install Application
In the Name field, enter “Application for LapTop”. Check “Install Single Application” and select Microsoft Network Monitor 3.3 in the ForLapTop folder. Click Apply and select the options tab.
Here you can define condition to realize, or not, the tasks. We will add a condition to realize the task, only if the computer is a laptop. Click on Add, in the options Tab: Note: If you have multiple applications to install for the laptop, you could create a group of Tasks, and within, add all the install application tasks you need.
71 Implementing the Deployment process
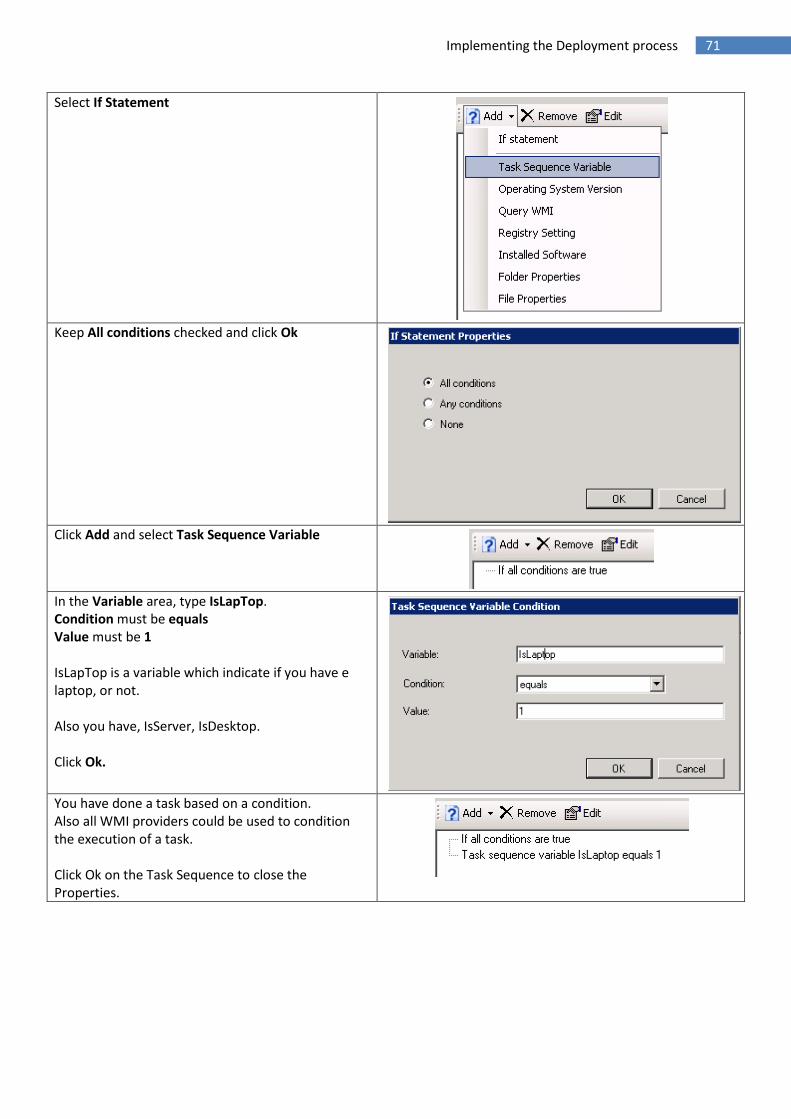
Select If Statement
Keep All conditions checked and click Ok
Click Add and select Task Sequence Variable
In the Variable area, type IsLapTop. Condition must be equals Value must be 1 IsLapTop is a variable which indicate if you have e laptop, or not. Also you have, IsServer, IsDesktop. Click Ok.
You have done a task based on a condition. Also all WMI providers could be used to condition the execution of a task. Click Ok on the Task Sequence to close the Properties.

72 Deploying Windows 7 with MDT 2010 – Basic scenarios
6.2.3 Create the automation Rules
The deployment must be the more silent as possible.
So, only the necessary wizard will be presented to the technician.
- Selection for keyboard layout and TimeZone
- Prompt for credentials (used for domain insertion)
- Name of the computer
- Selection of the Options for French Entity
Also, the deployment solution must ensure:
- At the end, the computer must be shutdown.
- The logs of the installation must be logged in realtime on a share, for debugging purpose
- The WSUS server already in place must be used during the deployment process.
- The name of the company must appear during the process.
Action Screen Expand the Workbench to the Production DS and open the properties
In the Default Section replace the variable and put these:
[Default] OSInstall=Y SkipAppsOnUpgrade=YES SkipCapture=YES SkipAdminPassword=YES SkipProductKey=YES SkipBitLocker=YES SkipBitLockerDetails=YES SkipComputerBackup=YES SKipDeploymentType=YES SkipDomainMemberShip=YES SkipLocaleSelection=NO SkipTimeZone=NO SkipUserData=YES SkipFinalSummary=YES SkipTaskSequence=YES
73 Implementing the Deployment process
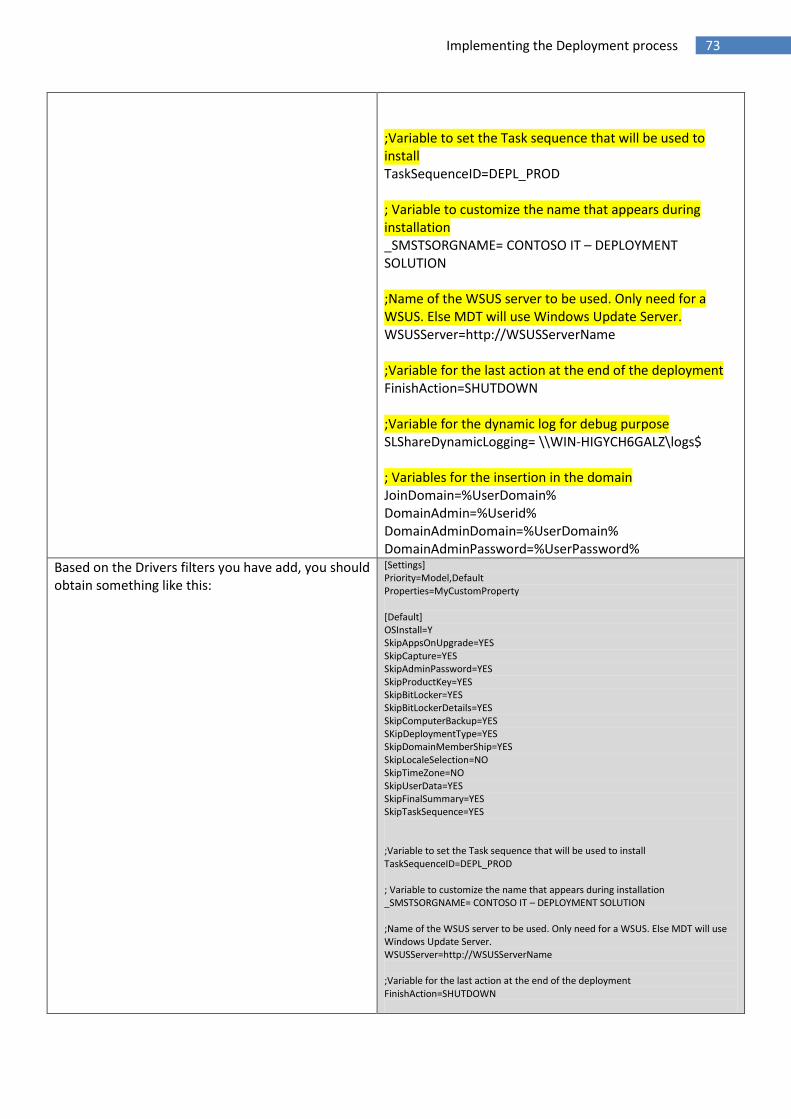
;Variable to set the Task sequence that will be used to install TaskSequenceID=DEPL_PROD ; Variable to customize the name that appears during installation _SMSTSORGNAME= CONTOSO IT – DEPLOYMENT SOLUTION ;Name of the WSUS server to be used. Only need for a WSUS. Else MDT will use Windows Update Server. WSUSServer=http://WSUSServerName ;Variable for the last action at the end of the deployment FinishAction=SHUTDOWN ;Variable for the dynamic log for debug purpose SLShareDynamicLogging= \\WIN-HIGYCH6GALZ\logs$ ; Variables for the insertion in the domain JoinDomain=%UserDomain% DomainAdmin=%Userid% DomainAdminDomain=%UserDomain% DomainAdminPassword=%UserPassword%
Based on the Drivers filters you have add, you should obtain something like this:
[Settings] Priority=Model,Default Properties=MyCustomProperty [Default] OSInstall=Y SkipAppsOnUpgrade=YES SkipCapture=YES SkipAdminPassword=YES SkipProductKey=YES SkipBitLocker=YES SkipBitLockerDetails=YES SkipComputerBackup=YES SKipDeploymentType=YES SkipDomainMemberShip=YES SkipLocaleSelection=NO SkipTimeZone=NO SkipUserData=YES SkipFinalSummary=YES SkipTaskSequence=YES ;Variable to set the Task sequence that will be used to install TaskSequenceID=DEPL_PROD ; Variable to customize the name that appears during installation _SMSTSORGNAME= CONTOSO IT – DEPLOYMENT SOLUTION ;Name of the WSUS server to be used. Only need for a WSUS. Else MDT will use Windows Update Server. WSUSServer=http://WSUSServerName ;Variable for the last action at the end of the deployment FinishAction=SHUTDOWN

74 Deploying Windows 7 with MDT 2010 – Basic scenarios
;Variable for the dynamic log SLShareDynamicLogging= \\WIN-HIGYCH6GALZ\logs$ ; Variables for the insertion in the domain JoinDomain=%UserDomain% DomainAdmin=%Userid% DomainAdminDomain=%UserDomain% DomainAdminPassword=%UserPassword% [D630] DriverSelectionProfile= DELL D630 [D4300] DriverSelectionProfile= DELL D4300
Click on Apply and click on Edit BootStrap.ini.
The Bootstrap.ini appeared.
Replace with this. Change the locale to respect your own needs.
[Default] DeployRoot=\\WIN-HIGYCH6GALZ\Production$ SkipBDDWelcome= No InputLocale= 040C :0000040C KeyboardLocale= 040c :0000040c
75 Implementing the Deployment process
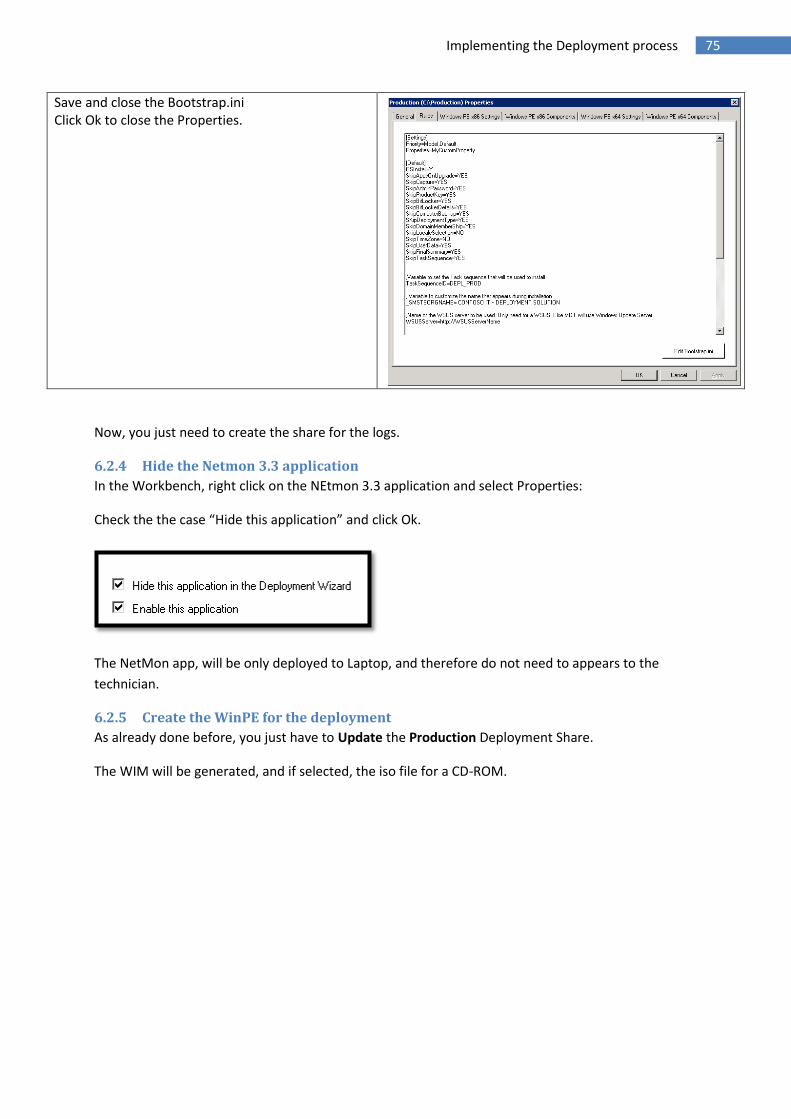
Save and close the Bootstrap.ini Click Ok to close the Properties.
Now, you just need to create the share for the logs.
6.2.4 Hide the Netmon 3.3 application
In the Workbench, right click on the NEtmon 3.3 application and select Properties:
Check the the case “Hide this application” and click Ok.
The NetMon app, will be only deployed to Laptop, and therefore do not need to appears to the
technician.
6.2.5 Create the WinPE for the deployment
As already done before, you just have to Update the Production Deployment Share.
The WIM will be generated, and if selected, the iso file for a CD-ROM.

76 Deploying Windows 7 with MDT 2010 – Basic scenarios
6.3 Deploy a computer in Production Start the computer you need to install with WINPE based on the production Deployment Share.
Action Screen The first screen to appear is the Wizard that let you choose the Keyboard layout, eventually configure an static IP address or use the WINRE recovery environment. Select your Keyboard Layout and click on “Run the deployment Wizard…”.
Enter the Username, the Password and the Domain to use for the deployment. These will be used also to insert the computer in the domain chosen.
Type the Computer Name and click Next.

77 Implementing the Deployment process
If needed, you can add the French language Pack for Windows 7. Click Next.
Select your Locale and Keyboard. Click Next.
Set the Time Zone and click Next.

78 Deploying Windows 7 with MDT 2010 – Basic scenarios
You can select the Applications you want to deploy in the same time. Click Next.
Review the Ready to begin screen and click Begin…
The deployment process will start.

79 Implementing the Deployment process
If you have installed the CCM Framework from the ConfigManager toolkit, you can use SMSTrace to read the log, on C:\logs, in real time.
The deployment process continues after the Setup phases…
At the end, the computer will shutdown.

80 Deploying Windows 7 with MDT 2010 – Basic scenarios
7 Annexes
7.1 Annex 1: Basic Packaging of Office 2007 within MDT 2010.
Action Screen Expand the Workbench to the Office 2007 application. Right click on Office 2007 and select Properties
Select the Office Products Tab.

81 Annexes
Click on Office Customization tool…
This Pop-Up informs you that you must save the MSP file you will create in the Updates folder! Click Ok
Click Ok to select the office 2007 version you need to install.
Here you have the possibility to customize all the installation process. Click on Licensing and user Interface

82 Deploying Windows 7 with MDT 2010 – Basic scenarios
In the Product Key field, type your Key, without any space! Check “I accept the terms…” Select the Display level to Basic
When done, click on “Set feature installation states”
Here you can select which part of the application you need to deploy. For example, you could disable Microsoft Infopath program.

83 Annexes
Expand the view to “Microsoft Office InfoPath”. Click on the hard-disk icon to the left and select Not Available.
Feel free to explore the others possibilities.
When done, click on the File menu and select Save As Browse to the Updates folder, in the Office 2007 application folder (the folder in the Deployment share). Name your file with a number. For example, 1-Custom.msp. This will ensure that the answer file will be processed before applying the updates files. Click Save.
Close the Office Customization Tool and the Office

84 Deploying Windows 7 with MDT 2010 – Basic scenarios
2007 properties.
With this, the Setup will automatically parse the MSP file, and apply your customization file and then
the updates files. In the Updates folder, you can put any update you need to patch Office 2007.
All you need is the MSP files, not the executable one. Add these, from the older to the newer, and
erase the existing when ask.
On TechNet, you will find all you need to perform an advanced packaging for Office 2007.
http://technet.microsoft.com/en-us/library/cc179099.aspx
7.2 Annex 2 : Using Windows Deployment Services to boot WinPE Images
7.2.1 Initial configuration
Launch the WDS snap-in:
Action Screen Expand the MMC to your server hosting the WDS Role. Right click on the Server and select Configure Server
Click Next:

85 Annexes
Accept the default folder location or add your own, and click Next:
If you have kept the default location, you will have this warning. Click Yes.
If you have a DHCP on the same server as the WDS, check the two boxes, and click Next:

86 Deploying Windows 7 with MDT 2010 – Basic scenarios
Check Respond to all (known and unknown) client computers and click Finish:
Uncheck Add images to the Windows Deployment Services now and click Finish.
The Initial configuration is done.
7.2.2 Adding the MDT 2010 WinPE boot images
Action Screen Expand the MMC to the Boot Images folder. Right click on the folderr and select Add Boot Image.

87 Annexes
Select the LiteTouchPE_X86.WIM file in the Boot folder in your MainShare directory and click Next:
Type the Image Name “Boot MainShare” and click Next:
Check the Summary screen and click Next:

88 Deploying Windows 7 with MDT 2010 – Basic scenarios
Click Finish
You have added a Winpe boot image to your WDS server.
7.3 Annex 3: Script to retrieve WMI Computer Make and Model variables Just create a VBS File with the following code.
strComputer = "." Set objWMIService = GetObject("winmgmts:\\" & strComputer & "\root\CIMV2") Set colItems = objWMIService.ExecQuery("SELECT * FROM Win32_ComputerSystem") For Each objItem In colItems WScript.Echo "In MDT Variable Make will be: " & objItem.Manufacturer WScript.Echo "In MDT Variable Model will be: " & objItem.Model Next
Once launched, it will give you the manufacturer (make variable in MDT) and the model.
For example, for a LENOVO T61P:
As you can see, the model variable could be quite confused some time!

89 Annexes