DEPLOYING IPS I QUICKASSIST ON THE A · Page 16 of 33 2.2 Intel DPDK pktgen The Pktget application...
33
Copyright 2017 Advantech Co. Ltd. All rights reserved. APPLICATION NOTE REVISION 0.2 DATE 2017/05/15 DEPLOYING IPSEC GATEWAY WITH INTEL® QUICKASSIST ON THE ADVANTECH FWA-5020U-D0A1R NETWORK APPLIANCE
Transcript of DEPLOYING IPS I QUICKASSIST ON THE A · Page 16 of 33 2.2 Intel DPDK pktgen The Pktget application...

Copyright 2017 Advantech Co. Ltd. All rights reserved.
APPLICATION NOTE REVISION 0.2 DATE 2017/05/15
DEPLOYING IPSEC GATEWAY WITH INTEL® QUICKASSIST ON THE ADVANTECH
FWA-5020U-D0A1R NETWORK APPLIANCE
Copyright 2017 Advantech Co. Ltd. All rights reserved. Page 2 of 33
Revision History
Date [mm/dd/yyyy]
Revision Modifications
04/20/2017 0.1 Initial version 05/11/2017 0.2 Revied by PAE
© Copyright 2017 – Advantech Co., Ltd.
All Rights Reserved
Advantech Co., Ltd. reserves the right to make improvements in the products described in this manual at any time without notice. No part of this manual may be reproduced, copied, translated or transmitted in any form or by any means without the prior written permission of Advantech Co., Ltd. Information provided in this manual is intended to be accurate and reliable. However, Advantech Co., Ltd. assumes no responsibility for its use, nor for any infringements of the rights of third parties, which may result from its use.

Copyright 2017 Advantech Co. Ltd. All rights reserved. Page 3 of 33
Description This application note describes how to deploy QAT with IPSec gateway on the FWA-5020U-D0A1R server. It is based on the standard process that DPDK.org provides and highlights any additional steps required.
We appreciate your input Please let us know if you consider any aspect of this application note needs improving or correcting. We appreciate your valuable input in helping make our products and documentation better.
Please send all such comments in writing to: [email protected]
Acknowledgements Xeon, QuickAssist and Intel are trademarked by Intel Corp.
All other product names or trademarks are properties of their respective owners.
Copyright 2017 Advantech Co. Ltd. All rights reserved. Page 4 of 33
1. EQUIPMENTSETUP
1.1 HardwareusedAn off-the-shelve Advantech system with Intel QuckAssist Technology (QAT) is required. In this document, The network appliance FWA-5020U-D0A1R with PCIe-3021-00E card are selected for demonstration. The PCIe-3021-00E is an external PCIe card with Intel coletocreek 8955 chipset accompanied with Intel QAT inside.
The QAT polling mode driver (PMD), which is part of Intel DPDK, provides a poll mode crypto driver with support for Intel QuickAssist Technology DH895xxC, Intel QuickAssist Technology C62x and Intel QuickAssist Technology C3xxx hardware accelerator. In this demonstration, the QAT card adopts Intel QuickAssist Technology DH895xxC hardware accelerator.
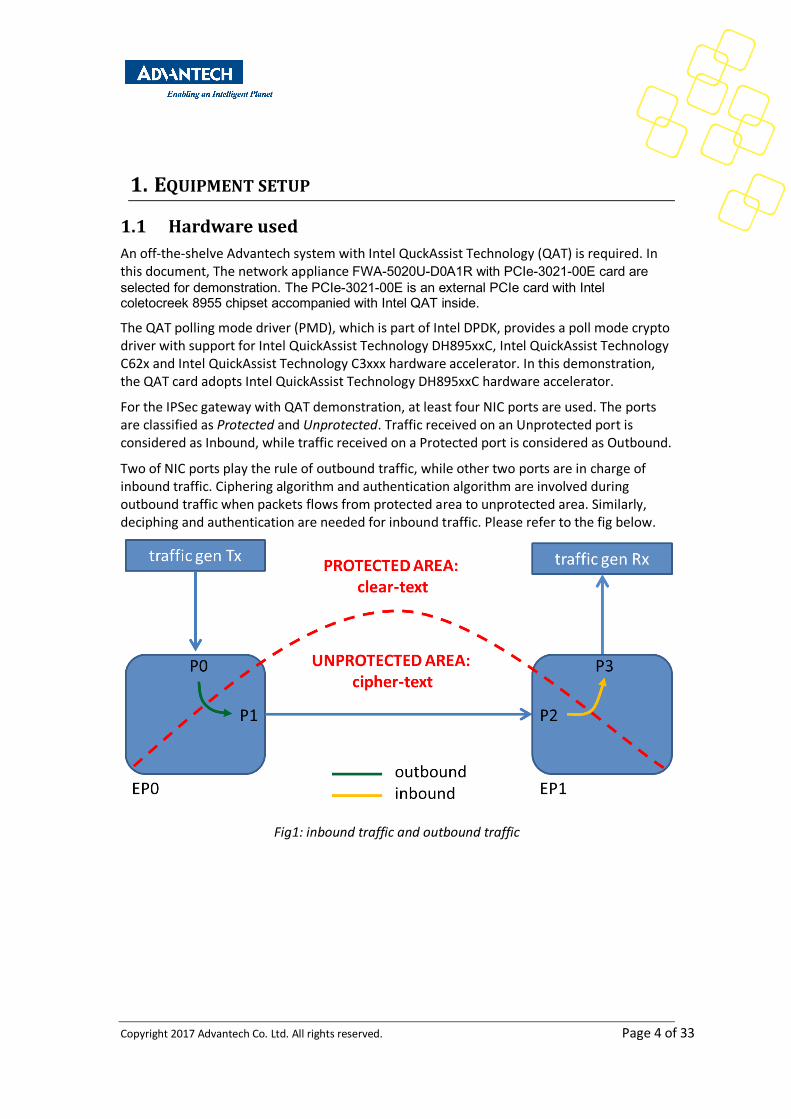
For the IPSec gateway with QAT demonstration, at least four NIC ports are used. The ports are classified as Protected and Unprotected. Traffic received on an Unprotected port is considered as Inbound, while traffic received on a Protected port is considered as Outbound.
Two of NIC ports play the rule of outbound traffic, while other two ports are in charge of inbound traffic. Ciphering algorithm and authentication algorithm are involved during outbound traffic when packets flows from protected area to unprotected area. Similarly, deciphing and authentication are needed for inbound traffic. Please refer to the fig below.
Fig1: inbound traffic and outbound traffic

Copyright 2017 Advantech Co. Ltd. All rights reserved. Page 5 of 33
If the demonstration is done by a single machine, at least six NIC ports are needed. Two extra NIC ports are used for packet generator sending and receiving packets. The architecture is shown below. It’s the final architecture for following illustration.
Fig2: Demonstration scenario
Here we prepared 2 Advantech Network Mezzanine Cards (NMC) to comply with the requirement, each contains Intel NIC X710 chipset with 10Gb Ethernet capability compatible with the i40e driver.

Copyright 2017 Advantech Co. Ltd. All rights reserved. Page 6 of 33
The summary of the environment list below for reference:
CPU Intel Broadwell-EP Xeon E5-2680 v4@ 2.40GHz , 14 cores per socket, 2 threads pre core supported, which 28 cores per socket.
2 sockets on board, 56 cores totally.
X710 for pktgen Two ports for packet generator, PCIe address:
87:00.0
87:00.1
X710 for ipsec-secgw Two ports for outbound traffic, PCIe address:
06:00.0
06:00.1
Two ports for inbound traffic, PCIe address:
06:00.2
06:00.3
QAT, DH895xcc Two virtual QAT crypto devices, PCIe address:
04:01.0
04:01.1

Copyright 2017 Advantech Co. Ltd. All rights reserved. Page 7 of 33
1.2 BIOSconfigurationrequirementFor the majority of platforms, no special BIOS settings are needed to use basic DPDK functionality. However, for usage of DPDK QAT PMD, an SRIOV-enabled QAT kernel driver is required. The Virtual Function (VF) devices exposed by this driver will be used by QAT PMD. Ensure that SRIOV is enabled and VT-d is disabled in the BIOS setting menu described below.
Fig3: Enable SRIOV step-1
Fig4: Enable SRIOV step-2
Fig5: Enable SRIOV step-3

Copyright 2017 Advantech Co. Ltd. All rights reserved. Page 8 of 33
Fig6: Disable VT-d step-1
Fig7: Disable VT-d step-2
Copyright 2017 Advantech Co. Ltd. All rights reserved. Page 9 of 33
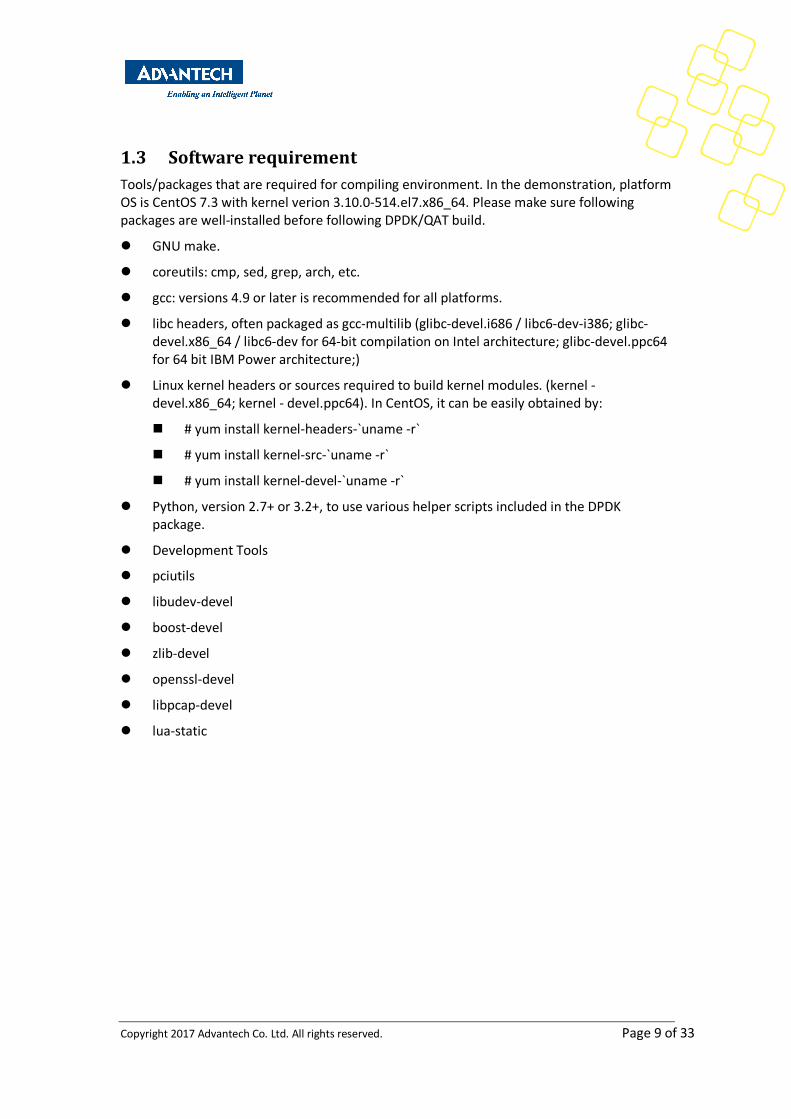
1.3 SoftwarerequirementTools/packages that are required for compiling environment. In the demonstration, platform OS is CentOS 7.3 with kernel verion 3.10.0-514.el7.x86_64. Please make sure following packages are well-installed before following DPDK/QAT build.
l GNU make.
l coreutils: cmp, sed, grep, arch, etc.
l gcc: versions 4.9 or later is recommended for all platforms.
l libc headers, often packaged as gcc-multilib (glibc-devel.i686 / libc6-dev-i386; glibc-devel.x86_64 / libc6-dev for 64-bit compilation on Intel architecture; glibc-devel.ppc64 for 64 bit IBM Power architecture;)
l Linux kernel headers or sources required to build kernel modules. (kernel - devel.x86_64; kernel - devel.ppc64). In CentOS, it can be easily obtained by:
n # yum install kernel-headers-`uname -r`
n # yum install kernel-src-`uname -r`
n # yum install kernel-devel-`uname -r`
l Python, version 2.7+ or 3.2+, to use various helper scripts included in the DPDK package.
l Development Tools
l pciutils
l libudev-devel
l boost-devel
l zlib-devel
l openssl-devel
l libpcap-devel
l lua-static

Copyright 2017 Advantech Co. Ltd. All rights reserved. Page 10 of 33
1.4 BuildDPDKPollModeDriverwithQATCryptoDevicesFirst, uncompress the DPDK archive and move to the uncompressed DPDK source directory, where the source tarball can be found at DPDK.org @ http://dpdk.org/download
The latest major version is 17.02 as of writing this. Given dpdk, pktgen and qat source packages are located at /root/ipsec_demo.
# cd /root/ipsec_demo
# tar xJf dpdk-17.02.tar.xz
# cd dpdk-17.02
The DPDK is composed of several directories:
• lib: Source code of DPDK libraries
• drivers: Source code of DPDK poll-mode drivers
• app: Source code of DPDK applications (automatic tests)
• examples: Source code of DPDK application examples
• config, buildtools, mk: Framework-related makefiles, scripts and configuration
The format of a DPDK target is: ARCH-MACHINE-EXECENV-TOOLCHAIN
where:
• ARCH can be: i686, x86_64, ppc_64
• MACHINE can be: native, power8
• EXECENV can be: linuxapp, bsdapp
• TOOLCHAIN can be: gcc, icc
The targets to be installed depend on the 32-bit and/or 64-bit packages and compilers
installed on the host. Available targets can be found in the DPDK/config directory. The
defconfig_ prefix should not be used.

Copyright 2017 Advantech Co. Ltd. All rights reserved. Page 11 of 33
To install and make targets, use the make install T=<target> command in the top-level DPDK
directory. Before making DPDK PMD, we need to let QAT supported by PMD be enabled
firstly.
# vi ./config/common_base
CONFIG_RTE_LIBRTE_PMD_QAT=y
# export RTE_SDK=/root/ipsec_demo/dpdk-17.02
# export RTE_TARGET=x86_64-native-linuxapp-gcc
# make install T=x86_64-native-linuxapp-gcc
Insert corresponding kernel modules when build process is successful.
# modprobe uio
# insmod ./x86_64-native-linuxapp-gcc/kmod/igb_uio.ko
Finally, make a soft link to /root/ipsec_demo for easy usage. This python script will be used later.
# ln -sf `pwd`/usertools/dpdk-devbind.py /root/ipsec_demo
For more detail, please refer to document from DPDK.org @
http://dpdk.org/doc/guides/linux_gsg/build_dpdk.html
1.5 BuildIPsecSecurityGatewaySampleApplicationGiven Section 2.3 is done.
# cd /root/ipsec_demo/dpdk-17.02
# make -C examples/ipsec-secgw
Make a soft link to /root/ipsec_demo for easy usage.
# ln -sf `pwd`/examples/ipsec-secgw/build/ipsec-secgw /root/ipsec_demo

Copyright 2017 Advantech Co. Ltd. All rights reserved. Page 12 of 33
1.6 BuildDPDKPktgenApplicationThe latest major version is 3.1.2 as of writing this. Given Section 2.3 is done.
# cd /root/ipsec_demo
# tar xzf pktgen-dpdk-pktgen-3.1.2.tar.gz
# cd pktgen-dpdk-pktgen-3.1.2
# make
Make a soft link to /root/ipsec_demo for easy usage.
// For pktgen main binary
# ln -sf `pwd`/app/app/x86_64-native-linuxapp-gcc/pktgen /root/ipsec_demo
// Make a soft link to target folder as running binary "pktgen" requires this file at the same directory.
# ln -sf `pwd`/Pktgen.lua /root/ipsec_demo
1.7 BuildQATdriver
To use the DPDK QAT PMD an SRIOV-enabled QAT kernel driver is required. The VF devices
exposed by this driver will be used by the QAT PMD. The devices and available kernel drivers
and device ids are listed below :
Device Driver Kernel Module Pci
Driver
PF
Did
Num
PFs
VF
Did
VFs
per PF
DH895xCC 01.org icp_qa_al n/a 435 1 443 32
DH895xCC 4.4+ qat_dh895xcc dh895xcc 435 1 443 32
The “Driver” column indicates either the Linux kernel version in which support for this device was introduced or a driver available on Intel’s 01.org website. For the external QAT card with device DH895xCC, the kernel version for demonstration platform is shown below:
# uname -r
3.10.0-514.el7.x86_64
Apparently, an extra effort for installing driver from 01.org is required. Ensure that SRIOV is enabled and VT-d is disabled in the BIOS setting. Given the latest QuickAssist Technology Driver from 01.org is well-prepared at path /root/ipsec_demo. The latest major version is “qat1.2.6.0-60” as of writing this.

Copyright 2017 Advantech Co. Ltd. All rights reserved. Page 13 of 33
Ensure that any existing QAT driver are uninstalled.
# rmmod qat_dh895xcc; rmmod intel_qat
Build and install the SRIOV-enabled QAT driver:
# cd /root/ipsec_demo
# mkdir qatmux.l.2.6.0-60
# tar zxof qatmux.l.2.6.0-60.tgz -C qatmux.l.2.6.0-60
# cd qatmux.l.2.6.0-60
# export ICP_WITHOUT_IOMMU=1
# ./installer.sh install QAT1.6 host
After above installation, the VFs can be checked by using below commands.
# lspci -d:443
# cat /proc/icp_dh895xcc_dev0/version
Totally 32 VF devices per QAT endpoint are available and the version can display which implies that the driver is correctly installed.
For more installation about other kernel or other QAT devices , please refer to document from DPDK.org @
http://dpdk.org/doc/guides/cryptodevs/qat.html

Copyright 2017 Advantech Co. Ltd. All rights reserved. Page 14 of 33
2. DEMONSTRATIONUNDERTHEPLATFORMDPDK is a set of data plan libraries and optimized network interface drivers for fast packet processing. It provides a programming framework for Intel x86 processors and enables faster development of high speed data packet networking applications. The DPDK framework creates a set of libraries for specific hardware/software environments through the creation of an Environment Abstraction Layer (EAL). The EAL hides the environment specific and provides a standard interface to libraries, available hardware accelerators and other hardware and operating system elements. On top of ELA, developers link to the library to create their applications.
We will not explain too much DPDK technical details here. For more introductions to DPDK and DPDK documentation, please visit the following websites:
http://dpdk.org/
http://dpdk.readthedocs.io/en/v17.02/
2.1 lscpuBefore using DPDK, you need to understand the platform CPU architecture first. The command ‘lscpu’ gathers CPU info like number of CPUs, threads, cores, sockets, NUMA nodes, CPU caches, CPU family, model, byte order and stepping from sysfs and /proc/cpuinfo, and then prints out in a human-readable format.
Use the ‘lscpu’ command to dump CPU info:
[root@5020 ipsec_demo]# lscpu
Architecture: x86_64
CPU op-mode(s): 32-bit, 64-bit
Byte Order: Little Endian
CPU(s): 56
On-line CPU(s) list: 0-55
Thread(s) per core: 2
Core(s) per socket: 14
Socket(s): 2
NUMA node(s): 2
Vendor ID: GenuineIntel
CPU family: 6
Model: 79
Model name: Intel(R) Xeon(R) CPU E5-2680 v4@ 2.40GHz
Stepping: 1
CPU MHz: 1473.000

Copyright 2017 Advantech Co. Ltd. All rights reserved. Page 15 of 33
BogoMIPS: 4805.87
Virtualization: VT-x
L1d cache: 32K
L1i cache: 32K
L2 cache: 256K
L3 cache: 35840K
NUMA node0 CPU(s): 0-13,28-41
NUMA node1 CPU(s): 14-27,42-55
Our example platform (FWA-5020U-D0A1R) has 2 CPU sockets, 14 cores per socket and 2 threads per core. As such, there are total 56 (socket*cores*threads) logical CPUs to the operating system (OS). Where logical CPU core ID 0 to 13, 28 to 41 are belongs to NUMA node0, while logical CPU core ID 14 to 27, 42 to 55 are as the other NUMA node (node1).
Fig8: Relationship between NIC PFA and CPU NUMA node
Considering the scenario described before, it’s suggested that the NIC ports are bound to the same CPU NUMA node within DPDK engine where its PCI Function Address (PFA) belongs to. In the demonstration, NIC port with PFA 87:00.0 and 87:00.1 will be bound to CPU NUMA node 1, while PFA 06:00.0~06:00.3, 04:01.0~04:01.1 will be bound to CPU NUMA node0.

Copyright 2017 Advantech Co. Ltd. All rights reserved. Page 16 of 33
2.2 IntelDPDKpktgenThe Pktget application is a software based traffic generator powered by the DPDK fast packet processing framework and is used for sourcing and sinking network traffic.
2.2.1 CommandUsageofPktgenPktgen splits its command line arguments into arguments for the EAL and arguments for the application itself. The first group is a list of EAL options that are common to all DPDK based applications. The second group of options are application specific. The two sets of arguments are separated using the standard convention of -- as shown below.
# pktgen [EAL options] -- [Application options]
Here is the usage of EAL and application arguments which are used in our examples:
l EAL options:
n --master-lcore <ID>: Core ID that is used as master. Note that the master core should not be used for handing Tx or Rx packets transmission
n -c <COREMASK>: a hexadecimal bitmask of the cores to run on
n -n <CHANNELS>: number of memory channels
n -w, --pci-whitelist: Add a PCI device in white list. Only use the specified PCI devices. The argument format is <[domain:]bus:devid.func>. This option can be present several times (once per device).
n --socket-mem: memory to allocate on specific sockets (use comma separated values)
n --file-prefix: prefix for hugepage filenames.
l Application options:
n -T: enable the color output
n -m <string>: Matrix for mapping ports to logical cores. The format of the port mapping string is defined with a BNF-like grammar. For example,
- “[rx_core:tx_core].port1_num,[rx_core:tx_core.port2_num” refers to which cores will be used for port1 and port2 tx/rx transmission. See http://pktgen.readthedocs.io/en/latest/usage_pktgen.html#usage-pktgen for more details.
n -P: Enable PROMISCUOUS mode on all ports. Sets all ports to promiscuous mode so that packets are accepted regardless of the packet’s Ethernet MAC destination address. Without this option, only packets with the Ethernet MAC destination address set to the Ethernet address of the port are accepted (default is enabled).
More complete usage can be found in http://pktgen.readthedocs.io/en/latest/running.html.

Copyright 2017 Advantech Co. Ltd. All rights reserved. Page 17 of 33
2.2.2 RunningPktgenStep 1: Given that kernel module and DPDK poll mode drivers are well-loaded
# modprobe uio
# cd /root/ipsec_demo
# insmod ./dpdk-17.02/x86_64-native-linuxapp-gcc/kmod/igb_uio.ko
Step 2: Setting the number of huge pages reserved for each CPU node. Default 1024 pages is selected for NUMA node 0 and so does NUMA node 1. As each huge page is 2MB (2048kB), in total 2GB (2MB*1024) huge page per NUMA node is reserved for DPDK usage.
# echo 1024 > /sys/devices/system/node/node0/hugepages/hugepages-2048kB/nr_hugepages
# echo 1024 > /sys/devices/system/node/node1/hugepages/hugepages-2048kB/nr_hugepages
Step 3: Creating /mnt/huge directory and mounting it as hugetlbfs
# mkdir -p /mnt/huge
# mount -t hugetlbfs nodev /mnt/huge
Step 4: Make sure huge page is mounted already
# grep '/mnt/huge' /proc/mounts
nodev /mnt/huge hugetlbfs rw,relatime 0 0
Step 5: Let the NIC ports which involve in the demonstration be managed by DPDK PMD engine. Total six ports with PFA 87:00.0~87:00.1, 06:00.0~06:00.3
# ip link set b87p0 down
# ip link set b87p1 down
# ip link set b06p0 down
# ip link set b06p1 down
# ip link set b06p2 down
# ip link set b06p3 down
# ./dpdk-devbind.py -b igb_uio b87p0 b87p1 b06p0 b06p1 b06p2 b06p3

Copyright 2017 Advantech Co. Ltd. All rights reserved. Page 18 of 33
Step 6: Configure the QAT VF ports which will be managed by DPDK
# ./dpdk-devbind.py -b igb_uio 04:01.0 04:01.1
The dpdk-devbind.py is a python script which is used by network device and crypto device driver to bind corresponding port to DPDK PMD. The parameter ‘-b’ indicates which driver is bound to following devices. In our example, the 6 NIC drivers and 2 QAT VF crypto device drivers are bound to DPDK PMD.
Use the command ‘dpdk-devbind.py --status’ to check whether they had been managed by DPDK PMD correctly:
# ./dpdk-devbind.py -s
Use the ‘dpdk-devbind.py --help’ command to get more detailed usage.
Step 7: Start Pktgen Program
./pktgen --master-lcore 18 -c 007c000 -n 16 -w 87:00.0 -w 87:00.1 --socket-mem=1,512 --file-prefix=dpdk_pktgen -- -P -T -m '[14:15].0,[16:17].1'
Parameters setting:
l --master-lcore 18
The 19th logical CPU core (CPU ID 18) in NUMA node1 is selected for running Pktgen master process.
l -c 007c000
CPU cores ID 14 and ID 15 are dedicated for Rx and Tx on Port 0 (b87p0, PFA 87:00.0) respectively. CPU cores ID 16 and ID 17 are dedicated for Rx and Tx on Port 1 (b87p1, PFA 87:00.1) respectively. Thus CPU core ID 18 is used by Pktgen master process.
l -n 16
memory channels = 16
l -w 87:00.0 -w 87:00.1
set white list of PFA of b87p0 and b87p1.

Copyright 2017 Advantech Co. Ltd. All rights reserved. Page 19 of 33
l --socket-mem=1,512
The huge page was assigned as 4096MB in Step 2. Allocate 512MB for CPU socket 1 for Pktgen program since the bound cores are located in CPU NUMA node 1, and allocate 1 MB for CPU socket 0. Here is an unknown issue that memory cannot allocate 0MB to CPU socket 0 in this DPDK Pktgen version (3.1.2) eventhough Pktgen won’t use any cores in CPU NUMA node 0.
l --file-prefix=dpdk_pktgen
As the programs of DPDK Pktgen and ipsec-secgw use the same DPDK engine, thus we need to assign a prefix label to make DPDK engine to differentiate them.
l -m ‘[14:15].0,[16:17].1
The logical CPU core (ID 14) handles port 0 RX
The logical CPU core (ID 15) handles port 0 TX
The logical CPU core (ID 2) handles port 1 RX
The logical CPU core (ID 3) handles port 1 TX
If running successfully, user shall end up with Pktgen CLI:
Fig9: Snapshot of Pktgen program starts
Type ‘help’ in CLI to get complete Pktgen CLI usage and type ‘exit’ to close.

Copyright 2017 Advantech Co. Ltd. All rights reserved. Page 20 of 33
2.3 IntelDPDKIPSecGatewayThe IPsec Security Gateway application is an example of a “real world” application using DPDK cryptodev framework. The application demonstrates the implementation of a Security Gateway (not IPsec compliant) using DPDK based on RFC4301, RFC4303, RFC3602 and RFC2404. The traffic is classified as inbound traffic and outbound traffic which is already described in Section 2.1.
The Path for the IPsec outbound traffic is:
1. Read packets from the port.
2. Perform outbound Security Policy (SP) check using Access Control List (ACL) of all IPv4
traffic.
3. Perform outbound Security Associations (SA) lookup for packets that need IPsec
protection.
4. Add Encapsulating Security Payload (ESP) and outer IP header.
5. Perform Encryption/Digest.
6. Routing.
7. Write packet to port.
The Path for IPsec inbound traffic is:
1. Read packets from the port.
2. Classify packets between IPv4 and ESP.
3. Perform inbound SA lookup for ESP packets based on their Security Parameter Index
(SPI).
4. Perform Verification/Decryption.
5. Remove ESP and outer IP header
6. Inbound SP check using ACL of decrypted packets and any other IPv4 packets.
7. Routing.
8. Write packet to port.

Copyright 2017 Advantech Co. Ltd. All rights reserved. Page 21 of 33
2.3.1 CommandUsageofipsec-secgwThe application ipsec-secgw usage is similar to Pktgen.
# ipsec-secgw [EAL options] --
-p PORTMASK -P -u PORTMASK
--config (port,queue,lcore)[,(port,queue,lcore]
--single-sa SAIDX
-f CONFIG_FILE_PATH
Where:
l EAL options:
n --master-lcore <ID>: Core ID that is used as master.
n -c <COREMASK>: a hexadecimal bitmask of the cores to run on
n -l <CORELIST>: List of cores to run on
n -n <CHANNELS>: number of memory channels
n -w, --pci-whitelist: Add a PCI device in white list. Only use the specified PCI devices. The argument format is <[domain:]bus:devid.func>. This option can be present several times (once per device).
n --socket-mem: memory to allocate on specific sockets (use comma separated values)
n --file-prefix: prefix for hugepage filenames.
l Application options:
n -p <PORTMASK>: Hexadecimal bitmask of ports to configure.
n -P: Sets all ports to promiscuous mode so that packets are accepted regardless of the packet’s Ethernet MAC destination address. Without this option, only packets with the Ethernet MAC destination address set to the Ethernet address of the port are accepted (default is enabled).
n -u <PORTMASK>: hexadecimal bitmask of unprotected ports
n --config (port,queue,lcore)[,(port,queue,lcore)]: determines which queues from which ports are mapped to which cores. For example,
n --single-sa <SAIDX>: use a single SA for outbound traffic, bypassing the SP on both Inbound and Outbound. This option is meant for debugging/performance purposes.
n -f <CONFIG_FILE_PATH>: the full path of text-based file containing all configuration items for running the application (See Configuration File Syntax section below). -f <CONFIG_FILE_PATH> must be specified. ONLY the UNIX format configuration file is accepted.

Copyright 2017 Advantech Co. Ltd. All rights reserved. Page 22 of 33
The application would do a best effort to “map” crypto devices to cores, with hardware devices having priority. Hardware devices if present would be assigned to a core before software ones. A way to achieve the case where the virtual crypto devices were forced to use is to whitelist the devices needed and therefore implicitly blacklisting all other hardware crypto devices.
2.3.2 ConfigurationFileSyntaxThe following sections provide the syntax of configurations to initialize your SP, SA and Routing tables. Configurations shall be specified in the configuration file to be passed to the application. The file is then parsed by the application. The successful parsing will result in the appropriate rules being applied to the tables accordingly.
2.3.2.1 GeneralRuleSyntaxThe parse treats one line in the configuration file as one configuration item (unless the line concatenation symbol exists). Every configuration item shall follow the syntax of either SP, SA, or Routing rules specified below.
The configuration parser supports the following special symbols:
l Comment symbol #. Any character from this symbol to the end of line is treated as comment and will not be parsed.
l Line concatenation symbol \. This symbol shall be placed in the end of the line to be concatenated to the line below. Multiple lines’ concatenation is supported.
2.3.2.2 SPRuleSyntaxThe SP rule syntax is shown as follows:
sp <ip_ver> <dir> esp <action> <priority> <src_ip> <dst_ip> <proto> <sport> <dport>
where each options means:
l <ip_ver>: IP protocol version
n Optional: No
n Avaliable options:
u ipv4: IP protocol version 4
u ipv6: IP protocol version 6
l <dir>: The traffic direction
n Optional: No
n Avaliable options:
u in: inbound traffic
u out: outbound traffic

Copyright 2017 Advantech Co. Ltd. All rights reserved. Page 23 of 33
l <action>: IPsec action
n Optional: No
n Available options:
u protect <SA_idx>: the specified traffic is protected by SA rule with id SA_idx. Note that the SA_idx would become SA’s SPI number. Please refer to below link for more detail: https://en.wikipedia.org/wiki/Security_Parameter_Index
u bypass: the specified traffic traffic is bypassed
u discard: the specified traffic is discarded
l <priority>: Rule priority
n Optional: Yes, default priority 0 will be used
n Syntax: pri <id>
l <src_ip>: The source IP address and mask
n Optional: Yes, default address 0.0.0.0 and mask of 0 will be used
n Syntax:
u src X.X.X.X/Y for IPv4
u src XXXX:XXXX:XXXX:XXXX:XXXX:XXXX:XXXX:XXXX/Y for IPv6
l <dst_ip>: The destination IP address and mask
n The destination IP address and mask
n Syntax:
u dst X.X.X.X/Y for IPv4
u dst XXXX:XXXX:XXXX:XXXX:XXXX:XXXX:XXXX:XXXX/Y for IPv6
l <proto>: The protocol start and end range
n Optional: yes, default range of 0 to 0 will be used
n Syntax: proto X:Y
l <sport>: The source port start and end range
n Optional: yes, default range of 0 to 0 will be used
n Syntax: sport X:Y
l <dport>: The destination port start and end range
n Optional: yes, default range of 0 to 0 will be used
n Syntax: dport X:Y
Currently, sport and dport option found an unknow issue that only 0:65535 is workable for now. Anyway, it doen’t affect our demonstration.
Copyright 2017 Advantech Co. Ltd. All rights reserved. Page 24 of 33
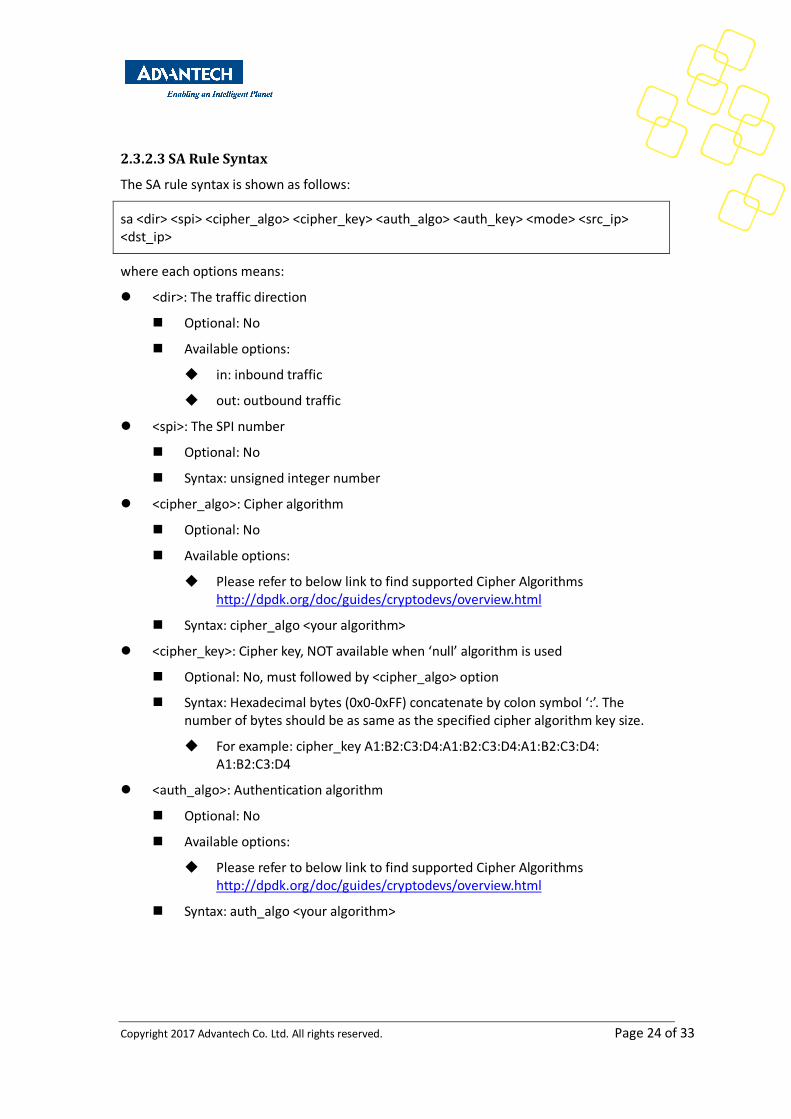
2.3.2.3 SARuleSyntaxThe SA rule syntax is shown as follows:
sa <dir> <spi> <cipher_algo> <cipher_key> <auth_algo> <auth_key> <mode> <src_ip> <dst_ip>
where each options means:
l <dir>: The traffic direction
n Optional: No
n Available options:
u in: inbound traffic
u out: outbound traffic
l <spi>: The SPI number
n Optional: No
n Syntax: unsigned integer number
l <cipher_algo>: Cipher algorithm
n Optional: No
n Available options:
u Please refer to below link to find supported Cipher Algorithms http://dpdk.org/doc/guides/cryptodevs/overview.html
n Syntax: cipher_algo <your algorithm>
l <cipher_key>: Cipher key, NOT available when ‘null’ algorithm is used
n Optional: No, must followed by <cipher_algo> option
n Syntax: Hexadecimal bytes (0x0-0xFF) concatenate by colon symbol ‘:’. The number of bytes should be as same as the specified cipher algorithm key size.
u For example: cipher_key A1:B2:C3:D4:A1:B2:C3:D4:A1:B2:C3:D4: A1:B2:C3:D4
l <auth_algo>: Authentication algorithm
n Optional: No
n Available options:
u Please refer to below link to find supported Cipher Algorithms http://dpdk.org/doc/guides/cryptodevs/overview.html
n Syntax: auth_algo <your algorithm>

Copyright 2017 Advantech Co. Ltd. All rights reserved. Page 25 of 33
l <auth_key>: Authentication key, NOT available when ‘null’ or ‘aes-128-gcm’ algorithm is used.
n Optional: No, must followed by <auth_algo> option
n Syntax: Hexadecimal bytes (0x0-0xFF) concatenate by colon symbol ‘:’. The number of bytes should be as same as the specified authentication algorithm key size.
u For example: auth_key A1:B2:C3:D4:A1:B2:C3:D4:A1:B2:C3:D4:A1:B2:C3:D4: A1:B2:C3:D4
l <mode>: The operation mode
n Optional: No
n Available options:
u ipv4-tunnel: Tunnel mode for IPv4 packets
u ipv6-tunnel: Tunnel mode for IPv6 packets
u transport: transport mode
n Syntax: mode XXX
l <src_ip>: The source IP address. This option is not available when transport mode is used
n Optional: Yes, default address 0.0.0.0 will be used
n Syntax:
u src X.X.X.X for IPv4
u src XXXX:XXXX:XXXX:XXXX:XXXX:XXXX:XXXX:XXXX for IPv6
l <dst_ip>: The destination IP address. This option is not available when transport mode is used
n Optional: Yes, default address 0.0.0.0 will be used
n Syntax:
u dst X.X.X.X for IPv4
u dst XXXX:XXXX:XXXX:XXXX:XXXX:XXXX:XXXX:XXXX for IPv6
Copyright 2017 Advantech Co. Ltd. All rights reserved. Page 26 of 33
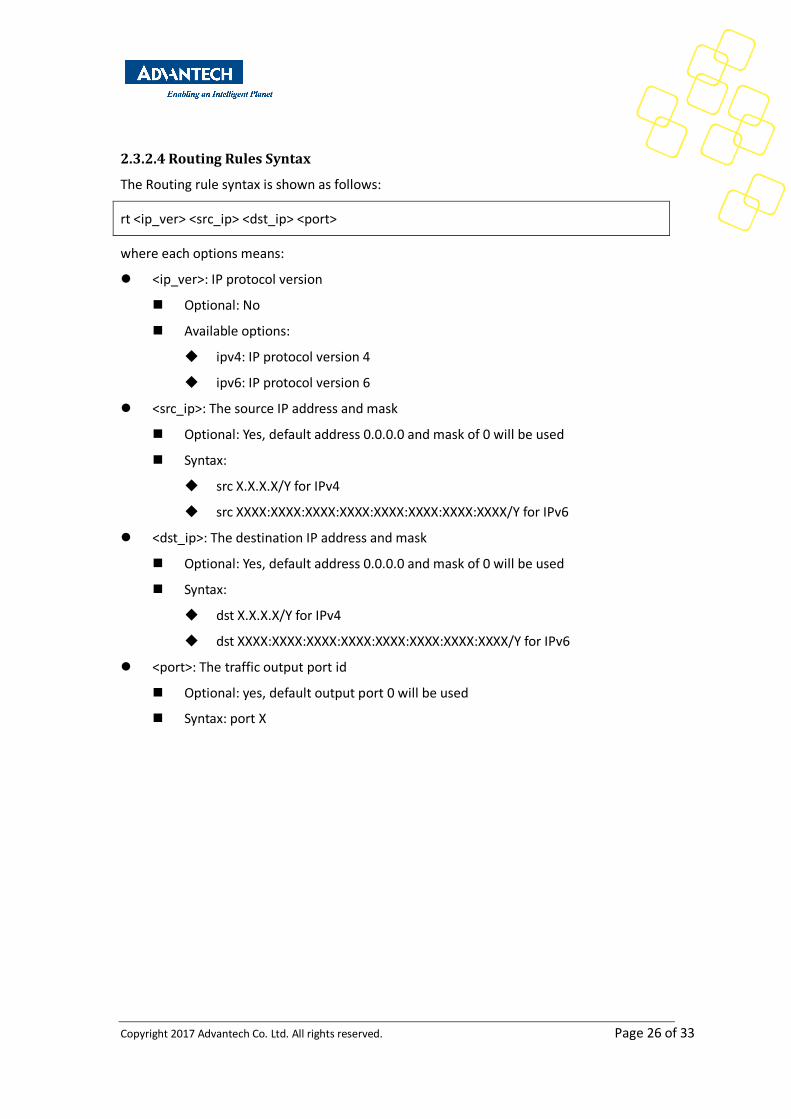
2.3.2.4 RoutingRulesSyntaxThe Routing rule syntax is shown as follows:
rt <ip_ver> <src_ip> <dst_ip> <port>
where each options means:
l <ip_ver>: IP protocol version
n Optional: No
n Available options:
u ipv4: IP protocol version 4
u ipv6: IP protocol version 6
l <src_ip>: The source IP address and mask
n Optional: Yes, default address 0.0.0.0 and mask of 0 will be used
n Syntax:
u src X.X.X.X/Y for IPv4
u src XXXX:XXXX:XXXX:XXXX:XXXX:XXXX:XXXX:XXXX/Y for IPv6
l <dst_ip>: The destination IP address and mask
n Optional: Yes, default address 0.0.0.0 and mask of 0 will be used
n Syntax:
u dst X.X.X.X/Y for IPv4
u dst XXXX:XXXX:XXXX:XXXX:XXXX:XXXX:XXXX:XXXX/Y for IPv6
l <port>: The traffic output port id
n Optional: yes, default output port 0 will be used
n Syntax: port X

Copyright 2017 Advantech Co. Ltd. All rights reserved. Page 27 of 33
2.3.3 Runningipsec-secgwBefore running ipsec-secgw program, we need to deploy our configuration firstly, which is already described in previous section. Remind the concept of inbound and outbound traffic, at least two endpoints (EP) are needed, one for ciphering, one for deciphering. And the ciphered content transmitted in the media by tunnenling protocol.
Fig10: Protected area and unprotected area
As a result, the security policy of each EPs for the demonstration are summarized in following tables.
l Endpoint 0 outbound traffic:
1. Security Policy:
Src Dest SA Index
Any 192.168.1.0/24 (Pktgen default setting)
5
The SA index is an arbitrary unsigned integer, which maps to the SPI number of SA. Here, a digit 5 is choosen. After all ciphering/authentication algorithms done, route the packets to port 1 with headers for tunnelling. And the IPs of ESP becomes to tunnelling IPs that we assigned. Please see below.
2. Security Associations:
SPI Cipher Auth Tunnel Src Tunnel Dest
5 aes-128-cbc sha1-hmac 172.16.1.5 172.17.2.5
The supported algorithms can refer to the following website @ http://dpdk.org/doc/guides/cryptodevs/overview.html

Copyright 2017 Advantech Co. Ltd. All rights reserved. Page 28 of 33
Because we use QAT driver for crypto devices, the supported functionality matrices differ with others.
Fig 11: Supported Cipher Algorithms
Fig 12: Supported Authentication Algorithms
3. Routing : port 1
Copyright 2017 Advantech Co. Ltd. All rights reserved. Page 29 of 33
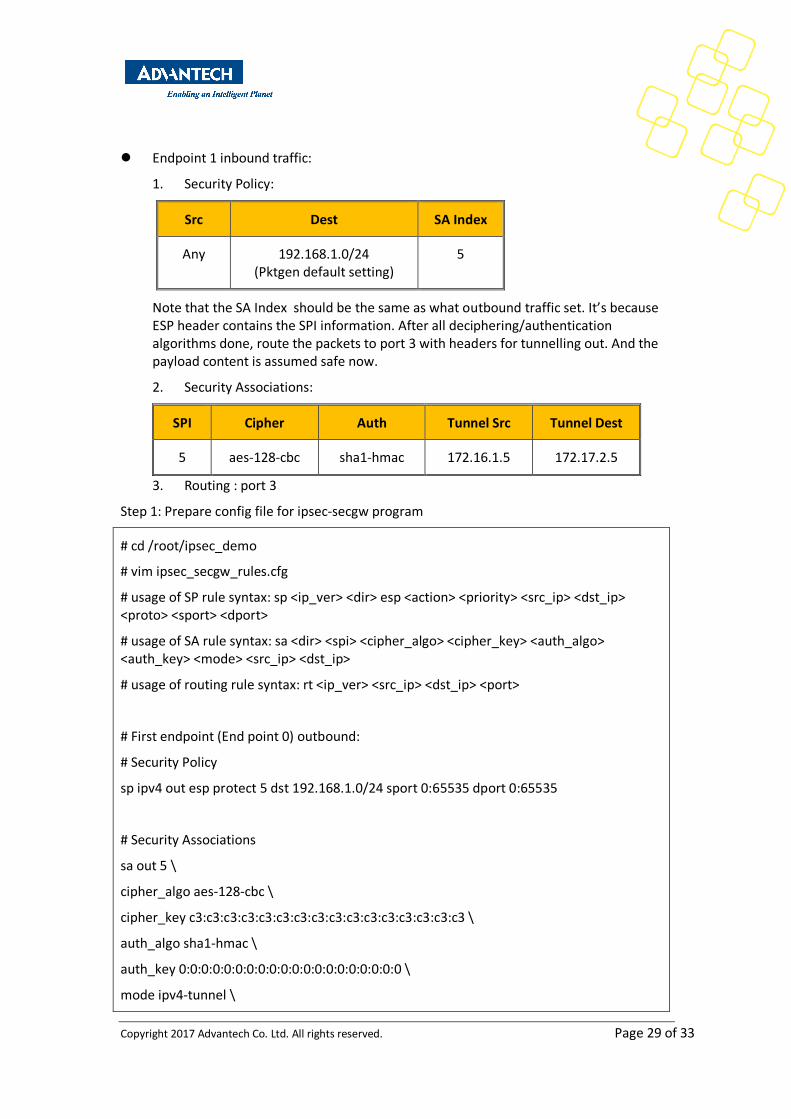
l Endpoint 1 inbound traffic:
1. Security Policy:
Src Dest SA Index
Any 192.168.1.0/24 (Pktgen default setting)
5
Note that the SA Index should be the same as what outbound traffic set. It’s because ESP header contains the SPI information. After all deciphering/authentication algorithms done, route the packets to port 3 with headers for tunnelling out. And the payload content is assumed safe now.
2. Security Associations:
SPI Cipher Auth Tunnel Src Tunnel Dest
5 aes-128-cbc sha1-hmac 172.16.1.5 172.17.2.5
3. Routing : port 3
Step 1: Prepare config file for ipsec-secgw program
# cd /root/ipsec_demo
# vim ipsec_secgw_rules.cfg
# usage of SP rule syntax: sp <ip_ver> <dir> esp <action> <priority> <src_ip> <dst_ip> <proto> <sport> <dport>
# usage of SA rule syntax: sa <dir> <spi> <cipher_algo> <cipher_key> <auth_algo> <auth_key> <mode> <src_ip> <dst_ip>
# usage of routing rule syntax: rt <ip_ver> <src_ip> <dst_ip> <port>
# First endpoint (End point 0) outbound:
# Security Policy
sp ipv4 out esp protect 5 dst 192.168.1.0/24 sport 0:65535 dport 0:65535
# Security Associations
sa out 5 \
cipher_algo aes-128-cbc \
cipher_key c3:c3:c3:c3:c3:c3:c3:c3:c3:c3:c3:c3:c3:c3:c3:c3 \
auth_algo sha1-hmac \
auth_key 0:0:0:0:0:0:0:0:0:0:0:0:0:0:0:0:0:0:0:0 \
mode ipv4-tunnel \

Copyright 2017 Advantech Co. Ltd. All rights reserved. Page 30 of 33
src 172.16.1.5 \
dst 172.17.2.5
# Routing
rt ipv4 dst 172.17.2.5/32 port 1
# Second endpoint (End point 1) inbound:
sp ipv4 in esp protect 5 dst 192.168.1.0/24 sport 0:65535 dport 0:65535
sa in 5 \
cipher_algo aes-128-cbc \
cipher_key c3:c3:c3:c3:c3:c3:c3:c3:c3:c3:c3:c3:c3:c3:c3:c3 \
auth_algo sha1-hmac \
auth_key 0:0:0:0:0:0:0:0:0:0:0:0:0:0:0:0:0:0:0:0 \
mode ipv4-tunnel \
src 172.16.1.5 \
dst 172.17.2.5
# Routing
rt ipv4 dst 192.168.1.0/24 port 3
Step 2: Given that Pktgen in section 2.2.2 is prepared ready (with CLI environment).
Step 3: Create another login window (SSH is recommended) to start ipsec-secgw program
# ./ipsec-secgw --master-lcore 1 -l 1,2,3,4 -n 16 --socket-mem=512,0 --file-prefix=qat -w 06:00.0 -w 06:00.1 -w 06:00.2 -w 06:00.3 -w 04:01.0 -w 04:01.1 -- -p 0xf -P -u 0x06 --config="(0,0,1),(1,0,2),(2,0,3),(3,0,4)" -f ./ipsec_secgw_rules.cfg
Parameters setting:
l --master-lcore 1
The 2nd logical CPU core (CPU ID 1) in NUMA node0 is selected for running ipsec-secgw master process.
l -l 1,2,3,4
CPU cores ID 1-4 are dedicated for the ipsec-secgw program, and how they are bound to NIC ports will be assigned within parameter “--config”.
l -n 16

Copyright 2017 Advantech Co. Ltd. All rights reserved. Page 31 of 33
memory channels = 16
l -w 06:00.0 -w 06:00.1 -w 06:00.2 -w 06:00.3 -w 04:01.0 -w 04:01.1
set white list of PFA of 4 ports NIC (PFA 06:00.0~06:00.3) and 2 QAT VFs (PFA 04:01.0~04:01.1).
l --socket-mem=512,0
The huge page was assigned as 4096MB for DPDK PMD. Allocate 512MB for CPU socket 0 for ipsec-secgw program since the bound cores are located in CPU NUMA node 0.
l --file-prefix=qat
As the programs of DPDK Pktgen and ipsec-secgw use the same DPDK engine, thus we need to assign a prefix label to make DPDK engine to differentiate them.
l -p 0xf
The configuration will apply to four ports, called port 0 (PFA 06:00.0) to port 3 (PFA 06:00.3) respectively.
l -u 0x06
Among four ports, two of them are tagged as unprotected ports, while the other two ports are regarded as protected ports. According to port classification, the traffic type as inbound or outbound can be defined thereafter. In our demonstration, port 1 and port 2 are unprotected ports, thus we set mask as 0x06. Please refer to Fig 10.
l --config="(0,0,1),(1,0,2),(2,0,3),(3,0,4)"
Map queue 0 from port 0 to CPU lcore 1, and so on.
Port Queue lcore
0 0 1
1 0 2
2 0 3
3 0 4
Where lcore is defined by -l <CORELIST> or -c <COREMASK> parameter.
For other information in more detail, following website can be referred directly.
http://dpdk.org/doc/guides/sample_app_ug/ipsec_secgw.html
The ipsec-secgw running result:
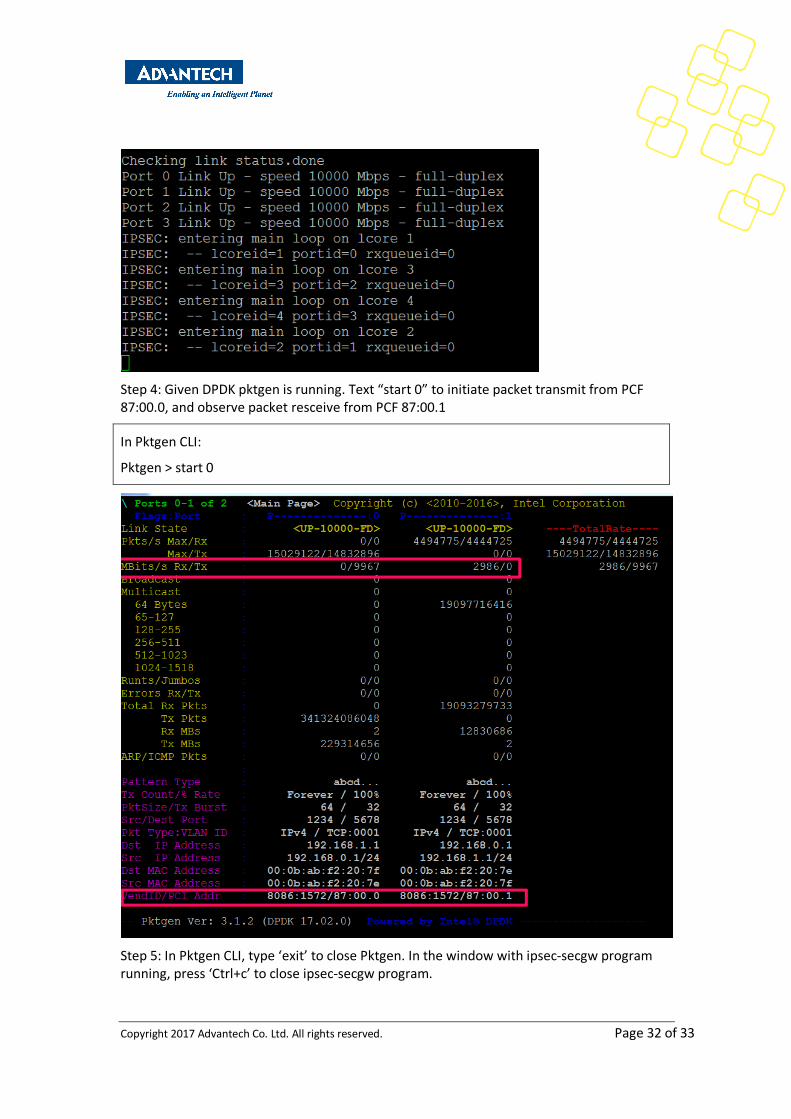
Copyright 2017 Advantech Co. Ltd. All rights reserved. Page 32 of 33
Step 4: Given DPDK pktgen is running. Text “start 0” to initiate packet transmit from PCF 87:00.0, and observe packet resceive from PCF 87:00.1
In Pktgen CLI:
Pktgen > start 0
Step 5: In Pktgen CLI, type ‘exit’ to close Pktgen. In the window with ipsec-secgw program running, press ‘Ctrl+c’ to close ipsec-secgw program.

Copyright 2017 Advantech Co. Ltd. All rights reserved. Page 33 of 33
3. REFERENCEl DPDK org:
n Getting Started Guide for Linux http://dpdk.org/doc/guides/linux_gsg/index.html
u System Requirements http://dpdk.org/doc/guides/linux_gsg/sys_reqs.html
u Compiling the DPDK Target from Source http://dpdk.org/doc/guides/linux_gsg/build_dpdk.html
n Crypto Device Drivers http://dpdk.org/doc/guides/cryptodevs/index.html
u Intel(R) QuickAssist (QAT) Crypto Poll Mode Driver http://dpdk.org/doc/guides/cryptodevs/qat.html
u Crypto Device Supported Functionality Matrices http://dpdk.org/doc/guides/cryptodevs/overview.html
n Sample Applications User Guides http://dpdk.org/doc/guides/sample_app_ug/
u IPsec Security Gateway Sample Application http://dpdk.org/doc/guides/sample_app_ug/ipsec_secgw.html
l 01.org https://01.org/zh/packet-processing/intel%C2%AE-quickassist-technology-drivers-and-patches?langredirect=1