Deltek Vision® Connect for Microsoft® Outlook 7.1, 7.2 and 7
145
Deltek Vision® Connect for Microsoft® Outlook 7.1, 7.2 and 7.3 Connect for Microsoft Outlook Installation Guide October 3, 2014
Transcript of Deltek Vision® Connect for Microsoft® Outlook 7.1, 7.2 and 7

Deltek Vision® Connect for Microsoft® Outlook 7.1, 7.2 and 7.3 Connect for Microsoft Outlook Installation Guide
October 3, 2014

Installation Guide ii
While Deltek has attempted to verify that the information in this document is accurate and complete, some typographical or technical errors may exist. The recipient of this document is solely responsible for all decisions relating to or use of the information provided herein.
The information contained in this publication is effective as of the publication date below and is subject to change without notice.
This publication contains proprietary information that is protected by copyright. All rights are reserved. No part of this document may be reproduced or transmitted in any form or by any means, electronic or mechanical, or translated into another language, without the prior written consent of Deltek, Inc.
This edition published October 2014.
© 2014 Deltek, Inc.
Deltek’s software is also protected by copyright law and constitutes valuable confidential and proprietary information of Deltek, Inc. and its licensors. The Deltek software, and all related documentation, is provided for use only in accordance with the terms of the license agreement. Unauthorized reproduction or distribution of the program or any portion thereof could result in severe civil or criminal penalties.
All trademarks are the property of their respective owners.

Installation Guide iii
Contents Overview .......................................................................................................................................... 1
What is Deltek Vision Connect for Microsoft Outlook? ............................................................... 1
Connect for Microsoft Outlook Documentation ........................................................................... 2
Adding Custom Notes to This Guide ............................................................................................... 5
If You Need Assistance ................................................................................................................... 6
Customer Services ...................................................................................................................... 6
Customer Care Connect Site ...................................................................................................... 6 Downloading Deltek Products Using Deltek Software Manager ..................................................... 8
Accessing DSM Directly .............................................................................................................. 8
Accessing DSM from Within the Customer Care Connect Site .................................................. 9
DSM Documentation and Troubleshooting ................................................................................. 9
Software Requirements for Connect for Microsoft Outlook ........................................................... 10 Supported Microsoft Outlook Configurations ................................................................................. 12
Outlook Profiles and Default Email Delivery Location ............................................................... 12
Cached Exchange Mode ........................................................................................................... 13
Third-Party Outlook Add-Ins .......................................................................................................... 17
Known Incompatible Third-Party Add-Ins.................................................................................. 17
Known Compatible Third-Party Add-Ins .................................................................................... 17 Connect for Microsoft Outlook Add-Ins ..................................................................................... 18
Microsoft Office 2007 Add-Ins ................................................................................................... 18
Microsoft Office 2010 Add-Ins ................................................................................................... 18
Third-Party Add-Ins ................................................................................................................... 19
Check for Third-Party Add-Ins Installed in Outlook ................................................................... 19
Disable Third-Party Add-Ins Installed in Outlook ...................................................................... 20 Re-Enable Connect for Microsoft Outlook Add-Ins ................................................................... 21
Supported Deltek Configurations ................................................................................................... 23
Multiple Users Who Use the Same Workstation ....................................................................... 23
Users with Multiple Mail Profiles ............................................................................................... 23
Languages ................................................................................................................................. 24 Customization for User-Defined Fields and Synchronization ................................................... 24
Microsoft Office Desktop Integration (MODI) ............................................................................ 24
Licensing ................................................................................................................................... 25
Non-Supported Environments ....................................................................................................... 26
Mobile Devices .......................................................................................................................... 26
Outlook Web Access ................................................................................................................. 28

Installation Guide iv
Outlook Contact Folders Without the "Contact" Name ............................................................. 28
Lotus Notes ............................................................................................................................... 28
Microsoft Outlook Delegates ..................................................................................................... 28
Vision Synchronization Server Migrations ..................................................................................... 29 Required Steps to Prevent Duplicate Contact Records ............................................................ 29
Synchronize Connect for Microsoft Outlook for the First Time ................................................. 29
Install and Configure Connect for Microsoft Outlook — New Installations .................................... 32
Summary of Installation and Configuration Steps ..................................................................... 32
Download and Install Connect for Microsoft Outlook onto Your Vision Web Server ................ 34
Synchronization Server and Other Migrations: Prevent Duplicate Contacts ............................ 36 Activate Connect for Microsoft Outlook ..................................................................................... 38
Select Vision Fields that Determine Duplicate Records (Duplicate Check Formulas) .............. 39
Specify Where You Want Vision Activities to Display ............................................................... 44
Provide Security Access to Connect for Microsoft Outlook Users ............................................ 46
Configuration Settings Passed from Vision to Connect for Microsoft Outlook .......................... 50 Back Up Your Outlook Data ...................................................................................................... 50
Download and Install Connect for Microsoft Outlook on a Workstation Using Vision Utilities .. 51
Download and Install Connect for Microsoft Outlook on Multiple Workstations Using Command Line Parameters ........................................................................................................................ 56
Configure Connect for Microsoft Outlook on a Workstation ...................................................... 61
Access and Use Connect for Microsoft Outlook ............................................................................ 79 Vision and Outlook Options and Functionality .......................................................................... 79
Vision Folders and Records ...................................................................................................... 80
Explorer View ............................................................................................................................ 81
Vision Toolbar ........................................................................................................................... 83
Outlook Menu Bar ..................................................................................................................... 84
Connect for Microsoft Outlook Application States ......................................................................... 86 Upgrade Installations ..................................................................................................................... 90
Upgrade Connect for Microsoft Outlook on Your Vision Web Server ....................................... 90
Upgrade Connect for Microsoft Outlook on Client Workstations .............................................. 91
Uninstall Connect for Microsoft Outlook for a Single User ............................................................ 93
If You Use Microsoft Office Desktop Integration (MODI) .......................................................... 93 Uninstall Procedure ................................................................................................................... 93
Uninstall Connect for Microsoft Outlook Using Microsoft SCCM .................................................. 95
Connect for Microsoft Outlook Cleanup Utility ............................................................................... 96
Troubleshooting ............................................................................................................................. 99
Audit Reports ............................................................................................................................. 99

Installation Guide v
General Log ............................................................................................................................... 99
Advanced Logs ........................................................................................................................ 100
Vision Data Structure is Inconsistent ...................................................................................... 101
Connect for Microsoft Outlook Does Not Start When You Launch Outlook ............................ 102 Appendix A: Complete and Incomplete Records ......................................................................... 103
Complete Records ................................................................................................................... 103
Incomplete Records ................................................................................................................ 103
How to Distinguish Incomplete Records from Complete Records .......................................... 104
Example: ................................................................................................................................. 104
Appendix B: Contact Forms ......................................................................................................... 106 Appendix C: Compare and Merge Duplicate Contacts................................................................ 108
Which Contact Records Are Compared for Duplicates? ......................................................... 108
If Duplicate Contacts Are Found ............................................................................................. 109
Auto-Merge Rules for Duplicate Contacts ............................................................................... 112
Appendix D: Synchronization Filters............................................................................................ 115 Default Filters .......................................................................................................................... 115
Filter Conditions for Associated Records ................................................................................ 117
Group Filter Conditions ........................................................................................................... 123
Wildcards (Asterisks) for Conditions ....................................................................................... 128
IN Condition ............................................................................................................................. 129
Filter Exceptions ...................................................................................................................... 129 Filters and the Vision Client Hierarchy Feature ...................................................................... 131
Appendix E: Synchronization Schedules ..................................................................................... 132
Manual Synchronization .......................................................................................................... 132
Automatic Synchronization ...................................................................................................... 133
Change Synchronization Settings ........................................................................................... 133
Appendix F: Vision Records and Fields in Connect for Microsoft Outlook .................................. 134 Activity Record ........................................................................................................................ 134
Client Record ........................................................................................................................... 135
Contact Record ....................................................................................................................... 136
Opportunity Record ................................................................................................................. 137
Vendor Record ........................................................................................................................ 138

Overview
Installation Guide 1
Overview This guide provides the information that you need to install Deltek Vision Connect for Microsoft Outlook for Vision 7.1, 7.2, or 7.3 on your Vision Web server and how to install, implement, and configure it on users' workstations.
The version of Connect for Microsoft Outlook that is provided with Vision versions 7.1, 7.2, and 7.3 is version 1.3.3.24 as of October 3, 2014.
This guide includes the following information:
Instructions for new installations and upgrade installations.
Software requirements necessary to use Connect for Microsoft Outlook.
Security considerations.
Information for users who are migrating from Deltek Vision Synchronization Server to Connect for Microsoft Outlook.
Instructions to download and install Connect for Microsoft Outlook on your Vision Web server.
Global configuration steps that a Vision system administrator must complete before installing Connect for Microsoft Outlook on users' workstations.
Instructions to install and configure Connect for Microsoft Outlook on users' workstations.
Instructions to upgrade and uninstall Connect for Microsoft Outlook on users' workstations.
What is Deltek Vision Connect for Microsoft Outlook? Deltek Vision Connect for Microsoft Outlook is add-in software that allows you to perform important and common Vision tasks directly in Microsoft Outlook. You can manage Vision business appointments, email messages, and contacts, as well as Vision clients, activities, and opportunities, all from Outlook.
After you install and configure Connect for Microsoft Outlook, when you open Outlook, Connect for Microsoft Outlook functionality is included in Outlook.
When you use Connect for Microsoft Outlook, you have the full functionality of Outlook as well as the following Vision functionality in Outlook:
Activity management — You can create and manage Vision activities, calendar items, and tasks and link them to Vision client, contact, employee, opportunity, or project records.
Contact, client, and vendor management — You can add or modify Vision contacts, clients, and vendors and link them to other Vision records.
Email message management — You can create and manage email messages related to Vision and link them to Vision records.
Opportunity management — You can manage Vision opportunities and related information.
Employee and Project reference — You can associate Vision employees and projects to other Vision records.

Overview
Installation Guide 2
Connect for Microsoft Outlook provides you with the following capabilities:
Bi-directional synchronization — The incremental and bi-directional synchronization process ensures that information between Connect for Microsoft Outlook and the Vision application stays up-to-date and consistent. You can set up a schedule for synchronization to occur at a regular time interval. You also have the option to perform a synchronization manually at any time.
Disconnected support — You can work with Vision data in Outlook even when you are disconnected from the Vision database.
Connect for Microsoft Outlook is a Vision application that you purchase separately from the core Vision software. Contact your Deltek representative for more information about purchasing Connect for Microsoft Outlook if you do not already own it.
Connect for Microsoft Outlook Documentation
Terminology In the Connect for Microsoft Outlook documentation, when we refer to Connect for Microsoft Outlook, we are referring to opening Outlook with the Vision Connect for Microsoft Outlook add-in software installed.
Microsoft Outlook 2007 The Connect for Microsoft Outlook documentation and screen shots are based on Microsoft Outlook 2007, unless otherwise noted.
Online Help The Connect for Microsoft Outlook online help:
Provides information on how to use Connect for Microsoft Outlook and how to modify Connect for Microsoft Outlook configuration settings after you initially set them up.
Is accessible when you have Connect for Microsoft Outlook either online or offline.
After you install and configure Connect for Microsoft Outlook on a workstation, you can access the Connect for Microsoft Outlook online help in Outlook. The following sections show you where the Connect for Microsoft Outlook help is located in the different Outlook versions.

Overview
Installation Guide 3
Outlook 2013
To open the Connect for Microsoft Outlook help in Outlook 2013: In Outlook, open the File tab and click Office Account in the pane on the left. Then click the Connect for Microsoft Help icon at the bottom of the screen.
Outlook 2010
To open the Connect for Microsoft Outlook help in Outlook 2010: In Outlook, open the File tab and click Help in the pane on the left. Then click the Connect for Microsoft Help icon at the bottom of the screen.
Overview
Installation Guide 4
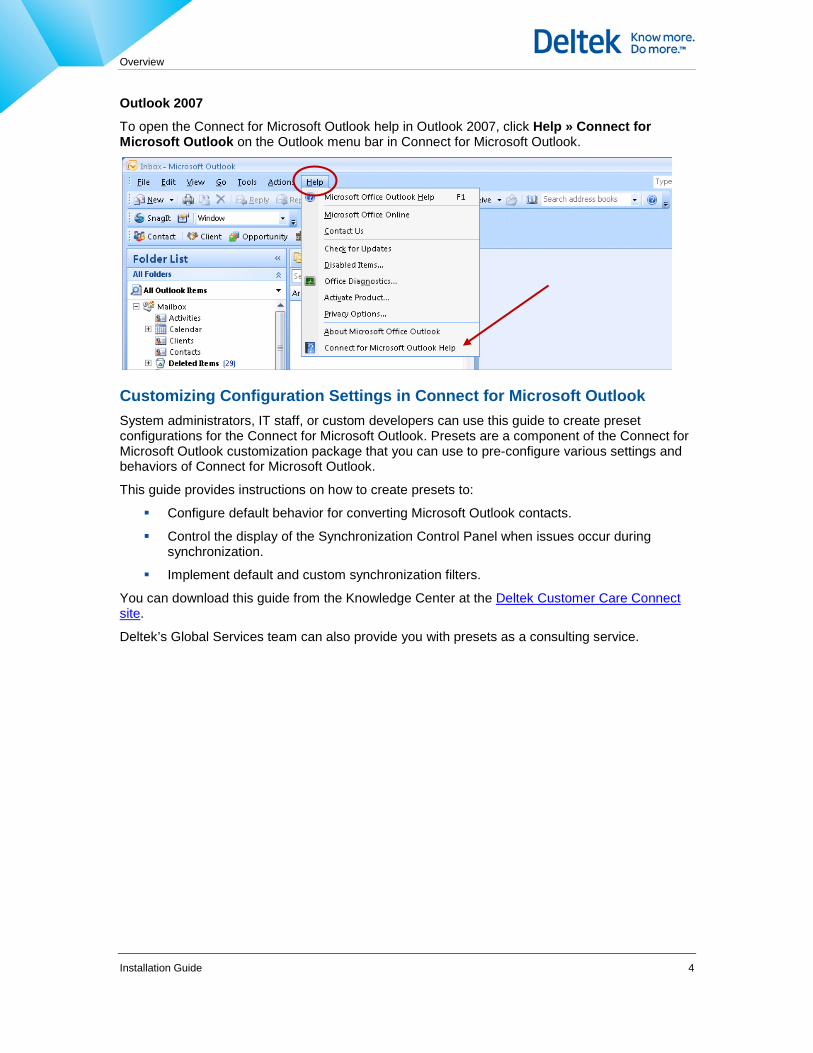
Outlook 2007
To open the Connect for Microsoft Outlook help in Outlook 2007, click Help » Connect for Microsoft Outlook on the Outlook menu bar in Connect for Microsoft Outlook.
Customizing Configuration Settings in Connect for Microsoft Outlook System administrators, IT staff, or custom developers can use this guide to create preset configurations for the Connect for Microsoft Outlook. Presets are a component of the Connect for Microsoft Outlook customization package that you can use to pre-configure various settings and behaviors of Connect for Microsoft Outlook.
This guide provides instructions on how to create presets to:
Configure default behavior for converting Microsoft Outlook contacts.
Control the display of the Synchronization Control Panel when issues occur during synchronization.
Implement default and custom synchronization filters.
You can download this guide from the Knowledge Center at the Deltek Customer Care Connect site.
Deltek’s Global Services team can also provide you with presets as a consulting service.

Adding Custom Notes to This Guide
Installation Guide 5
Adding Custom Notes to This Guide If you would like to add custom notes to this guide that are specific to your company, Adobe® Reader® X provides this ability. If you do not already use Adobe Reader X, you can download it here free from Adobe.
To add a custom note using Adobe Reader X, complete the following steps:
1. On the Reader toolbar, click Comment at the far right.
2. In the Annotations pane that displays, click Sticky Note. The cursor changes to match the button.
3. Position the cursor at the location in the guide where you want the note to appear, and click. A note icon is inserted at the location and a text box pops up.
4. Enter your information in the text box.
5. Continue adding notes as needed.
6. Save the document.
Deltek recommends that you save the document to a slightly different filename so as to keep the original file from being overwritten.
When reading the document, cursor over a note icon to see the information. Double-click a note icon to edit the information.

If You Need Assistance
Installation Guide 6
If You Need Assistance If you need assistance installing, implementing, or using Vision Connect for Microsoft Outlook, Deltek makes a wealth of information and expertise readily available to you.
Customer Services For over 20 years, Deltek has maintained close relationships with client firms, helping with their problems, listening to their needs, and getting to know their individual business environments. A full range of customer services has grown out of this close contact, including the following:
Extensive self-support options through the Customer Care Connect Web portal.
Phone and email support from Customer Care analysts
Technical services
Consulting services
Custom programming
Classroom, on-site, and Web-based training
Find out more about these and other services from the Customer Care Connect site.
Customer Care Connect Site The Deltek Customer Care Connect site is a support Web portal for Deltek customers who purchase an Ongoing Support Plan (OSP).
The following are some of the many options you have at the Customer Care Connect site:
Download the latest versions of your Deltek products
Search Deltek’s knowledge base
Ask questions, exchange ideas, and share knowledge with other Deltek customers through the Deltek Connect Customer Forums
Display or download product information, such as release notes, user guides, technical information, and white papers
Submit a support case and check on its progress
Transfer requested files to a Customer Care analyst
Use Quick Chat to submit a question to a Customer Care analyst online
Subscribe to Deltek communications about your Deltek products and services
Receive alerts of new Deltek releases and hot fixes
If you need assistance using the Customer Care Connect site, the online help available on the site provides answers for most questions.
If You Need Assistance
Installation Guide 7
Access Customer Care Connect
To access the Customer Care Connect site, complete the following steps:
1. Go to http://support.deltek.com.
2. Enter your Customer Care Connect Username and Password.
3. Click Log In.
If you do not have a username and password for the Customer Care Connect site, contact your firm’s Vision Administrator.
If you forget your username or password, you can click the Account Assistance button on the login screen for help.

Downloading Deltek Products Using Deltek Software Manager
Installation Guide 8
Downloading Deltek Products Using Deltek Software Manager You can use Deltek Software Manager (DSM) to download complete Deltek products, hot fixes, and sub-releases. You can access DSM directly or through the Deltek Customer Care Connect site.
When you access DSM directly, you will be prompted to log on before you can access the application. If you access DSM from within the Deltek Customer Care Connect site, you do not have to log on since you are already logged into the Customer Care Connect site.
Accessing DSM Directly To access Deltek Software Manager directly, complete the following steps:
1. Launch Deltek Software Manager by taking one of the following actions:
Click here.
On your desktop, click Start » Programs » Deltek » Vision » Deltek Software Manager.
2. On the Deltek Software Manager logon dialog box, enter your Deltek Customer Care Connect User ID and Password, and click Logon.
3. To select the folder where you want to download Deltek products, click Settings above the right pane of Deltek Software Manager.
When you log on for the first time, Deltek Software Manager asks you to select a default folder where Deltek products are to be downloaded.
4. Use the Settings dialog box to specify the folder where you want to download Deltek products, and click OK.
You can change this folder anytime on the Settings dialog box.
5. In the left pane of Deltek Software Manager, expand the Deltek product that you want to download, if it is not already expanded.
If you clicked the link in step 1 to access DSM, the application automatically selects Vision for you.
6. Select the product type that you want to download. Your options are Complete, HotFix, and Sub-Release.
7. In the table, select the check box that corresponds to the Deltek product that you want to download. The right pane displays a message stating that the product has been added to the download queue.
To view the items in the download queue, click View Download Queue at the bottom of the left pane.

Downloading Deltek Products Using Deltek Software Manager
Installation Guide 9
8. Click Download at the bottom of the left pane. Deltek Software Manager downloads the product to the folder that you selected.
Accessing DSM from Within the Customer Care Connect Site To access Deltek Software Manager from within Customer Care Connect site, complete the following steps:
In your Web browser, go to http://support.deltek.com.
1. Enter your Customer Care Connect Username and Password, and click Log In.
2. When the Customer Care Connect site displays, click the Product Downloads tab.
You are automatically logged in Deltek Software Manager.
3. To select the folder where you want to download Deltek products, click Settings above the right pane of Deltek Software Manager.
When you log on for the first time, Deltek Software Manager asks you to select a default folder where Deltek products are to be downloaded.
4. Use the Settings dialog box to specify the folder where you want to download Deltek products, and click OK.
You can change this folder anytime in the Settings dialog box.
5. In the left pane of Deltek Software Manager, expand the Deltek product that you want to download, if it is not already expanded.
6. Select the product type that you want to download. Your options are Complete, HotFix, and Sub-Release.
7. In the table, select the check box that corresponds to the Deltek product that you want to download. The right pane displays a message stating that the product has been added to the download queue.
To view the items in the download queue, click View Download Queue at the bottom of the left pane.
8. Click Download at the bottom of the left pane. Deltek Software Manager downloads the product to the folder that you selected.
DSM Documentation and Troubleshooting To view the online help for Deltek Software Manager, click here.
To view a tutorial on how to use Deltek Software Manager, click here.
To view more information on troubleshooting Deltek Software Manager, click here.
The above troubleshooting link will only work if you are logged into Deltek Customer Care Connect.

Software Requirements for Connect for Microsoft Outlook
Installation Guide 10
Software Requirements for Connect for Microsoft Outlook You must have the following software installed before you install and use Vision Connect for Microsoft Outlook 7.1, 7.2, or 7.3.
Supported operating systems installed on workstations:
Microsoft Windows 8.1, 32-bit or 64-bit (x64)
Microsoft Windows 8.0, 32-bit or 64-bit (x64)
Microsoft Windows 7 SP1, 32-bit and 64-bit (x64)
Microsoft Windows Vista SP2, 32-bit and 64-bit (x64)
Microsoft Windows Professional XP SP3, 32-bit and 64-bit (x64)
Supported Microsoft Office versions installed on workstations:
Microsoft Office 365 — The Outlook component of Office 365 (with a full local installation of Microsoft Outlook configured with the Cached Exchange Mode enabled). For adequate user experience and performance, Deltek recommends a reliable network connection with a throughput of 100 Kbps or better.
Microsoft Office 2013, 32-bit and 64-bit
Microsoft Office 2010, 32-bit version only
Microsoft Office 2007 SP2
Microsoft Office 2003 SP3
Microsoft Office 2010 products are available in 64-bit versions. However, for the best productivity and user experience, Microsoft recommends 32-bit Office 2010 for both 32-bit and 64-bit operating systems. Office 2010 64-bit is optimized for advanced data analysis scenarios that most users do not require, and existing 32-bit add-ins are not supported on Office 64-bit.
For more information about Office 2010 64-bit, see the following Microsoft Web page:
http://office.microsoft.com/en-us/products/office-2010-frequently-asked-questions-HA101674631.aspx#About_Office_2010_4
Supported Microsoft Outlook versions installed on workstations:
Microsoft Outlook 365, with a full local installation of Microsoft Outlook configured with the Cached Exchange Mode enabled. For adequate user experience and performance, Deltek recommends a reliable network connection with a throughput of 100 Kbps or better.
Microsoft Outlook 2013, 32-bit and 64-bit
Microsoft Outlook 2010, 32-bit version only
Microsoft Outlook 2007 SP2
Microsoft Outlook 2003 SP3

Software Requirements for Connect for Microsoft Outlook
Installation Guide 11
Supported Microsoft Exchange Server versions installed on your email server:
Microsoft Exchange Server 2013, Cached Exchange Mode only
Microsoft Exchange Server 2010, Cached Exchange Mode only
Microsoft Exchange Server 2007 SP2, Cached Exchange Mode only
Microsoft Exchange Server 2003 SP2, Cached Exchange Mode only
If your firm currently has Connect for Microsoft Outlook deployed with Microsoft Exchange and you plan to migrate your Exchange server from an on-premise implementation to a hosted instance (such as Office 365 or another email vendor): Before you migrate, all users who have Connect for Microsoft installed must uninstall Connect for Microsoft from their workstations, and then restart Microsoft Outlook to make sure that the Vision data has been deleted and those deletions have been synchronized with Microsoft Exchange.
If this is not performed before any mailbox migrations, the Vision data that was previously synchronized into the mailbox becomes stranded and then you must manually remove the data.
Supported Microsoft Outlook Configurations
Installation Guide 12
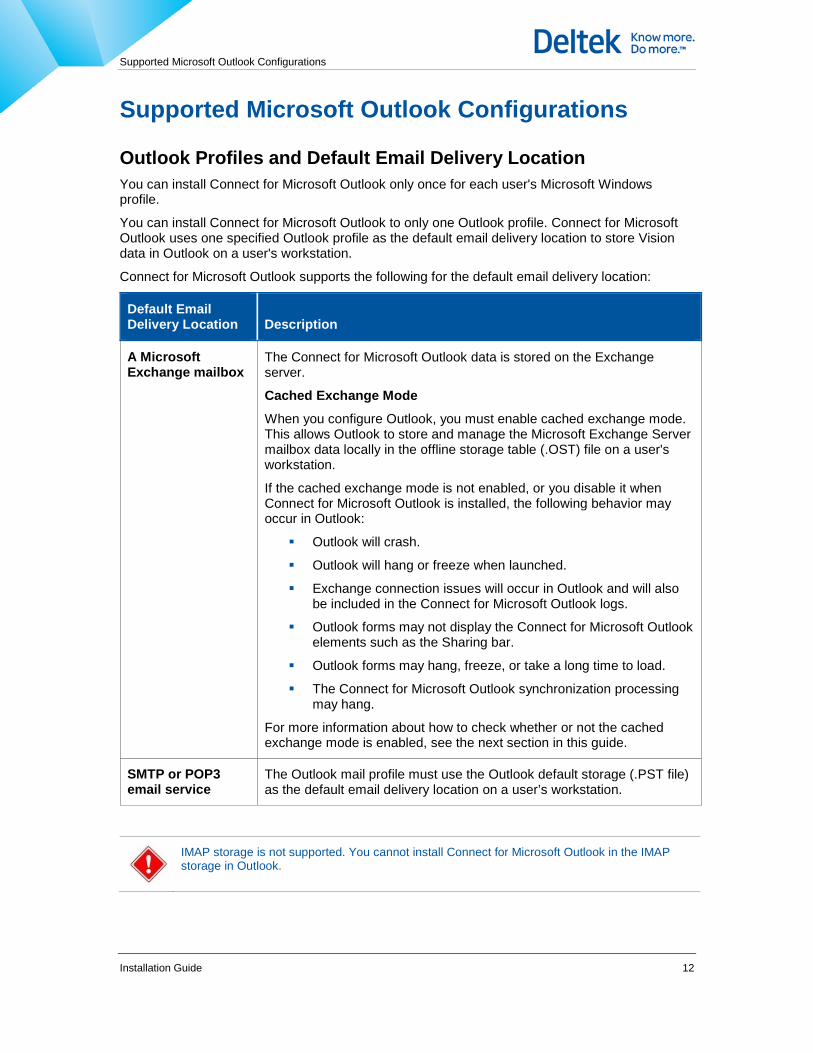
Supported Microsoft Outlook Configurations
Outlook Profiles and Default Email Delivery Location You can install Connect for Microsoft Outlook only once for each user's Microsoft Windows profile.
You can install Connect for Microsoft Outlook to only one Outlook profile. Connect for Microsoft Outlook uses one specified Outlook profile as the default email delivery location to store Vision data in Outlook on a user's workstation.
Connect for Microsoft Outlook supports the following for the default email delivery location:
Default Email Delivery Location Description
A Microsoft Exchange mailbox
The Connect for Microsoft Outlook data is stored on the Exchange server.
Cached Exchange Mode
When you configure Outlook, you must enable cached exchange mode. This allows Outlook to store and manage the Microsoft Exchange Server mailbox data locally in the offline storage table (.OST) file on a user's workstation.
If the cached exchange mode is not enabled, or you disable it when Connect for Microsoft Outlook is installed, the following behavior may occur in Outlook:
Outlook will crash.
Outlook will hang or freeze when launched.
Exchange connection issues will occur in Outlook and will also be included in the Connect for Microsoft Outlook logs.
Outlook forms may not display the Connect for Microsoft Outlook elements such as the Sharing bar.
Outlook forms may hang, freeze, or take a long time to load.
The Connect for Microsoft Outlook synchronization processing may hang.
For more information about how to check whether or not the cached exchange mode is enabled, see the next section in this guide.
SMTP or POP3 email service
The Outlook mail profile must use the Outlook default storage (.PST file) as the default email delivery location on a user’s workstation.
IMAP storage is not supported. You cannot install Connect for Microsoft Outlook in the IMAP storage in Outlook.

Supported Microsoft Outlook Configurations
Installation Guide 13
You can install Connect for Microsoft Outlook only once per mailbox. You cannot install it to the same user mailbox on multiple workstations or profiles. For example, you cannot install Connect for Microsoft Outlook on both your laptop and desktop machines. If you do, you receive a data structure collision error when you install Connect for Microsoft Outlook on the other workstations.
Cached Exchange Mode Use the following instructions to check whether the cached exchange mode is enabled for an Outlook mail profile on a workstation and change the setting if needed. These steps apply for all versions of Microsoft Outlook.
To check and change the cached exchanged mode setting for an Outlook mail profile on a workstation, complete the following steps:
1. On a workstation, exit Microsoft Outlook.
2. Open the Microsoft Windows Control Panel.
3. Complete one of the following, based on the version of Windows that you have:
For Windows 7 users, in the upper right corner of the Adjust your computer’s settings screen, select either Small icons or Large icons in the View by drop-down list.
For Windows XP or Windows Vista users, click Switch to Classic View.
4. Click the Mail icon.
If you are using a 64-bit machine, click the Mail (32-bit) icon.
5. On the Mail Setup – Outlook dialog box, click the Show Profiles… button.

Supported Microsoft Outlook Configurations
Installation Guide 14
6. On the General tab of the Mail dialog box, click the mail profile that you want to check or change, and then click the Properties button.
7. On the Mail Setup – Outlook dialog box, click the E-mail Accounts… button.

Supported Microsoft Outlook Configurations
Installation Guide 15
8. On the E-mail tab of the Account Settings dialog box, click the Change… icon that is located directly below the row of tabs.
9. On the Change Account dialog box, make sure that the Use Cached Exchange Mode
check box below the Server field is selected.
The check box must be selected for Vision Connect for Microsoft Outlook to work properly.
10. Exit the Change Account program:
If you made no changes, click Cancel to exit the Change Account program.
If you changed the Use Cached Exchange Mode setting, click the Next button to continue on and save the new setting.

Supported Microsoft Outlook Configurations
Installation Guide 16
11. Launch Microsoft Outlook for the changes to take effect.
Outlook will begin to save the mailbox data into the local cached copy. Allow the process to finish before you install Connect for Microsoft Outlook.
Third-Party Outlook Add-Ins
Installation Guide 17
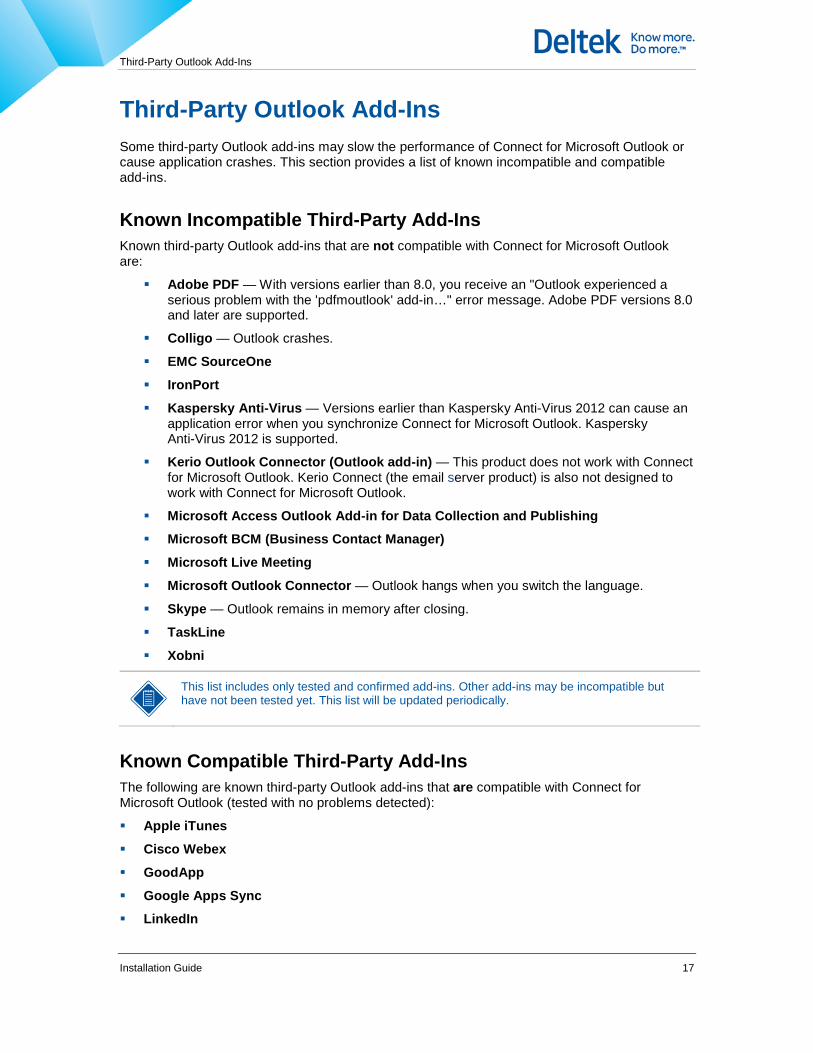
Third-Party Outlook Add-Ins Some third-party Outlook add-ins may slow the performance of Connect for Microsoft Outlook or cause application crashes. This section provides a list of known incompatible and compatible add-ins.
Known Incompatible Third-Party Add-Ins Known third-party Outlook add-ins that are not compatible with Connect for Microsoft Outlook are:
Adobe PDF — With versions earlier than 8.0, you receive an "Outlook experienced a serious problem with the 'pdfmoutlook' add-in…" error message. Adobe PDF versions 8.0 and later are supported.
Colligo — Outlook crashes.
EMC SourceOne
IronPort
Kaspersky Anti-Virus — Versions earlier than Kaspersky Anti-Virus 2012 can cause an application error when you synchronize Connect for Microsoft Outlook. Kaspersky Anti-Virus 2012 is supported.
Kerio Outlook Connector (Outlook add-in) — This product does not work with Connect for Microsoft Outlook. Kerio Connect (the email server product) is also not designed to work with Connect for Microsoft Outlook.
Microsoft Access Outlook Add-in for Data Collection and Publishing
Microsoft BCM (Business Contact Manager)
Microsoft Live Meeting
Microsoft Outlook Connector — Outlook hangs when you switch the language.
Skype — Outlook remains in memory after closing.
TaskLine
Xobni
This list includes only tested and confirmed add-ins. Other add-ins may be incompatible but have not been tested yet. This list will be updated periodically.
Known Compatible Third-Party Add-Ins The following are known third-party Outlook add-ins that are compatible with Connect for Microsoft Outlook (tested with no problems detected):
Apple iTunes
Cisco Webex
GoodApp
Google Apps Sync

Third-Party Outlook Add-Ins
Installation Guide 18
Mindjet MindManager
OneNote Notes about Outlook Items
Outlook Social Connector
Redemption Helper Outlook Extension
Skype Toolbar
This list includes only tested and confirmed add-ins. Other add-ins may be compatible but have not been tested yet. This list will be updated periodically.
Connect for Microsoft Outlook Add-Ins The two add-ins that are installed when you install Connect for Microsoft Outlook are:
Connect for Microsoft Outlook
CRMDesktop Ribbon Helper
Microsoft Office 2007 Add-Ins Microsoft Office 2007 installs the following COM (Component Object Model) add-ins by default:
Microsoft Access Outlook Add-in for Data Collection and Publishing
Microsoft Exchange Unified Messaging
Microsoft Office Groove Proxy for Outlook Add-in
Microsoft Office SharePoint Server Colleague Import Add-in
Microsoft Office Outlook Mobile Service
Microsoft VBA for Outlook Add-in
OneNote Notes about Outlook Items
Windows Search E-mail Indexer
Microsoft Office 2010 Add-Ins Microsoft Office 2010 installs the following COM (Component Object Model) add-ins by default:
Microsoft Office Communicator 2007 Add-ins
Business Connectivity Services Add-In
Microsoft SharePoint Server Colleague Import Add-in
Microsoft Exchange Add-kin
Microsoft SharePoint Workspace Proxy for Outlook Add-in
OneNote Notes about Outlook Items
Microsoft Outlook Social Connector

Third-Party Outlook Add-Ins
Installation Guide 19
Third-Party Add-Ins Any COM add-ins listed in the Trust Center other than the Microsoft Office 2007 add-ins and Connect for Microsoft Outlook add-ins are third-party software add-ins.
You must disable all of the add-ins from the above list of known incompatible third-party add-ins that display in the Active Applications Add-ins section of the Trust Center Add-ins screen. After that, if you still experience any crashes in Connect for Microsoft Outlook, disable the other third-party add-ins.
Check for Third-Party Add-Ins Installed in Outlook To check for third-party Outlook add-ins before you install Connect for Microsoft Outlook, complete the following steps in Outlook 2007:
1. Open Outlook.
2. On the Outlook menu bar, click Tools » Trust Center. (In Outlook 2010, click File » Options » Add-Ins. This directly opens the Add-ins screen.)
3. On the Trust Center dialog box, click Add-ins.
Active, inactive, and disabled application add-ins are identified on the Add-ins screen.
Third-Party Outlook Add-Ins
Installation Guide 20
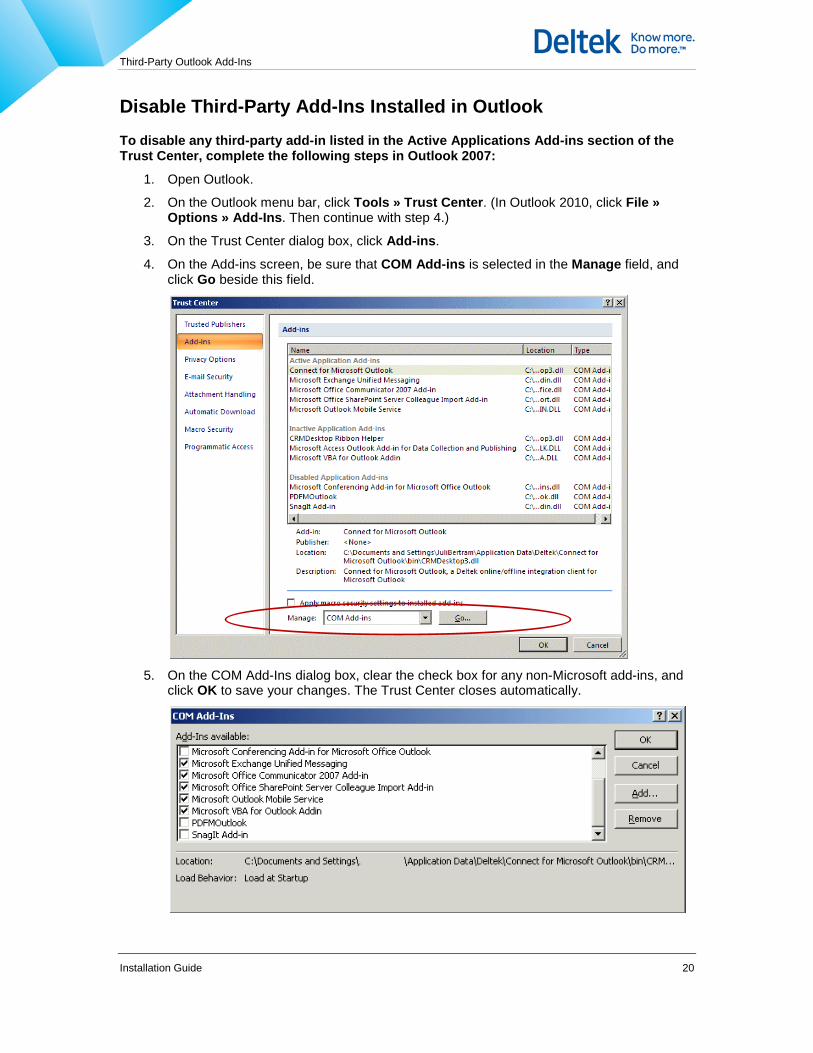
Disable Third-Party Add-Ins Installed in Outlook To disable any third-party add-in listed in the Active Applications Add-ins section of the Trust Center, complete the following steps in Outlook 2007:
1. Open Outlook.
2. On the Outlook menu bar, click Tools » Trust Center. (In Outlook 2010, click File » Options » Add-Ins. Then continue with step 4.)
3. On the Trust Center dialog box, click Add-ins.
4. On the Add-ins screen, be sure that COM Add-ins is selected in the Manage field, and click Go beside this field.
5. On the COM Add-Ins dialog box, clear the check box for any non-Microsoft add-ins, and
click OK to save your changes. The Trust Center closes automatically.

Third-Party Outlook Add-Ins
Installation Guide 21
When you click Tools » Trust Center » Add-ins again, you should now see any add-ins that you disabled listed in the Disabled Application Add-ins section.
Re-Enable Connect for Microsoft Outlook Add-Ins If the Connect for Microsoft Outlook add-ins become disabled, which can happen if a third-party add-in causes Connect for Microsoft Outlook to crash, you must re-enable them.
To re-enable the Connect for Microsoft Outlook add-ins in Outlook 2007, complete the following steps:
1. Open Outlook.
2. On the Outlook menu bar, click Tools » Trust Center. (In Outlook 2010, click File » Options » Add-Ins. Then continue with step 4.)
3. On the Trust Center dialog box, click Add-ins.
4. On the Add-in screen, click Connect for Microsoft Outlook in the Disabled Applications Add-in section of the box that lists all the add-ins.
5. From the drop-down list in the Manage field at the bottom of the screen, select Disabled Add-ins and click Go.
6. On the Disabled Items dialog box, click the Enable button.
7. On the Add-ins screen, click OK.
8. Repeat steps 4 through 7 for the CRM Desktop Ribbon Helper add-in.
9. Close and reopen Outlook.
Third-Party Outlook Add-Ins
Installation Guide 22
If the Connect for Microsoft Outlook add-in does not display at all in any of the add-in lists or Add-in screens, use the following steps to add it:
1. On the Trust Center Add-ins screen, select Com Add-ins in the Manage field and click Go.
2. On the Com Add-ins dialog box, click the Add button, and then navigate to C:\Documents and Settings\<your user name>Application Data\Deltek\Connect for Microsoft Outlook\bin.
3. Select the CRMDesktop3.dll file and click OK.
4. Close and reopen Outlook.
Connect for Microsoft Outlook should now display on the Trust Center Add-in screen as an active add-in.

Supported Deltek Configurations
Installation Guide 23
Supported Deltek Configurations
Multiple Users Who Use the Same Workstation When a user on a workstation installs Connect for Microsoft Outlook, it is installed into that individual user's Windows local profile location for applications.
The Windows local profile location for applications is as follows for the different Windows operating systems:
For Windows 7 and Windows Vista, it is located in C:\Users\<UserName>\Roaming\Deltek\Connect for Microsoft Outlook.
For Windows XP, it is located in C:\Documents and Settings\<UserName>\Deltek\Connect for Microsoft Outlook.
Individual users must complete a separate installation of Connect for Microsoft Outlook on the shared workstation while logged in as themselves. The Connect for Microsoft Outlook application is installed within each user’s profile and is visible only to the user who performed the installation.
For example, Mary, Tom, and Larry share workstation A and log into it at different times of the day. Mary logs into the workstation first and installs Connect for Microsoft Outlook and configures it when she launches Outlook. If Mary browses to %AppData\Deltek\Connect For Microsoft Outlook\, she will see her installation of Connect for Microsoft Outlook. When Tom or Larry eventually logs into the machine, neither of them will see Mary's installation. They must perform their own installation of Connect for Microsoft Outlook on workstation A.
Connect for Microsoft Outlook cannot be installed on multiple machines using Outlook profiles configured to the same mailbox. To install it on a single workstation, you must be logged into that machine as the user account whose mailbox is being used. That user must be a member of the local administrator group on that machine during the installation. Local administrator rights are not needed after the installation.
If you install Connect for Microsoft Outlook on multiple machines using Outlook profiles configured to the same mailbox, you can damage the mailbox customizations, which may be time consuming to fix.
Users with Multiple Mail Profiles When users install Connect for Microsoft Outlook on their workstations, a user's mailbox is updated to accommodate the Vision data that will be accessed and manipulated from Microsoft Outlook. Connect for Microsoft Outlook uses the Outlook Mail Profile to update the mailbox.
Occasionally, some users may have one Outlook mail profile configured to access their personal email account (GMail, AOL, and so on) and another Outlook mail profile to access their corporate (work) email account. If a user has used the Mail icon in the Windows Control Panel to create multiple email profiles for different mailboxes, the Connect for Microsoft Outlook installation will recognize the additional mail profiles and prompt the user to choose which profile to use. Connect for Microsoft Outlook can be installed for only one Outlook Mail profile.

Supported Deltek Configurations
Installation Guide 24
Languages The following languages are supported for Connect for Microsoft Outlook:
English (United States)
English (International)
Customization for User-Defined Fields and Synchronization Deltek Global Services can perform the following types of customization for Connect for Microsoft Outlook:
Add user-defined fields or grids to the Connect for Microsoft Outlook forms (Activity, Calendar, Client, Contact, Opportunity, Task, and Vendor forms).
Add presets for synchronization filters. Presets allow you to select a pre-defined filter configuration on the Synchronization Control Panel dialog box in Connect for Microsoft Outlook. Thus, you avoid the complex task of building the correct filters from scratch.
Limit synchronization frequency for users.
Apply hidden synchronization filters. You can create a filter in the XML file that determines the maximum set of records that users can synchronize. Any filter set by individual users would be a subset of the hidden filter. For example, in the XML file you could set it up so that users can synchronize opportunities only in their own organization. If a user sets up a filter based on opportunity probability without including organizations, then the user could synchronize only the opportunities in his or her own organization that match the probability filter.
Microsoft Outlook has a technical limitation that allows a form to have only one rich-text field. If a rich-text field already exists on a form, then you cannot add user-defined memo fields to the form as rich-text fields. However, you can add user-defined memo fields as unlimited plain-text fields. If a memo field is added to Connect for Microsoft Outlook as a plain-text field, then:
The memo field will contain HTML codes that control the format of the field in Vision.
If a user makes changes to the text in the memo field and the field was previously formatted in Vision, this formatting may be lost. Any new text that you add to the memo field will not be formatted.
Microsoft Outlook has a technical limitation that allows a form to have only one URL field. If a form already contains a URL field, then URL user-defined fields must be added as plain-text fields. A URL in a plain-text field will not contain a hyperlink to the URL.
If you have questions about user-defined fields, presets, and other customization, contact Deltek Global Services.
Microsoft Office Desktop Integration (MODI) The Outlook portion of MODI is disabled when you install Connect for Microsoft Outlook, but you can use other parts of MODI.

Supported Deltek Configurations
Installation Guide 25
Licensing Connect for Microsoft Outlook is a Vision application that you purchase separately from the core Vision software. Contact your Deltek representative for more information about purchasing Connect for Microsoft Outlook.
Non-Supported Environments
Installation Guide 26
Non-Supported Environments
Mobile Devices The Vision-only data fields from Connect for Microsoft Outlook are not available on mobile devices. If you use a mobile device and you synchronize it with Connect for Microsoft Outlook-enabled Outlook via Microsoft Exchange ActiveSync® or some other mechanism, Vision contacts, calendar items, and tasks synchronize to your mobile device. However, only the native (standard) Outlook data fields for those Vision records are synchronized.
The following fields do not synchronize from a mobile device to Connect for Microsoft Outlook:
Business Address
Home Address
The Contact’s Client/Vendor Name (Outlook Company)
Job Title
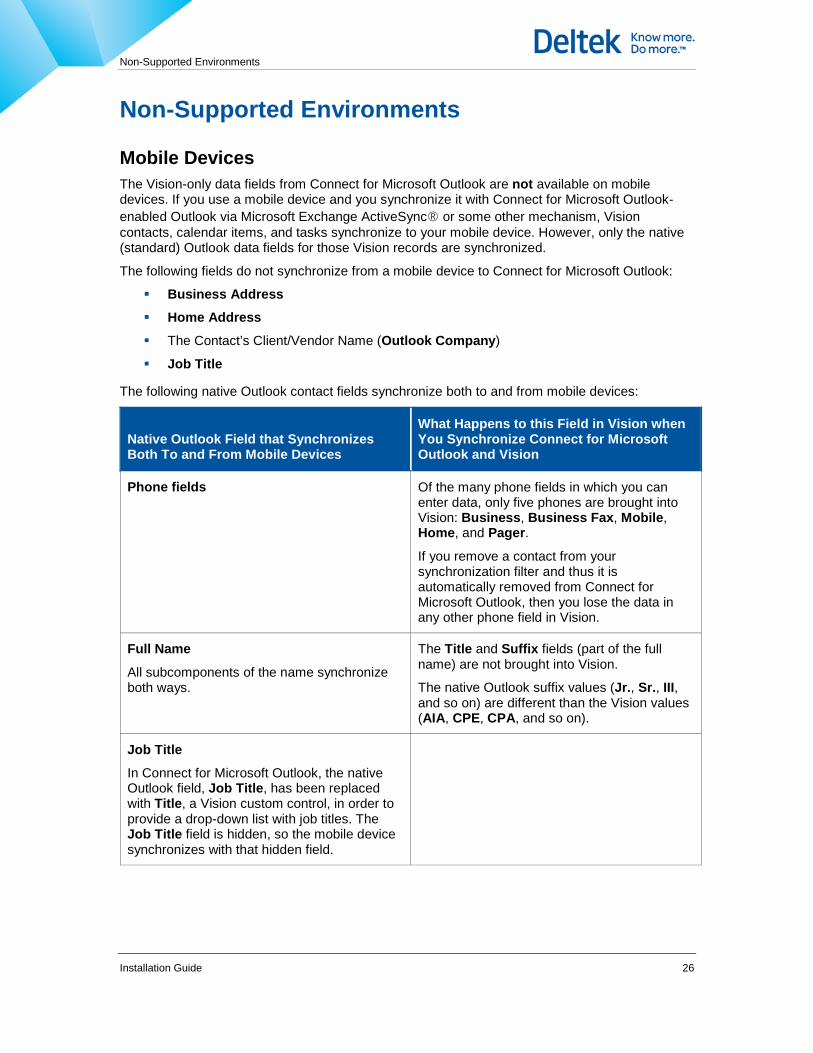
The following native Outlook contact fields synchronize both to and from mobile devices:
Native Outlook Field that Synchronizes Both To and From Mobile Devices
What Happens to this Field in Vision when You Synchronize Connect for Microsoft Outlook and Vision
Phone fields Of the many phone fields in which you can enter data, only five phones are brought into Vision: Business, Business Fax, Mobile, Home, and Pager.
If you remove a contact from your synchronization filter and thus it is automatically removed from Connect for Microsoft Outlook, then you lose the data in any other phone field in Vision.
Full Name
All subcomponents of the name synchronize both ways.
The Title and Suffix fields (part of the full name) are not brought into Vision.
The native Outlook suffix values (Jr., Sr., III, and so on) are different than the Vision values (AIA, CPE, CPA, and so on).
Job Title
In Connect for Microsoft Outlook, the native Outlook field, Job Title, has been replaced with Title, a Vision custom control, in order to provide a drop-down list with job titles. The Job Title field is hidden, so the mobile device synchronizes with that hidden field.

Non-Supported Environments
Installation Guide 27
Native Outlook Field that Synchronizes Both To and From Mobile Devices
What Happens to this Field in Vision when You Synchronize Connect for Microsoft Outlook and Vision
Web page address and IM address fields
If the record is removed from Connect for Microsoft Outlook because it no longer matches your synchronization filter, the data in these fields is removed from your mobile device.
These fields exist in native Outlook, but not in Vision, so they are not brought into Vision.
Email addresses Only E-mail is brought into Vision. E-mail 2 and E-mail 3 are not brought into Vision.
On a mobile device, you can edit a read-only native Outlook record. When you synchronize your mobile device with Connect for Microsoft Outlook, the record that you edited will be updated in Connect for Microsoft Outlook. But, when you synchronize Connect for Microsoft Outlook with Vision, the update fails and a synchronization issue occurs.
Limitations using ActiveSync in an Exchange 2003 Environment
The use of Connect for Microsoft Outlook with ActiveSync in an Exchange 2003 environment has a significant technical limitation. The sync engine within ActiveSync in Exchange 2003 does not properly recognize Connect for Microsoft Outlook-related data and objects. As a result, when contact data is updated on a mobile device and then synchronized back to Outlook via ActiveSync, it is no longer recognized by Connect for Microsoft Outlook. This can result in data loss. This limitation applies only when you use ActiveSync within Exchange 2003. It does not apply when you use ActiveSync within Exchange 2007 or Exchange 2010.
Limitations on iOS Based Devices (iPhone and iPad)
When contact data is synchronized to an iOS device, a large amount of extraneous Connect for Microsoft Outlook data comes along with it. As a result, additional contact folders or groups that are meaningless show up on these devices. On iOS-based devices, you will see extra groups and contact items that are actually project names, client names, opportunity names, and so on.
This happens because Connect for Microsoft Outlook stores a lot of additional information in Outlook that is typically hidden; you never see this information. On iOS devices, this extra data is visible and makes it very difficult for you to sort through contact information.
Currently there is no workaround for this issue. The issue manifests itself more severely when using Exchange 2007. With Exchange 2010 the issue exists, but it is far more manageable.
This limitation is related to the iOS platform, over which Deltek has no control.
Non-Supported Environments
Installation Guide 28
Outlook Web Access Outlook Web Access (OWA) is part of Microsoft Exchange Server. The Vision-only data fields from Connect for Microsoft Outlook are not available in Outlook Web Access.
When you use Connect for Microsoft Outlook, the OWA for Exchange Server 2007 displays the hidden MAPI attributes of Contact folders and other Connect for Microsoft Outlook objects. This is a Microsoft software defect; these hidden fields are not displayed in the full Microsoft Outlook client. In OWA for Exchange Server 2007, users could accidentally delete or modify the custom configurations made by the Connect for Microsoft Outlook installation in the mailbox.
This defect potentially affects all Connect for Microsoft Outlook users who use OWA in Exchange Server 2007. This problem does not occur in OWA for Microsoft Exchange Server 2003 or Exchange Server 2010.
Microsoft has resolved this defect in rollup 2 or later for Microsoft Exchange Server 2007 SP3. The Microsoft article related to this defect is http://support.microsoft.com/kb/2210042. (A sub contact folder is still visible after you set the "PR_ATTR_HIDDEN" attribute to "True" in an Exchange Server 2007 environment.)
Outlook Contact Folders Without the "Contact" Name Only contacts stored in the default Outlook “Contacts” folder are synchronized. If you rename your default Contacts folder, the contacts will not synchronize. Additionally, contacts stored within a subfolder of the default Contacts folder are not synchronized.
Lotus Notes Deltek does not support the use of Lotus Notes with Connect for Microsoft Outlook.
Microsoft Outlook Delegates Deltek does not support the use of the Outlook Delegates feature with Connect for Microsoft Outlook.
Delegates (other Outlook users) send Outlook items, such as meeting requests, on your behalf. For an explanation of how the Outlook Delegates feature works with Connect for Microsoft Outlook, see the Outlook Delegate Access help topic in the Connect for Microsoft Outlook help.
Vision Synchronization Server Migrations
Installation Guide 29
Vision Synchronization Server Migrations The information in this section applies only if you currently use Vision Synchronization Server and are migrating to Connect for Microsoft Outlook.
When you activate the Connect for Microsoft Outlook module in Vision Configuration » Module Activation, the Vision Synchronization Server module is automatically disabled, preventing future IntelliSync Mobile Suite (IMS) synchronizations. You do not need to uninstall the Synchronization Server software.
A system administrator must complete additional steps for a Connect for Microsoft Outlook implementation so that the Vision contacts in a user's Outlook software (by way of Synchronization Server) synchronize correctly and are not duplicated within Connect for Microsoft Outlook.
You must complete the additional steps to prevent duplicate contacts before you activate the Connect for Microsoft Outlook module in Vision.
Required Steps to Prevent Duplicate Contact Records A system administrator must complete the following steps before activating the Connect for Microsoft Outlook module in Vision:
1. Run a script on the Vision server to add a DLTKSYNC category to contacts synchronized by Vision Synchronization Server users.
2. Run a final Synchronization Server synchronization to add the DLTKSYNC category to Vision contacts in each user’s Outlook Contact folder. This category will be used to identify the contacts for each user that are synchronized with Vision through the Synchronization Server.
If you configured Vision Synchronization Server for one-way synchronization only—from Microsoft Outlook into Vision—or you do not use Synchronization Server but you manually imported your Outlook contact records into Vision during a data migration from another software or via another third-party product, you must add the DLTKSYNC category manually in Microsoft Outlook to the contacts that have already been synchronized with Vision. You need to do this because in this scenario, Vision is unable to send the category to Microsoft Outlook.
The "Summary of Installation and Configuration Steps" section on page 32 identifies the order of the Connect for Microsoft Outlook installation and configuration steps, including the additional steps for Synchronization Server migrations.
The specific instructions for performing the additional steps to prevent duplicate contacts are in the "Synchronization Server and Other Migrations: Prevent Duplicate Contacts" section on page 36 of this guide.
Synchronize Connect for Microsoft Outlook for the First Time This section describes what to expect when you synchronize Connect for Microsoft Outlook for the first time if you are migrating from Synchronization Server.
Contacts During the first Connect for Microsoft Outlook synchronization, contacts that match your synchronization filter criteria become shared contacts in Connect for Microsoft Outlook.

Vision Synchronization Server Migrations
Installation Guide 30
Shared with Vision
When you synchronize Connect for Microsoft Outlook for the first time, contacts are deleted from Outlook and recreated in Connect for Microsoft Outlook as shared-with-Vision contacts if they match your synchronization filters.
Shared contacts:
Contain Vision-specific data fields not found in Outlook (for example the Client/Vendor field on the Connect for Microsoft Outlook Contact form).
Synchronize with Vision.
Display in both Connect for Microsoft Outlook and Vision.
Data that Does Not Synchronize with Connect for Microsoft Outlook
Any data in a contact field that was not synchronized with Vision through the Synchronization Server is deleted.
For example, if a phone number is entered in the Car Phone field for a contact and this field was not synchronized with Vision using Synchronization Server, then the phone number is permanently deleted from the contact record.
Unshared with Vision
Contacts that were not synchronized previously with Vision through Synchronization Server remain in Connect for Microsoft Outlook as unshared contacts.
Unshared contacts:
Contain Vision-specific data fields that are not available in Outlook (for example the Client/Vendor field on the Connect for Microsoft Outlook Contact form).
Are not synchronized with Vision. They display in Connect for Microsoft Outlook only.
Can be shared with Vision on a contact-by-contact basis at any time by clicking the Shared with Deltek bar for the contact on the Contact form in Connect for Microsoft Outlook.
Tasks and Calendar Items During the first Connect for Microsoft Outlook synchronization, tasks and calendar items are converted to be shared or unshared with Vision.
Shared with Vision
A shared task or calendar item can be associated with a Vision record, and it is synchronized with Vision.
Task and calendar items are converted to shared-with-Vision records in Connect for Microsoft Outlook if the task or calendar items meet the user's synchronization filter requirements during the first Connect for Microsoft Outlook synchronization.
Unshared with Vision
Tasks and calendar items are converted to unshared-with-Vision records if no corresponding activity for them is brought over to Connect for Microsoft Outlook when you synchronize for the first time.

Vision Synchronization Server Migrations
Installation Guide 31
Example:
By default, the filter for the initial Connect for Microsoft Outlook synchronization includes all activities from today’s date into the future. There were two meetings synchronized previously with Synchronization Server—one occurring today and one that occurred yesterday. Today’s meeting will be shared, but yesterday’s meeting will be unshared because there is no corresponding activity for it in Connect for Microsoft Outlook.

Install and Configure Connect for Microsoft Outlook — New Installations
Installation Guide 32
Install and Configure Connect for Microsoft Outlook — New Installations These instructions apply if you have not previously installed Connect for Microsoft Outlook, and you are installing it for the first time.
If you currently have 7.0 or a 6.x version of Connect for Microsoft Outlook installed and you are upgrading to 7.1, 7.2, or 7.3, see the appropriate subsection of the “Upgrade Installations” section starting on page 90.
Summary of Installation and Configuration Steps After you install the required software identified in the “System Requirements” section on page 10 of this guide, complete the steps listed in the table below in the order listed to install and configure Vision Connect for Microsoft Outlook. The specific instructions for each step are included in the sections that follow.
You must have Vision 7.1, 7.2, or 7.3 installed before you complete the steps listed in the table below to install Connect for Microsoft Outlook.
You may want to print this "Summary of Installation and Configuration Steps" section to use as a check list as you work through the remaining sections of the guide.
Step Description Complete By Guide Section and Page
Steps to Perform on the Vision Web Server:
1 Download and install Connect for Microsoft Outlook onto your Vision Web server.
If you have multiple Web servers, complete this step for each server.
System administrator "Download and Install Connect for Microsoft Outlook onto Your Vision Web Server" on page 34.
2 For Synchronization Server and other Migrations only: Perform steps to prevent duplicate contact records.
System administrator "Synchronization Server and Other Migrations: Prevent Duplicate Contacts" on page 36.
You must complete the steps to prevent duplicate contact records before you activate the Connect for Microsoft Outlook module in Vision.
3 Activate the Connect for Microsoft Outlook module.
System administrator "Activate Connect for Microsoft Outlook" on page 38.

Install and Configure Connect for Microsoft Outlook — New Installations
Installation Guide 33
Step Description Complete By Guide Section and Page
4 Select Vision fields (natural keys) that determine duplicate records during synchronization.
System administrator "Select Vision Fields that Determine Duplicate Records (Duplicate Check Formulas) on page 39.
5 Specify where you want Vision activities to display in Connect for Microsoft Outlook.
System administrator "Specify Where You Want Vision Activities to Display" on page 44.
6 Provide Connect for Microsoft Outlook users with security access to download Connect for Microsoft Outlook and access appropriate applications and records.
System administrator "Provide Security Access to Connect for Microsoft Outlook Users" on page 46.
Vision configuration settings are updated to Connect for Microsoft Outlook users' workstations when an automatic or manual synchronization is performed on a workstation.
This occurs automatically during the synchronization process.
"Configuration Settings Passed from Vision to Connect for Microsoft Outlook" on page 50.
Steps to Perform on End Users' Workstations:
7 Back up your Outlook data. Connect for Microsoft Outlook user
"Back Up Your Outlook Data" on page 50.
8 Download and install Connect for Microsoft Outlook on a single workstation with Vision Utilities.
or
Download and install Connect for Microsoft Outlook for multiple users via Microsoft Systems Management Server (SCCM) or Group Policy with optional pre-configuration parameters.
or
Download and Install Connect for Microsoft Outlook on multiple workstations using Microsoft SMS or Group Policy. (Sample steps are provided.)
Connect for Microsoft Outlook user
System administrator
System administrator
"Download and Install Connect for Microsoft Outlook on a Workstation Using Vision Utilities" on page 51.
"Download and Install Connect for Microsoft Outlook on Multiple Workstations Using Command Line Parameters" on page 56.
"Download and Install Connect for Microsoft Outlook Using Microsoft SCCM, Group Policy, or Batch Files" on page 60.
Install and Configure Connect for Microsoft Outlook — New Installations
Installation Guide 34
Step Description Complete By Guide Section and Page
Connect for Microsoft Outlook cannot be installed on multiple machines using Outlook profiles configured to the same mailbox. To install it on a single workstation, you must be logged into that machine as the user account whose mailbox is being used. That user must be a member of the local administrator group on that machine during the installation. Local administrator rights are not needed after the installation.
If you install Connect for Microsoft Outlook on multiple machines using Outlook profiles configured to the same mailbox, you can damage the mailbox customizations, which may be time consuming to fix.
9 Configure the Connect for Microsoft Outlook software for the first time on a workstation using the Connect for Microsoft Outlook Assistant.
Connect for Microsoft Outlook user
"Configure Connect for Microsoft Outlook on a Workstation" on page 61.
Deltek recommends that you stagger the initial Connect for Microsoft Outlook implementation so that a significant number of users are not performing the initial synchronization all at the same time. This will help prevent overloading your system (Vision and email) with potentially large numbers of records and data being synchronized during the first synchronization. Users perform the initial synchronization when they complete the Connect for Microsoft Outlook Assistant, as described in the "Configure Connect for Microsoft Outlook on a Workstation" section of the guide.
For more information about synchronization schedules and automatic synchronization after the initial synchronization, see "Appendix E: Synchronization Schedules" on page 132.
The "Access and Use Connect for Microsoft Outlook" section on page 79 of this guide will help you get started using Connect for Microsoft Outlook. It tells you where to find the Vision Connect for Microsoft functionality within Outlook.
For more specific instructions on how to use the Connect for Microsoft Outlook software, see the online help in Connect for Microsoft Outlook. To access the help, click Help » Connect for Microsoft Outlook on the Outlook menu bar in Connect for Microsoft Outlook.
The online help also provides instructions on how to modify your Connect for Microsoft Outlook configuration settings. The help is accessible when Connect for Microsoft Outlook is either online or offline.
Download and Install Connect for Microsoft Outlook onto Your Vision Web Server The information in this section applies if you are installing Connect for Microsoft Outlook for the first time.
Use these instructions to download and install Deltek Connect for Microsoft Outlook for Vision 7.1, 7.2, or 7.3 onto your Vision Web server. If you have multiple Web servers, you must perform the installation on each Web server.

Install and Configure Connect for Microsoft Outlook — New Installations
Installation Guide 35
Because Internet Information Services (IIS) will be stopped and all users will be disconnected when you install Connect for Microsoft Outlook on your Vision Web server, Deltek recommends that you install this after your usual work hours when users are not logged on to Vision. If you do the installation during normal work hours, let users know about the system down time.
You must have Vision 7.1, 7.2, or 7.3 installed before you complete the steps in this section to install Connect for Microsoft Outlook.
To download and install Connect for Microsoft Outlook for Vision 7.1, 7.2, or 7.3 on your Vision Web server, complete the following steps:
1. Log on to your Vision Web server.
2. Open the Deltek Customer Care Connect Web site.
3. On the Product Downloads tab, click Launch Deltek Software Manager.
4. On the Deltek Software Manager screen, navigate to Vision 7.1, Vision 7.2, or Vision 7.3 in the pane on the left side of the screen.
5. Click the plus sign beside the version you are installing, and then click Sub-Release from the expanded list.
6. In the expanded grid, click the Deltek Connect for Microsoft Outlook check box to add it to the Download Queue.
7. Click the Download button.
This downloads the DeltekConnectForMicrosoftOutlookFor7x_1.3.3.24.exe file.
8. Navigate to the folder that contains the files downloaded from the Deltek Software Manager, and double-click the DeltekConnectForMicrosoftOutlookFor7x_1.3.3.24.exe file.
The EXE file is within the Vision\71, Vision\72, or Vision\73 folder (whichever version that you installed).
A Deltek – InstallShield Wizard that extracts the installation package is launched. The Preparing Setup page displays.
Install and Configure Connect for Microsoft Outlook — New Installations
Installation Guide 36
The setup process verifies that you have Vision prerequisites installed before it continues. If you do not have the most current prerequisites installed, you are instructed to install it first, and then re-rerun the Connect for Microsoft Outlook installation.
9. On the Welcome to the Deltek Vision Hot Fix Installation Wizard page, click Next to continue.
Internet Information Services (IIS) stops and all users are disconnected.
10. On the Ready to Install page, click Install to update your database, and install the
software on your Vision Web server.
11. When the installation is complete, on the Deltek Vision Hot Fix Wizard Complete page, click Finish.
Synchronization Server and Other Migrations: Prevent Duplicate Contacts Follow the instructions in this section only if you currently use Vision Synchronization Server with two-way or one-way data synchronization, and you are migrating to Connect for Microsoft Outlook.
You must complete these steps to prevent duplicate contacts from being created.
A system administrator must complete these steps before activating the Connect for Microsoft Outlook module in Vision.
Back up your Microsoft Outlook data before you complete the steps in this section. Backup instructions are on page 50 of this guide. If you have entered data in Microsoft Outlook contact fields that do not exist in Vision (such as the Birthday and Spouse/Partner fields), the content in these fields in Connect for Microsoft Outlook may be removed when you synchronize Connect for Microsoft Outlook. For this reason, we urge you to back up your Outlook data so you can view any missing data if needed.
A summary of Synchronization Server migrations is provided on page 29 of this guide.
To prevent duplicate contacts from being created, complete the following steps:
1. Run a script on the Vision server to add a DLTKSYNC category to contacts in Vision:
a. Log in to SQL Server Management Studio, and open a query window on the Vision database.
b. Enter the script name getAllSyncContactsForAllEmployees.
c. Press the F5 key on your keyboard to execute the script.

Install and Configure Connect for Microsoft Outlook — New Installations
Installation Guide 37
d. The DLTKSYNC contact category is assigned to all contacts in the Vision database.
2. Complete one of the following options that matches your situation:
If you currently use Synchronization Server with two-way data synchronization or one-way synchronization from Vision to Outlook:
Run a final Synchronization Server synchronization so that the DLTKSYNC category is added to Vision contacts in each user’s Outlook software. The category will be used to identify the contacts for each user that are synchronized with Vision through Synchronization Server.
If you currently use Synchronization Server with one-way synchronization from Outlook to Vision or you manually imported Outlook contact records into Vision during a data migration from another software or via another third-party product:
Vision is unable to send the DLTKSYNC category automatically to Outlook. To avoid the duplication of contacts that were previously synchronized into Vision, you must manually apply the DLTKSYNC category to the contact records in Outlook that you know were previously synchronized to Vision.
Most users who perform one-way synchronization into Vision use a category filter to allow only certain records to be synchronized into Vision. If that is the case, you can group the contacts in Outlook by those categories and add an additional category named DLTKSYNC to the category list.
The category will be used to identify the contacts for each user that are synchronized with Vision through Synchronization Server.
You must manually assign the DLTKSYNC category to only contacts that already exist in Vision. Any contact that has a DLTKSYNC category in Outlook that does not exist in Vision will be deleted from Outlook.
For either of the situations in step 2, when you follow step 18 on page 74 in the "Configure Connect for Microsoft Outlook on a Workstation" section on page 61, you must select Yes in the following Confirm Outlook Contact Conversion dialog box:
Install and Configure Connect for Microsoft Outlook — New Installations
Installation Guide 38
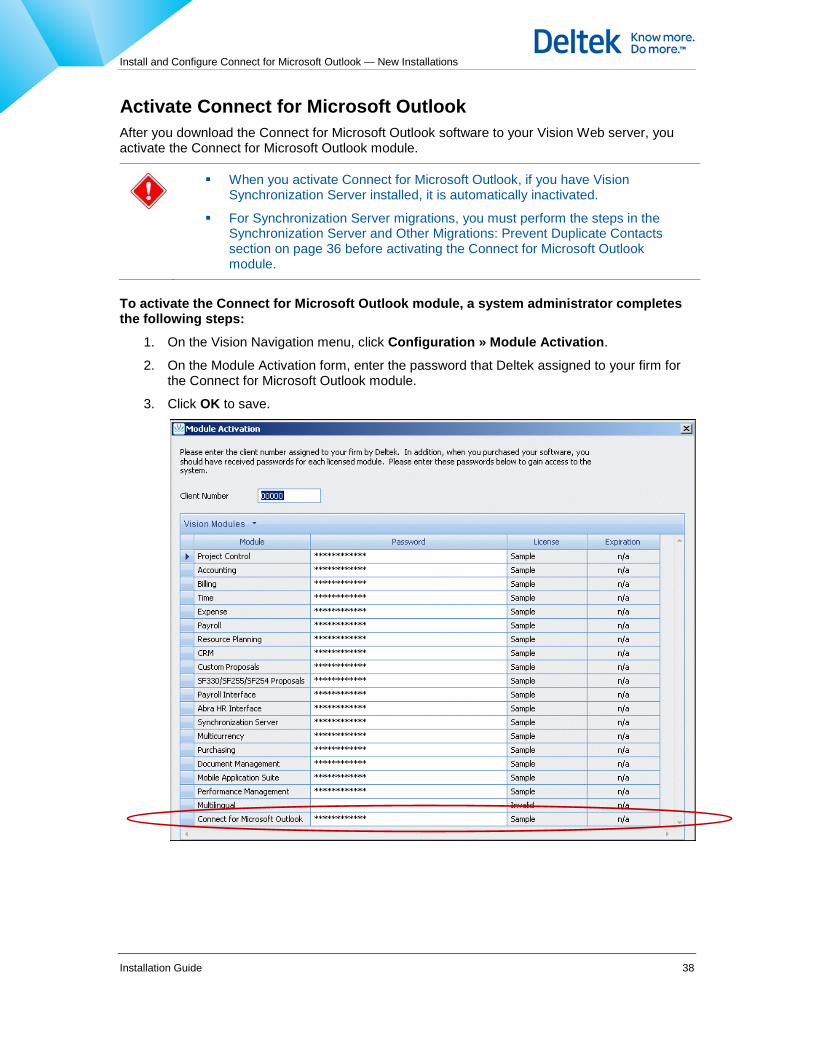
Activate Connect for Microsoft Outlook After you download the Connect for Microsoft Outlook software to your Vision Web server, you activate the Connect for Microsoft Outlook module.
When you activate Connect for Microsoft Outlook, if you have Vision Synchronization Server installed, it is automatically inactivated.
For Synchronization Server migrations, you must perform the steps in the Synchronization Server and Other Migrations: Prevent Duplicate Contacts section on page 36 before activating the Connect for Microsoft Outlook module.
To activate the Connect for Microsoft Outlook module, a system administrator completes the following steps:
1. On the Vision Navigation menu, click Configuration » Module Activation.
2. On the Module Activation form, enter the password that Deltek assigned to your firm for the Connect for Microsoft Outlook module.
3. Click OK to save.

Install and Configure Connect for Microsoft Outlook — New Installations
Installation Guide 39
Select Vision Fields that Determine Duplicate Records (Duplicate Check Formulas) To prevent duplicate records from being created in Vision, you must select Vision database fields (natural keys) that will be compared when information between Connect for Microsoft Outlook and Vision is synchronized.
These database fields identify unique individual Vision client, contact, opportunity, and vendor records so that the specific records are updated correctly as intended. This prevents data for two different records from being merged together unintentionally when each record has the same entry in one or more of its fields.
For example, for Vision contacts, if you choose the first name field and the last name field as the fields to determine duplicate contacts, any contacts with the same first name and last name would be considered as duplicate contacts (the same contact).
When Connect for Microsoft Outlook and Vision are synchronized, if duplicate records are found, you have the following options:
Select one record to keep; the other record is deleted.
Merge the two records into one record.
You select the fields for determining duplicate clients, contacts, opportunity, and vendors. However, the fields for determining duplicate activities are preset with the following fields:
ConversationID — This is an internal Vision field (not visible to users) that tracks the Outlook internal ID for the record (or thread, if it is an email). It prevents duplicate activities from being created if multiple people choose to share the same event or email.
Subject AND Start Date/Time AND Owner
These fields are checked against all other activities in Connect for Microsoft Outlook when you save an activity. If another activity has the same content in these fields as the new activity that you created, you receive a message telling you that the activity already exists. You cannot save duplicate activities.
When you synchronize an activity, these fields are checked against all Vision records for a duplicate.

Install and Configure Connect for Microsoft Outlook — New Installations
Installation Guide 40
To select the Vision fields that determine duplicate records, a Vision system administrator completes the following steps:
1. On the Vision Navigation menu, click Configuration » General » Connect for Microsoft Outlook.
On the Connect for Microsoft Outlook Configuration form, you see a separate grid for Clients, Contacts, Opportunities, and Vendors. Complete the remaining steps for each grid/record type. In these instructions, the Contact record is used as an example.
2. On a grid's toolbar, click Insert to open the Duplicate Check Formula dialog box and
select the fields for a duplicate check formula.
In the following example, duplicate check fields are being selected for contacts.

Install and Configure Connect for Microsoft Outlook — New Installations
Installation Guide 41
3. On the Duplicate Check Formula dialog box, click Insert on the toolbar to insert a new row in the grid.
4. In the new row, click in the Field column, and from the drop-down list, select a field to add to the duplicate check formula.
5. To add more fields to the formula, click Insert on the Duplicate Check Formula toolbar
and repeat step 4.
You must select at least one field for a duplicate check formula.
There is no limit to the number of fields that you can add to a duplicate check formula.
The Cond column in the grid on the Duplicate Check Formula dialog box always displays AND to indicate that an AND operator is used between the each field that you add to the duplicate check formula.

Install and Configure Connect for Microsoft Outlook — New Installations
Installation Guide 42
In the following example, we selected First Name from the Field drop-down list. Then, we clicked Insert again, and selected Last Name from the Field drop-down list.
6. When you finish adding fields to a formula, click OK to return to the Connect for Microsoft
Outlook Configuration form.
The fields that comprise the duplicate check formula display in a row in the record grid.
7. Repeat steps 2 through 6 to add another duplicate check formula.
Each formula displays in a separate row in the record grid on the Connect for Microsoft Outlook Configuration form.
When you create multiple duplicate check formulas for a record, the Cond column in the grid on the Connect for Microsoft Outlook Configuration form always displays OR to indicate that an OR operator is used between the each duplicate check formula.

Install and Configure Connect for Microsoft Outlook — New Installations
Installation Guide 43
In the following example, we added another duplicate check formula that is comprised of the Email field.
During synchronization, a duplicate contact is detected when multiple contacts have the same first and last names or when their email address is the same.
8. When you finish creating duplicate check formulas, click Save on the Connect for
Microsoft Outlook Configuration form toolbar.
To edit a duplicate check formula, complete the following steps:
1. Click anywhere in the duplicate check formula's row in the grid on the Connect for
Microsoft Outlook Configuration form. The row selector icon displays in the first column to indicate that the row is selected.
2. Click Edit to open the Duplicate Check Formula dialog box and modify the formula.
To delete a duplicate check formula, complete the following steps:
1. Click anywhere in the duplicate check formula's row in the grid on the Connect for
Microsoft Outlook Configuration form. The row selector icon displays in the first column to indicate that the row is selected.
2. Click Delete on the grid toolbar. The formula/row is immediately deleted.
Separate formulas in each row
With the OR operator, duplicate records are identified when records match any one of the formulas in the grid; matching all the formulas in the grid is not required.

Install and Configure Connect for Microsoft Outlook — New Installations
Installation Guide 44
Specify Where You Want Vision Activities to Display A Vision system administrator specifies where different types of Vision activities display in Connect for Microsoft Outlook. Vision activity types include appointments, mailings, meetings, tasks, and so on. You choose whether these display as calendar items, tasks, and/or items in the Activity Manager only.
The Activities display setting:
Applies for all Vision users.
Determines where the activities display in the Vision software as well as in Connect for Microsoft Outlook.
To determine where Vision activities display in Connect for Microsoft Outlook and Vision, complete the following steps:
1. Open Vision, and on the Navigation menu click Configuration » General » Code Tables.
2. On the Code Table Maintenance form, click Activity Type in the Description column of the Code table.
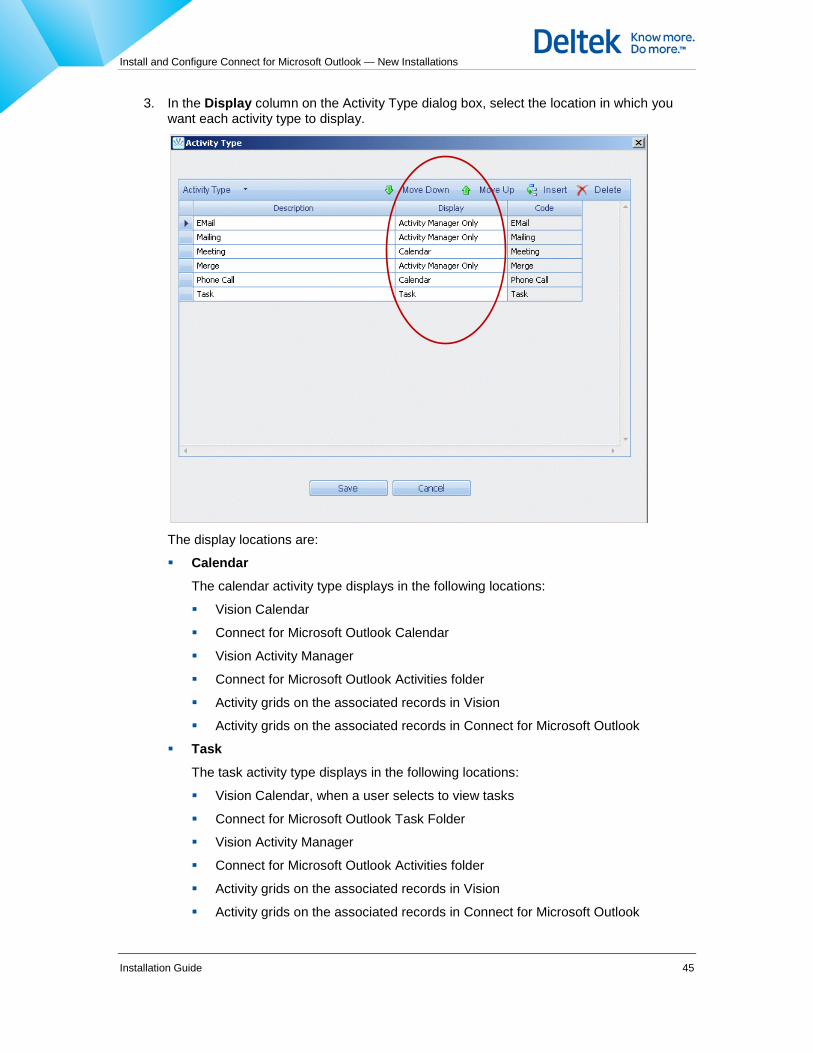
Install and Configure Connect for Microsoft Outlook — New Installations
Installation Guide 45
3. In the Display column on the Activity Type dialog box, select the location in which you want each activity type to display.
The display locations are:
Calendar
The calendar activity type displays in the following locations:
Vision Calendar
Connect for Microsoft Outlook Calendar
Vision Activity Manager
Connect for Microsoft Outlook Activities folder
Activity grids on the associated records in Vision
Activity grids on the associated records in Connect for Microsoft Outlook
Task
The task activity type displays in the following locations:
Vision Calendar, when a user selects to view tasks
Connect for Microsoft Outlook Task Folder
Vision Activity Manager
Connect for Microsoft Outlook Activities folder
Activity grids on the associated records in Vision
Activity grids on the associated records in Connect for Microsoft Outlook

Install and Configure Connect for Microsoft Outlook — New Installations
Installation Guide 46
Activity Manager Only
The activity-manager-only activity type displays in the following locations:
Vision Activity Manager
Connect for Microsoft Outlook Activities folder
Activity grids on the associated records in Vision
Activity grids on the associated records in Connect for Microsoft Outlook
4. When you finish, click Save.
Provide Security Access to Connect for Microsoft Outlook Users Vision security is applied directly in Connect for Microsoft Outlook.
The Vision security role assigned to Vision users determines:
Whether or not a user can download Connect for Microsoft Outlook
Which Vision applications and records are visible
The actions that users can perform with Vision records in Connect for Microsoft Outlook
The Vision security role and screen designer settings described in this section allow users to view, create, modify, delete, and associate Vision records in Vision as well as in Connect for Microsoft Outlook.
A system administrator sets up security roles and their access rights in Vision Configuration » Security » Roles. A system administrator assigns security roles to individual users in Vision Configuration » Security » Users and Passwords.
Access to Download Connect for Microsoft Outlook To be able to download Connect for Microsoft Outlook from Vision Utilities, a user’s security role must have rights to access the Download Connect for Microsoft Outlook utility.
The setting to allow this access is in Vision Configuration » Security » Roles. In the menu items access section on the General tab, select the Download Connect for Microsoft Outlook check box under the Utilities menu.
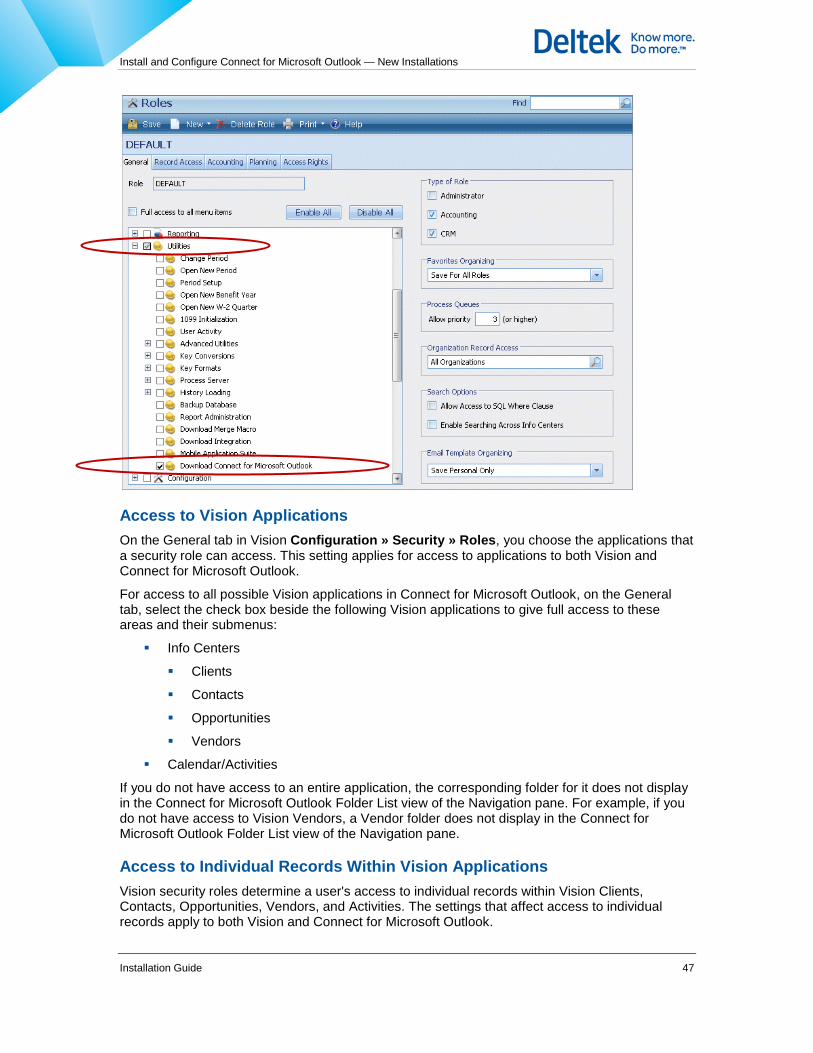
Install and Configure Connect for Microsoft Outlook — New Installations
Installation Guide 47
Access to Vision Applications On the General tab in Vision Configuration » Security » Roles, you choose the applications that a security role can access. This setting applies for access to applications to both Vision and Connect for Microsoft Outlook.
For access to all possible Vision applications in Connect for Microsoft Outlook, on the General tab, select the check box beside the following Vision applications to give full access to these areas and their submenus:
Info Centers
Clients
Contacts
Opportunities
Vendors
Calendar/Activities
If you do not have access to an entire application, the corresponding folder for it does not display in the Connect for Microsoft Outlook Folder List view of the Navigation pane. For example, if you do not have access to Vision Vendors, a Vendor folder does not display in the Connect for Microsoft Outlook Folder List view of the Navigation pane.
Access to Individual Records Within Vision Applications Vision security roles determine a user's access to individual records within Vision Clients, Contacts, Opportunities, Vendors, and Activities. The settings that affect access to individual records apply to both Vision and Connect for Microsoft Outlook.

Install and Configure Connect for Microsoft Outlook — New Installations
Installation Guide 48
A security role can have full rights, view-only, modify, or add/modify rights that allow users to view, create, modify, delete, and associate Vision records.
The Vision security settings in Configuration » Security » Roles » Record Access tab that affect individual record access are:
Application Record Access grid:
The Record Level View column
The Access column, which applies to the Record Level Update column in the grid
The Record Level Update column
Activity Access section:
The Record Level View field
The Record Level Update field
Rights to update "Accounting Only" client and vendor addresses are controlled by the Accounting check box in the Type of Role section of the General tab in Configuration » Security » Roles.
See the Security section of the Vision online help for more information about these security settings.
Deleting Records
You can delete a Vision record in Connect for Microsoft Outlook only if you have full rights to that record (in Configuration » Security » Roles » Record Access tab).
Associations
In Vision, you can associate records with each other. For example, you associate an activity record with a client record by entering the activity in the Activities grid on the Activities tab of the Clients form in the Client Info Center. In Connect for Microsoft Outlook, you associate an activity record with a client by entering an activity in the Activities grid on the Client form.
The same rules and security rights that apply when you associate records with each other in Vision also apply in Connect for Microsoft Outlook.
When you use a lookup dialog box in Connect for Microsoft Outlook to create an association with other Vision records, the lookup dialog box will contain only records that have been synchronized with Connect for Microsoft Outlook. This includes any records that matched your synchronization filter (complete records) and records that were synchronized because they are associated with a record that match your filter (incomplete records). See "Appendix A: Complete and Incomplete Records" on page 103 for more information about complete and incomplete records.
The following security rules affect the records available in lookup dialog boxes:
When you use a lookup dialog box to select an employee or project record to associate with another record, if you do not have access rights to the Employee or Project Info Center, then you can see and associate only the employee or project records for which you have view rights.
When you use a lookup dialog box to select a client, contact, vendor, opportunity, or activity record to associate with another record, you must have both access rights to the Client, Contact, Vendor, or Opportunity Info Center or the Calendar/Activities application and view rights to the specific record to be able to make an association. You cannot
Install and Configure Connect for Microsoft Outlook — New Installations
Installation Guide 49
make associations with these records if you have view rights only; you must have both access and view rights.
If your security role has rights to access an application and update records in that application, in addition to making an association with record from that application, you can edit the associated record if needed.
Access to Fields Within Vision Applications The Screen Designer in Vision allows you to specify access to specific fields in Vision by security roles. This access applies in Vision as well as in Connect for Microsoft Outlook.
To access Screen Designer in Vision, open an application, for example the Contacts Info Center.
Click the Screen Designer icon in the bottom right corner of the Contacts form.
The Screen Designer settings that apply when you access Vision data in Outlook are:
Hidden fields — Select a field on the Designer form. In the Properties panel on the right side of the form, click the Hidden field, and select the security roles for which you want to hide the field.
Locked fields — Select a field on the Designer form. In the Properties panel on the right side of the form, click the Locked field, and select the security roles for which you want the field read-only. The field can be viewed but not modified.
Required fields — Select a field on the Designer form. In the Properties panel on the right side of the form, click the Required field, and select the security roles for which you want to make entry in the field required.
Employees and Projects Vision employees and projects are synchronized one way only—from Vision to Connect for Microsoft Outlook.
You cannot create, edit, add, or delete Vision projects or employees in Connect for Microsoft Outlook. However, you can associate Vision projects and employees with activities, contacts, clients, opportunities, and vendors in Connect for Microsoft Outlook.
Vision Workflows Security can sometimes be enforced by Vision workflow. For example, a workflow can make a field required or read-only and display an error message when a user leaves the field empty or changes the field. These workflow rules are applied during synchronization.
If you initially have rights to a field, and then a workflow process changes your rights, that change is enforced during the first synchronization.
Workflows Example
Scenario:
You have add/modify access to records in the Client Info Center per your Vision security role.
You add a new client with a relationship of "Existing."
A workflow is set up for whenever you update a client.
Results:
Vision first checks your security role.

Install and Configure Connect for Microsoft Outlook — New Installations
Installation Guide 50
If you are in a non-administrative role, a validate error action in the workflow prevents you from making any changes to the fields on the General tab for clients with an existing relationship (as opposed to prospective clients).
You can make changes to these fields for existing clients in Connect for Microsoft Outlook. However, at synchronization, the client is not updated in Vision. You receive a synchronization issue with the workflow error message.
Configuration Settings Passed from Vision to Connect for Microsoft Outlook A set of default files on the Vision Web server contain Vision configuration information and the basic Vision schema that is used to configure Connect for Microsoft Outlook users' mailboxes. Passing the information in these files to Connect for Microsoft Outlook on users' workstations allows the Vision data to display in Outlook. This information is passed during the synchronization process.
The following Vision configuration settings are updated to Connect for Microsoft Outlook users' mailboxes during the initial synchronization when users open Connect for Microsoft Outlook for the first time and any time thereafter when users synchronize after a change is made to the configuration settings:
System-wide labels
Code table values
Role security
Field labels and Required, Locked and Hidden attributes from the Screen Designer
Configuration changes made after the initial synchronization
New code table and role security changes are enforced in Connect for Microsoft Outlook after a user performs the first synchronization after the changes are made.
Changes made in Screen Designer are enforced in Connect for Microsoft Outlook after a user performs the second synchronization after the changes are made. For example, in Screen Designer, a system administrator changes a contact field so that an entry in the field is now required when, previously, you could leave the field blank. After the user synchronizes, the newly required field is not yet enforced for new records. The new requirement is enforced after the user synchronizes a second time.
Vision workflow and auto-numbering for clients, opportunities, and vendors are also updated on Connect for Microsoft Outlook users’ workstations when users synchronize.
The following configuration changes are not passed to Connect for Microsoft Outlook users' workstations:
Placement of fields in the Screen Designer
User-defined fields
Back Up Your Outlook Data Before you download and install Connect for Microsoft Outlook to a user's workstation, we recommend that you back up your current Microsoft Outlook data using one of the following methods.

Install and Configure Connect for Microsoft Outlook — New Installations
Installation Guide 51
Export Data to a PST File
To back up data in Outlook, export data to a PST file by completing the following steps:
1. Open Outlook, and from the Outlook application-level menu bar, click File » Import and Export.
2. On the Import and Export Wizard page, select Export to a file from the list and click Next.
3. On the Export to a File page, select Personal Folder File (.pst) from the list, and click Next.
4. On the Export Personal Folders page, select the appropriate folders that contain personal data and click Next.
5. On the next Export Personal Folders page, click Finish.
Copy Your Outlook Contacts Folder Create a copy of your Outlook Contacts folder, or copy the contacts in your Outlook Contacts folder into another contacts folder that does not have the folder named "Contacts." Connect for Microsoft Outlook synchronizes only the contacts in the contact folder named "Contacts."
Download and Install Connect for Microsoft Outlook on a Workstation Using Vision Utilities This section is for new Connect for Microsoft Outlook users who are installing Connect for Microsoft Outlook for the first time.
The following instructions describe how individual Connect for Microsoft Outlook users can download and install Connect for Microsoft Outlook on their workstations with Vision Utilities.
Other ways that a system administrator can install the Connect for Microsoft Outlook 7.0 on users' workstations include the following:
Use command line parameters to install Connect for Microsoft Outlook on multiple workstations. For instructions, see page 56.
Download and install Connect for Microsoft Outlook on multiple workstations using Microsoft System Center Configuration Manager (SCCM) or Group Policy. For instructions, see page 60.
Connect for Microsoft Outlook cannot be installed on multiple machines using Outlook profiles configured to the same mailbox. To install it on a single workstation, you must be logged into that machine as the user account whose mailbox is being used. That user must be a member of the local administrator group on that machine during the installation. Local administrator rights are not needed after the installation.
If you install Connect for Microsoft Outlook on multiple machines using Outlook profiles configured to the same mailbox, you can damage the mailbox customizations, which may be time consuming to fix.

Install and Configure Connect for Microsoft Outlook — New Installations
Installation Guide 52
Before you download and install Connect for Microsoft Outlook on a workstation, the following tasks must be completed:
You must have installed all the required software, and a Vision system administrator must have completed the Connect for Microsoft Outlook global configuration, as outlined in the previous sections of this guide.
Microsoft Outlook must be installed on your workstation.
An Outlook profile must be created for you.
You must have opened Outlook and configured it.
Because some antivirus products can interfere with installations, we recommend that you temporarily disable any antivirus products that are on a workstation. You can enable them immediately after you complete the Connect for Microsoft Outlook First Run Assistant (FRA) wizard.
Your Vision security role must have access rights to the Download Connect for Microsoft Outlook utility. See the "Access to Download Connect for Microsoft Outlook" section on page 46 of this guide for more information.
To download and install the Connect for Microsoft Outlook software on your workstation for the first time using Vision Utilities, complete the following steps:
1. Close Outlook on your workstation.
2. On the Navigation menu in Vision, click Utilities » Download Connect for Microsoft Outlook.
3. On the Download Connect for Microsoft Outlook form, read the information on the screen, and click Install and Auto-configure Connect for Microsoft Outlook to start the software download and complete the installation wizard.

Install and Configure Connect for Microsoft Outlook — New Installations
Installation Guide 53
When you click the Install and Auto-configure Connect for Microsoft Outlook button, the Vision credentials that you used to log on to Vision will prefill in the Deltek - Login dialog box when you complete the Connect for Microsoft Outlook Assistant as described in the "Configure Connect for Microsoft Outlook on a Workstation" section on page 61.
When you click the Install and Manually Configure Connect for Microsoft Outlook button on the Download Connect for Microsoft Outlook form, you must supply the Vision connection information when you run the Connect for Microsoft Outlook Assistant.
The Preparing to Install… wizard page displays.
The Preparing to install…dialog box displays.
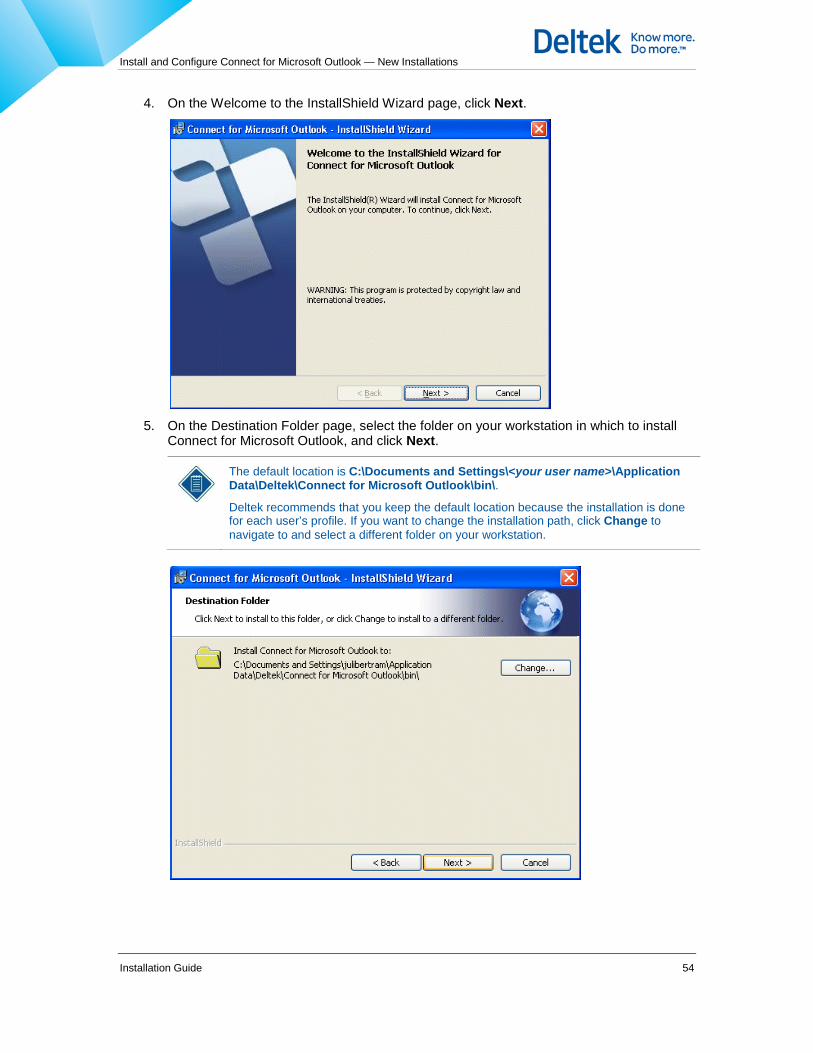
Install and Configure Connect for Microsoft Outlook — New Installations
Installation Guide 54
4. On the Welcome to the InstallShield Wizard page, click Next.
5. On the Destination Folder page, select the folder on your workstation in which to install
Connect for Microsoft Outlook, and click Next.
The default location is C:\Documents and Settings\<your user name>\Application Data\Deltek\Connect for Microsoft Outlook\bin\.
Deltek recommends that you keep the default location because the installation is done for each user’s profile. If you want to change the installation path, click Change to navigate to and select a different folder on your workstation.

Install and Configure Connect for Microsoft Outlook — New Installations
Installation Guide 55
6. On the Ready to Install the Program page, click Install to start the installation.
On the Installing Connect for Microsoft Outlook page, you see the status as the installation proceeds to completion.

Install and Configure Connect for Microsoft Outlook — New Installations
Installation Guide 56
7. On the InstallShield Wizard Completed page, click Finish. The InstallShield wizard closes.
You can now open Outlook and complete the Connect for Microsoft Outlook First Run Assistant to enter Connect for Microsoft Outlook configuration settings. See the "Configure Connect for Microsoft Outlook on a Workstation" section on page 61 for instructions.
Download and Install Connect for Microsoft Outlook on Multiple Workstations Using Command Line Parameters A system administrator can install Connect for Microsoft Outlook on multiple workstations and for multiple users via several options such as Microsoft Systems Center Configuration Manager (SCCM), Group Policy, or batch files. This section lists the parameters and provides examples of how to use command line parameters to install Connect for Microsoft Outlook silently with different configuration settings.
After you follow the instructions in this section to install Connect for Microsoft Outlook on workstations, users can open Outlook and complete the Connect for Microsoft Outlook First Run Assistant to enter Connect for Microsoft Outlook configuration settings. See the “Configure Connect for Microsoft Outlook on a Workstation” section on page 61.

Install and Configure Connect for Microsoft Outlook — New Installations
Installation Guide 57
Before you download and install Connect for Microsoft Outlook on workstations using SMS, the following tasks must be completed:
You must have installed all the required software and completed the Connect for Microsoft Outlook global configuration as outlined in the previous sections of this guide.
Microsoft Outlook must be installed on users' workstations.
An Outlook profile must be created for each user.
You must have opened Outlook and configured it.
Because some antivirus products can interfere with installations, we recommend that you temporarily disable any antivirus products that are on a workstation. You can enable them immediately after you complete the Connect for Microsoft Outlook First Run Assistant (FRA) wizard.
The Connect for Microsoft Outlook installer contains an MSI package that supports most of the command line parameters for installing MSI for multiple users.
You can use the command line to set optional parameters that impact installation. You run the installer program from a Windows DOS command line on a Connect for Microsoft Outlook user's workstation or from a command line on the SCCM server.
Connect for Microsoft Outlook supports most parameters that can be set in the msiexec command line. For a list of the MSI optional parameters, launch a command prompt and enter:
msiexec.exe /? To use parameters with the Connect for Microsoft Outlook installer, you must use /v and then pass the other parameters. See the examples on page 60.
For detailed information and correct syntax, see the documentation about Msiexec command-line options at the following Microsoft TechNet Website:
http://kb.flexerasoftware.com/doc/Helpnet/installshield16helplib_sp1/IHelpSetup_EXECmdLine.htm
http://kb.flexerasoftware.com/doc/Helpnet/installshield12helplib/IHelpSetup_EXECmdLine.htm
Set Optional Parameters During Installation
To use the command line to set optional parameters during installation, complete the following steps:
1. Open a DOS command line.
2. Navigate to the directory that contains the ConnectforMicrosoftOutlookSetup.exe file, such as C:\Users\Administrator\Desktop.
3. Enter the command. Use the following syntax:
ConnectforMicrosoftOutlookSetup.exe /v"<optional_parameter_1> <optional_parameter_n>"
Where optional_parameter is a parameter that you can enter that is executed when the installer runs.

Install and Configure Connect for Microsoft Outlook — New Installations
Installation Guide 58
For silent installations, you must specify the (/qr) parameter if you want to display a limited graphical user interface that allows users to see the status of the installation.
You must specify each optional parameter in the same command line after the name of the ConnectforMicrosoftOutlookSetup.exe file.
The ConnectforMicrosoftOutlookSetup.exe client installation file contains the MSI file that is used with msiexec.exe to perform the installation. In order to pass the optional parameters to the MSI file, you must use the /v option to pass command-line options and values through to the file.
The entire set of parameters in the command line after the /v must be enclosed between a pair of double quotation marks (" ").
Also, when a character is not a delimiter for the command line (it is a delimiter for the property/parameter value), you must enclose the character between a pair of backslashes and double quotation marks (\" \").
Parameter values must be enclosed between a pair of backslashes and double quotation marks.
Example: \"<parameter value>\"
Each parameter must be separated by a single space as seen in the "Parameter Examples" section below.
You can arrange optional parameters in any order. However, it is recommended that you put the (/qr) at the end of the parameter list.
4. Click Enter.
The Welcome page of the Connect for Microsoft Outlook Setup wizard displays.
You can use the optional /qr parameter at the end of your command line (to perform a silent installation) to automatically execute the dialog boxes that normally require user action. When you use the /qr parameter, the installer does not display dialog boxes that require user action.
If your users currently have Connect for Microsoft Outlook from Vision 6.1 SP4 or earlier installed, they will be prompted during the installation that the installation will remove the data from the previous configuration and they will be presented with Yes or No options. The user must select Yes to continue. After synchronization with the new version, the data will return.
Optional Values and Parameters The following special values are supported for the optional OL_PROFILE parameter:
$DEFAULT — When you specify this value, the default profile and default storage in this profile is used. The default profile is the profile specified in Control Panel » Mail » Profiles » Always use this profile. Default storage is the mail delivery location specified for the profile in OL_PROFILE.
$PREFERRED — When you specify this value, the profile is detected using the same algorithm as described for the $DEFAULT value. However, if a default profile is not found or is invalid, the installation chooses any other suitable profile. If no value is specified for the OL_PROFILE parameter, $PREFERRED value is used.

Install and Configure Connect for Microsoft Outlook — New Installations
Installation Guide 59
Parameter Examples
Parameters
The following Deltek parameters that correspond to the initial Connect For Microsoft Outlook login and configuration form can be passed to the installer to preconfigure the application.
In the following list, optional parameters and switches are listed on separate lines to make it easy to follow. If you copy and paste these examples into a text file, remember to replace the carriage returns with a space. Also, remember there should be no space between the /v and the first double quotation mark.
Deltek Parameters Value Description
OL_PROFILE= This is an optional parameter.
This is the Microsoft Outlook mail profile name that is found in the Windows Control Panel » Mail » Show Profiles section. If you are unsure what the mail profile name will be, do not enter this parameter. The Connect for Microsoft Outlook installation has built-in intelligence to use the default mail profile if this is not specified. This should be used only when a user has multiple Outlook mail profiles and the default is not being used with Connect for Microsoft Outlook.
Example: OL_PROFILE=\"Outlook\"
DELTEK_SERVER_URL= URL (with optional port number) to the Vision Web service ASMX page on the Vision Web server. The URL always ends in visionws.asmx.
Example:
DELTEK_SERVER_URL=\"http://webserver:80/vision/visionws.asmx\"
DELTEK_DATABASE= This is the description field of the Vision database that you are connecting (as displayed in Weblink or from the login drop-down list).
Example:
DELTEK_DATABASE=\"VisionDemo62 (DBSERVER1)\"
DELTEK_USERNAME= This is the Vision Login/Username. Use this parameter if you are not using Integrated Authentication to log in to Windows. This cannot be used with the DELTEK_NT_AUTH parameter.
Example: DELTEK_USERNAME=\"ADMIN\"
DELTEK_NT_AUTH= Enter this parameter if you are using Windows Integrated Authentication to log in to Vision.
Example: DELTEK_NT_AUTH=\"1"
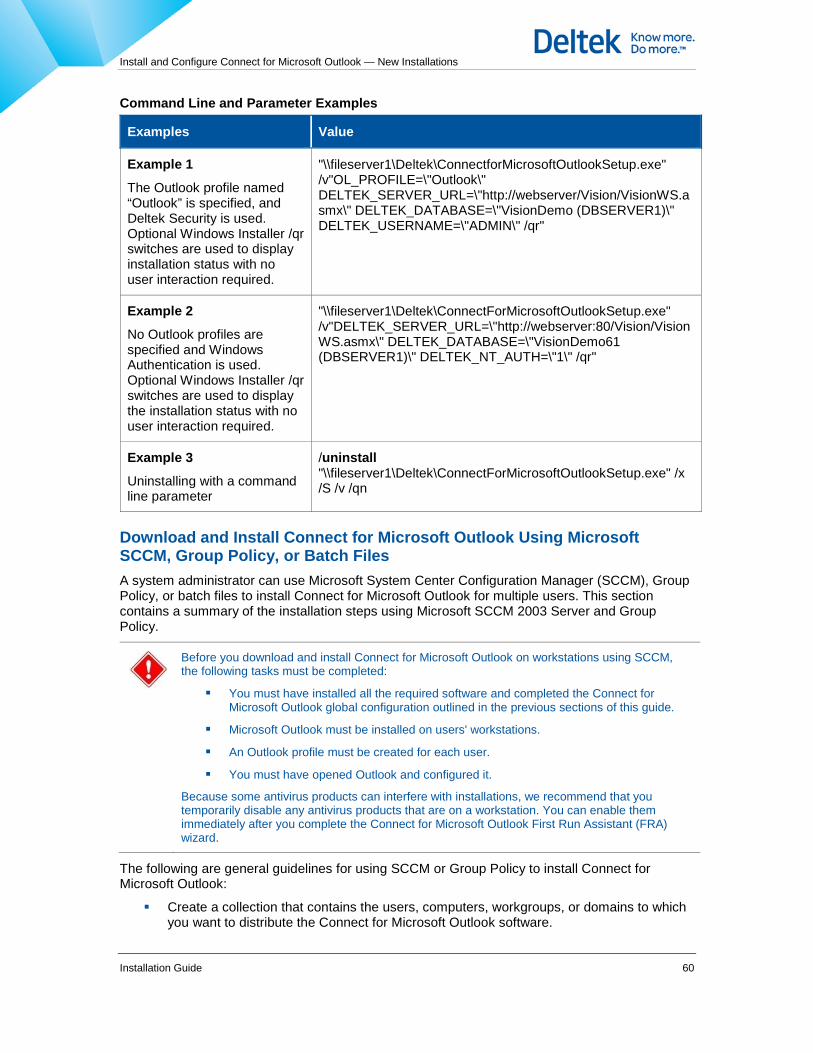
Install and Configure Connect for Microsoft Outlook — New Installations
Installation Guide 60
Command Line and Parameter Examples
Examples Value
Example 1
The Outlook profile named “Outlook” is specified, and Deltek Security is used. Optional Windows Installer /qr switches are used to display installation status with no user interaction required.
"\\fileserver1\Deltek\ConnectforMicrosoftOutlookSetup.exe" /v"OL_PROFILE=\"Outlook\" DELTEK_SERVER_URL=\"http://webserver/Vision/VisionWS.asmx\" DELTEK_DATABASE=\"VisionDemo (DBSERVER1)\" DELTEK_USERNAME=\"ADMIN\" /qr"
Example 2
No Outlook profiles are specified and Windows Authentication is used. Optional Windows Installer /qr switches are used to display the installation status with no user interaction required.
"\\fileserver1\Deltek\ConnectForMicrosoftOutlookSetup.exe" /v"DELTEK_SERVER_URL=\"http://webserver:80/Vision/VisionWS.asmx\" DELTEK_DATABASE=\"VisionDemo61 (DBSERVER1)\" DELTEK_NT_AUTH=\"1\" /qr"
Example 3
Uninstalling with a command line parameter
/uninstall "\\fileserver1\Deltek\ConnectForMicrosoftOutlookSetup.exe" /x /S /v /qn
Download and Install Connect for Microsoft Outlook Using Microsoft SCCM, Group Policy, or Batch Files A system administrator can use Microsoft System Center Configuration Manager (SCCM), Group Policy, or batch files to install Connect for Microsoft Outlook for multiple users. This section contains a summary of the installation steps using Microsoft SCCM 2003 Server and Group Policy.
Before you download and install Connect for Microsoft Outlook on workstations using SCCM, the following tasks must be completed:
You must have installed all the required software and completed the Connect for Microsoft Outlook global configuration outlined in the previous sections of this guide.
Microsoft Outlook must be installed on users' workstations.
An Outlook profile must be created for each user.
You must have opened Outlook and configured it. Because some antivirus products can interfere with installations, we recommend that you temporarily disable any antivirus products that are on a workstation. You can enable them immediately after you complete the Connect for Microsoft Outlook First Run Assistant (FRA) wizard.
The following are general guidelines for using SCCM or Group Policy to install Connect for Microsoft Outlook:
Create a collection that contains the users, computers, workgroups, or domains to which you want to distribute the Connect for Microsoft Outlook software.

Install and Configure Connect for Microsoft Outlook — New Installations
Installation Guide 61
Create a distribution package for the collection you created. The distribution package should contain the Connect for Microsoft Outlook installation and command line parameters that you specify for the collection.
When you enter command line information for program identification for the distribution package, you can enter either of the following:
The command line and the individual parameters.
A batch file containing the command line with any parameters you elect to use.
You can add optional parameters to the command line or the batch file. See the "Download and Install Connect for Microsoft Outlook on Multiple Workstations Using Command Line Parameters" section on page 56.
Create an advertisement of the distribution package for the collection.
The distribution package must be run with administrative rights.
Notify Connect for Microsoft Outlook users that Connect for Microsoft Outlook is ready for them to configure on their workstations.
The following link contains the steps to install an MSI package using Group Policy for Windows Server: http://support.microsoft.com/kb/816102.
Configure Connect for Microsoft Outlook on a Workstation When you open Outlook after you install Connect for Microsoft Outlook for the first time on a workstation, the Connect for Microsoft Outlook Assistant starts automatically. It guides you through the steps to configure Connect for Microsoft Outlook. After you enter configuration settings with the Connect for Microsoft Outlook Assistant and the initial synchronization finishes, you can start to use the Connect for Microsoft Outlook software.
Deltek recommends that you stagger the initial Connect for Microsoft Outlook implementation so that a significant number of users are not performing the initial synchronization all at the same time. This will help prevent overloading your system. Users perform the initial synchronization when they complete the Connect for Microsoft Outlook Assistant, as described in this section of the guide.
For more information about synchronization schedules and automatic synchronization after the initial synchronization, see "Appendix E: Synchronization Schedules" on page 132.
Summary of Configuration Information The following is a summary of the configuration information that you enter using the Connect for Microsoft Outlook Assistant:
Connection settings — You set up an Internet connection to your Vision database. If the connection cannot be established automatically, you enter it manually.
Vision credentials — Enter either your Vision user name and password or select Windows authentication. These credentials enable Connect for Microsoft Outlook to access and synchronize the Vision data. With these saved credentials, you do not have to log in to Vision each time that you start Outlook.
Obtain package — Vision information, based on your Vision employee record and security role, is downloaded automatically to Connect for Microsoft Outlook. After the package information is downloaded, the Vision Activities, Clients, Opportunities, and

Install and Configure Connect for Microsoft Outlook — New Installations
Installation Guide 62
Vendors folders display in the Connect for Microsoft Outlook Folder List view of the Navigation pane.
Filter settings — You set up data filters to limit the Vision records that are synchronized to Connect for Microsoft Outlook. For optimal synchronization performance, Deltek recommends that you apply filters to allow no more than 5,000 records to be synchronized.
Synchronization schedule — You select the time interval for automatic synchronization between Vision and Connect for Microsoft Outlook to occur.
Advanced settings — You specify whether or not new appointments, contacts, and tasks that you create in Connect for Microsoft Outlook will be shared with Vision by default. You can change the shared/unshared status when you create a new item, or change it at any time on an item-by-item basis as you work in Connect for Microsoft Outlook.
Convert contacts — You choose whether or not you want to convert your existing Outlook contacts to display on the Deltek Contact form. When contacts display on the Deltek Contact form, you have the option to share or not share them with Vision.
First synchronization — The first synchronization is performed. Vision data is downloaded to Connect for Microsoft Outlook based on your filter settings and other synchronization business rules.
Compare and Merge Duplicate Contacts — This process compares native Outlook contacts with Vision contacts to prevent duplicates from being created.
Steps to Configure
To enter Connect for Microsoft Outlook configuration settings with the Connect for Microsoft Outlook Assistant, complete the following steps:
1. After you install Connect for Microsoft Outlook, open Outlook.
2. On the Choose Profile dialog box, select the Outlook profile to use with Connect for Microsoft Outlook and click OK.
The drop-down list displays only the profiles with the supported default email delivery locations that are described in the “Supported Microsoft Outlook ” section on page 12.
3. When you receive the message that asks “Would you like to apply Connect for Microsoft Outlook configuration to this Outlook profile, click Yes to apply it.
If you are performing an upgrade installation, you can click No to apply configuration settings after Connect for Microsoft Outlook synchronizes.
4. Click anywhere on the Connect for Microsoft Outlook Assistant Welcome page to start the Connect for Microsoft Outlook Assistant.
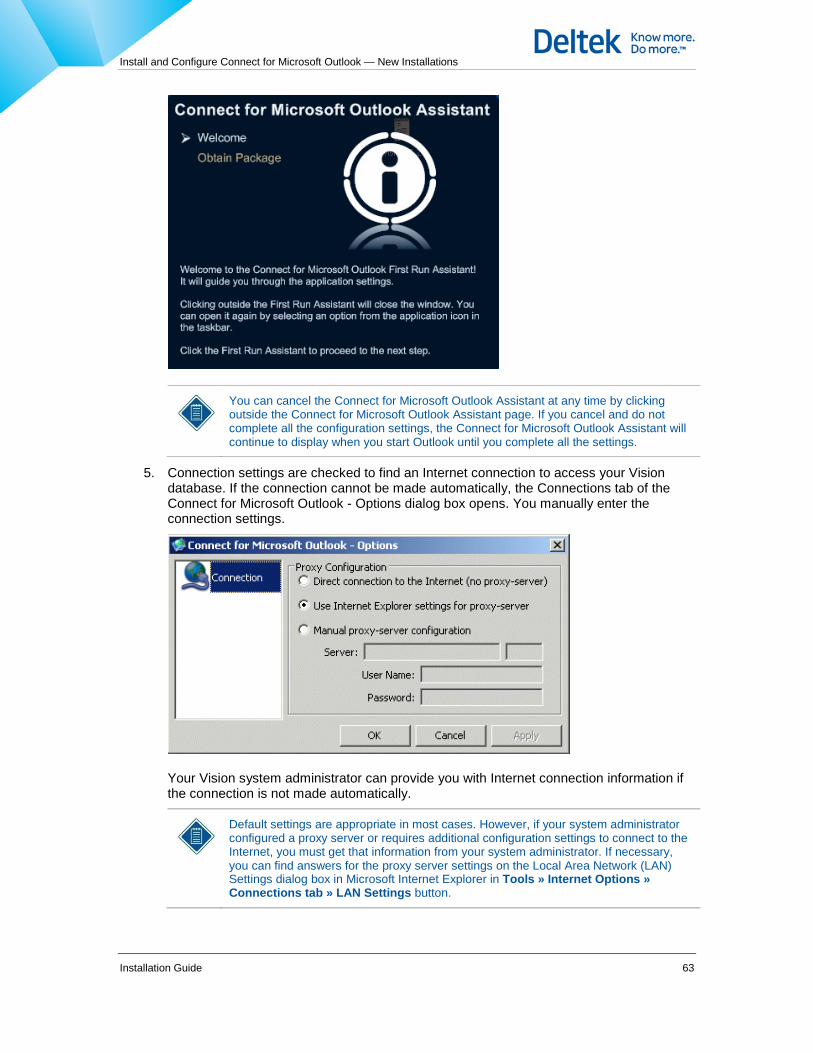
Install and Configure Connect for Microsoft Outlook — New Installations
Installation Guide 63
You can cancel the Connect for Microsoft Outlook Assistant at any time by clicking outside the Connect for Microsoft Outlook Assistant page. If you cancel and do not complete all the configuration settings, the Connect for Microsoft Outlook Assistant will continue to display when you start Outlook until you complete all the settings.
5. Connection settings are checked to find an Internet connection to access your Vision database. If the connection cannot be made automatically, the Connections tab of the Connect for Microsoft Outlook - Options dialog box opens. You manually enter the connection settings.
Your Vision system administrator can provide you with Internet connection information if the connection is not made automatically.
Default settings are appropriate in most cases. However, if your system administrator configured a proxy server or requires additional configuration settings to connect to the Internet, you must get that information from your system administrator. If necessary, you can find answers for the proxy server settings on the Local Area Network (LAN) Settings dialog box in Microsoft Internet Explorer in Tools » Internet Options » Connections tab » LAN Settings button.
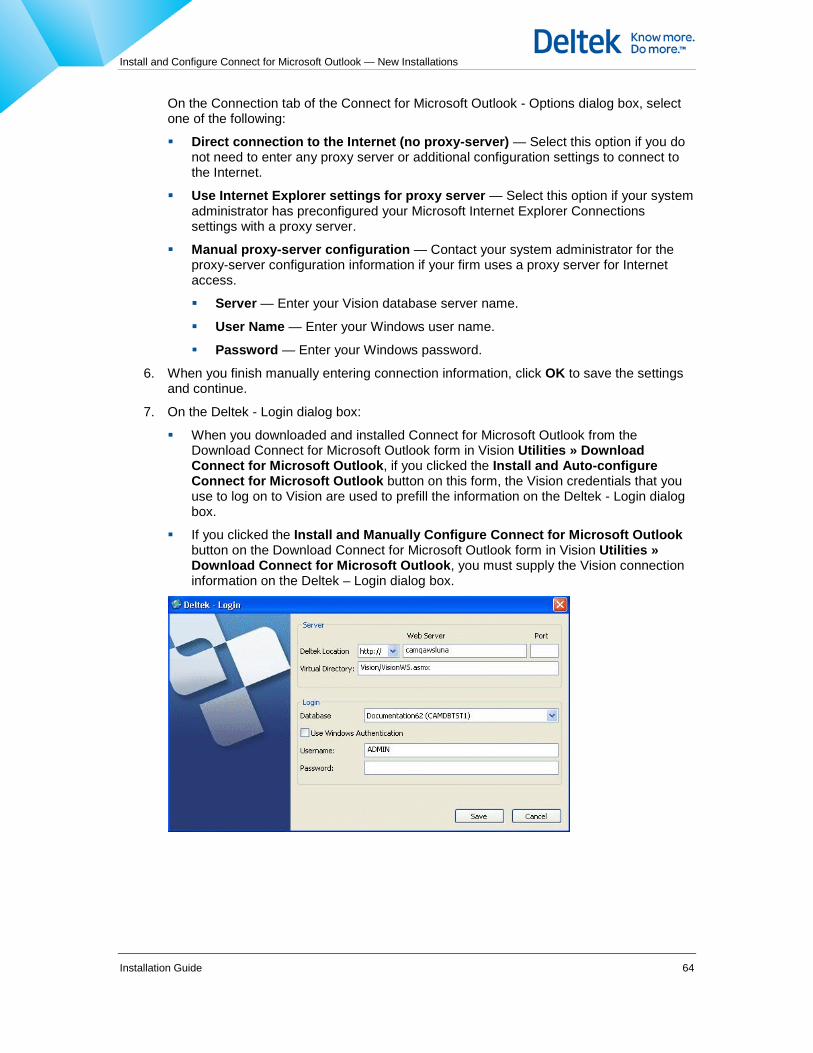
Install and Configure Connect for Microsoft Outlook — New Installations
Installation Guide 64
On the Connection tab of the Connect for Microsoft Outlook - Options dialog box, select one of the following:
Direct connection to the Internet (no proxy-server) — Select this option if you do not need to enter any proxy server or additional configuration settings to connect to the Internet.
Use Internet Explorer settings for proxy server — Select this option if your system administrator has preconfigured your Microsoft Internet Explorer Connections settings with a proxy server.
Manual proxy-server configuration — Contact your system administrator for the proxy-server configuration information if your firm uses a proxy server for Internet access.
Server — Enter your Vision database server name.
User Name — Enter your Windows user name.
Password — Enter your Windows password.
6. When you finish manually entering connection information, click OK to save the settings and continue.
7. On the Deltek - Login dialog box:
When you downloaded and installed Connect for Microsoft Outlook from the Download Connect for Microsoft Outlook form in Vision Utilities » Download Connect for Microsoft Outlook, if you clicked the Install and Auto-configure Connect for Microsoft Outlook button on this form, the Vision credentials that you use to log on to Vision are used to prefill the information on the Deltek - Login dialog box.
If you clicked the Install and Manually Configure Connect for Microsoft Outlook button on the Download Connect for Microsoft Outlook form in Vision Utilities » Download Connect for Microsoft Outlook, you must supply the Vision connection information on the Deltek – Login dialog box.

Install and Configure Connect for Microsoft Outlook — New Installations
Installation Guide 65
8. Enter the following information on the Deltek Login dialog box:
Server section:
Deltek Location — This is the path to your Vision Web server.
Web Server — This is your Vision database server name. It should contain only the server name IP address (not the remainder of the URL). You enter the URL in the virtual directory section.
Port — Leave this blank unless you are using a port other than default port 80.
Virtual Directory — This is a combination of your Vision virtual directory and the visionws.asmx file. The visionws.asmx is always required. In the screen shot example, the virtual directory is named Vision.
Login section:
In this section, you select whether to use Windows authentication or your Vision username and password for Connect for Microsoft Outlook to access Vision data.
Database — After you enter the server information and connections are made, a list of available Vision databases display in the drop-down list. Select the appropriate Vision database.
Use Windows Authentication — Select this check box to use your Windows user name and password.
User Name — If you do not select Windows authentication, enter your Vision username.
Password — If you do not select Windows authentication, enter your Vision password.
9. When you finish entering Vision login information, click Save.
The configuration settings that are based on your Vision employee information are automatically downloaded from Vision and applied to Connect for Microsoft Outlook during the "Obtain Package" process. This can take a few minutes. A box displays the progress of this download.
When this process finishes, the following Connect for Microsoft Outlook Assistant Welcome page displays:

Install and Configure Connect for Microsoft Outlook — New Installations
Installation Guide 66
10. Click anywhere on the Connect for Microsoft Outlook Assistant Welcome page to open the Filter Records screen of the Synchronization Control Panel dialog box.
11. On the Filter Records screen, enter the filter conditions to determine the Vision records that will synchronize with Connect for Microsoft Outlook.
Set the filters to select only the records that you normally work with. Filtering records limits the amount of records that synchronize from Vision to Connect for Microsoft Outlook. This reduces the time it takes to synchronize.
On the Filter Records tab, you cannot save the filter if more than 7,000 Vision records match the filter criteria. For optimal performance, Deltek recommends no more than 5,000 records. The record count includes only complete records that match your filter. It does not include incomplete records that are synchronized because of associations.
a. In the pane on the left side of the Filter Records screen, select the check box for the type of Vision record that you want to synchronize with Connect for Microsoft Outlook. Then click the check box name to display Match criteria: All and Any and the default filter condition in the filter criteria pane.
In the example below, the Client check box is selected and the check box name is highlighted in gray.
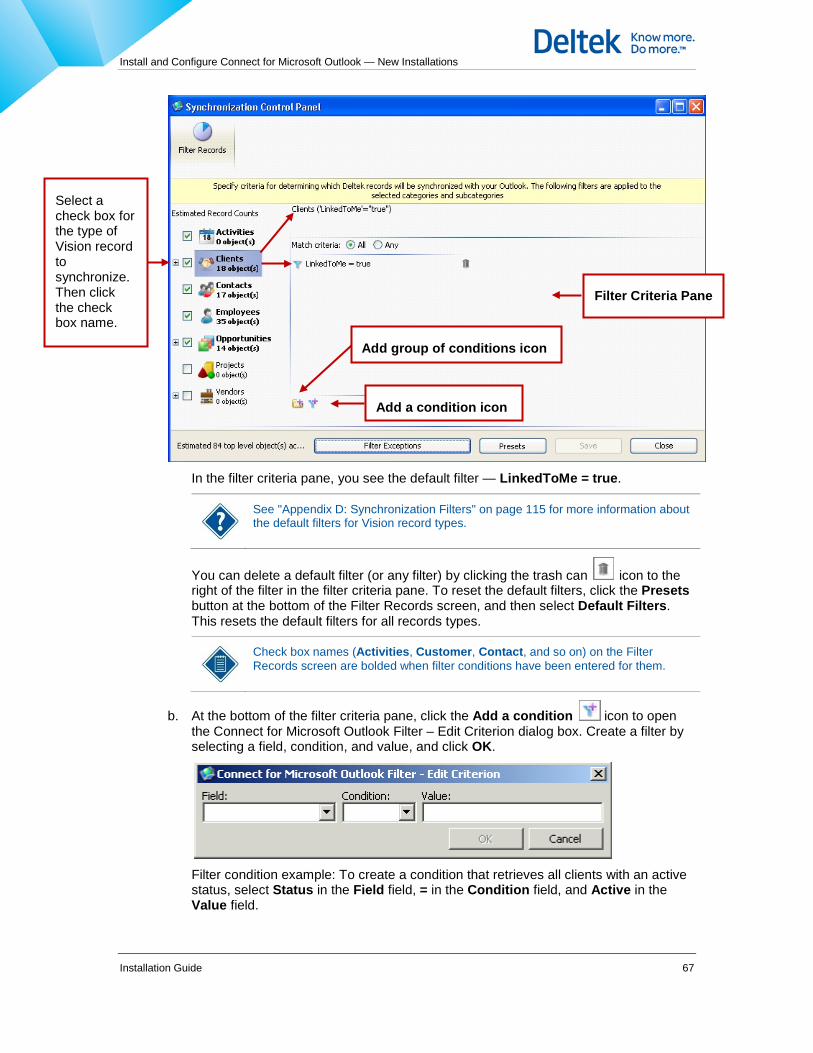
Install and Configure Connect for Microsoft Outlook — New Installations
Installation Guide 67
In the filter criteria pane, you see the default filter — LinkedToMe = true.
See "Appendix D: Synchronization Filters" on page 115 for more information about the default filters for Vision record types.
You can delete a default filter (or any filter) by clicking the trash can icon to the right of the filter in the filter criteria pane. To reset the default filters, click the Presets button at the bottom of the Filter Records screen, and then select Default Filters. This resets the default filters for all records types.
Check box names (Activities, Customer, Contact, and so on) on the Filter Records screen are bolded when filter conditions have been entered for them.
b. At the bottom of the filter criteria pane, click the Add a condition icon to open the Connect for Microsoft Outlook Filter – Edit Criterion dialog box. Create a filter by selecting a field, condition, and value, and click OK.
Filter condition example: To create a condition that retrieves all clients with an active status, select Status in the Field field, = in the Condition field, and Active in the Value field.
Add group of conditions icon
Add a condition icon
Filter Criteria Pane
Select a check box for the type of Vision record to synchronize. Then click the check box name.
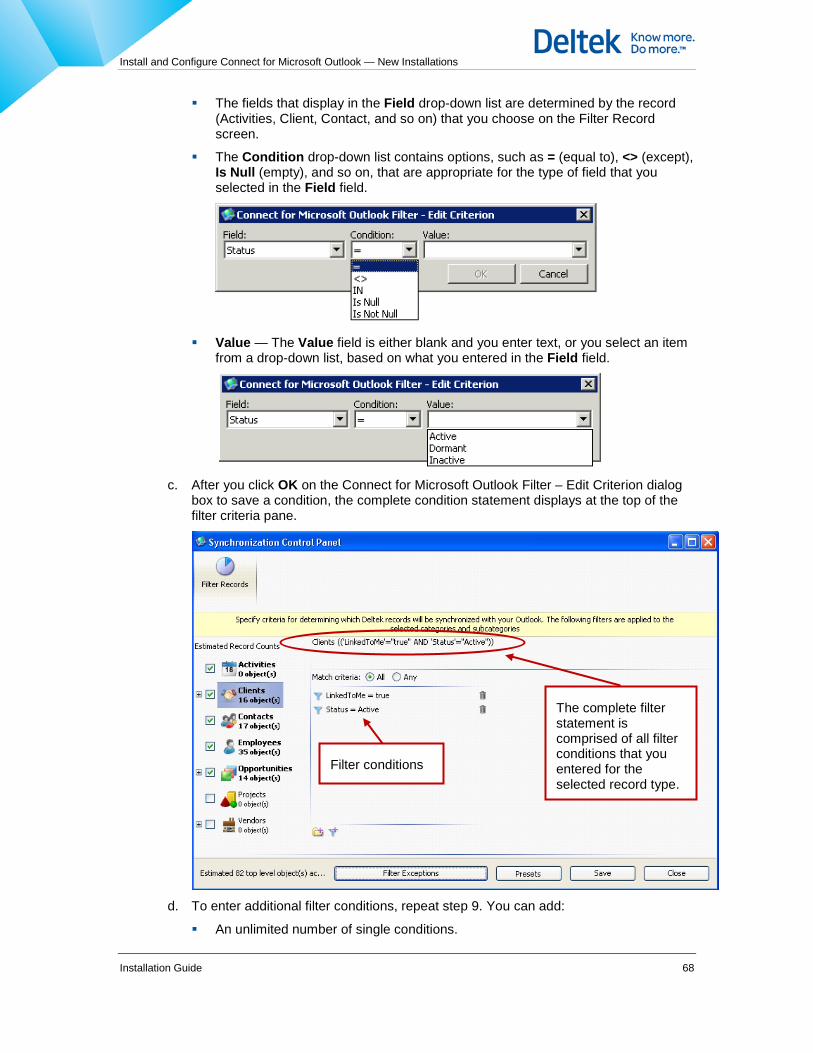
Install and Configure Connect for Microsoft Outlook — New Installations
Installation Guide 68
The fields that display in the Field drop-down list are determined by the record (Activities, Client, Contact, and so on) that you choose on the Filter Record screen.
The Condition drop-down list contains options, such as = (equal to), <> (except), Is Null (empty), and so on, that are appropriate for the type of field that you selected in the Field field.
Value — The Value field is either blank and you enter text, or you select an item
from a drop-down list, based on what you entered in the Field field.
c. After you click OK on the Connect for Microsoft Outlook Filter – Edit Criterion dialog
box to save a condition, the complete condition statement displays at the top of the filter criteria pane.
d. To enter additional filter conditions, repeat step 9. You can add:
An unlimited number of single conditions.
The complete filter statement is comprised of all filter conditions that you entered for the selected record type.
Filter conditions

Install and Configure Connect for Microsoft Outlook — New Installations
Installation Guide 69
Conditions for the records that are associated with top-level records.
A group of conditions (nested conditions) using the Add group of conditions
icon.
See "Appendix D: Synchronization Filters" on page 115 for more information about creating filter conditions. This includes instructions on how to create conditions for associated records and group conditions.
e. In the filter criteria pane, select the Match criteria setting as follows:
If you enter more than one filter, select All (AND-based) to synchronize records that match all of the conditions that you enter for a record.
If you enter more than one filter, select Any (OR-based) to synchronize records that match any one of the filter conditions; records do not have to meet all the filter conditions.
To create filters that mix AND and OR conditions, you must use a group (nested) condition.
See "Appendix D: Synchronization Filters" on page 115 for more information on group conditions.
Records that match your filter conditions are synchronized and brought into
Connect for Microsoft Outlook as "complete" records. This means all their information appears on the record form in Connect for Microsoft Outlook.
Records that do not match your filter criteria are synchronized and brought into Connect for Microsoft Outlook if they are associated with records that match your filter conditions. However, these records are brought in to Connect for Microsoft Outlook as "incomplete" records. This means that the records are read-only in
Match criteria: All or Any
Multiple Single Filter Conditions
Displays the number of complete records to synchronize

Install and Configure Connect for Microsoft Outlook — New Installations
Installation Guide 70
Connect for Microsoft Outlook, regardless of your access rights. Associations to the associated records are not brought into Connect for Microsoft Outlook at all. This prevents all records from coming into Connect for Microsoft Outlook through associations.
See "Appendix A: Complete and Incomplete Records" on page 103 for more information and an example of complete and incomplete records.
If you clear the Remove local records not matching filtering criteria check box on the Synchronization Control Panel dialog box, Vision records that synchronized previously, but do not match your current filter requirements, remain in Connect for Microsoft Outlook. Be aware that when you make any changes to these records in Vision, the changes are not updated to Connect for Microsoft Outlook when you synchronize.
f. When you finish creating filters, click Save and then click Close.
To edit a single filter condition, double-click it in the filter criteria pane to open the Connect for Microsoft Outlook Filter– Edit Criterion dialog box.
12. On the Connect for Microsoft Outlook - Options dialog box that displays automatically, complete the following synchronization settings:
Schedule an automatic synchronization interval — Select this check box to have
synchronization occur automatically at regular intervals.
Frequency slider bar — If you selected the Schedule an automatic synchronization interval check box, use this slider to select the automatic synchronization frequency.
The options are:

Install and Configure Connect for Microsoft Outlook — New Installations
Installation Guide 71
Once an Hour (default)
Twice a Day
Once a Day
Once a Week
The time of the next synchronization displays below the Frequency slider bar.
See "Appendix E: Synchronization Schedules" on page 132 for more information about automatic synchronization scheduling.
Synchronize recent changes to server automatically — Select this check box to schedule automatic, one-way synchronization of data from Connect for Microsoft Outlook to Vision at a recurring time. All the changes that you made in Connect for Microsoft Outlook since the last synchronization are updated to Vision. Changes made in Vision since the last synchronization are not updated in Connect for Microsoft Outlook during the synchronization.
Use the slider bar below the check box to choose one of the following synchronization frequencies:
Ten Minutes
Twenty Minutes
Half an Hour
Once an Hour
The time and date of the next scheduled one-way synchronization displays below the frequency slider bar.
You can run the synchronization manually at any time, in addition to the automatic synchronizations that you specify.
Show progress during automatic synchronization — Select this check box if you want the following synchronization progress dialog box to display during automatic synchronization.
The Stop button on the synchronization dialog box stops the synchronization. When you click this button, the synchronization stops after it finishes the current operation in process (it does not stop immediately).
When you click the button in the upper right corner of the screen, it minimizes the dialog box, and it does not stop the synchronization process.

Install and Configure Connect for Microsoft Outlook — New Installations
Installation Guide 72
Regardless of the synchronization settings that you select on the Connect for Microsoft Outlook Options dialog box, you can synchronize at any time. In the notification area of the Windows taskbar, select one of the following actions:
Right-click the Connect for Microsoft Outlook icon, and select Synchronize Local Changes from the menu, or left-click or double-
click the Connect for Microsoft Outlook icon. This immediately starts a one-way synchronization. The changes that you made in Outlook are updated in Vision, the but changes that have been made in Vision are not updated in Outlook.
Right-click the Connect for Microsoft Outlook icon, and select Synchronize All Changes from the menu to perform a complete, two-way synchronization. Records are updated in both Vision and Connect for Microsoft Outlook. You can use the Filtering Control Panel and the Configuration Options to change the configuration settings before you start the synchronization.
Show Control Panel — Click this button to open the Synchronization Control Panel dialog box. On this dialog box, you can select filter options for synchronization. The screen shot in step 7 displays the Synchronization Control Panel dialog box.
13. When you finish entering synchronization settings on the Connect for Microsoft Outlook - Options dialog box, click OK to save your settings.
To change synchronization settings at any time after you use the Connect for Microsoft Outlook Assistant during the initial installation, complete the following steps:
1. In the notification area of the Windows taskbar, right-click the Connect for
Microsoft Outlook icon and click Options.
2. On the Connect for Microsoft Outlook - Options dialog box, click the Synchronization tab.
14. On the next Connect for Microsoft Outlook - Options dialog box:
Select the Automatically Share New Contacts, Calendar Events and Tasks check box if you want new contacts, activities, and tasks that you create in Connect for Microsoft Outlook to be shared automatically with Vision by default. New shared records are updated in Vision when you synchronize Connect for Microsoft Outlook.
The Show warning when switching to the People View check box displays if you use Microsoft Outlook 2013. Select this check box if you want the following warning message to display every time that you switch to the Outlook People view from a different view: Connect for Microsoft Outlook items will be hidden from this Outlook view. Switch to another Outlook view to work with Connect for Microsoft Outlook data.
The warning message dialog box also includes a Don't show this message again check box that allows you to turn off the message at any time.

Install and Configure Connect for Microsoft Outlook — New Installations
Installation Guide 73
In the Automatic conflicts resolution section, in the drop-down list in the
Collisions and Duplications fields, select how you want to resolve collisions and duplicate records during synchronization.
The options are:
Ask user — The Synchronization Control Panel displays when a conflict is encountered during the synchronization. You can choose to resolve one or more of the conflicts at that time. Or, you can close the Control Panel and resolve the conflicts at a more convenient time.
Resolve to the Outlook side — The conflict is resolved automatically by using the record from Outlook. The Deltek record is ignored.
Resolve to the Deltek side — The conflict is resolved automatically by using the record from Deltek. The Outlook record is ignored.
When you select Ask user, the Synchronization Control Panel displays when a conflict is encountered during synchronization. A system administrator can change this default so that a balloon pop-up notification displays in the notification area of the Windows taskbar, instead. For specific instructions on how to change the default, see the Customizing Configuration Settings in Connect for Microsoft Outlook Guide, which is available at the Deltek Customer Care Connect site.
For more information about resolving conflicts see the “Resolve Conflicts” and the “Resolve Duplicates” topic in the Connect for Microsoft Outlook online help.

Install and Configure Connect for Microsoft Outlook — New Installations
Installation Guide 74
After you complete the Connect for Microsoft Outlook Assistant, you can change the default setting for sharing new contacts, calendar events, and
tasks at any time by right-clicking the Connect for Microsoft icon in the notification section of the Windows taskbar and selecting Options from the menu. Then select the Advanced tab on the Connect for Microsoft Outlook – Options dialog box.
You can easily change the prefilled default setting and share or not share a new record when you create individual records in Connect for Microsoft Outlook.
You can switch records from shared to unshared and vice versa at any time by clicking the Shared with Deltek button at the top of a Contact, Task, or calendar item form in Connect for Microsoft Outlook.
15. On the Connect for Microsoft Outlook - Options dialog box, click OK to continue.
You do not need to make any changes to the logging and reporting configuration settings in the Logging section of the Advanced tab. On the Logging Configuration dialog box that opens when you click the Configure Logging and Reporting button, the default setting in the Logging Policy field is Basic. You do not need to change this unless a Deltek Customer Care analyst instructs you to at a future time.
You can access the logging and reporting configuration at any time in Connect for Microsoft Outlook by opening the Connect for Microsoft Outlook – Options dialog box.
You can also use the Feedback tab of the Connect for Microsoft Outlook - Options dialog box to view and email the general log.
16. On the Confirm Outlook Contact Conversion dialog box, you choose whether or not to convert existing Outlook contacts to display on the Connect for Microsoft Outlook (Deltek) Contact form.
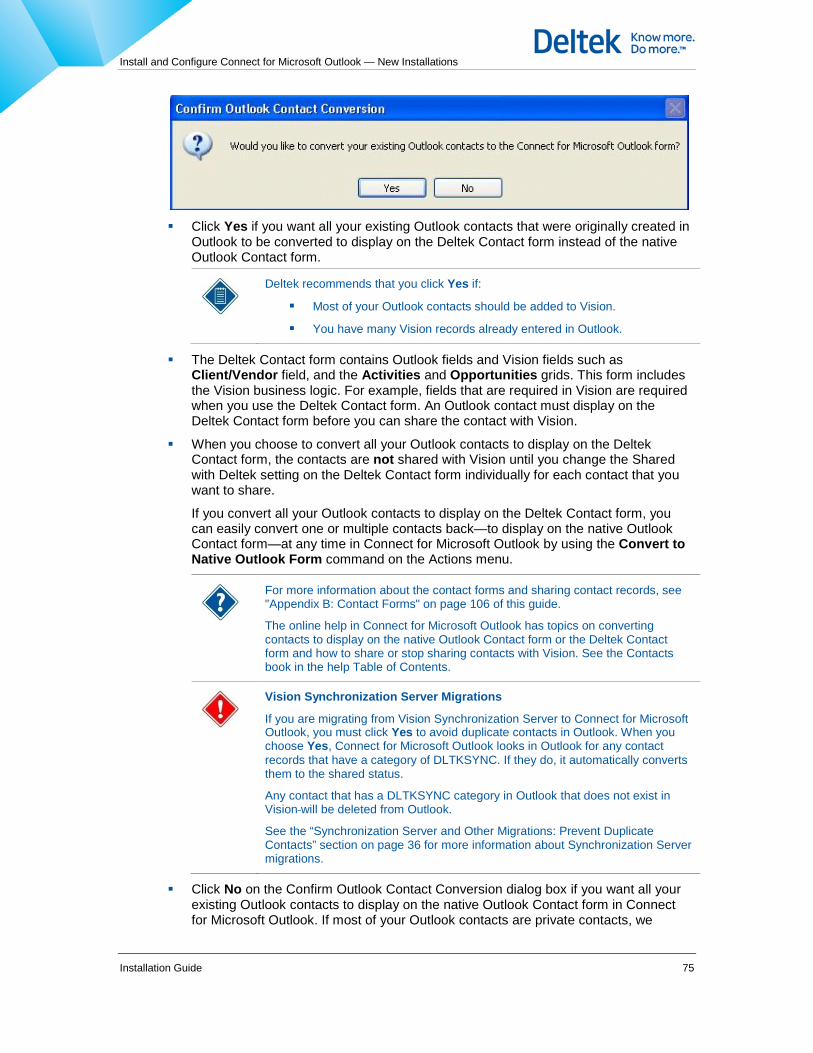
Install and Configure Connect for Microsoft Outlook — New Installations
Installation Guide 75
Click Yes if you want all your existing Outlook contacts that were originally created in
Outlook to be converted to display on the Deltek Contact form instead of the native Outlook Contact form.
Deltek recommends that you click Yes if:
Most of your Outlook contacts should be added to Vision.
You have many Vision records already entered in Outlook.
The Deltek Contact form contains Outlook fields and Vision fields such as Client/Vendor field, and the Activities and Opportunities grids. This form includes the Vision business logic. For example, fields that are required in Vision are required when you use the Deltek Contact form. An Outlook contact must display on the Deltek Contact form before you can share the contact with Vision.
When you choose to convert all your Outlook contacts to display on the Deltek Contact form, the contacts are not shared with Vision until you change the Shared with Deltek setting on the Deltek Contact form individually for each contact that you want to share.
If you convert all your Outlook contacts to display on the Deltek Contact form, you can easily convert one or multiple contacts back—to display on the native Outlook Contact form—at any time in Connect for Microsoft Outlook by using the Convert to Native Outlook Form command on the Actions menu.
For more information about the contact forms and sharing contact records, see "Appendix B: Contact Forms" on page 106 of this guide.
The online help in Connect for Microsoft Outlook has topics on converting contacts to display on the native Outlook Contact form or the Deltek Contact form and how to share or stop sharing contacts with Vision. See the Contacts book in the help Table of Contents.
Vision Synchronization Server Migrations
If you are migrating from Vision Synchronization Server to Connect for Microsoft Outlook, you must click Yes to avoid duplicate contacts in Outlook. When you choose Yes, Connect for Microsoft Outlook looks in Outlook for any contact records that have a category of DLTKSYNC. If they do, it automatically converts them to the shared status.
Any contact that has a DLTKSYNC category in Outlook that does not exist in Vision will be deleted from Outlook.
See the “Synchronization Server and Other Migrations: Prevent Duplicate Contacts” section on page 36 for more information about Synchronization Server migrations.
Click No on the Confirm Outlook Contact Conversion dialog box if you want all your existing Outlook contacts to display on the native Outlook Contact form in Connect for Microsoft Outlook. If most of your Outlook contacts are private contacts, we
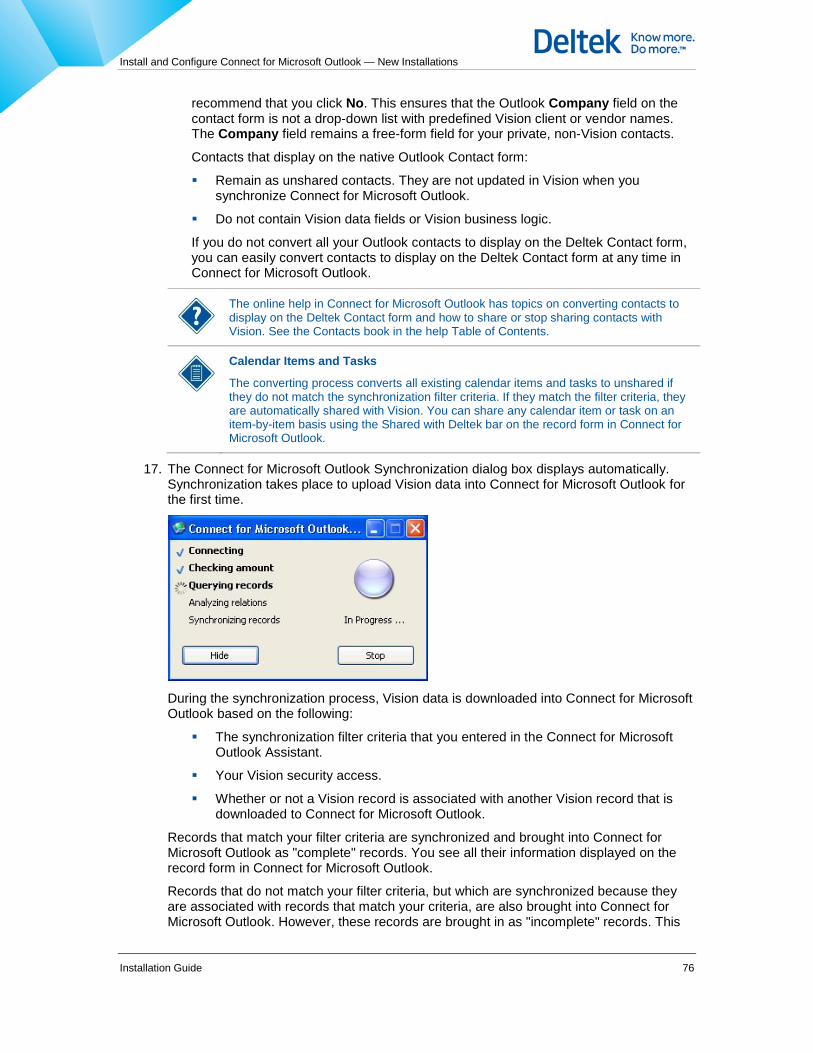
Install and Configure Connect for Microsoft Outlook — New Installations
Installation Guide 76
recommend that you click No. This ensures that the Outlook Company field on the contact form is not a drop-down list with predefined Vision client or vendor names. The Company field remains a free-form field for your private, non-Vision contacts.
Contacts that display on the native Outlook Contact form:
Remain as unshared contacts. They are not updated in Vision when you synchronize Connect for Microsoft Outlook.
Do not contain Vision data fields or Vision business logic.
If you do not convert all your Outlook contacts to display on the Deltek Contact form, you can easily convert contacts to display on the Deltek Contact form at any time in Connect for Microsoft Outlook.
The online help in Connect for Microsoft Outlook has topics on converting contacts to display on the Deltek Contact form and how to share or stop sharing contacts with Vision. See the Contacts book in the help Table of Contents.
Calendar Items and Tasks
The converting process converts all existing calendar items and tasks to unshared if they do not match the synchronization filter criteria. If they match the filter criteria, they are automatically shared with Vision. You can share any calendar item or task on an item-by-item basis using the Shared with Deltek bar on the record form in Connect for Microsoft Outlook.
17. The Connect for Microsoft Outlook Synchronization dialog box displays automatically. Synchronization takes place to upload Vision data into Connect for Microsoft Outlook for the first time.
During the synchronization process, Vision data is downloaded into Connect for Microsoft Outlook based on the following:
The synchronization filter criteria that you entered in the Connect for Microsoft Outlook Assistant.
Your Vision security access.
Whether or not a Vision record is associated with another Vision record that is downloaded to Connect for Microsoft Outlook.
Records that match your filter criteria are synchronized and brought into Connect for Microsoft Outlook as "complete" records. You see all their information displayed on the record form in Connect for Microsoft Outlook.
Records that do not match your filter criteria, but which are synchronized because they are associated with records that match your criteria, are also brought into Connect for Microsoft Outlook. However, these records are brought in as "incomplete" records. This

Install and Configure Connect for Microsoft Outlook — New Installations
Installation Guide 77
means they are read-only in Connect for Microsoft Outlook, regardless of your access rights. Associations with the associated records are not brought into Connect for Microsoft Outlook at all. This prevents all records from coming into Connect for Microsoft Outlook through associations.
For more information and an example of complete and incomplete records, see "Appendix A: Complete and Incomplete Records" on page 103.
The Stop button on the Connect for Microsoft Outlook Synchronization dialog box stops the synchronization. When you click this button, the synchronization stops after if finishes the current operation in process (it does not stop immediately).
The button at the top right of the dialog box minimizes the dialog box, and does not stop the synchronization process.
When the Synchronization dialog box closes, the Compare and Merge Duplicate Contacts process begins automatically.
You may receive a message that the contacts have not completed the conversion process, and the Compare and Merge Duplicate Contacts process will begin when the conversion is complete. You can work in Outlook during this time, but you may not see all your contacts in Explorer view. The contacts are removed and they re-appear after the conversion, one at a time.
18. The Compare and Merge Duplicate Contacts process compares your original Outlook contacts with the Vision contacts that have been synchronized with Connect for Microsoft Outlook to prevent duplicate contact records from being created. However, it does the comparison only if you converted all your Outlook contacts to display on the Deltek (Connect for Microsoft Outlook) Contact form in step 18.
This process allows you to merge duplicate contacts that have the same email address or the same first name and last name into a single shared contact record that displays in Connect for Microsoft Outlook and Vision.
If no duplicate contacts are found, you receive the following message:
The message explains that the Compare and Merge process does not compare Outlook contacts that were not converted to the Deltek (Connect for Microsoft Outlook) contact form.
Click OK, the dialog box closes, and you can now use Connect for Microsoft Outlook.
If duplicate contacts are found, follow the instructions in "Appendix C: Compare and Merge Duplicate Contacts" on page 108.
After you configure Connect for Microsoft Outlook for the first time, you can run the Compare and Merge Duplicate Contacts process at any time in Connect for Microsoft

Install and Configure Connect for Microsoft Outlook — New Installations
Installation Guide 78
Outlook. Compare and Merge Duplicate displays on the Vision toolbar in Connect for Microsoft Outlook when you have the Contacts folder open.
After the Compare and Merge Contacts process finishes, you have completed the Connect for Microsoft Outlook configuration settings. You now see Vision information in Outlook.
View or Modify Connect for Microsoft Outlook Configuration Settings
You can view or modify the Connect for Microsoft Outlook configuration settings after the initial set up at any time in Connect for Microsoft Outlook.
To view or modify the settings, complete the following steps:
1. Right-click the Connect for Microsoft Outlook icon in the notification area of the Windows taskbar that displays by default at the bottom of your Windows desktop.
2. Select one of the following items from the menu:
Show Control Panel — Opens the Synchronization Control Panel where you select Filter Records criteria.
Options — Opens the Options dialog box where you access the other Connect for Microsoft Outlook configuration settings.
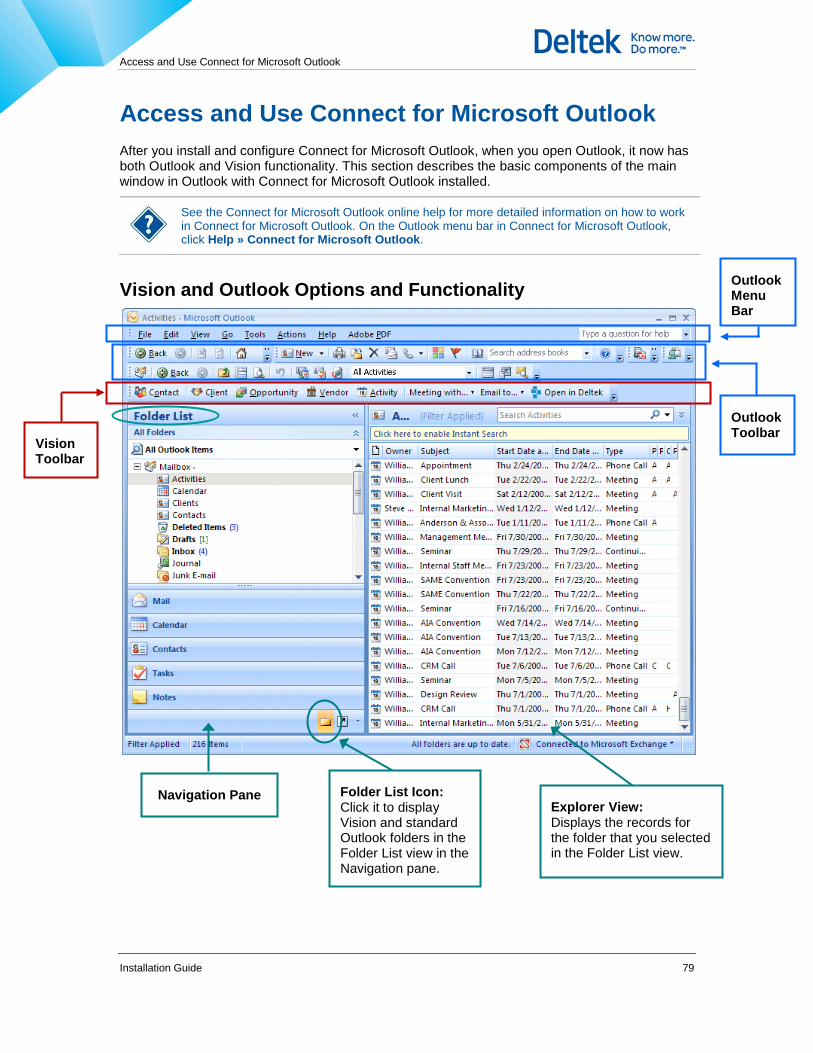
Access and Use Connect for Microsoft Outlook
Installation Guide 79
Access and Use Connect for Microsoft Outlook After you install and configure Connect for Microsoft Outlook, when you open Outlook, it now has both Outlook and Vision functionality. This section describes the basic components of the main window in Outlook with Connect for Microsoft Outlook installed.
See the Connect for Microsoft Outlook online help for more detailed information on how to work in Connect for Microsoft Outlook. On the Outlook menu bar in Connect for Microsoft Outlook, click Help » Connect for Microsoft Outlook.
Vision and Outlook Options and Functionality
Navigation Pane Explorer View: Displays the records for the folder that you selected in the Folder List view.
Folder List Icon: Click it to display Vision and standard Outlook folders in the Folder List view in the Navigation pane.
Outlook Toolbar
Vision Toolbar
Outlook Menu Bar

Access and Use Connect for Microsoft Outlook
Installation Guide 80
Vision Folders and Records
Click the Folder List icon at the bottom of the Navigation pane to display the Vision Activities, Clients, Opportunities, and Vendors folders and the standard Outlook folders in the Folder List view.
In Connect for Microsoft Outlook, you can share and synchronize records only if they are located in the top-level folders named Activities, Calendar, Clients, Contacts, Opportunities, Tasks, and Vendors (in the Folder List view). Records in top level folders with other names do no synchronize. Records in subfolders do not synchronize. (You will see a Shared with Deltek bar for sharing at the top of a form if you create a record in a subfolder; however the record will not synchronize.)
Vision Activities, Clients, Opportunities, and Vendors folders, along with standard
Outlook folders.
Explorer View: This displays the records for the folder that you selected in the Folder List view (in this example, Activities).
Folder List Icon

Access and Use Connect for Microsoft Outlook
Installation Guide 81
Explorer View When you click a folder in the Folder List view, the folder's records display in the Explorer view on the right side of the window. For example, when you click the Clients folder in the Folder List view, a list of Vision clients displays in the Explorer view.
Only complete Vision records display in the Explorer view list. Complete records match your Connect for Microsoft Outlook synchronization filter. For more information about complete and incomplete records, see "Appendix A: Complete and Incomplete Records" on page 103 of this guide.
Views
Current View
How the records display in the Explorer view is determined by the current view that you select for the folder.
To change the current view for a folder, select the folder in the Folder List view, and then from the Outlook menu bar, click View » Current View.
The Current View menu includes standard Outlook views and Connect for Microsoft Outlook views.
Connect for Microsoft Outlook Explorer Views
The following are Connect for Microsoft Outlook views that you can select from View » Current View.
Vision Folder in Folder List View
Vision-Specific View in View » Current View
Activities All Activities
Clients All Clients
Contacts All Contacts
All Clients is a Vision-specific view for the Vision Clients folder.

Access and Use Connect for Microsoft Outlook
Installation Guide 82
Vision Folder in Folder List View
Vision-Specific View in View » Current View
Opportunities All Opportunities
Vendors All Vendors
Deltek recommends that you do not modify the Connect for Microsoft Outlook views. It could be difficult to recreate an original view if you modify it. Instead, we recommend that you copy a Connect for Microsoft Outlook view and modify the copy to create a new view.
Customized and New Views
From the Current View menu, you can also select Customize Current View or Define Views to customize the current view further or to create a new view.
See the Outlook online help to learn how to create new views or customize current views. On the Outlook menu bar in Connect for Microsoft Outlook, click Help » Microsoft Office Outlook Help.
Filters and Views
When you work in Connect for Microsoft Outlook, Filter Applied displays in the Connect for Microsoft Outlook taskbar at the bottom of the screen. An applied filter is part of the Connect for Microsoft Outlook's normal, internal functionality that you cannot change. These filters are not the synchronization filters that you create in the Filter Records screen on the Synchronization Control Panel dialog box.

Access and Use Connect for Microsoft Outlook
Installation Guide 83
Vision Toolbar The Vision toolbar in the Explorer view contains buttons that you use to create new Vision records. The Contact, Client, Opportunity, Vendor, and Activity buttons always display. Other buttons are context-sensitive and display only when a certain type of record is selected.
The Open in Deltek button displays based on the type of record you select in Explorer view and the state of the record. Click this button to open the Vision software.
The following screen shot shows the Vision toolbar buttons that display when you select the Clients folder in the Folder List. These buttons include Contact, Client, Vendor, and so on.
For more information about all the options on the Vision toolbar, see the Vision Toolbar topic in the Connect for Microsoft Outlook online help.
Vision Toolbar
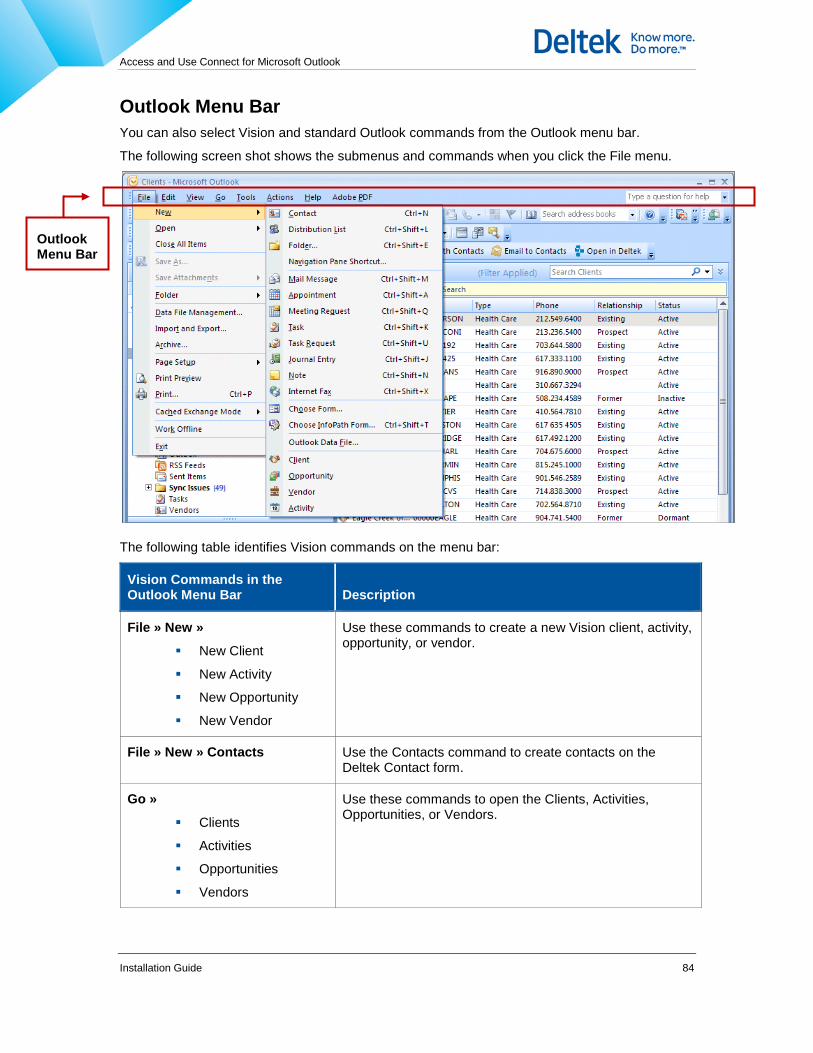
Access and Use Connect for Microsoft Outlook
Installation Guide 84
Outlook Menu Bar You can also select Vision and standard Outlook commands from the Outlook menu bar.
The following screen shot shows the submenus and commands when you click the File menu.
The following table identifies Vision commands on the menu bar:
Vision Commands in the Outlook Menu Bar Description
File » New »
New Client
New Activity
New Opportunity
New Vendor
Use these commands to create a new Vision client, activity, opportunity, or vendor.
File » New » Contacts Use the Contacts command to create contacts on the Deltek Contact form.
Go »
Clients
Activities
Opportunities
Vendors
Use these commands to open the Clients, Activities, Opportunities, or Vendors.
Outlook Menu Bar

Access and Use Connect for Microsoft Outlook
Installation Guide 85
Vision Commands in the Outlook Menu Bar Description
Actions » Convert to Native Outlook Form
This command displays when you open the Contacts folder in the Folder List view.
Use this command to convert an unshared contact that displays on the Deltek Contact form to display on the native Outlook Contact form. This removes the Vision fields and all the data contained in them.
You can convert one or more contacts at a time.
Actions » Convert to Deltek Form
This command displays when you open the Contacts folder in the Folder List view.
Use this command to convert a contact that displays on the native Outlook Contact form to display on the Deltek Contact form.
You can convert one or more contacts at a time.
Help » Connect for Microsoft Outlook Help
Opens the Connect for Microsoft Outlook help system, where you find topics on how to use Connect for Microsoft Outlook.
This help system is accessible when Connect for Microsoft Outlook is either online or offline.
For more information about the Vision commands on the Outlook menu bar, see the Connect for Microsoft Outlook Commands in the Outlook Menu Bar topic in the Connect for Microsoft Outlook online help.

Connect for Microsoft Outlook Application States
Installation Guide 86
Connect for Microsoft Outlook Application States The following table identifies the various Connect for Microsoft Outlook icons that you see in the notification area of your Windows taskbar, which displays at the bottom of your desktop by default. The various Connect for Microsoft Outlook icons indicate the current state of the Connect for Microsoft Outlook application.
Connect for Microsoft Outlook Application State Icon Description
Menu Items Available When You Click the Icon
Not Configured
The icon is gray.
Connect for Microsoft Outlook is not configured to be used in the selected Outlook profile.
Right-click the icon, and select one of the following options:
Obtain package — Select this option to apply the application configuration.
This menu is available during initial application confirmation.
It starts the customization package download and applies the application configuration.
It can also open the Login dialog box if the user's credentials are not supplied.
Options — Select this option to edit the proxy settings on the Connection tab of the Options dialog box.
Change credentials — Select this option to specify the Vision user credentials on the Login dialog box.
Connect for Microsoft Outlook icon in the notification area of your Windows taskbar
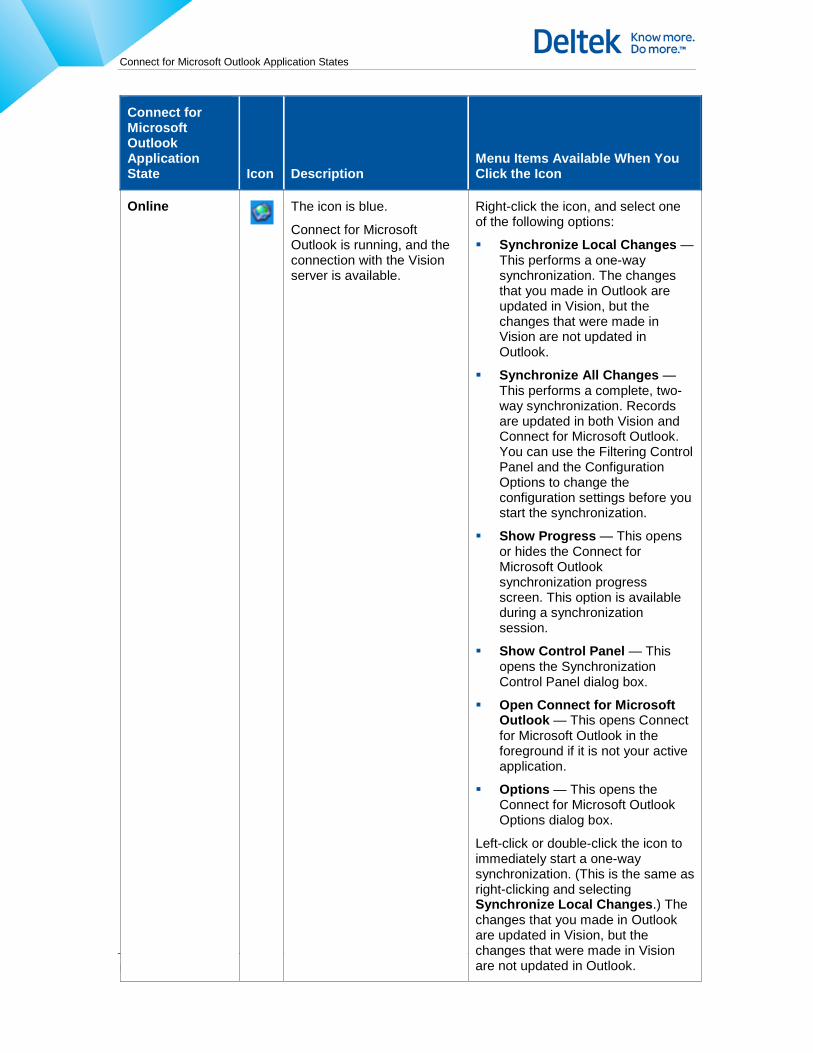
Connect for Microsoft Outlook Application States
Installation Guide 87
Connect for Microsoft Outlook Application State Icon Description
Menu Items Available When You Click the Icon
Online
The icon is blue.
Connect for Microsoft Outlook is running, and the connection with the Vision server is available.
Right-click the icon, and select one of the following options:
Synchronize Local Changes — This performs a one-way synchronization. The changes that you made in Outlook are updated in Vision, but the changes that were made in Vision are not updated in Outlook.
Synchronize All Changes — This performs a complete, two-way synchronization. Records are updated in both Vision and Connect for Microsoft Outlook. You can use the Filtering Control Panel and the Configuration Options to change the configuration settings before you start the synchronization.
Show Progress — This opens or hides the Connect for Microsoft Outlook synchronization progress screen. This option is available during a synchronization session.
Show Control Panel — This opens the Synchronization Control Panel dialog box.
Open Connect for Microsoft Outlook — This opens Connect for Microsoft Outlook in the foreground if it is not your active application.
Options — This opens the Connect for Microsoft Outlook Options dialog box.
Left-click or double-click the icon to immediately start a one-way synchronization. (This is the same as right-clicking and selecting Synchronize Local Changes.) The changes that you made in Outlook are updated in Vision, but the changes that were made in Vision are not updated in Outlook.

Connect for Microsoft Outlook Application States
Installation Guide 88
Connect for Microsoft Outlook Application State Icon Description
Menu Items Available When You Click the Icon
Offline
The connection with the Vision server is unavailable.
If a connection to the computer running the Vision server is not available, Connect for Microsoft Outlook switches to offline mode. In offline mode, you cannot synchronize, change credentials, or open the Connect for Microsoft Outlook Control Panel.
When the connection is restored, Connect for Microsoft Outlook automatically switches to online mode. Any changes that you made while a connection to the server was not available are synchronized when you run a synchronization session.
Right-click the icon, and select one of the following options:
Open Connect for Microsoft Outlook — This opens Connect for Microsoft Outlook in the foreground if it is not your active application.
Options — This opens the Connect for Microsoft Outlook Options dialog box.
The Change button on the General tab is disabled, and you cannot change the user credentials.
Collisions Detected/
Duplication Detected/
Deletion Detected/
Synchronization Issue
A synchronization conflict or issue has occurred. The application is connected to the Vision server.
See the Resolve Duplicates and Resolve Conflicts topics in the Connect for Microsoft online help for more information.
Right-click the icon, and select one of the following options:
Synchronize All Changes— This starts a synchronization session. If the collision is not resolved, the session ends with the same collision indicator.
Show Progress — This opens or hides the Connect for Microsoft Outlook synchronization progress screen. This option is available during a synchronization session.
Show Control Panel — This opens the Synchronization Control Panel dialog box.
Open Connect for Microsoft Outlook — This opens Connect for Microsoft Outlook in the foreground if it is not your active
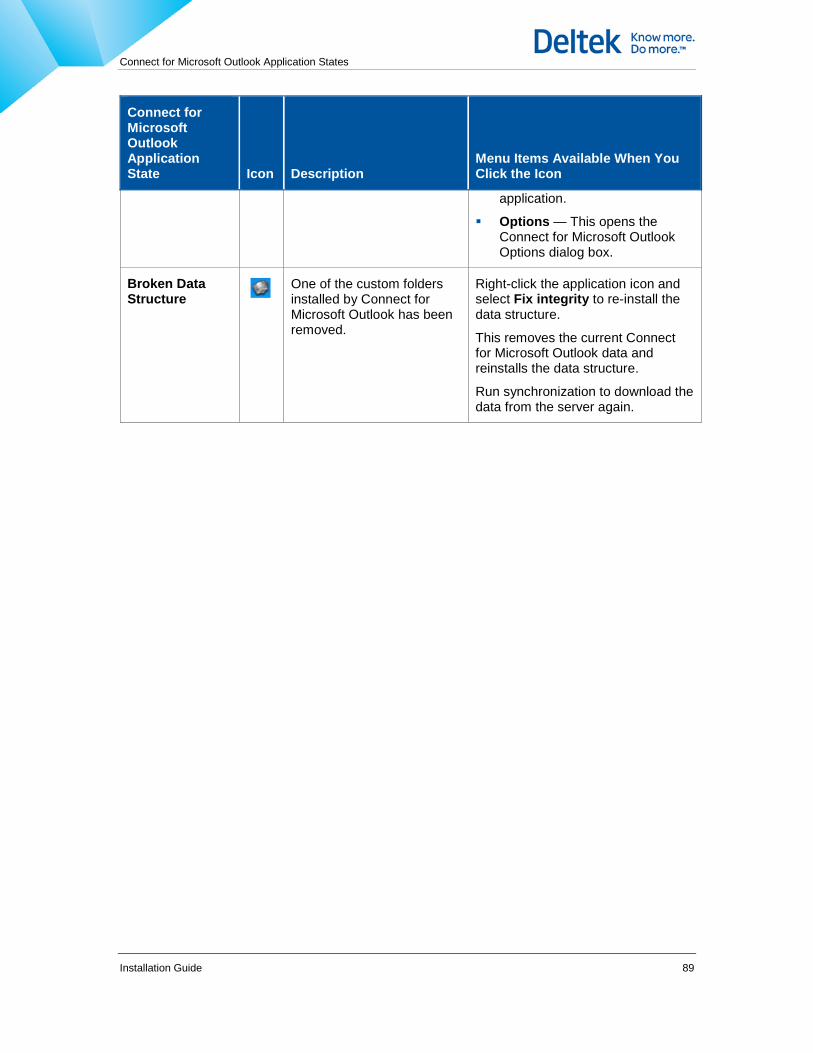
Connect for Microsoft Outlook Application States
Installation Guide 89
Connect for Microsoft Outlook Application State Icon Description
Menu Items Available When You Click the Icon
application.
Options — This opens the Connect for Microsoft Outlook Options dialog box.
Broken Data Structure
One of the custom folders installed by Connect for Microsoft Outlook has been removed.
Right-click the application icon and select Fix integrity to re-install the data structure.
This removes the current Connect for Microsoft Outlook data and reinstalls the data structure.
Run synchronization to download the data from the server again.

Upgrade Installations
Installation Guide 90
Upgrade Installations This section applies if you are upgrading to Connect for Microsoft Outlook 7.1, 7.2, or 7.3 from an earlier version.
Upgrade Connect for Microsoft Outlook on Your Vision Web Server You must install the Vision 7.1, 7.2, or 7.3 software before you upgrade your Vision Web Server with Connect for Microsoft Outlook.
After you install Connect for Microsoft Outlook on your server, Deltek recommends that you immediately install Connect for Microsoft Outlook on user workstations. If users open Connect for Microsoft Outlook before they install the new upgrade on their workstations, they will receive an Internal Error message when a synchronization occurs on their workstation. The log file will indicate that the Connect for Microsoft Outlook version is incompatible. In this scenario, you need to download and install Connect for Microsoft Outlook 7.1, 7.2, or 7.3 on the workstation.
Use these instructions to download and install Deltek Connect for Microsoft Outlook for Vision 7.1, 7.2, or 7.3 on your Vision Web server. If you have multiple Web servers, you must perform the installation on each Web server.
Because Internet Information Services (IIS) will be stopped and all users will be disconnected when you install Connect for Microsoft Outlook on your Vision Web server, Deltek recommends that you install this after your usual work hours when users are not logged on to Vision. If you do the installation during normal work hours, let users know about the system down time.
You must have Vision 7.1, 7.2, or 7.3 installed before you complete the steps in this section.
To download and install Connect for Microsoft Outlook for Vision 7.1, 7.2, or 7.3 on your Vision Web server, complete the following steps:
1. Log on to your Vision Web server.
2. Open the Deltek Customer Care Connect Web site.
3. On the Product Downloads tab, click Run Deltek Software Manager.
4. On the Deltek Software Manager screen, navigate to Vision 7.3 in the pane on the left side of the screen.
5. Click the plus sign beside the Vision version you are installing and then click Sub-Release on the expanded list.
6. In the expanded grid, click the Deltek Connect for Microsoft Outlook check box to add it to the Download Queue.
7. Click the Download button.
This downloads the DeltekConnectForMicrosoftOutlookFor7x_1.3.3.24.exe file.
8. Navigate to the folder that contains the files downloaded from the Deltek Software Manager, and double-click the DeltekConnectForMicrosoftOutlookFor7x_1.3.3.24.exe file.
The EXE file is within the Vision\71, Vision\72, or Vision\73 folder (whichever version number that you installed).

Upgrade Installations
Installation Guide 91
A Deltek – InstallShield Wizard that extracts the installation package is launched. The Preparing Setup page displays.
The setup process verifies that you have Vision prerequisites installed before it continues. If you do not have the most current prerequisites installed, you are instructed to install it first, and then re-rerun the Connect for Microsoft Outlook installation.
9. On the Welcome to the Deltek Vision Hot Fix Installation Wizard page, click Next to continue.
Internet Information Services (IIS) stops and all users are disconnected.
10. On the Ready to Install page, click Install to update your database, and install the
software on your Vision Web server.
11. When the installation is complete, on the Deltek Vision Hot Fix Wizard Complete page, click Finish.
Upgrade Connect for Microsoft Outlook on Client Workstations This section applies if you are upgrading to Connect for Microsoft Outlook 7.1, 7.2, or 7.3 from a 7.0 or 6.x version.
If you are upgrading from Connect for Microsoft Outlook 1.0.x.x or 1.1.x.x, complete the upgrade instructions in the “Major Upgrade” section below.
If you are upgrading from 1.2.x.x, complete the upgrade instructions in the “Minor Upgrade” section below.

Upgrade Installations
Installation Guide 92
Major Upgrade This applies if you are upgrading from Connect for Microsoft Outlook versions 1.0.x.x or 1.1.x.x to the Connect for Microsoft Outlook version in Vision 7.1, 7.2, or 7.3 (Connect for Microsoft Outlook version 1.3.3.24).
To upgrade Connect for Microsoft Outlook on a workstation, complete the following steps:
1. Complete the instructions in either of the following sections of the guide:
“Download and Install Connect for Microsoft Outlook on a Workstation Using Vision Utilities” on page 51.
“Download and Install Connect for Microsoft Outlook on Multiple Workstations Using Command Line Parameters” on page 56.
This automatically removes the old Connect for Microsoft Outlook version and then installs the new version on a workstation.
2. Complete the Connect for Microsoft First Run Assistant as described in the “Configure Connect for Microsoft Outlook on a Workstation” section on page 61.
Minor Upgrade This applies if you are upgrading from Connect for Microsoft Outlook version 1.2.x.x to the Connect for Microsoft Outlook version in Vision 7.1, 7.2, or 7.3 (Connect for Microsoft Outlook version 1.3.3.24).
To upgrade Connect for Microsoft Outlook on a workstation, complete the following step:
1. Complete the instructions in either of the following sections of the guide:
“Download and Install Connect for Microsoft Outlook on a Workstation Using Vision Utilities” on page 51.
“Download and Install Connect for Microsoft Outlook on Multiple Workstations Using Command Line Parameters” on page 56.
This automatically upgrades the Connect for Microsoft Outlook software without uninstalling the software.
You do not have to complete the First Run Assistant again. All the existing Connect for Microsoft configuration settings and synchronization filters are retained from the previous installation.

Uninstall Connect for Microsoft Outlook for a Single User
Installation Guide 93
Uninstall Connect for Microsoft Outlook for a Single User This section provides information and instructions on how to uninstall Connect for Microsoft Outlook on a workstation. When you uninstall Connect for Microsoft Outlook, all Vision data is removed from your Outlook mailbox.
You uninstall the software:
If you no longer plan to use Connect for Microsoft Outlook on your workstation.
If you are reinstalling the same version of Connect for Microsoft Outlook.
You do not need to uninstall Connect for Microsoft Outlook on a workstation before upgrading to a newer version of Connect for Microsoft Outlook.
If You Use Microsoft Office Desktop Integration (MODI) If you have Connect for Microsoft Outlook and the Deltek Microsoft Office Desktop Integration (MODI) modules installed on a workstation and you uninstall Connect for Microsoft Outlook, MODI may experience errors. If this occurs, you must log on to Vision and relaunch the MODI installation routine and choose the option to repair the installation. After the repair is performed, reconfigure the MODI options to continue using it.
Uninstall Procedure
To prevent loss of data, Deltek recommends that you synchronize Connect for Microsoft Outlook and Vision and back up all personal data in Outlook before you remove the Connect for Microsoft Outlook software from a workstation. These steps are included in the instructions below.
To uninstall Connect for Microsoft Outlook from a workstation, complete the following steps:
1. On the workstation, perform a complete, two-way synchronization between Connect for Microsoft Outlook and Vision:
Open Connect for Microsoft Outlook, right-click the Connect for Microsoft Outlook icon in the notification area of the Windows taskbar, and then select Synchronize All Changes from the menu.
2. To back up personal data in Outlook, export data to a PST file as follows:
a. From the Outlook application-level menu bar, click File » Import and Export.
b. On the Import and Export Wizard page, select Export to a file from the list and click Next.
c. On the Export to a File page, select Personal Folder File (.pst) from the list, and click Next.
d. On the Export Personal Folders page, select the appropriate folders that contain personal data and click Next.
e. On the next Export Personal Folders page, click Finish.

Uninstall Connect for Microsoft Outlook for a Single User
Installation Guide 94
3. Close Outlook.
4. From the Windows Start menu, open the Control Panel, and select Add or Remove Programs.
5. In the Currently installed programs window, click Connect for Microsoft Outlook in the list of programs, and then click Remove.
6. The Windows prompt allows you to confirm whether or not you really want to remove Connect for Microsoft Outlook. Click Yes to proceed with the removal.
7. A dialog box displays with the following message:
To avoid data loss, prior to removing the application, make sure to synchronize all changes to Vision and back up all personal data by exporting to a Personal Folders file (File » Import and Export » Export to a file » Personal Folder File (.pst)). If you have done a final synchronization and backed up your data, click Yes to proceed, otherwise click No and complete those steps first.
After you click Yes to proceed, Connect for Microsoft Outlook is removed from the Add or Remove Programs window after the software removal is complete.
The following table describes where records reside after you uninstall Connect for Microsoft Outlook. (Shared means that the record in Connect with Microsoft Outlook is shared with Vision when you synchronize.)
Records in Connect for Microsoft Outlook Where They Reside After You Uninstall Connect for Microsoft Outlook
Contacts, appointments, and tasks originally created in Vision
They remain in Vision.
They do not appear in standard (native) Outlook.
Shared calendar items and tasks originally created in Outlook
They remain in their corresponding folders in standard (native) Outlook.
They also appear in Vision.
Contacts, appointments, or tasks originally created in standard (native) Outlook that were either native or unshared in Connect for Microsoft Outlook
(a native Outlook contact never acquired Vision-specific data fields in Connect for Microsoft Outlook)
They remain in their corresponding folders in standard (native) Outlook.
They do not appear in Vision.
Contacts that were shared with Vision They are removed from Outlook.
Uninstall Connect for Microsoft Outlook Using Microsoft SCCM
Installation Guide 95
Uninstall Connect for Microsoft Outlook Using Microsoft SCCM You can use Microsoft System Center Configuration Manager (SCCM) to remove Connect for Microsoft Outlook for multiple users.
To prevent loss of data, Deltek recommends that you synchronize Connect for Microsoft Outlook and Vision and back up all personal data in Outlook on each workstation before you remove the Connect for Microsoft Outlook software from workstations. These are steps one and two in the below instructions.
To uninstall Connect for Microsoft Outlook on multiple workstations with SMS, complete the following steps:
1. On each workstation for which you are uninstalling Connect for Microsoft Outlook, perform a complete, two-way synchronization between Connect for Microsoft Outlook and Vision:
Open Connect for Microsoft Outlook, right-click the Connect for Microsoft Outlook icon in the notification area of the Windows, and then select Synchronize All Changes from the menu.
2. To back up personal data in Outlook on each workstation, export data to a .PST file:
a. From the Outlook application-level menu bar, click File » Import and Export.
b. On the Import and Export Wizard page, select Export to a file and click Next.
c. On the Export to a File page, select Personal Folder File (.pst), and click Next.
d. On the Export Personal Folders page, select the appropriate folders that contain personal data and click Next.
e. On the next export Personal Folders page, click Finish.
3. Close Outlook on each workstation.
4. Open the SMS management console.
5. Open the distribution package that you created for Connect for Microsoft Outlook and select Programs.
6. In the programs list, double-click Connect for Microsoft Outlook.
7. Edit the command line with the uninstall syntax.
Example:
\\fileserver1\Deltek\ConnectForMicrosoftOutlook.exe /v"x"
This is the same as Example 3 on page 60.
8. Save the distribution package.
9. Run the advertisement for Connect for Microsoft Outlook.
For more information, see the topic on how to uninstall a product in the Msiexec command-line options section of the Microsoft Technet Web site — http://technet.microsoft.com/en-us/library/bb490936.aspx.

Connect for Microsoft Outlook Cleanup Utility
Installation Guide 96
Connect for Microsoft Outlook Cleanup Utility Installing Connect for Microsoft Outlook on multiple workstations and connecting to the same user mailbox on these multiple workstations is not supported. If you attempt to do this, you will receive the following data structure collision error when you install Connect for Microsoft Outlook to the same user mailbox on a second workstation and run the Connect for Microsoft Outlook Assistant.
To resolve the issue and permanently use Connect for Microsoft Outlook on one workstation only, complete the following steps:
1. On the workstation that will not be using the Connect for Microsoft Outlook, uninstall Connect for Microsoft Outlook. This will remove the installation of Connect for Microsoft Outlook from the mailbox.
2. On the workstation that you plan to use Connect for Microsoft Outlook permanently, run the Cleanup Utility.
To use the Cleanup Utility, complete the following steps:
1. On the workstation that will permanently use Connect for Microsoft Outlook, close Connect for Microsoft Outlook.
2. From the Windows taskbar that displays at the bottom of your screen by default, click Start » All Programs » Deltek » Cleanup Utility.
3. On the Connect for Microsoft Outlook Cleanup dialog box that says this program will remove data structures installed by Connect for Microsoft Outlook from your Outlook profile, read the recommendation that urges you to try uninstalling and re-installing Connect for Microsoft Outlook to possibly solve your problem before you run the Cleanup Utility. Click No, and uninstall and then re-install Connect for Microsoft Outlook on your workstation.
4. If uninstalling and re-installing did not solve your problem, start the Cleanup Utility again.
On the "The Cleanup Utility will remove the data structure installed by Connect for Microsoft Outlook from our Outlook profile…. dialog box, click Yes.
This removes all data structures installed by a previous installation of Connect for Microsoft Outlook from your Outlook profile.

Connect for Microsoft Outlook Cleanup Utility
Installation Guide 97
5. On the Choose Profile dialog box, from the drop-down list in the Profile Name field, select the profile that you used when you installed Connect for Microsoft Outlook.
6. If you are prompted for your Outlook/Exchange credentials, enter them and click OK.
7. When the command prompt screen displays "The clean up finished" to indicate that the
process completed successfully, press Enter on your keyboard.

Connect for Microsoft Outlook Cleanup Utility
Installation Guide 98
8. Launch Outlook, and enter your credentials if prompted for them.
After a short delay, Connect for Microsoft Outlook begins the process of checking the structure of the mailbox and applying the Vision data structure into the mailbox. Then it launches the Connect for Microsoft Outlook Assistant to configure the Connect for Microsoft Outlook software.

Troubleshooting
Installation Guide 99
Troubleshooting
Audit Reports The following Vision reports have a Source column that displays a code to indicate whether changes were made in Vision or Connect for Microsoft Outlook:
Client Audit
Client Audit Detail
Contact Audit
Contact Audit Detail
Opportunity Audit
Opportunity Audit Detail
Vendor Audit
Vendor Audit Detail
The possible source codes are:
DTK — Changes were made in Vision.
SNC — Changes were made through synchronization with Connect for Microsoft Outlook.
These reports are located in the Vision software in Reporting.
General Log
View the Log Use the Feedback tab of the Connect for Microsoft Outlook - Options dialog box to view a general log that may help with any type of Connect for Microsoft Outlook error.
Click the View Log button to open the Log.0000.txt file in Microsoft® Notepad.

Troubleshooting
Installation Guide 100
You can also view the log from the Advanced tab on the Connect for Microsoft Outlook - Options dialog box. On the Advanced tab, click the Configure Logging and Reporting button, and on the Logging Configuration dialog box, click the View Files button beside the General log check box.
Email the Log
To attach the log to an email and send the email to Deltek Customer Care Support (or to whomever you want), complete the following on the Feedback tab:
1. Click the Attach a Log check box.
2. In the Comments text box, enter the text for the body of an email.
3. Click the Send Feedback… button to open the Message form, enter the email recipients in the To and Cc fields, and modify the email message.
4. Click the Send button to send the email message.
Advanced Logs If you encounter a synchronization problem or error that you cannot resolve, you can send the Advanced logs to Deltek Customer Care. These advanced logs are enabled by default.
Send the Advanced Logs to Deltek
After you encounter a synchronization problem, complete the following steps on a workstation:
1. Capture screen shots of the Connect for Microsoft Outlook Synchronization Control Panel dialog box and the Filter Settings screen, and/or document the settings information and any other details.
2. Zip the Logs folder in the Connect for Microsoft Outlook Profile directory. This folder contains the logs for troubleshooting.
Path to the Connect for Microsoft Outlook Profile directory:
Windows XP:
%AppData%\Deltek\Connect for Microsoft Outlook\Profile
(where %AppData% in the path is a system variable for the user's Windows profile)
This will take you to C:\Documents and Settings\<your UserName>\Deltek\Connect for Microsoft Outlook.
For example, a Windows user named MaryAnderson would find her logs in C:\Documents and Settings\MaryAnderson\Deltek\Connect for Microsoft Outlook\Profile folder.
Windows 7 and Windows Vista:
%AppData%\Deltek\Connect for Microsoft Outlook\Profile
(where %AppData% in the path is a system variable for the user's Windows profile)
This will take you to C:\Users\<your UserName>\Roaming\Deltek\Connect for Microsoft Outlook.

Troubleshooting
Installation Guide 101
For example, a Windows user named MaryAnderson would find her logs in C:\Users\MaryAnderson\Roaming\Deltek\Connect for Microsoft Outlook\Profile folder.
3. Send the following to Deltek Customer Care:
The zipped file containing the log files from the Outlook Profile directory.
Screen shots of the filter selections in the Synchronization Control Panel.
Any other screen shots or other detailed information.
Delete the Log Files You can delete the Logs folder to prevent the log files from getting large. Before you delete the folder, you must exit Outlook. After you delete the folder, the log files are automatically recreated, and they start recording again.
Vision Data Structure is Inconsistent
Symptoms When you start Outlook using your Connect for Microsoft Outlook profile, a pop-up message displays at the application icon informing you that Connect for Microsoft Outlook data structure is inconsistent and needs to be reinstalled. The application icon is gray, and the only menu available is Fix integrity.
Cause Connect for Microsoft Outlook is in the Broken Data Structure state. This situation may occur if you have completely deleted one of the folders that Connect for Microsoft Outlook uses to store Vision records from Outlook. Alternatively, Outlook may have exited incorrectly and the data storage is corrupt.
Solution
To fix the inconsistent structure, complete the following steps:
1. Click the pop-up message to reinstall the Connect for Microsoft Outlook data structure. Alternatively, right-click the application icon, and select Fix integrity from the contextual menu.
2. Connect for Microsoft Outlook reinstalls the data structure. You can see all the Vision folders in the folders list.
3. If needed, modify the synchronization filters.
4. Run synchronization to download the data from the Vision server.
Troubleshooting
Installation Guide 102
Connect for Microsoft Outlook Does Not Start When You Launch Outlook
Symptoms When you start Outlook, Connect for Microsoft Outlook does not start. The Connect for Microsoft Outlook icon does not display in the notification area on your Windows taskbar.
Cause Outlook has soft disabled the Connect for Microsoft Outlook add-in. Soft disabling occurs when an add-in throws an unhandled exception in the constructor or the Startup event handler, but the application does not unexpectedly close.
Solution Check to see whether or not the Connect for Microsoft Outlook add-in is enabled.
Outlook 2010:
1. On the Outlook toolbar, click File.
2. In the Info pane, click Options.
3. In the Outlook Options dialog box, click Add-Ins.
4. Ensure that COM Add-ins is selected in the Manage field, and then click Go.
5. On the COM Add-Ins dialog box, select the Connect for Microsoft Outlook check box if it is not already selected.
6. Click OK.
Outlook 2007:
1. On the Outlook Tools menu, click Trust Center » Add-ins.
2. On the Add-ins screen, ensure that COM Add-ins is selected in the Manage field, and then click Go.
3. On the COM Add-Ins dialog box, select the Connect for Microsoft Outlook check box if it is not already selected.
4. Click OK.
Outlook 2003:
1. On the Outlook Tools menu, click Options.
2. In the Options dialog box, click the Other tab.
3. Under General, click Advanced Options.
4. In the Advanced Options dialog box, click COM Add-Ins.
5. On the COM Add-Ins dialog box, select the Connect to Microsoft Outlook check box if it is not already selected.
6. Click OK.

Appendix A: Complete and Incomplete Records
Installation Guide 103
Appendix A: Complete and Incomplete Records When you synchronize Connect for Microsoft Outlook and Vision, Vision activity, client, contact, opportunity, and vendor records are brought into Connect for Microsoft Outlook as complete or incomplete records.
Complete Records Complete records match your synchronization filter and are brought completely into Connect for Microsoft Outlook. This means that all their information displays on the record form in Connect for Microsoft Outlook. You can edit these records.
When you create synchronization filters on the Filter Records screen of the Synchronization Control Panel, the number of complete Vision records that will synchronize displays in the lower left corner of the Filter Records screen as the number of record(s) accessible.
Incomplete Records Incomplete records:
Do not match your synchronization filter, but they synchronize because they are associated with a complete record that matches your filter.
Are records that you have security rights to at least view.
Are read-only in Connect for Microsoft Outlook, regardless of your security rights. You cannot edit them in Connect for Microsoft Outlook.
Displays the number of complete records to synchronize

Appendix A: Complete and Incomplete Records
Installation Guide 104
You can see incomplete records in the association grids or lookup fields on record forms. For example, you will see incomplete contact records in the Contacts grid on the Opportunity form or incomplete client or vendor records in the Client/Vendor lookup in the Client/Vendor field on the Contact form.
The associations for incomplete records are not brought into Connect for Microsoft Outlook during synchronization (to avoid bringing down the entire Vision database into Connect for Microsoft Outlook).
How to Distinguish Incomplete Records from Complete Records In Connect for Microsoft Outlook, incomplete records are identified with “This record is incomplete because it did not match your filter.” at the top of their record form. You will see this on the Activity, Client, Contact, Opportunity, Task, and Vendor forms. You cannot edit the information on the form for incomplete records.
The activity, client, contact, opportunity, task, and vendor lists (that display in Explorer view) and the calendar include only complete Vision records.
Record lists are displayed using Connect for Microsoft Outlook views. Deltek recommends that you do not modify these views. It could be difficult to recreate an original view if you modify it. Instead, we recommend that you copy a Connect for Microsoft Outlook view and modify the copy to create a new view.
Example:
Scenario: You have your synchronization filter set to bring a contact, John Miller, into Connect for
Microsoft Outlook.
The opportunity, Bayfield Remodel, is associated with John, but your filter is not set to bring this opportunity into Connect for Microsoft Outlook.
You have security rights to modify both John Miller and Bayfield Remodel.

Appendix A: Complete and Incomplete Records
Installation Guide 105
When you Synchronize: John Miller is brought into Connect for Microsoft Outlook as a complete contact record.
All associations (including Bayfield Remodel) display for John on the Contact form. You can modify John's information on the Contact form.
Bayfield Remodel is brought into Connect for Microsoft Outlook as an incomplete record. This means:
In the Connect for Microsoft Outlook Opportunities list (in Explorer view), Bayfield Remodel does not display.
On the Contact form for John Miller, Bayfield Remodel displays in the Opportunity grid. If you open the Bayfield Remodel opportunity in the grid, Bayfield Remodel displays on the Opportunity form as read-only despite your modify rights.
On the Opportunity form for Bayfield Remodel, you see John Miller in the Contacts grid because his record synchronized as a complete record.
The association grids (Contacts, Clients, Vendors, Activities, Files, and Employees grids) on the Opportunity form display only the associations for Bayfield Remodel that have been synchronized as complete records. Any other associations that Bayfield Remodel has that are incomplete or that were not brought into Connect for Microsoft Outlook at all (because they did not match your synchronization filter) do not display in the association grids on the Opportunity form.
Appendix B: Contact Forms
Installation Guide 106
Appendix B: Contact Forms In Connect for Microsoft Outlook, contacts display on either the native Outlook Contact form or the Deltek Contact form.
The contact forms are not specifically labeled "Deltek Contact" and "Native Outlook Contact" in Outlook.
Contact Form Description
Native Outlook Contact form This form contains only fields and information from the original Outlook software. It does not contain any Vision fields, grids, or commands.
The contacts that you originally created in Outlook or contacts that were imported into Outlook from mobile devices, web mail, card readers, vCards, and so on display on this form. These contacts are not shared with Vision when you synchronize Connect for Microsoft Outlook.
To share Outlook contacts that display on the native Outlook Contact form with Vision, you must first convert them to display on the Deltek Contact form. You can convert them at any time using the Convert to Deltek Form tool.
Deltek Contact form This form contains Outlook fields and Vision fields not found in Outlook, such as the Vision Client/Vendor field, the Activities grid, and the Employees grid. This form includes the Vision business logic. For example, fields that are required in Vision are required on the Deltek Contact form.
A contact that displays on this form can be either shared or not shared with Vision. A Shared with Deltek bar at the top of the form allows you to share or not share a contact. The bar says either:
Click here to share <contact> with Deltek.
Shared with Deltek. Click here to stop sharing and delete the item from Deltek.
You can change this setting for a contact at any time by clicking the bar.
Shared contacts are updated and displayed in Vision when you synchronize Connect for Microsoft Outlook.
After you install Connect for Microsoft Outlook, you can create new contacts only on the Deltek Contact form. You can, however, convert any of these contacts to display on the native Outlook Contact form at any time using the Convert to Native Outlook Form tool.
Appendix B: Contact Forms
Installation Guide 107
You can tell whether a contact is shared or not shared and whether it displays on the Deltek Contact form or the native Outlook Contact form by the icon that displays beside the contact name in the Contact list:
Icon The contact displays on this form Shared with Vision?
Native Outlook Contact form No
Deltek Contact form No
Deltek Contact form Yes
For more information about the contact forms, converting to different forms, and sharing or not sharing contacts, see the following topics in the Connect for Microsoft Outlook online help:
Shared and Unshared Contacts and the Contact Form
Contact Icons in the Contact List
Contact Form
Contact Forms: The Native Outlook Contact Form and the Deltek Contact Form
Share Outlook Contacts that Display on the Deltek Contact Form
Share Outlook Contacts that Display on the Native Outlook Contact Form
Stop Sharing a Contact
Convert to Deltek Form
Convert to Native Outlook Form

Appendix C: Compare and Merge Duplicate Contacts
Installation Guide 108
Appendix C: Compare and Merge Duplicate Contacts The Compare and Merge Duplicates process compares your original Outlook contacts with the Vision contacts that have been synchronized with Connect for Microsoft Outlook, to prevent duplicate contact records from being created. This process allows you to merge duplicate contacts that have the same email address or the same first name and last name into a single shared contact record that displays in Connect for Microsoft Outlook and Vision.
The Compare and Merge Duplicates process has two parts:
1. You can automatically merge duplicate contact records that do not have any fields with conflicting information. A field has conflicting information if the field is populated for both the original Outlook record and the Vision record that was synchronized with Connect for Microsoft Outlook, and the value in each field does not match exactly. You also have the option to review these contacts side by side before you merge them.
2. For duplicate contact records that have conflicting information, you must review them side by side and decide which conflicting information to keep before you merge the two into one contact record. You also have the option to keep both records instead of merging them.
Which Contact Records Are Compared for Duplicates?
Contacts that Are Compared When the Compare and Merge Duplicates process automatically runs when you use the Connect for Microsoft Outlook Assistant, Outlook contacts are compared with synchronized Vision contacts. However, Outlook contacts are compared only if you converted all your existing Outlook contacts to display on the Deltek Contact form during step 16 (on page 74) of configuration.
On the Confirm Outlook Contact Conversion dialog box, you choose whether or not you want to convert existing Outlook contacts to display on the Connect for Microsoft Outlook (Deltek) Contact form.
For more information about the native Outlook and Deltek Contact forms and shared and unshared contacts see "Appendix B: Contact Forms."

Appendix C: Compare and Merge Duplicate Contacts
Installation Guide 109
If Duplicate Contacts Are Found If duplicate contacts are found, complete the following steps:
1. Review the list of duplicate contacts on the Duplicate Contacts with No Conflicts dialog box.
These are the duplicate contacts that have the same email address or the same first
name and last name and no conflicting information. You can merge them automatically without reviewing them. For more information about the rules that determine conflicting information and the contacts that can be merged automatically, see the "Auto-Merge Rules for Duplicate Contacts" section on page 112.
Each contact in the list has a green check mark beside it to indicate that it will be merged automatically into one shared contact record.
If you prefer to inspect a duplicate pair of contact records that has no conflicts before you merge them, click the green check mark beside a contact to clear the check mark.
Click the Clear All or Check All buttons to clear or select the check marks beside all the contacts in the list.
You review these duplicate contacts on the next dialog box.
2. Select the Combine Notes Field in Merged Contact check box if you want the contents of the Notes field from both the Outlook contact and the Vision contact to be included in the Notes field for merged contact records. This check box applies to all contacts in the list that have a check mark beside their name.
When you clear the Combine Notes Field in Merged Contact check box, only the notes from the Vision contact record are included in the Notes field for the merged contact record.
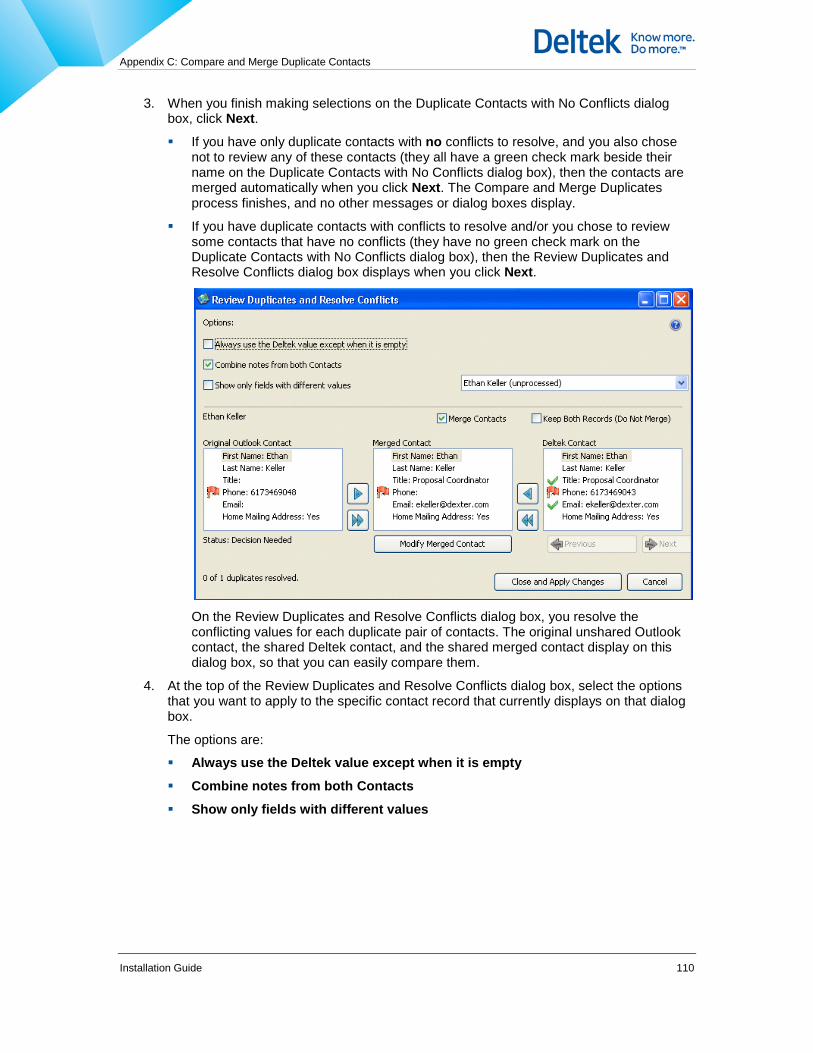
Appendix C: Compare and Merge Duplicate Contacts
Installation Guide 110
3. When you finish making selections on the Duplicate Contacts with No Conflicts dialog box, click Next.
If you have only duplicate contacts with no conflicts to resolve, and you also chose not to review any of these contacts (they all have a green check mark beside their name on the Duplicate Contacts with No Conflicts dialog box), then the contacts are merged automatically when you click Next. The Compare and Merge Duplicates process finishes, and no other messages or dialog boxes display.
If you have duplicate contacts with conflicts to resolve and/or you chose to review some contacts that have no conflicts (they have no green check mark on the Duplicate Contacts with No Conflicts dialog box), then the Review Duplicates and Resolve Conflicts dialog box displays when you click Next.
On the Review Duplicates and Resolve Conflicts dialog box, you resolve the conflicting values for each duplicate pair of contacts. The original unshared Outlook contact, the shared Deltek contact, and the shared merged contact display on this dialog box, so that you can easily compare them.
4. At the top of the Review Duplicates and Resolve Conflicts dialog box, select the options that you want to apply to the specific contact record that currently displays on that dialog box.
The options are:
Always use the Deltek value except when it is empty
Combine notes from both Contacts
Show only fields with different values

Appendix C: Compare and Merge Duplicate Contacts
Installation Guide 111
5. In the Original Outlook Contact pane, the Merged Contact pane, and the Deltek Contact pane, the conflicting values for the duplicate contact records have a red flag
beside them.
To select the value from the original Outlook or Vision contact for the merged contact,
click the value to highlight it, and then click or beside the Original Outlook Contact or Deltek Contact pane. The value is copied to the Merged Contact pane. The red flags disappear, and the value that you selected in either the Original Outlook or Deltek contact pane now has a green check mark beside it.
If you want all the values from either the Outlook contact or the Vision contact to be
used for the merged contact, click either or beside the appropriate Outlook or Vision pane. All the values from that pane are copied to the Merged Contact pane.
You can also double-click a value in the Original Outlook Contact pane or the Deltek Contact pane to move it to the Merged Contact pane.
6. If you need to enter information for the merged contact that is different than what is entered for the original Outlook contact or the Vision contact, click the Modify Merged Contact button. Then make your entries or selections for the merged contact on the Contact form. On this form, you can use Vision lookup lists to make selections in the Vision fields.
Examples:
You want to revise the notes that are entered in the Notes field.
You want to select a title from the drop-down list in the Title field on the Contact form to be sure the exact Vision title is entered correctly.
7. When you finish resolving conflicts and the merged contact has all the correct information, click the Next button to move to the next pair of duplicate contacts to review.
You can also use the Find Contact drop-down list at the top right corner of the dialog box to navigate to duplicate contacts.
8. Repeat steps 4–7 to resolve conflicts for all duplicate contacts.
9. When you are ready to merge all the duplicate contacts—contacts that were selected to be merged automatically on the Duplicate Contacts with No Conflicts dialog box and contacts that you compared and resolved on the Review Duplicates and Resolve Conflicts dialog box—click the Close and Apply Changes button.
The resulting merged contact records become shared contacts that display on the Deltek Contact form.
The following duplicate contact pairs are not merged when you click the Close and Apply Changes button. They remain as duplicate contact records:
Contacts for which you selected the Keep Both Records (Do Not Merge) option on the Review Duplicates and Resolve Conflicts dialog box.
Contacts that you reviewed, but which still have a red-flagged conflict.
Contacts that you did not view on the Review Duplicates and Resolve Conflicts dialog box.
In Connect for Microsoft Outlook, you can rerun the Compare and Merge Duplicate process at any time to merge any remaining duplicate contact pairs.

Appendix C: Compare and Merge Duplicate Contacts
Installation Guide 112
In Connect for Microsoft Outlook, you can run the Compare and Merge Duplicate Contacts process at any time. The tool is located on the Vision toolbar when you have the Contacts list open.
The Contacts book on the Contents tab in the Connect for Microsoft Outlook online help contains more topics about the Compare and Merge Duplicate Contacts tool.
Auto-Merge Rules for Duplicate Contacts The first part of the Compare and Merge Duplicates process allows you to merge automatically any duplicate contact records that have the same email address or the same first name and last name into a single record if they have no fields with conflicting information.
Conflicting Information A field has conflicting information if it is populated for both contact records and the value in each field does not match exactly. When fields contain conflicting information, you must decide which piece of information to keep and which to discard before the duplicate records can be merged into a single record.
Example of Conflicting Information The contact Emily Parks is entered in both Outlook and Vision with the email address [email protected]. Her business phone number is entered as follows:
Outlook Contact Record Vision Contact Record
Emily Park's Business Phone
617 388-1776 617 472-3390
Because the business phone number in the same field is different in each record, Emily's duplicate contact records cannot be auto-merged. During the Compare and Merge Duplicates process, you must manually review Emily's contact records and select which phone number to use to create the one merged contact record.
Exceptions for Determining Conflicting Information The following is a list of the exceptions for determining conflicting records.
Exception Explanation
Blank fields If a field is populated in one contact record and the same field is blank in a duplicate record, this is not considered to be a conflict. The value from the field with data is used to create the single contact record during the automatic merge.
Example: In Outlook, no home phone number is entered for David Simms (the Home phone number field is blank). In Vision, a home phone number 703 295-1187 is entered for David Simms.
The home phone number 703 295-1187 is used to create the single contact record for David during the automatic merge.
Appendix C: Compare and Merge Duplicate Contacts
Installation Guide 113
Exception Explanation
Client or Vendor Name
The client or vendor company name that is entered for the contact in Vision is always used for the company in the merged contact. (On the General tab of the Contact form in Vision you select whether the contact is a client or a vendor, and then you select the client or vendor company name.)
When the Vision client or vendor company name is used for the merged contact, the company that is entered in Outlook is added to the end of the Notes field.
If a contact has no client or vendor company entered in Vision, but there is a company entered in Outlook for the contact, the Outlook company name is not used to create the merged contact record. The Client or Vendor field remains blank.
In Vision, the client and vendor names are entered in a lookup field that contains a list of predefined names from the Client Info Center or the Vendor Info Center.
In Outlook, the company name is entered in a free-form field.
Because it is easy to type the same thing a little differently in a free form field (such as Inc., Inc, Incorporated, or omitting Inc. completely), it would be hard to compare the company name in Outlook with the Vision client or vendor and reach an accurate conclusion about whether the two different names are intended to be the same.
Client or Vendor Address
The client or vendor address from the Vision contact record is always used as the business address in the merged contact. (On the General tab of the Contact form in Vision, you select whether the contact is a client or vendor, you select the client or vendor name, and then you select the client or vendor address.)
When the Vision client or vendor address is used for the merged contact, the business address entered in Outlook is added to the Notes field for the merged contact.
If no business address is entered for a contact in Vision, but there is a business address entered in Outlook for it, the Outlook address is not used to create the merged contact record. The address field remains blank, and the original Outlook address is added to the Notes field for the merged contact.

Appendix C: Compare and Merge Duplicate Contacts
Installation Guide 114
Exception Explanation
Other/Home Address
On the original Outlook Contact form, there are two separate address fields—Other and Home. On the Deltek Contact form, there is one field—Other/Home.
If it is populated in Vision, the address from the Other/Home field from the Vision contact record is always used in the merged contact. (This address is entered for a contact's client or vendor on the General tab of the Contact form in Vision.)
When the Vision Other/Home address is used for the merged contact, the Other and Home addresses from the original Outlook contact are added to the end of the Notes field on the merged contact.
If a contact has no address in the Vision Other/Home field, but there is an address in both the Other and Home fields for the original Outlook contact, then the address in the Outlook Other field is used for the Other/Home field on the Deltek Contact form. The address in the Outlook Home field is added to the end of the Notes field on the merged contact.
If a contact has no address in the Vision Other/Home field, but there is an address in either the original Outlook Other or Home field, then the address in the populated Outlook address field is used for the Other/Home field on the merged contact.
Notes field The Notes field is not evaluated for conflicting information.
When duplicate contact records are auto-merged, you control the content of the Notes field with the Combine Notes Field in Merged Contact check box at the bottom of the Duplicate Contacts with No Conflicts dialog box.
When you select this check box, the merged contact record contains text from the Notes field from both Vision and Outlook records.
When you clear this check box, only the notes from the Vision contact record are included in the merged contact record.
This setting applies for all auto-merged contacts in the list on the Duplicate Contacts with No Conflicts dialog box.
Outlook fields that are not synchronized to Vision
For any field from Outlook (such as Spouse/Partner or Anniversary) that is not synchronized to Vision, the Outlook field's content is retained during the automatic merge.
If an Outlook contact is ever removed from Outlook and re-added, the information in these Outlook fields will be lost. This can happen if the contact did not match your synchronization filters or if you uninstall and reinstall Connect for Microsoft Outlook.

Appendix D: Synchronization Filters
Installation Guide 115
Appendix D: Synchronization Filters The "Configure Connect for Microsoft Outlook on a Workstation" section of this guide describes how to enter single filter conditions for determining the records that synchronize between Vision and Connect for Microsoft Outlook. This appendix provides the following additional information about filter conditions:
Default filters
Filter conditions for associated records
Group filter conditions
Wildcards (asterisks) for conditions
IN condition
Exclusions
Filters for client hierarchies
Default Filters The following table identifies the default filters that are automatically set up for Vision records.
The LinkedToMe = true condition allows you to synchronize all records that are associated with you.
Vision Top-Level Record Type Default Filter Condition
Contacts LinkedToMe = true
You are linked (associated) with contact records when your Vision employee name is entered in the Employees grid on a Contact record form.
Clients LinkedToMe = true
You are linked (associated) with client records when your Vision employee name is entered in the Employees grid on a Client record form.
Opportunities LinkedToMe = true
You are linked (associated) with opportunity records when your Vision employee name is entered in the Employees grid on an Opportunity record form.
Activities Two conditions make up an activity record's default condition:
LinkedToMe=true — Your Vision employee name is entered as the activity's owner or as an attendee.
Start Date >= <today's date> — The activity start date is greater or equal to today's date. Today's date is not dynamic. It is always the date that you installed Connect for Microsoft Outlook.

Appendix D: Synchronization Filters
Installation Guide 116
Vision Top-Level Record Type Default Filter Condition
Employees Status = Active — All Vision employees with an active status in the Employee Info Center.
Projects None. Only projects that are associated with other synchronized records are brought into Connect for Microsoft Outlook.
Vendors None. Vendors that are associated with complete records are brought into Connect for Microsoft Outlook as incomplete records. See "Appendix A: Complete and Incomplete Records" on page 103 for more information about complete and incomplete records.
Delete Filters
To delete default filters and any other filters that you create, click the trash can icon beside the condition.
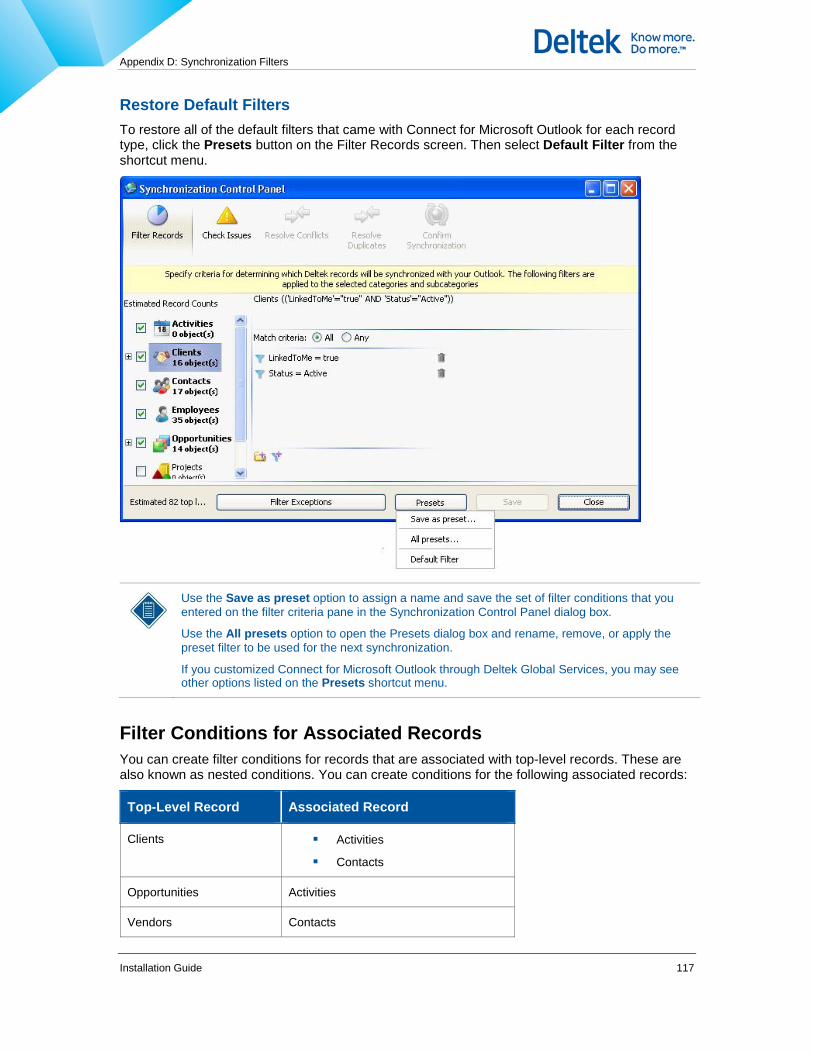
Appendix D: Synchronization Filters
Installation Guide 117
Restore Default Filters To restore all of the default filters that came with Connect for Microsoft Outlook for each record type, click the Presets button on the Filter Records screen. Then select Default Filter from the shortcut menu.
Use the Save as preset option to assign a name and save the set of filter conditions that you entered on the filter criteria pane in the Synchronization Control Panel dialog box.
Use the All presets option to open the Presets dialog box and rename, remove, or apply the preset filter to be used for the next synchronization.
If you customized Connect for Microsoft Outlook through Deltek Global Services, you may see other options listed on the Presets shortcut menu.
Filter Conditions for Associated Records You can create filter conditions for records that are associated with top-level records. These are also known as nested conditions. You can create conditions for the following associated records:
Top-Level Record Associated Record
Clients Activities
Contacts
Opportunities Activities
Vendors Contacts

Appendix D: Synchronization Filters
Installation Guide 118
Example
First, you create a filter for clients (a top-level filter) to retrieve all clients who are associated with you. Then, you create a filter to retrieve only the activities associated with those clients that start after a certain date.
To create a filter condition for an associated record, complete the following steps:
1. Before you can create a filter condition for an associated record type, you must create a filter condition for its top-level record (Clients, Opportunities, or Vendors). See steps 8 and 9 in the "Configure Connect for Microsoft Outlook on a Workstation" section on page 61 of this guide for specific instructions.
The following screenshot displays the LinkedToMe = true and the Status = Active conditions that were created for Clients (top-level record).

Appendix D: Synchronization Filters
Installation Guide 119
2. After you create a condition for the top-level record, click the plus sign icon beside the top-level record to expand the record list and display the possible associated records.
The associated records display below the top-level record. In the following screenshot, you see the Activities and Contacts check boxes below the Client check box:

Appendix D: Synchronization Filters
Installation Guide 120
3. Click the check box beside the associated record type for which you want to create a filter. Then, click the name of the associated record beside the check box. In this example, we clicked the Activities check box and name to create a filter for activities associated with clients.
4. In the filter criteria pane, click the Add a condition icon to open the Connect for Microsoft Outlook Filter – Edit Criterion dialog box. Select a field, condition, and value for the association record filter and click OK.

Appendix D: Synchronization Filters
Installation Guide 121
5. Repeat step 4 to create additional conditions for the associated record.
The filter conditions that you create display in the filter criteria pane. This example displays the filter condition to retrieve my activities that have a start date that is greater than or equal to 11/26/2013.

Appendix D: Synchronization Filters
Installation Guide 122
6. In the filter criteria pane, select the Match criteria setting as follows:
If you enter more than one filter, select All (AND-based) if you want only associated records that match all of the conditions to be synchronized.
If you enter more than one filter, select Any (OR-based) if you want associated records that match any one of the filter conditions to synchronize; associated records do not have to meet all the filter conditions.
7. When you finish creating filter conditions click Save on the Filter Records screen.
On the Filter Records screen, when you clear a top-level record check box to remove the filter conditions, any filter conditions for associated records are also removed.
When you create two filter conditions for the same record type, but one condition is at the top level and the other is at the associated record level, the conditions are combined as an OR statement. For example, if the top-level filter for contact records is set to contacts who are associated with me, and the filter for contacts who are associated with top-level customer records is set to all contacts, then the filters return contacts associated with me OR contacts associated with any customer that match the customer record top-level filter.
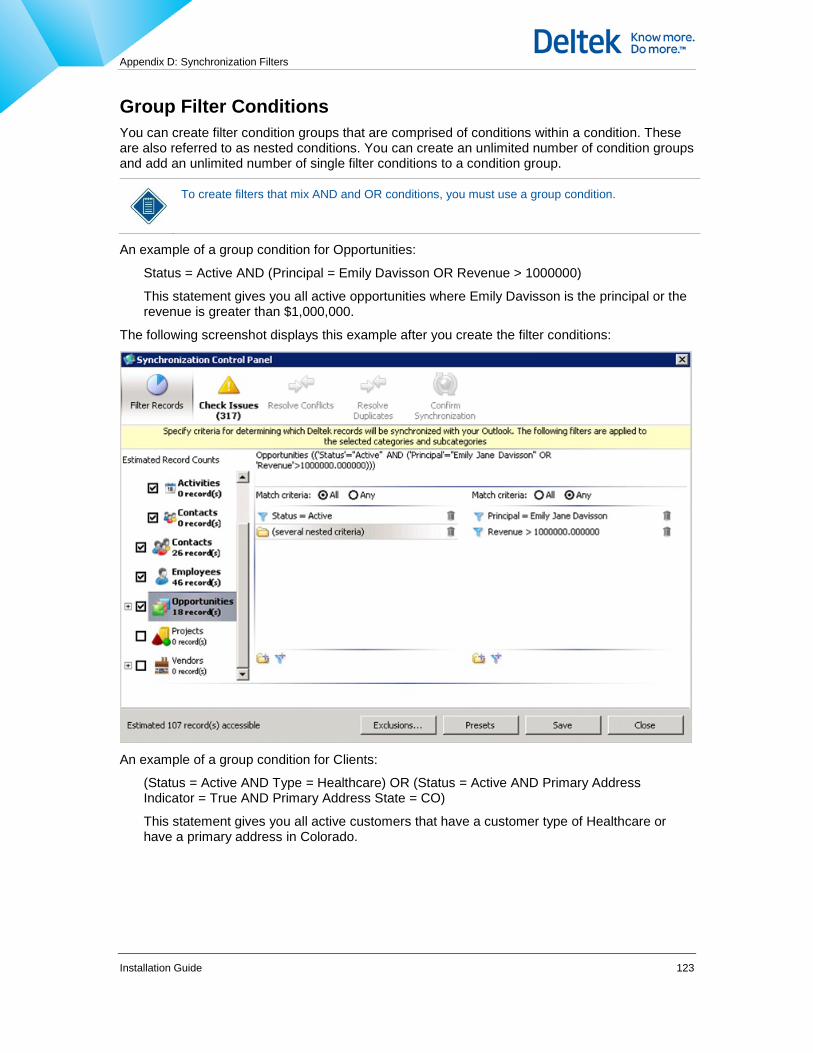
Appendix D: Synchronization Filters
Installation Guide 123
Group Filter Conditions You can create filter condition groups that are comprised of conditions within a condition. These are also referred to as nested conditions. You can create an unlimited number of condition groups and add an unlimited number of single filter conditions to a condition group.
To create filters that mix AND and OR conditions, you must use a group condition.
An example of a group condition for Opportunities:
Status = Active AND (Principal = Emily Davisson OR Revenue > 1000000)
This statement gives you all active opportunities where Emily Davisson is the principal or the revenue is greater than $1,000,000.
The following screenshot displays this example after you create the filter conditions:
An example of a group condition for Clients:
(Status = Active AND Type = Healthcare) OR (Status = Active AND Primary Address Indicator = True AND Primary Address State = CO)
This statement gives you all active customers that have a customer type of Healthcare or have a primary address in Colorado.

Appendix D: Synchronization Filters
Installation Guide 124
To create a group condition, complete the following steps:
The opportunity filter example that returns opportunities with an active status, where Emily Davisson is the principal or the revenue is greater than $1,000,000 is illustrated in the following instructions.
1. In the pane on the left side of the Filter Records screen, select the check box for the type of Vision record for which to create a group condition. Then click the check box name to highlight the check box name and display the Match criteria: All and Any setting in the filter criteria pane.
2. In the filter criteria pane, click the Add a condition icon to open the Connect for Microsoft Outlook Filter – Edit Criterion dialog box. Enter a filter condition, and click OK.
In this example, we enter a condition that returns all opportunities with an active status.

Appendix D: Synchronization Filters
Installation Guide 125
In this example, we leave the Match criteria setting at All (AND-based). This means all single conditions in this column must be met. In this example, we have only one filter condition.
3. In the filter criteria pane, click the Add group of conditions icon
A (several nested criteria) folder displays in the filter criteria pane.

Appendix D: Synchronization Filters
Installation Guide 126
4. Click the (several nested criteria) folder to display a second column on the right side of
the filter criteria pane that displays the Match criteria: All and Any setting and the
and icons. In this second column, you add single or group conditions that make up a group condition.
5. In the second column, click the Add a condition or Add group of conditions icons to open the Connect for Microsoft Outlook Filter – Edit criterion dialog box and add a filter condition. Click OK to save it and return to the filter criteria pane.
In this example, we click the Add a condition icon, and enter a condition to return opportunities where Emily Jane Davisson is the principal.
Second column where you enter a group condition

Appendix D: Synchronization Filters
Installation Guide 127
6. Repeat step 5 to enter another filter condition.
In this example, we enter another single condition to return opportunities that have revenue greater than $1,000,000.
7. In the group condition pane on the right side of the Filter Records screen, select the
Match criteria setting for the group condition.
In this example, we select Any (OR-based), so that opportunities with either Emily as the principal or revenue greater than $1,000,000 are returned by the synchronization filter.
Notice the complete condition statement at the top of the filter criteria pane is:
Opportunities (('Status'="Active" AND ('Principal'=Emily Jane Davisson" OR 'Revenue">1000000.000000)))
Between the single filter condition in the first column and the group condition in the second column is an AND operator.
8. When you finish adding conditions for the group condition, click Save.
9. In the group condition column (second column) on the filter criteria pane, when you click
the Add group of conditions icon, a third column displays. In this column, enter another set of conditions.
Complete condition statement
The Match criteria setting for the items within the group condition is Any.
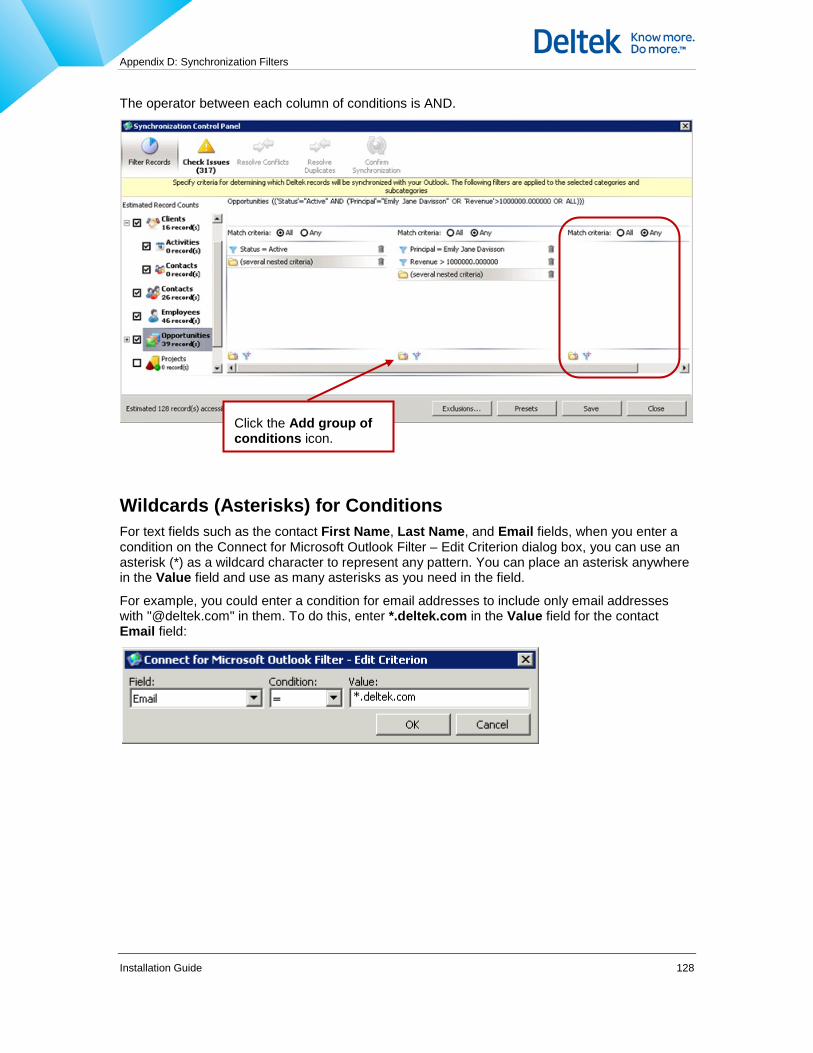
Appendix D: Synchronization Filters
Installation Guide 128
The operator between each column of conditions is AND.
Wildcards (Asterisks) for Conditions For text fields such as the contact First Name, Last Name, and Email fields, when you enter a condition on the Connect for Microsoft Outlook Filter – Edit Criterion dialog box, you can use an asterisk (*) as a wildcard character to represent any pattern. You can place an asterisk anywhere in the Value field and use as many asterisks as you need in the field.
For example, you could enter a condition for email addresses to include only email addresses with "@deltek.com" in them. To do this, enter *.deltek.com in the Value field for the contact Email field:
Click the Add group of conditions icon.
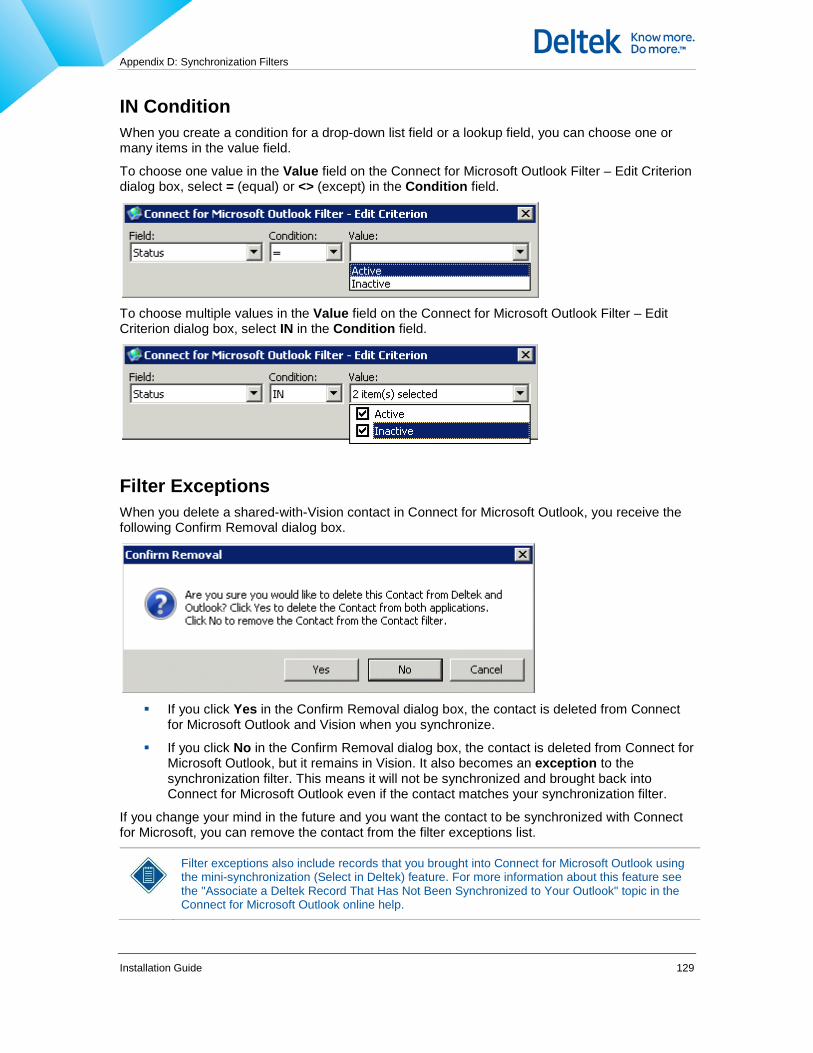
Appendix D: Synchronization Filters
Installation Guide 129
IN Condition When you create a condition for a drop-down list field or a lookup field, you can choose one or many items in the value field.
To choose one value in the Value field on the Connect for Microsoft Outlook Filter – Edit Criterion dialog box, select = (equal) or <> (except) in the Condition field.
To choose multiple values in the Value field on the Connect for Microsoft Outlook Filter – Edit Criterion dialog box, select IN in the Condition field.
Filter Exceptions When you delete a shared-with-Vision contact in Connect for Microsoft Outlook, you receive the following Confirm Removal dialog box.
If you click Yes in the Confirm Removal dialog box, the contact is deleted from Connect
for Microsoft Outlook and Vision when you synchronize.
If you click No in the Confirm Removal dialog box, the contact is deleted from Connect for Microsoft Outlook, but it remains in Vision. It also becomes an exception to the synchronization filter. This means it will not be synchronized and brought back into Connect for Microsoft Outlook even if the contact matches your synchronization filter.
If you change your mind in the future and you want the contact to be synchronized with Connect for Microsoft, you can remove the contact from the filter exceptions list.
Filter exceptions also include records that you brought into Connect for Microsoft Outlook using the mini-synchronization (Select in Deltek) feature. For more information about this feature see the "Associate a Deltek Record That Has Not Been Synchronized to Your Outlook" topic in the Connect for Microsoft Outlook online help.
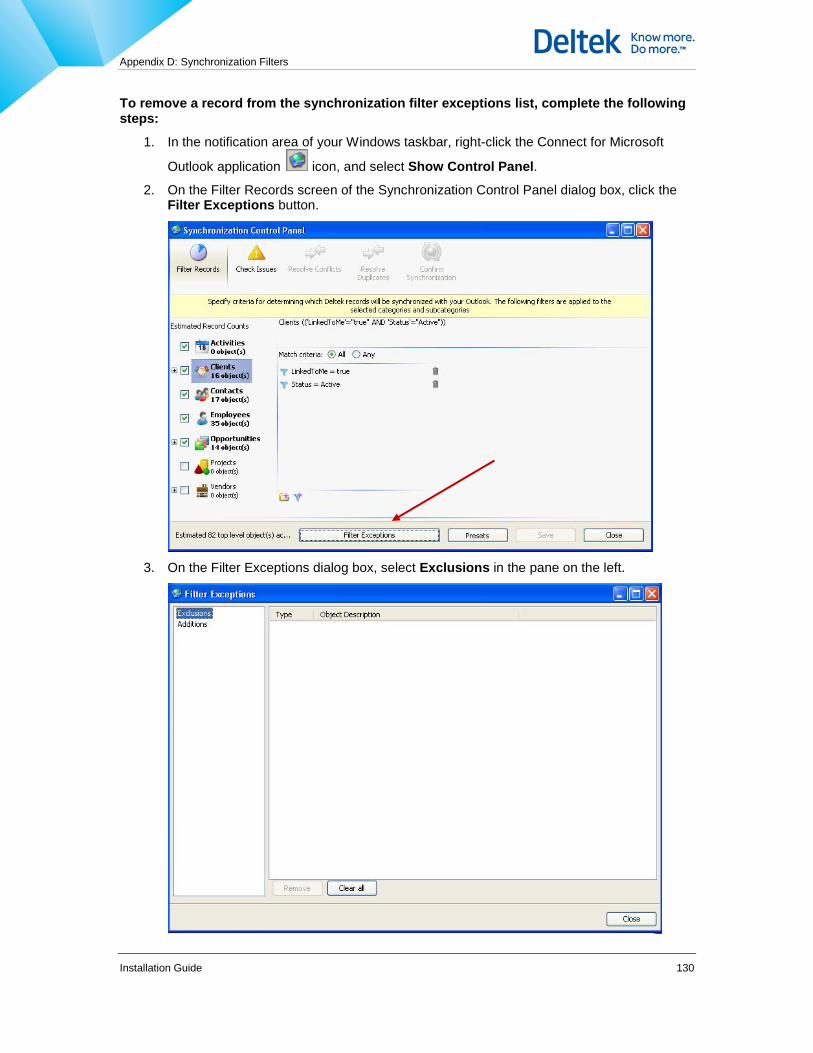
Appendix D: Synchronization Filters
Installation Guide 130
To remove a record from the synchronization filter exceptions list, complete the following steps:
1. In the notification area of your Windows taskbar, right-click the Connect for Microsoft
Outlook application icon, and select Show Control Panel.
2. On the Filter Records screen of the Synchronization Control Panel dialog box, click the Filter Exceptions button.
3. On the Filter Exceptions dialog box, select Exclusions in the pane on the left.

Appendix D: Synchronization Filters
Installation Guide 131
4. In the pane on the right, select the record that you want to remove from the filter exceptions list and click Remove.
When you delete the record from the filter exceptions list, it will be uploaded to Connect for Microsoft Outlook the next time you synchronize if the record matches your synchronization filters.
Filters and the Vision Client Hierarchy Feature When you create a filter condition that brings a client into Connect for Microsoft Outlook that is in a Vision client hierarchy, all other clients in that hierarchy (above and below that client) are downloaded as one of the following:
Complete records if you have view rights to them, and they match your client filter.
Incomplete records if you have view rights to them, and they do not match your client filter. (You can open the record and see some information such as the notes, but the association grids are incomplete.)
Client name and number only if you do not have view rights. When you click the Client Hierarchy button (on the Client form) for one of the clients that you have security rights to, you see this record in the list. However, if you try to open the record, you receive a message stating that you do not have rights.
"Appendix A: Complete and Incomplete Records" on page 103.
For more information about the client hierarchy feature, see the Vision online help. Open the help Contents tab, and then click the following books: Info Center » Client Info Center » Client Hierarchy.

Appendix E: Synchronization Schedules
Installation Guide 132
Appendix E: Synchronization Schedules When you open Outlook for the first time after you install Connect for Microsoft Outlook and you run the Connect for Microsoft Outlook Assistant, you choose whether or not to schedule automatic synchronization between Connect for Microsoft Outlook and Vision. You make this selection on the Synchronization tab of the Connect for Microsoft Outlook - Options dialog box.
Manual Synchronization If you do not choose to synchronize automatically, you run the synchronization manually as needed at any time.
To perform a manual synchronization, complete either of the following in the notification area of your Windows taskbar:
Right-click the Connect for Microsoft Outlook icon, and select Synchronize All Changes from the menu to perform a complete, two-way synchronization. Records are updated in both Vision and Connect for Microsoft Outlook. You can use the Filtering Control Panel and the Configuration Options to change the configuration settings before you start the synchronization.
Right-click the Connect for Microsoft Outlook and select Synchronize Local Changes from the menu, or left-click or double-click the Connect for Microsoft Outlook
icon. This immediately starts a one-way synchronization. The changes that you made in Outlook are updated in Vision, the but the changes that have been made in Vision are not updated in Outlook.

Appendix E: Synchronization Schedules
Installation Guide 133
Automatic Synchronization For automatic synchronizations, you select the synchronization frequency — once a week, once a day, twice a day, or once an hour on the Synchronization tab of the Connect for Microsoft Outlook - Options dialog box.
Synchronization Timer For automatic synchronizations, the synchronization timer starts at the end of each synchronization, starting with the initial synchronization that takes place after you configure the Connect for Microsoft Outlook for the first time.
If Connect for Microsoft Outlook is not open at the time of the next scheduled synchronization interval, it waits for the full interval before checking to synchronize again.
If you perform a manual synchronization in between the scheduled synchronization interval, the next synchronization is scheduled to start at the scheduled interval based on the time that the manual synchronization finishes.
Example You configure Connect for Microsoft Outlook to synchronize hourly and the initial synchronization ended at 3:35 PM. The next automatic synchronization is scheduled to start at 4:35 PM.
At 4:35 PM, synchronization begins; it finishes at 4:40 PM. The next synchronization is scheduled for 5:40 PM.
If you close Connect for Microsoft Outlook after the synchronization completed at 4:40 PM, no synchronization would occur at 5:40 PM (and 6:40 PM, and so on) because Connect for Microsoft Outlook is not open.
If you open Connect for Microsoft Outlook again the next morning at 8:00 AM, another synchronization starts at 8:40 AM. It resumes where the timer left off at 40 minutes past the hour.
If you perform a manual synchronization at 9:15 AM (in between the automatically scheduled synchronization interval), and the synchronization finishes at 9:20 AM, the next synchronization is scheduled to start at 10:20 AM.
Automatic Synchronization Has Stopped Completely If you rely solely on automatic synchronization and you turn your workstation off at the end of the day, it is possible that with a synchronization interval other than hourly, you will eventually prevent synchronization from occurring. This happens because the synchronization will be scheduled to occur outside normal working hours when your workstation is turned off. When this occurs, perform a manual synchronization to resolve it.
Change Synchronization Settings To change synchronization settings at any time after you use the Connect for Microsoft Outlook Assistant during the initial installation, complete the following steps:
1. In the notification area of the Windows taskbar, right-click the Connect for Microsoft
Outlook icon and click Options from the menu.
2. On the Connect for Microsoft Outlook - Options dialog box, click the Synchronization tab.

Appendix F: Vision Records and Fields in Connect for Microsoft Outlook
Installation Guide 134
Appendix F: Vision Records and Fields in Connect for Microsoft Outlook The following tables identify the Vision records and fields that appear in Connect for Microsoft Outlook.
Activity Record The following Vision Activity fields appear in Connect for Microsoft Outlook:
Vision Activity Field/Grid Connect for Microsoft Outlook Field/Grid
Connect for Microsoft Outlook Form
Subject Subject Activity, Task, and calendar item
Location Location Activity and calendar item
Type Type Activity, Task, and calendar item
Priority Priority Activity and Task
Completed check box Completed check box Activity and calendar item
Completed check box % Complete Task
Private check box Private check box Activity
Private check box Private icon in the Options group on the Outlook Ribbon
Task
Client Client Activity, Task, and calendar item
Primary Contact and/or Contacts
Primary Contact field and/or Contacts grid
Activity, Task, and calendar item
Opportunity Opportunity Activity, Task, and calendar item
Project Project Activity, Task, and calendar item
Activity Owner Owner Activity and Task
Activity Owner Employees Calendar item
CreatedBy CreatedBy Activity
Start Time (date and time) Start Time Activity and calendar item
End Time (date and time) End Time Activity and calendar item
Start Time (date) Start Date Task
End Time (date) Due Date Task

Appendix F: Vision Records and Fields in Connect for Microsoft Outlook
Installation Guide 135
Vision Activity Field/Grid Connect for Microsoft Outlook Field/Grid
Connect for Microsoft Outlook Form
Reminder check box Reminder check box Activity and Task
Reminder amount and minutes, hours, or days
Reminder amount and unit of time Activity and Task
Reminder amount and minutes, hours, or days
Reminder amount of time in the Options group on the Outlook Ribbon
Calendar item
All Day Event check box All Day Event check box Activity and calendar item
Show Time As Show Time As Activity
Contacts grid Contacts grid Activity
Employees Employees Task and calendar item
Attendees grid Employees grid Activity
Notes text box Notes text box Activity
Notes text box Description text box Task and calendar item
Recurring Activity Recurring Task and calendar item
Recurrence Type Recurrence Task and calendar item
Pattern Recurrence Pattern Task and calendar item
Recurrence End Recurrence Range End Task and calendar item
Client Record The following Vision Client fields display on the Client form in Connect for Microsoft Outlook:
Client Field/Grid Name
Name
Number
Client check box
Vendor check box
Parent
View Client Hierarchy
Addresses
Phone

Appendix F: Vision Records and Fields in Connect for Microsoft Outlook
Installation Guide 136
Client Field/Grid Name
FAX
Minority Status check boxes — Disadvantaged Business, Small Business, Veteran Owned Small Business, Disabled Vet. Small Business, Minority Business, Woman Owned, HBCU, and Alaska Native
Specialty
Prior Work check box
Recommend check box
Type
Status
Relationship
Website
Aliases grid
Activities grid
Files grid
Contacts grid
Opportunities grid
Projects grid
Employees grid
Contact Record The following Vision Contact fields display on the Contact form in Connect for Microsoft Outlook:
Contact Field/Grid Name
First Name, Middle Name, and Last Name — the Full Name field in Connect for Microsoft Outlook
Preferred
Client/Vendor
Title (job)
Business Phone

Appendix F: Vision Records and Fields in Connect for Microsoft Outlook
Installation Guide 137
Contact Field/Grid Name
Business Fax
Mobile
Home
Pager
Client Address — Address 1, Address 2, Address 3, Address 4, City, Country, State/Province, and ZIP/Postcode
Other/Home Address — Address 1, Address 2, Address 3, Address 4, City, Country, State/Province, and ZIP/Postcode
Mailing check box for the address fields
Notes text box
Activities grid
Opportunities grid
Employee grid
Projects grid
Files grid
Opportunity Record The following Vision Opportunity fields display on the Opportunity form in Connect for Microsoft Outlook:
Opportunity Field/Grid Name
Name
Number
Description
Organization
Primary Client
Primary Contact
Principal
Project Manager
Supervisor

Appendix F: Vision Records and Fields in Connect for Microsoft Outlook
Installation Guide 138
Opportunity Field/Grid Name
Regular Project
Status
Stage
Type
Source
Date Open
Date Closed
Estimated Start
Estimated Completion
Revenue
Probability
Weighted Revenue
Clients grid
Employees grid
Files grid
Activities grid
Contacts grid
Vendors grid
Vendor Record The following Vision Vendor fields display on the Vendor form in Connect for Microsoft Outlook:
Vendor Field/Grid Name
Number
Name
Associated Client
Organization
Addresses — Address 1, Address 2, Address 3, Address 4, City, Country, State/Province, and ZIP
Appendix F: Vision Records and Fields in Connect for Microsoft Outlook
Installation Guide 139
Vendor Field/Grid Name
Phone
FAX
Minority Status check boxes — Disadvantaged Business, Small Business, Veteran Owned Small Business, Disabled Vet. Small Business, Minority Business, Woman Owned, HBCU, and Alaska Native
Status
Specialty
Specialty Description text box
Web Site
Prior Work check box
Recommend check box
Aliases grid
Opportunities grid
Files grid
Contacts grid
Projects grid
Payment Terms

Deltek is the leading global provider of enterprise software and information solutions for professional services firms, government contractors, and government agencies. For decades, we have delivered actionable insight that empowers our customers to unlock their business potential. Over 14,000 organizations and 1.8 million users in approximately 80 countries around the world rely on Deltek to research and identify opportunities, win new business, optimize resource, streamline operations, and deliver more profitable projects. Deltek – Know more. Do more.®
deltek.com