Delta Water Leak Detector User Manual · PDF filemessage notifications, standard data rates...
40
Delta ® Water Leak Detector User Manual Rev: 2017.08.04
Transcript of Delta Water Leak Detector User Manual · PDF filemessage notifications, standard data rates...

Delta® Water Leak Detector User Manual
Rev: 2017.08.04

Contents:
1. Device Information
2. Getting Started
a. Download the Delta Leak Detector app
b. Account Setup
c. Installing Batteries
d. Device Setup
3. Lights
4. Receiving Mobile & Email Messages
5. App Tour
a. Leak Detector Status
b. Edit Leak Detector Information
i. Rename Your Leak Detector
ii. Change Assigned Home
iii. Update Firmware
iv. Wi-Fi
v. Adjust Temperature Settings
vi. Delete Leak Detectors
c. Menu
i. Add Leak Detector
ii. Account Information
iii. Notification Settings
iv. Legal
v. Shop
vi. Help
vii. Settings
viii. Homes
ix. Temperature Units
6. Operation
a. Alerts
i. Leak Alerts
ii. Battery Alerts
iii. Connection Alerts
iv. Temperature Alerts
b. Factory Reset
c. Connect to a new Wi-Fi Router
d. Shared app user accounts
e. Moving to a new home
f. App updates
g. Pairing to a new mobile device
h. Moving leak detector to a new app user profile
i. Leak Detector Maintenance
7. Device Info
8. Troubleshooting
a. Alerts
b. Lights
c. Wi-Fi Connection
d. Contact Us
-DEVICE INFORMATION-
When the Delta® Water Leak Detector encounters a leak, a message is sent over Wi-Fi to your email
and/or mobile device alerting you to the leak. It also sounds an audible alarm, while the light ring at
the top of the device flashes blue.
In your app settings, you can specify how you’d like your leak detector to alert you and set up
additional contacts to receive SMS messages and/or emails when a leak is detected. You may add,
edit or delete contacts at any time. You may add as many phone and email contacts as you want
within the app, but must enter at least one phone number or email to complete product setup.
⚠ Only phone numbers with a +1 country code (US and Canada) may be added to the device
contacts. If you have an international phone number, it is recommended to use an email address
instead.
The Delta Water Leak Detector will also send you SMS or email alerts when:
1. Device batteries reach 20% charge, so you know when to change them
2. The room in which the Leak Detector is placed is above or below the temperature thresholds
you’ve set within the app, helping to prevent potential damage to your home from freezing or
overheating.
3. Your device loses Wi-Fi connection
4. Wi-Fi signal strength becomes weak, presenting a potential connection problem
You can monitor as many as five homes, each with an unlimited number of leak detectors, in the
Delta Water Leak Detector app.
Your leak detector’s proprietary high-efficiency software uses very little Wi-Fi and network data, so
there will not be any added internet costs or disruptions to your standard usage. If you opt-in to text
message notifications, standard data rates apply.

-GETTING STARTED-
Download the Delta® Leak Detector App:
Permissions:
• If you want to take a custom picture of your home(s), you must allow the app to access your
phone’s camera.
• If you want to send alerts to people in your contact list, you must allow the app to access your
phone’s contacts.
⚠ Important for Android™ users: Android devices need Location Services turned on only for setup
and updates. Location Services can be turned off after set-up or updates.
Apple and the Apple logo are trademarks of Apple Inc., registered in the U.S. and other countries. App Store is a service mark of Apple Inc., registered in the U.S. and other countries. Android is a trademark of Google Inc. Google Play and the Google Play logo are trademarks of Google Inc.
🔍 Delta Leak Detect

Account Setup:
Open the Delta Leak Detector app and follow the on-screen prompts to set up your account.
You must enter a name, email address and password.
⚠ Be sure your email address is correct. If not correct, you will need to
wait three days before you can enter a different email address.
You will receive an email from [email protected] with a
confirmation number which you will need to complete your account setup.
Be sure to check your junk mail and clutter folders for the confirmation
number email if you do not receive it within 5 minutes. If you are having
trouble getting your confirmation number, you may contact our support
team at 855-833-LEAK (5325) or [email protected]
Enter your confirmation number when prompted.

You will then receive an email from Delta [email protected] to
confirm your subscription. This is a necessary step for your new leak
detector to be able to send you alerts. Your email address will not be sold or
used for promotional or marketing purposes.
Click “Confirm subscription”
Be sure to check your junk mail and clutter folders for the subscription
confirmation email if you do not receive it within 5 minutes. If you are having
troubles getting your subscription confirmation, you may contact our
support team at 855-833-LEAK (5325) or [email protected].
⚠ NOTICE If you do not confirm your subscription using this email, you will not be able to
receive alerts from your leak detector.

Installing Batteries:
Your device requires three AAA batteries (provided).
You can find your first set in the box.
Use a screw driver (not provided) to loosen and
remove the battery compartment cover on your leak
detector.
Insert three AAA batteries (provided).
⚠ For best performance, do not mix new and old
batteries.
As soon as the final battery is set, the Leak Detector
will BEEP to confirm.
Fit the battery cover back on and use a screw driver to
tighten.
The battery cover is designed to be tight enough to
keep out water. Do not over tighten the screws or
you may damage your leak detector.

Device Setup:
In the mobile app, tap “Get Started”
Mobile device Bluetooth must be ON to continue;
if it is not, the app will prompt you to turn it on. It
can be turned off once setup is complete and is
not required for day-to-day device operation.

Once your mobile device has Bluetooth set to “on,” press and hold the
button on the top of your Leak Detector until the light ring turns blue,
then release.
When you release the button, the light will blink blue to indicate it is in
Bluetooth pairing mode.
Your app will show that it is connecting
to the Leak Detector. This may take a
few minutes.

Once connected to your Leak Detector, the app will prompt you to
choose your Wi-Fi network.
Select your Wi-Fi network from the list and enter your password if
necessary
If your Wi-Fi network does not appear in the menu, select “Other” and
enter your Wi-Fi’s Network Name, Security Type and Password.
⚠ Be sure to connect to 2.4GHz Wi-Fi Networks only. The Leak Detector is not compatible with 5GHz
Wi-Fi and such networks will not be displayed in the list of network options.

Your Leak Detector is now connecting to your Wi-Fi network.
Set the location that this Leak Detector will be monitoring.
If you do not see the location you want, you can choose “Other” and
create a custom location.
ICONS: The only way to change the icon associated with your location
once it’s been selected is to delete the Leak Detector from the app and add
it back. (See “Delete Leak Detectors” for the deletion process)
Name your Leak Detector.
Choose a unique, descriptive name that will help you easily locate the
Leak Detector if needed. This is especially helpful if you have multiple Leak
Detectors installed in one home.
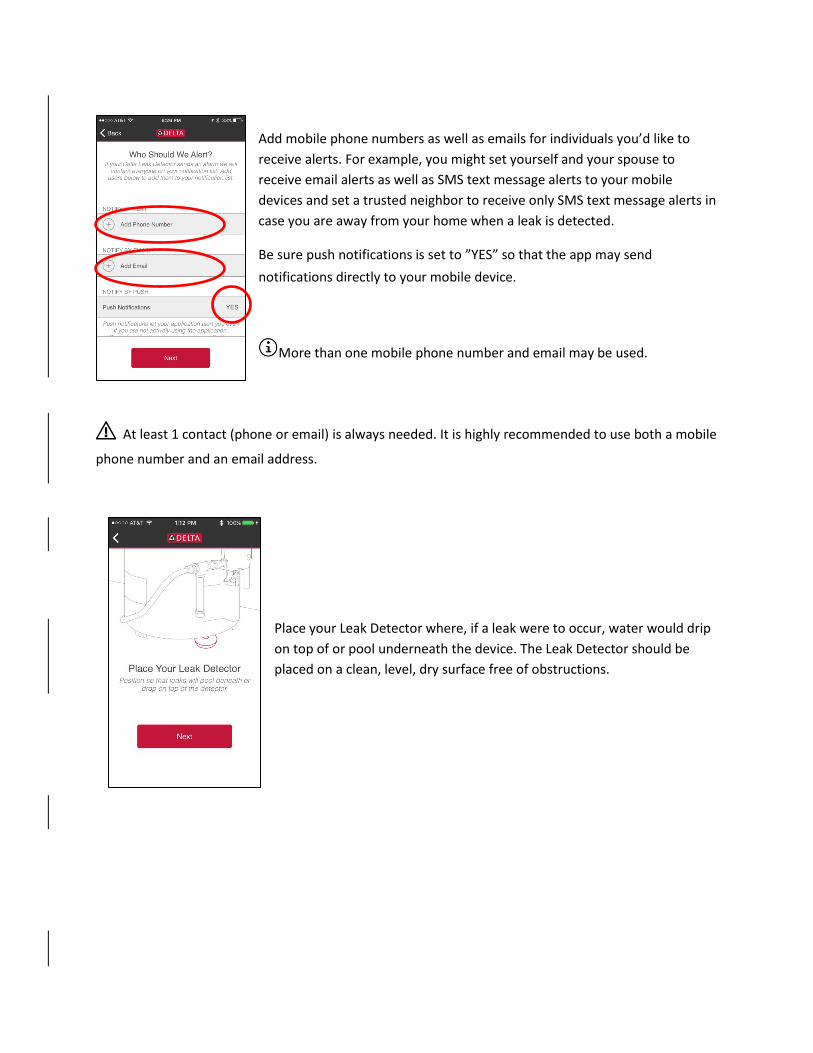
Add mobile phone numbers as well as emails for individuals you’d like to
receive alerts. For example, you might set yourself and your spouse to
receive email alerts as well as SMS text message alerts to your mobile
devices and set a trusted neighbor to receive only SMS text message alerts in
case you are away from your home when a leak is detected.
Be sure push notifications is set to ”YES” so that the app may send
notifications directly to your mobile device.
More than one mobile phone number and email may be used.
⚠ At least 1 contact (phone or email) is always needed. It is highly recommended to use both a mobile
phone number and an email address.
Place your Leak Detector where, if a leak were to occur, water would drip
on top of or pool underneath the device. The Leak Detector should be
placed on a clean, level, dry surface free of obstructions.

You can test that your Leak Detector is set up properly by setting it on top
of a wet cloth and making sure the unit’s audial/visual alert goes off and
the appropriate push, SMS text and email notifications are sent and
received.

-LIGHTS-
Your Leak Detector uses a variety of light signals to communicate with you. See the chart below to
determine what it is notifying you of.
LED Detector State
Flashing Blue During Setup: Bluetooth pairing mode During Operation: Leak Detector has detected a leak
Solid Blue Leak Detector has finished connecting to Wi-Fi
Flashing Green Leak Detector is recording a status update. During normal operation, the Leak Detector will send a status update to the user’s app every 8 hours. This will also occur during an alert and after an alert has been cleared.
White Single Flash Leak Detector has power, Wi-Fi connection, and is operation normally.
Solid Red Leak Detector is in reset mode. Once the LED turns red, the user should release the button. The Leak Detector will reset and will need to be added to the app again.

-RECEIVING MOBILE AND EMAIL MESSAGES / ALERTS-
Your Leak Detector will send a variety of alerts (such as low battery, loss of Wi-Fi connection, and leak
detection notifications) via push notification, SMS text message and/or email to the contacts you
designated during setup. Below are some examples of alerts you may receive from your Leak Detector.
⚠ In order to receive notifications, be sure Amazon Web Services (AWS) is not blocked in your mobile
device or email.
Example SMS Text Message
Example Email

Example In-app alert
Example In-app notice to show which Leak Detector is sending the alert.

-APP TOUR-
LEAK DETECTOR STATUS:
Tap on a Leak Detector from the main screen to
view its status.
Here, you can view whether your Leak Detector
has encountered a leak, what its battery level is
and the signal strength of the Wi-Fi network
your Leak Detector is connected to.
NOTE: The battery level, Wi-Fi signal
strength and temperature are not displayed in
real-time. These are updated every four hours.
Scrolling down on this page will show you the
report history of your Leak Detector.
Tap any of the summary dates to open a detailed
report showing the “Leak History” and
“Temperature History” of the selected Leak
Detector.
The “Temperature History” is the temperature of
the room, as measure by the Leak Detector, at
the time of the report.
⚠ Actual room temperature may differ from
that reported by the Leak Detector due to
location, moisture, floor temperature, etc.

EDIT LEAK DETECTOR INFORMATION:
Tap the gear icon in the upper right-hand
corner of the Leak Detector information screen
to open the “Product Edit” page.
RENAME YOUR LEAK DETECTOR:
To change the name of your Leak Detector, tap
“Name.” This will open the “Name Leak
Detector” page, where you can tap the field
beneath “Name” and enter a new name for your
Leak Detector.
When finished, tap “Done.”
Note: Icons can only be changed by deleting
and re-adding the leak detector.

CHANGE ASSIGNED HOME:
To change the assigned home for your Leak
Detector, tap on “Home” to open the “Homes”
page. Tap on the home you want to assign the
Leak Detector to.
⚠ This method only works if you will be
connecting the Leak Detector to the same Wi-Fi
network; see “Moving to a New Home” if you will
not be using the same Wi-Fi network.
If the home you would like to assign your device
to is not listed, see “Add a New Home.”
UPDATE FIRMWARE:
Tap “Firmware” to
see if an update is
available for your
Leak Detector.
If an update is
available, tap “Get
Started” and follow
the on-screen
instructions
The battery level
of the Leak Detector
must be at least 40%
and the Wi-Fi signal strength must be equal to or greater than 30% to perform a firmware update.
Please confirm that the Leak Detector has enough battery power and signal strength before proceeding
with an update.

⚠ To prevent damage to your Leak Detector,
DO NOT remove batteries during a firmware
update.

Wi-Fi:
“Wi-Fi” shows the Wi-Fi network your Leak Detector is currently
connected to.
ADJUST TEMPERATURE SETTINGS:
Tap “Low Temperature Threshold” or “High Temperature Threshold” to set alert limits for temperature
in the space your Leak Detector is located. Drag the slider up or down to set the limit.
⚠ Temperature is a reference only. Actual room temperatures may be much different due to variations
from floors and ceilings. Consider using warmer (for basements) and cooler (for attics) alert limits.

DELETE LEAK DETECTORS:
Tap “Delete Product” to remove the selected
Leak Detector from the app.

Main Menu:
When you first open the app ,your screen will show the first home in your
“Homes” list (see settings). If you have multiple homes set up in your app,
you can swipe left to scroll through them.
This screen will display the status of the home and allow you to view each
of the Leak Detectors you have set up in that home.
Tapping the menu bar ☰ will open a side tab with options to add a new
leak detector, access and edit your account information, view and update
your notification settings, access our privacy and warranty policies and
shop online for additional Leak Detectors.
ADD LEAK DETECTOR:
Tap “Add Leak Detector” to add more leak detectors to your home so that you
can monitor multiple potential leak points.
The on-screen instructions will show you how to connect additional Leak
Detectors to your app. The setup will be very similar to the initial Leak Detector
setup. For more information on how to set up a Leak Detector, see Device
Setup

ACCOUNT INFORMATION:
Tap “Account Information” to update your
account name and password or to log out of the
app.
⚠ The app will not be able to display alerts while
logged out.
NOTIFICATION SETTINGS:
Tap “Notification Settings” to update, add or
remove contacts.
You may add multiple mobile phone and email
contacts to your device.
⚠ We recommend you have at least two
contacts set up in the app, however only one
phone number or email is required.

LEGAL:
Tap “Legal” to view our privacy policy and warranty
policy.
“Privacy Policy” links to the Delta privacy policy at:
www.deltafaucet.com/privacy-policy
“Warranty Policy” links to the Delta warranty
policy at: www.deltafaucet.com/service-
parts/warranty . To view the warranty information
for your device, scroll to the bottom of the page
and click on: “LIMITED WARRANTY ON DELTA®
LEAK DETECTORS”
SHOP:
Tap “Shop” to see where additional Leak Detectors can be purchased.

SETTINGS:
HOMES:
Add a Home:
Tap “Settings” in the
bottom left-hand corner
of the menu to update
homes and temperature
units.
In the “Homes” section,
tap “Add a Home” to
add more homes
equipped with Leak
Detectors.
You can view what version of the app you have installed at the bottom of the settings page. For optimal
performance, it is recommended you always use the latest version of the app.
If you’d like to update a home, go to the “Homes”
section and tap the home you want to modify.
You can use the camera icon to take a photo of
your home or add an existing image from your
device image library.
You can use the field beneath the home “Name” to
change the name of the home.
Tap “Delete Home” to permanently remove the
home from the app.

Temperature Units:
In “Settings”, tap “Temperature Units” to select
Fahrenheit or Celsius.
Help:
“Help” in the bottom righthand corner of the menu takes you to the
www.deltafaucet.com/leakdetection web page.
-OPERATION-
Alerts:
Depending on your notification settings, the contacts you set up will receive SMS text messages and/or
emails for each alert.
Once an alert is pushed to the app, you will need to clear it to view your main screen.
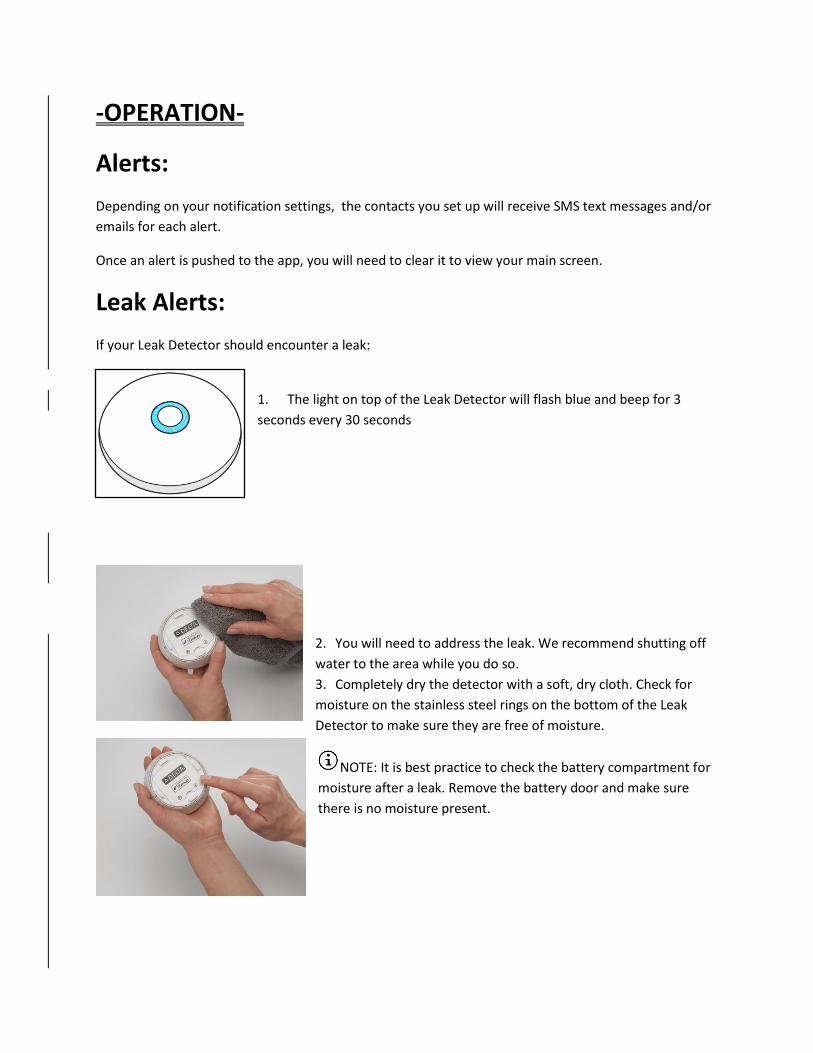
Leak Alerts:
If your Leak Detector should encounter a leak:
1. The light on top of the Leak Detector will flash blue and beep for 3
seconds every 30 seconds
2. You will need to address the leak. We recommend shutting off
water to the area while you do so.
3. Completely dry the detector with a soft, dry cloth. Check for
moisture on the stainless steel rings on the bottom of the Leak
Detector to make sure they are free of moisture.
NOTE: It is best practice to check the battery compartment for
moisture after a leak. Remove the battery door and make sure
there is no moisture present.

4. Acknowledge the leak alert in the app to clear it.
5. Press the button on the Leak Detector ONLY until the green light
appears, then release. This indicates that the Leak Detector has
communicated with the app and that it is still functioning properly.
6. Wait about 30 minutes and confirm the alert symbol in the app has
disappeared.

7. Double check the Wi-Fi signal strength and replace the batteries in your
Leak Detector if needed. (A leak alert uses a lot of battery, as the detector
sends frequent updates over Wi-Fi.)
NOTE: After a leak alert has been cleared, it is best practice to make
sure the Leak Detector is still properly functioning. To do this, place the Leak
Detector on a wet cloth to confirm that a leak can still be detected (see
“Device Setup” section).
Battery Alerts:
You will receive an alert when the batteries in your Leak Detector need to be
changed.
1. Acknowledge the battery alert in the app.
2. Change the batteries in the Leak Detector.
⚠ For best performance, do not mix new and old batteries.
3. Press the button on the top of the Leak Detector until the light shows
green, then release.
4. Wait about 30 minutes and confirm the alert symbol disappears in the
app.

Connection Alerts:
If your Leak Detector is unable to connect to the Wi-Fi network for 10 hours, it will send an alert.
1. Acknowledge the alert.
2. Check that your router is functioning properly and, if needed, fix the
wireless router.
3. Check that your internet connection is functioning properly and, if
needed, fixt the internet connection. To check your internet connection you
may, for example, attempt to connect a different device (such as a mobile
phone or laptop) to the Wi-Fi Network and see if it works properly.
4. Move the Leak Detector within range of the wireless router.
5. If none of the above solve the connection issue, the Leak Detector will
need to be deleted, reset and re-added to the app.
6. Check battery strength.
⚠ Batteries will drain rapidly until succesfully connected to the internet.
7. Wait about 30 minutes and confirm the alert symbol disappears in the app.

Temperature Alerts:
If your Leak Detector measures a temperature exceeding the limits you set, an alert is sent.
1. Take appropriate steps to correct the temperature.
2. Acknowledge the temperature alert in the app.
3. Wait about 4 hours and confirm the alert symbol disappears.

FACTORY RESET:
A factory reset is needed if:
• You want to move the Leak Detector to a different app user profile
• You need to pair with a new mobile device (for firmware updates)
• You need to troubleshoot Wi-Fi connection problems (see “Connection Alerts”)
To perform a factory reset of your Leak Detector:
1. Press and hold the button ONLY until the light turns RED
2. Immediately release the button when the light turns RED
⚠ The Leak Detector will NOT ALERT after a factory reset UNTIL you re-
connect to your Wi-Fi network and re-add the detector in the app

CONNECT TO A NEW Wi-Fi ROUTER:
If you replace your old Wi-Fi router with a new router or change your Wi-Fi password, you will need to
re-add each of your Delta Leak Detectors in the app.
1. Refer to “Add Leak Detector” for steps to add a Leak Detector
2. Make sure your mobile device is connected to the same Wi-Fi router that your Leak Detector
will be using.
3. Go to the home in the app where you want the Leak Detector to be assigned.
4. ADD the Leak Detector.
5. Follow the on-screen instructions.
SHARED ACCOUNTS:
It is possible to share the same account across 2 or more mobile devices. Sharing allows all people using
the same login to see the same Leak Detector information and alerts. This is convenient for families and
rental properties.
1. Download and install the Delta Leak Detector app on the mobile devices
2. Create one login
3. Share the login information with the other users.
⚠ Be aware that all shared users can update, add and delete all shared Leak Detectors.
MOVING TO A NEW HOME:
Congratulations on your new home!
1. If YOUR WI-FI NETWORK IS THE SAME:
a. In the app, go to the home you’d like to transfer your Leak Detectors from
b. Take a new picture of your home
c. If the Leak Detector(s) is/are in the same location as the old home:
i. Confirm the Leak Detector(s) are working properly
ii. If not, make sure the Leak Detectors are still connected to the Wi-Fi and correct
if needed (See “NEW WI-FI ROUTER” section for instructions)
d. If the Leak Detector is used in a new location
i. DELETE the Leak Detector in the app.
ii. ADD the Leak Detector back in.
iii. Follow the on-screen instructions.
2. IF YOU HAVE A NEW WI-FI NETWORK:
a. In the app, go to the home you’d like to transfer your Leak Detector(s) from.
b. Take a new picture of your home.
c. See “NEW WI-FI Router” section for instructions.
APP UPDATES:
From time to time, we might issue updates to your Delta Leak Detector app.
If you configured your mobile device to automatically update, the Apple Store or Google Play Store will
automatically update your Delta Leak Detector app.
If your mobile device is not configured to automatically update, you will need to go to the store
appropriate for your mobile device and manually download and update the Delta Leak Detector app for
your device.

PAIRING TO A NEW MOBILE DEVICE:
Congratulations on your new mobile device!
Since the Delta Leak Detector app is not on your new device, a few updates will need to be made.
1. Download and install a new Delta Leak Detector app from the store appropriate to your device
(Apple Store or Google Play Store)
2. Log in to the app
3. All information except the home(s) picture(s) should automatically update
4. Apply new pictures to your home(s)
5. Your app should now be working
To test if your Leak Detector is connected to the new mobile device properly:
a. Wet a cloth
b. Place the cloth across the stainless steel rings on the bottom of the Leak Detector
c. Make sure you get an alert
d. See the “Operation – Alerts” section to clear the alert
MOVE INDIVIDUAL LEAK DETECTORS BETWEEN APP
USER PROFILES:
It is easy to move a Leak Detector between different app user profiles only if the Leak Detector is on the
same Wi-Fi.
1. Navigate to the home where the Leak Detector will be located.
2. In the new user profile, ADD the Leak Detector.
3. Confirm the leak detector moved from the old user profile to the new user profile. Once the
Leak Detector is added to the new user profile, it will automatically disappear from the old user
profile. There is no need to actively delete it from the old user profile.

LEAK DETECTOR MAINTENANCE:
The Delta Leak Detector requires very little maintenance, but there are some things we recommend to
enable it to function properly.
1. Inspect the Leak Detector for any remaining moisture after a leak alert. The external surfaces of
the Leak Detector as well as the internal surfaces of the battery compartment should be free of
moisture.
⚠ If the Leak Detector has been submerged under water for more than 48 hours, it is
recommended that you replace the Leak Detector.
2. Change the batteries as indicated in the battery alerts or every 2 years, whichever occurs first.
⚠ For best performance, do not mix new and old batteries.
3. Dust the Leak Detector with a soft, clean, dry cloth every 6 months. This keeps the surface clean
and free of debris so leaks can be easily detected.
4. Remove all items and debris from the Leak Detector.
5. Be sure to place the Leak Detector on a clean, level, dry surface.
- DEVICE INFO -
Standard Specifications
• Detects water pooling beneath or dripping on top of the Leak Detector
• Sends alerts via SMS text message, email or combination dependent on user notification settings.
• No hub required
• Can be set to send alerts to multiple contacts.
• Built-in LED lights and an audible alarm provide additional notification to a leak. The alarm will sound for 3 seconds, rest for 30 seconds and repeat until the alert is cleared.
• Delta Leak Detect App required for set-up and operation.
• App is available in the Apple Store and Google Play store. Search: Delta Leak Detect.
• Compatible with most iOS and Android devices. Visit www.deltafaucet.com/leakdetection for a complete list.
• Wi-Fi 2.4 GHz 802.11 b/g/n compatible only.
• For indoor use only.
• Screwdriver (not included) required to remove battery door. No additional tools required for installation and operation.
Warranty
• 2-year limited warranty.
Models
• LEAKX1 single pack.
• LEAKX3 triple pack.
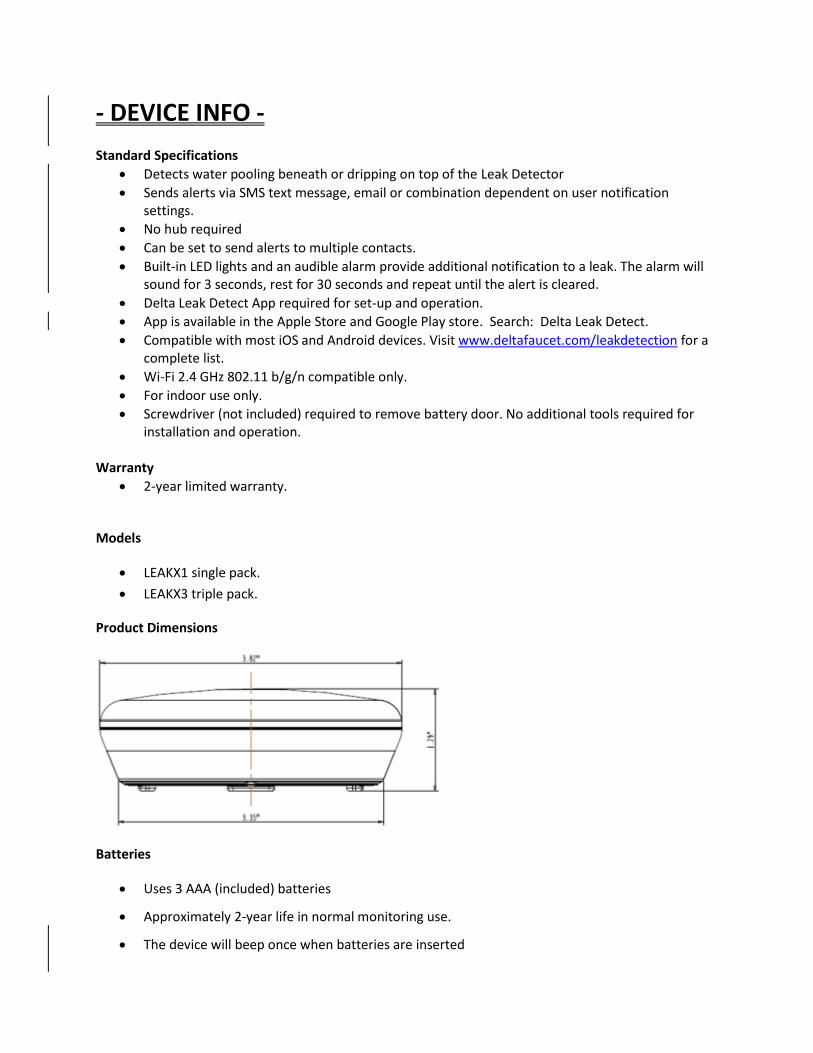
Product Dimensions
Batteries
• Uses 3 AAA (included) batteries
• Approximately 2-year life in normal monitoring use.
• The device will beep once when batteries are inserted

-TROUBLESHOOTING-
ALERTS
• See Receiving mobile and email messages/alerts section
LIGHTS
LED Detector State
Flashing Blue During Setup: Bluetooth pairing mode During Operation: Leak Detector has detected a leak
Solid Blue Leak Detector has finished connecting to Wi-Fi
Flashing Green Leak Detector is recording a status update. During normal operation, the Leak Detector will send a status update to the user’s app every 8 hours. This will also occur during an alert and after an alert has been cleared.
White Single Flash Leak Detector has power, Wi-Fi connection, and is operation normally.
Solid Red Leak Detector is in reset mode. Once the LED turns red, the user should release the button. The Leak Detector will reset and will need to be added to the app again.
WI-FI CONNECTION
• How to locate your Wi-Fi network while setting up your Leak Detector
⚠ Be sure to connect to 2.4GHz Wi-Fi Networks only. The Leak Detector is not compatible
with 5GHz Wi-Fi and such networks will not be displayed in the list of network options.
• How to determine the Wi-Fi signal strength of your Leak Detector
• How to determine which Wi-Fi network your Leak Detector is connected to
• How to connect your Leak Detector to a different Wi-Fi router
CONTACT US:
If you have any questions or concerns, you may contact our support team at 855-833-LEAK (5325) or