
DELTA VIRTUAL AIRLINES FLIGHT ACADEMY Navigation Manual Navigation Manual.pdf · DELTA VIRTUAL...
26
DELTA VIRTUAL AIRLINES FLIGHT ACADEMY Navigation Manual 1st EDITION 4 May 2008
Transcript of DELTA VIRTUAL AIRLINES FLIGHT ACADEMY Navigation Manual Navigation Manual.pdf · DELTA VIRTUAL...
DELTA VIRTUAL AIRLINES
FLIGHT ACADEMY
Navigation Manual 1st EDITION
4 May 2008
Table of Contents Navigation/Charts Manual 1st Edition............................................................................. 3
The Fundamentals of Radio Navigation........................................................................... 4
NDB (Non-Directional Beacon) ........................................................................................ 4
How to fly to the NDB ...................................................................................................... 4
Using the RMI .................................................................................................................. 5
Flying to KTVY .................................................................................................................. 7
Flying using the VOR...................................................................................................... 16
DME ................................................................................................................................ 16
Understanding Inbound and Outbound ......................................................................... 17
Flying a VOR................................................................................................................... 20
Flying the ILS. ................................................................................................................ 21
Acknowledgements and Legal .......……….....…………………...………………………....…....23
Delta Virtual Airlines Flight Academy
Navigation/Charts Manual 1st Edition
On behalf of Delta Virtual Airlines, we would like to thank you for taking the time to download this manual and enroll in this course. We think you will find the information clear and easy to understand. This is the Delta Virtual Flight Academy Navigation/Charts Manual 1st Edition. It is intended to teach the basics of navigation and was written with the flight simulation pilot in mind. This navigation manual, the course TASK outline, the FAA “Pilot's Handbook of Aeronautical Knowledge” and the Aeronautical Information Manual (AIM), make up some of the study materials to help you, the student, learn the basics of aviation navigation and flight simulation flying. We will provide you with an avenue for asking questions and flight instruction to teach you how to fly the flight simulation airplane in a way that resembles the type of flight instruction you could receive in the real world. Our instructors will fly with you and teach you the basics – how to navigate your airplane to your destination airport using VOR, NDB, RNAV and ILS equipment. You will learn how to read and use airport diagrams, STAR approach charts, SID departure charts, terminal and VFR charts, IFR (low & high altitude) Enroute charts, etc. If you spot a typo or notice something that doesn’t seem correct, let us know. We sincerely hope you enjoy this course and it helped you to continue your aviation education. Happy Flying! Scott Clarke George Lewis DVA 2370 DVA2253 Senior Captain Senior Captain of the Mighty 722 Vice President and Director of Training Vice President of Operations [email protected] [email protected]
The Fundamentals of Radio Navigation There are three fundamental radio navigations systems that you need to learn and understand in depth in order to complete this course. You will have to demonstrate your ability to use all three systems during your flight test.
NDB (Non-Directional Beacon) VOR (Very high Omni Range) DME (Distance Measuring Equipment)
The big difference between NDB and VOR systems is that the NDB is non-directional and the VOR is directional. The DME simply gives out the slant range distance from where it is located to your airplane. There are three problems with using the ADF/NDB system for navigation. The first is that you have no idea how far away from the NDB you are. It does not provide any distance measuring information. The second problem is the range. An NDB has about a 40 mile range. The third and biggest problem with the ADF is it always points to the NDB. Unless you hold a heading, you will end up flying in circles around the NDB. How to fly to the NDB Flying the NDB (non-directional beacon) isn’t complicated. It is an AM radio transmitter located on the ground, usually on or near an airport. When you combine it with the ADF (automatic direction finder) receiver in your airplane, you have a simple navigational aid that can be utilized by all pilots for cross county IFR or VFR navigation. Since it is an AM radio “station”, you can even listen to your favorite AM station while flying. The ADF needle always points to the NDB station. To fly to the station, turn your airplane until the ADF needle points to the nose of your airplane, set your heading bug to that heading and keep the ADF needle on that heading as you fly toward the NDB. You may need to provide some heading corrections due to wind, etc. If you continue to fly with the ADF needle pointed directly to the NDB and on the set heading, you will fly over the NDB, at which point the ADF needle swings around backwards, as it points back to the NDB you just flew past. If you do not maintain the specific heading first applied and keep the ADF needle on the same heading, you could fly around in a big circle before getting to the NDB station. Be careful. The NDB can be used not only as a navigational aid but also to provide you with better situational awareness when flying (Where you are). An NDB has no radial or mileage information like the VOR/DME. You use the ADF to tell you what direction the NDB is from where you are presently located.
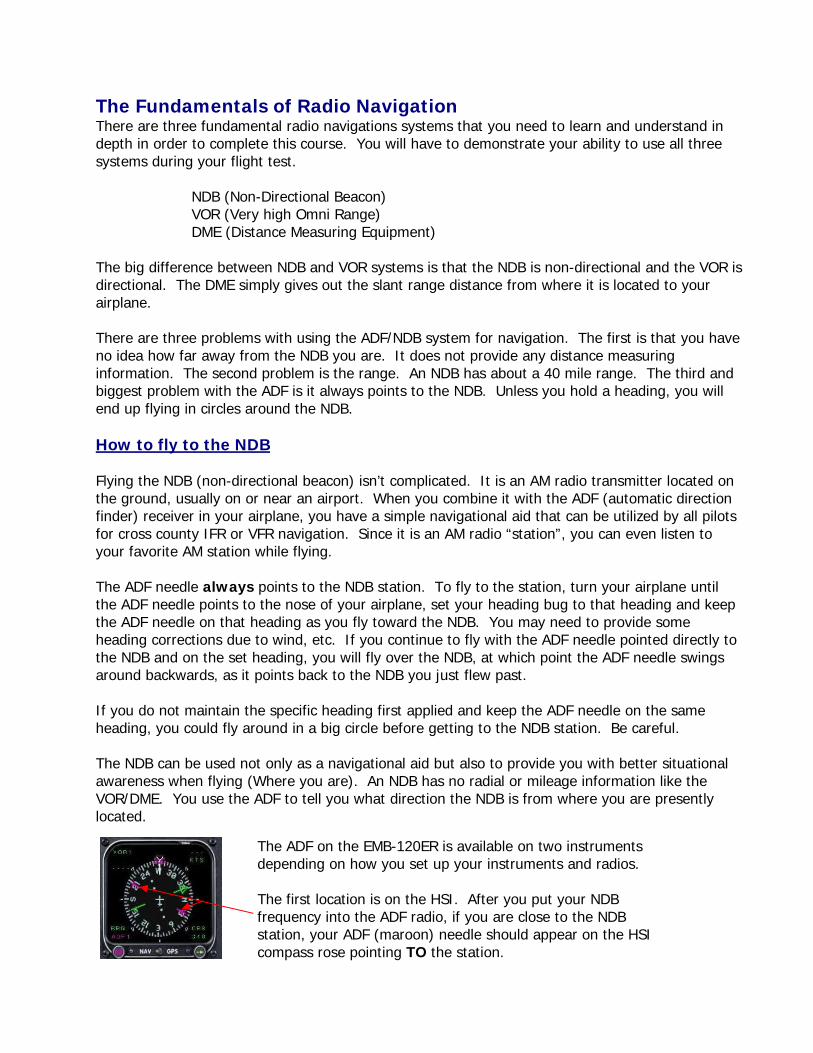
The ADF on the EMB-120ER is available on two instruments depending on how you set up your instruments and radios.
The first location is on the HSI. After you put your NDB frequency into the ADF radio, if you are close to the NDB station, your ADF (maroon) needle should appear on the HSI compass rose pointing TO the station.
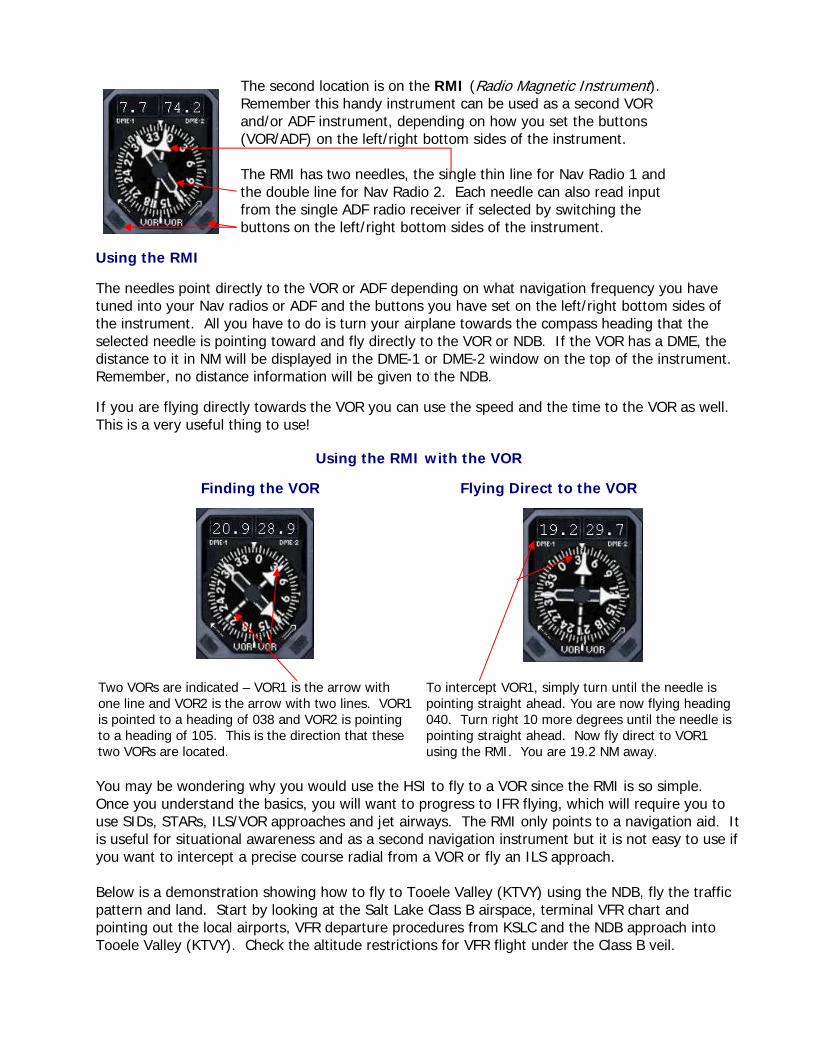
The second location is on the RMI (Radio Magnetic Instrument). Remember this handy instrument can be used as a second VOR and/or ADF instrument, depending on how you set the buttons (VOR/ADF) on the left/right bottom sides of the instrument. The RMI has two needles, the single thin line for Nav Radio 1 and the double line for Nav Radio 2. Each needle can also read input from the single ADF radio receiver if selected by switching the buttons on the left/right bottom sides of the instrument.
Using the RMI
The needles point directly to the VOR or ADF depending on what navigation frequency you have tuned into your Nav radios or ADF and the buttons you have set on the left/right bottom sides of the instrument. All you have to do is turn your airplane towards the compass heading that the selected needle is pointing toward and fly directly to the VOR or NDB. If the VOR has a DME, the distance to it in NM will be displayed in the DME-1 or DME-2 window on the top of the instrument. Remember, no distance information will be given to the NDB.
If you are flying directly towards the VOR you can use the speed and the time to the VOR as well. This is a very useful thing to use!
Using the RMI with the VOR
Finding the VOR Flying Direct to the VOR
Two VORs are indicated – VOR1 is the arrow with one line and VOR2 is the arrow with two lines. VOR1 is pointed to a heading of 038 and VOR2 is pointing to a heading of 105. This is the direction that these two VORs are located.
To intercept VOR1, simply turn until the needle is pointing straight ahead. You are now flying heading 040. Turn right 10 more degrees until the needle is pointing straight ahead. Now fly direct to VOR1 using the RMI. You are 19.2 NM away.
You may be wondering why you would use the HSI to fly to a VOR since the RMI is so simple. Once you understand the basics, you will want to progress to IFR flying, which will require you to use SIDs, STARs, ILS/VOR approaches and jet airways. The RMI only points to a navigation aid. It is useful for situational awareness and as a second navigation instrument but it is not easy to use if you want to intercept a precise course radial from a VOR or fly an ILS approach. Below is a demonstration showing how to fly to Tooele Valley (KTVY) using the NDB, fly the traffic pattern and land. Start by looking at the Salt Lake Class B airspace, terminal VFR chart and pointing out the local airports, VFR departure procedures from KSLC and the NDB approach into Tooele Valley (KTVY). Check the altitude restrictions for VFR flight under the Class B veil.
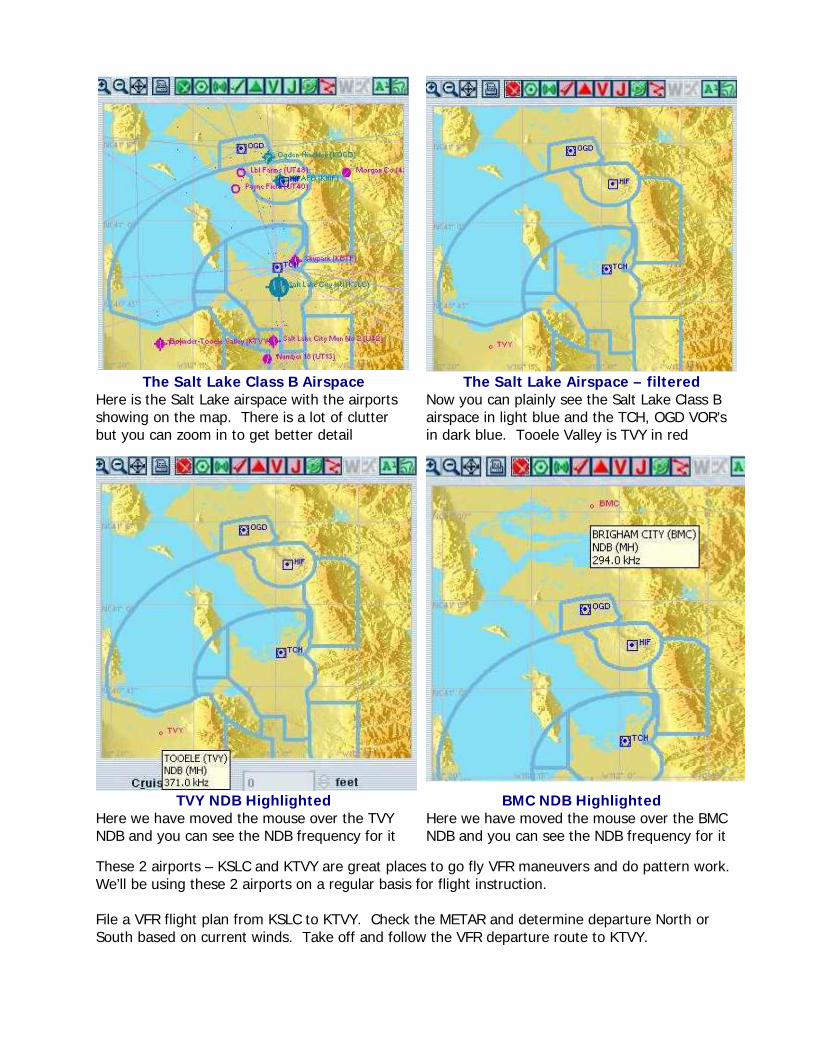
The Salt Lake Class B Airspace
Here is the Salt Lake airspace with the airports showing on the map. There is a lot of clutter but you can zoom in to get better detail
The Salt Lake Airspace – filtered Now you can plainly see the Salt Lake Class B airspace in light blue and the TCH, OGD VOR’s in dark blue. Tooele Valley is TVY in red
TVY NDB Highlighted Here we have moved the mouse over the TVY NDB and you can see the NDB frequency for it
BMC NDB Highlighted Here we have moved the mouse over the BMC NDB and you can see the NDB frequency for it
These 2 airports – KSLC and KTVY are great places to go fly VFR maneuvers and do pattern work. We’ll be using these 2 airports on a regular basis for flight instruction. File a VFR flight plan from KSLC to KTVY. Check the METAR and determine departure North or South based on current winds. Take off and follow the VFR departure route to KTVY.
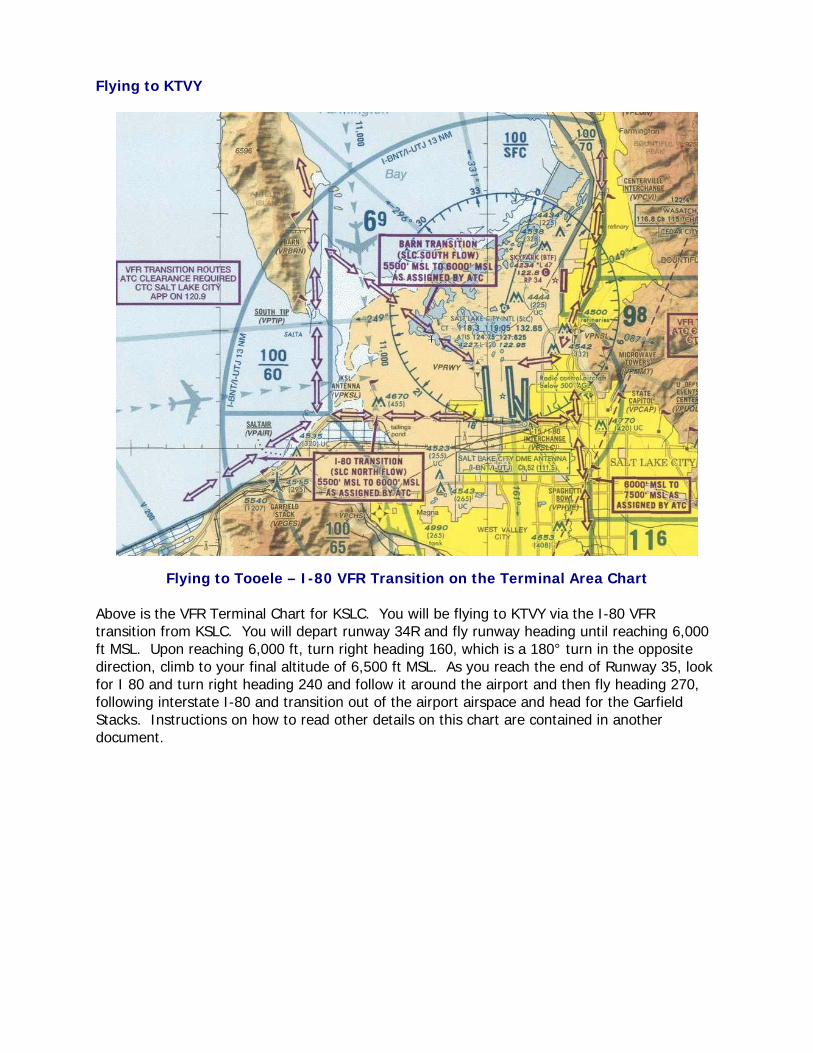
Flying to KTVY
Flying to Tooele – I-80 VFR Transition on the Terminal Area Chart Above is the VFR Terminal Chart for KSLC. You will be flying to KTVY via the I-80 VFR transition from KSLC. You will depart runway 34R and fly runway heading until reaching 6,000 ft MSL. Upon reaching 6,000 ft, turn right heading 160, which is a 180° turn in the opposite direction, climb to your final altitude of 6,500 ft MSL. As you reach the end of Runway 35, look for I 80 and turn right heading 240 and follow it around the airport and then fly heading 270, following interstate I-80 and transition out of the airport airspace and head for the Garfield Stacks. Instructions on how to read other details on this chart are contained in another document.
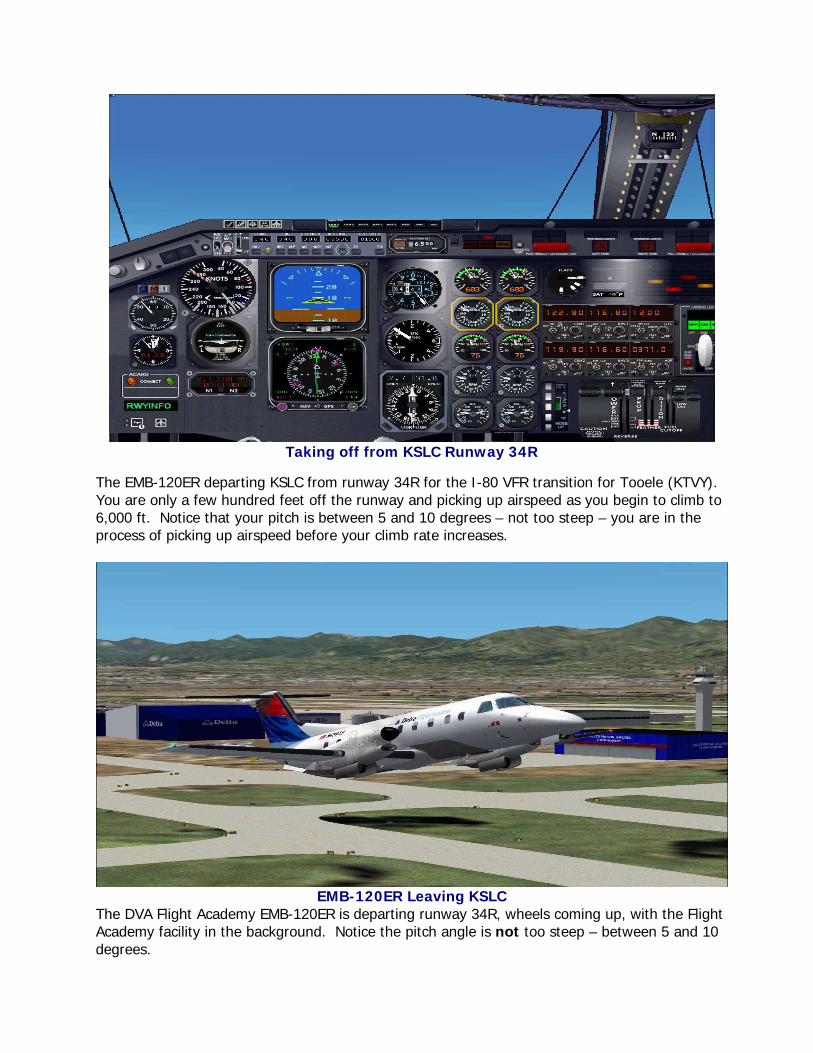
Taking off from KSLC Runway 34R
The EMB-120ER departing KSLC from runway 34R for the I-80 VFR transition for Tooele (KTVY). You are only a few hundred feet off the runway and picking up airspeed as you begin to climb to 6,000 ft. Notice that your pitch is between 5 and 10 degrees – not too steep – you are in the process of picking up airspeed before your climb rate increases.
EMB-120ER Leaving KSLC The DVA Flight Academy EMB-120ER is departing runway 34R, wheels coming up, with the Flight Academy facility in the background. Notice the pitch angle is not too steep – between 5 and 10 degrees.
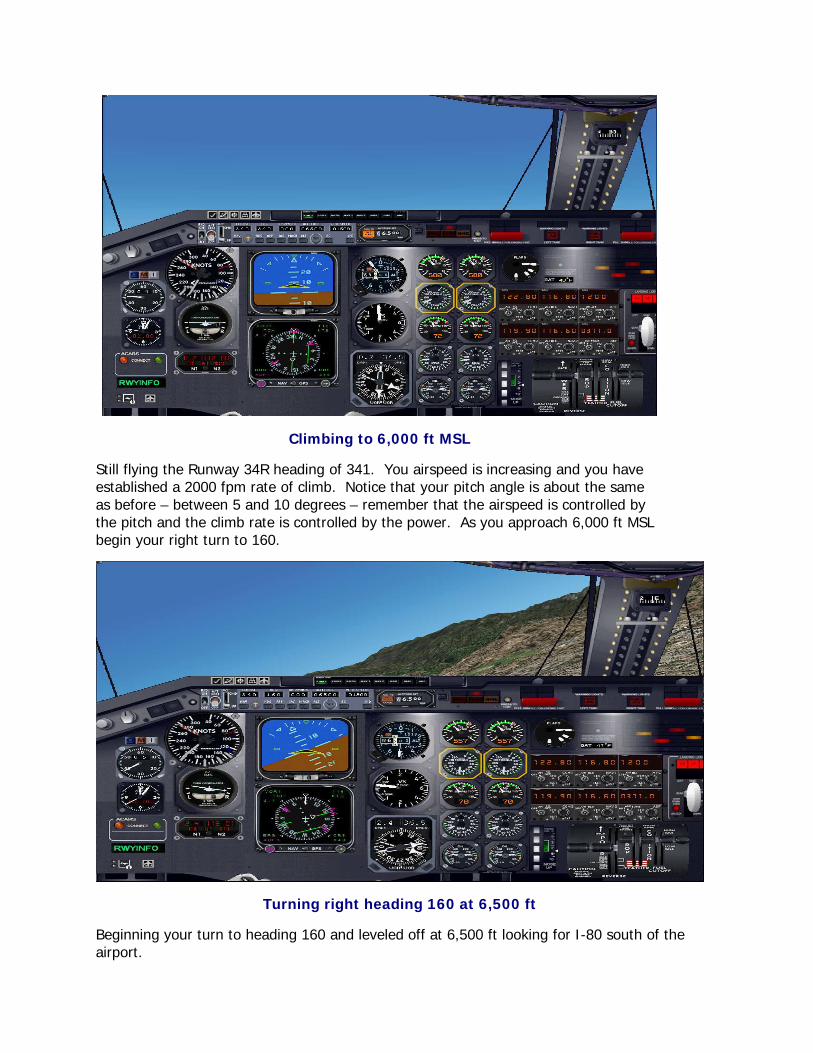
Climbing to 6,000 ft MSL
Still flying the Runway 34R heading of 341. You airspeed is increasing and you have established a 2000 fpm rate of climb. Notice that your pitch angle is about the same as before – between 5 and 10 degrees – remember that the airspeed is controlled by the pitch and the climb rate is controlled by the power. As you approach 6,000 ft MSL begin your right turn to 160.
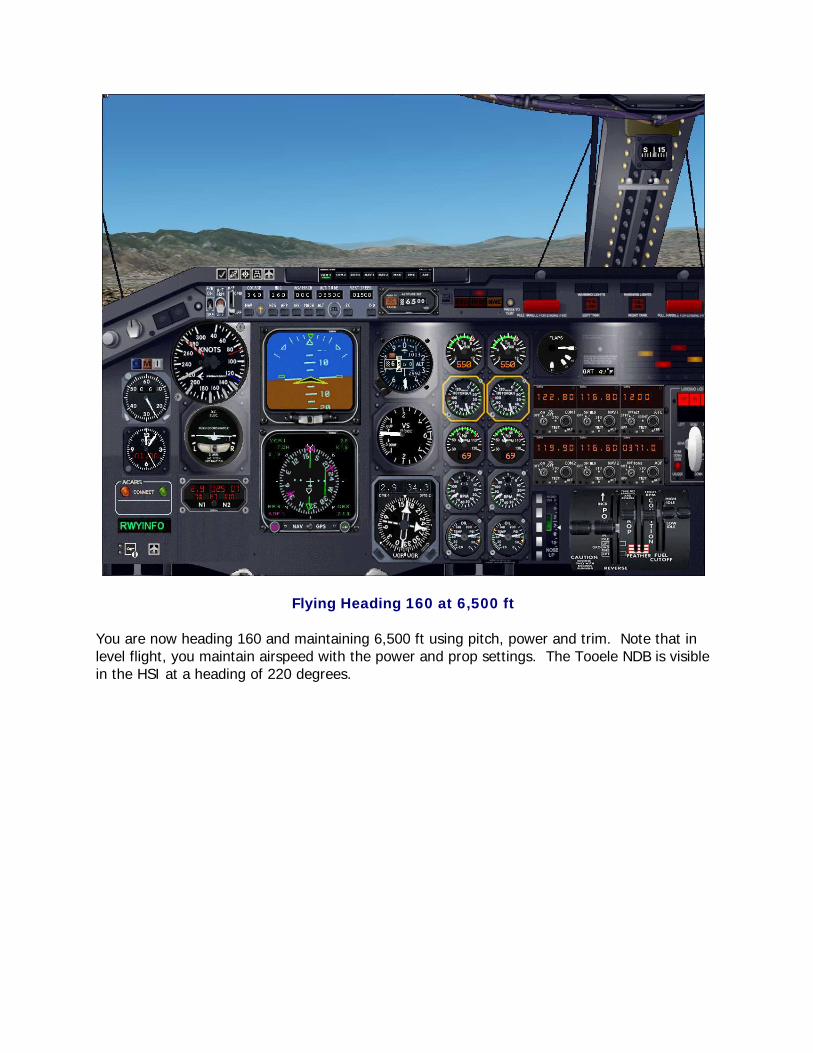
Turning right heading 160 at 6,500 ft
Beginning your turn to heading 160 and leveled off at 6,500 ft looking for I-80 south of the airport.
Flying Heading 160 at 6,500 ft You are now heading 160 and maintaining 6,500 ft using pitch, power and trim. Note that in level flight, you maintain airspeed with the power and prop settings. The Tooele NDB is visible in the HSI at a heading of 220 degrees.
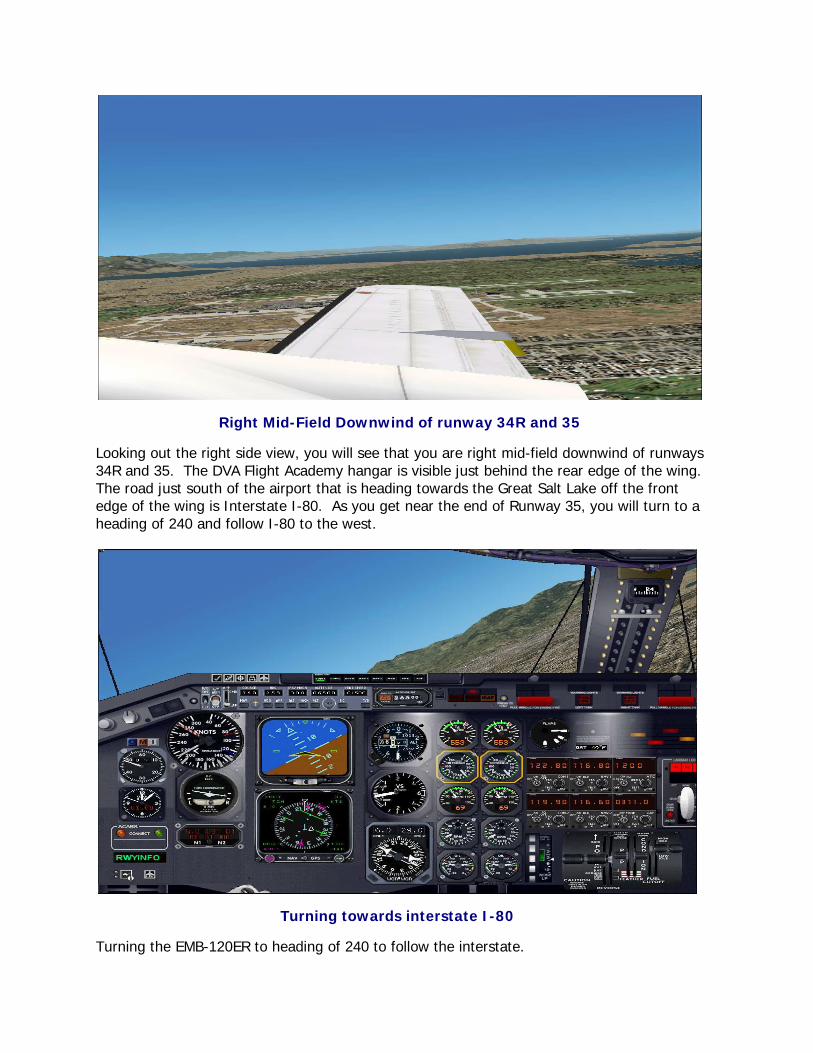
Right Mid-Field Downwind of runway 34R and 35
Looking out the right side view, you will see that you are right mid-field downwind of runways 34R and 35. The DVA Flight Academy hangar is visible just behind the rear edge of the wing. The road just south of the airport that is heading towards the Great Salt Lake off the front edge of the wing is Interstate I-80. As you get near the end of Runway 35, you will turn to a heading of 240 and follow I-80 to the west.
Turning towards interstate I-80
Turning the EMB-120ER to heading of 240 to follow the interstate.
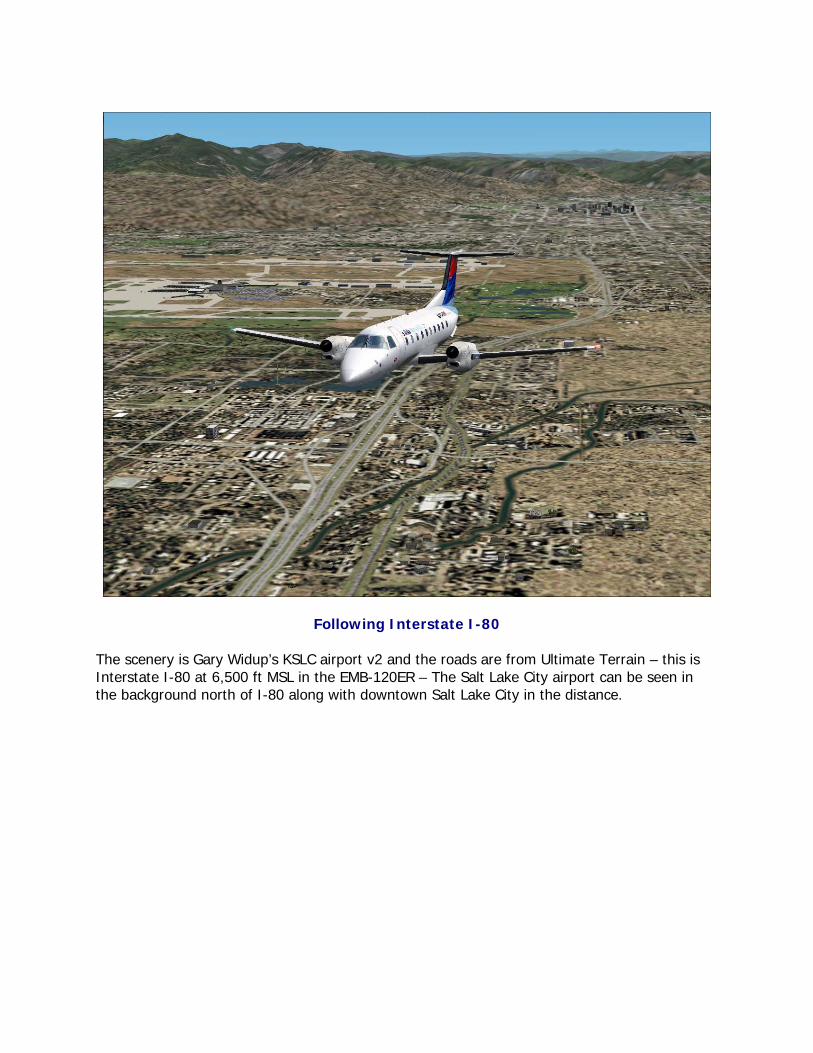
Following Interstate I-80 The scenery is Gary Widup’s KSLC airport v2 and the roads are from Ultimate Terrain – this is Interstate I-80 at 6,500 ft MSL in the EMB-120ER – The Salt Lake City airport can be seen in the background north of I-80 along with downtown Salt Lake City in the distance.
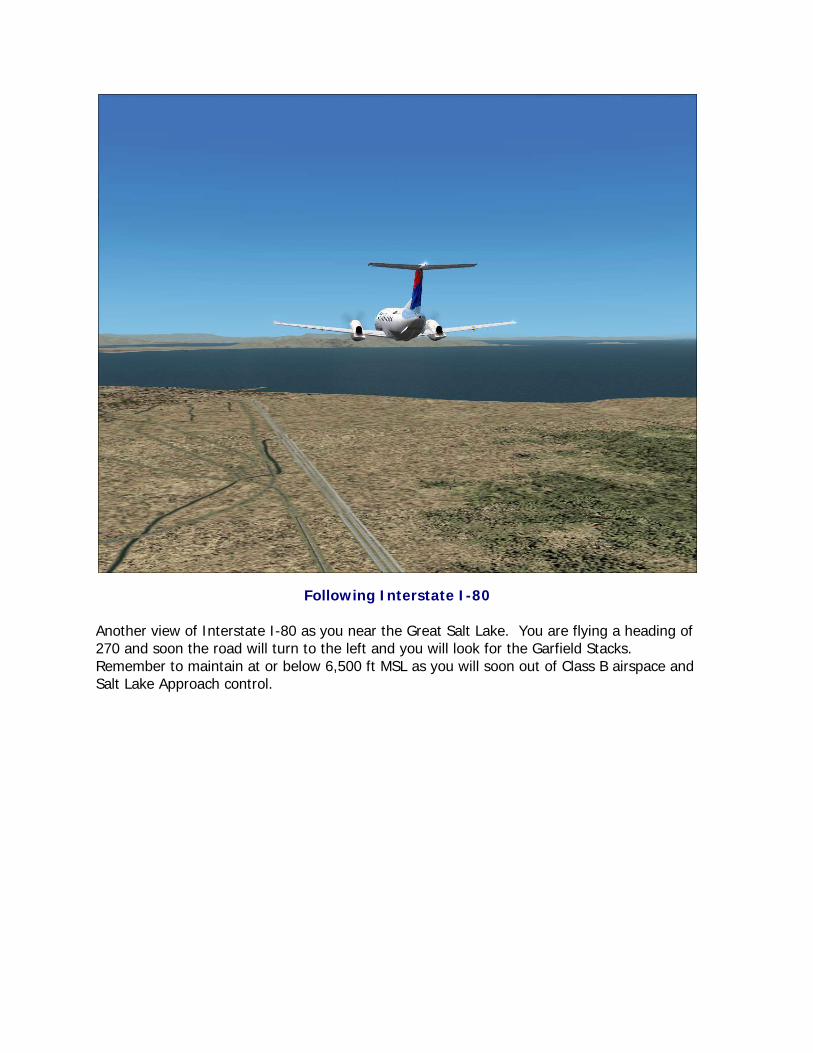
Following Interstate I-80 Another view of Interstate I-80 as you near the Great Salt Lake. You are flying a heading of 270 and soon the road will turn to the left and you will look for the Garfield Stacks. Remember to maintain at or below 6,500 ft MSL as you will soon out of Class B airspace and Salt Lake Approach control.
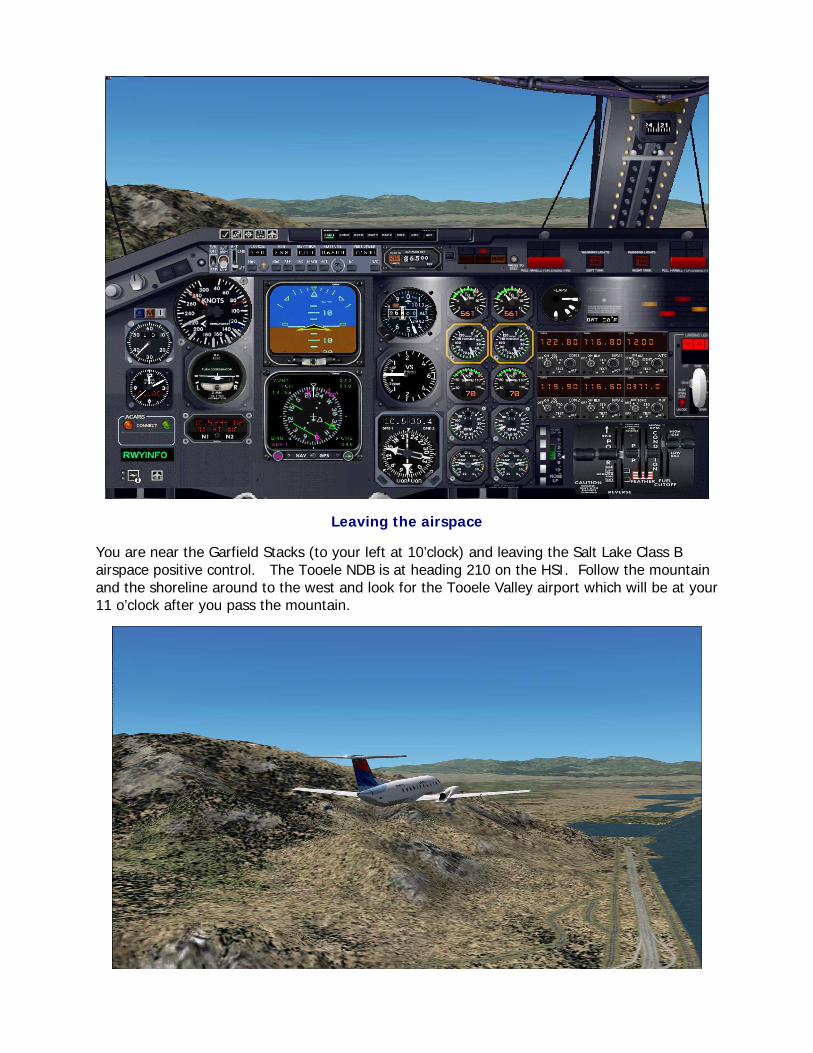
Leaving the airspace
You are near the Garfield Stacks (to your left at 10’clock) and leaving the Salt Lake Class B airspace positive control. The Tooele NDB is at heading 210 on the HSI. Follow the mountain and the shoreline around to the west and look for the Tooele Valley airport which will be at your 11 o’clock after you pass the mountain.
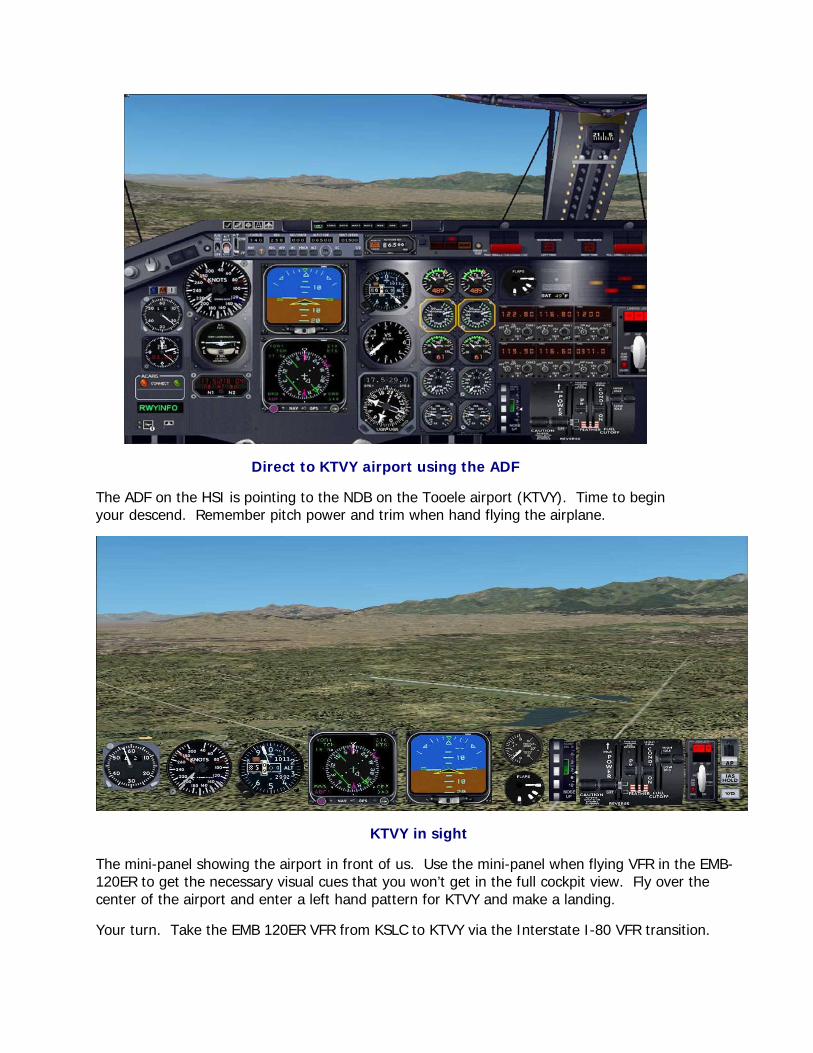
Direct to KTVY airport using the ADF
The ADF on the HSI is pointing to the NDB on the Tooele airport (KTVY). Time to begin your descend. Remember pitch power and trim when hand flying the airplane.
KTVY in sight
The mini-panel showing the airport in front of us. Use the mini-panel when flying VFR in the EMB-120ER to get the necessary visual cues that you won’t get in the full cockpit view. Fly over the center of the airport and enter a left hand pattern for KTVY and make a landing.
Your turn. Take the EMB 120ER VFR from KSLC to KTVY via the Interstate I-80 VFR transition.
Flying using the VOR You are now about to learn the single most important concept there is to know about navigation! Remember that even though you may not understand this VOR concept and how it works by reading the material at first, you will be shown how it works, practice, and practice until you understand it. Planning flights with a VOR overcomes the problems mentioned before when using a NDB for navigation. With the VOR/DME, you have mileage information for your flight planning. There are several different types of VORs that are used in flight simulation. Three of these VOR types are:
• Terminal VOR – has a range of about 25 NM • Low altitude VOR – has a range of about 60 NM • High altitude VOR – has a range of about 194 NM
Many people do not understand the VOR. It is very simple to use and understand. Some VORs have a DME (Distance Measuring Equipment) which will give you the slant distance from your airplane to the VOR. You will learn how to fly direct to a VOR, track inbound (TO) and outbound (FROM) on a specific radial and intercept a radial course/victor airway. The more advanced uses of the VOR will be taught later in the commercial and instrument course. The VOR is a radio transmitter located on the ground. It beams a radio signal in all 360 degrees of direction on a compass rose. Each degree signal is unique – this means that you can tell, when using this signal and the VOR receiver in your airplane, where you are in relationship to the VOR. DME DME refers to Distance Measuring Equipment. This is a very useful piece of equipment that you can utilize on nearly every flight you make, as long as the VOR you are using is DME capable. Please keep in mind that not all VORs are created equal – some are not equipped with a DME – this is more common in Europe than in the USA. If you were to tune in a specific VOR and the mileage on the DME instrument reads 25, you are approximately 25NM away from the DME depending on your altitude. This is not measured in a straight line between you and the VOR on the ground, but takes into consideration the distance you are from the VOR and the altitude you are flying. It is the distance from your airplane to the DME station, not the ground distance. This is called slant range. So if you fly near a VOR/DME, the DME mileage indicator will begin to slow down. If you fly over the VOR/DME at 30,000 ft AGL, you are approximately 6NM high, or 6NM from the DME, so the distance given on the instrument as you fly over the VOR will be 6NM and it will never go any lower.
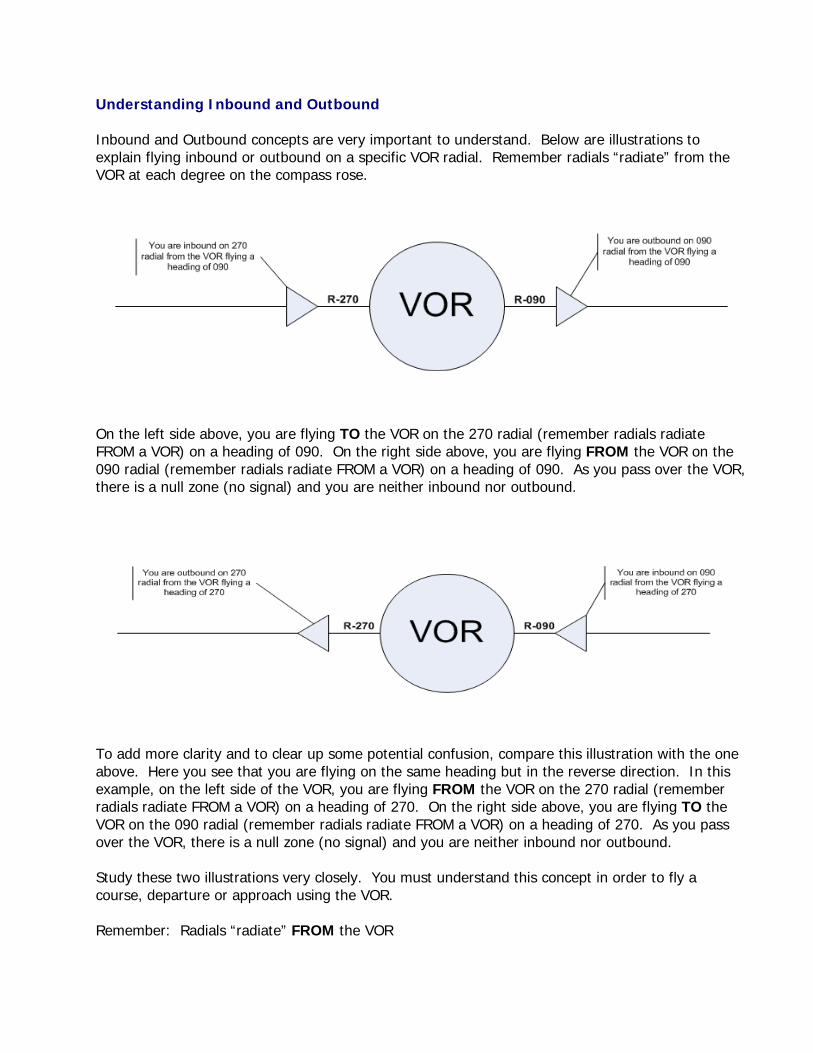
Understanding Inbound and Outbound Inbound and Outbound concepts are very important to understand. Below are illustrations to explain flying inbound or outbound on a specific VOR radial. Remember radials “radiate” from the VOR at each degree on the compass rose.
On the left side above, you are flying TO the VOR on the 270 radial (remember radials radiate FROM a VOR) on a heading of 090. On the right side above, you are flying FROM the VOR on the 090 radial (remember radials radiate FROM a VOR) on a heading of 090. As you pass over the VOR, there is a null zone (no signal) and you are neither inbound nor outbound.
To add more clarity and to clear up some potential confusion, compare this illustration with the one above. Here you see that you are flying on the same heading but in the reverse direction. In this example, on the left side of the VOR, you are flying FROM the VOR on the 270 radial (remember radials radiate FROM a VOR) on a heading of 270. On the right side above, you are flying TO the VOR on the 090 radial (remember radials radiate FROM a VOR) on a heading of 270. As you pass over the VOR, there is a null zone (no signal) and you are neither inbound nor outbound. Study these two illustrations very closely. You must understand this concept in order to fly a course, departure or approach using the VOR. Remember: Radials “radiate” FROM the VOR
VOR’s radiate outwards. Just as trim is the key to hand flying the airplane, knowing that VOR’s radiate outwards is the key to understanding intermediate navigation techniques.
Remember this saying, as it will be repeated over and over and over again.
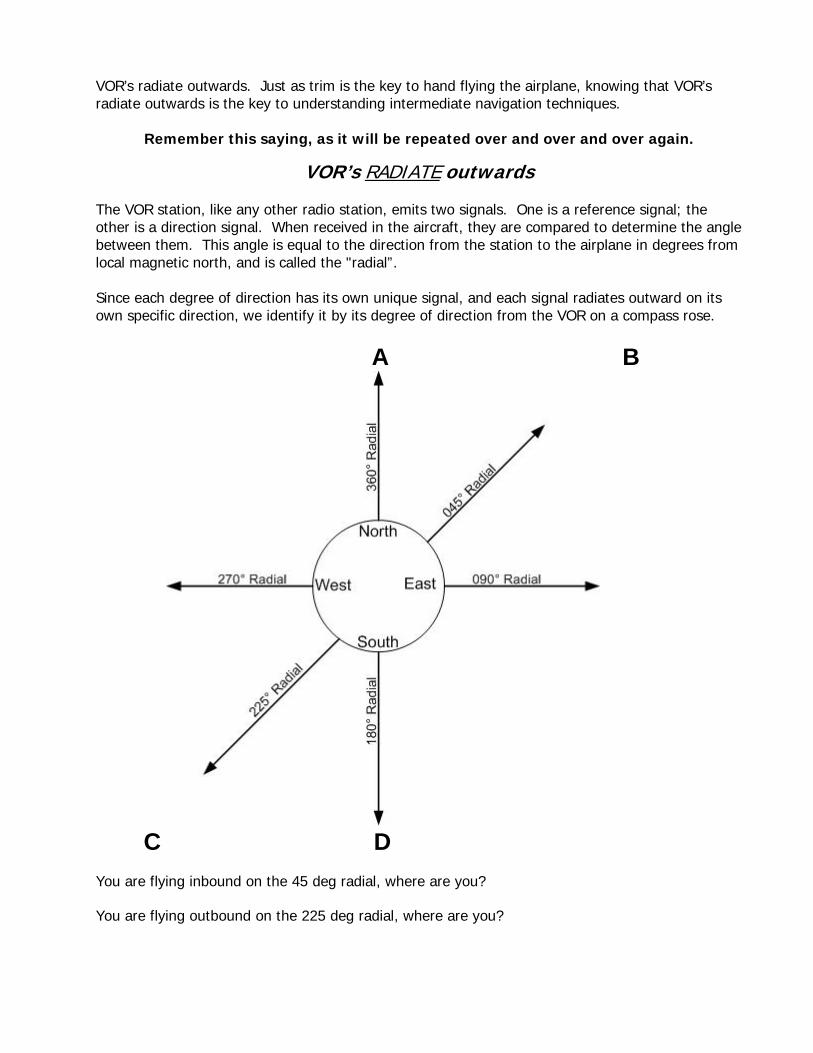
VOR’s RADIATE outwards The VOR station, like any other radio station, emits two signals. One is a reference signal; the other is a direction signal. When received in the aircraft, they are compared to determine the angle between them. This angle is equal to the direction from the station to the airplane in degrees from local magnetic north, and is called the "radial”. Since each degree of direction has its own unique signal, and each signal radiates outward on its own specific direction, we identify it by its degree of direction from the VOR on a compass rose.
A B
C D You are flying inbound on the 45 deg radial, where are you? You are flying outbound on the 225 deg radial, where are you?
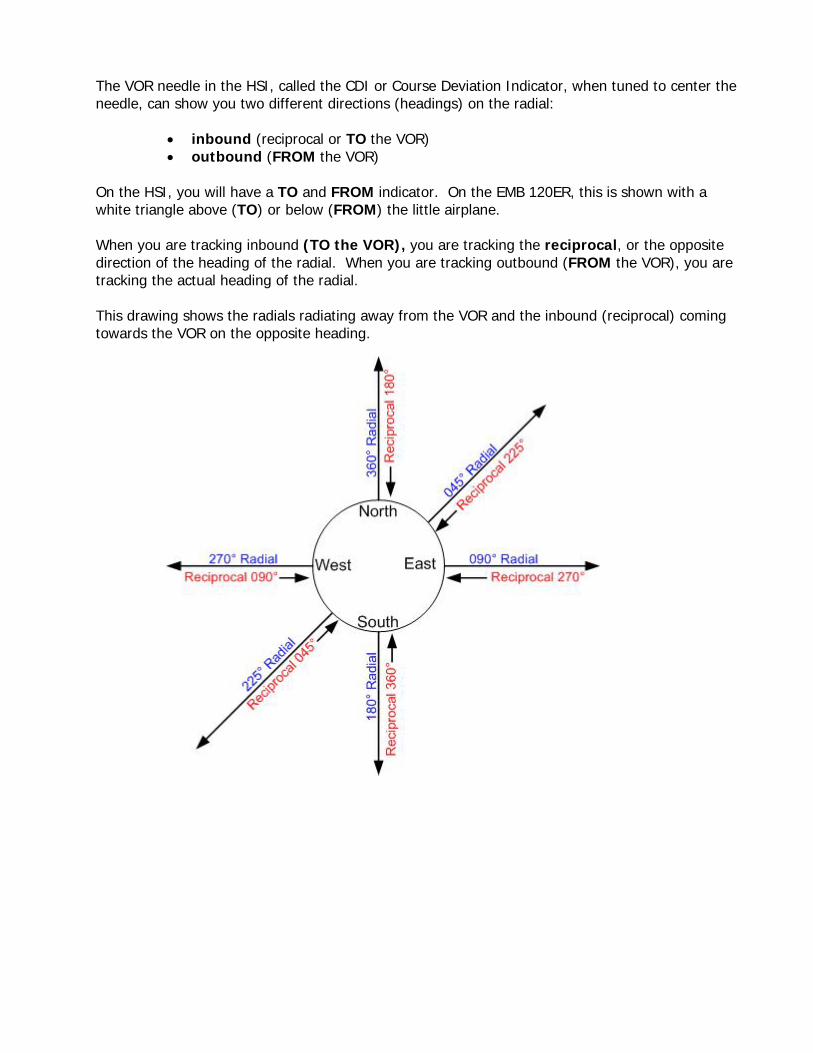
The VOR needle in the HSI, called the CDI or Course Deviation Indicator, when tuned to center the needle, can show you two different directions (headings) on the radial:
• inbound (reciprocal or TO the VOR) • outbound (FROM the VOR)
On the HSI, you will have a TO and FROM indicator. On the EMB 120ER, this is shown with a white triangle above (TO) or below (FROM) the little airplane. When you are tracking inbound (TO the VOR), you are tracking the reciprocal, or the opposite direction of the heading of the radial. When you are tracking outbound (FROM the VOR), you are tracking the actual heading of the radial. This drawing shows the radials radiating away from the VOR and the inbound (reciprocal) coming towards the VOR on the opposite heading.
Flying a VOR Most of the flying done in this course involves flying inbound (TO) to the VOR, flying outbound (FROM) and intercepting a radial to join an airway or course route. Here is how to do it:
1. Tune the VOR frequency into your nav 1 radio and identify it by listening to the Morse Code identifier.
2. Rotate the CRS (green) knob until the CDI (green needle) is pointing TO the VOR. Make sure the white triangle near the little airplane is pointing TO the VOR and the green needle is solid.
3. Turn the heading bug to the arrow point of the CDI (green needle) 4. Fly TO the VOR, keeping the CDI (green needle) and the white triangle pointing TO the
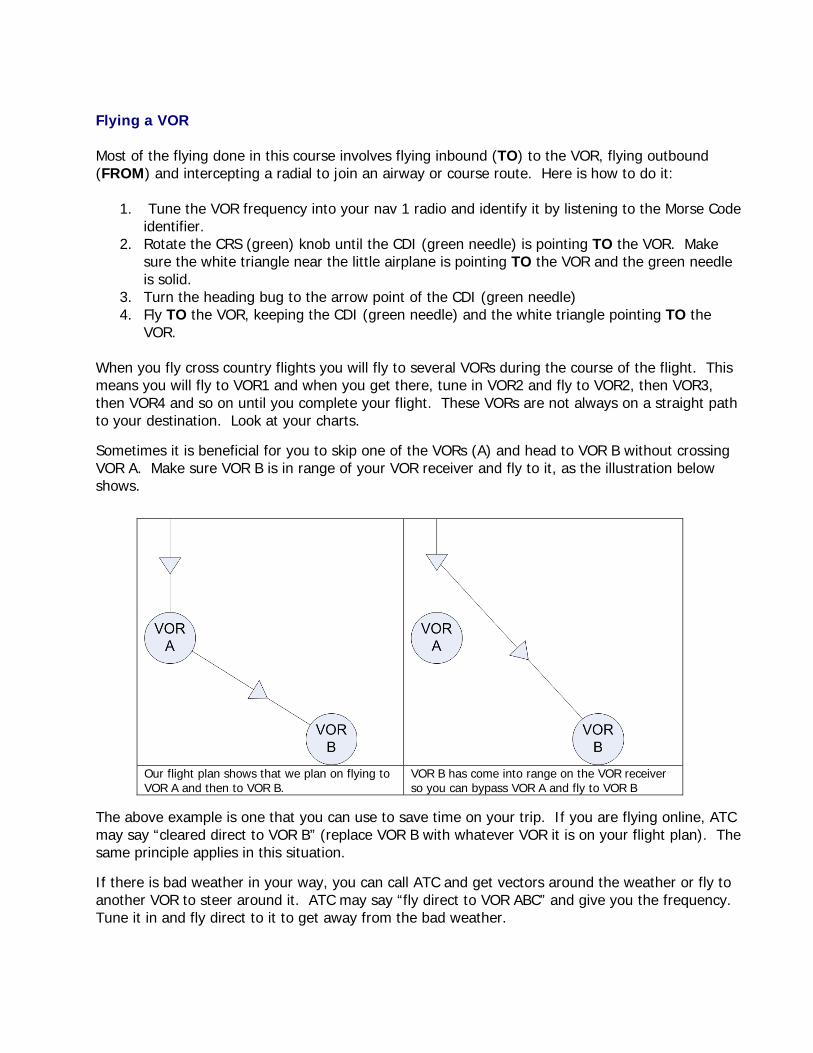
VOR. When you fly cross country flights you will fly to several VORs during the course of the flight. This means you will fly to VOR1 and when you get there, tune in VOR2 and fly to VOR2, then VOR3, then VOR4 and so on until you complete your flight. These VORs are not always on a straight path to your destination. Look at your charts. Sometimes it is beneficial for you to skip one of the VORs (A) and head to VOR B without crossing VOR A. Make sure VOR B is in range of your VOR receiver and fly to it, as the illustration below shows.
Our flight plan shows that we plan on flying to VOR A and then to VOR B.
VOR B has come into range on the VOR receiver so you can bypass VOR A and fly to VOR B
The above example is one that you can use to save time on your trip. If you are flying online, ATC may say “cleared direct to VOR B” (replace VOR B with whatever VOR it is on your flight plan). The same principle applies in this situation. If there is bad weather in your way, you can call ATC and get vectors around the weather or fly to another VOR to steer around it. ATC may say “fly direct to VOR ABC” and give you the frequency. Tune it in and fly direct to it to get away from the bad weather.
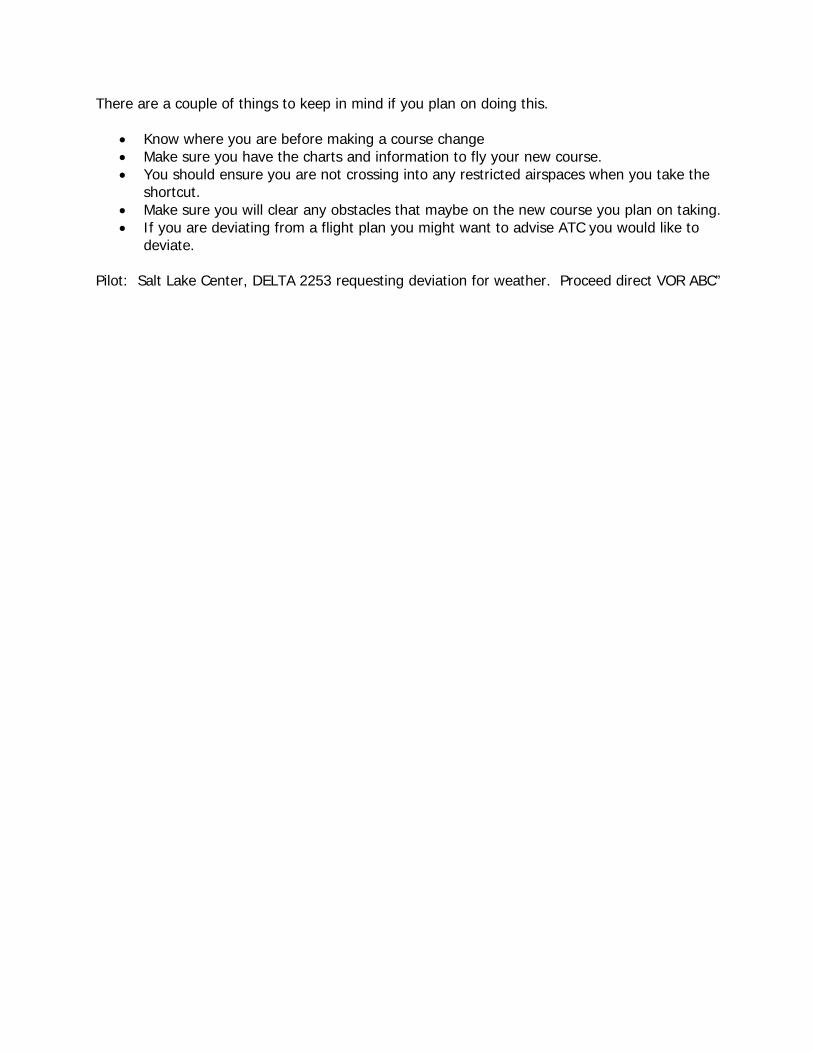
There are a couple of things to keep in mind if you plan on doing this.
• Know where you are before making a course change • Make sure you have the charts and information to fly your new course. • You should ensure you are not crossing into any restricted airspaces when you take the
shortcut. • Make sure you will clear any obstacles that maybe on the new course you plan on taking. • If you are deviating from a flight plan you might want to advise ATC you would like to
deviate. Pilot: Salt Lake Center, DELTA 2253 requesting deviation for weather. Proceed direct VOR ABC”
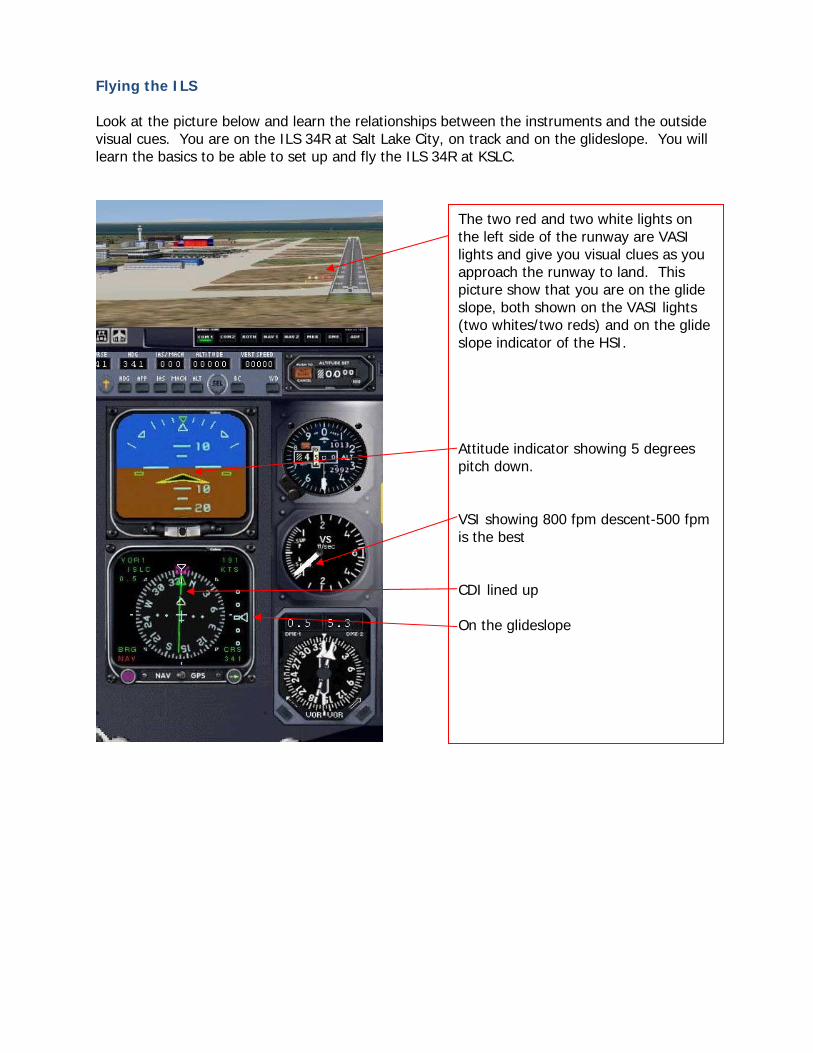
Flying the ILS Look at the picture below and learn the relationships between the instruments and the outside visual cues. You are on the ILS 34R at Salt Lake City, on track and on the glideslope. You will learn the basics to be able to set up and fly the ILS 34R at KSLC.
The two red and two white lights on the left side of the runway are VASI lights and give you visual clues as you approach the runway to land. This picture show that you are on the glide slope, both shown on the VASI lights (two whites/two reds) and on the glide slope indicator of the HSI. Attitude indicator showing 5 degrees pitch down. VSI showing 800 fpm descent-500 fpm is the best CDI lined up On the glideslope
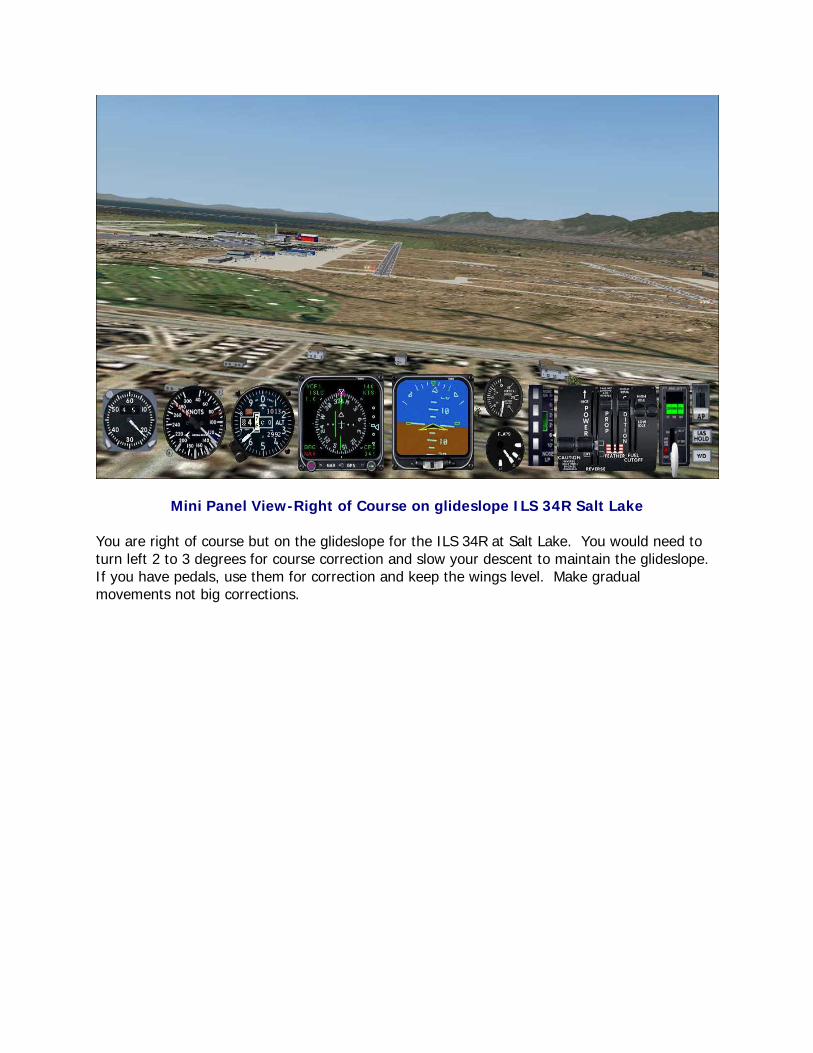
Mini Panel View-Right of Course on glideslope ILS 34R Salt Lake
You are right of course but on the glideslope for the ILS 34R at Salt Lake. You would need to turn left 2 to 3 degrees for course correction and slow your descent to maintain the glideslope. If you have pedals, use them for correction and keep the wings level. Make gradual movements not big corrections.
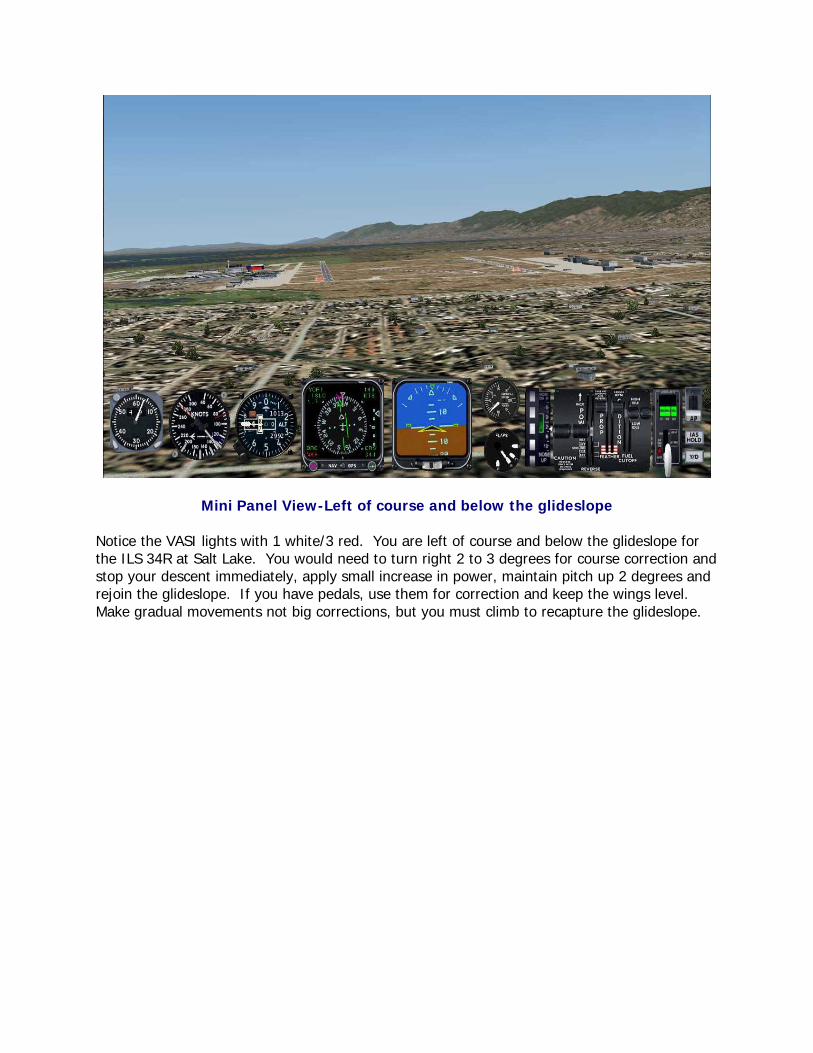
Mini Panel View-Left of course and below the glideslope
Notice the VASI lights with 1 white/3 red. You are left of course and below the glideslope for the ILS 34R at Salt Lake. You would need to turn right 2 to 3 degrees for course correction and stop your descent immediately, apply small increase in power, maintain pitch up 2 degrees and rejoin the glideslope. If you have pedals, use them for correction and keep the wings level. Make gradual movements not big corrections, but you must climb to recapture the glideslope.
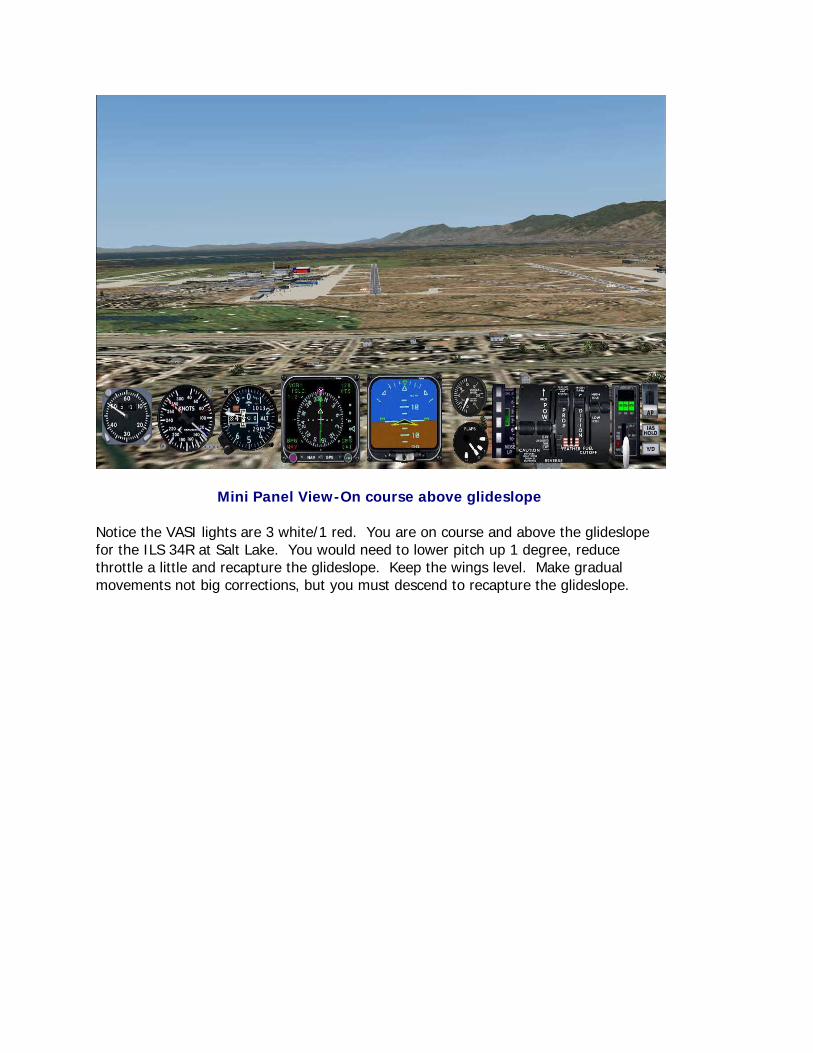
Mini Panel View-On course above glideslope
Notice the VASI lights are 3 white/1 red. You are on course and above the glideslope for the ILS 34R at Salt Lake. You would need to lower pitch up 1 degree, reduce throttle a little and recapture the glideslope. Keep the wings level. Make gradual movements not big corrections, but you must descend to recapture the glideslope.
Acknowledgements and Legal Stuff
• Delta Virtual Airlines 2008 Copyright ©2008 Global Virtual Airlines Group. All rights
reserved.
• For flight simulation purposes only. In no way are we affiliated with Delta Air Lines, its
affiliates, or any other airline.
• All logos, images, and trademarks remain the property of their respective owners. Delta
Virtual Airlines is a non-profit entity engaged in providing an avenue for flight simulation
enthusiasts.
• This 1st edition manual was created on April 2008 by Scott Clarke and George Lewis.
• The authors grant unlimited rights to Delta Virtual Airlines for modification and non-profit
electronic duplication and distribution. Materials from outside sources were used and other
copyrights may apply. All cited sections remain the property of their authors.
• While we strive to mirror real-world operations, this manual is not designed for use in the operation of real-world aircraft.
NOT FOR REAL WORLD AVIATION USE