Default, a clean user program - Ziggomembers.multiweb.nl/schaaijw/E80-G70_User-Tips.pdfUser -to-User...
57
● User -to-User Tips for Roland E-80 & G-70 Note: Most tips for the Roland G-70 do work for the Roland E-80 too, but there are exceptions. See the manual and addon. The mentioned Roland G-1000 has the same 'engine' as the EM-2000 keyboard. Version Nov. 21, 2014 ● Default, a clean user program Starting a new user program after making an user program, it is convenient to start with a clean one. You can do that by selecting a user program and pressing the <Default> button combination. Another method to start with a clean user program is in the EASY SETTING section, to press once the <Piano> key and after that pressing the <Arranger> key. All user program settings should now be default. ● Loading general settings when powering on If you have made some general settings (effects, vocalizer setting etc.) and I would like these settings to loaded when I turn on the keyboard, then follow this instruction: Saving a user program with your favorite settings. Press [MENU] -> [UTILITY] -> [STARTUP]. In this screen you can choose to recall any user program, when the keyboard starts up. Now select your "favorite settings user program" and your keyboard will always boot with your favorite settings loaded. ● About user programs In the previous generation of Roland arranger keyboards we were used to work with "User Performance Memory Registrations". With the G-70 and E-80 we call such registrations "User Program Registrations" (.UPG files). See also the manual (for E-80, see page 125). The G-70 / E-80 provides User Program memories that allow you to store almost all settings (or registrations) you make on the front panel and the various display pages. Additional registrations can be loaded directly from the internal memory or a memory card. Please notice that all settings related to MIDI must be written to a MIDI Set. MIDI settings are not saved to a User Program. (You can link a MIDI Set to each User Program, so that the User Program in question automatically loads the required MIDI settings).
Transcript of Default, a clean user program - Ziggomembers.multiweb.nl/schaaijw/E80-G70_User-Tips.pdfUser -to-User...

● User -to-User Tips for Roland E-80 & G-70 Note: Most tips for the Roland G-70 do work for the Roland E-80 too, but there are exceptions. See the manual and addon. The mentioned Roland G-1000 has the same 'engine' as the EM-2000 keyboard. Version Nov. 21, 2014
● Default, a clean user program
Starting a new user program after making an user program, it is convenient to start with a clean one. You can do that by selecting a user program and pressing the <Default> button combination. Another method to start with a clean user program is in the EASY SETTING section, to press once the <Piano> key and after that pressing the <Arranger> key. All user program settings should now be default.
● Loading general settings when powering on
If you have made some general settings (effects, vocalizer setting etc.) and I would like these settings to loaded when I turn on the keyboard, then follow this instruction:
Saving a user program with your favorite settings. Press [MENU] -> [UTILITY] -> [STARTUP]. In this screen you can choose to recall any user program, when the keyboard starts up. Now select your "favorite settings user program" and your keyboard will always boot with your favorite settings loaded.
● About user programs
In the previous generation of Roland arranger keyboards we were used to work with "User Performance Memory Registrations". With the G-70 and E-80 we call such registrations "User Program Registrations" (.UPG files). See also the manual (for E-80, see page 125).
The G-70 / E-80 provides User Program memories that allow you to store almost all settings (or registrations) you make on the front panel and the various display pages. Additional registrations can be loaded directly from the internal memory or a memory card. Please notice that all settings related to MIDI must be written to a MIDI Set. MIDI settings are not saved to a User Program. (You can link a MIDI Set to each User Program, so that the User Program in question automatically loads the required MIDI settings).

Unlike previous Roland instruments, the G-70 and E-80 no longer has a fixed area where it stores User Program settings, so that the number of User Programs is, in fact, unlimited. User Programs can reside in the internal memory or on a memory card. You can even load them individually using the User Program Finder. To keep this massive amount of information manageable, the G-70 / E-80 works with User Program Set Lists (hence the [SETLIST / LIST] button). Such lists are what their name suggests: Enumerations of User Program files stored in the same memory area as the list file itself.
Set Lists are references to User Programs. They do not contain those registrations. The advantage of User Program Set Lists is that loading a completely different set of registrations takes less than a second (loading User Program Sets on an older Roland arranger instrument took much longer). This allows to prepare different sets of User Programs for events, etc., that may access the same User Program data here and there. If you change a User Program (e.g. by selecting another sound for the LW2 part), that change is automatically adopted by all Set Lists that refer to that User Program.
Q: Can I playback a UPG file on my computer? A: No, that is not possible. However, you can edit UPG files with e.g. the Roland Database Manager or the Session Manager.
Q: Can I share UPG files with my friends? A: Yes, that is possible. But please notice that any UPG file has a pointer to a specific style, which is linked to the UPG file. If you share a UPG file with a friend, then your friend should also have the linked file present in his/her keyboard. This is not a problem, when you only use the internal ROM styles, but if your UPG links to a non ROM styles, then it suddenly becomes important that your friend has the style used in the UPG. And furthermore you should notice that it is not only needed to have the style present in your keyboard as the UPG file also has a pointer to the memory source of the style. Let's say that you have created a UPG which links to a style present on your external memory card. You now want to share this UPG with your friend. You are a wise man, so you send your friend the UPG file and the style (.STL file) used in the UPG. BUT now it is important that your friend saves the style file on his external memory card. Otherwise the keyboard will present the user with a "File not found" error.
Q: Can the E-80 read a UPG from the G-70? A: Yes, in general it is possible to read UPG files across models (E-50, E-60, E-80 and G-70). However, the best result will always be exchanging UPG files between keyboards of the same model. The E-80 has e.g. more effect settings than the G-70. These settings are saved in the UPG and these settings are of no use when the UPG is loading into the G-70.

● Strategy for managing styles, songs and UPG's
Overall strategy Several users have been contacting the user club asking for information on a best-practise for managing data on the G-70 / E-80. There are of course many possible strategies. However it is important to choose a strategy - otherwise you might "drown" in styles, songs and UPG's. Below I will describe one strategy to follow, so you will not eventually find yourself trapped with tons of unstructured data - and no way out. If your follow the instructions below you will get a system with the following characteristics:
• ROM styles will reside on internal memory • Songs will reside on external memory • Styles will reside on external memory • UPG's will reside on internal memory • UPS's will reside on internal memory
Why this? Well, I decided that songs and styles should reside on external memory because free internal memory is only 50MB. That is not enough free space for most professional musicians. Using external memory your memory limit can be extended up to 1GB. UPG's reside on internal memory because I want to be able to use the Music Assistant. The Music Assistant requires the UPG files to reside on internal memory. The ROM styles should reside only on internal memory so there is no choice about these files. Notice however that you can make a copy of the ROM styles to external memory, if you prefer a modified copy. The advanced user should notice that it is actually possible to override the ROM styles by making a modified version and via the PC load the factory data including these overrided ROM styles. Below I will describe how you structure your data as I suggest. Before you start - be sure that you have installed the latest system update version. Then:
• Backup all your data (Do not proceed before this is done!) • Unzip the latest factory data files. • Format your external memory card via the G-70 / E-80.
Now follow this instruction:
• Press and hold [Arr], [ARROW DOWN] and [Piano] - button while powering on the keyboard.
• Press [1] - button in the USER PROGRAM section to begin formatting internal memory.
• Connect your PC and keyboard using USB (connect to internal memory). • Copy the content of unzipped ROM Styles folder from the factory data folder
structure to the ROM Styles folder on the keyboard: • When the keyboard is done writing, press [DISCONNECT] in the keyboards display.
Disconnect the USB cable. • Power OFF the keyboard and after about 10 seconds, Power ON the keyboard. • Press [MENU] > [UTILITIES] > [FACTORY RESET] > [EXECUTE] to initialize the device

Now your keyboard is "clean". By clean I mean that keyboard is formatted and only the ROM styles resides on the internal memory. Notice that you have not compromised the internal database, because you did not copy the DB folder from PC to the keyboard! Let's continue:
• Connect your PC and keyboard using USB and connect to external memory. • Copy your songs from your PC to the "Put New Songs Here" folder on external
memory. • Copy your styles from your PC to the "Put New Styles Here" folder on external
memory. • When keyboard is done writing, press [DISCONNECT] in the keyboard display,
and disconnect the USB cable. • Power OFF the keyboard and after about 10 seconds, Power ON the keyboard. • Choose [FINDER]-section -> [SONG]-button -> [EXTERNAL MEMORY]-menu item.
Now the G-70 /E-80 will register all the copied songs in the keyboard’s database. • Choose [FINDER]-section -> [STYLE]-button -> [EXTERNAL MEMORY]-menu item.
Now the keyboard will register all the copied styles in the keyboard’s database.
In addition to the ROM styles residing on internal memory, the system now has all your songs and styles present on external memory. The only thing left now is to decide how to manage your User program registrations. You might not have any. However this is not realistic, so in this article I will assume that you have at least one user program that you wish to manage. Let's move on:
• Copy the user program file to a floppy disk to a folder called "USERPRG" • Copy the user program file from floppy disk to internal memory. Choose [FINDER]-
section -> [User Program]-button -> [COPY]-menu item. Now copy your UPG file to the internal memory.
There are lots of strategies as how to manage your user program registrations. Below I will describe my strategy: After completing the last step I give the user program a unique numeric ID - a number, e.g. "1", "247" or "5348" or whatever... The point is that you give the user program registration an ID which refers to a corresponding identifier in your paper notes collection. Notice that I write that number in the "genre" attribute! I also mark the user program as a Music Assistant registration. Let's say that my user program was called "Candle in the wind" and I gave this registration the unique identifier "20" in the genre attribute. I now press the Music Assistant button left of the display. In this display I now see one Music Assistant registration - that is "Candle in the wind". I now give the Music Assistant regitration the same unique identifier using the genre attribute in the Music Assistant. When I am done I now have:
• 1 User program registration with the name value "Candle in the wind" and genre value "20" which refers to page 20 in my paper notes collection.
• 1 Music Assistant registration with the name value "Candle in the wind" and genre value "20" which refers to page 20 in my paper notes collection.

The point in doing this is that I now have four ways to recall my registrations. I can either search using Music Assistant or I can search using the Finder. In either case I can decide to search by name searching with a string input parameter, or I can choose to search by the genre attribute searching with a numeric input parameter. Notice that there is a numeric button in the display which you can use searching by numeric values. This strategy is generic and very easy to manage. It gives you the opportunity to recall your registrations very fast using unique numeric values instead of only using the registration name. Being able to recall your registrations quickly is a user pattern all of you pro musicians need! I always attach my user programs to a set list. Doing this I can use another useful trick. Let's say that you have saved the user program "candle in the wind" in the set list on location 1-1. You now choose the hold function. In the Hold display you select holding everything except "tone". Save your user program to register this setting. You can now easily change between your favorite solo voice settings. Let's says that you have saved user programs in all 144 locations in the set list. If you use the hold function as described, you now choose user program 1-1 from the set list (Candle in the wind). Press the hold button. If you now choose another user program while playing only the solo voices change. The rhythm style is not changing! This is very useful. In this way you do not need to worry about the limitations in using OTS, because you can easily change between 144 different solo voice settings.
Working with user programs There are several issues to notice while working with user programs on the keyboard. In this article I will publish information relevant to those users who want to understand the concept of user programs on the G-70 / E-80. This area is very central for most musicians working with his or her repertoire settings.
Saving Settings for a specific song can be saved in a file in the keyboard. The saved settings for a specific song is called a "user program". This concept is common knowledge to most keyboard users using other brands and models. Previously Roland arrangers had a fixed memory area to store user programs. Users were therefore limited to create a max. number of user programs on the previous Roland models. My previous keyboard was a Roland G-1000. On this model you can save only 3x64 user programs. On the G-70 / E-80 however there is no limit. You can create as many user programs as you like. On the G-1000, I had to save my 3x64 user programs in a bundles called "User Program Sets". When I had more than 3x64 user programs in the G-1000, it was absolutely necessary to have more than one user program set. Personally I hated to manage more than 1 user program set, because it is very unhandy to load new user program sets during a live performance, where you in many situations typically do not have more than a splitsecond to change user program playing live. But these worries are gone using the G-70 / E-80. I think this one of the most important improvements on these keyboards compared to older Roland arrangers. Take a look at these illustrations to get an overview of how user programs and set lists are stored in the keyboard:
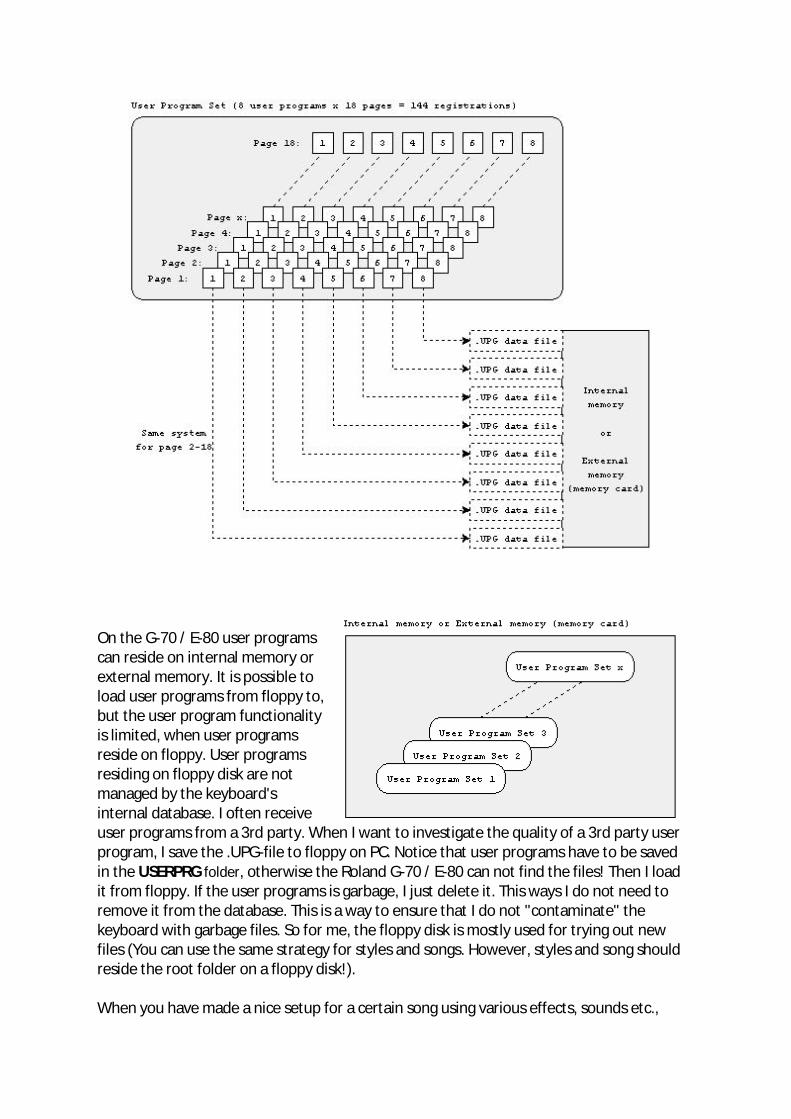
On the G-70 / E-80 user programs can reside on internal memory or external memory. It is possible to load user programs from floppy to, but the user program functionality is limited, when user programs reside on floppy. User programs residing on floppy disk are not managed by the keyboard's internal database. I often receive user programs from a 3rd party. When I want to investigate the quality of a 3rd party user program, I save the .UPG-file to floppy on PC. Notice that user programs have to be saved in the USERPRG folder, otherwise the Roland G-70 / E-80 can not find the files! Then I load it from floppy. If the user programs is garbage, I just delete it. This ways I do not need to remove it from the database. This is a way to ensure that I do not "contaminate" the keyboard with garbage files. So for me, the floppy disk is mostly used for trying out new files (You can use the same strategy for styles and songs. However, styles and song should reside the root folder on a floppy disk!). When you have made a nice setup for a certain song using various effects, sounds etc.,
you save your settings in a user program. You do this: Press [SET LIST / LIST]. You now see the user program menu. Press [WRITE] and choose among the 144 set list entries. Press one of the entries to save your settings. You will be asked to write a titlename for the user program. I have to mention that this user pattern is a bit stupid! I think it is stupid that you can only save a user program by assigning it first to a set list entry - this is not logical. The memory concept of the G-70 / E-80 should give the user the opportunity to save a user program "into the blue". Here I must also mention the lack of a dedicated "Save user program" button in the [Disk & Media] menu. You can save User program sets, but not user programs? I do miss that feature a lot. Saving settings User programs are always stored on the media that contains the present list set file. Please notice that you do not delete an existing user program by assigning a new user program to an existing Set list entry! Example: You save user program "MyFavSong1" by assigning it to set list entry 1-1. When you choose another style, effects and sounds for your favorite song 2, you want to save this user program too. You save the user program "MyFavSong2" by assigning it to set list entry...? In doubt what happens if you select 1-1 which already contains a user program? You might think that you would have erased "MyFavSong1", if you assign "MyFavSong2" to set list entry 1-1. But you did not! It is excactly why I think it is a higher level of stupidity not being able to save user programs without assigning them individually to a set list entry!
Loading Now you have created a few user programs. Let's say that your user programs are saved on internal memory. They reside in physical memory and are managed by the keyboard's database. Let us say that you have created two user programs: "MyFavSong1" and "MyFavSong2". You want to recall "MyFavSong1". This can be done in several ways:
• "User program list" screen. Click on [USER PRG]-button in the [FINDER] menu and you will get a menu from which all your user programs are visible/loadable.
• "User program" screen. Click on the [SET LIST / LIST]-button. If (and only if) you are looking for a user program that you have asssigned to a set list entry, you can find the user program this way! You can only search user programs in the currently loaded set list.
• "Music assistant list" screen. In this article I only will mention, that user programs marked with the "MA" icon can be loaded from the Music Assistant. You access the music assistant by pressing [MUSIC ASSISTANT] in the upper left corner of the display.
By intuition you might be looking in the [DISK & MEDIA] menu for a load button to load user programs. Notice that the [USER PRG]-button in the FINDER menu is in fact such a button! Nice choice by Roland to put to button here giving the user fast access to load user programs. Being able to load user programs in these 3 different ways can however be very confusing... it sure was to me for quite a long time. Thus, it might be useful to have a strategy for managing your registrations. You can find inspiration for a stategy here.

Updating You can edit a user program via the FINDER menu. In the "User program list" screen press the option button in the display. You can now rename the user program, but proceed with caution. This happens, if you rename the user program:
• If you rename a User Program that is referenced by the currently active Set List, the Set List is updated (and therefore finds the User Program despite its new name)
• If you rename a User Program that is referenced by other Set Lists (which you didn’t load), those lists no longer find the User Program you renamed. Consequently, when you select the memory in question (after loading the Set List), nothing happens, because that reference no longer works. So remember this!
• Renaming a User Program that doubles as Music Assistant entry (and therefore has a “MA” label) also affects the Music Assistants registration’s name (which changes accordingly).
Deleting You can delete a user program via the FINDER menu. In the "User program list" screen press the [OPTION]-button and then the [DELETE]-button. Note that :
• If a User Program you delete here is assigned to a Set List, the memory in question no longer works.
• Deleting a User Program that doubles as Music Assistant registration also discards the Music Assistant entry. For safety reasons, an error message is displayed in that case.
More information about user programs:
o Each User program takes up 1Kb of memory and is saved as a .UPG-file. o You can select user programs using an optional foot switch. o Saving a user program you can store additional information about genre.
This can be very useful and will be discussed in a separate article. o You can recall a user program assigned to a set list entry using a numeric
value. Press [NUM LOCK] while initiating the search user pattern. o All settings related to midi must be written to a midi set. Users can link a
midi set to a user program, so that the user program automatically loads the required midi settings.
o Using the HOLD function while changing user programs can be very useful. This will be discussed in a separate article.
o Set list files solely contains pointers to the user programs not user program data. Important: It is not enough to backup the user program set file, you also have to backup the coupled user program files. But this concept has the advantage that if you change settings in a user program, that change is automatically adopted by all set lists that refer to that user program.
o You can use more than one user program to play a specific song. Use separate user programs for separate parts of the song. Another one for the verse, another for the chorus, another for the bridge and so on.

● What is memorized in OTS?
After the release of OS3 for Roland G-70 you can't find official information about which information is memorized in the OTS and which is not. For the Parameters memorized in User Programs, see the Parameter Reference Guide (For E-80 page 19-33). User Club member Hans Peter Isenberg has provided information covering this subject:
Dbeam: not memorized
Foot Controllers: Hold Footswitch: memorized Foot Pedal: memorized Foot switch and FC7: not memorized
Hand Controllers: Bender Assign and Range: memorized
Modulation: memorized
Switches Assign: memorized
Vocal Harmonist: not memorized
Guitar Mode: not memorized, but if Guitar Mode is on at the time you save OTS, the equivalent guitar sound is assigned to UP1?!
Tone Edit: All parameter are memorized
Menu ‘Function’: not memorized
Arranger settings/Chord: Zone: not memorized, it’s set to ‘Left’ if you press an OTS button?! Type: memorized Mode: not memorized, it’s set to ‘Arranger Hold’ if you press an OTS. Dynamic Edit: not memorized
Options: /Tempo Change: memorized /Fill in(switches): not memorized /Tempo(function): not memorized
Melody Intelligence: All parameter memorized
One Touch (switches): not memorized

Split&Touch Split Point: /Main Split: memorized /Upper3 Split: memorized /Upper3 Split (switch): memorized
Key Touch: /CURF: not memorized (Bug?) /Value: memorized
Aftertouch: not memorized?!
Keyboard Options: /Lower 1+2: memorized /Portamento Time UP1+2: memorized /Poly-Mono (switch): not memorized?! /Up2 Coarse + Fine Tune: memorized
Tuning Parameter: not memorized
Panel Programming (Buttons): Style Control: All button functions memorized. Notice: If you start the Arranger with an OTS on, the Arranger starts with an equivalent Intro. If you press an OTS button during a running Arranger, only the definitive programmed Intro starts playing. Easy Settings: ARR, ORGAN and PIANO memorized Keyboard Mode: memorized
Keyboard PART: TONE ASSIGN memorized PART ON/OFF memorized
TONE EFFECTS: memorized

● Getting the most out of Pianostyle Mode...
Pianostyle is probably the best system to use for chording if you already know your chords. Standard, and especially so-called 'Intelligent' Mode create a LOT more glitches, if your fingering is not very fast and clean, as it 'assumes' what you are doing as soon as it sees even one note. Pianostyle waits until there are three notes pressed before it changes chords, so, firstly, there is a lot less 'assuming' going on, and secondly, you can play two notes on the keyboard Part that is triggering it without confusing the poor thing!
So all kinds of things can be achieved without driving the arranger's chord recognition crazy. Firstly, of course, allowing you to play fairly standard piano technique and getting good, accurate accompaniment, and secondly, if used in the LH only, allowing you to play counter melodies, passing notes, dissonance and extra rhythmical elements all without re-triggering the chord recognition.
BUT... it takes a specific form of practice to do well.
Primarily, you need to practice being ultra careful to ONLY play two notes MAXIMUM at a time. This sounds a lot easier to do than it actually is. Try it for yourself... Press the 'Piano' Easy Setting on your arranger. This will quickly change the chord recognition to Pianostyle, and the recognition area to Whole, and call up the piano sound. Now select a style to play with, and set it to Auto start. OK...
Now play a 'Cmaj' chord (or any key you want to practice in). The arranger has now started, and the accompaniment is happily playing away in 'Cmaj'. OK, next step... with just one hand, play a solo over that chord. Play some runs, some arpeggios. Listen carefully to the backing. How long can you go without it changing to something else (of it's own accord)?
Probably not very long, if you are not ultra careful!
So, here's something you can work on... First with just one hand, and then afterwards with two. Try to play for as long as you can, as much as you can, without accidentally triggering that chord section. You have to make your fingering ultra clean, as the first hint of a third note, whether from smearing notes down or from sloppy legato technique, holding notes while you trill or grace note, whatever, the chord will change.
Practice this first with your RH until it becomes more natural and automatic, then move to the LH, and practice some bass lines or counter melodies, all the while being ultra conscious of not changing that chord.
Now it starts to get interesting...

Now try it with two hands. Theoretically, you should be able to play something like a Bach Two part Invention without ever triggering the chord change. Tough, but doable. At least get the ability to solo two handed while still not using more than two notes.
Now, you can put it all together...
Play a piano piece where you keep the chords simple, and solo over the changes. If you have grasped these fingering exercises well, you should be able to play quite a decent solo over the top of it, without making the recognition section go crazy. Being ultra-conscious of where the chord boundaries are, and where they are NOT will help you chose the appropriate fingering technique...
Here a couple of other exercises that can make Pianostyle work for you in other situations.
Set up the arranger to Pianostyle, Left section recognition, and split the keyboard. Put a soft string sound on the lower. Practice making the changes for a song, and in between chord changes, play a counter melody (or even the main melody!) with your left hand...
Set up the same, but this time put a slap bass sound on the lower section, and set it up to ONLY sound when you hit the keyboard hard (higher than 110 or so works for my strength, yours may vary). Now finger the chords for a song (use a funk style, maybe), and, when you feel like adding a bit 'extra' in the bass part, slap down a note or two to add the 'pops'. This works great if the style uses a finger bass, but you want to spice it up now and then (just like a real bass player).
Once you get around the concept and practice the technique, all kinds of performance possibilities arise. Especially with the use of higher velocity ONLY lower sounds, you can add a great variety to your styles, without confusing the heck out of the chord recognition...
Hope this helps and encourages a few of you to go out and try these tips, and gain a greater control of your arranger... (Written by Diki).
● Choosing freely among intros and endings 1-4
Having experienced, that some users think that they can only choose the intro and the ending, that matches the selected style VAR pattern. This is not correct! The user can freely choose among all 4 INTRO patterns during an INTRO and the user can also choose among all 4 ENDING patterns during the ending. If the style e.g. play in VAR 2, you can actually choose the ENDING 4 pattern, without first changing to the VAR 4 style pattern.
Let me explain this by giving some examples:

Example 1:
The user will like to start playing the VAR4 INTRO pattern, but when the INTRO ends, the user will like the style VAR2 to be active.
WRONG Some users think this is not possible. They choose VAR2 , because they want the style VAR2 to play after the INTRO has finished. Therefore they hit the INTRO button with VAR2 selected. When they press the INTRO button, then the INTRO 2 pattern is playing.
CORRECT Instead the user should do this: Select the VAR2 (the VAR2 button is red). Now press the INTRO button, and then press the VAR4 button. The INTRO button and the VAR4 button are now red, while the MAIN button and the VAR2 button are flashing. When you start the style, the INTRO 4 pattern is played. When the INTRO pattern is finished, the G-70 will play the VAR2 style pattern.
Example 2:
The user are playing in style VAR4, but will like to end the song using the simple ENDING VAR1 pattern.
WRONG: Some users think this is not possible. They therefore just press the ENDING button, and the ENDING VAR4 pattern will be played.
CORRECT: Instead the user should do this (-IMPORTANT- The following instruction should be done within one measure!):
Method A: Press the ENDING button and quickly hereafter press the VAR1 button. When the style pattern reaches the next 1-1 bar, then the ENDING VAR1 pattern will be played.
Method B: press the VAR1 button and quickly hereafter press the ENDING button. The style now will do a break (if you have enabled AUTO FILL-IN. If you have not eanbled this feature, then refer to the behaviour seeen in method A above) going from the VAR4 pattern to the VAR1 button. When the style pattern reaches the next 1-1 bar, then the ENDING VAR1 pattern will be played.

Advanced tip:
For the tweak-heads out there, there IS a workaround. If you want to be able to trigger ANY Intro, Variation, Fill and Outro at ANY point in the music, take a look in the Parameter Reference Guide (look for the page that says 'Style Division Program Changes'). It is possible, through MIDI, to be able to directly trigger ANY of the Style Divisions (and Break / Mute!). All you would need is the MIDI controller of your choice (any MIDI control surface that allows you to program each of it's buttons/foot-switches to send MIDI Program Changes on a specific MIDI Channel) and voila! all the choice you need...
I hope, that you now see, that the INTRO/ENDING concept is much more flexible, than that it might seem at first glance.
● Easy backup of my data (The very quick method):
1. Format a memory card.
2. Turn off the G-70 / E-80.
3. In the [EASY SETTING] section press and hold ”Arr”, ”Piano”, and ”Arrow down” while powering on keyboard.
4. Now you have access to a menu from which you can choose among several functions. Choose copy internal to card to make a backup of all data from internal memory to external memory.
● Finding appropriate Music Assistant Registrations
Q: The keyboard has a Music Assistant function. Does the Music Assistant have styles for: - Love Changes Everything - Everything I Do I Do It For You - Songs from "Phantom of the Opera" - Beatles i.e. Hey Jude / Let it Be
A: The Music Assistant does not have styles. The keyboard has styles. The keyboard has a number of ROM styles, and your can save additional styles in the keyboard. The Music Assistant only contains a list of user programs - not even the actual user programs, but solely a list of pointers to user programs! These things seem to confuse quite a few people. However it is important to know these conceptual issues. Read here how it works:

Each user program stores settings for a specific song. When the keyboard was shipped from the factory, it has 700+ Music Assistant registrations. If you want to play e.g. "Love changes everything" and there is no Music Assistant registration for this song among the 700+ Music Assistant registrations, it does not mean that you can not play the song on the keyboard using one of the ROM styles. It only means that it was not shipped with a Music Assistant registration for the song. If you want to play a song and you can not find a Music Assistant registration for it, you just find a suitable ROM style and save your own Music Assistant registration.
If you can not find a suitable ROM style, you can search the internet or look at e.g. http://roland-arranger.com/index.php/files/styles or look into the topics at the legacy part at http://roland-arranger.com/index.php/forum-index/legacy-forum/share-work-styles or look in http://home.kpn.nl/aeduin/downloadRoland.htm etc. You can also buy additional styles from several other style producers. Regarding your question where you want to know whether the keyboard has Music Assistant registrations for some specific songs: Searching among the factory Music Assistant Registrations you will find out that Roland made Music Assistant registrations for "Everything I Do I Do It For You" (Everything I Do.UPG), "Hey Jude" (Hi Jude Ballad.UPG), "Let it Be" (Let It Be Ballad.UPG). Regarding songs from "Phantom of the opera", I do not think that there are any Music Assistant Registrations made for these songs, but you can probably easily make your own.
● Holding tones and effects when shifting between user programs
Q: I can not find out how to do what I call the obvious. Set up a March programme in 4/4 style. Want to hold all my tones/effects etc. Then want to quickly shift to a 6/8 style. Yes, I've copied over the entire lot to two positions and when I select the 6/8, I get an involuntary tones change.
A: When you know it is pretty obvious. Like everything else you know... well, this function is actually described in the manual on page 115 for the G-70 and page 129 for the E-80 (either manual can be downloaded as pdf file from the download section). This is how you do it:
The start condition is that you have saved to user programs which are assigned to the a loaded set list, let's say: 1-1 4/4testStyle 1-2 6/8testStyle
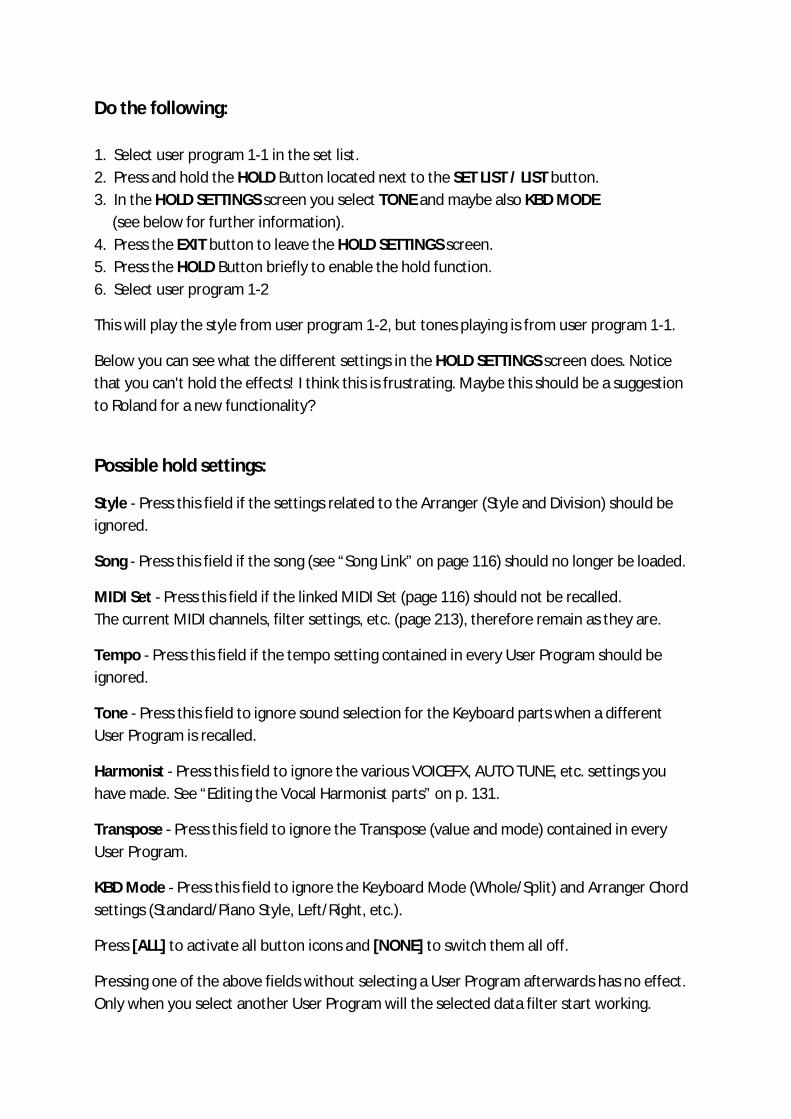
Do the following: 1. Select user program 1-1 in the set list. 2. Press and hold the HOLD Button located next to the SET LIST / LIST button. 3. In the HOLD SETTINGS screen you select TONE and maybe also KBD MODE (see below for further information). 4. Press the EXIT button to leave the HOLD SETTINGS screen. 5. Press the HOLD Button briefly to enable the hold function. 6. Select user program 1-2
This will play the style from user program 1-2, but tones playing is from user program 1-1.
Below you can see what the different settings in the HOLD SETTINGS screen does. Notice that you can't hold the effects! I think this is frustrating. Maybe this should be a suggestion to Roland for a new functionality?
Possible hold settings:
Style - Press this field if the settings related to the Arranger (Style and Division) should be ignored.
Song - Press this field if the song (see “Song Link” on page 116) should no longer be loaded.
MIDI Set - Press this field if the linked MIDI Set (page 116) should not be recalled. The current MIDI channels, filter settings, etc. (page 213), therefore remain as they are.
Tempo - Press this field if the tempo setting contained in every User Program should be ignored.
Tone - Press this field to ignore sound selection for the Keyboard parts when a different User Program is recalled.
Harmonist - Press this field to ignore the various VOICEFX, AUTO TUNE, etc. settings you have made. See “Editing the Vocal Harmonist parts” on p. 131.
Transpose - Press this field to ignore the Transpose (value and mode) contained in every User Program.
KBD Mode - Press this field to ignore the Keyboard Mode (Whole/Split) and Arranger Chord settings (Standard/Piano Style, Left/Right, etc.).
Press [ALL] to activate all button icons and [NONE] to switch them all off.
Pressing one of the above fields without selecting a User Program afterwards has no effect. Only when you select another User Program will the selected data filter start working.

● E-80 - using external Tone Generator Written by Hans Peter Isenberg
As you know, it's not possible to change tones in an external sound generator by using the arrangers 'Tone Division' because the sound generator usualy don't understand the arrangers 'Bank and Program Change' commands). For the styles this specific events may be inserted in the style tracks, but I think this is not a good idea to do that because of possible 3 modes x 18 divisions = 54 tracks per instrument or drum set. At the other hand we must prevent unintentional program changes e.g out of the styles. But there is a possibility to set up the right tones in the extern tone generator by the G70/E-Series arrangers. We can do it with, I call it: "Dummy Songs". In it we can insert the necessary events by using the 'Micro Edit' function of the 16 Track Sequencer. To transmit this events we must use a Midi program for songs. The Arranger can transmit on 16 Midi channels at the same time, that means either 16 Song-or 16 Keyboard/Style Parts. So we have to build another Midi program to transmit the played notes of the keyboard and/or the styles. Six types of these programs we can build for different transmit variations because one we need to reset the arranger to local play if no external tone generator is used. (only eight Midi programs are possible in one 'Midi Set', loading an other is possible however. The "Dummy Songs" and the Midi programs should be linked with the UPGs for an automatic set up, both, the arranger and the tone generator! Preparation: (take these Midi programs from this example) Step 1 'Creating the Midi program Type 1 to be linked to an UPG if no external Sound generator is used.Set all Keyboard/Style Channels to TX (transmit)=off and Local=on. (This Midi program is also the basis for Midi Sets to transmitting the played notes.)
1. Press 'MENU' 2. Select 'MIDI' 3. Select 'Keyboard & Style Parts' and 'Local' ='ON' (if not) 4. Select 'EDIT' 5. Select 'KEYBOARD PARTS' if not 6. Set all Parts to 'TX'=Off (use arrows in the lower right corner) 7. Select 'STYLE PARTS' 8. Set all Parts to 'TX'=Off like point 6 9. Touch 'Back' 10. Touch 'WRITE' 11. TOUCH '8' (that's the Midi program number) EXIT Step 2 'Creating the Midi program Type 2 to transmit the 'Dummy Song' events'. Set all SONG Channels to 'TX' (transmit)=on. Write (save) it to 7 (Midi program #)

1. Press 'MENU' 2. Select 'MIDI' 3. Select 'Song Parts' and 'Local Off' 4. Select 'EDIT' 5. Select 'SONG PARTS' 6. Set all Parts to 'TX'=On (if not) (use arrows in the lower right corner) 7. Touch 'Back' 8. Touch 'Write' 9. Touch '7' (the Midi program#) EXIT Working Set The Parts: Keyboard parts transmitted on Midi Channel number:
UP1=Channel 4 UP2=Channel 6 UP3=Channel 13 LW1=Channel 11 LW2=Channel 14 MBS=Channel 12 Melody Int=Channel 15 Style parts transmitted on Midi Channel number:
ADR=Channel 10 changed to channel 9 because of an Software Bug (see remark *1) ABS =Channel 2 ACC1=Channel 1 ACC2=Channel 3 ACC3=Channel 5 ACC4=Channel 7 ACC5=Channel 8 ACC6=Channel 9 , not used or may be changed (see remark *1) *1 The Midi filter 'Program Change' does not work on Channel 10 (A Bug, I think. E-80 V1.06) Creating the 'Dummy Songs': General steps to insert CC0, CC32, PC and CC11(expression) for the relevant tracks.

1. Press '16-TRK SEQ' 2. Select 'MICRO EDIT' 3. Select used TRACK by number 4. Select 'CREATE EVENT' 5. Select 'CONTROL CHANGE' 6. Set 'BAR' to 0001 (if not) 7. Touch 'EXECUTE' 8. Select the new inserted CC 9. Press arrow -> 10. Enter 0 (Bank Select MSB) 11. Press arrow -> 12. Enter the appropriate value 13. Repeat 3. to 8 14. Enter '32' (Bank Select LSB) 15. Press arrow -> 16. Enter the appropriate value 17. Select 'CREATE EVENT' 18. Select 'Program Change' 19. Select the new inserted PC 20. Enter the appropriate value 21. Repeat this procedure for the other tracks (Back-->2.
Don't forget to save the 'Dummy Song' Creating Midi programs Type 3: General steps to build a Midi program for transmitting the played notes and other events.
1. Press 'MENU' 2. Select 'MIDI' 3. Select '8' (the Basis) 4. Select 'EDIT' 5. Select Part(s) you need: Keyboard and or Styles 6. Set 'TX'=On 7. Touch 'TX EVENT' 8. Switch filter 'PROGRAM CHANGE' off (possibly others if necessary) 9. Touch 'CLOSE'' 10. Repeat 5. to 10. for next Parts, or 11. Touch 'BACK' 12. Touch 'WRITE' 13. Select a free Midi program storage 1 to 6 EXIT

The UPGs: Now we need two UPGs to play. The first one is necessary to switch the tones of the external tone generator, and the second one to play the musical piece. Of course you can have more UPGs per song but don't change the external parts because you have to transmit the a new "Dummy Song". If you like to do this, prepare All parts in the "Dummy Song". The part(s) you like to play will be fixed in the Midi program Type 3! Examples: I created two examples for GM tone generators: 1) Upper 1, 2 and Lower 1 shall be played by an external Tone Generator. 2) Arranger Drums, Bass, Acc 1 and Upper3 (second Split Point) shall be played by external Tone Generator Running a Test Preparation: 1. copy UPG's, "SONGS" and Midiset an External Memory in the appropreate folders (Put New..., Midiset)
2. press 'SONG' and after that 'USER PRG' in the 'Finder Section'
3. load Midi Set 'TESTSET'
4. connect the Arranger with a Tone Generator (Keyboard or Expander) Play: a. select UPG1-1, press 'PLAY/STOP' in the Recorder Section b. select UPG1-2, start playing next: a. select UPG2-1, press 'PLAY/STOP' in the Recorder Section b. select UPG2-2, start playing Remark: You may change the external tones in "Dummy1" and / or "
The keyboard’s Music Assistant is based on the user registrations (UPGs). You create your own UPGs and then decide if they have to be included into the Music Assistant as well. Since you can create up to 144 UPGs and save them inside a UPS (and you can have as many UPS as you want), I guess that it's also possible to have as many Music Assistants as you want. The trick is to mark each registration (UPG) with the little "M", which means that it will be a Music Assistant voice as well.

● Creating your own user style Roland-arranger.com member, Mart Weeho, is kindly sharing his work (user styles) with the user club community. The user club members have asked Mart Weeho and his friend, Bert Hokse, if they could tell how to create a user style.
This tutorial will guide you through creating your own style. During the tutorial you can download several files, which can be loaded into your G-70 / E-80 (and should be compatible with other E-series arrangers too).
PART I 1) Power on your keyboard 2) Press the ARR button in the EasySetting. 3) Press the MENU button. 4) Touch STYLE COMPOSER on the screen. 5) Touch INITIALIZE STYLE on the screen. 6) Here we have a choice to make: One of the templates, my choice here is now JAZZ, I touch the screen on Jazz and the word Jazz is blue now. 7) TEMPO: My choice here is now 120, touch 92 and turn the wheel to 120. 8) TIME SIGNATURE: By touching the screen and turning the wheel you can make a choice: My choice now is 4/4 9) Now touch EXECUTE on the screen. On top of the screen you see USER STL, the style is completely empty at this moment. 10) Because a template was chosen there is a preset for all the accompanimenttracks. Drums: V-JazzBrush AccBass: XV AccBass Acc 1 : Grand X piano and so on... You can change all these instruments if you like but for this moment I shall use the given template. 11) Touch the screen on INTRO 1 and turn the wheel to MAIN 1. We start with the Drumtrack. You see the drumtrack is white on the screen.( by touching the other parts on the screen you can make the other parts white.) 12) Press now the red REC button. In the screen you have now touch for MEASURE LENGTH. By turning the wheel I get 2 (for a track of two measures)
13) Touch the screen for INPUT QUANTIZE and turn the wheel to 1/8 Input quantize is not allways necessary but can be a good help. See the COUNT IN , 1 Meas, but you could change this. See the RECORD MODE is REPLACE, this is because there is nothing on the track until

yet. The OCTAVE is 0, do not change this now, but this can be done. We are ready now for the first take of the AccDrum Track. This will be the Major Track for the MAIN 1 VARIATION. With the black and the white keys you can play and hear now the druminstruments of the V-JazzBrush Drumset. Try them and hear them. 14) First we will use the second C key from the left , it is a Bassdrum.The key one more to the left is the same Bassdrum so you can play the Bassdrum with two fingers. PRESS the Start/Stop button and after hearing the Metronome you play the Bassdrum. As I said before , the quantize function can be a great help but it can be done without it. When you are more experienced you will find out when and when not to use the quantize function. I played as an example for you User A, so you can hear it when you load User A from the Floppy into your keyboard. To make it easy we will use the same drumtrack for the MAJOR, the MINOR and the SEVENTH Accompaniment chords. Therefore we have to make the next step. 15) PRESS the red REC button again. Touch in the screen MAJOR and change this by turning the wheel to M=m=7. The trackinstrument must be still JazzBrush so touch the screen at that place when it shows a different instrument. The RECORD MODE is MIX now because there is allready something on the track. Nothing has to be changed now. 16) PRESS the Start/Stop button and you will hear the Bassdrum again and at the end of the track you have the Bassdrum on the MAJ, MIN. and Seventh track. 17) Go out of the STYLE COMPOSER by PRESSING the red lightning EXIT button. On the screen you will be asked now, SAVE or NOT SAVE. My advice , save every step you made every time you changed something. And give it a new name every time. (One new extra character is enough). In our case I gave the name USER A and saved it to a Floppy Disk. Now you have a User Style with just 1 track with only 1 instrument , the Bassdrum. Please do not forget this is just an example and not a complete style until now. Now we will take a look in the MICRO for to see what we did. 18) PRESS MENU,... STYLE COMPOSER,... MAIN 1... and than MICRO EDIT. Here you can see the notes that are played, C2 and B1. You see the Velocity of the first note is 73 and of the second note 77 You could make them all have the same velocity but a real drummer does not allways play with the same velocity, music is dynamic. The last numbers are the Gatetime, at this moment less important but can be used more with other instrumenttracks. For going from left to right in the screen you have to use the ARROW buttons under the wheel. Try them. On example User B, I played a few extra instruments to the drumtrack. You can hear them and you can see them in the MICRO MODE. This is the first episode of Stylemaking. For many of you it will be too simple but if not I hope you can use this to become more experienced. Download user style created in this article.

PART II Every time you want to play a new instrument to the track which you have allready the REC Mode has to be MIX (not REPLACE). 1) Touch in the top of the screen REC DIVISION Mode and turn the wheel to M=m=7 2) Set the INPUT QUANTIZE to 1/8 3) The Drumset is automatically set to V-JazzBrush and the TEMPO is set to 120. 4) Press Start/Stop, hear the metronome and than play the new instrument. When the result is not good you have to reload the forgoing USER and try again. Here you see the importance of saving every step you made. As an example you can download USER C,D and E . USER E will be the Drumtrack for MAIN 1 (M, m and 7). The next step is playing the Bass to USER E. 5) Go to the STYLE COMPOSER as described in episode 1 6) Touch the screen on ABass and it becomes white. When the keyboard has been OFF you see FRETLESS Bass. 7) Press the red REC button. 8) Touch on the screen FRETLESS Bass and make the choice to XV Ac.Bass. 9) Press the EXIT button to go back to the forgoing screen. 10) Set INPUT QUANTIZE to 1/8 11) Set MEASURE LENGHT to 2. TEMPO is allready set to 120. You see REPLACE in the screen because there was no Bass. 12) Press Start/Stop, hear the metronome and play your Bassline. 13) Play the Bassline in the key of C and use the notes of a C-Chord. Now you have a Bassline. If the Result not good you have to play again. In that case the REC Mode should be set to REPLACE ( and not MIX ). 14) When the Bassline is OK than set the REC.DIVISION Mode to M=m=7. The REC Mode is now MIX. 15) Press START/STOP and after the metronome you hear the Bass playing. Now it gets recorded to the Min. and the 7 track. The result is until now a USER style with Drumtrack and Basstrack. As example you can download USER F For advanced players it is possible to create different Bass-and Drumtracks for Major, Minor and Seventh. The tracks can have more than 2 measures and can have different lenght.

PART III
Load USER F . When you understood every step we made until now we shall create the first AccTrack. 1) Go in in the STYLE COMPOSER to MAJOR MAIN 1. 2) Touch Accomp 1 and it gets white. Be sure the instrument for this track is STEREO PIANO. 3) PRESS the red button REC. 4) Set the INPUT QUANTIZE to 1/8 and the MEASURE LENGTH to 2. (The Guitar Mode is OFF, of course, when you want to play a piano) The REC DIVISION MODE is MAJOR. TEMPO is set allready on 120 and the REC MODE is REPLACE. ( you know why !!) 5) PRESS START/STOP and hear the metronome and after that you can play a pianoline. with the STEREO PIANO for the MAJOR track of the MAIN 1 variation. Play notes in the key of C and use only notes that are in a C-Chord. You may play single notes and/or C-Chords. Hear the result. If it is not good than set the REC MODE to REPLACE again and retry. When the track you have recorded now is OK, then 6) SAVE your work with a new name. We go back to the STYLE COMPOSER. 7) PRESS the red button REC again. Next step we are going to make we made before already. 8) Change the REC DIVISION MODE from MAJOR to M=m=7. The REC MODE is now MIX. 9) PRESS START/STOP and the MAJOR track you played before gets recorded to the MINOR and to the 7th track. When you hear the result now with drum , bass and piano you could be a little surprised. The MINOR track is good but the 7th track we are not sure. This depends from the notes you have played on the MAJOR track. It is now important to see in the MICRO EDIT which notes are played in the 7th track. Maybe you see notes that you did not play. The G70 itself did this for you. Do you see Bflat notes? 10) First you should SAVE your work now again with a new name. Now load my USER G and hear my example pianotrack with drum and bass. See in the MICRO EDIT now my 7th track of the piano. You see the Bflat4 notes. Now you can make a choice out of three possibilities. 1) Change nothing because you think the track OK. 2) ERASE the Bflat4 notes and now you think the track is OK. 3) TRANSPOSE the Bflat4 notes to Bflat3 notes and after hearing the result, you will think the track is OK now. How to ERASE or TRANSPOSE these Bflat4 notes?

In the MICRO EDIT you see the BLUE LINE. PRESS the ARROW (to the right side) button under the wheel. Now you see only the played note is blue. PRESS the ARROW (down) button to go the Bflat4 note. Touch in the screen now ERASE EVENT at the right side of the screen and you erased the Bflat4 note. In this way you can erase all the Bflat4 notes in the track. When you do not want to erase but you want to transpose the Bflat4 notes to Bflat 3 do not ERASE them. When only the note is BLUE you can turn the wheel and see the note changes. Change it in this way to Bflat3. Do this for all the Bflat4 notes in the track. 11) SAVE again every step you did and after that you can hear and compare three different tracks of the STEREO PIANO. It is up to you which one you will use in your USER STYLE. Load my example USER H ERASED and USER H TRANSPOSED . Hear them and hear the difference between them. Do we have to do the same job for the MINOR track, no the keyboard does this for you. You can see it in the MICRO EDIT and hear it when you play the MAIN 1 variation.
PART IV
1) Load my example USER H ERASED ( The Bflat is erased). Now we are going to play a simple guitartrack on Accomp.Track 2. 2) Go to the STYLE COMPOSER for MAIN 1. 3) Touch Accomp. 2 and it gets white. 4) PRESS the red REC button. 5) Touch on the screen GUITAR MODE. 6) Turn the wheel to Acoustic. 7) Set INPUT QUANTIZE again to 1/8 and MEASURE LENGTH to 2. 8) Play on the left side of the keys a C-Chord. You will hear nothing and that is correct. 9) Play now with one finger the F5 key and you hear a strummed Guitar chord. The F5 key now stands for the MUTED STRUMMED GUITAR. 10) PRESS START/STOP and after the metronome you play with one finger the MUTED GUITAR . Hear the result and when you are not satisfied try it again but make sure everything in the screen is set as before.( MIX should be changed to REPLACE again ). In the MICRO EDIT you can see what you played.At the left side in the screen you see that all the

notes of the strummed chord are not played exactly on the same moment. And do you see the D0 notes, the STYLE COMPOSER played them for you. Are you happy with your MAIN 1 Accomp. MAJOR track? Than the next step is to record them to the MINOR and the 7th track. You did this before so you know how to do this. Remember the Bflat notes and the Blue line and the Arrow buttons. 11) Load the USER GUITAR Style ( without the Bflat notes) and hear and see the result. In the MICRO EDIT you can see in the top of the screen something is changing when you use the ARROW button to the right. You see On VELOCITY and GATE TIME. You have seen the numbers for velocity and gate time ? Each time when a number is Blue you can change the VELOCITY or the GATE TIME by the wheel. I changed something in these parameters and when you load now the next USER STYLE with the name GUITAR EDITED you can hear what the result of this editing work is. Do you hear some chords are played with more velocity and with longer gate times? You can see it in the MICRO MODE. In the next USER FIILL UP I made a simple FILL UP with only a one measure drumtrack and basstrack. They are nearly similar to the MAIN track drum and bass, but just one measure length. The drumtrack has just some more accent comparing to the MAIN track. Hear it and see it in the MICRO EDIT. When you understand everything what I tried to explain until now you should be able to make a complete USER Style with 4x INTRO, 4xENDING and all the Fills you want. And Yes, that takes a few hours but practising will help you a lot. And remember you could make for MAJOR, MINOR and 7th completely different tracks. But than a few hours will not reach ,than you need more time. However it can be done !!! The commercial stylemakers are there to do this job for you and offer you a long list of styles which you can buy. They make your life easier, they are a great help for mankind.
PART V In this episode we will try to complete the style with more VARIATIONS and FILLS. And we will see a simple way to get some differences in the VARIATIONS and FILLS. 1) LOAD USER FILL UP Style . 2) Go in the STYLE COMPOSER. 3) Touch in the screen at the right side TRACK EDIT. 4) Touch in the following screen COPY. 5) Touch now SOURCE and it gets blue. 6) Touch DISK USER and after this you have a choice to make; You have three possible lists with Styles: - EXTERNAL MEMORY - FLOPPY - INTERNAL MEMORY

7) Touch the list on which you have your USER FILL UP STYLE. 8) Touch the USER FILL UP STYLE. 9) Touch the flashing red button EXIT and you go back to the STYLE TRACK EDIT screen. 10) Touch DIVISION and turn the wheel to MAIN 1. 11) Touch ADrums and turn the wheel to ALL. 12) Touch MAJOR and turn the wheel to ALL. 13) Touch DESTINATION (it gets blue) 14) Touch MAIN 1 and turn the wheel to MAIN 2. 15) Touch EXECUTE and you get the message "OPERATION SUCCESFULL". At this moment your MAIN 2 VARIATION is the same as MAIN 1. 16) SAVE your work and hear what you have done. 17) Follow the same procedure to copy MAIN 1 to MAIN 3 and 4. Now your USER Style has 4 VARIATIONS but they are all the same. In my example I made in this way USER STYLE X . Hear my example. Did you understand the steps you made and did you save your work you should be able to do the same COPYwork to get all the FILLS UP and the FILLS DOWN. Again , they are all the same now. My result you can hear in USER X2 . Remember EPISODE 1-4 and you know how to play new and extra notes to an existing track. Now we are going to make small differences in the Drumtrack for MAIN 2 compared to MAIN 1. Hear the result in example USER X3 . Then I changed MAIN 3 and MAIN 4 a little bit. You know how I made thes steps and I hope you understand what I did. In MAIN 4 I played 2 extra instruments in the Drumtrack compared to MAIN 3. Hear this in USER X4 . See it in the MICRO EDIT. Next step is to make a small difference between FILL UPs and FILL DOWNs. I changed the Bass track a little bit and I changed only a few notes in the MICRO EDIT. SEE IT in the MICRO EDIT. Now the Bass track from the FILL DOWN has no longer the same notes as the Bass track in the FILL UP. I played some extra notes to the FILL DOWN Drumtrack. Load USER X5 and you can hear it. See it in the MICRO EDIT. I think you can make these steps now yourself. Making INTROs and ENDINGs are made in the same way. Hear these simple INTROs and ENDINGs I made in USER X6 . Now you could have your own homemade USER STYLE with small differences in the VARIATIONS and in the FILLS. Important is to know the COPY FACILITIES, they can do a lot for you. You can copy not only your own tracks but also every track you have in your keyboard including the Styletracks you have in Styles in the Internal and the External Memory. And of course the tracks in the Factory Styles. There is an endless number of variations you can make in this way. Combining

your own tracks with tracks taken from other existing styles is possible. Be a complete keyboardplayer and try out every facility your instrument offers. Mart Weeho said this once in the early days in the Synthzone Forum which he left because there was too little understanding there for his words. But now in 2007 there are new and different players in this Roland Arranger Forum. Many thanks for your attention.
● Organ Overview The G-70 / E-80 has two ways of accessing the organ sounds: The "Organ presamples" and the "Harmonic Bars" Section Ad 1 - Organ presamples On the G-70 / E-80 there is an organ Tone bank with lots of superb and very useful presampled organ sounds. To these sounds can be added effects e.g. the "VK rotary" MFX effect which features the same specifications as the VK-7’s built-in rotary speaker. There are other useful MFX effects, e.g. the "VIB-OD-rotary" effect which combines an overdrive and a rotary with Vibrato/ Chorus. The vibrato effect cyclically modulates the pitch of organ sounds (which is not the same as the Rotary effect). The chorus effect mixes the normal sound of the organ with a sound to which vibrato has been applied, adding richness and spaciousness to the sound. All MFX effects are described in the keyboard’s manual which can be downloaded in the download section. Ad 2 - Harmonic Bars Section The G-70 / E-80 implements Roland’s Virtual ToneWheel technology (derived from the VK series). This section is called the "Harmonic Bars" Section. The G-70 contains a virtual drawbar organ that is based on Roland’s Virtual ToneWheel technology found in organs like the VK-8, VK-88, VK-7, VK-8M, etc. But the G-70 / E-80 has not a built-in VK-8/VK-88 etc.! Does "based on" mean, that there is a VK-series instrument inside? The answer is "NO". There are a lot of differences between the VK-series and the Harmonic Bars section of the G-70 / E-80. You can say that it has as "built-in downgraded VK-instrument". What are the differences then between the G-70 / E-80 and the VK-series instruments? Well, the VK-series instruments have lots of configurable parameters for both the sound base and the Leslie emulation (Rotary effect). Roland has preconfigured all these parameters for you. Furthermore the harmonics bars section sounds can only be used for UPPER1 and LOWER1 which means that you can't use the Harmonics Bars section sounds for the arranger section and for midi songs. Nor can you use the MFX effects in the Harmonics bars section, and the Harmonics bars section sounds can't be routed to the 2nd output. Note that the G-70 / E-80 offers only 1 linear basesound, whereas e.g. the VK-88 offers four tonewheels: "Vintage1, vintage2, solid and clean" - each with their special characteristics. The VK-88 has three wheel Tables (Mellow, Bright, and Low-Boost Mellow). On the G-70 and E-80 you can't select between different wheel tables.

The Rotary Speaker emulation in the VK-instruments is based on COSM sound modeling technology. There’s realistic organ-type reverb which can be selected before or after the rotary speaker modeling, as well as rich, smooth vibrato and chorus effects that can be added in as desired. The VK has a wide palette of awesome overdrive sounds courtesy of a COSM-powered Amp Simulator with seven distinct amplifier types. In addition to its manuals with realistic organ touch, the VK sports 21 independent harmonic bars - nine for upper manual tones, nine for lower manual tones, two for pedal control and one for blending in Orchestral and auxiliary tones. The G-70 / E-80 is a downgrade compared to all these features of the VK-88! The Harmonic Bars section contains the following controllable organ effects: OVERDRIVE: This effect distorts the sound, giving it an “edge” and making it suitable for hard rock and similar musical genres. Press The effect can be switched on or off. LEAKAGE: On tone wheel organs, the sound of the note that was pressed is slightly “contaminated” by audio signals from tone wheels not related to that note. Formerly, this was seen as a problem, but today this idiosyncrasy is considered an important element of the distinctive sound of a traditional instrument. This parameter allows you to set the level of the “noise”. PERCUSSION: By selecting “HARD”, you strengthen the percussion sound. That’s because the organ sound specified with the harmonic bars becomessofter. Conversely, you can select “SOFT”, in which case the volume of the “real” organ sound is raised to its normal level. ROTARY SOUND: This section contains an on/off switch for activating or switching off the Rotary effect. This effect simulates the typical sound modulation generated by a cabinet with rotating loudspeakers. VIBRATO/CHORUS: The vibrato effect cyclically modulates the pitch of organ sounds (which is not the same as the Rotary effect). The chorus effect mixes the normal sound of the organ with a sound to which vibrato has been applied, adding richness and spaciousness to the sound. The possibilities are: V-1, V-2, V-3 -this applies vibrato (pitch modulation). Increasing the value will produce a deeper effect. C-1, C-2, C-3 - this applies chorus to add depth and spaciousness to the sound. Increasing the value will produce a deeper effect. The G-70 / E-80 has not the same amount of adjustments and settings as the VK-series instruments, and the subjective impression is also that the sounding of the VK instruments is much more realistic than the G-70 / E-80, therefore I prefer to call it a "downgraded VK-instrument". However, when this is said - the G-70 / E-80 is one of the best arranger keyboard (in this price-class) when it comes to the organ part.
● Solving the limitations of the Harmonic Bars section When you buy a G-70 or E-80 mainly because of the built-in Hammond sound module called Harmonic Bars, you should be aware that there are a number of limitations. 1. Harmonic Bars can only be used with UPPER1 and LOWER1. It also means that Harmonic Bar sound cannot be used with arranger or midi parts 2. Harmonic Bars cannot be routed to the second output, which means that you can’t apply a rotary speaker to compensate for the weak built-in Rotary speaker emulation 3. Harmonic Bars cannot be used with MFX effects 4. Harmonic Bars has no dedicated reverb effect, which means that if you want reverb, you have to use the common reverb effect used for the general mix, which may be OK as long as you choose a hall effect for the general mix. 5. The dedicated effects of Harmonic Bars are not customisable as the MFX effects, and therefore you have no chance to compensate the weak Rotary and Overdrive effects The sound of Harmonic Bars is very clean and it is not possible to configure Harmonic Bars to get even close to some of the built-in organ samples. Roland must be aware for this, because in almost all of the G-70 / E-80 factory settings, Roland have chosen to use the sampled organ sounds in stead on the Harmonic Bars, even for lead organ. Although I am very fund of my keyboard, I do not want these limitations and bought an external organ module as supplement. Roland has a nice organ module called VK-8M with real drawbars, which will solve all the limitations of the Harmonic Bar section. But I found out that the Nord Electro Rack 2 has just the sound I have dreamed of just out of the box. Even the Leslie emulation of the Nord Electro is so good that I have dropped to invest in a rotary speaker. This combination of G-70 / E-80 and organ module works perfect for me. I have assigned UPPER1 and LOWER1 to midi-out and local sound switched off.
● Using rotary effect for organ sounds
Question: Is it right that for the Organ presets, you can't switch off/on a Rotary Speaker effect? Only for the Drawbars?

Answer: Some of them (the parameter reference has a list of which) use CC13 to cross fade between fast and slow samples, but you have to go into Tone edit mode (push and HOLD the button above the Part selector buttons) and move the left hand fader up and down. Then some of them have a velocity switch between Fast and Slow (and middle, too). And finally, some of them (you have to listen to them to find out which) have NO Leslie or chorus on them. These make great candidates for feeding into the MFX section, which has two or three different Leslie options (although, the VK Leslie preset is the best) and then the bender lever becomes the F/S switch (up/down, NOT sideways!)... I don't recommend sending an organ Tone that already HAS some sampled slow Leslie into the MFX, it makes it too weird (unless weird is good!) Leslie-ing an already Leslied sound...
If you WANT to use a push button to change Leslie F/S on the voices that use CC13 to go from fast to slow sampled Leslie, you can set up TWO Parts (either Upper 1&2 or Lower 1&2) to have the same sound, and edit one to be fast and one to be slow (using the CC13 fader in Tone edit page). Now you can use an Assign switch to switch between the two Parts. One button Leslie...! (but no ramp-up or -down, because it's sampled...).
● Choose the right MFX effects
Using the powerful MFX effects for your solo voices is what really make your G-70 / E-80 sound juicy. Turning off the MFX effects sounds in the vicinity of going from stereo to mono in the sense that you can hear a remarkable change in the sound. When you use the MFX effects, your solo voices become much more "alive".
The G-70 / E-80 features 80+ MFX effects from humanizer to VS Overdrive. Because of this wide range of choices you can easily end up being confused about what MFX to choose.
In the forum section all User Club members are urged to come forward with input to this topic. Send you personal favorites and tell about your experiences with MFX effects.
● Workaround for no Delay Send
Maybe you miss the more powerful effect sends of the G1000? The G1000 used to have sends (for every Keyboard, Arranger AND Song Part) for reverb, chorus AND delay (and a handy, dandy EQ insert on each as well).
The G70 only has Reverb and Chorus sends, now - how do you get them back? Here's how (or nearly, anyway!)

Change the Chorus Type to Delay (it has far longer delay times and much better control than the old G1000 'Chorus set to Delay'). You now have a Delay send using the regular Chorus send sliders, so different Parts have different Delay amounts.
How do I get a Chorus on my Parts now, you ask? Here's how (now this step is a bit of a compromise)... You assign a MFX Chorus setting (or DimensionD or Trem Chorus or Hexa-Chorus, you get the idea) as an insert on the part(s) you need Chorus on (MFX Part Assign), or try to find a Tone that already has Chorus programmed into it. I have found that you tend to need more variation in Delay sends than Chorus sends (the right amount of Chorus for one part is usually not much different to another, at least less so than Delay).
Once you have Chorused up the part(s) with the MFX you'll notice the Reverb and Chorus sends in the top right hand corner of the MFX main page. Here's where you'll put Reverb and Delay (remember... the Chorus send is now Delay!) on the Parts. Don't use the main Reverb / Chorus sends for this part because you'll want to reverb up the chorused sound, not the dry sound. So that's how you do it... Have fun!
● Intros and endings sound odd
If your intros and endings sound odd, switch off the "Alteration function". Doing this the keyboard uses the normal chord progression (e.g. C, Am, F, G). If you switch on the function, the chord progression of the selected intro/ending is adapted to the chord played. This might lead to odd results - if you play e.g. a "Csus4" during the intro.
You set the alteration function here: [MENU] -> [ARRANGER SETTINGS] -> [INTRO ENDING ALTERATION]. You can also press "Chord" in the main display (Display: upper left corner).
● Organizing User Programs using multiple memory cards Because the G70 / E-80 doesn't have a folder system for organizing UPGs (everything gets chucked into the same UPG folder), I have started to think that buying several different Memory Cards is a good idea. They don't need to be very big ones, and you only need the one adapter, but they can help solve a couple of nagging problems. Let's say you are working on a long project to modify ALL the Factory ROM styles to have your own OTSs, and performance parameters and address any SRX cards you use. You can dump the saved styles into the Internal memory, chew up your available memory quickly, and they end up all over the place mixed in with other styles. Confusing....

And let us assume you have a card already for storing lots of 3rd party styles, older Roland styles, SMFs, lyrics, etc., etc.. Save your edited ROM style there, same problem.... The same for 3rd party styles for other arrangers, projects for commercial clients, and style creation from MIDI file projects you may have going on. Your best solution here is to have a separate Card for each big task. It will save you from having to search, hunt and peck for all the relevant files when they are mixed up on one card, and having to do a lot of computer transferring chores, where, unfortunately, you can not even select by Date Modified, because the G70 doesn't time stamp it's files. One other use for a another dedicated card is that there is a hidden function that can backup the entire Internal memory to a card, and transfer it back in without messing up the Database. This allows you to have a clone of your internal drive available in the event (touch wood!) that your G70 crashes, and takes out it's entire memory just before a gig, when you away from your computer. So you can see there are several good reasons to consider getting more than just ONE Memory Card.
● G-70 - overall sound tips
When you see the specifications on the G-70, there is no doubt that it must be one of the best keyboards in the arranger keyboard area. The sound chip has 192 MB wave memory and some sounds are from the Fantom X synth. You get a lot of new styles, a VK8 (alike) organ with drawbars and a vocal harmonist. Can you expect more from an arranger keyboard? Yes, it has to sound good and that was not the case when the G-70 was released in November 2004 and first when I installed the OS2 in September 2005 the “out of the box sound” sounds acceptable. I finally start enjoying playing the keyboard, but still missed the “WOW” feeling you get when something sounds really good. Read this tip, and you might get the same “WOW” feeling as I have now experienced...
The problem might be that the bottom sounds (Kick drums and basses / low frequency sounds) are not harmonized with the other sounds, which means that some sounds are too near the bottom sounds and will result in an overall rumble sound. In the last 10 months, I have tried to make the G-70 sound as good as possible, but I have never been 100% satisfied with the overall sound - until now. The trick is to the sound image: The bottom sounds and the Acc. have to be separated and then put some good reverb to the Acc. sounds to obtain a softer sound. You can do it this way:

Step 1 Connect the Direct Out with the External Source input. You need 2 cables with jack-aux. Step 2 Select the Part Output in EFFECTS. Step 3 Select Style and set the Acc1-6 to Direct. Step 4 Go to Audio In and select 25 : Reverb. Step 5 Set e.g. the EQ Low Gain to –4 and EQ High Gain to +4. Step 6 Select a Reverb type and set the Reverb time as you like. Step 7 You can adjust the volume using the External Source knops. You maybe think there’s too much reverb in some sounds where you don’t want it, but if it’s a sound that doesn’t affect the bottom sounds, just put it to Main in Part Output. Maybe the result is not what you like, but I’m personally very satisfied with the sound using the described procedure. Try e.g. some deep guitar sounds in the styles and you will clearly hear the difference. You can also try the same reverb and Eq. settings for the solo voices from the Mfx “25:Reverb” it sounds great. Also remember to adjust the volume and pan for the sounds. I always set the bas volume about 20 under the drum sounds, but of course it’s a matter of taste. I just wondered why the internal bass sounds don’t sounds as good as the basses from the SRX expansion cards, so you can look forward to the release of the SRG-01 or buy the SRX-07. It’s the best buy I’ve done for a long time, and lot of fat basses, and lot of other good useable sounds. I hope you can use the tip, and hopefully get the "WOW" feeling that I finally got.
In the download section you find a user program and style with the new settings. Try playing "Love is blue" with intro var. 3 and use var. 2 in the verses. I really want to hear what you think about the result, and if you have some other tips, it will be appreciated.
● Restoring a corrupt database Some users like to challenge the keyboard and the possibilities of handling files on the G-70 / E-80 and tranferring data between the PC and the keyboard. Following the instructions in the Roland user manual on how to operate the keyboard and handling files, it is very unlikely that you will ever experience a corrupt database. However, not all users follow the instructions well and this might lead to a corrupted database.
If the database in your G-70 / E-80 for some reason is corrupted, then you can experience that your instrument is more or less inoperable. Before we look at solutions, let's talk about what it means, when we say that keyboard's internal database is corrupted?

The file structure in the G-70 consists of 14 file folders (15 on the E-80 V2). When you power on the keyboard, the OS software will index folder content. While using certain functions on the keyboard the OS software will continuously index folder content. An example is the OS operation that copies files from the "put new xxx here" folders to the folders containing user data. When the OS does this, the files are also indexed and structured in the database. The DB folder contain a number of NDX and DAT files containing all information about the files, which are present in the instrument. Every time the OS software updates information about styles, songs, user programs etc., then these corrections are reflected in the NDX and DAT files. Therefore it is evident that the NDX and the DAT files are not damaged. Let's say that the user in some way has bypassed the directions for handling files, then this illegal behaviour might result in the OS software not to be able to update the NDX and DAT files correctly. If the NDX and DAT files are no longer in sync with the content of files present in the instrument, then we call it a "corrupt database". A corrupt database can result in strange behaviour such as strange error messages. Luckily there is a way to fix the database. Let's say the database is corrupt and you want to restore it, then you must first copy all files from these folders to you PC: ROMStyle Song Userprg Style Now you should format the keyboard. After that copy data back into the keyboard. Do this: .STL files (ROMstyles) are copied to the ROMStyle folder .MID files are copied to the "Put New Songs Here" folder .UPG files are copied to the "Put New UserPrograms Here" folder .STL files (non ROM styles) are copied to the "Put New Styles Here" folder After that you turn on your keyboard and then the G-70 / E-80 OS software will rebuild the database while importing all midi files, user programs and user styles. When this is done your database is restored! Notice that you might want to copy your .UPG files to the target folder "Put New Music Assistants Here" instead of the folder "Put New UserPrograms Here", but you only do this, if you want the keyboard to automatically create Music Assistant registrations based upon each user program.
NOTICE THAT THIS TRICK CAN LEAVE YOU WITH A NON WORKING INSTRUMENT, SO ONLY TRY THIS, IF YOU KNOW WHAT YOU DO!

● Help if you lost all your data while installing a new system update. Situation: Before I installed the new system version update, I did backup the "User program Set", but when I reloaded the User program set after updating, I could not recall any user programs? All my data is lost...
Solution: Yes, all your data is lost! Saving your User Program Set is not enough! You also have to save all user programs. A user program set only contains pointers. Each pointer in the user program set points out a specific user program (.UPG-file). Always backup both your User Program Sets AND your User Programs! See also the user tip: ‘Easy backup of my data'.
● Is the G-70 better than the G-1000?
Let me start by telling you, that I love my G-1000 too! For me the G-1000 is the first arranger keyboard ever which have managed to be going strong - still after 6 years. That is amazing! In May 2005 I still think that G-1000 can fullfill what is expected of an arranger keyboard when being used on a gig. After 6 months exploring my G-70 I still use the G-1000 at gigs. I tell you this, so you will know that I - REALLY - am a dedicated fan of the G-1000 - just like you... However the G-70 is here.... so why should you replace your beloved G-1000 with a G-70? Is it really necessary? Below I will tell you my personal view about this:
G-1000 cons. 1. Still loving my G-1000 I must admit that I really "hate" certain intros and ending. That's because I have listened to them for years now... for a musician this is not inspiring at all!
2. The keys are not that good quality anymore. Seems to have been pressed so many times over the years, that the keys feel more like any other ordinary keyboard without the special action key concept. So the keys are just not THAT fantastic anymore.
3. I am living with an ever lasting fear of experiencing COD (Click of death) - the next time it might occur in a live situation.
4. I am not satisfied with the concept of managing User Programs on the G-1000. I feel very limited in having only 3x64 user performance memories at hand at a time (A-, B- and C-banks). Needing more UPM's at a time, you will have to load a new set. This is a showstopper in a live situation, where you have only a splitsecond to choose a certain UPM.

5. I am using only a very limited number of solo voices from G-1000 because I think that most of the solo sounds are not of high enough quality to use as right-hand solo voice.
6. Playing my dinner-repertoire I decrease the drums volume level quite a lot, because I think the G-1000 drums are not of high enough quality to use in many dinner-rep. style registrations.
7. Looking at the cabinet you can definately see that my G-1000 is not new anymore....
G-70 pros. Are these problems solved by buying a G-70. Yes! For me the decision to buy a G-70 was taken only a few minutes after having heard a few solo sounds and a few ROM styles from the G-70. Combined with the released specifications I had NO doubt. The G-70 is indeed a big improvement to the G-1000.
So what did it for me was the quality of the new sounds and the new styles, but there are MUCH more great improvements compared to the G-1000:
1. The G-70's sounds are MUCH better than the G-1000 sounds! For me that means, that I will be able to use a large variaty of solo sounds on G-70. I did not do that on the G-1000 - because I think the G-1000 sounds are not good enough to be used as solo sounds. For example I simply do not believe that it is a saxophone when I play with a G-1000 saxophone sound. It does not sound acoustic enough. But on the G-70 the saxophone is so realistic that you just can't stop smiling. Yes, the "grand X" is also nice! I will use it a lot! I miss the "E12 piano" sound of the E-series though. That was one of my favorite sounds on the E/G-series keyboards. Also the guitar sounds, the el-piano sounds, the organ sounds, the brass sounds, the trumpet sounds etc. are amazing on G-70. The drum sounds are dramatically improved compared with the G-1000. This should be describes in a separate chapter. I would have liked even more drum sets though. You can fine tune every drum sound in every style and/or song. This gives you an opportunity to adjust each drum sound in your drum set. Especially the pitch function is very useful!.
2. The internal styles are very sophisticated. Many of them are however "light weight styles". By this I mean that the style is rather simple - not filled with irrelevant acc. part patterns! So this is a great progress for Roland ROM Styles, which are normally "to much" - I mean to many tracks with to many acc. patterns. Often musicians wants a rather simple acc. and there are many great simple styles on the G-70.
3. The music assistant gives you the possibility to administrate your registrations using the melody name in stead of numbers like on the G-1000. Today playing the G1000 I know that the registration for "Robbie Williams Feel" is located in C-bank number 54 (C54) in my setup.

On the G-70 you make a user registration for the melody and store the registration in the MA with the title instead. This is a HUGE improvement making administration MUCH easier!
4. The G-70 has a fantastic integrated vocal part with effect section, harmonizer and vocoder. All easy to use and high quality.
5. The touch screen dramatically improves user interfacing with the instrument and the score display gives me the possibility to play to the Midi file without paper notes.
6. I feel safer storing my data on a non-mechanical media. On the G-70 you store data on a memory card. On the G-1000 you store data on a zip-media using a zip-drive.
7. On G-70 you have very easy access from PC to keyboard.
8. On G-70 you have a mark and jump function using midifiles.
9. On G-70 you can modify your styles or songs very easy on the fly using a make-up tool.
10. The PRO ACTION keys are the best keys on any keyboard on the market!
G-70 cons.
1. You can’t make your own custom drum set. (The E-80 can ?) 2. I could need a few old E-/G-series sounds. 3. Some vital buttons are placed the wrong place on the keyboard. 4. Some of the buttons are too high (stupid design).
● Creating your own style mix
Make a choice for a style, in this example I take "Live Pop". 1. Press MENU. 2. Touch STYLE COMPOSER. 3. Touch TRACK EDIT in the display. 4. Touch COPY. 5. Touch SOURCE and it becomes blue.
Now you have to make the choice from which style you want to have the Drumtracks! Press now the button of the FACTORY Stylegroup and after that touch the Style you want.
1. Take e.g. DREAM DANCE from the Stylegroup DISCO DANCE. 2. Press the flashing button EXIT and you are back in the STYLE COMPOSER. 3. Touch SOURCE (blue again) and you will see DREAM DANCE as the SOURCE.

4. Touch INT 1 and turn the DATA ENTRY WHEEL to MAIN ALL. 5. Touch MAJOR and turn the wheel to ALL. 6. Touch DESTINATION and it gets blue. 7. Touch EXECUTE! You see the first copywork is done. 8. Press EXIT and be clever to save now your work with the name LIVE POP MIX A.
For this name you have to delete the wrong name DREAM DANCE by touching DELETE in the screen several times. Write the new name , I think you know how. You can copy the BASS-tracks or any of the ACCOMP-tracks in the same way. I took for the BASS the tracks of the STYLE LATIN FUSION.
At the moment you turn the WHEEL you can see how many possibilities there are to copy. In this way you can copy from all the styles you have. You can copy from FACTORY STYLES, from STYLES in the INTERNAL MEMORY and from STYLES in the EXTERNAL MEMORY. And now it is your turn to make your own STYLE MIX !!!!
● Importing G-1000 settings It is possible to import your old G-1000 user programs into G-70. But how does it work? Well the interaction with the keyboard is easy. press two buttons and you are there. In v.1.1 you can import user programs from G-1000 and VA-76.
On the flip side of the coin is the bad news... in my opinion this function is nearly useless! All my G-1000 user programs were 100% top tuned on the G-1000. Every little detail was over the years adjusted to perfection. When importing all my G-1000 user programs into G-70, it sounded terrible. Okay - the G-70 did the job, but the result was not what I expected, even less. So in my opinion - if you are a professional musician, you can not use the import function. You have to create EVERYTHING from scratch! This is a tough one!
It took me almost 5 months to do this converting. I used approx. 3 evenings every week for 5 months. I had 250 user programs, 285 styles and 200 midi files. After 5 months everything was perfectly adjusted to use sounds, effects etc. from the G-70. Even though the process was hard, the result is VERY VERY nice! Having upgraded all my G-1000 settings to G-70, the G-1000 now sounds very inferior :-) So my point is: It is hard work, but you will NEVER regret it, when you are done. You will be amazed listening to your old G-1000 styles converted using the G-70 sounds and effects!!!

● Making screenshots of the keyboard display
You might find it useful to make screenshots from your keyboard. This is actually possible. You can make a screenshot and save it on external memory using a memory card.
You need to mount a memory card. Then press and hold [INTRO], [MAIN], [ENDING] and [EXIT]. Now the keyboard will save a screenshot to the memory card. The screenshot file will be saved in the root folder in .BMP format. The files will be saved using the following names: PIC_001.BMP, PIC_002.BMP, PIC_003.BMP and so on.
● Solving error when creating an OTS for a Style.
Sometimes a 3th party style can give an error when setting an OTS (One Touch Setting), like a 'Disk Error' or 'Incorrect dimension of One Touch Area'. Just load the style and go to the (Style) MakeUp Tools, click Freeze Data and after that click the Save button to write the style. The problem should normally be solved now.
● Easter egg - see the R&D team
Power on while keeping buttons "cover", "make up tools", "menu", "exit", "assign switch 1", "assign switch 2" pressed (wew!). You will now see the Research & Development team.
● Access to the drive utility menu
You can access the G-70/ E-80 internal drive utility by pressing and holding the "Piano", "Arr" and "Arrow down" buttons while powering on. Warning! You can format and delete here.
● File cluster size Look at this scenario: You want to copy some files from your PC to your keyboard. In the PC you determine the files to be xxKb. You then copy the files to the keyboard and on the keyboard you determine the files to be xxKb + yyKb. This is not a bug. The explanation is that the G-70 file system is FAT, which organises files in 16K clusters. Your PC's file system is normally FAT32, which organises files in 4K clusters. Let's look at an example: you copy a style file from PC to G-70. The .STL file is 34Kb. How much space will this file take up?

FAT-32 (PC) the 34Kb file takes up (9 clusters of 4Kb) 36Kb. (Note: E-80 is using FAT-32) FAT (G-70) the 34Kb file takes up (3 clusters of 16K) 48Kb. So in this case the G-70 uses 12Kb more space on the file system than the PC, when saving the .STL file! An unpleasant observation is that e.g. 1Kb .UPG files will take up 16Kb in the G-70 hereby "wasting" 15Kb of "unused" disk space. However, these are the laws of physics, and there is nothing to do about that. You might ask why Roland has decided to FAT format the internal drive? The answer is that it was made to have the data transfer as fast as possible being aware of the global slowness of data transfer and database updating. Some users then look for the possibility to extending the internal memory. However, this is not possible. The internal memory is soldered on the main board and is in fact the largest size available (January 2006) for the type of memory used. Please notice that it is very easy to expand the memory space by purchasing a PCMCIA adaptor and memory card. So if you find differences comparing file sizes on your PC and your G-70, now you know the explanation.
● G-70 - How to put MFX effects on Song and Sequencer Parts
The G-70 has a very nice multi-effects processor that you can insert on any of the Keyboard Parts, with just about any effect you might need – from nice tube amps to put on guitar parts to Lo-Fi bit-depth reducers for ‘crunchy’ techno sounds, to beautiful shimmery 3D Choruses, you name it, it’s in there.
But... you can only put them on Keyboard parts, not Style Parts or Song Parts - until now!
It occurred to me that the Audio Inputs on the G70 have pretty much the same MFX effect section as the Keyboard section (they call them IFX effects, but they are basically the same), and the G70 has a pair of Direct Outputs that you can route ANY Keyboard, Song AND Style Part to (except Harmonic Bars). So why not hook up the Direct Outs to the Audio Ins??
A pair of short 1/4inch to RCA cables and it is done. Set your Ext Source knob to about 9 o’clock for unity gain (this is important – you don’t want to overload your IFX section) and now go to the Part Outputs section (bottom right of the main Effects screen) and Assign whatever part(s) you want to go into the IFX section. You’ve just DOUBLED your G70’s effects power!
Here’s the REALLY cool part... all of these assignment get memorized with each UPG, including the IFX settings! So for each Song or Style you can set up a UPG that routes whatever part you need into the correct effect, edit the effect to be how you like it, and STORE it to a User Program.

The possibilities are endless, here are a few… A ‘real’ tube amp sound on Rock Guitar Styles. Two different reverbs for Drum Kits (one short, one long?) By using more that one Drum Channel in the Sequencer (or the Style Composer section) you can select which drum sounds get put into the IFX reverb (which has it’s own Chorus and Reverb sends – back to the Song/Style Effects). Pretty flexible, eh??!! Remember, the IFX section is an insert, not a send, so if you put ALL your drums through it, it's going to reverb up the WHOLE kit, not just the drums with a reverb send on them (boomy kick, anyone?!)
Because you can have as many Drum Parts in the song or style as you want (thank you, Roland!), you put the Kick (or whatever else you want) through the main Song or Style reverb on one channel and all the stuff for the IFX on another and ONLY route that to Direct outs.
You can now do my Reverb, Chorus AND Delay trick from here; on the Song or Style section.
You don’t HAVE to use the IFX on Song or Style Parts…….. you can now have two different MFX effects on different Keyboard Parts for playing live. You CAN’T, however, route one MFX into the other MFX because the Direct Outputs bypass the effects completely…. Oh well!! You can EQ a Part(s) individually, rather than use the Mastering section.
Let’s get weird... Why not route the Vocalist’s Direct Outputs into the IFX (with a patch cord) and use effects like the Step Flanger or Slicer for that ‘BT’ sound??
Your imagination will come up with many more than these –
● Adjust overall bass while playing
If you think the overall bass is too loud you might want to adjust it using these settings:
[EFFECTS] -> [COMPRESSOR] = OFF
[EFFECTS] -> [MASTERING TOOLS] LO GAIN DB = +1
Use can save the MASTERING TOOL setting by pressing [WRITE USER]. You might want to decrease LO GAIN DB even further. Try it out!

● Overriding the ROM styles
This is one of my favorite customization tips. It should probably be categorized as a "do not try this at home" tip. Consider this scenario:
You choose an internal ROM style, e.g. the ROM style "Schlager pop". You now select upper- and lower voices, effect etc. When you are done you save your settings as user program 1-1. You now notice that the reverb setting for the a.bass has the value "0". You do not like your bass sounds with reverb, so you adjust the reverb to the value "-127". Now the automatic bass is 100% dry. You now save your user program again to save your setting.
Now try to recall the user program. What is the reverb value of the a.bass? It is still value "0". Now you might be confused, because you had just adjusted the level to "-127"? This is not a bug. The concept is that you can not override the settings of the ROM styles. But you desperately want to adjust the reverb, so you now have two alternative ways to proceed:
Alternative 1. Save a copy of the ROM style to - let's say external memory. You can modify the a.bass reverb on this copy an use the copy style in your user program.
This was what the users typically do, but there is however another way to change the reverb. Watch this:
Alternative 2. Follow the instruction in alternative 1. You now have a copy of the style "Schlager Pop" on external memory. Connect keyboard to your PC via USB. Via PC you now replace the ROM style "Schlager Pop.STL" with your modified copy of "Schlager Pop.STL" which resides on external memory.
Congratulations! You have now overrided the ROM style. The original ROM style "Schlager Pop.STL" is replaced by your modified "Schlager Pop.STL" with no reverb in the a.bass.
One very important note is that the file names has to match 100%. Otherwise it will not work properly. So why should you do this?
Well, you should do it, if you are not satisfied with the settings of the ROM styles. Personally I am not satisfied. So why don't I just make a copy of the ROM styles to external memory? Well, you could do that, but I think it is stupid to have a copy of all 285 ROM styles residing on external memory. Furthermore I like to be able to select the ROM style from the "STYLE" section on the keyboard. So this is my motivation for overriding the ROM styles.

As you probably have realized is that you are actually making your own factory data bundle by using this trick. Remember - do not try this unless you know what you are doing. Enjoy!
● Combining styles and songs
There are three ways to make music on a G70:
1. You can either use the arranger section 2. Or you can use SMFs 3. Or you can always just play the keyboard and turn off the machines!
How about a FOURTH way...? What if you combine Style Play AND SMF playback...? Brilliant!
The ability to take a tune anywhere you want to is the strength of arranger play. Flexibility, the possibility of throwing some extra section in if the audience is dancing, or a friend sits in and you want an extra solo, or a 'vamp' while you talk to the audience.
A MIDI file, or SMF's strength is the freeing of your left hand from the chore of just inputting the chords, so you can play normally (at least normal to those of us who grew up playing in bands or without arrangers!), and the ability to better fine-tune the bassline and accompaniment to better suit your arrangement, or get closer to the record. You can have the best of both worlds. Here's a few possibilities:
Combine Recording the verse and chorus accompaniment for a song in four variations with the Mark/Jump buttons to cue each. Save the Song, and save the Style (if you want to make specific OTSs for each section of the song) and make a UPG that links the Style you just used with the SMF you just saved. Now you can link lyrics to the SMF, and the four total keyboard setups for this particular song via OTS, and save the style.
You now have four different variations of the Verse / Chorus, cued by the Mark/Jump, that does EXACTLY what you would have done with your left hand anyway...! And you now have synced lyrics to the style (in a way!). You can see that SMFs can combine the flexibility of arranger use, with the freedom to play with both hands without having to tie up your left for chord input.
And you can still sync start the arranger, have it take over from the SMF seamlessly (or at least as good as you can play on the 'one'!), cue up the next verse / chorus SMF section via the Mark / Jumps while you play a free-form section or bridge, or vamp, and go back to the SMF by hitting Play. Parts of your tune done with an SMF, parts done with the arranger, and you in control the whole time. WOW!

Another strength in combining Styles and SMFs, for those of us who need to just use an SMF all the way through a song, but with Mark / Jump cues to change structure if we wish to (after all, there's nothing to stop you from recording an extra section or vamp 16 bars AFTER the end of the song, and Jumping to it during the song to extend it, or not Jumping if not needed, as well as just Verse / Chorus marker points), is now we can use the linked style (it can even be an empty style if nothing matches the SMF) to hold the OTS settings, and now have four totally different keyboard setups for different sections of the song. Brilliant...!
The linked style to SMF, so you can store 4 keyboard total setups in the OTS, is something that DRAMATICALLY increases the G70's power as a live keyboard. Anyway, as you can see, this is just the tip of the iceberg...
● How to operate the Guitar Mode
This function is the most advanced and most innovative new feature in OS2. Guitar mode allows you to play extremely realistic guitar parts via the keyboard. The guitar mode relies on a special approach which is very musical and surprisingly logical once you have come to grips with the underlying principle.
When you activate the guitar mode, the UP1 parts acts as main guitar, while the UP2 part is used as additional guitar that doubles the notes of the main guitar part. This means that, while the guitar mode is active, UP1 and UP2 cannot be used for other melodic purposes.
Though, with a little practice - used in realtime, the guitar mode will prove invaluable for song and style recording. I will not describe how to enter the guitar mode. However, it is very easy and intuitively. Instead I will describe how to operate the keyboard, when the guitar mode is enabled:
Step 1: Press the [ELECTRIC] and the [ACOUSTIC] switch icon to specify guitar type. The choice is reflected by a big guitar picture in the display
Step 2: Play a chord in the keyboard area called "CHORD" in the display. The keys in the "CHORD" area (unlike the keys of the "ARPEGGIO" and "STRUMM" areas, see below) also trigger other keyboard parts you may have switched on. Depending on the keyboard parts you switch on, those keys may play the MBS, LW1, LW2 (left half) and the UP3 part (UP3 split area). Even

the arranger's chord regognition remains active. The notes played in the "CHORD" area are not played by the keyboard's guitar section. They only specify what you will hear.
Step 3: Press the first "C" key to the right of the "CHORD" area. This sounds the note a guitarist would play on the low E string. The key you are pressing now belongs to the "ARPEGGIO" section.
Step 4: Now press the "D" key to the right of the "C" you used in step 3. This is the note a guitarist would play on the A string.
Step 5: Continue with "E", "F", "G" and "A" keys to sound the remaining guitar notes for the chord you specified.
To sum up: the six keys you have pressed so far are assigned to the virtual guitar strings. This allows you to play a guitar arpeggios that use the chord information you supplied in the "CHORD" area. The exact phrasing of your arpeggios depends on the order in which you press the keys. If you start pressing these "string" keys right after switching on the keyboard (before specifying a chord), the guitar mode sounds the basic pitches of the six strings (i.a. E-A-D-G-B-E). As soon as you play a chord in the "CHORD" area, however, the keyboard memorized and uses it until you play a different chord.
Step 6: Play a different chord in the "CHORD" area and again use the "strings" keys (in the "ARPEGGIO" area) to sound the constituent notes.
Additional ARPEGGIO functions. Pressing the black keys in the "ARPEGGIO" area you can use the "effects" assigned to them. The following effects are available:
B3 & F#4 keys (lowest chord note) These keys allow you to sound the lowest note of the chords you play in the "CHORD" area. Here is an example: If you play a "C" chord using the C-E-G keys, this function sounds a C. If you play that same chord using G-C-E, this function sounds a G.
C#4 key (6 strings) This key causes all six strings to sound more or less at the same time. Later on, you will discover there is also a "fast" variety, where all string are hit almost simultaneously. "Down", by the way, means that the simulated plectrum moves from the upper part of the guitar (the low E) towards the floor.
Eb4 key (Strum down slow) This is similar to the above, except that only four notes are played.

Ab4 key (Fifth of the chord) This key plays the fifith of the last chord you specified. Consider combining it with the next function for popular guitar licks based on the alteration between the root and the fifth (can also be played together)
Bb4 key (Root of the chord) Unlike the B3 or the F#4, this key always sounds the root note of the last chord you specified.
Selecting guitar sounds After choosing between [ELECTRIC] and the [ACOUSTIC] guitar type you can select the desired sounds from the select guitar sound bank. The possibilities are:
[ELECTRIC] 01: Jazz Man 02: Open Hard 03: O.H. DstFX 04: Open Hard2 05: O.H. OvdFX 06: V Jazz Gtr 07: V Cln Half 08: V Dist. 3 09: V Warm Drv 10: V Power 3 11: Dist Guitar
[ACOUSTIC] 01: V Nylon 02: V Steel 2 03: V Steel 3 04: V Steel 4 05: V Steel 5 06: V 2 Guitars 07: V Nyl+Steel 08: V Nyl+Stee2
The chord indicator. The guitar mode page contains a "window" that shows how the chords you play on the keyboard are transformed into guitar chords. The small numbers refer to the lowest fret being used. An "x" means that the string in question doesn't sound (guitarist not alway use

all strings for the chord). The strings are shown from high (E top) to low (E bottom) - that's how guitar tablatures are usually printed. The guitar neck has therefore been turned upside down.
Using STRUMM techniques. While the "ARPEGGIO" area essentially provides functions that allow you to "compose" your own guitar parts in realtime, the "STRUMM" area contains a series of presets for various strumming techniques. "Strumming" means that all guitar strings are played more or less simultaneously using a plectrum or one's fingers.
All functions described below use the chords you specify in the "CHORD" area (see above). Note the keys that make up the "STRUMM" section (as stated above, the UP1 and UP2 are not available in guitar mode, because they are used as guitar parts.
Note too that the keyboard's arranger can also be used and controlled while guitar mode is active, so that the chords you play with your left hands are used both by the keyboard's arranger and its guitar mode functionality.
Some of the keys mentioned below produce two effects: one when you press them, another when you release them. Below this is indicated using these symbols [P] for key-pressed effects and [R] for key-released effects.
C5 key (down fast) All six strings sounds at the same time. This is the fast version of the strumming pattern (the slow version can be played using the F#5 key).
C#5 key ([P] down fast / [R] up fast) Pressing this key triggers a fast strum downward strum. "Down" means that the simulated plectrum/thumb or finger moves from the lowest to the highest string. Releasing the key will trigger an upward strum in the opposite direction.
D5 key (up fast) This key causes all six strings to sound at the same time, this time from the highest to the lowest string.
Eb5 key ([P] down fast mute / [R] up fast) Here is another downward strum that is muted almost instantly when you press this key. Guitarist achieve this effect by putting their hand on all strings. When you release this key, your virtual guitar plays an upward strum, ehich is not muted.
E5 key ([P] down fast / [R] up fast mute) This is the opposite of the previous pattern.

F5 key (down fast mute) This key triggers a downward strum that is muted almost instantly.
F#5 key (down slow) This key yields the same effects as the C#4 (in the "ARPEGGIO" area).
G5 key (downfast mute + knock) Here is a more elaborated technique, especially suitable for acoustic guitars - a downward strum that is muted almost instantly and accompanied by a "knocking" sound.
Ab5 key (up slow) This is a slow upward strum.
A5 key (down slow mute) Slightly slower downward strum that is muted.
Bb5 key ([P] down fast4 / [R] up fast mute4) This one only uses the 4 highest strings.
B5 key (power chords3) This one is intended for electrical guitars. Great for a distortion guitar. Only the lowest 3 strings are played.
C6 key (down fast4) A downward strum using only the highest 4 strings.
C#6 key ([P] down fast4 / [R] up fast4) Again a combined pattern using only the highest 4 strings.
D6 key (up fast4) An upward strum using only 4 strings.
Eb6 key ([P] down fast mute4 / [R] up fast4) Again 4 simulated strings that are strummed in two directions.
E6 key ([P] down fast4 / [R] up fast mute4) This is the opposite of the previous pattern.
F6 key (down fast mute) A one-way pattern that produces a fast downward strum which is muted.
Temporarily remove the guitar function. This is possible to remove the guitar function from the keyboard and to play the UP3 in the entire right half. After some practice this should allow you to alternate between a guitar and another instrument part. I will not describe in details how this is done, but it is pretty easy.

Guitar mode options. After telling you about the "ARPEGGIO" and the "STRUMMING" techniques let's have a glance at the options you can use to fine-tune your virtual guitar's behaviour.
Retrigger Allows you to specify whether notes pressed are replayed again when you play another chord. This function is on by default.
Chord off muting Switch this function on when you want to mute the virtual guitar strings by releasing all keys in the "CHORD" area. That way, your left hand can be used for occasional "mute" instances whose effect is similar to the one obtained with any of the "mute" patterns in the "STRUMM" area.
"V" noises Guitar parts usually contains gentle squeaking and sliding noises. Use this function if you want to add such noises to your virtual guitar parts
Adapt chord Use this function if you want your virtual guitar to adapt its chord voicings to the inversions you play in the "CHORD" area. As you know, each chord can be played in a variety of ways on a keyboard and a guitar. Though the guitar mode always voices its chord in a typical fashion, you may need even more flexibility than this basic system can provide. In that case, switch on this parameter and try out different inversions to discover how that affects your guitar.
Auto sustain Enabled, all guitar notes you trigger using the "ARPEGGIO" keys have a longer decays
Hold pedal This function only works with an optional DP-2, DP-6 or BOSS FS-5U footswitch to the hold footswitch socket.
Doubling This allows you to add a second guitar to the main guitar part. This gives the impression that the guitar part is actually played by two musicians.
Stereo width This allows you to adjust the distance between the two guitar sounds.
User programs Notice: All guitar mode settings can be written to a user program and recalled at a later stag.

● Using piano string layer
Don't you HATE the Piano String layer Piano Str1? Every time you hit the piano hard, the strings 'jump out' WAY too much... How can we make a better one? And make better Piano layers with any pad sound?
Try this... When you layer a string or pad sound with a piano, change the string or pad layer's Key Touch to 'Low' if you have the Piano set to Medium (my favorite for general playing) or Medium if the Piano is at 'High' key touch.
Now turn down the volume of the string/pad layer until, when played at medium strength, it sits just about right. Now when you play hard and the piano note spanks out nicely, the string/pad layer doesn't get too much louder, and when you play softer, the piano sound gets nice and quiet, but the string/pad doesn't disappear... Lovely, isn't it?
Finally, you might want to turn down the filter cutoff parameter of the string/pad layer if you feel it is getting too bright, and edit the release if you think it is too long or short. Give it a try, see what you can come up with.
● Getting a PK-5/7(A) Midi Bass Pedal working with the keyboard transpose
Goto Main Menu, select MIDI. In MIDI, select Midi Easy Setting Output: MIDI. Click the EDIT button. Select in the MIDI EDIT window the SYSTEM box and goto PAGE 6, Param. Check if the box OCTAVE TX is set to Relative. Select the TRANSPOSE RX box and set it to ON. Click the BACK key and select WRITE and click box 1 to save the midi settings. If you want to start the keyboard automatically with these MIDI settings, click the MENU key and after that the UTILITY key. Select in the STARTUP window the box RECALL from the MIDI SET RECALL part (Must be blue to be ON), select the box right next to the RECALL box and select MIDI SET 1. Press the BACK and/or EXIT button. (For the E-80, see also the keyboard manual page 239/240).

● Session Manager software
The Session Manager help file states that you MUST transfer the session to INTERNAL memory before you actually use it.
I have tried to make Roland aware of this problem - so if you're listening Roland, here is the problem again (Sorry - it's a bit technical!):
"UPG’s in External memory will not look-up custom styles by filename - they use an index instead, which causes the UPGs and custom styles to be locked together inextricably. UPG’s in Internal memory WILL look-up custom styles by filename if the index at $00AF, $00B0 is set to $FFFC. Please make External memory work the same way".
● Limited access to SRX expansion board sounds? When placing a SRX expansion card into the G-80 or E-80, we can't access all the sounds from the SRX card. This is normal, because the amount of available sounds from an SRX card is defined by a patch list. Look in the SRX owner's manual and you will find two separate patch lists: But use the RD-700 / MC-909 / VR-760 list as compatibility list for your G-70 / E-80 (as they are using the same list as the RD-700).
● Using the video output
Connect an external monitor (TV or monitor) to the Video Output Socket to display the lyrics of songs that contain such information and the note information extracted in realtime even if the [LYRICS&SCORE] button does not light (in which case the lyrics, chords and notes no longer appear in the keyboard’s display. Note that the monitor always displays the Lyrics if available), even if you –or the keyboard– select(s) other display pages. Scores, on the other hand, are never displayed by the external monitor.
1. Connect the VIDEO OUTPUT socket to the video input of the TV-set or monitor. (connector: Video output Composite, PAL & NTSC) 2. Switch on your TV set or monitor and start playback of a song with Lyrics. If the lyrics and chords do not appear correctly on the external screen, proceed as follows: 3. Press the [LYRICS&SCORE] button, after that press the [OPTIONS] field. 4. Press the [PAL] or [NTSC] field to select the desired setting (or the one that works).
● Using external memory
It is a very good idea to expand the memory using external memory by connecting a PCMCIA adapter and Compact Flash or Secure Digital memory cards. You can NOT use 32 bit Cardbus types, but only the 16 bit PCMCIA to CF or PCMCIA to SD adapters. When sliding an adapter into the keyboards PCMCIA slot, take care not to use excessive force! Just slide the adaptor into the slot with minimal force, to prevent damage to the internal PCMCIA port pins. Most PCMCIA to SD adaptors are supporting till 2GB SD memory cards, depending on the adapters. I prefer using 1GB SD cards and 1 and 2 GB CF cards. Most of the PCMCIA to CF adaptors and also the E-80 and G-70 are supporting till 4GB CF cards. When these smaller capacity memorycards are difficult to get in shops, try getting them on Ebay. Do NOT use the industrial types or ultra high speed and / or SDHC types. They are not compatible. Always format the memory cards in the keyboard and not at the computer. There is no need to use larger memory cards as the keyboard indexes most files in the database and when the amount of files is growing, the database will also slow down… Please, keep that in mind.
● In short: UPG (User ProGram), UPS (User Program Set) and MA’s
All names, references of Styles, UPG's and MA's (Music Assistant) are stored in database files (present in internal and external memory DB map). New to add files of Styles and UPG's MUST be added by putting them into their specific 'Put New .... Here' map in the internal or external memorystorage. Only this way the database will update correctly.
UPS (User Program Set) are only UPG-lists with max. 144 entries per set (18 pages with 8 entries). This way people can make their own sets for all kind of specific occasions. An UPS does not contain UPG's nor Styles but only contains references to them. UPS files reside always in the Userprg folder and are NEVER added through the "Put New UserPrograms Here" folder.
When making or editting a UPG (User ProGram), it is a good idea to have one 'SPARE' (free) entry in the current loaded UPS (Set) e.g. the last entry: To save the made or editted UPG there when that one was not already in the set. When this one is already in the set, you can just overwrite that same entry. Music Assistant (MA) does ONLY work with UPG's in Internal memory. In the User program Options screen you can set UPG's to be MA's.
An UPS (Set) can also contain the personal custom added stylenames. When you add style-names into the internal Custom Style pages, their references are stored into the current loaded UPS. So, do not forget to save the UPS when changes are made, otherwise those changes will be lost...

● Making back-ups of the internal and external memory
It can not be said enough to regularly make Back-Ups of your work. In the case of the keyboard that would be, backing-up all internal- and external memory data files. When a problem with the database or a memorycard failure arises, restoring all the data within a short time is a relieve when you know you have back-ups. See the BACKUP instructions in this document for the instructions (see the next pages).
● General hints and tips - Keep filenames below 18 characters and try and use filenames with the first 8 characters unique (Roland uses the old 8.3 filenaming convention internally in places, which can confuse the used file database). Best thing is to keep filenames at max. 16 characters, so that in the display longer names do not get the all confusing ~1 behind the name.
- The E60, E50, GW8, Prelude, BK9-BK5-BK3 keyboards do not have LW-2 and UP-3, therefore Style OTS and UPG from those may need editting.
- Styles from G-70 PRE V3.0 OS do not have OTS (One Touch) into the styles. The styles from the E-80 are nearly fully compatible with the G-70 V3.
- You can add OTS to Styles not having OTS, by copying them from other Styles. Select a Style which has OTS in it, select an OTS from it and listen to it while playing. If it's a good one, deselect the OTS button and select another Style without OTS. Press an OTS button till a popup OTS Menuscreen pops up. Than write the setting into an OTS of your choice. Ofcource editting can be done to suit your own needs and/or taste. Every good and complete Style should have 4 OTS settings, if not, a dull and dry default setting will be used when pushing an OTS button. You can edit the soundparameters and save your own settings into the Style OTS'ses.
- When editting a style (MT-tool) the Country field will be reset. That entry might need to be set again.
- When keyboard stops working when saving style after freezing data: Do not freeze the data, but just save it without freezing first.
- It is a good idea, considering the relative small internal memory, to put extra styles only on the external memorycard. Styles are in ratio the most spaceconsuming files. Changing a memorycard is cheap, so consider a few of them depending on what you need.
- When playing, do make a good use of the Variation buttons, the Tone Assign Part on/off buttons, and do try the Style OTS buttons.

- When you are regularly loosing files, did you format the card in the Keyboard or on a PC before using it? You should format it only on the Keyboard. If you haven't, copy all the data to the PC, format the card in the Keyboard then copy the files back. Secondly, ALWAYS use the Keyboard to transfer data from the PC via the 'Put New..." folders. Otherwise the databases will not update. Put Midi KAR (karaoke) files in the "Put New Songs Here" folder. It is a good habit to rename karaoke .kar extention to .mid for using them in the keyboard.
NOTE:
A lot of these tips were taken from the old roland-arranger.com internet forum site. http://roland-arranger.com/ Section ‘Tips & Tricks’, the ‘User to user tips’. The site has been changed and you will have to look in the legacy part of the forum for the old info. Do take a look at the roland-arranger.com forum in the Files section! See there also Ralph Schink his ‘Tips and Tricks Workshop’.

Update - Backup - Recovery data *For your personal data safety read with attention - Before any update operation, please make a personal data backup. If you have some trouble you can come back restoring your personal data previously backup. *Attention! To perform update operation you need at least 7000 Kbytes free. Please check your free memory space. Please don’t perform any updating operation if you haven't enough free memory. If you have not enough space please read the "BACKUP instructions"
How to check your free memory space 1. Press [MENU] > [UTILITY] > [INFO] 2. The E-80 / G-70 shows the “FREE SPACE INTERNAL MEMORY” 3. Please check if the memory free is more than 7000 Kbytes
BACKUP instructions 1. Connect the E-80 / G70’s USB port to your computer. 2. Save your personal user program set pressing [DISK&MEDIA] > [SAVE] > [USER PROGRAM SET] 3. Press [MENU] > [USB DATA STORAGE] > [INTERNAL MEMORY] As soon as the connection has been established, the display shows “CONNECTED” (USB DATA STORAGE page). 4. On your computer, open the “My Computer” window. There should be a “Removable Disk” referring to the keyboard’s internal memory (E80_SSD or G70_SSD). 5. Create a folder “My Backup” on your PC. This folder will contain your personal backup. Note: Do make separate Back-Ups of the internal- and external memory frequently. 6. Drag & drop or Select-All/Copy/Paste all the E-80 / G-70 folders into “My Backup” folder. 7. When all files have been copied, terminate the USB connection using the tray icon at the right of your computer’s tool bar. The tray icon related to the USB connection looks like a green arrow on top of an electronic device. Leave the mouse pointer on this icon and wait for the “safely remove hardware” message to appear. 8. Using the left mouse button, double-click this icon to open a window that lists all hardware devices that are currently connected to that USB port. Select “USB mass storage device” and check at the bottom whether the device description refers to your E-80 / G-70 (“Roland Arranger USB device”). Click “Disconnect”, and in the next window “OK”, then wait for the message that informs you that you can disconnect the hardware. Click “OK” to close this window. 9. On the keyboard, press the [EXIT] button or [DISCONNECT] field. 10. Disconnect the keyboard’s USB port from your computer.

RESTORE PERSONAL BACKUP instructions Attention! The following procedure will delete your personal data by replacing it with the personal data previously backed-up! Before starting with the following procedure, please make sure that your PC USB connection works properly with the Roland keyboard. 1. Before starting the update procedure, make sure that the “Internal Protection” switch (on the E-80 / G-70 rear panel) is set to the unlocked position. 2. Power on the keyboard while pressing and holding “REC” and “TOP” switches on the RECORDER section 3. A format menu message appears. Press the "USER PROGRAM1” switch to format. The E-80 / G-70 initializes the internal memory. When this is ready, goto point 4. 4. Power off and on again and after that, connect the keyboard’s USB port to your computer 5. Press [MENU] > [USB DATA STORAGE] > [INTERNAL MEMORY] As soon as the connection has been established, the keyboard’s display shows “CONNECTED” (USB DATA STORAGE page) 6. On your computer, open the “My Computer” window. There should be a “Removable Disk” entry that refers to the keyboard’s internal memory (E80 or G70_SSD) 7. Drag & drop all folders in “My Backup” into “Removable Disk” icon (E80 or G70_SSD) 8. When all files have been copied, terminate the USB connection safely using the tray icon at the right of your computer’s tool bar. Leave the mouse pointer on this icon and wait for the “safely remove hardware” message to appear. 9. Using the left mouse button, double-click this icon to open a window that lists all hardware devices that are currently connected to that USB port. Select “USB mass storage device” and check at the bottom whether the device description refers to your keyboard (“Roland Arranger USB device”). Click “Disconnect”, and in the next window “OK”, then wait for the message to disconnect the hardware. Click “OK” to close this window. 10. Press the [EXIT] button or [DISCONNECT] field and disconnect the keyboard’s USB. 11. Press [MENU] > [UTILITY] > [FACTORY RESET] and press the “EXECUTE” button. 12. Load your personal user program set previously saved, pressing [DISK&MEDIA] > [LOAD] > [USER PROGRAM SET]
WARNING! Roland does not suggest users to format the G-70 INTERNAL MEMORY (SSD) in any way. Formatting INTERNAL MEMORY (SSD) may sometimes cause serious damage of the internal circuit of your G-70. Roland assumes no responsibility and shall not be liable for any damages to your keyboard caused by following the G-70 INTERNAL MEMORY (SSD) format instructions available on internet that are unofficial and not authorized by Roland. ATTENTION! We recommend to save the User Program Set and Midi Sets you are currently using as the G-70 doesn't load them after the update procedure and any unsaved changes will be lost.


![V. Mikhalevski, J. Gallagher, A. Martin - Saemisch [E80-89]](https://static.fdocuments.us/doc/165x107/55cf8fe1550346703ba0cdc1/v-mikhalevski-j-gallagher-a-martin-saemisch-e80-89.jpg)