Deep Defender 1.x Best Practices Guide - McAfee
48
Best Practices Guide McAfee Deep Defender Technical Evaluation and Best Practices Guide Version 1.0
Transcript of Deep Defender 1.x Best Practices Guide - McAfee
Best Practices Guide
McAfee Deep Defender Technical Evaluation and Best Practices GuideVersion 1.0

McAfee Deep Defender Technical Evaluation and Best Practices Guide2
Table of ContentsUnderstanding the Problem 4
What is a rootkit? 4
Rootkits and rings 4
Rootkit operation 4
Traditional antivirus solutions 5
McAfee Deep Defender Characteristics 6
McAfee DeepSAFE technology and Intel VT-x 6
The Boot Process and McAfee Deep Defender 6
The standard boot process 6
The boot process with McAfee Deep Defender 6
McAfee DeepSAFE 7
McAfee DeepSAFE trusted memory services layer (TMSL) 7
MFE handler 7
IBAgent 7
Solution integrity 8
McAfee Deep Defender Detection Methods 8
Detection methods in action 8
Detection methods in detail 9
Detection Examples 11
Detecting an unknown rootkit 11
Watch scan automatically whitelisting a good driver 11
Administratively whitelisting a good driver 11
Pilot or Evaluation Plan 12
1. Define and document objectives 12
2. Establish success criteria 13
3. Define the approach 13
4. Identify resources 16
5. Understand and document risks and mitigations 21
6a. Create McAfee Deep Defender policy and assign to systems 22
6b. Tuning VirusScan Enterprise policy 31
6c. Tuning McAfee Application Control and McAfee Change Control policy 32

3McAfee Deep Defender Technical Evaluation and Best Practices Guide
7. Install and update McAfee Deep Defender 34
8. Test and monitor behavior 35
9. Review results 35
10. Success criteria achieved 36
11. Tune policy 36
McAfee Deep Defender Detections 38
View events from the McAfee ePO dashboard 38
Dashboard drill-down on threat event 38
Check the hash of the threat source process name 38
Check with McAfee GetSusp 39
Clean file detected 40
Suspicious file detected 40
File requires further investigation 40
Editing the blacklist/whitelist drivers policy 40
Testing McAfee Deep Defender 40
Testing detection 40
Testing blacklist entries 41
Reporting Best Practices 42
DDBP: Candidate Systems 42
DDBP: Compliance Report 43
DDBP: Inventory Compliant Processors 43
DDBP: Operating System Breakdown 44
DDBP: OS Breakdown Compliant Processors 45
DDBP: Threat Events Report 45
DDBP: Unknown Driver Load 46
Measuring Performance Impact 46
Methodology 46
Test results 47
About the Author 48

4 McAfee Deep Defender Technical Evaluation and Best Practices Guide
Understanding the Problem
What is a rootkit?
The expression rootkit originally referred to a set of administrative tools for Unix operating systems that had been modified to granted root access. If an attacker was able to replace the standard administrative tools with a rootkit, the attacker could obtain root access while simultaneously hiding these activities from the legitimate system administrator. Modern rootkits do not elevate access, but instead are used to make another typically malicious software payload undetectable by adding stealth capabilities. The payload might covertly steal user passwords, credit card information, computing resources, or conduct other unauthorized activities. Due to the stealthy nature of this malicious activity the attack may go unnoticed for an extended length of time, perhaps years. Two examples of the most prolific rootkits are Koutodoor and TDSS, both of which hide malware to steal data.
Rootkits and rings
Computer operating systems provide different levels, or rings, of access to hardware resources. Rings are arranged concentrically from the central most privileged ring, ring 0, to the least privileged ring, usually ring 3. On Microsoft Windows operating systems, ring 0 is the level with the most privileges and interacts most directly with the physical hardware such as the CPU or memory. In ring 3, interaction with the kernel is accomplished using an application program interface (API). The operating system kernel operates in ring 0 (also known as kernel mode) while applications operate in ring 3, (also known as user mode). Rings 1 and 2 tend not to be used.
Rootkits can operate in either ring 0 (and are referred to as kernel mode rootkits) or ring 3 (known as user mode rootkits). While user mode rootkits are easier to develop (since they typically subvert a single application), they are less powerful than kernel mode rootkits. Since a kernel mode rootkit can subvert the entire operating system and any applications installed within it.
McAfee® Deep Defender version 1.0 targets the more dangerous kernel mode rootkits.
Rootkit operation
The operation of a rootkit is best illustrated by providing a generic example: prior to infection, during normal operation, a request is made from a user mode application using the appropriate API function. This request is handled by the kernel, which collects and maintains various data structures. Finally, the requested information is returned by the same route. After infection, stealth malware can divert the execution path through a special filter function—a technique known as hooking. While hooking is by no means the only technique employed by rootkits, it is a very common technique for both user mode and kernel mode rootkits. Hooking is the intercepting of system function calls and modification of their results to deny the presence of the rootkit. Hooking, therefore, modifies the course of the program, by diverting legitimate system functions to rootkit-supplied functions.
Hooking takes many forms, with kernel-mode rootkits hooking tables or data structures used by the kernel, such as the system service descriptor table (SSDT) and the interrupt descriptor table (IDT); there are hooks in ntoskrnl in kernel mode (BadRkDemo); hooks in user mode DLLs (Hacker Defender); and hooks inside a driver (Rustock.B). Regardless of technique, kernel-mode rootkits share a set of common characteristics: the ability to load prior to antivirus to avoid detection at load time, and the ability for remain hidden when active. Once these two requirements have been achieved, the malware contained within the rootkit is able to operate covertly to execute its payload.
Two recent white papers describe current rootkit technologies and stealth attacks.
• New Reality of Stealth Crimeware: http://www.mcafee.com/us/resources/white-papers/wp-reality-of-stealth-crimeware.pdf
• Predicting the Future of Stealth Attacks: http://www.mcafee.com/us/resources/reports/rp-predicting-stealth-attacks.pdf

5McAfee Deep Defender Technical Evaluation and Best Practices Guide
Traditional antivirus solutions
There are a number of limitations when using traditional antivirus solutions to protect against rootkits.
DetectionMcAfee® Labs™ sees approximately 1,000 new rootkits or variants each day. The actual rootkit being delivered is unlikely to be entirely new due to the complexity involved in creating an original rootkit. However, the package that delivers it will be sufficiently different to what has been already identified by anti-malware products to ensure that it goes undetected. For example, the malware may be specially packed or encrypted before run-time to make it appear unique. Malware authors can ensure that the variant is indeed undetectable by more than 40 of the leading antivirus products by using VirusTotal (https://www.virustotal.com/), or similar free services. During the development of the rootkit, an iterative process may occur until the rootkit is sufficiently different to avoid any detection. At this point, the rootkit is free to install and hide itself. So, this variant, from an antivirus scanning perspective, will be entirely new and undetectable.
Detection of this variant is likely to first appear in the McAfee Global Threat Intelligence™ cloud database and other cloud services. Later, in the typical course of events, McAfee and other vendors will include detection and removal capabilities within the standard signature database. Both of these mechanisms will protect against other systems becoming infected, but what about the already compromised system(s)?
RemovalIf the rootkit were a standard piece of malware then a signature update would allow the antivirus solution to find and remove the malicious code. However, since the rootkit has been installed and has become active it will be hiding itself from the operating system before antivirus fully initiates. In addition, the rootkit may have disabled the antivirus technology. Since the antivirus software often relies on the operating system in order to be able to access files for scanning, detection faces three distinct problems:
• First, it may struggle to find the rootkit. The antivirus software requests files from the operating system, but the rootkit is hidden from the operating system—so the antivirus software cannot easily gain access to the rootkit. McAfee VirusScan® contains a kernel mode component (StealthScan), used to perform scanning at this level, but if the rootkit were to disable scanning (a common behavior), then both detection and removal are a challenge.
• Secondly, assuming the rootkit has been found, the antivirus software will attempt to remove the malicious files from the operating system. Again, since the rootkit is hiding from the operating system, removal will be hindered and may require additional steps to fully cleanse a system, such as booting from a CD-ROM prior to running cleaning routines.
•Thirdly, if a rootkit has been found to be present on a system that system has been compromised, the system will be hiding malware, may be hemorrhaging data, and could have been used as a zombie resource within a distributed denial-of-service (DDoS) attack. Essentially, it is too late. While it is important to clean the rootkit from the system, detecting after the fact is not sufficient.
ConclusionWhen a traditional on-demand scan completes and indicates that a system is clear of viruses, is it actually clear, or is it harboring stealth malware? Using traditional technology, it is not possible to have confidence in the accuracy of results. McAfee Deep Defender improves confidence in scan results, by preventing the kernel mode rootkit component of a piece of malware from hiding itself from the operating system. This in turn greatly eases the malware removal process. McAfee Deep Defender offers the added value of real-time kernel memory monitoring to detect and block malicious events as they happen (rather than at some undetermined time after the fact)—along with proactive coverage through behavioral profiling.

6 McAfee Deep Defender Technical Evaluation and Best Practices Guide
McAfee Deep Defender Characteristics
McAfee DeepSAFE™ technology and Intel VT-x
McAfee Deep Defender includes a VMX root application known as McAfee DeepSAFE that uses Intel VT-x to provide a trusted memory services layer (TMSL). This layer is used to intercept both specific CPU instructions classed as potentially dangerous and calls to specific areas of memory to detect and block stealth attacks prior to the operating system fully initializing. This is critically important, as otherwise rootkits initiate prior to antivirus initiating, and so go undetected.
Intel VT (Intel Virtualization Technology) includes both the VT-x and VT-d functions. While VT-x pertains to Intel VT for IA-32 and Intel 64 processors and is used by McAfee DeepSAFE, VT-d represents Intel VT for Directed I/O Architecture Specification, a feature not currently used by McAfee DeepSAFE. The Intel TXT loader validation technology is an example of the use of VT-d, but is not currently implemented. Note that while both Intel and AMD have new virtualization features in their processors (called Intel-VT and AMD-V respectively) McAfee Deep Defender currently supports Intel-VT exclusively.
The Boot Process and McAfee Deep Defender
The standard boot process
BIOS Boot Loader
BootDrivers
OtherDrivers
Services andApplications
Decryption Routines
Figure 1. Standard boot process.
During the standard boot process, the BIOS first looks at the master boot record (MBR), which contains the boot loader. If full disk encryption is present (for example, McAfee Endpoint Encryption for PC, Microsoft BitLocker, or Symantec PGP), a modified MBR will be present to provide a pre-boot environment. After successful pre-boot authentication, the Windows boot loader will attempt to load the operating system kernel (ntoskrnl.exe) and (boot-class) device drivers. Once complete, the remaining drivers are loaded and the system continues to boot. A key point to note here is that the boot loader does not commence loading drivers until pre-boot authentication has completed. This order of operation means that pre-boot authentication and boot drivers have no direct impact on each other and so the addition of further boot drivers will not impact the pre-boot stage of system start-up. For this reason, there should be no conflict between McAfee Deep Defender and full disk encryption products.
The boot process with McAfee Deep Defender
BIOSBoot
Loader mfeib.sysOtherDrivers
Remaining Boot
Drivers
Servicesand
Applications
Decryption Routines
Figure 2. Boot process with McAfee Deep Defender.
As with the standard boot process the BIOS first looks at the Master Boot Record (MBR), which contains the boot loader. If full disk encryption is present (for example, McAfee Endpoint Encryption for PC, Microsoft BitLocker, or Symantec PGP) the modified MBR will provide a pre-boot environment. After successful pre-boot authentication, the boot loader starts to load the operating system in the normal way. The McAfee Deep Defender boot driver mfeib.sys is loaded to initiate McAfee DeepSAFE technology. McAfee DeepSAFE technology low-level protection is enabled when a VMX root application is instantiated to create the trusted memory services layer (TMSL) that resides between the BIOS and the operating system. The remaining drivers load, and the system starts up in the normal way, and then initializes the additional protection routines within McAfee Deep Defender.
7McAfee Deep Defender Technical Evaluation and Best Practices Guide
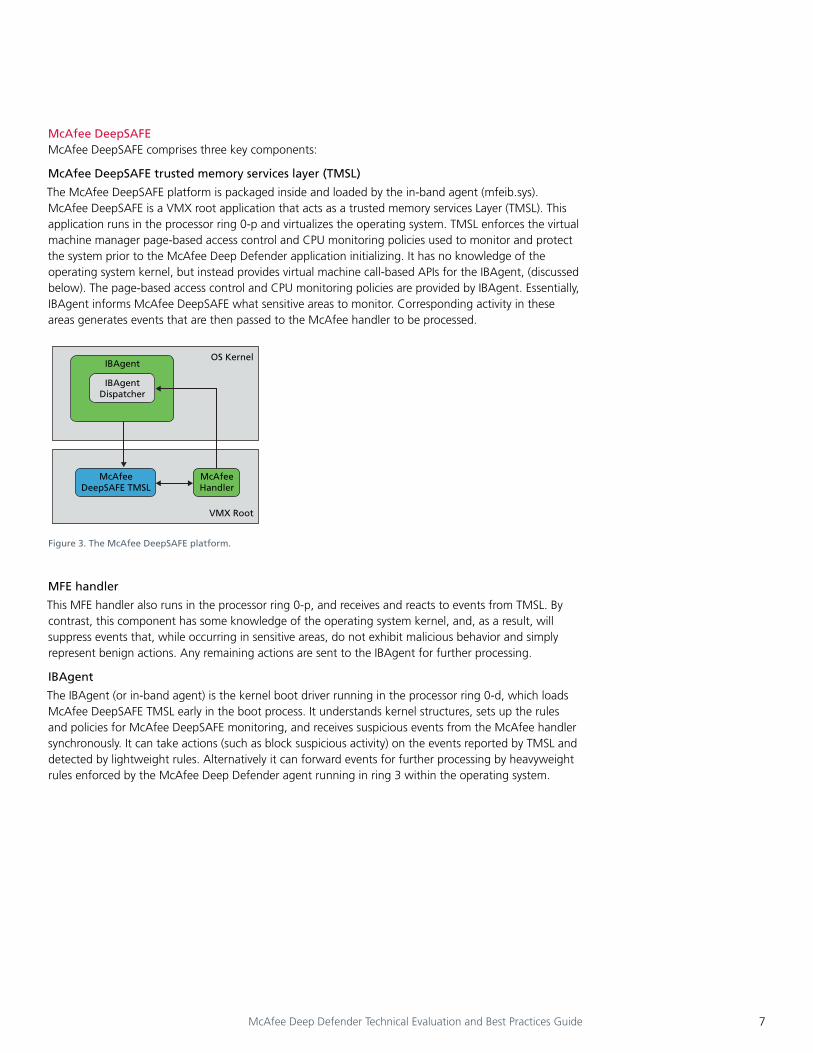
McAfee DeepSAFEMcAfee DeepSAFE comprises three key components:
McAfee DeepSAFE trusted memory services layer (TMSL)
The McAfee DeepSAFE platform is packaged inside and loaded by the in-band agent (mfeib.sys). McAfee DeepSAFE is a VMX root application that acts as a trusted memory services Layer (TMSL). This application runs in the processor ring 0-p and virtualizes the operating system. TMSL enforces the virtual machine manager page-based access control and CPU monitoring policies used to monitor and protect the system prior to the McAfee Deep Defender application initializing. It has no knowledge of the operating system kernel, but instead provides virtual machine call-based APIs for the IBAgent, (discussed below). The page-based access control and CPU monitoring policies are provided by IBAgent. Essentially, IBAgent informs McAfee DeepSAFE what sensitive areas to monitor. Corresponding activity in these areas generates events that are then passed to the McAfee handler to be processed.
OS Kernel
VMX Root
McAfee Handler
McAfee DeepSAFE TMSL
IBAgent
IBAgent Dispatcher
Figure 3. The McAfee DeepSAFE platform.
MFE handler
This MFE handler also runs in the processor ring 0-p, and receives and reacts to events from TMSL. By contrast, this component has some knowledge of the operating system kernel, and, as a result, will suppress events that, while occurring in sensitive areas, do not exhibit malicious behavior and simply represent benign actions. Any remaining actions are sent to the IBAgent for further processing.
IBAgent
The IBAgent (or in-band agent) is the kernel boot driver running in the processor ring 0-d, which loads McAfee DeepSAFE TMSL early in the boot process. It understands kernel structures, sets up the rules and policies for McAfee DeepSAFE monitoring, and receives suspicious events from the McAfee handler synchronously. It can take actions (such as block suspicious activity) on the events reported by TMSL and detected by lightweight rules. Alternatively it can forward events for further processing by heavyweight rules enforced by the McAfee Deep Defender agent running in ring 3 within the operating system.

8 McAfee Deep Defender Technical Evaluation and Best Practices Guide
Solution integrity
McAfee Deep Defender provides protection by ensuring it is the first driver to load. Since McAfee Deep Defender includes a boot driver, this will load ahead of other types of drivers. In addition to this, the installation process creates a load order group for McAfee Deep Defender and ensures that it is the only driver in that group and that the group loads first. By protecting the registry keys that need to be modified to change the boot order, McAfee Deep Defender ensures it remains the first boot driver to load. Once active, any attempt made to modify this configuration will be blocked and an event will be raised.
All product binaries are digitally signed and checks are made before binaries are launched, (using McAfee Validation Trust Protection inter-component communication). When the McAfee Deep Defender service starts, it checks that IBAgent and McShield are running and that IBAgent has been able to load the TMSL component and obtain exclusive use of VT hooks. McAfee Validation Trust Protection ensures that McAfee processes are secure against vulnerabilities that could be leveraged by an attacker to gain additional privileges on a system. McAfee Validation Trust Protection monitors privileges granted to McAfee drivers by the operating system kernel interface during code execution and ensures the validity of McAfee processes utilizing those drivers. Only processes that contain code signed by either McAfee or Microsoft will be trusted to utilize most aspects of McAfee drivers. In addition, TMSL is designed to accept commands from only the IBAgent. Communication is authentication using a hash of the IBAgent. This prevents TMSL from accepting commands from rogue agents associated with malware.
McAfee Deep Defender Detection Methods
Detection methods in action
McAfee Deep Defender operates at multiple levels and is triggered by multiple mechanisms within the operating system to provide a secure environment in which the operating system can load and run. The figure below shows the four key protection mechanisms provided by McAfee Deep Defender.
• Lightweight rules (LWR) are simple rules designed to protect before the operating system has initialized. In the figure below, McAfee DeepSAFE and the McAfee Deep Defender agent have loaded as a result of mfeib.sys loading. The second driver to load is wbf0100.sys, which will be subject to scrutiny using lightweight rules.
• Heavyweight rules (HWR) are complex rules with greater detection and remediation capabilities. Later, when the McAfee Deep Defender agent service has loaded, any subsequent driver will be subject to both lightweight and heavyweight rules.
•Triggered rescan are rules designed to detect secondary signs of infection, once primary detection has occurred. Below, lightweight rules have detected malicious activity in baddrv.sys and triggered a rescan. Event store information is used to determine what to scan to determine, for example, from where the driver was loaded and then scan files associated with this driver to look for further signs of infection.
• Watch scan is designed to watch a system for new content being installed and rate that content. In this case, the user has just downloaded and installed a new video driver. When the driver is registered, watch scan will scan this file and attempt to determine if it is trusted, and, if so, whitelist it, so that on subsequent reboots the lightweight and heavyweight rules ignore this file.

9McAfee Deep Defender Technical Evaluation and Best Practices Guide
ibagent.syswbf0100.sys
umdrv.sys
1
23
4 1. Driver loads before operating system completes.2. Driver loads after operating system completes.3. Known bad driver attempts to load.4. New driver downloaded and installed.
Detection Methods
File system Memory
dloaddrv.sys baddrv.sys another.sys umdrv.sys
Driver load order First
E.g. .\windows\system32\drivers\
baddrv.sys msisadrv.sys acpi.sys wbf0100.sys ibagent.sys
Watchscan Trigger
rescan
Light-weight
rules
Light-weight
rules
Heavy-weight
rules
User mode
Kernel mode
Figure 4. McAfee Deep Defender detection methods.
Detection methods in detail
Lightweight rules (LWRs)Lightweight rules become activated once the first boot driver loads and persist in Windows until the system is shut down. LWRs are behavioral and instruct McAfee DeepSAFE on the areas of memory to map and the CPU instructions that need to be monitored and protected. Lightweight rules will monitor the type of access made, the location of kernel code executed, and the kernel structure being accessed—and will capture a quantity of executing code to add to the antivirus event store. Lightweight rules also contain detection logic to determine activity to be classed as suspicious. As drivers attempt to load, these rules determine when to detect and what action to take based on the configured sensitivity level. When events are blocked, the malware instruction attempting to make a change in a CPU register or write to memory is skipped by the CPU. This content is an essential process to ensure a rootkit-free system start-up.
An infected system may include a driver designed to hide the malware from the operating system. So this protection is designed to ensure all drivers that access specific memory and/or CPU registers are scanned prior to being loaded. In addition, dangerous CPU instructions (for example, LIDT used to modify the base address of the IDT) are monitored and these operations blocked if necessary.
Legacy antivirus is unable to operate until later in the boot process and thus provides zero protection during systems start-up. Once a rootkit has taken steps to hide its presence, protection effectiveness within Windows is dramatically reduced.

10 McAfee Deep Defender Technical Evaluation and Best Practices Guide
Heavyweight rules (HWRs)Heavyweight rules are activated when the McAfee Deep Defender agent (ring 3 user mode application), loads and remains in place until the system is shut down. The agent contains the higher end logic for remediation and removal, the user interface and notification components. HWRs act on the same event data as LWRs, but they also have access to the antivirus event store so they can correlate across other McAfee Deep Defender events. Where the LWRs may detect a driver that is behaving maliciously, the HWRs are able to take this information in conjunction with the content of the event store to determine other components involved in the attack and remove more than just the driver element of the attack.
When the McAfee Deep Defender agent loads, it looks to see if any rootkits were detected during boot and, if so, removes these from the system (for example a driver file that previously attempted to load). From this point forward, when any rootkit attempts to load, it will get caught by McAfee DeepSAFE technology, relayed to the McAfee DeepSAFE loader, processed against not only LWRs within McAfee DeepSAFE, but also against HWRs within the McAfee Deep Defender agent. If identified as malware, it is blocked and can be automatically removed from the system.
Legacy antivirus will operate at this stage of the boot process but will detect based on the appearance of a file, not the behavior it exhibits during execution. The result of this is that legacy antivirus requires constant updating to identify the appearance of rootkit variants. Because HWRs are behavior-based, they are not required to be updated on anything like the same frequency as legacy solutions.
Triggered rescanTriggered rescan is an event-driver on-demand scanner that allows instant triggering and targeting using traditional signature-based antivirus detection techniques to significantly enhance detection and removal capabilities. Rescan content is a subset of traditional content found in legacy antivirus and contains file, registry, stealth memory, and process scanning techniques.
For example, if HWRs detect a rootkit family that is also known to infect the memory of particular processes, the HWRs can issue an instantaneous, aggressive, and targeted rescan of the processes that are known to be targets of the family.
Legacy antivirus will typically scan files rather than memory accessed, using the same configuration regardless of how and when files are accessed or what detections have previously been detected.
Watch scanWatch scan uses traditional static content that runs inside an antivirus engine. Watch scan will scan drivers when they are either written to disk or are registered. Watch scan statically examines all kernel mode driver files on a system and classifies them as trusted, unknown, bad, or special.
Watch scan classifications are made available to LWRs and HWRs, so that the system treats classified files appropriately. Some video drivers exhibit apparently suspicious behavior; if watch scan determines one such driver is trusted and LWRs or HWRs see suspicious behavior that can be attributed to the driver image, they will not trigger detection. Note that only drivers with known digital signatures or with good cloud (McAfee Global Threat Intelligence) reputation scores are trusted currently, although the number of trust mechanisms will be extended in future releases.
Similarly, to support VMware Workstation and similar type 2 hypervisors, these applications must be trusted to perform apparently suspicious CPU operations with detection events suppressed at a low level so that performance is not noticeably impacted.
In some respects, this is similar to a traditional on-demand scan, where on-demand scan results, (based, for example, on driver signing), may be fed back and cached by the on-access scanner to avoid the file being re-examined by the antivirus software.

11McAfee Deep Defender Technical Evaluation and Best Practices Guide
Detection Examples
Detecting an unknown rootkit
A new kernel driver (mal.sys) loads. At this point, the driver has not been classified as good (and therefore not whitelisted), or bad (and therefore not blacklisted) and is classified as unknown. Mal.sys behaves suspiciously by attempting to load the Interrupt descriptor table at a new address. This operation is normally something only the operating system would attempt to perform. Alternatively, the driver may try to patch the SSDT, a construct often targeted by rootkits. Since this driver is classified as unknown, LWRs can log, block, or blacklist this driver (by recording its hash) and generate an event as a result of the action attempted by the driver. The action taken by LWRs is determined by the detection sensitivity and corresponding action configured in the McAfee Deep Defender general policy. The event is processed by LWRs in kernel mode and escalated to HWRs when the system enters user mode. The HWRs report detection and then determine the safest way to remediate the system. Depending on the action taken by LWRs, the HWRs may automatically blacklist the driver and request a reboot or may delete the file (assuming LWRs have blocked the driver from loading). After a subsequent reboot, the driver is prevented from loading, (since it has been blacklisted), and the event is escalated to the HWRs, and this triggers a rescan of mal.sys (passing along the knowledge of the previous blacklisted driver load event) and now classifies the driver as bad. The HWRs use more complex detection and removal logical to clean mal.sys based on the information passed in the rescan and also have the capability of quarantining the file for example.
Watch scan automatically whitelisting a good driver
The system has booted in to Windows, and the Windows Update process has initiated. Part of this process involves replacing a series of drivers. A new driver is downloaded and installed by this process. Watch scan will scan the driver as it is installed and determine if it can be classified as good or bad to prevent the need to subsequently monitor this driver.
Watch scan is initiated when drivers are registered by the installation process, and a scan of new files commences. In this case, the files are seen to be signed by Microsoft, the signatures are valid, and so the drivers are trusted. These drivers are then automatically added to the driver whitelist so that any subsequent actions carried out by these files are trusted.
Administratively whitelisting a good driver
During the pilot period, a driver behaves in a way that mimics that of stealth malware. This driver is detected as being malicious and added to the driver blacklist as in the previous example. It is not recognized as being legitimate by a watch scan, and an event is raised by McAfee Deep Defender and the management system shows a dashboard alert. The administrator may now add a driver to the whitelist policy using a relative or absolute file path, a SHA1 hash or a combination of the two, to allow the driver to load unhindered. If both hash and path are listed, the path is used early load, (before the file system is available and a hash can be enforced). Subsequently, the file is hashed, the hash is applied, and the path is no longer whitelisted.

12 McAfee Deep Defender Technical Evaluation and Best Practices Guide
Pilot or Evaluation PlanIt is recommended that a pilot or evaluation should include the stages depicted below. These are each discussed in the proceeding pages.
1. Define and Document Objectives
3. Define the Approach
2. Establish Success Criteria
4. Identify Resources
Select Manually, Query or
Report/Tag
6. Create Policy & Assign to Systems
8. Test and Monitor Behavior
9. Review Results10. Success
Criteria Achieved?
Start
End
11. Tune Policy
5. Understand & Document Risks and
Mitigations
No
Yes
7. Install andUpdate McAfeeDeep Defender
OptimizeExistingPolicies
Figure 5. Pilot plan.
1. Define and document objectives
A pilot allows McAfee Deep Defender to be evaluated at low cost and provide indications as to its suitability within the organization. Conducting a highly visible pilot project will help you pre-sell the system, by assuring and demonstrating to staff that they will experience little or no impact or disruption both while installation is occurring and when installation has completed and the product is protecting the PC. This will assist with organization-wide deployment of the product.
The pilot provides a tangible way of communicating the potential of the system to protect and detect otherwise hidden threats and/or to assure that stealth threats are not installed and compromising systems. In addition, a pilot may indicate the presence of an existing rootkit and provide a simple mechanism for its identification and removal. Therefore, the results of the pilot are evidence of the system’s immediate, tangible value.
The objectives of the pilot are likely to be a combination of the following:
• Evaluate the suitability of the solution in your environment• Determine the compatibility of the product with existing systems and applications• Assess the impact of the product on systems within your environment• Evaluate the capabilities of the product•Test the detection and cleaning abilities of the product• Verify the functionality of the product• Determine the deployment, management, and reporting capabilities of the management system• Identify and address obstacles for a full-scale implementation• Decide how many systems will be tested and over what time period

13McAfee Deep Defender Technical Evaluation and Best Practices Guide
By conducting a pilot, you are able to more easily identify technical risk (for example, compatibility problems with existing systems and infrastructure); areas for policy and procedure changes (workflow issues); and information for production planning (for example, providing information for developing a realistic implementation schedule). Information gained as a result of the pilot will mitigate acquisition risks and prepare for deployment with the production environment
2. Establish success criteria
The success criteria should be carefully defined to ensure that they will be the measurement used to assess whether the product is a good fit in the environment and that it has the required capabilities. It should be used to illustrate the business value of the solution in addition to any technical merits.
The success criteria should follow from the pilot objectives. Using the objectives above, the test criteria may be defined as below. The example below illustrates the success criteria obtained from interpreting one objective—that of evaluating the suitability of the solution in your environment. Before commencing the pilot, it is important to interpret all objectives for success criteria. If you fail to do this, then the results of testing will have little value in relation to the pilot, since they will not necessarily allow you to assess if the objectives have been met. This is a common mistake seen numerous times by the author and will most likely lead to a failed pilot.
Table 1. Establish success criteria
Success Criteria Indicators How to Measure
A significant proportion of systems are compatible with McAfee Deep Defender
The compatibility checker indicates that 50% or more of tested PCs are shown as compatible
Review McAfee Deep Defender compatibility report
The product successfully installs and operates across a range of systems
No errors are indicated during the installation process, and the product appears to load and function correctly after installation
Number of installation issues
No unexpected behavior or obvious incompatibilities are observed
After installation, the PC operates correctly Number of errors attributable to McAfee Deep Defender identified
3. Define the approach
The approach will define how and when the pilot will occur.
Roles and responsibilitiesIt will define the roles and responsibilities, some of which to be met internally by the organization and some to be met by McAfee. It will establish how the product will be implemented and how this implementation will be used to assess if the product meets the success criteria.
AdministrationThe requirements to administer the pilot infrastructure will consist of a McAfee® ePolicy Orchestrator® (McAfee ePO™) server. While the product does not require the McAfee ePO server to be present, the pilot process is significantly simplified by its presence. McAfee ePO software version 4.5 or 4.6 is required. This will be used for installation, configuration, updating, and reporting. PCs to be protected will require the McAfee agent version 4.6 to be installed and working. To gain the maximum benefit from the pilot process, it is envisioned that the management system will be present and already used to manage existing products on the pilot PCs.
Pilot scheduleThe approach will also document the duration of the pilot. The pilot process should be of sufficient duration to conduct any testing required to demonstrate success criteria, perform any required tuning, and allow a reasonable residual period for soak testing, where protected systems are used in the normal way by typical users to confirm compatibility with existing systems or highlight any issues. The residual period, after testing and tuning has completed should cover at least one work cycle. For example, specific activities may occur every week, while others only at the end of each month. The residual soak test period should be of sufficient duration to cover both of these cycles.

14 McAfee Deep Defender Technical Evaluation and Best Practices Guide
Types of testingTesting should include the following general topics:
• Functionality testing—The objective of this test set is to ensure that each element of the product meets the functional requirements of the business. For example, the product must install, execute, protect, detect, and remove stealth malware; alert; respond correctly to administrative and user interaction; report back; and uninstall correctly.
• Empirical performance testing—These tests ensure that the system provides acceptable response times and that general performance is not impacted. The product should impose no more than an acceptable overhead on the PC it is protecting. It should not hamper user or administrative interaction with the protected PC. It should not cause any existing application, service, or operation to fail or run in an unacceptable way. PC and application start-up times should not be increased beyond an acceptable level. Resume from standby and hibernation should continue to function.
• Measured performance testing—This test set can consider system metrics, such as measured start-up or reboot times, launch time for local and network applications, and standard benchmarking of CPU, memory, video, and disk operations
• User acceptance testing—This test set, which is planned and executed by the user, ensures that the system continues to operate in the manner expected once the software has been installed. This covers both the look and feel of the system being maintained, as well as making sure its functionality is unimpaired. It will typically run over a longer period of time than other tests and is more designed to determine if the user’s normal tasks are influenced by the product being installed and active.
• Manageability—The series of tests covered in this set includes all of the basic management functions, including remote installation, product upgrade and removal, configuration, content updating and reporting
Often two or more of these elements will be combined in a single test. The sample test below is designed to assess the first success criteria: “A significant proportion of systems are compatible with McAfee Deep Defender.” In doing so, it will look at both a functional aspect (installation of the compatibility tester) and a manageability aspect (remote installation and reporting).
Table 2. Sample test plan
Success Criteria Test Cases Tests
A significant proportion of systems are compatible with McAfee Deep Defender
Determine the proportion of potentially compatible systems
•Create a report within McAfee ePO software to determine potentially compatible systems
• Run this report and record the number of potentially compatible systems
• Determine the proportion of potentially compatible systems
Select a representative sample of potentially compatible systems and determine how many are compatible
• Select a proportion of systems from the set of potentially compatible systems designed to represent the population of all systems
• Run the compatibility checker and record the number of compatible systems
• Determine the proportion of compatible systems
Select a random sample of potentially compatible systems and determine how many are compatible
• Select a proportion of systems from the set of potentially compatible systems designed to represent the population of all systems
• Run the compatibility checker and record the number of compatible systems
• Determine the proportion of compatible systems

15McAfee Deep Defender Technical Evaluation and Best Practices Guide
The sample test plan will greatly depend on a comprehensive set of evaluation criteria being established. Once established, each criterion this can be broken down into one or more test cases used to evaluate the criterion. Once the test cases have been determined, steps required to perform tests can be created, and the tests executed and results recorded.
Define and test escape hatchesWhen an issue is encountered, the first consideration should be whether it needs to be investigated and resolved. By doing so, the policy can be tuned to ensure this issue does not reoccur. However, this is not always practical, and so it is useful (and often essential) to provide a means by which normal activity can be resumed as quickly as possible.
The objective of an escape hatch is to provide both the means with which normal activity can be resumed and the confidence that such a capability exists. By communicating the purpose of the product, the reasons for piloting, the schedule for testing, and the escape hatches to affected users, the perceived risk to end-user productivity will be reduced. This is especially important for users who might be taking protected laptops on the road.
There are a number of escape hatch methods available. The three main approaches to achieving this are:
•Temporarily disabling protection• Disabling protection using IBP mode• Uninstalling the product
Disable protection temporarilyProtection can be disabled via McAfee ePO software or through the local GUI.
To disable protection within McAfee ePO software, modify the McAfee Deep Defender > General policy as shown below, and ensure a wake-up call then propagates the policy change to the affected system(s).
Figure 6. Disabling McAfee Deep Defender by policy.
The GUI policy setting, “Allow user to enable/disable McAfee Deep Defender protection,” allows the user to enable or disable protection using the McAfee Deep Defender tray application. In a pilot environment, this setting provides a local escape hatch for use in the unlikely event that McAfee Deep Defender blocks activity deemed necessary by the user. Ensure you have this policy set to allow the pilot user to disable to protection and ensure that they are aware of how this can be achieved.
Figure 7. Select status to open the McAfee Deep Defender dialog.

16 McAfee Deep Defender Technical Evaluation and Best Practices Guide
The McAfee Deep Defender protection status dialog allows the product to be enabled or disabled.
Figure 8. Disabling McAfee Deep Defender protection.
The McAfee agent will check and enforce policy periodically according to the McAfee agent Policy Enforcement Interval setting, which defaults to five minutes. This policy enforcement will re-enable McAfee Deep Defender protection, or, more accurately, it will enforce the McAfee Deep Defender protection policy, (which is likely to be set to Enabled). So, by default, disabling protection using the button shown above will only disable protection for a maximum of five minutes.
Disabling protection using IBP modeWith IBP enabled within the general policy (McAfee Deep Defender 1.0.1 and higher), three unclean shutdowns will result in IBP mode being invoked, where McAfee Deep Defender protection is disabled (by shutting down the IBAgent). If the protected system is powered off consecutively three times, McAfee Deep Defender protection is disabled until this mode is reset within the McAfee Deep Defender GUI.
Uninstalling McAfee Deep DefenderThe section entitled Uninstalling McAfee Deep Defender later in this document outlines the processes by which the product can be uninstalled.
4. Identify resources
The resources to be identified include personnel and systems.
PersonnelPersonnel are likely to include a skilled and experienced McAfee administrator, but may also include resources made available from McAfee, such as a systems engineer, account manager, or technical support contact. Identification of these people and agreement of roles and responsibilities throughout the duration of the pilot will ensure that everybody is aware of what is required. This stage will also ensure that all parties are aware of what is happening and when this will be happening and should reduce the chances of unexpected occurring.
SystemsThis section describes how to identify and categorize compatible systems and how to use this information during the pilot
There are a number of considerations to identifying compatible systems for testing:
• Systems should meet hardware and operating system requirements, and this decision can be made in a number of ways
• Systems should not have known incompatibilities• Candidate systems should have good rather than bad system characteristics

17McAfee Deep Defender Technical Evaluation and Best Practices Guide
Hardware and operating system requirementsSystems are deemed compatible when they are running compatible operating systems (Windows 7, 32- and 64-bit versions with 2 GB [32-bit] or 4 GB [64-bit] RAM, and 16 GB [32-bit] or 20 GB [64-bit] free disk space), have a compatible CPU (Intel Core i3, i5, and i7 processors with Intel VT support), and have Intel VT enabled in the BIOS. Note that though Intel VT support is available on all i series processors, the feature may not always be exposed in the BIOS. If not, a BIOS update will probably be required in order to configure this setting. A later section of this document discusses how Intel VT can be enabled remotely on some systems.
Known incompatibilitiesThere are a small number of system characteristics that can result in a system being incompatible with the current version of McAfee Deep Defender. At the present time, systems with these characteristics should be excluded from testing.
Table 3. Known incompatibilities with McAfee Deep Defender 1.0
Product Version Observed Incompatibilities
McAfee Deep Defender version 1.0
• UEFI enabled systems—the BIOS should be in legacy BIOS compatibility mode
•Computers with an extensible firmware interface (EFI) system partition
• NX bit/data execution bit (XD bit) disabled in BIOS
• VMware Workstation 8.x
• VMware Player 4.x
• HP DV6 laptop with Intel i5 2410M processor configured with 6 GB RAM
•Avecto Privilege Guard software
Compatibility with type 2 hypervisorsMcAfee Deep Defender uses Intel VT-x technology—the same virtualization technique used by some Type 2 hypervisors. Where the Type 2 hypervisor can fall back to an alternative technique, such as binary (or byte) translation, it can function alongside McAfee Deep Defender. In some situations, the type 2 hypervisor cannot use another technique, in which case the hypervisor will be incompatible with McAfee Deep Defender. The table below illustrates compatibility with common hypervisors.
Table 4. Compatibility with type 2 hypervisors
Virtualisation Vendor and Product Compatibility with McAfee Deep Defender
VMware Workstation, Player, and Server 32-bit guests fall back to binary translation
64-bit guests cannot run
Windows Virtual PC (Windows XP mode) Guests fall back to binary translation
Oracle VM VirtualBox Guests fall back to binary translation
Parallels Workstation Guests cannot run

18 McAfee Deep Defender Technical Evaluation and Best Practices Guide
Candidate system characteristicsIt is recommended that you select systems from the available pool based on the good characteristics listed and avoid selecting systems that exhibit the bad characteristics listed.
Table 5. Candidate system characteristics
Good Candidate Systems Poor Candidate Systems
• Systems having typical configuration and running typical software
• Systems physically close to the testing location and easily accessible
• Users that have a higher than normal tolerance for testing
• Systems with existing McAfee products present, such as McAfee VirusScan Enterprise and the McAfee agent
• IT Department PCs, since these tend to not run standard software and run non-standard software.
• Systems accessing large volumes of small files (such as developer systems running compilers or systems acting as web servers)
• Systems running competing antivirus products
• Laptops where users are infrequently connected to the corporate LAN
Determining hardware and operating system requirementsThere are a number of approaches to this problem:
• If you are familiar with the environment, or have already selected or provided hardware to participate in the pilot, you can manually select these systems from within McAfee ePO software. Grouping or tagging can be used to assign policies and tasks to these systems
• McAfee Deep Defender ships with the capability to identify compatible systems using a McAfee Deep Defender product deployment task with the -report switch specified on the command line. This is fully described within the McAfee Deep Defender version 1.0 product guides.
Figure 9. Using a product deployment task to report compatibility.
• Alternatively the CompatibilityTester.exe tool (located within the McAfee ePO repository folder structure under the …\ePolicy Orchestrator\DB\Software\Current\PATMOS__1000\Install\0000) can be used to determine compatibility. Run this tool using the –simple switch within a script to determine the resultant ERRORLEVEL. This is fully described within the product guide.
• As an alternative to running the compatibility tester tool, you can create a query from within McAfee ePO software that will determine systems likely to be compatible with McAfee Deep Defender. The benefit of this approach over the use of the compatibility tester tool is that all data comes from within the McAfee ePO server database. The disadvantage of this approach is that it is not entirely accurate—it will identify systems that are not compatible and those systems that may be compatible. Create a managed systems query and set the filter as below to report on potentially compatible systems. Full details of this query are included in the “Reporting best practices” section of this document, but the filter criteria is shown below.
Figure 10. Query to determine potentially compatible systems.

19McAfee Deep Defender Technical Evaluation and Best Practices Guide
• Finally, you can combine approaches, using the query above to tag systems and then use the compatibility tester tool on tagged systems to accurately identify compatibility. This approach avoids running the compatibility tester tool on systems that are clearly not compatible; it saves bandwidth; and reduces the need to impact systems to those likely to be compatibility. However, it introduces complexity.
Using McAfee ePO software for compatibility testingOnce the compatibility checker deployment task has run, it will collect results and report these back in to McAfee ePO software. The compatibility checker tool uses the data channel rather than an event file to return results back to McAfee ePO software.
Figure 11. Sample McAfee Deep Defender compatibility report with drill-down shown.
Using CompatibilityTester.exe for compatibility testingIf using the CompatibilityTester.exe within a batch file you could include logic to record results, or even deploy the product.
Figure 12. Sample batch file.
Table 6. Interpreting compatibility tester results from batch file
Compatibility Tester Result Issue
0 System is fully compliant
1,3,5,7 The operating system is incompatible
2,3,6,7 The CPU is incompatible
4,5,6,7 Intel VT is not enabled in the BIOS, or it is not available.

20 McAfee Deep Defender Technical Evaluation and Best Practices Guide
Enabling Intel VT remotelyBy default, many systems are shipped with Intel VT disabled in the BIOS. There is no general method for enabling this setting remotely, but several manufacturers have provided mechanisms to permit this.
Lenovo SystemsLenovo provide a VBScript-based solution to reconfigure the BIOS. The following link provides details: http://support.lenovo.com/en_US/research/hints-or-tips/detail.page?&LegacyDocID=MIGR-68488. The process involves two scripts: ListAll.vbs and setconfig.vbs. Extract these two files from script.zip, and then run them as follows:
• Run cscript ListAll.vbs | Find “VirtualizationTechnology”• Run cscript setconfig.vbs VirtualizationTechnology Enable• Reboot the client to complete the change• Rerun the ListAll.vbs script command to confirm change
Once this is confirmed to work correctly, this process could be packaged and distributed by an existing management tool.
Figure 13. Lenovo scripts to enable VT.
HP systemsThe HP System Software Manager (SSM) utility can be used to reconfigure the BIOS. The following link provides details: http://h20331.www2.hp.com/Hpsub/cache/284133-0-0-225-121.html. Before using this process (because some BIOS settings are unique across generations), it is recommended that HP confirm if a template captured from one system can safely be provided to similar models. Once confirmed, the process involves the following:
• Run BiosConfigUtility.exe /getconfig:current.txt• Open the current.txt output file and validate that Virtualization Technology is set to disable• Remove the asterix (*) from disable and place in front of enable, and save the current.txt file• Run BiosConfigUtility.exe /setconfig:current.txt• Reboot the system• Upon reboot accept the System Configuration Change Request, (shown opposite), if displayed
Figure 14. User notification of BIOS change.
Once this is confirmed to work correctly, again this process could be packaged and distributed by an existing management tool.

21McAfee Deep Defender Technical Evaluation and Best Practices Guide
Dell systemsDell provides a number of tools.
The first of these is the Dell Client Configuration Utility (DCCU). It is available at http://en.community.dell.com/techcenter/systems-management/w/wiki/1975.dell-client-configuration-utility.aspx, but is not maintained. This utility is used to create a custom executable, which can be used to reconfigure BIOS settings.
The newer Dell Client Configuration Toolkit is available here: http://en.community.dell.com/techcenter/systems-management/w/wiki/1952.dell-client-configuration-toolkit.aspx. This utility is used directly, with command line switches, to reconfigure the BIOS.
Other manufacturersOther manufacturers may have similar tools to enable Intel VT without physically visiting each system. It is recommended that you check with them for the latest information.
5. Understand and document risks and mitigations
Risks to the successful completion of the project should be identified and mitigations defined. This stage is used to anticipate issues and provide a plan for dealing with these upfront, rather than ignore them and panic when and if they happen. Risks are likely to focus on three key areas, but individual organizations may identify other risks.
Typical risks•Availability of key personal—A successful project will depend on the availability of the right people
at the right time. If people are likely to be involved in other projects, then there is scope for conflicts and changes to availability, which will necessitate either changing the people assigned to the project, or delaying the project. Personnel changes will tend to delay projects, as employees are bought up to speed.
•Availability of systems—In order for the project to proceed, the correct management and endpoint systems need to be available. Management system hardware needs to be identified and prepared and may require change processes to be completed. This will require availability of personnel and time to bring it to completion. Endpoint systems used for testing need to be identified, confirmed as being suitable and, where these are in everyday use, may need to be physically located and recalled to the office. Any users assisting with the pilot need to be informed, need to agree to help, and may need to be briefed on what is happening (and any procedures to be followed in the case of an issue).
• Software behavior—Software testing by users in a production environment is the most effective and efficient way to determine if a solution is compatible and to understand the typical behavior of that solution. However, it introduces risks that are not present in a test environment. These risks are increased if the user population testing the solution is mobile; they may not be within easy reach and not always have network connectivity. A back-out plan should be identified that provides the user with an escape hatch for fast mitigation of issues, especially with a mobile worker.
MitigationsOnce risks are identified, mitigation should be determined for each risk. Scheduling should take into account assessment of availability of personal and systems and the likelihood of changes to these assignments. In addition, providing additional leeway for slippage is advisable. When users are selected for piloting the solution, preference should be given to local users, while remote users should be thoroughly briefed on what action to take in the event that an issue that affects their productivity.

22 McAfee Deep Defender Technical Evaluation and Best Practices Guide
6a. Create McAfee Deep Defender policy and assign to systems
The objective of this phase is to determine the optimal configuration for both McAfee Deep Defender configuration and for configuration of other installed McAfee products to ensure peaceful co-existence and optimal performance.
Behavioral detection Before looking at the configuration options within policy, it is essential to understand how behavioral detection is handled. McAfee Deep Defender uses behavioral protection to prevent stealth malware infections. While traditional antivirus will block known signatures for drivers where no known signature detection exists, McAfee Deep Defender is able to determine malicious activity by looking at behavior.
Providing any form of protection based on behavior implies detection will never be absolute, but rather it will be made with a level of confidence. This can be almost complete confidence that the behavior represents malicious activity and is almost never going to represent benign activity—a high level of confidence. At the other end of the scale, activity seen may typically represent acceptable behavior, but on a few occasions it may also represent malicious actions—a low level of confidence. So, when a detection is made, there will be an implied level of confidence or certainty that the detection is accurate.
To illustrate this, consider the figure below. Three detections are made with differing levels of confidence.
• Detection A has a high probability of being malicious (so there is a very small chance that this is a false positive), and so will be detected by any sensitivity level of the product. The lowest level of sensitivity that triggers is used to determine what action should be taken. In this case, the action associated with the Very Low sensitivity level, Action 1, is performed.
• Detection B has a reasonable probability of being malicious (so there is a greater chance that this is a false positive), and so will be detected by the Medium sensitivity level and higher. The lowest level of sensitivity that triggers is used to determine what action should be taken. In this case, the action associated with the Medium sensitivity level, Action 3, is performed.
• Detection C has a lower probability of being malicious (so there is the greatest probability that this is a false positive), and so will be detected by the Very High sensitivity level only. The lowest level of sensitivity that triggers is used to determine what action should be taken. In this case, the action associated with the Very High sensitivity level, Action 5, is performed.
Figure 15. Behavioral detection. (Note: The detection percentages given and the spread across the five different sensitivity levels are not in any way indicative of true values, but simply used to illustrate the general approach.)

23McAfee Deep Defender Technical Evaluation and Best Practices Guide
Available actionsThe actions referred to above can be any of the following:
Table 7. Available actions
Action Description
Ignore Ignore any detection events. Do not block or alert on these events.
Log Log any detection events but take no further action on these events.
Block Block the behavior coming from the suspicious file (the driver), but do not act on the file or otherwise clean the system.
Block will generally block the detected behavior. Subsequent suspicious behavior from the file (driver) may be blocked if it can be safely performed. This is determined on a per-family basis. The LWRs determine what can be blocked safely (and in doing so not trigger unexpected system behavior, instability, or Stop Errors).
Where LWRs believe this will destabilize the system on certain events, then a driver blacklist will occur, followed by a prompt to reboot the system.
Remove Remove—block the event, remove and quarantine the responsible file (driver) and its service entries.
McAfee Deep Defender policyThe McAfee Deep Defender configuration is defined by three policies:
• General policy—The general policy defines the security level at which McAfee Deep Defender operates, specifies the quarantine folder to use for blacklisted drivers, the quarantine retention period, whether McAfee Global Threat Intelligence will be used, and whether access protection will be used to protect Deep Defender from being disabled
• User interface (UI) options policy—This policy specifies whether the McAfee Deep Defender icon will be shown and whether the user can disable the protection. It also determines what alert messages will be shown to the user and whether the user can delay a restart requested by malware deletion.
• Blacklist/whitelist drivers policy—This policy is used to manually add drivers (either by using a relative or absolute file path, a SHA1 hash, or a combination of the two options). The drivers can be added as either Block (blacklist), or Allow, (whitelist). Note that whitelisted files are only whitelisted for behavioral (CPU and memory) detection events. Binary detection (a match on the file itself) could still occur since whitelisting does not apply to file inspection.
Policy selection will at times differ depending on whether the policy is required for a pilot environment or a production environment. Where this is the case, this will be highlighted in the following sections.
For example, in a pilot environment, it is useful to provide feedback to the user and allow the user to make changes where necessary. This provides a number of benefits:
• If some product activity is taking place, it will help explain why the user is seeing changes to performance or behavior of an application. This may help indicate either detection, a requirement to tune configuration, or an incompatibility, and having immediate visibility to any of these situations is useful during the pilot.
•The ability for the user to disable protection in order to work around an issue that is preventing or slowing their productivity

24 McAfee Deep Defender Technical Evaluation and Best Practices Guide
General policy
Figure 16. General policy.
General policy: security protection levelsThe general policy provides three defined security levels:
• Low—Very low probability of false detection causing any impact to system, but will miss some obscure detections
• Medium—Low probably of false detection, and will detect a high proportion of malware• High—Higher chance of false detection causing an impact but highest chance of malware detection
The default security protection level is medium. This provides a good general level of protection while reducing the impact of a false detection. However, there are a number of factors that can both influence the most suitable protection level and at the same time reduce the possibility of a false detection affecting a system. If none of the above security levels provide exactly the desired actions, the custom level allows each sensitivity level action to be manually defined.
Selecting a security protection levelThe following can be used to determine the recommended security protection level for the production environment. For most environments, medium is a good starting point. Where the environment is subject to significant or uncontrolled levels of change (for example the user has administrative rights), there is less if any chance to test the impact of these environmental changes on detection. With many or frequent changes occurring, this implies an increased possibility of detection resulting in an action being taken by McAfee Deep Defender that negatively impacts the system. Similarly, in low change and controlled change environments, additional testing can mitigate the possibility of false detection when a higher level of protection is enabled. Mobile systems are inherently more at risk, and high assurance environments demand higher levels of protection.

25McAfee Deep Defender Technical Evaluation and Best Practices Guide
Low Medium High
• High-change environment
• Change control process undefined
• High-assurance environment
• Low-change environment
• Mobile worker
Figure 17. Selecting the security protection level.
When testing McAfee Deep Defender to determine its impact on systems, the four stages represented in the table below are recommended.
Table 8. Testing protection levels
Stage Objective
Initial Stage This stage assumes that the actions taken at each sensitivity level are set to Log. This will prevent any action being taken against any detection, but will raise an event that will be reported to McAfee ePO software. To configure the protection at this level, set the security level to Custom, and set the sensitivity level actions to Log, in order, from very high to very low. Once policy is applied, reboot the system to trigger any common detection, if there are likely to be any. Any logged detections can now be investigated, and basic changes made to policy. Where detection has occurred (and has been investigated and determined to be a false positive) the offending driver can be whitelisted
Selected Detection Level
The protection level selected during the pilot phase should not differ significantly from that selected for the production deployment, since the whole point of the pilot is to determine the impact in production. This stage is designed to test the selection chosen previously, determine if it is suitable for your environment, and help identify any changes required. When this new policy is applied, it should be tested for a representative period to ensure all common activity has occurred on the pilot systems.
Optimized Detection Level
The stage is designed to allow retesting of the new, optimized protection level or configuration obtained during testing of the previous phase.
If the protection level selected above results in no false positive detections, you may wish to increase the level of logging but not blocking. For example, if the Very Low Sensitivity level is set to Ignore, you may wish to change it to Log. Similarly, if the protection level selected results in numerous false positive detections, you may wish to decrease the protection level.
In addition, where detection has occurred, (has been investigated and determined to be a false positive), this stage allows for retesting with the offending driver whitelisted
Organizational Driver Whitelisting
This final optional stage allows the administrator to understand the quantity of drivers present on pilot systems that have either not been whitelisted, (administratively or automatically by McAfee Deep Defender) or blacklisted. It reports in to McAfee ePO software every driver that is not classified as good or bad.
Triggering detection and the security protection levelMcAfee Deep Defender will assign a score to detection, and this score will trigger some action. The action taken will depend on the certainty of detection and the configured sensitivity level. Sensitivity refers to how the certainty of detection is interpreted by the product. Very low sensitivity means that McAfee Deep Defender must have a very high certainty that the detection is accurate before it will take the configured action. Conversely, very high sensitivity means that McAfee Deep Defender can have a quite low certainty that the detection is accurate, yet still take action on the detection.
General policy: quarantine folder and retention periodThe quarantine folder determines where quarantined drivers will be stored. Drivers are stored in an encrypted format, and usually the default location for quarantine can be used without issue.
The quarantine retention period defaults to 28 days.

26 McAfee Deep Defender Technical Evaluation and Best Practices Guide
During the pilot, it is suggested that this value be increased to slightly exceed the duration of the pilot. For example, a five-week pilot should have a retention period just greater than 35 days. If this approach is adopted, then no drivers should be deleted from quarantine until the pilot completes. The impact of retaining quarantine for this period is likely to be minimal, since quarantined drivers are protected to prevent user access and are likely to be very small files. If during the later stages of a pilot, detection is found to be inaccurate, then the misidentified file can be whitelisted and restored from quarantine without loss.
After the pilot completes and the deployment goes live in the production environment, the quarantine retention period should match any other quarantine retention periods you use, such as that for McAfee VirusScan Enterprise. The recommended value will depend on the responsiveness of the organization to detections. If this typically takes up to a week due for example to the difficulty in locating roaming users, then the period should be chosen to allow for this. An IT department that responds in hours is unlikely to need quarantine duration in excess of one week.
General policy: McAfee Global Threat IntelligenceMcAfee GTI file reputation is comprehensive, real-time, cloud-based multivector reputation service that enables McAfee products to protect customers against both known and emerging malware-based threats.
The cloud-based system receives billions of reputation queries each month and responds with a score that reflects the likelihood that the request in question represents malware. The score is based not only on the collective intelligence from sensors querying the McAfee cloud and the analysis performed by McAfee Labs researchers and automated tools, but also on the correlation of cross-vector intelligence from web, email, and network threat data. The McAfee anti-malware engine—whether deployed as part of an endpoint anti-malware, gateway, or other solution—uses the score to determine action (such as block or quarantine) based on local policy. The use of McAfee GTI compresses the time taken to deliver threat protection from days to milliseconds, increases malware detection rates, and reduces downtime and remediation costs associated with malware attacks.
Assume an unknown driver is written to disk (for example, c:\windows\system32\drivers\strange.sys).
McAfee GTI file reputation will be queried to determine a file reputation score. Depending on the result of this query any of the following are possible actions:
• McAfee GTI file reputation reports the file is known “good.” This driver would be whitelisted by McAfee Deep Defender.
• McAfee GTI file reputation reports the file is “unknown”—no immediate action will be taken. Later, if you assume this file exhibits suspicious behaviour and if it is determined by McAfee Deep Defender to be bad, McAfee Deep Defender will take the configured action, such as blacklisting the SHA1 hash of this file to prevent future loads. Prior to taking this action however, a second McAfee GTI query will be launched against this file—a cloud false mitigation query—to ensure this file is not known and clean.
• McAfee GTI file reputation reports the file is known “bad.” This results in a detection event being raised, which will subsequently result in McAfee Deep Defender blacklisting the SHA1 hash of this file and performing a repair. Prior to taking remediating action, again a cloud false mitigation query will be launched against this file to ensure it is not known and clean
The lookups received by McAfee GTI can be used to prioritize sample analysis, and this is then used to protect systems that cannot be directly protected by McAfee Deep Defender due to hardware limitations. For example, if 50 percent of the hardware or operating systems within your organization are McAfee Deep Defender compatible, the remaining 50 percent of systems cannot receive direct protection from McAfee Deep Defender. However, they can receive indirect protection as a result of those incompatible systems requesting information about suspicious files that have already been reported by McAfee Deep Defender as being malicious.

27McAfee Deep Defender Technical Evaluation and Best Practices Guide
The recommendation here is that McAfee GTI is enabled, which is also the default setting. Note that the McAfee GTI sensitivity level used will be determined by the highest McAfee Deep Defender sensitivity that is set with an action of remove. This, in turn, will be determined by the McAfee Deep Defender security protection level selected. For example, where the McAfee Deep Defender security level is set to medium, the actions configured are shown in the figure below. The highest McAfee Deep Defender sensitivity level set to Remove is low, so McAfee GTI will be configured with a sensitivity level of Low.
Figure 18. Actions set for sensitivity levels where security level is medium.
McAfee GTI proxy settings allow the use of a McAfee GTI proxy server. The recommendation here is to use the same configuration used with McAfee VirusScan. If a McAfee GTI proxy server is already in use, then simply replicate these settings here.
General policy: access protectionAccess protection rules are designed to protect the product from being disabled by malicious code. Access protection will protect the binaries, processes, services, and registry settings from modification or deletion. The default setting for this is enabled, and this should be used within a production and pilot environment, unless specific troubleshooting requires this setting to be disabled.
General policy: IBP modeInfinite blue screen of death (BSOD) prevention (IBP) mode provides mitigation against a situation that could occur where McAfee Deep Defender prevents a driver from loading, which, in turn, prevents the system from starting, which itself prevents McAfee Deep Defender from being disabled. In this situation, without IBP availability, the system would be able to do nothing more than cycle through reboot, blue screen, reboot, blue screen ad infinitum.
In the situation described above, with IBP available, three successive blue screens, system stops, or other unclean shutdowns will result in IBP mode being invoked, and McAfee Deep Defender protection will be disabled automatically (by shutting down the IBAgent). This will then allow a break out of the reboot, blue screen, reboot, blue screen loop. Where this situation occurs, the user is able to clear IBP mode (and hence re-enable McAfee Deep Defender protection) using the SysTray menu option once the issue is resolved. Note that this option is hidden until a system enters IBP mode.
Figure 19. Clear IBP Mode GUI option.
During the pilot, it is suggested that this feature be enabled to allow a relatively simple exit strategy for this type of blue screen reboot loop. This also allows a simple approach to disabling the product if issues occur—perform three consecutive unclean shutdowns, and the product will be disabled. This feature can therefore be highly useful, but since it allows the product to be disabled, it should be used with care.

28 McAfee Deep Defender Technical Evaluation and Best Practices Guide
In a production environment, you can choose one of the following approaches, based on your requirements:
•To provide higher security by preventing McAfee Deep Defender from being disabled, (by deliberately shutting down the system in an unclean manner) at a cost of higher risk, then disable this setting
•To provide an escape hatch to avoid consecutive blue screens, ensure this setting is enabled
In production, it is anticipated that this setting will be enabled, at least initially.
General policy: driver load settingsEnable unknown driver logging Use this option with caution and fully understand the purpose and consequences of doing so, before enabling it.
The feature Enable unknown driver logging enables the logging of unknown drivers as potentially unwanted programs (PUPs).
One strategy that can be adopted with this product is to identify all kernel drivers that are being loaded, and (after determining they are indeed good files) to manually whitelist each file. Once this has been done, any other drivers attempting to load can be easily identified regardless of whether they are seen to be performing malicious actions.
This feature can be very useful during the pilot phase of a deployment to determine just how many drivers are not categorized and to allow these to be identified and, if practical and appropriate, whitelisted. During production it is suggested that this feature be disabled unless the environment is one of high assurance and significant prior effort has been made to whitelist all drivers that are being loaded. By enabling this feature you can check to ensure driver whitelisting has been achieved. If this feature is to be used, then a controlled change process must be adhered to in order to ensure that unknown driver detection does not flag non-malicious drivers that have been updated or otherwise added to the system.
Enabling this option generates events (displayed within the event viewer and McAfee ePO software) whenever any unknown driver tries to load. An unknown driver is defined as any driver that is not part of the whitelist or blacklist, that is, any uncategorized driver. Driver categorization uses McAfee GTI lookups, so in an environment that does not have Internet access, this setting may result in many drivers, (perhaps 200 per system) categorized as unknown drivers, and, as a consequence, a large number of events will be generated to report on these uncategorized drivers.
The typical characteristics of an unknown driver load are shown below. The process name will be FUNCEXIT_DRIVERLOAD; the Threat Name will be Behavior: Unknown Driver Load; and the Threat Type will be PUP. The Threat Source Process Name will give the name and full path to the driver being loaded, C:\Windows\System32\drivers\asyncmac.sys below.
Figure 20. A unknown driver load event.

29McAfee Deep Defender Technical Evaluation and Best Practices Guide
In order to enable detection of unknown drivers:
• Enable this setting• Set the sensitivity level of very high to have an action of one of the following: log, block, or remove
Note that regardless of the sensitivity level action, unknown driver loads will only ever be logged, (with no user alerting occurring). Details of how to use this feature to tune whitelisting policy is given in the section entitled “Tuning policy,” later in this document.
Block self-signed drivers from installingTest-signing refers to using a test certificate to sign a prerelease version of a driver package for use on test computers. Test signing is particularly useful to attackers on 64-bit Windows, on which Microsoft enforces driver signing. By default, such drivers will not load. However, Microsoft provides developers with the means to disable this policy—see http://msdn.microsoft.com/en-us/library/windows/hardware/ff552275(v=vs.85).aspx. Rootkits such as Necurs used by Banker, Advanced PC Shield 2012, and Cridex on 64-bit Windows use this approach to compromise the operating system. To quantify the size of the threat—more than 200,000 new and unique malware binaries discovered by mid-March 2012 have valid digital signatures. While not all are rootkits, this trend indicates the rise in prevalence of digitally signed malware. To combat this, McAfee Deep Defender blocks test-signed drivers by default, while allowing McAfee ePO administrators to selectively exclude in-house kernel driver developer’s systems as necessary.
User interface policy
Figure 21. McAfee Deep Defender GUI policy.
•Tray options show tray icon—This option displays the McAfee Deep Defender tray menu icon in the system tray of the client system. By default, it is enabled and hence shows the icon by default. This setting is recommended for both pilot and production environments. The reason for showing the icon is to indicate to the users that their systems are protected.
•Allow user to enable/disable McAfee Deep Defender protection—Enabling this option allows the user to enable or disable McAfee Deep Defender protection using the McAfee Deep Defender tray application. In a pilot environment prior to the product being fully tested and the configuration tuned, this setting provides an escape hatch for use in the unlikely event that McAfee Deep Defender blocks activity deemed necessary by the user. By default, this setting is disabled, and, in a production environment, this setting should remain disabled to prevent users from simply disabling protection when it suites them.
• Show user alert messages—This option displays alert messages for the selected range of McAfee Deep Defender events and actions occurring at the client system
30 McAfee Deep Defender Technical Evaluation and Best Practices Guide
There are three levels of alerting:
• Show all messages—All McAfee Deep Defender events are shown as pop-up messages to the user when this is enabled. This setting is useful if an administrator is performing troubleshooting on a protected PC, or if the user is assisting in a troubleshooting process. Generally, this setting should not be enabled for either the pilot or production phases of deployment.
• Show only error messages—Only McAfee Deep Defender events of error category are shown as pop-up messages to the user when enabled. This is the default setting and is recommended during the production phase of deployment if users are routinely alerted by their existing anti-malware software. If no user alerting is already configured, the McAfee Deep Defender configuration should be set to not show user alert messages.
• Show warning and error messages—Only McAfee Deep Defender events of the warning category are shown as pop-up messages to the user. This is recommended during the pilot phase of deployment to provide visibility of activity and provide feedback to the user.
•Allow user to postpone the restart—This configuration allows the user to postpone a system restart caused by a malware deletion and the subsequent cleaning process. Not all stealth malware requires a reboot to clean the system, but where it is required, this option controls how it happens. When disabled it will automatically reboot the system after warning the user and the warning interval has expired if the warning interval is greater than zero. If disabled and the warning interval is zero, it will not automatically reboot the system. If enabled, it will allow the user to postpone the reboot before the warning interval has expired if the warning interval is greater than zero. Otherwise, it will simply prompt the user to perform a reboot. The warning interval is between zero and 300 seconds. The default is to allow the user to postpone the reboot while not automatically rebooting the system. This is the recommendation for both pilot and production environments.
Blacklisted and whitelisted drivers policy
Figure 22 . Blacklisted/whitelisted drivers policy.
This policy starts empty with no drivers listed as either blacklisted (automatically banned) or whitelisted (allowed regardless of any detection on these files). This policy is the main method of tuning McAfee Deep Defender configuration. This policy is likely to change in the following circumstances:
• If detection occurs, and this detection after careful examination is found to be a false positive, then the driver that triggered this detection can be whitelisted to ensure detection is prevented in future. The purpose of whitelisting the driver is to prevent suspicious behavior reports for known clean drivers. Whitelisting applies to behavioral detection rather than signature-based detections. The whitelisting can be either in the form of a file path and/or a hash.
• If the driver is unlikely to change in the future, then a hash can be used to exclude this file. This is the recommended approach wherever possible, since it the most secure way of whitelisting just the required file. There is no point in specifying a path, since the driver is accepted as good by the organization, and this acceptance is unlikely to depend on where the file is located.
• If the driver is likely to change frequently, then administrators need to determine whether they have processes that can anticipate this change and build in a capability to reconfigure policy as required, in which case a hash should be used. For a less secure option that requires lower administrative overhead, the file can be whitelisted by path. The reason that this is less secure is that a malicious file could assume this excluded file name and path and be allowed to operate without detection.

31McAfee Deep Defender Technical Evaluation and Best Practices Guide
• In the unlikely event that a driver is detected as being malicious, then the offending file can be administratively blacklisted on the system by adding the hash of the file into the policy. When blacklisting, the recommendation is to use a hash, since only a very specific file is to be blacklisted.
Drivers can be blacklisted or whitelisted either automatically by McAfee Deep Defender (for example, as the result of a McAfee GTI lookup) or by an administrator. The administratively defined lists are defined by this policy, whereas McAfee Deep Defender blacklisted or whitelisted drivers are stored internally. Where a driver appears on both lists, the administratively defined list takes precedence.
6b. Tuning VirusScan Enterprise policy
While there is no specific optimization for McAfee VirusScan Enterprise when used in conjunction with McAfee Deep Defender, before installing McAfee Deep Defender, it is suggested that the McAfee VirusScan Enterprise configuration is optimized, per the McAfee VirusScan Enterprise Best Practices Guide.
McAfee VirusScan Enterprise performance can be enhanced by the following policy configuration:
• Disabling Processes on enable during system start-up will reduce system start-up time. This is particularly useful, since the McAfee Deep Defender initiation process is likely to increase system start-up time.
•The on-access scan Trusted Installers setting is disabled by default with McAfee VirusScan Enterprise 8.8. When enabled, this option allows the installation of trusted software without on-access scanning, which improves performance. This is specifically true for service pack installations for Microsoft Windows.
These settings are found under the On-Access Scan Proprties > General Settings.
Figure 23. Scan process on enable option.
• Including Scan inside archives (for example, .zip files) can significantly impact system performance. Scanning these archive files during a scheduled on-demand scan off-hours avoids impacting users and eliminates any threats from these files. This setting is found under the On-Access Scan Proprties > All Processes.
Figure 24. Scan inside archives option.
• During on-demand scans McAfee VirusScan Enterprise 8.8 uses the Windows Set Priority setting for the scan process and thread priority. This lets the operating system set the amount of CPU time that the on-demand scanner receives at any point in the scan process. The system utilization setting on the On-Demand Scan Properties page maps to the Windows Set Priority control. By reducing the system utilization, the impact of an on-demand scan can be reduced.
Figure 25. On-demand scan system utilization.

32 McAfee Deep Defender Technical Evaluation and Best Practices Guide
• By default the McAfee agent registry setting is configured to run at normal priority. Changing the McAfee Agent registry setting to use LowerWorkingThreadPriority improves McAfee VirusScan Enterprise performance. This configuration is described in https://kc.mcafee.com/corporate/index?page=content&id=kb53690.
• Implementing the high-risk processes and low-risk processes policies offers a means to alternately configure the on-access scanner and streamline computer performance. Utilizing low risk processes allows files accessed by specified processes to be scanned with lower resource consumption. Lower resource consumption can be achieved by configuring when, (for example, when reading or writing) and what (extensions and exclusions, with or without heuristics) to scan.
Table 9. Recommended low-risk processes
Application Process Effect
McAfee Agent FrameworkService.exe Improves overall performance
McAfee VirusScan Enterprise McScanCheck.exe
McScript_InUse.exe
mcupdate.exe
Improves .DAT update performance
McAfee SiteAdvisor® Enterprise mcsacore.exe Improves overall browser performance, especially at start-up
Microsoft SQL Server sqlservr.exe
sqlwriter.exe
Improves overall performance
VMware Workstation or Player vmware.exe
vmware-vmx.exe
Improves overall performance
6c. Tuning McAfee Application Control and McAfee Change Control policy
McAfee Application Control and McAfee Change Control is compatible with McAfee Deep Defender with minimal changes to default policies for either solution. There is no specific installation order that needs to be observed when deploying McAfee Deep Defender in conjunction with McAfee Application Control and/or McAfee Change Control. In general, it is recommended that you install McAfee Application Control as the final step after all applications and layered solutions are installed, (since McAfee Application Control is designed to freeze the binaries and McAfee Change Control the configuration data present on an endpoint). McAfee Application Control then allows all currently installed binaries and applications to run but prevents any new binaries or applications from executing, unless these are introduced to the protected endpoint by a trusted updater which is defined in the McAfee Application Control policy.
If McAfee Deep Defender is installed and operational prior to installing McAfee Change Control, all McAfee Deep Defender binaries and configuration files will be solidified (or added to the whitelist) automatically when McAfee Change Control is installed and enabled. If McAfee Deep Defender is installed on to an endpoint that is already solidified, the proper McAfee processes and binaries must be defined as updaters in the McAfee Change Control policy to allow McAfee Deep Defender to install. Once McAfee Deep Defender is installed, these same processes need to be defined as updaters to make changes and updates to McAfee Deep Defender’s policy, as well as execute content updates, install patches, and perform other regular maintenance tasks on McAfee Deep Defender via McAfee ePolicy Orchestrator. The policy that controls this functionality is the McAfee Change Control Application Control Rules (Windows). It is import to ensure that pre-defined McAfee rule groups are included in this policy and that it is applied to systems running McAfee Deep Defender and McAfee Application Control. These rule groups are included in the pre-defined Solidcore extension and should not be modified.

33McAfee Deep Defender Technical Evaluation and Best Practices Guide
There are two McAfee rules groups that are required for proper functionality of McAfee Deep Defender when McAfee Application Control is enabled—McAfee and McAfee Publisher. These are shown in the screenshots below.
•The McAfee rule group contains updater definitions for McAfee processes and services used by the McAfee ePO agent to perform administrative functions such as policy enforcement, patching, and/or new McAfee solution installation and content updates
Figure 26. The Application Control Rules (Windows) policy with the McAfee Application Control rule group highlighted.
•The McAfee Publisher rule group contains McAfee PKI certificate information, which allows binaries signed with a McAfee private key to execute. This allows flexibility in future McAfee solution and patch deployments, as any signed McAfee binary will be allowed to execute, install, and/or update an endpoint’s configuration even though the process binary itself is not defined as an updater.
Figure 27. The Application Control Rules (Windows) policy with the McAfee Publisher rule group highlighted.

34 McAfee Deep Defender Technical Evaluation and Best Practices Guide
7. Install and update McAfee Deep Defender
McAfee Deep Defender installationMcAfee Deep Defender can be installed using either McAfee ePO software or by running the installer using another method (such as manually, via script, or using another management tool). As part of the installation process, McAfee Deep Defender will scan existing drivers and whitelist those drivers identified as safe by the Casper trust mechanism (using digital signatures currently) and via McAfee GTI. Depending on the system, this process may take a few minutes and is expected behavior. Following this, a reboot is required to allow the McAfee Deep Defender driver (IBAgent.sys in McAfee Deep Defender version 1.0, mfeib.sys in subsequent versions) to load. The user can be prompted to reboot, can have a reboot imposed after a specified duration, or the software can install without prompting the user. This action is specified in the UI policy. Before this driver is loaded, McAfee Deep Defender is not providing protection. As soon as it is loaded, any drivers that are subsequently loaded will be examined as they execute.
Installing McAfee Deep Defender using McAfee ePO softwareMcAfee Deep Defender can be installed using a standard McAfee ePO software product deployment task.
Figure 28. McAfee ePO deployment task.
Installing McAfee Deep Defender manuallyThe installation package is supplied as a separate executable for x86 and x64 systems, setup_32.exe, and setup_64.exe respectively. For silent installation you can append /S /v/qn to the command line.
setup+32.exe setup+64.exe
Figure 29. McAfee Deep Defender installation files.
The McAfee Deep Defender update processMcAfee Deep Defender is updated using a standard update task.
Updating McAfee Deep Defender using McAfee ePO software When managed by McAfee ePO software, a standard product update task can update McAfee Deep Defender. For this to occur, there are two prerequisites:
•The correct update files must reside within the repository. These files are located within the ..\ePolicy Orchestrator\DB\Software\Current\AMCORDAT1000 directory. If this is not populated, confirm the Pull Task is configured to pull all packages, or if the Selected Packages option is chosen, ensure that the AMCore Content Package is selected to be pulled.
Figure 30. Selecting to download McAfee Deep Defender content updates.

35McAfee Deep Defender Technical Evaluation and Best Practices Guide
•The client update task must be configured to update either All packages or if the Selected Packages option is chosen, the task must be configured to update the AMCore Content Package.
Updating McAfee Deep Defender without using McAfee ePO softwareIn stand-alone mode this update will occur when another McAfee product on the system is updated, for example McAfee VirusScan Enterprise.
Uninstalling McAfee Deep DefenderUninstalling via McAfee ePO softwareIf an affected system is present and responding on the network, then the product can be uninstalled via McAfee ePO software, using a deployment task with action set to Remove. Note that the Access Protection setting within the general policy, if enabled, will not prevent an administrator uninstalling McAfee Deep Defender with McAfee ePO software. Regardless of how the McAfee Deep Defender uninstall process is initiated, a reboot will be required in order to fully unload the product.
Uninstall McAfee Deep Defender manuallyIf an affected system is not present or responding on the network, then the product can be uninstalled via the Windows control panel using the Uninstall a Program command. Be aware that this will require administrative privileges, so affected users may need to be temporarily granted these rights. Note that the Access Protection setting within the general policy will not prevent an administrator uninstalling McAfee Deep Defender manually.
8. Test and monitor behavior
The purpose of this phase of the pilot process is twofold:
• System testing against established objectives• Behavior monitoring to identify deviations from expected behavior
System testingThe pilot process should have been started by specific objectives being identified and from this, the corresponding success criteria established. The role of system testing is to allow the objectives to be tested, and, from the results obtained, measure how closely McAfee Deep Defender meets these objectives. This may be an iterative process, where policy is tuned in order to change behavior so that results may more closely meet objectives.
Behavior monitoringBehavior monitoring should allow you to observe the behavior of the system—the operating system and any applications, user interaction with the system, overall system responsiveness, unexpected events or behaviors, and anything else that differs from the norm.
The purpose of this is to establish whether any general incompatibilities exist between the system being tested and McAfee Deep Defender, and, more specifically, if any policy changes are required in order to prevent incompatibilities. For example, a driver may generate a detection event—and, after investigation, it is shown this driver is not malicious. In this example, the driver can be legitimately whitelisted. Once this policy change has been made, further testing can be used to determine if this issue has been resolved and if any further issues can be identified.
9. Review results
This phase is designed to take the objectives and the success criteria designed to measure attainment of these objectives and compare these to the results obtained in the previous phase to determine how closely the objectives have been met.

36 McAfee Deep Defender Technical Evaluation and Best Practices Guide
10. Success criteria achieved
If the success criteria have all been met, then the pilot phase has completed successfully, and the pilot can be terminated. Therefore during this stage of the process the test results and observed behavior are collected and collated, and then compared against the success criteria. If all success criteria have been met then the process has completed successfully. If issues have been encountered, or unexpected behavior has been observed, this can be researched, and a proposed solution implemented. Once complete, the product can be retested and behavior observed to determine if the changes have resolved the issue or changed the behavior.
11. Tune policy
Due to the behavioral nature of the product, detections are to be expected during a pilot deployment. These detections may represent either genuine rootkits or other stealth malware, or they may simply indicate that some tuning is required within the product configuration. Once deployed in a production environment, detections should only represent genuine malware, but even so, it is likely that confirmation of this will be required initially to grow confidence in the product.
Selecting an initial policy is discussed in a previous section (“Understanding and selecting the security protection level”). Once the initial policy is assigned and testing has begun, the following may be observed:
• No detections• Few detections• Many detections• Unexpected behaviour or conflict observed
For each of these situations, the following sections recommend follow-up actions. If policy changes have been made as a result of these actions, it is recommended that the product is tested again to confirm expected behavior.
No detectionsIf no detections are observed, the first step is to ensure that the product is deployed correctly and is active. The section entitled “Testing detection” explains how to check McAfee Deep Defender is active. If this testing shows the system is detecting behavior correctly, it may be that the McAfee Deep Defender policy is set correctly.
The recommendation here is to increase the sensitivity of the product by increasing the security protection level. The higher the security protection level setting, the greater the level of protection that is provided. By increasing the security protection level, you can determine the impact of providing a higher level of security. If this change results in many new detections triggering (for example, if you move from Ignore to Log as the action for detections occurring at Very High sensitivity), then you may want to revert to the original security protection level, or troubleshoot the detection. Alternatively, if, after re-testing, few or no detections are encountered, then it may be that this new enhanced level can be used with a small number of whitelist entries being created. To investigate detections and whitelist drivers, see the section entitled “McAfee Deep Defender detections.”
Few detectionsIf a small number of detections are triggered, these should be investigated to ensure they are not actual rootkit infections. The section entitled “McAfee Deep Defender Detections” discusses an approach to deal with detection events. The section entitled “Editing the blacklist/whitelist drivers policy” then discusses how to add a driver to the whitelist manually.

37McAfee Deep Defender Technical Evaluation and Best Practices Guide
Many detectionsIf a small number of detections are triggered, this is likely to be as a result of either having the security protection level too high or having unknown driver logging enabled and reporting on unknown driver load events.
In the former case, it is worth confirming the systems is not infected, although even a heavily infected system will rarely have more than five or six different variants of malware present. This can best be achieved by booting with a CDROM and running a scan using Stinger, for example (http://www.mcafee.com/us/downloads/free-tools/stinger.aspx). Once you confirm that the systems are clean, reduce the security protection level and retest the system.
If unknown driver detection is enabled, ensure the correct workflow has been followed.
Unknown driver load detection workflowIf unknown driver detection is enabled, the following workflow should be followed:
• Enable this setting (and ensure the Sensitivity Level of Very High has an action of one of the following: Log, Block, or Remove). This will enable unknown driver logging.
• Reboot the system, and start it up in the normal way•This may generate many unknown driver detections (since drivers will initially be neither classed as bad
nor good and, as such, detected as PUP)• Ensure these events are sent to McAfee ePO software for reporting purposes• Create a query that reports PUP detections. This is discussed in the “Reporting best practices” section
of this document• Confirm that each detection is a legitimate driver, using the process described in the section entitled “McAfee Deep Defender detections”
• Whitelist legitimate drivers. See the section “Editing the blacklist/whitelist drivers policy” for details of how this is done.
• Once you have done this, retest the system and confirm that no detections are triggered
Unexpected behavior or conflict observed
If a system exhibits unexpected behavior of any kind then the following is recommended:• Confirm steps to reproduce the issue. These should be explicit, so that anybody unaccustomed to your
environment can easily reproduce the steps and the effect.• Collect the minimum escalation requirements information. The MER tool does not collect McAfee
Deep Defender-specific information, but the information provided for other products will assist in troubleshooting McAfee Deep Defender. The MER tool is available at https://kc.mcafee.com/corporate/index?page=content&id=KB59385.
• Export system information using msinfo32.exe. Run this utility, select System Summary and File > Save, and save the data as an .info file.
• If a Blue Screen or Stop occurs, collect dumps from %systemroot%/MEM.DMP• Disable McAfee Deep Defender and retest. If the behavior is still present, then uninstall McAfee Deep
Defender, reboot, and retest.

38 McAfee Deep Defender Technical Evaluation and Best Practices Guide
McAfee Deep Defender DetectionsThis section looks at how to approach a potential detection scenario.
View events from the McAfee ePO dashboard
The McAfee Deep Defender Threat Events Chart will indicate any detection. The chart below shows the Behavior:Dispatch threat event, which will be used as an example of the process of investigating a detection.
Figure 31. McAfee Deep Defender Threat Events Chart.
Dashboard drill-down on threat event
Dashboard drill-down on a detection event (Behavior:Dispatch in this case) shows the time and date, but more importantly the Threat Source Process Name responsible for the detection. In this case, the action taken was to allow the driver to continue to load. The Scan Object Hash is important at this point, since it can be used to verify that any sample file examined is identical to the file responsible for the detection.
Figure 32. Detection event details.
Check the hash of the threat source process name
Locate the file mentioned in the Threat Source Process Name to determine its hash using any hash tool available, for example, Hash My Files from Nirsoft, http://www.nirsoft.net/utils/hash_my_files.html.
Figure 33. Viewing a SHA1 file hash using HashMyFiles.

39McAfee Deep Defender Technical Evaluation and Best Practices Guide
The SHA1 hash shown in your chosen hashing tool should match the Scan Object Hash shown in McAfee ePO software. This will ensure that any further investigation is being carried out on the correct file.
Note: Hashes are not case sensitive, so in our example 905F70F8085C5AD0F328C9DD4BD64185620F050D matches 905f70f8085c5ad0f328c9dd4bd64185620f050d exactly.
If the file cannot be found or accessed, or the hashes do not match, double-check that you have the correct file, that you are comparing the SHA-1 hash (rather than the SHA-256, MD5 or other hash) with the Scan Object Hash, not the Target Hash shown in McAfee ePO software. If all of these are correct and the action shown in McAfee ePO software was set to Continue, then this behavior is indeed suspicious. If the behavior is suspicious, jump to the section below entitled “Suspicious file detected.” If the file could be found or accessed, or the hashes did not match, then once you have implemented the recommendations shown in “Suspicious file detected,” repeat this analysis.
Check with McAfee GetSusp
McAfee GetSusp is intended for users who suspect undetected malware on their computer. McAfee GetSusp eliminates the need for deep technical knowledge of computer systems to isolate undetected malware. It does this by using a combination of heuristics and querying the McAfee GTI file reputation database to gather suspicious files.
Download McAfee GetSusp from http://www.mcafee.com/us/downloads/free-tools/getsusp.aspx, and launch the application. Navigate to the file mentioned in Threat Source Process Name and upload the file.
Figure 34. Uploading a suspicious file using McAfee GetSusp.
The results should indicate if the file is known clean, known malicious, or requires further investigation.
McAfee Labs(r) GetSusp(tm) Version 3.0.0.226 built on Nov 17 2011
Copyright (c) 2011 McAfee, Inc. All Rights Reserved.
GetSusp initiated on Wed Feb 08 11:41:18 2012
Successfully connected to McAfee Known Files Database.
C:\tmp\Dispdd.sys ... is OK.
No suspicious files found.
Figure 35. Results from McAfee GetSusp.

40 McAfee Deep Defender Technical Evaluation and Best Practices Guide
Clean file detected
If the file is known to be clean, then you can whitelist this file. Jump to the section entitled “Editing the blacklist/whitelist drivers policy” for instructions.
Suspicious file detected
If the file is known to be infected, then you can blacklist this file. Jump to the section entitled “Editing the blacklist/whitelist drivers policy” for instructions.
File requires further investigation
In this case we recommend working with McAfee Labs. Details are available here http://www.mcafee.com/us/mcafee-labs/resources/how-to-submit-sample.aspx.
Editing the blacklist/whitelist drivers policy
To add a detection to the policy, access and edit the McAfee Deep Defender blacklist/whitelist drivers policy from the system tree or policy catalog.
Figure 36. Whitelisting a known clean driver.
• Add a description to explain why the entry is being added.• Add the Scan Object Hash value• Set the Blocking Actions to:
•Allow—To whitelist the driver and allow it to load regardless of any detection
•Block—To blacklist the driver and prevent it from loading
Save and apply this policy using a wake-up call, for example, and reboot the affected system(s) to test the results of this. Whitelisted drivers should not show as detected, whereas blacklisted drivers should show within the McAfee ePO report.
Testing McAfee Deep Defender
Testing detection
McAfee Deep Defender can be tested to confirm that protection is active using the EICAR-like test executable and accompanying driver. The test files are located in the McAfee Deep Defender installation directory. No exclusions are required for this file, since detection is behavior-based rather than being triggered as a result of a binary comparison of the actual files.
To trigger detection, simply execute DDInstallCheck.exe as an administrator. If you run this executable without administrative rights, the operating system will deny access.

41McAfee Deep Defender Technical Evaluation and Best Practices Guide
Figure 37. Using DDInstallCheck to test McAfee Deep Defender.
Testing blacklist entries
To safely test manual driver blacklisting, the beep.sys driver can be blacklisted. Before blacklisting the driver, ensure that it is currently working by setting the speaker volume to a sufficient level and issuing echo <Ctrl-G> at a command prompt. This should cause a beep and indicates a working driver. To blacklist the driver, create or modify the Blacklist/Whitelist Drivers policy and add an entry for <SYSTEM_ROOT>\system32\drivers\beep.sys, with Block as the action.
Figure 38. Blacklisting the beep.sys driver.
Assign the policy to the system on which you are testing manual driver blacklisting and then reboot the system. Once rebooted, issue echo <Ctrl-G> at a command prompt. The beep should not be heard, but instead an event should be reported.
Figure 39. Blacklisted driver event.

42 McAfee Deep Defender Technical Evaluation and Best Practices Guide
Reporting Best PracticesThe following reports are recommended to assist in the identification of pilot systems, identify threats, and enhance policy.
• DDBP: Candidate Systems—This report will show systems that have a compatible operating systems and processor based on the information available within the McAfee ePO database
• DDBP: Compliance Report—This report is a modified version of the supplied McAfee Deep Defender compliance report. However, this query will only report on compliance of systems that are known to be compatible with McAfee Deep Defender, rather than all systems within the McAfee ePO database.
• DDBP: Inventory Compliant Processors—This report will show how many systems known to McAfee ePO software have compatible CPU types
• DDBP: Operating System Breakdown—This report will show the breakdown of all systems known to McAfee ePO by operating system. This will give an indication of what proportion of systems are compatible from an operating system perspective.
• DDBP: OS Breakdown Compliant Processors—This is a modified version of DDBP: Operating System Breakdown that filters out systems that do not have compatible CPU types
• DDBP: Threat Events Report—This shows an overall summary of threats over time, and for each period (for example, each week), a summary and count of each event type received
• DDBP: Unknown Driver Load—This table shows the name of each PUP or unclassified driver loaded by a system. This can be used to help establish a whitelist policy.
DDBP: Candidate Systems
Figure 40. DDBP: Candidate Systems table.
Description Value
Result Type Managed systems
Display Results as Table
Configure Chart Sort by system name; value (ascending)
Columns System name, CPU type, OS type, OS version, OS service pack version, is laptop, last communication
Filter OS type equals Windows 7
CPT type contains i3 or contains i5 or contains i7
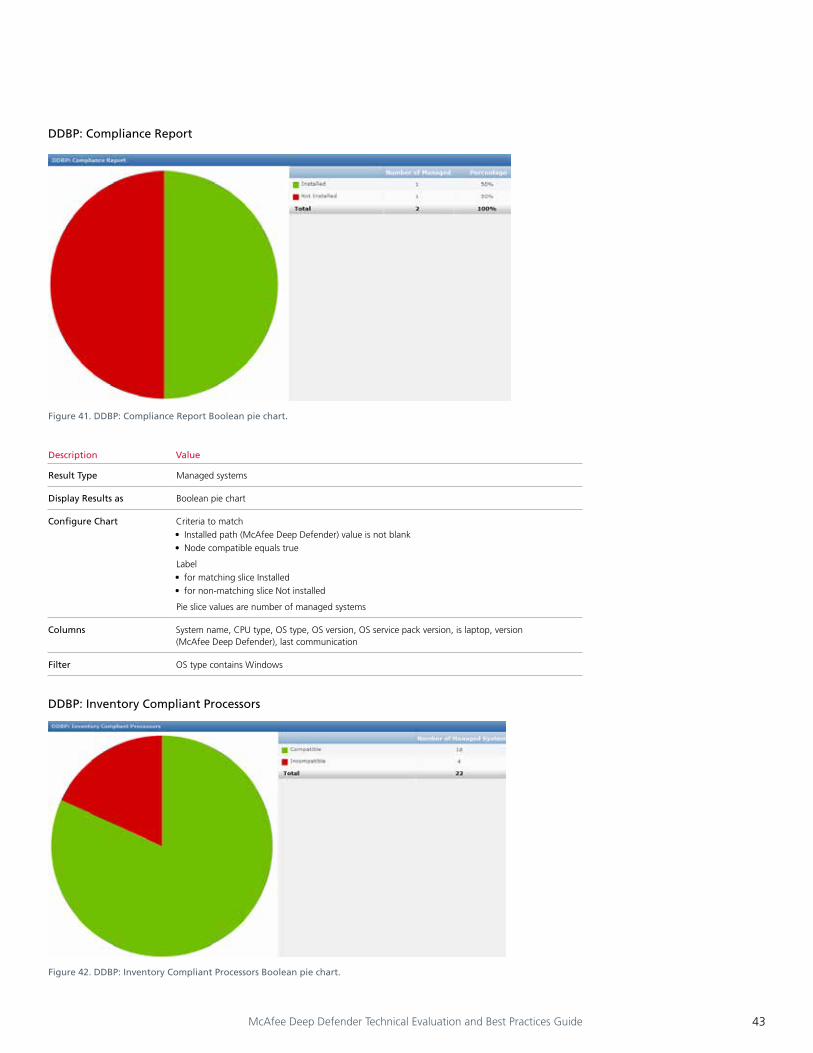
43McAfee Deep Defender Technical Evaluation and Best Practices Guide
DDBP: Compliance Report
Figure 41. DDBP: Compliance Report Boolean pie chart.
Description Value
Result Type Managed systems
Display Results as Boolean pie chart
Configure Chart Criteria to match• Installed path (McAfee Deep Defender) value is not blank• Node compatible equals true
Label• for matching slice Installed• for non-matching slice Not installed
Pie slice values are number of managed systems
Columns System name, CPU type, OS type, OS version, OS service pack version, is laptop, version (McAfee Deep Defender), last communication
Filter OS type contains Windows
DDBP: Inventory Compliant Processors
Figure 42. DDBP: Inventory Compliant Processors Boolean pie chart.

44 McAfee Deep Defender Technical Evaluation and Best Practices Guide
Description Value
Result Type Managed systems
Display Results as Boolean pie chart
Configure Chart CPT type contains i3 or contains i5 or contains i7 label• for matching slice Installed• for non-matching slice incompatible
Pie slice values are number of managed systems
Columns System name, CPU type, OS type, OS version, OS service pack version, is laptop, last communication
Filter None
DDBP: Operating System Breakdown
Figure 43. DDBP: Operating System Breakdown pie chart.
Description Value
Result Type Managed systems
Display Results as Pie chart
Configure Chart Labels are OS type value (descending)
Pie slice values are number of managed systems
Columns System name, CPU type, OS type, OS version, OS service pack version, is laptop, last communication
Filter OS type value is not blank
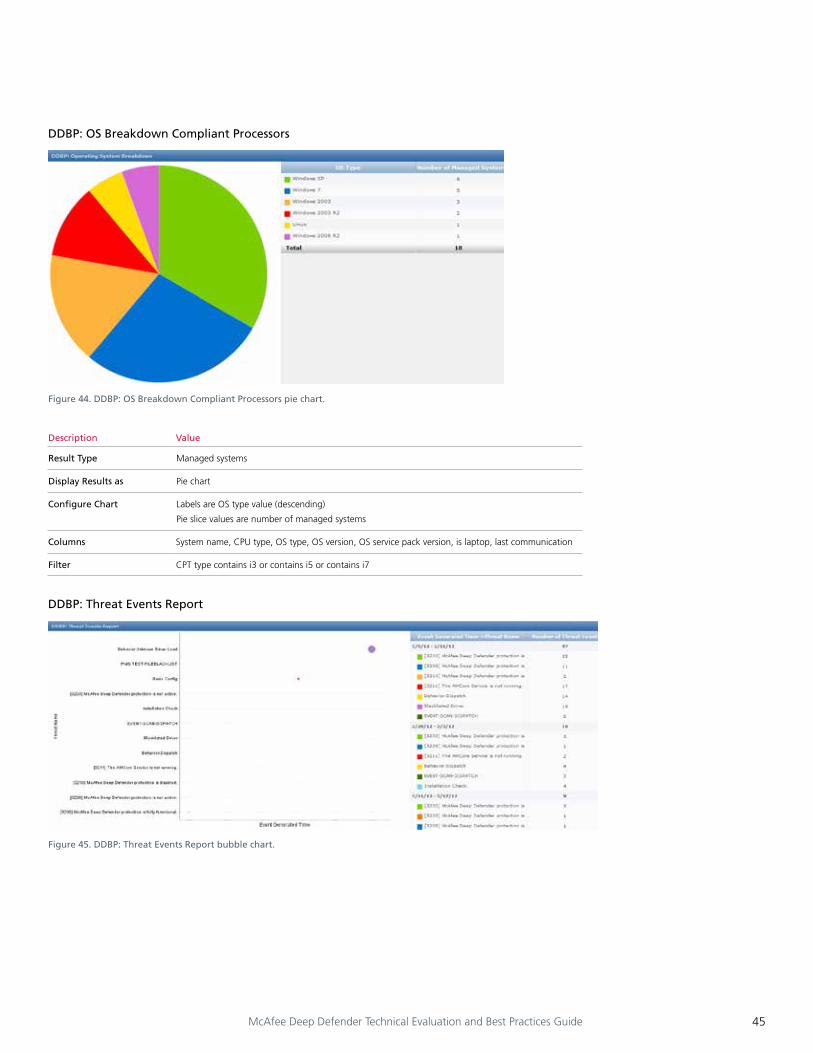
45McAfee Deep Defender Technical Evaluation and Best Practices Guide
DDBP: OS Breakdown Compliant Processors
Figure 44. DDBP: OS Breakdown Compliant Processors pie chart.
Description Value
Result Type Managed systems
Display Results as Pie chart
Configure Chart Labels are OS type value (descending)
Pie slice values are number of managed systems
Columns System name, CPU type, OS type, OS version, OS service pack version, is laptop, last communication
Filter CPT type contains i3 or contains i5 or contains i7
DDBP: Threat Events Report
Figure 45. DDBP: Threat Events Report bubble chart.
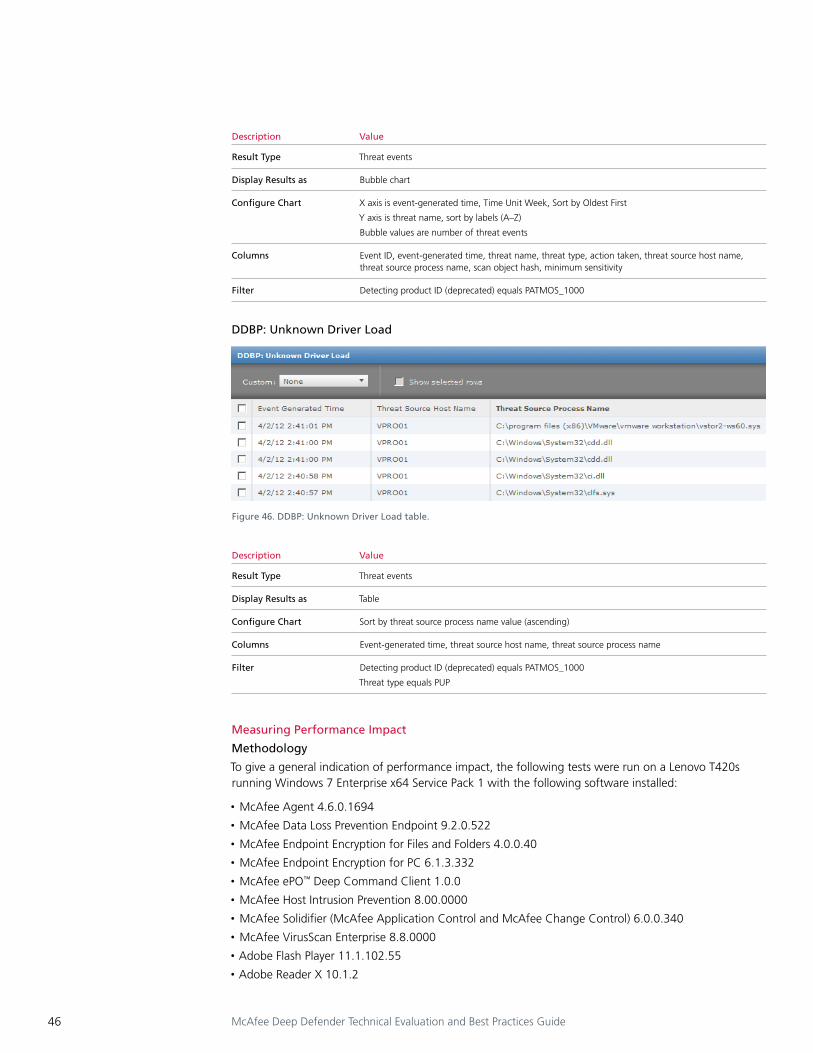
46 McAfee Deep Defender Technical Evaluation and Best Practices Guide
Description Value
Result Type Threat events
Display Results as Bubble chart
Configure Chart X axis is event-generated time, Time Unit Week, Sort by Oldest First
Y axis is threat name, sort by labels (A–Z)
Bubble values are number of threat events
Columns Event ID, event-generated time, threat name, threat type, action taken, threat source host name, threat source process name, scan object hash, minimum sensitivity
Filter Detecting product ID (deprecated) equals PATMOS_1000
DDBP: Unknown Driver Load
Figure 46. DDBP: Unknown Driver Load table.
Description Value
Result Type Threat events
Display Results as Table
Configure Chart Sort by threat source process name value (ascending)
Columns Event-generated time, threat source host name, threat source process name
Filter Detecting product ID (deprecated) equals PATMOS_1000
Threat type equals PUP
Measuring Performance Impact
Methodology
To give a general indication of performance impact, the following tests were run on a Lenovo T420s running Windows 7 Enterprise x64 Service Pack 1 with the following software installed:
• McAfee Agent 4.6.0.1694• McAfee Data Loss Prevention Endpoint 9.2.0.522• McAfee Endpoint Encryption for Files and Folders 4.0.0.40• McAfee Endpoint Encryption for PC 6.1.3.332• McAfee ePO™ Deep Command Client 1.0.0• McAfee Host Intrusion Prevention 8.00.0000• McAfee Solidifier (McAfee Application Control and McAfee Change Control) 6.0.0.340• McAfee VirusScan Enterprise 8.8.0000• Adobe Flash Player 11.1.102.55• Adobe Reader X 10.1.2

47McAfee Deep Defender Technical Evaluation and Best Practices Guide
• Java 6 Update 30 6.0.300• Microsoft Office Professional Plus 2010 14.0.6029.1000• Internet Explorer 9.0.8112.16421• VMware Workstation 7.1.1.13618• NovaBench 3.0.4
These tests were conducted using a simple stopwatch, so they may include errors of +/- 0.25 seconds. Where multiple tests were conducted over the same data set, reboots were made midway to reduce the skewing impact of caching on results. Saving of scan results across reboots for McAfee VirusScan Enterprise was deliberately disabled for the same reason.
Test results
Table 10. Start-up, shutdown, and reboot
Operation Percentage Increase in Time Actual Increase in Seconds
From a logged-on system, time to shutdown, reboot and logon dialog box to appear
30% 9.9 seconds
From a logged-on system, time to shutdown 49% 4.8 seconds
From a powered-off system, time to start up and logon dialog box to appear
30% 7.1 seconds
Table 11. Launch of multiple Microsoft Office 2010 documents
Document/Application Percentage Increase in Open Time Actual Increase in Seconds
Microsoft Word 2010 39% 2.6 seconds
Microsoft Excel 2010 0% 0 seconds
Microsoft PowerPoint 2010 17% 1 second
Microsoft Outlook 2010 12% 0.5 seconds
Table 12. Launch of Internet Explorer 9
Document/Application Percentage Increase in Open Time Actual Increase in Seconds
Time to open Internet Explorer and load home pages from Google, McAfee, Microsoft, VMware, and Yahoo!
44% 2.8 seconds
Table 13. Launch of Adobe Reader documents
Document/Application Percentage Increase in Open Time Actual Increase in Seconds
Time to open Adobe Reader and load five documents
36% 1.4 seconds
Table 14. McAfee VirusScan Enterprise on-demand scans
Scan Type Percentage Increase in Scan Time Actual Increase in Seconds
Scan of Windows Folder and Subfolders
155% 377 seconds
Scan of Processes and Memory 24% 3.8 seconds

2821 Mission College Boulevard Santa Clara, CA 95054 888 847 8766 www.mcafee.com
McAfee, the McAfee logo, McAfee Labs, McAfee Global Threat Intelligence, McAfee GTI, McAfee VirusScan, McAfee DeepSAFE, SiteAdvisor, ePolicy Orchestrator, and McAfee ePO registered trademarks or trademarks of McAfee, Inc. or its subsidiaries in the United States and other countries. Other marks and brands may be claimed as the property of others. The product plans, specifications and descriptions herein are provided for information only and subject to change without notice, and are provided without warranty of any kind, express or implied. Copyright © 2012 McAfee, Inc. 45900wp_deep-defender_0612_fnl_ETMG
Table 15. VMware Workstation virtual machine start-up time
Virtual Machine Percentage Increase in Start Time Actual Increase in Seconds
Windows XP Service Pack 3 (32-bit) 601% 75.5 seconds
Scan of Processes and Memory 24% 3.8 seconds
Table 16. NovaBench benchmarking results
Feature Increase/Decrease Percentage of Original Increase/Decrease
Overall Score -2.7 0%
RAM -1.0 -1%
Ram Speed MB/Second -203.7 -3%
CPU 0.3 0%
Floating Points Operations/Second -11270.7 0%
Integer Operations/Second 797133.3 0%
MD5 Hash-Generated/Second 2958.7 0%
Graphics 0.0 0%
Frames/Second 0.0 0%
Hardware -2.0 -25%
Capacity GB 0.0 0%
Drive Write Speed MB/Second -23.7 -44%
About the AuthorJason Brown is an enterprise solutions architect specializing in endpoints at McAfee who works within EMEA. He is responsible for ensuring that optimal solutions are provided to customers within the enterprise market segment. Previously, as principal sales engineer, he has assisted in delivering solutions in both a pre-sales and post-sales capacity to many of the FTSE 100 companies and authored best practice white papers. He has created and executed partner training across EMEA and has reviewed and delivered many customer training courses. Jason has 15 years of experience in the security industry. Prior to joining McAfee, Jason worked at a defense contractor after completing a bachelor’s degree in computer modeling for business and master’s degrees in both operational research and finance. He is CISSP-certified and is a Cisco Certified Network Professional.
About McAfeeMcAfee, a wholly owned subsidiary of Intel Corporation (NASDAQ:INTC), is the world’s largest dedicated security technology company. McAfee delivers proactive and proven solutions and services that help secure systems, networks, and mobile devices around the world, allowing users to safely connect to the Internet, browse, and shop the web more securely. Backed by its unrivaled global threat intelligence, McAfee creates innovative products that empower home users, businesses, the public sector, and service providers by enabling them to prove compliance with regulations, protect data, prevent disruptions, identify vulnerabilities, and continuously monitor and improve their security. McAfee is relentlessly focused on constantly finding new ways to keep our customers safe. http://www.mcafee.com