December2005
44
ISSUE - DECEMBER 2005
-
Upload
sergey-demchishin -
Category
Documents
-
view
214 -
download
1
description
ISSUE - DECEMBER 2005 PAGE 40-42 Best ofC4D Gallery Page 44 Holiday Rendering by Sebastien Florand (Fluffy) Page 13-19 JENNA Step by Step by Gary Zullo PAGE 21-23 zBlur - Working On A Project by Thomas Pasieka PAGE 33-35 Layered Shaders by Rui Batista PAGE 37-39 Artist Spotlight on Cornel Swoboda PAGE 28-32 Interview: Dennis Miller by Tavy Ann Page 4 3D Attack and Vital Disclosure Present “Story Time” PAGE 26-27 Review:Discovering BodyPaint 2 & 2.5 by Mark Gmehling Page 3 Editors Notes
Transcript of December2005
ISSUE - DECEMBER 2005

Page 3 Editors Notes
Page 4 3D Attack and Vital Disclosure Present “Story Time”
Page 6-11 Interview: Jana Rot by Tavy Ann
Page 13-19 JENNA Step by Step by Gary Zullo
PAGE 20 WIN Unity!
PAGE 21-23 zBlur - Working On A Project by Thomas Pasieka
PAGE 24-25 Modeling A Book by Bram van Gerwen
PAGE 26-27 Review: Discovering BodyPaint 2 & 2.5 by Mark Gmehling
PAGE 28-32 Interview: Dennis Miller by Tavy Ann
PAGE 33-35 Layered Shaders by Rui Batista
PAGE 36 Gnomon Workshop by Aaron Biscombe
PAGE 37-39 Artist Spotlight on Cornel Swoboda
PAGE 40-42 Best of C4D Gallery
Page 43 Attack Team
Page 44 Holiday Rendering by Sebastien Florand (Fluffy)

03
Editor’Editor’s Notess Notes
Contact Information
3D Attack
158 S. Saginaw St.
Chesaning, Michigan 48616 - USA
E-mail: [email protected]
Tutorials
If you have any questions or com-
ments regarding the tutorials within
the magazine, please feel free to
express them on or CINEMA 4D dis-
cussion forum at www.3dattack.net
Harvey Reitano 1924 - 2005
The December 2005 issue of 3D
Attack is dedicated to the memory of
Harvey Reitano. He will be remem-
bered with great admiration and
much love.
Attack the CINEMA4D Magazine and all material con-
tained therein are copyright protected. You may not dis-
assemble or distribute any part of this publication with-
out prior written consent from 3D Attack directly. Any
attempts to do so will be prosecuted to the fullest extent
of the law as it applies in Michigan, USA. This applies
for both 3D Attack material as well as any named artist
contained in its publications. Although we read through
all the tutorials and proof-read them for errors we can-
not guarantee that they are 100% error-free and there-
fore cannot issue refunds based on those errors.
Happy Holidays Attackers!
The Holiday Season is upon us. A
time for giving, receiving, sharing,
caring, reflection and love.
In the United States the first holiday
of the winter season is
Thanksgiving. Although
Thanksgiving’s roots can be found in
our rich American history, many fam-
ilies find it to be a time to reflection
of all they are thankful for. 3D
Attack would like to take this time to
thank you, our readers. Thank you
for all of your support this past year.
You make our work worth doing.
May you and your families be richly
blessed throughout the holiday sea-
son and into the New Year.
Seasons Greetings,
The 3D Attack Team
***GOODIES FOLDER***
http://www.3dattack.net/goodies/
As most of our readers know, your
goodies folder usually comes zipped
with your magazine. We have
decided to do the Goodies a bit dif-
ferent. You will now find your
Goodies folder at http://www.3dat-
tack.net/goodies/ for download.
This allows us to make changes to
the Goodies folder easily, (if need-
ed) and provide you with the access
to the Goodies at all times.
Remember, the Goodies are copy-
right protected, as is the magazine.
These Goodies are for paying read-
ers only. DO NOT redistribute your
download link or your Goodies fold-
er.
BODYPAINT TRAINING DVD
Nigel Doyle (3DKiwi) of
C4dcafe.com has released his new
BodyPaint training DVD.
Discovering BodyPaint 3D 2 & 2.5
with 3DKiwi is now available for
purchase at:
http://www.c4dcafe.com/3dkiwi/bpsh
op/index.html
3D ATTACK RADIO
Yep, 3D Attack is now doing a radio
type broadcast. Our goal with the
radio show is to have fun and bring
our listeners CINEMA 4D related
information. While we are not pro-
fessionals in this area, we hope you
will enjoy the show. Be sure to
check it out on
www.3dattack.ne/radio, or subscribe
to our podcasts within ITunes.
Simply go to the "Advanced" menu
in iTunes and choose "Subscribe to
Podcast...". Enter this link:
http://www.3dattack.net/radio/3DAT-
TACK-CINEMA4DNEWS.xml
Advertising with 3D Attack
If you would like to advertise with 3D
Attack send us an e-mail requesting
our media kit and rate card.
Reviews
If you would like 3D Attack to evalu-
ate and review your product, or if
you are a member of the press and
would like to evaluate and review
the 3D Attack line of plug-ins for
CINEMA 4D, feel free to contact
Thomas Pasieka at:
Tavy: Jana, it’s a true pleasure to
speak with you today. We are look-
ing forward to learning more about
you and your work. Would you mind
introducing yourself to our readers?
Where do you live…how old are
you…etc…?
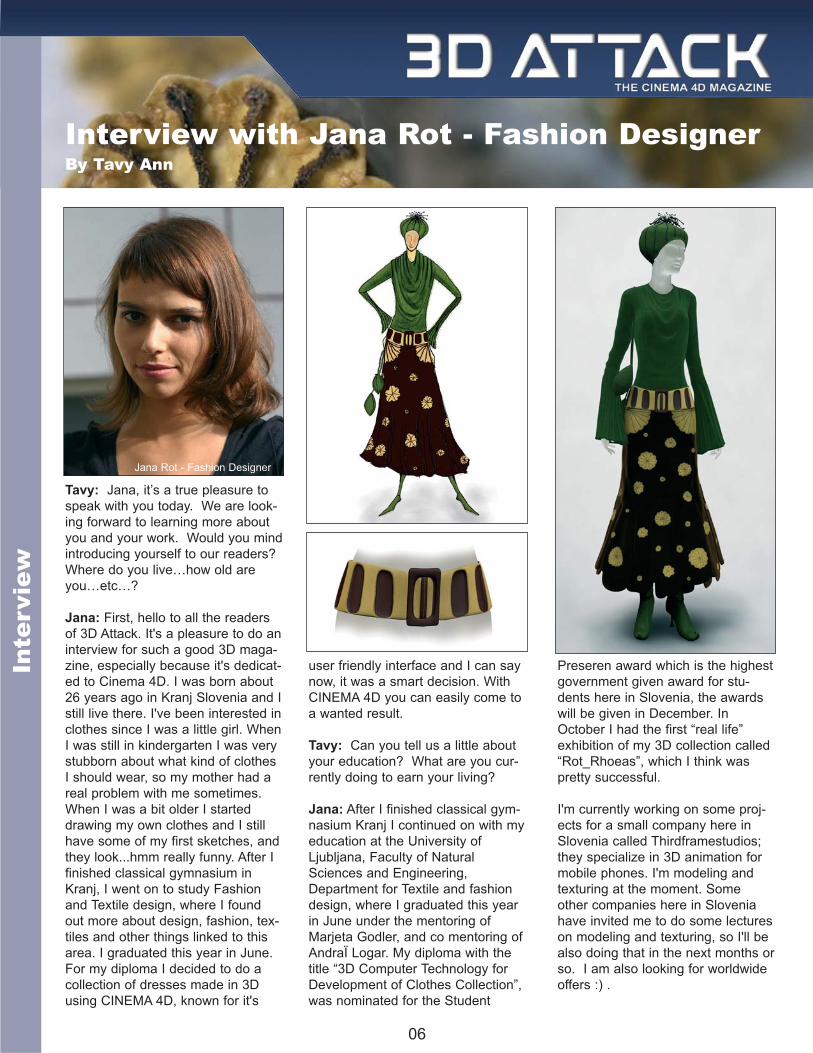
Jana: First, hello to all the readers
of 3D Attack. It's a pleasure to do an
interview for such a good 3D maga-
zine, especially because it's dedicat-
ed to Cinema 4D. I was born about
26 years ago in Kranj Slovenia and I
still live there. I've been interested in
clothes since I was a little girl. When
I was still in kindergarten I was very
stubborn about what kind of clothes
I should wear, so my mother had a
real problem with me sometimes.
When I was a bit older I started
drawing my own clothes and I still
have some of my first sketches, and
they look...hmm really funny. After I
finished classical gymnasium in
Kranj, I went on to study Fashion
and Textile design, where I found
out more about design, fashion, tex-
tiles and other things linked to this
area. I graduated this year in June.
For my diploma I decided to do a
collection of dresses made in 3D
using CINEMA 4D, known for it's
user friendly interface and I can say
now, it was a smart decision. With
CINEMA 4D you can easily come to
a wanted result.
Tavy: Can you tell us a little about
your education? What are you cur-
rently doing to earn your living?
Jana: After I finished classical gym-
nasium Kranj I continued on with my
education at the University of
Ljubljana, Faculty of Natural
Sciences and Engineering,
Department for Textile and fashion
design, where I graduated this year
in June under the mentoring of
Marjeta Godler, and co mentoring of
AndraÏ Logar. My diploma with the
title “3D Computer Technology for
Development of Clothes Collection”,
was nominated for the Student
Preseren award which is the highest
government given award for stu-
dents here in Slovenia, the awards
will be given in December. In
October I had the first “real life”
exhibition of my 3D collection called
“Rot_Rhoeas”, which I think was
pretty successful.
I'm currently working on some proj-
ects for a small company here in
Slovenia called Thirdframestudios;
they specialize in 3D animation for
mobile phones. I'm modeling and
texturing at the moment. Some
other companies here in Slovenia
have invited me to do some lectures
on modeling and texturing, so I'll be
also doing that in the next months or
so. I am also looking for worldwide
offers :) .
Interview with Jana Rot - Fashion DesignerBy Tavy Ann
06
Inte
rvie
w
Jana Rot - Fashion Designer

Tavy: What inspired you to com-
bine 3D/CG and fashion design?
Jana: My boyfriend AndraÏ Logar
was very interested in 3D animation.
He went on to study 3D animation at
the Media Design School in New
Zealand three years ago. During
that time I was finishing my educa-
tion as a Textile and Fashion
designer here in Slovenia and I had
to think of what will I do for my
diploma.
So, as I stayed in touch with him all
through his learning process of 3D
animation, we heard from each
other almost everyday, and seeing
what he was doing, he infected me
with 3D. I started thinking of how, as
a Fashion designer, I could imple-
ment 3D in my designs. At first I was
aiming really high.
I wanted to do a catwalk animation
of my own designed dresses, but
when I started to learn CINEMA 4D,
and I actually started to work on my
clothes, I realized that all areas such
as modeling, texturing, lighting and
animation are so extensive and take
so much time to really get to know
and use them, that I wouldn't be
able to finish my project on time.
Although C4D is very easy to use, I
left out animation and some other
things. As no one at my faculty was
doing something like this in 3D, (as
far as I knew, and only a few in the
world according to my knowledge),
this was also another challenge for
me. I was doing something new and
that kept me going through the
rough times. This is quite often the
case with 3d graphics.
Tavy: What software applications
are you currently using and why?
Jana: I use CINEMA 4D 9.0 for
modeling, texturing, lighting and ren-
dering of my 3D models of clothes,
accessories and other 3D objects
that I create for clients. I'm currently
using Corel Painter together with my
Wacom tablet for doing my sketches
of clothes and accessories or just
for drawing.
I also use Adobe Photoshop mainly
for correcting images, and Adobe
Illustrator for arranging images for
printing. And for writing things down
I use OpenOffice2. And I should not
forget BodyPaint as an essential
Interview with Jana Rot - Fashion DesignerBy Tavy Ann
07
Inte
rvie
w
tool for texturing. But being a part of
the CINEMA package, I often forget
to mention this great piece of soft-
ware.
Tavy: CINEMA 4D is known for
being an “easy to learn” 3D applica-
tion. When did you start using CIN-
EMA 4D, and how long did it take
you to learn its tools and begin
designing your creations?
Jana: I have been using CINEMA
4D for about a year and a half and, I
have to say, that you can fast and
easily get your wanted result with it.
In my first 6 months with C4D I went
through numerous tutorials I found
on the web, books, and of course
the CINEMA 4D Manual. First. My
boyfriend, AndraÏ Logar, also helped
me a lot. In that time I learned the
tools, the basics of modeling, textur-
ing, lighting and rendering. Then
after first six months of learning the
program I started to work on my cre-
ations. First, I did sketches of my
designs - They've been a sort of sto-
ryboard for my 3D designs, and then
I started to work on real 3D. One
dress, together with the accessories,
took more than a month to finish. To
complete all four, it took me, togeth-
er with lighting and rendering, more
than six months.
Tavy: When starting a new design,
where do you start? Where do you
end?
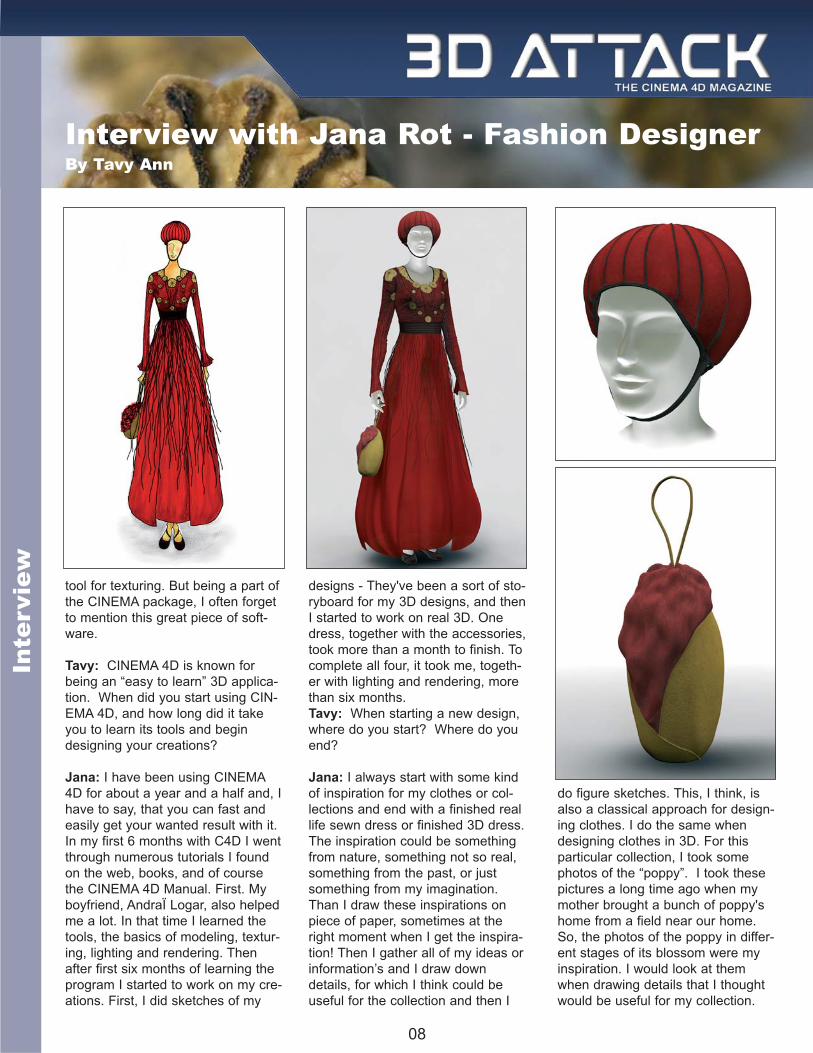
Jana: I always start with some kind
of inspiration for my clothes or col-
lections and end with a finished real
life sewn dress or finished 3D dress.
The inspiration could be something
from nature, something not so real,
something from the past, or just
something from my imagination.
Than I draw these inspirations on
piece of paper, sometimes at the
right moment when I get the inspira-
tion! Then I gather all of my ideas or
information’s and I draw down
details, for which I think could be
useful for the collection and then I
do figure sketches. This, I think, is
also a classical approach for design-
ing clothes. I do the same when
designing clothes in 3D. For this
particular collection, I took some
photos of the “poppy”. I took these
pictures a long time ago when my
mother brought a bunch of poppy's
home from a field near our home.
So, the photos of the poppy in differ-
ent stages of its blossom were my
inspiration. I would look at them
when drawing details that I thought
would be useful for my collection.
Interview with Jana Rot - Fashion DesignerBy Tavy Ann
08
Inte
rvie
w

Then I started to do sketches on a
computer with Painter and my
Wacom tablet. I drew like thirty
sketches, chose four of them, and
started working on materials. I had
to choose from which fabrics or
materials the clothes and the acces-
sories would be made of. I tried to
find “real life” fabrics and used them,
later on, when I was texturing and
making 3D materials.
I also decided where the stitches,
darts, zippers and other details of
the clothes will go, and where, or
how, these kinds of clothes should
be sewn in real life, and how the
fabrics should behave. After all the
preparations, or when I did the sto-
ryboard, I started working in CINE-
MA 4D. First I started with modeling.
I modeled all four dresses together
with accessories, continued with
UV's for all the objects. After that I
started working on materials and I
had to figure out how to imitate the
real live fabrics in 3D so they would
look in 3D, like they do in real life.
When I was working on materials I
had the fabrics and other materials,
like leather, always by my side. I
was always checking their parame-
ters out and looking at what kind of
reflection they have. Do they have
Fresnel or not? What is their diffu-
sion like? And so on…. I was look-
ing for irregularities and how certain
fabrics behave. This wasn't an easy
thing to do in 3D, and sometimes I
did more than a hundred variations
of the fabric. This is how I got the
one that I was satisfied with. When I
had the materials that I wanted, I
started texturing and sometimes I've
combined or used more than three
different materials on one part of a
dress in order to get the look that I
wanted. So I had, in average, more
than fifteen materials on one dress.
Sometimes even twenty or more.
The basic lighting was set before I
started working on materials. This
enabled me to do test renders to
see how the materials behaved and
if they were looking as real to life as
possible, according to the fabrics I
had for reference. When all the
materials were finished, the render-
ing started, which took approximate-
ly eleven hours for one dress with-
out the separate details and single
parts of the dress. When everything
was rendered I did some corrections
in Photoshop, and that is how I
ended the 3D dress or collection.
Tavy: To date, what is your greatest
achievement?
Jana: My greatest achievement to
date would have to be my 3D diplo-
Interview with Jana Rot - Fashion DesignerBy Tavy Ann
09
Inte
rvie
w

ma. I have put so much of my life
into it. There were times or days
when I thought that I would never
reach my goal, but with a lot of help
and love from Andraz and my moth-
er Vojka, I made it through the hard
times of a intensive one year of
work. I would like to thank them
both again.
Tavy: Are you currently working on
any projects you can tell us little
about?
Jana: I'm currently working on some
projects for company here in
Slovenia called Thirdframestudios.
Soon I will start to work on a tutorial
on how to make a bag. I have been
getting some other offers as well.
The future seems bright.
Tavy: Do you see a future for
3D/CINEMA 4D in fashion design?
Jana: Yes, I think CINEMA 4D has a
real perspective in fashion design,
especially with features like
Clothilde and Dress-o-Matic.
And especially if in the future we
see specific plug-ins just for fashion
design, like, for example, plugins or
softwares for architects, this would
be really nice. When I was doing my
schooling I did some research on
what kind of 3D programs exist for
fashion design, and I didn't find any
real 3D programs.
I mean all the programs for fashion
and textile design aren't made in a
way that a fashion designer would
be able to model, texture, set light-
ing and render in a certain way for
his own clothes. They are mainly
library based, and there you can
only use the already made parts of
clothes, patterns and fabrics, put
them together or change them in a
certain way. But these kinds of pro-
grams don't leave much room for a
designer to be creative, but being
creative is a fundamental of being a
designer. On the other hand, CINE-
MA 4D offers all that.
You can model, texture and every-
thing else in every way that you like.
I was very surprised when I've dis-
covered how many new ideas you
can get when working in a 3D pro-
gram and how many new possibili-
ties open with such tools that this
kind of program offers.
I also think, that you start to think in
a way that you have not thought
before. Though we must never for-
get that 3D programs are just a tool
to help us come to fresh, liberating
ideas, and not just a tool that we are
fascinated and limited with.
A real innovation in the fashion
world would be a 3D plug-in or a
program in which you could model
clothes in a way that you can do in
CINEMA 4D, and the end result
would be patterns for your clothes.
Current fashion programs offer just
3D simulation of clothes from
already made patterns, but this real-
ly isn't a very innovative way for a
designer. So if there is anyone pre-
pared to develop something like
this, maybe even MAXON itself,
please, let me know!
Tavy: Do you have any words of
wisdom/advice for the thousands of
aspiring fashion and graphic design-
ers throughout the world?
Jana: Hahaha words of wisdom,
well if I would have something to
say it would be this: Don't ever stop
doing what you think is worth of giv-
ing up some of your free time for,
but never forget that love and health
should be the first things on your
mind. And of course, keep using
Internet communities like 3D Attack
or CG Talk and don't forget to return
a favor!
Tavy: Jana, thank you so much for
taking time from you busy schedule
Interview with Jana Rot - Fashion DesignerBy Tavy Ann
10
Inte
rvie
w

to enlighten us with a little deeper
look at you and your work. We are
looking forward to what the future
holds for you and 3D in fashion. Do
you have any last words you would
like to leave our readers with?
Jana: Thank you for this interview.
I'm very honored that you contacted
me to do an interview for your won-
derful magazine. I hope that the
readers will, or have, enjoyed it. I
would also like to thank all CINEMA
4D communities for all the help they
gave to me during the realization of
my project.
And I wish to the 3D Attack team, to
all the readers and to the magazine,
an inspiring, creative, challenge
filled new New Year (2006), with a
lot of great 3D Stuff.
Have fun and keep the creativity
going!
Jana Rot
Interview with Jana Rot - Fashion DesignerBy Tavy Ann
11
Inte
rvie
w

Hello my fellow Attackers! In this
issue I am going to take you through
an overview of JENNA and show
you its power in simplicity. As you
know 3D Attack and Core Arsenal
have found a way to keep JENNA
alive. CoreArsenal’s dedication to
the CINEMA 4D community and 3D
Attack’s desire to bring this fantastic
plugin back, has blown life back into
JENNA (!!). 3D Attack dug deep and
pulled out the resources needed to
obtain this “must have” plugin for
distribution to the CINEMA 4D com-
munity. So, what do we want to
accomplish in this tutorial? Well, I
want to show you how each object
works and how you can quickly cre-
ate some crazy things by using
them in different combinations. If
feedback is positive I would like to
then do another project-based tutori-
al in the future where you and I
could explore JENNA in an actual
project. So, if you would be interest-
ed in that please email us at:
[email protected] and voice
your opinions ?
Ok, so some of you may be asking
what the heck is JENNA anyway?
Well, allow me to answer that!
Simply put, JENNA is a real-time
procedural geometry engine for
objects and animated hierarchies in
Cinema4D (R9.1+). The plugin
objects include:
ITERATOR (transform-based multi-
ple source object generator)
TWEENER (object hierarchy
blender)
GRIDARRAY (volumetric object
hierarchy distributor)
MESHARRAY (material aware
object hierarchy distributor)
ALLIE (geometric material inter-
preter).
NICKL (loopable function-based
deformer)
displaceVIEW (material displace-
ment preview)
In addition to these objects, JENNA
has some additional, and very use-
ful, objects as part of the suite:
Multiple Source (allows multiple
source objects and hierarchies to be
used in JENNA objects)
uberNULL (pure null object)
jTAG (Jenna data container tag)
jSHADER (Jenna object data shad-
er)
If you’re new to JENNA then you’re
in for a treat. If you are familiar with
JENNA then you can attest to the
fact that it is most likely a “must-
have” plugin in your toolbox. JENNA
can best be summed up as being
CINEMA 4D’s Duplicate command
on steroids! Certain things still can-
not be done without it without a lot
of work and effort, so you can
understand what all of the buzz was
about when it looked as though
JENNA was gone forever…
Now, let’s discuss each object, what
it does and how to use them.
ITERATOR
ITERATOR is a generator that
allows you to create repetitive
objects in a non-destructive editable
way (e.g. Think of things such as
fence posts along a field, techy-
nurnies on a spaceship, people in a
line, chains, ropes, lights, etc, etc.).
Under normal circumstances even
JENNA - STEP BY STEPGary Zullo aka Mr. Pixar
13
Tuto
rial

CINEMA’s duplicate function would
leave you with a lot of post-work to
do in order to place these items,
and that work would be destructive;
meaning you’re stuck with what you
did unless you remembered to save
a file before going at it ? ITERATOR
allows you to define symmetry and
placement all from a comfy control
panel and it’s completely non-
destructive. Don’t like what you end
up with? Reset your parameters, or
remove the ITERATOR object and
that’s that – back to “normal”!
Making it do something (basic):
This is a basic example of how you
can setup and use the ITERATOR
object generator.
Create a primitive object (I used a
cube)- Create the ITERATOR gener-
ator object (Plugins > CaJENNA >
ITERATOR)
Since ITERATOR is an object gen-
erator we will need to drag the prim-
itive object under the ITERATOR so
that the primitive is a child of the
ITERATOR.
As soon as the primitive is placed
as a child of the ITERATOR you
should immediately see an array of
transformed primitives
Now you can tweak the various val-
ues to describe each object’s place-
ment, rotation, variation from the
other objects, size, etc.
Making it do something
(advanced):
This is a more advanced example of
how one can use the ITERATOR
object generator.
Create a text spline primitive
Create a cone primitive and change
its “Bottom Radius” to 5, “Height” to
15, “Height Segments” to 1 and
“Rotation Segments” to 15
Create a new ITERATOR generator
(Plugins > CaJENNA > ITERATOR)
Change the ITERATOR’s “Count” to
50
Go to the ITERATOR’s “Transform”
tab and change the “Translate
Vector” Y value to 10 and change
the “Rotation Vector” Y value to 0.
Move the cone so that it is a child of
the ITERATOR.
Move the text spline primitive so that
it is a child of the ITERATOR (until
we add the cone as a child the text
spline primitive will be iterate)
In the “Path” tab make sure that the
“Use Path” and “Tangential” are both
checked.
Make sure that animation time slider
is at frame 0. Then CTRL-Click
(CMD-Click on the MAC, I believe)
the grey circle next to the “Origin
Offset “parameter. This will create a
key frame at our current frame (0)
and at “Origin Offset” 0. Move the
animation time slider to frame 90
and then adjust the “Origin Offset”
value to the position where the
cones have made it through the
entire text spline primitive. CTRL-
Click (CMD-Click on the MAC, I
believe) again to create a key frame
at frame 90. Rewind the animation
time slider and press play. Pretty
cool, eh?
TWEENER
TWEENER is a generator that
allows you to create objects by
“blending” two object hierarchies.
Ultimately, TWEENER is a powerful
interpolation generator. To function,
it requires two source object hierar-
chies which are identical in their
makeup (object types and vertex
counts) but different in their parame-
ters and/or vertex placement. For
instance, by dropping a sphere into
JENNA - STEP BY STEPGary Zullo aka Mr. Pixar
14
Tuto
rial

TWEENER, duplicating it to make a
second sphere inside the TWEEN-
ER object, changing the radius of
either sphere, and transforming
either sphere (position is the most
obvious ), a series of spheres is
generated by mixing the two source
spheres.
Making it do something:
This is a basic example of how you
can setup and use the TWEENER
object generator.
Create two separate (but similar)
primitive objects. I used cubes.
Place some space between each
object so that you can easily see the
effect.
Create a new TWEENER generator.
Move both primitive objects so that
they are children of the TWEENER
Immediately after moving the primi-
tives you should see the space
between the primitives disappear
and tweened objects fill the space
Experiment with each parameter of
the TWEENER as well as each
primitive and see what cool effects
you can come up with.
This not only works with primitive
object but with splines, object hierar-
chies, etc. Feel free to try this same
technique using splines instead of
primitives. The only thing to remem-
ber is to make the splines editable
(‘c’ key by default).
GRIDARRAY
GRIDARRAY is an object generator
that allows for the regular and
arranged distribution of objects and
hierarchies within a cubic volume.
The distribution of objects can be
constrained to any combination of
specific topological regions of the
volume (corners, edges, faces, and
volume). GRIDARRAY is ideal for
the quick and efficient creation of
crystalline, repeating structures as
well as irregular, organic structures
composed from a specific object
(stars, dust, clouds, etc).
With a bit of experimentation and
creativity you can realize a huge
range of forms. It is well worth tak-
ing some time to explore the wealth
of GRIDARRAY’s possibilities.
Making it do something:
(See next picture)
This is a basic example of how you
can setup and use the GRIDARRAY
object generator.
Create a cylinder primitive and use
the following settings: radius=32,
height=100, height segments=8 and
rotation segments=18
Create a tube primitive and use the
following settings: inner radius=34,
outer radius=70, rotation seg-
ments=18, cap segments=1,
height=19, height segments=1
Drag the tube primitive so that it is a
child of the cylinder. Create a new
GRIDARRAY generator. Move the
cylinder/tube hierarchy to that it is a
child of the GRIDARRAY. You
should immediately see the genera-
tor doing its job as our cylinder/tube
object is duplicated several times
Tweaking values such as variation,
scale etc can yield some pretty
ingenious results.
MESHARRAY
MESHARRAY is an object generator
that allows you to create instanced
hierarchies based on the geometry
JENNA - STEP BY STEPGary Zullo aka Mr. Pixar
15
Tuto
rial

of a source hierarchy that can be
further influenced by material prop-
erties. Creation, source hierarchy
selection, translation, scale, orienta-
tion, visible light color, and even
final shading properties can be influ-
enced by these material channels.
MESHARRAY’s support for animat-
ed deformed bodies offers a wealth
of design opportunities.
Making it do something:
This is a basic example of how you
can setup and use the MESHAR-
RAY object generator.
Create four cube primitives
Create a new MESHARRAY object
generator (Plugins > CaJENNA >
MESHARRAY). Either set “Auto-
Update” to “Always, or you will have
to click “Force update” to see
changes. Move the 4 cubes so that
they are children of the MESHAR-
RAY object. Immediately after mov-
ing the cubes you should see the
effects of MESHARRAY on the
cubes. Resize the cubes as follows:
cube1=no changes, cube2=all size
parameters set to 25, cubes 3 and
4=all size parameters set to 10
Since we are creating a noise-driven
animation we need to create the
material noise that will be the driver.
So create a new material. Add noise
to the color channel. I used “Ober”
at global scale=1000% and anima-
tion speed=1. This will give us a
large enough scale to see the true
pattern of the function as well as
seeing it animate over time.
In order to use the new material in
the MESHARRAY object it first has
to be applied to an object in the
hierarchy. To avoid having the mate-
rial being rendered on our
MESHARRAY-created objects we
can simply use an uberNULL (more
on that in a bit) that will be ignored
by MESHARRAY when it evaluates
the objects.
Create an uberNULL object (Plugins
> CaJENNA > uberNULL) and move
it so that it is the first child of the
MESHARRAY object then click the
green check (which will turn to a red
X) to make MESHARRAY ignore it.
To use the material to influence the
attributes of the instanced objects
we must first place the texture tag in
one the texture evaluation channels
of the MESHARRAY object. Select
the MESHARRAY object and locate
the “Texture” tab in the Attribute
Manager. Drag the texture tag from
the uberNULL object to the first tex-
ture channel.
With the MESHARRAY object
selected to go the “Parameter” tab.
Make sure “Density” is checked and
set channel=1. Now play the time-
line and change the “Density”
“Tolerance”. In order to animate this
one from the timeline you’ll have to
set key frames, but you should see
what can be done by simply playing
with the tolerance value ?
ALLIE
(See next picture)
ALLIE is an object generator that
allows you to utilize a grid of
instanced hierarchies that can be
further influenced by material prop-
erties. Creation, source hierarchy
selection, translation, scale, orienta-
tion, visible light color, and even
final shading properties can be influ-
enced by these material channels.
ALLIE is ideal for the quick and effi-
cient creation of stylized, repeating
structures as well as irregular,
organic structures composed from a
specific object (droplets on a sur-
face, cloud structures, etc...). This
particular generator is a lot like
another plugin called
“PlaceOnPoints” if you are familiar
with its functionality
Making it do something:
(See picture on next page)
This is a basic example of how you
can setup and use the ALLIE object
generator. Create a cube primitive
JENNA - STEP BY STEPGary Zullo aka Mr. Pixar
16
Tuto
rial

and set each of the size compo-
nents to 50.Create a new ALLIE
object generator. Move the cube
primitive so that it is a child to the
ALLIE object. Immediately after
moving the cube you should see the
effects of ALLIE (a cube instance
will be placed on each point inter-
section). With the ALLIE object
selected go to its “Transform” tab
and change each of the “Count” val-
ues to 5
Since we are creating a noise-driven
animation we need to create the
material noise that will be the driver.
So create a new material. Add noise
to the color channel. I used “Ober”
at global scale=1000% and anima-
tion speed=1. This will give us a
large enough scale to see the true
pattern of the function as well as
seeing it animate over time.
In order to use the new material in
the ALLIE object it first has to be
applied to an object in the hierarchy.
To avoid having the material being
rendered on our ALLIE-created
objects we can simply use an
uberNULL (more on that in a bit)
that will be ignored by ALLIE when it
evaluates the objects.
Create an uberNULL object (Plugins
> CaJENNA > uberNULL) and move
it so that it is the first child of the
ALLIE object then click the green
check (which will turn to a red X) to
make ALLIE ignore it.
To use the material to influence the
attributes of the instanced objects
we must first place the texture tag in
one the texture evaluation channels
of the ALLIE object. Select the
ALLIE object and locate the
“Texture” tab in the Attribute
Manager. Drag the texture tag from
the uberNULL object to the first tex-
ture channel. With the ALLIE object
selected to go the “Parameter” tab.
Make sure “Density” is checked and
set channel=1. Now play the time-
line and change the “Density”
“Tolerance”. We have a noise driven
animation my friends!
NICKL
NICKL is an object deformer that
allows you to easily define looping
deformations for animation, but also
allows you to easily deform just
about anything. NICKL gives you
unparallel power related to deforma-
tions by giving you: numerous
tweakable function defaults, real-
time feedback and tons of falloff
options. NICKL is still just as appli-
cable now (NICKL2) as it was when
it debuted.
Making it do something (basic):
This is a basic example of how you
can setup and use the NICKL object
deformer.
Create a primitive object (I used a
plane). Create a new NICKL
deformer (Plugins > CaJENNA >
NICKL). Since NICKL is an object
deformer and works just as native
C4D deformers do you will need to
drag it so that NICKL is a child of
your primitive, or other object
The NICKL deformation should be
immediately visible to you in the edi-
tor viewport(s). Tweak the settings
to your liking. Try the different
falloffs and functions for some really
cool effects – easily! Press play and
see what you’ve done ?
Making it do something
(advanced):
(See image on next page)
This is a more advanced example of
how one can use the NICKL object
deformer.
JENNA - STEP BY STEPGary Zullo aka Mr. Pixar
17
Tuto
rial

Create a text spline primitive
We need to add sufficient detail to
the points in the splines for the
deformation to show well on the
splines. So, first change the
“Intermediate Points” value to
“Uniform” and set the number to
something like 30. Alter the different
strength values until you have
something that looks good ?
Alter the global scale value until
golden brown. Now, press the play
button. Since NICKL was created for
loopable deformations; you just cre-
ated an animation! As long as you
haven’t changed any of the parame-
ters in the functions tab the anima-
tion should loop seamlessly
displaceVIEW
displaceVIEW is a new addition to
JENNA that allows you to preview
material displacement in the editor
without any restrictions (or having to
render). To my knowledge this is the
only displacement previewer for
CINEMA 4D currently. displaceVIEW
can be converted to a polygon
object from the deformed (pre-
viewed) geometry (for this you
would use the “Current State To
Object” function).
Making it do something:
This is a basic example of how you
can setup and use displaceVIEW.
Create a new primitive object (plane
for example). Create a new
displaceVIEW object (Plugins >
CaJENNA > displaceVIEW). Since
displaceVIEW is a deformer and it
works just like native C4D deform-
ers it must be placed as a child to
the object.
Now we need to create a material
that uses displacement, which is
pretty easy to do. Create a new
material, and go to the material edi-
tor. Check the box to enable the dis-
placement channel and add a noise
of your choice (I used Stupl @
100% strength / 200m height).
Once you have a suitable material
apply it to the plane primitive.
If displaceVIEW is enabled you
should immediately see the flat
plane become displaced according
to the noise you applied to the
material. If you want to change the
way it looks then all you need to do
is change your material accordingly
and refresh the displaceVIEW object
by clicking the “force update” button
in the attributes manager.
Alternately, you can also set the
“Auto Update” value to “Always” ?
and any change you make to the
material will immediately appear in
the editor window
Some other invaluable JENNA items
Multiple Source. This object is used
mainly by ITERATOR and ALLIE to
allow for multiple source object hier-
archies. I know you’re probably
thinking, “Wow! You don’t say?” LOL
Let me explain…ITERATOR, by
default, can only use a single object
hierarchy instance. The same goes
for ALLIE. This removes that limita-
tion. GRIDARRAY also can make
use of Multiple Source…think of
using separate object hierarchies for
the edges, surface and volume. This
allows for limitless possibilities; and
easily to boot.
uberNULL
uberNULL exists to eliminate an
issue with virtual hierarchy baking in
Cinema4D. If you use a NULL
object without children objects in a
virtual hierarchy (created by an
array object for instance) the NULL
objects will be deleted when the
array object is converted to a real
object hierarchy by using the
“Current State To Object” command.
The uberNULL does convert and
preserves the parental axis function-
ality. It can also be used (when dis-
JENNA - STEP BY STEPGary Zullo aka Mr. Pixar
18
Tuto
rial
abled) for texturing evaluation pur-
poses in MESHARRAY or ALLIE
objects.
jTag and jSHADER
jTAG is a data tag applied to objects
instanced by JENNA object genera-
tors like ITERATOR, TWEENER,
GRIDARRAY, MESHARRAY, and
ALLIE. It stores data including UVW,
Position, Texture 1 - 5 (these are the
evaluated texture results of the tex-
ture channels associated with a
generator object). These data chan-
nels can be used by jSHADER,
XPresso, or even other plugins that
add properties based on jTAG data
jSHADER is a shader whose pur-
pose is using the jTAG data created
for JENNA object instances for
shading during rendering. This adds
an incredible amount of power to
JENNA by allowing instances to
become unique.
Summary:
Well, first of all I’d like to thank you
for making it this far. I realize that
this tutorial may have been a bit
long but I wanted to go over JENNA
and all its functionality in great
detail. I’ve personally never really
seen any tutorials or much of any-
thing JENNA-related on the web
which is somewhat depressing.
So, I was more than excited to write
this and share this invaluable tool
with everyone. If you liked this
month’s JENNA tutorial please let us
know and if there is enough
response I’d love to do a project-
based tutorial that moves away from
how each parameter works and
actually make something! You
decide ?
You can find each of the scene files
created in the tutorial in this month’s
goodies (see the editor’s notes at
the beginning of the magazine for
more information).
Until next time -- Gary
JENNA - STEP BY STEPGary Zullo aka Mr. Pixar
19
Tuto
rial

Unity is valued at $999.00. For a chance to win Unity e-mail your answer to the question above to [email protected], (hint: The answer
can be found at www.unity3d.com under “Company”). UNITY should be your subject line and your answer and your real name must be
included in the e-mail body. Your e-maill address with then be pooled with the other entries and we will pick one random winner on January 1,
2006. The winner will be notified via e-mail and on our forum at www.3dattack.net.
*3D Attack staff and their immediate families are not eligible to enter and/or win 3D Attack prize giveaways.
**Unity is currently only available for OS X.

Hello there ATTACKERS!
Well this is not really a tutorial, but
surely an interesting piece of work
by Pierre Magnol. Pierre is a free-
lance artist is using zBlur and CINE-
MA 4D to create professional com-
mercials. One example can be
found on our 3D Attack page at:
http://3dattack.net/shop/index.php?pl
ugin=5
This commercial was completely
produced by him using various 2D
and movie layers.
A while ago Pierre and I made con-
tact and he asked me to give his
some assistance on a new commer-
cial for ROSSIGNOL. He showed
me some example shots of his cur-
rent work and I noticed some arti-
facts in almost every scene. I took
the time and explained why he was
getting these artifacts and showed
him some tips and tricks on how to
avoid these while using zBlur.
For those of you that are not familiar
with z-Blur, let me give you a quick
description: zBlur is a post effect for
Cinema 4D, which can be used as
an alternative to C4D’s, own DOF.
zBlur does not cancel out other post
effects, it does not require the
Advanced Render module, and it
supports reflections and bleed con-
trol. zBlur also has a preview win-
dow and a reference object that can
make changes right in the editor.
The first screenshot (see big pic-
ture) will show you the setup for this
shot. You will notice a lot of planes
and cubes plus some extruded
objects. A lot of the planes use 2D
motion graphics (Picture in Picture)
with alpha channels. Actually an
easy task for zBlur, but the setup
can be a bit tricky at times and one
would need a little experience with
zBlur. The scene itself is very basic,
but the combination of 2D motion
graphics and animated 3D Objects
makes this an interesting project.
Here is a shot of the scene com-
pletely without any blur effects. The
different layers are placed all over
the place in different levels. (See
picture below) A nice little setup
which gives the expression of a high
tech product. Most of the graphics
you see are done with Adobe
Photoshop and the animation of
these files, on the other hand, was
then done in Adobe After Effects.
The very next picture will show you
the result of Pierre's settings. I
marked the various render artifacts
right in the picture (1-6) and you can
clearly see that the blur ends
abruptly on several objects that use
alpha channels and such. (See pic-
ture on next page). It seems like the
transition is not smooth and you
would most likely blame zBlur for
this. Well, zBlur is not the problem,
but as mentioned in the beginning, it
requires a little training and knowl-
edge with zBlur to avoid these
"errors". Now let's have a look at
zBlur - zBlur - WWororking On king On A PrA ProjectojectBy By TThomas Phomas Pasiekaasieka
21
Tuto
rial

Pierre's zBlur Render Settings
shown in the next picture (See pic-
ture below - zBlur settings). Pierre
chose to use the "spline" blur type
with a Sample Radius of 1 and 2
Iterations for a not so heavy blurring
of his scene (The higher the
Iteration the more blur). The Blur
profiles almost shows a nice curve
and Pierre is also using "Bleed
Control" to get rid of the bleeding
(blurring of edges around objects
that should not be affected). There
seems to be nothing wrong with his
settings, but have a look at the set-
tings I've made in the next picture
(See my settings in the pic below).
I chose to go with a medium blur
type and 2 Iterations in order to get
pretty much the same result Pierre
was after. I also chose to use the
bleed control option, and as you can
see, it goes from low to high (nice
transition). Now here is a little trick.
As you can see the first point of this
curve (bottom left) is not totally on
the lowest setting, and the last point
of the curve (top right) is not all at
the top. This makes for a smooth
transition. Here is a preview of the
zbuffer (zBlurPreview), which is very
helpful and allows for easy and fast
setups of your desired blur range.
The dark areas represent the
"sharp" areas while the white areas
represent the blurred areas, and in
between (grey) is the transition. The
preview window will allow you to set
start and length of the zbuffer (Start
at 0 and ends at 6400 - scene
depended). The preview window will
also allow you to "set keys" in order
to create a camera animation with
blur.
The following picture (on the next
page) will show the end result of my
settings. You can clearly see that
there are no artifacts and we have a
nice smooth transition. That's what
we wanted! The scene is ready to
be rendered in high resolution!
A little side note: zBlur requires a lit-
tle knowledge. It is best to play
around with zBlur on easy scenes to
get a feel for it. Learn how to use
the different blur types and learn
how to use the preview window.
zBlur is an amazing tool, but like
with any other plug-in/software, it
requires a bit of effort and time. But
once you become a pro with zBlur, it
zBlur - zBlur - WWororking On king On A PrA ProjectojectBy By TThomas Phomas Pasiekaasieka
22
Tuto
rial

will be as easy as eating breakfast!
If you have problems using zBlur in
your project, please don’t hesitate to
ask us on the forum or directly write
me e-mail, and we will check your
scene or give you some tips and
tricks!
Happy rendering!
Thomas
Check out some example render-
ings and videos on our shop page
at:
http://3dattack.net/shop/index.php?pl
ugin=5
zBlur has been updated to version
1.5 and is now also able to create
“bokeh” effects (see video on the
bottom of the shop page for more
information).
zBlur - zBlur - WWororking On king On A PrA ProjectojectBy By TThomas Phomas Pasiekaasieka
23
Tuto
rial

Basic Modeling - Basic Book using
Splines
In this basic modeling tutorial we'll
learn how to create a realistic look-
ing hard cover book using some
simple spline techniques. The
splines are easily adjustable so that
you can use your resulting docu-
ment as a template to quickly create
other books that differ in size and
form.
Let's begin by drawing the rough
form of the cover. Go to Top View
(F2), look at Picture 1 and draw a
similar spline using the Draw Bezier
Spline Tool (selected also shown for
reference). When setting down
points with this tool you can hold the
mouse down to drag out the tan-
gents and aim the spline. Make sure
you start drawing the bottom points
at the 0 position of the axis so that
we'll be able to mirror this spline
properly in the next step. To check if
both points are at the 0 position
select them and go to the Structure
Manager (under the Window menu).
The structure manager let's you edit
the position and tangent positions of
individual points. You can see the
rows of the two selected points high-
lighted in the structure manager.
Make sure both of their Z values are
set to 0. The other values with the
arrows next to them are the position
values for the tangents of that point.
Rename the spline to 'Cover Spline'
when done.
When satisfied with the cover spline
create a Symmetry object and drop
the spline into it. You'll notice that it
mirrors on the wrong plane, so set
the Mirror Plane of the symmetry
object to XY to get the proper result.
The spline for the cover is finished
now and we are ready to extrude it.
Go back to the main view (F1), cre-
ate an Extrude NURBS object and
drop the symmetry object into it.
We need to change a couple of set-
tings before it looks correct. First
click the spline and enable 'Close
Spline', this will close the gap in the
spline and enable the extrude object
to utilize caps. Next we have to
change the extrude direction. Click
the extrude object and change its
rightmost value, which is set to 20
by default, to 0 and the middle value
of 0 to 160. Now the book spline will
be extrude along the Y axis. You
might want to use a different value
than 160 depending on what scale
you drew the spline, as long as the
dimension of the book look like in
Picture 2.
We notice a little oddity in the mid-
dle of the cover where it closes the
spline. The book appears to be one
object but is in fact two. We want it
to be one object. The procedure is
quite simple but you have to pay
attention to the points you are going
to connect here. Duplicate the spline
object for the cover and rotate it 180
degrees over the X axis (P 180).
Now the duplicate object is like the
symmetry. drag the first spline out of
the symmetry and delete the sym-
metry object, it looked fancy but this
method is not convincing. After this
select both splines and use the
'Connect' Function. A new spline will
be created from the two loose ones.
The two loose ones can now be
deleted.
Now comes the part where to pay
attention. Go to top view and zoom
in on the middle points of the cover
that are on the X axis. Because of
the loose splines combined those
points are actually double and are
on top of each other, they need to
be welded together to work correct-
ly. select one of the points and drag
the just a tiny bit along the z axis so
that you can see the other point
underneath it. Now select both
Basic Modeling: A BookBy Bram van Gerwen
24
Tuto
rial
Picture 1
Picture 2

points, use the Weld function and
click on the bright yellow point that
appears between them. Those
points will now be connected. To fin-
ish the spline you can now delete
the other double point which isn't
welded yet and enable the 'close
spline' option.
The extrusion won't display the loop
error in the middle anymore now.
Let's continue, to smooth the current
flat caps go the the Caps tab of the
extrude object and set both Start
and End to Fillet Cap, the Steps to 4
and the radius to 1. This should give
nice rounded edges. Lastly we need
to get the subdivisions down a bit, a
lot of them are generated along the
back of the book. To remedy this
select the spline, set its Intermediate
points to Natural and its Number to
3. This will change how the spline
extrapolates its extra points and
build up the polygons accordingly.
Also a good way to keep polycount
down if you are using a lot of spline
objects in your scene.
Next we'll make the pages, this is
not for animating so its just going to
be a static object. Use the Draw
Bezier Spline tool to draw a spline
like in Picture 3 (selected also
shown for reference). Don't drag out
tangents for the points except for
the one indicated. This will give
points with linear interpolation and
will simply become sharp corners
instead of rounded off. When the
points are drawn select 'Close
Spline' in the spline options and the
gap will be closed.
Now create another Extrude Nurbs
object and drop the spline into it.
The pages section is of course a bit
smaller than the cover itself. Set the
Y position of the extrude nurbs
object to 2.5 and change the Y
movement to 156 in the object prop-
erties. This will give the pages a bit
of room under the book and above.
To tweak out the form set the
Intermediate Points of the spline to
Natural and its number to 3. Result
in Picture 4 (Left).
The last detail is the piece of materi-
al (to which the pages are
bound/glued) that sticks out with
most bound books. Draw a spline
like in Picture 4 (inset). Then create
a Sweep NURBS object and a
Circle Spline. Set the Circle spline to
0,5 and drop it into the Sweep
object along with the drawn spline.
The circle spline must be above the
other spline for the sweep to work.
You'll notice the spline being 'swept'
with the small circle, but the ends
are still flat. To round them of we'll
simply enable the Fillet Caps in the
Cap tab of the sweep nurbs object.
To prevent the sweep from getting
thicker due to the fillet caps enable
'constrain'. When Start and End are
set to Fillet Cap set their steps to 3
to get roundings and the radius to
0,5 to match the sweep. This part is
now complete finishing off our basic
book. Result in Picture 4 (Right), I
colored the cover simple green to
show the different objects better.
The book is now finished. But
because of the splines it is still high-
ly adjustable. You can tweak the
form of them very easily by dragging
a couple of points. For instance you
can make the back cover rounded
by dragging the middle points out-
ward, you can make the cover thick-
ness thinner by dragging its outer
points inward. A couple of examples
shown in Picture 5.
Texturing is also easy, If you only
want to see the front take your jpeg
of the book cover you need and
apply it to the model with flat projec-
tion, then click the tag and select 'Fit
to Object' from the texture menu.
If you also want a text on the spine
it is better to make the cover
editable and create a vertex selec-
tion for the front and the spine. That
way you have more control over
how you align the different textures.
Have fun making some books. If you
have any more questions on making
books please ask them on the 3D
Attack Forum.
Bram
Basic Modeling: A BookBy Bram van Gerwen
25
Tuto
rial
Picture 3
Picture 4Picture 5
REVIEW:
DISCOVERING BODYPAINT 3D
R.2 & 2.5 WITH 3D KIWI
On October 11. Nigel Doyle a.k.a.
3D Kiwi launched shipping of his
“DISCOVERING BODYPAINT 3D
R.2 & 2.5 WITH 3D KIWI”-DVD.
It’s available in the C4DCafe shop
for $59.99 (including postage):
HYPERLINK
"http://www.c4dcafe.com/3dkiwi/bps
hop/index.html"
http://www.c4dcafe.com/3dkiwi/bpsh
op/index.html
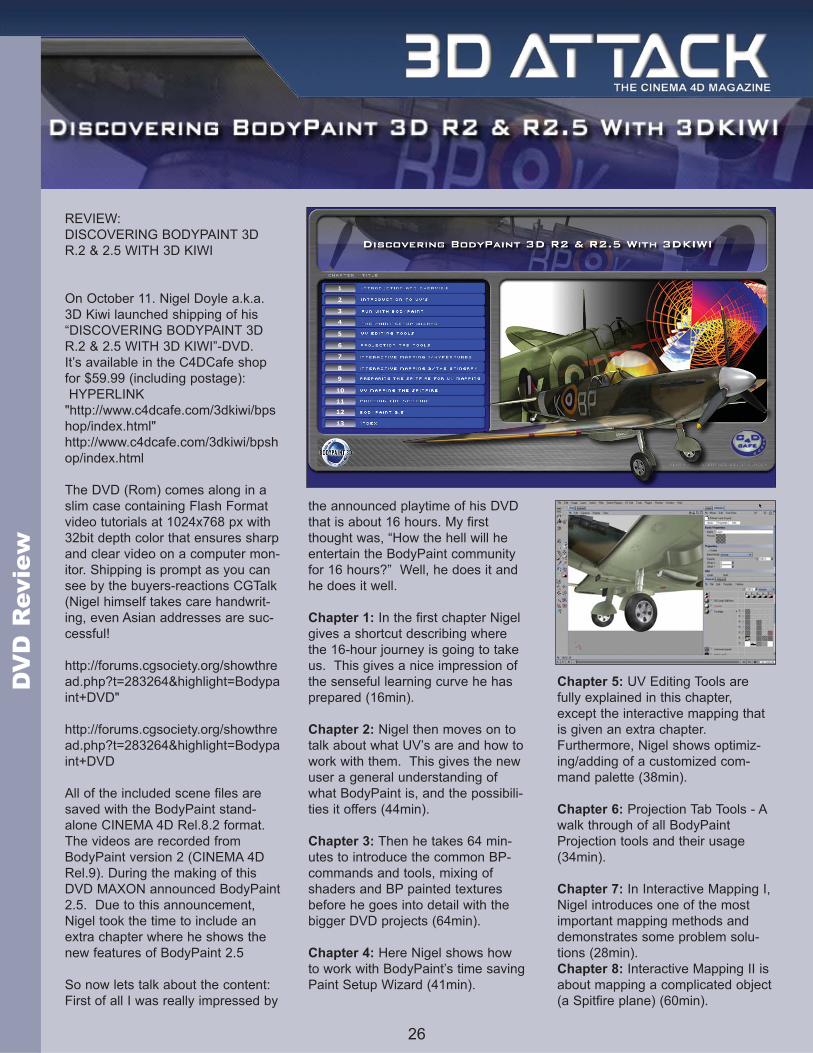
The DVD (Rom) comes along in a
slim case containing Flash Format
video tutorials at 1024x768 px with
32bit depth color that ensures sharp
and clear video on a computer mon-
itor. Shipping is prompt as you can
see by the buyers-reactions CGTalk
(Nigel himself takes care handwrit-
ing, even Asian addresses are suc-
cessful!
http://forums.cgsociety.org/showthre
ad.php?t=283264&highlight=Bodypa
int+DVD"
http://forums.cgsociety.org/showthre
ad.php?t=283264&highlight=Bodypa
int+DVD
All of the included scene files are
saved with the BodyPaint stand-
alone CINEMA 4D Rel.8.2 format.
The videos are recorded from
BodyPaint version 2 (CINEMA 4D
Rel.9). During the making of this
DVD MAXON announced BodyPaint
2.5. Due to this announcement,
Nigel took the time to include an
extra chapter where he shows the
new features of BodyPaint 2.5
So now lets talk about the content:
First of all I was really impressed by
the announced playtime of his DVD
that is about 16 hours. My first
thought was, “How the hell will he
entertain the BodyPaint community
for 16 hours?” Well, he does it and
he does it well.
Chapter 1: In the first chapter Nigel
gives a shortcut describing where
the 16-hour journey is going to take
us. This gives a nice impression of
the senseful learning curve he has
prepared (16min).
Chapter 2: Nigel then moves on to
talk about what UV’s are and how to
work with them. This gives the new
user a general understanding of
what BodyPaint is, and the possibili-
ties it offers (44min).
Chapter 3: Then he takes 64 min-
utes to introduce the common BP-
commands and tools, mixing of
shaders and BP painted textures
before he goes into detail with the
bigger DVD projects (64min).
Chapter 4: Here Nigel shows how
to work with BodyPaint’s time saving
Paint Setup Wizard (41min).
Chapter 5: UV Editing Tools are
fully explained in this chapter,
except the interactive mapping that
is given an extra chapter.
Furthermore, Nigel shows optimiz-
ing/adding of a customized com-
mand palette (38min).
Chapter 6: Projection Tab Tools - A
walk through of all BodyPaint
Projection tools and their usage
(34min).
Chapter 7: In Interactive Mapping I,
Nigel introduces one of the most
important mapping methods and
demonstrates some problem solu-
tions (28min).
Chapter 8: Interactive Mapping II is
about mapping a complicated object
(a Spitfire plane) (60min).
26
DV
D R
evie
w
Chapter 9: Preparing the Spitfire for
UV Mapping (36min).
Chapter 10: UV Mapping the
Spitfire - divided in 8 parts (226min).
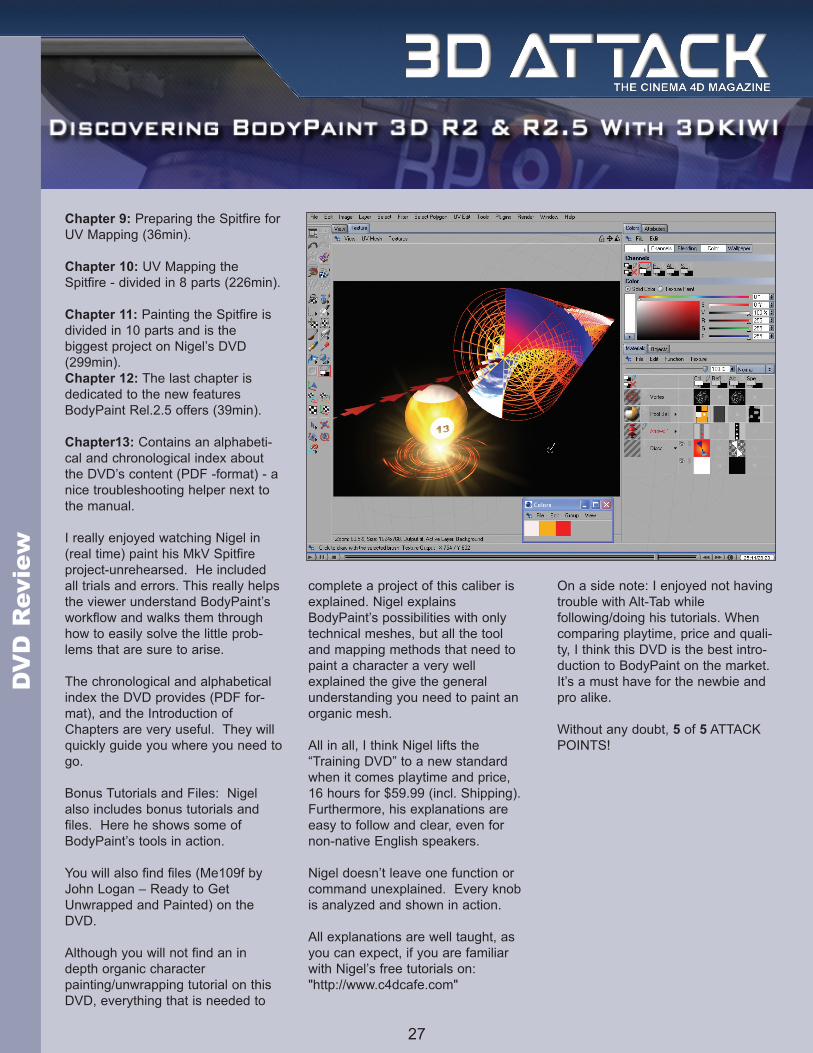
Chapter 11: Painting the Spitfire is
divided in 10 parts and is the
biggest project on Nigel’s DVD
(299min).
Chapter 12: The last chapter is
dedicated to the new features
BodyPaint Rel.2.5 offers (39min).
Chapter13: Contains an alphabeti-
cal and chronological index about
the DVD’s content (PDF -format) - a
nice troubleshooting helper next to
the manual.
I really enjoyed watching Nigel in
(real time) paint his MkV Spitfire
project-unrehearsed. He included
all trials and errors. This really helps
the viewer understand BodyPaint’s
workflow and walks them through
how to easily solve the little prob-
lems that are sure to arise.
The chronological and alphabetical
index the DVD provides (PDF for-
mat), and the Introduction of
Chapters are very useful. They will
quickly guide you where you need to
go.
Bonus Tutorials and Files: Nigel
also includes bonus tutorials and
files. Here he shows some of
BodyPaint’s tools in action.
You will also find files (Me109f by
John Logan – Ready to Get
Unwrapped and Painted) on the
DVD.
Although you will not find an in
depth organic character
painting/unwrapping tutorial on this
DVD, everything that is needed to
complete a project of this caliber is
explained. Nigel explains
BodyPaint’s possibilities with only
technical meshes, but all the tool
and mapping methods that need to
paint a character a very well
explained the give the general
understanding you need to paint an
organic mesh.
All in all, I think Nigel lifts the
“Training DVD” to a new standard
when it comes playtime and price,
16 hours for $59.99 (incl. Shipping).
Furthermore, his explanations are
easy to follow and clear, even for
non-native English speakers.
Nigel doesn’t leave one function or
command unexplained. Every knob
is analyzed and shown in action.
All explanations are well taught, as
you can expect, if you are familiar
with Nigel’s free tutorials on:
"http://www.c4dcafe.com"
On a side note: I enjoyed not having
trouble with Alt-Tab while
following/doing his tutorials. When
comparing playtime, price and quali-
ty, I think this DVD is the best intro-
duction to BodyPaint on the market.
It’s a must have for the newbie and
pro alike.
Without any doubt, 5 of 5 ATTACK
POINTS!
27
DV
D R
evie
w

Tavy: Hello Dennis, and thank you
for taking time to speak with 3D
Attack. Would you please share
with our readers a little about your-
self? Where you live....your
career...etc?
Dennis: Hi Tavy. Thanks for asking!
I live in the suburbs of Boston with
my wife, dog and cat. I work at
Northeastern University in Boston,
where I teach courses in electronic
music composition and multimedia
studies. I’ve been there many years
(my only real job!) and plan to stay
until they throw me out. It’s a great
place to work - they love the idea of
combining arts and technology - and
my students force me to keep up on
new developments. I also write
about technology for Electronic
Musician Magazine, where I am an
Associate Editor.
Tavy: Can you tell us a little about
your education? Where did you go
to school...your major(s)...etc?
Dennis: I grew up in New Orleans
(very sad...), where I graduated with
a Bachelor’s of Music Composition
from Loyola University. I then went
to grad school first in Hartford (CT),
then later in New York City. I fin-
ished up at Columbia University,
which was one of the pioneering
institutions in electronic music, but I
didn’t really focus on that while I
was there (that came later).
It wasn’t until a few years after I left
Columbia that I got interested in
computer music. I convinced
Northeastern to let me take some
classes at MIT so I could get on the
fast track with the subject. After
another few years, I saw how similar
some of the graphics languages
(POVray, to be specific) were to the
music programming language I was
using (Csound), so I taught myself
POVray (a work in progress..) and
started to create images that had
some of the characteristics of my
music (repetition with variation, etc.).
I gradually migrated to moving
images, where I was really able to
apply techniques from music com-
position - both are time-based, after
all - and along the way, I took cours-
es in art history, art fundamentals
and the like to begin my “new
career.”
Tavy: When I took a first look at
some of your work I thought, ok this
guy is an abstract artist and a good
one at that. As I looked a little
deeper and played a few of your
animations I realized you have gone
far beyond 3D abstract imagery.
You have found a way to success-
fully blend music, 3D and animation
to produce some of the most stun-
ning modern art I’ve ever seen. I
guess my question to you would be,
where did this all start?
Dennis: Well it just seemed so nat-
ural to try and organize the images
in my animations along the same
lines that I had been using in my
music, which is also “abstract.” Take
a sequence of images, “transpose”
it, “invert” it, reverse it, lengthen or
shorten its duration, flip it upside
down... all of those things are very
common ways to develop musical
themes, and they all work well in
abstract moving art.
But coming up with a lot of “raw
material” - oftentimes, many varia-
tions on a few basic themes - is only
Interview with Dennis MillerBy Tavy Ann
28
Inte
rvie
w
Dennis Miller
Ammonite I.
One of my earliest POVray images.
the start. The hard part is arranging
all this material into a cohesive and
integrated composition. And of
course, the music and the images
also have to “play well together,” so
that becomes another part of the
challenge (and the fun) of compos-
ing these pieces. Throw in the ren-
dering time, and you can see why
each of my “Concert” works took
one year to complete!
But really, it all just comes down to
intuition - what goes where and
what comes next, how long to focus
on one basic idea before moving on
to another. That’s the approach I
used in writing modern concert
music for 20 years and it’s the exact
approach I use in my mixed media
works.
Tavy: What operating system are
you using? Mac/Windows?
Dennis: I’m on the PC - just started
out that way and stayed with it. But
except for some rare exceptions, it’s
all the same to me.
Tavy: What software applications
have you used, and are currently
using, to create your beautiful work?
Why?
Dennis: I started out with POVray
and ran with it for about 6 years,
during which time, I created six of
my Concert Animations. It’s incredi-
bly open-ended - you can write pure
math equations to generate images,
or use any of hundreds of primitive
objects, including many contributed
by users. And of course, it is entirely
free. But in Spring of 2004, I decid-
ed I wanted to try a “more tradition-
al” 3D program so I could do some
of the things (camera movement,
real-time previews) that POVray just
couldn’t do (it’s a scripting language,
after all). Also, my last POVray work,
Faktura, really seemed like it went
about as far as I could go with that
software.
Fortunately, I came across some
images created with DiTools (big
round of applause!), and immediate-
ly bought CINEMA 4D. I’ve been
totally immersed in it ever since (I
own every book and have read most
all of the tutorials) and feel as if I am
just getting competent. I owe a lot to
the great gang of users who hang
out at Remotion’s site (thanks to
Gunter, et al!) and at the other
forums, and I’ve been amazed with
the help and generosity of the entire
C4D community. Except for POVray
and Csound, which both had great
support communities, I’ve never
seen anything like it.
So now I am strictly using CINEMA,
and I look forward to all the new
Interview with Dennis MillerBy Tavy Ann
29
Inte
rvie
w
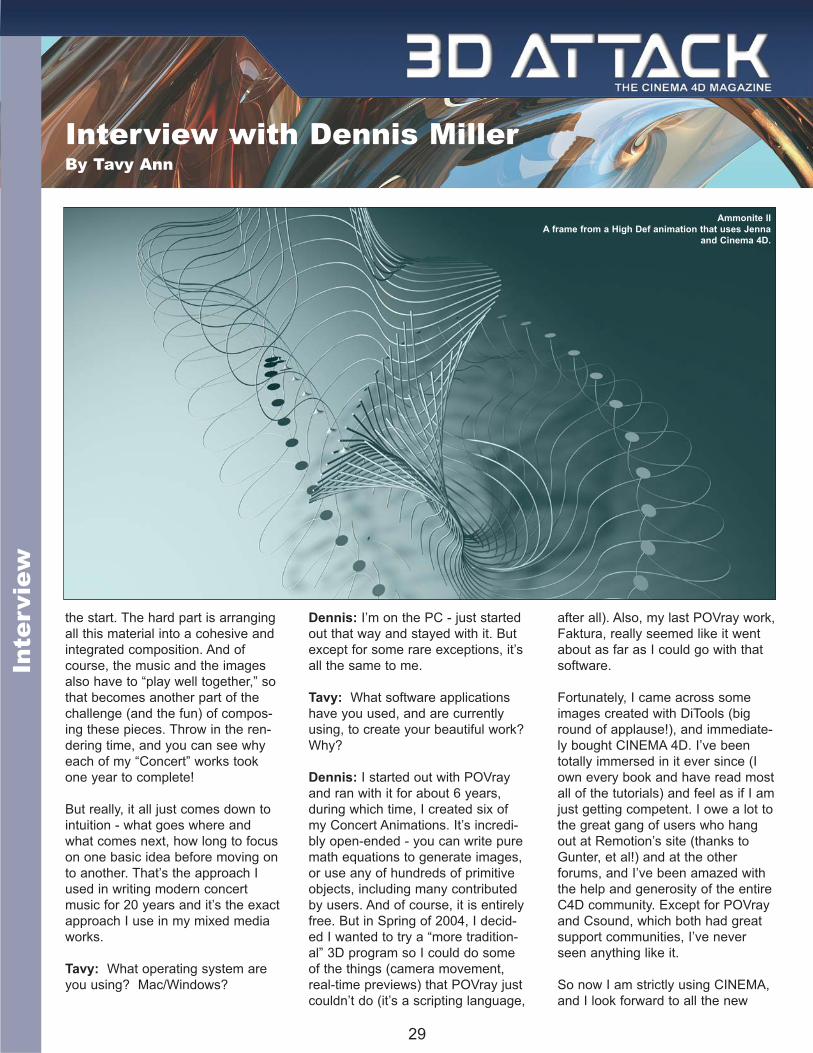
Ammonite II
A frame from a High Def animation that uses Jenna
and Cinema 4D.
developments from both Maxon and
the plug-in community. There are
just an abundance of riches (includ-
ing your own, Tavy!).
Tavy: Often when I ask an artist,
“Where do you find your inspira-
tion?” they will tell me in the shower,
while driving in my car, by looking at
the world around me etc..where do
you find yours?
Dennis: That’s a tough one. I have
a great need to immerse myself in
art, what with all the horrible things
that are happening around the
world. For me, working is one part
escape and for the other part, an
attempt to put something positive
back into the world.
Personally, I think of my work as a
way to explore creative challenges -
it’s not really so much “about” any-
thing as it is an on-going effort to
create an abstract work that can be
as compelling and involving to an
audience as any representational
work. But since there is no story line
per se, I have to give the different
musical and visual elements their
own meaning, and try to keep every-
thing unified and moving along, and
I hope some of that is clear to the
viewer.
Tavy: Your work has been seen at
exhibits and presentations the world
over. If you could pick one of your
works as a favorite, what would it be
and why?
Dennis: Tough question - like ask-
ing, which of your kids do you like
the best?? I think the visual ele-
ments in Faktura are about as
advanced as I will ever do, but the
combination of color and movement,
Interview with Dennis MillerBy Tavy Ann
30
Inte
rvie
w
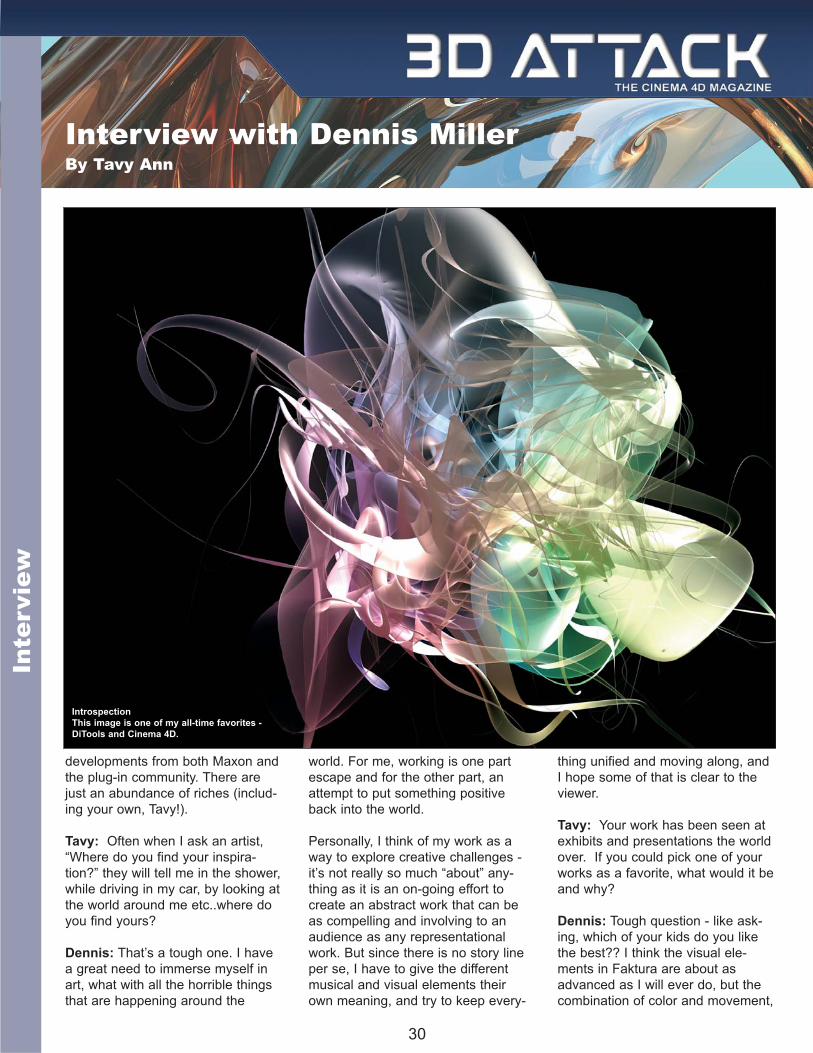
Introspection
This image is one of my all-time favorites -
DiTools and Cinema 4D.

not to mention the shape of the
basic objects, in Cross Contours,
will be hard to beat. But hopefully,
every new work will get better in
some way, so my final answer is: My
favorite work is the next one I cre-
ate!
Tavy: Could you tell us a little
about your workflow? Where do
you start and end? How do you
know when a piece is finished, or is
it ever?
Dennis: My work habits are much
the same as they have been when I
was writing concert music - con-
stantly sketching, trying to stay
focused, always looking for the line
or thread that will hold a piece
together. The toughest part is
always just committing to a begin-
ning - getting started! Then things
often seem to take on a life of their
own, and in most cases, the work
gets easier.
I don’t always work in a linear way -
sometimes I have an ending before
a middle section. I also like to keep
the music and the images moving
along somewhat in sync - often, I
will work on the music for a few
days and it will get ahead of the ani-
mation; sometimes, it is the other
way around. What I don’t want to do
is finish an animation and then go
figure out what the music will be (or
vice versa, which I often did in my
earliest works). So there’s a lot to
juggle - and simply finding files on
my hard drives is no small task -
but I’m not complaining...
Tavy: Are you currently working on
any projects that you could share a
bit about with us?
Dennis: I guess you could say
“Always working on a project....” (My
wife wishes I would take a vacation
some time, but she’s a cancer
researcher, so she should talk!).
With all the resources available
today - and CINEMA provides so
many - I constantly find news ways
to produce interesting images,
though only a small fraction of them
will end up in a piece. Right now I
am exploring Katachi’s DPiT 3 and
Interview with Dennis MillerBy Tavy Ann
31
Inte
rvie
w
Julia
After seeing a contemporary glass show at a muse-
um in Boston, I gave it my best shot.

getting some great “results,” plus
DiTools is always on hand. I have
four or five short “movements,” each
with some similarities in the basic
type of images, that might end up in
a suite. That’s the plan, anyway. But
if I can find some other way to con-
nect them and bring them together
into a unified composition, I could go
a different route.
Tavy: If you could give one piece of
advice to the millions of aspiring
artists in the world, what would it
be?
Dennis: Hang in there! Get advice
from people you respect. Send your
work out to festivals and confer-
ences - they’re everywhere. But
remember that you are the only one
that needs to be satisfied.
Tavy: Once again, thank you for
sharing with 3D Attack and our read-
ers a little about you and your art.
Any last words?
Dennis: Thanks for the opportunity!
It was a true pleasure interviewingDennis Miller, his work in innovativeand inspiring. Available on Mr.Miller’s website is a DVD collectionof all 7 of his Concert Animations.Although his still images are stun-ning, there is nothing like seeingthem flying and morphing across thescreen. Visit Dennis Millers websiteat www.dennismiller.neu.edu.
Interview with Dennis MillerBy Tavy Ann
32
Inte
rvie
w
Frame from Release
Release was a short animation created for the Voom
High Def network.

Layers! Almost every graphic appli-
cation has them and, lets face it,
they are tremendously useful, if not
completely indispensable.
They are also, luckily, present in
CINEMA 4D. You can find them in
the BodyPaint module, and you use
them just like you do in Photoshop.
The other place you have layers is
on the Material Editor, in the form of
a shader, and this is exactly what
I'm going to talk about.
Using the Layers shader is almost
like having a small compositing
application inside any channel of
your materials. In fact, the Layers
shader is like a Fusion shader on
steroids!
You can add to the Layers shader
whatever you would be able to use
in any channel and you can com-
bine all you want in whatever way
you wanted. You can even add
masks, to create more complex
combinations.
Anything you add to the Layers
shader is stacked on top of whatev-
er is already there - you can change
the position whenever you want, by
dragging - and it will influence
everything that is bellow it, just like
the Layers floater, in Photoshop.
So, if you add a Colorize effect to
the Layers shader, it will not just col-
orize the image that is directly bel-
low it, but it will colorize the result of
everything that is bellow it. There is
a way to change that rule, as we will
see later. But first, let us explore the
Layer shader dialog:
The leftmost button, labeled
"Image..." allows us to load a bitmap
into the Layer shader. The following
button, labeled "Shader...", when
clicked, shows a menu with all the
procedural shaders available in
Cinema4D. The third button, labeled
"Effect...", when clicked, shows a
menu with a set of effects specific to
the Layer shader. We will talk about
them right away. The "Folder" but-
ton, when clicked, generates a fold-
er inside which we can place what-
ever we want: bitmaps, shaders,
effects, other folders... We will talk a
bit more about folders later because
they are not there just for
cleanup/organizational purposes.
Finally, the "Remove" button deletes
whatever is selected in the bottom
of the Layers shader dialog.
The effects that are specific to the
Layers shader are the following:
The Brightness / Contrast / Gamma
effect is, I believe, obvious enough.
Everyone has a TV set at home and
knows how to control the brightness
and contrast of the image. The
Gamma parameter is not so obvious
for non-professionals.
I will try to explain in a very simple
and quick way: not all devices dis-
play/reproduce color the same way.
For example, if we feed a printer
with a value of 75% of cyan, the end
result may be a shade of 79% on
the paper (due to uncontrollable rea-
sons, like ink quality, paper quality,
etc). The same can happen with
monitors: the video board sends out
an RGB value of 15,120,34 and the
monitor displays a value of
13,117,30 (again, due to uncontrol-
lable reasons, like phosphor quality,
backlight lumen power, etc). The
Gamma curve is used to correct
those discrepancies.
For example, an image viewed on a
Mac computer will always look
brighter than when seen on a
Windows PC computer, because
those OSs use different gammas to
display images. Actually, the gamma
on Windows will almost always oblit-
erate the darker shades and that is
why Windows is so crappy for
design work, but that is another sub-
ject ;-) So, Gamma is used mainly
for correction. If you don't know how
to use it, leave it. Stick to Brightness
and Contrast.
The Hue / Saturation / Lightness
effect allows to individually control
the color (the hue means just that,
color. If something is red, no matter
what type of red, if it is yellow, no
matter what type of yellow, etc), the
saturation (is it a vivid color, a dull
color or no color at all, as in... grey)
and the brightness of the color (is it
dark? is it light?).
The Posterize effect will reduce the
number of colors of the image. For
example, if you set the number of
colors to 5, the image will only show
5 different colors, sampled from the
most common colors of the original
image.
The Clamp Color and Clip Color
effects look similar, at first sight, but
they do different things. Both have a
Low and a High limit. The Low limit
is 0% and the High limit is 10000%.
Layered ShadersBy Rui Batista
33
Tuto
rial

Yes, you read it right, ten thousand
percent!! Don't forget that CINEMA
4D can deal with HDRI images too
and those images can have pretty
high luminance values. Now, for the
difference between the Clamp and
Clip color effects. Since the manual
in not very clear about what they do,
I will provide my explanation, based
on my observation and interpretation
of the outcome.
When you set a Low value in Color
Clamp, all values below that bright-
ness will become that value.
Meaning that, if you set a Low value
of 23%, all brightness values bellow
23% will be, from now on, treated as
23%. The same for a High value, as
in, if you set, for example, a high
value of 77%, all brightness values
above 77% will be, from now on,
treated as 77%.
Setting a Low value for the Clip
Color effect will set a NEW low
value for the image bellow it.
Meaning, if you set a Low value of
23%, everything bellow 25% will be
treated as 0% and the place where
the 23% value was, is now treated
as the new 0%, scaling all the
brightness values above.
If you set, for example, a High value
of 77%, the values of the brightness
are adjust in a way that the old 77%
brightness value is now treated as
100% brightness.
In this case, we can't say that every-
thing above 77% is treated as 100%
because, as we learned, these val-
ues can go as high as 10000%.
So, all the values are simply scaled.
Since this is all very abstract, I
believe it can be better understood
with a graphical representation:
The Transform effect will "physically"
transform the image bellow it. You
can rotate, flip vertical and horizon-
tally, move and scale the image.
Actually, the Layers shader could be
used just for transforming a bitmap,
using the Transform effect because
there is no other easier way to do
these kind of manipulations.
When the image is
moved/scaled/rotated, the missing
content that should appear at the
edges is filled in with a wrapped mir-
rored image. Having a hard time
understanding the last sentence?
Just check out the sample pictures:
This is done to minimize the evident
seam that appears at the limits of
the images when they are tiled. But,
some images are already prepared
for seamless tiling and, for those,
there should be an option to turn off
this mirror/wrap behavior.
Unfortunately, there isn't. I already
asked Maxon to include this but I'm
only one voice shouting in the
crowd. Please, go to
http://maxon.net/pages/support/sug-
gestions_e.html and ask for this
addition (and any more you may
want). Finally, there is the Distort
effect. The pixels of the underlying
image are shifted, depending on the
brightness value of the noise type
chosen from the Noise list. This is,
by default, a 2D (X and Y) displace-
ment. But, if you are creating volu-
metric textures, turn on the 3D
option and the Z axis will also be
evaluated. The Strength value
defines how strong the displacement
will be. The Noise Scale defines
how big or small will be the noise
pattern. Actually, the scale parame-
ter should be called Frequency
because higher values generate
smaller noises, but this is not a per-
fect world! Some noises can have
variable detail generation. The
amount of detail is set by the
Octaves parameter. The higher the
value, the more detail you get, but
also longer calculation times.
The Time Scale parameter defines
how fast/slow the noise animates.
What? The noise animates? Yes, it
does. But you will only see it when
you render the final movie (if it is a
movie) or if you press the left-mouse
button (Command+click on the Mac)
on the thumbnail preview of the
material and choose Animate. My
personal opinion is that the Time
Scale parameter should default to
0%, because, usually, people don't
want the noise to change over time.
What the user usually wants is sim-
ply a "distress" effect on the image.
But, if you are rendering a still, you
will not see any animation, so, lets
leave it this way. Finally, the Wrap
options allows you to decide how
the missing pixels from the edges of
the image will be filled. HINT FOR
MAXON!!! This is what we also
need in the Transform effect!! Now
that we saw what we can add to the
Layers shader, let us see HOW we
can add those things.
Usually, like stated before, whatever
Layered ShadersBy Rui Batista
34
Tuto
rial

you add to the Layers shader,
appears on the top of the list and
affects everything bellow.
How it affects, depends on the
transfer Mode and the intensity at
which it is applied. The intensity is
how much the above image is
blended with everything that is bel-
low it. Its like the Opacity slider in
Photoshop. This can be changed by
dragging the slider or adjusting the
value numerically. The transfer
modes are quite a few:
Normal
Multiply
Screen
Overlay
Hard Light
Soft Light
Dodge
Burn
Darken
Lighten
Add
Subtract
Difference
Exclusion
Hue
Saturation
Color
Luminance
Levr
Layer Mask
You probably know all the transfer
modes from Photoshop (that is why
I will not explain each and every
one, individually), except for the last
two.
The Levr mode acts as a Threshold
filter. If the brightness value of the
pixel of the image bellow is darker
than the brightness value of the cor-
respondent pixel of the image
whose transfer mode is set to Levr,
the result will be black. If it is lighter,
the result will be white.
The Layer Mask mode affects the
way the layer above is displayed.
This is better understood with an
image, as usual.
The top layer is a simple gradient
(1). The layer right beneath it is also
a Gradient, set to Circular (2). Its
transfer mode is set to Layer Mask
so, it will serve as the layer mask of
the layer above it. That is why, we
can see a “hole” in the top gradient
and, through it, see the bottom
layer, a Tiles shader (3).
White pixels in the layer set to Layer
Mask will make the top layer
opaque. Black pixels in the layer set
to Layer Mask will make the top
layer transparent. Grey values will
produce correspondent translucent
results.
Clicking on the eye icon, on the left
of each layer, will turn its visibility on
and off. This will also affect the
results of the final image, since each
layer influences everything that is
beneath it. So, turning a single layer
off can produce drastic changes.
Double clicking the name of the
layer allows us to change its name.
Why? Well, having a dozen layers
named Gradient is not as clear as
having layers with names like
Green-Red, Contrast, Sky gradient,
etc.
Clicking the little thumbnail at the
right of the layer name enters edit
mode for that shader/image. It
resulting dialog depends on the type
of shader/image, of course.
When the editing of that particular
shader/image is finished, go back to
the Layer shader dialog by clicking
the left facing arrow at the top of the
Material Editor window (the up
arrow can also be used).
You can re-arrange the order of the
layers by simply clicking and drag-
ging them up and down. A little grey
bar appears, showing where the
layer will be placed, when the
mouse button is released.
If you drag the little thumbnail,
instead of the name, you will get a
copy of the layer that you can place
wherever you want.
Until now, I said, repeatedly, that
each layer usually affects everything
bellow it. But, what if we want to
restrict a certain effect to a group of
layers? Easy! We use a folder.
Consider a folder as an independent
“universe”. Everything you place
inside a folder (by dragging layers
into it – the cursor chances to show
that it will be placed INSIDE the
folder) is evaluated first and then,
the final result of the folder is com-
bined with whatever is bellow it. Of
course, the final result of the folder
calculation can also be applied with
variable intensity (opacity) and with
different transfer modes.
Double clicking the folder name also
allows changing its name. This is
specially important because the
name “Folder” is not particularly
informative.
And this is it. The only thing you
need now is to use your imagination
and combine shaders and effects in
the best way possible.
Rui Batista
Layered ShadersBy Rui Batista
35
Tuto
rial

Hey Attackers, long time no see.
I’ve been busy this past few months
with school, but of course I’m never
to busy to bring our loyal readers an
article or two. This month, I’m here
to report on a event I recently
attended here in LA on behalf of 3D
Attack. Our friends at The Gnomon
School of Visual Effects were kind
enough to let me sneak in and
observe some master digital artists
at work during the first ever Gnomon
Workshop: Live! I’m sure by now,
most of our readers are familiar with
the good people at Gnomon, espe-
cially their Gnomon Workshop divi-
sion, which provides a plethora of
training material in the forum of
dvds. While its truly a godsend that
Gnomon offers this kind of material
so that boring folks like me can
learn about ZBrush in the corner of
my room while all the cool kids go
out partying and engaging in gener-
al acts of debauchery, I think most
would agree with me in that there’s
nothing quite like learning from the
source. That’s what this 2-day
event was all about. The people at
Gnomon seem to be pulling out all
the stops when it comes to providing
great educational resources for 3D
Artists, and this was no exception.
While there were a few rough edges
throughout the day I was there (I
was only able to attend on the sec-
ond day, which focused on digital
painting techniques), overall the
event went smoothly. The event
seemed to feature most of the big
names that spring to mind when
thinking about the cutting edge of
visual effects, from organic modeling
to matte painting. On day one,
which focused on 3D techniques
and technologies, the instructors
included: Eric Hanson, Kevin
Hudson, Zack Petroc, Mayan
Escalante, and the infamous Meats
Meier. I’ll discuss the second day a
bit, as that was when I was there.
Scott Robertson discussed creating
reflective surfaces in Adobe
Photoshop, Dylan Cole discussed
his approach to designing matte
paintings, Neville Page explored
rendering illustrations in Adobe
Photoshop, Ryan Church of course
discussed concept painting in Corel
Painter, while Christian Lorenz
Scheurer discussed conceptual art
direction. My two favorite lectures
were given by Dylan Cole and
Neville Page. For an hour and a
half, I sat in awe as Cole was able
to render what to me looked like an
excellent matte painting of a city in
the time it takes for me to roll out of
bed in the morning. He literally
started with a blank canvas in
Photoshop, and we watched every
stroke that he put down, and it was
fascinating to discover the different
aspects of his painting as he was
painting it. Of course along the way
he explained what he was doing,
what keyboard shortcuts he was
attempting to use (he was having
trouble transferring the mac com-
mands to pc), and seemed com-
pletely fine with sharing all the little
tricks he uses on a daily basis to
make his work easier and faster. I
really appreciated it, and I’m pretty
sure I shan’t be painting 4K resolu-
tion matte paintings anytime soon.
But even though I probably won’t be
making photorealistic film quality
images, the techniques he showed
were applicable to quickly mocking
up concepts for your personal or
professional projects. What was
even better, is that Dylan encour-
aged people in the audience to
shout out questions, which he would
repeat for everyone- and then
answer. Neville Page, as I stated
above, was also another favorite.
Mr. Page is definitely an amazing
artist, but what I found most appeal-
ing about the techniques he demon-
strated to us, was that I actually had
a chance of doing them. I’m not
sure if this was merely because I
was watching him do it in front of
me on a rather large screen, I was
nevertheless impressed with the
clarity by which he explained his
methods. For his session, he
walked us through the creation of an
illustration he had made prior to that
weekend- that of some sort of shiny
beetle. He demonstrated the use of
different Photoshop tools in the
approximation and simulation of dif-
ferent surfaces and the interaction
of light with them. It was highly
informative. Overall, I was pretty
impressed with Gnomon Workshop:
Live, in its first iteration. Its definite-
ly strange to sit in a huge space with
hundreds of other people that want
to do the same things that you want
to do, but at the same time it’s a
great feeling, and anyone who can
facilitate that kind of atmosphere
among artists should be applauded.
And on top of the great instruction
that was being provided, Gnomon
had also wrangled top art directors
and representatives from studios
such as Dreamworks Animation,
Sony Pictures Imageworks, Ubisoft,
and Fheng Zhu design among oth-
ers. I’m sure that guests were
thrilled to have the opportunity to
show their portfolios to these indus-
try professionals, and I’m sure some
careers were made in the process.
The pure networking potential of the
event is kind of mind boggling when
one thinks about it. We all lurk or
participate in online forums in some
aspect or another, but the opportuni-
ty to meet a real person that has
your interests and who could possi-
bly be your future collaborator on a
short film, or your contact at that
dream job, well- you get the idea.
36
RE
PO
RT
- G
NO
MO
N S
CH
OO
L

3
I was born in Silesia, Poland in the
middle of April 1981. For more than
20 years now I’ve lived in Cologne,
Germany. During my mercantile
education I started getting interested
in CG-graphics, so I switched from
classic pen & paper to the first 3D-
app demos. This if when CINEMA
4D became my weapon of choice. I
really don’t consider myself a pro-
fessional 3D Artist, but more of a
simple Graphics Designer like thou-
sands of others. Maybe this is the
reason I enjoy spending time in the
different communities. It keeps the
dialog open.
During this time, Thomas (Tank)
Pasieka, introduced me to his plan
to launch a new e-portal called 3D
Attack. I’ve really enjoyed watching
how successful 3D Attack has
Artist SpotlightCornel Swoboda aka “Cornel”
Spotl
ight
Name: Cornel Swoboda
Age: 24
Country: Germany
Software: CINEMA 4D 9.1, ZBrush2,
Photoshop CS
Website: http://www.nutshells.de
Favorite resources on the web:
3dattack, c4dtreff, CGTalk, ZBrush
Central
become, and am really happy to be
one of 3D Attack’s Spotlighted
Artists.
As you can see from some of my
images, I never understood the prin-
ciples of XPresso, Thinking Particles
and other node-based stuff. I didn’t
find my interest in it till recently.
Don’t even ask for C.O.F.F.E.E. at
this point! One good thing about
being a C4D user is the great sup-
port that comes from the plug-in
developers. I’ll let those talented
people do that job!
I especially like to work with lights
and shaders, experimenting, and
just starting CINEMA 4D to see
where the journey takes me. This is
my way of “Zen Meditation”. While
working for an advertising agency I
did a lot of product visualization. It’s
a very interesting aspect when work-
ing in 3D, but it’s definitely not
something I can see myself doing
for the rest of my life. I always try to
keep a good balance between 3D
work and 3D the hobby. The hobby
side can really eat up a lot of time.
But then again, why do we have fall
and winter?
Not too long ago I was asked by the
European Space Agency (ESA) in
Munich, Germany to join their team
and work on an 80-minute docu-
mentation about space. CINEMA
4D was already integrated into their
pipeline and the deadline was close
(as always – what a surprise). With
two graphicians and two scientists
we spent 6 months faking, cheating,
working and rendering with CINEMA
37

3
Artist SpotlightCornel Swoboda aka “Cornel”
Spotl
ight
38
4D to solve this difficult task. For
example... ask yourself how would
you visualize a detailed flythrough of
the galaxy with its billions of stars
when you work on a regular work-
station with 1GB of RAM? This was
probably the most stressing, yet
interesting time of my life. I would
be more than happy to do it all over
again.
Things are now moving a bit slower
for me. I am currently busy with
studying communication design and
will work as a trainer for CINEMA 4D
beginner courses in January of 2006
for 3dpowerstore.de.
I really try to keep as busy as I can.
PUH! That’s why most of my ren-
dered pictures are months, or even,
years old. Well, I also try to
squeeze in 6 hours of sleep daily
(minimum)! However, I have 2 pri-
vate projects currently frozen, so
keep visiting the 3D Attack Forums.
Maybe I’ll have some updates soon.
A few last words: Always do what
you love and many doors will magi-
cally open.
KEEP ON ATTACKING!
- Cornel
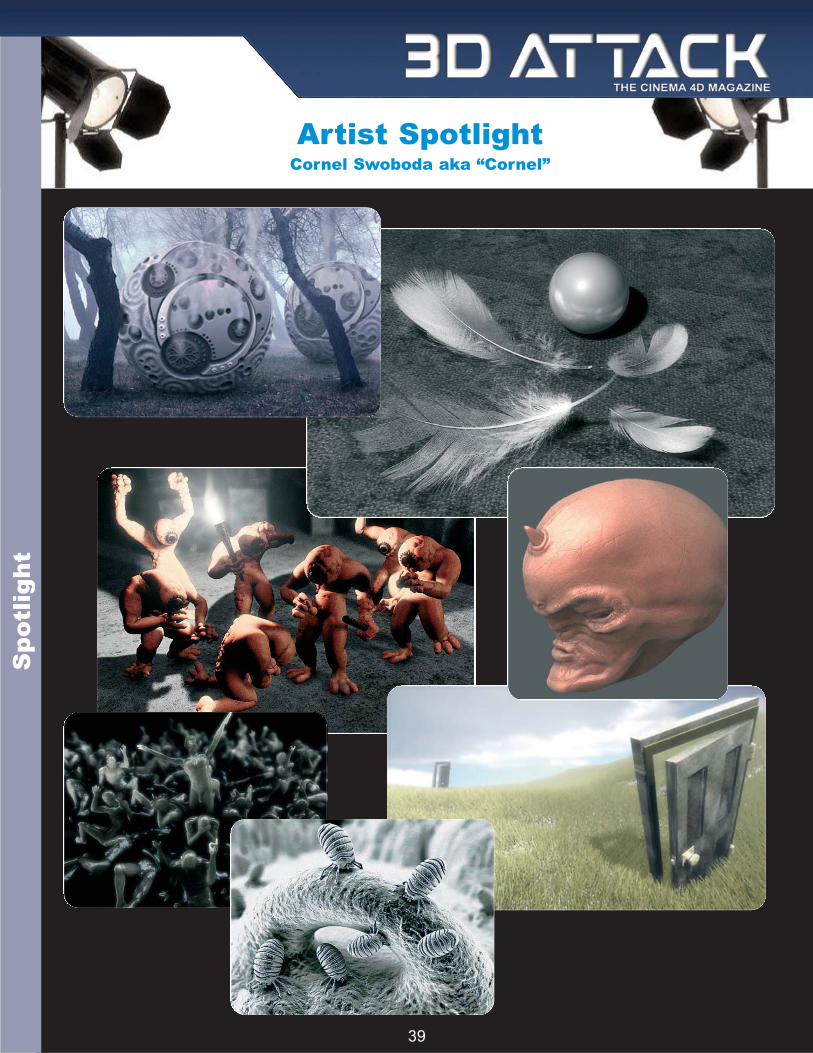
3
Artist SpotlightCornel Swoboda aka “Cornel”
Spotl
ight
39

Best of CINEMA 4DSome of the best artists around the world using CINEMA 4D
40
Image: Furniture on the Run
Artist: Wes Ware
Country: USA
Date Created: 9/10/05
Website: www.wesart.com
Software: CINEMA 4D and Photoshop
Client: Guardian SPF Glass
Agency: Gish, Sherwood & Friends
Creative Director: Roland Gibbons
Artist Comments: This piece really challenged the way I
approach a project. Many different elements had to work
together to tell the story. I absolutely love working in 3d, down
to the smallest details. I find myself getting lost in the simplest
things. I actually spent 2 days working on a procedural wood
texture when I hadn't even built the entire scene yet. Not that
it's a bad thing to achieve a realistic wood texture, but when
the timeline for the project suffers for it then it's an issue.
I stepped back from the project for awhile and realized that I
need to approach this in the same way I would a painting... work
in broad, general strokes and refine the image as a whole as you
go along so that at any point in the process, you have a "fin-
ished" piece. My workflow changed. As a Sole proprietor, I have
to do it all myself (I do farm out a little but not much, I'm too much
of a control freak).
There's no one working on the textures for me in the corner while
I build the models. If I get ahead of myself then the timeline is
doomed.
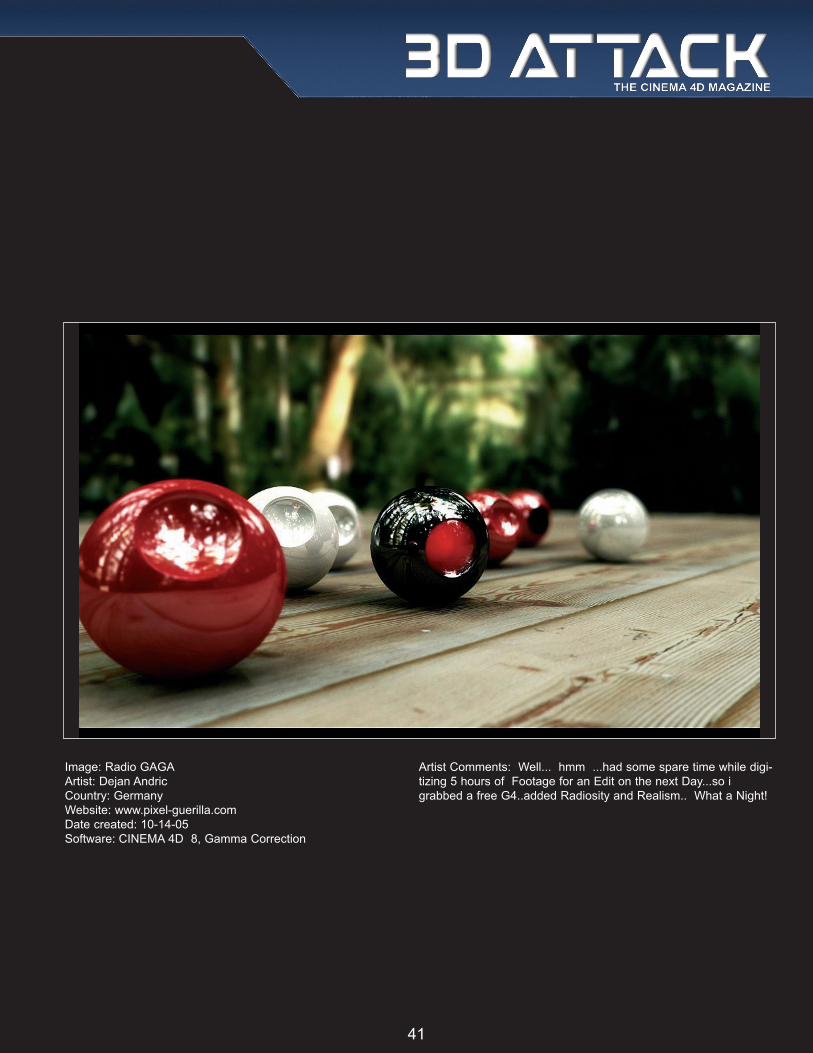
41
Image: Radio GAGA
Artist: Dejan Andric
Country: Germany
Website: www.pixel-guerilla.com
Date created: 10-14-05
Software: CINEMA 4D 8, Gamma Correction
Artist Comments: Well... hmm ...had some spare time while digi-
tizing 5 hours of Footage for an Edit on the next Day...so i
grabbed a free G4..added Radiosity and Realism.. What a Night!

42
Image: Gothic
Artist: Matthew S. M. King
Country: USA
Website: http://matthias-art.tripod.com
Date created: November 2005
Software: CINEMA 4D 7
Artist Comments: I modeled my cathedral
after the Royal Abbey Church of St.-
Denis, where the Gothic style was invent-
ed. I used the number 7 as a base for all
amounts and measurements, such as tan-
gent values, surface subdivisions, and
light intensity values. I chose not to tex-
ture it so to purely emphasize the model-
ing.

43