Dean Suzuki Blog Title: Deploying AD into Windows Azure ... · 02/06/2014 · ... Deploying AD into...
22
(C) 2012 Dean Suzuki, All Rights Reserved 1 Dean Suzuki Blog Title: Deploying AD into Windows Azure with No Corporate Connectivity Created: 6/2/2014 Description: In this blog post, I record the process that I went through to build an Active Directory (AD) environment in Microsoft Azure. There are multiple scenarios for deploying AD in Azure. In this scenario, I will document the scenario with no connectivity back to the corporate network. It is basically a stand-alone AD forest in Azure. In the future blog post, we will work through the other scenarios. Please refer to the article (http://msdn.microsoft.com/en-us/library/azure/jj156090.aspx) for a description of the other scenarios. DC1 Int: 10.0.0.10 Microsoft Azure References: http://msdn.microsoft.com/en-us/library/azure/jj156090.aspx ; Guidelines for Deploying Windows Server Active Directory on Azure Virtual Machines http://msdn.microsoft.com/en-us/library/dn631643.aspx ; Configure a Cloud-Only Virtual Network in the Management Portal http://azure.microsoft.com/en-us/documentation/articles/active-directory-new-forest-virtual- machine/ ; Install a new Active Directory forest on an Azure virtual network Disclaimer: Contents of this blog and article represent the opinions of Dean Suzuki, and do not reflect the views of my employer. (C) 2012 Dean Suzuki, All Rights Reserved
Transcript of Dean Suzuki Blog Title: Deploying AD into Windows Azure ... · 02/06/2014 · ... Deploying AD into...

(C) 2012 Dean Suzuki, All Rights Reserved 1
Dean Suzuki Blog
Title: Deploying AD into Windows Azure with No Corporate Connectivity
Created: 6/2/2014
Description:
In this blog post, I record the process that I went through to build an Active Directory (AD) environment
in Microsoft Azure. There are multiple scenarios for deploying AD in Azure. In this scenario, I will
document the scenario with no connectivity back to the corporate network. It is basically a stand-alone
AD forest in Azure. In the future blog post, we will work through the other scenarios. Please refer to
the article (http://msdn.microsoft.com/en-us/library/azure/jj156090.aspx) for a description of the other
scenarios.
DC1Int: 10.0.0.10
Microsoft Azure
References:
http://msdn.microsoft.com/en-us/library/azure/jj156090.aspx ; Guidelines for Deploying
Windows Server Active Directory on Azure Virtual Machines
http://msdn.microsoft.com/en-us/library/dn631643.aspx ; Configure a Cloud-Only Virtual
Network in the Management Portal
http://azure.microsoft.com/en-us/documentation/articles/active-directory-new-forest-virtual-
machine/ ; Install a new Active Directory forest on an Azure virtual network
Disclaimer:
Contents of this blog and article represent the opinions of Dean Suzuki, and do not reflect the
views of my employer. (C) 2012 Dean Suzuki, All Rights Reserved
(C) 2012 Dean Suzuki, All Rights Reserved 2
Table of Contents 1 Create the Azure Virtual Network......................................................................................................... 3
1.1 Creating a Cloud-Only Network .................................................................................................... 3
2 Install Active Directory in Azure ............................................................................................................ 4
2.1 Create the VM to Host the Domain Controller ............................................................................. 5
2.2 Set Static IP Address for VM ......................................................................................................... 7
2.2.1 Download and Install Powershell for Azure .......................................................................... 7
2.2.2 Connect to your Azure subscription. .................................................................................... 8
2.2.3 Verify that Static IP Address is Available ............................................................................... 9
2.2.4 Update VM with Static IP Address ........................................................................................ 9
2.3 Add a Data Disk to VM for AD Database ..................................................................................... 10
2.4 Install Active Directory ................................................................................................................ 12
2.4.1 Install Active Directory Domain Services Role (AD DS) ....................................................... 12
2.4.2 Promote the machine to a domain controller .................................................................... 16
2.5 DNS Configuration ....................................................................................................................... 20
2.6 Configure the DNS Server on the Azure Virtual Network ........................................................... 21

(C) 2012 Dean Suzuki, All Rights Reserved 3
1 Create the Azure Virtual Network You have a couple options when creating an Azure Virtual Network. They are:
Create a Cloud-Only Network that will only exist in Azure
Create a network that will be connected through VPN with your on-premise corporate network.
1.1 Creating a Cloud-Only Network This section describes how to create a cloud-only network (not connected to corporate note).
NOTE: Its important to create the Azure Virtual Network before creating the virtual machine, because
you can’t go back and put a VM in a virtual network after you’ve created the VM.
See http://msdn.microsoft.com/en-us/library/dn631643.aspx
1. Log in to the Windows Azure Management Portal (manage.windowsazure.com)
2. In the lower left-hand corner of the screen, click New. In the navigation pane, click Networks, and
then click Virtual Network. Click Custom Create to begin the configuration wizard.
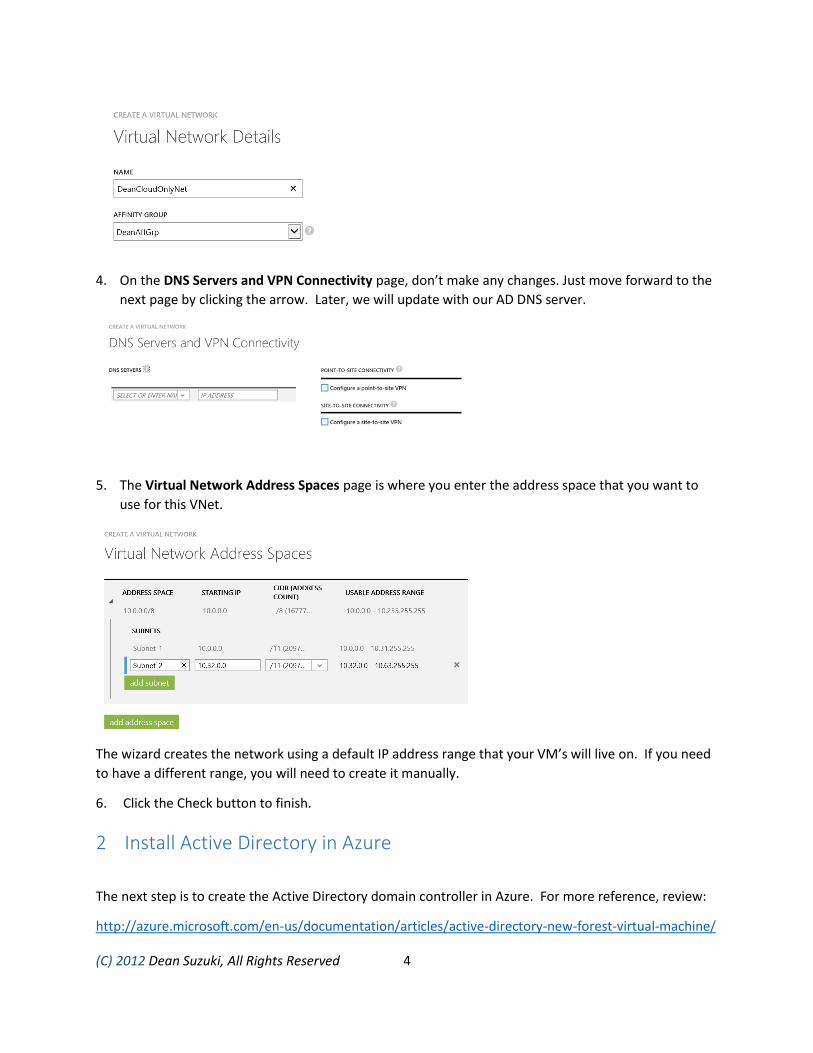
3. On the Virtual Network Details page, enter a name for the network:
(C) 2012 Dean Suzuki, All Rights Reserved 4
4. On the DNS Servers and VPN Connectivity page, don’t make any changes. Just move forward to the
next page by clicking the arrow. Later, we will update with our AD DNS server.
5. The Virtual Network Address Spaces page is where you enter the address space that you want to
use for this VNet.
The wizard creates the network using a default IP address range that your VM’s will live on. If you need
to have a different range, you will need to create it manually.
6. Click the Check button to finish.
2 Install Active Directory in Azure
The next step is to create the Active Directory domain controller in Azure. For more reference, review:
http://azure.microsoft.com/en-us/documentation/articles/active-directory-new-forest-virtual-machine/
(C) 2012 Dean Suzuki, All Rights Reserved 5
2.1 Create the VM to Host the Domain Controller
1. Click New > Compute > Virtual Machine > From Gallery.
2. Select Windows Server 2012 R2
3. Fill in the fields
Give the VM a name (E.g. dc1).
Select the VM Size. Note that the size will affect the costs in Azure.
Select a user name that will be added to the administrators group in the VM and password.

(C) 2012 Dean Suzuki, All Rights Reserved 6
4. Fill in the fields.
Select “Create a new cloud service.”
For Cloud Service DNS name, I tried to keep the default, but got an error stating that a cloud app already
exists with that name so I had to change it and give it a new name.
For Region/Affinity Group/Virtual Network, select the Azure Virtual Network created early.
For Virtual network Subnets, select the subnet that I want to use.
Keep defaults on other options.
Notice the Endpoints that will be enabled for this VM: A remote desktop and a powershell access to the
VM.
(C) 2012 Dean Suzuki, All Rights Reserved 7
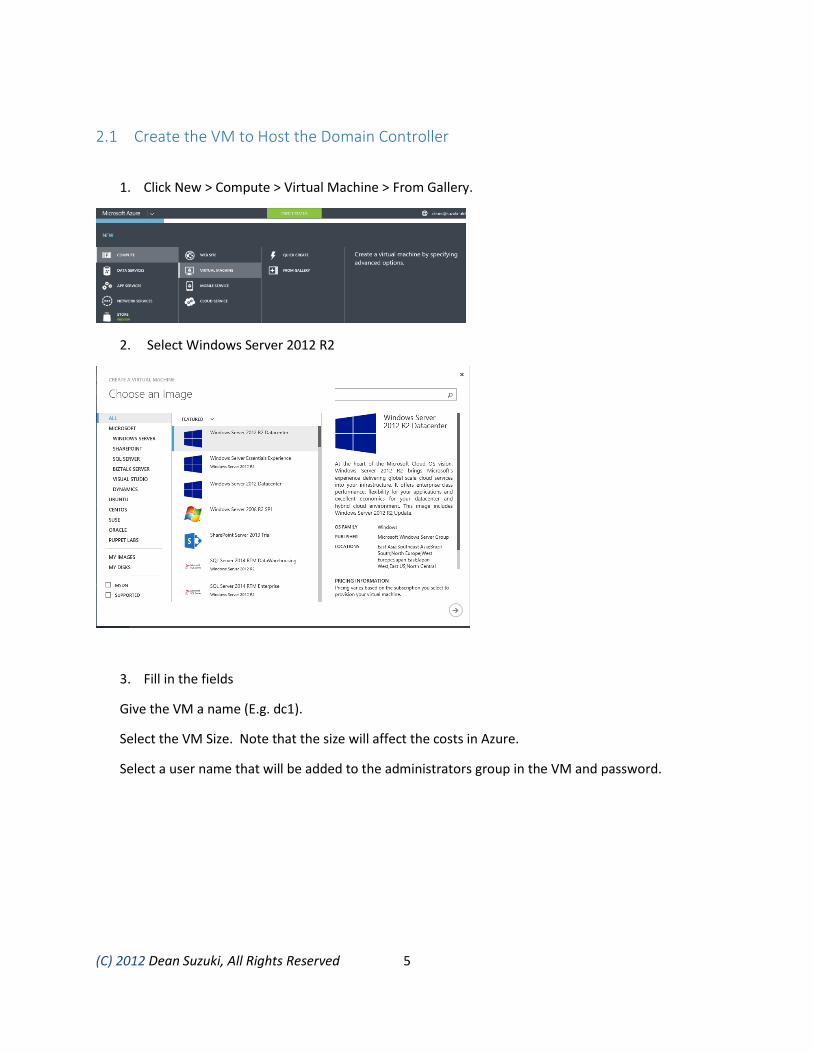
5. Install the VM Agent
2.2 Set Static IP Address for VM By default Azure VM’s are assigned dynamic ip addresses (DIP). The Dynamic IP addresses persist for
the life of the VM. However, the dynamic address is deallocated if the VM is shutdown. To prevent the
IP address from being deallocated, you can use Set-AzureStaticVNetIP to assign a static IP address.
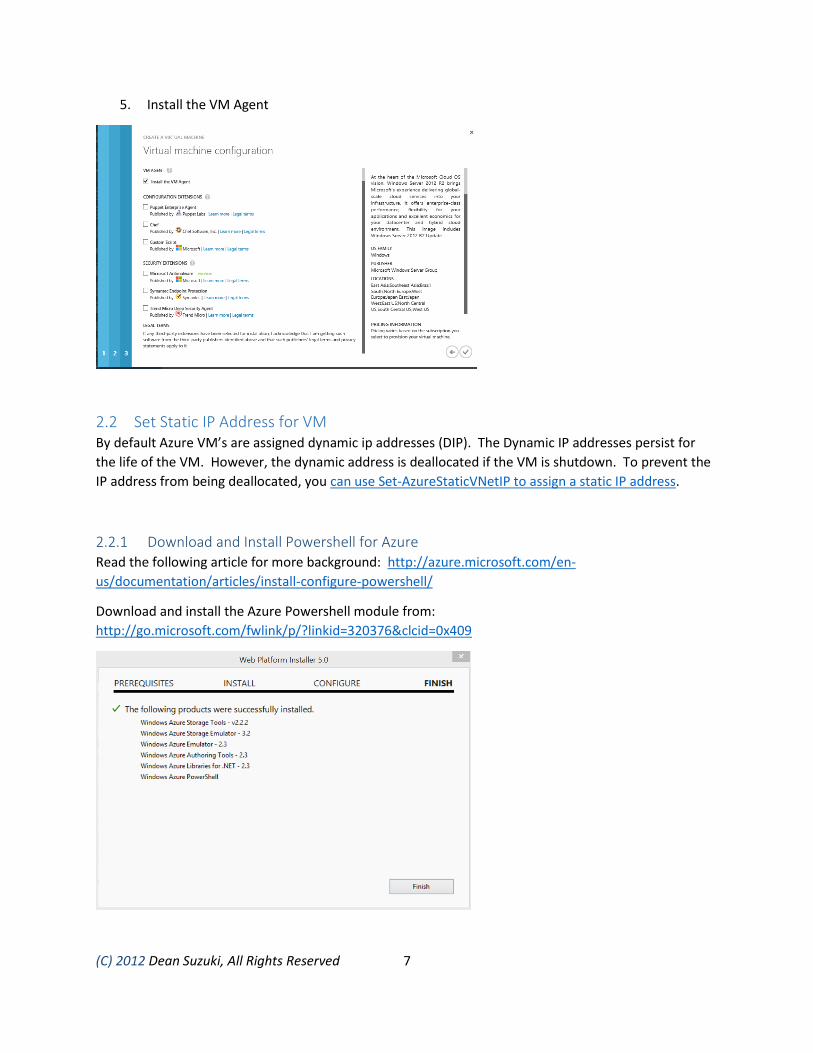
2.2.1 Download and Install Powershell for Azure Read the following article for more background: http://azure.microsoft.com/en-
us/documentation/articles/install-configure-powershell/
Download and install the Azure Powershell module from:
http://go.microsoft.com/fwlink/p/?linkid=320376&clcid=0x409
(C) 2012 Dean Suzuki, All Rights Reserved 8
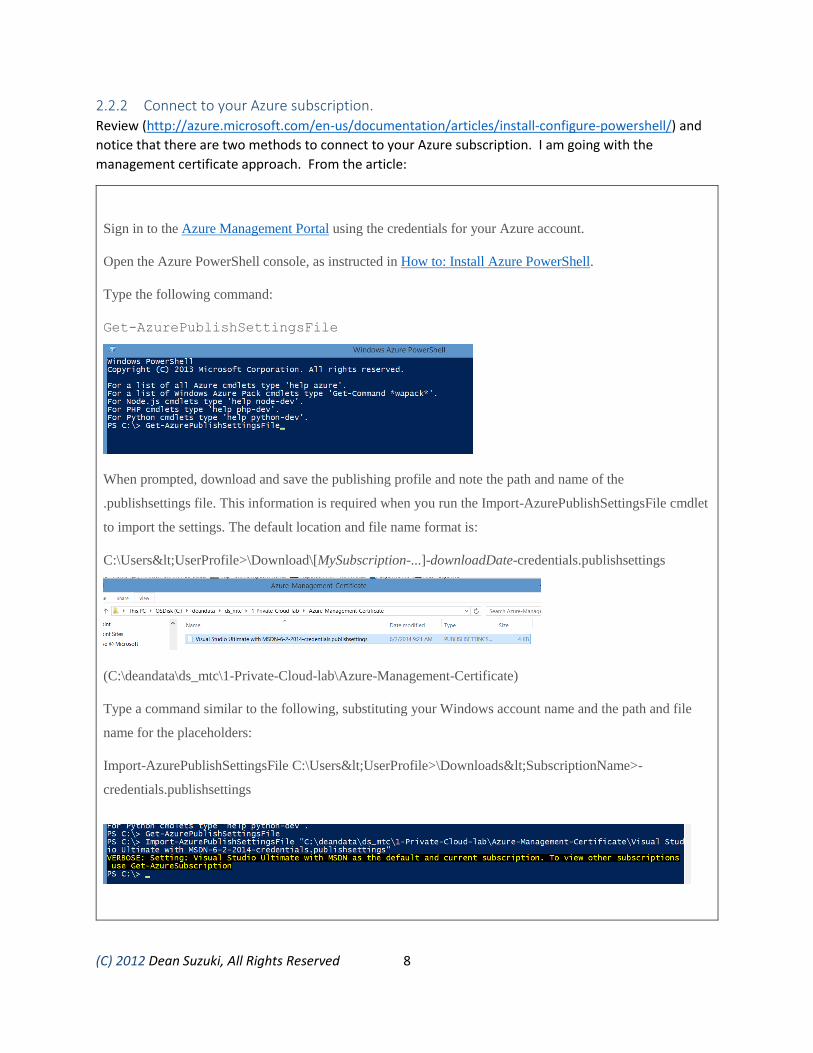
2.2.2 Connect to your Azure subscription. Review (http://azure.microsoft.com/en-us/documentation/articles/install-configure-powershell/) and
notice that there are two methods to connect to your Azure subscription. I am going with the
management certificate approach. From the article:
1. Sign in to the Azure Management Portal using the credentials for your Azure account.
2. Open the Azure PowerShell console, as instructed in How to: Install Azure PowerShell.
3. Type the following command:
Get-AzurePublishSettingsFile
1. When prompted, download and save the publishing profile and note the path and name of the
.publishsettings file. This information is required when you run the Import-AzurePublishSettingsFile cmdlet
to import the settings. The default location and file name format is:
C:\Users<UserProfile>\Download\[MySubscription-...]-downloadDate-credentials.publishsettings
(C:\deandata\ds_mtc\1-Private-Cloud-lab\Azure-Management-Certificate)
1. Type a command similar to the following, substituting your Windows account name and the path and file
name for the placeholders:
Import-AzurePublishSettingsFile C:\Users<UserProfile>\Downloads<SubscriptionName>-
credentials.publishsettings
(C) 2012 Dean Suzuki, All Rights Reserved 9
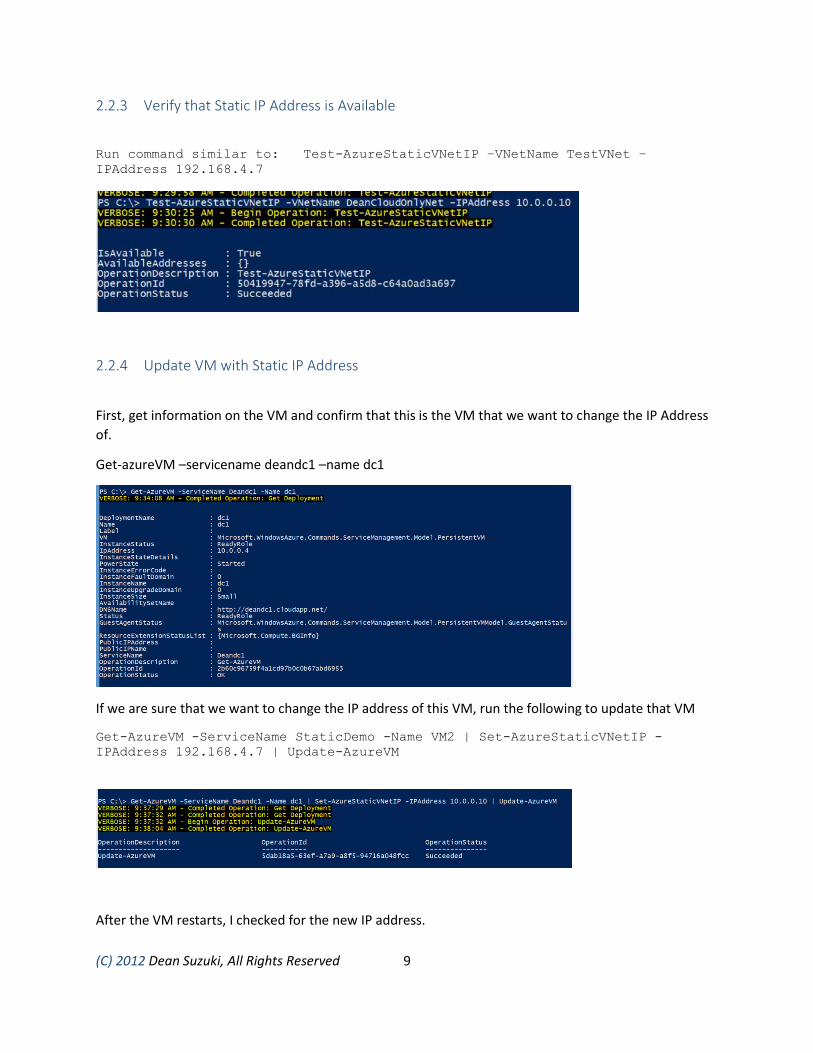
2.2.3 Verify that Static IP Address is Available
Run command similar to: Test-AzureStaticVNetIP –VNetName TestVNet –
IPAddress 192.168.4.7
2.2.4 Update VM with Static IP Address
First, get information on the VM and confirm that this is the VM that we want to change the IP Address
of.
Get-azureVM –servicename deandc1 –name dc1
If we are sure that we want to change the IP address of this VM, run the following to update that VM
Get-AzureVM -ServiceName StaticDemo -Name VM2 | Set-AzureStaticVNetIP -
IPAddress 192.168.4.7 | Update-AzureVM
After the VM restarts, I checked for the new IP address.
(C) 2012 Dean Suzuki, All Rights Reserved 10
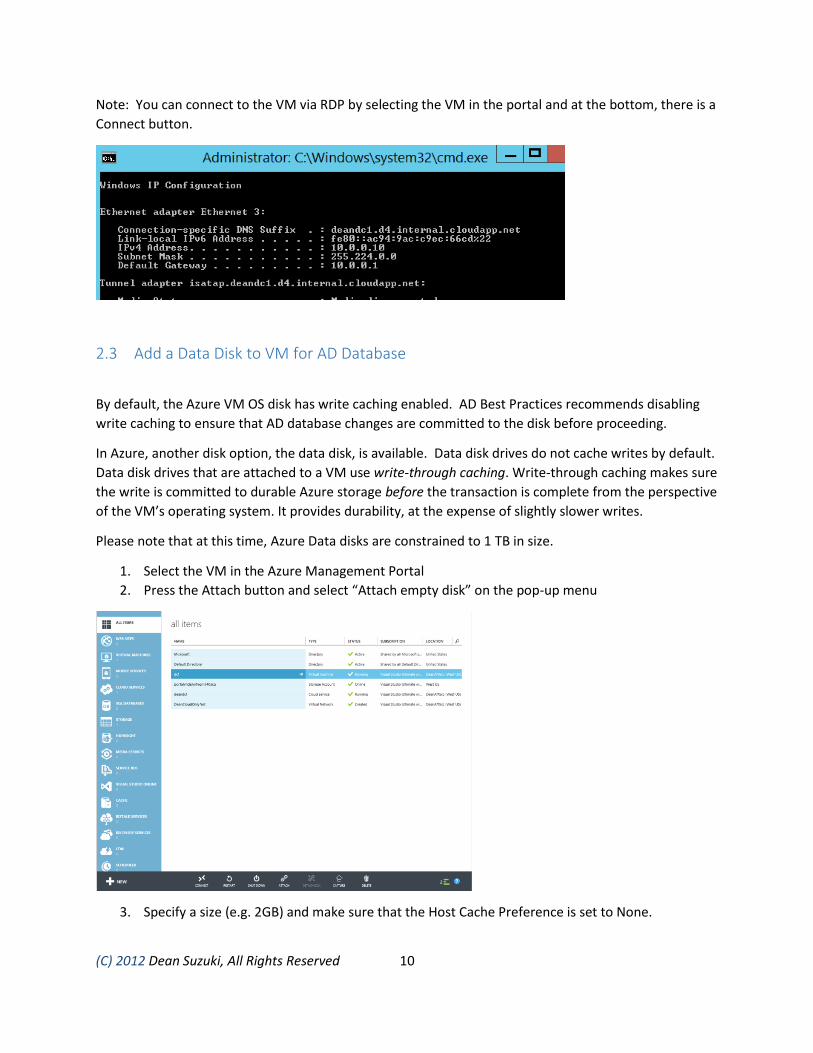
Note: You can connect to the VM via RDP by selecting the VM in the portal and at the bottom, there is a
Connect button.
2.3 Add a Data Disk to VM for AD Database
By default, the Azure VM OS disk has write caching enabled. AD Best Practices recommends disabling
write caching to ensure that AD database changes are committed to the disk before proceeding.
In Azure, another disk option, the data disk, is available. Data disk drives do not cache writes by default.
Data disk drives that are attached to a VM use write-through caching. Write-through caching makes sure
the write is committed to durable Azure storage before the transaction is complete from the perspective
of the VM’s operating system. It provides durability, at the expense of slightly slower writes.
Please note that at this time, Azure Data disks are constrained to 1 TB in size.
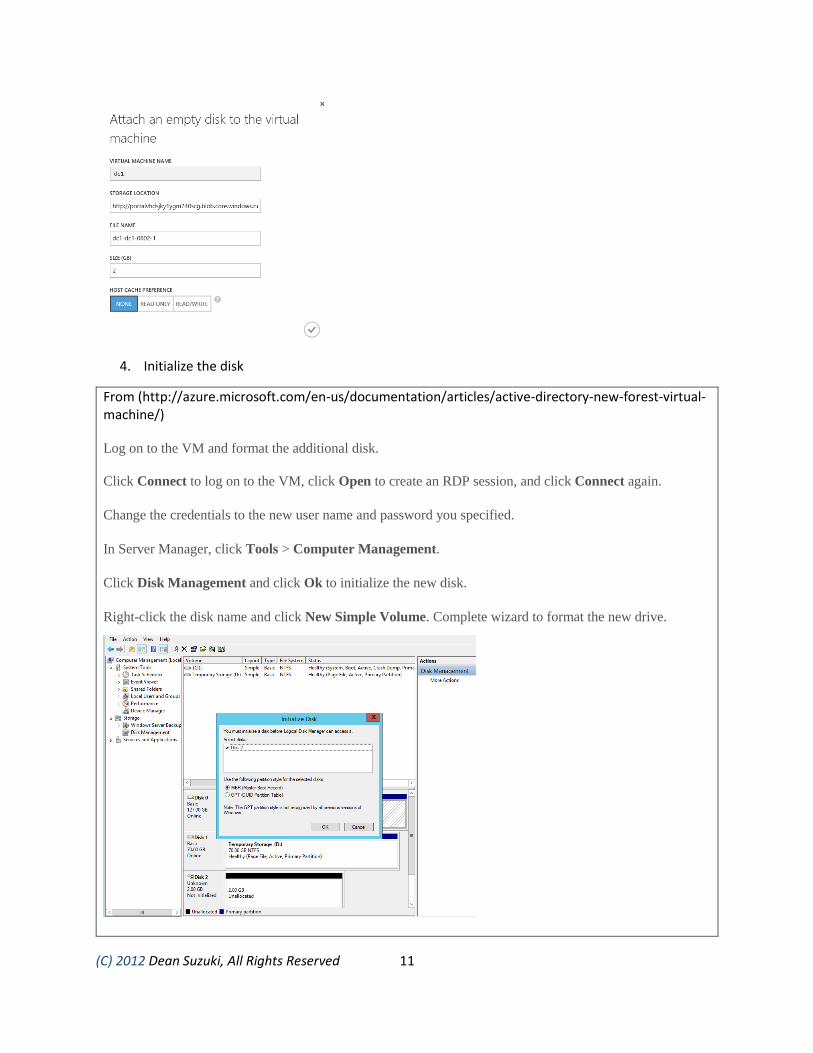
1. Select the VM in the Azure Management Portal
2. Press the Attach button and select “Attach empty disk” on the pop-up menu
3. Specify a size (e.g. 2GB) and make sure that the Host Cache Preference is set to None.
(C) 2012 Dean Suzuki, All Rights Reserved 11
4. Initialize the disk
From (http://azure.microsoft.com/en-us/documentation/articles/active-directory-new-forest-virtual-machine/)
1. Log on to the VM and format the additional disk.
1. Click Connect to log on to the VM, click Open to create an RDP session, and click Connect again.
2. Change the credentials to the new user name and password you specified.
3. In Server Manager, click Tools > Computer Management.
4. Click Disk Management and click Ok to initialize the new disk.
5. Right-click the disk name and click New Simple Volume. Complete wizard to format the new drive.
(C) 2012 Dean Suzuki, All Rights Reserved 12
2.4 Install Active Directory
I used (http://technet.microsoft.com/library/jj574166.aspx) as a reference.
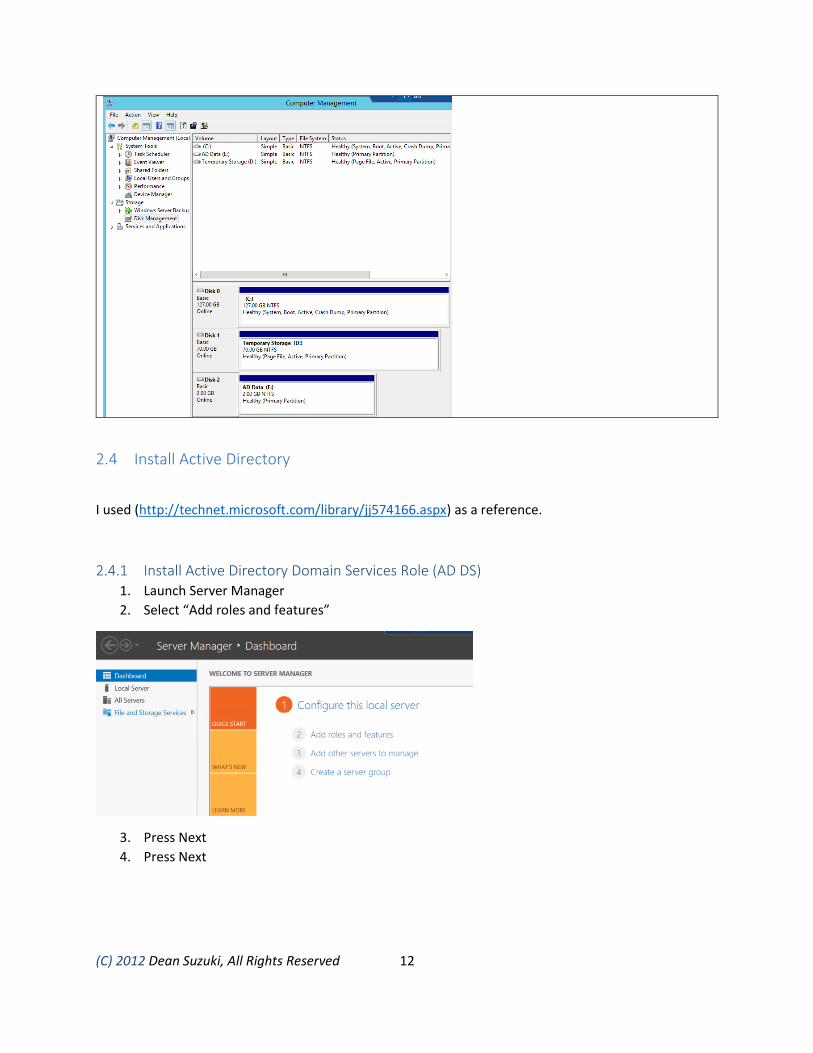
2.4.1 Install Active Directory Domain Services Role (AD DS) 1. Launch Server Manager
2. Select “Add roles and features”
3. Press Next
4. Press Next

(C) 2012 Dean Suzuki, All Rights Reserved 13
5. Press Next.
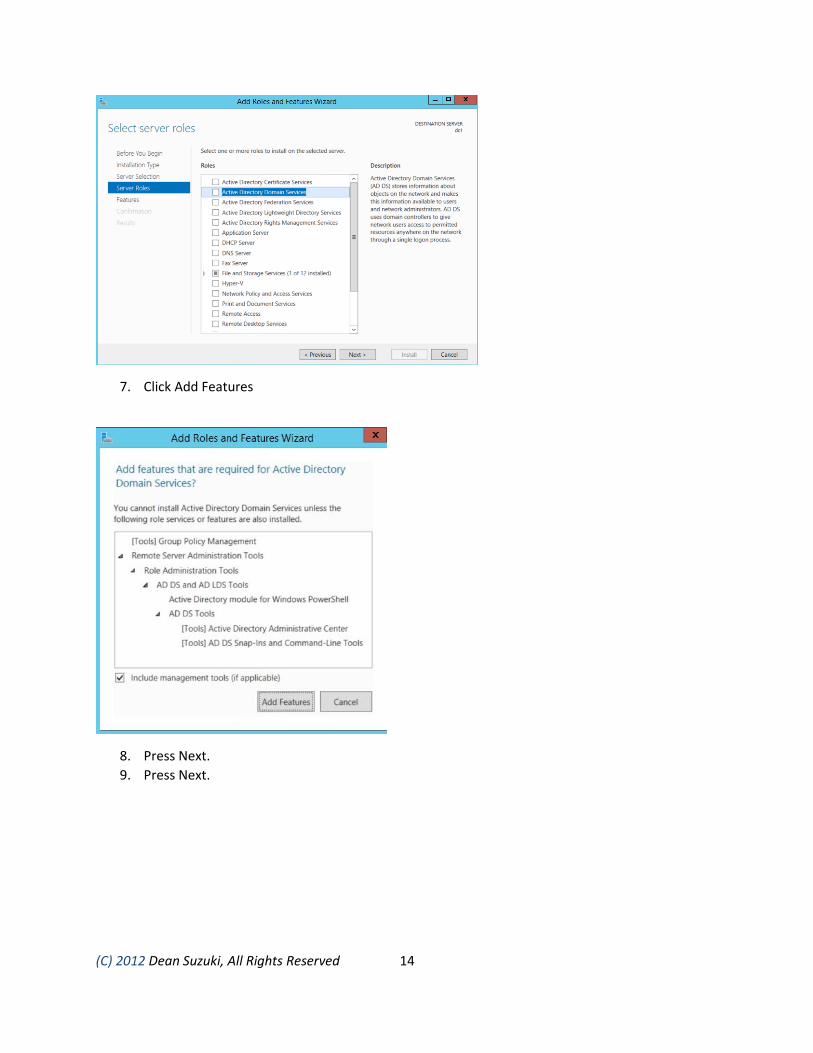
6. Select “Active Directory Domain Services”
(C) 2012 Dean Suzuki, All Rights Reserved 14
7. Click Add Features
8. Press Next.
9. Press Next.
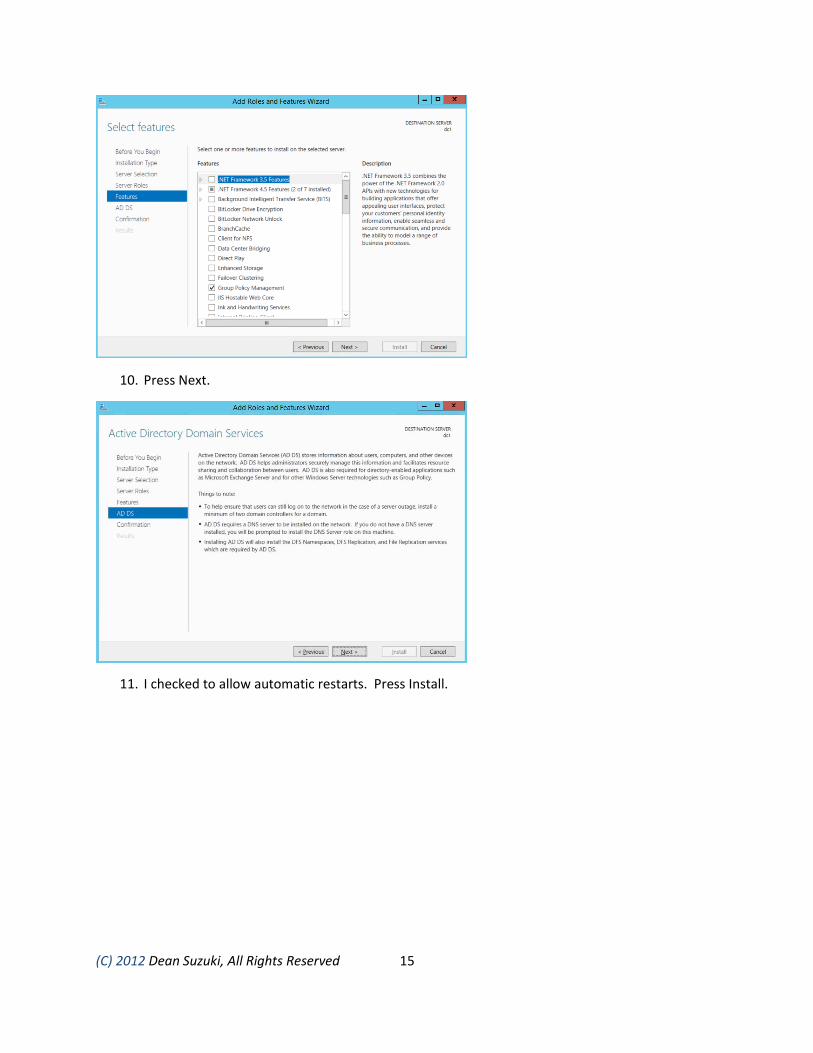
(C) 2012 Dean Suzuki, All Rights Reserved 15
10. Press Next.
11. I checked to allow automatic restarts. Press Install.
(C) 2012 Dean Suzuki, All Rights Reserved 16
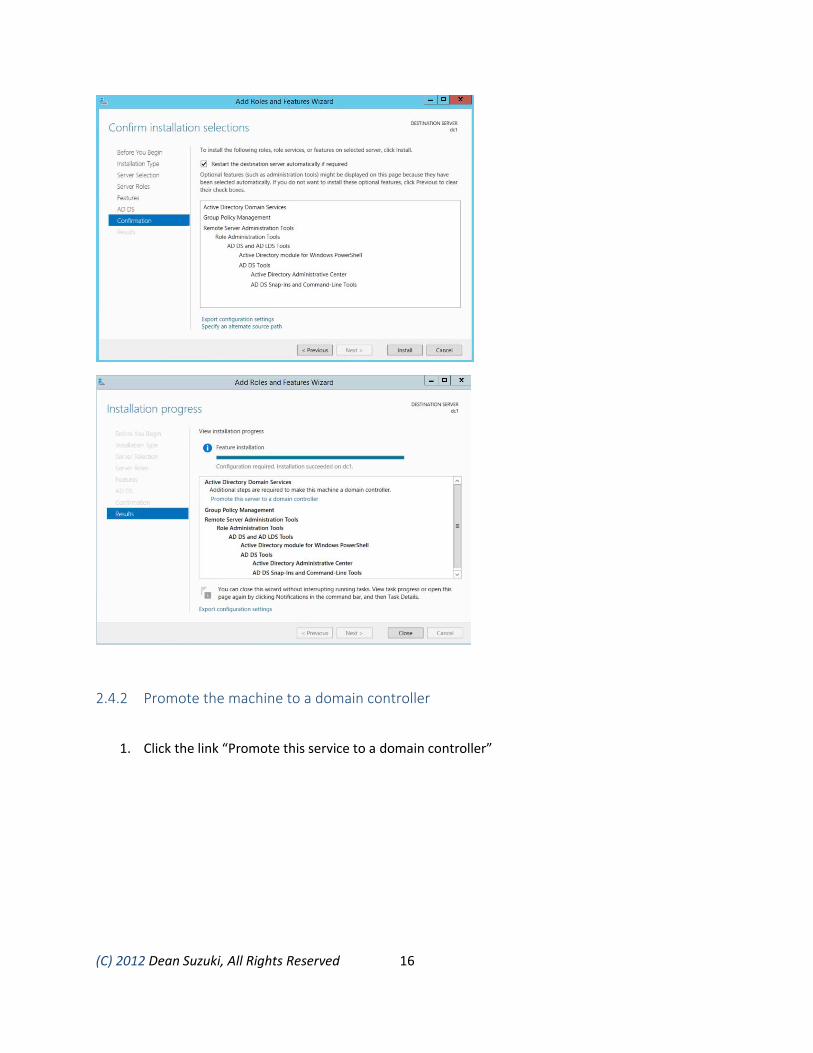
2.4.2 Promote the machine to a domain controller
1. Click the link “Promote this service to a domain controller”

(C) 2012 Dean Suzuki, All Rights Reserved 17
2. Select “Add a new forest”
3. Choose forest and domain functional level. Notice that the wizard installs the DNS and GC.
Specify a DSRM password.
(C) 2012 Dean Suzuki, All Rights Reserved 18
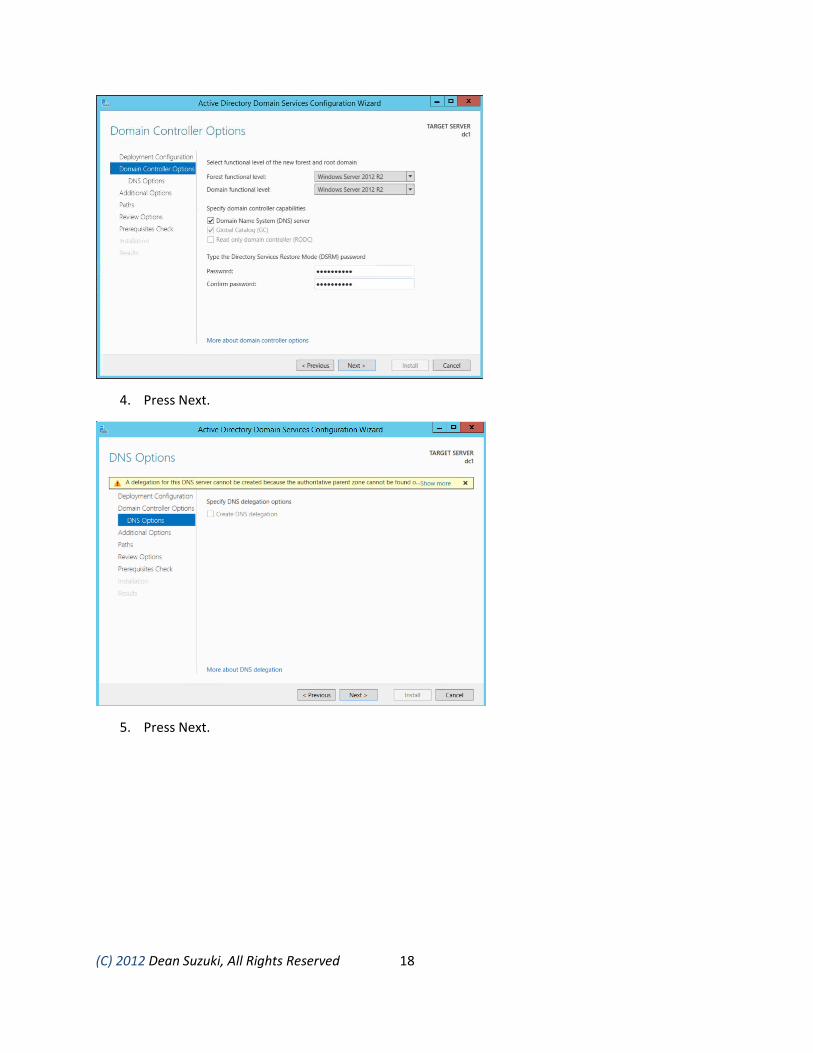
4. Press Next.
5. Press Next.

(C) 2012 Dean Suzuki, All Rights Reserved 19
6. Change folder locations to the new data disk created earlier.
7. Press Next
(C) 2012 Dean Suzuki, All Rights Reserved 20
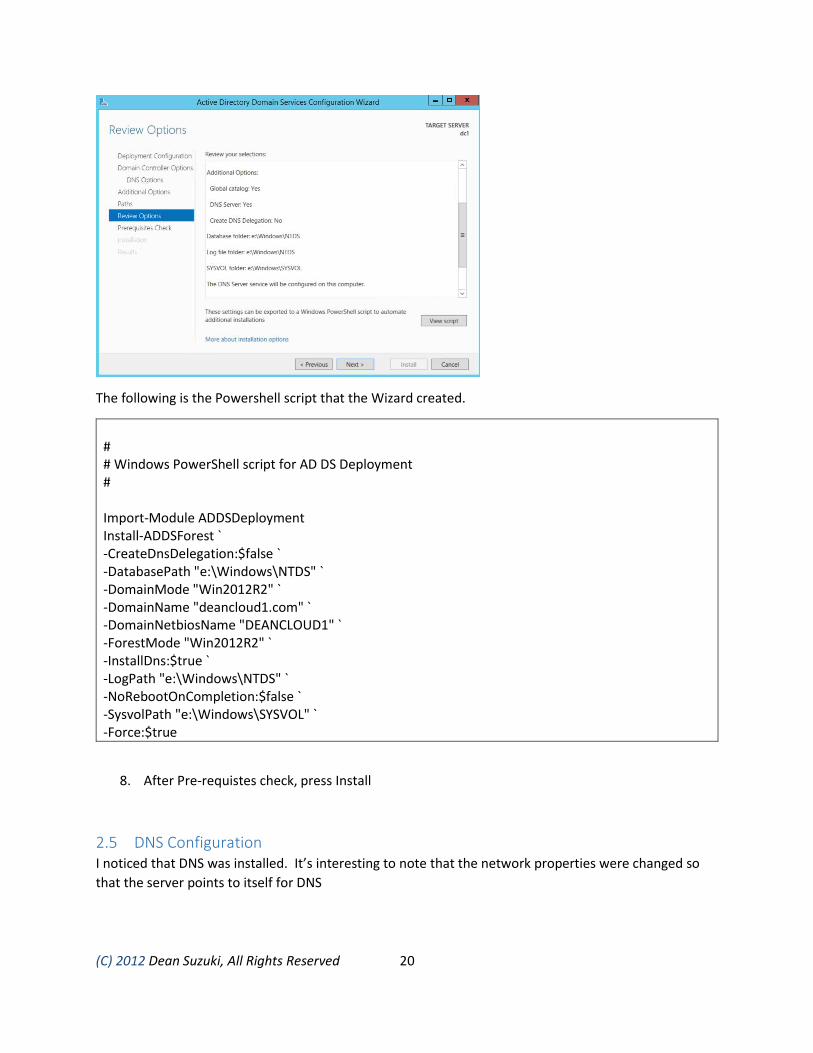
The following is the Powershell script that the Wizard created.
# # Windows PowerShell script for AD DS Deployment # Import-Module ADDSDeployment Install-ADDSForest ` -CreateDnsDelegation:$false ` -DatabasePath "e:\Windows\NTDS" ` -DomainMode "Win2012R2" ` -DomainName "deancloud1.com" ` -DomainNetbiosName "DEANCLOUD1" ` -ForestMode "Win2012R2" ` -InstallDns:$true ` -LogPath "e:\Windows\NTDS" ` -NoRebootOnCompletion:$false ` -SysvolPath "e:\Windows\SYSVOL" ` -Force:$true
8. After Pre-requistes check, press Install
2.5 DNS Configuration I noticed that DNS was installed. It’s interesting to note that the network properties were changed so
that the server points to itself for DNS

(C) 2012 Dean Suzuki, All Rights Reserved 21
In the DNS configuration, the install process created a forwarder to the Azure DNS.
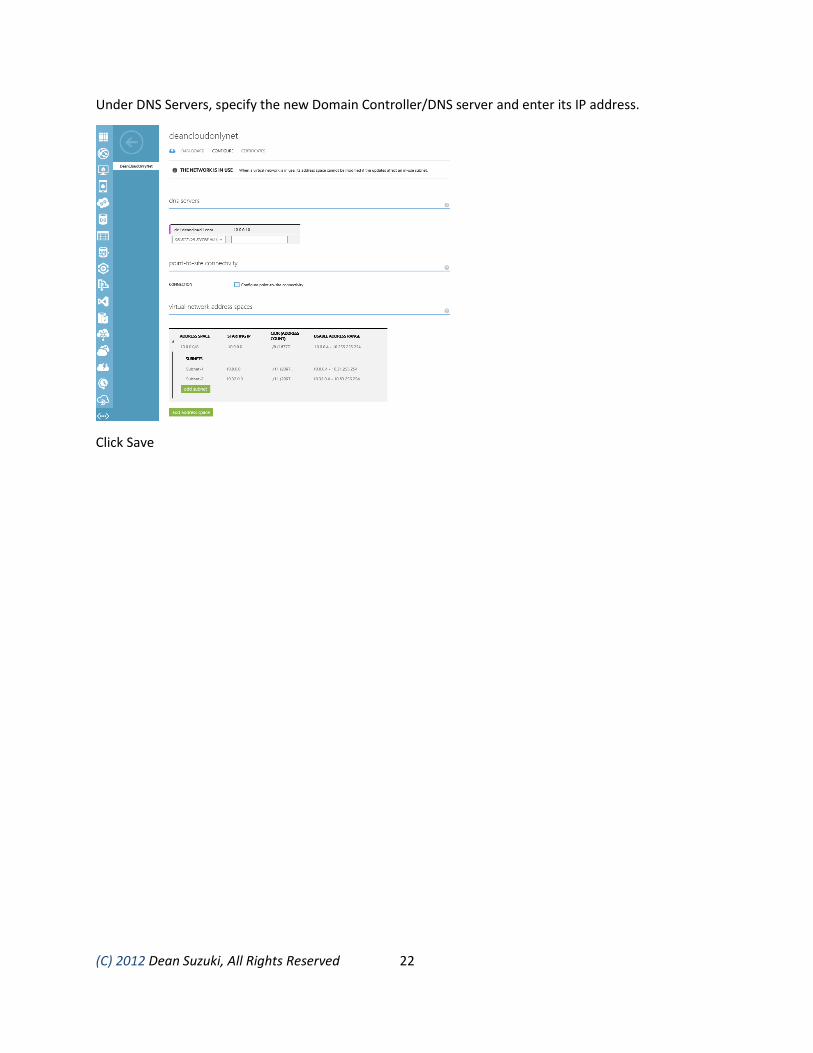
2.6 Configure the DNS Server on the Azure Virtual Network
In the Azure Management Portal, select the Azure Virtual Network created earlier and select
“Configure”
(C) 2012 Dean Suzuki, All Rights Reserved 22
Under DNS Servers, specify the new Domain Controller/DNS server and enter its IP address.
Click Save