
DCI401
26
Digital Adapter Easy Setup Guide Installation • Operation • Troubleshooting 3698674A final4 1 10/5/11 4:37 PM
-
Upload
oldschool8 -
Category
Documents
-
view
218 -
download
4
description
Device Manual
Transcript of DCI401

Digital Adapter Easy Setup Guide
Installation • Operation • Troubleshooting
3698674A final4 1 10/5/11 4:37 PM

2
Table of Contents
What’s included in this Install Kit? 4
Connecting to a TVwith HDMI Cable 8
Connecting to a TV with Coax Cable 9
Power Up 10
Connecting to the Network and Activating your Digital Adapter 12
Remote Control Setup Instructions 14
Verify your Services 18
Digital Adapter Operation Guide 19
Remote Operation Guide 21
Troubleshooting Guide 24
3698674A final4 2 10/5/11 4:37 PM

3
What you need to know To bring you better service now and in the future your cable operator is
upgrading to an All-Digital network – All-Digital for every channel, on every TV set.
To continue to receive all the channels you are used to, you will need to make sure that every TV in your home is equipped with
one of our Digital Adapter or Digital Cable Boxes.
What you need to do
3698674A final4 3 10/5/11 4:37 PM

4
What’s included in this Install Kit?
Digital AdapterEach TV will need to be connected to a Digital Adapter or a Digital Cable Box, but not both.
HDMI Cable
5 Foot Coax Cable
Power Cord
Remote ControlIn order to operate the Digital Adapter you must use the remote control included with this kit. Programming instructions for the remote control are included in this guide.
2 AAA Batteries
Adhesive FastenersUse these if you want to stick the Digital Adapter to your TV.
Note: Please be careful. Your operator is not responsible for any damage done to any surface you stick these to.
3698674A final4 4 10/5/11 4:38 PM

5
Items that you may also need:
Flashlight
Power StripYou’ll need a power strip if you already have 2 items plugged into the electrical outlet that you plan to use.
Extension CordYou’ll need an extension cord if you already have 2 items plugged into the electrical outlet closest to your TV.
3698674A final4 5 10/5/11 4:38 PM

6
3698674A final4 6 10/5/11 4:38 PM

7
The last four digits of the serial number of each Digital Adapter that you will be activating:
Serial Number Location in your home Output Channel
Note: The serial number can be found on the bottom of the Digital Adapter itself and is also printed on the outside of the Digital Adapter package.
3698674A final4 7 10/5/11 4:38 PM

8
ATurn off your TV.
BLocate the cable that currently runs from the cable wall outlet to the back of your
TV. Leave one end of the cable connected to the wall, but disconnect
the other end from the back of your TV.
CReconnect this end of the cable to the
“Cable In” input on the back of the Digital Adapter.
Cable Outlet
Wall
B
TV
Connecting to a TV with HDMI Cable
AFind the HDMI cable included in this kit.
Connect one end of the cable to the “HDMI” output on the back of the Digital Adapter.
BConnect the other end to the “HDMI” input
on the back of your TV.
Connect the Digital Adapterto the Cable Outlet
Connect the Digital Adapterto the TV
1 2
Wall
Cable Outlet C
A
BTV
3698674A final4 8 10/5/11 4:38 PM

9
Cable Outlet
Wall
B
TV
Connecting to a TV with Coax Cable
AFind the 5-foot coax cable included in this kit. Connect one end of the cable to the
“To TV” output on the back of the Digital Adapter.
BConnect the other end to the “Cable In/RF
In” input on the back of your TV.
ATurn off your TV.
BLocate the cable that currently runs from the cable wall outlet to the back of your
TV. Leave one end of the cable connected to the wall, but disconnect
the other end from the back of your TV.
CReconnect this end of the cable to the
“Cable In” input on the back of the Digital Adapter.
Wall
Cable Outlet C
A
B
Cable IN / RF IN
Connect the Digital Adapterto the Cable Outlet
Connect the Digital Adapterto the TV
1 2
3698674A final4 9 10/5/11 4:38 PM

10
AIf you are connecting the Digital Adapter to a television with HDMI,
set your TV to choose “HDMI” as the input source.Or
Pick which output channel your TV will use and make sure your television is set to that selected channel
by setting the switch on the back of the Digital Adapter to the proper output channel (Ch 3 or Ch 4).
Power Up
A
B
B Find the power cord included in the kit. Plug the end of the
power cord into the power input “+5V DC In” on the back of the Digital Adapter.
3698674A final4 10 10/5/11 4:38 PM

11
CPlug the other end into a working electrical outlet or power strip.
Make sure that the outlet is not controlled by a switch that gets turned on and off.
DCheck the front of the Digital Adapter to see if the green light is on and
blinking. If it is not on, check to make sure the power plug was plugged
into the power input “+5V DC In” and that the other end is plugged into a working electrical outlet.
Note: After activation, this light will remain on and constantly lit.
BC
Please wait 20 minutes before calling to activate. This will allow the Digital Adapter to connect to
the network and get the latest updates.
D
3698674A final4 11 10/5/11 4:38 PM

12
AIf you received more than one Digital Adapter, this would be a good time to
get the others installed so you can activate them all with one call.
Connecting to the Network and Activating your Digital Adapter
Remember, you must wait 20 minutes before calling to activate. This will allow the Digital Adapter to connect to the network and
get the latest updates.
Note: The serial number can be found on the bottom of the Digital Adapter itself and is also printed on the outside of the Digital Adapter package.
Note: To complete your activation, you will need your account information and the serial number of each Digital Adapter you are activating.
3698674A final4 12 10/5/11 4:38 PM

13
BCall your cable operator’s automated activation line
and follow the instructions.
CTurn on your TV and tune it to the proper output channel (Ch 3 or Ch 4).
Channel 3/4
3698674A final4 13 10/5/11 4:38 PM

14
Setup Remote to Control the Digital AdapterRF Remote Pairing Process:When multiple remotes work in a shared space, interference can result. To avoid this problem, the remote must be paired with the Digital Adapter.
Step 1Turn on your TV using the buttons on the TV or the TV remote. Make sure power is connected to your Digital Adapter and it is plugged into the TV.
Note: Your TV must always be set to the proper channel (Ch 3 or Ch 4) or HDMI Input to match the output channel on the back of your digital adapter
Step 2Install the batteries (included in your kit) in your new remote control.
Step 3Make certain no other Digital Adapter remote is in the area. Make sure power is connected to your Digital Adapter. Turn on your TV using the buttons on the TV or the TV remote (not a digital adapter remote in this instance).
Remote Control Setup InstructionsThe RF Remote Control you received with your Digital Adapter Kit must be setup before it will work with your Television and Digital Adapter.This is a two step process. First, you must setup the Remote to control the Digital Adapter. Next you setup the Remote to control the television.
3698674A final4 14 10/5/11 4:38 PM

15
Code appears on the screen.
Red light location
Blinks twice
Step 4Press and hold both DTA POWER and SELECT keys at the same time.
Once the red light on the remote turns on, then release both keys.Wait 10 seconds, then a 3 digit validation code will display on the TV.
123
Step 5Enter the 3 digit code using the Digital Adapter remote.When remote is successfully paired with the digital adapter, the remote’s red light will blink twice.
Proceed to next page to setup the Remote Control with your television.
3698674A final4 15 10/5/11 4:38 PM

16
Step 6Press and hold both Digit 1 and Digit 3 keys together until the red light turns on. Release both keys.Keep your eyes on the Remote so you can watch the red light.
Press and hold both buttons at
the same time
Keep your eyes on the remote so you can watch the red light.
Note: Your TV must always be set to the proper channel (Ch 3 or Ch 4) or HDMI Input to match the output channel on the back of your Digital Adapter.
Step 7Point the new remote at the TV.Press and hold the TV POWER key.
The remote will start searching for the right code while you are holding this key.
Setup Remote to Control the Television
When the TV turns off, release the key within 2 seconds to lock in the code.
3698674A final4 16 10/5/11 4:38 PM
17
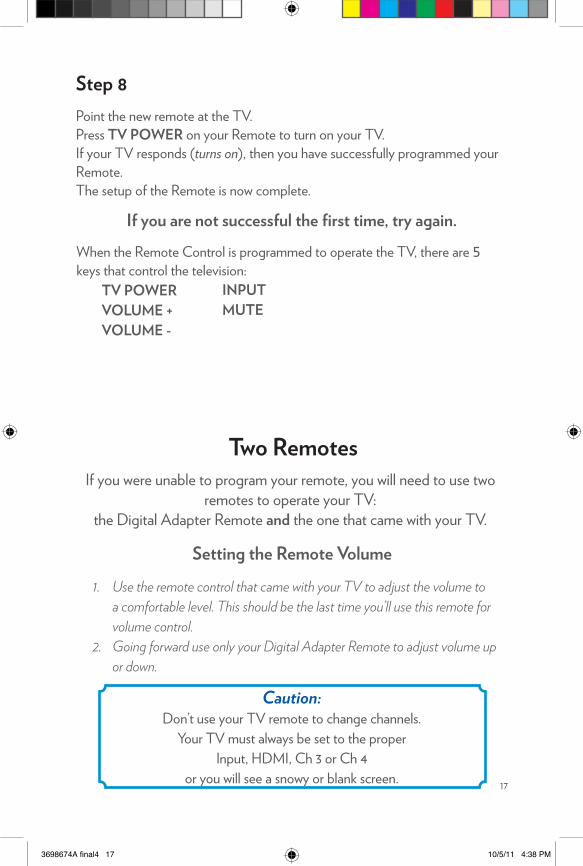
If you are not successful the first time, try again.
Step 8Point the new remote at the TV.Press TV POWER on your Remote to turn on your TV.If your TV responds (turns on), then you have successfully programmed your Remote.The setup of the Remote is now complete.
Two RemotesIf you were unable to program your remote, you will need to use two
remotes to operate your TV: the Digital Adapter Remote and the one that came with your TV.
Setting the Remote Volume1. Use the remote control that came with your TV to adjust the volume to
a comfortable level. This should be the last time you’ll use this remote for volume control.
2. Going forward use only your Digital Adapter Remote to adjust volume up or down.
Caution: Don’t use your TV remote to change channels.
Your TV must always be set to the proper Input, HDMI, Ch 3 or Ch 4
or you will see a snowy or blank screen.
When the Remote Control is programmed to operate the TV, there are 5 keys that control the television:
TV POWERVOLUME + VOLUME -
INPUTMUTE
3698674A final4 17 10/5/11 4:38 PM

18
After completing the activation step, wait a few minutes for programming to appear.
AConfirm that the Digital Adapter is connected to the power and that
the light on the front is solid (not blinking).
BMake sure that the TV is on.
CUse the Digital Adapter’s remote control to operate your Digital Adapter.
Scroll through your channels to make sure they are all working.
Verify your Services
Note: If the light is blinking or your channels are not showing up, turn to the troubleshooting section of this guide.
A
B
C
3698674A final4 18 10/5/11 4:38 PM
19
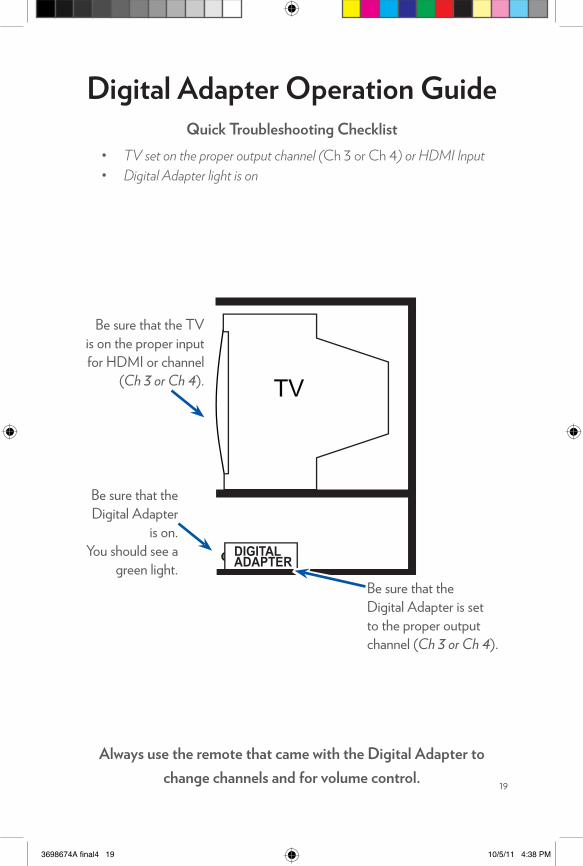
Digital Adapter Operation GuideQuick Troubleshooting Checklist
• TVsetontheproperoutputchannel(Ch 3 or Ch 4) or HDMI Input• DigitalAdapterlightison
Be sure that the Digital Adapter
is on. You should see a
green light.Be sure that the Digital Adapter is set to the proper output channel (Ch 3 or Ch 4).
Be sure that the TV is on the proper input for HDMI or channel
(Ch 3 or Ch 4).
Always use the remote that came with the Digital Adapter to change channels and for volume control.
3698674A final4 19 10/5/11 4:38 PM

20
Low Battery Indicator: The Remote Control will blink 10 times fast when the battery is low.
Replace with new batteries at that time.
3698674A final4 20 10/5/11 4:38 PM

21
When the remote has been programmed to the TV, TV POWER will turn the TV on and off.
Use DTA POWER to turn the Digital Adapter on and off. Note: the DTA Power Off feature may not be enabled.
Use the key pad (0-9) to directly select the channels.
Use MENU to display the Menu screen.
Use CLEAR to erase the last digit you entered.
Use Navigation Keys to move the cursor UP, DOWN, LEFT, DOWN.
Use SELECT to select the item the cursor is pointing to.
Press MUTE once to turn the sound on or off.
FUNCTIONKEY
Remote Operation Guide
3698674A final4 21 10/5/11 4:38 PM

22
Use LAST to recall the last channel.
Use GUIDE to display the Electronic Program Guide. Note: Guide feature may not be offered on your Digital Adapter.
Use INFO to display information relating to current contents.
Use INPUT to toggle among TV Input signals.
Use VOL+ (or VOL-) to raise (or lower) the volume.
Use CH+ (or CH-) to select the next higher (or lower) channel.
FUNCTIONKEY
Remote Operation Guide
3698674A final4 22 10/5/11 4:38 PM
23
Use LAST to recall the last channel.
Use GUIDE to display the Electronic Program Guide. Note: Guide feature may not be offered on your Digital Adapter.
Use INFO to display information relating to current contents.
Use INPUT to toggle among TV Input signals.
Use VOL+ (or VOL-) to raise (or lower) the volume.
Use CH+ (or CH-) to select the next higher (or lower) channel.
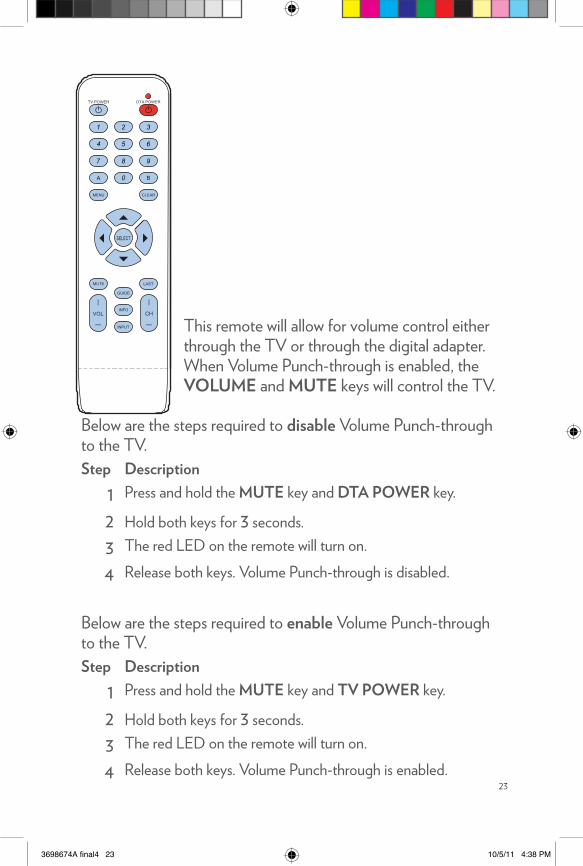
This remote will allow for volume control either through the TV or through the digital adapter.When Volume Punch-through is enabled, the VOLUME and MUTE keys will control the TV.
Below are the steps required to disable Volume Punch-through to the TV.Step Description
1 Press and hold the MUTE key and DTA POWER key.
2 Hold both keys for 3 seconds.3 The red LED on the remote will turn on.
4 Release both keys. Volume Punch-through is disabled.
Below are the steps required to enable Volume Punch-through to the TV.Step Description
1 Press and hold the MUTE key and TV POWER key.
2 Hold both keys for 3 seconds.3 The red LED on the remote will turn on.
4 Release both keys. Volume Punch-through is enabled.
3698674A final4 23 10/5/11 4:38 PM

24
Troubleshooting Guide
If the remote control does not work:
• Checkthatthebatteriesstillhavechargeandareinsertedcorrectly.
If there is no picture on the TV and the light on the Digital Adapter is blinking:
• Checkyourcablesandmakesurethattheyareattachedcorrectly.
• UnplugtheDigitalAdapter,plugitbackin,thenwait5minutesfor it to reset.
If there is no picture on the TV and the light on the Digital Adapter is on (not blinking):
• CheckthattheTVistunedtotheproperchannel (Ch 3 or Ch 4).
• IfyouarealsoconnectedtoaVCR,tryturningtheVCRoff.• CheckthattheDigitalAdapterisconnecteddirectlytothe
cable provider outlet in your wall.• Makesurethatallcablesarefirmlyconnected.• ChecktheinputsettingonyourTV,makesurethatitisseton
HDMI,ANTorCABLE.
3698674A final4 24 10/5/11 4:38 PM

25
If the remote is turning the TV off and on and changing the channels but not changing the volume:
• Your TV volume may have been turned all the way down or muted with the old TV remote. .
If your Digital Adapter is not coming on:
• MakesurethatthepowercordissecurelyconnectedtothebackoftheDigital Adapter.
• MakesurethattheDigitalAdapterpowercordispluggedintoaworkingpower outlet.
If you cannot get the Digital Adapter remote programmed to your TV:
• Youmaynotbeholding“POWER”longenough(upto2minutes).• Besuretoreleasethe“POWER”buttonwithin2secondsonceyourTV
turnsoff.
VCR is not recording the right channel:
• TheVCRwillonlyrecordthechannelthattheDigitalAdapteristunedto.SetyourTVandVCRtotheproperchannel(Ch 3 or Ch 4), then use the Digital Adapter remote to tune the Digital Adapter to the channel to be recorded.
3698674A final4 25 10/5/11 4:38 PM

3698674A Printed in China
3698674A final4 26 10/5/11 4:38 PM


