DB2 Manager OnDemand Multiplatforms - CMOD.wiki Guide.pdfDB2 ® Content Manager OnDemand for...
526
DB2 ® Content Manager OnDemand for Multiplatforms Administration Guide Version 8 Release 4 SC18-9237-01
Transcript of DB2 Manager OnDemand Multiplatforms - CMOD.wiki Guide.pdfDB2 ® Content Manager OnDemand for...
DB2® Content Manager OnDemand for Multiplatforms
Administration Guide
Version 8 Release 4
SC18-9237-01
���


DB2® Content Manager OnDemand for Multiplatforms
Administration Guide
Version 8 Release 4
SC18-9237-01
���

Note
Before using this information and the product it supports, read the information in “Notices” on page 493.
This edition replaces SC18-9237-00.
This edition applies to IBM DB2 Content Manager OnDemand for Multiplatforms, Version 8 Release 4 (product
number 5724-J33) and to all subsequent releases and modifications until otherwise indicated in new editions.
This product includes software developed by the Apache Software Foundation (http://www.apache.org/).
© Copyright International Business Machines Corporation 1993, 2007. All rights reserved.
US Government Users Restricted Rights – Use, duplication or disclosure restricted by GSA ADP Schedule Contract
with IBM Corp.

Contents
About this publication . . . . . . . . ix
Who should use this publication . . . . . . . ix
How this publication is organized . . . . . . . x
Where to find more information . . . . . . . xi
Information center . . . . . . . . . . . xi
PDF publications . . . . . . . . . . . . xi
Support available on the Web . . . . . . . xii
Education and training . . . . . . . . . xii
How to send your comments . . . . . . . . xii
What’s new in Version 8.4 . . . . . . . . . xiii
Summary of changes . . . . . . . . . . . xiv
Part 1. Database administration . . . 1
Chapter 1. Database concepts . . . . . 3
System . . . . . . . . . . . . . . . . 3
Instance . . . . . . . . . . . . . . . . 3
Database . . . . . . . . . . . . . . . . 3
Table . . . . . . . . . . . . . . . . . 4
Table space . . . . . . . . . . . . . . . 4
Container . . . . . . . . . . . . . . . 4
Index . . . . . . . . . . . . . . . . . 5
System catalog tables . . . . . . . . . . . 5
Buffer pool . . . . . . . . . . . . . . . 6
Configuration parameters . . . . . . . . . . 6
Log files . . . . . . . . . . . . . . . . 6
Active and archive logging . . . . . . . . 6
Configuration parameters for database logging . . 8
Using the standard Tivoli Storage Manager
backup commands for file system backups . . . 8
Recovery history file . . . . . . . . . . . . 9
Backup files . . . . . . . . . . . . . . 9
Chapter 2. Of table spaces and storage
volumes . . . . . . . . . . . . . . 11
Overview . . . . . . . . . . . . . . . 11
Database storage configuration . . . . . . . . 12
Recommendations for database storage
configuration . . . . . . . . . . . . . . 19
Chapter 3. Managing database growth 21
Estimating table and index size . . . . . . . . 21
Checking space available in a table space . . . . 21
Adding more space to a table space . . . . . . 21
Chapter 4. Database maintenance . . . 23
Collecting statistics . . . . . . . . . . . . 23
How to collect statistics . . . . . . . . . 23
Removing index data . . . . . . . . . . . 24
How to remove index data . . . . . . . . 28
Migrating indexes . . . . . . . . . . . . 28
How to migrate indexes . . . . . . . . . 29
Chapter 5. Migrating and importing
index data . . . . . . . . . . . . . 31
Configuring the system . . . . . . . . . . 31
System log messages . . . . . . . . . . 31
System log user exit program . . . . . . . 31
Tivoli Storage Manager . . . . . . . . . 32
Storage sets . . . . . . . . . . . . . 32
Application groups . . . . . . . . . . . 32
What happens when a user queries migrated data 33
Message to the user . . . . . . . . . . 33
Message to the system log . . . . . . . . 33
Importing index data . . . . . . . . . . . 33
Verify temporary work space . . . . . . . 33
Verify database storage space . . . . . . . 33
Verify database log file space . . . . . . . 34
Run the ARSADMIN program . . . . . . . 34
After you import index data . . . . . . . . . 34
Querying data . . . . . . . . . . . . 34
Expiring imported migrated indexes . . . . . 34
Configuring index migration . . . . . . . 35
Chapter 6. Monitoring database
performance . . . . . . . . . . . . 37
Administration tools . . . . . . . . . . . 37
Monitoring database performance . . . . . . . 38
Chapter 7. Tuning an Oracle database 41
Using the ARSDB program . . . . . . . . . 42
Using the ARSMAINT program . . . . . . . 42
Recommended practice for managing tablespace for
Oracle . . . . . . . . . . . . . . . . 43
Chapter 8. Backup and recovery . . . . 45
DB2 table spaces . . . . . . . . . . . . . 45
Database backup . . . . . . . . . . . . 45
Using Tivoli Storage Manager to maintain
backup images . . . . . . . . . . . . 46
Backup to a tape device . . . . . . . . . 46
Creating a full offline backup of the database . . . 47
Database backup in Windows . . . . . . . . 47
Database logging . . . . . . . . . . . . 48
Using Tivoli Storage Manager to maintain
archived log files . . . . . . . . . . . 48
Database recovery . . . . . . . . . . . . 48
Factors affecting recovery . . . . . . . . . 49
Part 2. Storage administration . . . 51
Chapter 9. Document storage . . . . . 53
Defining document storage management . . . . 53
Application groups . . . . . . . . . . . 54
Load policy . . . . . . . . . . . . . 54
Migration policy . . . . . . . . . . . . 54
Cache storage manager . . . . . . . . . 55
© Copyright IBM Corp. 1993, 2007 iii
||||

Archive storage manager . . . . . . . . . 55
Migrating documents . . . . . . . . . . . 55
Migration processing in the system log . . . . 57
Removing documents . . . . . . . . . . . 57
Removing documents from cache storage . . . 58
Removing documents from archive storage . . . 60
Chapter 10. Managing Tivoli Storage
Manager storage . . . . . . . . . . 63
Overview . . . . . . . . . . . . . . . 63
Using magnetic disk devices . . . . . . . . 63
Using removable media devices . . . . . . 64
Managing removable media operations . . . . 64
Defining drives and libraries . . . . . . . 65
Defining device classes . . . . . . . . . 65
Managing storage pools . . . . . . . . . 65
Managing storage pool volumes . . . . . . 65
Managing policies . . . . . . . . . . . 66
Managing client nodes . . . . . . . . . . 66
Automating server operations . . . . . . . 67
Managing server operations . . . . . . . . 67
Managing the database and recovery log . . . 67
Monitoring the server . . . . . . . . . . 67
Protecting and recovering data . . . . . . . 68
Mapping Tivoli Storage Manager objects to
OnDemand application group objects . . . . . 68
Starting, halting, and restarting the server . . . . 69
Starting the server . . . . . . . . . . . 69
Starting the Tivoli Storage Manager server
command line interface . . . . . . . . . 69
Halting the server . . . . . . . . . . . 70
Restarting the server . . . . . . . . . . 70
Using scratch and private volumes . . . . . . 70
Labeling storage volumes . . . . . . . . . . 71
Overwriting volume labels . . . . . . . . 71
Identifying volume labels . . . . . . . . . 71
Labeling volumes one at a time . . . . . . . 72
Searching the library . . . . . . . . . . 72
Adding storage volumes . . . . . . . . . . 72
Checking in volumes one at a time . . . . . 73
Searching the library . . . . . . . . . . 73
Allowing swapping of volumes . . . . . . . 73
Removing storage volumes . . . . . . . . . 74
Removing volumes from a library . . . . . . 74
Returning volumes to a library . . . . . . . 74
Managing a full library . . . . . . . . . 74
Offline storage of storage volumes . . . . . . 75
Protecting data with the data retention protection
(DRP) protocol . . . . . . . . . . . . . 75
Chapter 11. Backup and recovery . . . 79
Tivoli Storage Manager database . . . . . . . 79
Tivoli Storage Manager recovery log . . . . . 80
Tivoli Storage Manager volume history file . . . 81
Tivoli Storage Manager device configuration file 81
Tivoli Storage Manager database recovery . . . 81
Reports . . . . . . . . . . . . . . . . 82
Cache storage . . . . . . . . . . . . 82
Archive storage . . . . . . . . . . . . 83
Part 3. Using the administrative
client . . . . . . . . . . . . . . . 85
Chapter 12. Installation . . . . . . . . 87
System requirements . . . . . . . . . . . 87
Hardware . . . . . . . . . . . . . . 87
Software . . . . . . . . . . . . . . 87
Memory . . . . . . . . . . . . . . 87
Disk space . . . . . . . . . . . . . . 87
Installing the administrative client . . . . . . . 88
Running Setup . . . . . . . . . . . . 88
To install on a user’s PC . . . . . . . . . 88
To install on a network file server . . . . . . 89
To use automated install . . . . . . . . . 89
Excluding the administrative client from the
client installation package . . . . . . . . 89
To uninstall . . . . . . . . . . . . . 89
Updating the administrative client software . . . 90
Chapter 13. Introduction . . . . . . . 91
How does the administrative client help me do my
job? . . . . . . . . . . . . . . . . . 91
Getting started . . . . . . . . . . . . . 91
Starting the administrative client . . . . . . 91
Using online help . . . . . . . . . . . 92
Adding a server . . . . . . . . . . . . 93
Logging on a server . . . . . . . . . . 93
Changing passwords . . . . . . . . . . 94
System parameters . . . . . . . . . . . . 94
Maximum Password Age . . . . . . . . . 94
Minimum Password Length . . . . . . . . 95
Inactivity Time Out . . . . . . . . . . . 95
System Logging . . . . . . . . . . . . 95
User Exit Logging . . . . . . . . . . . 96
Login Processing . . . . . . . . . . . 96
Annotations . . . . . . . . . . . . . 97
System log comments . . . . . . . . . . 97
Setting system parameters . . . . . . . . 97
Administrative client start up parameters . . . . 99
Changing start up parameters . . . . . . . 100
Displaying the OnDemand splash screen or
About window . . . . . . . . . . . . 100
Examples . . . . . . . . . . . . . . 101
Adding items to a server . . . . . . . . . 101
New command . . . . . . . . . . . . 101
Copy command . . . . . . . . . . . 101
Export command . . . . . . . . . . . 101
Drag and drop operation . . . . . . . . 102
Report Wizard . . . . . . . . . . . . . 103
Starting the Report Wizard . . . . . . . . 103
Using the Report Wizard . . . . . . . . 104
Chapter 14. Concepts . . . . . . . . 107
Introduction . . . . . . . . . . . . . . 107
Users . . . . . . . . . . . . . . . 107
Groups . . . . . . . . . . . . . . 109
Printers . . . . . . . . . . . . . . 110
Storage sets and storage nodes . . . . . . 111
Application groups . . . . . . . . . . 111
iv Administration Guide
|||
|||
| | | |
| | |
Applications . . . . . . . . . . . . . 112
Folders . . . . . . . . . . . . . . 112
Cabinets . . . . . . . . . . . . . . 113
About application groups, applications, and folders 114
OnDemand permissions . . . . . . . . . . 115
Folder permissions . . . . . . . . . . 116
Application group permissions . . . . . . 116
Specifying permissions . . . . . . . . . 117
Chapter 15. Advanced system
administration . . . . . . . . . . . 121
Overview . . . . . . . . . . . . . . . 121
User types . . . . . . . . . . . . . . 121
Authority . . . . . . . . . . . . . . . 121
Permissions . . . . . . . . . . . . . . 124
Users . . . . . . . . . . . . . . . 124
Groups . . . . . . . . . . . . . . 125
Applications . . . . . . . . . . . . . 125
Application Groups . . . . . . . . . . 125
Folders . . . . . . . . . . . . . . 126
Storage sets . . . . . . . . . . . . . 127
Printers . . . . . . . . . . . . . . 127
Cabinets . . . . . . . . . . . . . . 127
System administration . . . . . . . . . . 127
Object Type model . . . . . . . . . . 128
Object Owner model . . . . . . . . . . 129
Summary . . . . . . . . . . . . . . . 131
Helpful hints . . . . . . . . . . . . . 131
Chapter 16. LDAP (Lightweight
Directory Access Protocol)
authentication support . . . . . . . 133
Requirements . . . . . . . . . . . . . 133
How OnDemand works with LDAP . . . . . . 133
Enabling LDAP authentication . . . . . . . 134
Chapter 17. Examples . . . . . . . . 135
Overview . . . . . . . . . . . . . . . 135
About the examples . . . . . . . . . . 135
System configuration . . . . . . . . . . 135
Adding a user . . . . . . . . . . . . . 136
About the example . . . . . . . . . . 136
The basics . . . . . . . . . . . . . 136
Adding the customer service users . . . . . 137
Adding a group . . . . . . . . . . . . 139
About the example . . . . . . . . . . 139
The basics . . . . . . . . . . . . . 140
Adding the customer service group . . . . . 141
Adding the Customer XYZ group . . . . . 142
Adding a printer . . . . . . . . . . . . 143
About the example . . . . . . . . . . 143
The basics . . . . . . . . . . . . . 143
Adding the printer . . . . . . . . . . 143
Adding a storage set and storage node . . . . . 144
About the example . . . . . . . . . . 144
The basics . . . . . . . . . . . . . 144
Adding the storage set . . . . . . . . . 145
Adding a report . . . . . . . . . . . . 148
About the example report . . . . . . . . 148
The basics . . . . . . . . . . . . . 149
About the application group . . . . . . . 150
Adding the application group . . . . . . . 151
About the application . . . . . . . . . 159
Adding the application . . . . . . . . . 160
About the folder . . . . . . . . . . . 169
Adding the folder . . . . . . . . . . . 170
Summary . . . . . . . . . . . . . . 176
Part 4. Web administrative client 177
Chapter 18. Business scenarios of
using the Web administrative client . . 179
Scenario 1: Managing user access and permission
levels . . . . . . . . . . . . . . . . 179
Scenario 2: Managing user access . . . . . . . 179
Chapter 19. Requirements for the Web
administrative client . . . . . . . . 181
Browser . . . . . . . . . . . . . . . 181
Mid tier application . . . . . . . . . . . 181
Chapter 20. Installing the Web
administrative client . . . . . . . . 183
Part 5. Loading data . . . . . . . 185
Chapter 21. Loading AFP and line data 187
Overview . . . . . . . . . . . . . . . 187
Before you begin loading input data . . . . . . 188
Estimating storage space . . . . . . . . 188
Defining the application group . . . . . . 188
Defining the application . . . . . . . . . 189
Accessing reports, index data, and resources . . 189
Configuring the ARSLOAD program . . . . 190
Indexing input data . . . . . . . . . . . 192
Indexing reports on OnDemand servers . . . 193
Indexing reports on OS/390 systems . . . . 193
Processing the input data . . . . . . . . . 195
Processing index data . . . . . . . . . 195
Processing reports and resources . . . . . . 195
Loading index data . . . . . . . . . . . 196
Loading storage objects . . . . . . . . . . 196
Cache storage . . . . . . . . . . . . 196
Archive storage . . . . . . . . . . . . 196
Copy storage pool . . . . . . . . . . . 197
Resources . . . . . . . . . . . . . 197
Verifying processing . . . . . . . . . . . 197
Backing up databases . . . . . . . . . . . 198
Backup the OnDemand database . . . . . . 198
Backup the Tivoli Storage Manager database 199
Protecting cache storage . . . . . . . . . . 199
Loading a previously indexed AFP file . . . . . 199
Loading metacode documents in large object
format . . . . . . . . . . . . . . . . 200
Chapter 22. Loading image files . . . 201
Overview . . . . . . . . . . . . . . . 201
Defining the application group . . . . . . . 201
Contents v
||
||
| |
| | | | | | | |
| | | | | | |
| | |

Database Organization . . . . . . . . . 201
Expiration Type . . . . . . . . . . . 202
Permissions . . . . . . . . . . . . . 202
Field Definition . . . . . . . . . . . . 202
Defining the application . . . . . . . . . . 202
Application Group . . . . . . . . . . 202
Data Format . . . . . . . . . . . . . 203
Indexer . . . . . . . . . . . . . . 203
Data Compression . . . . . . . . . . . 203
Defining the folder . . . . . . . . . . . 203
Application Group . . . . . . . . . . 203
Permissions . . . . . . . . . . . . . 204
Field Definition . . . . . . . . . . . . 204
Field Mapping . . . . . . . . . . . . 204
Accessing the input files . . . . . . . . . . 204
Creating index data . . . . . . . . . . . 204
Configuring the ARSLOAD program . . . . . 205
Processing the input data . . . . . . . . . 206
Processing index data . . . . . . . . . 206
Processing the image files . . . . . . . . 207
Verifying processing . . . . . . . . . . 207
Chapter 23. Loading user-defined data 209
Overview . . . . . . . . . . . . . . . 209
Defining the application group . . . . . . . 209
Database organization . . . . . . . . . 210
Expiration type . . . . . . . . . . . . 210
Permissions . . . . . . . . . . . . . 210
Field definition . . . . . . . . . . . . 210
Defining the application . . . . . . . . . . 211
Application Group . . . . . . . . . . . 211
Data Format . . . . . . . . . . . . . 211
File Extension . . . . . . . . . . . . 211
Indexer . . . . . . . . . . . . . . 211
Data Compression . . . . . . . . . . . 211
Defining the folder . . . . . . . . . . . 211
Application Group . . . . . . . . . . 212
Permissions . . . . . . . . . . . . . 212
Folder fields . . . . . . . . . . . . . 212
Field Mapping . . . . . . . . . . . . 212
Accessing the input files . . . . . . . . . . 212
Creating the index data . . . . . . . . . . 213
Configuring the ARSLOAD program . . . . . 214
Processing the input data . . . . . . . . . 214
Processing index data . . . . . . . . . 214
Processing the Lotus WordPro files . . . . . 215
Verifying processing . . . . . . . . . . 215
Chapter 24. Restarting a load process 217
Chapter 25. Deleting a report . . . . . 219
Chapter 26. Download exits and
processing . . . . . . . . . . . . 221
Overview . . . . . . . . . . . . . . . 221
Using Download . . . . . . . . . . . . 221
Invoking the Download user exit . . . . . . . 222
Chapter 27. Importing and exporting
administrative objects through an
XML interface . . . . . . . . . . . 223
Overview . . . . . . . . . . . . . . . 223
Installing batch system administration . . . . . 223
Prerequisites . . . . . . . . . . . . . 223
Installing Xerces2 Java Parser . . . . . . . 224
Installation verification . . . . . . . . . 224
Common problems during installation . . . . 225
Importing an XML file into an OnDemand system 226
Preparing an XML file for the import process 226
Creating an XML file . . . . . . . . . . 228
Importing the XML file by using the ARSXML
command . . . . . . . . . . . . . 233
Exporting OnDemand administrative objects to an
XML file . . . . . . . . . . . . . . . 233
Part 6. Command reference . . . . 235
Chapter 28. Overview . . . . . . . . 237
Reading a syntax diagram . . . . . . . . . 237
Using quotes in commands . . . . . . . . . 239
Removing trailing blank characters . . . . . . 240
Using the h and I parameters . . . . . . . . 240
Working with instances . . . . . . . . . . 240
Manually starting and stopping instances . . . 241
Connecting to instances . . . . . . . . . 242
Working with instances . . . . . . . . . 242
Chapter 29. ARSADMIN . . . . . . . 245
Purpose . . . . . . . . . . . . . . . 245
Description and syntax . . . . . . . . . . 245
Parameters . . . . . . . . . . . . . . 249
Examples . . . . . . . . . . . . . . . 253
Notes . . . . . . . . . . . . . . . . 254
Files . . . . . . . . . . . . . . . . 254
Chapter 30. ARS_ADSM . . . . . . . 255
Purpose . . . . . . . . . . . . . . . 255
Syntax . . . . . . . . . . . . . . . . 255
Description . . . . . . . . . . . . . . 255
Parameters . . . . . . . . . . . . . . 255
Examples . . . . . . . . . . . . . . . 256
Notes . . . . . . . . . . . . . . . . 256
Files . . . . . . . . . . . . . . . . 256
Chapter 31. ARSDATE . . . . . . . . 257
Purpose . . . . . . . . . . . . . . . 257
Syntax . . . . . . . . . . . . . . . . 257
Description . . . . . . . . . . . . . . 257
Parameters . . . . . . . . . . . . . . 257
Examples . . . . . . . . . . . . . . . 260
Notes . . . . . . . . . . . . . . . . 260
Files . . . . . . . . . . . . . . . . 261
Chapter 32. ARSDB . . . . . . . . . 263
Purpose . . . . . . . . . . . . . . . 263
Syntax . . . . . . . . . . . . . . . . 263
Description . . . . . . . . . . . . . . 263
vi Administration Guide
| | | | | | | | | |
Parameters . . . . . . . . . . . . . . 264
Examples . . . . . . . . . . . . . . . 271
Notes . . . . . . . . . . . . . . . . 272
Using the ARSDB program with Oracle . . . . 272
Files . . . . . . . . . . . . . . . . 273
Chapter 33. ARSDOC . . . . . . . . 275
Purpose . . . . . . . . . . . . . . . 275
Description and syntax . . . . . . . . . . 275
ADD function . . . . . . . . . . . . 275
DELETE function . . . . . . . . . . . 277
GET function . . . . . . . . . . . . 277
PRINT function . . . . . . . . . . . 278
QUERY function . . . . . . . . . . . 279
UPDATE function . . . . . . . . . . . 280
Parameters . . . . . . . . . . . . . . 281
Examples . . . . . . . . . . . . . . . 293
Exit codes used by ARSDOC . . . . . . . . 296
Notes . . . . . . . . . . . . . . . . 296
Files . . . . . . . . . . . . . . . . 297
Chapter 34. ARSJESD . . . . . . . . 299
Purpose . . . . . . . . . . . . . . . 299
Syntax . . . . . . . . . . . . . . . . 299
Description . . . . . . . . . . . . . . 299
Parameters . . . . . . . . . . . . . . 300
Examples . . . . . . . . . . . . . . . 300
Notes . . . . . . . . . . . . . . . . 301
Files . . . . . . . . . . . . . . . . 301
Chapter 35. ARSLOAD . . . . . . . 303
Purpose . . . . . . . . . . . . . . . 303
Syntax . . . . . . . . . . . . . . . . 303
Description . . . . . . . . . . . . . . 303
Parameters . . . . . . . . . . . . . . 304
Examples . . . . . . . . . . . . . . . 312
Notes . . . . . . . . . . . . . . . . 313
Files . . . . . . . . . . . . . . . . 313
Chapter 36. ARSMAINT . . . . . . . 315
Purpose . . . . . . . . . . . . . . . 315
Syntax . . . . . . . . . . . . . . . . 315
Description . . . . . . . . . . . . . . 315
Parameters . . . . . . . . . . . . . . 316
Examples . . . . . . . . . . . . . . . 320
Notes . . . . . . . . . . . . . . . . 320
Using the ARSMAINT program with Oracle . . . 321
Files . . . . . . . . . . . . . . . . 321
Chapter 37. ARSTBLSP . . . . . . . 323
Purpose . . . . . . . . . . . . . . . 323
Syntax . . . . . . . . . . . . . . . . 323
Description . . . . . . . . . . . . . . 323
Parameters . . . . . . . . . . . . . . 323
Examples . . . . . . . . . . . . . . . 325
Notes . . . . . . . . . . . . . . . . 325
Files . . . . . . . . . . . . . . . . 326
Chapter 38. ARSVIEW . . . . . . . . 327
Purpose . . . . . . . . . . . . . . . 327
Syntax . . . . . . . . . . . . . . . . 327
Description . . . . . . . . . . . . . . 327
Parameters . . . . . . . . . . . . . . 327
Examples . . . . . . . . . . . . . . . 328
Files . . . . . . . . . . . . . . . . 328
Chapter 39. ARSXML . . . . . . . . 329
Purpose . . . . . . . . . . . . . . . 329
Syntax . . . . . . . . . . . . . . . . 329
Description . . . . . . . . . . . . . . 329
Parameters for ARSXML [add|update|delete] . . 330
Parameters for ARSXML export . . . . . . . 332
Examples . . . . . . . . . . . . . . . 334
Example 1: Adding users . . . . . . . . 334
Example 2: Updating users . . . . . . . . 334
Example 3: Deleting printers . . . . . . . 335
Example 4: Exporting multiple objects . . . . 335
Example 5: Exporting a group . . . . . . . 335
Example 6: Exporting all of the users . . . . 336
Appendix A. Mastering CDs from the
OnDemand client . . . . . . . . . . 337
Activating the client data distribution for the
CD-ROM mastering option . . . . . . . . . 337
Transferring documents from an OnDemand server
to a staging drive . . . . . . . . . . . . 337
Burning the CD image to the CD-ROM . . . . . 338
Appendix B. Accessibility features 341
Keyboard input and navigation . . . . . . . 341
Keyboard input . . . . . . . . . . . . 341
Keyboard focus . . . . . . . . . . . . 341
Features for accessible display . . . . . . . . 341
High-contrast mode . . . . . . . . . . 341
Font settings . . . . . . . . . . . . . 341
Non-dependence on color . . . . . . . . 341
Alternative alert cues . . . . . . . . . . . 341
Compatibility with assistive technologies . . . . 342
Accessible documentation . . . . . . . . . 342
Appendix C. ARSSOCKD stop
command . . . . . . . . . . . . . 343
Appendix D. Monitoring servers . . . 345
Errors and alerts . . . . . . . . . . . . 345
OnDemand errors and alerts . . . . . . . 345
Related software errors and alerts . . . . . 345
Windows server errors and alerts . . . . . . 345
System logging facility . . . . . . . . . . 346
Searching for and viewing messages . . . . . 346
System log user exit . . . . . . . . . . 347
Monitoring users . . . . . . . . . . . 348
Reviewing a CD-ROM creation manifest . . . 348
Monitoring performance . . . . . . . . . . 349
Appendix E. System control tables 351
List of tables . . . . . . . . . . . . . 351
Application group table (ARSAG) . . . . . . 352
Contents vii
||
| |

Field mapping table (ARSAG2FOL) . . . . . . 353
Application group field table (ARSAGFLD) . . . 354
Application group field alias table
(ARSAGFLDALIAS) . . . . . . . . . . . 355
Composite index table (ARSAGINDEX) . . . . 355
Application group permissions table
(ARSAGPERMS) . . . . . . . . . . . . 356
Cabinet table (ARSCAB) . . . . . . . . . . 356
Cabinet to folder mapping table (ARSCAB2FOL) 356
Cabinet permissions table (ARSCABPERMS) . . . 357
Annotation table (ARSANN) . . . . . . . . 358
Application table (ARSAPP) . . . . . . . . 359
User logical views table (ARSAPPUSR) . . . . . 360
Folder table (ARSFOL) . . . . . . . . . . 361
Folder field table (ARSFOLFLD) . . . . . . . 362
Folder user fields table (ARSFOLFLDUSR) . . . 363
Folder permissions table (ARSFOLPERMS) . . . 365
Group table (ARSGROUP) . . . . . . . . . 366
Load table (ARSLOAD) . . . . . . . . . . 367
Named query table (ARSNAMEQ) . . . . . . 368
Node table (ARSNODE) . . . . . . . . . . 369
Printer table (ARSPRT) . . . . . . . . . . 370
Printer options table (ARSPRTOPTS) . . . . . 371
Printer user table (ARSPRTUSR) . . . . . . . 372
Resources table (ARSRES) . . . . . . . . . 373
Segment table (ARSSEG) . . . . . . . . . 374
Storage set table (ARSSET) . . . . . . . . . 376
System parameters table (ARSSYS) . . . . . . 377
User table (ARSUSER) . . . . . . . . . . 378
Users in groups table (ARSUSRGRP) . . . . . 380
User group ID table (ARSUSRGRPID) . . . . . 381
Application group data table . . . . . . . . 382
Appendix F. Objects and data model
used in the OnDemand XML file . . . 383
XML objects in the OnDemand XML file . . . . 383
User object . . . . . . . . . . . . . 385
Group object . . . . . . . . . . . . 391
Application object . . . . . . . . . . . 396
Application group object . . . . . . . . 434
Storage set object . . . . . . . . . . . 451
Folder object . . . . . . . . . . . . 455
Printer object . . . . . . . . . . . . 471
Cabinet object . . . . . . . . . . . . 475
Data field limitations . . . . . . . . . . 480
Appendix G. Troubleshooting . . . . 483
Logging and tracing . . . . . . . . . . . 483
Identifying a load ID from a user folder query . . 483
Troubleshooting scenario 1: Cannot find data when
using a mm/dd/yy date format in search . . . . 484
Troubleshooting scenario 2: Error occurred during
the CD-ROM mastering process . . . . . . . 484
Troubleshooting scenario 3: ARSLOAD daemon
cannot load an application group with multiple
applications . . . . . . . . . . . . . . 484
Troubleshooting scenario 4: The load process is
slowed down by a .lst file . . . . . . . . . 485
Troubleshooting scenario 5: You received the error
that connection cannot be established while using
ARSLOAD . . . . . . . . . . . . . . 485
Troubleshooting scenario 6: ARSLOAD cannot find
the TIFF images when using generic index . . . 485
Troubleshooting scenario 8: Buffer overrun problem
while exporting application groups to a local
server or another OnDemand server . . . . . . 486
Troubleshooting scenario 9: The ARSLOAD
program with a generic indexer does not load my
AFP documents with inline resources correctly . . 486
Troubleshooting scenario 10: Why OnDemand does
not support query result modifier SQL clauses . . 487
Troubleshooting scenario 11: AFP file loading failed
with invalid user ID or password . . . . . . 489
Troubleshooting scenario 12: The text search failed
with error that module arsusdoc cannot be loaded . 489
Hints and tips about using an XML interface to
import and export administrative objects . . . . 490
Tip 1: Child objects must be created under
parent objects . . . . . . . . . . . . 490
Tip 2: Application group and folder authorities
and permissions are not linked . . . . . . 490
Tip 3: Parsing error while running ARSXML . . 490
Notices . . . . . . . . . . . . . . 493
Trademarks . . . . . . . . . . . . . . 495
Index . . . . . . . . . . . . . . . 497
viii Administration Guide
||
||||||
||
| | | | | | | | | | | | | | | | |

About this publication
The information in this book can help administrators maintain an IBM® DB2®
Content Manager OnDemand for Multiplatforms Version 8 Release 4 (OnDemand)
system. OnDemand requires a database manager product, such as IBM DB2
Universal Database (DB2). If you plan to maintain reports in archive storage,
OnDemand requires the IBM Tivoli Storage Manager product. If you plan to use
the OnDemand server print function, then you must install the IBM Infoprint
Manager (Infoprint) on a workstation that is connected to the OnDemand network.
If you plan to transmit files from an OS/390 system to an OnDemand server, IBM
recommends that you use Download for OS/390 (Download), a licensed feature of
Print Services Facility (PSF) for OS/390.
This book describes how to:
v Maintain the database
v Manage cache storage and archive storage
v Use the administrative client to define reports to the system and maintain other
types of objects on the system
v Load reports and other types of data into the system
v Use administrative commands to complete other types of tasks
Before you begin, IBM recommends that you familiarize yourself with concepts
and terminology used in this book. See the IBM DB2 Content Manager OnDemand
for Multiplatforms: Introduction and Planning Guide for information about
OnDemand.
IBM hopes that you find using this book and administering OnDemand
straightforward. You can let IBM know if you find this book helpful and how well
the information in this book was presented. Use the reader’s comment form at the
back of the book to send your comments to IBM.
In this publication, the term UNIX refers to the AIX, HP-UX, Solaris, Linux and
Linux for zSeries operating systems on which you can run the OnDemand server
programs. OnDemand Version 8 Release 4 supports 64-bit AIX, HP-UX, Solaris,
Linux and Linux for zSeries operating systems only.
The term Windows client refers to the OnDemand client software that runs under
Windows XP and Windows Vista. The term Windows server refers to the
OnDemand server software that runs under the following Windows systems:
v For 32 bit Windows system: Windows Server 2003 R2
v For 64 bit Windows system: Windows Server 2003 R2 64 bit version
Who should use this publication
This book is of primary interest to administrators that are responsible for working
with and maintaining an OnDemand system. Some administrators can use this
book and the tools described in it to define reports to the system. Other
administrators can use this book and the tools described in it to maintain users,
groups, printers, storage sets, and so forth. Still other administrators can use the
administrative commands described in this book to maintain the database and
cache storage, extract documents from the system, and so forth.
© Copyright IBM Corp. 1993, 2007 ix
||||
|||
|
|

How this publication is organized
Part 1, “Database administration,” on page 1 describes the key database objects
that you will need to understand to perform the tasks in this book, describes how
to maintain the database, and provides information about backup and recovery.
This part contains the following sections:
Chapter 1, “Database concepts,” on page 3
Chapter 2, “Of table spaces and storage volumes,” on page 11
Chapter 3, “Managing database growth,” on page 21
Chapter 4, “Database maintenance,” on page 23
Chapter 5, “Migrating and importing index data,” on page 31
Chapter 6, “Monitoring database performance,” on page 37
Chapter 7, “Tuning an Oracle database,” on page 41
Chapter 8, “Backup and recovery,” on page 45
Part 2, “Storage administration,” on page 51 provides information about managing
cache storage and archive storage devices and objects. This part contains the
following sections:
Chapter 9, “Document storage,” on page 53
Chapter 10, “Managing Tivoli Storage Manager storage,” on page 63
Chapter 11, “Backup and recovery,” on page 79
Part 3, “Using the administrative client,” on page 85 contains information about the
administrative client, a program that you can use to define and maintain objects on
the system. For example, you can use the administrative client to define reports to
OnDemand and maintain OnDemand users, groups, printers, and storage sets. This
part contains the following sections:
Chapter 12, “Installation,” on page 87 describes the hardware, software,
memory, and disk space requirements for the administrative client and how to
install the administrative client
Chapter 13, “Introduction,” on page 91 provides an introduction to the
administrative client, including how to start the program, log on to a server,
and maintain passwords, describes the types of tasks that you can do with the
administrative client, and contains information about the system parameters
that you can maintain with the administrative client
Chapter 14, “Concepts,” on page 107 provides an overview of the OnDemand
objects: users, groups, printers, storage sets, application groups, applications,
folders, and cabinets.
Chapter 15, “Advanced system administration,” on page 121 provides more
information about managing users, groups, printers, storage sets, application
groups, applications, folders, and cabinets.
Chapter 17, “Examples,” on page 135 provides step-by-step instructions for
using the administrative client to define users, groups, printers, storage sets,
and reports to the system
Part 5, “Loading data,” on page 185 provides information about and examples of
loading reports on the system. This part contains the following sections:
Chapter 21, “Loading AFP and line data,” on page 187
Chapter 22, “Loading image files,” on page 201
Chapter 23, “Loading user-defined data,” on page 209
Chapter 24, “Restarting a load process,” on page 217
x Administration Guide
|||
|||
Chapter 25, “Deleting a report,” on page 219
Chapter 26, “Download exits and processing,” on page 221
Chapter 27, “Importing and exporting administrative objects through an XML
interface,” on page 223
Part 6, “Command reference,” on page 235 describes the OnDemand administrative
commands. This part contains the following sections:
Chapter 28, “Overview,” on page 237
Chapter 29, “ARSADMIN,” on page 245
Chapter 30, “ARS_ADSM,” on page 255
Chapter 31, “ARSDATE,” on page 257
Chapter 32, “ARSDB,” on page 263
Chapter 33, “ARSDOC,” on page 275
Chapter 34, “ARSJESD,” on page 299
Chapter 35, “ARSLOAD,” on page 303
Chapter 36, “ARSMAINT,” on page 315
Chapter 37, “ARSTBLSP,” on page 323
Chapter 38, “ARSVIEW,” on page 327
Appendices provide additional reference information including:
v Appendix A, “Mastering CDs from the OnDemand client,” on page 337
v Appendix B, “Accessibility features,” on page 341
v Appendix C, “ARSSOCKD stop command,” on page 343
v Appendix D, “Monitoring servers,” on page 345
v Appendix E, “System control tables,” on page 351
v Appendix F, “Objects and data model used in the OnDemand XML file,” on
page 383
v Appendix G, “Troubleshooting,” on page 483
Where to find more information
The product package contains an information center and each publication in
Portable Document Format (PDF).
Information center
The product package contains an information center that you can install when you
install the product. For information about installing the information center see IBM
DB2 Content Manager OnDemand for Multiplatforms: Installation and Configuration
Guide.
The information center includes the technical product documentation for
OnDemand. The information center contains the documentation for administrators
(such as the installation guide and the administration guide) and end-users (such
as the user’s guide and the client customization guide). In addition to the provided
navigation mechanism and indexes, a search facility also aids retrievability.
PDF publications
You can view the PDF files online using the Adobe® Acrobat® Reader for your
operating system. If you do not have Acrobat Reader installed, you can download
it from the Adobe Web site at www.adobe.com.
About this publication xi
Table 1 lists the OnDemand publications.
Table 1. IBM DB2 Content Manager OnDemand for Multiplatforms Version 8.4 publications
Title Order number
Administration Guide SC18-9237
Indexing Reference SC18-9235
Installation and Configuration Guide SC18-9232
Introduction and Planning Guide GC18-9236
Messages and Codes SC27-1379
Report Distribution: Installation, Use, and
Reference
SC18-9233
User’s Guide SC27-0836
Web Enablement Kit Implementation Guide SC18-9231
Windows® Client Customization Guide and
Reference
SC27-0837
The IBM DB2 Content Manager OnDemand for Multiplatforms: Introduction and
Planning Guide contains a glossary of terms for the OnDemand library. The IBM
DB2 Content Manager OnDemand: User’s Guide has a smaller glossary selected for
OnDemand users rather than administrators. The IBM DB2 Content Manager
OnDemand for Multiplatforms: Report Distribution Installation, Use, and Reference
includes a glossary of terms that are specific to the OnDemand Report Distribution
feature.
Product documentation is also available from the OnDemand library on the Web at
www.ibm.com/software/data/ondemand/mp/library.html and the IBM
Publication Ordering System www.ibm.com/shop/publications/order.
Support available on the Web
IBM provides updated product information online. Go to OnDemand support on
the Web at www.ibm.com/software/data/ondemand/mp/support.html for
frequently asked questions, hints and tips, and technical notes.
Education and training
IBM offers several classes for OnDemand administrators. Follow the Training and
certification link at www.ibm.com/software/data/ondemand/mp for course
descriptions and prices.
How to send your comments
Your feedback helps IBM to provide quality information. Please send any
comments that you have about this publication or other OnDemand
documentation. Visit the IBM Data Management Online Reader’s Comment Form
(RCF) page at www.ibm.com/software/data/rcf.
Be sure to include the name of the product, the version number of the product,
and the name of the book. If you are commenting on specific text, please include
the location of the text (for example, a chapter and section title, a table number, a
page number, or a help topic title).
xii Administration Guide

What’s new in Version 8.4
Version 8.4 includes the following new features and enhancements:
Web administrative client
With Version 8 Release 4, you can use a Web administrative client to
administer OnDemand. This client allows you to add, view, update, and
delete users, groups, applications, application groups, folders, printers, and
storage sets.
Native LDAP support on the OnDemand server
The Lightweight Directory Access Protocol (LDAP) is an open industry
standard that has evolved to share information between distributed
applications on the same network, organize information clearly and
consistently, and prevent unauthorized modification or disclosure of
private information. In recent years, LDAP has gained wide acceptance as
the directory access method of the Internet, and becomes strategic within
corporate intranets. Starting from Version 8 Release 4, you can use LDAP
to manage basic login authentication directly on the server.
Ability to change the life of cached data retroactively
Before Version 8 Release 4, when you changed the cache data value in the
administrative client, the change affected data subsequently loaded, and
not data that is already in the cache. Starting with Version 8 Release 4, the
cache data value setting expires all data for the application after the
indicated number of days regardless of when the data is loaded.
Server-based sorting
In Version 8 Release 4, OnDemand allows you to sort the document hit
lists on the server before the document hits lists are returned to the
OnDemand client. You can specify server-based sorting in the Folder
permissions options window in the administrative client.
Event-based expiration for data in Tivoli® Storage Manager
In OnDemand, the data retention protection (DRP) protocol prevents Tivoli
Storage Manager from explicitly deleting data but allows it to expire data.
Version 8 Release 4 introduces a new expiration type, event-based
expiration. Under the event-based expiration, Tivoli Storage Manager holds
items forever until an event activates the creation-based expiration
parameters. After the expiration parameters are activated, they determine
how long an object exists until Tivoli Storage Manager deletes the object.
Global annotations
You can now determine whether public, private, and group annotations
can be created at the system level. If you have the correct permission, you
can also determine which type of annotation to use as the default.
Ability to define DB2 database information at the application group level
DB2 Content Manager OnDemand Version 8.4 enables you to define a
database name at the application group level when you query against an
OnDemand for z/OS® library server. This database name is used during
tablespace creation and deletion, and you can modify it at any time.
Cabinets support
A cabinet is an object that contains a collection of folders. Cabinets help
OnDemand users organize folders and navigate through folders. Each
cabinet can contain multiple folders, and each folder can belong to
multiple cabinets.
About this publication xiii
|
|
|||||
|||||||||
||||||
|||||
||||||||
||||
|||||
|||||
Internet Protocol Version 6 (IPv6) compliant
DB2 Content Manager OnDemand Version 8.4 is Internet Protocol Version
6 (IPv6) compliant. Internet Protocol Version 6, abbreviated to IPv6, is the
next version of the network protocols that are used across the Internet.
IPv6 provides greater network deployment flexibility, a much expanded
address space, authentication and privacy. Many countries are moving
quickly to deploy IPv6. The U.S. Federal Government has mandated the
procurement of IPv6 enabled products and is working toward a transition
to IPv6 between 2008 and 2010.
For backup and recovery information, see Content Manager OnDemand Backup,
Recovery, and High Availability at:
http://www.redbooks.ibm.com/Redbooks.nsf/RedbookAbstracts/SG246444.html
Summary of changes
This edition of IBM DB2 Content Manager OnDemand for Multiplatforms
Administration Guide, SC18-9237-01 contains new technical information and
editorial changes. There may be some instances where changes were made, but
change bars are missing. Significant changes to note from SC18-9237-00 include:
Documentation of new features:
v Added a new section Part 4, “Web administrative client,” on page 177.
v Added a section about using Lightweight Directory Access Protocol (LDAP)
authentication in OnDemand server. For details, see Chapter 16, “LDAP
(Lightweight Directory Access Protocol) authentication support,” on page 133.
v Added “Cabinet object” on page 475 in Appendix F, “Objects and data model
used in the OnDemand XML file,” on page 383.
Revision of existing information:
v Added two new parameters to the “System parameters” on page 94 section.
v All data that is cached for an application expires after the number of days that
you specify in the administrative client regardless of when it is loaded. For more
details, see “Removing documents from cache storage” on page 58.
v Added two parameters, -B and -D to Chapter 35, “ARSLOAD,” on page 303.
v Chapter 36, “ARSMAINT,” on page 315 program is enhanced to query the
database for any application groups that are flagged for migration to Tivoli
Storage Manager or Object Access Method (OAM), and create migration links in
the cache against which ARSMAINT is run.
v Changed the user number limitation in OnDemand from 80,000 to 1,080,000.
v Documented the exit codes for the Chapter 33, “ARSDOC,” on page 275
command.
v Added a section about protecting data with the data retention protection (DRP)
protocol (see “Protecting data with the data retention protection (DRP) protocol”
on page 75).
v Revised information about running ARSLOAD on UNIX servers. See “Running
ARSLOAD on UNIX servers” on page 191.
v If caching of data is enabled, OnDemand stores resources in the cache, and the
resources are not expired from the cache, to provide fast retrieval when a user
selects an item for viewing. See “Loading index data” on page 196.
v Added instructions on installing batch system administration. See “Installing
batch system administration” on page 223.
xiv Administration Guide
|||||||||
||
|
|
||||
|
|
|||
||
|
|
|||
|
||||
|
||
|||
||
|||
||

v Revised information about ARSDB parameters. See “Parameters” on page 264.
v Revised the -u userid parameter in ARSLOAD. See Chapter 35, “ARSLOAD,”
on page 303.
v Added the -F and -L parameters to ARSLOAD. For details, see Chapter 35,
“ARSLOAD,” on page 303.
v Added the -L parameter to ARSMAINT. For details, see Chapter 36,
“ARSMAINT,” on page 315.
v Updated multiple tables in the description of XML objects in “XML objects in the
OnDemand XML file” on page 383.
v Added information about mapping Tivoli Storage Manager objects to
OnDemand application group objects. See Chapter 10, “Managing Tivoli Storage
Manager storage,” on page 63.
v Added information about displaying the OnDemand splash screen or About
dialog box. See “Administrative client start up parameters” on page 99.
v Added a statement that the ARSJESD command now receives files greater than 4
GB (see Chapter 34, “ARSJESD,” on page 299).
v In “Folder permissions” on page 116, added the Full Report Browser permission.
v In “Permissions” on page 124, added permissions for cabinets.
v In Appendix E, “System control tables,” on page 351, updated several tables, and
added four new tables:
– “Composite index table (ARSAGINDEX)” on page 355
– “Cabinet table (ARSCAB)” on page 356
– “Cabinet to folder mapping table (ARSCAB2FOL)” on page 356
– “Cabinet permissions table (ARSCABPERMS)” on page 357
Enhancement of troubleshooting information:
v “Troubleshooting scenario 9: The ARSLOAD program with a generic indexer
does not load my AFP documents with inline resources correctly” on page 486
v “Troubleshooting scenario 10: Why OnDemand does not support query result
modifier SQL clauses” on page 487
v “Troubleshooting scenario 11: AFP file loading failed with invalid user ID or
password” on page 489
v “Troubleshooting scenario 12: The text search failed with error that module
arsusdoc cannot be loaded” on page 489
v Addressed a common user question about whether expired reports are deleted
from Tivoli Storage Manager. See Chapter 4, “Database maintenance,” on page
23.
About this publication xv
|
||
||
||
||
|||
||
||
|
|
||
|
|
|
|
|
||
||
||
||
|||

xvi Administration Guide
Part 1. Database administration
This part is of primary interest to administrators responsible for configuring and
maintaining the OnDemand database. This part is organized as follows:
v Database concepts
v Of table spaces and storage volumes
v Managing database growth
v Database maintenance
v Migrating and importing index data
v Monitoring database performance
v Tuning the database in Oracle
v Backup and recovery
Note: This publication describes how to do some of the database administration
tasks, but you will need your database manager technical product
information to do others.
© Copyright IBM Corp. 1993, 2007 1

2 Administration Guide
Chapter 1. Database concepts
Note: This section describes database objects in DB2. If you plan to use some other
database management product with OnDemand, then see your database
management product information for detailed information about the
database objects.
This section provides an overview of the key database objects:
v System
v Instance
v Database
v Table
v Index
v Table space
v Containers
v System catalog tables
v Buffer pool
v Configuration parameters
v Log files
v Recovery history file
v Backup files
System
A database system represents a physical machine that contains a copy of the
database manager, sometimes called an instance. In OnDemand, the library server is
the physical machine that contains the instance.
Instance
A copy of the database manager and the data that it manages. An instance has its
own data, which other instances cannot access, and also has separate security from
other instances on the same machine. Part of initial installation and configuration
of the database manager is to create an instance. For OnDemand, you should name
your primary production, or only, instance archive to take advantage of default
configuration options and to help with problem determination and support.
Database
A collection of data that is stored in tables. In OnDemand, generally speaking,
there are two types of tables:
v System tables, which contain information about the objects you define to the
system, such as users, groups, application groups, applications, folders, storage
sets, printers, and cabinets. There are also system tables that contain information
OnDemand uses to control and maintain the system.
v Application group tables, which contain the index data for the reports that you
load on the system
A database is organized into parts called table spaces.
© Copyright IBM Corp. 1993, 2007 3
||||

Table
A table consists of data logically arranged in columns and rows. For example,
when you create an application group, the system creates a table definition that
contains one column for each field that you define. When you load a report into an
application group, the system adds one row to an application group table for each
document contained in the report.
Table space
A database is organized into table spaces. A table space is a place to store tables.
OnDemand supports System Managed Space (SMS) table spaces. For an SMS table
space, each container is a directory in the file space of the operating system. The
operating system’s file manager controls the storage space.
OnDemand system and application group tables, by default, exist in a table space
called USERSPACE1. If you define one or more table space file systems to
OnDemand, then the application group tables can be stored in them instead. (IBM
strongly encourages you to define table space file systems.) By storing tables in
table spaces other than the USERSPACE1 table space, you can improve
performance, enable more efficient backup and recovery options, and provide a
more flexible configuration.
Container
A container is a physical storage device. It can be identified by a directory name, a
device name, or a file name.
A container is assigned to a table space. All database and table data is assigned to
table spaces.
A single table space can span several containers, but each container can belong to
only one table space. It is possible for multiple containers (from one or more table
spaces) to be created on the same physical disk.
The database manager attempts to balance the load of data across the containers.
For SMS table spaces, OnDemand decides on the number and locations of the
containers, the database manager controls their names, and the file system is
responsible for managing them.
Figure 1 on page 5 illustrates the concepts described so far in this section. The
picture also shows the relationship of tables and table spaces, and SMS table
spaces.
4 Administration Guide

Index
In OnDemand, an index is a key that points to a document. An index allows more
efficient access to documents by creating a direct path to a document through
pointers.
You define indexes when you create an application group. The indexes should
contain information that uniquely identify a document, such as date, account
number, and customer name. Indexes are populated by values extracted from a
report when you load a report on the system. Each row in an application group
table identifies one document.
However, keep in mind that you do not want lots of indexes on a report just to
have indexes. You should have a good business reason to have an index. While
indexes can help you find documents faster, having too many of them can slow
you down when you load reports on the system. Every time you add a new row
(document) to a table, you have to add a row to each and every one of the indexes
for that table. So the more indexes that you have, the longer it may take when you
load a report.
The SQL optimizer automatically chooses the most efficient way to access data in
tables. The optimizer takes indexes into consideration when determining the fastest
access path to data.
System catalog tables
Each database includes a set of system catalog tables, which describe the logical
and physical structure of the data. The database manager creates and maintains an
extensive set of system catalog tables for each database. These tables contain
information about the definitions of the database objects, such as user tables,
views, and indexes, as well as security information about the authority that users
have for these objects. They are created when the database is created, and are
updated in the course of normal operation. You cannot explicitly create or drop
them, but you can query and view their contents using the catalog views.
System
Instance(archive)
Database
Table SpaceTable Spaces arewhere tables arestored:
SMSEach container isa directory in thefile space of theoperating system.
Table
Figure 1. Database objects and relationships
Chapter 1. Database concepts 5

Buffer pool
A buffer pool is an allocation of main memory allocated to cache table and index
data pages as they are being read from disk or being modified. The purpose of
buffer pools is to improve database system performance. Data can be accessed
much faster from memory than from a disk; therefore, the fewer times the database
manager needs to read from or write to a disk, the better the performance.
The configuration of the buffer pool is the single most important tuning area, since
you can reduce the delay caused by slow physical I/O.
Configuration parameters
When a database instance or a database is created, a corresponding configuration
file is created with default parameter values. You can modify the parameter values
to improve performance. Configuration files contain parameters that define values
such as the resources allocated to the database manager and to individual
databases, and the diagnostic level. There are two types of configuration files: the
database manager configuration file for each instance and the database
configuration file for each database.
The database manager configuration file is created when an instance is created.
The parameters it contains affect system resources at the instance level,
independent of any one database that is part of that instance. Many of these
parameters can be changed from the system default values to improve
performance or increase capacity, depending on your system’s configuration.
A database configuration file is created when a database is created, and resides
where the database physically resides. There is one configuration file per database.
Its parameters specify, among other things, the amount of resources to be allocated
to that database. Many of the parameters can be changed to improve performance
or increase capacity. Different changes may be required depending on the type of
activity in that specific database.
Log files
Each database includes recovery logs, which are used to recover from application
or system errors. In combination with database backups, logs are used to recover
the consistency of the database right up to a point in time when an error occurred.
All databases have logs associated with them. These logs keep records of database
changes. Some logs, called active logs, prevent a failure (system power, application
error) from leaving a database in an inconsistent state. They restore the state of a
database to the point before the change. Other logs, called archived logs, enable
forward recovery to any point in time before the failure.
Active and archive logging
Active logs contain transactions which have not yet been committed or rolled back,
or whose changes have not yet been written to disk. Active logs are located in the
database log path directory (see ARS_PRIMARY_LOG_PATH in the ARS.CFG file).
Archive logging enables forward recovery using active and archived logs to any
point in time before a failure, rather than only to the point in time of a full backup.
6 Administration Guide
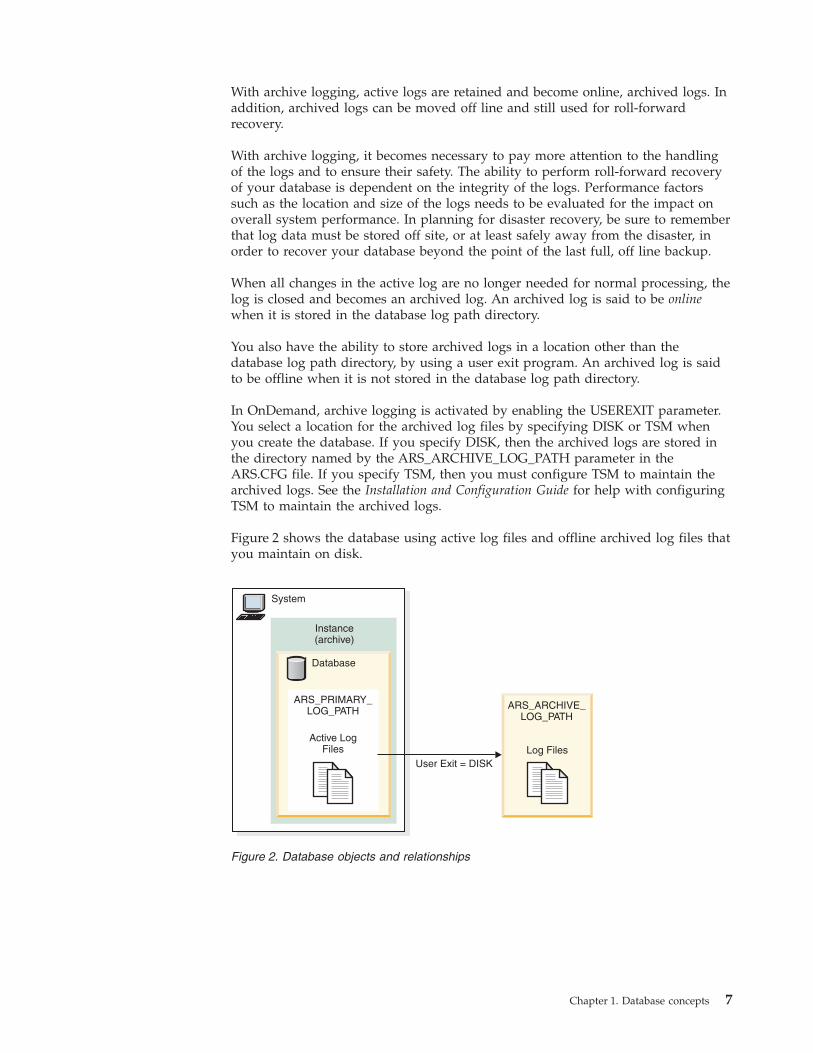
With archive logging, active logs are retained and become online, archived logs. In
addition, archived logs can be moved off line and still used for roll-forward
recovery.
With archive logging, it becomes necessary to pay more attention to the handling
of the logs and to ensure their safety. The ability to perform roll-forward recovery
of your database is dependent on the integrity of the logs. Performance factors
such as the location and size of the logs needs to be evaluated for the impact on
overall system performance. In planning for disaster recovery, be sure to remember
that log data must be stored off site, or at least safely away from the disaster, in
order to recover your database beyond the point of the last full, off line backup.
When all changes in the active log are no longer needed for normal processing, the
log is closed and becomes an archived log. An archived log is said to be online
when it is stored in the database log path directory.
You also have the ability to store archived logs in a location other than the
database log path directory, by using a user exit program. An archived log is said
to be offline when it is not stored in the database log path directory.
In OnDemand, archive logging is activated by enabling the USEREXIT parameter.
You select a location for the archived log files by specifying DISK or TSM when
you create the database. If you specify DISK, then the archived logs are stored in
the directory named by the ARS_ARCHIVE_LOG_PATH parameter in the
ARS.CFG file. If you specify TSM, then you must configure TSM to maintain the
archived logs. See the Installation and Configuration Guide for help with configuring
TSM to maintain the archived logs.
Figure 2 shows the database using active log files and offline archived log files that
you maintain on disk.
System
Instance(archive)
Database
User Exit = DISK
ARS_PRIMARY_LOG_PATH ARS_ARCHIVE_
LOG_PATH
Active LogFiles Log Files
Figure 2. Database objects and relationships
Chapter 1. Database concepts 7

Figure 3 shows the database using active log files and offline archived log files that
are maintained by the archive storage manager.
Configuration parameters for database logging
OnDemand uses two main configuration parameters for database logging:
v Log file size. Determines the size of a log file, in 4 KB blocks. The default value
(see ARS_LOGFILE_SIZE in the ARS.CFG file) is 1000, which means that each
log file is about 4 MB in size.
v The number of active log files. The maximum number of active log files that can
be allocated to the database at one time. The default value (see
ARS_LOG_NUMBER in the ARS.CFG file) is 40.
These values provide approximately 160 MB of active log file space.
Important: The database manager will stop if there is not enough active log file
space to complete a transaction.
Using the standard Tivoli Storage Manager backup commands
for file system backups
You can use the standard Tivoli Storage Manager backup commands to do file
system backups. See the Tivoli Storage Manager Administrator’s Reference for detailed
information about the commands that you can use and to schedule backups.
If you use the standard Tivoli Storage Manager backup commands to backup file
systems on the server, it is recommended that you exclude the database file
systems and the cache file systems from the backup. The database file systems
should be backed up using the facilities provided by OnDemand, such as the
ARSDB program, although the database backup images created by the ARSDB
program can be maintained by Tivoli Storage Manager. You should use the data
loading and migration facilities of OnDemand to make sure that data in cache
storage is copied to Tivoli Storage Manager-managed storage as needed.
While you can store the file system backups in the same optical library as the
OnDemand data, you should define different client nodes to hold the file system
backups. The client nodes should be assigned to a different domain than the
System
Instance(archive)
Database
Archive StorageManagerStorage
User Exit = ADSM
ARS_PRIMARY_LOG_PATH
Active LogFiles
Figure 3. Database objects and relationships
8 Administration Guide

OnDemand data. The retention period of the file system backups will likely be
different than the retention period for the OnDemand data.
File system backups generally require re-writable media.
You should plan a library with at least two drives:
v One for the file system backup.
v One for the OnDemand data.
If you plan to run the file system backups at the same time when you load data
into OnDemand, plan a library with four drives, or you may store the file system
backups in a different library than the OnDemand data.
Recovery history file
A recovery history file contains a summary of the backup information that can be
used in case all or part of the database must be recovered to a given point in time.
A recovery history file is created with each database and is automatically updated
when certain actions are performed, such as backups and restores.
Backup files
Backup files contain a copy of the database or table spaces that can be used to
recover the database.
The following are general guidelines for planning what types of backup files you
might need:
v Databases that contain read-only data do not need to be protected through
archive logging if full, offline backups are run following each new data load
activity. For most customers, the table spaces that contain application group data
is probably read only.
v With continuously updated data that is deemed important to your business, you
must use archive logging. If you use the audit feature of OnDemand to update
documents throughout the day, then you probably need to use archive logging.
v If your database must be continuously available, you must take online backups.
This requires the use of archive logs.
v If in the event of a failure your database must be recovered in a short time, you
will need to run more frequent backups. In this case, you need to establish how
long it would take to recover from a failure (the sum of the time to restore the
database from a backup plus the time needed to roll the log forward).
Note: Storing application group data in table spaces may reduce the time
required to recover from a failure of a single device.
Consideration should also be given to keeping the database on disk arrays
or mirrored volumes.
Probably the most common type of failure is caused by media problems. This is
not limited to disk problems, but can extend to other I/O devices, including disk
controllers and tape devices. As a starting point, do not back up your database to
the same disk on which the production version exists: use either a separate disk or
external media. The handling of your logs should be similar: consider directing
these to a separate physical disk from that of the database. In addition to
protecting against a disk failure affecting both, this may also result in performance
improvements.
Chapter 1. Database concepts 9

Though unlikely, it is possible that your backup media could suffer a problem just
when it is needed to let you recover from a disk failure. Consider the impact of a
tape going bad. If your data is absolutely critical, you should consider having
duplicate tape media. Another strategy is to minimize the potential for impact
caused by a bad disk. This applies to the disks that both the database and logs
reside upon. Using disk arrays for your database volumes or logs (or both) is
perhaps the best defense against disk media failures. If you extend redundancy to
disk controllers as well, it is highly unlikely that your database will ever be
unavailable or that logs will be lost due to a media failure.
10 Administration Guide
Chapter 2. Of table spaces and storage volumes
Overview
A database is organized into table spaces. A table space is a place to store tables.
With DB2, OnDemand supports SMS table spaces. For an SMS table space, each
container is a directory in the file space of the operating system. The operating
system’s file manager controls the storage space.
All database and table data is assigned to table spaces. OnDemand system and
application group data tables, by default, exist in a table space called
USERSPACE1. If you define one or more table space file systems to OnDemand,
then the application group data tables can be stored in them instead. (IBM strongly
encourages you to define table space file systems.) By storing tables in table spaces
other than the USERSPACE1 table space, you can improve performance, enable
more efficient backup and recovery options, and provide a more flexible
configuration.
A container is a physical storage device. It can be identified by a directory name, a
device name, or a file name. A container is assigned to a table space. A single table
space can span several containers, but each container can belong to only one table
space. It is possible for multiple containers (from one or more table spaces) to be
created on the same storage volume.
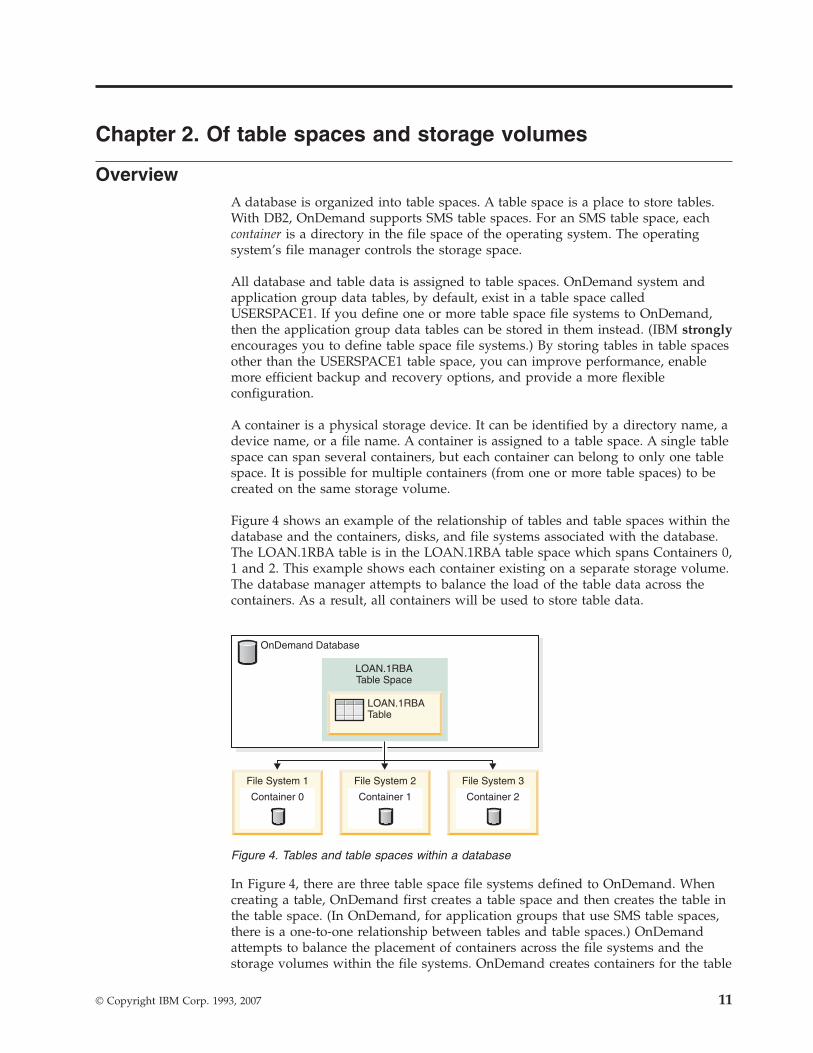
Figure 4 shows an example of the relationship of tables and table spaces within the
database and the containers, disks, and file systems associated with the database.
The LOAN.1RBA table is in the LOAN.1RBA table space which spans Containers 0,
1 and 2. This example shows each container existing on a separate storage volume.
The database manager attempts to balance the load of the table data across the
containers. As a result, all containers will be used to store table data.
In Figure 4, there are three table space file systems defined to OnDemand. When
creating a table, OnDemand first creates a table space and then creates the table in
the table space. (In OnDemand, for application groups that use SMS table spaces,
there is a one-to-one relationship between tables and table spaces.) OnDemand
attempts to balance the placement of containers across the file systems and the
storage volumes within the file systems. OnDemand creates containers for the table
OnDemand Database
LOAN.1RBATable Space
LOAN.1RBATable
File System 1 File System 2 File System 3
Container 0 Container 1 Container 2
Figure 4. Tables and table spaces within a database
© Copyright IBM Corp. 1993, 2007 11

space in the file system (or file systems) with the most free space. If there are
multiple table space file systems defined to OnDemand, then containers may be
placed in more than one file system. If there are multiple storage volumes in a
table space file system, OnDemand places the container on the storage volume
with the most free space.
OnDemand decides on the number and locations of the containers, the database
manager controls their names, and the file system is responsible for managing
them. By controlling the amount of data written to each container, the database
manager evenly spreads the data over the table space file systems.
Database storage configuration
For SMS table spaces, OnDemand determines the number of containers to create
when creating the table space. By defining multiple table space file systems to
OnDemand and assigning multiple storage volumes to the file systems, you enable
OnDemand to create multiple containers and spread them across the storage
system, which improves the performance of your system. When you need to
increase the size of your table space file systems, add an equal amount of storage
to each file system. The pictures that follow provide more information about
configuring and using table space file systems.
Figure 5 shows the placement of containers and table data with one table space file
system defined to OnDemand. The file system contains one storage volume. All of
the data is written to a single container and storage volume.
OnDemand Database
LOAN.1RBATable Space
LOAN.1RBATable
File System 1
Container 0
Figure 5. Defining table space file systems. Part 1 of 7
12 Administration Guide

Figure 6 shows the placement of containers and table data with one table space file
system defined to OnDemand. The file system contains two storage volumes.
OnDemand creates a table space with one container on each storage volume in the
file system. The database manager balances the load of data across the containers.
OnDemand Database
LOAN.1RBATable Space
LOAN.1RBATable
File System 1
Container 0 Container 1
Figure 6. Defining table space file systems. Part 2 of 7
Chapter 2. Of table spaces and storage volumes 13

Figure 7 shows the placement of containers and table data with two table space file
systems defined to OnDemand. Each file system contains one storage volume.
OnDemand creates a table space with two containers – one on each storage volume
in each file system. The database manager balances the load of data across the
containers.
OnDemand Database
LOAN.1RBATable Space
LOAN.1RBATable
File System 1 File System 2
Container 0 Container 1
Figure 7. Defining table space file systems. Part 3 of 7
14 Administration Guide

Figure 8 shows the placement of containers and table data with two table space file
systems defined to OnDemand. Each file system contains two storage volumes.
OnDemand creates four containers – one on each of the storage volumes in each
file system. The database manager balances the load of data across the containers.
OnDemand Database
LOAN.1RBATable Space
LOAN.1RBATable
File System 2File System 1
Container 1
Container 3
Container 0
Container 2
Figure 8. Defining table space file systems. Part 4 of 7
Chapter 2. Of table spaces and storage volumes 15

Figure 9 shows the recommended method for increasing the size of a table space
file system. Add an equal amount of storage to each file system. In the example,
one storage volume is added to each file system.
OnDemand Database
LOAN.1RBATable Space
LOAN.1RBATable
File System 2File System 1
Container 1Container 0
Figure 9. Defining table space file systems. Part 5 of 7
16 Administration Guide

Because all of the containers for an SMS table space must be created when the
table space is created, the only time that OnDemand can use new storage in a table
space file system is when it creates a new table space. For existing table spaces, the
database manager continues to load data into the containers that were created
when the table space was created. When OnDemand creates a new table space, it
can create containers on the new storage volumes, as Figure 10 shows.
OnDemand Database
LOAN.1RBATable Space
LOAN.2RBATable Space
LOAN.1RBATable
LOAN.2RBATable
File System 2File System 1
Container 1Container 0
Container 1Container 0
Figure 10. Defining table space file systems. Part 6 of 7
Chapter 2. Of table spaces and storage volumes 17

Figure 11 shows what would happen if, instead of adding storage volumes to
existing table space file systems, you placed the storage volumes in a new file
system and added the new file system to the list of OnDemand’s table space file
systems. One of the parameters that OnDemand uses to determine where to place
the containers for new table spaces is the amount of free space available in a table
space file system. Because the new file system contains the most free space (at least
for the time being), that is where OnDemand will place the containers for new
table spaces. Adding a new table space file system to OnDemand may unbalance
the performance of your database storage configuration. (In the example, all new
data loading, and searching for that data, takes place on the same file system.)
OnDemand Database
LOAN.1RBATable Space
LOAN.2RBATable Space
LOAN.1RBATable
LOAN.2RBATable
File System 1 File System 3File System 2
Container 0 Container 0
Container 1
Container 1
Figure 11. Defining table space file systems. Part 7 of 7
18 Administration Guide
Recommendations for database storage configuration
For a database using SMS table spaces, do the following:
v Estimate the database storage space required to hold the index data for each
report that you plan to load into OnDemand. See the IBM DB2 Content Manager
OnDemand for Multiplatforms: Introduction and Planning Guide for details and
examples.
v Allocate enough database storage space to keep the index data for any given
version of a report in the database at least until such time that 99 percent of the
requests for the report have passed. As a rule of thumb, if there is any chance
that someone in your organization will need to retrieve a version of a report,
keep the index data in the database – don’t allow it to be migrated.
v Define table space file systems to OnDemand and enable table space support in
your application groups.
v Configure your table space file systems deep and wide and, most importantly,
even. Before you begin loading reports, define as many table space file systems
as your hardware configuration permits. Add the same number of storage
volumes to each file system. The storage volumes should be the same size and
speed. (A typical configuration for a large database is four table space file
systems, with four, 8.4 GB storage volumes in each file system. Given such a
configuration, OnDemand could create up to 16 containers for each table space,
enabling the database manager to balance the load of data across the storage
configuration. This would not only improve the performance when loading data,
but also help when lots of users access data from the same table.)
v After your OnDemand system is in production for a while, it may become
necessary to increase the amount of storage space available for your database.
You may find that you need to allocate more storage for new reports, growing
application groups, and so forth. When you are ready to increase the size of
your database storage configuration, add an equal amount of storage to each
table space file system. That way, OnDemand can continue to balance the load of
the table data across the storage configuration. (Of course, if you’ve reached the
operating system limits placed on file systems, you’ll need to define new table
space file systems to OnDemand.)
v Expire data periodically, and migrate data only when absolutely necessary.
(Never use migration as a convenient way to reclaim database storage space. If
you are running low on database storage space, add more storage volumes.)
v Before you import migrated index data, add an equal amount of storage space to
each table space file system.
Note: If you plan to place your database on a disk array or use mirrored volumes,
see your database manager and operating system information for help with
optimizing performance and the hardware configuration.
Chapter 2. Of table spaces and storage volumes 19

20 Administration Guide

Chapter 3. Managing database growth
As a database administrator, you need to estimate the size of tables and indexes,
and to check the amount of space available in a table space, adding more space to
an existing table space when it gets full. You should use the database manager
tools to monitor table and table space growth to make sure that space allocation
does not become a critical issue. You should also monitor the space used by the
database and the space that is available on the system.
This section describes how to:
v Estimate the size of tables and indexes
v Check the amount of space available in a table space
v Add more space to an existing table space when it starts to get full
Estimating table and index size
You can estimate the amount of storage space required for new or existing tables
or indexes by using the worksheets provided with the IBM DB2 Content Manager
OnDemand for Multiplatforms: Introduction and Planning Guide. For DB2, you can also
estimate the size of existing tables and indexes by invoking the Estimate Size
dialog. You can invoke this dialog by selecting a table or index in the Control
Center, clicking mouse button two, and selecting Estimate Size. The size is
estimated on the definition of the particular table and its dependent indexes. The
estimate is the projected amount of storage space that would be used when the
table has a given number of rows. See the online help for the Control Center for
more information.
Estimating the size of a table or index is helpful if you want to:
v Create a new table and you want to know how large to make the table space
v Create a new table based on the size estimate of an existing table
v Know how much space is used by different table and index objects in a table
space because the system is running out of storage space
v Estimate the projected size of a table prior to loading a report into the system
Checking space available in a table space
In DB2, to check the amount of space available in an SMS table space, use the
facilities provided by your operating system to monitor space usage and to ensure
that available room in the directory for the table space is not exhausted.
Adding more space to a table space
In general, you cannot extend the size of an SMS table space very easily because
SMS capacity depends on the space available in the file system and the maximum
size of the file supported by the operating system. However, depending on your
operating system, you may be able to increase the size of a file system using the
operating system facilities. For an SMS table space on a UNIX-based file system,
you can increase the size of the table spaces by using the appropriate UNIX-based
system commands. See the documentation for the UNIX system that you are
running. If the file system containing the SMS table space also contains non-DB2
files, then you may be able to move these files to another file system, thus making
© Copyright IBM Corp. 1993, 2007 21

more room available in the file system for DB2’s use. You can also perform a
redirected restore, which involves restoring a table space into a larger number of
containers than it was backed up from. See the DB2 information for help with a
redirected restore process.
22 Administration Guide

Chapter 4. Database maintenance
You need to maintain the OnDemand database to keep it performing in an optimal
manner. Run the following database maintenance tasks on a regular basis:
v Collect statistics on tables to keep optimization information up-to-date
v Remove index data that has reached its life of data and indexes period
v Migrate indexes to archive storage, if your organization needs to keep indexes
for some period of time after users no longer need to retrieve the documents to
which they point
Collecting statistics
Statistics describe the physical and logical characteristics of a table and its indexes.
You should collect table and index statistics periodically for each active table.
These statistics are used by the database manager to determine a good way to
access the data. If the data has changed significantly, to the extent that the
information last collected no longer reflects the actual table data, then performance
may begin to deteriorate when users are accessing data.
Collect statistics at least once a week. You may also want to collect statistics after
loading data on the system. For example, when you load data into an application
group that uses Multiple Loads per Database Table, OnDemand may add rows to
an existing table. After the load completes, the information used by the SQL query
optimizer does not reflect the latest updates to the table. Before you allow users to
access the data, you should collect statistics on the table.
OnDemand lets you collect statistics for all of the tables in the database with the
ARSMAINT program. When you run the ARSMAINT program to collect statistics,
it collects statistics on all of the tables in the database that have changed since the
last time that you collected statistics. You can automate the collection of statistics
by scheduling the ARSMAINT program to run with the appropriate options. The
IBM DB2 Content Manager OnDemand for Multiplatforms: Installation and
Configuration Guide provides help with scheduling tasks. You can also manually
collect statistics by running the ARSMAINT program from the prompt. See
Chapter 36, “ARSMAINT,” on page 315 for details about the parameters and
options that you can specify.
How to collect statistics
You can control the automatic collecting of statistics by scheduling the ARSMAINT
program to run with the appropriate options. The IBM DB2 Content Manager
OnDemand for Multiplatforms: Installation and Configuration Guide provides help with
scheduling tasks. You can also manually collect statistics by running the
ARSMAINT program from the prompt. For example, to collect statistics on all
tables in the database that have changed since the last time that statistics were
collected:
arsmaint -r
When the ARSMAINT program collects statistics on a table, it saves the following
message in the system log:
164 ApplGrp Segment Maintenance (ApplGrp) (Segment)
© Copyright IBM Corp. 1993, 2007 23
One message is saved in the system log for each table on which statistics were
collected.
Removing index data
Indexes expire (are eligible for removal) because their life of data period has
passed. The indexes, and the documents that they point to, can then be removed
from the system. When you remove an index, information about the document to
which it points is removed from the database (the document can no longer be
retrieved). However, because indexes are eligible to be removed does not mean
that they will be deleted from the database. OnDemand does not delete expired
index data from the database until expiration processing runs.
The application group expiration policy determines when index data is eligible for
deletion from the database. You define the expiration policy when you create the
application group. The following properties on the Storage Management page
comprise the expiration policy:
v Life of Data and Indexes. The length of time in days to maintain index data and
documents on the system. After the index data has been on the system for this
number of days, it is eligible to be deleted.
Note: If you specify Never Expire, then expiration processing is disabled for the
application group. (That is, index data will not be removed from the
database.)
v Expiration Type. Determines whether individual indexes or an entire table of
index data is deleted at a time. When OnDemand deletes index data, it either
deletes a row (if the Expiration Type is Document) or drops a table (if the
Expiration Type is Segment or Load). The amount of index data in a table and
the number of reports the data represents is determined by the Database
Organization. If the Database Organization is Multiple Loads per Database
Table, then by default, a table of index data can hold up to 10 million indexes.
These types of tables usually hold the indexes for many reports. If the Database
Organization is Single Load per Database Table, then each table holds the
indexes for one and only one load.
A table of index data is not eligible to be deleted until the latest date in any of its
rows reaches the Life of Data and Indexes period. For example, suppose that the
Life Of Data and Indexes is set to 365 days, the Expiration Type is set to Segment,
and the Database Organization is set to Multiple Loads per Database Table. By
default, a table will contain approximately 10 million rows. Further, suppose that a
report is loaded into the application group once every month and that each report
adds one million rows to the database. Each table can hold the index data from
approximately ten reports. Using these assumptions, the data that is loaded into
the application group in January will not be eligible to be deleted by expiration
processing until November of the following year. If you need to remove the index
data for a report as soon as it reaches its Life of Data and Indexes period, then set
the Database Organization to Single Load per Database Table and set the
Expiration Type to Segment or Load. (And run expiration processing at least once
a month.)
OnDemand and the archive storage manager delete the documents that expired
index data points to independently of each other. OnDemand uses the application
group’s expiration policy to determine when indexes and documents expire and
should be removed from the system. The archive storage manager marks
documents for removal based on the criteria specified in the archive copy group.
24 Administration Guide

However, you should specify the same criteria to OnDemand and the archive
storage manager. The Life of Data and Indexes, which is used by OnDemand, and
the Retention Period, which is used by the archive storage manager, should specify
the same value.
OnDemand does not explicitly delete data stored with segment or document
expiration from Tivoli Storage Manager, however, the data might still expire in the
storage manager based on its expiration settings.
The following pictures show an example of expiration processing. For purposes of
the example, assume that the Life of Data and Indexes is 365 days, the Database
Organization is Single Load per Database Table, and the Expiration Type is Load.
Further, assume that one report is loaded into the application group every month,
beginning on January 15, 1999, and that expiration processing has never been run
on this particular application group.
Chapter 4. Database maintenance 25
|||
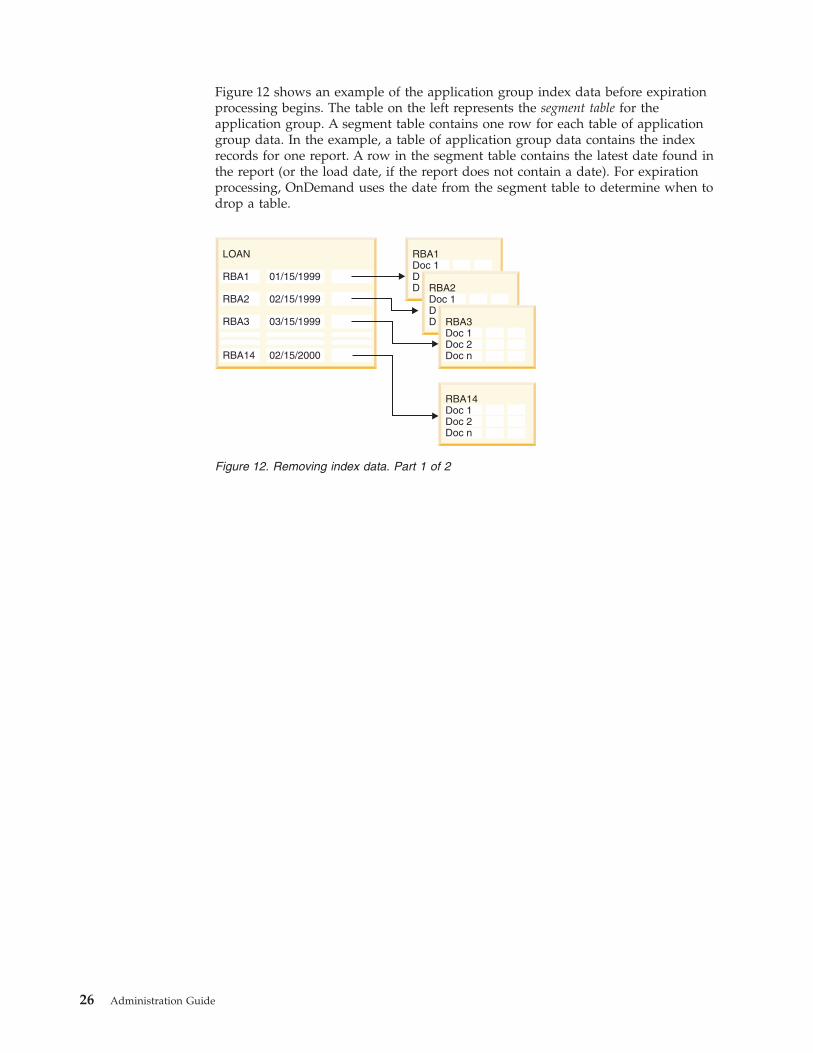
Figure 12 shows an example of the application group index data before expiration
processing begins. The table on the left represents the segment table for the
application group. A segment table contains one row for each table of application
group data. In the example, a table of application group data contains the index
records for one report. A row in the segment table contains the latest date found in
the report (or the load date, if the report does not contain a date). For expiration
processing, OnDemand uses the date from the segment table to determine when to
drop a table.
RBA1Doc 1DD
LOAN
RBA1 01/15/1999
RBA2 02/15/1999
RBA3 03/15/1999
RBA14 02/15/2000
RBA2Doc 1DD RBA3
Doc 1Doc 2Doc n
RBA14Doc 1Doc 2Doc n
Figure 12. Removing index data. Part 1 of 2
26 Administration Guide

Figure 13 shows an example of the application group index data after expiration
processing ends. For purposes of the example, assume that expiration processing
ran on March 4, 2000. That date, along with the criteria specified in the expiration
policy (specifically, the Life of Data and Indexes is 365 days) causes the
ARSMAINT program to drop two tables of application group index data: 1RBA,
which has a date of January 15, 1999, and 2RBA, which was has a date of February
15, 1999. OnDemand also deleted the rows in the segment table that pointed to the
application group tables that were dropped.
Application Group - LOAN
LOAN
RBA3 03/15/1999
RBA4 04/15/1999
RBA5 05/15/1999
RBA14 02/15/2000
RBA3Doc 1DD RBA4
Doc 1DD RBA5
Doc 1Doc 2Doc n
RBA14Doc 1Doc 2Doc n
Figure 13. Removing index data. Part 2 of 2
Chapter 4. Database maintenance 27
How to remove index data
OnDemand does not delete expired index data from the database until expiration
processing runs. The ARSMAINT program is the expiration utility. You can
schedule the ARSMAINT program to run automatically or you can run it manually.
You should make sure that the ARSMAINT program command runs periodically
so that OnDemand deletes indexes when it is time to do so (so that expired
documents can no longer be retrieved). See Chapter 36, “ARSMAINT,” on page 315
for details about the parameters and options that you can specify.
You can control automatic expiration processing by scheduling the ARSMAINT
program to run with the appropriate options. The IBM DB2 Content Manager
OnDemand for Multiplatforms: Installation and Configuration Guide provides help with
scheduling tasks. You can also manually start expiration processing by running the
ARSMAINT program from the prompt. For example, to run expiration processing,
enter the following command at the prompt:
arsmaint -d
When the ARSMAINT program removes indexes, it saves the following message in
the system log:
128 ApplGrp Segment Expire (ApplGrp) (Segment)
One message is saved in the system log for each table that was dropped during
expiration processing.
Migrating indexes
Note: This section provides an overview of the process of migrating index data
from the database to archive storage. See Chapter 5, “Migrating and
importing index data,” on page 31 for information about configuring the
system for migration processing.
OnDemand provides automatic migration to move indexes from the database to
archive storage to maintain seldom used indexes for long periods of time.
Important: If you use migration to move indexes to archive storage, make sure
that you migrate them after there is no longer a need to retrieve the
documents to which they point.
The ARSMAINT program uses an application group’s migration policy to control
when migration of indexes for an application group occurs:
v Migration of Indexes. If you specify No Migration, then migration of indexes is
disabled for the application group. (That is, index data will not be migrated.) If
you specify Migrate After n Days, then index data is eligible to be migrated after
reaching the specified number of days. Indexes will be migrated the next time
that the ARSMAINT program runs.
v Life of Data and Indexes. The length of time in days to maintain index data on
the system. For migration, this value must be greater than the Migrate After n
Days value.
OnDemand does not migrate index data from the database to archive media until
migration processing runs. The ARSMAINT program is the migration utility. You
can control automatic migration processing by scheduling the ARSMAINT program
to run with the appropriate options. You can also manually start migration
processing by running the ARSMAINT program from the prompt. See Chapter 36,
28 Administration Guide

“ARSMAINT,” on page 315 for more information about the ARSMAINT program.
The IBM DB2 Content Manager OnDemand for Multiplatforms: Installation and
Configuration Guide provides help with scheduling tasks.
The ARSMAINT program migrates indexes from each file system listed in the table
space file system file.
After a migrated table is successfully loaded into the System Migration application
group, the table is dropped from the database. However, OnDemand keeps track
of all migrated tables. That way, if index data in a migrated table is needed, then
OnDemand can alert an administrator to take action (such as manually import the
table back into the database).
How to migrate indexes
You can control automatic migration processing by scheduling the ARSMAINT
program to run with the appropriate options. See Chapter 36, “ARSMAINT,” on
page 315 for more information about the ARSMAINT program. The IBM DB2
Content Manager OnDemand for Multiplatforms: Installation and Configuration Guide
provides help with scheduling tasks. You can also manually start migration
processing by running the ARSMAINT program from the prompt. For example, to
run migration processing, enter the following command at the prompt:
arsmaint -e
When the ARSMAINT program migrates indexes, it saves the following messages
in the system log. A set of three messages should be saved in the system log for
each table that is migrated from the database to archive storage:
166 ApplGroup Segment Export (ApplGrp) (Segment)
14 DB Info Exported (SQL Code)
87 ApplGrp Load (System Migration)
The first message identifies a segment of application group index data that is to be
migrated from the database to archive storage. The second message reports the
status of exporting the table from the database to temporary storage. The third
message reports the status of loading the migrated table into the System Migration
application group. The System Migration application group must be assigned to a
storage set that identifies a client node that is maintained by the archive storage
manager.
Chapter 4. Database maintenance 29

30 Administration Guide
Chapter 5. Migrating and importing index data
Migration is the process by which OnDemand moves index data from the database
to archive storage. This process optimizes database storage space while allowing
you to maintain index data for a very long time. You typically migrate index data
after users no longer need to access the information, but for legal or other business
requirements, you still need to maintain the data for some number of years. If a
user queries index data that has been migrated, an administrator must import a
copy of the migrated table into the database. After maintaining the imported table
in the database for a specified number of days, OnDemand deletes it from the
database.
This section provides information about importing index data into the database,
including how to configure your system to migrate index data from the database
to archive storage, what happens when a user queries for migrated data, how to
import the index table or tables required by the query, and what happens after you
import a table into the database.
IBM assumes that an experienced OnDemand administrator will use the
information provided in this section. If you have questions about any of the topics
in this section or if you would like help configuring your system to support
migrating and importing of index data, please contact the IBM support center.
Configuring the system
System log messages
OnDemand provides the system log for administrators to monitor the system.
When you install and configure OnDemand, you initialize the system log tables.
The system log is critical to the operation of the system.
When OnDemand processes a query for application group data that has been
migrated to archive storage, it saves a message in the system log, sends the
message to the system log user exit program, and prints the message at the
/dev/console (UNIX servers) or saves the message in the Event log (Windows
servers).
You can configure the system to examine the messages that OnDemand sends to
the system log user exit and mail them to an administrator or send them to
another program, such as the Tivoli system management console. You can also
configure the system log user exit program to determine what action to take when
a user queries for data that has been migrated to archive storage.
System log user exit program
When a client queries index data that has been migrated to archive storage,
OnDemand saves message number 168 ApplGrp Segment Not Available in the
system log. OnDemand also sends the message to the system log user exit. If you
have written your own system log user exit program, you can determine the action
to take when OnDemand sends the message to the system log user exit. For
example, you may want the user-written program to notify an administrator that a
request for a table of migrated index data has occurred. See the IBM DB2 Content
© Copyright IBM Corp. 1993, 2007 31
Manager OnDemand for Multiplatforms: Installation and Configuration Guide for more
information about the system log user exit.
Tivoli Storage Manager
Before OnDemand can migrate index data to archive storage, you must configure
Tivoli Storage Manager to maintain OnDemand data. You must define the library
in which Tivoli Storage Manager will maintain the index data, define a device class
and storage pool for the library, and configure a policy domain with the
management information that Tivoli Storage Manager uses to maintain the data.
The policy domain should maintain the data indefinitely. If you need the system to
maintain a backup copy of the index data, you should configure a copy storage
pool in Tivoli Storage Manager. See your Tivoli Storage Manager information for
assistance with defining libraries, policy information, and configuring a copy
storage pool.
Storage sets
OnDemand uses the System Migration application group to manage all index data
that is migrated to archive storage. You must assign the System Migration
application group to a storage set that identifies a client node in Tivoli Storage
Manager. You must also configure the System Migration application group to
maintain the data indefinitely. See the IBM DB2 Content Manager OnDemand for
Multiplatforms: Installation and Configuration Guide for help with configuring the
System Migration application group.
The storage set must identify a client node in Tivoli Storage Manager. The client
node must be registered in a policy domain that stores the System Migration data
on archive media and maintains the data indefinitely. See the IBM DB2 Content
Manager OnDemand for Multiplatforms: Installation and Configuration Guide for help
with defining Tivoli Storage Manager client nodes and policy domains.
Application groups
When you define an application group, you specify the storage management
information that determines how long OnDemand maintains data stored in the
application group and when OnDemand takes certain actions. For example:
v Life of Data and Indexes. Determines the length of time that OnDemand
maintains index data and report data stored in the application group.
v Migration of Indexes. Determines the number of days before OnDemand moves
index data from the database to archive storage.
You should plan to migrate index data only after users no longer need to access
the reports to which it refers. Only in exceptional situations should users need to
access index data that has been migrated. If a user needs to access index data
that has been migrated to archive storage, the process of importing the table
back into the database requires manual actions by an administrator, and usually
results in a significant delay in completing the query. The import process also
requires additional space in the database to hold the imported tables, additional
log file storage, and temporary storage on the server to run the import process.
v Keep Imported Migrated Indexes. Determines how long that OnDemand
maintains the imported index data in the database before it is scheduled for
deletion.
To migrate data from one application group to another application group, you
must reload the data. You cannot associate data from one ApplGroup to another
ApplGroup.
32 Administration Guide
If you need to maintain index data in archive storage, then you must configure the
Migration of Indexes in your application groups. If you want OnDemand to
maintain the imported index data in the database for longer than thirty days, then
you must specify the number of days in Keep Imported Migrated Indexes.
OnDemand will schedule imported index data for deletion from the database after
it resides in the database for the number of days specified in Keep Imported
Migrated Indexes or Life of Data and Indexes, whichever occurs first.
You can use the administrative client to configure your application groups.
What happens when a user queries migrated data
Message to the user
When the server determines that the index data required to complete a query has
been migrated to archive storage, it sends a message to the client program. The
message states that the data required to complete the query is not available and
that the user should contact an administrator.
Message to the system log
When OnDemand determines that the index data required to complete a query has
been migrated to archive storage, it saves a message in the system log. An
administrator can open the System Log folder to search for and display messages
in the system log.
OnDemand also sends a message to /dev/console (UNIX servers) or the Event log
(Windows servers) and the system log user exit. If you provide a user-written
program to be invoked by the system log user exit, you can configure the system
to examine the message and send an alert to an administrator or call another
program to take some action.
If you do not use some other facility that routes messages to an administrator or
another program (such as the Tivoli system management console), you should
provide a user-written program to process the message. The function of the
program can vary, however at a minimum, the program should notify a system
administrator when a query for migrated index data occurs.
Importing index data
Verify temporary work space
Importing migrated index data from archive storage back into the database
requires temporary storage. Before you import the index data, you should verify
that sufficient free space is available in the file system that OnDemand uses for
temporary storage. The ARS_TMP parameter in the ARS.CFG file (UNIX servers)
determines the location that OnDemand uses for temporary storage. For Windows
servers, you can use the configurator program to define temporary storage
locations to OnDemand.
Verify database storage space
Importing migrated index data from archive storage back into the database
requires additional database storage. Before you import the index data, you should
verify that sufficient free space is available in the database file systems. For
example, for DB2, the ARS_DB2_DATABASE_DRIVE parameter in the ARS.CFG
file (UNIX servers) determines the location of the base database file system. If you
Chapter 5. Migrating and importing index data 33
store application group index data in table spaces, the ARS.DBFS file identifies the
table space file systems. For Windows servers, you can use the configurator
program to determine the drives and directories used by the database.
Verify database log file space
Importing migrated index data from archive storage back into the database
requires database log file storage. Before you import the index data, you should
verify that sufficient free space is available in the log file directories. For example,
for DB2, the ARS_PRIMARY_LOGPATH and ARS_ARCHIVE_LOGPATH
parameters in the ARS.CFG file (UNIX servers) determine the locations for the log
files. For Windows servers, you can use the configurator program to determine the
drives and directories used to hold the log files.
Run the ARSADMIN program
OnDemand provides the ARSADMIN program to import tables of index data from
archive storage back into the database. The following examples shows how to run
the ARSADMIN program on a UNIX server to copy a migrated index table from
archive storage back into the database. The name of the application group and the
index table to import can be obtained from the message that OnDemand saved in
the system log.
arsadmin import -g Credit -u admin -p "" SL27
To run the ARSADMIN program on a Windows server:
1. Start —� Programs —� IBM OnDemand for Windows —� Command Window.
2. Enter the command and runtime parameters at the prompt. For example:
arsadmin import -g Credit -u admin -p "" SL27
After the ARSADMIN program completes the import operation, you can open the
System Log folder to see the messages that were generated by the import process.
See Chapter 29, “ARSADMIN,” on page 245 for a description of the ARSADMIN
program and information about the parameters and options.
After you import index data
Querying data
After you import index data from archive storage back into the database, you
should notify the user to retry the query.
Expiring imported migrated indexes
OnDemand schedules an imported index table for deletion after it resides in the
database for the number of days specified in the Length of Time to Keep Imported
Indexes property in application groups. After an imported index data reaches the
specified value, the next time that the ARSMAINT program runs, the imported
index table is deleted from the database. (However, the table still exists in archive
storage.)
You typically configure the ARSMAINT program to run automatically on a regular
schedule, using the CRON facility (UNIX servers) or the configurator program
(Windows servers). See the IBM DB2 Content Manager OnDemand for Multiplatforms:
Installation and Configuration Guide for information about scheduling the
ARSMAINT program. You can also run the ARSMAINT program command from
34 Administration Guide

the prompt. See Chapter 36, “ARSMAINT,” on page 315 for a description of the
ARSMAINT program and information about its parameters and options.
Configuring index migration
If you find that your users are often querying for index data that has been
migrated to archive storage, configure your application groups to increase the
length of time that OnDemand maintains the index data in the database. This
should reduce the number of queries that need migrated index data.
Keeping imported migrated indexes
OnDemand schedules imported index data for deletion after the index data resides
in the database for the number of days specified in Keep Imported Migrated
Indexes or Life of Data and Indexes, whichever occurs first. The default value for
Keep Imported Migrated Indexes is thirty days. If you want OnDemand to
maintain imported index data in the database for longer than thirty days, then you
must change the value of Keep Imported Migrated Indexes for your application
groups.
Chapter 5. Migrating and importing index data 35

36 Administration Guide

Chapter 6. Monitoring database performance
One of the major tasks involved in administering the OnDemand database is to
monitor the database performance and tune the system to keep optimization
information up-to-date.
This section briefly describes the tools that are available to do these tasks in DB2.
For more detailed information, see the DB2 Administration Guide. If you are using
some other database management product, please see your product information for
help with doing these tasks.
Administration tools
DB2 provides GUI tools to help you administer the database from one central
location called the “Control Center”. From the Control Center, you get a clear
overview of all the objects that make up the OnDemand database. The Command
Center enables you to issue DB2 database commands, SQL statements, and
operating system commands. The Alert Center notifies you when thresholds that
you have set have been exceeded. The Journal allows you to view the status of jobs
and to view the messages log. The Information Center gives you quick access to
the information in the DB2 product manuals and sample programs and provides
access to other sources of DB2 information on the Web.
For some functions that you can perform with the GUI tools, you are given the
option of using a SmartGuide. SmartGuides are invoked from the pop-up menus in
the Control Center. They provide a greater level of help by prompting you
step-by-step on how to fill in the information necessary for the task that you are
doing and even making calculations and recommendations based on information
that you supply. SmartGuides are very useful if you are a new database
administrator or someone who only administers a database occasionally. See the
online help for Control Center for a list of available SmartGuides and how to use
them.
From Control Center, you can administer database objects for the DB2 family of
products for UNIX, and Windows. You can also administer DB2 for OS/390
subsystems from the Control Center if an Administration Server (DAS) is running
on the DB2 for OS/390 system and if a DB2 Connect product is available to the
client on which the Control Center is running. See your DB2 information for
details.
You can administer the following database objects from the Control Center:
v Systems
v Instances
v Databases
v Tables
v Indexes
v Users and Groups
You can do the following tasks from the Control Center:
v Manage database objects. For example, you can create, alter, and drop table
spaces; you can also manage users.
© Copyright IBM Corp. 1993, 2007 37

v Manage data. For example, you can import, export, and reorganize data and
gather statistics.
v Schedule jobs.
v Perform preventative maintenance by backing up the database.
v Monitor performance and perform troubleshooting.
v Configure and tune instances and databases.
Monitoring database performance
The Performance Monitor provides information about the state of DB2 and the
data that it controls. It is a graphical utility that you can customize for your
database environment. You can define thresholds or zones that trigger warnings or
alarms when the values being collected by the Performance Monitor are not within
acceptable ranges. When a threshold is reached, you can specify that you want any
or all of the following actions to occur:
v You are notified through the Alert Center
v You receive an audible alarm
v A program is run
v A message is displayed
v No notification is given
You can monitor DB2 objects such as instances, databases, tables, table spaces, and
connections by selecting the object in the Control Center and clicking mouse
button two. From there, you can choose to start monitoring activity.
When an object is being monitored, its color represents the severity of a problem as
defined by the thresholds that you have defined. Green signifies that the monitor
is running and everything is fine. Yellow is a warning and signifies that the
monitor is reaching the thresholds that you have set. Red indicates an alarm and
that the monitor has reached the threshold. You can use the predefined monitors
that are included with DB2 or you can create your own monitors. See the DB2
Administration Guide for a list of the predefined monitors. See the online help for
examples of how to use the predefined monitors and how to create your own
monitors.
You can use the Performance Monitor when you need to monitor an existing
problem or when you want to observe the performance of your system. It lets you
take a snapshot of database activity and performance data at a point in time. These
snapshots are used for comparison over time. The information can help you to
identify and analyze potential problems, or identify exception conditions which are
based on thresholds that you set. You should use the Performance Monitor if you
need to know the performance of the database manager and the OnDemand
database at a single point in time and look at trends over time. You can also use it
to get a visual overview of what elements are in a state of alarm. This helps you to
identify which parameters may need tuning. You can then look closely at the
parameters that have been set for that element and change them to improve
performance.
You can use the Performance Monitor to see if bottlenecks are hardware related.
For example, you may want to monitor database connection activity or table space,
buffer pool, and I/O activity. To see if bottlenecks are hardware related, you would
analyze the information collected by the Performance Monitor if:
v Too many database tasks are scheduled during peak time
38 Administration Guide

v There is a high number of user connections
v Database partitioning (hardware load balancing) is not well optimized
v The server is being used for more than just a database server
Chapter 6. Monitoring database performance 39

40 Administration Guide

Chapter 7. Tuning an Oracle database
This section briefly describes the tools that are available to tune the OnDemand
database when using Oracle. For more detailed information, see your Oracle
technical product information.
In general, most customers use OnDemand in one of two ways:
v Long-term archive for larger reports. These customers create table spaces for
each application group that they add to the system, load many rows into the
database at one time, maintain data on the system for many months or years,
and delete a report at a time from the system. These parameters usually result in
very static data and a low maintenance operation.
– A table space contains data from one application group.
– Inserts are done by a high-volume batch process.
– After a table reaches its Maximum Rows value, OnDemand closes the table
and no additional inserts are made to the table. Closed tables remain
available for queries until the data is removed from the system.
– Data is removed from the system by dropping a table or deleting a large
number of consecutive rows at a time.
Because of the low rate of change within the tables, these customers should
seldom or never need to tune their database.
v Short-term archive for smaller reports. These customers store all application
group data in the SYSTEM table space (or in one or more DATA table spaces),
load very few rows into the database at one time, maintain data on the system
for a short period of time, or use the Delete Document method to remove data
from the system. These parameters usually result in very dynamic data and a
high maintenance operation.
– A table space contains data from more than one application group.
– Inserts are done by a low-volume batch process.
– Inserts and deletes happen frequently.
– Data is removed from the system by deleting one row at a time.
Because of the high rate of change within the tables, these customers should
plan to tune their database on a time-based schedule, such as a weekly or
nightly process. Note: Some customers tune their database every day. However,
most customers do not tune their database until the optimizer ignores the
current set of statistics or generates an inefficient plan. Those customers should
tune the database just before they plan to take an offline backup of the database.
This schedule keeps the optimization information up to date and minimizes the
impact to system availability, because a system outage is already planned.
Tuning the database is done by collecting statistics on the tables, which can
provide faster access to the data, thereby improving performance. Statistics on
tables are gathered by using the ANALYZE command. When you analyze a table,
its associated indexes are automatically analyzed as well. The frequency with
which you analyze the tables depends on the rate of change within the tables.
Note: If you collect statistics and do not notice a visible performance improvement,
then dropping and recreating the indexes to your tables may help. Customers in a
© Copyright IBM Corp. 1993, 2007 41

high maintenance operation may need to periodically rebuild the indexes on their
most active tables. See your Oracle information for details about rebuilding
indexes.
OnDemand provides two programs to collect statistics on database tables: the
ARSDB program and the ARSMAINT program.
Using the ARSDB program
You can use the ARSDB program to collect statistics on the OnDemand system
tables. The OnDemand system tables include the user table, the group table, and
the application group table. See Appendix E, “System control tables,” on page 351
for a complete list of the OnDemand system tables. For most customers, the
OnDemand system tables require very little maintenance. You can probably
schedule the ARSDB program to collect statistics once a month (or less often).
The syntax is:
/opt/ondemand/bin/arsdb <options>
The options are:
–e Drop configuration indexes
–r Create configuration indexes
–s Collect statistics
Using the ARSMAINT program
You can use the ARSMAINT program to maintain the tables that contain
user-defined application group data. User-defined application groups are the
application groups that you define to the system. Customers in a high maintenance
operation should run the ARSMAINT program on a regular schedule.
The syntax is:
/opt/ondemand/bin/arsmaint <options>
The options are:
–d, –i Expire index data from the database. The –i parameter expires index data
that has been imported from archive storage. If you do not migrate index
data to archive storage, then you do not need to specify the –i parameter.
–e Migrate index data from the database to archive storage. If you do not
migrate index data to archive storage, then you do not need to specify the
–e parameter.
–r Collect statistics. Note: The ARSMAINT program collects statistics only on
the tables that have changed since the last time that statistics were
collected. OnDemand keeps information about all of its tables, including
the last time that it modified a table and the last time that it collected
statistics on a table.
–g applGroup
Process the tables for the specified application group. If you do not specify
this parameter and name an application group, then the ARSMAINT
program processes all of the user-defined application groups.
42 Administration Guide
Recommended practice for managing tablespace for Oracle
There are both advantage and disadvantage if you use one table per tablespace if
you use Oracle for the OnDemand database.
v Advantage: Having one table per tablespace enables you to move tables among
volumes easily. To move tables among volumes, you should take the tablespace
offline, move the tablespace’s datafile to a new location, rename the datafile in
the database, and then bring the tablespace back online. You might also notice a
small performance improvement when each table has its own tablespace.
v Disadvantage: Having one table per tablespace requires more frequent updates
to the ars.dbfs file. Also, if each OnDemand application group has its own data
table, after a new application group is created, a new application group data
table and an associated tablespace are created.
Therefore, in most cases, it is recommended that you bundle the tablespace into
one single logical unit and spread that logical unit over as many devices as
possible by using striping or a logical volume manager. This method provides
equal or faster performance than manually separating tablespaces. However, with
one table per tablespace, other DBA tasks, especially monitoring the growth of
tablespaces, can become more difficult, because there are more tablespaces.
Note: Oracle Version 8 allows a maximum of 1023 data files per tablespace. If your
operating system allows a maximum size of 2 GB per file, the maximum
size for a tablespace is 2 TB (terabytes) minus 2 GB. For example, if you
want to add 2 GB to tablespace "ROOT_DBA12", use this command:
ALTER TABLESPACE "ROOT_DBA12" ADD DATAFILE ’/a099’ SIZE 2048M;
Also, you can resize a datafile if you use Oracle, for example:
ALTER DATABASE foo DATAFILE ’/mydatafile’ resize 2048M;
Chapter 7. Tuning an Oracle database 43

44 Administration Guide

Chapter 8. Backup and recovery
Note: The information in this section is specific to DB2. If you use a different
database manager product, please see the information provided with the
product for details about database backup and recovery.
DB2 table spaces
DB2 table space support provides enhanced flexibility and improved performance
for your application group data. For example, after you store a report in
OnDemand, you can create a backup image of the table that changed during the
load process, rather than creating a backup image of the entire database. You can
also create an incremental backup image of the database, which contains only
those tables that changed since the last backup image. Because the backup image
only contains the changes made to the database, the backup process typically runs
much faster than a full backup.
OnDemand creates one table space for each segment of application group data.
After OnDemand closes the segment and you back up the table space, you do not
need to back up the table space again, unless it is recovered or restored.
When you use the incremental table space backup capability, backup the
OnDemand database each time that you load a report into the system. If your
schedule does not permit you to run the backup command after each load, backup
the database once a day (assuming that you load multiple reports each day). While
you can use incremental backup images to recover the database, you should
periodically create a full backup image of the database. A full backup image of the
database is the quickest way to recover the database in the event that you need to
do so. However, if your OnDemand database is very large and cannot be backed
up in a reasonable amount of time or requires many storage volumes to back up,
then you may find that maintaining full backup images of the database is not
possible.
The IBM DB2 Content Manager OnDemand for Multiplatforms: Installation and
Configuration Guide provides information to help you configure the system for table
spaces.
Database backup
OnDemand provides the ARSDB program to create backup images of the
OnDemand database. The ARSDB program can take incremental table space
backups and full database backups. The ARSDB program can run while other users
are connected to the system or you can run it after you stop the OnDemand server
programs and other related processes:
v An online backup can be taken when other applications or processes are
connected to the database. That is, other applications and processes can continue
to read or modify data while the backup is in process. An online backup can be
scheduled with the CRON facility (UNIX servers) or OnDemand configurator
program (Windows servers).
v During an offline backup, only the backup task is connected to the database.
Before starting an offline backup, stop the OnDemand server programs and
other related processes to make sure that no users can connect to the database.
© Copyright IBM Corp. 1993, 2007 45

When you back up the database with the ARSDB program, OnDemand removes
the log files from the archived log file directory, releasing the space taken by files
that are no longer needed. However, if you use Tivoli Storage Manager to maintain
DB2 log files, then the Tivoli Storage Manager policy domain determines when the
archived log files are removed.
If your schedule allows, create offline backups on a regular schedule, perhaps once
a week. Taking weekly offline backups can reduce the time required to rebuild
table spaces or the database if you need to do so. Create offline backup images to
removable media or storage that is managed by Tivoli Storage Manager. You
should keep the backup images in a safe place until the next time that you create
an offline backup image of the table space or database. If your schedule does not
allow enough time to take offline backups (that is, your system must always be
available to users), then you should take online backups on a regular schedule.
Chapter 32, “ARSDB,” on page 263 shows examples of scheduling the database
backup command and provides details about the parameters and options that you
can specify to backup the database.
See the DB2 Administration Guide for details about backing up a database.
Using Tivoli Storage Manager to maintain backup images
You can use Tivoli Storage Manager to maintain DB2 backup image files in archive
storage. This eliminates the need for you to maintain the DB2 backup image files
on disk. Tivoli Storage Manager can maintain the incremental table space backups
and full database backups that you create with the ARSDB program.
Before you can use Tivoli Storage Manager to maintain the DB2 backup image
files, you must define the Tivoli Storage Manager storage objects to maintain them.
The storage objects identify the type of media and storage devices that Tivoli
Storage Manager stores the files on, determine the length of time that Tivoli
Storage Manager maintains the files, and specify the number of backup copies that
Tivoli Storage Manager maintains. Before you schedule the ARSDB program to
take a database backup, you must make sure that Tivoli Storage Manager storage
volumes exist with sufficient free space to hold the backup image.
The IBM DB2 Content Manager OnDemand for Multiplatforms: Installation and
Configuration Guide provides information to help you configure Tivoli Storage
Manager to maintain the DB2 backup image files. See Chapter 32, “ARSDB,” on
page 263 for details about how to use the ARSDB program to backup the database
to storage that is managed by Tivoli Storage Manager.
Backup to a tape device
If you plan to backup the database to a tape device, then you may need to
configure the Buffer Size Limit in DB2. If you plan to backup the database to a
tape device and specify a variable block size, then you must configure the DB2
buffer size to a value that is less than or equal to the maximum block size limit for
the backup device. For maximum performance, you should set the buffer size to
the maximum block size for the backup device. See the DB2 documentation for
details. Contact the IBM support center if you have questions.
46 Administration Guide

Creating a full offline backup of the database
An offline backup of the database must be run at a time when no users are
accessing the system and there are no other applications connected to the database.
Stop the OnDemand server programs and other related processes before starting
the offline backup. After completing the backup command, you can restart the
OnDemand server programs and other related processes.
If you plan to create the backup image on removable media, such as tape, you
must place a blank, formatted tape in the tape device before you start the backup
command. If you are writing the backup image to a manual tape device, then the
backup image must fit on one tape volume.
The ARSDB program sends processing messages to the system log. After the
backup completes, you can open the System Log folder to search for and view the
messages generated by the backup process.
On UNIX servers, you can run the ARSDB program from a terminal window to
create a full offline backup of the database on tape. For example:
arsdb -v -y /dev/rmt0
To run the ARSDB program on a Windows server, do the following:
1. Start —� Programs —� IBM OnDemand for Windows —� Command Window.
2. Enter the command and runtime parameters at the prompt. For example:
arsdb -v -y \\.\Tape0
See Chapter 32, “ARSDB,” on page 263 for details about the ARSDB program,
parameters, and options. The DB2 Administration Guide provides details about
backing up a database.
Database backup in Windows
The OnDemand configurator program that is provided for Windows servers allows
for the scheduling of database backups. You can perform a backup while the
database is either online or offline.
v If the backup is to be performed online, other applications or processes can
continue to connect to the database, as well as read and modify data while the
backup operation is running.
v If the backup is to be performed offline, only the backup operation can be
connected to the database; other OnDemand services and the rest of your
organization cannot connect to the database while the backup task is running.
To schedule an offline backup with the configurator program, you must do the
following:
1. Manually disconnect all other processes from the database before the backup
task is scheduled to begin. This includes stopping the OnDemand LibSrvr,
MVSD Server, and Load Data services on the library server. In addition, if you
load data to the library server from another object server, then you should
manually stop the OnDemand ObjSrvr and Load Data services on the object
server.
2. Run the offline backup.
3. Verify that the offline backup completed successfully.
Chapter 8. Backup and recovery 47
4. Manually restart the OnDemand LibSrvr service and the OnDemand MVSD
Server and OnDemand Load Data services on the library server. If you stopped
OnDemand services on an object server, manually restart the services.
Database logging
DB2 uses transaction logging to record changes to the OnDemand database. The
information in the log file is used to recover from corruption of data in the
database. Logging ensures that no data is lost. By combining the information in the
log files with a backup copy of the database, the OnDemand database can be
recovered to any point in time.
The OnDemand database and the DB2 log files should reside on different physical
volumes. The database backup image should be written to removable media.
Unless multiple disk and tape volumes are damaged or lost at the same time,
there is no possibility of losing the information contained in the OnDemand
database.
The DB2 Administration Guide provides details about the database logs.
Using Tivoli Storage Manager to maintain archived log files
You can use Tivoli Storage Manager to maintain the DB2 archived log files. This
eliminates the need for you to maintain the DB2 archived log files on disk.
Before you can use Tivoli Storage Manager to maintain the DB2 log files, you must
define the Tivoli Storage Manager storage objects to maintain the files. The storage
objects identify the type of media and storage devices on which Tivoli Storage
Manager stores the files, determine the length of time that Tivoli Storage Manager
maintains the files, and specify the number of backup copies that Tivoli Storage
Manager maintains. Before you begin using the system (and DB2 creates archived
log files), you must make sure that Tivoli Storage Manager storage volumes exist
with sufficient free space to hold the files.
The IBM DB2 Content Manager OnDemand for Multiplatforms: Installation and
Configuration Guide provides information to help you configure the system to use
Tivoli Storage Manager to maintain the DB2 archived log files.
Database recovery
This section provides an overview of the different recovery methods that you can
use in the event that there is a problem involving the database.
Note: Before you begin using the system, ask your IBM representative about the
strategies that are available to you when there are problems with the
database. You should also speak with a DB2 specialist to help implement a
backup and recovery plan that is best suited to your business and operating
environment. The DB2 Administration Guide provides details about database
backup and recovery.
Typically you will need to recover the OnDemand database because of media and
storage problems, power interruptions, and application failures. When a problem
occurs that damages or corrupts the database in some way, you must rebuild the
database. The rebuilding of the database is called recovery. There are two types of
database recovery:
48 Administration Guide

v The first type recovers from failures that occur while update transactions are
taking place. For example, a system failure occurs while update transactions are
taking place. The database is left in an inconsistent and unusable state and must
be moved to a consistent and usable state before you can permit users to access
the system.
The log files help correct this type of failure by allowing the transactions
received before the failure to either be reapplied to the database or to be
rolled-out. Rolling-out transactions is a way to return the database to the state it
was in before the transaction that caused the failure.
This type of recovery is done with the DB2 RESTART DATABASE command. If
you want this type of recovery to occur in every case of a failure, you can use
the AUTOMATIC RESTART ENABLE database configuration parameter. The
default for this configuration parameter is that the RESTART DATABASE routine
will be started every time it is needed. Once enabled, you do not need to do
anything to have this command done at the time of a failure.
v The second type of recovery deals with corruption of the OnDemand database
and is usually caused by media failure. For example, one of the disk storage
volumes that belongs to the database volume group becomes damaged and
unusable. To recover from this type of failure, an administrator must intervene
to recover the database.
The combination of the DB2 log files and a full backup copy of the database can
be used to recreate the OnDemand database to any particular point in time.
First, the latest full backup image of the database rebuilds the database to a
point in time. Then, a roll-forward recovery restores all of the units of work that
occurred since the backup image was created. This allows you to restore the
database to a state identical to the time of the failure.
The OnDemand database and the DB2 log files should reside on different
physical volumes. The database backup image should be written to removable
media. Unless multiple disk and tape volumes are damaged or lost at the same
time, there is no possibility of losing the information contained in the
OnDemand database.
Factors affecting recovery
To decide which database recovery method to use, you should consider the
following:
v How near to the time of failure you will need to recover the database?
When you restore a full backup copy of the database, the database is only as
current as the time that the last backup was made.
To restore the database to the time of a failure, you must use the log files to
reapply changes that were made to the database since the backup copy was
created. You can reapply the changes to the end of the logs or to a point in time.
A point in time recovery may be useful if an application corrupts the database
and you do not want to reapply its changes.
v How much time is spent associated with recovery?
Your recovery plan should allow for regularly scheduled backups, since backing
up the database requires time and system resource.
You can take a backup while the database is either online or offline. If it is
online, users can access the system and other processes can connect to the
database and read and modify data while the backup task is running. If the
backup is performed offline, only the backup task can be connected to the
database. Users cannot access the system and other processes cannot connect to
the database while the offline backup task is running.
Chapter 8. Backup and recovery 49

v How much storage space can you allocate for backup copies and archived log
files?
To restore the database, you must allocate enough free disk space to hold the
backup copy of the database and the restored database. To roll-forward
transactions requires space to hold the backup copy of the database, the restored
database, and all of the archived log files created between backup copies of the
database.
v Table space level or full database level backup.
With a table space backup, you can specify one or more tables spaces to be
backed up, rather than the entire database. You can then restore selected table
spaces to a state identical to the time the backup was made. However, those
table spaces not selected at the time of the backup will not be in the same state
as those that were restored.
IBM strongly encourages you to contact the IBM support center to help you with
a backup and recovery plan that includes table space backup and recovery.
The DB2 Administration Guide provides details about recovering a database.
50 Administration Guide

Part 2. Storage administration
This part is of primary interest to administrators responsible for configuring and
maintaining cache storage and archive storage. This part is organized as follows:
v Document storage
v Managing Tivoli Storage Manager storage
v Backup and recovery
Note: This publication describes how to do some of the storage administration
tasks, but you will need your archive storage manager product information
to do others.
© Copyright IBM Corp. 1993, 2007 51

52 Administration Guide
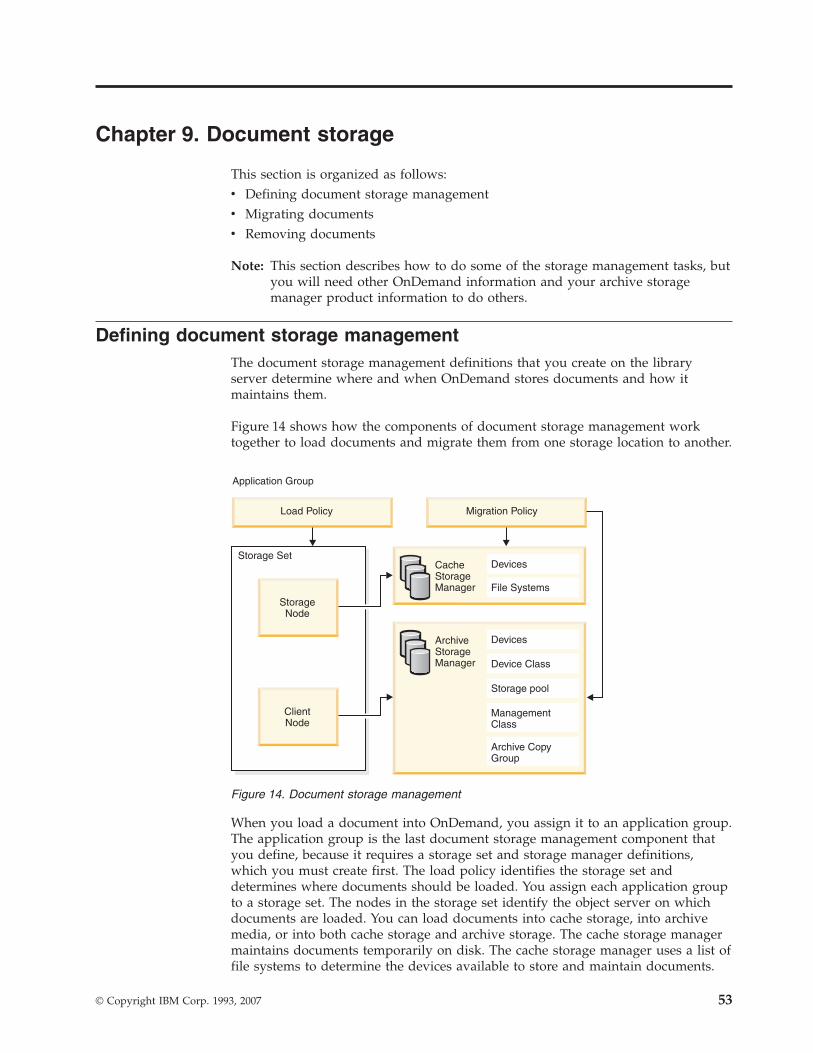
Chapter 9. Document storage
This section is organized as follows:
v Defining document storage management
v Migrating documents
v Removing documents
Note: This section describes how to do some of the storage management tasks, but
you will need other OnDemand information and your archive storage
manager product information to do others.
Defining document storage management
The document storage management definitions that you create on the library
server determine where and when OnDemand stores documents and how it
maintains them.
Figure 14 shows how the components of document storage management work
together to load documents and migrate them from one storage location to another.
When you load a document into OnDemand, you assign it to an application group.
The application group is the last document storage management component that
you define, because it requires a storage set and storage manager definitions,
which you must create first. The load policy identifies the storage set and
determines where documents should be loaded. You assign each application group
to a storage set. The nodes in the storage set identify the object server on which
documents are loaded. You can load documents into cache storage, into archive
media, or into both cache storage and archive storage. The cache storage manager
maintains documents temporarily on disk. The cache storage manager uses a list of
file systems to determine the devices available to store and maintain documents.
Load Policy
Storage Set
Migration Policy
CacheStorageManager
ArchiveStorageManager
Application Group
StorageNode
ClientNode
Devices
Devices
File Systems
Device Class
Storage pool
ManagementClass
Archive CopyGroup
Figure 14. Document storage management
© Copyright IBM Corp. 1993, 2007 53

The archive storage manager maintains documents on optical and tape storage.
The archive storage manager uses devices, a device class, a storage pool, a
management class, and an archive copy group to determine where to store
documents and how long to maintain them. Depending on the load policy,
documents may remain where the loading program put them for the number of
days that are specified by the migration policy. After a document ages for the
specified number of days, the migration process can move it from cache storage to
archive storage.
Application groups
The application group is the last component that you must define because it
requires a storage set and storage manager definitions. The application group
provides a way to group related documents. All documents in the application
group are loaded in the storage nodes that are part of the storage set to which the
application group is assigned. All documents in the application group migrate
according to the rules that are defined for the application group’s migration policy.
Use the administrative client to create the application groups that determine the
document storage for your documents. You typically define one application group
for each set of your documents that have similar storage requirements. For
example, documents that must be retained for a specific length of time, in specific
storage locations and stored on specific types of media.
Load policy
A load policy contains the rules for loading documents into an application group.
It requires one or more storage sets, which you must create first. The load policy
determines if documents are loaded into cache storage, archive storage, or both. If
the load policy causes documents to be stored only in cache storage, then the
migration policy specifies when (or if) documents are copied to archive storage.
You define the load policy when you create the application group. The following
properties on the Storage Management page comprise the load policy:
v Storage Set. Determines where documents will be loaded.
Note: If you specify Cache Only, then documents can be loaded into cache
storage only.
v Cache Data. Determines if documents will be loaded into cache storage.
Note: If the storage set is a cache-only storage set, then documents must be
loaded into cache storage.
v Migrate Data from Cache. If you specify When Data is Loaded, then documents
will be loaded into archive storage. (Migration is disabled for the application
group.)
Migration policy
Migration is the process of copying documents from cache storage to archive
storage as controlled by the rules of the application group’s migration policy.
However, because a document is eligible to be migrated does not mean that it will
be migrated. Other factors affect migration, such as the frequency with which you
run migration processing (migration cannot take place until you run migration
processing).
A migration policy contains the rules for migrating the documents in an
application group. Migration requires an archive storage manager and its
54 Administration Guide
associated devices, storage pools, and so forth, which you must install and
configure before you begin migrating documents.
The migration policy determines how long a document stays in cache storage and,
through the storage set, where the document will be copied to next. The client
node in the storage set identifies the next location.
You define the migration policy when you create the application group. The
following settings on the Storage Management page comprise the migration policy:
v Storage Set. Determines the next location for documents.
Note: If you specify Cache Only, then migration is disabled for the application
group.
v Migrate Data From Cache. Determines when documents are eligible to be
migrated.
Note: If you specify No or When Data is Loaded, then migration is disabled for
the application group.
Cache storage manager
The cache storage manager is the interface between the object server and the disk
storage system. The cache storage manager maintains documents temporarily on
disk. Before loading documents, you must identify the file systems that the cache
storage manager can use to store and maintain documents. You must define at
least one storage set for each object server. Documents migrate from cache storage
to archive storage based on the migration policy that is defined for the application
group. The cache storage manager can delete documents after they exceed the
Cache Data for n Days or Life of Data, whichever occurs first. See “Removing
documents” on page 57 for more information.
Archive storage manager
The archive storage manager is the interface between the object server and an
optical or tape storage system. The archive storage manager maintains a backup or
long-term copy of documents. Before loading documents, you must configure your
archive storage devices and define storage pools, client nodes, and management
classes to the archive storage manager. The management class determines how
long documents remain in archive storage. The archive storage manager can delete
documents after they exceed the Retention Value specified for the management
class. See “Removing documents” on page 57 for more information.
Migrating documents
OnDemand provides automatic migration to copy documents from cache storage
to archive storage (for documents that were not loaded to archive storage) and to
make documents eligible for deletion to maintain free space in cache storage file
systems. Migration helps to ensure that there is sufficient free space in the cache
storage file systems, where faster devices can provide the most benefit to your
users.
Important: If you use migration to copy documents to archive storage (that is, you
do not load documents to archive storage), then you should run
migration processing on a regular schedule to make sure that a backup
copy of your documents gets created as soon as practically possible. If
Chapter 9. Document storage 55

you defer the migration of documents to archive storage and cache
storage were to become corrupted, then you could be left without a
backup copy of your documents.
You control automatic migration processing by scheduling the ARSMAINT
program to run with the appropriate options. See Chapter 36, “ARSMAINT,” on
page 315 for details about the options. See your operating system information for
details about how to schedule tasks. You can also manually start migration
processing by running the ARSMAINT program from the prompt.
The ARSMAINT program uses an application group’s migration policy to control
when migration for an application group occurs:
v If you use Next Cache Migration to control when migration for an application
group occurs, then the cache storage manager runs migration processing each
time that you start the ARSMAINT program with the appropriate options.
v If you use After n Days in Cache to control when migration for an application
group occurs, then a document must be stored in cache storage for at least the
specified number of days before it is eligible to be migrated.
The ARSMAINT program migrates documents from each cache storage file system
listed in the cache storage file system file.
The cache storage space that migrated documents occupy can be reclaimed by the
cache storage manager after expiration processing completes. After you run
migration processing, you should run expiration processing so that the cache
storage manager can reclaim the cache storage space occupied by migrated
documents.
Figure 15 shows an example of migration processing.
In the example, assume that you have never run migration processing on this
particular cache storage file system. The box on the left shows the cache storage
file system before migration processing begins – it is quite full. (You would have
ignored all of the ″full cache file system″ messages in the OnDemand system log.)
The box in the middle shows what happens during migration – the process of
copying documents that are eligible to be migrated to archive storage. The box on
the right shows the cache storage file system when migration processing
completes. The cache storage file system is still full, however, some two-thirds of
the documents are eligible to be removed. You need to run expiration processing to
Before Migration During Migration After Migration
CacheFileSystem
ArchiveStorage
Documentseligiblefordeletion
Figure 15. Migration Processing
56 Administration Guide
remove documents from the cache storage file system, reclaiming at least some of
the space occupied by migrated documents. After expiration processing completes,
you will have free storage available in the cache storage file system to load
additional documents.
Migration processing in the system log
When you run the ARSMAINT program, it saves messages about its activities in
the system log. The types of messages saved in the system log depend on the
options that you specify when you run the ARSMAINT program. The number of
messages saved in the system log during a migration process depend on the
options that you specify for the ARSMAINT program, the number of application
groups and segments of data processed, and the number of cache storage file
systems defined on the server. You will see one set of messages for each object
server on which you run the ARSMAINT program. Table 2 lists the messages you
could see in the system log following migration processing.
Table 2. Messages from the ARSMAINT program in the OnDemand System Log
Message
Number
Message
Information
Explanation
110 Cache
Migration
(Date)
(Server)
About to begin cache migration on the specified
server. Migration processing uses the specified date
(the default is ″today″ in internal format).
197 Cache
Migration
(ApplGrp)
(ObjName)
(Server)
One of these messages for each storage object
migrated to archive storage. Migration copies a
storage object if its ″After n Days in Cache″ period
has passed or the application group uses the ″Next
Cache Migration″ migration method.
124 Filesystem
Statistics
(filesystem)
(% full)
(server)
One of these messages for each cache file system on
the server. Information only to report the percentage
of space used in the file system.
Important: In addition to the messages listed in Table 2, you should monitor the
system log every day for messages that indicate your cache storage file
systems are becoming full. The ARSMAINT program automatically
saves a message in the system log when the amount of space used in a
cache storage file system exceeds a threshold. The default threshold is
95%. You can specify a different threshold by using the -f parameter
when you run the ARSMAINT program.
Removing documents
Documents expire (are eligible for removal) because their cache expiration date or
archive retention period has passed. Expired documents can then be removed by
the storage managers. The cache storage manager identifies documents for removal
by using the application group’s expiration policy and high and low expiration
thresholds. The archive storage manager marks documents for removal based on
the criteria defined in the archive copy group.
Documents expire from cache storage when they reach their cache expiration date.
If a document’s cache expiration date is less than its Life of Data period, then the
document is simply removed from cache storage. Subsequent requests for the
document are satisfied by the archive storage manager. When the document
reaches its Life of Data period, information about it is removed from the
OnDemand database (the document can no longer be retrieved). When the
Chapter 9. Document storage 57
document’s archive retention period has passed, information about it is removed
from the archive storage manager database.
Because a document is eligible to be removed does not mean that it will be deleted
from storage. The cache storage manager does not delete expired documents from
storage until expiration processing runs. During expiration processing, the archive
storage manager deletes information about expired documents from its database.
However, the actual documents remain on archive media until such time that the
space that they occupy is reclaimed.
Important: OnDemand and the archive storage manager delete documents
independently of each other. Each uses their own criteria to determine
when documents expire and should be removed from the system. Each
uses their own utilities to remove documents. However, for final
removal of documents from the system, you should specify the same
criteria to OnDemand and the archive storage manager. The Life of
Data, which is used by OnDemand, and the Retention Period, which is
used by the archive storage manager, should be the same value.
Removing documents from cache storage
The expiration policy determines when documents are eligible for deletion from
cache storage. You define the expiration policy when you create the application
group. The following properties on the Storage Management page comprise the
expiration policy:
v Cache Data For n Days. The length of time in days to keep documents in cache
storage. The documents include documents that are already in the cache and any
documents that are subsequently loaded. After a document reaches this value, it
is eligible to be deleted from cache storage.
v Life of Data. The length of time in days to maintain documents on the system.
Note: If you specify Never Expire, then expiration processing is disabled for the
application group.
v Expiration Type. Determines whether one or more documents are eligible to be
deleted at a time. For example, the Segment expiration type means that a
segment of data (unless you specify otherwise, 10 million documents) can be
deleted at a time.
Note: This is the first time that segment has been mentioned. Up to now,
documents and reports have been discussed, which are the data objects
that most people associate with the OnDemand system. However,
administrators who maintain the system work primarily with segments,
which represent many documents, and storage objects, which are containers
of compressed documents that are maintained by the storage managers.
The cache storage manager does not delete expired documents from cache storage
until expiration processing runs. The ARSMAINT program is the expiration utility.
You can schedule the ARSMAINT program to run automatically or you can run it
manually. You should make sure that the ARSMAINT program runs periodically so
that the cache storage manager can reclaim the space that is occupied by expired
documents.
You control automatic expiration processing by scheduling the ARSMAINT
program to run with the appropriate options. SeeChapter 36, “ARSMAINT,” on
page 315 for details about the options. See your operating system information for
58 Administration Guide
||||

details about how to schedule tasks. You can also manually start expiration
processing by running the ARSMAINT program from the prompt.
The ARSMAINT program uses expiration thresholds to control when expiration
processing begins and ends. The thresholds are set as levels of the space that is
used in a cache storage file system, expressed as a percent of total space available
in the file system. For each cache storage file system, the ARSMAINT program
compares the high threshold with a calculation of the amount of data stored in the
file system as a percent of the actual data capacity of the storage volumes that
belong to the file system. When the amount of data stored in a cache storage file
system exceeds the high threshold, expiration begins. The ARSMAINT program
deletes documents from the file system until the amount of space used in the cache
storage file system falls below the low expiration threshold. The ARSMAINT
program expires documents from each cache storage file system listed in the cache
storage file system file. You can use the defaults for the expiration thresholds, or
you can change the threshold values to identify the minimum and maximum
amount of space for your cache storage file systems.
Figure 16 shows an example of expiration processing.
This example uses the cache storage file system from the migration example in
Figure 15 on page 56. Some two-thirds of the file system contains documents that
are eligible to be removed. When you run the ARSMAINT program, it first
determines that the cache storage file system’s capacity is equal to or exceeds the
high threshold. The ARSMAINT program can then begin deleting documents from
the file system, beginning with the oldest documents. After the ARSMAINT
program deletes the documents that have the oldest date, it checks the low
migration threshold. If the amount of space that is used in the file system is now
below the low expiration threshold, then expiration ends. If not, then the
ARSMAINT program deletes the next oldest documents, and the process continues.
In the example, expiration processing ends before all of the eligible documents
have been removed. That’s typically OK for two reasons:
v The expiration process has probably reclaimed enough space to load new
documents. (In our example, that is certainly true; some 40 percent of the cache
storage file system is now free space.) If not, you need to check your high and
low thresholds or add more storage volumes to the cache storage file system.
v Because a document is eligible to be removed from cache storage does not
always mean that it is a good thing to do so. For example, suppose you copy a
document to cache storage for 60 days and to archive media for two years. After
60 days, the document is eligible to be removed from cache storage. However,
your users continue to access the document on a regular basis for 90, or even
120, days. With the correct set of high and low thresholds, you can probably
guarantee that the document will remain in cache storage for another 30 or more
Before Expiration After Expiration
HighExpirationThreshold80%
LowExpirationThreshold60%
HighExpirationThreshold80%
LowExpirationThreshold60%
Figure 16. Expiration Processing
Chapter 9. Document storage 59
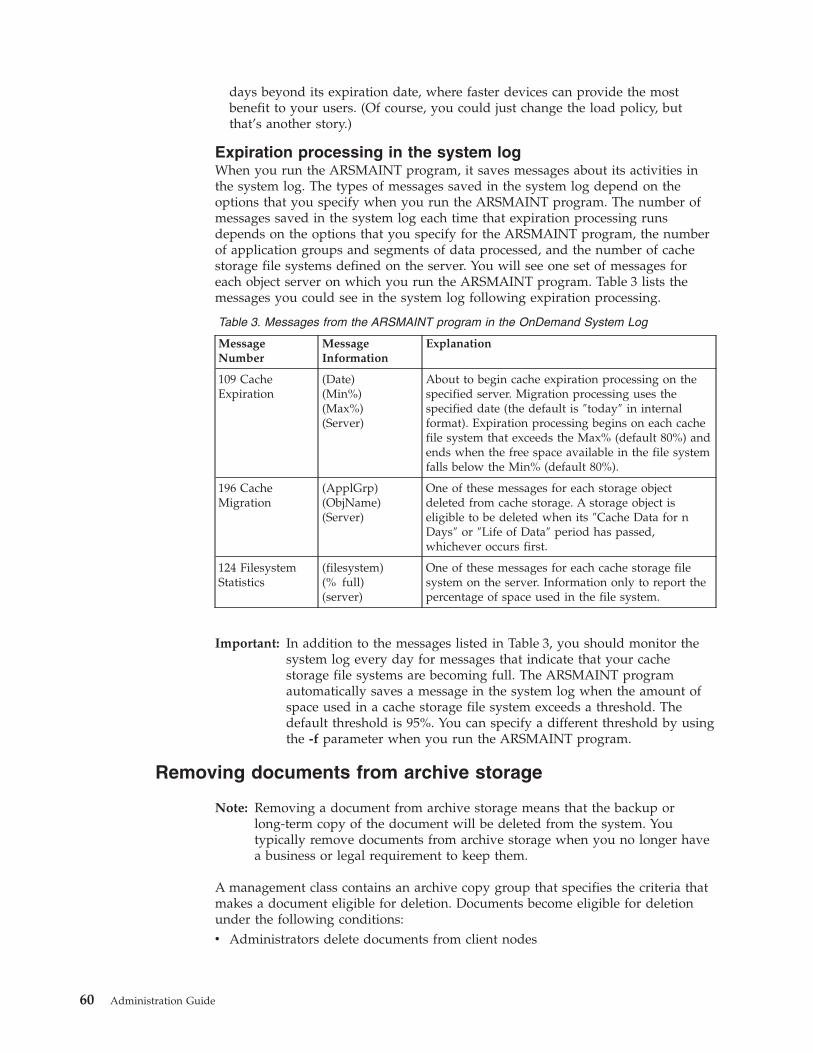
days beyond its expiration date, where faster devices can provide the most
benefit to your users. (Of course, you could just change the load policy, but
that’s another story.)
Expiration processing in the system log
When you run the ARSMAINT program, it saves messages about its activities in
the system log. The types of messages saved in the system log depend on the
options that you specify when you run the ARSMAINT program. The number of
messages saved in the system log each time that expiration processing runs
depends on the options that you specify for the ARSMAINT program, the number
of application groups and segments of data processed, and the number of cache
storage file systems defined on the server. You will see one set of messages for
each object server on which you run the ARSMAINT program. Table 3 lists the
messages you could see in the system log following expiration processing.
Table 3. Messages from the ARSMAINT program in the OnDemand System Log
Message
Number
Message
Information
Explanation
109 Cache
Expiration
(Date)
(Min%)
(Max%)
(Server)
About to begin cache expiration processing on the
specified server. Migration processing uses the
specified date (the default is ″today″ in internal
format). Expiration processing begins on each cache
file system that exceeds the Max% (default 80%) and
ends when the free space available in the file system
falls below the Min% (default 80%).
196 Cache
Migration
(ApplGrp)
(ObjName)
(Server)
One of these messages for each storage object
deleted from cache storage. A storage object is
eligible to be deleted when its ″Cache Data for n
Days″ or ″Life of Data″ period has passed,
whichever occurs first.
124 Filesystem
Statistics
(filesystem)
(% full)
(server)
One of these messages for each cache storage file
system on the server. Information only to report the
percentage of space used in the file system.
Important: In addition to the messages listed in Table 3, you should monitor the
system log every day for messages that indicate that your cache
storage file systems are becoming full. The ARSMAINT program
automatically saves a message in the system log when the amount of
space used in a cache storage file system exceeds a threshold. The
default threshold is 95%. You can specify a different threshold by using
the -f parameter when you run the ARSMAINT program.
Removing documents from archive storage
Note: Removing a document from archive storage means that the backup or
long-term copy of the document will be deleted from the system. You
typically remove documents from archive storage when you no longer have
a business or legal requirement to keep them.
A management class contains an archive copy group that specifies the criteria that
makes a document eligible for deletion. Documents become eligible for deletion
under the following conditions:
v Administrators delete documents from client nodes
60 Administration Guide

v An archived document exceeds the time criteria in the archive copy group (how
long archived copies are kept)
The archive storage manager does not delete information about expired documents
from its database until expiration processing runs. You can run expiration
processing either automatically or manually by command. You should make sure
that expiration processing runs periodically to allow the archive storage manager
to reuse storage pool space that is occupied by expired documents. When
expiration processing runs, the archive storage manager deletes documents from its
database. The storage space that these documents occupy then becomes
reclaimable. See “Reclaiming space in storage pools” for more information.
You control automatic expiration processing by using the expiration processing
interval (EXPINTERVAL) in the server options file (dsmserv.opt). You can set the
option by editing the dsmserv.opt file (see the Installation and Configuration Guide
for details).
If you use the server option to control when expiration processing occurs, the
archive storage manager runs expiration processing each time that you start the
server. After that, it runs expiration processing at the interval that you specified
with the option, measured from the start time of the server.
You can manually start expiration processing by issuing the EXPIRE INVENTORY
command. Expiration processing then deletes information about expired files from
the database. You can schedule this command by using the DEFINE SCHEDULE
command. If you schedule the EXPIRE INVENTORY command, set the expiration
interval to 0 (zero) in the server options so that the archive storage manager does
not run expiration processing when you start the server. You can control how long
the expiration process runs by using the DURATION parameter with the EXPIRE
INVENTORY command.
Reclaiming space in storage pools
Space on a storage pool volume becomes reclaimable as documents expire or are
deleted from the volume. For example, documents become obsolete because of
aging.
The archive storage manager reclaims the space in storage pools based on a
reclamation threshold that you can set for each storage pool. When the percentage
of space that can be reclaimed on a volume rises above the reclamation threshold,
the archive storage manager reclaims the volume. The archive storage manager
rewrites documents on the volume to other volumes in the storage pool, making
the original volume available for new documents.
The archive storage manager checks whether reclamation is needed at least once
per hour and begins space reclamation for eligible volumes. You can set a
reclamation threshold for each storage pool when you define or update the storage
pool.
During reclamation, the archive storage manager copies the files to volumes in the
same storage pool unless you have specified a reclamation storage pool. Use a
reclamation storage pool to allow automatic reclamation for a storage pool with
only one drive. See your archive storage manager documentation for details.
After the archive storage manager moves all documents to other volumes, one of
the following occurs for the reclaimed volume:
Chapter 9. Document storage 61
v If you have explicitly defined the volume to the storage pool, the volume
becomes available for reuse by that storage pool
v If the volume was acquired as a scratch volume, the archive storage manager
deletes the volume from its database
Important: See your archive storage manager documentation for more information
about reclamation processing, including choosing a reclamation threshold,
reclaiming volumes in a storage pool with one drive, reclamation for WORM
optical media, reclamation for copy storage pools, and reclamation of off-site
volumes.
62 Administration Guide
Chapter 10. Managing Tivoli Storage Manager storage
This part of the book provides information about tasks required to maintain Tivoli
Storage Manager storage, such as preparing storage volumes, managing storage
volumes in an automated library, managing media mount operations, automating
operations, and registering client nodes.
Overview
This part of the book provides a brief overview of tasks that Tivoli Storage
Manager administrators need to do to manage Tivoli Storage Manager storage. The
Tivoli Storage Manager Administrator’s Guide presents the details of the tasks and the
concepts that you need to understand to complete them. The Installation and
Configuration Guide is another important source of information. When you installed
and configured an OnDemand server with Tivoli Storage Manager, you completed
many of the tasks described here: configuring devices and defining them to Tivoli
Storage Manager, defining policy management information, preparing storage
volumes, registering client nodes, and increasing the size of the database and
recovery log.
The following topics provide more information:
v Using magnetic disk devices with Tivoli Storage Manager
v Using removable media devices with Tivoli Storage Manager
v Managing removable media operations
v Defining drives and libraries
v Defining device classes
v Managing storage pools
v Managing storage pool volumes
v Managing policies
v Managing client nodes
v Automating server operations
v Managing server operations
v Managing the database and recovery log
v Monitoring the server
v Protecting and recovering your data
Using magnetic disk devices
In an OnDemand system, the primary use of magnetic disk devices with Tivoli
Storage Manager is the storage of the database and recovery log. The Tivoli
Storage Manager database contains information needed for server operations and
information about data that has been backed up, archived, and space-managed.
The database contains pointers to the locations of all client files in the Tivoli
Storage Manager storage pools. Changes to the database are recorded in the
recovery log in order to maintain a consistent database image. The recovery log
contains information about updates that have not yet been committed to the
database. If the database is unusable, the entire Tivoli Storage Manager server is
unavailable. If a database is lost and cannot be recovered, the backup, archive, and
space-managed data for that server is lost. Refer to “Managing the database and
© Copyright IBM Corp. 1993, 2007 63

recovery log” on page 67 and “Protecting and recovering data” on page 68 for
steps that you can take to protect your database.
Using removable media devices
In an OnDemand system, removable media devices can be used with Tivoli
Storage Manager for the following purposes:
v Storage of application group data, including migrated index data. Application
group data is typically stored in optical libraries, but can also be stored in
automated tape libraries.
v Storage of Tivoli Storage Manager database backups. Database backups are
typically stored on manually operated devices, such as an 8mm tape drive, but
can also be stored in optical or automated tape libraries.
v Storage of DB2 archived log files and backup image files. DB2 files must be
stored on rewriteable optical media (not WORM) or tape.
Tivoli Storage Manager allows you to use and reuse removable media to store
data. You must prepare removable media for initial use by Tivoli Storage Manager.
You also control how and when media are reused. The IBM DB2 Content Manager
OnDemand for Multiplatforms: Installation and Configuration Guide shows examples of
labeling removable media for initial use and checking storage volumes into a
library. For detailed guidance and scenarios on configuring your removable media
devices, see the Tivoli Storage Manager Administrator’s Guide.
Managing removable media operations
Tivoli Storage Manager allows you to use and reuse removable media to store
data. You must prepare removable media for initial use by Tivoli Storage Manager.
You also control how and when media are reused.
Volumes must be mounted in response to mount requests from Tivoli Storage
Manager. For manual libraries, you can monitor the mount requests by using an
administrative client in mount mode or console mode. Someone you designate as
the operator must respond to the mount requests by putting in tape volumes as
requested. For devices in automated libraries, Tivoli Storage Manager interacts
with the library to mount volumes, but sends messages when the library needs
attention from an operator. Tivoli Storage Manager also tracks the inventory of
media in each automated library.
For automated libraries, Tivoli Storage Manager works with the operating system
and the library to accomplish volume mounts. Mount messages are not sent to an
operator. However, information about problems with the library are still sent to the
mount message queue. You can see these messages on administrative clients that
have been started with either the mount mode or console mode parameter.
However, you cannot use the Tivoli Storage Manager REPLY command to respond
to these messages. You can get information about pending operator requests either
by using the QUERY REQUEST command or by checking the mount message
queue on an administrative client started in mount mode.
In many cases, an operator request has a time limit. If the requested action is not
performed within the time limit, the operation times out and fails.
For most types of requests, such as volume mounts, the server detects when the
operator performs the action. The operator does not usually need to respond to the
Tivoli Storage Manager server carrying out the requested activity. However,
sometimes the server cannot detect the completion of the requested action. When
64 Administration Guide

the server requires a reply, the message that is displayed by the server requests
that the operator reply when the activity has been completed. For example, a
request to mount a scratch volume requires that the operator reply when a scratch
volume has been placed in the drive. Tivoli Storage Manager waits for a reply to
prevent the use of the wrong volume.
For information about managing removable media operations, see the Tivoli Storage
Manager Administrator’s Guide.
Defining drives and libraries
To use removable media devices with Tivoli Storage Manager, you must define the
libraries and drives to Tivoli Storage Manager.
The IBM DB2 Content Manager OnDemand for Multiplatforms: Installation and
Configuration Guide provides examples of defining drives and libraries. For detailed
information about defining drives and libraries, see the Tivoli Storage Manager
Administrator’s Guide.
Defining device classes
A device class represents a set of storage devices with similar availability,
performance, and storage characteristics. You must define devices classes for the
types of drives available to a Tivoli Storage Manager server. You specify a device
class when you define a storage pool, which is a named collection of volumes for
storing data.
The IBM DB2 Content Manager OnDemand for Multiplatforms: Installation and
Configuration Guide provides examples of defining device classes. See the Tivoli
Storage Manager Administrator’s Guide for detailed information about device classes.
Managing storage pools
OnDemand data is stored in groups of volumes called storage pools. The data on
these primary storage pools can be backed up to copy storage pools for disaster
recovery purposes. Because each storage pool is assigned to a device class, you can
logically group your storage devices to meet your storage management needs.
The IBM DB2 Content Manager OnDemand for Multiplatforms: Installation and
Configuration Guide provides examples of defining primary storage pools. For more
information about copy storage pools, see the Tivoli Storage Manager Administrator’s
Guide.
Managing storage pool volumes
You manage storage volumes by defining, updating, and deleting volumes, and by
monitoring the use of server storage. Monitoring volumes can reveal
inconsistencies between information in the database and client node files in storage
pools. You can also move files within and across storage pools to optimize the use
of server storage.
For each automated library, Tivoli Storage Manager tracks in its volume inventory
for the library whether a volume has scratch or private status:
v A scratch volume is a labeled volume that is empty or contains no valid data,
and can be used to satisfy any request to mount a scratch volume. To support
OnDemand, you typically define scratch volumes to Tivoli Storage Manager.
Chapter 10. Managing Tivoli Storage Manager storage 65

Tivoli Storage Manager uses scratch volumes as needed, and returns the
volumes to scratch when they become empty (for example, when all data on the
volume expires).
v A private volume is a volume that is in use or owned by an application, and
may contain valid data. Volumes that you define to Tivoli Storage Manager are
private volumes. A private volume is used to satisfy only a request to mount
that volume by name. When Tivoli Storage Manager uses a scratch volume, it
changes the volume’s status to private by defining it. Tivoli Storage Manager
tracks whether defined volumes were originally scratch volumes. Volumes that
were originally scratch volumes return to scratch status when they become
empty.
In addition to preparing removable media for Tivoli Storage Manager, you need to
maintain a supply of scratch volumes and manage the volume inventory in an
automated library. Managing a library may mean that you need to remove
volumes from a library, return volumes to a library, and manage a full library.
Other chapters in this part of the book provide examples of preparing storage
volumes and adding storage volumes to and removing storage volumes from
automated libraries. For details about these tasks, see the Tivoli Storage Manager
Administrator’s Guide.
Managing policies
OnDemand documents, application group index data, and DB2 files can be backed
up to the server. This process ensures that the information can be retrieved when
needed. Recall of documents and DB2 files is transparent and automatic when a
client retrieves a document or DB2 needs to retrieve a backup image file or
archived log file to restore the database. Importing migrated index data requires
administrator intervention.
You define policies based on your requirements for archiving, backing up, or
migrating data. You do this by defining policy objects, which identify archive,
backup, and migration criteria, and by scheduling client operations.
The IBM DB2 Content Manager OnDemand for Multiplatforms: Installation and
Configuration Guide provides examples of defining policies to support archiving
documents, backing up DB2 files, and migrating index data. See the Tivoli Storage
Manager Administrator’s Guide for more information about establishing and
managing policies.
Managing client nodes
You register OnDemand primary storage nodes as client nodes in Tivoli Storage
Manager. You provide client/server authentication by requiring the use of
passwords to ensure that the client and the server are authorized to communicate
with each other. You can also set the length of passwords and determine when
passwords expire.
You can define sets of client options for clients to use. For example, you typically
define one set of client options for OnDemand application group data and another
set of client options for DB2 files.
You can control access to the server by administrators. An organization may name
a single administrator or may distribute the workload among a number of
administrators and grant them different levels of authority.
66 Administration Guide

The IBM DB2 Content Manager OnDemand for Multiplatforms: Installation and
Configuration Guide provides examples of registering client nodes, defining client
options for OnDemand primary storage nodes, and registering administrators. See
the Tivoli Storage Manager Administrator’s Guide for more information about
managing clients.
Automating server operations
You can define schedules for the automatic processing of most administrative
commands, such as backing up primary storage pool data to a copy storage pool
and backing up the database.
See the Tivoli Storage Manager Administrator’s Guide for information about
scheduling Tivoli Storage Manager commands and operations.
Managing server operations
You can manage server operations such as starting and stopping the server,
maintaining and suspending client sessions with the server, and controlling server
processes.
In an OnDemand system, after you initially set up the Tivoli Storage Manager
Server and Scheduler services to start automatically and define schedules for
specific server operations (such as backing up the database and copying data from
primary storage pools to copy storage pools), there is very little you need to do to
manage the server operations on a day-to-day basis.
See the Tivoli Storage Manager Administrator’s Guide for details about the day-to-day
tasks involved in administering the server and about reports and information
available to help you manage the server.
Managing the database and recovery log
The Tivoli Storage Manager database contains information about OnDemand data
in storage pools, registered client nodes, Tivoli Storage Manager policies, and Tivoli
Storage Manager schedules. The server recovery log, which records changes made
to the database, is used to restore the database to a consistent state and to maintain
consistency across server start-up operations.
After your system is operational, you should monitor the database and recovery
log to see if you should add space. You can reset the maximum utilization counters
for the database and recovery log to monitor daily utilization. To set the maximum
utilization percentage equal to the current utilization, you might want to reset the
utilization statistics each day. The IBM DB2 Content Manager OnDemand for
Multiplatforms: Installation and Configuration Guide shows how to increase the size of
the database and the recovery log. See the Tivoli Storage Manager Administrator’s
Guide for information about monitoring the database and recovery log.
Monitoring the server
Tivoli Storage Manager provides you with many sources of information about
server and client status and activity, the state of the database, and resource usage.
By monitoring this information, you can provide reliable services to users while
making the best use of available resources.
You can use Tivoli Storage Manager queries and SQL queries to get information
about the server. You can also set up logging of information about Tivoli Storage
Chapter 10. Managing Tivoli Storage Manager storage 67
Manager clients and server events. See the Tivoli Storage Manager Administrator’s
Guide for more information about these tasks.
Protecting and recovering data
Tivoli Storage Manager provides a number of ways to protect and recover your
data from media failure or from the loss of the Tivoli Storage Manager database or
storage pools due to a disaster. These recovery methods are based on the following
preventive measures:
v Mirroring, by which the server maintains one or more copies of the database or
recovery log, allowing the system to continue when one of the mirrored disks
fails. IBM recommends that you mirror at least one copy of the database and the
recovery log to different physical storage volumes.
v Periodic backup of the database. IBM recommends that you schedule frequent
backups of the database, after every load or system configuration change, or
once a day. If you do not load reports every day or your system configuration
does not change very often, you may be able to schedule backups less
frequently, perhaps once a week.
v Periodic backup of the storage pools. To protect OnDemand data stored in Tivoli
Storage Manager, you may want to backup data in a primary storage pool to a
copy storage pool. See your Tivoli Storage Manager information for assistance
with configuring a copy storage pool.
v Recovery of damaged files.
Disaster Recovery Manager (DRM) is an optional feature of Tivoli Storage Manager
that assists an administrator with preparing a disaster recovery plan. The disaster
recovery plan can be used to guide an administrator through disaster recovery as
well as for audit procedures to certify the recoverability of the Tivoli Storage
Manager server. DRM’s disaster recovery methods are based on the following
measures:
v Enabling Disaster Recovery Manager
v Creating a backup copy of server primary storage pools and database
v Sending server backup volumes offsite
v Moving reclaimed or expired volumes back onsite
v Create the Tivoli Storage Manager server disaster recovery plan file
v Storing client machine information
v Defining and tracking client recovery media
For more information about protecting your data and for details about recovering
from a disaster, see the Tivoli Storage Manager Administrator’s Guide.
Mapping Tivoli Storage Manager objects to OnDemand
application group objects
You might need to reload data with files that are obtained from the Tivoli Storage
Manager volume. For example, here is some typical Tivoli Storage Manager
volume content:
OD6YNODE Arch /JCA 12 /RES/ 27120
OD6YNODE Arch /JCA 12 /DOC/ 39072FAAA
OD6YNODE Arch /LCA 15 /RES/ 7268
OD6YNODE Arch /LCA 15 /DOC/ 31844FAA1
In some instances, you might not be able to determine the application group name,
or know how to search in the application group tables. You might also miss system
68 Administration Guide
|
|
|||
||||
||
log records to find out the load ID to extract the object file name. The challenge
here is to determine and verify the object file name from the existing data.
The Tivoli Storage Manager file space names (for example, /JCA) correspond to the
OnDemand application group three-letter identifier. With the three letter
application group identifier, you can obtain the application group ID (AGID) by
querying the ARSAG table.
You can use the application group ID to query the ARSSEG table for the
corresponding application group table name or names. The table name is
TABLE_NAME. The application group table name is something like AGIDn, where n is
an integer. For example, JCA1.
The object file names are recorded in the DOC_NAME field of the application
group table.
Important: If you delete an application group, the Tivoli Storage Manager filespace
is also deleted, and all of the objects for that application group are
removed regardless of their expiration parameters.
Exception: If you use data retention protection, the Tivoli Storage Manager
filespace is not deleted, instead, OnDemand deletes all application
group objects.
Starting, halting, and restarting the server
Tivoli Storage Manager administrators can manage server operations. These
operations include such tasks as starting and halting the server, adding or
updating server options, defining devices and policies, managing removable
media, and monitoring server information.
Starting the server
To start the server, complete the following steps:
1. Change to the Tivoli Storage Manager server program directory.
2. Start the server:
dsmserv
When the server is started, Tivoli Storage Manager displays information about
product licensing, server options, the database and recovery log, storage pools,
and progress messages and any errors encountered during server initialization.
Note: You can capture Tivoli Storage Manager server console messages to a user
log file with the Tivoli Storage Manager dsmulog utility. See the Tivoli
Storage Manager documentation for more information.
Starting the Tivoli Storage Manager server command line
interface
In this part of the book, most examples illustrate how to perform tasks by using
the Tivoli Storage Manager server command line interface. To start the Tivoli
Storage Manager server command line interface, type the following command:
dsmadmc
Tivoli Storage Manager provides you with ways to monitor processes and
messages:
Chapter 10. Managing Tivoli Storage Manager storage 69
||
||||
||||
||
v Use the console mode from an administrative client to monitor processes and
messages:
dsmadmc -consolemode
While the system is running in console mode, you cannot enter any
administrative commands from the client session. You can, however, start
another administrative client session for entering commands.
v Specify the OUTFILE option to write all terminal output to a file. For example:
dsmadmc -consolemode -outfile=adsm.out
v From the command line interface, query the activity log for status information
and possible error messages:
query actlog
Refer to the Tivoli Storage Manager documentation for more information about
managing client sessions.
Halting the server
When you halt the server, all processes are abruptly stopped and client sessions are
canceled, even if they are not completed. Any in-progress transactions are rolled
back when the server is restarted. When the server is halted, administrator activity
is not possible. If possible, halt the server only after current administrative and
client node sessions have completed or canceled. To shut down the server without
severely impacting administrative and client node activity with the server, follow
the instructions in the Tivoli Storage Manager documentation.
To halt the server and shut down all server operations, enter halt at the Tivoli
Storage Manager Server command line interface.
Restarting the server
To start the server after it has been halted, follow the instructions in “Starting the
server” on page 69.
When you restart the server after it has been halted, Tivoli Storage Manager rolls
back any operations that had been in process to ensure that the database remains
in a consistent state.
Using scratch and private volumes
A scratch volume is a labeled volume that is empty or contains no valid data, and
can be used to satisfy any request to mount a scratch volume. A private volume is
a volume that is in use or owned by an application, and may contain valid data.
Volumes that you define to Tivoli Storage Manager are private volumes. A private
volume is used to satisfy only a request to mount that volume by name. For each
storage pool, you must decide whether to use scratch volumes.
If you use scratch volumes, Tivoli Storage Manager uses volumes as needed, and
returns the volumes to scratch when they become empty (for example, when all of
the data on the volume expires). If you do not use scratch volumes, you must
define each volume you want Tivoli Storage Manager to use. Volumes that you
define to Tivoli Storage Manager are private volumes, and do not return to scratch
when they become empty.
For each automated library, Tivoli Storage Manager tracks in its volume inventory
for the library whether a volume has a scratch or private status. If you allow
70 Administration Guide

scratch volumes to be used for a storage pool, Tivoli Storage Manager chooses a
scratch volume from the scratch volumes that are checked in for the library.
When Tivoli Storage Manager uses a scratch volume, Tivoli Storage Manager
changes the volume’s status to private by defining it. Tivoli Storage Manager
tracks whether defined volumes were originally scratch volumes. Volumes that
were originally scratch volumes return to scratch status when they become empty.
One of the benefits of using scratch volumes is that different storage pools that
share the same automated library can dynamically acquire volumes from the
library’s pool of scratch volumes. The volumes need not be preallocated to the
different storage pools.
Another benefit of using scratch volumes, even if only a single storage pool is
associated with an automated library, is that you need not explicitly define all of
the volumes for the storage pool using DEFINE VOLUME commands. Volumes are
automatically added to and deleted from the storage pool by the server.
If a scratch volume is used for a Tivoli Storage Manager database backup or export
operation, then Tivoli Storage Manager changes the volume’s status to private. The
volume returns to the scratch pool only when a Tivoli Storage Manager
administrator determines that the volume’s data is no longer needed, and uses the
UPDATE LIBVOL command to change the status of the volume to scratch.
Labeling storage volumes
All removable media must be labeled before it can be used by Tivoli Storage
Manager. When the server accesses a volume, it checks the volume name in the
header to make sure that the correct volume is being used. Any tape storage
volumes must be labeled before the server can use them.
For storage pools in automated libraries, use the CHECKIN LIBVOL command to
check labeled volumes into a library.
Use the LABEL LIBVOL command with drives in an automated library to label
and check in the volumes with one command. To use the LABEL LIBVOL
command, there must be a drive that is not in use by another Tivoli Storage
Manager process. This includes volumes that are mounted but idle. If necessary,
use the DISMOUNT VOLUME command to dismount the idle volume to make
that drive available.
Overwriting volume labels
By default, the label command does not overwrite an existing label on a volume.
However, if you want to overwrite existing volume labels, you can specify the
OVERWRITE=YES parameter when you use the LABEL LIBVOL command.
Important: By overwriting a volume label, you destroy all of the data that resides
on the volume. Use caution when overwriting volume labels to avoid
destroying important data.
Identifying volume labels
Use the LABEL LIBVOL command to specify the volume for labeling. You can use
the VOLRANGE parameter of the LABEL command for a large number of
volumes. For automated libraries, you are prompted to mount the volume in the
Chapter 10. Managing Tivoli Storage Manager storage 71
entry/exit port of the library. If no entry/exit port is available, mount the volume
in an empty slot within the library. For manual libraries, you are prompted to load
the volume directly into the library.
Labeling volumes one at a time
The LABEL LIBVOL command assumes that you will insert volumes into the
library when prompted to do so. The label process then mounts each inserted
volume into a drive and writes a label to it using a name that you enter at a
prompt. This is the default mode of operation when you specify a library for use
with the LABEL LIBVOL command.
If the library does not have an entry/exit port, you are prompted to remove the
volume from a specified slot number. If the library has an entry/exit port, the
command by default returns each labeled volume to the entry/exit port of the
library.
To label one volume in the odlib0 library, enter:
label libvol odlib0 od5000 search=no
Where od5000 is the volume label.
Searching the library
The LABEL LIBVOL command searches all of the storage slots in the library for
volumes and tries to label each one that it finds. You choose this mode when you
specify the SEARCH parameter. After a volume is labeled, the volume is returned
to its original location in the library.
For an automated SCSI library, you can simply open the library access door, place
all of the new volumes in unused storage slots, close the door, and issue the
LABEL LIBVOL command with the SEARCH=YES parameter.
To label all of the volumes in the odlib0 library by searching the library and
specifying a range of volume labels, enter:
label libvol odlib0 search=yes volrange=od5000
Tivoli Storage Manager labels the first volume od5000 and increments the number
5000 for the label of each additional volume you label with this command.
Adding storage volumes
You inform the server that a new volume is available in an automated library by
checking in the volume with the CHECKIN LIBVOL command. When a volume is
checked in, the server adds the volume to its library volume inventory. You can
also use the LABEL LIBVOL command to label and check in volumes in one
operation.
Because the CHECKIN LIBVOL command involves device access, it may take a
long time to complete.
When you check in a volume, you must supply the name of the library and the
status of the volume (private or scratch).
To check in one or just a few volumes, you can specify the name of the volume
with the command, and issue the command for each volume.
72 Administration Guide
To check in a larger number of volumes, you can use the search capability of the
CHECKIN command or you can use the VOLRANGE parameter of the CHECKIN
command.
Checking in volumes one at a time
Use this option if you want to check in only a single volume that is not currently
in the library. Tivoli Storage Manager requests that the volume be placed in the
entry/exit port of the library.
If the library does not have an entry/exit port, Tivoli Storage Manager requests
that the volume be loaded into a slot within the library. The mount request
specifies the location with an element address. Element addresses are listed on the
device configuration worksheets for the libraries supported by Tivoli Storage
Manager. See the Tivoli Storage Manager Administrator’s Guide or the documentation
provided with the library.
To check in a private volume:
checkin libvol odlib0 od1092 status=private search=no
Where odlib0 is the name of the library and od1092 is the volume label.
To check in a scratch volume:
checkin libvol odlib0 od2001 status=scratch search=no
Where odlib0 is the name of the library and od2001 is the volume label.
Searching the library
Use this option if you want Tivoli Storage Manager to automatically search the
library for new volumes that have not already been added to the library volume
inventory. Use this mode when you have a large number of volumes to check in,
and you want to avoid issuing an explicit CHECKIN LIBVOL command for each
volume.
With this option, you cannot specify a volume name because the server searches
for new volumes in the library.
For an automated SCSI library, you can simply open the library access door, place
all of the new volumes in unused storage slots, close the door, and issue the
CHECKIN LIBVOL command with SEARCH=YES. For example:
checkin libvol odlib0 search=yes status=scratch
Where odlib0 is the name of the library. Tivoli Storage Manager will label the new
volumes, check them into the library, and add them to the library volume
inventory.
Allowing swapping of volumes
If no empty slots are available in the library when you are checking in volumes,
the check-in fails unless you allow swapping. If you allow swapping and the
library is full, Tivoli Storage Manager selects a volume to eject before checking in
the volume you requested.
Tivoli Storage Manager selects the volume to eject by checking first for any
available scratch volume, then for the least frequently mounted volume.
Chapter 10. Managing Tivoli Storage Manager storage 73

Removing storage volumes
Tivoli Storage Manager tracks the scratch and private volumes available in an
automated library through a library volume inventory. Tivoli Storage Manager
maintains an inventory for each automated library. The library volume inventory is
separate from the inventory of volumes for each storage pool. To add a volume to
a library’s volume inventory, you check in a volume to that library.
To make sure that Tivoli Storage Manager’s library volume inventory remains
accurate, you must check out volumes when you need to physically remove them
from a SCSI or 3494 library device. When you check out a volume that is being
used by a storage pool, the volume remains in the storage pool. If Tivoli Storage
Manager requires the volume to be mounted while it is checked out, a message to
mount the volume is displayed with a request to check in the volume. If the check
in is not successful, Tivoli Storage Manager marks the volume as unavailable.
To check whether Tivoli Storage Manager’s library volume inventory is consistent
with the volumes that are physically in the library, you can audit the library. The
inventory can become inaccurate if volumes are moved in and out of the library
without informing the server (by using check-in and check-out commands).
Removing volumes from a library
You may need to remove a volume from a library because all of the volumes in the
library are full, and you want to remove some that are not likely to be accessed in
order to make room for new volumes that can be used to store more data.
To remove a volume from an automated library, use the CHECKOUT LIBVOL
command. By default, the server mounts the volume being checked out and
verifies the internal label. When the label is verified, the server removes the
volume from the library volume inventory, and then moves it to the entry/exit
port of the library. If the library does not have an entry/exit port, Tivoli Storage
Manager requests that the volume be removed from a slot within the library.
If you check out a volume that is defined in a storage pool, the server may attempt
to access it later to read or write data. If this happens, the server requests that the
volume be checked in.
Returning volumes to a library
When you check out a volume that is defined to a storage pool, to make the
volume available again, you must do the following:
1. Check in the volume for the library, with private status. Use the CHECKIN
LIBVOL command with the STATUS=PRIVATE parameter.
2. Update the volume’s ACCESS value. You must change the access from
unavailable to read/write or read-only. Use the UPDATE VOL command with
the ACCESS parameter.
Managing a full library
As Tivoli Storage Manager fills volumes in a storage pool, the number of volumes
needed for the pool may exceed the physical capacity of the automated library. To
make room for new volumes while keeping track of existing volumes, you can
define an overflow location near the library for the storage pool. You then remove
media to the overflow location as needed.
The following shows a typical sequence of steps to manage a full library:
74 Administration Guide

1. Define or update the storage pool associated with the automated library,
including the overflow location parameter. For example, you have a storage
pool named odaix1 associated with an automated library. To update the storage
pool to add an overflow location of room2948, enter:
update stgpool odaix1 ovflocation=room2948
2. When the library becomes full, use the MOVE MEDIA command.
Tivoli Storage Manager records the location of the volumes that you move with
the MOVE MEDIA command. The location of the volumes is the overflow
location that you defined for the storage pool. For example, to move all full
volumes in the specified storage pool out of the library, enter:
move media * stgpool=odaix1
3. Check in new scratch volumes, if needed.
4. As requested through Tivoli Storage Manager mount messages, check in
volumes that Tivoli Storage Manager needs for operations. The mount
messages include the overflow location of the volumes.
To find the location of volumes in a storage pool that has an overflow location,
you can use the QUERY MEDIA command. You can also use the QUERY MEDIA
command to generate the commands required to check in all of the volumes into
the library.
Offline storage of storage volumes
Refer to the documentation provided by the library manufacturer for instructions
that describe how to handle physical storage volumes and remove them from the
library.
Refer to your organization’s media storage guide for instructions about
documentation you may need to complete when you remove a storage volume
from a library and where to store them for safekeeping.
Protecting data with the data retention protection (DRP) protocol
To avoid the accidental erasure or overwriting of critical data, OnDemand now
supports the Tivoli Storage Manager Version 5.2.2 or later APIs related to data
retention. Specifically:
data retention protection (DRP)
Prohibits the explicit deletion of documents until their specified retention
criterion is met. Although documents can no longer be explicitly deleted,
they can still expire. Attention: DRP is permanent. Once it is turned on, it
cannot be turned off.
Event-based retention policy
Retention based on an external event other than the storage of data. For
OnDemand, the retention event is the call to delete the data. A load,
unload, application group delete, or expiration of data triggers the
retention event.
Restriction: OnDemand does not support deletion hold, a feature that prevents
stored data from being deleted until the hold is released.
If you decide to use these policies in Tivoli Storage Manager, then the following
scenarios result:
Chapter 10. Managing Tivoli Storage Manager storage 75
|
|||
|||||
|||||
||
||

Table 4.
Creation-based object
expiration policy
Event-based retention object
expiration policy
Data retention protection off OnDemand issues a delete
object command through the
TSM API. Objects are deleted
during the next inventory
expiration. If an OnDemand
application group is being
deleted, a delete filespace
command is issued instead,
and the objects are
immediately deleted along
with the filespace.
OnDemand issues an event
trigger command through
the TSM API. The status of
the objects affected are
changed from PENDING to
STARTED, and will be
expired by TSM based on
their retention parameters. If
the retention parameters are
set to NOLIMIT, then the
objects never expire. If an
OnDemand application
group is being deleted, a
delete filespace command
is issued instead, and the
objects are immediately
deleted along with the
filespace.
Data retention protection on OnDemand issues no
commands to TSM. The
objects are effectively
orphaned by OnDemand and
will be expired by TSM
based on their retention
parameters. If the retention
parameters are set to
NOLIMIT, then the objects
never expire.
OnDemand issues an event
trigger command through
the TSM API. The event
status of the objects affected
are changed from PENDING
to STARTED and will be
expired by TSM based on
their retention parameters. If
the retention parameters are
set to NOLIMIT, then the
objects never expire. If an
OnDemand application
group is being deleted, then
a delete filespace cannot
be used with DRP on so the
operation is treated the same
as if a delete were indicated.
The status of all the affected
objects is changed from
PENDING to STARTED, and
they will be expired by TSM
based on their retention
parameters. Because this
leaves the filespace entries in
TSM, you must manually
delete these entries when the
filespace is empty (even with
DRP on).
Recommendations:
v Set up the application groups to expire by load.
v Define the Tivoli Storage Manager archive copy groups to be event-based, and
retain data for 0 days.
v Run the Tivoli Storage Manager inventory expiration regularly to ensure that
expired data is cleaned up.
76 Administration Guide
||
|||||
||||||||||||
||||||||||||||||||
|||||||||||
|||||||||||||||||||||||||||||
|
|
||
||

Additionally, OnDemand supports the following devices:
IBM DR450 and DR550
Disk-based system that contains a Tivoli Storage Manager running DRP.
EMC Centera
Disk-based system, treated as a device by Tivoli Storage Manager. Tivoli
Storage Manager must be running DRP.
Chapter 10. Managing Tivoli Storage Manager storage 77
|
||
|||

78 Administration Guide
Chapter 11. Backup and recovery
Tivoli Storage Manager database
Tivoli Storage Manager maintains a database that contains information about the
devices and files that it manages. When the system maintains data in archive
storage, Tivoli Storage Manager updates its database with the status of the storage
it manages. When you define devices and register client nodes, Tivoli Storage
Manager updates the database. When Tivoli Storage Manager maintains storage
volumes, it updates the database with status information about files and storage
volumes. The Tivoli Storage Manager database is critical to proper operation of the
system in storing objects on and retrieving objects from archive storage.
Mirroring the Tivoli Storage Manager database is strongly encouraged. When you
mirror the database, Tivoli Storage Manager replicates the database onto different
physical storage. Tivoli Storage Manager automatically keeps track of and refreshes
both copies of the database. When you configure physical storage so that Tivoli
Storage Manager can mirror the database on different physical devices and
adapters, you can provide protection for the database due to failure of a single
device. With mirroring, Tivoli Storage Manager can continue operation without
interruption if a database volume fails by using a mirrored copy of the failed
volume. Mirroring requires additional storage space for the mirrored volumes. The
Tivoli Storage Manager Administrator’s Guide provides details about mirroring the
Tivoli Storage Manager database.
To protect the information in the database, and ensure that it can be restored if a
disaster occurs, you must periodically create a backup copy of the database. You
can recover the database to its most current state or to a specific point in time with
the backup copy:
v A full backup image of the database should be taken after you install and
configure Tivoli Storage Manager with OnDemand. In addition, IBM
recommends that you create a full backup of the database on a regular schedule,
such as once a week. A full backup copy of the database should be written to
removable media.
v An incremental backup image of the database records changes that occurred
since the last backup of the database (full or incremental). You can create a
maximum of 32 incremental backups between full backups of the database. If
you write incremental backup images of the database to disk, make sure that the
disk is on a different controller than any of the database or recovery log
volumes.
There are several factors to consider when you decide the type and frequency of
backups:
v A full backup takes longer to run than an incremental backup.
v Recovery time is faster with a full backup. Incremental backups increase the
time it takes to recover the database because a full backup must be loaded first,
followed by some or all of the incremental backups.
v A full backup is required under specific conditions. You must create a full
backup after installing and customizing Tivoli Storage Manager with
OnDemand. You can run up to 32 incremental backups between each full
backup.
© Copyright IBM Corp. 1993, 2007 79

IBM recommends that you back up the database after you load reports into
OnDemand and following Tivoli Storage Manager maintenance of storage volumes
(such as expiration processing). Most customers should plan to back up the
database every day.
Tivoli Storage Manager includes a central scheduling component that allows the
automatic processing of administrative commands, such as a database backup.
Each administrative command is called an event. Each scheduled event is tracked
by the server and recorded in the database. You can set up an administrative
command schedule by defining schedule parameters, such as the start day, date,
and time, specifying the command to be executed, such as the BACKUP
DATABASE command, and activating the schedule. The Tivoli Storage Manager
Administrator’s Guide provides details about scheduling operations.
For UNIX servers, OnDemand provides the ARS_ADSM program to create a full
backup of the database. You can submit the ARS_ADSM program by using the AT
command or you can run the ARS_ADSM program automatically on a regular
schedule using the CRON facility. If you run the ARSLOAD program from a
user-defined shell script, you can add a step that runs the ARS_ADSM program
after the ARSLOAD program completes. The IBM DB2 Content Manager OnDemand
for Multiplatforms: Installation and Configuration Guide describes how to configure the
system to start the ARS_ADSM program to create a full backup image of the
database automatically on a regular schedule. Chapter 30, “ARS_ADSM,” on page
255 provides details about the ARS_ADSM program, parameters, and options.
Note: The ARS_ADSM shell script can be used to invoke the Tivoli Storage
Manager processes that start and stop the Tivoli Storage Manager server and
backup the Tivoli Storage Manager database. The ARS_ADSM shell script does not
monitor the Tivoli Storage Manager processes or report on the success or failure of
the Tivoli Storage Manager processes. If you use the ARS_ADSM shell script to
start the Tivoli Storage Manager process that backs up the Tivoli Storage Manager
database, you must query the Tivoli Storage Manager server to determine whether
the backup was successful before you continue with other OnDemand or Tivoli
Storage Manager work. See your Tivoli Storage Manager documentation for details.
For Windows servers, you can backup the database from the Tivoli Storage
Manager Admin Command Line interface. You can also define a backup schedule
to Tivoli Storage Manager. See the Tivoli Storage Manager documentation for more
information.
Tivoli Storage Manager recovery log
The recovery log is critical to the operation of the Tivoli Storage Manager server. If
the recovery log is unusable, the entire server is unavailable. With the recovery log
available, and a restored backup image of the database, you can recover the
database to its most current state.
To ensure fast recovery time and high availability of the database, you should
always mirror the recovery log. Mirroring the recovery log requires much less
space than mirroring the database. If you do not mirror the recovery log, you
should allocate the recovery log on a disk other than the one on which the
database resides. The Tivoli Storage Manager Administrator’s Guide provides details
about mirroring the Tivoli Storage Manager recovery log.
80 Administration Guide
When a database backup completes, Tivoli Storage Manager deletes recovery log
records preceding the backup, and releases recovery log storage for reuse. Taking
frequent database backups reduces recovery log storage requirements and the time
required to recover the database.
Tivoli Storage Manager volume history file
Volume history information is vital for recovery of a lost or damaged database. The
volume history file contains information that Tivoli Storage Manager needs about
the volumes to use for database backups. The volume history file contains
information that you need to know about which storage pool volumes to audit
after a recovery.
Tivoli Storage Manager cannot obtain volume history information from the
database during a restore of the database. Therefore, you should store at least one
backup copy of the volume history file on a disk other than the one on which the
database resides.
The Tivoli Storage Manager Administrator’s Guide provides details about creating
volume history backup files.
Tivoli Storage Manager device configuration file
When you define, update, or delete a device class, drive, or library, Tivoli Storage
Manager updates the database and makes an entry in the device configuration file.
To restore the database, Tivoli Storage Manager requires a definition for the device
class from which backup data is to be read. This definition is in the device
configuration file.
When the database is being restored, no definitions can be read from the database.
Therefore, you should have at least one backup copy of the device configuration
information on a disk other than the one on which the database resides.
The Tivoli Storage Manager Administrator’s Guide provides details about creating
device configuration backup files.
Tivoli Storage Manager database recovery
Recovering using mirrored copies of the database
If a database volume fails because of media failure and you have enabled
mirroring, you can recover the database by using mirrored copies of the database.
After fixing the failing device, you can allocate space for the new mirrored copy
and define the volume to Tivoli Storage Manager. After you define the volume to
Tivoli Storage Manager, the server synchronizes the volume with the database.
Recovering using backup copies of the database
Tivoli Storage Manager provides commands to recover the database should a
catastrophic failure occur. These commands restore the database from the latest
available full backup copy, apply all incremental backups that apply, and use the
recovery log to apply any changes made to the database since the last backup was
created.
If you restore the database to its most current state, Tivoli Storage Manager
automatically synchronizes the database and storage volumes.
If you restore the database to a specific point in time, you must audit all storage
pool volumes to check for and resolve any inconsistencies between database
Chapter 11. Backup and recovery 81

information and storage pool volumes. Depending on the number of storage pool
volumes and the amount of activity that occurred after the database backup that
you restored, the audit may require a significant amount of time.
To perform a database recovery, you should have the following information,
preferably stored offsite:
v Back up volumes of the database
v Copy storage pool volumes
v Server options file
v Volume history file
v Device configuration file
v Output from Tivoli Storage Manager commands that provide details of the
database and recovery log setup
The Tivoli Storage Manager Administrator’s Guide provides details about recovering
the Tivoli Storage Manager database.
Reports
OnDemand can store copies of reports and resources in the cache storage and
archive storage:
v The primary purpose of cache storage is short-term, high-speed storage and
retrieval of reports. Cache storage consists of disk storage volumes maintained
by OnDemand on one or more object servers.
v The primary purpose of archive storage is long-term storage and retrieval of
reports. The reports in archive storage can also be used as backup copies in the
event that cache storage becomes corrupted or unavailable. Archive storage
consists of optical or tape storage volumes managed by Tivoli Storage Manager.
Most customers configure the system to copy reports to cache storage and archive
media at the same time, when they load a report into the system.
OnDemand can retrieve a copy of a report from archive storage after the report has
been deleted from cache storage or if the copy on cache storage is unavailable.
However, you must configure the system to maintain multiple copies of reports.
You must install and configure Tivoli Storage Manager, define storage devices to
Tivoli Storage Manager, define policy management information to Tivoli Storage
Manager, and configure OnDemand to use archive storage. You configure
OnDemand to use archive storage by registering client nodes in Tivoli Storage
Manager, defining storage sets that identify client nodes in Tivoli Storage Manager,
assigning application groups to the storage sets, and configuring other storage
management parameters in application groups.
Note: If you do not plan to copy reports to archive storage, then IBM recommends
that you take regular backups of the file systems that comprise cache
storage. However, if a media failure occurs or cache storage becomes
corrupted, users cannot retrieve reports until the file systems are restored.
Cache storage
Cache storage is the primary, short-term storage location for reports.
If you do not copy reports to archive storage when you store them in OnDemand,
then you need to consider how you can recover the reports in the event that you
need to do so (for example, if a cache storage device fails).
82 Administration Guide
Cache storage can be protected by maintaining it on high-availability storage
devices. If no high-availability storage is available, IBM recommends that backups
of reports in cache storage (the file systems) be taken on a regular basis.
Archive storage
The OnDemand storage node identifies the object server and the client node in
Tivoli Storage Manager where the primary copy of a report is maintained.
OnDemand retrieves the primary copy of the report from archive storage after the
report has been deleted from cache storage. Customers with special business, legal,
or performance reasons may want to configure the system to maintain a backup
(second) copy of their reports in archive storage. The backup copy can be used if
the primary copy becomes corrupted or unavailable.
You must configure Tivoli Storage Manager to maintain multiple copies of reports.
For example, you can define a copy storage pool to Tivoli Storage Manager. With a
copy storage pool, Tivoli Storage Manager manages a backup copy of files that are
stored in a primary storage pool independently and transparently to OnDemand.
The backup copy is stored in a copy storage pool that can be used to restore the
original files if they become damaged, lost, or unusable. The copy storage pool can
be assigned to the same library as the primary storage pool. However, most
customers assign the copy storage pool to a different library. You can copy data
from one or more primary storage pools to the same copy storage pool. Copy
storage pools require additional space in the Tivoli Storage Manager database. A
copy storage pool must reside on the object server where the primary storage pool
resides.
Tivoli Storage Manager includes a central scheduling component that allows the
automatic processing of administrative commands, such as copying data from a
primary storage pool to a copy storage pool. Each administrative command is
called an event. Each scheduled event is tracked by the server and recorded in the
database. You set up an administrative command schedule by defining schedule
parameters, such as the start day, date, and time, specifying the command to be
executed, such as the BACKUP STGPOOL command, and activating the schedule.
The Tivoli Storage Manager Administrator’s Guide provides details about defining and
managing a copy storage pool, storage pool backup and recovery, and scheduling
operations.
Chapter 11. Backup and recovery 83

84 Administration Guide

Part 3. Using the administrative client
This part contains information about the administrative client, a program that you
can use to define and maintain objects on the system. For example, you can use the
administrative client to define reports to OnDemand and maintain OnDemand
users, groups, printers, and storage sets. The administrative client runs on a
Windows workstation.
This part describes a typical system, including requirements about users of the
system and data to be loaded on the system, and contains examples and ideas
about how to use the administrative client to implement the requirements. In it
you’ll find:
v An introduction to the administrative client
v Advice about what is required to get your work done
v Pointers to detailed how-to information in the online Help
The information provided in this part gives you a frame of reference. If you need
more information, the book tells you where to look in the online Help. If you can’t
find answers to your questions, the book tells you how to contact IBM. This part is
organized in roughly the order you define your first report to OnDemand: It starts
with adding users and groups to the system, shows how to define a printer, and
then moves into procedures for adding a storage set and defining a primary
storage node. Later chapters provide detailed instructions about defining a report:
adding an application group, an application, and a folder.
Note: IBM assumes that you are familiar with the Windows operating
environment and using applications that run under Windows. You should
know how to start programs, use a pointing device, such as a mouse, and
that you are familiar with terminology, such as window, dialog box, entry
field, button, scroll bar, list, and check box.
© Copyright IBM Corp. 1993, 2007 85

86 Administration Guide
Chapter 12. Installation
System requirements
This section describes the hardware, software, memory, and disk space
requirements for installing and using the administrative client.
Hardware
The administrative client requires the following hardware:
v Pentium or Pentium compatible 800 MHz or faster processor
v A super-VGA display and adapter with a minimum resolution of 800x600
v Physical connection to the network, such as a Token Ring or Ethernet network
adapter
v A CD-ROM drive for installation (optional, if you plan to install the
administrative client from a network file server)
Software
The administrative client requires Windows XP, or Windows Vista. To install the
administrative client from a CD-ROM, the CD-ROM drivers must be installed on
your computer. To install the administrative client from a network file server, the
appropriate network software must be running on your computer. To connect to an
OnDemand server, the standard TCP/IP support for the Windows operating
system must be running on your computer.
If you plan to use the report wizard or the graphical indexer from the
administrative client to process PDF input files, you must first install Adobe
Acrobat on your workstation. See http://www.adobe.com for information about
how to obtain Adobe Acrobat products. Note: OnDemand provides the
ARSPDF32.API file to enable PDF viewing from the client. If you install the client
after you install Adobe Acrobat, then the installation program will copy the API
file to the Acrobat plug-in directory. If you install the client before you install
Adobe Acrobat, then you must copy the API file to the Acrobat plug-in directory.
Also, if you upgrade to a new version of Acrobat, then you must copy the API file
to the new Acrobat plug-in directory. The default location of the API file is
\Program Files\IBM\OnDemand32\PDF. The default Acrobat plug-in directory is
\Program Files\Adobe\Acrobat x.y\Acrobat\Plug_ins, where x.y is the version of
Acrobat, for example, 4.0, 5.0, and so forth.
Memory
The administrative client requires a PC with at least 256 MB of memory (RAM).
Your PC may need more memory if you run more than one application at the same
time.
Disk space
To install OnDemand clients, disk space requirements depend on the features that
you select.
You need at least 55 MB of free disk space to install all of the OnDemand features.
To use less than 55 MB of disk space, use the Installation Components dialog box
© Copyright IBM Corp. 1993, 2007 87
||||||

in Setup to select only the features you need. To install only the software required
for the administrative client, you need at least 12 MB of available disk space.
For more information on disk space requirements for each OnDemand feature,
start Setup from the CD-ROM, or follow the Setup steps below:
1. Insert the CD-ROM in the appropriate drive.
2. From the Windows taskbar, click Start, and then choose Run.
3. Type x:\client\win32\setup (where x is the letter of your CD-ROM drive).
4. On the Setup Type and Working Directory dialog box, select Custom.
5. On the Installation Components dialog box you can select each component
individually and then click Change to see all the specific features and their disk
space requirements.
Installing the administrative client
The Setup program transfers the OnDemand client files from the CD-ROM to each
user’s PC.
You can install all of the OnDemand features at once, or individual features as you
need them.
Running Setup
When you run the Setup program, the Setup screens show the names of the
OnDemand directories so you know where the files are being placed.
Information about network installations is available in the IBM DB2 Content
Manager OnDemand: Windows Client Customization Guide.
To install on a user’s PC
To install from the CD-ROM or to install from a network file server, follow these
instructions:
1. Insert the CD-ROM in the appropriate drive or obtain the drive letter of the
network drive on which the OnDemand software is located on the network file
server.
2. From the Windows taskbar, click Start, and then choose Run.
3. Type x:\client\win32\setup (where x is the letter of your CD-ROM drive or
the network drive).
4. Click OK.
After the Setup program starts, click Next to continue.
On the Setup Type and Working Directory dialog box, select Custom and then click
Next to continue.
On the Installation Components dialog box, select Administrator. (You can also
select other components that you want to install on the PC.)
Click Next to continue. Follow the instructions on the screen to complete the
installation.
88 Administration Guide
To install on a network file server
Information about network installations is available in the IBM DB2 Content
Manager OnDemand: Windows Client Customization Guide.
To use automated install
Automated install allows administrators to standardize the OnDemand installation
for all users in an organization. It also allows administrators to install OnDemand
clients without the presence of users at their PCs. To read more about automated
install, see the IBM DB2 Content Manager OnDemand: Windows Client Customization
Guide.
Excluding the administrative client from the client installation
package
Prerequisite: You need a file extraction and archiving utility, such as PKZIP or
INFOZIP.
To exclude the administrative client from the client installation package, follow
these steps:
1. Download the odwin32.zip file from the ftp://service.software.ibm.com/software/ondemand/fixes directory to a temporary directory, such as c:\temp.
2. Extract the files from the odwin32.zip file to a new working directory, such as
d:\ondemand.
3. Delete the arsadm32.exe file from the ars32 subdirectory of the working
directory (for example, d:\ondemand\ars32).
4. Create a new ZIP file from the files in the working directory. Make sure that
you use a file archiving utility that preserves the directory and file structure of
the working directory.
5. Distribute the new ZIP file to your users. When your users run the setup.exe
file, the installation program recognizes that the main administrative client file
is not present. The option to install the administrative client will not be
available to the user.
To uninstall
You can use Add/Remove Programs in Control Panel to remove the OnDemand
client from your PC. Add/Remove Programs removes the directories for
OnDemand and any references to OnDemand in system files.
To run the uninstall
1. From the Windows taskbar, click Start. Choose Settings, and then choose
Control Panel.
2. Double-click Add/Remove Programs.
3. From the list, select OnDemand32.
4. Click Add/Remove.
5. Click OK.
Chapter 12. Installation 89
Updating the administrative client software
Note: When upgrading the administrative client, the Setup program automatically
replaces all out-of-date files with new ones; the user is not permitted to add
or remove components. To add or remove components, the user must run
the Setup program after successfully upgrading the administrative client.
The following information can be used to obtain and install the latest version of
the OnDemand client software from IBM service on the Web.
To get the latest version of the OnDemand client software:
1. Point your browser to ftp://service.software.ibm.com/software/ondemand/fixes and follow the links to the latest fix pack for the client.
2. Click the ZIP file for the client software. For example:
odwin32.zip
3. Select to save the file to disk.
4. Select a location and save the file.
After the download is complete, you can expand the ZIP file or store the ZIP file in
a shared location, depending on how you plan to distribute the administrative
client software:
v A user can expand the ZIP file to a temporary directory and then run the Setup
program to upgrade the administrative client on a PC. After installing the
administrative client, the user can delete the temporary directory and the ZIP
file.
v An administrator can store the ZIP file in a shared location so that other users
can access it.
v An administrator can expand the ZIP file to a shared location so that other users
can run the Setup program from the shared location.
v If your organization shares a copy of the OnDemand administrative client
software from a network server, then an administrator can expand the ZIP file
and run the Setup program to upgrade the administrative client on the network
server.
v If your organization distributes user-defined files with the OnDemand client
software, an administrator must expand the ZIP file to a shared location and
then copy the user-defined files to that location. Users can then run the Setup
program from the shared location to upgrade the client software and the
user-defined files on their PCs.
90 Administration Guide

Chapter 13. Introduction
How does the administrative client help me do my job?
Welcome to the OnDemand administrative client, a powerful and flexible program
designed to help you maintain your OnDemand system.
The administrative client provides tools to:
v Define reports to the system
v Add and maintain OnDemand users and groups
v Add and maintain server printers
v Add and maintain storage sets and storage nodes
v Create summaries about users, groups, applications, application groups, storage
sets, folders, printers, and cabinets
v Add and maintain servers
v Set system parameters for OnDemand servers and client programs
v Copy items from one OnDemand server to another
v Track changes made to the system. When you use the administrative client to
add or update an object in OnDemand, information about the object is saved in
the system log. The information includes the changes that you made.
Getting started
Starting the administrative client
To start the administrative client:
1. Click Start.
2. Select Programs, then choose IBM OnDemand32.
3. Click OnDemand32 Administrator.
4. When you start the administrative client, OnDemand opens the administrator
window that contains a menu bar, toolbar, navigator pane, list pane, and status
bar. Figure 17 on page 92 shows the administrator window.
© Copyright IBM Corp. 1993, 2007 91
||

v You can collapse and expand areas in the navigator pane (on the left) to
make it easier to see. A plus sign next to an area means there are items
inside.
v When you click on an area in the navigator pane, the items appear in the list
pane (on the right).
v To make the panes narrower or wider, point to the vertical bar between the
two panes of the window until the pointer turns into a two-headed arrow.
Then click and hold the left mouse button and drag it in either direction.
v Use buttons on the toolbar to switch between the different ways to look at
items: large or small icons, a list, or details.
v To query the server for a new list of items, press the F5 key or select Refresh
List from the View menu.
v After you log on to a server, the status bar shows the OnDemand userid and
the name and version number of the OnDemand server.
Using online help
Online help provides information to assist you with completing tasks. The
administrative client online help contains information about the options, fields, and
commands on the windows, dialog boxes, and property sheets that you see when
using the program.
To display the online help, press F1 any time the administrative client is active in
Windows. Help is available for dialog box commands and options. The main help
topic for each dialog box usually contains information about the kinds of tasks you
can perform. For example, the online help about Logical Views lets you learn how
to create public and private logical views. The online help provides brief
procedures rather than lengthy descriptions.
To display an index of help topics, select the Index tab from the Help window. You
can type keywords to locate topics in the help file.
To search the index of help topics, select the Search tab from the Help window.
You can type search words to locate related topics in the help file.
Figure 17. Administrative client main window
92 Administration Guide
Adding a server
You can use the New Server command to add a server.
1. Select OnDemand Servers.
2. From the File menu, select New Server to open the Add a Server dialog box.
3. Type the name of the server in the Server field. The server name identifies the
server in the navigator pane of the administrator window. You can use an alias,
the actual computer or network name of the workstation, or any other
identifier you choose. By default, the administrative client copies what you
type to the Host Name field.
4. Verify the value of the Host Name field. (By default, the Host Name field
contains the same value as the Server field.) The host name can be a host name
alias, fully-qualified host name, or IP address of the server.
5. Verify the Protocol. Choose from TCP/IP and Local:
v TCP/IP. Use TCP/IP (Transmission Control Protocol/Internet Protocol) as the
network protocol. To use TCP/IP, the server and the client must include
TCP/IP in the protocol stack.
v Local. Define a server that uses the file system on this workstation. After you
define a local server, you must use the Setup command to initialize the
database on the local server.6. For TCP/IP, verify the Port Number over which the library server and the
client communicate.
The default value, 0 (zero), means that the server and client communicate over
the port number assigned to the OnDemand TCP/IP service. If the OnDemand
TCP/IP service is not assigned a port number, the server and client will
attempt to communicate over port number 1445. If the OnDemand TCP/IP
service is not assigned a port number and you plan to use a port number other
than 1445, then you must enter a valid port number. The value range is from 0
to 65535.
7. If you are adding a Windows server, you should select Attempt Unified Logon;
otherwise, you should clear the Attempt Unified Logon check box. See the IBM
DB2 Content Manager OnDemand for Multiplatforms: Installation and Configuration
Guide for more information about unified logon.
8. If you are adding a Local server, specify a Directory and select an Operating
System and a Database. See the online help for assistance.
9. Click OK to add the server.
Logging on a server
1. Point to the library server and double click the left mouse button to open the
Logon dialog box.
2. Type your OnDemand userid and password in the spaces provided. Then click
OK. Note: For a Local server, the built-in userid is admin; no password is
assigned to the admin userid.
Note: If the OnDemand system is configured for unified logon and you are
running the administrative client on a Windows system, the client attempts
to automatically log on to the server by using the Windows logon account
username. If the Windows logon account username exists in the OnDemand
user table, then the log on is successful. Otherwise, the client opens the
Logon dialog box and you must enter a valid OnDemand userid and
password to continue. If you need to log on to a Windows server using an
OnDemand userid that is different than the Windows logon account
username, you must use the Logon As command. To access the Logon As
Chapter 13. Introduction 93

command, point to the server and click the right mouse button. If you are
currently logged on to the server, you must log off the server before you can
select the Logon As command. See IBM DB2 Content Manager OnDemand for
Multiplatforms: Installation and Configuration Guide for more information about
unified logon.
Changing passwords
Note: Depending on how you set the Login Processing system parameters, the
case of a password may be significant. See “System parameters” for details.
Changing a password
To change a user’s password:
1. Select and expand the library server.
2. Select Users.
3. In the User ID list, point to the userid and click the right mouse button.
4. From the pop-up menu, select Update to open the Update a User dialog box.
5. Type the new password in the Password field.
Note: If your organization has not implemented the security user exit, then
OnDemand security verifies only the first eight characters that you type.
If you type more than eight characters, then the client will display an
error message. If your organization has implemented the security user
exit, then you can type a maximum of 128 characters.
6. Verify the new password by retyping it into the Verify Password field.
7. Click OK. OnDemand updates the database and returns to the main window.
Changing an expired password
OnDemand provides password expiration processing to help you manage security
on the system. You can set a value that represents the time in days that passwords
assigned to users remain valid. After a user’s password reaches the value that you
specify, the user must change the password. See “System parameters” for
information about how OnDemand expires passwords.
After a password reaches the expiration value, the next time the userid is used to
log on to a server, OnDemand prompts the user to enter a new password.
The user must enter the current password for the userid, a new password, and
verify the new password by retyping the new password
System parameters
OnDemand system parameters allow you to establish the following operational
settings for client programs and servers.
Maximum Password Age
Sets a time limit for passwords and determines when OnDemand prompts users to
change passwords. The default setting is Password Never Expires, meaning that
passwords do not expire and OnDemand never prompts users to change
passwords. If you select Password Always Expires, then users must change to new
passwords each time that they log on to a server. To set a specific time limit for
passwords, select Expires In __ Days and enter the number of days that
passwords are valid in the space provided. The value can be from 1 (one) to 365.
94 Administration Guide
Minimum Password Length
Determines whether passwords are required. If passwords are required, also
determines the fewest number of characters that passwords can contain. The
default value is At Least 8 Characters, meaning that passwords must contain at
least eight characters.
If you select Permit Blank Password, meaning that passwords are not required,
then the valid password length is 0 (zero) to 128 characters, if your organization
uses the security user exit; otherwise, the maximum valid value that you can
specify is 8 (eight) characters.
To set a specific minimum password length, select At Least __ Characters and
type a number in the space provided. If your organization has implemented the
security user exit, then the value can be from 1 (one) to 128. Otherwise, the value
can be from 1 (one) to 8 (eight).
Note: The password authentication that is built into OnDemand verifies only the
first eight characters that are entered by the user. The additional characters
are provided for customers that choose to implement their own password
security by using the security user exit.
When a user changes a password, the client checks the number of characters that
the user typed. The new password must contain the minimum number of
characters. Otherwise, the client issues an error message. If your organization has
not implemented the security user exit and the user types more than eight
characters, then the client issues an error message.
Inactivity Time Out
Determines when OnDemand terminates sessions between inactive clients and the
server. The default setting, Never Time Out, means that OnDemand does not
terminate a session, regardless of how long the client remains inactive. To set a
specific inactivity time out, select Time Out In __ Minutes and enter the number of
minutes in the space provided. The value can be from 1 (one) to 1440 (24 hours).
The period of inactivity is measured between requests to a server. For example,
when a user enters a query, OnDemand searches the database and builds the
document list. This completes a request to the server. If the user does not work
with the items in the document list, open another folder, or invoke another query
before the inactivity time out occurs, OnDemand automatically terminates the
session with the client.
Use caution when you set the inactivity time out. For example, assume that you set
the inactivity time out to 10 (ten). You log on to OnDemand to add an application
group. Creating the application group takes you 15 minutes to complete. After
entering all of the information about the application group, you click OK to create
the application group. OnDemand issues a message that shows a time out has
occurred. You must logoff the server, and you cannot save the information you
entered about the application group.
System Logging
Determines the messages that OnDemand saves in the system log. OnDemand
provides the system log to help you track activity and monitor the system.
Chapter 13. Introduction 95

OnDemand save messages that are generated by the various programs, such as the
ARSLOAD program. OnDemand can save a message in the system log when the
following events occur:
v A user logs on to the system
v A user logs off the system
v A user logon fails
v Application group data is queried, retrieved, loaded, updated, deleted, or
maintained
User Exit Logging
OnDemand provides a user exit point to process the system log messages. This exit
allows a user-written program to filter the messages that OnDemand saves in the
system log and take action when a particular event occurs. For example, you could
provide a user-written program to send a message to a security administrator
when someone attempts and fails to log on to the system.
If you plan to migrate index data to archive storage, you should configure the
system to save application group messages in the system log and process them
with a user-written, system log user exit program. You should design the system
log user exit program to notify an administrator when a query for migrated data
occurs. Before a query for migrated data can be completed, an administrator must
manually import a copy of the table or tables that are required from archive
storage to the database.
See the IBM DB2 Content Manager OnDemand for Multiplatforms: Installation and
Configuration Guide for more information about the system log user exit.
Login Processing
The login processing system parameters allow you to specify whether userids and
passwords are case sensitive.
By default, userids and passwords are case insensitive. When you add a user,
OnDemand converts lowercase letters in the userid to uppercase. A person can
type letters in a userid in uppercase, lowercase, or mixed case letters. For example,
if you add the userid LaGuarde, a person can enter LAGUARDE, laguarde, or LaGuarde
to log on to the server.
If you select UserID Case Sensitive, then a user must type the userid exactly as it
was entered when the user was added. For example, if you add the userid
LaGuarde, then the user must enter LaGuarde to log on to the server.
If you select Password Case Sensitive, then a user must type the password exactly
as it was entered when the user was added. For example, if you set the password
to Spring2Far, then the user must enter Spring2Far to log on to the system.
Important: You should decide whether to make userids and passwords case
sensitive when you install the system, change the defaults if necessary,
and do not change the settings again. Otherwise:
v If userids are initially case insensitive and you later choose UserID
Case Sensitive, then userids that were added before you changed the
parameter must be entered in uppercase. The same is true for
passwords.
96 Administration Guide
v If userids are initially case sensitive and you later clear UserID Case
Sensitive, then the userids that were added before you changed the
parameter that contain mixed or lowercase letters will no longer be
valid. The same is true for passwords.
If users log on to OnDemand with the CICS client program, you should configure
the system to ignore the case of userids and passwords.
Annotations
This section specifies which types of annotations (referred to as ″notes″ in the
OnDemand client) can be added by a user. This selection applies to all users with
authority to add annotations in the system.
There are three types of annotations that a user can add:
Allow Public
Allows the user to add public annotations. Public annotations to a
document can be viewed by anyone who opens that document.
Allow Private to User
Allows the user to add private annotations to a document, and those
annotations can be viewed only by the user that created the note,
application group administrators, and system administrators.
Allow Private to Group
Allows the user to add annotations to a document, and those annotations
can be viewed only by a specific group of users.
The Default Annotation Type section specifies the annotation that is selected as the
default.
System log comments
The system log comments specify whether the administrative client displays the
System Log Comments window when you perform an add, update, or delete
operation.
Enable comments
Select this option to display the System Log Comments window when you
perform an add, update, or delete operation.
Require comments
This option requires the user to enter one or more characters in the
Comments field.
Setting system parameters
To set the system parameters for an OnDemand server:
1. Log on to the library server.
2. Point to the library server and click the right mouse button.
3. From the pop-up menu, select System Parameters to open the System
Parameters dialog box. Figure 18 on page 98 shows an example of the System
Parameters dialog box.
Chapter 13. Introduction 97
|
|||
|
|||
||||
|||
||
|
|||
|||
|||

4. To change the Minimum Password Age, select the appropriate option. If you
select Expires In, enter the number of days in the space provided.
5. To change the Minimum Password Length, select the appropriate option. If
you select At Least, enter the number of characters in the space provided.
6. To change the Inactivity Time Out, select the appropriate option. If you select
Time Out In, enter the number of minutes in the space provided.
7. To choose a System Logging, User Exit Logging, or Login Processing option,
select the check box next to the item. OnDemand places a check mark in the
check box. (To clear a System Logging, User Exit Logging, or Login Processing
option, select the check box next to the item. OnDemand removes the check
mark from the check box.)
8. Specify which types of annotations can be used by a user. This selection
applies to all users with authority to add annotations in the system. There are
three annotation types available:
Allow Public
Allows the user to add public annotations. Public annotations to a
document can be viewed by anyone who opens that document.
Allow Private to User
Allows the user to add private annotations to a document, and those
annotations can be viewed only by the user that created the note,
application group administrators, and system administrators.
Allow Private to Group
Allows the user to add annotations to a document, and those
annotations can be viewed only by a specific group of users.
In the Default Annotation Type section, specify the annotation that is selected
as the default.
9. Specify whether the administrative client displays the System Log Comments
window when you perform an add, update, or delete operation.
Figure 18. System Parameters
98 Administration Guide
|
|||
|||
|||
||||
|||
||
||

10. To generate a summary of the system parameters and display the information
in a window where it can be viewed and printed, click Summary.
11. When you have finished making changes to the system parameters, click
Update. OnDemand stores the changes in the database and returns to the
administrator window. (Click Cancel to close the System Parameters dialog
box without saving your changes.)
Administrative client start up parameters
OnDemand provides parameters that you can specify as properties that the
operating system uses when you start the administrative client program. The
parameters can be used, for example, to automate the logon process and to select
the areas that appear in the navigator pane. Table 5 lists the start up parameters for
the administrative client.
Table 5. Administrative client start up parameters
Parameter Purpose Example
/1 location Identifies the drive and full path name of the
national language environment program file
directory.
/1 D:\Program Files\IBM\OnDemand32\Locale\Enu
/A Include Cabinets in the navigator pane. /A
/B Include Applications in the navigator pane. /B
/C Include Data Distribution in the navigator
pane. This parameter is valid only if you
install the Production Data Distribution
feature on the library server.
/C
/D Include Folders in the navigator pane. /D
/D 2 Include Folders in the navigator pane, but
display only the Permissions and Field
Information pages.
/D 2
/E Include Storage Sets in the navigator pane. /E
/I Include Users in the navigator pane. /I
/N Include Report Distribution in the navigator
pane.
/N
/O Include Groups in the navigator pane. /O
/P password The password for the OnDemand user
identified with the /U parameter. Use with
the /S and /U parameters to log on to a
specific server, without displaying the Logon
dialog box. If the logon is not successful,
then OnDemand opens the Logon dialog box
to allow the user to log on to the system.
/P password
/Q Include Application Groups in the navigator
pane.
/Q
/R Include Printers in the navigator pane. /R
/S server Identifies the logon server. Use with the /U
and /P parameters to log on to a specific
server, without displaying the Logon dialog
box. If the logon is not successful, the
OnDemand opens the Logon dialog box to
allow the user to log on to the system.
/S broncos
Chapter 13. Introduction 99
|

Table 5. Administrative client start up parameters (continued)
Parameter Purpose Example
/T Determines the name that appears on the
title bar of the administrator window. The
default name is OnDemand Administrator.
/T Customer Service
/U userid Identifies the OnDemand user. Use with the
/S and /P parameters to log on to a specific
server, without displaying the Logon dialog
box. If the logon is not successful,
OnDemand opens the Logon dialog box to
allow the user to log on to the system.
/U admin
Changing start up parameters
To change start up parameters:
1. Click Start —� Programs.
2. Point to IBM OnDemand32.
3. Point to OnDemand32 Administrator and click the right mouse button.
4. From the pop-up menu, select Properties.
5. Click the Shortcut tab.
6. In the Target field, enter the startup parameters. Make sure that you enter any
startup parameters after the string:
"D:\Program Files\IBM\OnDemand32\ARSADM32.EXE"
/1 D:\Program Files\IBM\OnDemand32\LOCALE\ENU
7. Click OK.
The next time that you start the administrative client, Windows uses the start up
parameters and values that you specified.
Displaying the OnDemand splash screen or About window
When the administrative client is first started, either an OnDemand splash screen
(default) or an ″About″ window is displayed for approximately two seconds.
However, if the About window has been customized, or if the OnDemand splash
screen bitmap file (ODSplash.bmp) does not exist in the OnDemand installation
directory, the About window is displayed. The amount of time to display the
splash screen or About window can be changed to a longer or shorter time by
adding an entry in the Windows Registry. The display time is specified in seconds.
A value of zero can be specified to prevent the splash screen or the About window
from being displayed.
If you have customized the About window to provide customer support
information, it might be desirable to increase the display time. Alternatively, to
provide a uniform look for all of the products used by a company, it might be
desirable not to display the OnDemand splash screen so that the administrative
client appears to be part of a suite of programs used by the company.
To disable the splash screen, set the SHOWLOGO parameter to 0.
To change the display time, locate the section My Computer\HKEY_CURRENT_USER\Software\IBM\OnDemand32\Admin\Preferences. Add a new string under Preferences
called SHOWLOGO. Set the string value to a value of zero or more seconds.
100 Administration Guide
|
|||||||||
|||||
|
|||
For more information about customizing the OnDemand administrative client, read
the technical document Customizing the IBM Content Manager OnDemand
Administrative Client..
Examples
The following program properties could be used to set up the administrative client
so that when a person starts the program, the name Customer Service is displayed
in the title bar of the administrator window.
"D:\Program Files\IBM\OnDemand32\ARSADM32.EXE"
/1 D:\Program Files\IBM\OnDemand32\LOCALE\ENU /T "Customer Service"
The following program properties could be used to set up the administrative client
so that when a person starts the program, OnDemand displays only users and
folders in the navigator pane. When the user selects folders, OnDemand displays
only the Permissions and Field Information pages.
"D:\Program Files\IBM\OnDemand32\ARSADM32.EXE"
/1 D:\Program Files\IBM\OnDemand32\LOCALE\ENU /I /D 2
The following program properties could be used to set up the administrative client
so that when a person starts the program, OnDemand attempts to log on to the
specified server, without displaying the Logon dialog box. If the logon attempt is
not successful, then OnDemand opens the Logon dialog box to allow the user to
log on to the system.
"D:\Program Files\IBM\OnDemand32\ARSADM32.EXE"
/1 D:\Program Files\IBM\OnDemand32\LOCALE\ENU /S peak /U admin /P pw
Adding items to a server
This section explains how to add items to a server. You can use commands or a
drag-and-drop operation to add items to a server.
Note: When you use the administrative client to add or update the database,
OnDemand adds a record to the system log that shows the changes you
made.
New command
After logging on to a server, select the area, for example, Users. From the File
menu, select the New command to open the Add dialog box.
Copy command
After logging on to a server, select the area. In the list pane, point to the item that
you want to copy and click the right mouse button. From the pop-up menu, select
Copy to open the Add dialog box. The fields in the Add dialog box contain
information copied from the item you selected. Before you can add the item, you
must change the item name. Depending on the item you want to add, you may
need to change other fields.
Export command
The Export command is like the Copy command, except OnDemand adds the item
to a different library server. You can use the Export command to export items from
one library server (the source server) and add them to another (the destination
server).
Chapter 13. Introduction 101
|||

After logging on to the server that contains the item you want to export, select the
area. In the list pane, point to the item that you want to export and click the right
mouse button. From the pop-up menu, select Export to open the Export dialog
box. Verify the destination server. Then click Export to add the item to the server.
Note: If the item exists on the destination server, the export fails.
To retain permissions when you export users or groups from one library server to
another library server, export them in the following order:
1. Printers
2. Users
3. Groups
4. Storage sets
5. Application groups
6. Folders
7. Cabinets
If you have added users or groups to an application group or folder that you want
to export, you should export the users and groups first. Otherwise, OnDemand
issues a warning and does not export the data. However, if you want to export the
application group or folder without the users or groups, click the Ignore Warnings
check box. OnDemand generates a warning message for each user or group that
cannot be added.
If you export applications to a target server, note the following:
v You can export an application only to an application group with the same name
as the application group that is associated with the application being exported.
v An application group with the same name as the application group that is
associated with the application to be exported must already exist on the target
server.
v The application group on the target server must have the same database fields
as the application group that is associated with the application to be exported.
v The application to be exported does not already exist in the application group
on the target server.
v The application identifier of the application that is being exported is not already
used by an application in the application group on the target server.
v If the application identifier of the application being exported is not already
defined in the application group, the Displayed Value and Database Value pair
is added to the application group as part of the export process.
Drag and drop operation
You can copy and export items using a drag-and-drop operation. For example, to
export items from one library server and add them to another, select one or more
items from the list pane and, while holding the left mouse button down, point to
the destination server. Then release the mouse button. If you are logged on to the
destination server, then OnDemand opens the Export dialog box. If you are not
logged on to the destination server, then OnDemand opens the Logon dialog box.
After verifying options in the Export dialog box, click Export to copy the items to
the server.
Note: If the item exists on the destination server, the export fails.
102 Administration Guide
|
You can also use a drag-and-drop operation to copy an item. For example, to copy
a user, select the userid from the User ID list and, while holding the left mouse
button down, point to the same server on which the user is listed. Then release the
mouse button to open the Add dialog box.
Report Wizard
OnDemand provides user assistance and easy-to-use tools to help you administer
the system. The Report Wizard assists you in adding reports to the system. The
Report Wizard helps you add a report to the system by asking questions, which
allows you to progress in an organized manner toward completing an application
group, application, and folder. Here are a few things to remember about the Report
Wizard:
v You move through the Report Wizard by answering questions that appear on the
screen.
v You can return to the previous screen at any time by clicking Previous.
v You can advance to the next screen at any time by clicking Next.
v You can advance to the final screen by clicking Finish. By choosing Finish, you
permit the Report Wizard to make all remaining decisions for you.
v You can obtain online help for a screen at any time by clicking Help or pressing
F1.
Important: The Report Wizard processes input files that contain line data or PDF
data. You must select a sample input file to proceed.
You can use the Report Wizard to add an application group, application, and
folder for a report. These actions include defining indexing information, defining
database and folder fields, configuring data and storage management, specifying
whether the application group can contain more than one application, and naming
the application group, application, and folder.
You can also use the Report Wizard to add an application to an existing
application group. This action includes defining indexing information, specifying
storage information, and identifying the application within the application group.
To add an application to an application group, the application group must have a
database field to hold the values that uniquely identify an application within the
application group. The field must contain at least one unassigned application
identifier. See the Field Information page in application groups for detailed
information about application identifiers.
Starting the Report Wizard
From the administrative client, log on to the library server to which you want to
add the report.
v To define a new application group, application, and folder, click the Report
Wizard icon on the toolbar.
v To add an application to an existing application group:
– Under the server, select Application Groups
– Select the name of the application group to which you want to add the
application
– Click the Report Wizard icon on the toolbar
Follow the on-screen instructions to add the report.
Chapter 13. Introduction 103

Using the Report Wizard
The screens in the Report Wizard are described below. On most screens, standard
options will already be selected for you. Unless you have a clear reason not to,
accept the defaults.
Note: Depending on how you use the Report Wizard, you may not see all of the
screens described below.
Introduction screen
Provides a brief explanation of the Report Wizard. If you are processing line data,
first decide whether you want to convert the input line data to AFP. Then select a
file that contains a sample of the actual report data.
After you select a file, the Report Wizard opens the Indexer Properties dialog box
to the Data Format page. The Data Format page is where you can change options
that the Report Wizard uses to display the report. For example, the Maximum
pages to display field lets you limit the number of pages that the Report Wizard
reads into the Report window. For example, assume that the input report contains
thousands of pages. However, you need only the first 20 pages of the report to
define the indexing information. You can select the ____ Pages field and enter 20 in
the space provided.
When you click OK, the Report Wizard reads the data into the Report window.
Report window
Displays the sample file and provides easy-to-use tools to help you define indexing
information, database fields, and folder fields. Press F1 to display the online help
for options and commands available from the Report window. Use the online help
to learn how to define triggers, fields, and indexes, database fields, and folder
fields.
Important: When you have finished defining the indexing, database, and folder
information, be sure to save your changes.
Managing data screen
When you load a report into the system, you can specify that you want report data
to be stored in Large Objects. You also need to specify how you want OnDemand
to manage annotations that users attach to pages of the report.
Figure 19. Report Wizard
104 Administration Guide

Application identifier screen
When you use the Report Wizard to add an application to an existing application
group, you must specify the name of the application and select a value that
uniquely identifies the application within the application group.
Storage management screen
Determines where the storage manager maintains copies of reports, and how and
when OnDemand deletes report data from the system.
Applications in the application group screen
If the report that you are defining is one of several that will be stored in the same
application group, then you can use the Report Wizard to define the database field
that contains the values that identify an application within the application group,
define the folder field that users use to search a specific application, and specify
the length of the application ID field.
Name screen
Specify the names of the application group, application, and folder. After you enter
the names, OnDemand queries the library server to make sure that the names are
valid and unique.
Wizard complete screen
Confirms the selections that you made for the report. Click Display to view a
summary of the application group, application, and folder definitions. From the
summary window, choose the Print icon from the toolbar to print a copy of the
definitions.
Note: When you are satisfied with the selections that you made for the report,
click Finish to complete defining the report. OnDemand adds the application
group, application, and folder to the library server, closes the Report Wizard,
and returns to the administrator window.
Chapter 13. Introduction 105

106 Administration Guide

Chapter 14. Concepts
Introduction
You can use the administrative client to maintain OnDemand users, groups,
printers, storage sets and storage nodes, application groups, applications, folders,
and cabinets.
An object cannot be updated by multiple users at the same time. If the same object
is updated by multiple users simultaneously, changes might be overridden, and
invalid data might be created in the database.
Users
When you define an OnDemand user, you create a userid with which a person in
your organization logs on to the OnDemand library server. You can optionally add
the userid to folders and application groups, which is one way to let the user open
folders and access data.
Each person in your organization logs on to the library server using an OnDemand
userid. OnDemand authenticates the userid and determines the usage and
administrative authority available to that person, based on the userid.
DB2 Content Manager OnDemand can store a maximum of 1,080,000 separate
user IDs.
An OnDemand userid does not necessarily have to identify an individual by name.
However, for accounting purposes, most customers assign an OnDemand userid to
each person that will use the system. When you initialize the system, OnDemand
automatically creates the ADMIN userid. The ADMIN userid has system
administrator authority. A system administrator can do the basic user functions,
such as logging on the system and opening folders. A system administrator can
also do administrative functions, such as maintaining users and groups and
creating, updating, and deleting application groups, applications, folders, storage
sets, printers, and cabinets.
Note: The ADMIN userid does not have an initial password assigned. Because the
ADMIN userid has system authority, IBM recommends that you assign a
password to the ADMIN userid immediately after installation.
When naming OnDemand users, the name that you specify:
v Can contain one to 128 characters (bytes)
v Cannot include the ’ (apostrophe), *, %, +, [ (left bracket), ] (right bracket), ″
(double quote), or blank character
v Must be unique to the library server
You can specify a userid in mixed case. By default, OnDemand ignores the case
(for example, LaGuarde is the same as laguarde). OnDemand converts lowercase
letters in a user name to uppercase (LaGuarde is stored as LAGUARDE). However,
depending on how you configure the Login Processing system parameters, userid
processing on your system may be different (the case may be significant). See
“System parameters” on page 94 for more information.
© Copyright IBM Corp. 1993, 2007 107
|||
|||
||
|

User types
When you add a user to OnDemand, you specify the User Type. The User Type and
the Authority determines the types of tasks that the user can do when logged on to
the system. You can choose from the following User Types:
User Users can log on to OnDemand, open folders that they are authorized to
access, and search for and retrieve data from application groups that they
are authorized to access. Users can be given authority to do other things
on the system.
User Administrator
A user that can also add, update, and delete users and user administrators.
A user administrator can be given authority to do other things on the
system.
Application Group/Folder/Cabinet Administrator
A user that can also add, update, and delete application groups,
applications, folders, and cabinets. An application group/folder/cabinet
administrator is automatically given Logical Views permission to all
application groups. An application group/folder/cabinet administrator can
be given authority to do other things on the system.
System Administrator
A user that can also add, update, and delete any user, group, application
group, application, folder, or cabinet on the system. A system administrator
is automatically given Logical Views permission to all application groups.
A system administrator is also the only user that can maintain storage sets
and printers.
Note: When adding or updating a user, you are not permitted to set the User Type
or Authority to a level that exceeds your own. For example, a user with
Create Users and Create Groups authority cannot create a user with Create
Folders authority.
By default, only the user, the user that created the user, user administrators,
and system administrators can view or maintain the user. See the User
Permissions page for more information
Only a system administrator, an application group/folder/cabinet
administrator, a user with administrator authority for an application group,
or a user with add document permission can store data in an application
group.
Only a system administrator, an application group/folder/cabinet
administrator, or a user with delete document permission can delete data
from an application group.
Authority
The Authority optionally lets the user do other things on the system. For example,
A User Type of User can be permitted to create users. The authority options that
you can select depend on the User Type. For example, if the User Type is
Application Group/Folder/Cabinet Administrator, then by definition, the user can
create application groups and folders. Therefore, the only additional authorities
that the user can be given are Create Users and Create Groups. Choose from the
following:
108 Administration Guide
||||||
|||||
||||
|||
||

Create Users
An optional authority for users and application group/folder/cabinet
administrators:
v If the User Type is User, lets the user create users with a User Type of
User.
v If the User Type is Application Group/Folder/Cabinet Administrator,
lets the user create users with a User Type of User or a User Type of
Application Group/Folder/Cabinet Administrator.
Note: Users with Create Users authority can maintain the users that they
create, as long as they remain an administrator of the user.
Create Groups
An optional authority for users, user administrators, and application
group/folder/cabinet administrators. Lets the user create groups. Users
with Create Groups authority can maintain the groups they create, as long
as they remain a group owner.
Create Application Groups
An optional authority for users and user administrators. Lets the user
create application groups. Users with Create Application Groups authority
can maintain the application groups that they create, as long as they
remain an administrator of application groups.
Create Folders
An optional authority for users and user administrators. Lets the user
create folders. Users with Create Folders authority can maintain the folders
that they create, as long as they remain an administrator of folders.
Create Cabinets
An optional authority for users and user administrators. Lets the user
create cabinets. Users with Create Cabinets authority can maintain the
cabinets that they create, as long as they remain an administrator of
cabinets.
Note: When adding or updating a user, you are not permitted to set the User Type
or Authority to a level that exceeds your own. For example, a user with
Create Users and Create Groups authority cannot create a user with Create
Folders authority.
Groups
OnDemand groups are a means to organize users of the system by function,
authorization, or any other purpose that you might require. You do not have to
assign a user to a group, however doing so can simplify administration of users
with similar requirements and capabilities.
When you define a group, you can add users to the group and specify folder and
application group permissions that are common to all of the users that belong to
the group. The permissions determine the types of actions users assigned to the
group can perform on the system.
When naming groups, the name that you specify:
v Can contain one to 128 characters (bytes)
v Cannot include the ’ (apostrophe), * (asterisk), % (percent), + (plus), [ (left
bracket), ] (right bracket), ″ (double quote), or blank character
Chapter 14. Concepts 109
|||
||||
|||
|||||

v Can be mixed case. However, the case does not create a unique name (LaGuarde
is the same as laguarde)
v Must be unique to the library server
You can assign a group owner. The group owner can add users to and remove
users from the group. To maintain a group’s application group and folder
permissions, the group owner must have administrator authority for the
application groups, folders, cabinets, or be an application group/folder/cabinet
administrator or a system administrator. If you do not assign a group owner, only
a system administrator user can maintain the group.
Printers
An OnDemand printer is an interface between the user and a print device that is
controlled by a server.
The OnDemand server print function is the highest performance print option that
is available to end-users of the system. The server print function is designed to
allow many documents to be selected for reprint from the document list, without
retrieving the documents to the user’s PC.
The OnDemand server print function supports printing by submitting a print job
to an IBM Infoprint Server print queue. Infoprint is an intelligent printer driver
that provides AFP capabilities for OnDemand servers. These capabilities mean that
you can use electronic forms, images, graphics, and typographical fonts in the
documents that you print. Infoprint accepts input data streams, such as AFP and
S/390 line data, prepares the data for the destination print device, and manages
print jobs that are queued for printing, in process, or on the output device.
When a user selects an item and chooses the server print command, OnDemand
retrieves a copy of the item and places it on the queue (or printer) identified by the
server printer. The data stream can include application print options. Infoprint
processes the item and the print options, sending the data to the appropriate
physical device. While Infoprint makes no distinction between print and FAX
devices, OnDemand manages these devices differently. When the user chooses a
server printer that identifies a Printer with Information, the user can specify
information that OnDemand uses to generate a header page that is sent to the
printer along with the document. When the user chooses a server printer that
identifies a FAX device, OnDemand generates a FAX cover page and places the
cover page and the item on the appropriate queue (or printer).
If your application group contains multiple applications, and your document list
contains a document from each of the application groups, when you use the server
print function to print all of the documents, one print request is generated for each
document.
OnDemand supports two types of server print devices: a FAX machine and a
physical printer. A server print device can be physically connected to the library
server or attached to another workstation on the network. Server print devices are
managed by Infoprint.
A server printer names a queue in the AIX operating system. For AIX servers, the
queue must be defined on the library server. The queue must be connected to an
Infoprint print queue. For HP-UX, Sun Solaris, and Windows servers, in addition
to identifying the queue name when you define the printer with the administrative
client, you must also configure the ARSPRT file (on HP-UX and Sun Solaris
110 Administration Guide
|

servers) or the ARSPRT.BAT file (on Windows servers) with the TCP/IP host name
or TCP/IP address of the workstation on which Infoprint is running. See IBM DB2
Content Manager OnDemand for Multiplatforms: Installation and Configuration Guide
for information about configuring OnDemand server printing.
Storage sets and storage nodes
A storage set is a named collection of primary storage nodes that support application
groups with similar storage management requirements, such as the length of time
that files are maintained in the application group and the type of media on which
the files are stored.
You typically define one or two storage sets for an OnDemand system, based on
the storage requirements of the reports that you plan to store in OnDemand. For
example, you might define one storage set to maintain reports for a period of ten
years and another storage set to maintain reports for a period of 180 days.
A storage set can contain one or more primary storage nodes. A primary storage
node identifies an object server on which OnDemand copies data to cache storage.
A storage set can write data to one and only one primary storage node at a time.
When you add an application group to the system, you assign the application
group to a storage set. The storage set must support the storage requirements of
the data that you plan to store in the application group.
If the data will be stored in archive storage, then the primary storage node must
identify a client node in storage that is managed by Tivoli Storage Manager. The
client node must be registered in a Tivoli Storage Manager policy domain. The
policy domain determines the archive storage devices that will hold the data and
how long Tivoli Storage Manager will maintain the data. In addition, the retention
period of the files in Tivoli Storage Manager must be the same as the life of the
data and indexes in OnDemand.
If you use Tivoli Storage Manager to maintain data stored in the system and you
need the system to maintain two copies of reports that are stored in archive
storage, IBM recommends that you configure a copy storage pool in Tivoli Storage
Manager. See your Tivoli Storage Manager information for assistance with
configuring a copy storage pool.
Application groups
An application group represents the data that you store in OnDemand and the
documents that you query, view, print, and FAX using OnDemand client programs.
For example, the data can be reports generated by an OS/390 application program,
index data generated by ACIF, and annotations created by users. Application group
data can be managed by OnDemand or it can be managed independently of
OnDemand.
When you define an application group, you specify properties of the application
group, such as the organization of the database and the storage characteristics for
the files that are to be stored in the application group. You also define the database
fields that will hold index data extracted from the reports that you store in the
application group.
Chapter 14. Concepts 111

OnDemand extracts index data from the reports that you load into an application
group and places the data in the database fields that you define. OnDemand uses
the index values to identify the documents that meet the search criteria entered by
a user.
When you define an application group, you can also select the types of application
group messages that OnDemand saves in the system log.
When you define an application group, you specify permissions that let users
access and maintain the application group and application group data. You can
identify the groups and users that can access data stored in the application group
with OnDemand client programs. You can specify the types of functions that users
can perform, such as viewing, printing, and annotating reports. You can assign
administrator authority to a user or a group. Administrator authority allows a user
to update the application group, for example, to authorize other users to access
data stored in the application group.
OnDemand organizes information about an application group into sections:
General, Message Logging, Storage Management, Permissions, Field Definition,
Field Information, and Advanced Index Information. Each section contains options,
fields that you can use to enter information about the application group, and
command buttons.
Applications
You typically define an application for each different type of report or source of
data that you plan to store in OnDemand.
When you define an application, you assign the application to an application
group and specify the physical and logical characteristics of the report. The
physical characteristics of a report include the code page, the type of data found in
the input file, and information about carriage control characters. The logical
characteristics of a report include the different ways that you want to present the
information contained in the report to your users.
The OnDemand data indexing, loading, and viewing programs process the report
by using the information that you specify to the application. For example, you can
specify the parameters that the OnDemand indexing program uses to locate and
extract index data from the report. You can create logical views for the application.
Logical views represent different ways to display pages of the report. You can set
up printing options, such as defining a default printer for users and printing
options for AFP and line data documents.
OnDemand organizes information about an application into sections: General,
View Information, Indexer Information, Load Information, Logical View Fields,
Logical Views, and Miscellaneous Options. Each section contains options, fields
that you can use to enter information about the application, and command buttons.
Folders
A folder provides users with the means to access the reports that you store in
OnDemand. A user opens a folder to construct a query and search for documents
in one or more of the application groups that can be accessed from the folder. The
user can also view, print, annotate, and e-mail documents from the folder.
112 Administration Guide
|||||

When you define a folder, you specify the properties of the folder, such as the
name and description of the folder, create the search and display fields that appear
when the user opens the folder, and map the folder fields to application group
database fields.
You can also specify the groups and users that can open the folder with
OnDemand client programs and other folder permissions. For example, you can
authorize a user to be the folder administrator. The folder administrator can
authorize other users to open the folder and make changes to the folder fields.
OnDemand organizes information about a folder into sections: General,
Permissions, Field Definition, Field Information, and Field Mapping. Each section
contains options, fields that you can use to enter information about the folder, and
command buttons.
Cabinets
A cabinet is a container for folders. You can use cabinets to manage folders and
enable users to navigate to folders more easily. A folder can belong to one or more
cabinets. The following diagram describes the relationship between two cabinets
and five folders. The Monthly Report cabinet contains three folders: Fund balance,
Fund transactions, and Fund performance. The Client Report cabinet also
contains three folders: Fund performance, Bond performance, and Stock
performance. The two cabinets share the Fund performance folder. In this example,
you can use the Client Report cabinet to quickly retrieve information about a
client’s portfolio, and use the Monthly Report cabinet to obtain fund information
for internal analysis.
Figure 20.
Chapter 14. Concepts 113
|
|||
|
|||||||||||
About application groups, applications, and folders
Before you can load a report into the system, you must create an application group
and an application. Before users can search for and retrieve data, you must create a
folder.
v Users open a folder to search for the reports that you load into the system. You
define one or more search fields for the folder. A folder search field is mapped
to an application group database field.
v Each database field that you define represents a category of information in the
report, such as a customer name, invoice number, or balance. When you add an
application group, OnDemand creates a database table. The database fields that
you define are columns in the table.
v You define an application for each report that you plan to store in OnDemand.
When you add an application to the system, you define information for the
OnDemand viewing, indexing, and loading programs. When you define
indexing information, you identify the name, location, and length of each
category of index information that you want to extract from the report. When
you define loading information, you map index fields in the report to
application group database fields.
v When you load a report into the system, OnDemand stores the index values that
are extracted from the report into database fields in records that are added to an
application group table.
v OnDemand uses the index values to identify the documents that meet the search
criteria that the user entered into the folder search fields.
When you want to define a report to OnDemand, your first task is to identify the
application group from which OnDemand obtains information about the index
fields and how documents are to be maintained on the system. When you define
an application group, you specify how you want OnDemand to structure
information in the database and define the database fields. When you define an
application group, you also specify how you want OnDemand to maintain data on
the system. For example, you might specify that report data should be maintained
in cache storage for 60 days and in archive storage for five years. OnDemand
maintains all of the data stored in the application group the same way. OnDemand
maintains each report that you store in the application group for the same length
of time.
v You can store the report in an existing application group. However, you must be
able to index the report using the database fields that are already defined in the
application group. The storage management information for the application
group must support the length of time that you want OnDemand to maintain
the report on the system and how and where that you want OnDemand to store
and maintain the report data.
You can verify information about an existing application group with the
Properties command. The General page shows the database organization for the
application group. The Storage Management page shows the data caching and
migration information. The Field Definition page shows the application group
database fields.
v If there are no application groups defined to OnDemand or there are no
application groups that support the database and storage management
requirements of the report, then you must add an application group to the
system.
After you add an application group, you must define an application for the report.
Most customers create an OnDemand application for each different type of report
114 Administration Guide

or source of data that they plan to store in OnDemand. When you create an
application, you must assign it to an application group. The application group
determines where OnDemand will store the report data. When you create an
application, you also specify information that the OnDemand client programs use
to view and print pages of the report and you specify instructions for the data
indexing and loading programs.
The last step in the process of adding a report to OnDemand is to create a folder.
Users open the folder to search for, display, and print reports. When you define a
folder, you select the application group that contains the data that you want users
to search when they open the folder. By creating folders that can search specific
application groups, you can determine the reports that are available to users when
they open a folder.
When you define a folder, you define search and display fields. You specify
characteristics of the folder fields, such as default search operators and whether
OnDemand displays default search values for the fields when a user opens the
folder. You also map the folder fields to application group database fields.
OnDemand permissions
Permissions are the means by which OnDemand determines who can open folders
and search for documents stored in application groups. OnDemand also uses
permissions to determine who can maintain folders, application groups, and other
objects with the administrative client.
By default, only the person that adds the folder, an application
group/folder/cabinet administrator, or a system administrator can open and
maintain the folder. By default, only the person that adds the application group, an
application group/folder/cabinet administrator, or a system administrator can
access data stored in the application group or maintain the application group.
OnDemand provides several ways for you to specify permissions. You can specify
permissions when you add or update a folder or an application group. You can
also add, remove, or update a user’s or group’s folder or application group
permissions when you add or update the user or group.
As both a convenience and security measure, you can assign a user to a group.
OnDemand groups allow you to organize users by function, authorization, or any
other logical grouping that you might require. When you assign a user to a group,
the user obtains the permissions that are in effect for the group. For example,
suppose that you create a group and authorize the group to open the Student
Information folder. Any user that you assign to the group automatically obtains
permission to open the Student Information folder. If you assign a user to more
than one group, the user normally obtains the permissions of all of the groups.
However, there are exceptions. See “Specifying permissions” on page 117 for
details.
You can specify a default set of permissions for folders and application groups.
OnDemand uses the default permissions when users and groups do not have
specific permissions for the folder or application group. If you specify permissions
for a group, then the group permissions take precedence over the default
permissions. If you specify permissions for a user, then the user permissions take
precedence, regardless of any group that the user may belong to or the default
permissions that you specified.
Chapter 14. Concepts 115
||
|
Folder permissions
You can specify default folder permissions and folder permissions for specific
groups and users. The default permissions provide every user and group defined
to the library server with the permissions that you specify. Permissions for a group
provide the users that you add to the group with the permissions that you specify
for the group. Permissions for a user provide the user with the permissions that
you specify. By default, only the person that adds the folder, an application
group/folder/cabinet administrator, or a system administrator can open the folder
or maintain the folder.
You can specify the following types of folder permissions:
Authority
Determines the types of folder functions that users can perform. For
example, Access lets users open the folder with OnDemand client
programs. To search for and retrieve data from the application groups
referenced by the folder, the user must be given access permission to the
application groups.
Named Queries
A named query is a set of search criteria, saved by name, that can be
selected and restored into folder search fields. OnDemand supports two
types of named queries: public and private. A public named query is
available to any user that can access the folder. A private named query is
available to the user that created the named query. A system administrator
or application group/folder/cabinet administrator can also access private
named queries. A user can be given authority to view, create, modify, and
delete named queries.
User/Group Fields
Lets users open the folder with OnDemand client programs and modify
the folder field information with the administrative client.
Maximum Hits
Determines the maximum number of documents that OnDemand displays
in the document list, regardless of the number that match the query. By
default, OnDemand lists all of the documents that match the query. The
OnDemand CICS client program lists a maximum of 200 documents that
match a query, regardless of the number that match a query or the value
that you specify.
Secondary Folder
Use to mark the folder as a secondary folder. When a user logs on to a
server, the client lists the primary folders that a user can open. A user can
list all of the folders that they can open, including those marked as
secondary, by choosing the All Folders option from the Open a Folder
dialog box.
Full Report Browse
Use to allow a user of the OnDemand client to select a document, retrieve
that document, and view the entire report (load) to which the document
belongs.
Application group permissions
You can specify default application group permissions and application group
permissions for specific groups and users. The default permissions provide every
user and group defined to the library server with the permissions that you specify.
Permissions for a group provide the users that you add to the group with the
116 Administration Guide
||
|
||||

permissions that you specify for the group. Permissions for a user provide the user
with the permissions that you specify. By default, only the person that adds the
application group, an application group/folder/cabinet administrator, or a system
administrator can access data stored in the application group or maintain the
application group.
You can specify the following types of application group permissions:
Application Group
Determines the types of application group functions that users can
perform. For example, Access lets users search for and retrieve data stored
in the application group using OnDemand client programs.
Document
For users that can access the application group, determines the types of
document functions that users can perform.
Annotation
For users that can access the application group, determines the types of
annotation functions that users can perform.
Query Restriction
Limits access to application group data. You typically set up a query
restriction to limit the data that a specific user or group of users can access.
Specifying permissions
To ease the administration of OnDemand, most customers organize their users into
groups, add the groups to folders and application groups, and specify permissions
for the groups. You should plan your groups before you begin creating them. After
you start using the system, you may find it difficult to change the organization of
your groups.
When you add a user to a group, the user automatically obtains the permissions
that were specified for the group. When you add a user to more than one group,
the user normally obtains the permissions of all of the groups. For example, using
the group properties listed in Table 6, a user that belongs to both groups can open
the Student Bills and Student Transcripts folders.
Table 6. Group permissions
Group GID Folders Permission
Admissions 1080100 Student Transcripts Access
Accounting 1080101 Student Bills Access
Most situations involve adding a group to a folder, specifying permissions for the
group, and then adding users to the group. However, there may be situations
when you need to deny a group of users access to a folder. When you use groups
to deny access to a folder, you must understand how OnDemand determines
folder permissions for a group (and users assigned to the group). For example,
consider the group properties listed in Table 7.
Table 7. Group permissions
Group GID Folders Permission
Admissions 1080100 Student Bills None
Admissions 1080100 Student Transcripts Access
Accounting 1080101 Student Bills Access
Chapter 14. Concepts 117
|
||
||||
||||
|||||
||
||||
||||
||||
||||
Table 7. Group permissions (continued)
Group GID Folders Permission
Accounting 1080101 Student Transcripts Access
A user that belongs to both groups can not open the Student Bills folder.
When a user belongs to more than one group, OnDemand uses the group identifier
(GID) to determine the user’s permissions. When two (or more) groups provide
permissions for the same folder, the user obtains the permissions of the group with
the lowest GID. In the example depicted in Table 7 on page 117, both groups have
been added to the Student Bills folder. Since the Admissions group has a lower
GID than the Accounting group, OnDemand uses the permissions specified for the
Admissions group to determine the permissions of a user that is assigned to both
groups. Consequently, users assigned to both groups cannot access the Student
Bills folder.
You’re probably asking yourself, “why would I assign a user to more than one
group” or “why would I create a group with no access to a folder?” Perhaps some
examples will help answer these questions (and clarify the OnDemand permission
hierarchy). As you review the examples, please remember the following rules:
v By default, the person that created the folder, a system administrator, and an
application group/folder/cabinet administrator can access the folder
v You can use the *PUBLIC name to specify default permissions for all other users
v You can specify permissions for specific groups and users:
– All of the users that belong to a group that you add to a folder will obtain
the permissions that you specify for the group
– A user that belongs to two (or more) groups that have been added to the
same folder will obtain the permissions of the group that has the lowest GID
– The permissions that you specify for a user override all other permissions,
including any default permissions (*PUBLIC) and any groups to which the
user belongs and that are added to the folder
Examples
The examples that follow show how to add groups to folders and specify folder
permissions. The same considerations hold true for adding groups to application
groups and specifying application group permissions.
Providing a group of users access to a folder: Let’s say that you want to provide
a single group of users access to a folder. Complete the following steps:
1. With *PUBLIC selected, clear all of the permissions check boxes (this is the
default).
2. Add the group to the folder.
3. Select the Access check box.
Users assigned to the group automatically obtain permission to open the folder.
Denying a group of users access to a folder: Let’s say that you want to prohibit a
single group of users from accessing a folder, while allowing all other users
defined to the library server to open the folder. Complete the following steps:
1. With *PUBLIC selected, select the Access check box (this lets all users open the
folder).
2. Add the group to the folder.
3. Clear all of the permissions check boxes.
118 Administration Guide
|
||||
|||||
|
Users assigned to the group cannot open the folder.
Providing one group of users access and denying another group of users access
to the same folder: Let’s say that you want to allow a group of users to access a
folder. However, you need to prohibit certain users in the group from accessing the
folder. You could exclude the users from the group that can access the folder.
However, there may be other folders that you want the users to access as part of
the group. To solve this, create two groups, one without access to the folder and
the other with access to the folder, and assign the users to the respective groups.
For example:
1. Create the “no access” group. This group must have a lower GID than the
“access” group. Add users to the group.
2. Create the “access” group. Add users to the group.
3. With *PUBLIC selected, clear all of the permissions check boxes (this is the
default).
4. Add the “access” group to the folder.
5. Select the Access check box.
6. Add the “no access” group to the folder.
7. Clear all of the permissions check boxes.
If you later need to deny other users access to the folder, simply add the users to
the “no access” group. You can also move users from one group to the other.
Denying one user in a group access to a folder: Assume that you want to
prohibit one user in a group from accessing a folder. After adding the group to the
folder and specifying the access permission, all users assigned to the group can
open the folder. To override the group permissions, add an individual user to the
folder and set permissions at the user level. Complete the following steps.
1. With *PUBLIC selected, clear all of the permissions check boxes (this is the
default).
2. Add the group to the folder.
3. Select the Access check box.
4. Add the user to the folder.
5. Clear all of the permissions check boxes.
Even though the user belongs to the group, the user cannot open the folder.
Providing one user in a group administrator authority: Let’s say that you want
to provide one user in a group the ability to administer the folder. Complete the
following steps.
1. With *PUBLIC selected, clear all of the permissions check boxes (this is the
default).
2. Add the group to the folder.
3. Select the Access check box.
4. Add the user to the folder.
5. Select the Administrator check box.
Only the user that you added can administer the folder; the other users in the
group can open the folder.
Chapter 14. Concepts 119
Specifying default permissions: The default permissions that you specify for an
application group or a folder will apply to every user or group defined to the
library server who is not provided with specific permissions.
For example, suppose that you specify Access as the default permission for an
application group. Every user and group that is not provided with specific
permissions can access the data that is stored in the application group. Then, you
specify Access as the default permission for a folder. Every user and group that is
not provided with specific permissions can open the folder. Later, you add a user,
without specifying application group or folder permissions. The user can open the
folder and access the data stored in the application group.
While default permissions do provide flexibility to maintain your system, you
must make sure that using the default permissions does not circumvent your
security strategy. Rather than specifying default permissions for application groups
and folders, you may want to use groups as a means to implement your security
strategy. For example, you can clear all of the permissions under *PUBLIC and
then add groups to a folder and specify the appropriate permissions for each
group. When you add a user to the system, you can assign the user to a group.
The user automatically obtains the permissions of the group. If the group does not
have access to a particular application group or folder, then neither does the user.
With this strategy, until you assign the user to a group, or provide the user with
specific permissions, the user cannot access the folder.
120 Administration Guide

Chapter 15. Advanced system administration
Overview
Applications, application groups, folders, printers, storage sets, and cabinets are
the objects that represent how OnDemand stores, manages, prints, retrieves, and
views reports and index data. Controlling and limiting access to the reports and
index data is accomplished by defining users and groups and giving them the
level of authority that is required to meet the data security strategy of an
organization.
User types
OnDemand provides the ability to centralize or decentralize the administration of
the system. OnDemand also provides the flexibility to control access to objects
from different levels. The most basic level of control is how the user is defined to
the system. When a user is added, a user type is specified. Each user type has a
different level of authority:
System Administrator
A system administrator has the highest level of authority on the system. A
system administrator can perform all tasks on all of the objects that are
defined to an OnDemand system. The objects are users, groups,
applications, application groups, folders, printers, storage sets, and
cabinets. The tasks are add, update, delete, copy, export, create a summary,
and view properties. A system administrator also has the authority to
modify the system parameters.
Application Group/Folder/Cabinet administrator
An application group/folder/cabinet administrator has the authority to
perform all tasks on all of the applications, application groups, folders, and
cabinets that are defined to an OnDemand system. The tasks are add,
update, delete, copy, export, create a summary, and view properties.
User Administrator
A user administrator has the authority to perform all tasks on all of the
users that are defined to an OnDemand system. The tasks are add, update,
delete, copy, export, create a summary, and view properties. Note: A user
administrator cannot create or delete a system administrator or an
application group/folder/cabinet administrator or change the user type of
a system administrator or an application group/folder/cabinet
administrator.
User A user has the lowest level of authority on the system. A user does not
have access to any object on the system and therefore, cannot perform any
tasks. The user must be given the authority to access an object and to
perform a task on the object.
Authority
A user’s authority can be extended beyond the authority that is built into the user
type of the user. Depending on the user type, up to five additional levels of
authority can be given:
© Copyright IBM Corp. 1993, 2007 121
|||||
||||||||
Create Users
An application group/folder/cabinet administrator or a user can be given
the authority to add users to the system. By default, when a user is added
to the system, the user that performs the add task automatically has the
authority to perform all other tasks on the user. The tasks are update,
delete, create a summary, and view properties. When a user is added, the
system automatically gives the user with Create Users authority the
permission to access and administer the newly created user. (See
“Permissions” on page 124 for information about permissions at the user
level.) If the permissions are later taken away, then the user with Create
Users authority no longer has access to the user or the authority to
administer the user.
A user with Create Users authority is similar to a user administrator in
that both can create users. However, they differ because a user with Create
Users authority can access and administer only the users that they create,
so long as their access and administrator authority is not taken away. Note:
A user with Create Users authority cannot create or delete a system
administrator, an application group/folder/cabinet administrator, or a user
administrator or change the user type of a system administrator, an
application group/folder/cabinet administrator, or a user administrator.
A user with Create Users authority also has the authority to perform copy
and export tasks on a user because both tasks add a user. An export task
involves two userids: one on the server where the user exists and one on
the server where the user will be added. The userid on the server where
the user will be added must have the authority to add a user.
Create Groups
A user administrator, an application group/folder/cabinet administrator, or
a user can be given the authority to add groups to the system. The only
other type of user that can add groups is a system administrator
By default, when a group is added to the system, the user with Create
Groups authority is designated as the group owner. The group owner has
the authority to perform all other tasks on the group. The tasks are update,
delete, create a summary, and view properties. If the owner is changed to a
different user or group, then the system automatically takes the authority
to perform tasks on the group away from the user that originally created
the group.
In general, a user has access to a group if the user is a system
administrator, the owner of the group, a member of the group that has
been designated as the owner, or a member of the group.
A user with Create Groups authority also has the authority to perform
copy and export tasks on a group because both tasks add a group. An
export task involves two userids: one on the server where the group exists
and one on the server where the group will be added. The userid on the
server where the group will be added must have the authority to add a
group.
Create Application Groups
A user administrator or a user can be given the authority to add
application groups to the system. By default, when an application group is
added to the system, the user that performs the add task automatically has
the authority to perform all other tasks on the application group. The tasks
are update, delete, create a summary, and view properties. When the
application group is added, the system automatically gives the user with
122 Administration Guide
|
|
|
|

Create Application Groups authority the permission to access and
administer the newly created application group. (See “Permissions” on
page 124 for information about permissions at the application group level.)
If the permissions are later taken away, then the user with Create
Application Groups authority no longer has access to the application group
or the authority to administer the application group.
A user with Create Application Groups authority is similar to an
application group/folder/cabinet administrator in that both can create
application groups. However, they differ because a user with Create
Application Groups authority can access and administer only those
application groups that they create, so long as their access and
administrator authority is not taken away. An application
group/folder/cabinet administrator can access and administer all of the
application groups that are defined to the system.
Because applications are considered by OnDemand to be part of an
application group, the permissions for accessing and administering
applications are defined by the permission for the application group. For
this reason too, a user with Create Application Groups authority can also
create applications for the application group.
A user with Create Application Groups authority also has the authority to
perform copy and export tasks on an application group because both tasks
add an application group. An export operation involves two userids: one
on the server where the application group exists and one on the server
where the application group will be added. The userid on the server where
the application group will be added must have the authority to add an
application group.
Create Folders
A user administrator or a user can be given the authority to add folders to
the system. By default, when a folder is added to the system, the user that
performs the add task automatically has the authority to perform all of the
other tasks on the folder. The tasks are update, delete, create a summary,
and view properties. When a folder is added, the system automatically
gives the user with Create Folders authority the permission to access and
administer the newly created folder. (See “Permissions” on page 124 for
information about permissions at the folder level.) If the permissions are
later taken away, then the user with Create Folders authority no longer has
access to the folder or the authority to administer the folder.
A user with Create Folders authority is similar to an application
group/folder/cabinet administrator in that both can create folders.
However, they differ because a user with Create Folders authority can
access and administer only the folders that they create, so long as their
access and administrator authority is not taken away. An application
group/folder/cabinet administrator can access and administer all of the
folders that are defined to the system.
A user with Create Folders authority also has the authority to perform
copy and export tasks on a folder because both tasks add a folder. An
export task involves two userids: one on the server where the folder exists
and one on the server where the folder will be added. The userid on the
server where the folder will be added must have the authority to add a
folder.
Create Cabinets
A user administrator or a user can be given the authority to add cabinets
Chapter 15. Advanced system administration 123
|
||
||
||
||
to the system. By default, when a cabinet is added to the system, the user
that performs the add task automatically has the authority to perform all
of the other tasks on the cabinet. The tasks are update, delete, create a
summary, and view properties. When a cabinet is added, the system
automatically gives the user with Create Cabinets authority the permission
to access and administer the newly created cabinet. (See “Permissions” for
information about permissions at the cabinet level.) If the permissions are
later taken away, then the user with Create Cabinets authority no longer
has access to the cabinet or the authority to administer the cabinet.
A user with Create Cabinets authority is similar to an application
group/cabinet administrator in that both can create cabinets. However,
they differ because a user with Create Cabinets authority can access and
administer only the cabinets that they create, so long as their access and
administrator authority is not taken away. An application group/cabinet
administrator can access and administer all of the cabinets that are defined
to the system.
A user with Create Cabinets authority also has the authority to perform
copy and export tasks on a cabinet because both tasks add a cabinet. An
export task involves two user IDs: one on the server where the cabinet
exists and one on the server where the cabinet will be added. The user ID
on the server where the cabinet will be added must have the authority to
add a cabinet.
Permissions
Access and control of users, groups, applications, application groups, folders,
printers, and storage sets can be given at various levels. In “User types” on page
121, the level of control was determined by the user type of the user. In this
section, a different level of control is described. Permissions on an object can be set
from the Permissions page of the object. The following topics describe the objects
and the permissions that can be set.
Users
A user can be given the authority to view documents that have been archived. A
user can also be given the authority to perform administrative tasks on the system.
A user can retrieve a list of users from the server with the administrative client.
The list contains the users that the user has the authority to access. If the user is a
system administrator or a user administrator, then the user also has the authority
to administer any user in the list.
Access authority means the user can see the user in any list that contains users and
can print or view the properties of the user. Access authority can be given to an
individual user or to a group.
Access authority is especially helpful to application group/folder/cabinet
administrators, because they can give any user in the list access to application
groups and folders. This is also true for group owners; access authority allows
them to add users to the groups that they own.
Administrator authority of a user can be given to another user or to a group.
Having administrator authority for a user means that the user or group given the
authority can delete or update the user.
124 Administration Guide
|||||||||
|||||||
||||||
|
Groups
Groups can be created by a system administrator or a user that has Create Groups
authority. Updating or deleting a group can be performed by a system
administrator or the group owner. A group owner can be a user or another group.
Allowing the group owner to be another group provides the ability to allow
multiple users to administer the group.
To see a group in a list, a user must be a member of the group, the owner of the
group, or a system administrator. For example, an application
group/folder/cabinet administrator can give groups access to application groups
and folders. However, the application group/folder/cabinet administrator must be
able to see the groups in the list on the Permissions page of the application group,
folder, or cabinet. This means that the application group/folder/cabinet
administrator must be a member of any group that requires access authority to an
application group or a folder.
A system administrator, a group owner, or a member of the group can view the
properties of the group and create a summary.
Applications
Because applications are considered by OnDemand to be part of an application
group, the permissions for accessing and administering applications are defined by
the permission for the application group. (See “Application Groups.”)
Application Groups
Application Groups can be created by system administrators, application
group/folder/cabinet administrators, and users with Create Application Groups
authority. After an application group is created, only a system administrator, an
application group/folder/cabinet administrator, a user with administrator
authority for the application group, or a member of a group that has administrator
authority for the application group can update or delete the application group.
When a user with Create Application Groups authority creates an application
group, the system automatically gives the user the authority to administer the
application group. The user can update or delete the application group, so long as
the administrator authority is not taken away.
To allow other users to see an application group in a list with the administrative
client or to search for documents with the end-user client, the users must be given
access authority to the application group. A user with access authority can also
print or view the properties of the application group. Access is given on the
Permissions page of an application group. There are three ways to give a user
access to an application group:
1. Add the user’s userid to the access list.
2. Add the name of a group to which the user belongs to the access list. The user
and all of the other members of the group will have access to the application
group.
3. Set the access permission for the reserved name *PUBLIC. All users on the
system will have access to the application group. (The *PUBLIC name is used
to set permissions for all users on the system.)
The levels of authority within the application group have a precedence order in
which the permissions are enforced. The permissions that have been set for a user
Chapter 15. Advanced system administration 125
|||
|
||
|
take precedence over any permissions that have been set for any groups that the
user may belong to. User permissions also take precedence over permissions that
have been set using the *PUBLIC name.
A user can also be given the authority to save a specific set of viewing attributes
such as zoom, background color, and so forth. The viewing attributes can be used
when a document is viewed with the end-user client. The set of viewing attributes,
called a logical view, is accessible only to the user that created the logical view.
Document and Annotation permissions can also be set for users by using the
*PUBLIC name, group names, and userids. Document permissions include add,
delete, update, view, copy, print, and FAX. Annotation permissions include add,
delete, update, view, and copy.
Folders
Folders can be created by system administrators, application group/folder/cabinet
administrators, and users with Create Folders authority. After a folder is created,
only a system administrator, an application group/folder/cabinet administrator, a
user with administrator authority for the folder, or a member of a group that has
administrator authority for the folder can update or delete the folder. When a user
with Create Folders authority creates a folder, the system automatically gives the
user the authority to administer the folder. The user can update or delete the
folder, so long as the administrator authority is not taken away.
To allow other users to see a folder in a list with the administrative client or to
open a folder with the end-user client, the users must be given access authority to
the folder. A user with access authority can also print or view the properties of the
folder. Access is given on the Permissions page of a folder. There are three ways to
give a user access to a folder:
1. Add the user’s userid to the access list.
2. Add the name of a group to which the user belongs to the access list. The user
and all of the other members of the group will have access to the folder.
3. Set the access permission for the reserved name *PUBLIC. All users on the
system will have access to the folder. (The *PUBLIC name is used to set
permissions for all users on the system.)
The levels of authority within the folder have a precedence order in which the
permissions are enforced. The permissions that have been set for a user take
precedence over any permissions that have been set for any groups that the user
may belong to. The user permissions also take precedence over permissions that
have been set using the *PUBLIC name.
In addition to allowing a user to access or administer a folder, a user can also be
given the authority to customize the appearance of the folder search and display
fields with the administrative client. The authority can be given to a specific user
or to a group. If the authority is given to a group, then any member of the group
has the authority to customize the appearance of the search and display fields.
Only the authorized user or members of the group see the customized search and
display fields with the end-user client. All other users will see the search and
display fields that have been defined using the *PUBLIC name in the folder.
A user can also be given the authority to save a specific set of search criteria when
using the end-user client. The user can restore the set of search criteria when
needed, into the search fields of a folder. The set of search criteria, called a named
query, can be made available to all of the users that have access to the folder (a
126 Administration Guide
|
|
public named query) or it can be made available only to the user that created the
named query (a private named query). When giving Named Query authority to a
user, the user can be given the authority to view named queries, but not create
them; the user can also be given the authority to create public named queries,
private named queries, or both. A user can get Named Query authority from a
group, if the group has been given Named Query authority for the folder.
Storage sets
Any user on the system can view the properties of a storage set and create a
summary. However, only a system administrator can add, delete, update, copy, or
export a storage set.
Printers
Printers are maintained by system administrators. Only a system administrator can
add, delete, update, copy, or export a printer. By default, only system
administrators can see printers in a list and therefore, only a system administrator
can view the properties of a printer or create a summary. However, it is almost
always necessary for other users to have access to printers. For this reason, a user
or group can be given access to a particular printer. A printer’s access list is
maintained on the Permissions page under printers, by using the administrative
client. Access to a printer can be given to all users and groups defined to the
system, individual groups, and individual users.
Limiting access to printers provides the ability to control which printers can be
used to print archived documents by OnDemand users. For example, suppose that
there is a printer in the customer service department. Only people in the customer
service department should be permitted to print on the printer. You can accomplish
this by creating an OnDemand group that contains only the department members
and giving only that group access to the printer.
Cabinets
You must have Create Cabinets authority, or be an application
group/folder/cabinet administrator or system administrator to work with a
cabinet.
If you have the appropriate permission, you can add, update, delete, copy, export,
summarize, find, explore, or view the properties of a cabinet.
You can also give a user one of the following two types of authority:
Access
Access authority enables the user to see the cabinet in a list of cabinets and
view the contents of the cabinet.
Administrator
Administrator authority enables the user to update and delete the cabinet
in addition to the authority that is provided by Access.
System administration
OnDemand provides the ability to centralize or decentralize the administration of
the system. A centralized environment means that one type of user, a system
administrator, controls the creation and access to all of the objects defined on the
system. A decentralized environment means that the tasks of the system
administrator are divided and assigned to other users. The responsibilities of the
Chapter 15. Advanced system administration 127
|
|||
||
|
|||
|||
other users may vary from user administration, group administration, application
group administration, folder administration, or any combination of the
administrative tasks.
The decision to centralize or decentralize the administration of the system should
be made before objects are added to the system. While the decision is reversible,
the amount of work required to change from one type of administration to the
other can be significant if a large number of users, groups, folders, and application
groups have already been added.
There are many ways to decentralize the administration of the system, because of
the various user types and the additional authority levels that can be specified for
users. Two specific models will be discussed in this section: the Object Type model
and the Object Owner model.
v In the Object Type model, all of the objects on the system are logically grouped
into administrative domains according to the type of the object. The
administrator of a domain maintains all of the objects within the domain. For
example, an application group/folder/cabinet administrator maintains all of the
application, application group, folder, and cabinet objects on the system.
v In the Object Owner model, the objects on the system are logically grouped into
administrative domains according to the creator/owner of the object. An
administrator maintains only the objects that they create. For example, a user
with create application groups and create folders authority can maintain only the
applications, application groups, and folders that they created. The Object
Owner model can be used to separate the objects on the system into logical
parts, such as a department, a company, or some other entity. Each part is
independent of the other and should be maintained separately. Each part
typically requires two administrative users. One user has the responsibility for
creating and maintaining users and groups. The other user has the responsibility
for creating and maintaining applications, application groups, and folders.
However, you can also define one user with the authority to create and maintain
users, groups, applications, application groups, and folders. In effect, the one
user would be the system administrator for a logical part of the system.
Object Type model
In the Object Type model, the system administrator defines two new users. One
user is responsible for administering applications, application groups, and folders
and is defined as an application group/folder/cabinet administrator. The second
user is responsible for administering users and groups and is defined as a user
administrator with Create Groups authority. Table 8 shows the administrative users
and the tasks assigned to the users.
Table 8. Administrator Roles in the Object Type Model
User Type Tasks
System Administrator
Create an application
group/folder/cabinet administrator
Create a user administrator with Create
Groups authority
Create and maintain storage sets
Create and maintain system printers
Create and maintain cabinets
User Administrator with Create Groups
authority
Create and maintain users
Create and maintain groups
128 Administration Guide
|
|
||
|

Table 8. Administrator Roles in the Object Type Model (continued)
User Type Tasks
Application Group/Folder/Cabinet
Administrator
Create and maintain application groups
Create and maintain applications
Create and maintain folders
Create and maintain cabinets
When maintaining application groups and folders, the application
group/folder/cabinet administrator must give other users access to the application
groups, folders, and cabinets. The recommended and simplest way to do this task
is to give access to a group, rather than to individual users. No additional work is
required by the application group/folder/cabinet administrator when another user
needs access to the application group, folder, or cabinet. When a new user is added
to the group, the user automatically gets access to the application group, folder, or
cabinet. Adding the user to the group is the responsibility of the user administrator
since the user administrator owns all of the groups in this model.
Another reason for giving groups rather than individual users access to application
groups and folders is that the application group/folder/cabinet administrator does
not have access to the users and groups in this model. Because the application
group/folder/cabinet administrator must first be given access to any users or
groups that require access to application groups, folders, or cabinets, it is simpler
and less time consuming to give access to a few groups rather than hundreds or
even thousands of users. The application group/folder/cabinet administrator is
given access to a group by adding the application group/folder/cabinet
administrator to the group. This task is done by the user administrator with Create
Groups authority. As a group member, the application group/folder/cabinet
administrator will be able to see the group in the list and will therefore be able to
give the group access to any application groups and folders on the system.
To give an application group/folder/cabinet administrator access to a user, the
user administrator with Create Groups authority must update each user and give
the application group/folder/cabinet administrator access to the user. Once access
has been given, the application group/folder/cabinet administrator will be able to
see the user in the list and will therefore be able to grant the user access to any
application groups, folders, and cabinets on the system. Again, this is not the
recommended approach because this task will have to be repeated each time that a
user is added to the system.
Object Owner model
In the Object Owner model, the system administrator defines two users for each
logical part of the system. One user is responsible for maintaining the users and
groups for a logical part of the system. The other user is responsible for
maintaining the applications, application groups, folders, and cabinets for a logical
part of the system. The Object Owner model allows you to store data from several
sources on one OnDemand system and let only one set of users access each set of
data. Table 9 on page 130 shows the administrative users and the tasks assigned to
the users.
Chapter 15. Advanced system administration 129
||
|
||
|
|||
||
|
|
||
|
|

Table 9. Administrator Roles in the Object Owner Model
User Type Tasks
System Administrator
Create a user with Create Users and
Create Groups authority
Create a user with Create Application
Groups and Create Folders authority
Create and maintain storage sets
Create and maintain system printers
User with Create Users and Create Groups
authority
Create and maintain users
Create and maintain groups
User with Create Application Groups, Create
Folders, and Create Cabinets authority
Create and maintain application groups
Create and maintain applications
Create and maintain folders
Create and maintain cabinets
In addition to the tasks listed in Table 9 under System Administrator, it is also
necessary for the system administrator to give the user with Create Users and
Groups authority access to the user with Create Application Groups, Create
Folders, and Create Cabinets authority. Otherwise, the user that creates groups will
not be able to add the user that creates application groups, folders, and cabinets to
any groups. To simplify the explanation that follows, the user with Create Users
and Groups authority will be called the user administrator and the user with
Create Application Groups and Folders authority will be called the application
group/folder/cabinet administrator.
When maintaining application groups folders, and cabinets, the application
group/folder/cabinet administrator must give access to application groups,
folders, and cabinets to other users on the system. The recommended and simplest
way to do this task is to give access to a group, rather than to individual users. No
additional work is required by the application group/folder/cabinet administrator
when another user needs access to the application group, folder, or cabinet. When
a new user is added to the group, the user automatically gets access to the
application group, folder, or cabinet. Adding the user to the group is the
responsibility of the user administrator since the user administrator owns the
groups in this model.
Another reason for providing access to application groups, folders, and cabinets
from a group rather than to an individual user is that the application
group/folder/cabinet administrator does not have access to the users and groups
in this model. Since the application group/folder/cabinet administrator must first
be given access to any users or groups that require access to application groups,
folders, or cabinets, it is simpler and less time consuming to give access to a few
groups rather than hundreds or even thousands of users. The application
group/folder/cabinet administrator is given access to a group by adding the
application group/folder/cabinet administrator to the group. This is done by the
user administrator in this model. As a group member, the application
group/folder/cabinet administrator will be able to see the group in the list and
will therefore be able to grant the group access to the application groups, folders,
and cabinets that have been defined by the application group/folder/cabinet
administrator in this model.
To give an application group/folder/cabinet administrator access to a user, the
user administrator must update each user and give the application
group/folder/cabinet administrator access to the user. Once access has been given,
130 Administration Guide
||
|
|||
||
||
|
|||
|||||
|
|||
the application group/folder/cabinet administrator will be able to see the user in
the list and will therefore be able to grant the user access to the application groups,
folders, and cabinets. Again, this is not the recommended approach because this
task will have to be repeated each time that a user is added to the system.
To illustrate how the Object Owner model can be used, assume that a company
installs an OnDemand system to provide data archival and retrieval services for
other organizations. The company provides the hardware and software required to
administer the system and archive and retrieve the data. An administrator from
each organization defines application groups and folders for their data. Another
administrator defines the users that can access the data. The system must be able
to limit access to an organization’s application groups and folders. Only users
defined by an organization should have access to the application groups and
folders that are owned by the organization. The system must also be able to limit
access to the data. Only users defined by an organization should have access to the
data that is owned by the organization. By using the Object Owner model, both
requirements can be met.
Summary
There can be many different variations of the two models that have been
described. For example, in the Object Owner model, rather than one user
administering both application groups and folders, one user can be defined to
administer application groups and another user can be defined to administer
folders. Choosing the right model or variation is an important decision that should
be made early in the planning process. Changing to a different model later is not
impossible but may require additional work if there are a large number of objects
defined on the system.
Helpful hints
1. To simplify the task of providing access to application groups, folders, and
cabinets, give access to a group rather than a user. When a new user needs
access, add the user to the group.
2. To allow an application group/folder/cabinet administrator to see groups in
the permissions list, add the application group/folder/cabinet administrator to
the groups that require access to application groups, folders, and cabinets.
3. To allow multiple users to administer the same groups, create a group of users
and make that group the group owner for any groups that need to be
administered by multiple users.
4. The Create Groups authority is most effectively used if it is combined with the
Create Users authority or added to a user administrator. Because the purpose of
a group is to give a set of users permissions to another object, it is not very
useful if the user that creates the group does not have access to any users.
Otherwise, the user that creates a group must be given access to each user that
needs to be added to the group.
Chapter 15. Advanced system administration 131
|
||

132 Administration Guide

Chapter 16. LDAP (Lightweight Directory Access Protocol)
authentication support
The Lightweight Directory Access Protocol (LDAP) is an open industry standard
that has evolved to share information between distributed applications on the same
network, organize information in a clear and consistent manner, and prevent
unauthorized modification or disclosure of private information. In recent years,
LDAP has gained wide acceptance as the directory access method of the Internet,
and becomes strategic within corporate intranets.
Starting from Version 8 Release 4, you can use LDAP to manage basic login
authentication directly on the server, in other words, you no longer need to use the
user security exit.
Requirements
Ensure that you have an LDAP Version 2 or Version 3 server.
The LDAP calls can be made over a non-secure communications port or an
SSL-enabled communications channel for more security.
How OnDemand works with LDAP
The following diagram illustrates how OnDemand works with LDAP:
When an OnDemand client makes a login request to the OnDemand server, if you
enabled LDAP authentication in the server, the OnDemand server makes an
authentication request to the LDAP through either an anonymous or credentialed
bind.
This initial call accesses the LDAP server, searches for the user’s credentials and
finds the user’s distinguished name (DN). If the user’s DN is found, the
OnDemand server makes another call to the LDAP server using that DN to
confirm that the password that was given by the user is correct. If the password is
correct, the LDAP server returns a mapped attribute in LDAP, which is usually the
OnDemand user ID. The OnDemand server takes the attribute, and proceeds with
its login.
Browserclient
ODWEKHTTP server/Application server
OnDemand Version 2 orVersion 3LDAP server
OnDemandclient
HTTP
Figure 21. How OnDemand works with LDAP
© Copyright IBM Corp. 1993, 2007 133
Enabling LDAP authentication
To enable LDAP authentication, in the administrative client, right-click your
OnDemand server, and select System Parameters. In the System Parameters
window, under LDAP Authentication, select the Enable check box. To disable
LDAP authentication, clear the Enable check box.
134 Administration Guide
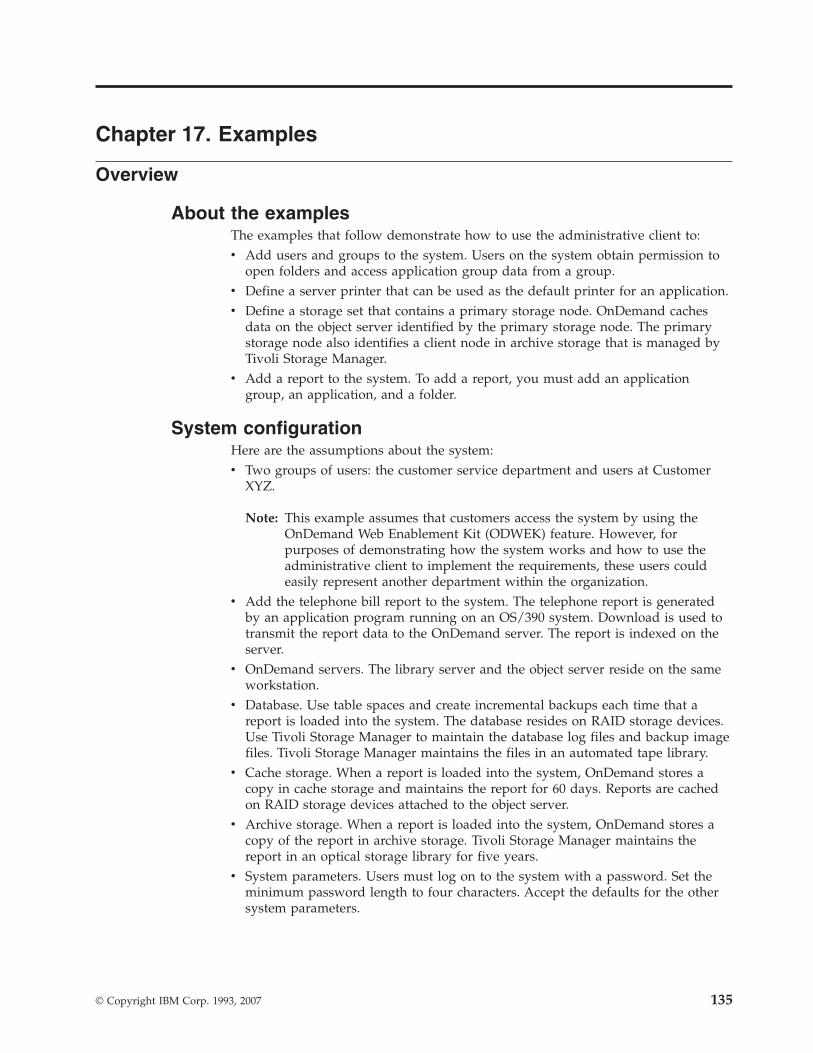
Chapter 17. Examples
Overview
About the examples
The examples that follow demonstrate how to use the administrative client to:
v Add users and groups to the system. Users on the system obtain permission to
open folders and access application group data from a group.
v Define a server printer that can be used as the default printer for an application.
v Define a storage set that contains a primary storage node. OnDemand caches
data on the object server identified by the primary storage node. The primary
storage node also identifies a client node in archive storage that is managed by
Tivoli Storage Manager.
v Add a report to the system. To add a report, you must add an application
group, an application, and a folder.
System configuration
Here are the assumptions about the system:
v Two groups of users: the customer service department and users at Customer
XYZ.
Note: This example assumes that customers access the system by using the
OnDemand Web Enablement Kit (ODWEK) feature. However, for
purposes of demonstrating how the system works and how to use the
administrative client to implement the requirements, these users could
easily represent another department within the organization.
v Add the telephone bill report to the system. The telephone report is generated
by an application program running on an OS/390 system. Download is used to
transmit the report data to the OnDemand server. The report is indexed on the
server.
v OnDemand servers. The library server and the object server reside on the same
workstation.
v Database. Use table spaces and create incremental backups each time that a
report is loaded into the system. The database resides on RAID storage devices.
Use Tivoli Storage Manager to maintain the database log files and backup image
files. Tivoli Storage Manager maintains the files in an automated tape library.
v Cache storage. When a report is loaded into the system, OnDemand stores a
copy in cache storage and maintains the report for 60 days. Reports are cached
on RAID storage devices attached to the object server.
v Archive storage. When a report is loaded into the system, OnDemand stores a
copy of the report in archive storage. Tivoli Storage Manager maintains the
report in an optical storage library for five years.
v System parameters. Users must log on to the system with a password. Set the
minimum password length to four characters. Accept the defaults for the other
system parameters.
© Copyright IBM Corp. 1993, 2007 135

Adding a user
About the example
First, review the requirements of the users that need to access the telephone bill
reports.
v One set of userids for the customer service department. Identify one user as a
user administrator. The user administrator can add other users and reset
passwords.
v One userid for Customer XYZ.
On the example system, users obtain permissions from groups. That means that
the users are not added to application groups and folders. When groups are
defined, the users are added to the groups.
The basics
In general, here is how you work in the administrative client to add a user. See the
online help for details.
1. Choose a library server and select Users.
2. Pick one of two ways to add a user.
3. Define the properties of the user by completing fields in the Add a User dialog
box.
4. Optionally add the user to groups.
5. Optionally add the user to application groups and set application group
permissions.
6. Optionally add the group to folders and set folder permissions.
7. When finished, add the user by clicking OK in the Add a User dialog box.
Note: To add a user, the logon userid must be a user with create users authority, a
user administrator, or a system administrator.
Choose a server
1. On the left side of the administrator window, click the name of the library
server to which you want to add the user.
2. Expand the areas of the library server. Double click the server name or click the
+ (plus) to the left of the server name.
3. Select Users.
Two ways to add a user
This section explains how to add a user by using the New User command. You can
also add a user by copying an existing user definition.
New User command: From the File menu, select New User to open the Add a
User dialog box.
Copy command: You can use the copy command to add a user. In the User ID
list, point to the user that you want to copy and click the right mouse button.
Select Copy from the pop-up menu to open the Add a User dialog box. The fields
in the dialog box contain information copied from the user you selected. At a
minimum, you need to change the User ID (userids must be unique to the library
server).
136 Administration Guide

Adding the user
In the Add a User dialog box, click OK. The administrative client adds the user to
the database and returns to the main window.
Adding the customer service users
Note: The following shows how to add two of the users. You can repeat the steps
to add the others.
Use the New User command to add a user.
1. First, point to Users and click the right mouse button. From the pop-up menu,
select New User to open the Add a User Dialog box.
2. In the User ID field, enter the name of the user: CSR1
3. Accept the UID generated by OnDemand.
4. Set the user’s initial password to the userid. In the Password field, enter:
service1
5. In the Verify Password field, enter: service1. The password needs to be
between 6 and 8 characters.
6. In the Description field, enter: Customer Service Representative
7. Under User Type, select User Administrator. The user will be able to maintain
userids on the system.
8. Click the User Information tab.
9. Complete the fields on the User Information page, such as the Name,
Department, and Phone Number.
10. Click the General tab.
The user will obtain application group and folder permissions from a group.
Add the user to the group when the group is added to the system. Therefore,
do not add the user to application groups, folders, or groups at this time.
Figure 22 on page 138 shows the Add a User dialog box with the basic
information completed.
Chapter 17. Examples 137
||

11. At this point, the properties of the user meet the requirements. Click OK to
add the user.
Use the Copy command to add another user.
1. Point to CSR1 and click the right mouse button. From the pop-up menu, select
Copy to open the Add a User Dialog box.
2. In the User ID field, replace CSR1 with CSR2
3. Accept the UID generated by OnDemand.
4. Set the user’s initial password to the userid. In the Password field, enter:
service2
5. In the Verify Password, enter: service2
6. Under User Type, select User.
7. Click the User Information tab.
8. Replace the information in the fields on the User Information page.
9. Click the General tab.
Figure 23 on page 139 shows the Add a User dialog box with the basic
information completed.
Figure 22. Add a User dialog box - basic information
138 Administration Guide
|
|||
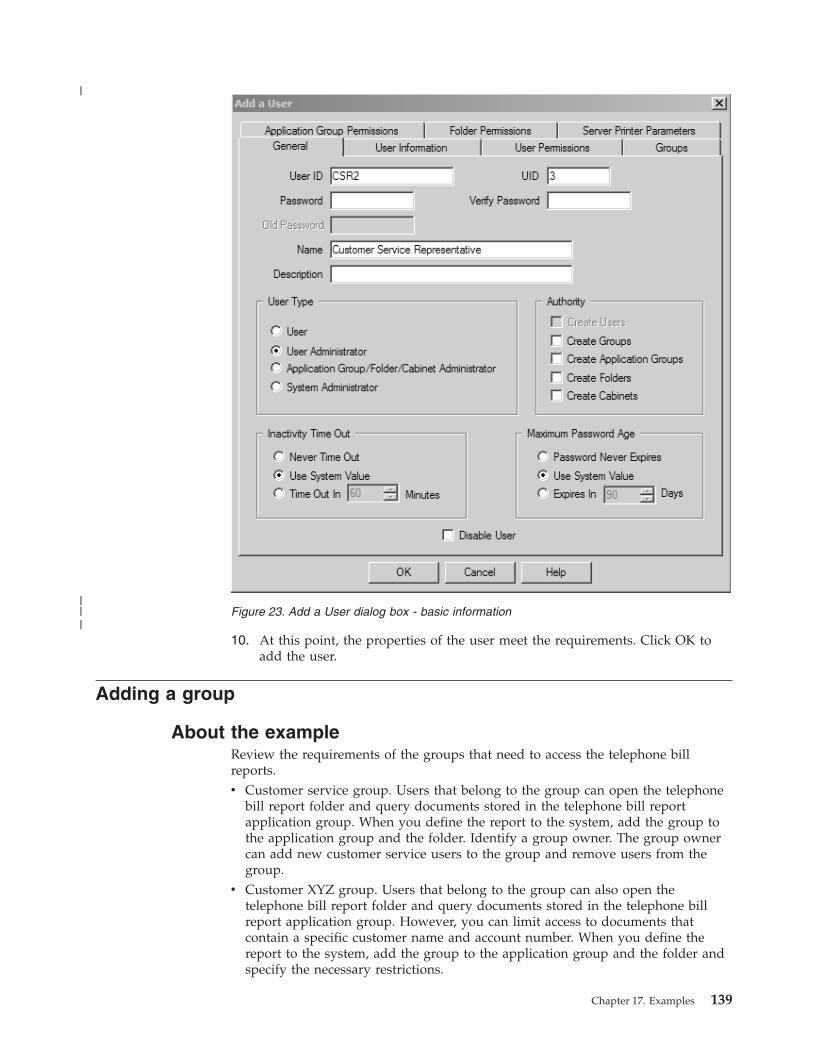
10. At this point, the properties of the user meet the requirements. Click OK to
add the user.
Adding a group
About the example
Review the requirements of the groups that need to access the telephone bill
reports.
v Customer service group. Users that belong to the group can open the telephone
bill report folder and query documents stored in the telephone bill report
application group. When you define the report to the system, add the group to
the application group and the folder. Identify a group owner. The group owner
can add new customer service users to the group and remove users from the
group.
v Customer XYZ group. Users that belong to the group can also open the
telephone bill report folder and query documents stored in the telephone bill
report application group. However, you can limit access to documents that
contain a specific customer name and account number. When you define the
report to the system, add the group to the application group and the folder and
specify the necessary restrictions.
Figure 23. Add a User dialog box - basic information
Chapter 17. Examples 139
|
|||

v Users. Add the users that were defined in “Adding a user” on page 136 to the
groups.
The basics
In general, here is how you work in the administrative client to add a group. See
the online help for details.
1. Choose a library server and select Groups.
2. Pick one of two ways to add a group.
3. Define the properties of the group by completing fields in the Add a Group
dialog box.
4. Optionally assign a group owner.
5. Optionally add users to the group.
6. Optionally add the group to application groups and set application group
permissions.
7. Optionally add the group to folders and set folder permissions.
8. When finished, add the group by clicking OK in the Add a Group dialog box.
Note: To add a group, the logon userid must be a user with create groups
authority or a system administrator.
Choose a library server
1. On the left side of the window, click the name of the library server to which
you want to add the group.
2. Expand the areas of the library server. Double click the server name or click the
+ (plus) to the left of the server name.
3. Select Groups.
Two ways to add a group
This section explains how to add a group by using the New Group command. You
can also add a group by copying an existing group definition.
New Group command: From the File menu, select New Group to open the Add a
Group dialog box.
Copy command: You can use the copy command to add a group. In the Name
list, point to the group that you want to copy and click the right mouse button.
Select Copy from the pop-up menu to open the Add a Group dialog box. The
fields in the dialog box contain information copied from the group you selected. At
a minimum, you need to change the group name (group names must be unique to
the library server).
Adding users
You can add one or more users to the group. Complete the following steps to add
a user to a group.
1. From the List of Users list, select the user.
2. Click Add. The administrative client moves the user to the Users in the Group
list.
To remove a user from the group, select the user in the Users in the Group list
and click Remove.
Adding the group
In the Add a Group dialog box, click OK. The administrative client adds the group
to the database and returns to the main window.
140 Administration Guide
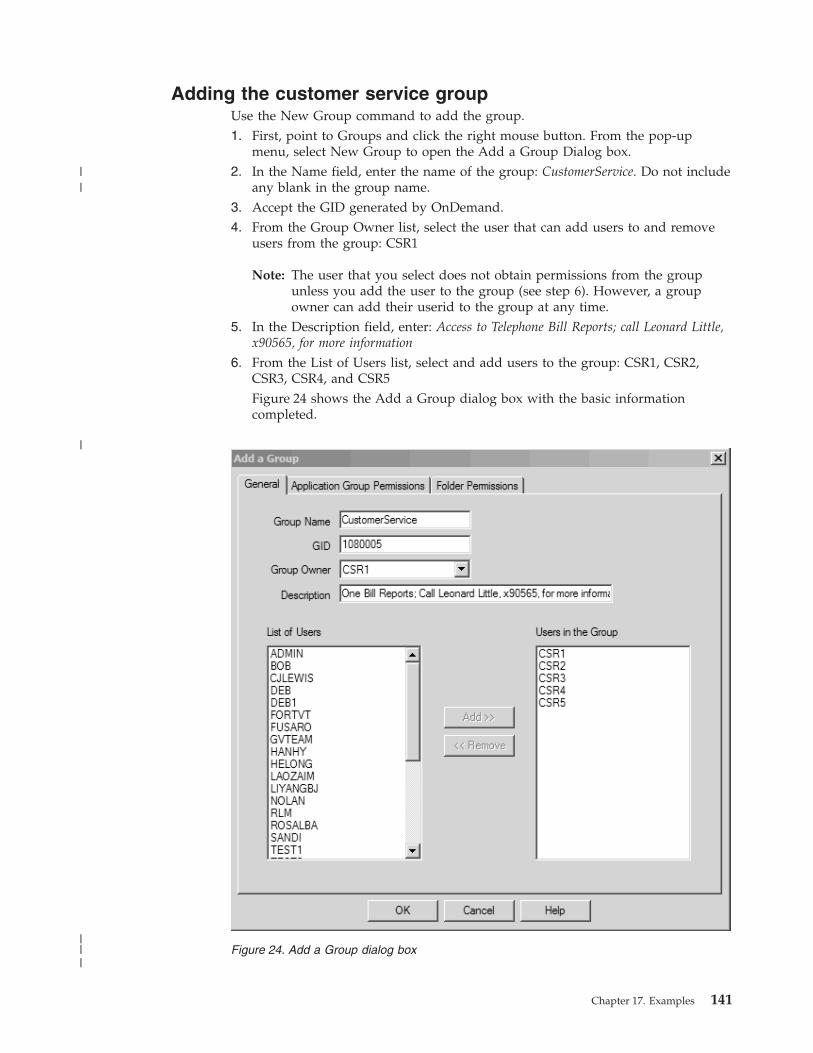
Adding the customer service group
Use the New Group command to add the group.
1. First, point to Groups and click the right mouse button. From the pop-up
menu, select New Group to open the Add a Group Dialog box.
2. In the Name field, enter the name of the group: CustomerService. Do not include
any blank in the group name.
3. Accept the GID generated by OnDemand.
4. From the Group Owner list, select the user that can add users to and remove
users from the group: CSR1
Note: The user that you select does not obtain permissions from the group
unless you add the user to the group (see step 6). However, a group
owner can add their userid to the group at any time.
5. In the Description field, enter: Access to Telephone Bill Reports; call Leonard Little,
x90565, for more information
6. From the List of Users list, select and add users to the group: CSR1, CSR2,
CSR3, CSR4, and CSR5
Figure 24 shows the Add a Group dialog box with the basic information
completed.
Figure 24. Add a Group dialog box
Chapter 17. Examples 141
|
|||
||
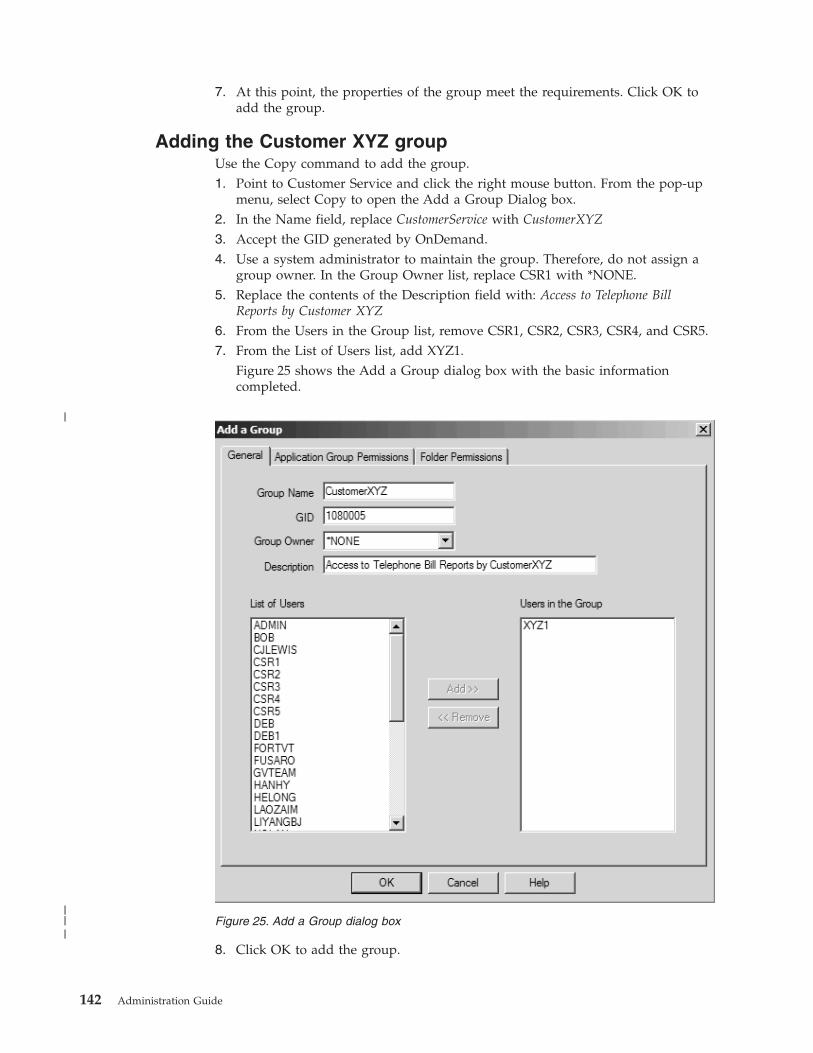
7. At this point, the properties of the group meet the requirements. Click OK to
add the group.
Adding the Customer XYZ group
Use the Copy command to add the group.
1. Point to Customer Service and click the right mouse button. From the pop-up
menu, select Copy to open the Add a Group Dialog box.
2. In the Name field, replace CustomerService with CustomerXYZ
3. Accept the GID generated by OnDemand.
4. Use a system administrator to maintain the group. Therefore, do not assign a
group owner. In the Group Owner list, replace CSR1 with *NONE.
5. Replace the contents of the Description field with: Access to Telephone Bill
Reports by Customer XYZ
6. From the Users in the Group list, remove CSR1, CSR2, CSR3, CSR4, and CSR5.
7. From the List of Users list, add XYZ1.
Figure 25 shows the Add a Group dialog box with the basic information
completed.
8. Click OK to add the group.
Figure 25. Add a Group dialog box
142 Administration Guide
|
|||

Adding a printer
About the example
Add a printer that can be used as the default server printer for the application that
will be defined in “Adding a report” on page 148. The physical printer resides in
the customer service department. By default, when users of the telephone bill
report application select a document and choose the printer command, OnDemand
sends the document to this print device.
The basics
In general, here is how you work in the administrative client to add a printer. See
the online help for details.
1. Choose a library server and select Printers.
2. Pick one of two ways to add a printer.
3. Define the properties of the printer by completing fields in the Add a Printer
dialog box.
4. When finished, add the printer by clicking OK in the Add a Printer dialog box.
Note: To add a printer, the logon userid must be a system administrator.
Choose a library server
1. On the left side of the main window, click the name of the library server to
which you want to add the printer.
2. Expand the areas of the library server. Double click the server name or click the
+ (plus) to the left of the server name.
3. Select Printers.
Two ways to add a printer
This section explains how to add a printer by using the New Printer command.
You can also add a printer by copying an existing printer definition.
New Printer command: From the File menu, select New Printer to open the Add
a Printer dialog box. Figure 26 on page 144 shows an example of the Add a Printer
dialog box.
Copy command: You can use the copy command to add a printer. In the Name
list, point to the printer that you want to copy and click the right mouse button.
Select Copy from the pop-up menu to open the Add a Printer dialog box. The
fields in the dialog box contain information copied from the printer you selected.
At a minimum, you need to change the name (printer names must be unique to
the library server).
Adding the printer
In the Add a Printer dialog box, click OK. The administrative client adds the
printer to the database and returns to the main window.
Adding the printer
Use the New Printer command to add the printer.
1. First, point to Printers and click the right mouse button. From the pop-up
menu, select New Printer to open the Add a Printer dialog box.
2. In the Name field, enter the name of the printer: Customer Service Printer
Chapter 17. Examples 143

3. In the Description field, enter: Customer service printer for the telephone bill report
application
4. In the Server Queue Name, enter: ip60cs
5. Accept the default Printer Type of Printer
Figure 26 shows the completed Add a Printer dialog box.
6. At this point, the properties of the printer meet the requirements. Click OK to
add the printer.
Adding a storage set and storage node
About the example
Review the storage requirements for the telephone bill report that will be defined
in “Adding a report” on page 148. Each report that is loaded into the system must
be copied to cache storage. In addition, for long term storage, the system must
maintain a copy of the report in archive storage.
v Cache storage. OnDemand can automatically copy report data to cache storage
on the object server identified by the primary store node. However, you need to
do two things to make sure that this happens. First, define cache storage file
systems to OnDemand. (The IBM DB2 Content Manager OnDemand for
Multiplatforms: Installation and Configuration Guide describes how to define cache
storage file systems.) Second, specify the correct storage management
information when you define the application group. For example, specify that
the data stored in the application group is copied to cache storage and specify
the number of days that you want the system to maintain the data in cache
storage.
v Archive storage. This is the storage set to which report data is copied for long
term storage. Define one primary storage node in the storage set. The primary
storage node will identify the object server on which the data is stored. In this
example, the object server is on the same workstation as the library server. Tivoli
Storage Manager is used to maintain data in archive storage. The primary
storage node identifies a client node in Tivoli Storage Manager.
The basics
In general, here is how you work in the administrative client to add a storage set.
See the online help for details.
1. Choose a library server and select Storage Sets.
2. Pick one of two ways to add a storage set.
Figure 26. Add a Printer dialog box
144 Administration Guide
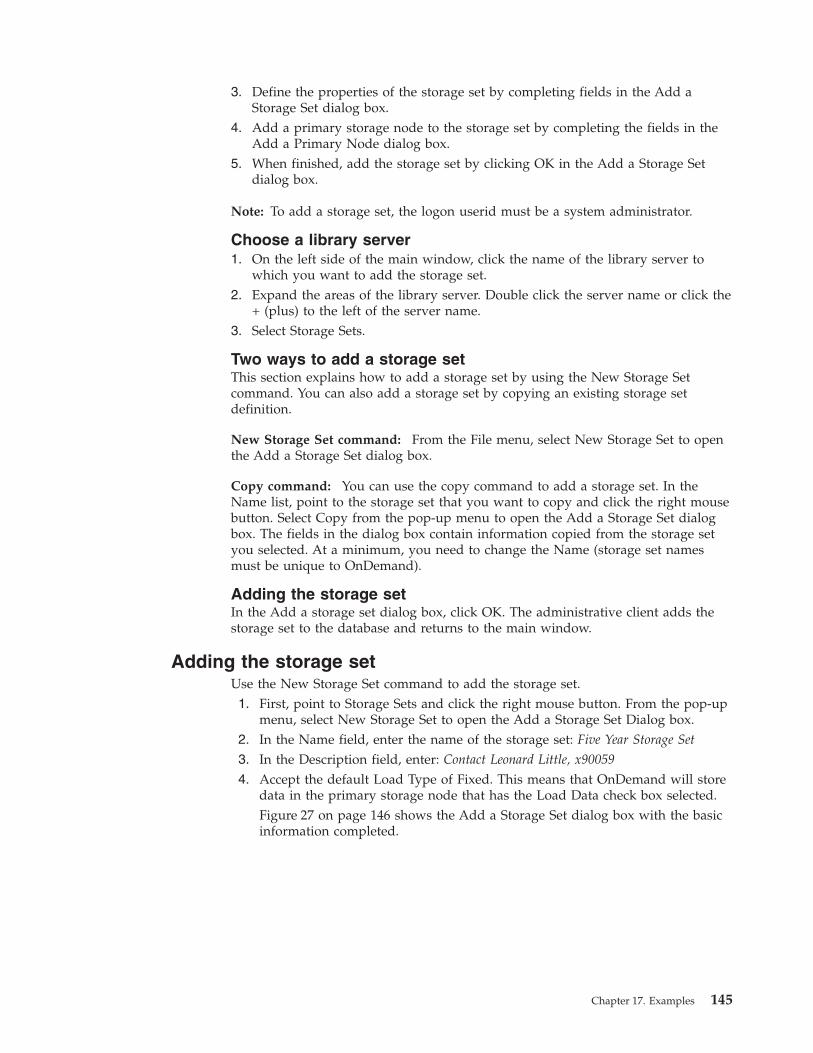
3. Define the properties of the storage set by completing fields in the Add a
Storage Set dialog box.
4. Add a primary storage node to the storage set by completing the fields in the
Add a Primary Node dialog box.
5. When finished, add the storage set by clicking OK in the Add a Storage Set
dialog box.
Note: To add a storage set, the logon userid must be a system administrator.
Choose a library server
1. On the left side of the main window, click the name of the library server to
which you want to add the storage set.
2. Expand the areas of the library server. Double click the server name or click the
+ (plus) to the left of the server name.
3. Select Storage Sets.
Two ways to add a storage set
This section explains how to add a storage set by using the New Storage Set
command. You can also add a storage set by copying an existing storage set
definition.
New Storage Set command: From the File menu, select New Storage Set to open
the Add a Storage Set dialog box.
Copy command: You can use the copy command to add a storage set. In the
Name list, point to the storage set that you want to copy and click the right mouse
button. Select Copy from the pop-up menu to open the Add a Storage Set dialog
box. The fields in the dialog box contain information copied from the storage set
you selected. At a minimum, you need to change the Name (storage set names
must be unique to OnDemand).
Adding the storage set
In the Add a storage set dialog box, click OK. The administrative client adds the
storage set to the database and returns to the main window.
Adding the storage set
Use the New Storage Set command to add the storage set.
1. First, point to Storage Sets and click the right mouse button. From the pop-up
menu, select New Storage Set to open the Add a Storage Set Dialog box.
2. In the Name field, enter the name of the storage set: Five Year Storage Set
3. In the Description field, enter: Contact Leonard Little, x90059
4. Accept the default Load Type of Fixed. This means that OnDemand will store
data in the primary storage node that has the Load Data check box selected.
Figure 27 on page 146 shows the Add a Storage Set dialog box with the basic
information completed.
Chapter 17. Examples 145

5. Next, add a primary storage node to the storage set. In the Storage Nodes
area, click Add to open the Add a Primary Node dialog box.
6. Accept the default Object Server of *ONDEMAND. This means that the object
server (and primary storage node) reside on the same workstation as the
library server.
7. In the Storage Node field, enter: FiveYearPSN1. This is the name of the
primary storage node. By convention, use the same name for the primary
storage node and its associated client node in Tivoli Storage Manager.
8. In the Description field, enter: Five year storage node.
9. In the Logon field, enter: FiveYearPSN1. This is the name of the client node in
Tivoli Storage Manager. The logon name must be the same as the client node
in Tivoli Storage Manager.
10. In the Password field, enter: FiveYearPSN1. This is the password for the client
node in Tivoli Storage Manager.
11. In the Verify Password, enter: FiveYearPSN1
12. Select the Load Data check box to identify this node as the primary storage
node in which OnDemand will load data for the application groups that are
assigned to the storage set.
Figure 28 on page 147 shows the completed Add a Primary Node dialog box.
Figure 27. Add a Storage Set dialog box - basic information
146 Administration Guide
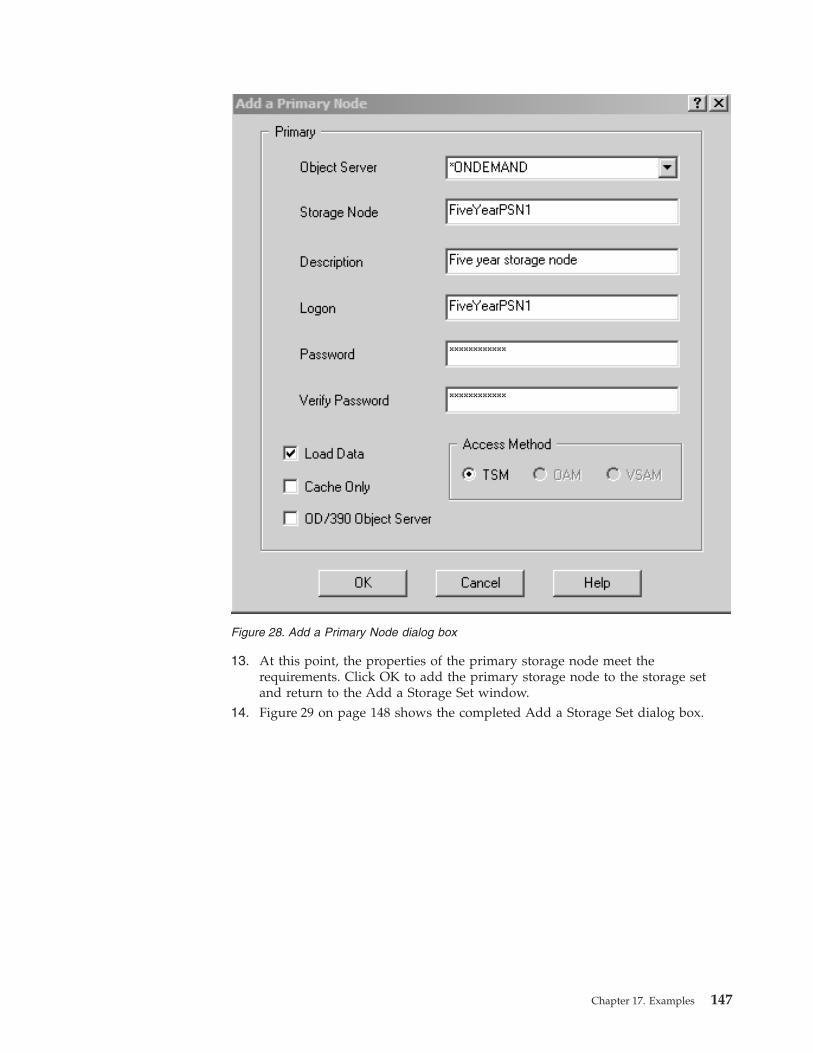
13. At this point, the properties of the primary storage node meet the
requirements. Click OK to add the primary storage node to the storage set
and return to the Add a Storage Set window.
14. Figure 29 on page 148 shows the completed Add a Storage Set dialog box.
Figure 28. Add a Primary Node dialog box
Chapter 17. Examples 147
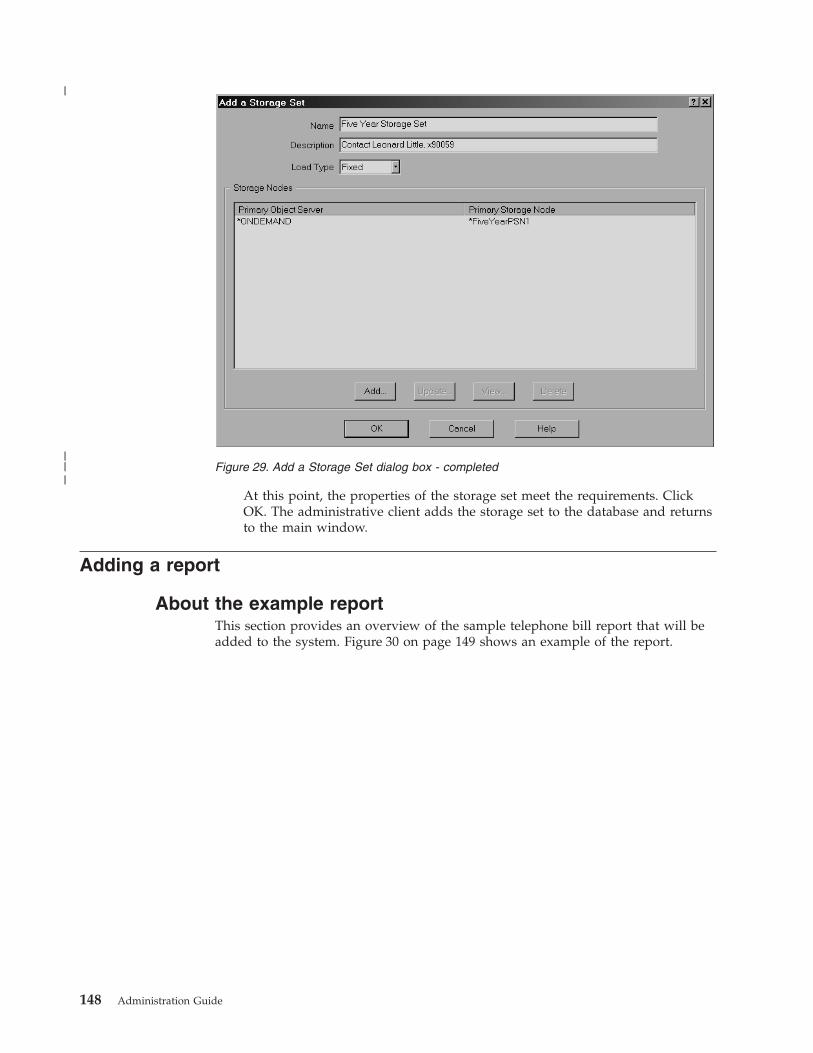
At this point, the properties of the storage set meet the requirements. Click
OK. The administrative client adds the storage set to the database and returns
to the main window.
Adding a report
About the example report
This section provides an overview of the sample telephone bill report that will be
added to the system. Figure 30 on page 149 shows an example of the report.
Figure 29. Add a Storage Set dialog box - completed
148 Administration Guide
|
|||

A telephone bill report typically contains hundreds of pages of line data. The
report is logically segmented into statements. Users search for statements using a
date and any combination of account number and customer name. The line data
will be formatted into pages and the appearance of the output will be enhanced
with images and fonts.
Most queries about a statement occur in the first sixty days after it is mailed to the
customer. Little or no activity occurs a year after a statement is generated. For legal
reasons, statements are kept for five years. The system must maintain index
information in the most efficient way possible.
Two groups of users need to access the telephone bill reports. The customer service
department is responsible for handling queries from customers. They answer
questions about the statements, attach annotations to statements, and reprint
statements. As part of a customer self-service initiative, Customer XYZ is permitted
to access the system and retrieve and view their statements.
The basics
In general, here is how you work in the administrative client to add a report to the
system:
1. Choose a library server. On the left side of the main window, click the name of
the library server on which you want to define the report.
2. Select the area. First expand the areas of the library server. Double click the
server name or click the + (plus) to the left of the server name. Then select the
area.
Figure 30. Report window
Chapter 17. Examples 149
When you define a report to the system, you typically add an application
group, an application, and a folder.
v The application group identifies database and storage management
information.
v The application identifies viewing, indexing, loading, and printing
information.
v The folder provides users the ability to search for, retrieve, view, and print
report data.3. Pick one of two ways to add an application group, an application, and a folder.
For example, use one of the following methods to add an application group:
v Add a new application group. From the File menu, select New Application
Group to open the Add an Application Group dialog box.
v Copy an existing application group. In the Name list, point to the application
group that you want to copy and click the right mouse button. Select Copy
from the pop-up menu to open the Add an Application Group dialog box.
The fields in the dialog box contain information copied from the application
group you selected. At a minimum, you need to change the Name
(application group names must be unique to the library server).4. Define the properties of the application group, application, and folder.
5. When finished, add the application group, application, and folder by clicking
OK in the add dialog box.
Note: To add an application group, the logon userid must be a system
administrator, an application group/folder/cabinet administrator, or a user
with create application groups authority.
To add an application, the logon userid must be a system administrator, an
application group/folder/cabinet administrator, or a user with create
application groups authority.
To add a folder, the logon userid must be a system administrator, an
application group/folder/cabinet administrator, or a user with create folders
authority.
About the application group
Before adding the application group, review the database and storage management
requirements.
Database requirements
Database requirements can be grouped in two categories: database tables and the
database fields.
Database tables:
v Index data is stored in table spaces
v A database table contains index data from one or more reports
v Data is managed by OnDemand
v An annotation field is not required in the database
v The date field is the segment field for the application group
Database fields:
v Three database fields: account number, customer name, and report date
150 Administration Guide
|
|
|
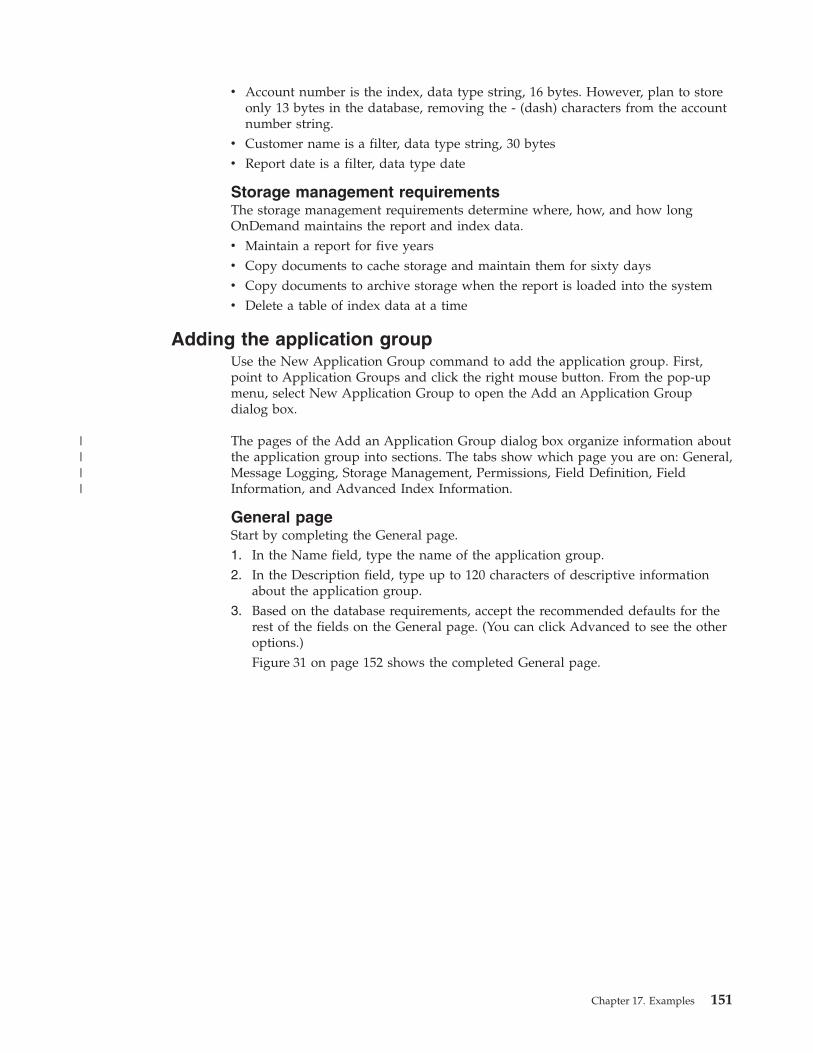
v Account number is the index, data type string, 16 bytes. However, plan to store
only 13 bytes in the database, removing the - (dash) characters from the account
number string.
v Customer name is a filter, data type string, 30 bytes
v Report date is a filter, data type date
Storage management requirements
The storage management requirements determine where, how, and how long
OnDemand maintains the report and index data.
v Maintain a report for five years
v Copy documents to cache storage and maintain them for sixty days
v Copy documents to archive storage when the report is loaded into the system
v Delete a table of index data at a time
Adding the application group
Use the New Application Group command to add the application group. First,
point to Application Groups and click the right mouse button. From the pop-up
menu, select New Application Group to open the Add an Application Group
dialog box.
The pages of the Add an Application Group dialog box organize information about
the application group into sections. The tabs show which page you are on: General,
Message Logging, Storage Management, Permissions, Field Definition, Field
Information, and Advanced Index Information.
General page
Start by completing the General page.
1. In the Name field, type the name of the application group.
2. In the Description field, type up to 120 characters of descriptive information
about the application group.
3. Based on the database requirements, accept the recommended defaults for the
rest of the fields on the General page. (You can click Advanced to see the other
options.)
Figure 31 on page 152 shows the completed General page.
Chapter 17. Examples 151
||||

Message Logging page
1. Select the Message Logging tab to specify the types of application group
messages that you want OnDemand to save in the system log. You can use the
information in the system log messages to generate system usage reports.
2. Select Retrieval, Database Queries, and Server Printing. Clear all of the other
check boxes.
Figure 32 on page 153 shows the completed Message Logging page.
Figure 31. General page
152 Administration Guide

Storage Management page
1. Select the Storage Management tab to provide information that OnDemand
uses to manage data stored in the application group.
2. From the Storage Set Name list, select the name of the storage set that the
system will use to maintain the report in cache storage and in archive storage.
The storage set was added to the system in “Adding a storage set and storage
node” on page 144. The storage set can contain one or more primary storage
nodes. A primary storage node identifies an object server and archive storage
node in Tivoli Storage Manager. The system caches the report on the object
server on which the primary storage node resides.
3. Under Cache Data, select Cache Data for __ Days and type 60 in the space
provided. The system should maintain the report in cache storage for 60 days.
After that time, when a user views or prints the report, the system retrieves the
report from archive storage.
4. Under Life of Data and Indexes, select Expire in ____ Days and type 1825 in
the space provided. This is the number of days (1825, or five years) that the
system should maintain index data, documents, and resources related to the
report. After that number of days, the system can delete the report from the
system.
5. Select Load from the Expiration Type list.
Figure 32. Message Logging page
Chapter 17. Examples 153
|
|||
|
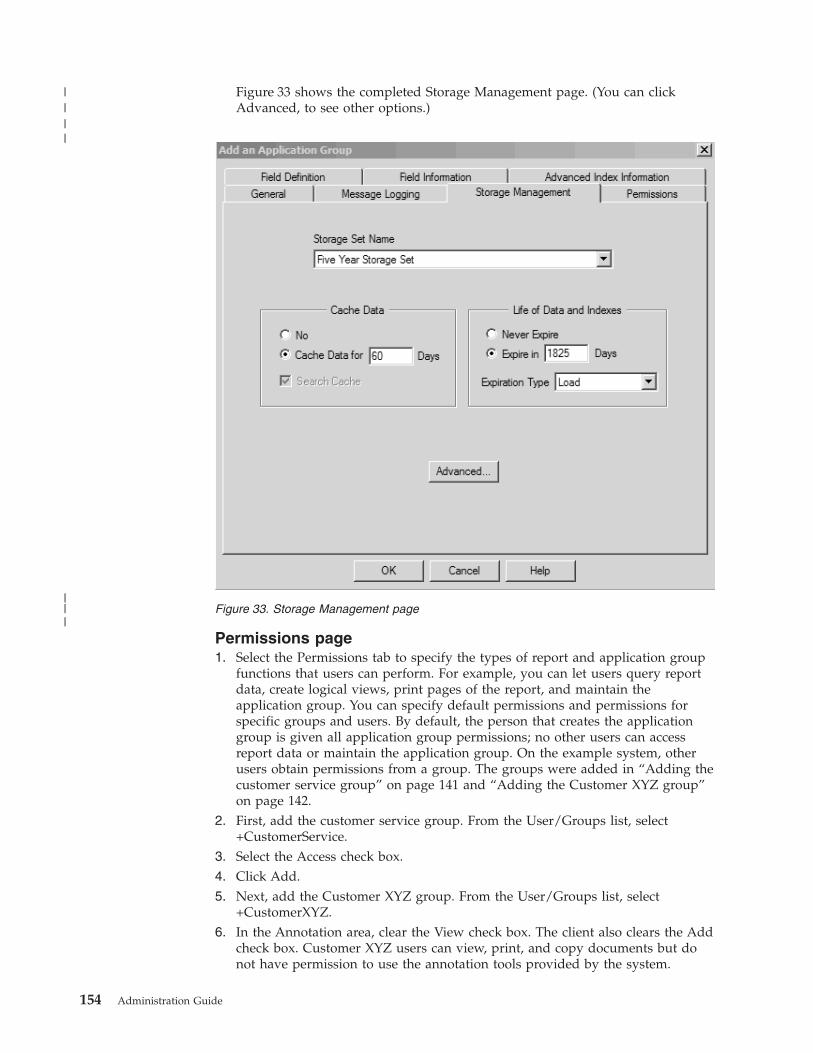
Figure 33 shows the completed Storage Management page. (You can click
Advanced, to see other options.)
Permissions page
1. Select the Permissions tab to specify the types of report and application group
functions that users can perform. For example, you can let users query report
data, create logical views, print pages of the report, and maintain the
application group. You can specify default permissions and permissions for
specific groups and users. By default, the person that creates the application
group is given all application group permissions; no other users can access
report data or maintain the application group. On the example system, other
users obtain permissions from a group. The groups were added in “Adding the
customer service group” on page 141 and “Adding the Customer XYZ group”
on page 142.
2. First, add the customer service group. From the User/Groups list, select
+CustomerService.
3. Select the Access check box.
4. Click Add.
5. Next, add the Customer XYZ group. From the User/Groups list, select
+CustomerXYZ.
6. In the Annotation area, clear the View check box. The client also clears the Add
check box. Customer XYZ users can view, print, and copy documents but do
not have permission to use the annotation tools provided by the system.
Figure 33. Storage Management page
154 Administration Guide
|
|||
|||
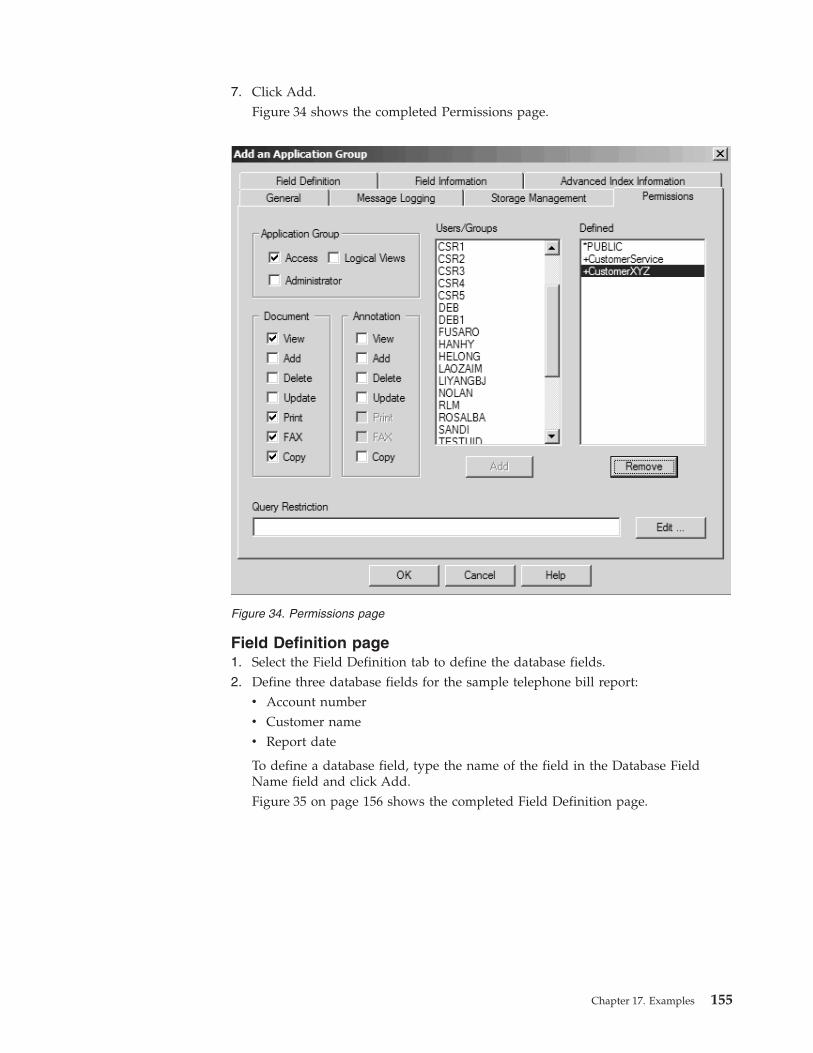
7. Click Add.
Figure 34 shows the completed Permissions page.
Field Definition page
1. Select the Field Definition tab to define the database fields.
2. Define three database fields for the sample telephone bill report:
v Account number
v Customer name
v Report date
To define a database field, type the name of the field in the Database Field
Name field and click Add.
Figure 35 on page 156 shows the completed Field Definition page.
Figure 34. Permissions page
Chapter 17. Examples 155

Field Information page
1. Select the Field Information tab to define the attributes of the database fields.
2. First, define field information for the account number field.
v From the Type list, select Index
v Type the string length (13)
Figure 36 on page 157 shows the Field Information page for the account
number field.
Figure 35. Field Definition page
156 Administration Guide
|
|||

3. Next, define field information for the customer name field.
v From the Name list, select custname
v From the Type list, select Variable
v In the Length field, type 30
Figure 37 on page 158 shows the Field Information page for the customer name
field.
Figure 36. Field Information page
Chapter 17. Examples 157
|
|||

4. Next, define field information for the report date field.
v From the Name list, select rdate
v From the Data Type list, select Date
v Select the Segment check box
Figure 38 on page 159 shows the Field Information page for the report date
field.
Figure 37. Field Information page
158 Administration Guide
|
|||

For this example, leave the Advanced Index Information tab as default.
At this point, the properties of the application group meet the requirements. Click
OK in the Add an Application Group window. The administrative client adds the
application group to the database and returns to the main window.
About the application
Before adding the application, review the viewing, indexing, loading, and printing
requirements.
Viewing requirements
v Source (line) data stored in OnDemand as AFP data
v Format data into pages and enhance the appearance with images and fonts
v Retrieve statements of one or more pages
v Define a default printer for the application. The default printer is where
OnDemand sends documents when users select the server print command.
Indexing requirements
v Source data is EBCDIC, code page 500
v Segment report into groups of pages, one statement in each group
v Identify the beginning of a statement using:
Skip-to-channel one (X'F1')
Figure 38. Field Information page
Chapter 17. Examples 159
|
||||
PAGE 1 (X'D7C1C7C5404040F1')v Generate three indexes for each statement: statement date, account number, and
customer name
v Collect resources
Loading requirements
v Compress and store data in the most efficient method possible
v Application group database field names and index names match
v Date format is Mth d, yyyy
v Remove embedded - (dash) character from account number before storing value
in the database
Adding the application
Use the New Application command to add the application. First, point to
Applications and click the right mouse button. From the pop-up menu, select New
Application to open the Add an Application dialog box.
The pages of the Add an Application dialog box organize information about the
application into sections. The tabs show which page you are on: General, View
Information, Indexer Information, Load Information, Logical View Fields, Logical
Views, and Miscellaneous Options.
General page
Start by completing the General page.
1. In the Name field, type the name of the application.
2. In the Description field, type information about the application.
3. Click Select to open the Application Groups dialog box.
4. From the Names list, select Telephone Bill Reports.
5. Click OK.
Figure 39 on page 161 shows the completed General page.
160 Administration Guide

View Information page
1. Select the View Information tab to specify information needed by OnDemand
client programs to display the telephone bill report. This information is also
used by the indexing program.
2. From the Data Type list, select Line.
Even though the report will be stored in the system as AFP data, initially set
the Data Type to Line so that a sample of the source data can be processed
with the graphical indexer. After generating the indexing parameters, you must
reset the Data Type to AFP by selecting CONVERT=YES on the Data Format
page of the Indexer Properties dialog box.
3. In the RECFM area, select Fixed. The report contains fixed length records, 133
bytes in length.
Figure 40 on page 162 shows the View Information page.
Figure 39. General page
Chapter 17. Examples 161

Indexer Information page
The Indexer Information page is where you can use a sample input report to
define the indexing parameters and extract sample data values for use when
processing reports in production.
Note: The example provides instructions for using the OnDemand graphical
indexer to process a sample report and create indexing information. The
graphical indexer is part of the OnDemand administrative client, a Windows
application. To process a sample report, you typically create or extract a
subset of a complete report. The report in this example was generated on an
OS/390 system, transferred to a Windows workstation (as a binary file) and
then loaded into the graphical indexer.
It is important that the sample data that you use to create the indexing
information matches the actual data to be indexed and loaded into the
system. When you load a report into the system, OnDemand uses the
indexing parameters, options, and data values from the OnDemand
application to index the data. If the data being loaded does not match the
data that you use to generate indexing parameters with the graphical
indexer, then OnDemand may not index the data properly. For example,
OnDemand may not be able to locate triggers, indexes, and fields or extract
the correct index values.
1. Select the Indexer Information tab. Figure 41 on page 163 shows an example
of the Indexer Information page.
Figure 40. View Information page
162 Administration Guide

2. From the Indexer list, select ACIF.
3. Process a sample report using the graphical indexer. In the Parameters Source
area, select Sample Data.
4. Click Modify to open the Open dialog box.
5. Select the name of the file that contains the sample report data.
6. Click Open. The client opens the Indexer Properties dialog box to the Data
Format page. The Data Format page is where you can specify information that
the client uses to read the report into the report window. For example, you
can use the Maximum pages to display field to limit the number of pages that
the client reads into the report window. Assume that the input report contains
thousands of pages. You need only the first 20 pages of the report to define
the indexing information. You can select the ____ Pages field and type 20 in
the space provided.
7. No changes are required on the Data Format page for the example. However,
when processing your own sample data, you must verify the information on
the Data Format page; the report data will be displayed correctly only if all
the information is correct for the type and format of the input data.
8. Click OK. The client reads the file into the report window. Figure 42 on page
164 shows the report window.
Figure 41. Indexer Information page
Chapter 17. Examples 163
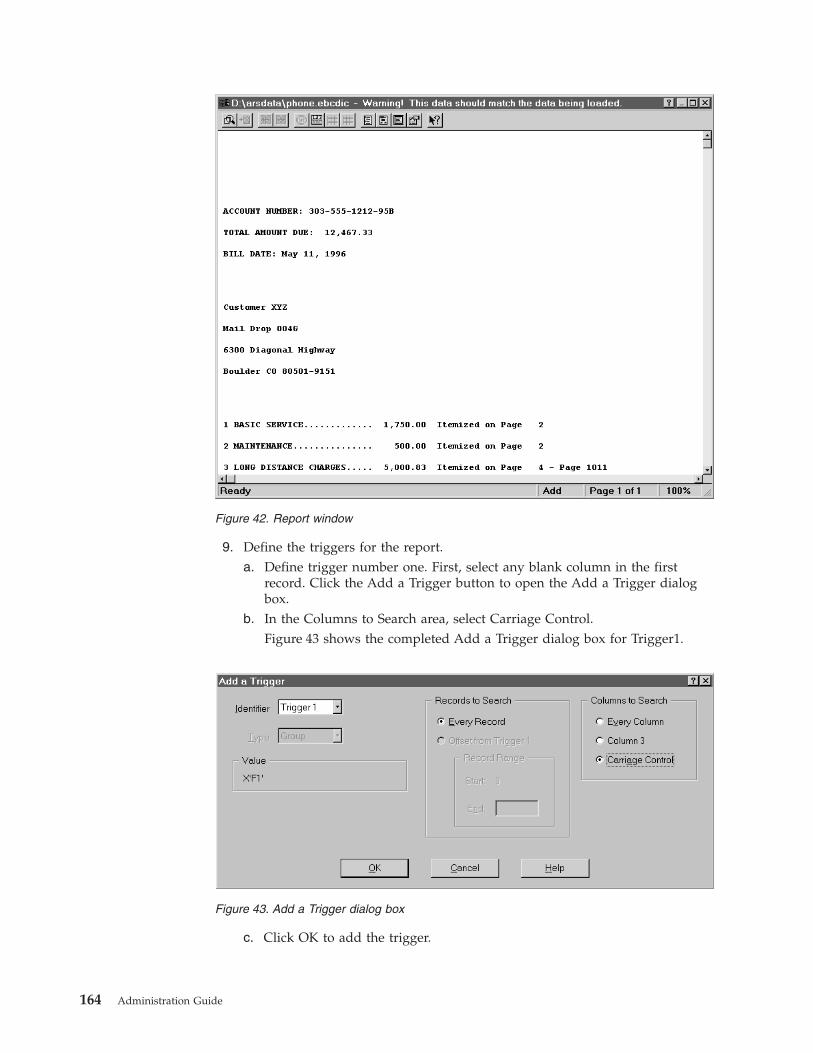
9. Define the triggers for the report.
a. Define trigger number one. First, select any blank column in the first
record. Click the Add a Trigger button to open the Add a Trigger dialog
box.
b. In the Columns to Search area, select Carriage Control.
Figure 43 shows the completed Add a Trigger dialog box for Trigger1.
c. Click OK to add the trigger.
Figure 42. Report window
Figure 43. Add a Trigger dialog box
164 Administration Guide
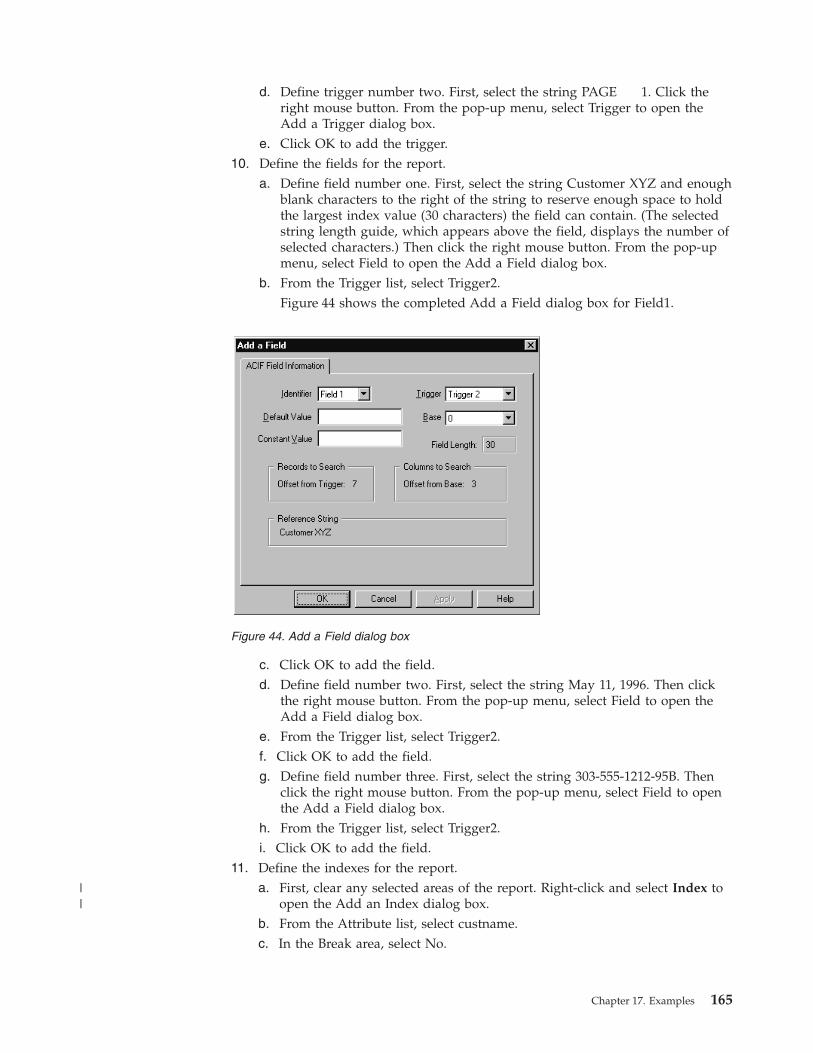
d. Define trigger number two. First, select the string PAGE 1. Click the
right mouse button. From the pop-up menu, select Trigger to open the
Add a Trigger dialog box.
e. Click OK to add the trigger.10. Define the fields for the report.
a. Define field number one. First, select the string Customer XYZ and enough
blank characters to the right of the string to reserve enough space to hold
the largest index value (30 characters) the field can contain. (The selected
string length guide, which appears above the field, displays the number of
selected characters.) Then click the right mouse button. From the pop-up
menu, select Field to open the Add a Field dialog box.
b. From the Trigger list, select Trigger2.
Figure 44 shows the completed Add a Field dialog box for Field1.
c. Click OK to add the field.
d. Define field number two. First, select the string May 11, 1996. Then click
the right mouse button. From the pop-up menu, select Field to open the
Add a Field dialog box.
e. From the Trigger list, select Trigger2.
f. Click OK to add the field.
g. Define field number three. First, select the string 303-555-1212-95B. Then
click the right mouse button. From the pop-up menu, select Field to open
the Add a Field dialog box.
h. From the Trigger list, select Trigger2.
i. Click OK to add the field.11. Define the indexes for the report.
a. First, clear any selected areas of the report. Right-click and select Index to
open the Add an Index dialog box.
b. From the Attribute list, select custname.
c. In the Break area, select No.
Figure 44. Add a Field dialog box
Chapter 17. Examples 165
||
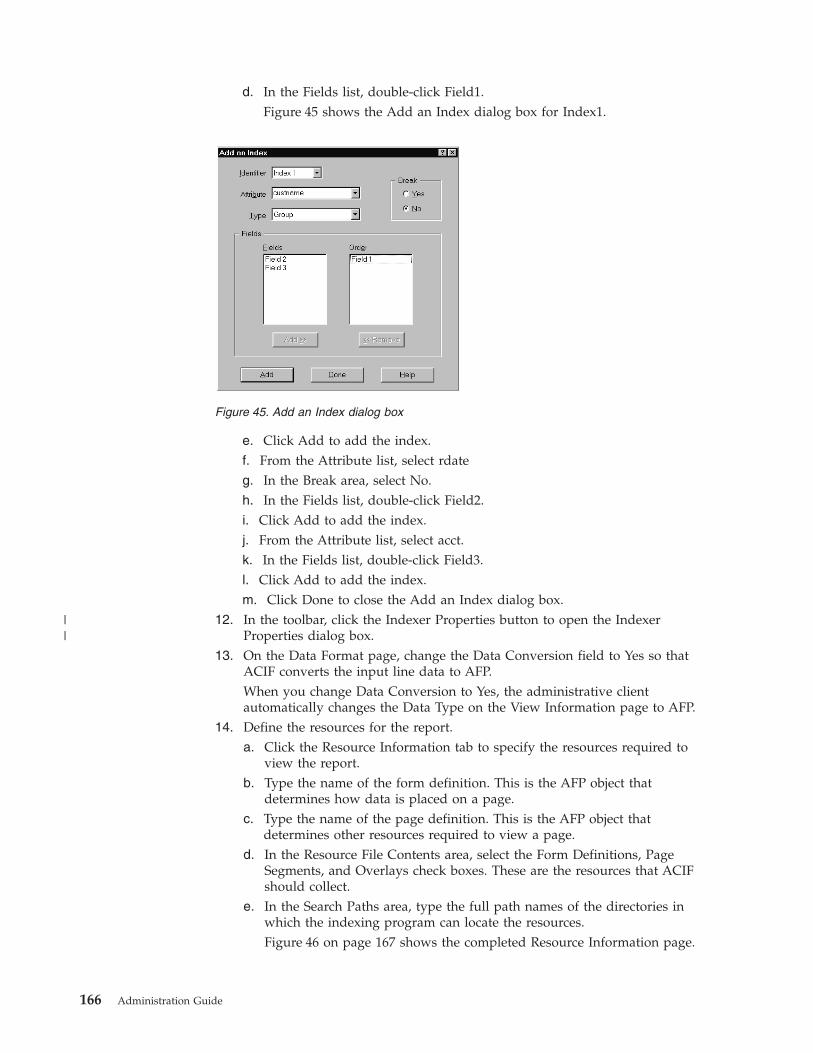
d. In the Fields list, double-click Field1.
Figure 45 shows the Add an Index dialog box for Index1.
e. Click Add to add the index.
f. From the Attribute list, select rdate
g. In the Break area, select No.
h. In the Fields list, double-click Field2.
i. Click Add to add the index.
j. From the Attribute list, select acct.
k. In the Fields list, double-click Field3.
l. Click Add to add the index.
m. Click Done to close the Add an Index dialog box.12. In the toolbar, click the Indexer Properties button to open the Indexer
Properties dialog box.
13. On the Data Format page, change the Data Conversion field to Yes so that
ACIF converts the input line data to AFP.
When you change Data Conversion to Yes, the administrative client
automatically changes the Data Type on the View Information page to AFP.
14. Define the resources for the report.
a. Click the Resource Information tab to specify the resources required to
view the report.
b. Type the name of the form definition. This is the AFP object that
determines how data is placed on a page.
c. Type the name of the page definition. This is the AFP object that
determines other resources required to view a page.
d. In the Resource File Contents area, select the Form Definitions, Page
Segments, and Overlays check boxes. These are the resources that ACIF
should collect.
e. In the Search Paths area, type the full path names of the directories in
which the indexing program can locate the resources.
Figure 46 on page 167 shows the completed Resource Information page.
Figure 45. Add an Index dialog box
166 Administration Guide
||

15. Click OK to close the Indexer Properties dialog box.
16. Close the report window, saving the changes.
Load Information page
1. Select the Load Information tab to specify information that OnDemand uses to
process the index data before storing it in the database.
2. In the Application Group DB Name list, select rdate to specify the format of the
date as it appears in the report.
3. From the format list, select %b %e, %Y
Figure 47 on page 168 shows the Load Information for the report date field.
Figure 46. Resource Information page
Chapter 17. Examples 167
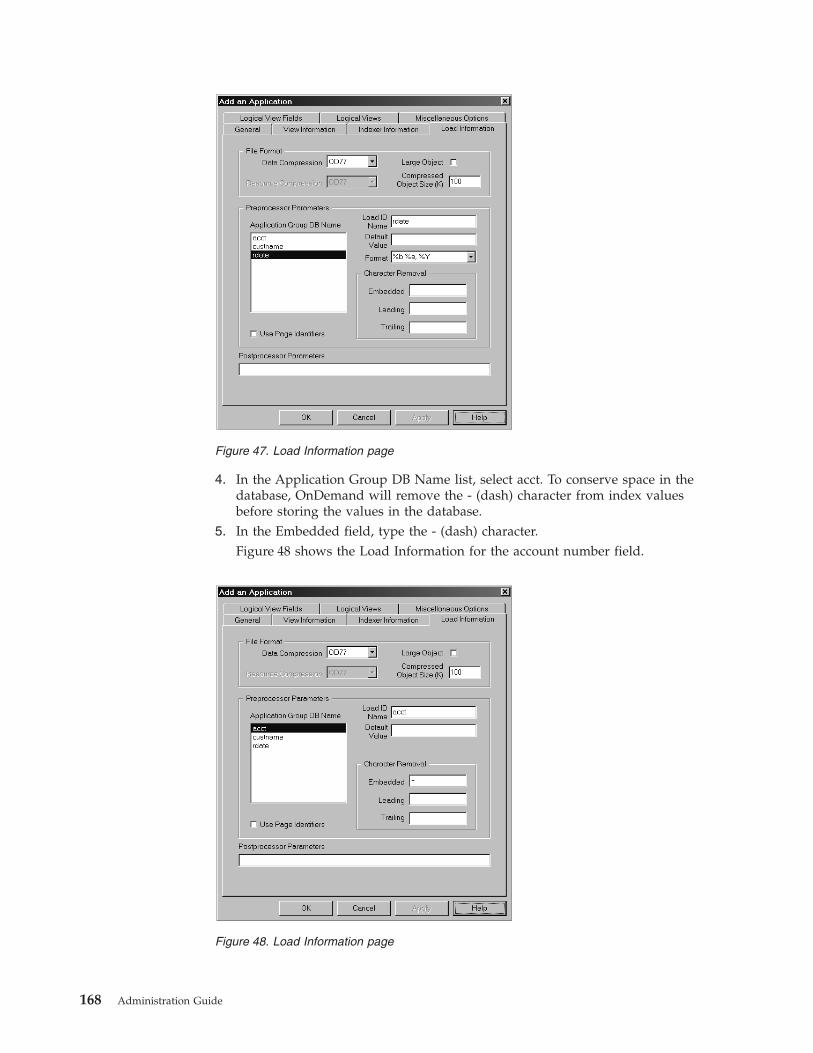
4. In the Application Group DB Name list, select acct. To conserve space in the
database, OnDemand will remove the - (dash) character from index values
before storing the values in the database.
5. In the Embedded field, type the - (dash) character.
Figure 48 shows the Load Information for the account number field.
Figure 47. Load Information page
Figure 48. Load Information page
168 Administration Guide

Miscellaneous Options page
1. Select the Miscellaneous Options tab to specify client and server processing
options for the application.
2. Under Client Options, in the Default Server Printer list, select Customer Service
Printer. This is the printer that was defined in “Adding a printer” on page 143.
Figure 49 shows the completed Miscellaneous Options page.
At this point, the properties of the application meet the requirements. Click OK in
the Add an Application window. The administrative client adds the application to
the database and returns to the main window.
About the folder
Before adding the folder, review the data access requirements, the types of
permissions that should be specified, and the search and display fields that should
be defined.
Data access requirements
The folder allows users to access the telephone bill report application group and
the telephone bill report application.
Permissions
Who needs access to the folder and what types of permissions do the users need?
v Users in the customer service department can open the folder to search for and
retrieve statements.
v Users at Customer XYZ can open the folder to search for and retrieve statements
that contain their account number and customer name.
v Define a set of folder fields for the Customer XYZ users. The folder fields will
limit access to specific statements.
Figure 49. Miscellaneous Options page
Chapter 17. Examples 169
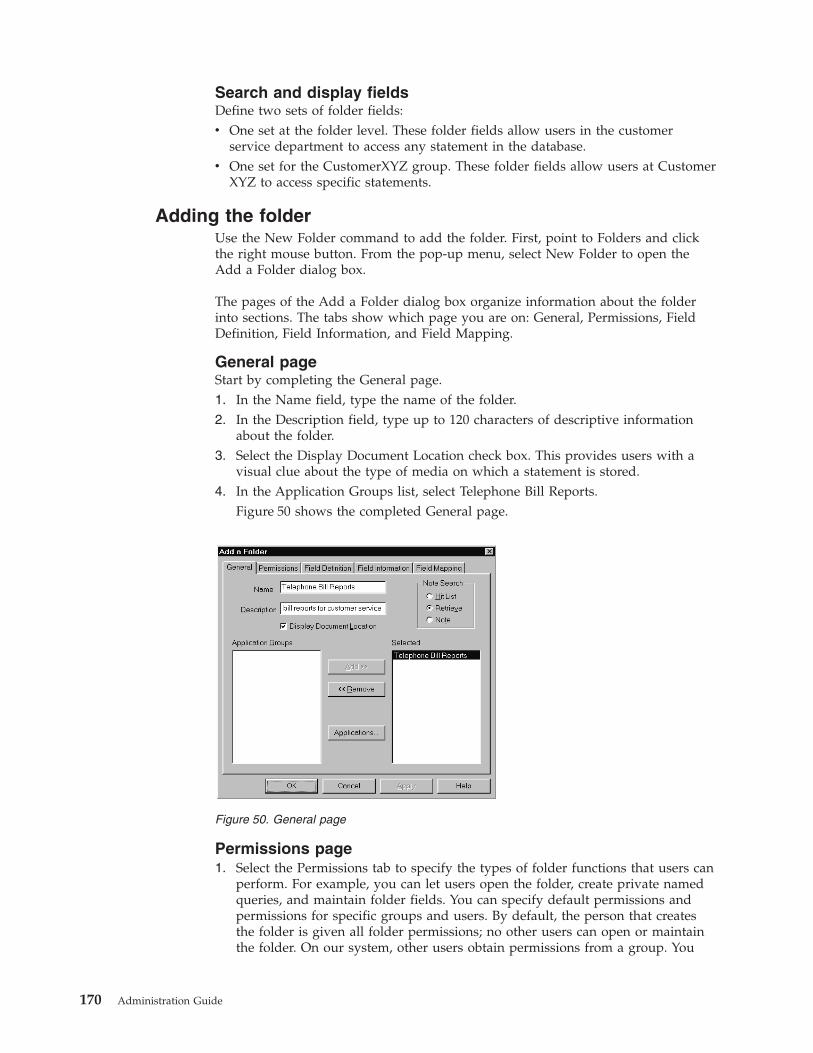
Search and display fields
Define two sets of folder fields:
v One set at the folder level. These folder fields allow users in the customer
service department to access any statement in the database.
v One set for the CustomerXYZ group. These folder fields allow users at Customer
XYZ to access specific statements.
Adding the folder
Use the New Folder command to add the folder. First, point to Folders and click
the right mouse button. From the pop-up menu, select New Folder to open the
Add a Folder dialog box.
The pages of the Add a Folder dialog box organize information about the folder
into sections. The tabs show which page you are on: General, Permissions, Field
Definition, Field Information, and Field Mapping.
General page
Start by completing the General page.
1. In the Name field, type the name of the folder.
2. In the Description field, type up to 120 characters of descriptive information
about the folder.
3. Select the Display Document Location check box. This provides users with a
visual clue about the type of media on which a statement is stored.
4. In the Application Groups list, select Telephone Bill Reports.
Figure 50 shows the completed General page.
Permissions page
1. Select the Permissions tab to specify the types of folder functions that users can
perform. For example, you can let users open the folder, create private named
queries, and maintain folder fields. You can specify default permissions and
permissions for specific groups and users. By default, the person that creates
the folder is given all folder permissions; no other users can open or maintain
the folder. On our system, other users obtain permissions from a group. You
Figure 50. General page
170 Administration Guide
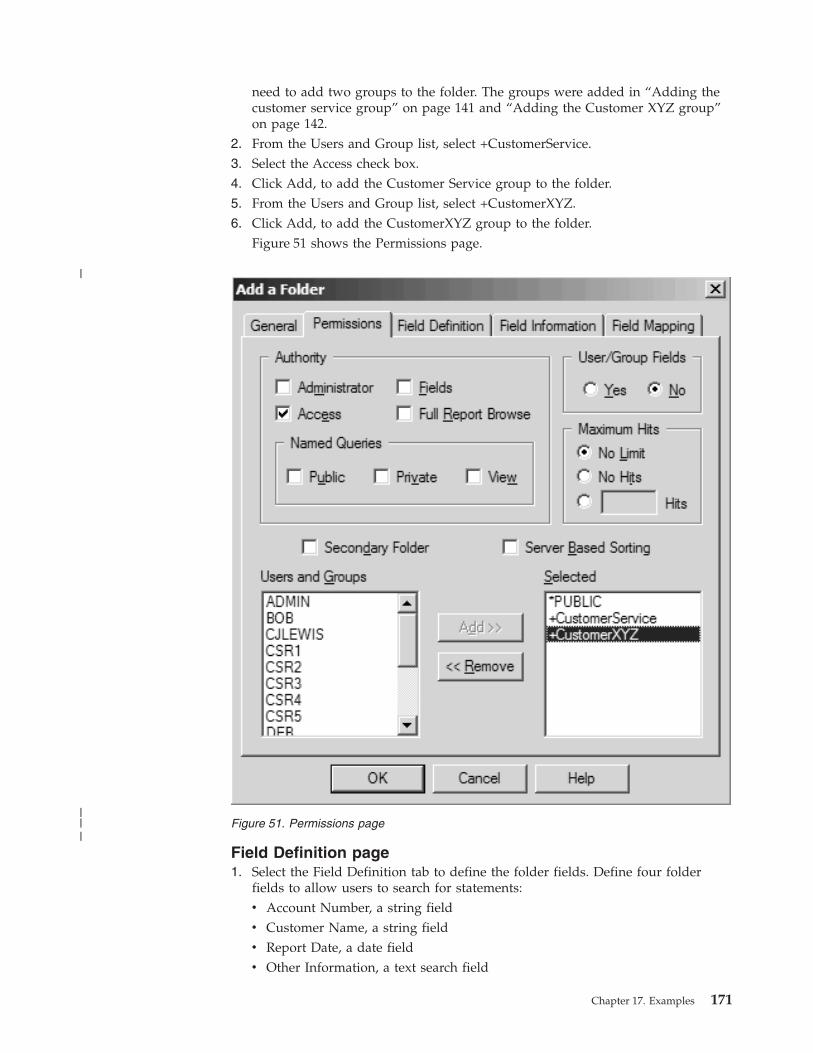
need to add two groups to the folder. The groups were added in “Adding the
customer service group” on page 141 and “Adding the Customer XYZ group”
on page 142.
2. From the Users and Group list, select +CustomerService.
3. Select the Access check box.
4. Click Add, to add the Customer Service group to the folder.
5. From the Users and Group list, select +CustomerXYZ.
6. Click Add, to add the CustomerXYZ group to the folder.
Figure 51 shows the Permissions page.
Field Definition page
1. Select the Field Definition tab to define the folder fields. Define four folder
fields to allow users to search for statements:
v Account Number, a string field
v Customer Name, a string field
v Report Date, a date field
v Other Information, a text search field
Figure 51. Permissions page
Chapter 17. Examples 171
|
|||
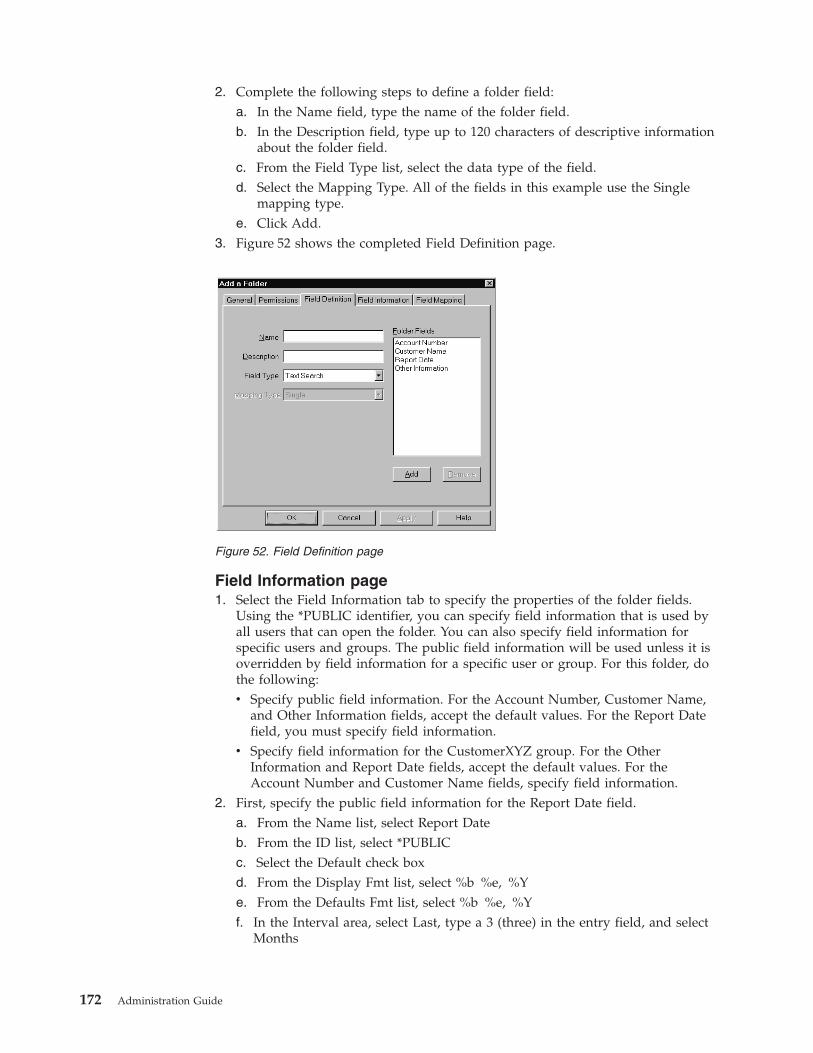
2. Complete the following steps to define a folder field:
a. In the Name field, type the name of the folder field.
b. In the Description field, type up to 120 characters of descriptive information
about the folder field.
c. From the Field Type list, select the data type of the field.
d. Select the Mapping Type. All of the fields in this example use the Single
mapping type.
e. Click Add.3. Figure 52 shows the completed Field Definition page.
Field Information page
1. Select the Field Information tab to specify the properties of the folder fields.
Using the *PUBLIC identifier, you can specify field information that is used by
all users that can open the folder. You can also specify field information for
specific users and groups. The public field information will be used unless it is
overridden by field information for a specific user or group. For this folder, do
the following:
v Specify public field information. For the Account Number, Customer Name,
and Other Information fields, accept the default values. For the Report Date
field, you must specify field information.
v Specify field information for the CustomerXYZ group. For the Other
Information and Report Date fields, accept the default values. For the
Account Number and Customer Name fields, specify field information.2. First, specify the public field information for the Report Date field.
a. From the Name list, select Report Date
b. From the ID list, select *PUBLIC
c. Select the Default check box
d. From the Display Fmt list, select %b %e, %Y
e. From the Defaults Fmt list, select %b %e, %Y
f. In the Interval area, select Last, type a 3 (three) in the entry field, and select
Months
Figure 52. Field Definition page
172 Administration Guide

Figure 53 shows the Field Information page for the Report Date field.
3. Next, specify the field information for the CustomerXYZ group. First, make a
copy of the folder fields. Click the Permissions tab.
4. From the Selected List, select +CustomerXYZ.
5. In the User/Group Fields area, click Yes.
Figure 54 on page 174 shows the completed Permissions page.
Figure 53. Field Information page
Chapter 17. Examples 173
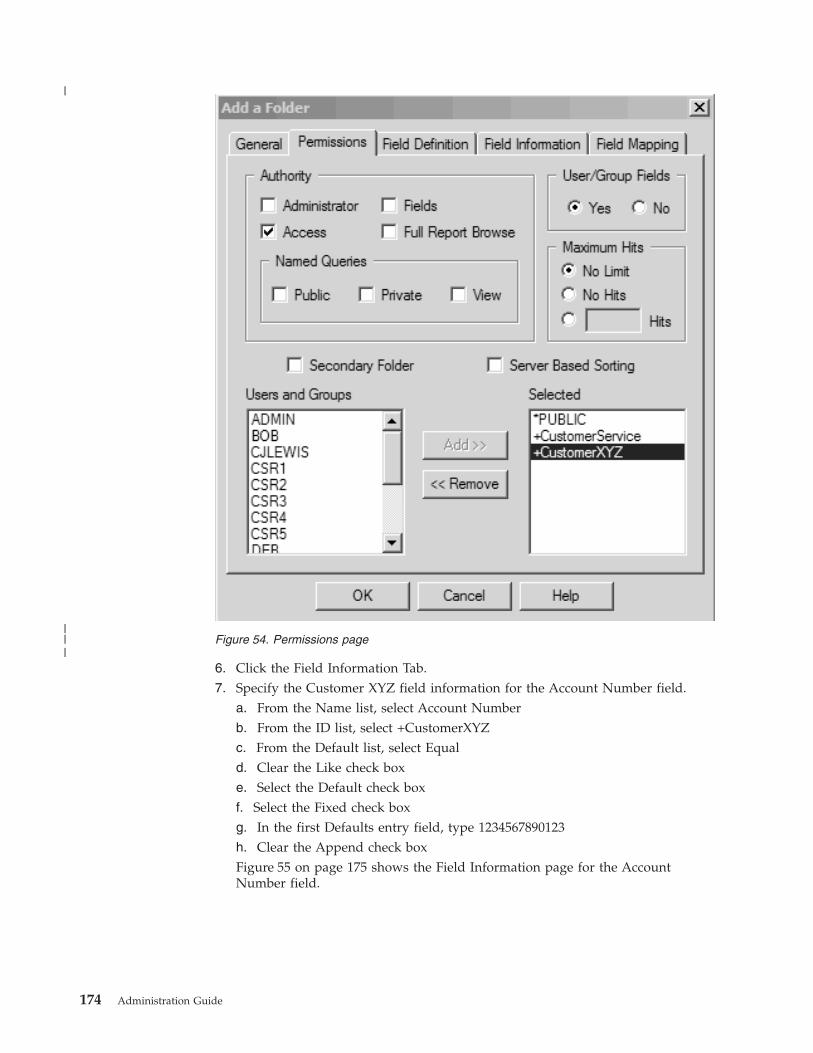
6. Click the Field Information Tab.
7. Specify the Customer XYZ field information for the Account Number field.
a. From the Name list, select Account Number
b. From the ID list, select +CustomerXYZ
c. From the Default list, select Equal
d. Clear the Like check box
e. Select the Default check box
f. Select the Fixed check box
g. In the first Defaults entry field, type 1234567890123
h. Clear the Append check box
Figure 55 on page 175 shows the Field Information page for the Account
Number field.
Figure 54. Permissions page
174 Administration Guide
|
|||

8. Next, specify the Customer XYZ field information for the Customer Name field.
a. From the Name list, select Customer Name
b. From the Default list, select Equal
c. Clear the Like check box
d. Select the Default check box
e. Select the Fixed check box
f. In the first Defaults entry field, type Customer XYZ
g. Clear the Append check box
Figure 56 shows the Field Information page for the Customer Name field.
Field Mapping page
1. Select the Field Mapping tab to map the folder fields to application group
database fields. OnDemand uses the values that users type in folder fields to
construct queries against the OnDemand database.
2. Map the following folder fields to their corresponding application group fields:
Figure 55. Field Information page
Figure 56. Field Information page
Chapter 17. Examples 175

v Account Number to acct
v Customer Name to custname
v Report Date to rdate
Figure 57 shows the completed Field Mapping page.
At this point, the properties of the folder meet the requirements. Click OK in the
Add a Folder window. The administrative client adds the folder to the database
and returns to the main window.
Summary
The example shows the basic requirements for adding a report to the system.
Hopefully the scenario that was described and developed is similar to how you
plan to use OnDemand at your company. The example should have enough
variations to show the flexibility of OnDemand to meet a range of business and
operational requirements. Of course, there are several tasks that were not shown.
For example, logical views of the report were not created. The system log user exit
was not explored. And all of the ways to complete a given task or implement a
specific requirement were not shown. As with most administrative software, there
is more than one way to accomplish a task. Hopefully, the example showed you
the most straightforward way to get things done with the administrative client.
You can use reference information provided with the product and the online help
to find out more about how to use OnDemand. If you have questions and can’t
find the answers, please contact the IBM support center. IBM also offers classes
that further explore how to administer the system. Finally, you can let IBM know
how well the information in this book was presented and if you found the book
helpful. The section titled How to Send Your Comments explains how to let IBM
know.
Figure 57. Field Mapping page
176 Administration Guide
Part 4. Web administrative client
With Version 8 Release 4, you can use a Web administrative client to administer
OnDemand. This client provides advantages to both OnDemand administrators
and individuals who are not full-time administrators but might perform certain
administrative tasks:
v For administrators: The OnDemand Web administrative client allows you to
add, view, update, and delete users, groups, applications, application groups,
folders, printers, and storage sets. You can create custom administrative forms
by using the Web administrative client and IBM Workplace Forms™ Designer.
Individuals who are not full-time administrators can use the custom forms to
perform administrative tasks.
v For individuals who are not full-time administrators: The Web administrative
client enables users who do not have indepth knowledge of OnDemand to
complete administrative tasks.
This section describes two business scenarios of using the Web administrative
client, the requirements for the client, and how to install the client.
© Copyright IBM Corp. 1993, 2007 177
|
|
||||
||||||
|||
||

178 Administration Guide
Chapter 18. Business scenarios of using the Web
administrative client
This section expands the examples in Chapter 17, “Examples,” on page 135, and
describes two scenarios in which the Web administrative client enables individuals
who are not full-time administrators to complete administrative tasks without
involving the administrators. Refer to Chapter 17, “Examples,” on page 135 for
context and background information.
Scenario 1: Managing user access and permission levels
In this scenario, the manager of the customer service department needs to monitor
the service representatives and make changes to the users and user permissions in
OnDemand. The manager’s tasks include:
v A new customer service representative joined the department, and the manager
needs to add that person as CSR6 to the OnDemand system and to the
CustomerService user group, and grant this user the same permissions as those
of all other customer service reps.
v A customer service rep, CSR1, left the company. The manager needs to remove
her user ID from the CustomerService user group and from the system.
v Before she left, CSR1 was the team lead of the service representatives, and the
user administrator in OnDemand. After she left, the manager decided to name
CSR2 as the user administrator, and needs to make this change in the system.
By using the Web administrative client, the manager can use a browser to access
the users and user groups in a form format, and make appropriate updates.
Scenario 2: Managing user access
In this scenario, all customer access to phone bill reports is controlled by Director
of Customer Service. At this time, a group of users from XYZ can access XYZ’s
phone bill reports through ODWEK.
There is a new customer BCD. The director wants to add them as a new customer
group and let them access their phone bill reports through ODWEK. By using the
Web administrative client, the director can add a new user group and grant this
group access to the appropriate data.
You can certainly use the installed administrative client to complete all above tasks,
however, if you use the Web administrative client and IBM Workplace Forms
Designer to simplify the forms, you can enable people who are not OnDemand
administrators to complete administrative tasks.
© Copyright IBM Corp. 1993, 2007 179
|
|
|
|||||
||
|||
||||
||
|||
||
||
|||
||||
||||

180 Administration Guide

Chapter 19. Requirements for the Web administrative client
Browser
To use the Web administrative client, make sure that you have one of the following
browsers:
v Internet Explorer 6 Service Pack 1
v Internet Explorer 7 for Windows XP Service Pack 2
v Firefox 2.0 for Windows XP Service Pack 1
Mid tier application
Make sure that you installed one of the following mid-tier applications:
v Microsoft® Windows Server 2003 R2
v IBM AIX 5L™ for POWER™ 5.2 or AIX 5L for POWER 5.3
v WebSphere® Application Server Version 6.0.2.11 or above
© Copyright IBM Corp. 1993, 2007 181
|
|
||
||
|
|
|
||
|
|
|
|

182 Administration Guide
Chapter 20. Installing the Web administrative client
For procedures of installing the Web administrative client, see:
http://www.ibm.com/support/docview.wss?rs=129&uid=swg21257664
© Copyright IBM Corp. 1993, 2007 183
|
|
|
|
|

184 Administration Guide
Part 5. Loading data
This part describes how to load data into the system. The OnDemand data
indexing and loading programs can process many types of input data, including
AFP™ data, Xerox Metacode/DJDE, line data, unformatted ASCII data, and Adobe
PDF files. You can also create index data for and load compressed and
uncompressed, single and multi-page TIFF images into the system. OnDemand can
also process input files that contain graphics data, such as BMP, GIF, JFIF, and
PCX. You can load almost any type of input data into the system.
When you load data into the system, the data indexing and loading programs
extract index data from or generate index data about the input data. The index
data is loaded into the OnDemand database. The input data is divided into
indexed groups of pages (documents), compressed into storage objects, and copied
to storage volumes. The OnDemand database is updated with the index
information that allows users to search for and retrieve documents using
OnDemand client programs. You can store copies of documents in cache storage
and archive storage. You can configure the system to maintain a backup copy of
documents that are copied to archive storage.
© Copyright IBM Corp. 1993, 2007 185

186 Administration Guide

Chapter 21. Loading AFP and line data
This section provides an overview of the data loading process. The process begins
with configuring storage on the system and configuring the programs that
transmit, index, and load data. You need to decide where to index your reports
and define the application groups and applications for the reports. The next step is
to load the data – the process of adding the index data to the database and loading
the report data and resources on storage volumes. When a load process completes,
you can view the messages that were saved in the system log. To complete the
data loading process, you should backup the OnDemand and archive storage
manager databases.
Overview
You can archive the print output of your existing application programs in
OnDemand without changing the print data stream or writing programs to process
the data. In OnDemand, the print output of an application program is called a
report. OnDemand provides programs that can automatically receive reports from
OS/390 systems, index the reports, add the index data to the database, divide the
input data into indexed groups of pages (documents), compress the documents,
and copy the compressed documents to storage volumes. After you load a report
into the system, your users can query, retrieve, and view or print pages of the
report using one of the OnDemand client programs.
The OnDemand data indexing and loading programs process input files that reside
on an OnDemand server. If you generate your reports on an OS/390 system, then
you would typically transfer the reports to the server and use the data indexing
and loading programs to process them. When you index a report that contains AFP
data (or if you plan to convert line data to AFP data), you must make sure that the
data indexing program can access the resources required by the report. Resources
include page segments and fonts. You can transfer the resources to the server or
you can mount a resource library using the Network File System (NFS). You can
also index your reports on the OS/390 system and then transmit the report, index,
and resource files to the server to load them.
You can create up to 32 index fields for each type of report that you define to
OnDemand, providing many ways for users to query information contained in a
report. The number of index fields that you define depends on the organization of
the data in the report. For example, when you index a report that contains logical
items, such as policies and statements, you might define index fields for the date,
customer name, customer number, balance due, transaction number, and amount.
When you index a report that contains transaction data, such as a general ledger,
you might define index fields for the date and transaction number. After you
determine what index fields you need and define them to the system, OnDemand
extracts the index values from a report during the load process and stores them in
records that are added to the database.
OnDemand compresses report data into storage objects, using information that you
specify in the application. Depending on how you configure storage management
for your application groups, OnDemand can automatically copy the report to cache
storage and archive storage. If you use Tivoli Storage Manager to maintain report
data in archive storage, you can configure the system to maintain a backup copy of
the reports that are stored in archive storage.
© Copyright IBM Corp. 1993, 2007 187

The load process saves messages in the system log each time that you load an
input file into the system. You can open the System Log folder and view the
messages for information such as the name of the input file, the indexing
information, and the number of rows that were added to the database.
The load process provides checkpoints so that you can restart a previously
interrupted load process. You can recover or restart the steps that add the index
data to the database and copy the storage objects to storage volumes.
Before you begin loading input data
Estimating storage space
When you initially configure an OnDemand system, you calculate the total amount
of disk, optical, and tape storage required to hold the OnDemand database,
database log files, reports, and the Tivoli Storage Manager database and recovery
log. You also need to plan for the temporary space needed by OnDemand
programs. The amount of storage space that you need on your system is usually a
factor of how much data that you plan to store in OnDemand, how long you need
OnDemand to maintain the data, the compression ratio that you can expect to
achieve on the report data, and the number of copies of reports that you need the
system to maintain. If you plan to index your reports on the OnDemand server,
then you must allocate temporary space for the data indexing program. Temporary
space is also required for the data loading program.
After you determine how much storage space that you need, you should organize
the physical storage devices for the various components of the system, such as the
database, Download, and cache storage. If you plan to maintain data in archive
storage, then you also need to prepare storage devices for use by Tivoli Storage
Manager. Physically separating program directories, the database, cache storage,
and temporary work spaces can improve performance.
The IBM DB2 Content Manager OnDemand for Multiplatforms: Introduction and
Planning Guide provides information, formulas, and worksheets that can help you
calculate your storage requirements. The IBM DB2 Content Manager OnDemand for
Multiplatforms: Installation and Configuration Guide contains recommendations for
organizing storage devices, describes how to define the database, cache storage,
and temporary storage areas, and describes how to configure storage libraries and
devices and define them to Tivoli Storage Manager.
Defining the application group
When you archive reports in OnDemand, the ARSLOAD program adds index data
to the database and compresses report data into storage objects and copies the
storage objects to storage volumes. The index data and the storage objects are
associated with an application group. As part of defining a report to OnDemand,
you must define or specify the application group that OnDemand uses to maintain
the data. The application group specifies the database fields that hold the index
data and the storage management information that determines where OnDemand
maintains the report data and how long it maintains the index data and the report
data. You can use the OnDemand administrative client to define an application
group. See the online help for the administrative client for more information about
defining database fields and specifying storage management information for
application groups.
188 Administration Guide
If you plan to maintain a copy of your reports in archive storage, then the
application group must use a storage set that includes a primary node that
identifies a client node in Tivoli Storage Manager. The IBM DB2 Content Manager
OnDemand for Multiplatforms: Installation and Configuration Guide provides
information about configuring Tivoli Storage Manager.
Defining the application
Most customers define an application for each different report (or source of data)
that they plan to load into the system. When you create an application, you specify
information about the report, such as:
v The application group in which you want to store the report
v Physical information about the report, including the type of data found in the
report and the code page of the data
v The indexing parameters, if you plan to index the report on the server
v The processing that OnDemand should do to the index data before adding it to
the database
You can use the OnDemand administrative client to define an application. See the
online help for the administrative client for more information about defining
applications.
Accessing reports, index data, and resources
Most customers process reports that were created by programs that run on OS/390
systems. You can use several methods to transfer report data from the OS/390
system to the OnDemand server. For example:
v You can use Download for OS/390 to transmit a print data set from the JES
Spool to file systems on the server. The OS/390 component of Download
operates as one or more JES writers. You configure the writers to interpret JCL
parameters, such as CLASS and DEST, and route spool files to an OnDemand
server. You can specify other JCL parameters, such as FORM and DATASET, and
invoke a user-written program to process additional job information that is sent
with the data. The ARSJESD program starts the server component of Download
and monitors a specific TCP/IP port for data from an OS/390 system. You can
start one or more occurrences of the ARSJESD program, each monitoring a
different port, receiving data sets from different Download writers, and storing
data on different file systems. You can configure Download to automatically
transmit all of the reports that you need to archive on the system. See PSF for
OS/390: Download for z/OS for information about installing, configuring, and
operating Download on the OS/390 system. PSF for OS/390: Download for z/OS
lists the supported JCL parameters and provides information about the user exit
point at which you can invoke a user-written program. See Chapter 26,
“Download exits and processing,” on page 221 for more information about using
the ARSJESD program to invoke a user-written program to process a
downloaded file, the JCL parameters, and the additional job information. The
IBM DB2 Content Manager OnDemand for Multiplatforms: Installation and
Configuration Guide shows how to configure the server to start the ARSJESD
program whenever the system is initialized.
v You can provide network access to files that reside on an OS/390 system. For
example, if you plan to index reports on the server, you can use NFS to mount
the resource library on the server so that the ARSLOAD program can access the
resources required by a report. However, for performance reasons, IBM
recommends against using NFS to access the data sets that contain the actual
report or index data.
Chapter 21. Loading AFP and line data 189

v You can save a copy of your reports on tape storage volumes. For example, if a
system that generates a report is not connected to the same network as the
OnDemand server, then you may need to save a copy of the report on a tape
storage volume and have it delivered to a location where it can be processed.
Configuring the ARSLOAD program
The ARSLOAD program is the primary OnDemand data indexing and loading
program. The ARSLOAD program determines if the input data needs to be
indexed, and if it does, calls the indexing program. The ARSLOAD program then
processes the index data, adding it to the database, optionally compresses the
report data into storage objects, and copies the storage objects to storage volumes.
You run the ARSLOAD program each time that you want to load a report or set of
reports into the system. You can either run the ARSLOAD program from the
command line or configure it to run as a daemon (UNIX servers) or service
(Windows servers) to periodically check for input data to process.
Note: The OnDemand server program (ARSSOCKD or ARSOBJD in UNIX; LibSrvr
or ObjSrvr in Windows) must be running, otherwise the ARSLOAD program
will fail.
See Chapter 35, “ARSLOAD,” on page 303 for more information about the
ARSLOAD program, including the parameters that you can specify to process your
reports.
Specifying input data to process
The ARSLOAD program can derive the name of the application group to load from
the input file name. To do so, the input file name must conform to the following
format:
MVS.JOBNAME.DATASET.FORM.YYYYDDD.HHMMSST.ARD
Important: The .ARD file name extension is required to initiate a load process.
Unless you specify otherwise, the ARSLOAD program uses the FORM part of the file
name to identify the application group to load. However, you can use the -G
parameter to specify a different part of the file name (MVS, JOBNAME, or
DATASET) to identify the application group to load.
If the application group contains more than one application, you must identify the
application to load; otherwise the load will fail. You can run the ARSLOAD
program with the -A parameter to specify the part of the input file name (MVS,
JOBNAME, DATASET, or FORM) that identifies the application.
Specifying userid and password
When you run the ARSLOAD program, you must specify a userid with
administrator authority for the application group. You must also specify a
password for the user. There are several ways that you can provide the userid and
password:
v You can specify the -u and -p parameters each time that you run the ARSLOAD
program
v For UNIX servers, you can specify the -U parameter each time that you run the
ARSLOAD program and name a file that contains the userid and password for a
user with administrator authority for the application group
v For UNIX servers, you can specify a system administrator userid and password
in the ARSLOAD.CFG configuration file. The ARSLOAD program will use the
190 Administration Guide
values in the ARSLOAD.CFG file, unless you specify otherwise (with the -u and
-p parameters or if you specify a different configuration file with the -U
parameter).
v For Windows servers, the Load Data service uses the userid and password of the
instance owner. If you run the ARSLOAD program from the command line, then
you should use Windows unified logon.
The IBM DB2 Content Manager OnDemand for Multiplatforms: Installation and
Configuration Guide describes how to configure the ARSLOAD.CFG file.
Note: After you configure the userid and password in the ARSLOAD.CFG file,
remember to change the password any time that you change the user’s
password in OnDemand. Otherwise the load will fail. The ARSLOAD
program can accept an expired password. However, the ARSLOAD program
will fail if an incorrect password is specified.
Running ARSLOAD on UNIX servers
You can use the INIT facility to start the ARSLOAD program as a daemon. The
INIT facility makes sure that the ARSLOAD program starts each time that the
system is restarted. Each record that you add to the INIT facility defines a process
to run and its parameters.
The following shows an example of an INIT record for an AIX server to
automatically start the ARSLOAD program. The ARSLOAD program checks the
specified directories for input data to process and stores temporary data in the file
system specified with the -c parameter. The ARSLOAD program will process any
input file that has a file type of ARD or PDF.
Important: OnDemand does not support loading files that have spaces in the file
names. The space character is used as a delimiter for the command line
of arsload and the functions it calls.
Unless otherwise specified, the ARSLOAD program uses the FORM part of the
input file name to determine the application group to load. By default, an
application group must contain one and only one application. The ARSLOAD
program checks for input data to process every thirty minutes. By default, the
ARSLOAD program logs on to the server and accesses an application group with
the userid and password from the ARSLOAD.CFG file.
ars6:2:once:/usr/lpp/ars/bin/arsload -d /arsacif/acif2
-d /arsacif/acif3 -d /arsacif/acif4 -c /arsacif/acif1 -t 1800 -v
See the IBM DB2 Content Manager OnDemand for Multiplatforms: Installation and
Configuration Guide for more information about configuring the system to
automatically load data. See your operating system documentation for information
about the INIT facility, automating tasks, and operating system initialization.
Running ARSLOAD on Windows servers
You should configure the ARSLOAD service to start automatically when the
system is started. To configure ARSLOAD service:
1. Start the OnDemand configurator program.
2. Expand the server that you want to configure.
3. Select Services.
4. Point to OnDemand Load Data and click the right mouse button.
5. From the pop-up menu, select Properties.
Chapter 21. Loading AFP and line data 191
|
|||

6. On the Service page, verify the Startup Type. See the online help for more
information.
7. On the Directories page, assign directories to the service. (You add directories
to the Available Directories list from the Directory page of the instance
properties dialog box.)
8. On the Load Information page, configure the other properties of the service.
See the online help for information on the data that you can enter.
9. Click OK.
Note: When you configure one of the OnDemand services, you must stop and
restart the OnDemand server service and the service that you configured.
Indexing input data
You must generate index data for a report before you load the report into the
system. OnDemand supports several programs to help you generate index data for
your reports:
v AFP Conversion and Indexing Facility (ACIF), to index AFP data and line data
reports. ACIF can also collect AFP resources. If the report contains AFP data (or
you are converting line data to AFP data), then you need to store the AFP
resources in OnDemand. The resources are required to display and reprint pages
of a report that contains AFP data.
v PDF indexer, to index Adobe PDF files
v The Xenos d2e Platform, an optional and separately-priced set of programs to
index and convert AFP, Metacode/DJDE, and PCL print files.
v Generic indexer, to index almost any other type of input data
If the report contains AFP data (or you are converting line data to AFP data), then
you need to store the AFP resources in OnDemand. The resources are required to
display and reprint pages of a report that contains AFP data.
Important: Some users find that they are able to pass large files through ACIF
successfully, and then the job fails during the load. This problem is
typically related to ulimits. RSS and file size usually have default
settings from installation. Increasing these values usually fixes this
issue.
For details about indexing data, see IBM DB2 Content Manager OnDemand for
Multiplatforms: Indexing Reference.
The information in the following sections shows examples of using ACIF to index
reports. You can use ACIF to index reports and collect resources into a resource
group. ACIF processes a report and produces an output file with indexed groups
of pages to load on storage volumes, an index file for the database manager, and a
resource group file that contains the resources required to view and reprint pages
of the report. ACIF can run on an OnDemand server or an OS/390 system. Before
you run ACIF on an OnDemand server, you must transfer the report to the server
and provide access to the resources that may be required to process the report.
After you run ACIF on an OS/390 system, you must transfer the output file, index
file, and resources created by ACIF to the OnDemand server before you can run
the load process.
192 Administration Guide
|||||

Indexing reports on OnDemand servers
If you plan to index your reports on the server, then you must first transfer the
report to the server. You must also provide access to the resources required by the
report. Figure 58 depicts one method that you can use to index reports on the
server.
In the example, Download is used to automatically transmit the report to the
OnDemand server. After the report has been successfully transmitted to the server,
the ARSLOAD program can process the data. You can either invoke the ARSLOAD
program from the command line to process a specific file or use facilities of the
server operating system to run the ARSLOAD program and automatically check
for input data to process. Since the report must be indexed before it can be loaded
into the system, the ARSLOAD program automatically calls the data indexing
program. In the example, the ARSLOAD program calls ACIF to index the report. In
the example, ACIF uses NFS to access the library that contains the resources.
The IBM DB2 Content Manager OnDemand for Multiplatforms: Indexing Reference
contains details about indexing reports and shows examples of indexing several
types of input data.
Indexing reports on OS/390 systems
If you plan to index your reports on OS/390 systems, then after you index a
report, you must transfer the output file, index file, and resource group file
generated by ACIF to the OnDemand server where you plan to load the data.
Figure 59 on page 194 depicts one method that you can use to index reports on
OS/390 systems.
OS/390 System
OnDemand Server
ApplicationProgram
Report
Data DownloadFile Systems
Report Data
ARSJESD
ACIF
Index Data
JES Spool
Download
ResourceLibrary
ResourceGroup
Figure 58. Indexing reports on OnDemand servers
Chapter 21. Loading AFP and line data 193
In the example, ACIF processes a line data report, generates index data, converts
the input to AFP data, and collects resources from a library on the system. After
running ACIF, you must combine the three output files generated by ACIF into one
file and then store the combined file in the JES Spool. Download can be used to
automatically transmit the combined file to the OnDemand server. After the
combined file has been successfully transmitted to the server, you must run ACIF
on the OnDemand server to process the combined file. Using parameters to
convert the data and name a default form definition (it is not necessary to specify
any trigger, field, or index parameters when you run ACIF on the server), ACIF
splits the combined file into separate index, resource, and output files that can be
processed by the ARSLOAD program. Contact the IBM support center if you have
questions about indexing data on OS/390 systems and processing the output on an
OnDemand server. Chapter 26, “Download exits and processing,” on page 221
provides more information about processing files transmitted by Download.
The IBM DB2 Content Manager OnDemand for Multiplatforms: Indexing Reference
contains details about indexing reports and shows examples of indexing several
types of input data with ACIF.
OS/390 System
OnDemand Server
ApplicationProgram
Report
Data DownloadFile Systems
Report Data
Report Data
ACIF
ARSJESD
Index Data
ACIF
CombinedFile
Index Data
JES Spool
Download
ResourceLibrary
ResourceGroup
ResourceGroup
Figure 59. Indexing Reports on OS/390 systems
194 Administration Guide
Processing the input data
After a report has been indexed, the ARSLOAD program can process the index file
to prepare the index data for loading into the database and prepare the report data
and resource group files for the storage manager to load on storage volumes.
Processing index data
The index file that ACIF creates is processed by the ARSLOAD program before the
index data is added to the database. The ARSLOAD program extracts information
from the application group and the application and performs the following
processing:
v Extracts the database field information from the application group.
v Extracts the preprocessing information from the application. This step is required
if the field names in the index file are not the same as the database field names.
Then you must map the field names so that OnDemand stores index values in
the correct database fields.
v After preprocessing the index file, the ARSLOAD program creates the database
rows:
– One row for every group of indexed pages in a report that contains a sorted
transaction value
– One row for every indexed item in a report that contains logical items, such
as policies and statementsv Extracts the postprocessing information from the application. For example, the
ARSLOAD program may need to drop duplicate index records. You specify
exactly what processing you want the ARSLOAD program to do when you
define the application.
v Passes the index rows to the database manager. The rows consist of fields that
contain the index values that the indexing program extracted from the report
and other fields generated by OnDemand. An index row contains:
– One column for each field defined in the application group
– One or more columns of OnDemand control information
Processing reports and resources
The ARSLOAD program divides the input data into indexed groups of pages
(documents) and compresses the documents into storage objects. Dividing a report
into groups of pages improves the efficiency of queries and can improve the time
required to retrieve and display the report. Compression improves the efficiency of
the storage manager. In this step, the ARSLOAD program:
v Extracts the compression information from the application.
v Extracts the storage management information from the application group. The
storage management information determines the storage locations, such as cache
storage and archive storage.
v Compresses the documents into storage objects. OnDemand compresses report
data into approximately 100 KB blocks (a default value) and places the blocks
into a storage object. OnDemand uses a 10 MB storage object (a default value) to
improve storage efficiency and performance. Compressed data does not span
storage objects. OnDemand assigns unique file names to the storage objects and
sequentially numbers them within an application group.
Chapter 21. Loading AFP and line data 195

Loading index data
The ARSLOAD program works with the database manager to add the index data
to the database. Depending on the database organization that you specified when
you defined the application group, OnDemand either creates a new database table
each time that you load a report or adds the index data to an existing database
table.
OnDemand uses a segment table as a high level index to the index data for an
application group. Each row in the segment table identifies a specific table of
application group index data. The fields in the segment table identify the
application group and the dates found in a table. The dates represent the earliest
and latest date that can be found in that segment of application group index data.
OnDemand can use the segment table to limit a query to a specific table of
application group index data.
The database manager updates the segment table if the beginning date in the
report is earlier than a date already stored in the table.
OnDemand limits the size of a table to improve performance and storage
management. The number of rows in a table can be specified when you define the
application group. The default size of a table is ten million rows. The database
manager automatically closes a table and opens a new table when this threshold is
reached. When closing a table, the database manager updates the segment table
with the latest ending date found in the table.
Loading storage objects
The ARSLOAD program calls the storage manager to copy storage objects to cache
storage and archive storage. The storage manager extracts information from the
application group to determine where and when to copy the storage objects.
OnDemand uses an object called a storage set to determine the locations that can
hold report data. A storage set contains one or more storage nodes. A storage node
identifies an object server. A storage node can specify cache storage, archive
storage, or both. A storage set can write data to one and only one storage node at a
time (the active storage node).
Cache storage
The primary purpose of cache storage is for short-term, high-speed retrieval of
report data. Cache storage can be located on one or more object servers, depending
on how you configure your system and define your storage nodes. Reports are
always stored in cache storage on the object server identified by the active storage
node.
If you configure your application groups to copy data to cache storage, then the
storage manager copies the storage object to cache storage. The Cache Data for xx
Days setting on the Storage Management page determines whether OnDemand
copies documents to cache storage.
Archive storage
A storage node can identify a client node in storage that is managed by Tivoli
Storage Manager. OnDemand works with Tivoli Storage Manager to maintain
storage objects in archive storage for long-term storage and for backup copies of
reports.
196 Administration Guide
The storage manager can copy the storage object to archive storage when the
report is initially loaded into the system or at a later time, depending on how you
configure your application groups. Most customers configure the system to copy
report data to cache storage and archive storage at the same time.
Copy storage pool
You can define a copy storage pool in Tivoli Storage Manager to maintain a
backup copy of files that are stored in archive storage. Tivoli Storage Manager
maintains the backup copy independently of OnDemand. If the primary copy of a
file is unavailable or becomes corrupted, then Tivoli Storage Manager can
automatically retrieve the backup copy of the file. See your Tivoli Storage Manager
information for help with configuring a copy storage pool.
If you define a copy storage pool on your system, you must copy files from the
primary storage pool to the copy storage pool. Tivoli Storage Manager provides a
scheduling component that you can use to automate the copy process. IBM
recommends that you schedule the copy process to take place soon after you load
reports into the system.
Resources
If caching of data is enabled, OnDemand stores resources in the cache, and the
resources are not expired from the cache, to provide fast retrieval when a user
selects an item for viewing. The ARSLOAD program saves only one copy of a
resource on the system, even if several reports use the same resource. When
processing a resource group file, the ARSLOAD program checks the resource
identifier to determine if the resource is already present on the system.
If the storage node identifies a client node in storage that is managed by Tivoli
Storage Manager, then the storage manager copies the resources to archive storage.
Verifying processing
When you load an input file into the system, the ARSLOAD program saves a copy
of the messages generated during the load process in the system log. (Search for
message number 87 in the system log.) After a load process completes, you can
open the System Log folder and view the messages. The information in the
messages includes the date and time that the load process started and completed,
the name of the input file, and the number of rows that were added to the
database. For example:
arsload: Processing file >br1010a<
arsload: Fri Mar 29 12:37:23 MST 1996 Indexing started,
394419060 bytes to process
arsload: Fri Mar 29 12:41:33 MST 1996 Indexing completed
arsload: Fri Mar 29 12:41:35 MST 1996 Load Started,
394419060 bytes to load
Resource br1010a.res matches the resource 2
OnDemand Load ID = >6850-25-0-15FAA-9577-9577<
Loaded 130000 rows into the database
arsload: Fri Mar 29 13:05:14 MST 1996 Load Completed
arsload: Processing successful for file >br1010a<
You can verify the number of rows that OnDemand added to the database:
v For a report that contains transaction data that you have divided into indexed
groups of pages, the number of pages in the report divided by the number of
pages in an indexed group of pages should equal the number of rows added to
Chapter 21. Loading AFP and line data 197
||||||
the database. For example, if a report contains 150,010 pages and there are 100
pages in an indexed group of pages, then OnDemand should have added 1,501
rows to the database.
v For a report that contains logical items, such as statements and policies, the
number of rows added to the database should equal the number of indexed
items in the report. For example, if a report contains 1,000 statements,
OnDemand should have added 1,000 rows to the database.
The OnDemand Load ID represents the data that the ARSLOAD program stored in
the system during a load process. The Load ID can be used to identify a specific
load process. For example, you can run the ARSADMIN program and specify the
Load ID to delete the index data and documents that were created when the
ARSLOAD program processed an input file. Table 10 lists the fields in a Load ID.
Table 10. OnDemand Load ID
Load ID Field Meaning
6850 Application group identifier
25 Primary node identifier
0 Secondary node identifier
15FAA The load identifier within the application group
9577 The earliest date in the report
9577 The latest date in the report
Backing up databases
After you load reports into the system, IBM recommends that you create a backup
copy of the OnDemand database and the Tivoli Storage Manager database.
v When you backup the OnDemand database, you protect control information and
index data that OnDemand and the database manager need to support the
system. Also, if you maintain DB2 archived log files on disk, then after the
backup completes, the database manager can reclaim the disk space used by the
log files.
v When you backup the Tivoli Storage Manager database, you protect control
information that Tivoli Storage Manager uses to maintain report data in archive
storage.
IBM recommends that you backup the databases at least once a week, and more
often, if you load reports every day. If you are using DB2, then you can use the
ARSDB program to backup the database. If you are using Oracle, then you should
use the Oracle procedures to backup the database. If you are using SQL Server,
then IBM recommends that you use the Database Maintenance Plan Wizard to
configure and schedule your database backups. For Tivoli Storage Manager, you
can run or schedule the Tivoli Storage Manager database backup using the Tivoli
Storage Manager administrative client.
Backup the OnDemand database
For DB2, OnDemand provides the ARSDB program so that you can create a
backup image of the OnDemand database. When you use the ARSDB program to
backup the database and you maintain the archived log files on disk, OnDemand
automatically removes the log files from the archived log file directory when the
backup completes. If you use Tivoli Storage Manager to maintain the DB2 archived
198 Administration Guide

log files, the Tivoli Storage Manager policy domain determines when the archived
log files are removed from Tivoli Storage Manager storage.
The ARSDB program supports two types of database backups, an online backup
and an offline backup:
v An online backup can be taken when other applications or processes are
connected to the database. That is, other applications and processes can continue
to read or modify data while the backup is in progress. You can use facilities of
the server operating system to schedule an online backup.
v During an offline backup, only the backup task is connected to the database.
Before starting an offline backup, IBM recommends that you stop the
OnDemand server programs and other related processes.
If your schedule allows, IBM recommends that you create an offline backup of the
database on a regular schedule, perhaps once a week. Taking an offline backup on
a regular schedule can reduce the time required to rebuild the database if you need
to do so.
Part 1, “Database administration,” on page 1 provides more information about
backup and recovery strategies and options. See Chapter 32, “ARSDB,” on page
263 for information about how to use the ARSDB program to create a backup
image of the OnDemand database.
Backup the Tivoli Storage Manager database
After you load reports into the system, IBM recommends that you backup the
Tivoli Storage Manager database. A backup image can be used to recover the
database, in the event that a hardware failure occurs or the database becomes
corrupted.
The IBM DB2 Content Manager OnDemand for Multiplatforms: Installation and
Configuration Guide describes how to define a backup device to Tivoli Storage
Manager and create a full backup of the Tivoli Storage Manager database. See the
Tivoli Storage Manager Administrator’s Guide for details about protecting the Tivoli
Storage Manager database.
Protecting cache storage
Cache storage is the primary, short-term storage location for reports. If you do not
configure the system to copy reports to archive storage when you load them into
the system, then you need to consider how you can recover the reports in the
event that you need to do so (for example, if a cache storage device fails).
Cache storage can be protected by maintaining it on high-availability storage
devices. If no high-availability storage is available, IBM recommends that backups
of reports in cache storage (the file systems) be taken on a regular basis.
Loading a previously indexed AFP file
If AFP files are previously indexed, that is, the *.out, *.ind, *.res files are already
in the indexing directory, you can use ARSLOAD to load the .out files into the
system. When you load the files, specify the file names without the .out extension.
That is, instead of specifying filename.out, just specify filename.
Chapter 21. Loading AFP and line data 199

Loading metacode documents in large object format
Large object documents are stored in groups of pages called segments, which can
be retrieved individually to improve performance. You can set the number of pages
in a segment in the application. In order to load documents in large object format,
the loading process must create an index file that contains, in addition to the group
information, offset and length information for each page in the document.
OnDemand uses Xenos to create the index file when it is loading metacode
documents, the Xenos script must be written to create the index file with the
necessary information.
For more information, see the ″JS program reference″ section in the Indexing
Reference.
200 Administration Guide

Chapter 22. Loading image files
Overview
OnDemand provides support for storing and retrieving letters and other types of
correspondence. The most straight forward way to store this type of information is
to transform a printed copy of a letter into an image file using a scanner and
image capture software. In addition to scanning the letter and saving it as an
image file, you must create index data for the letter. You can then use the
ARSLOAD program to load the index data into the database and store the letter
file on the system. Your users can then query, retrieve, and view, print or send
copies of the letter using one of the OnDemand client programs.
OnDemand provides the Generic indexer so that you can index input files that
contain data other than AFP data, line data, Metacode/DJDE, and PDF. You specify
the index data for the input files that you want to index with the Generic indexer
in a parameter file. The parameter file contains the index field names and values
and identifies the input files that you want to process. You can create up to 32
index fields for each input file that you want to load into the system, providing
many ways for users to query and retrieve the letters. The number of index fields
that you define usually depends on how your users retrieve documents from the
system. In the example that follows, index fields were specified for the date on the
letter, the name of the person that sent the letter, the company name, and the
subject of the letter.
This section describes how to use a scanner and image capture software to create
the image files. Before you can load the image files into the system, you must
define an application group to manage the storage of the letters, an application to
specify the physical and logical properties of the letters, and a folder to let users
search for and retrieve the letters.
Defining the application group
When you load an input file into the system, OnDemand updates the database
with the index data that you provide and stores the indexed groups of pages as
documents in cache storage and archive storage. The application group contains
the information that OnDemand uses to store and maintain the index data and the
documents on the system. This section provides information about some of the key
properties of the application group. You can use the OnDemand administrative
client to define an application group.
Database Organization
The Database Organization determines how OnDemand organizes the index data
that is stored in the application group.
Accept the default Database Organization of Multiple Loads per Database Table
and Table Size of 10 million rows. Each time that a letter (input file) is loaded into
into the system, OnDemand adds one row to a database table. When a table
reaches 10 million rows, OnDemand closes the table and creates a new table.
OnDemand always adds index records to the open table; the closed tables can be
queried.
© Copyright IBM Corp. 1993, 2007 201

Expiration Type
The Expiration Type determines how OnDemand deletes index data and
documents from the application group.
Accept the default Expiration Type of Load. This means that OnDemand deletes
the index data and documents from one load process (one or more input files) at a
time from the application group. Depending on the number of input files that are
processed during a load process, one or more letters (input files) may be deleted at
a time. For example, if you create a parameter file for the Generic Indexer that
contains index data for several input files, then OnDemand will delete all of the
index data and documents from the application group at the same time.
Permissions
Application group permissions determine the users that can access information
stored in the application group and determine the users that can do other types of
tasks related to the application group.
Under the *PUBLIC identifier, specify the Access permission so that all of the users
defined to the library server can access data stored in the application group.
Field Definition
The Field Definition page is where you define the database fields for the
application group. When you load an input file into the system, OnDemand stores
the index data that is specified in the parameter file into fields in records that are
added to the database. When a user searches for letters, OnDemand compares the
search criteria entered by the user with index data in the application group.
Define the following database fields. The fields allow users to locate letters based
on different criteria, such as the date of the letter, the name of the person that sent
the letter, and the subject of the letter.
ldate The date on the letter. Defined as a date field.
name The person that sent the letter. Defined as a string field that
contains variable length data.
company The person’s company. Defined as a string field that contains
variable length data.
subject The subject of the letter. Defined as a string field that contains
variable length data.
Defining the application
Most customers define an application for each different source of input data that
they plan to load into OnDemand. This section provides information about some
of the key properties of the application. You can use the OnDemand administrative
client to define an application.
Application Group
You must assign an application to an application group. Assign the application to
the application group that was created in “Defining the application group” on
page 201.
202 Administration Guide
Data Format
The Data Format determines the kind of data that is found in the documents that
are stored on the system. If the type of the data that is found in the original input
file is different than the type of the data that is found in the documents that are
stored on the system, then you should specify the type of the data that will be
stored in OnDemand. (In this example, the type of the data is the same – a TIFF
image.) Select TIFF as the Data Type. When saving the scanned image of a letter,
save the data as a TIFF image.
Indexer
The Indexer determines the indexing program that OnDemand uses to index and
convert input data. Select Generic as the Indexer. To store TIFF images in the
system, you must index them with the Generic indexer program that is provided
with OnDemand.
Note: some users may get the following error when trying to load a TIFF to
OnDemand:
"arsload: Processing file >D:\SourceDBHK\SOURCE\120040511.txt<
arsload: 05/20/04 18:13:06 -- Loading started, --UNKNOWN-- bytes to proc
Unable to allocate enough memory. File=arslacif.c, Line=402
OnDemand Load Id = >5242-3-0-27FAA-12461-12466<
An unexpected error occurred. Contact your System Administrator and/or
Unable to store the object >27FAAA<. Object size 8
Loaded 0 rows into the database".
The failure is because of the 0 byte file. It does not work to try to reallocate a
buffer to the 0 byte file. OnDemand issues a generic allocation message ″Unable to
allocate enough memory. File=arslacif.c, Line=402″. The 0 byte file loading is not
supported by OnDemand.
Data Compression
The Data Compression determines whether OnDemand compresses the input files.
Select Disable, so that OnDemand does not attempt to compress the input files. In
this example, the scanned image files are saved as compressed TIFF images,
Therefore, it is not necessary for the system to compress them. If you need to save
scanned image files as uncompressed TIFF images, then you should select one of
the compression methods supported by OnDemand so that OnDemand can
compress the input files to improve storage efficiency and retrieval performance.
Defining the folder
You must define a folder so that users can search for and retrieve the input files
that you load into OnDemand. This section provides information about some of
the key properties of the folder. You can use the OnDemand administrative client
to define a folder.
Application Group
A folder can be used to search one or more application groups. Select the
application group that was created in “Defining the application group” on page
201. When users open the folder, they can search for and retrieve the input files
that were loaded into the application group.
Chapter 22. Loading image files 203
||
Permissions
Folder permissions determine the users that can open the folder and determine the
users that can do other types of tasks related to the folder.
Under the *PUBLIC identifier, specify the Access permission so that all users
defined to the library server can open the folder.
Field Definition
The Field Definition page is where you define the search fields for the folder. The
search fields contain the search criteria entered by the user. For most folders, you
probably want to define a search field for each field that you defined for the
application group.
Define the following fields. The fields allow users to locate letters based on
different criteria, such as the date of the letter, the name of the person that sent the
letter, and the subject of the letter.
Letter Date The date on the letter.
From The person that sent the letter.
Company The person’s company.
Subject The subject of the letter.
Field Mapping
The Field Mapping page is where you map, or associate, the folder fields to the
application group fields. This is how you specify that the search criteria that a user
enters in a particular folder field should be used to search a specific application
group field. Map each of the folder fields to their corresponding application group
fields. For example, map the folder field named Letter Date to the application
group field named ldate.
Accessing the input files
The ARSLOAD program runs on the OnDemand server. Therefore, the files that
you want to load into the system must be stored on the server or you must
provide network access to files that reside on some other system.
In the example, the files were copied from a PC to the server as binary files with a
file type of TIF.
Store the input files on the server in the location from which you plan to run the
ARSLOAD program. Otherwise, specify the full path name of the input files in the
Generic index file.
Creating index data
You must create index data for your input files before you can load them into
OnDemand. If the input data is other than AFP, line data, Metacode/DJDE, PCL,
or PDF, then you must use the Generic indexer to load it into the system. You
specify index data for the Generic indexer using a parameter file. You should use a
standard text editor to create the parameter file. Figure 60 on page 205 shows an
example of a parameter file that can be used by the Generic indexer to process
image files. See the IBM DB2 Content Manager OnDemand for Multiplatforms:
Indexing Reference for more information about the Generic indexer and the
204 Administration Guide

parameter file.
Save the parameter file as LETTERS.IND on the server in the directory from which
you plan to run the ARSLOAD program.
Configuring the ARSLOAD program
Note: The OnDemand server program (ARSSOCKD or ARSOBJD in UNIX; LibSrvr
or ObjSrvr in Windows) must be running, otherwise the ARSLOAD program
will fail.
CODEPAGE:819
COMMENT: input file number 1
GROUP_FIELD_NAME:ldate
GROUP_FIELD_VALUE:09/01/95
GROUP_FIELD_NAME:name
GROUP_FIELD_VALUE:Mr. Earl Hawkins
GROUP_FIELD_NAME:company
GROUP_FIELD_VALUE:Soft Products
GROUP_FIELD_NAME:subject
GROUP_FIELD_VALUE:optical storage devices
GROUP_OFFSET:0
GROUP_LENGTH:0
GROUP_FILENAME:letter1.tif
COMMENT: input file number 2
GROUP_FIELD_NAME:ldate
GROUP_FIELD_VALUE:09/01/95
GROUP_FIELD_NAME:name
GROUP_FIELD_VALUE:Hans G. Piker
GROUP_FIELD_NAME:company
GROUP_FIELD_VALUE:MBI Company
GROUP_FIELD_NAME:subject
GROUP_FIELD_VALUE:optical storage devices
GROUP_OFFSET:0
GROUP_LENGTH:0
GROUP_FILENAME:letter2.tif
COMMENT: input file number 3
GROUP_FIELD_NAME:ldate
GROUP_FIELD_VALUE:09/16/95
GROUP_FIELD_NAME:name
GROUP_FIELD_VALUE:Laurie Unicolas
GROUP_FIELD_NAME:company
GROUP_FIELD_VALUE:Dove Properties
GROUP_FIELD_NAME:subject
GROUP_FIELD_VALUE:account balance due
GROUP_OFFSET:0
GROUP_LENGTH:0
GROUP_FILENAME:letter3.tif
COMMENT: input file number 4
GROUP_FIELD_NAME:ldate
GROUP_FIELD_VALUE:10/01/95
GROUP_FIELD_NAME:name
GROUP_FIELD_VALUE:George VanLocal
GROUP_FIELD_NAME:company
GROUP_FIELD_VALUE:Express American
GROUP_FIELD_NAME:subject
GROUP_FIELD_VALUE:airline fares
GROUP_OFFSET:0
GROUP_LENGTH:0
GROUP_FILENAME:letter4.tif
Figure 60. Example of a Generic indexer parameter file
Chapter 22. Loading image files 205

The ARSLOAD program is the primary OnDemand data indexing and loading
program. The ARSLOAD program determines if the input data needs to be
indexed, and if so, it calls the indexing program. The ARSLOAD program then
processes the index data, loading it into the database, optionally compresses the
input data into storage objects, and copies the storage objects to storage volumes.
See Chapter 35, “ARSLOAD,” on page 303 for more information about the
ARSLOAD program, including the parameters that you can specify to process
input files.
You typically run the ARSLOAD program each time that you want to load files
into the system. You can either run the ARSLOAD program from the command
line or configure it to run as a daemon (UNIX servers) or service (Windows
servers) to periodically check for input data to process. To support a low volume
scanning operation, most customers choose to run the ARSLOAD program from
the command line. For example:
/usr/lpp/ars/bin/arsload -u admin -p "" -n -g Letters letters
Specify the following parameters to the ARSLOAD program:
-u admin The name of an OnDemand user that can add documents to the
application group. This is typically a user with administrator
authority for the application group.
-p ″″ The password for the OnDemand user.
-n Do not delete the input files.
-g Letters The name of the application group to load.
letters The name of the input file to process.
In the example, the ARSLOAD program locates the input file LETTERS.IND in the
directory from which the program was started. The input file contains the index
information that was created in “Creating index data” on page 204 (which is a
parameter file for the Generic indexer). Because the full path names of the input
files were not specified in the parameter file, the input files must be in the
directory from which the ARSLOAD program is started.
Processing the input data
The ARSLOAD program processes the parameter file, loads the index data into the
database, and loads the image files on to storage volumes.
Processing index data
The ARSLOAD program processes the parameters that were specified on the
command line and the indexing parameter file before loading the index data into
the database. The ARSLOAD program extracts information from the application
group and the application and performs the following processing:
v Extracts the database field information from the application group
v Extracts the data type and other information from the application
v Creates one database row for each group that was specified in the parameter
file. Specified one group for each image file.
v Passes the index rows to the database manager. The rows contain the index
values and other fields generated by OnDemand. An index row contains:
– One column for each field that was defined for the application group
– One or more columns of OnDemand control information
206 Administration Guide

Processing the image files
The ARSLOAD program processes each image file that was specified in the
parameter file. The ARSLOAD program extracts information from the application
group and the application and performs the following processing:
v Extracts the compression information from the application
v Extracts the storage management information from the application group. The
storage management information determines the storage locations, such as cache
storage and archive storage.
v Stores the image files in storage objects. OnDemand uses a 10 MB storage object
(the default value) to improve storage efficiency and performance. OnDemand
assigns unique names to the storage objects and sequentially numbers them
within an application group.
Verifying processing
The ARSLOAD program saves a copy of the messages that were generated during
a load process in the system log. (Search for message number 87 in the system
log.) After a load process completes, you can open the System Log folder and
review the messages. The information in the messages includes the date and time
that the load process started and completed, the name of the input file(s), and the
number of rows that were added to the database. For example:
arsload: Processing file >letters<
arsload: Mon Dec 18 13:04:37 MST 1995 Indexing started,
116017 bytes to process
OnDemand Load ID = >6927-0-0-1FAA-0-0<
Loaded 4 rows into the database
arsload: Mon Dec 18 13:05:14 MST 1995 Loading Completed
arsload: Processing successful for file >letters<
You can verify the number of rows that OnDemand added to the database. In the
example, the number of rows added to the database should equal the number of
groups (and image files) that were specified in the parameter file.
The OnDemand Load ID represents the data that the ARSLOAD program stored
into the system during a load process. The Load ID can be used to identify a
specific load process. For example, you can run the ARSADMIN program and
specify the Load ID to delete the index data and documents that were created
when the ARSLOAD program processed a Generic indexer parameter file.
Chapter 22. Loading image files 207

208 Administration Guide

Chapter 23. Loading user-defined data
Overview
OnDemand provides support for storing and retrieving almost any type of data.
For example, OnDemand provides support for AFP data, line data,
Metacode/DJDE, PDF files, and image data (GIF, JFIF (JPEG), PCX, and TIFF).
However, OnDemand is not limited to maintaining these types of data. OnDemand
provides the User-Defined data type to support almost any other type of data that
you want to store in the system. For example, you can configure the system to
process Lotus WordPro documents, so that when a user retrieves one of the
documents from the system, OnDemand automatically starts Lotus WordPro to
open the document.
To store user-defined data on the system, you must create index data for the input
files and you must register the file type of the input file with OnDemand. The file
type determines the program that is started on the client PC to open a file when a
user retrieves one of the files from the system. The file type must also be registered
with the client operating system. If your OnDemand system supports client
programs that run under different operating systems, then you must register the
specified file type on all of the client operating systems.
OnDemand provides the Generic indexer so that you can index user-defined data.
You specify the index data for the input files that you want to index with the
Generic indexer in a parameter file. The parameter file contains the index field
names and values and identifies the input files that you want to process. You can
create up to 32 index fields for each input file that you want to load into the
system, providing many ways for users to query and retrieve documents. The
number of index fields that you define usually depends on how your users retrieve
documents from the system. For example, you might want to define index fields
for the date, author, and subject or purpose of the user-defined data.
Before you can load user-defined data into the system, you must define an
application group to manage the storage of the data, an application to specify the
physical and logical attributes of the input files, and a folder to let users search for
and retrieve the documents. This section contains an example that shows how to
define Lotus WordPro files to OnDemand. It provides an overview of defining the
application group, application, and folder. For details and a comprehensive
example of defining input data to OnDemand, see Part 3, “Using the
administrative client,” on page 85.
Defining the application group
When you load an input file into the system, OnDemand updates the database
with the index data that you provide and stores the indexed groups of pages as
documents in cache storage and archive storage. The application group contains
the information that OnDemand uses to store and maintain the index data and the
documents on the system. This section provides information about some of the key
properties of the application group. You can use the OnDemand administrative
client to define an application group.
© Copyright IBM Corp. 1993, 2007 209

Database organization
The Database Organization determines how OnDemand organizes the index data
that is stored in the application group.
Accept the default Database Organization of Multiple Loads per Database Table
and Table Size of 10 million rows. Each time that a Lotus WordPro file is loaded
into the system, OnDemand adds one row to a database table. When a table
reaches 10 million rows, OnDemand closes the table and creates a new table.
OnDemand always adds index records to the open table; closed tables can be
queried.
Expiration type
The Expiration Type determines how OnDemand deletes index data and
documents from the application group.
Accept the default Expiration Type of Load. This means that OnDemand deletes
the index data and documents from one load process (one or more input files) at a
time from the application group. Depending on the number of input files
processed during a load process, one or more Lotus WordPro files may be deleted
at a time. For example, if you create a parameter file for the Generic indexer that
contains index data for several input files, then OnDemand will delete all of the
index data and documents from the application group at the same time.
Permissions
Application group permissions determine the users that can access information
stored in the application group and determine the users that can do other types of
tasks related to the application group.
Under the *PUBLIC identifier, specify the Access permission so that all of the users
defined to the library server can access data stored in the application group.
Field definition
The Field Definition page is where you define the database fields for the
application group. When you load an input file into the system, OnDemand stores
the index data that is specified in the parameter file into fields in records that are
added to the database. When a user queries the system, OnDemand compares the
search criteria entered by the user with index data in the application group.
Define the following database fields. The fields allow users to locate files based on
different criteria, such as the date, author, and subject of the file.
fdate The date associated with the input file. For example, the date that
the file was created or the date that the file was published. Defined
as a date field.
author The author of the file. Defined as a string field that contains
variable length data.
subject The subject or purpose of the file. Defined as a string field that
contains variable length data.
210 Administration Guide

Defining the application
Most customers define an application for each different source of input data that
they plan to load into the system. This section provides information about some of
the key properties of the application. You can use the OnDemand administrative
client to define an application.
Application Group
You must assign the application to an application group. Assign the application to
the application group that was created in “Defining the application group” on
page 209.
Data Format
The Data Format determines the kind of data that is found in the documents that
are stored on the system. If the type of the data that is found in the original input
file is different than the type of the data that is found in the documents that are
stored on the system, then you should specify the type of the data that will be
stored in OnDemand.
Because there is not a supplied Data Format for Lotus WordPro files, select User
Defined from the Data Type list.
File Extension
When you select User Defined from the Data Type list, you must also enter a value
in the File Extension. The File Extension determines the program that is started by
the client to open a user-defined document when it is retrieved from the system.
For the example, enter the characters LWP, for Lotus WordPro.
The File Extension that you specify must also be registered on the client operating
system. See your operating system information for help with registering file
extensions.
Indexer
The Indexer determines the indexing program that OnDemand uses to index and
convert input data. Select Generic as the Indexer. To store user-defined files on the
system, you must index them with the Generic indexer program that is provided
with OnDemand.
Data Compression
The Data Compression determines whether OnDemand compresses the input files.
On the Load Information page, accept the default Data Compression of OD77, to
compress the input files before storing them on the server.
Note: Resources are not supported for user-defined input data.
Defining the folder
You must define a folder so that users can search for and retrieve the input files
that you load into OnDemand. This section provides information about some of
the key properties of the folder. You can use the OnDemand administrative client
to define a folder.
Chapter 23. Loading user-defined data 211
Application Group
A folder can be used to search one or more application groups. Select the
application group that was created in “Defining the application group” on page
209. When users open the folder, they can search for and retrieve the Lotus
WordPro files that were loaded into the application group.
Permissions
Folder permissions determine the users that can open the folder and determine the
users that can do other types of tasks related to the folder.
Under the *PUBLIC identifier, specify the Access permission so that all users
defined to the library server can open the folder.
Folder fields
The Field Definition page is where you define the search fields for the folder. The
search fields contain the search criteria entered by the user. For most folders, you
probably want to define a search field for each field that you defined for the
application group.
Define the following folder fields. The fields allow users to locate files based on
different criteria, such as the date, the author, and the subject.
File Date The date associated with the file. For example, the date the file was
created or the date that the file was published.
Author The person that created the file.
Subject The subject or purpose of the file.
Field Mapping
The Field Mapping page is where you map, or associate, the folder fields to the
application group fields. This is how you specify that the search criteria that a user
enters in a particular folder field should be used to search a specific application
group field. Map each of the folder fields to their corresponding application group
fields. For example, map the folder field named File Date to the application group
field named fdate.
Accessing the input files
The ARSLOAD program runs on the OnDemand server. Therefore, the files that
you want to load into the system must be stored on the server or you must
provide network access to files that reside on some other system.
In the example, the files were copied from a PC to the server as binary files with a
file type of LWP.
Store the input files on the server in the location from which you plan to run the
ARSLOAD program. Otherwise, specify the full path name of the input files in the
Generic index file.
212 Administration Guide

Creating the index data
You must create index data for your input files before you can load them into the
system. If the input data is other than AFP, line, Metacode/DJDE, or PDF, then you
must use the Generic indexer to load it into the system. You must specify index
data for the Generic indexer using a parameter file. You should use a standard text
editor to create the parameter file. Figure 61 shows an example of a parameter file
that can be used by the Generic indexer to process the Lotus WordPro files. See the
IBM DB2 Content Manager OnDemand for Multiplatforms: Indexing Reference for more
information about the Generic indexer and the parameter file.
Save the parameter file as LWP.IND on the server in the directory from which you
plan to run the ARSLOAD program.
CODEPAGE:819
COMMENT: input file number 1
GROUP_FIELD_NAME:fdate
GROUP_FIELD_VALUE:12/18/95
GROUP_FIELD_NAME:author
GROUP_FIELD_VALUE:Jessica Hawkins
GROUP_FIELD_NAME:subject
GROUP_FIELD_VALUE:optical storage devices
GROUP_OFFSET:0
GROUP_LENGTH:0
GROUP_FILENAME:letter1.lwp
COMMENT: input file number 2
GROUP_FIELD_NAME:fdate
GROUP_FIELD_VALUE:12/18/95
GROUP_FIELD_NAME:author
GROUP_FIELD_VALUE:Paul Garveys
GROUP_FIELD_NAME:subject
GROUP_FIELD_VALUE:optical storage devices
GROUP_OFFSET:0
GROUP_LENGTH:0
GROUP_FILENAME:letter2.lwp
COMMENT: input file number 3
GROUP_FIELD_NAME:fdate
GROUP_FIELD_VALUE:12/18/95
GROUP_FIELD_NAME:author
GROUP_FIELD_VALUE:Randy Perkinsen
GROUP_FIELD_NAME:subject
GROUP_FIELD_VALUE:account balance due
GROUP_OFFSET:0
GROUP_LENGTH:0
GROUP_FILENAME:letter3.lwp
COMMENT: input file number 4
GROUP_FIELD_NAME:fdate
GROUP_FIELD_VALUE:12/18/95
GROUP_FIELD_NAME:author
GROUP_FIELD_VALUE:Georgia July
GROUP_FIELD_NAME:subject
GROUP_FIELD_VALUE:airline fairs
GROUP_OFFSET:0
GROUP_LENGTH:0
GROUP_FILENAME:letter4.lwp
Figure 61. Example of a Generic indexer parameter file
Chapter 23. Loading user-defined data 213

Configuring the ARSLOAD program
Note: The OnDemand server program (ARSSOCKD or ARSOBJD in UNIX; LibSrvr
or ObjSrvr in Windows) must be running, otherwise the ARSLOAD program
will fail.
The ARSLOAD program is the primary OnDemand data indexing and loading
program. The ARSLOAD program determines if the input data needs to be
indexed, and if so, it calls the indexing program. The ARSLOAD program then
processes the index data, loading it into the database, optionally compresses the
input data into storage objects, and copies the storage objects to storage volumes.
See Chapter 35, “ARSLOAD,” on page 303 for more information about the
ARSLOAD program, including the parameters that you can specify to process
input data.
You typically run the ARSLOAD program each time that you want to load a file or
set of files into the system. You can either run the ARSLOAD program from the
command line or configure it to run as a daemon (UNIX servers) or service
(Windows servers) to periodically check for input data to process. To store a few
WordPro files at a time, most customers choose to run the ARSLOAD program
from the command line. For example:
/usr/lpp/ars/bin/arsload -u admin -p "" -n -g "Lotus WordPro Documents" lwp
The following parameters were specified to the ARSLOAD program:
-u admin The name of an OnDemand user that can add documents to the
application group. This is typically a user with administrator
authority for the application group.
-p ″″ The password for the OnDemand user.
-n Do not delete the input files.
-g ″Lotus WordPro Documents″
The name of the application group to load.
lwp The name of the input file to process.
In the example, the ARSLOAD program can locate the input file LWP.IND in the
directory from which the program was started. The input file contains the index
information that was created in “Creating the index data” on page 213 (which is a
parameter file for the Generic indexer). Because the full path names of the input
files were not specified in the Generic index file, the input files must reside in the
directory from which you start the ARSLOAD program.
Processing the input data
The ARSLOAD program processes the parameter file, loads the index data into the
database, and loads the Lotus WordPro files on to storage volumes.
Processing index data
The ARSLOAD program processes the parameters that were specified on the
command line and the indexing parameter file before loading the index data into
the database. The ARSLOAD program extracts information from the application
group and the application and performs the following processing:
v Extracts the database field information from the application group
v Extracts the data type and other information from the application
214 Administration Guide

v Creates one database row for each group that was specified in the parameter
file. One group was specified for each Lotus WordPro file.
v Passes the index rows to the database manager. The rows contain the index
values and other fields generated by OnDemand. An index row contains:
– One column for each field that was defined for the application group
– One or more columns of OnDemand control information
Processing the Lotus WordPro files
The ARSLOAD program processes each Lotus WordPro file that was specified in
the parameter file. The ARSLOAD program extracts information from the
application group and the application and performs the following processing:
v Extracts the compression information from the application
v Extracts the storage management information from the application group. The
storage management information determines the storage locations, such as cache
storage and archive storage.
v Stores the Lotus WordPro files in storage objects. OnDemand uses a 10 MB
storage object (the default value) to improve storage efficiency and performance.
OnDemand assigns unique names to the storage objects and sequentially
numbers them within an application group.
Verifying processing
The ARSLOAD program saves a copy of the messages that were generated during
a load process in the system log. (Search for message number 87 in the system
log.) After a load process completes, you can open the System Log folder and
review the messages. The information in the messages includes the date and time
that the load process started and completed, the name of the input file, and the
number of rows that were added to the database. For example:
arsload: Processing file >lwp<
arsload: Mon Dec 18 14:14:47 MST 1995 Indexing started,
5116017 bytes to process
OnDemand Load ID = >6927-0-0-4FAA-0-0<
Loaded 4 rows into the database
arsload: Mon Dec 18 14:25:11 MST 1995 Loading Completed
arsload: Processing successful for file >lwp<
You can verify the number of rows that OnDemand added to the database. In the
example, the number of rows added to the database should equal the number of
groups (and Lotus WordPro files) that were specified in the parameter file.
The OnDemand Load ID represents the data that the ARSLOAD program stored
into the system during a load process. The Load ID can be used to identify a
specific load process. For example, you can run the ARSADMIN program and
specify the Load ID to delete the index data and documents that were created
when the ARSLOAD program processed a Generic indexer parameter file.
Chapter 23. Loading user-defined data 215

216 Administration Guide

Chapter 24. Restarting a load process
The ARSLOAD program will terminate if an unrecoverable error occurs during
index, database, or storage manager processing. Termination processing includes
setting a return code and saving error messages in the system log.
To start problem determination, open the System Log folder and view the
messages that the ARSLOAD program generated during the load process. (Search
for message number 87 in the system log.) The message log will contain normal
processing messages, return codes, and error messages. See IBM DB2 Content
Manager OnDemand: Messages and Codes for more information about messages.
If the ARSLOAD program failed during indexing, correct the problem and then
restart the load process from the beginning. Common causes of problems during
indexing include invalid input files or indexing parameter files and insufficient
temporary space.
If the ARSLOAD program failed during database processing or storage manager
processing:
v Determine and correct the problem.
v If a Load ID is listed in the message log that the ARSLOAD program saved in
the system log, then you can use the ARSADMIN program to unload the data.
See Chapter 25, “Deleting a report,” on page 219 for information about
unloading data from OnDemand.
v Restart the load process from the beginning.
© Copyright IBM Corp. 1993, 2007 217

218 Administration Guide
Chapter 25. Deleting a report
You can use the UNLOAD function of the ARSADMIN program to delete the
index data and documents that the ARSLOAD program stored in the system
during a load process. To use the UNLOAD function, you must specify the Load
ID that the ARSLOAD program generated during the load process. The Load ID
represents the index data that was added to the database and the storage objects
that were copied to cache storage and archive storage. The Load ID can be found
in the message log that the ARSLOAD program saved in the system log.
When you use the UNLOAD function, you specify the name of the application
group and the Load ID. You can obtain the Load ID from the message log that the
ARSLOAD program generated during the load process. (Search for message
number 87 in the system log.) If there is more than one Load ID listed in the
message log, then you should use the last Load ID listed in the log. Storage
locations include cache storage, the primary storage node, and the secondary
storage node. By default, the UNLOAD function deletes the storage objects from
all locations. The UNLOAD function also deletes the rows of index data that were
added to the database during the original load process.
The following shows how to run the ARSADMIN program on a UNIX server from
the command line to delete a load process from all of the storage locations:
/usr/lpp/ars/bin/arsadmin unload -g Credit -L 1220-1-0-8FAA-5538-5673
To UNLOAD a report on a Windows server:
1. Start —� Programs —� IBM OnDemand for Windows —� Command Window.
2. Run the ARSADMIN program from the prompt. For example:
arsadmin unload -g Credit -L 1220-1-0-8FAA-5538-5673
When the ARSADMIN program completes, you should open the System Log folder
to view the messages that were generated during the UNLOAD process. (Search
for message number 85 in the system log.) See IBM DB2 Content Manager
OnDemand: Messages and Codes for more information about messages.
Note: The OnDemand server program (ARSSOCKD or ARSOBJD in UNIX; LibSrvr
or ObjSrvr in Windows) must be running, otherwise the ARSADMIN
program will fail.
See Chapter 29, “ARSADMIN,” on page 245 for more information about the
ARSADMIN program and the parameters that you can specify to UNLOAD data.
© Copyright IBM Corp. 1993, 2007 219

220 Administration Guide

Chapter 26. Download exits and processing
Overview
When processing files transmitted by Download, unless you specify otherwise, the
ARSLOAD program uses a part of the name of the file that is saved on the server
to identify the application group to load. If the ARSLOAD program cannot
determine the correct application group to load from the file name, then the load
will fail. If the application group to load contains more than one application, then
you must identify the application to load. Otherwise, the load will fail.
OnDemand provides ways for you to identify the correct application group and
application to load. For example, you can run the ARSLOAD program with the -A
and -G parameters to specify the parts of the file name that identify the application
group and application. However, if the file name does not contain information that
can be used to identify the application group and application, then you must use
some other method to determine the correct application group and application
before the load process can proceed.
Using Download
You can use Download to transmit reports from OS/390 systems to OnDemand
servers. If you use Download to automate the data loading process, then you may
need to provide a user-written program to process the files transmitted by
Download before they can be processed by the ARSLOAD program. You must
provide a user-written program if the file name does not contain information that
can be used to identify the application group to load.
For example, suppose that you use a report distribution system to place the output
of your application programs on the spool data set. Download selects the output
and transmits the data to an OnDemand server. However, after the output has
been processed by the report distribution system, the resulting file name on the
spool data set can no longer be associated with the application program that
generated the output. Therefore, the ARSLOAD program cannot use the file name
to determine the application group to load. (And because the file name does not
contain information that can use used to identify the application group and
application to load, you cannot run the ARSLOAD program with the -A and -G
parameters.) You must find some other way to identify the application group and
application to load.
Download provides a user exit (APSUX15) that allows you to provide additional
job information to OnDemand. Download includes the additional job information
in the data stream that is transmitted from the spool data set to the server. The
additional job information is installation dependent. See PSF for OS/390: Download
for z/OS for details about the APSUX15 user exit and the content, format, and
purpose of the additional job information. The processing done by the user-written
program is also installation dependent. See your Infoprint Manager or PSF
information for information about processing the additional job information with a
user-written program.
The ARSJESD program is the component of Download for OS/390 that runs on the
workstation. The -x parameter of the ARSJESD program may be used to specify the
name of a user-written program to process additional job information sent by PSF
© Copyright IBM Corp. 1993, 2007 221
through the APSUX15 user exit. If the ARSJESD program was invoked with the -x
parameter, it calls the specified user-written program. The ARSJESD program
passes the file name and the additional job information to the user-written
program.
Invoking the Download user exit
When Download selects output data from the spool data set for transmission to an
OnDemand server, it invokes the APSUX15 user exit program. The user exit
program concatenates a string of additional job information to the print parameters
that Download transmits to the server. Upon completion, the user exit program
passes the location of the string and the string length to Download, which
transmits the output data set with associated JCL and the additional job
information to the server.
The ARSJESD program receives the data sets into file systems on the server. If you
start the ARSJESD program with the -x parameter, the ARSJESD program invokes
the specified user-written program. The program specified with the -x parameter
can be any user-written program.
For example, you could provide a user-written program that parses the additional
job information transmitted by Download and the APSUX15 user exit program.
The user-written program could extract the value of the WRITER parameter to
identify the application to load. Using this value, the user-written program could
then query the database to determine the name of the application group to which
the application belongs. The user-written program could then run the ARSLOAD
program with the -a parameter to identify the application to load and the -g
parameter to identify the application group to load. (The user-written program
could also rename the input file and then run the ARSLOAD program with the -A
parameter to specify the part of the new file name that identifies the application
and the -G parameter to specify the part of the new file name that identifies the
application group.)
By using the Download user exit program, the -x parameter with the ARSJESD
program, and a user-written program, you can configure the system so that each
file that Download transmits to the server is automatically processed and loaded
into the correct application group and application.
See IBM DB2 Content Manager OnDemand for Multiplatforms: Installation and
Configuration Guide for more information about using the ARSJESD program and
the Download user exit.
222 Administration Guide
Chapter 27. Importing and exporting administrative objects
through an XML interface
Overview
You can use an XML interface to import and export administrative objects from
and into an OnDemand system. The administrative objects that can be imported
and exported include:
v users
v groups
v applications
v application groups
v storage sets
v folders
v printers
v cabinets
This XML interface expands the functionality and enables you to export all
administrative objects into a single XML file, and later import them into the same
OnDemand system or another system.
Also, you can create an XML file from scratch through a user application or Web
interface according to the defined specifications, and import it into the system.
Prerequisite: For all platforms, you should have an appropriate Java Runtime
Environment (JRE).
Installing batch system administration
This section discusses how to install and setup the prerequisites for OnDemand
batch system administration, and guides you through a short installation
verification process.
Prerequisites
The OnDemand Batch System Administration code requires the following software:
v Java Runtime Environment Version 1.4.1 or higher
v XML Parser Xerces2 Java Parser Version 2.6.2 or higher
The following files are included with the OnDemand batch system administration:
v /bin/arsxml
v /bin/arsxml.exe (Windows)
v /bin/xml/ODAdmin.jar
v /bin/arsxapi.dll (Windows)
v /bin/xml/libarsxapi.a (AIX)
v /bin/xml/libarsxapi.so (SunOS, Linux)
v /bin/xml/libarsxapi.sl (HPUX)
v /bin/xml/ondemand.xsd - OnDemand XML Schema file
v /bin/xml/samples/addgroups.xml
© Copyright IBM Corp. 1993, 2007 223
|
|
|||
|
|
|
|
|
|
|
|
|
|
|
|
|
|
v /bin/xml/samples/addusers.xml
v /bin/xml/samples/deletegroups.xml
v /bin/xml/samples/deleteusers.xml
v /bin/xml/samples/exportgroups.xml
v /bin/xml/samples/exportusers.xml
v /bin/xml/samples/updategroups.xml
v /bin/xml/samples/updateusers.xml - Sample OnDemand XML files
Installing Xerces2 Java Parser
The OnDemand batch system administration process uses the Xerces2 Java Parser
Version 2. You must download the parser code before you can use the batch
system administration. Download the Xerces2 Java Parser parser at:
http://xml.apache.org/xerces2-j/download.cgi
Follow the instructions on the Web site, download and install the parser code.
After the code is successfully installed, locate the directory where the following
two files reside:
v xercesImpl.jar
v xml-apis.jar
In the OnDemand config directory, create a file named arsxml.cfg. This file is
used to specify the directory of the jar files listed above. The file should contain
only one line:
ODXMLDIR=<dir>
where <dir> indicates the full path of the directory that contains the Xerces2 Java
Parser jar files.
Installation verification
Before you run the batch system administration functions, make sure that the
OnDemand environment is properly set up:
On Windows systems:
Open an OnDemand command prompt by selecting Start -> Programs ->
IBM OnDemand for Windows -> Command Window.
On UNIX systems:
Set up the PATH environment variable to include the OnDemand bin
directory /usr/lpp/ars/bin. Use this command:
export PATH=${PATH}:/usr/lpp/ars/bin
On other systems:
Set up the PATH environment variable to include the OnDemand bin
directory /opt/ondemand/bin. Use this command:
export PATH=${PATH}:/opt/ondemand/bin
To run the ARSXML command, change directories to the OnDemand XML samples
directory.
Run this command:
arsxml add -h <hostname> -u <user> -p <password> -i addusers.xml -v
where
224 Administration Guide
|
|
|
|
|
|
|
|
|||
|
|||
|
|
|||
|
||
|
||
|||
|||
|
|||
|
||
|
||
|
<hostname>
Hostname for the OnDemand system
<user>
An OnDemand user which has authority to add users and printers
<password>
The password for the OnDemand user. If the user does not have a
password, this should be left blank
The XML file contains user passwords that are between 6 and 8 characters long. If
the OnDemand system where these users are created has different password
restrictions, these passwords might need to be changed before you run the
command.
After you run the command, you should receive several messages stating that a
printer, and five users have been added successfully.
If the command is properly run, you should be able to use the OnDemand system
administrator GUI to view the newly added users and printer.
To remove the newly added objects, run this command:
arsxml delete -h <hostname> -u <user> -p <password> -i deleteusers.xml -v
There are several other sample XML files that can be used. However, they depend
on the users that are created by the addusers.xml file.
Common problems during installation
This section discusses some common errors that you might encounter during
installation verification.
The input file .../xerces-2_6_2/xml-apis.jar was not found
This error indicates that the required Xerces2 Java Parser code file xml-apis.jar
was not found. make sure that the Xerces2 Java Parser directory was correctly
entered into the XML configuration file. For more information, see “Installing
Xerces2 Java Parser” on page 224.
The input file .../xerces-2_6_2/xercesImpl.jar was not found
This error indicates that the required Xerces2 Java Parser code file xml-apis.jar
was not found. make sure that Xerces2 Java Parser directory was correctly entered
into the XML configuration file. For more information, see “Installing Xerces2 Java
Parser” on page 224.
Exception in thread main java.lang.NoClassDefFoundError:
org/w3c/dom/Node
This error usually indicates that the required Xerces2 Java Parser code file
xercesImpl.jar was not found or is not valid. See “Installing Xerces2 Java Parser”
on page 224 and make sure that Xerces2 Java Parser code was downloaded
properly and that the directory was correctly entered into the XML configuration
file.
Exception in thread main java.lang.NoClassDefFoundError:
org/apache/xerces/parsers/AbstractDOMParser
This error usually indicates that the required Xerces2 Java Parser code file
xercesImpl.jar was not found or is not valid. See “Installing Xerces2 Java Parser”
on page 224
Chapter 27. Importing and exporting administrative objects through an XML interface 225
||
||
|||
||||
||
||
|
||
||
|
||
|||||
|||||
|||||||
|||||

on page 224 and make sure that Xerces2 Java Parser code was downloaded
properly, and that the directory was correctly entered into the XML configuration
file.
A parsing error occurred in file xxxx/samples/addusers.xml, Line
3, Column 62: cvc-elt.1: Cannot find the declaration of element
onDemand.
This error usually indicates that the OnDemand schema file, ondemand.xsd, was not
found. See “Installation verification” on page 224 and make sure that the ARSXML
command is run from correct directory.
The sample files require that the OnDemand schema file be located in the directory
″above″ where the ARSXML command is run. If changes are made to the sample
files, it might be necessary to update the location of the schema file within the
sample files to the full path name of the ondemand.xsd file.
Importing an XML file into an OnDemand system
Importing an XML file that contains administrative objects into an OnDemand
system is a two-step process:
1. Preparing an XML file for the import process
2. Importing the XML file by using the ARSXML command
Preparing an XML file for the import process
Before importing data into an OnDemand system, you need to have an XML file
that contains all the data that needs to be imported. The XML file can be either
created during a previous XML export process or written from scratch. If you
decide to develop an XML file from scratch, you must follow the format of the
OnDemand XML schema file.
The OnDemand XML schema file defines the syntactical format for all OnDemand
XML files, and is used during the import process to validate the contents of the
import XML file. For different objects, the schema file specifies which fields are
required and which fields are optional. Also, the schema file can establish a list of
valid values for certain fields.
The following is a portion of the OnDemand schema file for the object user:
<xs:element name="user">
<xs:complexType>
<xs: choice maxOccurs="unbounded">
<xs:element name="userPermission" minOccurs="0" maxOccurs="unbounded">
<xs:complexType>
<xs:attribute name="task" type="taskString" use="optional"/>
<xs:attribute name="user" type="nameString" use="optional"/>
<xs:attribute name="group" type="nameString" use="optional"/>
<xs:attribute name="userAuthority" type="authString" use="optional"
default="Access"/>
</xs:complexType>
</xs:element>
</xs:choice>
<xs:attribute name="name" type="nameString" use="required"/>
<xs:attribute name="uid" type="xs:integer" use="optional"/>
<xs:attribute name="description" type="descString" use="optional"/>
<xs:attribute name="password" type="passwordString" use="optional"/>
<xs:attribute name="fullName" type="userMiscString" use="optional"/>
<xs:attribute name="acctInfo" type="userMiscString" use="optional"/>
226 Administration Guide
|||
||||||
||||
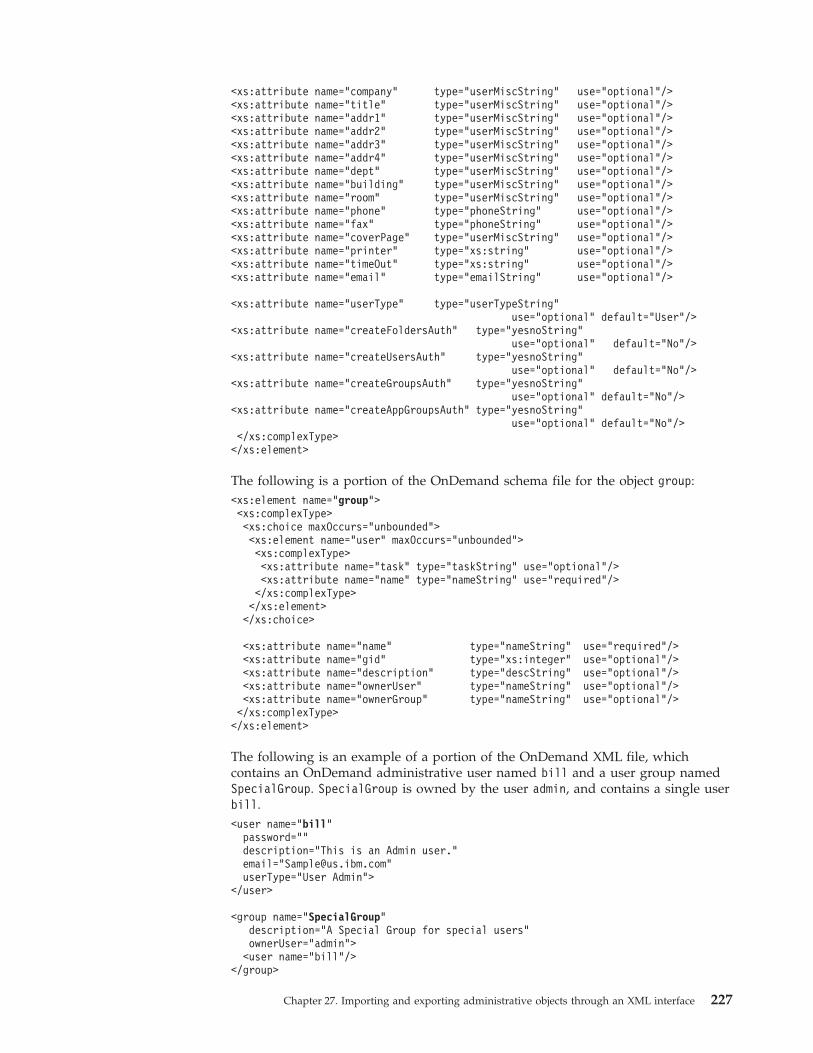
<xs:attribute name="company" type="userMiscString" use="optional"/>
<xs:attribute name="title" type="userMiscString" use="optional"/>
<xs:attribute name="addr1" type="userMiscString" use="optional"/>
<xs:attribute name="addr2" type="userMiscString" use="optional"/>
<xs:attribute name="addr3" type="userMiscString" use="optional"/>
<xs:attribute name="addr4" type="userMiscString" use="optional"/>
<xs:attribute name="dept" type="userMiscString" use="optional"/>
<xs:attribute name="building" type="userMiscString" use="optional"/>
<xs:attribute name="room" type="userMiscString" use="optional"/>
<xs:attribute name="phone" type="phoneString" use="optional"/>
<xs:attribute name="fax" type="phoneString" use="optional"/>
<xs:attribute name="coverPage" type="userMiscString" use="optional"/>
<xs:attribute name="printer" type="xs:string" use="optional"/>
<xs:attribute name="timeOut" type="xs:string" use="optional"/>
<xs:attribute name="email" type="emailString" use="optional"/>
<xs:attribute name="userType" type="userTypeString"
use="optional" default="User"/>
<xs:attribute name="createFoldersAuth" type="yesnoString"
use="optional" default="No"/>
<xs:attribute name="createUsersAuth" type="yesnoString"
use="optional" default="No"/>
<xs:attribute name="createGroupsAuth" type="yesnoString"
use="optional" default="No"/>
<xs:attribute name="createAppGroupsAuth" type="yesnoString"
use="optional" default="No"/>
</xs:complexType>
</xs:element>
The following is a portion of the OnDemand schema file for the object group:
<xs:element name="group">
<xs:complexType>
<xs:choice maxOccurs="unbounded">
<xs:element name="user" maxOccurs="unbounded">
<xs:complexType>
<xs:attribute name="task" type="taskString" use="optional"/>
<xs:attribute name="name" type="nameString" use="required"/>
</xs:complexType>
</xs:element>
</xs:choice>
<xs:attribute name="name" type="nameString" use="required"/>
<xs:attribute name="gid" type="xs:integer" use="optional"/>
<xs:attribute name="description" type="descString" use="optional"/>
<xs:attribute name="ownerUser" type="nameString" use="optional"/>
<xs:attribute name="ownerGroup" type="nameString" use="optional"/>
</xs:complexType>
</xs:element>
The following is an example of a portion of the OnDemand XML file, which
contains an OnDemand administrative user named bill and a user group named
SpecialGroup. SpecialGroup is owned by the user admin, and contains a single user
bill.
<user name="bill"
password=""
description="This is an Admin user."
email="[email protected]"
userType="User Admin">
</user>
<group name="SpecialGroup"
description="A Special Group for special users"
ownerUser="admin">
<user name="bill"/>
</group>
Chapter 27. Importing and exporting administrative objects through an XML interface 227

Creating an XML file
Occasionally, you need to create an OnDemand XML file, and this section discusses
the overall syntax and layout of the XML file. The XML syntax discussed in this
section helps you understand XML to be able to construct the XML objects which
are used by OnDemand. For more detailed information on XML and specific XML
syntax information, reference XML documentation.
Overall file structure
An OnDemand XML file is a basic text file that can be created by the user.
Every OnDemand XML file will contain the following:
v An XML identifier tag
v An OnDemand identifier tag
v One or more OnDemand objects
v An OnDemand ending tag
XML identifier tag
The XML identifier tag specifies the version of XML that is used and the
encoding that is used. The standard XML identifier is:
<?xml version="1.0" encoding="UTF-8"?>
OnDemand identifier tag
The OnDemand identifier tag specifies what the XML file is used for and
what schema file to use. The standard OnDemand identifier is:
<onDemand xmlns:xsi="http://www.w3.org/2001/XMLSchema-instance"
xsi:noNamespaceSchemaLocation="ondemand.xsd">
The name of the ondemand.xsd file, shown here as "ondemand.xsd", should
be changed to reference the OnDemand XML schema file which is located
in the OnDemand bin/xml directory.
OnDemand objects
See Appendix F, “Objects and data model used in the OnDemand XML
file,” on page 383 for objects and data model used in the XML file.
OnDemand ending tag
The OnDemand ending tag indicates the end of the OnDemand XML file.
The ending tag is:
</onDemand>
Every standard OnDemand XML file looks like this:
<?xml version="1.0" encoding="UTF-8"?>
<onDemand xmlns:xsi="http://www.w3.org/2001/XMLSchema-instance"
xsi:noNamespaceSchemaLocation="ondemand.xsd">
... OnDemand Objects ...
</onDemand>
OnDemand objects
The basic building blocks for the XML file are referred to as objects.
The following objects can be included within the OnDemand XML file:
v user
v group
v application
v applicationGroup
228 Administration Guide
||
||
|||
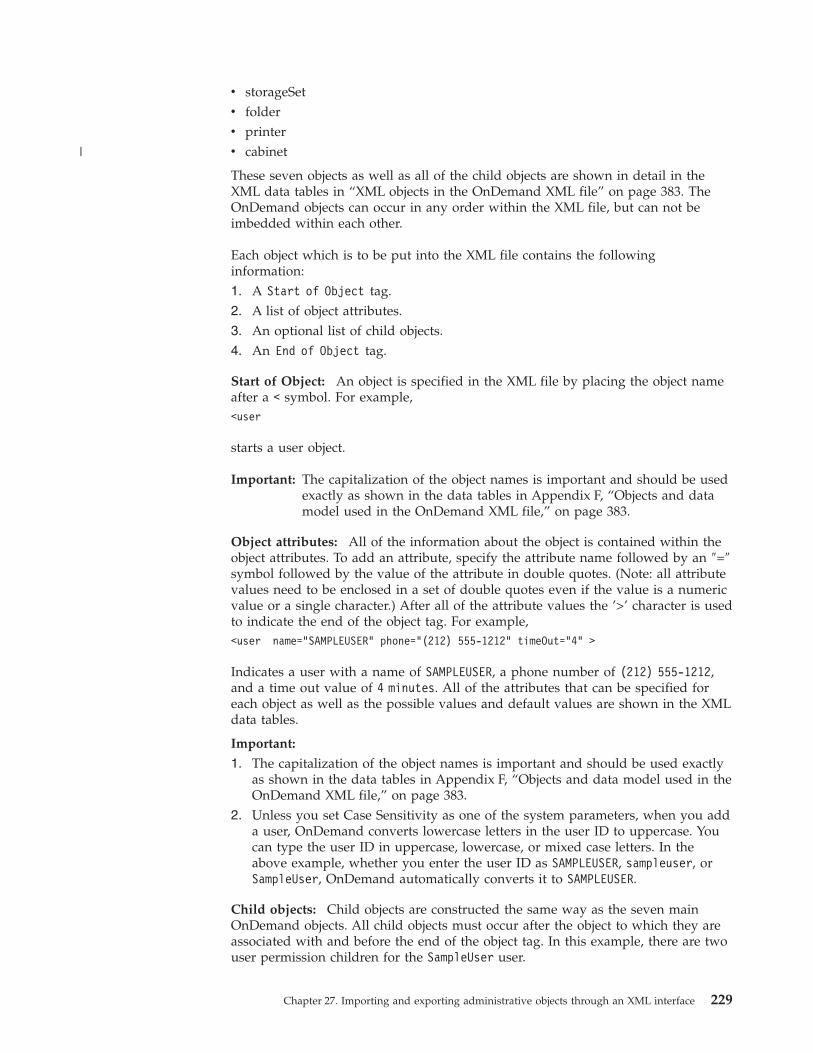
v storageSet
v folder
v printer
v cabinet
These seven objects as well as all of the child objects are shown in detail in the
XML data tables in “XML objects in the OnDemand XML file” on page 383. The
OnDemand objects can occur in any order within the XML file, but can not be
imbedded within each other.
Each object which is to be put into the XML file contains the following
information:
1. A Start of Object tag.
2. A list of object attributes.
3. An optional list of child objects.
4. An End of Object tag.
Start of Object: An object is specified in the XML file by placing the object name
after a < symbol. For example,
<user
starts a user object.
Important: The capitalization of the object names is important and should be used
exactly as shown in the data tables in Appendix F, “Objects and data
model used in the OnDemand XML file,” on page 383.
Object attributes: All of the information about the object is contained within the
object attributes. To add an attribute, specify the attribute name followed by an ″=″
symbol followed by the value of the attribute in double quotes. (Note: all attribute
values need to be enclosed in a set of double quotes even if the value is a numeric
value or a single character.) After all of the attribute values the ’>’ character is used
to indicate the end of the object tag. For example,
<user name="SAMPLEUSER" phone="(212) 555-1212" timeOut="4" >
Indicates a user with a name of SAMPLEUSER, a phone number of (212) 555-1212,
and a time out value of 4 minutes. All of the attributes that can be specified for
each object as well as the possible values and default values are shown in the XML
data tables.
Important:
1. The capitalization of the object names is important and should be used exactly
as shown in the data tables in Appendix F, “Objects and data model used in the
OnDemand XML file,” on page 383.
2. Unless you set Case Sensitivity as one of the system parameters, when you add
a user, OnDemand converts lowercase letters in the user ID to uppercase. You
can type the user ID in uppercase, lowercase, or mixed case letters. In the
above example, whether you enter the user ID as SAMPLEUSER, sampleuser, or
SampleUser, OnDemand automatically converts it to SAMPLEUSER.
Child objects: Child objects are constructed the same way as the seven main
OnDemand objects. All child objects must occur after the object to which they are
associated with and before the end of the object tag. In this example, there are two
user permission children for the SampleUser user.
Chapter 27. Importing and exporting administrative objects through an XML interface 229
|
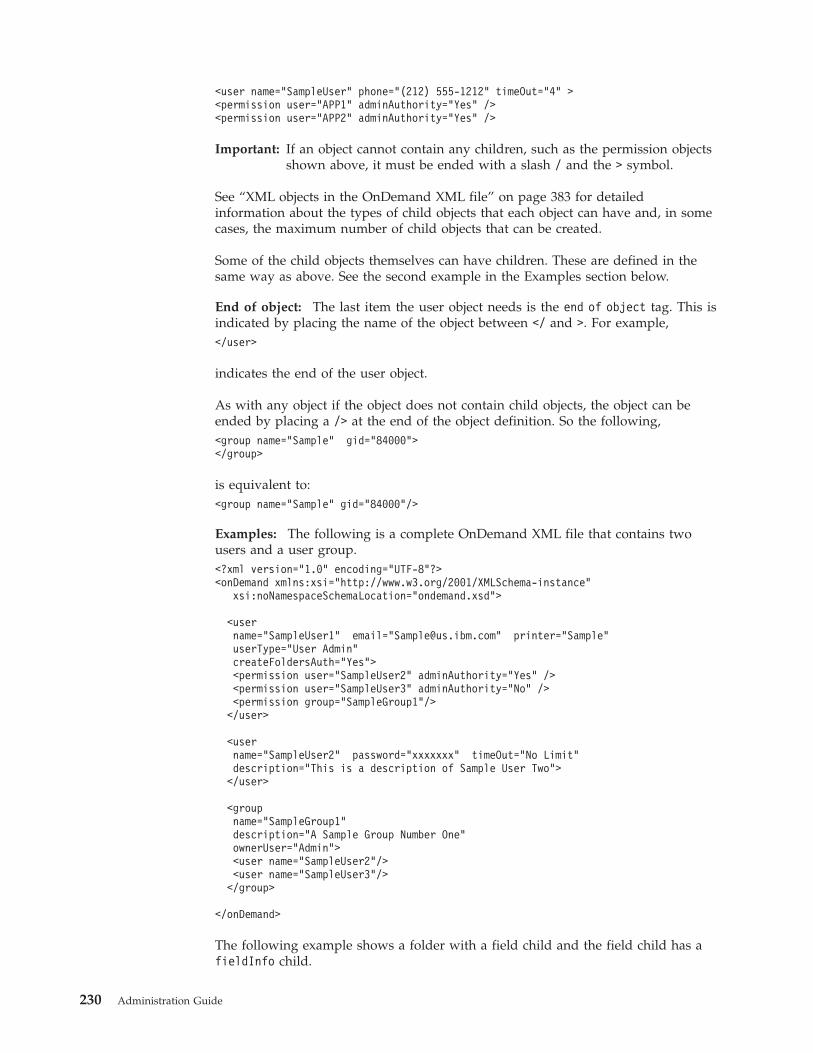
<user name="SampleUser" phone="(212) 555-1212" timeOut="4" >
<permission user="APP1" adminAuthority="Yes" />
<permission user="APP2" adminAuthority="Yes" />
Important: If an object cannot contain any children, such as the permission objects
shown above, it must be ended with a slash / and the > symbol.
See “XML objects in the OnDemand XML file” on page 383 for detailed
information about the types of child objects that each object can have and, in some
cases, the maximum number of child objects that can be created.
Some of the child objects themselves can have children. These are defined in the
same way as above. See the second example in the Examples section below.
End of object: The last item the user object needs is the end of object tag. This is
indicated by placing the name of the object between </ and >. For example,
</user>
indicates the end of the user object.
As with any object if the object does not contain child objects, the object can be
ended by placing a /> at the end of the object definition. So the following,
<group name="Sample" gid="84000">
</group>
is equivalent to:
<group name="Sample" gid="84000"/>
Examples: The following is a complete OnDemand XML file that contains two
users and a user group.
<?xml version="1.0" encoding="UTF-8"?>
<onDemand xmlns:xsi="http://www.w3.org/2001/XMLSchema-instance"
xsi:noNamespaceSchemaLocation="ondemand.xsd">
<user
name="SampleUser1" email="[email protected]" printer="Sample"
userType="User Admin"
createFoldersAuth="Yes">
<permission user="SampleUser2" adminAuthority="Yes" />
<permission user="SampleUser3" adminAuthority="No" />
<permission group="SampleGroup1"/>
</user>
<user
name="SampleUser2" password="xxxxxxx" timeOut="No Limit"
description="This is a description of Sample User Two">
</user>
<group
name="SampleGroup1"
description="A Sample Group Number One"
ownerUser="Admin">
<user name="SampleUser2"/>
<user name="SampleUser3"/>
</group>
</onDemand>
The following example shows a folder with a field child and the field child has a
fieldInfo child.
230 Administration Guide

<?xml version="1.0" encoding="UTF-8"?>
<onDemand xmlns:xsi="http://www.w3.org/2001/XMLSchema-instance"
xsi:noNamespaceSchemaLocation="ondemand.xsd">
<folder name="FolderOne" searchType="Hit List">
<field name="cost" fieldType="Decimal" >
<fieldInfo user="SampleUser" sortOrder="2" greaterThan="Default" lessThan="Yes"/>
</field>
</folder>
</onDemand>
Creating OnDemand XML files for update: When creating an XML file to be
used for updating information, the syntax and layout of the file are the same as
discussed in the previous section. However, there are two major differences.
1. Only the fields which are intended to be updated need to be specified.
2. Child objects might contain an additional attribute, task. The task attribute
indicates the task that is performed by the child object.
Each object that you update must contain the name of the object. Any other
attributes that are specified are updated to the specified value. If an object that is
updated requires a change to another object, that object must be included in the
XML file before the object that references it. For example, to change the user
SampleUser to timeout after 10 minutes, you need to put the following XML code
into an XML file.
<user name="SampleUser" timeOut="10"/>
For all of the main objects, the name field may be specified as _ALL to update all of
the objects of that type. For example, to remove the authority to create folders from
all of the defined users, you can use the following XML code:
<user name="_ALL" createFoldersAuth="No"/>
To rename some objects, you should use the newName attribute. For example, to
change the name of a printer from Boston to New York, use the following XML
code during an update:
<printer name="Boston" newName="NewYork"/>
Most objects might contain a set of similar child objects. To update these objects,
you should use the task attribute. The task attribute can have three values:
add Indicates that the child object should be added to the parent object. The
default value for the task attribute is add. However, some child objects do
not contain a task attribute. For those objects without a task attribute, the
action taken for the object is the same action as the parent object.
update
This indicates that the child object already exists and should be updated
with the attributes provided.
delete This indicates that the child object already exists and should be removed
from the parent object.
The task attribute is only examined during an update process. To add, update or
delete a child object, the parent object must be specified, and must contain the
child object to be updated. See the examples below.
The default value for the task attribute is ″add″. However, some child objects do
not contain a task attribute. For those objects without a task attribute, the action
taken for the object will be the same action as the parent object.
Chapter 27. Importing and exporting administrative objects through an XML interface 231
||
|||
||||
|||

When updating or deleting child permission objects the value of _ALL might be
specified for the user and/or the group to indicate that the update or removal
should pertain to ALL of the user or groups which are already defined for the
parent object.
If an object that is updated requires a change to another object, that object must be
included in the XML file before the object that references it.
Examples: To add a permission for the user SampleUser to the folder FolderOne, the
following code could be used during an update:
<folder name="FolderOne">
<permission user="SampleUser" adminAuthority="Yes" maxHits="No Limit" />
</folder>
To remove the admin authority permission from SampleUser on the folder
FolderOne, you need to update the permission child. The following code is an
example:
<folder name="FolderOne">
<permission task="update" user="SampleUser" adminAuthority="No" />
</folder>
To remove the SampleUser permission from the folder, you need to delete the
permission child.
<folder name="FolderOne">
<permission task="delete" user="SampleUser"/>
</folder>
To remove all user permissions which are currently defined for the folder
FolderOne, the following XML code can be used during an update:
<folder name="FolderOne">
<permission task="delete" user="_ALL"/>
</folder>
Creating OnDemand XML files for delete and export: When creating an
OnDemand XML file to be used to export or delete objects, the syntax and layout
of the file is the same as discussed above, however there are two major differences:
1. The only attribute field which is examined is the name field.
2. All child objects are ignored.
When you export or delete objects, the only information that is required is the
name of the objects. All other attributes might be present in the XML file but is
ignored. It is only possible to delete child objects through the update process, so
during a delete process all child objects are ignored.
When you specify an application for delete or export, you must also specify the
name of the application group in which the application is contained.
The name of _ALL can be used during export and delete to indicate that all objects
of that type should be exported or deleted.
To export the users, SampleOne, SampleTwo and SampleThree, the following
OnDemand XML file can be used during an export:
<?xml version="1.0" encoding="UTF-8"?>
<onDemand xmlns:xsi="http://www.w3.org/2001/XMLSchema-instance"
xsi:noNamespaceSchemaLocation="ondemand.xsd">
232 Administration Guide
||
||

<user name="SampleOne"/>
<user name="SampleTwo"/>
<user name="SampleThree"/>
</onDemand>
To delete the printer, OldPrinter, and the folder, MyFolder, use the following XML
code:
<printer name="OldPrinter"/>
<folder name="MyFolder"/>
To delete all defined printers, the following XML code could be used during a
delete process.
<printer name="_ALL"/>
When you specify an application for delete or export, the name of the application
group in which it is contained must also be specified.
Application Index Parameter Object: The indexParm child object of the
application object has a slightly different syntax than all other objects. Due to the
nature of the data associated with the Index Parameters it is not appropriate to use
an object attribute to specify this information. Therefore, for this object (and only
this object), the data associated with the object is simply the character data which
appears between the <indexParm> and the </indexParm> flags.
For example, the following code can be used to set the index parameters associated
with the SampleApp application:
<application name="SampleApp" .... >
<indexParm>
*dummy index parameters
parm1=value;
parm2=value;
parm3=value;
</indexParm>
</application>
Importing the XML file by using the ARSXML command
Use the ARSXML command to import the XML file into the OnDemand system.
For syntax, description, and parameters of this command, see “Purpose” on page
329.
Exporting OnDemand administrative objects to an XML file
You can use the ARSXML command to export objects from OnDemand into an
XML file in several ways:
v Export a single object, such as a single user
v All of the defined objects of a particular type, for example, all user groups
v Any combination of objects, for example, a user group and all users in that
group
This feature can be used to backup part of an OnDemand system, copy objects
from one system to another, or store objects into an XML file so that they can be
processed by another application.
Use the ARSXML command to export administrative objects into an XML file. For
syntax, description, and parameters of this command, see “Purpose” on page 329.
Chapter 27. Importing and exporting administrative objects through an XML interface 233
||

If you are exporting objects that have dependencies on other objects: Some
objects in OnDemand might have dependencies on other objects, for example, a
group object has a dependency on all of the users that are defined within the
group. When you export these objects, you can use the —r parameter with a value
of d to include in the XML file all of the dependent objects that the exported
objects might have.
See “Purpose” on page 329 for more example XML files that are generated in
different export scenarios.
234 Administration Guide

Part 6. Command reference
This part contains reference information about the OnDemand administrative
commands. Please see Chapter 28, “Overview,” on page 237 for important
information about interpreting the command syntax used in this book.
© Copyright IBM Corp. 1993, 2007 235

236 Administration Guide

Chapter 28. Overview
The commands contained in this reference are OnDemand programs that you can
use to perform server, archive storage manager, and database manager functions.
The commands are presented in alphabetical order. Each command contains a
description of its purpose and syntax (including descriptions of the parameters that
can be used). Examples and general information about using the commands have
also been included.
Examples of commands in this book may appear on one or more lines, for
example:
arsdate -z "09/01/99 04:00:00"
09/01/99 04:00:00 -> 936180000
However, when you enter the command information at the prompt, you must type
the entire command, parameters, and values on a single line.
The OnDemand server program (ARSSOCKD or ARSOBJD in UNIX; LibSrvr or
ObjSrvr in Windows) must be running; otherwise the commands will fail.
Reading a syntax diagram
A syntax diagram shows you how to specify a command so that the operating
system can correctly interpret what you type.
Read a syntax diagram from left to right and from top to bottom, following the
horizontal line (the main path). If the line ends with an arrowhead, the command
syntax is continued and the next line starts with an arrowhead. Facing arrowheads
mark the end of the command syntax.
When you type a command from the syntax, be sure to include punctuation, such
as commas and equal signs.
Parameters are classified as keywords or variables:
v Keywords represent constants and are shown (in syntax) in uppercase letters;
however, at the command prompt, you can enter keywords in either uppercase
or lowercase. An example of a keyword is a command name. On UNIX servers,
command names are case sensitive. On Windows servers, command names are
not case sensitive.
v Variables represent names or values you supply and are shown (in syntax) in
lowercase letters; however, at the command prompt, you can enter variables in
either uppercase or lowercase unless the syntax directions explicitly state the
case restrictions. An example of a variable is a file name. On UNIX servers, file
names are case sensitive. On Windows servers, file names are not case sensitive.
A parameter can be a combination of a keyword and a variable.
Required parameters are displayed on the main path.
�� COMMAND required parameter ��
© Copyright IBM Corp. 1993, 2007 237
|||

Optional parameters are displayed below the main path.
�� COMMAND
optional parameter ��
A stack of parameters, with the first parameter displayed on the main path, shows
that you must choose one of the parameters.
�� COMMAND required choice 1
required choice 2 ��
A stack of parameters, with the first parameter displayed below the main path,
shows that you can choose one of the parameters.
�� COMMAND
optional choice 1
optional choice 2
��
An arrow returning to the left, above the path, shows that items can be repeated
following these conventions:
v If the repeat arrow contains a break, the item can be repeated in a list with the
items separated by blank spaces.
��
COMMAND
�
repeatable parameter
��
v If the repeat arrow contains a comma, the item can be repeated in a list with the
items separated by commas.
��
COMMAND
�
,
repeatable parameter
��
You can repeat items from parameter stacks following the stack conventions for
required and optional parameters described previously.
Some syntax diagrams contain parameter stacks within other parameter stacks. You
can only repeat items from stacks according to the conventions described
previously. That is, if an inner stack does not have a repeat arrow above it but an
outer stack does, you can choose only one parameter from the inner stack and
combine it with any parameter from the outer stack, and that combination can be
repeated. For example, the following diagram shows that you could combine
parameter choice2a with parameter choice2 and then you can repeat that
combination again (choice2 plus choice2a).
238 Administration Guide
��
COMMAND
�
,
parameter choice1
parameter choice2
parameter choice2a
parameter choice2b
parameter choice2c
parameter choice3
��
Some commands are preceded by an optional path parameter.
�� COMMAND
path ��
If you do not supply the path parameter, the system searches the current directory
for the command. If the command is not in the current directory, the system
continues to search for the command using the directories defined in the PATH
environment variable.
Some commands in this section have several formats that accomplish the same
task. These commands appear (in syntax) similar to the following:
�� COMMAND FORM1
COMMAND FORM2 ��
The description of the command directs you to the correct format to use.
Using quotes in commands
When you run an OnDemand program from the command line and you specify
parameter values that contain a null (blank) character or some other special
character (such as the parenthesis), if the command line interpreter of the operating
system from which you are running the command requires the quoting of special
characters, then you must delimit the parameter value with double quote
characters. For example, when running the ARSDOC GET program from the
command line under UNIX and you specify the -o parameter to specify one or
more database field names, then in addition to delimiting each field name with
parenthesis, you must also delimit the entire parameter value with double quote
characters. For example:
-o "(sdate)(student)"
However, if you were to run the same program under Windows, then you would
not need the double quote characters. For example:
-o (sdate)(student)
See your operating system documentation for more information about quoting and
running commands.
Note: There are some exceptions to this rule, where quotes may always be
required. See the specific commands in this reference to identify specific
instances where parameters and values may always require quoting.
Chapter 28. Overview 239

Removing trailing blank characters
Trailing blank characters are trimmed from the name when adding or updating an
application, application group, folder, printer, storage set, or cabinet. As a
reminder, for existing objects, the name specified to a command line program must
include trailing blank characters that are part of the name.
Using the h and I parameters
The OnDemand programs use the -h and -I parameters to determine the name of
the OnDemand instance to process. You must specify the parameter and name the
instance if any of the following are true:
v The name of the default instance is archive and you are using a port number
other than the default port number (1445).
v The name of the default instance is not archive.
v You are running more than one instance on the same workstation and you want
to process an instance other than the default instance.
v You are running the program from an object server that resides on a different
system or node than the library server.
The OnDemand programs locate the specified instance name in the ARS.INI file
(UNIX servers; the registry for Windows servers) to determine the TCP/IP address,
host name alias, or fully-qualified host name of the system on which the
OnDemand library server is running and other information about the instance. The
ARSADMIN, ARSDOC, and ARSLOAD programs support the -h parameter. The
ARSDB, ARSLOAD, ARSMAINT, and ARSTBLSP programs support the -I
parameter. For the ARSLOAD program, if both the -h and -I parameters are
specified, the value of the last parameter specified is used.
Working with instances
An OnDemand instance is a logical server environment made up of a database, a
library server, and one or more object servers. An instance is defined in the
ARS.INI file by specifying a unique name for the instance, identifying the userid of
the instance owner, and identifying the library server on which the database will
be maintained.
You can run multiple instances on the same workstation or node, with each
instance configured differently:
v To have separate test and production environments
v To have databases using different code pages
Each instance has different security from other instances on the same machine. You
must define users and groups to each instance and set application group and
folder permissions for users of each instance. Each instance has its own system log.
When you work with more than one instance, you must identify the instance name
when you run OnDemand programs (such as ARSDB, ARSLOAD, and
ARSSOCKD) and database commands (such as connecting to the database).
When the OnDemand client programs connect to an instance, they must specify
the TCP/IP port number over which the instance listens for requests from clients.
Each instance that is operating on the same workstation must use a different
TCP/IP port number.
240 Administration Guide
||||

See IBM DB2 Content Manager OnDemand for Multiplatforms: Installation and
Configuration Guide for information about configuring and creating instances,
including:
v Adding an instance to the ARS.INI file
v Modifying the server configuration in the ARS.CFG file
v Defining table space file systems in the ARS.DBFS file
v Defining cache file systems in the ARS.CACHE file
v Automating instance operations
The following topics in this section describe how to work with OnDemand
instances:
v Manually starting and stopping instances
v Connecting to instances
v Working with instances
Manually starting and stopping instances
You must start an instance before clients can connect to databases on the instance.
To start an instance:
1. Log on as the root user or instance owner.
2. Start the instance:
arssockd test arssockd
Where test is the name of the instance that you want to start. The name test
is the value of the SRVR_INSTANCE parameter in the ARS.INI file.
3. Use the PS command to verify that the instance started:
ps -ef ¦ grep ars
root 6014 28991 0 60 13:30:13 - 0:00 arssockd -test: (accepting)
To stop an instance:
1. Log on as the root user or the instance owner.
2. Use the ARSSOCKD command to stop the initial ARSSOCKD process. If there
is more than one ARSSOCKD process running, determine the initial
ARSSOCKD process. The initial ARSSOCKD process has a status of accepting:
ps -ef ¦ grep ars
root 6022 28991 0 60 13:43:03 - 0:00 arssockd: db (USERID)
root 6018 28991 0 60 13:33:03 - 0:00 arssockd: db (idle)
root 6014 28991 0 60 13:30:13 - 0:00 arssockd -arssockd: (accepting)
3. Then stop the accepting process. For example:
arssockd stop 6014
The initial process and all of its children will be stopped.
Notes:
1. When you stop the server process, all users who are connected over the
network to the OnDemand system are disconnected. Therefore, it is a good idea
to warn connected users before stopping the server process.
Chapter 28. Overview 241

2. The ARSSOCKD STOP command is for UNIX servers only. For Windows
servers, the server process runs as a service. The service can be stopped by
using the Services administrative tool in Windows or the OnDemand
Configurator client.
3. To stop an instance when you are running more than one instance on the same
workstation or node, make sure that you kill the correct accepting ARSSOCKD
process. There is no instance name associated with the accepting ARSSOCKD
process for the default instance (the default instance name is archive). The
following shows an example of the processes for two instances: the default
instance and an instance named test:
ps -ef ¦ grep ars
root 3326 25955 0 60 10:03:59 - 0:00 arssockd: db (USERID)
root 3303 25955 0 60 10:03:31 - 0:00 arssockd: db (idle)
root 3299 25955 0 60 10:01:45 - 0:00 arssockd: (accepting)
root 6022 28991 0 60 13:43:03 - 0:00 arssockd: db (USERID)
root 6018 28991 0 60 13:33:03 - 0:00 arssockd: db (idle)
root 6014 28991 0 60 13:30:13 - 0:00 arssockd -TEST: (accepting)
In the example, process 3299 belongs to the default instance and process 6014
belongs to the instance named test.
Connecting to instances
Connecting from OnDemand clients
To connect to a particular instance, the client must log on to the correct library
server. Use the Update Servers dialog box to add library servers to the client.
When you add a library server, you identify the host name of the library server
and the port number and communications protocol used to communicate with the
instance. The port number that you specify in the Update Servers dialog box must
be the same as the value that you specified for the PORT parameter in the ARS.INI
file.
Connecting to a database
You can connect to a database using the DB2 command line processor or other
tools provided with DB2. To connect to and use a database, log on as root, the
instance owner, or some other user that belongs to the instance owner’s primary
group.
You can connect to only one database at a time. If you are currently connected to a
database, you must disconnect from that database before you can connect to a
different database.
Working with instances
OnDemand provides programs that you can use to work with an instance. For
example, OnDemand provides programs to create databases, start instances, load
data, and maintain index data. One of the parameters that you can specify to a
program is the name of the instance. If you do not specify otherwise, the name of
the instance is archive. If you name your first or only instance something other
than archive or you work with more than one instance, you should always specify
the name of the instance when you run a program. That way you can make sure
you are working with the correct instance. Depending on the program that you
need to run, there are different ways that you can specify the name of the instance.
242 Administration Guide
The ARSADMIN, ARSDB, ARSLOAD, ARSMAINT, and ARSSYSCR programs use
the –I instance parameter. OnDemand retrieves the host name of the library
server that is associated with the instance from the HOST parameter in the
ARS.INI file. For example:
arsdb -I test -gcv
arssyscr -I test -l
arsload -I test -d /arsacif/test/acif1 -c /arsacif/test/acif2
Where test is the name of the instance, and matches the value of a
SRVR_INSTANCE parameter in the ARS.INI file.
The ARSSOCKD and ARSOBJD programs use the following syntax:
arssockd test arssockd
arsobjd test arsobjd
arssockd stop test
Where test is the name of the instance, and matches the value of a
SRVR_INSTANCE parameter in the ARS.INI file.
Chapter 28. Overview 243

244 Administration Guide
Chapter 29. ARSADMIN
Purpose
The ARSADMIN program is the primary OnDemand input data processing
program. The ARSLOAD program calls the Load function of the ARSADMIN
program to process the input file, index file, and optionally, resource group file to
create index data and storage objects. The ARSADMIN program processes the
output files that are produced by the various data indexing and conversion
programs (output files, index files, and optionally, resource group files) to load
index data into the OnDemand database and copy documents and resources to
cache storage and archive storage.
The Import function can be used to import migrated index data from archive
storage to the database.
The ARSADMIN program can also be run from the command line by an
experienced OnDemand administrator to help with problem determination, error
recovery, and other administrative tasks. For example, an experienced OnDemand
administrator can create, delete, and restore storage objects, retrieve individual
documents and resources from storage volumes, and calculate data compression
ratios.
Description and syntax
The ARSADMIN program provides the following functions:
Load. The Load function creates storage objects and index data. The storage
manager copies the storage objects to cache storage and archive storage. The
database manager loads the index data into the database. The input data to the
Load function can be one or more of the following: an input file (specify with the
-s parameter), an index file (specify with the -i parameter), and a resource group
file (specify with the -r parameter). If you use ACIF to index a report, then you can
concatenate the three input files into a single input file. If you do so, then the -s, -i,
and -r parameters must specify the same file name. The index data that the Load
function creates can be saved to a file.
�� arsadmin load
-a
application
-d
directory
-e
resourceID �
� -f
-g applGroup -h instance
-i
indexFile �
� -n
prinid-secnid
-o
outputFile
-p
password �
� -r
resourceFile
-s
sourceFile
-u
userid
-y
delimiter �
� -Z
userExit ��
© Copyright IBM Corp. 1993, 2007 245

Unload. The Unload function can be used to delete the storage objects and index
data that were loaded into the system during input processing. To use the Unload
function, you must specify a Load ID. The Load ID represents the database rows
and storage objects that were created when an input file was loaded into the
system. You would typically use the Unload function to manually remove an input
file (report) from the system. You can also use the Unload function to delete data
that was created during testing. You must specify the userid of a user that is
permitted to delete documents from the application group. The ARSADMIN
program searches the system log for the specified Load ID. If the Load ID is not
found in the system log, the unload will fail unless you specify the -Q parameter.
�� arsadmin unload -g applGroup -h instance -L loadID
-p
password �
� -Q
-u
userid ��
Load_db. The Load_db function stores the index data that was created by the Load
function into the database. If you specify Postprocessing information for the
application (on the Load Information page), the index data is processed as
specified before the Load_db function stores the index data in the database.
�� arsadmin load_db
-a
application -g applGroup -h instance �
� -L loadID
-p
password -s sourceFile
-u
userid �
� -y
delimiter
-Z
userExit ��
Import. The Import function can be used to import migrated index data from
archive storage to the database. When OnDemand determines that a query requires
index data that has been migrated to archive storage, then a message is sent to
stdout (UNIX servers) or the console (Windows servers) and saved in the system
log. An administrator must use the ARSADMIN program to import the required
table or tables into the database. After the index data has been imported, the user
can retry the query.
Note: Importing migrated index data requires additional space in the database,
additional log file storage, and additional temporary space.
�� arsadmin import -g applGroup -h instance
-p
password �
� -u
userid tableName ��
Store. The Store function can be used to copy storage objects from one storage
location to another. For example, you could copy a storage object from cache
storage to a primary storage node.
246 Administration Guide

�� arsadmin store
-d
directory -g applGroup -h instance �
� 7
-m
1
2
3
4
5
6
-n prinid-secnid
-p
password
-u
userid �
�
�
filename
��
Retrieve. The Retrieve function can be used to retrieve a storage object from a
specified location. For example, you could retrieve a storage object from cache
storage or a primary storage node. After retrieving a storage object, you could use
the Decompress function to extract a specific document or resource from the
storage object file.
�� arsadmin retrieve
-b
offset
-d
directory -g applGroup �
� -h instance
-l
length
7
-m
1
2
3
4
5
6
-n prinid-secnid �
�
-p
password
-u
userid
�
filename
��
Compress. The Compress function is used to compress input files and resources in
preparation for creating storage objects.
The Compress function can also be used to estimate the amount of storage space
required to store an input file in the system:
v To estimate the amount of storage required to load an input file that contains
logical items, such as bills, invoices, or statements, first extract a representative
sample of data from an input file. Then compress the sample with the -l
parameter. Divide the size of the compressed output file by the number of bytes
of input data that you compressed. The result is the compression ratio achieved.
Chapter 29. ARSADMIN 247
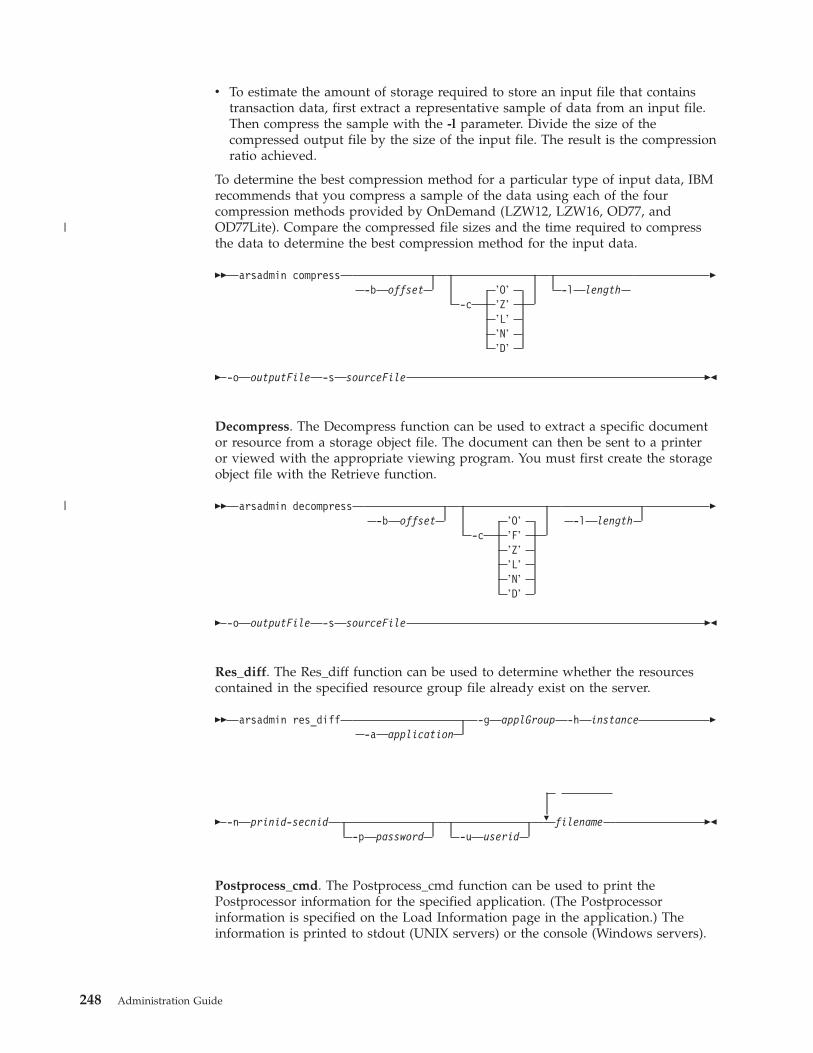
v To estimate the amount of storage required to store an input file that contains
transaction data, first extract a representative sample of data from an input file.
Then compress the sample with the -l parameter. Divide the size of the
compressed output file by the size of the input file. The result is the compression
ratio achieved.
To determine the best compression method for a particular type of input data, IBM
recommends that you compress a sample of the data using each of the four
compression methods provided by OnDemand (LZW12, LZW16, OD77, and
OD77Lite). Compare the compressed file sizes and the time required to compress
the data to determine the best compression method for the input data.
�� arsadmin compress
-b
offset
’O’
-c
’Z’
’L’
’N’
’D’
-l
length �
� -o outputFile -s sourceFile ��
Decompress. The Decompress function can be used to extract a specific document
or resource from a storage object file. The document can then be sent to a printer
or viewed with the appropriate viewing program. You must first create the storage
object file with the Retrieve function.
�� arsadmin decompress
-b
offset
’O’
-c
’F’
’Z’
’L’
’N’
’D’
-l
length �
� -o outputFile -s sourceFile ��
Res_diff. The Res_diff function can be used to determine whether the resources
contained in the specified resource group file already exist on the server.
�� arsadmin res_diff
-a
application -g applGroup -h instance �
�
-n
prinid-secnid
-p
password
-u
userid
�
filename
��
Postprocess_cmd. The Postprocess_cmd function can be used to print the
Postprocessor information for the specified application. (The Postprocessor
information is specified on the Load Information page in the application.) The
information is printed to stdout (UNIX servers) or the console (Windows servers).
248 Administration Guide
|
|
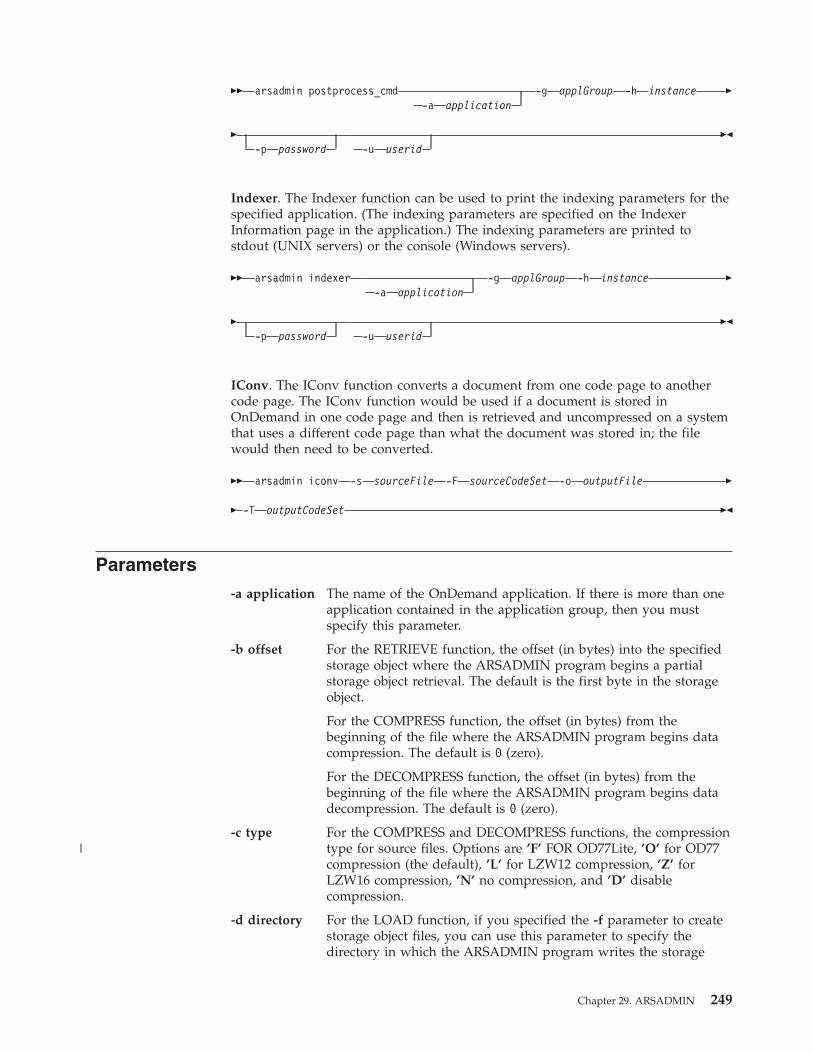
�� arsadmin postprocess_cmd
-a
application -g applGroup -h instance �
� -p
password
-u
userid ��
Indexer. The Indexer function can be used to print the indexing parameters for the
specified application. (The indexing parameters are specified on the Indexer
Information page in the application.) The indexing parameters are printed to
stdout (UNIX servers) or the console (Windows servers).
�� arsadmin indexer
-a
application -g applGroup -h instance �
� -p
password
-u
userid ��
IConv. The IConv function converts a document from one code page to another
code page. The IConv function would be used if a document is stored in
OnDemand in one code page and then is retrieved and uncompressed on a system
that uses a different code page than what the document was stored in; the file
would then need to be converted.
�� arsadmin iconv -s sourceFile -F sourceCodeSet -o outputFile �
� -T outputCodeSet ��
Parameters
-a application The name of the OnDemand application. If there is more than one
application contained in the application group, then you must
specify this parameter.
-b offset For the RETRIEVE function, the offset (in bytes) into the specified
storage object where the ARSADMIN program begins a partial
storage object retrieval. The default is the first byte in the storage
object.
For the COMPRESS function, the offset (in bytes) from the
beginning of the file where the ARSADMIN program begins data
compression. The default is 0 (zero).
For the DECOMPRESS function, the offset (in bytes) from the
beginning of the file where the ARSADMIN program begins data
decompression. The default is 0 (zero).
-c type For the COMPRESS and DECOMPRESS functions, the compression
type for source files. Options are ’F’ FOR OD77Lite, ’O’ for OD77
compression (the default), ’L’ for LZW12 compression, ’Z’ for
LZW16 compression, ’N’ no compression, and ’D’ disable
compression.
-d directory For the LOAD function, if you specified the -f parameter to create
storage object files, you can use this parameter to specify the
directory in which the ARSADMIN program writes the storage
Chapter 29. ARSADMIN 249
|

object files. The default is the directory from which the
ARSADMIN program was invoked.
For the STORE function, the name of the directory that contains
the storage object file to load. The default is the directory from
which the ARSADMIN program was invoked.
For the RETRIEVE function, the directory in which the
ARSADMIN program writes the file that contains the storage
object retrieved from OnDemand. The default is the directory from
which the ARSADMIN program was invoked.
-e res_ID For AFP files, this parameter and the -r parameter determine how
OnDemand processes the resource group file. The default resource
ID is 0 (zero).
v If you specify a resource ID and a resource file (with the -r
parameter), then OnDemand loads the resource from the file and
overrides the resource specified in the document with the
resource ID you specified.
v If you specify a value of 0 (zero) and a resource file (with the -r
parameter), then OnDemand checks the server to determine if
the resource specified in the document exists. If the resource
does exist, then OnDemand does not load the resource from the
file. Otherwise, OnDemand loads the resource from the file.
v If you specify a value of 0 (zero) and do not specify a resource
file (with the -r parameter), then OnDemand does not assign a
resource ID to the document.
v If you specify a value other than 0 (zero) and do not specify a
resource file (with the -r parameter, then OnDemand assigns the
resource ID that you specified to the document.
-f For the LOAD function, write storage objects to file, rather than to
storage volumes. By default, OnDemand creates storage objects in
memory and copies them to cache storage and archive storage. You
can specify this parameter when you want OnDemand to process
an input file and create storage objects, but you do not want to
copy the storage objects to storage volumes. You may want to use
this option when you are testing the data loading process.
-F For the ICONV function, specifies the code set for the document
specified by the -s parameter.
-g applGroup The name of the application group from which OnDemand extracts
processing information and stores the data.
-h instance The name of the OnDemand instance to process. The ARSADMIN
program will attempt to locate the specified instance name in the
ARS.INI file (UNIX servers; the registry on Windows servers) to
obtain the TCP/IP address, host name or host name alias of the
workstation or node on which the instance is running. If the
ARSADMIN program cannot locate the instance name in the
ARS.INI file, the specified value is treated as a host name.
The -h parameter is required for all functions, except COMPRESS,
DECOMPRESS, and ICONV.
Note: If you are running multiple instances of OnDemand on the
same workstation, always specify the -h parameter to identify the
name of the instance that you want to process. Verify that the
250 Administration Guide

system is configured with the correct information for all instances
of OnDemand. See IBM DB2 Content Manager OnDemand for
Multiplatforms: Installation and Configuration Guide for information
about configuring instances.
-i indexFile The name of the input index file created by the data indexing
program. Optionally, for AFP data, the name of a concatenated
input file that also contains resource group and report data. (See
also the -r and -s parameters.)
-l length For the RETRIEVE function, the number of bytes that the
ARSADMIN program retrieves from the specified storage object.
The -l parameter and the -b parameter provides support for partial
storage object retrieval.
For the COMPRESS function, the number of bytes (from the offset)
of data to compress. The default is zero bytes.
For the DECOMPRESS function, the number of bytes (from the
offset) of data to decompress. The default is zero bytes.
-L loadID Identifies the value that OnDemand generates to uniquely identify
an input file that was loaded into the system. The Load ID
contains six parts. For example:
1220-1-0-8FAA-9339-9345
Where 1220 is the internal application group identifier, 1 is the
primary storage node, 0 is the secondary storage node, 8FAA
represents the name of the object that was stored during the load
process, 9339 is the first (internal) date in the report, and 9345 is
the last (internal) date in the report. If you redirected the output of
the ARSLOAD program or the Load function to a log file, see the
log file for the Load ID that was created during load processing.
For the UNLOAD function, the Load ID that you want to delete.
When recovering from a system failure or some other problem that
occurred during input processing, you should delete the last (or
only) Load ID that is listed in the log file.
For the LOAD_DB function, the Load ID that represents the input
file from which the index data was generated.
-m location Determines the location(s) of the storage objects that are processed
by the storage manager. Possible locations are cache storage, the
primary storage node, and the secondary storage node. The default
value is 7 (seven), which specifies that the storage manager should
process the storage objects for all of the locations that are specified
in the application group. Specify 1 (one) for cache storage, 2 (two)
for the primary storage node, or 4 (four) for the secondary storage
node. The values are additive; that is, if you specify a value of 3
(three), then the storage manager processes the storage objects in
cache storage and the primary storage node.
-n prinid-secnid
The primary and secondary storage node identifiers for the
application group. Separate the identifiers with the − (dash)
character.
Chapter 29. ARSADMIN 251
OnDemand stores the primary and secondary storage node
identifiers in the database when you load data into an application
group. OnDemand includes the identifiers in the Load ID.
The values specified with the -n and -g parameters enable the
ARSADMIN program to store data on or retrieve data from a
specific OnDemand object server.
-o outputFile For the LOAD function, optionally create a file that contains the
index information that the database manager uses to update the
OnDemand database. You can use this option to create the index
data, but not load it into the database; for example, if you want to
test the index process or inspect the index data.
For the COMPRESS function, the name of the compressed output
file.
For the DECOMPRESS function, the name of the file that contains
the uncompressed document or resource.
For the ICONV function, specifies the name of the file that will
contain the document after it has been converted to the code set
specified by the -T parameter.
-p password The password for the OnDemand userid specified with the -u
parameter. If the userid is not assigned a password, then enter a
null password (that is, specify -p ""). If you do not specify this
parameter, then the ARSADMIN program will prompt you to enter
the password. If the userid is not assigned a password, then press
the Enter key when prompted.
-Q For the UNLOAD function, allows you to force the ARSADMIN
program to unload the Load ID named with the -L parameter, even
if the Load ID is not found in the system log. If the ARSADMIN
program does not find the Load ID in the system log and you do
not specify the -Q parameter, then the Unload function will fail.
-r resourceFile The name of the input resource group file. Created by the data
indexing program. Optionally, for AFP data, the name of a
concatenated input file that also contains index and report data.
(See also the -i and -s parameters.)
-s sourceFile For the LOAD function, the input file or a concatenated file that
contains the report data, index data, and resource group data. (See
also the -i and -r parameters.)
For the LOAD_DB function, the name of the file that contains the
index data to load.
For the COMPRESS function, the name of the uncompressed input
file.
For the DECOMPRESS function, the name of the storage object file
that contains the document or resource to be uncompressed.
For the ICONV function, specifies the name of the file that contains
the document that is in the code set specified by the -F parameter.
-T For the ICONV function, specifies the code set for the document
specified by the -o parameter.
-u userid An OnDemand userid with administrator authority for the
252 Administration Guide
application group. If you do not specify this parameter, then the
ARSADMIN program prompts you to enter the userid.
For the UNLOAD function, the userid that you specify must have
permission to delete documents from the application group.
-y delimiter The column delimiter. Optionally specify the character that
separates the columns (fields) in the index records that are in the
index file to be processed by the database manager. The default
delimiter is the pipe character.
OnDemand uses the delimiter when you specify the -o parameter
to save the index records to an output file.
-Z userExit For the LOAD and LOAD_DB functions, specifies a user-defined
string that is passed to the load user exit program (ARSULOAD).
filename For the STORE function, the name of the storage object file (or
files) to load. To specify more than one storage object file, separate
the file names with the blank character.
For the RETRIEVE function, the name of the storage object(s) to
retrieve. Also determines the name of the file that the ARSADMIN
program creates in the directory specified with the -d parameter.
Specify a valid six-part load ID. For example:
1220-1-0-8FAA-9339-9345
Where 1220 is the internal application group identifier, 1 is the
primary storage node, 0 is the secondary storage node, 8FAA
represents the name of the of the object that was stored during the
load process, 9339 is the first (internal) date in the report, and 9345
is the last (internal) date in the report.
For the RES_DIFF function, the name of the resource group file(s)
to process.
tableName For the IMPORT function, the name of the migrated index table to
import into the database.
Examples
1. The following example shows how to use the LOAD function to load the
credit.out input file, the resources in the credit.res resource group file, and
the index data in the credit.ind index file into the Credit application group.
arsadmin load -g Credit -i credit.ind -s credit.out -r credit.res
2. The following example shows how to use the LOAD function to load a
concatenated input file that contains the input data, index data, and resource
group file.
arsadmin load -g Credit -i credit.cat -s credit.cat -r credit.cat
3. The following example shows how to use the UNLOAD function to delete an
input file from the system.
arsadmin unload -g Credit -L 1220-1-0-1FAA-9339-9345
4. The following example shows how to use the COMPRESS function to estimate
the amount of storage required for an input file that contains logical items,
such as bills, invoices, or statements. The ARSADMIN program compresses the
first 200 KB of data in the input file using the default (OD77) compression
method.
arsadmin compress -s report_file -o output_file -l 200000
Chapter 29. ARSADMIN 253

5. The following example shows how to use the COMPRESS function to estimate
the amount of storage required for an input file that contains transaction data,
such as a general ledger. The input file is a portion of a larger input file.
arsadmin compress -s report_file_segment -o output_file
6. The following example shows how to use the IMPORT function to import a
migrated index table from archive storage into the database. The name of the
application group and the index table to import can be obtained from the
message that OnDemand saves in the system log.
arsadmin import -g Credit SL27
7. The following example shows how to use the ICONV function to convert the
input.utf8 file from Unicode to EBCDIC and save the output in the
output.ibm500 file.
arsadmin iconv -s input.utf8 -F UTF-8 -o output.ibm500 -T IBM-500
Notes
The OnDemand server program (ARSSOCKD or ARSOBJD in UNIX; LibSrvr or
ObjSrvr in Windows) must be running, otherwise the ARSADMIN program will
fail.
Files
/usr/lpp/ars/bin/arsadmin The AIX executable program.
/opt/ondemand/bin/arsadmin The HP-UX and Sun Solaris executable program.
\Program Files\IBM\OnDemand for WinNT\bin\arsadmin
The Windows executable program.
254 Administration Guide
Chapter 30. ARS_ADSM
Purpose
Provides an interface to Tivoli Storage Manager for specific functions, such as
starting and stopping the Tivoli Storage Manager server and creating a backup
image of the Tivoli Storage Manager database.
Note: The ARS_ADSM program is available only for UNIX servers.
Syntax
�� ars_adsm -d
-s
-t
-u
userid
-p
password
-v ��
Description
The ARS_ADSM program provides a command line interface to Tivoli Storage
Manager for the following functions:
v Start the Tivoli Storage Manager server as a background process.
v Stop the Tivoli Storage Manager server.
v Create a backup image of the Tivoli Storage Manager database.
When you run Tivoli Storage Manager administrative tasks, you must log on to the
Tivoli Storage Manager server using an administrative userid and password. A set
of default values for the userid and password are in the ARS_ADSM program
provided by IBM. You can use the values in the program or specify different
values using the -u and -p command line parameters. The IBM DB2 Content
Manager OnDemand for Multiplatforms: Installation and Configuration Guide describes
how to change the Tivoli Storage Manager administrative userid and password in
the ARS_ADSM program.
Parameters
-d Create a backup image of the Tivoli Storage Manager database.
Writes the backup image to the backup device that you configured
when you installed and configured Tivoli Storage Manager. The
IBM DB2 Content Manager OnDemand for Multiplatforms: Installation
and Configuration Guide provides help with configuring the
database backup device.
If you plan to create a backup image of the database on tape,
mount a tape storage volume that was formatted by Tivoli Storage
Manager in the tape drive before you start the ARS_ADSM
program.
-s Start the Tivoli Storage Manager server as a background process.
-t Stop the Tivoli Storage Manager server.
-u userid The userid of a Tivoli Storage Manager administrative user.
© Copyright IBM Corp. 1993, 2007 255
-p password The password for the Tivoli Storage Manager administrative userid
specified with the -u parameter. If the user is not assigned a
password, enter a null password. For example, -p "".
-v Enables verbose mode, to display all messages (informational and
error). By default, the ARS_ADSM program displays error
messages.
Examples
1. To start the Tivoli Storage Manager server, enter:
ars_adsm -sv
2. To stop the Tivoli Storage Manager server, enter:
ars_adsm -tv
3. To create a backup image of the Tivoli Storage Manager database, enter:
ars_adsm -dv
Note: If you plan to backup the database to tape, put a tape storage volume
that was formatted by Tivoli Storage Manager in the drive before you start the
ARS_ADSM program.
Notes
Before you use the ARS_ADSM program for the first time, you must configure it
for your system. See IBM DB2 Content Manager OnDemand for Multiplatforms:
Installation and Configuration Guide for help with configuring the ARS_ADSM
program.
The ARS_ADSM program can be used to invoke the Tivoli Storage Manager
processes that start and stop the Tivoli Storage Manager server and backup the
Tivoli Storage Manager database. The ARS_ADSM program does not monitor the
Tivoli Storage Manager processes or report on the success or failure of the Tivoli
Storage Manager processes. Important: If you use the ARS_ADSM program to start
the Tivoli Storage Manager process that backs up the Tivoli Storage Manager
database, query the Tivoli Storage Manager server to determine whether the
backup was successful before you continue with other OnDemand or Tivoli
Storage Manager work. See your Tivoli Storage Manager documentation for details.
OnDemand server programs can remain running while you create a backup copy
of the Tivoli Storage Manager database. However, IBM recommends that you stop
all OnDemand processes before you backup the database.
If you stop the Tivoli Storage Manager server while the OnDemand processes are
running, errors may occur. For example, if a client attempts to retrieve a document
that resides on a storage volume that is managed by Tivoli Storage Manager, an
error will occur and OnDemand will send a message to the client and the system
log.
Files
/usr/lpp/ars/bin/ars_adsm The AIX executable program.
/opt/ondemand/bin/ars_adsm The HP-UX and Sun Solaris executable program.
256 Administration Guide
Chapter 31. ARSDATE
Purpose
Display the OnDemand internal database value for a given date and time string or
display the date and time string for a given OnDemand internal database value.
Syntax
��
arsdate -a
-i
-t
-z
-g
-h
hours
-n
minutes
-s
seconds
�
� -d
days
-m
months
-y
years
-f
″format″ �
�
�
internalValue
″dateString″
��
Description
The ARSDATE program can be used to display the OnDemand internal database
value for a given date and time string or display the date and time string for a
given OnDemand internal database value.
Values whose data types are Date, Time, Date/Time, or Date/Time (TZ) are
represented in an internal form that is transparent to the casual user of
OnDemand. Casual users enter date and time values the same way that they
appear in a report. However, to search the database with an SQL string, a user
must enter the internal form of the value. The ARSDATE program lists the internal
value of a date or time string.
Parameters
-a Use to display database values and date strings for Date fields. For
example, to display the database value for the date 9/1/99, enter:
arsdate -a 9/1/99
The ARSDATE program returns:
9/1/99 -> 10836
To display the date string for the database value 10836 in the
default date format, enter:
arsdate -a 10836
© Copyright IBM Corp. 1993, 2007 257
The ARSDATE program returns:
10836 -> 9/1/99
-i Use to display database values and date and time strings for
Date/Time fields. The time part of a Date/Time field is not
adjusted for the local time zone. You typically use the -i parameter
to find out one of two things:
v Given a date and time printed on a report, what value did
OnDemand store in a Date/Time database field? You can use the
result to search a Date/Time field with an SQL string.
v Given a value stored in a Date/Time database field, what would
be the date and time printed on a report?
-t Use to display database values and time strings for Time fields.
The time is not adjusted for the local time zone. For example, to
display the database value for the time 04:00:00, enter:
arsdate -t 04:00:00
The ARSDATE program returns:
04:00:00 -> 4800
To display the time string for the database value 4800, enter:
arsdate -t 4800
The ARSDATE program returns:
4800 -> 04:00:00
-z Use to display database values and date and time strings for
Date/Time (TZ) fields. The time part of a Date/Time (TZ) field is
adjusted for the local time zone. If you run the ARSDATE program
with the -z parameter on systems in different time zones and you
specify the same date and time value, the result will be different.
For example, suppose that you need to determine the value stored
in a Date/Time (TZ) field for ″09/01/00 04:00:00″. The command:
arsdate -z "09/01/00 04:00:00"
When run on a server in the Eastern time zone will return:
09/01/00 04:00:00 -> 936187200
If you run the same command on a server in the Mountain time
zone, then result will be:
09/01/00 04:00:00 -> 936180000
A typical use of the -z parameter is to determine a database value
with which to search the system log. You can use the result to
search the Date/Time (TZ) field of the system log with an SQL
string. For example, suppose a user in New York logs on to a
server in Denver. To retrieve the log on messages with an SQL
string, you must specify the date and time part of the query using
the local time of the client that is running the query. If the user
logged on to the server at 4 a.m. Eastern time, then a query that is
run in Denver must specify 2 a.m. to retrieve the message.
-g Display the current system date.
-d days Add the specified number of days to the specified internal value.
258 Administration Guide

-h hours Add the specified number of hours to the specified internal value.
-m months Add the specified number of months to the specified internal
value.
-n minutes Add the specified number of minutes to the specified internal
value.
-s seconds Add the specified number of seconds to the specified internal
value.
-y years Add the specified number of years to the specified internal value.
-f ″format″ Determines the format of the date and time string that OnDemand
displays.
Table 11 lists the standard date and time formats that are
supported by OnDemand. If the input data contains a date or time
format that is not listed in the table, you can specify the format to
OnDemand. However, when specifying a format, you can only use
values and separators from the standard formats that are listed in
the table. Date and time formats may also be specified on the Load
Information page in the application and the Field Information page
in the folder.
The format consists of a set of values (for example, %m) and
separators (such as the blank character).
Table 11. Date and time format specifications
Date Format Specifier Date Format Example
%m/%d/%y mm/dd/yy 01/31/95
%d/%m/%y dd/mm/yy 31/01/95
%f/%e/%y m/d/yy 1/31/95
%e/%f/%y d/m/yy 31/1/95
%m-%d-%y mm-dd-yy 01-31-95
%d-%m-%y dd-mm-yy 31-01-95
%m%d%y mmddyy 013195
%m%d%Y mmddyyyy 01311995
%y%m%d yymmdd 950131
%Y%m%d yyyymmdd 19950131
%b %e, %Y Mth d, yyyy Jan 31, 1995
%B %e, %Y Month d, yyyy January 31, 1995
%m/%d/%y %H:%M mm/dd/yy hh:mm 01/31/95 10:50
%H:%M hh:mm 10:50
%T hh:mm:ss 10:50:59
internalValue The internal date and time value from the OnDemand database.
Enter one or more internal values when you want to display
formatted date strings.
″dateString″ The date and time string. Enter one or more strings when you
want to display internal date values.
Chapter 31. ARSDATE 259
Examples
1. The following example shows how to determine the database value for the
specified date and time string. The data type of the database field is
Date/Time.
arsdate -i "09/01/99 04:00:00"
09/01/99 04:00:00 -> 936158400
In the example, you could use the database value to search a Date/Time field
in the database with an SQL string. For example:
arsdoc get -i "WHERE somedate=936158400" ...
2. The following example shows how to determine the date and time string for
the specified database value. The data type of the database field is Date/Time.
The result is shown using the default display format.
arsdate -i 936158400
936158400 -> 09/01/99 04:00:00
3. The following example shows how to determine the database value for the
specified date and time string. The data type of the database field is Date/Time
(TZ). The ARSDATE program adjusts the time part of the result for the local
time zone.
arsdate -z "09/01/99 04:00:00"
09/01/99 04:00:00 -> 936180000
If you were to run the same command on a server in the Eastern time zone, the
result would be:
arsdate -z "09/01/99 04:00:00"
09/01/99 04:00:00 -> 936187200
Notes
1. When displaying the date string for a given internal value, by default, the
ARSDATE program displays the date string using the mm/dd/yy format. If you
want the ARSDATE program to display the date string using a different format,
then you must specify the date format with the -f parameter. For example:
arsdate 10907
10907 -> 11/11/99
arsdate -f "%m/%d/%Y" 10907
10907 -> 11/11/1999
2. When displaying the internal value for a given date string, by default, the
ARSDATE program expects you to specify the date string using the mm/dd/yy
format. If you want to specify the date string using a different format, then you
must specify the date format with the -f parameter. For example:
arsdate 11/12/99
11/12/99 -> 10908
arsdate 11/12/1999
11/12/1999 -> -1 (Error)
260 Administration Guide
arsdate -f "%m/%d/%Y" 11/12/1999
11/12/1999 -> 10908
3. The upper limit of the date is September 17, 2059. To format the output for a
date, specify the -f parameter as follows:
arsdate -f "%m/%d/%Y" 32767
32767 -> 09/17/2059
Files
/usr/lpp/ars/bin/arsdate The AIX executable program.
/opt/ondemand/bin/arsdate The HP-UX and Sun Solaris executable program.
\Program Files\IBM\OnDemand for WinNT\bin\arsdate
The Windows executable program.
Chapter 31. ARSDATE 261
||
||

262 Administration Guide

Chapter 32. ARSDB
Purpose
Provide an interface to the database manager for specific OnDemand database
functions, such as creating the database, starting and stopping the database
manager, activating the database, creating a backup image of the database, and
reorganizing the OnDemand system tables. The OnDemand database resides on
the library server.
Note to Oracle users: See “Using the ARSDB program with Oracle” on page 272.
Syntax
�� arsdb
-c
-d
-e
-f
-g
-h
-i �
� -I
instance
-k
-l
-m
-r
-s
-t
-v �
�
-x
-y
device
-z
device
-Y
device
-Z
device
-X
�
tableName
��
Description
The ARSDB program provides an interface to the database manager for the
following database functions:
v Create and initialize the OnDemand database.
v Start the database manager.
v Stop the database manager.
v Create backup images of the OnDemand database. You can use the ARSDB
program to create backup images of table spaces and the full database. When
you run the ARSDB program to create backup images of DB2 table spaces and
databases, you can specify that you want Tivoli Storage Manager to maintain the
backup image files. However, to do so, you must first configure Tivoli Storage
Manager. See IBM DB2 Content Manager OnDemand for Multiplatforms: Installation
and Configuration Guide for assistance with configuring Tivoli Storage Manager to
maintain DB2 backup image files.
v Reorganize and optimize the OnDemand system tables.
v Import and export tables and databases.
© Copyright IBM Corp. 1993, 2007 263

The ARSDB program reads the ARS.CFG file (UNIX servers) or the registry
(Windows servers) to obtain the database configuration information. Before
creating the database, you should verify the database configuration information.
The IBM DB2 Content Manager OnDemand for Multiplatforms: Installation and
Configuration Guide provides details.
Parameters
-c For DB2 and SQL Server, create the (initial) OnDemand database
structure. (Not supported for Oracle.)
The -c parameter performs the same functions as the -r, -s, and -t
parameters.
-d Drop tables from the database. The default is all tables. To drop a
specific table, use the -d tableName form of the command, where
tableName is the name of the OnDemand system table.
-e The arsdb -e command will drop all the indexes for the specified
OnDemand System table (using -e tableName). The default, if no
tableName is specified, is to drop all indexes for all OnDemand
System tables.
-f Ignore database manager failures.
-g For DB2 and SQL Server, start the database manager. (Not
supported for Oracle.)
-h For DB2 and SQL Server, stop the database manager. (Not
supported for Oracle.)
-i Import tables. The default is all OnDemand system tables. To
import a specific table, use the -i tableName form of the command,
where tableName is the name of the OnDemand system table and
the name of the file that contains the table to be imported.
OnDemand reads the file from the directory where the ARSDB
program was invoked.
-I instance The name of the OnDemand instance to process. The ARSDB
program will attempt to locate the specified instance name in the
ARS.INI file (UNIX servers) or the registry (Windows servers) to
obtain the TCP/IP address, host name or host name alias of the
system on which the instance is running. If the ARSDB program
cannot locate the instance name in the ARS.INI file, then the
specified value is treated as a host name.
Note: If you are running multiple instances of OnDemand on the
same workstation, always specify the -h parameter to identify the
name of the instance that you want to process. Verify that the
system is configured with the correct information for all instances
of OnDemand. See IBM DB2 Content Manager OnDemand for
Multiplatforms: Installation and Configuration Guide for information
about configuring instances.
-k For DB2, activate the connection to the OnDemand database. (Not
supported for Oracle or SQL Server.)
-l For DB2, import or export tables in the IXF file format instead of
the DEL file format (the default). For SQL Server, import or export
tables in the native file format. (Not supported for Oracle.)
264 Administration Guide
||||

The IXF file format is the PC version of the Integrated Exchange
Format. A DEL file is a sequential ASCII file with row and column
delimiters.
This flag is valid only with the -i and -x parameters.
-m For DB2 and SQL Server, run maintenance on the OnDemand
database, reorganizing the OnDemand system tables. (Not
supported for Oracle.) This option refreshes the tables and
optimizes access to information in the database. The system must
be idle when you run the ARSDB program with this option. (Users
should not be using the system and other applications should not
be connected to the database.)
-r Create configuration indexes. The default is all indexes. To
configure a specific index, use the -r tablename form of the
command, where tableName is the name of the OnDemand system
table.
-s Run database statistics. This parameter is used to optimize indexes
and tables and make access to information as efficient as possible.
The default is all OnDemand system tables. To run statistics for a
specific table, use the -s tableName form of the command, where
tableName is the name of the OnDemand system table.
-t Create configuration tables. The default is all OnDemand system
tables. To configure a specific table, use the -s tableName form of
the command, where tableName is the name of the OnDemand
system table.
-v Enables verbose mode, to display all messages (informational and
error). By default, the ARSDB program displays only error
messages.
-x Export tables. The default is all OnDemand system tables. To
export a specific table, use the -x tablename form of the command,
where tableName is the name of the OnDemand system table (and
also the name of the file that OnDemand creates). OnDemand
writes the file in the directory from which the ARSDB program
was invoked.
-y device For DB2, create an offline backup image of the OnDemand
database on the specified device. For SQL Server, create a complete
database backup to the specified device. (Not supported for
Oracle.)
Before you start this type of backup, you must make sure that no
other users or applications are connected to the OnDemand
database. IBM recommends that you run this type of backup at a
time when you are certain that no users will access the system.
Otherwise, you should stop the OnDemand server programs and
other related processes before you start the backup.
If you specify a tape device, you must place a blank tape volume
in the device before starting the ARSDB program.
If the specified device is ADSM, it means that the backup image file
will be stored in storage that is managed by Tivoli Storage
Manager. However, before you use the ARSDB program to store
backup image files in Tivoli Storage Manager storage, you must
configure Tivoli Storage Manager. See IBM DB2 Content Manager
Chapter 32. ARSDB 265

OnDemand for Multiplatforms: Installation and Configuration Guide for
help with configuring Tivoli Storage Manager to maintain DB2
backup image files. The DB2 Administration Guide also contains
information about Tivoli Storage Manager support and
applicability for your system.
When backing up the database to devices that are managed by the
operating system, the maximum number of backup devices that
may be specified with the ARSDB program is 100. To specify
backup devices, use the following format:
arsdb -y device1 [,device2, ... ,device100]
For example, the following shows how to initiate a backup by
using three devices:
arsdb -y device1,device2,device3
Where:
-y is the backup option.
device1,device2,device3 is a comma-separated list of devices
to which the database manager will concurrently write the
backup image of the database. Examples:
/dev/rmt0,/dev/rmt1,/dev/rmt2
\\.\Tape0,\\.\Tape1,\\.\Tape2
/arsdb/backup1,/arsdb/backup2,/arsdb/backup3
DB2 provides support for backing up the OnDemand database to
Tivoli Storage Manager storage. The ARSDB program may be used
to backup the database by using multiple connections to Tivoli
Storage Manager. Multiple connections to Tivoli Storage Manager
can improve the performance of the backup task and reduce the
time that it takes to complete the backup. Use the following format
of the ARSDB program:
arsdb -y ADSM [,n]
For example, the following shows how to initiate a backup to
Tivoli Storage Manager storage by using three connections to Tivoli
Storage Manager:
arsdb -y ADSM,3
Where:
-y is the backup option.
ADSM specifies that the backup image file will be created in
Tivoli Storage Manager storage.
3 is the number of connections that DB2 establishes with Tivoli
Storage Manager. The number can be from 1 (one) to 10 (ten).
-z device For DB2, create an online backup image of the OnDemand
database on the specified device. For SQL Server, create a
differential database backup to the specified device. (Not
supported for Oracle.)
This type of backup may run while other users and applications
are connected to the database. That is, other users and applications
can read and modify the database while the backup is in process.
266 Administration Guide
If you specify a tape device, then you must place a blank tape
volume in the device before starting the ARSDB program.
If the specified device is ADSM, it means that the backup image file
will be stored in storage that is managed by Tivoli Storage
Manager. However, before you use the ARSDB program to store
backup image files in Tivoli Storage Manager storage, you must
configure Tivoli Storage Manager. See the IBM DB2 Content
Manager OnDemand for Multiplatforms: Installation and Configuration
Guide for help with configuring Tivoli Storage Manager to maintain
DB2 backup image files. The DB2 Administration Guide also
contains information about Tivoli Storage Manager support and
applicability for your system.
When backing up the database to devices that are managed by the
operating system, the maximum number of backup devices that
may be specified with the ARSDB program is 100. To specify
backup devices, use the following format:
arsdb -z device1 [,device2, ... ,device100]
For example, the following shows how to initiate an online backup
of the database by using three devices:
arsdb -z device1,device2,device3
Where:
-z is the backup option.
device1,device2,device3 is a comma-separated list of devices
to which the database manager will concurrently write the
backup image of the database. Examples:
/dev/rmt0,/dev/rmt1,/dev/rmt2
\\.\Tape0,\\.\Tape1,\\.\Tape2
/arsdb/backup1,/arsdb/backup2,/arsdb/backup3
DB2 provides support for backing up the OnDemand database to
Tivoli Storage Manager storage. The ARSDB program may be used
to backup the database by using multiple connections to Tivoli
Storage Manager. Multiple connections to Tivoli Storage Manager
can improve the performance of the backup task and reduce the
time that it takes to complete the backup. Use the following format
of the ARSDB program:
arsdb - z ADSM [,n]
For example, the following shows how to initiate an online backup
of the database to Tivoli Storage Manager storage by using three
connections to Tivoli Storage Manager:
arsdb -z ADSM,3
Where:
-z is the backup option.
ADSM specifies that the backup image file will be created in
Tivoli Storage Manager storage.
3 is the number of connections that DB2 establishes with Tivoli
Storage Manager. The number can be from 1 (one) to 10 (ten).
Chapter 32. ARSDB 267

-X Exclude the USERSPACE1 table space from the backup image. The
USERSPACE1 table space is created by DB2 when you initialize the
OnDemand database. It contains system tables and application
group tables that have not been migrated to their own table spaces.
This parameter is only valid with the -Y and -Z parameters.
A typical use of this parameter is to test the table space backup
process. For example, assume that you migrated a table of
application group data to its own table space. All other tables of
application group data remains in the USERSPACE1 table space. To
create an online backup image of the migrated application group
table, use the arsdb –XZ form of the command.
-Y device For DB2, create an incremental, offline backup image of table
spaces on the specified device. (Not supported for Oracle or SQL
Server.) An incremental backup means that OnDemand backs up
only those tables that have changed since the last time they were
backed up. OnDemand keeps track of table space backups and can
determine which table spaces have changed and need to be backed
up.
Before you start an offline backup of the database, you must make
sure that no other users or applications are connected to the
OnDemand database. IBM recommends that you run the offline
backup at a time when you are certain that no users will access the
system. Otherwise, you should stop the OnDemand server
programs and related processes before you start the offline backup.
If you specify a tape device, you must place a blank tape volume
in the device before starting the ARSDB program.
If the specified device is ADSM, it means that the backup image file
will be stored in storage that is managed by Tivoli Storage
Manager. However, before you use the ARSDB program to store
backup image files in Tivoli Storage Manager storage, you must
configure Tivoli Storage Manager. See IBM DB2 Content Manager
OnDemand for Multiplatforms: Installation and Configuration Guide for
help with configuring Tivoli Storage Manager to maintain DB2
backup image files. The DB2 Administration Guide also contains
information about Tivoli Storage Manager support and
applicability for your system.
When backing up the database to devices that are managed by the
operating system, the maximum number of backup devices that
may be specified with the ARSDB program is 100. To specify
backup devices, use the following format:
arsdb -Y device1 [,device2, ... ,device100]
For example, the following shows how to initiate a backup of the
database by using three devices:
arsdb -Y device1,device2,device3
Where:
-Y is the backup option.
device1,device2,device3 is a comma-separated list of devices
to which the database manager will concurrently write the
backup image of the database. Examples:
268 Administration Guide

/dev/rmt0,/dev/rmt1,/dev/rmt2
\\.\Tape0,\\.\Tape1,\\.\Tape2
/arsdb/backup1,/arsdb/backup2,/arsdb/backup3
DB2 provides support for backing up the OnDemand database to
Tivoli Storage Manager storage. The ARSDB program may be used
to backup the database by using multiple connections to Tivoli
Storage Manager. Multiple connections to Tivoli Storage Manager
can improve the performance of the backup task and reduce the
time that it takes to complete the backup. Use the following format
of the ARSDB program:
arsdb -Y ADSM [,n]
For example, the following shows how to initiate a backup of the
database to Tivoli Storage Manager storage by using three
connections to Tivoli Storage Manager:
arsdb -Y ADSM,3
Where:
-Y is the backup option.
ADSM specifies that the backup image file will be created in
Tivoli Storage Manager storage.
3 is the number of connections that DB2 establishes with Tivoli
Storage Manager. The number can be from 1 (one) to 10 (ten).
-Z device For DB2, create an incremental, online backup image of table
spaces on the specified device. (Not supported for Oracle or SQL
Server.) An incremental backup means that OnDemand backs up
only those tables that have changed since the last time they were
backed up. OnDemand keeps track of table space backups and can
determine which table spaces have changed and need to be backed
up.
An online backup of the database can run while other users and
applications are connected to the database. That is, other users and
applications can read and modify the database while the backup
process is running.
If you specify a tape device, you must place a blank tape volume
in the device before starting the ARSDB program.
If the specified device is ADSM, it means that the backup image file
will be stored in storage that is managed by Tivoli Storage
Manager. However, before you use the ARSDB program to store
backup image files in Tivoli Storage Manager storage, you must
configure Tivoli Storage Manager. See IBM DB2 Content Manager
OnDemand for Multiplatforms: Installation and Configuration Guide for
help with configuring Tivoli Storage Manager to maintain DB2
backup image files. The DB2 Administration Guide also contains
information about Tivoli Storage Manager support and
applicability for your system.
When backing up the database to devices that are managed by the
operating system, the maximum number of backup devices that
may be specified with the ARSDB program is 100. To specify
backup devices, use the following format:
Chapter 32. ARSDB 269
arsdb -Z device1 [,device2, ... ,device100]
For example, the following shows how to initiate a backup of the
database by using three devices:
arsdb -Z device1,device2,device3
Where:
-Z is the backup option.
device1,device2,device3 is a comma-separated list of devices
to which the database manager will concurrently write the
backup image of the database. Examples:
/dev/rmt0,/dev/rmt1,/dev/rmt2
\\.\Tape0,\\.\Tape1,\\.\Tape2
/arsdb/backup1,/arsdb/backup2,/arsdb/backup3
DB2 provides support for backing up the OnDemand database to
Tivoli Storage Manager storage. The ARSDB program may be used
to backup the database by using multiple connections to Tivoli
Storage Manager. Multiple connections to Tivoli Storage Manager
can improve the performance of the backup task and reduce the
time that it takes to complete the backup. Use the following format
of the ARSDB program:
arsdb -Z ADSM [,n]
For example, the following shows how to initiate an online backup
of the database to Tivoli Storage Manager storage by using three
connections to Tivoli Storage Manager:
arsdb -Z ADSM,3
Where:
-Z is the backup option.
ADSM specifies that the backup image file will be created in
Tivoli Storage Manager storage.
3 is the number of connections that DB2 establishes with Tivoli
Storage Manager. The number can be from 1 (one) to 10 (ten).
Restriction:
If you want to restore a backup database image, and
roll it forward to a certain point, do not use the arsdb
-z command, because the archive logs, which are
needed for the operation, are removed after the
backup is completed. In this situation, a message
SQL4970N is displayed. For example:
SQL4970N Roll-forward recovery on database
"TEST2" cannot reach the specified stop point
(end-of-log or point-in-time) because
of missing log file(s) on node(s) "0".
It is recommended that you use the DB2 backup
command. When you issue the DB2 command line to
do backup, DB2 does not delete the archive logs.
tableName Optionally specify the name of one or more OnDemand system
270 Administration Guide
||||||
||||
|||
tables for the drop (-d and -e), import (-i), create configuration (-r
and -t), run statistics (-s), and export (-x) parameters. If you do not
specify the tableName parameter, then OnDemand runs the
command for all of the OnDemand system tables.
For the import (-i) parameter, OnDemand reads the imported
tables from a file in the directory in which the ARSDB program
was invoked. For the export (-x) parameter, OnDemand writes the
exported tables to a file in the directory in which the ARSDB
program was invoked.
Examples
1. The following shows how to start the database manager:
arsdb -gkv
2. The following shows how to stop the database manager:
arsdb -hv
3. The following shows how to reorganize the OnDemand system tables and run
the database statistics command, which optimizes access to the tables:
arsdb -msv
4. The following shows how to reorganize a specific OnDemand system table. In
the example, the ARSDB program reorganizes the indexes for the Application
Group table:
arsdb -mv arsag
5. The following shows how to export a specific OnDemand system table to an
IXF format file:
arsdb -xl arsag
6. The following shows how to create an offline backup image of the OnDemand
database on tape:
UNIX servers arsdb -v -y /dev/rmt0
Windows servers
arsdb -v -y \\.\Tape0
Note: You must place a blank, formatted tape in the device before you start
the ARSDB program.
7. The following shows how to create an online, incremental backup of all table
spaces in the OnDemand database. The backup image is written to storage
that is managed by Tivoli Storage Manager.
arsdb -v -Z ADSM
8. The following shows how to create an offline, incremental backup of all table
spaces in the OnDemand database. The backup image is written to storage
that is managed by Tivoli Storage Manager.
arsdb -v -Y ADSM
9. The following shows how to create an online, full backup of the OnDemand
database. The backup image is written to storage that is managed by Tivoli
Storage Manager.
arsdb -v -z ADSM
10. The following shows how to create an offline, full backup of the OnDemand
database. The backup image is written to storage that is managed by Tivoli
Storage Manager.
arsdb -v -y ADSM
Chapter 32. ARSDB 271

Notes
The ARSDB program should be run only on the library server.
IBM recommends that you stop the OnDemand server programs and related
processes before you run the ARSDB program with the create (-c), import (-i),
reorganize (-m) or offline database backup (-y, -Y) parameters.
The OnDemand server program (or service) can continue to run even after you
stop the database manager. However, OnDemand sends an error message to the
client and the system log when a user attempts to query the database and the
database manager has been stopped.
The online database backup command (-z, -Z parameters) can be run while other
applications are connected to the database.
IBM recommends that you do not load data into the system at the same time that
you run the ARSDB program with the -m or -s parameters.
If you plan to back up the database to a tape device, then you may need to
configure the Buffer Size Limit in DB2. If you plan to backup the database to a
tape device and specify a variable block size, then you must configure the DB2
buffer size to a value that is less than or equal to the maximum block size limit for
the backup device. For maximum performance, you should set the buffer size to
the maximum block size for the backup device. See the DB2 documentation for
details. Contact the IBM support center if you have questions.
Using the ARSDB program with Oracle
If you plan to use Oracle with OnDemand, then you will need to use the standard
Oracle procedures to start, stop, maintain, and optimize the database, to make
backup copies of the database, and so forth. In addition, some of the other options
for the ARSDB program do not apply when you use Oracle with OnDemand.
Table 12 lists the options of the ARSDB program that are not valid when you use
Oracle with OnDemand.
Table 12. ARSDB program and Oracle
Option Purpose Notes
arsdb –g Start the database Use the Oracle procedures
instead
arsdb –h Stop the database Use the Oracle procedures
instead
arsdb –k Activate the database Does not apply to Oracle
arsdb –l Import/Export tables Does not apply to Oracle
arsdb –m Reorganize the database Does not apply to Oracle
arsdb –y Backup the database Use the Oracle procedures
instead
arsdb –Y Backup the database Use the Oracle procedures
instead
arsdb –z Backup the database Use the Oracle procedures
instead
arsdb –Z Backup the database Use the Oracle procedures
instead
272 Administration Guide

You can use the ARSDB program to collect statistics on the OnDemand system
tables. The OnDemand system tables include the user table, the group table, and
the application group table. See Appendix E, “System control tables,” on page 351
for a complete list of the OnDemand system tables. For most customers, the
OnDemand system tables require very little maintenance. You can probably
schedule the ARSDB program to collect statistics once a month (or less often).
The syntax is:
/opt/ondemand/bin/arsdb <options>
The options are:
–e Drop configuration indexes
–r Create configuration indexes
–s Collect statistics
Files
/usr/lpp/ars/bin/arsdb The AIX executable program.
/opt/ondemand/bin/arsdb The HP-UX and Sun Solaris executable program.
\Program Files\IBM\OnDemand for WinNT\bin\arsdb
The Windows executable program.
Chapter 32. ARSDB 273

274 Administration Guide
Chapter 33. ARSDOC
Purpose
The ARSDOC program is a multi-purpose document processing program. You can
use the ARSDOC program to query the database and generate a list of items that
match a query, retrieve documents from the system, add, delete, and update
documents, and send documents to a server printer.
Description and syntax
The ARSDOC program provides the following functions:
v ADD
v DELETE
v GET
v PRINT
v QUERY
v UPDATE
For each function, you can specify all of the required options on the command line
or you can specify the name of a parameter file that contains the options. The
syntax of each function is listed twice: first, when you specify the options on the
command line; second, when you specify a parameter file.
ADD function
Use to store data into the system by specifying the folder, application group,
application, and database fields and values. If you specify the -O parameter, then
you do not have to specify all of the database fields (however, you must always
specify date and time fields). When you specify the -O parameter, the ARSDOC
program stores a default value in any database field that you omit. The default
value for string fields is an empty (null) string. The default value for numeric
fields is 0 (zero). Numeric fields include integer and decimal fields. When adding a
document, you can specify the data in one of three ways:
v A document file
v An SQL query that contains clauses, database field names, index values, and
operators
v A public named query
When you specify an SQL query or public named query, you are creating a
database row that points to an existing document that has been identified by the
query.
When you use the ADD function to add a row for an existing document, the row
must be added to the application group that contains the document. The
application group must be specified with the -g parameter and must be one of the
application groups referenced by the folder named with the -f parameter.
Important: The ADD function will fail unless the Database Organization for the
application group named with the -g parameter is Multiple Loads per
Database Table and the Expiration Type is Segment or Document. If
© Copyright IBM Corp. 1993, 2007 275
|||
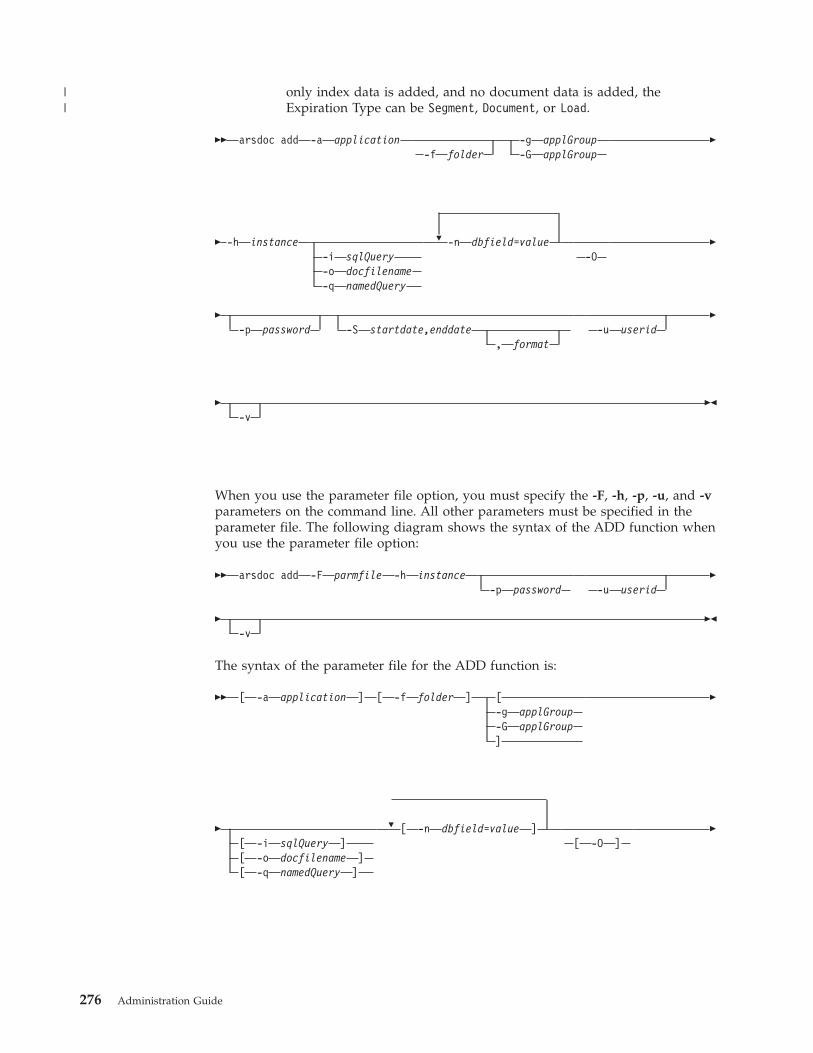
only index data is added, and no document data is added, the
Expiration Type can be Segment, Document, or Load.
�� arsdoc add -a application
-f
folder -g applGroup
-G
applGroup �
�
-h
instance
-i
sqlQuery
-o
docfilename
-q
namedQuery
�
-n
dbfield=value
-O
�
� -p
password
-S
startdate,enddate
,
format
-u
userid �
� -v
��
When you use the parameter file option, you must specify the -F, -h, -p, -u, and -v
parameters on the command line. All other parameters must be specified in the
parameter file. The following diagram shows the syntax of the ADD function when
you use the parameter file option:
�� arsdoc add -F parmfile -h instance
-p
password
-u
userid �
� -v
��
The syntax of the parameter file for the ADD function is:
�� [ -a application ] [ -f folder ] [
-g
applGroup
-G
applGroup
]
�
�
[
-i
sqlQuery
]
[
-o
docfilename
]
[
-q
namedQuery
]
�
[
-n
dbfield=value
]
[
-O
]
�
276 Administration Guide
||

� [
-S
startdate,enddate
]
,
format
��
DELETE function
Use to delete documents from the system. To identify the documents that you
want to delete, you must enter an SQL query or specify the name of a public
named query. The SQL query must contain clauses, database field names, index
values, and operators. The DELETE function deletes all documents that match the
query.
�� arsdoc delete
-f
folder
-G
applGroup -h instance �
� -i sqlQuery
-q
namedQuery
-p
password �
� -S
startdate,enddate
,
format
-u
userid
-v ��
When you use the parameter file option, you must specify the -F, -h, -p, -u, and -v
parameters on the command line. All other parameters must be specified in the
parameter file. The following diagram shows the syntax of the DELETE function
when you use the parameter file option:
�� arsdoc delete -F parmfile -h instance
-p
password �
� -u
userid
-v ��
The syntax of the parameter file for the DELETE function is:
�� [ -f folder ]
[
-G
applGroup
] [ -i sqlQuery ]
[
-q
namedQuery
] �
� [
-S
startdate,enddate
]
,
format
��
GET function
Use to retrieve documents and resources from the system. The GET function can
also generate and save generic index data for the documents that match the query.
You must identify the name of the OnDemand library server. You specify the
application group or folder that you want to search. To query the database, you
can enter an SQL query or specify the name of a public named query. The SQL
query must contain clauses, database field names, index values, and operators. By
default, the ARSDOC program sends a copy of the documents that match the
query to stdout (UNIX servers) or the console (Windows servers). You can also
choose to write the output to a file. To retrieve documents in a sorted order, you
must specify the -n parameter.
Chapter 33. ARSDOC 277

�� arsdoc get
-a
-c
-d
dir
-f
folder
-g �
� -G
applGroup -h instance -i sqlQuery
-q
namedQuery
-L
max#
-n �
� -N
-o
name
-p
password
-P
-Q
SQLqueryfile �
� -s
seconds
-S
startdate,enddate
,
format
-u
userid �
� -v
-x
loadId
-X
loadId ��
When you use the parameter file option, you must specify the -F, -h, -p, -s, -u, and
-v parameters on the command line. All other parameters must be specified in the
parameter file. The following diagram shows the syntax of the GET function when
you use the parameter file option:
�� arsdoc get -F parm_file -h instance
-p
password
-s
seconds �
� -u
userid
-v ��
The syntax of the parameter file for the GET function is:
��
[
-a
]
[
-c
]
[
-d
directory
] [ -f folder ] �
� [
-g
]
[
-G
applGroup
] [ -i sqlQuery]
[
-q
namedQuery] �
� [
-L
max#
]
[
-n
]
[
-N
] [ -o name ] �
� [
-S
startdate,enddate
]
,
format
[
-x
loadId
] �
� [
-X
loadID
] ��
PRINT function
Use to send documents to an OnDemand server printer. You must name the
OnDemand library server and the folder that you want to search and specify the
query to run. The items that match the query are sent to the server printer named
with the -P parameter. The server printer must be defined to OnDemand using the
administrative client. To query the database, you can enter an SQL query or specify
the name of a public named query. The SQL query must contain clauses, database
field names, index values, and operators. You can limit the number of documents
sent to the printer by using the -L parameter and specifying the maximum number
of documents that should be retrieved, regardless of the number of documents that
match the query. You can limit the number of database tables searched, and
278 Administration Guide
|||
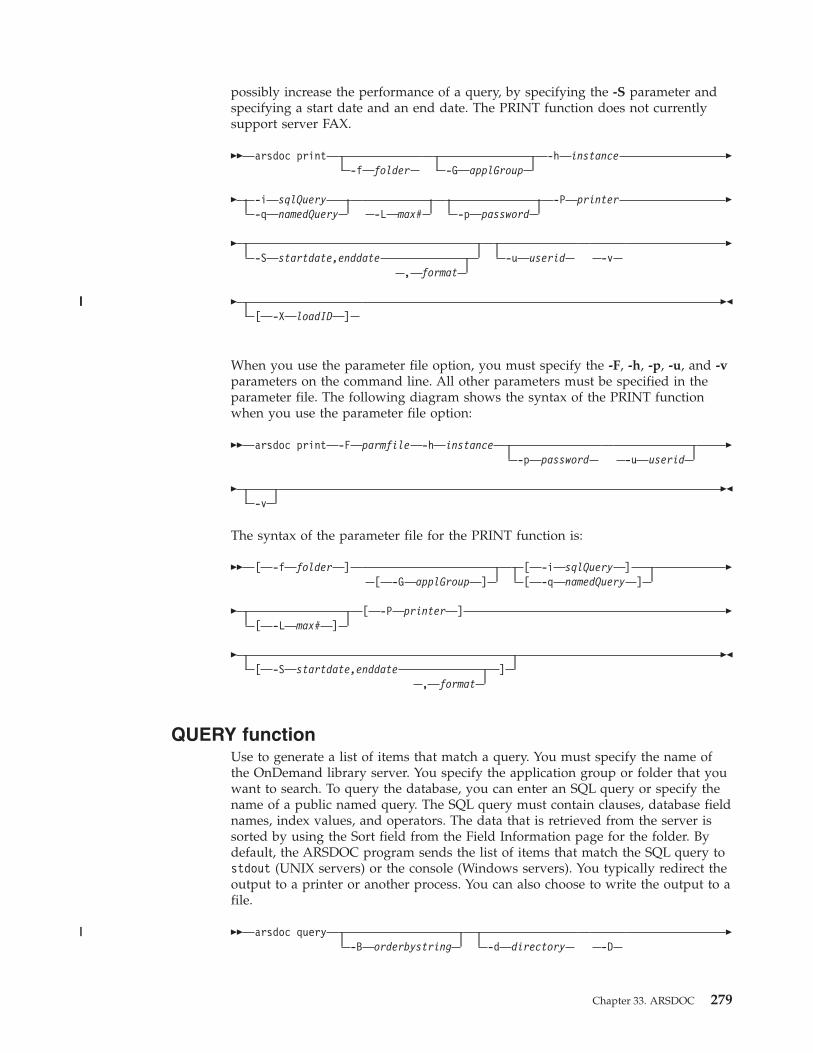
possibly increase the performance of a query, by specifying the -S parameter and
specifying a start date and an end date. The PRINT function does not currently
support server FAX.
�� arsdoc print
-f
folder
-G
applGroup -h instance �
� -i sqlQuery
-q
namedQuery
-L
max#
-p
password -P printer �
� -S
startdate,enddate
,
format
-u
userid
-v �
� [
-X
loadID
] ��
When you use the parameter file option, you must specify the -F, -h, -p, -u, and -v
parameters on the command line. All other parameters must be specified in the
parameter file. The following diagram shows the syntax of the PRINT function
when you use the parameter file option:
�� arsdoc print -F parmfile -h instance
-p
password
-u
userid �
� -v
��
The syntax of the parameter file for the PRINT function is:
�� [ -f folder ]
[
-G
applGroup
] [ -i sqlQuery ]
[
-q
namedQuery
] �
� [
-L
max#
] [ -P printer ] �
� [
-S
startdate,enddate
]
,
format
��
QUERY function
Use to generate a list of items that match a query. You must specify the name of
the OnDemand library server. You specify the application group or folder that you
want to search. To query the database, you can enter an SQL query or specify the
name of a public named query. The SQL query must contain clauses, database field
names, index values, and operators. The data that is retrieved from the server is
sorted by using the Sort field from the Field Information page for the folder. By
default, the ARSDOC program sends the list of items that match the SQL query to
stdout (UNIX servers) or the console (Windows servers). You typically redirect the
output to a printer or another process. You can also choose to write the output to a
file.
�� arsdoc query
-B
orderbystring
-d
directory
-D �
Chapter 33. ARSDOC 279
||||
||
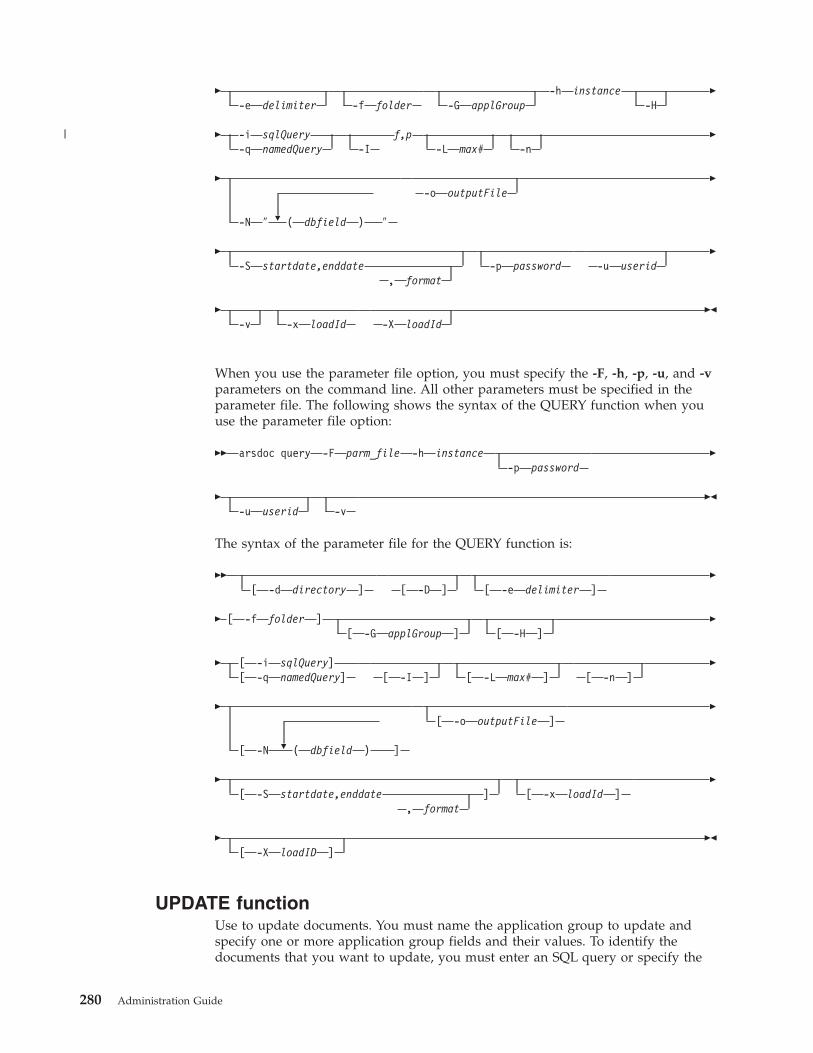
� -e
delimiter
-f
folder
-G
applGroup -h instance
-H �
� -i sqlQuery
-q
namedQuery f,p
-I
-L
max#
-n �
�
�
-N
″
(
dbfield
)
″
-o
outputFile �
� -S
startdate,enddate
,
format
-p
password
-u
userid �
� -v
-x
loadId
-X
loadId ��
When you use the parameter file option, you must specify the -F, -h, -p, -u, and -v
parameters on the command line. All other parameters must be specified in the
parameter file. The following shows the syntax of the QUERY function when you
use the parameter file option:
�� arsdoc query -F parm_file -h instance
-p
password �
� -u
userid
-v ��
The syntax of the parameter file for the QUERY function is:
��
[
-d
directory
]
[
-D
]
[
-e
delimiter
] �
� [ -f folder ]
[
-G
applGroup
]
[
-H
] �
� [ -i sqlQuery]
[
-q
namedQuery]
[
-I
]
[
-L
max#
]
[
-n
] �
�
�
[
-N
(
dbfield
)
]
[
-o
outputFile
] �
� [
-S
startdate,enddate
]
,
format
[
-x
loadId
] �
� [
-X
loadID
] ��
UPDATE function
Use to update documents. You must name the application group to update and
specify one or more application group fields and their values. To identify the
documents that you want to update, you must enter an SQL query or specify the
280 Administration Guide
|

name of a public named query. The SQL query must contain clauses, database field
names, index values, and operators. The UPDATE function updates all of the rows
that match the query.
�� arsdoc update
-f
folder -g applGroup
-G
applGroup -h instance �
�
-i
sqlQuery
-q
namedQuery
�
-n
dbfield=value
-p
password
�
� -S
startdate,enddate
,
format
-u
userid
-v ��
When you use the parameter file option, you must specify the -F, -h, -p, -u, and -v
parameters on the command line. All other parameters must be specified in the
parameter file. The following shows the syntax of the UPDATE function when you
use the parameter file option:
�� arsdoc update -F parm_file -h instance
-p
password �
� -u
userid
-v ��
The syntax of the parameter file for the UPDATE function is:
�� [ -f folder ] [
-g
applGroup
-G
applGroup
]
[ -i sqlQuery ]
[
-q
namedQuery
] �
�
�
[
-n
dbfield=value
]
[
-S
startdate,enddate
]
,
format
��
Parameters
-a For the GET function, when retrieving AFP documents, specify this
parameter to include resources with the documents that are
retrieved. If documents from the same application have different
resource groups, then the ARSDOC program creates separate
output files for each resource group.
For the ADD function, you must specify the name of the
OnDemand application. The application must belong to the
application group named with the -g (or -G) parameter.
Chapter 33. ARSDOC 281

-B orderbystring
For the Query function, use this parameter to permit SQL to
recorder your table rows for the purpose of viewing.
-c For the GET function, use to concatenate all of the documents that
match the query into one output file. Name the output file with
the -o parameter. However, even if you do specify the -c parameter,
the ARSDOC program creates separate output files when any of
the following conditions occur:
v If more than one application group is referenced by the folder.
The ARSDOC program creates one output file for each
application group that contains items that match the query.
v If more than one application is contained in an application
group. The ARSDOC program creates one output file for each
application that contains items that match the query.
v If documents from the same application have different resource
groups, the ARSDOC program creates separate output files for
each resource group.
For example, if a folder references two application groups, then the
following specification:
-o student -c
Can result in file names such as:
student.516
student.517
Where 516 and 517 are application group identifiers. One file is
created for each application group. Each file contains all of the
items that match the query for that particular application group.
-d directory The name of the directory where the ARSDOC program writes the
output files. The directory must exist before the ARSDOC program
attempts to save the output files. For UNIX servers, directory
names are case sensitive; for Windows servers, directory names are
not case sensitive.
-D For the QUERY function, appends the document handle
information to the end of each line. The document handle
information consists of the following ten values, in the order listed:
Document name
Offset
Length
Compressed object offset
Compressed object length
Annotation type
Compression type
Resource ID
Primary node ID
Secondary node ID
The values are separated by a delimiter. The default delimiter is
the comma character. You can specify a different delimiter with the
-e parameter.
282 Administration Guide
|||
||

You cannot specify the -H, -n, or -N parameters when you specify
the -D parameter.
-e delimiter For the QUERY function, specifies a one character delimiter to use
as a separator between values. By default, OnDemand separates
values in the output with a comma.
-f folder The name of the OnDemand folder. The folder name must be
specified exactly as it appears in OnDemand. The case of the folder
name is significant. For example, to query the OnDemand System
Log folder, you must enter:
-f "System Log"
If you are using a parameter file, then you must specify the -f
parameter in the parameter file. If you are not using a parameter
file and you do not specify the -f parameter, then the ARSDOC
program prompts you for the folder name when you run the
program.
For the GET and QUERY functions, you can omit the -f parameter
and specify the -G parameter to search a specific application
group.
For the UPDATE function, if the folder that is specified with the -f
parameter contains only one application group, then you can omit
the -g or -G parameter (you do not have to specify the name of the
application group).
When you specify the -X parameter, you cannot specify the -f
parameter.
Note: The following information applies only when an application
group name is not provided.
A folder can be used to search one or more application
groups. Because the ARSDOC program generates a single
SQL query to search all of the application groups, the
properties of the database fields must be the same for each
application group. The properties include the field name,
type, and length. For example, suppose that you define the
following application groups and fields:
Application Group Field Names
Student Bills name, account, billDate
Student Grades name, account, gradeDate
Student Transcripts name, account, transcriptDate
You cannot query the application groups using the ARSDOC
program because the name of the date field is not the same
for each application group. However, if you were to define
the application groups and fields as follows:
Application Group Field Names
Student Bills name, account, studentDate
Student Grades name, account, studentDate
Student Transcripts name, account, studentDate
Then you could query the application groups using the
Chapter 33. ARSDOC 283
||
ARSDOC program because the names of the database fields
are the same for each application group.
-F parmFile Specifies the name of the file that contains the actions to run and
other parameters, values, and, and options. You typically specify
this option when you want to perform more than one action.
Ensure that you enclose the parameters and values that are
specified in the parameter file in the left and right brackets, that is,
[ and ]. The left and right brackets are used to identify each
parameter in the file, and are required in the parameter file.
Important: In the parameter file, the parameter values cannot
contain the left or right bracket.
Here is an example of using the ARSDOC program with the -F
parameter:
arsdoc get -u oduser -p odpasswd -h odhost -F parmfile -v
Here is an example of the parameter values in the above parameter
file:
[-f "Credit Card Statements"][-i "where account = ’000-000-000’"]
[-a][-o credit.out]
An action (one or more input lines) can contain a maximum of
32767 characters (bytes).
You can use the \ (backslash) character to continue the parameters
of an action to two or more lines.
A parameter file can contain blank lines and comment lines. A
comment line contains the # character in the first column.
-g For the GET function, use to generate Generic indexer data for the
items that match the query. See the IBM DB2 Content Manager
OnDemand for Multiplatforms: Indexing Reference for details about the
Generic indexer.
When you specify the -g parameter, you must specify the -c, -N,
and -o parameters. However, you cannot specify database field
names with the -o parameter.
The ARSDOC program uses the following convention to name the
output files that are generated with the -g parameter:
-o.res_id.appl_group.appl.type
Where:
-o is the value specified with the -o parameter
res_id is the resource group identifier.
appl_group is the name of the application group
appl is the name of the application
type is the file type:
– out identifies a document file
– ind identifies a generic index file
– res identifies a resource file
284 Administration Guide
||||
||
||
|
||
||

In general, the number of files generated is dependent on the
number of application groups in a folder, the number of
applications in an application group, and the number of versions
of resource groups in an application.
For the ADD and UPDATE functions, specifies the name of the
application group. The application group that you specify will be
searched from the folder that is named with the -f parameter. For
the UPDATE function, if the folder that is specified with the -f
parameter contains only one application group, then you can omit
the -g parameter (you do not have to specify the name of the
application group).
-G applGroup Use to specify the name of the application group.
Note: For the UPDATE function, if the folder that is specified with
the -f parameter contains only one application group, then
you can omit the -G parameter (you do not have to specify
the name of the application group).
For ADD: When the database query is run to retrieve the
document that contains the data that is to be used in the add
function, the search is limited to the specified application group,
even if the folder named with the -f parameter can be used to
search more than one application group. This ensures that only
documents in the specified application group can be used for the
add function. You can specify the name of the application group
with the -g parameter or the -G parameter.
For DELETE: The -G parameter is an optional parameter. If
specified, then the database query that is run to determine the
document(s) to delete is limited to the specified application group.
The addition of the -G parameter allows you to delete documents
from a specific application group in folders that can search more
than one application group. If you do not specify the -G parameter,
then the query runs against all of the application groups that can
be searched from the folder.
For GET: Specifies the application group to query and retrieve
documents from. The -G parameter lets you retrieve documents
from a specific application group from a folder that can search
more than one application group. If you do not specify the -G
parameter, then the query runs against all of the application
groups that can be searched from the folder. You can omit the -f
parameter and specify the -G parameter to search a specific
application group. The -G parameter is required if you specify the
-X parameter.
For PRINT: The -G parameter is an optional parameter. If specified,
then the database query that is run to determine the document(s)
to print is limited to the specified application group. The addition
of the -G parameter allows you to print documents from a specific
application group in folders that can search more than one
application group. If you do not specify the -G parameter, then the
query runs against all of the application groups that can be
searched from the folder.
For QUERY: Specifies the application group to search. The -G
parameter lets you search a specific application group from folders
Chapter 33. ARSDOC 285
that can search more than one application group. If you do not
specify the -G parameter, then the query runs against all of the
application groups that can be searched from the folder. You can
omit the -f parameter and specify the -G parameter to search a
specific application group. The -G parameter is required if you
specify the -X parameter.
For UPDATE: When the database query is run to determine the
document(s) to update, the search is limited to the specified
application group, even if the folder named with the -f parameter
can search more than one application group. This guarantees that
only documents in the specified application group can be updated.
You can specify the name of the application group with the -g
parameter or the -G parameter.
You can use the -G parameter with the -i parameter to query
folders that can search more than one application group. For
example, a folder contains three application groups; you want to
query only one of the application groups. Use the -G parameter to
specify the name of the application group that you want to query.
Use the -i parameter to specify the application group’s database
field names. You can also use the -G and -i parameters when the
application groups have different database field names. The
following example shows how to search a folder and three
application groups that have different database field names:
arsdoc get -f "Student Information" -G loans
-i "WHERE number LIKE ’123456’ AND loanDate = 10593"
arsdoc get -f "Student Information" -G grades
-i "WHERE number LIKE ’123456’ AND gradeDate = 10593"
arsdoc get -f "Student Information" -G transcripts
-i "WHERE number LIKE ’123456’ AND transDate = 10593"
You can use the -G parameter with the -q parameter to query
folders that can search more than one application group. When
you specify the -G parameter and you specify a public named
query with the -q parameter, the ARSDOC program queries the
application group named with the -G parameter instead of the
application group specified in the named query. (If you do not
specify the -G parameter, then the query runs against the
application group specified in the named query. If the named
query does not identify an application group, then the query runs
against all of the application groups that can be searched from the
folder.)
-h instance The name of the OnDemand instance to process. The ARSDOC
program will attempt to locate the specified instance name in the
ARS.INI file (UNIX servers; the registry on Windows servers) to
obtain the TCP/IP address, host name or host name alias of the
workstation or node on which the instance is running. If the
ARSDOC program cannot locate the instance name in the ARS.INI
file, the specified value is treated as a host name.
This is a required parameter.
Note: If you are running multiple instances of OnDemand on the
same workstation, always specify the -h parameter to identify the
name of the instance that you want to process. Verify that the
system is configured with the correct information for all instances
286 Administration Guide
of OnDemand. See IBM DB2 Content Manager OnDemand for
Multiplatforms: Installation and Configuration Guide for information
about configuring instances.
-H For the QUERY function, specify this parameter to generate a
header record in the output. The default header record contains the
application group field names. This parameter also generates a line
that contains the names of the database fields. By default, the field
names are delimited with the comma character. You can specify a
delimiter of your choice with the -e parameter.
You can use the -H parameter to generate output that contains only
the application group database field names. To do so, specify the
-H parameter without specifying the -i or -q parameters. (You also
must not specify the -L, -n or -N parameters.) The ARSDOC
program writes the database field names to the specified output
file or to stdout (UNIX servers) or the console (Windows servers),
in the format used for the header record.
-i sqlQuery A valid SQL query, that includes the names of one or more
application group database fields, index values, and operators.
OnDemand does not validate the string that you specify. See the
SQL reference for your database manager product for an overview
of SQL concepts and details about how to construct a query.
Note: If you specify the -q or the -X parameters, then you cannot
specify the -i parameter.
For the DELETE or UPDATE functions, if more than one document
meets the search criteria, then multiple documents will be deleted
or updated. For an update, all of the documents will be updated
with the same values.
To construct a query with a database field of type date, you must
use the OnDemand internal format of the date. That is, the number
of days since January 1, 1970. You can use the ARSDATE program
to list the internal format for a given date string. For example, the
following shows how to use the ARSDATE program on an AIX
server to obtain the internal date for July 21, 1995:
/usr/lpp/ars/bin/arsdate -a 7/21/95
The ARSDATE program displays:
7/21/95 -> 9333
You would then enter 9333 as the index value for the date field.
-I
Important: When you use this parameter, you must specify the f
or p variable. For example:
arsdoc query .. .-I f
For the QUERY function, this parameter appends the Load ID to
each line. The Load ID is separated from the database field values
by a delimiter. The default delimiter is the comma character. You
can specify a different delimiter with the -e parameter. You cannot
specify the -H, -n, or -N parameters when you specify the -I
parameter.
Chapter 33. ARSDOC 287
||
||
|
||

To use the -I parameter, the user running the query must have
permission to access the System Log application group and folder.
If the Load ID is not found in the system log, then the string Load
ID could not be found is appended to the end of the output
record.
Note: The Load ID for a document is determined by searching the
system log. Searching the system log can be very time
consuming, depending on the number of records stored in
the system log. The system log is searched for each
document that matches the query.
-L max# For the GET and PRINT functions, determines the maximum
number of items retrieved from OnDemand, regardless of the
number of items that match the query.
For the QUERY function, determines the number of items included
in the hit list, regardless of the number of items that match the
query.
-n For the GET function, use to retrieve items one at a time from the
server. For the QUERY function, include the line numbers. By
default, the ARSDOC program uses a bulk retrieval method for
high-speed retrieval of items from the server.
Note: Specify the -n parameter if a sort order has been defined in
the folder and it is a requirement that the documents be retrieved
in the order specified by the sort order. For more information
about the sort order, see the online help on the Field Information
page for the folder.
For the QUERY function, use to number the items in the output
file. If you specify this option, the ARSDOC program sequentially
numbers each line in the output file, beginning with 1 (one).
For the ADD and UPDATE functions, use to specify the application
group database field names and their values using the form -n
dbfield=value. Note:
v Specify a null (blank) field value by using single quotes within
double quotes. For example: -n middle="’’"
v Specify a string field value that contains a null (blank) or other
special character by enclosing the field value in single quotes
within double quotes. For example: -n name="’Sally Smith’"
You can specify one or more field names and their values (by
specifying the -n parameter one time for each database field name
and its value). When adding a document, you must specify all of
the application group fields unless you specify the -O parameter.
When updating a document, you can specify one or more fields
and their values. For a date field, you must specify the value using
the Display Format from the Field Information page under folders.
-N ″(dbfield1)(dbfield2)(dbfieldn)″
For the QUERY function, specify the order and names of the
database fields to include in the output. For the GET function,
when querying a folder that searches more than one application
group or a folder that searches an application group that contains
more than one application, specify this parameter to add the
resource identifier, application group name, and application name
288 Administration Guide
|
|||
to the output file name. When you specify the -N parameter, you
must specify the -c parameter. If you specify the -g parameter to
generate generic index data, you must specify the -N parameter.
If the folder searches more than one application group or an
application group contains more than one application and you do
not specify the -N parameter, then the ARSDOC program adds the
application group or application identifier to the output file name.
For example, the following specification:
-o student -c
Can result in output file names such as:
student.516
student.517
Where 516 and 517 are application group identifiers. However,
when you specify the -N parameter, the ARSDOC program uses
the resource identifier, application group name, and application
name to name the output file. For example, the following
specification:
-o student -c -N
Can result in output file names such as:
student.1.BILLS.1995
student.1.BILLS.1996
Where 1 is the resource identifier, BILLS is the application group
name, and 1995 and 1996 are application names.
The number of index files created is dependent on the number of
application groups in a folder, the number of applications in an
application group, and the number of resource groups in an
application.
For the QUERY function, determines the application group fields
that the ARSDOC program writes to the output file and the field
names that appear in the header record. By default, the ARSDOC
program writes all fields to the output file. You can specify one or
more application group field names using the form
-N(dbfield)...(dbfield). Each field name that you specify must be
delimited with parenthesis. When you run a query from the
command line, you must delimit the entire string in double quote
characters. For example, -N″(dbfield1)(dbfield2)″.
-o name For the GET function, use to write documents to one or more files
and identify a user-defined string used to generate unique file
names. For example, the following specification:
-o student -c
Can result in the following output file name:
student
You can concatenate one or more of the database field names that
you specify with the -i parameter to generate a unique file name.
For example, the following specification:
Chapter 33. ARSDOC 289

-o "(sdate)(student)"
-i "WHERE sdate=’971025’ AND student=’001200340056’"
Can result in the file name:
971025.001200340056
When you use database field names to generate a unique file
name:
v OnDemand verifies that the field names that you specify are
valid for the application groups that can be searched by the
folder specified with the -f parameter.
v If the field name that you specify is a date field, the output
format of the date is determined by the Format on the Load
Information page under applications.
v The field names must be delimited with parenthesis.
v You can specify the fields in any order. The order that you
specify determines the file name that the ARSDOC program
generates.
v You cannot use a field name to represent a directory name. For
example:
-o "(field_1)/(field_2)"
Is not valid.
v You cannot specify the -c parameter to concatenate items in one
output file. Each item that matches the query is stored in a
separate output file.
If more than one item matches a query and you do not generate a
unique file name using database field names, concatenate items in
a single file with the -c parameter, or specify the -g parameter, then
the ARSDOC program generates a unique file name for each item
that matches the query by adding a .n extension to the file name.
Where n is the number of the item that matched the query. For
example, if you specify:
-o statements
And two items match the query, the ARSDOC program creates the
following files:
statements.1
statements.2
You must specify the -o parameter when you specify the -c
parameter.
For the QUERY function, determines the file name of the output
file in which the ARSDOC program writes the list of items that
match the query.
For the ADD function, determines the name of the input file that
contains the document to be added. The value that you specify is
not checked for valid characters. You can specify a full path name,
including the back slash or forward slash characters that are part
of a directory path. When adding a document, you can provide the
input data by specifying the name of the input file that contains
290 Administration Guide
the data with the -o parameter, an SQL query with the -i
parameter, or a public named query with the -q parameter. Only
one document may be added at a time.
-O For the ADD function, you must specify this parameter if you
intend to omit one or more database fields. However, you may
never omit date or time fields. When you specify the -O parameter,
the ARSDOC program stores a default value in any other database
field that you omit. The default value for string fields is an empty
(null) string. The default value for numeric fields is 0 (zero).
Numeric fields include integer and decimal fields.
-p password The password of the OnDemand user that you named with the -u
parameter. If there is no password assigned to the user that you
specify, use double quotes to show a null password. That is,
specify -p ″″. If you omit the -p parameter, then the ARSDOC
program prompts you to enter the password when you run the
program. If there is no password assigned to the user that you
specify, press the Enter key when prompted.
-P Indicates PDF files that are retrieved and should be stored in
individual files even if concatenation has been requested.
-P printer For the PRINT function, identifies the OnDemand server printer to
which you want to send the documents that match the query.
-q namedQuery
The name of a public named query for the folder named with the
-f parameter. A named query is a set of search criteria previously
saved on the library server that can be recalled by name to search
a folder. A named query is typically defined to search a folder for a
specific document or set of documents.
Note: If you specify the -i or the -X parameters, then you cannot
specify the -q parameter.
-Q SQLqueryfile
Use this parameter to specify a file name that contains one or more
query strings. Specify only one of the parameters, -i, -q, or -Q.
-s seconds For the GET function, determines the number of seconds that the
ARSDOC program waits between query requests when you specify
more than one query with the -F parameter. If you do not specify
this option, then the ARSDOC program does not wait between
query requests. That is, the default is 0 (zero) seconds.
-S startdate,enddate,format
Provides a date range that the ARSDOC program uses to limit a
search to specific tables. When you specify this parameter, the
ARSDOC program searches only tables that contain a segment
within the specified date range.
You can optionally specify a date format. See Chapter 31,
“ARSDATE,” on page 257 for a list of the standard date formats.
An example of a date range with a date format is:
-S "01011990,12311990,%m%d%Y"
Chapter 33. ARSDOC 291
|||
|||

If you do not specify a date format, then the date values must be
specified by using the Display Format that is set on the Field
Information page in the folder. An example of a date range without
a date format is:
-S "01011990,12311990"
Notes:
1. For most queries, you should always specify the -S parameter
and specify a date range. Doing so limits the range of a query
and can significantly improve the performance of a query.
2. For the ADD function, if you specify the -o parameter, you
cannot specify the -S parameter.
3. For the GET and QUERY functions, if you specify the -X
parameter, you cannot specify the -S parameter.
4. For all functions, if you specify the -q parameter, you cannot
specify the -S parameter.
-u userid The OnDemand user that is permitted to perform the specified
function. The ARSDOC program verifies that the userid that you
specify is a valid OnDemand user for the library server that you
name with the -h parameter, that the userid is permitted to open
the folder that you name with the -f parameter, and that the userid
has permission in application groups to perform the specified
function. If you omit the -u parameter, then the ARSDOC program
prompts you to enter the userid when you run the program.
-v Enables verbose mode, which displays all messages (informational
and error). By default, the ARSDOC program displays error
messages.
-x loadId For the GET function, use to limit the documents that can be
retrieved to the set of documents that were loaded into the system
under the specified loadId.
For the QUERY function, use to limit the query to the set of
documents that were loaded into the system under the specified
loadId.
When you specify the -x parameter, use the -f and -G parameters
as follows:
v Specify the -f parameter to search all application groups. You
can specify the search using the -i parameter or the -q
parameter.
v Specify the -G parameter to search a specific application group.
You must specify the search using the -i parameter.
v Specify both the -f parameter and the -G parameter. The
ARSDOC program will verify that the application group can be
searched from the folder.
When you specify the -x parameter, you cannot specify the -X
parameter.
-X loadId For the GET function, retrieve documents by using the index file
that was generated for the specified loadId.
For the QUERY function, build a hit list from the index file that
was generated for the specified loadId.
292 Administration Guide
For the PRINT function, the -i SQL parameter can be specified
when the -X flag is used. If it is specified, it is used only if the
retrieve fails using the loadID. If the -X flag is used, the application
group name must be provided using the -G flag.
When you specify the -X parameter, you must specify the -G
parameter and name the application group.
When you specify the -X parameter, you cannot specify the -x
parameter, or the -i, -q, -S, and -f parameters.
Examples
1. The following shows how to use the GET function to retrieve documents and
save them in a file in the current directory.
arsdoc get -h rockies -f "Student Information" -o student
-c -S 1/1/97,12/31/97 -i "WHERE student=’001200340056’" -v
The ARSDOC program saves all of the documents that match the query in the
following output file:
student
2. The following shows how to use the GET function and a parameter file to run
more than one query at a time. The parameter file is in the current directory.
The output files are saved in the current directory.
arsdoc get -h rockies -F parmfile -v
The parameter file contains two queries:
[-f "Student Information"] [-S 1/1/97,12/31/97] [-o "(student)(type)"] \
[-i "WHERE student=’123420010056’ AND type=’B’ OR type=’G’ OR type=’T’"]
[-f "Student Information"] [-S 1/1/97,12/31/97] [-o "(student)(type)"] \
[-i "WHERE student=’123450011917’ AND type=’B’ OR type=’G’ OR type=’T’"]
Assuming that documents exist for all of the specified types, the ARSDOC
program creates the following output files:
123420010056.Bills
123420010056.Grades
123420010056.Transcripts
123450011917.Bills
123450011917.Grades
123450011917.Transcripts
3. The following shows how to use the GET function to retrieve documents,
write the documents to a file, and generate and save generic index data for
the documents that match the query. The example shows how to specify the
name of a public named query that is valid for the specified folder.
arsdoc get -h rockies -f "Student Information"
-a -c -g -o student -q "3rd yr students GPA>3.5" -N -v
The number of output files that the ARSDOC program generates is a factor of
the number of application groups queried, the applications contained in the
application groups, whether the data is AFP and if so, the versions of resource
groups in each application. At a minimum, for AFP data with one version of
the resource group and one application group, the ARSDOC program
generates three output files. For example:
student.1.Student Information.TRANSCRIPTS.ind
student.1.Student Information.TRANSCRIPTS.out
student.1.Student Information.TRANSCRIPTS.res
Chapter 33. ARSDOC 293
||||

For AFP data, if there is more than one version of the resource group per
application, then the ARSDOC program can generate additional output files.
For example:
student.1.Student Information.TRANSCRIPTS.ind
student.1.Student Information.TRANSCRIPTS.out
student.1.Student Information.TRANSCRIPTS.res
student.2.Student Information.TRANSCRIPTS.out
student.2.Student Information.TRANSCRIPTS.ind
student.2.Student Information.TRANSCRIPTS.res
If the application group contains more than one application, then the
ARSDOC program can generate additional output files. For example:
student.1.Student Information.BILLS.ind
student.1.Student Information.BILLS.out
student.1.Student Information.BILLS.res
student.1.Student Information.GRADES.ind
student.1.Student Information.GRADES.out
student.1.Student Information.GRADES.res
4. The following shows how to use the QUERY function to generate a list of
items and save the list in a file in the current directory.
arsdoc query -h rockies -f "Student Information" -o query1.out -H
-S 1/1/97,12/31/97 -i "WHERE student=’0012-0034-0056’ AND type=’B’ OR
type=’G’ OR type=’T’" -v
5. The following shows how to use the QUERY function and a parameter file to
run more than on query at a time. The parameter file is in the current
directory. The output files are saved in the current directory.
arsdoc query -h rockies -F parmfile -v
The parameter file contains three queries:
[-f "Student Information"] [-i "WHERE type=’B’"] [-o query2.out] \
[-S 1/1/97,12/31/97] [-H] [-N (student)(id)(p_date)]
[-f "Student Information"] [-i "WHERE type=’G’"] [-o query3.out] \
[-S 1/1/97,12/31/97] [-H] [-N (student)(id)(p_date)]
[-f "Student Information"] [-i "WHERE type=’T’"] [-o query4.out] \
[-S 1/1/97,12/31/97] [-H] [-N (student)(id)(p_date)]
6. The following example shows how to use the QUERY function to search a
specific application group:
arsdoc query -h rockies -i "where Date_Taken BETWEEN 9863 AND 11531"
-G load-scanned-images-jpeg -o jpeg -v
7. The following example shows how to use the ADD function to add a
document to the Credit Card Statements folder:
arsdoc add -h rockies -o /newdata/crd.dat -n "crd_date=01/21/98"
-n "account=’000-000-000’" -n balance=123.45 -n "name=’John Watpole’"
-f "Credit Card Statements" -g CRD -a CRD -v
8. The following example shows how to use the UPDATE function to update a
document in the Credit Card Statements folder, changing the balance from
123.45 to 0.00:
arsdoc update -h rockies -i "where account=’000-000-000’ and
name=’John Watpole’" -n "balance=0.00" -S 1/1/97,12/31/97 -f
"Credit Card Statements" -g CRD -v
9. The following example shows how to use the DELETE function to delete a
document from the Credit Card Statements folder:
arsdoc delete -h rockies -i "where account=’000-000-000’ and
name=’John Watpole’" -f "Credit Card Statements" -S 1/1/97,12/31/97
-v
294 Administration Guide
10. The following example shows how to use the PRINT function to send the
documents that match a query to a server printer:
arsdoc print -h rockies -P svrprt1 -i "where account=’000-000-000’ and
name=’John Watpole’" -f "Credit Card Statements" -S 1/1/97,12/31/97 -v
11. You can use the ARSDOC program to use the ADD function to add an index
that points to an existing document. For example, assume that you loaded a
bank statement for account number 000-000-000, date 5/23/97, and account
name Joe Smith. You want to add a new index, but point to the existing
statement. The new index uses the same account number and date, but
contains a different account name (for example, Sally Smith). After adding the
index, if a query is run with account name Joe Smith or Sally Smith, the
same bank statement will be retrieved. To add an index for an existing
document:
arsdoc add -h rockies -i "where sdate=10005 and account=’000-000-000’
and name=’Joe Smith’" -n "sdate=5/23/97" -n "account=000-000-000" -n
"name=’Sally Smith’" -f "Credit Card Statements" -S 1/1/97,6/31/97 -v
12. The following example shows how to use the QUERY function to limit a
search to the documents that were loaded into the system under a specific
load ID. For example, assume that the specified folder could be used to search
several application groups; each application group contains more than one
application; there are 500,000 documents in the application groups. By using
the -x parameter, the query will be limited to the set of documents that was
loaded into the system under the specified load ID. Without the -x parameter,
the query is run against all 500,000 documents.
arsdoc query -h rockies -x 19867-025-0-3FAA-10136-10136
-f load-scanned-images -q query -o out -v
13. The following example shows how to use the QUERY function to limit a
search to the documents that were loaded into the system under a specific
load ID. In the example, the load ID, application group name, and query
string are provided. The search is limited to the application group and only
those documents that were loaded into the system under the specified load
ID.
arsdoc query -h rockies -x 19867-025-0-3FAA-10136-10136
-i "where Date_Taken BETWEEN 9863 AND 11531" -G load-scanned-images-jpeg
-o jpeg -v
14. The following example shows how to use the QUERY function to limit a
search to the documents that were loaded into the system under a specific
load ID. In the example, the load ID, folder name, application group name,
and named query are provided. The search is limited to the application group
and only those documents that were loaded into the system under the
specified load ID. Because a folder was specified, a named query can be used.
(If an application group name is specified and a folder name is not specified,
a named query cannot be used, because a named query is associated with a
folder.)
arsdoc query -h rockies -x 19867-025-0-3FAA-10136-10136
-f load_scanned-images -q query -G load-scanned-images-jpeg -o jpeg -v
15. The following example shows how to use the GET function and an index file
to retrieve documents from the system. The index file was generated for the
set of documents that was loaded into the system under the specified load ID.
When using the -X parameter, the database is not queried; rather, documents
are retrieved based on the information in the index file.
arsdoc get -h rockies -X 19867-025-0-3FAA-10136-10136
-G load-scanned-images-jpeg -o jpeg -v
16. You can run ARSDOC GET with the -a and -g parameters to create generic
indexer files. This also creates the .res resource file.
Chapter 33. ARSDOC 295
||
arsdoc get -c -h <host> -u <usr> -p <pwd> -G <ApplGrp> -F <Folder>
-i <SQL Query> -a -g -n -o <filename> -S <data range>
Note: if the -S <data range> is not specified, all tables will be searched,
resulting in poor performance.
Exit codes used by ARSDOC
The ARSDOC command uses the following exit codes:
0 Success
1 No hits
2 Syntax error. For example, the parameter or value is invalid.
3 An error occurred with the specified request. For example: the user ID has
an incorrect permission level, the specified folder does not exist, or the
specified database field does not exist.
4 Unrecoverable error. For example, the operation failed, or the user cannot
connect to the server.
Notes
The ADD function will fail unless the Database Organization for the application
group named with the -g parameter is Multiple Loads per Database Table and the
Expiration Type is Segment or Document.
The ADD function can be run without providing an input document from a file or
by retrieving an existing document from the system. This means that you can add
database field values without adding a document. To add database field values
without adding a document, do not specify the -o, -i, or -q parameters; specify the
database field names and their values using one or more -n parameters.
The ARSDOC program can print the PTF version number and the ARSDOC GET
function can print the number of documents that were queried and retrieved and
print a status message for each document that is retrieved. To enable the messages,
specify the -v parameter.
For the purpose of retrieving a document from an OnDemand server (with the
intention of reloading or loading the data into another OnDemand serve),
ARSDOC GET should be used to retrieve reports, as opposed to the ARSADMIN
RETRIEVE and DECOMPRESS.
You can use ARSDOC GET with a load ID by specifying the -X parameter, for
example
arsdoc get ...... -X <loadid>.
Use the load ID as it appears in the system log, for example
-X 5804-1-0-5FAA-12360-12360
You can also specify the -g parameter to produce a generic index file. Alternatively,
the documents retrieved can be re-indexed.
When running ARSDOC GET -a with the -g parameter to create generic indexer
files, the .res resource file is created. See example 16, above.
296 Administration Guide
||
||
|
|
||
||
||
||||
|||
||||
||
|
|
|
||
||
Files
/usr/lpp/ars/bin/arsdoc The AIX executable program.
/opt/ondemand/bin/arsdoc The HP-UX and Sun Solaris executable program.
\Program Files\IBM\OnDemand for WinNT\bin\arsdoc
The Windows executable program.
Chapter 33. ARSDOC 297

298 Administration Guide
Chapter 34. ARSJESD
Purpose
The ARSJESD program monitors a TCP/IP port for data sets transmitted by
Download from an OS/390 system and stores data in file systems on the server.
Syntax
��
arsjesd
-p
port#
�
-d
filesystem
-x
command
��
Description
The ARSJESD program is the server component of Download. A licensed feature of
PSF for OS/390, Download can be used to automatically transmit the output data
sets of application programs from the JES spool to file systems on OnDemand
servers. Download also transmits values that you specify in JCL parameters and
can optionally transmit additional job information. You can use the values and job
information to specify the name of the application and application group into
which OnDemand loads the transmitted data. Download is made up of a pair of
cooperating components, a Download writer that transmits the data set and a
program that receives and stores the data on the server. See PSF for OS/390:
Download for z/OS for details about Download, including how to configure and
operate Download on OS/390 systems, a list of the JCL parameters that are
transmitted with a file, and information about a user-written program that may be
used to provide additional job information to the ARSJESD program. See
Chapter 26, “Download exits and processing,” on page 221 for more information
about using the Download user exit with OnDemand.
The ARSJESD program monitors a TCP/IP port for activity from an OS/390
system. Multiple instances of the ARSJESD program may be started, each
monitoring a specific port for data transmitted from a different Download writer. A
Download writer and its corresponding ARSJESD instance must specify the same
port number. If you start multiple instances of the ARSJESD program, you must
specify different file systems for use by each instance. Using the same file systems
for more than one ARSJESD program can adversely affect performance.
The ARSJESD program now receives files larger than 4GB.
The ARSJESD program stores the transmitted data sets into file systems on the
server. You can specify up to ten file systems that the ARSJESD program can use to
store the transmitted data. The ARSJESD program always stores data beginning
with the first file system specified. If there is not enough space available to store
the data set being transmitted in the first file system specified, the ARSJESD
command switches to the second file system specified. If there is not enough space
available to store the data set being transmitted in the last file system specified, the
ARSJESD program switches to the first file system specified.
© Copyright IBM Corp. 1993, 2007 299
|
Parameters
-p port# The TCP/IP port number that the ARSJESD program monitors for
data from the OS/390 system. The valid range of port numbers is
5001 through 64000. However, you should avoid using port
numbers 5001, 8251, and 8253. The Download writer and the
ARSJESD program must specify the same port number. See PSF for
OS/390: Download for z/OS for information about configuring
Download on OS/390 systems.
-d filesystem The name of the file system into which the ARSJESD program
stores the transmitted data. You can specify up to 10 file system
parameters, each separated by the blank character.
-x command The name of a user-written program that the ARSJESD program
invokes to process the downloaded file, JCL parameters, and other
job information after receiving and storing the file on the server.
You can specify the full path name of the program. If you do not
specify the full path name, the operating system searches the
current directory for the program. If the file is not found in the
current directory, the operating system continues to search for the
file using the directories defined in the PATH environment
variable.
You typically specify this parameter when you need to process the
transmitted data before it can be loaded into the system. See
Chapter 26, “Download exits and processing,” on page 221 for
more information.
Examples
1. The following shows how to start the ARSJESD program to monitor TCP/IP
port number 6001 and place transmitted data in the /arsacif/acif1 file system:
arsjesd -p 6001 -d /arsacif/acif1
2. The following shows how to start the ARSJESD program to monitor TCP/IP
port number 6002 and place transmitted data in the /arsacif/acif1 file system.
If there is not enough space available in the /arsacif/acif1 file system to store
the data set being transmitted, then the ARSJESD program stores the data set in
the /arsacif/acif2 file system.
arsjesd -p 6002 -d /arsacif/acif1 -d /arsacif/acif2
3. The following shows how to start the ARSJESD program to monitor TCP/IP
port number 6002 and place transmitted data in the /arsacif/acif1 file system.
After transmitting the file to the server, the ARSJESD program invokes the
/usr/lpp/ars/exits/download.exe user-written program. A user-written
program may perform any required functions, such as determining the name of
the application group and application to load, renaming or copying input files,
and invoking other programs.
arsjesd -p 6002 -d /arsacif/acif1 -x /usr/lpp/ars/exits/download.exe
Note: You must supply your own user-written program, although IBM
provides a sample program in Chapter 26, “Download exits and
processing,” on page 221.
300 Administration Guide

Notes
A file transmitted by Download uses the following file naming convention:
MVS.JOBNAME.DATASET.FORM.YYYYDDD.HHMMSST.ARD
Important: The .ARD file name extension is required to initiate a load process.
v By default, the ARSLOAD program uses the FORM part of the file name to
identify the application group to load. When you run the ARSLOAD program,
you can use the -G parameter to specify a different part of the file name to
identify the application group (MVS, JOBNAME, or DATASET). For example,
arsload -G JOBNAME.
v If the application group to load contains more than one application (source of
data), you must identify the application to load. Otherwise, the load will fail.
When you run the ARSLOAD program, you can use the -A parameter to specify
the part of the file name that identifies the application (MVS, JOBNAME,
DATASET, or FORM). For example, to use the DATASET part of the file name to
identify the application, run the ARSLOAD program with the -A DATASET
parameter.
Depending on the date format that you specify when you initiate Download on the
OS/390 system, the date part of the file name may be YYYYDDD or YYDDD. Apply
APAR OW36539 to Download and use the DATE_FORMAT keyword in the routing
file to control the format of the date part of the file name. See PSF for OS/390:
Download for z/OS for details.
Files
/usr/lpp/ars/bin/arsjesd The AIX executable program.
/opt/ondemand/bin/arsjesd The HP-UX and Sun Solaris executable program.
\Program Files\IBM\OnDemand for WinNT\bin\arsjesd
The Windows executable program.
Chapter 34. ARSJESD 301

302 Administration Guide

Chapter 35. ARSLOAD
Purpose
The ARSLOAD program can be used to process the input files that you want to
load into the system. The ARSLOAD program determines if the input data needs
to be indexed, and if so, calls the appropriate indexing program. The ARSLOAD
program calls the storage manager programs to load report data on storage
volumes and the database manager to update the OnDemand database with the
index information that was extracted from or specified for the input file.
Syntax
�� arsload
-a
application
-A
applID
-B
Format
-c
indexDir �
�
�
�
-d
dataDir
-D
DELIM
-E
-f
-F
C
T
X
-g
applGroup
-G
applGroupID
�
� -h
instance
-i
-I
instance
-j
parmFile
-L
-n �
� -p
password
-t
seconds
-T
-u
userid
-U
filename �
�
-v
-X
A
G
-Z
userExit
�
loadFilename
��
Description
The ARSLOAD program is the main OnDemand data indexing and loading
program. The ARSLOAD program calls the indexing program if the input data
needs to be indexed, creates input files for the storage manager, and updates the
OnDemand database. The ARSLOAD program saves processing messages in the
system log. You can open the System Log folder and list the messages that were
generated when an input file was processed.
© Copyright IBM Corp. 1993, 2007 303
||
||||
|
|
You typically configure the ARSLOAD program to run as a daemon (UNIX
servers) or service (Windows servers), to periodically check specified file systems
for input files to process.
The ARSLOAD program can use the following sources for input files to process:
v one or more file systems specified with one or more -d parameters,
v one or more load file names.
If you omit the load file name, the ARSLOAD program will run in daemon mode
and attempt to load input data from the directories that are specified by the -d
parameter. If you omit the load file name and do not specify the daemon mode
parameter (-d), the ARSLOAD program will issue a usage note and exit. Note:
When running the ARSLOAD program in daemon mode, the .ARD and .PDF file
name extensions are required to initiate a load process.
When you run the ARSLOAD program, you must provide the userid and
password of an OnDemand user with administrator authority for the application
group into which the input data will be loaded. There are several ways that you
can provide the userid and password:
v Use the -u and -p parameters each time that you run the ARSLOAD program.
v Use the -U parameter each time that you run the ARSLOAD program to name a
file that contains a single line with the userid and password of a user that has
administrator authority for the application group.
v On UNIX servers, set a default system administrator userid and password in the
ARSLOAD.CFG configuration file. The ARSLOAD program uses the values in
the ARSLOAD.CFG file unless you specify otherwise (with the -u and -p
parameters) or if you specify a different configuration file with the -U parameter.
v On Windows servers, the Load Data service uses the userid and password of the
instance owner. If you run the ARSLOAD program from the command line, you
should use Windows unified logon. See the -u and -U parameters for details.
Parameters
-a application The name of the application to load. If the application group
contains more than one application, then you must identify the
application to load. Otherwise, the load will fail. If you plan to
automate the loading of files into different application groups and
applications, then use the -A parameter to specify the part of the
file name that identifies the name of the application.
-A applID Determines the part of the file name that identifies the application
to load. If the application group contains more than one
application, then you must identify the application to load;
otherwise, the load will fail.
You typically specify this parameter when you run the ARSLOAD
program as a daemon (UNIX servers) or service (Windows servers)
to automate the loading of files into different application groups
and applications. For example, you can use Download to transmit
files from OS/390 systems to the server. A file transmitted by
Download uses the following file naming convention:
MVS.JOBNAME.DATASET.FORM.YYYYDDD.HHMMSST.ARD
v Unless you specify otherwise, the ARSLOAD program uses the
FORM part of the file name to identify the application group to
load. You can use the -G parameter to specify a different part of
304 Administration Guide
the file name that identifies the application group (MVS,
JOBNAME, or DATASET). For example, arsload -G JOBNAME.
v If the application group to load contains more than one
application (source of data), then you must identify the
application to load; otherwise, the load will fail. When you run
the ARSLOAD program, you can use the -A parameter to specify
the part of the file name that identifies the application (MVS,
JOBNAME, DATASET, or FORM). For example, to use the
DATASET part of the file name to identify the application, run the
ARSLOAD program with the -A DATASET parameter.
-B Format Use this parameter to define file name formats for MVS download
files and files that are processed by the ARSLOAD daemon. Use
the following to create the file name format:
v WRIter
v MVS
v JOBname
v DATaset
v FORms
v YYddd
v HHmmm
v
AG Application group name
APP Application name
IDX Indicates which part of the file name to use as index
IGN Ignore
.EXT Extension
The letters in lowercase are optional.Here are some examples:
ARSLOAD –G FORMS –D “-“ –B “WRItER-MVS-IGN-IGN-FORms”
ARSLOAD –G JOBNAME –B “WRITER.IGN.JOB.IGN.DAT.IGN.EXT”
ARSLOAD –D “-“ –B “IGN-IGN-AG-APP-IGN.EXT”
ARSLOAD –B “APP.IGN.AG.IGN.IGN”
Here are two examples of using the IDX identifier:
v Simple index input format:
arsload –b “account_num” –B “AG.APP.IDX”
where the system uses the IDX part of the file name as an index
parameter for the account_num field.
v Dual purpose index format:
arsload –b “report_name” –B “AG.IDXAPP”
where the system uses the APP part of the file name as an index
parameter for the report_name field
-c indexDir The file system in which OnDemand temporarily stores data
created by the indexing program. The default location is the
directory from which the ARSLOAD program was invoked.
For better performance, IBM recommends that the -c parameter
specify a different file system than the file system that is specified
with the -d parameter.
Chapter 35. ARSLOAD 305
||||
|
|
|
|
|
|
|
|
||
||
||
||
||
|
||||
|
|
|
||
|
|
||
-d dataDir Specifies a file system that contains input files to process.
Any file with a file type extension of .ARD or .PDF will be
processed (.ARD files are transmitted to the server by Download;
.PDF files are created by Acrobat Distiller). The case of the file type
extension is not significant.
You can specify this parameter one or more times. The ARSLOAD
program will search for input files to load in each of the directories
that you specify.
For better performance, IBM recommends that the -d parameter
specify a different file system than the file system that is specified
with the -c parameter.
Files transmitted by Download from an OS/390 system must
conform to the following file naming convention:
MVS.JOBNAME.DATASET.FORM.YYYYDDD.HHMMSST.ARD
Important: The .ARD file name extension is required to initiate a
load process.Unless you specify otherwise, the ARSLOAD program uses the
FORM part of the file name to identify the application group to load.
However, you can use the -G and -A parameters to specify
different parts of the file name (MVS, JOBNAME, DATASET, or
FORM) to identify the application group and application to load.
-D DELIM Use this parameter to define file name formats for MVS download
files and files that are processed by the ARSLOAD daemon. By
default, this parameter is "."
-E When specified, the user-written program that is associated with
the ARSUUPDT exit point is to be invoked. If the -E parameter is
not specified, the user-written program is not invoked. The
user-written program may be used to modify some of the
parameters that are used by OnDemand when document data is
being loaded by the ARSLOAD program, such as the name of the
application group, application, or storage node into which the data
will be loaded. For more information, see “Report Specifications
Archive Definition Exit ” in the IBM DB2 Content Manager
OnDemand for Multiplatforms: Installation and Configuration Guide.
-f Use to unload the data if the load process fails. If the database
manager step fails, then OnDemand should remove any index data
that was added to the database. If the storage manager step fails,
then OnDemand should remove any storage objects that were
copied to storage volumes.
Note: If an input file fails to load, you should review the message
log that was created during the load process. You can
retrieve a message log from the system log. If the message
log contains a Load ID, then it means that for some reason,
OnDemand stored at least some of the input data in the
application group. Before you attempt to reload the input
data, you must remove the data that was created during the
failed load process by using the UNLOAD function of the
ARSADMIN program. See Chapter 29, “ARSADMIN,” on
page 245 for help with removing the data that is created
when a file is loaded into the system.
306 Administration Guide
||||
-F Trace output format
Optional parameter when -T is specified. The default output is text
format. The possible values are C, T, and X:
C or CSV
The CSV format is a comma separated file that is useful in
spreadsheets.
T or TEXT
Default output format.
X or XML
The XML format outputs XML structured data. Using the
XML output requires a header and trailer to be added to
the trace file to complete the XML syntax and create valid
XML. After the XML structured data is combined with
.XSL and .DTD files, it can be viewed in a browser or XML
editor.
-g applGroup The name of the application group to load. This parameter is
required if you specify a load file name to process. This parameter
is optional if you specify the -d parameter. However, if you specify
the -d parameter, unless you specify otherwise, the ARSLOAD
program uses the FORM part of the file name to determine the name
of the application group to load. If you plan to automate the
loading of files into different application groups and applications,
then you should use the -G parameter to specify the part of the file
name that identifies the application group to load.
-G applGroupID
Determines the part of the file name that the ARSLOAD program
uses to identify the name of the application group to load.
You typically specify this parameter when you run the ARSLOAD
program as a daemon (UNIX servers) or service (Windows servers)
to automate the loading of files into different application groups
and applications. For example, you can use Download to transmit
files from OS/390 systems to the server. A file transmitted by
Download uses the following file naming convention:
MVS.JOBNAME.DATASET.FORM.YYYYDDD.HHMMSST.ARD
v Unless you specify otherwise, the ARSLOAD program uses the
FORM part of the file name to identify the application group to
load. You can use the -G parameter to specify a different part of
the file name that identifies the application group (MVS,
JOBNAME, or DATASET). For example, arsload -G JOBNAME.
v If the application group to load contains more than one
application (source of data), then you must identify the
application to load; otherwise, the load will fail. When you run
the ARSLOAD program, you can use the -A parameter to specify
the part of the file name that identifies the application (MVS,
JOBNAME, DATASET, or FORM). For example, to use the
DATASET part of the file name to identify the application, run the
ARSLOAD program with the -A DATASET parameter.
-h instance The name of the OnDemand instance to process. The ARSLOAD
program will attempt to locate the specified instance name in the
ARS.INI file (UNIX servers; the registry for Windows servers), to
obtain the TCP/IP address, host name or host name alias of the
system on which the instance is running. If the ARSLOAD
Chapter 35. ARSLOAD 307
|||
|||
||
|||||||
program cannot locate the instance name in the ARS.INI file, then
the specified value is treated as a host name. Note: The ARSLOAD
program also supports the -I parameter. You can use either
parameter to specify the name of the instance to process. If you
specify both, the value of the last parameter specified is used.
You must specify this parameter and name the instance if:
v The name of the default instance is not ARCHIVE.
v You are running more than one instance on the same system and
you want to process an instance other than the default instance.
v You are running the ARSLOAD program on a system other that
the system on which the instance that you want to process is
running.
Note: If you are running multiple instances of OnDemand on the
same workstation, always specify the -h parameter to identify the
name of the instance that you want to process. Verify that the
system is configured with the correct information for all instances
of OnDemand. See IBM DB2 Content Manager OnDemand for
Multiplatforms: Installation and Configuration Guide for information
about configuring instances.
-i Use to run the data indexing program only; do not copy report
data to storage volumes or add the index data to the database.
-I instance The name of the OnDemand instance to process. The ARSLOAD
program will attempt to locate the specified instance name in the
ARS.INI file (UNIX servers; the registry for Windows servers), to
obtain the TCP/IP address, host name or host name alias of the
system on which the instance is running. If the ARSLOAD
program cannot locate the instance name in the ARS.INI file, then
the specified value is treated as a host name. Note: The ARSLOAD
program also supports the -h parameter. You can use either
parameter to specify the name of the instance to process. If you
specify both, the value of the last parameter specified is used.
You must specify this parameter and name the instance if:
v The name of the default instance is not ARCHIVE.
v You are running more than one instance on the same system and
you want to process an instance other than the default instance.
v You are running the ARSLOAD program on a system other that
the system on which the instance that you want to process is
running.
Note: If you are running multiple instances of OnDemand on the
same workstation, always specify the -h parameter to identify the
name of the instance that you want to process. Verify that the
system is configured with the correct information for all instances
of OnDemand. See IBM DB2 Content Manager OnDemand for
Multiplatforms: Installation and Configuration Guide for information
about configuring instances.
-j parmFile Use to specify the name of a file that contains additional indexing
parameters. Each line (or record) in the file represents one
complete indexing parameter, including keywords and data values.
Typical usages of this command include:
308 Administration Guide
v Appending a document name to an index value.
v Populating an index value with something not seen within the
data.
v Populating an index value with something that does not change
regularly.
When you specify the -j parameter and name a file, the ARSLOAD
program adds the indexing parameters from the specified file to
the indexing parameters that it extracts from the application.
(Indexing parameters are typically specified on the Indexing
Information page in applications.) If an indexing parameter
appears in both the application and the file that you specify, then
the ARSLOAD program uses the value from the file.
The following shows an example of a file that contains additional
indexing parameters to be processed by ACIF.
FORMDEF=F1ABBB0
PAGEDEF=P1ABBB0
USERLIB=/usr/acif/resources/sapkuli1
-L Trace level number
Optional parameter when –T is specified. Possible trace levels
include:
1 Errors
2 Warnings
4 Info
Provides informational trace messages for debugging
problems.
Important: Use only under the supervision of support
because it might affect performance.
8 Flow
Provides function entry and exit information.
Important: Use only under the supervision of support
because it might affect performance.
The trace level numbers are added up, and the default level is 3,
which is used to report errors and warnings which occur during
loading.
-n Determines whether OnDemand deletes the input files when the
ARSLOAD program terminates.
v If you specify the -n parameter, then OnDemand does not delete
the input files when the ARSLOAD program ends.
v If you do not specify the -n parameter, then OnDemand deletes
the input files when the ARSLOAD program ends.
In either case, if the ARSLOAD program fails in the load step
because of a device or system problem, then you can restart the
load step after you correct the problem by using the intermediate
files that were created by the ARSLOAD program. The ARSLOAD
program stores the intermediate files in the directory named with
the -c parameter (or the directory from which you started the
Chapter 35. ARSLOAD 309
|||
||
||
||
||
||
||
|
||
|||
ARSLOAD program, if you did not specify the -c parameter). The
intermediate files have the same file name as the original input file.
-p password The password for the user that is specified with the -u parameter.
If the user is not assigned a password, enter a null password (that
is, specify -p "").
-t seconds Determines the polling time in seconds. This is the interval of time
in which the ARSLOAD program checks the input directory
(specified by the -d parameter) for input files to process. The
default value is 600 seconds, which means that the ARSLOAD
program checks the input directory every ten minutes.
-T Fully qualified trace file name
When a file is specified, trace is activated for ARSLOAD. If the file
already exists, it is renamed with the current date and time, and a
new file is created.
-u userid The user ID of an OnDemand user with administrator authority for
the application group. The user must have permission to add
documents to the application group.
There are several ways that you can provide the user ID and
password:
v You can specify the -u and -p parameters each time that you run
the ARSLOAD program.
v For Windows servers, if you run the ARSLOAD program from
the command line, use Windows unified logon to protect your
OnDemand user ID and password. Unified logon attempts to log
on to the OnDemand server with the Windows logon account
user name.
v For UNIX servers, you can specify the -U parameter each time
that you run the ARSLOAD program and name a file that
contains a single line with the user ID and password of a user
with administrator authority for the application group.
v For UNIX servers, you can specify a system administrator user
ID and password in the ARSLOAD.CFG configuration file. The
ARSLOAD program uses the values in the ARSLOAD.CFG file,
unless you specify otherwise (with the -u and -p parameters or
if you specify a different configuration file with the -U
parameter).
v For Windows servers, the Load Data service uses the user ID
and password of the instance owner.
-U filename For UNIX servers, if you omit the -u parameter, determines the file
that contains the userid and password that the ARSLOAD program
uses to log on to the system and access the application group. If
the ARSLOAD program cannot locate or use the file named with
the -U parameter, it attempts to log on to the system and access the
application group with a userid of admin and no password. If you
omit the -U parameter (and the -u parameter), OnDemand
attempts to obtain the userid and password from the
/usr/lpp/ars/config/arsload.cfg file. If the ARSLOAD program
cannot locate or use the /usr/lpp/ars/config/arsload.cfg, it
attempts to log on to the system and access the application group
with a userid of admin and no password. The IBM DB2 Content
Manager OnDemand for Multiplatforms: Installation and Configuration
Guide describes how to configure the arsload.cfg file.
310 Administration Guide
||||
|||
||
||
|||||
||||
||||||
||

Important: After you configure the file named with the -U
parameter (or the arsload.cfg file), remember to
change the password any time that you change the
user’s password in OnDemand; otherwise the load will
fail. The ARSLOAD program can accept an expired
password; however, the ARSLOAD program will fail if
you specify an incorrect password.
Note: The ARSLOAD.CFG file and the -U parameter are not used
on Windows servers. The OnDemand Load Data service logs
on to the system and accesses the application group with the
userid and password of the instance owner (typically an
OnDemand system administrator user). If you run the
ARSLOAD program from the command line, Windows
unified logon should be used to log on to the system and
access the application group. See IBM DB2 Content Manager
OnDemand for Multiplatforms: Installation and Configuration
Guide for help with configuring services and unified logon.
-v Enables verbose mode, which displays all messages (informational
and error). By default, the ARSLOAD program displays error
messages.
-X indexer Allows you to override the indexing program that was specified on
the Indexer Information page for the application. The possible
values are A and G:
v Specify -X A to use ACIF.
v Specify -X G to use the OnDemand Generic indexer.
You must specify an indexing program if the input contains index
data in a format other than the one supported by the indexing
program that was specified for the application. For example,
assume that you defined an application and specified ACIF as the
indexing program. Later, you used the ARSDOC program to
extract documents from an application group. The ARSDOC
program generates index data that is in the Generic indexer format.
To load the index data into the application, you must specify:
arsload -X G . . .
-Z userExit Specifies a user-defined string that is passed to the load user exit
program (ARSULOAD). The ARSULOAD program is installed in
the exits directory.
loadFilename Specifies an input file to process.
You may specify the names of one or more input files to process. If
you specify more than one input file, separate the file names with
a blank character.
The ARSLOAD program concatenates the following file type
extensions to the file name that you specify: IND, OUT, and RES
v The IND file contains the index data
v The OUT file contains the report data
v The RES file contains the resource data
For example, if you specify arsload -g BILLS po3510, the
ARSLOAD program processes the following files:
v po3510.ind
Chapter 35. ARSLOAD 311

v po3510.out
v po3510.res
If the ARSLOAD program does not find a file with the IND file
type extension, it automatically calls the indexing program to
process the input file.
If you omit an input file name, the ARSLOAD program will run in
daemon mode and attempt to load input data from the directories
that are specified by the -d parameter. If you omit an input file
name and do not specify the daemon mode parameter (-d), the
ARSLOAD program will issue a usage note and exit.
Examples
1. The following shows how to run the ARSLOAD program to check the specified
directory for input files to process. The input files must have a file type
extension of .ARD or .PDF. The ARSLOAD program stores temporary work files
in the location specified by the -c parameter. In this example, the ARSLOAD
program uses the FORM part of the file name to determine the application group
to load and the application group contains only one application; the ARSLOAD
program logs on to the system and accesses the application group by using the
userid and password from the /usr/lpp/ars/config/arsload.cfg file.
arsload -c /arsacif/acif1 -d /arsacif/acif2
2. The following shows how to run the ARSLOAD program to check the specified
directory for input files to process. The input files must have a file type
extension of .ARD or .PDF. The ARSLOAD program stores temporary work files
in the location specified by the -c parameter. In this example, the ARSLOAD
program uses the JOBNAME part of the file name to determine the application
group to load and the DATASET part of the file name to determine the
application to load; the ARSLOAD program logs on to the system and accesses
the application group by using the userid and password from the
/usr/lpp/ars/config/arsload.cfg file.
arsload -c /arsacif/acif1 -d /arsacif/acif2 -A DATASET -G JOBNAME
3. The following shows how to run the ARSLOAD program to load the specified
file into the specified application group. The ARSLOAD program logs on to the
system and accesses the application group by using the userid and password
from the -u and -p parameters.
arsload -g BILLS -u bob -p secret PO3510
4. The following shows how to run the ARSLOAD program to load several input
files into the specified application group. The application group name contains
an embedded blank character, and must be quoted. The ARSLOAD program
logs on to the system and accesses the application group by using the userid
and password from the -u and -p parameters.
arsload -g "ABC Credit" -u bob -p secret RW7505 RW8505
5. The following shows how to run the ARSLOAD program to load the specified
file into the specified application group. The TCP/IP address of the OnDemand
library server is specified. This format of the command can be used to load
input files from an object server and store the index data on the library server.
The ARSLOAD program logs on to the system and accesses the application
group by using the userid and password from the file named with the -U
parameter.
arsload -g BILLS -h "9.99.111.222" -U /tmp/userpw.cfg ARSP0MST
312 Administration Guide
Notes
IBM recommends that you do not run the ARSLOAD program at the same time
that you run the ARSMAINT program with the -r parameter (or any other
program that optimizes or reorganizes the database).
IBM recommends that you do not run the ARSLOAD program at the same time
that you run the ARSDB program with the -m or -s parameters (or any other
program that optimizes or reorganizes the database).
If you do not specify an input file name, the ARSLOAD program checks the
directory specified with the -d parameter(s) for input files to process. Any file with
a file type extension of .ARD or .PDF will be processed (.ARD files are transmitted
to the server by Download; .PDF files are created by Acrobat Distiller). The case of
the file type extension is not significant.
The OnDemand server program (ARSSOCKD or ARSOBJD in UNIX; LibSrvr or
ObjSrvr in Windows) must be running, otherwise the ARSLOAD program will fail.
Files
/usr/lpp/ars/bin/arsload The AIX executable program.
/opt/ondemand/bin/arsload The HP-UX and Sun Solaris executable program.
\Program Files\IBM\OnDemand for WinNT\bin\arsload
The Windows executable program.
Chapter 35. ARSLOAD 313

314 Administration Guide
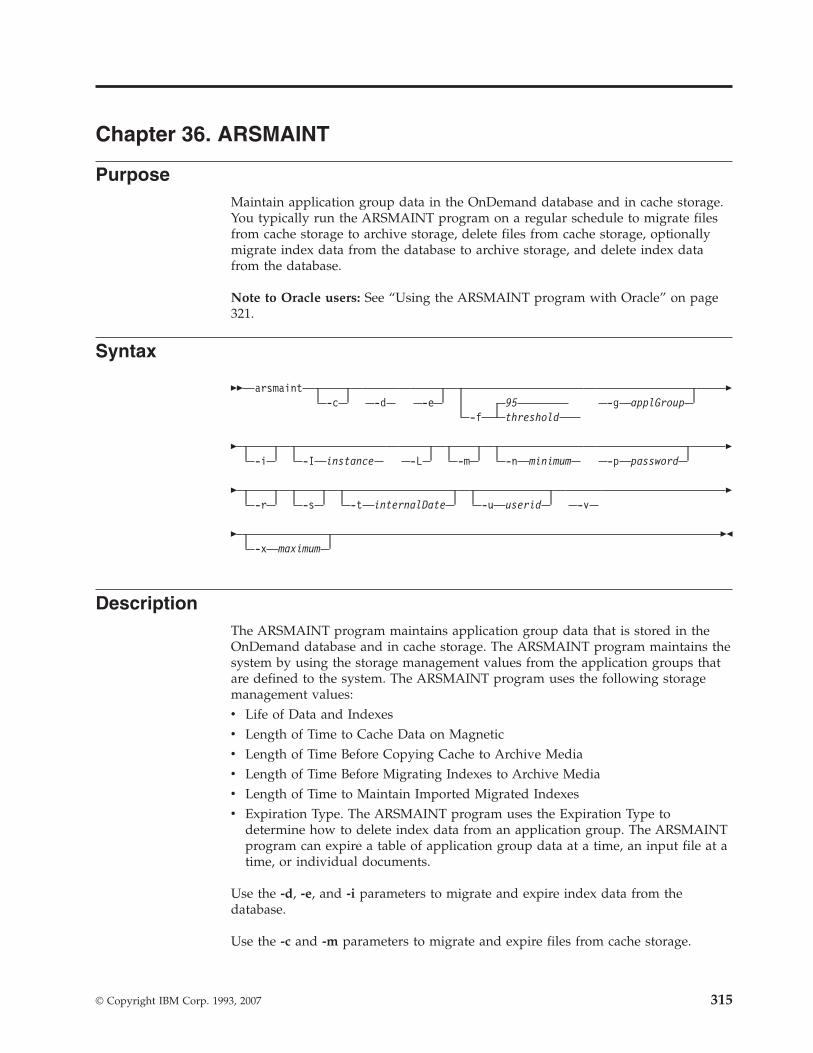
Chapter 36. ARSMAINT
Purpose
Maintain application group data in the OnDemand database and in cache storage.
You typically run the ARSMAINT program on a regular schedule to migrate files
from cache storage to archive storage, delete files from cache storage, optionally
migrate index data from the database to archive storage, and delete index data
from the database.
Note to Oracle users: See “Using the ARSMAINT program with Oracle” on page
321.
Syntax
�� arsmaint
-c
-d
-e
95
-f
threshold
-g
applGroup �
� -i
-I
instance
-L
-m
-n
minimum
-p
password �
� -r
-s
-t
internalDate
-u
userid
-v �
� -x
maximum ��
Description
The ARSMAINT program maintains application group data that is stored in the
OnDemand database and in cache storage. The ARSMAINT program maintains the
system by using the storage management values from the application groups that
are defined to the system. The ARSMAINT program uses the following storage
management values:
v Life of Data and Indexes
v Length of Time to Cache Data on Magnetic
v Length of Time Before Copying Cache to Archive Media
v Length of Time Before Migrating Indexes to Archive Media
v Length of Time to Maintain Imported Migrated Indexes
v Expiration Type. The ARSMAINT program uses the Expiration Type to
determine how to delete index data from an application group. The ARSMAINT
program can expire a table of application group data at a time, an input file at a
time, or individual documents.
Use the -d, -e, and -i parameters to migrate and expire index data from the
database.
Use the -c and -m parameters to migrate and expire files from cache storage.
© Copyright IBM Corp. 1993, 2007 315

Note: Most maintenance processes should run when no other applications are
updating the database or need exclusive access to the database and when
you are sure that no one will be retrieving documents from the system. You
should not maintain the database at the same time that you load data into
the system. There may be other processes that conflict; for example, you
cannot maintain the database while an offline backup of the database is in
progress.
The time of day and frequency with which you run the maintenance
programs and the processing options that you specify will vary, based on
your requirements. For example, if you do not load data into the system
every day or you add few rows to the database when you do load data, you
should be able to maintain the database less often, perhaps once a month.
However, if you load a high volume of data every day, you may need to
maintain the database after the load processing completes. If your system
has sufficient space available to store index and report data, you may be
able to maintain the database less often.
The examples in this section illustrate one way to maintain the database and
cache storage. You should use the examples as a guideline. The options that
you use on your system and the times that you can run the ARSMAINT
program on your system will be different.
ARSMAINT also queries the database for any application groups that are
flagged for migration to Tivoli Storage Manager or Object Access Method
(OAM), and creates migration links in the cache against which ARSMAINT
is run. The migration date is the current date so when ARSMAINT normally
processes files for migration, it picks up these newly created links.
Parameters
-c Expires files from cache storage. Most customers should plan to
schedule the ARSMAINT program to expire files every day.
-d Expires indexes from the OnDemand database. Most customers
should plan to schedule the ARSMAINT program to expire indexes
every day.
-e Migrates index data from the database to archive storage.
Customers that plan to use migration processing should schedule
the ARSMAINT program to migrate data every day.
Migration is the process of moving tables of index data from the
database to archive storage. The migration process allows you to
maintain index data for a very long time, on indirect access media.
You typically migrate index data after users no longer need to
access the documents to which the indexes point, but for legal or
other requirements, you still need to maintain the index data for
some number of months or years.
Important: Before you can migrate index data, the index tables
must be closed. If the Database Organization for the application
group is set to Single Load per table, the index table is closed
when the report is loaded. Otherwise, if the Database Organization
is Multiple Loads per table, the index table is closed when the
Maximum Rows value is reached. To close a table to loading before
316 Administration Guide
|||||
the Maximum Rows value is reached, use the ARSTBLSP program
with the -a1 parameter. For more information, see Chapter 37,
“ARSTBLSP,” on page 323.
You must configure application groups for migration. OnDemand
uses the Length of Time Before Migrating Indexes to determine
when to migrate index data. If you need to import index data from
archive storage back into the database, then OnDemand will
maintain the index data in the database for the number of days
specified in the Length of Time to Keep Imported Migrated
Indexes. (OnDemand maintains migrated index data in archive
storage until it reaches its Life of Data and Indexes.) See Part 2,
“Storage administration,” on page 51 for more information about
migration.
Before you can migrate index data to archive storage, you must
configure the System Migration application group. See IBM DB2
Content Manager OnDemand for Multiplatforms: Installation and
Configuration Guide for help with configuring the System Migration
application group.
-f threshold Sends an alert message when a cache storage file system is filled to
the specified percentage. The default value is 95 (percent). The
range is 0 (zero) to 100.
When a cache storage file system exceeds the threshold, it usually
means that the ARSMAINT program cannot delete enough
documents from the file system to fall below the threshold. You
may need to run migration and expiration processing more often,
increase the size of your cache storage file systems, or add new
cache storage file systems.
The ARSMAINT program sends the alert message to stdout (UNIX
servers), the console (Windows servers), the system log, and the
system log user exit point.
-g applGroup The name of the application group to process. Unless you specify
this parameter, the ARSMAINT program maintains the database
and cache storage for all of the application groups defined on the
library server. You can specify this parameter and name an
application group when you need to maintain the database and
cache storage for a specific application group. The -g parameter is
valid only with the -c, -d, -e, -i, -m, and -r parameters.
-i Expires imported index data from the database. Customers that
need to use migration processing should schedule the ARSMAINT
program to expire imported indexes every day.
An administrator must import index data that was previously
migrated to archive storage back into the database to satisfy a
query. After maintaining the imported index data for the number
of days specified in the Length of Time to Keep Imported Migrated
Indexes (see the Storage Management page in the application
group), the data is eligible to be removed from the database. (And
will be removed the next time that the ARSMAINT program runs
with the -i parameter.)
-I instance The name of the OnDemand instance to process. The ARSMAINT
program will attempt to locate the specified instance name in the
ARS.INI file (UNIX servers; the registry for Windows servers), to
Chapter 36. ARSMAINT 317
obtain the TCP/IP address, host name or host name alias of the
system on which the instance is running. If the ARSMAINT
program cannot locate the instance name in the ARS.INI file, then
the specified value is treated as a host name.
You must specify this parameter and name the instance if:
v The name of the default instance is not ARCHIVE.
v You are running more than one instance on the same system and
you want to process an instance other than the default instance.
v You are running the ARSMAINT program on a system other that
the system on which the instance that you want to process is
running.
Note: If you are running multiple instances of OnDemand on the
same workstation, always specify the -h parameter to identify the
name of the instance that you want to process. Verify that the
system is configured with the correct information for all instances
of OnDemand. See IBM DB2 Content Manager OnDemand for
Multiplatforms: Installation and Configuration Guide for information
about configuring instances.
-L Queries the ARSLOAD table and updates the aid value for all the
load IDs that have not been previously found. For multiple
applications in an application group, queries the data tables to find
a corresponding hit for the load in order to determine the aid
value.
-m Migrates files from cache storage to archive storage. IBM
recommends that you schedule the ARSMAINT program to
migrate files every day.
-n minimum Specifies the low expiration threshold percentage for cache storage
file systems. This value determines when the ARSMAINT program
stops expiring files from cache storage file systems (see the -c and
-x parameters). The range is 0 (zero) to 100.
The default value is 80 (percent), which should keep cache storage
file systems fairly full, to provide good retrieval hit rates while
leaving adequate free space to load new input files. IBM
recommends that you periodically check the amount of space
available in your cache storage file systems. Depending on the
amount of data that you load into the system and the length of
time that you maintain documents in cache storage, you may need
to increase the size of the cache storage file systems or add new
cache storage file systems.
-p password Specifies the password for the OnDemand userid that is identified
with the -u parameter. If the user is not assigned a password, enter
a null password (that is, specify -p ""). If you do not specify this
parameter, the ARSMAINT program prompts you to enter the
password when you run the program. If the user is not assigned a
password, then press the Enter key when prompted.
-r Runs database statistics, which causes the database manager to
optimize application group index data and make access to
information as efficient as possible. IBM recommends that you
schedule the ARSMAINT program to optimize the database every
day.
318 Administration Guide
||||||

-s Prints a report that contains status information about the cache
storage file systems. The report includes information such as the
name of the file systems, the amount of space allocated to each file
system, and the amount of free space for each file system. The
ARSMAINT program saves the report in the system log. IBM
recommends that you schedule the ARSMAINT program every day
to report the status.
-t internalDate
Specifies that you want the ARSMAINT program to process the
database and cache storage by using a date other than the current
system date (the default value). For example, you can specify a
date in the future to cause the ARSMAINT program to process
data and files before their actual expiration and migration period
(for example, if you wanted to clear cache storage). The value that
you specify must be a valid OnDemand internal date value. You
can use the ARSDATE program to display the internal date value
for a given date string. When you specify this option, you must
specify the -u and -p parameters. The ARSMAINT program
processes all data and files belonging to the application groups for
which the user (specified with the -u parameter) has been given
permission to delete documents.
Note: Use this option with caution. Contact the IBM support
center before you run the ARSMAINT program with this
option.
-u userid Specifies an OnDemand user that has administrator permission for
the application groups to be processed. If you specify the -g
parameter, the user must have permission to delete documents
from the application groups. If you do not specify this parameter,
the ARSMAINT program prompts you to enter the userid when
you run the program.
-x maximum Specifies the high expiration threshold percentage for cache storage
file systems. This value determines when the ARSMAINT program
begins expiring files from cache storage file systems (see the -c
parameter). When a cache storage file system reaches this
threshold, the ARSMAINT program begins deleting data from the
file system by using the data migration and caching values from
the application groups. The ARSMAINT program stops deleting
files from a file system when the amount of used space in the file
system drops below the low expiration threshold (see the -n
parameter). The range is 0 (zero) to 100.
The default value is 80 (percent), which should keep cache storage
file systems fairly full, to provide good retrieval hit rates while
leaving adequate free space to load new input files. IBM
recommends that you periodically check the amount of space
available in your cache storage file systems. Depending on the
amount of data that you load into the system and the length of
time that you maintain data in cache storage, you may need to
increase the size of the cache storage file systems or add new cache
storage file systems.
-v Validates cache storage. When you specify this option, the
Chapter 36. ARSMAINT 319

ARSMAINT program inspects all cache storage file systems to
make sure that they are correctly linked with the proper file
permissions.
Examples
1. The following shows how to run the ARSMAINT program with options to
migrate and expire files from cache storage, migrate and expire indexes from
the database, optimize database index data, print statistics, and validate cache
storage. These options are typical of those used to maintain a standard
library/object server system (with archive storage on the library server).
arsmaint -cdeimrsv
2. The following shows how to run the ARSMAINT program with options to
migrate and expire files from cache storage, print statistics, and validate cache
storage. These options are typical of those used to maintain cache storage and
archive storage on an object server that resides on a different workstation or
node than the library server.
arsmaint -cmsv
Notes
See the online help that is provided with the administrative client for assistance
with configuring the storage management information in your application groups.
The OnDemand server programs can remain active while you run the ARSMAINT
program. However, IBM recommends that you schedule the ARSMAINT program
to run at a time when little or no other OnDemand activity takes place on the
system.
IBM recommends that you do not load data on the system when you run the
ARSMAINT program with the -r parameter.
IBM recommends that you create a backup image of the OnDemand database and
the Tivoli Storage Manager database before you run the ARSMAINT program.
The OnDemand server program (ARSSOCKD or ARSOBJD in UNIX; LibSrvr or
ObjSrvr in Windows) must be running, otherwise the ARSMAINT program will
fail.
Before you can migrate index data, the index tables must be closed. If the Database
Organization for the application group is set to Single Load per table, the index
table is closed when the report is loaded. Otherwise, if the Database Organization
is Multiple Loads per table, the index table is closed when the Maximum Rows
value is reached. To close a table to loading before the Maximum Rows value is
reached, use the ARSTBLSP program with the -a1 parameter. For more
information, see Chapter 37, “ARSTBLSP,” on page 323.
If the OnDemand cache file system becomes unavailable (as during a system
failure), automatic retrieval from the archive storage might be possible, depending
on the outage cause.
For example, assume that the HBA Adapter fails and causes the file systems to be
unmounted. In this instance, the system looks in the cache first. If the file system is
320 Administration Guide
|||
||
unmounted, the data will not be there, OnDemand then looks in the archive
storage (if the data was stored there). There are several other factors that might
affect this function:
v The file system is damaged, and commands such asls will not work.
v OnDemand does not look in the archive storage if there is an error reading the
cache. The permissions of the unmounted file system are incorrect. AFP data has
resources that are put back into the cache if they are ever removed.
v The unmounted file system might not have enough storage space, so retrievals
fail.
For the situations listed above, update the application group and turn off the
search cache option. The search cache is located on the Storage Management tab of
the application group properties. This causes OnDemand to retrieve directly from
the archive storage.
Using the ARSMAINT program with Oracle
You can use the ARSMAINT program to maintain the tables that contain
user-defined application group data. User-defined application groups are the
application groups that you define to the system. Customers in a high maintenance
operation should run the ARSMAINT program on a regular schedule.
The syntax is:
/opt/ondemand/bin/arsmaint <options>
The options are:
–d, –i Expire index data from the database. The –i parameter expires index data
that has been imported from archive storage. If you do not migrate index
data to archive storage, you do not need to specify the –i parameter.
–e Migrate index data from the database to archive storage. If you do not
migrate index data to archive storage, you do not need to specify the –e
parameter.
–r Collect statistics. Note: The ARSMAINT program collects statistics only on
the tables that have changed since the last time that statistics were
collected. OnDemand maintains information about the tables, including the
last time that a table was modified and the last time that statistics were
collected on a table.
–g applGroup
Process the tables for the specified application group. If you do not specify
this parameter and name an application group, the ARSMAINT program
processes all of the user-defined application groups.
Files
/usr/lpp/ars/bin/arsmaint The AIX executable program.
/opt/ondemand/bin/arsmaint The HP-UX and Sun Solaris executable program.
\Program Files\IBM\OnDemand for WinNT\bin\arsmaint
The Windows executable program.
Chapter 36. ARSMAINT 321
|||
|
|||
||
||||

322 Administration Guide

Chapter 37. ARSTBLSP
Purpose
Migrate tables of application group data from the default table space to separate
table spaces. The ARSTBLSP program may also be used to change the table that
OnDemand loads data into.
Note: The ARSTBLSP program is available only for DB2.
Syntax
�� arstblsp -a action
-d
dir -g applGroup
-I
instance �
� -p
password
-t
table
-u
userid ��
Description
The ARSTBLSP program can be used to migrate existing tables of application
group data from the default table space to separate table spaces. IBM recommends
that all customers who are upgrading from earlier versions of OnDemand use this
program to migrate their existing application group data to table spaces.
During normal operation, OnDemand loads index rows into a table until the
Maximum Rows value for the application group has been reached. Such a table is
said to be open for loading. When the Maximum Rows value is reached, the table
is closed and a new table and table space are created. Under certain circumstances,
a customer may desire to close a table to loading before the Maximum Rows value
is reached. For example, migration processing (by using the ARSMAINT -e
function) will not process a table that is open for loading, and the customer may
desire to migrate the table earlier than initially anticipated.
Parameters
-a action The action to perform. The action can be one of the following
values:
0 Migrate one or more tables of application group data to
separate table spaces. Specify the application group to
migrate with the -g parameter. Optionally specify a table to
migrate with the -t parameter. A table must be closed
before you can migrate it to a table space.
1 Close a table that is still open for loading. This action
causes OnDemand to close the table that is currently open
for loading in the specified application group. The next
time that data is loaded into the application group, the
data is loaded into a table space. Optionally specify a table
to close with the -t parameter.
© Copyright IBM Corp. 1993, 2007 323

2 List the tables of application group data that have not been
migrated to separate table spaces.
3 List the tables of application group data that are open for
loading. An open table must be closed before you can
migrate it to a table space.
-d dir Forces the ARSTBLSP program to export the existing application
group data to disk. If you specify this parameter, then you must
name a directory or file system that contains sufficient free space to
hold a copy of the existing application group table. Depending on
the size of the table that you are migrating, this can be a significant
amount of disk space. For example, a table that contains ten
million rows, where each row is one hundred bytes, may require
up to 2 GB of disk space to complete the migration.
Note: Unless you specify otherwise, on UNIX servers, OnDemand
uses named pipes to export the existing application data,
which provides the best performance with no file system
overhead. IBM recommends that you use the named pipes
method. On Windows servers, the system uses a temporary
directory to export data; you can specify the temporary
directory by using the OnDemand configurator program.
-g applGroup The name of the application group to process.
-I instance The name of the OnDemand instance to process. The ARSTBLSP
program will attempt to locate the specified instance name in the
ARS.INI file (UNIX servers; the registry for Windows servers), to
obtain the TCP/IP address, host name or host name alias of the
system on which the instance is running. If the ARSTBLSP
program cannot locate the instance name in the ARS.INI file, then
the specified value is treated as a host name.
You must specify this parameter and name the instance if:
v The name of the default instance is not ARCHIVE.
v You are running more than one instance on the same system and
you want to process an instance other than the default instance.
v You are running the ARSTBLSP program on a system other that
the system on which the instance that you want to process is
running.
Note: If running multiple instances of OnDemand on the same
system, always specify the -I parameter to identify the name of the
instance that you want to process. Verify that the ARS.INI file is
configured with the correct information for all instances of
OnDemand. See IBM DB2 Content Manager OnDemand for
Multiplatforms: Installation and Configuration Guide for information
about configuring instances.
-p password The password for the userid specified with the -u parameter. If the
user is not assigned a password, enter a null password (that is,
specify -p ""). If you do not specify this parameter, the ARSTBLSP
program will prompt you to enter the password when you run the
program. If the user is not assigned a password, press the Enter
key when prompted.
-t table When used with the -a1 parameter, identifies the table to close.
When used with the -a0 parameter, optionally identifies the table
324 Administration Guide

of application group data to migrate. If you do not specify this
parameter when you use the -a0 option, the ARSTBLSP program
migrates all tables for the specified application group to separate
table spaces.
-u userid The userid of a user with administrator authority for the
application group. If you do not specify this parameter, the
ARSTBLSP program will prompt you to enter the userid when you
run the program.
Examples
1. The following shows how to list the tables that have not been migrated for a
specific application group:
arstblsp -a 2 -g credit
2. The following shows how to list the tables that are open for loading for a
specific application group:
arstblsp -a 3 -g credit
3. The following shows how to close any open tables for a specific application
group:
arstblsp -a 1 -g credit
4. The following shows how to close a specified table for a specific application
group:
arstblsp -a 1 -g credit -t AAA26
5. The following shows how to migrate all tables for a specific application group.
The ARSTBLSP program migrates each table in the application group to a
separate table space:
arstblsp -a 0 -g credit
6. The following shows how to migrate a specific table of application group data:
arstblsp -a 0 -g credit -t AAA26
Notes
When migrating application group data to table spaces, you should do so at a time
when there is little or no other activity on the system.
Do not load data into the system while you are migrating tables with the
ARSTBLSP program.
Before you can migrate application group data to table spaces, all of the tables in
the application group must be closed. You can use the ARSTBLSP program
command with the -a1 parameter to close a table.
Before you begin to migrate application group data to table spaces, IBM
recommends that you create a backup image of the OnDemand database.
If you plan to use Tivoli Storage Manager to maintain DB2 archived log files and
backup image files, then you must define the Tivoli Storage Manager storage
objects before you begin migrating application group data to table spaces. See IBM
DB2 Content Manager OnDemand for Multiplatforms: Installation and Configuration
Guide for assistance with configuring Tivoli Storage Manager.
Chapter 37. ARSTBLSP 325
Files
/usr/lpp/ars/bin/arstblsp The AIX executable program.
/opt/ondemand/bin/arstblsp The HP-UX and Sun Solaris executable program.
\Program Files\IBM\OnDemand for WinNT\bin\arstblsp
The Windows executable program.
326 Administration Guide

Chapter 38. ARSVIEW
Purpose
The ARSVIEW program processes an AFP document and creates a line data file
suitable for viewing on a 3270 display or other line-mode terminal.
Syntax
�� arsview
18
-c
cpi
-f
fontDir
11.0
-h
height
�
� 12
-l
lpi
0
-o
90
180
270
-r
resourceFile
-t
traceFile �
� 8.5
-w
width
-x
-y
csra inputFile ��
Description
You can use the OnDemand CICS client program to view documents retrieved
from the system on 3270 displays (line-mode terminals). If the document contains
AFP data, OnDemand calls the ARSVIEW program to process the AFP data and
create a line data file. OnDemand then sends the line data file to the client
program. The ARSVIEW program can also be used as a general purpose AFP to
line data batch conversion utility. You can invoke the ARSVIEW program from a
user-defined program or from the command line.
You can optionally specify a directory that contains user-defined character sets and
code page files that the ARSVIEW program can use to process the input data. See
IBM DB2 Content Manager OnDemand: Windows Client Customization Guide for
information about defining character set and code page files for use with
OnDemand client programs.
The ARSVIEW program ignores any graphics, images, and typographic fonts that
may be present in the input data. All fonts in the input data are mapped to a
single point, monospaced font. You can specify the name of the resource group file
that contains the form definition and overlay associated with the input file. The
ARSVIEW program can process information contained in the form definition, such
as the offset, and write the overlay text to the output file.
Parameters
-c cpi Characters per inch in the horizontal direction of the smallest (or
only) font in the input file. For example, if the input file contains
text at 12 characters per inch and 10 characters per inch, then you
would specify -c 12. The default value is 18 characters per inch.
© Copyright IBM Corp. 1993, 2007 327

-f fontDir The name of the directory that contains user-defined character set
and code page files required to process the input file. See IBM DB2
Content Manager OnDemand: Windows Client Customization Guide for
information about defining character set and code page files for
use with OnDemand client programs.
-h height The height of a page in the input file. The -w and -h parameters
define the paper size used to print a page of the input file. The
default value is 11.0 inches.
-l lpi Lines per inch in the vertical direction of the smallest (or only) font
in the input file. The default value is 12 lines per inch.
-o orientation The orientation of the data on the page in the input file. You can
specify that the data appears rotated 0, 90, 180, or 270 degrees. The
default value is 0 degrees.
-r resourceFile The name of the resource group file that contains the form
definition and overlay associated with the input file. The
ARSVIEW program can process information contained in the form
definition, such as the offset, and include text from an overlay in
the output file.
-t traceFile Specifies the name of the file in which the ARSVIEW program
saves debugging information. You can use this option to obtain
detailed information about how the ARSVIEW program converts
the input file.
-w width The width of a page in the input file. The -w and -h parameters
define the paper size used to print a page of the input file. The
default value is 8.5 inches.
-x Use to specify that you do not want the output to contain any
horizontal or vertical lines that were present in the AFP document.
-y csra Use to specify the value that represents the character space reset
algorithm with which to place text in the output.
inputFile The name of the AFP input file to process
Examples
1. The following shows how to process an AFP input file located in the current
directory and redirect the line data output to a file. By default, the input file
contains 8.5 x 11 inch pages:
arsview -c 12 -l 8 -o 90 37271600.AFP > 37271600.LIN
2. The following shows how to process an input file using the default options for
characters per inch, lines per inch, width, height, and orientation. The output is
redirected to stdout:
arsview 96089900.AFP
Files
/usr/lpp/ars/bin/arsview The AIX executable program.
/opt/ondemand/bin/arsview The HP-UX and Sun Solaris executable program.
\Program Files\IBM\OnDemand for WinNT\bin\arsview
The Windows executable program.
328 Administration Guide
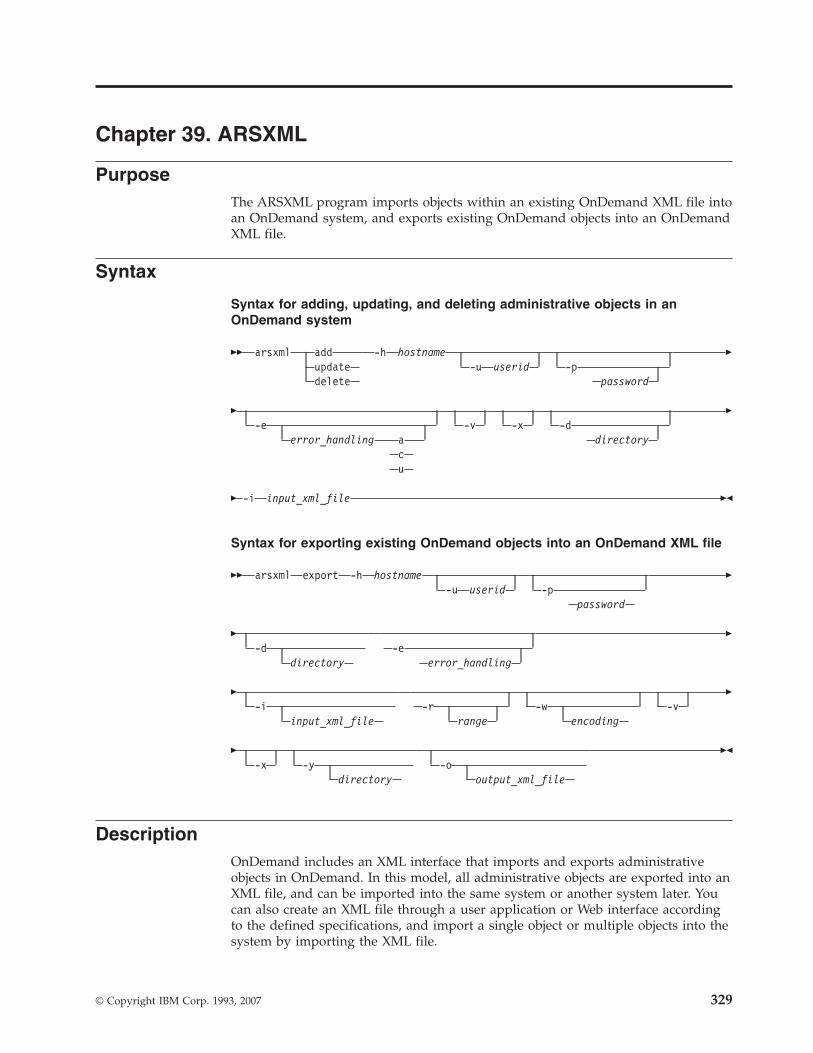
Chapter 39. ARSXML
Purpose
The ARSXML program imports objects within an existing OnDemand XML file into
an OnDemand system, and exports existing OnDemand objects into an OnDemand
XML file.
Syntax
Syntax for adding, updating, and deleting administrative objects in an
OnDemand system
�� arsxml add
update
delete
-h hostname
-u
userid
-p
password
�
� -e
error_handling
a
c
u
-v
-x
-d
directory
�
� -i input_xml_file ��
Syntax for exporting existing OnDemand objects into an OnDemand XML file
�� arsxml export -h hostname
-u
userid
-p
password
�
� -d
directory
-e
error_handling
�
� -i
input_xml_file
-r
range
-w
encoding
-v �
� -x
-y
directory
-o
output_xml_file
��
Description
OnDemand includes an XML interface that imports and exports administrative
objects in OnDemand. In this model, all administrative objects are exported into an
XML file, and can be imported into the same system or another system later. You
can also create an XML file through a user application or Web interface according
to the defined specifications, and import a single object or multiple objects into the
system by importing the XML file.
© Copyright IBM Corp. 1993, 2007 329

The data import feature allows you to import a single object, a set of defined
objects, or even an entire OnDemand system. This features enables you to
complete the following tasks:
v Update a system with newly defined objects
v Backup a complete system
v Copy a set of objects from one system to another system
The XML import file can be one of the following:
v A file which was previously created during an OnDemand export process.
v A user created XML file which conforms to the OnDemand XML schema.
Important:
1. The syntax of each OnDemand object that is supported by the import process is
specified in the OnDemand XML schema file. Each object within the XML file
must conform to the exact syntax as specified in the OnDemand XML schema
file that is shipped with the product. However, objects may appear in any order
within the body of the XML file.
2. To use the XML import function, an appropriate Java Runtime Environment
(JRE) is required.
3. The import XML file references an ondemand.xsd file, which is provided with
OnDemand. The ondemand.xsd file must reside in the same directory where the
input XML file is located, otherwise, the reference in the input XML file must
contain a full path name for the ondemand.xsd file.
4. The capitalization of the object names is important and should be used exactly
as shown in the data tables in Appendix F, “Objects and data model used in the
OnDemand XML file,” on page 383.
Parameters for ARSXML [add|update|delete]
add This is the default action. It adds all of the objects in the input
XML file into the specified OnDemand system. For objects that
contain child objects, such as a list of users or a set of permissions,
each child object that is found in the XML file is added to the
current list of objects.
update
All the fields that are specified in the input XML file are updated
for the object. For example, if the XML file contains a user with a
name of harry and a description of The New Description specified,
then only the description field of the user harry is updated. All
other fields remain unchanged.
Note: Not all fields of all objects can be updated.
For objects which contain child objects, such as a list of users or a
set of permissions, each child object that is found in the XML file
are added to the list of objects. A special attribute on each child
object can be set to delete for the cases where a member of a list
need to be removed. For example, if you want to add the user
newUser to a group, and delete the user oldUser, the following
XML code can be used during an update:
330 Administration Guide
...
<group name="MyGroup">
<user name="newUser" />
<user name="oldUser" task="delete" />
</group>
...
If you specify the name of _ALL with the task of delete, all child
objects are removed.
delete
All of the objects that are specified in the input XML file are
deleted from the system. The only attribute that is examined in the
XML file is the name attribute. While all other fields might be
present in the XML file, they are ignored. If an object is specified
with the name of _ALL, all existing objects of that type on a system
are deleted.
Child objects such as permissions and user lists cannot be removed
by using the delete action. Use the update action described above
to remove them. You are prompted for confirmation before each
object is deleted.
-h hostname Specifies the host name of the OnDemand system
-u userid The user ID is optional. If it is omitted, you are prompted for it
before the command is processed.
-p password The password is optional. If it is omitted, you are prompted for it
before the command is processed.
-e error_handling
Controls how the import process handles any OnDemand errors.
Note: XML file syntax errors and other XML specific errors are
detected by the parsing code, and no objects are processed.The error_handling parameter can take three values:
a Abort. This is the default value.
c Continue. If an error occurs due to problems in the objects
or the OnDemand system (for example, you attempt to add
an object but that object already exists, or you attempt to
delete an object that does not exist), the object that contains
the error is skipped, and the process continues. However, if
an XML parsing error occurs, ARSXML stops regardless of
whether this option is specified.
u Update. This value should only be used during an add
action.
During an add action:
Abort If an error occurs during an add, for example, there is an
invalid parameter, or the object already exists, the error is
logged, and the entire import process is stopped and no
further objects are added.
Continue
If an error occurs during an add action, the object that
contains the error is skipped and an error message is
logged, however, the import process continues.
Chapter 39. ARSXML 331

Update
If an object already exists, perform an update action
instead of an add action.
During a delete action:
Abort If an error occurs during a delete, for example, there is an
invalid object or the object does not exist, the error is
logged, and the entire delete process is stopped and no
further objects will be deleted.
Continue
If an error occurs during a delete action, the object that
contains the error is skipped and an error message is
logged, however, the delete process continues.
During an update action:
Abort If an error occurs during an update, for example, there is
an invalid parameter or the object does not exist, the error
is logged, and the entire update process is stopped and no
further items are updated.
Continue
If an error occurs during an update, the object that
contains the error is skipped and an error message is
logged, however, the update process continues.
-v Enables verbose mode, which displays all messages (informational
and error). By default, the ARSXML program displays error
messages.
-x Used to prevent prompting from occurring. If you do not use this
option, during a delete operation, you are prompted whether you
really want to complete the operation, for example:
The printer object named ’LabPrinter’ is about to be deleted.
Do you want to delete this object? (Y/N)
You need to respond with a y or Y to confirm the process. Any
other response terminates the process. If you use this option, you
do not get the prompt during an operation.
-d Use this option to specify the directory that contains the XML file.
If you do not use this parameter, the arsxml command looks for
the input XML file that is specified by the -i flag in the current
working directory where the command is run.
-i Specifies the input XML file.
Important: While importing objects, if an object references another object in its
definition but the referenced object cannot be found, and the import
command uses the -e c parameter, an error message is issued, and the
default value is used. For example, if a user is defined with a default
printer and the default printer cannot be found, the user is added with
a default printer of *NONE. If the -e c parameter is not used, the above
action will not occur.
Parameters for ARSXML export
-h hostname Specifies the host name of the OnDemand system
332 Administration Guide

-i Use to specify the input XML file. All of the objects that are
specified in the XML file are exported from the system into the
output XML file. In this case, the only attribute in the XML file that
is examined is the name attribute. While all other attributes are
present in the XML file, they are ignored. If an object is specified
with the name _ALL, all of the objects of that type defined on the
system are exported. If the -i parameter is not present, all of the
objects in the specified system are exported. However, you are
prompted to confirm whether this is what is intended, because the
export process could take a long time. You can use the -x option to
turn off the prompting.
-u userid The user ID is optional. If it is omitted, you are prompted for it
before the command is processed.
-p password The password is optional. If it is omitted, you are prompted for it
before the command is processed.
-e error_handling
Specifies what to do if an error occurs during the export process.
The error_handling parameter can take two values:
a Abort. This is the default value. The export process stops
when an error occurs.
c Continue. If an error occurs due to problems in the objects
or the OnDemand system (for example, you attempt to
export an object but that object already exists), the object
that contains the error is skipped, and the process
continues. However, if an XML parsing error occurs,
ARSXML stops regardless of whether this option is
specified.
-v Enables verbose mode, which displays all messages (informational
and error). By default, the ARSXML program displays error
messages.
-d Use this option to specify the directory for the input XML file. If
you do not use this parameter, the arsxml command looks for the
input XML file that is specified by the -i flag in the current
working directory where the command is run.
-x Used to prevent prompting from occurring. If you do not use this
option, during an export operation, you are prompted whether you
really want to complete the operation, for example:
No input file was specified.
Do you want to export all of the objects on the system? (Y/N)
You need to respond with a y or Y to confirm the process. Any
other response terminates the process. If you use this option, you
do not get the prompt during an operation.
-y Use this option to specify the directory for the output XML file. If
this option is not used, the output file that is specified by the -o
parameter is written to the current working directory where the
command is run.
-r range Use this option to specify how much data to export. The range
parameter can take four values:
Chapter 39. ARSXML 333
a When an application group is exported, all of the
applications that are contained within the application
group are exported.
d Export the specified objects and all dependent objects. If
you use this parameter, each object is examined for any
dependent objects, and those objects are exported as well.
For example, if only user groups are exported and the d
option is used for the extent, then any users that the
groups refer to are exported as well.
p Export the objects and a list of permissions for each object.
l Export the objects and any logical views that are associated
with them.
More than one range option can be specified in the command line,
in other words, the options may be combined. For example,
-r pl
If no range option is specified, then only the specified object or
objects are exported.
-w Specifies the encoding in which the resultant output XML file will
be created. The encodings that are supported are those supported
by the Xerces2 Java Parser. See
http://xml.apache.org/xerces-j/faq-general.html
for more information.
-o Used to specify the name of the output XML file. If this parameter
is not specified, the output is directed to stdout.
Examples
Example 1: Adding users
A user wants to add several users to an OnDemand system. That user has created
an XML file called newusers.xml.
To complete this task, the following command line function is called:
arsxml add -h neptune.ny.ibm.com -u admin -i newusers.xml
The file newusers.xml might look like this:
<?xml version="1.0" encoding="UTF-8"?>
<onDemand xmlns:xsi="http://www.w3.org/2001/XMLSchema-instance"
xsi:noNamespaceSchemaLocation="ondemand.xsd">
<user name="Bill" password="xxxxx" userType="User Admin"/>
<user name="Erin" password="xxxxx" userType="User"/>
<user name="Brie" password="xxxxx" userType="User"/>
</onDemand>
Example 2: Updating users
A user wants to update the telephone numbers of the users in the system. This
user created an XML file phone.xml, which contains the data for the users and their
phone numbers.
To complete this task, the following command line function is called:
334 Administration Guide
||||
||||
|
|
arsxml update -h neptune.ny.ibm.com -u admin -i phone.xml
The file phone.xml might look like this:
<?xml version="1.0" encoding="UTF-8"?>
<onDemand xmlns:xsi="http://www.w3.org/2001/XMLSchema-instance"
xsi:noNamespaceSchemaLocation="ondemand.xsd">
<user name="Bill" phone="(212) 555-0919"/>
<user name="Erin" phone="(212) 555-4295"/>
<user name="Brie" phone="(212) 555-0301"/>
</onDemand>
Example 3: Deleting printers
A user needs to delete all of the defined printers, and that user has created an
XML file printers.xml.
To complete this task, the following command line function is called:
arsxml delete -h neptune.ny.ibm.com -u admin -i printers.xml
The file printers.xml might look like this:
<?xml version="1.0" encoding="UTF-8"?>
<onDemand xmlns:xsi="http://www.w3.org/2001/XMLSchema-instance"
xsi:noNamespaceSchemaLocation="ondemand.xsd">
<printer name="_ALL"/>
</onDemand>
Example 4: Exporting multiple objects
A user wants to export the printer objects named Prz1 and Prz2. This user also
want to export the storage set named FavoriteSS. An XML file exportlist.xml has
been created, and contains the information on these objects.
To complete this task, the following command line function is called:
>arsxml export -h jupiter.ibm.com -i exportlist.xml -o output.xml
The file exportlist.xml might look like this:
<?xml version="1.0" encoding="UTF-8"?>
<onDemand xmlns:xsi="http://www.w3.org/2001/XMLSchema-instance"
xsi:noNamespaceSchemaLocation="ondemand.xsd">
<printer name="Prz1"/>
<printer name="Prz2"/>
<storageSet name="FavoriteSS"/>
</ondemand>
After the user runs the command, an output file named output.xml is created, and
contains the information for the two printers and the storage set.
Example 5: Exporting a group
A user wants to export a group named BigGroup and any users and user groups
that are referenced by it. A file named exportbiggroup.xml has been created and
looks like this:
<?xml version="1.0" encoding="UTF-8"?>
<onDemand xmlns:xsi="http://www.w3.org/2001/XMLSchema-instance"
xsi:noNamespaceSchemaLocation="ondemand.xsd">
<group name="BigGroup"/>
</ondemand>
To complete the task, the following command should be used:
>arsxml export -h jupiter.ibm.com -i exportbiggroup.xml -r d -o output.xml
Chapter 39. ARSXML 335

This command creates an XML file that contains the BigGroup object and all the
users and groups that are referenced by it. Also, any users within the referenced
groups are exported.
Example 6: Exporting all of the users
A system administrator wants to export all of the users in an OnDemand system.
A file named exportallusers.xml is created, and looks like this:
<?xml version="1.0" encoding="UTF-8"?>
<onDemand xmlns:xsi="http://www.w3.org/2001/XMLSchema-instance"
xsi="noNamespaceSchemaLocation="ondemand.xsd">
<user name="_ALL"/>
</ondemand>
To complete the task, the following command should be used:
arsxml export -h jupiter.ibm.com -i exportallusers.xml -o users.xml
This command creates an XML file users.xml that contains the information on all
of the users that are defined on the specified system.
336 Administration Guide

Appendix A. Mastering CDs from the OnDemand client
You can extract data from an OnDemand server, transfer the documents to a
staging driver, and then use a CD-ROM authoring software to burn the staging
drive to a CDR.
When you use the CD-ROM mastering option, selected data is transferred from the
server to the client, and then to a staging drive on the client PC. The data transfer
is repeated for additional folders if necessary.
Prerequisite: You need to activate the client data distribution for the CD-ROM
mastering option to be available in the OnDemand client.
Activating the client data distribution for the CD-ROM mastering option
To activate the client data distribution, copy arsmstr.ini from the OnDemand
server or from the temporary installation directory that is created by arssetup. You
can download arsmstr.ini from /usr/lpp/ars/client/windows/win32/ars32 or
copy from Odwin32.zip\ars32, and copy the file to x:\program
files\ibm\ondemand32\arsmstr.ini.DLL and DFN files are handled by arssetup.
After all the files are in their correct locations, the CD-ROM mastering option is
available in the OnDemand client on the File menu.
Mastering CDs from the OnDemand client is a two-step process:
1. Transfer documents from an OnDemand server to a staging drive.
2. Burn the CD image to the CD-ROM
Transferring documents from an OnDemand server to a staging drive
Follow these steps to use the CD-ROM mastering option:
1. Launch the OnDemand client, and select File —> Set CD-ROM Mastering
Options. The Set CD-ROM Mastering Options window opens.
2. Under CD-ROM User, enter your user ID and password to the CD-ROM, which
is an OnDemand server. The default user ID and password are both cdrom.
Optional: select the staging drive. By default, the staging drive is d:.
Important:
v If the Exclude Notes check box is checked, public exportable
annotations are not copied even if they are present.
v Only local hard drives are available as staging drives.
v You cannot select more than 1 copy.3. Click OK. The CD-ROM Mastering option becomes active on the File menu.
4. After you run a search and get a list of documents, select File —> CD-ROM
Mastering.... The CD-ROM Mastering window opens.
Important:
v The CD-ROM Mastering option is only available when a search
results list is displayed. If a document in the list is being viewed,
the CD-ROM Mastering option is grayed out.
© Copyright IBM Corp. 1993, 2007 337
|||
5. In the CD-ROM Mastering window, select the folder that you want to add to
CD-ROM. Your current folder is automatically selected, and you can select
alternate folders from the drop-down list. Provide a description in the CD-ROM
folder description field. This description is required, and will be saved in the
drop-down list for user in other mastering sessions. You can update the
CD-ROM mastering options by choosing the Set Options button.
Important:
v To transfer the documents to a staging drive, you must keep the
search results list on the screen. Only one folder can be staged at
a time.
v All items in the search results list will be placed on the CD-ROM.
Click OK after you set the options. The CD-ROM mastering process starts. You
should be able to see the a window with five options in it:
Clean Removes all files on the stage drive
Setup Creates the necessary directory structures on the staging drive
Fetch Retrieves the data and resources for the items in the hit list
Index Re-indexes the retrieved data for the CD-ROM
Stage Copies the CD-ROM installation files and the OnDemand GUI (along
with any installed languages) to the staging drive6. After the CD-ROM mastering process finishes, you receive this message:
Do you wish to add another folder?
Click No to finish the process. Click Yes to return to the previous screen to
select another folder.
After the CD-ROM image is completed, OnDemand writes an entry into the
system log indicating the contents of the CD-ROM image. This log entry contains
the user ID, password, and a complete listing of all the hits that are included in the
image. The following is an example system log:
CD-ROM Volume AOD00000094
Produced on Saturday, August 22, 1998 at 14:50:41 MDT by CJLEWIS
COPIES 0
USER cdrom
PASSWORD cdrom
FOLDER Customer Information - Testing...
Account Customer Name Document Date
------------------------------------------------------------------------------
000-000-152 A & T PIANO Customer Letters 11/15/94
000-000-152 A & T PIANO Credit Card Statement 10/20/94
000-000-152 A & T PIANO Customer Reports 11/30/94
000-000-152 A & T PIANO Company Letters 11/21/94
000-000-152 A & T PIANO Company Letters - PDF 11/15/94
Burning the CD image to the CD-ROM
Use a CD-ROM authoring software to burn the staging drive to a CDR. The
staging drive is as specified in the arsmstr32.ini. Popular CD-ROM authoring
software includes Roxio Ez-CD Creator, Nero, and Stomp.
338 Administration Guide
|
|||

Important: Any issue from burning the staging drive to CD is not supported by
IBM.
Appendix A. Mastering CDs from the OnDemand client 339
||

340 Administration Guide

Appendix B. Accessibility features
This product includes a number of features that make it more accessible for people
with disabilities. These features include:
v The ability to operate all features using the keyboard instead of the mouse.
v Support for enhanced display properties
v Options for audio and visual alert cues
v Compatibility with assistive technologies
v Compatibility with operating system accessibility features
v Accessible documentation formats
Keyboard input and navigation
Keyboard input
The OnDemand clients can be operated using only the keyboard. Menu items and
controls provide access keys that allow users to activate a control or select a menu
item directly from the keyboard. These keys are self-documenting, in that the
access keys are underlined on the control or menu where they appear.
Keyboard focus
In Windows-based systems, the position of the keyboard focus is highlighted,
indicating which area of the window is active and where the user’s keystrokes will
have an effect.
Features for accessible display
The clients have a number of features that enhance the user interface and improve
accessibility for users with low vision. These enhancements include support for
high-contrast settings and customizable font properties.
High-contrast mode
The clients support the high-contrast-mode option that is provided by the
operating system. This feature assists users who require a higher degree of contrast
between background and foreground colors.
Font settings
In Windows-based systems, you can specify display settings that determine the
color, size, and font for the text in menus and dialog windows. The client allows
you to select the font for the document list.
Non-dependence on color
You do not need to distinguish between colors in order to use any function of this
product.
Alternative alert cues
In Windows-based systems, the SoundSentry feature can be used to provide visual
feedback for general application and system alerts such as warning beeps.
© Copyright IBM Corp. 1993, 2007 341
Compatibility with assistive technologies
The clients are compatible with screen reader applications such as Narrator and
Via Voice. The clients have properties required for these accessibility applications
to make onscreen information available to visually impaired users.
Accessible documentation
Documentation for the OnDemand product is available in HTML format. This
allows users to view documentation according to the display preferences set in
their browsers. It also allows the use of screen readers and other assistive
technologies.
342 Administration Guide
Appendix C. ARSSOCKD stop command
IBM provides a command to stop the server process on UNIX® servers. The syntax
is:
arssockd stop instance
Where instance is the name of the OnDemand instance to stop. Instance names are
listed in the ARS.INI file. The default instance name is archive.
Notes:
1. When you stop the server process, all users who are connected over the
network to the OnDemand system are disconnected. Therefore, it is a good idea
to warn connected users before stopping the server process.
2. The ARSSOCKD STOP command is for UNIX servers only. For Windows
servers, the server process runs as a service. The service can be stopped by
using the Services administrative tool in Windows or the OnDemand
configurator client.
© Copyright IBM Corp. 1993, 2007 343

344 Administration Guide
Appendix D. Monitoring servers
Errors and alerts
OnDemand errors and alerts
During normal processing, the OnDemand programs generate messages.
OnDemand saves the messages in the system log and sends a copy of each
message to the system log user exit point. OnDemand assigns a severity to each
message. For Windows servers, messages that are assigned a severity of alert or
error are also sent to the Event Log. When a user runs a query that requires a table
of index data that has been migrated to archive storage, OnDemand sends a
message to /dev/console (UNIX servers) or the Event Log (Windows servers).
OnDemand provides the system logging facility and a message reference to help
you identify and resolve any alerts and errors that you may receive. You can open
the System Log folder to display the messages that are saved in the system log. See
“System logging facility” on page 346 for more information. The IBM DB2 Content
Manager OnDemand: Messages and Codes is the message reference and contains
troubleshooting information for the messages that may be generated by the
OnDemand programs.
Related software errors and alerts
For help with error messages issued by the software products that you may be
using with OnDemand, see the following publications for a listing of error
messages and associated articles:
v DB2 Messages Reference
v Infoprint Administrator’s Reference
v Oracle Administrator’s Guide
v SQL Server Administrator’s Companion
v Tivoli Storage Manager Messages
Windows server errors and alerts
Windows records events in three kinds of logs:
v A system log that contains events logged by the Windows system components
v A security log that contains information about logon attempts
v An application log that contains events logged by programs such as DB2,
OnDemand, and Tivoli Storage Manager
You can use the Event Viewer program to troubleshoot various hardware and
software problems, monitor security events, and archive the logs in various
formats.
For more information about Windows server events, see the Messages Database
Help on the Resource Kit compact disc.
© Copyright IBM Corp. 1993, 2007 345

System logging facility
OnDemand provides a logging facility to help administrators track OnDemand
activity and monitor the system. When you enable logging for system events, user
events, and application group events, OnDemand stores the messages that are
generated by the various OnDemand programs in the system log. You can use one
of the OnDemand client programs to search for and filter messages by time stamp,
severity, message number, and user name.
Note: Before you start OnDemand for the first time, you must initialize the system
logging facility. See IBM DB2 Content Manager OnDemand for Multiplatforms:
Installation and Configuration Guide for information about initializing the
system logging facility.
Searching for and viewing messages
To search for and view the messages that are stored in the system logging facility,
log on to OnDemand with an OnDemand client program and open the System Log
folder. Enter search criteria in one or more of the search fields. When you choose
the Search command, OnDemand retrieves the messages from the database that
match the search criteria that you specified.
You can specify a date and time value to search for and retrieve messages. You can
also specify other search criteria, such as:
Log Id Each time that a client logs on to the server, OnDemand assigns a
transaction number to that instance of the client program. All
messages that are generated by that instance of the client program
include the same Log Id.
Userid The OnDemand userid
Severity OnDemand assigns a severity to each message: Alert, Error,
Warning, Info, and Debug
View Depending on the type of message in the system log, you may be
able to view other information that is related to or associated with
the message. For example:
v You can display the message log that was generated during a
load process by selecting an ARSLOAD message and then
choosing the View all Selected command.
While most processes do not generate other information that can
be stored in the system log, you could provide a user-written
program to process the messages and generate your own
information about the events. For example, you could provide a
user-written program to generate a report that lists the number
of users that are logged on to the system in thirty minute
increments. OnDemand provides a system log user exit point so
that you can process any message that is stored in the system
log and take the action that you require. See IBM DB2 Content
Manager OnDemand for Multiplatforms: Installation and
Configuration Guide for more information about the system log
user exit.
v Other messages in the system log do not provide additional
records or other data associated with an event. For example, the
Logon and Logoff events each generate a single message, with
no additional information that you can view.
346 Administration Guide
Msg Num The message number that is assigned by OnDemand
Message The text of the message that OnDemand uses to restrict a search.
For example, if you type Login, OnDemand searches for and
displays the messages issued by the Logon to a Server command.
System log user exit
When you enable logging for system, user, and application group events,
OnDemand sends a copy of each message that is generated by the system to the
system log user exit program. The system log user exit program on UNIX servers
is named arslog and resides in the OnDemand executable directory (bin). The
system log user exit program on Windows servers is named ARSLOG.BAT.
The system log user exit program that is provided by IBM does not perform any
functions. However, you can replace the program that is provided by IBM with a
user-written program that does user-defined processing. For example, you could
provide a user-written program to check for certain message numbers or severity,
and take whatever action you deem appropriate.
You configure the system to send messages to the system log user exit by selecting
User Exit Logging options from the System Parameters dialog box. See the online
help for the administrative client for more information about the User Exit Logging
options on the System Parameters dialog box.
See IBM DB2 Content Manager OnDemand for Multiplatforms: Installation and
Configuration Guide for more information about the system log user exit.
Sample ARSLOG user exit script for UNIX
Figure 62 shows the sample ARSLOG user exit script for UNIX that is provided by
IBM.
# $1 - OnDemand Instance Name
# $2 - Time Stamp
# $3 - Log Identifier
# $4 - Userid
# $5 - Account
# $6 - Severity
# $7 - Message Number
# $8 - Message Text
# $9 - Document File
#
echo "$@" >> ${ARS_TMP}/syslog.log
if [ -n "$9" ];then
if [ -f "$9" ];then
print "Copy log doc $9\n" >> ${ARS_TMP}/syslog.log
cp $9 /tmp/syslogdocs/$(basename $9).doc 2>> ${ARS_TMP}/syslog.log
else
print "$9 does not exist\n" >> ${ARS_TMP}/syslog.log
fi
fi
exit 0
Figure 62. Sample ARSLOG user exit script for UNIX
Appendix D. Monitoring servers 347

Sample ARSLOG user exit batch file for Windows
Figure 63 shows the sample ARSLOG user exit batch file for Windows that is
provided by IBM.
Monitoring users
The OnDemand server generates system log messages to help you track the
number of users that are logged on to the server:
v OnDemand stores message number 201 in the system log every thirty minutes.
This message contains the current number of users that are logged on to the
server.
v OnDemand stores message number 202 in the system log every time that the
number of concurrent users exceeds the previous maximum number of
concurrent users. The number of concurrent users is reset each time that you
restart the OnDemand server processes.
Reviewing a CD-ROM creation manifest
You can open the System Log folder to review a manifest created by the
OnDemand ad-hoc CD mastering software. A CD creation manifest contains a
cover page with control information about the CD and one or more pages that list
the items retrieved from the database and written on the CD.
To review a CD creation manifest:
1. Log on to OnDemand with an OnDemand client program and open the System
Log folder.
2. Type CD in the Message field.
Note: If you know the CD volume number of the manifest that you want to
review, enter the number in the Message field. For example, you can
enter %171 in the Message field to locate the manifest for volume
number AOD00000171.
3. Specify a date. For example:
v If you want to display a manifest for a particular date, then select the Equal
operator for the Time Stamp search field and enter the date in the Time
Stamp field.
v If you want to display the manifests that were created during a range of
dates or you do not know the exact date on which a particular manifest was
REM %1 - OnDemand Instance Name
REM %2 - Time Stamp
REM %3 - Log Identifier
REM %4 - Userid
REM %5 - Account
REM %6 - Severity
REM %7 - Message Number
REM %8 - Message Text
REM %9 - Document File
REM
ECHO %1 %2 %3 %4 %5 %6 %7 %8 %9>%ARS_TMP%\System.log
REM make sure the %ARS_TMP%\Syslog directory exists
IF EXIST %9 COPY %9 %ARS_TMP%\Syslog
EXIT
Figure 63. Sample ARSLOG user exit batch file for Windows
348 Administration Guide

created, select the Between operator for the Time Stamp search field and
enter a date range in the Time Stamp fields.4. Choose Search. OnDemand displays the manifests that match the search
criteria that you specified.
5. Review a manifest by selecting an item from the list and choosing the View All
Selected command.
6. Use the Next Page and Previous Page commands to scroll through the manifest.
Monitoring performance
You should monitor server resources on a regular schedule. The following
resources often have the most impact on server performance:
v Memory. The lack of adequate RAM results in excess paging. In general, the
more RAM and cache, the better your system will perform.
v Processor. The type of processor and the number of processors affects the overall
performance of the system. OnDemand supports symmetric multiprocessing so
that if a system has multiple applications running concurrently, or applications
that are multithreaded, the overall processor power is shared.
v Disk subsystem. Free space, fragmented files, and high transfer rates affect the
performance of the database manager and the storage manager. Lack of
adequate RAM, resulting in excess paging, can cause a disk subsystem to
become very busy. In addition, the type and number of disk controllers affects
the overall system responsiveness when responding to reads and writes to disk
drives.
v Network subsystem. High transfer rates and otherwise overloaded networks
reflect badly on client/server applications. Network I/O is the resource that
most affects the performance of TCP/IP.
You can also monitor applications, such as DB2 and Tivoli Storage Manager.
You can choose to monitor snapshots or events. Snapshots allow you to capture
point-in-time information at specified intervals. Events allow you to record
information over the duration of an event, such as a connection to the database.
As part of the initial setup of your system, IBM recommends that you create a
measurement baseline of information for use in analyzing system performance.
This is important because to determine if a resource is being overused, under used,
or is at maximum capacity and performance, you need to identify what is normal.
You can also use this information to set expectations of system performance for
users.
Automating the collection of server data is essential to control the amount of data
collected and to facilitate its analysis. You can use tools provided with the
operating system, such as Performance Monitor and Network Monitor on
Windows servers, to automatically capture server data during specified periods
and then store the data in a database.
Finally, you should establish and implement a plan for long-term record keeping
and long-term trend analysis. If you store server performance data in a database,
you can use tools such as a spreadsheet to analyze the data and generate charts
and create reports.
For Windows servers, Performance Monitor is the tool most often used to monitor
server performance. Performance Monitor performs data collection and analysis.
Performance Monitor uses objects and counters to associate statistical information
Appendix D. Monitoring servers 349
with monitored components. For OnDemand server analysis, IBM recommends
that you collect information about the following objects:
v System
v Processor
v Memory
v Logical disk
v Physical disk (if using RAID)
v Server
v Cache
v Network adapter
v Database (DB2, Oracle, and SQL Server provide Performance Monitor objects
and counters)
For more information about Performance Monitor, see your Windows operating
system documentation.
350 Administration Guide

Appendix E. System control tables
This section contains a description of each OnDemand system table, including
column names and data types. This section also contains a description of the
application group data tables (also known as dynamic tables).
The system tables are created when the OnDemand database is created by using
the ARSDB program. The system tables are updated during normal operation in
response to dynamic SQL statements.
Warning: The OnDemand system tables should not be modified or queried
directly. Doing so may effect the operation or performance of the system.
The system tables are subject to change in future versions of OnDemand.
List of tables
“Application group table (ARSAG)” on page 352
“Field mapping table (ARSAG2FOL)” on page 353
“Application group field table (ARSAGFLD)” on page 354
“Application group field alias table (ARSAGFLDALIAS)” on page 355
“Composite index table (ARSAGINDEX)” on page 355
“Application group permissions table (ARSAGPERMS)” on page 356
“Annotation table (ARSANN)” on page 358
“Application table (ARSAPP)” on page 359
“User logical views table (ARSAPPUSR)” on page 360
“Cabinet table (ARSCAB)” on page 356
“Cabinet to folder mapping table (ARSCAB2FOL)” on page 356
“Cabinet permissions table (ARSCABPERMS)” on page 357
“Folder table (ARSFOL)” on page 361
“Folder field table (ARSFOLFLD)” on page 362
“Folder user fields table (ARSFOLFLDUSR)” on page 363
“Folder permissions table (ARSFOLPERMS)” on page 365
“Group table (ARSGROUP)” on page 366
“Load table (ARSLOAD)” on page 367
“Named query table (ARSNAMEQ)” on page 368
“Node table (ARSNODE)” on page 369
“Printer table (ARSPRT)” on page 370
“Printer options table (ARSPRTOPTS)” on page 371
“Printer user table (ARSPRTUSR)” on page 372
“Resources table (ARSRES)” on page 373
“Segment table (ARSSEG)” on page 374
“Storage set table (ARSSET)” on page 376
“System parameters table (ARSSYS)” on page 377
“User table (ARSUSER)” on page 378
“Users in groups table (ARSUSRGRP)” on page 380
“User group ID table (ARSUSRGRPID)” on page 381
“Application group data table” on page 382
© Copyright IBM Corp. 1993, 2007 351
|
|||

Application group table (ARSAG)
This table maintains a catalog of application groups.
Table 13. Application group table (ARSAG)
Column Name Data Type Description
name VARCHAR(60) Application group name
description VARCHAR(120) Application group
description
agid INTEGER Application group identifier
agid_name VARCHAR(8) Application group internal
identifier
db_seg CHAR(1) FOR BIT DATA Segment type (Database
Organization)
ann_type CHAR(1) FOR BIT DATA Annotation update
database_name VARCHAR(8) Internal database alias name
db_exp_date INTEGER Expire database indexes
db_mgrt_date INTEGER Migrate database indexes
sm_cache_doc INTEGER Storage manager cache
definition
resgrp INTEGER Resource group identifier
load_id INTEGER Load Id counter
log INTEGER Log mask
load_id_suffix VARCHAR(8) Load Id suffix
mgrt_cache_date INTEGER Copy cache to archive storage
reimport_exp_date INTEGER Number of days to keep
imported table before
re-expiring
sid INTEGER Storage set identifier
sm_cache_delta INTEGER Delta value of the expiration
(number of days) of cached
data
expire_type CHAR(1) FOR BIT DATA Expiration type
seg_rows INTEGER Rows per segment
(Maximum Rows)
seg_id INTEGER Segment Id counter
obj_size INTEGER Size of storage object
type SMALLINT Type of application group
(Data Management; Create
Tablespace Type)
upd_userid VARCHAR(128) Last user to update the
application group
upd_date BIGINT (DB2, SQL Server)INTEGER (Oracle)
Date and time application
group was last updated
last_doc_date BIGINT (DB2, SQL Server)INTEGER (Oracle)
Migrate last document date
migr_srvr_str VARCHAR(254) Migrate server string
352 Administration Guide
|
|
Table 14. Indexes for application group table (ARSAG)
Index Cluster Index Unique Index
Unique Cluster
Index
Columns
Included with
Index
N/A N/A 1. name
2. agid
N/A N/A
Field mapping table (ARSAG2FOL)
This table maintains a catalog of mappings between application group fields and
folder fields. This table also contains a catalog of applications within application
groups that can be queried from a folder.
Table 15. Field mapping table (ARSAG2FOL)
Column Name Data Type Description
fid INTEGER Folder identifier
agid INTEGER Application group identifier
aid INTEGER Application within the
application group
folder_field SMALLINT Folder field identifier
appgrp_field1 SMALLINT Application group field
identifier
appgrp_field2 SMALLINT Application group field
identifier
Table 16. Indexes for field mapping table (ARSAG2FOL)
Index Cluster Index
Unique Index
(Oracle, SQL
Server)
Unique Cluster
Index (DB2)
Columns
Included with
Index (DB2)
N/A N/A fid, agid, aid,
folder_field
fid, agid, aid,
folder_field
appgrp_field1,
appgrp_field2
Appendix E. System control tables 353
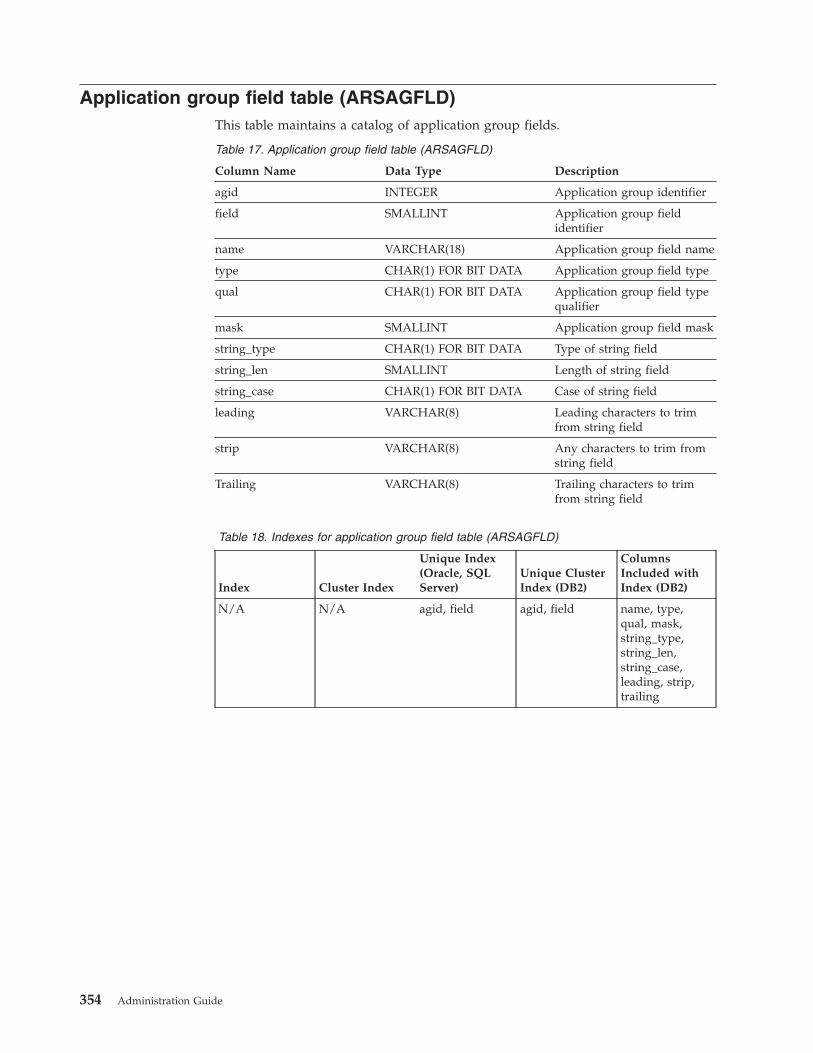
Application group field table (ARSAGFLD)
This table maintains a catalog of application group fields.
Table 17. Application group field table (ARSAGFLD)
Column Name Data Type Description
agid INTEGER Application group identifier
field SMALLINT Application group field
identifier
name VARCHAR(18) Application group field name
type CHAR(1) FOR BIT DATA Application group field type
qual CHAR(1) FOR BIT DATA Application group field type
qualifier
mask SMALLINT Application group field mask
string_type CHAR(1) FOR BIT DATA Type of string field
string_len SMALLINT Length of string field
string_case CHAR(1) FOR BIT DATA Case of string field
leading VARCHAR(8) Leading characters to trim
from string field
strip VARCHAR(8) Any characters to trim from
string field
Trailing VARCHAR(8) Trailing characters to trim
from string field
Table 18. Indexes for application group field table (ARSAGFLD)
Index Cluster Index
Unique Index
(Oracle, SQL
Server)
Unique Cluster
Index (DB2)
Columns
Included with
Index (DB2)
N/A N/A agid, field agid, field name, type,
qual, mask,
string_type,
string_len,
string_case,
leading, strip,
trailing
354 Administration Guide

Application group field alias table (ARSAGFLDALIAS)
This table maintains a catalog of application group field aliases (Database values
and Displayed values).
Table 19. Application group field alias table (ARSAGFLDALIAS)
Column Name Data Type Description
agid INTEGER Application group identifier
field SMALLINT Application group field
identifier
internal VARCHAR(254) Internal (Database) value
external VARCHAR(254) External (Displayed) value
Table 20. Indexes for application group field alias table (ARSAGFLDALIAS)
Index Cluster Index
Unique Index
(Oracle, SQL
Server)
Unique Cluster
Index (DB2)
Columns
Included with
Index
N/A N/A agid, field agid, field N/A
Composite index table (ARSAGINDEX)
This table maintains application group composite indexes on application group
fields.
Table 21. Composite index table (ARSAGINDEX)
Column Name Data Type Description
agid INTEGER Application group identifier
iid SMALLINT Index identifier
type INTEGER Application group identifier
sort_order SMALLINT Specifies the order of the
application group fields
ag_fld SMALLINT Application group field
identifier
sort_type CHAR(1) FOR BIT DATA Specifies that index entries
should be kept in ascending
or descending order of the
column values
Appendix E. System control tables 355
|
||
||
|||
|||
|||
|||
||||
||||
||||||||

Application group permissions table (ARSAGPERMS)
This table maintains permissions specifications for application groups. Each row
contains two primary elements: who (id) and what (agid) and specifies the user’s
authority for the application group, the user’s document and annotation
permissions, and a query restriction, if any.
Table 22. Application group permissions table (ARSAGPERMS)
Column Name Data Type Description
id INTEGER User identifier
agid INTEGER Application group identifier
id_perms SMALLINT User authority for the
application group
doc_perms SMALLINT Document permissions
ann_perms SMALLINT Annotation permissions
q_restrict LONG VARCHAR Query restriction;
user-defined and validated
SQL string
Table 23. Indexes for application group permissions table (ARSAGPERMS)
Index Cluster Index
Unique Index
(Oracle, SQL
Server)
Unique Cluster
Index (DB2)
Columns
Included with
Index
N/A N/A agid, id agid, id N/A
Cabinet table (ARSCAB)
This table maintains a catalog of cabinet definitions.
Table 24. Cabinet table (ARSCAB)
Column Name Data Type Description
name VARCHAR(60) Cabinet name
description VARCHAR(120) Cabinet description
cid INTEGER Cabinet identifier
upd_userid VARCHAR(128) Userid of last user to update
the cabinet
upd_date BIGINT Date and time cabinet was
last updated
Cabinet to folder mapping table (ARSCAB2FOL)
This table maintains a catalog of mappings between cabinets and folders.
Table 25. Cabinet to folder mapping table (ARSCAB2FOL)
Column Name Data Type Description
cid INTEGER Cabinet identifier
fid INTEGER Folder identifier
356 Administration Guide
|
|
||
|||
|||
|||
|||
||||
|||||
||
|
||
|||
|||
||||
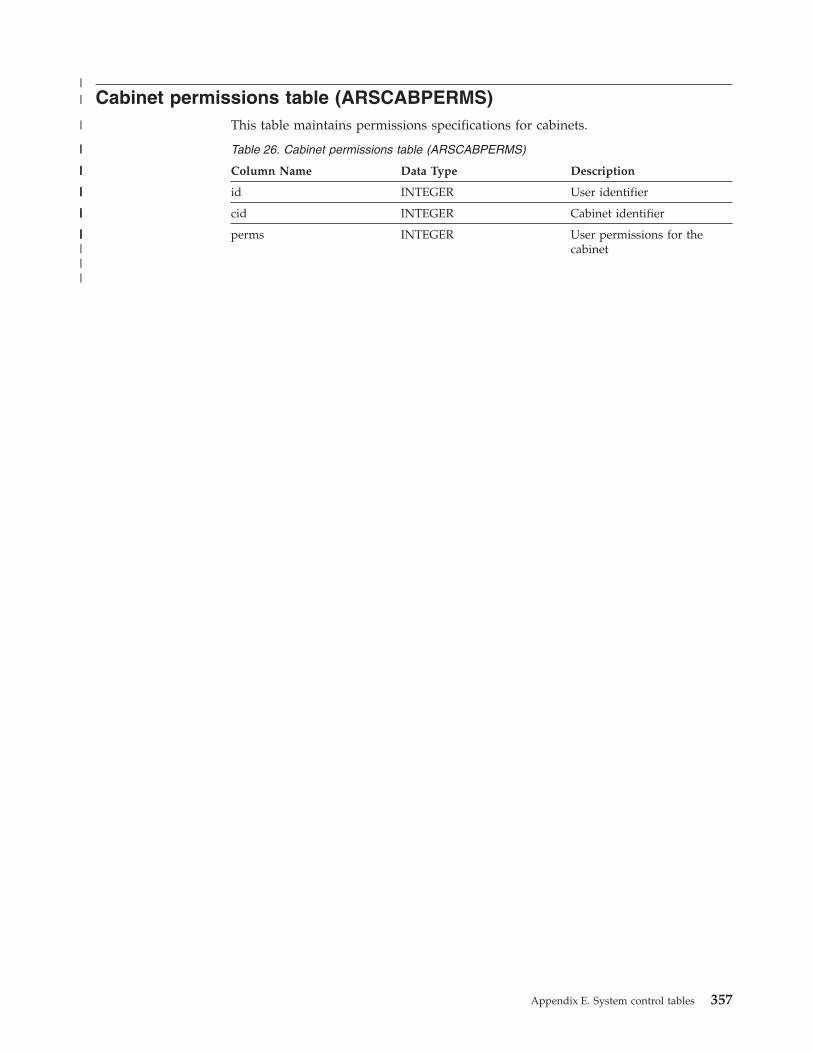
Cabinet permissions table (ARSCABPERMS)
This table maintains permissions specifications for cabinets.
Table 26. Cabinet permissions table (ARSCABPERMS)
Column Name Data Type Description
id INTEGER User identifier
cid INTEGER Cabinet identifier
perms INTEGER User permissions for the
cabinet
Appendix E. System control tables 357
||
|
||
|||
|||
|||
||||||
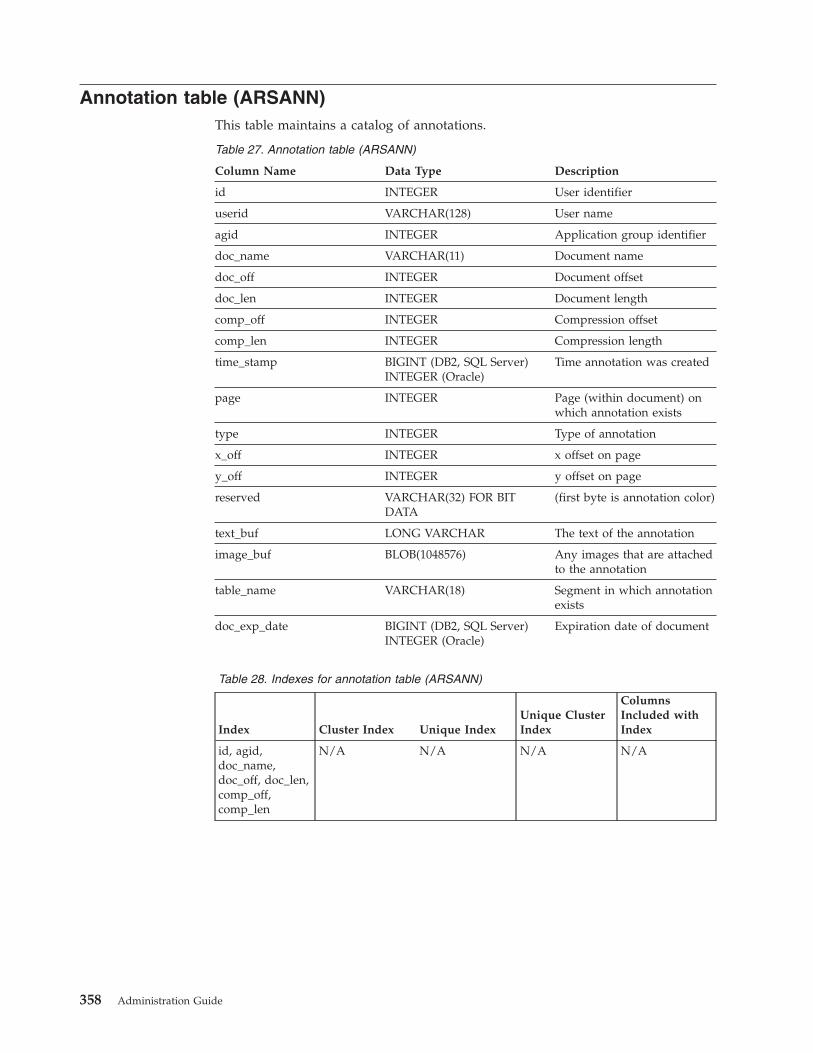
Annotation table (ARSANN)
This table maintains a catalog of annotations.
Table 27. Annotation table (ARSANN)
Column Name Data Type Description
id INTEGER User identifier
userid VARCHAR(128) User name
agid INTEGER Application group identifier
doc_name VARCHAR(11) Document name
doc_off INTEGER Document offset
doc_len INTEGER Document length
comp_off INTEGER Compression offset
comp_len INTEGER Compression length
time_stamp BIGINT (DB2, SQL Server)INTEGER (Oracle)
Time annotation was created
page INTEGER Page (within document) on
which annotation exists
type INTEGER Type of annotation
x_off INTEGER x offset on page
y_off INTEGER y offset on page
reserved VARCHAR(32) FOR BIT
DATA
(first byte is annotation color)
text_buf LONG VARCHAR The text of the annotation
image_buf BLOB(1048576) Any images that are attached
to the annotation
table_name VARCHAR(18) Segment in which annotation
exists
doc_exp_date BIGINT (DB2, SQL Server)INTEGER (Oracle)
Expiration date of document
Table 28. Indexes for annotation table (ARSANN)
Index Cluster Index Unique Index
Unique Cluster
Index
Columns
Included with
Index
id, agid,
doc_name,
doc_off, doc_len,
comp_off,
comp_len
N/A N/A N/A N/A
358 Administration Guide

Application table (ARSAPP)
This table maintains a catalog of applications.
Table 29. Application table (ARSAPP)
Column Name Data Type Description
name VARCHAR(60) Application name
description VARCHAR(120) Application description
agid INTEGER Application group identifier
aid INTEGER Application identifier
db_exp_date INTEGER Expiration date
doc_type CHAR(1) FOR BIT DATA Document type
doc_comp_type CHAR(1) FOR BIT DATA Default document
compression type
res_comp_type CHAR(1) FOR BIT DATA Default resource compression
type
idx_type CHAR(1) FOR BIT DATA Indexer
comp_obj_size INTEGER Compressed object size
pid INTEGER Default printer identifier
alias VARCHAR(254) Application identifier within
application group
fixed_view LONG VARCHAR Default and fixed logical
view information
indexer LONG VARCHAR Indexing parameters
preprocessor LONG VARCHAR Parameters used to
preprocess rows before
loading
upd_userid VARCHAR(128) Userid of last user to update
application
upd_date BIGINT (DB2, SQL Server)INTEGER (Oracle)
Date and time application
was last updated
Table 30. Indexes for application table (ARSAPP)
Index Cluster Index
Unique Index
(Oracle, SQL
Server)
Unique Cluster
Index (DB2)
Columns
Included with
Index
N/A N/A agid, aid, name agid, aid, name N/A
Appendix E. System control tables 359
|

User logical views table (ARSAPPUSR)
This table maintains a catalog of logical views.
Table 31. User logical views table (ARSAPPUSR)
Column Name Data Type Description
agid INTEGER Application group identifier
aid INTEGER Application identifier
id INTEGER User identifier
user_view LONG VARCHAR Logical view information
Table 32. Indexes for user logical views table (ARSAPPUSR)
Index Cluster Index
Unique Index
(Oracle, SQL
Server)
Unique Cluster
Index (DB2)
Columns
Included with
Index
N/A N/A agid, aid, id agid, aid, id N/A
360 Administration Guide

Folder table (ARSFOL)
This table maintains a catalog of folders.
Table 33. Folder table (ARSFOL)
Column Name Data Type Description
name VARCHAR(60) Folder name
description VARCHAR(120) Folder description
fid INTEGER Folder identifier
ann_search CHAR(1) FOR BIT DATA Annotation display
upd_userid VARCHAR(128) Userid of last user to update
folder
upd_date BIGINT (DB2, SQL Server)INTEGER (Oracle)
Date and time folder was last
updated
Table 34. Indexes for folder table (ARSFOL)
Index Cluster Index
Unique Index
(Oracle, SQL
Server)
Unique Cluster
Index (DB2)
Columns
Included with
Index (DB2)
N/A N/A name fid name,
description,
ann_search,
upd_userid,
upd_date
Appendix E. System control tables 361

Folder field table (ARSFOLFLD)
This table maintains a catalog of folder fields.
Table 35. Folder field table (ARSFOLFLD)
Column Name Data Type Description
fid INTEGER Folder identifier
field SMALLINT Folder field identifier
name VARCHAR(60) Folder field name
description VARCHAR(120) Folder field description
type CHAR(1) FOR BIT DATA Folder field type
qual CHAR(1) FOR BIT DATA Folder field type qualifier
map_type SMALLINT Type of field mapping
Table 36. Indexes for folder field table (ARSFOLFLD)
Index Cluster Index
Unique Index
(Oracle, SQL
Server)
Unique Cluster
Index (DB2)
Columns
Included with
Index (DB2)
N/A N/A fid, field fid, field name,
description,
type, qual,
map_type
362 Administration Guide
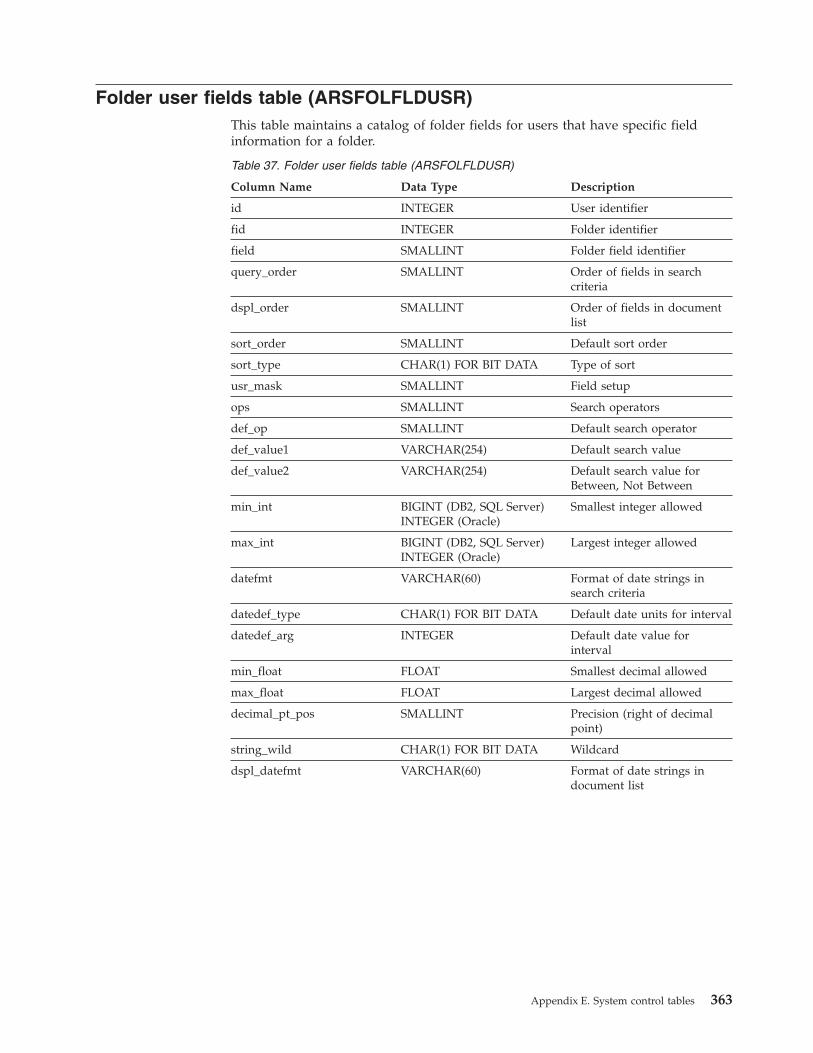
Folder user fields table (ARSFOLFLDUSR)
This table maintains a catalog of folder fields for users that have specific field
information for a folder.
Table 37. Folder user fields table (ARSFOLFLDUSR)
Column Name Data Type Description
id INTEGER User identifier
fid INTEGER Folder identifier
field SMALLINT Folder field identifier
query_order SMALLINT Order of fields in search
criteria
dspl_order SMALLINT Order of fields in document
list
sort_order SMALLINT Default sort order
sort_type CHAR(1) FOR BIT DATA Type of sort
usr_mask SMALLINT Field setup
ops SMALLINT Search operators
def_op SMALLINT Default search operator
def_value1 VARCHAR(254) Default search value
def_value2 VARCHAR(254) Default search value for
Between, Not Between
min_int BIGINT (DB2, SQL Server)INTEGER (Oracle)
Smallest integer allowed
max_int BIGINT (DB2, SQL Server)INTEGER (Oracle)
Largest integer allowed
datefmt VARCHAR(60) Format of date strings in
search criteria
datedef_type CHAR(1) FOR BIT DATA Default date units for interval
datedef_arg INTEGER Default date value for
interval
min_float FLOAT Smallest decimal allowed
max_float FLOAT Largest decimal allowed
decimal_pt_pos SMALLINT Precision (right of decimal
point)
string_wild CHAR(1) FOR BIT DATA Wildcard
dspl_datefmt VARCHAR(60) Format of date strings in
document list
Appendix E. System control tables 363

Table 38. Indexes for folder user fields table (ARSFOLFLDUSR)
Index Cluster Index
Unique Index
(Oracle, SQL
Server)
Unique Cluster
Index (DB2)
Columns
Included with
Index (DB2)
N/A N/A fid, id, field fid, id, field query_order,
dspl_order,
sort_order,
sort_type,
usr_mask, ops,
def_op
364 Administration Guide

Folder permissions table (ARSFOLPERMS)
This table maintains permissions specifications for folders. Each row contains two
primary elements: the user (id) and the folder (fid) and specifies the user’s
authority for the folder, fields, and named queries.
Table 39. Folder permissions table (ARSFOLPERMS)
Column Name Data Type Description
id INTEGER User identifier
fid INTEGER Folder identifier
perms SMALLINT User permissions for the
folder
hits INTEGER Maximum hits returned from
a query
Table 40. Indexes for folder permissions table (ARSFOLPERMS)
Index Cluster Index
Unique Index
(Oracle, SQL
Server)
Unique Cluster
Index (DB2)
Columns
Included with
Index (DB2)
N/A N/A fid, id fid, id perms, hits
Appendix E. System control tables 365

Group table (ARSGROUP)
This table maintains a catalog of groups.
Table 41. Group table (ARSGROUP)
Column Name Data Type Description
gid INTEGER Group identifier
id INTEGER Owner of the group; can be a
user or a group
name VARCHAR(128) Name of group
description VARCHAR(120) Group description
upd_userid VARCHAR(128) Userid of last user to update
group
upd_date BIGINT (DB2, SQL Server)INTEGER (Oracle)
Date and time group was last
updated
Table 42. Indexes for group table (ARSGROUP)
Index Cluster Index Unique Index
Unique Cluster
Index
Columns
Included with
Index
N/A N/A 1. gid
2. name
N/A N/A
366 Administration Guide

Load table (ARSLOAD)
Use this table to track loads for expiration by load. This table maintains a record of
all successful loads to application groups with the "expire by load" expiration
type.
Table 43. Load table (ARSLOAD)
Column Name Data Type Description
agid INTEGER Application group identifier
aid INTEGER Application ID
pri_nid SMALLINT Primary storage node
identifier
sec_nid SMALLINT Secondary storage node
identifier
name VARCHAR(11) Name of load
start BIGINT (DB2, SQL Server)INTEGER (Oracle)
Start date in segment
stop BIGINT (DB2, SQL Server)INTEGER (Oracle)
Stop date in segment
exp_date BIGINT (DB2, SQL Server)INTEGER (Oracle)
Expiration date
Table 44. Indexes for load table (ARSLOAD)
Index Cluster Index Unique Index
Unique Cluster
Index
Columns
Included with
Index
agid, name N/A agid, exp_date N/A N/A
Appendix E. System control tables 367
|
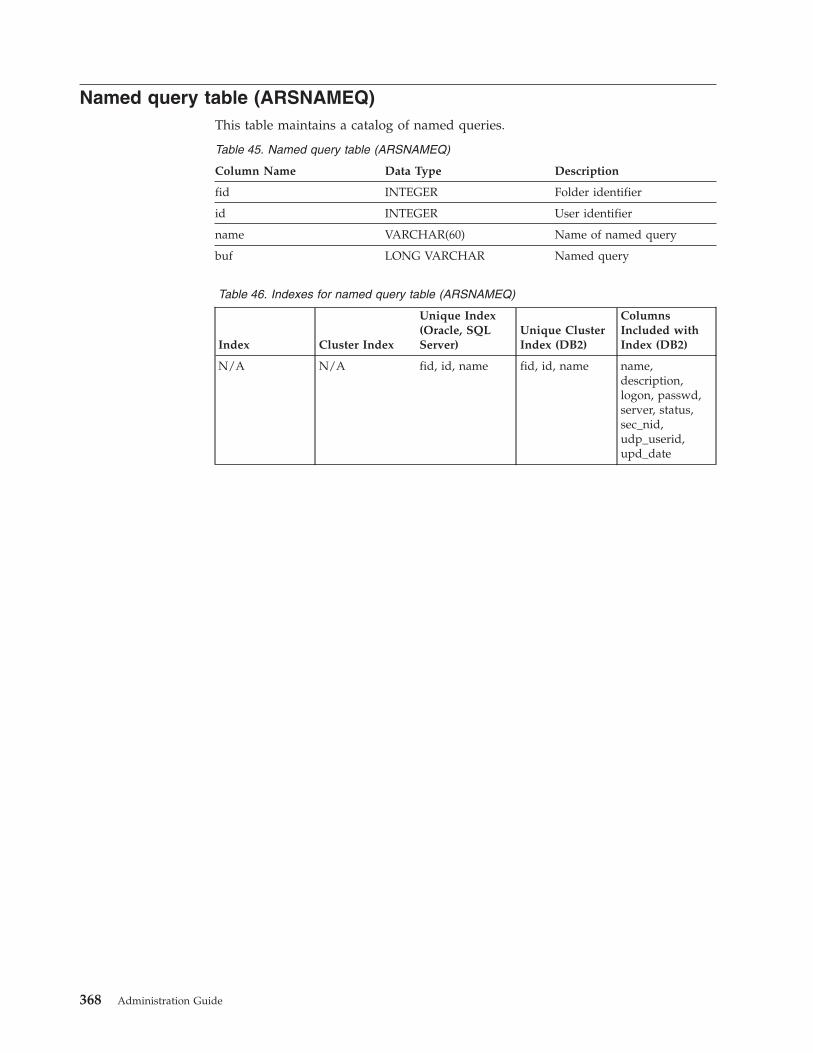
Named query table (ARSNAMEQ)
This table maintains a catalog of named queries.
Table 45. Named query table (ARSNAMEQ)
Column Name Data Type Description
fid INTEGER Folder identifier
id INTEGER User identifier
name VARCHAR(60) Name of named query
buf LONG VARCHAR Named query
Table 46. Indexes for named query table (ARSNAMEQ)
Index Cluster Index
Unique Index
(Oracle, SQL
Server)
Unique Cluster
Index (DB2)
Columns
Included with
Index (DB2)
N/A N/A fid, id, name fid, id, name name,
description,
logon, passwd,
server, status,
sec_nid,
udp_userid,
upd_date
368 Administration Guide

Node table (ARSNODE)
This table maintains a catalog of storage nodes.
Table 47. Node table (ARSNODE)
Column Name Data Type Description
sid INTEGER Storage set identifier
nid SMALLINT Storage node identifier
name VARCHAR(60) Name of storage node
description VARCHAR(120) Description of storage node
logon VARCHAR(128) Storage manager logon userid
passwd VARCHAR(128) Storage manager logon
password
server VARCHAR(254) Name of OnDemand object
server
status SMALLINT Current location of storage
set
sec_nid SMALLINT Secondary storage node
upd_userid VARCHAR(128) Userid of last user to update
storage node
upd_date BIGINT (DB2, SQL Server)INTEGER (Oracle)
Date and time storage node
was last updated
Table 48. Indexes for node table (ARSNODE)
Index Cluster Index
Unique Index
(Oracle, SQL
Server)
Unique Cluster
Index (DB2)
Columns
Included with
Index
N/A N/A sid, nid sid, nid N/A
Appendix E. System control tables 369
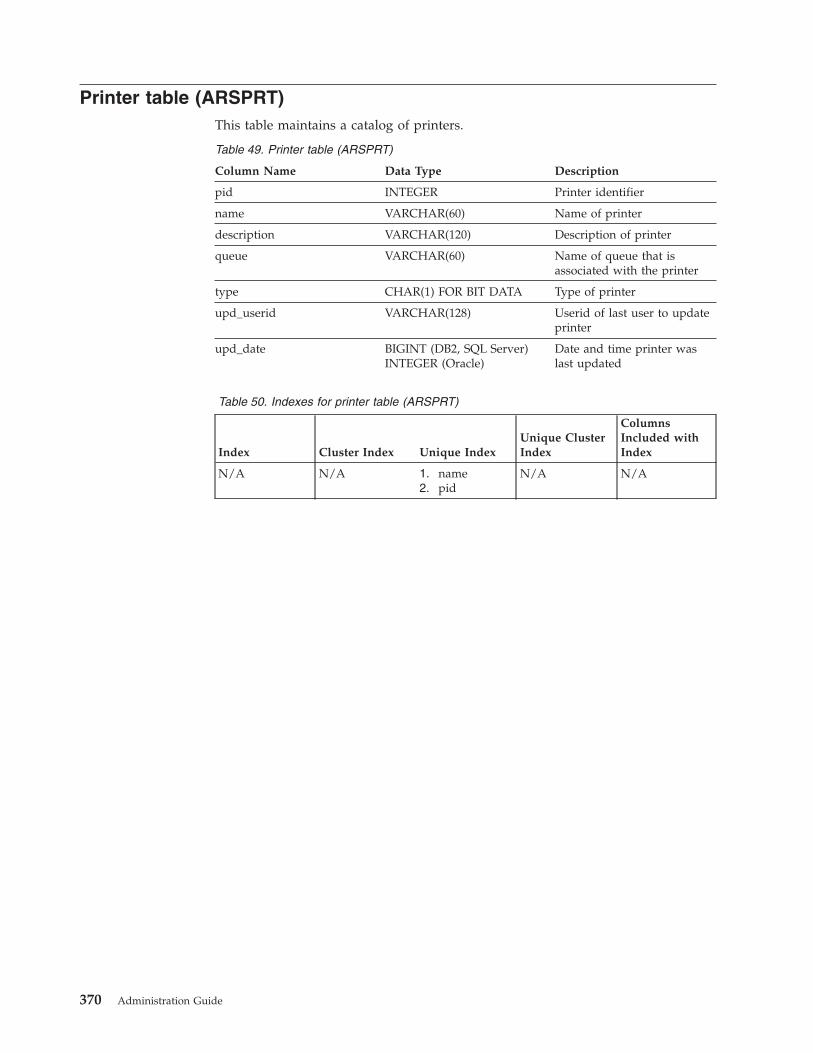
Printer table (ARSPRT)
This table maintains a catalog of printers.
Table 49. Printer table (ARSPRT)
Column Name Data Type Description
pid INTEGER Printer identifier
name VARCHAR(60) Name of printer
description VARCHAR(120) Description of printer
queue VARCHAR(60) Name of queue that is
associated with the printer
type CHAR(1) FOR BIT DATA Type of printer
upd_userid VARCHAR(128) Userid of last user to update
printer
upd_date BIGINT (DB2, SQL Server)INTEGER (Oracle)
Date and time printer was
last updated
Table 50. Indexes for printer table (ARSPRT)
Index Cluster Index Unique Index
Unique Cluster
Index
Columns
Included with
Index
N/A N/A 1. name
2. pid
N/A N/A
370 Administration Guide

Printer options table (ARSPRTOPTS)
This table maintains a catalog of printing options (parameters) for printers.
Table 51. Printer options table (ARSPRTOPTS)
Column Name Data Type Description
id INTEGER Printer identifier
name VARCHAR(60) Name of printer options
type CHAR(1) FOR BIT DATA Type of printer
buf LONG VARCHAR Printing options
Table 52. Indexes for printer options table (ARSPRTOPTS)
Index Cluster Index
Unique (Oracle,
SQL Server)
Unique Cluster
Index (DB2)
Columns
Included with
Index
N/A N/A id, name id, name N/A
Appendix E. System control tables 371
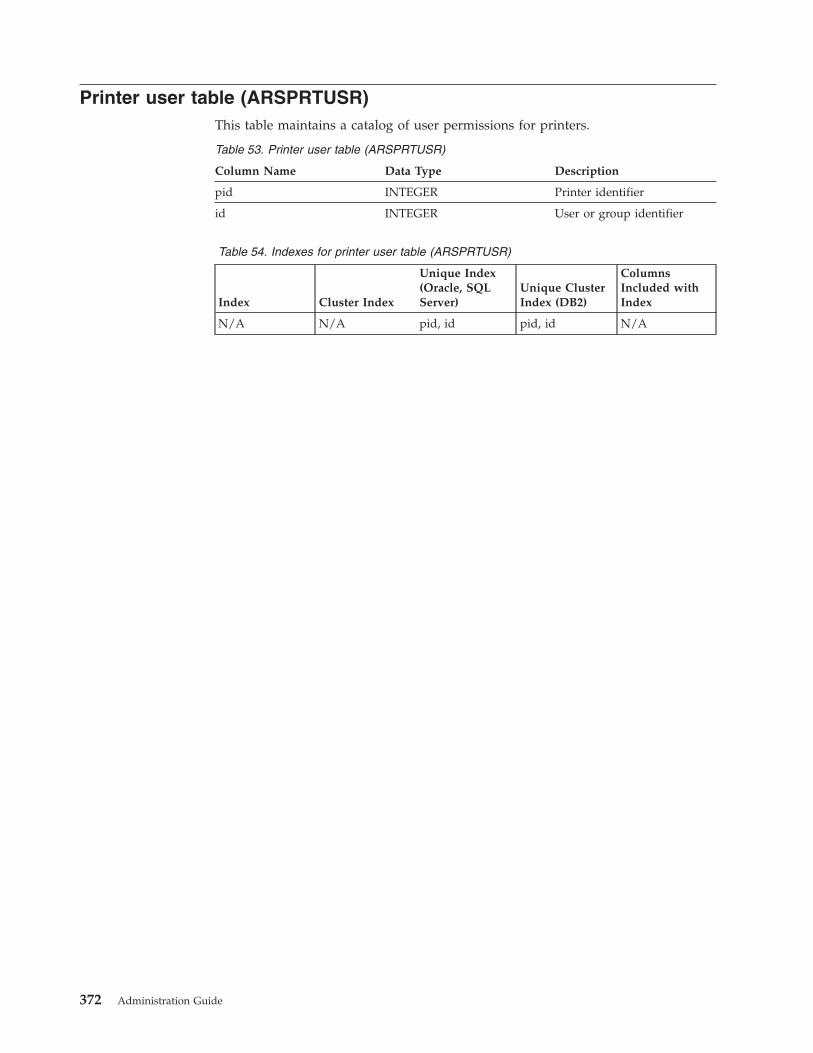
Printer user table (ARSPRTUSR)
This table maintains a catalog of user permissions for printers.
Table 53. Printer user table (ARSPRTUSR)
Column Name Data Type Description
pid INTEGER Printer identifier
id INTEGER User or group identifier
Table 54. Indexes for printer user table (ARSPRTUSR)
Index Cluster Index
Unique Index
(Oracle, SQL
Server)
Unique Cluster
Index (DB2)
Columns
Included with
Index
N/A N/A pid, id pid, id N/A
372 Administration Guide
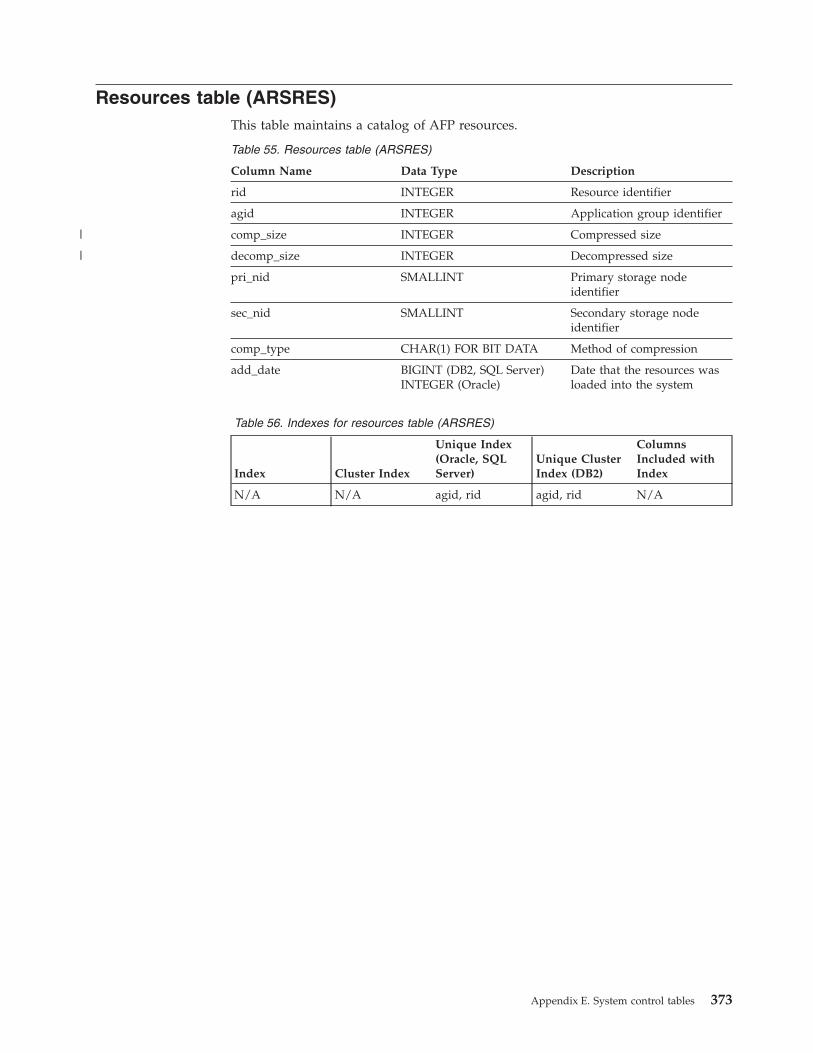
Resources table (ARSRES)
This table maintains a catalog of AFP resources.
Table 55. Resources table (ARSRES)
Column Name Data Type Description
rid INTEGER Resource identifier
agid INTEGER Application group identifier
comp_size INTEGER Compressed size
decomp_size INTEGER Decompressed size
pri_nid SMALLINT Primary storage node
identifier
sec_nid SMALLINT Secondary storage node
identifier
comp_type CHAR(1) FOR BIT DATA Method of compression
add_date BIGINT (DB2, SQL Server)INTEGER (Oracle)
Date that the resources was
loaded into the system
Table 56. Indexes for resources table (ARSRES)
Index Cluster Index
Unique Index
(Oracle, SQL
Server)
Unique Cluster
Index (DB2)
Columns
Included with
Index
N/A N/A agid, rid agid, rid N/A
Appendix E. System control tables 373
|
|
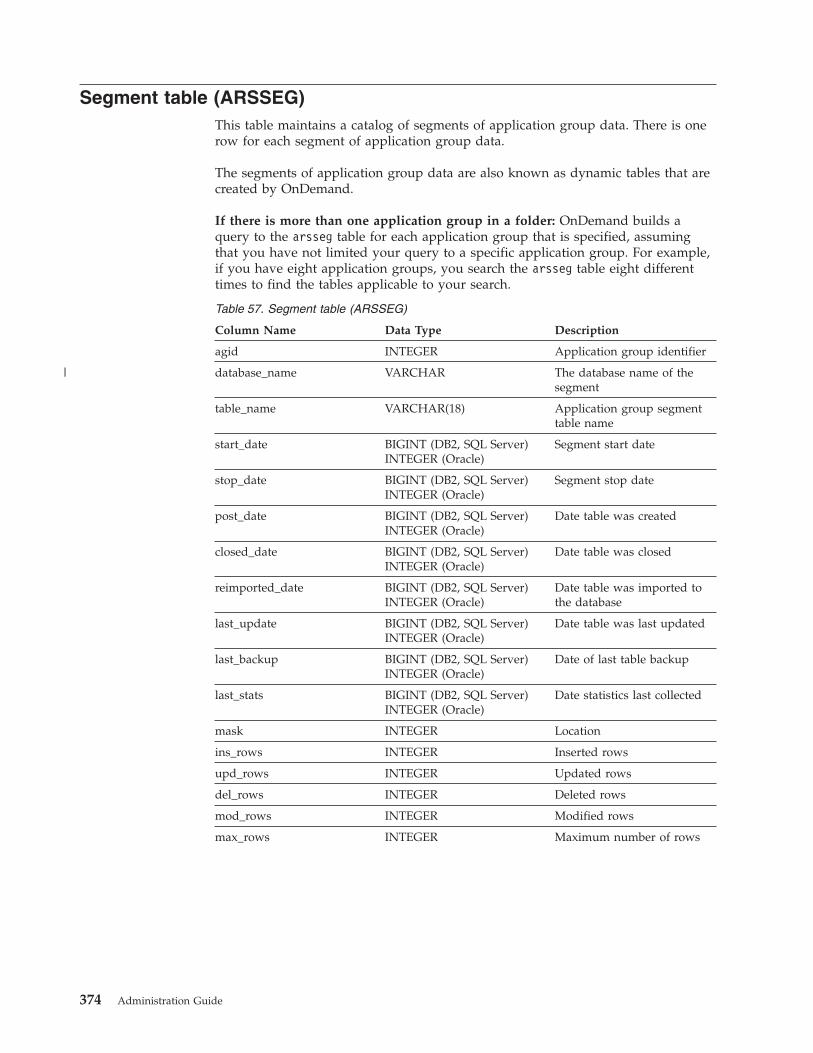
Segment table (ARSSEG)
This table maintains a catalog of segments of application group data. There is one
row for each segment of application group data.
The segments of application group data are also known as dynamic tables that are
created by OnDemand.
If there is more than one application group in a folder: OnDemand builds a
query to the arsseg table for each application group that is specified, assuming
that you have not limited your query to a specific application group. For example,
if you have eight application groups, you search the arsseg table eight different
times to find the tables applicable to your search.
Table 57. Segment table (ARSSEG)
Column Name Data Type Description
agid INTEGER Application group identifier
database_name VARCHAR The database name of the
segment
table_name VARCHAR(18) Application group segment
table name
start_date BIGINT (DB2, SQL Server)INTEGER (Oracle)
Segment start date
stop_date BIGINT (DB2, SQL Server)INTEGER (Oracle)
Segment stop date
post_date BIGINT (DB2, SQL Server)INTEGER (Oracle)
Date table was created
closed_date BIGINT (DB2, SQL Server)INTEGER (Oracle)
Date table was closed
reimported_date BIGINT (DB2, SQL Server)INTEGER (Oracle)
Date table was imported to
the database
last_update BIGINT (DB2, SQL Server)INTEGER (Oracle)
Date table was last updated
last_backup BIGINT (DB2, SQL Server)INTEGER (Oracle)
Date of last table backup
last_stats BIGINT (DB2, SQL Server)INTEGER (Oracle)
Date statistics last collected
mask INTEGER Location
ins_rows INTEGER Inserted rows
upd_rows INTEGER Updated rows
del_rows INTEGER Deleted rows
mod_rows INTEGER Modified rows
max_rows INTEGER Maximum number of rows
374 Administration Guide
|
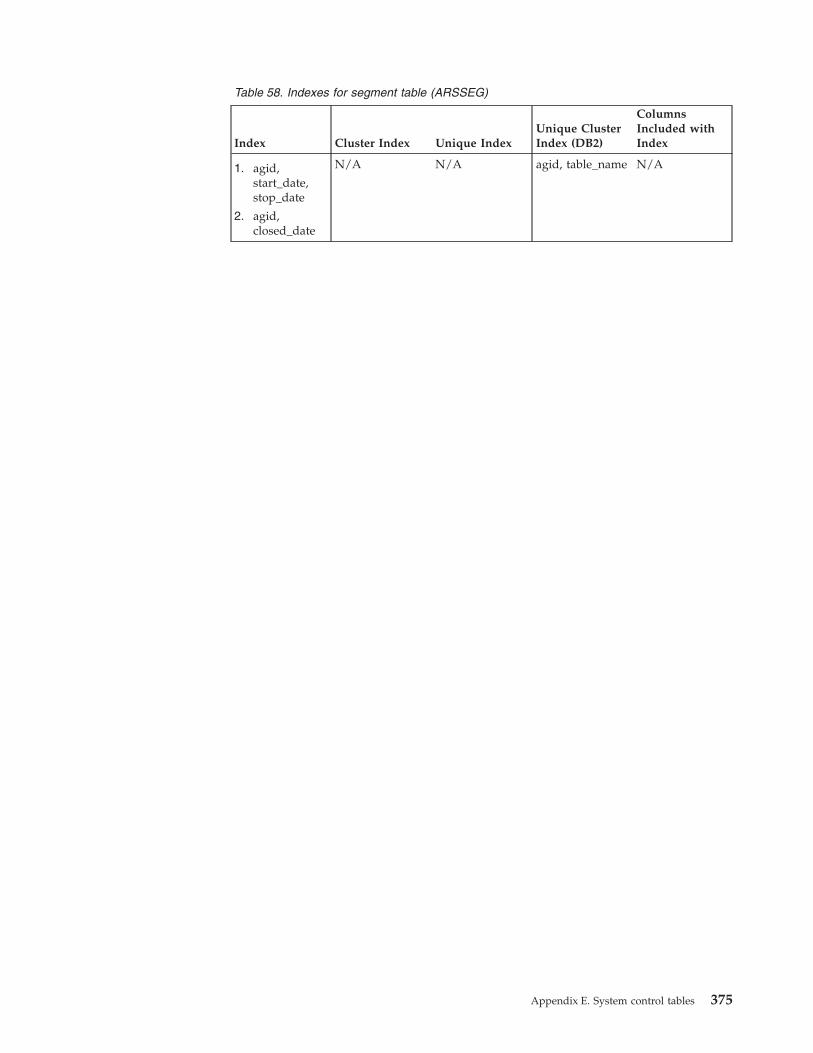
Table 58. Indexes for segment table (ARSSEG)
Index Cluster Index Unique Index
Unique Cluster
Index (DB2)
Columns
Included with
Index
1. agid,
start_date,
stop_date
2. agid,
closed_date
N/A N/A agid, table_name N/A
Appendix E. System control tables 375

Storage set table (ARSSET)
This table maintains a catalog of storage sets.
Table 59. Storage set table (ARSSET)
Column Name Data Type Description
sid INTEGER Storage set identifier
name VARCHAR(60) Name of storage set
description VARCHAR(120) Description of storage set
load_type CHAR(1) FOR BIT DATA Type of load
upd_userid VARCHAR(128) Userid of last user to update
storage set
upd_date BIGINT (DB2, SQL Server)INTEGER (Oracle)
Date and time storage set
was last updated
Table 60. Indexes for storage set table (ARSSET)
Index Cluster Index
Unique Index
(Oracle, SQL
Server)
Unique Cluster
Index (DB2)
Columns
Included with
Index (DB2)
N/A N/A name sid name,
description,
load_type,
upd_userid,
upd_date
376 Administration Guide

System parameters table (ARSSYS)
This table contains a single row that specifies the current system parameters.
Table 61. System parameters table (ARSSYS)
Column Name Data Type Description
id INTEGER Identifier counter
name VARCHAR(8) Internal application group
identifier
cdid INTEGER CD-ROM identifier
min_gid INTEGER Group ID starting value
passwd_exp INTEGER Password expiration value
time_out BIGINT (DB2, SQL Server)INTEGER (Oracle)
System inactivity timeout
value
syslog_mask INTEGER Message logging options
sys_mask2 INTEGER Types of annotations
exitlog_mask INTEGER User exit logging options
passwd_min_len SMALLINT Minimum password length
nid SMALLINT Internal storage node
identifier
sys_mask INTEGER Case of userids and
passwords
buf_resv LONG VARCHAR reserved
upd_userid VARCHAR(128) Userid of last user to update
system parameters
upd_date BIGINT (DB2, SQL Server)INTEGER (Oracle)
Date and time system
parameters were last updated
Indexes: The system parameters table is not indexed
Appendix E. System control tables 377
|
|

User table (ARSUSER)
This table maintains a catalog of users.
Table 62. User table (ARSUSER)
Column Name Data Type Description
uid INTEGER User identifier
userid VARCHAR(128) User name
passwd VARCHAR(128) User’s password
description VARCHAR(120) Description of user
admin SMALLINT User type and authority
banner VARCHAR(1) Printer banner
dest VARCHAR(8) Printer dest value
last_update BIGINT (DB2, SQL Server)INTEGER (Oracle)
Date password last set
node VARCHAR(8) The system name
pid INTEGER Default printer identifier
acct_info VARCHAR(60) User-defined accounting
information
name VARCHAR(60) User’s name
company VARCHAR(60) User’s organization
title VARCHAR(60) User’s title
addr1 VARCHAR(60) User’s address
addr2 VARCHAR(60) User’s address
addr3 VARCHAR(60) User’s address
addr4 VARCHAR(60) User’s address
dept VARCHAR(60) User’s department
building VARCHAR(60) User’s building or location
formdef VARCHAR(8) Printer FormDef
forms VARCHAR(8) Printer Forms
misc390 VARCHAR(254) Reserved for future use
room VARCHAR(60) User’s office or room
routing VARCHAR(24) Printer routing field
pagedef VARCHAR(8) Printer PageDef
passwd_exp INTEGER Password expiration
phone VARCHAR(32) User’s phone number
fax VARCHAR(32) User’s fax number
cover_page VARCHAR(60) Default fax cover page
time_out BIGINT (DB2, SQL Server)INTEGER (Oracle)
User’s inactivity timeout
value
email VARCHAR(254) User’s e-mail address
uclass VARCHAR(1) Printer class value
upd_userid VARCHAR(128) Userid of last user to update
user
378 Administration Guide
|
|
|
|
|
|
|
|
|
|
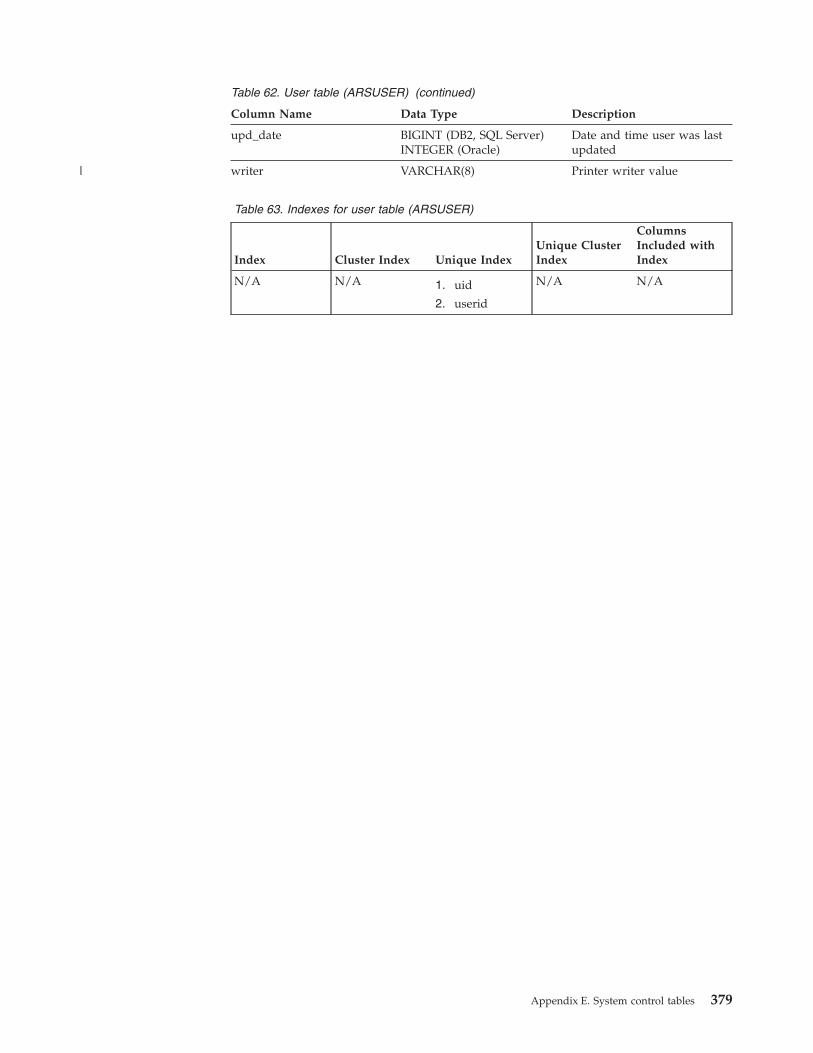
Table 62. User table (ARSUSER) (continued)
Column Name Data Type Description
upd_date BIGINT (DB2, SQL Server)INTEGER (Oracle)
Date and time user was last
updated
writer VARCHAR(8) Printer writer value
Table 63. Indexes for user table (ARSUSER)
Index Cluster Index Unique Index
Unique Cluster
Index
Columns
Included with
Index
N/A N/A 1. uid
2. userid
N/A N/A
Appendix E. System control tables 379
|

Users in groups table (ARSUSRGRP)
This table maintains the association of groups with individual users.
Table 64. Users in groups table (ARSUSRGRP)
Column Name Data Type Description
gid INTEGER Group identifier
uid INTEGER User identifier
Table 65. Indexes for users in groups table (ARSUSRGRP)
Index Cluster Index
Unique Index
(Oracle, SQL
Server)
Unique Cluster
Index (DB2)
Columns
Included with
Index
N/A N/A gid, uid gid, uid N/A
380 Administration Guide
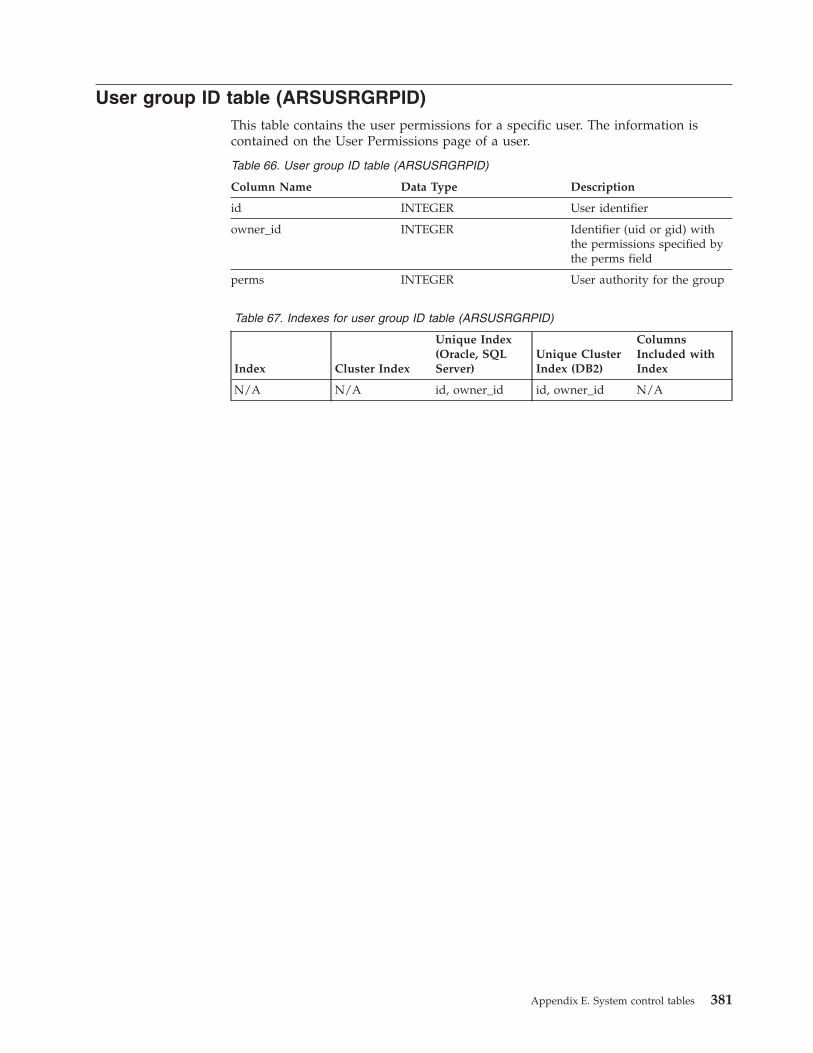
User group ID table (ARSUSRGRPID)
This table contains the user permissions for a specific user. The information is
contained on the User Permissions page of a user.
Table 66. User group ID table (ARSUSRGRPID)
Column Name Data Type Description
id INTEGER User identifier
owner_id INTEGER Identifier (uid or gid) with
the permissions specified by
the perms field
perms INTEGER User authority for the group
Table 67. Indexes for user group ID table (ARSUSRGRPID)
Index Cluster Index
Unique Index
(Oracle, SQL
Server)
Unique Cluster
Index (DB2)
Columns
Included with
Index
N/A N/A id, owner_id id, owner_id N/A
Appendix E. System control tables 381

Application group data table
An application group data table contains one row for each document that is stored
in the application group. The name of an application group data table is
owner.applgrpInternalIdn, where owner is the value of the
SRVR_INSTANCE_OWNER parameter for the instance from the ARS.INI file,
applgrpInternalId is the identifier that is assigned to the application group when
the application group is created, and n is an incremental value. For example,
arsdbas3.rba1, arsdbas3.rba2, and so on. The application group identifier is listed
on the Advanced Storage Management page of the application group.
The application group data tables are also known as dynamic tables that are
created by OnDemand.
A row in an application group data table contains from one to 32 user-defined
fields followed by approximately 40 bytes of OnDemand control information
(fields).
Table 68. Application group data table
Column Name Data Type Description
user_field_1 varies First user-defined application
group field
user_field_n varies Last user-defined application
group field
doc_name VARCHAR(11) Document name
doc_off INTEGER Document offset
doc_len INTEGER Document length
comp_off INTEGER Compression offset
comp_len INTEGER Compression length
annot CHAR(1) FOR BIT DATA Annotation flag
comp_type CHAR(1) FOR BIT DATA Compression type
resource INTEGER Resource identifier
pri_nid SMALLINT Primary storage node
identifier
sec_nid SMALLINT Secondary storage node
identifier
Table 69. Indexes for application group data table
Index Cluster Index Unique Index
Unique Cluster
Index
Columns
Included with
Index
user_field_1 ...
user_field_ndoc_name
N/A N/A N/A N/A
Notes:
1. This table is indexed on one or more of the user-defined fields, as represented
by user_field_1 ... user_field_n in the table.
2. The index doc_name is used only when the Expiration Type of the application
group is set to Load or Storage Manager.
382 Administration Guide

Appendix F. Objects and data model used in the OnDemand
XML file
XML objects in the OnDemand XML file
You can use an XML interface to import data into an OnDemand system. Before
importing data, you need to have an XML file that contains all the data that needs
to be imported. The XML file can be either created during a previous XML export
process or written from scratch. This section helps you to understand the objects in
the XML file.
The following diagram illustrates the overall layout of the OnDemand XML file.
© Copyright IBM Corp. 1993, 2007 383
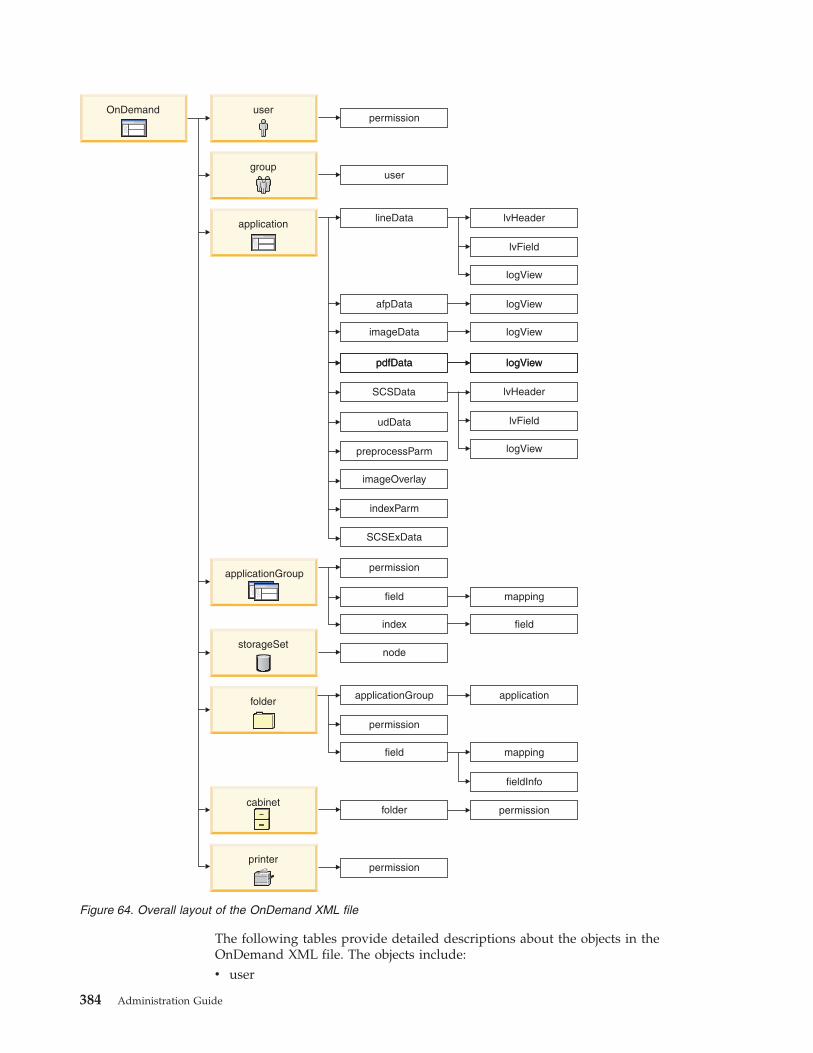
The following tables provide detailed descriptions about the objects in the
OnDemand XML file. The objects include:
v user
OnDemand user
storageSet
cabinet
folder
group
application
applicationGroup
permission
node
folder
applicationGroup application
mapping
fieldInfo
permission
field
user
lineData
permission
field
lvHeader
lvField
mapping
logView
afpData
imageData
pdfData
udData
preprocessParm
imageOverlay
indexParm
logView
logView
logViewpdfData logView
SCSData lvHeader
lvField
logView
SCSExData
index field
printerpermission
permission
Figure 64. Overall layout of the OnDemand XML file
384 Administration Guide
v group
v application
v applicationGroup
v user
v storageSet
v folder
v printer
v cabinet
For each object, the following information is provided:
Name The name of the attribute. An attribute name in bold indicates that the
attribute is a ″key″ attribute, which is used to uniquely identify the object.
For all top-level objects, this is the Name attribute.
DataType
The XML data type of the attribute. Types in italics indicates an XML data
type that is defined in the OnDemand XML schema file.
Required
Whether this attribute is required. Dependent means that the attribute may
be required based on the settings of other attributes.
Default Value
The value that is used internally if the optional attribute is not specified in
the XML file.
Possible Values
Lists any limitations on the value for attributes. If there are no limitations,
this is blank.
Updateable
Whether this attribute can be updated.
For each children, the following information is provided:
Name The name of the child object. An attribute name in bold indicates that the
attribute is a ″key″ attribute which is used to uniquely identify the object.
Min/Max Number
Indicates the minimum and maximum number of children of this type that
are allowed.
Deleteable
Whether this child object can be deleted.
Updateable
Whether this child object can be updated.
For all XML objects, the data that is associated with an object is only in the form of
attribute data and child objects.
Important: The capitalization of the object names is important and should be used
exactly as shown in the data tables.
User object
Appendix F. Objects and data model used in the OnDemand XML file 385
|

Tabl
e 70
. Attr
ibut
es fo
r th
e us
er ob
ject
Nam
e D
escr
ipti
on
Dat
aTyp
e R
equ
ired
Def
ault
valu
e P
ossi
ble
va
lues
U
pd
atea
ble
nam
e N
ame
of th
e us
er
nam
eStr
ing
Yes
Yes
uid
U
ser
ID va
lue
Inte
ger
No
0 v
Inte
ger
valu
e 1–
1,08
0,00
0
v 0
to in
dic
ate
syst
em ge
nera
ted
valu
es
No
des
crip
tion
D
escr
ipti
on of
th
e us
er
desc
Stri
ng
No
″″
Yes
pass
wor
d
Use
r’s
pass
wor
d
pass
wor
dStr
ing
No
″″
Yes
user
Type
Ty
pe of
us
er
user
Type
Stri
ng
No
″Use
r″
v ″U
ser″
v ″U
ser
Ad
min
″
v ″A
G/
Fold
er
Ad
min
″
v ″S
yste
m A
dm
in″
Yes
tim
eOut
Ti
me
out
leng
th in
min
utes
tim
eOut
Type
N
o ″U
se Sy
stem
Val
ue″
v ″U
se Sy
stem
Val
ue″
v ″N
o L
imit
″
v A
ny po
siti
ve
inte
ger
valu
e
Yes
fullN
ame
Use
r’s
full
nam
e us
erM
iscS
trin
g N
o ″″
Ye
s
acct
Info
A
ccou
ntin
g fo
r th
e us
er
user
Mis
cStr
ing
No
″″
Yes
com
pany
N
ame
of th
e co
mpa
ny
user
Mis
cStr
ing
No
″″
Yes
titl
e U
ser’
s ti
tle
of jo
b re
spon
sibi
lity
user
Mis
cStr
ing
No
″″
Yes
add
r1
Use
r’s
add
ress
us
erM
iscS
trin
g N
o ″″
Ye
s
add
r2
Ad
dre
ss, l
ine
num
ber
2 us
erM
iscS
trin
g N
o ″″
Ye
s
add
r3
Ad
dre
ss, l
ine
num
ber
3 us
erM
iscS
trin
g N
o ″″
Ye
s
386 Administration Guide
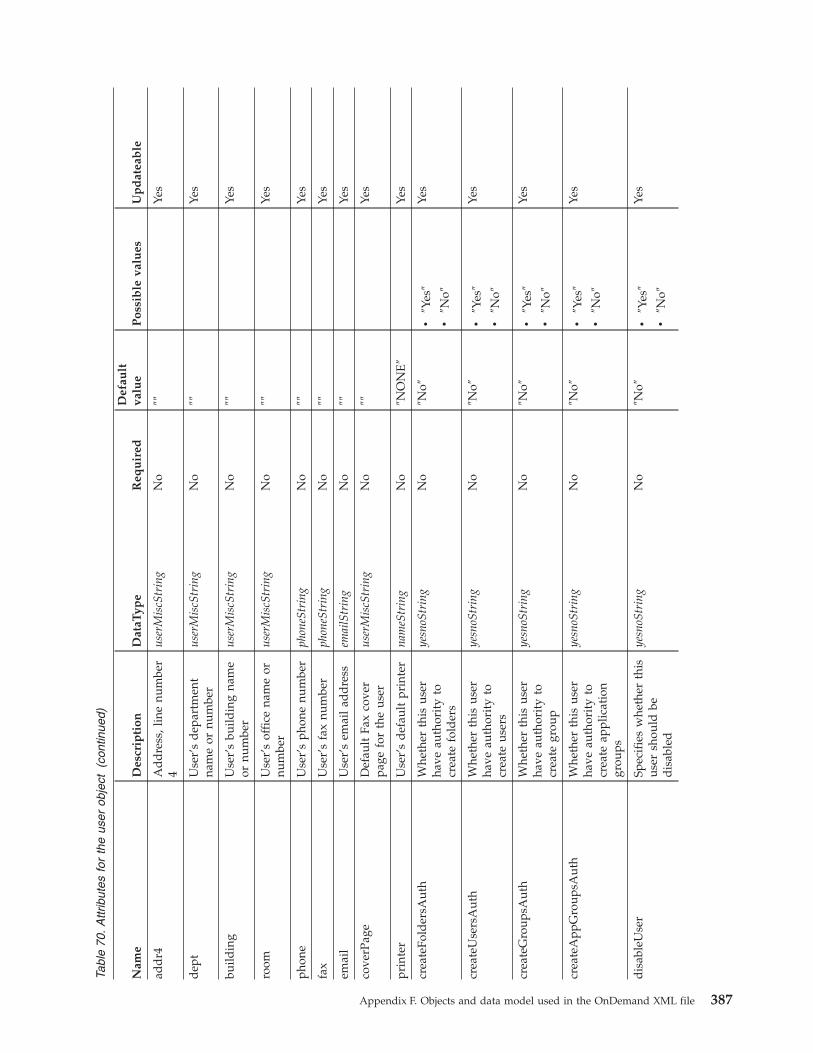
Tabl
e 70
. Attr
ibut
es fo
r th
e us
er ob
ject
(c
ontin
ued)
Nam
e D
escr
ipti
on
Dat
aTyp
e R
equ
ired
Def
ault
valu
e P
ossi
ble
va
lues
U
pd
atea
ble
add
r4
Ad
dre
ss, l
ine
num
ber
4 us
erM
iscS
trin
g N
o ″″
Ye
s
dep
t U
ser’
s d
epar
tmen
t na
me
or nu
mbe
r us
erM
iscS
trin
g N
o ″″
Ye
s
build
ing
Use
r’s
build
ing
nam
e or
nu
mbe
r us
erM
iscS
trin
g N
o ″″
Ye
s
room
U
ser’
s of
fice
na
me
or
num
ber
user
Mis
cStr
ing
No
″″
Yes
phon
e U
ser’
s ph
one
num
ber
phon
eStr
ing
No
″″
Yes
fax
Use
r’s
fax
num
ber
phon
eStr
ing
No
″″
Yes
emai
l U
ser’
s em
ail
add
ress
em
ailS
trin
g N
o ″″
Ye
s
cove
rPag
e D
efau
lt Fa
x co
ver
page
fo
r th
e us
er
user
Mis
cStr
ing
No
″″
Yes
prin
ter
Use
r’s
def
ault
pr
inte
r na
meS
trin
g N
o ″N
ON
E″
Yes
crea
teFo
lder
sAut
h W
heth
er th
is us
er
have
au
thor
ity
to
crea
te fo
lder
s
yesn
oStr
ing
No
″No″
v ″Y
es″
v ″N
o″
Yes
crea
teU
sers
Aut
h W
heth
er th
is us
er
have
au
thor
ity
to
crea
te us
ers
yesn
oStr
ing
No
″No″
v ″Y
es″
v ″N
o″
Yes
crea
teG
roup
sAut
h W
heth
er th
is us
er
have
au
thor
ity
to
crea
te gr
oup
yesn
oStr
ing
No
″No″
v ″Y
es″
v ″N
o″
Yes
crea
teA
ppG
roup
sAut
h W
heth
er th
is us
er
have
au
thor
ity
to
crea
te ap
plic
atio
n gr
oups
yesn
oStr
ing
No
″No″
v ″Y
es″
v ″N
o″
Yes
dis
able
Use
r Sp
ecif
ies
whe
ther
th
is
user
sh
ould
be
dis
able
d
yesn
oStr
ing
No
″No″
v ″Y
es″
v ″N
o″
Yes
Appendix F. Objects and data model used in the OnDemand XML file 387
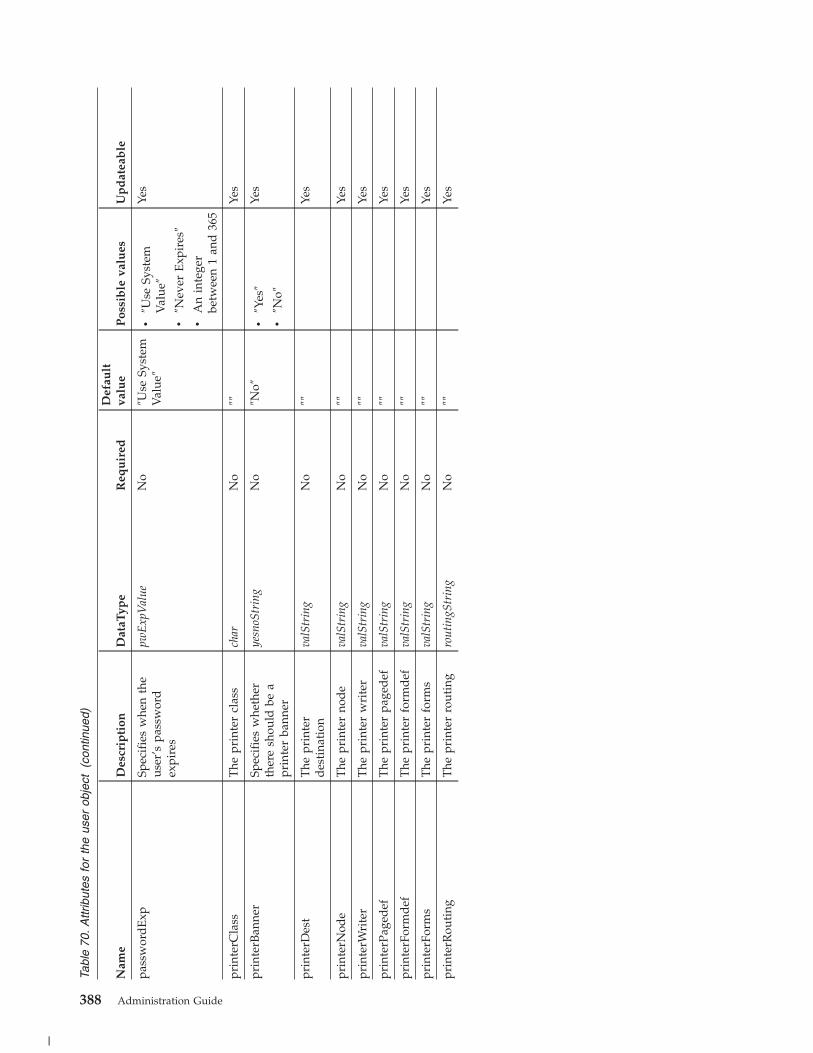
Tabl
e 70
. Attr
ibut
es fo
r th
e us
er ob
ject
(c
ontin
ued)
Nam
e D
escr
ipti
on
Dat
aTyp
e R
equ
ired
Def
ault
valu
e P
ossi
ble
va
lues
U
pd
atea
ble
pass
wor
dE
xp
Spec
ifie
s w
hen
the
user
’s pa
ssw
ord
expi
res
pwE
xpV
alue
N
o ″U
se Sy
stem
Val
ue″
v ″U
se Sy
stem
Val
ue″
v ″N
ever
E
xpir
es″
v A
n in
tege
r be
twee
n 1
and
36
5
Yes
prin
terC
lass
T
he pr
inte
r cl
ass
char
N
o ″″
Ye
s
prin
terB
anne
r Sp
ecif
ies
whe
ther
ther
e sh
ould
be
a
prin
ter
bann
er
yesn
oStr
ing
No
″No″
v ″Y
es″
v ″N
o″
Yes
prin
terD
est
The
pr
inte
r d
esti
nati
on
valS
trin
g N
o ″″
Ye
s
prin
terN
ode
The
pr
inte
r no
de
valS
trin
g N
o ″″
Ye
s
prin
terW
rite
r T
he pr
inte
r w
rite
r va
lStr
ing
No
″″
Yes
prin
terP
aged
ef
The
pr
inte
r pa
ged
ef
valS
trin
g N
o ″″
Ye
s
prin
terF
orm
def
T
he pr
inte
r fo
rmd
ef
valS
trin
g N
o ″″
Ye
s
prin
terF
orm
s T
he pr
inte
r fo
rms
valS
trin
g N
o ″″
Ye
s
prin
terR
outi
ng
The
pr
inte
r ro
utin
g ro
utin
gStr
ing
No
″″
Yes
388 Administration Guide
|

Tabl
e 71
. C
hild
ob
ject
un
der
the
user
ob
ject
Nam
e M
inim
um
n
um
ber
M
axim
um
n
um
ber
D
elet
eab
le
Up
dat
eab
le
perm
issi
on
0 U
nbou
nded
Ye
s Ye
s
Appendix F. Objects and data model used in the OnDemand XML file 389

Tabl
e 72
. Attr
ibut
es fo
r th
e pe
rmis
sion
ob
ject
un
der
the
user
ob
ject
Att
rib
ute
s D
escr
ipti
on
Dat
atyp
e R
equ
ired
D
efau
lt V
alu
e P
ossi
ble
V
alu
es
Up
dat
eab
le
task
T
he ta
sk to
pe
rfor
m
on th
is ob
ject
task
Stri
ng
No
″ad
d″
v ″a
dd
″
v ″d
elet
e″
v ″u
pdat
e″
N/
A
user
T
he na
me
of a
user
that
ca
n vi
ew an
d
mai
ntai
n th
is us
er
nam
eStr
ing
Yes
″″
v U
ser
nam
e
v ″_
AL
L″
No
grou
p T
he na
me
of a
grou
p th
at ca
n vi
ew
and
m
aint
ain
this
user
nam
eStr
ing
Yes
″″
v G
roup
na
me
v ″_
AL
L″
No
adm
inA
utho
rity
W
heth
er th
is us
er or
grou
p ha
s au
thor
ity
to up
dat
e an
d d
elet
e th
e us
er
yesn
oStr
ing
No
″No″
v ″Y
es″
v ″N
o″
Yes
390 Administration Guide
||
|||||||
|||||||
|
|
Note: In the permission child, you must specify either a user or a group object,
however, you cannot specify both.
Group object
Appendix F. Objects and data model used in the OnDemand XML file 391
Tabl
e 73
. Attr
ibut
es fo
r th
e gr
oup
obje
ct
Nam
e D
escr
ipti
on
Dat
aTyp
e R
equ
ired
D
efau
lt
valu
e P
ossi
ble
va
lues
U
pd
atea
ble
nam
e N
ame
of th
e gr
oup
nam
eStr
ing
Yes
Yes
gid
G
roup
ID
va
lue
Inte
ger
No
0 v
Inte
ger
valu
e gr
eate
r th
an
or eq
ual
to 80
001
v 0
to in
dic
ate
a sy
stem
valu
e
No
des
crip
tion
D
escr
ipti
on of
th
is gr
oup
desc
Stri
ng
No
″″
Yes
owne
rUse
r N
ame
of th
e us
er th
at is
the
owne
r of
th
is gr
oup
nam
eStr
ing
No
″NO
NE
″ Ye
s
owne
rGro
up
Nam
e of
th
e gr
oup
that
is
the
owne
r of
th
is gr
oup
nam
eStr
ing
No
″NO
NE
″ Ye
s
392 Administration Guide
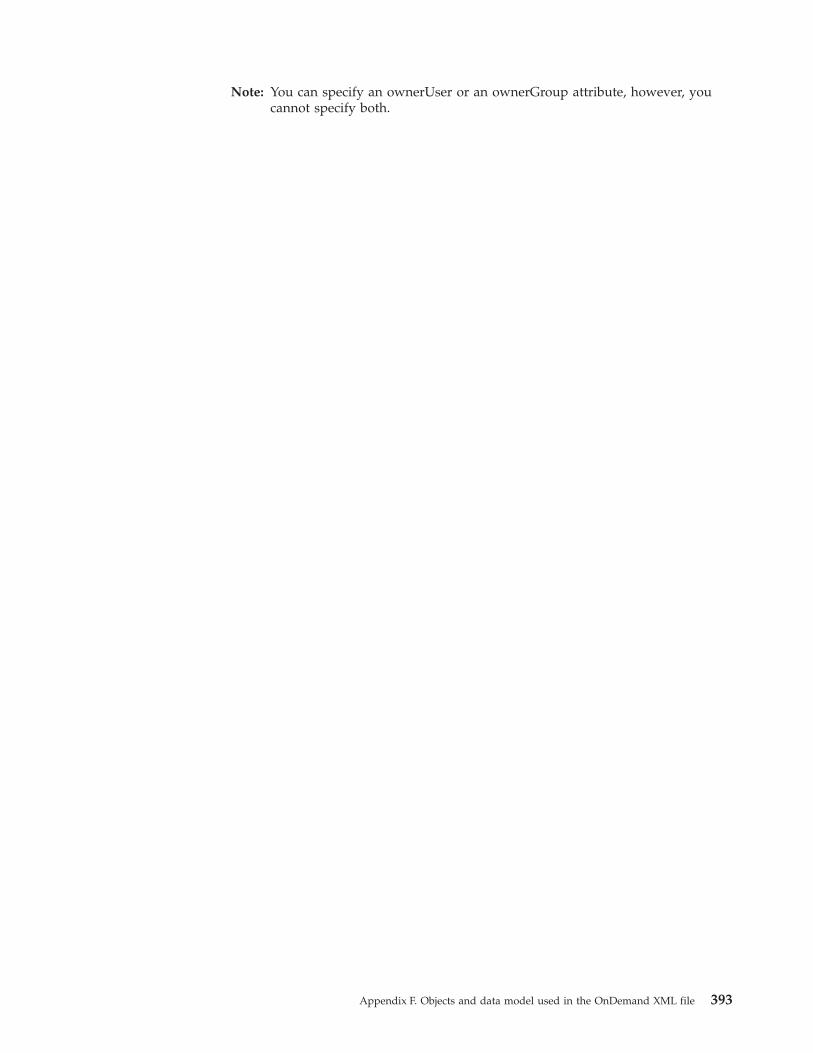
Note: You can specify an ownerUser or an ownerGroup attribute, however, you
cannot specify both.
Appendix F. Objects and data model used in the OnDemand XML file 393

Tabl
e 74
. C
hild
ob
ject
un
der
the
grou
p ob
ject
Nam
e M
inim
um
n
um
ber
M
axim
um
n
um
ber
D
elet
eab
le
Up
dat
eab
le
user
0
Unb
ound
ed
Yes
No
394 Administration Guide

Tabl
e 75
. Attr
ibut
es fo
r th
e us
er ob
ject
un
der
the
grou
p ob
ject
Att
rib
ute
s D
escr
ipti
on
Dat
atyp
e R
equ
ired
D
efau
lt V
alu
e P
ossi
ble
V
alu
es
Up
dat
eab
le
task
T
he ta
sk to
pe
rfor
m
on th
is ob
ject
task
Stri
ng
No
″ad
d″
v ″a
dd
″
v ″d
elet
e″
N/
A
nam
e T
he na
me
of a
user
that
is
a
mem
ber
of
this
gr
oup
nam
eStr
ing
Yes
No
Appendix F. Objects and data model used in the OnDemand XML file 395

Application object
396 Administration Guide

Tabl
e 76
. Attr
ibut
es fo
r th
e ap
plic
atio
n ob
ject
Nam
e D
escr
ipti
on
Dat
aTyp
e R
equ
ired
D
efau
lt va
lue
Pos
sib
le va
lues
U
pd
atea
ble
nam
e N
ame
of th
e ap
plic
atio
n na
meS
trin
g Ye
s Ye
s
des
crip
tion
D
escr
ipti
on of
th
e ap
plic
atio
n de
scSt
ring
N
o ″″
Ye
s
appG
roup
T
he ap
plic
atio
n gr
oup
that
th
is ap
plic
atio
n be
long
s to
nam
eStr
ing
Yes
No
iden
tifi
er
The
ap
plic
atio
n gr
oup
iden
tifi
er
dbSt
ring
2 Ye
s ″″
D
eter
min
ed by
the
appl
icat
ion
grou
p
Yes
dat
aTyp
e T
he d
ata
type
of
th
is
appl
icat
ion
appT
ypeS
trin
g N
o v
″AFP
″
v ″S
CS″
v ″A
FP″
v ″L
ine″
v ″B
MP″
v ″G
IF″
v ″P
CX
″
v ″T
IFF″
v ″P
DF″
v ″J
PEG
″
v ″P
NG
″
v ″M
etac
ode″
v ″U
ser
Def
ined
″
v ″O
D D
efin
ed″
v ″E
-Mai
l″
v ″N
one″
v ″S
CS″
v SC
S-E
xten
ded
v G
loba
l D
JDE
No
Appendix F. Objects and data model used in the OnDemand XML file 397||
|||||||
|||||||
|||||||
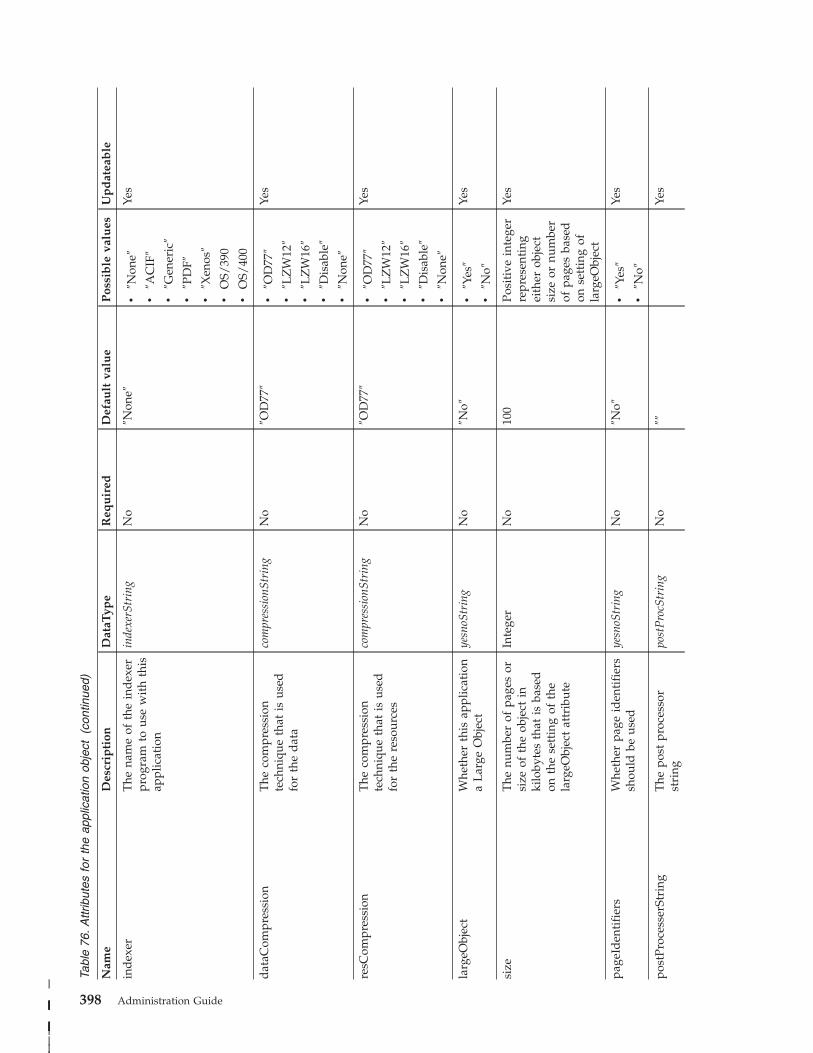
Tabl
e 76
. Attr
ibut
es fo
r th
e ap
plic
atio
n ob
ject
(c
ontin
ued)
Nam
e D
escr
ipti
on
Dat
aTyp
e R
equ
ired
D
efau
lt va
lue
Pos
sib
le va
lues
U
pd
atea
ble
ind
exer
T
he na
me
of th
e in
dex
er
prog
ram
to
us
e w
ith
this
appl
icat
ion
inde
xerS
trin
g N
o ″N
one″
v ″N
one″
v ″A
CIF
″
v ″G
ener
ic″
v ″P
DF″
v ″X
enos
″
v O
S/39
0
v O
S/40
0
Yes
dat
aCom
pres
sion
T
he co
mpr
essi
on
tech
niqu
e th
at is
us
ed
for
the
dat
a
com
pres
sion
Stri
ng
No
″OD
77″
v ″O
D77
″
v ″L
ZW
12″
v ″L
ZW
16″
v ″D
isab
le″
v ″N
one″
Yes
resC
ompr
essi
on
The
co
mpr
essi
on
tech
niqu
e th
at is
us
ed
for
the
reso
urce
s
com
pres
sion
Stri
ng
No
″OD
77″
v ″O
D77
″
v ″L
ZW
12″
v ″L
ZW
16″
v ″D
isab
le″
v ″N
one″
Yes
larg
eObj
ect
Whe
ther
th
is ap
plic
atio
n a
Lar
ge O
bjec
t ye
snoS
trin
g N
o ″N
o″
v ″Y
es″
v ″N
o″
Yes
size
T
he nu
mbe
r of
pa
ges
or
size
of
th
e ob
ject
in
kilo
byte
s th
at is
ba
sed
on th
e se
ttin
g of
th
e la
rgeO
bjec
t at
trib
ute
Inte
ger
No
100
Posi
tive
in
tege
r re
pres
enti
ng
eith
er ob
ject
size
or
nu
mbe
r of
pa
ges
base
d
on se
ttin
g of
larg
eObj
ect
Yes
page
Iden
tifi
ers
Whe
ther
pa
ge id
enti
fier
s sh
ould
be
us
ed
yesn
oStr
ing
No
″No″
v ″Y
es″
v ″N
o″
Yes
post
Proc
esse
rStr
ing
The
po
st pr
oces
sor
stri
ng
post
Pro
cStr
ing
No
″″
Yes
398 Administration Guide|
|||||||
||||
||||
|
|

Tabl
e 76
. Attr
ibut
es fo
r th
e ap
plic
atio
n ob
ject
(c
ontin
ued)
Nam
e D
escr
ipti
on
Dat
aTyp
e R
equ
ired
D
efau
lt va
lue
Pos
sib
le va
lues
U
pd
atea
ble
prin
tAm
ount
T
he d
efau
lt pr
int
opti
on
to sp
ecif
y w
hich
pa
ge or
page
s to
pr
int
prin
tAm
Stri
ng
No
″All
Page
s″
v ″A
ll Pa
ges″
v ″C
urre
nt
Page
s″
Yes
def
ault
Prin
ter
Def
ault
pr
inte
r na
meS
trin
g N
o ″*
NO
NE
″ Ye
s
cics
JCL
Parm
s V
alue
s th
at ar
e us
ed by
the
CIC
S or
E
SA cl
ient
prog
ram
to
pr
int
doc
umen
ts
stri
ng
No
″Non
e″
Yes
prin
tPar
ms
Prin
t pa
ram
eter
s th
at ar
e us
ed by
th
e se
rver
pr
int
man
ager
stri
ng
No
″″
Yes
afpT
oLin
e O
ptio
ns th
at O
nDem
and
uses
to
co
nver
t A
FP d
ata
to lin
e d
ata
stri
ng
No
″″
Yes
useP
revi
ew
Whe
ther
to
us
e th
e pr
evie
w us
er ex
it
yesn
oStr
ing
No
″No″
v ″Y
es″
v ″N
o″
Yes
prev
iew
Parm
s W
heth
er th
e pr
evie
w
para
met
ers
shou
ld be
used
stri
ng
No
″″
Yes
expi
rati
onD
ate
Spec
ifie
s th
e lif
e of
th
e d
ata
and
in
dex
es
expD
ateS
trin
g N
o ″U
se A
ppG
roup
Val
ue″
v ″U
se
App
Gro
up
Val
ue″
v Po
siti
ve
inte
ger
Yes
Appendix F. Objects and data model used in the OnDemand XML file 399|
|||||||
||||
||||
|
|

Notes:
1. If the application group contains more than one field object, identifier is
required.
2. The identifier object can be updated to an unused field value only.
400 Administration Guide

Tabl
e 77
. C
hild
ob
ject
s un
der
the
appl
icat
ion
obje
ct
Nam
e M
inim
um
n
um
ber
M
axim
um
n
um
ber
D
elet
eab
le
Up
dat
eab
le
lineD
ata
0 1
No
Yes
afpD
ata
0 1
No
Yes
pdfD
ata
0 1
No
Yes
imag
eDat
a 0
1 N
o Ye
s
udD
ata
0 1
No
Yes
ind
exPa
rm
0 1
Yes
Yes
prep
roce
ssPa
rm
0 D
epen
den
t N
o Ye
s
imag
eOve
rlay
0
Unb
ound
ed
Yes
No
Appendix F. Objects and data model used in the OnDemand XML file 401||
|||||
|||||
|||||

Important: The udData child is required if the application dataType is User
Defined.
402 Administration Guide

Tabl
e 78
. Attr
ibut
es fo
r th
e S
CS
Dat
a ob
ject
un
der
the
appl
icat
ion
obje
ct
Att
rib
ute
s D
escr
ipti
on
Dat
aTyp
e R
equ
ired
D
efau
lt va
lue
Pos
sib
le va
lues
U
pd
atea
ble
cod
ePag
e T
he co
de
page
to
us
e In
tege
r N
o 37
N
onne
gati
ve
inte
ger
Yes
prM
ode
Proc
essi
ng M
ode
prm
odeS
trin
g N
o ″N
one″
v ″N
one″
v ″S
OSI
1″
v ″S
OSI
2″
v ″S
OSI
3″
Yes
Appendix F. Objects and data model used in the OnDemand XML file 403||
|||||||
||||||||
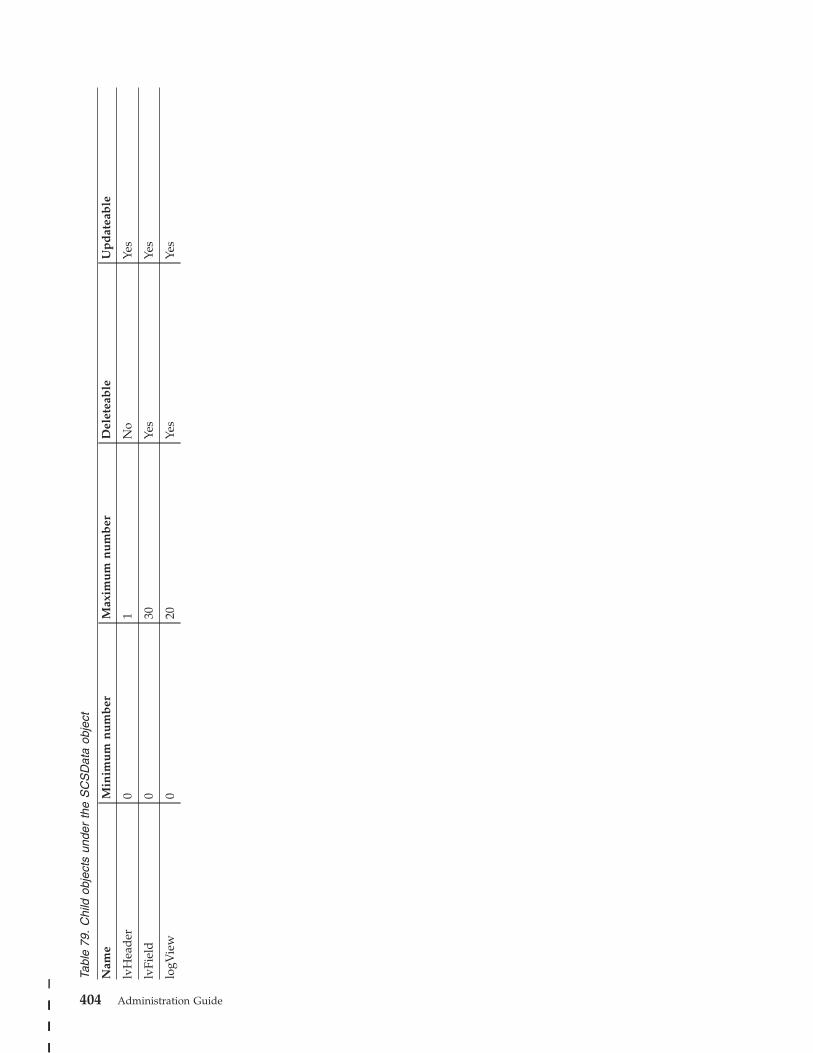
Tabl
e 79
. C
hild
ob
ject
s un
der
the
SC
SD
ata
obje
ct
Nam
e M
inim
um
n
um
ber
M
axim
um
n
um
ber
D
elet
eab
le
Up
dat
eab
le
lvH
ead
er
0 1
No
Yes
lvFi
eld
0
30
Yes
Yes
logV
iew
0
20
Yes
Yes
404 Administration Guide
||
|||||
|||||
|||||
See Table 85 on page 413, Table 86 on page 414, and Table 87 on page 415 for
descriptions of the lvHeader, lvField, and logView objects.
Appendix F. Objects and data model used in the OnDemand XML file 405
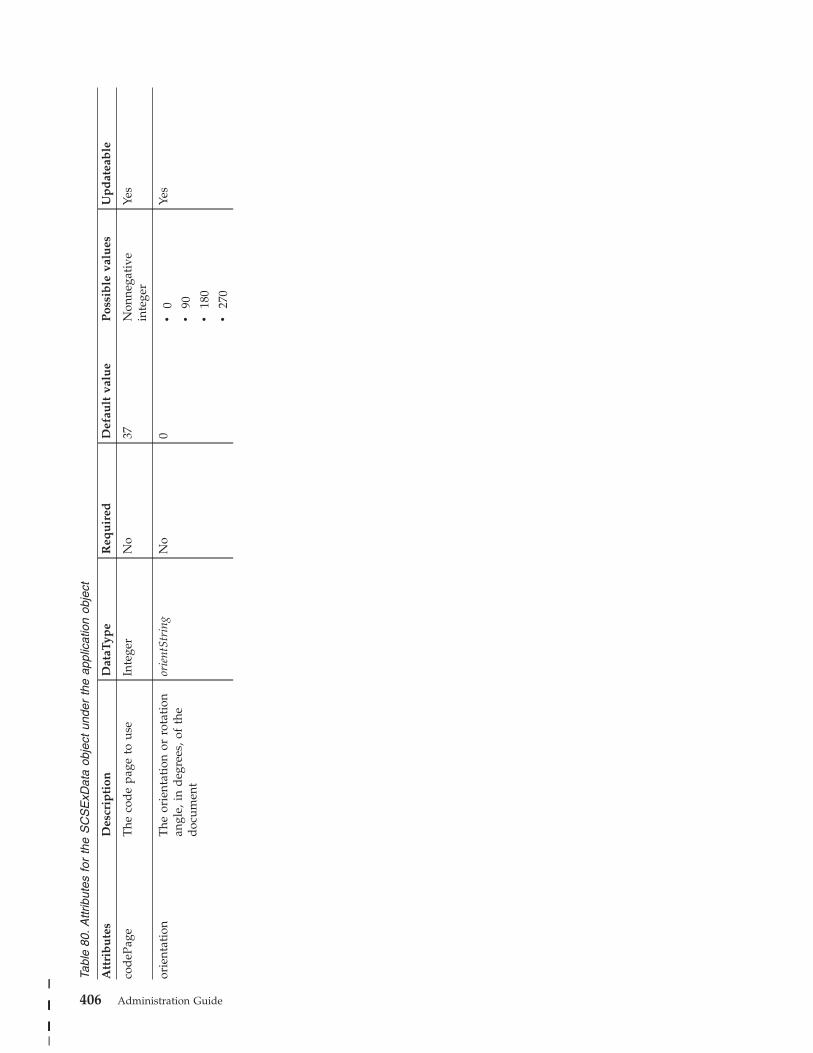
Tabl
e 80
. Attr
ibut
es fo
r th
e S
CS
ExD
ata
obje
ct un
der
the
appl
icat
ion
obje
ct
Att
rib
ute
s D
escr
ipti
on
Dat
aTyp
e R
equ
ired
D
efau
lt va
lue
Pos
sib
le va
lues
U
pd
atea
ble
cod
ePag
e T
he co
de
page
to
us
e In
tege
r N
o 37
N
onne
gati
ve
inte
ger
Yes
orie
ntat
ion
The
or
ient
atio
n or
ro
tati
on
angl
e, in
d
egre
es, o
f th
e d
ocum
ent
orie
ntSt
ring
N
o 0
v 0
v 90
v 18
0
v 27
0
Yes
406 Administration Guide
||
|||||||
||||||||

Tabl
e 80
. Attr
ibut
es fo
r th
e S
CS
ExD
ata
obje
ct un
der
the
appl
icat
ion
obje
ct (c
ontin
ued)
Att
rib
ute
s D
escr
ipti
on
Dat
aTyp
e R
equ
ired
D
efau
lt va
lue
Pos
sib
le va
lues
U
pd
atea
ble
pape
rSiz
e T
he ou
tput
pa
per
size
pa
perS
trin
g N
o ″A
utos
ize″
v A
3
v A
4 W
ide
v A
4
v A
5
v A
utos
ize
v B
4 W
ide
v B
4
v B
5
v C
ut Sh
eet
v E
uro
Fanf
old
v E
xecu
tive
1
v E
xecu
tive
2
v E
xecu
tive
3
v Fo
lio
v L
edge
r
v L
egal
W
ide
v L
egal
v L
ette
r W
ide
v L
ette
r
v N
arro
w
v Q
uart
o
v Sh
ort
v St
atem
ent
v St
atio
nery
v Ta
bloi
d
v W
ide
v 14
03W
v 14
03W
S
v 38
00N
v 38
00N
S
v 38
00W
v 38
00W
S
Yes
Appendix F. Objects and data model used in the OnDemand XML file 407|
|||||||
||||||
|
|

408 Administration Guide
|

Tabl
e 81
. C
hild
ob
ject
un
der
the
SC
SE
xDat
a ob
ject
Nam
e M
inim
um
n
um
ber
M
axim
um
n
um
ber
D
elet
eab
le
Up
dat
eab
le
logV
iew
0
20
Yes
Yes
Appendix F. Objects and data model used in the OnDemand XML file 409
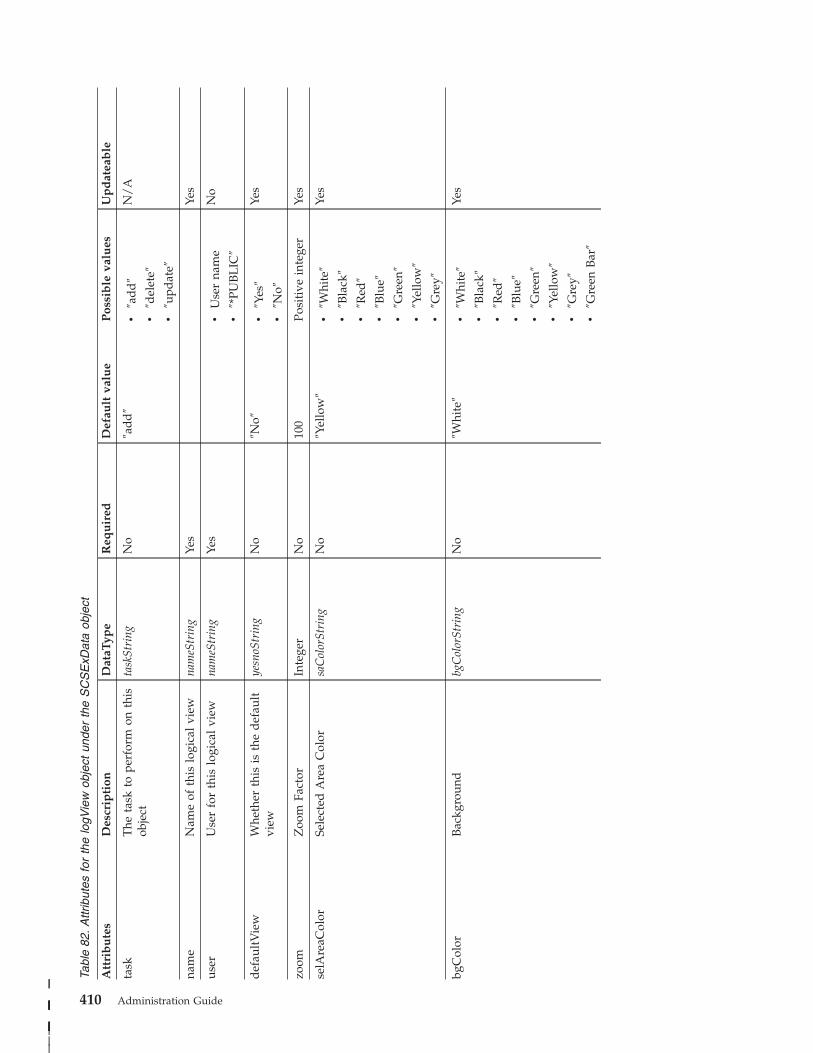
Tabl
e 82
. Attr
ibut
es fo
r th
e lo
gVie
w ob
ject
un
der
the
SC
SE
xDat
a ob
ject
Att
rib
ute
s D
escr
ipti
on
Dat
aTyp
e R
equ
ired
D
efau
lt va
lue
Pos
sib
le va
lues
U
pd
atea
ble
task
T
he ta
sk to
pe
rfor
m on
th
is
obje
ct
task
Stri
ng
No
″ad
d″
v ″a
dd
″
v ″d
elet
e″
v ″u
pdat
e″
N/
A
nam
e N
ame
of th
is lo
gica
l vi
ew
nam
eStr
ing
Yes
Yes
user
U
ser
for
this
lo
gica
l vi
ew
nam
eStr
ing
Yes
v U
ser
nam
e
v ″*
PUB
LIC
″
No
def
ault
Vie
w
Whe
ther
th
is is
th
e d
efau
lt
view
yesn
oStr
ing
No
″No″
v ″Y
es″
v ″N
o″
Yes
zoom
Z
oom
Fa
ctor
In
tege
r N
o 10
0 Po
siti
ve in
tege
r Ye
s
selA
reaC
olor
Se
lect
ed A
rea
Col
or
saC
olor
Stri
ng
No
″Yel
low
″ v
″Whi
te″
v ″B
lack
″
v ″R
ed″
v ″B
lue″
v ″G
reen
″
v ″Y
ello
w″
v ″G
rey″
Yes
bgC
olor
B
ackg
roun
d
bgC
olor
Stri
ng
No
″Whi
te″
v ″W
hite
″
v ″B
lack
″
v ″R
ed″
v ″B
lue″
v ″G
reen
″
v ″Y
ello
w″
v ″G
rey″
v ″G
reen
B
ar″
Yes
410 Administration Guide
||
|||||||
|||||||
|
|
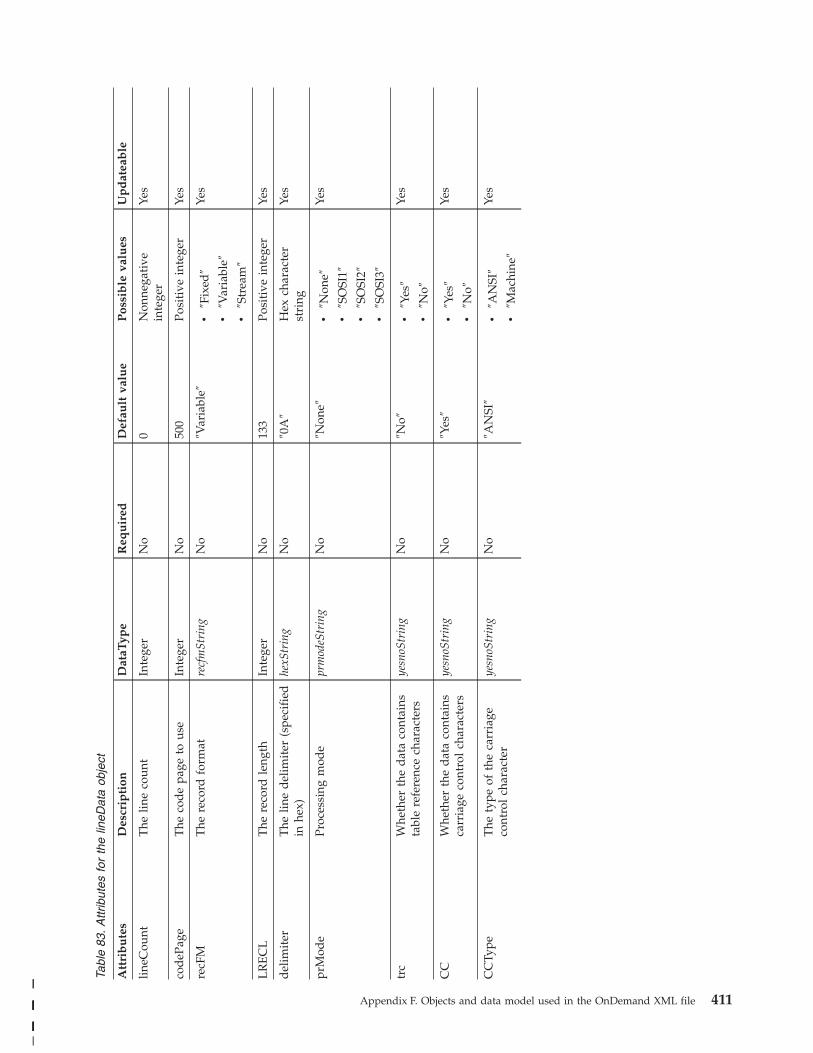
Tabl
e 83
. Attr
ibut
es fo
r th
e lin
eDat
a ob
ject
Att
rib
ute
s D
escr
ipti
on
Dat
aTyp
e R
equ
ired
D
efau
lt va
lue
Pos
sib
le va
lues
U
pd
atea
ble
lineC
ount
T
he lin
e co
unt
Inte
ger
No
0 N
onne
gati
ve
inte
ger
Yes
cod
ePag
e T
he co
de
page
to
us
e In
tege
r N
o 50
0 Po
siti
ve in
tege
r Ye
s
recF
M
The
re
cord
fo
rmat
re
cfm
Stri
ng
No
″Var
iabl
e″
v ″F
ixed
″
v ″V
aria
ble″
v ″S
trea
m″
Yes
LR
EC
L
The
re
cord
le
ngth
In
tege
r N
o 13
3 Po
siti
ve in
tege
r Ye
s
del
imit
er
The
lin
e d
elim
iter
(s
peci
fied
in he
x)
hexS
trin
g N
o ″0
A″
Hex
ch
arac
ter
stri
ng
Yes
prM
ode
Proc
essi
ng m
ode
prm
odeS
trin
g N
o ″N
one″
v ″N
one″
v ″S
OSI
1″
v ″S
OSI
2″
v ″S
OSI
3″
Yes
trc
Whe
ther
th
e d
ata
cont
ains
tabl
e re
fere
nce
char
acte
rs
yesn
oStr
ing
No
″No″
v ″Y
es″
v ″N
o″
Yes
CC
W
heth
er th
e d
ata
cont
ains
carr
iage
co
ntro
l ch
arac
ters
yesn
oStr
ing
No
″Yes
″ v
″Yes
″
v ″N
o″
Yes
CC
Type
T
he ty
pe of
th
e ca
rria
ge
cont
rol
char
acte
r ye
snoS
trin
g N
o ″A
NSI
″ v
″AN
SI″
v ″M
achi
ne″
Yes
Appendix F. Objects and data model used in the OnDemand XML file 411||
|||||||
||||||||

Tabl
e 84
. C
hild
ob
ject
s un
der
the
lineD
ata
obje
ct
Nam
e M
inim
um
n
um
ber
M
axim
um
n
um
ber
D
elet
eab
le
Up
dat
eab
le
lvH
ead
er
0 1
No
Yes
lvFi
eld
0
30
Yes
Yes
logV
iew
0
20
Yes
Yes
412 Administration Guide
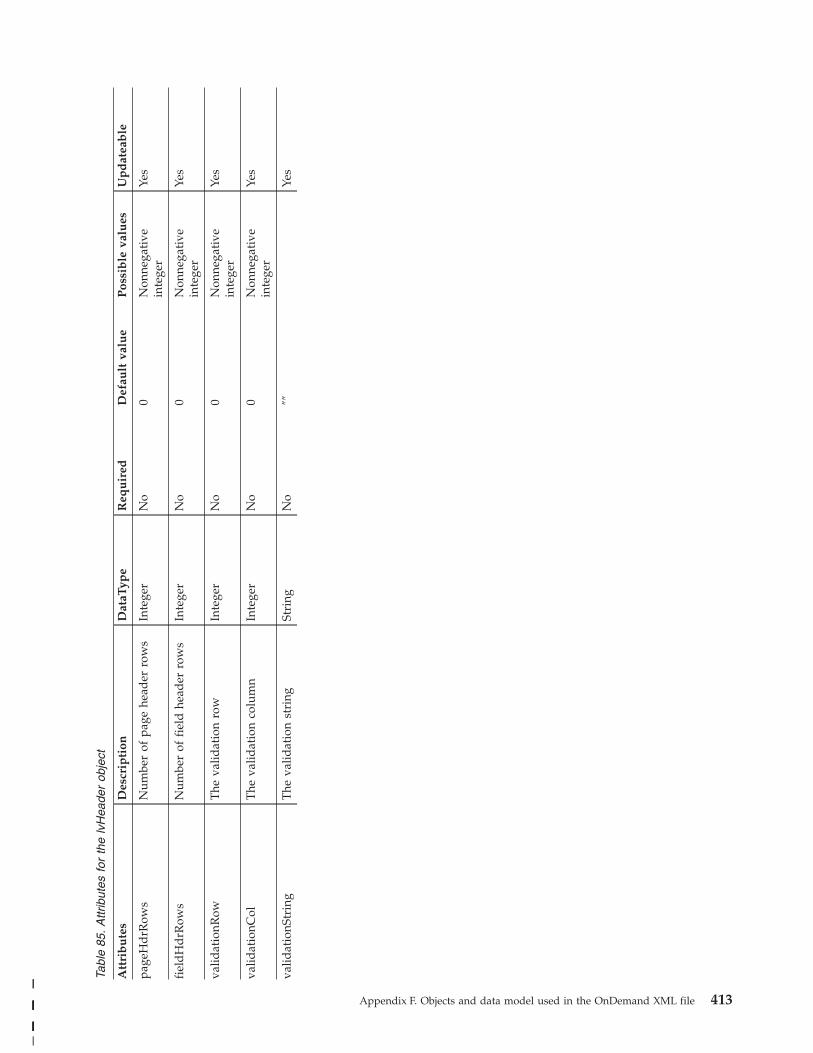
Tabl
e 85
. Attr
ibut
es fo
r th
e lv
Hea
der
obje
ct
Att
rib
ute
s D
escr
ipti
on
Dat
aTyp
e R
equ
ired
D
efau
lt va
lue
Pos
sib
le va
lues
U
pd
atea
ble
page
Hd
rRow
s N
umbe
r of
pa
ge he
ader
ro
ws
Inte
ger
No
0 N
onne
gati
ve
inte
ger
Yes
fiel
dH
drR
ows
Num
ber
of fi
eld
he
ader
ro
ws
Inte
ger
No
0 N
onne
gati
ve
inte
ger
Yes
valid
atio
nRow
T
he va
lidat
ion
row
In
tege
r N
o 0
Non
nega
tive
inte
ger
Yes
valid
atio
nCol
T
he va
lidat
ion
colu
mn
Inte
ger
No
0 N
onne
gati
ve
inte
ger
Yes
valid
atio
nStr
ing
The
va
lidat
ion
stri
ng
Stri
ng
No
″″
Yes
Appendix F. Objects and data model used in the OnDemand XML file 413||
|||||||
||||||||
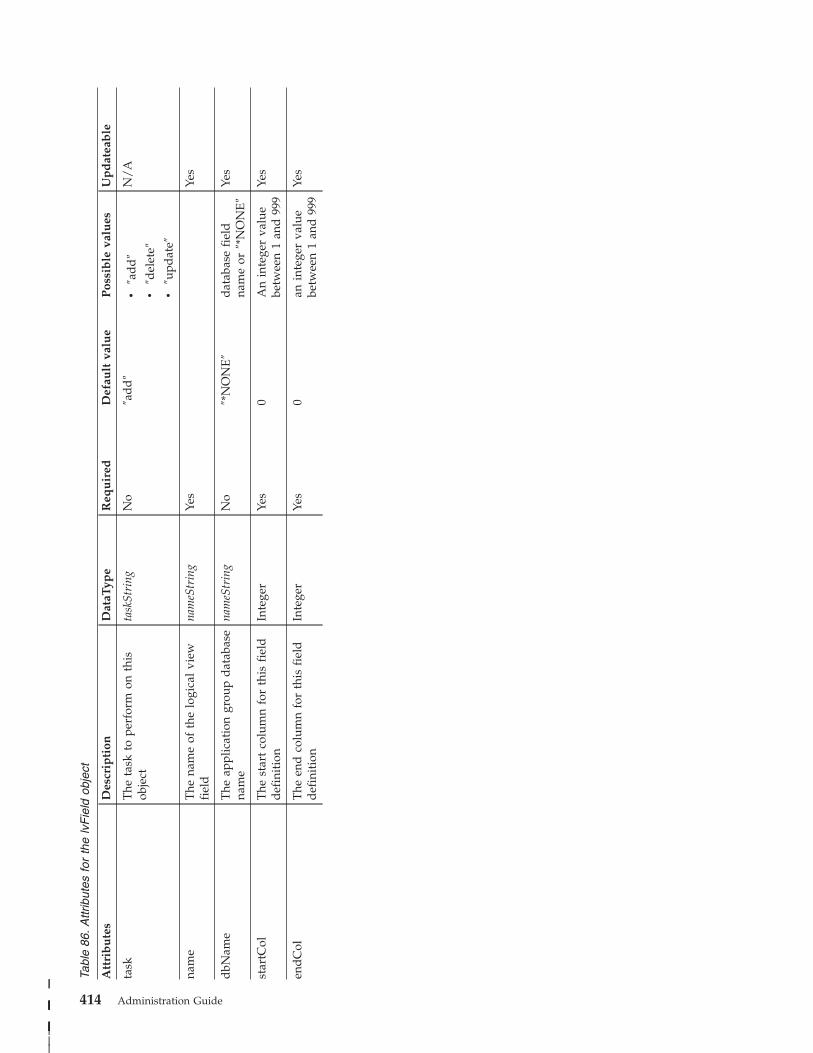
Tabl
e 86
. Attr
ibut
es fo
r th
e lv
Fie
ld ob
ject
Att
rib
ute
s D
escr
ipti
on
Dat
aTyp
e R
equ
ired
D
efau
lt va
lue
Pos
sib
le va
lues
U
pd
atea
ble
task
T
he ta
sk to
pe
rfor
m on
th
is
obje
ct
task
Stri
ng
No
″ad
d″
v ″a
dd
″
v ″d
elet
e″
v ″u
pdat
e″
N/
A
nam
e T
he na
me
of th
e lo
gica
l vi
ew
fiel
d
nam
eStr
ing
Yes
Yes
dbN
ame
The
ap
plic
atio
n gr
oup
dat
abas
e na
me
nam
eStr
ing
No
″*N
ON
E″
dat
abas
e fi
eld
nam
e or
″*
NO
NE
″ Ye
s
star
tCol
T
he st
art
colu
mn
for
this
fi
eld
def
init
ion
Inte
ger
Yes
0 A
n in
tege
r va
lue
betw
een
1 an
d 99
9 Ye
s
end
Col
T
he en
d co
lum
n fo
r th
is fi
eld
def
init
ion
Inte
ger
Yes
0 an
in
tege
r va
lue
betw
een
1 an
d 99
9 Ye
s
414 Administration Guide
||
|||||||
|||||||
|
|

Tabl
e 87
. Attr
ibut
es fo
r th
e lo
gVie
w ob
ject
Att
rib
ute
s D
escr
ipti
on
Dat
aTyp
e R
equ
ired
D
efau
lt va
lue
Pos
sib
le va
lues
U
pd
atea
ble
task
T
he ta
sk to
pe
rfor
m
on th
is ob
ject
task
Stri
ng
No
″ad
d″
v ″a
dd
″
v ″d
elet
e″
v ″u
pdat
e″
N/
A
nam
e N
ame
of th
is lo
gica
l vi
ew
nam
eStr
ing
Yes
Yes
user
us
er fo
r th
is lo
gica
l (o
r PU
BL
IC)
nam
eStr
ing
Yes
v U
ser
nam
e
v ″*
PUB
LIC
″
No
def
ault
Vie
w
Whe
ther
th
is is
th
e d
efau
lt vi
ew
yesN
oStr
ing
No
″No″
v Ye
s
v N
o
Yes
zoom
Z
oom
fa
ctor
In
tege
r N
o 10
0 Po
siti
ve in
tege
r Ye
s
selA
reaC
olor
Se
lect
ed ar
ea co
lor
saC
olor
Stri
ng
No
″Yel
low
″ v
″Whi
te″
v ″B
lack
″
v ″R
ed″
v ″B
lue″
v ″G
reen
″
v ″Y
ello
w″
v ″G
rey″
Yes
bgC
olor
B
ackg
roun
d co
lor
bgC
olor
Stri
ng
No
″Whi
te″
v ″W
hite
″
v ″B
lack
″
v ″R
ed″
v ″B
lue″
v ″G
reen
″
v ″Y
ello
w″
v ″G
rey″
v ″G
reen
B
ar″
Yes
Appendix F. Objects and data model used in the OnDemand XML file 415||
|||||||
|||||||
|
|

Tabl
e 87
. Attr
ibut
es fo
r th
e lo
gVie
w ob
ject
(c
ontin
ued)
Att
rib
ute
s D
escr
ipti
on
Dat
aTyp
e R
equ
ired
D
efau
lt va
lue
Pos
sib
le va
lues
U
pd
atea
ble
head
ingC
olor
H
ead
ing
colo
r hd
gCol
orSt
ring
N
o ″B
G C
olor
″ v
″BG
C
olor
″
v ″W
hite
″
v ″B
lack
″
v ″R
ed″
v ″B
lue″
v ″G
reen
″
v ″Y
ello
w″
v ″G
rey″
Yes
text
Fid
elit
y Te
xt fi
del
ity
fidel
ityS
trin
g N
o ″L
ine″
v ″L
ine″
v ″W
ord
″
v ″C
har″
v ″D
raft
″
v ″2
40-p
el″
Yes
over
stri
ke
Text
ov
erst
rike
opti
on
over
stri
keSt
ring
N
o ″S
epar
ate
Lin
es″
v ″S
epar
ate
Lin
es″
v ″M
erge
L
ines
″
v ″O
vers
trik
e L
ines
″
Yes
fiel
dO
rder
A
st
ring
sh
owin
g th
e or
der
in
w
hich
the
fiel
ds
are
to be
dis
play
ed
Stri
ng
No
″″
Yes
lock
Hea
der
W
heth
er th
e he
ader
lines
sh
ould
be
lock
ed in
pl
ace
dur
ing
scro
lling
yesn
oStr
ing
No
″No″
v ″Y
es″
v ″N
o″
Yes
lock
Fiel
d
Num
ber
of fi
eld
s th
at yo
u w
ant
to
lock
in
pl
ace
Inte
ger
No
0 N
onne
gati
ve in
tege
r Ye
s
416 Administration Guide|
|||||||
||||||
|
|

Tabl
e 88
. Attr
ibut
es fo
r th
e af
pDat
a ob
ject
Att
rib
ute
s D
escr
ipti
on
Dat
aTyp
e R
equ
ired
D
efau
lt va
lue
Pos
sib
le va
lues
U
pd
atea
ble
orie
ntat
ion
The
or
ient
atio
n or
ro
tati
on
angl
e, in
d
egre
es, o
f th
e d
ocum
ent
orie
ntSt
ring
N
o 0
v ″0
″
v ″9
0″
v ″1
80″
v ″2
70″
Yes
Appendix F. Objects and data model used in the OnDemand XML file 417||
|||||||
||||
||||
|
|
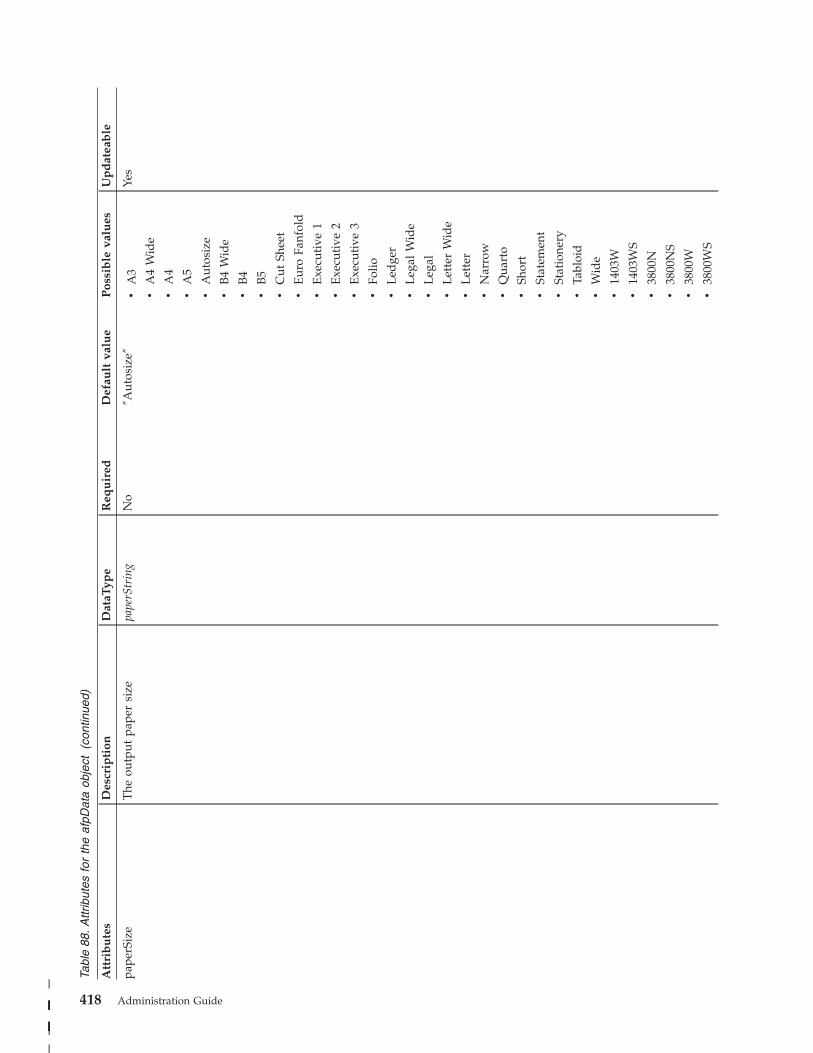
Tabl
e 88
. Attr
ibut
es fo
r th
e af
pDat
a ob
ject
(c
ontin
ued)
Att
rib
ute
s D
escr
ipti
on
Dat
aTyp
e R
equ
ired
D
efau
lt va
lue
Pos
sib
le va
lues
U
pd
atea
ble
pape
rSiz
e T
he ou
tput
pa
per
size
pa
perS
trin
g N
o ″A
utos
ize″
v A
3
v A
4 W
ide
v A
4
v A
5
v A
utos
ize
v B
4 W
ide
v B
4
v B
5
v C
ut Sh
eet
v E
uro
Fanf
old
v E
xecu
tive
1
v E
xecu
tive
2
v E
xecu
tive
3
v Fo
lio
v L
edge
r
v L
egal
W
ide
v L
egal
v L
ette
r W
ide
v L
ette
r
v N
arro
w
v Q
uart
o
v Sh
ort
v St
atem
ent
v St
atio
nery
v Ta
bloi
d
v W
ide
v 14
03W
v 14
03W
S
v 38
00N
v 38
00N
S
v 38
00W
v 38
00W
S
Yes
418 Administration Guide|
|||||||
||||||
|
|

Appendix F. Objects and data model used in the OnDemand XML file 419|
Tabl
e 89
. C
hild
ob
ject
s un
der
the
afpD
ata
obje
ct
Nam
e M
inim
um
n
um
ber
M
axim
um
n
um
ber
D
elet
eab
le
Up
dat
eab
le
logV
iew
0
20
Yes
Yes
420 Administration Guide

Tabl
e 90
. Attr
ibut
es fo
r th
e lo
gVie
w ob
ject
un
der
the
afpD
ata
obje
ct
Att
rib
ute
s D
escr
ipti
on
Dat
aTyp
e R
equ
ired
D
efau
lt va
lue
Pos
sib
le va
lues
U
pd
atea
ble
task
T
he ta
sk to
pe
rfor
m on
th
is
obje
ct
task
Stri
ng
No
″ad
d″
v ″a
dd
″
v d
elet
e
v ″u
pdat
e″
N/
A
nam
e N
ame
of th
is lo
gica
l vi
ew
nam
eStr
ing
Yes
Yes
user
U
ser
for
this
lo
gica
l vi
ew (o
r PU
BL
IC)
nam
eStr
ing
Yes
v U
ser
nam
e
v ″*
PUB
LIC
″
No
def
ault
Vie
w
Whe
ther
th
is is
th
e d
efau
lt
view
yesn
oStr
ing
No
″No″
v Ye
s
v N
o
Yes
zoom
Z
oom
fa
ctor
In
tege
r N
o 10
0 Po
siti
ve in
tege
r Ye
s
selA
reaC
olor
Se
lect
ed ar
ea co
lor
saC
olor
Stri
ng
No
″Yel
low
″ v
″Whi
te″
v ″B
lack
″
v ″R
ed″
v ″B
lue″
v ″G
reen
″
v ″Y
ello
w″
v ″G
rey″
Yes
bgC
olor
B
ackg
roun
d co
lor
bgC
olor
Stri
ng
No
″Whi
te″
v ″W
hite
″
v ″B
lack
″
v ″R
ed″
v ″B
lue″
v ″G
reen
″
v ″Y
ello
w″
v ″G
rey″
v ″G
reen
B
ar″
Yes
Appendix F. Objects and data model used in the OnDemand XML file 421||
|||||||
|||||||
|
|

Tabl
e 90
. Attr
ibut
es fo
r th
e lo
gVie
w ob
ject
un
der
the
afpD
ata
obje
ct (c
ontin
ued)
Att
rib
ute
s D
escr
ipti
on
Dat
aTyp
e R
equ
ired
D
efau
lt va
lue
Pos
sib
le va
lues
U
pd
atea
ble
imag
eCol
or
Imag
e co
lor
imgC
olor
Stri
ng
No
″Bla
ck″
v ″B
lack
″
v ″R
ed″
v ″B
lue″
v ″G
reen
″
v ″Y
ello
w″
v ″M
agen
ta″
v ″C
yan″
Yes
text
Fid
elit
y Te
xt fi
del
ity
fidel
ityS
trin
g N
o ″L
ine″
v ″L
ine″
v ″W
ord
″
v ″C
har″
v ″D
raft
″
v ″2
40-p
el″
Yes
imag
eInt
ensi
ty
Imag
e in
tens
ity
inte
nsit
yStr
ing
No
″Nor
mal
″ v
″Nor
mal
″
v ″L
ight
″
v ″N
one″
Yes
copy
Gro
up
The
co
py gr
oup
for
the
doc
umen
t In
tege
r N
o 1
Non
nega
tive
inte
ger
Yes
422 Administration Guide|
|||||||
||||||
|
|

Tabl
e 91
. Attr
ibut
es fo
r th
e pd
fDat
a ob
ject
Att
rib
ute
s D
escr
ipti
on
Dat
aTyp
e R
equ
ired
D
efau
lt va
lue
Pos
sib
le va
lues
U
pd
atea
ble
orie
ntat
ion
The
or
ient
atio
n or
ro
tati
on
angl
e, in
d
egre
es, o
f th
e d
ocum
ent
orie
ntSt
ring
N
o 0
v 0
v 90
v 18
0
v 27
0
Yes
Appendix F. Objects and data model used in the OnDemand XML file 423||
|||||||
||||
||||
|
|
Tabl
e 92
. C
hild
ob
ject
s un
der
the
pdfD
ata
obje
ct
Nam
e M
inim
um
n
um
ber
M
axim
um
n
um
ber
D
elet
eab
le
Up
dat
eab
le
logV
iew
0
Unb
ound
ed
Yes
Yes
424 Administration Guide
Tabl
e 93
. Attr
ibut
es fo
r th
e lo
gVie
w ob
ject
un
der
pdfD
ata
Att
rib
ute
s D
escr
ipti
on
Dat
aTyp
e R
equ
ired
D
efau
lt va
lue
Pos
sib
le va
lues
U
pd
atea
ble
task
T
he ta
sk to
pe
rfor
m on
th
is
obje
ct
task
Stri
ng
No
″ad
d″
v ″a
dd
″
v d
elet
e
v ″u
pdat
e″
N/
A
nam
e N
ame
of th
is lo
gica
l vi
ew
nam
eStr
ing
Yes
Yes
user
U
ser
for
this
lo
gica
l vi
ew (o
r PU
BL
IC)
nam
eStr
ing
Yes
v U
ser
nam
e
v ″*
PUB
LIC
″
No
def
ault
Vie
w
Whe
ther
th
is is
th
e d
efau
lt
view
yesn
oStr
ing
No
″No″
v Ye
s
v N
o
Yes
zoom
Z
oom
fa
ctor
In
tege
r N
o 10
0 Po
siti
ve in
tege
r Ye
s
selA
reaC
olor
Se
lect
ed ar
ea co
lor
saC
olor
Stri
ng
No
″Yel
low
″ v
″Whi
te″
v ″B
lack
″
v ″R
ed″
v ″B
lue″
v ″G
reen
″
v ″Y
ello
w″
v ″G
rey″
Yes
Appendix F. Objects and data model used in the OnDemand XML file 425||
|||||||
|||||||
|
|

Tabl
e 94
. Attr
ibut
es fo
r th
e im
ageD
ata
obje
ct
Att
rib
ute
s D
escr
ipti
on
Dat
aTyp
e R
equ
ired
D
efau
lt va
lue
Pos
sib
le va
lues
U
pd
atea
ble
orie
ntat
ion
The
or
ient
atio
n or
ro
tati
on
angl
e, in
d
egre
es, o
f th
e d
ocum
ent
orie
ntSt
ring
N
o 0
v 0
v 90
v 18
0
v 27
0
Yes
426 Administration Guide
||
|||||||
||||
||||
|
|
Tabl
e 95
. C
hild
ob
ject
s un
der
the
imag
eDat
a ob
ject
Nam
e M
inim
um
n
um
ber
M
axim
um
n
um
ber
D
elet
eab
le
Up
dat
eab
le
logV
iew
0
20
Yes
Yes
Appendix F. Objects and data model used in the OnDemand XML file 427
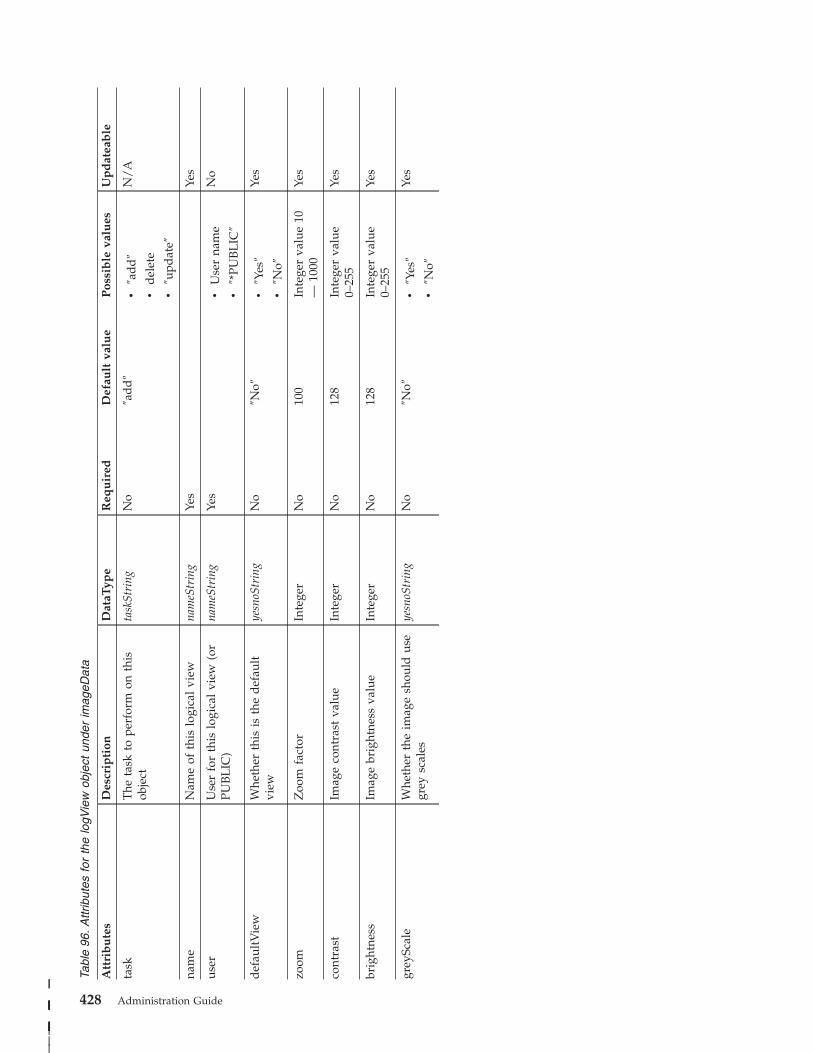
Tabl
e 96
. Attr
ibut
es fo
r th
e lo
gVie
w ob
ject
un
der
imag
eDat
a
Att
rib
ute
s D
escr
ipti
on
Dat
aTyp
e R
equ
ired
D
efau
lt va
lue
Pos
sib
le va
lues
U
pd
atea
ble
task
T
he ta
sk to
pe
rfor
m on
th
is
obje
ct
task
Stri
ng
No
″ad
d″
v ″a
dd
″
v d
elet
e
v ″u
pdat
e″
N/
A
nam
e N
ame
of th
is lo
gica
l vi
ew
nam
eStr
ing
Yes
Yes
user
U
ser
for
this
lo
gica
l vi
ew (o
r PU
BL
IC)
nam
eStr
ing
Yes
v U
ser
nam
e
v ″*
PUB
LIC
″
No
def
ault
Vie
w
Whe
ther
th
is is
th
e d
efau
lt
view
yesn
oStr
ing
No
″No″
v ″Y
es″
v ″N
o″
Yes
zoom
Z
oom
fa
ctor
In
tege
r N
o 10
0 In
tege
r va
lue
10
— 10
00
Yes
cont
rast
Im
age
cont
rast
va
lue
Inte
ger
No
128
Inte
ger
valu
e 0–
255
Yes
brig
htne
ss
Imag
e br
ight
ness
va
lue
Inte
ger
No
128
Inte
ger
valu
e 0–
255
Yes
grey
Scal
e W
heth
er th
e im
age
shou
ld us
e gr
ey sc
ales
yesn
oStr
ing
No
″No″
v ″Y
es″
v ″N
o″
Yes
428 Administration Guide
||
|||||||
|||||||
|
|

Tabl
e 97
. Attr
ibut
es fo
r th
e ud
Dat
a ob
ject
Att
rib
ute
s D
escr
ipti
on
Dat
aTyp
e R
equ
ired
D
efau
lt va
lue
Pos
sib
le va
lues
U
pd
atea
ble
file
Ext
Fi
le ex
tens
ion
fileE
xtSt
ring
Ye
s Ye
s
Appendix F. Objects and data model used in the OnDemand XML file 429||
|||||||
||||||||

Tabl
e 98
. Attr
ibut
es fo
r th
e in
dexP
arm
ob
ject
Att
rib
ute
s D
escr
ipti
on
Dat
aTyp
e R
equ
ired
D
efau
lt va
lue
Pos
sib
le va
lues
U
pd
atea
ble
task
T
he ta
sk to
pe
rfor
m on
th
is
obje
ct
task
Stri
ng
No
″ad
d″
v ″a
dd
″
v ″d
elet
e″
v ″u
pdat
e″
n/a
<ch
arac
ter
dat
a>
The
ch
arac
ter
dat
a th
at
repr
esen
ts th
e in
dex
para
met
ers
for
this
ap
plic
atio
n
stri
ng
Yes
Yes
430 Administration Guide

Important: The index parameters are not represented by any attribute data. They
are represented by the character data field between the <indexParm>
and </indexParm> fields.
Appendix F. Objects and data model used in the OnDemand XML file 431

Tabl
e 99
. Attr
ibut
es fo
r th
e pr
epro
cess
Par
m ob
ject
Att
rib
ute
s D
escr
ipti
on
Dat
aTyp
e R
equ
ired
D
efau
lt va
lue
Pos
sib
le va
lues
U
pd
atea
ble
dbN
ame
App
licat
ion
grou
p d
atab
ase
nam
e db
Stri
ng
Yes
No
load
IDN
ame
Loa
d ID
na
me
nam
estr
ing
No
dbN
ame
Yes
def
ault
Val
ue
The
d
efau
lt va
lue
stri
ng
No
Bas
ed on
d
ata
type
Ye
s
stri
p T
he em
bed
ded
char
acte
rs to
re
mov
e st
ring
N
o B
ased
on
d
ata
type
Ye
s
lead
ing
The
le
adin
g ch
arac
ters
to
rem
ove
stri
ng
No
″″
Yes
trai
ling
The
tr
ailin
g ch
arac
ters
to
rem
ove
stri
ng
No
″″
Yes
div
ideB
y T
he va
lue
to d
ivid
e by
if
the
fiel
d is
nu
mer
ic
Inte
ger
No
1 or
10
0 ba
sed
on
d
ata
type
Po
siti
ve in
tege
r Ye
s
form
at
The
d
ate
or ti
me
form
at
to us
e st
ring
N
o ″″
Ye
s
432 Administration Guide
||
|||||||
||||||||
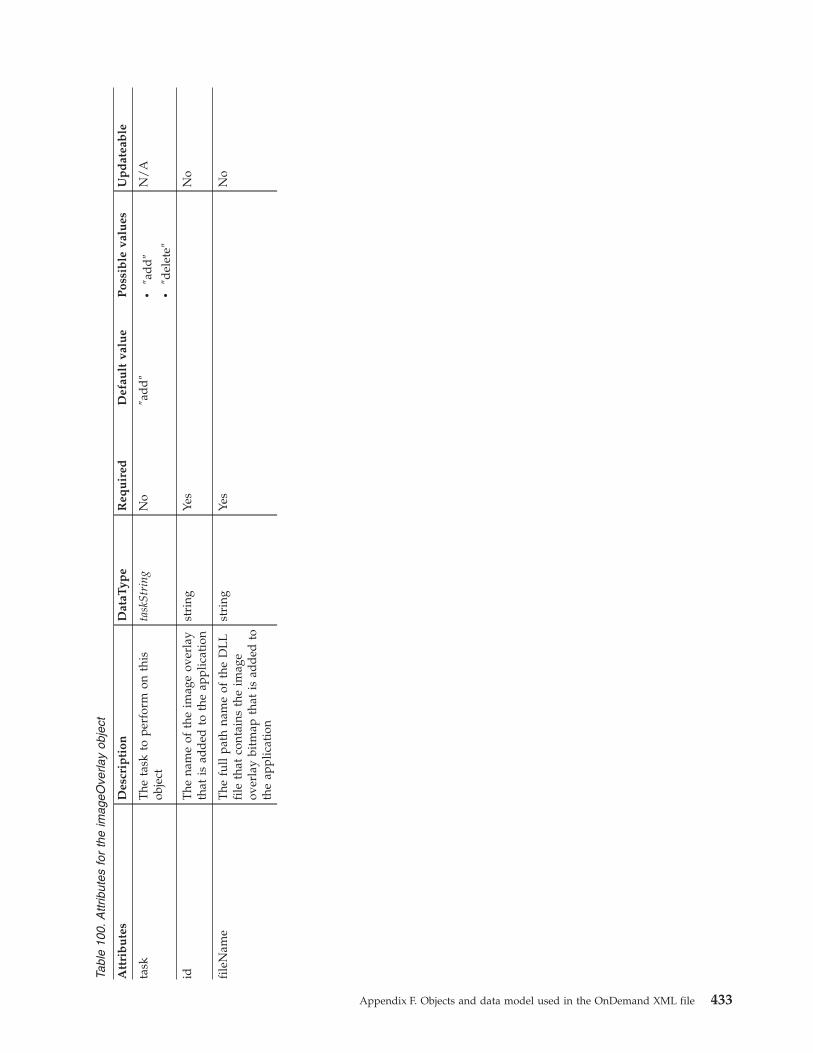
Tabl
e 10
0. A
ttrib
utes
fo
r th
e im
ageO
verla
y ob
ject
Att
rib
ute
s D
escr
ipti
on
Dat
aTyp
e R
equ
ired
D
efau
lt va
lue
Pos
sib
le va
lues
U
pd
atea
ble
task
T
he ta
sk to
pe
rfor
m on
th
is
obje
ct
task
Stri
ng
No
″ad
d″
v ″a
dd
″
v ″d
elet
e″
N/
A
id
The
na
me
of th
e im
age
over
lay
that
is
ad
ded
to
th
e ap
plic
atio
n st
ring
Ye
s N
o
file
Nam
e T
he fu
ll pa
th na
me
of th
e D
LL
file
th
at co
ntai
ns th
e im
age
over
lay
bitm
ap th
at is
ad
ded
to
the
appl
icat
ion
stri
ng
Yes
No
Appendix F. Objects and data model used in the OnDemand XML file 433

Application group object
434 Administration Guide

Tabl
e 10
1. A
ttrib
utes
fo
r th
e ap
plic
atio
nGro
up ob
ject
Nam
e D
escr
ipti
on
Dat
aTyp
e R
equ
ired
D
efau
lt va
lue
Pos
sib
le va
lues
U
pd
atea
ble
nam
e N
ame
of th
e ap
plic
atio
n gr
oup
nam
eStr
ing
Yes
Yes
dat
abas
e N
ame
of th
e d
atab
ase
nam
eStr
ing
No
″″
Yes
des
crip
tion
D
escr
ipti
on of
th
e ap
plic
atio
n gr
oup
desc
Stri
ng
No
″″
Yes
stor
ageS
et
Nam
e of
th
e st
orag
e se
t to
us
e fo
r th
is
appl
icat
ion
grou
p
nam
eStr
ing
No
″″
Yes
cach
eDat
aLen
H
ow m
any
day
s to
cach
e th
e d
ata
for
cach
eDat
aLen
Val
ue
No
90
v ″N
o C
ache
″
v ″S
earc
h C
ache
″
v A
po
siti
ve in
tege
r
Yes
expi
rati
onTy
pe
Det
erm
ines
ho
w d
ata
is
del
eted
fr
om th
e ap
plic
atio
n gr
oup
expT
ypeS
trin
g N
o ″L
oad
″ v
″Loa
d″
v ″S
egm
ent″
v ″D
ocum
ent″
v St
orag
e M
anag
er
No
expi
rati
onD
ate
The
nu
mbe
r of
d
ays
that
O
nDem
and
ke
eps
doc
umen
ts, r
esou
rces
, an
d in
dex
d
ata
in th
e ap
plic
atio
n gr
oup
expD
ateV
alue
N
o 90
v ″N
ever
E
xpir
e″
v A
po
siti
ve in
tege
r
Yes
logR
etri
eval
W
heth
er d
ocum
ent
retr
ieva
l m
essa
ges
shou
ld be
lo
gged
yesn
oStr
ing
No
″Yes
″ v
″Yes
″
v ″N
o″
Yes
logB
ulkR
etri
eval
W
heth
er d
ocum
ent
bulk
re
trie
val
mes
sage
s sh
ould
be
lo
gged
yesn
oStr
ing
No
″Yes
″ v
″Yes
″
v ″N
o″
Yes
logD
BQ
ueri
esA
fter
W
heth
er d
atab
ase
quer
ies
(aft
er th
e qu
ery)
sh
ould
be
logg
ed
yesn
oStr
ing
No
″No″
v ″Y
es″
v ″N
o″
Yes
logD
BQ
ueri
esB
efor
e W
heth
er d
ocum
ent
dat
abas
e qu
erie
s sh
ould
be
lo
gged
yesn
oStr
ing
No
″No″
v ″Y
es″
v ″N
o″
Yes
Appendix F. Objects and data model used in the OnDemand XML file 435||
|||||||
||||||||

Tabl
e 10
1. A
ttrib
utes
fo
r th
e ap
plic
atio
nGro
up ob
ject
(c
ontin
ued)
Nam
e D
escr
ipti
on
Dat
aTyp
e R
equ
ired
D
efau
lt va
lue
Pos
sib
le va
lues
U
pd
atea
ble
logS
erve
rPri
ntin
g W
heth
er d
ocum
ent
serv
er pr
inti
ng
mes
sage
s sh
ould
be
doc
umen
ted
yesn
oStr
ing
No
″Yes
″ v
″Yes
″
v ″N
o″
Yes
logI
ndex
Ad
d
Whe
ther
d
ocum
ent
ind
ex ad
d m
essa
ges
shou
ld be
d
ocum
ente
d
yesn
oStr
ing
No
″Yes
″ v
″Yes
″
v ″N
o″
Yes
logI
ndex
Upd
ate
Whe
ther
d
ocum
ent
ind
ex up
dat
e m
essa
ges
shou
ld be
d
ocum
ente
d
yesn
oStr
ing
No
″Yes
″ v
″Yes
″
v ″N
o″
Yes
logI
ndex
Del
ete
Whe
ther
d
ocum
ent
ind
ex d
elet
e m
essa
ges
shou
ld be
d
ocum
ente
d
yesn
oStr
ing
No
″Yes
″ v
″Yes
″
v ″N
o″
Yes
logO
bjec
tSto
re
Whe
ther
ob
ject
st
ore
mes
sage
s sh
ould
be
doc
umen
ted
yesn
oStr
ing
No
″Yes
″ v
″Yes
″
v ″N
o″
Yes
logO
bjec
tRet
riev
e W
heth
er ob
ject
re
trie
ve
mes
sage
s sh
ould
be
logg
ed
yesn
oStr
ing
No
″Yes
″ v
″Yes
″
v ″N
o″
Yes
logA
nnot
Ad
d
Whe
ther
an
nota
tion
add
m
essa
ges
shou
ld
be lo
gged
yesn
oStr
ing
No
″Yes
″ v
″Yes
″
v ″N
o″
Yes
logA
nnot
Upd
ate
Whe
ther
an
nota
tion
upd
ate
mes
sage
s sh
ould
be
lo
gged
yesn
oStr
ing
No
″Yes
″ v
″Yes
″
v ″N
o″
Yes
logA
nnot
Del
ete
Whe
ther
an
nota
tion
del
ete
mes
sage
s sh
ould
be lo
gged
yesn
oStr
ing
No
″Yes
″ v
″Yes
″
v ″N
o″
Yes
max
DB
Row
s T
he m
axim
um nu
mbe
r of
d
atab
ase
row
s fo
r th
is ap
plic
atio
n gr
oup
Inte
ger
No
1000
0000
v Po
siti
ve in
tege
r
v ″S
ingl
e ta
ble
for
all
load
s″
Yes
load
sPer
Tabl
e T
he am
ount
of
lo
ads
per
tabl
e lo
adsS
trin
g N
o ″M
ulti
ple″
v ″S
ingl
e″
v ″M
ulti
ple″
No
436 Administration Guide|
|||||||
||||
||||
|
|
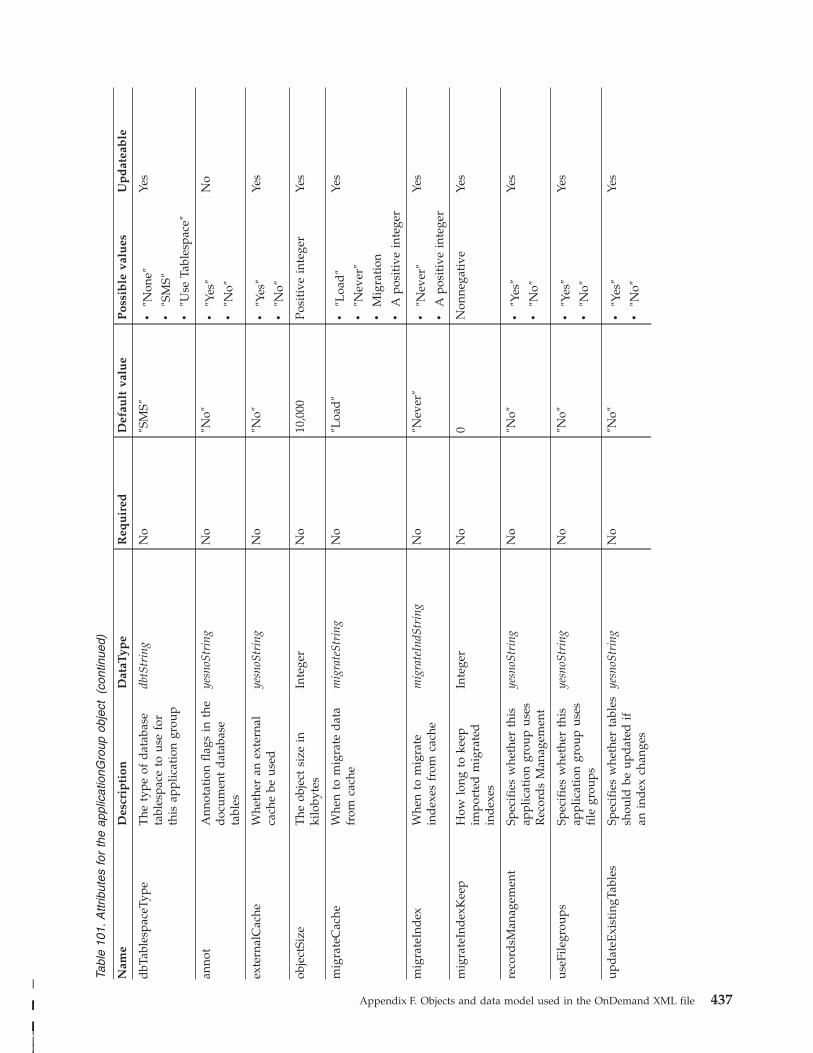
Tabl
e 10
1. A
ttrib
utes
fo
r th
e ap
plic
atio
nGro
up ob
ject
(c
ontin
ued)
Nam
e D
escr
ipti
on
Dat
aTyp
e R
equ
ired
D
efau
lt va
lue
Pos
sib
le va
lues
U
pd
atea
ble
dbT
able
spac
eTyp
e T
he ty
pe of
d
atab
ase
tabl
espa
ce to
us
e fo
r th
is ap
plic
atio
n gr
oup
dbtS
trin
g N
o ″S
MS″
v ″N
one″
v ″S
MS″
v ″U
se Ta
bles
pace
″
Yes
anno
t A
nnot
atio
n fl
ags
in th
e d
ocum
ent
dat
abas
e ta
bles
yesn
oStr
ing
No
″No″
v ″Y
es″
v ″N
o″
No
exte
rnal
Cac
he
Whe
ther
an
ex
tern
al
cach
e be
us
ed
yesn
oStr
ing
No
″No″
v ″Y
es″
v ″N
o″
Yes
obje
ctSi
ze
The
ob
ject
si
ze in
kilo
byte
s In
tege
r N
o 10
,000
Po
siti
ve in
tege
r Ye
s
mig
rate
Cac
he
Whe
n to
m
igra
te d
ata
from
ca
che
mig
rate
Stri
ng
No
″Loa
d″
v ″L
oad
″
v ″N
ever
″
v M
igra
tion
v A
po
siti
ve in
tege
r
Yes
mig
rate
Ind
ex
Whe
n to
m
igra
te
ind
exes
fr
om ca
che
mig
rate
IndS
trin
g N
o ″N
ever
″ v
″Nev
er″
v A
po
siti
ve in
tege
r
Yes
mig
rate
Ind
exK
eep
How
lo
ng to
ke
ep
impo
rted
m
igra
ted
ind
exes
Inte
ger
No
0 N
onne
gati
ve
Yes
reco
rdsM
anag
emen
t Sp
ecif
ies
whe
ther
th
is
appl
icat
ion
grou
p us
es
Rec
ord
s M
anag
emen
t
yesn
oStr
ing
No
″No″
v ″Y
es″
v ″N
o″
Yes
useF
ilegr
oups
Sp
ecif
ies
whe
ther
th
is
appl
icat
ion
grou
p us
es
file
gr
oups
yesn
oStr
ing
No
″No″
v ″Y
es″
v ″N
o″
Yes
upd
ateE
xist
ingT
able
s Sp
ecif
ies
whe
ther
ta
bles
shou
ld be
up
dat
ed if
an in
dex
ch
ange
s
yesn
oStr
ing
No
″No″
v ″Y
es″
v ″N
o″
Yes
Appendix F. Objects and data model used in the OnDemand XML file 437|
|||||||
||||
||||
|
|
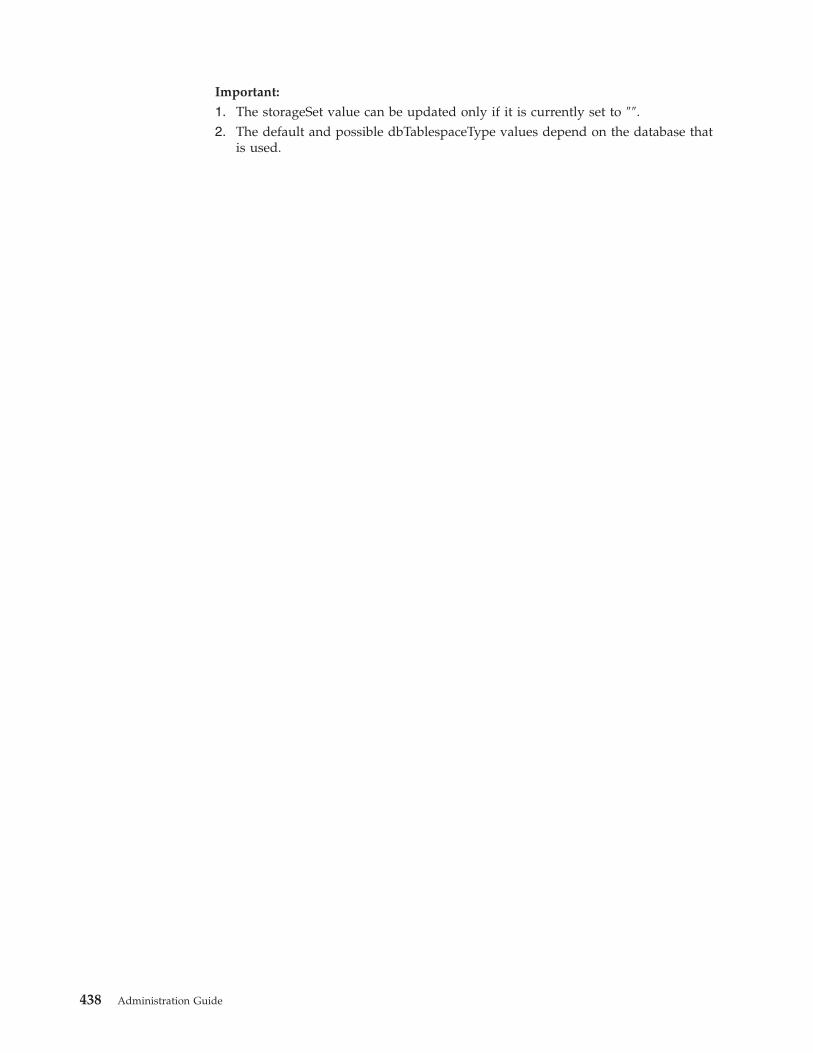
Important:
1. The storageSet value can be updated only if it is currently set to ″″.
2. The default and possible dbTablespaceType values depend on the database that
is used.
438 Administration Guide
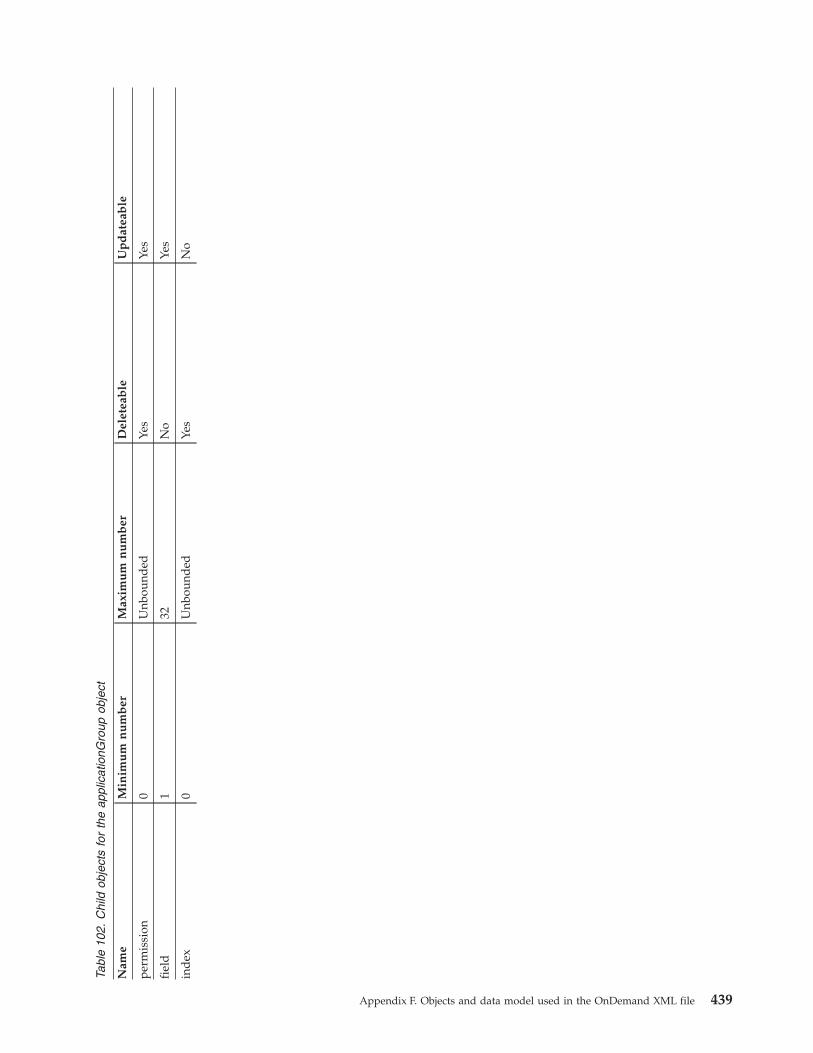
Tabl
e 10
2. C
hild
ob
ject
s fo
r th
e ap
plic
atio
nGro
up ob
ject
Nam
e M
inim
um
n
um
ber
M
axim
um
n
um
ber
D
elet
eab
le
Up
dat
eab
le
perm
issi
on
0 U
nbou
nded
Ye
s Ye
s
fiel
d
1 32
N
o Ye
s
ind
ex
0 U
nbou
nded
Ye
s N
o
Appendix F. Objects and data model used in the OnDemand XML file 439
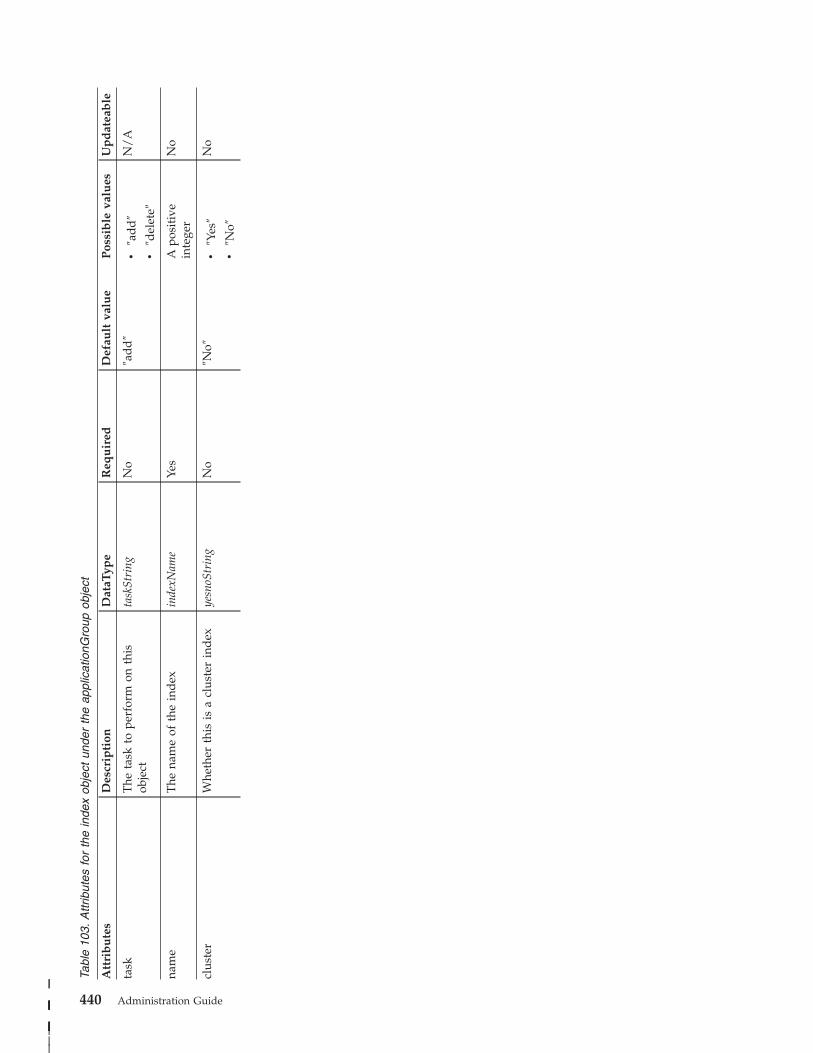
Tabl
e 10
3. A
ttrib
utes
fo
r th
e in
dex
obje
ct un
der
the
appl
icat
ionG
roup
ob
ject
Att
rib
ute
s D
escr
ipti
on
Dat
aTyp
e R
equ
ired
D
efau
lt va
lue
Pos
sib
le va
lues
U
pd
atea
ble
task
T
he ta
sk to
pe
rfor
m on
th
is
obje
ct
task
Stri
ng
No
″ad
d″
v ″a
dd
″
v ″d
elet
e″
N/
A
nam
e T
he na
me
of th
e in
dex
in
dexN
ame
Yes
A po
siti
ve
inte
ger
No
clus
ter
Whe
ther
th
is is
a
clus
ter
ind
ex
yesn
oStr
ing
No
″No″
v ″Y
es″
v ″N
o″
No
440 Administration Guide
||
|||||||
|||||||
|
|
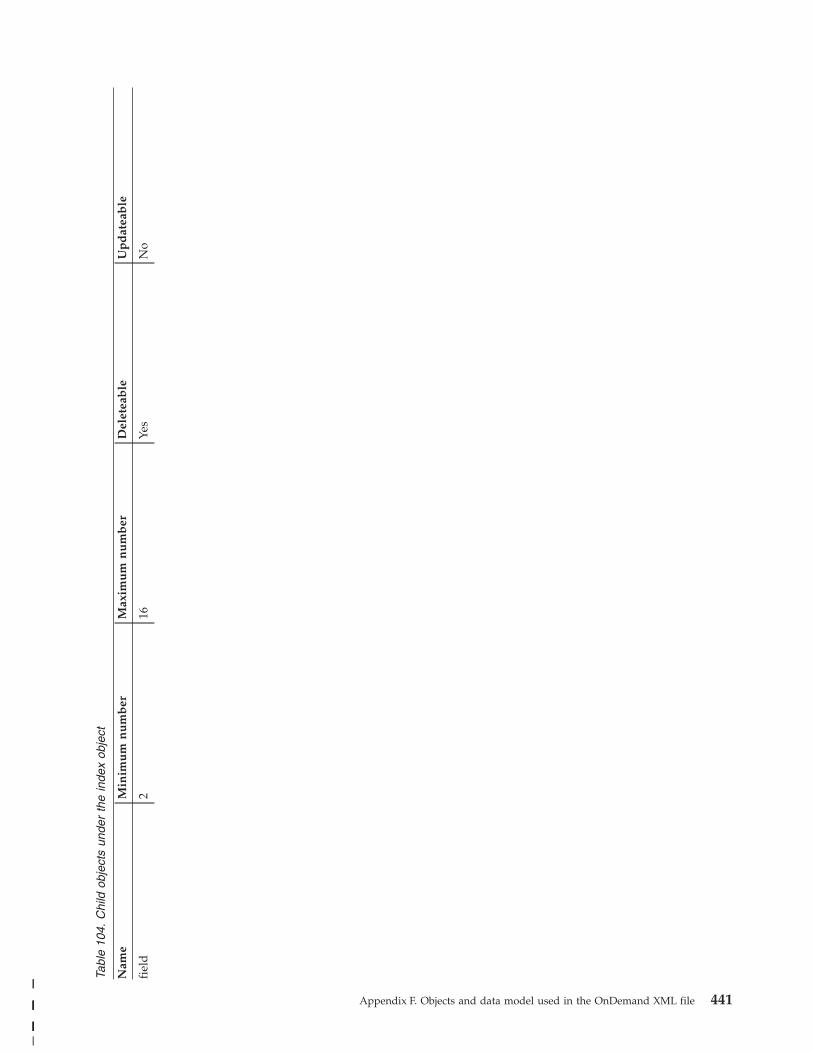
Tabl
e 10
4. C
hild
ob
ject
s un
der
the
inde
x ob
ject
Nam
e M
inim
um
n
um
ber
M
axim
um
n
um
ber
D
elet
eab
le
Up
dat
eab
le
fiel
d
2 16
Ye
s N
o
Appendix F. Objects and data model used in the OnDemand XML file 441||
|||||
||||||
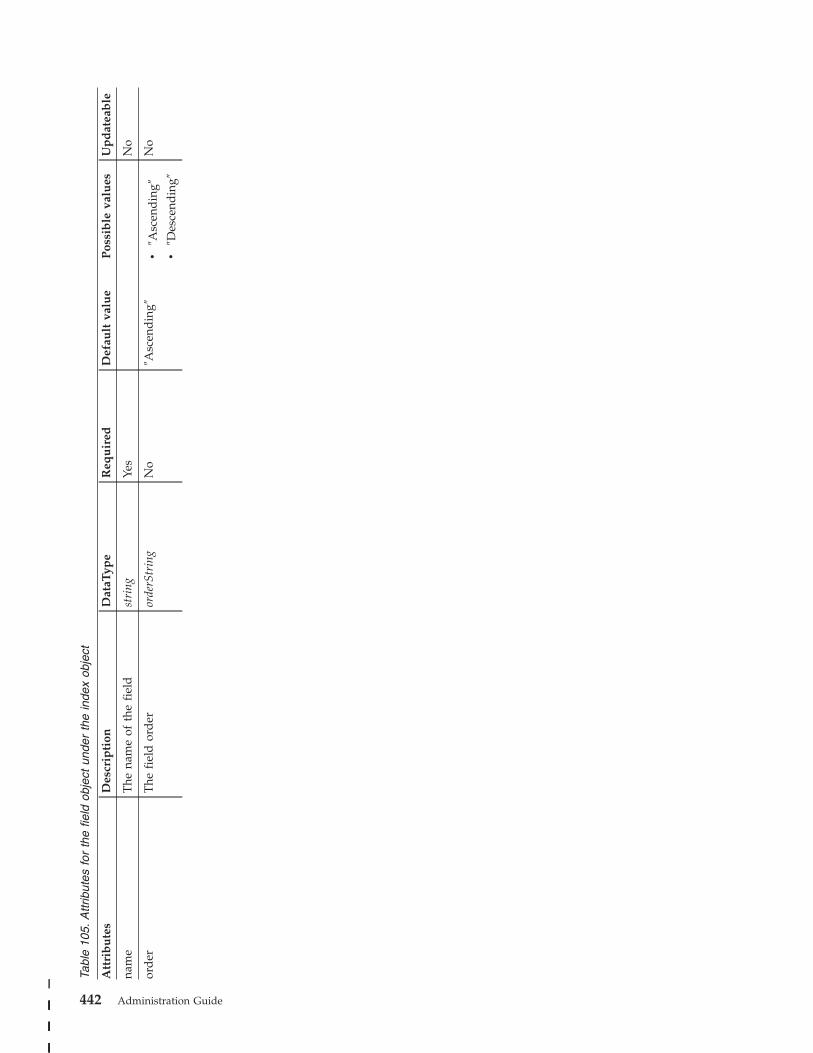
Tabl
e 10
5. A
ttrib
utes
fo
r th
e fie
ld ob
ject
un
der
the
inde
x ob
ject
Att
rib
ute
s D
escr
ipti
on
Dat
aTyp
e R
equ
ired
D
efau
lt va
lue
Pos
sib
le va
lues
U
pd
atea
ble
nam
e T
he na
me
of th
e fi
eld
st
ring
Ye
s N
o
ord
er
The
fi
eld
or
der
or
derS
trin
g N
o ″A
scen
din
g″
v ″A
scen
din
g″
v ″D
esce
ndin
g″
No
442 Administration Guide
||
|||||||
|||||||
|||||||

Tabl
e 10
6. A
ttrib
utes
fo
r th
e pe
rmis
sion
ob
ject
un
der
the
appl
icat
ionG
roup
ob
ject
Att
rib
ute
s D
escr
ipti
on
Dat
aTyp
e R
equ
ired
D
efau
lt va
lue
Pos
sib
le va
lues
U
pd
atea
ble
task
T
he ta
sk to
pe
rfor
m on
th
is
obje
ct
task
Stri
ng
No
″ad
d″
v ″a
dd
″
v ″d
elet
e″
v ″u
pdat
e″
N/
A
user
Pr
ovid
e pe
rmis
sion
s to
th
e ap
plic
atio
n gr
oup
to th
is us
er
nam
eStr
ing
Yes
″″
v U
ser
nam
e
v ″_
AL
L″
v ″*
PUB
LIC
″
No
grou
p Pr
ovid
e pe
rmis
sion
s to
th
e ap
plic
atio
n gr
oup
to th
is gr
oup
nam
eStr
ing
Yes
″″
v G
roup
na
me
v ″*
PUB
LIC
″
v ″_
AL
L″
No
doc
Ad
dPe
rm
Whe
ther
th
is us
er or
gr
oup
shou
ld be
al
low
ed to
ad
d
doc
umen
ts to
th
is ap
plic
atio
n gr
oup
yesn
oStr
ing
No
″No″
v ″Y
es″
v ″N
o″
Yes
doc
Del
eteP
erm
W
heth
er th
is us
er or
gr
oup
shou
ld be
al
low
ed to
re
mov
e d
ocum
ents
fr
om th
is ap
plic
atio
n gr
oup
yesn
oStr
ing
No
″No″
v ″Y
es″
v ″N
o″
Yes
doc
Upd
ateP
erm
W
heth
er th
is us
er or
gr
oup
shou
ld be
al
low
ed to
up
dat
e d
ocum
ents
in
th
is ap
plic
atio
n gr
oup
yesn
oStr
ing
No
″No″
v ″Y
es″
v ″N
o″
Yes
doc
Prin
tPer
m
Whe
ther
th
is us
er or
gr
oup
shou
ld be
al
low
ed to
pr
int
doc
umen
ts fr
om th
is ap
plic
atio
n gr
oup
yesn
oStr
ing
No
″No″
v ″Y
es″
v ″N
o″
Yes
doc
Cop
yPer
m
Whe
ther
th
is us
er or
gr
oup
shou
ld be
al
low
ed to
co
py
doc
umen
ts fr
om th
is ap
plic
atio
n gr
oup
yesn
oStr
ing
No
″No″
v ″Y
es″
v ″N
o″
Yes
anno
tVie
wPe
rm
Whe
ther
th
is us
er or
gr
oup
be
allo
wed
to
vi
ew an
nota
tion
in
this
ap
plic
atio
n gr
oup
yesn
oStr
ing
No
″No″
v ″Y
es″
v ″N
o″
Yes
Appendix F. Objects and data model used in the OnDemand XML file 443||
|||||||
|||||||
|
|

Tabl
e 10
6. A
ttrib
utes
fo
r th
e pe
rmis
sion
ob
ject
un
der
the
appl
icat
ionG
roup
ob
ject
(c
ontin
ued)
Att
rib
ute
s D
escr
ipti
on
Dat
aTyp
e R
equ
ired
D
efau
lt va
lue
Pos
sib
le va
lues
U
pd
atea
ble
anno
tAd
dPe
rm
Whe
ther
th
is us
er or
gr
oup
be
allo
wed
to
ad
d an
nota
tion
to
this
ap
plic
atio
n gr
oup
yesn
oStr
ing
No
″No″
v ″Y
es″
v ″N
o″
Yes
anno
tDel
eteP
erm
W
heth
er th
is us
er or
gr
oup
be
allo
wed
to
d
elet
e an
nota
tion
from
th
is ap
plic
atio
n gr
oup
yesn
oStr
ing
No
″No″
v ″Y
es″
v ″N
o″
Yes
anno
tUpd
ateP
erm
W
heth
er th
is us
er or
gr
oup
be
allo
wed
to
up
dat
e an
nota
tion
in
this
ap
plic
atio
n gr
oup
yesn
oStr
ing
No
″No″
v ″Y
es″
v ″N
o″
Yes
anno
tPri
ntPe
rm
Whe
ther
th
is us
er or
gr
oup
be
allo
wed
to
pr
int
anno
tati
on fr
om
this
ap
plic
atio
n gr
oup
yesn
oStr
ing
No
″No″
v ″Y
es″
v ″N
o″
Yes
anno
tCop
yPer
m
Whe
ther
th
is us
er or
gr
oup
be
allo
wed
to
co
py an
nota
tion
fr
om
this
ap
plic
atio
n gr
oup
yesn
oStr
ing
No
″No″
v ″Y
es″
v ″N
o″
Yes
auth
orit
y Sp
ecif
ies
the
auth
orit
y gi
ven
auth
agSt
ring
N
o ″A
cces
s″
v ″A
cces
s″
v
″Ad
min
istr
ator
″
v ″L
ogic
al
Vie
ws″
Yes
quer
yRes
A
qu
ery
rest
rict
ion
for
the
user
or gr
oup
quer
yStr
ing
No
″″
Yes
444 Administration Guide|
|||||||
||||
||||
|
|

Important: Either a user or a group must be specified, but not both.
Appendix F. Objects and data model used in the OnDemand XML file 445
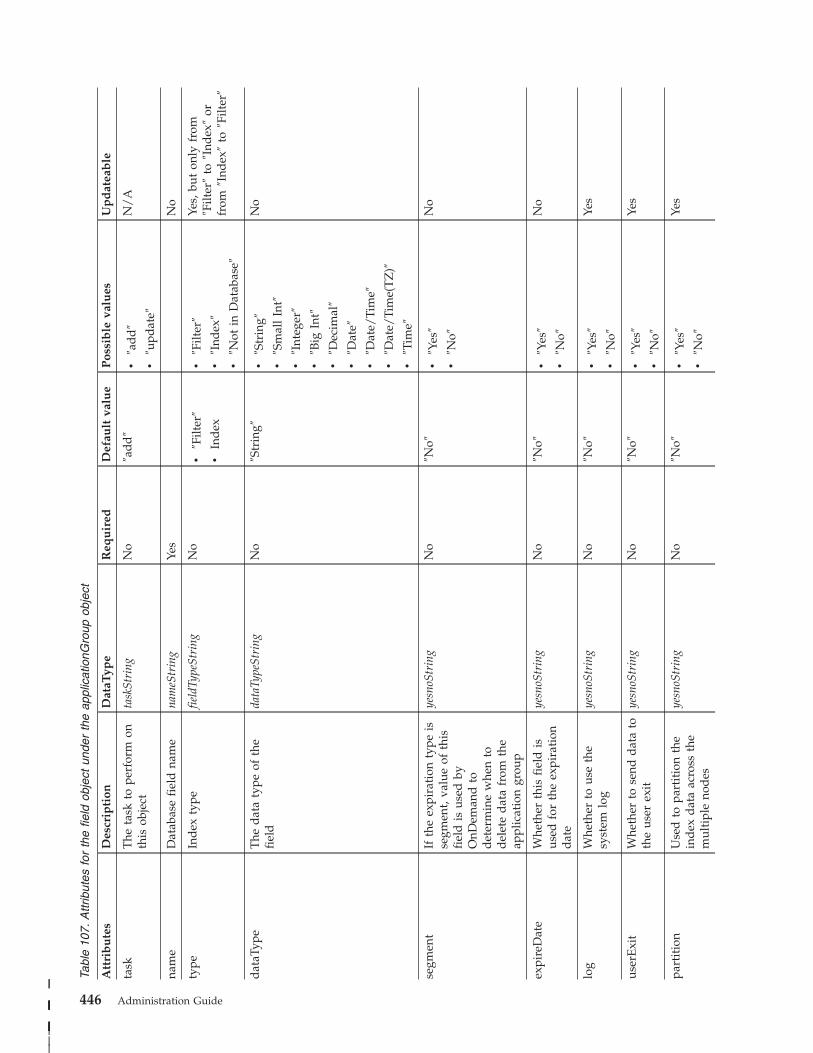
Tabl
e 10
7. A
ttrib
utes
fo
r th
e fie
ld ob
ject
un
der
the
appl
icat
ionG
roup
ob
ject
Att
rib
ute
s D
escr
ipti
on
Dat
aTyp
e R
equ
ired
D
efau
lt va
lue
Pos
sib
le va
lues
U
pd
atea
ble
task
T
he ta
sk to
pe
rfor
m on
this
ob
ject
task
Stri
ng
No
″ad
d″
v ″a
dd
″
v ″u
pdat
e″
N/
A
nam
e D
atab
ase
fiel
d na
me
nam
eStr
ing
Yes
No
type
In
dex
ty
pe
field
Type
Stri
ng
No
v ″F
ilter
″
v In
dex
v ″F
ilter
″
v ″I
ndex
″
v ″N
ot in
D
atab
ase″
Yes,
bu
t on
ly fr
om
″Filt
er″
to ″I
ndex
″ or
from
″I
ndex
″ to
″F
ilter
″
dat
aTyp
e T
he d
ata
type
of
th
e fi
eld
data
Type
Stri
ng
No
″Str
ing″
v ″S
trin
g″
v ″S
mal
l In
t″
v ″I
nteg
er″
v ″B
ig In
t″
v ″D
ecim
al″
v ″D
ate″
v ″D
ate/
Tim
e″
v ″D
ate/
Tim
e(T
Z)″
v ″T
ime″
No
segm
ent
If th
e ex
pira
tion
ty
pe is
segm
ent,
valu
e of
th
is
fiel
d is
us
ed by
OnD
eman
d to
det
erm
ine
whe
n to
del
ete
dat
a fr
om th
e ap
plic
atio
n gr
oup
yesn
oStr
ing
No
″No″
v ″Y
es″
v ″N
o″
No
expi
reD
ate
Whe
ther
th
is fi
eld
is
used
fo
r th
e ex
pira
tion
dat
e
yesn
oStr
ing
No
″No″
v ″Y
es″
v ″N
o″
No
log
Whe
ther
to
us
e th
e sy
stem
lo
g ye
snoS
trin
g N
o ″N
o″
v ″Y
es″
v ″N
o″
Yes
user
Exi
t W
heth
er to
se
nd d
ata
to
the
user
ex
it
yesn
oStr
ing
No
″No″
v ″Y
es″
v ″N
o″
Yes
part
itio
n U
sed
to
pa
rtit
ion
the
ind
ex d
ata
acro
ss th
e m
ulti
ple
nod
es
yesn
oStr
ing
No
″No″
v ″Y
es″
v ″N
o″
Yes
446 Administration Guide
||
|||||||
|||||||
|
|
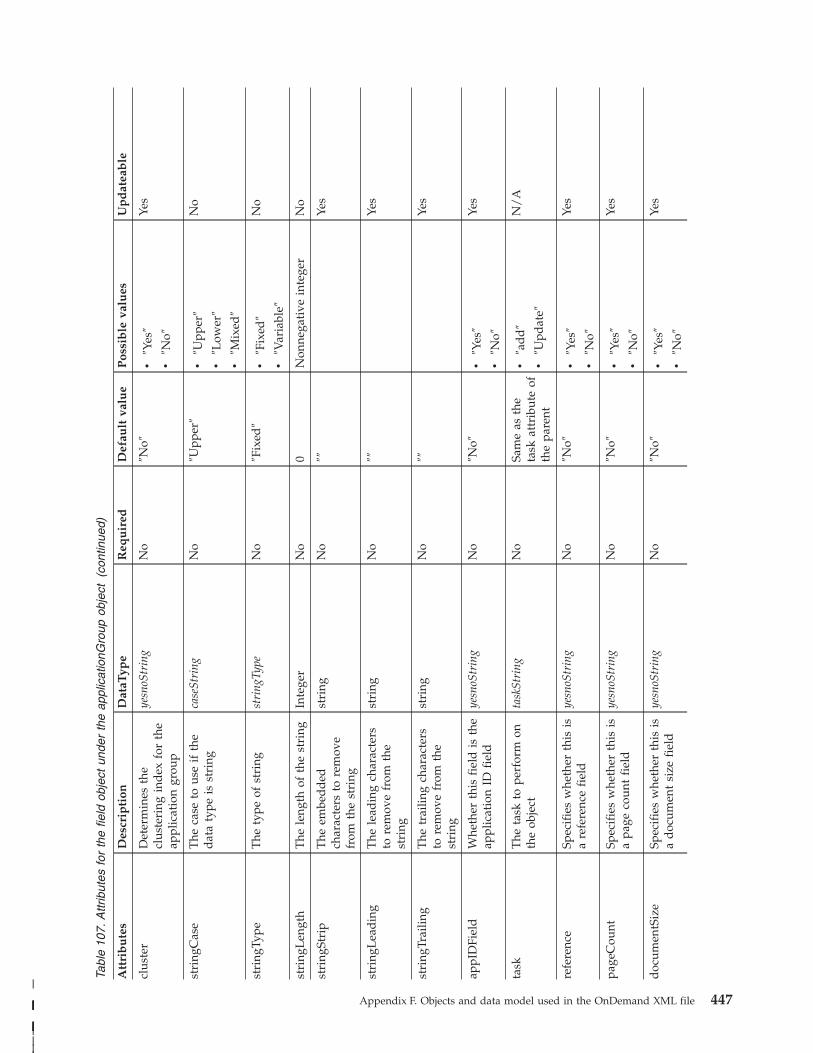
Tabl
e 10
7. A
ttrib
utes
fo
r th
e fie
ld ob
ject
un
der
the
appl
icat
ionG
roup
ob
ject
(c
ontin
ued)
Att
rib
ute
s D
escr
ipti
on
Dat
aTyp
e R
equ
ired
D
efau
lt va
lue
Pos
sib
le va
lues
U
pd
atea
ble
clus
ter
Det
erm
ines
th
e cl
uste
ring
in
dex
fo
r th
e ap
plic
atio
n gr
oup
yesn
oStr
ing
No
″No″
v ″Y
es″
v ″N
o″
Yes
stri
ngC
ase
The
ca
se to
us
e if
th
e d
ata
type
is
st
ring
case
Stri
ng
No
″Upp
er″
v ″U
pper
″
v ″L
ower
″
v ″M
ixed
″
No
stri
ngTy
pe
The
ty
pe of
st
ring
st
ring
Type
N
o ″F
ixed
″ v
″Fix
ed″
v ″V
aria
ble″
No
stri
ngL
engt
h T
he le
ngth
of
th
e st
ring
In
tege
r N
o 0
Non
nega
tive
in
tege
r N
o
stri
ngSt
rip
The
em
bed
ded
char
acte
rs to
re
mov
e fr
om th
e st
ring
stri
ng
No
″″
Yes
stri
ngL
ead
ing
The
le
adin
g ch
arac
ters
to re
mov
e fr
om th
e st
ring
stri
ng
No
″″
Yes
stri
ngTr
ailin
g T
he tr
ailin
g ch
arac
ters
to re
mov
e fr
om th
e st
ring
stri
ng
No
″″
Yes
appI
DFi
eld
W
heth
er th
is fi
eld
is
th
e ap
plic
atio
n ID
fi
eld
yesn
oStr
ing
No
″No″
v ″Y
es″
v ″N
o″
Yes
task
T
he ta
sk to
pe
rfor
m on
the
obje
ct
task
Stri
ng
No
Sam
e as
th
e ta
sk at
trib
ute
of
the
pare
nt
v ″a
dd
″
v ″U
pdat
e″
N/
A
refe
renc
e Sp
ecif
ies
whe
ther
th
is is
a re
fere
nce
fiel
d
yesn
oStr
ing
No
″No″
v ″Y
es″
v ″N
o″
Yes
page
Cou
nt
Spec
ifie
s w
heth
er th
is is
a pa
ge co
unt
fiel
d
yesn
oStr
ing
No
″No″
v ″Y
es″
v ″N
o″
Yes
doc
umen
tSiz
e Sp
ecif
ies
whe
ther
th
is is
a d
ocum
ent
size
fi
eld
yesn
oStr
ing
No
″No″
v ″Y
es″
v ″N
o″
Yes
Appendix F. Objects and data model used in the OnDemand XML file 447|
|||||||
||||
||||
|
|

Tabl
e 10
7. A
ttrib
utes
fo
r th
e fie
ld ob
ject
un
der
the
appl
icat
ionG
roup
ob
ject
(c
ontin
ued)
Att
rib
ute
s D
escr
ipti
on
Dat
aTyp
e R
equ
ired
D
efau
lt va
lue
Pos
sib
le va
lues
U
pd
atea
ble
reco
rdsM
anag
emen
t Sp
ecif
ies
whe
ther
th
is is
a re
cord
s m
anag
emen
t fi
eld
yesn
oStr
ing
No
″No″
v ″Y
es″
v ″N
o″
Yes
448 Administration Guide|
|||||||
||||
||||
|
|

Tabl
e 10
8. C
hild
ob
ject
s un
der
the
field
ob
ject
Nam
e M
inim
um
n
um
ber
M
axim
um
n
um
ber
D
elet
eab
le
Up
dat
eab
le
map
ping
0
Unb
ound
ed
Yes
Yes
Appendix F. Objects and data model used in the OnDemand XML file 449||
|||||
||||||

Tabl
e 10
9. A
ttrib
utes
fo
r th
e m
appi
ng ob
ject
un
der
field
Att
rib
ute
s D
escr
ipti
on
Dat
aTyp
e R
equ
ired
D
efau
lt va
lue
Pos
sib
le va
lues
U
pd
atea
ble
task
T
he ta
sk to
pe
rfor
m on
th
is
obje
ct
task
Stri
ng
No
″ad
d″
v ″a
dd
″
v ″u
pdat
e″
v ″d
elet
e″
N/
A
dbV
alue
T
he d
atab
ase
valu
e db
Stri
ng2
Yes
No
dis
play
edV
alue
T
he d
ispl
ayed
va
lue
dvSt
ring
Ye
s Ye
s
450 Administration Guide
||
|||||||
|||||||
|
|

Storage set object
Appendix F. Objects and data model used in the OnDemand XML file 451

Tabl
e 11
0. A
ttrib
utes
fo
r th
e st
orag
eSet
ob
ject
Att
rib
ute
s D
escr
ipti
on
Dat
aTyp
e R
equ
ired
D
efau
lt va
lue
Pos
sib
le va
lues
U
pd
atea
ble
nam
e N
ame
of th
e st
orag
e se
t na
meS
trin
g Ye
s Ye
s
des
crip
tion
A
d
escr
ipti
on of
th
e st
orag
e se
t de
scSt
ring
N
o ″″
Ye
s
stor
ageT
ype
The
lo
ad ty
pe of
th
e st
orag
e se
t st
orag
eTyp
eStr
ing
No
″Fix
ed″
v ″F
ixed
″
v ″L
ocal
″
Yes
452 Administration Guide
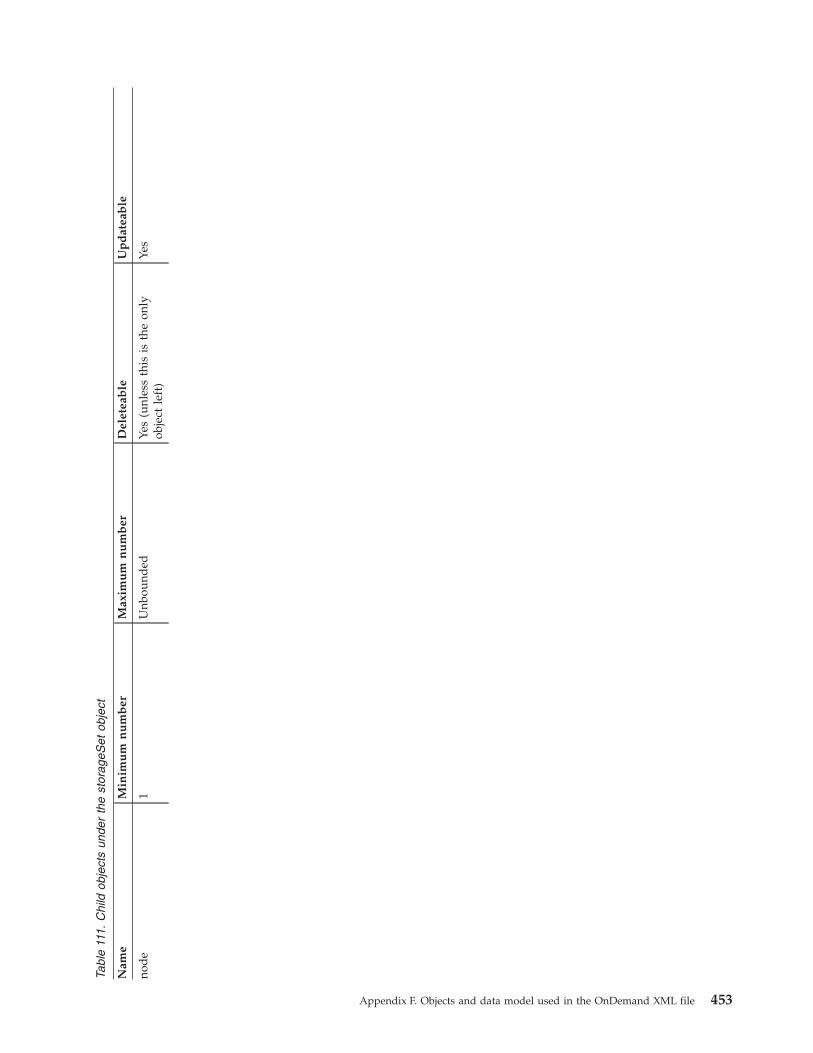
Tabl
e 11
1. C
hild
ob
ject
s un
der
the
stor
ageS
et ob
ject
Nam
e M
inim
um
n
um
ber
M
axim
um
n
um
ber
D
elet
eab
le
Up
dat
eab
le
nod
e 1
Unb
ound
ed
Yes
(unl
ess
this
is
th
e on
ly
obje
ct le
ft)
Yes
Appendix F. Objects and data model used in the OnDemand XML file 453

Tabl
e 11
2. A
ttrib
utes
fo
r th
e no
de ob
ject
un
der
the
stor
ageS
et ob
ject
Att
rib
ute
s D
escr
ipti
on
Dat
aTyp
e R
equ
ired
D
efau
lt va
lue
Pos
sib
le va
lues
U
pd
atea
ble
task
T
he ta
sk to
pe
rfor
m on
this
ob
ject
task
Stri
ng
No
″ad
d″
v ″a
dd
″
v ″d
elet
e″
v ″u
pdat
e″
N/
A
nam
e N
ame
of th
e st
orag
e se
t no
de
nam
eStr
ing
Yes
No
des
crip
tion
A
d
escr
ipti
on of
th
e st
orag
e se
t no
de
desc
Stri
ng
No
″″
Yes
serv
er
The
se
rver
w
here
th
e no
de
resi
des
stri
ng
No
″*O
ND
EM
AN
D″
Yes
logo
n C
lient
no
de
nam
e na
meS
trin
g D
epen
den
t ″″
Ye
s
pass
wor
d
Clie
nt no
de
pass
wor
d
pass
wor
dStr
ing
Dep
end
ent
″″
Yes
load
Dat
a W
heth
er th
is is
a
load
dat
a no
de
yesN
oStr
ing
No
″No″
v ″Y
es″
v ″N
o″
Yes
acce
ssM
etho
d
Det
erm
ines
th
e ty
pe of
arch
ive
stor
age
for
the
prim
ary
nod
e
acce
ssSt
ring
N
o ″T
SM″
v ″O
AM
″
v ″V
SAM
″
v ″T
SM″
v ″C
ache
″
Yes
454 Administration Guide
||
|||||||
|||||||
|
|

Note: The logon and password attributes might be required based on the type of
node.
Folder object
Appendix F. Objects and data model used in the OnDemand XML file 455
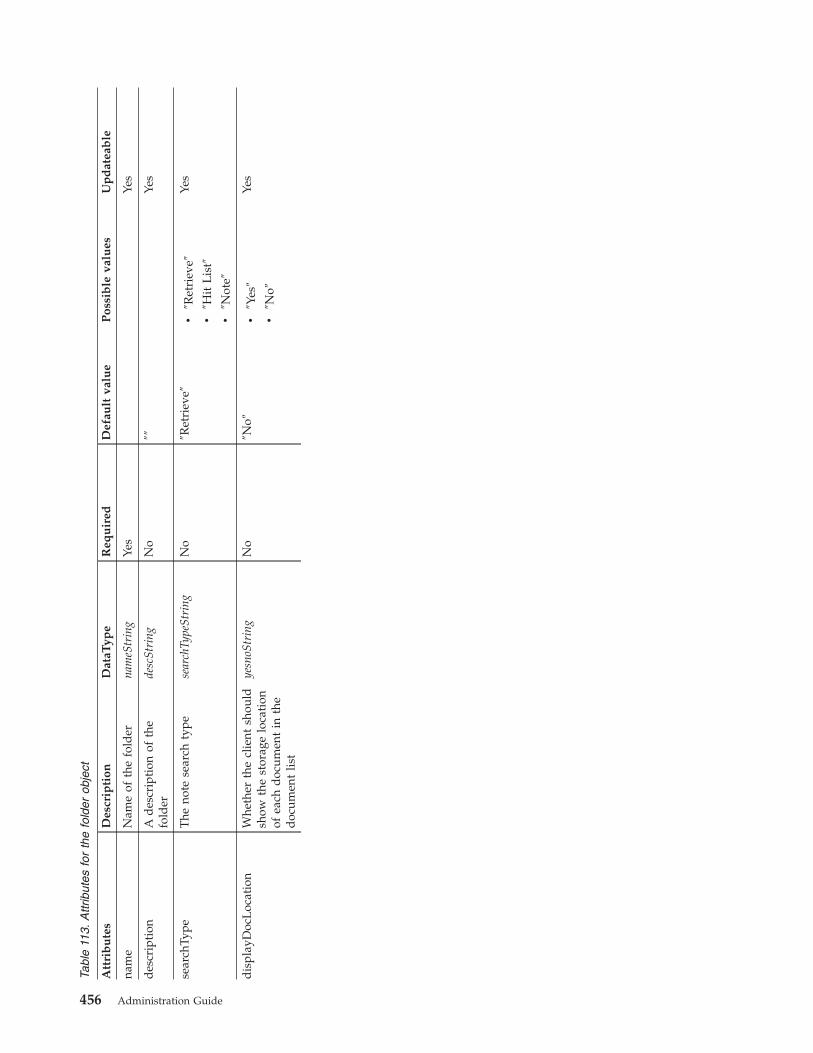
Tabl
e 11
3. A
ttrib
utes
fo
r th
e fo
lder
ob
ject
Att
rib
ute
s D
escr
ipti
on
Dat
aTyp
e R
equ
ired
D
efau
lt va
lue
Pos
sib
le va
lues
U
pd
atea
ble
nam
e N
ame
of th
e fo
lder
na
meS
trin
g Ye
s Ye
s
des
crip
tion
A
d
escr
ipti
on of
th
e fo
lder
desc
Stri
ng
No
″″
Yes
sear
chTy
pe
The
no
te se
arch
ty
pe
sear
chTy
peSt
ring
N
o ″R
etri
eve″
v ″R
etri
eve″
v ″H
it L
ist″
v ″N
ote″
Yes
dis
play
Doc
Loc
atio
n W
heth
er th
e cl
ient
sh
ould
show
th
e st
orag
e lo
cati
on
of ea
ch d
ocum
ent
in th
e d
ocum
ent
list
yesn
oStr
ing
No
″No″
v ″Y
es″
v ″N
o″
Yes
456 Administration Guide
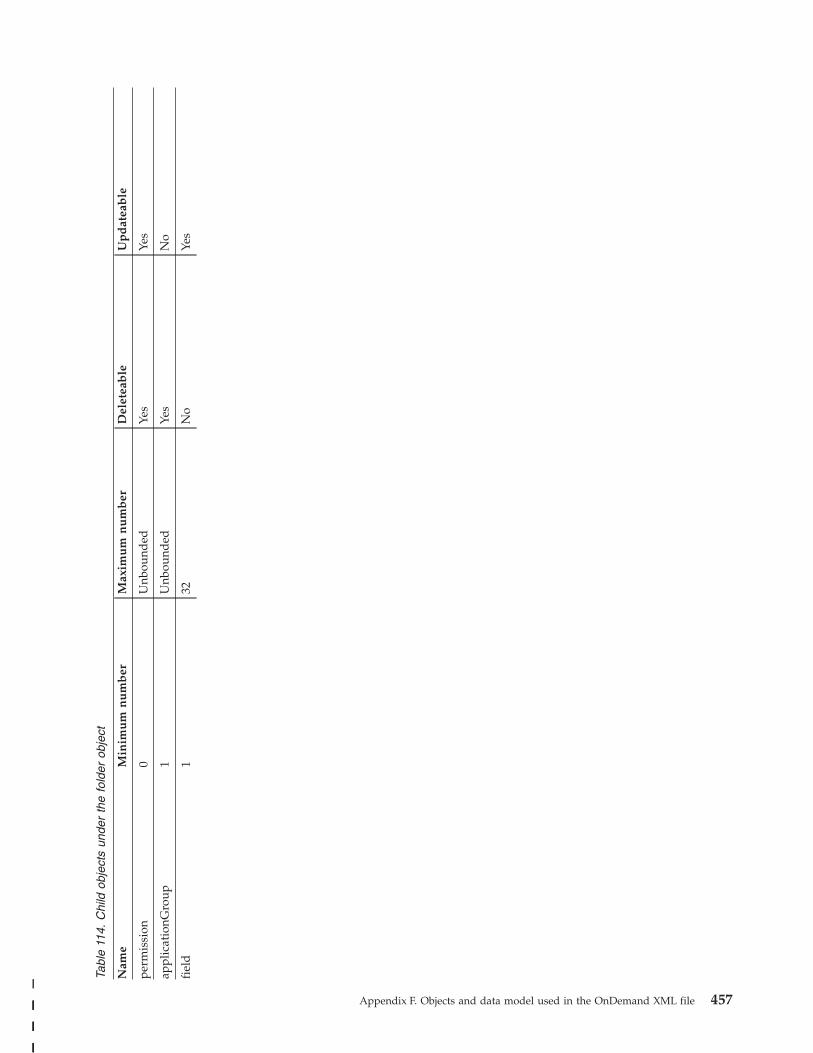
Tabl
e 11
4. C
hild
ob
ject
s un
der
the
fold
er ob
ject
Nam
e M
inim
um
n
um
ber
M
axim
um
n
um
ber
D
elet
eab
le
Up
dat
eab
le
perm
issi
on
0 U
nbou
nded
Ye
s Ye
s
appl
icat
ionG
roup
1
Unb
ound
ed
Yes
No
fiel
d
1 32
N
o Ye
s
Appendix F. Objects and data model used in the OnDemand XML file 457||
|||||
|||||
|||||

Tabl
e 11
5. A
ttrib
utes
fo
r th
e pe
rmis
sion
ob
ject
un
der
the
fold
er ob
ject
Att
rib
ute
s D
escr
ipti
on
Dat
aTyp
e R
equ
ired
D
efau
lt va
lue
Pos
sib
le va
lues
U
pd
atea
ble
task
T
he ta
sk to
pe
rfor
m on
th
is
obje
ct
task
Stri
ng
No
″ad
d″
v ″a
dd
″
v ″d
elet
e″
v ″u
pdat
e″
N/
A
user
Pr
ovid
e pe
rmis
sion
to
th
e fo
lder
of
th
is us
er
nam
eStr
ing
Yes
″″
v U
ser
nam
e
v ″_
AL
L″
No
grou
p Pr
ovid
e pe
rmis
sion
to
th
e fo
lder
of
th
is gr
oup
nam
eStr
ing
Yes
″″
v G
roup
na
me
v ″*
PUB
LIC
″
v ″_
AL
L″
No
adm
inA
utho
rity
W
heth
er th
e us
er or
gr
oup
shou
ld ha
ve ad
min
istr
ator
auth
orit
y
yesn
oStr
ing
No
″No″
v ″Y
es″
v ″N
o″
Yes
acce
ssA
utho
rity
W
heth
er th
e us
er or
gr
oup
shou
ld ha
ve ac
cess
au
thor
ity
yesn
oStr
ing
No
″No″
v ″Y
es″
v ″N
o″
Yes
fiel
dsA
utho
rity
W
heth
er th
e us
er or
gr
oup
shou
ld ha
ve au
thor
ity
to
chan
ge fi
eld
s
yesn
oStr
ing
No
″No″
v ″Y
es″
v ″N
o″
Yes
publ
icN
QA
utho
rity
W
heth
er th
e us
er or
gr
oup
shou
ld ha
ve pu
blic
na
med
quer
y au
thor
ity
yesn
oStr
ing
No
″No″
v ″Y
es″
v ″N
o″
Yes
priv
ateN
QA
utho
rity
W
heth
er th
e us
er or
gr
oup
shou
ld ha
ve pr
ivat
e na
med
quer
y au
thor
ity
yesn
oStr
ing
No
″No″
v ″Y
es″
v ″N
o″
Yes
view
NQ
Aut
hori
ty
Whe
ther
th
e us
er or
gr
oup
shou
ld ha
ve na
med
qu
ery
view
au
thor
ity
yesn
oStr
ing
No
″No″
v ″Y
es″
v ″N
o″
Yes
max
Hit
s T
he m
axim
um nu
mbe
r of
hi
ts
allo
wed
max
Hit
sTyp
e N
o ″N
o L
imit
″ v
″No
Lim
it″
v ″N
one″
v A
po
siti
ve
inte
ger
valu
e
Yes
seco
ndar
yFol
der
W
heth
er th
is is
a
seco
ndar
y fo
lder
yesn
oStr
ing
No
″No″
v ″Y
es″
v ″N
o″
Yes
458 Administration Guide
||
|||||||
|||||||
|
|
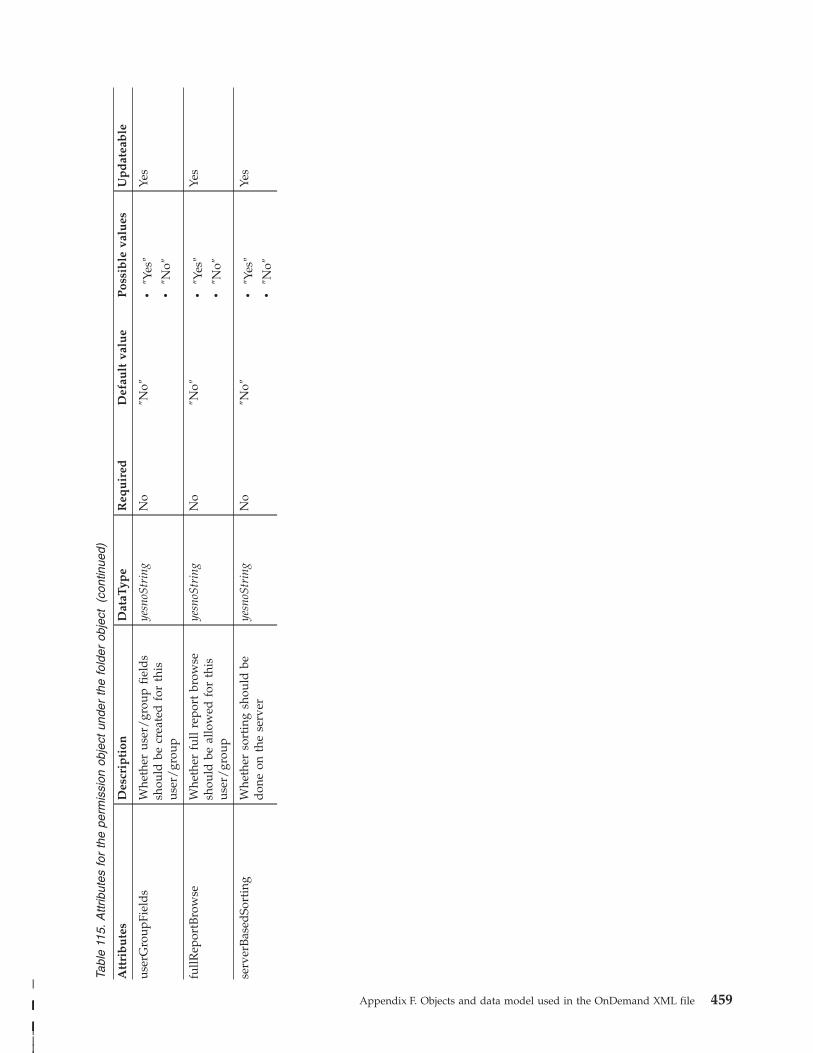
Tabl
e 11
5. A
ttrib
utes
fo
r th
e pe
rmis
sion
ob
ject
un
der
the
fold
er ob
ject
(c
ontin
ued)
Att
rib
ute
s D
escr
ipti
on
Dat
aTyp
e R
equ
ired
D
efau
lt va
lue
Pos
sib
le va
lues
U
pd
atea
ble
user
Gro
upFi
eld
s W
heth
er us
er/
grou
p fi
eld
s sh
ould
be
cr
eate
d fo
r th
is
user
/gr
oup
yesn
oStr
ing
No
″No″
v ″Y
es″
v ″N
o″
Yes
fullR
epor
tBro
wse
W
heth
er fu
ll re
port
br
owse
shou
ld be
al
low
ed fo
r th
is
user
/gr
oup
yesn
oStr
ing
No
″No″
v ″Y
es″
v ″N
o″
Yes
serv
erB
ased
Sort
ing
Whe
ther
so
rtin
g sh
ould
be
don
e on
th
e se
rver
yesn
oStr
ing
No
″No″
v ″Y
es″
v ″N
o″
Yes
Appendix F. Objects and data model used in the OnDemand XML file 459|
|||||||
||||
||||
|
|

Important: You must specify either a user or a group object, however, you cannot
specify both.
460 Administration Guide
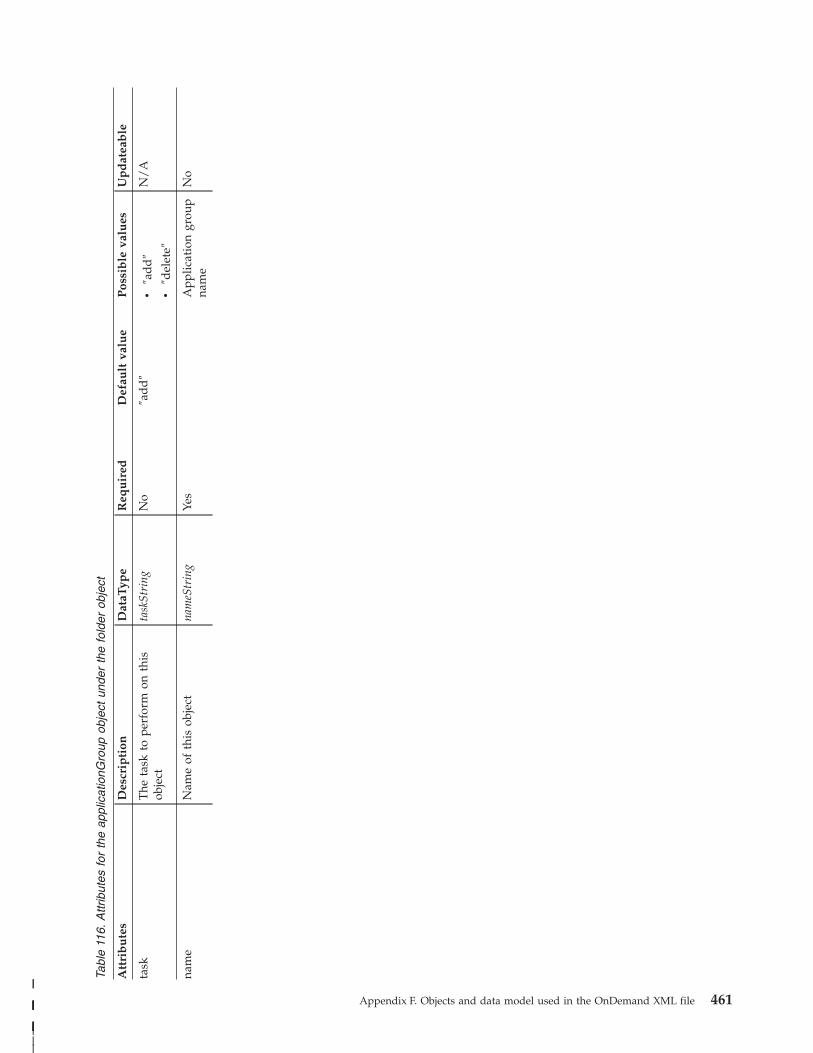
Tabl
e 11
6. A
ttrib
utes
fo
r th
e ap
plic
atio
nGro
up ob
ject
un
der
the
fold
er ob
ject
Att
rib
ute
s D
escr
ipti
on
Dat
aTyp
e R
equ
ired
D
efau
lt va
lue
Pos
sib
le va
lues
U
pd
atea
ble
task
T
he ta
sk to
pe
rfor
m on
th
is
obje
ct
task
Stri
ng
No
″ad
d″
v ″a
dd
″
v ″d
elet
e″
N/
A
nam
e N
ame
of th
is ob
ject
na
meS
trin
g Ye
s A
pplic
atio
n gr
oup
nam
e N
o
Appendix F. Objects and data model used in the OnDemand XML file 461||
|||||||
|||||||
|
|

Tabl
e 11
7. C
hild
ob
ject
s un
der
the
appl
icat
ionG
roup
ob
ject
un
der
the
fold
er ob
ject
Nam
e M
inim
um
n
um
ber
M
axim
um
n
um
ber
D
elet
eab
le
Up
dat
eab
le
appl
icat
ion
0 U
nbou
nded
Ye
s N
o
462 Administration Guide

Tabl
e 11
8. A
ttrib
utes
fo
r th
e ap
plic
atio
n ob
ject
un
der
the
appl
icat
ionG
roup
ob
ject
Att
rib
ute
s D
escr
ipti
on
Dat
aTyp
e R
equ
ired
D
efau
lt va
lue
Pos
sib
le va
lues
U
pd
atea
ble
task
T
he ta
sk to
pe
rfor
m on
th
is
obje
ct
task
Stri
ng
No
″ad
d″
v ″a
dd
″
v ″d
elet
e″
N/
A
nam
e N
ame
of th
is ob
ject
na
meS
trin
g Ye
s A
pplic
atio
n na
me
No
Appendix F. Objects and data model used in the OnDemand XML file 463||
|||||||
|||||||
|
|
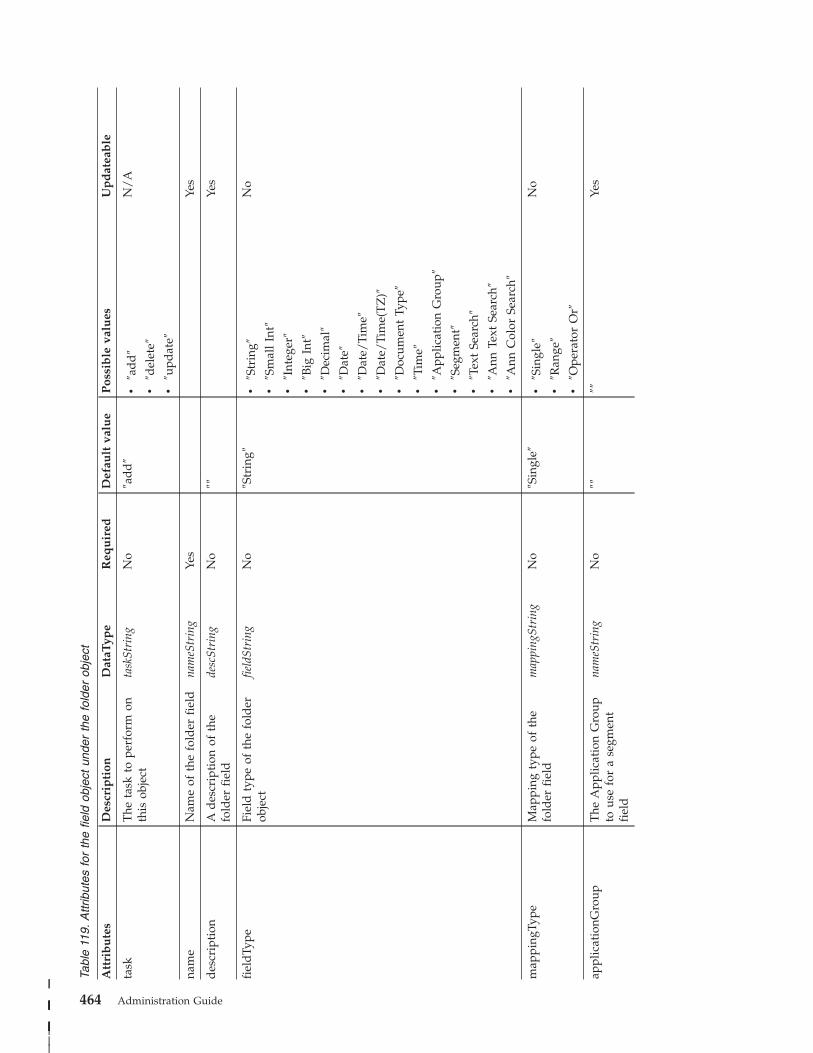
Tabl
e 11
9. A
ttrib
utes
fo
r th
e fie
ld ob
ject
un
der
the
fold
er ob
ject
Att
rib
ute
s D
escr
ipti
on
Dat
aTyp
e R
equ
ired
D
efau
lt va
lue
Pos
sib
le va
lues
U
pd
atea
ble
task
T
he ta
sk to
pe
rfor
m on
this
ob
ject
task
Stri
ng
No
″ad
d″
v ″a
dd
″
v ″d
elet
e″
v ″u
pdat
e″
N/
A
nam
e N
ame
of th
e fo
lder
fi
eld
na
meS
trin
g Ye
s Ye
s
des
crip
tion
A
d
escr
ipti
on of
th
e fo
lder
fi
eld
desc
Stri
ng
No
″″
Yes
fiel
dTy
pe
Fiel
d ty
pe of
th
e fo
lder
obje
ct
field
Stri
ng
No
″Str
ing″
v ″S
trin
g″
v ″S
mal
l In
t″
v ″I
nteg
er″
v ″B
ig In
t″
v ″D
ecim
al″
v ″D
ate″
v ″D
ate/
Tim
e″
v ″D
ate/
Tim
e(T
Z)″
v ″D
ocum
ent
Type
″
v ″T
ime″
v ″A
pplic
atio
n G
roup
″
v ″S
egm
ent″
v ″T
ext
Sear
ch″
v ″A
nn Te
xt Se
arch
″
v ″A
nn C
olor
Se
arch
″
No
map
ping
Type
M
appi
ng ty
pe of
th
e fo
lder
fi
eld
map
ping
Stri
ng
No
″Sin
gle″
v ″S
ingl
e″
v ″R
ange
″
v ″O
pera
tor
Or″
No
appl
icat
ionG
roup
T
he A
pplic
atio
n G
roup
to us
e fo
r a
segm
ent
fiel
d
nam
eStr
ing
No
″″
″″
Yes
464 Administration Guide
||
|||||||
|||||||
|
|

Tabl
e 12
0. C
hild
ob
ject
s un
der
the
field
ob
ject
un
der
the
fold
er ob
ject
Nam
e M
inim
um
n
um
ber
M
axim
um
n
um
ber
D
elet
eab
le
Up
dat
eab
le
map
ping
0
Unb
ound
ed
Yes
No
fiel
dIn
fo
1 U
nbou
nded
Ye
s Ye
s
Appendix F. Objects and data model used in the OnDemand XML file 465

Tabl
e 12
1. A
ttrib
utes
fo
r th
e m
appi
ng ob
ject
un
der
the
field
ob
ject
Att
rib
ute
s D
escr
ipti
on
Dat
aTyp
e R
equ
ired
D
efau
lt va
lue
Pos
sib
le va
lues
U
pd
atea
ble
task
T
he ta
sk to
pe
rfor
m on
th
is
obje
ct
task
Stri
ng
No
″ad
d″
v ″a
dd
″
v ″d
elet
e″
N/
A
dbN
ame
The
d
atab
ase
fiel
d na
me
nam
eStr
ing
Yes
No
appG
roup
T
he ap
plic
atio
n gr
oup
nam
e na
meS
trin
g Ye
s N
o
466 Administration Guide
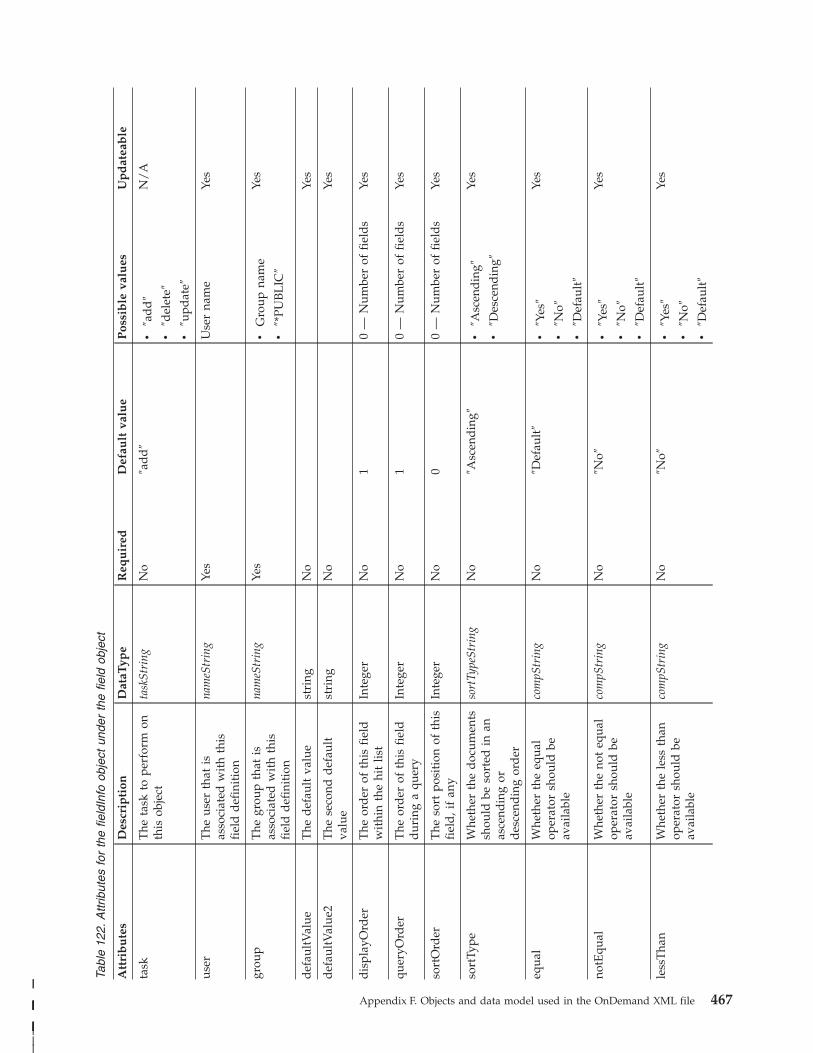
Tabl
e 12
2. A
ttrib
utes
fo
r th
e fie
ldIn
fo ob
ject
un
der
the
field
ob
ject
Att
rib
ute
s D
escr
ipti
on
Dat
aTyp
e R
equ
ired
D
efau
lt va
lue
Pos
sib
le va
lues
U
pd
atea
ble
task
T
he ta
sk to
pe
rfor
m on
this
ob
ject
task
Stri
ng
No
″ad
d″
v ″a
dd
″
v ″d
elet
e″
v ″u
pdat
e″
N/
A
user
T
he us
er th
at is
asso
ciat
ed w
ith
this
fiel
d d
efin
itio
n
nam
eStr
ing
Yes
Use
r na
me
Yes
grou
p T
he gr
oup
that
is
asso
ciat
ed w
ith
this
fiel
d d
efin
itio
n
nam
eStr
ing
Yes
v G
roup
na
me
v ″*
PUB
LIC
″
Yes
def
ault
Val
ue
The
d
efau
lt va
lue
stri
ng
No
Yes
def
ault
Val
ue2
The
se
cond
d
efau
lt
valu
e st
ring
N
o Ye
s
dis
play
Ord
er
The
or
der
of
th
is fi
eld
wit
hin
the
hit
list
Inte
ger
No
1 0
— N
umbe
r of
fi
eld
s Ye
s
quer
yOrd
er
The
or
der
of
th
is fi
eld
dur
ing
a qu
ery
Inte
ger
No
1 0
— N
umbe
r of
fi
eld
s Ye
s
sort
Ord
er
The
so
rt po
siti
on of
th
is
fiel
d, i
f an
y In
tege
r N
o 0
0 —
N
umbe
r of
fi
eld
s Ye
s
sort
Type
W
heth
er th
e d
ocum
ents
shou
ld be
so
rted
in
an
asce
ndin
g or
des
cend
ing
ord
er
sort
Type
Stri
ng
No
″Asc
end
ing″
v ″A
scen
din
g″
v ″D
esce
ndin
g″
Yes
equa
l W
heth
er th
e eq
ual
oper
ator
sh
ould
be
avai
labl
e
com
pStr
ing
No
″Def
ault
″ v
″Yes
″
v ″N
o″
v ″D
efau
lt″
Yes
notE
qual
W
heth
er th
e no
t eq
ual
oper
ator
sh
ould
be
avai
labl
e
com
pStr
ing
No
″No″
v ″Y
es″
v ″N
o″
v ″D
efau
lt″
Yes
less
Tha
n W
heth
er th
e le
ss th
an
oper
ator
sh
ould
be
avai
labl
e
com
pStr
ing
No
″No″
v ″Y
es″
v ″N
o″
v ″D
efau
lt″
Yes
Appendix F. Objects and data model used in the OnDemand XML file 467||
|||||||
|||||||
|
|
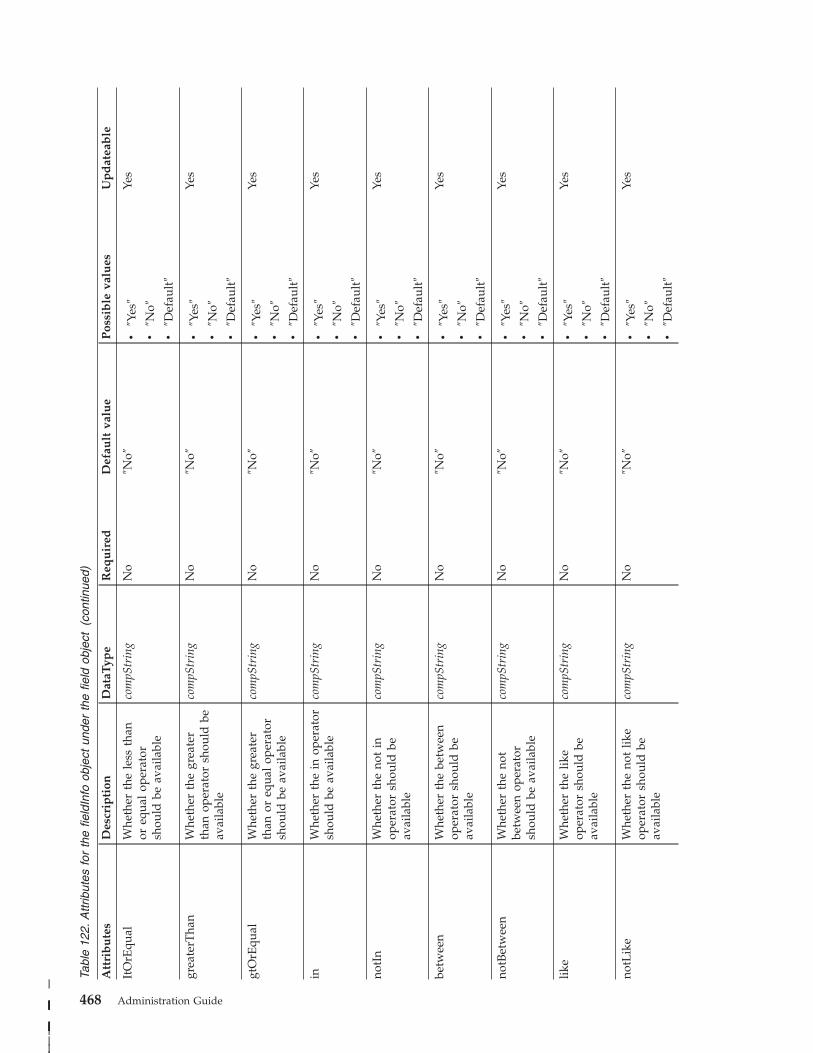
Tabl
e 12
2. A
ttrib
utes
fo
r th
e fie
ldIn
fo ob
ject
un
der
the
field
ob
ject
(c
ontin
ued)
Att
rib
ute
s D
escr
ipti
on
Dat
aTyp
e R
equ
ired
D
efau
lt va
lue
Pos
sib
le va
lues
U
pd
atea
ble
ItO
rEqu
al
Whe
ther
th
e le
ss th
an
or eq
ual
oper
ator
shou
ld be
av
aila
ble
com
pStr
ing
No
″No″
v ″Y
es″
v ″N
o″
v ″D
efau
lt″
Yes
grea
terT
han
Whe
ther
th
e gr
eate
r th
an op
erat
or sh
ould
be
avai
labl
e
com
pStr
ing
No
″No″
v ″Y
es″
v ″N
o″
v ″D
efau
lt″
Yes
gtO
rEqu
al
Whe
ther
th
e gr
eate
r th
an or
eq
ual
oper
ator
shou
ld be
av
aila
ble
com
pStr
ing
No
″No″
v ″Y
es″
v ″N
o″
v ″D
efau
lt″
Yes
in
Whe
ther
th
e in
op
erat
or
shou
ld be
av
aila
ble
com
pStr
ing
No
″No″
v ″Y
es″
v ″N
o″
v ″D
efau
lt″
Yes
notI
n W
heth
er th
e no
t in
oper
ator
sh
ould
be
avai
labl
e
com
pStr
ing
No
″No″
v ″Y
es″
v ″N
o″
v ″D
efau
lt″
Yes
betw
een
Whe
ther
th
e be
twee
n op
erat
or sh
ould
be
avai
labl
e
com
pStr
ing
No
″No″
v ″Y
es″
v ″N
o″
v ″D
efau
lt″
Yes
notB
etw
een
Whe
ther
th
e no
t be
twee
n op
erat
or
shou
ld be
av
aila
ble
com
pStr
ing
No
″No″
v ″Y
es″
v ″N
o″
v ″D
efau
lt″
Yes
like
Whe
ther
th
e lik
e op
erat
or sh
ould
be
avai
labl
e
com
pStr
ing
No
″No″
v ″Y
es″
v ″N
o″
v ″D
efau
lt″
Yes
notL
ike
Whe
ther
th
e no
t lik
e op
erat
or sh
ould
be
avai
labl
e
com
pStr
ing
No
″No″
v ″Y
es″
v ″N
o″
v ″D
efau
lt″
Yes
468 Administration Guide|
|||||||
||||
||||
|
|
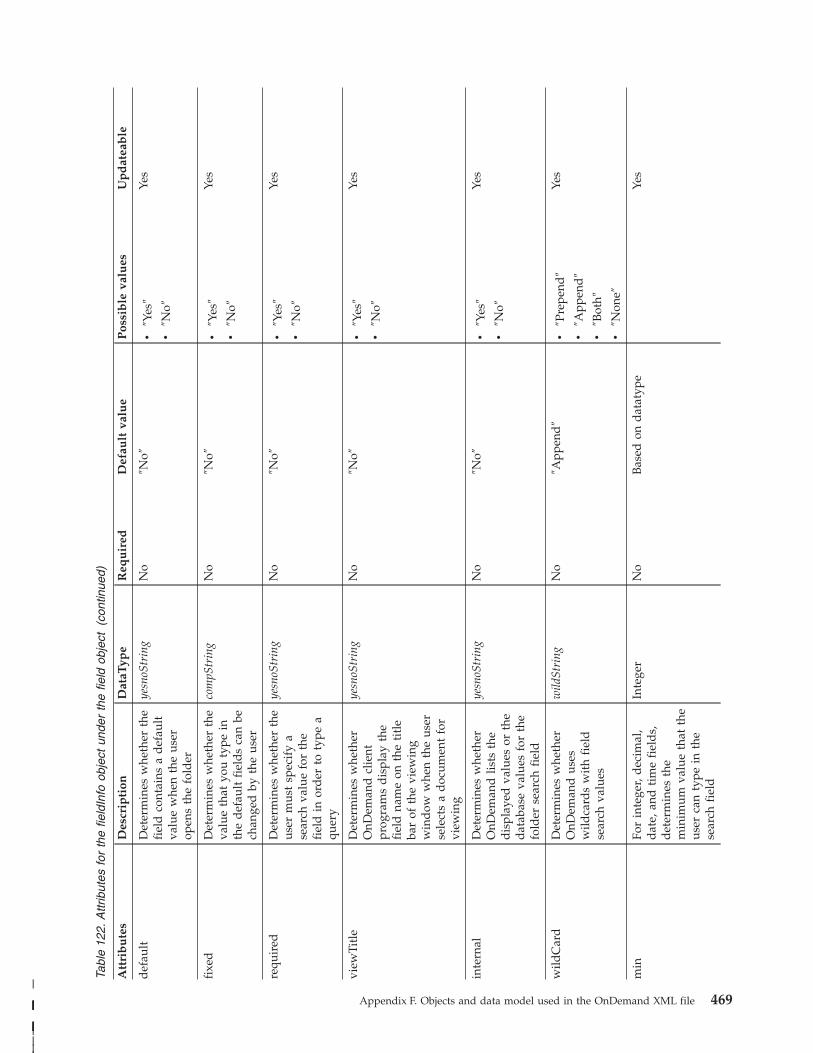
Tabl
e 12
2. A
ttrib
utes
fo
r th
e fie
ldIn
fo ob
ject
un
der
the
field
ob
ject
(c
ontin
ued)
Att
rib
ute
s D
escr
ipti
on
Dat
aTyp
e R
equ
ired
D
efau
lt va
lue
Pos
sib
le va
lues
U
pd
atea
ble
def
ault
D
eter
min
es w
heth
er th
e fi
eld
co
ntai
ns a
def
ault
valu
e w
hen
the
user
open
s th
e fo
lder
yesn
oStr
ing
No
″No″
v ″Y
es″
v ″N
o″
Yes
fixe
d
Det
erm
ines
w
heth
er th
e va
lue
that
yo
u ty
pe in
the
def
ault
fi
eld
s ca
n be
chan
ged
by
th
e us
er
com
pStr
ing
No
″No″
v ″Y
es″
v ″N
o″
Yes
requ
ired
D
eter
min
es w
heth
er th
e us
er m
ust
spec
ify
a se
arch
va
lue
for
the
fiel
d in
or
der
to
ty
pe a
quer
y
yesn
oStr
ing
No
″No″
v ″Y
es″
v ″N
o″
Yes
view
Titl
e D
eter
min
es w
heth
er
OnD
eman
d cl
ient
prog
ram
s d
ispl
ay th
e fi
eld
na
me
on th
e ti
tle
bar
of th
e vi
ewin
g w
ind
ow w
hen
the
user
sele
cts
a d
ocum
ent
for
view
ing
yesn
oStr
ing
No
″No″
v ″Y
es″
v ″N
o″
Yes
inte
rnal
D
eter
min
es w
heth
er
OnD
eman
d lis
ts th
e d
ispl
ayed
va
lues
or
th
e d
atab
ase
valu
es fo
r th
e fo
lder
se
arch
fi
eld
yesn
oStr
ing
No
″No″
v ″Y
es″
v ″N
o″
Yes
wild
Car
d
Det
erm
ines
w
heth
er
OnD
eman
d us
es
wild
card
s w
ith
fiel
d
sear
ch va
lues
wild
Stri
ng
No
″App
end
″ v
″Pre
pend
″
v ″A
ppen
d″
v ″B
oth″
v ″N
one″
Yes
min
Fo
r in
tege
r, d
ecim
al,
dat
e, an
d ti
me
fiel
ds,
det
erm
ines
th
e m
inim
um va
lue
that
th
e us
er ca
n ty
pe in
th
e se
arch
fi
eld
Inte
ger
No
Bas
ed on
d
atat
ype
Yes
Appendix F. Objects and data model used in the OnDemand XML file 469|
|||||||
||||
||||
|
|
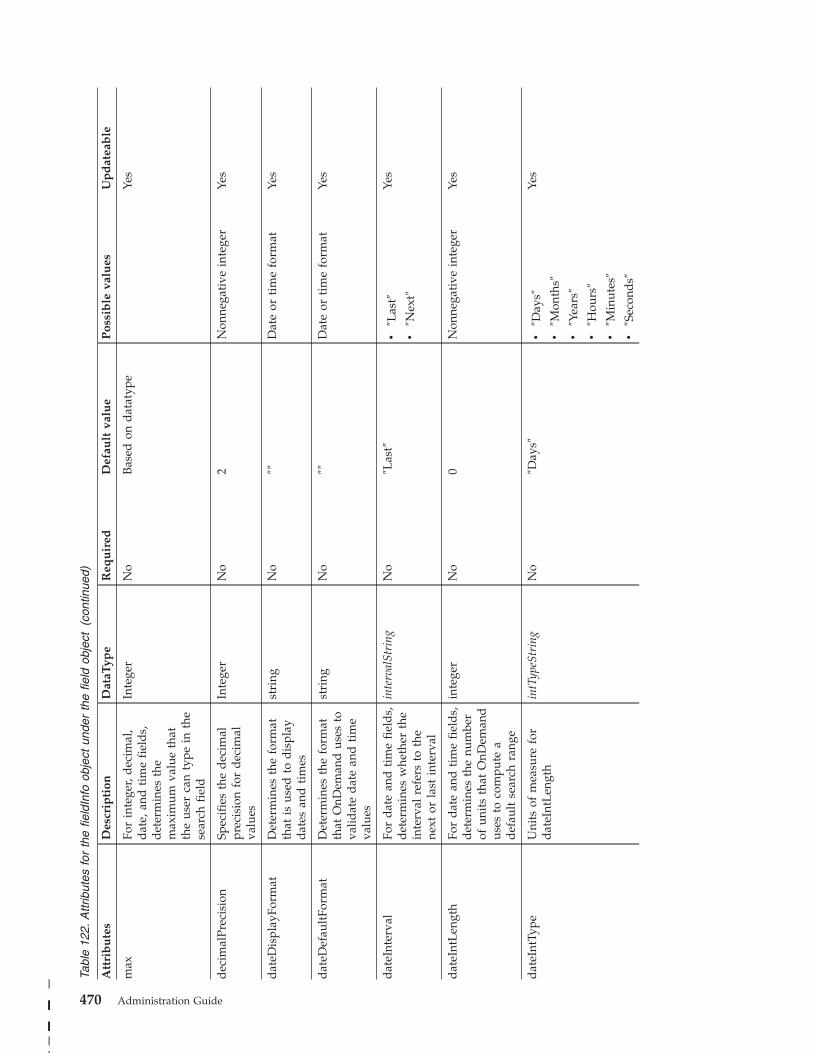
Tabl
e 12
2. A
ttrib
utes
fo
r th
e fie
ldIn
fo ob
ject
un
der
the
field
ob
ject
(c
ontin
ued)
Att
rib
ute
s D
escr
ipti
on
Dat
aTyp
e R
equ
ired
D
efau
lt va
lue
Pos
sib
le va
lues
U
pd
atea
ble
max
Fo
r in
tege
r, d
ecim
al,
dat
e, an
d ti
me
fiel
ds,
det
erm
ines
th
e m
axim
um va
lue
that
the
user
ca
n ty
pe in
th
e se
arch
fi
eld
Inte
ger
No
Bas
ed on
d
atat
ype
Yes
dec
imal
Prec
isio
n Sp
ecif
ies
the
dec
imal
prec
isio
n fo
r d
ecim
al
valu
es
Inte
ger
No
2 N
onne
gati
ve in
tege
r Ye
s
dat
eDis
play
Form
at
Det
erm
ines
th
e fo
rmat
that
is
us
ed to
d
ispl
ay
dat
es an
d ti
mes
stri
ng
No
″″
Dat
e or
ti
me
form
at
Yes
dat
eDef
ault
Form
at
Det
erm
ines
th
e fo
rmat
that
O
nDem
and
us
es to
valid
ate
dat
e an
d ti
me
valu
es
stri
ng
No
″″
Dat
e or
ti
me
form
at
Yes
dat
eInt
erva
l Fo
r d
ate
and
ti
me
fiel
ds,
det
erm
ines
w
heth
er th
e in
terv
al re
fers
to
th
e ne
xt or
la
st in
terv
al
inte
rval
Stri
ng
No
″Las
t″
v ″L
ast″
v ″N
ext″
Yes
dat
eInt
Len
gth
For
dat
e an
d ti
me
fiel
ds,
det
erm
ines
th
e nu
mbe
r of
un
its
that
O
nDem
and
uses
to
co
mpu
te a
def
ault
se
arch
ra
nge
inte
ger
No
0 N
onne
gati
ve in
tege
r Ye
s
dat
eInt
Type
U
nits
of
m
easu
re fo
r d
ateI
ntL
engt
h in
tTyp
eStr
ing
No
″Day
s″
v ″D
ays″
v ″M
onth
s″
v ″Y
ears
″
v ″H
ours
″
v ″M
inut
es″
v ″S
econ
ds″
Yes
470 Administration Guide|
|||||||
||||
|||||
Notes:
1. You must specify either a user or a group, however, you cannot specify both.
2. The default values for displayOrder and queryOrder are based on their position
within the file.
Printer object
Appendix F. Objects and data model used in the OnDemand XML file 471

Tabl
e 12
3. A
ttrib
utes
fo
r th
e pr
inte
r ob
ject
Att
rib
ute
s D
escr
ipti
on
Dat
aTyp
e R
equ
ired
D
efau
lt va
lue
Pos
sib
le va
lues
U
pd
atea
ble
nam
e N
ame
of th
e pr
inte
r na
meS
trin
g Ye
s Ye
s
des
crip
tion
A
d
escr
ipti
on of
th
e pr
inte
r de
scSt
ring
N
o ″″
Ye
s
queu
e T
he pr
inte
r qu
eue
queu
eStr
ing
Yes
Yes
prin
terT
ype
The
ty
pe of
pr
inte
r pr
inte
rTyp
eStr
ing
No
″Pri
nter
″ v
″Pri
nter
″
v ″F
ax″
v ″P
rint
er W
ith
Info
rmat
ion″
Yes
472 Administration Guide

Tabl
e 12
4. C
hild
ob
ject
s un
der
the
prin
ter
obje
ct
Nam
e M
inim
um
n
um
ber
M
axim
um
n
um
ber
D
elet
eab
le
Up
dat
eab
le
perm
issi
on
0 U
nbou
nded
Ye
s N
o
Appendix F. Objects and data model used in the OnDemand XML file 473

Tabl
e 12
5. A
ttrib
utes
fo
r th
e pe
rmis
sion
ob
ject
un
der
the
prin
ter
obje
ct
Att
rib
ute
s D
escr
ipti
on
Dat
aTyp
e R
equ
ired
D
efau
lt va
lue
Pos
sib
le va
lues
U
pd
atea
ble
task
T
he ta
sk to
pe
rfor
m on
th
is
obje
ct
task
Stri
ng
No
″ad
d″
v ″a
dd
″
v ″d
elet
e″
N/
A
user
T
he us
er to
gi
ve pe
rmis
sion
to
na
meS
trin
g Ye
s ″″
v U
ser
nam
e
v ″_
AL
L″
No
grou
p T
he gr
oup
to gi
ve pe
rmis
sion
to
nam
eStr
ing
Yes
″″
v G
roup
na
me
v ″*
PUB
LIC
″
v ″_
AL
L″
No
474 Administration Guide
||
|||||||
|||||||
|
|

Cabinet object
Appendix F. Objects and data model used in the OnDemand XML file 475
|
|

Tabl
e 12
6. A
ttrib
utes
fo
r th
e ca
bine
t ob
ject
Att
rib
ute
s D
escr
ipti
on
Dat
aTyp
e R
equ
ired
D
efau
lt va
lue
Pos
sib
le va
lues
U
pd
atea
ble
nam
e N
ame
of th
e ca
bine
t na
meS
trin
g Ye
s Ye
s
des
crip
tion
A
d
escr
ipti
on of
th
e ca
bine
t de
scSt
ring
N
o ″″
Ye
s
476 Administration Guide
||
|||||||
|||||||
|||||||

Tabl
e 12
7. C
hild
ob
ject
s un
der
the
cabi
net
obje
ct
Nam
e M
inim
um
n
um
ber
M
axim
um
n
um
ber
D
elet
eab
le
Up
dat
eab
le
fold
er
0 U
nbou
nded
Ye
s N
o
perm
issi
on
0 U
nbou
nded
Ye
s Ye
s
Appendix F. Objects and data model used in the OnDemand XML file 477||
|||||
|||||
|||||

Tabl
e 12
8. A
ttrib
utes
fo
r th
e fo
lder
ob
ject
un
der
the
cabi
net
obje
ct
Att
rib
ute
s D
escr
ipti
on
Dat
aTyp
e R
equ
ired
D
efau
lt va
lue
Pos
sib
le va
lues
U
pd
atea
ble
nam
e N
ame
of th
e fo
lder
na
meS
trin
g Ye
s N
o
task
T
he ta
sk to
pe
rfor
m on
this
ob
ject
task
Stri
ng
No
″ad
d″
v ″a
dd
″
v ″d
elet
e″
N/
A
478 Administration Guide
||
|||||||
|||||||
|||||||
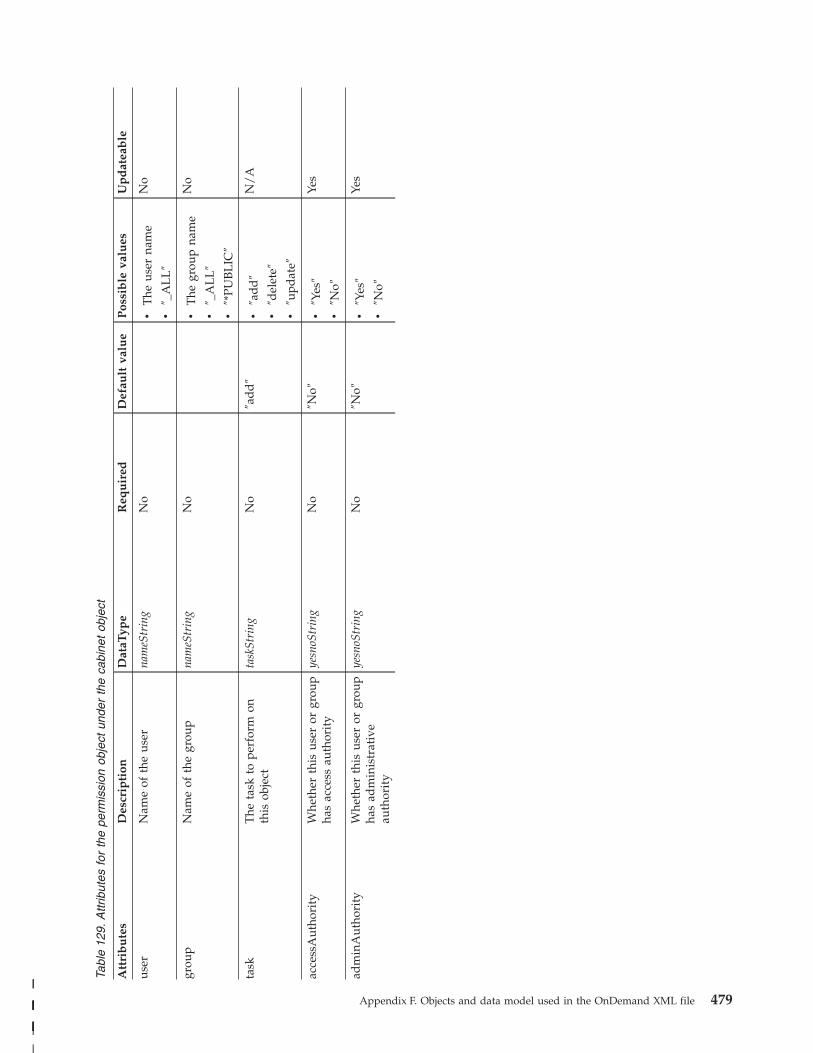
Tabl
e 12
9. A
ttrib
utes
fo
r th
e pe
rmis
sion
ob
ject
un
der
the
cabi
net
obje
ct
Att
rib
ute
s D
escr
ipti
on
Dat
aTyp
e R
equ
ired
D
efau
lt va
lue
Pos
sib
le va
lues
U
pd
atea
ble
user
N
ame
of th
e us
er
nam
eStr
ing
No
v T
he us
er na
me
v ″_
AL
L″
No
grou
p N
ame
of th
e gr
oup
nam
eStr
ing
No
v T
he gr
oup
nam
e
v ″_
AL
L″
v ″*
PUB
LIC
″
No
task
T
he ta
sk to
pe
rfor
m on
this
ob
ject
task
Stri
ng
No
″ad
d″
v ″a
dd
″
v ″d
elet
e″
v ″u
pdat
e″
N/
A
acce
ssA
utho
rity
W
heth
er th
is us
er or
gr
oup
has
acce
ss au
thor
ity
yesn
oStr
ing
No
″No″
v ″Y
es″
v ″N
o″
Yes
adm
inA
utho
rity
W
heth
er th
is us
er or
gr
oup
has
adm
inis
trat
ive
auth
orit
y
yesn
oStr
ing
No
″No″
v ″Y
es″
v ″N
o″
Yes
Appendix F. Objects and data model used in the OnDemand XML file 479||
|||||||
||||||
|
|

Data field limitations
480 Administration Guide

Tabl
e 13
0. D
ata
field
lim
itatio
ns
Dat
atyp
e M
inim
um
le
ngt
h
Max
imu
m le
ngt
h
dbS
trin
g 1
18
dbS
trin
g2
1 25
4
def
Stri
ng
0 25
4
des
cStr
ing
0 12
0
dvS
trin
g 1
254
emai
lStr
ing
0 25
4
file
Ext
Stri
ng
1 20
form
Stri
ng
1 20
ind
exPa
rm
0 32
,700
nam
eStr
ing
1 60
nam
eStr
ingU
G (U
sers
an
d G
roup
s)
1 12
8
pass
wor
dSt
ring
0
128
phon
eStr
ing
0 32
post
Proc
Stri
ng
0 10
00
queu
eStr
ing
1 60
rout
ingS
trin
g 0
24
valS
trin
g 0
8
user
Mis
cStr
ing
0 60
Appendix F. Objects and data model used in the OnDemand XML file 481||
|||
|||
|||

482 Administration Guide

Appendix G. Troubleshooting
Logging and tracing
OnDemand provides the ability to log many different items, errors, and actions for
application groups, users, and server events. Every application group has some
message logging turned on by default, and the number of default items that are
logged depends on the level of the administrative client in use. To reduce the
amount of unwanted logging information, for any new application group, verify
that only those items needing to be logged are checked on the Message Logging
tab.
The System Log or System Logging Facility is the main message and error logging
interface and repository in OnDemand. It is a standard OnDemand application
group with a folder that can be viewed from an OnDemand client like any other
data. Therefore, if you try to log the actions of the System Log itself, you are
essentially logging your logging.
For example, if you log the Index Add command, which generates message #103,
you see a vast multiplication of messages as the initial action is logged, and then
the logging of the action is logged, then the logging of the logging of the action is
logged, and so on, into an infinite loop.
Under normal circumstances, no message logging should be turned on for the
System Log application group. If you need to turn on message logging for the
System Log application group for troubleshooting purposes, you should turn it off
again as soon as possible.
Identifying a load ID from a user folder query
To determine what load a document is from, given a particular hit list, you can use
the ARSDOC query command.
Use the —D parameter to obtain the document handle information. This gives you
some of the following information to query the system log to find the exact load
ID:
v Primary node ID
v Secondary node ID
v Part of the doc_name
To get the exact load ID for a specific index, use the ARSDOC query command
with the option -I. For the QUERY command function, option -I appends the load
ID to the end of each output record. The load ID is separated from the database
field values by a delimiter, that is, the comma character. You can specify a different
delimiter with the -e parameter. To use the -I parameter, you must have
permission to access the system log application group and folder. If the load ID is
not found in the system log, the string Load ID could not be found is appended to
the end of the output record.
Restriction: You cannot specify the -H, -n, or -N parameters when you specify the
-I parameter.
© Copyright IBM Corp. 1993, 2007 483
Important: Searching the system log can be time-consuming, depending on the
number of records stored in the system log. The system log is searched
for each document that matches the query.
Troubleshooting scenario 1: Cannot find data when using a mm/dd/yy
date format in search
Symptom
You defined a new application or application group that contains date fields
formatted as %d/%m/%Y, however, I am only able to find the data when I use a date
search format of mm/dd/yy.
Possible causes
The display format of the field in your folder definitions needs to be changed.
Action
Change the display format to: %d/%m/%Y.
Troubleshooting scenario 2: Error occurred during the CD-ROM
mastering process
Symptom
You received this error message during the CD-ROM mastering process:
Unable to open original file for staging.
Possible causes
It is possible that the OnDemand client was updated on your PC, but the new
master INI file was not transferred.
Action
Copy the new master INI file over to your PC.
Troubleshooting scenario 3: ARSLOAD daemon cannot load an
application group with multiple applications
Symptom
You created an OnDemand load daemon to automate the load process for an
application group that contains multiple applications. However, the arsload
daemon cannot load an application group.
Possible causes
The Application Name for your OnDemand Load Data services is set to None.
Action
Verify your load information in the OnDemand Configurator for Windows:
484 Administration Guide

1. Open the OnDemand Configurator.
2. Click Services.
3. Right click OnDemand Load Data (ARCHIVE). Assuming your OnDemand
instance is ARCHIVE.
4. Open its Properties and select Load Information.
5. Deselect the None option in the Application Name field. You must deselect the
None option in the Application Name field to allow the OnDemand load
daemon to process an application group with multiple applications.
Troubleshooting scenario 4: The load process is slowed down by a .lst
file
Symptom
The loading of Adobe Acrobat PDF files are slowed down due to a .lst file. The
file name should be similar to AdobeFnt05.lst.
Possible causes
It is possible that you have not installed the Adobe fonts on your server. The .lst
file that you see is a mapping of fonts from the documents. With each load, this
file grows and maps the fonts within the new load object. If you install the Adobe
fonts on the server, the .lst file maps to those server fonts and does not continue
to grow. The only exception is when it adds those fonts that it could not map to.
Action
You can either delete the .lst font file regularly, or install the Adobe fonts on the
server so that they are only mapped once.
Troubleshooting scenario 5: You received the error that connection
cannot be established while using ARSLOAD
Symptom
While running the ARSLOAD command, you received this error:
connection cannot be established
Possible causes
A possible cause is that when you specified the —h parameter for ARSLOAD, you
did not set the instance name as ARCHIVE and set the port number to 1445 or 0.
Action
If the only parameter that you specify for ARSLOAD is the —h parameter, make
sure that you set the instance name as ARCHIVE and set the port number to 1445 or
0.
Troubleshooting scenario 6: ARSLOAD cannot find the TIFF images
when using generic index
Symptom
Appendix G. Troubleshooting 485
While running ARSLOAD to automatically load data into OnDemand, each load
fails.
Possible causes
It is possible that you did not specify full file names. The generic index file format
requires that you specify absolute file names, that is, full file names.
Action
Make sure that you specify absolute file names. If you cannot make this happen,
try to run separate ARSLOAD command daemons for each download directory,
and start them up by making sure that they are invoked from the download
directory in which they monitor.
Troubleshooting scenario 8: Buffer overrun problem while exporting
application groups to a local server or another OnDemand server
Symptom
The OnDemand administrative client encounters a buffer overrun problem while
exporting application groups to a local server or another OnDemand server if the
application identifier field contains large numbers of Displayed Value/Database
Value mappings, for example, 2619 pairs.
You might receive one or both of the following error messages:
Buffer overrun detected!
or
Unable to add the application group application group name.
A return code of ’Exists’ was returned from the server.
Possible causes
The current buffer is not large enough to contain so many internal and external
mappings. This is a limitation in the export functionality.
Action
You can use one of the following workarounds:
v Limit the number of the application group field mappings.
v Use the XML batch administration program ARSXML to export the application
groups. For instructions, see Chapter 27, “Importing and exporting
administrative objects through an XML interface,” on page 223.
Troubleshooting scenario 9: The ARSLOAD program with a generic
indexer does not load my AFP documents with inline resources
correctly
Symptom
You used ARSLOAD with a generic indexer to load a data file with more than one
AFP document and a resource group, confirmed that the structure of your data file
was correct, and received a confirmation on your console that the documents were
486 Administration Guide
|
|
|
||||
|
|
|
||
|
||
|
|
|
|||
|
|
|
|
|||
successfully loaded into your OnDemand server. However, when you retrieve the
documents from the OnDemand server, you received a 1303 error message
indicating that some resource was missing.
Possible causes
The primary cause of this problem is that the resources must be in a separate file
when you use ARSLOAD with a generic indexer to load the AFP documents into
your DB2 Content Manager OnDemand server. Using ARSLOAD with a generic
indexer does not allow resources to be defined inline with the documents in the
data file.
Action
Change the extension of your data file to *.out if your data file has another
extension, because ARSLOAD searches for a data file with the *.out extension.
Ensure that you have a lowercase extension (for example, *.out, *.ind, *.res) for
all the files that ARSLOAD needs to load on AIX®, because AIX is case-sensitive.
Also ensure that the GROUP_FILENAME in *.ind is identical to the name of your data
file.
If you use ARSLOAD with a generic indexer, you can load several AFP documents
(multiple BDT/EDT pairs) into your OnDemand server with just one data file. To
do so, set the length and offset in your *.ind file. However, if the ACIF indexer is
used, you cannot do so, because ACIF indexer allows only one data file to contain
one document (one BDT/EDT pair).
Troubleshooting scenario 10: Why OnDemand does not support query
result modifier SQL clauses
Symptom
Several commands and APIs are available that allow a user to submit raw SQL for
querying the OnDemand application group data tables. However, because the
submitted SQL is not parsed or validated, certain query result modifiers are not
supported. These query result modifiers include but are not limited to:
v ORDER BY
v READ ONLY
v FETCH FIRST
v OPTIMIZE FOR
v SORT ASC/DESC
v GROUP BY
Possible causes
This happened because of the overall design of the OnDemand application group.
OnDemand uses database segments, multiple tables, and even multiple queries in
order to increase the performance of queries and lessen the workload of the
database. SQL queries against the application group data tables are first limited to
just the tables that meet the database segment constraints. This is accomplished by
using a start and stop date for each data table. That list of tables is used to
generate a full-select with UNION ALL SQL statement. This generated SQL string is
limited by some restraints, such as the maximum length of the generated SQL
Appendix G. Troubleshooting 487
|||
|
|||||
|
||
||||
|||||
|
|
|
||||
|
|
|
|
|
|
|
||||||||
statement and the number of tables that are searched in a single query. These
generated SQL statements create some highly complex queries that are repeated in
multiple select statements while searching over a large range of data. Adding
search result modifiers, such as ORDER BY, compounds the workload on the
database.
Action
In attempt to reduce the work to the clients, the OnDemand folder definitions
support actions such as sorting, grouping, and limiting the number of rows. This
approach frees the database from having to perform complex query modifications
that require a large amount of time to optimize and large amounts of memory to
perform.
The following is an example using the arsdoc command, where you submit an
SQL query like ACCTNO LIKE ‘1001% and specify a segment date like 12/01/2004 to
12/31/2004 to OnDemand:
arsdoc query –u user –p whatever –f “Credit Card Statements”
–i “ACCTNO LIKE ‘1001%’” –s “12/01/2004,12/31/2004”
The OnDemand server uses the database segment values to determine what tables
need to be searched. This might yield only a single table to search and the
generated SQL looks like:
SELECT * FROM root.BAA20 WHERE ACCTNO LIKE ‘1001%’
In this case, you can append a modifier such as ORDER BY to your submitted SQL.
The generated SQL is simply appended to the end of a single SELECT/WHERE
statement.
In another example, extend the database segment date range to
01/01/2004-12/31/2004:
arsdoc query –u user –p whatever –f “Credit Card Statements”
–i “ACCTNO LIKE ‘1001%’” –s “01/01/2003,12/31/2004”
The number of tables being searched increase, possibly by two tables, and the
generated SQL looks like:
SELECT * FROM BAA18 WHERE ACCTNO LIKE ‘1001%’ UNION ALL
SELECT root.BAA19.*, ‘BAA19’ FROM root.BAA19
WHERE ACCTNO LIKE ‘1001%’ UNION ALL
SELECT root.BAA20.*,’BAA20’
FROM root.BAA20
WHERE ACCTNO LIKE ‘1001%’
This example indicates that using a modifier like ORDER BY cannot be appended
directly onto each WHERE clause. It results in invalid SQL syntax because it is
included as part of each WHERE clause. Valid SQL appends it to the end of the
entire full-select statement. Because OnDemand does not parse the query SQL that
is submitted, it is not able to append the ORDER BY modifier to the end of the
full-select statement.
To take this example a step further, change the database segment range to
01/01/1990-12/31/2004:
arsdoc query –u user –p whatever –f “Credit Card Statements” –i
“ACCTNO LIKE ‘1001%’” –s “01/01/1990,12/31/2004”
The number of tables might increase to a hundred or more, and the resulting SQL
is too long or span too many tables. In this case, OnDemand generates multiple
488 Administration Guide
|||||
|
|||||
|||
||
|||
|
|||
||
||
||
||||||
||||||
||
||
||
full-select queries to accomplish the task, and cannot generate valid SQL across the
queries and have it perform an ORDER BY for the entire result set.
In this case, OnDemand depends on the client to modify the results. While using
APIs or commands like ARSDOC to submit SQL queries directly to OnDemand,
use just the fields being queried and always supply a segment date range. Without
a segment date range supplied, all tables in the application group are searched.
After the results are returned, you can modify them accordingly.
Troubleshooting scenario 11: AFP file loading failed with invalid user
ID or password
Symptom
I tried to load an AFP file, but the loading failed with the following error:
"Userid or password is invalid
Unable to retrieve the object >2<
arsload: 11/14/05 14:58:36 Loading failed
arsload: Processing failed for file
>SYSD.LWMB88FC.FCMNTHYD.FCOCTDEV.2005312.13100688809.ARD<"
Possible causes
The reason that the loading failed is that this specific user does not have the view
permission although the user has add permission.
Action
Grant the view permission to this user ID for loading.
Troubleshooting scenario 12: The text search failed with error that
module arsusdoc cannot be loaded
Symptom
I tried to do a text search, and received an error similar to the following in my
system log:
"19/10/2005 15:06:34 ADMIN 8617 Error No 160
Unable to load module >/opt/ondemand/bin/exits/arsusdoc<.
rc=12 Srvr->wd00<-
19/10/2005 15:06:34 ADMIN 8617 Error No 176
BulkTextSearch Failed Srvr->wd00<- "
Possible causes
This error occurred because the library dependencies were missing although
arsusdoc existed.
Action
Run the command
"ldd /opt/ondemand/bin/exits/arsusdoc"
to output the shared library dependencies for arsusdoc.
Appendix G. Troubleshooting 489
||
|||||
|
|
|
|
|||||
|
||
|
|
|
|
|
||
|||||
|
||
|
|
|
|

The following output of ″ldd arsusdoc″ shows that shared library ’libOPP.sl’ is
missing:
"/usr/lib/libm.2 => /usr/lib/libm.2
/usr/lib/libcl.2 => /usr/lib/libcl.2
/usr/lib/libisamstub.1 => /usr/lib/libisamstub.1
/usr/lib/libdld.2 => /usr/lib/libdld.2
/usr/lib/libc.2 => /usr/lib/libc.2
/usr/lib/libdld.2 => /usr/lib/libdld.2
/usr/lib/libdld.2 => /usr/lib/libdld.2
/usr/lib/libc.2 => /usr/lib/libc.2
/usr/lib/libstream.2 => /usr/lib/libstream.2
/usr/lib/libstd.2 => /usr/lib/libstd.2
/usr/lib/libCsup.2 => /usr/lib/libCsup.2
/usr/lib/dld.sl: Can’t open shared library: /opt/ondemand/lib/libOPP.sl"
Make sure that all the dependencies of arsusdoc are in the OnDemand library
subdirectory.
Hints and tips about using an XML interface to import and export
administrative objects
This section includes some hints and tips about using an XML interface to import
and export administrative objects.
Tip 1: Child objects must be created under parent objects
In the XML interface, it is only possible to have child objects under parent objects,
not the other way around. For example, the following XML file example is valid:
<group name="MyGroup">
<user name="tom" />
<user name="chuck" />
</group>
However, this example is not valid:
<user name="tom">
<group name="MyGroup">
</group>
</user>
The same is true for permissions for users and groups. They are child objects
under the application group and folder objects. For example, to add a folder that
contains permission for the user Bill, the XML file might look like this:
<folder name="MyFolder"...>
<permission user="Bill" accessAuthority="Yes"
viewNQAuthority="Yes" maxHits="No Limit" />
...
</folder>
Tip 2: Application group and folder authorities and
permissions are not linked
In the XML interface, the application group and folder authorities and permissions
are not linked. For example, if you specify adminAuthority="Yes", you do not get
the view, add, print, fax, and copy document permissions, or the view, add, and
copy annotations permissions. You need to specify each item individually.
Tip 3: Parsing error while running ARSXML
If you receive this error message while running ARSXML:
490 Administration Guide
||
||||||||||||
||

A parsing error occurred in file fileName, Line nnn, Column nnn :
cvc-elt.1: Cannot find the declaration of element ’onDemand’.
It usually indicates that the OnDemand schema file (ondemand.xsd) cannot be
found. The OnDemand schema file should be placed in the directory where the
OnDemand XML file resides, otherwise, the fully qualified path name should be
placed in the noNamespaceSchemaLocation element of the OnDemand XML file.
Appendix G. Troubleshooting 491

492 Administration Guide

Notices
This information was developed for products and services offered in the U.S.A.
IBM may not offer the products, services, or features discussed in this document in
other countries. Consult your local IBM representative for information on the
products and services currently available in your area. Any reference to an IBM
product, program, or service is not intended to state or imply that only that IBM
product, program, or service may be used. Any functionally equivalent product,
program, or service that does not infringe any IBM intellectual property right may
be used instead. However, it is the user’s responsibility to evaluate and verify the
operation of any non-IBM product, program, or service.
IBM may have patents or pending patent applications covering subject matter
described in this document. The furnishing of this document does not give you
any license to these patents. You can send license inquiries, in writing, to:
IBM Director of Licensing
IBM Corporation
North Castle Drive
Armonk, NY 10504-1785
U.S.A.
For license inquiries regarding double-byte (DBCS) information, contact the IBM
Intellectual Property Department in your country or send inquiries, in writing, to:
IBM World Trade Asia Corporation
Licensing
2-31 Roppongi 3-chome, Minato-ku
Tokyo 106, Japan
The following paragraph does not apply to the United Kingdom or any other
country where such provisions are inconsistent with local law:
INTERNATIONAL BUSINESS MACHINES CORPORATION PROVIDES THIS
PUBLICATION “AS IS” WITHOUT WARRANTY OF ANY KIND, EITHER
EXPRESS OR IMPLIED, INCLUDING, BUT NOT LIMITED TO, THE IMPLIED
WARRANTIES OF NON-INFRINGEMENT, MERCHANTABILITY OR FITNESS
FOR A PARTICULAR PURPOSE. Some states do not allow disclaimer of express or
implied warranties in certain transactions, therefore, this statement may not apply
to you.
This information could include technical inaccuracies or typographical errors.
Changes are periodically made to the information herein; these changes will be
incorporated in new editions of the publication. IBM may make improvements
and/or changes in the product(s) and/or the program(s) described in this
publication at any time without notice.
Any references in this information to non-IBM Web sites are provided for
convenience only and do not in any manner serve as an endorsement of those Web
sites. The materials at those Web sites are not part of the materials for this IBM
product and use of those Web sites is at your own risk.
IBM may use or distribute any of the information you supply in any way it
believes appropriate without incurring any obligation to you.
© Copyright IBM Corp. 1993, 2007 493

Licensees of this program who wish to have information about it for the purpose
of enabling: (i) the exchange of information between independently created
programs and other programs (including this one) and (ii) the mutual use of the
information which has been exchanged, should contact:
IBM Corporation
J46A/G4
555 Bailey Avenue
San Jose, CA 95141-1003
U.S.A.
Such information may be available, subject to appropriate terms and conditions,
including in some cases, payment of a fee.
The licensed program described in this document and all licensed material
available for it are provided by IBM under terms of the IBM Customer Agreement,
IBM International Program License Agreement or any equivalent agreement
between us.
Any performance data contained herein was determined in a controlled
environment. Therefore, results obtained in other operating environments may
vary significantly. Some measurements may have been made on development-level
systems and there is no guarantee that these measurements will be the same on
generally available systems. Furthermore, some measurements may have been
estimated through extrapolation. Actual results may vary. Users of this document
should verify the applicable data for their specific environment.
Information concerning non-IBM products was obtained from the suppliers of
those products, their published announcements or other publicly available sources.
IBM has not tested those products and cannot confirm the accuracy of
performance, compatibility or any other claims related to non-IBM products.
Questions on the capabilities of non-IBM products should be addressed to the
suppliers of those products.
All statements regarding IBM’s future direction or intent are subject to change or
withdrawal without notice, and represent goals and objectives only.
This information contains examples of data and reports used in daily business
operations. To illustrate them as completely as possible, the examples include the
names of individuals, companies, brands, and products. All of these names are
fictitious and any similarity to the names and addresses used by an actual business
enterprise is entirely coincidental.
COPYRIGHT LICENSE:
This information contains sample application programs in source language, which
illustrate programming techniques on various operating platforms. You may copy,
modify, and distribute these sample programs in any form without payment to
IBM, for the purposes of developing, using, marketing or distributing application
programs conforming to the application programming interface for the operating
platform for which the sample programs are written. These examples have not
been thoroughly tested under all conditions. IBM, therefore, cannot guarantee or
imply reliability, serviceability, or function of these programs.
494 Administration Guide
Trademarks
The following terms are trademarks of the International Business Machines
Corporation in the United States, other countries, or both:
IBM DRDA OS/2
Advanced Function Presentation EDMSuite OS/390
Advanced Function Printing Enterprise Storage Server Parallel Sysplex
AFP ES/3090 OS/400
AIX eServer Presentation Manager
AIX/6000 FlowMark Print Services Facility
AS/400 ImagePlus pSeries
Bar Code Object Content Architecture Infoprint RACF
BCOCA Intelligent Printer Data Stream RS/6000
BookManager IPDS S/390
CICS i5/OS SecureWay
Cryptolope iSeries SET
DataJoiner Language Environment SP
DB2 Lotus System/370
DB2 Connect Lotus Notes Tivoli
DB2 Universal Database Mixed Object Document Content
Architecture
Ultrastar
DFSMSdfp MO:DCA VideoCharger
DFSMSdss MQSeries VisualInfo
DFSMShsm MVS WebSphere
DFSMS/MVS MVS/DFP z/OS
Domino Notes
Domino.Doc OpenEdition
Adobe, Acrobat, Portable Document Format (PDF), and PostScript are either
registered trademarks or trademarks of Adobe Systems Incorporated in the United
States, other countries, or both.
Intel, Intel logo, Intel Inside, Intel Inside logo, Intel Centrino, Intel Centrino logo,
Celeron, Intel Xeon, Intel SpeedStep, Itanium, and Pentium are trademarks or
registered trademarks of Intel Corporation or its subsidiaries in the United States
and other countries.
Java and all Java-based trademarks are trademarks of Sun Microsystems, Inc. in the
United States, other countries, or both.
Linux is a registered trademark of Linus Torvalds in the United States, other
countries, or both.
Microsoft, Windows, and Windows NT are trademarks of Microsoft Corporation in
the United States, other countries, or both.
UNIX is a registered trademark of The Open Group in the United States and other
countries.
Portions of the OnDemand Windows client program contain licensed software
from Pixel Translations Incorporated, © Pixel Translations Incorporated 1990, 2003.
All rights reserved.
Notices 495

Other company, product or service names may be trademarks or service marks of
others.
496 Administration Guide

Index
Numerics109 Cache Expiration 60
110 Cache Migration 57
124 Filesystem Statistics 57, 60
128 ApplGrp Segment Expire 28
14 DB Info Exported 29
164 ApplGrp Segment Maintenance 23
166 ApplGrp Segment Export 29
168 ApplGrp Segment Not Available 31
171 CD-ROM Manifest 348
196 Cache Migration 60
197 Cache Migration 57
201 Concurrent Licenses 348
202 Concurrent Licenses 348
85 ApplGroup Unload 219
87 ApplGroup Load 197, 217
87 ApplGrp Load (System Migration) 29
Aaccessibility 341
accessing reports 162
ACIFfields
defining 165
indexesdefining 165
indexing parameters 164, 165, 166
processing 193
resource information 166
triggers 164
U limits 193
activating the client data distribution 337
active log files 6
addingapplication groups 148
applications 148
folders 148
groups 139
primary storage nodes 144
printers 143
reports 148
server printers 143
servers 93
storage nodes 144
storage sets 144
users 136
users to a group 140
adding storage volumes 72
administrative clientAbout window 100
adding servers 93
assistants and wizards 103
changing a password 94
customizing 100
displaying 100
excluding from the client installation package 89
hardware requirements 87
installing 87
logging on a server 91
administrative client (continued)passwords 94
program properties 99
report wizard 103
software requirements 87
splash screen 100
start up parameters 99
starting 91
updating 90
using 85, 91
Web 179
Web-based 177
wizards and assistants 103
administrative objectsexporting 223
importing 223
administratorsapplication group/folder/cabinet administrator 108
system administrator 108
user administrator 108
advanced system administrationauthority 121
native Lightweight Directory Access Protocol (LDAP)
support 133
Enabling LDAP authentication 134
How OnDemand works with LDAP 133
LDAP server requirements 133
overview 121
permissions 124
system administration 127
user types 121
AFP dataconverting to line data 327
indexing information 163
processing 193
resources 193, 248
viewing information 161
annotation group permissions table (ARSANN) 358
annotation permission 116
annotations 97
application group data table 382
application group field alias table (ARSAGFLDALIAS) 355
application group field table (ARSAGFLD) 354
application group object 434
application group permissions table (ARSAGPERMS) 356
application group table (ARSAG) 352
application group/folder administrator 109
application group/folder/cabinet administrator 108
application groupsaccess permission 116
adding 148, 151
administrator 108
administrator permission 116
annotation permission 116
closing tables 323
collecting statistics 23
concepts 111
defining 148, 151, 188, 201, 209
document permission 116
documentsmaintaining 57, 60
© Copyright IBM Corp. 1993, 2007 497

application groups (continued)expiration processing 28, 32, 60, 315
fieldsdefining 155, 156
FORM parameter 301, 304, 307
importing migrated index data 32
importing migrated indexes 31
index datamaintaining 23, 28, 29, 31
logical views permission 116
maintenance 23, 28, 29, 31, 57, 60
messages 23, 28, 29, 31, 57, 60
migrating to table spaces 323
migration processing 29, 31, 32, 57, 315
overview 111
permissions 116, 117, 154
query restriction 116
storage management 153
table spaces, migrating to 323
tables, closing 323
application object 396
application table (ARSAPP) 359
applicationsadding 148, 159
AFP data 161, 163
concepts 112
DATASET parameter 301, 305, 307
defining 148, 159, 189, 202, 211
fieldsdefining 165
indexesdefining 165
indexing parameters 164, 165, 166
load information 167
miscellaneous options 169
overview 112
resource information 166
triggers 164
archived log filesDB2 6
maintaining in Tivoli Storage Manager 48
maintaining in TSM 7
ARS_ADSMbackup command 199
reference 255
ARS_ARCHIVE_LOG_PATH parameter 7
ARS_ARCHIVE_LOGPATH parameter 34
ARS_DB2_DATABASE_DRIVE parameter 33
ARS_LOGFILE_SIZE parameter 8
ARS_LOGNUMBER parameter 8
ARS_PRIMARY_LOG_PATH parameter 6
ARS_PRIMARY_LOGPATH parameter 34
ARS_TMP parameter 33
ARS.CFG fileactive log files 6
archived log files 7
ARS_ARCHIVE_LOG_PATH parameter 7
ARS_ARCHIVE_LOGPATH parameter 34
ARS_DB2_DATABASE_DRIVE parameter 33
ARS_LOG_NUMBER parameter 8
ARS_LOGFILE_SIZE parameter 8
ARS_PRIMARY_LOG_PATH parameter 6
ARS_PRIMARY_LOGPATH parameter 34
ARS_TMP parameter 33
database configuration 264
database log files 6, 7
DB2 log files 6, 7
ARS.CFG file (continued)importing migrated index data 33, 34
log files 6, 7
primary log files 6
ARSADMINdeleting a report 219
importing migrated index data 34
migration processing 34
reference 245
unloading a report 219
ARSAG (application group table) 352
ARSAG2FOL (field mapping table) 353
ARSAGFLD (application group field table) 354
ARSAGFLDALIAS (application group field alias table) 355
ARSAGINDEX (composite index table) 355
ARSAGPERMS (application group permissions table) 356
ARSANN (annotation table) 358
ARSAPP (application table) 359
ARSAPPUSR (user logical views table) 360
ARSCAB (cabinet table) 356
ARSCAB2FOL (cabinet to folder mapping table) 356
ARSCABPERMS (cabinet permissions table) 357
ARSDATEreference 257
ARSDBbackup command 45, 47, 198
Oracle, using 272
reference 263
using with Oracle 272
ARSDOCreference 275
ARSFOL (folder table) 361
ARSFOLFLD (folder field table) 362
ARSFOLFLDUSR (folder user fields table) 363
ARSFOLPERMS (folder permissions table) 365
ARSGROUP (group table) 366
ARSJESDreference 299
ARSLOADDownload for OS/390 301, 304, 307
reference 303
running 190, 205, 214
ARSLOAD (load table) 367
ARSLOAD.CFG file 190, 310
ARSMAINTcollecting statistics 23
deleting imported migrated indexes 34
expiration processing 28, 34
messages 23, 28, 29
migration processing 29
Oracle, using 321
reference 315
using with Oracle 321
ARSNAMEQ (named query table) 368
ARSNODE (node table) 369
ARSPRT (printer table) 370
ARSPRTOPTS (printer options table) 371
ARSPRTUSR (printer user table) 372
ARSRES (resources table) 373
ARSSEG (segment table) 374
ARSSET (storage set table) 376
ARSSOCKDstopping 343
ARSSYS (system parameters table) 377
ARSTBLSPreference 323
ARSUSER (user table) 378
498 Administration Guide
ARSUSRGRP (users in groups table) 380
ARSUSRGRPID (user group ID table) 381
ARSUUPDTexit 306
report specification archive definition exit 306
user exit 306
ARSVIEWreference 327
ARSXMLreference 329
assistants and wizards 103
authoritycreate application groups 109
create cabinets 109
create folders 109
create groups 109
create users 109
Bbackup and recovery
database 9, 45, 198, 263
recovery log 80
reports and resources 82
table spaces 45
Tivoli Storage Manager database 79
TSM database 81
TSM device configuration file 81
TSM recovery log 80
TSM volume history file 81
backup image filesDB2 45
maintaining in Tivoli Storage Manager 46, 263
batch system administration 223
Common problems during installation 225
installation verification 224
installing 223
installing Xerces2 Java Parser 224
prerequisites 223
buffer pools 6
Ccabinet administrator 108
cabinet object 475
cabinet permissions table (ARSCABPERMS) 357
cabinet table (ARSCAB) 356
cabinet to folder mapping table (ARSCAB2FOL) 356
cabinetsadministrator 108
concepts 113
overview 113
cache storageexpiration processing 315
migration processing 315
CDmastering 337
CD creation manifestmessages 348
reviewing 348
clientdefault server printer 169
client data distributionactivating 337
clientsconnecting to instances 242
code page 249
collecting statistics 23
column delimiter 253
commandsadding documents 275
AFP data, viewing 327
ARS_ADSM 255
ARSADMIN 245
ARSDATE 257
ARSDB 263
ARSDOC 275
ARSJESD 299
ARSLOAD 303
ARSMAINT 315
ARSTBLSP 323
ARSVIEW 327
ARSXML 329
compress 247
data, loading 303
decompress 248
deleting data 315
deleting documents 275
documents, adding, deleting, getting, printing,
updating 275
documents, loading 303
expiring data 315
exporting an XML file 329
getting documents 275
how to read a syntax diagram 237
import 246
importing an XML file 329
indexer 249
load 245
load_db 246
loading data, documents, reports 303
postprocess_cmd 248
printing documents 275
reference 235
reports, loading 303
res_diff 248
retrieve 247
store 246
unload 246
updating documents 275
viewing AFP data 327
XML file, exporting 329
XML file, importing 329
composite index table (ARSAGINDEX) 355
compressionARSADMIN program 247
concurrent usersmonitoring 348
configuration parameters 6
connecting to instances 242
containers 4
conventionsgroup name 109
user name 107
copying items 101
create application groups authority 109
create cabinets authority 109
create folders authority 109
create groups authority 109
create users authority 109
creating an XML file 228
Index 499

Ddata
adding 246, 275
deleting 24, 57, 275
deleting a report 219, 246
Download for OS/390 189, 221, 301, 304, 307
estimating storage space for 21, 188
expiration processing 24, 57
image data 201
importing migrated indexes 31
loading 187, 201, 209, 245, 303
migration processing 28, 31, 55
printing 275
restarting a load process 217
retrieving 247, 275
storage space for 21
storing 246
TIFF image data 201
unloading 219, 246
updating 275
user exit programs 221
databaseactivating 263
adding index data 196, 246
administration 1
backup 45, 198, 263
collecting statistics 23
column delimiter 253
concepts 3
connecting to instances 242
creating 263
deleting index data 24, 31
estimating size 21
expiration processing 24, 31, 315
exporting tables 263
fieldsdefining 155, 156
importing migrated index data 31, 246
importing tables 263
logging 48
maintenance 23
migration processing 28, 31, 246, 315
monitoring 37, 41
performance 37, 41
recovery 48
reorganizing 263
segment table 196
size of 21
statistics 23, 263
Tivoli Storage Manager 79, 263
updating 275
database managerconcepts 3
database tablesSee system control tables
DATASET parameterapplications 301, 305, 307
ARSLOAD program 301, 305, 307
dateformats of 257
internal format 257
obtaining OnDemand internal format 257
OnDemand internal format 257
DB2archived log files, maintaining in Tivoli Storage
Manager 48
ARS_ARCHIVE_LOG_PATH parameter 7
DB2 (continued)ARS_ARCHIVE_LOGPATH parameter 34
ARS_DB2_DATABASE_DRIVE parameter 33
ARS_LOG_NUMBER parameter 8
ARS_LOGFILE_SIZE parameter 8
ARS_PRIMARY_LOG_PATH parameter 6
ARS_PRIMARY_LOGPATH parameter 34
ARS_TMP parameter 33
backup 9, 45, 198, 263
backup image files, maintaining in Tivoli Storage
Manager 46, 263
buffer pools 6
collecting statistics 23, 263
concepts 3
configuration parameters 6
containers 4
database 3
exporting tables 263
importing migrated index data 33, 34
importing tables 263
indexes 5, 21
instances 3
log files 6
log files, maintaining in Tivoli Storage Manager 48
logging 48
maintenance 263
messages 345
monitoring 37
parameters 6
performance 37
recovery 48
recovery history file 9
SMS table spaces 4, 21
starting 263
statistics 23
stopping 263
system catalog tables 5
systems 3
table space backup 45, 263
table spaces 4, 11, 21
tables 4
decompressARSADMIN program 248
definingapplication groups 148
applications 148
folders 148
groups 139
primary storage nodes 144
printers 143
reports 148
server printers 143
storage nodes 144
storage sets 144
users 136
deleting a report 219, 246
deleting index data 24, 31
device configuration file 81
disability 341
document permission 116
documentsburning the CD image to the CD-ROM 338
transferring from an OnDemand server to a staging
drive 337
Download for OS/390configuring ARSJESD 299
transmitting data 189
500 Administration Guide
Download for OS/390 (continued)user exit programs 221, 299, 300
drag and drop operations 102
EEnabling LDAP authentication 134
estimating storage space 188
event log 345
exitsARSUUPDT 306
report specification archive definition 306
expiration of passwords 94
expiration processing 24, 31, 315
expired passwords 94
expiring reports and TSM 24
exporting administrative objects 223
exporting items 101
exporting tables 263
Ffield mapping table (ARSAG2FOL) 353
fieldsapplication group
defining 155, 156
databasedefining 155, 156
defining 155, 156, 172
folderdefining 172
indexingdefining 165
fields permission 116
file systemsdatabase 11
table space 11
folder administrator 108
folder field table (ARSFOLFLD) 362
folder object 455
folder permissions table (ARSFOLPERMS) 365
folder table (ARSFOL) 361
folder user fields table (ARSFOLFLDUSR) 363
foldersaccess permission 116
adding 148, 169
administrator 108
administrator permission 116
concepts 112
defining 148, 169, 203, 211
fieldsdefining 172
fields permission 116
named queries permission 116
overview 112
permissions 116, 117, 171
FORM parameterapplication groups 301, 304, 307
ARSLOAD program 301, 304, 307
Ggeneric indexer
parameter file 204, 213
group administration 139
group object 391
group owner 110
group table (ARSGROUP) 366
groupsadding 139
adding users 140
assigning users 140
concepts 109
defining 139
naming 109
overview 109
owner 110
permissions 117
Hhints and tips
Tip 1 490
Tip 2 490
Tip 3 490
using an XML interface to import and export
administrative objects 490
how to read a syntax diagram 237
IIConv
ARSADMIN program 249
image dataloading 201
image filesindex data 204
importing administrative objects 223
importing migrated index data 31, 246
importing tables 263
inactivity time out 95
index dataabout 5
ACIF 193
adding 246, 275
column delimiter 253
creating 193, 204, 213
deleting 24, 31, 219, 275
estimating size 21
expiration processing 24, 31
fieldsdefining 165
generic indexer 204, 213
importing 31, 246
indexesdefining 165
load information 167
loading 187, 201, 209, 246, 303
migration processing 28, 31
parameters 249
resource information 166
restarting a load process 217
retrieving 275
size of 21
system catalog tables 5
triggers 164
updating 275
indexerARSADMIN program 249
indexesdefining 165
Index 501
Infoprintmessages 345
installing batch system administration 223
installing the administrative client 87
instances 3
-h parameter 240
-I parameter 240
about 240
clients, connecting from 242
connecting to 242
database, connecting to 242
programs, specifying 240
starting 241
stopping 241
internal date format 257
Kkeyboard 341
Llabeling storage volumes 71
LDAP 133
licensesmonitoring 348
line dataconverting to AFP 193, 327
processing 193
loadARSADMIN program 245
load table (ARSLOAD) 367
load user exit 253, 311
load_dbARSADMIN program 246
loading data 187, 201, 209, 245
loading image data 201
loading index data 187, 201, 209
loading PDFsallowed file names for 191
loading reports 187
loading TIFF image data 201
loading user-defined data 209
log filesDB2 6, 48
maintaining in Tivoli Storage Manager 48
maintaining in TSM 7
logging 6
logging on a server 93
logical views permission 116
logical views table (ARSAPPUSR) 360
login processing 96
logon as 93
Mmanifest
reviewing CD contents 348
mastering CDs 337
maximum password age 94
messages109 Cache Expiration 60
110 Cache Migration 57
124 Filesystem Statistics 57, 60
128 ApplGrp Segment Expire 28
14 DB Info Exported 29
messages (continued)164 ApplGrp Segment Maintenance 23
166 ApplGrp Segment Export 29
168 ApplGrp Segment Not Available 31
171 CD-ROM Manifest 348
196 Cache Migration 60
197 Cache Migration 57
201 Concurrent Licenses 348
202 Concurrent Licenses 348
85 ApplGroup Unload 219
87 ApplGroup Load 197, 217
87 ApplGrp Load (System Migration) 29
application groups 23, 28, 29, 31, 57, 60, 197, 217, 219
CD manifests 348
collecting statistics 23
DB2 errors and alerts 345
errors and alerts 345
expiration processing 28, 60
licenses 348
loading data 197, 217
migration processing 29, 31, 57
OnDemand errors and alerts 345
Oracle errors and alerts 345
PSF errors and alerts 345
related software errors and alerts 345
SQL Server errors and alerts 345
system log 346
Tivoli Storage Manager errors and alerts 345
unloading data 219
metacode documents in large object formatloading 200
migrating data to table spaces 323
migration processing 28, 31, 246, 315
minimum password length 95
monitoringconcurrent users 348
database 37, 41
DB2 37
licenses 348
Oracle 41
performance 37, 41, 349
servers 345
users 348
Nnamed queries permission 116
named query table (ARSNAMEQ) 368
naming groups 109
naming users 107
NLS 249
node table (ARSNODE) 369
Oobjects
OnDemand 228
obtaining OnDemand internal date format 257
OnDemanddate formats 257
internal date format 257
OnDemand objectchild objects 229
end of object 230
object attributes 229
Start of Object 229
502 Administration Guide

OnDemand objects 228
OnDemand XML filedata model 383
objects 383
OnDemand XML filescreating 231
for delete and export 232
OracleARSDB program, using 272
ARSMAINT program, using 321
managingtablespace 43
messages 345
monitoring 41
performance 41
using the ARSDB program 272
using the ARSMAINT program 321
Pparameters
DB2 6
passwordsADMIN user password 107
age 94
built-in administrator password 107
case sensitivity 96
changing 94
expiration 94
length 94, 95
login processing 96
maximum password age 94
minimum password length 95
security user exit 94, 95
specifying in ARSLOAD 310
PDFsallowed file names for 191
loading 191
performancedatabase 37, 41
DB2 37
monitoring 37, 41, 349
Oracle 41
permissionsabout 115
application groups 116, 154
concepts 115
examples 117
folders 116, 171
overview 115
strategies 120
postprocess_cmdARSADMIN program 248
previous indexed AFP fileloading 199
primary log files 6
primary storage nodesadding 144
concepts 111
defining 144
overview 111
printer object 471
printer options table (ARSPRTOPTS) 371
printer table (ARSPRT) 370
printer user table (ARSPRTUSR) 372
printersadding 143
printers (continued)concepts 110
defining 143
options 169
overview 110
printing documents 275
private volumes 70
program properties 99
programsdate formats 257
IConv 249
instance name 240
internal date format 257
obtaining OnDemand internal format 257
quote characters 239
Qquery restriction 116
Rrecovery
database 48
DB2 recovery history file 9
TSM database 81
TSM recovery log 80
removing a report 246
removing storage volumes 74
reorganizing the database 263
report specifications archive definition exit 306
report wizard 103
reportsaccessing 162
adding 148, 275
backup and recovery 82
defining 148
deleting 219, 246, 275
Download for OS/390 189, 221, 301, 304, 307
estimating storage space for 188
example of 162
expiring 24
indexing 193
interaction with TSM 24
loading 187, 303
printing 275
restarting a load process 217
retrieving 247, 275
storing 246
unloading 219, 246
updating 275
user exit programs 221
requirementshardware 87
software 87
res_diffARSADMIN program 248
resources 166, 193, 197, 248
resources table (ARSRES) 373
restarting a load process 217
retrieveARSADMIN program 247
reviewing a CD creation manifest 348
Index 503

Sscratch volumes 70
security and user administration 136, 139
security user exit 94, 95
segment table 196
segment table (ARSSEG) 374
server printersadding 143
concepts 110
defining 143
options 169
overview 110
serversadding 93
adding items 101
copying items 101
drag and drop operations 102
exporting items 101
logging on 93
monitoring 345
system parameters 97
updating 93
SMS table spaces 4, 21
SQL Servermessages 345
start up parameters 99
starting instances 241
starting the administrative client 91
statisticscollecting 23, 263
stoppingARSSOCKD 343
server 343
stopping instances 241
storageadministration 51, 144
for reports 188
management 51, 153
storage nodesadding 144
concepts 111
defining 144
loading data 196
overview 111
storage objectsloading 196
retrieving 247
storing 246
storage set object 451
storage set table (ARSSET) 376
storage set table (ARSSYS) 377
storage setsadding 144
application groupassigning to 153
assigning to an application group 153
concepts 111
defining 144
loading data 196
migration processing 32
overview 111
System Migration application group 32
storage volumesadding 72
labeling 71
removing 74
storeARSADMIN program 246
syntax diagramhow to read 237
system administrator 108
system catalog tables 5
system control tablesannotation table (ARSANN) 358
application group data table 382
application group field alias table
(ARSAGFLDALIAS) 355
application group field table (ARSAGFLD) 354
application group permissions table (ARSAGPERMS) 356
application group table (ARSAG) 352
application table (ARSAPP) 359
ARSAG (application group table) 352
ARSAG2FOL (field mapping table) 353
ARSAGFLD (application group field table) 354
ARSAGFLDALIAS (application group field alias
table) 355
ARSAGINDEX (composite index table) 355
ARSAGPERMS (application group permissions table) 356
ARSANN (annotation table) 358
ARSAPP (application table) 359
ARSAPPUSR (user logical views table) 360
ARSCAB (cabinet table) 356
ARSCAB2FOL (cabinet to folder mapping table) 356
ARSCABPERMS (cabinet permissions table) 357
ARSFOL (folder table) 361
ARSFOLFLD (folder field table) 362
ARSFOLFLDUSR (folder user fields table) 363
ARSFOLPERMS (folder permissions table) 365
ARSGROUP (group table) 366
ARSLOAD (load table) 367
ARSNAMEQ (named query table) 368
ARSNODE (node table) 369
ARSPRT (printer table) 370
ARSPRTOPTS (printer options table) 371
ARSPRTUSR (printer user table) 372
ARSRES (resources table) 373
ARSSEG (segment table) 374
ARSSET (storage set table) 376
ARSSYS (system parameters table) 377
ARSUSER (user table) 378
ARSUSRGRP (users in groups table) 380
ARSUSRGRPID (user group ID table) 381
cabinet permissions table (ARSCABPERMS) 357
cabinet table (ARSCAB) 356
cabinet to folder mapping table (ARSCAB2FOL) 356
composite index table (ARSAGINDEX) 355
field mapping table (ARSAG2FOL) 353
folder field table (ARSFOLFLD) 362
folder permissions table (ARSFOLPERMS) 365
folder table (ARSFOL) 361
folder user fields table (ARSFOLFLDUSR) 363
group table (ARSGROUP) 366
important information 351
load table (ARSLOAD) 367
logical views table (ARSAPPUSR) 360
named query table (ARSNAMEQ) 368
node table (ARSNODE) 369
overview 351
printer options table (ARSPRTOPTS) 371
printer table (ARSPRT) 370
printer user table (ARSPRTUSR) 372
resources table (ARSRES) 373
segment table (ARSSEG) 374
504 Administration Guide

system control tables (continued)storage set table (ARSSET) 376
system parameters table (ARSSYS) 377
user group ID table (ARSUSRGRPID) 381
user logical views table (ARSAPPUSR) 360
user table (ARSUSER) 378
users in groups table (ARSUSRGRP) 380
system log messages109 Cache Expiration 60
110 Cache Migration 57
124 Filesystem Statistics 57, 60
128 ApplGrp Segment Expire 28
14 DB Info Exported 29
164 ApplGrp Segment Maintenance 23
166 ApplGrp Segment Export 29
168 ApplGrp Segment Not Available 31
171 CD-ROM Manifest 348
196 Cache Migration 60
197 Cache Migration 57
201 Concurrent Licenses 348
202 Concurrent Licenses 348
87 ApplGrp Load (System Migration) 29
application groups 23, 28, 29, 31, 57, 60
CD manifests 348
collecting statistics 23
enabling 95, 96
expiration processing 28, 60
loading data 197, 207, 215, 217
migration processing 29, 31, 57
monitoring 346
unloading data 219
user exit programs 96
user messages 348
system log user exit 347
cache storage file system filled 317
migration processing 31
System Migration application group 32
system parametersabout 94
annotations 97
inactivity time out 95
login processing 96
maximum password age 94
minimum password length 95
password 96
password age 94
password expiration 94
password length 95
passwords 95
setting 97
system log 95
time out 95
user exit logging 96
userid 96
system tablesexpiration processing 315
migration processing 315
systems 3
Ttable space file systems 11
table spacesabout 4, 11
adding space 21
backup 45, 263
checking space available in 21
table spaces (continued)configuring 11
estimating size 21
exporting 263
importing 263
managing 11
migrating data to 323
size of 21
SMS 4, 11, 21
space available in 21
tables 4
See also system control tables
closing 323
TIFF image dataloading 201
time out 95
Tivoli Storage Manageradding storage volumes 72
administrative client 69
backup and recovery 79, 199
databasebackup and recovery 79, 199
DB2 archived log files 48
DB2 backup image files 46, 263
halting 69
labeling storage volumes 71
messages 345
migration processing 32
overview 63
private volumes 70
removing storage volumes 74
restarting 69
scratch volumes 70
starting 69
stopping 69
storage volumes 71, 72, 74
storage, managing 63
triggersdefining 164
troubleshooting 483
logging and tracing 483
troubleshooting scenariosAFP file loading failed with invalid user ID or
password 489
ARSLOAD cannot find the TIFF images when using
generic index 485
ARSLOAD daemon cannot load an application group with
multiple applications 484
Buffer overrun problem while exporting applications to a
local server or another OnDemand server 486
connection cannot be established error 485
errorUnable to open original file for staging 484
PDF files do not load 191
The ARSLOAD program with a generic indexer does not
load my AFP documents with inline resources
correctly 486
The text search failed with error that module arsusdoc
cannot be loaded 489
Why OnDemand does not support query result modifier
SQL clauses 487
TSMdatabase
backup and recovery 81
device configuration file 81
halting 255
recovering the database 81
Index 505
TSM (continued)recovery log 80
starting 255
stopping 255
volume history file 81
Uunified logon 93
unloading a report 219, 246
update servers dialog box 93
updating administrative client software 90
user 108, 109
user administration 136
user administrator 108, 109
user exitsARSUUPDT 306
Download for OS/390 221, 299, 300
load user exit 253, 311
loading data 221, 299, 300
logging messages 96
migration processing 31
report specification archive definition 306
security user exit 94, 95
system log 31
system log user exit 317, 347
System Parameters dialog box 98
user group ID table (ARSUSRGRPID) 381
user logical views table (ARSAPPUSR) 360
user object 385
user table (ARSUSER) 378
user-defined dataindex data 213
loading 209
useridcase sensitivity 96
login processing 96
specifying in ARSLOAD 310
usersadding 136
adding to a group 140
ADMIN user 107
administrator 107
application group/folder/cabinet administrator 108
assigning to a group 140
authority 108
built-in administrator 107
changing a password 94
concepts 107
defining 136
licenses 348
monitoring 348
naming 107
overview 107
passwords 94, 96
permissions 115, 117
system administrator 108
types 108
user 108
user administrator 108
users in groups table (ARSUSRGRP) 380
using the administrative client 85, 91
using the Web administrative client 179
using the Web-based administrative client 177
Vvolume history file 81
WWeb administrative client
requirements 181
browser 181
mid tier application 181
user access and permission 179
Windows serversevent log 345
wizards and assistants 103
XXerces2 Java Parser 224
XMLexporting 223
importing 223
XML filecreating 228
exporting 329
importing 329
XML objectsapplication 396
application group 434
cabinet 475
folder 455
group 391
printer 471
storage set 451
user 385
XML schema file 226
506 Administration Guide


����
Program Number: 5724-J33
SC18-9237-01